Jump to content

Neophyte - what I've been buying (for better or worse!)


OCB

Recommended Posts

Following on from my intro + initial post, here's what my first round of "OCB fixes watches" tooling looks like:

Feel free to laugh/cry etc - don't worry, I most certainly don't take myself seriously :lol:

First book arrived: "Repairing quartz LCD and analog watches, volume 3" by Scriptar, Lausanne. No ISBN.
Bought from formby-clocks.co.uk. I presume he's known on here?

I do regret buying the oil from amazon actually, and I've not even opened it!

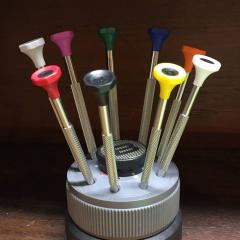
On the active lookout for a decent screwdriver kit, non magnetic tweezers, some more books/PDF, 
Already have basic electronics kit, a microscope with x4 + x10 which will do for now, and even tempted to try the "smart phone microscope" kit one of my kids has.

Now I'm off to pop the back off a few of that lot of 100+ watches I bought and start to play!

IMG_6418.jpg

IMG_6417.jpg

IMG_6416.jpg

IMG_6415.jpg

IMG_6414.jpg

  • Like 1
Link to comment
Share on other sites

Your tools look a lot like mine at the beginning. I still haven't bought better oilers and cups. :biggrin:

Part of the fun is also finding which tools do work and which don't, and where is worth to save from 1 Euro to 1,000, with anything in between. Spoiler, that "caseback wrench", may get you very, very upset when presented to the "right" caseback. In that case (pun intended) the latter -albeit scratched- always come out winning.

Edited by jdm
  • Like 1
Link to comment
Share on other sites

Lol- yes. I just finished my first case opening (my Seiko/Feiko), and - even though it "did the job" - I can see how it could easily slip and rip a nice scratch along a case back.I'll post about that watch later on the repairs section.

The microscope didn't work out - not enough clearance. Fair enough, it's not built for that.
Not tried the kids smart phone "microscope" yet, but I did heavily use my iPhone camera.

Need to source gaskets - any recommendations?

+ different batteries. Of course, for the Timex I opened up - I don't have any CR2016.. 


Link to comment
Share on other sites

10 minutes ago, OCB said:

Need to source gaskets - any recommendations?

+ different batteries. Of course, for the Timex I opened up - I don't have any CR2016.

I buy from Cousins UK but if you're not in the UK /EU that can be a bit slow for small orders. However it's true they have unrivaled inventory. Batteries are easily found at the hardware or electronics store.

  • Like 1
Link to comment
Share on other sites

Alright, some more spoilers. The yellow case holder is crap but the black one is damn good. Fit it in a vice or clamp it. The pin remover is also good. Punches, on pin and collar bracelets all you need is 0.8 or 0.9, and 1.1mm. Also urgently needed Seiko style (there are 4 types, pick based on your mood) caseback opener, which you may need to sharpen. A crystal press and lot of other cheap stuff. Some you can also use for electronic repair, some is just cute to look at. Once in there is no way out. Sorry. 
 

Edited by jdm
  • Thanks 1
Link to comment
Share on other sites

Hi  I am afraid jdm is right about most of it but as you get better at it and skill levels get better so will the tools, As for learning material Have a look at Mark Lovick( our founder) he has some very good watch training videos on U Tube to get you fired up. books are a plenty to be had on ebay "Donald De Carles" practical watch repairing is good for a starter.

Link to comment
Share on other sites

Cheers gents.

No worries, to live is to learn :)

i found Mark’s vidéos via this forum - I didn’t realise it was “his” forum in fact!

I know perfectly well I’m going to make shed loads of mistakes, and if I’d spent shed loads of time reading forums etc I’d save a few quid.

Sure, I’d be happy if I’d had a “this is the perfect kit” link, it got delivered and it had all the “basics”, and the delivered kit was low cost but top notch.

I’m fighting lack of knowledge overall , lack of knowledge specifically with the tools, lack of knowledge on the terminology re: the various components.
 

Thats fine though! It is actually part of the fun.


Link to comment
Share on other sites

Join the conversation

You can post now and register later. If you have an account, sign in now to post with your account.
Note: Your post will require moderator approval before it will be visible.

Guest
Reply to this topic...

×   Pasted as rich text.   Restore formatting

  Only 75 emoji are allowed.

×   Your link has been automatically embedded.   Display as a link instead

×   Your previous content has been restored.   Clear editor

×   You cannot paste images directly. Upload or insert images from URL.


  • Recently Browsing

    • No registered users viewing this page.
  • Topics

  • Posts

    • I see Mark has sorted this one out. 
    • We need to identify the movement to help you, but the oldest of these Rolco watches use Aegler-Rebberg movements that lack a calibre number and are very difficult to identify. You may end up having to make or modify a stem to fit . Post pictures of both sides of the movement when you have it and the size of the movement and hopefully it’s one that has a calibre number.  Gruen used a lot of the same Aegler movements at the time and it’s worth comparing your movement with those if you can’t find it labeled as an Aegler or Rolex/Rolco calibre. Best Regards, Mark  
    • Onlly a pro's eye would notice that OH, you've still got it old fella 🙂
    • The triple lobed spring, as you suggest needs to be rotated to remove it or replace it. Suitably shaped pegwood should suffice, but tools (shaped as you describe) for the purpose also exist.  If you have an assorted of replacement springs, a trilobe style KIF spring of the right size might fit.  The other spring securing the jewel also needs rotating. There is a slight opening in the setting at about the 5 o’clock position in your photo and one side of the spring should be able to be removed  there when rotated into position.  Hope that helps, Mark
    • As an update, it transpired the setting on the balance side, with the jewel had one flat end and one curved. When I rotated it enough it popped out. The chaton was entirely conical and a tricky customer but once lubricated and dropped back in I put the flat edge in first and poked it in with the peg wood tool mentioned above (I made it with flattening off the end then sizing with a pencil sharpener before poking a hole in the end) then rotated and it went in well.    For the other side, magnet searching for the spring has been fruitless.    thanks for the link to the other thread
×
×
  • Create New...