Jump to content

Timex 24 setting lever


Haboy

Recommended Posts

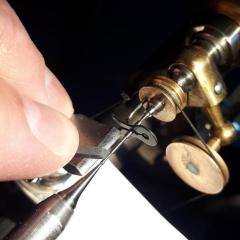
Setting lever screw broke on my Timex 24 movement. I have another working 24 but in need to install the setting lever and new screw which seems somewhat impossible. Is there an easy way to get the lever and screw inserted into the hole?

Link to comment
Share on other sites

Hold the setting leaver exactly in place with rodic (or similar), position the screw with tweezers, and screw in place.
... or..

Position the lever with rodico, position the screw with rodico, screw in place.

It is fiddly. I presume you removed any remaining parts of the broken screw.

Link to comment
Share on other sites

One other thing that occurs to me.

Fit the setting lever (443) and the screw (5443) *BEFORE* you fit the stem and crown.

Once you have it fitted, screw the screw right down, then back off by about 2 1/2 turns, then fit the stem under the tab that operates the lever and position it correctly. With the crown/stem in position, screw the screw back down till finger tight, and prove the lever/crown/stem is operating correctly, then tighten the screw completely.

Attempting to fit the setting lever, crown/stem and screw all at the same time is a much more difficult (and unnecessary) task.

Edited by AndyHull
  • Like 1
Link to comment
Share on other sites

most times the broken screw will be accessbile from the dial side of the movement.  I use a pair of fine tipped diaginal cutters to grasp the screw and slowly turn it out of the hole. 

TIP -  Apply some watch grease to the bottom of the set lever to hold it in place.   Line up the holes and with tweezers, drop the set screw into place.  The turn the screw about 2.5 turns.   


  • Like 1
Link to comment
Share on other sites

Thank you AndyHull and JerseyMo for responding with really helpful instructions!  You guys rock!  i have to get some rodic to help hold these two little mini-monsters in place. I was trying to use a small bit of sticky-tack but it didn't hold well enough.  I would get the screw into position but it would fall over when the screwdriver touched the screw.  

For the 24 movement that still has the broken screw end in it, I will try to get that out after I get the lever and screw installed in my working 24. 

And yes, I will install the crown/stem AFTER I have the lever and screw in place on the plate. Again, thanks for your help- i really appreciate it!!!  Will let you know when I get things back together.

  • Like 1
Link to comment
Share on other sites


  • Recently Browsing

    • No registered users viewing this page.
  • Topics

  • Posts

    • Just missed it! I have a donor movement on its way. But thank you for the offer--I'll let you know if I need anything else.
    • My latest. Timex 2465. Replaced the crystal, caseback gasket and spring bars. All in less than $5US. Added a gray NATO strap I already had in stock.
    • I have some Gruen 510's in my donor pile if you need parts.
    • I've been intrigued by everyone's input here...so I decided to give this a shot. I bought the"typical" Pearl watch-machine basket and trays, for about $65. The trays are good,..the housing is a nightmare ! Thought it would take the mixer off my bench at anything above about 200rpm. The housing is cast of course,..and it's not "true" at all...so the harmonic vibration was insane. So,..I bit the bullet and bought the Elma housing and top. Not the baskets though, as the Pearl one's fit the Elma. Saved a bunch there. The basket and lid came to about $80 with shipping. The opening in the Elma top is 8mm, and the shaft that came with my stirrer is 6mm. I bought a piece of steel tube, 8mm O.D., and 6mm I.D. Cut off about an inch of the tube, and drove the rod into it. Gives a really snug fit.... Lightly champfered the leading edge of the 8mm section, then lightly tapped it into the top of the Elma lid. Spins like a dream now So... I have about $240 total into this including jars and steel mesh for the wave breakers   I'm pretty happy Best to you all   Randy
    • Still haven't gotten around to getting stems or screws, but I did make my first attempt at polishing a case. I just used a soft mop and rouge to reduce my odds of ruining them, and I think they came up pretty nice. Also gave the crystals a polish on the same wheel while I was at it. They were both very badly scratched up. The one on the left is fairly beat up, but it'll still make for a decent presentation.
×
×
  • Create New...