
Tight steady pins on balance cocks


-
Recently Browsing
- No registered users viewing this page.
-
Topics
-
-
Posts
-
 You do realise that the +ve contact is supposed to press against the side of the battery and not sit on top of it.
 -
.thumb.jpg.cb17a66989f1e796fd4217db2e9ca9df.jpg) Hi @nevenbekriev, thanks for having such a close look. But it's actually all how it's supposed to be. It may be an optical illusion. These a 2/3 circle brass bushing on the lever itself and a full jewel on the plate below. The pic from the manual will clarify:
Hi @nevenbekriev, thanks for having such a close look. But it's actually all how it's supposed to be. It may be an optical illusion. These a 2/3 circle brass bushing on the lever itself and a full jewel on the plate below. The pic from the manual will clarify: -

By HectorLooi · Posted
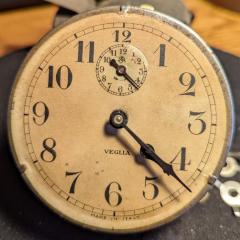
Hi @nevenbekriev, I'm thinking of replacing the whole platform. Mine is marked 4-82. The seller has 4-69, 4-71 and 4-72. Will any of them fit my clock? The white powder was not visible at first. It only appeared after I did a preclean in 95% denatured alcohol. -
 What you are showing most of it is missing. Just looked on ebay this is the best machine I ever had. I have had a few machines in my time. https://www.ebay.co.uk/itm/285902116112?itmmeta=01J0EW3685DS3DXFT0YK1M6CRW&hash=item4291181510:g:eRgAAOSwKBpmZsMW&itmprp=enc%3AAQAJAAAA0KMFnc%2BwDg6kFufauQZxMmo%2FXMOZUb8B8ZtxalJPVcGZYl0sjSXjgIHEyZ0dvGY57wsEJupTrvZkGyRH5A8KGf8GYSzSXE1F8VMaR5oJYP%2FgVmvU5QSidrbXULj3h1iqvptGXGVfko2HM%2BWKK5XSOE9Ek1FPwkVOi9p%2FbmX7FAp7Cr0GbUjAovPOI1QZdyc7ChZLNJiGQAsjfz4FzJAz8mvLKL2xwXGtbmhYf4l0BU7gQRLQ%2BHfKogEt5AO3xlR2F6fZxjNi5iB3W4RY7n7HniE%3D|tkp%3ABk9SR5bkjNyDZA There is also this one. https://www.ebay.co.uk/itm/176424434347?itmmeta=01J0EW3685CBSTMC6HZCD24VJA&hash=item2913b73aab:g:WcIAAOSwm-ZmS3vn&itmprp=enc%3AAQAJAAAA0G7k%2FSuYiX%2Fhn1xO9kSpOZnqO525%2FC29sG7K0LRkRyzClvecttiEGFWe4ZOrXR42I6LCP9RSWPjnOdr3wzuhofuIAI%2FUhHq2VwPDTLpy5M%2FATDlCvUueqPlNL9%2FXBOJx8HpxavHbrw%2Bz3%2FW9YOil2nq5U%2BRfu10yBilLrFeJeCi8kZL6gcrIOnReTuh1tO%2F4XG0uVDr0Y9Vze27CMKpR2cb8I%2Fqyt%2FHVXS2tMu7x%2FJTfOTzw85wzUpt5WeVLCcV7MKpGytwVesyPs9t4g05KWLk%3D|tkp%3ABk9SR5LkjNyDZA Another https://www.ebay.co.uk/itm/196429850292?itmmeta=01J0EW3686SKPN1WSF129KR20N&hash=item2dbc21a6b4:g:~7kAAOSw41pmYXfG&itmprp=enc%3AAQAJAAAA8Cj5grIbnKC5SFi%2B0%2B83GgokdKXHur9QvJ%2FKnte%2FDar5L9PoB%2BFs%2BcOti9BkDgCd7r9vBSG%2BINHCtprmUtKJC%2BA%2BPKBEQbgYVt3mp3VVi%2Bk4sX6%2BlrwoSZD5wW8btH8YRQbvBTo1y%2BfAZWhBN7dBbOncVlsDPeIQnxhoX27onRA0cOkqJwaB95xhK9lIUZ1qHeMb8J58cmLfmy4dt7HuQOMQ%2BIJCz9Yd96Kw1SyprG90yB2wCUd4dshpzK0z1cSX7dvHPy7ZTn1GJL2Zs%2B1j630ZPwEeSwTsxDtKUuLTyPx20SE37XD%2Fllg2llakO7AH7g%3D%3D|tkp%3ABk9SR5jkjNyDZA More https://www.ebay.co.uk/itm/176410156286?itmmeta=01J0EW3686RHQ5CNHDSSZ17QW0&hash=item2912dd5cfe:g:nJIAAOSwnztmYEVF&itmprp=enc%3AAQAJAAAA0I56oof2IHqmGAwUUoqpoIM971obYtQeElg%2B7X8PL9CG7PXDtCKgovcgq7uu5OcLTmZRDSf3qiSuZUxZKafLo08I4OHEYDa3uMi4jKcAYZJq2M3kDK3utnODNLx9VN0swZqGi7KVdVzrAMV7V4UCF7eUBpAYJizdbSyxbnCgnAStxQEdBuBroTbPzj6%2B79HetBmFknueT9%2BfLRePi6y0LMN0VsDG3yEstvRHKW%2BlC5LNWgWnweQwAy8qDPKW9lfFRnI%2FDzLbLI3yCPT3NClmGYQ%3D|tkp%3ABk9SR5jkjNyDZA Make sure it comes with the jars and basket. Members on here have restored some dilapidated machines and the look like new.
 -

By nevenbekriev · Posted
Just in case You didn't notice this: The jewej is broken and no wonder, the decision of the movement designer is a little strange here.
-

Recommended Posts
Join the conversation
You can post now and register later. If you have an account, sign in now to post with your account.
Note: Your post will require moderator approval before it will be visible.