Jump to content

Recommended Posts

Posted (edited)

I have a new case I'm attempting to use, and the gaskets needed lubrication. The pushers stick pretty badly with no movement in the case. No big deal. I remove the pushers, grease the o-rings, and when I go to install the first one, the o-ring pushes out into the case... Oops. No big deal. Only, the o-ring is still in there. There are TWO o-rings! OK... Investigating the stack, I have the pusher itself with its shaft. A spring goes on the shaft, a washer, then.. two o-rings, and it's all held into the case with a screw. I can assemble the stack easily and get the pusher in the case with ONE o-ring, but the second invariably tries to squish through the hole.

I figure the situation is one of the following: 

a) There's only supposed to be one o-ring, and the second is a manufacturing oopsie, or

b) There's some trick to getting pushers installed with two o-rings that I'm completely unaware of and can't find any instances of.

Can anyone point me down the right path?

EDIT: I've not done a ton of chronographs yet...

So, the pusher stem with the spring, washer, and one o-ring works out to where the o-ring is even with the top of the stem. The second o-ring sits on top of, and free from the rest of the stack, and when pushed into the case, invariably gets out of alignment. If I attempt to push the pusher in and through, the o-ring gets squeezed through the hole every time. 

Edited by spectre6000
Posted

Just a parts watch. eBay case. 

It seems I just sproinged the little washer into the ether, but didn't realize it until some time later. No idea where to even look... My house is a construction zone, and my office a dumping ground, so the odds of finding it amidst the piles seem very poor...

I'll see what I can do for photos once I finish digging around for that little washer...

Posted (edited)

I was going to say that if it's a Seiko then it's quite common to have 2 o-rings on the pusher.

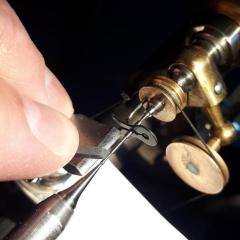
You are putting the o-ring onto the stem and inserting as example below?

image.png.3a7a3258e87a6797a5559ff4aee6f2a6.png

Edited by AndyGSi
Posted

IMG_5984.thumb.JPG.548e2eb79efca22ce3476c012d9b8f00.JPG

The issue is that if you stack the spring, washer, and o-rings on the pusher stem, the stack is one o-ring longer than the stem. So it invariably gets out of line when inserting it into the case, and you can't get the pusher to go all the way in. Then the o-ring gets pinched or pushed through the hole, and you have to start the whole exercise over. I tried stacking everything on the pusher stem, stacking it all in the case hole, and tried threading a screwdriver blade of matching diameter (which I think is when the washer took its leave). Can NOT get things to line up and get all the way in there. Which is all pretty much moot at the moment, because I need that washer, and it's thoroughly gone.

Posted

So you can't even insert the o-rings into the crown tube first and then insert the pusher, spring and washer through them?

Is the crown solid or does the stem extend into it?

Posted

Found the washer!

I was able to get ONE pusher almost assembled using the other pusher as a guide. I was able to get it all the way into the case, but then I couldn't really get the screw in there without letting go, and it all went to hell again. I'm sure I could figure out a way past this particular obstacle, but the next would be installing the second pusher without a third to use as a guide. I tried screwdriver tips, but unless I grind one end down to where it's flat for a ways, that's no good either... Spring bar maybe?

So far, I've tried assembling the stack on the pusher. It's just an o-ring's width too short, and the second o-ring invariably gets out of line and the whole thing falls apart. I've tried assembling the stack inside the case. The stem ends up pushing one o-ring out and extruding it through the hole. Only thing that has almost worked was using the second pusher as a guide from inside the case.

In the meantime, I've definitely damaged an o-ring... But at least I found the washer! O-rings can be had as service parts, those tiny washers are not published specs, and I spent the time the flashlight was charging (my 4yo keeps having "camp outs" in her room...) looking through the supply houses. 

I'm going to clean the dust off the washer, and see if I can't find something cylindrical, and approximately stem diameter.

Posted

Sorry but I can't understand why you're having such difficulty at least installing the o-rings in the tube and then passing the stem through them.

Something you could try is making a ring of thin plastic to install inside the case to cover the holes.

You can then insert the o-rings into the tube followed by the stem with spring and washer.

When you've inserted the stem as far as it will go to the plastic you can then remove the plastic and fit the screw.

Do you have the case details you bought.

Posted

It shouldn't be this hard, and I've never had this sort of issue in the past. Usually the o-rings fit nicely on the pusher shaft.

The rings are a tight fit between the tube and the stem. They don't default to around the tube, and I can't get the second ring to start around the tube. There's a shelf on the inside of the tube through which the o-rings are not supposed to pass. That shelf serves the purpose of the plastic you're describing, assuming I understand correctly.

I just sacrificed a cheap screwdriver. I'm about to re-grease the o-rings and try using the screw driver shaft as a guide. Fingers crossed.

Got one! Pretty much first try! Shop made tools for the win! Now I just need to replicate that success with the second pusher...

Got it! Wow! When I sat down to case this movement, I didn't even give half a thought to prepping the case! That was ridiculous! Now I get to clean up all the silicone greasy finger prints... What a PITA...

Posted

The stem/tube/o-ring is an interference fit. When the o-ring is in the tube without the stem, or when it gets ahead of the stem, it deforms toward the middle. When the stem tries to push through the hole at the end, the o-ring is ahead of it, and ends up getting pushed through first, but only slightly. When the stem stops, you obviously don't force it, so you back off a little, and the o-ring continues to deform toward the center, because it's the only place it can go. 

The answer, was to essentially assemble the stack on a rod, and then follow it through with the stem. Didn't work so well with a sharpened screwdriver (lots of space in the center for o-ring deformation), but once I got rid of the blade and flattened it out, it worked the first time every time. The nearly complete shaft going all the way through didn't give the o-ring anywhere to jump into and get in the way. 

Posted

It must be something to do with the case or wrong sized o-rings as I've never had any problems fitting anything like these.

If the stem isn't long enough then just drop them in the tube so they're seated against the stop and then push the stem/pusher into place.

Posted
  On 7/21/2024 at 10:33 PM, AndyGSi said:

It must be something to do with the case or wrong sized o-rings as I've never had any problems fitting anything like these.

If the stem isn't long enough then just drop them in the tube so they're seated against the stop and then push the stem/pusher into place.

Expand  

I think it's a design issue. If the stems were just an o-ring width's longer, it wouldn't have been a problem. Or if the o-ring were specified to be able to handle the sealing on its own, it wouldn't have been a problem. If the o-rings were a smidge thinner, it wouldn't have been a problem. If they came pre-greased, it wouldn't have been a problem (for a while anyway). Lots of things could have been done differently, but that's what it is. 

Join the conversation

You can post now and register later. If you have an account, sign in now to post with your account.
Note: Your post will require moderator approval before it will be visible.

Guest
Reply to this topic...

×   Pasted as rich text.   Restore formatting

  Only 75 emoji are allowed.

×   Your link has been automatically embedded.   Display as a link instead

×   Your previous content has been restored.   Clear editor

×   You cannot paste images directly. Upload or insert images from URL.

×
×
  • Create New...