Jump to content

Recommended Posts

Posted (edited)

Hi all,

so, for the fist time, I'm going to be repairing a pallet fork. Specifically, repositioning a pallet stone that has come off and then applying new shellac.

In order to do so comfortably, I created this tool. I tested it once with a spare fork and it seems to be useful.


Ingredients: 

- 1mm thick brass sheet: https://www.cousinsuk.com/product/sheet-brass?code=B55335
- a cheap saw : https://www.cousinsuk.com/product/saw-frames-fixed?code=P33903
- ..and blades: https://www.cousinsuk.com/product/value-premium-saw-blade-set
- a cheap set of M2 screws and nuts like this: https://www.amazon.co.uk/Screws-230pcs-Stainless-Assortment-Storage/dp/B08T8BB1YN
- a spare chunk of 2cm thick, heavy multi-layer wood panel
- non-watchmaking electric drill with a 2mm drill bit


Building steps:

I don't have many tools, so I free-hand cut a piece of the brass sheet, approx 8x5cm.  I then drilled a few holes in it.

- No 1: a 2mm hole to then cut a slit (No 5) with the saw to fit the pivots of pallet forks. After taking the below picture, I used thin strips of sanding paper to taper the slit (to accommodate different sizes of pivots).
- No 2 and 3: I drilled this hole and again used the saw to create a 2mm wide slot.
- No 4 is also a 2mm hole.
- now I sew out a piece No 6. Let's call it "holding bar". Wide enough at the ends to accommodate 2mm screw holes and tapered in the middle to accommodate different sizes of pallet fork levers.
- I loosely attach piece No6 with 2mm screws and nuts.
- two additional holes though brass and a hand-cut piece of 20x5cm wood. Then fix the brass to the wood. The brass place over-hangs the wood so that screw holes 1-4 are still free from below.
- the heavy and large piece of wood creates a solid and flat base that keeps the brass sheet nice and stable when working on the fork. Of course, it's not too heavy to be picked up and held over a sprit lamp.

image.thumb.png.60b5c43c7d288206c65e395b9c349211.png

20250201_214434.thumb.jpg.a1daad3b68ec0df6d67ac31e01d5c2b8.jpg


Operation:

- loosen the screws No 3 and 4 and lift the "holding bar" (no 6). [For additional positions, one can also use the holes No 1 and 2 (in case you were already wondering...)]
- insert the pallet fork pivot in an appropriately sized section of the tapered slot.
- position the holding bar (carefully!) over the lever section of the fork.  The slot No3 allows different positions. The "holding bar can also be turned around/upside down for more flexibility.
- Carefully secure the screws to hold the "holding bar", keeping a close eye on the fork and pivots.

-> now the fork is secured and ready to be worked on.


Advantage of the slit and the fork position as below: this allows to separate entry and exit stones for separate cleaning and heating.

By the way, I tested using a soldering iron (15 bucks on Amazon) to heat only specific areas of the brass plate or fork. Played around with shellac for the first time. I found it very useful! E.g. if I set the iron to 400 C°, I would just slowly come near the fork (like 1-2mm distance) and the shellac would gently melt. Alternatively, setting to 180°C (minimum on that soldering iron), I could just touch the pallet for slots from the outside (not touching the shellac) and that would also slowly melt the shellac. I found that this gave me a lot of control. 


20250201_214506.thumb.jpg.feb484c9c1726d451b49d578e9102cd0.jpg

image.png.eb095aa7ddf133758d924361251431e7.png


I wonder what you think of my tool 🙂

Edited by Knebo
  • Like 7
  • Knebo changed the title to made myself a simple tool for pallet stone adjustments / shellac application
Posted

Nice! I've been thinking about upgrading my design which is just a coin sanded flat and two holes drilled - one for the pivot and one for the safety pin rivet or whatever it's called. Is your pallet fork in the photos completely flat on the side facing the tool? So that you don't risk bending the lever.

Join the conversation

You can post now and register later. If you have an account, sign in now to post with your account.
Note: Your post will require moderator approval before it will be visible.

Guest
Reply to this topic...

×   Pasted as rich text.   Restore formatting

  Only 75 emoji are allowed.

×   Your link has been automatically embedded.   Display as a link instead

×   Your previous content has been restored.   Clear editor

×   You cannot paste images directly. Upload or insert images from URL.

  • Recently Browsing

    • No registered users viewing this page.
  • Topics

  • Posts

    • We the human beings never see our own aging.      
    • Hello Tom and welcome to the forum.
    • Hah! Well, California will have to do. Lived in TX for a brief period back in the early 70s, though, so maybe that counts. 🙂 Funny you should mention making vacuum tubes- I've actually tinkered with that! It's REALLY tough to do, and I've never made one more complicated than a simple diode that barely worked, but I have played around at it. But there's just no infrastructure for vacuum tube fabrication. I can get a lathe and learn how to use it to make complex parts, and while it might take a while to learn- and money to get the equipment, of course- it is possible to do more or less "off the shelf". But vacuum tubes, not so much. There are a few folks out there doing some crazy cool work with bespoke tubes, but they have setups that are far beyond what I can manage in my environment and it's mostly stuff they built by hand. I also have been playing with making piezoelectric Rochelle Salt crystals to replace ancient vacuum tube turntable needles- nobody's made those commercially for probably 60 years. I'm a sucker for learning how to do weird things no one does any more so I can make things no one uses work again. (I think this is drifting off the topic of lathes, lol).
    • You shoulda been born in Texas. Tough to make a vacuum tube though. You can substitute with a MOSFET eq ckt I guess. I was playing around making a pinion the other day. More to it than meets the eye.
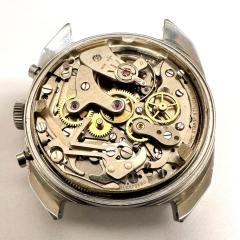
    • Well, turns out it was a fake bezel! The crystal is domed mineral glass and I was able to find a cheap replacement that should be here in two days.  I used my crappy little press to pop out the cracked crystal, Ill give the case a good cleaning in the meantime and do a once over on the movement.     
×
×
  • Create New...