
Early Accurist quartz, quartz testing and replacement.

-
Recently Browsing
- No registered users viewing this page.
-
Topics
-
-
Posts
-
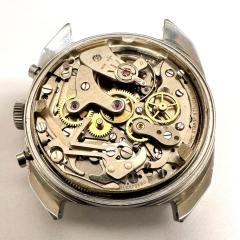
 Righty ho, I re-serviced the chrono module and got a reasonable result with minimal loss of amplitude when not running the chrono and about 30 degrees loss when running. Great. The problem is now that the chrono (and movement) stops running after about a minute or so, a tap on the watch starts it running again. No issues with the movement running when the chrono is stopped. Going to service it yet again, obviously some residual issues with friction in the chrono module (Very frustrating - I wish there was some way of testing it as I go!) I also seem to have a problem with the cannon pinion where the movement is running continuously (with the chrono stopped) but it's losing significant time / stopping. This is one of those two piece ETA style with a driving wheel pressed over the cannon pinion, obviously arranged for driving the chrono module. I had no issues with this prior to service and just added a small amount of grease between the driving wheel and the centre cannon pinion as the technical guide required. What's the best way of tightening these up? I would like to replace it but I guess this is going to be hard to find as it is dedicated to the DD chrono movement.
 -
 He uses the micrometer cap, but he leaves the spring out (you can see that in the video). If you leave the spring in, the spindle will move up as well (as shown by @Knebo).
 -
 Seems like he doesn't have the micrometer cap attached to the spindle so he can only push down but cannot pull up? If the cap screws into the spindle I guess you don't need the spring? I only have a "normal" Seitz so I really have no idea.
 -
 Do you have a part number for the bearing shim lock tool?
 -
 Yes in my opinion the 3/4HP is plenty but it’s your decision & yes it does come with speed control but foot operation so my reason for changing to potentiometer was because my leg shakes so it was like me revving the lathe & anyway I prefer to set the speed. I & a few others that I recommended the motor to run a Pultra 10mm lathe so if you have a 6 or 8mm B & L then it will be plenty, if you have seen any of my videos you will have seen that when using a graver I run quite slow without any problems. Dell
-


Recommended Posts
Join the conversation
You can post now and register later. If you have an account, sign in now to post with your account.
Note: Your post will require moderator approval before it will be visible.