Jump to content

Recommended Posts

Posted

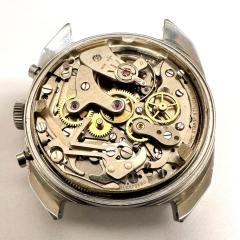
Hello. 1950’s Leazer watch with a stuck dial. Appears to have had water ingress, movement looks very good, but the screw holes for the dial  have rust in them and I can’t see to get a screwdriver to work in them. Dial doesn’t seem to want to move at all and is solid against the movement. Not sure if there is glue or rust under dial. My first thought is to put something in the dial screw holes to remove rust. I don’t have evaporustwhich is hard to find in Canada. WD40? Vinegar? I’m afraid of hurting the rest of the movement. Any suggestions? I’ve been working on watches for about 6 months now on weekends, first time I’ve run into a challenge like this. Thanks!

Posted

personally i would go for a drop of WD on top of the screw heads and wait for it to soak through to the threads.... you might be able to get some to run down the locking side of dial feet, give the fluid time to soak in, a few days. dont try an ultrasonic , good chance it will strip the face completely and leave worse than you already have.

Posted

Done. It doesn’t even feel like there is any thing left of whatever screws were in there. Hopefully if that’s the case the WD40 will at least let the feet on the dial go. I’ve been mainly fixing and restoring pocket watches up to now and building wrist watches from new parts so this is my first foray into a vintage wristwatch movement.  Looks like I didn’t pick an easy one, LOL.

Posted (edited)
15 minutes ago, AndyGSi said:

It looks to me like the screws are long gone as I'd expect to see the slot level with the edge.

As @Neverenoughwatches said I'd put a drop of WD40 in the holes and leave it to soak for a bit.

Do you intend on reusing the dial?

My main intent for this was to restore as if it was a more valuable watch than it is. I would like to try to keep the dial and maybe just save the watch as a trophy of my first vintage wristwatch rebuild. I might consider replacing it if the movement works well. The original case and strap are in very good condition, just dirty. My main goal here is really to practice rebuilding a swiss movement.There was also a beautiful set of gold hands with it, similar to the old Tudor ones.

Edited by capoman
Additional info.
Posted
3 minutes ago, capoman said:

My main intent for this was to restore as if it was a more valuable watch than it is. I would like to try to keep the dial and maybe just save the watch as a trophy of my first vintage wristwatch rebuild. I might consider replacing it if the movement works well. The original case and strap are in very good condition, just dirty. My main goal here is really to practice rebuilding a swiss movement.

Not sure what you mean by 'restore as if it was a more valuable watch than it is' but what movement is it?

Posted
4 minutes ago, AndyGSi said:

Not sure what you mean by 'restore as if it was a more valuable watch than it is' but what movement is it?

I just mean to do the best job I can with it including cleaning the dial carefully. I didn’t pay much for this, but I still intend to try to restore using as many original parts as possible. It’s an AS 1187.

Posted

I get that fella , you want make the best job of your first watch repair. What you do now will be 10 times as less  effective compared to what you can do in a year if you practice regularly and develop the skill and knowledge that follows. Re the dial, you won't make much if any improvement as a beginner but surprisingly enough you could make it a whole lot worse if you try to improve it 😅. So if you want your trophy first watch fix....then mostly leave it be . I think we need more info on the condition of those dial feet screws, as it is we can see the tops of the dial feet and you've shown us some holes where the screws go, but without using my superpowers of night or xray vision....which can only work if I'm actually with you in person looking at your watch with you, then some light in there might give us a clue as to whats going on. 

Maybe John will come along with his crystal ball, give it a polish and fire it up John.  Maybe...just maybe...I'm in a funny old mood today. I guess I'll just apologise now in case my behaviour hits an all time low today. Seriously we need to see a screw.

head...oh my 

Shoot me now.

  • Like 1
Posted
10 hours ago, Neverenoughwatches said:

I get that fella , you want make the best job of your first watch repair. What you do now will be 10 times as less  effective compared to what you can do in a year if you practice regularly and develop the skill and knowledge that follows. Re the dial, you won't make much if any improvement as a beginner but surprisingly enough you could make it a whole lot worse if you try to improve it 😅. So if you want your trophy first watch fix....then mostly leave it be . I think we need more info on the condition of those dial feet screws, as it is we can see the tops of the dial feet and you've shown us some holes where the screws go, but without using my superpowers of night or xray vision....which can only work if I'm actually with you in person looking at your watch with you, then some light in there might give us a clue as to whats going on. 

Maybe John will come along with his crystal ball, give it a polish and fire it up John.  Maybe...just maybe...I'm in a funny old mood today. I guess I'll just apologise now in case my behaviour hits an all time low today. Seriously we need to see a screw.

head...oh my 

Shoot me now.

Thanks for your words. There were two dial feet, not 3 I expected and they are fine. I think there was only one screw with anything left, and nothing there to grip on. The WD-40 did the trick though to loosen things up enough to get the dial off, and it seems to be in decent shape on the underside. The movement came apart without issue after that and seems in good shape. I won’t be getting back to it until next weekend, took lots of pics along the way. I guess the question going forward is what to do to remount the dial when complete? Two dial feet are fine, but not sure the holes are very useful. I guess I’ll see after I give the plate a good cleaning. I have a screw collection I might find some in, but I don’t have any taps that small. I know it’s not kosher, but maybe a couple drops of hot glue would be sufficient, LOL.

Posted
27 minutes ago, capoman said:

Thanks for your words. There were two dial feet, not 3 I expected and they are fine. I think there was only one screw with anything left, and nothing there to grip on. The WD-40 did the trick though to loosen things up enough to get the dial off, and it seems to be in decent shape on the underside. The movement came apart without issue after that and seems in good shape. I won’t be getting back to it until next weekend, took lots of pics along the way. I guess the question going forward is what to do to remount the dial when complete? Two dial feet are fine, but not sure the holes are very useful. I guess I’ll see after I give the plate a good cleaning. I have a screw collection I might find some in, but I don’t have any taps that small. I know it’s not kosher, but maybe a couple drops of hot glue would be sufficient, LOL.

If the threads are shot you can re-drill them for a bigger screw size, and the holes to accommodate a larger head or reduce the head diameter if need be. The screw should cut its own thread in the brass plate.

Posted

See, there is simple way to take the dial off without damaging it's legs. Disassemble the rear side of movement in order to get to the holes where dial legs go in. Then You must fix the movement as to be able to press the legs trough the holes and in the same time the dial to be free to go down. Press the legs little by little first one then the other, again the first one and so on until the dial is free. In the end You will be able to etch the screws in alum or sulfuric acid

  • Like 1
Posted

As per my previous post, the dial is off now. The WD-40 did the trick. Just a matter of figuring out how to put it back in if the holes are pooched. Weird that the rest of the movement is just fine, and didn’t have the same corrosion issues as the dial screws.

  • Like 1
Posted
26 minutes ago, capoman said:

As per my previous post, the dial is off now. The WD-40 did the trick. Just a matter of figuring out how to put it back in if the holes are pooched. Weird that the rest of the movement is just fine, and didn’t have the same corrosion issues as the dial screws.

Sorry, I missed it. But, You already will know what to do in similar situations, where the screws are damaged and will not want to untighten.

Now, if the threads are damaged, just use slightly bigger screw. Put some oil and screw it forward-reverse carefully until new thread is formed to the end.

  • Like 1

Join the conversation

You can post now and register later. If you have an account, sign in now to post with your account.
Note: Your post will require moderator approval before it will be visible.

Guest
Reply to this topic...

×   Pasted as rich text.   Restore formatting

  Only 75 emoji are allowed.

×   Your link has been automatically embedded.   Display as a link instead

×   Your previous content has been restored.   Clear editor

×   You cannot paste images directly. Upload or insert images from URL.

  • Recently Browsing

    • No registered users viewing this page.
  • Topics

  • Posts

    • Righty ho, I re-serviced the chrono module and got a reasonable result with minimal loss of amplitude when not running the chrono and about 30 degrees loss when running. Great. The problem is now that the chrono (and movement) stops running after about a minute or so, a tap on the watch starts it running again. No issues with the movement running when the chrono is stopped. Going to service it yet again, obviously some residual issues with friction in the chrono module (Very frustrating - I wish there was some way of testing it as I go!) I also seem to have a problem with the cannon pinion where the movement is running continuously (with the chrono stopped) but it's losing significant time / stopping. This is one of those two piece ETA style with a driving wheel pressed over the cannon pinion, obviously arranged for driving the chrono module. I had no issues with this prior to service and just added a small amount of grease between the driving wheel and the centre cannon pinion as the technical guide required. What's the best way of tightening these up? I would like to replace it but I guess this is going to be hard to find as it is dedicated to the DD chrono movement. 
    • He uses the micrometer cap, but he leaves the spring out (you can see that in the video). If you leave the spring in, the spindle will move up as well (as shown by @Knebo).
    • Seems like he doesn't have the micrometer cap  attached to the spindle so he can only push down but cannot pull up? If the cap screws into the spindle I guess you don't need the spring? I only have a "normal" Seitz so I really have no idea. 
    • Do you have a part number for the bearing shim lock tool?
    • Yes in my opinion the 3/4HP is plenty but it’s your decision & yes it does come with speed control but foot operation so my reason for changing to potentiometer was because my leg shakes so it was like me revving the lathe & anyway I prefer to set the speed. I & a few others that I recommended the motor to run a Pultra 10mm lathe so if you have a 6 or 8mm B & L then it will be plenty, if you have seen any of my videos you will have seen that when using a graver I run quite slow without any problems. Dell
×
×
  • Create New...