Jump to content

Recasing a Tudor 9411


Recommended Posts

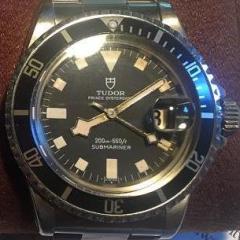
Finally tonight I (nearly) finished recasing my blue snowflake. I have been collecting parts for years and the case is quite elusive. I’ve been using a (decent) aftermarket case and a few months ago found a nice 1976 Case. I’ve been itching to get this together ever since!

we start with disassembly of the current watch. It served well and I always enjoy wearing this watch. At least as much as my 1680. Take the back off, pull the stem and then the movement. We must be VERY CAREFUL as these original blue dials are extremely delicate. The blue paint “rots” on these. It gets lumpy and then flakes off. 

Once the movement is out, I also want to replace the seconds hand, which has a short tail. I have a genuine one but it needs to be broached slightly. This is an aftermarket one of near perfect shape. Lume color was adjusted by Dunkin Donuts coffee. 

Next we case it up. Again, very careful to protect the dial. Set the dial in the counterbore - It’s small, but it’s there. And very important to set the dial straight in it. That paint can chip on any dial messing this part up and these old blue ones are particularly vulnerable. 

Then the movement ring goes in. It is notched for the stem, so we need to line that up well. I sight through the crown tube to be sure all is aligned and centered. Start the tab opposite the crown then the crown side. Just catch the screw threads because it always needs further tweaking. Check the dial is seated perfectly... Once I’m happy I tighten it evenly,  back and forth. 

New old stock 702 crown. One word of caution here- the o-ring was petrified even though sealed in the little blister since 1973 or so. If you work on this vintage stuff, be sure you have fresh gaskets. Two o rings go inside the tube, and one on the crown. The crown one seals on the end face of the tube and the two in the tube seal on the crown stem OD. Three seal points- the “triplock “ crown. 

Stem length was perfect and it took some effort to screw the stem in so I left it dry. When they are loose, I’ll use purple low strength loctite on them. I avoid it when I can because it can make life miserable and 2784 stems are not easy (or cheap) to find. 

Now we finally set the crystal. A lot of guys set it earlier, getting the case “ready” ahead as it is a bit more “brute” than other watch work. The reason I wait is to set the crystal in perfect alignment with the date window. I use the loupe and ensure the top and bottom edge of the cyclops are parallel to the date window. Not a big deal but when it’s off, it’s annoying to me. I keep a scrap crystal on the case so I don’t ham fist the hand stack...

Now the crystal retainer- it slides over the crystal and is pressed firm and flush to the top of the mid Case. Mine is 99% there now. A crystal press doesn’t have the “nut” to do it so I use a small arbor press out in the garage. It was for pressing frets into fingerboards when I was building guitars. The drill press works fine too, if it’s a floor model. 

Well that’s where we’re at now. Tomorrow I’ll press the retainer fully home and then deal with the bezel. That may end up another complete thread...

03A0B68E-313F-4526-B438-E76134579AA9.jpeg

9B1A6180-8B1C-4BC6-9B75-A0B00D4A9C77.jpeg

926A3963-5964-4E17-A5B0-3527C068973D.jpeg

C5E82B14-643B-4ADA-8100-6A174B473927.jpeg

00356C05-04E9-4792-984D-F76E02458C39.jpeg

3F660B80-2731-431F-B780-73BA9E43EBF9.jpeg

  • Like 1
Link to comment
Share on other sites

  • 2 years later...


  • Recently Browsing

    • No registered users viewing this page.
  • Topics

  • Posts

    • Here is the insert ring for rectangular or elliptical movements: Note that the length is the side with the stem cut out on the spreadsheet (in the picture below this is 15.15: Here is the fake pdf file, again you need to convert to .zip after download to access the FreeCAD and 3mf files. Rectangular insert disc.pdf    
    • as you took the mainspring out what did it look like? It's amazing how much amplitude you can get if the mainspring actually has the proper shape. last week I was doing a 12 size Hamilton and was very much surprised with the beautiful back curvature the mainspring had. Then the watch had a really nice amplitude the group would be so proud it was 350 until I dropped the lift angle down to 38 that drop the amplitude quite a bit below 300. then with the beautiful back curve it still had really nice amplitude the next day. I really wish all my mainspring's look like this as the watch had beautiful amplitude the next day. So many of the aftermarket pocketwatch Springs I see now do not have anything resembling a back curve may be a slight curve and that's about all. They still work but they just don't work as nice as a properly made spring. then Omega as all sorts of nifty technical documentation unfortunately every single corner is watermarked with where it came from who downloaded it etc. very paranoid company. On the other hand I will snip out images like from the document on recycling a mainspring barrel. for instance here's the section on what your mainspring should look like. water damaged a lot of times means rust was there rust on this watch?
    • I dont understand why a patreon membership would have limited places ??
    • Welcome to the forum, enjoy. It’s highly unlikely you will be able to purchase a new bezel look on eBay for a pulsar watch for repair to find a bezel.
×
×
  • Create New...