Jump to content

taking apart a Seiko 5Y23


Recommended Posts

If you have hand levers (as in two separate levers not the modern presto type tool) you can remove this in a similar manner to hands, to pry it directly up, you may be able to improvise with screwdrivers otherwise, but that's the method, first time i saw this I thought it had to be pulled apart somehow like other C-clips but no, it pries up and off and is then pressed directly back down again to be refitted. 

  • Like 1
  • Thanks 2
Link to comment
Share on other sites

16 hours ago, measuretwice said:

It seems to me the brass in the centre has to come off - any suggestions on how to do so without making a mess of things?

Just don't buff the "brass" off, that would make a sure mess. :D

  • Haha 1
Link to comment
Share on other sites

progress report......

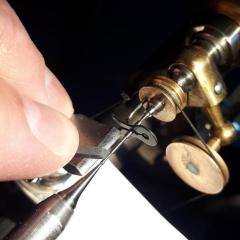
You know what the difference is between a watchmaker who knows what he's doing and me?  sore knees searching the tiled floor for parts.  An that's with a bench with glass sides back and top and the pull out catch tray.  Good news is I'm getting lots of practice and manual dexterity is improving.  I usually find the part, but this time I managed to lose the rotor when it flew off :(.  Being magnetic exacerbates the challenge, it could have stuck to so many things.

This movement is out of production.  I suppose these electronic watches are sort of a disposable consumer thing given the electronics will eventually fail, and with all the plastic they're not exactly inspiring....but hey, that one lonely jewel needed to be serviced and I'm a dog with a bone.

As it turns out the yoke is just about rusted through.  While Seiko forsakes you on the movement, the good news is both parts are still used in other watches (yoke and lost rotor) so they're available and on order.  Hopefully I can make it work.

The symptom of the watch was a jumpy second hand and not really keeping time.  Turns out there were bits of metal stuck to the rotor, no doubt the missing chunks of the yoke.  Interesting how the metal corroded in just that one spot which is an obvious stress riser.  Stress does increase corrosion in steel so it seems a bit of a design flaw....the thin spring arm could have been wider through this section.   Other than some crud from the battery, there was no other corrosion in the watch

5a0b408b19987_DSC_5242mod.thumb.jpg.95b663d41687ee402fde13814f4f17cf.jpg


Edited by measuretwice
  • Thanks 1
Link to comment
Share on other sites

  • 1 year later...


  • Recently Browsing

    • No registered users viewing this page.
  • Topics

  • Posts

    • Welcome to the group Stirky. You can search for just about every subject in the craft here. Don't be afraid to ask if you can't find the answer that may have already been covered ( some ad nauseum LOL ). You don't have to buy Bergeon to get good quality. There are many decent mid-range tools available that will last you a lifetime. Cousins would be a good place to start . Cheers from across the pond ! Randy
    • I picked up a similar amount of these jewels some years ago in a watch and clock fair. Every now and then they come in handy. This week I've got a rubbed in bombe jewel in the balance cock that is cracked and needs replacing. Very handy to have a vintage assortment of these type of jewels!
    • Great diagram with the teeth and pinion count. Simple way to reduce the speed of the hour wheel by the 12:1 minute wheel. Genius and yet so simple. Always good to reinforce the principal by what you have done in your drawing. Keep doing that. I had a drawing on my wall for years showing me this which is very similar to the drawing you have done. Here's a formula to work out the beats per hour of a watch movement. The movement's BPH is dictated by the wheel teeth and pinion count and the hairspring being vibrated to the correct BPH by finding the pinning up point on the hairspring using a vibrating tool.  The reason in the formula there is X2 on the top line is because there are two pallet stones.
    • So I just wanted to say "thank you" again.  The angle is the key bit it seems and yes, it did basically just fall, or float, back into position when I got it lined up just right. I had meant to add that now that I see how it goes in, I totally see how it came out in the first place, and that whomever cloned the original movement didn't pay much attention to the fine details around the setting or how it interfaces with the balance cock or the "rings" on the regulator and/or stud carrier arms.
×
×
  • Create New...