Jump to content

First time lumed dial..


Recommended Posts

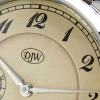
I'm very satisfied with how this dial turned out. I'm building and Elgin pocket watch conversion into wristwatch and wanted a vintage military dial look. 

I had recently purchased a lume kit but hadn't had the chance to use it yet. I design the dial with bold outlined numerals for the purpose of filling with lume. It really turned out better than I ever hoped!

The first dial I did turned out very acceptable, except that I had another issue with it and had to start over. I learned quite a bit just from doing that one dial.

Once I had the printing plate made I repainted the original Elgin dial to a flat white. I then Inked the plate and printed the new dial. Once everything was dry I then slowly added the lume using a 100 - 0 paintbrush which is about the size of a watch Oiler. I went around the dial 4 times adding a layer little by little. I'm very surprised just how much Lume this process adds. The markers have a nice three-dimensional heft to them...

IMG_20170812_213625.jpg

IMG_20170812_213129041_HDR.jpg

IMG_20170812_214600436_HDR.jpg

IMG_20170812_213512.jpg

Edited by DJW
  • Like 11
Link to comment
Share on other sites

I will try to put together a walk-through of the process of dial printing along with creating the plate itself. Honestly I spend more time on the computer designing the dial layout then it takes two create the actual plate or print the dial.:wacko:


IMG_20170813_165330.jpg

IMG_20170813_165420.jpg

IMG_20170813_194608.jpg

  • Like 5
  • Thanks 3
Link to comment
Share on other sites

  • 1 month later...
  • 5 months later...
  • 2 weeks later...
Yes!!! I've been wanting to that to make dials for the Chinese movements that seem to not have any unless you but some brand that uses the dial. I know they have number stickers but if I could design my own I would simply be in heaven!

Hi again DJW, if it makes life easier for you, do you have a suitable link to a website which explains the dial printing process please? As you might have noticed, the natives are restless and want to know more[emoji6]


Sent from my iPhone using Tapatalk
  • Like 1
Link to comment
Share on other sites

20 minutes ago, Deggsie said:

Hi again DJW, if it makes life easier for you, do you have a suitable link to a website which explains the dial printing process please? As you might have noticed, the natives are restless and want to know moreemoji6.png

It's nothing secret, but beside the printing "machine" itself, the need to use a precisely engraved plate places the job largely outside the domain of the average hobbyist and even professional watchmaker  I think that if you can find someone that makes the plate on your design, or are willing to spend pretty good money on a CNC machine that does that, you could be game. I don't know if 3D printing would do a good enough plate. Fact is, at the present time dial making/reprinting specialists are rare.


Link to comment
Share on other sites

  • 3 months later...

This is incredible! Awesome job! I have the same movement I've been trying to figure out how to do the dial forever. I've thought about the whole water slide decals, having vinyl made, trying to have someone hand paint it, nothing is ever as nice as the real deal like you have. I bow at you completing a project I've only begun to think about! It's beautiful.

Sent from my Moto E (4) using Tapatalk

Link to comment
Share on other sites


  • Recently Browsing

    • No registered users viewing this page.
  • Topics

  • Posts

    • Hello everyone, for what it's worth, here is my approach: 1. Escape wheel submerged in Epilame, then dried quickly with a hairdryer. Then the final tip of the pivots are cleaned by poking into pithwood. The logic being that the Epilame is removed at the intended contact point (to avoid any residue that may mix with the oil), but remains in the areas where oil is not supposed to spread to (further down the pivot towards the wheel). The escape wheel teeth also benefit from having Epilame to keep the 9415 in place.  2. I use a syringe to treat only the pallet stones. I suspend the pallet fork with some Rodico so that the stones hang downwards. I notably use a rather thick needle where a drop WON'T form, but rather where the Epilame liquid stays in the needle tip, which I then dip into the pallet stones. It requires some practice to get the right amount of Epilame into the needle tip, but it works for me now. This way, no drop will "jump" onto the pallet fork and potentially go all the way to the pivots.  3. I let the movement run for a few minutes without lubricating the pallet stones... to scrape off the Epilame in the intended contact "channel". Then I remove the balance again and lubricate the exit pallet stone with 3-4 successive drops. See the "channel" that forms on the pallet stone in the picture -- not so easy to see, but it's visible.       I am conflicted about the use of Epliame in balance jewel settings. My impression is that the two jewels sufficiently suspend the oil (even 9010). Apparently Rolex recommends NOT to use Epliame there (heard from a former Rolex service center watchmaker), as it could cause additional wear. Apart from that, I follow specific instructions where I can find them. E.g. the infamous Rolex reverser wheels or sometimes (parts of) the seconds wheel. Exception: I'm currently servicing an Eta 2824 and will probably ignore the service sheet that recommends treating the whole keyless works with Epilame and then using HP1300... I'll skip the Epilame and use 9504 grease.        
    • I'm going to give this a try today/tomorrow on my UTC33/Seiko 66, thanks!
    • Hello and welcome from Leeds, England. 
    • Don't forget Mark is a hard working watch maker so he is also tied up with work. I'm sure he is keeping his eye on this forum making sure it is running along nicely. 
    • Thank you for your introduction and welcome to this friendly forum. We all look forward to your contributions and continued involvement.    
×
×
  • Create New...