I Was Invited So Don't Get Upset That I Am Here Lol
-
Recently Browsing
- No registered users viewing this page.
-
Topics
-
Posts
-
That's a good idea - shrinking down the nut and wrench size from the old casebook trick!
-
I missed this earlier. The dial isn't going into the holder, it should sit proud of it. This is what I am currently using which I print for each different movement.
-
By Neverenoughwatches · Posted
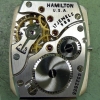
I didn't think pulling to set position would work harden the spring, in that position it is stressed where the arm starts. By work hardening i meant rapid polishing at that point, a bit like polishing a pivot work hardens as it compresses the steel. I doubt polishing by hand would achieve much in that respect though. Its finished, arm polished up mostly at the join to the bridge's main body. I'm ok with it, the screw holes aren't great as i had to open them up by redrilling and positioning it was difficult, I'm not much use with a loupe, opening up with a file might be a better option for me or i could just use the correct drill size 😅. And the detent is way too deep, i had to guess that with the stem release out of position and sat on top, but i only took one measure and went for it, no slowly slowly catch your monkey 😅. First go I'm happy , well sort of, it works and thats a big thing for me, next one will have a bit more finesse. Anyone thats interested, after filing, i used a 2000 grade home made diamond micro file and then 20 micron film, the film is much better than wet and dry, more stable to use and doesn't shed cheap grade grit everywhere , then auto polish on a sponge pad. -
By RichardHarris123 · Posted
I'm assuming that every time you set the watch you are work hardening the detent spring, maximum hardening is where it meets the plate due to maximum deflection. That's why it snaps there. The Young's modulus may be the same but after it's reached its maximum yeid strength it breaks. My mechanic engineering is very rusty, correct me if I'm wrong. -
By Neverenoughwatches · Posted
Ah ok yes that makes sense to polish it where the arm starts to form from the body of the bridge, i thought you meant the underneath of all the arm.
-


Recommended Posts
Join the conversation
You can post now and register later. If you have an account, sign in now to post with your account.
Note: Your post will require moderator approval before it will be visible.