Jump to content

No technique...


Recommended Posts

I don't know that this belongs here - I'm not certain that I'm going to document my progress step-by-step but since I've just begun and it's not done yet, I'll put it here and somebody can move it if that's what's needed.

I received my first practice movement yesterday and wasn't able to leave it alone - after all, there's been all of these tools arriving over the last couple of weeks.

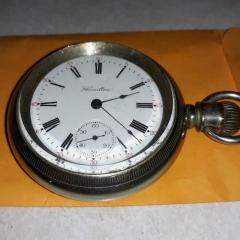
I didn't expect the movement to have a dial and hands. I thought the dial was nice but it's not clear that I'll be able to clean it up.


elgin grade 313 f+r.png

Link to comment
Share on other sites

One of my concerns was that I was going to have trouble due to the situation with my left eye. Following a stroke last year, there is a gray cloud in the center of my left eye that I only notice if my right eye is closed. If I'm looking at you I can see all around but your head would be obscured by the damage to my optical nerve. Luckily it isn't getting worse but it's not getting better either.

So, yesterday I removed the hands and dial, noticed some missing screws and removed the balance, bridges, train of wheels and other components from the dial side. I got to the keyless works and realized that these watches must have a winding stem that is part of the case? Anyway, there were some springs that I was reluctant to remove last night as I wasn't sure how I'd put them back. I solved that by finding a copy of the 1897 patent that describes the spring configuration.


patent 585025 small.jpg

patent 585025001.jpg

  • Like 1
Link to comment
Share on other sites

I also ordered a mainspring since I don't have my own winder. I'll pop open the barrel and pop in the new spring. My next steps will be to run my parts through the wash (in small batches). I'm planning to keep like-with-like as (unlike you guys) I still have no confidence that I'll be able to figure out where they all go if they're just lumped in one big pile.

Somewhere along the line I'm going to need to figure out winding it up outside of a case.

My only goals with this are to: a) see if this is something I can do and b) get this un-running movement back to life.

Thanks for watching...

  • Like 2
Link to comment
Share on other sites

Which screws are not there? You will face issues getting everything to fit together if you don’t have all of them. Have you tried getting a screw assortment? You should take photos of the spring positions to help you put them back later.Also be very careful as they tend to fly off easily when removing. Try doing it in a ziplock bag.

When you say that there’s a gray cloud when your left eye when you close your right eye, do you mean that you only notice it when the right eye is closed? Or is the gray cloud still there, just don’t you don’t notice it. You may want to use a microscope (usb digital/ or a proper two eye microscope for electrical work) for all watch work to reduce eye strain.

https://www.cousinsuk.com/product/cousins-microscope-with-articulating-arm-camera

  • Like 1
Link to comment
Share on other sites

14 hours ago, ifibrin said:

When you say that there’s a gray cloud...

The brain compensates by doing all it can to "remove" the gray cloud when both eyes are open. It's still there since the left retina is damaged.

Actually I've been seeing OK just using my visor with an occasional hand-held glass. I may just get a glass on a gooseneck.

I did take photos of the spring configuration and then I found the patent drawing and thought that was pretty cool.

Thanks ifibrin!

Link to comment
Share on other sites

What about the traditional way by watchmakers. Eyeglass and holding band. Get 2 or 3 magnifications of the highest quality you can afford. There must be a reason why it works for me and many millions of other people.

  • Like 1
Link to comment
Share on other sites

6 hours ago, jdm said:

What about the traditional way by watchmakers.

I have a 10x loupe and a 4x on the way. The 10x is like a microscope. I'm hoping the 4x will work with a band.

Thanks jdm!

Link to comment
Share on other sites

6 hours ago, grsnovi said:

The 10x is like a microscope.

Correct. It's used for examination not general work, you hold the workpiece in hand and move it closer to establish the correct focal distance, angle the piece around so it takes the better lighting. For the others you need to be sitting so that work is about armpits high, elbows standing by the sides, great lighting be it natural, artificial or mixed, and you can focus looking slightly down. Many people which are short sighted can so work without any lens, but if you need one try all magnifications power until you find the one that suits you better, it can be more than one for different work.
This is the first and most important advice written in the good old books, but that you won't see even mentioned in videos. 

  • Like 2
Link to comment
Share on other sites

My revival has slowed to a standstill as I await some additional odds-and-ends: oils, mainspring winder, 2nd movement to cannibalize (and harvest those missing screws). I suspect I'll probably also pickup a Timegrapher 1000 by the time this revival comes to a close. Then I'll start browsing shops for reasonably priced and interesting looking pieces the play with. I'll continue with this when things show up.

Link to comment
Share on other sites

In reference to your comments about remembering were all the bits go, you could do what I do, I use plastic 24 compartment boxes sold for bead storage in my local hobby store, then as I dismantle the watch each part and it's associated screws and springs go into each section of the box, once stripped I take a photo of the box so that after cleaning all the parts are sorted back to the correct section, then when rebuilding the watch I just work in the reverse order from the box.

I also work under a stereo microscope that has a high definition camera fitted so I also video the whole strip down and take individual still shots of every single step, including showing every single screw next to the hole it came from to aid correct reassembly.

It seems to work well for me 

  • Like 1
Link to comment
Share on other sites

9 hours ago, Paul80 said:

...I use plastic 24 compartment boxes sold for bead storage in my local hobby store...

Thanks @Paul80, I thought that the red tray would be enough but I suspect something with more compartments would be better. At the moment, the cleaned parts are all sitting in covered glass petri dishes.

bench.jpg

Link to comment
Share on other sites

On 4/2/2022 at 6:49 PM, ifibrin said:

Which screws are not there?

@ifibrin I sourced another 313 model 7 movement from eBay, so once my oils get here and my mainspring winder I ought to be able to get it all together without worrying about screws.

Link to comment
Share on other sites

A important thing to remember when working on watches that you're unfamiliar with is to take lots of pictures. It's really nice you can refer back to them and see how the watch looked before you took it apart. Then it's also important for everyone to remember it's really nice to take pictures of things even if you've a technical guide pictures are a lot nicer of how things looked before it came apart if you have any questions.

I snipped out an image of your image?  As you are beginning to grasp American pocket watches and some European watches rely on the stem being in the case. When the movement comes out of the case it will usually go into setting which is undesirable if you're trying to run the watch. The watch companies came up with a variety of methods to put it back into a winding position like the object in the photograph? If you push it in the other direction of where it is now and if the rest of the watch was there it would go into winding when it's out of the case. Then you're going to need some bench key is those of the square keys that go into the square opening to wind the watch when it's out of the case. Yes if you find them on eBay their silly expensive unless you're really lucky.

On 4/2/2022 at 10:20 AM, grsnovi said:

I also ordered a mainspring since I don't have my own winder. I'll pop open the barrel and pop in the new spring.

Wishful thinking. Yes he really do Need mainspring winders and you can find the answer at the link below

https://www.watchrepairtalk.com/topic/22099-old-v-nos-mainspring/

Elgin not so mysterious component.JPG

Link to comment
Share on other sites

Hi @JohnR725 yes, that was my photo (I also have way too many cameras and lenses).

I was wondering what that lever was for - thanks!

I have a Bergeon winder and handle on the way. I also have a 2nd grade 313 model 7 movement on the way. In the event that I fail to remember how things go, I can disassemble the 2nd one to that point.

Thanks for your help on mainspring installation.

  • Like 1
Link to comment
Share on other sites

  • 2 weeks later...
  • 2 weeks later...

Spent some time assembling (and disassembling and re-assembling) the Elgin today. Had a go at manually replacing the old mainspring into the barrel. If I hadn't had the 2nd movement, I'd have never have gotten it back together. Robbed the 2nd movement for lost screws and constantly referenced it during assembly. My problem (well one of them anyway) was that it didn't track my original disassembly so I'd get to a point and realize that I should have done some other things first. That happened a couple of times.

I thought that I had some power - enough to watch the pallet fork flip back and forth but when I was "done" the balance didn't make it go. I suspect that I may not have placed the arbor correctly or that in replacing the keyless works I buggered something.

Tomorrow I'll start fresh. Open the barrel up. Check the arbor and go from there.


partial 1.jpg

partial 2.jpg

Link to comment
Share on other sites

as a reminder you can take baby steps here? In other words when you put the gear train in you can push on the gear train and see that it spins. When you put the mainspring in the push on barrel gently and make sure the gear train still spins. When you get the keyless mechanism in and with your bench key you can start the wind the watch without the pallet fork in and make sure the gear train spins.

one of these you do want to be careful about as you start swapping components around you do need to make sure that they actually work in your watch. There tends to be some variations amongst the various batches of components as always possible you can find things that might not actually work unless the serial numbers are really close together.


  • Like 1
Link to comment
Share on other sites

8 hours ago, JohnR725 said:

when you put the gear train in you can push on the gear train and see that it spins. When you put the mainspring in the push on barrel gently and make sure the gear train still spins

Did all of that.

8 hours ago, JohnR725 said:

When you get the keyless mechanism in and with your bench key you can start the wind

Didn't do that.

8 hours ago, JohnR725 said:

you do want to be careful about as you start swapping components

All I stole from the one was screws.

Thanks John!

Link to comment
Share on other sites

I'm convinced I'm not getting power from the mainspring for whatever reason. In any case, I've signed up for Mark's Level 3 course. Eventually I'll get this figured out...

Link to comment
Share on other sites

This afternoon I opened up the barrel and took out the old spring and (manually) inserted the NOS spring that I had purchased, The old spring didn't have the right curl to stay engaged with the arbor. I put everything back together and it's got a pulse. I'm happy but it doesn't seem to run for long... it's always something.


Edited by grsnovi
  • Like 1
Link to comment
Share on other sites

On 4/8/2022 at 1:43 AM, Paul80 said:

In reference to your comments about remembering were all the bits go, you could do what I do, I use plastic 24 compartment boxes sold for bead storage in my local hobby store, then as I dismantle the watch each part and it's associated screws and springs go into each section of the box, once stripped I take a photo of the box so that after cleaning all the parts are sorted back to the correct section, then when rebuilding the watch I just work in the reverse order from the box

I do this as well.  Particularly helpful w/r to screws.  Unless screws are notably dirty, they stay in their respective compartment and when the other parts are cleaned, they go into their compartment with respective screws.  Then assembly.

But, I 3D printed my compartmentalized holder.


  • Like 2
Link to comment
Share on other sites

Now that I have a set of Elma baskets, it may be easier to clean "subsystems" in a section of a basket. I cleaned the Buren yesterday that way. I also think that laying everything out as shown with like screws together can help.

organization.jpg

Link to comment
Share on other sites

3 hours ago, grsnovi said:

Now that I have a set of Elma baskets, it may be easier to clean "subsystems" in a section of a basket. I cleaned the Buren yesterday that way. I also think that laying everything out as shown with like screws together can help.

organization.jpg

It does G 👍 . Grouping parts really helps. It's needed less and less though as your experience developes and part recognition increases 

  • Like 1
Link to comment
Share on other sites


  • Similar Content

  • Recently Browsing

    • No registered users viewing this page.
  • Topics

  • Posts

    • Got another one today! It took 10 weeks, but finally arrived. Fairly complete but I added the pivot guage. The burnisher and bow came with the tool. The case is a bit rough and the tool pretty dirty, but trying to decide how much I want to restore.
    • OK, so long story short, I'm working my way through Mark's courses using a "Sea-gul ST36" (or ST3600 from some vendors) AKA an ETA 6497 clone. as a practice piece.  I've had it fully appart and cleaned it, and have had it fully back together an "running", but only briefly as my oil hadn't arrived at the time.  In the course of that work, I saw no markings on the movement that would tell me if it was a true Sea-gul or just a clone of their clone of the original ETA movement. Well, fast forward to this weekend, when my oils arrived in my mailbox and I sat down to try my hand at oiling.  Everything was going swimmingly until I got to the shock setting on the top of the balance cock.  I was able to open the lyre spring without issue, but in attempting to swing the open to access the cap jewel and chaton, I apparently accidentally pressed the launch button as I sent the lyre spring into low earth orbit.  Like most things that make into such orbits it came back down at a place not too far from where it started, but of course that also means that it is no longer in the setting. So my task is now to get said spring back into setting.  What I have read so far tells me that I seem to have two options: Another thread here seems to indicate that the spring came out without taking the balance cock apart, therefore it should go back without the need for that procedure.  That seems a bit pie in the sky for me, but the posts in said thread also gave some high level information about how to get the spring back in (putting it at an angle to the channel cut in the cock and canted so that the tabs fit in the slots, followed by some "wiggling" to get it turned around the right direction.)  I've tried this a couple of times, which have lead to more trips to low earth orbit, but with successful recovery of the orbital vehicle after each trip.  This thread also suggests that what I did to cause the initial launch was to push the spring "back" with more pressure on one side than the other, which put it under tension and caused it to deform out the slot either on one side or at the end (where there is apparently no "back stop".) The other option appears to be varying degrees of disassembly of the balance cock.  Some things I've read suggest that the whole shock setting needs to come out, while other threads here suggest that I only need to remove the regulator arm and the arm carrying the balance stud.  After the last trip the spring made, this is seeming like a better option, but I'm super short on details on how to do what needs to be done.  if I am following correctly: I need to loose the balance spring stud screw so the stud is not held in the arm. I need to somehow disengage the balance spring from the regulator (all the regulators I've seen in videos look nothing like what I see on the balance cock I have.)  What I've seen on the interwebs is a couple of "pins" that the spring passes through.  What I see on my assembly is something that looks more like a single pin with a "V" shaped notch cut in the bottom of it.  The spring is secured in that notch with something that I guessed was glue, Posts here suggest that on some of these movements glue is in fact used.  So I'm trying to figure out how to tell, how to soften dissolve it (I'm guessing IPA or acetone) and how to put it back when I'm done (superglue?  UV glue?) With the spring detached from the cock, I've read that the regulator and stud carrier are basically glorified C clamps around the shock setting and that one removes them by slipping a razor blade under one side of each and prizing them up.  I assume that they go back in the reverse manner like another C clamp, but that again is only a guess.  The place I got this information from seemed to leave that bit out. Once I have one or both arms off the shock setting the above mentioned post seemed to indicate that I could just slide the spring back in the slot, though again, I'm interpolating between the lines I read.  The alternative that I've seen demonstrated on high end movements on Youtube is to remove the entire shock setting and to replace the spring from "underneath" rotating the setting so that spring basically falls into place. I'm not anxious to try this method, as I don't have a jeweling tool to put the shock setting back into place.  That not to mention that the professional watch maker who did the demonstration described "fiddly work." So at the end of the day I'm looking for a little guidance on which pathway to follow, or if I've missed something obvious, a new direction to follow.  If this is a repair that just need to wait until my skills improve I'm totally good with that, I can get another of these movements in relatively short order, I just don't want to treat this one as disposable, and I do want to make an honest effort at fixing it and learning from this experience. Thank you in advance for reading my ramblings and for any suggestions that you might have!
    • All the best, family always comes first, and I believe you have made the right call that you mother deserves your full attention. However, when you need a little outside distraction the guys here will always be available for some banter or a heated discussion on lubrication 🤣.
    • Wire for what? if it's steel then only certain types of steel can be hardened ie high carbon steels: "Mild steel doesn't harden very well. It doesn't have enough carbon. Get something like O1, silver steel or if you want to go full watchmaker, then Sandvik 20AP". Source
    • I'm wondering if there's any specific type of wire I should get for hardening? I would assume it doesn't matter as long as the wire doesn't melt before it is at temp. 
×
×
  • Create New...