Jump to content

Certina 13-20 Walkthrough


Recommended Posts

My first week of vacation I got hurt in my back playing superman while lifting 24-wheelers with one arm. Unfortunately, I’m not 20 any more so I had to limp for a week bent like a U after the show ended.
So today I felt like I could make a strong comeback so I wanted to put me to a test, in doing that I whipped out the smallest woman’s watch from the man cave I could find and off I went. What better way to spend a sunday off.
This walkthrough will not show any disassembly since I also only had the smallest camera I could find at hand. I fast forward until the point everything been properly cleaned and I just have to magically piece everything together.
To save place at the site I compiled everything into one PDF enjoy…     Cetina 13-20 Build Walkthrough.pdf

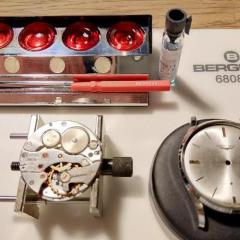
Here we can see the movement beside its bigger brother.

FamilyPhoto.thumb.png.f4dc25848d1d8da5bae41626309ff3a9.png

  • Like 1
  • Thanks 2
Link to comment
Share on other sites

8 hours ago, Nucejoe said:

Is the big brother a Chrono grade and if not what makes it a good grade luxury watch.

They are just chronograde for so long, don't know of so many sending them back for re-certification.

Link to comment
Share on other sites

4 hours ago, HSL said:

They are just chronograde for so long, don't know of so many sending them back for re-certification.

So what do owners want recertification for? are not all in-house Certinas Chronograde? or we like certification to verify our watch still performs up to Chronograde?  or that it is not a fake.

Link to comment
Share on other sites

After you serviced a chronometer graded watch and even perhaps switched parts in it you can’t guarantee it performs after the specifications, of course the text will be there but otherwise it isn’t the same watch as in the beginning. Very few workshops have the ability to test a watch according to the COSC standard. Even fewer hobbyists.

Rolex might send some chrono-grade watches back, but no one hardly would do that with a Certina for a fraction of the price.

Link to comment
Share on other sites

 Knowing you to be a Certina enthusiast and I owe Rogart63, I have been keeping an eye open for Certina for sale on domestic sites, there is a 919-1 Certina, square case , with imperfect dial paint, decent price, you pay. ha ha🤠

 I wonder if a regulare balance complete for 919-1 exists and could have been fittef in this piece. Unfortunate my tablet wont cooperate to send you a picture of it. 

Regs Joe

Link to comment
Share on other sites


22 minutes ago, Nucejoe said:

you pay. ha ha🤠


lol, yes Rogart63 lives just around the corner in the town below mine.
I already have a couple of nice 919-1, my favourite sits in a Argonaut 285..

Link to comment
Share on other sites

Great and entertaining walkthrough. Thanks!

"Either the summer heat or the 26 beers made me sloppy but I revers and fast forward and by magic
I’m back in track."

Definitely the "summer heat" being the culprit here! 😆

Just out of curiosity, what would you say is the diameter of the smallest jewel in this movement? The smallest pusher in my Seitz jeweling tool set is 0.65 mm and I guess that would be way too wide if you needed to adjust end shake.


Link to comment
Share on other sites

3 hours ago, VWatchie said:

Just out of curiosity, what would you say is the diameter of the smallest jewel in this movement? The smallest pusher in my Seitz jeweling tool set is 0.65 mm and I guess that would be way too wide if you needed to adjust end shake.

Took a measurement and the smallest jewel on this one actually is seven hundred of a millimeter (0.7mm).
I guess one can’t have them too small of practical reasons since you need a hole for the pivot, an oil cup and some space in the sides. The tricky part is to see how to lubricate without making a mess around the whole jewel. The ones on the train is slightly larger.

So no problems adjusting the end shake...
OilCheck.thumb.png.a6b57192e7cc074ce4c541e5d7ce9cc0.png

Link to comment
Share on other sites

57 minutes ago, HSL said:

So no problems adjusting the end shake...

Thanks, that's good to know (I have never serviced a ladies watch movement)! So, obviously the jewels aren't sized in proportion to the rest of the movement. I replaced a cracked pallet fork jewel (80/10) on the main plate of a Vostok 2414 yesterday, and it was pretty fiddly. A 0.8 mm diameter doesn't sound all that small but it sure feels small to handle. A 0.7 mm jewel would probably feel twice as tiny.

Oh BTW, that oiling looks absolutely perfect! Beautiful!

Edited by VWatchie
Link to comment
Share on other sites


  • Recently Browsing

    • No registered users viewing this page.
  • Topics

  • Posts

    • I didn't think pulling to set position would work harden the spring, in that position it is stressed where the arm starts. By work hardening i meant rapid polishing at that point, a bit like polishing a pivot work hardens as it compresses the steel. I doubt polishing by hand would achieve much in that respect though. Its finished, arm polished up mostly at the join to the bridge's main body. I'm ok with it, the screw holes aren't great as i had to open them up by redrilling and positioning it was difficult, I'm not much use with a loupe, opening up with a file might be a better option for me or i could just use the correct drill size 😅. And the detent is way too deep, i had to guess that with the stem release out of position and sat on top, but i only took one measure and went for it, no slowly slowly catch your monkey 😅. First go I'm happy , well sort of, it works and thats a big thing for me, next one will have a bit more finesse.  Anyone thats interested, after filing, i used a 2000 grade home made diamond  micro file and then 20 micron film, the film is much better than wet and dry, more stable to use and doesn't shed cheap grade grit everywhere , then auto polish on a sponge pad.
    • I'm assuming that every time you set the watch you are work hardening the detent spring, maximum hardening is  where it meets the plate due to maximum deflection.   That's why it snaps there.  The Young's modulus may be the same but after it's reached its maximum yeid strength it breaks.  My mechanic engineering is very rusty, correct me if I'm wrong. 
    • Ah ok yes that makes sense to polish it where the arm starts to form from the body of the bridge, i thought you meant the underneath of all the arm.
    • this is something I've never quite understood about the some of the Swiss companies. In 1957 Omega was using 9010 for the keyless parts with epilam. there's been a slow migration towards using heavier lubrication's but still typically oils and epilam to keep them in place. When it seems like 9504 works so much better.  
    • OK, welcome in the world of alarm clocks... I guess the 4th wheel is dished because it is from another movement. If it was not dishet, then it would not mesh with the pinion of the escape wheel, am I right? The marks of wear on the 4th wheel pinion doesn't corespond to the 3th wheel table position, at list this is what i see on the picts. Calculating the rate is easy - there is a formula - BR = T2 x T3 x T4 x T5 x 2 /(P3 x P4 x P5) where T2 - T5 are the counts of the teeth of the wheels tables, and P3 - P5 are the counts of the pinion leaves. Vibrating the balance is easy - grasp for the hairspring where it should stay in the regulator with tweasers, let the balance hang on the hairspring while the downside staff tip rests on glass surface. Then make the balance oscillate and use timer to measure the time for let say 50 oscillations, or count the oscillations for let say 30 seconds. You must do the free oscillations test to check the balance staff tips and the cone cup bearings for wear. This kind of staffs wear and need resharpening to restore the normal function of the balance.
×
×
  • Create New...