Jump to content

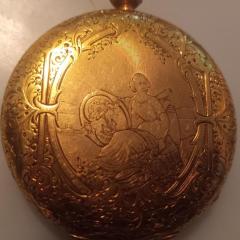
Do I glue this jewel back in????


Recommended Posts

Several options according to your skill and equipment.

Close the hole with a domed punch, then ream if necessary

Tin the hole with solder then ream

Loctite 638 gap sealant

SLO-ZAP gap sealant (CousinsUK)

Jewellers cement

And of course shellac - make a thick solution in alcohol. This is the easy fix and it is reversible.


  • Like 3
Link to comment
Share on other sites

There are two jewels here. I'm guessing when you installed the bridge the center wheel wasn't seated in its jewel, pushed up, and knocked out the upper jewel (it's for the 4th wheel). I would try pressing it back in; but first, push out the other jewel. Then press each one in from its side, making them just-flush with the surface. They aren't supposed to touch each other.

  • Like 1
Link to comment
Share on other sites

If the bridge would be of brass I would recommend to close it with a punch since the material is so soft the jewels would widen the hole when they go in and they wouldn’t stay in place when pushed in again, but if it is a harder alloy like nickelsilver or steel I would just push them back in as @nickelsilver suggests. One sometimes has to asses what material is holding the jewel.

  • Like 1
Link to comment
Share on other sites

OK, here is the big (little) picture.

As you can see, there is a place for only one jewel.  It sits on a recessed rim.  The jewel sits top side.

I think the jewel is providing a bearing surface for the sweep second wheel.

Sooo, I think that I do nothing special.  Place the bridge, place the jewel, drop in the sweep second wheel (et al.) and install the train plate.

BTW, these pictures were taken on my stereo microscope.  Only yesterday I designed an interface between the eyepiece and my old Canon S95 camera (3D printed converter). Wow...my new tool appeared just in time!

2021-07-03 06_27_35-IMG_7369.JPG ‎- Photos.png

2021-07-03 06_27_09-IMG_7370.JPG ‎- Photos.png

2021-07-03 06_26_51-IMG_7371.JPG ‎- Photos.png

2021-07-03 06_26_39-Photos.png

Link to comment
Share on other sites

9 hours ago, jdrichard said:

I would make a setting

Yes you would.  I have seen your work...I am not there yet.  This is watch came from the pile...using it to learn but not ready to learn jeweling.  I have all the tools to do it I think...Dad left me a lot!


  • Thanks 1
Link to comment
Share on other sites

Not sure what sins I committed to receive the punishment I got today.

This P75 presented yet another jewel issue.

The shock jewels are MT Antichoc.  They suck big time.  They come out in three pieces, hole jewel, cap jewel, spacer.  SPACER!! Really?  And I was not paying attention as to order and orientation (I am still a noob 😞 ).  Moreover, the spring on the bottom jewel can easily disconnect (and fly away).  The top jewel spring is blocked from escaping by the regulator ring.  Well...I was assembling the jewels wrong and could not get the springs to engage. Finally posted for help on a FB watchmaking forum and got an instant answer.  Still...with the true knowledge, it was a very challenging task.

All of my work was done inside a baggie.  Thankfully so, because that spring went flying five or six times.  Jewels too.

It is all together now but I am not happy with the readout on the timegrapher.  This is part of my training...figure this stuff out.

2021-07-03 12_23_37-IMG_7348.JPG ‎- Photos.png

2021-07-03 12_30_38-Photos.png

  • Like 1
Link to comment
Share on other sites

On 7/3/2021 at 1:35 PM, LittleWatchShop said:

As you can see, there is a place for only one jewel.  It sits on a recessed rim.  The jewel sits top side.

While I had the Lorsa P72 case back open I thought I take a couple of shots to show how the bridge should look like. As you see the Lorsa P72 and the Lorsa P75 are quite the same with small tweaks separating them. (Yes, I already took the click away).

1_Movement.thumb.jpg.09186ff5a882a7dd6c1ef79269e51249.jpg


Here we see the Lorsa logotype, same as in your Waltham.

2_Logo.thumb.jpg.d6674e6f889d652ef77825f675211103.jpg


We fast forward a bit to get to the lower bridge. Here it is with its upper jewel.

3_Bridge.thumb.jpg.15710f927dfea416221ccee16898ebf3.jpg


The upper jewel is slightly smaller with a small hole in it to guide the second wheel, it also has an oil sink.

5_Lower_Jewel.thumb.jpg.975a445e249f03bc6a9b6d8e7e3a6129.jpg


The lower jewel is larger one with a large hole to guide the center wheel, this one is just flat.

4_Upper_Jewel.thumb.jpg.6d840713993b9225371a4cf51d3893e2.jpg

So, two jewels and if you found them you should be able to just press them in flush with the bridge, no extensive
work or quirky ideas needed.

  • Like 1
Link to comment
Share on other sites

10 minutes ago, HSL said:

The lower jewel is larger one with a large hole to guide the center wheel

I am virtually certain there was no lower jewel on the P75.  I check to see how the center wheel interfaced to the plate and it appeared to be metal-metal.  Furthermore, odds of two jewels being loose and falling out seem pretty low.  A real mystery.  Thanks for taking the time to take the pictures.

Link to comment
Share on other sites

  • 2 years later...
On 7/3/2021 at 5:09 PM, LittleWatchShop said:

The shock jewels are MT Antichoc.  They suck big time.  They come out in three pieces, hole jewel, cap jewel, spacer.  SPACER!! Really?  And I was not paying attention as to order and orientation (I am still a noob 😞 ).  Moreover, the spring on the bottom jewel can easily disconnect (and fly away).  The top jewel spring is blocked from escaping by the regulator ring.  Well...I was assembling the jewels wrong and could not get the springs to engage. Finally posted for help on a FB watchmaking forum and got an instant answer.  Still...with the true knowledge, it was a very challenging task.

Hey @LittleWatchShop! Do you remember what order these parts go in? Spacer between the hole jewel and cap jewel, or spacer below the hole jewel? I just put a new balance complete in a Waltham Lorsa P72 I had sitting in a box for a year, and however I assembled it last time I get no end shake and no balance movement. I think I had the spacer in between but now I'm wondering if it should have been below the hole jewel.

I can't find a diagram of the Antichoc 102 system anywhere.


Also, for whatever it's worth now, my Lorsa P72 also had that loose center wheel jewel that just sits in on the bridge. It was not friction fit, just sat in a recess.


It does seem to be that the spacer washer goes between the hole jewel and the cap jewel. Without my pallet fork installed and the shock setting in that configuration I'm getting a solid 45sec of free balance movement after a puff of air. So my issue is something between the new balance complete and the pallet fork.

Edited by mbwatch
Link to comment
Share on other sites

58 minutes ago, mbwatch said:

Hey @LittleWatchShop! Do you remember what order these parts go in? Spacer between the hole jewel and cap jewel, or spacer below the hole jewel? I just put a new balance complete in a Waltham Lorsa P72 I had sitting in a box for a year, and however I assembled it last time I get no end shake and no balance movement. I think I had the spacer in between but now I'm wondering if it should have been below the hole jewel.

I can't find a diagram of the Antichoc 102 system anywhere.


Also, for whatever it's worth now, my Lorsa P72 also had that loose center wheel jewel that just sits in on the bridge. It was not friction fit, just sat in a recess.


It does seem to be that the spacer washer goes between the hole jewel and the cap jewel. Without my pallet fork installed and the shock setting in that configuration I'm getting a solid 45sec of free balance movement after a puff of air. So my issue is something between the new balance complete and the pallet fork.

Lol...2.5 years ago. I probably have pictures of the assembly at home. If I remember tomorrow I will take a look

  • Thanks 1
Link to comment
Share on other sites

2 hours ago, LittleWatchShop said:

I probably have pictures of the assembly at home. If I remember tomorrow I will take a look

No need, thank you. I got it figured out - spacer goes between the hole jewel and cap jewel. My problem was bent pallet fork horns, not sure how that happened because it was running before the old hairspring got damaged. I had another pallet fork from a parts movement that was also bent downward and not contacting the roller, so I went back to the first fork and pretty much just said YOLO  and wedged tweezers into the horns. Guess what - it runs perfectly after that. The watch has no sentimental and little monetary value but it was mostly a matter of sunk cost to get it ticking.

  • Like 1
Link to comment
Share on other sites


  • Recently Browsing

    • No registered users viewing this page.
  • Topics

  • Posts

    • All the best, family always comes first, and I believe you have made the right call that you mother deserves your full attention. However, when you need a little outside distraction the guys here will always be available for some banter or a heated discussion on lubrication 🤣.
    • Wire for what? if it's steel then only certain types of steel can be hardened ie high carbon steels: "Mild steel doesn't harden very well. It doesn't have enough carbon. Get something like O1, silver steel or if you want to go full watchmaker, then Sandvik 20AP". Source
    • I'm wondering if there's any specific type of wire I should get for hardening? I would assume it doesn't matter as long as the wire doesn't melt before it is at temp. 
    • Thanks Michael, sorry you were affected by this terrible condition. It can happen to anyone, 50's is the starting territory for it. My mum has been telling me for decades, " if i lose my marbles then shoot me",  my standard reply for that has always been " dont worry mum i bought the shotgun years ago ".  The same goes for me, not being able to communicate or comprehend is a very lonely place, now known to me as Aphasia. My mum had no warning of arriving there, I've had my warning and it was my mum that gave it to me. 
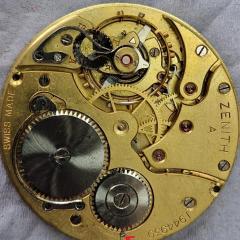
    • It's the hole in the mainplate that has become too big due to wear. I will try with some fine abrasive paper wrapped around a small file. I will start with 3000 grit and see what effect that has. Or I could try with a homemade burnisher. Anyway, I will post the result here soon.
×
×
  • Create New...