Jump to content

Recommended Posts

Not sure if anyone has had difficulty working on bent hairsprings but I thought I should share my idea...

My problem is with the Bergeon 30105 tool - I've found that the hole for the collet (3.5 or 4.5mm) is too large and that it doesn't allow the hairspring to lay flat on the glass with the stud attached. Plus, it's way too expensive for what it is (I'm a big fan of their tools normally)!

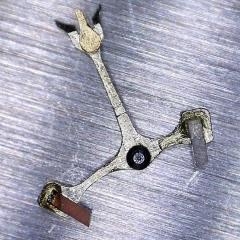
I've drilled a few hole in an old petri dish and I think I'm close to making a tool that is better suited to wristwatches, the balance in the photo is from a Landeron 48.

The holes are a bit rough on the underside of the glass but it doesn't affect the hairspring which lies flat on the surface.

IMG_0192.JPG

IMG_0195.JPG

IMG_0196.JPG

  • Thanks 2
Link to comment
Share on other sites

Forgot to mention that with the extra hole for the stud, you can work on the spring from either side.

I used a 1mm diamond core drill bit (Eternal Tools) for the initial hole and then a Dremel 7134 diamond bit to widen the holes.

Both bits are about £7 so still a lot cheaper than the Bergeon tool.

Link to comment
Share on other sites

2 minutes ago, watchweasol said:

Good idea, the same could be done using clear. plexiglas or thick polycarbonate, easier to drill than glass.

Won't there be some 'give' even with hard plastics? The glass is surprisingly easy to drill through. It just needed water to cool it down. I just used a Dremel with a not very sturdy pillar drill attachment.

Link to comment
Share on other sites

Intrigued...but I have only tried to bend one hairspring and it was just a slight adjustment. 

So the idea behind the bergeon and your tool is simply to have a hole for the stud so that the hairspring can lie flat?  Why does it need to be clear?  Why is flexing an issue because I cannot imagine any pressure on the plate since you are tweaking a hairspring with the finest amount of force. 

Anxious to understand this!

Link to comment
Share on other sites

Hi My understanding is this, clarity of the base over a white card enhances the definition of the spring, flexation I would have thought was not a problem on a solid base. I have done this with just a thick white card but the idea of the drilled dish is sound as its weight wiill make it stable and not prone to moving as you work.

  • Like 1
Link to comment
Share on other sites

12 hours ago, LittleWatchShop said:

Intrigued...but I have only tried to bend one hairspring and it was just a slight adjustment. 

So the idea behind the bergeon and your tool is simply to have a hole for the stud so that the hairspring can lie flat?  Why does it need to be clear?  Why is flexing an issue because I cannot imagine any pressure on the plate since you are tweaking a hairspring with the finest amount of force. 

Anxious to understand this!

Getting the hairspring round is tricky but keeping it flat at the same time is even more of a pain. 

My problem with the Bergeon tool is that the hole is way too large for a wristwatch collet so the hairspring just droops at it's centre. Also, with no hollow for the stud, the spring itself isn't lying properly flat. With the extra hole for the stud, the spring can now be adjusted from either side. 

I think the glass is for clarity and stability as watchweasel explains above... I have to use a microscope when trying to adjust a hairspring, the glass (or very clear plastic) gives an unhindered image of the hairspring. 

I have one shot of correcting a Valjoux 92 hairspring or having to adapt another balance and hairspring to fit... either way I need all the help I can get! 

I'm also trying to adapt some old tweezers to have right angled tips so I can properly see what I'm adjusting when using the microscope. 

Link to comment
Share on other sites

  • 4 weeks later...
On 6/12/2021 at 8:07 PM, LittleWatchShop said:

Intrigued...but I have only tried to bend one hairspring and it was just a slight adjustment. 

So the idea behind the bergeon and your tool is simply to have a hole for the stud so that the hairspring can lie flat?  Why does it need to be clear?  Why is flexing an issue because I cannot imagine any pressure on the plate since you are tweaking a hairspring with the finest amount of force. 

Anxious to understand this!

I think the reason is to reduce friction between the surface and the hairspring+tweezers? I worked on my first hairspring on a matt and the feedback sensation from my tweezers was not great as it rubs the surface. I imagine glass would feel so much better.

  • Like 1
Link to comment
Share on other sites

The reason there is only one hole in the tool from the beginning is because when getting the hairspring in shape you work on it without the stud on it. Taking the stud away gives you greater control to work on the hairspring and gives you a better chance to get it really flat and nice.
The glass/plastic surface makes it easier to rotate it while working. Having a white paper underneath gives you a better contrast so you can see how the hairspring should be turned/bent. With the stud still in I think makes it harder to get a perfect shape on the hairspring.

If you are afraid of losing the stud when you take it away you always could invest in an assortment of them (to the right in the picture).


Hairspring.png

  • Like 2
Link to comment
Share on other sites

22 hours ago, HSL said:

The reason there is only one hole in the tool from the beginning is because when getting the hairspring in shape you work on it without the stud on it.

Still quite a large hole though, 3.5mm or 4.5mm for the Bergeon tool. Surprised they haven't made a smaller version.

Link to comment
Share on other sites

Join the conversation

You can post now and register later. If you have an account, sign in now to post with your account.
Note: Your post will require moderator approval before it will be visible.

Guest
Reply to this topic...

×   Pasted as rich text.   Restore formatting

  Only 75 emoji are allowed.

×   Your link has been automatically embedded.   Display as a link instead

×   Your previous content has been restored.   Clear editor

×   You cannot paste images directly. Upload or insert images from URL.


  • Recently Browsing

    • No registered users viewing this page.
  • Topics

  • Posts

    • Thank you for your introduction and welcome to this friendly forum. We all look forward to your contributions and continued involvement.  Where are you from Wai? 
    • The wire you wrap around a piece of blue pivot steel or what ever high carbon steel to heat it up for hardening? 
    • Hello, I am Wai, new member here. I would like to learn how to restore watch and repair my watch pusher. Thank you
    • Got another one today! It took 10 weeks, but finally arrived. Fairly complete but I added the pivot guage. The burnisher and bow came with the tool. The case is a bit rough and the tool pretty dirty, but trying to decide how much I want to restore.
    • OK, so long story short, I'm working my way through Mark's courses using a "Sea-gul ST36" (or ST3600 from some vendors) AKA an ETA 6497 clone. as a practice piece.  I've had it fully appart and cleaned it, and have had it fully back together an "running", but only briefly as my oil hadn't arrived at the time.  In the course of that work, I saw no markings on the movement that would tell me if it was a true Sea-gul or just a clone of their clone of the original ETA movement. Well, fast forward to this weekend, when my oils arrived in my mailbox and I sat down to try my hand at oiling.  Everything was going swimmingly until I got to the shock setting on the top of the balance cock.  I was able to open the lyre spring without issue, but in attempting to swing the open to access the cap jewel and chaton, I apparently accidentally pressed the launch button as I sent the lyre spring into low earth orbit.  Like most things that make into such orbits it came back down at a place not too far from where it started, but of course that also means that it is no longer in the setting. So my task is now to get said spring back into setting.  What I have read so far tells me that I seem to have two options: Another thread here seems to indicate that the spring came out without taking the balance cock apart, therefore it should go back without the need for that procedure.  That seems a bit pie in the sky for me, but the posts in said thread also gave some high level information about how to get the spring back in (putting it at an angle to the channel cut in the cock and canted so that the tabs fit in the slots, followed by some "wiggling" to get it turned around the right direction.)  I've tried this a couple of times, which have lead to more trips to low earth orbit, but with successful recovery of the orbital vehicle after each trip.  This thread also suggests that what I did to cause the initial launch was to push the spring "back" with more pressure on one side than the other, which put it under tension and caused it to deform out the slot either on one side or at the end (where there is apparently no "back stop".) The other option appears to be varying degrees of disassembly of the balance cock.  Some things I've read suggest that the whole shock setting needs to come out, while other threads here suggest that I only need to remove the regulator arm and the arm carrying the balance stud.  After the last trip the spring made, this is seeming like a better option, but I'm super short on details on how to do what needs to be done.  if I am following correctly: I need to loose the balance spring stud screw so the stud is not held in the arm. I need to somehow disengage the balance spring from the regulator (all the regulators I've seen in videos look nothing like what I see on the balance cock I have.)  What I've seen on the interwebs is a couple of "pins" that the spring passes through.  What I see on my assembly is something that looks more like a single pin with a "V" shaped notch cut in the bottom of it.  The spring is secured in that notch with something that I guessed was glue, Posts here suggest that on some of these movements glue is in fact used.  So I'm trying to figure out how to tell, how to soften dissolve it (I'm guessing IPA or acetone) and how to put it back when I'm done (superglue?  UV glue?) With the spring detached from the cock, I've read that the regulator and stud carrier are basically glorified C clamps around the shock setting and that one removes them by slipping a razor blade under one side of each and prizing them up.  I assume that they go back in the reverse manner like another C clamp, but that again is only a guess.  The place I got this information from seemed to leave that bit out. Once I have one or both arms off the shock setting the above mentioned post seemed to indicate that I could just slide the spring back in the slot, though again, I'm interpolating between the lines I read.  The alternative that I've seen demonstrated on high end movements on Youtube is to remove the entire shock setting and to replace the spring from "underneath" rotating the setting so that spring basically falls into place. I'm not anxious to try this method, as I don't have a jeweling tool to put the shock setting back into place.  That not to mention that the professional watch maker who did the demonstration described "fiddly work." So at the end of the day I'm looking for a little guidance on which pathway to follow, or if I've missed something obvious, a new direction to follow.  If this is a repair that just need to wait until my skills improve I'm totally good with that, I can get another of these movements in relatively short order, I just don't want to treat this one as disposable, and I do want to make an honest effort at fixing it and learning from this experience. Thank you in advance for reading my ramblings and for any suggestions that you might have!
×
×
  • Create New...