Jump to content

Elgin 607 Bumper & new clueless owner


Recommended Posts

  • 3 weeks later...
1 hour ago, Nucejoe said:

Good luck.

Thank You...I might be picking your brain later. I was careful to remove the regulator 1st and unhook/unscrew the balance wheel hairspring before doing anything else. I'm looking into a product called One Dip to see if there is a consensus on its beneficial use.

I had a bit of luck while looking for parts movements and picked up what looks like a NOS round case bumper. I'm not sure if it's a 607 or a 618 because I'm trying to locate a tool. I thought a "screw-ball" would do the trick but it is really stuck.

1279088061_ElginBumper.thumb.jpg.623efc7c4298277e2b1084ea35b9306e.jpg

thumbnailfbbg.thumb.jpg.b54087f87736f2dfd244f511bbf5d9e5.jpg

Beautiful though and almost/maybe 70 yrs old.

Link to comment
Share on other sites

Now for cleaning...

1) Zippo ultrasonic bath for 5 minutes for everything except the escape wheel, pallet fork & balance/hairspring.

2) Remove from bath and peg wood all jewel holes & anything else that looks dirty.

3) Zippo ultrasonic rinse for another 5 min.

4) One-Dip escape wheel, pallet fork & balance+hairspring. Hand clean end stones & jewels on regulator w/ One-dip also.

5) Treat escape wheel & pallet stones with Epilame.


Link to comment
Share on other sites

55 minutes ago, SuspectDevice said:

5) Treat escape wheel & pallet stones with Epilame.

Epilame did not exist at the these watches were made, yet they could attain remarkable "railroad" precision. One wonders if it is really needed for beginner then. 

In my opinion a better approach would be to avoid smoker's products and maybe use a specific product to brighen the movement. 

  • Like 1
Link to comment
Share on other sites

All clean and waiting on a spring winder from the UK. I started to assemble it but had to stop.

Everything went well except I think I'll wash the barrel & lid with the main plate next time because they were so dirty that they needed an additional rinse. 

I found 3 tiny screws in the dirty solution that I didn't remove from the watch. That was puzzling. They look kinda like those screws on the balance wheel and are about jewel cap size but are steel. I never used my orange (0.05mm) screwdriver once but they are that size with a really pointy end.

Also, the yoke spring was horrible looking and appeared home made. It also looked like someone smashed it in there with a center punch & was a real problem to get out. Not sure what I'm going to do about that.

thumbnailrgg.jpg.565d1f093f59eb6222d5b533bc2fa307.jpg

Link to comment
Share on other sites

7 minutes ago, markr said:

Are the screws for the dial?  They vibrate out sometimes.

They have a shoulder and are smaller. The only screws I've seen with a sharp point. No clue where they came from.

I did ultrasonic my oscillator bridge but the jewel cap screws are still on it. Plus, there are 3 of them???

thumbnailaergaegr.jpg.3aad0b141a4b4b85b76590790eb137e4.jpg

Link to comment
Share on other sites

The most satisfying tiny little click was when the train bridge dropped into place. I was tickling it for so long that peg wood fibers were accumulating on the gears. (about 30 min)

Next up was oiling the center wheel and I totally messed that up. I approached with a large drop of 1300 and it sucked it in so fast that I couldn't pull the oiler away in time. Lesson learned. No way I'm pulling the bridge off to clean the excess oil. I tried sopping it up with rodico but I'm pretty sure there is still too much on there.

The 9010 went fine. I switched to a smaller oiler and only put enough on it to lubricate the bearing. Same thing though, it sucked it in very quickly.

The pallet fork & cock where easy. Still waiting on the winder from the UK.

thumbnaileqfvvte.jpg.2558d3c861156ca5b7cce0a2bb5a4990.jpg

Edited by SuspectDevice
Link to comment
Share on other sites

On 4/16/2021 at 12:04 PM, jdm said:

Epilame did not exist at the these watches were made, yet they could attain remarkable "railroad" precision. One wonders if it is really needed for beginner then. 

In my opinion a better approach would be to avoid smoker's products and maybe use a specific product to brighen the movement. 

as you're a beginner it seems like may be perhaps rather than spending money on Epilame you could probably find something else to spend your money on better.

Then the second paragraph above cryptically at least it was cryptic for me is indicating he should look at some of the discussions we've had on cleaning products. It's amazing what these modern cleaning solutions for watches can do for you. Because spending time and effort with marginal cleaning fluids long term is not going to have the desired results you want and even if you do use surface treatment on a few components the other components are going to have issues eventually.

  • Like 1
Link to comment
Share on other sites

3 minutes ago, JohnR725 said:

as you're a beginner it seems like may be perhaps rather than spending money on Epilame you could probably find something else to spend your money on better.

Then the second paragraph above cryptically at least it was cryptic for me is indicating he should look at some of the discussions we've had on cleaning products. It's amazing what these modern cleaning solutions for watches can do for you. Because spending time and effort with marginal cleaning fluids long term is not going to have the desired results you want and even if you do use surface treatment on a few components the other components are going to have issues eventually.

Yes...I think I walked into a discussion about Epilame that was over my head for a beginner. I also found the topic of cleaning solutions to be very confusing and so I went with something I thought was simple. Everything is new to me and I'm trying to make sense of it all. So far I have not destroyed or lost anything so I'm feeling pretty good about that.

Link to comment
Share on other sites

IT LIVES!

thumbnailrheth.thumb.jpg.5fb886fe3e4eccf3f9063116e7dcaca6.jpg

I haven't done the 9015 yet but the little fellow just really wanted to tick again.

The winder came today and it's good that I had an old spring to play with because this happened twice when I was trying to reposition my fingers to feed the braking attachment into the winder. I got the hang of it after a few tries and my new spring went together without too much drama.

thumbnaildgtd.thumb.jpg.357d488ebed376d17be4f38d1a16b30d.jpg

Link to comment
Share on other sites

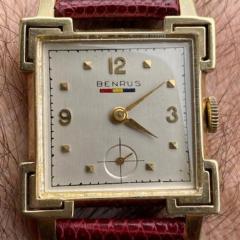
All back together & a new strap.

Apologies to Markr, the screws were from the dial & the 3rd one was the hairspring stud retaining screw.

The timegrapher results were mixed. I have to work on correcting beat error & getting better at oiling.

And yes...It bump winds!

thumbnailRDggr.thumb.jpg.08bcc43550bc607a11ccd8d09c88992b.jpg

FFFFFFFFFF.thumb.png.b9136ae5dd7839dd9d258096f7a4a5f0.png

  • Like 1
Link to comment
Share on other sites

Join the conversation

You can post now and register later. If you have an account, sign in now to post with your account.
Note: Your post will require moderator approval before it will be visible.

Guest
Reply to this topic...

×   Pasted as rich text.   Restore formatting

  Only 75 emoji are allowed.

×   Your link has been automatically embedded.   Display as a link instead

×   Your previous content has been restored.   Clear editor

×   You cannot paste images directly. Upload or insert images from URL.


  • Recently Browsing

    • No registered users viewing this page.
  • Topics

  • Posts

    • I'd be grateful for recommendations of good sources of advice on getting clocks with balance spring - as opposed to pendulum - escapements 'in beat'.....
    • Well I am in a bit of a quandary. I can't find the correct colour for the dial. I even wrote to Hettich a while back hoping they would give me the colour code for the dial. The reply that I received was "We don't make those anymore." I am thinking now to silver the dial and use a water transfer decal to put minute markers and the HETTICH logo (which is the very font that this forum uses) and the Made in Germany down the bottom. Not sure of the success rate of the water transfer method, but I have no other solution for the markers and logo. Handpainting is just not an option. In trying to get the top piece of the clock polished, it has progressively lost its sharp edges. My stupid hamfisted effort. I am thinking of purchasing a replacement piece of brass and drilling new holes in it for the corner posts. Why I attempted to repolish using wet & dry and not simply using a paint remover to remove the old lacquer from the brass, I don't know. You whistle and I'll point at the idiot. I also need to purchase some sheet spring steel as the two small ratchet springs that arrest the wheel that supports the weight after it is lifted by the electromagnet are worn. The two from the donor clock that I purchased are worse. I am hoping that I will be able to manufacture new springs without having to fiddle about with tempering etc to the steel. I have some ideas on that front. How many things until the clock is no longer the original? Like an axe. Heard a woodchopper on tv once saying that he had replaced the head on his axe twice and the handle three times, but it was the same axe that he began woodchopping with. 😉
    • I use the exact OD and it fits in with a little force and a pleasing 'click' so it's snug and wont rotate within the holder, but that depends on how you have set up and calibrated your printer so you may need to play with the settings/dimensions a little to allow for any discrepancies in your printer calibration. PS I just finished (2 days ago) a new revision which automatically prints the movement OD on the bottom of the holder, I'll see if I can upload it here Here is rev 4 remember to change the .pdf to .FCStd so it will open in FreeCAD - also you may need to install the LiberationSansBold font and tell FreeCAD where it lives on your PC, or change the font to something you already have on your system. Para Movement Holder V4.pdf Examples below:
    • Only someone on this forum would ever understand the Oooooo I just did
    • Hi, guys I'm very interested in printing out this design as I've seen the orignals used on many occasions and I'm fed up with my movements popping out the standard Bergeon type so want to give this type a go 😀  As I've never used this type before should the movement be a snug fit in the holder? Once you've measured the diameter of the movement do you put this exact value in the spreadsheet or increase it a little 🤔 Comments would be appreciated 👍  
×
×
  • Create New...