Jump to content

Elgin 607 Bumper & new clueless owner


Recommended Posts

  • 3 weeks later...
1 hour ago, Nucejoe said:

Good luck.

Thank You...I might be picking your brain later. I was careful to remove the regulator 1st and unhook/unscrew the balance wheel hairspring before doing anything else. I'm looking into a product called One Dip to see if there is a consensus on its beneficial use.

I had a bit of luck while looking for parts movements and picked up what looks like a NOS round case bumper. I'm not sure if it's a 607 or a 618 because I'm trying to locate a tool. I thought a "screw-ball" would do the trick but it is really stuck.

1279088061_ElginBumper.thumb.jpg.623efc7c4298277e2b1084ea35b9306e.jpg

thumbnailfbbg.thumb.jpg.b54087f87736f2dfd244f511bbf5d9e5.jpg

Beautiful though and almost/maybe 70 yrs old.

Link to comment
Share on other sites

Now for cleaning...

1) Zippo ultrasonic bath for 5 minutes for everything except the escape wheel, pallet fork & balance/hairspring.

2) Remove from bath and peg wood all jewel holes & anything else that looks dirty.

3) Zippo ultrasonic rinse for another 5 min.

4) One-Dip escape wheel, pallet fork & balance+hairspring. Hand clean end stones & jewels on regulator w/ One-dip also.

5) Treat escape wheel & pallet stones with Epilame.


Link to comment
Share on other sites

55 minutes ago, SuspectDevice said:

5) Treat escape wheel & pallet stones with Epilame.

Epilame did not exist at the these watches were made, yet they could attain remarkable "railroad" precision. One wonders if it is really needed for beginner then. 

In my opinion a better approach would be to avoid smoker's products and maybe use a specific product to brighen the movement. 

  • Like 1
Link to comment
Share on other sites

All clean and waiting on a spring winder from the UK. I started to assemble it but had to stop.

Everything went well except I think I'll wash the barrel & lid with the main plate next time because they were so dirty that they needed an additional rinse. 

I found 3 tiny screws in the dirty solution that I didn't remove from the watch. That was puzzling. They look kinda like those screws on the balance wheel and are about jewel cap size but are steel. I never used my orange (0.05mm) screwdriver once but they are that size with a really pointy end.

Also, the yoke spring was horrible looking and appeared home made. It also looked like someone smashed it in there with a center punch & was a real problem to get out. Not sure what I'm going to do about that.

thumbnailrgg.jpg.565d1f093f59eb6222d5b533bc2fa307.jpg

Link to comment
Share on other sites

7 minutes ago, markr said:

Are the screws for the dial?  They vibrate out sometimes.

They have a shoulder and are smaller. The only screws I've seen with a sharp point. No clue where they came from.

I did ultrasonic my oscillator bridge but the jewel cap screws are still on it. Plus, there are 3 of them???

thumbnailaergaegr.jpg.3aad0b141a4b4b85b76590790eb137e4.jpg

Link to comment
Share on other sites

The most satisfying tiny little click was when the train bridge dropped into place. I was tickling it for so long that peg wood fibers were accumulating on the gears. (about 30 min)

Next up was oiling the center wheel and I totally messed that up. I approached with a large drop of 1300 and it sucked it in so fast that I couldn't pull the oiler away in time. Lesson learned. No way I'm pulling the bridge off to clean the excess oil. I tried sopping it up with rodico but I'm pretty sure there is still too much on there.

The 9010 went fine. I switched to a smaller oiler and only put enough on it to lubricate the bearing. Same thing though, it sucked it in very quickly.

The pallet fork & cock where easy. Still waiting on the winder from the UK.

thumbnaileqfvvte.jpg.2558d3c861156ca5b7cce0a2bb5a4990.jpg

Edited by SuspectDevice
Link to comment
Share on other sites

On 4/16/2021 at 12:04 PM, jdm said:

Epilame did not exist at the these watches were made, yet they could attain remarkable "railroad" precision. One wonders if it is really needed for beginner then. 

In my opinion a better approach would be to avoid smoker's products and maybe use a specific product to brighen the movement. 

as you're a beginner it seems like may be perhaps rather than spending money on Epilame you could probably find something else to spend your money on better.

Then the second paragraph above cryptically at least it was cryptic for me is indicating he should look at some of the discussions we've had on cleaning products. It's amazing what these modern cleaning solutions for watches can do for you. Because spending time and effort with marginal cleaning fluids long term is not going to have the desired results you want and even if you do use surface treatment on a few components the other components are going to have issues eventually.

  • Like 1
Link to comment
Share on other sites

3 minutes ago, JohnR725 said:

as you're a beginner it seems like may be perhaps rather than spending money on Epilame you could probably find something else to spend your money on better.

Then the second paragraph above cryptically at least it was cryptic for me is indicating he should look at some of the discussions we've had on cleaning products. It's amazing what these modern cleaning solutions for watches can do for you. Because spending time and effort with marginal cleaning fluids long term is not going to have the desired results you want and even if you do use surface treatment on a few components the other components are going to have issues eventually.

Yes...I think I walked into a discussion about Epilame that was over my head for a beginner. I also found the topic of cleaning solutions to be very confusing and so I went with something I thought was simple. Everything is new to me and I'm trying to make sense of it all. So far I have not destroyed or lost anything so I'm feeling pretty good about that.

Link to comment
Share on other sites

IT LIVES!

thumbnailrheth.thumb.jpg.5fb886fe3e4eccf3f9063116e7dcaca6.jpg

I haven't done the 9015 yet but the little fellow just really wanted to tick again.

The winder came today and it's good that I had an old spring to play with because this happened twice when I was trying to reposition my fingers to feed the braking attachment into the winder. I got the hang of it after a few tries and my new spring went together without too much drama.

thumbnaildgtd.thumb.jpg.357d488ebed376d17be4f38d1a16b30d.jpg

Link to comment
Share on other sites

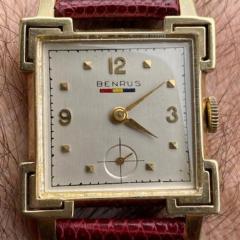
All back together & a new strap.

Apologies to Markr, the screws were from the dial & the 3rd one was the hairspring stud retaining screw.

The timegrapher results were mixed. I have to work on correcting beat error & getting better at oiling.

And yes...It bump winds!

thumbnailRDggr.thumb.jpg.08bcc43550bc607a11ccd8d09c88992b.jpg

FFFFFFFFFF.thumb.png.b9136ae5dd7839dd9d258096f7a4a5f0.png

  • Like 1
Link to comment
Share on other sites

Join the conversation

You can post now and register later. If you have an account, sign in now to post with your account.
Note: Your post will require moderator approval before it will be visible.

Guest
Reply to this topic...

×   Pasted as rich text.   Restore formatting

  Only 75 emoji are allowed.

×   Your link has been automatically embedded.   Display as a link instead

×   Your previous content has been restored.   Clear editor

×   You cannot paste images directly. Upload or insert images from URL.


  • Recently Browsing

    • No registered users viewing this page.
  • Topics

  • Posts

    • Thank you all for the replies!  Very informative! True enough, the Gamsol took some time to evaporate and does leave a residue. So not all naphtha are created equal!  Need to find alternatives then. i was able to try Hexane recommended by Alex and it seems great.  I wonder what the cons are?
    • Yeah, I saw that in the tech sheet but I don't see how it can be adequately cleaned with the friction pinion still in place. I've accidentally pulled the arbor right out of the wheel once when I used a presto tool to try and remove it. Mark shows how he does it with the Platax tool. Those are a little too pricey for me so I got one of these from Aliexpress and I just push down on the arbor with the end of my brass tweezers. That usually gets it most of the way out and then I just grab the wheel with one hand the and the friction pinion with the other and gently rotate them until it pops off. Probably not the best way but it's seemed to work for me so far.    
    • Thanks, Jon Sounds like a plan. Obviously I'll have the face on so do you think gripping with the holder will create any problems, but I will check in the morning to see how feasible it is but I assume it only needs to be lightly held. As for holding the movement instead of the holder won't be possible in this scenario as one hand will be puling on the stem while the other pushes the spring down. That was my initial concern is how the hell can I do this with only one pair of hands. All the other times I've had to remove the stem hasn't been a problem, apart from the force required to release the stem from the setting lever, but now I need to fit the face and hands its sent me into panic mode. If it had the screw type release things would be a lot simpler but that's life 😀   Another thing I will need to consider is once the dial and hands are fitted and the movement is sitting in the case I will need to turn it over to put the case screws in. I saw a vid on Wristwatch revival where he lightly fitted the crystal and bezel so he could turn it over, is this the only option or is there another method?      
    • Hi Jon, do You think that relation spring torque - amplitude is linear? I would rather guess that the amplitude should be proportional to the square of the torque. I had once idea to check it, but still haven't.
    • I did not. I thought about it, but I had cleaned it in my ultrasonic, and the tech sheet shows lubricating it in place already assembled, so I figured discretion was the better part of valor. Although since I have to depth the jewels anyway, maybe I pull the pinion off to rule it out 100% as part of the problem. Do you know if there's a safe way to do it? I don't want to use a puller because it would push down on the plane of the wheel, and that seems like a Bad Idea. I thought about using a roller table remover, but I don't think I have a hole stake pointy enough to push it down.
×
×
  • Create New...