Jump to content

Replacing jewels on a pocket watch


Recommended Posts

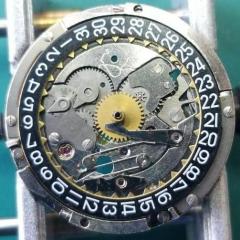
My steep learning curve may about to become steeper still. As my first project I am working on a 17 jewel, Cyma 999 movement for which the replacement mainspring is now ordered.

On closer inspection I can see that some of these 17 jewels are totally knackered so have been reading up on jeweling tools. On eBay the majority of interesting jeweling and staking sets are in the US. What is the most cost effective way to get myself kitted out? I have seen references to combined staking and jeweling tools but looking on the Cousins site they are two different tools. Is a Chinese imitation of a Horia like this any good:

https://www.ebay.co.uk/itm/Horia-Clone-Watchmakers-Micrometric-Jewelling-Tool-Set-4mm-4mm-Multiple-Colors/303690725547?hash=item46b560b8ab:g:~LUAAOSwG-dfXw~Y

Many thanks.

IMG_20210124_154121[1].jpg

IMG_20210124_154128[1].jpg

IMG_20210124_155052[1].jpg

IMG_20210124_154255[1].jpg

Link to comment
Share on other sites

10 minutes ago, Marc said:

I think it may be more complicated than you think (or less depending on your perspective) as those appear to be rubbed in jewels rather than friction fit.

Notice the quote above rubbed in jewels or burnished in jewels? Plus look at the color of them those are natural stones they always have flaws in them or can always have. You need to look very carefully at the hole itself is it nice and shiny does the crack extended in such a way that you can see it. Look at the pivots do they have score marks where the crack scored cut into the pivot? What unlikely the answer is the jewels look fine at least from a bearing point of view and the pivots are fine.

Then notice the color the jewels which by the way can be any color but these are clear? Modern jewels are a nice pretty intense red color which means you're going to change the look of the watch. Probably nobody cares here if you are restoring something nice it would look really bad.

Then I'm attaching an image jewel on the last is a burnished in jewel. Instead have a straight sides like the modern jewel the sides are tapered. You can actually modify relatively easy modern jewels to that shape. But you require additional tools to do the burnishing and sometimes it breaks off no matter how careful you are.

Or you can replace it with the modern jewel which is what the picture showing.. But you have to open up the whole large enough so it's nice and smooth for the modern jewel. Which means usually there physically bigger than what was there before.

Then in addition to all of that the watch is old enough that the whole sizes might not correspond to standard jewel slices of today perhaps. Then have you looked up the cost of those tools is this watch worth it.

Then the tool at your link I have the Swiss version is an outstanding tool. Personally I think it's almost a must have for doing jewels as it makes it really easy to push them get them exactly where they have to be. But you still have a problem? The problem is modern jewels require a very specific hole size. That's usually made by a tool from the same company that makes the jewels and that means basically you have to have both.

Normally what most people do is buy a tool like at this link. Notice the price looks quite reasonable right now check back when the auctions completed it's going to be quite a bit higher as a guess

https://www.ebay.co.uk/itm/Seitz-Jeweling-Set-for-Watchmaker-Swiss/373424385098

To understand the tool above which looks in a really outstanding condition normally log a little bits and pieces go missing with time or whenever there. The most important aspect of this tool is the reamers which I circled in the image. Then to understand the tool I've also attached the PDF manual for it. Basically wouldn't need the tool above if you have this one. I just think the tool above is much nicer for adjusting jewels.


jewel plate burnished versus friction.JPG

jewel tool bits and pieces.JPG

seitz BOOK.pdf

  • Like 1
  • Thanks 1
Link to comment
Share on other sites

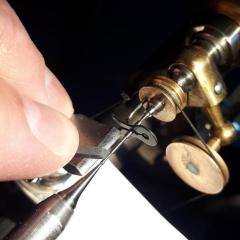
The colour of the jewels is definitely paler than I have seen in more modern movements so they may very well be natural stones as you suggest. In the shots I attached in my previous message, they were photographed through a loupe with my phone on max magnification and against a green background so the colour came out a little different.

I have inspected the pivots and they actually look is decent condition as far as I can tell. The fracture lines on the jewels are clearly visible but the hole looks relatively ok.

I think what I will do is keep it as is and put everything together again once the mainspring arrives and see how it runs.

Thank you John for the Seitz book PDF. Really useful as I will get one in the not too distant future. Is this watch worth it? No almost certainly not but it is training ground for what comes after.

Link to comment
Share on other sites


  • Similar Content

  • Recently Browsing

    • No registered users viewing this page.
  • Topics

  • Posts

    • Thank you for the advise!! It worked. The setting screw was a lock/unlock to remove the rotor. 
    • I have that French tech sheet too, it is a little different than the English one (eg, it doesn't have the auto works diagram). BTW, it looks like you are looking up the case number in the 1979 ABC supplement. The 1974 ABC catalog does have the 3093 case. As you determined it takes the 1222-5 crystal.  When I serviced my President 'A' (which also takes that crystal), I was able to fit a 29.8 crystal from my DPA crystal assortment. Those are, in my opinion, a great deal. The assortment comes with 10 sizes each from 27.8mm to 32.4mm in 0.2 increments. I pretty much use them for any non-armored crystal that takes a high dome crystal. I think they no longer make them but Cousins has still has some in stock but when I bought them they were around $40 for the set and now they are around $100. Still, at 40 cents a crystal it's still a good deal. For the large driving wheel, I remember I once assembled the keyless/motion works first and when I placed the large driving wheel it was interfering with the setting wheel on the dial side as the teeth were not fully meshing and it wouldn't fully seat. If that isn't the issue I got nothing and am looking forward to see how you solve it 🙂
    • Not sure, but just looking at it, it seems like the screw on the right may be a fake? The one on the left may not be a screw in the regular sense at all, rather a 2 position device, I think you need to point the slot towards either of the 2 dots and one will secure and one will open. Like I said this is just my best guess looking at the pictures.
    • Hi! I am in the process of restoring a rado captain cook mkII. I want to remove the rotor, but I am not sure how to and need some help. As you can hopefully see on the photo there are 2 screws. The left one has two positions, the right one looks like a regular screw. I have tried turning the right one, but it does not give even after using more force than I would expect. Anyone know the function of the left screw with the two positions and how to remove the rotor? Thanks!!
    • Welcome to the group Stirky. You can search for just about every subject in the craft here. Don't be afraid to ask if you can't find the answer that may have already been covered ( some ad nauseum LOL ). You don't have to buy Bergeon to get good quality. There are many decent mid-range tools available that will last you a lifetime. Cousins would be a good place to start . Cheers from across the pond ! Randy
×
×
  • Create New...