Jump to content

Tongji Times Two


Recommended Posts

In one of my Uncle Mario's bags of modest pieces I found two Chinese "standard movement", aka Tongji. For those that don't know its history, it has been developed as a copy of the Enicar AR 1010, a 17 jewels mov't form the '50s that has been also made in COSC grade. The Chinese began producing it at multiple factories in 1972, and I believe is still made today.
I will service both of them, as I'm curious to learn about any difference, if parts interchange, and such small things.

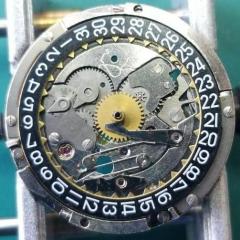
Let me proudly introduce Darts Target, and (Farting ?) Lady. 

P7191399.thumb.JPG.338aa2cdc7ccc0b38eaf81cb154b95ae.JPG

Target runs happily, but Lady only does for a bit when shaken.

P7191401.JPG.ec68d93003f2713a0273078d98f30e54.JPG

P7191402.JPG.db3312e4196f0ad0cfe74c5f2e14fe1e.JPG

I will start with Target, and then move to Lady for comparison, with the hope of having them both run nicely.
To be consistent with how the piece was made and repaired back then I will only do manual cleaning with basic chemicals, and use just two lubricant types.
I also wanted to use my Chinese driver set, but the screw slots are of the narrow type so I will resort to my A&F set.
If you have Chinese or Indian drivers that don't fit narrow slow when new, dress the tips to a thin wedge and, then buy another set for Seiko and all the rest.

Target is actually a front loader, just pop the crystal out pushing up on its base. There are dial screws, but no dial feet, conveniently replace by glue.

P7191403.JPG.dcf37a499fcdccc53fc6dbe56f8f46fe.JPG

To minimize heath exposition I took the unorthodox approach of removing all parts on this side parts before warming the glue.
Two dial screws that I can save for spares.

 P7191404.JPG.0cfb9aeccd8e6d9d71069bd1c648fb21.JPG

Balance is shock protected with movable stud arm. Counting all parts that make it, these should be 17

P7191426.JPG.803ab49e0754ee02625795af772b19dd.JPG

Let power down by doing as to wind but holding the crown, keep the click opened with sturdy tweezers, and slowly let the crown turn in your fingers.
Crown wheel screw is left handed, with its wheel and core, plus ratchet wheel and screw, click and screw that makes 7 parts.
The latter two screws are the same, and all three have the same head size, WOW!


P7191405.JPG.d6854e51216b123c49f5f0970925279a.JPG

Pallet bridge screw, bridge (which has a nice snug fitting), and pallet fork, 3 parts.


P7191407.JPG.6bcd667f26e772079de8ff4008dddf3a.JPG

Remove the  barrel bridge first. Barrel complete is 4 parts, for a total of 7.

P7191408.JPG.3658290f5e1288c977fdf80fea65e950.JPG 

Also remove the stem, sliding and winding pinions for 3 parts.

P7191412.JPG.9a67837b7dafc43e2ea7e79b4c57bfe2.JPG

Here's my method to open the barrel. Keep it upside down on the mov't holder and push the arbor down with the handle of the tweezers. The mainspring will not fully come out, but for safety sake keep a (gloved) finger on the lid and do this away from face and other parts. Of course I take no responsibility whatsoever.

P7191416.JPG.2a2539c7a55bfeee2b2ababe359abdce.JPG

Slowly and patiently remove the mainspring and make the due observations. In my case it was totally dry, not flat, and the arbor does not want to leave the hook - I will not compel it to do so.

P7191417.JPG.cdbc7b669e79f93c143b0c4ea0a8aaae.JPG

Moving on to the main bridge, again a snug fit, then the usual train and escape wheels, 6 parts.

 P7191410.JPG.014c076a1230cf33e22bc87d5a22d300.JPG 

It's marked Zhongguo (meaning China) Bengbu, that's the city where the factory was located.

 P7191427.JPG.b7191b1b9edaee8dd6219743eab06952.JPG

Center wheel bridge has two screws and these are the same as the other bridges!
However to "precisely" set the train endshake, few notches have been  punched on the underside.

P7191429.JPG.01354a9fe7d62abe010b2ac2048fd4e1.JPG

I could not remove the center wheel yet, but the total here is 4 parts.

P7191411.JPG.82d7cfcc8a46651b9babe1fc08e00b1b.JPG

Few seconds of hair dryer and the superbly applied dial can be separated, dial washer and hour wheel set apart.

P7191413.JPG.5f4461b942a7e9ccf29287feb5bb759b.JPG

The cannon pinion does not require any special tool to be pulled out and the center wheel simply dropped on the mat.

P7191414.JPG.aa1721fd8952167ddf2b6275f77d5b39.JPG

The keyless / motion works is very simple, from left to right we removed the screw plate, plate, minute wheel, and intermediate wheel.
Then the jumper screw, jumper, yoke spring, setting lever and its pin. 9 parts.

P7191415.JPG.acaf3a7aa768b26472c854aba0d8785e.JPG

Only the yoke was a bit more difficult to remove, requiring a bit of prying near its post, here's pictured separately.

P7191419.JPG.31c047d8ce68408cdae09d6bce09834e.JPG

A notch was made near the plate screw to adjust its height

P7191422.JPG.491036b567e508541b28ee713f0e4379.JPG

The stripped main plate, E could be a variation  or inspection identifier?

P7191424.JPG.a0fe1bf2ae8df70a0e04d63e02552c5a.JPG

P7191425.JPG.9a20a378a7c4c195c10d4a650bf5819c.JPG

I have counted 70 parts including jewels (plus or minus) for this simple movement.
This concludes the first part, thank you for patiently waiting for the next.


P7191406.JPG

  • Like 2
Link to comment
Share on other sites

These are in fact still made and vary wildly in quality. Your examples look to be far better made and I would assume they're vintage. Some thought was put into the finish and even have beveled edges as opposed to the nasty heavy chrome-ish plating you see on a lot of modern incarnations. The jewels are also cupped, something that's a also bit of a rarity on modern examples as well.

Link to comment
Share on other sites

  • 2 weeks later...

Time for an update. I've got a small issue with the Bengbu mov't which I'll tell later. So I moved on with the Lady one. It's powered by a ZQC marked mov't, meaning Chongqing factory. The main plate is chrome plated, that and the rough maching marks make so that isn't very nice.

I will jump into some notable reassembly points. Replacing the train bridge isn't the easiest task. I have sort of developed a technique, which is to align first the seconds, then the third, and last the escape wheel, all that while applying light pressure in between jewels. The bridge doesn't really fall in place like e.g. a Seiko one, because the posts are tight, but that is the best way I could find.

P7291453.thumb.JPG.477449e94790794912ff95f31f81d2a0.JPG

Not pictured the removal and reassembly of the barrel. The mainspring was easily fitted by hand. I cheated a bit and used 8301 in the barrel and on the arbour, it's metal to metal and may benefit from that. In this execution the click has a thin spring, which engage the pointy cut on the click. But in my case the lower side was actually better polished.

P7301462.thumb.JPG.0d38972aa17273887ac6a435df2f0f2c.JPG

Small detail, the 7 same screws have a nice chamfer and reduced diameter on the tip, which makes easy to refit them. They are however very fragile, it was enough to drop the screwdriver while wedged into the slot to snap one. Fortunately i was able to pull it out cutting the stump a bit with a thin saw, and the size is the same as a 7S26 screw.

P7291463.thumb.JPG.bc4138b2767755a3f88736a9237c872c.JPG

The rest of the reassembly proceded quickly, as the design is very optimized and rational. I was rewarded with an excellent result on the timegrapher, stable and solid across positions. The jump is because I moved the stand.

P7301461.JPG.18baf2f92683c0cb2fe213c6b4b0c403.JPG

To be concluded.

Edited by jdm
Link to comment
Share on other sites


  • Recently Browsing

    • No registered users viewing this page.
  • Topics

  • Posts

    • Unfortunately I'm not that lucky. I started on the train side and after I noticed the binding I pulled everything out except the driving wheel to rule everything else out. It still binds. I'm going to double check that the pinion is fully seated on the staff first, then if no joy I'll push the bridge jewel up a fraction of a mm. Fingers crossed!
    • Happy to have helped, great way to start the day with a win! 🥳
    • Thank you for the advise!! It worked. The setting screw was a lock/unlock to remove the rotor. 
    • I have that French tech sheet too, it is a little different than the English one (eg, it doesn't have the auto works diagram). BTW, it looks like you are looking up the case number in the 1979 ABC supplement. The 1974 ABC catalog does have the 3093 case. As you determined it takes the 1222-5 crystal.  When I serviced my President 'A' (which also takes that crystal), I was able to fit a 29.8 crystal from my DPA crystal assortment. Those are, in my opinion, a great deal. The assortment comes with 10 sizes each from 27.8mm to 32.4mm in 0.2 increments. I pretty much use them for any non-armored crystal that takes a high dome crystal. I think they no longer make them but Cousins has still has some in stock but when I bought them they were around $40 for the set and now they are around $100. Still, at 40 cents a crystal it's still a good deal. For the large driving wheel, I remember I once assembled the keyless/motion works first and when I placed the large driving wheel it was interfering with the setting wheel on the dial side as the teeth were not fully meshing and it wouldn't fully seat. If that isn't the issue I got nothing and am looking forward to see how you solve it 🙂
    • Not sure, but just looking at it, it seems like the screw on the right may be a fake? The one on the left may not be a screw in the regular sense at all, rather a 2 position device, I think you need to point the slot towards either of the 2 dots and one will secure and one will open. Like I said this is just my best guess looking at the pictures.
×
×
  • Create New...