Jump to content

Trouble installing date jumper and spring


Lc130

Recommended Posts

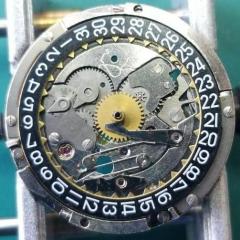
I'm a beginner.  I've been trying to install this jumper and spring for a few days now.  This is an AS 1950/51.  Using a technique from one of Mark's videos , I'm able to get the spring in but the jumper then springs under the date wheel (it doesn't in the video).  The date wheel is up against the raised outer edge of the plate.  Doesn't stop it though.  I've tried holding the date wheel in place with rodico but that always leaves a bit stuck under the date wheel.  Is there a better technique?  I've lost two springs and have one remaining.

IMG_4252.thumb.JPG.3875f3f416bfd39120ada80581f16856.JPG

Thank you

Charlie


Link to comment
Share on other sites

Hi  Charlie   Under normal circumstances this should not happen, Once the spring is installed the pawl should snug up to the date wheel, Saying that is the date wheel in place correctly and sitting flat. Also when fitting the spring hold it down onto the stud with a piece of rodico that way if the spring slips you still have it captive.  Check the rotation of the wheel without the spring installed so as to acertain it flatness and freedom.  are all the guide plates in place to hold and guide the wheel smoothly.  hope all  this helps somewhat  for you to achieve your goal.

Link to comment
Share on other sites

Until you get more experienced I suggest you always do this operation in a clear plastic bag. You can then work on the movement through the opening of the bag or, for even more security, make small insertions in the bag for your tools to fit through whilst the movement is at the end of the bag. This technique massively reduces the chance of losing a spring as if it does become airborn it should at least be contained in the bag! B)

As @watchweasol says, once the spring is set the date jumper should just stay in place until you get the plate on to hold things in place permanently. There shouldn't be enough force to be lifting the date ring ... unless the ring wasn't seated correctly (or there's perhaps an incorrect spring).

I personally don't use Rodico as mentioned by ww; my preferred technique is with tweezers and a spring bar tool (that has the 'V' shaped notch in its blade). I position the jumper just like you have in your photo and place the 'V' over the spring (just before the spring kink that's nearest the jumper). This is now securing the spring before we load it. With my other hand I use the tweezers to gently push the spring inwards to load the jumper as expected. I then keep that spring bar tool in the same place just as a precaution whilst my tweezers get the plate to put in position.

Link to comment
Share on other sites

Put the spring on a flat surface... it should lay flat. If it is slightly twisted one end will stick up a bit and the spring will move if you press on the end that's off the surface,

The spring needs to be flat otherwise it will always want to escape.

Good luck.

Anilv

Link to comment
Share on other sites

Hi LC,

I also notice that there is some wear to the plate (circled below). If the springs slips off here because of the worn portion, it would need to be filed so that it presents a level face to the spring.

Capture.JPG.49e625178dd0f841501517d5ac152417.JPG

Anilv


Edited by anilv
Link to comment
Share on other sites


  • Recently Browsing

    • No registered users viewing this page.
  • Topics

  • Posts

    • Unfortunately I'm not that lucky. I started on the train side and after I noticed the binding I pulled everything out except the driving wheel to rule everything else out. It still binds. I'm going to double check that the pinion is fully seated on the staff first, then if no joy I'll push the bridge jewel up a fraction of a mm. Fingers crossed!
    • Happy to have helped, great way to start the day with a win! 🥳
    • Thank you for the advise!! It worked. The setting screw was a lock/unlock to remove the rotor. 
    • I have that French tech sheet too, it is a little different than the English one (eg, it doesn't have the auto works diagram). BTW, it looks like you are looking up the case number in the 1979 ABC supplement. The 1974 ABC catalog does have the 3093 case. As you determined it takes the 1222-5 crystal.  When I serviced my President 'A' (which also takes that crystal), I was able to fit a 29.8 crystal from my DPA crystal assortment. Those are, in my opinion, a great deal. The assortment comes with 10 sizes each from 27.8mm to 32.4mm in 0.2 increments. I pretty much use them for any non-armored crystal that takes a high dome crystal. I think they no longer make them but Cousins has still has some in stock but when I bought them they were around $40 for the set and now they are around $100. Still, at 40 cents a crystal it's still a good deal. For the large driving wheel, I remember I once assembled the keyless/motion works first and when I placed the large driving wheel it was interfering with the setting wheel on the dial side as the teeth were not fully meshing and it wouldn't fully seat. If that isn't the issue I got nothing and am looking forward to see how you solve it 🙂
    • Not sure, but just looking at it, it seems like the screw on the right may be a fake? The one on the left may not be a screw in the regular sense at all, rather a 2 position device, I think you need to point the slot towards either of the 2 dots and one will secure and one will open. Like I said this is just my best guess looking at the pictures.
×
×
  • Create New...