Jump to content

Dial foot soldering


watchweasol

Recommended Posts

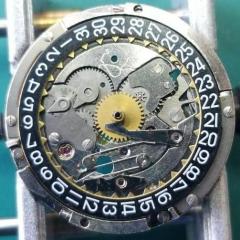
Hi Working on a seiko 7009A today, a bit of a wreck. Dial loose intermediate date wheel u/s, all back up and running but had to sort out the dial so I dug out the dial foot machine build a couple of years ago, as you can see by the pics it still works and no marking on the dial. It was build from readily available parts. The power source is a car battery charger which plugs into the unit. the probe is the carbon center core from a battery. I belive it goes under the heading of cold soldering, basicaly it provides an arc at the bottom of the dial foot wire where you place some flux and bits of solder. the resulting arc melts the solder and attaches the foot wire. Any body interested can find the details on the net. The origionator of this particular design was one Dirk Fassbender the details he put on the net are still there or alternativly there is a book,  Quartz watch retro fitting  by Wesley R Door, available in America but not so easy over here in the uk. I have some pictures I copied from the net that give the basics. All it is is a transformer providing the Arc not hard to build and a very hand tool to have in your collection.. 

DSCF3258.JPG

DSCF3260.JPG

DSCF3262.JPG

DSCF3264.JPG

DSCF3265.JPG

DSCF3266.JPG

  • Like 5
  • Thanks 1
Link to comment
Share on other sites

I haven't done any dial feet soldering, but I have done quite a lot of electronic soldering over the years.

You might also be interested in low temperature solders.

https://www.digikey.com/en/product-highlight/c/chip-quik/low-temperature-indium-solder-wire

Keeping the heat as local as possible helps, when working with sensitive components, as does careful heat sinking and using suitable fluxes to minimise soldering time.

  • Like 1
Link to comment
Share on other sites

I've been experimenting with a similar setup too, using a 10A DC power supply and carbon rod, minus the nice case. Not sure what's wrong, but I just couldn't get anything to stick to the dial, with various fluxes (resin core, electronics type flux, nasty plumber flux). It seems like the dial doesn't get hot enough through thermal conductivity via the dial foot wire.

Link to comment
Share on other sites

15 hours ago, teegee said:

I've been experimenting with a similar setup too, using a 10A DC power supply and carbon rod, minus the nice case. Not sure what's wrong, but I just couldn't get anything to stick to the dial, with various fluxes (resin core, electronics type flux, nasty plumber flux). It seems like the dial doesn't get hot enough through thermal conductivity via the dial foot wire.

Perhaps not enough current.  Any sense of the voltage/ current you are getting?  very low voltage high current is  the usually way to make a resistance solderer.  A great way is to take the secondary off a microwave transformer and replace it with a few loops of that super thick speaker wire some audiophiles love (little do they know it only sounds different because you've added capacitance lol).

I've got one that's half built, I used the rack and pinion from an old microscope as a way to move the pin into perfect perpendicular contact with the dial.  A sponge sits under the deal to insure the heat doesn't affect the dial face.  Pics to follow.

Oh, carbon rods are readily available in different diameters at welding supply places - just ask for carbon gouging rod


Link to comment
Share on other sites

Join the conversation

You can post now and register later. If you have an account, sign in now to post with your account.
Note: Your post will require moderator approval before it will be visible.

Guest
Reply to this topic...

×   Pasted as rich text.   Restore formatting

  Only 75 emoji are allowed.

×   Your link has been automatically embedded.   Display as a link instead

×   Your previous content has been restored.   Clear editor

×   You cannot paste images directly. Upload or insert images from URL.


  • Recently Browsing

    • No registered users viewing this page.
  • Topics

  • Posts

    • Unfortunately I'm not that lucky. I started on the train side and after I noticed the binding I pulled everything out except the driving wheel to rule everything else out. It still binds. I'm going to double check that the pinion is fully seated on the staff first, then if no joy I'll push the bridge jewel up a fraction of a mm. Fingers crossed!
    • Happy to have helped, great way to start the day with a win! 🥳
    • Thank you for the advise!! It worked. The setting screw was a lock/unlock to remove the rotor. 
    • I have that French tech sheet too, it is a little different than the English one (eg, it doesn't have the auto works diagram). BTW, it looks like you are looking up the case number in the 1979 ABC supplement. The 1974 ABC catalog does have the 3093 case. As you determined it takes the 1222-5 crystal.  When I serviced my President 'A' (which also takes that crystal), I was able to fit a 29.8 crystal from my DPA crystal assortment. Those are, in my opinion, a great deal. The assortment comes with 10 sizes each from 27.8mm to 32.4mm in 0.2 increments. I pretty much use them for any non-armored crystal that takes a high dome crystal. I think they no longer make them but Cousins has still has some in stock but when I bought them they were around $40 for the set and now they are around $100. Still, at 40 cents a crystal it's still a good deal. For the large driving wheel, I remember I once assembled the keyless/motion works first and when I placed the large driving wheel it was interfering with the setting wheel on the dial side as the teeth were not fully meshing and it wouldn't fully seat. If that isn't the issue I got nothing and am looking forward to see how you solve it 🙂
    • Not sure, but just looking at it, it seems like the screw on the right may be a fake? The one on the left may not be a screw in the regular sense at all, rather a 2 position device, I think you need to point the slot towards either of the 2 dots and one will secure and one will open. Like I said this is just my best guess looking at the pictures.
×
×
  • Create New...