Jump to content

A bushed jewel to replace a rubbed in jewel


Recommended Posts

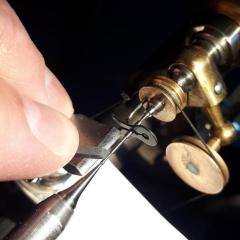
In another thread I mentioned sometimes making bushings to repair a watch with a broken or missing rubbed in jewel, and as I had one to do today I thought I'd show the process. There are tools for opening and closing the settings, but they don't always work as sometimes the metal just doesn't want to be flexed back an forth like that; on this piece, a LeCoultre 409,  the bridge is quite thin where the jewel sets (0.30mm), and is german silver, and the walls of the setting just crumbled when trying to close and looked horrible.


I determined the outermost diameter of the original setting was 1.30mm and had a jewel with the correct hole size and an outside diameter of 0.90. The plate was glued to a support and centered on a faceplate. My setup is pretty "fancy" but it's the same as a regular watch lathe faceplace, just bigger, and I have the advantage of using a scope in the little jig borer to check the centering rather than the old school wobble stick technique. Once centered, the bridge with the bad setting was installed, and it gets put on the lathe. I bored the hole to 1.29mm, then made a bushing with an outside diameter of 1.30, and hole of 0.89. This was done with a cross slide in the watchmaker's lathe, the hole being bored not drilled, to ensure exact size and concentricity. The wheels in this caliber have very very short pinions, so any error in alignment between the jewels could easily tilt a wheel enough to crash somewhere. A rather large bevel was cut on the bushing to simulate the rubbed over area of the original, everything pressed together like it should, and is pretty much invisible. While perhaps a bit invasive if working on a museum piece by Berthoud, it's a solid way to approach this sort of repair, and down the road if there's ever a problem with that jewel again, easy for the next guy to replace.

IMG_0034 (Large).JPG

IMG_0035 (Large).JPG

IMG_0036 (Large).JPG

IMG_0037 (Large).JPG

IMG_0038 (Large).JPG

IMG_0039.JPG

IMG_0040.JPG

  • Like 3
  • Thanks 1
Link to comment
Share on other sites

Thank you very much for posting that.

Can you show a picture of the set of gauges you used for measuring the diameter of the hole you bored as that looks to be something very handy, although I'm guessing they have a heft price tag to go with them.

Link to comment
Share on other sites

4 minutes ago, Tmuir said:

Thank you very much for posting that.

Can you show a picture of the set of gauges you used for measuring the diameter of the hole you bored as that looks to be something very handy, although I'm guessing they have a heft price tag to go with them.

They are made by Cary (Swiss), new price around 1200 francs/dollars for a set of 50. In 0.01mm increments... I have from 0.05mm to 3mm, definitely didn't buy new, but even used they go for a few hundred per box; took a few years to track down and accumulate my sets. There are inexpensive sets from China that don't have the handy little handles and are quite accurate. When doing precise hole work they really are a must.

cary.JPG

  • Thanks 1
Link to comment
Share on other sites

Hi Nickelilver, Would you furthure comment on keepin the integrity of the piece.   

Was this more of a lesson, or any reason why replacement wasn,t with another rub-in jewel.

Where would you draw a red line for a collector?

Thanks in advance.


Link to comment
Share on other sites

35 minutes ago, Nucejoe said:

Hi Nickelilver, Would you furthure comment on keepin the integrity of the piece.   

Was this more of a lesson, or any reason why replacement wasn,t with another rub-in jewel.

Where would you draw a red line for a collector?

Thanks in advance.


The setting on this one was compromised, the metal just couldn't take being opened and then reclosed. I had a jewel in it, but with about half the retaining metal flaked off it just looked horrible. For me doing this sort of "false setting"is better for a nice piece like an old Lecoultre than simply opening the hole up to take a friction jewel- not to mention the bridge on this one is so thin that a friction jewel at around 1.30mm diameter would almost certainly be too thick, as well as unsightly (way too big). On a very rare, unique, valuable museum type piece the name of the game is generally conservation, so one wouldn't even attempt the jewel change, just clean everything up and conserve it. When a customer wants functionality it's necessary to be quite clear on the difference between repair (what I did here) and restoration, which in this case might have gone as far as remaking the entire bridge. That's a far fetched scenario, certainly for a serially produced watch movement such as this. A replacement bridge might be sourced but these old movements don't always interchange like one might like... The cans of worms are many when getting into parts fabrication, but generally price gets everyone on the same page.

  • Like 1
  • Thanks 1
Link to comment
Share on other sites

6 minutes ago, nickelsilver said:

The setting on this one was compromised, the metal just couldn't take being opened and then reclosed. I had a jewel in it, but with about half the retaining metal flaked off it just looked horrible. For me doing this sort of "false setting"is better for a nice piece like an old Lecoultre than simply opening the hole up to take a friction jewel- not to mention the bridge on this one is so thin that a friction jewel at around 1.30mm diameter would almost certainly be too thick, as well as unsightly (way too big). On a very rare, unique, valuable museum type piece the name of the game is generally conservation, so one wouldn't even attempt the jewel change, just clean everything up and conserve it. When a customer wants functionality it's necessary to be quite clear on the difference between repair (what I did here) and restoration, which in this case might have gone as far as remaking the entire bridge. That's a far fetched scenario, certainly for a serially produced watch movement such as this. A replacement bridge might be sourced but these old movements don't always interchange like one might like... The cans of worms are many when getting into parts fabrication, but generally price gets everyone on the same page.

Thank you for your response and showing Inspiring work.  I do cheat a little in restorations, may replace a part even for unsightly looks, needed a standard for grading my work.  Best wishes. Joe.

Link to comment
Share on other sites

In another thread I mentioned sometimes making bushings to repair a watch with a broken or missing rubbed in jewel, and as I had one to do today I thought I'd show the process. There are tools for opening and closing the settings, but they don't always work as sometimes the metal just doesn't want to be flexed back an forth like that; on this piece, a LeCoultre 409,  the bridge is quite thin where the jewel sets (0.30mm), and is german silver, and the walls of the setting just crumbled when trying to close and looked horrible.
 
I determined the outermost diameter of the original setting was 1.30mm and had a jewel with the correct hole size and an outside diameter of 0.90. The plate was glued to a support and centered on a faceplate. My setup is pretty "fancy" but it's the same as a regular watch lathe faceplace, just bigger, and I have the advantage of using a scope in the little jig borer to check the centering rather than the old school wobble stick technique. Once centered, the bridge with the bad setting was installed, and it gets put on the lathe. I bored the hole to 1.29mm, then made a bushing with an outside diameter of 1.30, and hole of 0.89. This was done with a cross slide in the watchmaker's lathe, the hole being bored not drilled, to ensure exact size and concentricity. The wheels in this caliber have very very short pinions, so any error in alignment between the jewels could easily tilt a wheel enough to crash somewhere. A rather large bevel was cut on the bushing to simulate the rubbed over area of the original, everything pressed together like it should, and is pretty much invisible. While perhaps a bit invasive if working on a museum piece by Berthoud, it's a solid way to approach this sort of repair, and down the road if there's ever a problem with that jewel again, easy for the next guy to replace.
515175374_IMG_0034(Large).thumb.JPG.84e1cc23082239b6119194ccf2eb07c5.JPG
520212344_IMG_0035(Large).thumb.JPG.2dd1a0e1f28b93dc4b21e757f035f8ed.JPG
368025176_IMG_0036(Large).thumb.JPG.3f426f8ef68c452b08d1cc5b684cb9d1.JPG
973782235_IMG_0037(Large).thumb.JPG.f67b10b4c11c8b204c33212e32a811c2.JPG
69145903_IMG_0038(Large).thumb.JPG.500ff1cd01f72dec633701753ae4bfc5.JPG
IMG_0039.thumb.JPG.a361a2ec587c7f126f3f0acc0520b0c4.JPG
IMG_0040.thumb.JPG.32b336f61de94291f79a5895708f9bb6.JPG

What material did you use to make the bushing? And once made, did you friction fit the new jewel in the bushing and then friction fit the bushing in the plate.


Sent from my iPhone using Tapatalk Pro
Link to comment
Share on other sites

31 minutes ago, jdrichard said:


What material did you use to make the bushing? And once made, did you friction fit the new jewel in the bushing and then friction fit the bushing in the plate.


Sent from my iPhone using Tapatalk Pro

I used german silver (nickel) bar, to match the bridge color. Yes, fitted the jewel to bushing, then bushing to bridge, though it works the other way too. I'm pretty sure supply houses still offer assortments of nickel bars, they are very handy!

  • Like 2
  • Thanks 1
Link to comment
Share on other sites

I used german silver (nickel) bar, to match the bridge color. Yes, fitted the jewel to bushing, then bushing to bridge, though it works the other way too. I'm pretty sure supply houses still offer assortments of nickel bars, they are very handy!

Will try to find...5mm diameter?


Sent from my iPhone using Tapatalk Pro
Link to comment
Share on other sites


  • Recently Browsing

    • No registered users viewing this page.
  • Topics

  • Posts

    • Welcome to the group Stirky. You can search for just about every subject in the craft here. Don't be afraid to ask if you can't find the answer that may have already been covered ( some ad nauseum LOL ). You don't have to buy Bergeon to get good quality. There are many decent mid-range tools available that will last you a lifetime. Cousins would be a good place to start . Cheers from across the pond ! Randy
    • I picked up a similar amount of these jewels some years ago in a watch and clock fair. Every now and then they come in handy. This week I've got a rubbed in bombe jewel in the balance cock that is cracked and needs replacing. Very handy to have a vintage assortment of these type of jewels!
    • Great diagram with the teeth and pinion count. Simple way to reduce the speed of the hour wheel by the 12:1 minute wheel. Genius and yet so simple. Always good to reinforce the principal by what you have done in your drawing. Keep doing that. I had a drawing on my wall for years showing me this which is very similar to the drawing you have done. Here's a formula to work out the beats per hour of a watch movement. The movement's BPH is dictated by the wheel teeth and pinion count and the hairspring being vibrated to the correct BPH by finding the pinning up point on the hairspring using a vibrating tool.  The reason in the formula there is X2 on the top line is because there are two pallet stones.
    • So I just wanted to say "thank you" again.  The angle is the key bit it seems and yes, it did basically just fall, or float, back into position when I got it lined up just right. I had meant to add that now that I see how it goes in, I totally see how it came out in the first place, and that whomever cloned the original movement didn't pay much attention to the fine details around the setting or how it interfaces with the balance cock or the "rings" on the regulator and/or stud carrier arms.
×
×
  • Create New...