


-
Recently Browsing
- No registered users viewing this page.
-
Topics
-
-
Posts
-

By Hawaiikook808 · Posted
Thank you so much, Hector and CJ. I appreciate the tech sheet and the video. Gasp, I think I will make the attempt. What's the worst that can happen? I think there may be a new balance complete in my future, though. I'll update the post and let you know the result. R, Frank -
 So here is the new base (v 2.1), I made it so that the base will fit over and swallow the stump of the hand pusher tool (or at least my clone of the tool), I also reduced the OD of the bottom skirt a little as it looked/felt a little large, here are a few pictures and the fake .pdf file which you need to convert to .zip once downloaded. The cut-out seen on the below image on the bottom of the base should swallow the OD (40 mm, +0.1 mm tolerance) of the stump and the height of the stump 9.5mm (measured to 9.1mm, but rounded to 9.5mm) - let me know if this works for your tool. Note, I think you may need to print supports for the new internal shelf created? Here is the fake .pdf for just the FreeCAD base file and 3mf files Modular Movement Holder.pdf Here is the fake pdf for complete set of the new base and ring FreeCAD/3mf files: Modular Movement Holder base and ring v 2.1.pdf However, I'm wondering how often you could use this feature, adding the dial usually increases the OD of the movement, so you would need a new (larger) adapter ring tuned to the OD of the dial and I wouldn't like to grip the dial in any kind of movement holder if It could be avoided for fear of damaging it. Maybe I'm misunderstanding you?
 -

By HectorLooi · Posted
Hi Frank, you have dived headlong into the deep end. Hairspring work has to be the scariest thing a newbie has to tackle. Your hairspring appears to be bent and just putting it back into the regulator would not allow the balance to work properly. It might start oscillating but the performance would not be good. The proper thing to do is to unstud the hairspring, remove the hairspring from the balance, reinstall the hairspring on the stud carrier, reshape the endcurve and centre the collet to the balance jewel hole. This challenge would either make you or break you. Hope that you will be able to fix your watch. Welcome to the world of watchmaking. Watch this video. It think it'll give you an idea of the task ahead. From your 1st photo, I think you have a etachron type stud. Let me see if I can find a video on how to remove it from the arm. -
 Have read of the Tech Sheet attached on the balance section page 12. It may be bent but until you reposition it back in the regulator pins you'll never know. Cheers CJ 4R35B_4R36A.pdf
 -
By Hawaiikook808 · Posted
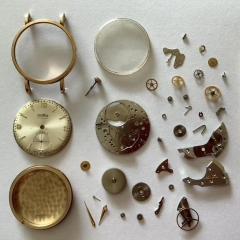
Aloha All, My Seiko 4R35B movement stopped working today. Upon closer inspection, it looks like the balance spring came out of the regulator pin. This is my first time working on a balance. Any advice on how to get this spring repositioned (back to normal)? I'm pretty sure that while adjusting the beat error on this movement, I must have turned the stud (I didn't even know they turned), and the spring eventually fell out. Will the spring go back to even spacing when it's back in the pin, or does it look bent? Thanks, Frank
-


Recommended Posts
Join the conversation
You can post now and register later. If you have an account, sign in now to post with your account.
Note: Your post will require moderator approval before it will be visible.