Jump to content

Anybody fancy plank for dinner?


Recommended Posts

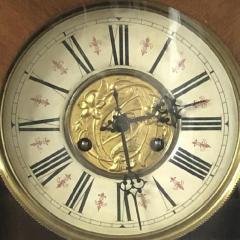
Coming along nicely, I had to do something with the little French movement and there were no cases suitable coming along so I decided to have a go at making one. There is a reason for all these shenanigans but more about that if anything comes to fruition. 


3424A7A2-1BFD-496D-B99C-5A131101C4FD.jpeg

Link to comment
Share on other sites

4 hours ago, Squiffything said:

I know there are proper ways of doing things but I just don’t have the tools and equipment to do it the correct way so time to experiment.

If it works then why not!  :Bravo:

Whilst a lot gets said about the 'correct way' to do things, experimentation is how the 'correct way' became so regarded.

Looking forward to seeing the outcome, I am rather curious now... 

Link to comment
Share on other sites

Thought about that and also a door to access the movement. There will be no base (got to let the chime sound out) so access may be had from there.

Looking forward to polishing up the burr, I love working with wood and getting a good finish.

Edited by Squiffything
Link to comment
Share on other sites

Looking forward to see the end result.

Used to live next to a carpenter who restored old furniture picked up at local auctions as a hobby.

He used to use an old wallpaper steamer as a source of steam when bending wood.


Sent from my moto g(6) play using Tapatalk

Link to comment
Share on other sites

It’s attached. Wood glue finely spread and left until tacky then the leather stretched taught. Trimmed to fit.

I’m unsure how the case will be assembled, either screws that will be on display or covered with some kind if fake rivet head if I can find any. The ulternative would be to screw from the inside but that would need a curved frame and there’s not much to then go into in the leather covered ply. Glue and tacks might be the way but would not be as strong and the curve might give problems as it tries to pull away.

I’m thinking that evenly spaced brass screws might look good set into the black of the leather. 

The front panel housing the clock will also be covered in leather so only the sides will have the burr wood finish.

Edited by Squiffything
Link to comment
Share on other sites

The first few coats of Danish oil has been applied and the burr has really popped. It’s a fantastic process and takes time. Different to French polishing in that when it’s finished it will glow with a shine but will not have that glass like surface that a French polish has. I will apply a varnish at the end to give it a protection.

5D5572C1-4DCD-4274-A899-3AC7DA68BCCF.jpeg

Link to comment
Share on other sites

The front plate has received its leather coat and looks mighty fine, also popped down to the local hardware shop to see what they had by way of fixings. Not much :( the did have mirror screws with the rivet type heads that screw onto the end of the screws. They are a compromise and I will look to see if I can find any black or brass caps but they do not look too bad.

Right, back to the wood, these coats will not layer themselves.

ED970443-E0EF-4311-A551-5F1944DC4F0D.jpeg

Link to comment
Share on other sites

8 hours ago, JimmyD said:

I am not sure so I will ask the question, does oil not prevent the varnish from adhearing?

My understanding is that the oil soaks in to the fibers of the wood, swelling them slightly and turning them from fairly opaque to translucent, and since the oil is mainly in, rather than on the fibers, and is also compatible with the finishing coat  it doesn't really affect the varnish.

The finish (synthetic varnish, shellac or whatever)  adheres to the wood fiber surfaces and to itself, effectively producing a bonded membrane.

There a few tweaks that will turn an Ok result in to a spectacular one.

First ensure the surface is as finely sanded and blemish free as possible, to the extent that french polishers will fill the tiny blemishes with pumice powder, and use 000 wire wool to knock down any fibers that insist on spoiling the look. There are  of course a bunch of other tricks, but you need to read up on the subject to learn them all.

Don't to use too much of the oil, and apply it as several light coats, as it may not fully soak in if you are not careful, and  apply the finish as several very thin coats, rather than one heavy one. The more care and time you take, and the more you polish between coats, the better the finish.

Wood polishing, and by extension, French polishing is an art in itself. Quite time consuming, but worth the effort. In my opinion French polishing with a wax finish produces much finer results than simply slapping on a coat of PU varnish. You need a lot of patience though.

Incidentally, that boiled plank dinner is starting to look quite delicious. :P Keep up the good work.

Edited by AndyHull
Link to comment
Share on other sites

Thanks Andy. I am not going for a high gloss French polish finish on this one as it’s a prototype to show a guy an idea for a project. If he goes for it then we will work on the finish and tweak the design. 

I never was much good at drawing so making it seemed the best way to go. It’s all from scrapage and spares from down the shed and it’s kept me busy for a couple of days. 


C3154CD4-CE7C-4A8C-82AA-8132030130DE.jpeg

  • Like 1
Link to comment
Share on other sites

You can remove the movement from the front. It’s a snugg tight fit around the bezel no need for screws. If anything comes from it the design will be improved with a door at the back hinged in the curve like a car boot and a opening in the front to view the pendulum. Maybe a draw under that to house the key

Link to comment
Share on other sites

Join the conversation

You can post now and register later. If you have an account, sign in now to post with your account.
Note: Your post will require moderator approval before it will be visible.

Guest
Reply to this topic...

×   Pasted as rich text.   Restore formatting

  Only 75 emoji are allowed.

×   Your link has been automatically embedded.   Display as a link instead

×   Your previous content has been restored.   Clear editor

×   You cannot paste images directly. Upload or insert images from URL.


  • Recently Browsing

    • No registered users viewing this page.
  • Topics

  • Posts

    • Thanks, This watch was in a box of old scrape units that a friend gave me. They used to be his late father's who was a watchmaker before the war and then continued later in life. I picked this one out as it looked like it had potential, and I liked the dial, it's been a bit of a learning curve for a beginner but I was determined to get it going. Now I'm on the final lap it feels good. I'm just wondering whether to invest in a decent set of hand placement tools or stick with the cheap Chinese red thing I have, decisions decision 😆
    • An update, for everyone who contributed advice, and for those who come after with a similar problem. Based on the answers received, I decided to work on the face of the hammer first. I used a square degussit stone to guarantee a vertical surface to work against, and ground the face back until it was square across 90% of the depth. I was conscious of the risk of removing too much material.* After I'd got the shape how I wanted it, I polished the surface with lapping film. To cut a long story short, it did the trick and the hammer hasn't slipped off the cam since. Of course, that wasn't the end of my problems. Have a look at this video and tell me what you think is wrong. https://youtu.be/sgAUMIPaw98 The first four attempts show (0 to 34 sec.) the chrono seconds hand jumping forwards, the next two attempts (35 to 47 sec.) seem "normal", then on the seventh attempt (48 to 54 sec.) the seconds hand jumps to 5 sec. and the minute counter jumps to 1. The rest of the video just shows repeats of these three variants. I solved it by rotating the minute counter finger on the chronograph (seconds) runner relative to the cam.  I'd be interested to hear your opinions on that. It seemed to be the right thing to do, but maybe I've introduced another problem I'm not aware of. * What is the correct relationship between the two hammers and cams, by the way? Should both hammers strike the cams exactly at the same time, or is it correct for the minute counter hammer to be a bit behind the seconds hammer? In this picture, I removed the adjusting screw at 1, and the hammers are contacting the cams simultaneously at 3 and 4. I had to turn the screw down tight to achieve this condition after stoning the seconds hammer and replacing the bridge.
    • It was easy enough to pop off. Once I had the cannon pinion hanging on the blades of the stump, I got my #2 tweezers on the gear attached to the staff and levered it down. That way none of the force was on the brass wheel itself.   I reinstalled it and the bridge, and it looks like a small but reasonable amount of end shake. It also spins easily with a blower. It stops quickly, but I think that's due to the large shoulder and about what I'd expect from this wheel.  
    • Oh, right. For some reason I was picturing a monocoque case in my head. Good looking watch!
    • Well said Ross. My reason for the thread, i like many of us dont want to lose the forum, such a well knitted group of individuals i feel. But things can happen out of anyone's control. Would be nice to have something in place just in case, if anyone has any ideas please speak up. 
×
×
  • Create New...