


-
Recently Browsing
- No registered users viewing this page.
-
Topics
-
-
Posts
-
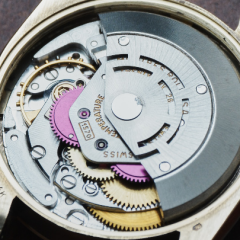
 Typically for introductions all you would have to say is hi I am interested in repairing watches and nobody's going to care about the technical details. Then to certain degree the introductions are not life or death in some cases I guess it depends upon what you did when you came to the discussion group. It's good that you're getting a balance complete for variety of reasons and getting a bonus balance bridge. Because I want you to pay attention to something when you get it as your hairspring still has a problem quite an amusing problem in a way. You notice your hairspring stud is a triangle or shape and it fits into a triangular shaped hole. It also notice how your hairspring has some weird bending right around the stud? So when you get your new balance bridge and the balance complete if you look carefully you'll find that I'm pretty sure the stud will be rotated and that they hairspring will come out the end not the way it's coming here you have managed to twist the stud putting it into the hole and that's why it looks so bad in the previous image. If you are skilled at fixing hairsprings which are not you can fix this. On the other hand are getting replacement so that's good. No it's supposed to be straight up and down. So in addition to twisting the stud you also bent it. On the other hand this is the most common place where people like to bend their hairspring and yes if you had practice with bending hairsprings this is all relatively sort of easy to fix. But I would really suggest practicing on another watch or basically scrap of balance wheels off of eBay that nobody cares about. Because practicing on something you care about really isn't the best. Then the reason I wanted the image below was to see how the balance jewel assembly is attached to the bridge. Sometimes it needed jeweling tool to push it out but in this particular case all you have to do is remove the U-shaped clip in the whole thing falls apart. But if you're lucky here replacement balance bridge will solve the problem.
 -

-
.thumb.jpg.cb17a66989f1e796fd4217db2e9ca9df.jpg) Just a quick update on my T17. I just finished the service and, boy, was this nerve-wrecking.... I bent the hairspring a few times. Stupid accidents. Once it was beyond repair and I had to get a donor movement. The replacement hairspring turned out to be a few millimeters shorter and therefore the watch was running 6min too fast even when the regulator was set to the slowest position. So I needed to get timing washers (see another post here: https://www.watchrepairtalk.com/topic/25505-30t2-adjustment-of-timing-washers/?do=findComment&comment=248100). After all, I'm now, getting a 310° amplitude (fully wound, dial up, lift angle 54°). About 250 in vertical positions. Quite a drop, but apparently not too abnormal for a 90-year-old watch with a slow beat rate (18000bph) and rather heavy balance wheel. After 24h I still get 280 (horizontal) and 220 (vertical). And now the highlight: 66h of power reserve! You may remember that I posted that I used a slightly weaker, but also slightly longer mainspring than prescribed. See my comments above. I used GR 3937 (instead of GR 3632). So I recommend this mainspring and ticker oils (9020 on escape wheel and HP1300 on the rest of the train). Some random pictures..
Just a quick update on my T17. I just finished the service and, boy, was this nerve-wrecking.... I bent the hairspring a few times. Stupid accidents. Once it was beyond repair and I had to get a donor movement. The replacement hairspring turned out to be a few millimeters shorter and therefore the watch was running 6min too fast even when the regulator was set to the slowest position. So I needed to get timing washers (see another post here: https://www.watchrepairtalk.com/topic/25505-30t2-adjustment-of-timing-washers/?do=findComment&comment=248100). After all, I'm now, getting a 310° amplitude (fully wound, dial up, lift angle 54°). About 250 in vertical positions. Quite a drop, but apparently not too abnormal for a 90-year-old watch with a slow beat rate (18000bph) and rather heavy balance wheel. After 24h I still get 280 (horizontal) and 220 (vertical). And now the highlight: 66h of power reserve! You may remember that I posted that I used a slightly weaker, but also slightly longer mainspring than prescribed. See my comments above. I used GR 3937 (instead of GR 3632). So I recommend this mainspring and ticker oils (9020 on escape wheel and HP1300 on the rest of the train). Some random pictures.. -
OK! I was able to get a nice set of timing washers from ebay! And they worked really well. I needed to slow down the movement by about 6min and I put four (=two pairs) of 3-minute washers (rated for the the size of the movement) and it did pretty much exactly that. On one pair of screws, there were already washers. So I added a second washer on those screws. Maybe not ideal, but it doesn't cause any problems. Poise is ok.. not perfect.. but I had so many issues with the watch that I decided to accept it. It's a 90-year-old watch. Delta is around 40 seconds.
-

By RichardHarris123 · Posted
I think it is friction fit, there are tools to remove them, cheaper versions are available. You could try adapting some pliers, see my crap drawing. The pushers are available in various sizes, you could measure once the tube is removed.
-
.thumb.png.f90dbf035d35248cb483d466310379d3.png)


Recommended Posts