Jump to content

Smiths mantle clock project


Davey57

Recommended Posts

Sorry I could not get back yesterday. My other love is genealogy my family tree.   If you are sure, you now have it sorted. I was going to suggest taking the chime leavers off and starting from the beginning and describing what each part will do when the chiming starts and how to set it.

Link to comment
Share on other sites

1 hour ago, oldhippy said:

Sorry I could not get back yesterday. My other love is genealogy my family tree.   If you are sure, you now have it sorted. I was going to suggest taking the chime leavers off and starting from the beginning and describing what each part will do when the chiming starts and how to set it.

I wouldn’t mind doing that anyway OH if you could help. Now I have a clue as to what’s supposed to be happening it would be good way to help it make complete sense.

Link to comment
Share on other sites

If you want to start at the beginning, I suggest you remove all parts from the front. When you have done that, put this piece in, move the wheels around, and tell me, in what position is the wheel at next to the fly? Also on the strike, side after the hammer has lifted where that wheel that has a pin next to the fly is. They both need to be around the 10 number on a clock face as that will be the warning for both chime and strike.  

E0EF4146-12CA-4F62-B499-7423ADE928C0.thumb.jpeg.ffddfd4595ac13e1bce20dd33b1fb7b6.jpg

Link to comment
Share on other sites

Ok, I have taken everything off. I have put that lever back in, haven’t tightened the screw yet. When the hook has stopped the wheel, the other wheel with the pin is at about 2.00 position. On the strike side, when you say after the hammers have lifted, do you mean at the top of the strike or just as they begin to lift?  Just as they lift, the pin is at 10 position,  just before they drop the pin is at about 12 position.

Link to comment
Share on other sites

Chime side. The wheel with pin next to the fly needs to around the 10. This gives it the warning, anything over that and the warning is too short.

The strike side. After the hammer has lifted and just dropped, the wheel with the pin needs to be at about the 10. Just put on the green arrow part and the blue arrow gathering pallet, part with the black arrow. When green arrow part drops into the pallet (blue arrow), the two parts should be in the slot brown lines. Make sure when it is trapped the hammer is not on the rise.   

E0EF4146-12CA-4F62-B499-7423ADE928C0.thumb.jpeg.ffddfd4595ac13e1bce20dd33b1fb7b6.jpg.db20d0156a85715a1c7adb470a1de770.jpg

Link to comment
Share on other sites

I’m not clear about the pins lying at the 10 position OH

Strike side.  After the hammers have dropped the wheels still spin slightly and stop randomly, the pin doesn’t always stop at 10 position. If I hold the wheels, at the moment the hammers fall the pin does seem to be around the 10 position. Is this how you mean to check it?

Chime side.  The pin is at 2 position when the hooked levers are engaged with the other wheel. How do you get it to be in the 10 position?

I put those parts back on. After the hammers have dropped and the lever comes down and is trapped, the pin on the wheel is stopped at 12 position by the green lever part. No hammers are moving.

Link to comment
Share on other sites

OH,  I think this may be easier hope you don't mind.

The chime side, you have the pin on the 2nd wheel in the hook, therefore the lifting pallet must have the pin on the lever in one of the recess, if not loosen the screw behind the lifting pallet turn the pallet till the pin is housed.

Next put the minute hand on and take it round till the lever it is lifting drops , now the chime is set up.

Next, the strike,

Take the pallet lifter off.

Lift the rack (the one that counts the strike) past the lever (the one with the green arrow) and let the lever fall and rest the rack on it.

Next, turn the wheel with the pin on it till it hits the lever stop (if the hammer is half way through a strike just turn it till it has dropped) , now put the lifting pallet on with the lever pin housed in the recess.  

All done,

Some  adjustment may be needed on the chime hook so it is free when at the apex of the lever rise, to do this just loosen the screw on the hook lever and adjust it till it is just clear of the pin.  

Also the chime sequence will need to be set, however that is simple and will help when you get this done.

Link to comment
Share on other sites

I think it’s correct. With a bit of luck I’ll find out when I put the movement back in the case. If it runs,  all well and good. If not, well I have learned a bit regardless. That’s worth something. Thanks for your help. I’ll let you all know the outcome.

Link to comment
Share on other sites

It’s been running and chiming since Friday. I set the time properly on Saturday and it is still correct. I know it has issues and needs some repairs carried out but, all things considered, it wasn’t even working when I got it. 

Thanks everyone for the help and advice.

Edited by Davey57
Link to comment
Share on other sites

It all looks good, however no sound? Just check that when it chimes the 1/4 past the hour the four beats (the hammers fall in this order) are 1,2,3,4,  if they do not, most likely the westminster chime will sound odd. Well done though :woohoo-jumping-smiley-emoticon: this is a hard movement to start on, get yourself a time only and take it apart and bush it even if it does not need it as this will be the most common issue you will find on any type of movement.

Link to comment
Share on other sites

I don’t think it was chiming in the order you mentioned JD. I Think it’s ok now, although the half hour does not sound as I had expected it. I have some short clips of the quarter, half, quarter to and hour.

Link to comment
Share on other sites

I don’t think it was chiming in the order you mentioned JD. I Think it’s ok now, although the half hour does not sound as I had expected it. I have some short clips of the quarter, half, quarter to and hour.  Looks like they are not in the order I uploaded. Looks like, the hour, three quarter, quarter and half are the order of the clips.

Link to comment
Share on other sites

Join the conversation

You can post now and register later. If you have an account, sign in now to post with your account.
Note: Your post will require moderator approval before it will be visible.

Guest
Reply to this topic...

×   Pasted as rich text.   Restore formatting

  Only 75 emoji are allowed.

×   Your link has been automatically embedded.   Display as a link instead

×   Your previous content has been restored.   Clear editor

×   You cannot paste images directly. Upload or insert images from URL.


  • Recently Browsing

    • No registered users viewing this page.
  • Topics

  • Posts

    • Not sure, but just looking at it, it seems like the screw on the right may be a fake? The one on the left may not be a screw in the regular sense at all, rather a 2 position device, I think you need to point the slot towards either of the 2 dots and one will secure and one will open. Like I said this is just my best guess looking at the pictures.
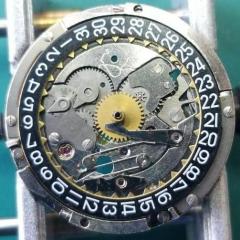
    • Hi! I am in the process of restoring a rado captain cook mkII. I want to remove the rotor, but I am not sure how to and need some help. As you can hopefully see on the photo there are 2 screws. The left one has two positions, the right one looks like a regular screw. I have tried turning the right one, but it does not give even after using more force than I would expect. Anyone know the function of the left screw with the two positions and how to remove the rotor? Thanks!!
    • Welcome to the group Stirky. You can search for just about every subject in the craft here. Don't be afraid to ask if you can't find the answer that may have already been covered ( some ad nauseum LOL ). You don't have to buy Bergeon to get good quality. There are many decent mid-range tools available that will last you a lifetime. Cousins would be a good place to start . Cheers from across the pond ! Randy
    • I picked up a similar amount of these jewels some years ago in a watch and clock fair. Every now and then they come in handy. This week I've got a rubbed in bombe jewel in the balance cock that is cracked and needs replacing. Very handy to have a vintage assortment of these type of jewels!
×
×
  • Create New...