Jump to content

Girard Perregaux Identification


Stevelp

Recommended Posts

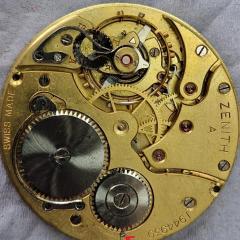
Hi everyone!  So I found this guy lying in the bottom of a pile of parts watches and was wonder if someone could help me identify it?  I would like to dive in and fix it up but I have a bit of a concern when it comes to the possibility of radium dials.  I see so see what looks like luminous dots at the hour indicators but I don’t know what it is.  Any thoughts would be great!  Thanks!

DC0DD3E2-8875-492C-BCA8-6DB3063D264C.jpeg

image.jpg

Link to comment
Share on other sites

Assuming you don't have a geiger counter, then the next best thing is a UV torch (the sort of thing used to check bank notes).

Shine it on the dial, while sitting in a darkened room, and if there is any phosphorescent material on the dial (zinc sulphide generally), then it will glow. This of course doesn't tell you exactly what the luminous paint is, but you can make an educated guess from the age of the watch, and the info here -> https://en.wikipedia.org/wiki/Luminous_paint#radioluminescent_paint
 

The zinc sulphide degrades over time, so even if the watch doesn't appear to have active lume, this doesn't mean it isn't mildly radioactive.

I don't think these things actually present a significant radiolgical hazard, so long as you treat them with the same caution you would if handling any other hazardous material. Wear nitryl gloves, avoid breathing in any dust from the watch, wash your hands afterwards and you should be fine. Once the case and crystal are back on, the amount of radiation they emit is so small as to be almost unmeasurable, since it is mainly alpha radiation, which would be stopped by a thin piece of paper. You probably encounter similar levels of radioactive material of one sort or another daily anyway, especially if you live in an area where there is granite in the rocks, or you have granite work surfaces.

See here->  https://www.watchrepairtalk.com/topic/10086-radon-hazards-of-luminous-timepieces/?tab=comments#comment-91769

.. for a more in depth discussion of luminous dials.

Edited by AndyHull
  • Like 1
Link to comment
Share on other sites

Don’t worry about radium dials. I used to handle them for years and I have not grown two heads. This is just one you have found. You need to remove the hands and dial and take a good clear photo of the keyless work. That is the way to I D watch movements.

Link to comment
Share on other sites

@oldhippy is of course completely correct and normally the keyless works are what is necessary to accurately identify a movement. In this case however enlarging the picture there's a '20' on the barrel bridge which puts it at this model: http://www.ranfft.de/cgi-bin/bidfun-db.cgi?10&ranfft&&2uswk&Girard-Perregaux_20

You might therefore also be interested in this: https://forum.tz-uk.com/showthread.php?419737-Resurrecting-a-Girard-Perregaux

  • Like 1
Link to comment
Share on other sites

Way back in the day , the ladies who painted radium dials had all sorts of health problems.They would sharpen the point of their brush by putting it in their mouth. As a precaution, wear gloves, wash hands and do not lick the dial.

Link to comment
Share on other sites

1 hour ago, yankeedog said:

Way back in the day , the ladies who painted radium dials had all sorts of health problems.They would sharpen the point of their brush by putting it in their mouth. As a precaution, wear gloves, wash hands and do not lick the dial.

.. and even if you do decide to lick it, I think you are more likely to get Delhi belly from licking the dial than any radiation effects.... but don't... not even if you are sorely tempted to find out what it tastes of. 

You should wear gloves or finger cots anyway when removing any dial, or handling the mechanism as it stops you from putting nasty corrosive fingermarks on them. You may not notice them initially, but once they have been on there for a few weeks, those greasy sweaty paw prints can destroy the dial and set up corrosion on metal parts.
 

Link to comment
Share on other sites

  • 2 weeks later...

Sorry for the delayed response everyone!  Thanks so much for all the information!!  Haha yankeedog and andyhull, I will do my best to resist the urge to lick the dial.  I have made it habit to use finger cots at all times when taking down or assembling a watch. I will maybe add a mask when dealing with potential radium dials to be on the safe side.  So as far as cleaning the movement, is there any precautions needed there as far as pre cleaning any potential radium dust from the dial, I don’t really want anything like that in my cleaning solutions, or am I being to paranoid?

Link to comment
Share on other sites


  • Recently Browsing

    • No registered users viewing this page.
  • Topics

  • Posts

    • This post has some pictures that describe how to get the spring back into the setting without having to disassemble anything.  With patience, this approach works.  The advice that the spring will ‘float’ back in when positioned just right is spot on. If you try to push it so it flexes and pops back into the setting, it’ll probably just fly away, as you’ve already found.  Hope that helps, Mark
    • I recognize myself all too well. It takes a lot of experience and discipline to recognize when it's time to cancel and come back at a later time. Very well said! We should have a forum dedicated to this topic as it is critical to achieve success when working on watches. It's a lot more important than most other things related to watch repair. And yes, just a short break can make a world of difference!
    • Hello Wai and welcome to the forum. A little information to enlighten you a little more TZIllustratedGlossary.pdf
    • I am certainly not the first one who happen to ruin the chronograph center-wheel of a Seiko 6139B. The internet, when you search for it, is littered with stories, even here on WRT there are some. One of the problems is that the service manual of the 6139A is readily available on the net, not so with the service manual of the 6139B. On top, reading other forums & stories, there are people who claim that there is hardly any difference between the 6139A and the 6139B movement, so the 6139A service manual will suffice. However, one of the crucial differences is the design of the chronograph center-wheel. Also the Seiko reference numbers are different. For the 6139A, the reference number for the chronograph center-wheel is 888610 and for the 6139B: 888611 or 888612, depending on which manual you are reading (and perhaps there is a difference between these two wheel too !??) To lubricated the 6139A chronograph center-wheel, the following graphic picture in the 6139A service manual is given; One has to press down the sprocket and oil it. Unaware of the difference in chrono center-wheel design, I pressed down on the sprocket, but there was no movement. Perhaps not understanding or interpreting the drawing correctly, I pressed with the tweezers on the 4th wheel. This caused the 4th wheel, which turned out to be a press fit to the sprocket by the 6139B, to strip off the sprocket. Thereby me joining the line of all the others, who tried this before and are now searching for "how to fix" this misfortune. In an older thread on WRT, member @ricardopalamino place a picture in which he shows the difference in center-wheel design between the 6139A and the 6139B. To the left the 6139B and to the right the 6139A. As can be seen on the left center-wheel, the 4th wheel is pressed onto a sprocket. Pressing down on it, as shown in the 6139A service manual, gives a ruinous result. People did several attempts to repair the damage, but so far, I haven't found a success story. Here is one of the attempts; Reading what already has been tried, I tried a different approach ..... but sadly failed too. Nevertheless, I'll show what I've done; perhaps somebody may fine-tune or expand on the idea and has success? In my staking set was an anvil with a 4.5mm hole, exact the size needed to fit the chrono center-wheel "up-side-down". The distance between the clutch parts and the 4th wheel was 0.25mm. To support the 4th wheel as close as possible up to its center, I used feeler gauge blades, on one side a 0.25mm blade, and on the other side a combination of 0.15mm + 0.10mm blades. This allowed me to tap the sprocket back onto the 4th wheel ...... The thickness of 0.25 blades doesn't prevent some "spring" action, and so my 4th wheel was slightly deformed. The re-attachment seemed successful, but when trying to true the wheel, the connection failed again 😭 Currently there is a NOS 6139B chronograph center-wheel on eBay. Last Sunday the price was €150, on Monday the seller increased the price to €165 !!         Prevention is better than the cure and I do hope that anyone in the future, searching for a 6139 manual, with read my "Warning". As for my Seiko, I'm not going to invest €165 for one part and since the rest is pretty good, I will sell the watch for "parts or repair" 😞  
    • Off the top of my head I can't remember which was which, but one of the hands had the clutch with the very fine radial teeth as described above, the other had a flat disc with two tiny 'pins', there was what looked like the remains of something black smeared on the opposite face, maybe the remains of rotted rubber? When I can get some good pictures of both I will post
×
×
  • Create New...