Search the Community
Showing results for tags 'Service'.
-
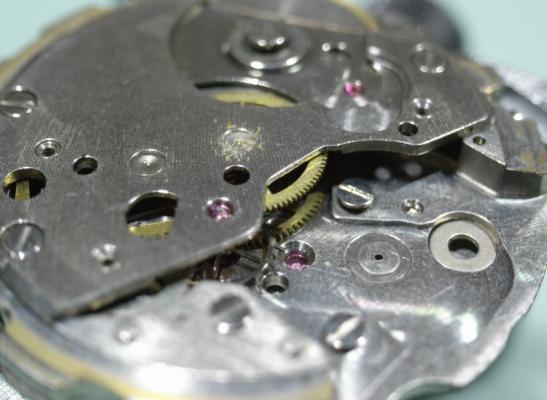
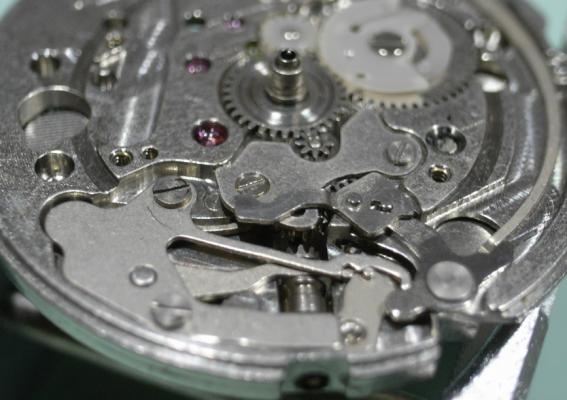
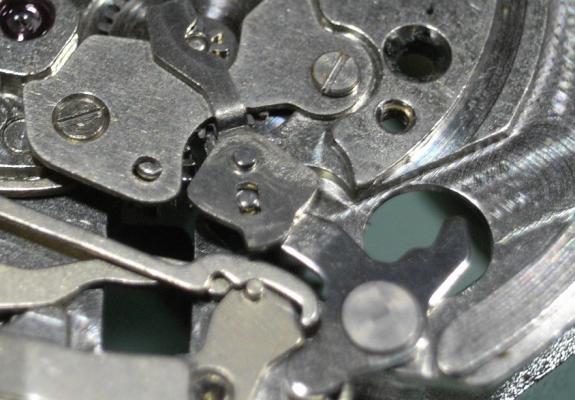
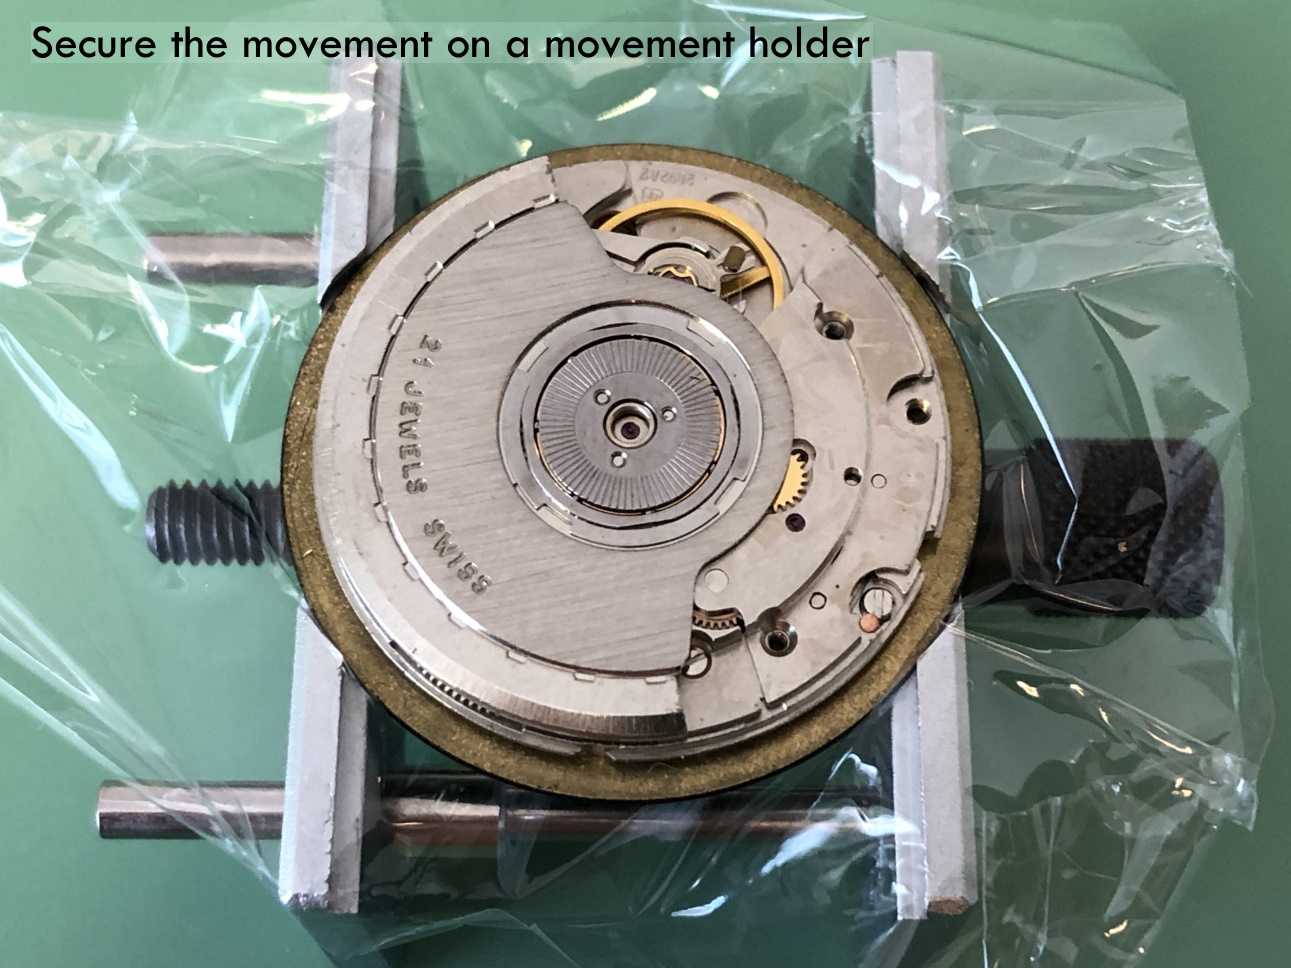
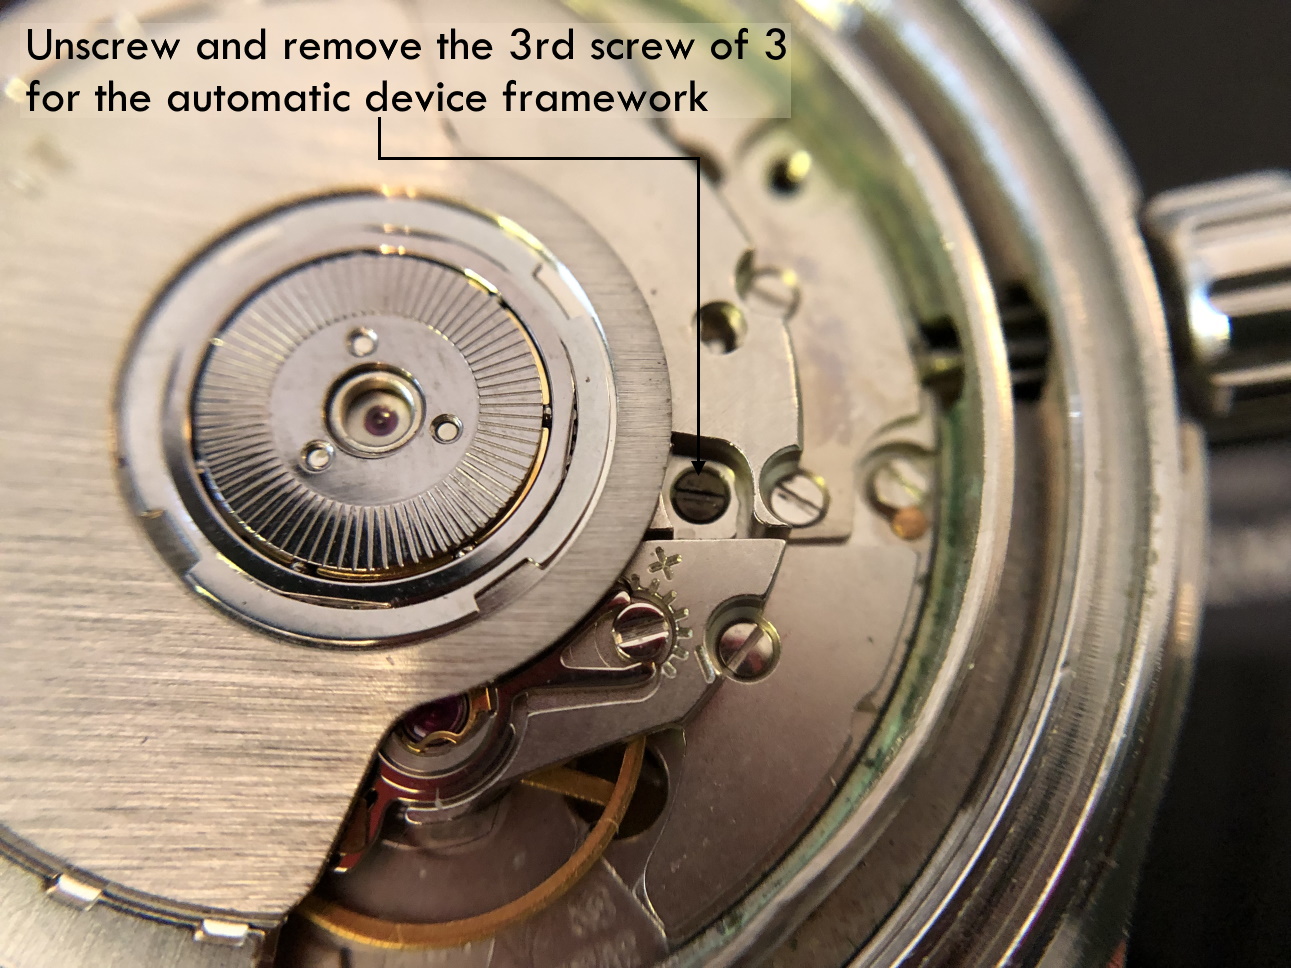
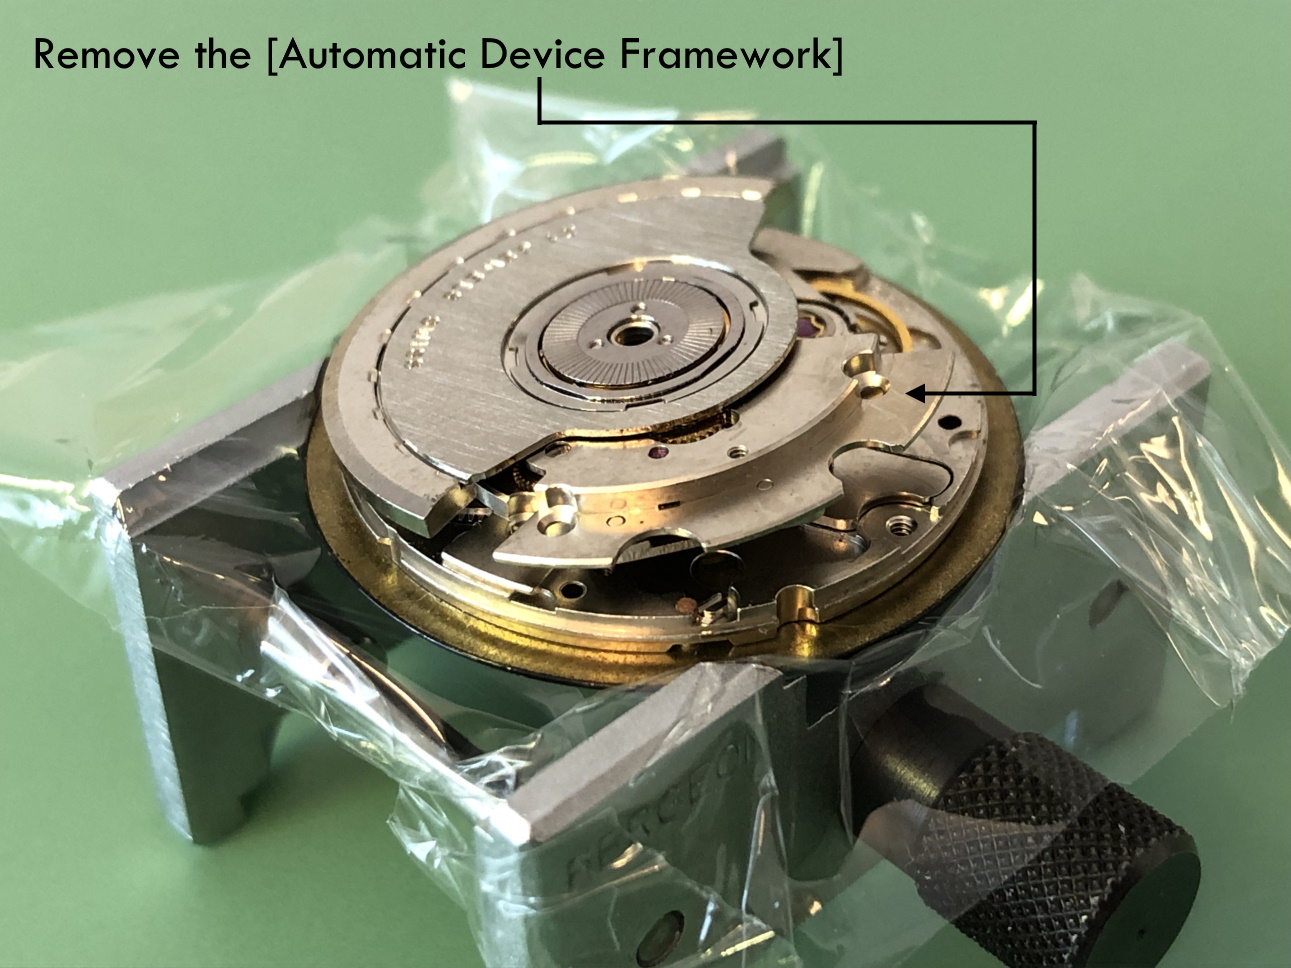
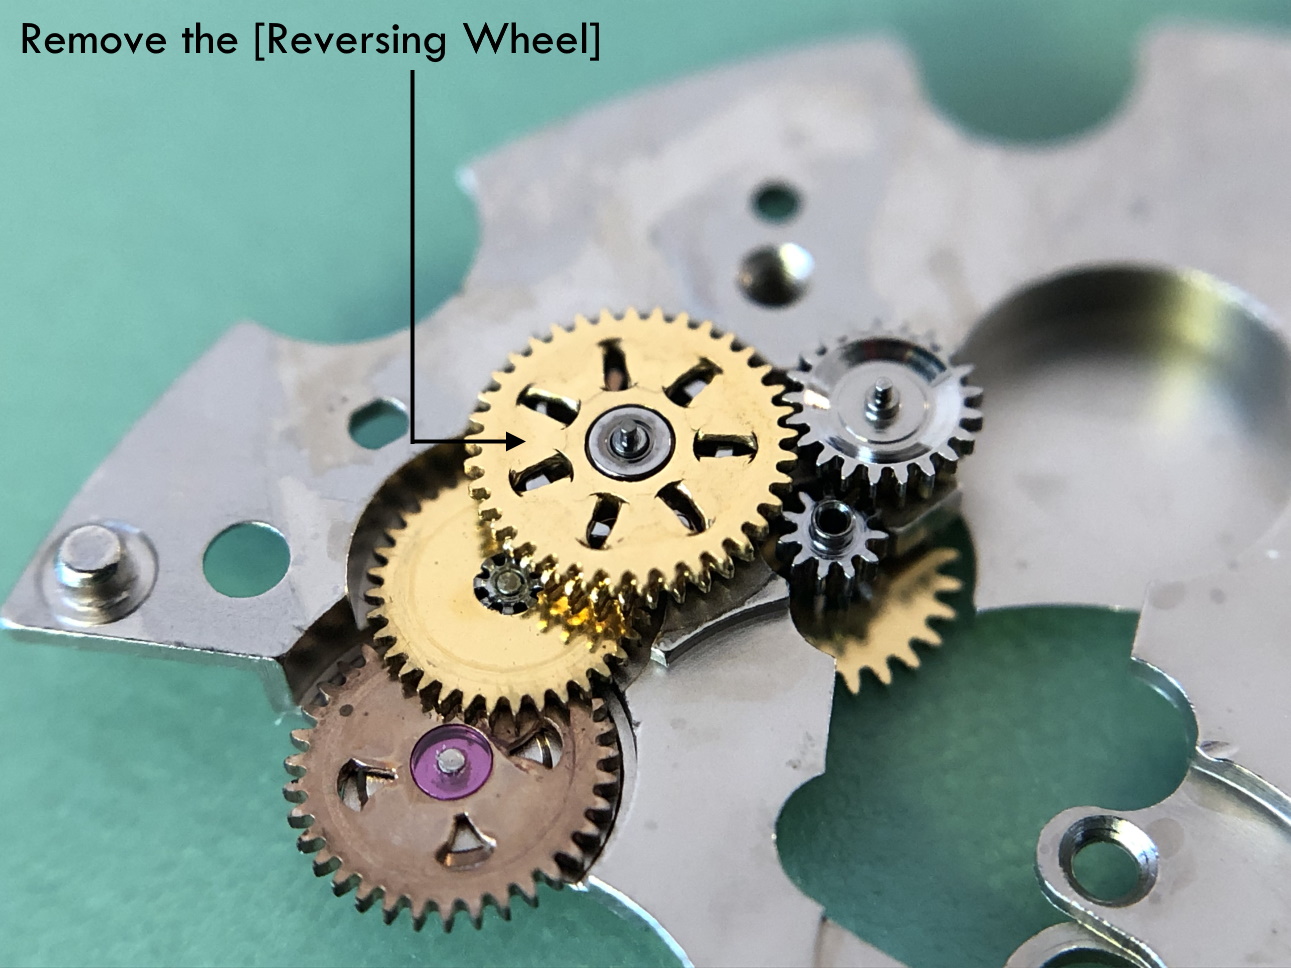
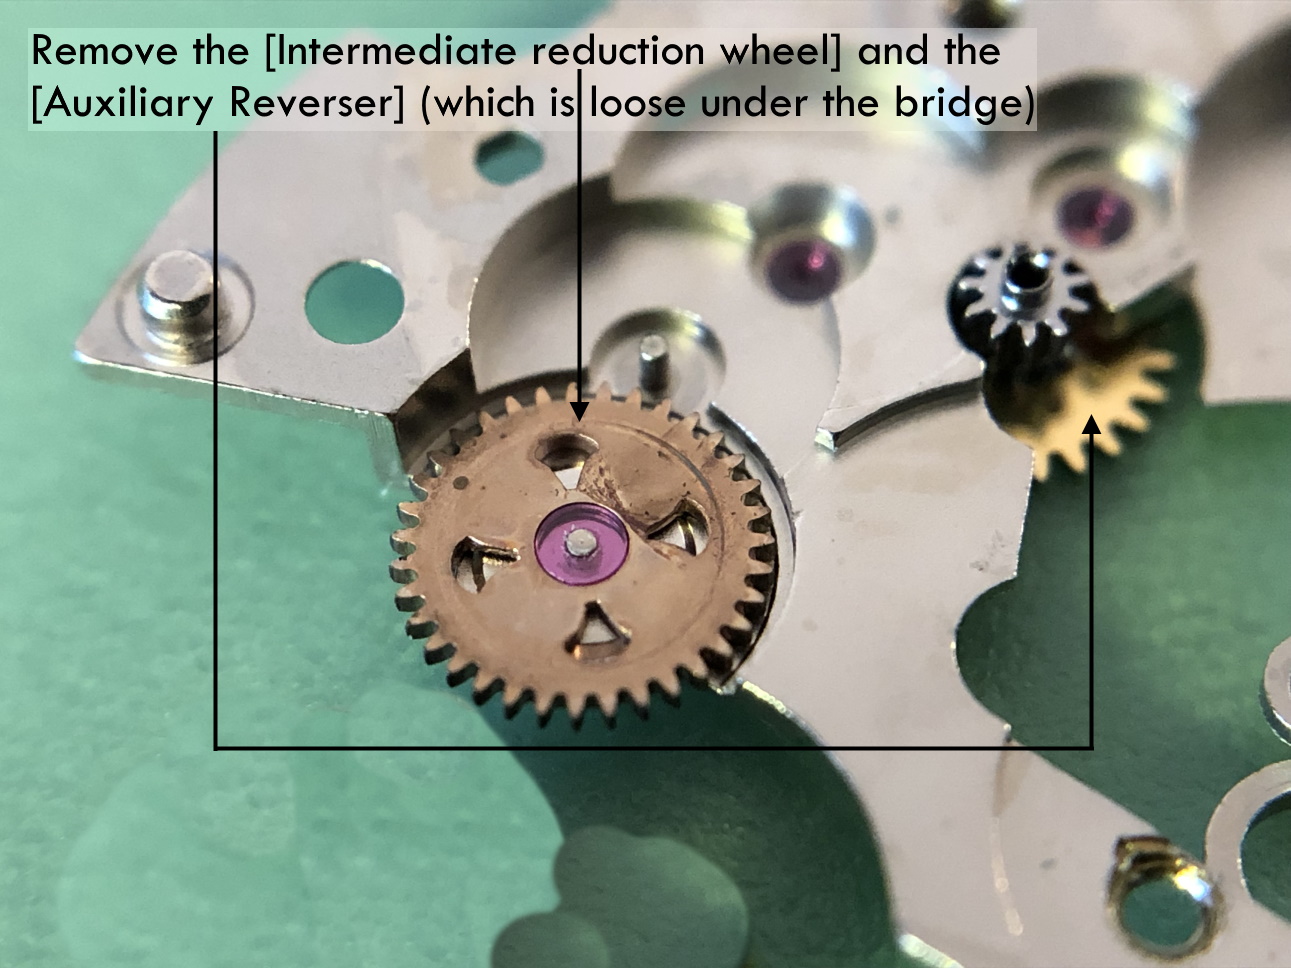
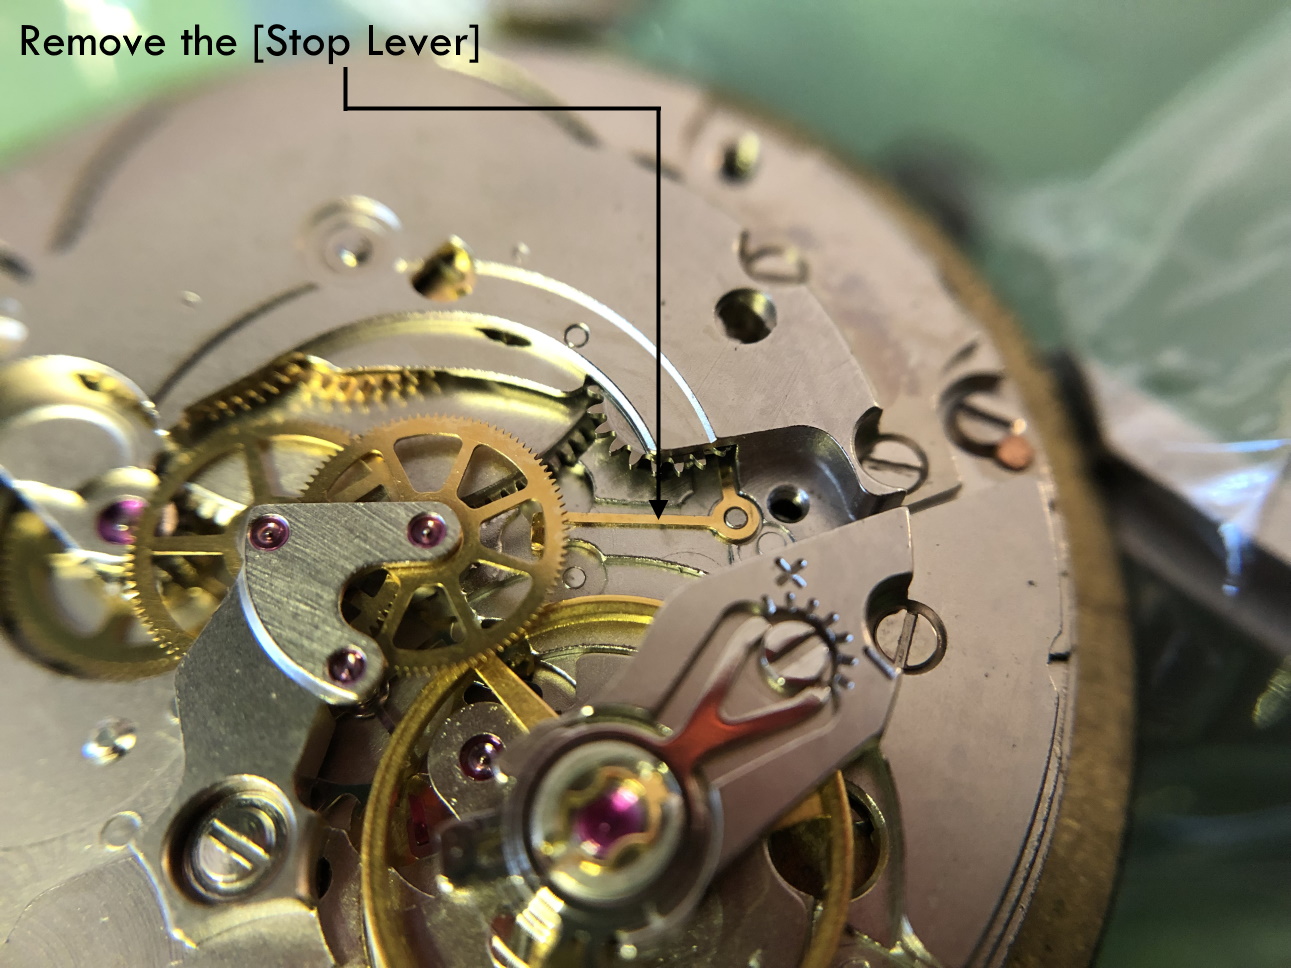
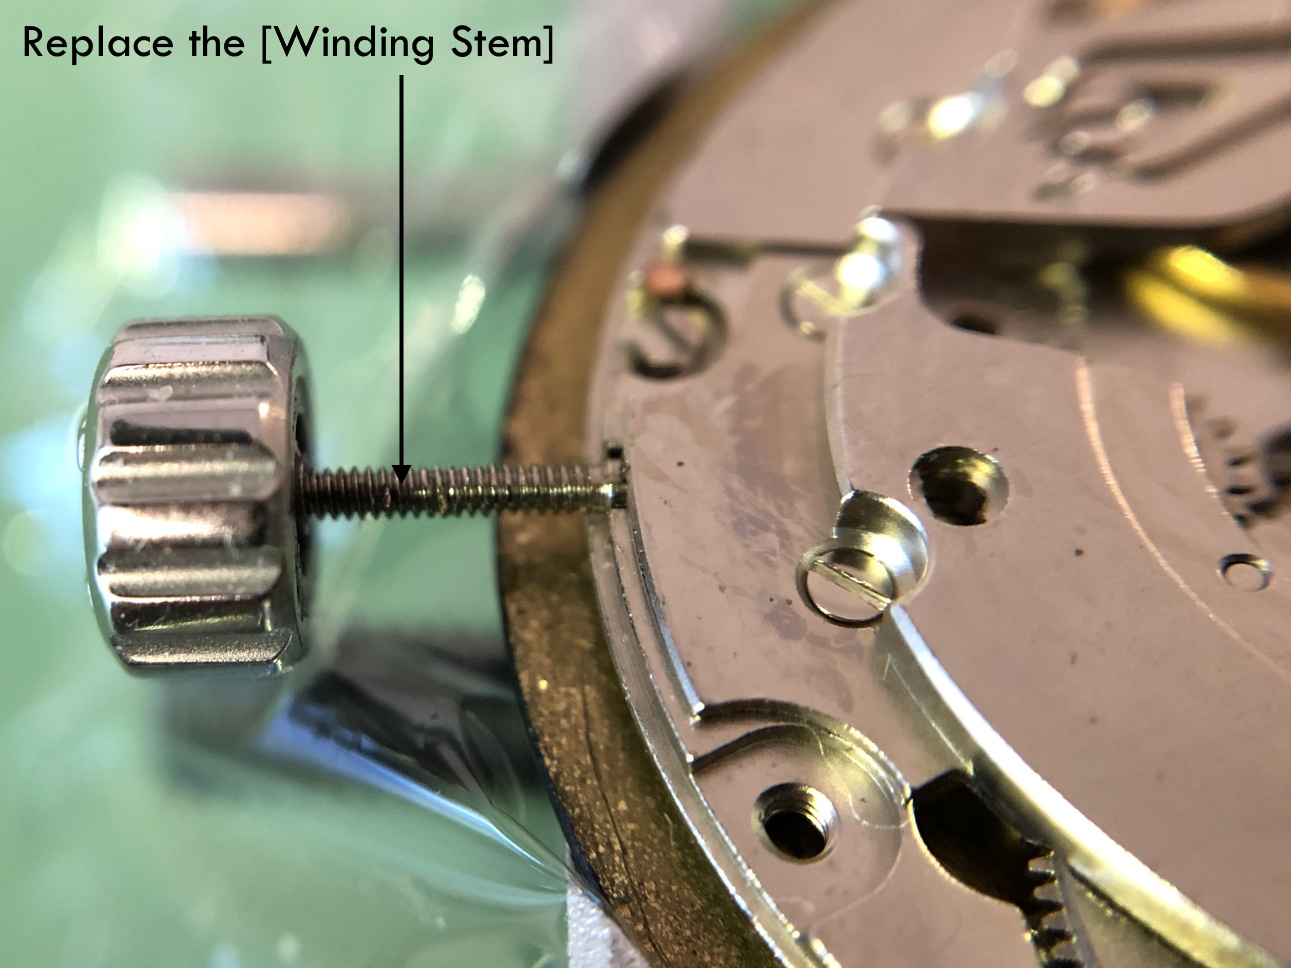
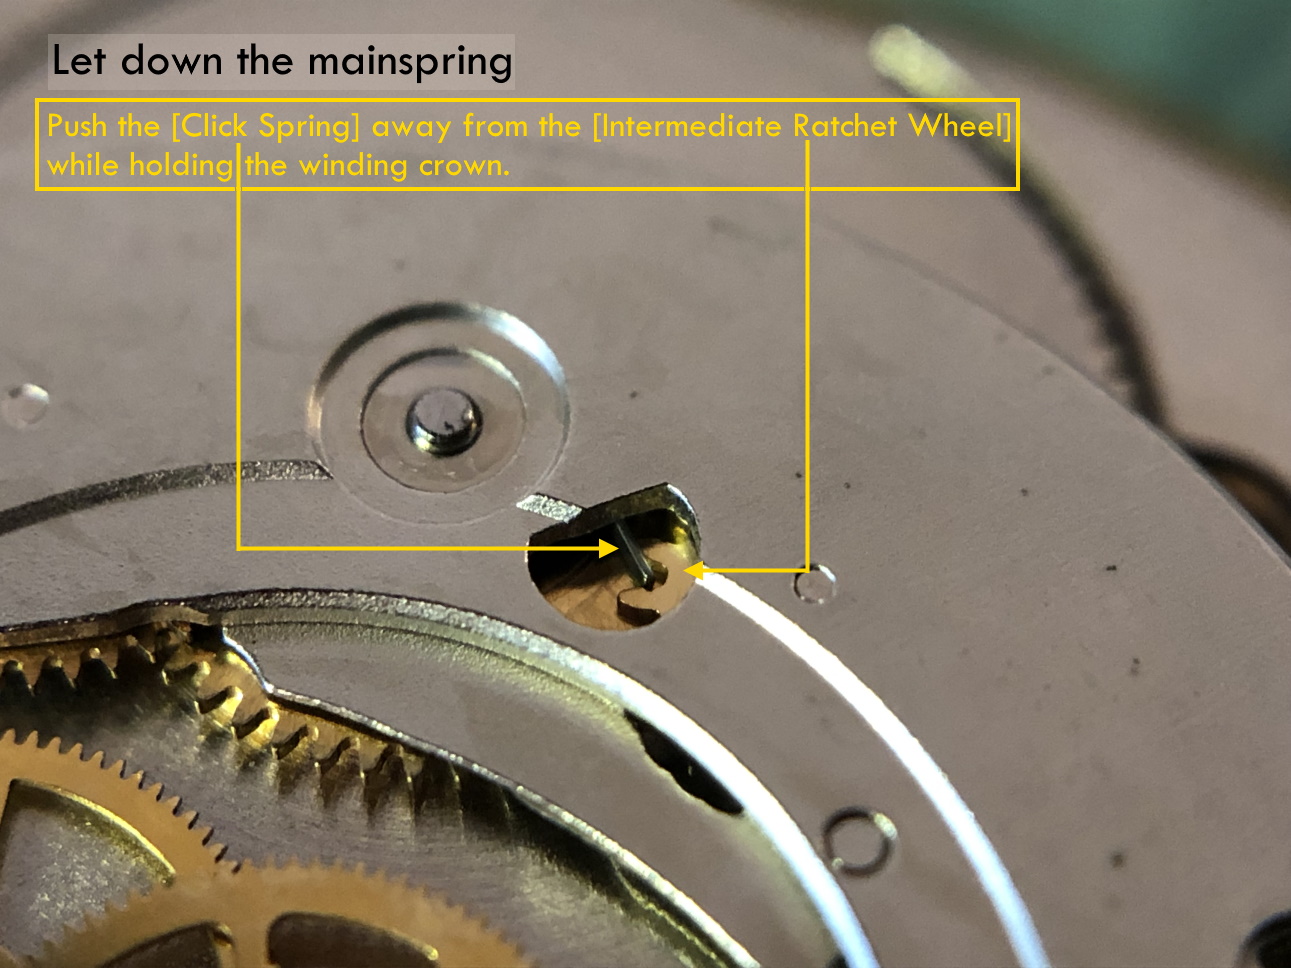
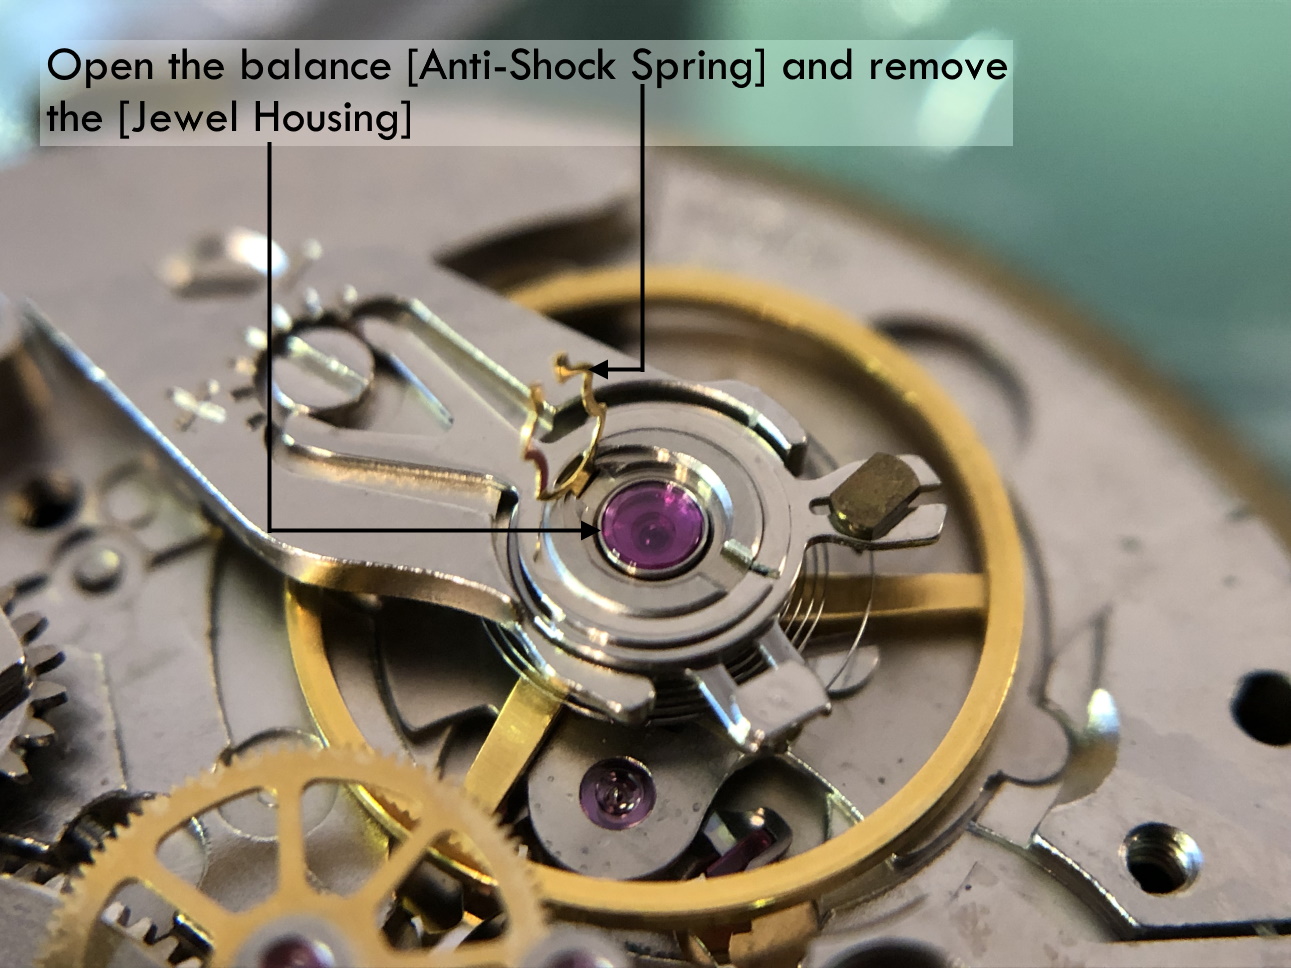
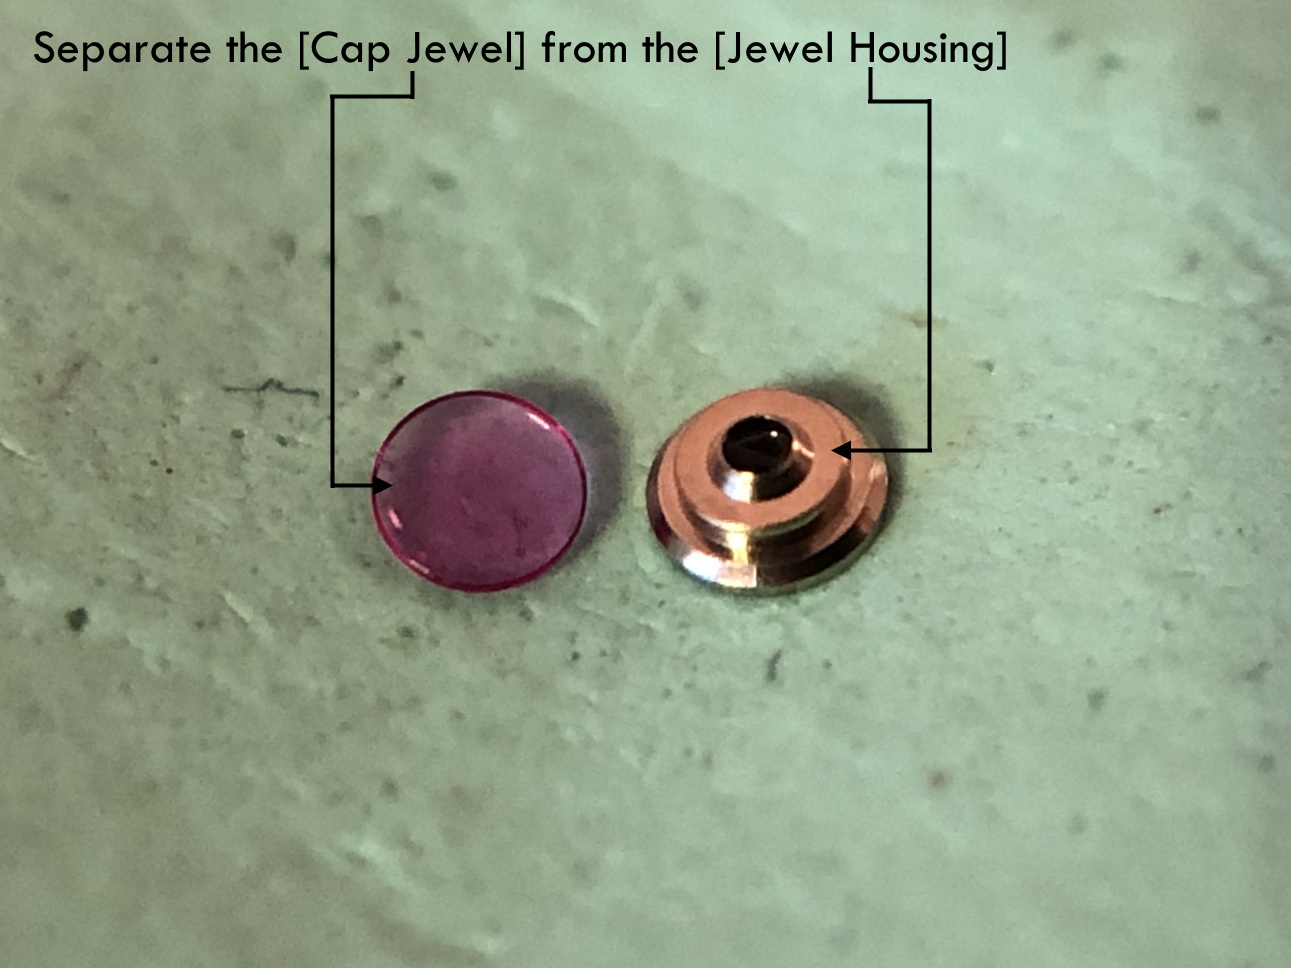
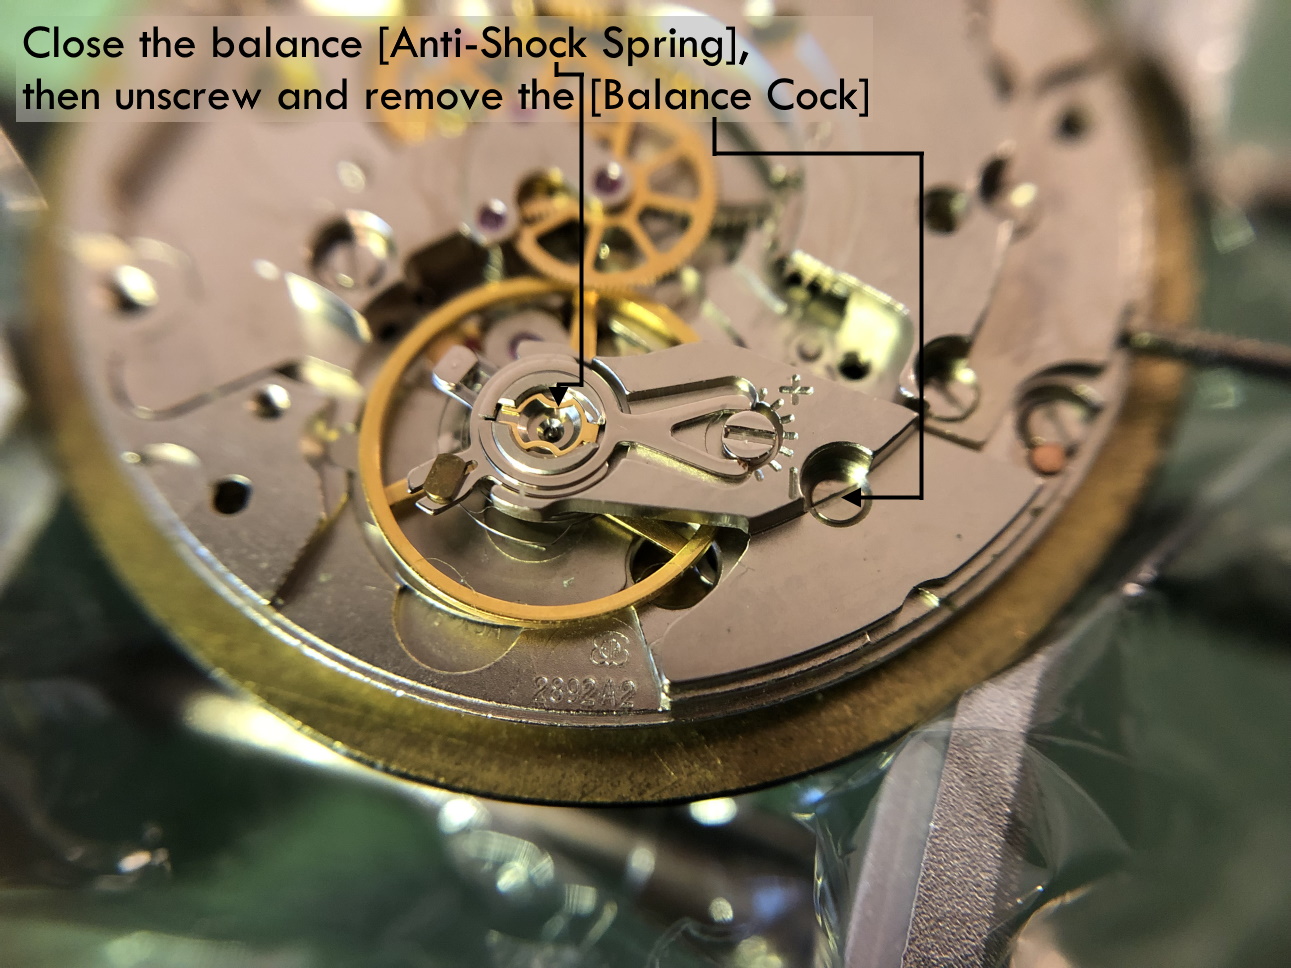
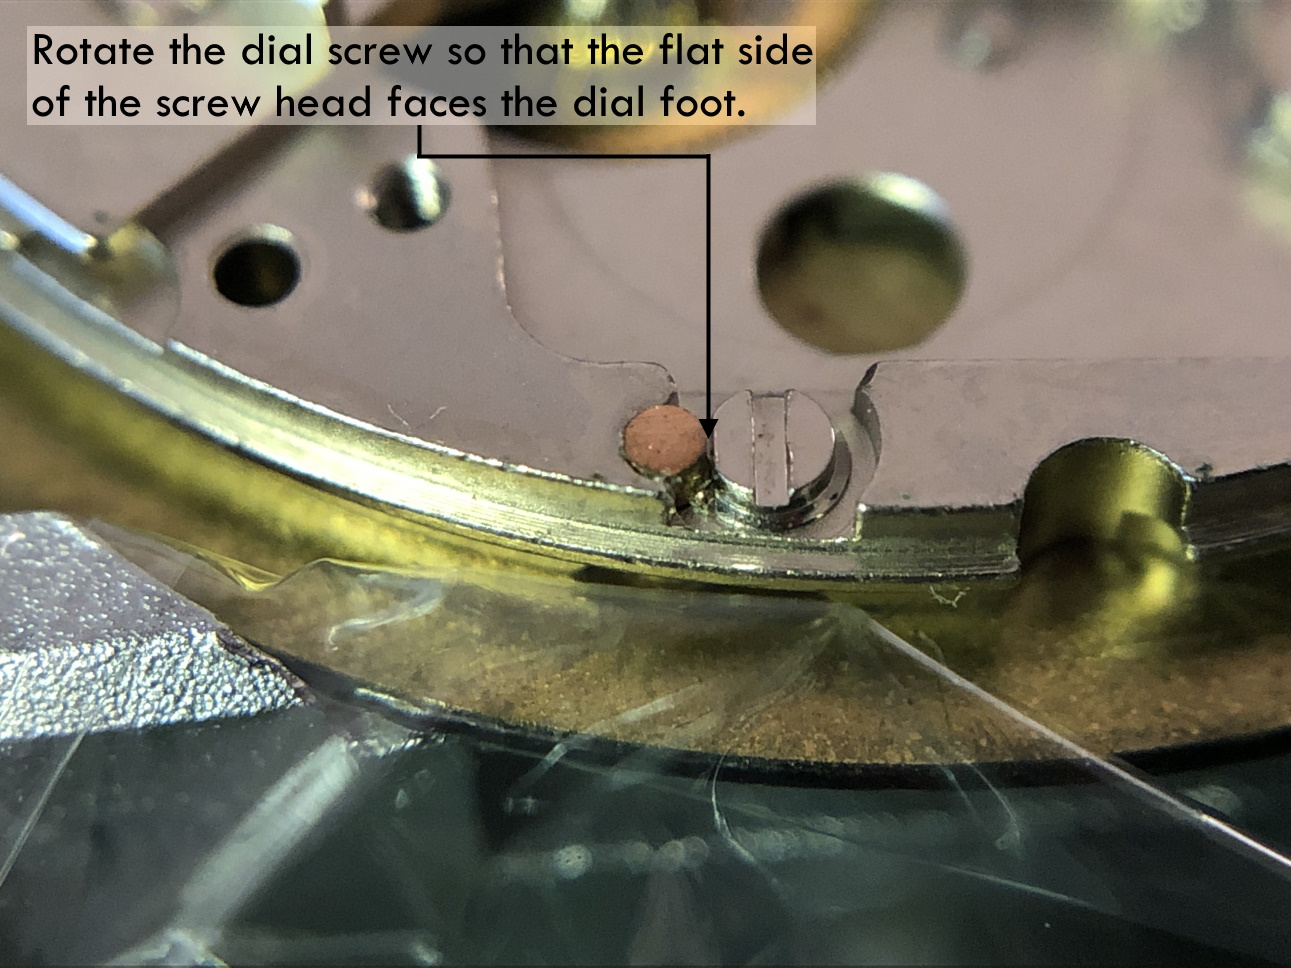
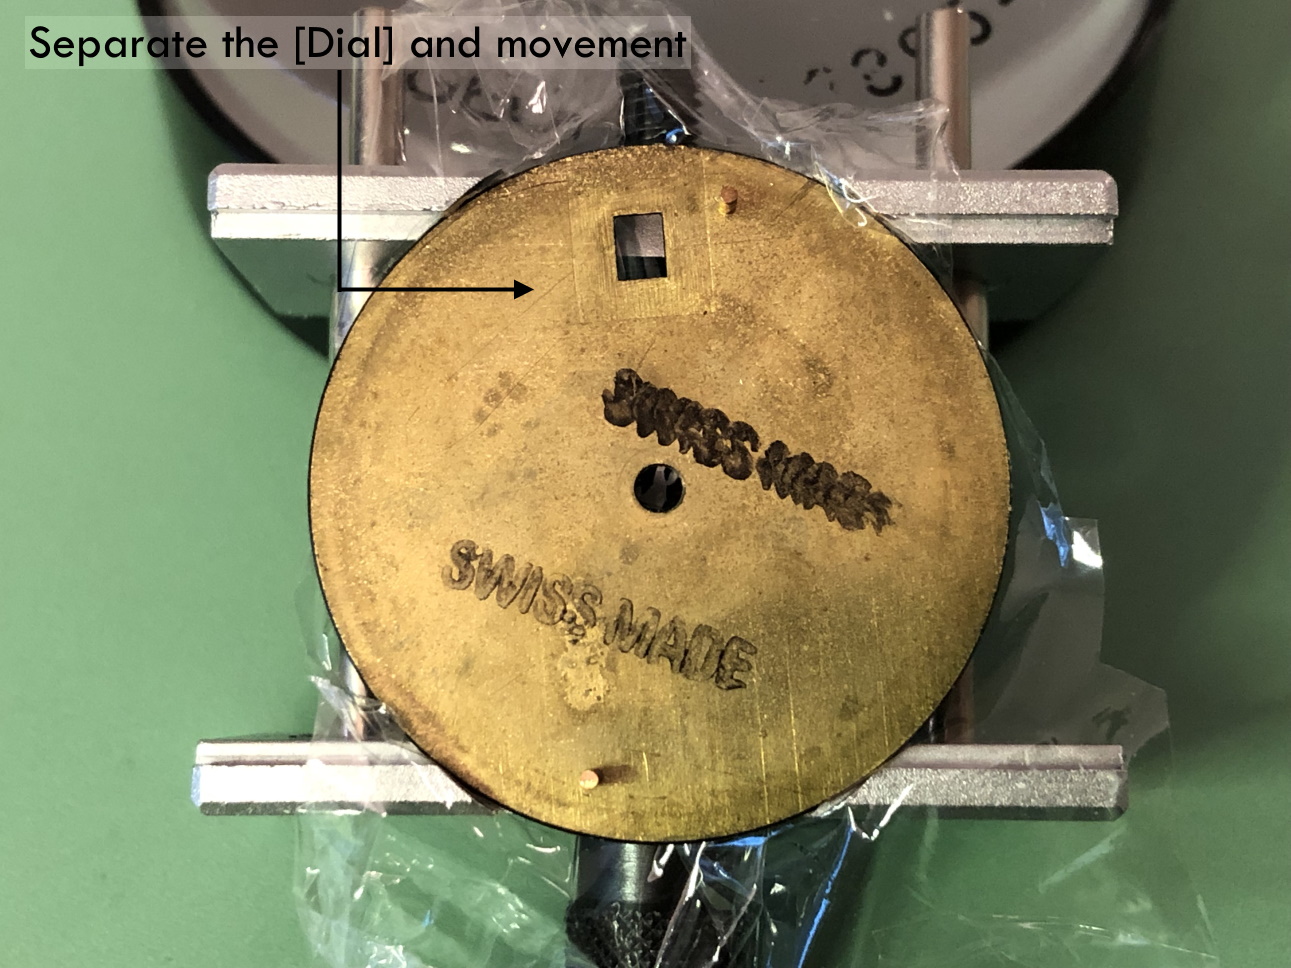
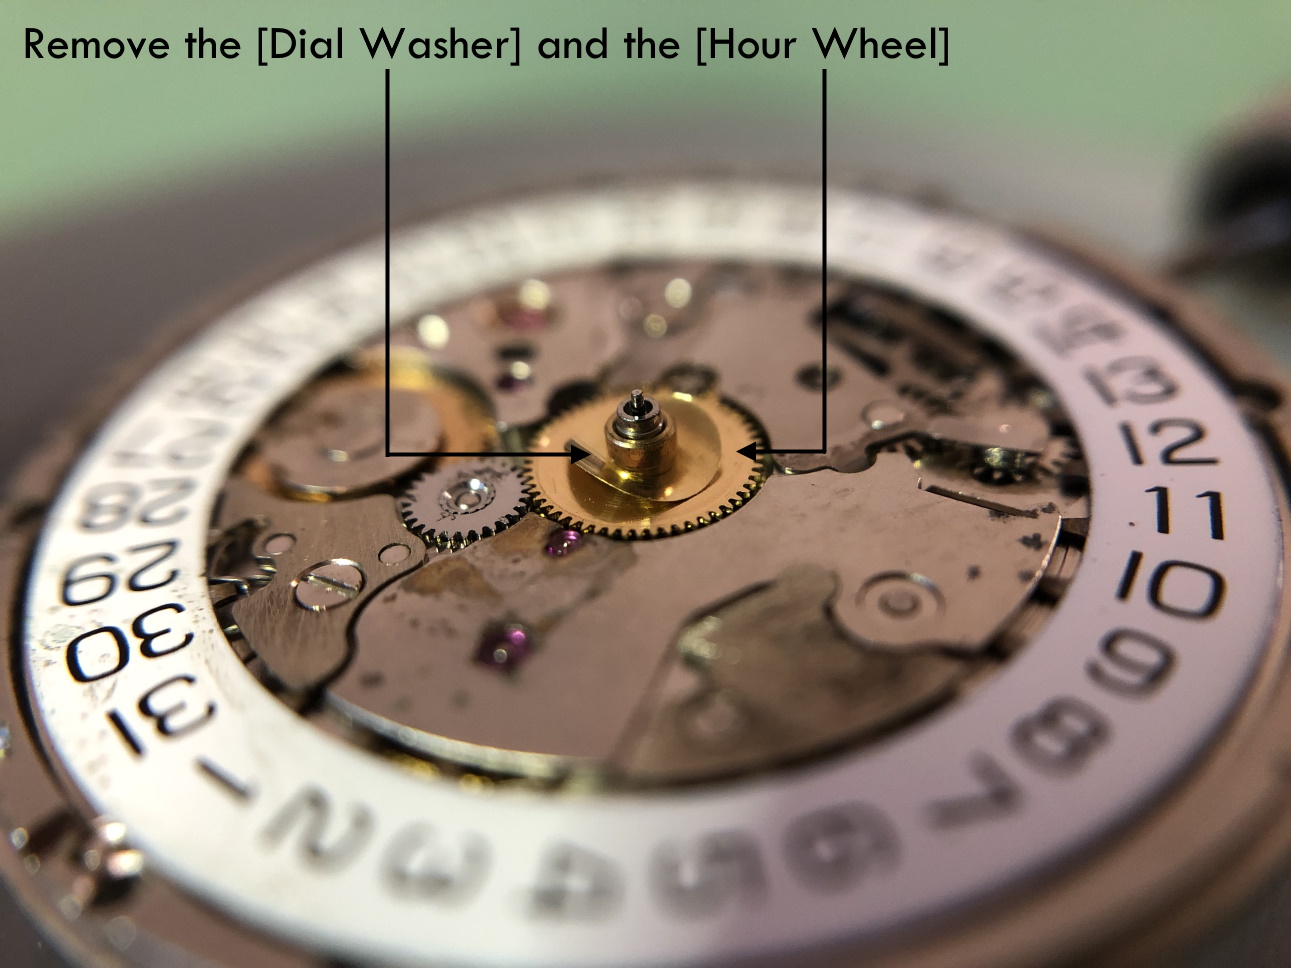
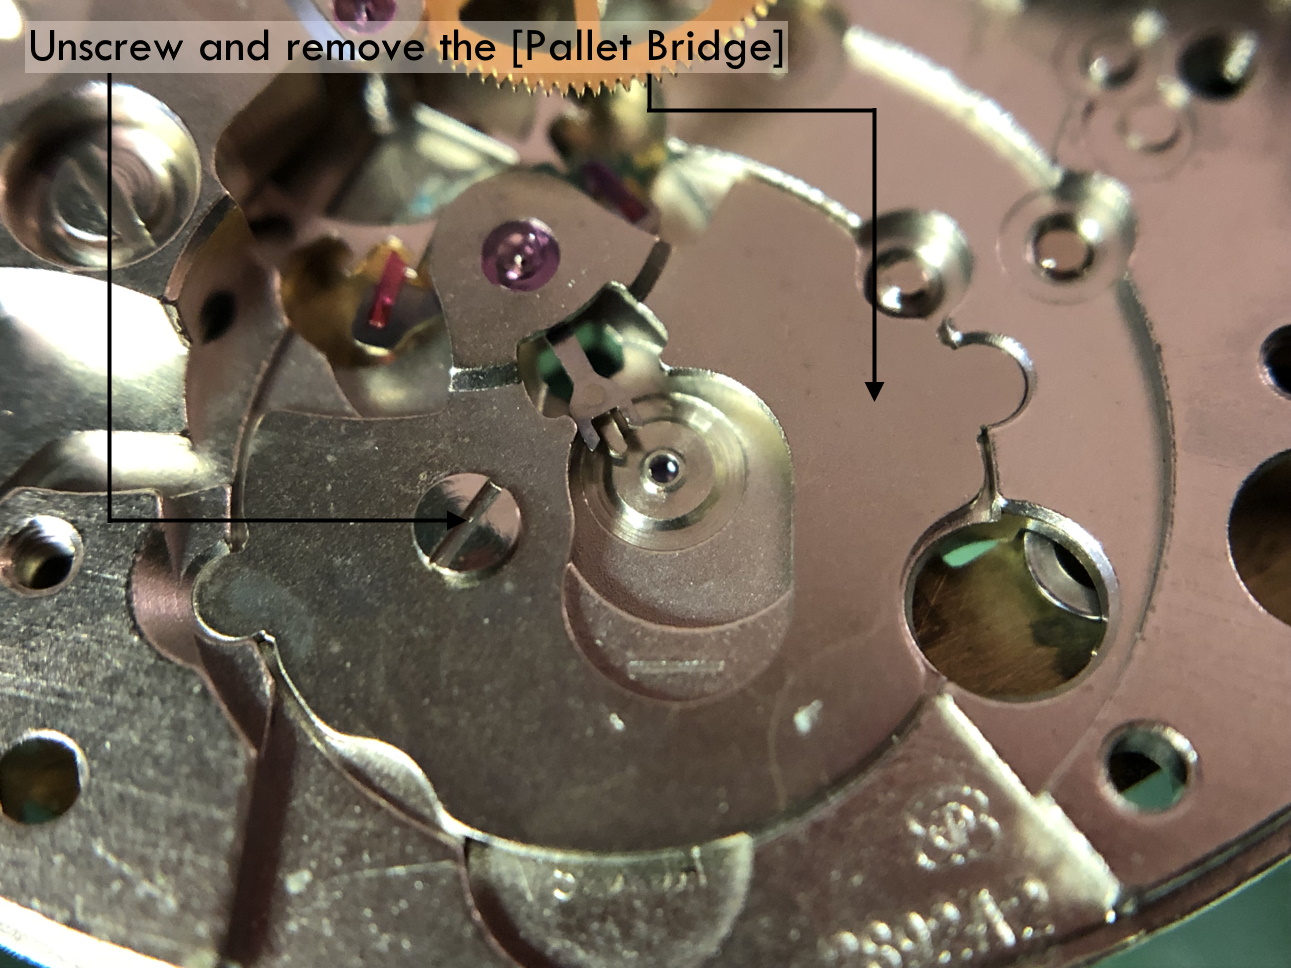
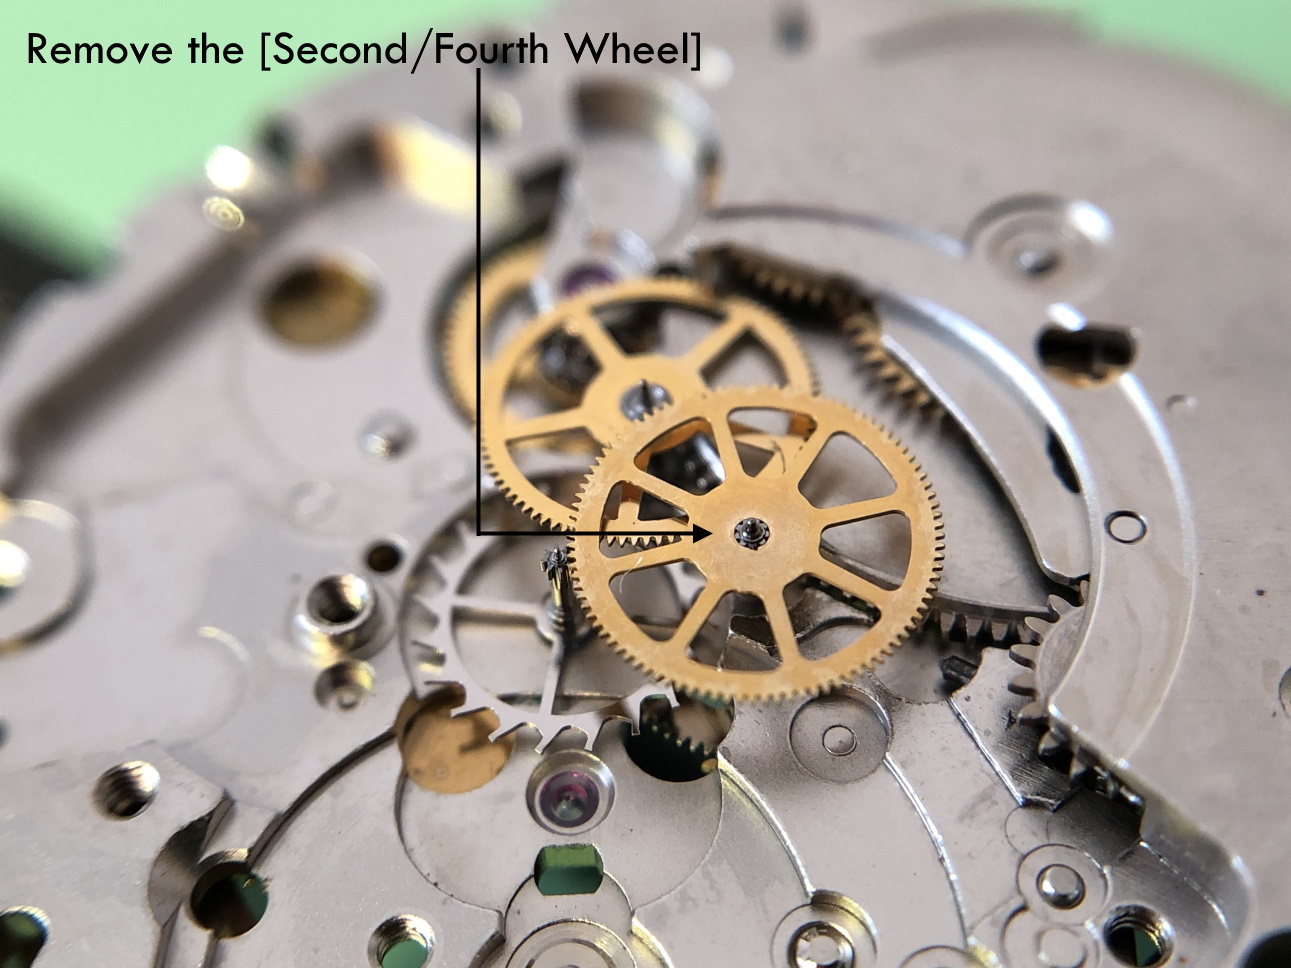
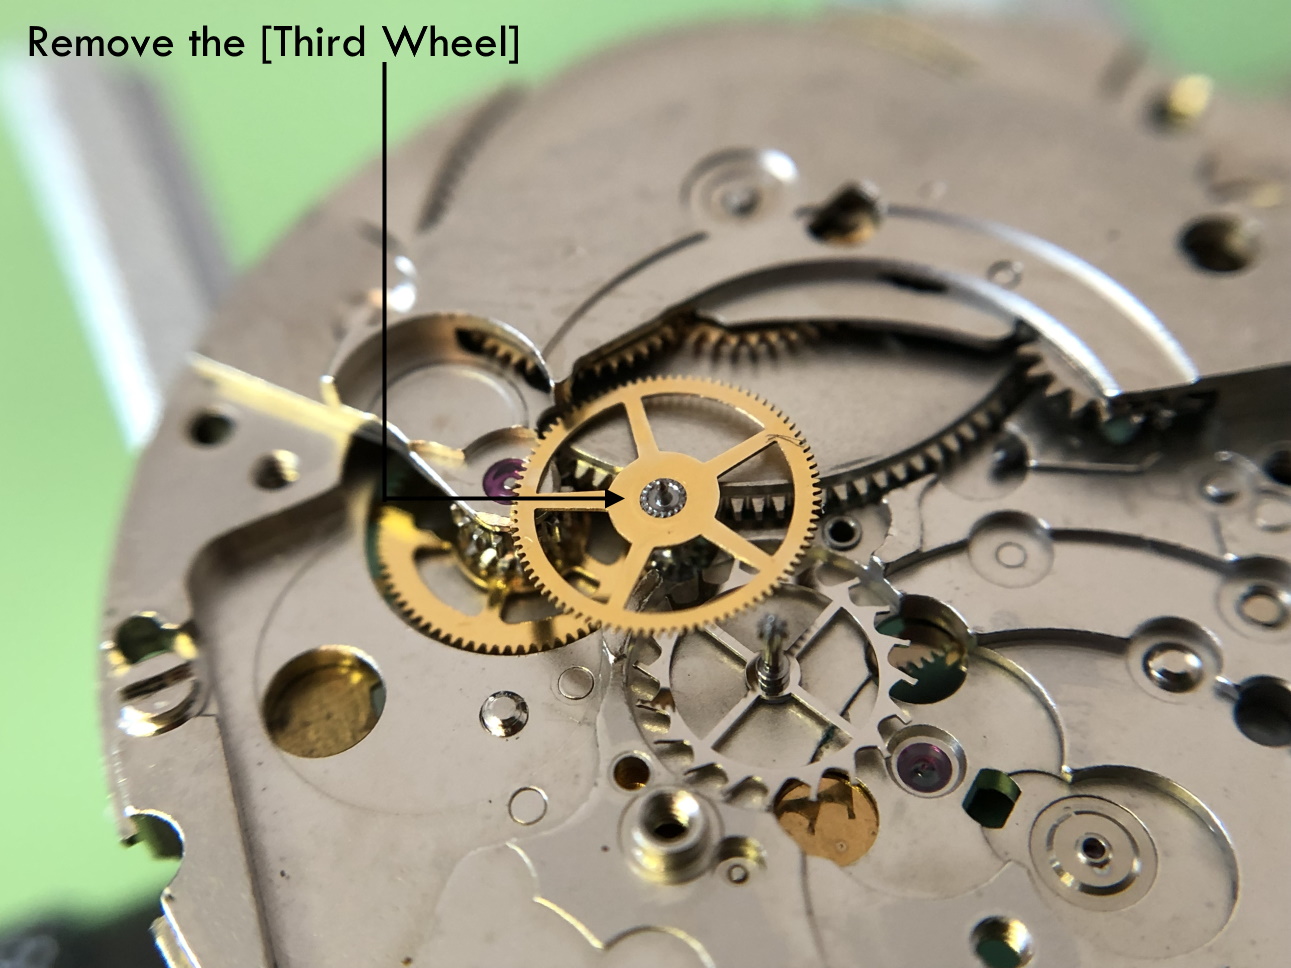
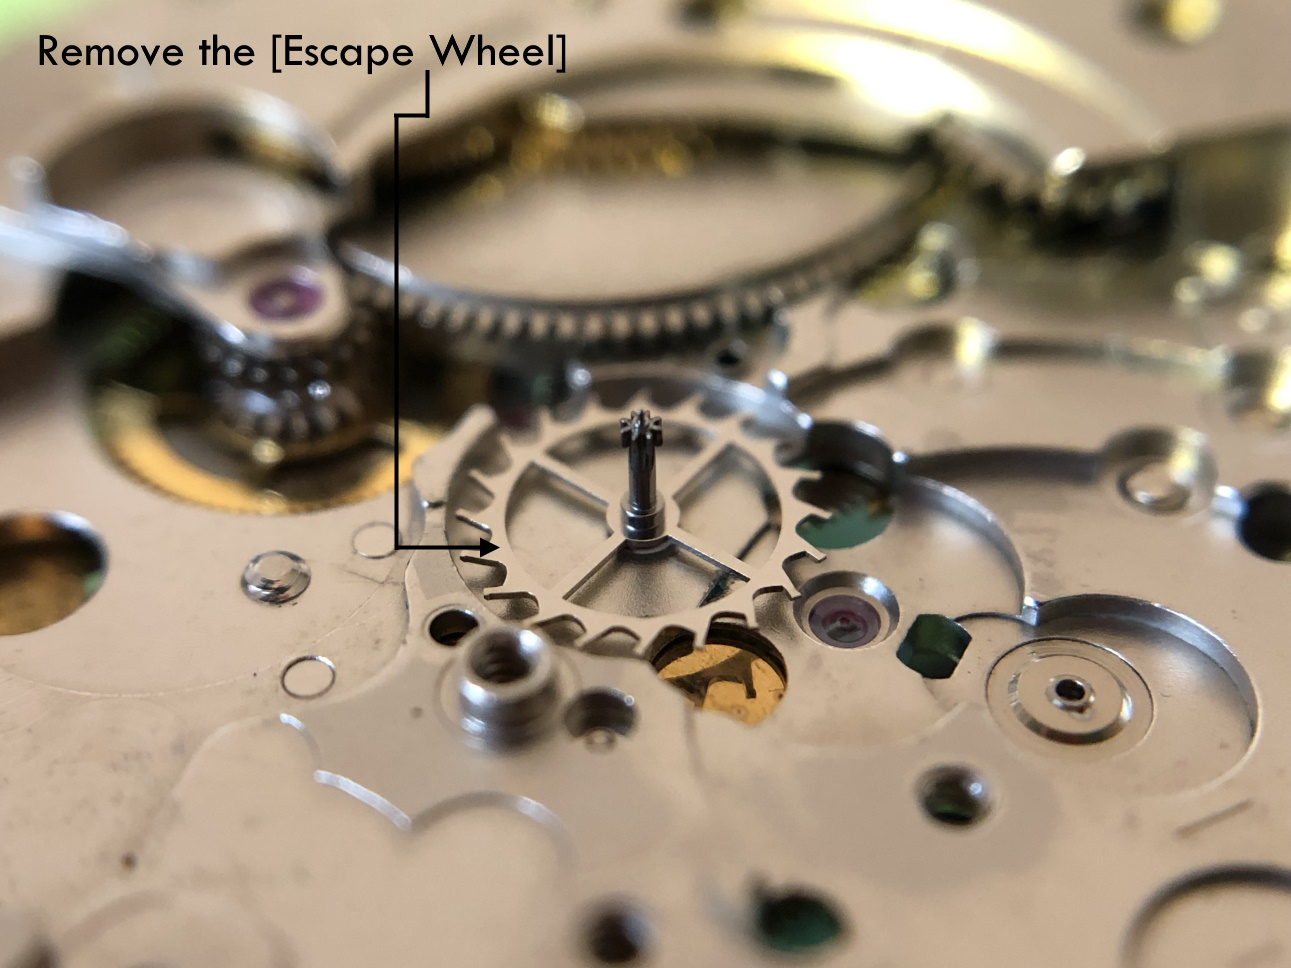
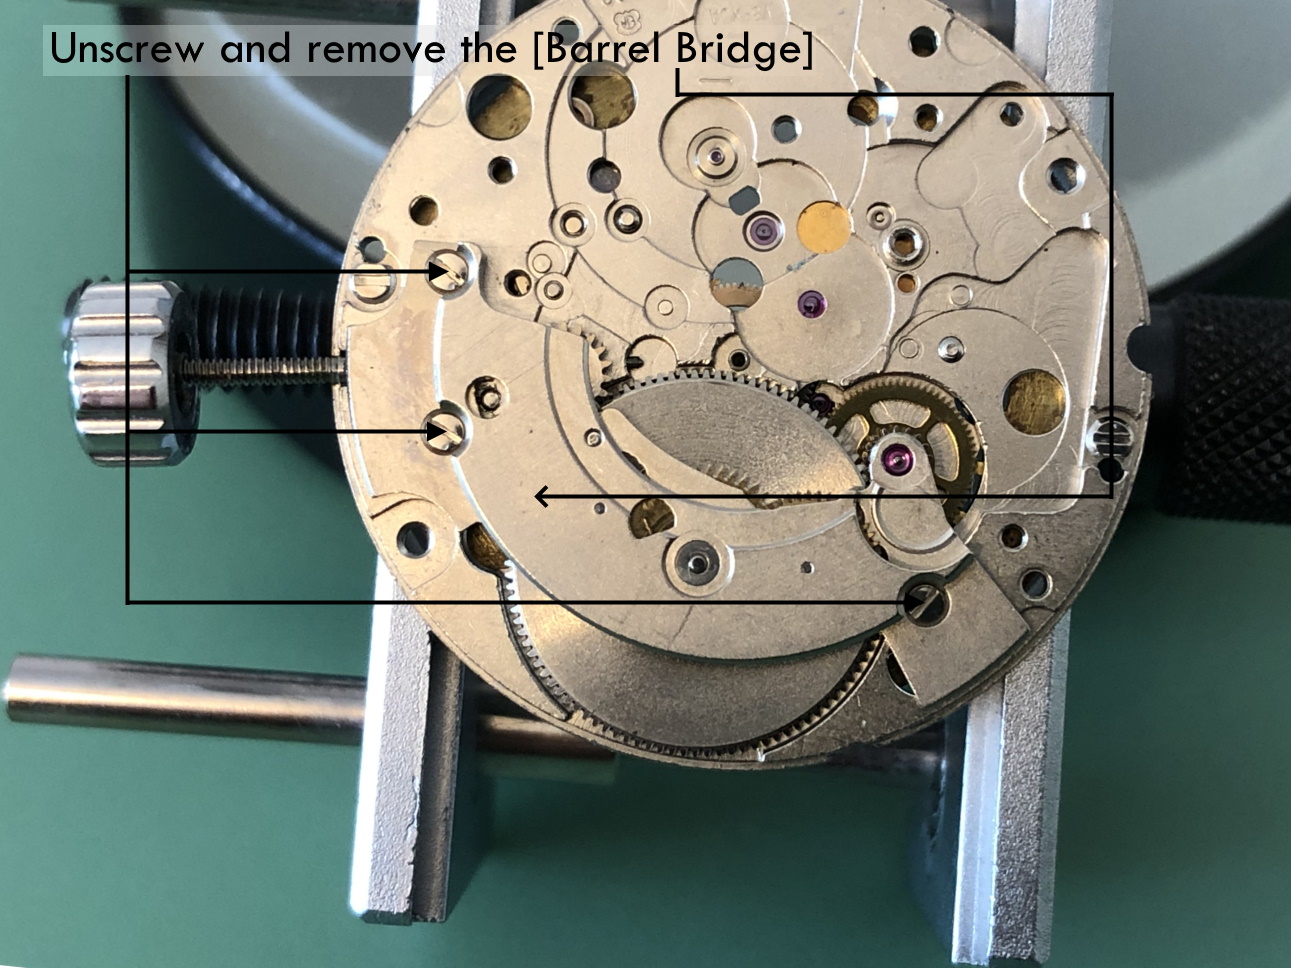
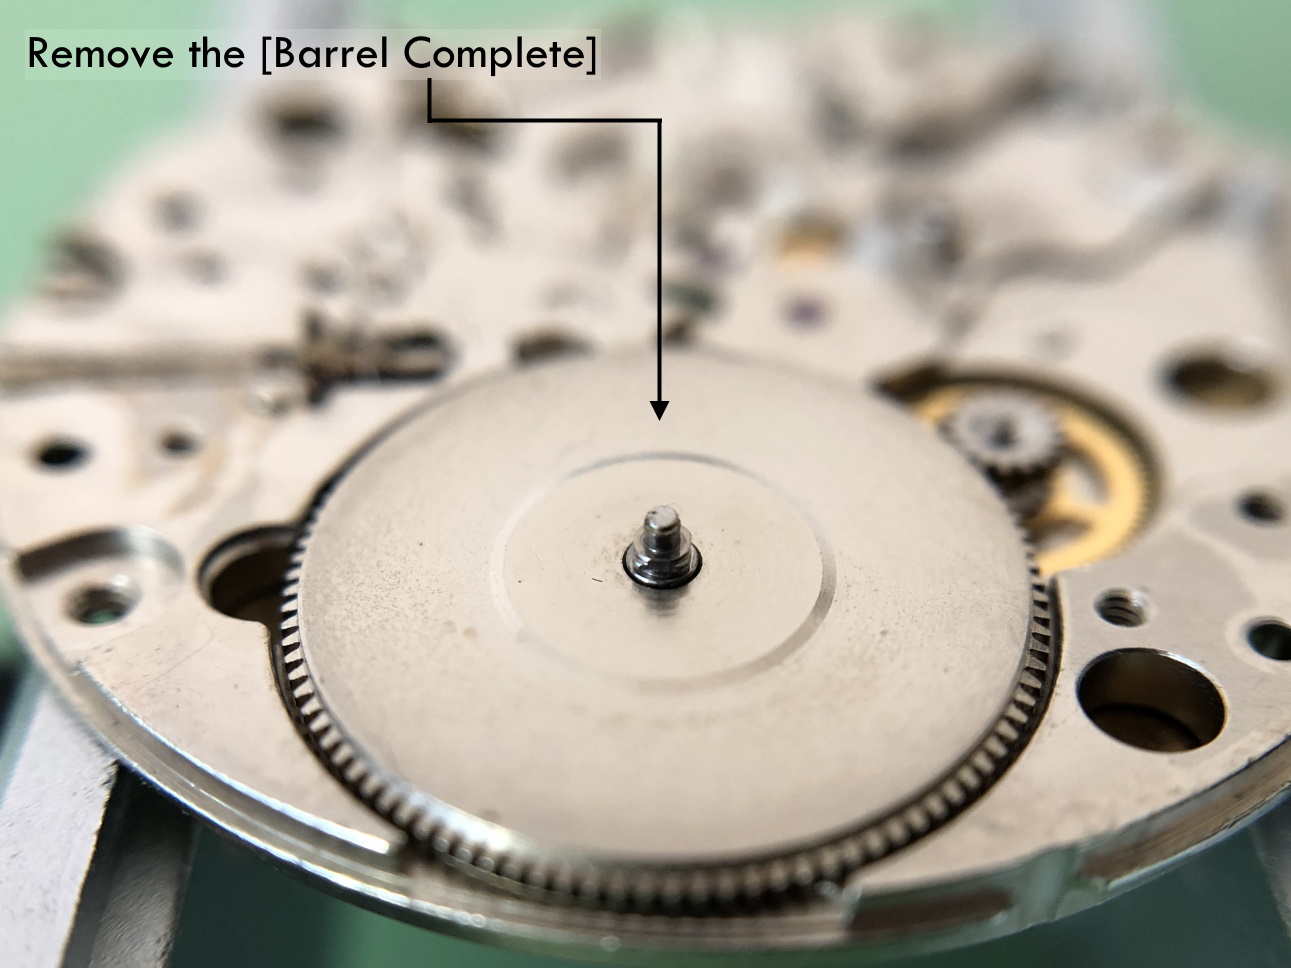
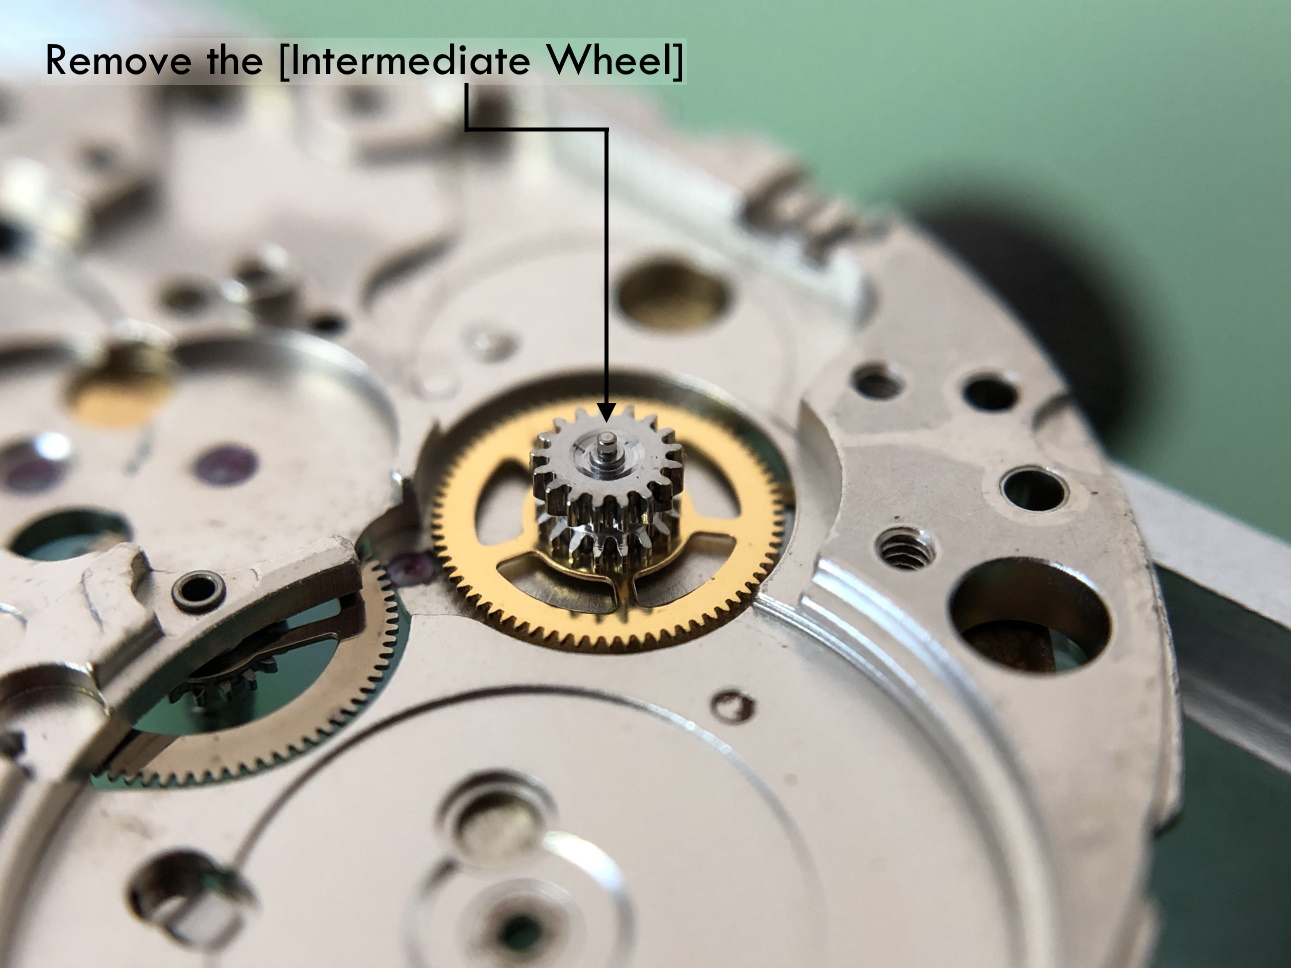
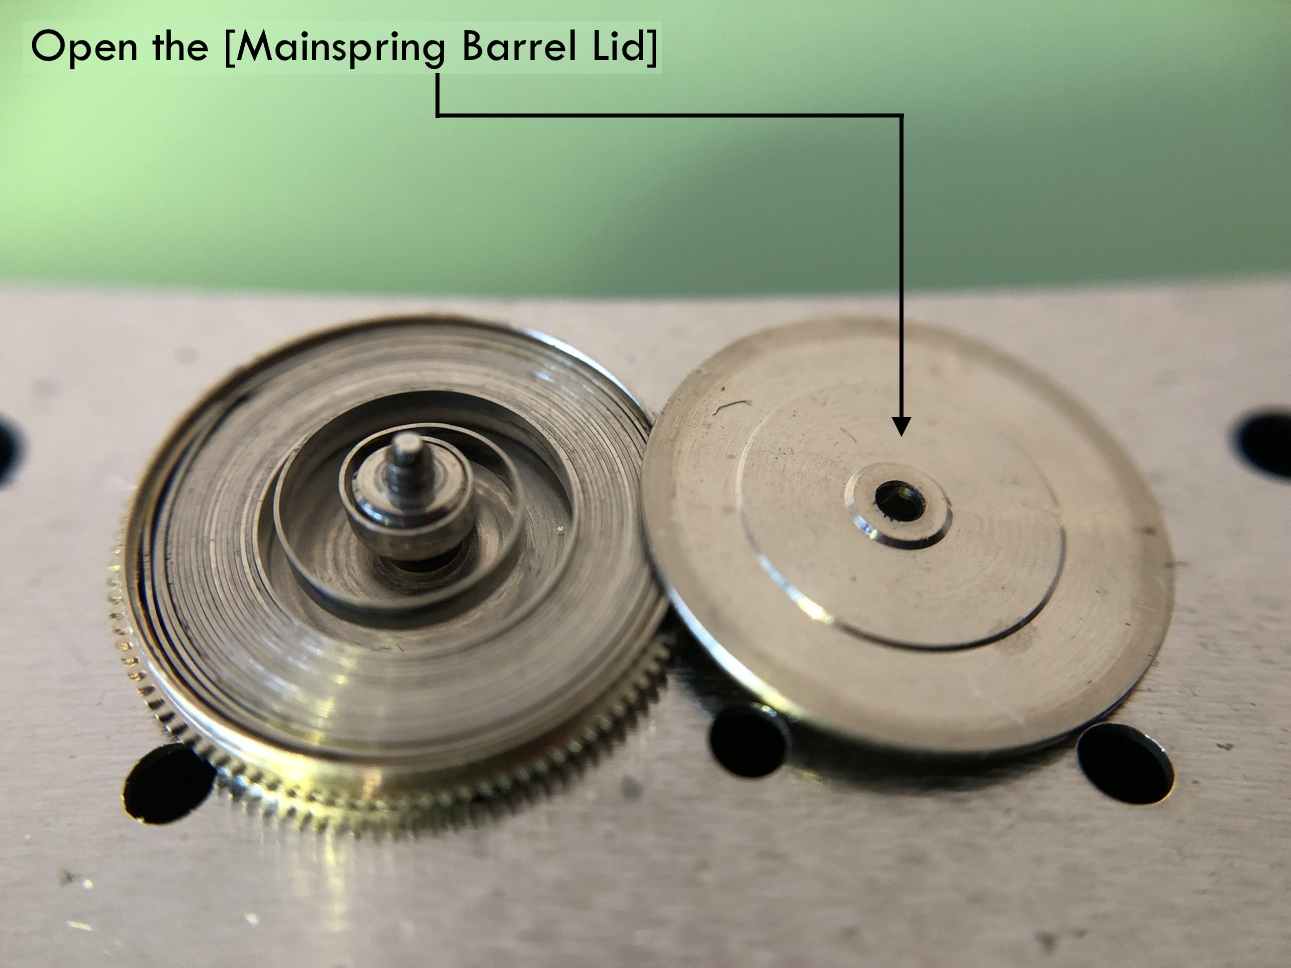
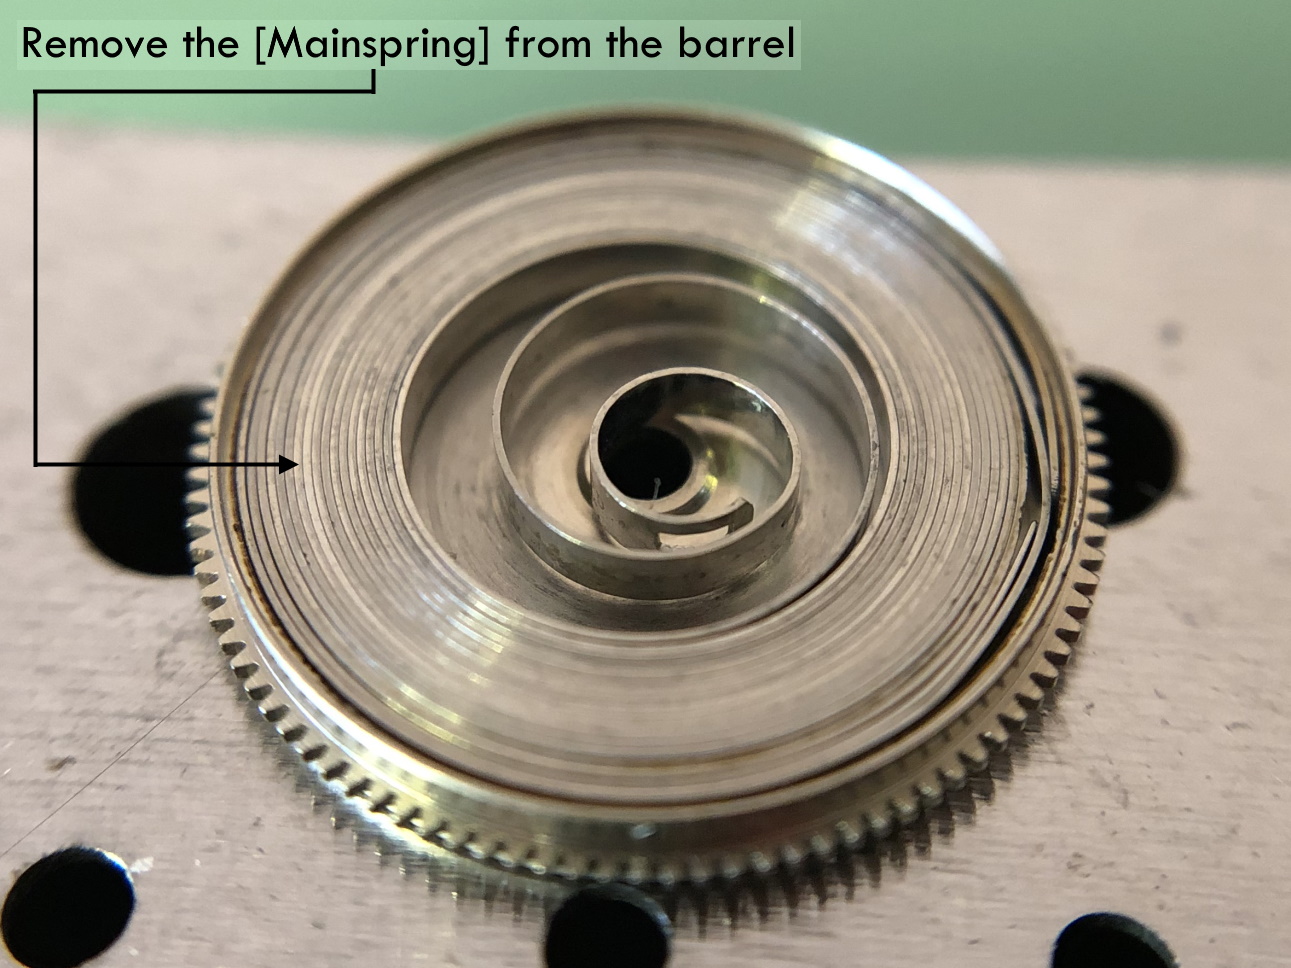
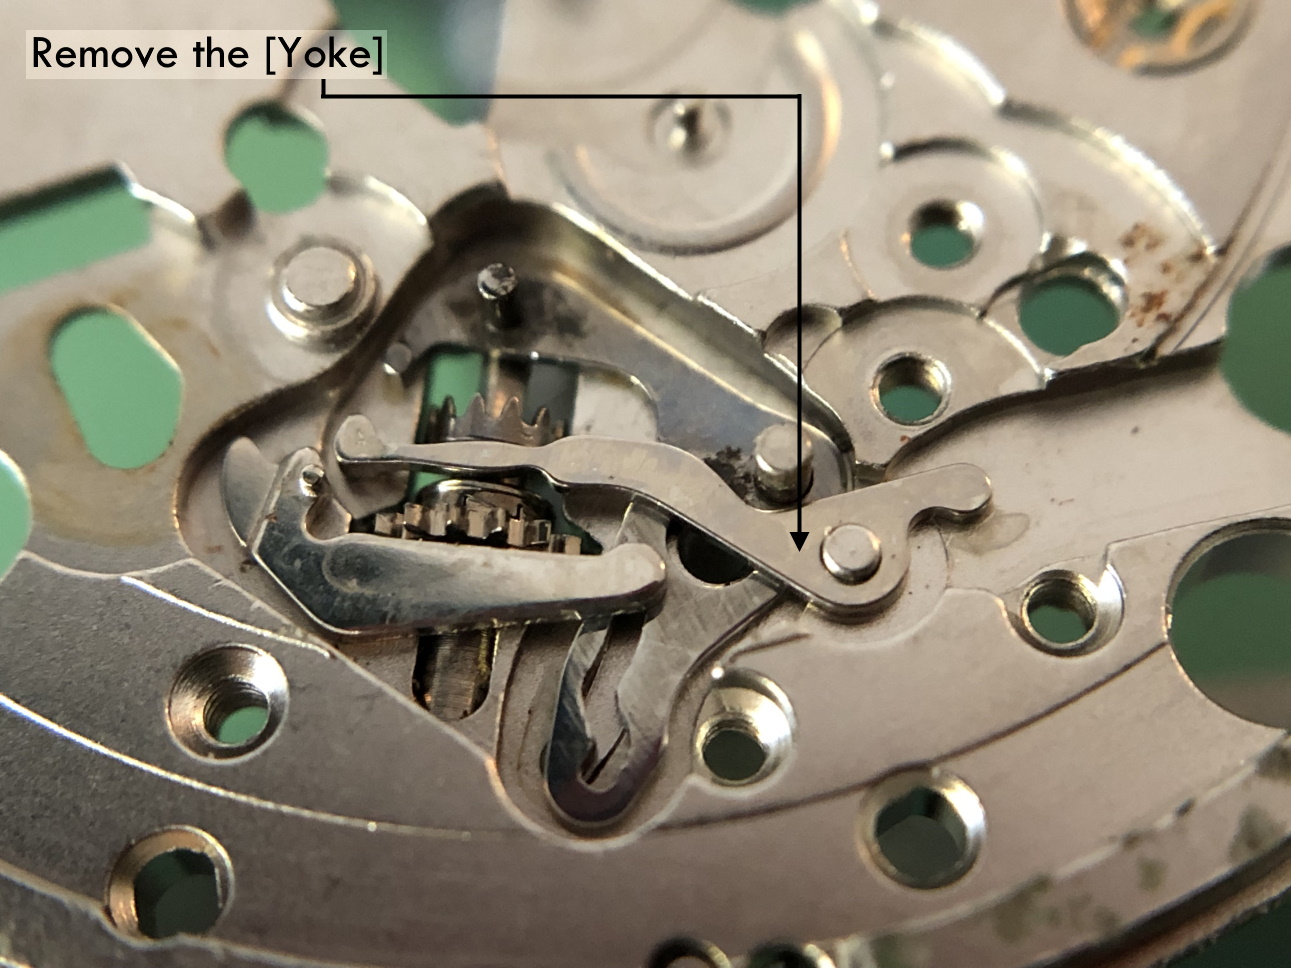
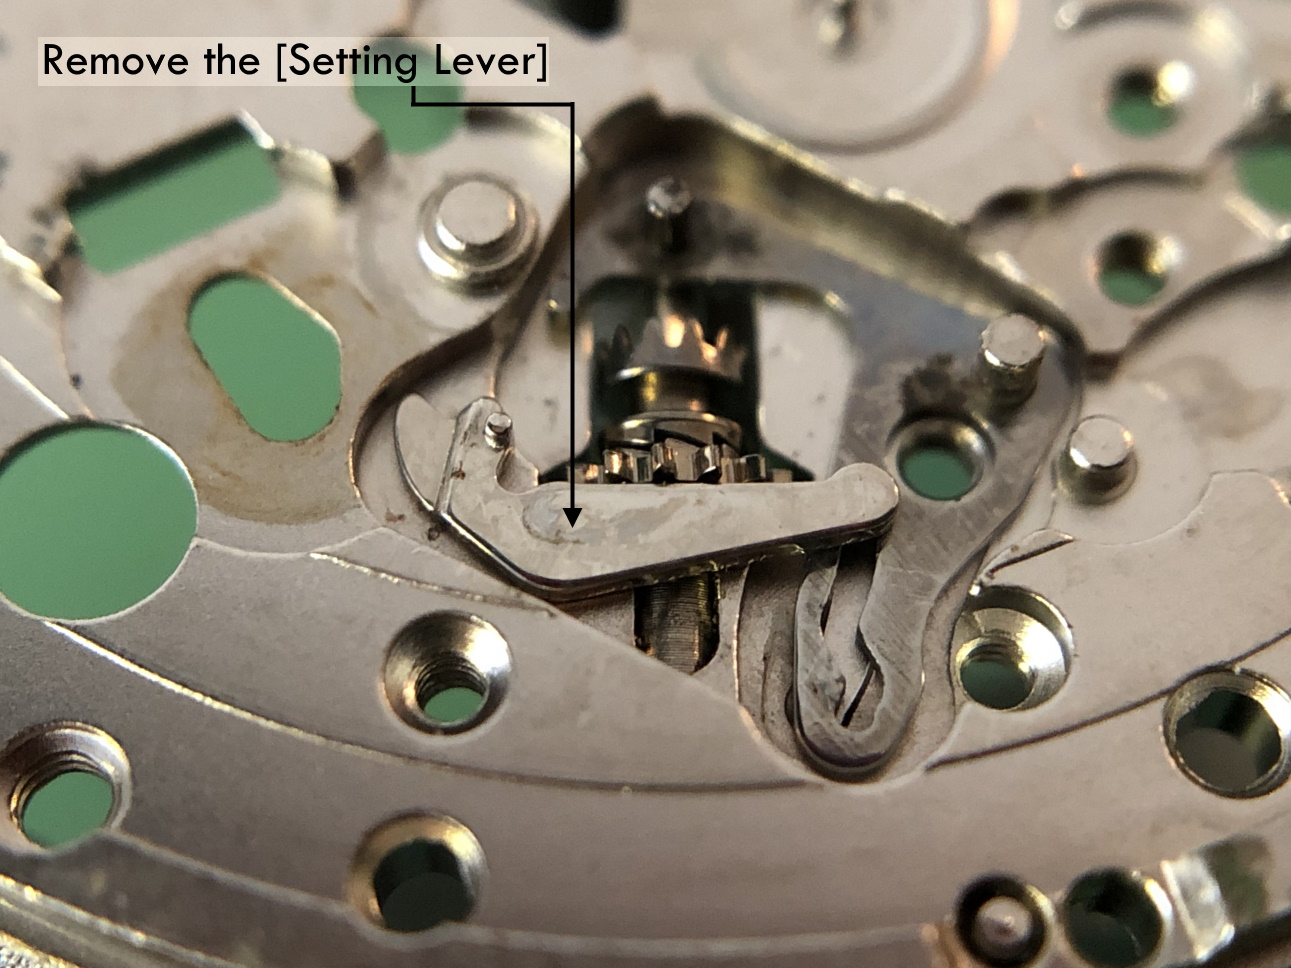
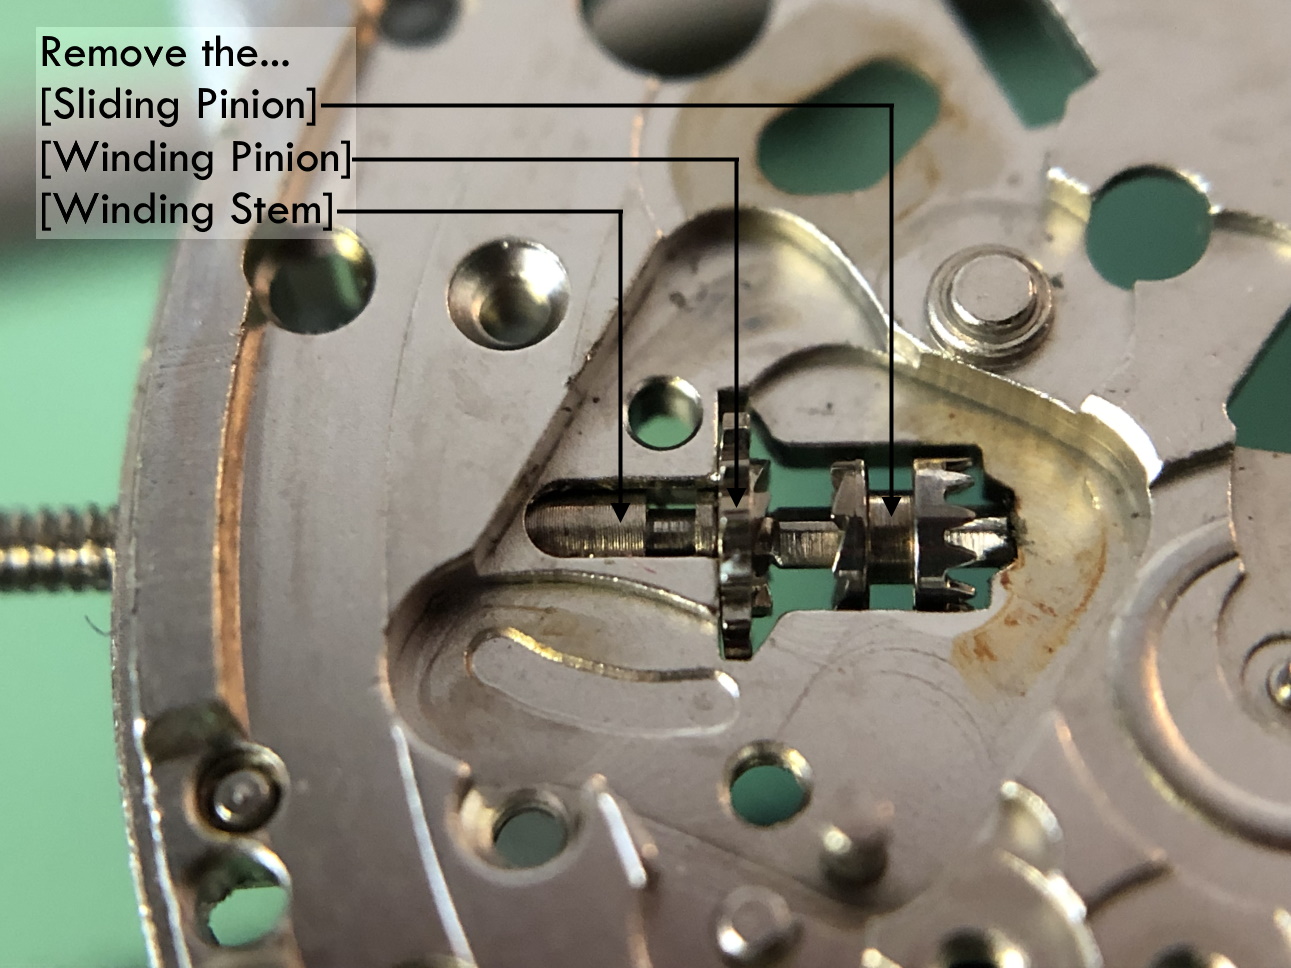
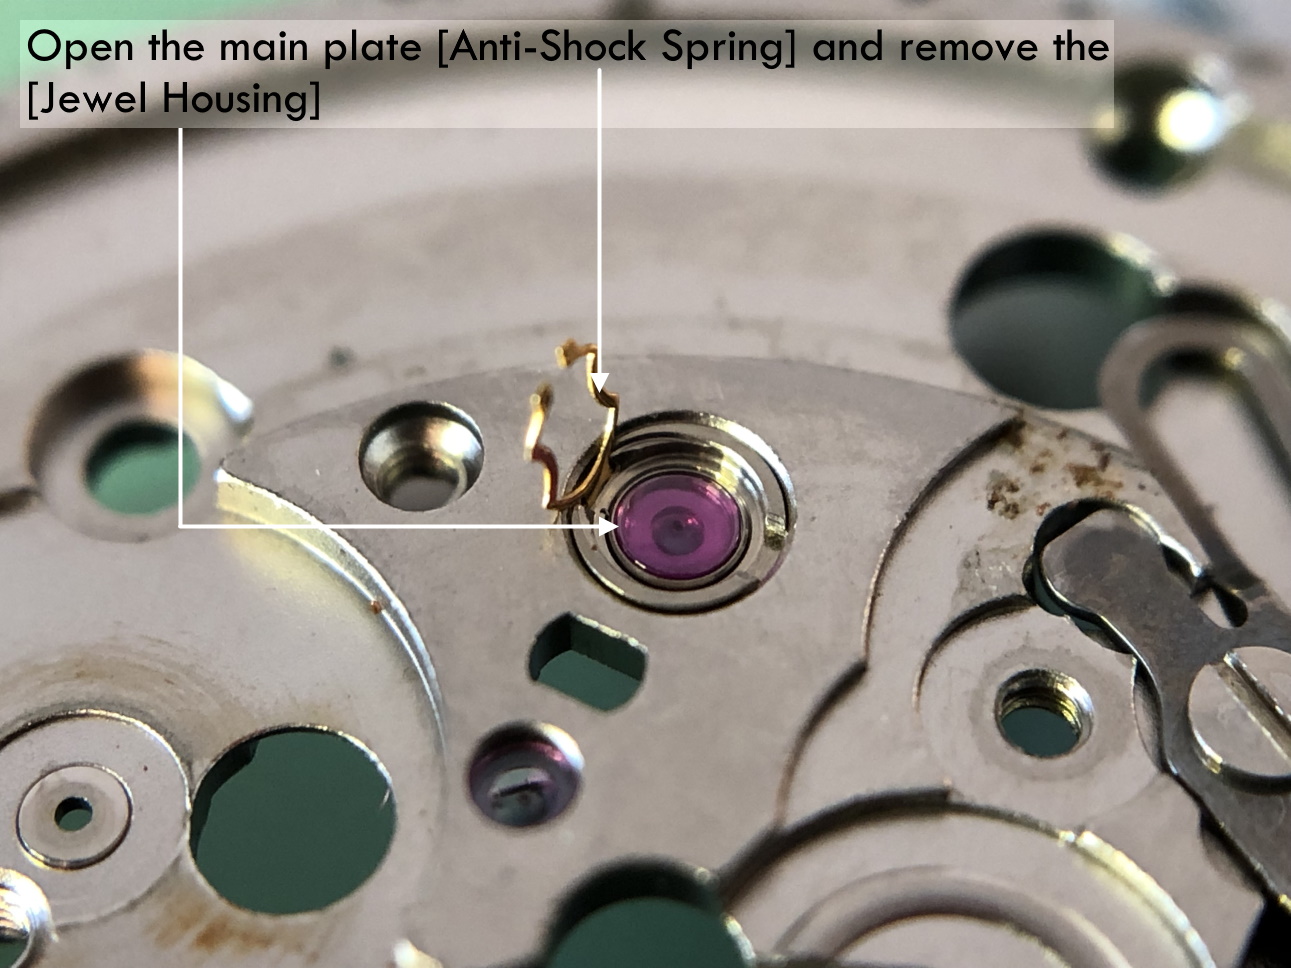
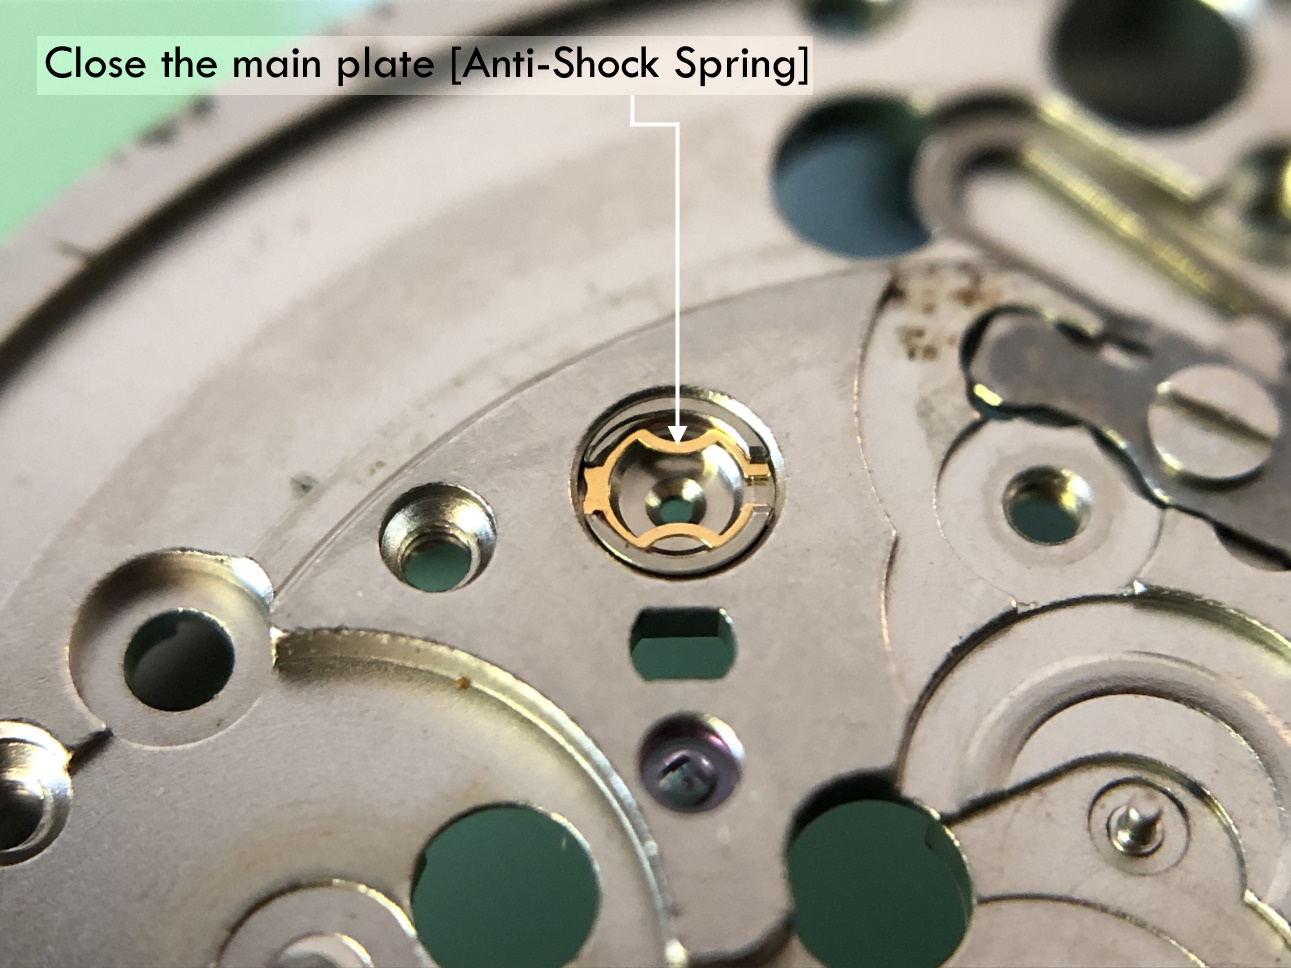
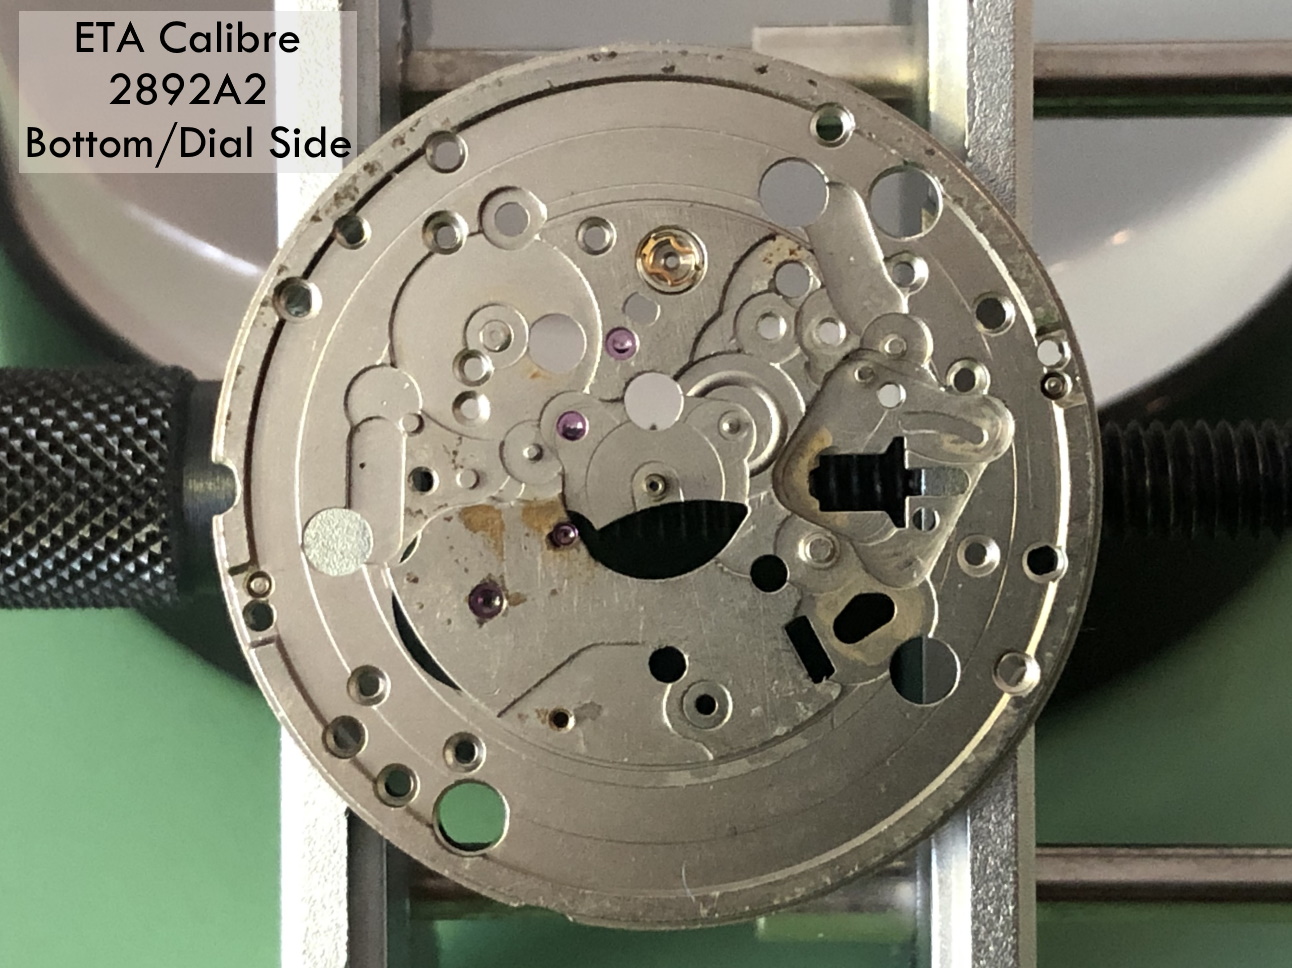
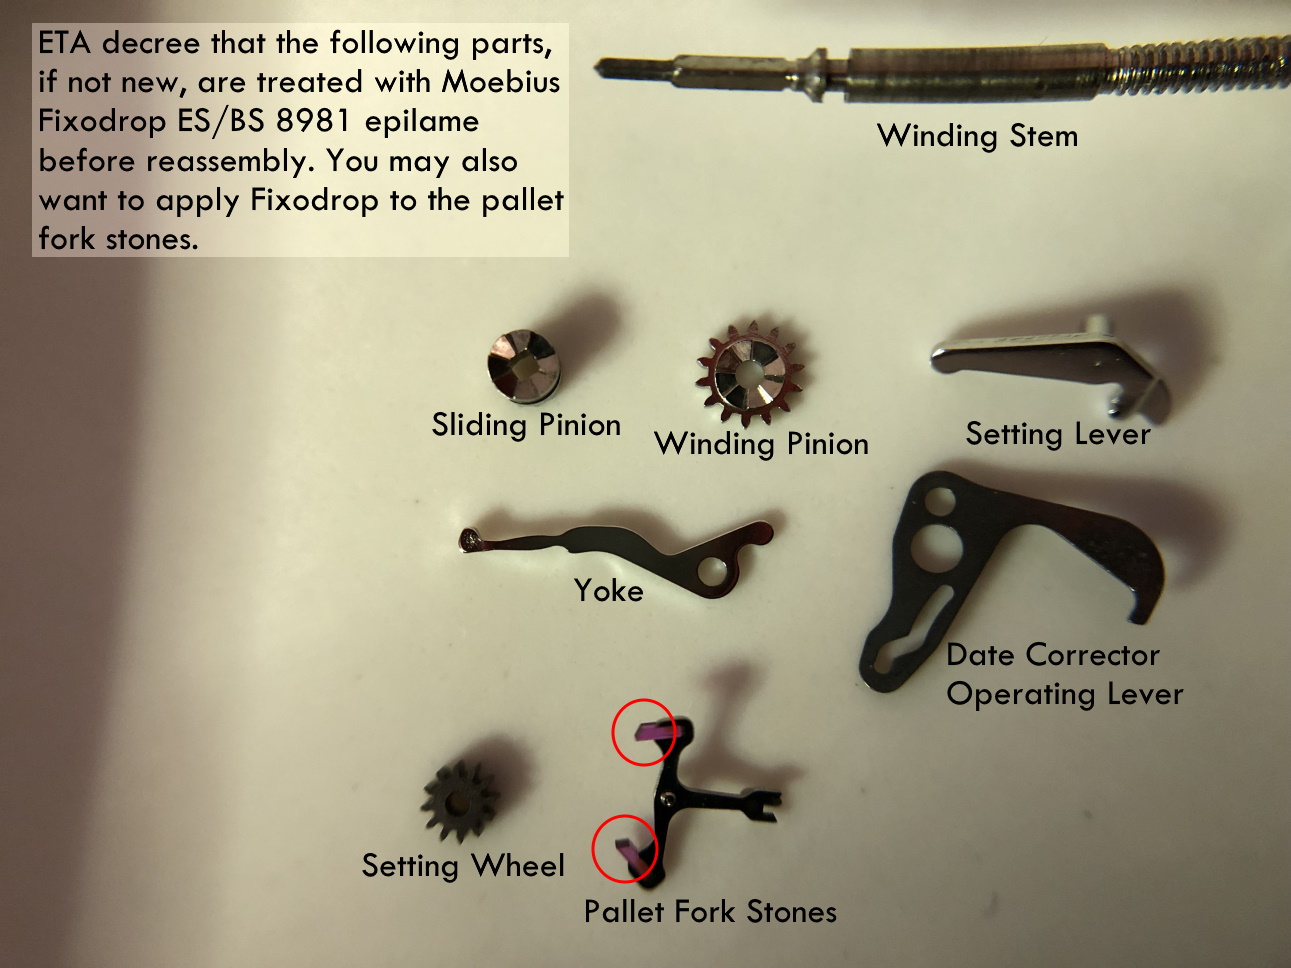
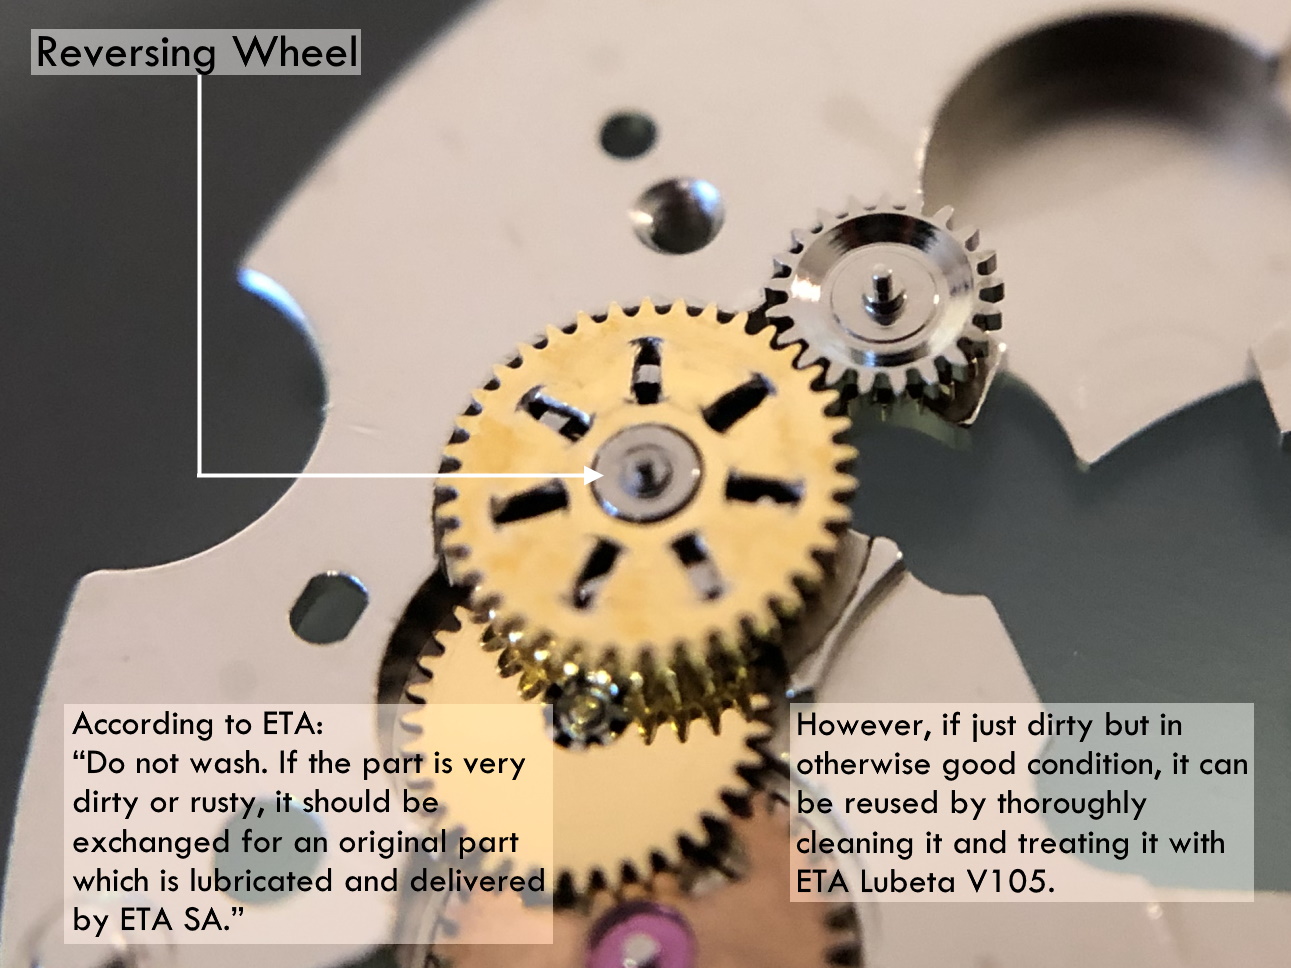
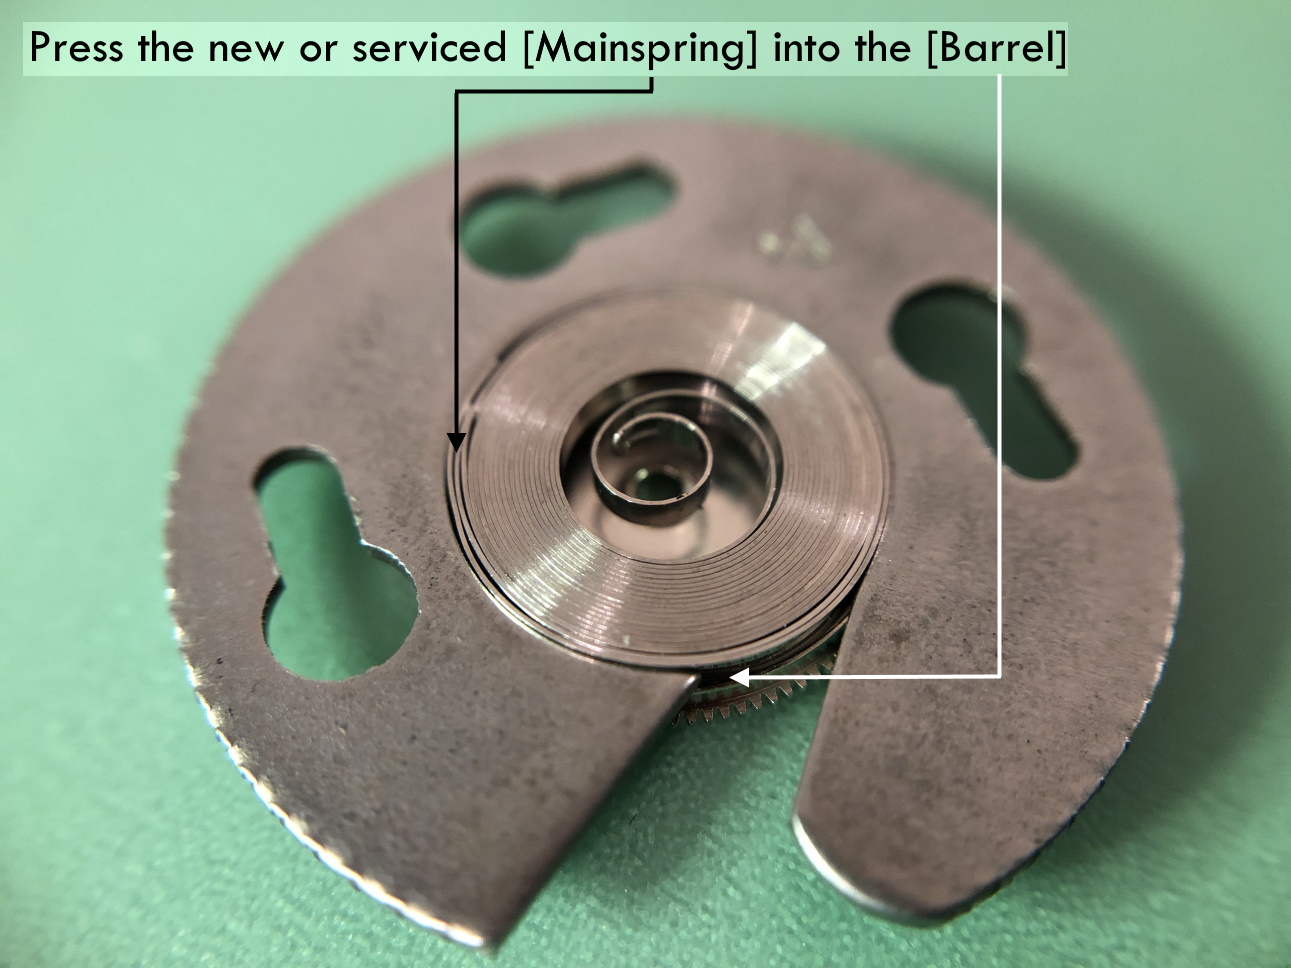
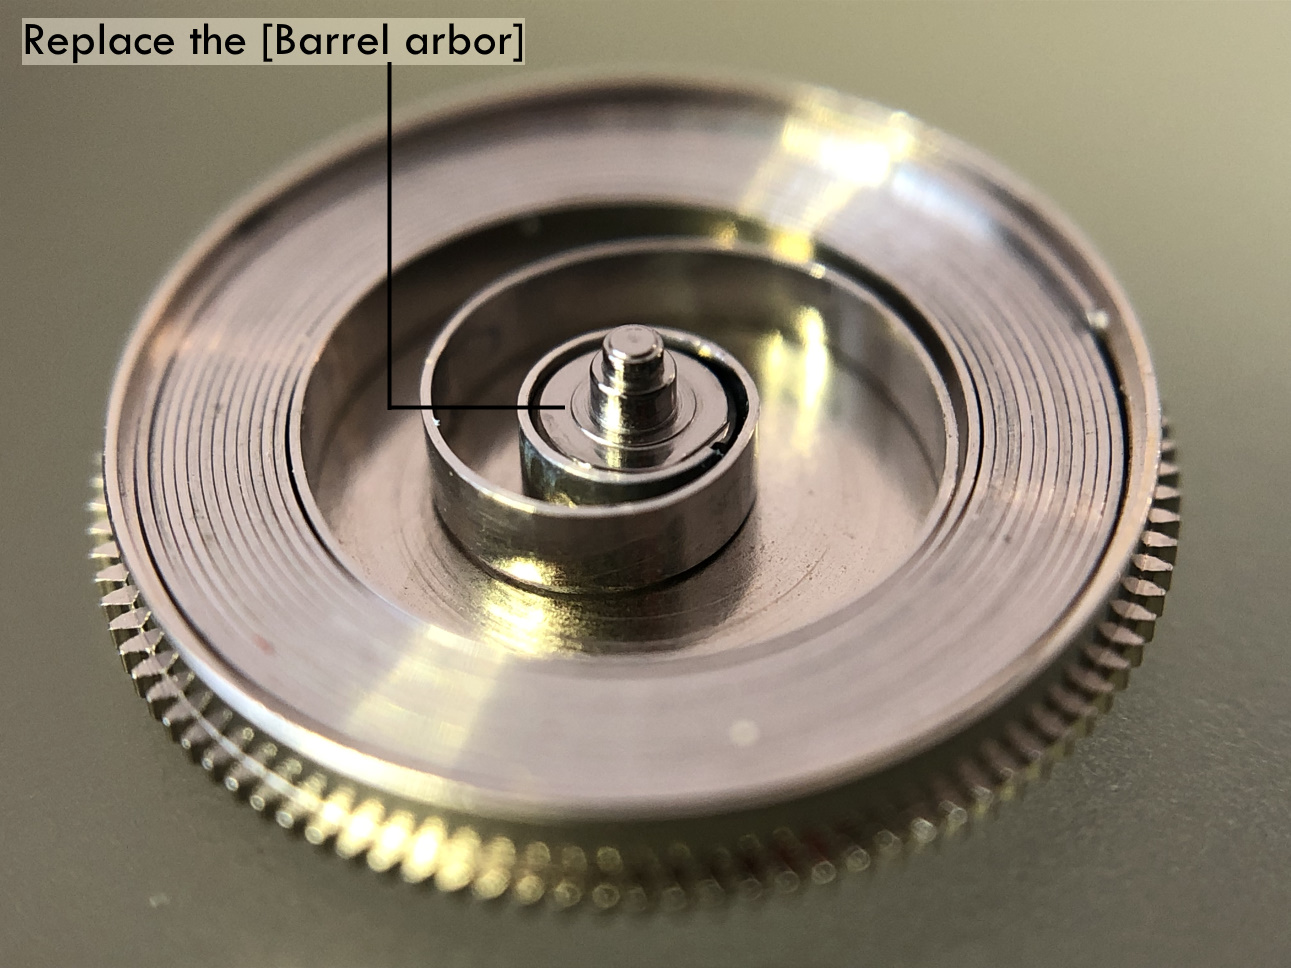
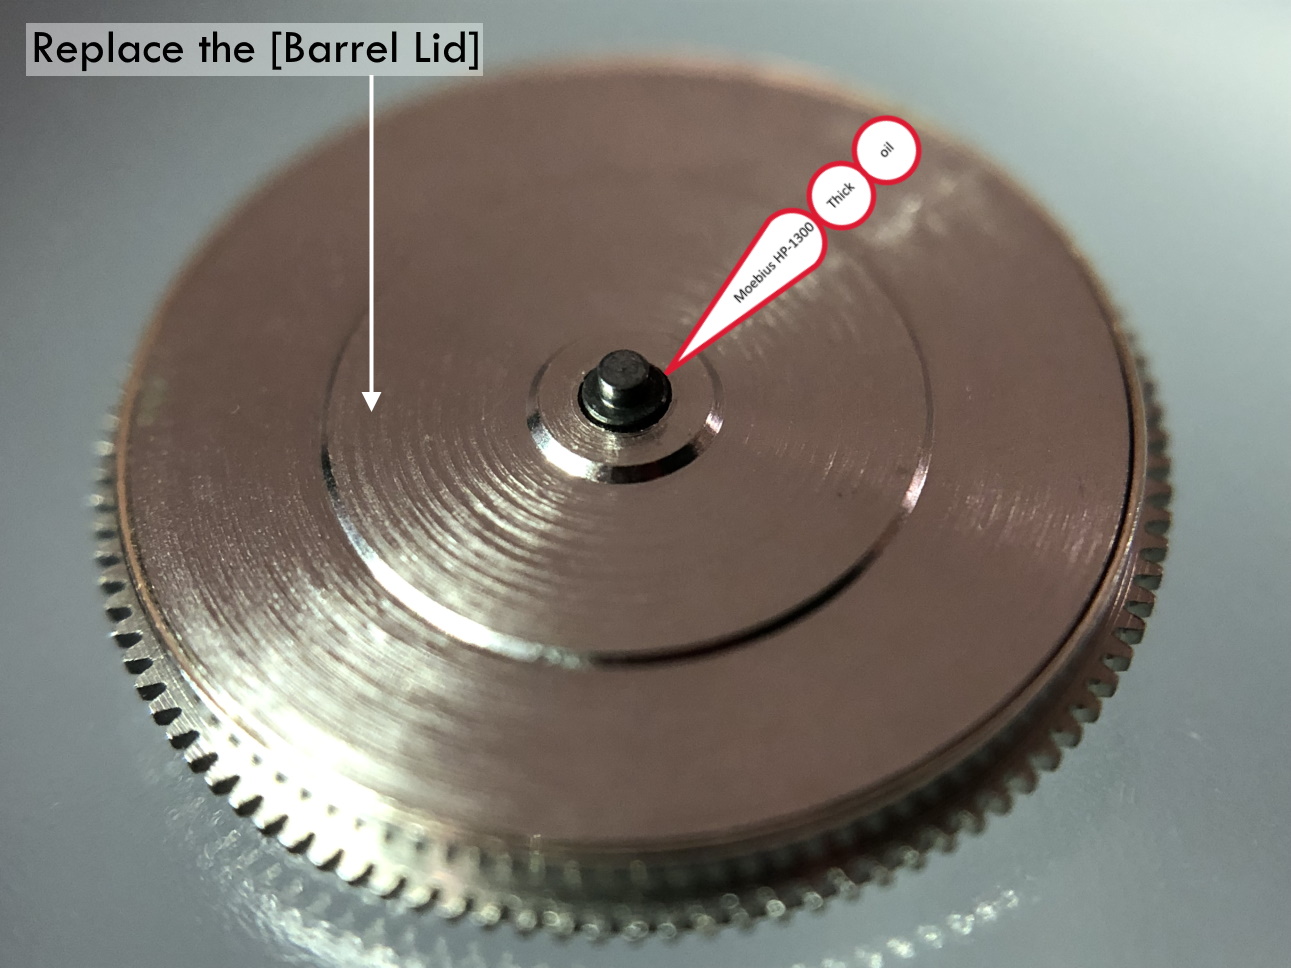
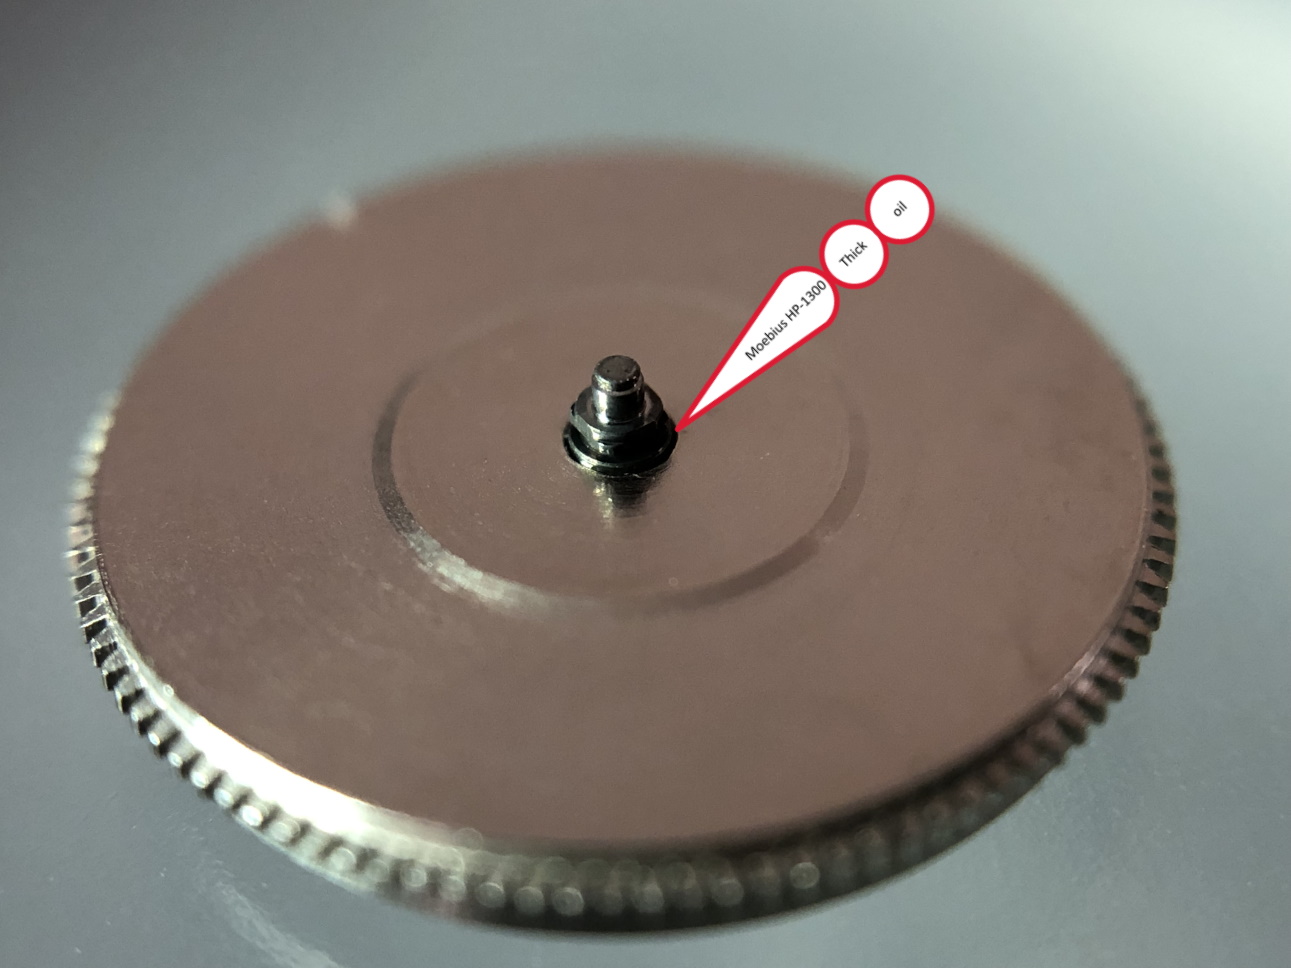
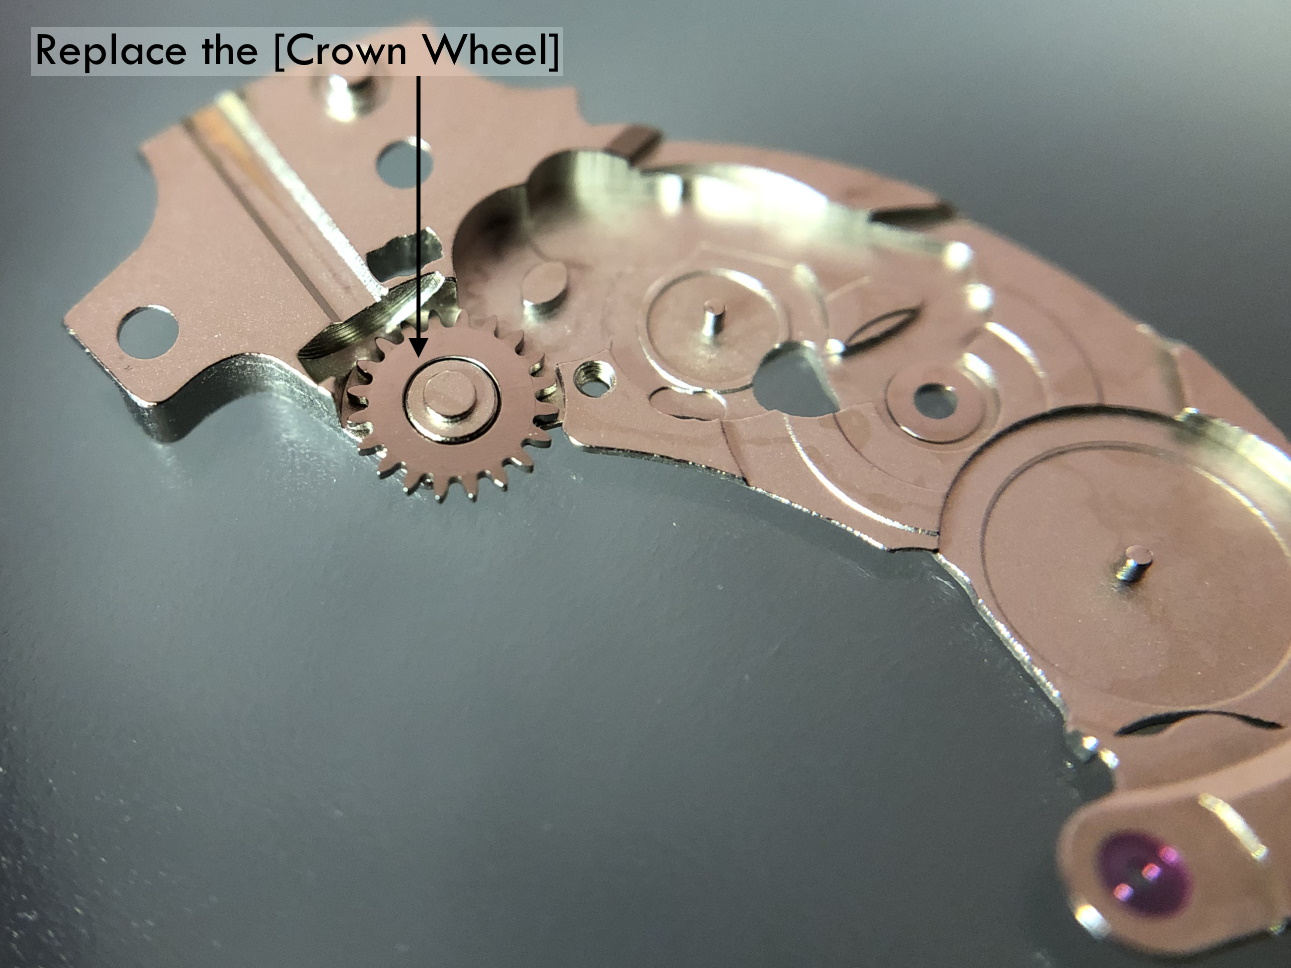
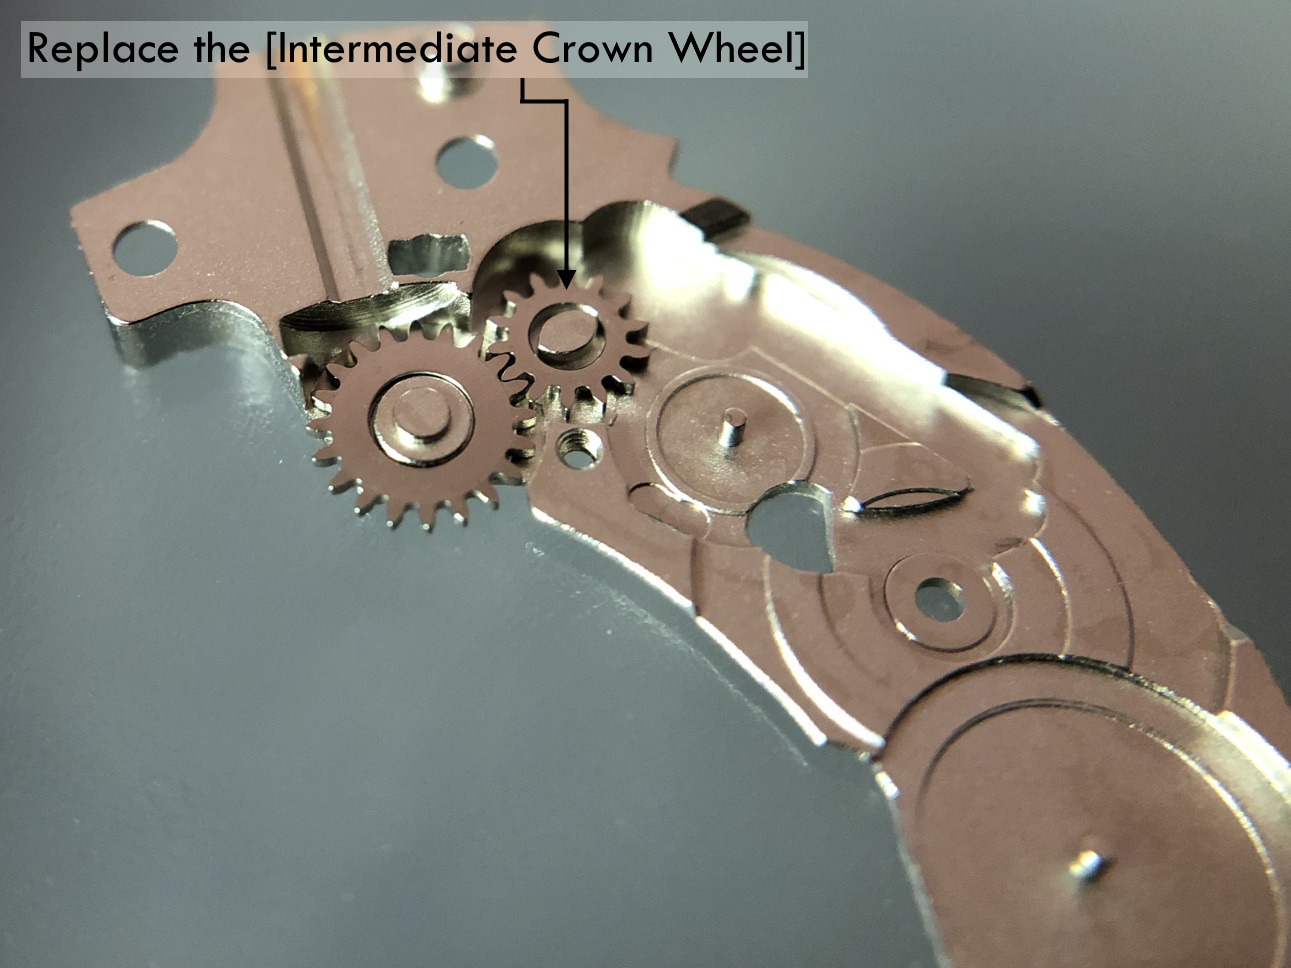
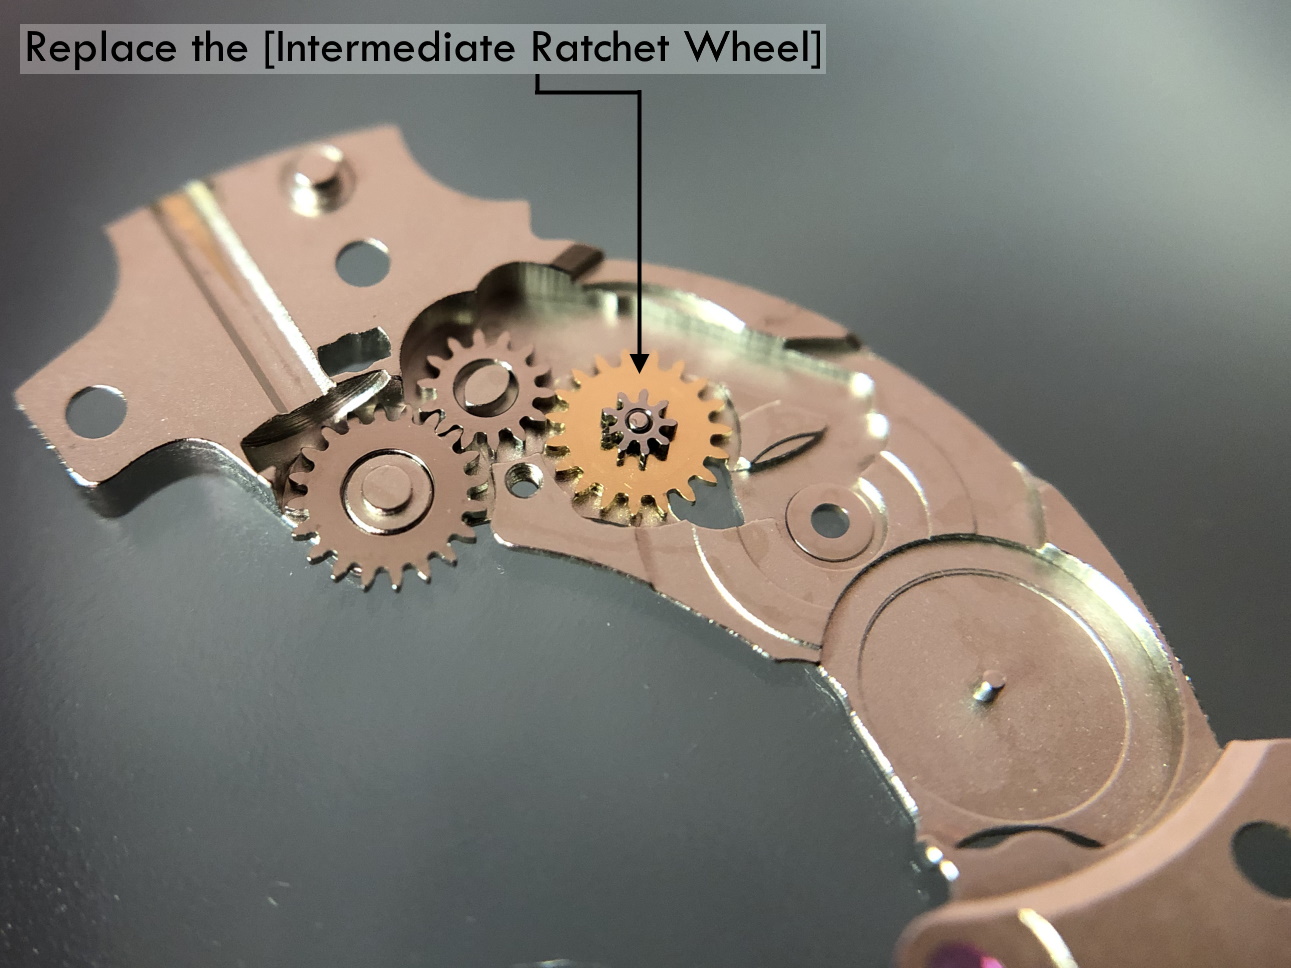
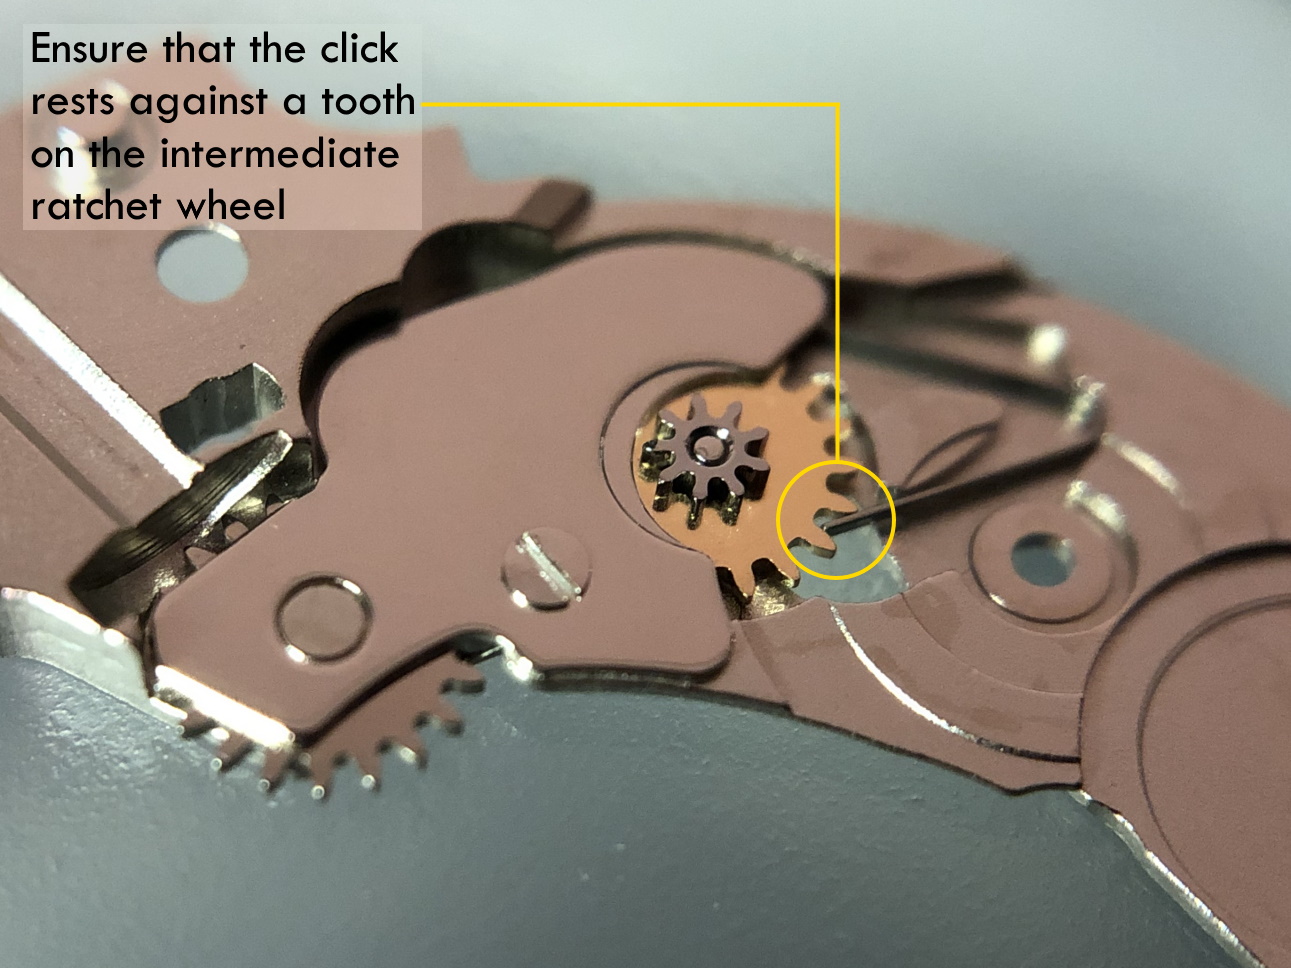
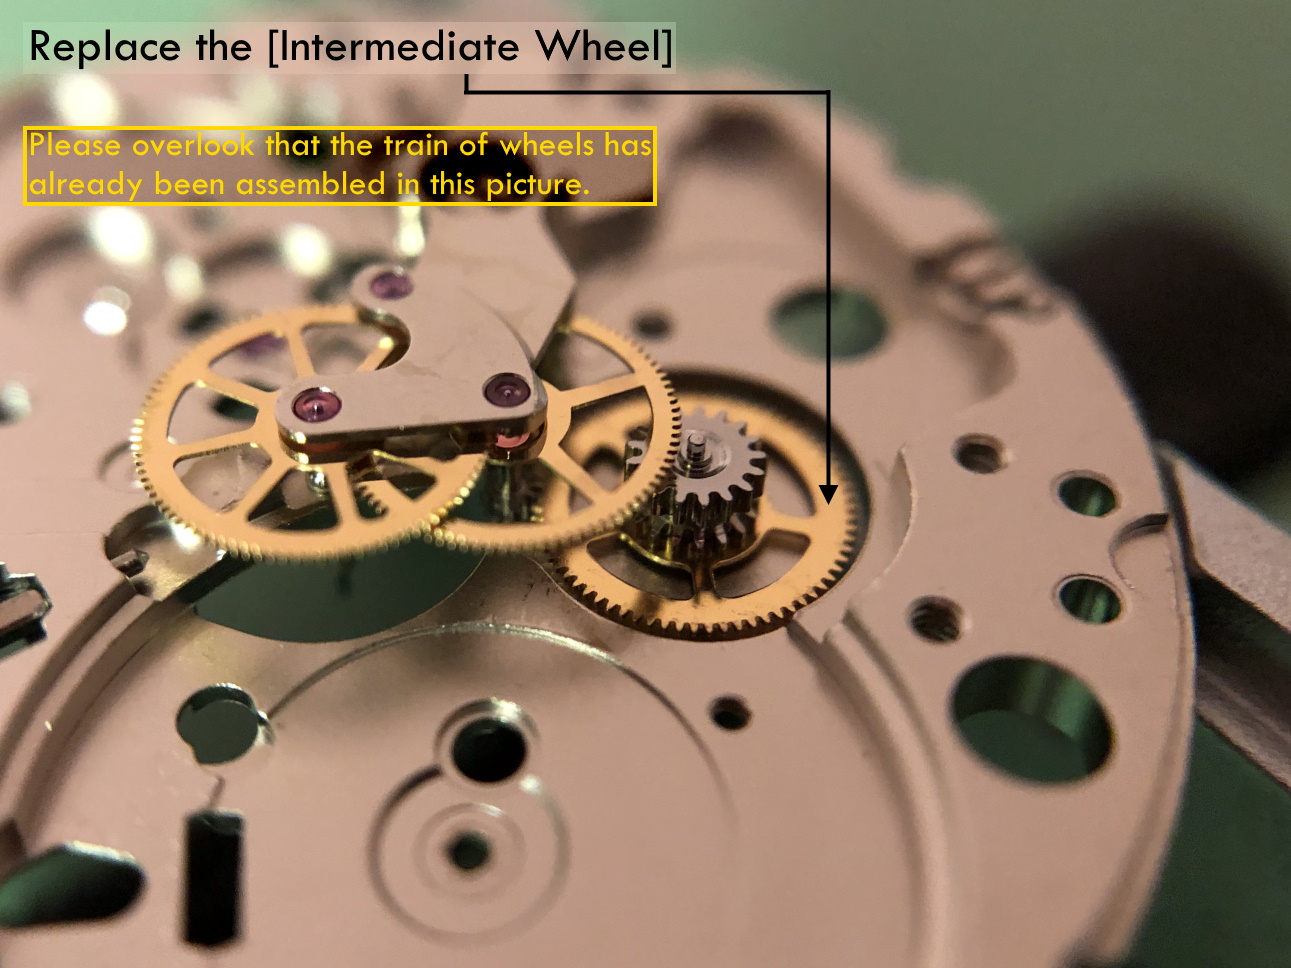
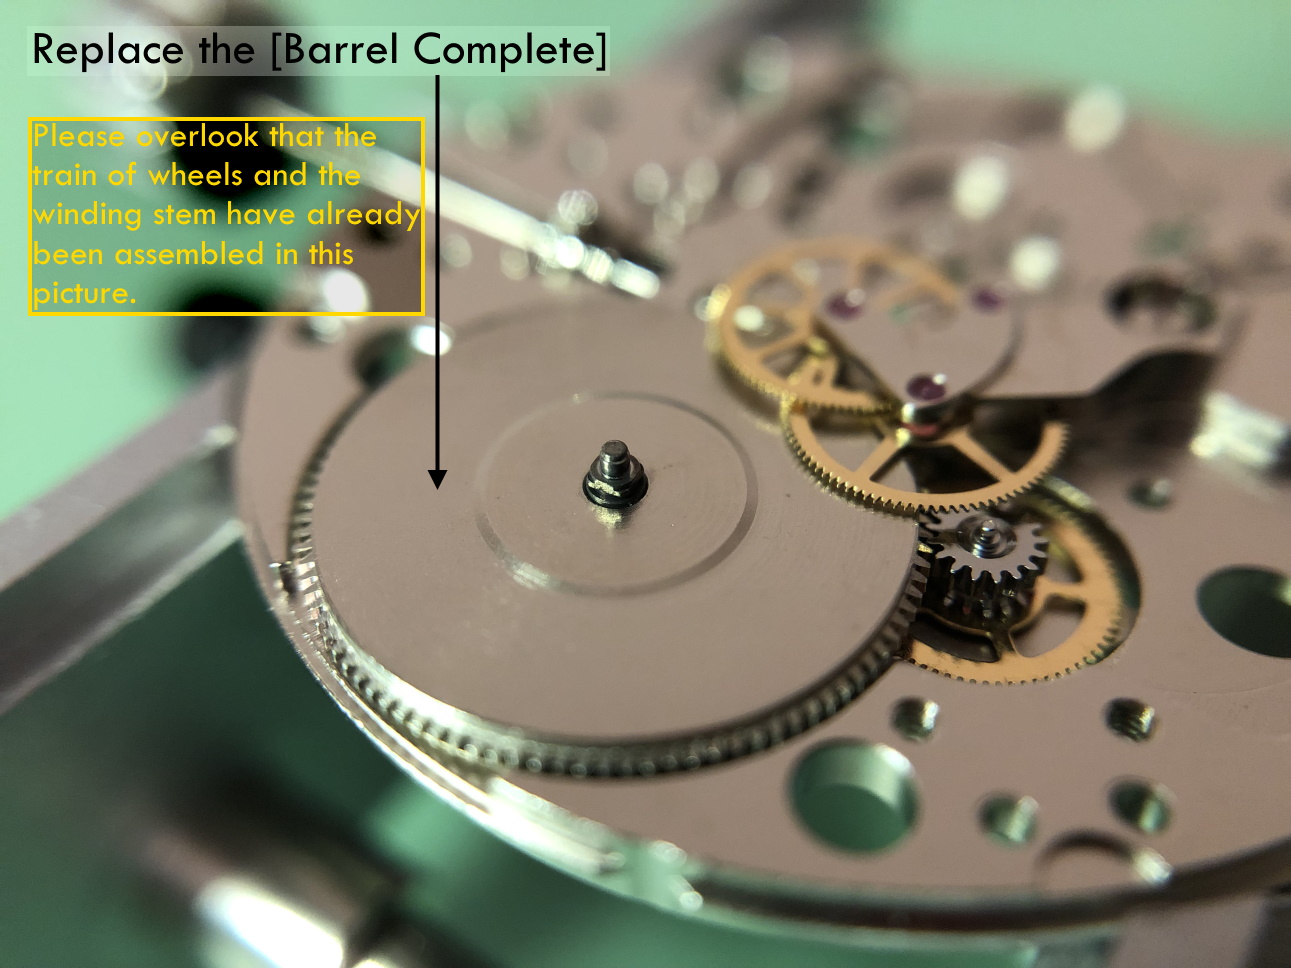
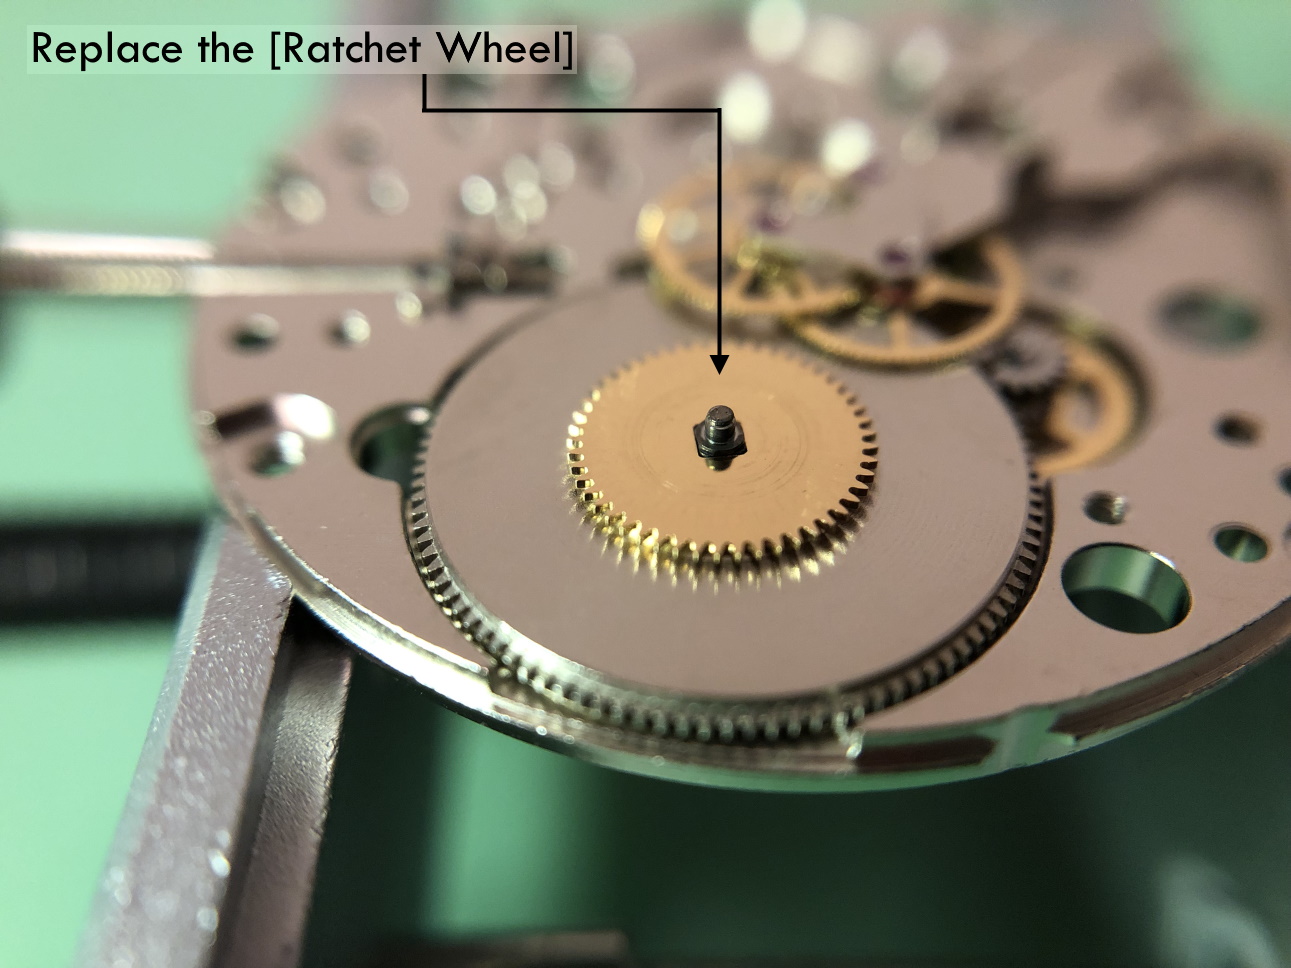
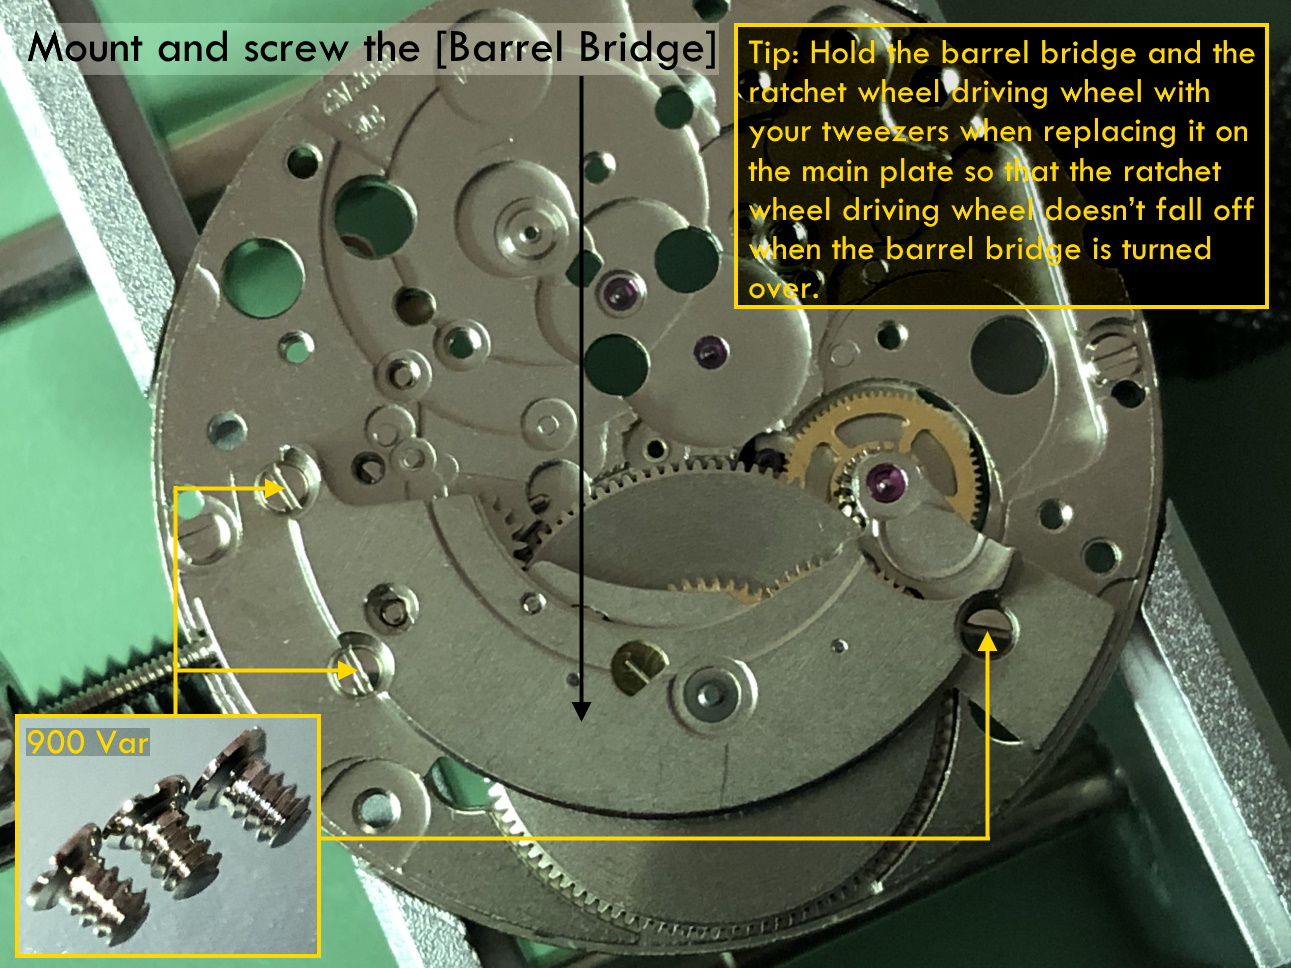
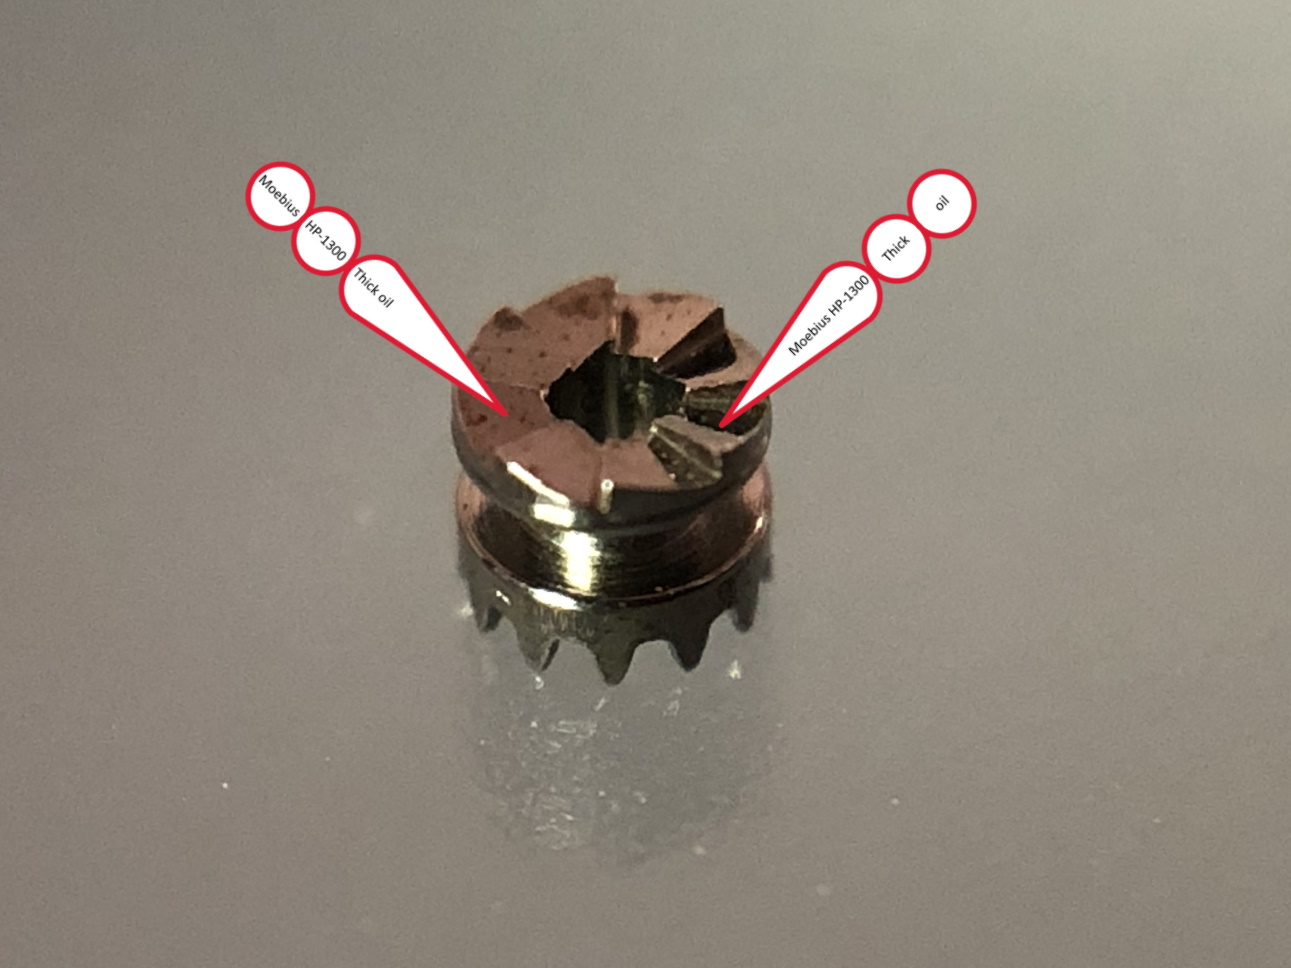
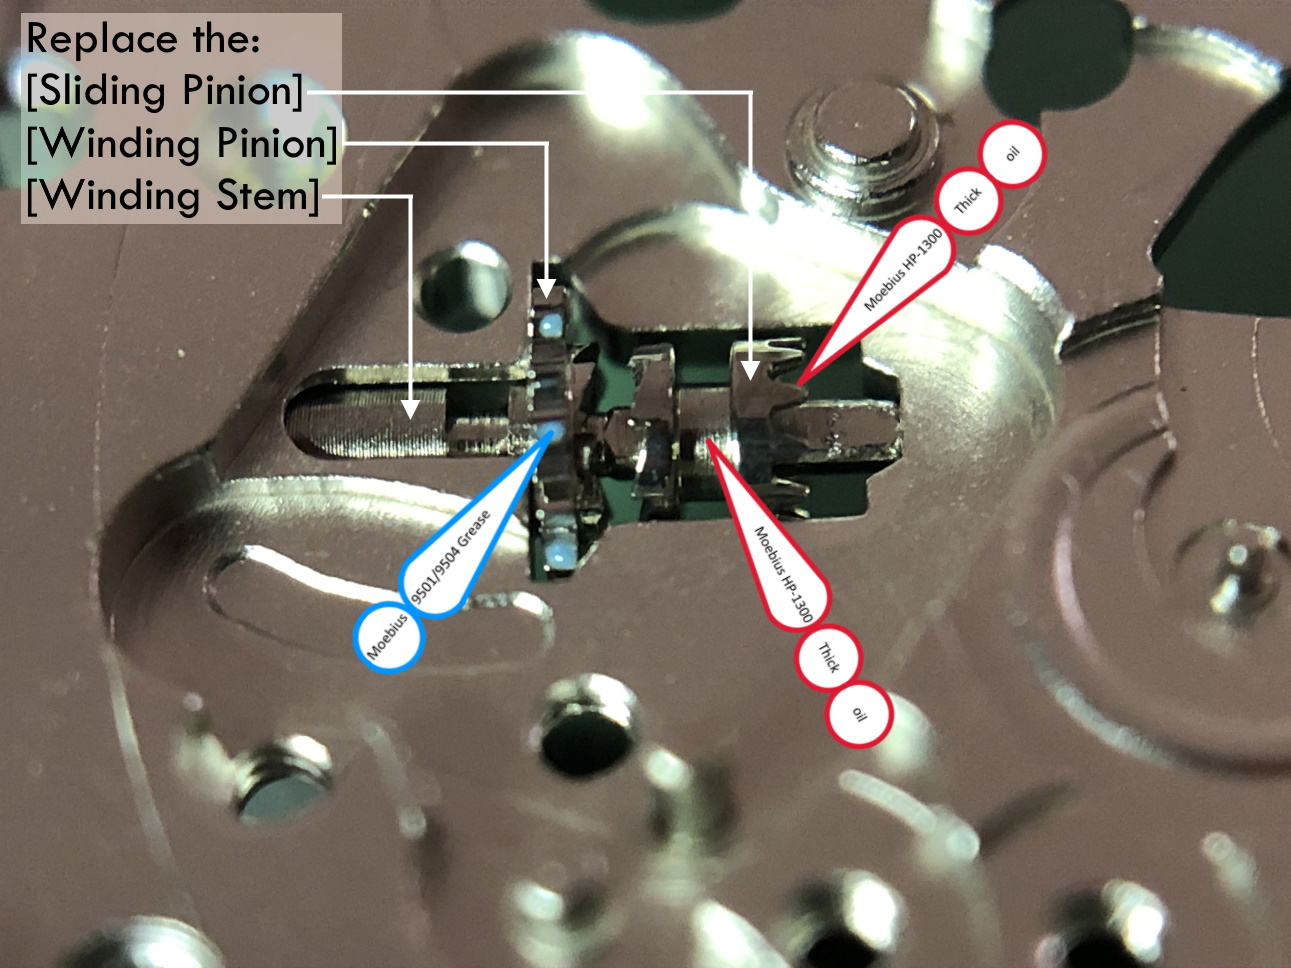
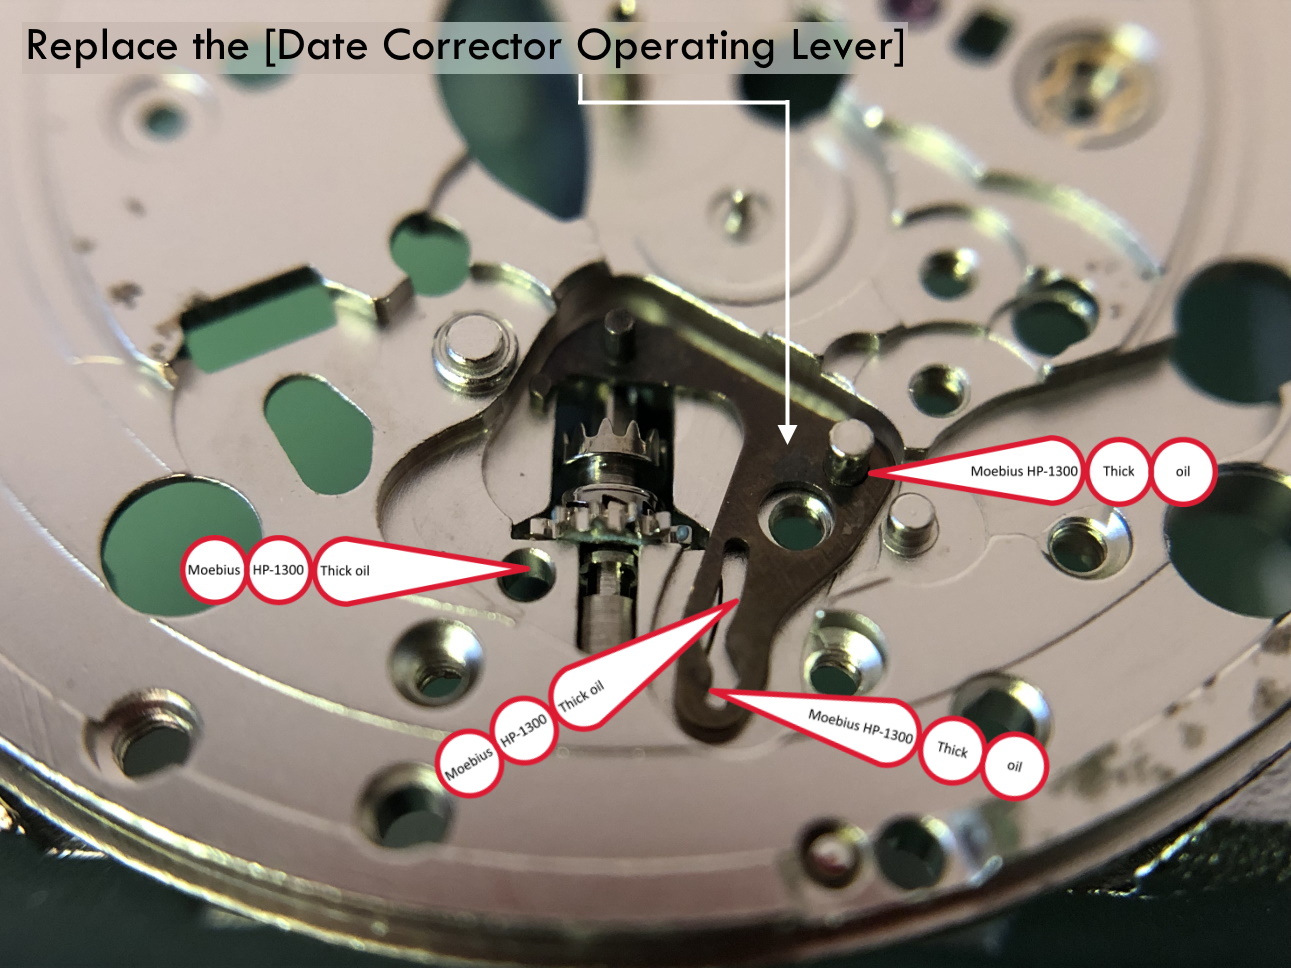
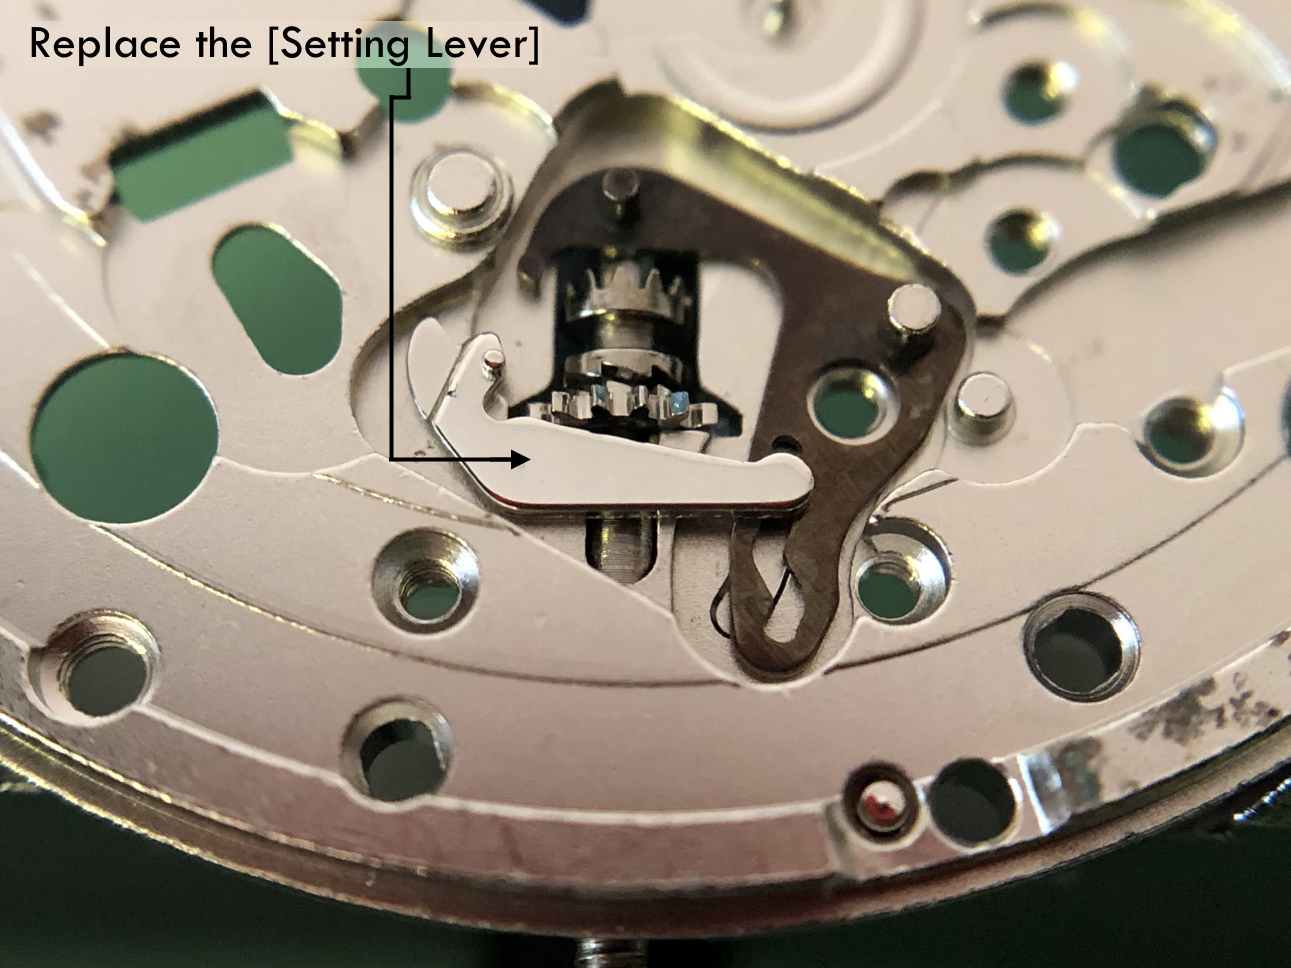
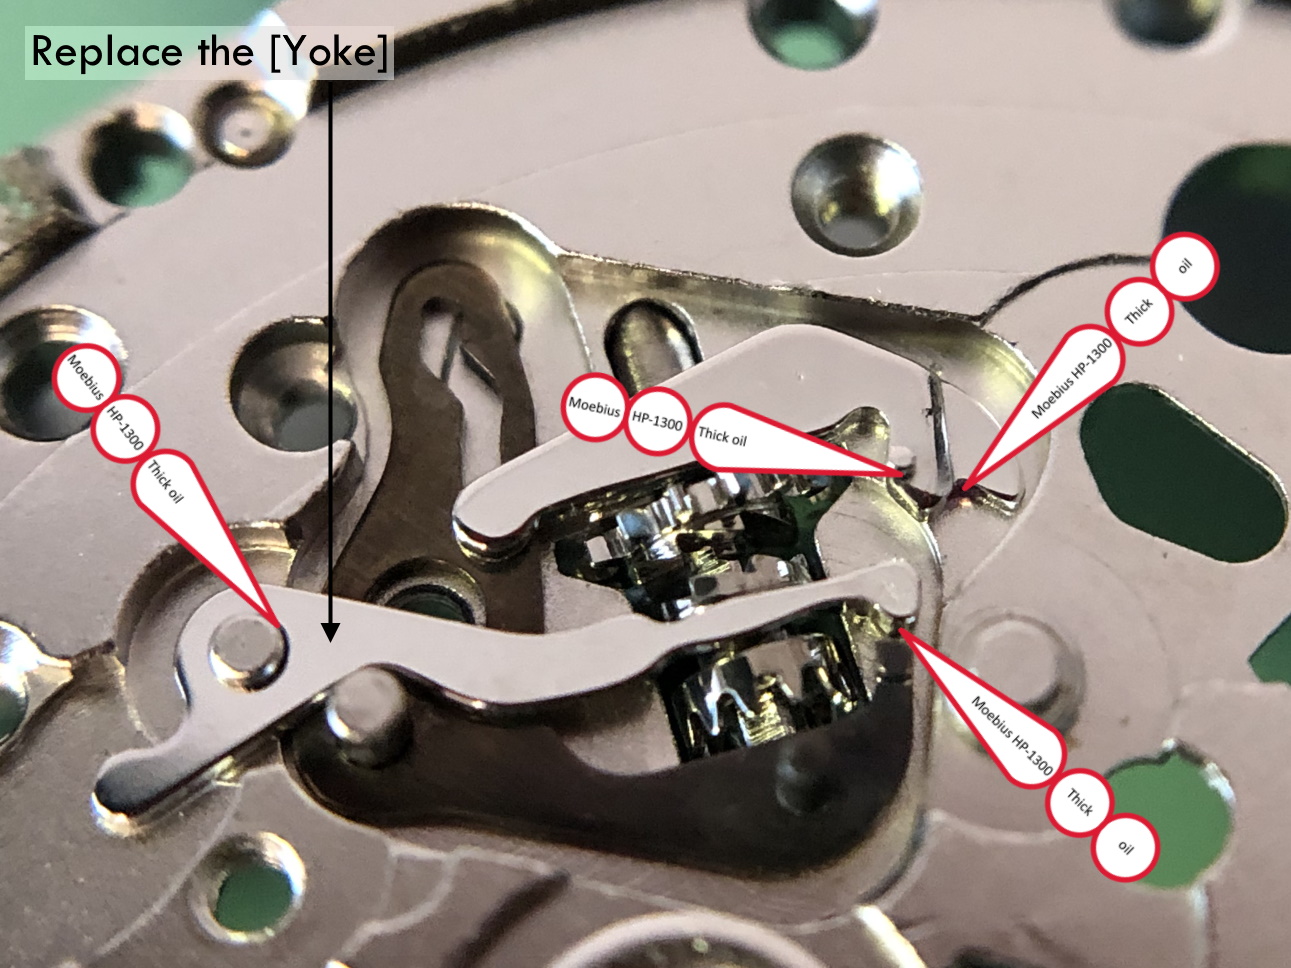
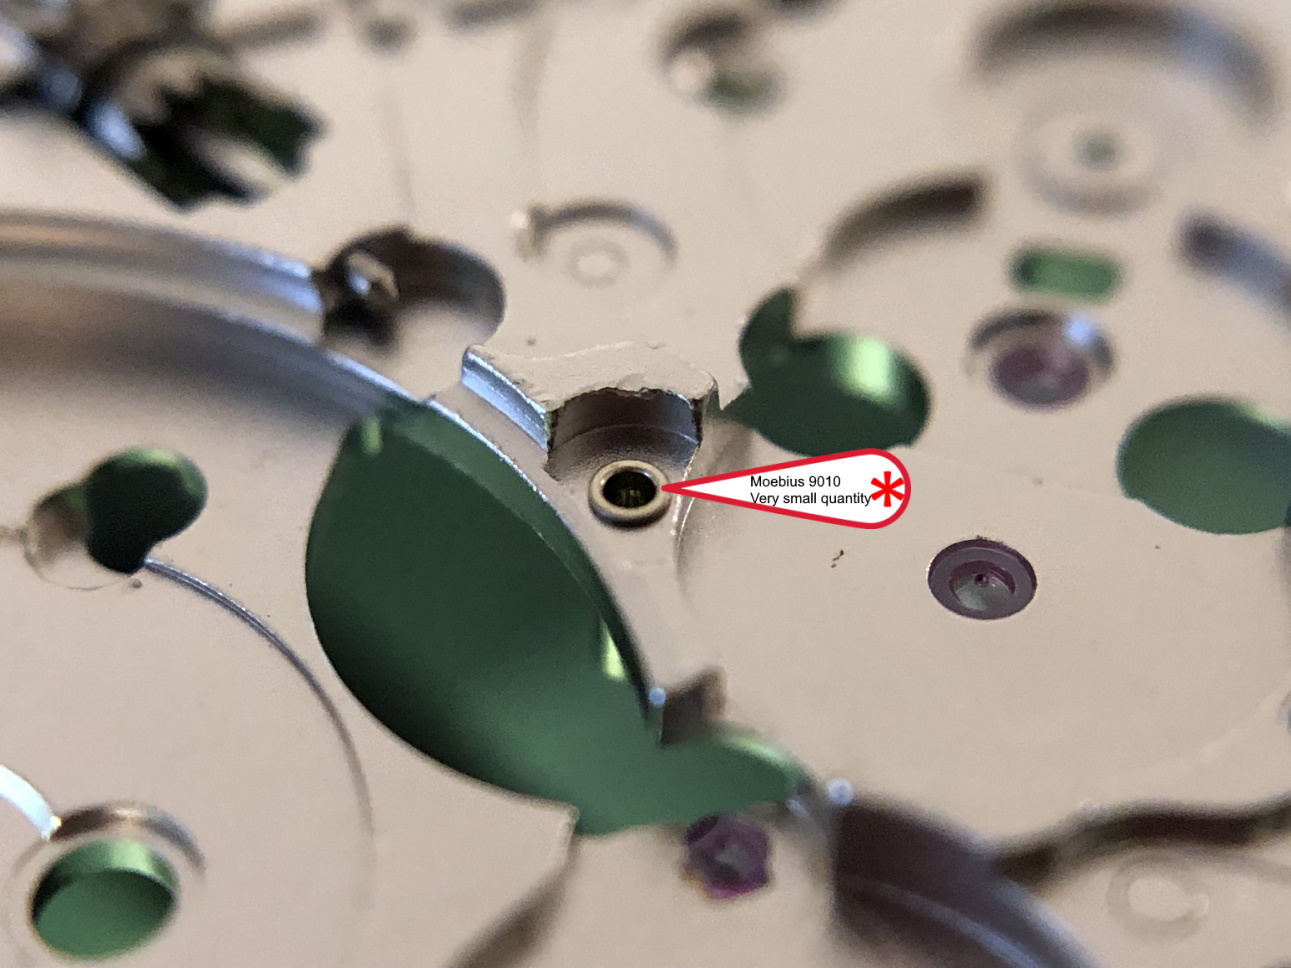
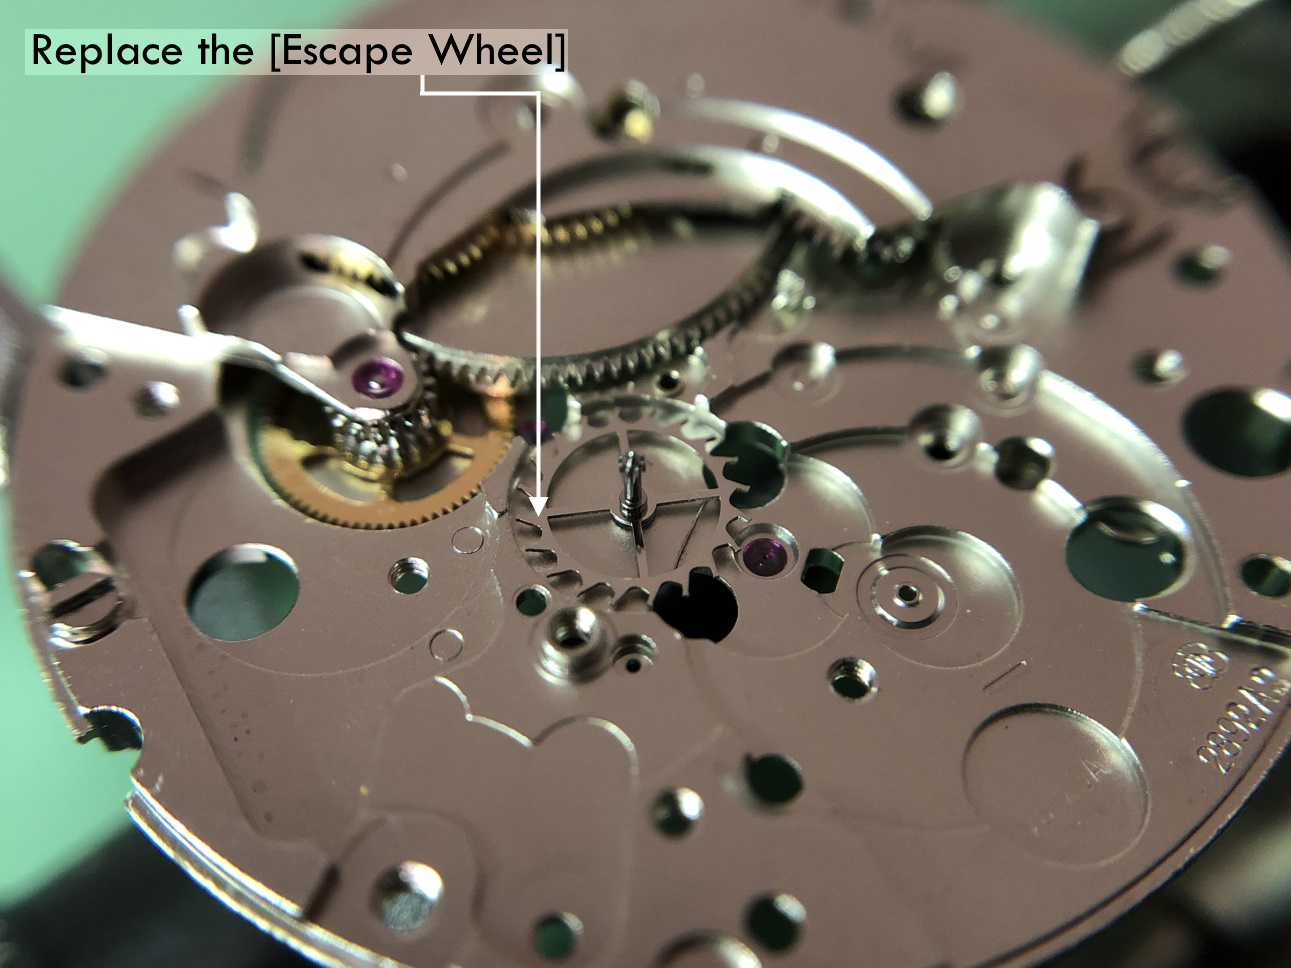
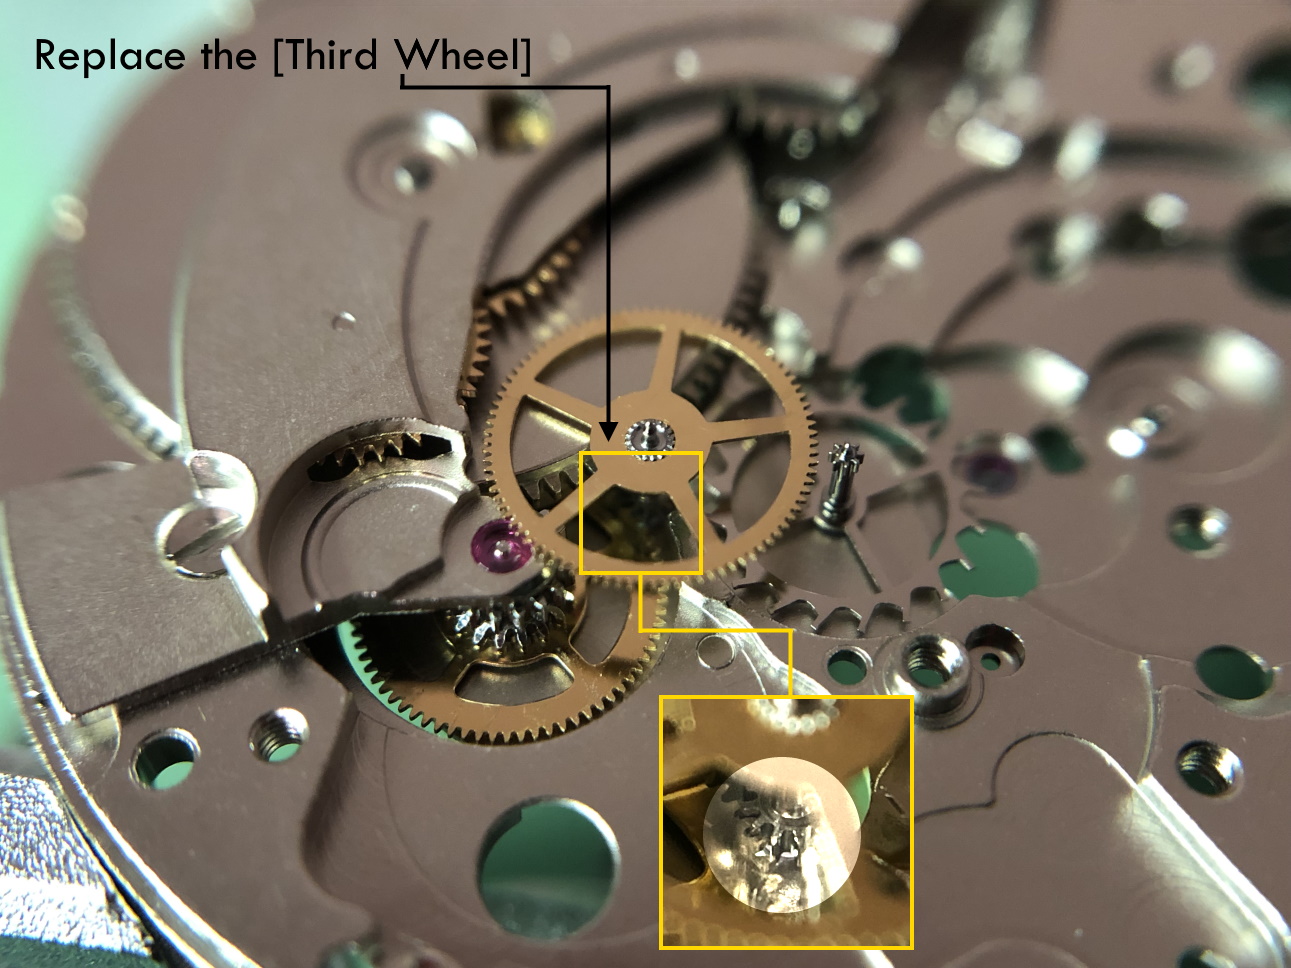
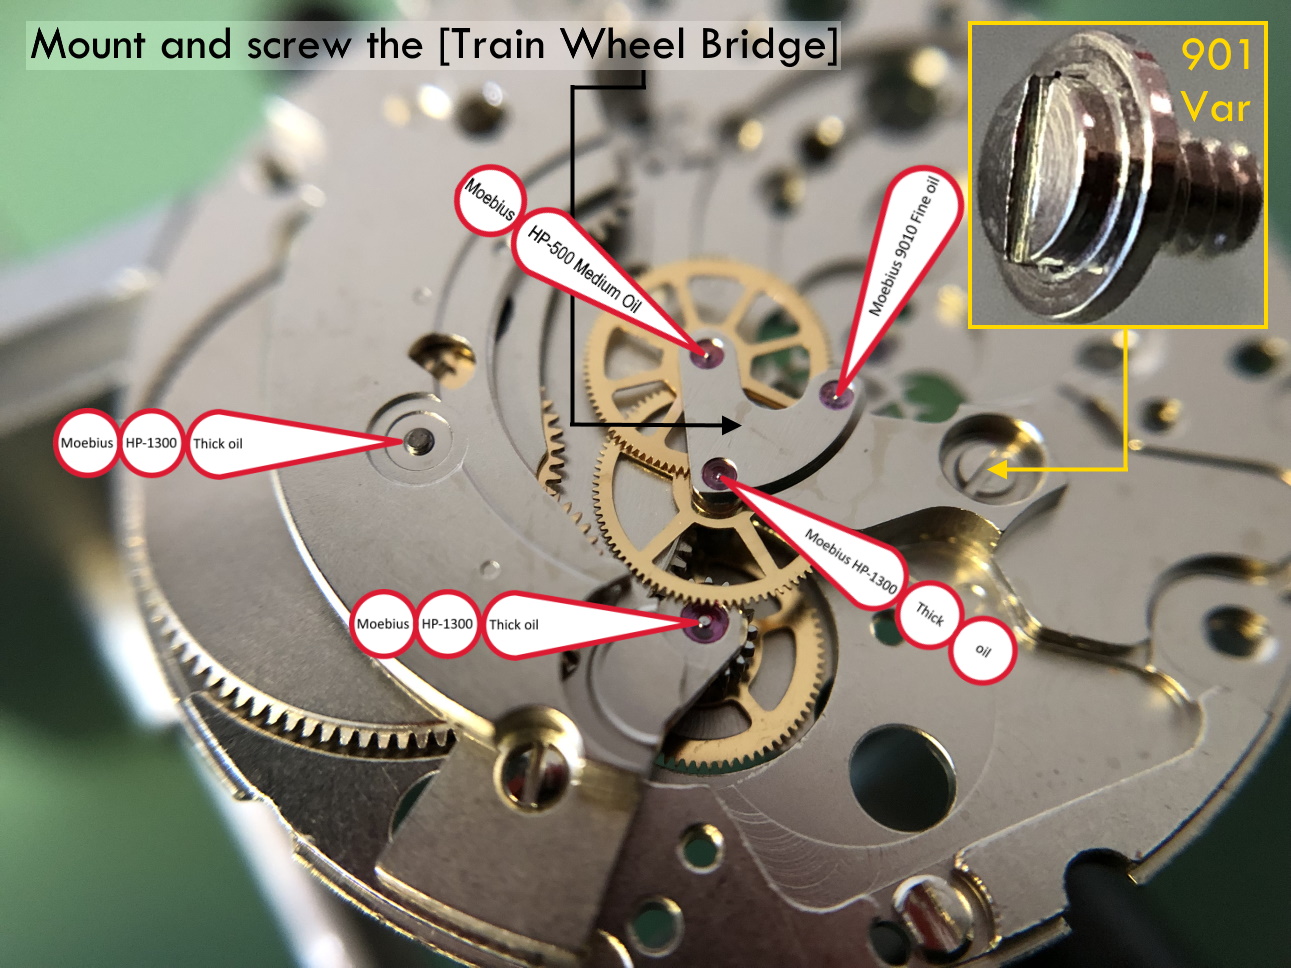
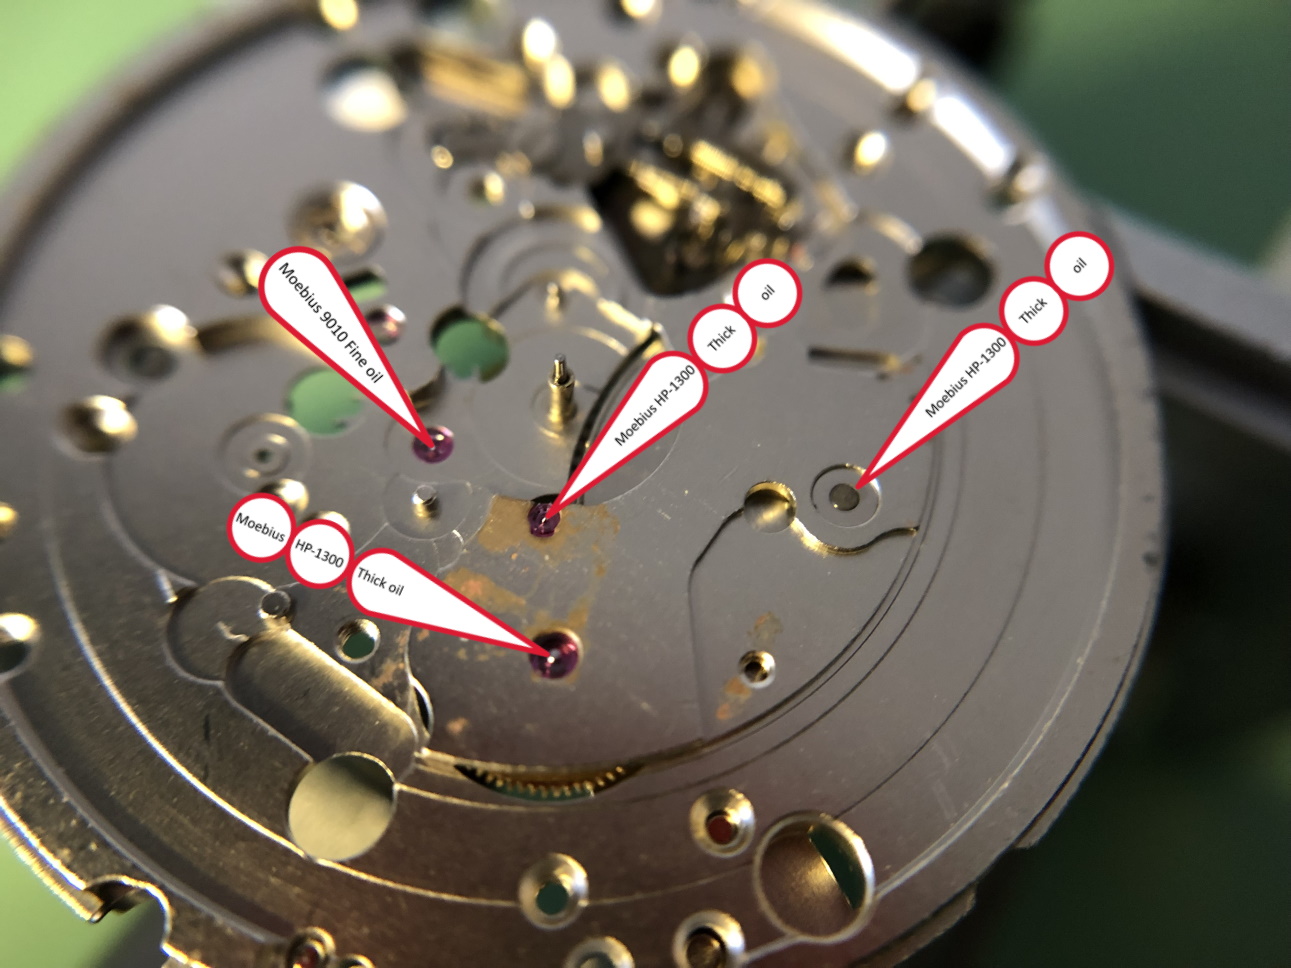
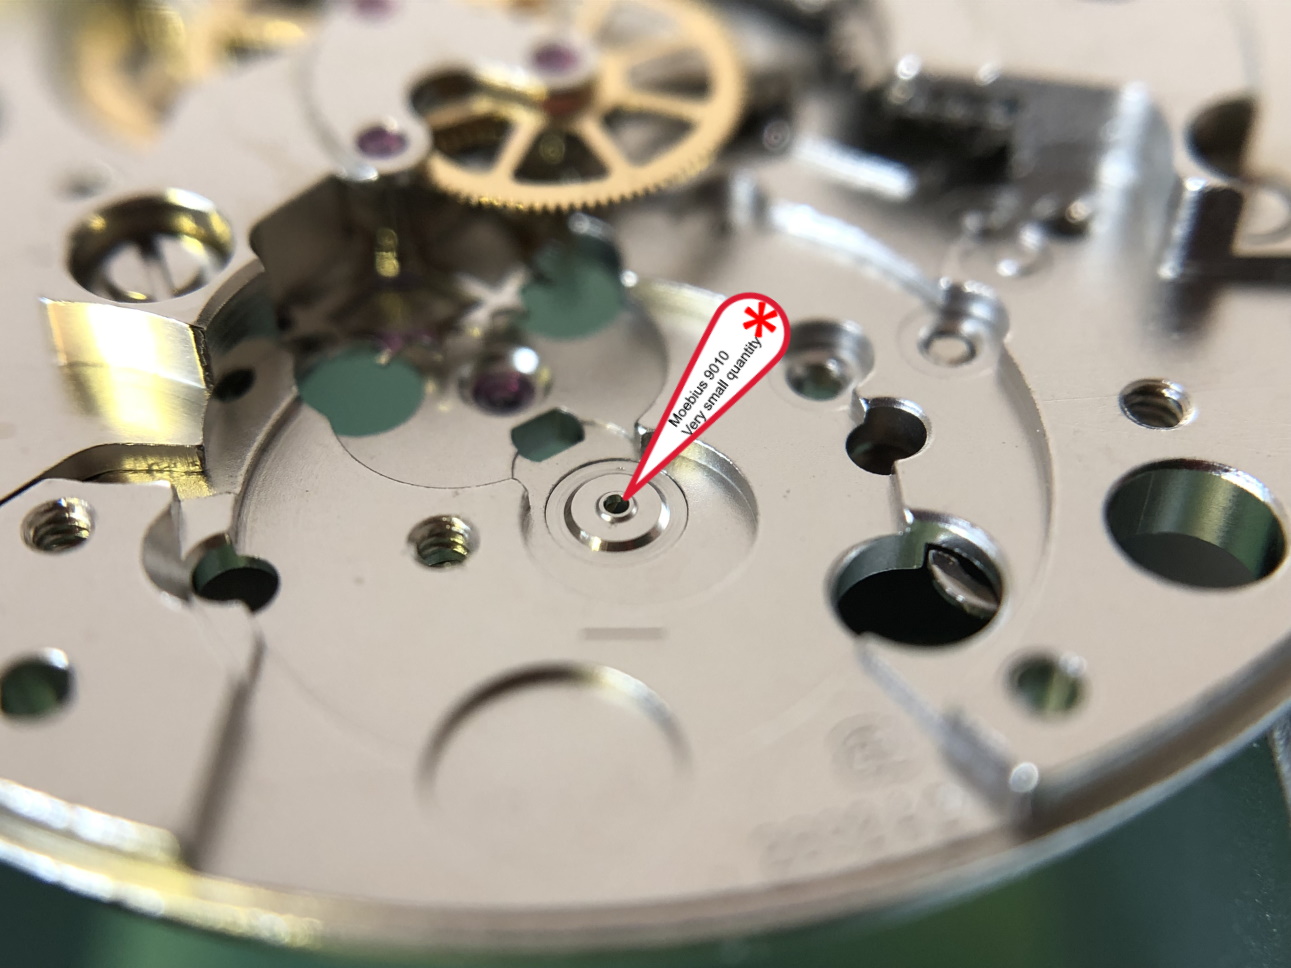
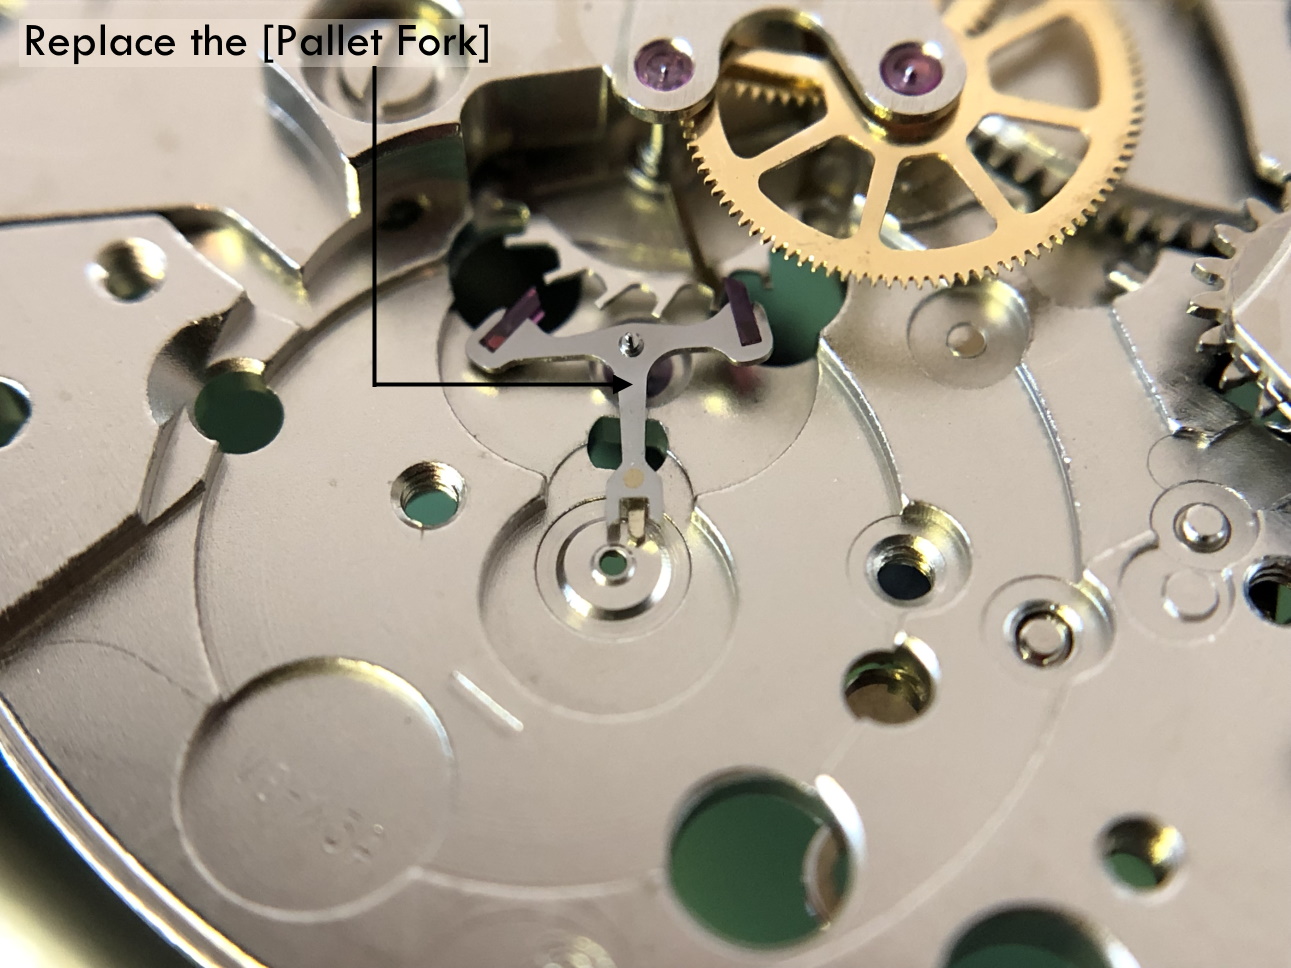
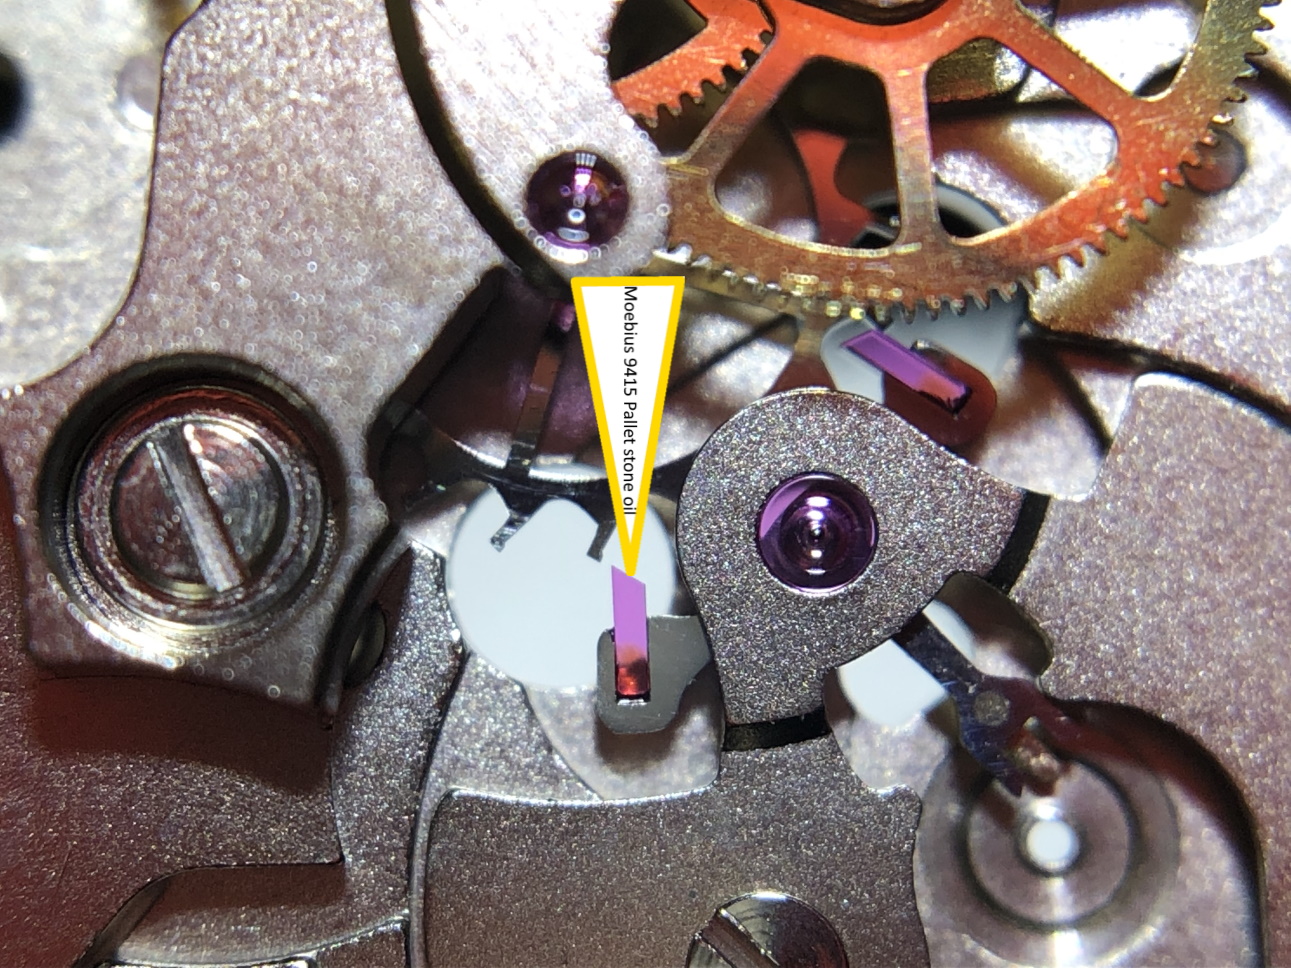
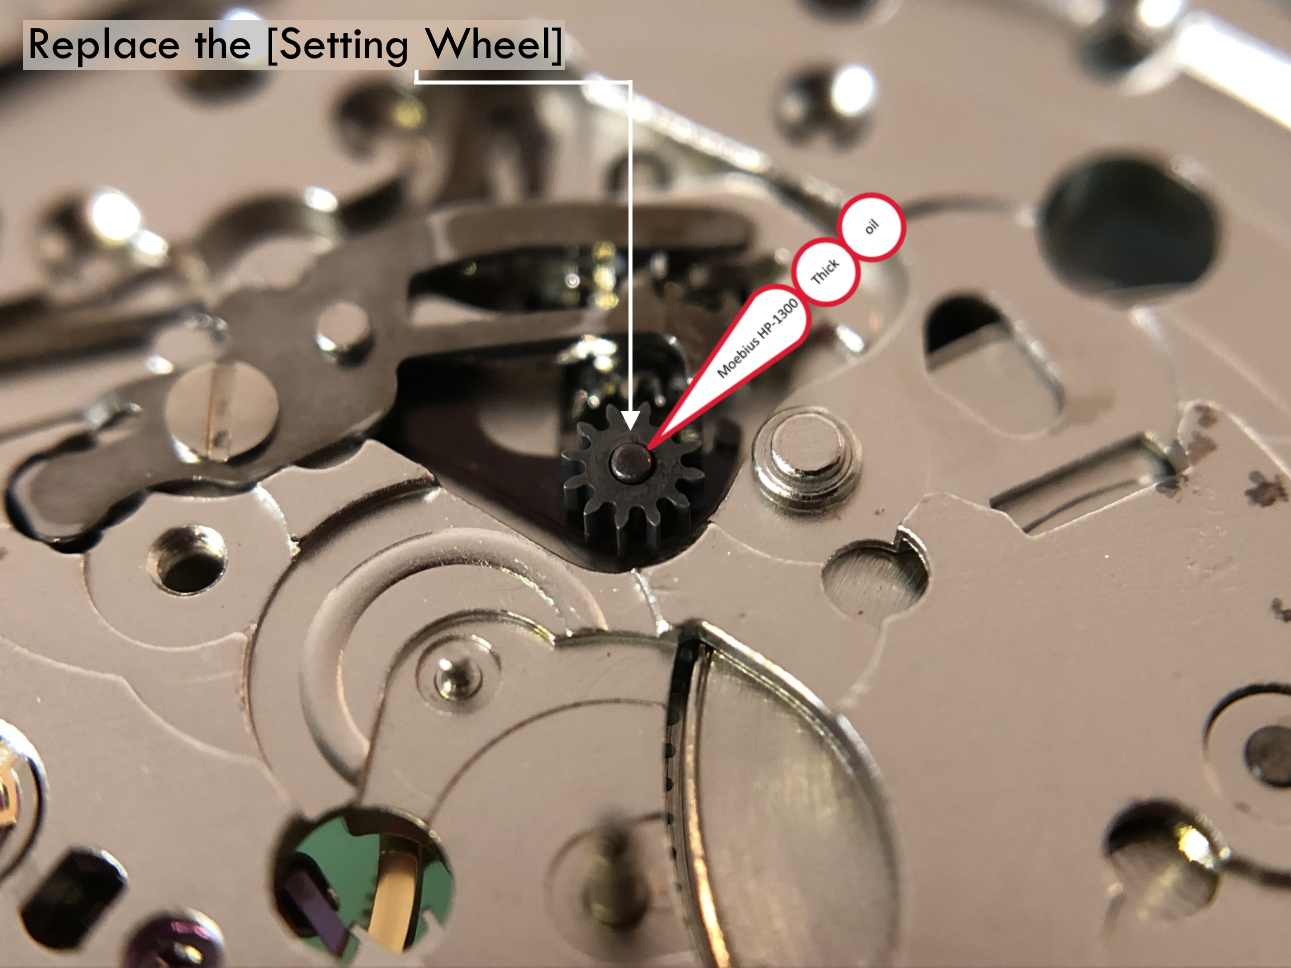
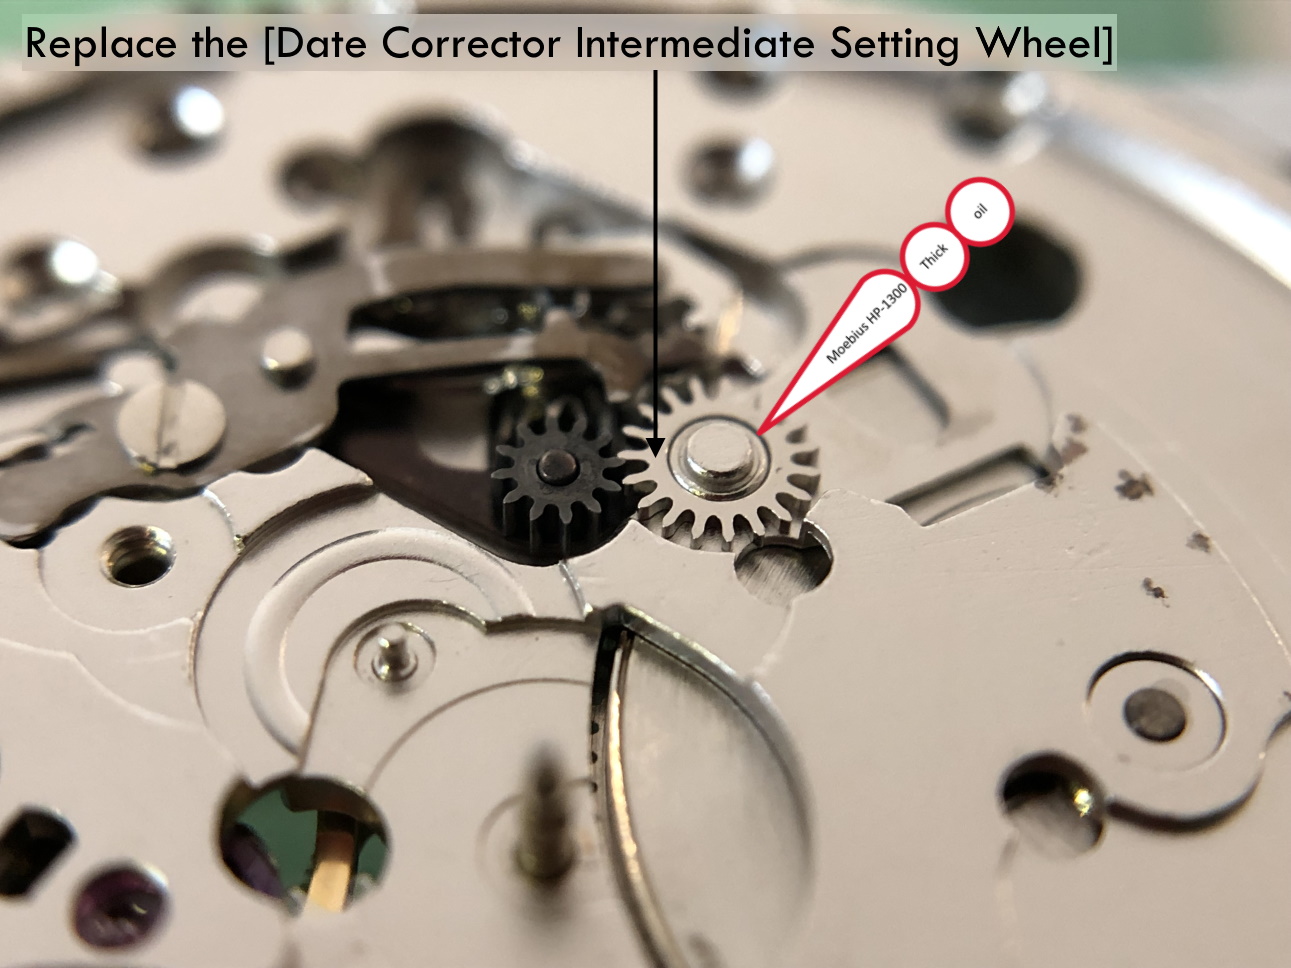
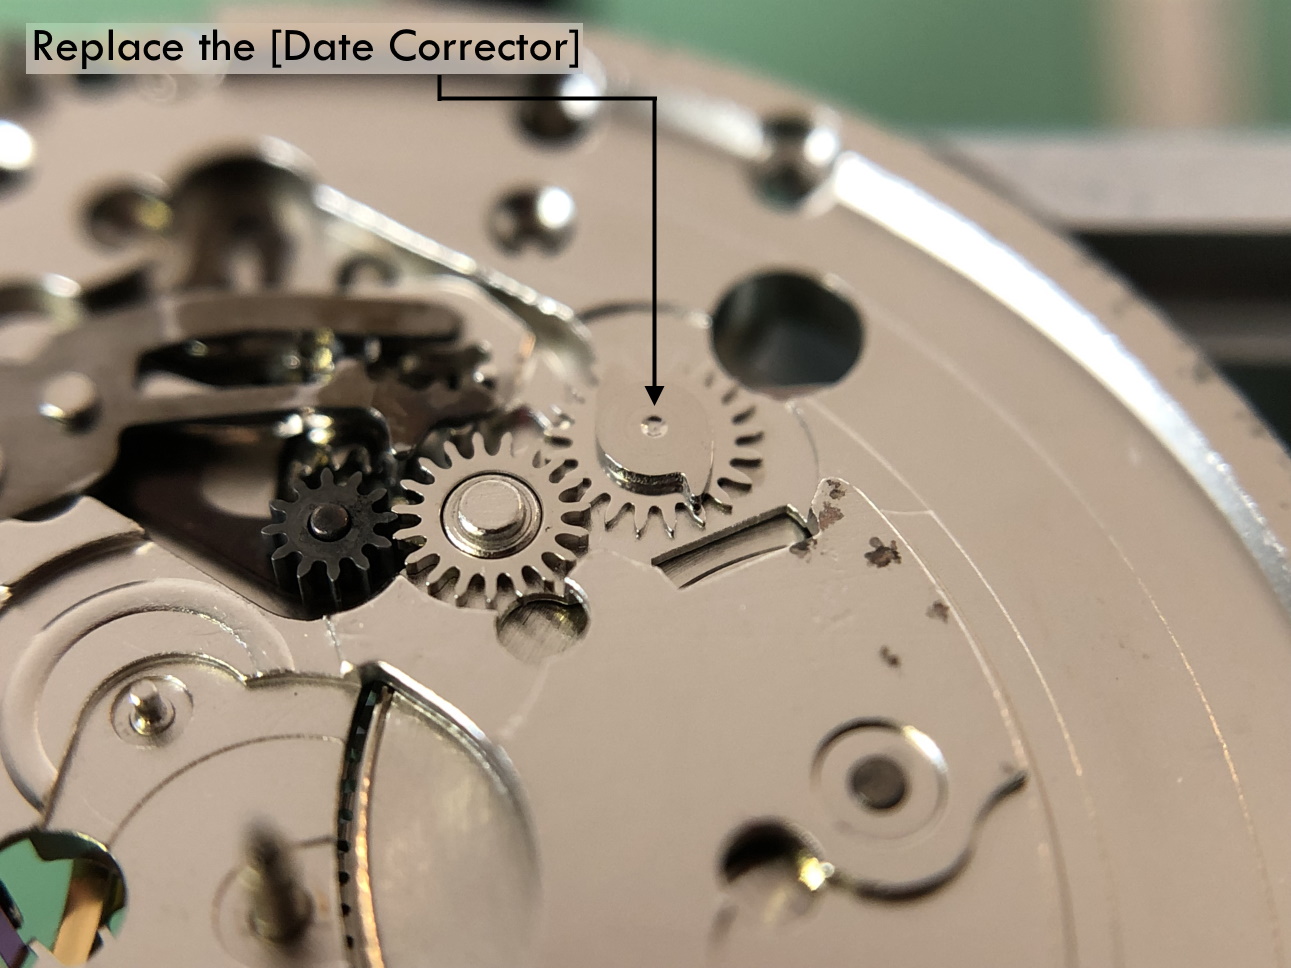
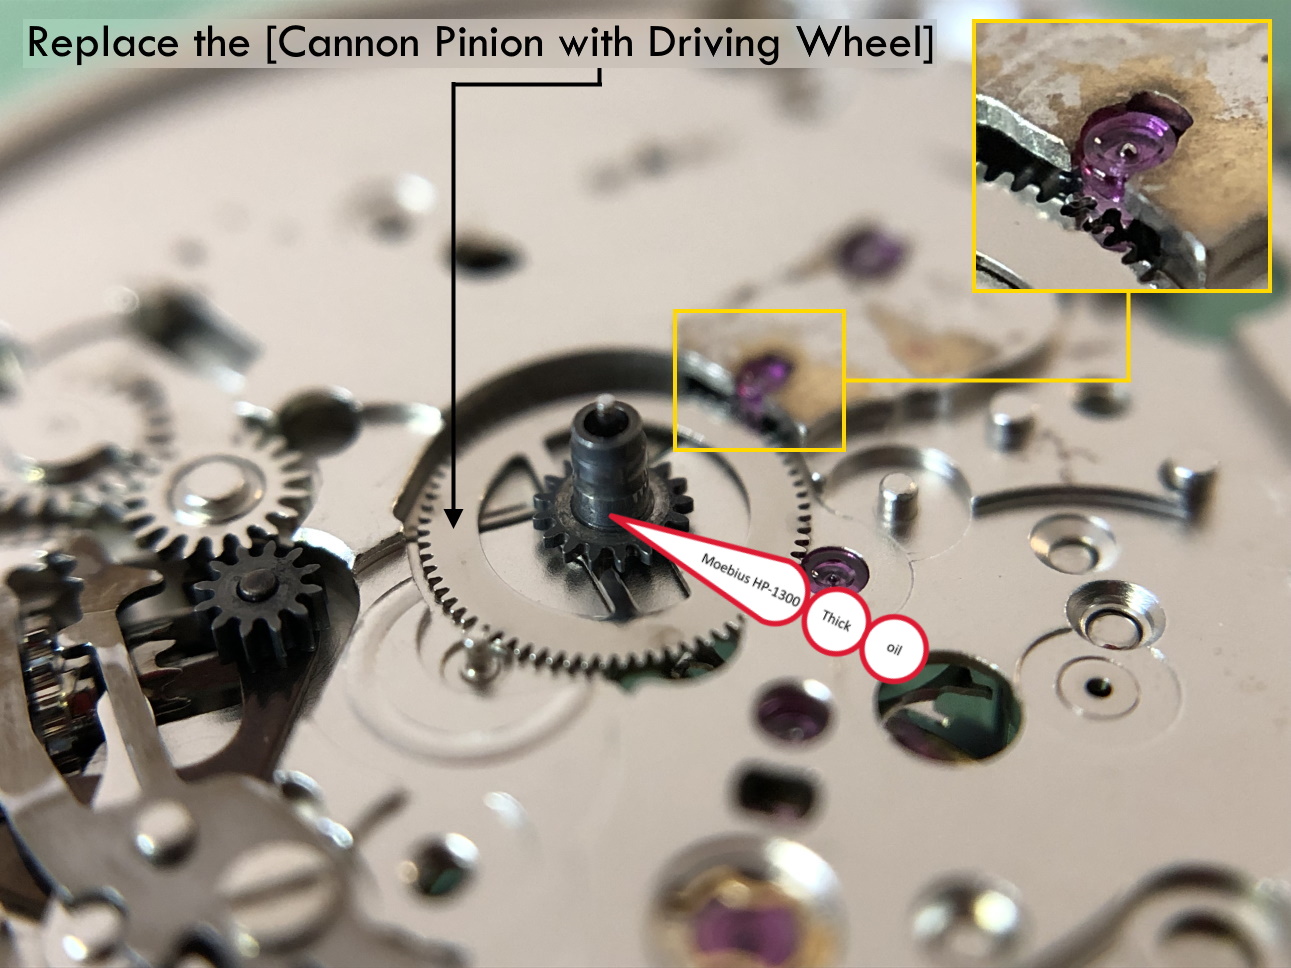
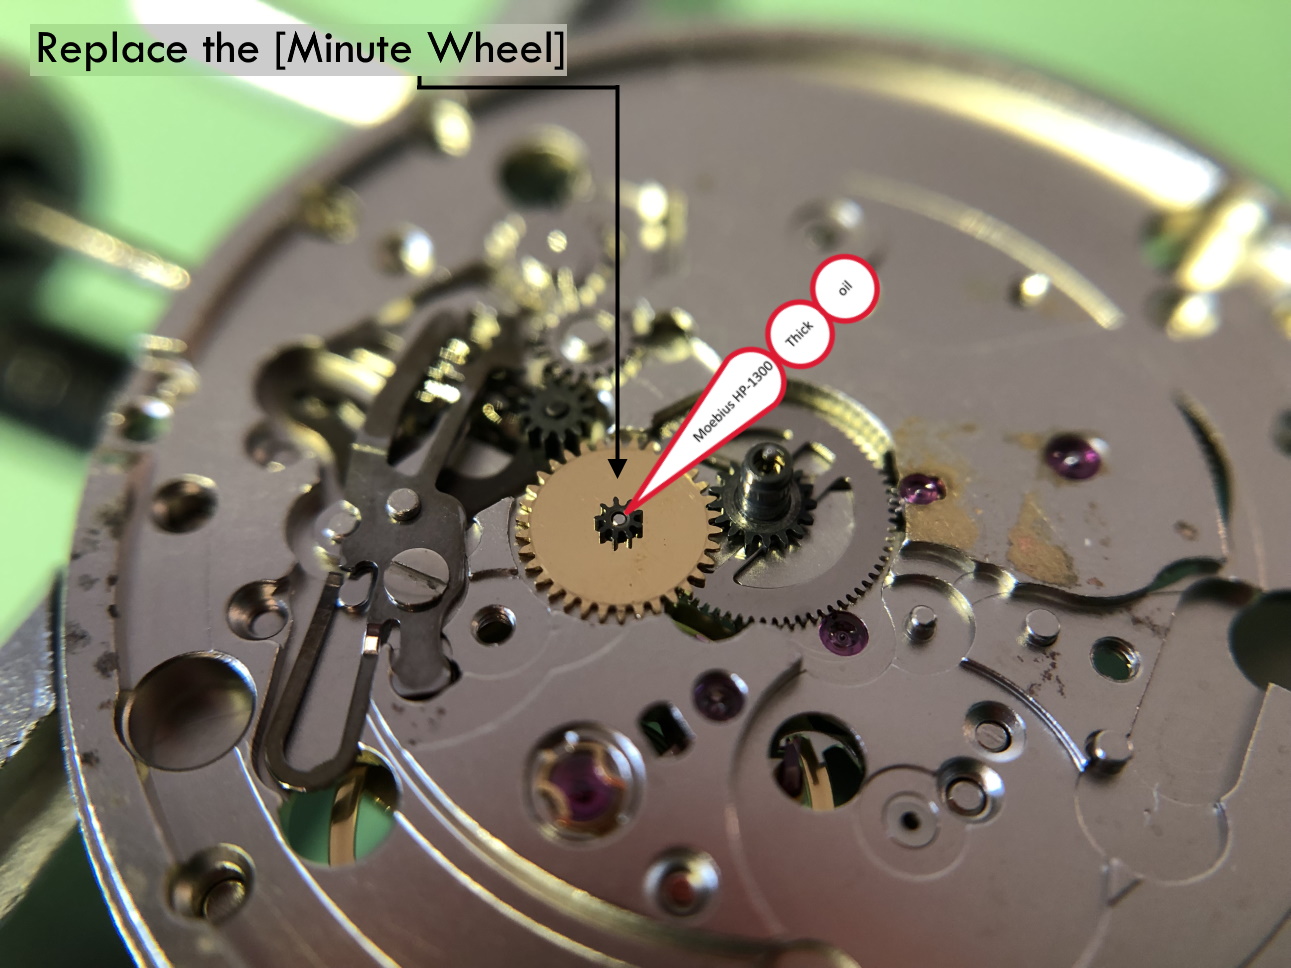
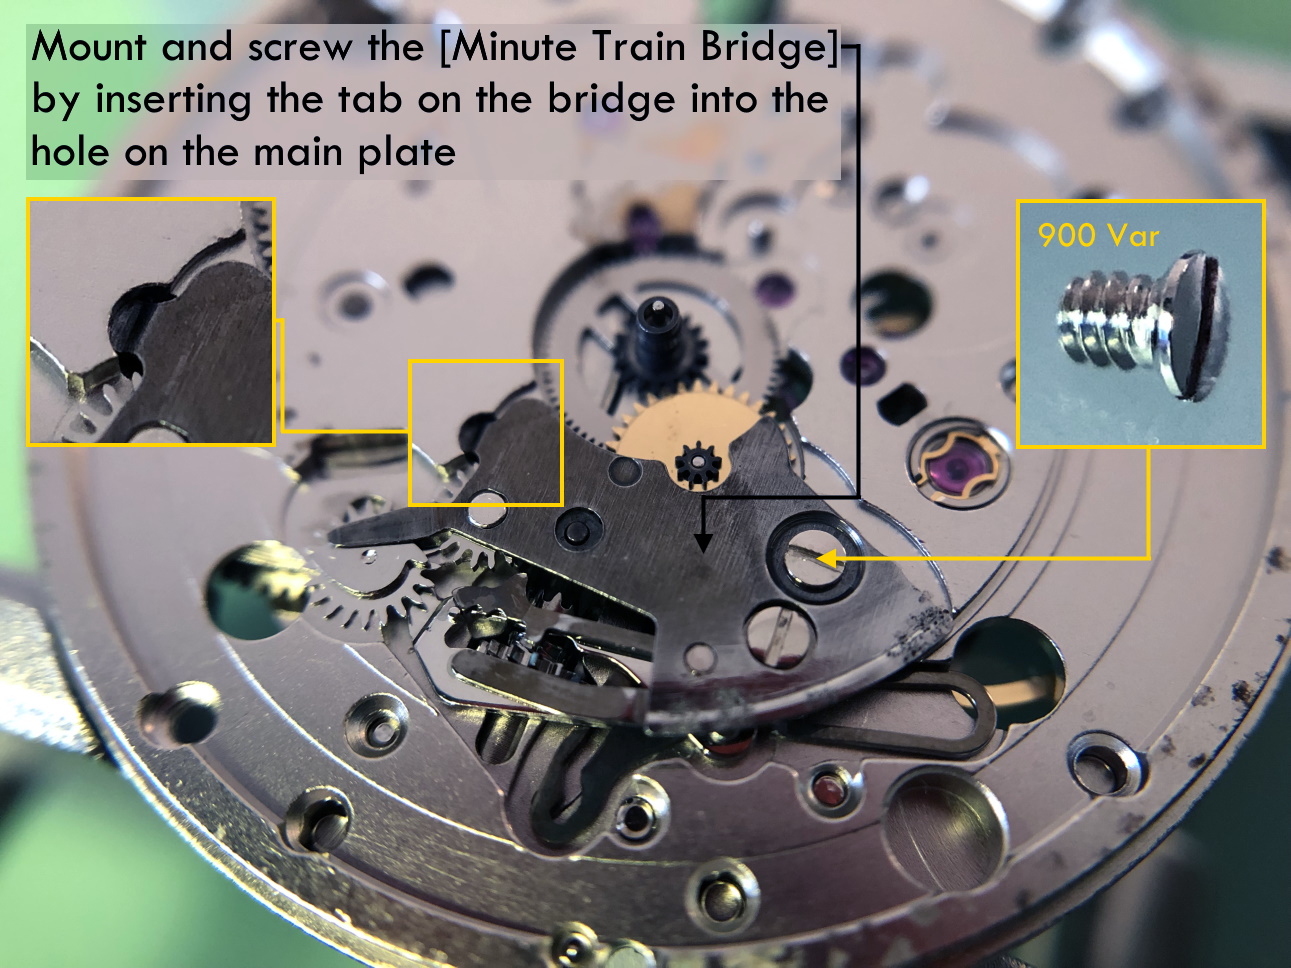
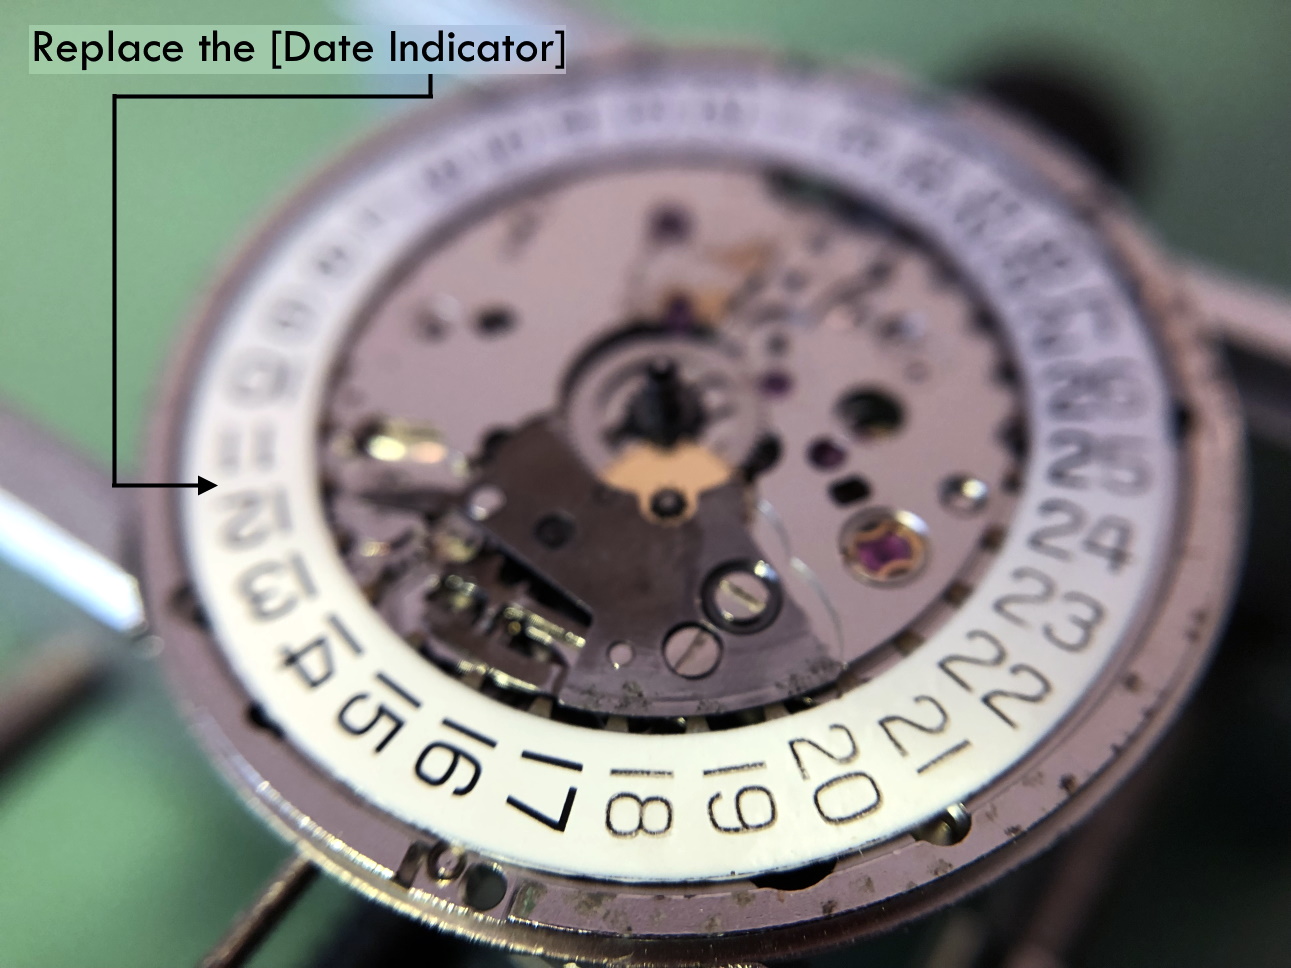
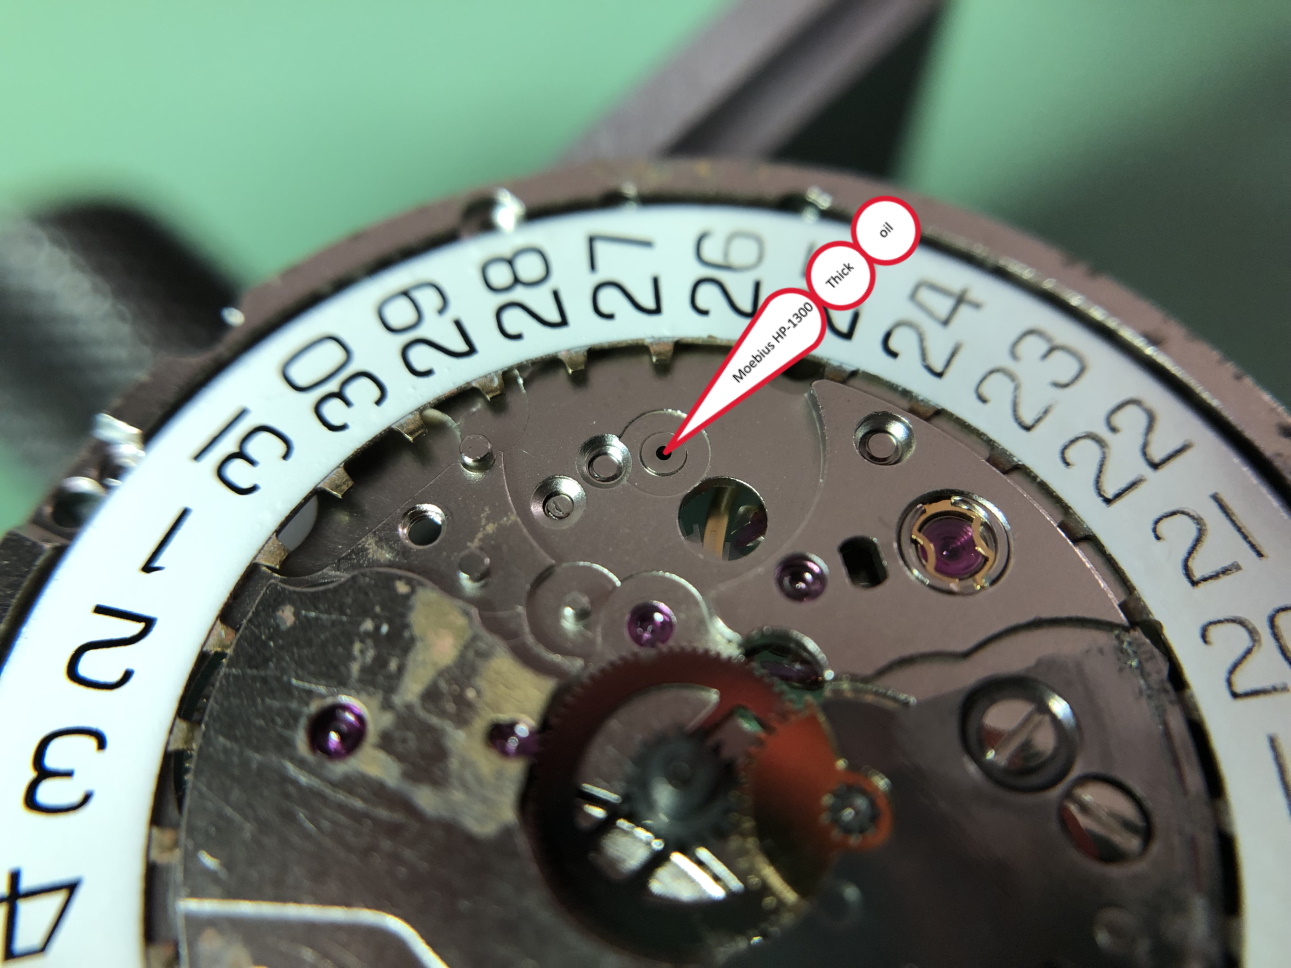
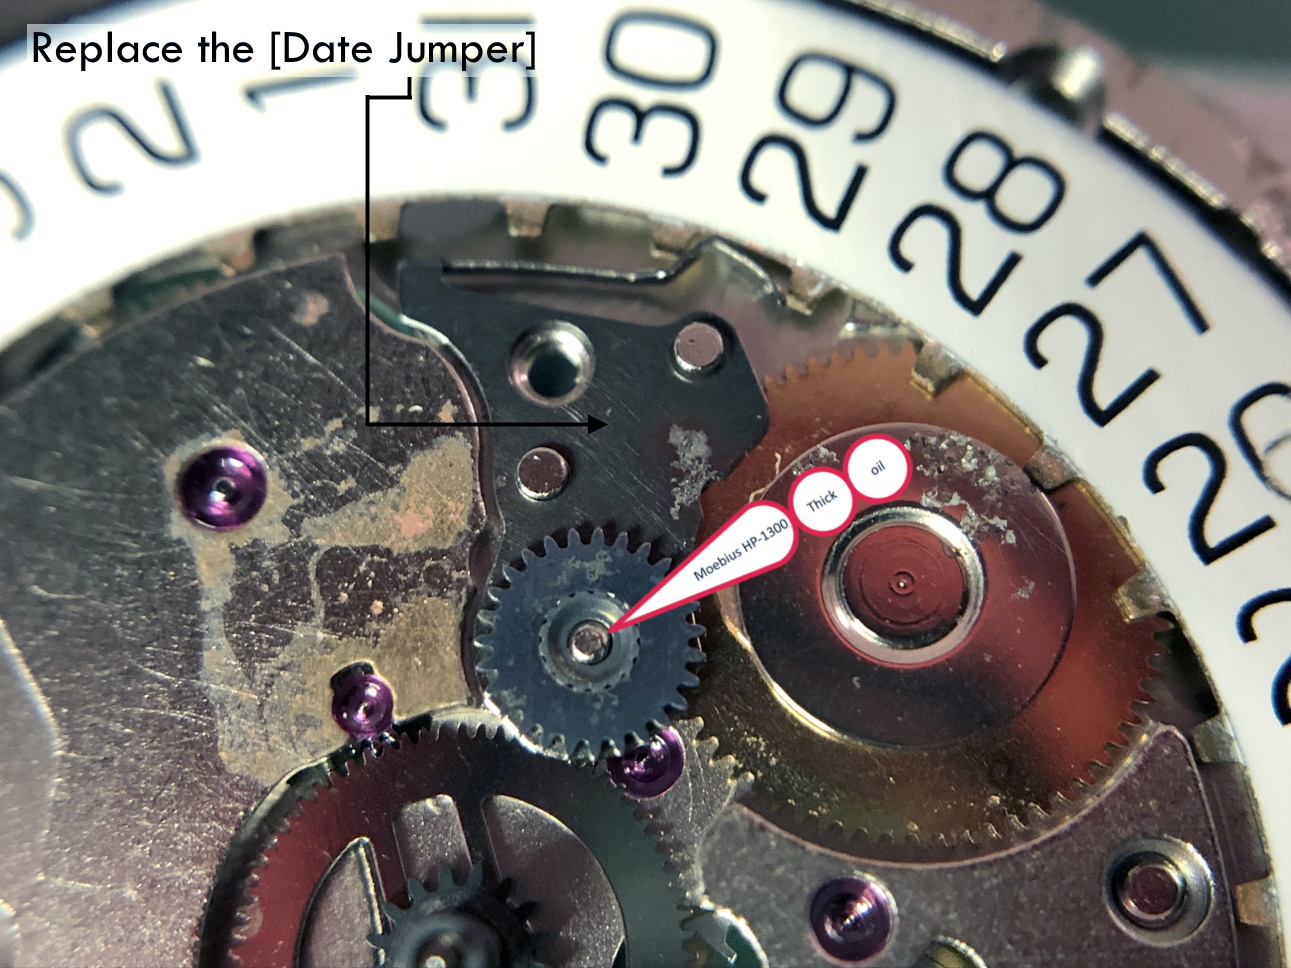
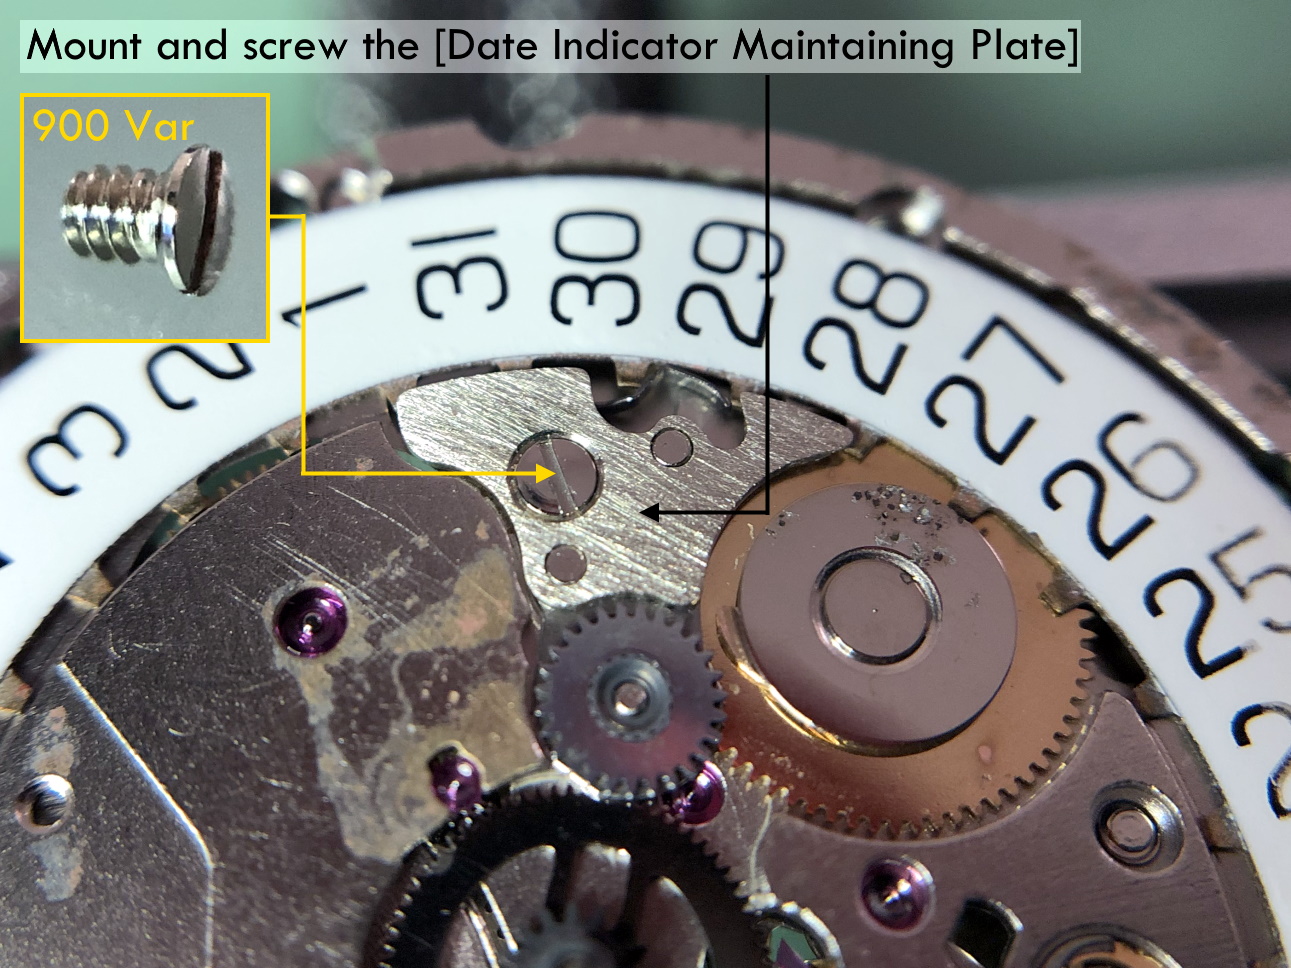
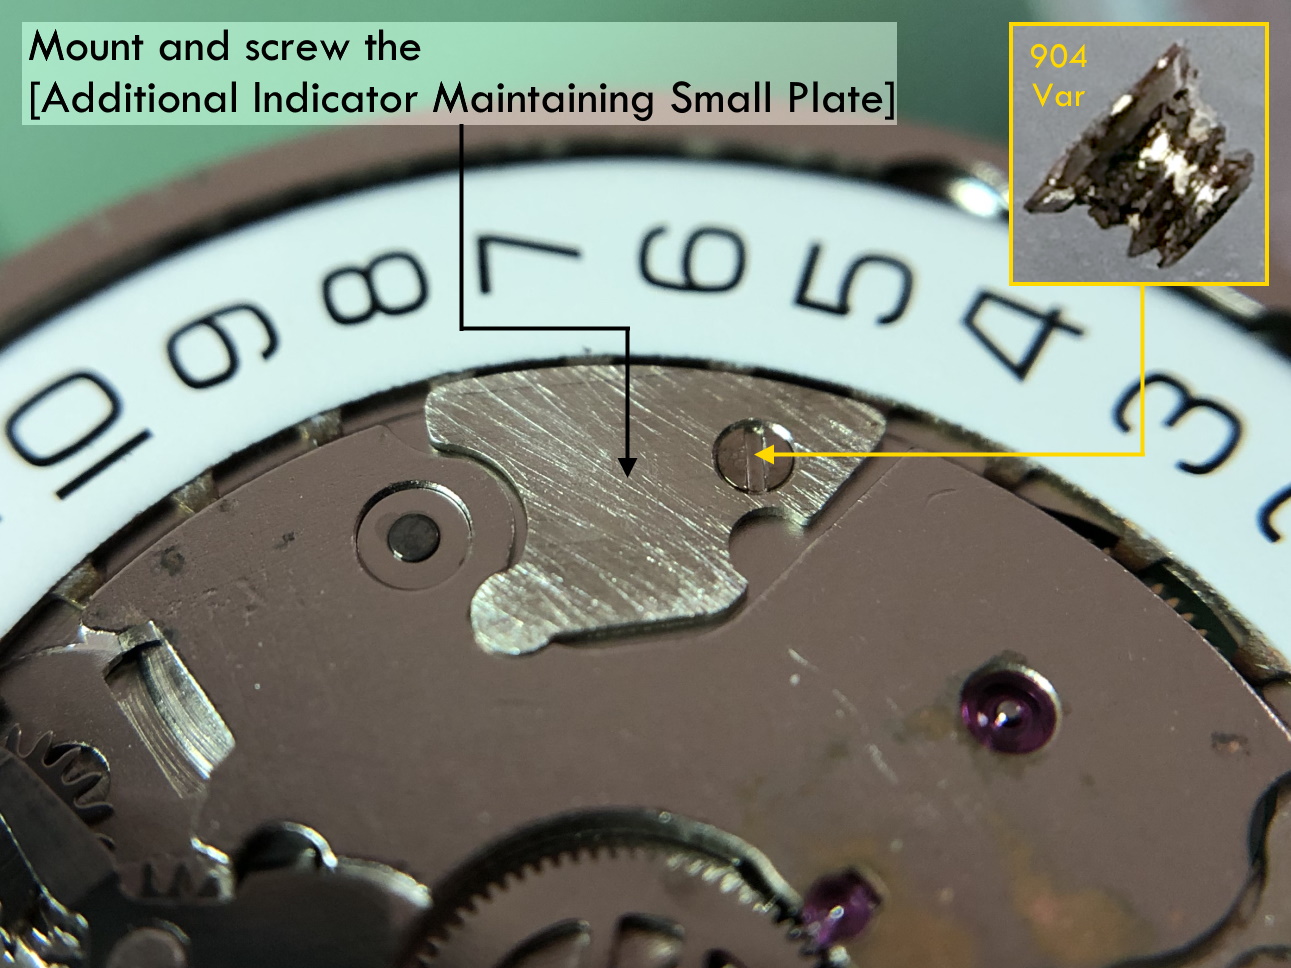
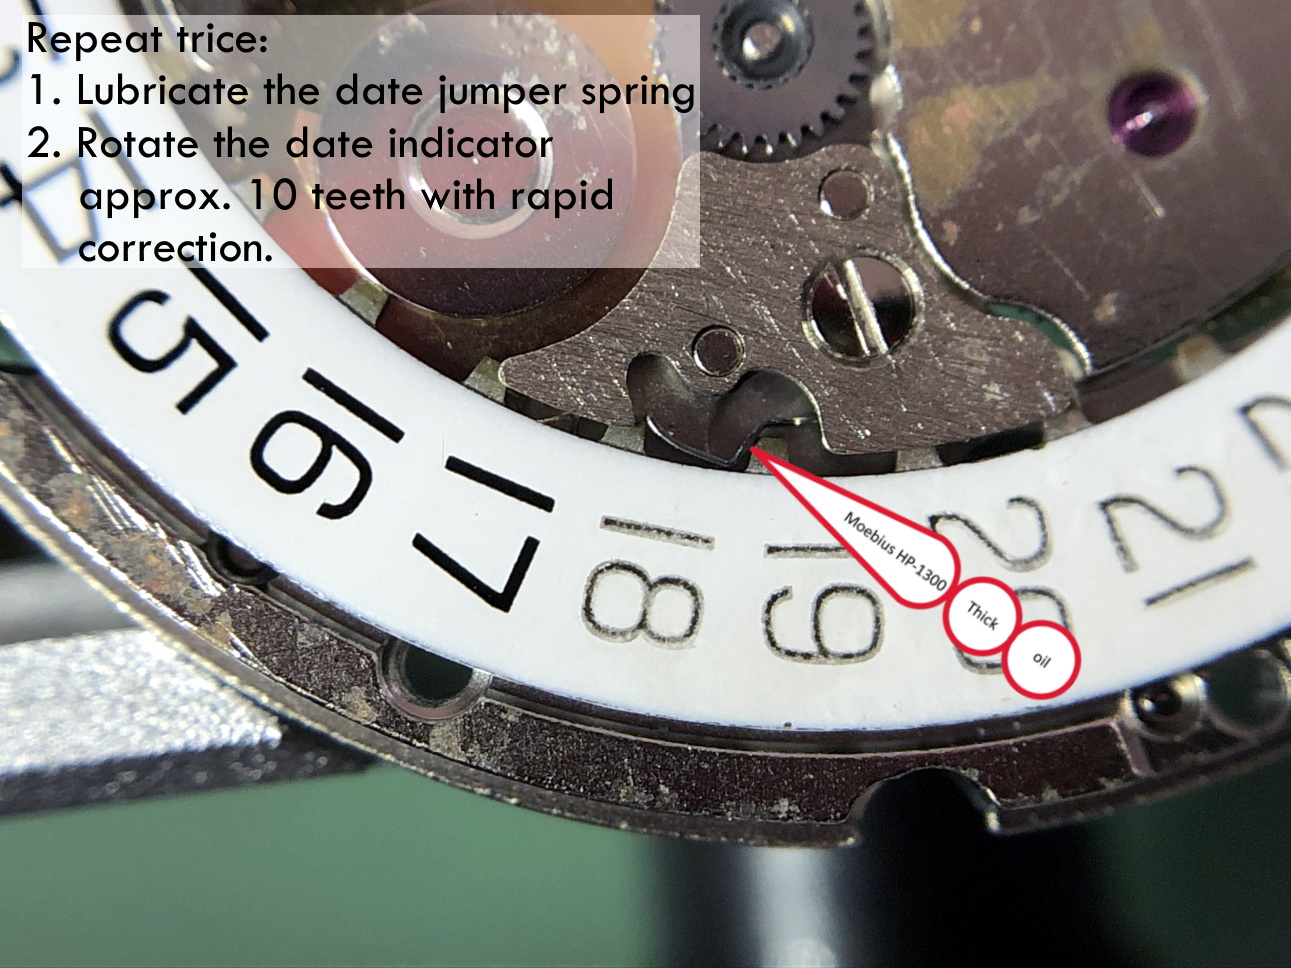
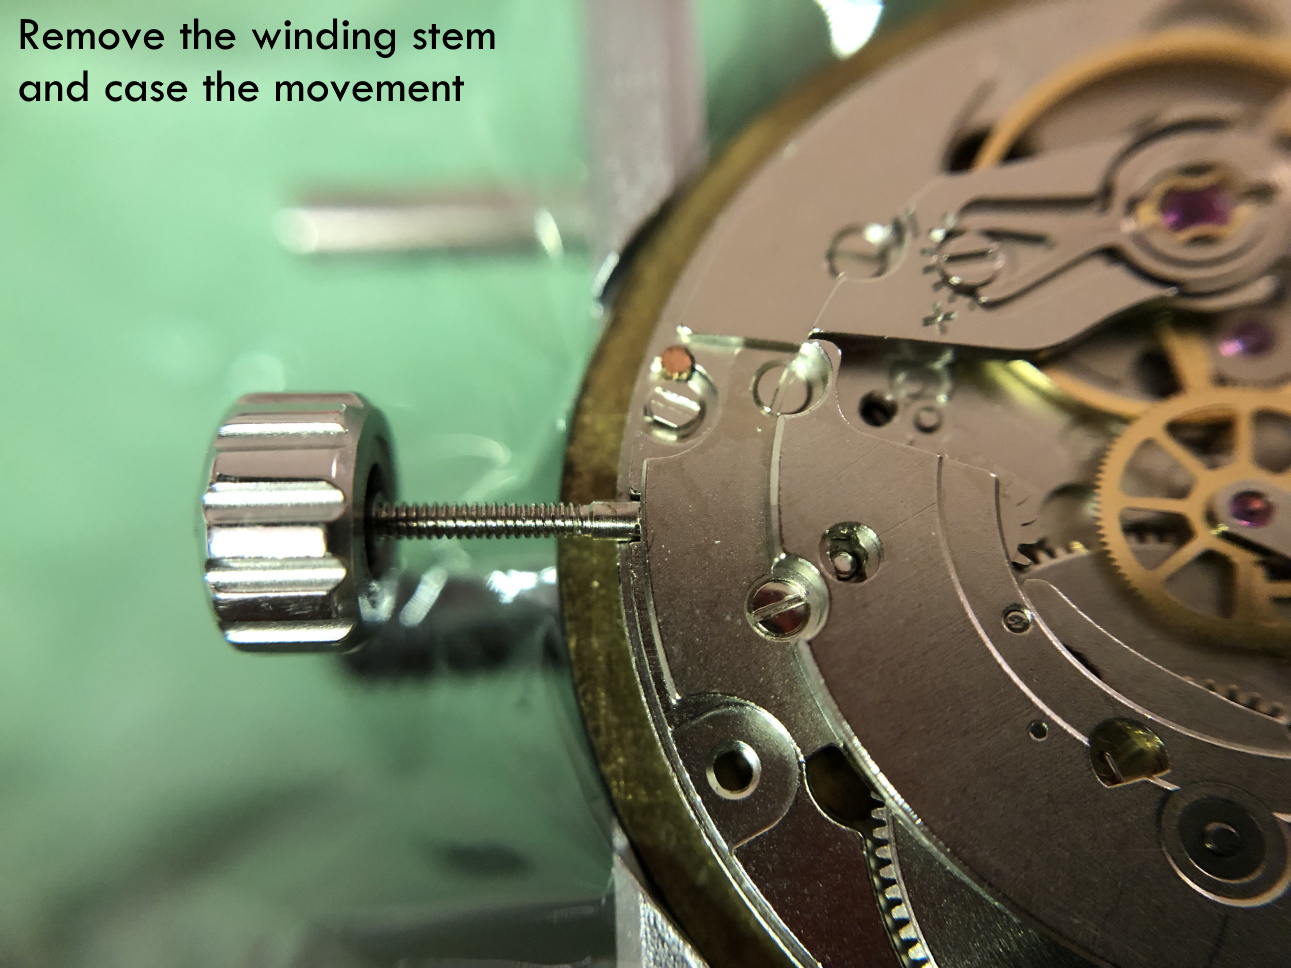
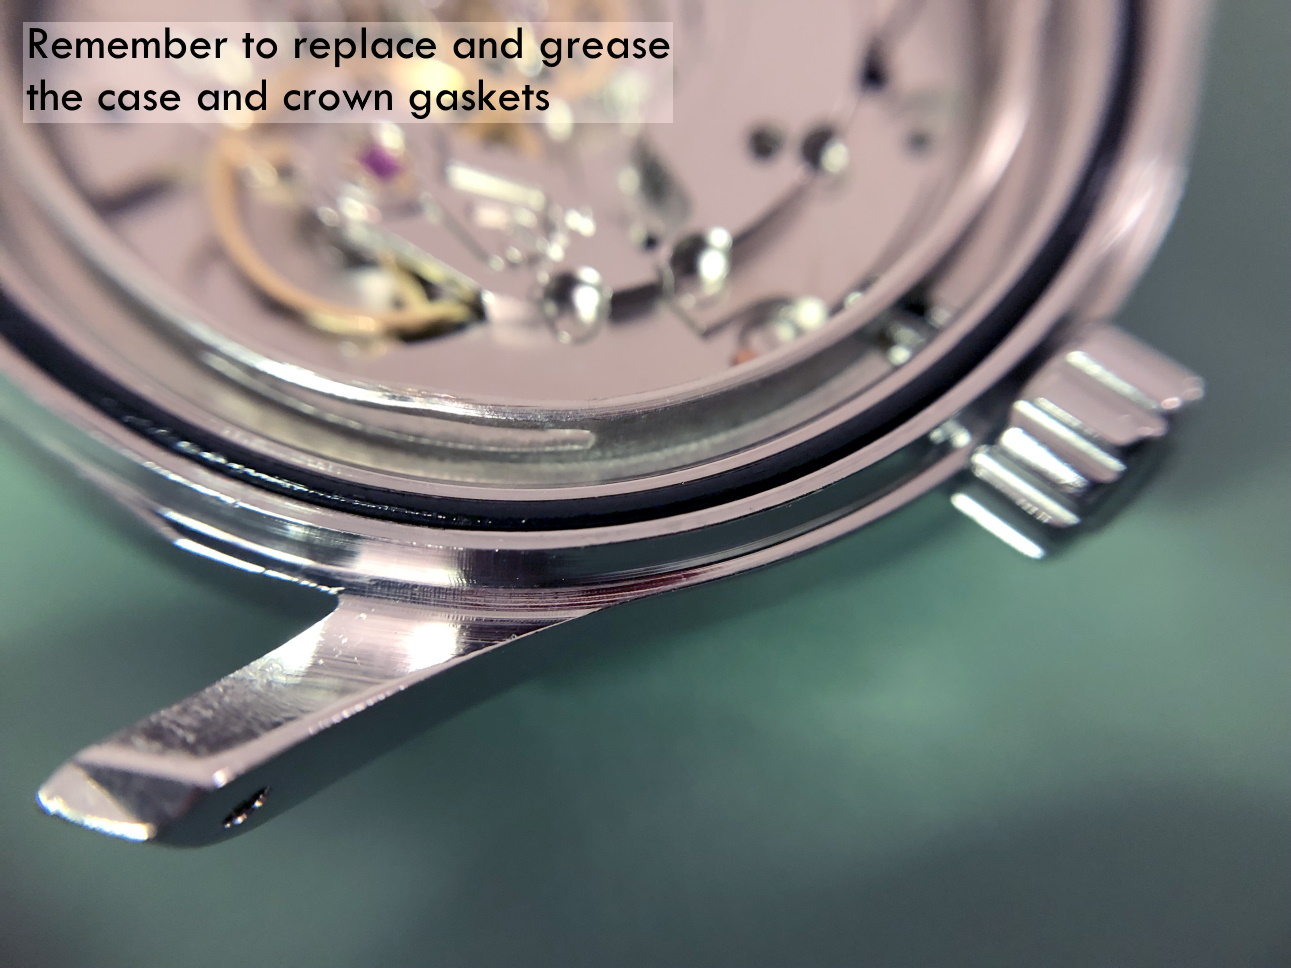
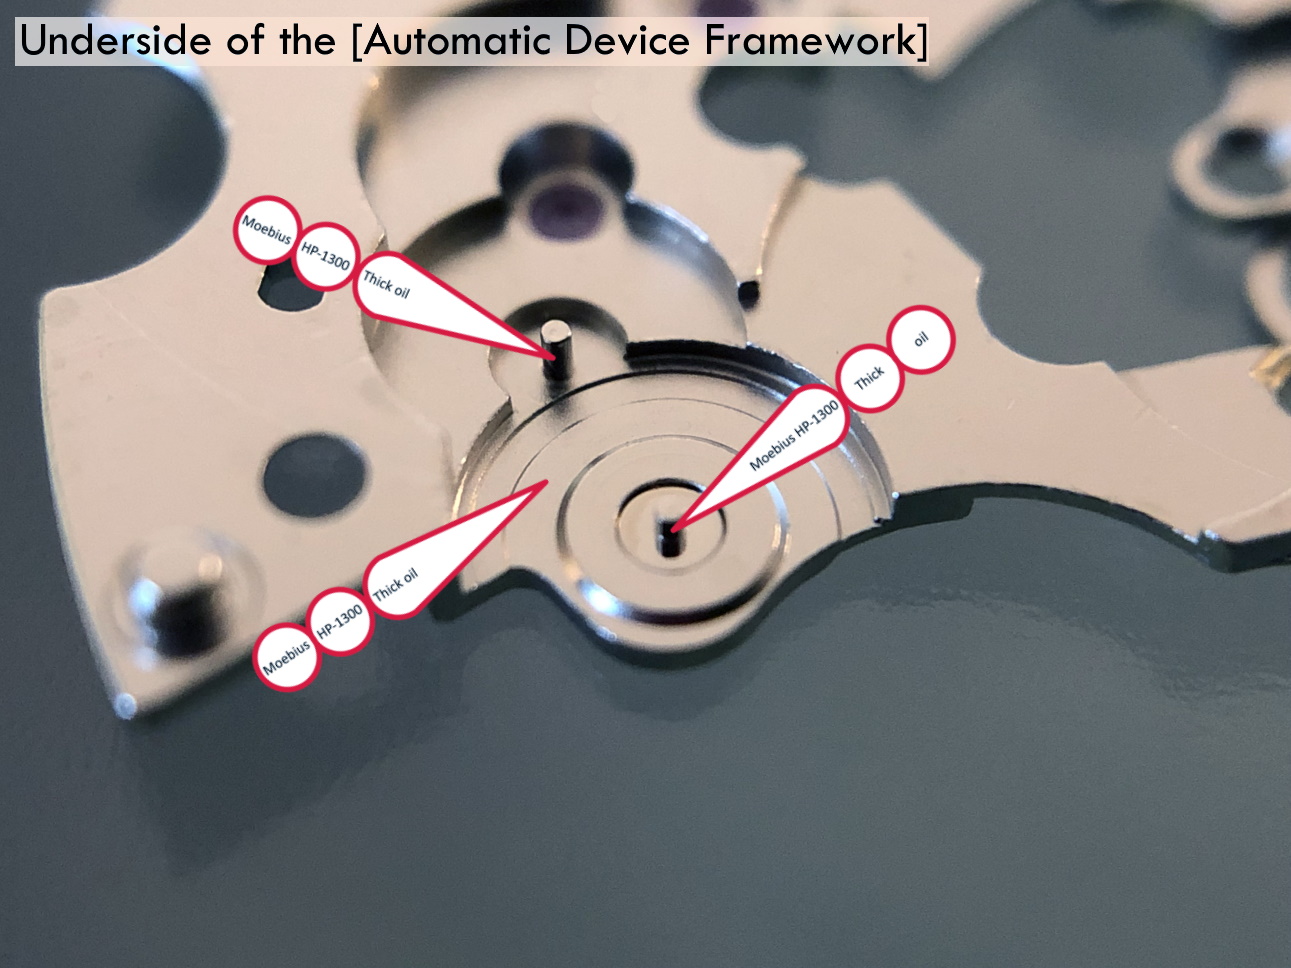
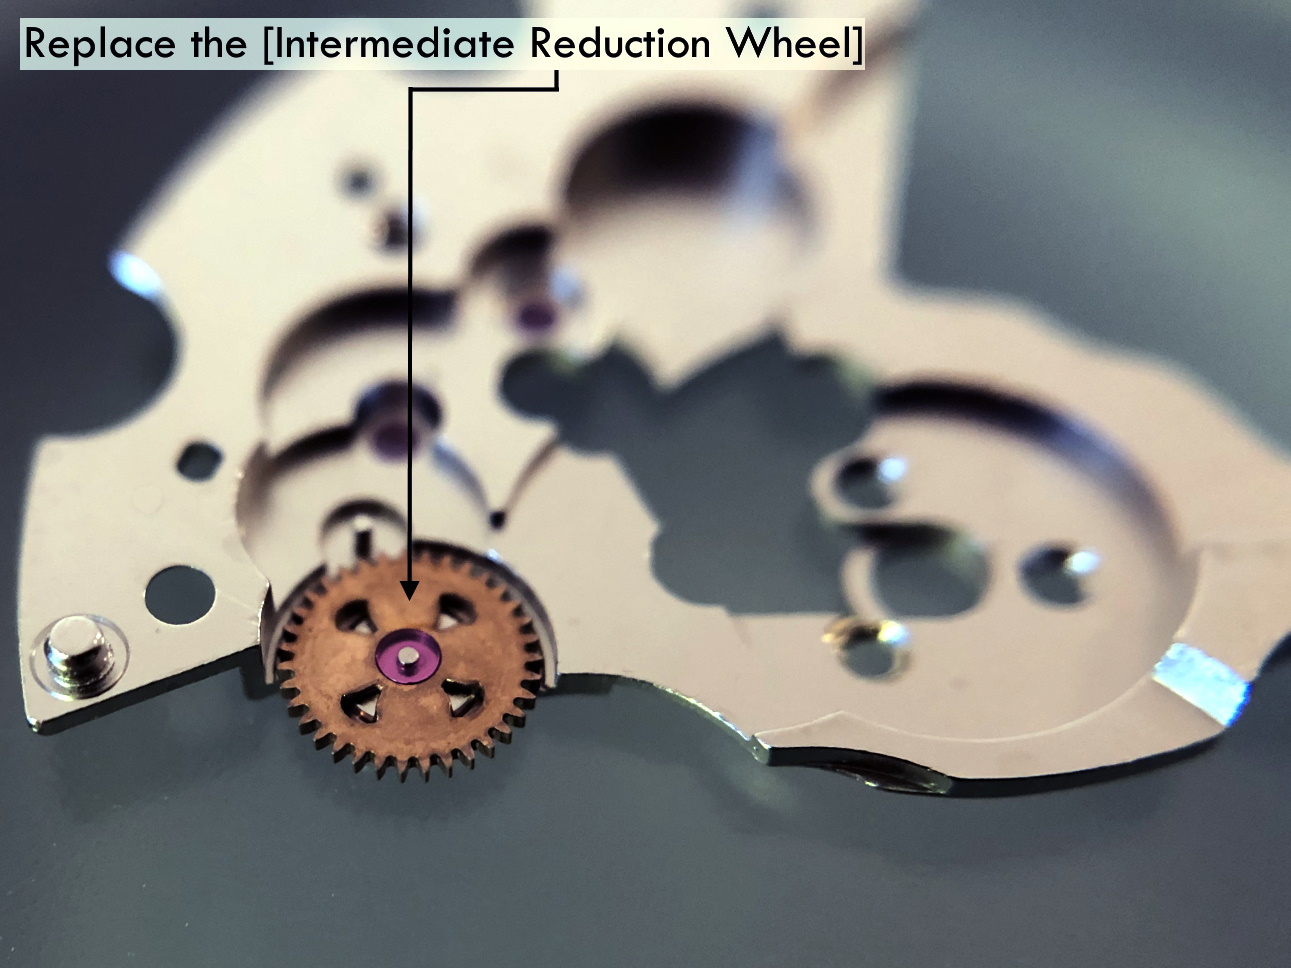
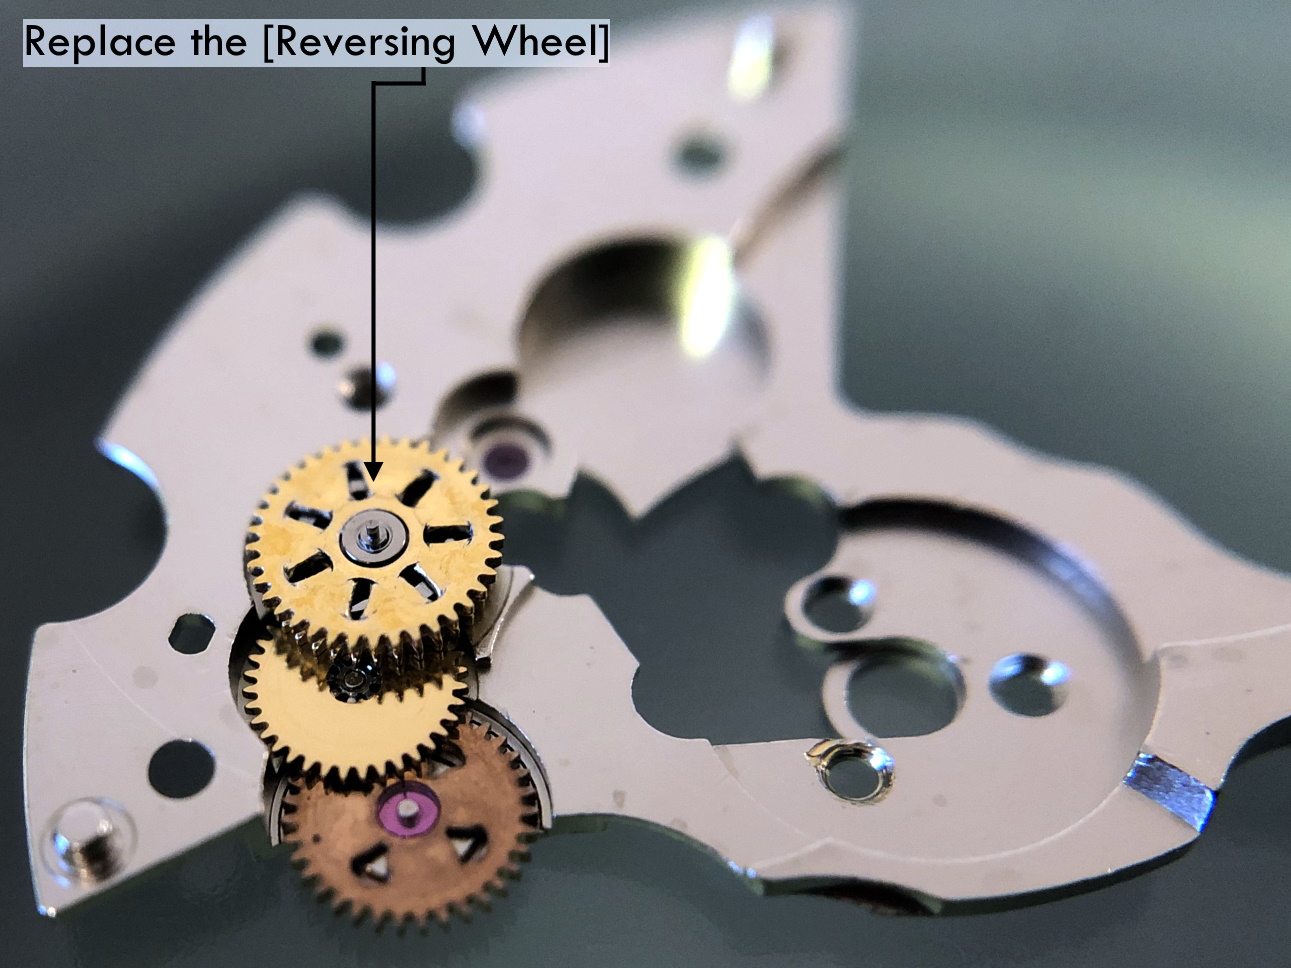
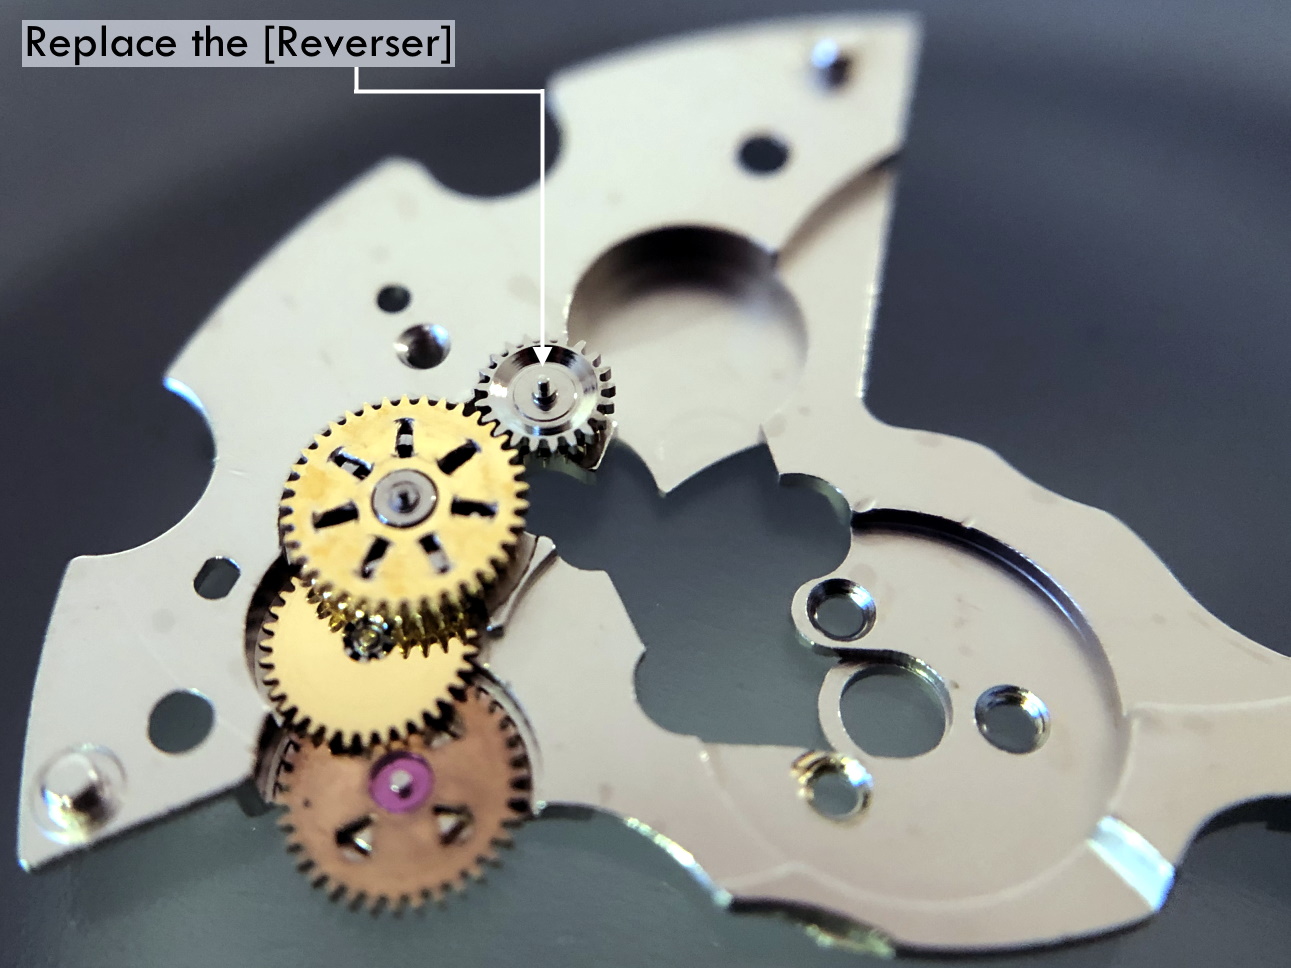
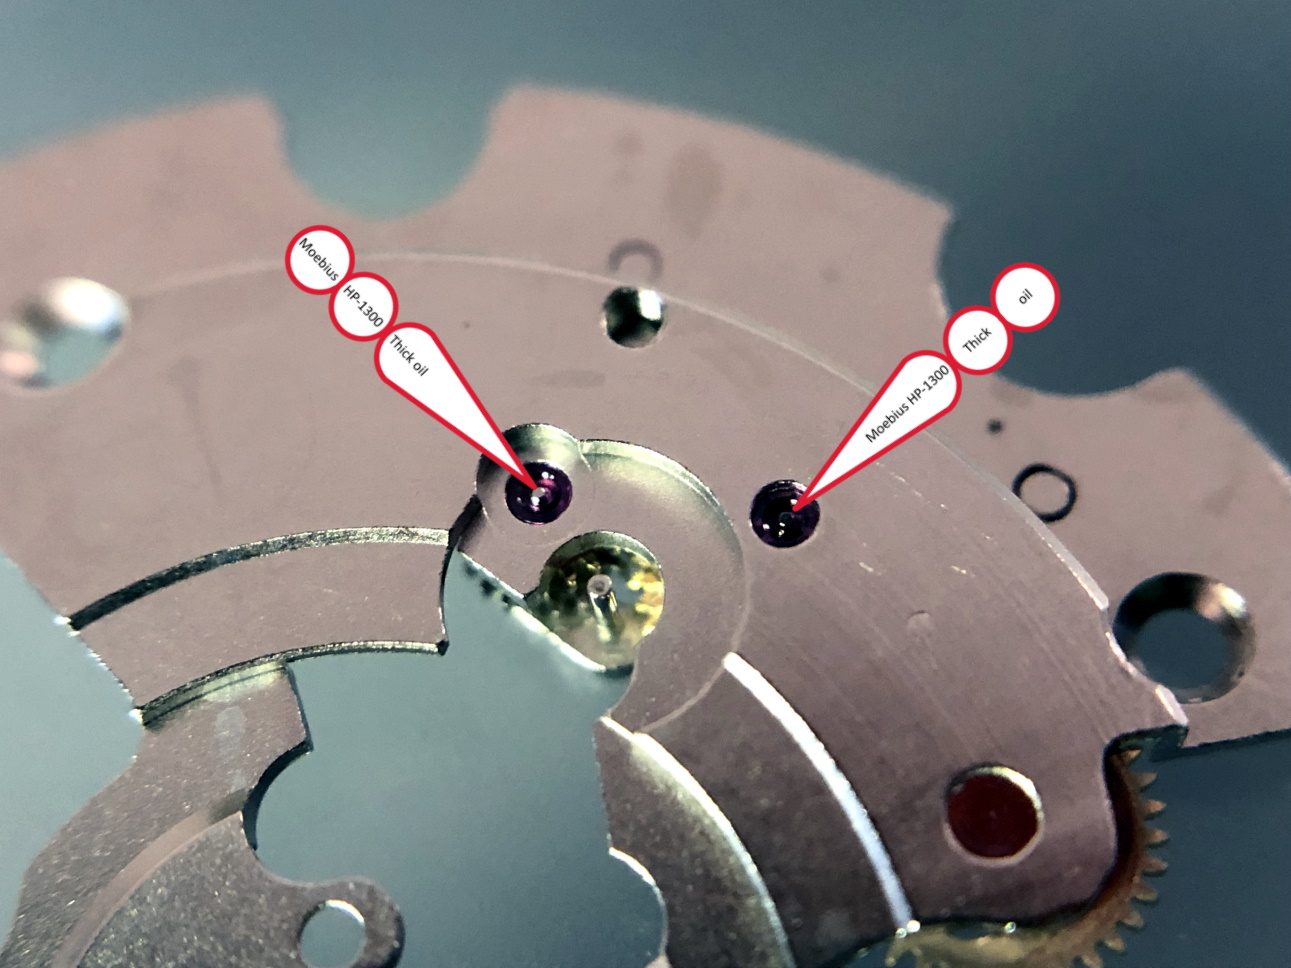
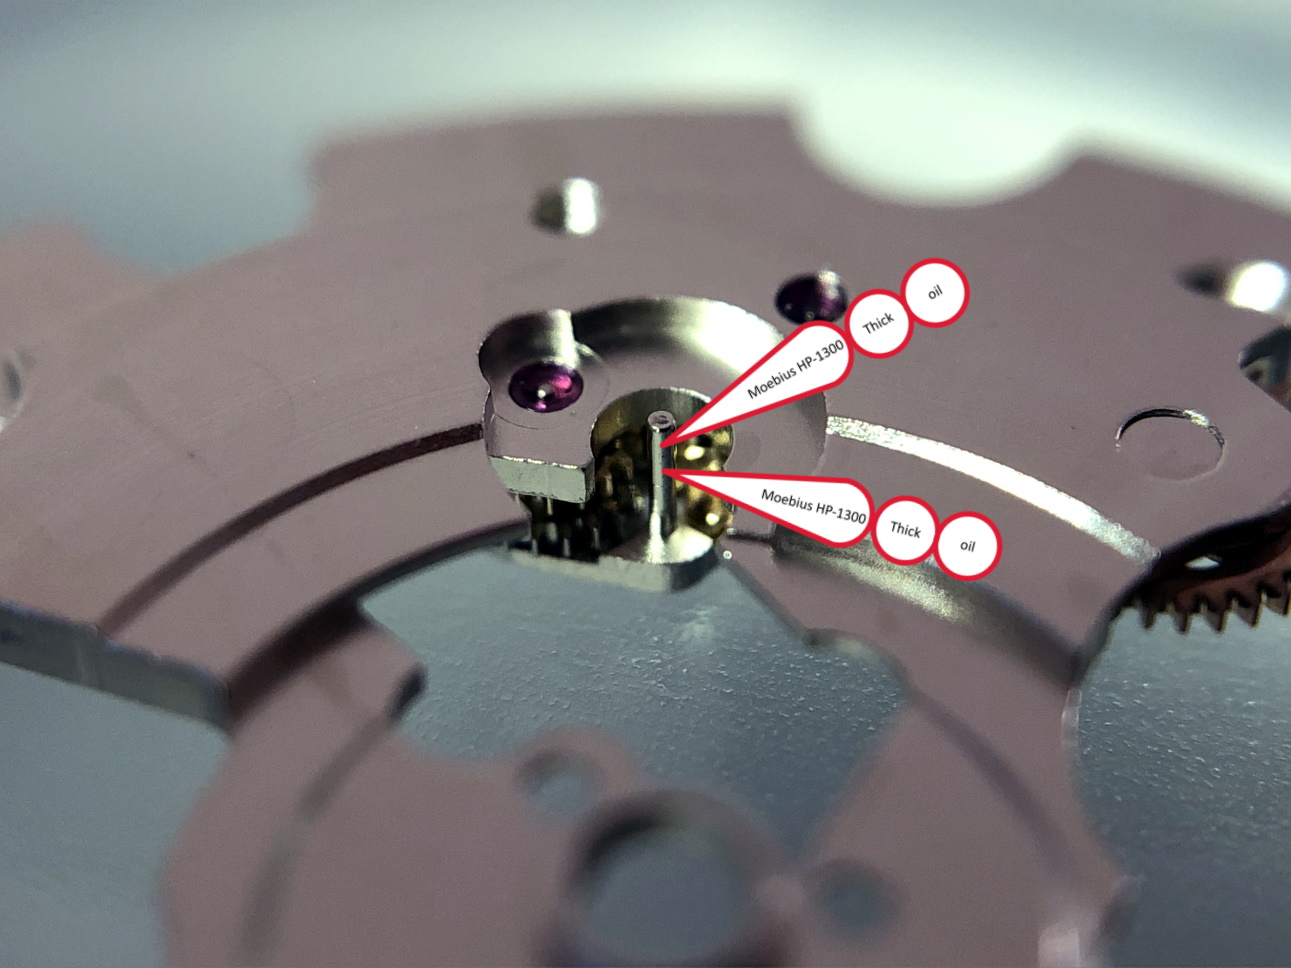
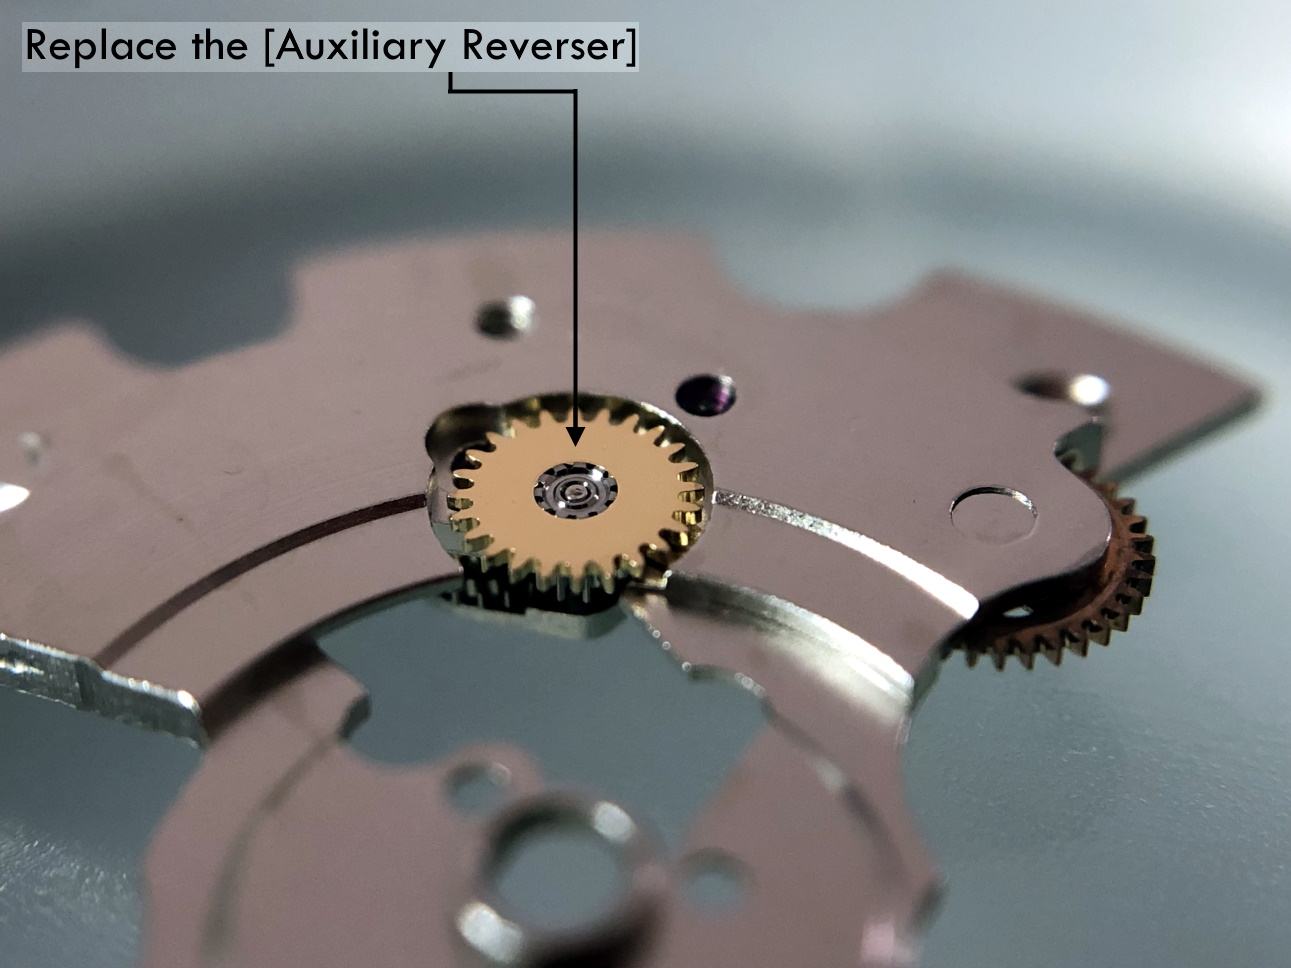
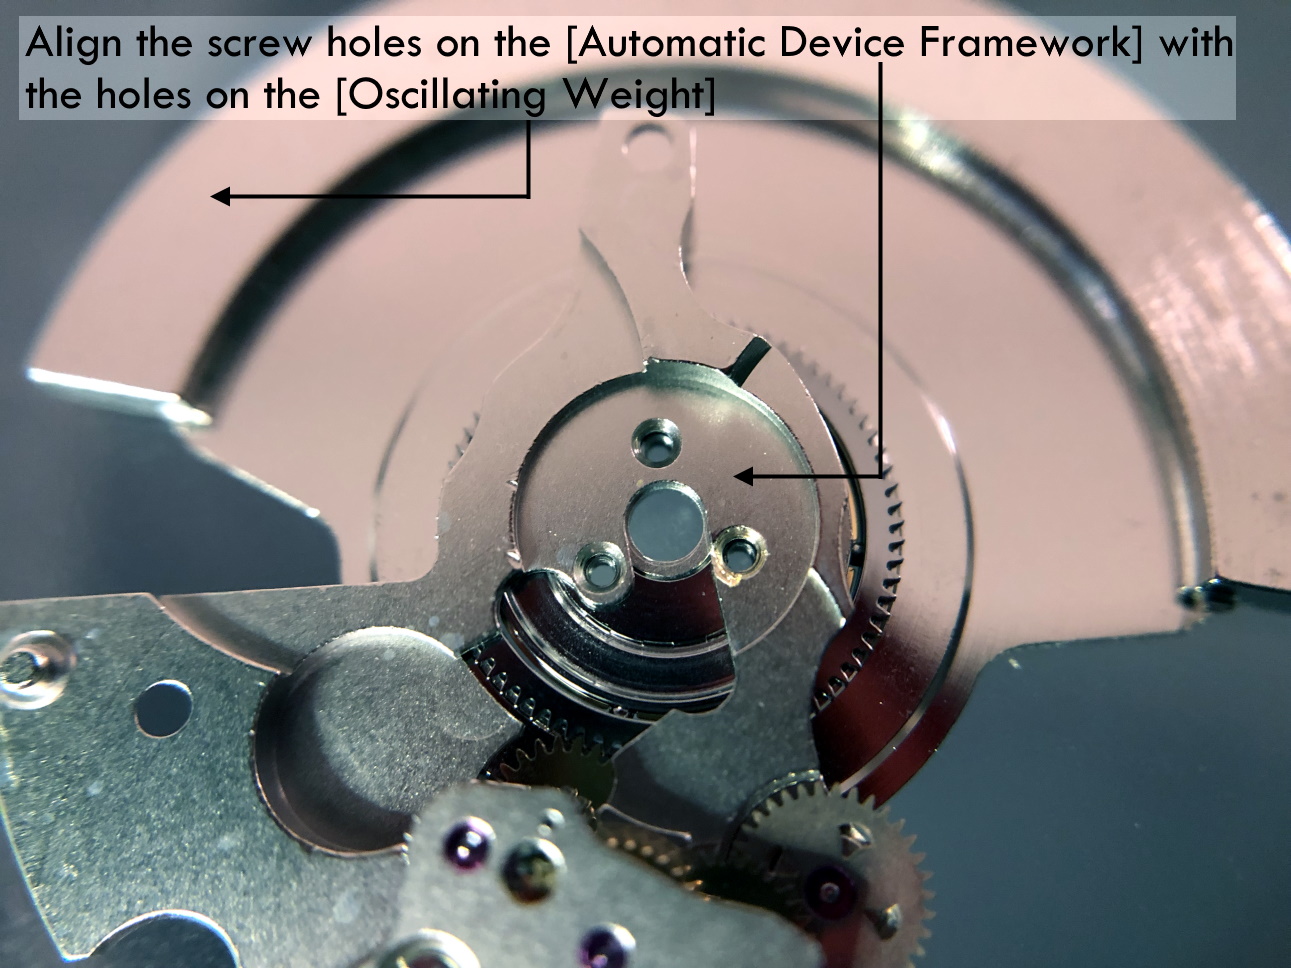
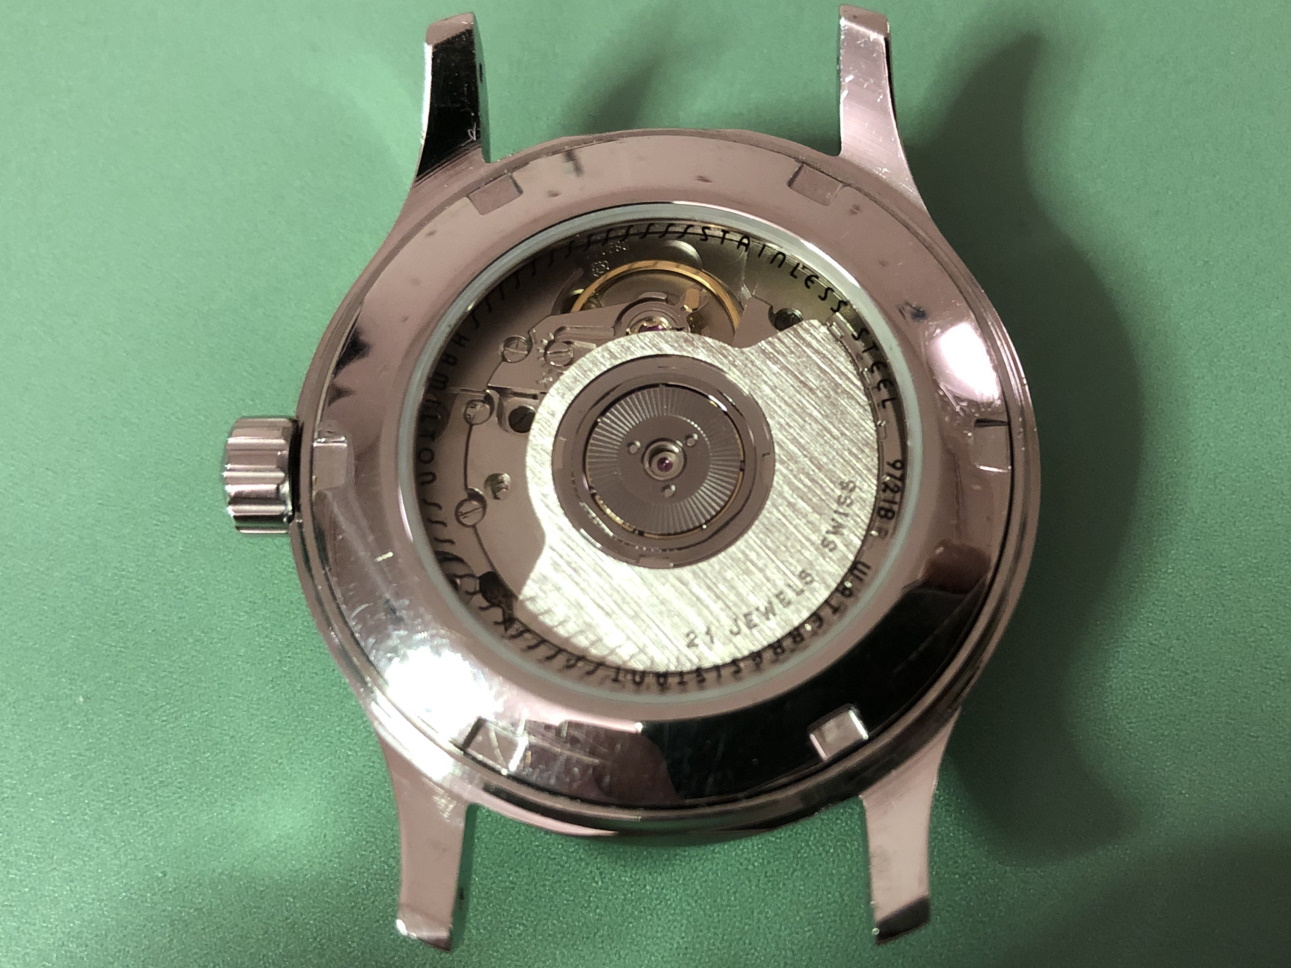
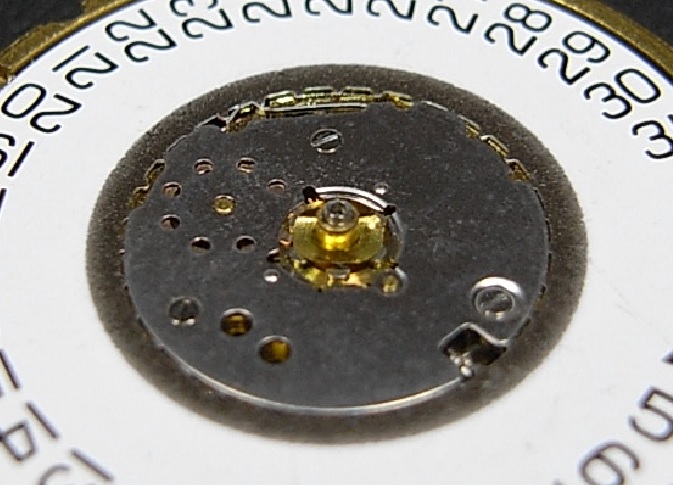
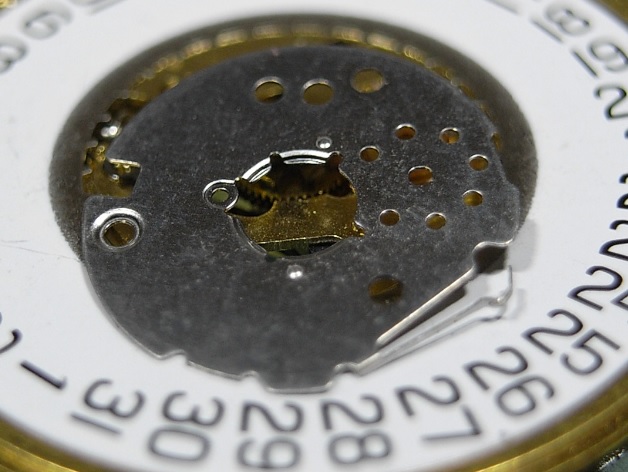
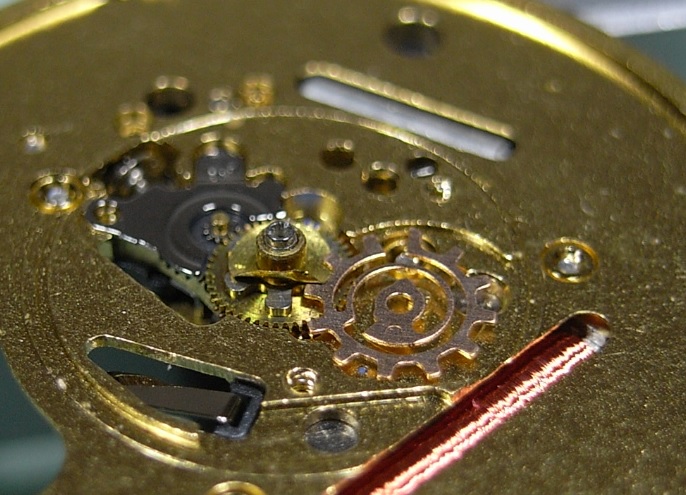
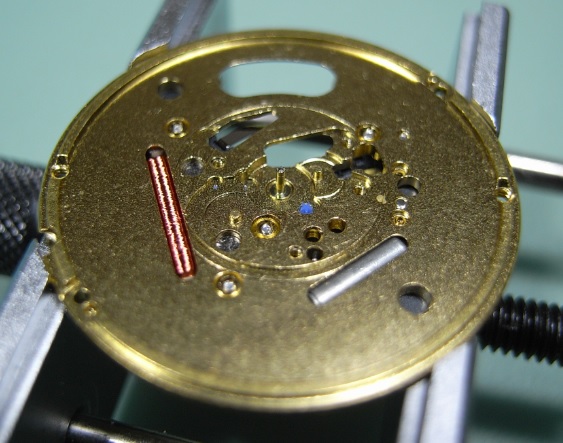
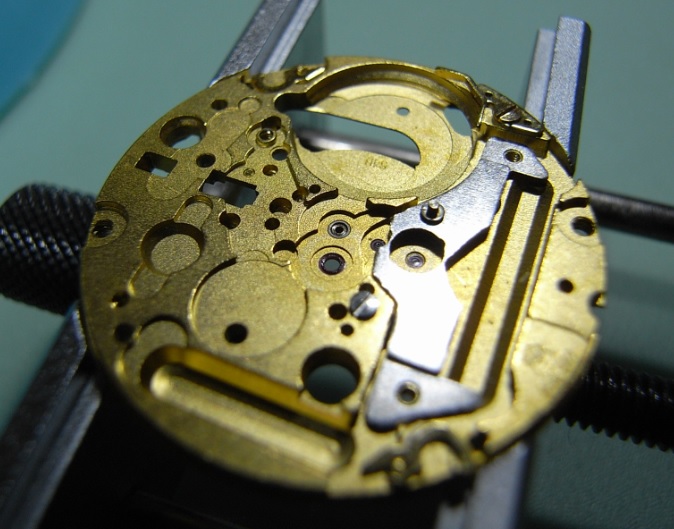
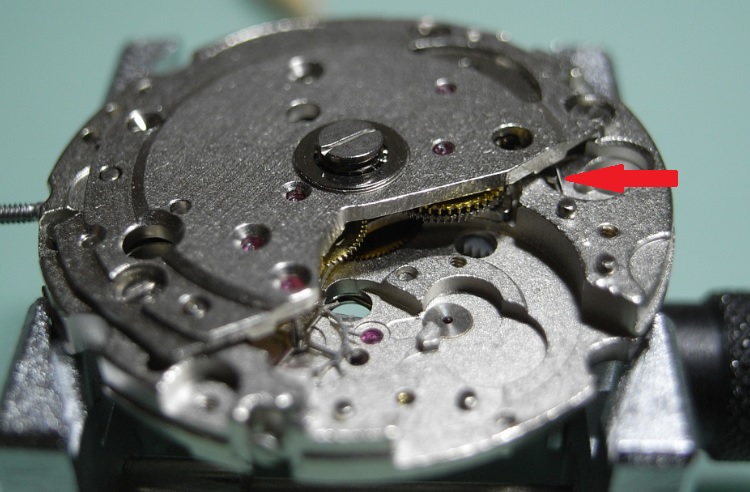
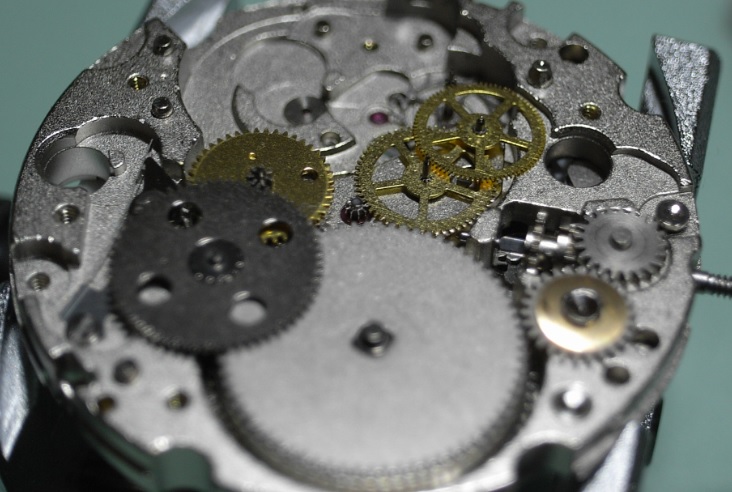
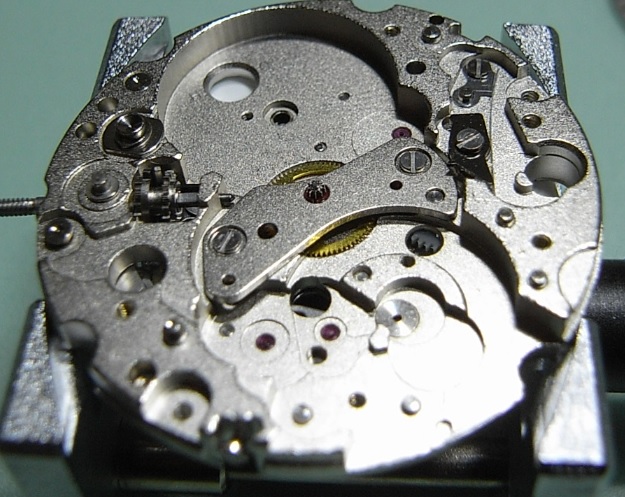
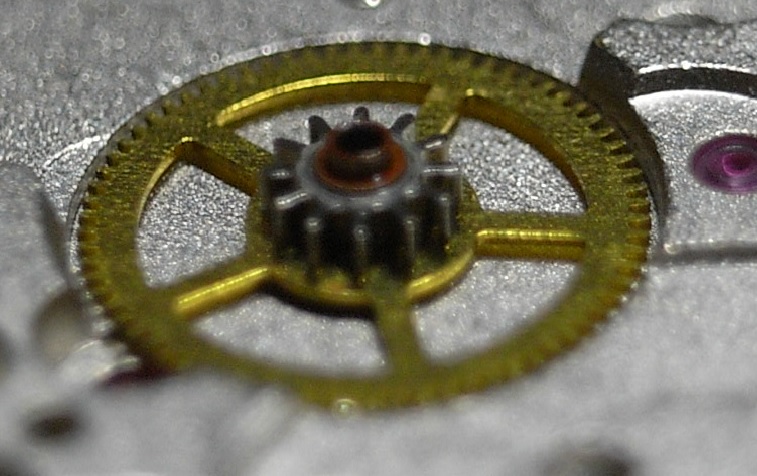
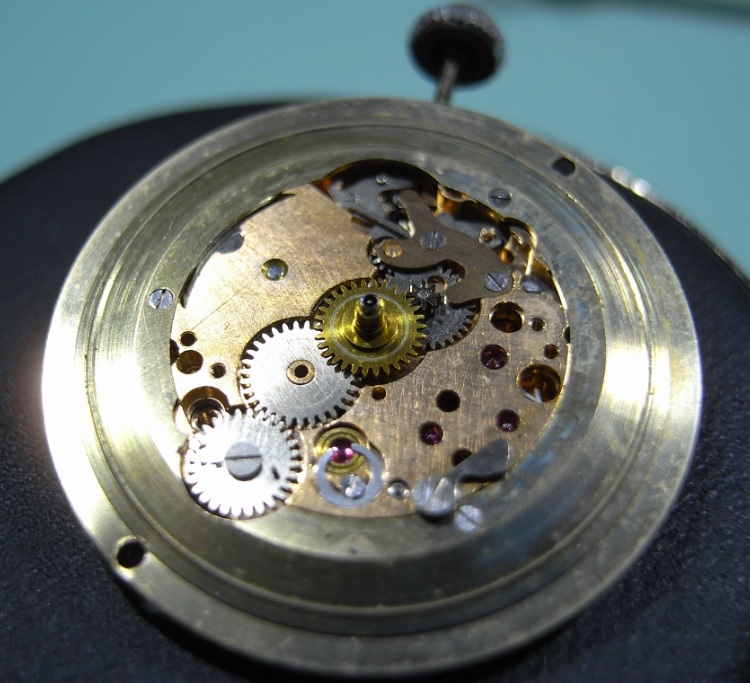
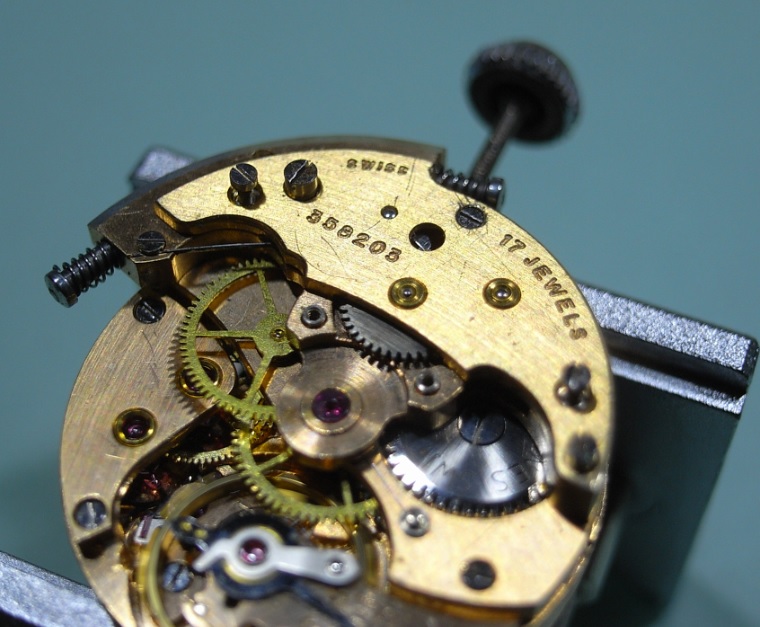
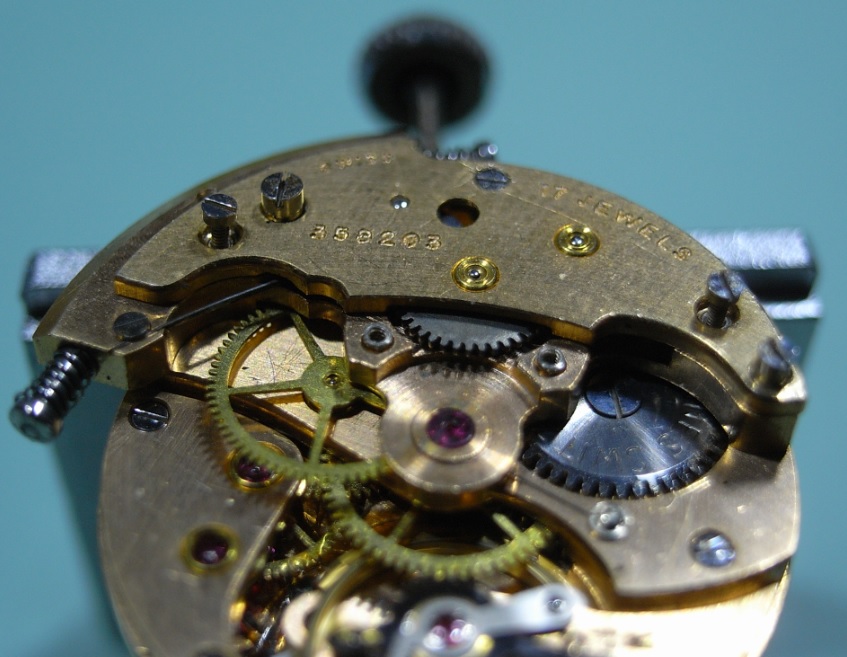
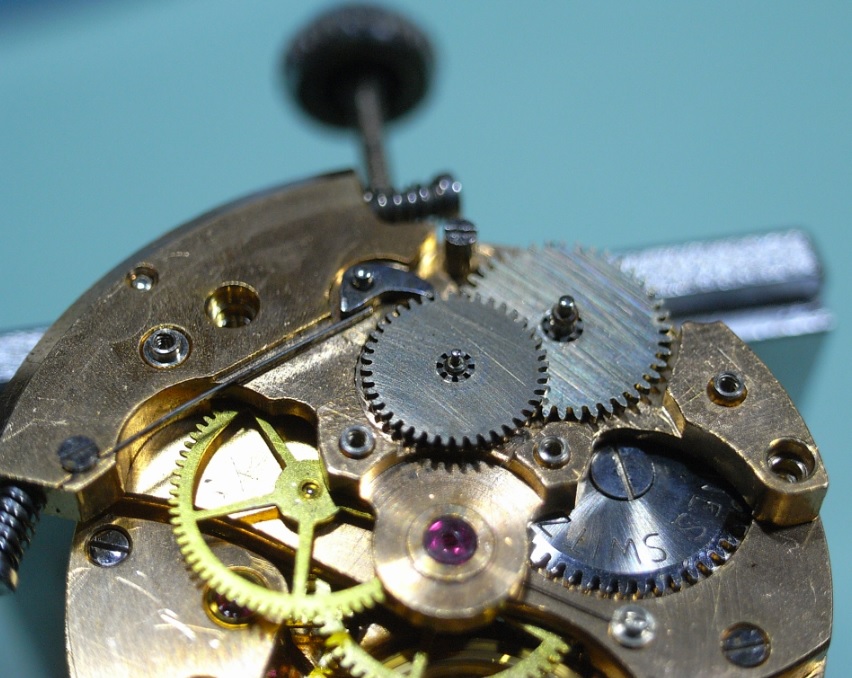
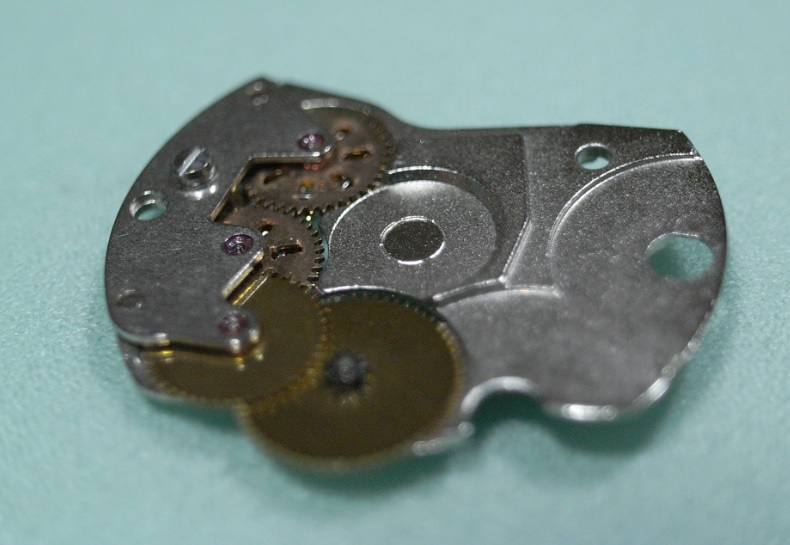
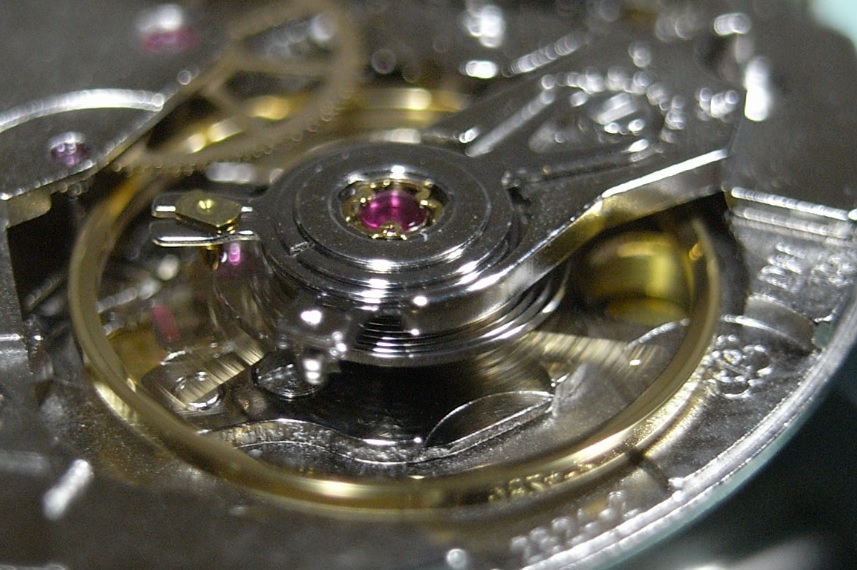
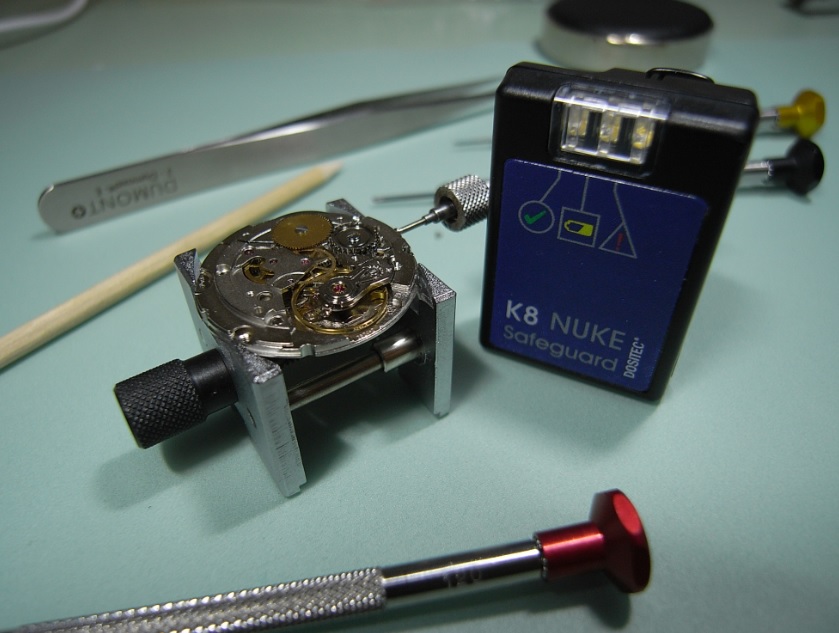
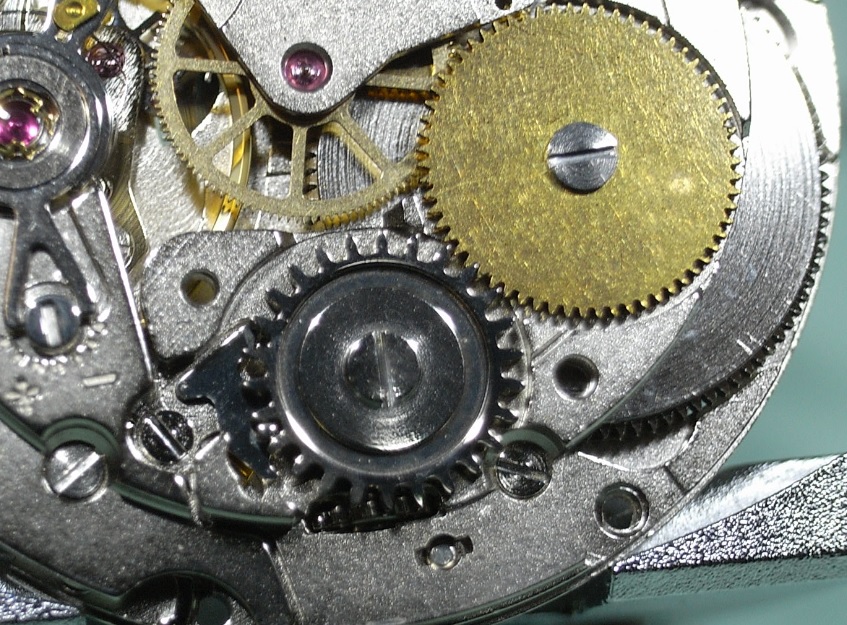
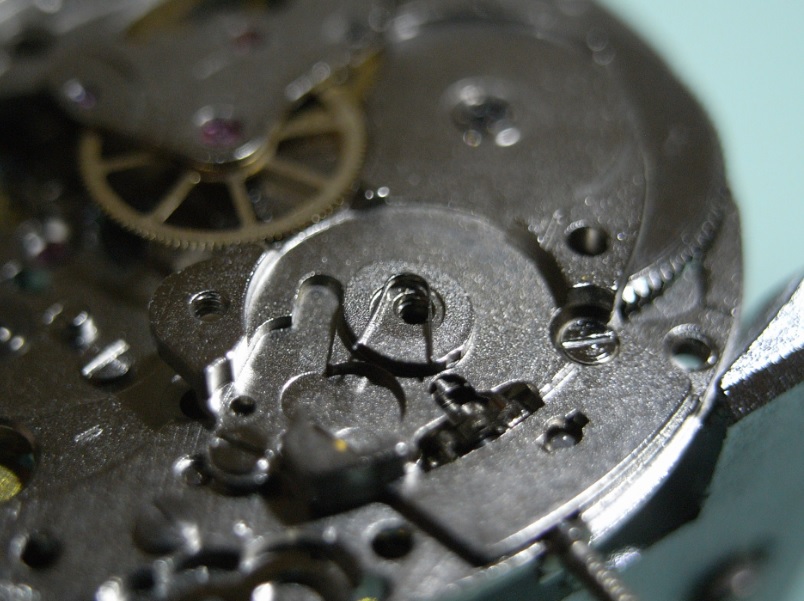
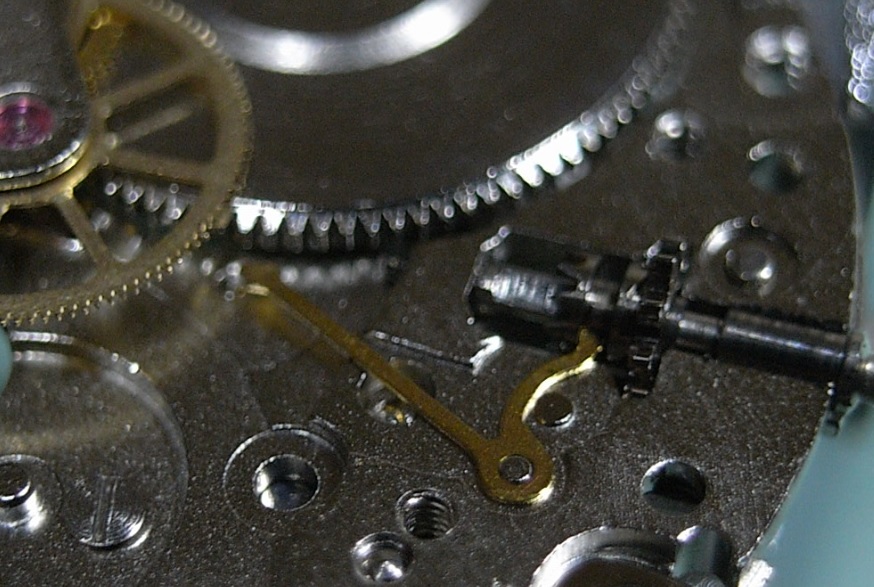
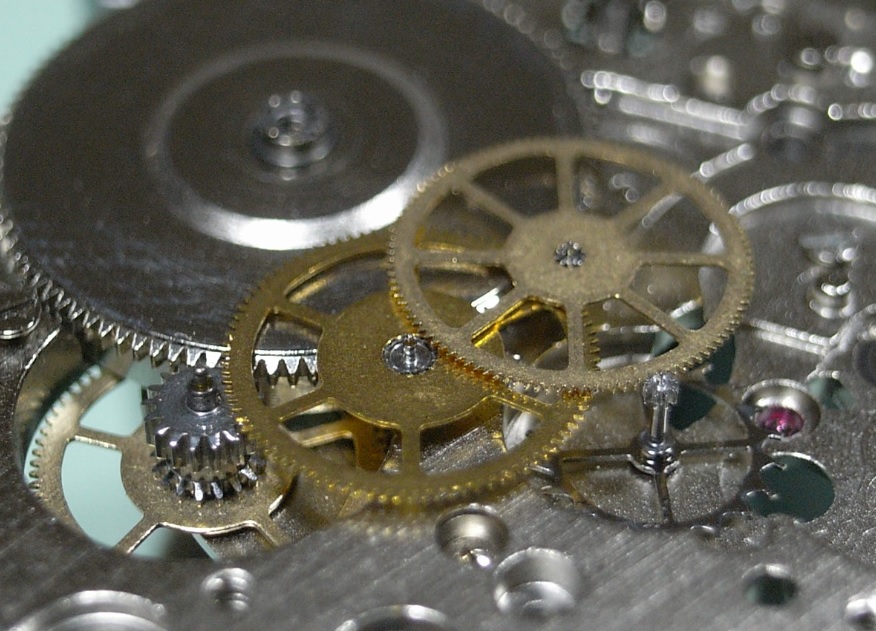
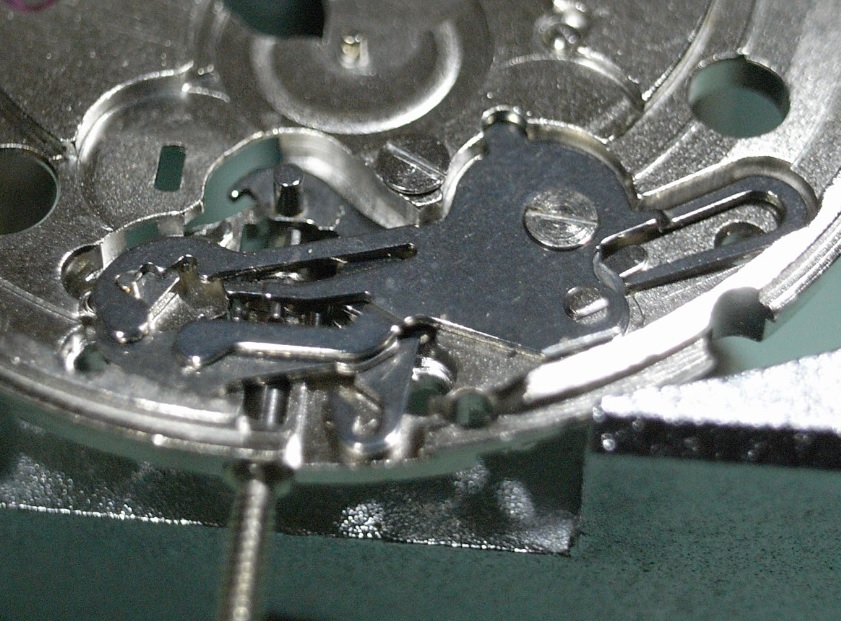
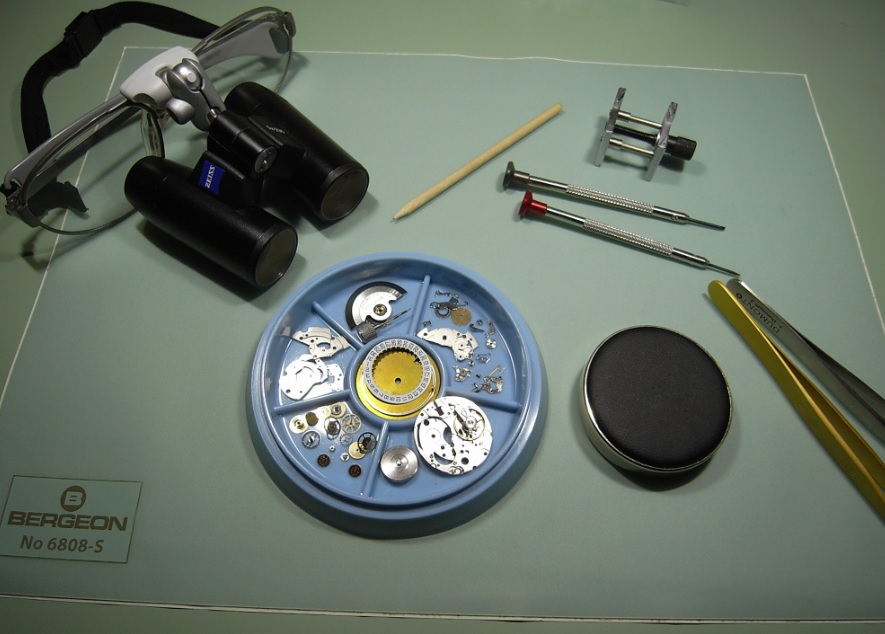
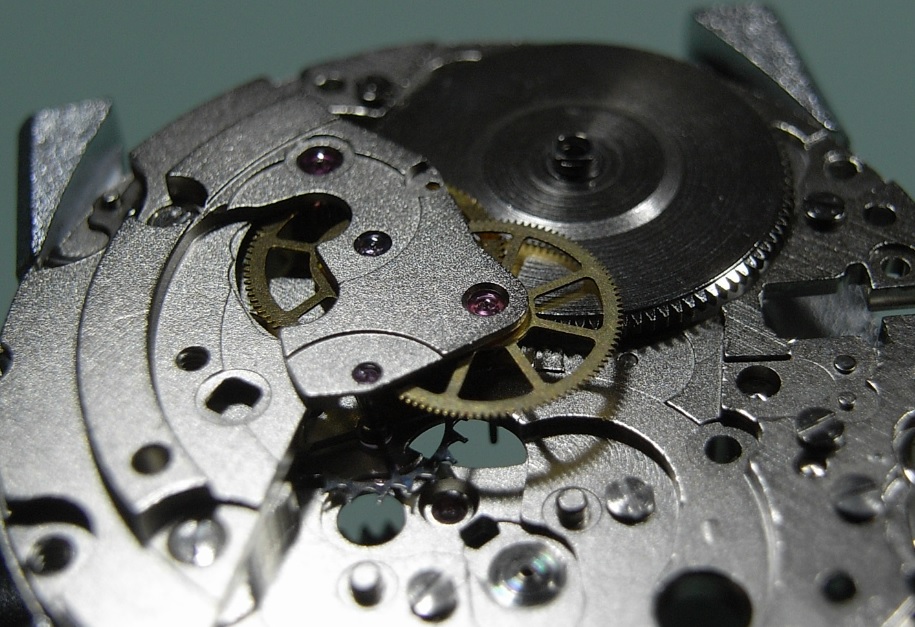
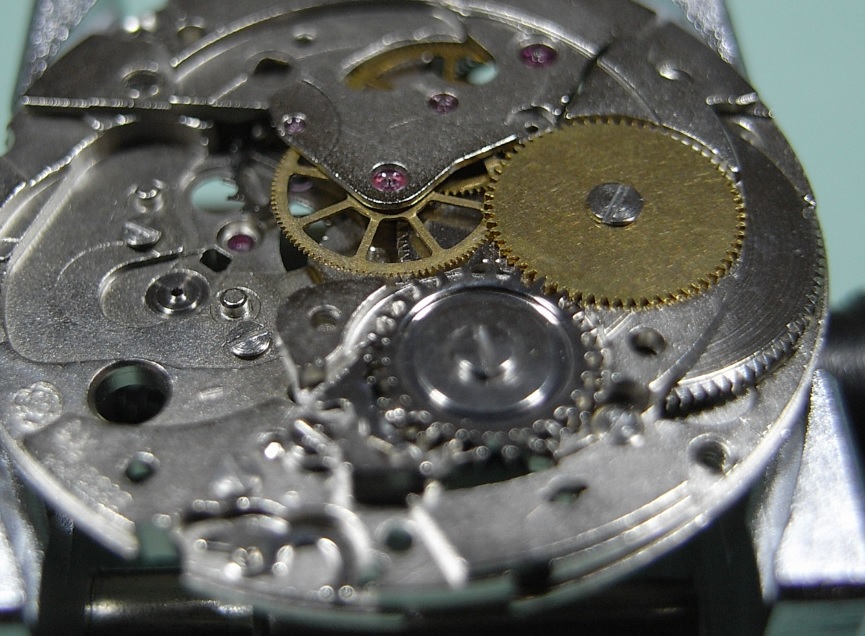
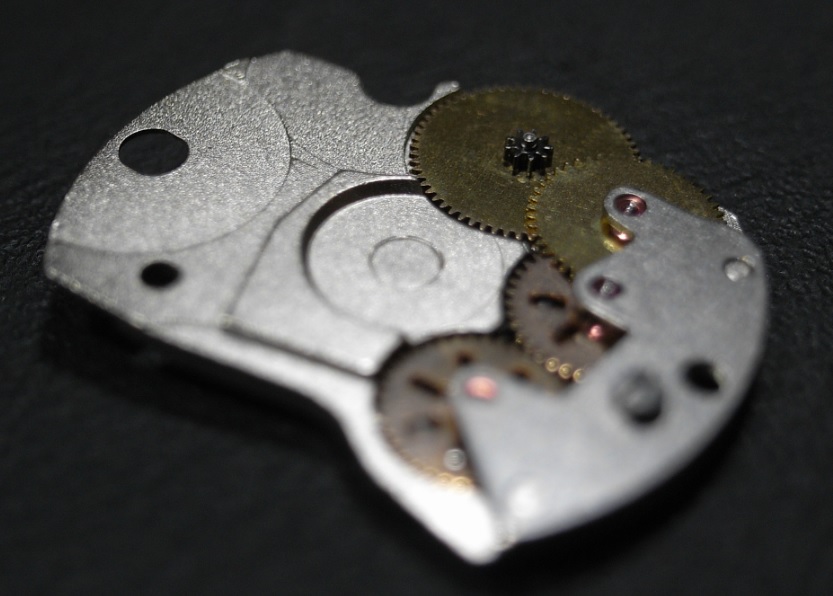
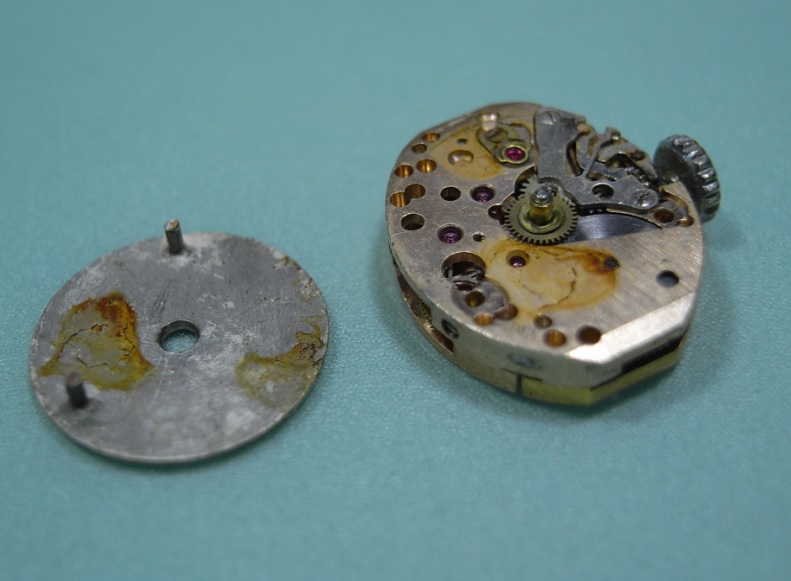
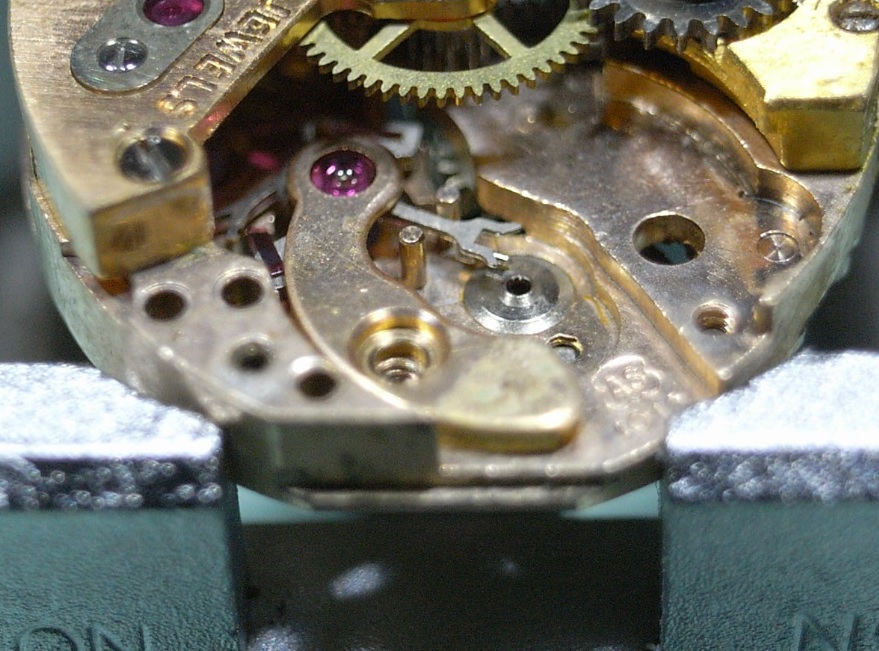
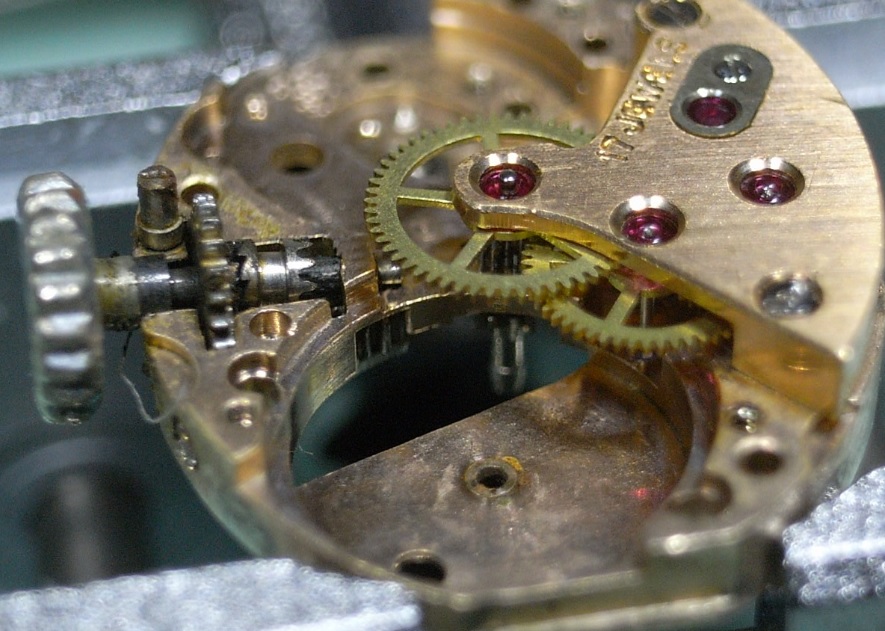
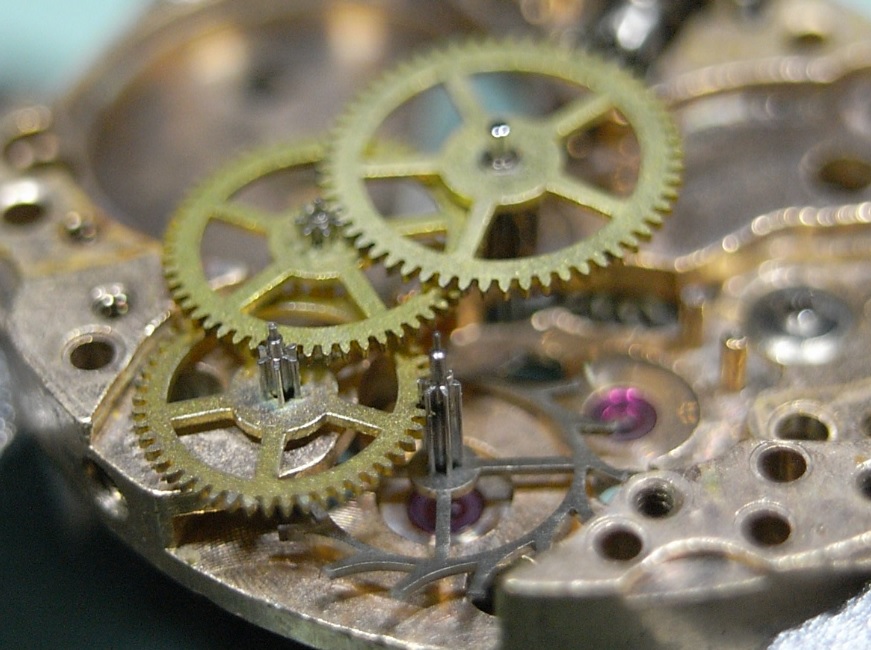
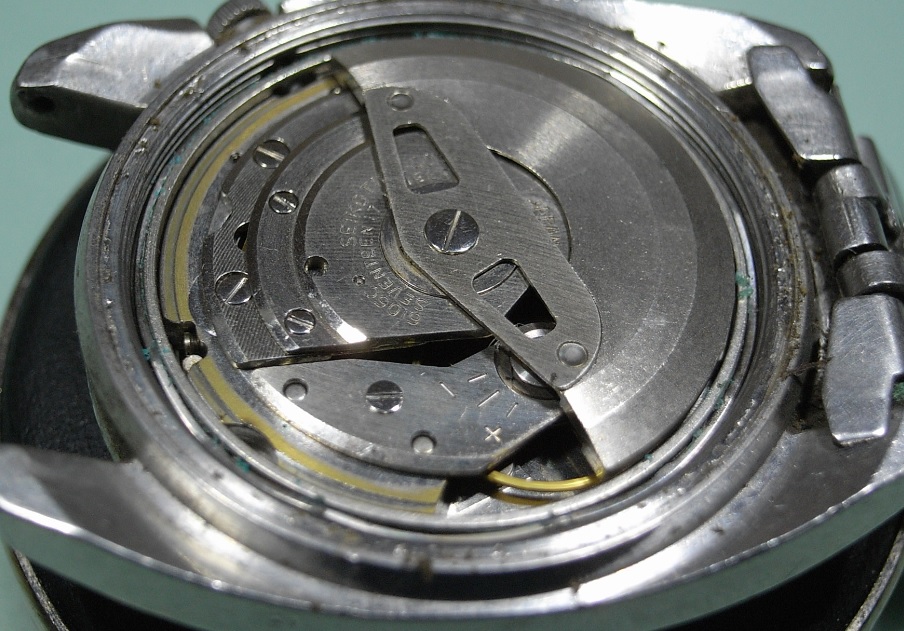
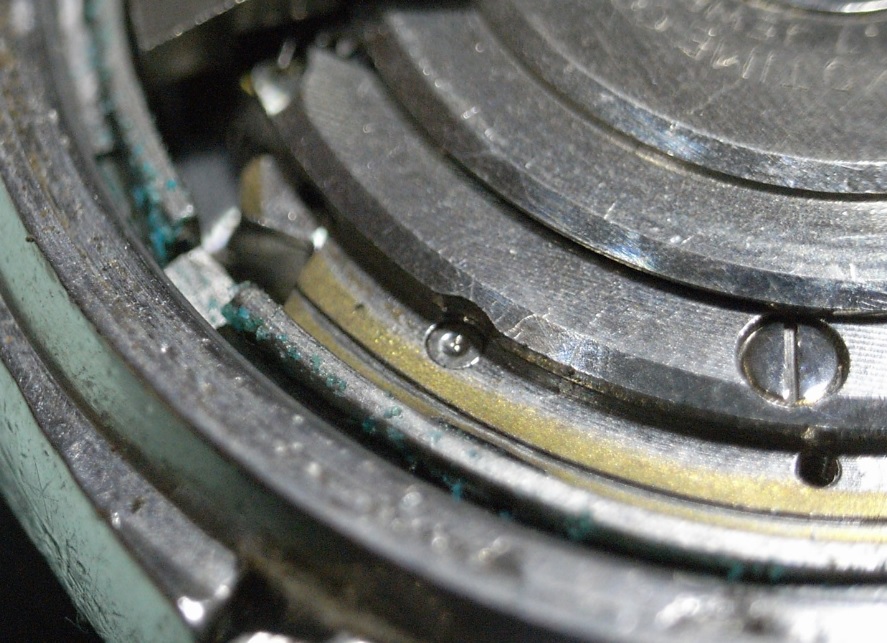
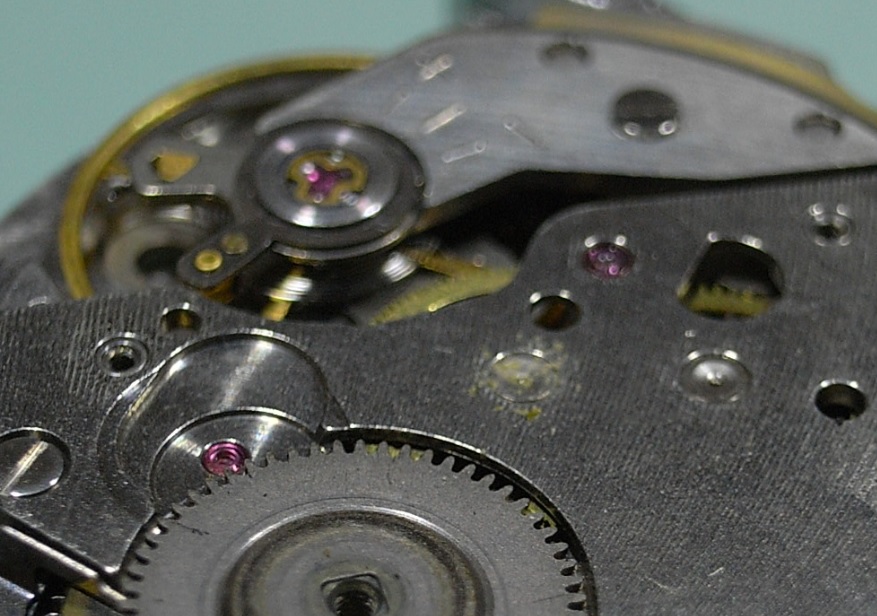
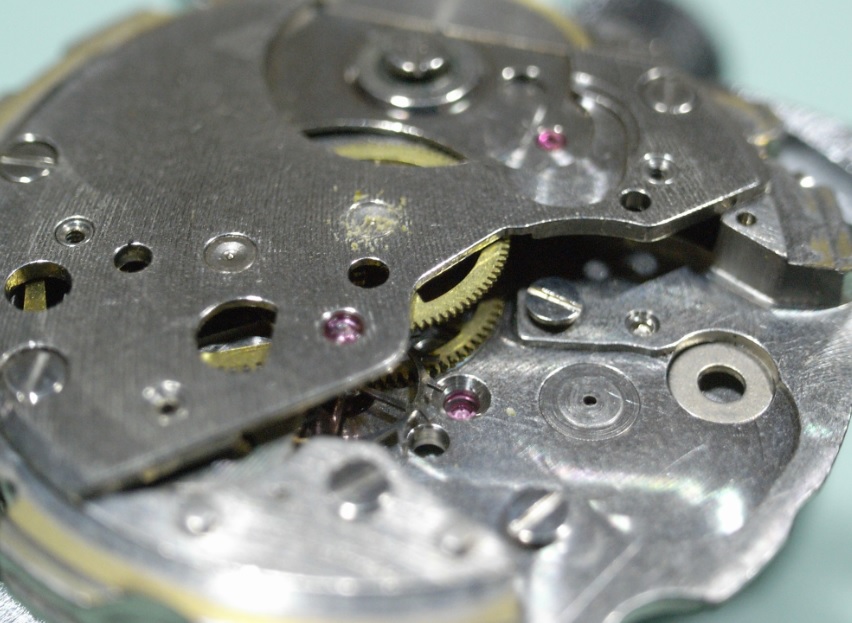
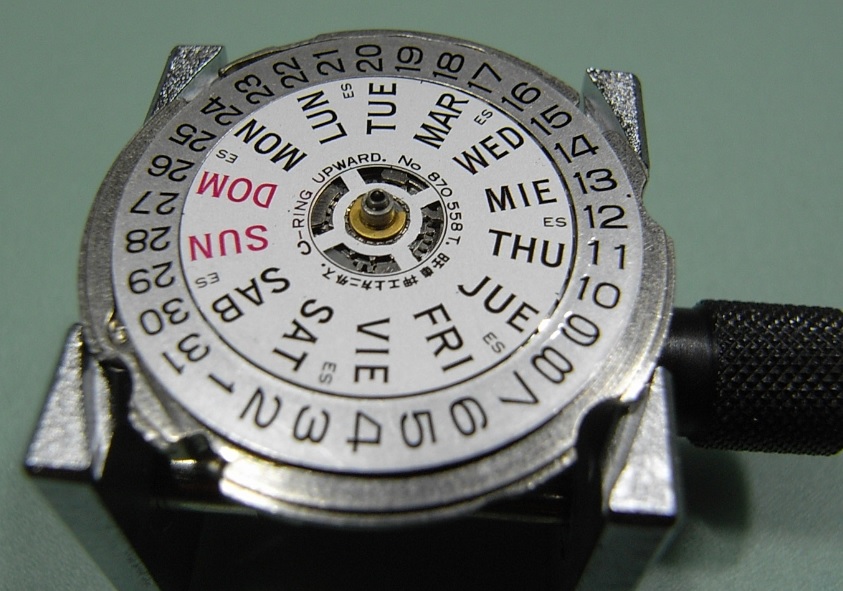
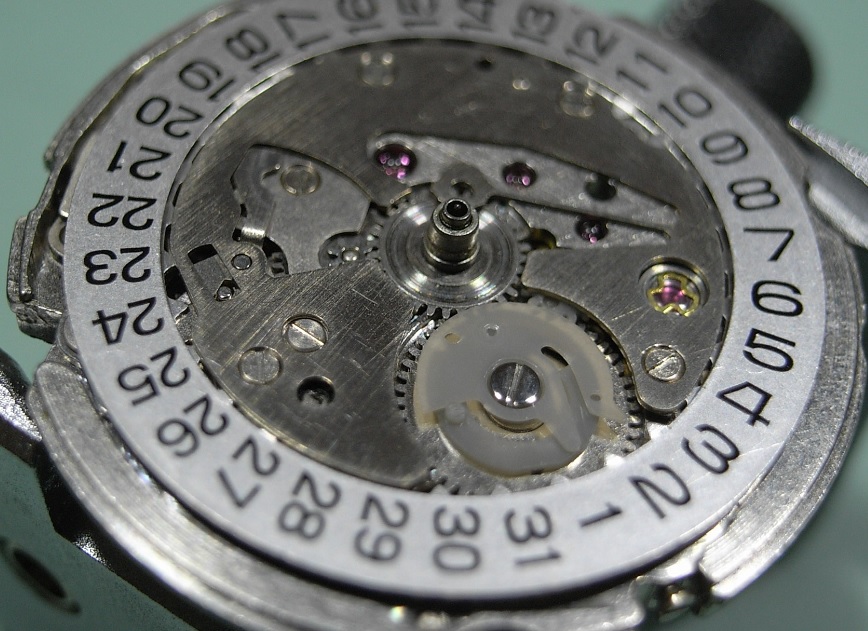
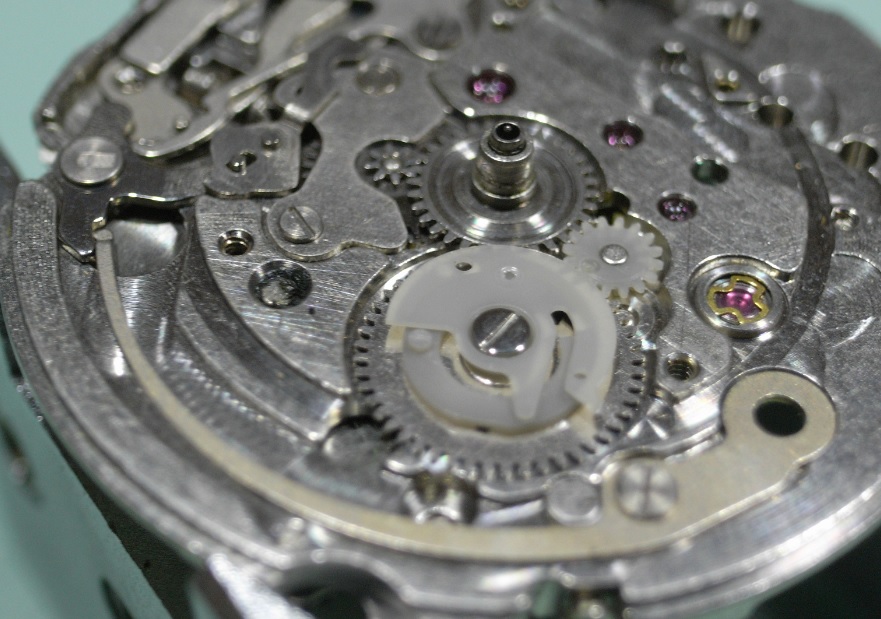
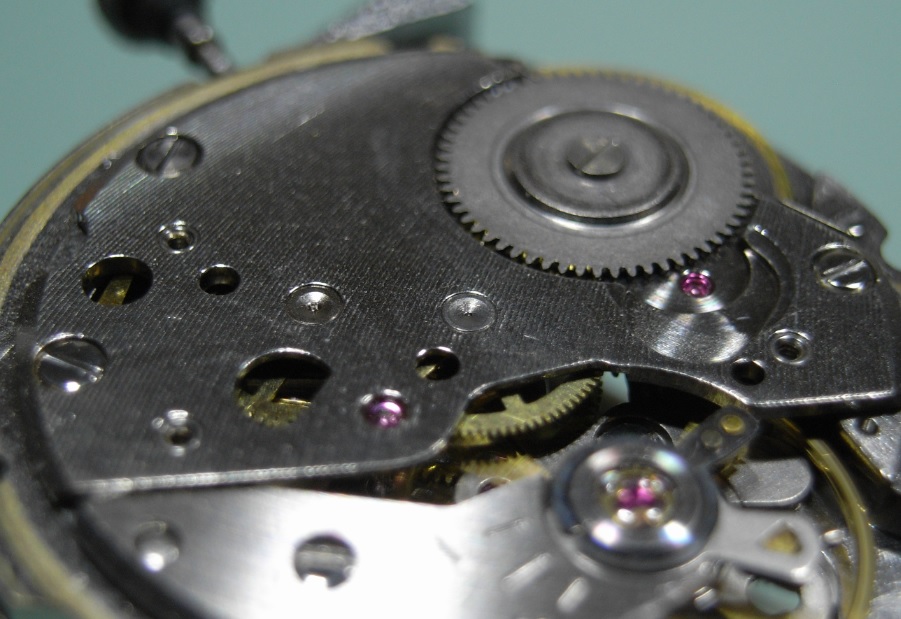
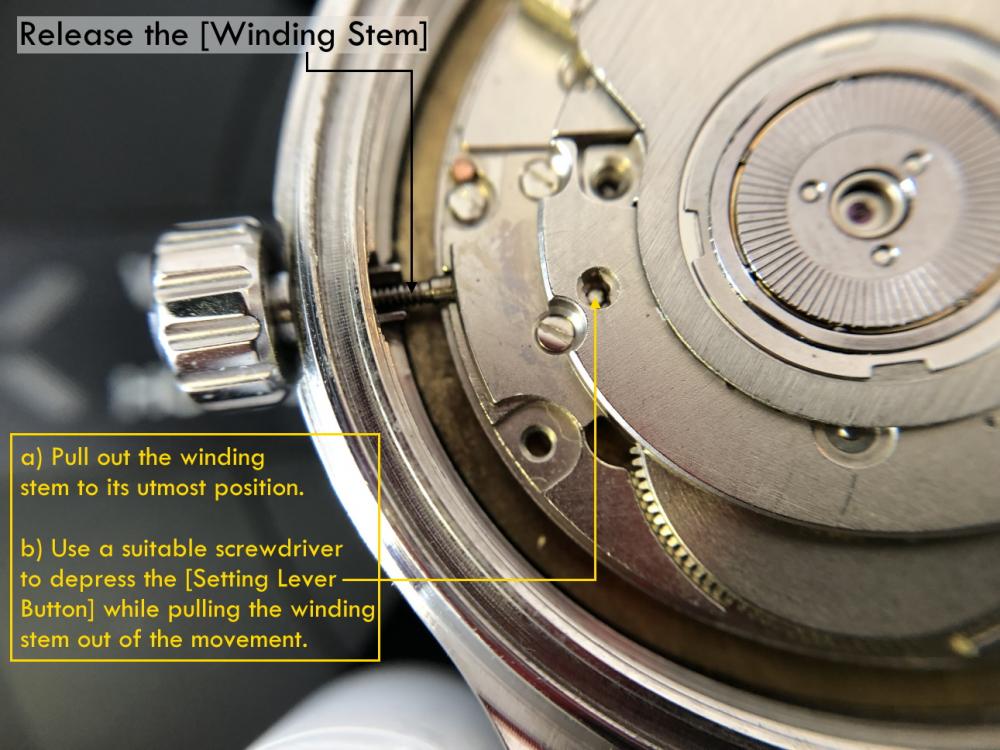
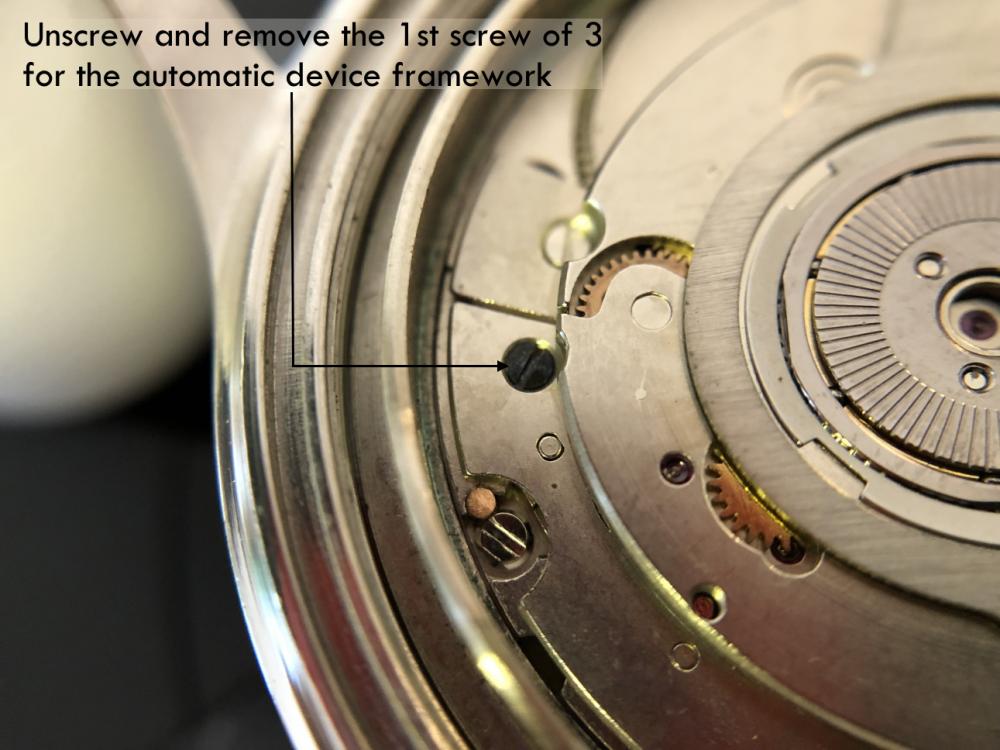
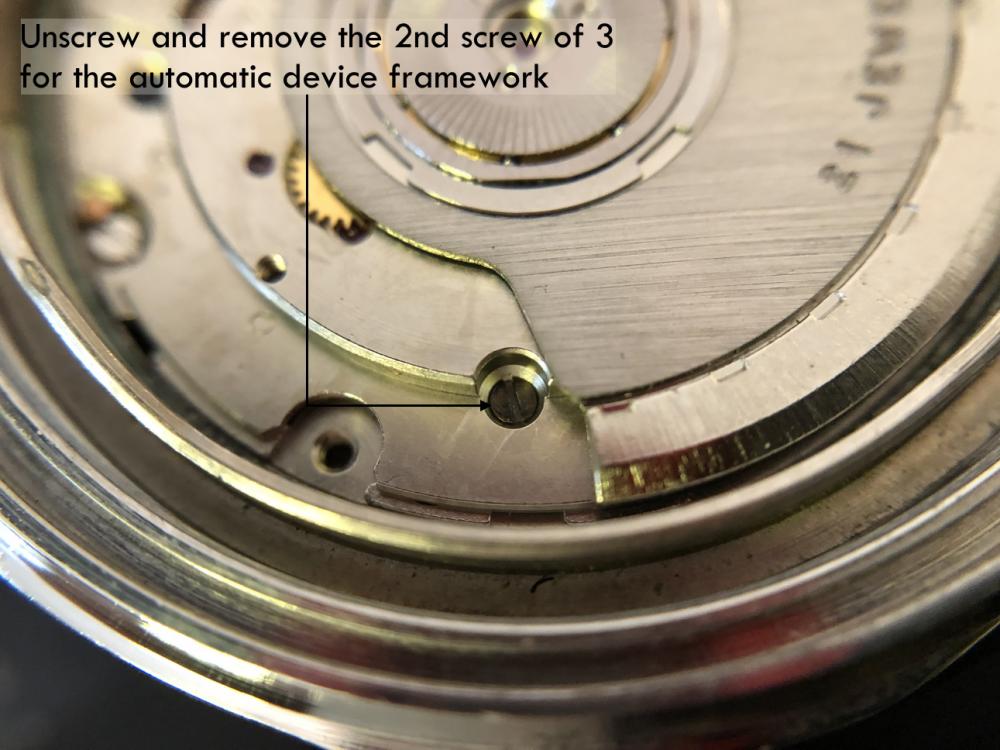
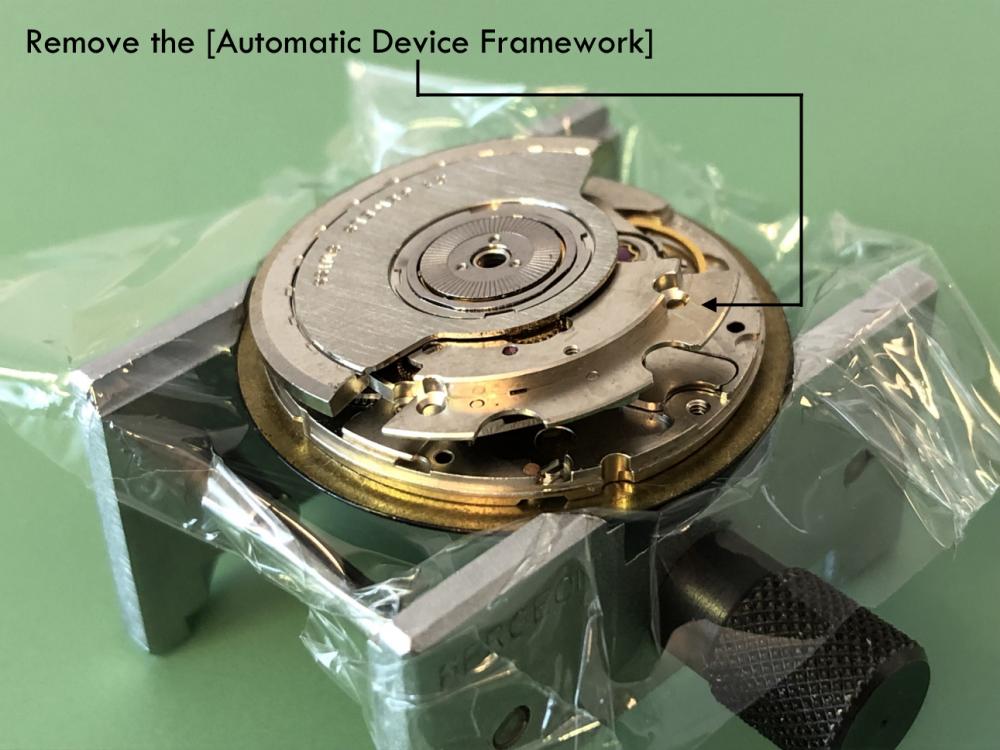
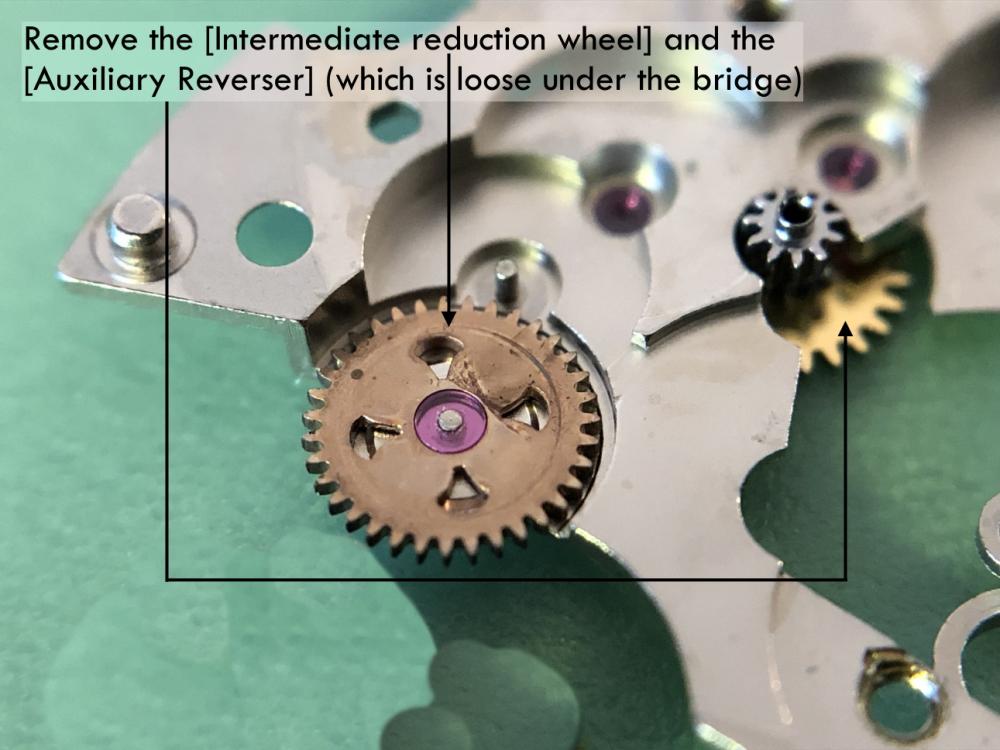
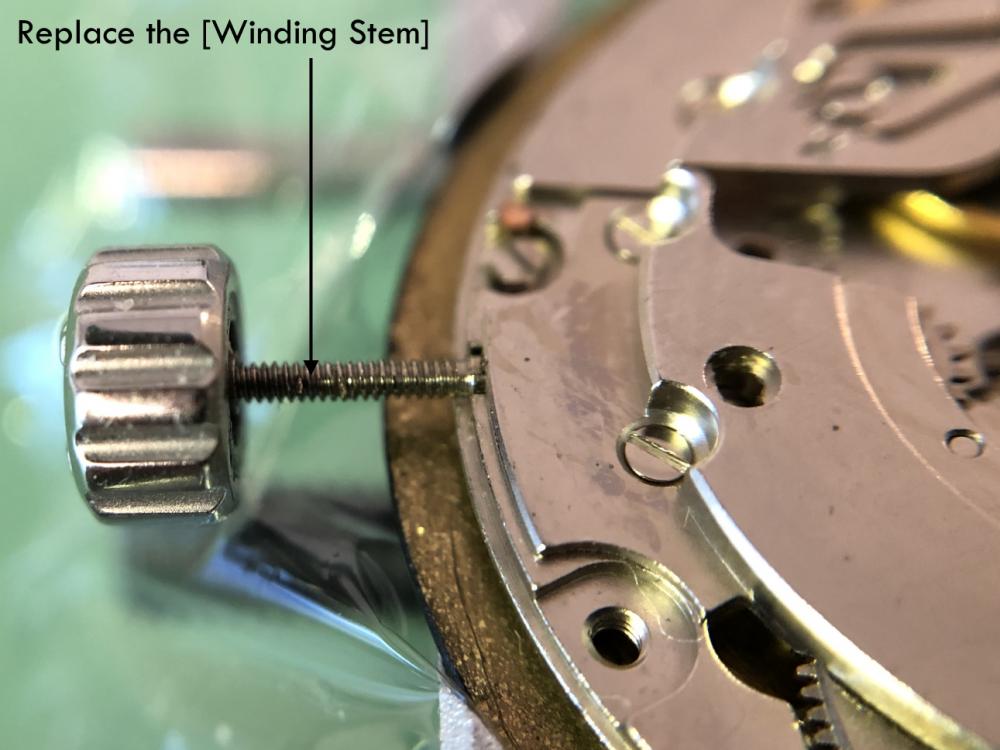
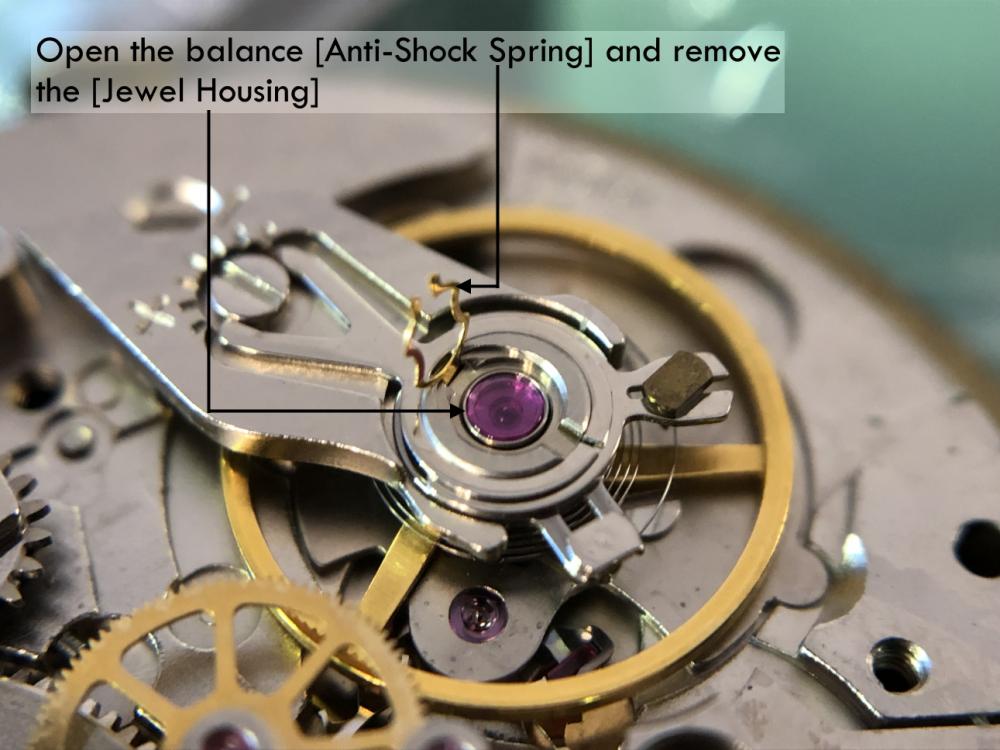
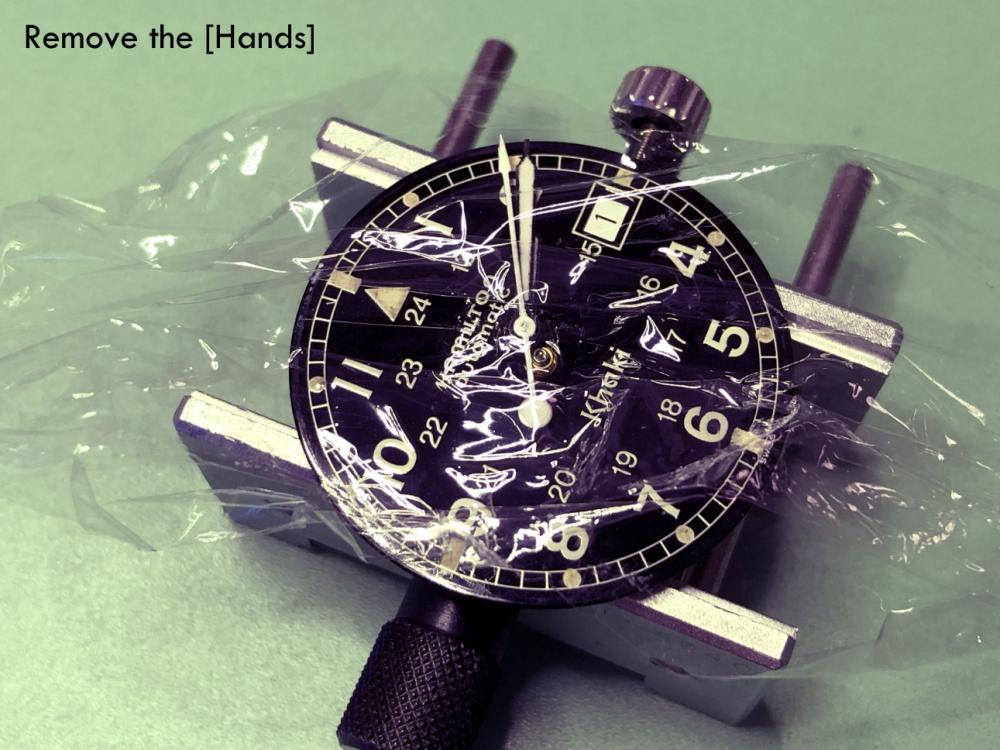
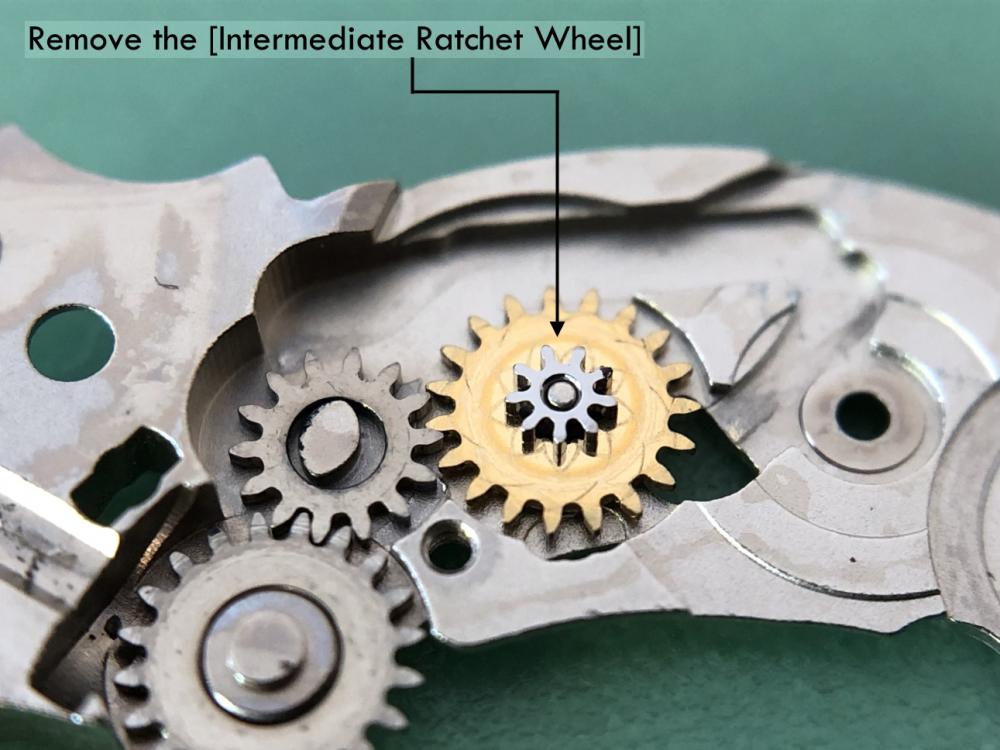
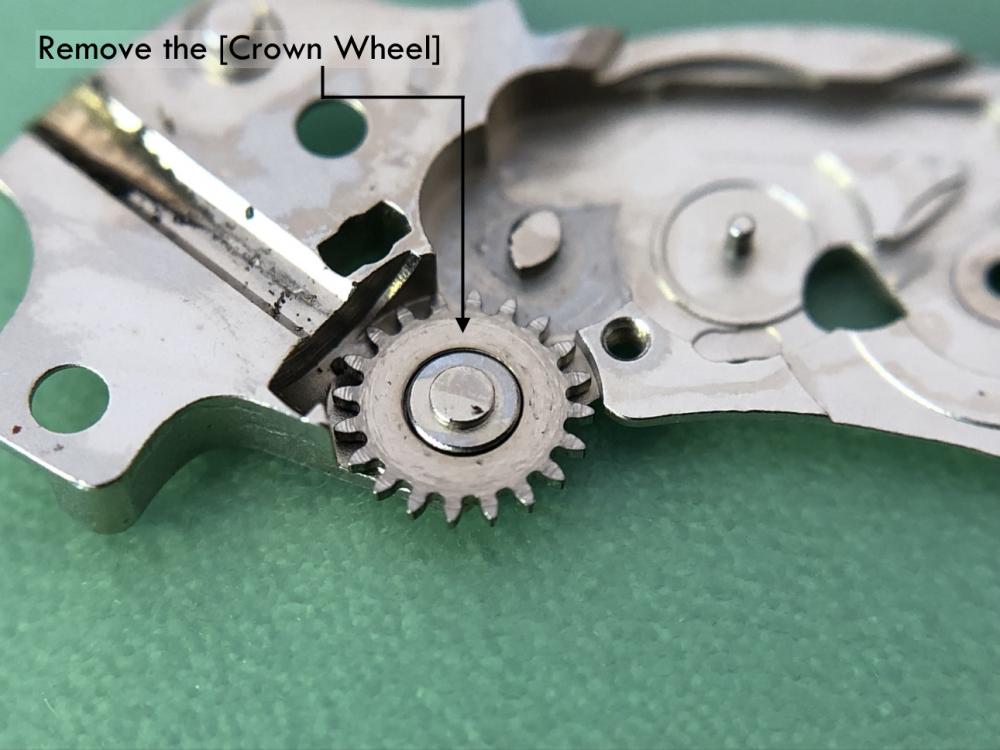
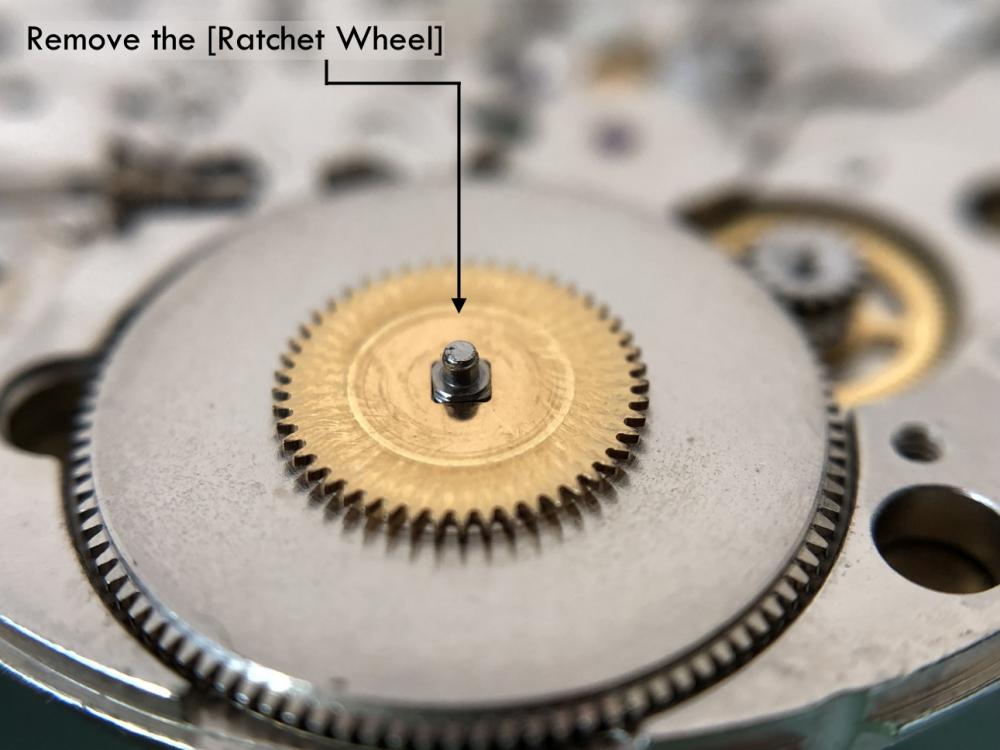
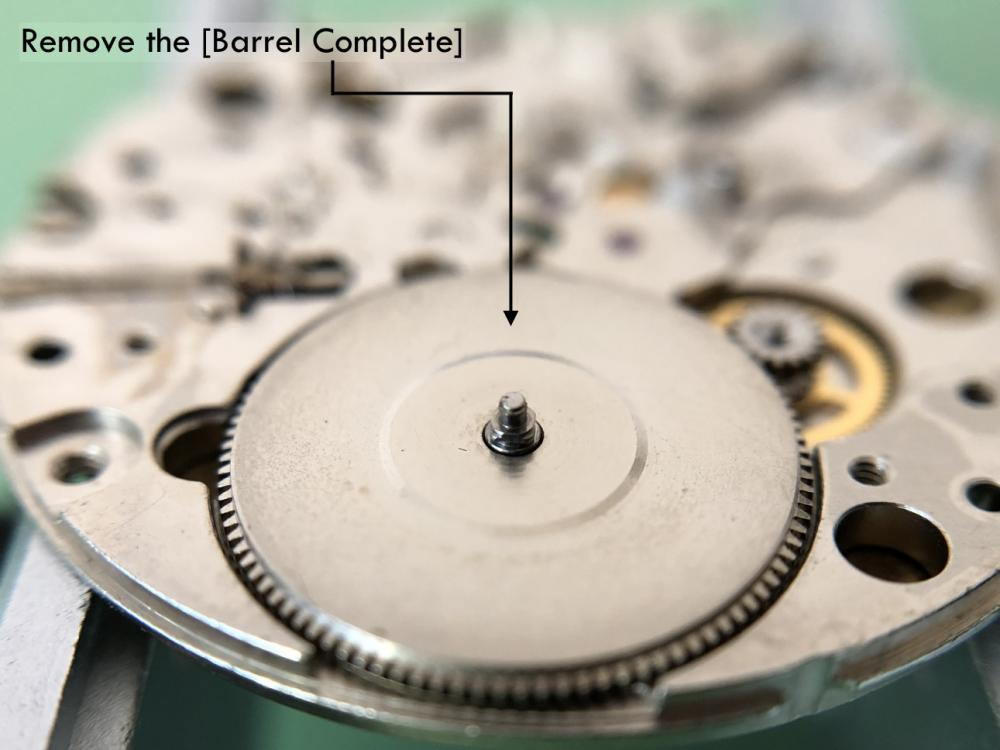
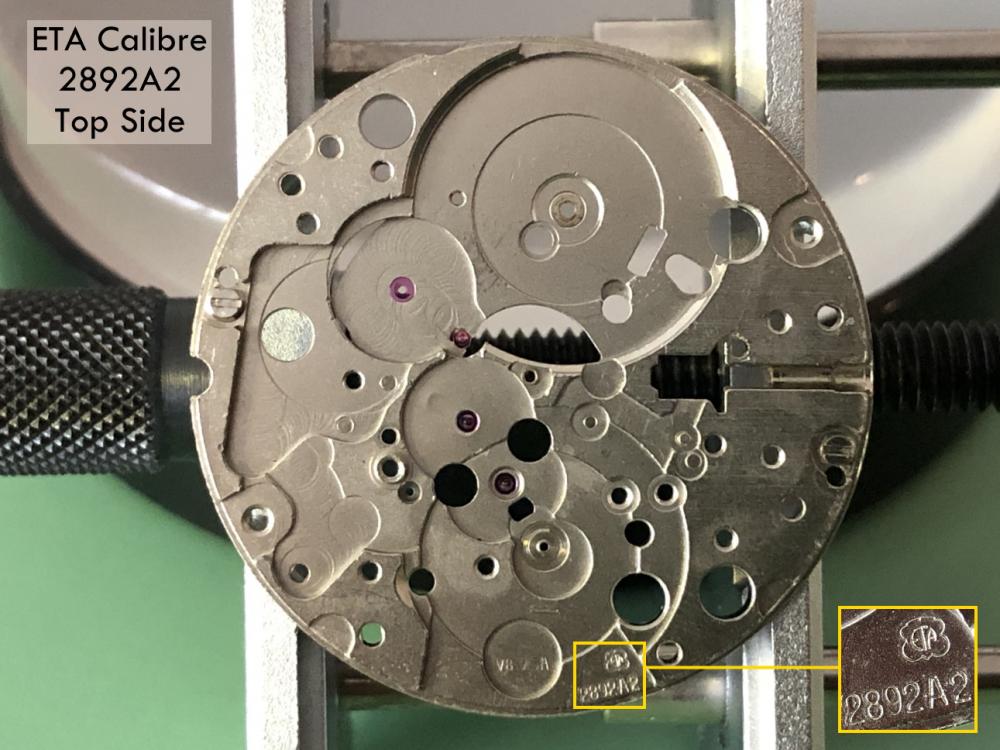
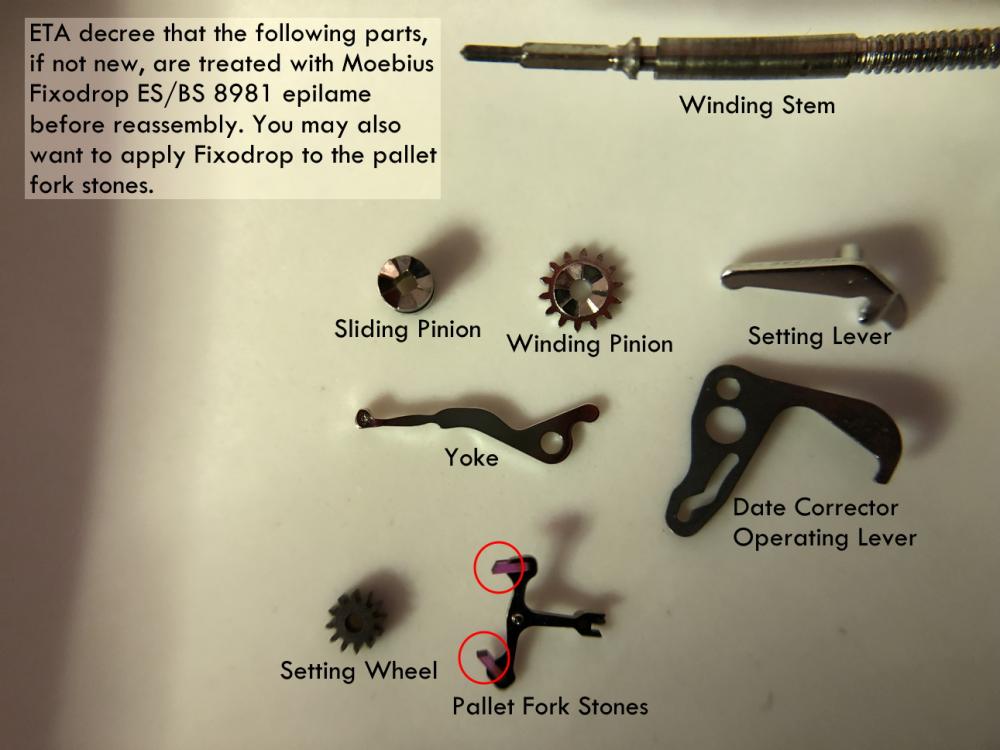
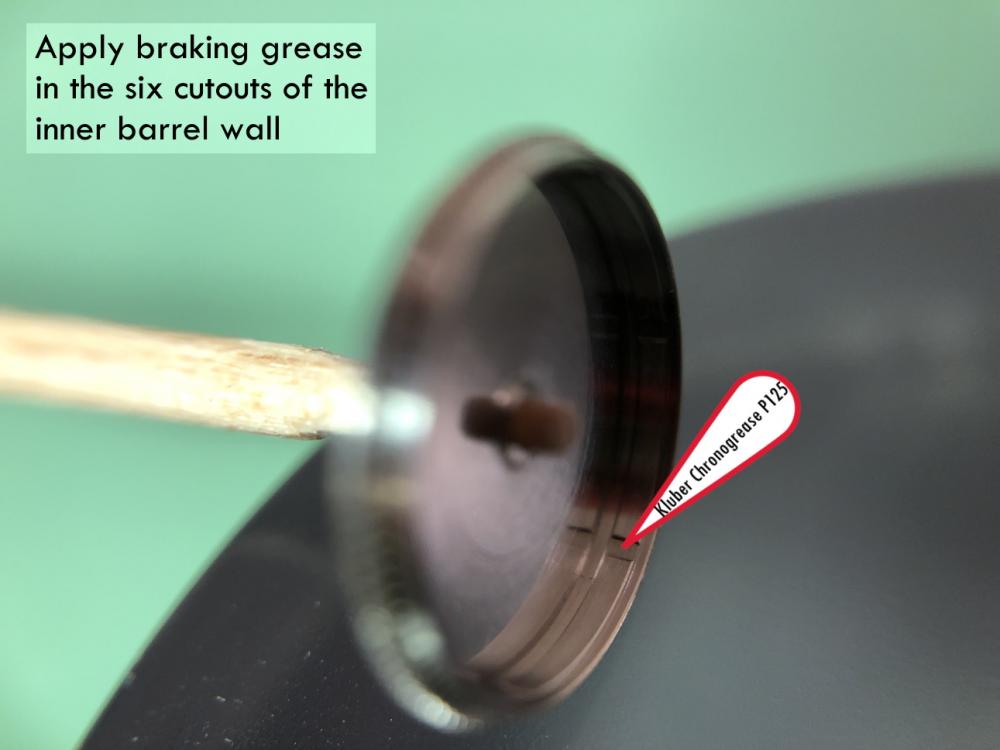
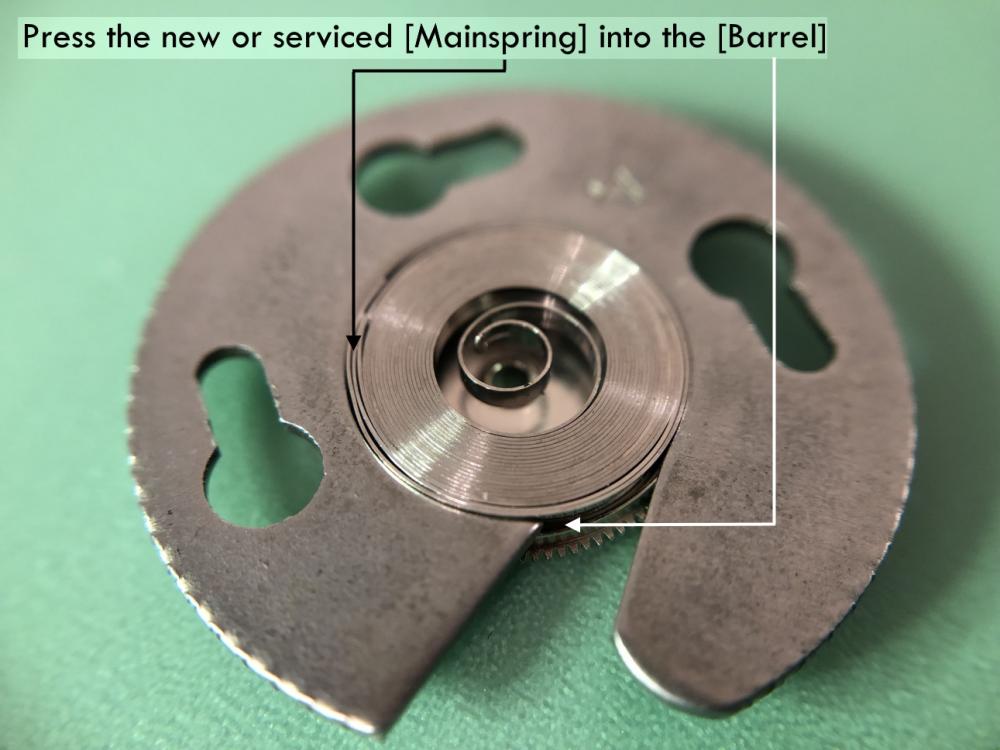
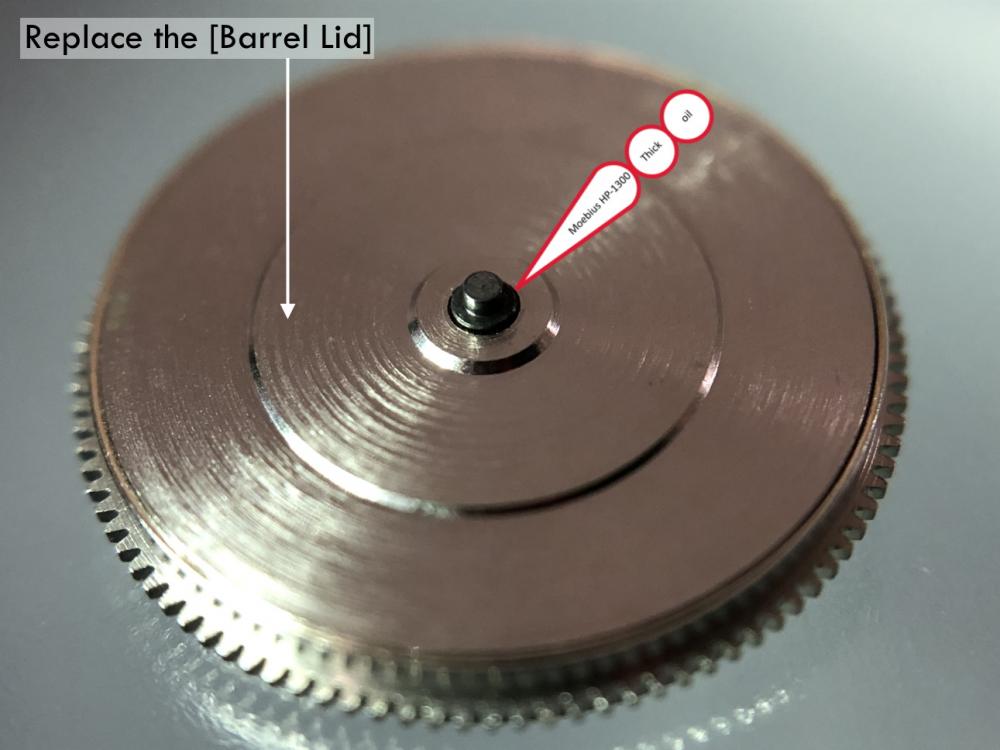
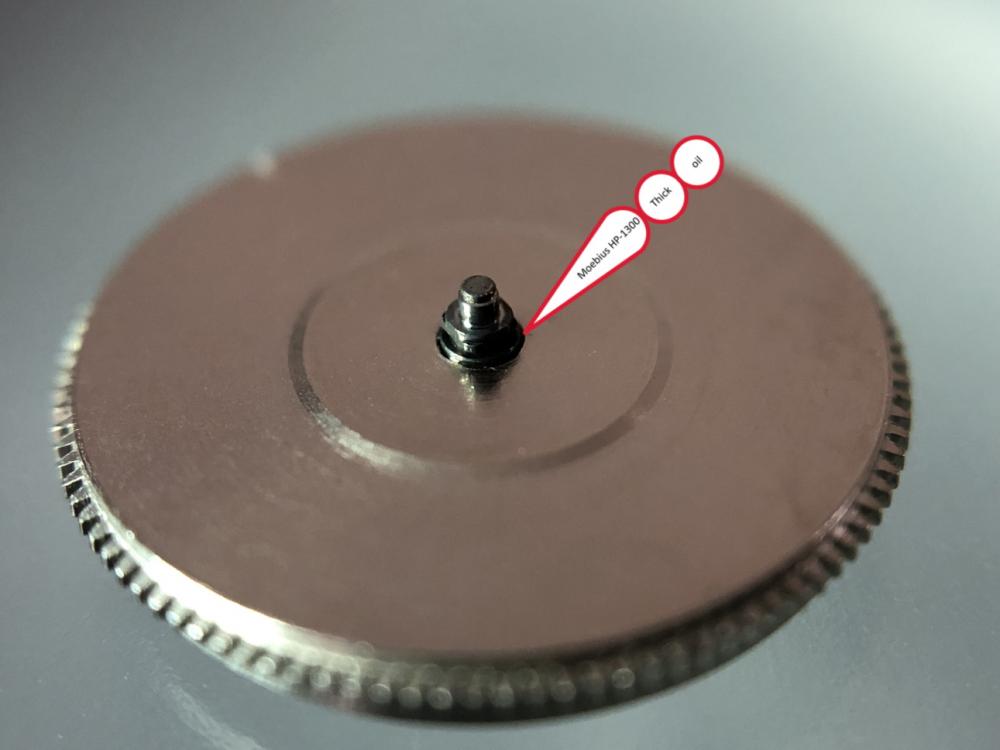
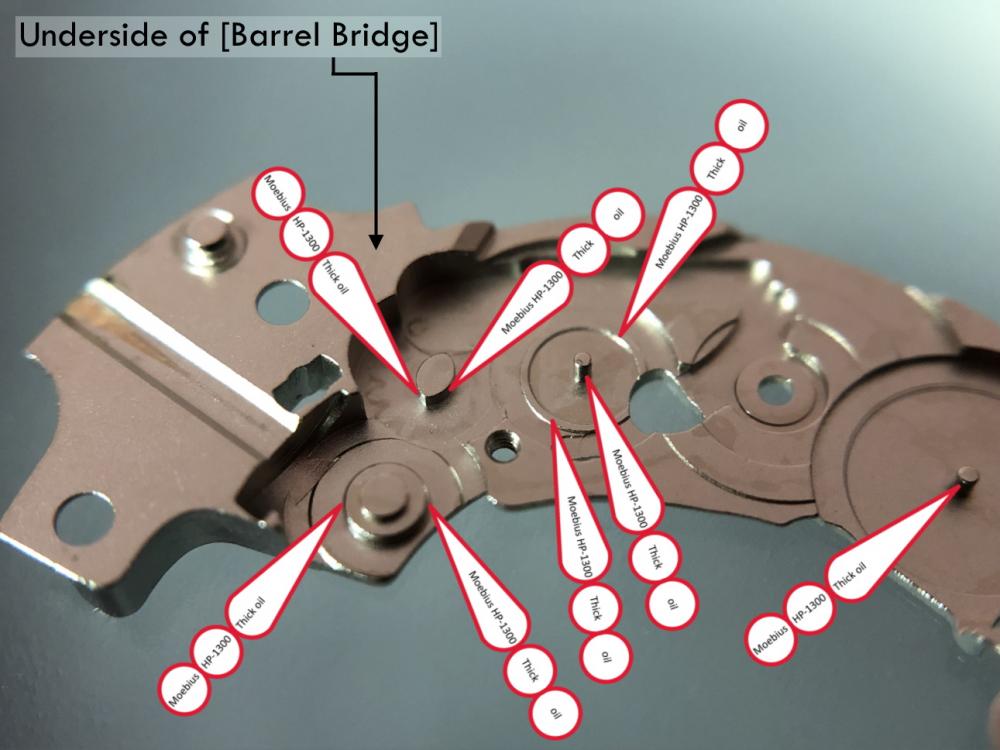
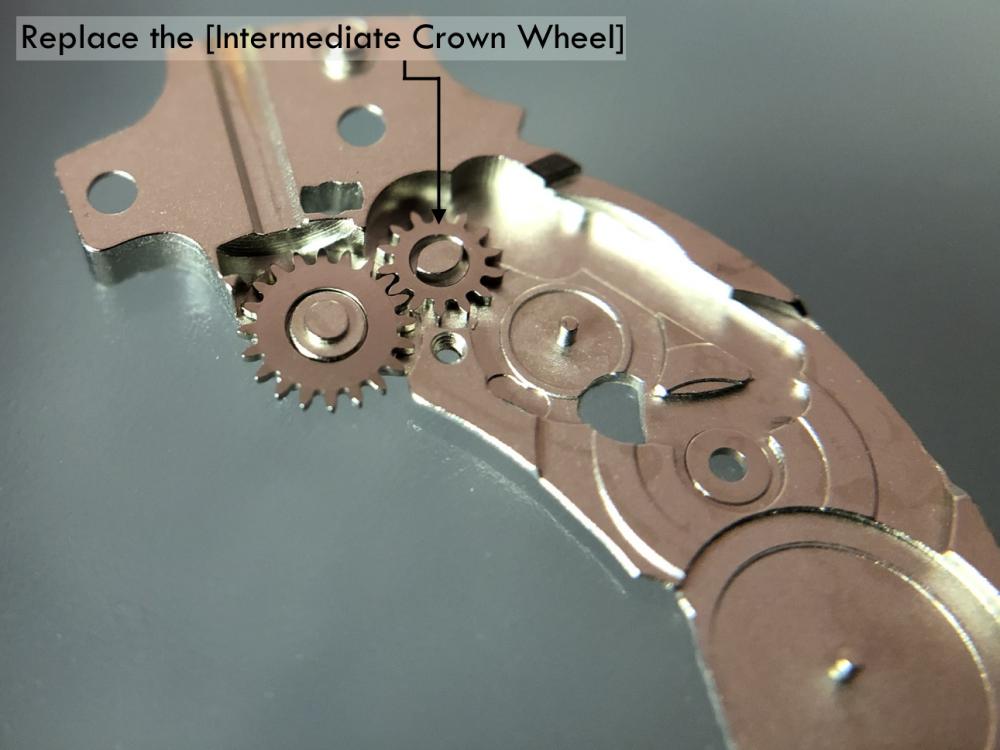
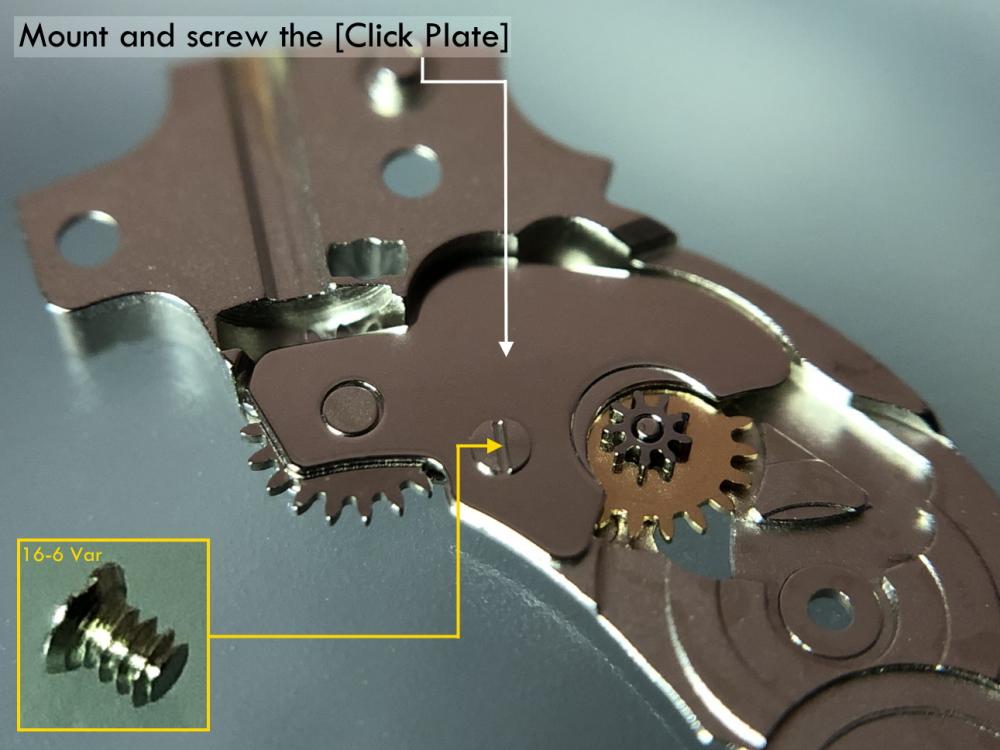
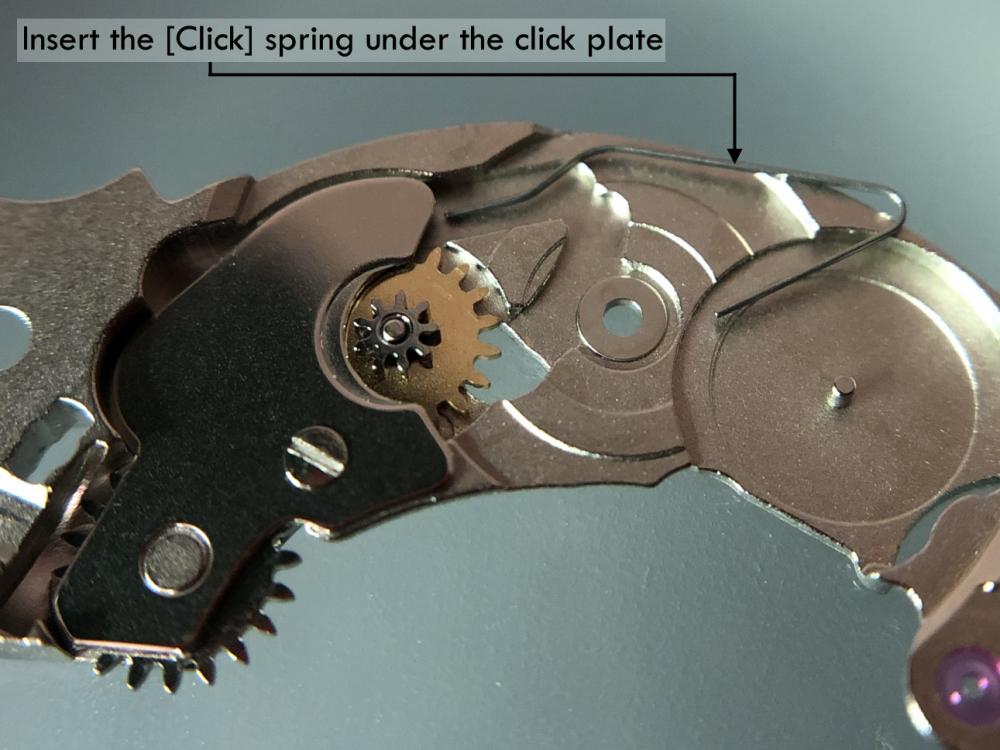
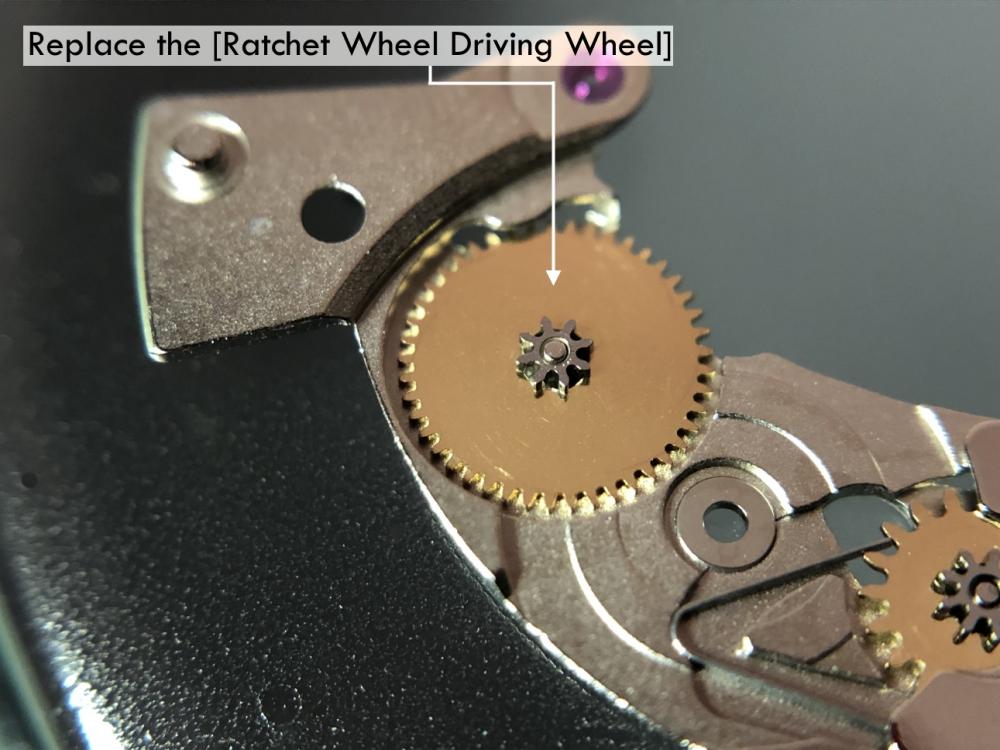
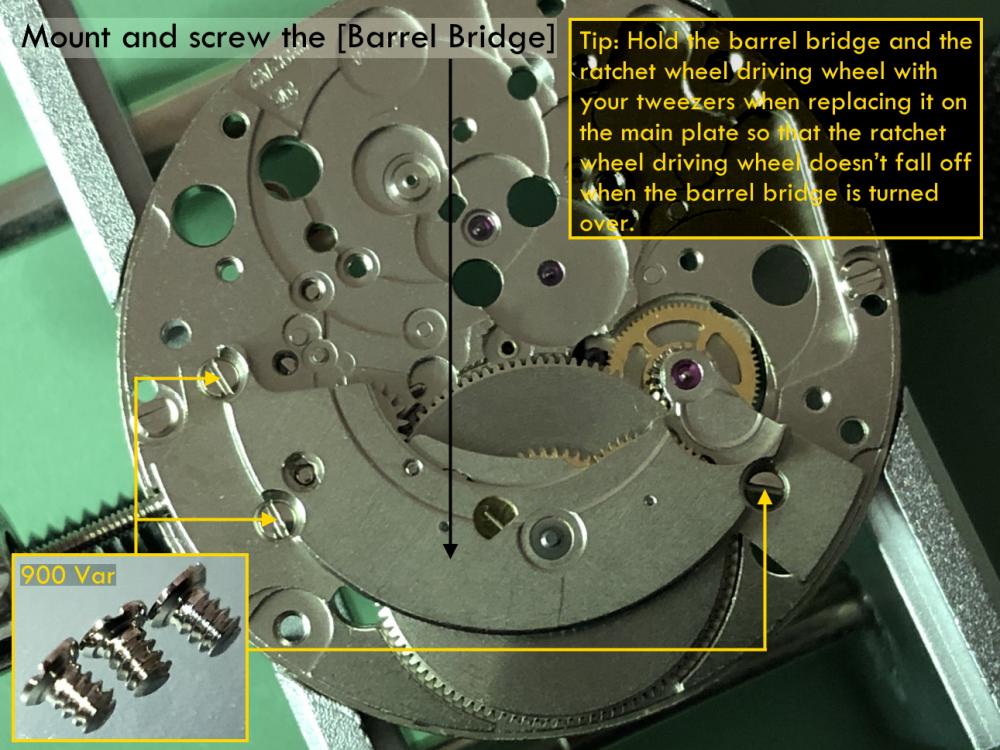
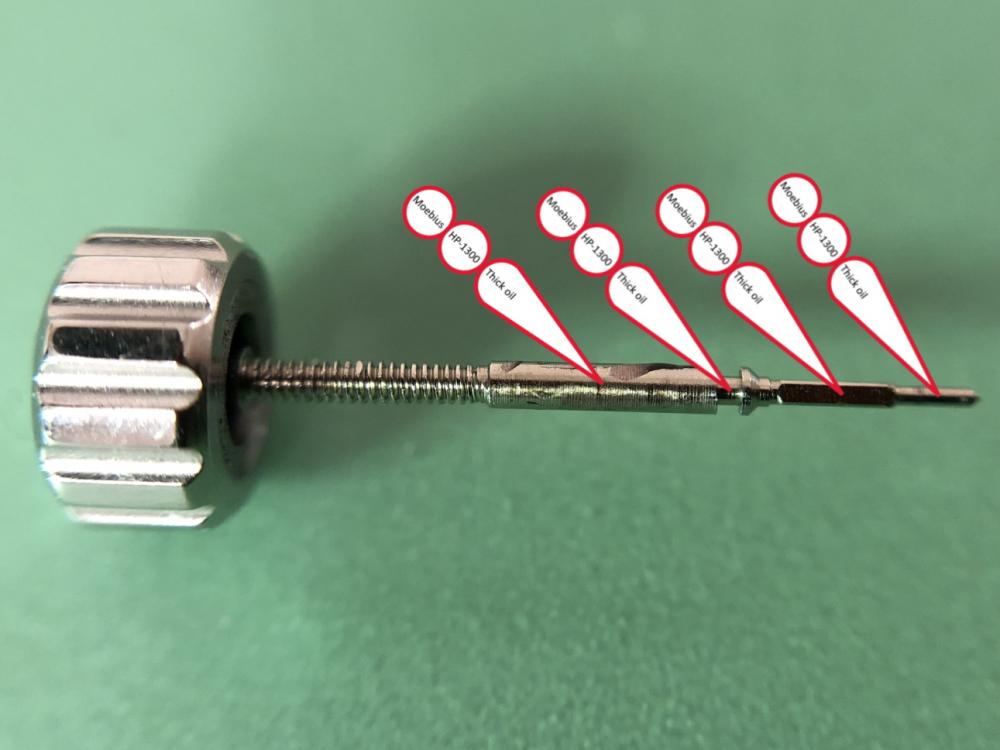
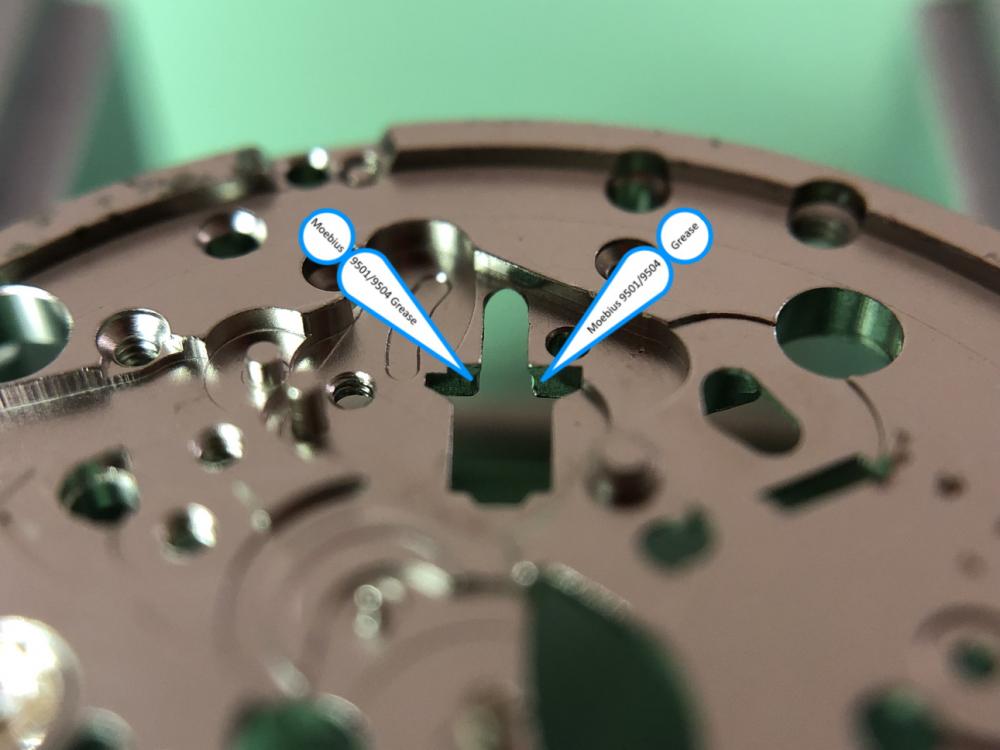
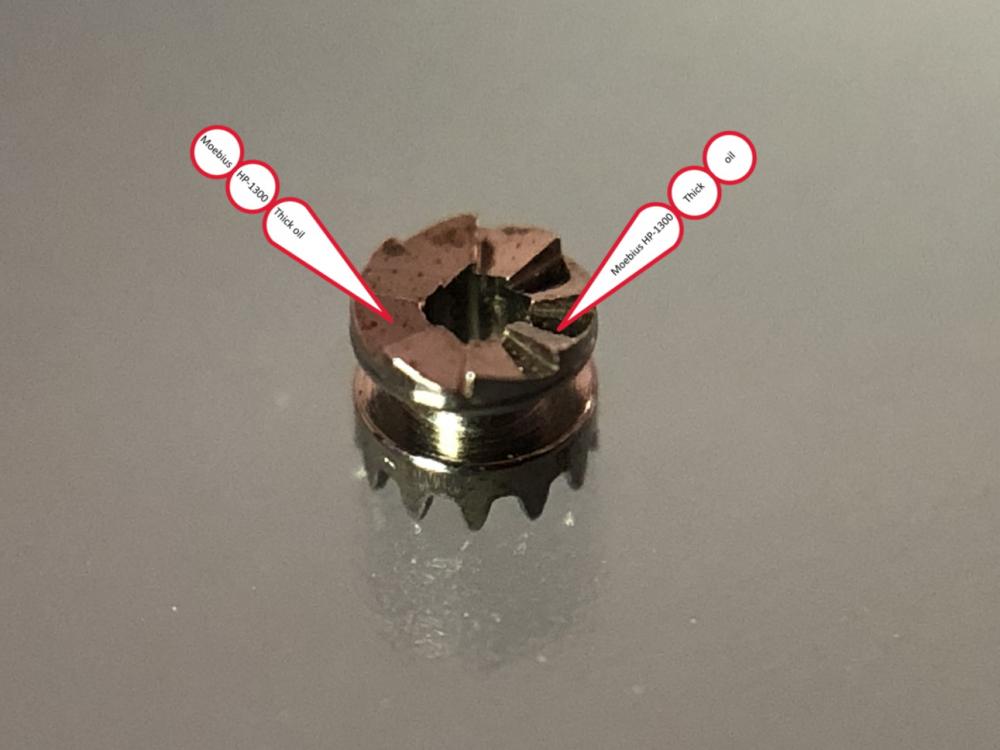
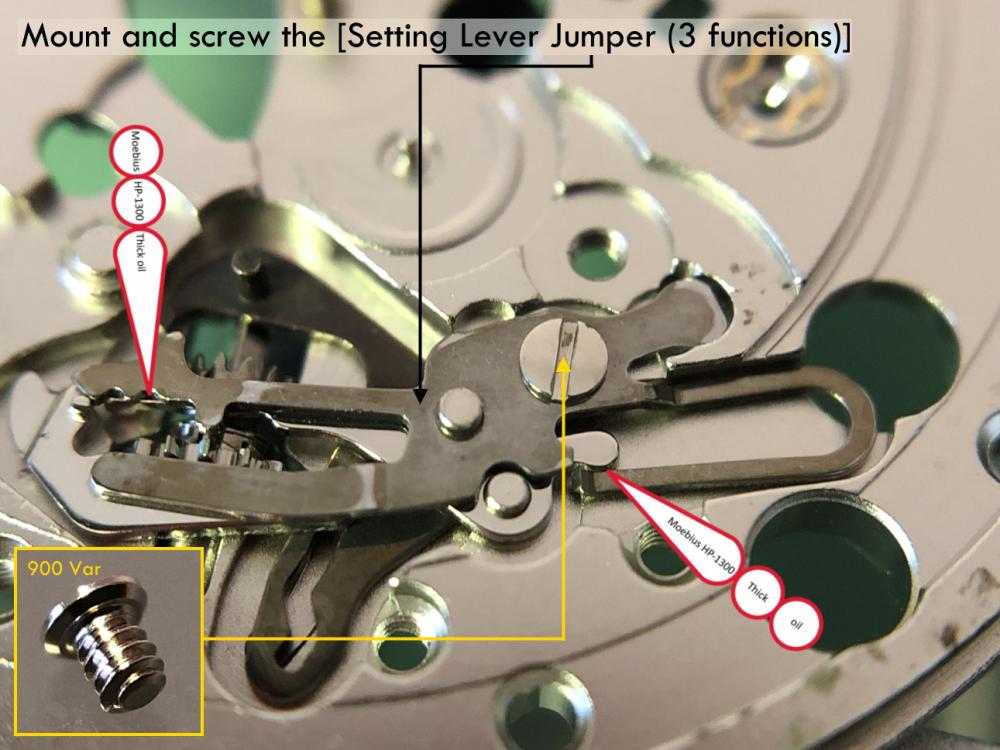
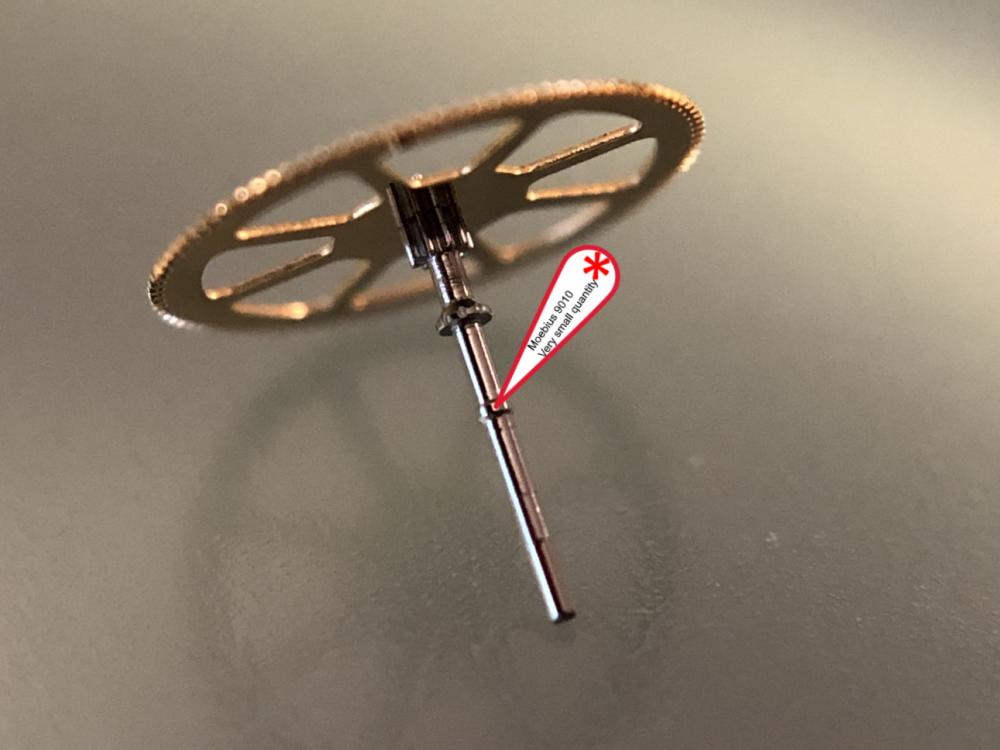
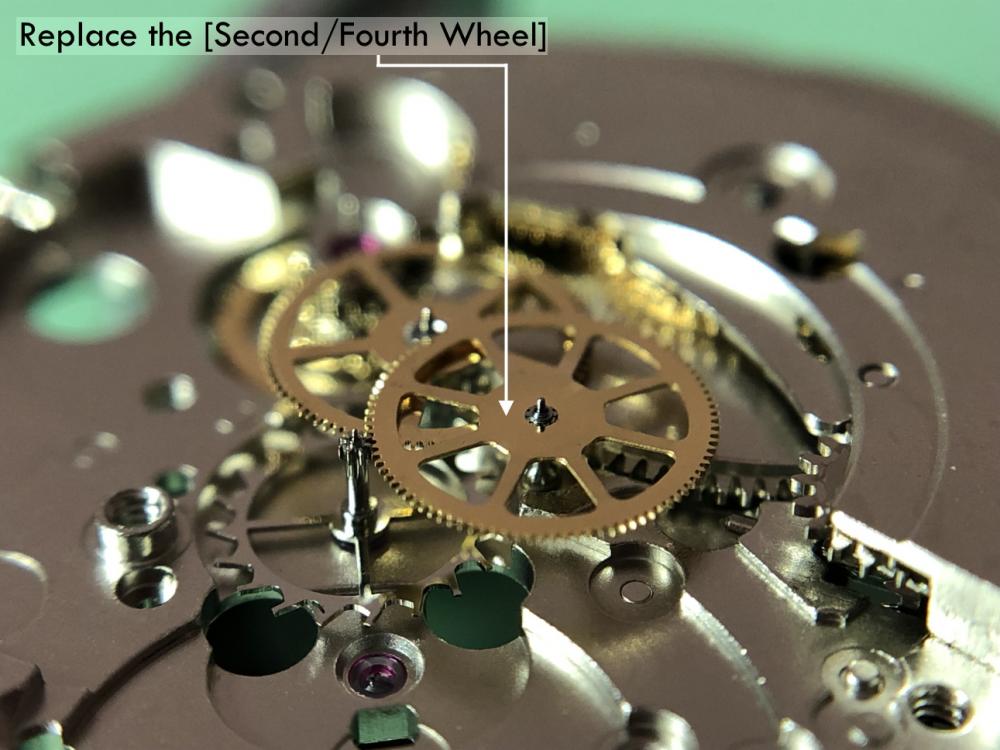
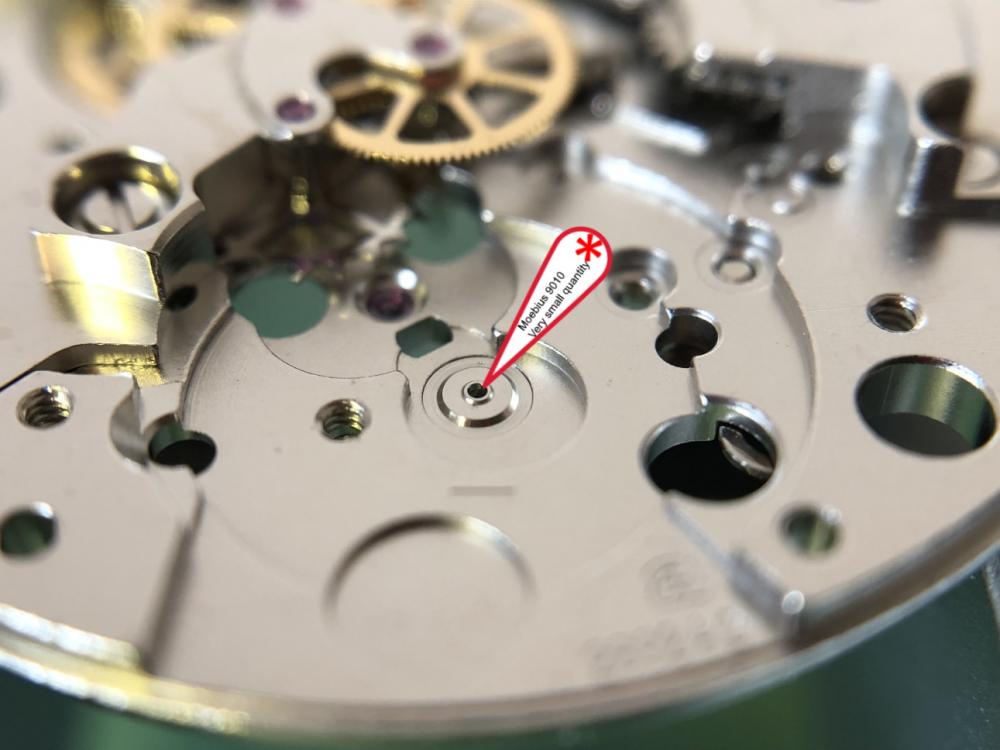
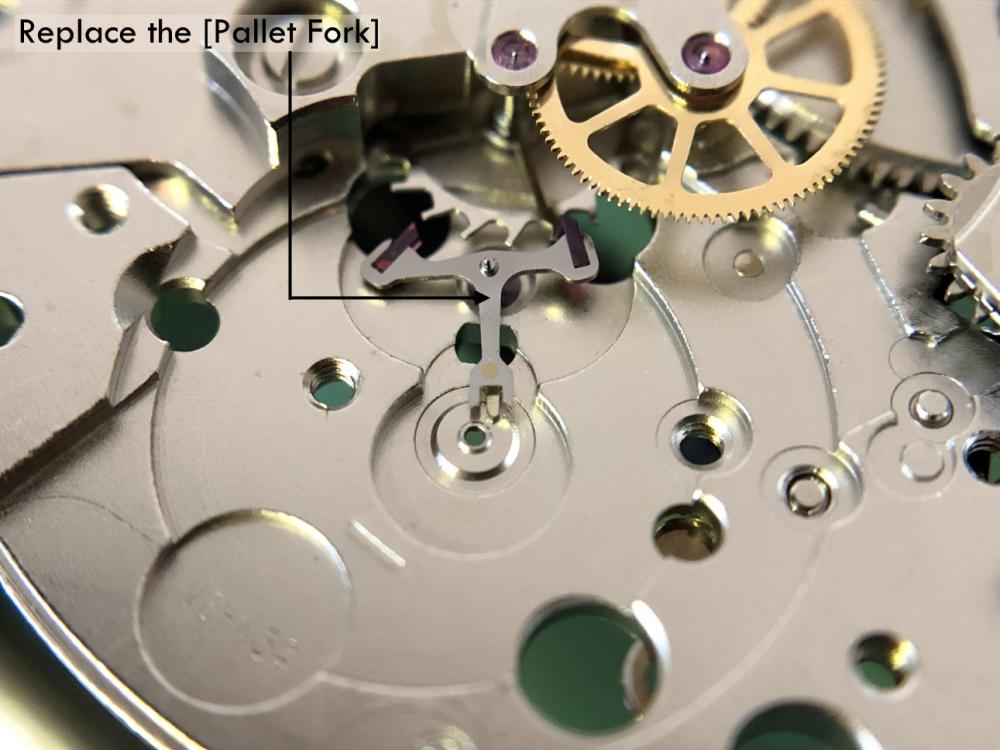
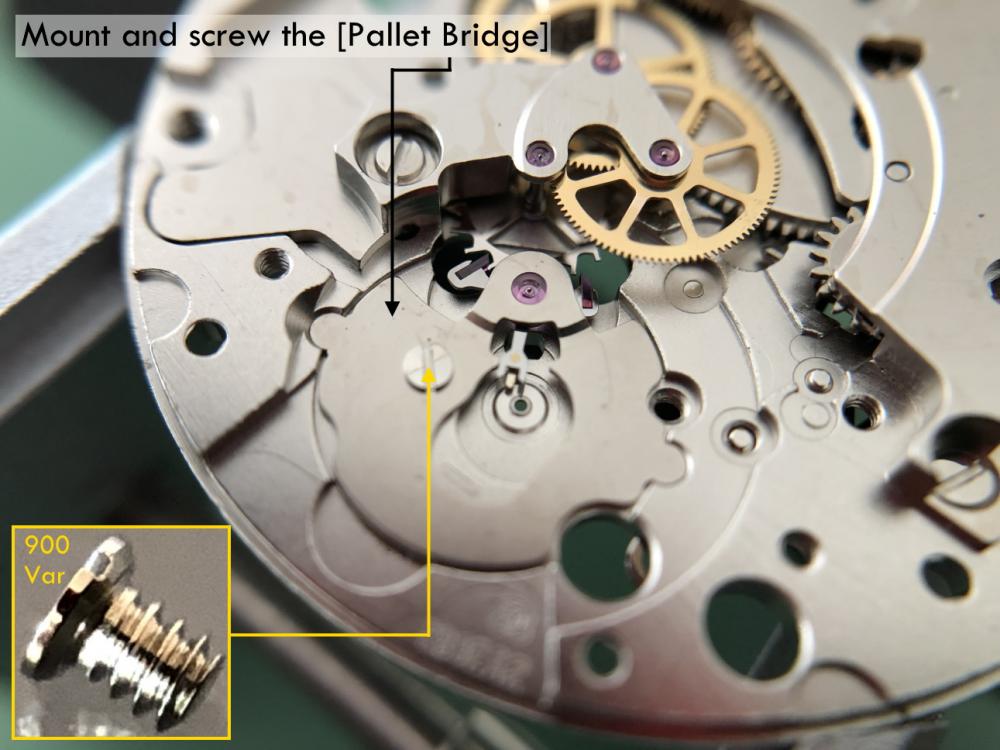
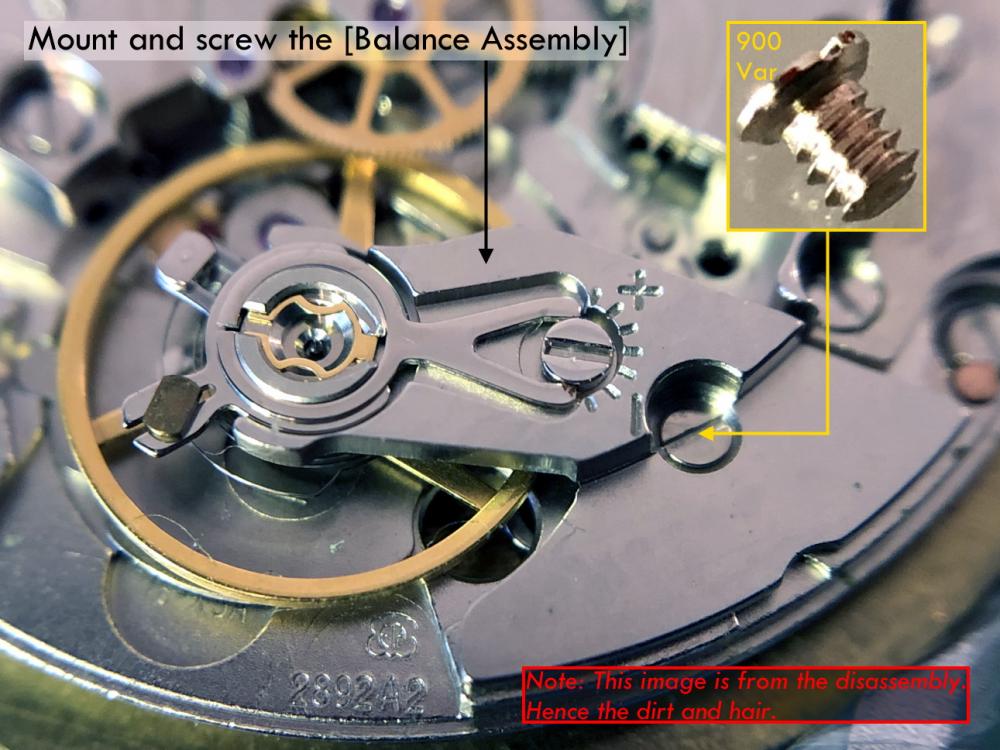
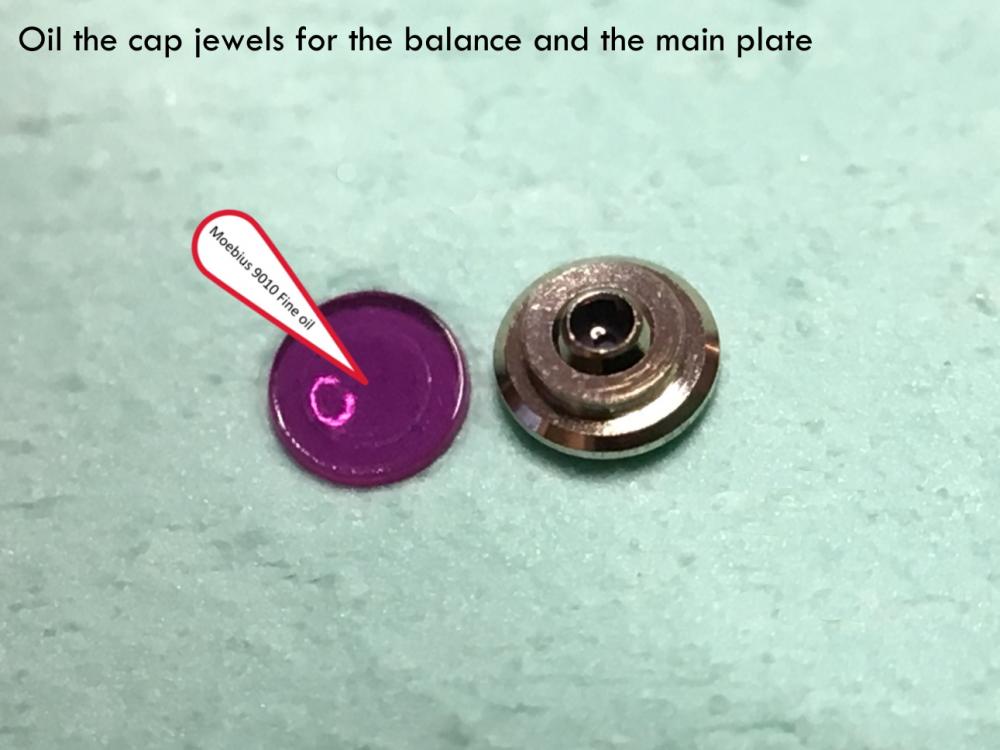
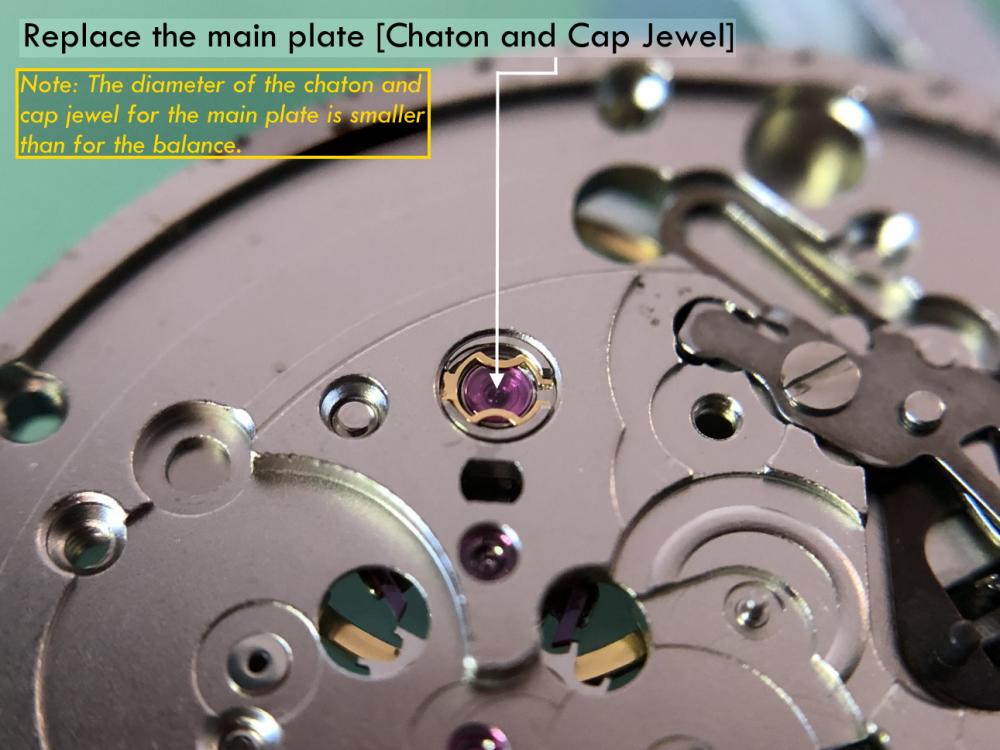
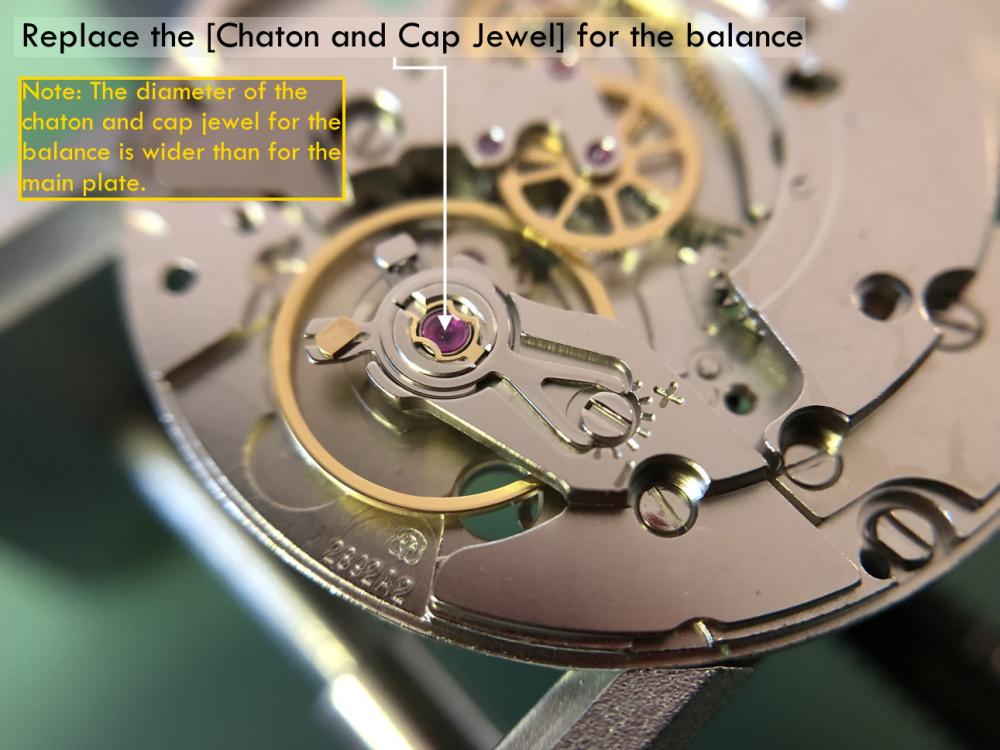
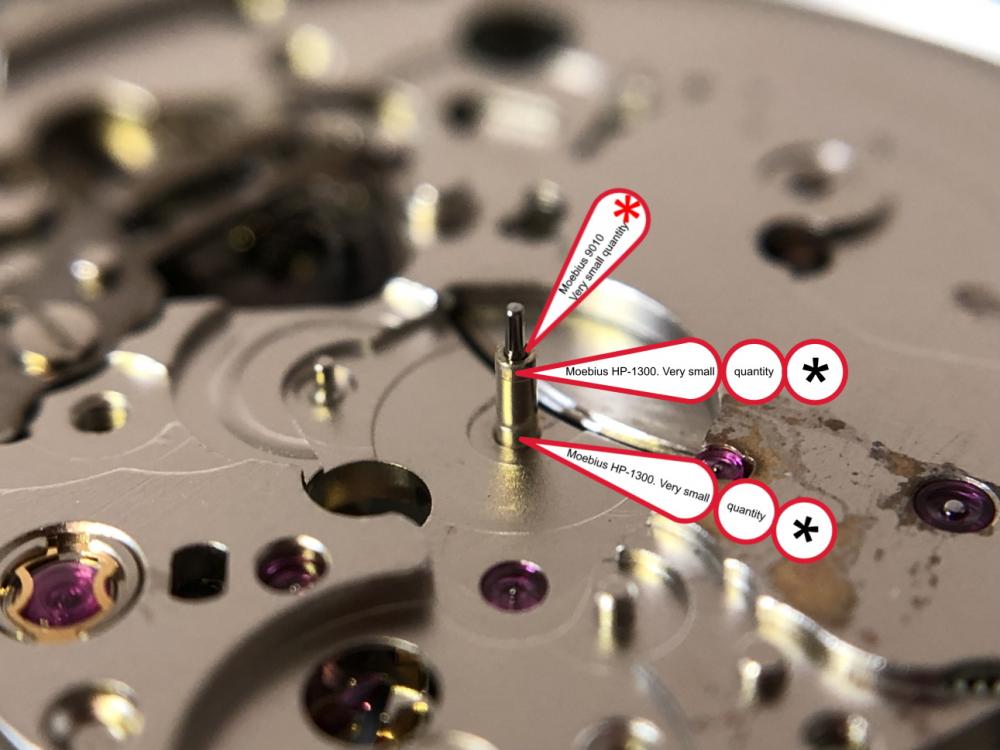
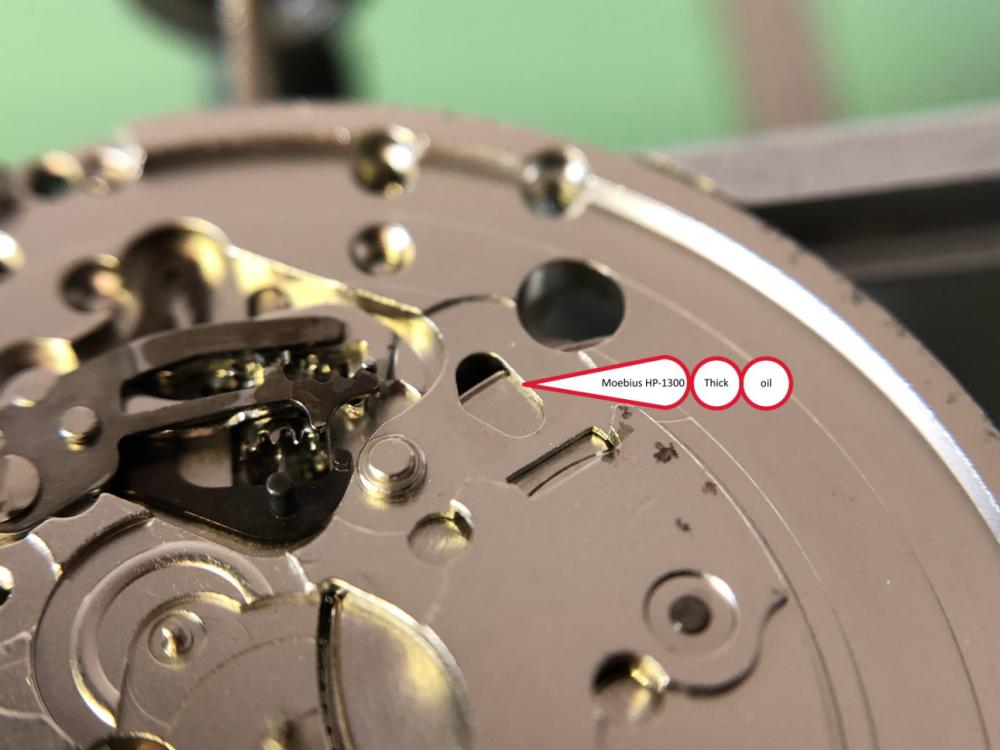
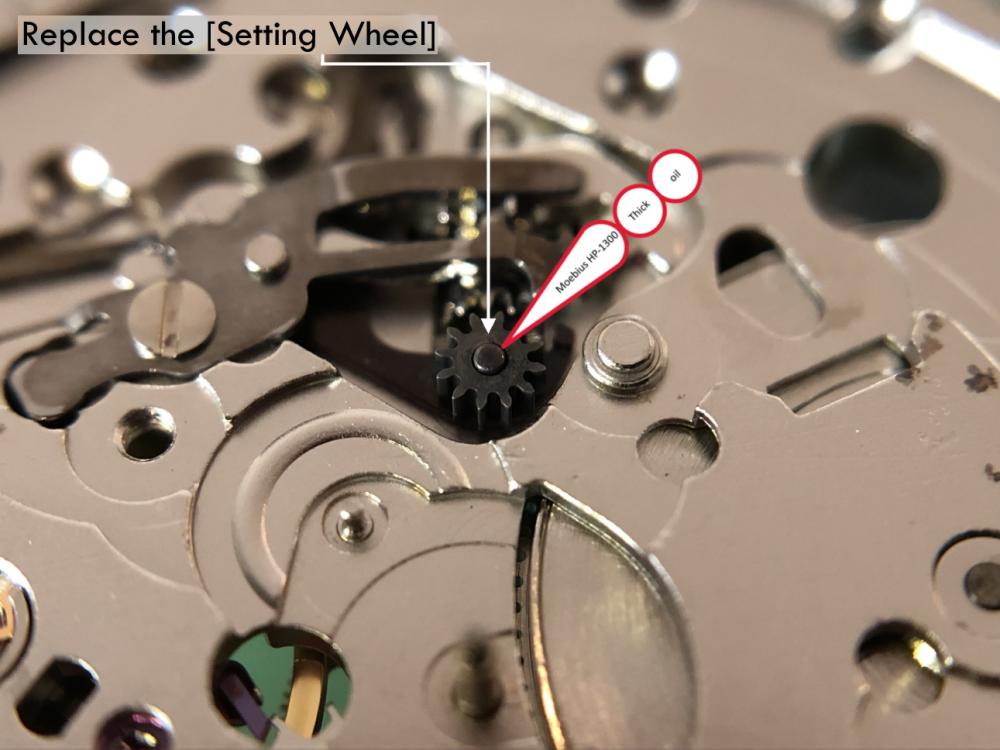
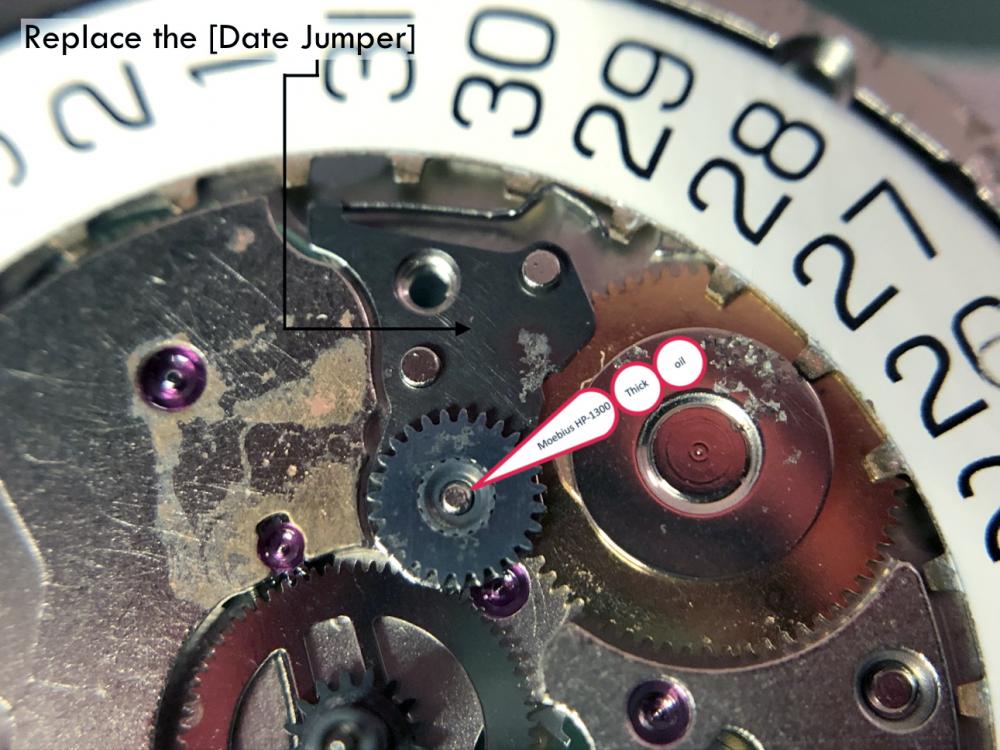
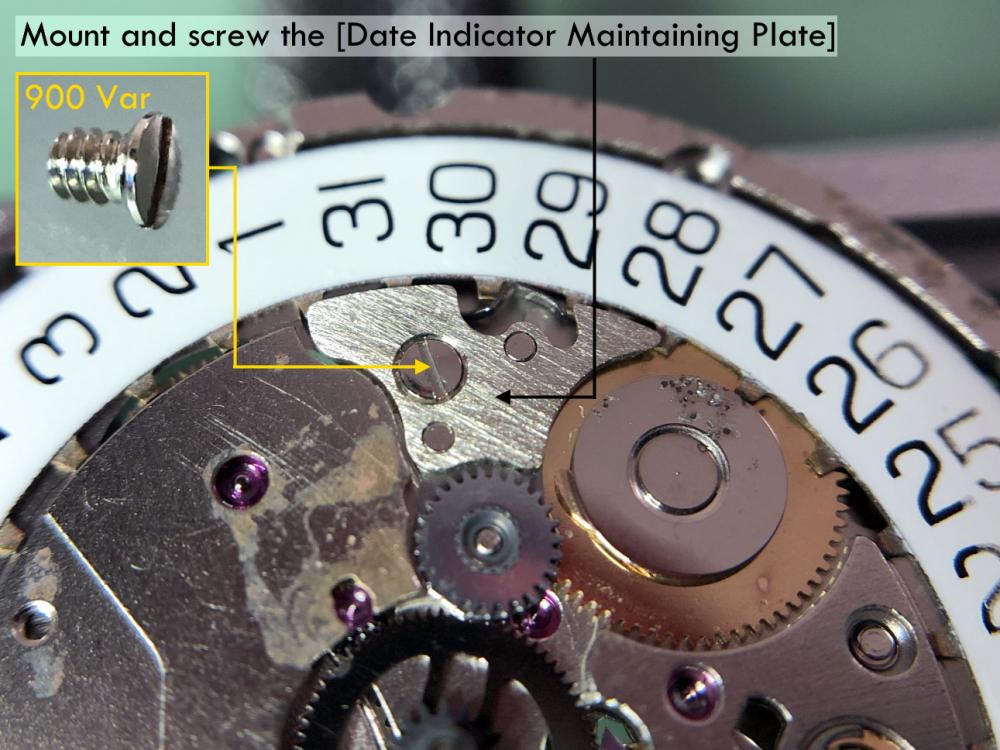
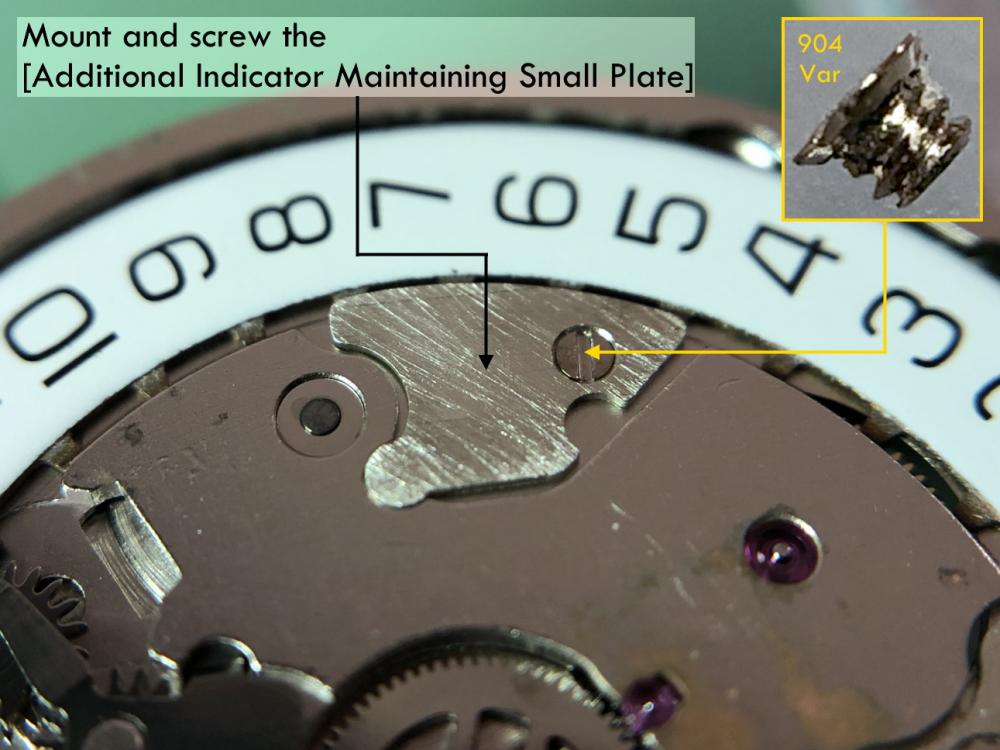
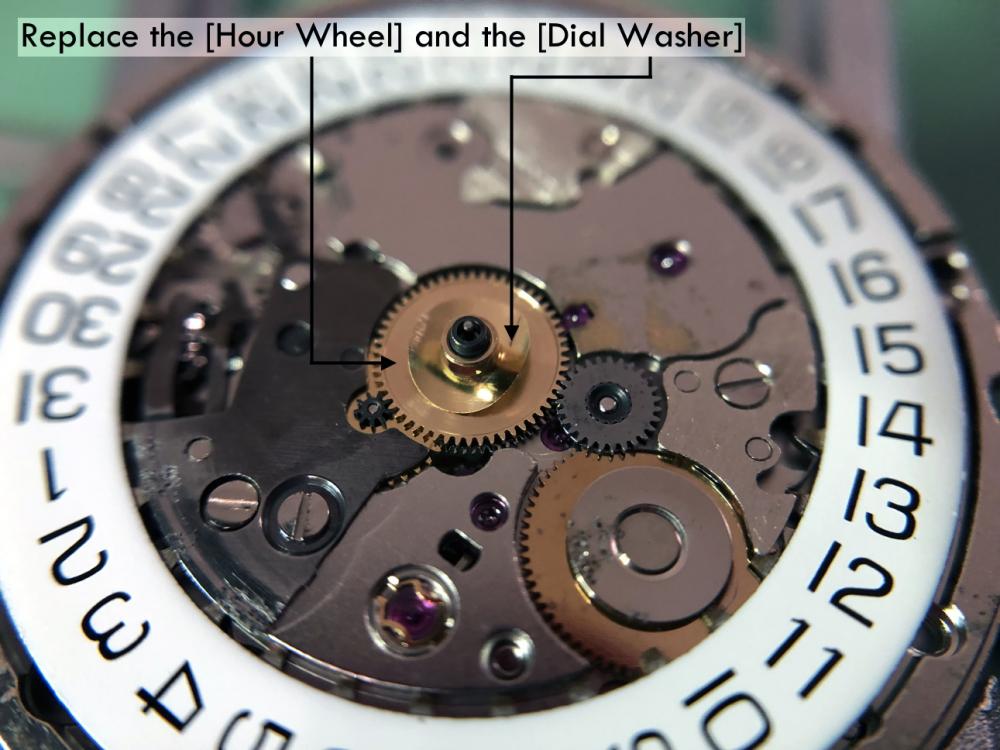
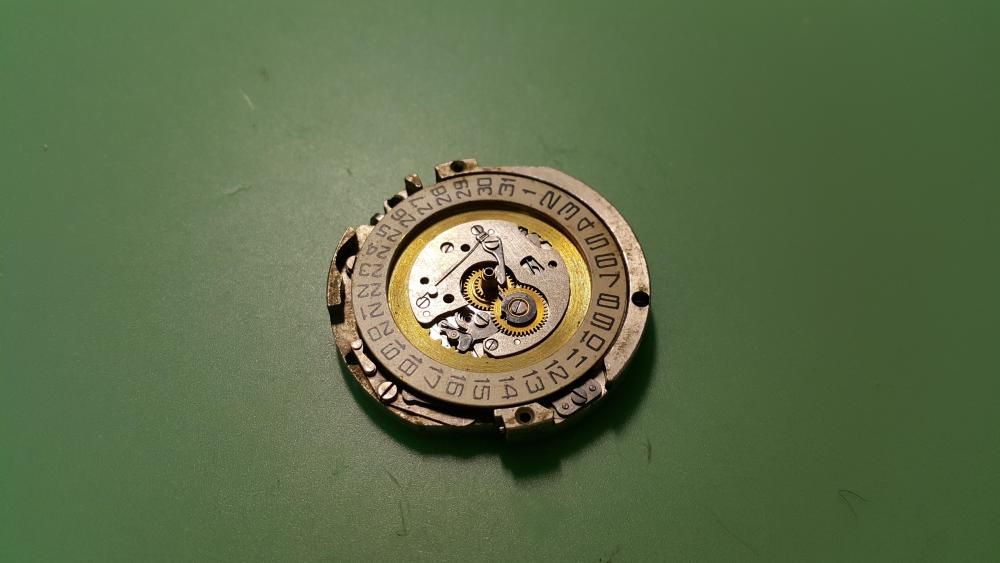
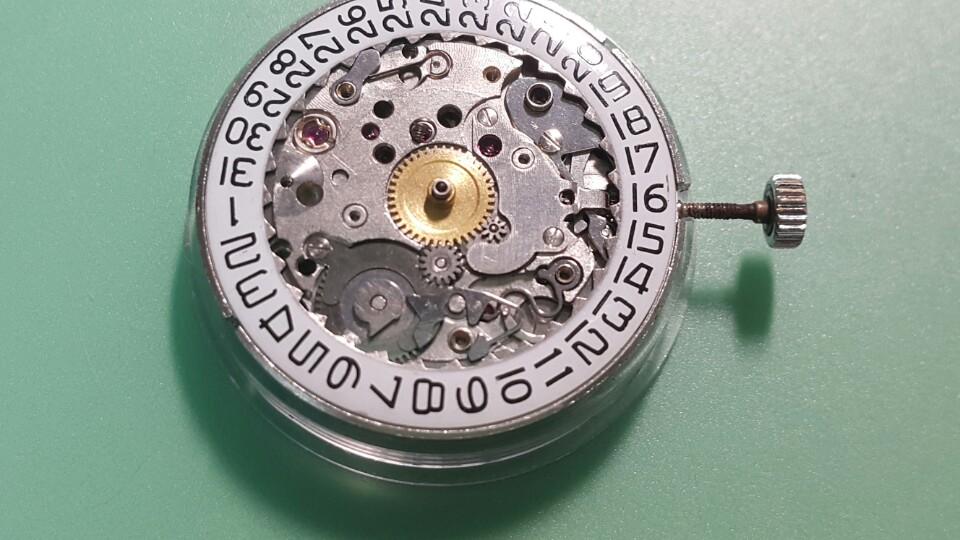
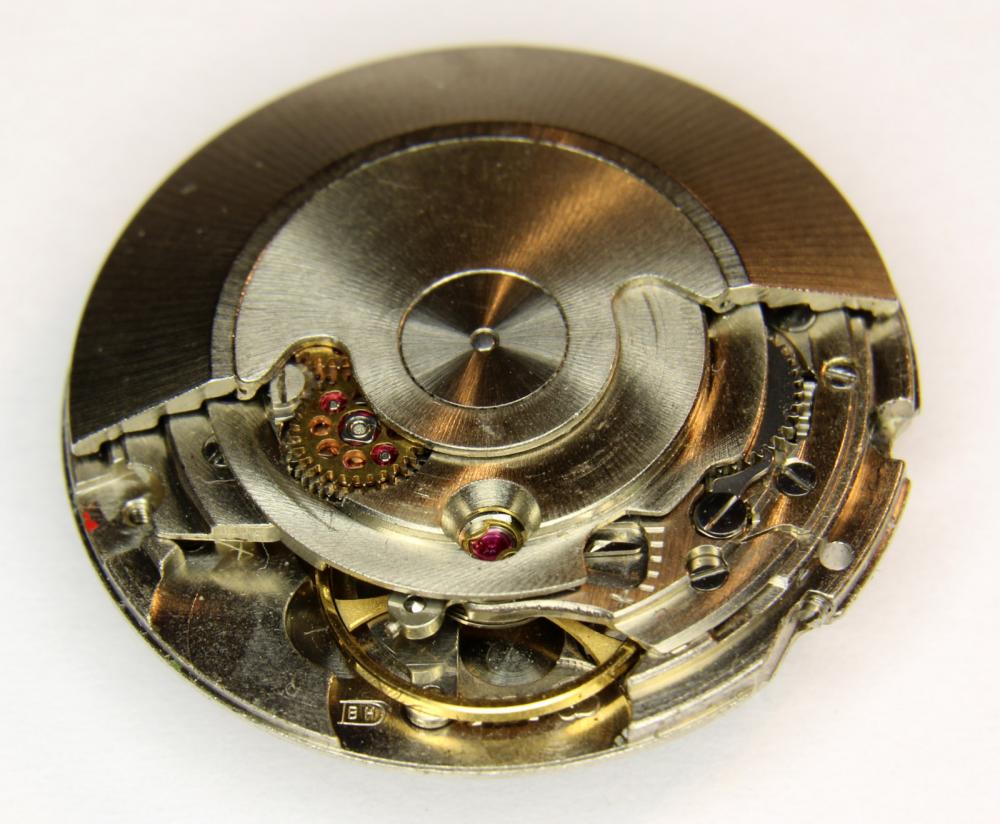
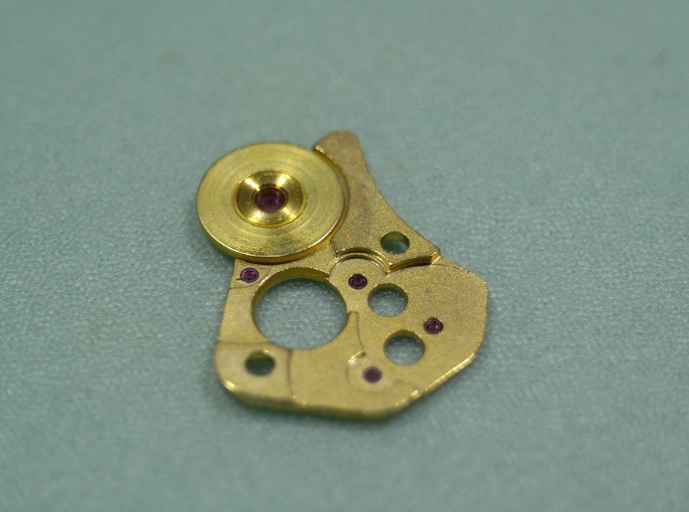
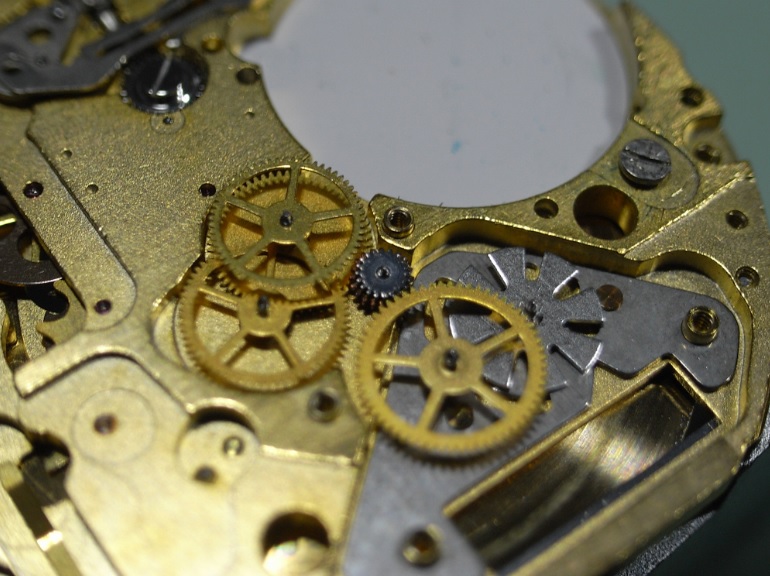
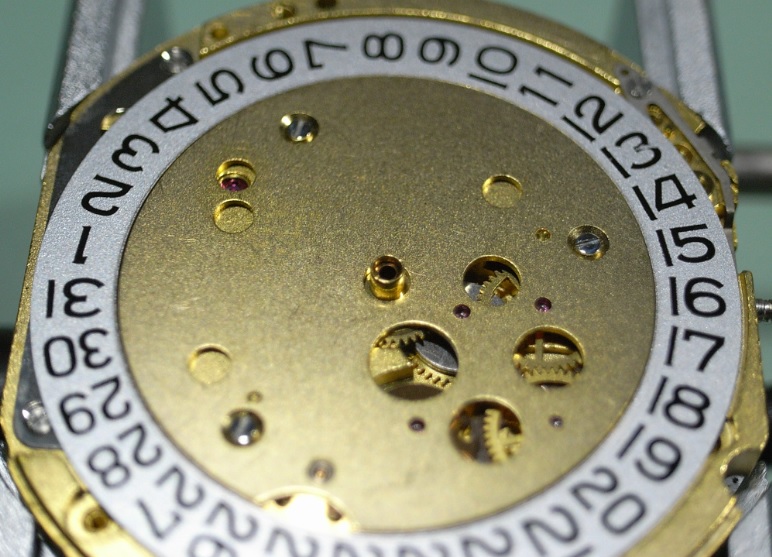
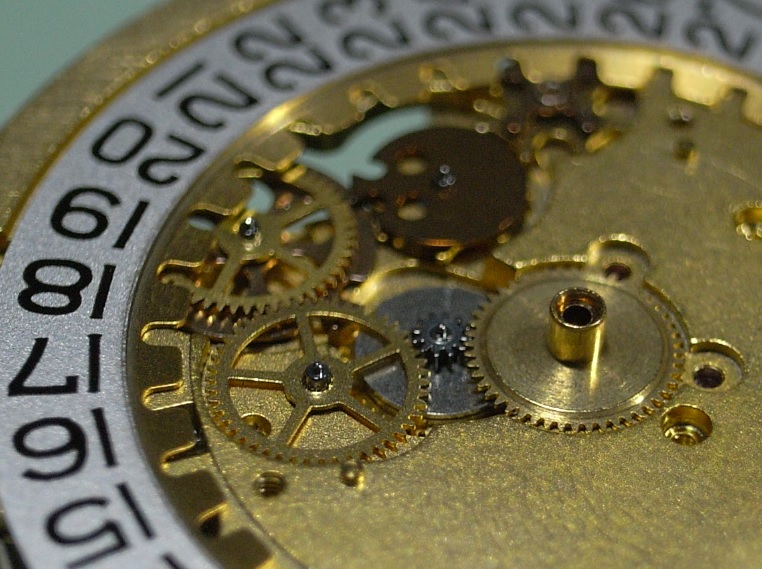
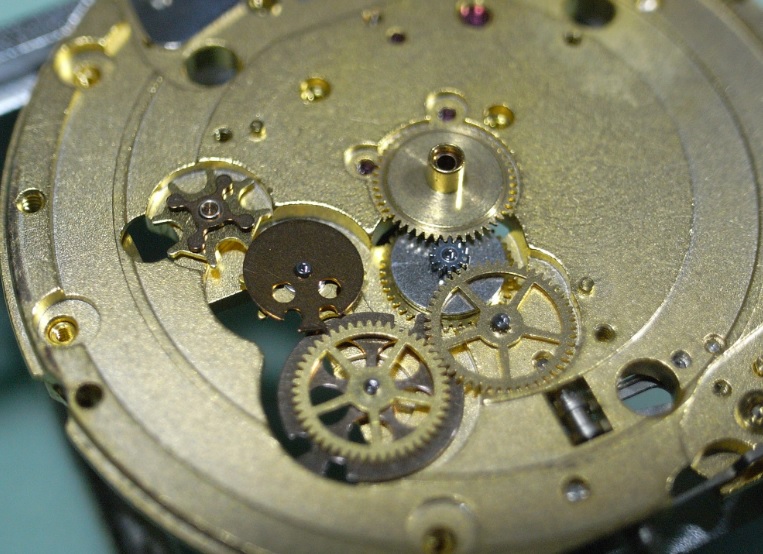
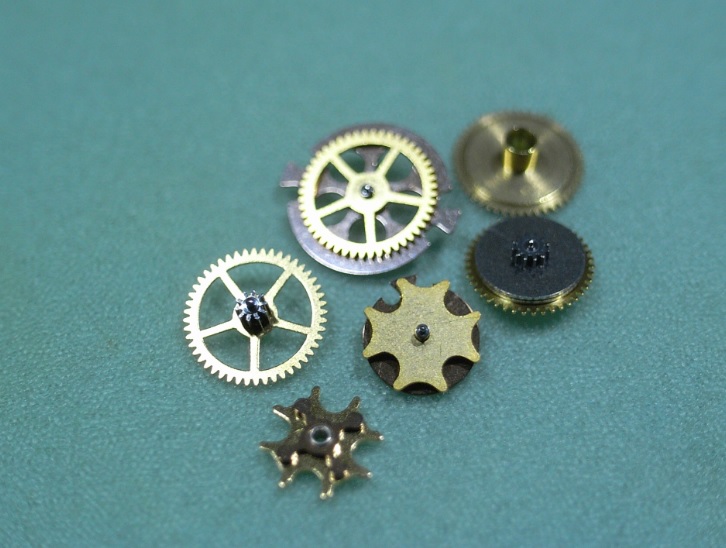
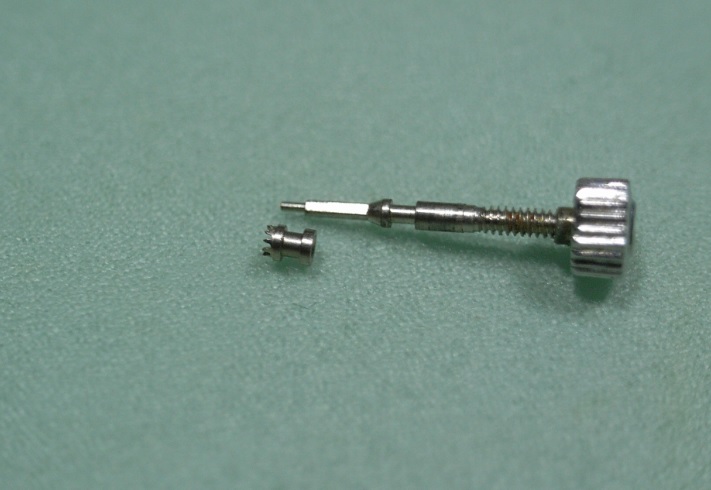
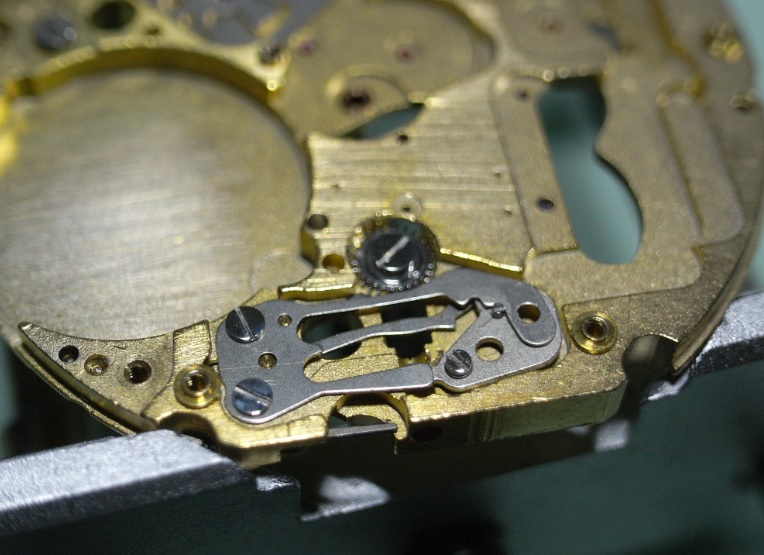
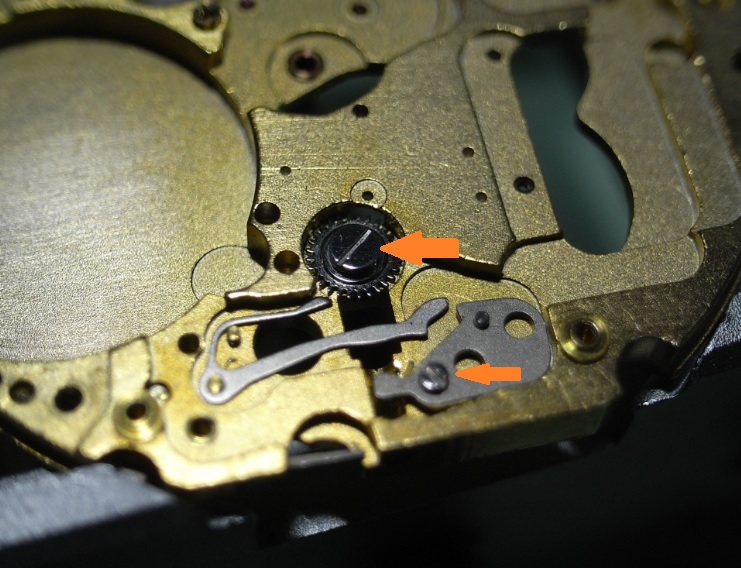
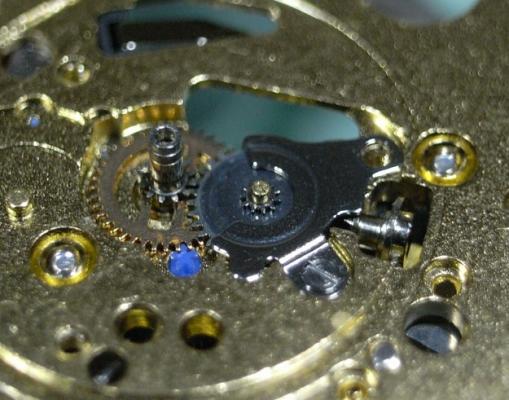
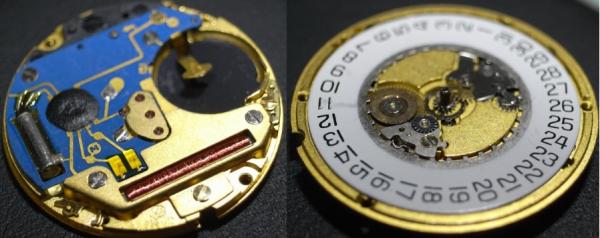
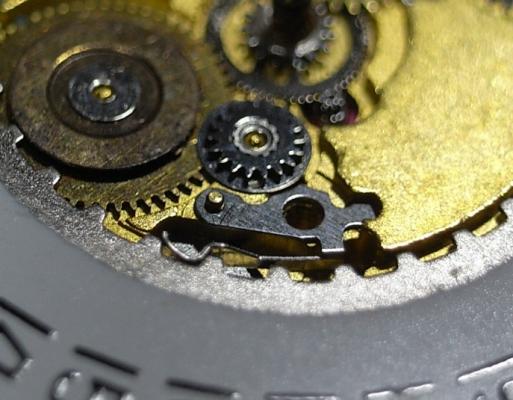
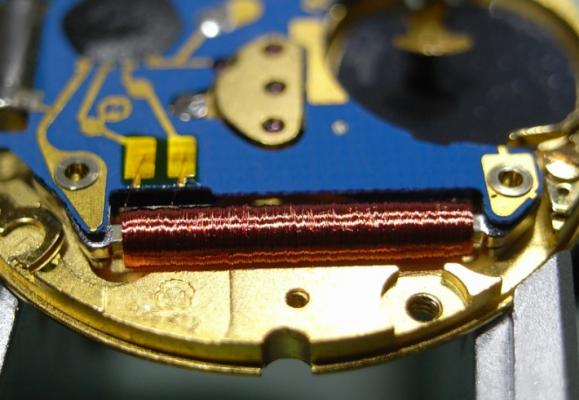
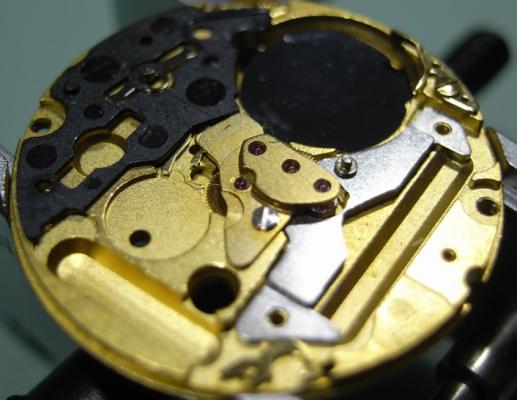
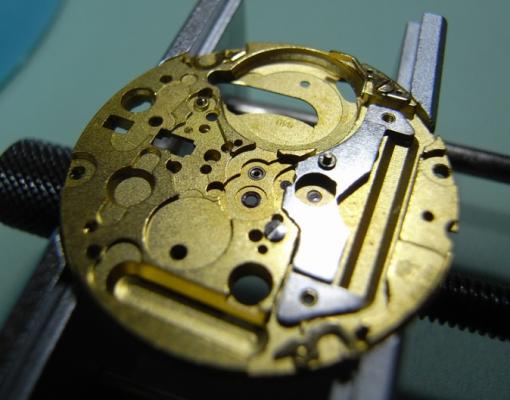
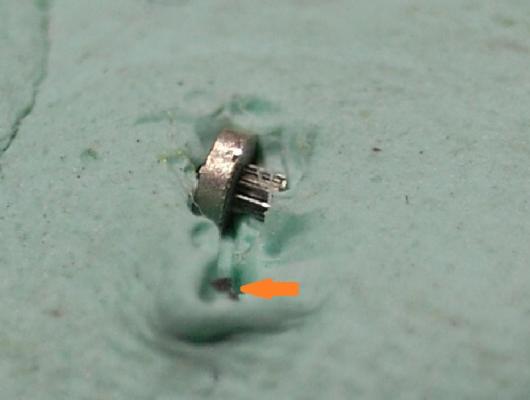
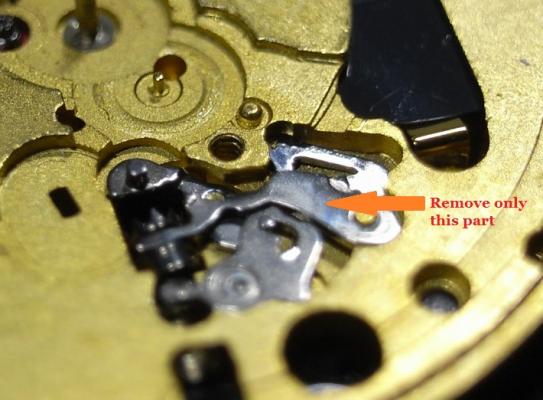
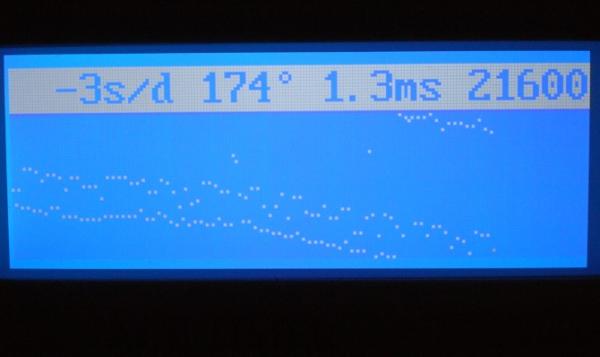
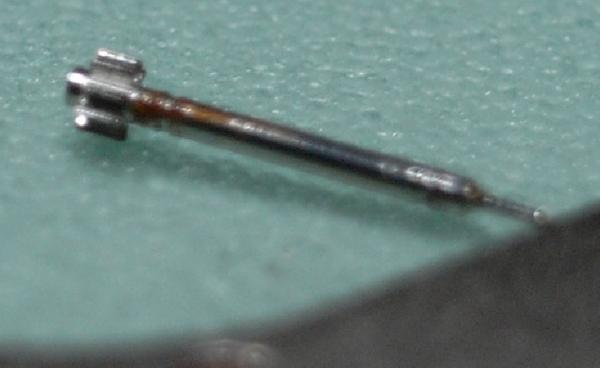
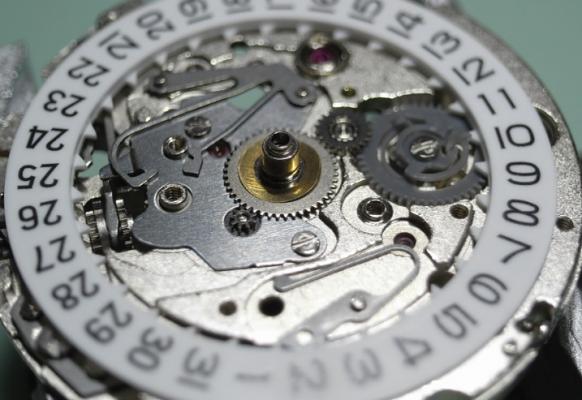
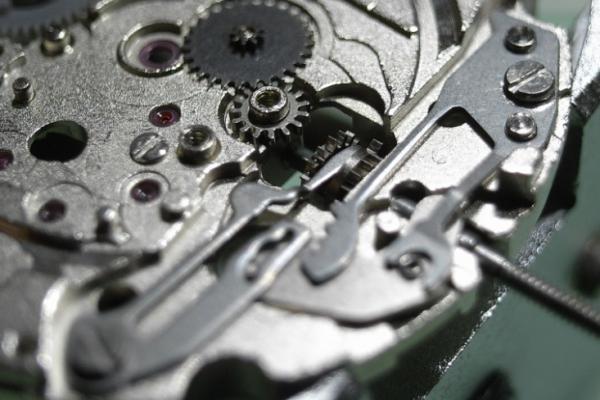
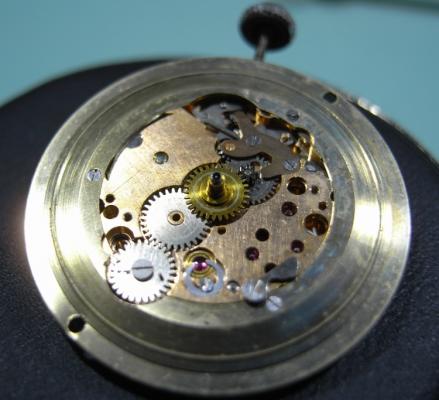
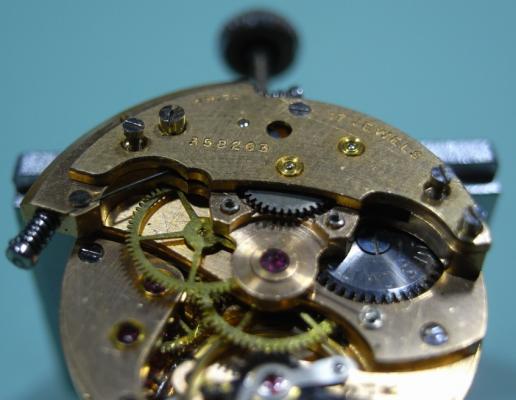
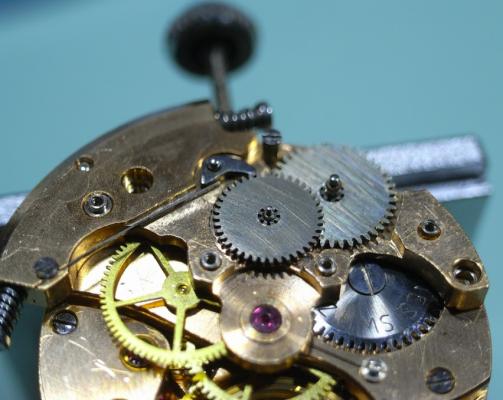
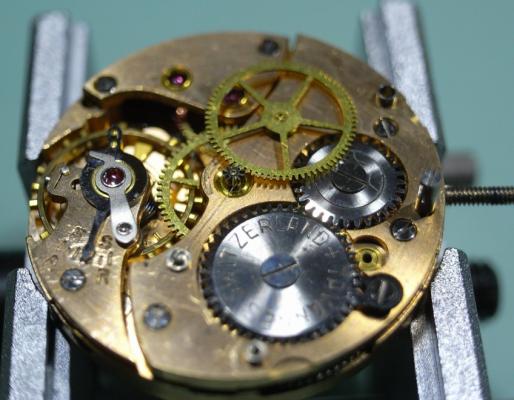
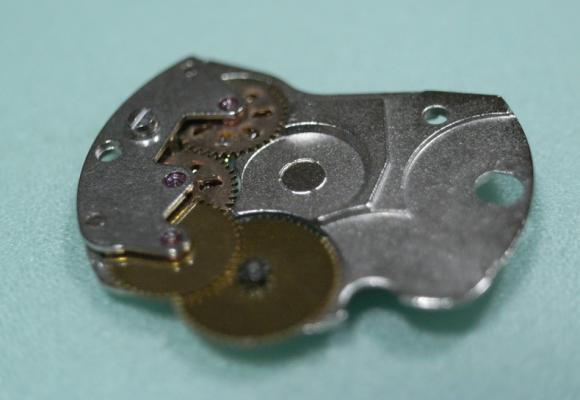
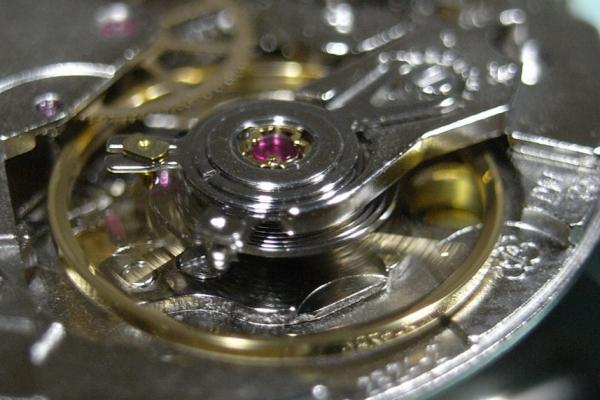
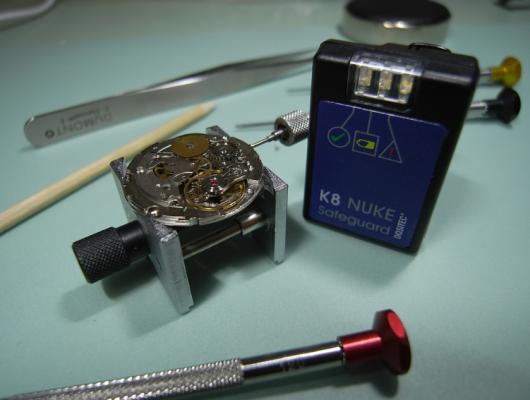
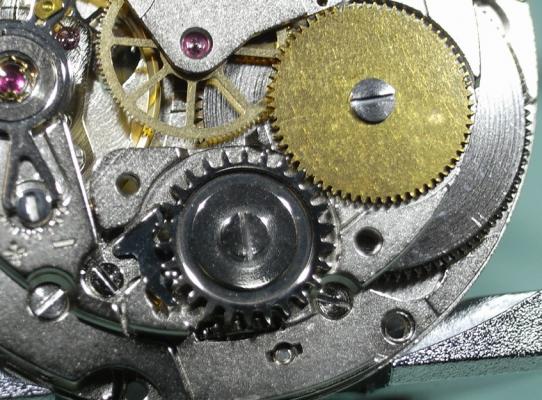
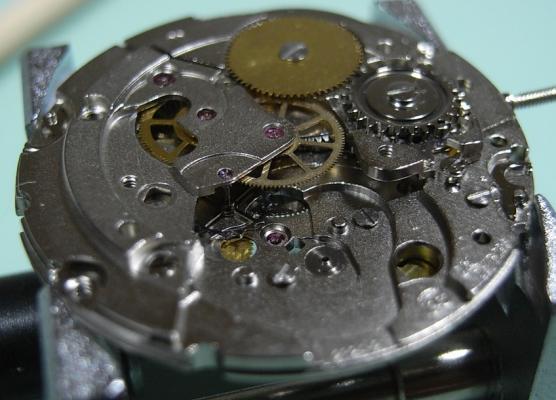
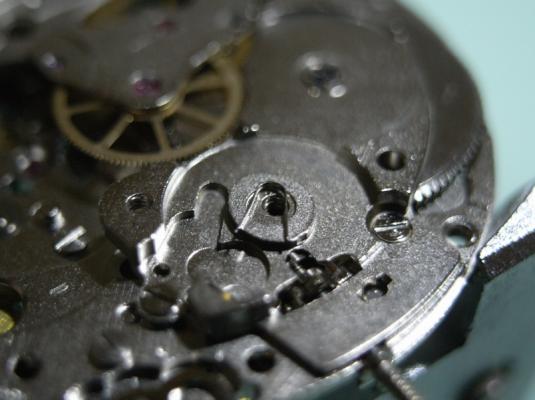
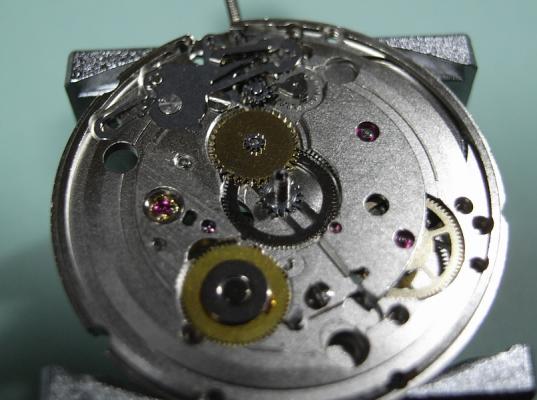
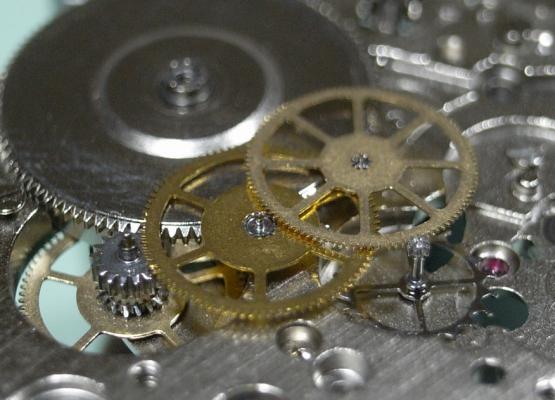
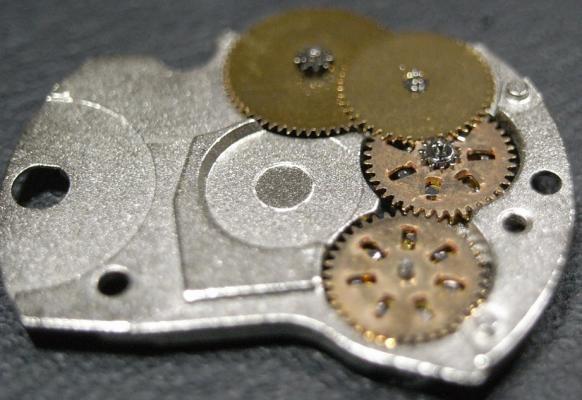
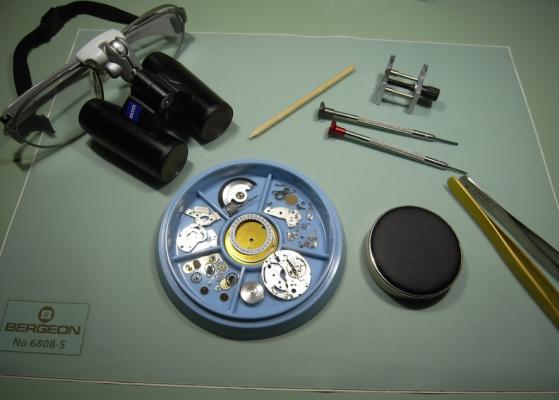
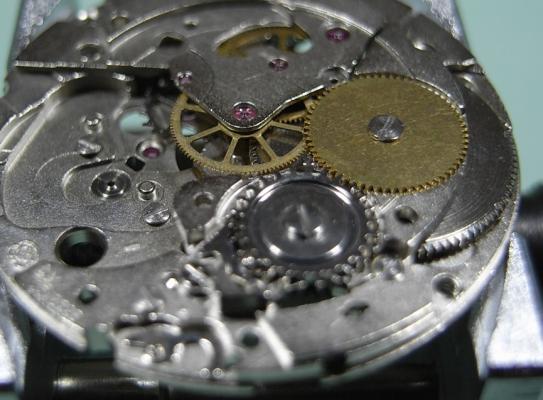
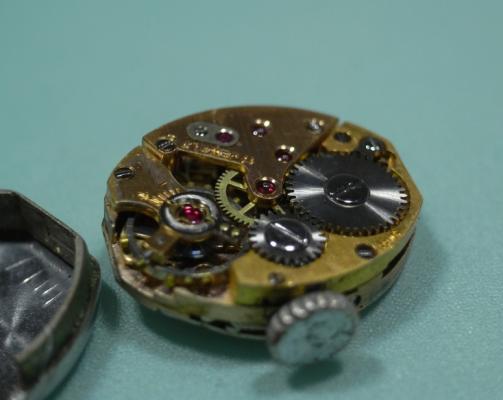
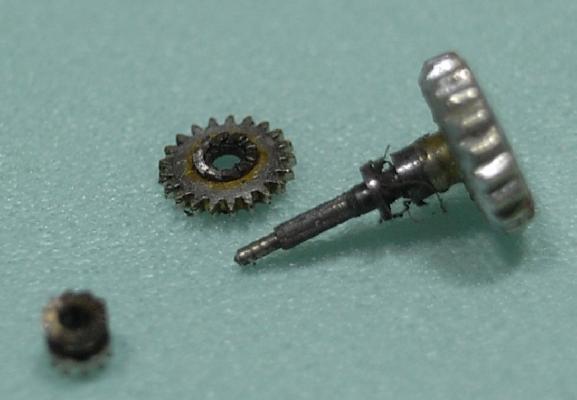
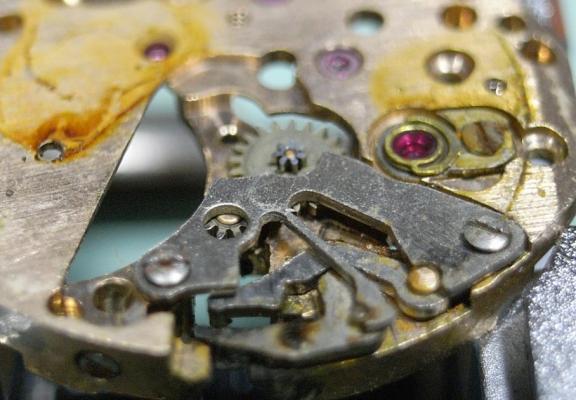
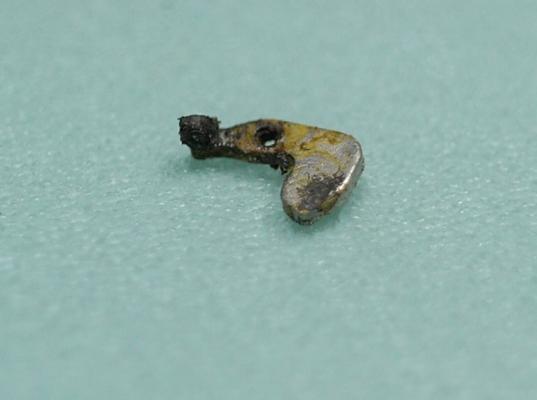
It is my impression that ETA's calibre 2892-A2 is usually found in more expensive watches and in luxury watches where oftentimes the movement has been modified. Mechanically, I don't think the 2892-A2 is superior to ETA’s classic 2824-2. Both movements have the same diameter (11 ½´´´ Ø 25.60 mm), the same frequency (28’800 A/h), and the same date complication. The decisive difference is the thickness where the 2892-A2 is one-millimetre thinner (3.6mm). That, combined with being a reliable and well-functioning movement, has made it popular for additional complications and alterations such as moon phase, power reserve display, co-axial escapement, chronograph modules from Dubois Depraz, and so on. The Swiss Sellita Calibre SW300-1 is, as far as I understand, an excellent clone of the 2892-A2. There is also a Chinese clone, the Seagull Calibre ST1812 (reviewed by @Markin the video “Chinese eta 2892-A2 Clone - Service and Review - Seagull ST1812”), and possibly others. Mark has made a playlist of videos that excellently demonstrate how to service the ETA 2892-A2 movement. The playlist is named: "Omega 2500 Co-Axial Stripdown and Service (ETA 2892-A2)" I recommend Mark’s playlist for several reasons. Among other things, he shows how to mount the barrel bridge safely and how to hold the minute train bridge with your tweezers to easily get it into place on the main plate (which I found a bit fiddly). In addition, he shows and compares the parts that are all too easy to mix up. One thing that is not shown in Mark's service video is that the Incabloc setting (chaton and cap jewel) for the balance and the main plate have different diameters. The main plate Incabloc setting diameter is smaller than that of the balance. The reason this is not shown in the video is probably that Mark removes, cleans, and lubricates the Incabloc settings one at a time after he reassembles the balance, so he wouldn’t notice. Anyway, don't mix up the two sets! Something that I appreciate about Mark's videos in general and that sets him apart from basically all other watch repairers on YouTube is that he doesn't continuously babble in his videos but mainly talks to make clarifications. I enjoy those segments of silence where I can just focus on the work being done. When I started my service, I decided to follow Mark's disassembly which worked perfectly. But for the assembly, I made up my mind to follow ETA's technical documentation to the letter. It turned out to be a mistake. In ETA's documentation, the assembly of the movement begins with the keyless works, then the train of wheels and then the barrel bridge. The crucial problem with this arrangement is that it is physically impossible to mount the barrel bridge if the train of wheels is already mounted. It is also very fiddly and difficult to baste the end of the winding stem into the winding pinion hole because the hole for the winding stem in the main plate is both open and tapered and therefore does not hold the winding stem. Mark takes a considerably more hands-on approach. He begins the assembly with the barrel bridge. He then mounts the keyless works whose constituent parts (the winding stem, the winding pinion, and the sliding pinion) are supported by the underside of the barrel bridge, making it considerably easier to get the keyless works in place. After I revised my strategy, this service walkthrough now follows Mark’s approach. It surprises me, but it seems like no watchmaker has proofread ETA's technical documentation. Alternatively, ETA follows an established practice and expects those using the documentation to understand that the assembly order in the document is not significant. I am also somewhat sceptical of ETA's recommendations regarding lubrication. Where we traditionally use grease, for example in the keyless works, ETA chooses mainly oil (HP-1300). I guess that ETA treats all parts of the movement with epilame (Fixodrop) and that oil may then be a better alternative. For better or for worse, my service walkthrough follows ETA's lubrication recommendations. As usual, I would like to remind those of you with no previous experience in watch servicing that this service walkthrough should not be seen as a tutorial on how to service a watch movement. A lot of tools, consumables, training and know-how are required to succeed. Fortunately, there are several excellent resources and watchmaking schools online. When looking through the pictures you’ll see that a few screws and plates are either marred or have pits and grooves in them. None of this is my doing but is either the result of rust (that I removed) or the doings of a less scrupulous repairer than myself. Finally, someone may ask, “Why to bother to do a service walkthrough with pictures when there is such an excellent video?" The main answer to the question is that I find it interesting and fun, and I see it as a complement to Mark's service video. Using this walkthrough, you can quickly scroll through the pictures to read what the different parts are called and where and in what order they should go, what the screws to be used look like, and to read ETA's lubrication recommendations. So, I hope you’ll find this ETA 2892-A2 service walkthrough useful, now or in the future. *** ETA Calibre 2892-A2 Disassembly *** ' *** ETA Calibre 2892-A2 Assembly ***


- 20 replies
-
- 16
-

-

-
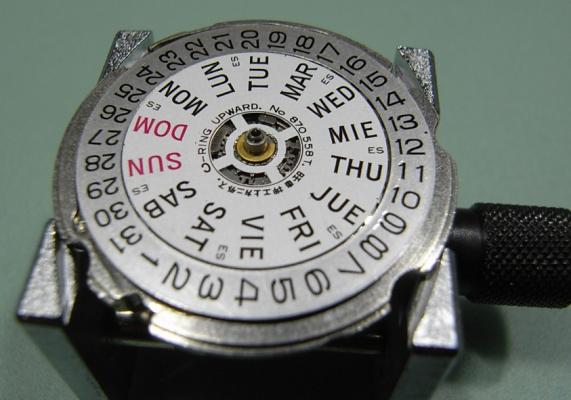
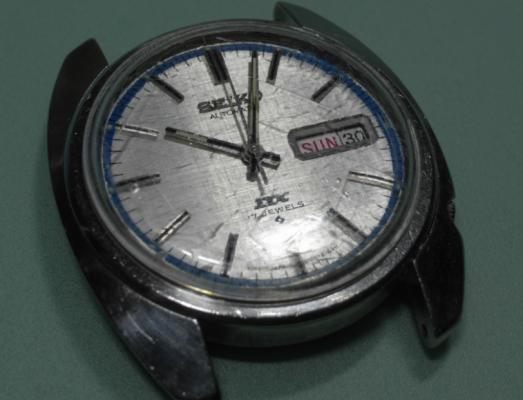
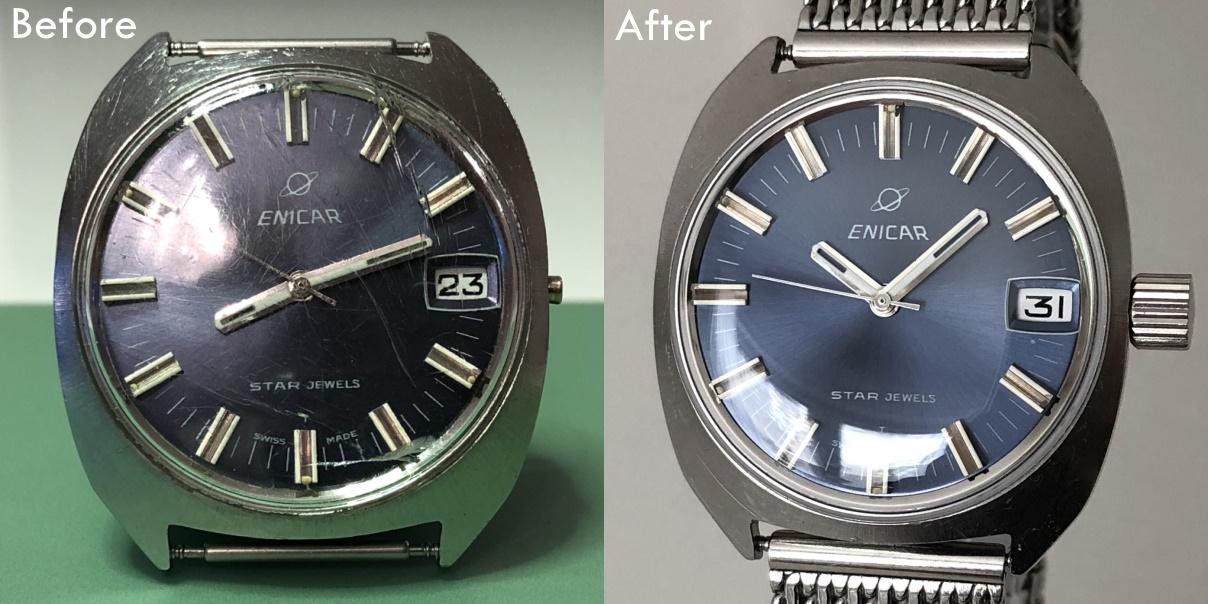
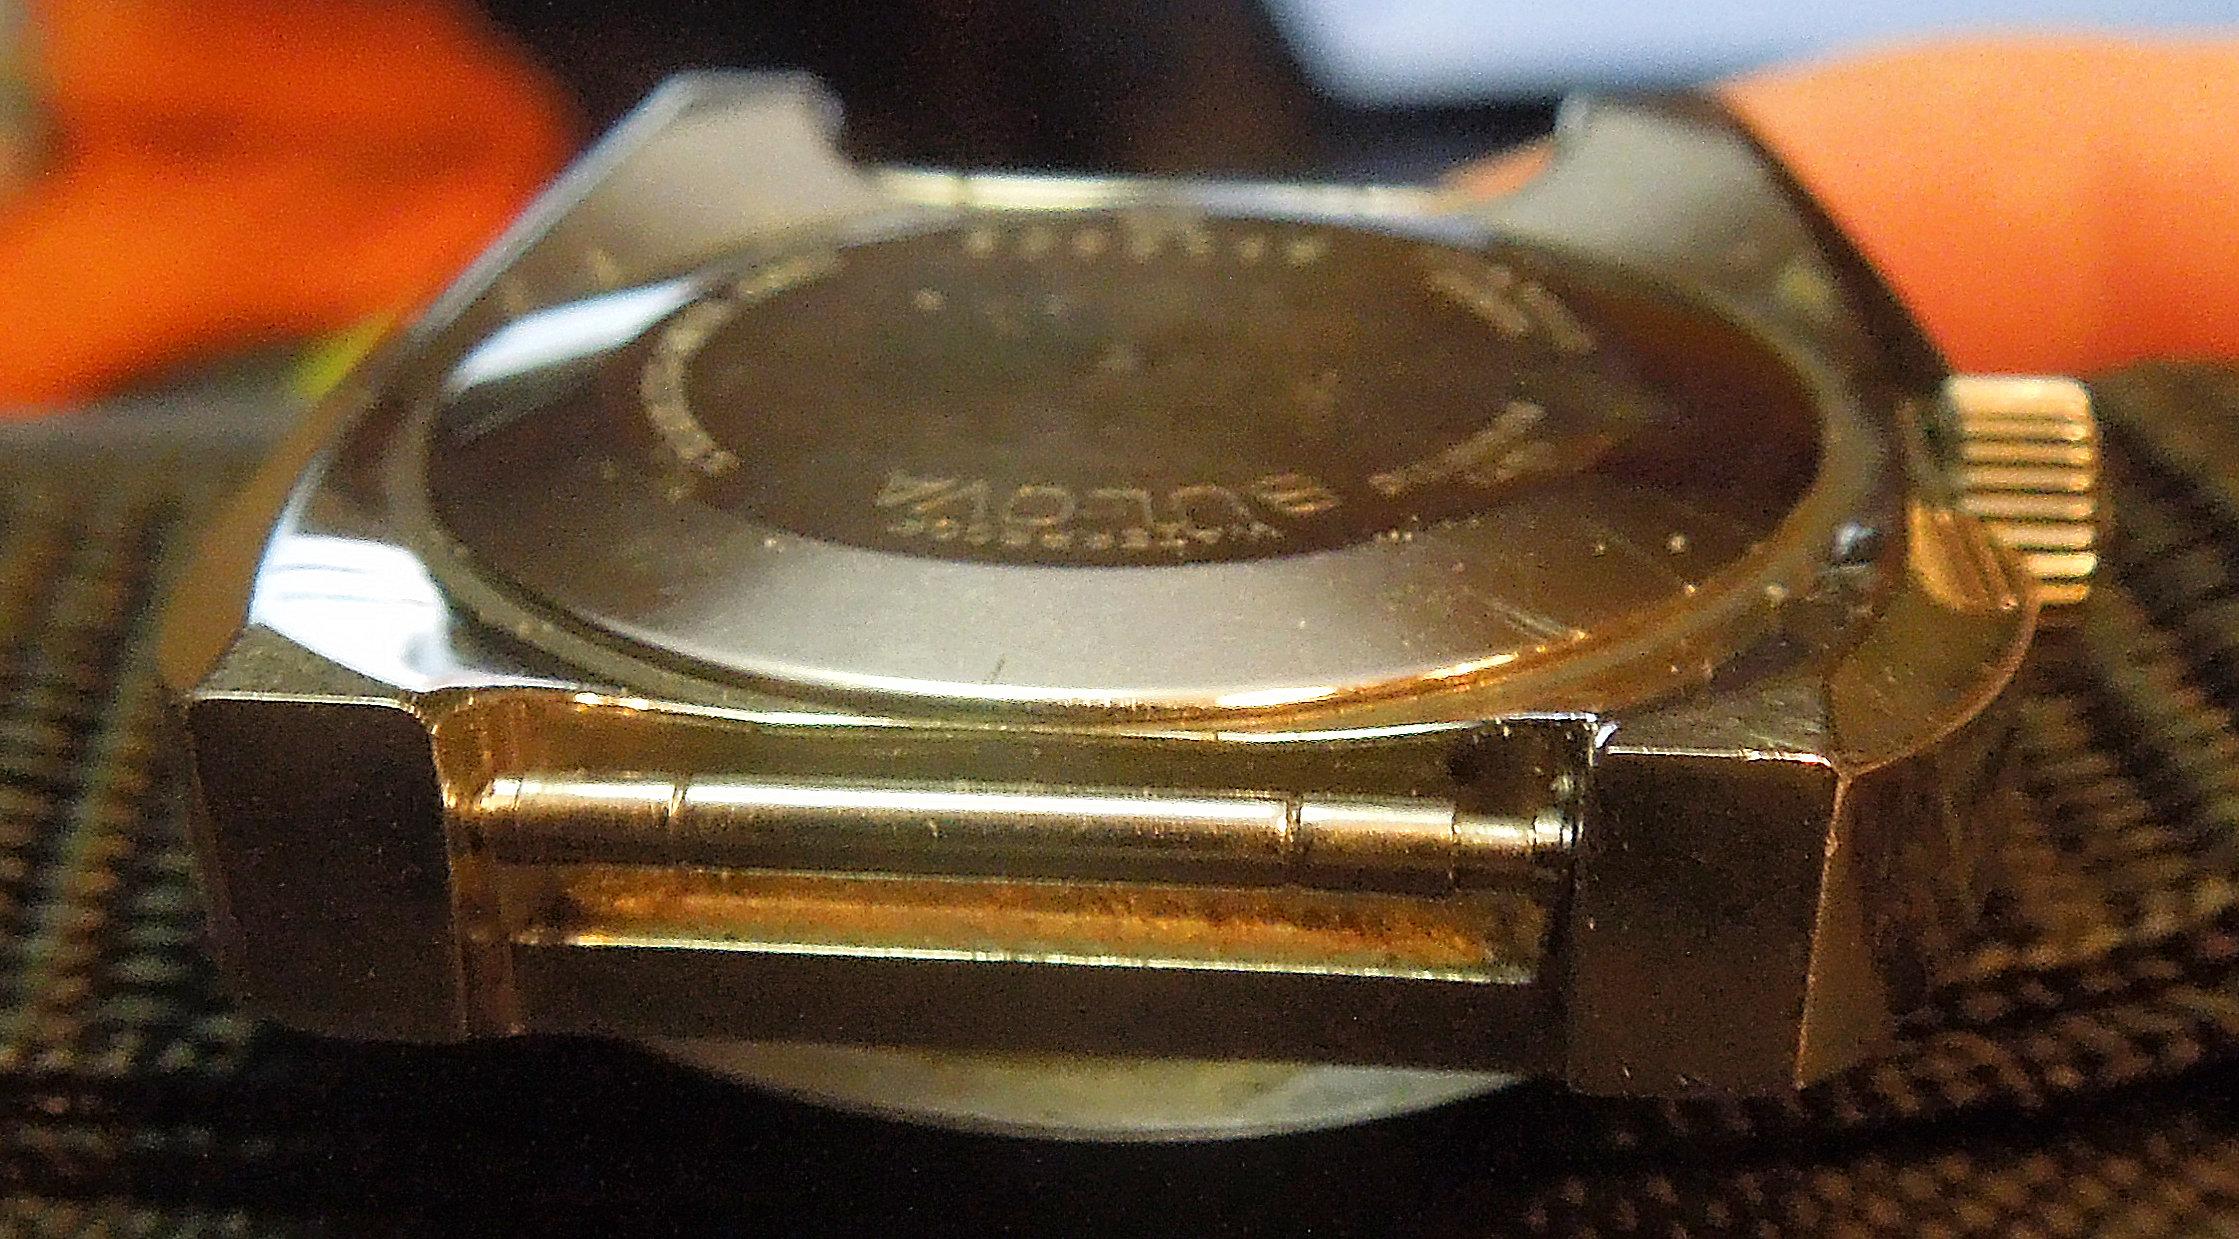
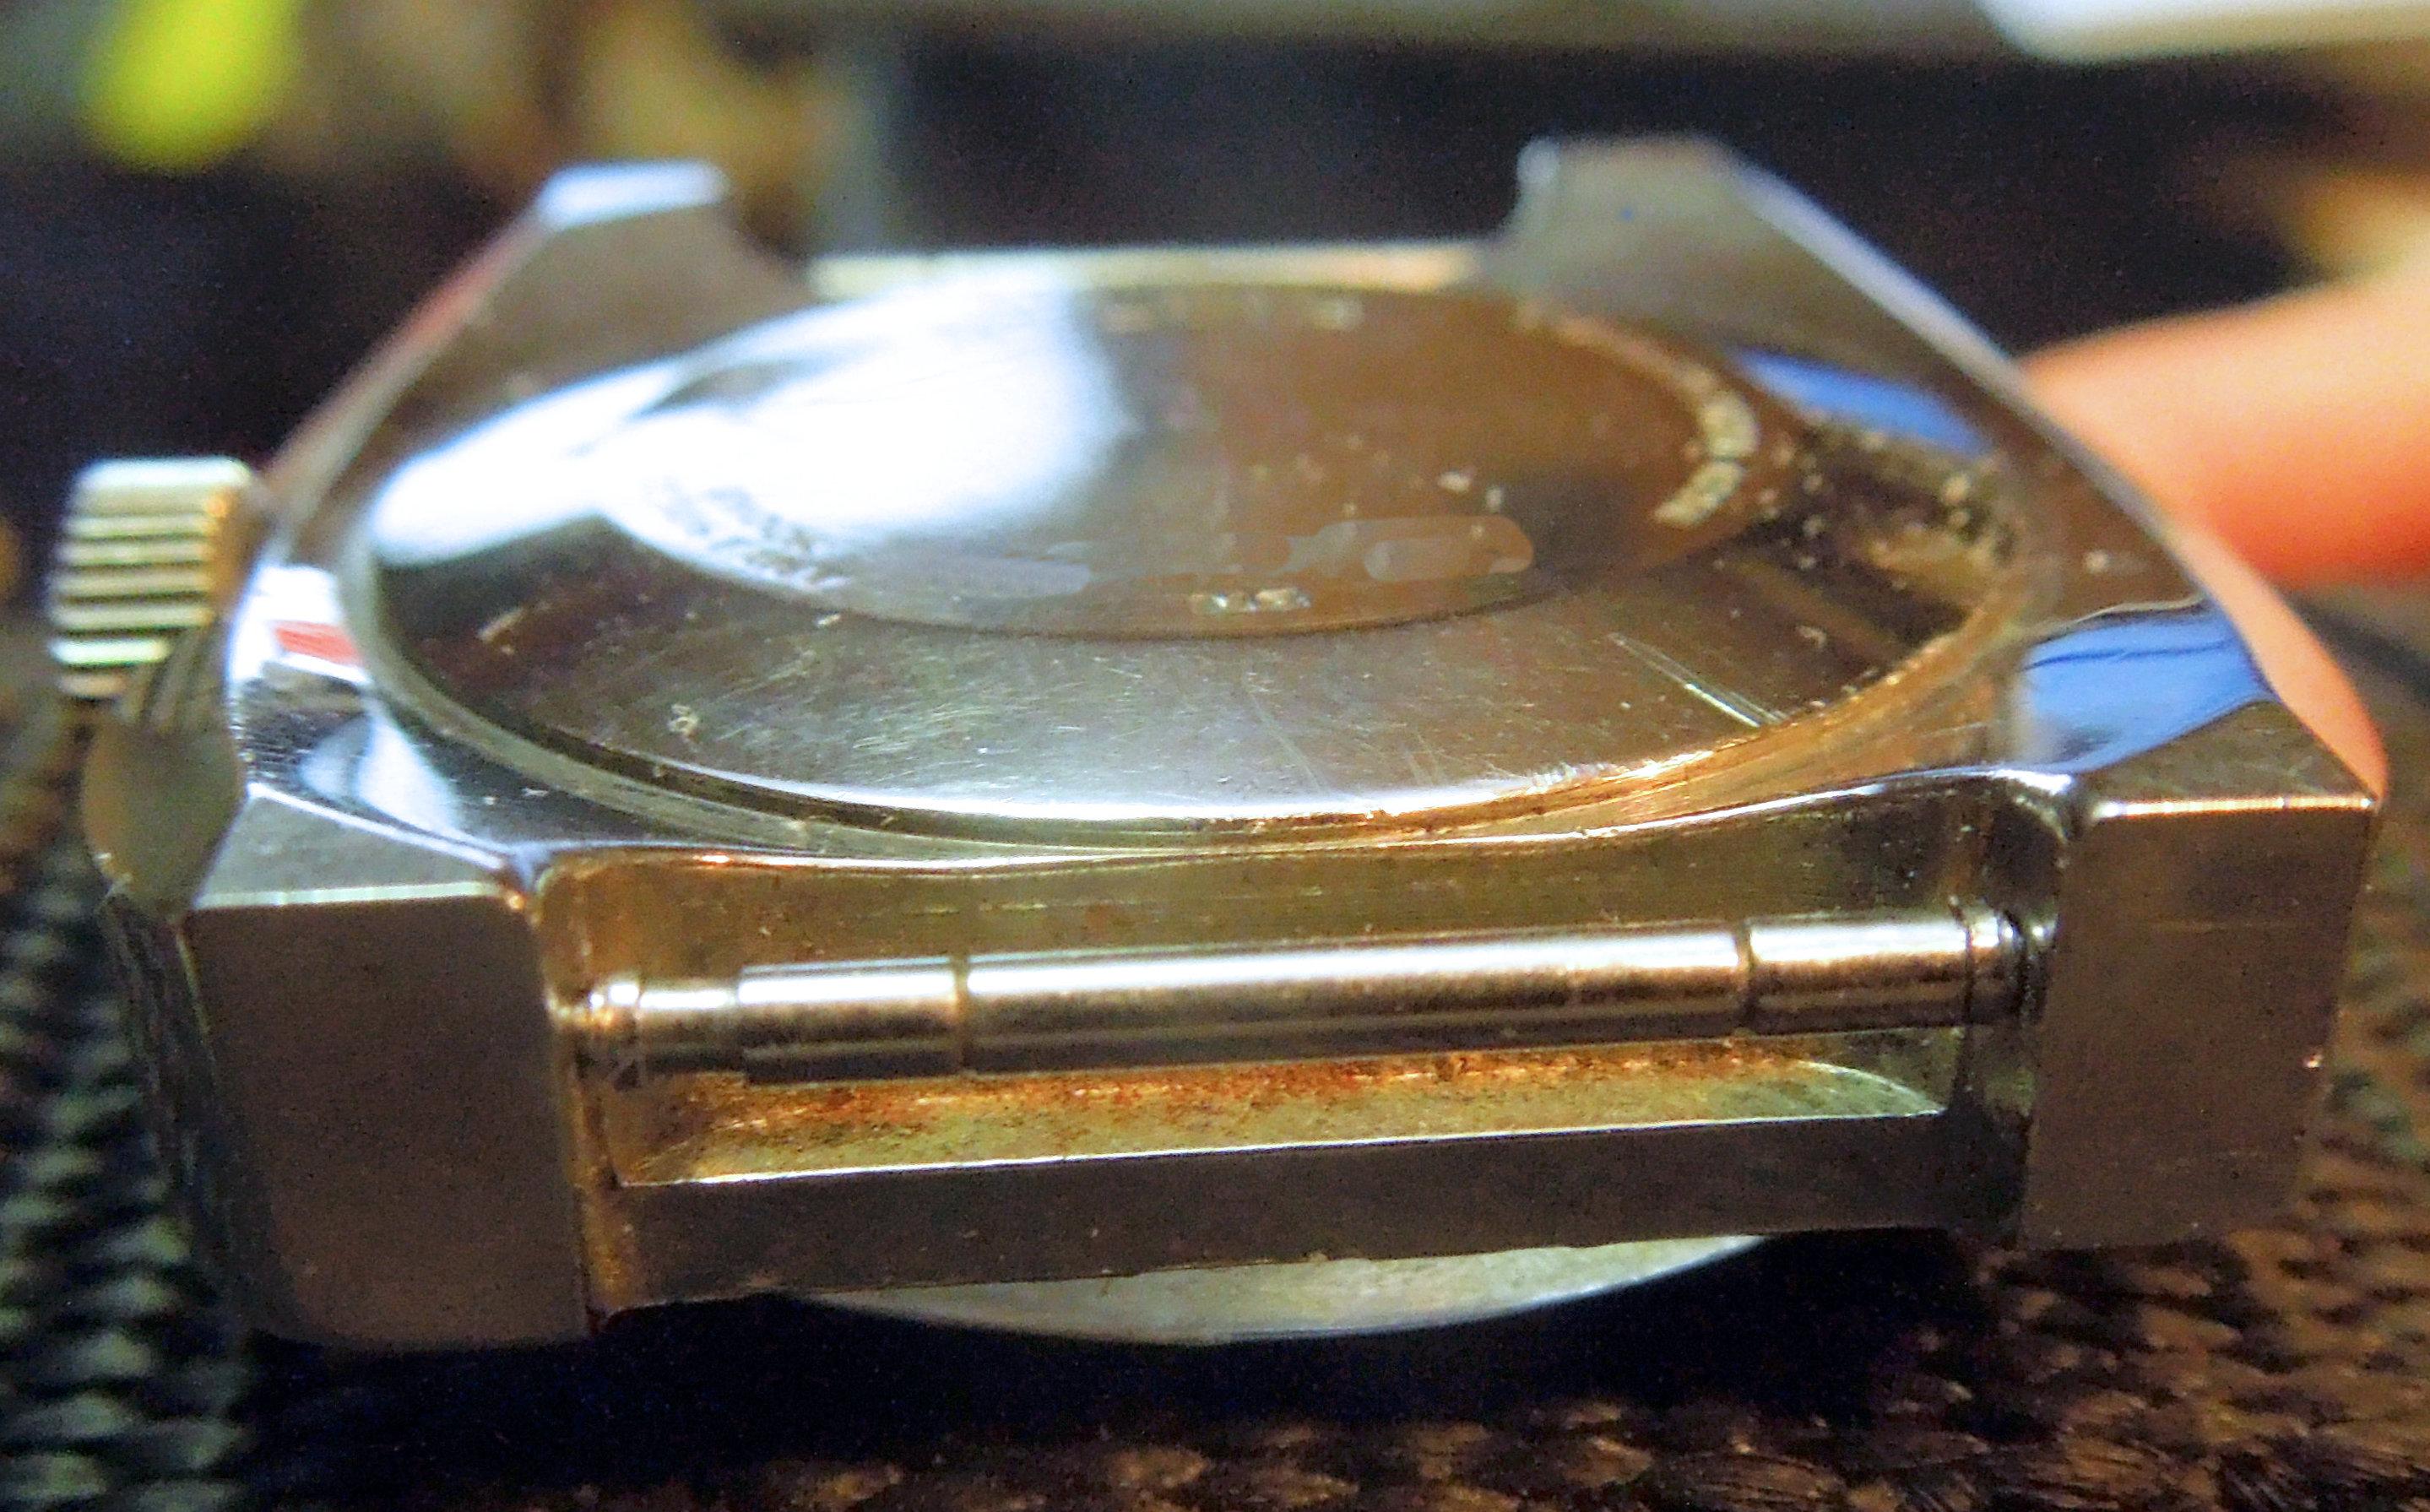
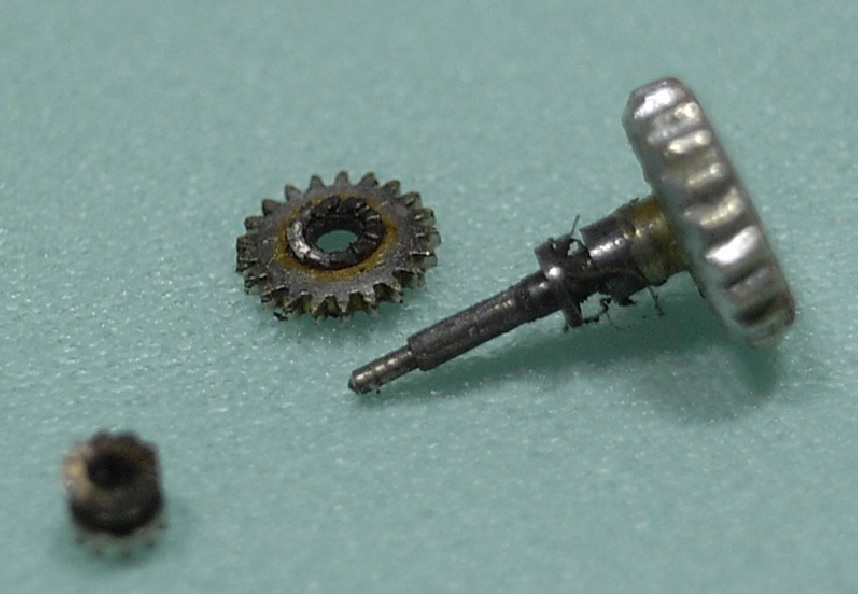
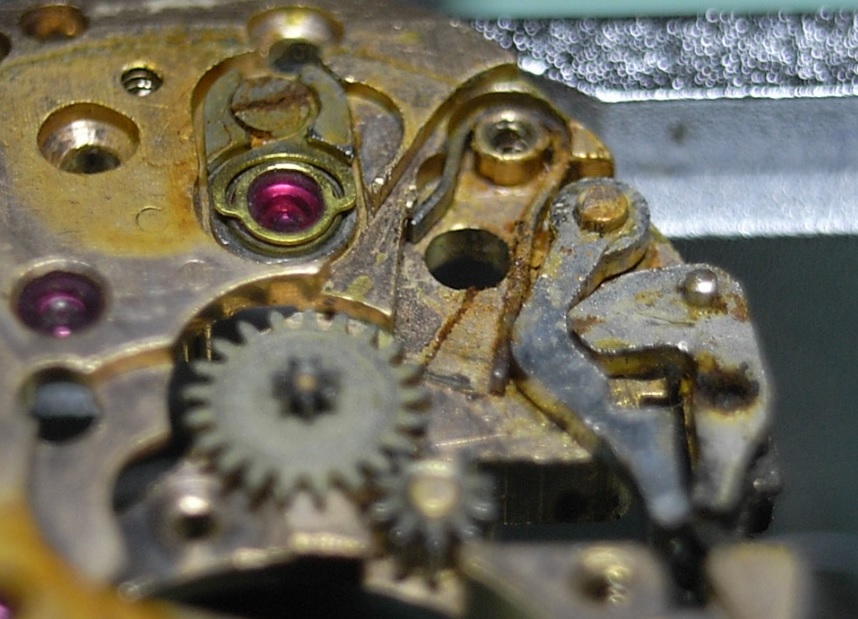
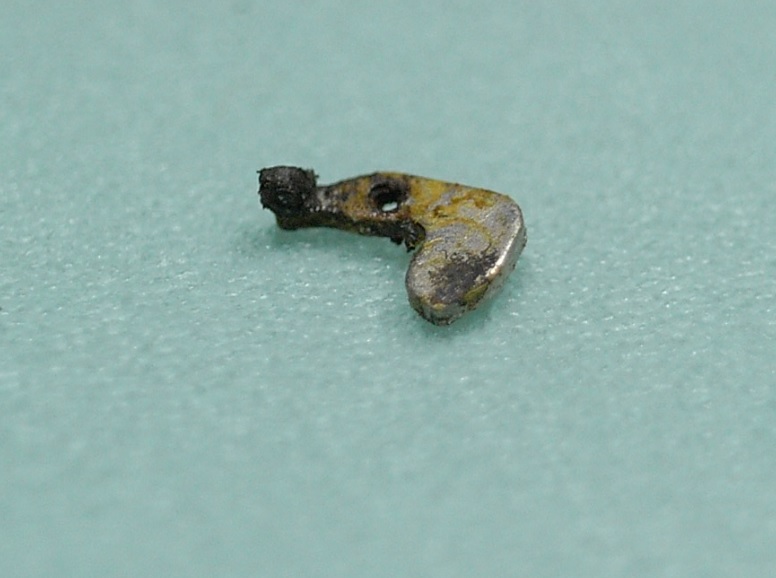
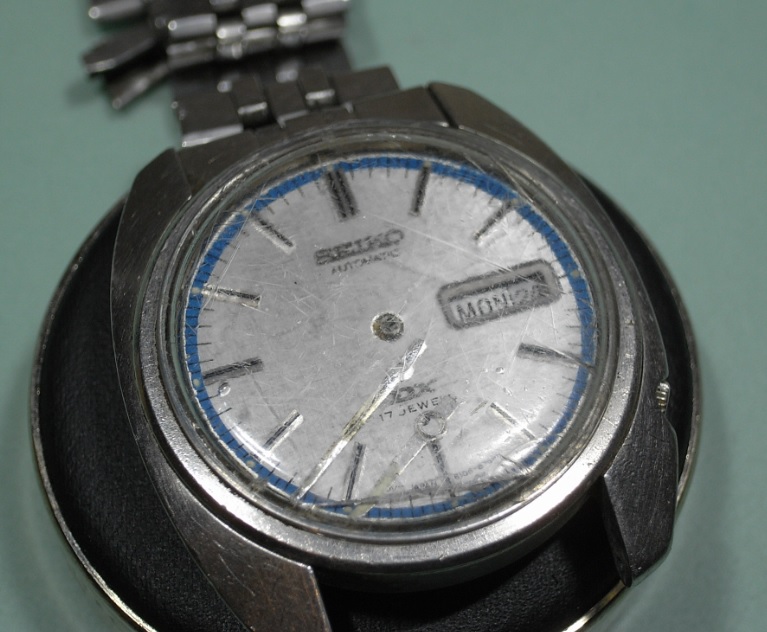
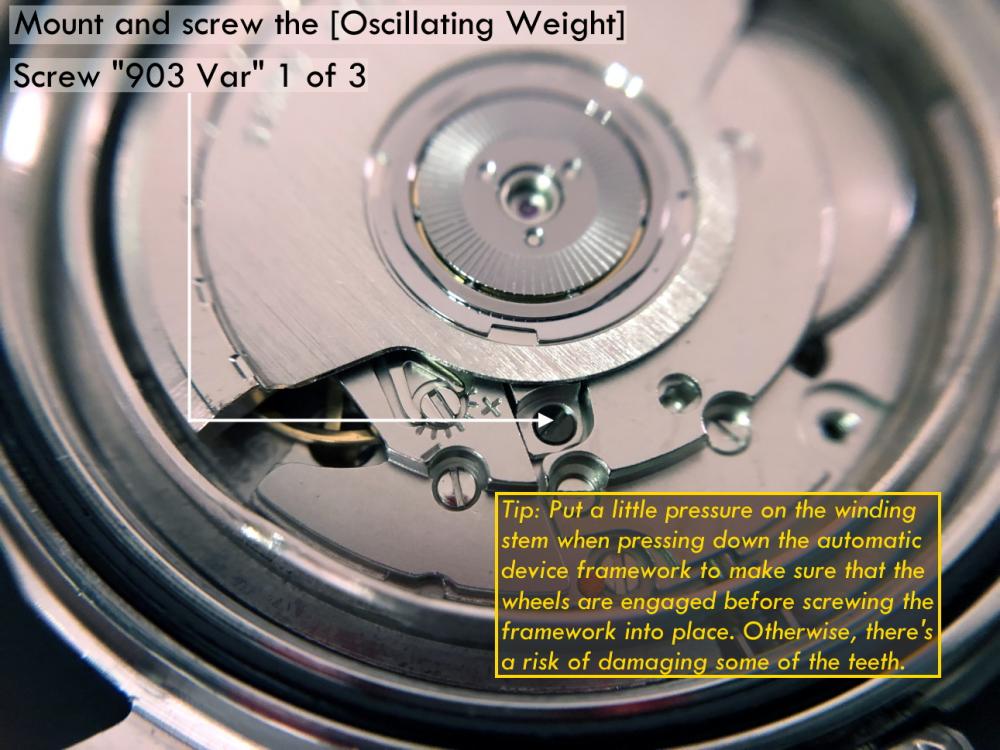
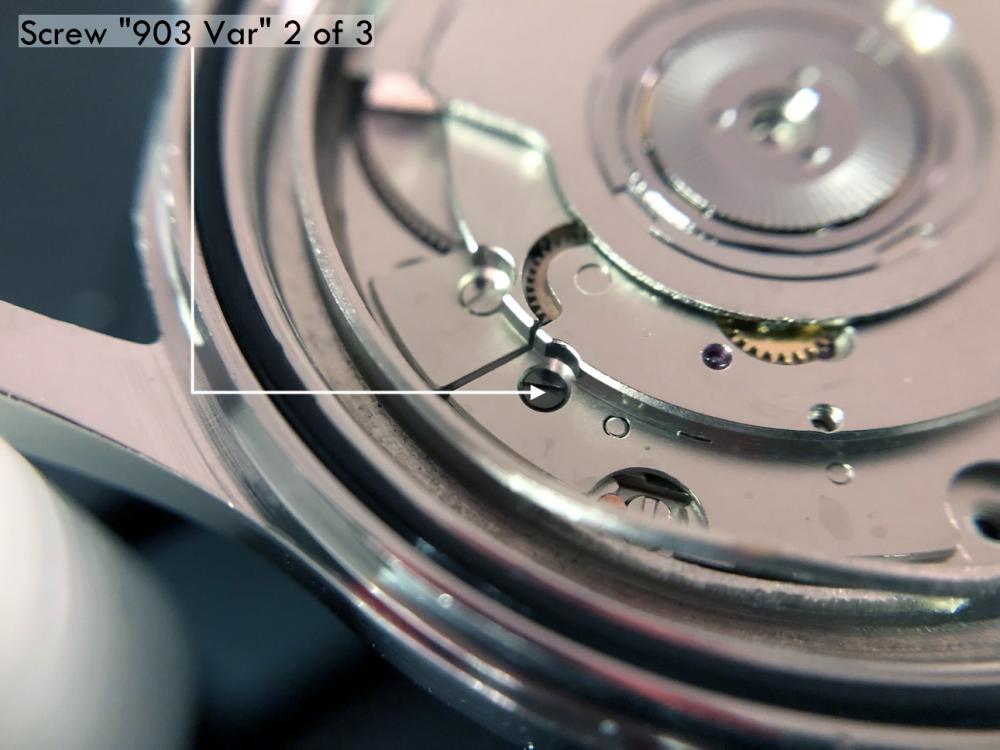
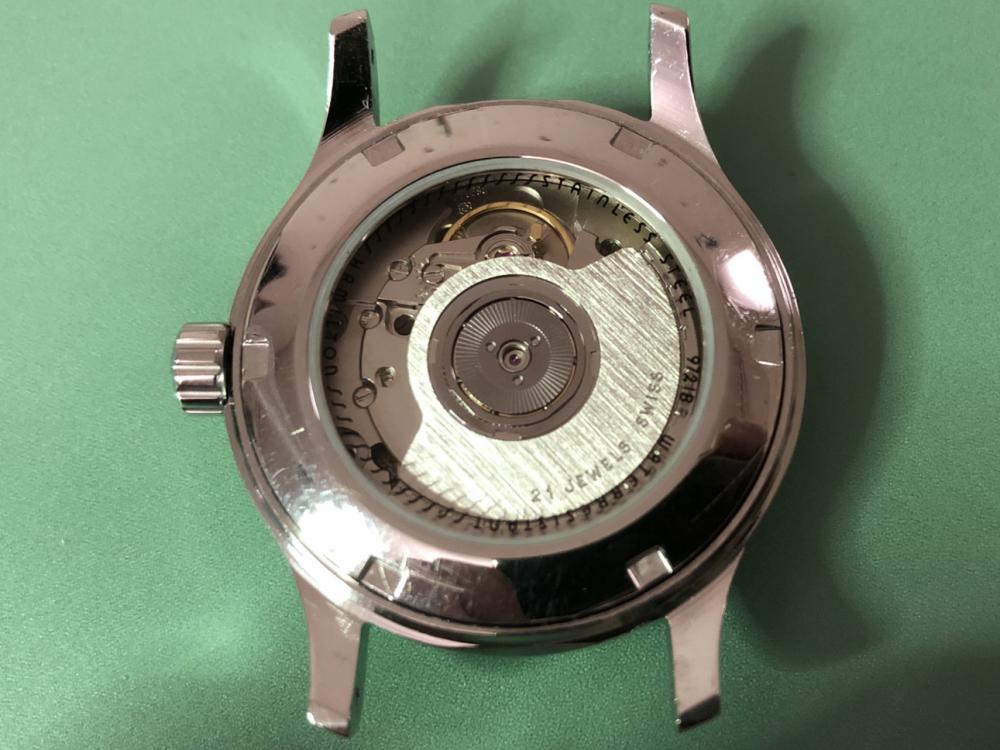
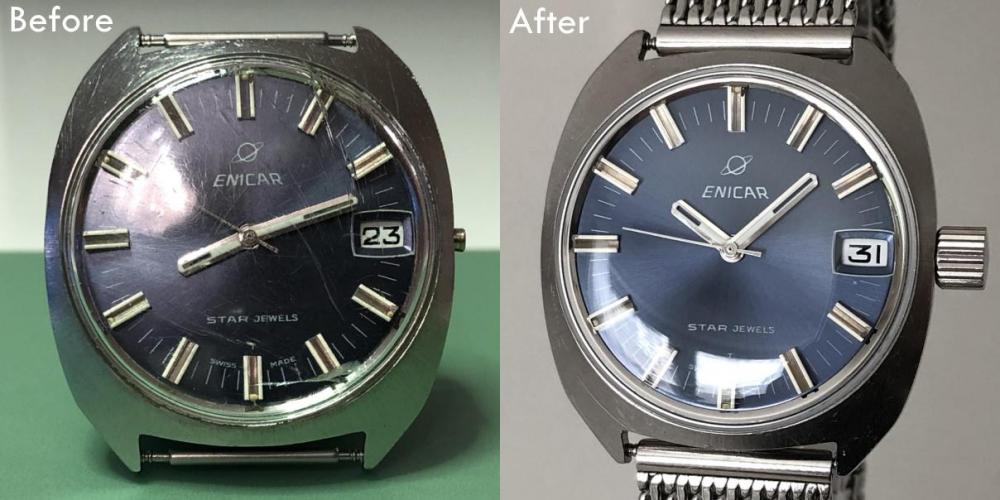
Disassembly sequence here (Please sort by name in ascending order) Assembly sequence here (Please sort by name in ascending order) The watch is an Enicar Star Jewels Ocean Pearl from the 1970s A bit of background I bought this watch on tradera.com (Swedish eBay) listed in the category "Klockor/Renoveringsobjekt" ("Watches / Renovation items"). It was listed as "working" despite lacking the winding stem. I bought it for three reasons. I wanted to try my hands on an inexpensive watch in visual need of renovation. I was curious of the Enicar brand and their in-house movements, and I thought the blue dial with its applied indices had potential. It was clear that the watch needed a new winding stem, crown, and armoured crystal. I found an original stem on eBay from Spain for less than €10 including shipping (a bit of a bargain I think). I bought a bunch of inexpensive waterproof crowns from CousinsUK.com so that I could select the most comfortable and at least somewhat nice looking. I also bought a couple of inexpensive Sternkreutz armoured glasses from CousinsUK.com Overall the movement looked pretty OK except for a third wheel pivot that was rusty. Removing the rust (using vinegar essence) the pivot became Coca Cola bottle shaped so I burnished it and in the process had to remove approx. 2 to 3/100 mm. This in turn created too much side-shake so I replaced the jewel as well. The mainspring looked pretty OK too so I kept it. The cannon pinion also needed a bit of tightening. I guess the friction between the centre wheel arbor and the cannon pinion really can't last forever when a watch is being used for many, many years, perhaps even for decades (looking at the case back of this watch it has seen massive use). Anyway, to tighten the cannon pinion I first tried with my Seitz jewelling pusher and stake for lanterning cannon pinions, but it feels like the edges of the pusher and stake are somehow too blunt or perhaps not designed for wrist watch movements?! So, I resorted to my cannon pinion tightening tool (Bergeon 4733) which is really a bit scary to use but works very well once you've destroyed your first two or three cannon pinions learning how to use it. The trick is not to alter the position of the screw (unscrew it) once it reaches the inside of the handle. As soon as the screw touches the inside of the handle it's time to press. That will usually tighten the cannon pinion the required 1-3/100 mm (I would guess). To give back some of the luster to the dial and hands I simply used a Dial & Hand Cleaning Pen from CousinsUK.com. It worked better than I had expected. The old lume was partly missing and what was left was completely crusty so I simply scratched the remains off and didn't bother to replace it (the blue colour shining through the hands looked pretty great and I don't care much for lume anyway) Despite throwing everything in my arsenal of collected knowledge and experience on the this watch I couldn't get it to run perfectly. The amplitude (as well as the rate) in the horizontal positions fluctuates between 260 and 280 degrees but mostly stays around 260 degrees. I did adjust the curb pin as the hairspring was pinched between the boot and the curb pin and made sure it bounced evenly between the two, but the effect was only marginal. I suspect that the hairspring touches the lower part of the boot. Anyway, I decided to wait with further investigations, put it together, wear it and enjoy it. Despite this shortcoming it performs very well as a daily wearer, only varying in rate between about +1 and -1 seconds per day.
- 13 replies
-
- 9
-
-
- star jewels
- ocean pearl
- (and 4 more)
-
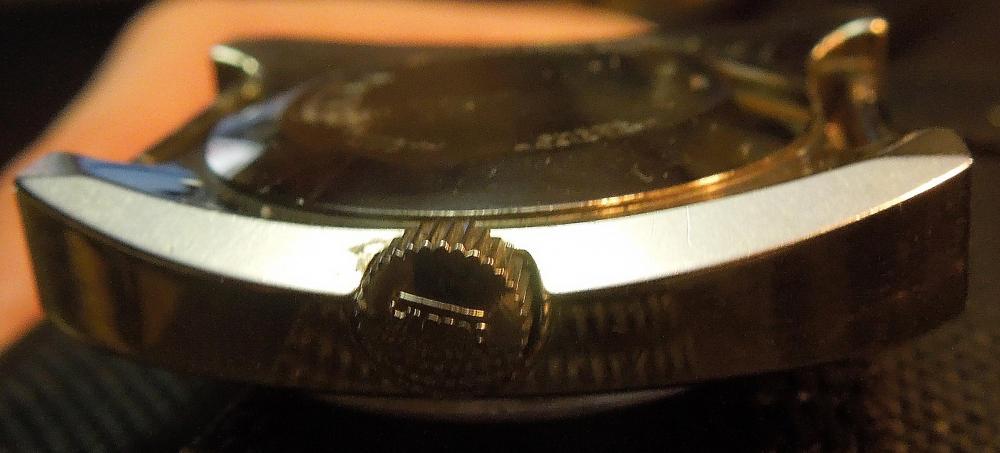
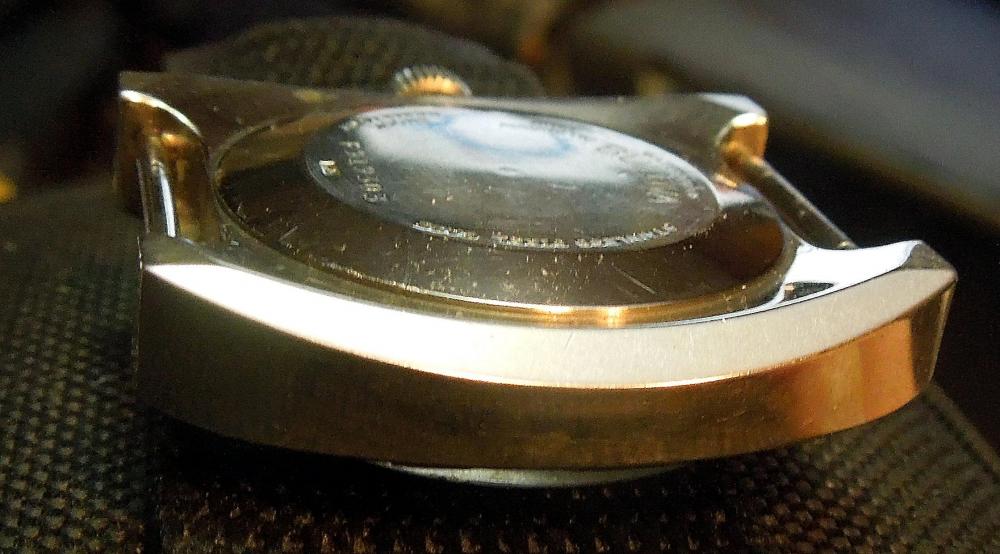
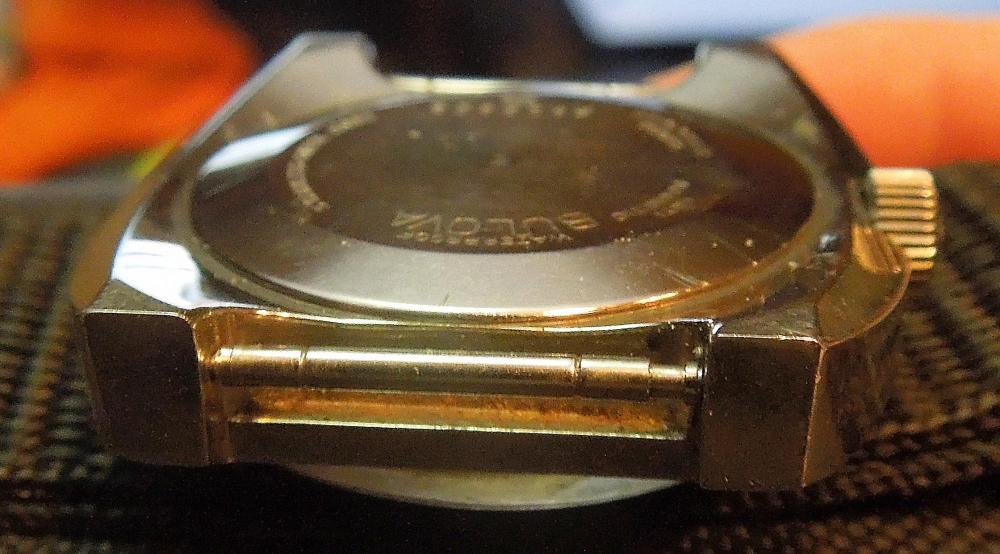
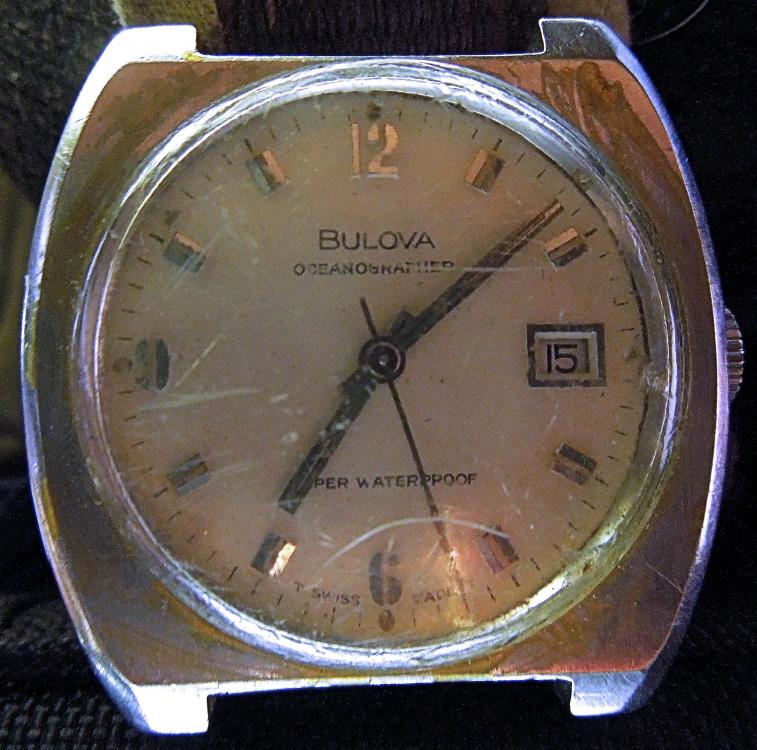
I bought this watch in 1968 and am interested in getting it running again. It is a "t Swiss Made t", it has tritium dust inside the case and the second hand has rust on it. I wanted to open the case back and see if it has rust inside but can't figure out how. I've already scratched it 3 times and figure I can polish that out but I quit until I know what I am doing. Can anybody help. I thought it was a press fit and would just pry it off but their isn't any space to fit any tool. I used a Bergeron pry tool but again, it won't catch any where on the case back. Any help would be appreciated. Also if you know of a watchmaker that might be interested in tackling a service on this let me know. this one let me know.

-
 Hello I just bought A Mido watch pre-owned and certified COSC of course it must be a really accurate watch right but at least +/-10second a day worst But this watch run fast like 1- 1.5 minutes a day...from the movement blue screws i see that the watch has never being serviced since it first owner, I want to ask,does this watch need service or this watch got magnetize? Cause it just run fast 1-2 minutes fast and i see many articles say that magnetize watch can run fast to hours.. Thanks
 -
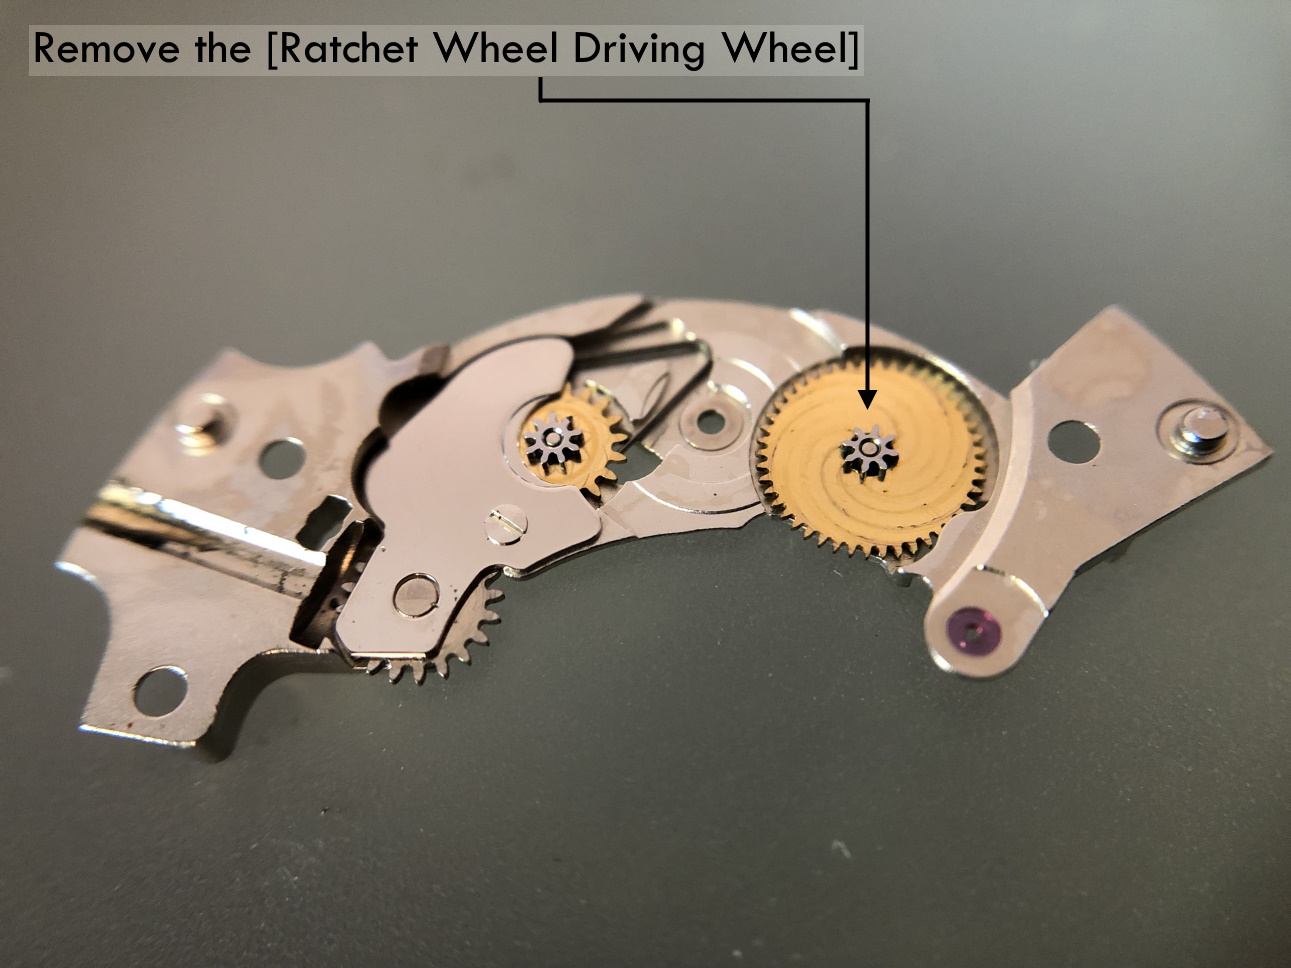
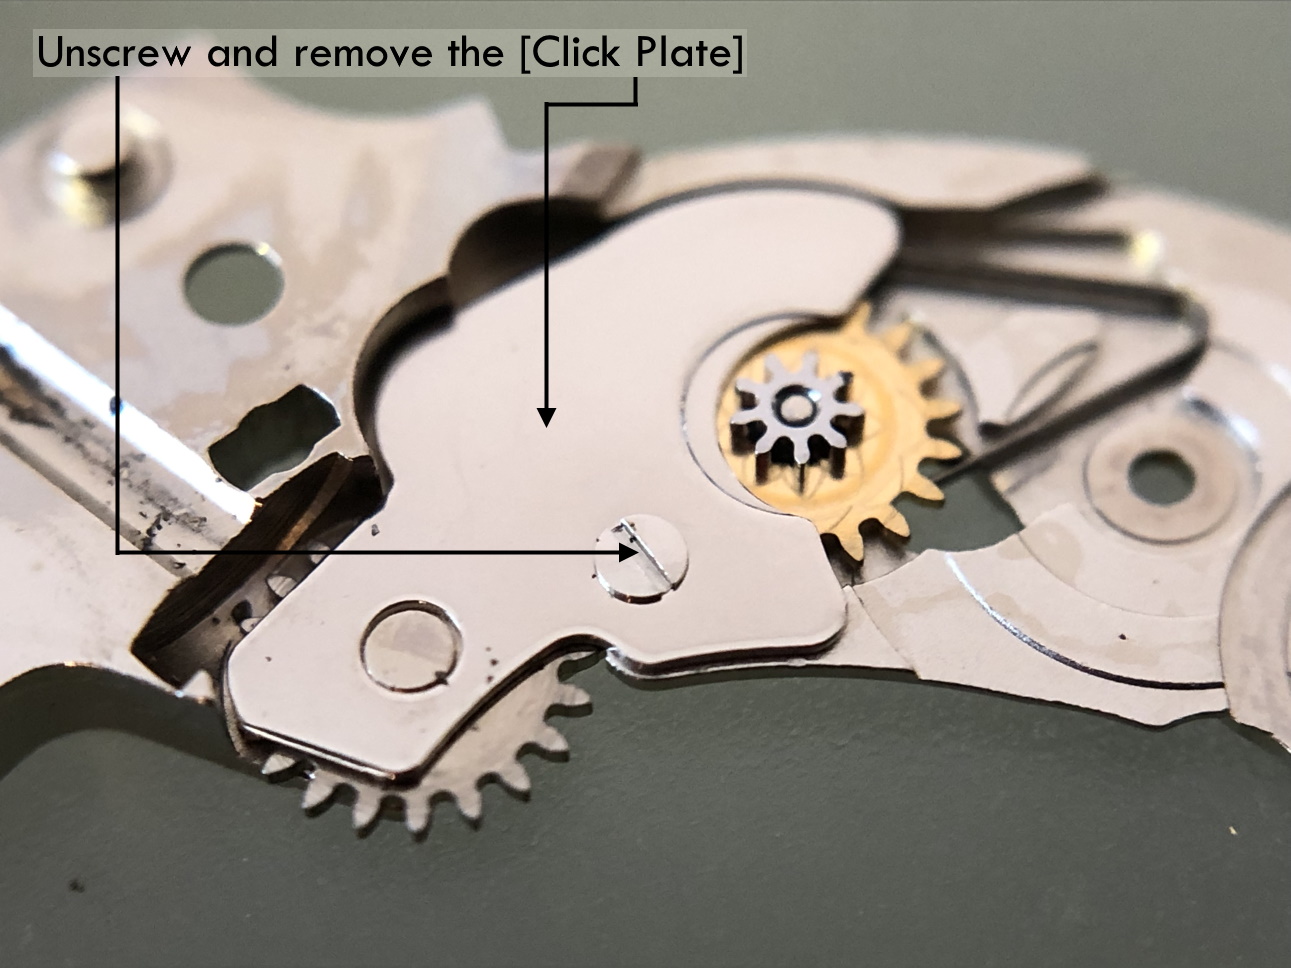
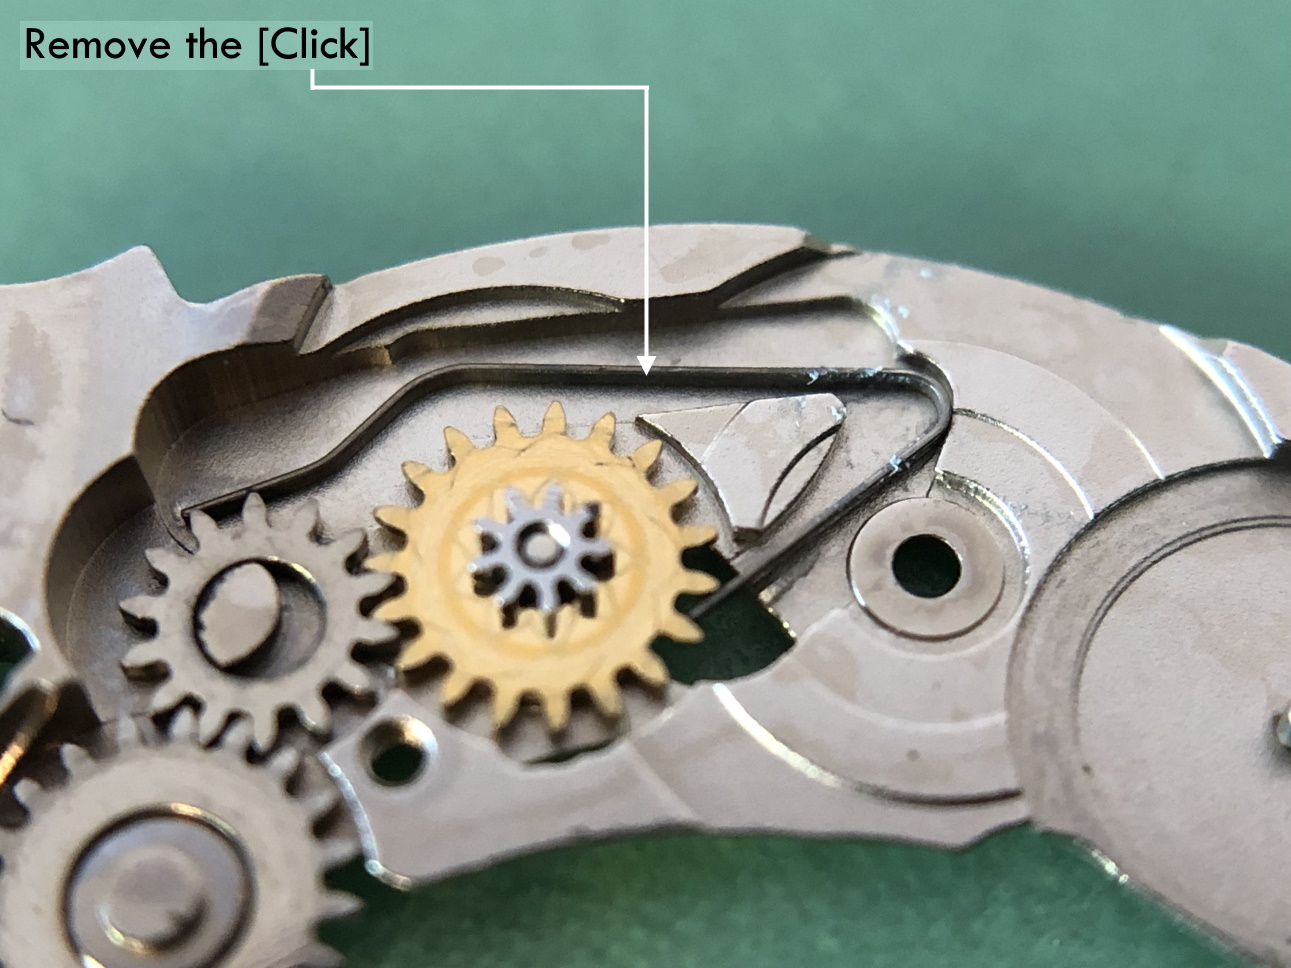
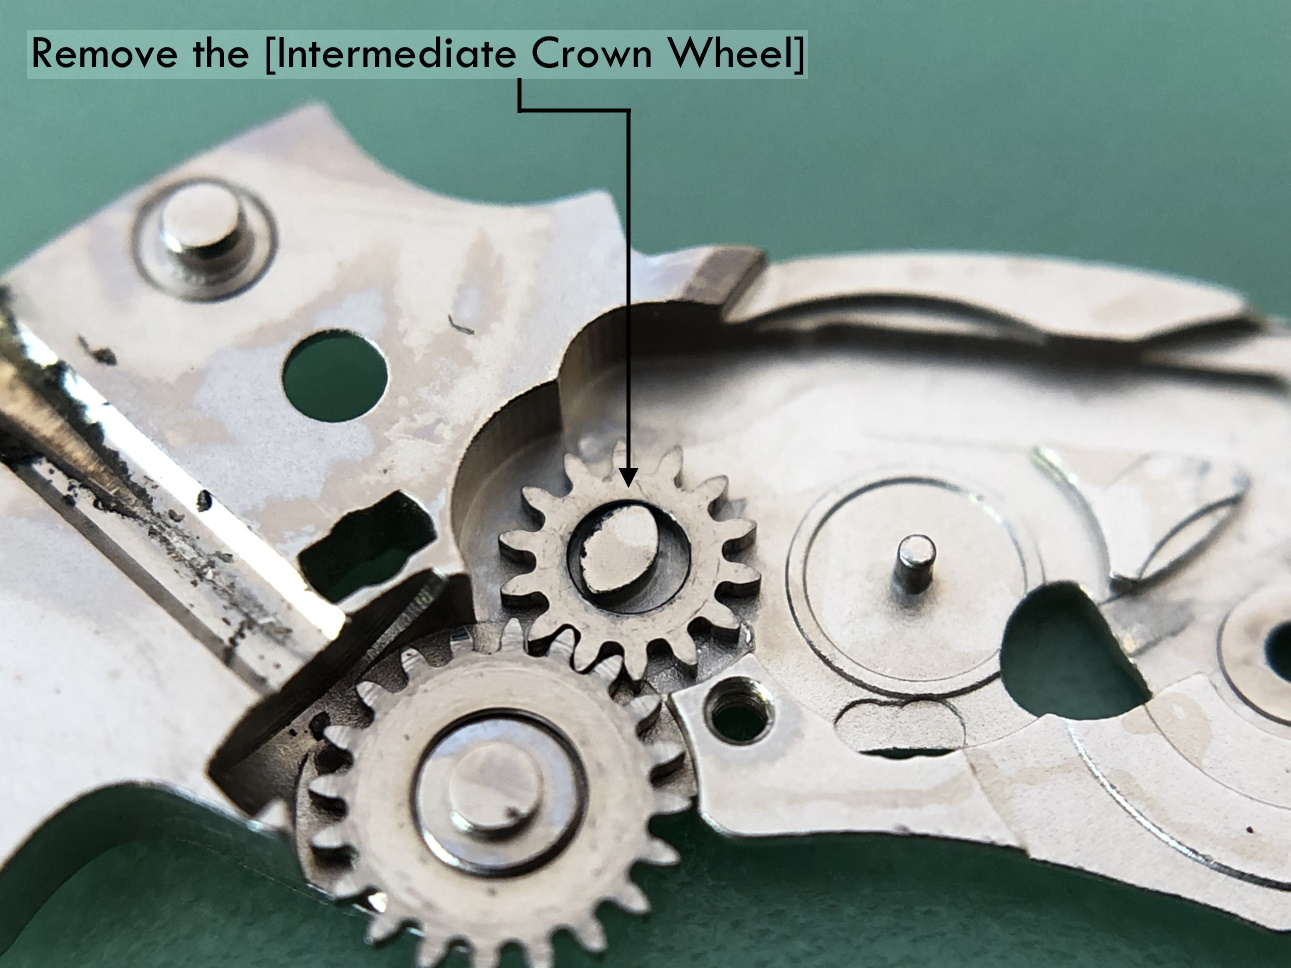
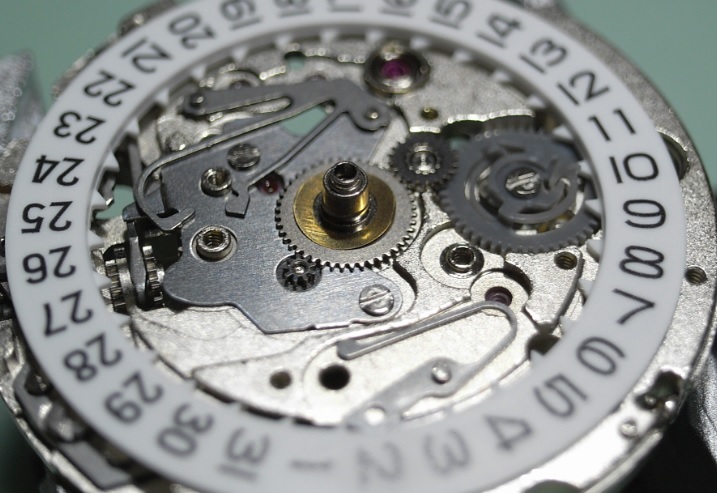
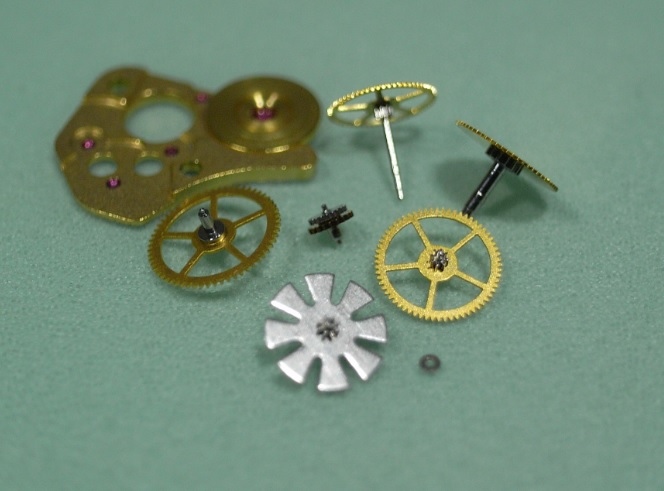
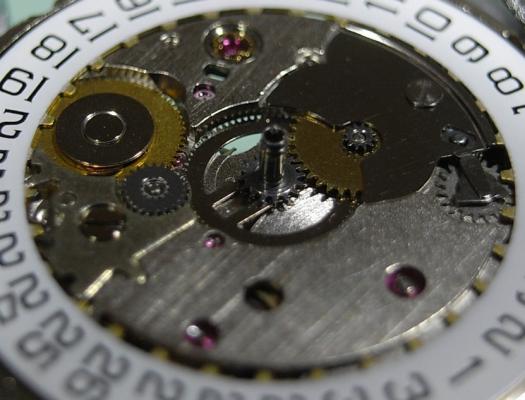
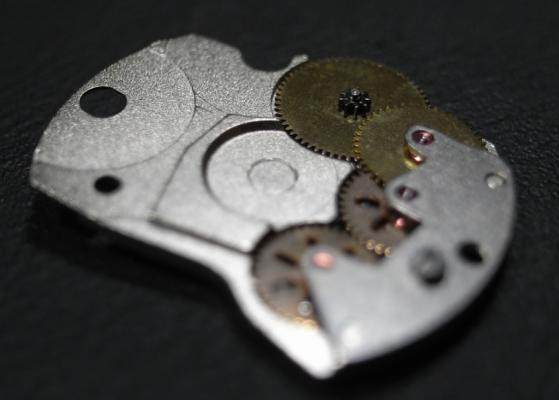
 ETA Calibre 2772 Service Walkthrough Pictures – Disassembly (Please sort the pictures by name in ascending order) ETA Calibre 2772 Service Walkthrough Pictures – Assembly (Please sort the pictures by name in ascending order) For the disassembly sequence to make sense it is important that the pictures are sorted by name in ascending order. Generally, the sequence of pictures first shows the part to be removed in its position on the movement and the following picture shows the removed part along with any screws that held it in place. For the assembly sequence to make sense it is important that the pictures are sorted by name in ascending order. Generally, the sequence of pictures first shows the part to be assembled along with any screws holding it in place. If needed, the following picture shows the section of the movement where that part is to be assembled along with my lubrication suggestion, and the picture after that shows the part when assembled to the movement. Note that this is not a maintenance servicing tutorial. To be able to service a watch movement some basic tools are required as well as some basic skills. It’s not difficult but it requires a bit of practice and perseverance. I’ve used a lot of sources on the internet to learn about servicing and repairing but watchrepairlessons have so far not only been the best source but also the most affordable source I’ve come across. I am a patron of watchrepairlessons but I’m in no way affiliated with it. Prior to servicing this calibre 2772, I’ve serviced an ETA calibre 2472 and two ETA calibre 2824-2s and the kinship between these movement is obvious. The 2472 is from the mid-60s, the 2772 is from the mid-70s, and the 2824-2 is from the early 80s. They all have the same type of distinguishing train. The keyless works of the 2472 and the 2772 is of the more traditional type whereas the keyless works of the 2824-2 quite a bit more sophisticated. However, the calendar works of the older 2472 is by far the more complex with its instant flip over of the date. It has been very interesting to study the similarities and differences between these three related automatic ETA movements.
 -
vostok 2409 Vostok 2409 Service Walkthrough
VWatchie posted a topic in Your Walkthroughs and Techniques
Vostok 2409 Service Walkthrough Disassembly Pictures (Please sort by name in ascending order) Vostok 2409 Service Walkthrough Assembly Pictures (Please sort by name in ascending order) Being able to service the ETA calibre 2824-2 was a long-term goal and a dream when I started servicing and repairing watches some years ago. However, my first “calibre love” was the Vostok 2409; a reliable Soviet/Russian 17 jewels manual workhorse without any complications which has been around since 1970. It is still in production and found in Vostok’s Komandirskie series of watches, by some called the AK-47s of the watch world, together with its bigger brother the Vostok Amphibian dive watch. Modern-day Vostok Amphibians use the automatic Vostok 2415 (w/o date complication) and 2416 (with date complication) calibres, but the Amphibian that I’m servicing in this walkthrough, an Albatross Radio Room, popular among collectors, is from the 1980s and in those days the manual 2409, as well as its predecessor 2209, was commonly used in the Amphibians as well as the Komandirskies. While I was servicing this watch, I noticed that the crystal didn’t fit perfectly in the watch case. Being a serious dive watch originally designed for the Soviet navy this was, of course, unacceptable, so I replaced the crystal and video recorded the event in my “Bergeon No 5500 Crystal Press Review”. For me, the 2409 was a great movement to get started with as it probably is the most affordable movement on the planet, and spare parts are readily available and cost next to nothing. A lost or damaged part never spells financial disaster. Also, eBay offers an abundance of used Vostok watches in decent condition housing this movement for as little as $20 and sometimes less. A brand new Vostok 2409 (www.meranom.com) can be had for as little as $27. Be aware that, almost without exception, the eBay listings always state that these Vostok watches have been serviced, but in my experience they never are. Well, maybe dipped in a can of naphtha, left to dry and then injected with a bit of oil here and there. I’ve seen horrible examples! A somewhat tricky bit about the 2409 is to remove and replace the anti-shock springs. For this, I use a self-made tool made from peg wood. It’s shown in one of the assembly pictures together with a description of how I made it. A very similar tool is demonstrated in this video. Later, as I was working myself through Mark Lovick’s watchrepairlessons.com courses, I trained with the Unitas 6498 pocket watch movement which is the selected movement for the courses. In all honesty, from a learning point, the Unitas 6498 would have been an easier movement to get started with (especially the anti-shock springs), but the tinkering with the Vostok 2409 was a low-cost and fun way to get started and made me better prepared for the courses which answered a bunch of questions and was amazingly instructive. Eventually, I plan to publish a “Vostok 2414 Service Walkthrough”. The 2414 is identical to the 2409 but adds a very uncomplicated date complication. So, if you want a whole lot of fun for next to nothing when it comes to money, there is no other movement I would recommend before the Vostok 24XX movements, and the 2409 is a great starting point if you have a desire to begin tinkering with watches. Be warned though; tinkering may take over a substantial chunk of your life! -
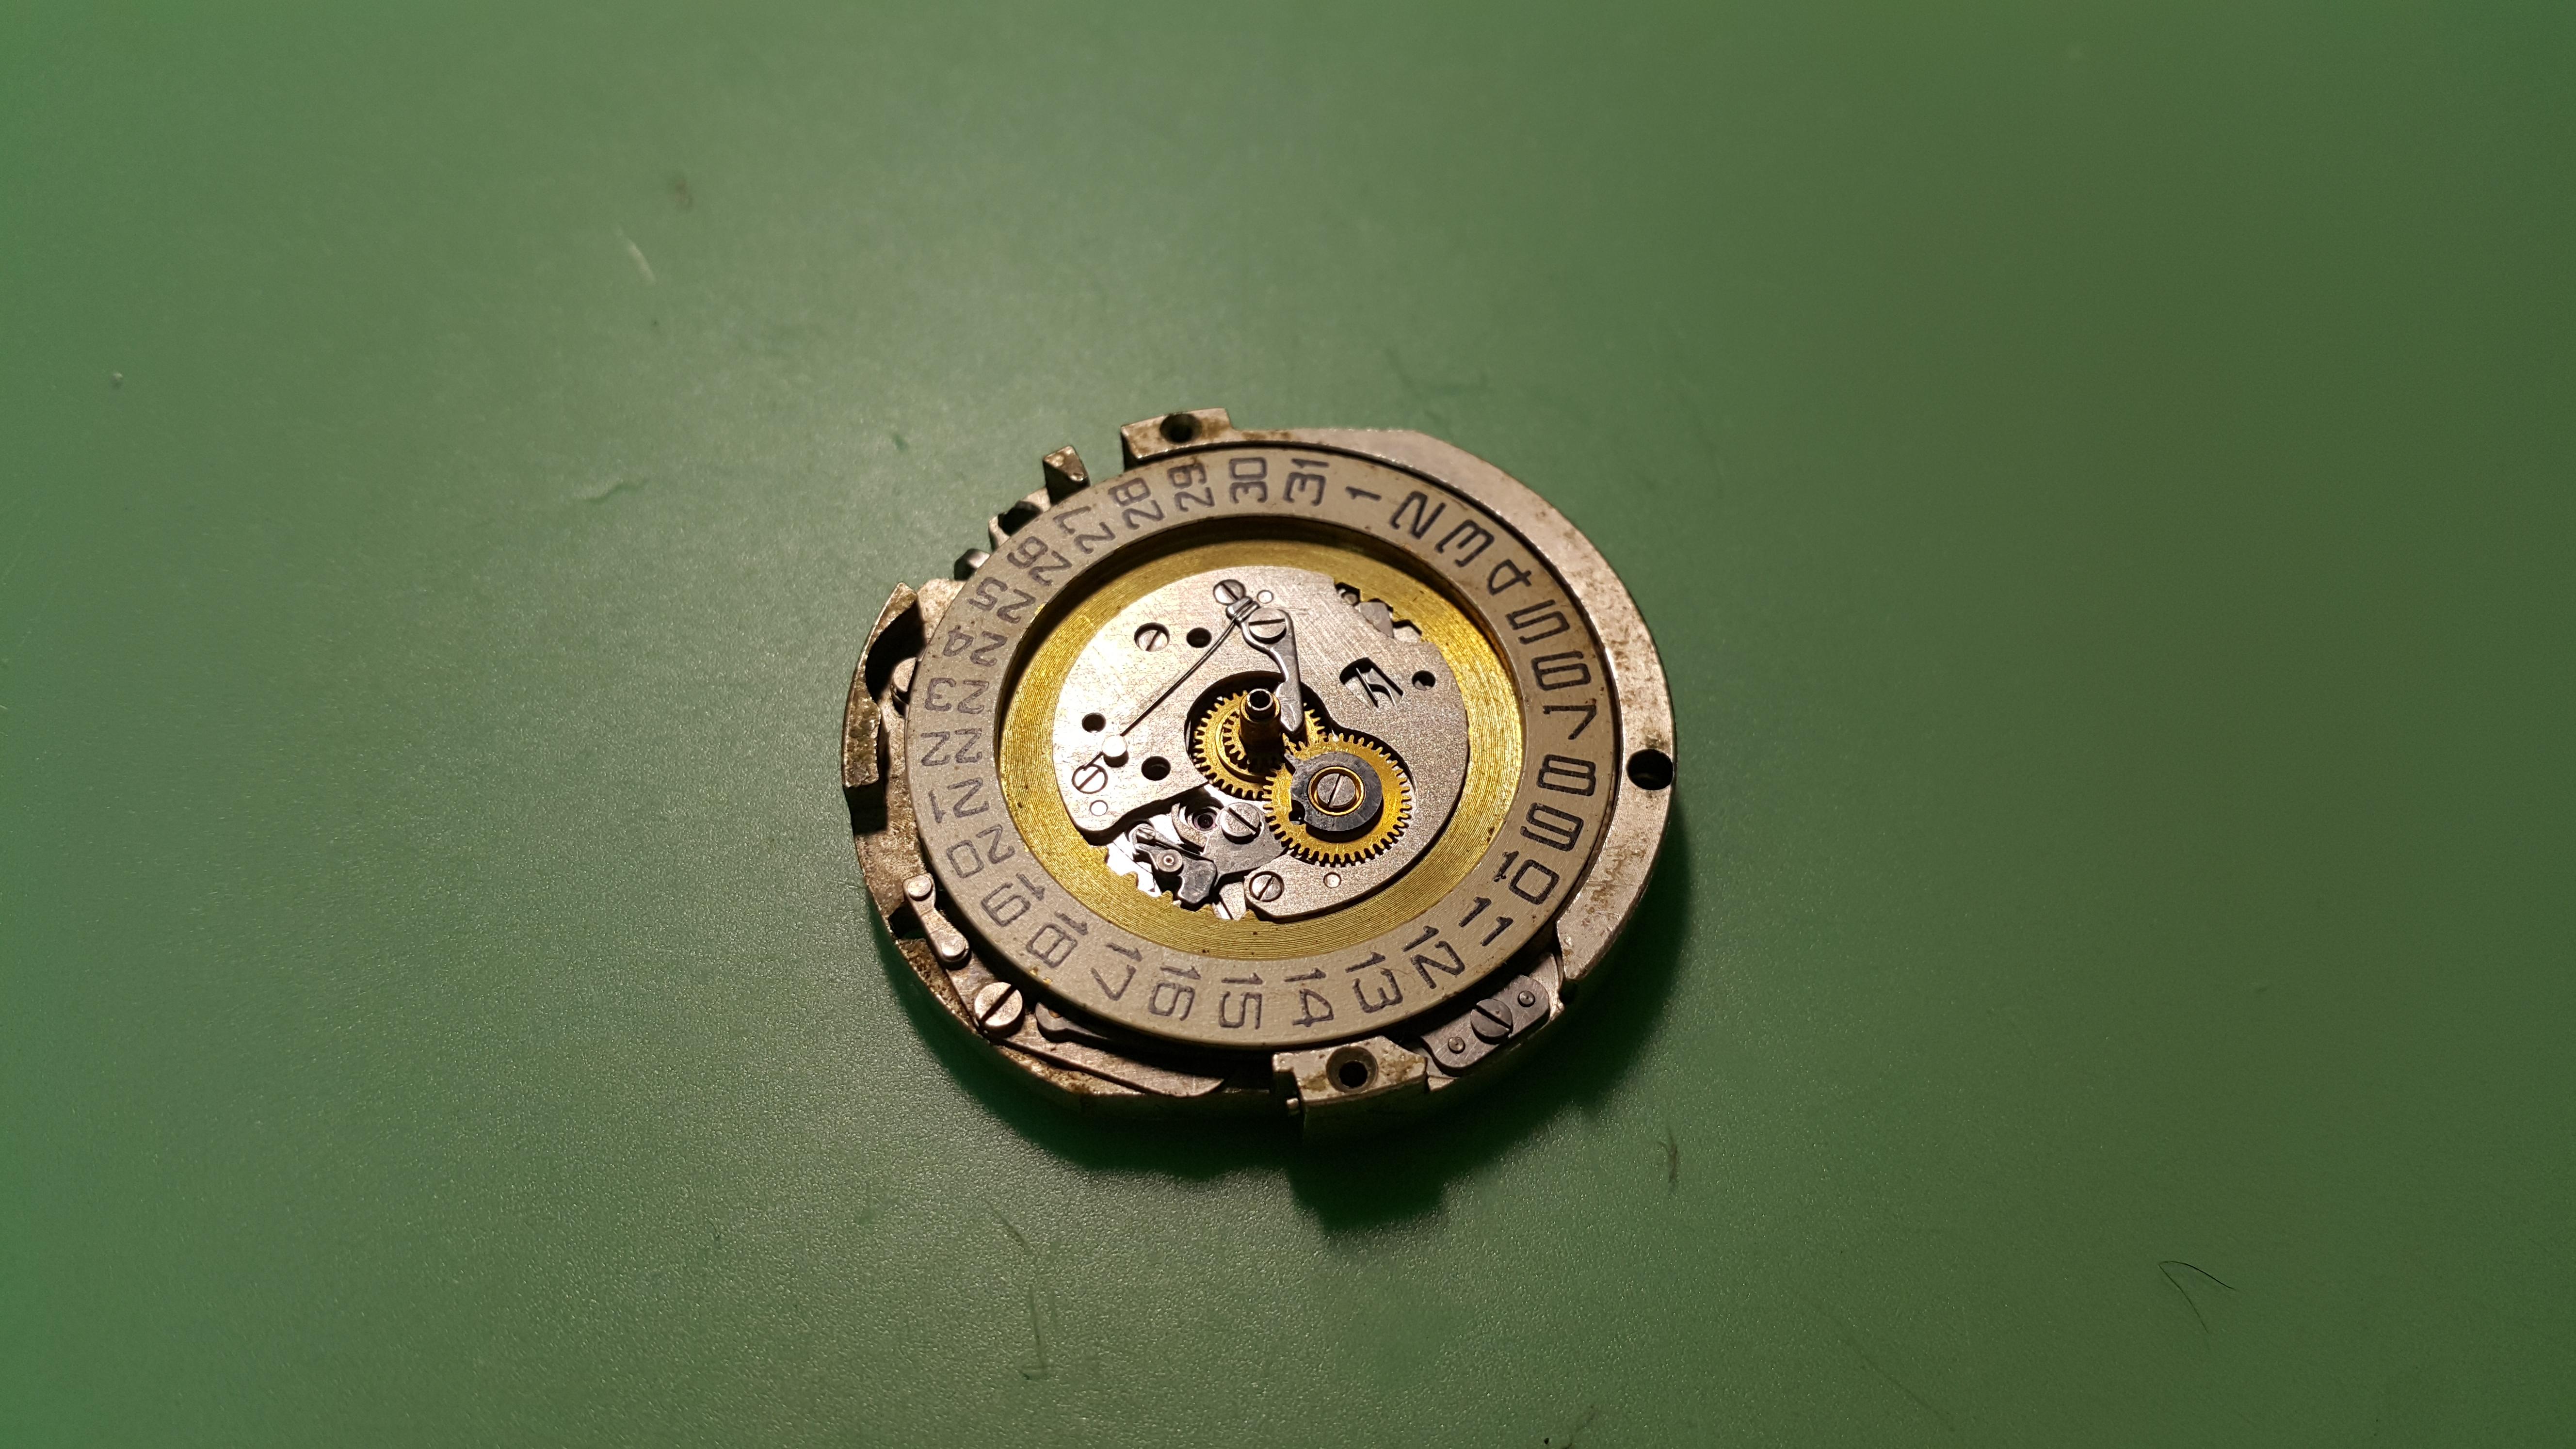
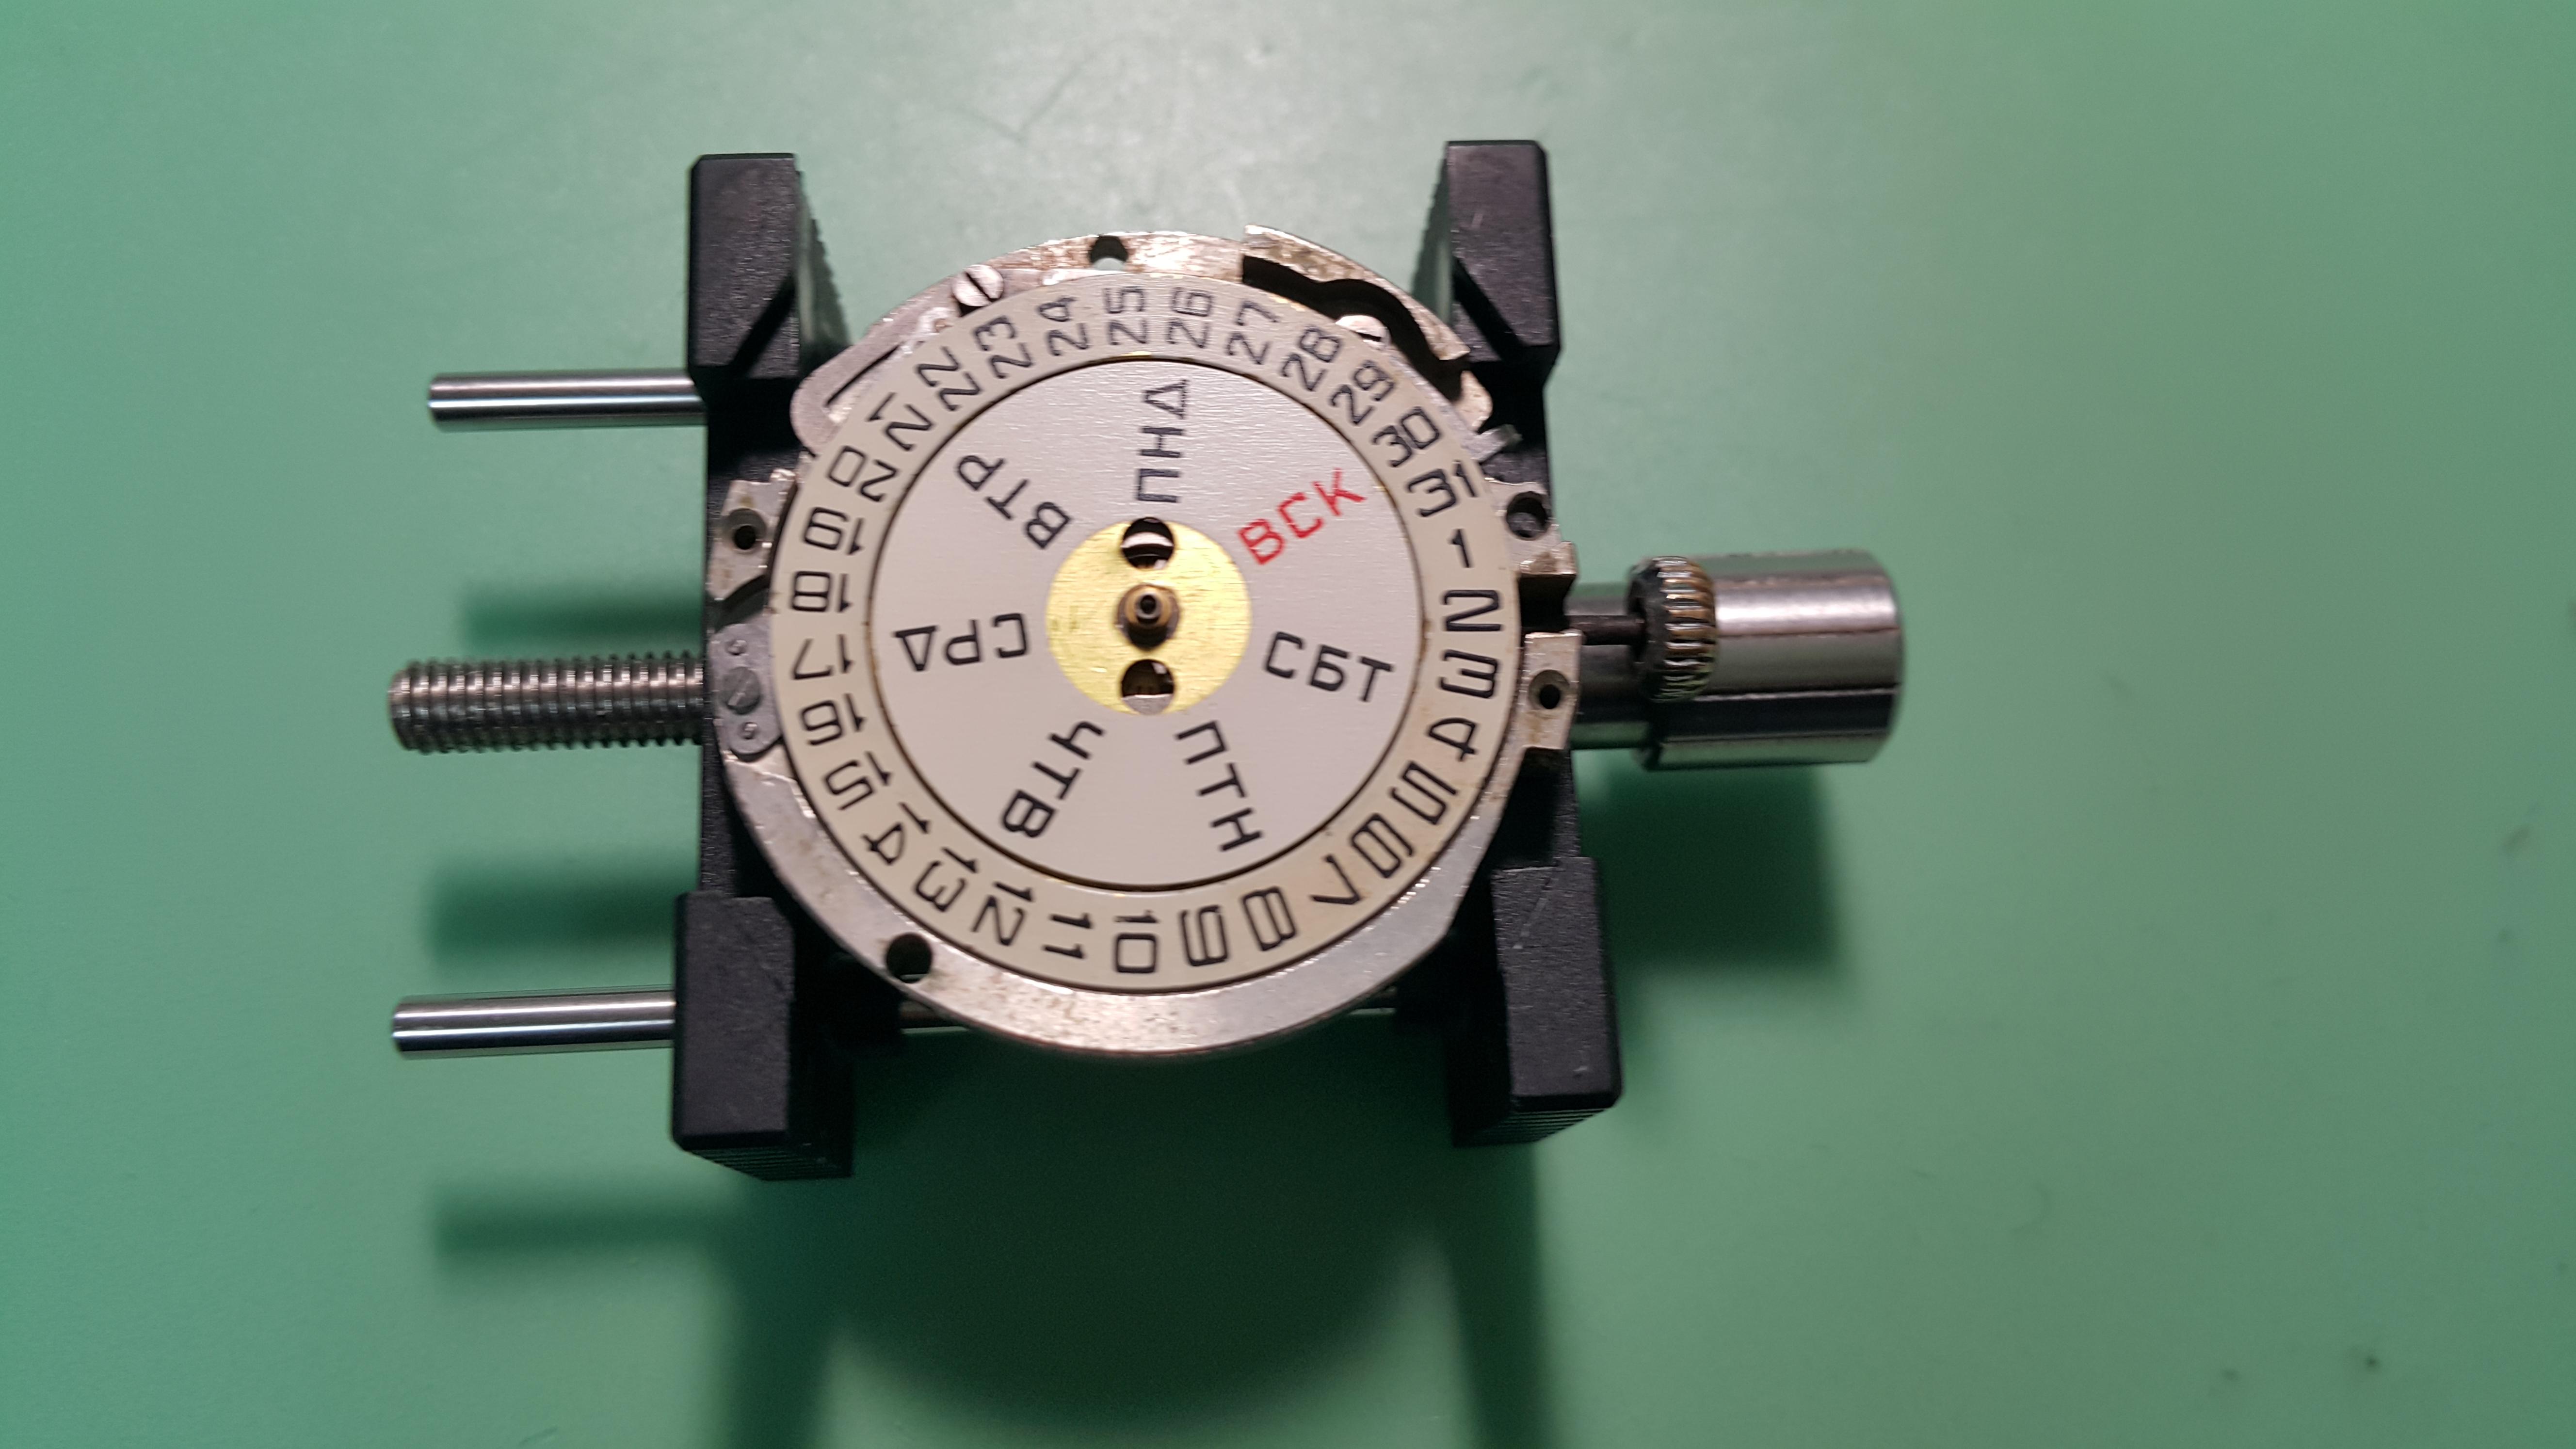
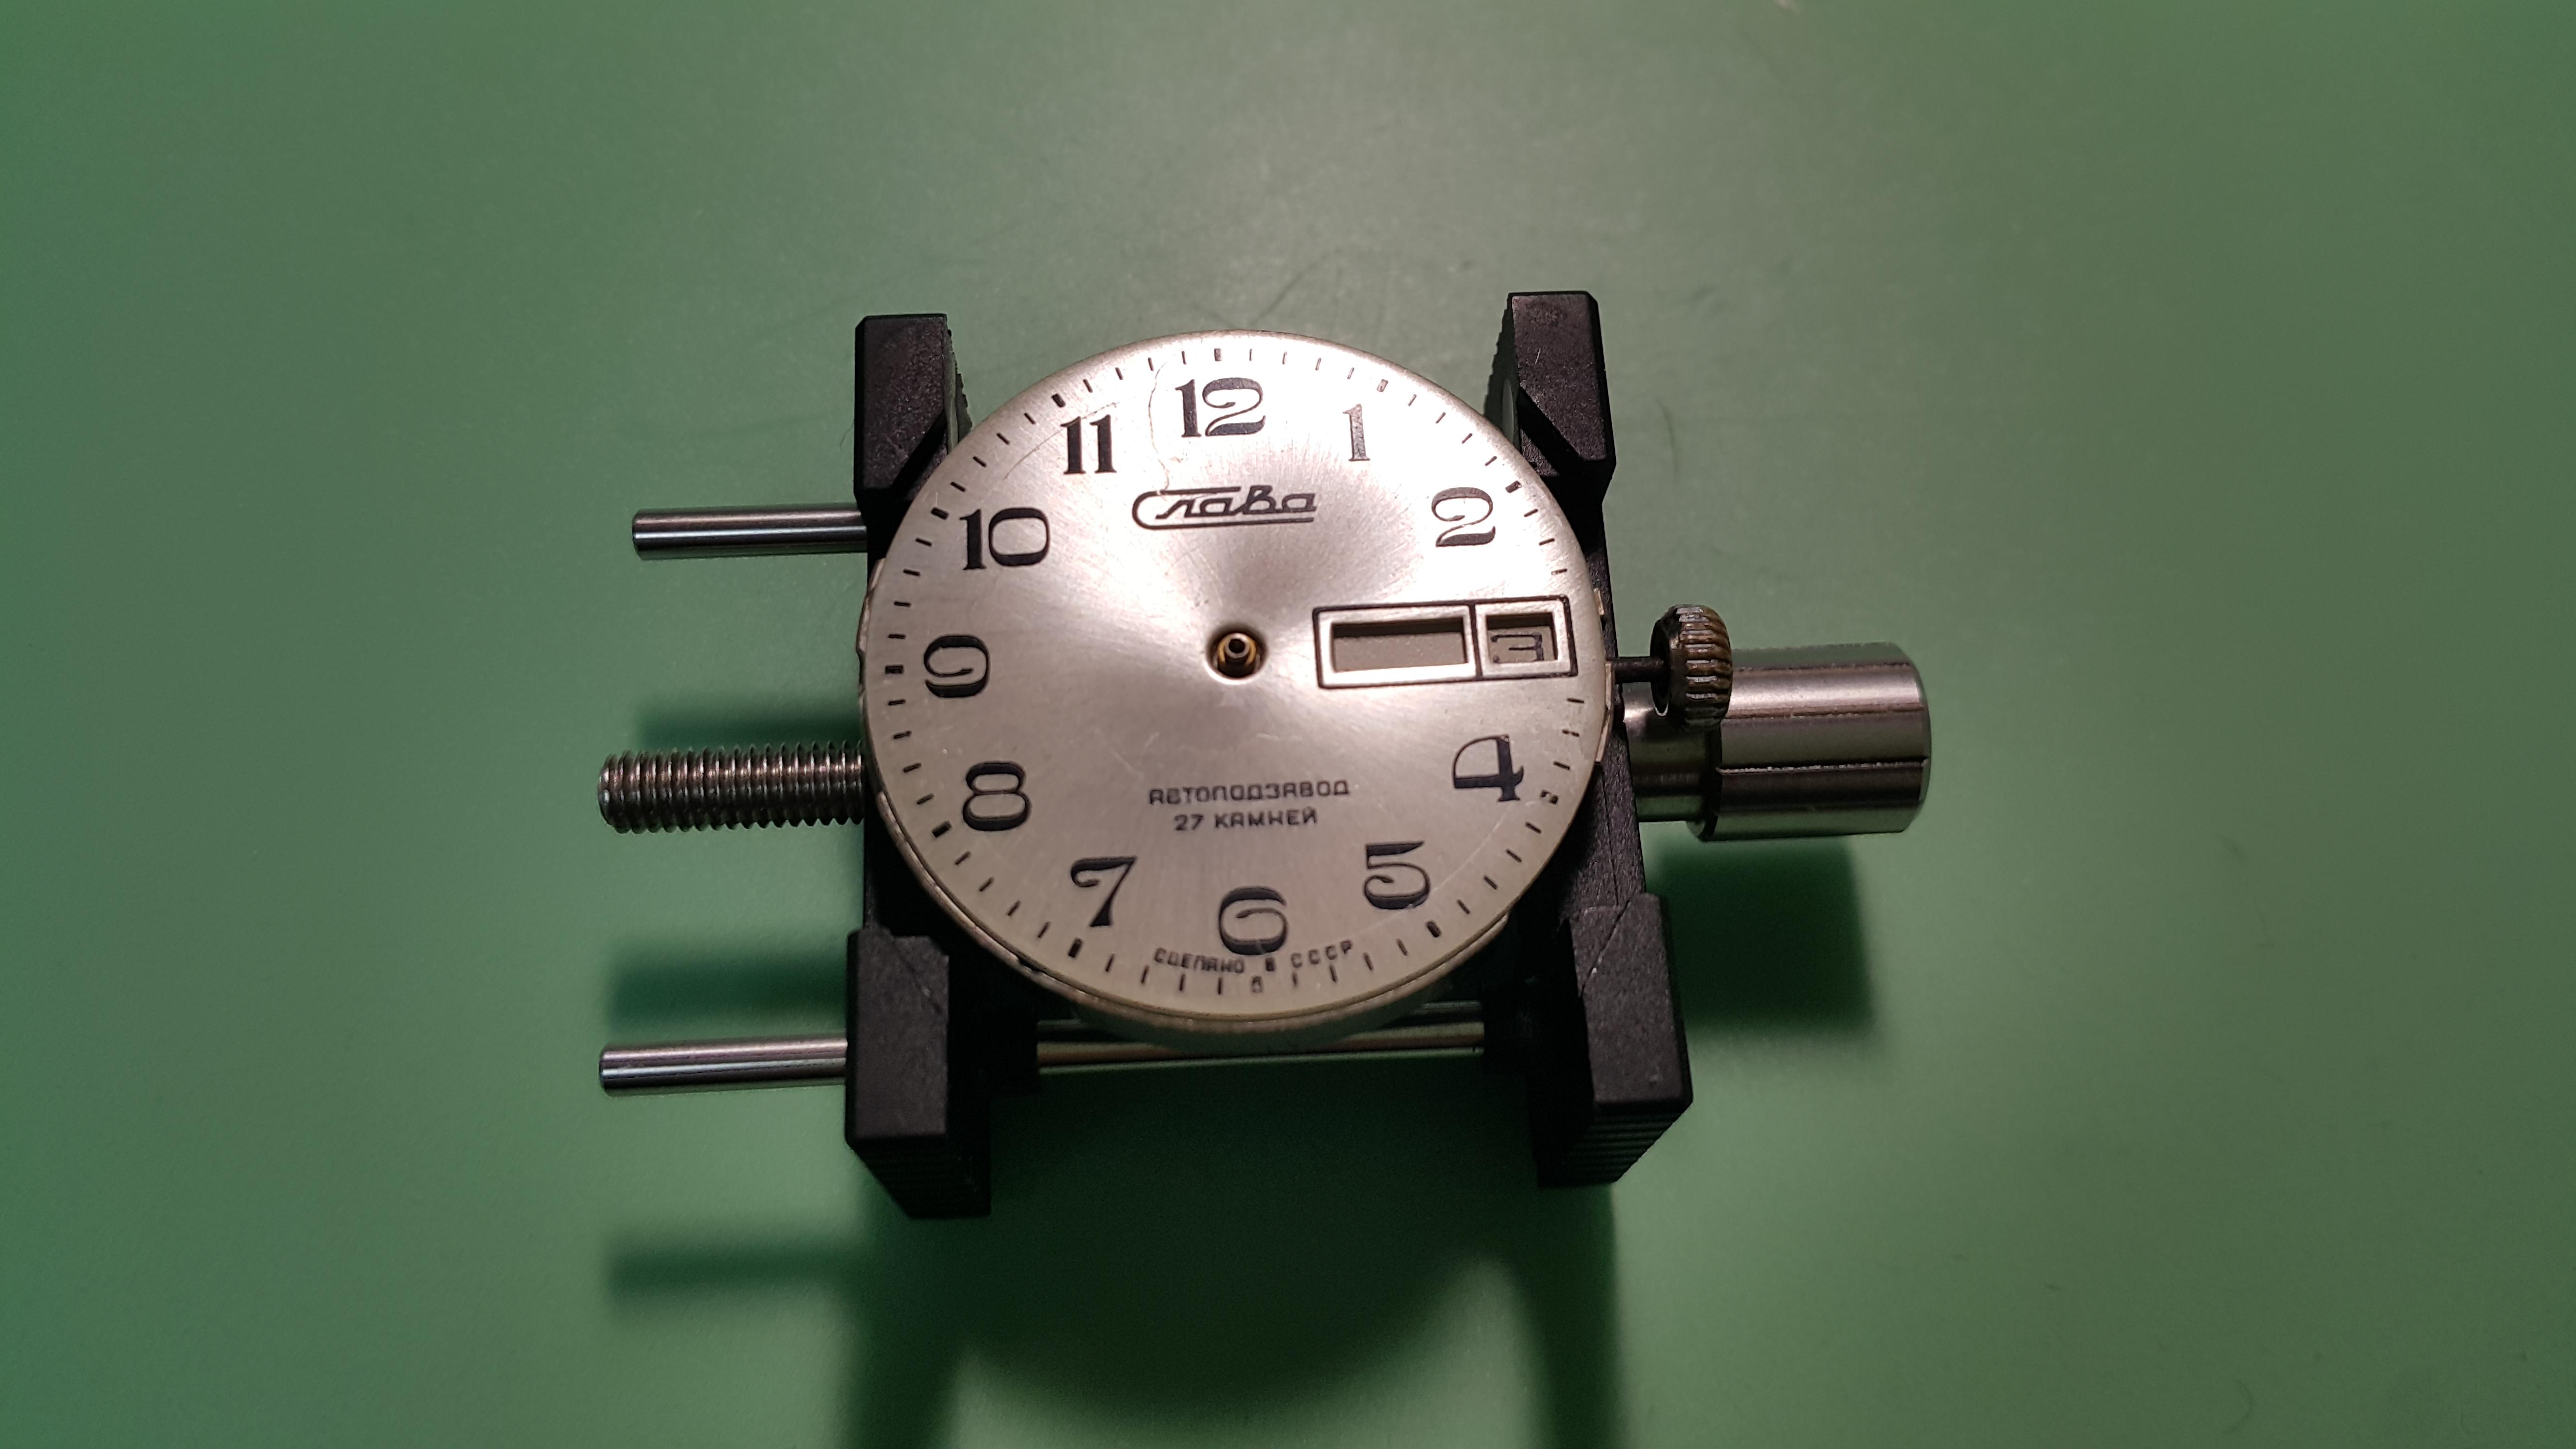
Hello dear watchmakers! I am now working on a SU movement, Slava 2427. It is a manual-wind movement with day-date complication I am trying to assemble the watch back together after service but I am stuck on the day disc. The day disc is fitted OK in my view, teeth underneath the disc interacts with the click and the disc advances naturally as other motion works move clockwise. However, the problem is that the days written on the disc are not in the right position and do not fit inside the day window of the dial. What could I have done wrong?? Thank you!


-
Good evening everyone. I am new to this forum and i can see we have some outstanding experts on the site. brand new to watch repair and looking to get some advice. I purchased an Omega seamaster quarts 1342 watch (not currently working and not tested) as it was a bargain and understand that 329 is the equivalent of the original mercury battery used when the watch was manufactured? I am hoping the battery change will mean it is functional but in the event it does not work, how easy/costly is it to repair. (I’ve heard parts can turn this bargain into a money pit) would anyone in this community willing to have a go at fixing it after i try battery change? paid service of course. any help advice would be much appreciated thank you
-
Hello.I have been working on a vintage movement. It is German movement, PUW 1561. It is automatic and has date with quickset function by pulling and pushing back the crown. Before I disassembled it, the quickset did not work instead the date changed as hands passed 00:00. However, as I am trying to put the watch back, the date won't change either by quickset or just manually. The date disk won't move no matter how long I move the hands. I think I have assembled the date function part wrong but I have no idea how the parts should fit it. I read a post about servicing this same movement but it did not work for me. (http://watchguy.co.uk/service-arowe-puw-1561/) Could anyone help me how to put the date parts back in?? I attached a photo of the movement I am working on.
-
I'm having a watch serviced for the first time, its a vintage (1974) Seiko 5 Actus, because its running two mins fast, i don't know its past history. Will a service include regulations or is that a separate service?
-
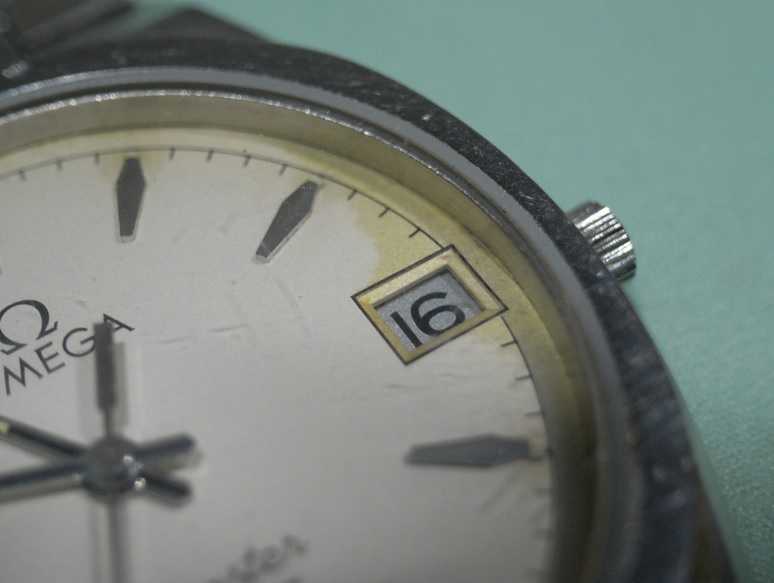
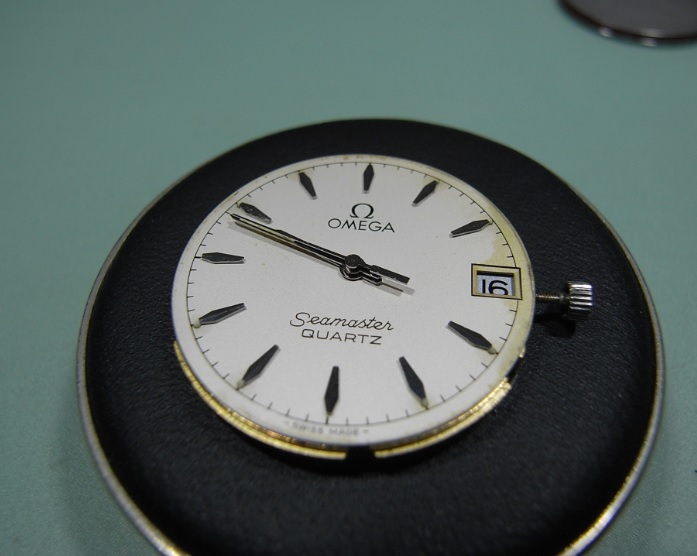
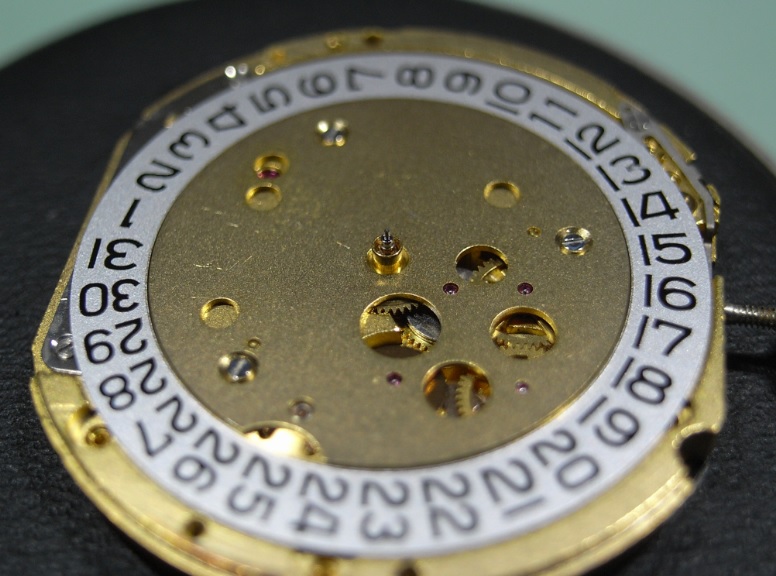
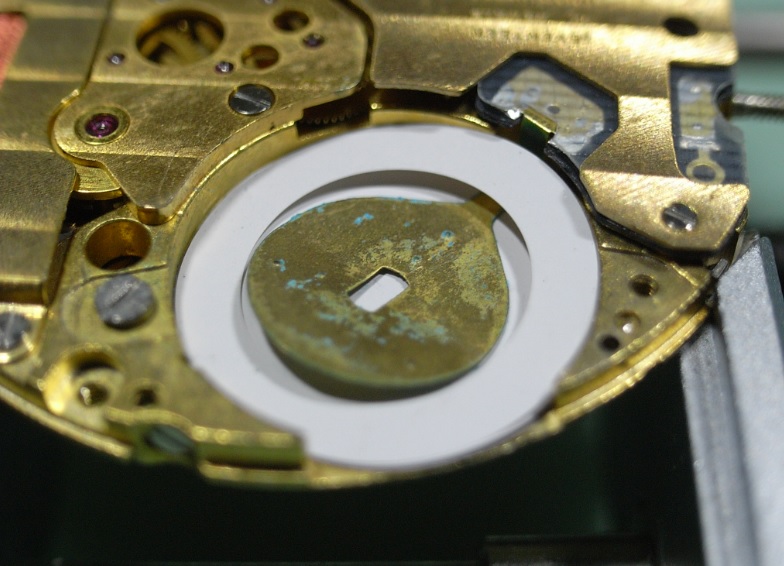
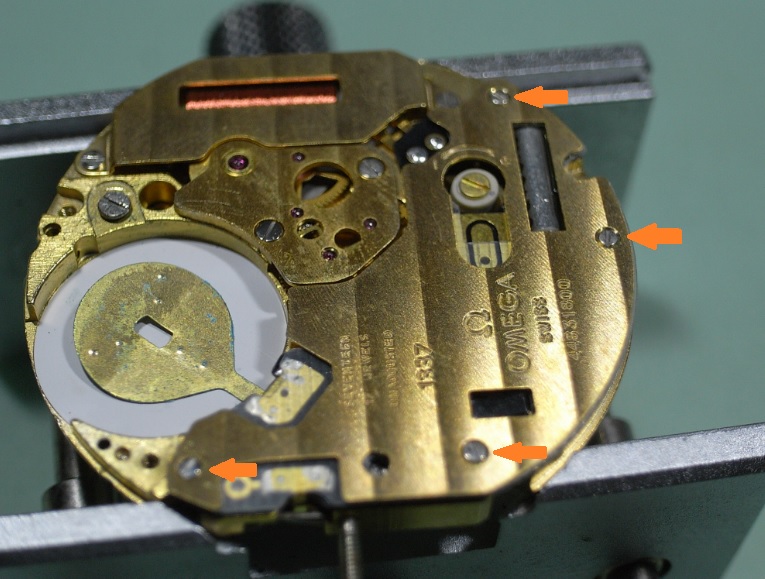
I have one of these in for service, cant figure out why the hour hand does not go round when time is set. The hour hand sets OK although sometimes it clicks every hour and other times it runs smooth. The minutes and seconds function fine even when setting the time. http://www.old-omegas.com/1337en.html Maybe a problem with the magnetic wheel on the date set? I looked under the microscope and it looks like the 2 part magnetic wheel on the date side is only rotating on the bottom half and not transferring the force to the top half to the hour wheel. Any ideas on how to remedy it and get her going again?? Omega 1332.pdf
-
I have an Omega Speedmaster 1861 which is gaining 55-60 seconds per day. How can you tell if the watch needs a service or just regulating? I have checked the watch for magnetism and it is not magnetised. The watch was originally purchased in 2010. I only wear the watch a few times per month. I have made a short video of the watch on a Timegrapher . Any suggestions / comments would be most appreciated.
-
Since I was working on the Landeron 48 with wrong dial, from which I used the case and a Landeron 151 and correct dial to make a new watch, I saw this Landeron 248 sitting in the drawer at my desk and devided to finally tackle the issue it had: a slipping mainspring. I documented the disassembly of the movement vith 3 videos, the first of which is here below: Hope you enjoy
-
Has anyone had the experience of doing a full service on this movement with a tutorial or video?
-
Also merely to gather more and more experience, I bought two ETA 2472 over the time for little money on ebay. I think they were less than 20 EUR each. I already worked on one which did not work, since one of the escapement wheel pivots was sheared off. I demagnetized the movement which I hadn't worked on earlier and put on the timegrapher. The result is excellent, especially since the beat error is zero. I did not adjust anything yet. For the first movement I ordered a replacement escapement wheel on ebay. Unfortunately the seller didn't pack it properly. This is the result: A bent wheel. I was able to fix it with this trueing caliper which I also got for very little money on ebay. This is the result of the movement with the repaired escapement wheel. BTW the seller of the bent wheel refunded me and apologized. He asked me to keep the bent part. The movement which I will work on now has a problem in the date mechanism. The date just doesn't move after midnight. I assume it's a problem of lubrication. Let's see. I will now disassemble the movement. I will use the order that ETA suggests on the 2824, @bobm12, this thread is only for you Cheers Alexander


-
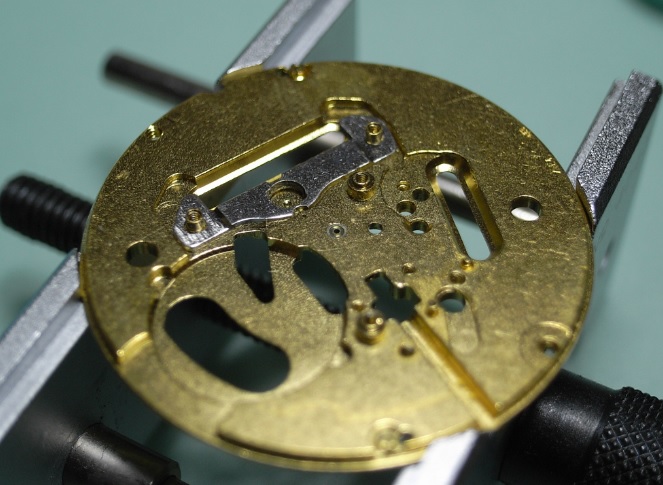
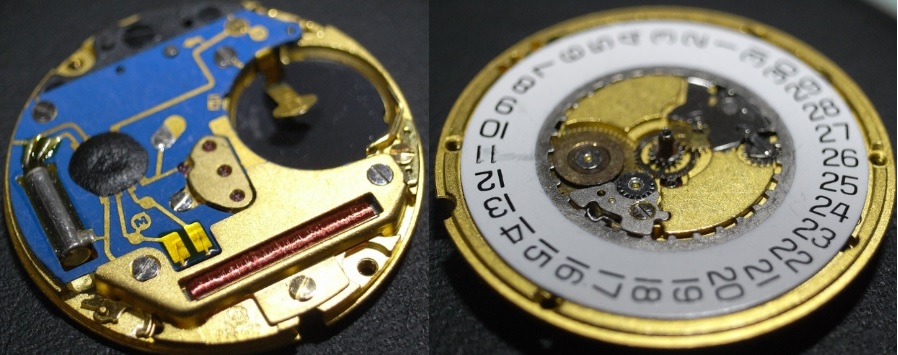
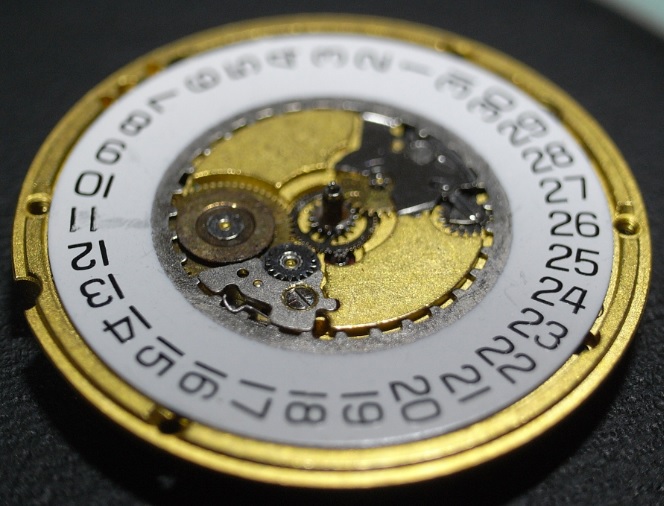
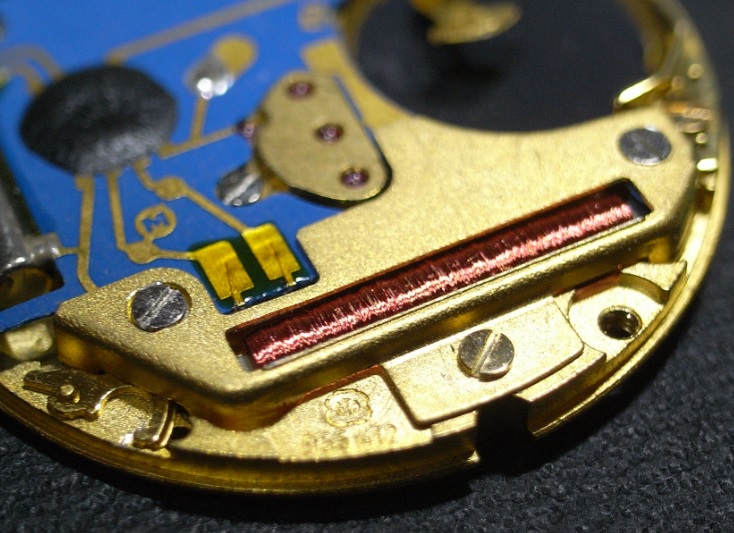
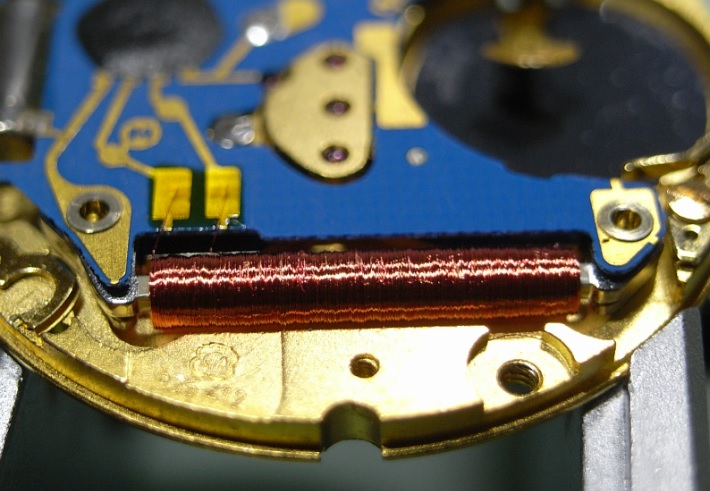
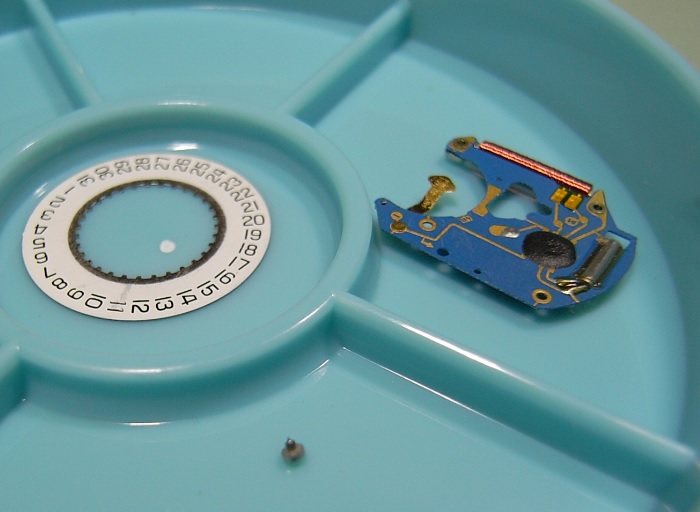
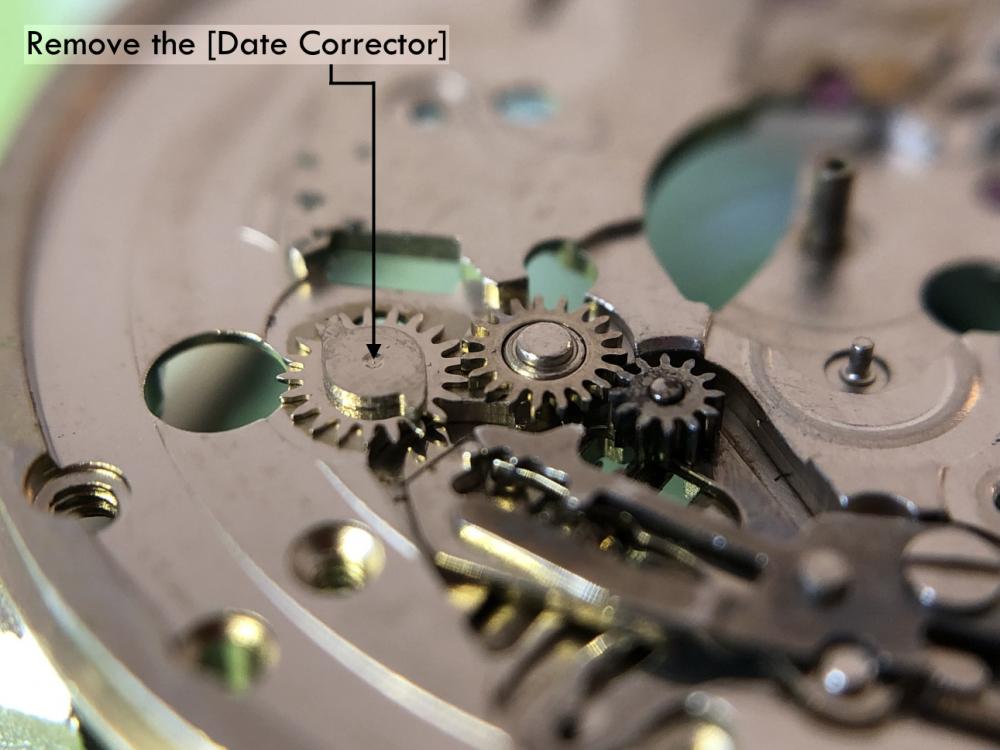
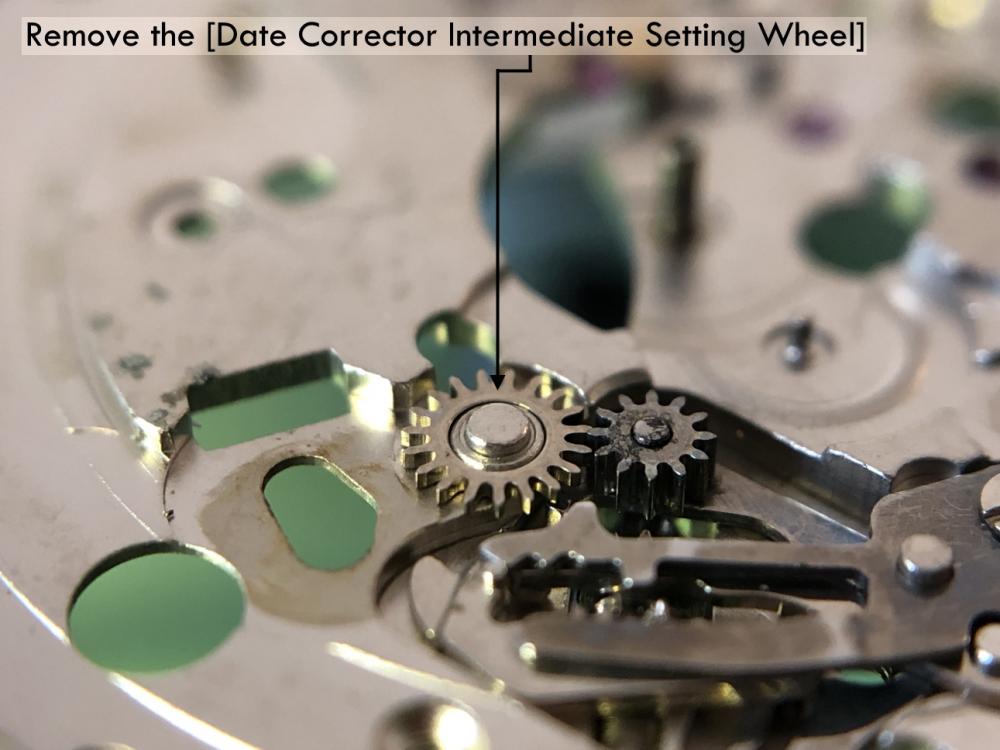
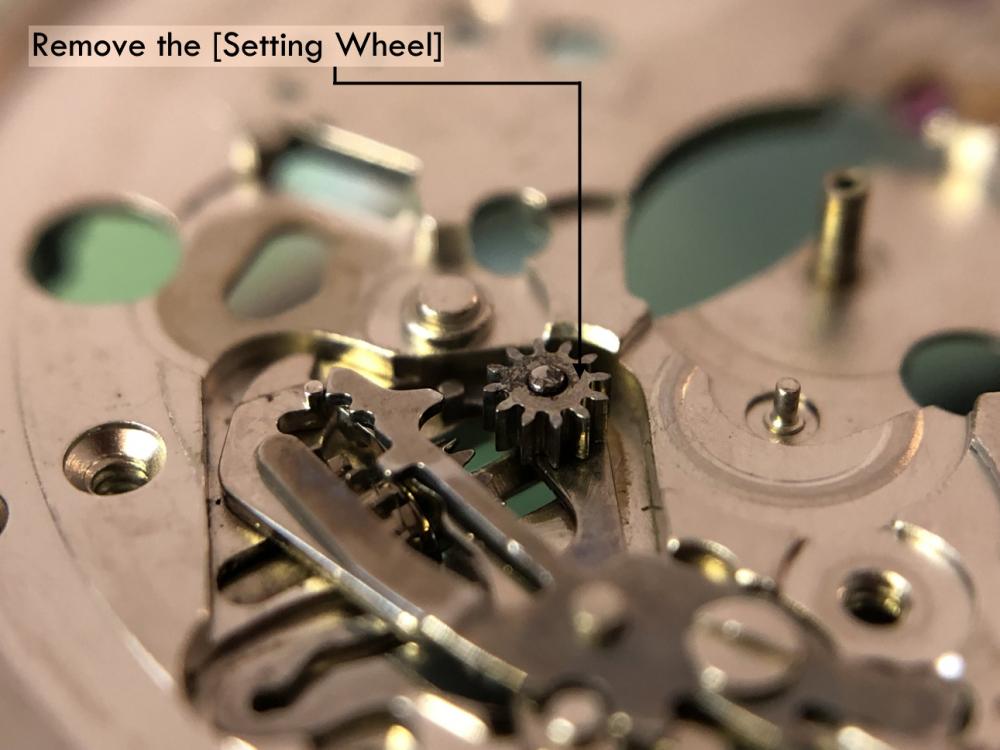
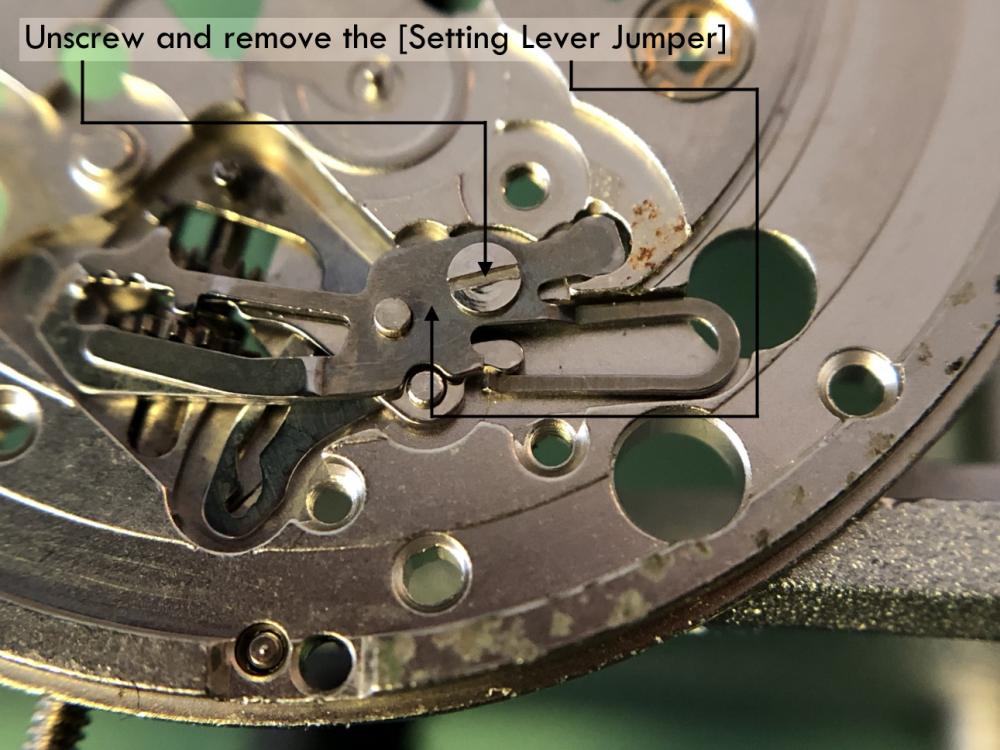
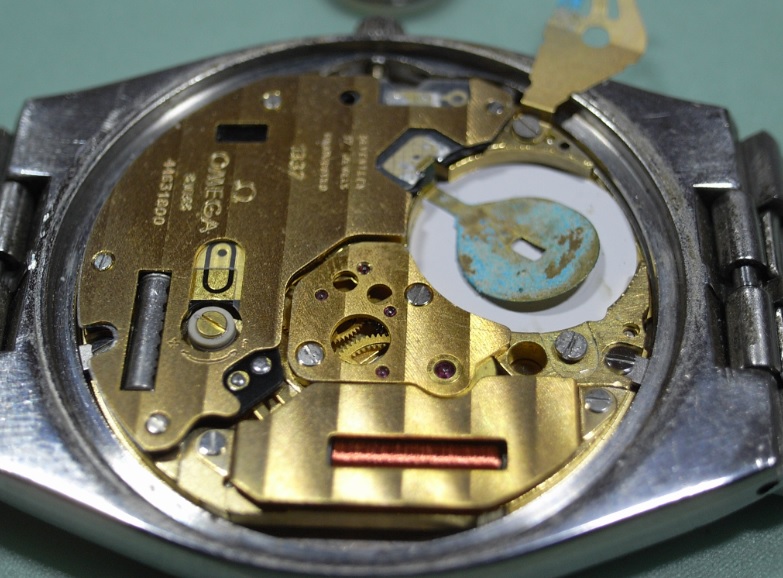
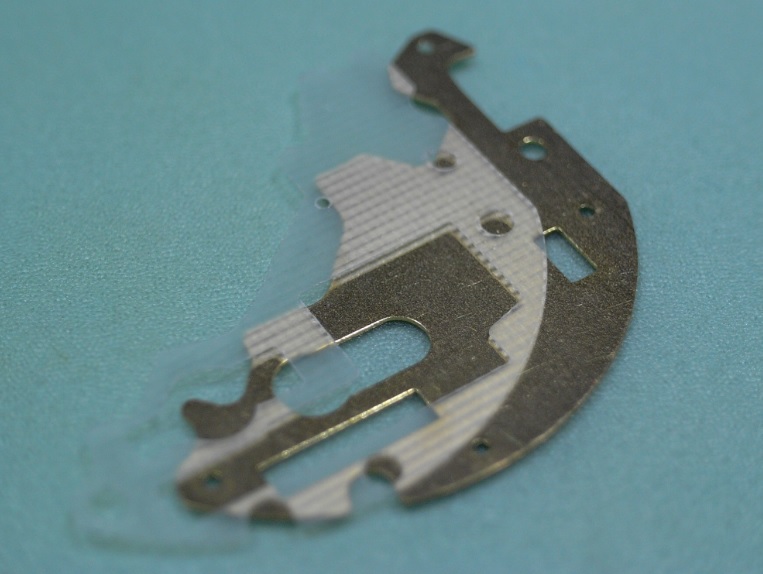
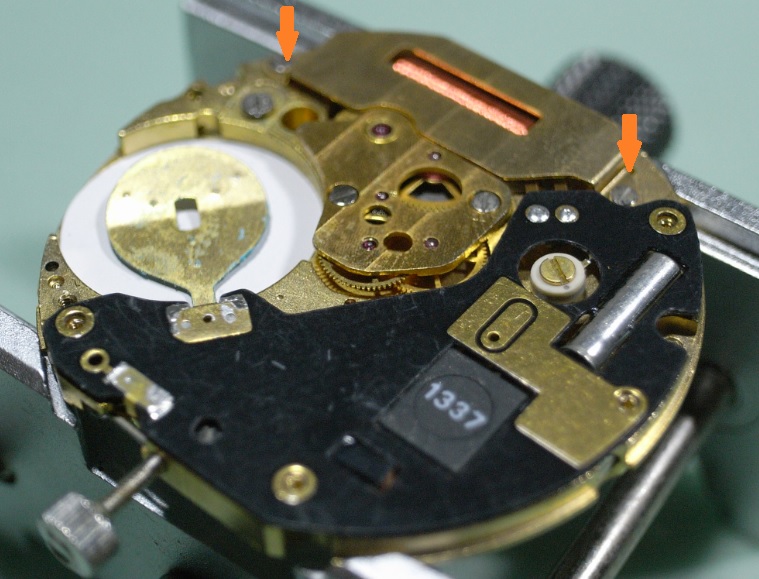
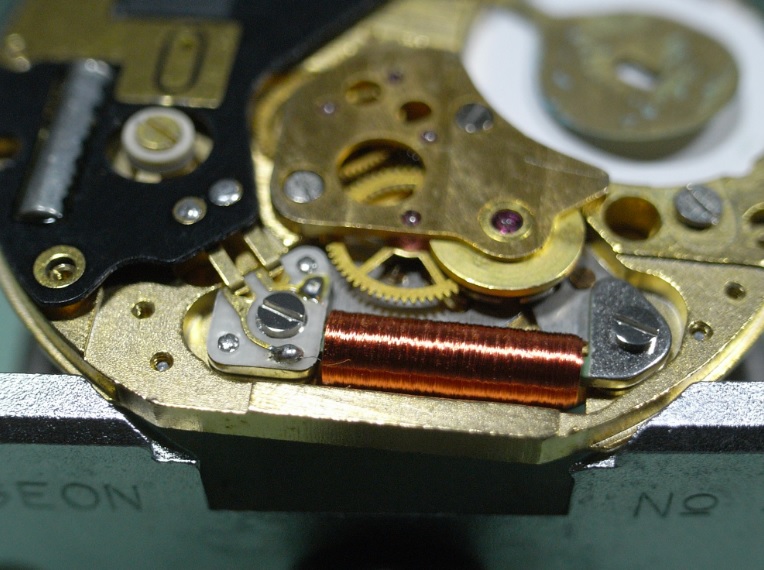
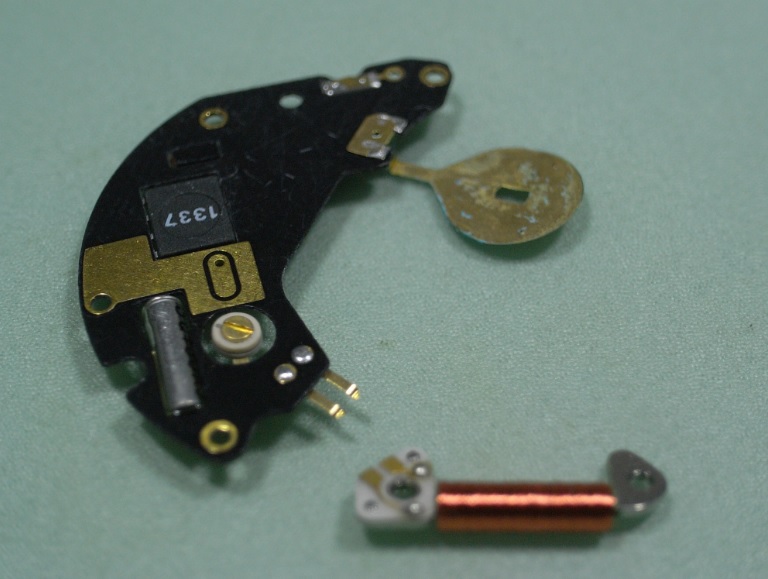
 Hello fellow watch freaks. It's been a while since I've posted a service walkthrough, but I had an accident that destroyed my left shoulder and needed surgery. It's been a rough 6 months for me, with a LOT of soul searching throughout my recovery period. But I'm back on the bench ... at least at home anyway; work is a different matter, and my close friends on this forum know about that ... nuff said. This watch is owned by one of my older brother's friends. My older brother is one of the most selfless people I know, and has always been there for me. So when he asked me to do this for him it became TOP priority. It was the first item his friend purchased after he left school and began work: so there's a lot of good memories tied to this watch. As you can see it's an older quartz Seamaster with an 1337 Movement. On first inspection you can see water damage to the Dial @ 3 o'clock. So I wasn't expecting to see a happy movement inside. But when I got the Caseback off things didn't look too bad at all. Just a bit of corrosion from a cheap nasty Chinese battery. The movement still looked nice and shiny and the Stem only had a touch of rust up near the Crown. So this watch looks like one we can save :) Disassembly OK, lets begin. Fist remove the Hands and Dial from the movement. Again, absolutely no moisture damage under the Dial ... this made me VERY happy indeed. So on to the Movement Holder it goes. Remove the Battery Clamp and Insulator Ring. Then remove the 4 screws that hold the Circuit Cover. Note that there is an insulator under the cover. It is very delicate, so great care should be taken when handling it. Once the cover is removed the circuit is exposed; but before removing it, unscrew the 2 screws holding the Coil Protector and remove it. Then unscrew the Coil, and remove the Circuit and Coil. Place both the Circuit and Coil in a safe place to avoid damage, as this parts are obsolete, and if damaged you'll have to scour the internet for a donor movement ... good luck with that!! Next remove the Train Bridge Here is a reference photo of the train. As you can see, the Rotor is a very different looking animal to the modern ETA rotors. Carefully remove all the wheels, and store the Rotor in a safe place AWAY from the rest of the parts to be cleaned ... as this has to be hand cleaned due to it being magnetic. Please Note: There is a very small washer that fits between the minute wheel and the extended pivot of the Second Wheel. Be sure to identify it, and make sure it's put in the small parts container for cleaning. Here's the complete train removed from the movement for reference. Flip the movement over in the holder and remove the 3 screws of the cover that holds the Calendar Ring. As you can see that Motion Work and Calendar Work are fairly complex on this movement. Make sure you take good reference photos and study them carefully so they are not confused with wheels of the train. Remove the Calendar Ring. Remove the Motion Work and Calendar Work. Here's the complete Motion Work and Calendar Work removed from the movement for reference. The Crown and Clutch should now be able to be removed. Flip the movement over once again to tackle the Keyless Work Unscrew and remove the Setting Lever Spring. Lastly unscrew and remove the Setting Lever, Intermediate Wheel and Yoke. The Omega 1337 Movement is now completely disassembled and ready for cleaning. I will post the assembly soon.
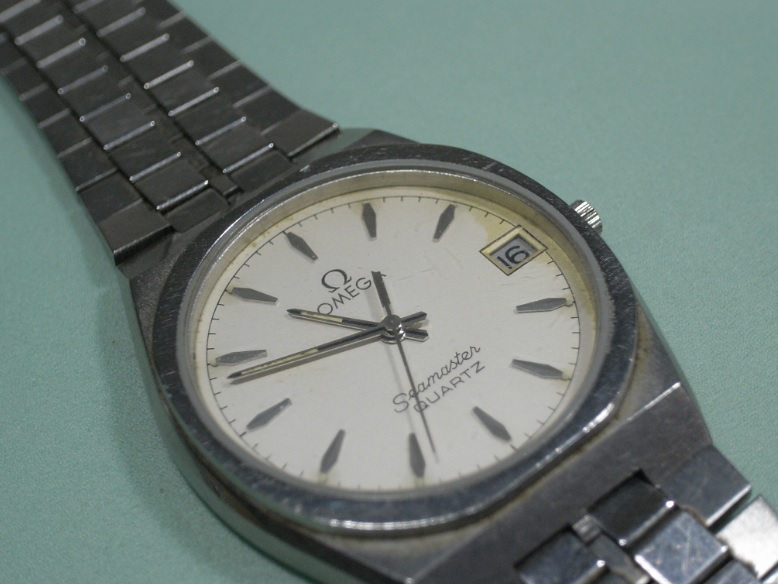


-
I have an Omega Speedmaster Cal. 1861 purchased in 2007. I haven't yet had it serviced and I am starting to feel some guilt. However, the watch is keeping +2 over 24 hours so I am very happy with that and it gets about a months wrist time a year. I am concerned because I don't want to interrupt what is essentially a good thing right now - I know this can't go on forever. Anyway, Omega repairers say every 5 years and as long as 10 years for a co-axiel like the SMP or PO. Anyway can I get your thoughts on it.
-
So, I'm new and love disassembling things. I have an 18/0s ladies waltham watch I'm about to tear into to. So at what point do I just clean the assembled watch? This is a very small watch. I just don't want to be spinning my wheels trying to take apart and reassemble something even the pros don't do.
-
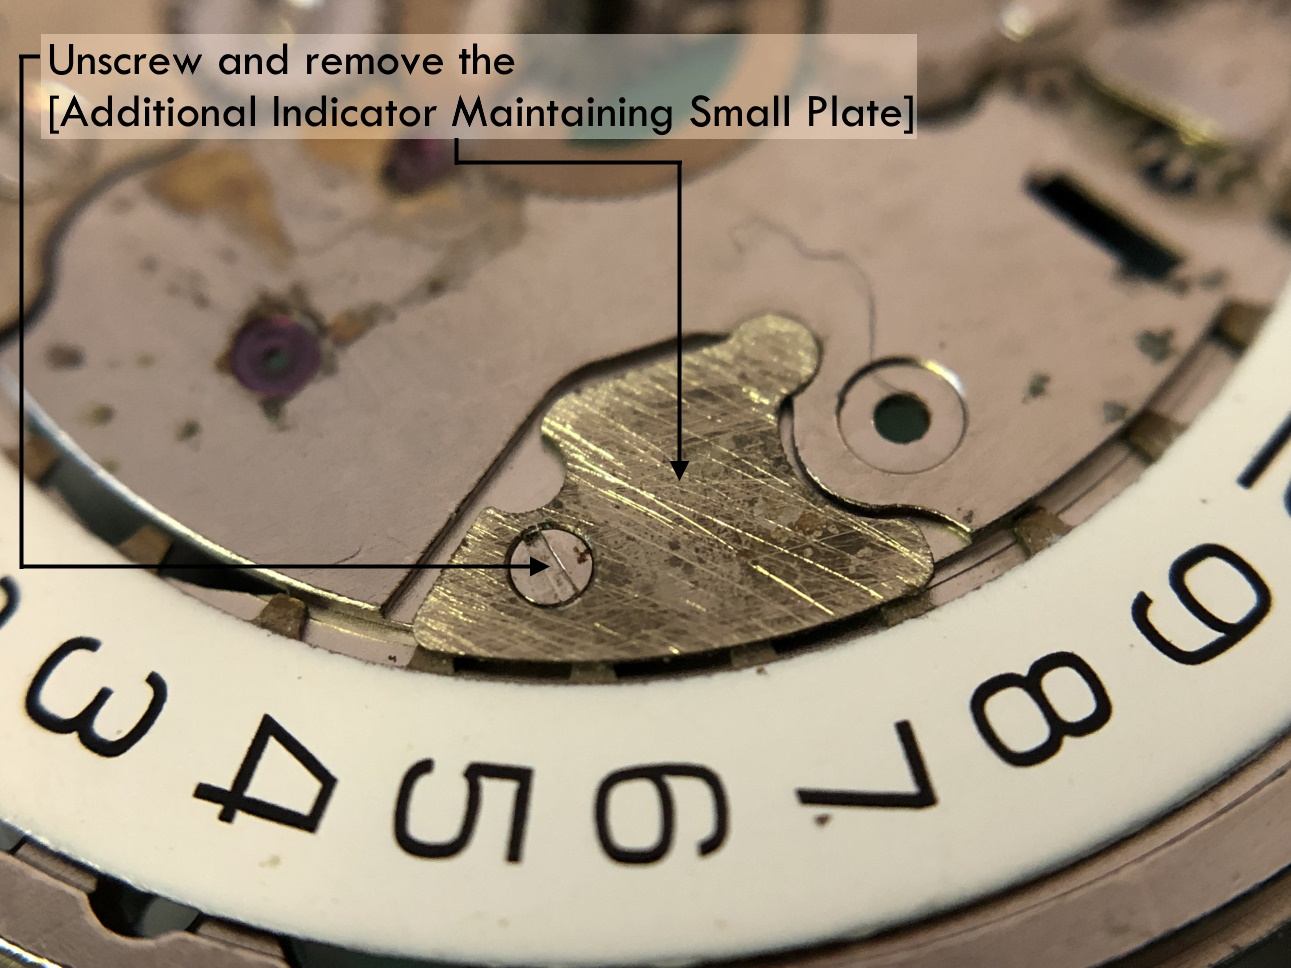
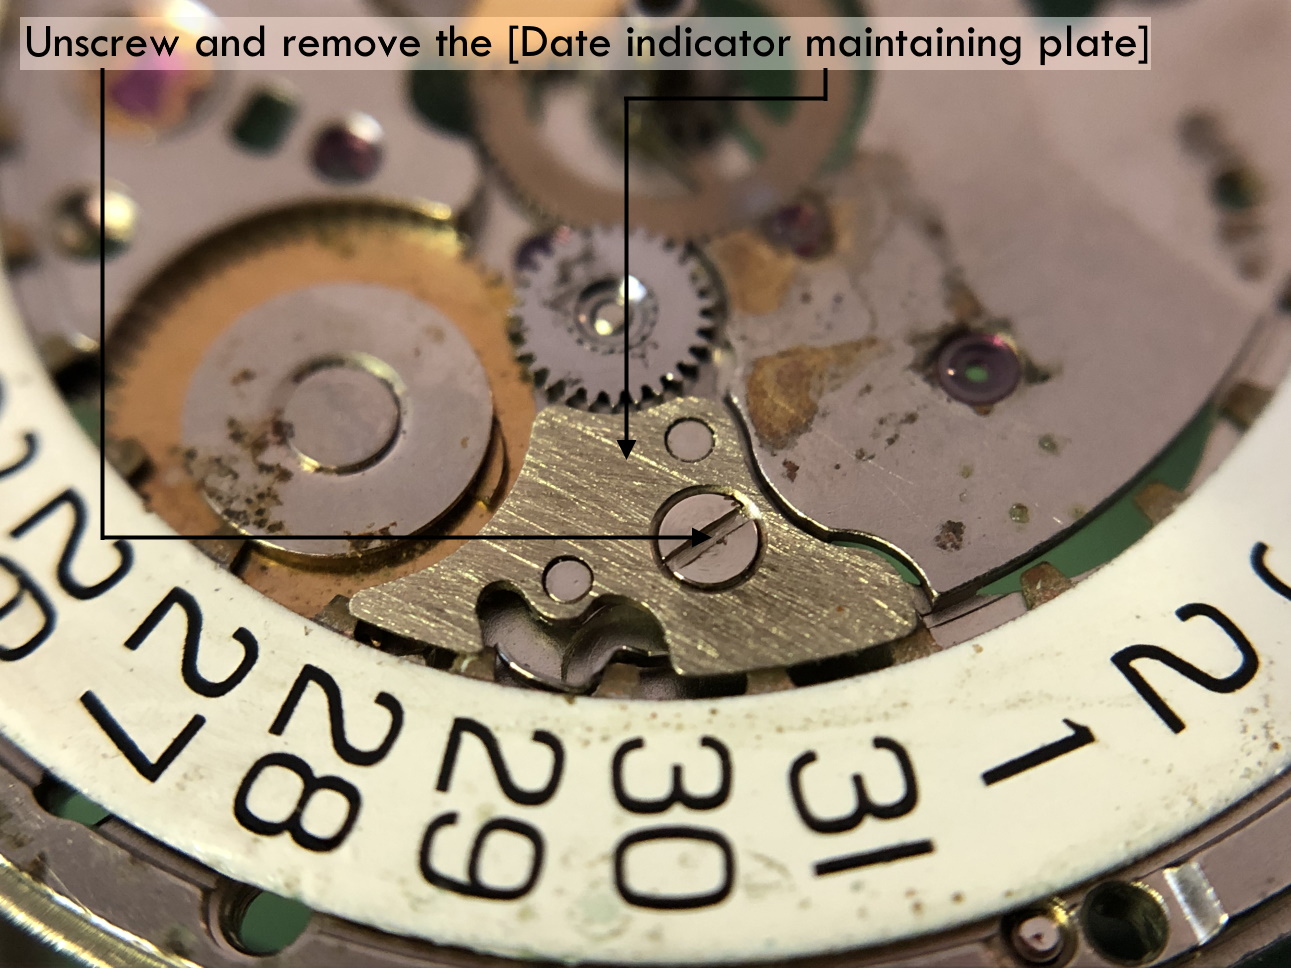
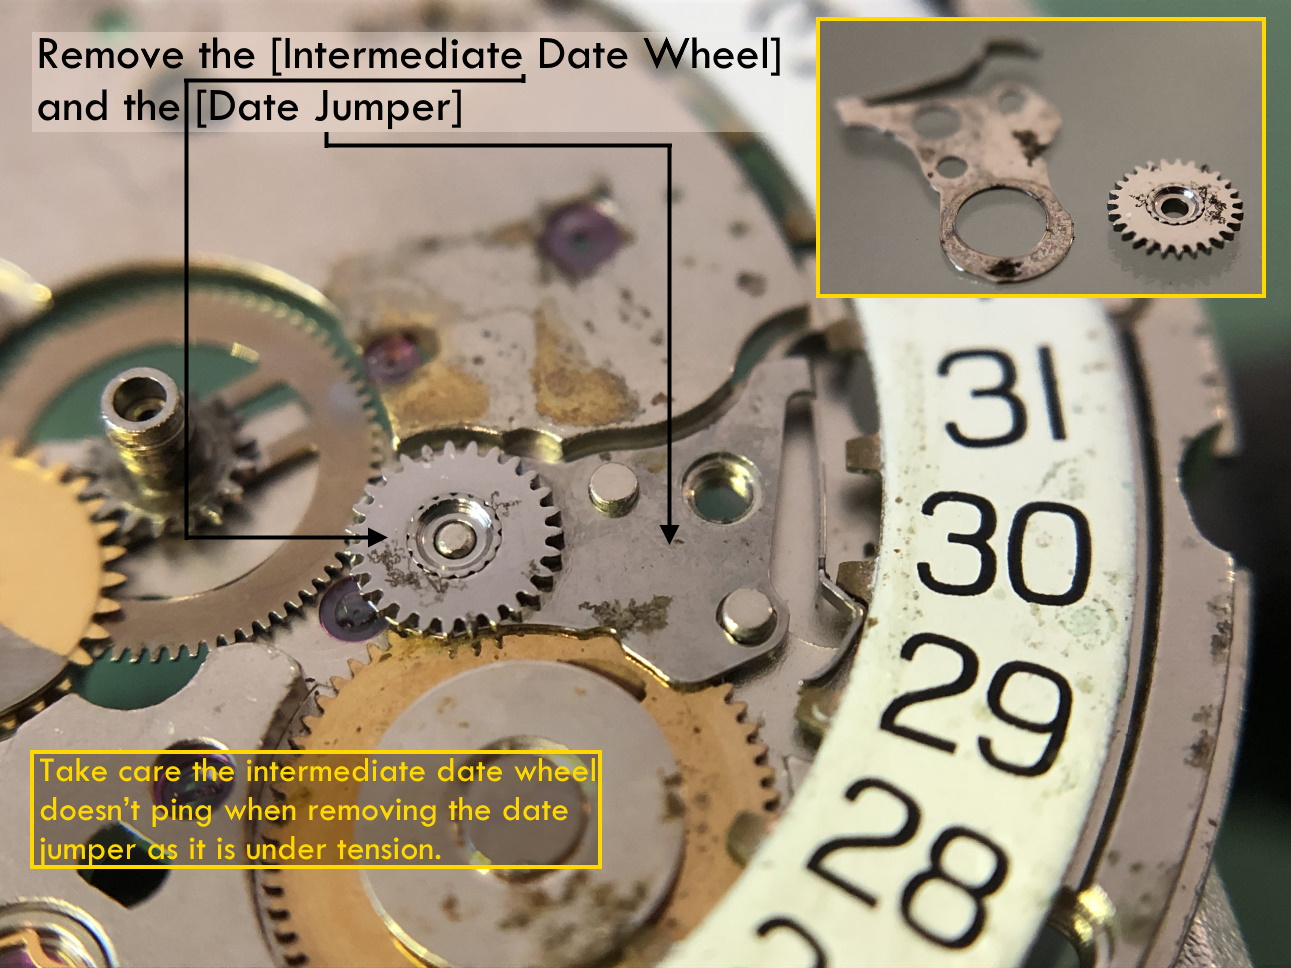
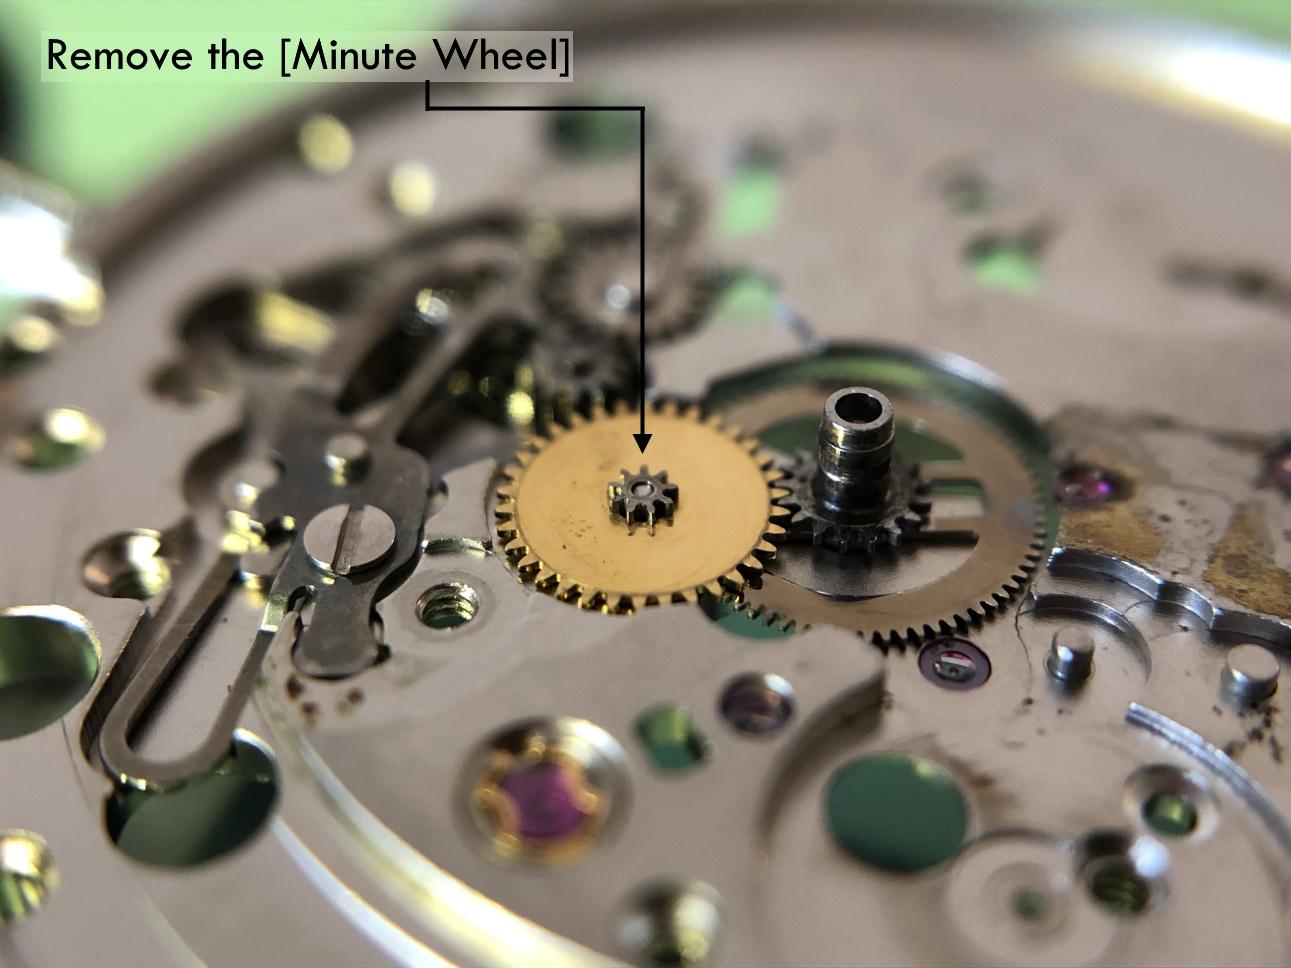
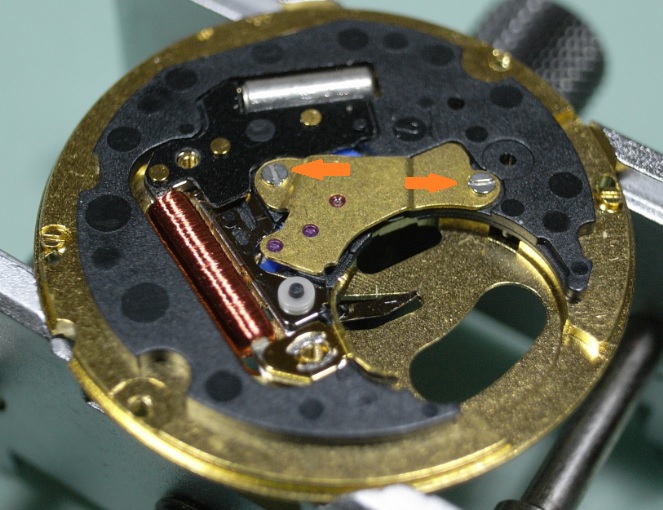
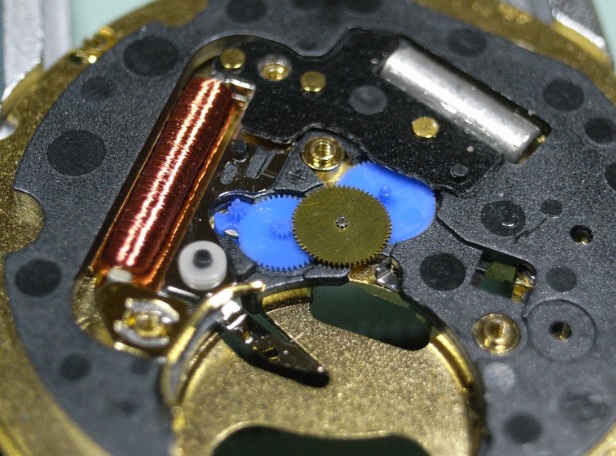
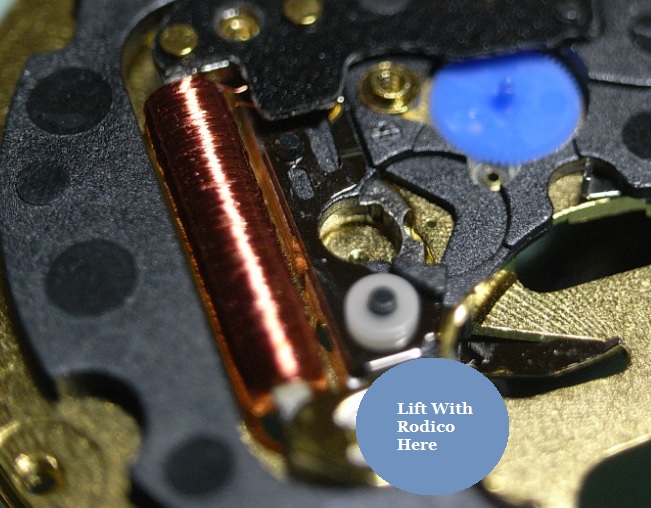
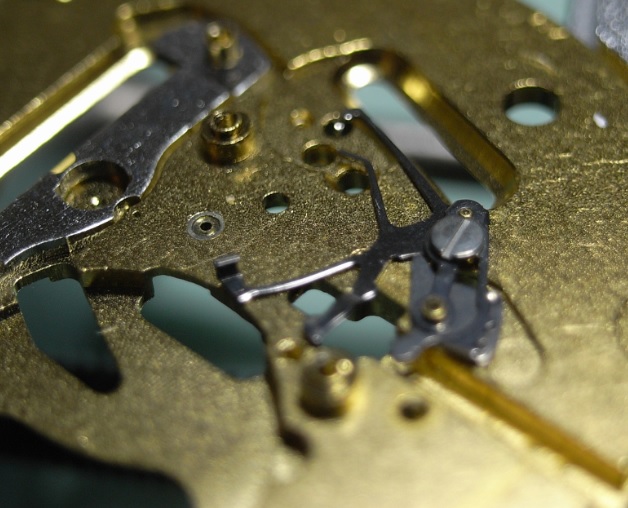
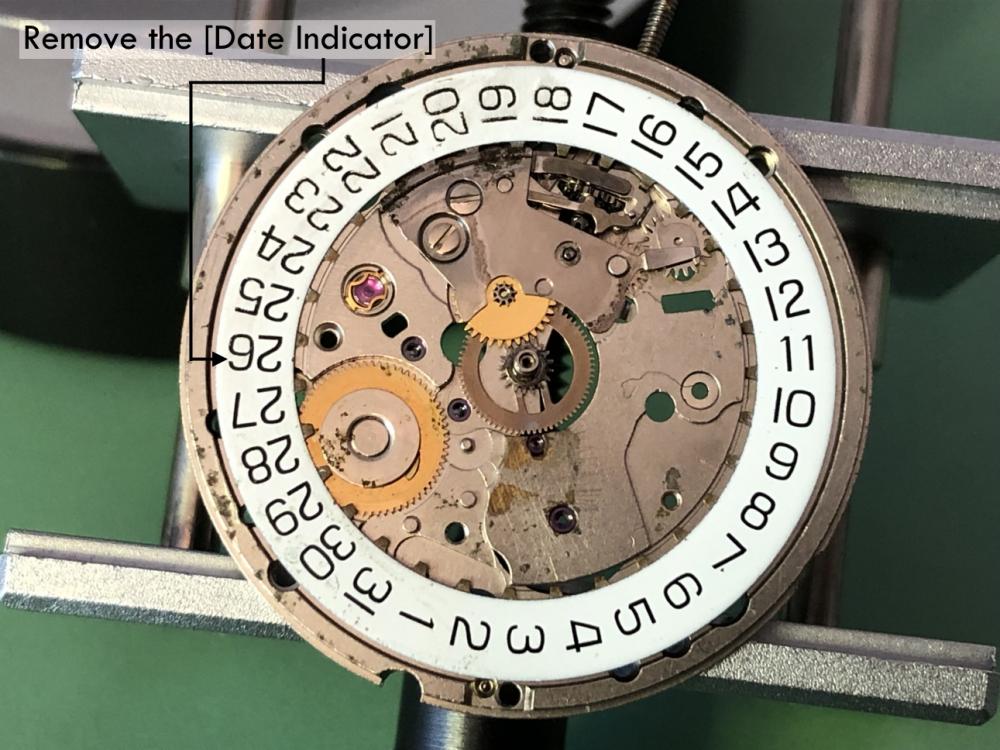
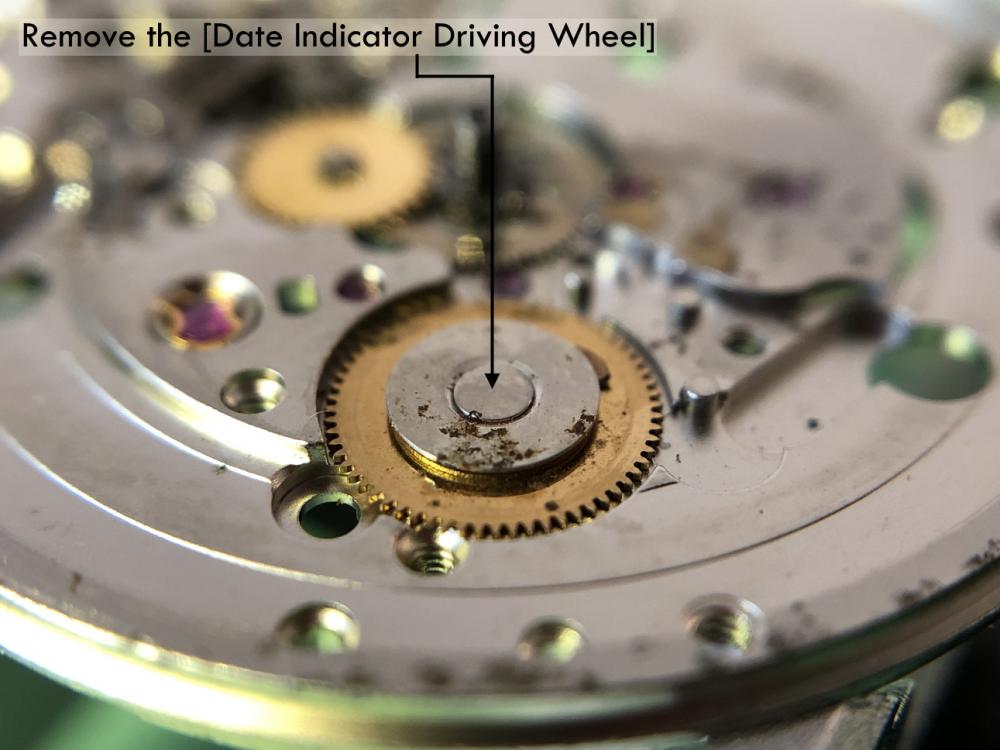
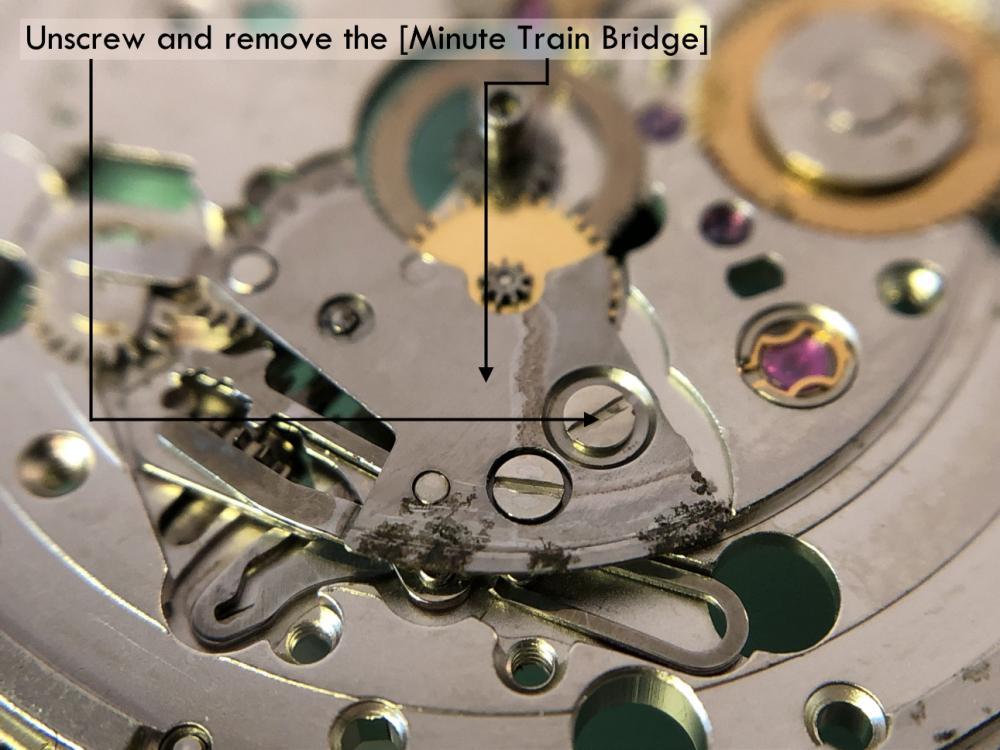
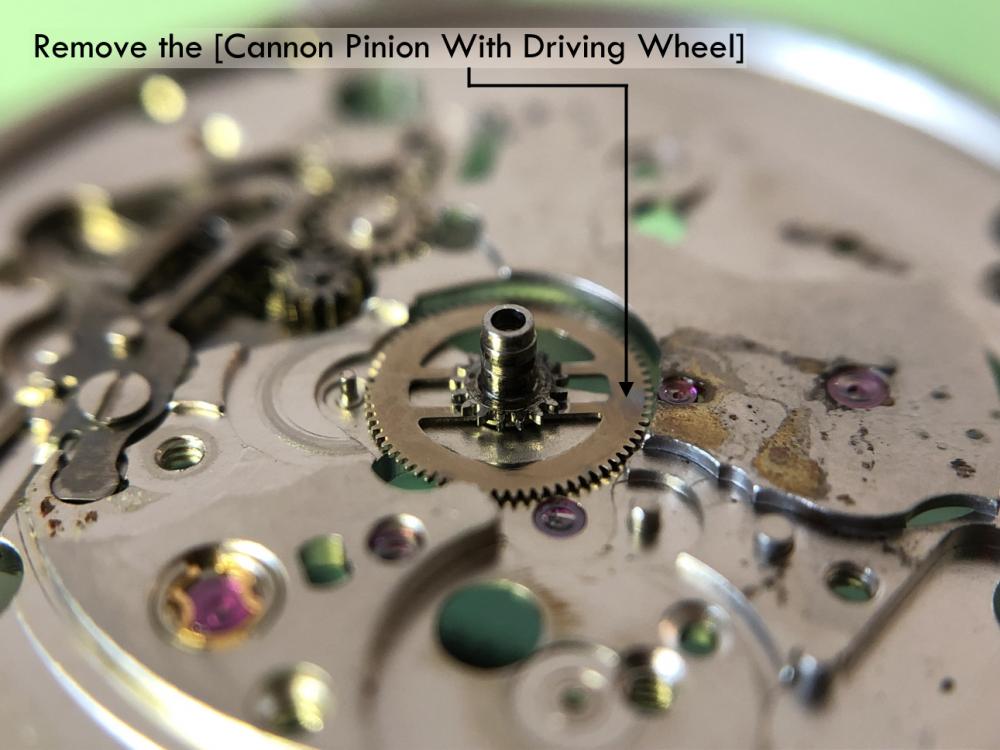
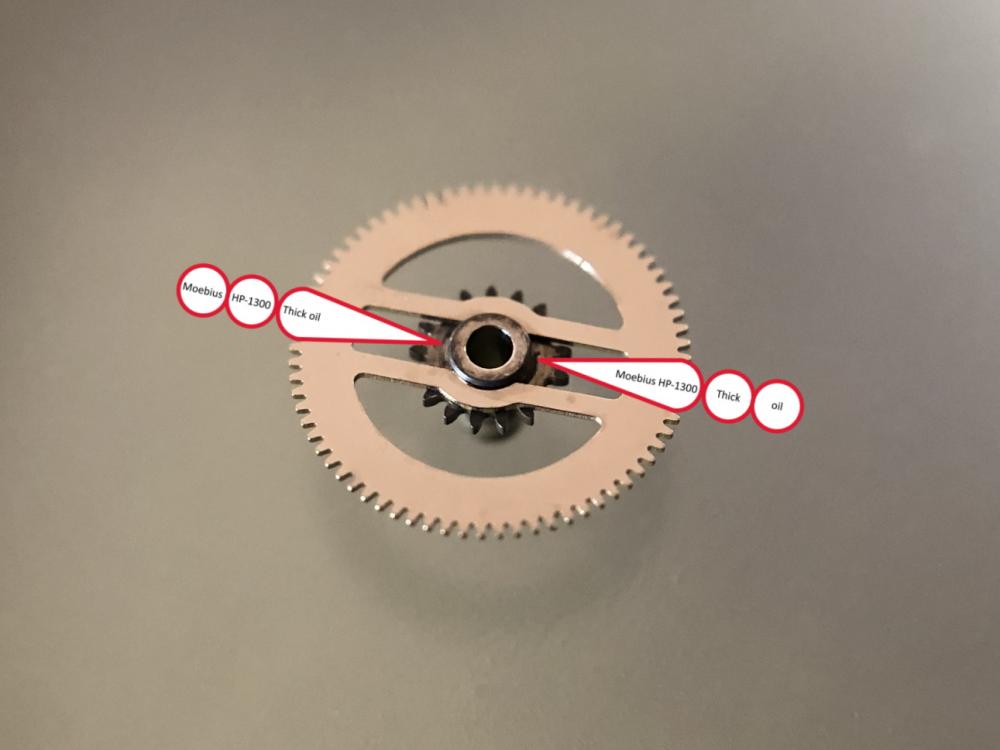
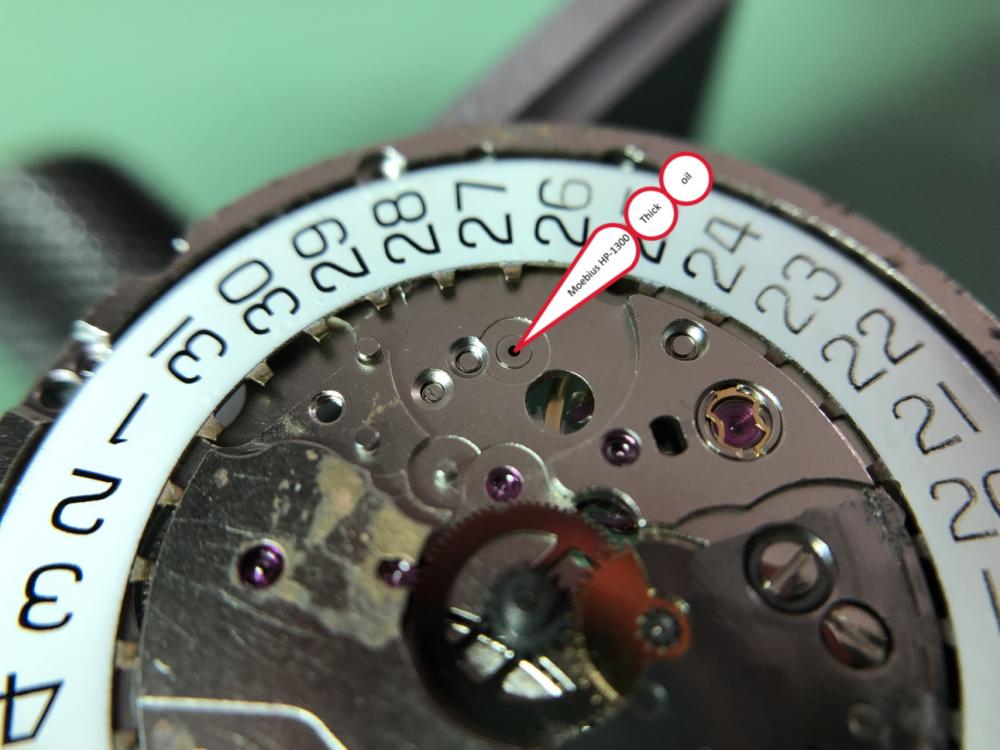
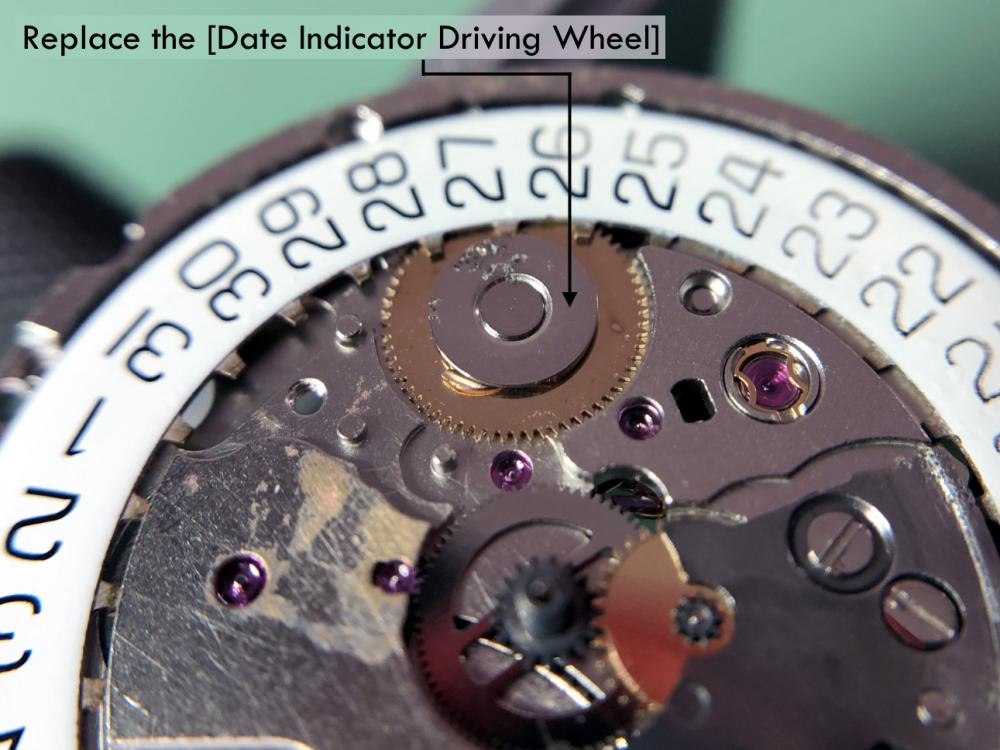
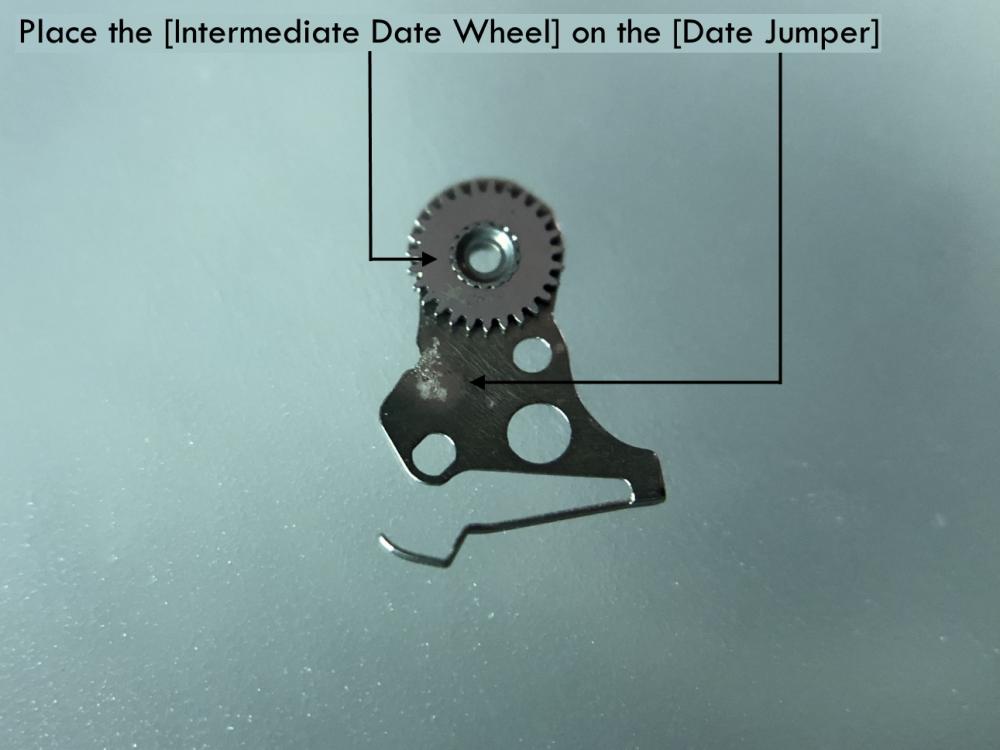
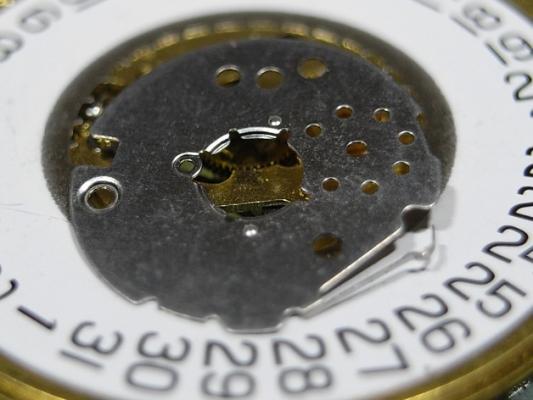
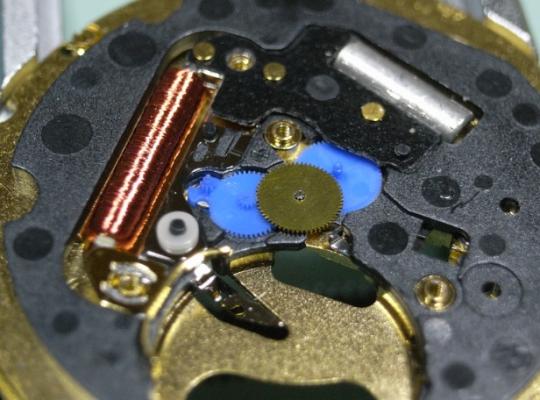
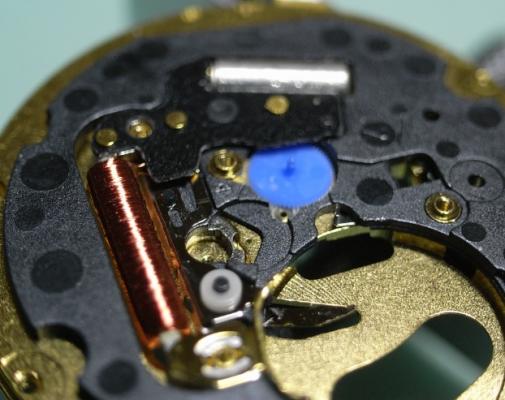
ETA F05-111 Service Walkthrough "The Workhorse Of Midrange Quartz" Moving on from the ETA 955.412 service, another common quartz movement, this time found in mid-range quartz watches, is the F05 111. It doesn't have the build quality of the 955/6 model; but it's still a very robust movement, and able to be serviced. In saying that, this movement is rarely serviced by a professional watchmaker due to the low cost of a replacement movement. Personally, I think it's sad we live in such a throw-away society, and are slowly loosing the skills and confidence to performance maintenance at home. So if you've got the tools and confidence to service this movement at home, do it, and save yourself $$$. Service Manual for the F05 111 Movement ETAF05.111.pdf We will first start with the Motion Work and Calendar Work. Remove the three screws holding the Cover Plate. You will see that this also has the Date Jumper Spring incorporated into it. Next remove the Hour Wheel, and the Date Indicator Driving Wheel. Note too that there is no quick date change on this movement. Remove the Minute Train Bridge, Minute Wheel, Canon Pinion and the Sliding Pinion And that's it for this basic movement on the dial side. Flip the movement over and we'll begin on the drive side Remove the three screws marked below and lift out the Electronic Module Cover. Next remove the two remaining screws that hold the Gear Train Bridge. As you can see with plastic wheels, this is not up to the same quality and finish as the 955/6 movement. Remove the Second Wheel, Intermediate Wheel, and the Rotor I would not recommend removing the Third Wheel at this time as the IC Board circuits are directly above it, and there is no point risking damage to it. To remove the IC Board, gentle lever up the where the location pin goes through the board just at the end of the Quartz Crystal housing. This pin is often firmly pegged to the board and must be lifted up first. This will loosen the board away from the Main Plate. Then gentle lift out the IC Board by sticking a piece of Rodico to the mark position below and lifting out. This will avoid any damage to the circuit or Coil. Now that the IC Board has been removed, access for removal of the Third Wheel is risk free. You can also remove the Insulating Block at this time. This is also the time to remove the Battery Insulator, but this being just a spare movement I own, it's been used elsewhere ... sorry :unsure: The Keyless Work is now exposed, and is a very basic setup, being held only with 1 shouldered screw. The movement is now completely stripped and ready for cleaning. All the parts can go in for cleaning EXCEPT the following Date Ring Rotor IC Board PLEASE NOTE: Due to most of the wheels being plastic, be careful when you come to the heating/drying stage if you are using an Elma/Pearl Parts Cleaner. Make sure the basket is high up in the drying cylinder and ONLY RUN FOR 11 MINUTES MAXIUM ... too much heat isn't good for those little plastic wheels. I hope this has been fun and edifying to read. I'll post the assembly procedures latter tonight after dinner ... my tummy is talking to me :)


-
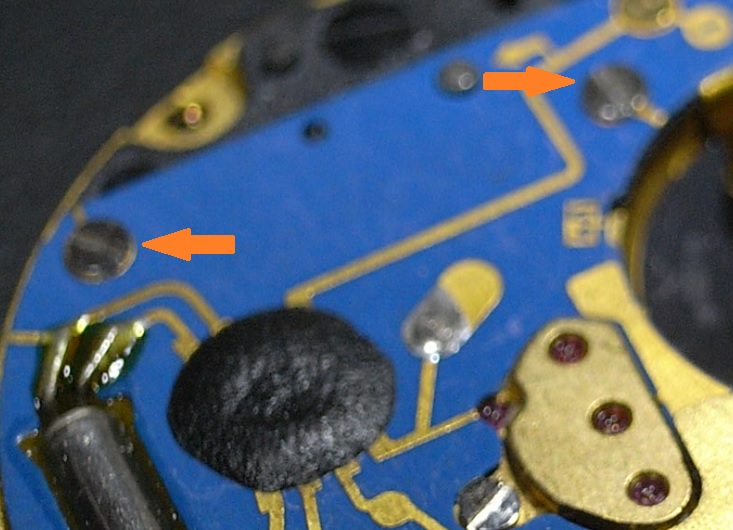
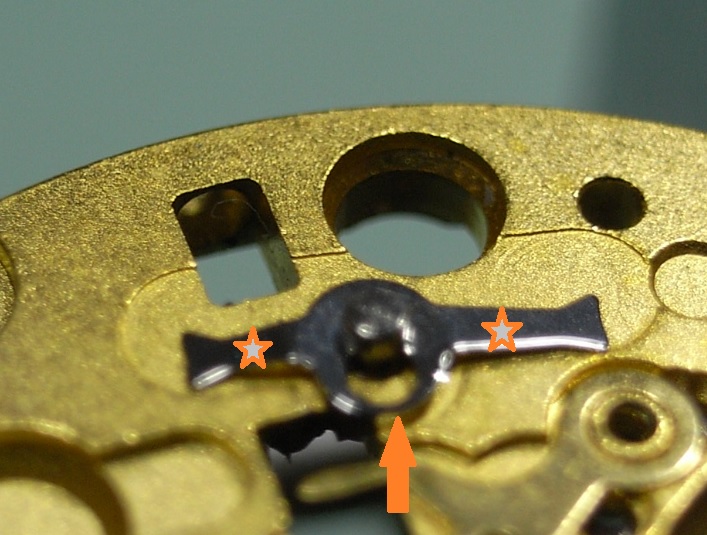
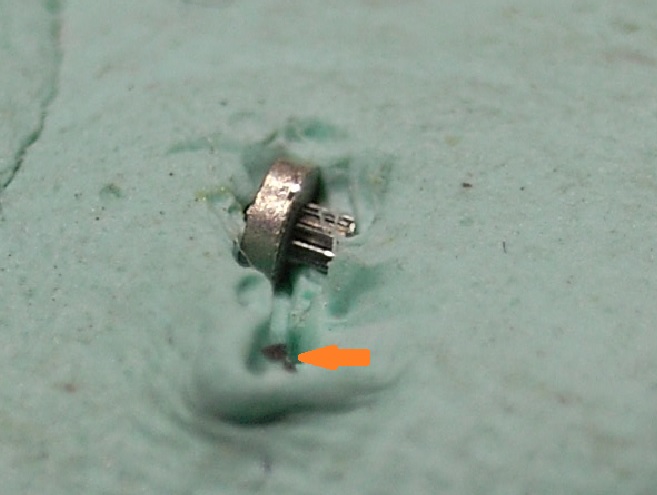
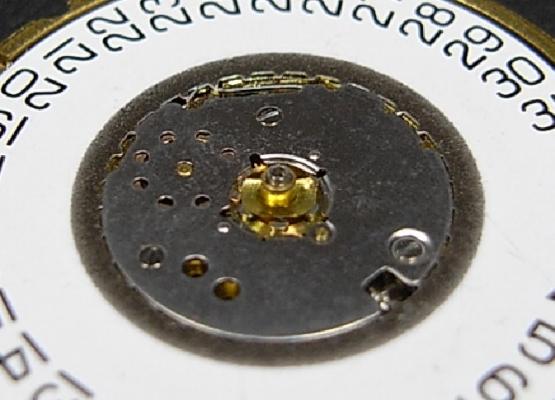
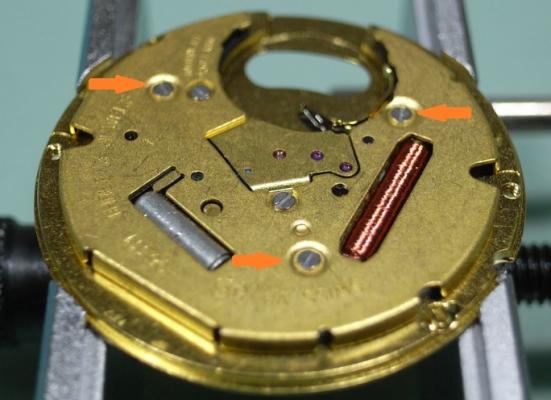
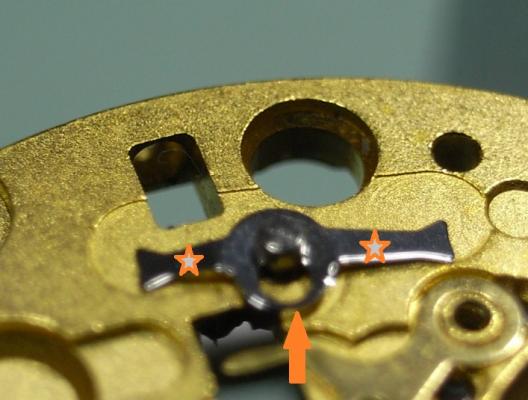
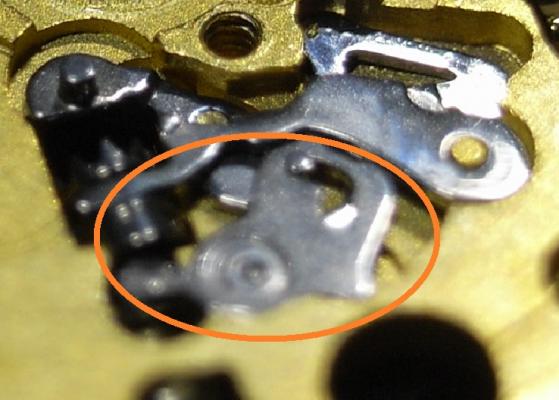
ETA 955 Service Walkthrough "The Workhorse of Highend Quartz" The ETA 955 and 956 Quartz Movements are the most commonly found movement in high-end quartz watches with three hands and a date feature. You will find them in Omega, Tag, and many other brands on the market. For this walkthrough I will be using an 955.412 Movement as my example; but the 956 is so similar to the 955, that this walkthrough will suffice for both. Please note that the numbers after the decimal place only relates to the factory in which the movement was made, so yours could read 955.112, or another factory number ... regardless, the parts are identical and interchangeable. As with all movements, quartz or mechanical, they have a service interval that should be adhered to for longevity of the movement. With quartz movements when the lubrication becomes dried out, or the movement becomes dirty, they will draw more and more current from the battery in order to maintain accurate time keeping. The ETA 955/6, when in optimum condition should draw around 800nA ~ 1.5uA, if the movement is drawing more power than this, a service is required. If a service is not performed, the battery life with decrease markedly, and can go as far as drawing more power from the battery than it was designed for, and damage the battery and cause it to leak and corrode your valuable time piece. Service Manual for the 955/6 Movement CT_956412_FDE_493024_06.pdf.PDF Disassembly Remove the two Date Wheel Keepers. I always start with the one holding the Date Jumper Spring in place. Sometimes the Date Jumper Spring can ping out of place, so be careful when removing the keeper plate above it. Here is a reference photo in case it moves before you see how it's properly seated. Next remove the Keepers and Date Wheel. Then remove the Date Jumper Spring, Motion and Calendar Work. This will leave only the Keyless Work; remove the Yoke and the Sliding Pinion only. We need to flip the movement over, and disassemble the IC Board before we can remove the rest of the Keyless Work. With the movement flipped over, remove the 3 screws holding the Coil Protector. Note for re-assembly the Gold Screw in the centre. Now that the Coil Protector is removed, GREAT care must be taken not to damage the exposed fine windings of the Coil. Then to remove the IC Board, simply remove the 2 remaining screws that hold it. Do this slowly and carefully, as you do not want to slip off the screw and damage this delicate circuit. The same level of care needs to be taken when removing the IC Board from the Main Plate. Take your time and carefully lift it off and store it immediately out of harms way. Next remove the black Insulator Block, and Battery Insulator. This will expose the Setting Lever Spring Clip, which will enable you to remove the rest of the Keyless Work. To remove the Setting Lever Spring Clip, place both points of your tweezers on the locations where I've placed the stars and gently push down on the spring. Then with a piece of Pegwood, push the spring in the direction of the arrow until it moves to the larger opening slot. This will now allow the Setting Lever to be removed, along with the rest of the Keyless Work. Next remove the Stop Lever and Switch, and remove the one screw holding the Train Bridge in place. Then carefully remove the Gear Train and the Rotor. The movement is now completely stripped and ready for inspection and cleaning. There are some parts that you do not place in the parts cleaner, they are as follows: Date Ring Rotor IC Board The rest should be demagnetized prior to cleaning to avoid any metal particles in your cleaning solution from sticking to your parts. When cleaning I also including the Insulator Block, and Battery Insulator in the basket, normal watch cleaning solutions do not harm these items and it is essential they are completely clean to provide the best insulation possible. The Rotor should be cleaned by use of Rodico. As you can see from the picture below, it's surprising the dirt and old oil this will remove ... and it is sufficient cleaning for the Rotor. I hope this has been a help to you, and I will post the assembly procedure later today, if time permits.


- 23 replies
-
- 12
-
-
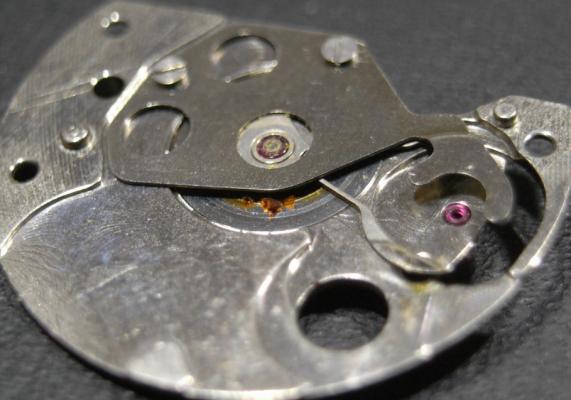
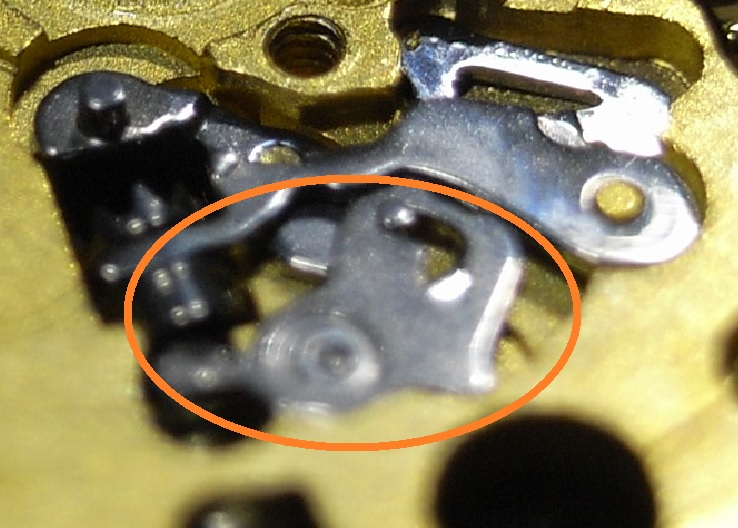
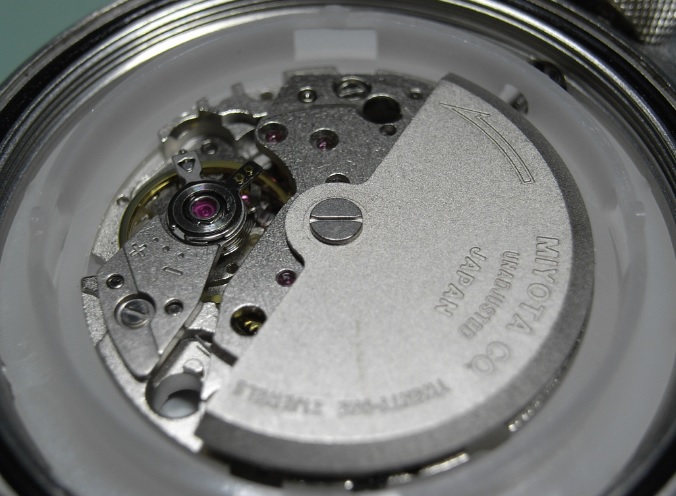
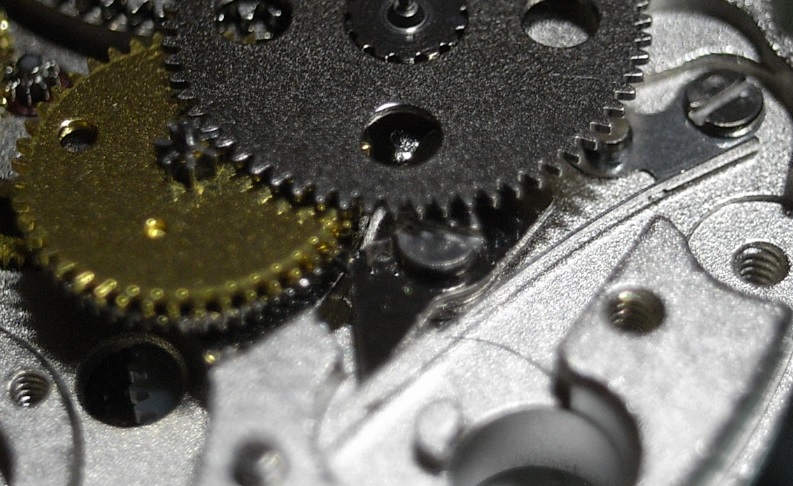
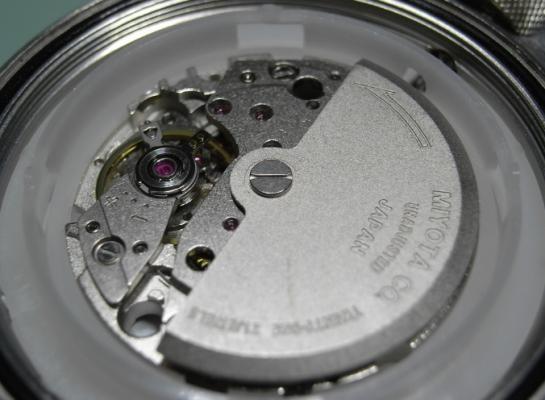
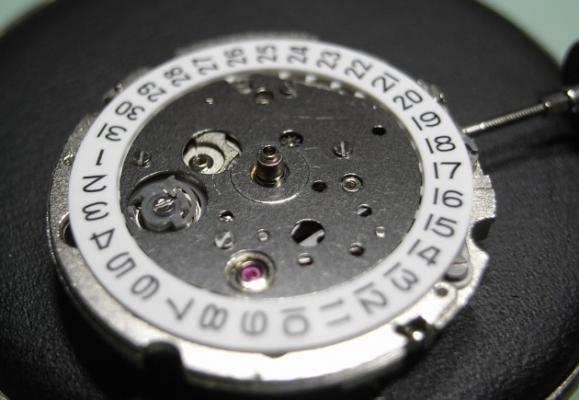
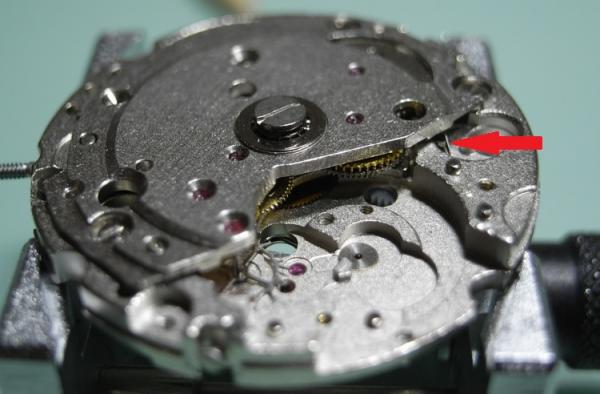
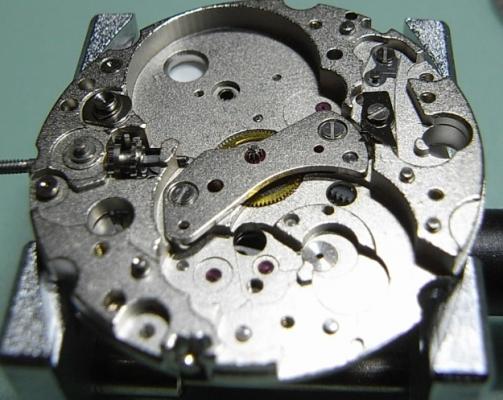
Miyota Automatic Service - "Three Screws to Rule Them All" Now for something completely different, a Japanese Automatic from Miyota. This is a budget driver's watch from a fashion brand called Scorpion, and I had no idea what I'd find when I removed the caseback :huh: Whatever! I just wanna work on watch movements, increase my knowledge, and the repertoire of movements I've had experience with. It's also a blessing to post these to help people with reference photos and walkthrough of various movements. When put on the timegrapher, it was quickly obvious that this movement was not running well at all. Extremely low amplitude, high beat error, and a graph that looks like the pepper in your mash potatoes :P Well, it happened to be a Miyota Automatic Movement ... I have no idea of the caliber, as there are no stampings on any of the plate ... beside the brand name. Once removed from the case, I pulled the Hands... ...and then the Dial. After that, I flipped it over and removed the oscillating weight to get a better look at the movement itself. Notice anything scary about this already?? There are only 3 screws holding the complete movement together!! :o Ack!! Visions of the Seiko 5J22A Kinetic "Auto Relay" , with it's 9 pivot gear train plate flashed before my eyes!! This was NOT going to be fun putting back together :P But I do so love a challenge. As per usual, I removed the tension from the Mainspring, and removed the Balance and Fork. Note: The red arrow is pointing to a very thin spring which you pull back to disengage the Click. Here's a closer reference photo of it after I'd pulled the plate off So as the title says ... Three Screws to Rule Them All .... Bam! The whole movement has to be located into ONE plate, that's only held by three screws ... this is not Rolex quality gentlemen ^_^ After tipping the movement up-side-down and telling the complete movement fall onto the desk (just kidding), you are left with only the Centre Wheel. Once the Centre Wheel Bridge was removed, the fault with the movement running so badly came to light ... RUST on the lower piviot! Rust also on the Pinion Over to the Calendar and Keyless Work ... looking way over complicated for a simple Date Wheel, as all the springs are there for a day complications as well; minus just the Day Wheel :( ... Gotta love cheap movements. Reference photos of the Keyless Work. One last thing to note with this movement. The setting lever is riveted into the Main Plate, so it's not able to be removed. Well this little gem is in the Watch Cleaner, and I've got a few weekend chores to do, so I'll put it back together tonight and post the results later. Hope you enjoyed this write-up, and got a few giggles out of it as well :)


-
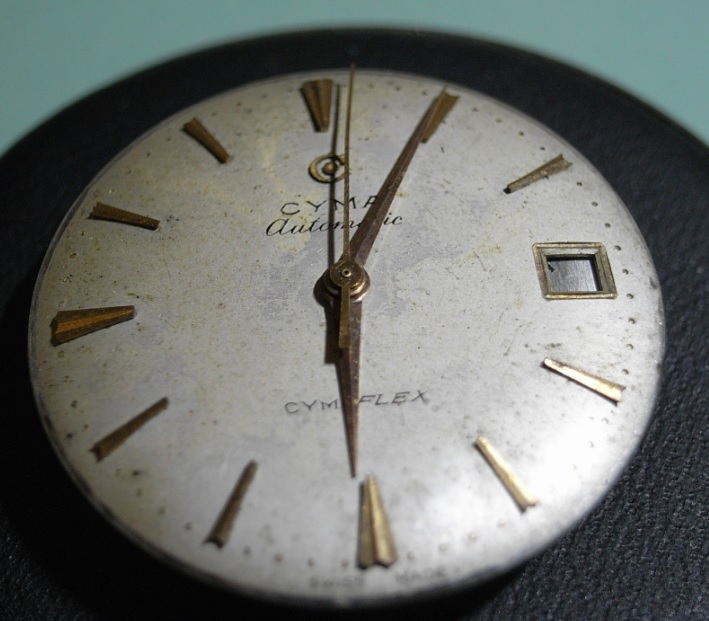
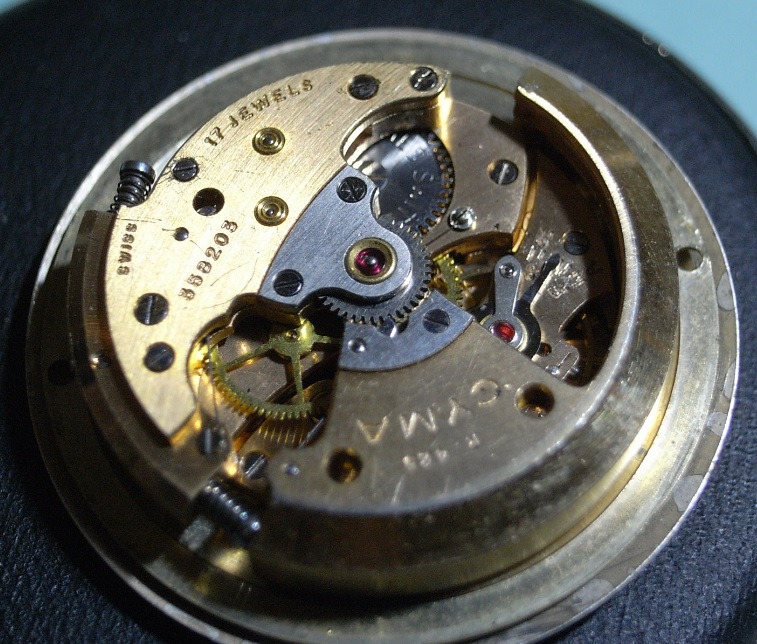
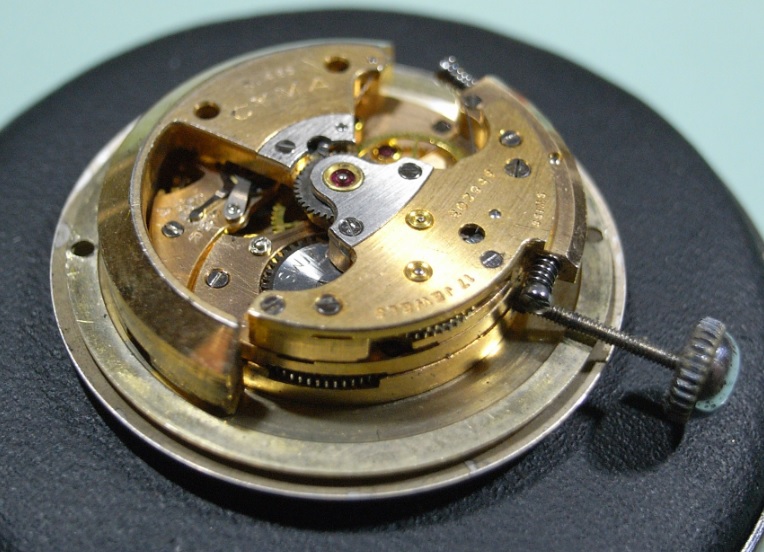
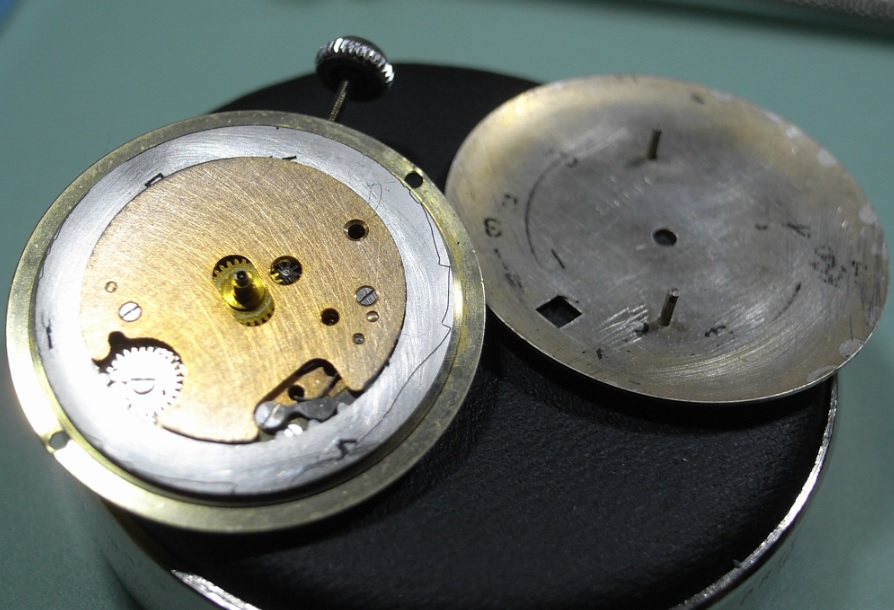
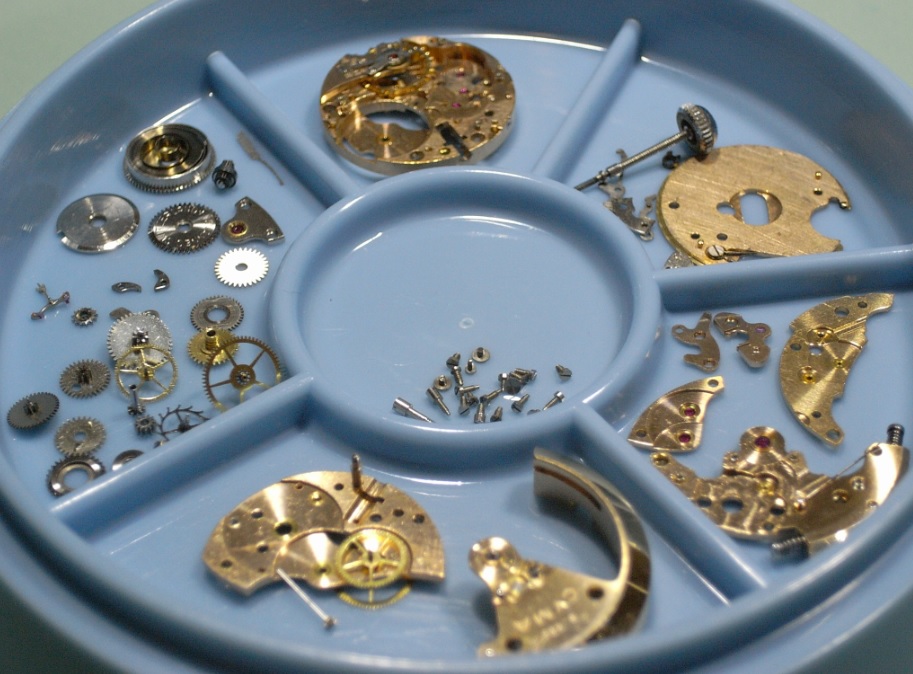
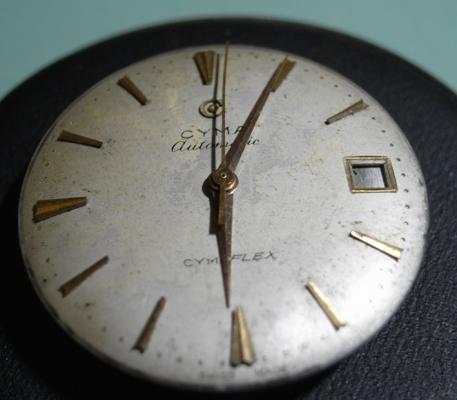
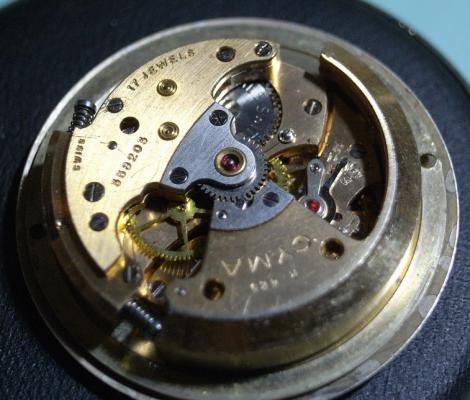
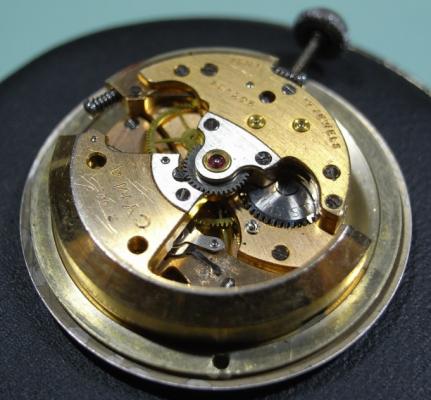
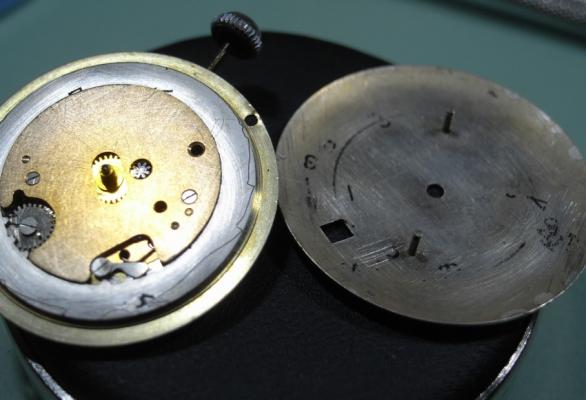
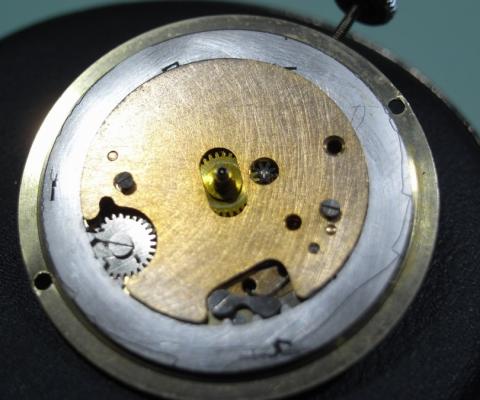
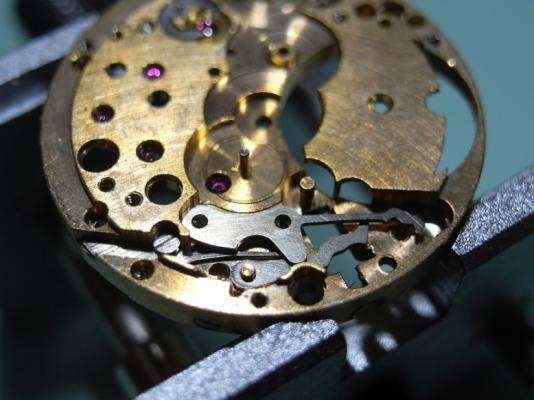
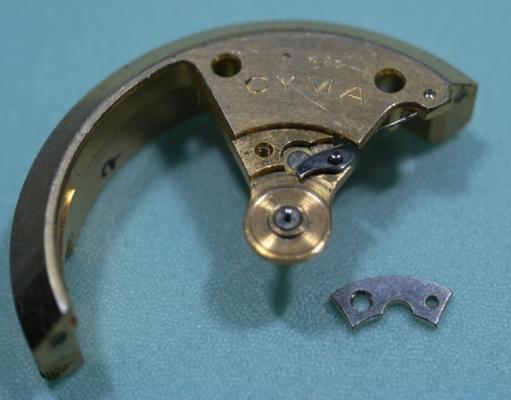
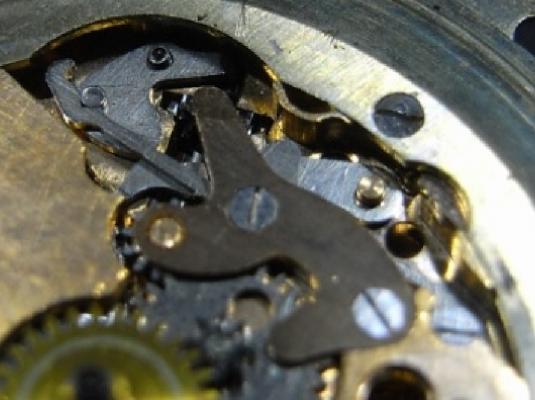
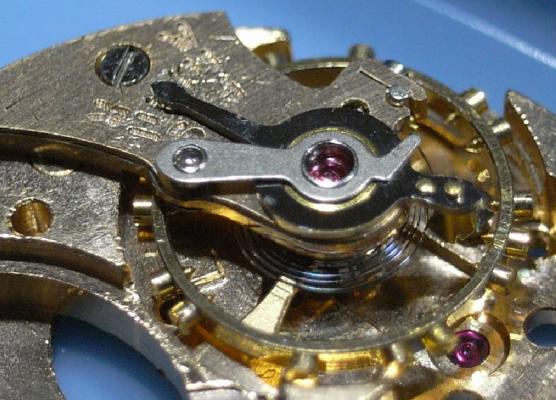
Cyma R-425 Service "Things that go bump in the night" Here's something a little different, that I hope you all find enjoyable to follow. A Bump Automatic by Cyma ... the R-425 Movement. This watch was purchased by my Uncle in Sierra Leone back in the 60's, in his wilder younger years. The automatic winding feature of this movement using a "Bump" system, which these days is a very rare method of winding the mainspring As you may have noticed in the first picture of the Dial, the numbers on the Date Wheel have been removed. Once I pulled off the Dial I could see that the number have peeled off the Date Wheel and adhered to the back of the Dial. I have no idea how this happened :wacko: One possible explanation is that the previous person who serviced this watch cleaned the Date Wheel with something that over time loosened the paint and glued it to the back of the Dial ... who knows :blink: As you can see, whatever they used completely stripped the painted ... absolutely nothing remained on the Date Wheel. Anyhooooo, on with the disassembly ... The plate that secures the Date Wheel on this movement is a full plate, held by 2 screws. Once removed we can see the Keyless Work and the Calendar Work. All very standard looking with no surprises. Here's a closer reference photo of the Keyless work. Once the Calendar and Keyless Work was removed I flipped the movement over and removed the Bump Weight. The Automatic Gear Train Bridge was the next to be removed. Once the bridge was removed the Automatic Work is revealed. Notice the fine spring system for the Ratchet Arm of the Automatic Work ... this same spring system is used throughout I removed the plate that holds the Auto Work revealing the next layer containing the Barrel Bridge and Gear Train Bridge. The Gear Train is your typical looking train except for the having the Second Wheel come up through the plate and running to a long fine pinion. Very interesting and you rarely see this type of complexity in your average movement these days. The shock system for the Balance is one I'm not familiar with and would appreciate some input from the old hands on how to clean and oil this correctly. And yes, the Balance is 18ct Gold ... very purrety B) Here are all the parts after cleaning ... LOTS of plates in this movement, they fill half the parts tray :P Stay tuned for the assembly!! And I may have a solution for the Date Wheel ... :ph34r:


-
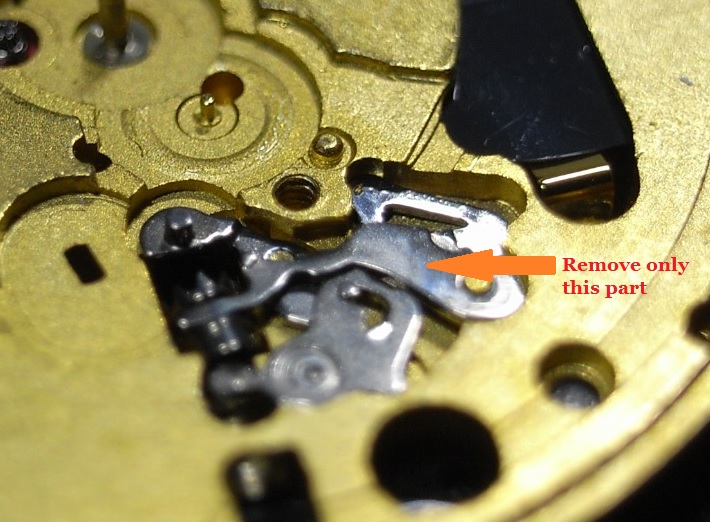
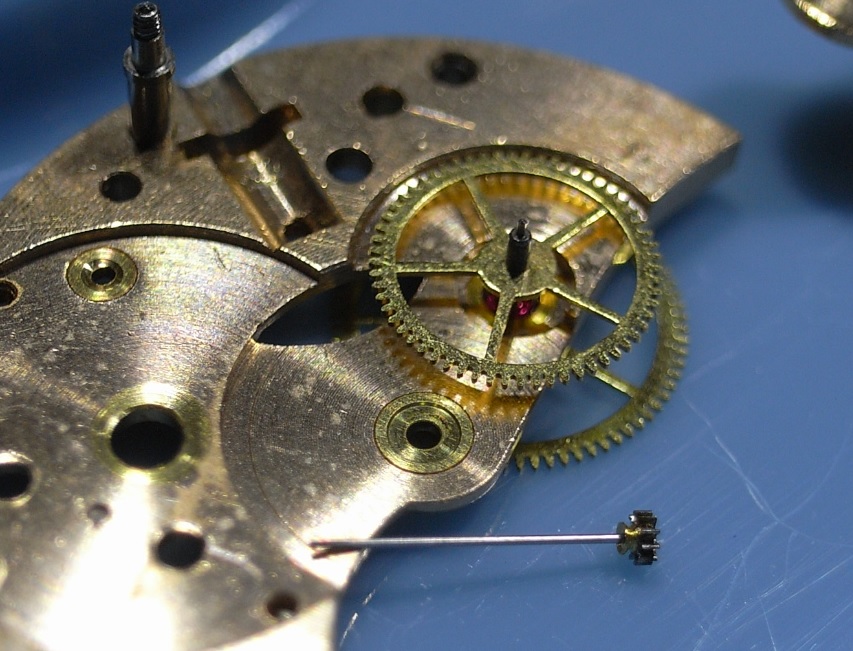
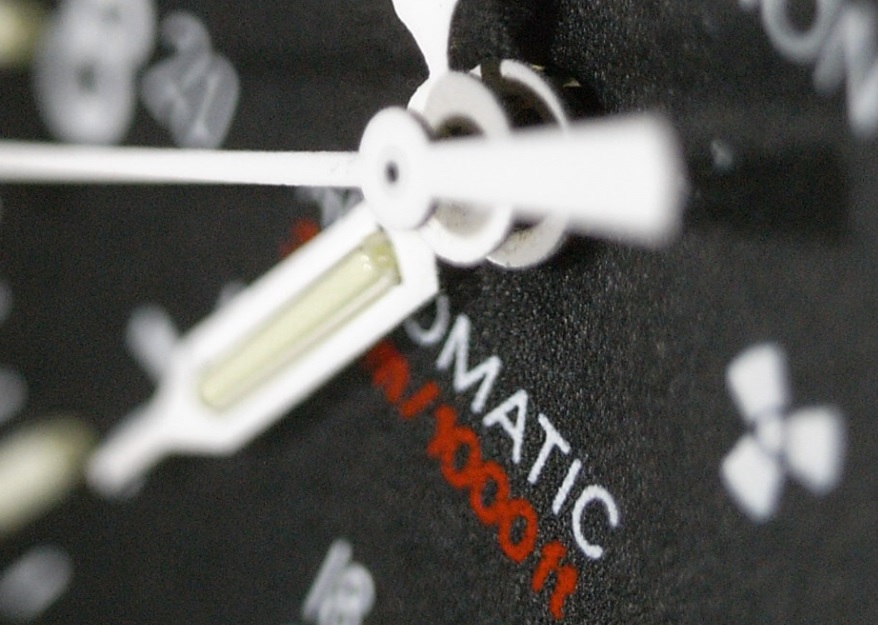
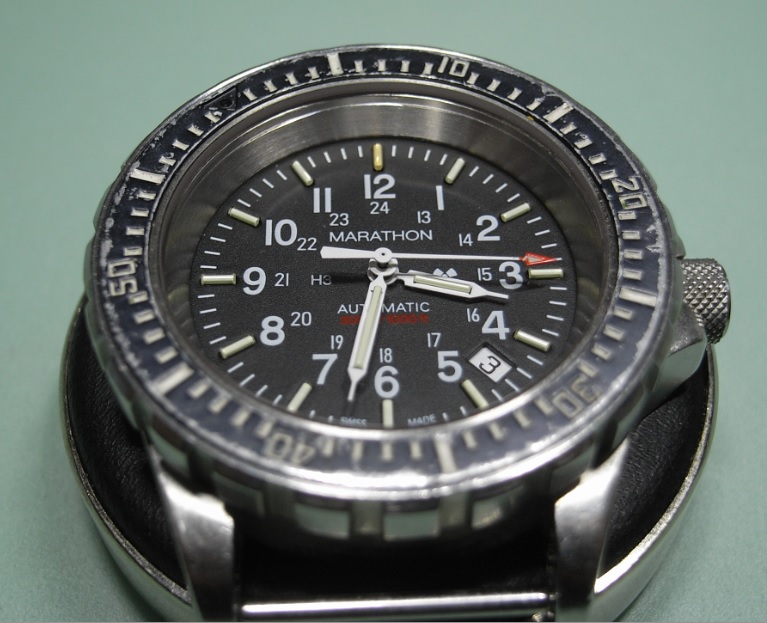
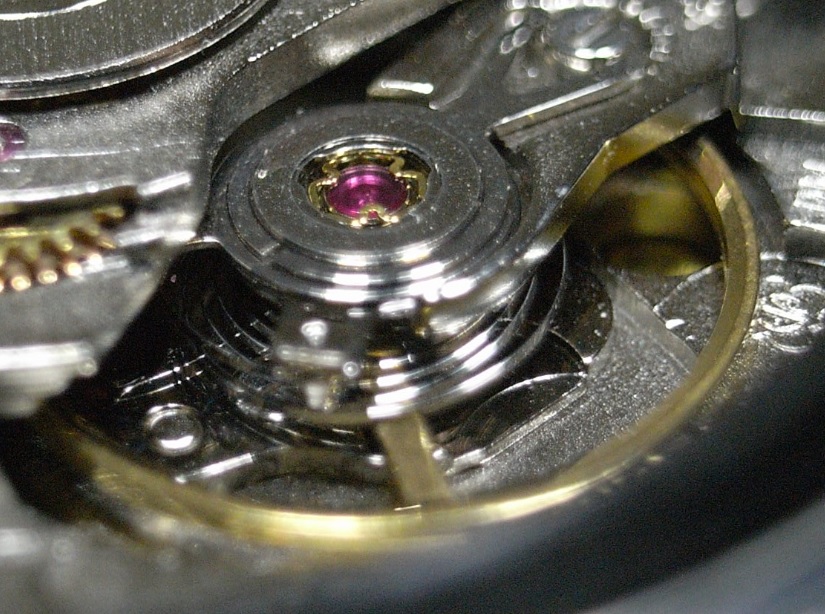
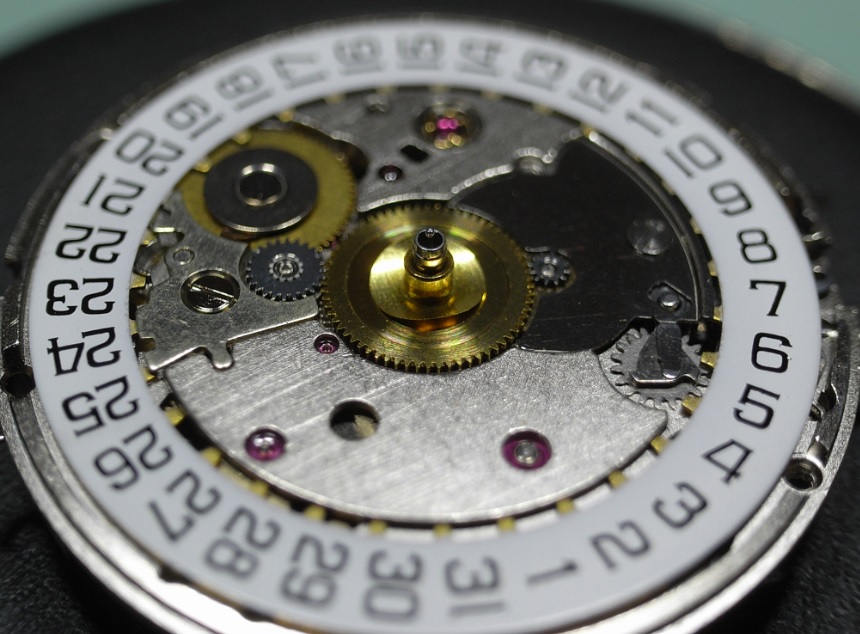
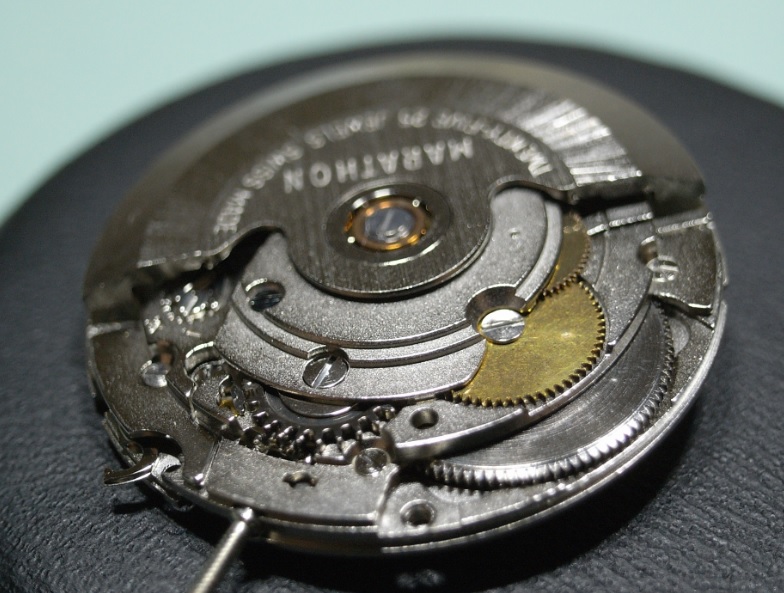
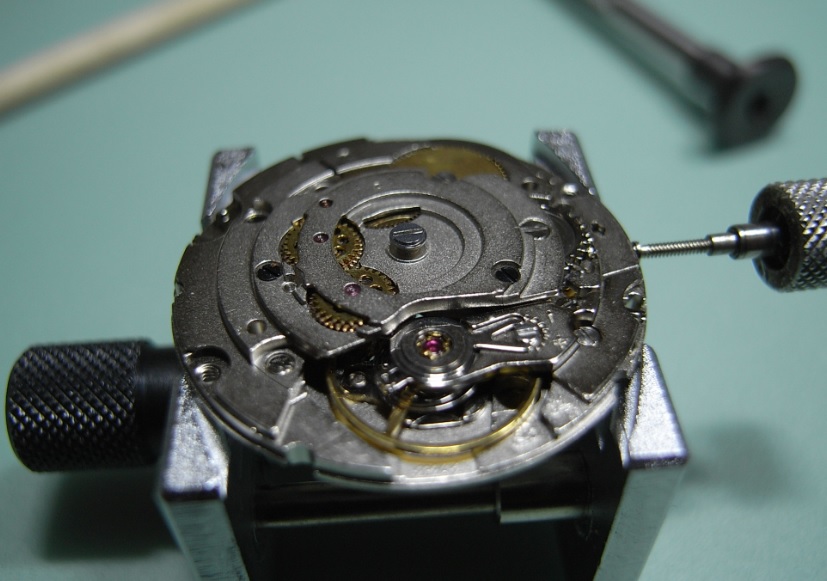
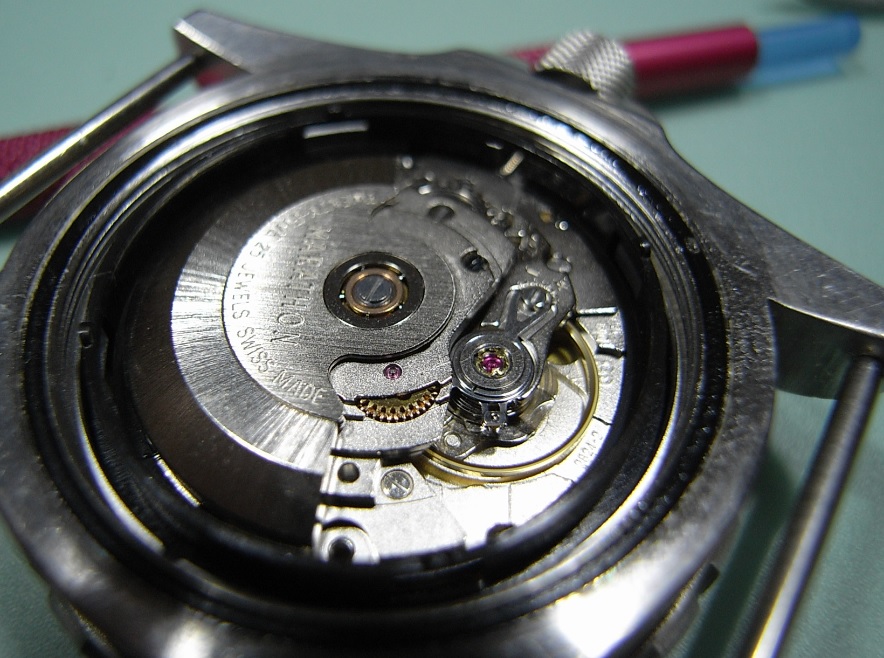
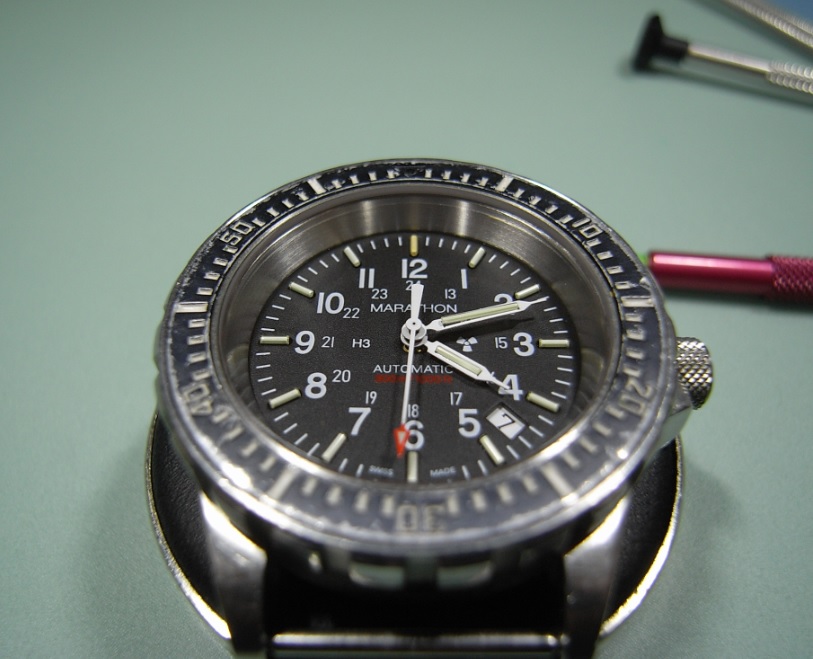
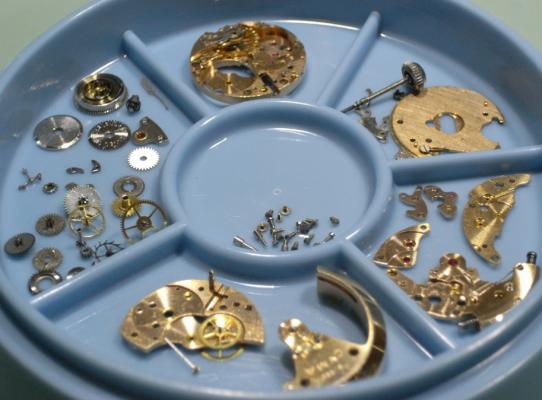
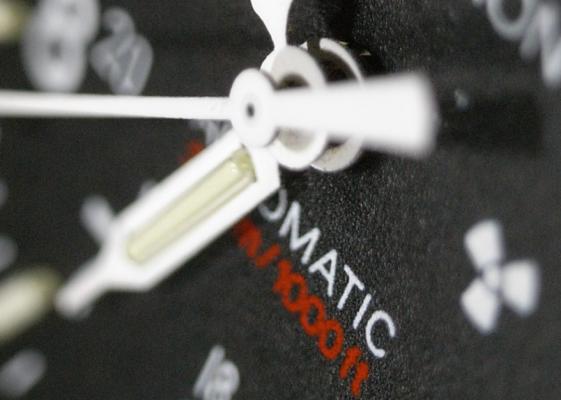
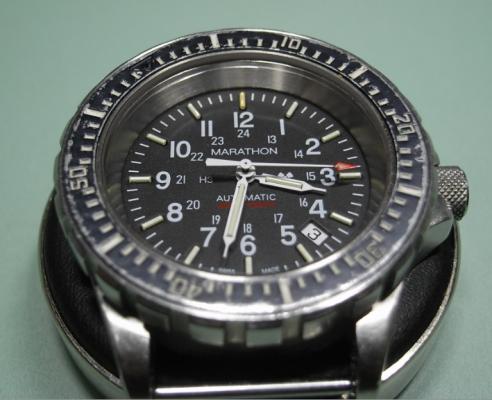
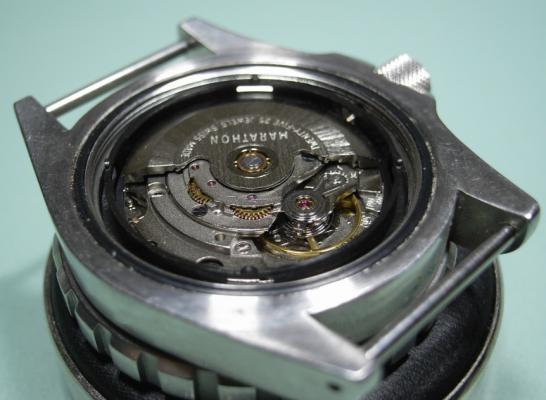
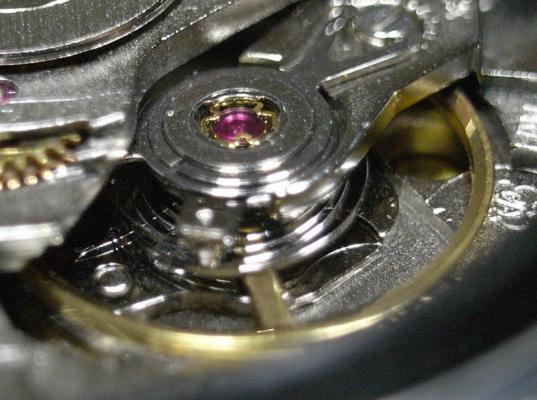
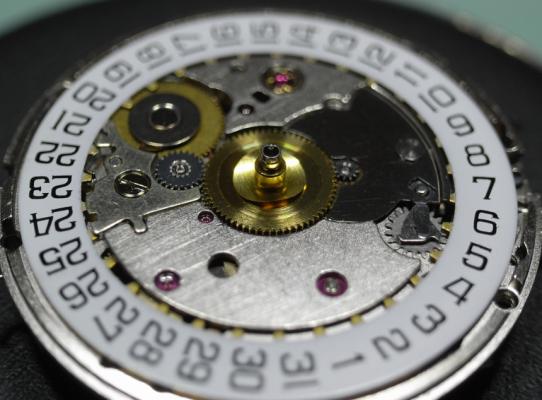
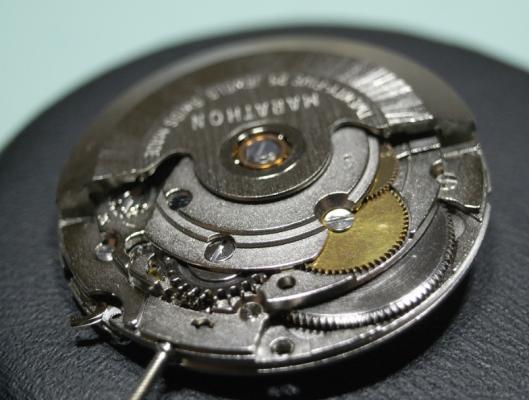
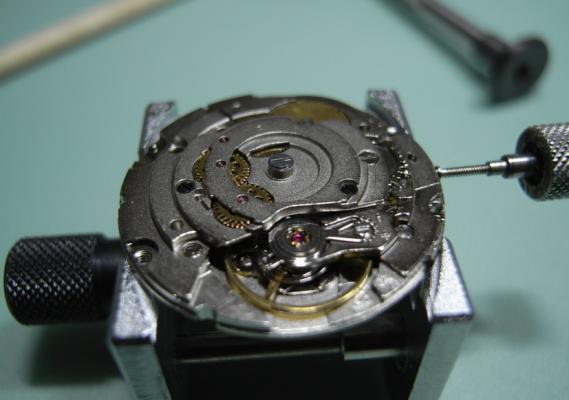
ETA2824 Service - The Radioactive Watch! Yes this watch is Radioactive ... so to speak :P It contains H3 Tritium Tubes to illuminate the dial at night. This watch belongs to my brother, and he has owned it for many years. I have to say that Marathon Watches are great "bang for buck", as this watch has served him well over those years, and he rarely takes it off his wrist. Unfortunately, on one of the rare occasions that he did (to wash his hands after work) he dropped it on the ground, and it stopped dead ... right at his quitting time 3:30pm. He was very angry with himself, and asked if I could found out what damage had been done by the drop, and repair it ... of course I was happy to help my bro :) While he was with me, I pulled the Caseback off and could instantly see the problem. The Hairspring was jammed up and the Balance was seized. I told him there also could be broken pivots, and I'd have to dig further to assess the total damage; but not to panic, as all parts for this movement are readily available (at the moment) ... so he left the watch with me. So I removed the movement from the case, pulled the Hands, and the Dial off to inspect the Calendar Works ... everything looked good. Next I removed the Oscillating Weight, and checked that the bearing hadn't been damaged by the impact ... it was fine too. Next I pulled the Automatic Work off the movement, so I could gain access to the main body of the watch. Here's a reference photo of the Automatic Work for ya Next I undid the screw of the Balance Cock and began to gently lift it ... and hey presto, and Hairspring dropped back into place, and the movement started tickin away ... these are a solid movement indeed! I carefully watched the movement ticking away, noting to see that the Pallet was working properly, and that the Train Gears ran smoothly ... all seemed fine, and the problem with this movement was resolved. I could have just stopped there, but this movement hadn't seen a service in over 8 years, and was already out of the case and 1/4 stripped, so I deiced to burn the midnight oil and do a complete service on the watch. And yes, that is a real radiation dosimeter, as I wanted to be sure nothing from those glass vials had leaked into the movement I was handling ... I'm glad to say it was clean B) Continuing with the strip down. All mainspring tension was removed from the unit. Notice with this movement too, that the click is on the Crown Wheel; instead of the Ratchet Wheel. Balance and Pallet was removed Crown Wheel, Ratchet Wheel and Barrel Bridge was removed. This is a reference photo of the Click Spring sitting on the Barrel Bridge. Under the Barrel Bridge there is a small Balance Hack to be removed as well. Next I flipped the movement and removed the Calendar Work. Then the Keyless Work Back the to other side and Train Gear was removed. Here is a reference of the Gear Train. Lastly the Automatic Work was stripped. Back from a bath, and all parts clean and ready for inspection and assembly. All pivots where intact and unburred, no damaged teeth or pallet stones, and no wrapped gears ... GOOD NEWS!! Ready to be put back together! :woohoo-jumping-smiley-emoticon: Nice clean and shiny Gear Train, Train Bridge and Barrel back in place and oiled Back on with the Barrel Bridge, Ratchet Wheel, Crown Wheel and Click Keyless Work clean, oiled and working smooooooth Automatic Work back together as well The rest of the re-assembly wasn't photographed ... sorry guys, it was VERY late, or should I say EARLY, in the wee hours of the morning, and I just got carried away with the build :huh: But it all went smoothly and as per the reference photos early. After the Dial was attached, the hands where next. Let me tell ya, these are NOT easy to fit correctly! With those glass tubes of H3, there is NO room for error fitting them. You literally have a couple of thousands of an inch to play with ... here's the photos to scare ya :o. This type of watch will really test your hand setting abilities. Here's she is all back in the case with the Automatic Work and Oscillating Weight fitted, purring like a kitten! Job Complete!! And as you can see, it now is showing my quittin time of 4:11am OUCH!! :hot: Hope you enjoyed this post as much as I enjoyed working on this movement. It was really nice to finally work on a watch that hasn't been molested, with nice clean screwheads, and no rust to deal with.


-
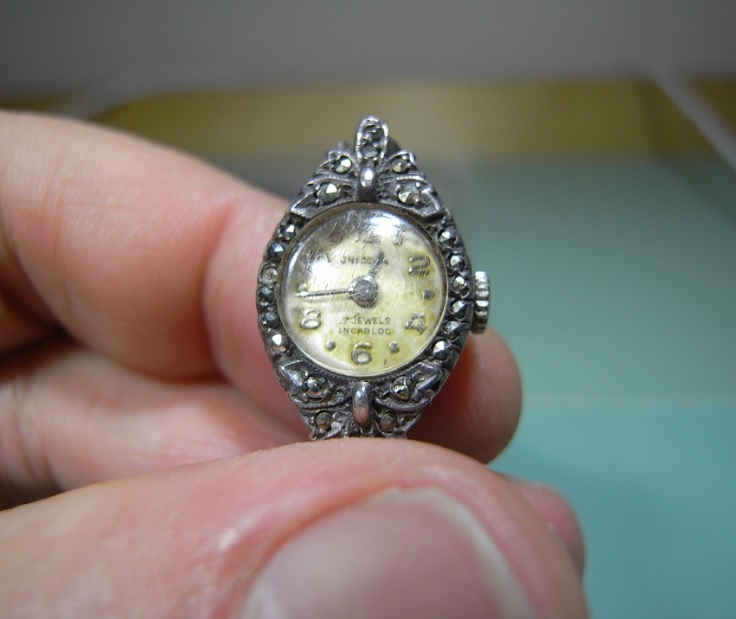
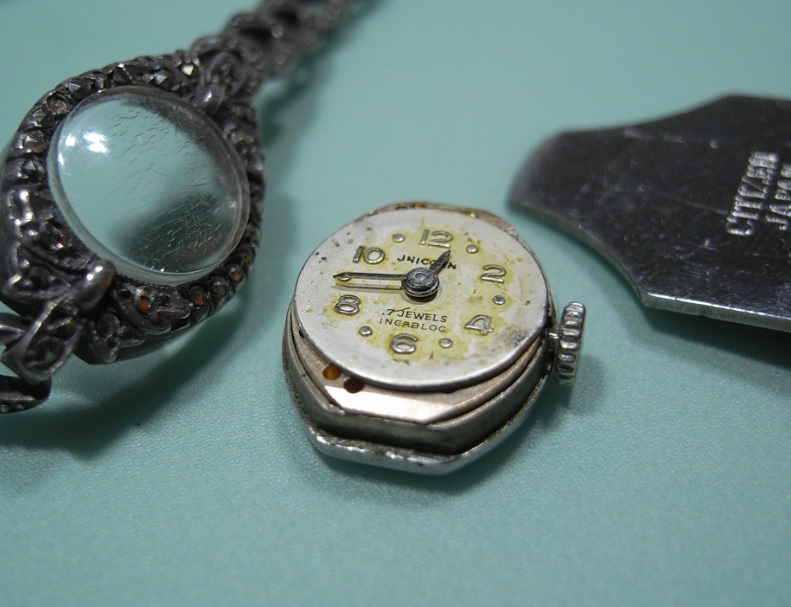
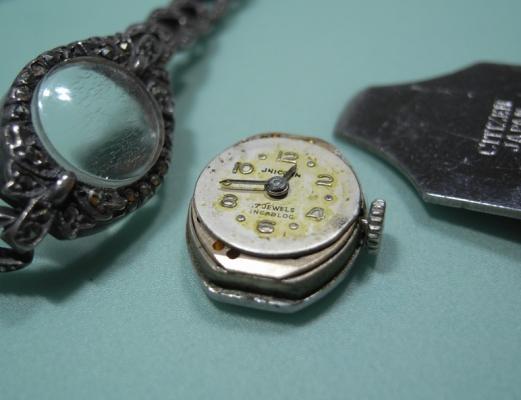
Hi fellow watch friends, back again with another service for ya :) This one is a woman's bracelet watch that were popular 20-30 years ago ... your Mum probably had/has one of these. Now when I say this movement is small, I mean it's small ... I don't think I used a driver over 0.8mm on it. And being small doesn't mean they are more difficult, but you need good optics to make working on them enjoyable. ...yes, that's my thumb! I've worked on a few of these now, and they commonly are held in the Caseback as seen below. So be careful when removing them so as you don't damage the Dial or Hands. Once I had removed the movement from the Caseback, I saw my very first indication that this job wasn't going to be a quick service. Notice that Ratchet Screw? Here's a close-up of it. I see this way too much servicing watches, and it's become my pet hate. King Kong has worked on it before me, and has tighten every screw up to 50 foot/pound ... Arrghhh!! :growl: Needless to say, when it came to removing nearly all the screws, it was a battle; but the battle was lost with the Ratchet Screw and I was unable to undo it (even after applying some heat) and it seared off ... so 1x Barrel Abor and 1x Ratchet Screw to be ordered. My mentor and trainer is a 78 year old master watch maker, and the VERY first thing he impressed on me is not to over tighten screws. "We are not torqueing down head bolts on a V8, these threads are less an a millimeter across ... use a light touch son.", is what he told me. I'm sure some old hands here can also add their words on wisdom on this matter. Ok, end of rant :P Back to the service... Firstly, I removed the Hands and Dial, and as per normal with this style of watch, there was moisture ingress. These types of watches aren't very well sealed from the elements (no Caseback Seal, no Stem Seal), so you'll nearly always encounter some rust removal in the servicing. This looked fairly light corrosion, and I was hoping it hadn't gone further into the movement. Here's one of the reasons this watch stopped. Heavy corrosion around the lower Barrel Arbor pivot. Next, as always, I removed any tension from the Mainspring, and removed the Balance and Pallets. Next I removed the Ratchet (shearing the screw in the process), Crown Wheel, and then removed the Barrel Bridge. As you can see, very old, dry, and dirty grease. Main Plate looked in good shape, which saves a LOT of work ... if this thing is covered in rust you've got your work cut out for you. Pulled the Cannon Pinion, and happily it wasn't ceased, but also is still a good fiction fit. Here's a reference photo of the Gear Train setup once the Bridge is removed. Again all looks good and no damage to any of the pivots or jewels. Stem, Clutch, and Setting wheel are filthy and typical of a non-sealed movement of this age. On to the Keyless Work, and unfortunately rust had gotten in here too. The Yoke Spring was the worst of it, but with a little time and effort, it cleaned up fine. Setting Lever needed a little work too :unsure: So the parts are in the cleaner, having a bath for the first time in 20+ years. And I've emailed the good people at Old Swiss Watch to get a new Arbor and Ratchet Screw. I'll have the assembly post up as soon as the parts arrive, and get this little movement tickin like new! Thanks for reading my post, and I hope this helps and was informative. :)


-
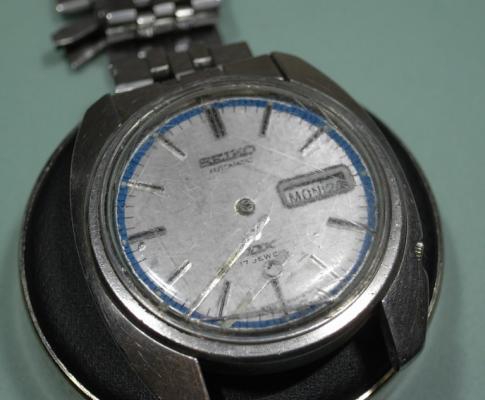
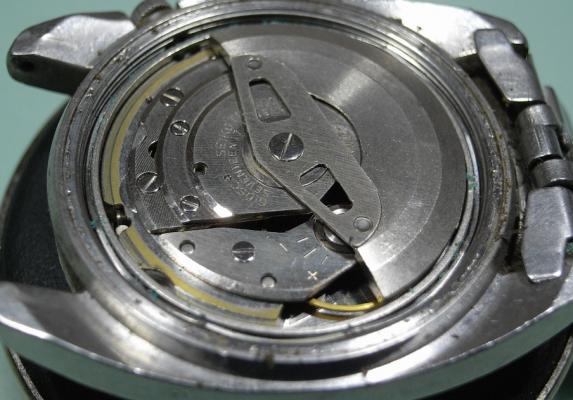
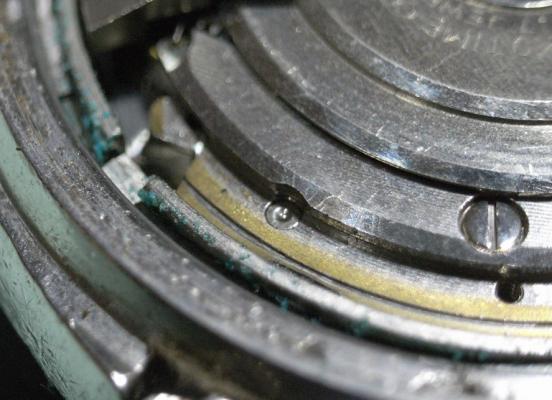
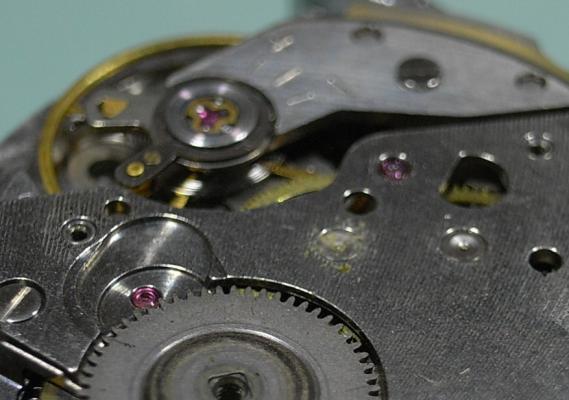
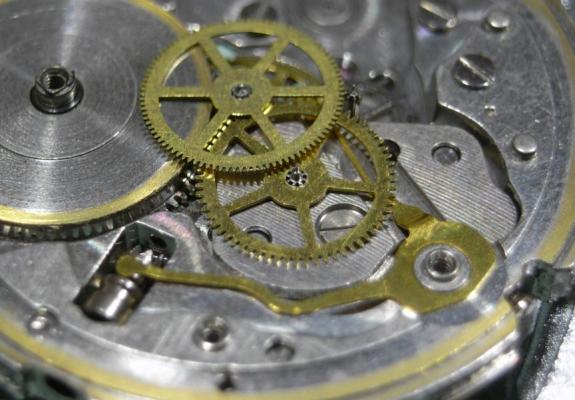
Service of a Seiko 6106 Movement Sorry I have been slack posting movements I've serviced at home, but work has been busy, and the movements I've been servicing are not that different than what I've already posted ... just more of the same. Well, I got another one of my Mum's friends who asked if I could repair their watch that was given to him on his wedding day by his wife: who has now sadly passed away :( Of course I said YES!! And it turned out to be a lovely old Seiko; but a little worse for wear :unsure: The hands had fallen off, and the plexiglass was so scratched you could hardly read the dial. After opening up the caseback, there was evidence of corrosion starting to set in ... but thankfully it was caught in time. Here's what the intact movement looks like. Once the automatic works were removed, it was obvious this poor old thing has never seen a service since it was purchased in 1974. Very dirty, and very dry. This movement has a complex keyless works which included a pusher for rapid date change, so before I started removing the dial side, I pulled the Balance and Pallet Fork ... just to be sure to be sure :) Notice how dirty the movement is from this angle as well. Ok, on to the dial side, to remove the calendar work and the Keyless work. Calendar work is pretty much like all Seiko's ... minus that annoying phillipshead screw, thank the Lord! Here's a picture of the Keyless work, with the incorporated pusher system for date change. More of a close-up of the pusher arm There is also a large spring for the pusher mechanism Once that was all disassembled, it was back to the Train Gears and Mainspring. Notice this movement also has a hack that stops the Train Gears; instead of the Balance ... all very interesting :) And for my good mate Bob ... here's the picie of the Automatic work mate :P Look how dirty and nasty the Eccentric Bearing is ... Ewwwww! Here she is coming back together after a long bath in the suds Lookin much better! I polished the case, and spent about 15mins with Ploywatch trying to polishing all the scratches out of the glass ... but it was just too far gone :( Still at least you can read the Dial now :P Off to the Timegrapher and in typical Seiko fashion, once cleaned it purrs :D Hope you enjoyed this post, and I'll try to post more often guys.