Leaderboard


Popular Content
Showing content with the highest reputation since 08/04/13 in all areas
-
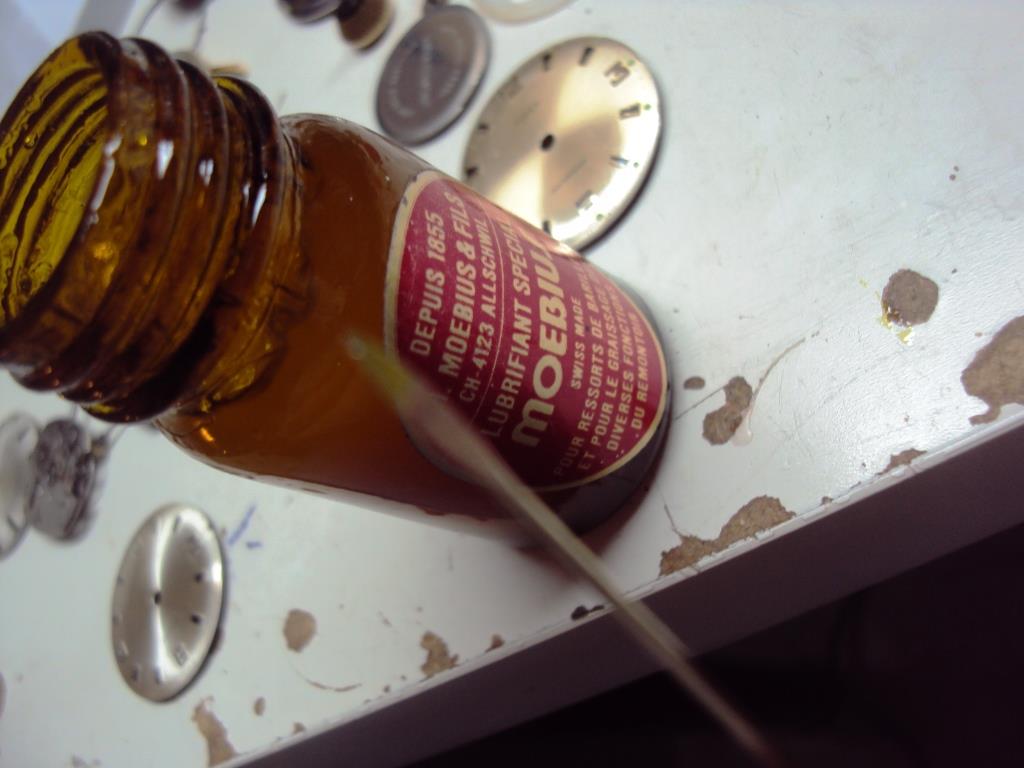
Well I would definitely start with Moebius 9010 (for train wheels and balance endstones) and 9020 (for train wheels) if you are working on Pocket Watches. Moebius 9415 is a must for Pallet/Escape wheel teeth. A quality silicon grease. Moebius D5 is essential (barrel arbor, motion work). Molycote DX or Moebius 9501 grease for keyless work. Moebius 9501 or 9504 for high friction (e.g. Cannon pinion, Setting lever spring and anything at high friction). Moebius 8200 grease for mainspring. Moebius 8217 for barrel wall (automatic watches) It's a lot but at a minimum get 9010, 9415, D5 and 8200 I hope this helps. Recommended Lubricants for Getting Started.pdf Moebius_Oil_Chart.pdf25 points
-
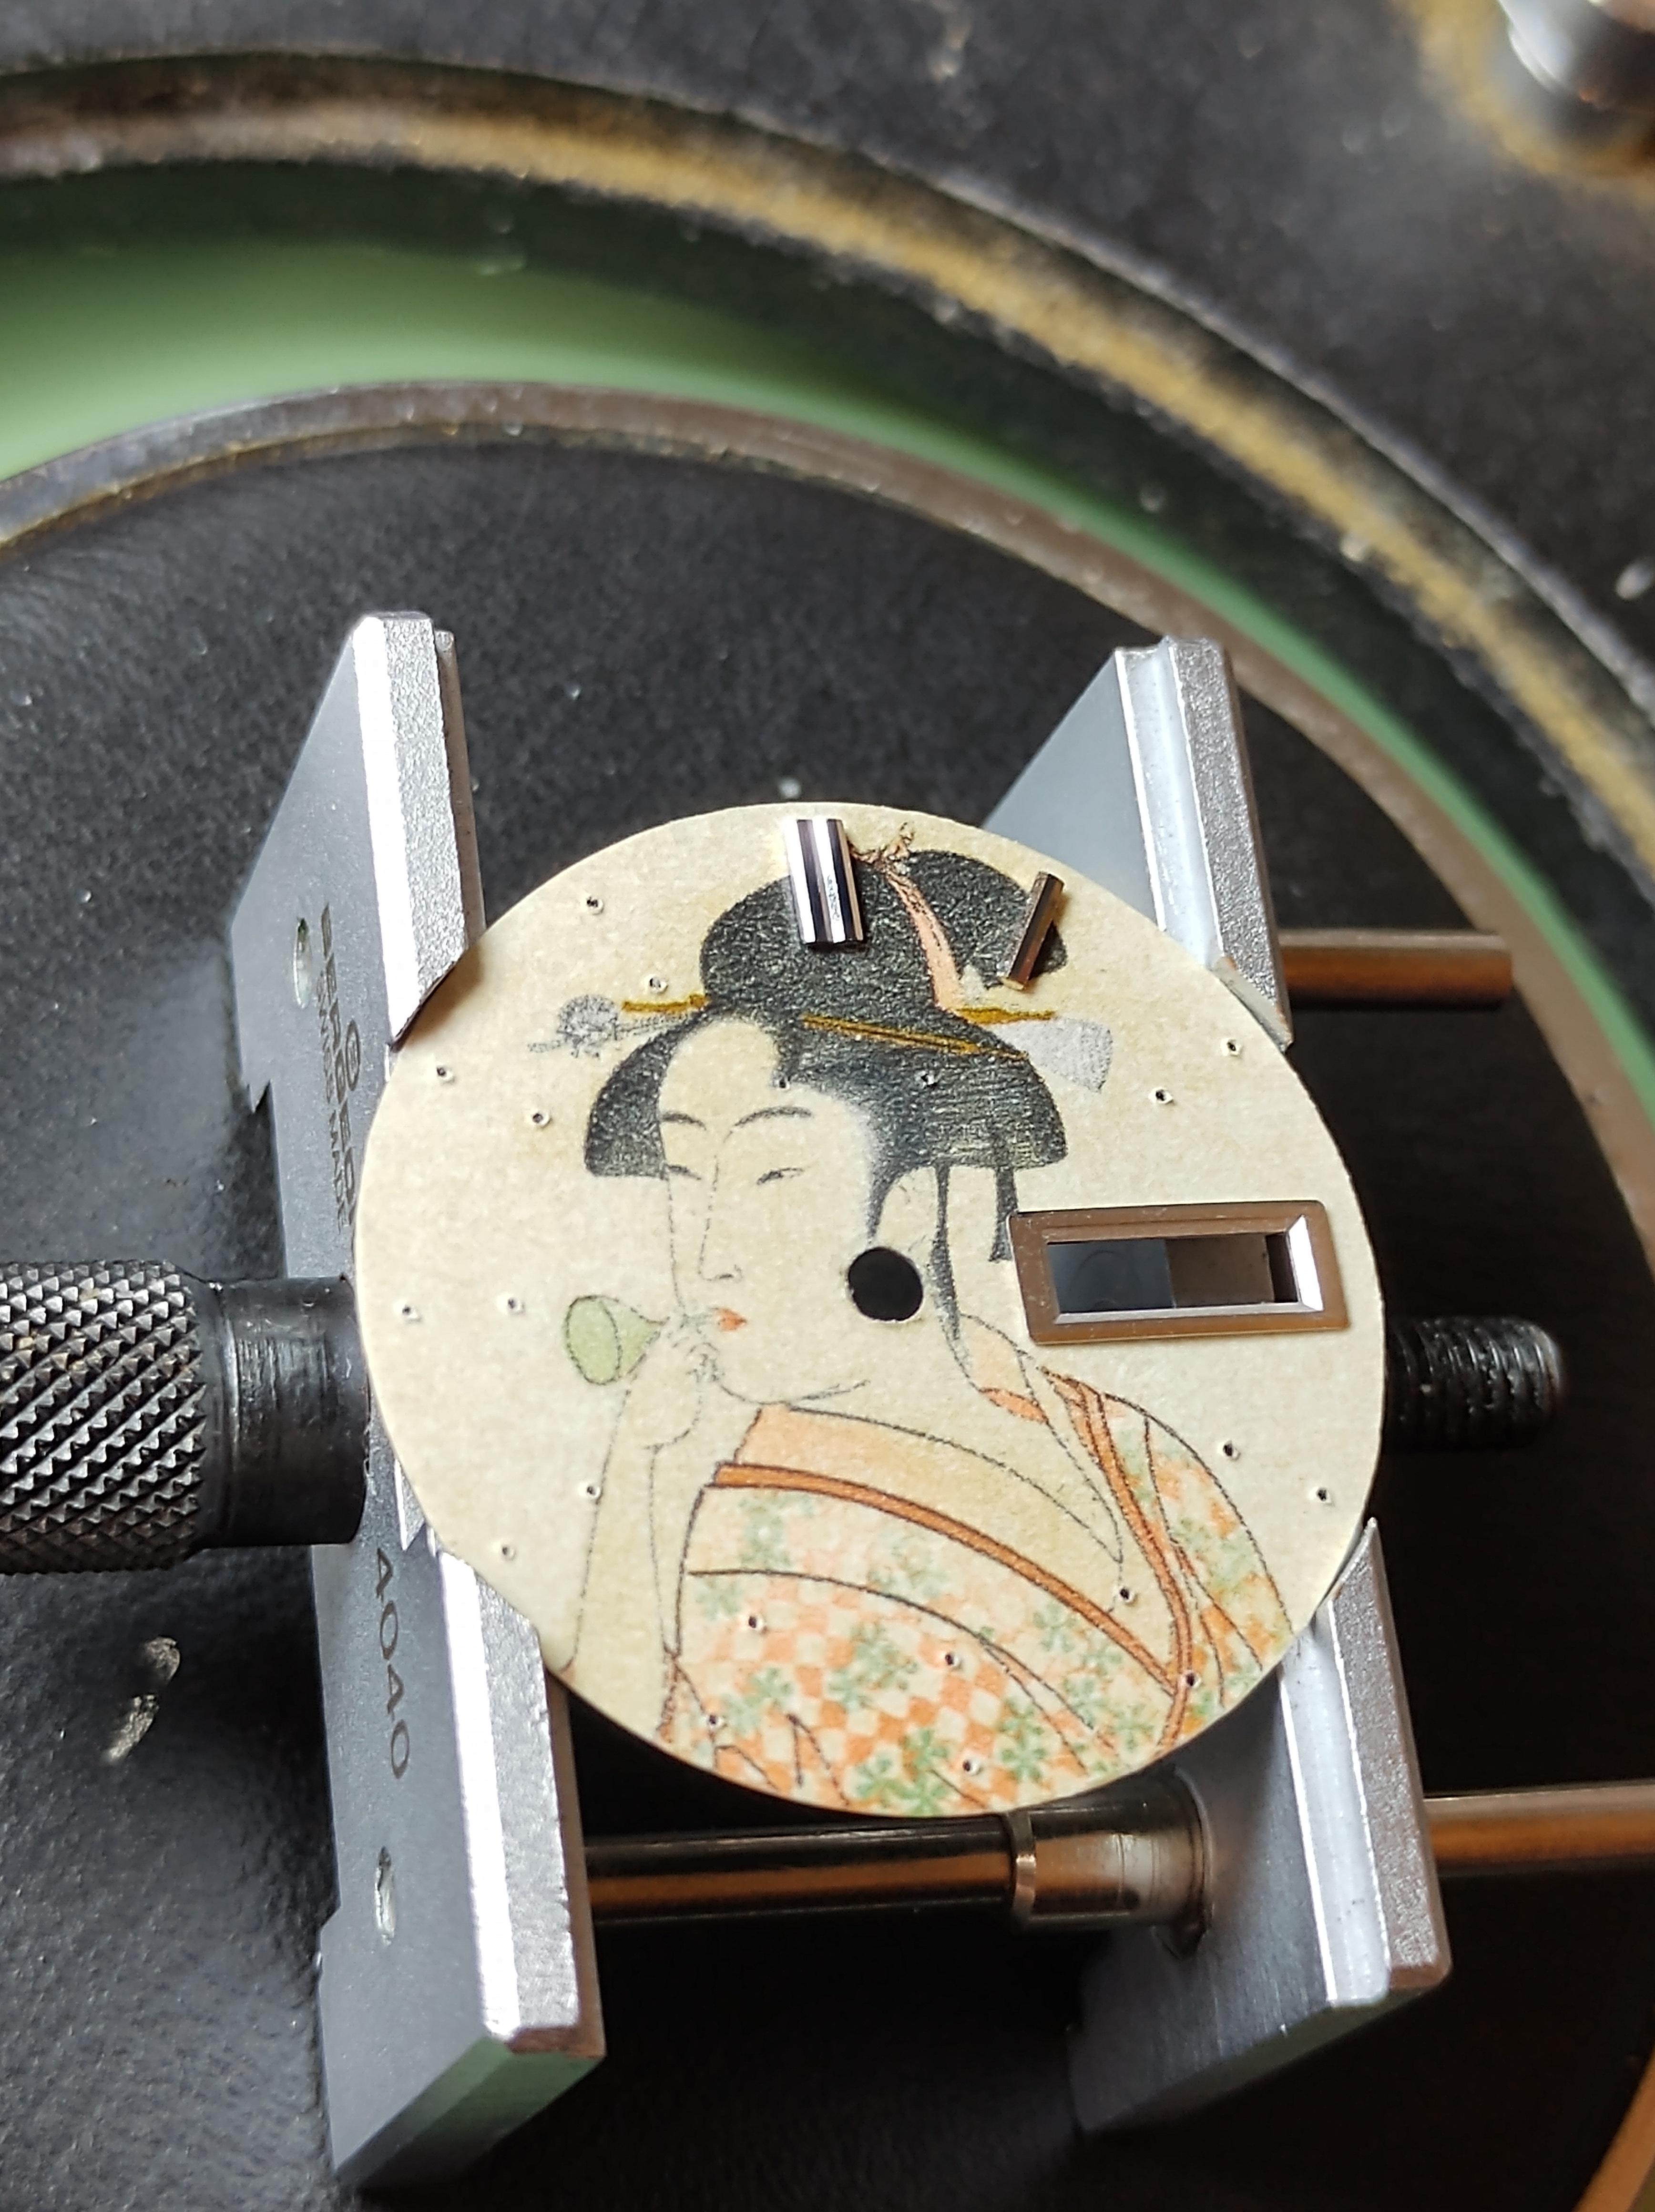
Hi guys … I had promised that I would make a « custom decal dial tutorial » on another thread there So here we are … There are many variations of decal dials, the best IMHO being the « negative gilt » dials which gives the best results. The process I’m showing today is aabout how to make a dial with black printings on a one color background. I had a cheap quartz diver waiting in my drawers so I’ll make a Heuer diver hommage based on the 980.016 model (quartz one too). DAY 01 : It’s 4:30 AM (I’m an early bird) and I have 2 hours to kill before a business trip to Paris (I’m French) so I decide I have time enough to begin. The first part of the process is to prepare the dial plate : - stripped it, removing all the lumes bars and dots - soaked the dial for some minutes in acetone to remove the paint - filled the tiny holes where the bars and dots go with cyanolite glue - sand everything flat I sand with 800 and don’t try to get a smooth surface as I want the paint to adhere perfectly to thedial plate. Here is the result … Then I want to spray paint. I make a tube with some painter’s tape, from a « curve » with it and place it on a plastic bottle cap. I want it curved so that I can stick the dial on it without any risk of bstructing the center hole or the date window of the dial plate. So I stick the sanded dial plate on the tape tube. As you can guess from the pic below … that’s not the first time a make an orange dial. Then I place the bottle cap and dial plate on a paper sheet and spray paint in orange. I use street art spray paint as it is « water resistant ». As you can see on the next pic, I don’t try to get a smooth surface, or even to perfectly cover the dial plate at first. I will let this coat dry, sand it with 2000 grade, then spray 1 or 2 coats until I get a perfectly smooth orange dial plate, ready for receiving a decal. So I place the bottle cap and dial under a shooter glass and will let it dry for about 24 hours before sanding and spraying the second paint coat. The 24 hours drying time is really important (though it could depend on the paint you use). The paint I use looks perfectly dry after about 5 hours but if you spray the second coat without waiting enough, that coat won’t perfectly adhere to the first and you could get a granular surface like an orange peel. And here is the dial waiting under the shooter glass. On the right is a « negative gilt » dial (third and last matte varnish coat) On the background there are two Raketa 2609 movements from the 70ies, quietly (really loudly to be honest) ticking for test after I‘ve recently serviced them. Now it’s 5:45 AM so I will have a and go to the train station. I’ll sand the dial plate this evening and spray the second paint coat tomorrow morning. Then sand it in the evening and spray the third coat (if needed) the day after. DAY 02 - DAY 03 : So here's what you get after the first paint coat … doesn't look really good but no matter as there's still some work to do to get a better result. And here's what you get after 3 coats of paint, each one sanded with 2000 grade, to get a perfect finish, flat and smooth. Now the dial plate is eady to receive the decal. DAY 03 : I won’t explain anything about Photoshop and Illustrator here … I’ll only explain how I print my decals. One thing really important, from my own experience, is the definition of the design. I’ve tried several, from 1200ppp to 6000pp and the best results I’ve got on printing decal sheets were with a 4000ppp definition. So all my dial designs are done in 4000ppp. The result is really BIG files … for example an A6 template with 12 dial desings ready to print is about 800Mo. As that dial is black printing only I open it with Photoshop and let the softwre (so ont the printer) deal with the printing quality. My printer is an old Epson Picturemate with a 1200 maximum definition. As the good quality decal sheets are not cheap and as I’m a « skinflint» I often print on A7 sheets … 6 dial designs on one sheet. When printed you should let it dry for about 4 hours then spray 2 really thin coats of matte varnish, letting each coat dry for at least 12 hours (24 hours is better). DAY 04 - DAY 05 : 2 days of speed-hiking with my wife so I didn’t worked on that tuto. You can check on the net what speed-hiking is, but to summarize it’s hiking as fast as you can with really light backpacks, trying not to run (or only short runs). On a good day you can walk 5 to 6 miles/hour … when trained you can walk up to 6,5 miles/hour … and while I trained for my first 62 miles ultra I achieved to walk (no running) up to 6,85 miles/hour (11 km/heure). DAY 06 : Today is Monday 6:00 AM. It’s been 5 days since I begun that tutorial and … my legs ache and all my body is painful (see Day 04 - Day 05) The dial plate is ready and the decal sheet too. You can see that the decal sheet looks matte now. That is because I have sprayed 2 coats of matte varnish on it, to protect the inkjet ink while I’ll soak the decal in water. Of course if you print with a laser you won’t have to spray varnish as the laser inks are (almost) water resistant. First thing to do is to chose the best item on the decal sheet and cut it round. Then you are ready to go. On the next pic you can see all you need now : - dial plate … fixed on a foam board using the dial feets - decal dial … nicely cut round - tweezers - thin and smooth brush (mine’s a watercolor brush) - some « micro set » … or just vhite wine vinegar (it helps the decal to set on the dial plate) - cold water Now you put the decal in cold water and while it soaks you brush some micro-set (or white vinegar) on the dial plate. Then you put the decal on the dial plate. Here you can see why I prefer using clear decal sheets on coloured dial plates … because it’s much easier to « perfectly » positionate the decal, using the central hole and the date-window. When you’re happy with the position of your decal you use a paper tissue to absorb the excess of water. Do that carefully as you don’t want to move the decal on the plate. And here we are … everything worked fine while absorbing the water and the decal position is OK. I’ll let it dry for about 12 hours before I cut the central hole and the date window, before I proceed to the varnish finish. Still Day 06 but 7:00 PM The decal has dried for about 13 hours so now I can proceed on cutting the decal sheet That's what I do then I : - fix it back on the foam board - apply some « micro set » around the center hole, the date-window and the outer diameter - gently press with a paper tissue so that the decal is perfectly applied (no more «air bubbles) And I let dry for 3 hours more Evening … 10:00 PM Now the decal is « perfectly » applied and dried and ready for the finish Last pic for today is after spraying the first coat of glossy varnish I will let it dry for 12 hours, sand it with 2000 grade paper and apply the 2nd coat. DAY 07 : 20:00 AM … only 1 pic today just after finely sanding with 2000 grade the 2nd varnish coat I applied yesterday DAY 08 : Yesterday evening I applied the 3rd and final varnish coat after finelt sanding and cleaning And today I can show you the final result … and say I'm pretty happy That dial is so glossy it’not easy to get a good pic, even on close-up. May I say that me hpone is nit the best at shooting pics (just like me) and the actual dial is much much better that it looks on the pictures below. I hope that you liked that tutorial and that it could be helpfull to members who want to try to build their own watch dials. I’ll try to make better pics with a real camera and a better lens … next week of the week after, after luming the dial together with the hands. Then I will still have to get a case and rework it so that it could be a 980,016 lookalike. Some of you may wonder how much time did I spend to make that dial. It took 8 days to achieve the all process but I spent only 1 hour the first day then only from 15mnm to 5mn the days after. So, apart from the design work on Illustrator and Photoshop (which took me hours), I would say that the whole process is about 2 to 3 hours. I must say that it's not my first try at dial making and I've trained for 2 years now. So if you want to try you should consider spending a few more hours but it's really worth the time spent as at the end you get your unique DIY dial.24 points
-
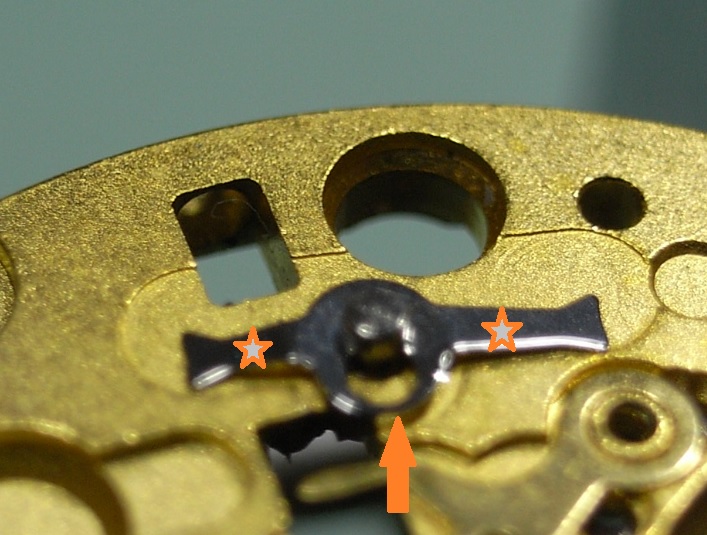
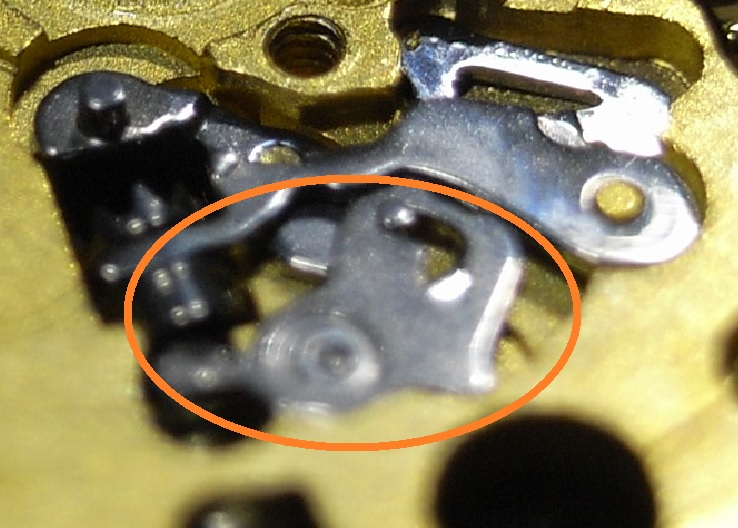
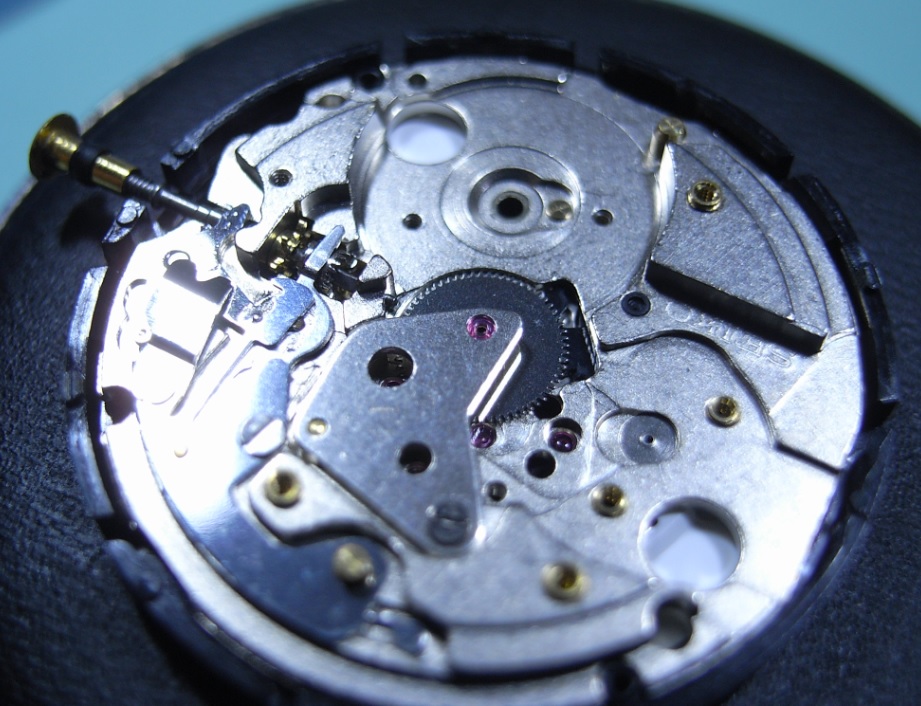
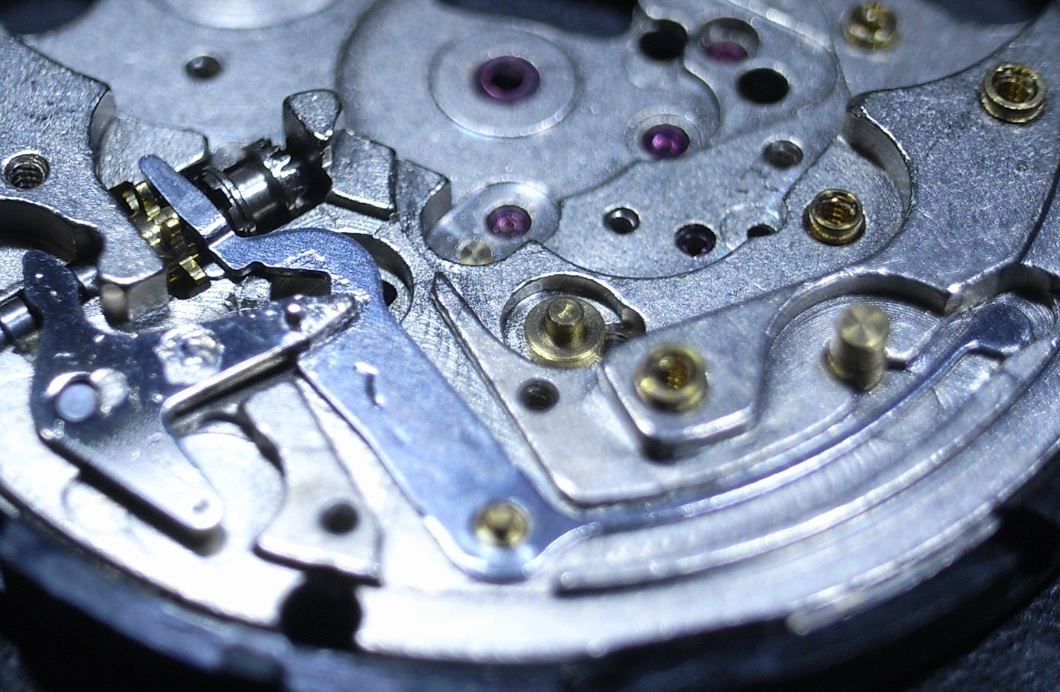
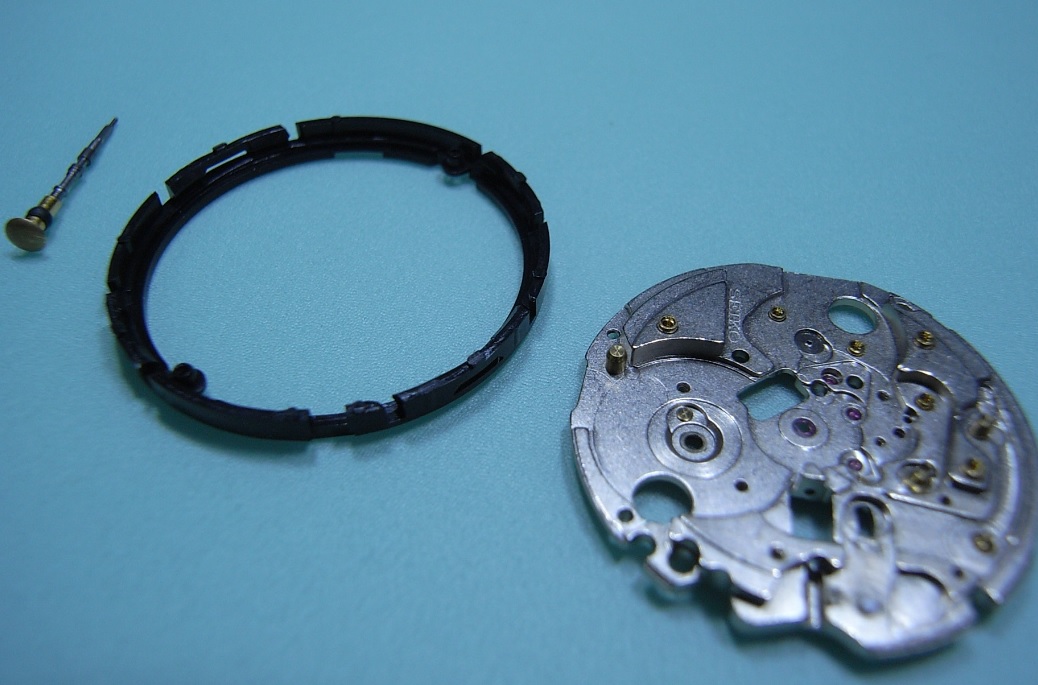
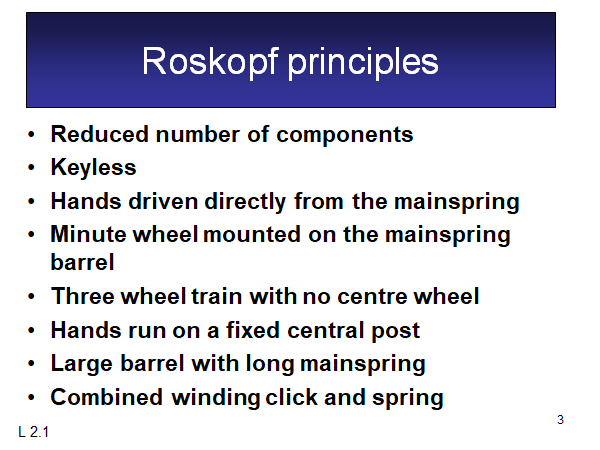
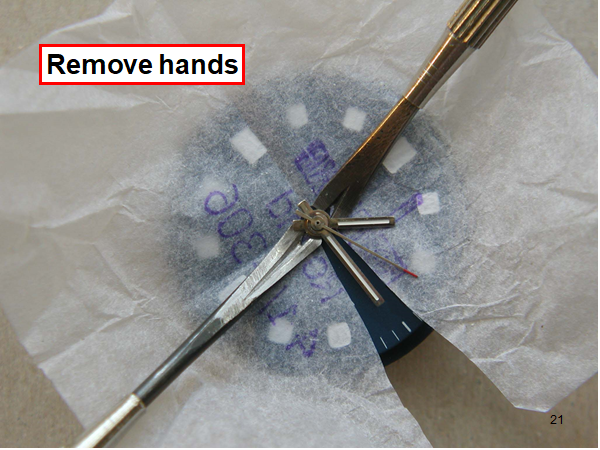
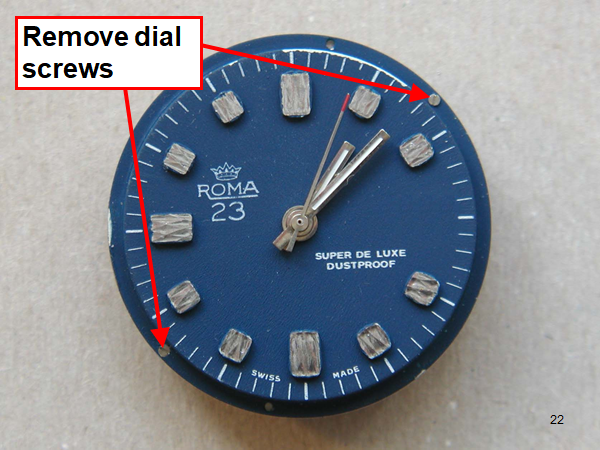
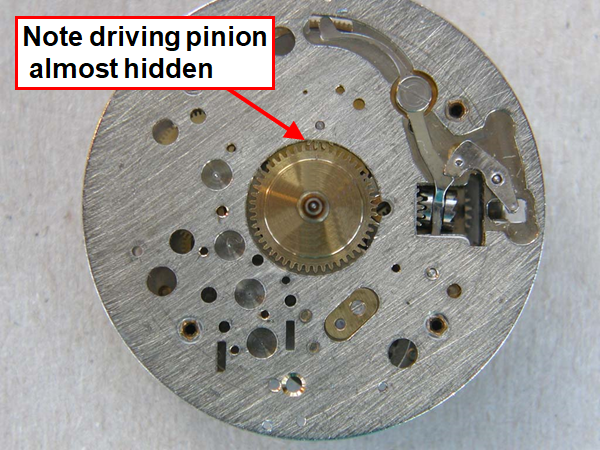
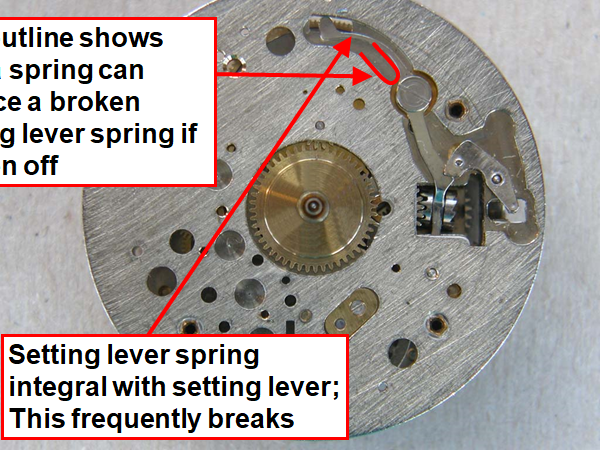
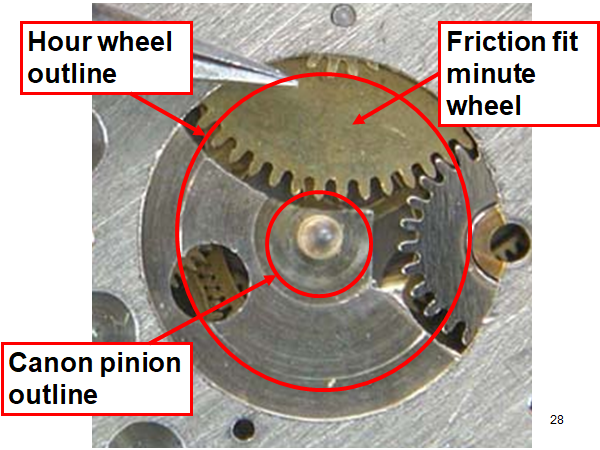
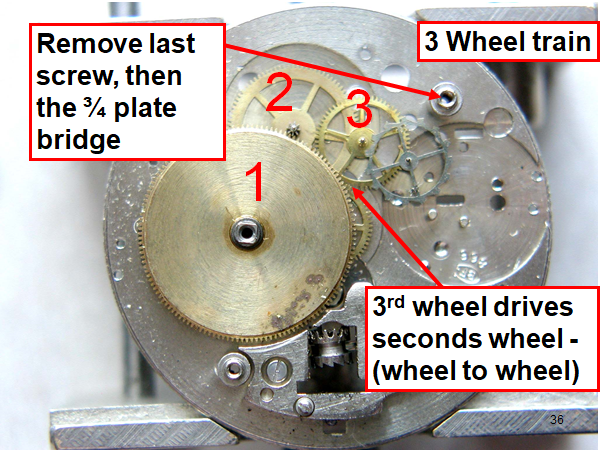
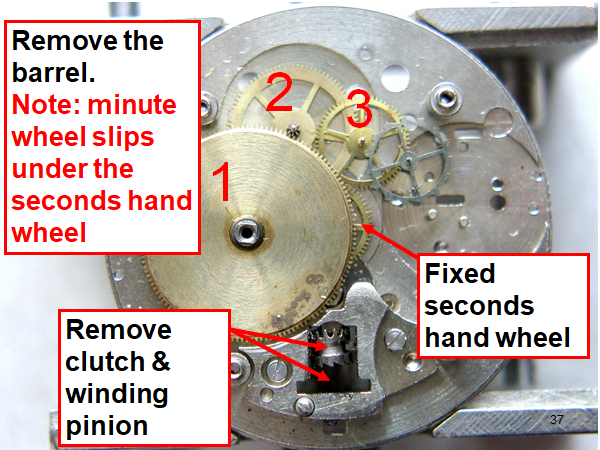
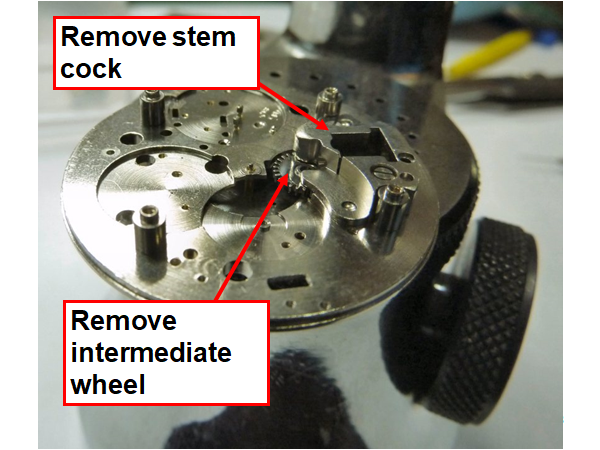
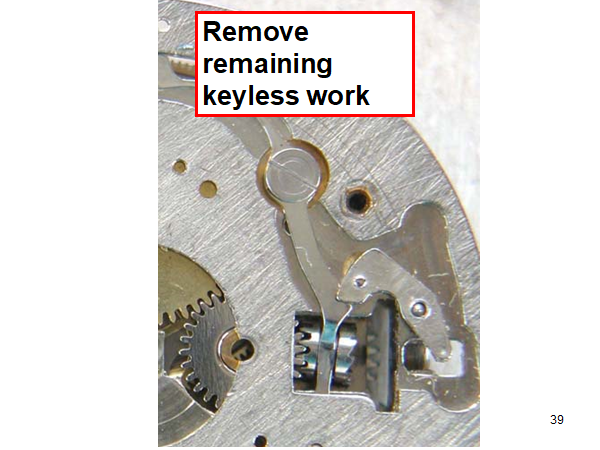
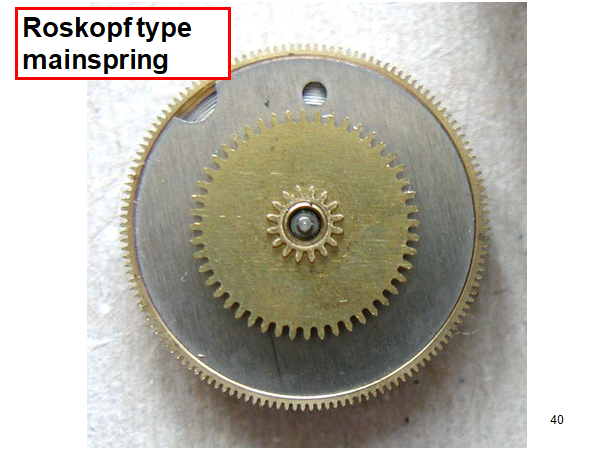
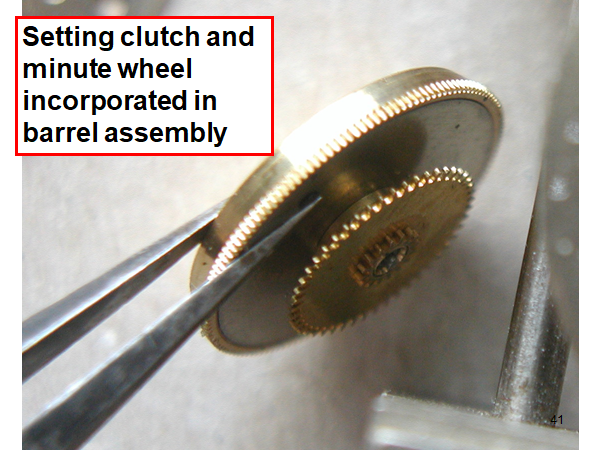
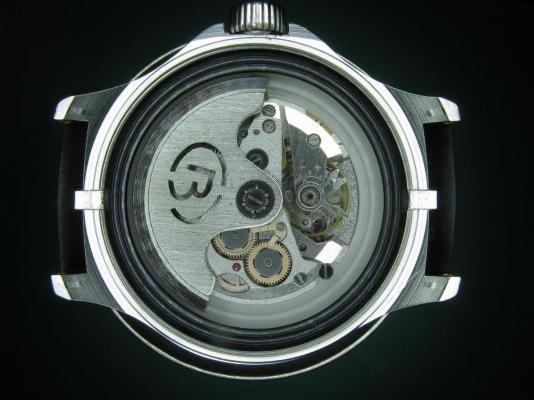
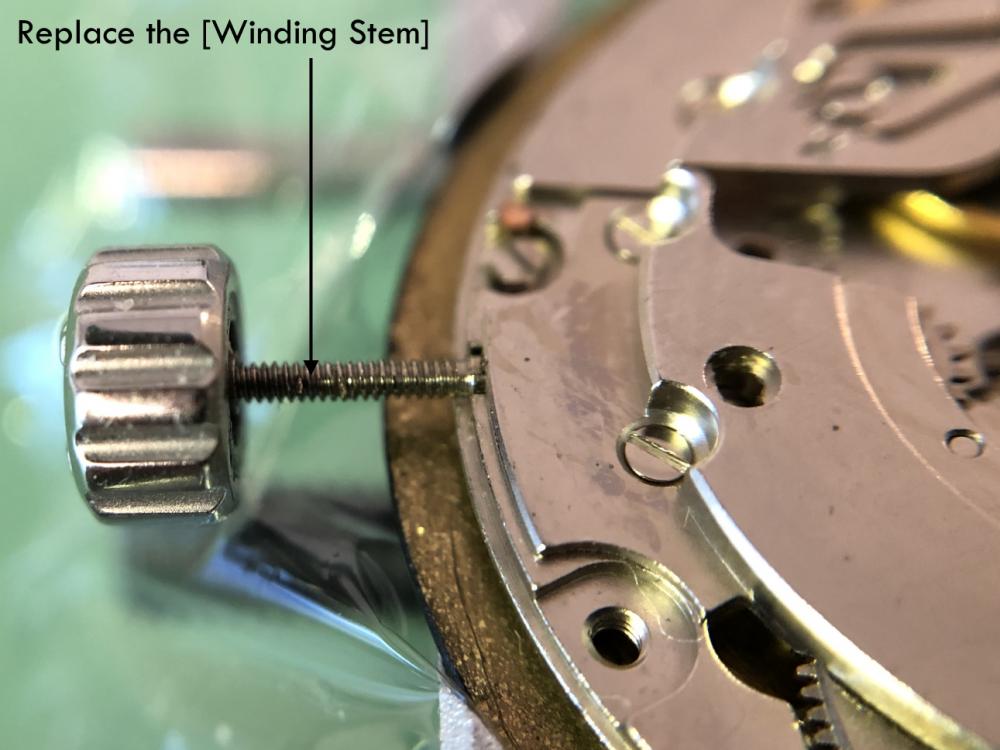
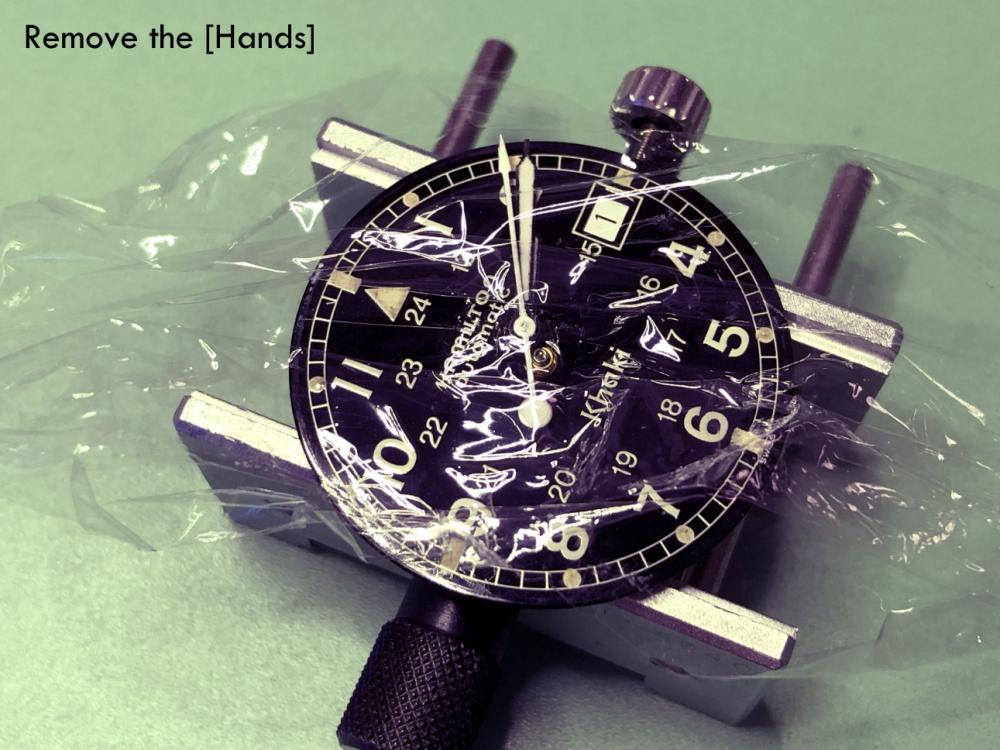
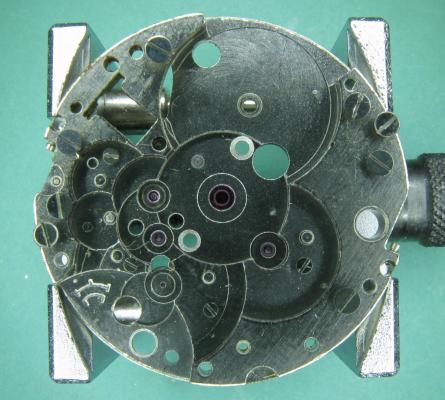
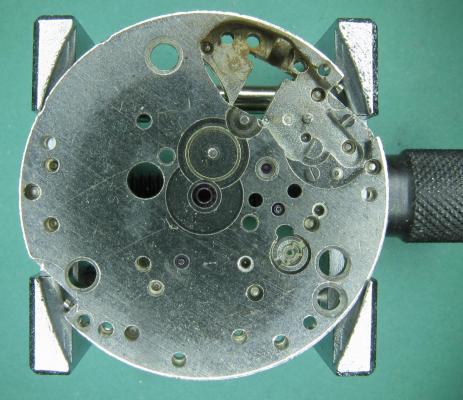
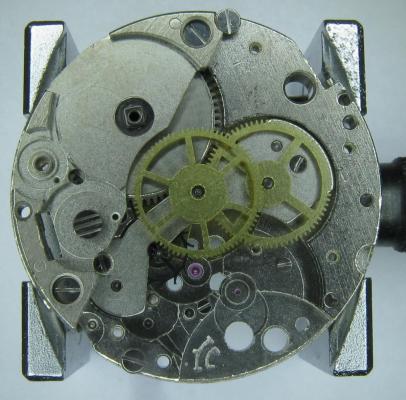
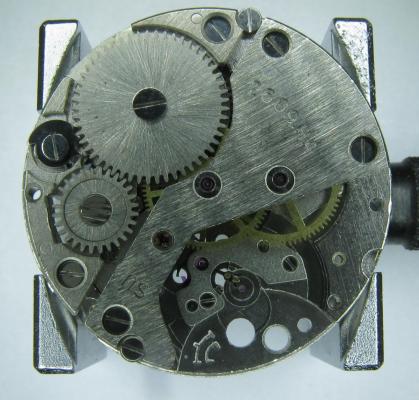
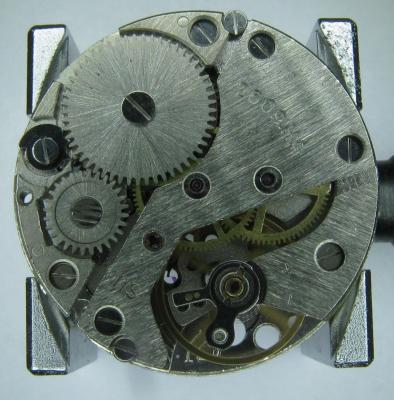
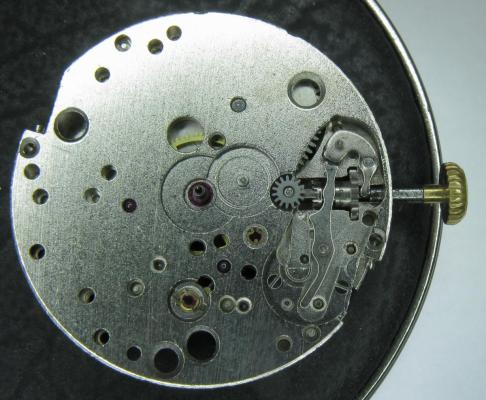
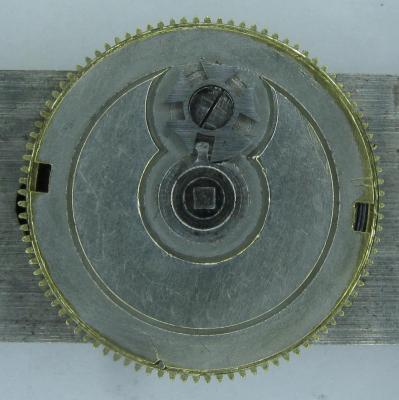
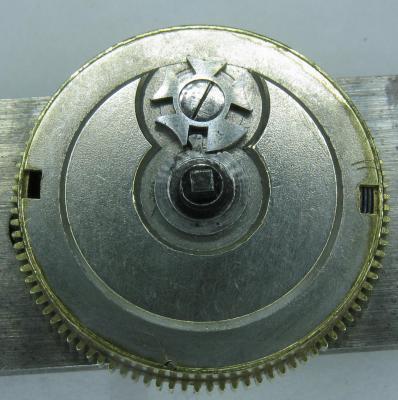
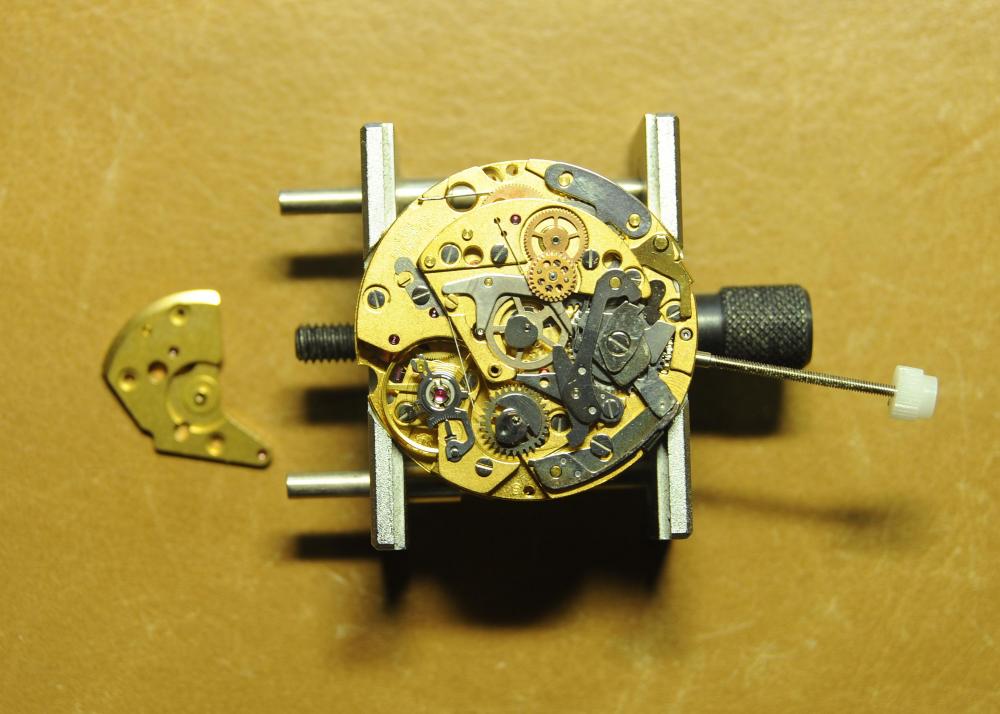
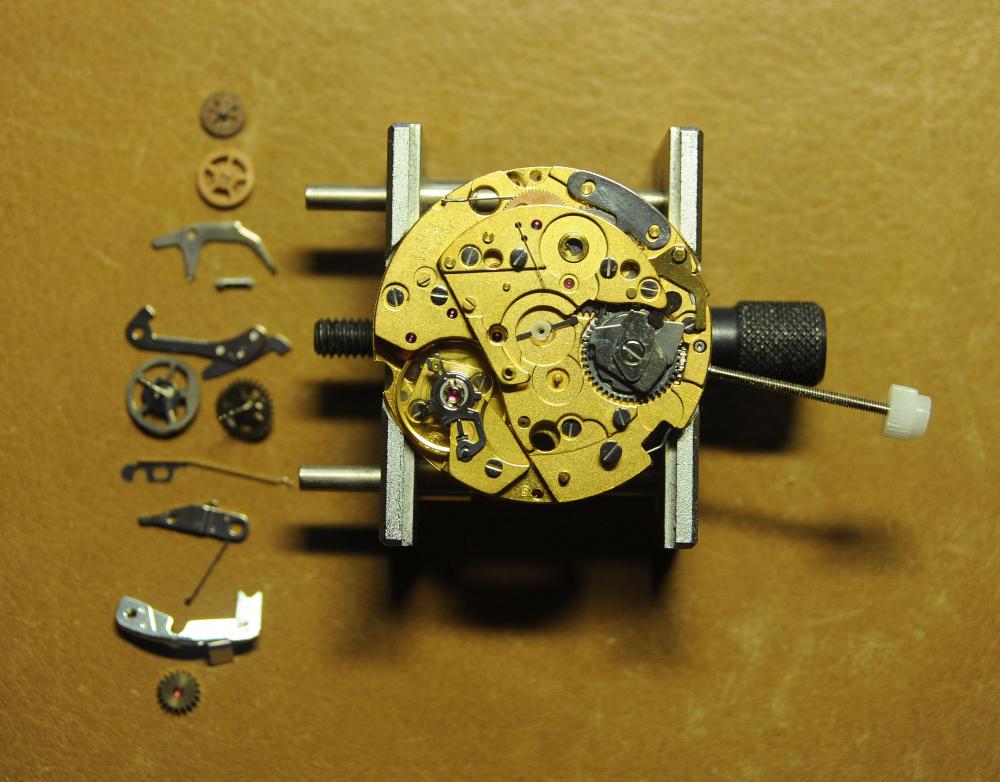
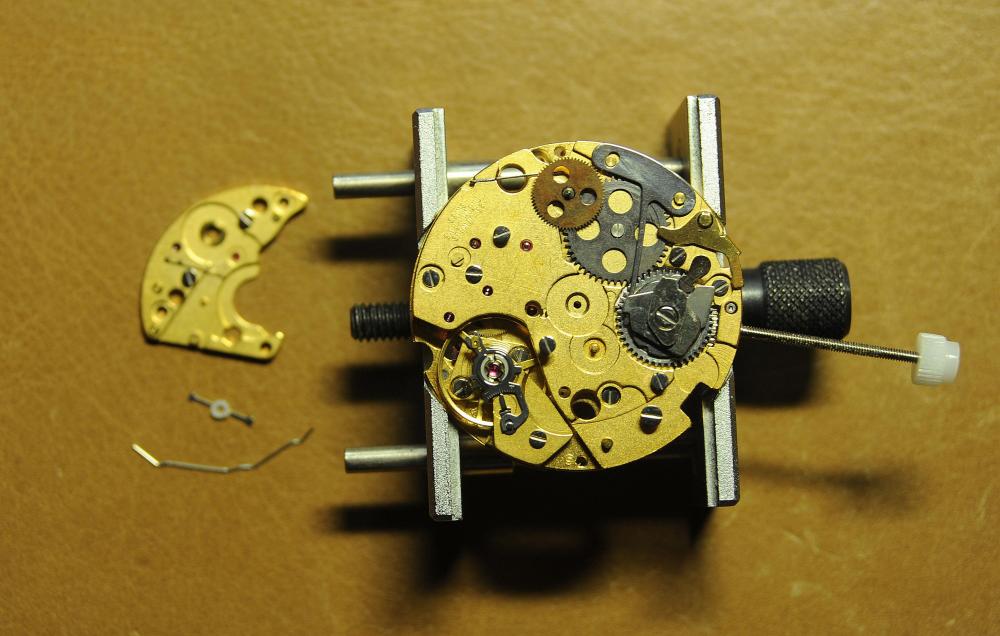
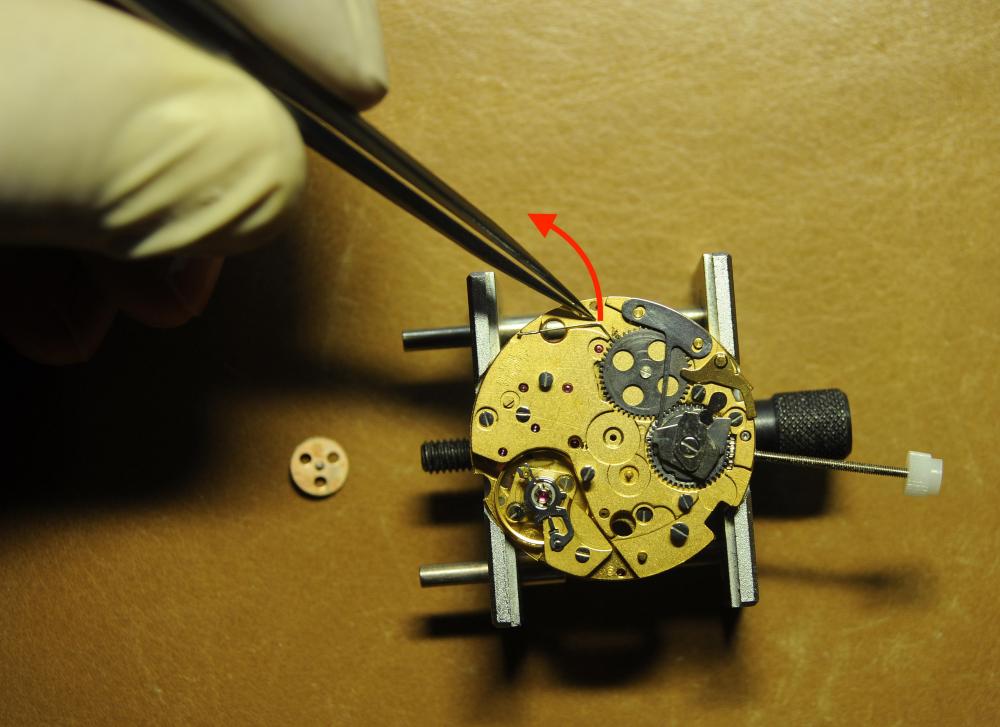
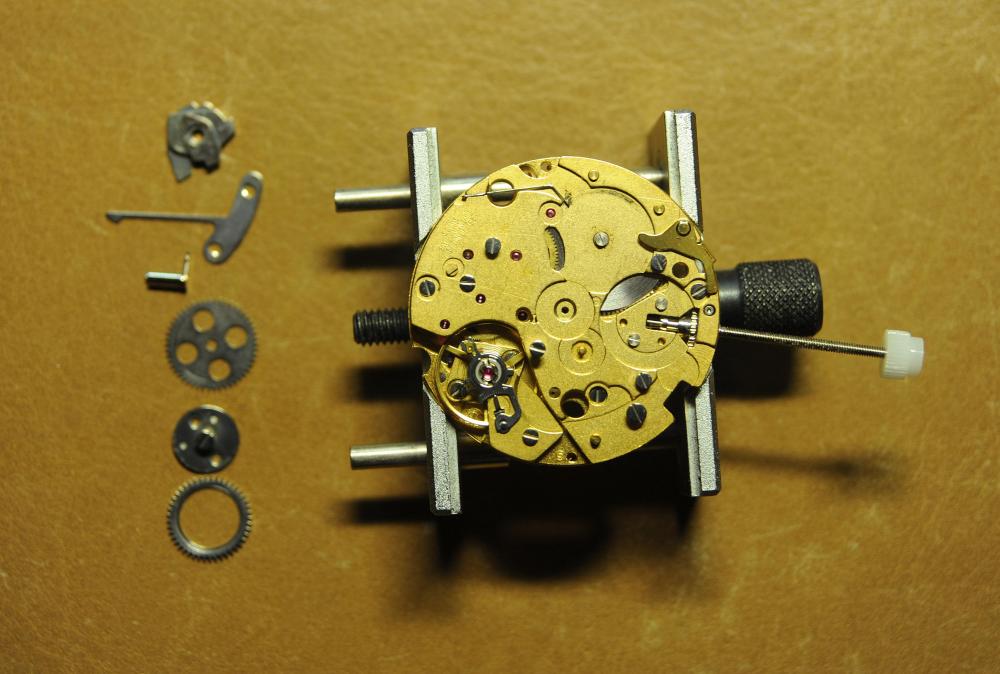
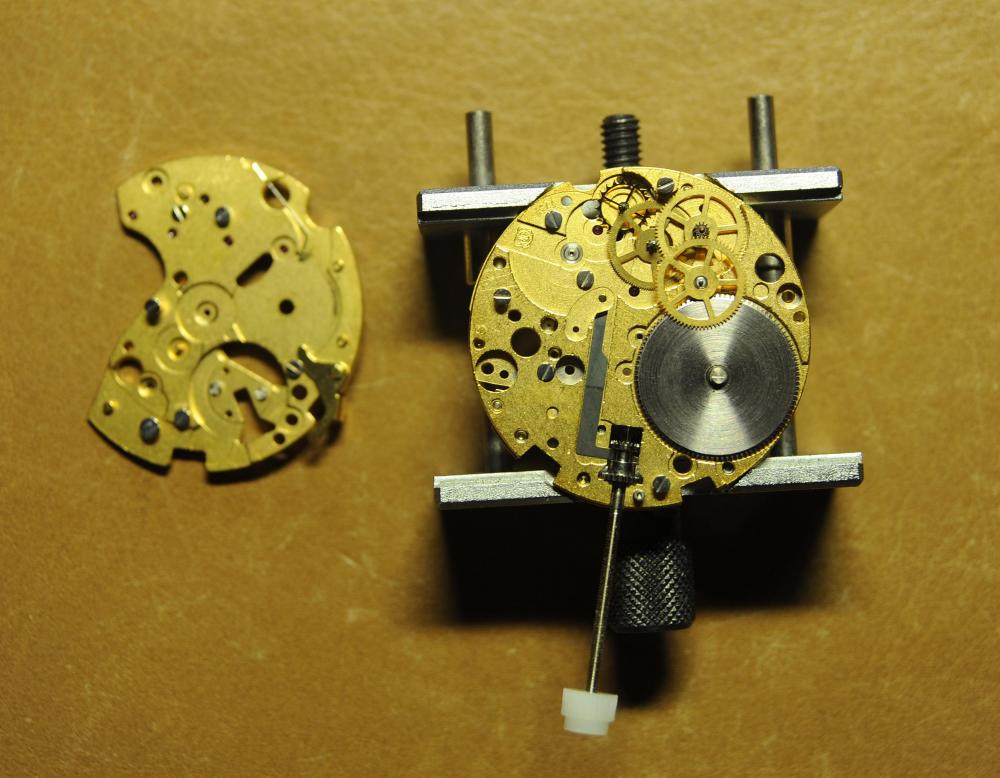
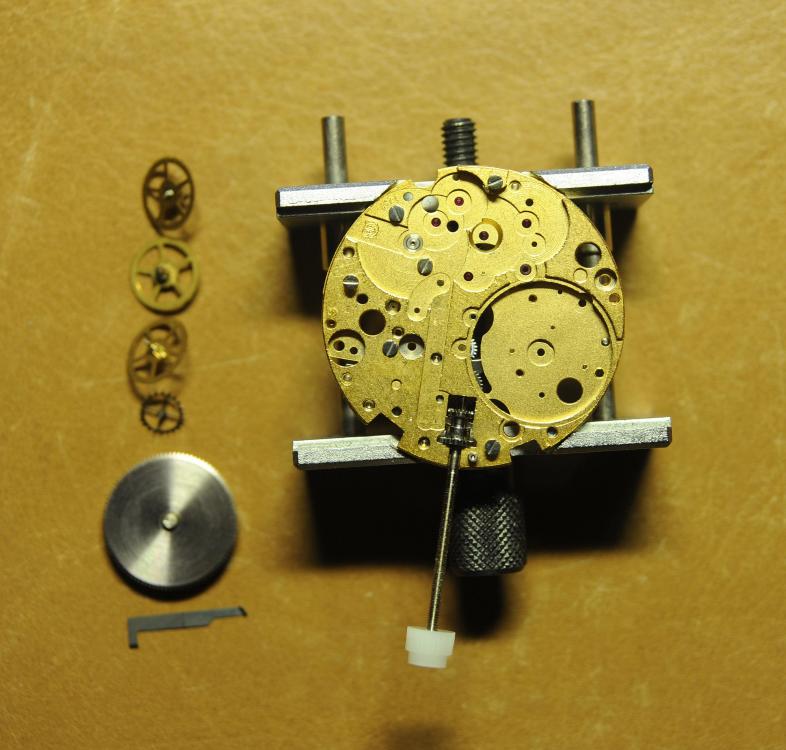
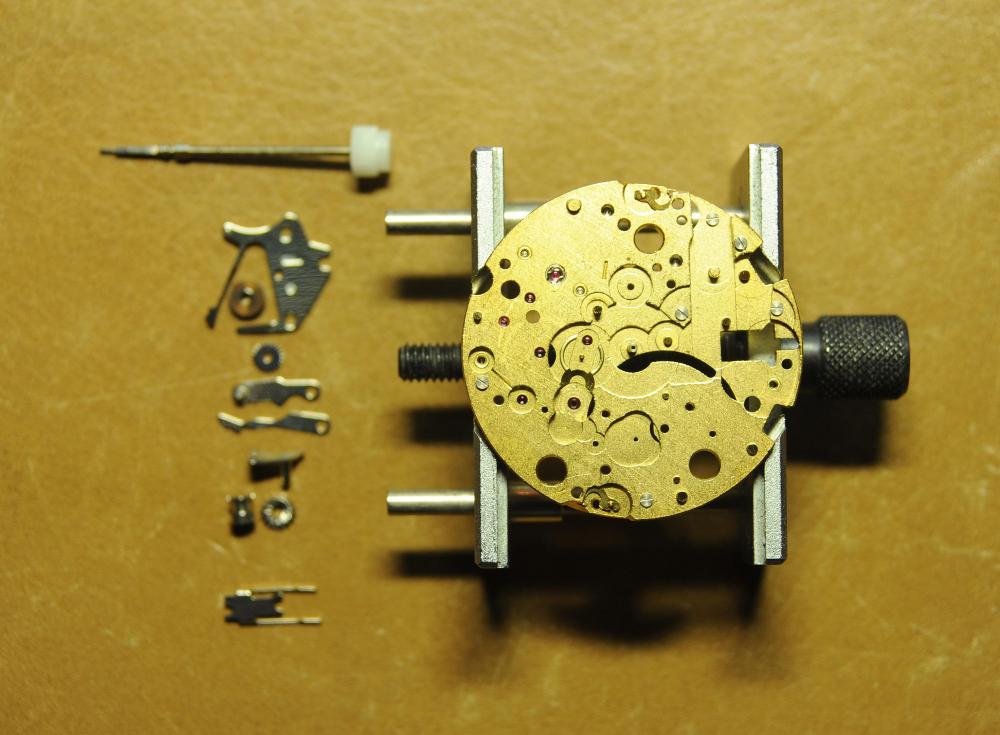
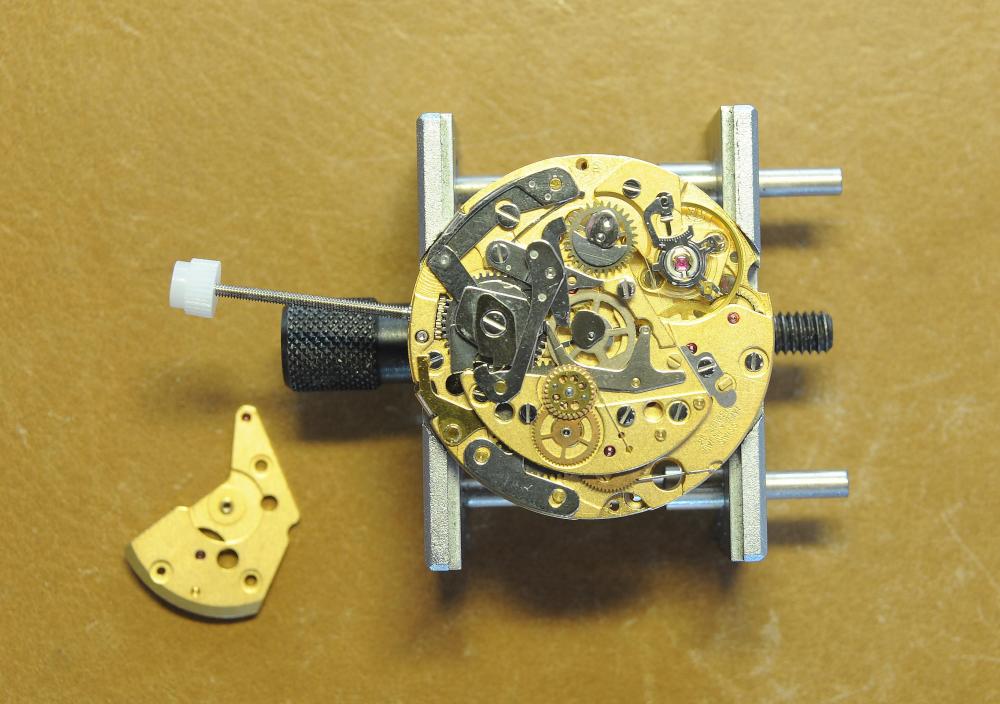
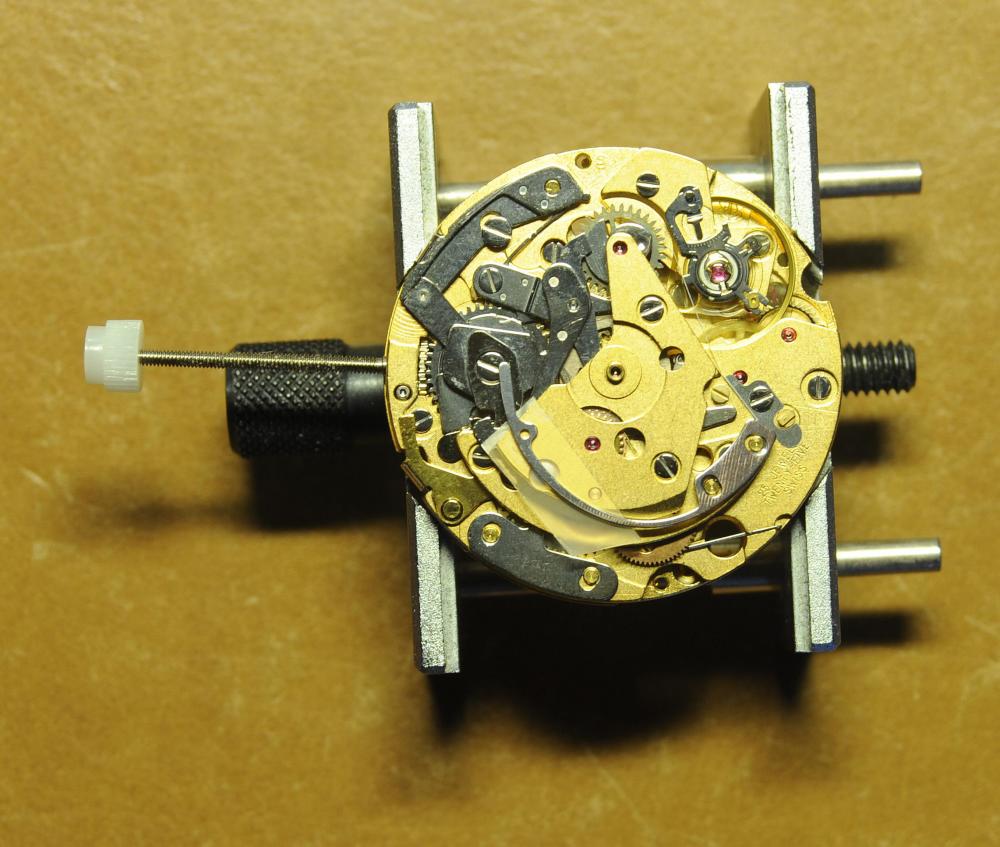
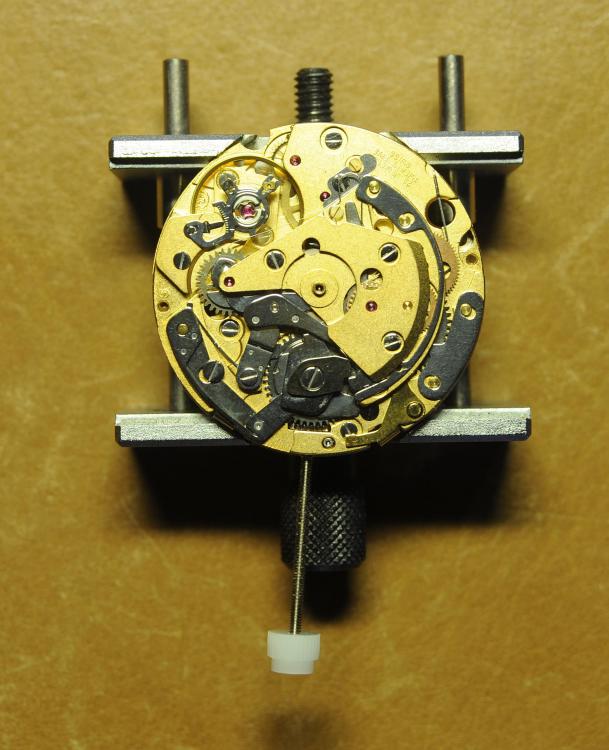
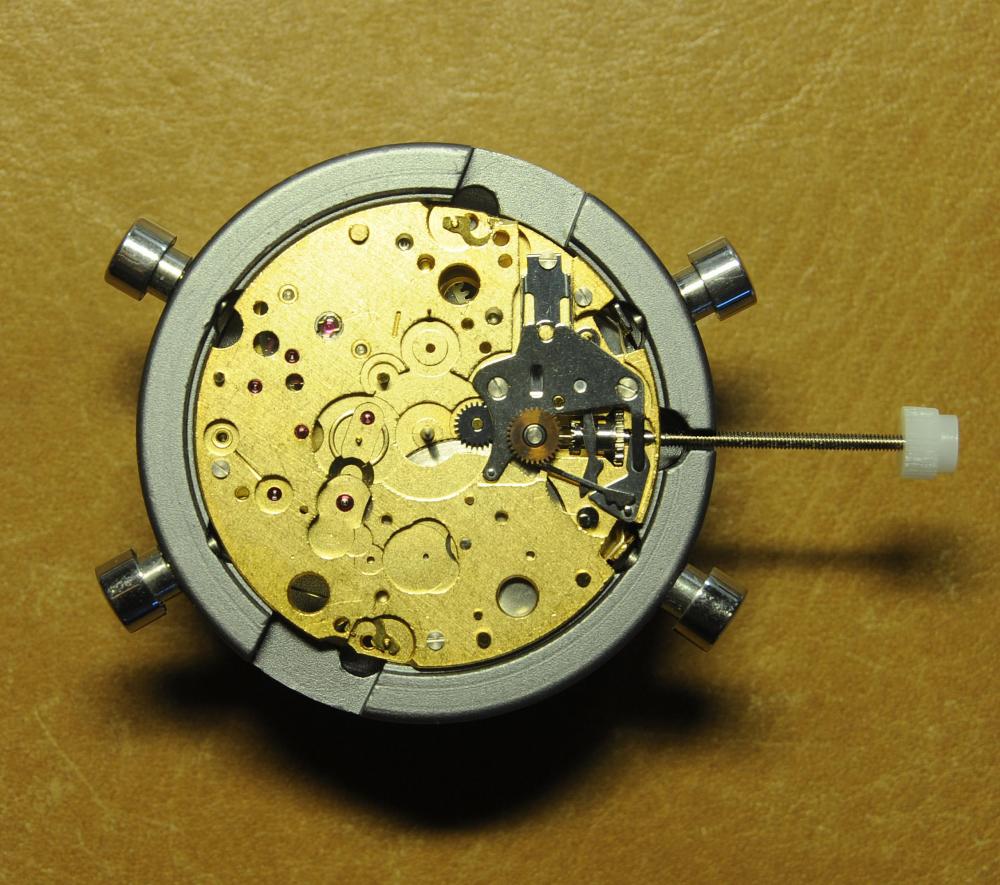
Hi, I teach watchmaking to complete beginners at Epping Forest Horology Centre, close to Epping and this is one of the lessons on the BFG 866. I wanted to show my class a classic pin pallet (Roskopf) movement and how to service it, as many watchmakers won't touch these watches as they hold no monetary value. Turn the setting lever screw 1 to 1 and a half turns to release the winding stem A piece of watch paper or small plastic jiffy bag to protect the dial, whilst removing the hands The driving pinion is part of the friction fitted minute wheel on top of the barrel. This work in a similar way to a friction fitted canon pinion to set the watch hands Remove the keyless work: setting lever, held in place by the setting lever screw, screwed from the other side of the mainplate, then the yoke, which sits on top of the clutch (castle) and also the winding pinion. I have three other lessons on this movement that cover bringing the watch 'into beat' as well as taking apart the friction fitted minute wheel from the barrel, lubricating and staking back on to achieve the correct friction setting and finally how to remove the centre seconds wheel safely and refit using a staking set. Many people leave the friction fitted minute wheel on top of the barrel, not realising the amount of old grease that can't be cleaned out from it, as well as not removing the wheel of the centre seconds arbor and again not cleaning out the pipe which has old grease inside. Hope you enjoyed the tutorial? More to come....
 21 points
 -
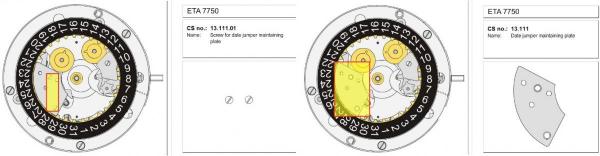
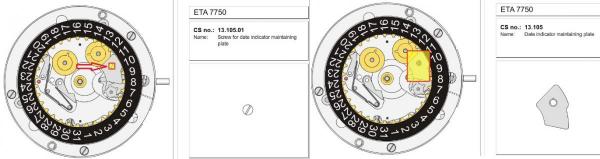
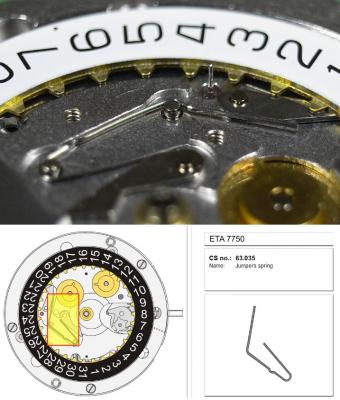
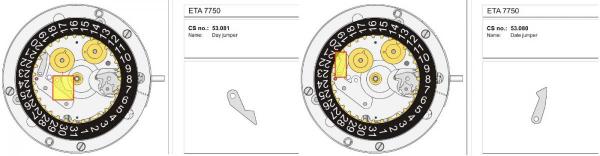
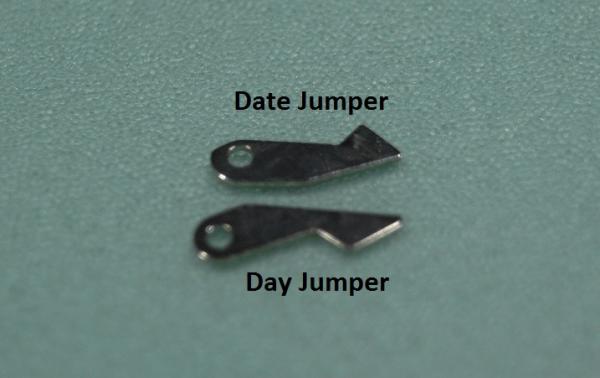
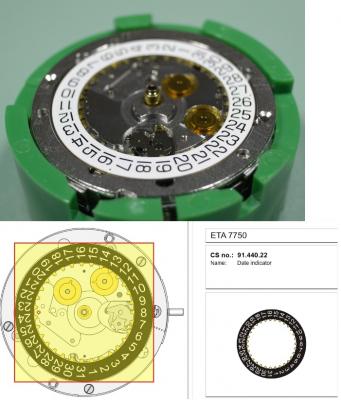
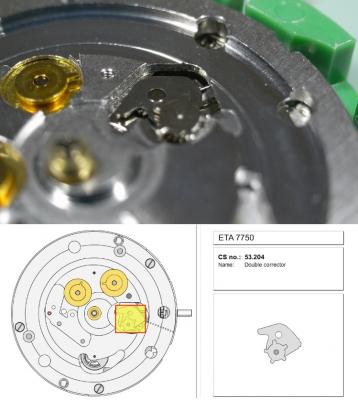
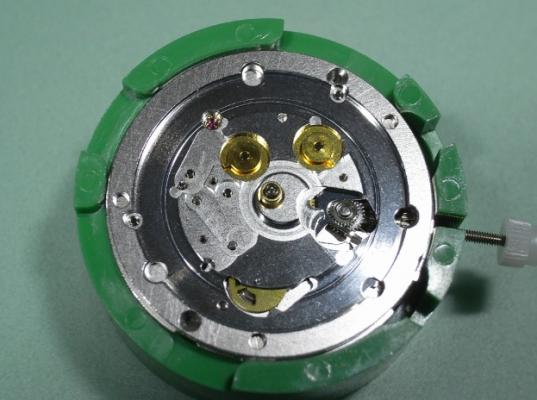
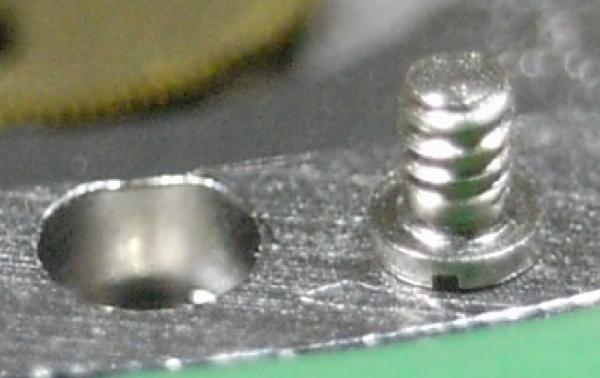
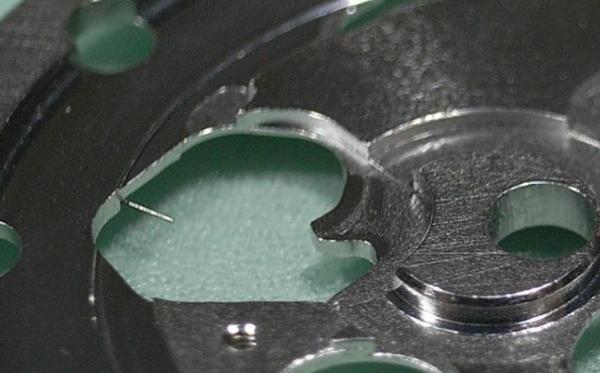
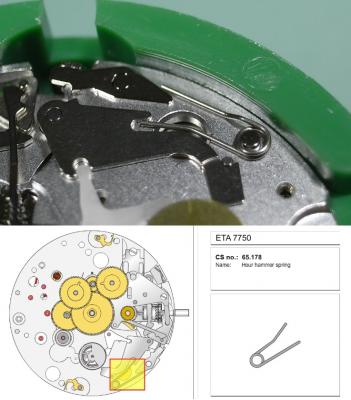
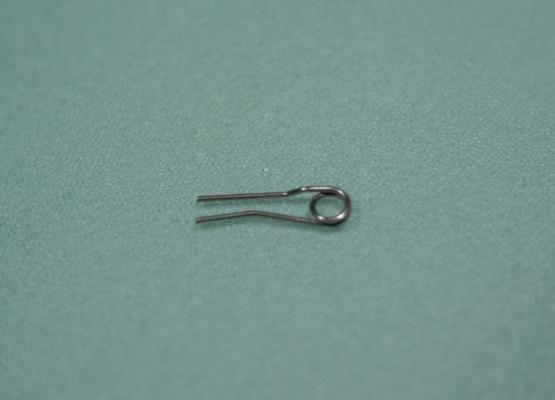
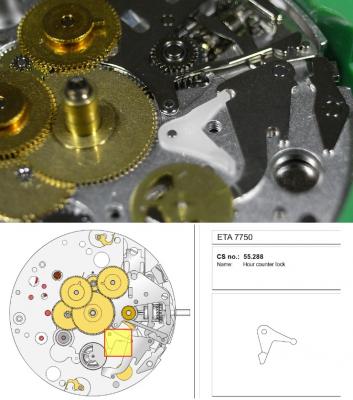
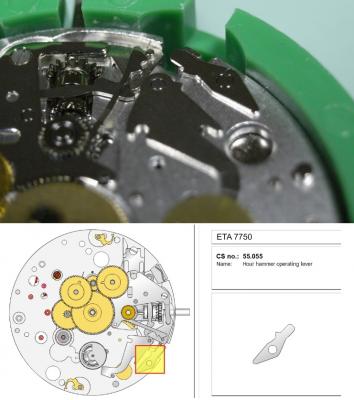
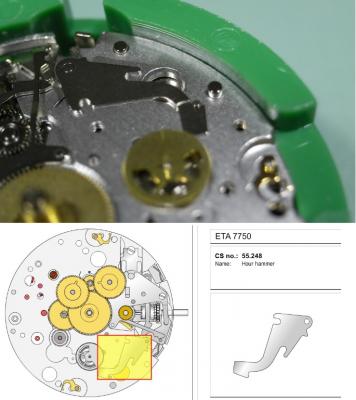
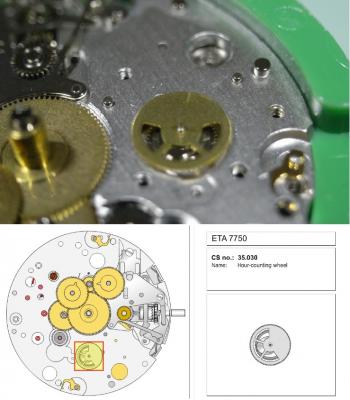
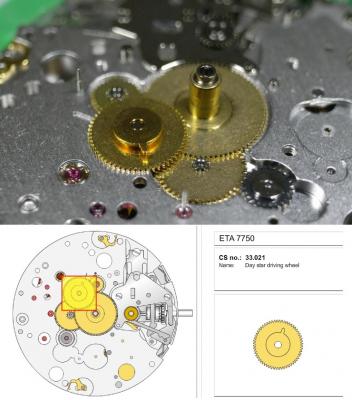
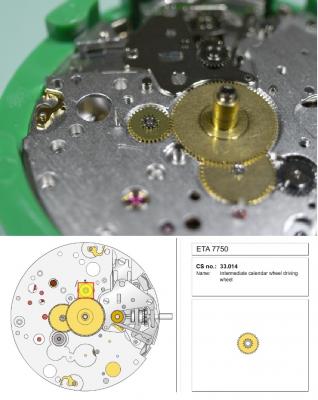
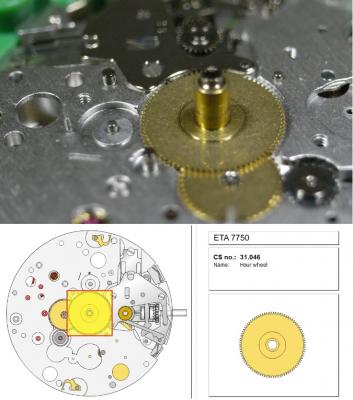
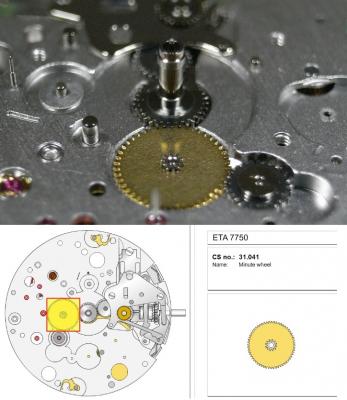
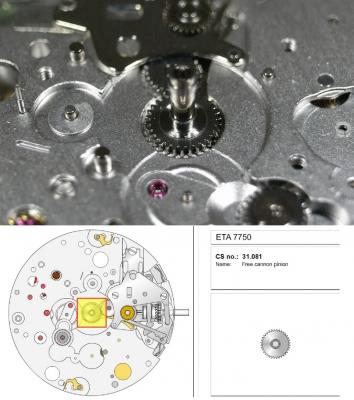
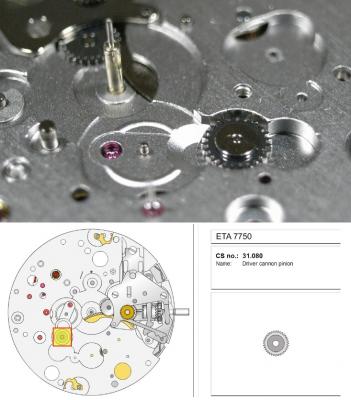
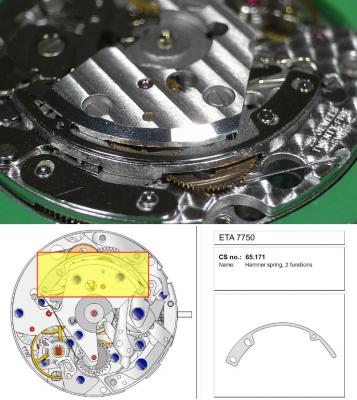
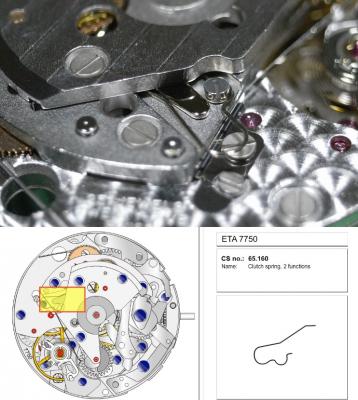
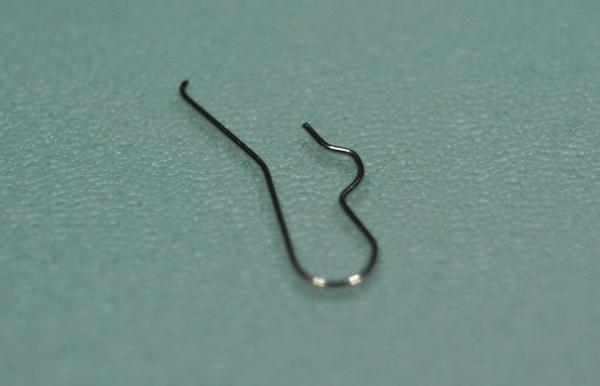
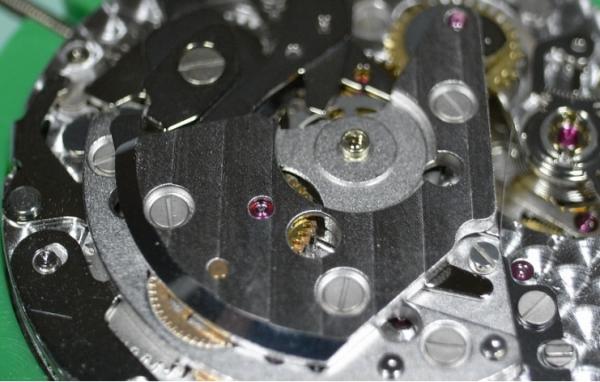
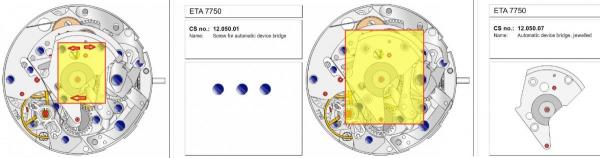
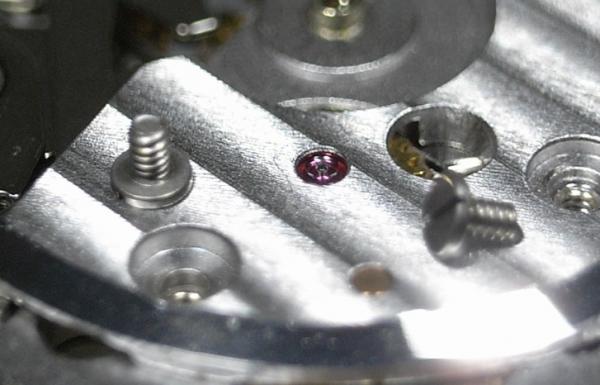
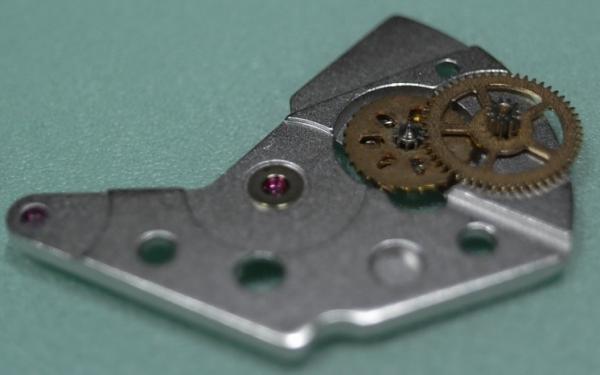
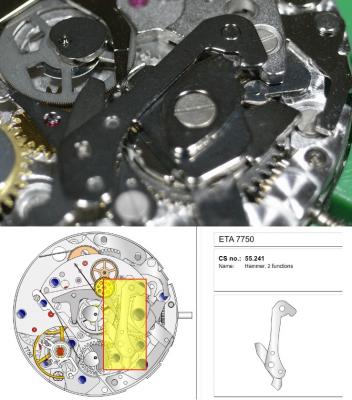
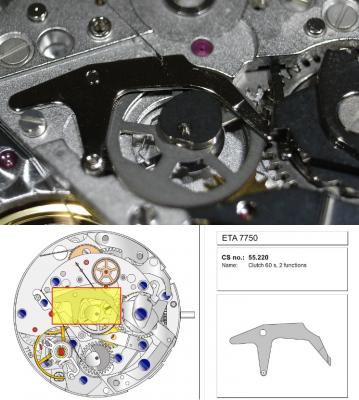
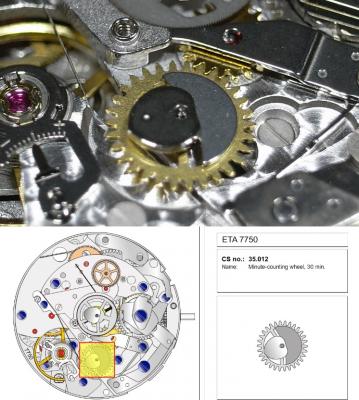
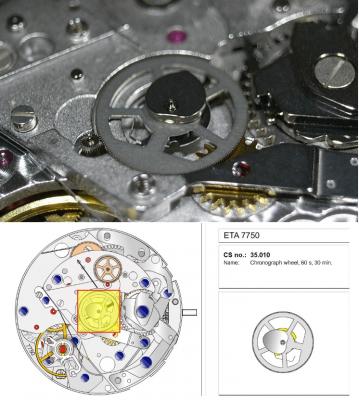
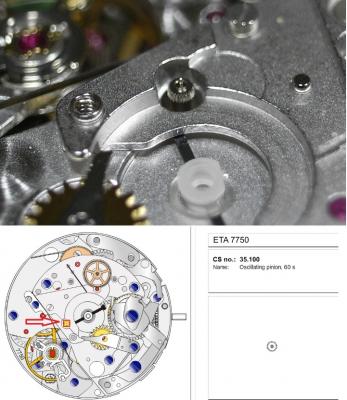
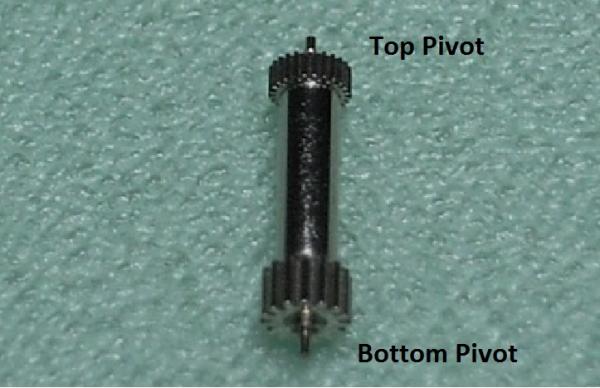
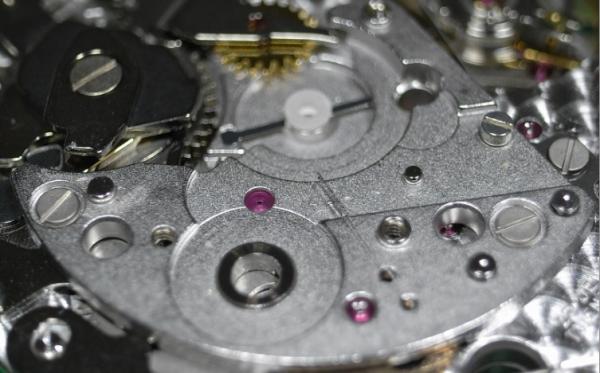
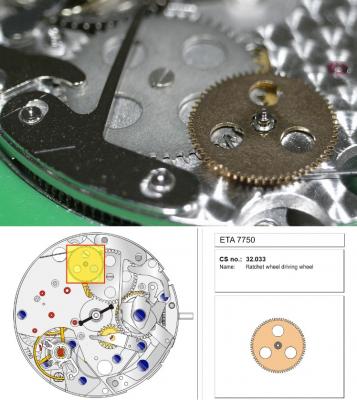
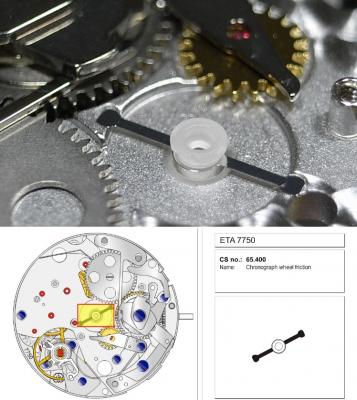
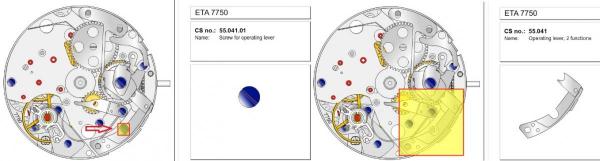
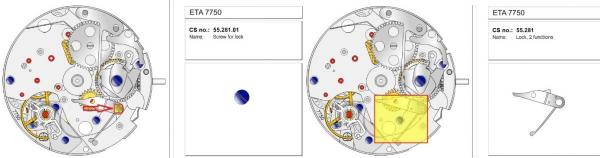
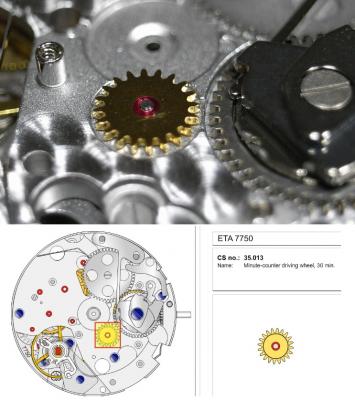
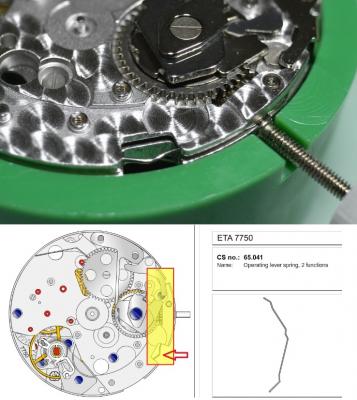
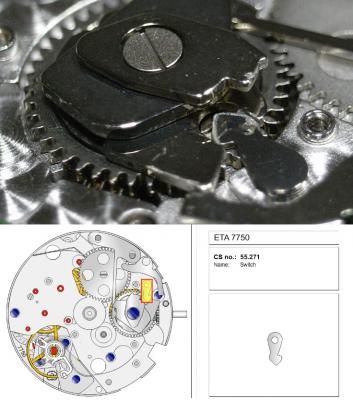
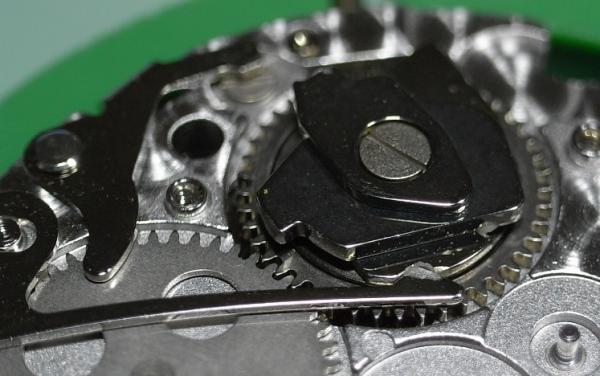
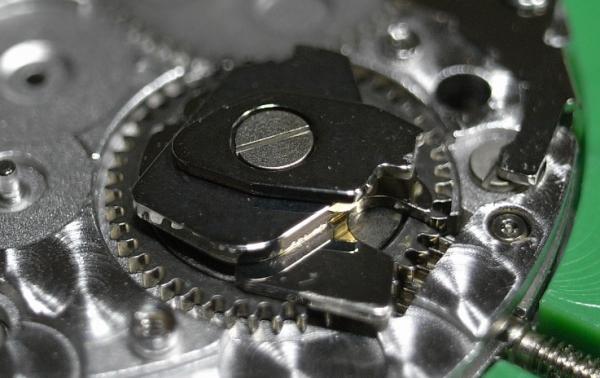
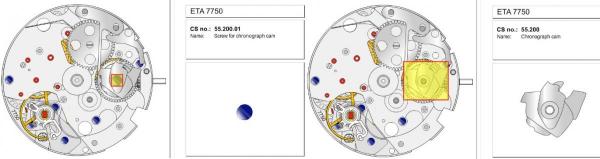
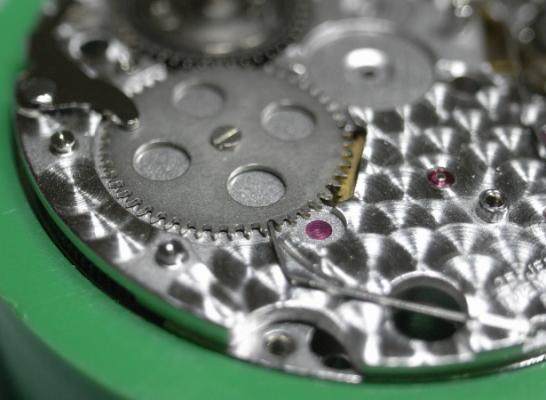
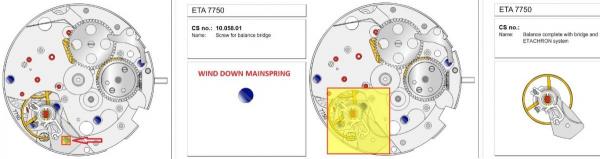
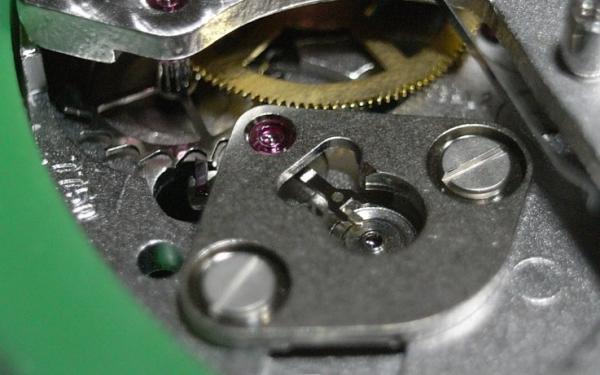
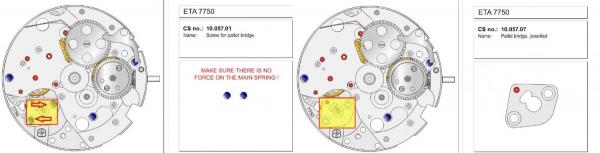
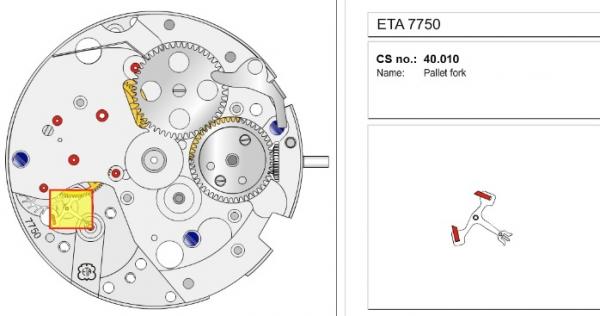
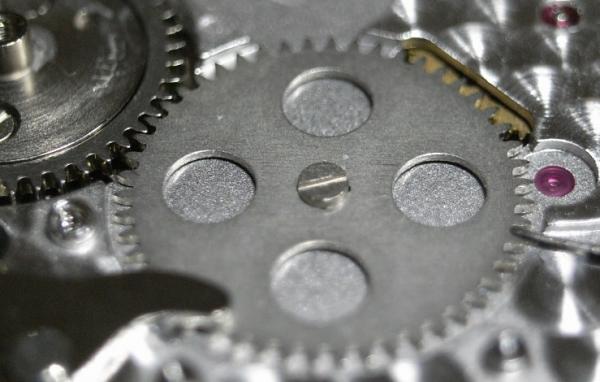
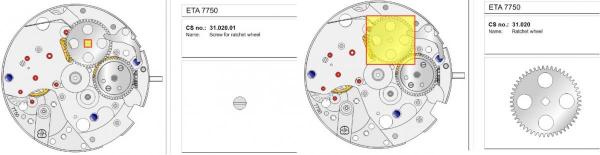
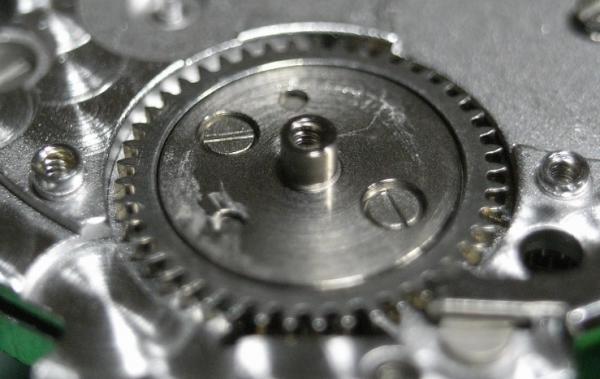
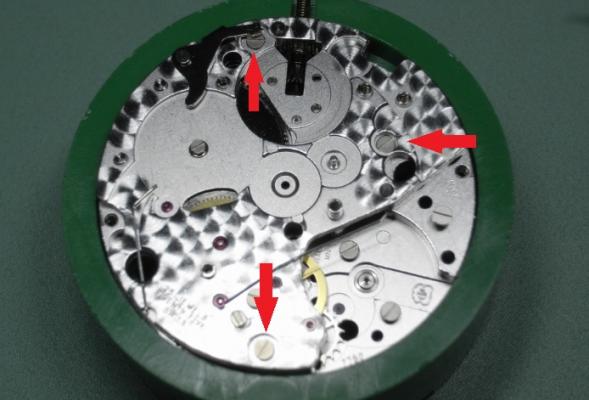
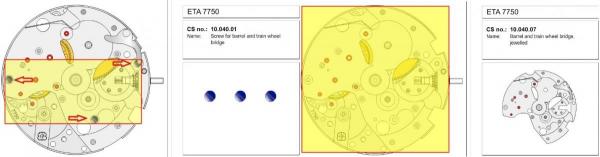
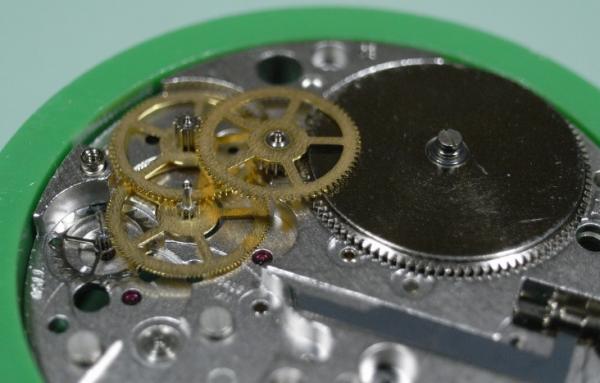
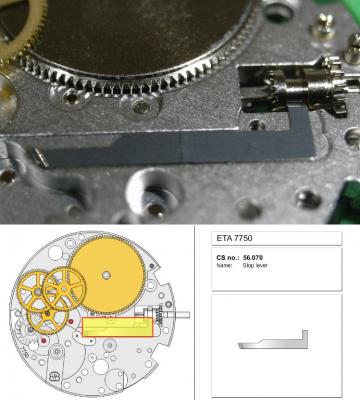
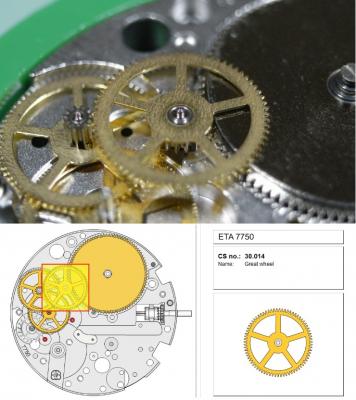
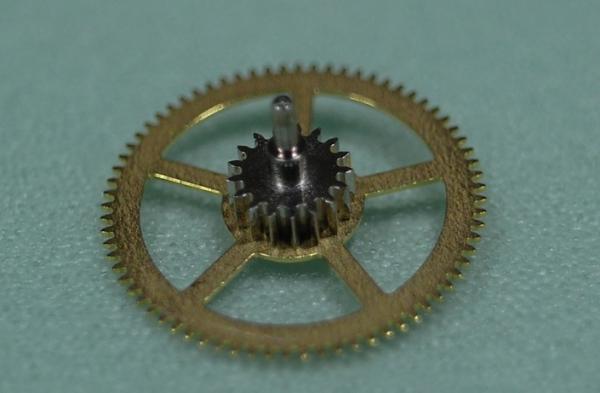
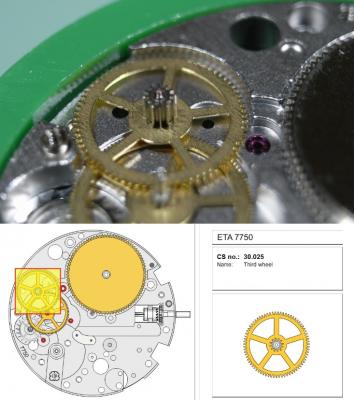
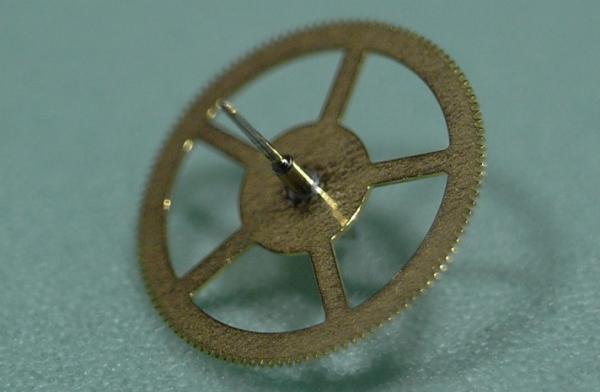
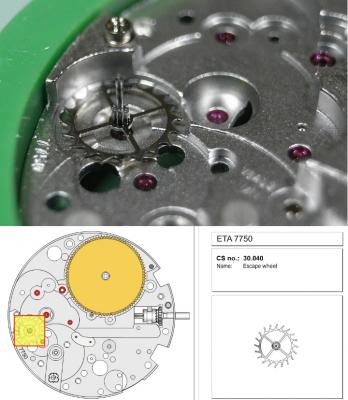
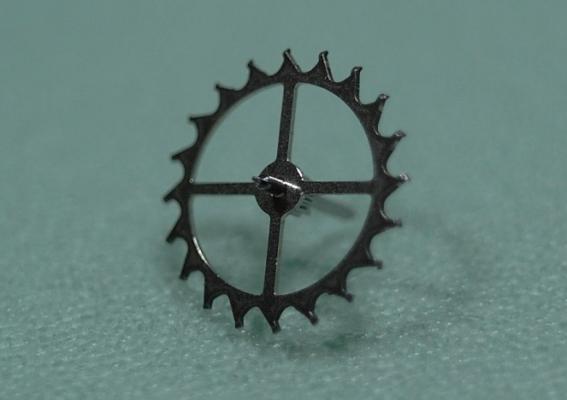
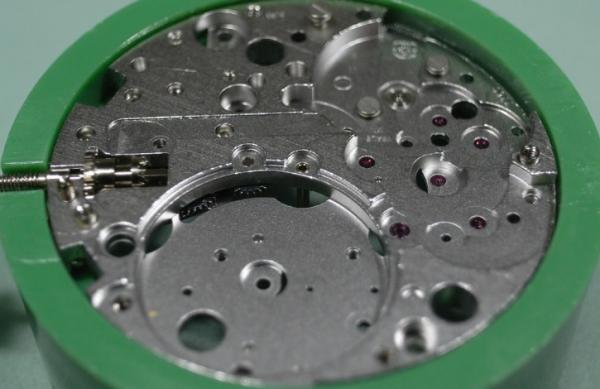
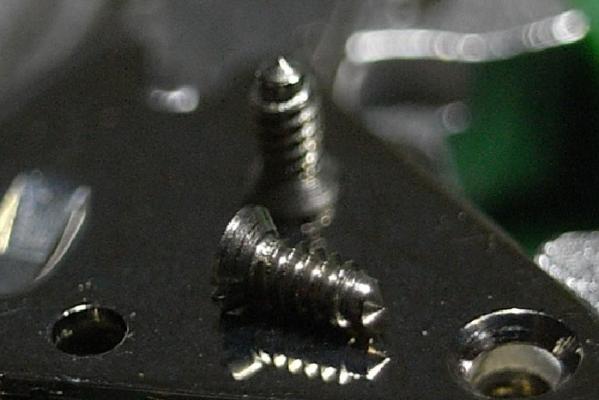
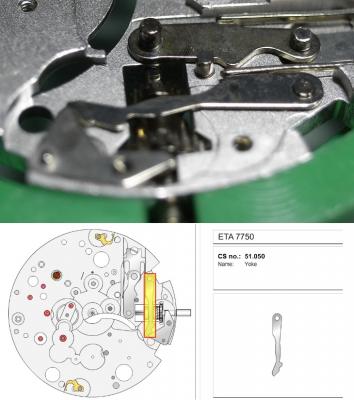
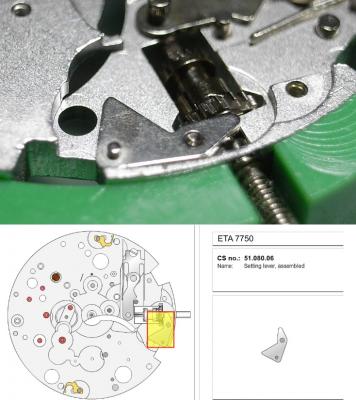
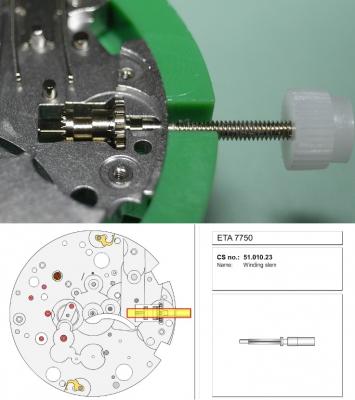
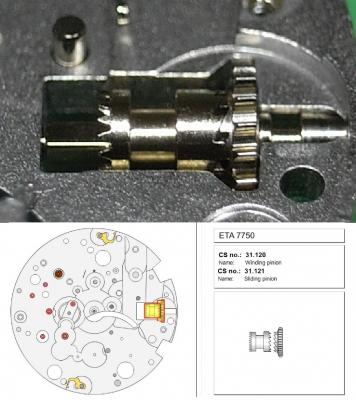
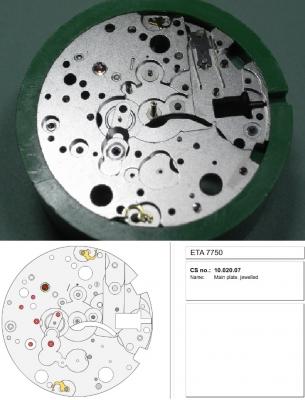
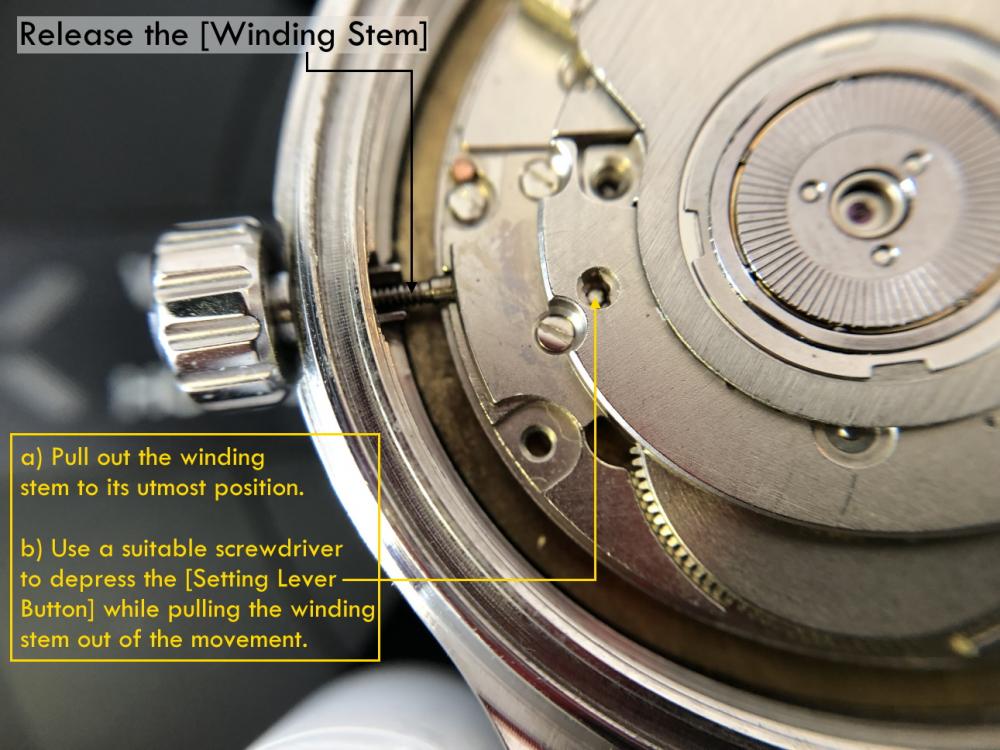
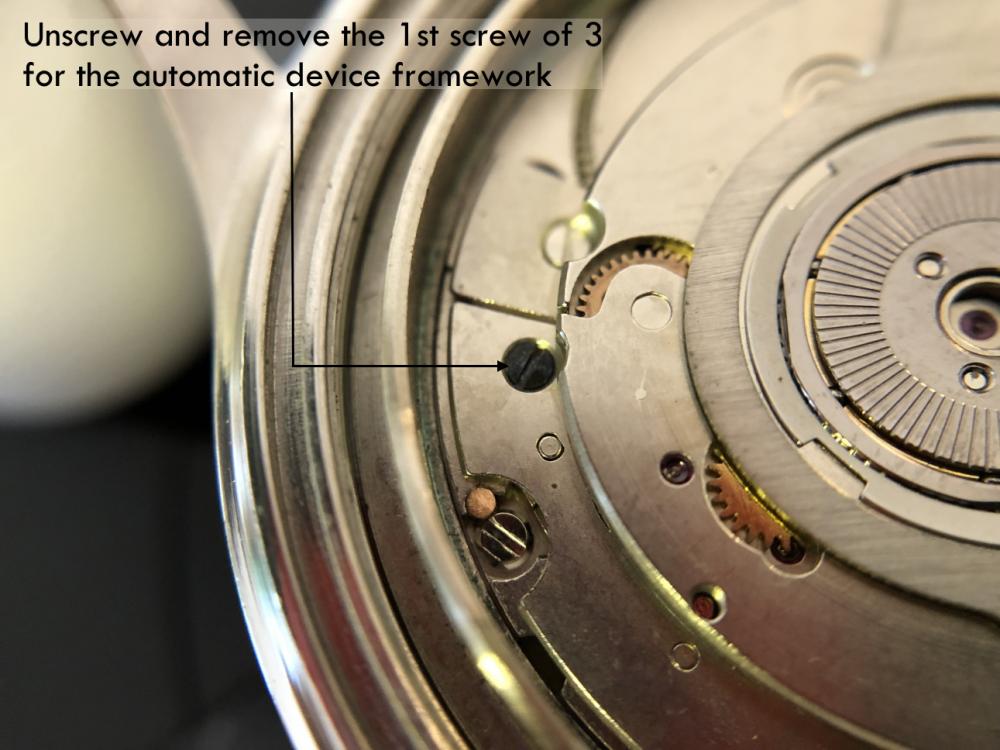
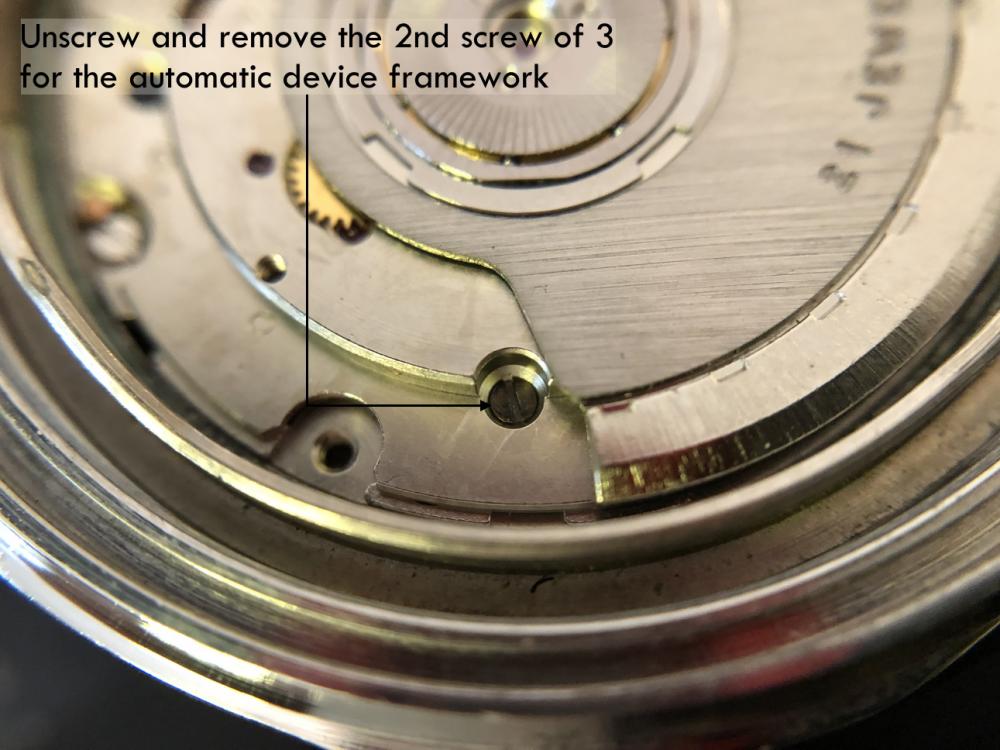
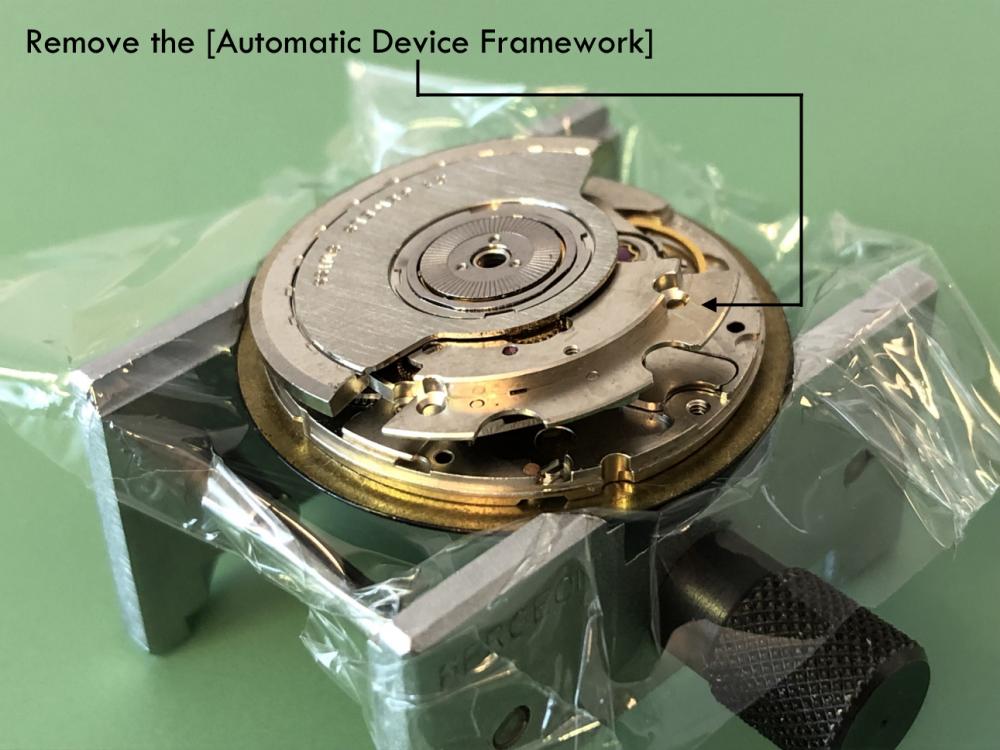
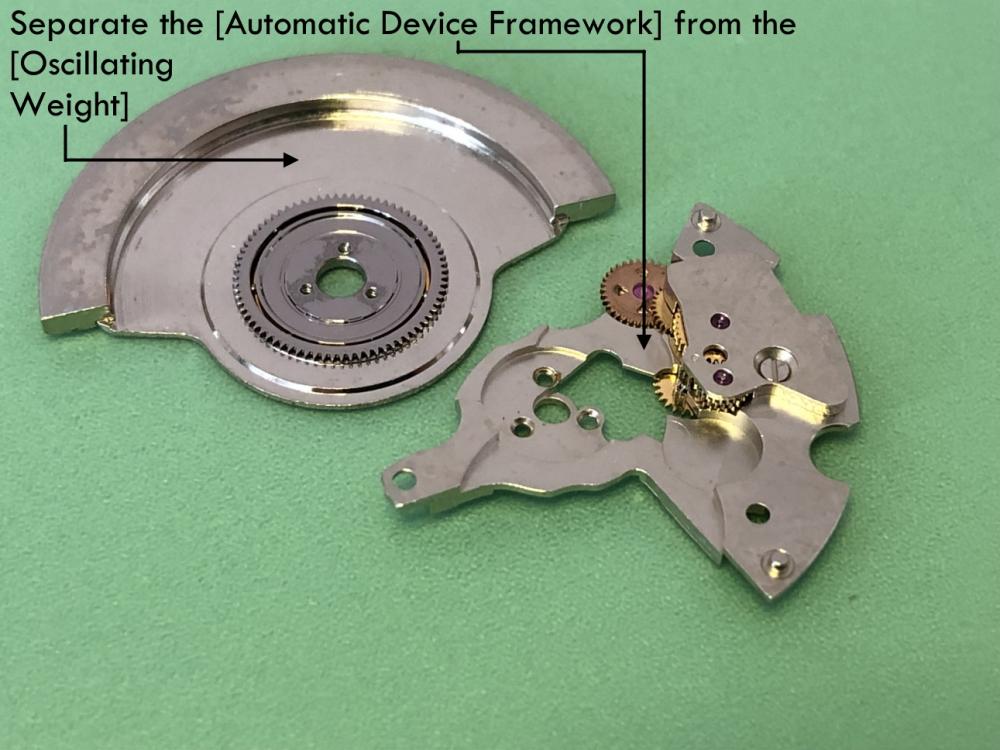
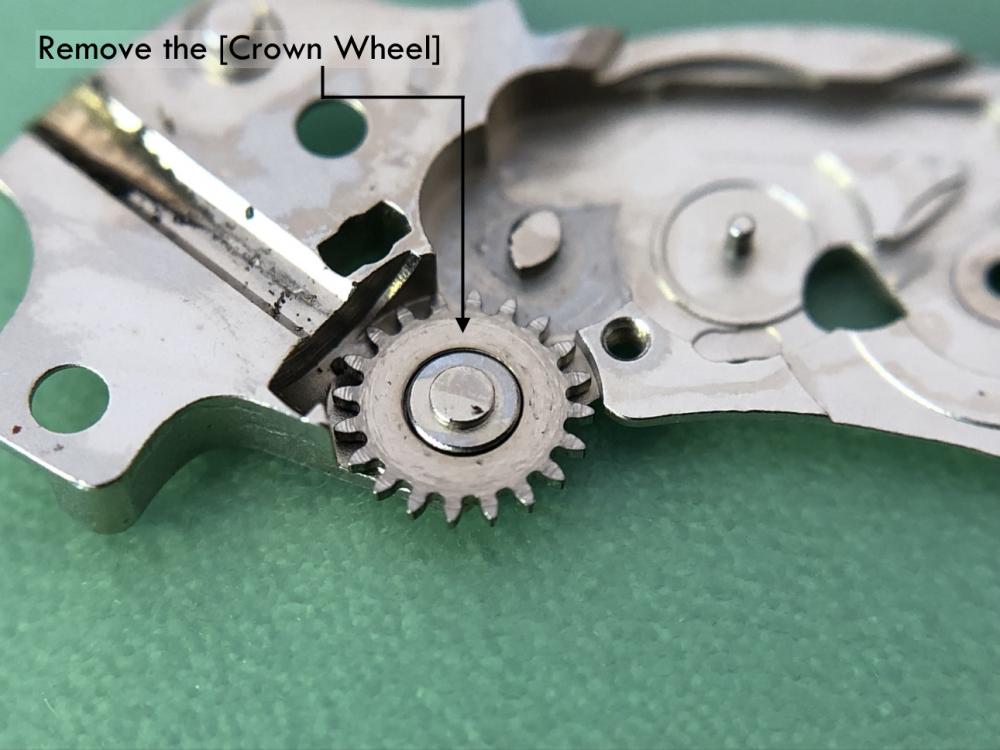
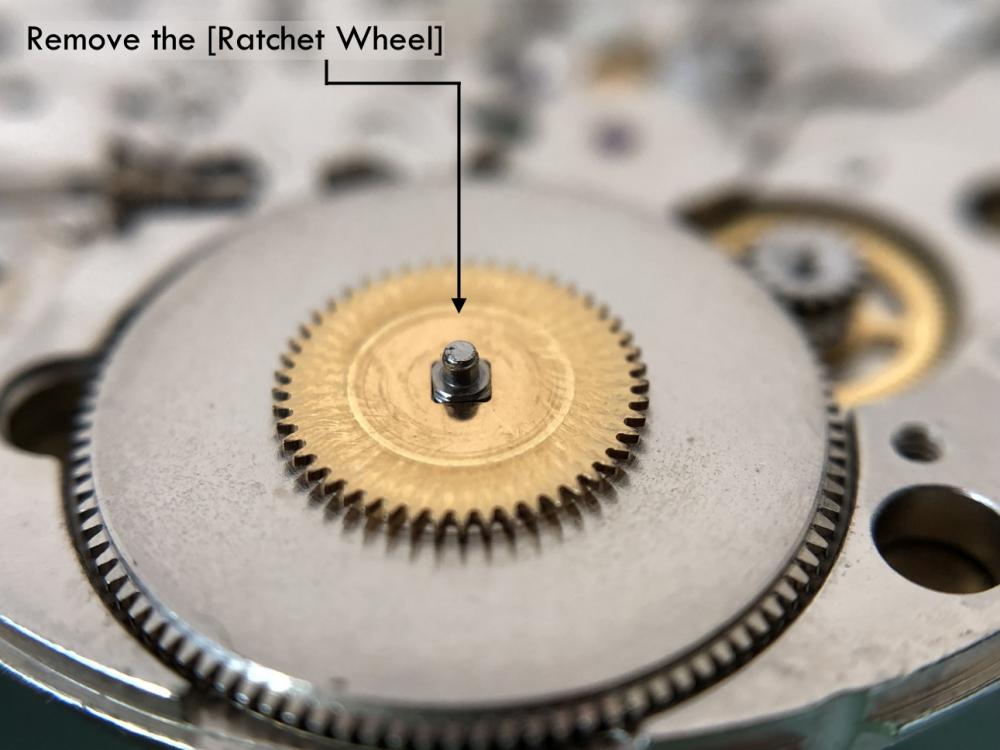
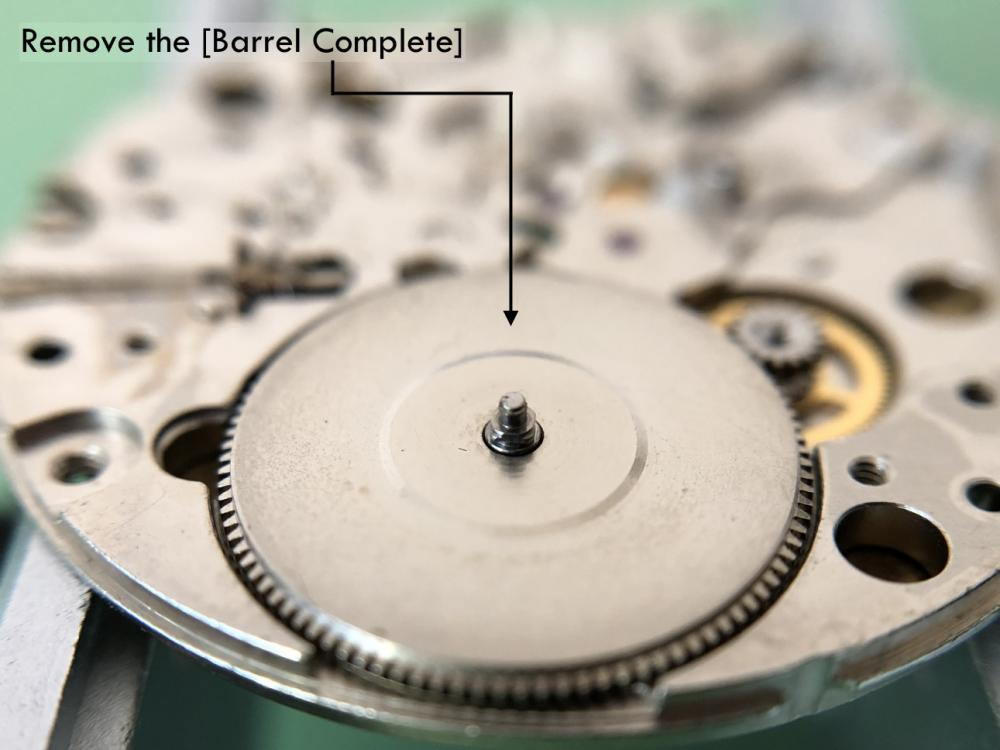
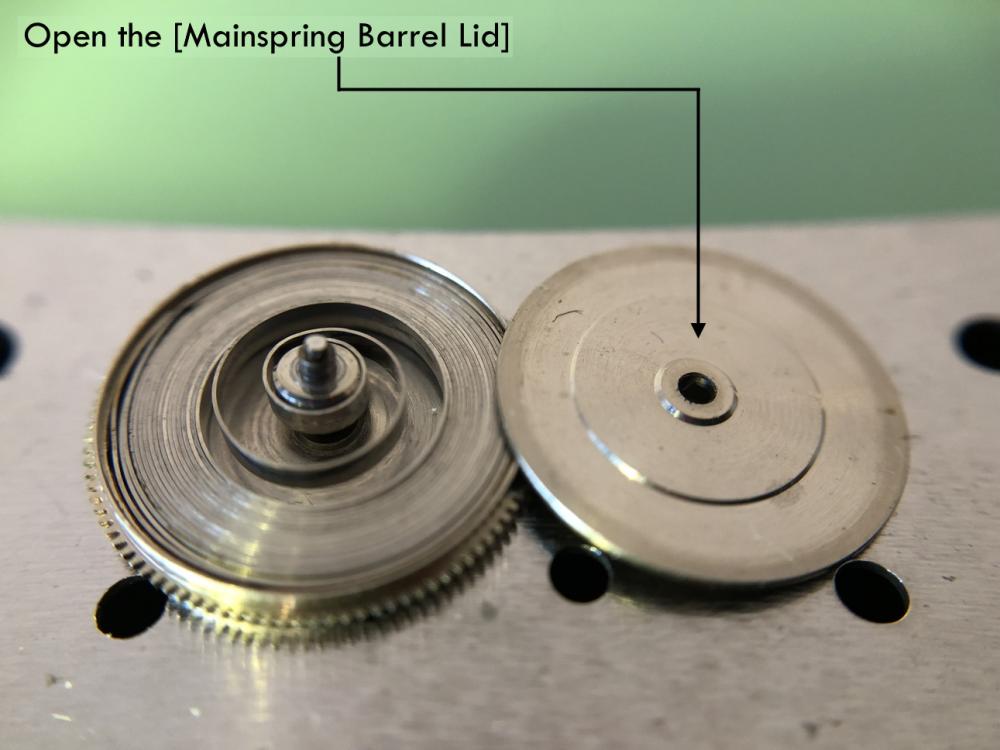
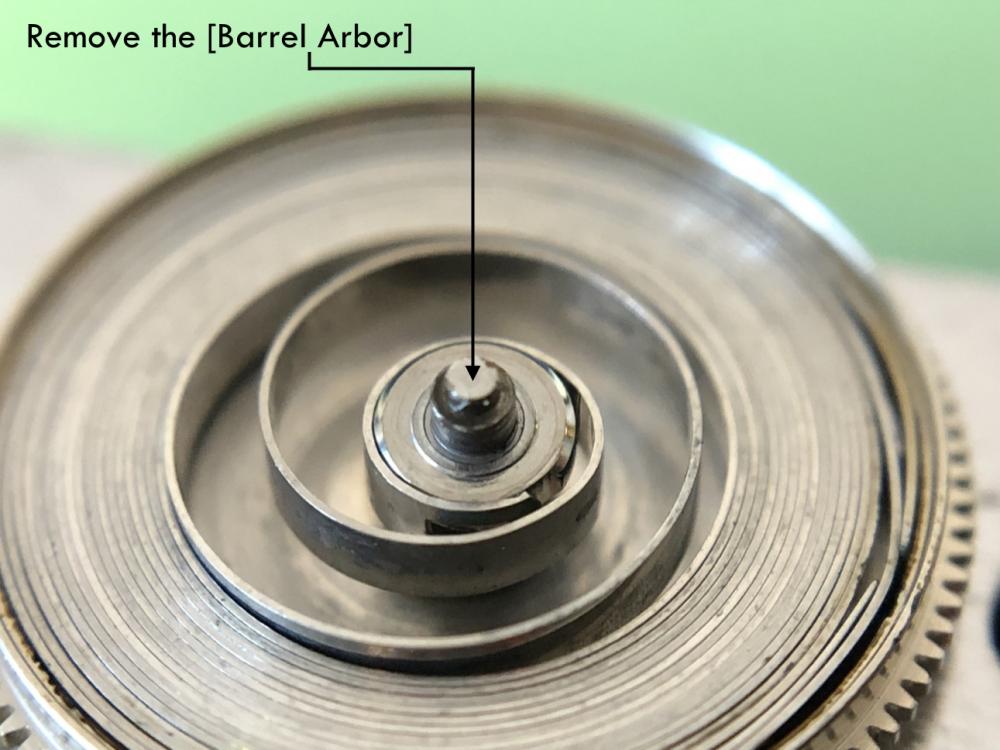
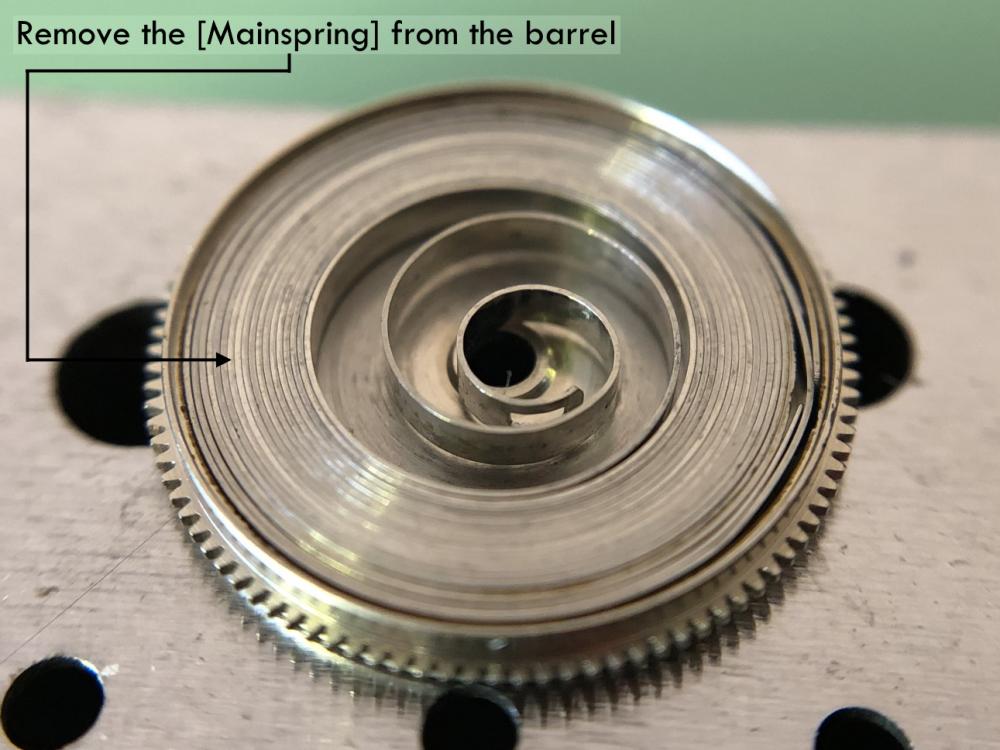
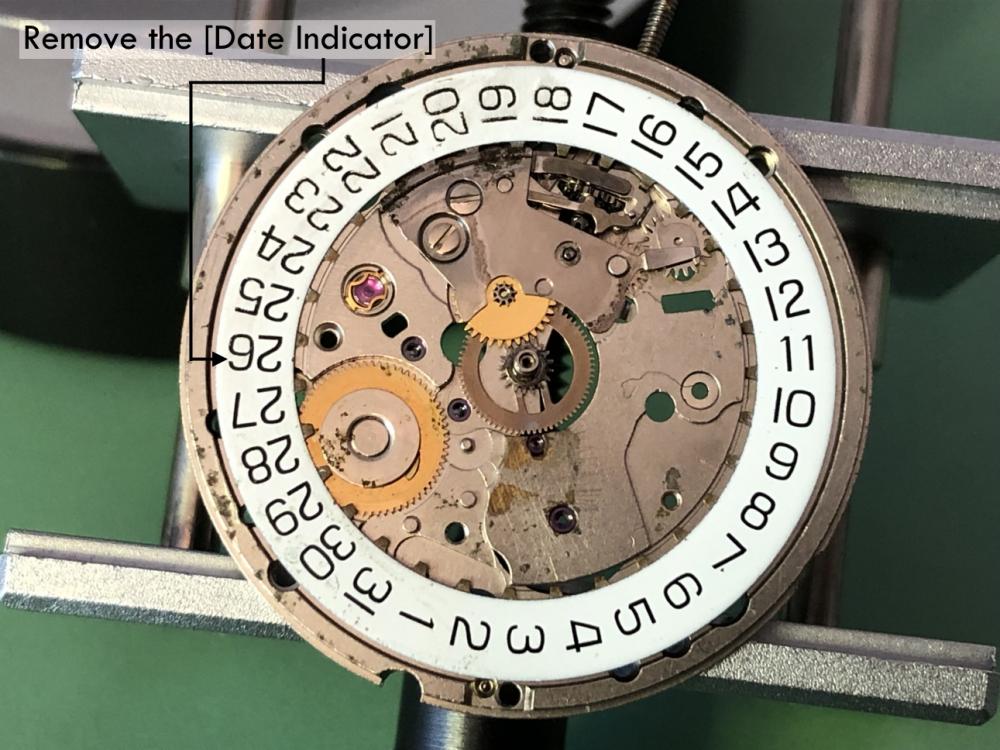
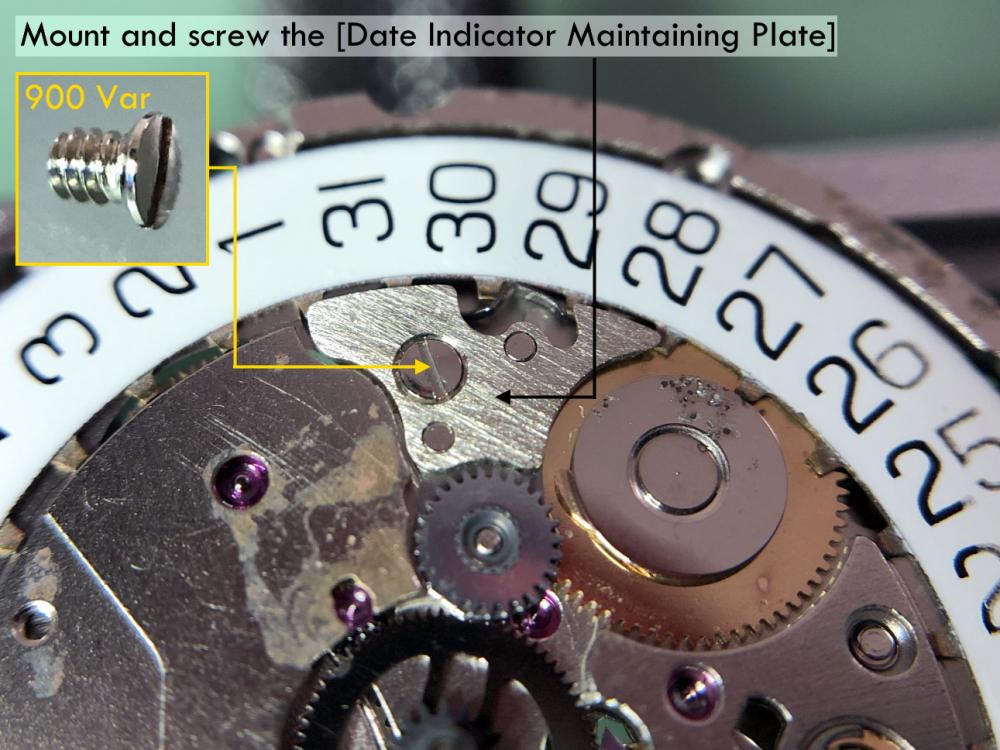
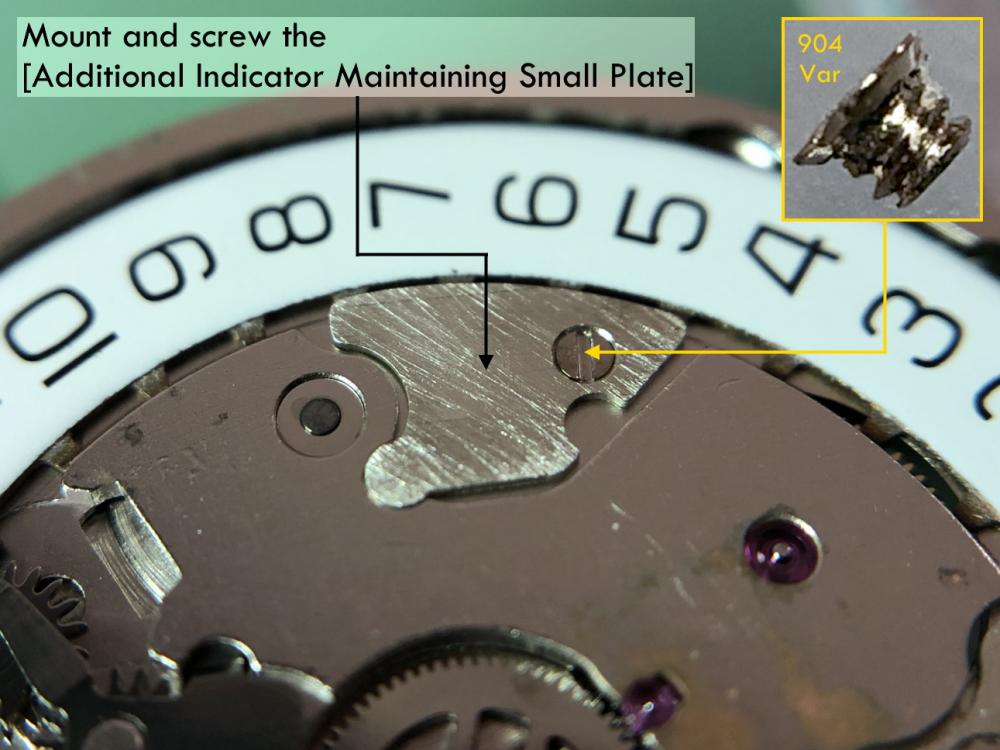
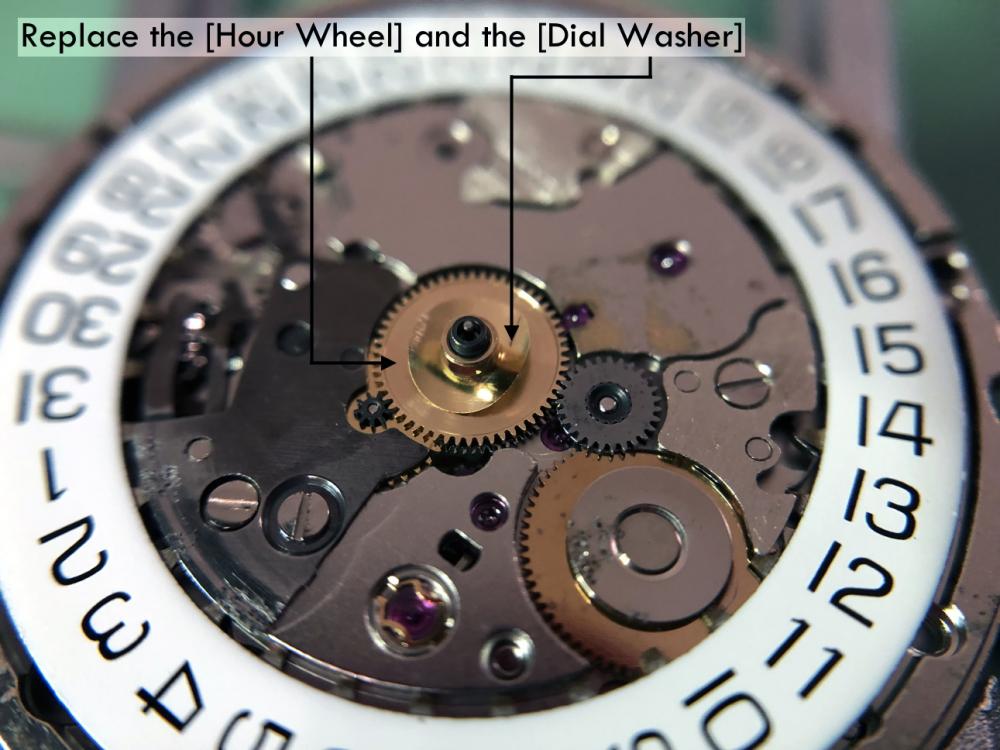
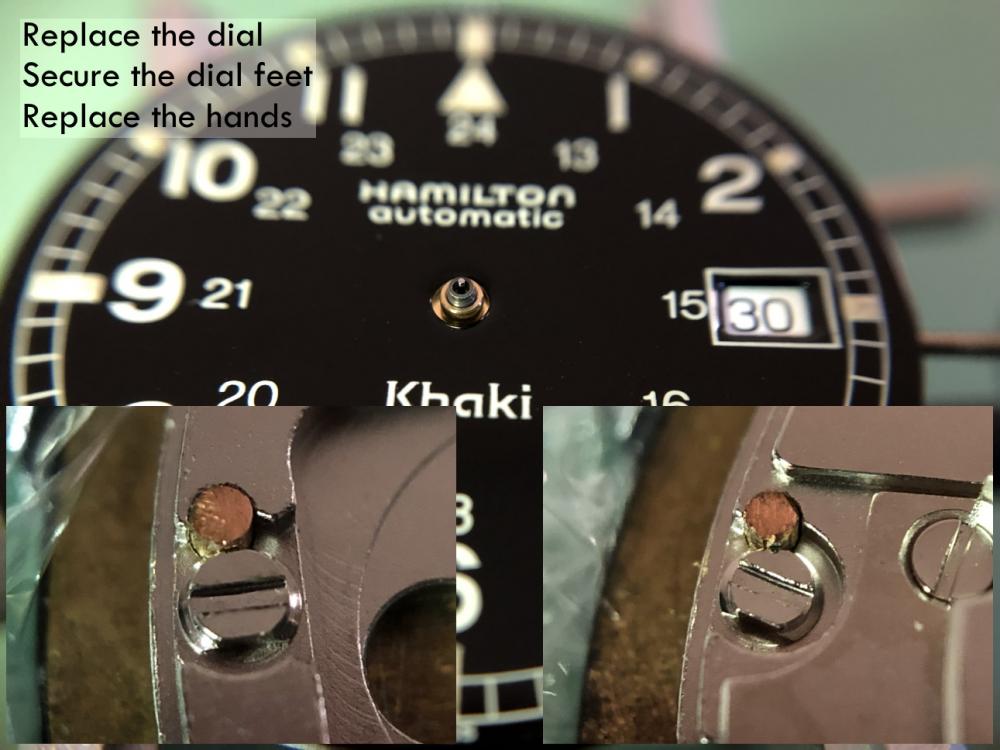
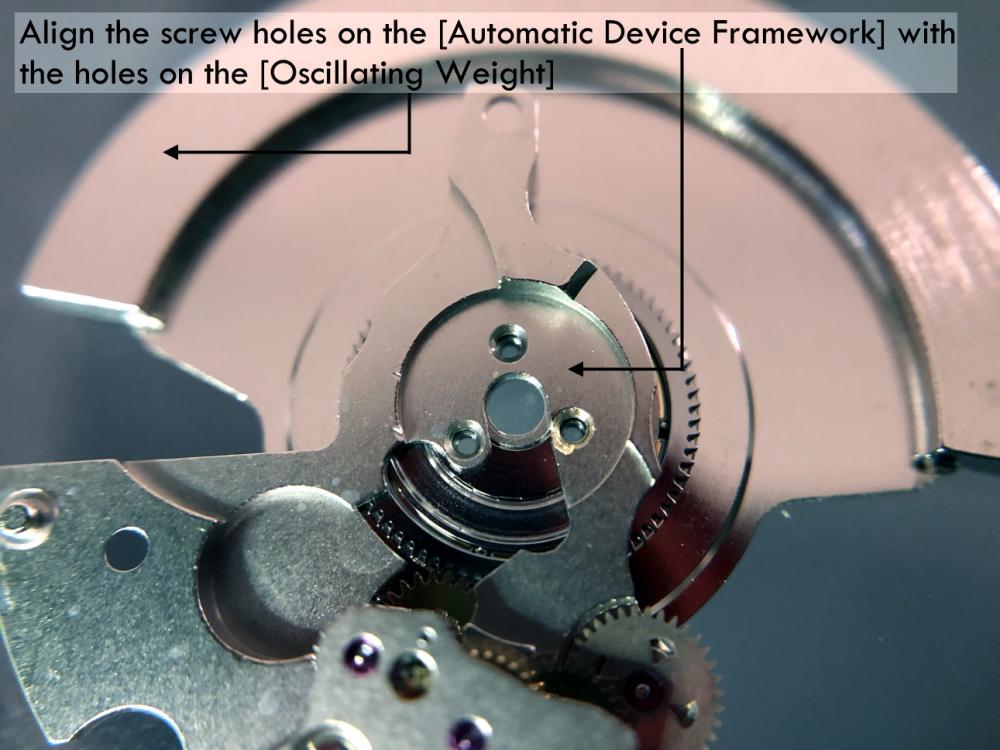
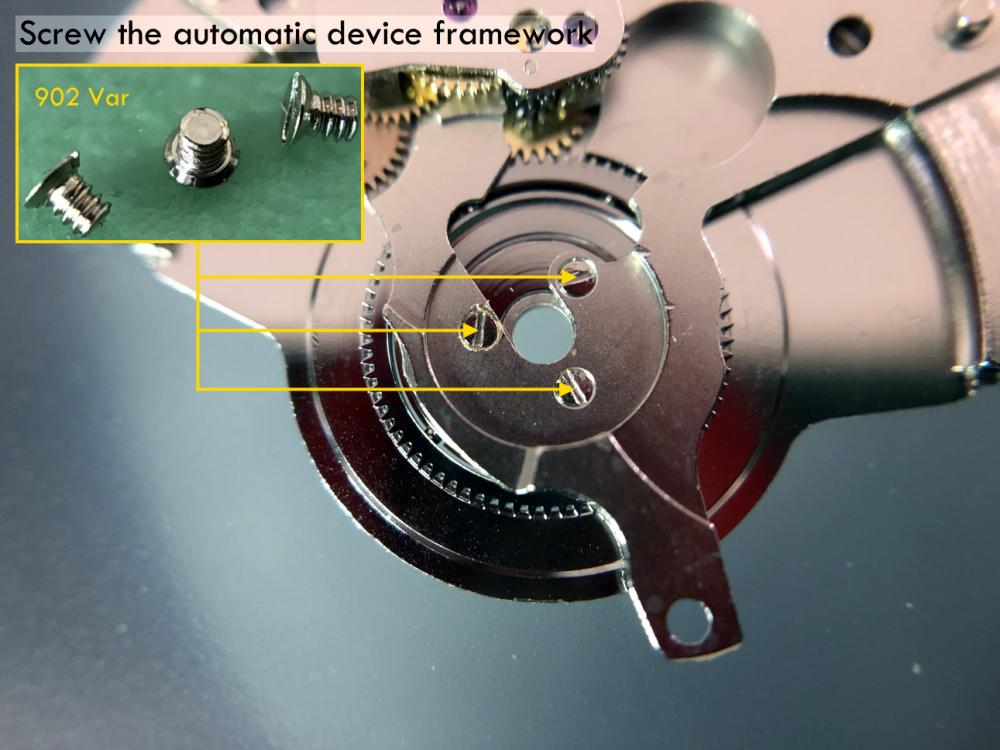
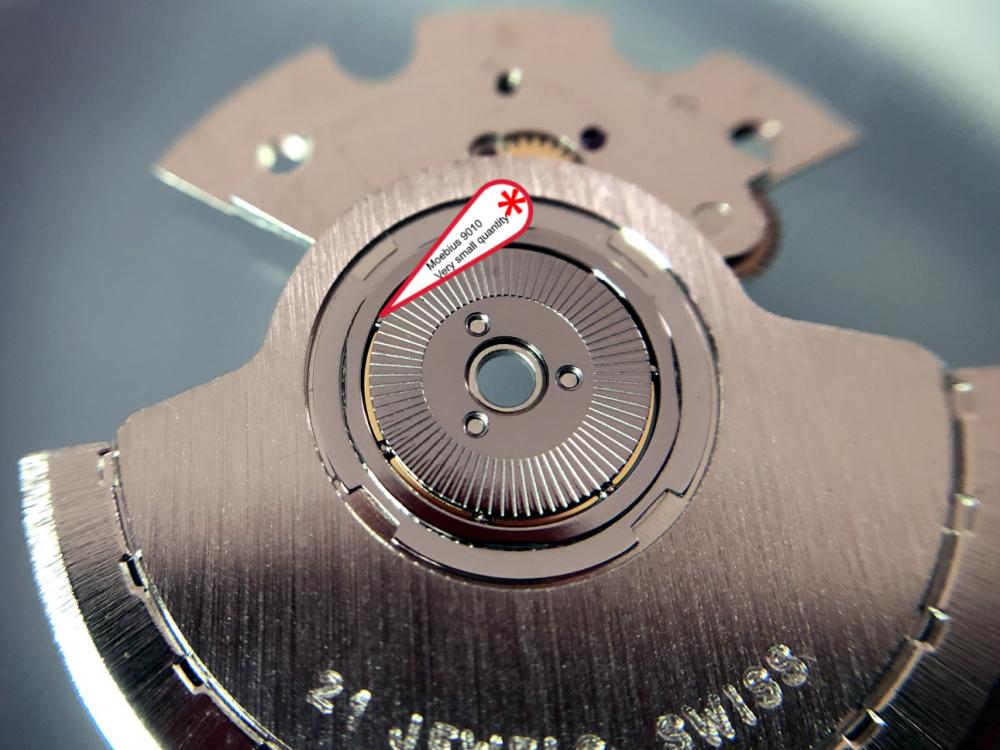
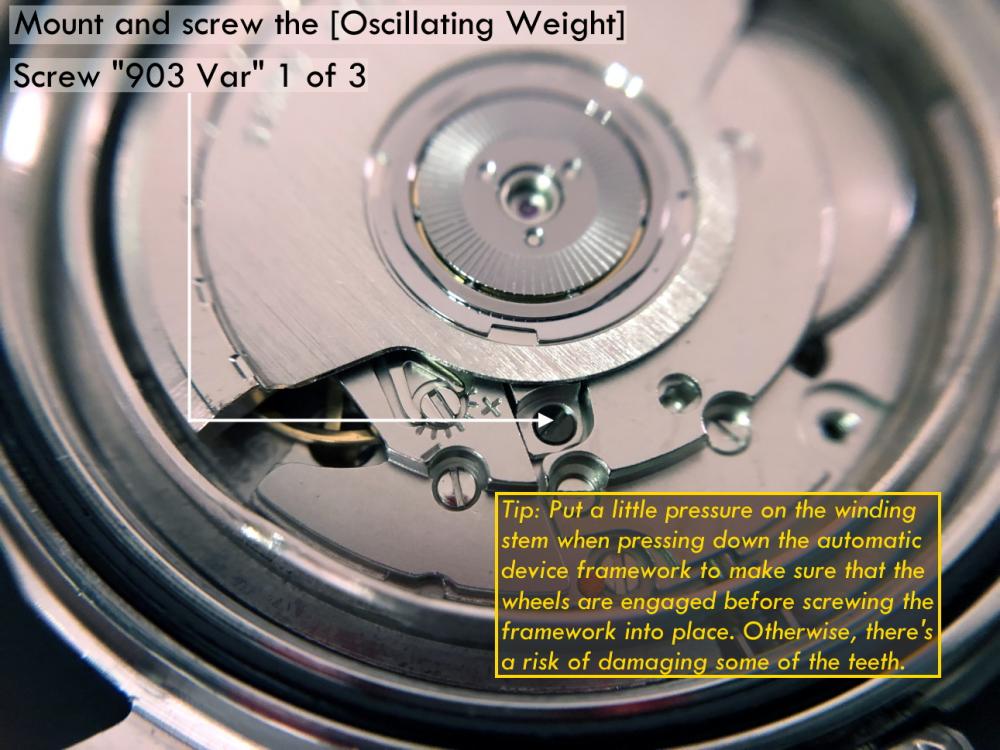
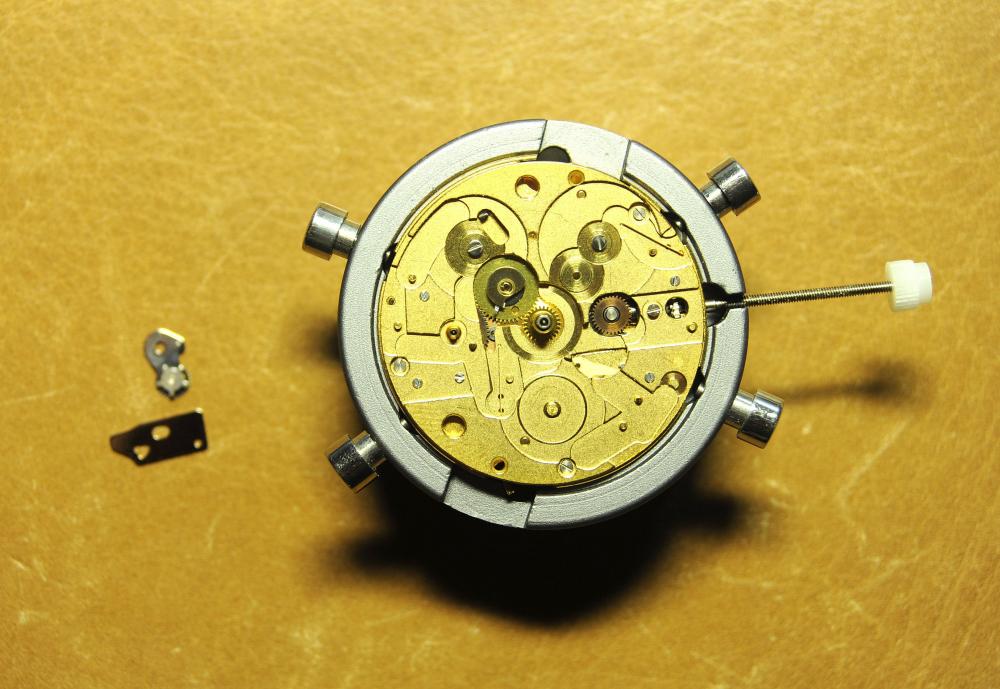
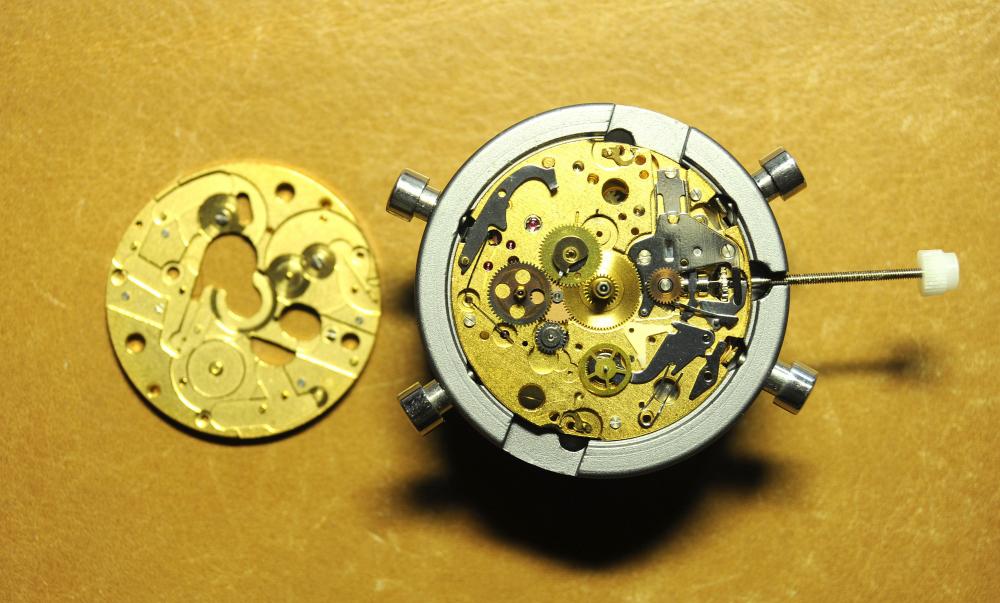
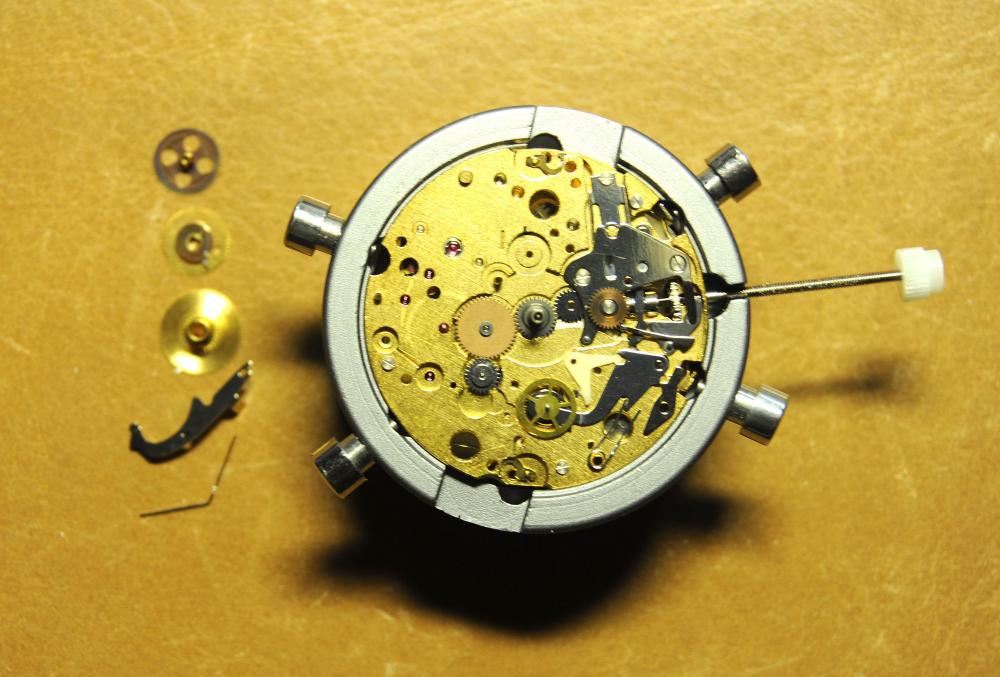
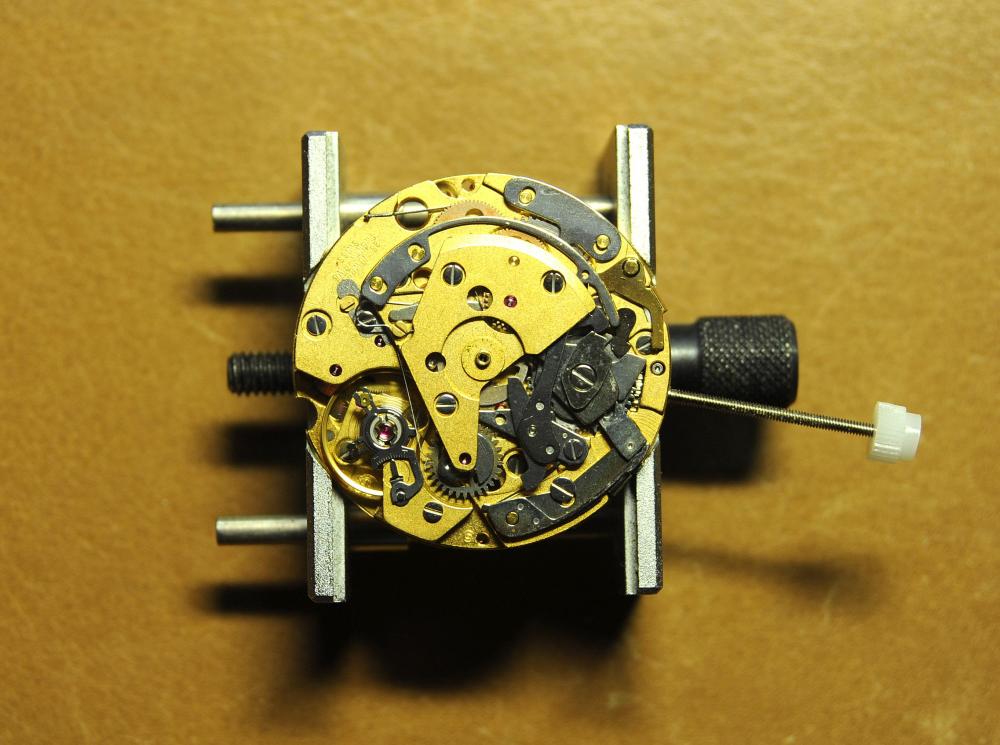
ETA 7750 Service Walkthrough The 7750 was first available in 1974, having been one of the first movements to be designed with the aid of a computer. It's hard to believe that the 7750 is still the industry standard movement for chronographs considering it's history. It was developed over 40 years ago by Valjoux, who was then a legendary movement maker that was part of the giant ASUAG conglomerate. But by the end of 1975 production was stopped due to the onslaught of the Quartz Era, and the 7750, along with many other mechanical calibers, was abandoned. Industry demand for this movement was so low that the stock produced in that 1 year manufacturing lasted until 1982! Such was the devastation of cheap Japanese produced quartz watches to Swiss manufactures. History may have forgotten the 7750 except for the local management at Zenith who ignored the orders by Valjoux to destroy the dies and equipment used to manufacture the 7750, instead hiding the equipment away from corporate eyes. You can find many more fascinating facts about this caliber online, and it's well worth the read. ................................................... This walkthrough will be very detailed, and I hope this will give people the courage to tackle this movement. I've serviced quite a few calibers, and this is one of the most beautiful, with a very logical layout. ETA7750 Tech.PDF If you have built your skills with basic movements, and become proficient in servicing them, I would highly recommend this movement to be your first chronograph to tackle. Lets begin. DEMAGNETIZE THE MOVEMENT BEFORE DISASSEMBLY. Remove the Day Indicator and store it in a safe place where it won't be damaged. Unscrew (0.8 Driver) the Jumper Maintaining Plate and remove it. Do the same for the Date Indicator Maintaining Plate Carefully remove the Jumpers Spring, holding it with a piece of pegwood so it doesn't ping away. Next remove the jumpers for the day and date. The jumpers differ from one another, so here is a reference photo so you can see the difference. Remove the Date Indicator and place it in a safe place where it won't be damaged. The last piece to remove on the Date Platform is the Double Corrector Now unscrew (1.4 Driver) the Date Platform and gentle pry it from the movement. Be careful when removing this plate, as there is a fine spring pressed into the plate that can be easily damaged. Here is a reference photo of the screws that hold the Date Platform. Remove the Hour Hammer Spring, once again using the pegwood to hold the spring while removing the tension. Here is a reference photo of the correct orientation of the spring. Remove the Hour Counter Lock. Remove the Hour Hammer Operating Lever. Next is the Hour Hammer, be careful when removing this item so as not to damage the Hour-Counting Wheel. Now remove the Hour-Counting Wheel. Remove the Date Indicator Driving Wheel Remove the Day Star Driving Wheel Then remove the Intermediate Calendar Driving Wheel Remove the Hour Wheel Then the Minute Wheel Remove the Cannon Pinion, which does not require a puller. The last component to be removed on this side of the Main Plate is the Driver Cannon Pinion. To lift the Driver Cannon Pinion I used what Mark used, a set of hand lifter from Horotec (MSA05.007); but you can also use a Presto Tool (30636-1) which will also work well. The dial side of the movement is now complete disassembled. Flip the movement over and unscrew (1.5 Driver) the Oscillating Weight. To remove the Hammer Spring lift it up gently over the automatic work and move it inwards. This will move the tail of the spring in a clockwise motion to the opening in the slots, which will free the spring. Slide out the Clutch Spring. Here is a reference photo of this spring, and it's orientation. Remove the screws (1.4 Driver) for the Automatic Device Bridge, and gently pry it loose. Here is a reference photo of these screws for the bridge. Once the Automatic Bridge has been removed, the two wheels for the automatic work are able to be removed. Below is a reference photo of how the sit inside the bridge. We now begin to disassemble the chronograph section of this movement. Begin with removing the Hammer, 2 Functions. Next remove the Clutch 60s, 2 Functions. Then remove the Minute-counting Wheel, 30min. Remove the Chronograph Wheel 60s, 30min. Gently lift out the Oscillating Pinion, 60s. Here is a reference photo of the orientation of this pinion. Unscrew (1.4 Driver) the Chronograph Bridge and gently pry it off the Train Wheel Bridge. Remove the Ratchet Driving Wheel. Remove the Chronograph Wheel Fiction. Unscrew (1.4 Driver) the Operating Lever, 2 Functions. Unscrew (1.4 Driver) the Lock, 2 Functions. Next remove the Minute-counter Driving Wheel, 30min. Slide out the Operating Lever Spring, 2 Functions. This spring can be fitting in both directions; but only 1 way is correct. Here is a reference photo of it's correct orientation. Remove the Switch. Here I digress from the order the SwissLab document illustrates the order of removal. They show to remove the Chronograph Cam before removing the Hammer Cam Jumper. This in my opinion is not the best way, as all the force from the jumper is pressing on the cam whilst your trying to remove it, and could lead to damage. Instead I move the Chronograph Cam until it reaches the notch as shown in the photo below. Then lift the Hammer Cam Jumper up to the top of the Chronograph Cam, which will release it's tension. Then, just as you removed the previous hammer, rotate the jumper to the opening in the slots, which will free the spring. Now you can unscrew (1.4 Driver) and remove the Chronograph Cam safely without tension on it. RELEASE THE MAINSPRING TENSION Once the tension has been released, unscrew (1.4 Driver) and remove the Balance Cock. Then unscrew (1.4 Driver) the Pallet Bridge and remove the bridge and Pallets. Unscrew (1.2 Driver) and remove the Ratchet Wheel. Then remove the Crown Wheel. Unscrew (1.4 Driver) the Train Wheel Bridge and gently pry it off the Main Plate. Note that one of the screws is under the Operating Lever. This needs to be moved out of the way to access this screw. The last level of this movement contains the train. Here is a reference photo of the wheel locations. Remove the Stop Lever. Remove the Great Wheel. Here is a reference photo of the underneath of this wheel. Remove the Third Wheel. Here is a reference photo of the underneath of this wheel. Remove the Second Wheel. Here is a reference photo of the underneath of this wheel. Note this has the long lower pivot. Remove the Escape Wheel. Here is a reference photo of the underneath of this wheel. Then remove the Barrel. This completes the removal of the train. Flip the movement over so we can complete the disassembly by removing the keyless work. Firstly, release the tension from the Setting Lever Jumper. Then unscrew (1.2 Driver) and remove the Setting Lever Jumper. These are unique screws with pointed ends, and below is a reference photo of them. This will also remove the Intermediate Setting Wheel. Next remove the Setting Wheel Then remove the Yoke. Remove the Setting Lever. Remove the Rocking Bar. Now pull out the Stem. Once the Stem is removed the Winding and Sliding Pinion should fall out of the movement onto your work mat. Disassembly of the 7750 is now complete If you've come this far, congratulation on completing the disassembly. Make sure you pegwood all the jewels and reinstall the Balance back onto the movement for cleaning. Assembly of the movement will be posted as soon as I complete the write-up.


 20 points
 -
On behalf of "Watch Repair Talk" moderators, I would like to extend a warm welcome to all new members. This is a friendly place with plenty of knowledgeable people who have varying degrees of horological expertise, the great thing is they are willing to share that invaluable knowledge and help one another. To help us keep things running smoothly, I would ask all new members to read the forum rules and place their posts in the correct sections.20 points
-
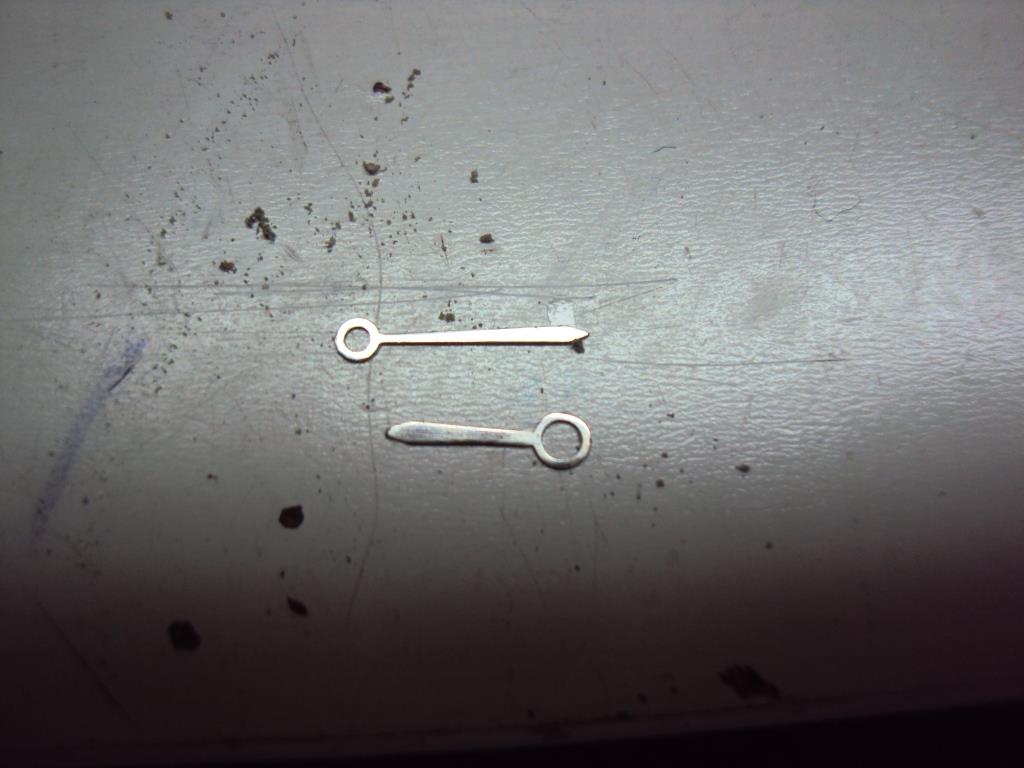
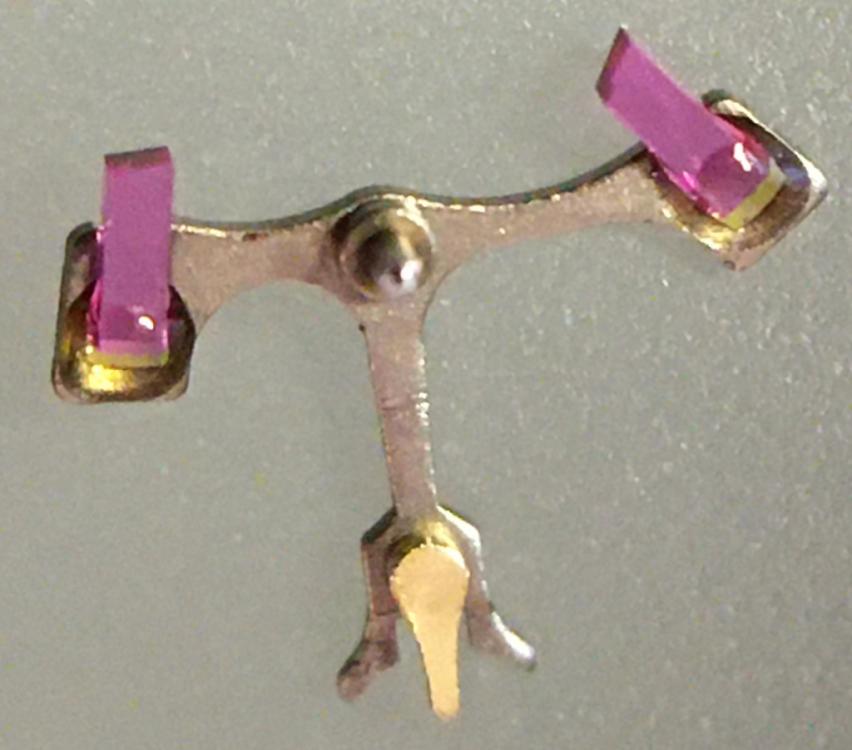
Intro A while back I successfully made my first attempt refitting and adjusting pallet stones using shellac. It was something I had dreaded doing (it seemed difficult) but in the end it wasn’t that difficult at all. Having gathered experience from a few years of handling tiny watch parts using tweezers and having developed some left-hand dexterity as well (I’m right handed) probably helped. Anyway, I thought I’d share the experience with anyone who would be interested and hopefully there’ll be some other WR-talker, now or in the future, who’ll find it useful. If you’re new to this topic you might find this page and this video on the watch repair channel a good start. As I didn't want to risk ruining my Gaston tool I melted and prepared the small pieces of shellac on a chisel tool (my improvisation) that I happened to have in my tool box. However, the chisel tool had a very tough plastic y surface but I was able to burn it away to expose the bare metal with my alcohol lamp before melting and forming small pieces of shellac on it. However, the pieces of shellac needed were much smaller than what they looked like to me in the video. My way of making even smaller pieces was simply to poke the small pieces that I had made with tweezers once they had cooled and were hard. Setting and adjusting the pallet stones was easier than I thought it would be. I didn't realize the fork slots for the stones pinch the pallet stones (Vostok calibre 2414) and actually keep them in place before the shellac is applied. So, I could replace the pallet stones and then check and adjust the locking depth to the escape wheel teeth before applying the shellac. A bit fiddly yes, and you do need to develop some dexterity with tweezers before you try this but not to the point that you break a sweat. Anyway, thank god for my stereo microscope! Anyway, it was my first attempt, and as is common when you try something for the first time, I made a mistake. Despite very consciously applying what I felt was a little too little shellac it still flooded the stones and a large portion of the fork when it melted. Also, I applied too much heat so that the shellac started boiling creating bubbles. So, I decided to start all over. Fortunately, the “industrial isopropanol” (so called on eBay) that I have is very efficient so no problem removing the shellac from the stones and the fork. The second time around I only used a minuscule amount of shellac. Also, I heated the Gaston tool holding the fork in short turns, just so that the shellac would fully melt without staring to boil. Much better! The following is what I would suggest based on my first experience: Basically, follow the video I linked to above. In the video, Mark pokes and scrapes the fork and the stones with tweezers to get rid of old shellac. I tried that, but it wasn’t very efficient. Instead I would let the pallets soak in industrial isopropanol for about 10 minutes and then use a paintbrush to brush them clean. The shellac dissolves completely in the isopropanol and the stones can then be easily removed and further brushed if required. To insert or slide a stone back into the fork slot I found holding the fork by the end of the slot (opposite side of where the pallet stone is inserted) with tweezers (left hand) was giving me the most control. I placed the pivot of the fork (guard pin up, of course) in a small hole in my staking block while inserting/sliding the stones with another pair of tweezers (right hand) into the slots. After having applied the shellac Mark suggests re-heating the shellac to adjust the stones. I was worried that it might result in a mess if I tried it, so I decided to do the adjusting before applying the shellac as shown in this video. The slots for the stones pinch the stones pretty well so if you're careful while you're testing the lock to the escape wheel teeth this method works well and won't dislocate the stones. However, to make sure, double check the positions (depth and angle) of the stones before applying the shellac. Now, the tiny piece of shellac should be placed on the rear section were the stone meets the fork. Mark is clear about this in his video but for some reason it completely passed me by when I made my first attempt. In my second attempt I followed Mark's instruction, but the piece of shellac, being very asymmetrical in shape, was difficult to place in the right spot. However, after warming the pallets to the point that it had only softened the shellac a bit, I discovered, to my surprise, that I could manipulate the shellac into the perfect spot with the tip of my tweezers, without the shellac sticking to the tweezers. Of course, as I've come to realize, every repairer must find his or her own way, but hopefully you'll find my "discoveries" useful. Above is a picture of the result. It's not perfect but still worked very well. The amount of shellac on the entry stone is a bit too little, and there is a < 1 degree tilt on the exit stone (which, of course, can’t be seen in the picture).
 17 points
 -
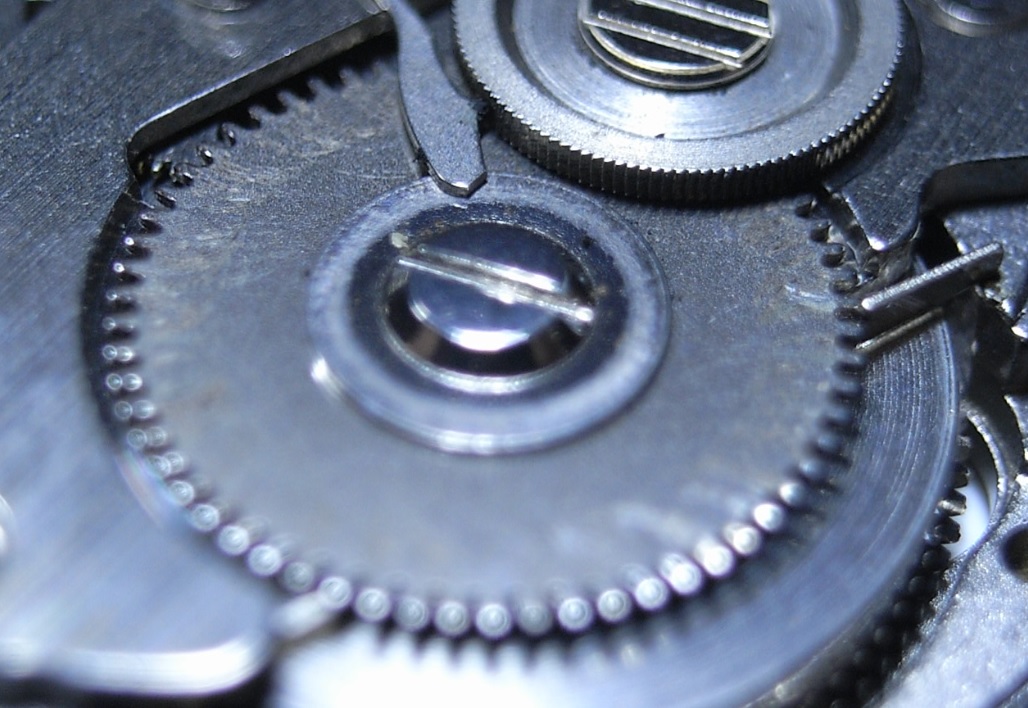
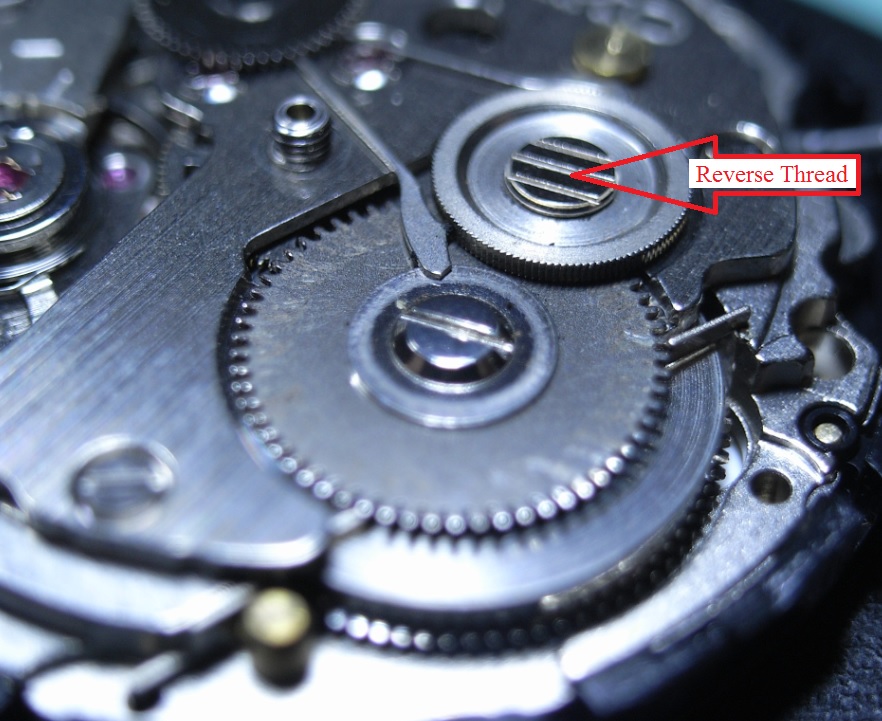
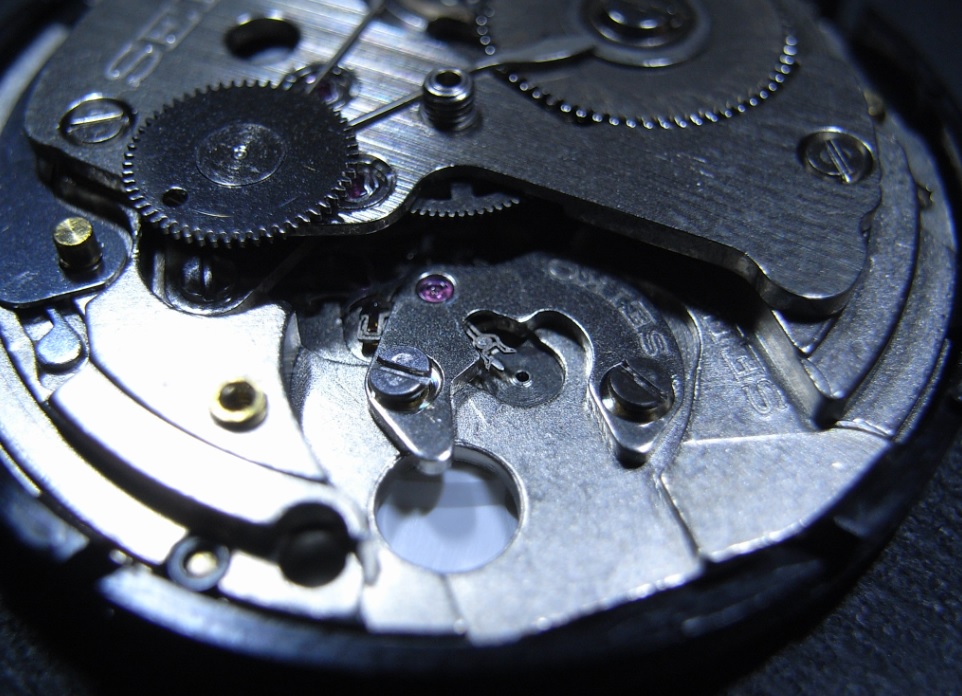
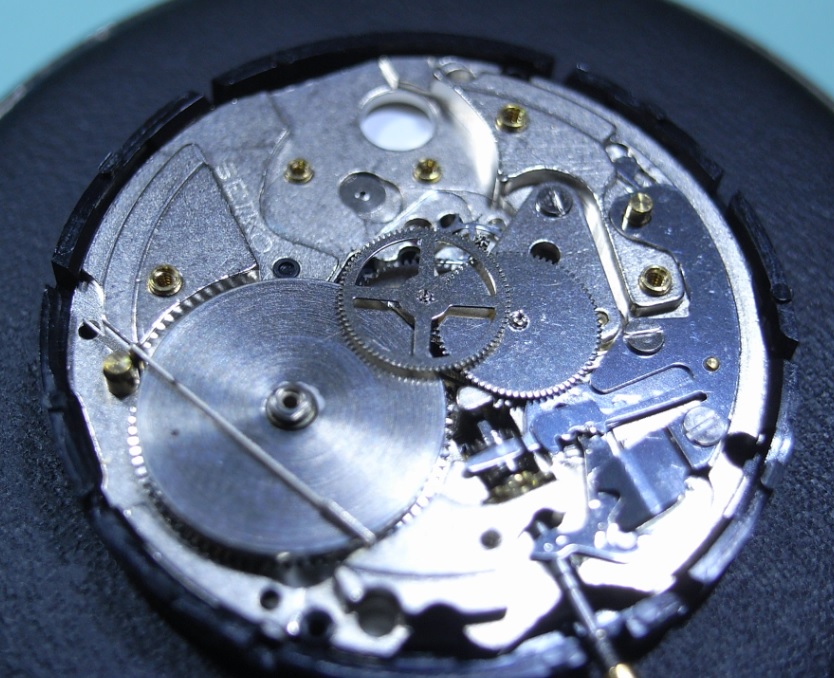
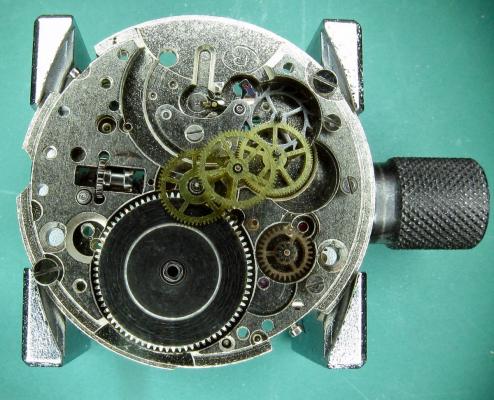
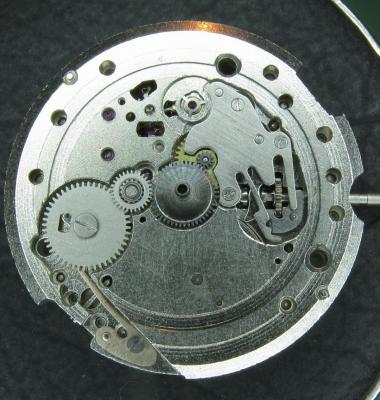
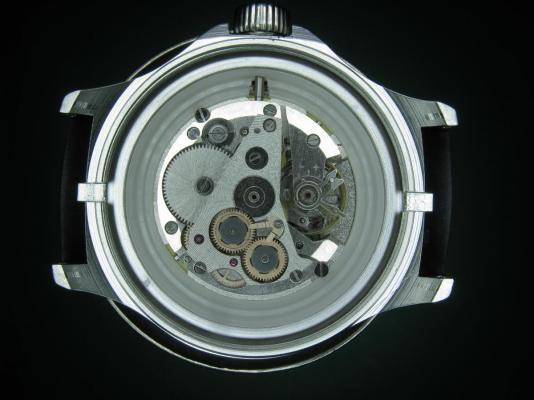
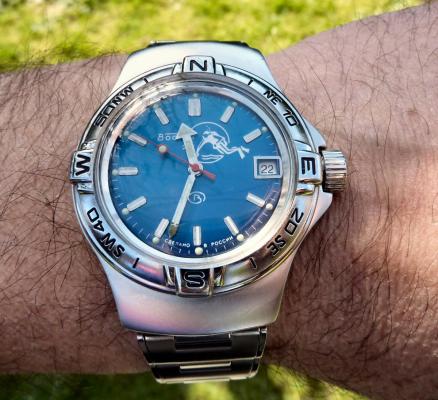
This is a bit of a departure for me as I usually like to play with stuff a little more vintage and a little more Swiss. That being said I have done a few vintage Russians in the past and this is a watch that I had been curious about for some time. I picked this one up at a car boot sale last summer for just £3 in a less than wonderful state. As you can see, the seconds hand was off and it was described a not running. It turned out that it did run, just not too well and the hour and minute hands didn't move. Canon pinion anyone? First impression with the back off is pretty encouraging. Still looking good with the rotor off. This is a 31 jewel movement, 10 of the jewels are inside those reverser wheels. Somewhat minimalist under the dial. With the calendar wheel retaining plate off you can access the motion works, the calendar works, and the keyless works. Flipped back over and with the auto-wind bridge out of the way. This is an indirect driven centre seconds hand which has a tension spring to hold the seconds hand pinion in place. This has to be supported when installing the seconds hand otherwise the hand simply pushes the pinion against the spring and won't install. Balance cock removed with the shim that the soviets are so fond of for adjusting end shake. Hair spring is in good shape. With the train and barrel bridges out of the way the going train is revealed in all its glory. Flipped over again to strip out the bottom plate and a problem comes to light. There is some damage to the minute wheel (marked in red ink). Maybe the canon pinion isn't the problem after all? In close up you can see the damaged minute wheel tooth. This I didn't think would be a problem, just replace it..... I thought. Not so easy as it turned out as I couldn't find anyone that could supply a new wheel, and a donor movement proved elusive unless I wanted to spend a fortune on a complete, working watch, which I didn't, so I had to wait for eBay to come up with a spares or repair victim at the right price, which it eventually did. The stripped out main plate with the balance and cock, minus jewels, ready for the cleaning machine. The bottom plate back together again after a good wash cycle in the Elma. At this point I did check the canon pinion anyway and it was as well that I did. There was virtually no transfer of power through to the hands at all so a suitable adjustment was made and a tighter fit achieved. Back in the case and ticking like a champ. The rotor and massive case back gasket back in place. And a much improved trace on the timer. This is with the original mainspring which turned out to be in very good shape requiring just a clean and relube. The trace isn't perfect by any means, but compared with other Russian watches that I have played with (and with it's starting trace), it's pretty good. There is still a hint of a periodic variation that I may investigate at some point but for now I shall just wear it and enjoy it. And here it is on the wrist after a bit of a cosmetic brush up. These are available with many different dial designs, apparently this one is referred to as a "SCUBA Dude". I have worn it for two days now and it has gained about 5 seconds a day so there is a little fine tuning to do to get it right "on the wrist". All in all I'm very pleased with this one. I had been curious about the Amphibia for some time having read a couple of articles detailing its history and design. It also has quite a large following of avid enthusiasts who rate it for both value and robustness. On the value front I can't complain with this one as the total cost to me was just £11 (including the donor). As for ruggedness only time will tell, but the performance so far is very impressive.


 17 points
 -
When fitting new stems to watches I use these tools :- Digital calipers, Fine grade diamond lap Wire cutter Pin vice Now for fitting. (1) Hold the stem in the pin vice and screw on the crown tightly by hand. (2) With the movement fitted correctly in the case, insert the stem until it locks in place. Now measure the gap between the case and the underside of the stem. In this case it is 2.16mm. (3) Subtract 0.2mm from this size and this will give the amount to remove from the stem. In this case it will be 1.96mm which will give 0.2mm clearance below the crown when fitted to the watch. (4) Now remove the crown from the stem and hold the stem very tightly in the pin vice, then place the pin vice and stem between the jaws of the digital calipers then zero the calipers. (5) Remove the calipers and without touching the zero button set them to minus 1.96mm. THEN RE-ZERO THE CALIPERS AT THIS LENGTH The wire cutters are now used cut off the excess thread leaving a small amount to be filed to the exact length. (6) All that is required now is to dress the stem with the diamond lap a little at a time until the calipers read zero. (7) Finally screw the crown on tightly and it should be ready to fit to the watch without further adjustment. I find that this method cuts down on trial and error. FOR SCREW DOWN CROWNS. A) Screw down the crown tightly onto the case without the stem and measure the distance nbetween the bottom of the crown and the case. B ) Screw the new stem tightly into the crown, then insert into the watch until it engages and locks into the movement. C) Press the crown down firmly as far as it will go and hold it there. D) Using the vernier callipers, measure the distance between the bottom of the crown and the case. E) Subtract the size determined in (D) from the size measured in (A) then subtract a further 0.15mm from this size. This is the amount to shorten the stem by. This should allow the crown to screw full home without compressing the stem too tightly between the movement and the inside of the crown. F) Cut the stem leaving it slightly longer than the size determined in (E), and dress down to size using the diamond lap and vernier callipers as described in the original post. G) Screw the crown onto the shortened stem and check fit and function, before using a tiny spot of Loctite 221 to secure. Click here to view the article17 points
-
I spent the day literally watching paint dry. I was using black lacquer to fill in the engraving on a pocket watch case to make it stand out. I will send pictures when it is finished. In the mean time I was looking for screwdriver sharpening stone holders on the net. The sticker shock was amazing. So i said to myself, "Self" your only watching paint dry, make your own, you have a sharpening stone and some wood. So I made this from scrap wood while watching paint dry. I'm happy with it & it cost nothing. It is perhaps not as pretty as Bergeon but they have enough money.
.jpg.8a21c5bda26dd240cf8d9417ecce3edf.jpg) 17 points
17 points -
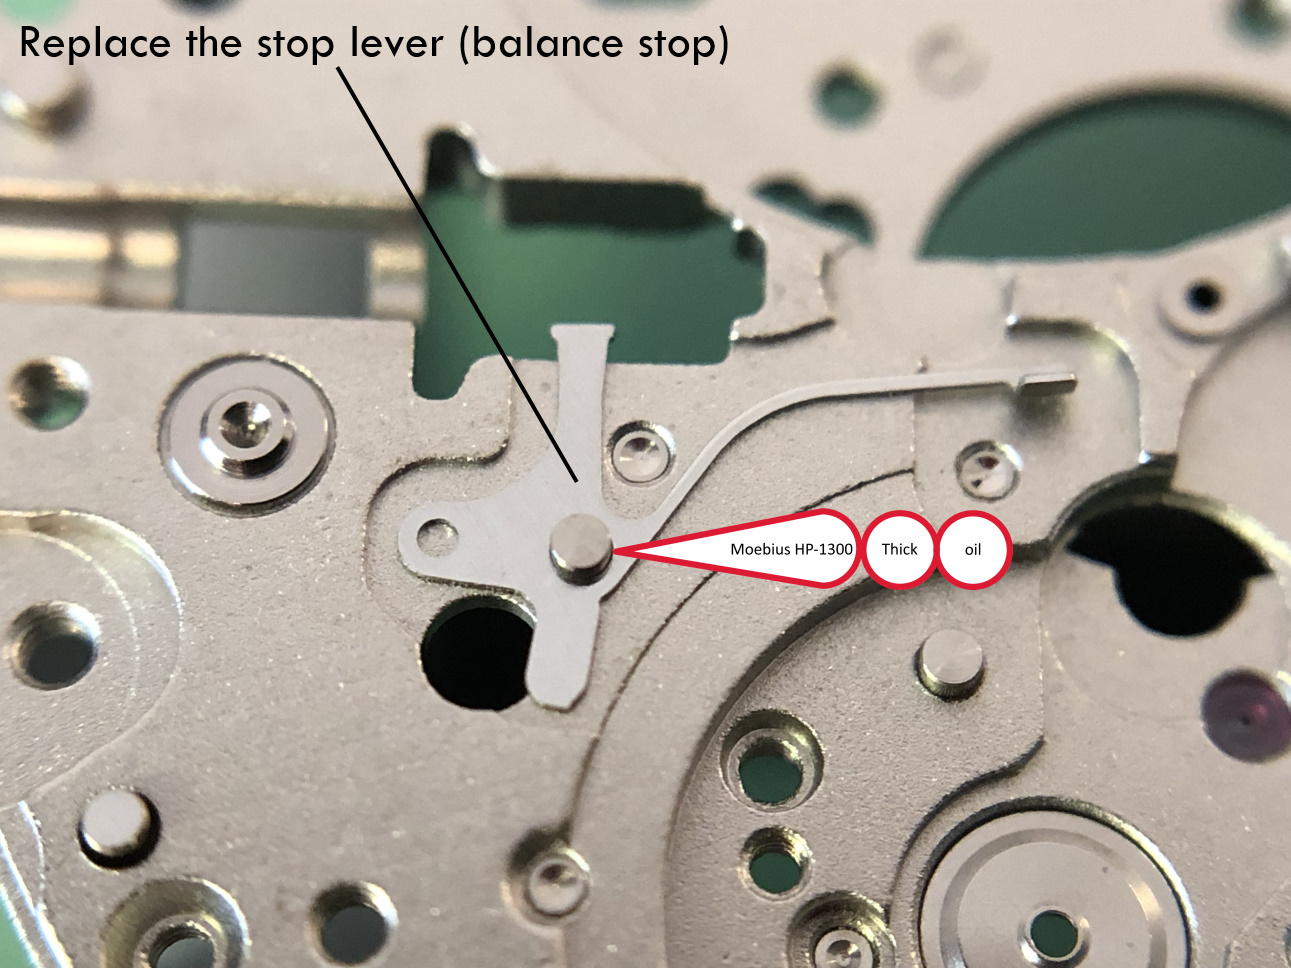
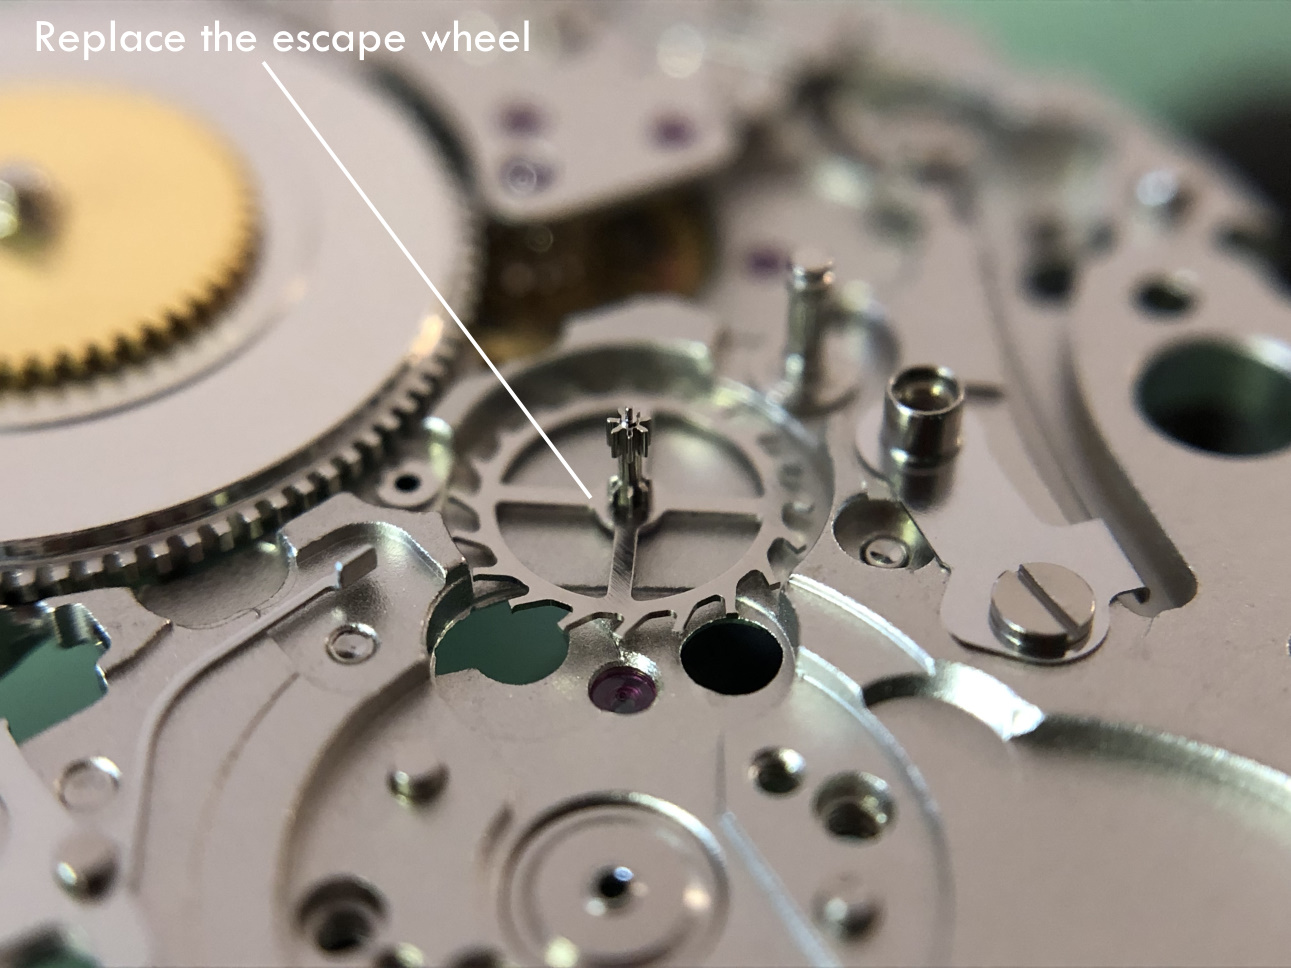
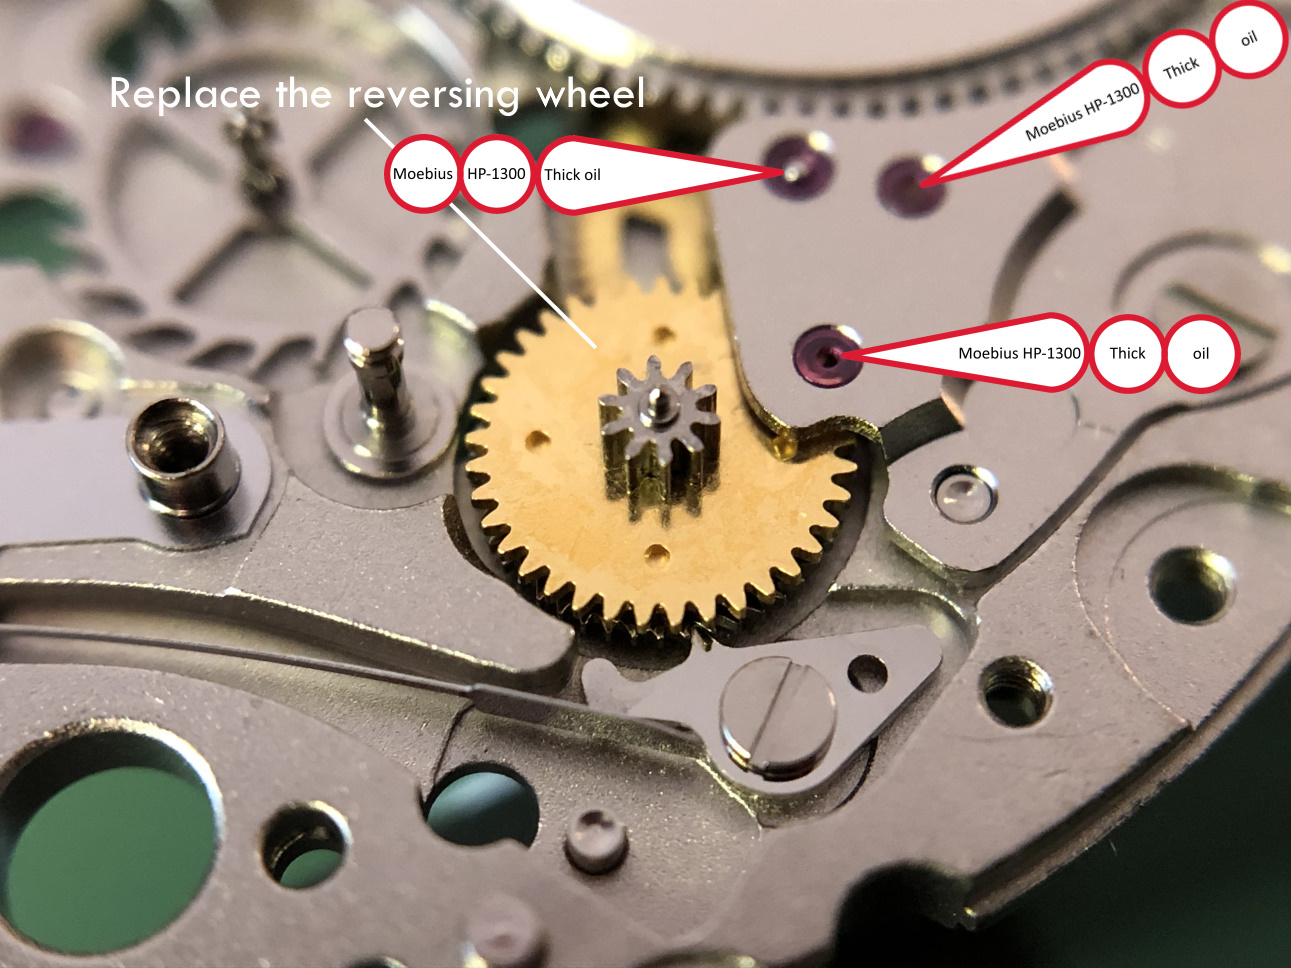
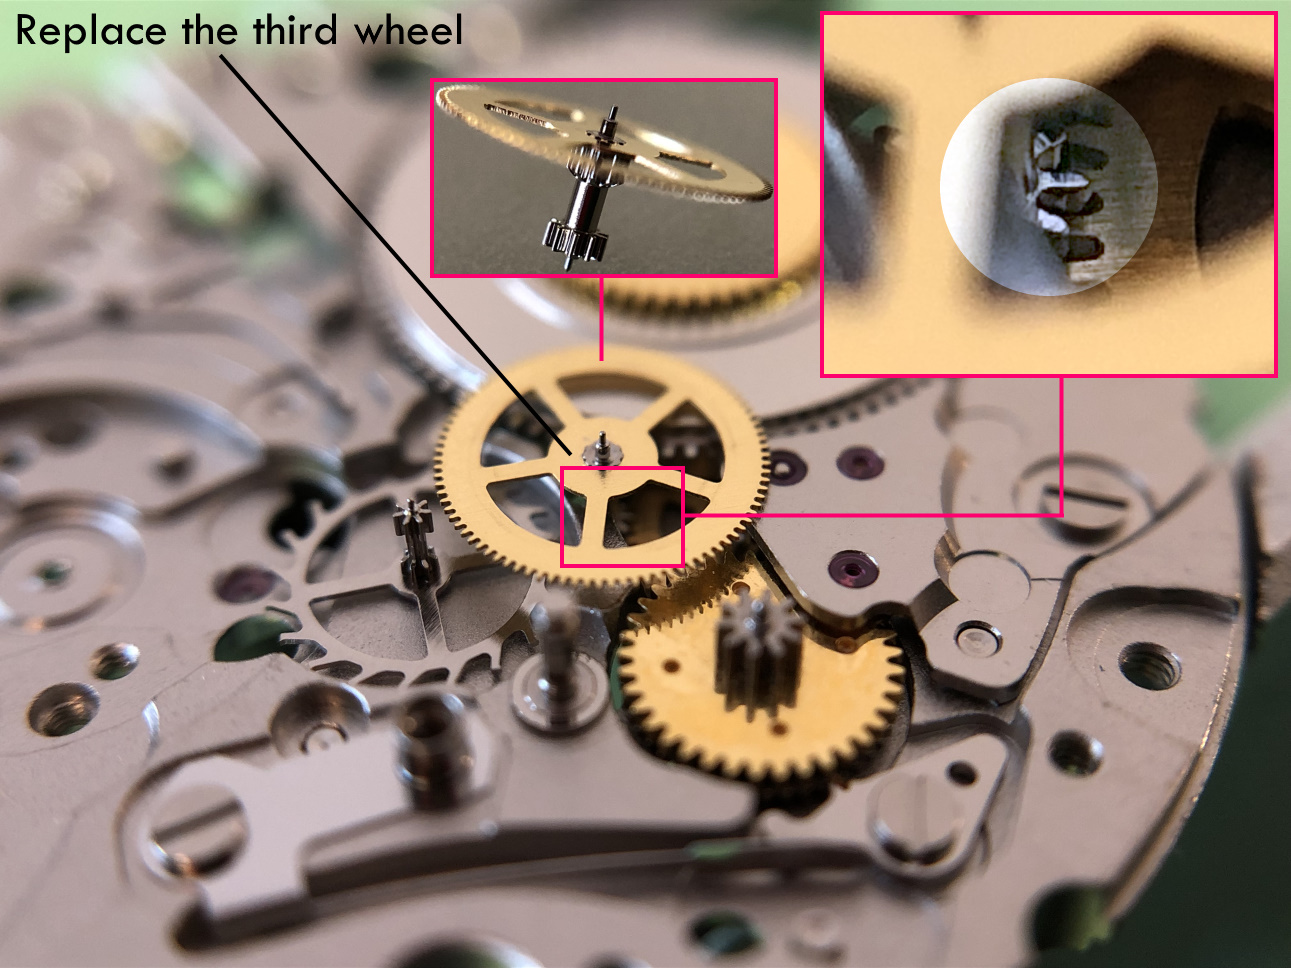
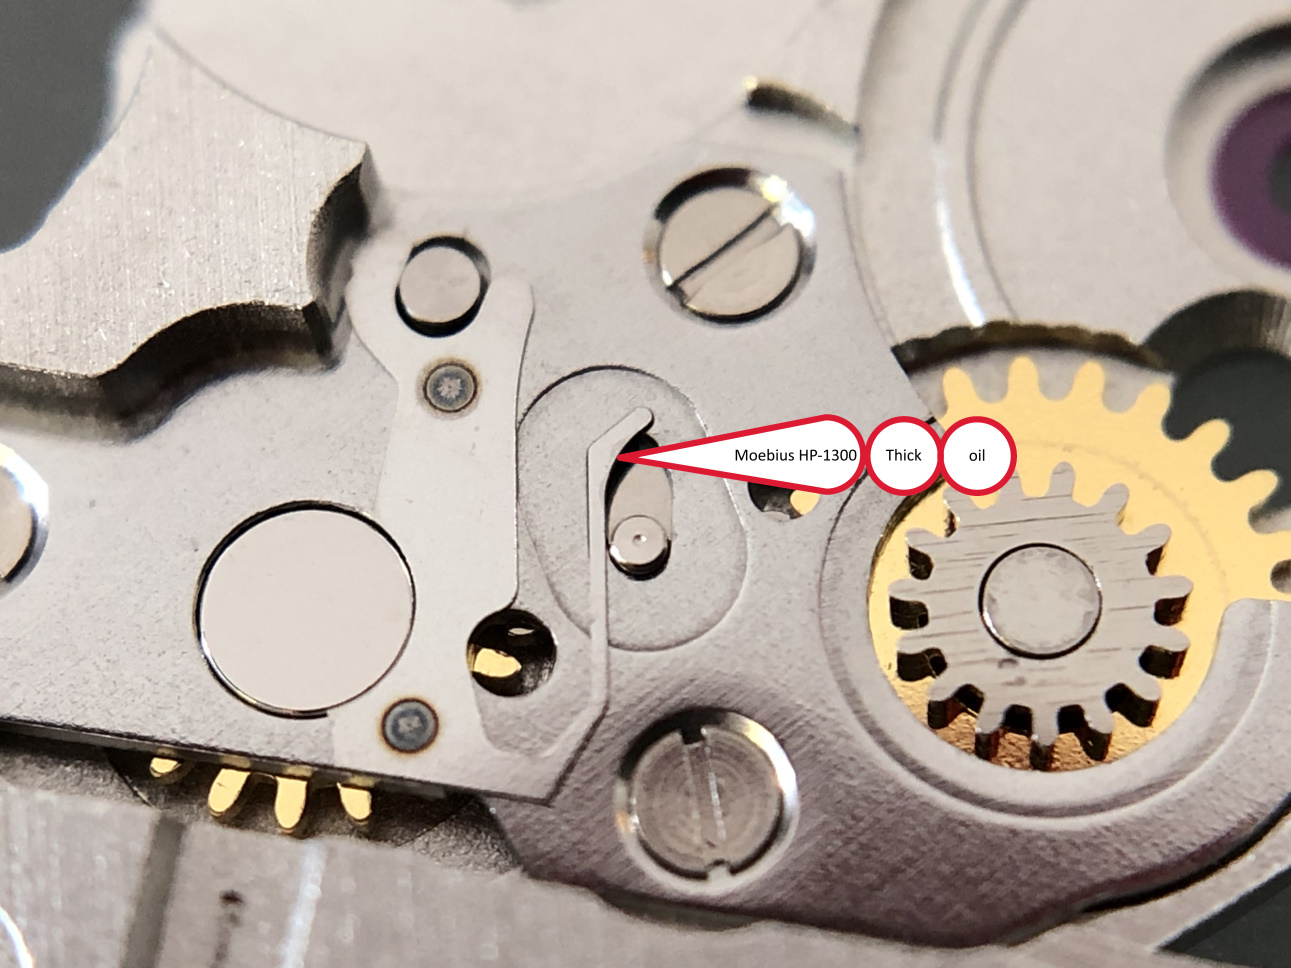
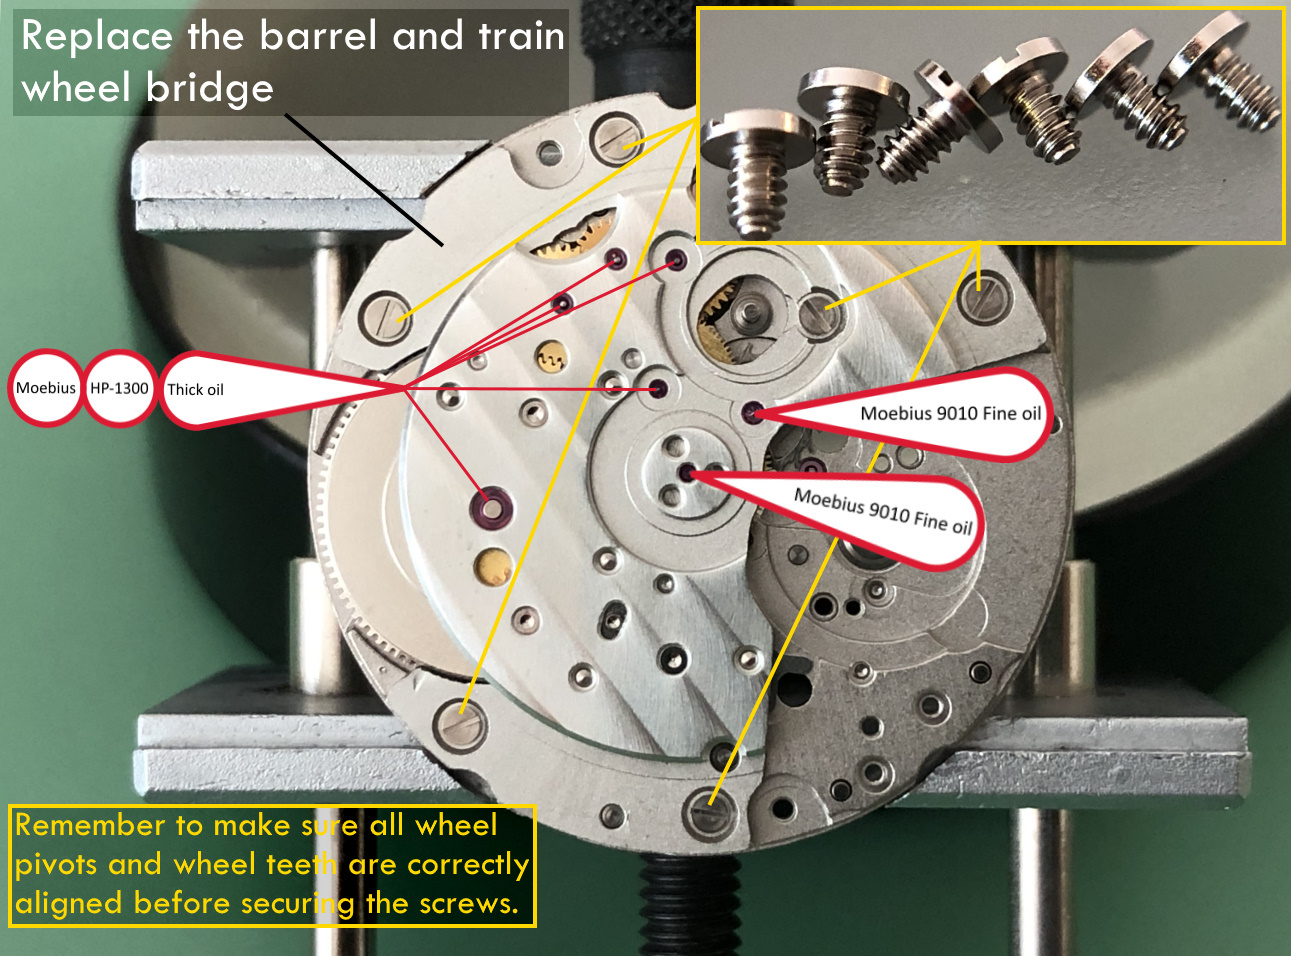
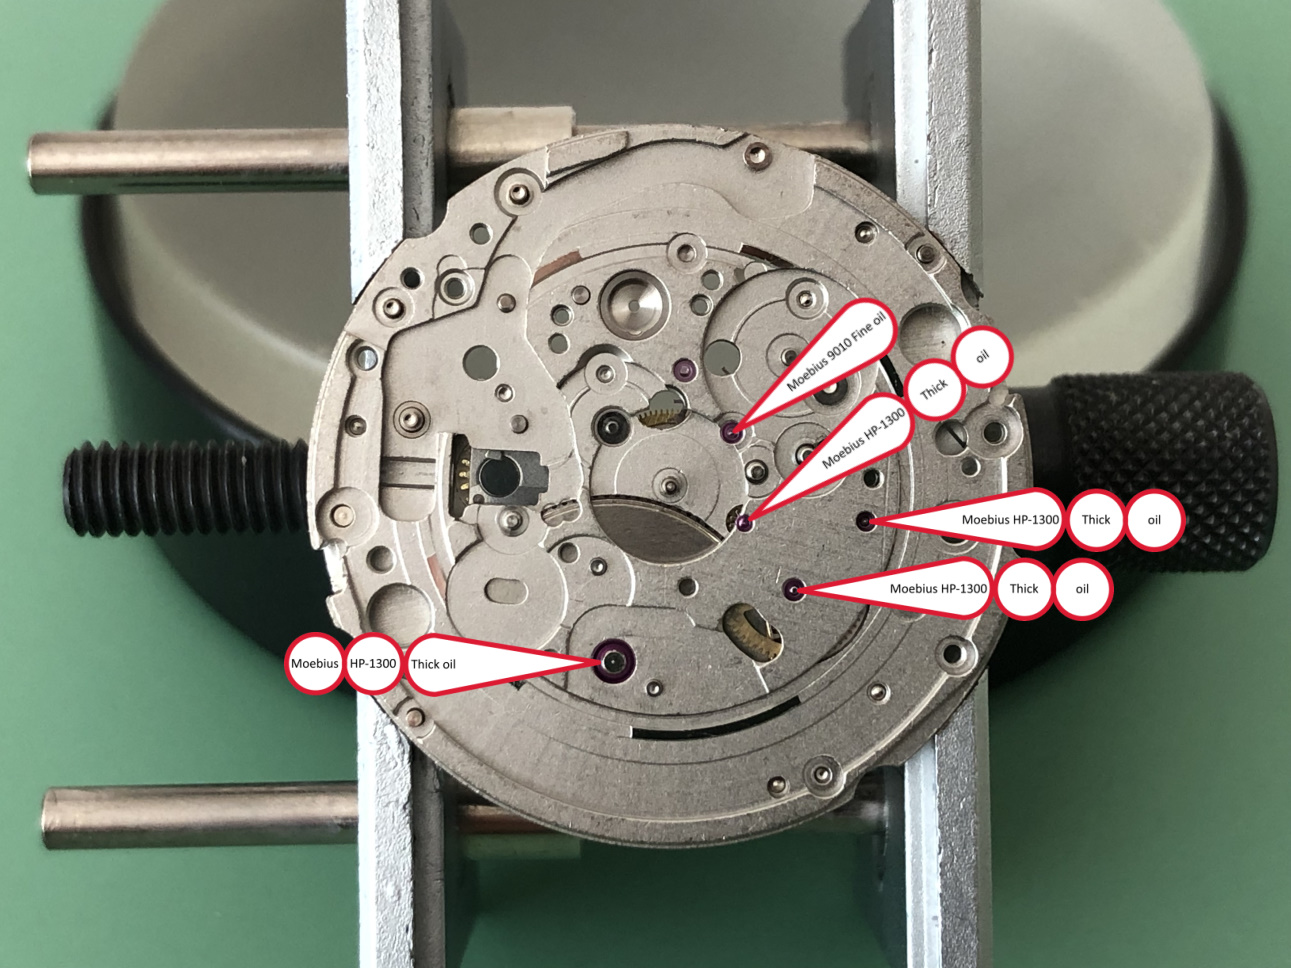
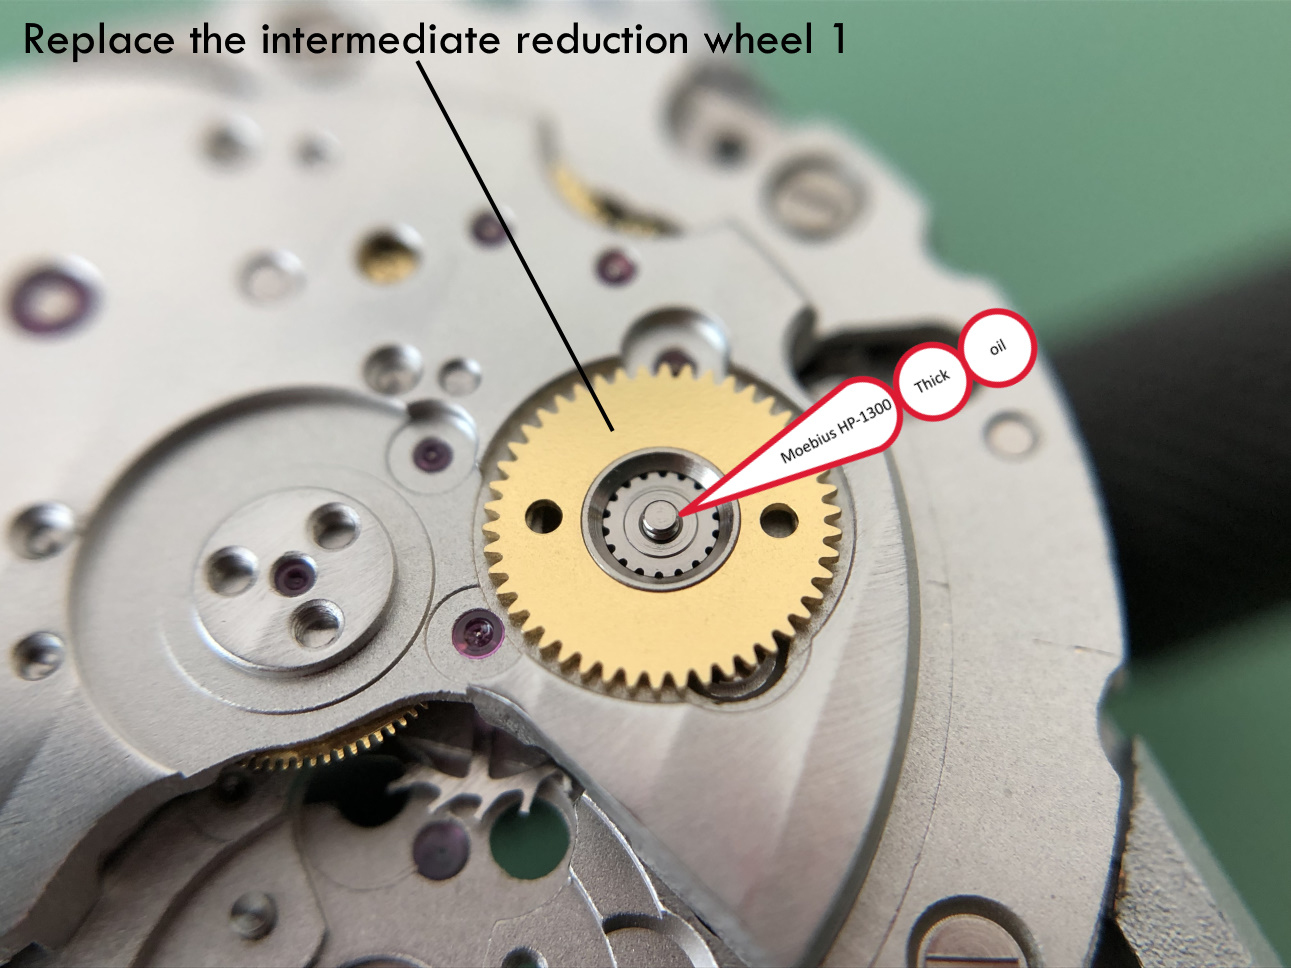
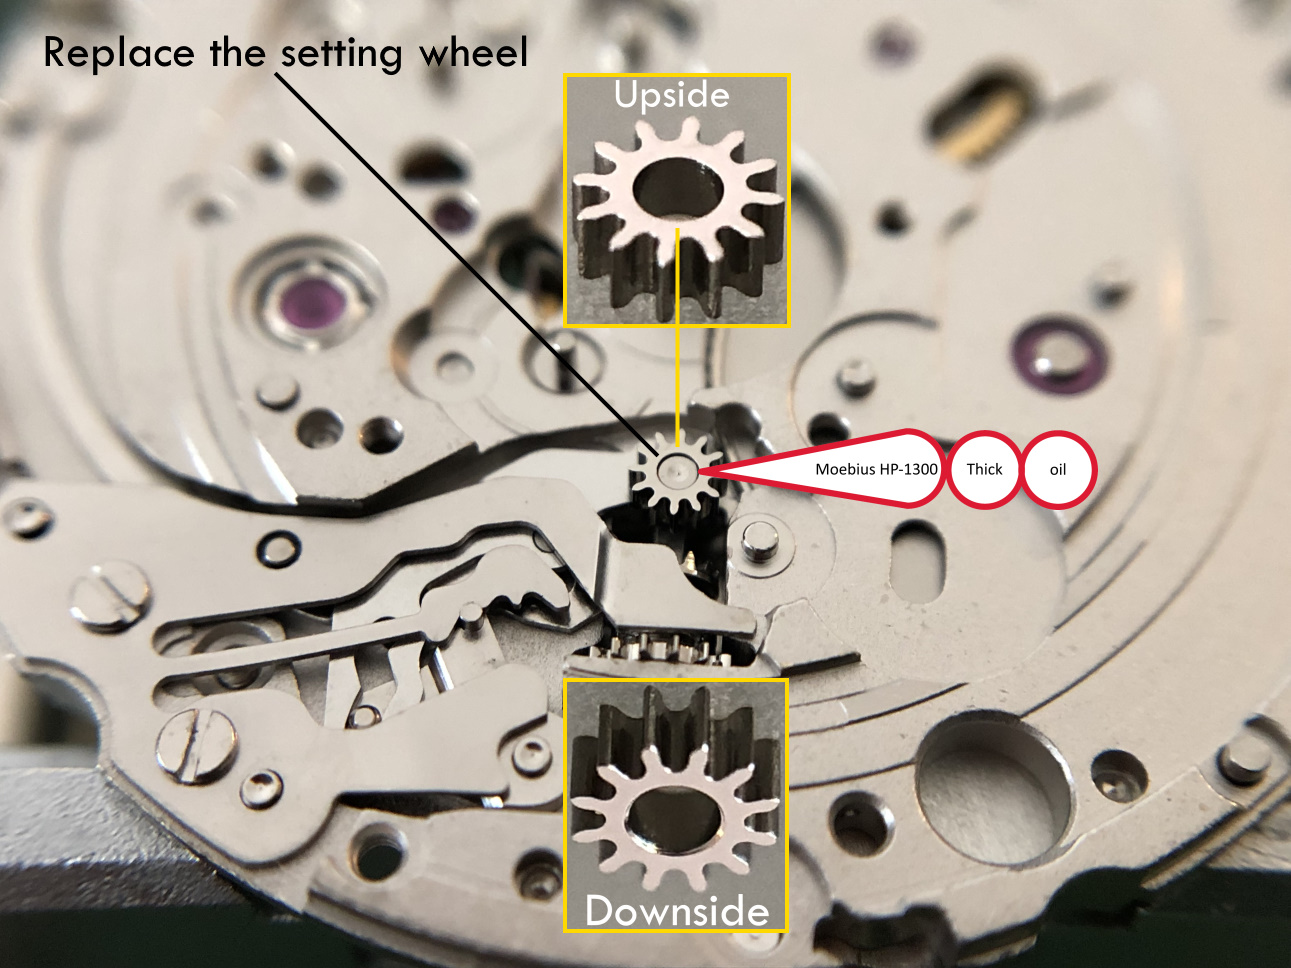
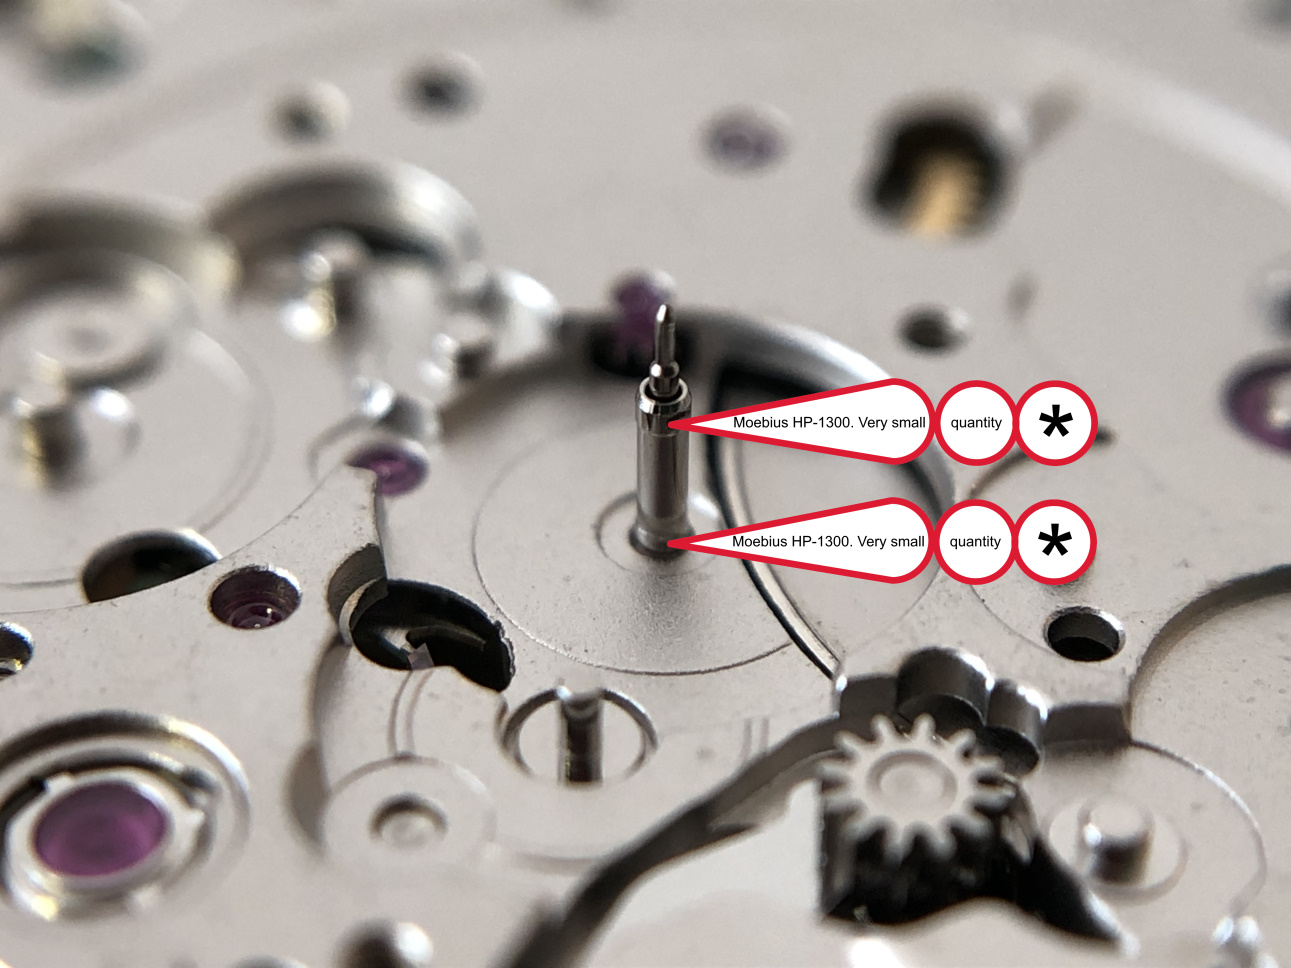
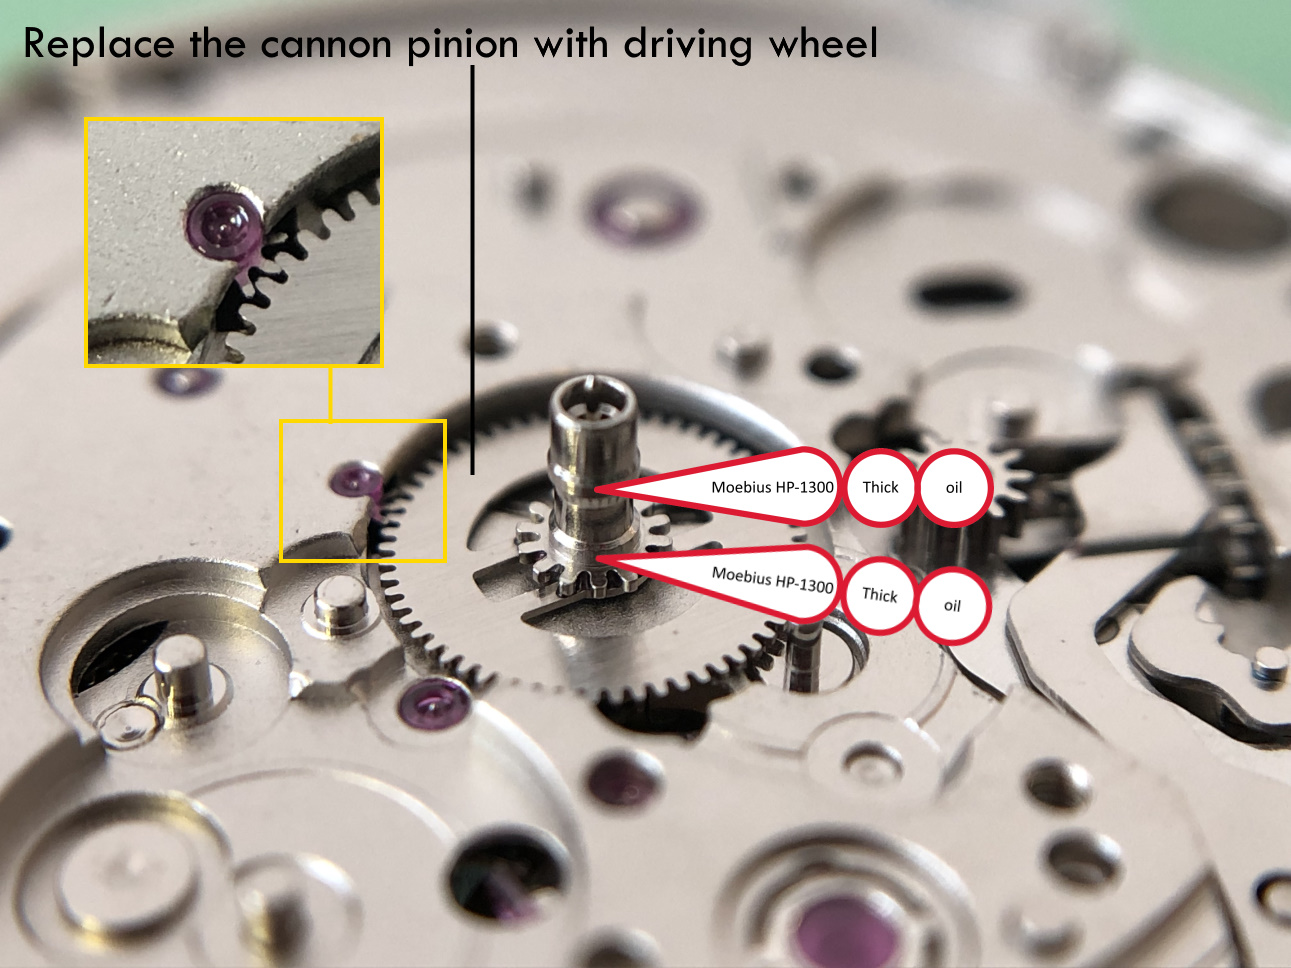
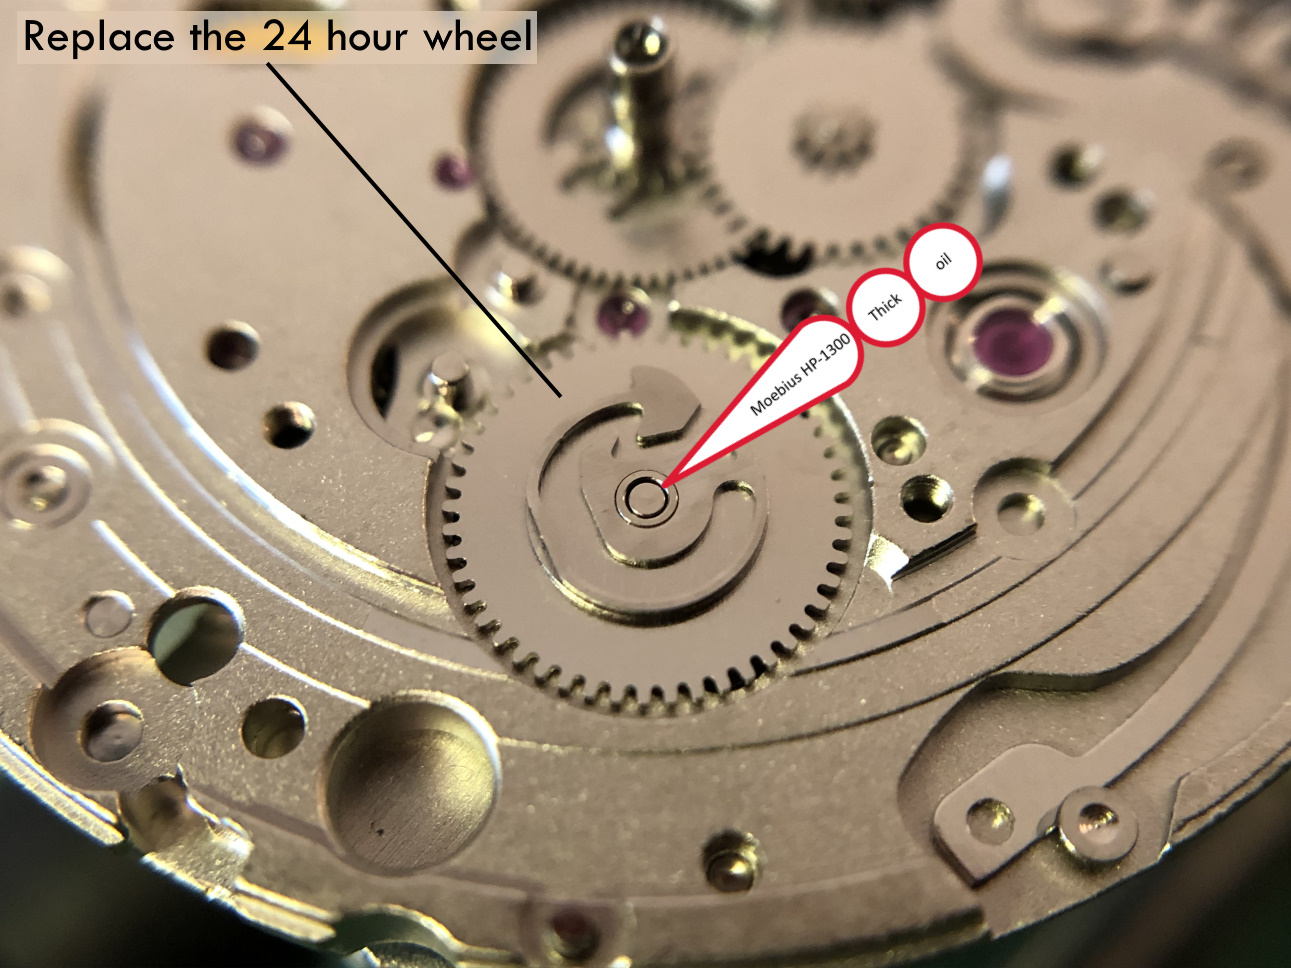
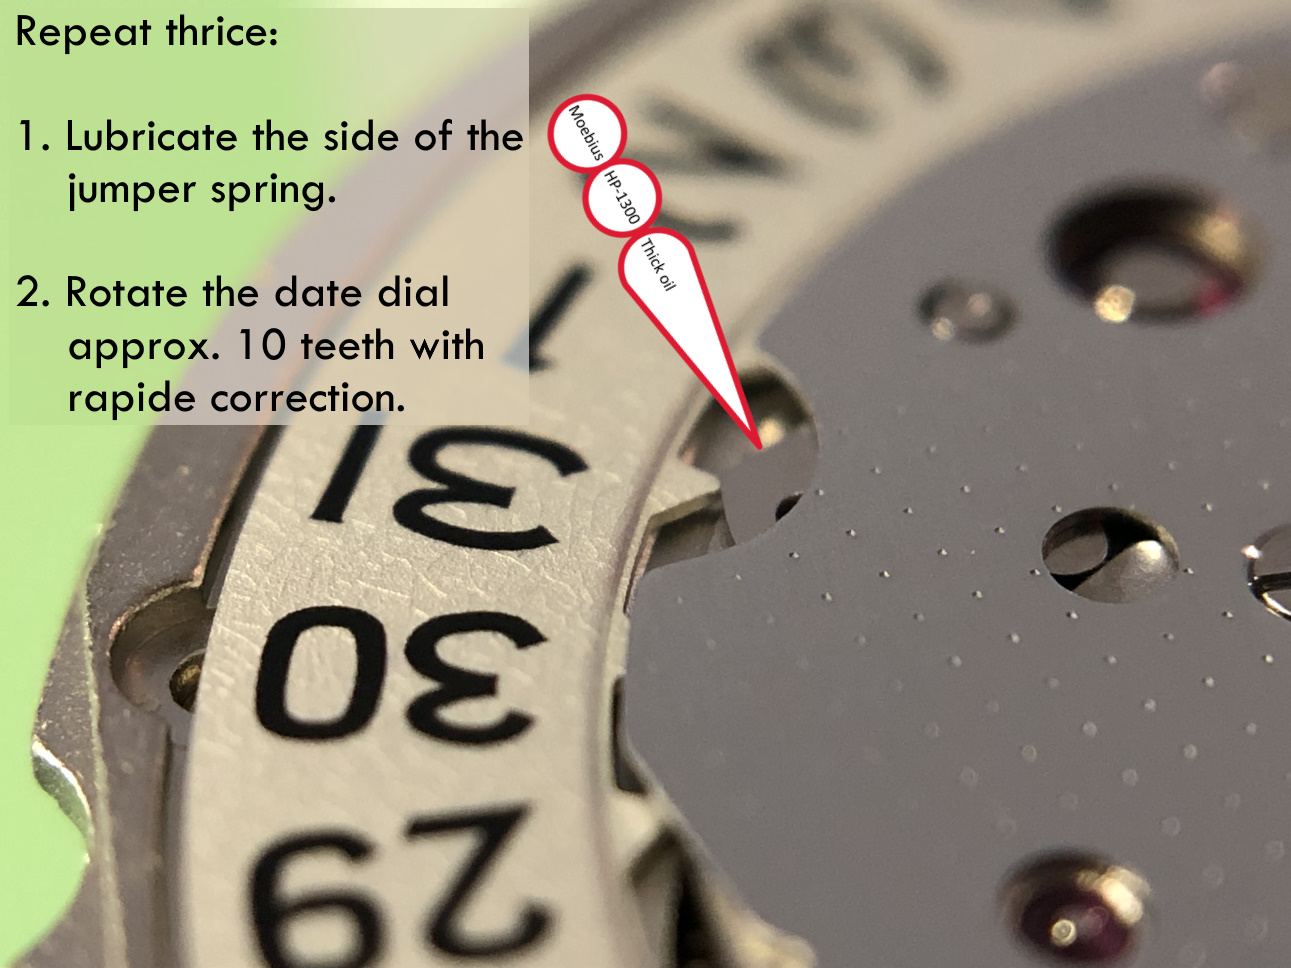
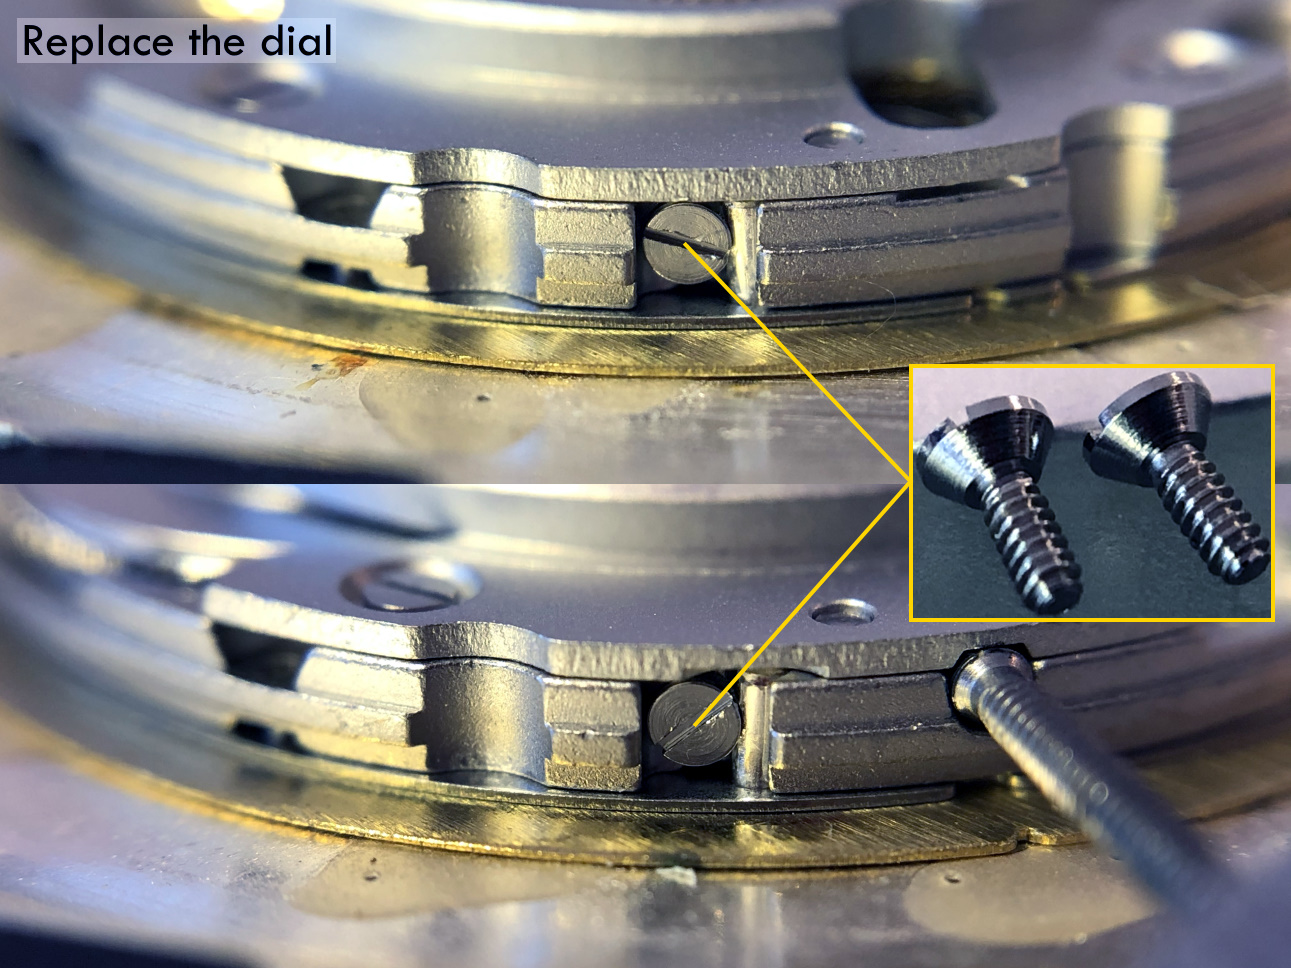
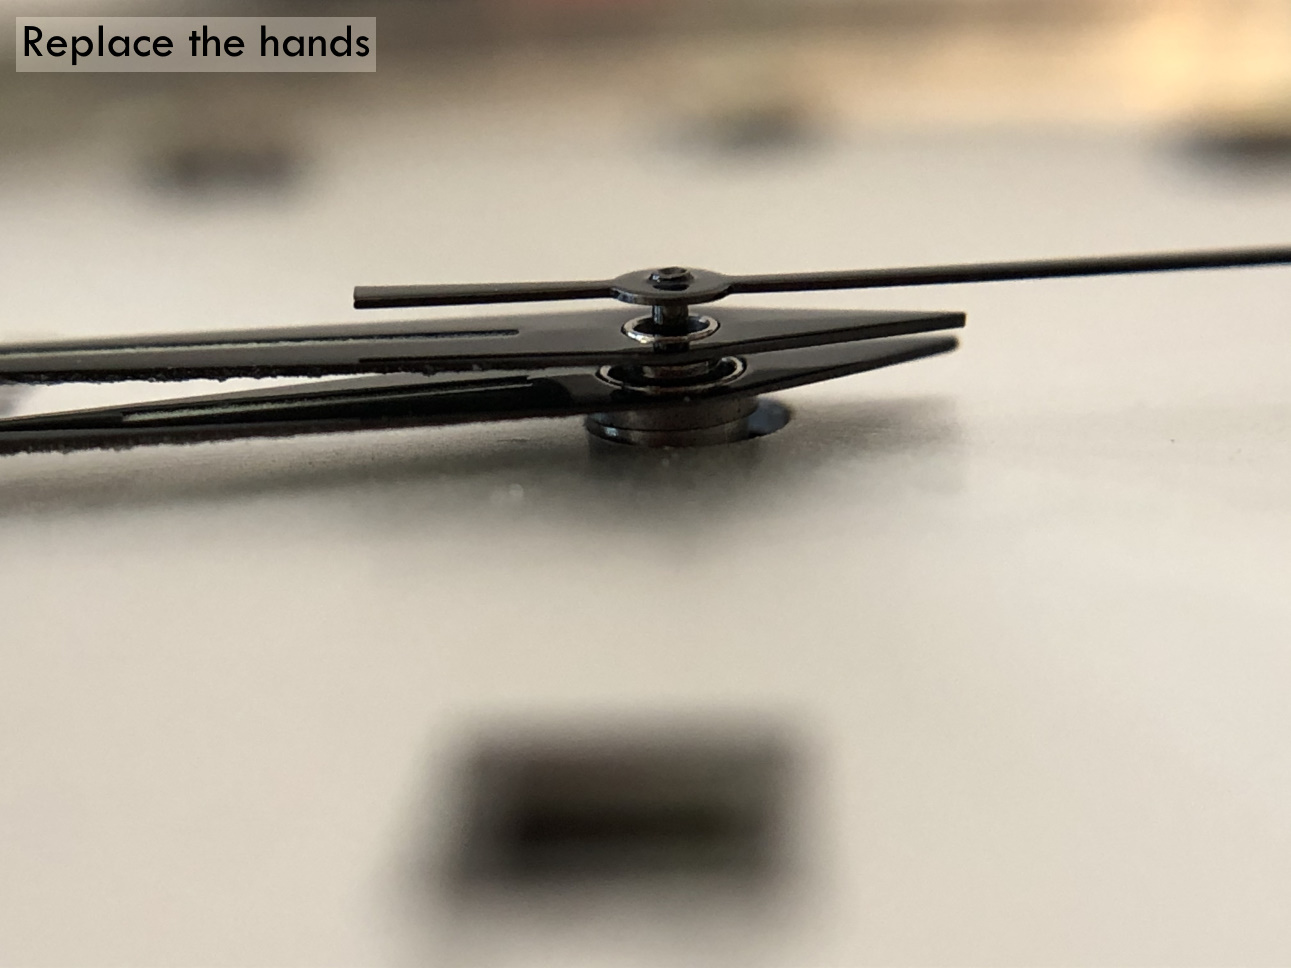
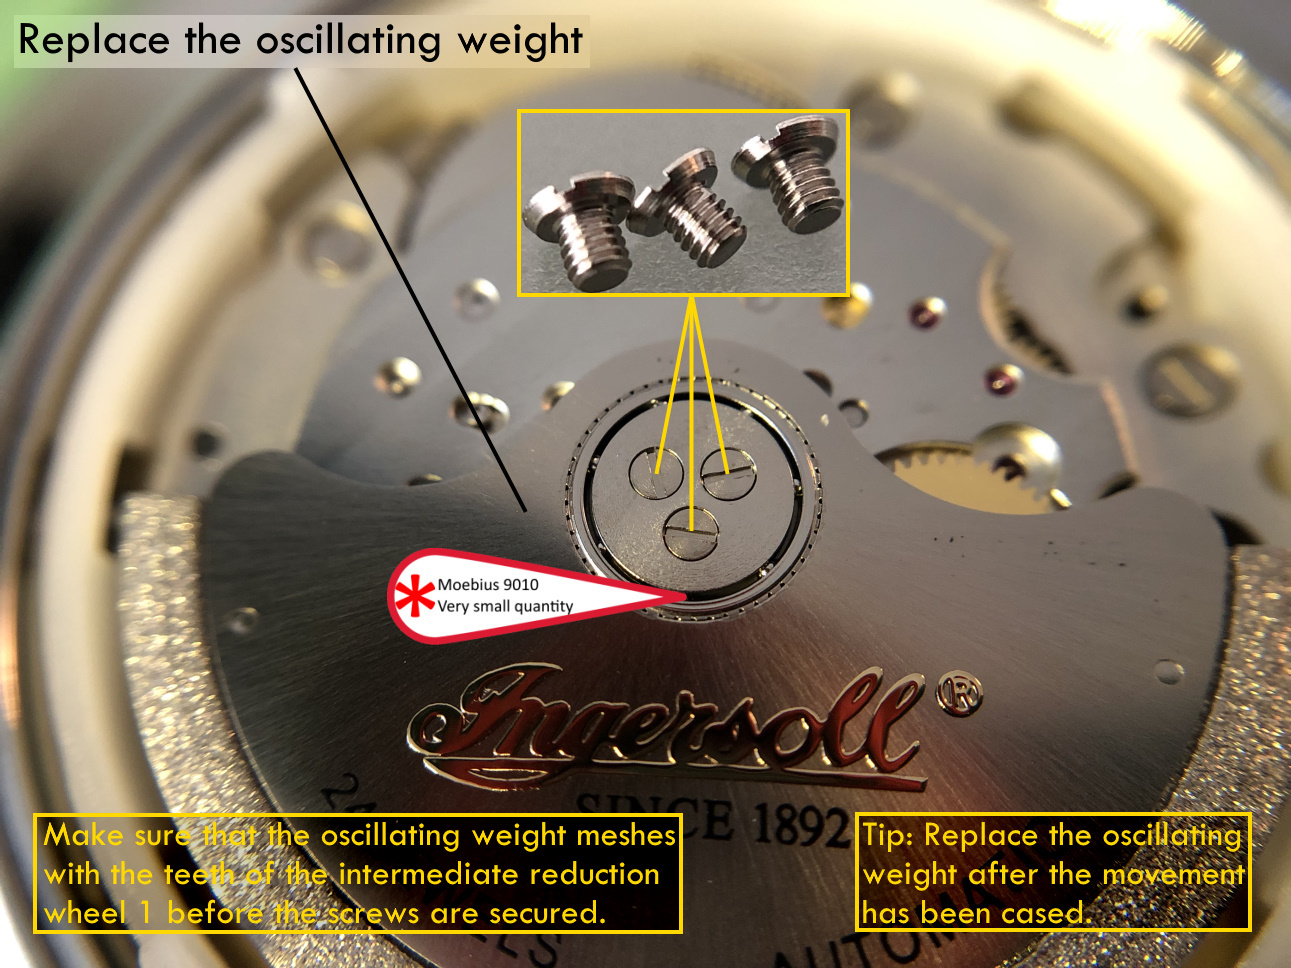
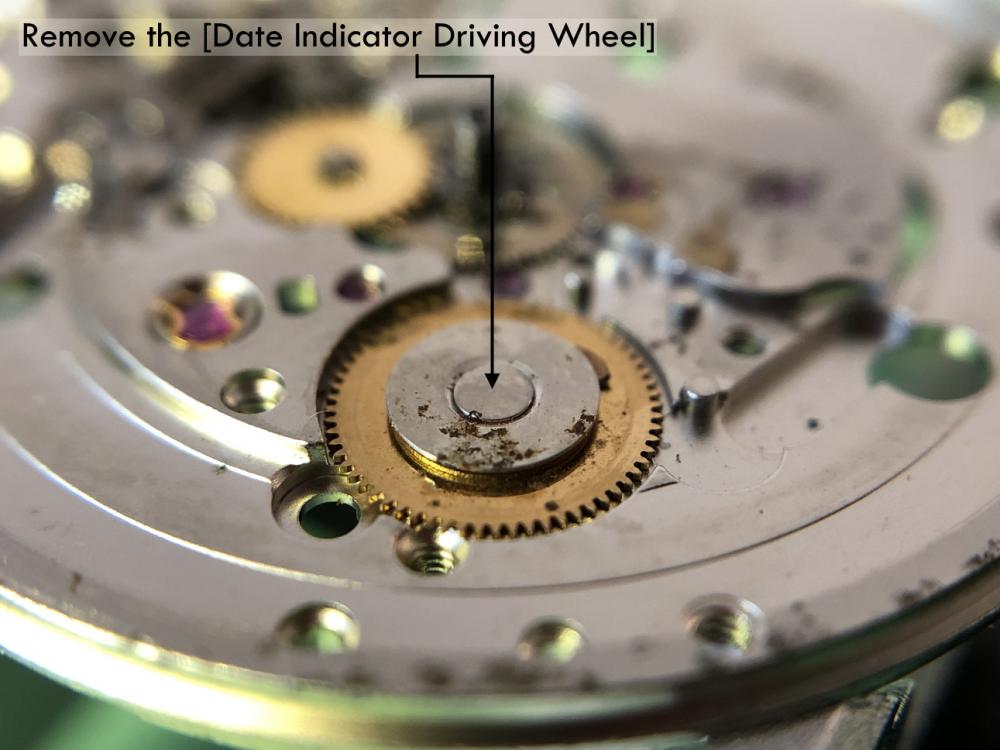
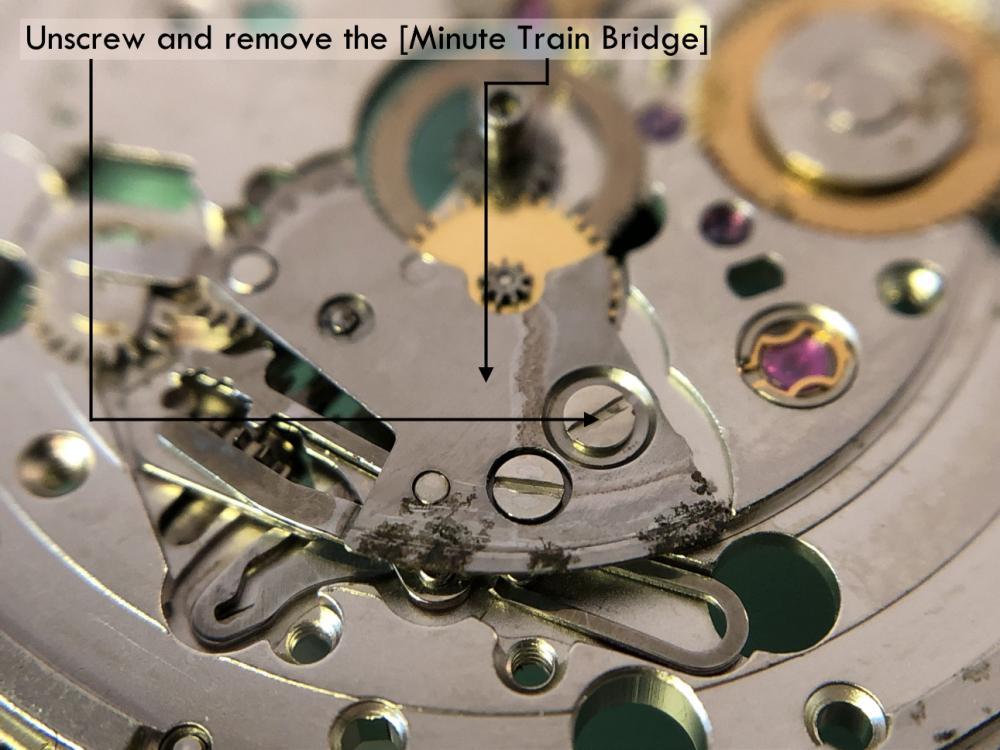
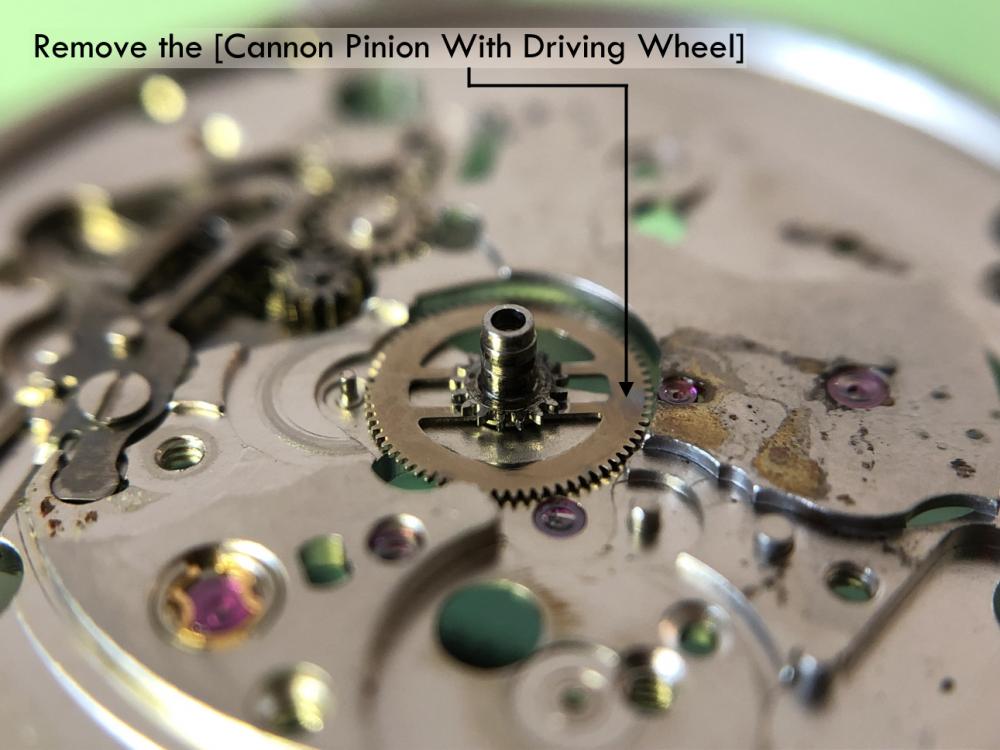
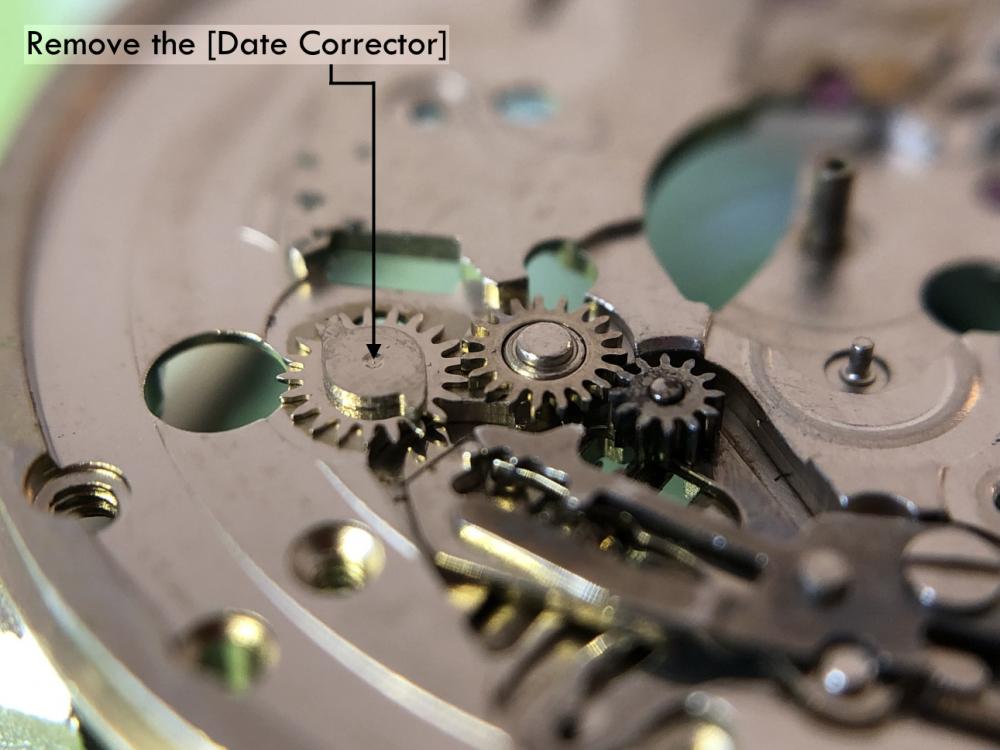
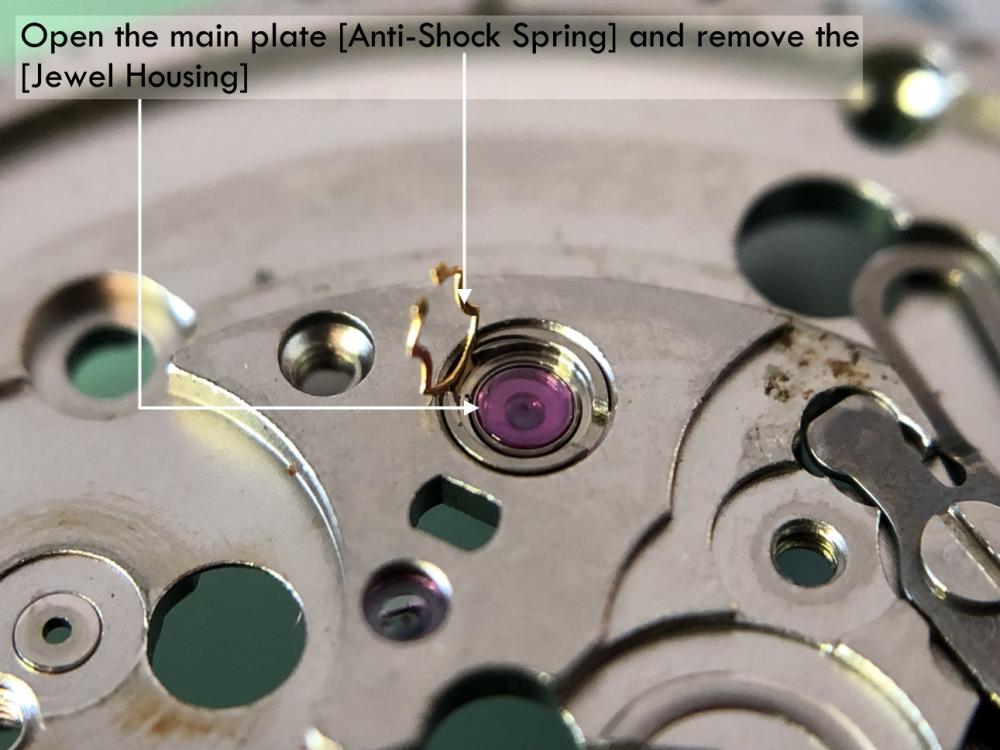
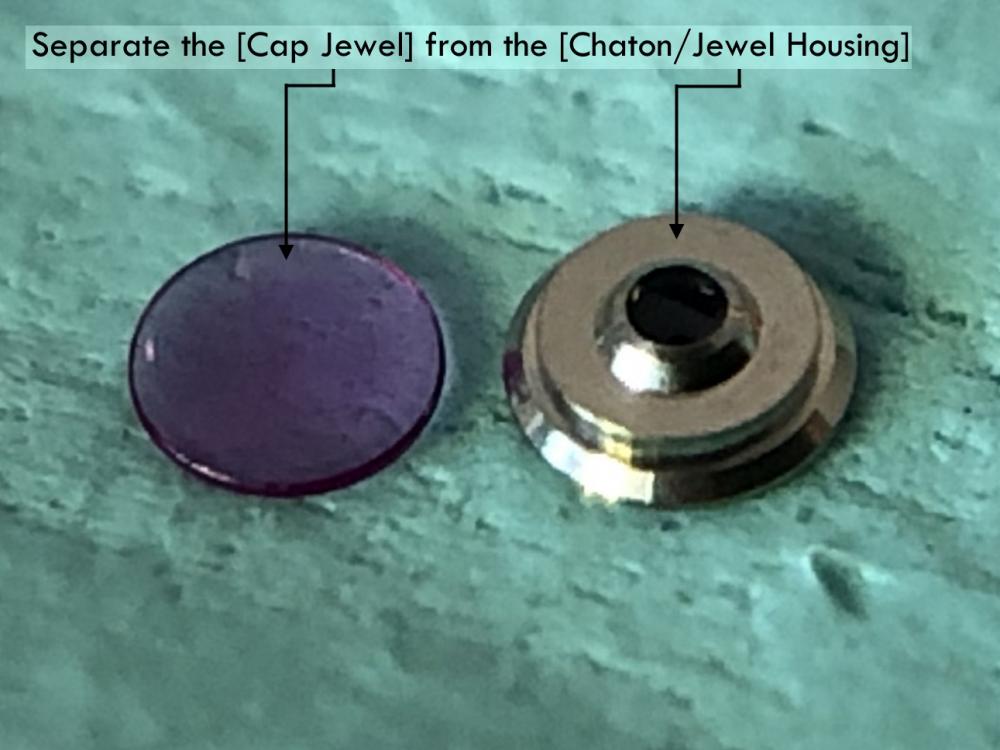
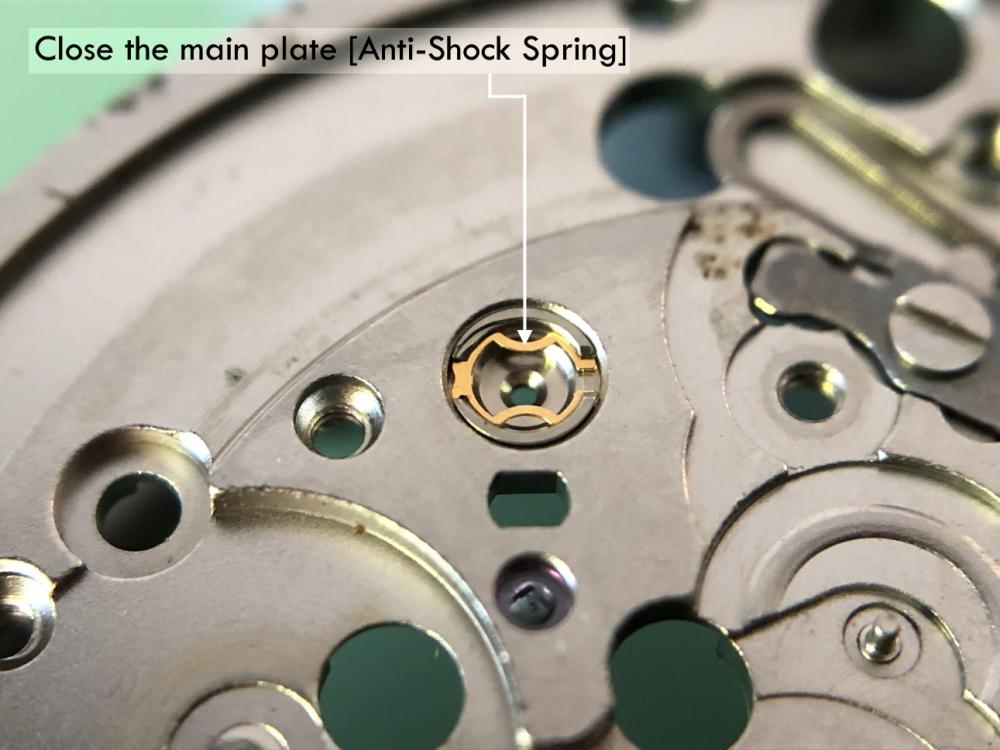
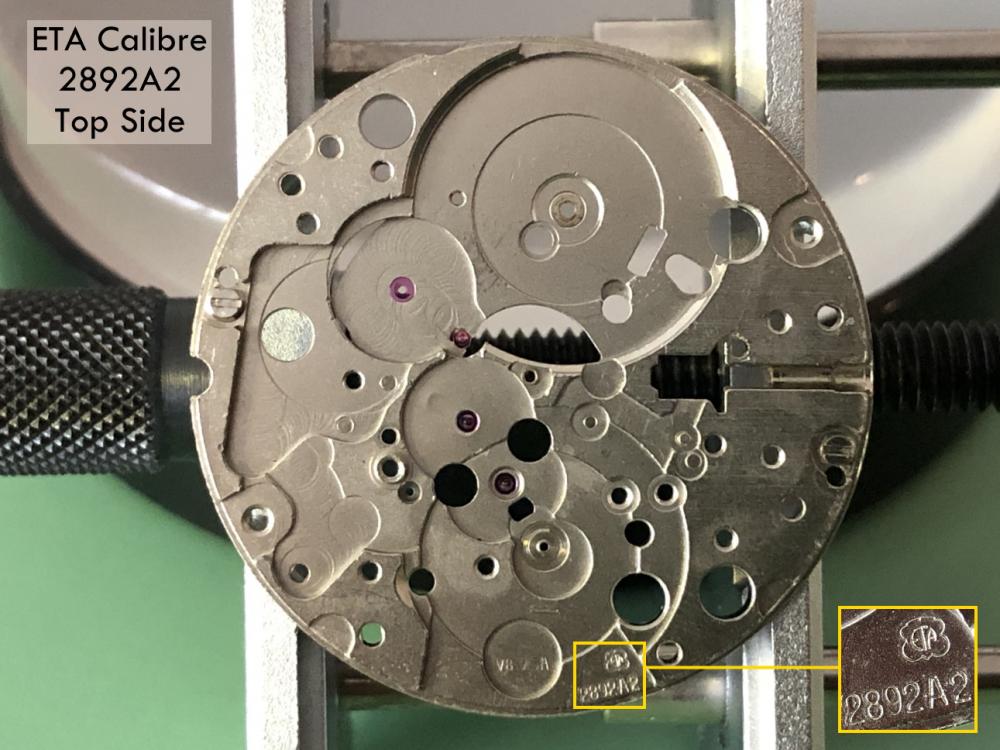
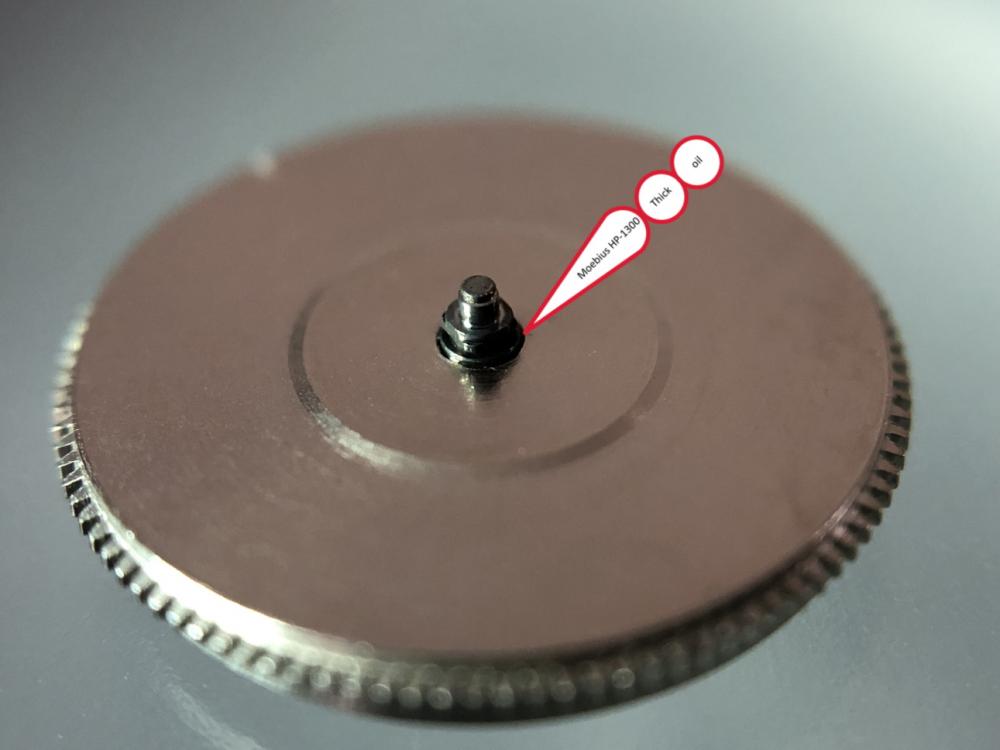
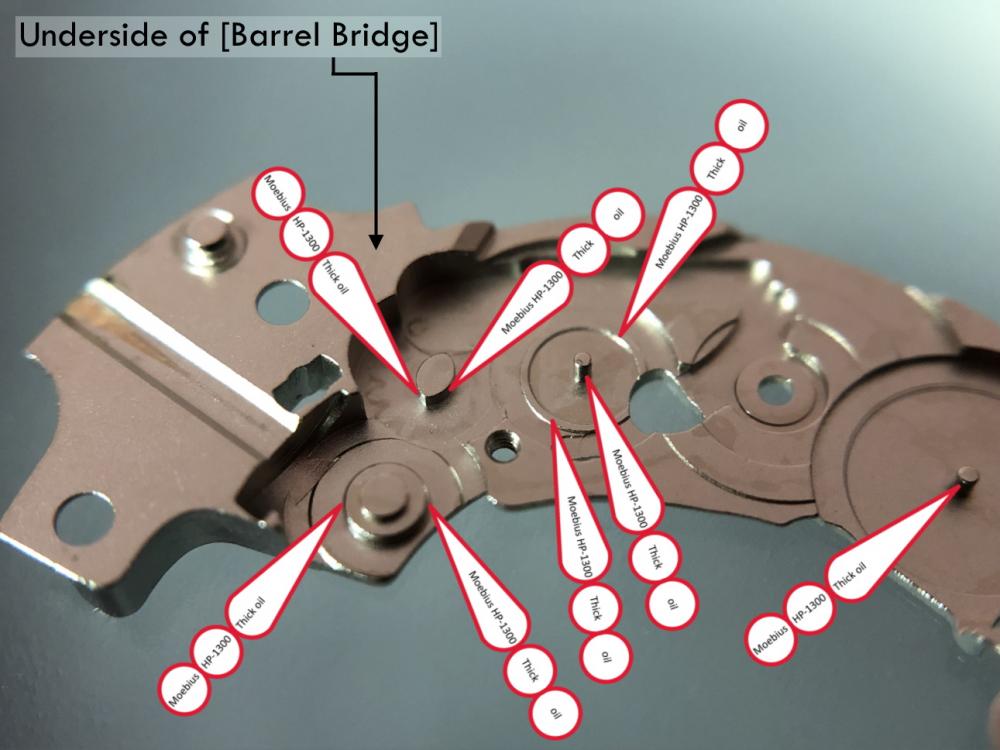
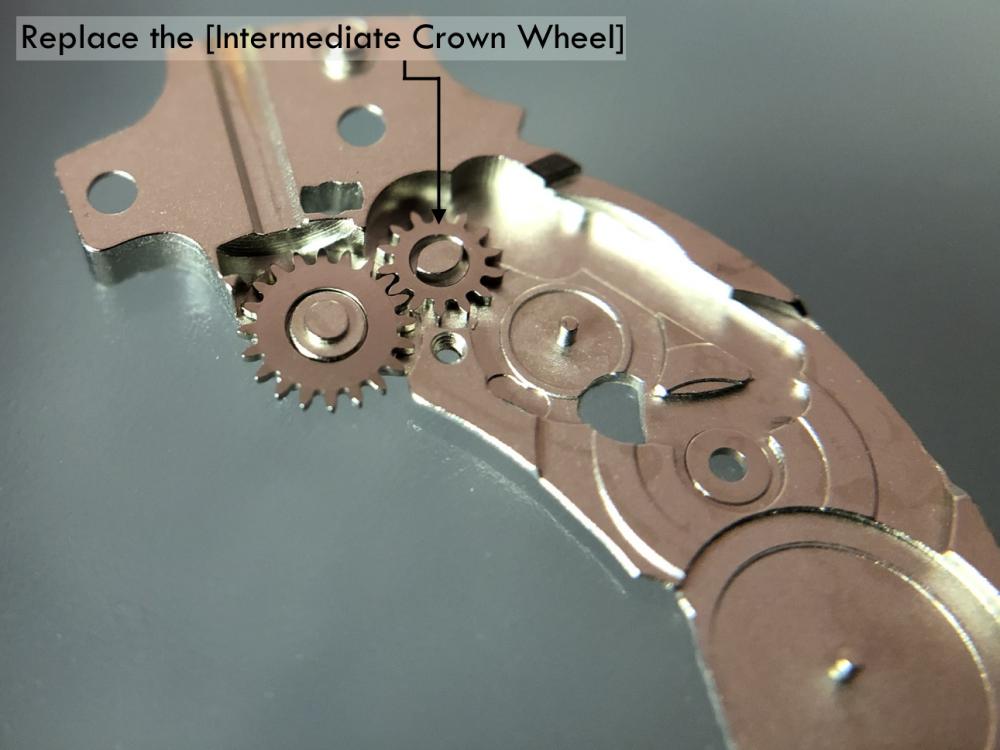
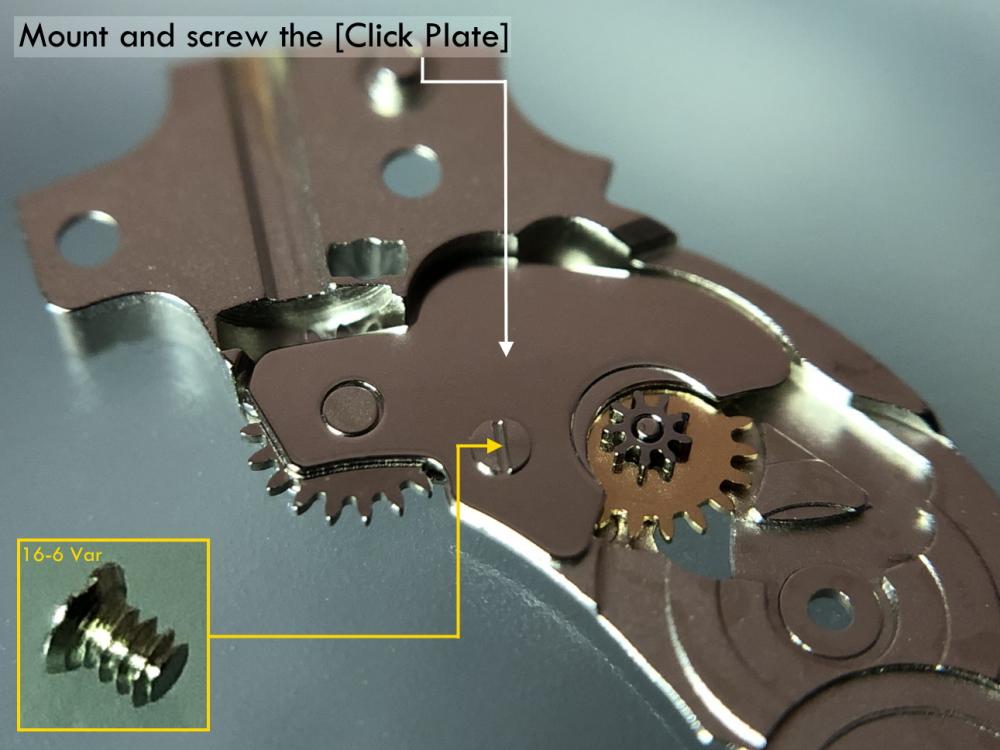
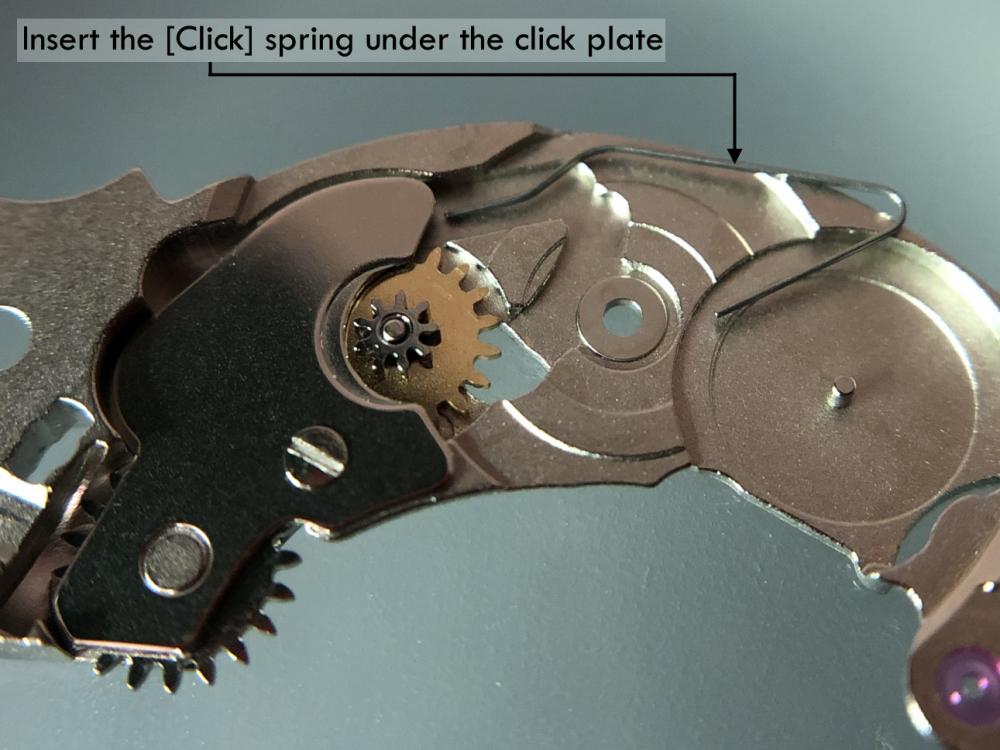
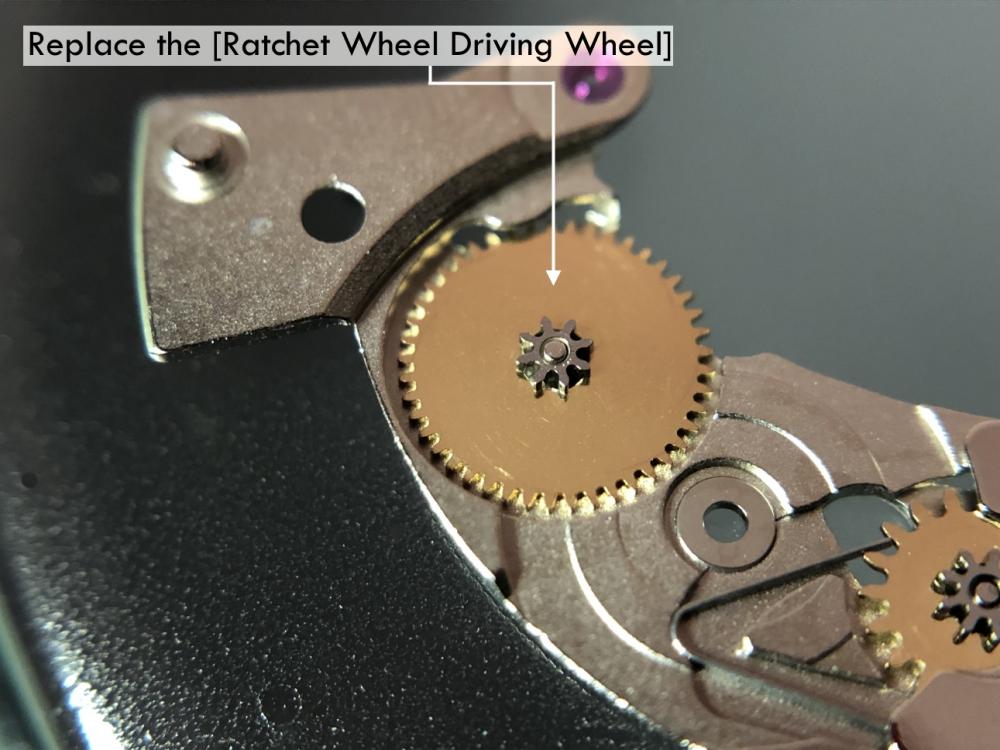
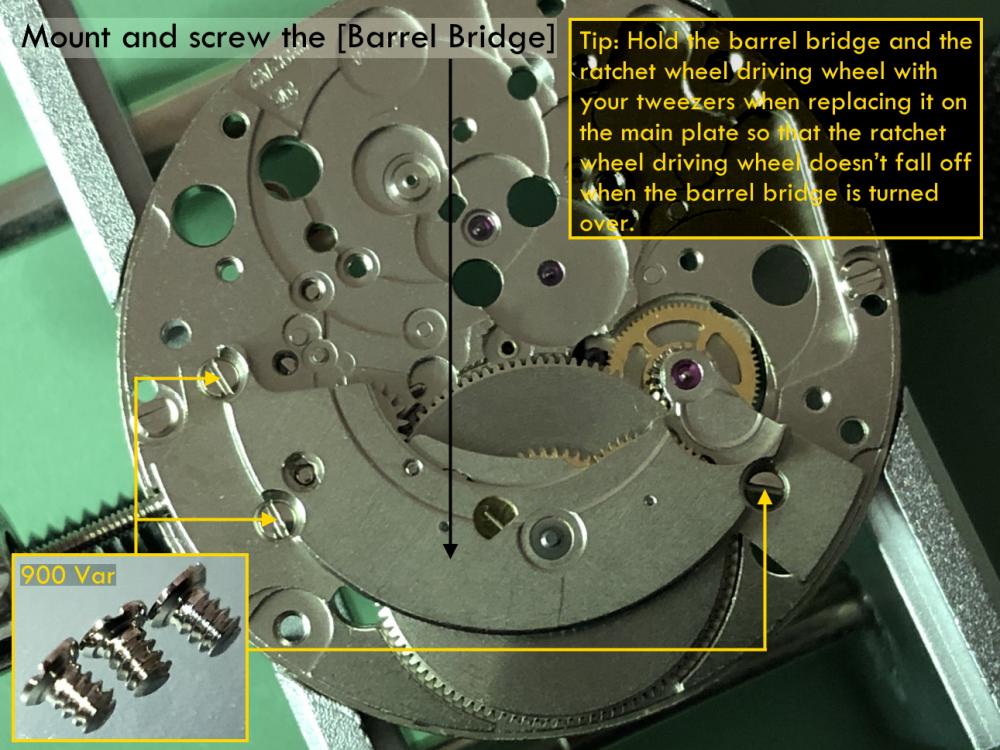
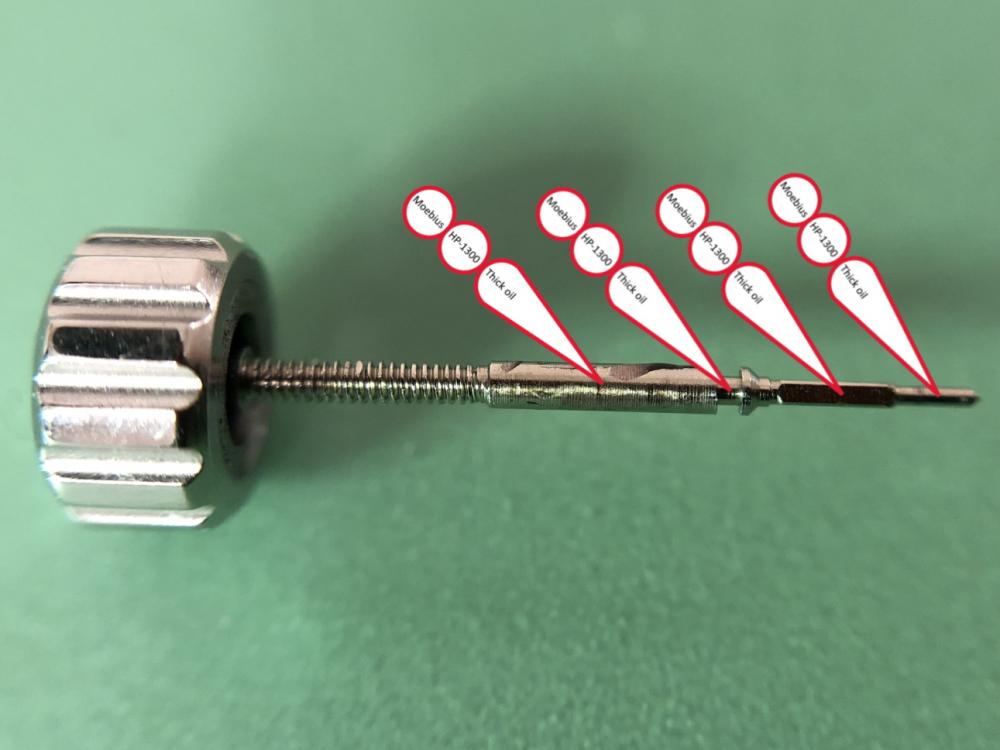
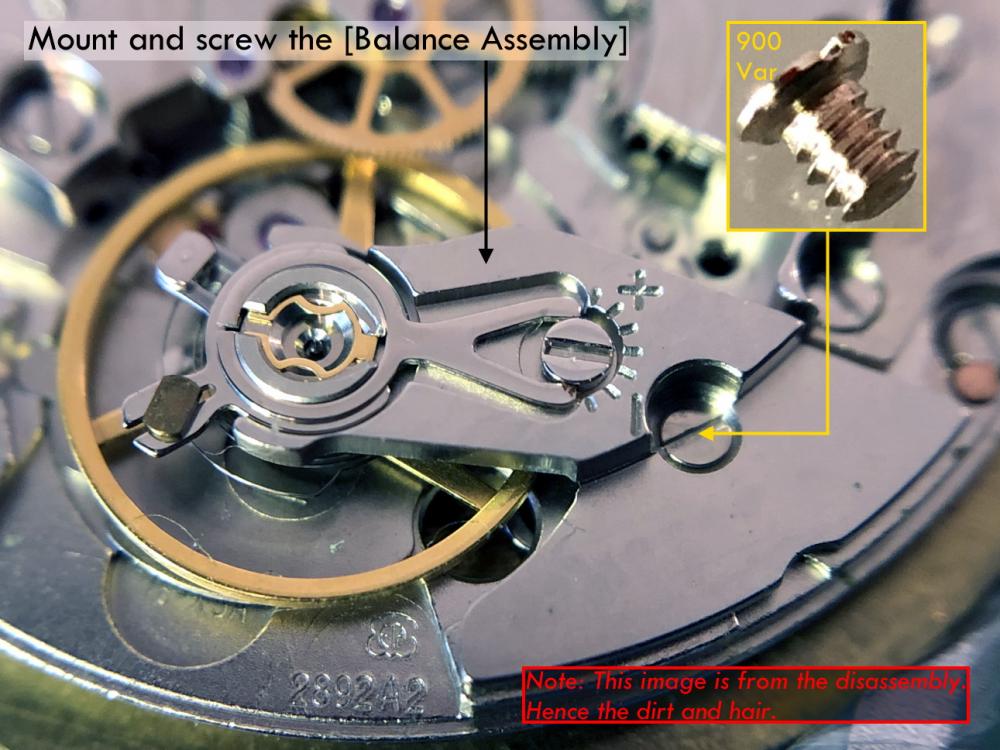
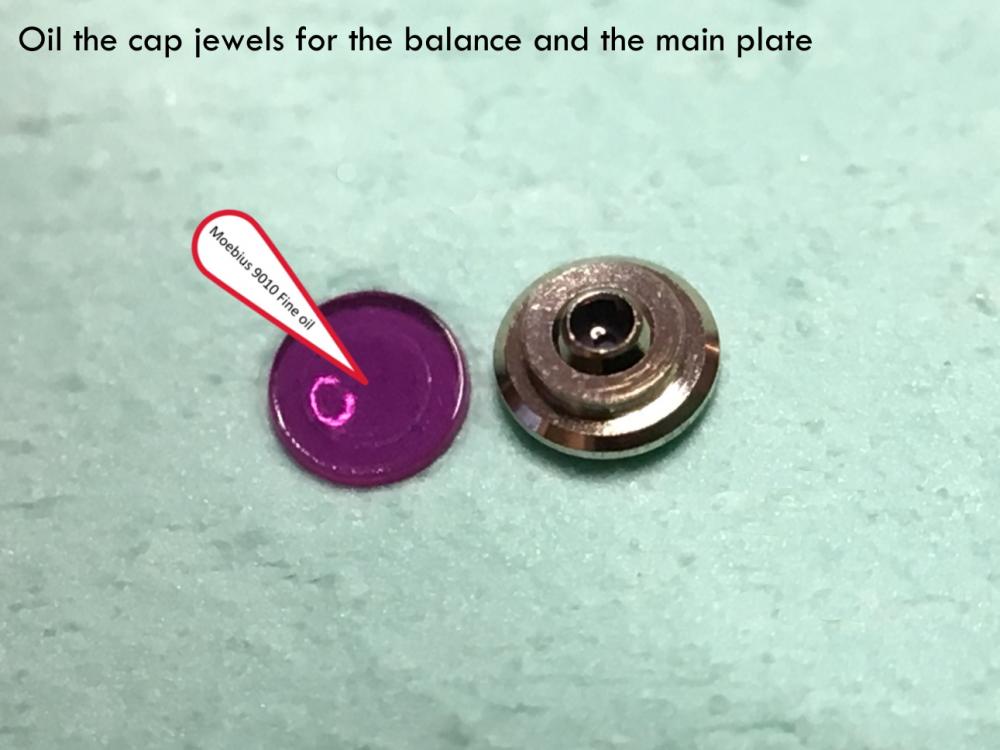
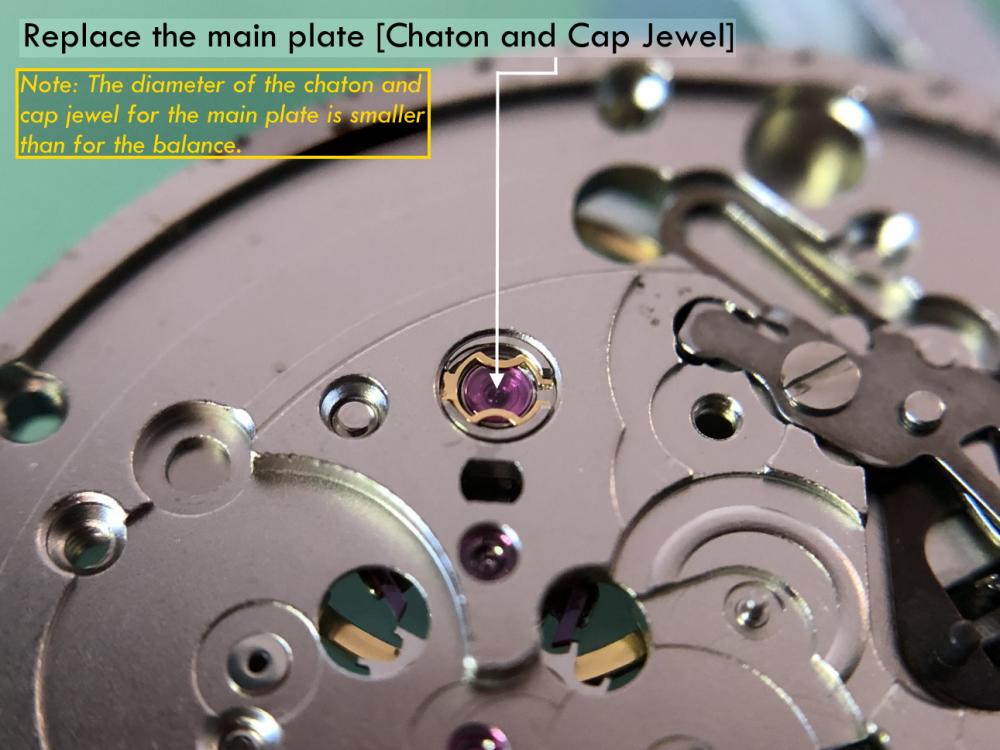
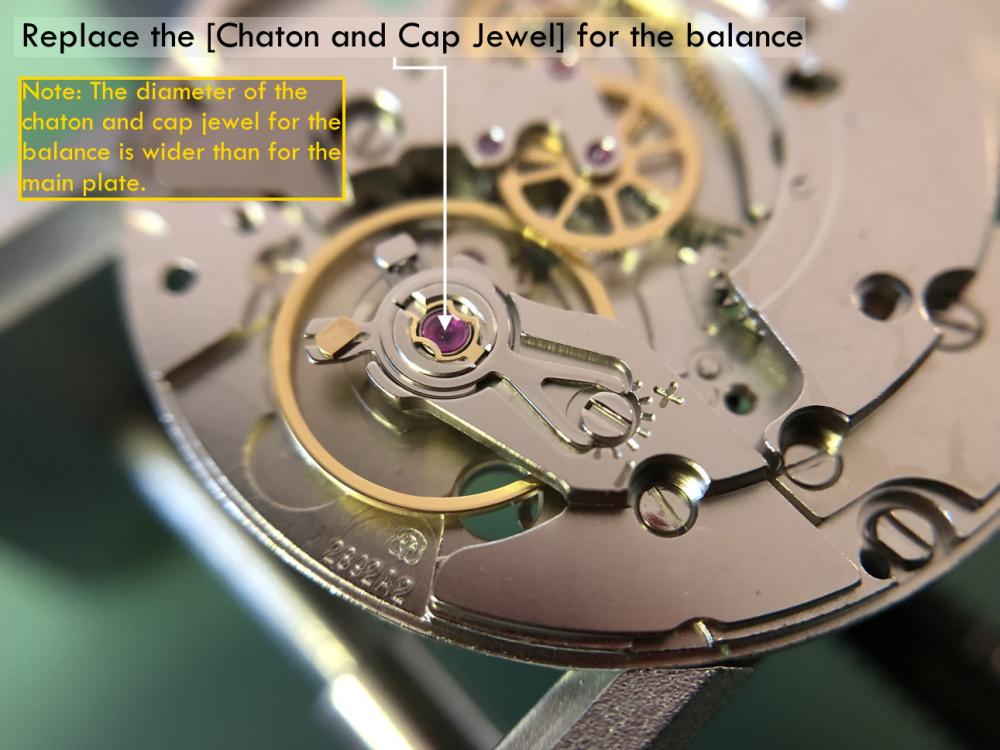
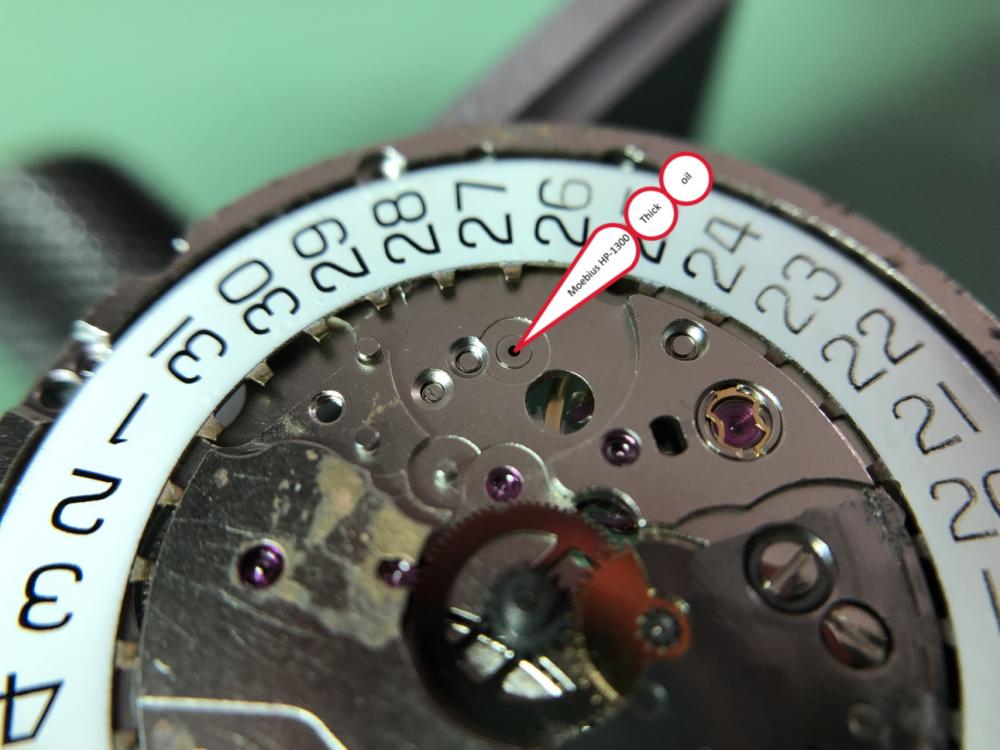
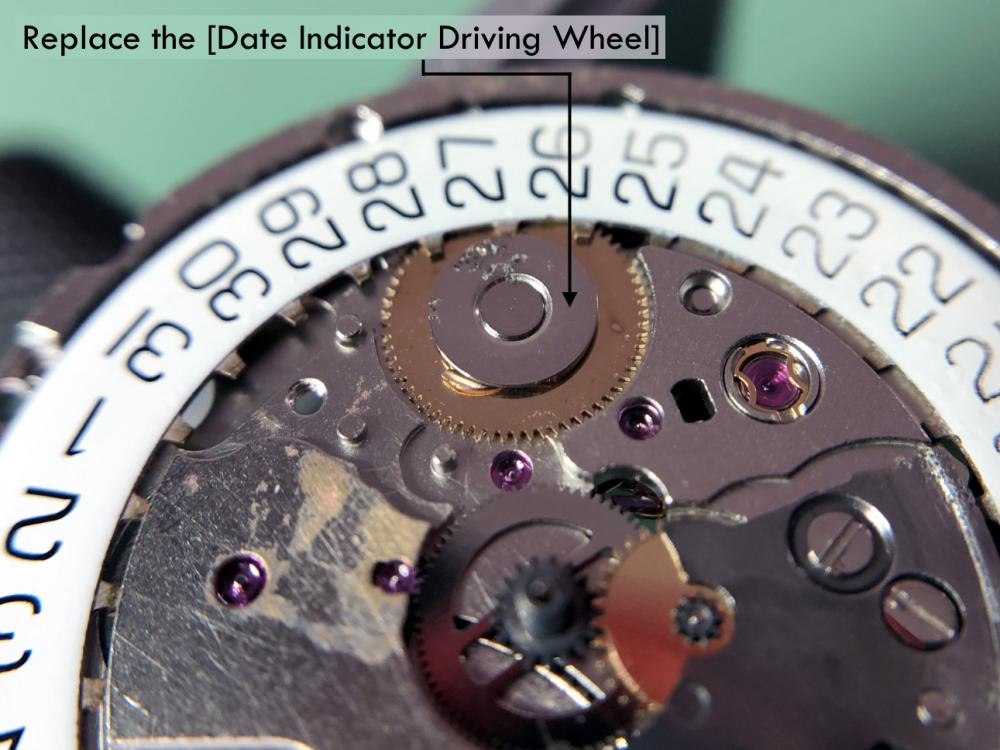
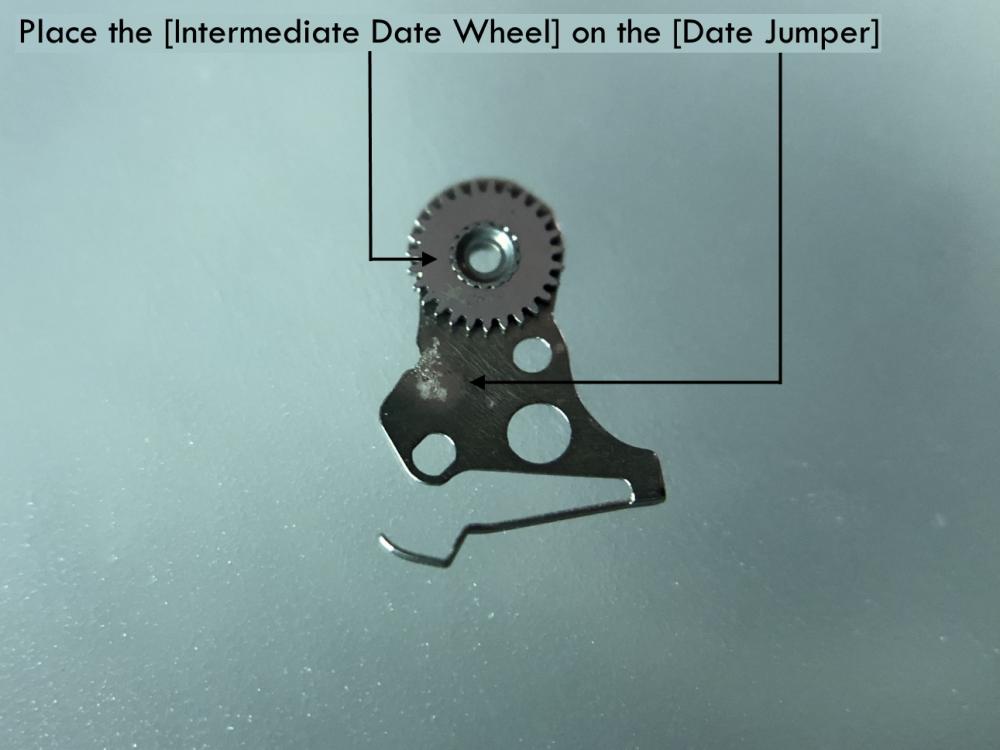
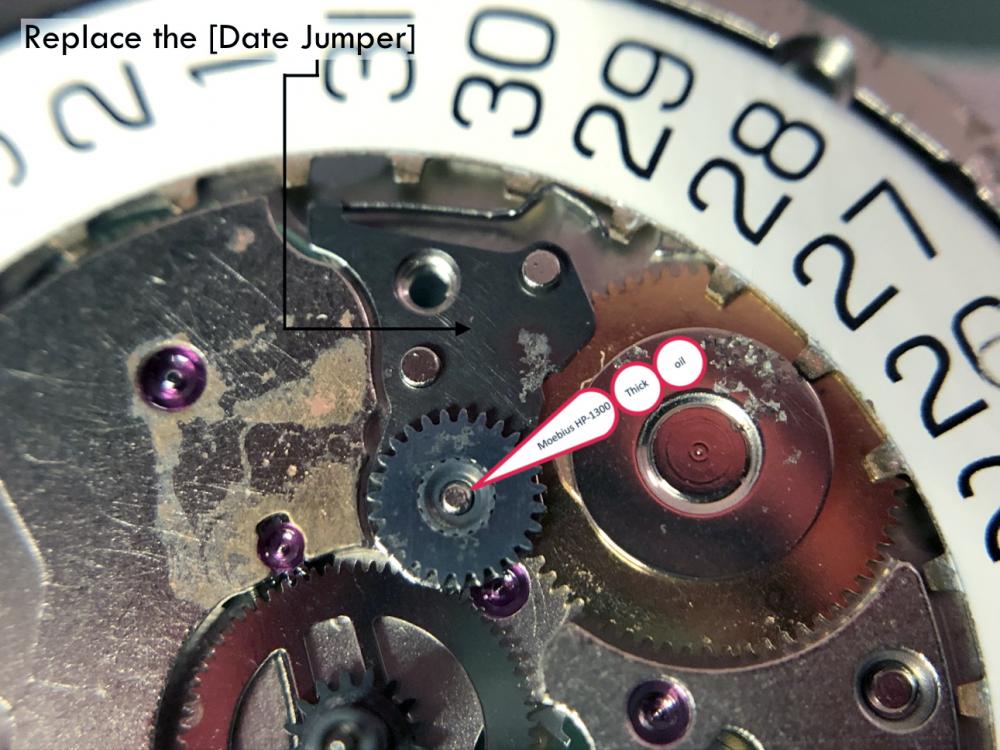
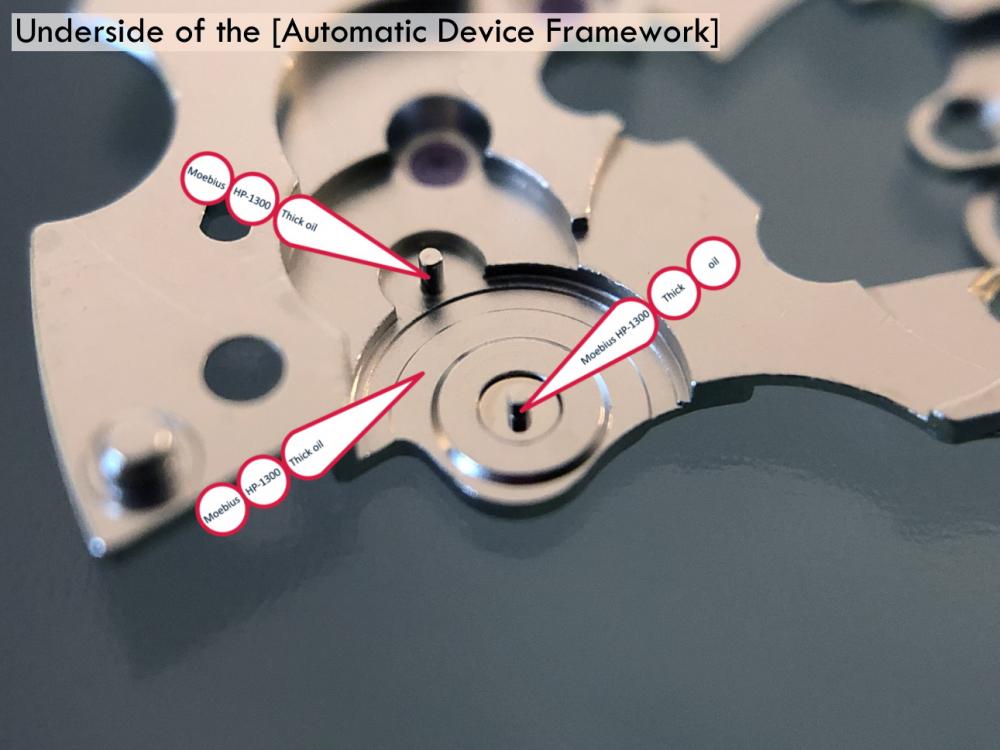
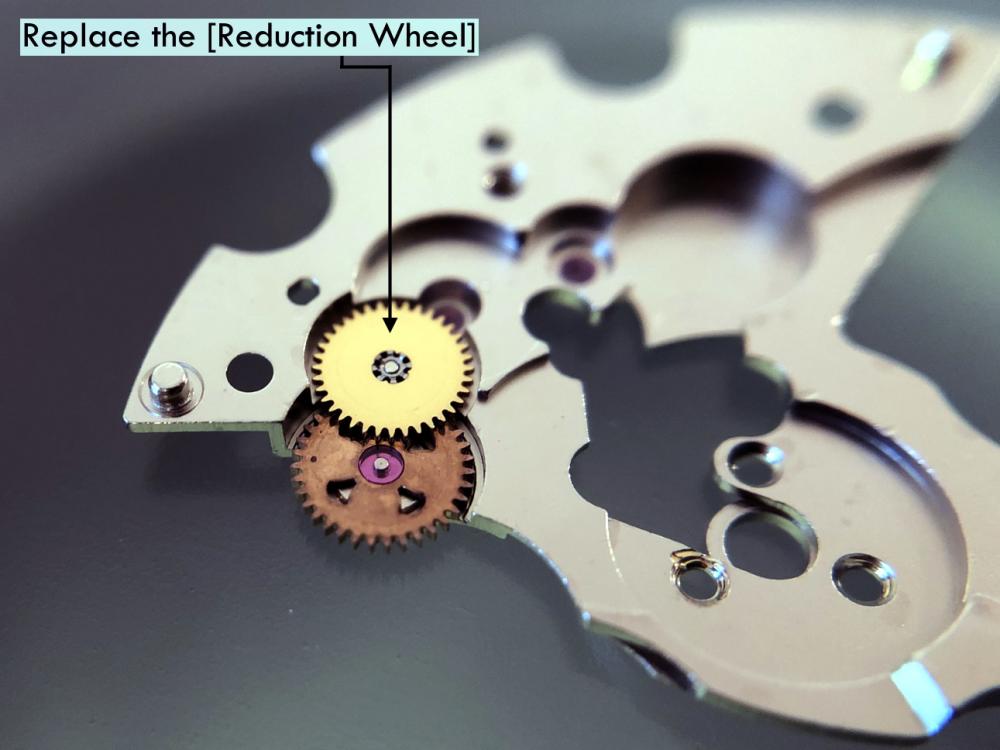
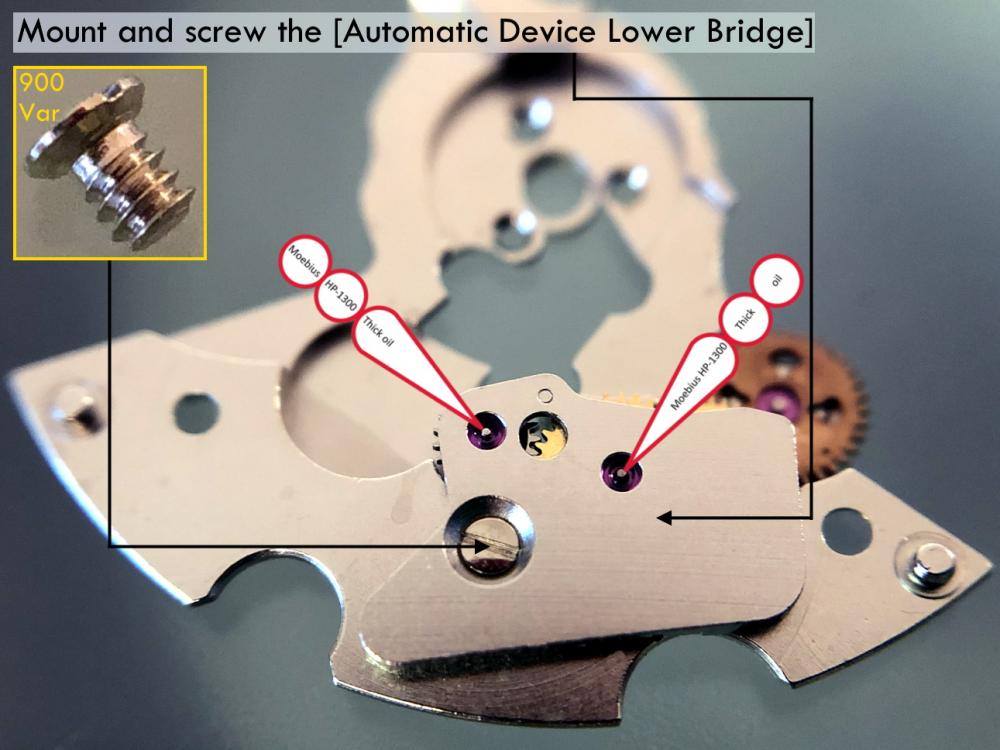
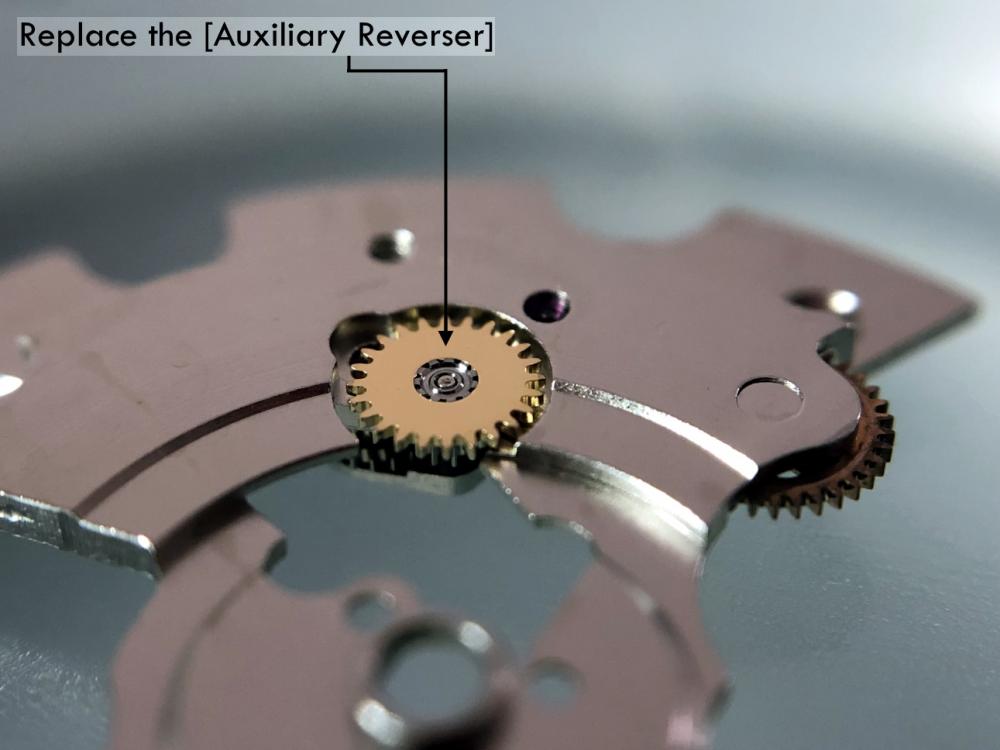
It is my impression that ETA's calibre 2892-A2 is usually found in more expensive watches and in luxury watches where oftentimes the movement has been modified. Mechanically, I don't think the 2892-A2 is superior to ETA’s classic 2824-2. Both movements have the same diameter (11 ½´´´ Ø 25.60 mm), the same frequency (28’800 A/h), and the same date complication. The decisive difference is the thickness where the 2892-A2 is one-millimetre thinner (3.6mm). That, combined with being a reliable and well-functioning movement, has made it popular for additional complications and alterations such as moon phase, power reserve display, co-axial escapement, chronograph modules from Dubois Depraz, and so on. The Swiss Sellita Calibre SW300-1 is, as far as I understand, an excellent clone of the 2892-A2. There is also a Chinese clone, the Seagull Calibre ST1812 (reviewed by @Markin the video “Chinese eta 2892-A2 Clone - Service and Review - Seagull ST1812”), and possibly others. Mark has made a playlist of videos that excellently demonstrate how to service the ETA 2892-A2 movement. The playlist is named: "Omega 2500 Co-Axial Stripdown and Service (ETA 2892-A2)" I recommend Mark’s playlist for several reasons. Among other things, he shows how to mount the barrel bridge safely and how to hold the minute train bridge with your tweezers to easily get it into place on the main plate (which I found a bit fiddly). In addition, he shows and compares the parts that are all too easy to mix up. One thing that is not shown in Mark's service video is that the Incabloc setting (chaton and cap jewel) for the balance and the main plate have different diameters. The main plate Incabloc setting diameter is smaller than that of the balance. The reason this is not shown in the video is probably that Mark removes, cleans, and lubricates the Incabloc settings one at a time after he reassembles the balance, so he wouldn’t notice. Anyway, don't mix up the two sets! Something that I appreciate about Mark's videos in general and that sets him apart from basically all other watch repairers on YouTube is that he doesn't continuously babble in his videos but mainly talks to make clarifications. I enjoy those segments of silence where I can just focus on the work being done. When I started my service, I decided to follow Mark's disassembly which worked perfectly. But for the assembly, I made up my mind to follow ETA's technical documentation to the letter. It turned out to be a mistake. In ETA's documentation, the assembly of the movement begins with the keyless works, then the train of wheels and then the barrel bridge. The crucial problem with this arrangement is that it is physically impossible to mount the barrel bridge if the train of wheels is already mounted. It is also very fiddly and difficult to baste the end of the winding stem into the winding pinion hole because the hole for the winding stem in the main plate is both open and tapered and therefore does not hold the winding stem. Mark takes a considerably more hands-on approach. He begins the assembly with the barrel bridge. He then mounts the keyless works whose constituent parts (the winding stem, the winding pinion, and the sliding pinion) are supported by the underside of the barrel bridge, making it considerably easier to get the keyless works in place. After I revised my strategy, this service walkthrough now follows Mark’s approach. It surprises me, but it seems like no watchmaker has proofread ETA's technical documentation. Alternatively, ETA follows an established practice and expects those using the documentation to understand that the assembly order in the document is not significant. I am also somewhat sceptical of ETA's recommendations regarding lubrication. Where we traditionally use grease, for example in the keyless works, ETA chooses mainly oil (HP-1300). I guess that ETA treats all parts of the movement with epilame (Fixodrop) and that oil may then be a better alternative. For better or for worse, my service walkthrough follows ETA's lubrication recommendations. As usual, I would like to remind those of you with no previous experience in watch servicing that this service walkthrough should not be seen as a tutorial on how to service a watch movement. A lot of tools, consumables, training and know-how are required to succeed. Fortunately, there are several excellent resources and watchmaking schools online. When looking through the pictures you’ll see that a few screws and plates are either marred or have pits and grooves in them. None of this is my doing but is either the result of rust (that I removed) or the doings of a less scrupulous repairer than myself. Finally, someone may ask, “Why to bother to do a service walkthrough with pictures when there is such an excellent video?" The main answer to the question is that I find it interesting and fun, and I see it as a complement to Mark's service video. Using this walkthrough, you can quickly scroll through the pictures to read what the different parts are called and where and in what order they should go, what the screws to be used look like, and to read ETA's lubrication recommendations. So, I hope you’ll find this ETA 2892-A2 service walkthrough useful, now or in the future. *** ETA Calibre 2892-A2 Disassembly *** ' *** ETA Calibre 2892-A2 Assembly ***


 16 points
 -
You may have noticed a few changes - I have removed the Gallery section and the CMS pages app from the site as it costs too much to 'rent' those modules with comparatively very little use by members - it just did not make sense to keep them going. I apologise if this inconveniences or annoys anybody but I think it is better to keep the core of this website to be a discussion forum. The WRT website is costing me a lot of money per month to run and I am making a few changes to help with that - there is a little income from eBay affiliate ads but not enough to cover the cost of hosting and some help from Patrons and for this we are very grateful. The site has over 30GB in uploaded media now!!! And the notification emails generated is quite high too - I have to use a separate company to handle this so that the site doesn't get email black-listed. One of these services suddenly and without notice stopped our service a few months ago and it was a few days before anybody even noticed (password reset emails were no longer working). I did manage to find a new email provider and things have been running smoothly ever since. Getting back to the uploaded media, as mentioned it's over 30GB and this covers images in topics going back several years. I do back this up every night and I backup the site database every hour in order to protect the content should we ever have a disaster I have a Synology NAS here in the office which has a full backup on and I also keep a backup offsite on a cloud service. I have also decided to use Amazon Cloudfront to host all the uploaded media. I am in the process of migrating this content over and you may notice broken images for a very short period during the migration. But ultimately this will maintain and even improve performance of the site. Anyway, all being said, this is a fantastic community and I am fully committed to continuing with it's administration, keeping our little corner of the net alive - Just a little update to let you know what's happening -16 points
-
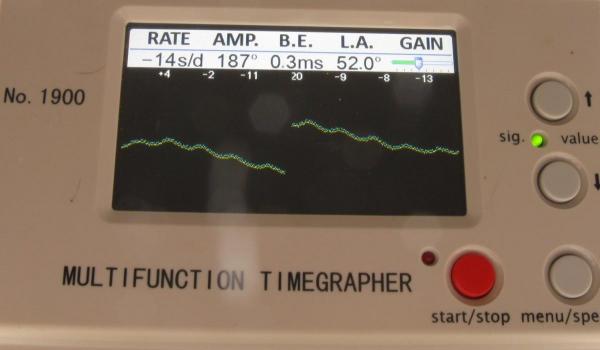
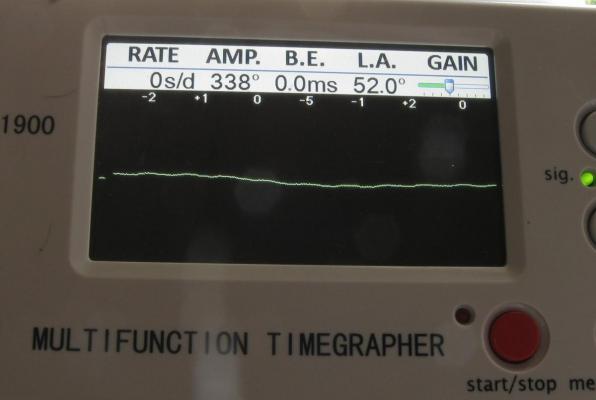
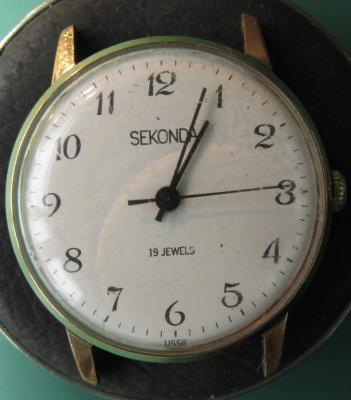
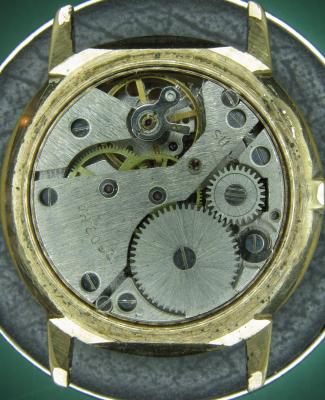
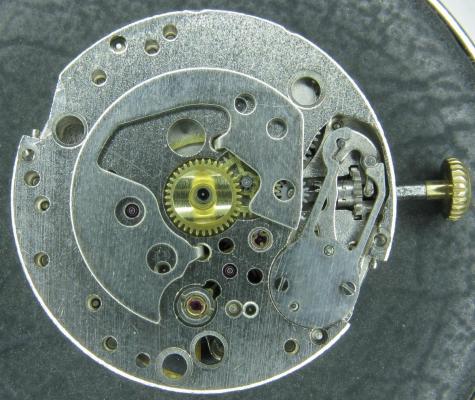
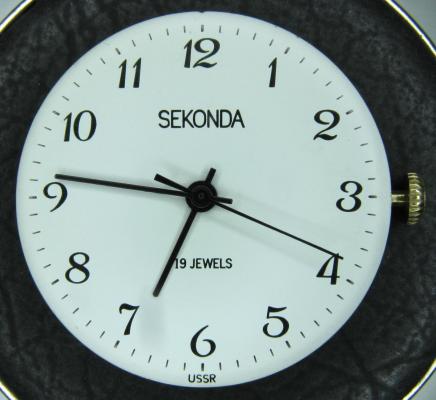
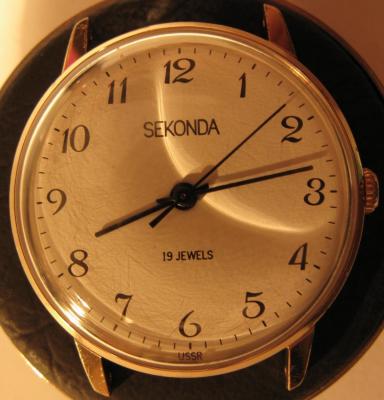
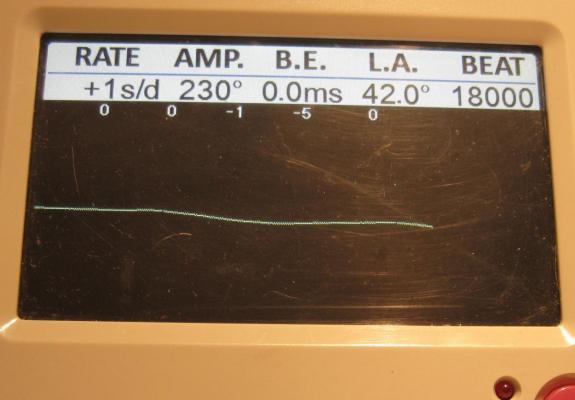
Just before Christmas I sold (through the good offices of eBay) an absolutely immaculate example of a 19 jewel Sekonda hand winder. I was a little sad to see it go as I don't think I am likely to see another in as good order for some time, and having just serviced it it was running like a champ but I couldn't justify holding on to it. Well, shortly after it had arrived with its new owner I received a message through eBay from the buyer. Huw had contacted me to say how pleased he was with his new acquisition, and did I service watches? as he had another example of one of these that was a little stiff in the winder and gained about a minute per day, and he felt that it maybe could benefit from a bit of a spruce up. I have done quite a few of these so am reasonably comfortable with them so I quoted a price and accepted the commission. A couple of weeks ago Huw's watch arrived so I thought I'd do this as a walk through. Looking well used but not abused, Huw had explained that he bought this not too long ago as a stop gap whilst his other watch (a Sekonda quartz chrono) was out of action with battery issues. First impressions are of a watch that has seen a lot of wrist time in its (probably) 40 years. The Timegrapher trace confirms the rate at roughly +60s/day, and confirms that a service is long over due. With the crystal out of the way the condition of the dial is actually rather good. The shadow to the right of the 7 is a lens fault on my camera, not the dial. With the back removed there is plenty of dirt speckled around the whole movement and everything is bone dry. The good news though is that it doesn't look like anyone has messed anything up inside. You can see the spring clip retainer on the escape wheel end stone (a bit like Seiko Diafix but not quite as clever). You can also see corrosion to the back of the bezel, this watch spent a lot of time on some ones wrist. With the movement out of the case the reason for the stiff winder and all of the dusty crud in the movement is brutally apparent. The outer end of the stem has started to rust causing it to bind in the case, and the resulting rust powder is thick on the inside of the case. These cases are a bit prone to this kind of problem as there is absolutely no attempt to seal them even against dust, let alone water, so even sweat on a hot day can seed the beginnings of a corrosion problem. With the dial off the press fit retaining plate for the motion works is exposed along with the keyless works. There's that little end stone retaining clip again, and the Raketa version of Incabloc on the balance. The rust doesn't seem to have got this far. With the set bridge out of the way though there is a hint of rust in the keyless works. Ouch!!! Just in time me thinks!! Balance and cock removed and the hairspring looks to be in good shape apart from the terminal curve which is off concentric. That will need to be sorted or the regulator will distort the hair spring as it is moved. Here also is the shim that Raketa are fond of using under the balance cock to adjust the balance end shake. A bit further in and plenty of gunge under the ratchet and crown wheels. Train bridge removed to reveal the train layout and a sub-bridge for the 2nd wheel. The main plate stripped with the screws put back in their respective holes. I do this so that screws don't go missing in the cleaning machine and I always know which screw goes where. The stripped main plate dial side. And then with the balance reinstalled (minus jewels) ready for the Elma. After a thorough clean everything is ready for inspection and reassembly..... ....starting with the balance jewels. This is when I check and adjust the hair spring for flatness and concentricity, eyeball the beat, check the end and side shake on the balance, and that everything swings freely. If you leave it until later there is too much other stuff in the way. Once I'm happy with it the balance/cock assembly comes back off until later. There is still a little work to do in this pic as the coils are still not quite concentric. The main spring re-lubricated and back in the barrel. This maybe could have been replaced but it wasn't too bad so went back in to help keep the cost down. Barrel, barrel bridge, 2nd wheel sub-bridge, and train back in place. Pallet fork and bridge installed. You can see the exit pallet poised ready to receive a drop of 941 on its impulse face. Walking the pallet too and fro then distributes the oil to the escape wheel teeth. Drop in the balance and away she goes. The cleaned up and de-rusted keyless works go back in.... ...and then the motion works and cover plate. Dial and hands back on, and ready to re-case. Again, to help keep the cost down I didn't replace the crystal with a new one, however, the original was just a little too deeply scored to easily polish out and there was what looked like a very small fracture. So a quick scout through my spares box and I found a second hand replacement which has cleaned up nicely. And the proof of the pudding ... as they say!! At 230 degrees the amplitude isn't anything to write home about but it is a significant improvement on the starting point. A new mainspring would almost certainly help this up into the high 200's (on the watch Huw bought from me I seem to remember it was 300+), but 230 is certainly usable. It is otherwise a nice clean trace with minimal beat error. It has been running for a week now in which it has gained just under a minute, so after a final tweak to the regulator it will be ready to return to Huw. I like these movements a lot. They are well designed and well executed, and capable of excellent results if looked after. They also seem to turn up quite frequently at the boot fairs. Unfortunately though, the lack of any attempt to keep moisture out of the case does mean that they quite often suffer from corrosion issues, and the relatively low cost (both when they were new, and when they turn up second hand) means that they are often used as a beginner watch smiths practice or learning watch, with the resultant butchery that many of us have dealt out as part of our learning curve. It's a shame in many respects, but then we all have to learn somehow. When you do find one that has survived unmolested though they are very well worth looking after. My thanks to Huw firstly for buying my watch, secondly for asking me to help this one to keep going for a few more years, and finally for allowing me to post his watch on here.


 16 points
 -
16 points
-
Here we go with part 2. Now it's easy to note, that I'm not a professional as the cleaning equipment is only... ehm... semi-professional. Special treatment for the balance and the pallet fork. The equipment for oiling and grease. Inserting the new mainspring. Reassembling the train bridge. Surprise: Much easier than on other watches, the parts fall into correct positions by themselves. Nice. Barrel bridge and ratchet system. The keyless works. Assembling and oiling the Pallet fork. The return of the balance. A drop of oil for the balance and escape wheel stones. Winding up and...it runs! Oops, some adjustment needed. Better. Reassembling the automatic device. Inserting the screws for movement and dial. Time for the cannon pinion and the hour wheel. Bringing back dial and hands (oh, I love those Maxi dials). Back in the case... ...and completed with the automatic device. Some grease for the gasket. Got it. It's called a wrist watch, so it's for the wrist not for the safe.16 points
-
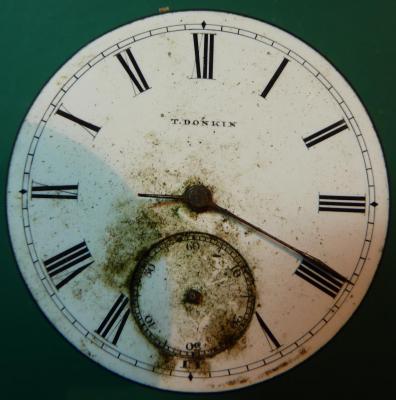
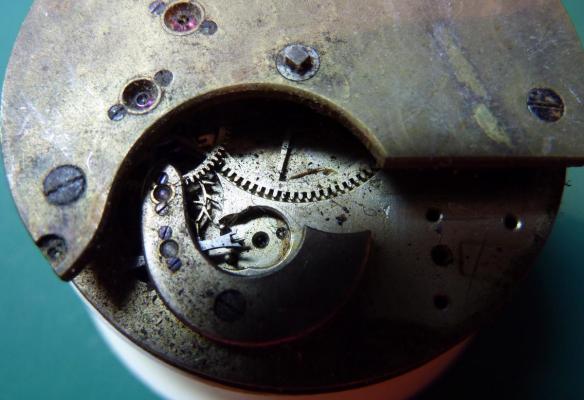
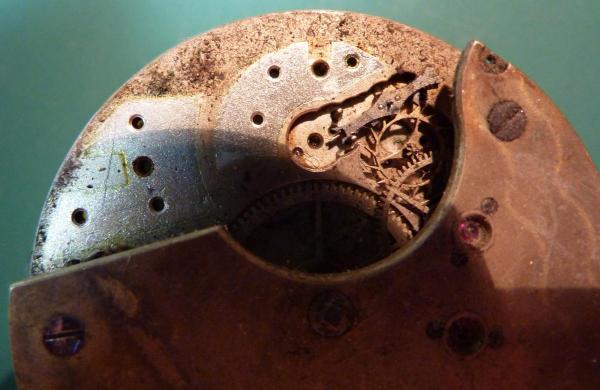
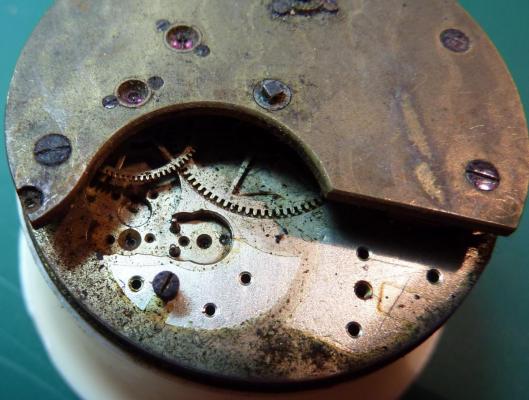
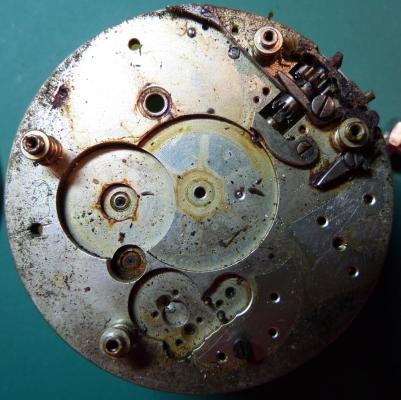
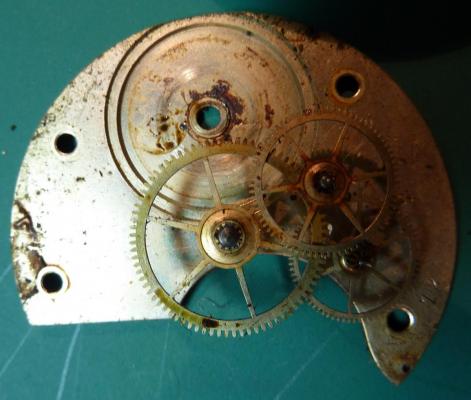
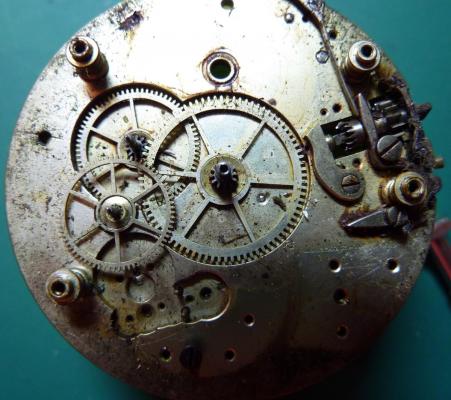
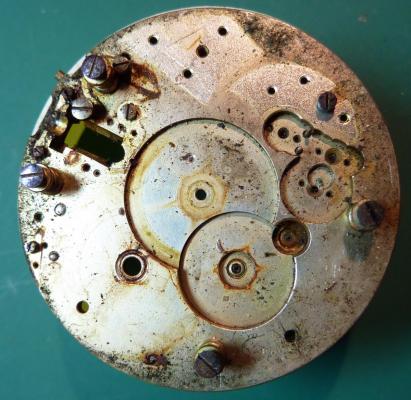
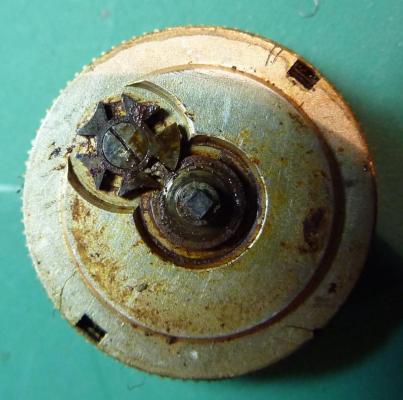
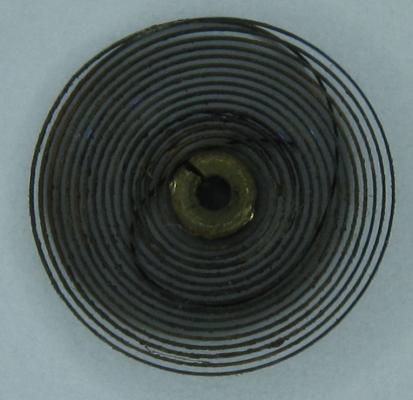
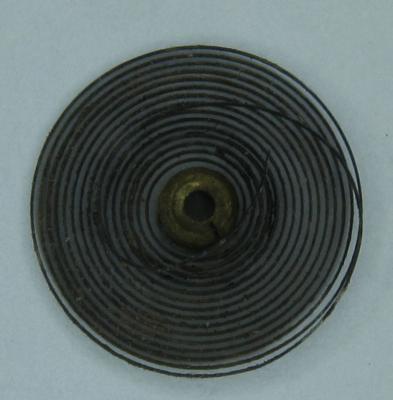
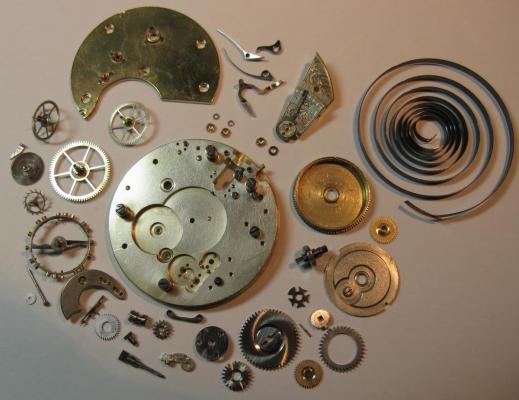
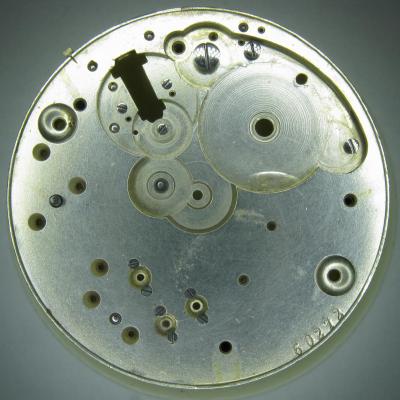
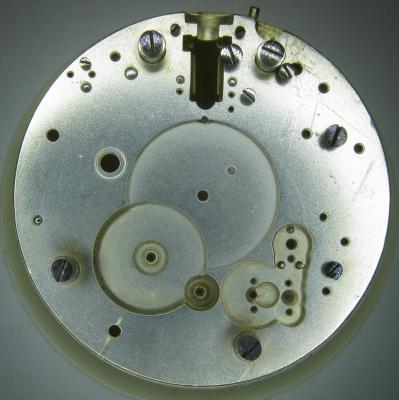
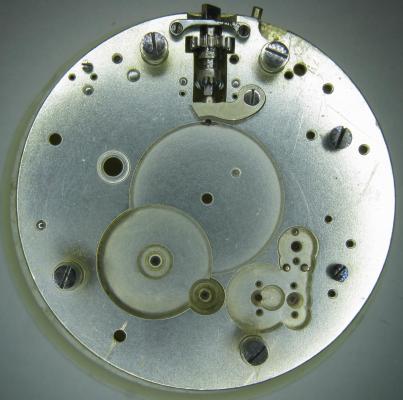
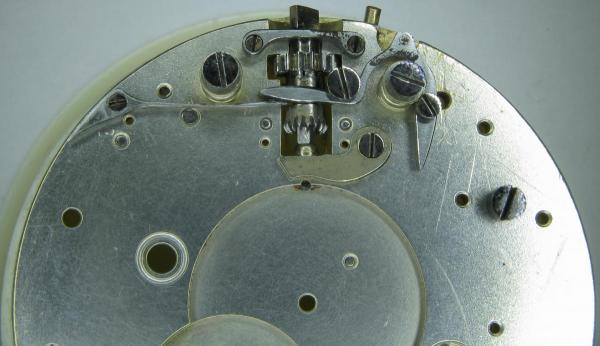
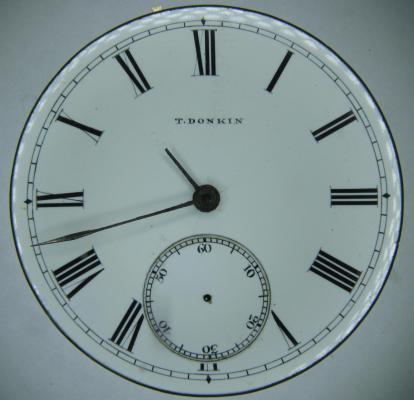
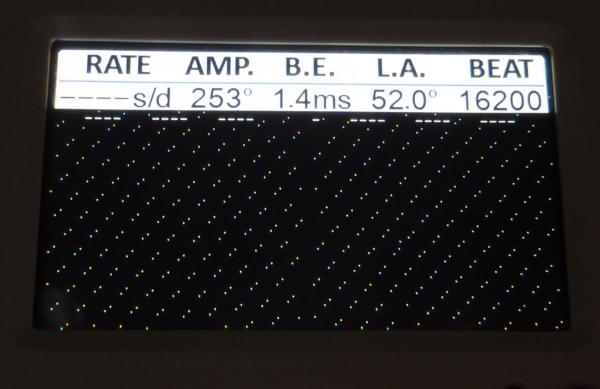
OK, so me and Mrs H did Christmas day with the family, and then we did Boxing day with the family, and then we were granted a day off so got to relax, and for me that meant I had the chance to tackle a little project that I had acquired as part of a job lot from a long retired watchmaker that had been sitting around in a shed for about 35 years (the job lot, not the watchmaker). Pocket watches are not usually my thing although I do own and use a couple. Orphaned pocket watch movements are even less my thing; but this little baby was in such a state that I couldn't resist the challenge. I don't think I have ever attempted to resurrect anything in quite such a sorry state as this before but it wasn't all bad. The balance was free and with sufficiently little end shake to hint that the pivots were not broken. However, the accumulation of dirt and dried grease obscured just about everything else. The inner coils of the hair spring also looked to be completely filled in with rust/gunk. With the balance cock and balance removed things got a little more interesting. Underneath the grime is a rather nice English Lever escapement with cap jewels on both the pallet and escape wheel pivots. A good sign, but I need to let down any power in the mainspring before I go any further, which means flipping it over and removing the dial as the keyless works are dial side. Not quite so bad under here as the dial has kept the worst of the dirt away. You can see too that both ends of the pallet and escape wheel pivots are capped, and the click spring is a proper cut steel affair, not wire. There is worrying evidence of rust on the steel work though. With the power let down the pallet and escape wheel cock is removed and you can now see the English Lever escapement in all its (rather grubby) glory. What a mess, but through the gunge there are just little hints of quality watchmaking peeping through; the thickness of the 3/4 top plate, and the cut and form of the teeth on the wheels. The top plate comes off taking the entire train and barrel with it as the pivots are seized in their bearings. The main plate is a mess. The under side of the top plate with the train still in place. The barrel has vacated its bearing revealing rust. Not a good sign but it could be worse. The train now removed from the top plate and dropped back into the main plate for a reference shot. The set lever and stem retaining bridge do not look healthy. Again though the set lever spring is cut steel, not wire. Oh yuk!!! The main plate now stripped. The barrel lid, with another nice touch; Geneva stop work, designed to only allow the central portion of the springs torque curve to be utilised thus reducing isochronism. Main plate, top plate, and escapement cock ready for cleaning. Ok, so whilst I was stripping all of this down, the hair spring, removed from the balance has been sitting in some Cola. The result is that the rust has softened and with a little careful tweezer work with a pair of Dumont #5's, most of it has been dislodged. The terminal curve of the Breguet over coil is badly out of shape due to a mishap when trying to unpin it from the rusted steel stud. I'll sort that out later. For now it's back into the pop to see if I can get those coils a little cleaner. Everything cleaned and ready for reassembly. I have a couple of spare jars for my cleaning machine and when I renew the cleaning solutions, the old stuff is kept in the spare jars. Any really heavily soiled movements get a "pre-wash" in the old chemistry so as to prolong the life of the new. With this watch everything was washed in the old gear and then very carefully gone over with peg wood, a G/F scratch brush, and tooth paste on a cotton bud in order to remove all of the staining that the bath didn't touch. All the jewels, bearings, and pinion leaves were also pegged out. Then it all went for another cycle through the old stuff before going through a normal cycle through the fresh chemistry. Main plate dial side prior to reassembly. And train side. Scrubbed up quite well I think. Stem, winding pinion, clutch, and stem retaining bridge reinstalled. Set lever and spring back in place. I haven't removed all of the rust pitting from the stem bridge and the set lever as it was too deep and to take it out would alter the shape too much, but it has been stabilised. The reassembled barrel and Geneva Stop work. I have reused the old main spring for now but made a note of its dimensions in case I choose to replace it. Another (gratuitous) shot of the Stop work as I just love it :-) Barrel and train back in place and things are starting to look fairly healthy. The top plate goes on. Quite a difference compared to the strip down shot from the same angle. The keyless works back in place dial side. And the balance, with reshaped and re-pinned hair spring goes back into place. After about half a dozen attempts to adjust the beat, removing the balance from the cock and turning the hair spring collet each time, and she comes to life!! Everything back in place dial side. And the cleaned up dial goes back on, complete with (broken) hands. And if you ignore the rate error for now (I need to re-pin the hair spring a little shorter), it's actually not a bad performance. As I said at the outset this was a challenge for challenge sake. I really enjoyed doing it and have learned a little bit about quality English watchmaking from the days when we were really rather good at it. I have absolutely no idea what to do with it now though although I want to try and find a bit more about it. Here is what I know; The name on the dial is T Donkin. There was a T Donkin watchmaker in Scarborough but I have no dates (yet) I'm guessing somewhere between about 1890 and 1910. It is a 19 ligne, 19 jewel English Lever escapement movement with capped balance, pallet, and escape wheel pivots (diamond on at least the balance top pivot). It has a screwed, split bi-metalic compensating balance, Breguet over coil hair spring, and Geneva Stop work on the barrel, and a 16200 train. A technical spec that suggests that it was of a reasonably high grade for its day. I still have a couple of issues to address though, the most problematic of which is that it has a slightly bent balance staff pivot. I decided not to tackle this on this occasion as the risk of breaking it whilst trying to straighten it was too great and I desperately wanted to see it running, but I may have a go in the future. I will re-pin the hair spring at the same time to get the rate up to where I can regulate it properly; it is currently about 25 minutes a day slow which is way beyond the range of the regulator. I also need to re-attach one of the dial feet and source some new hands. Then of course there is the question of recasing it. If you have made it this far then thank you for indulging me :-) I hope you have enjoyed it. If anyone can shed any more light on this little old lady I would be very grateful.


 16 points
 -
Just made a program to download all issues I could find of the AWCI Horological Times to my OneDrive. I hope I didn't do anything illegal, but I'd be happy to remove the files in case I did. Enjoy! https://1drv.ms/f/s!AnVrKJ9agkNWkfFk72cqE5ISkNJ78A?e=mYbidJ15 points
-
15 points
-
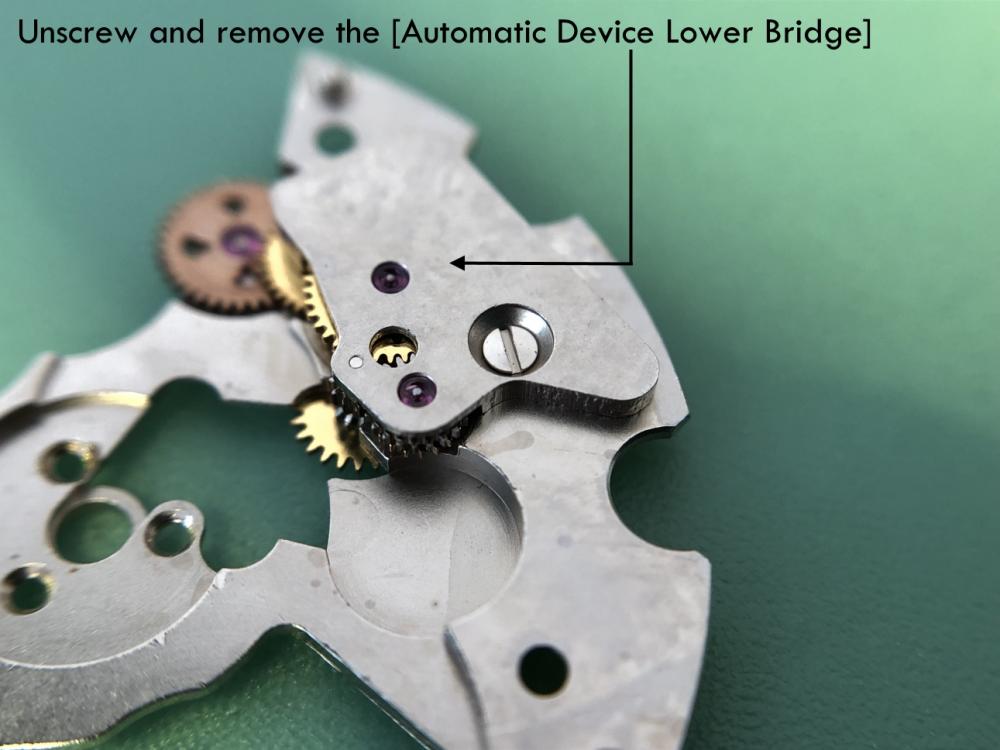
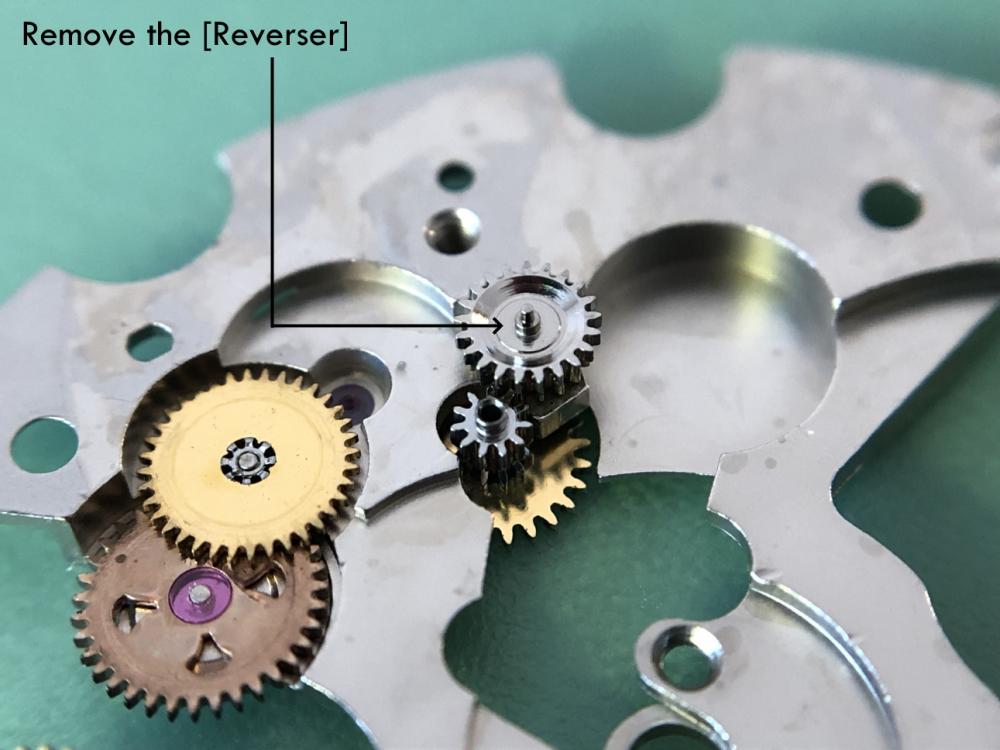
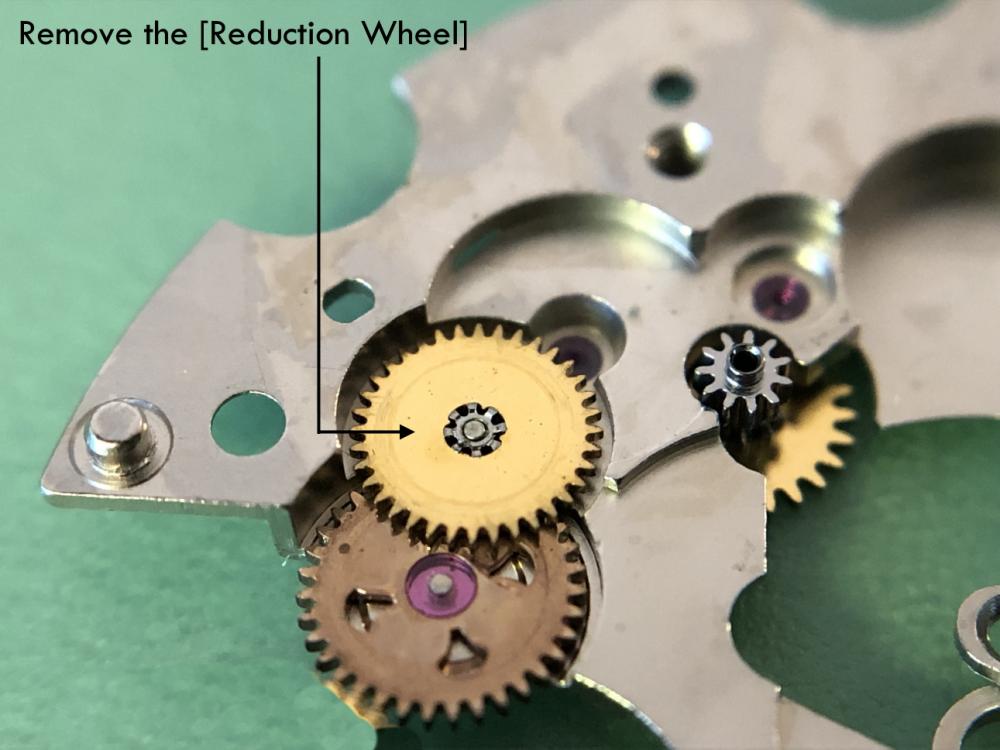
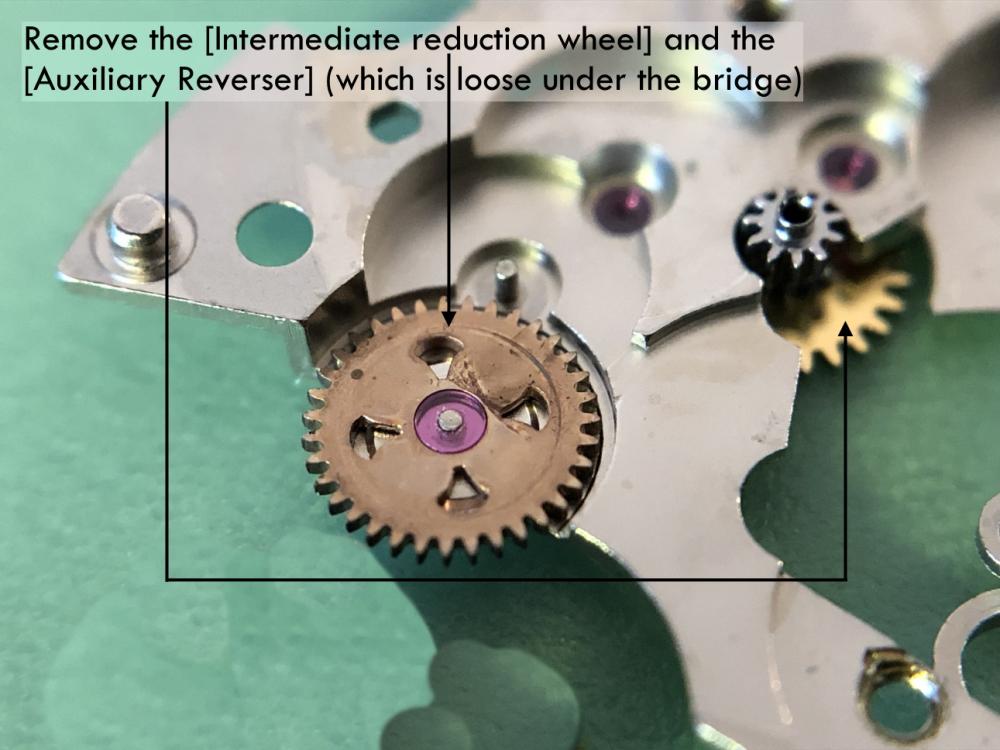
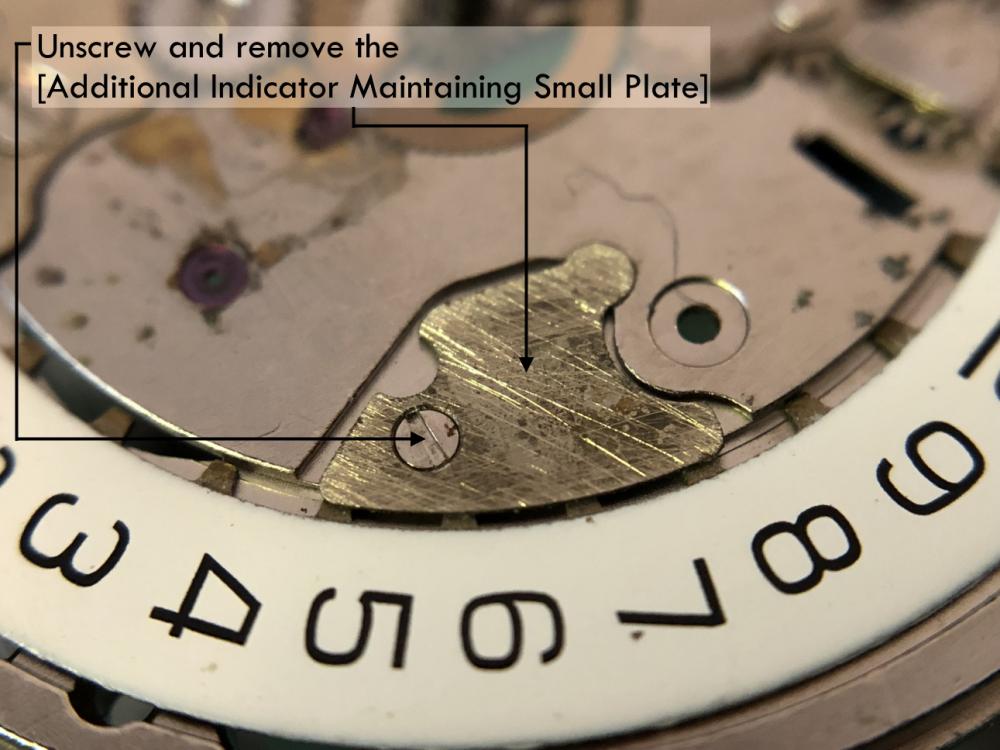
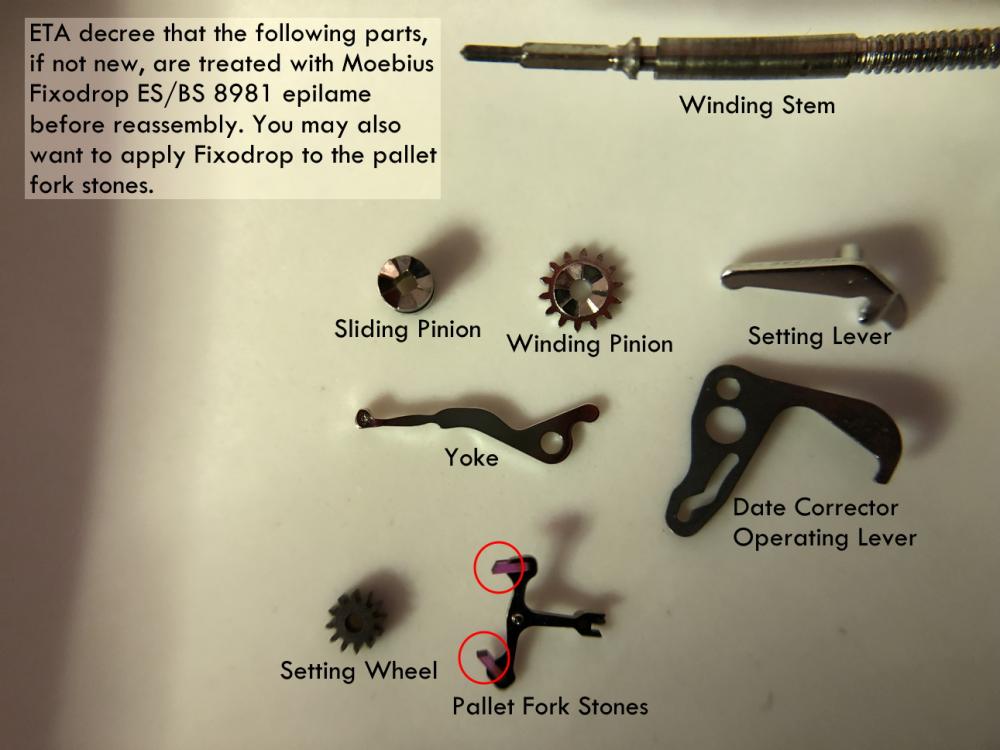
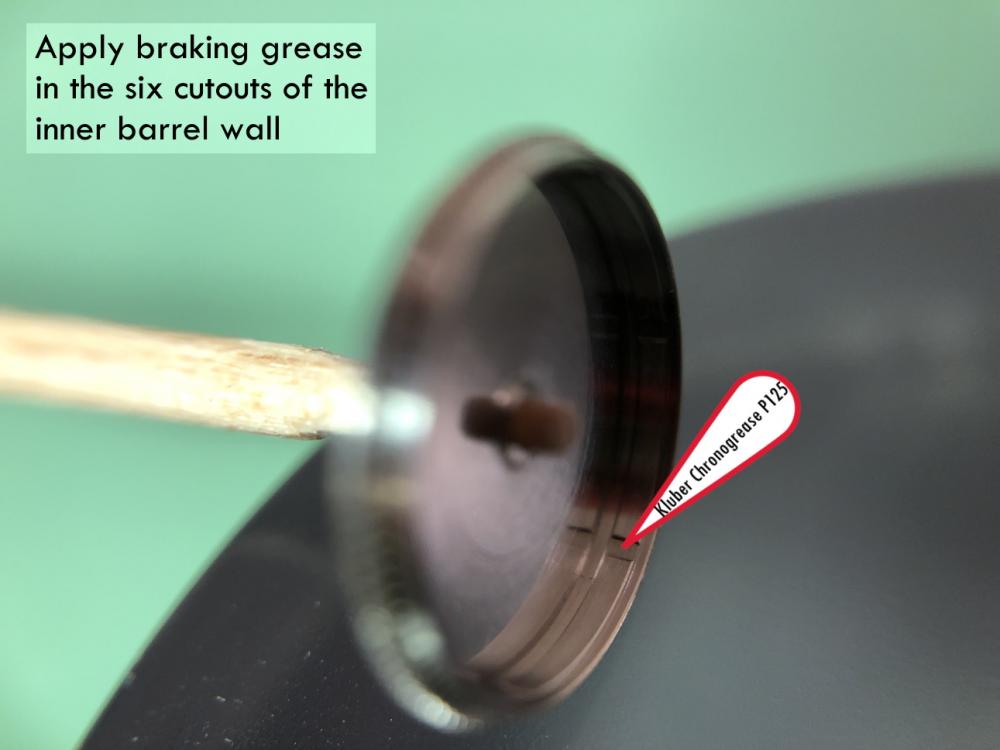
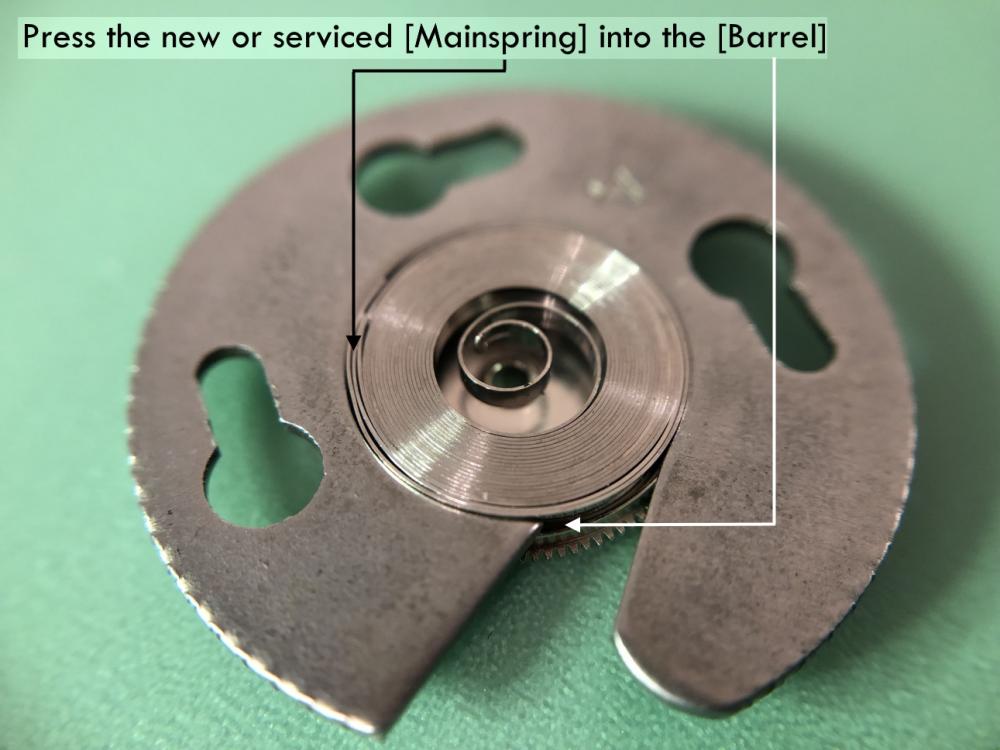
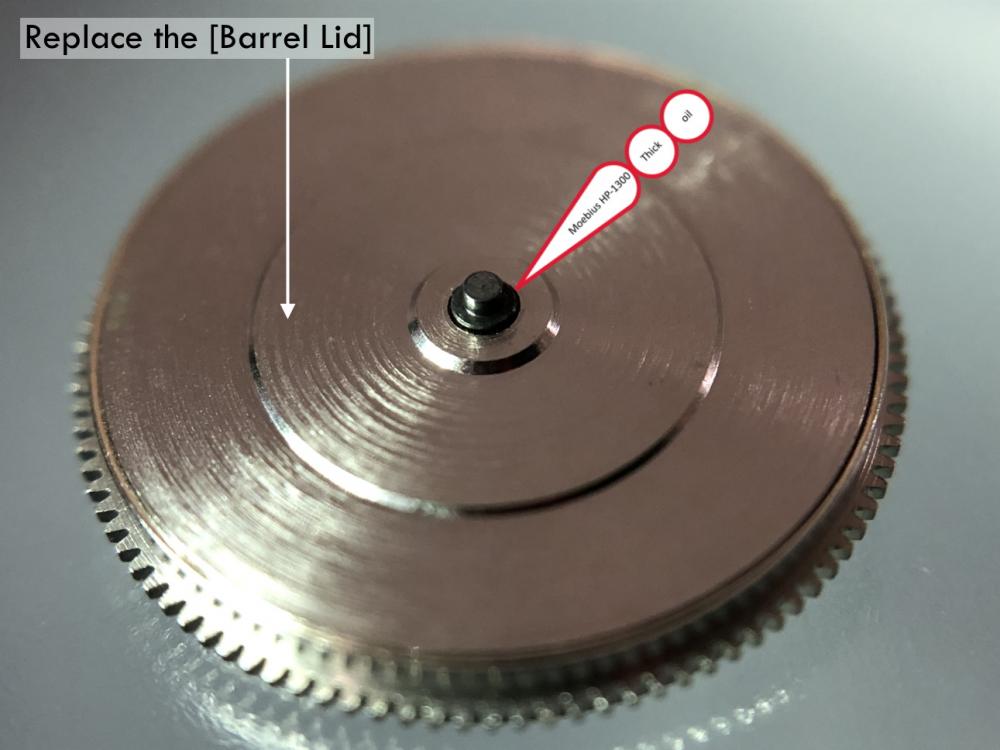
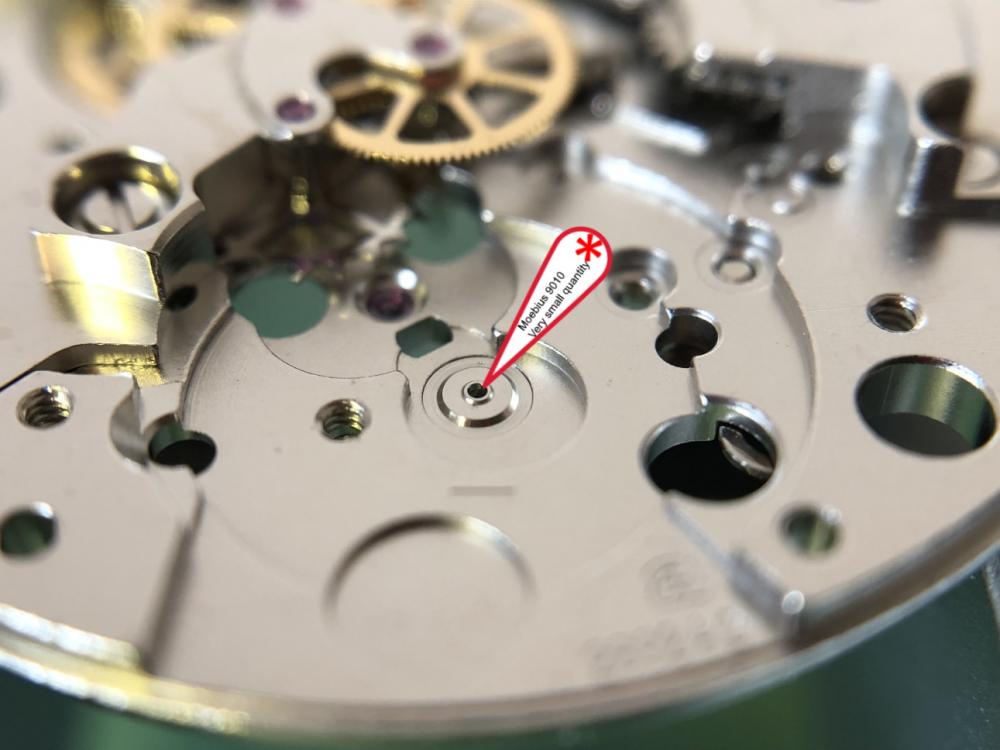
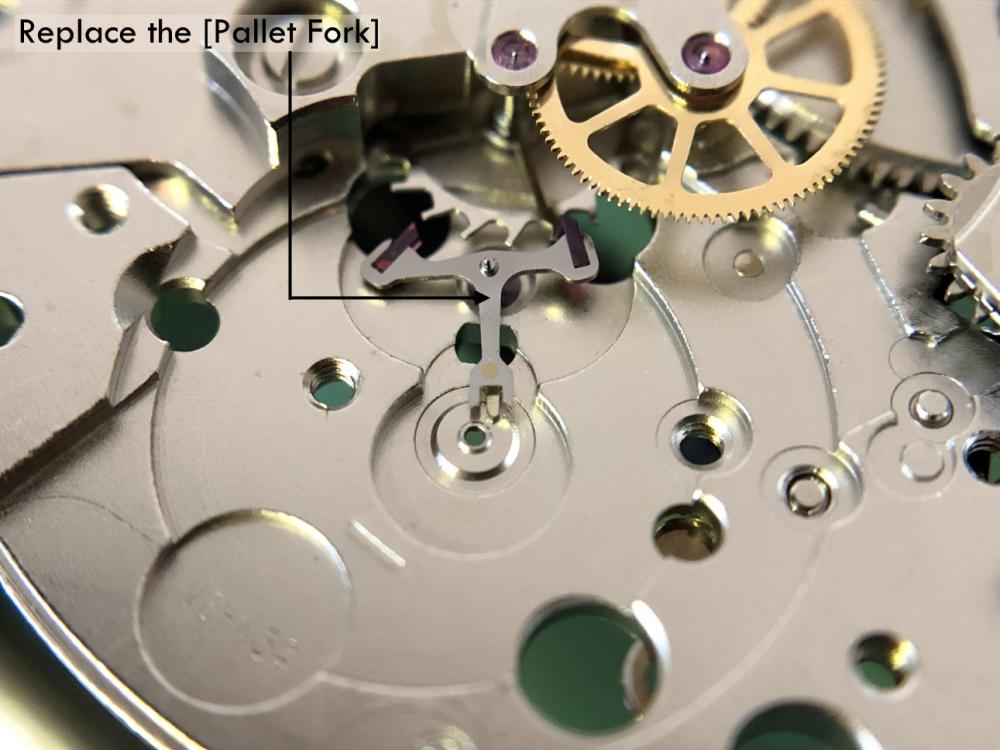
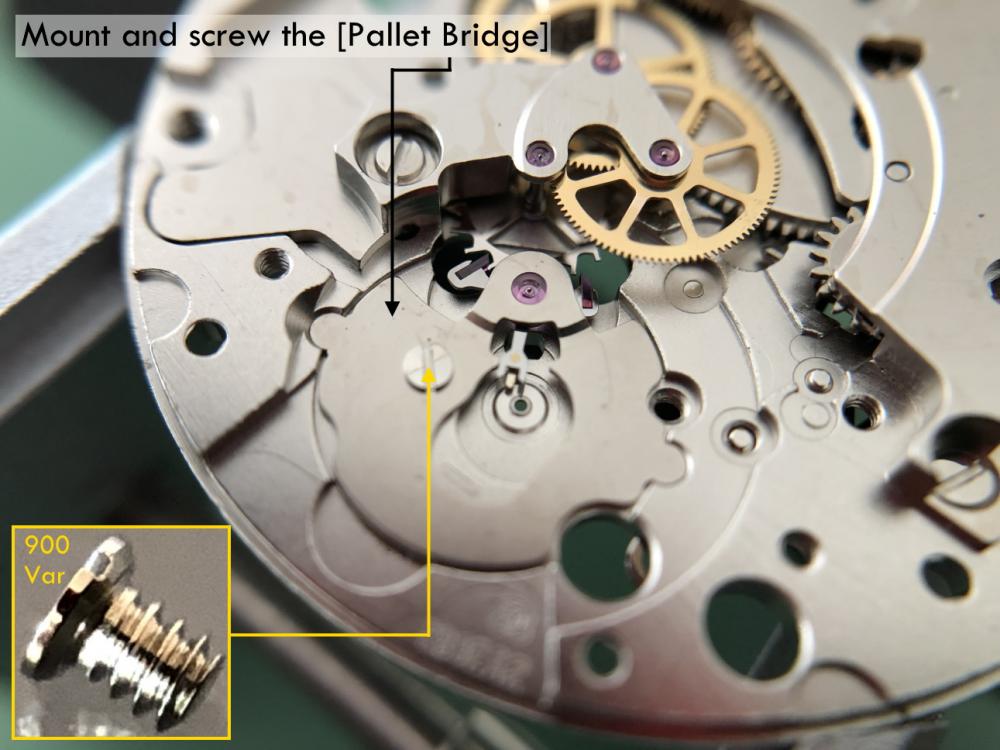
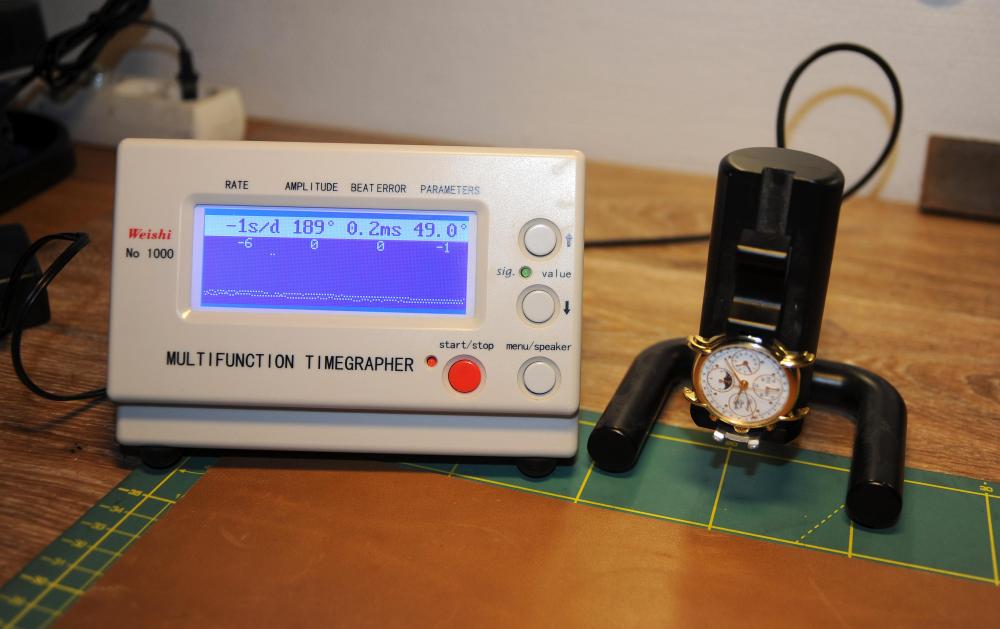
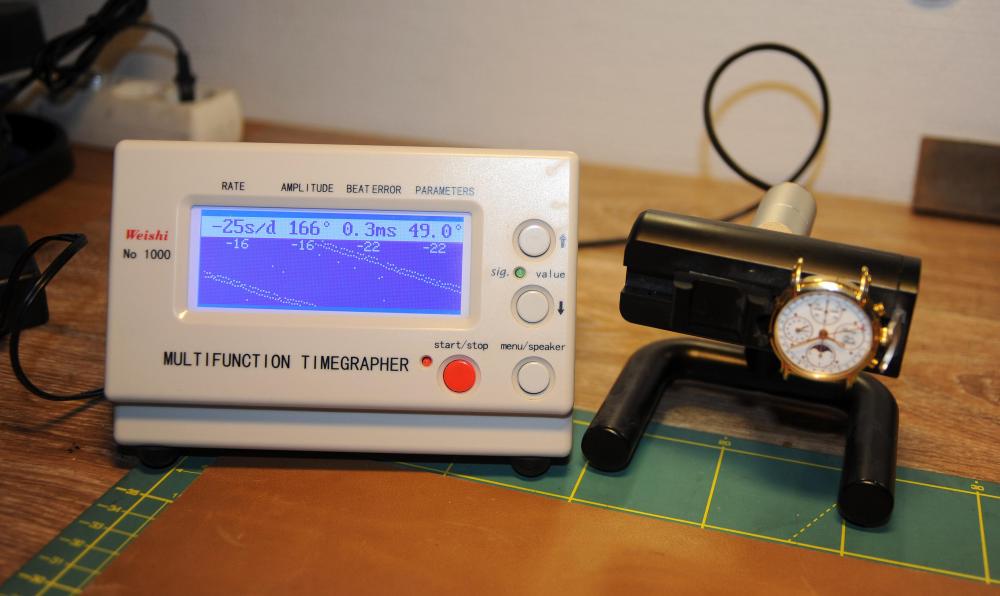
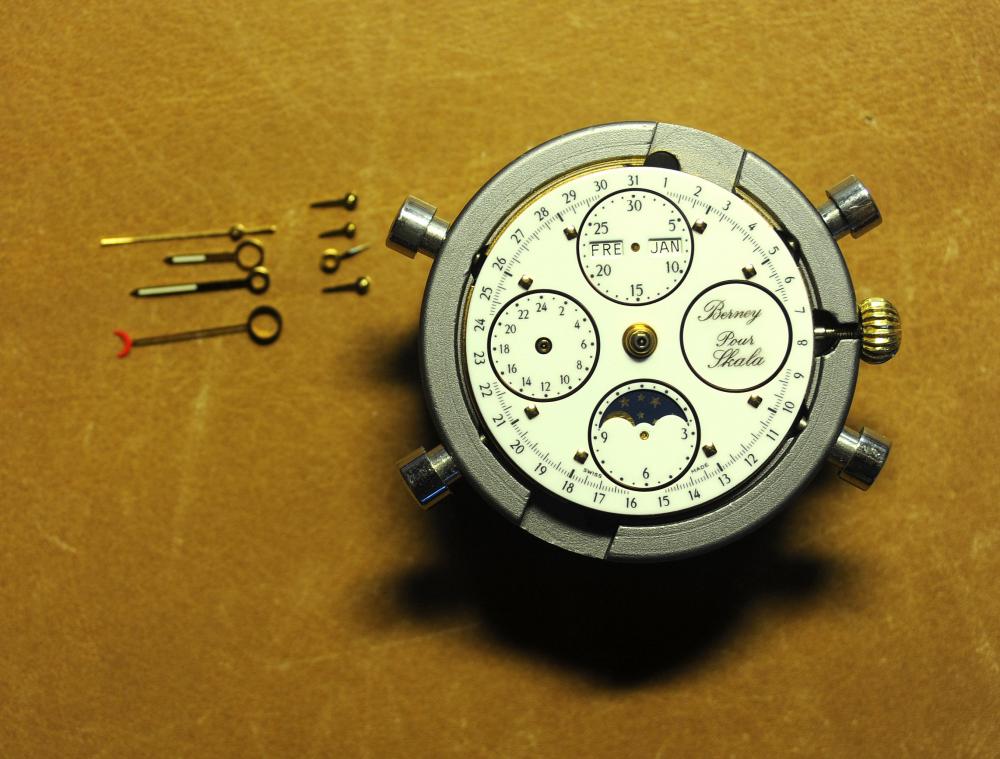
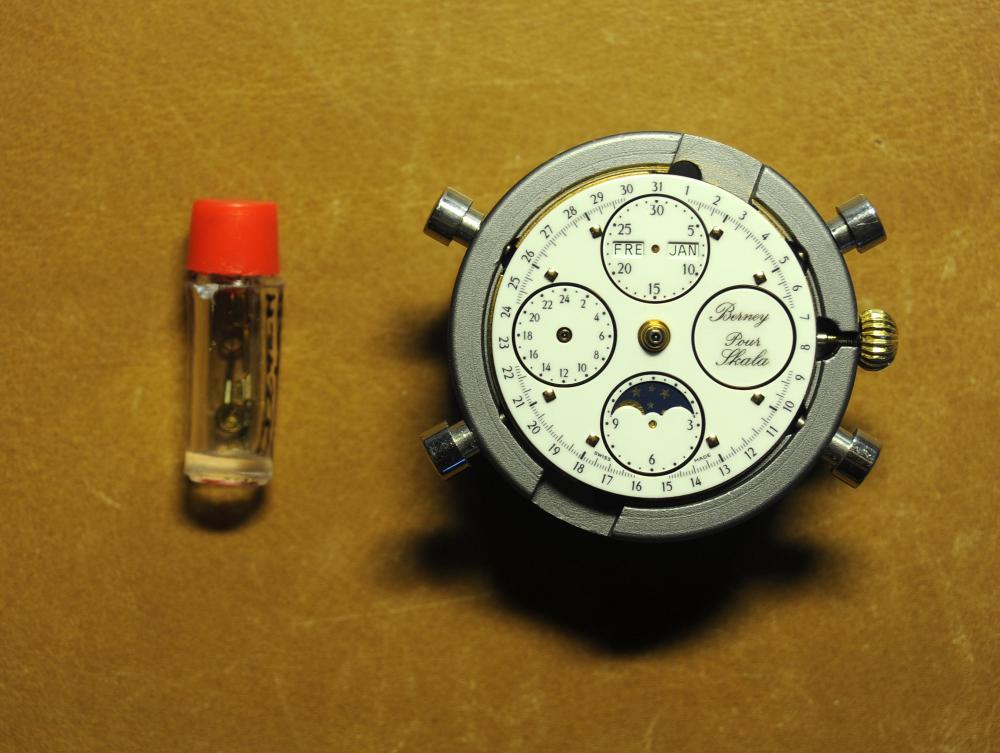
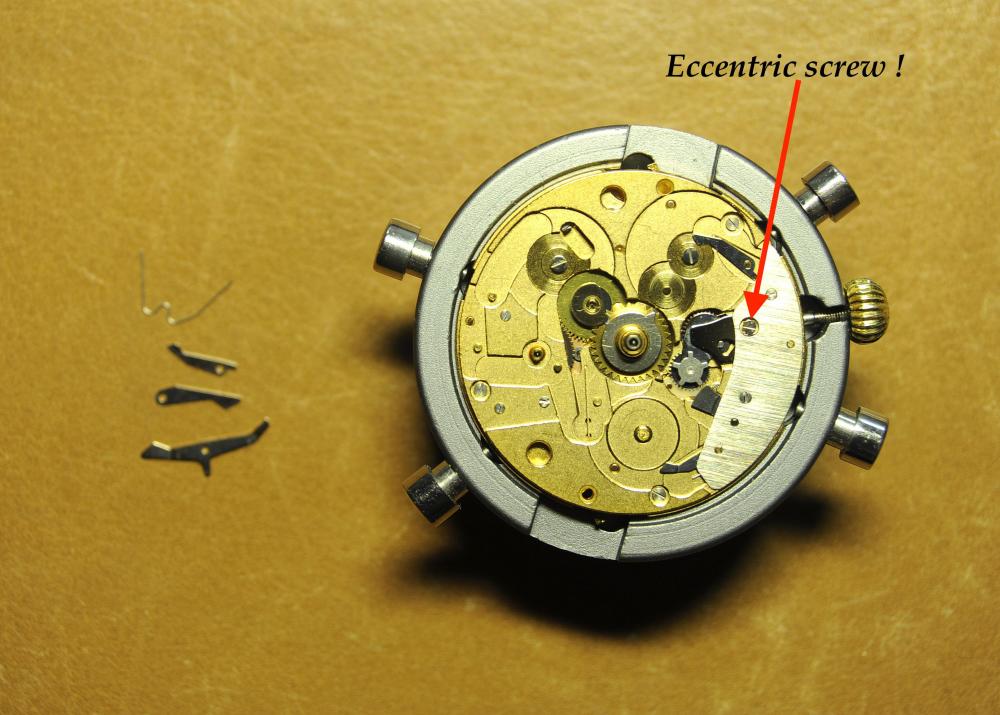
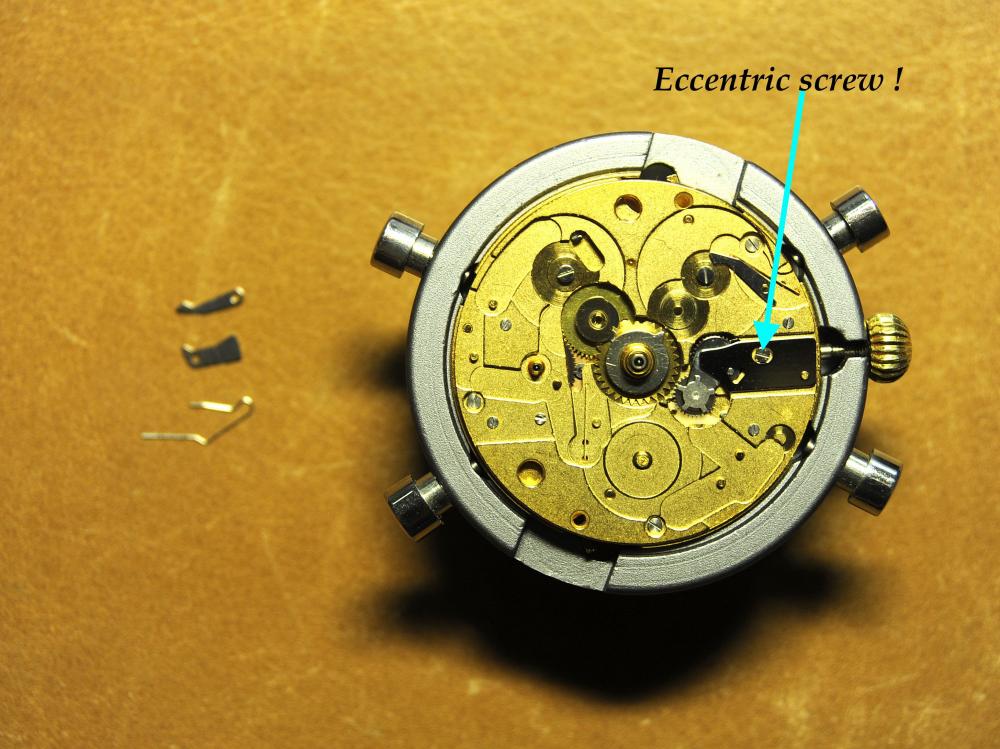
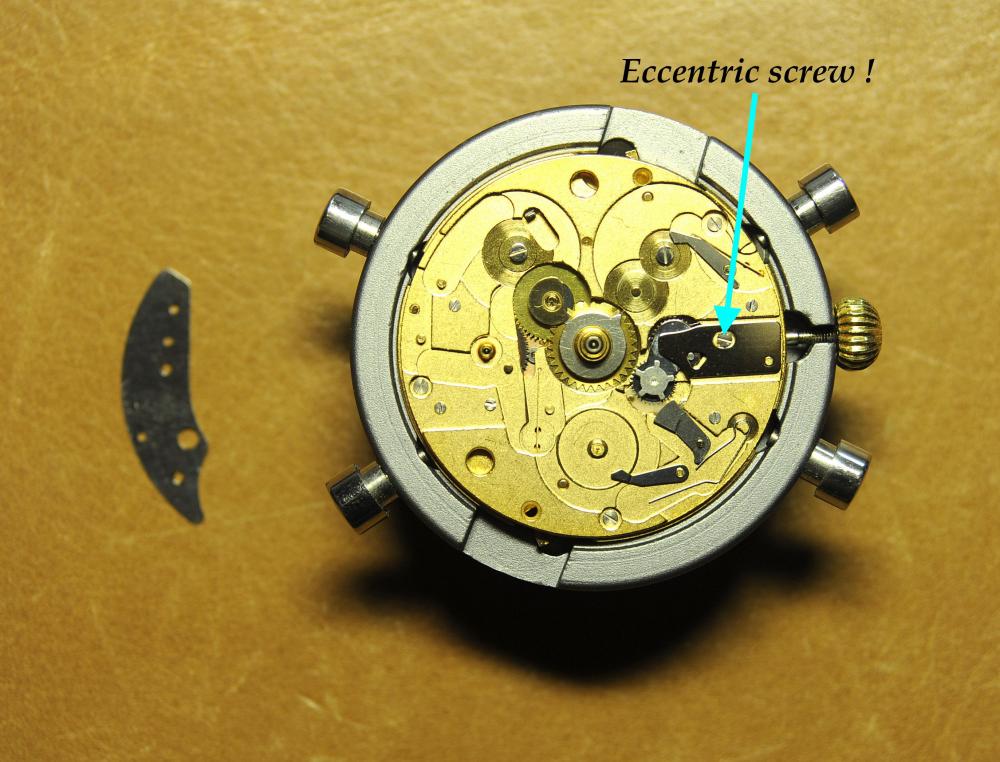
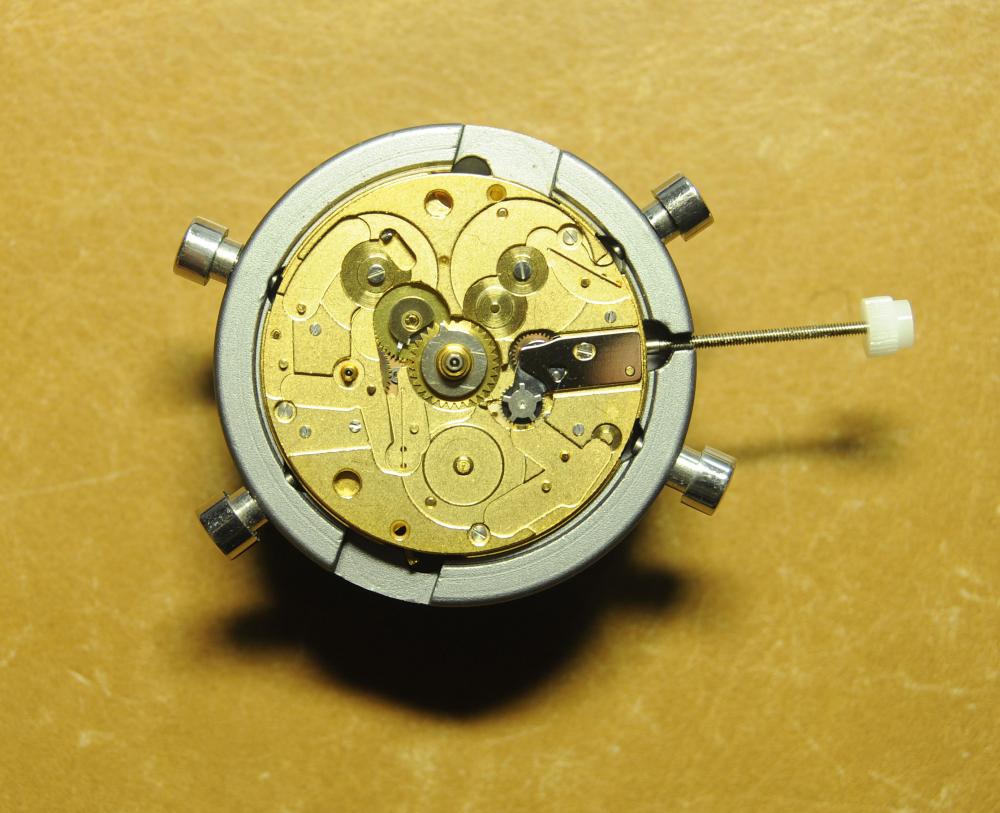
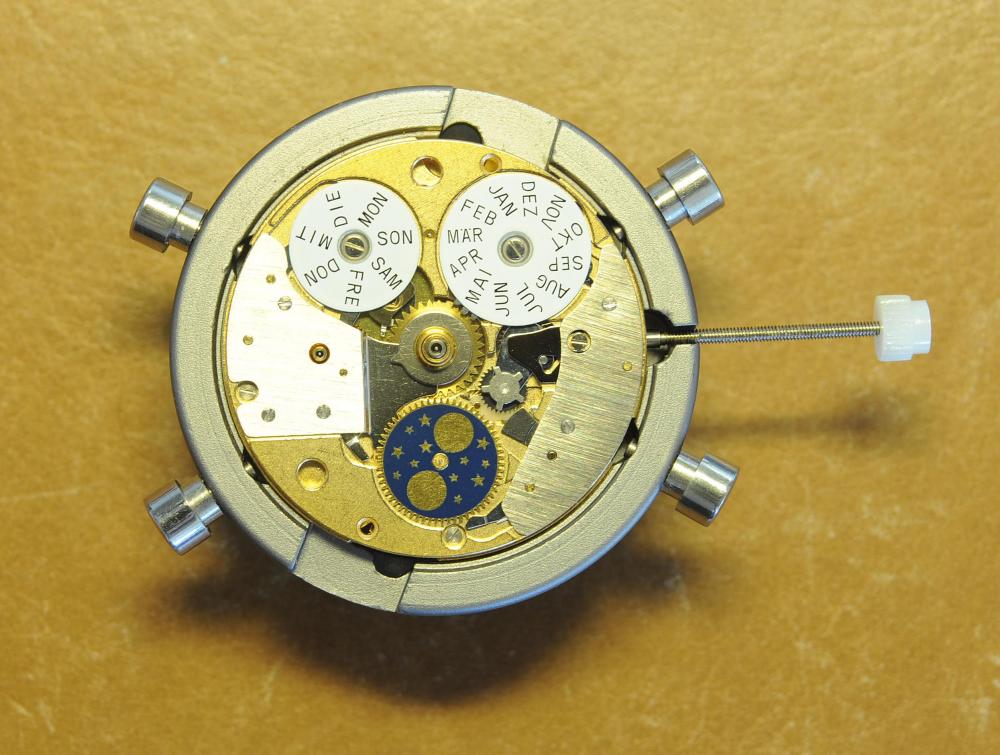
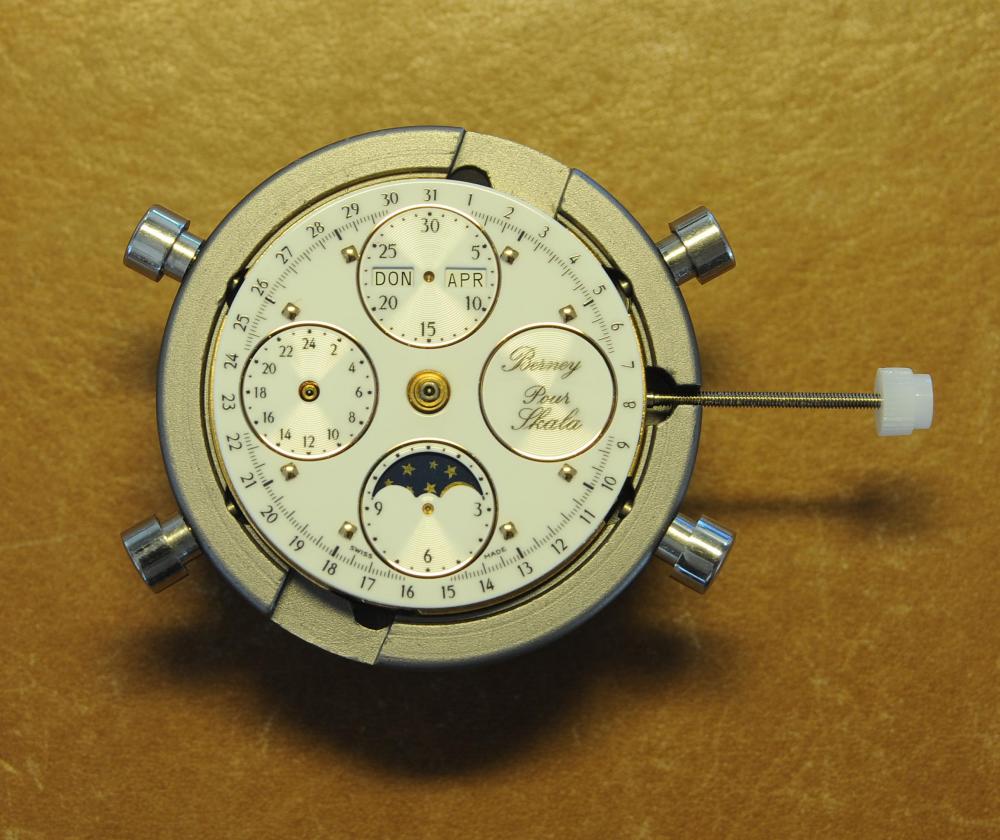
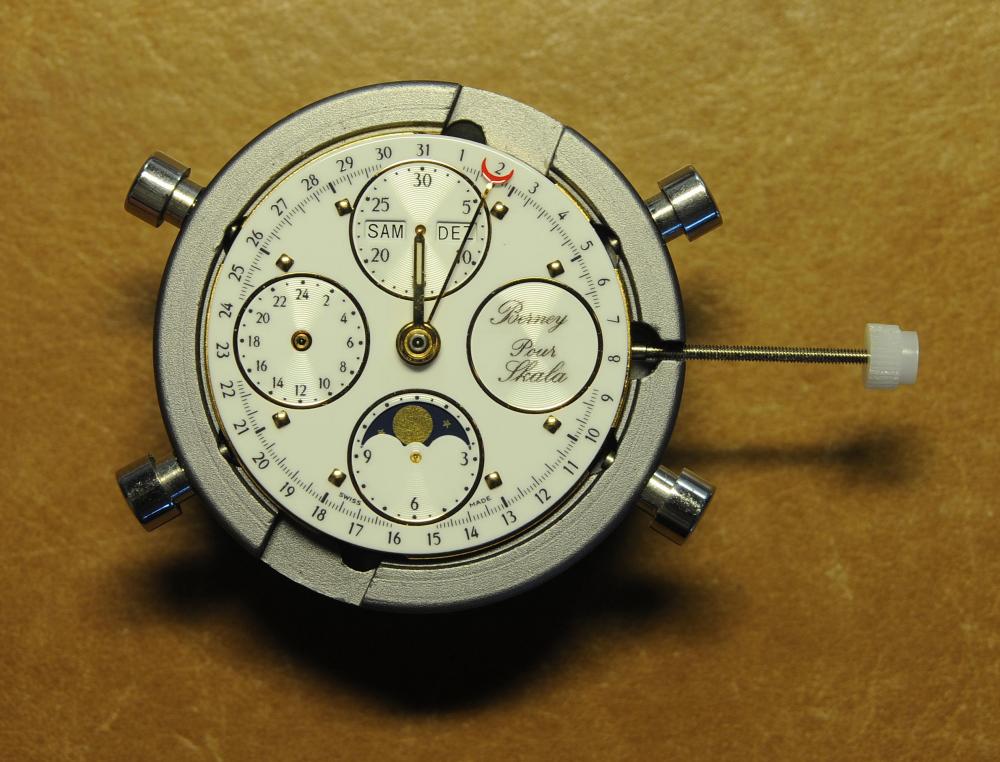
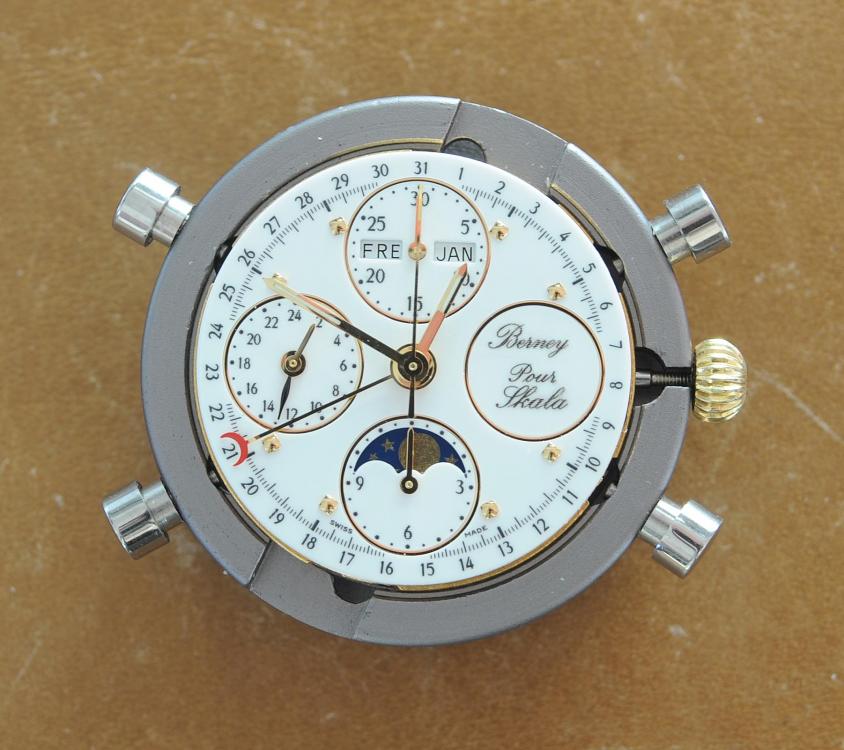
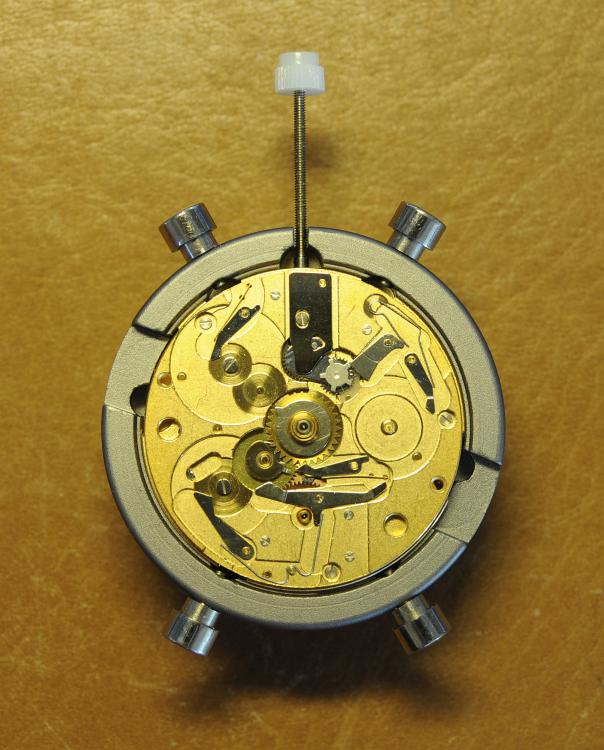
Valjoux / ETA 7751 Triple calendar moon-phase; This gold-plated Berney-Blondeau S.A. with an ETA 7751 belonged to a German gentleman who received it new on his 60th birthday in 1995. Through the years he kept the original box, the warranty card as well as the 1995 price-list and the dealer’s business card. He has worn the watch only on social accessions and the watch spent most of its time stored in a "Panzerschrank". According to the original price-list, the 1995 purchase price was 1450 CHF. As you can see, the watch held up pretty well, only a few small scratches in the front- and rear mineral-glass crystal and on the top of the lugs some of the gold-plating has worn through. The watch ran, all function did work. It had never been serviced nor opened Disclaimer; This walk-through is written in the way I do it. That's not to say it's the most correct way of doing things but as they say: there are many ways to Rome, all leading to the same result. Neither do I, as a hobbyist, have fancy horological equipment such as a cleaning machine or a "sterile" & "dust-free" room and therefor the end result will not be "Rolex"-standards. All I can say is that I'm always give it my best shot and I will mention problems encountered or were I went wrong, so you don't have to Without any further ado, let's dig into this beautiful & complicated watch ...... First make sure that you downloaded the latest ETA 7751 "Technical Communication". Throughout this walk-through I'll use the same parts reference numbers as used in the "Technical Communication". Below the currently latest September 2021 version; 7751 manual.pdf Before having done anything to the watch, I tested all the functions for proper working and took the timegrapher readings to see if there was anything which needed special attention. These readings can later be compared with the readings after the service. Dial-Up; Dial-Down; Crown-Right; Crown-Down; Crown-Left; Crown-Up; From the readings, it's clear to see that the watch needed a proper service. The back-lid, just like the front-crystals found on pocket-watches, required a knife-type case-opener. Checked out the oscillating weight ball-bearing, it had next to no play and therefor good for another round. Removed the oscillating weight (48). Removed the two casing-screws and clamps, pulled the stem and flipped the case over onto a soft pillow. With the watch-case removed, the winding stem re-inserted and the movement was placed in a proper 7750 (or family) movement-holder. To me, working on these movements a proper movement-holder is paramount. During the disassembly of the movement I encountered some problems and without this holder I most likely would have made scratches or worse..... Pulling the 8x hands; they all came off without any problems. All the hands safely nicely stored in a small plastic container. The same counts for the dial, after the removal directly stored in a plastic container with on both sides of the dial a soft lining. Removal of the Day & Month indicator disk (78) and the Moon phase indicator (79) The keen observer may have noticed that there are no screws next to the movement holder, for example the two screws holding the Day & Month indicator respectively. When working on complicated movements or movements which I'm not familiar with, I took on the habit, when possible, to replace the screws in the same hole as they came from. For sure, it's more work, but some movements do have multiple types/sizes screws and it will become a big puzzle if you store them in the same container / basket. Replacing the screws works (most of the time) very well for me, but in some cases the replaced screws shoulder-out deeper than as they would have done when holding the part above. The protruding screw may touch parts below or when replacing bridges, prevent the bridge from not seating fully "level". To me, replacing the screws thoughtfully is far simpler than facing a huge sorting puzzle later. Removal of the combined maintaining plate (76) and the Month star driving wheel (77). The three tiny screws holding the maintaining plate (76) were extremely tight. I couldn't loosen them with my standard (new) screwdriver bits so I had to grind the screwdriver bit to match the exact the same shape as the screw-grooves. Only then, with "force", they came loose and I was glad for having a proper movement-support! One slip of the screwdriver, with the force that was required, could / would have easily made a deep score in the plate or worse ........ Removal of the Day jumper spring (71), Day & Month jumper (70), Day jumper (72) and the Moon phase yoke (73) plus an early warning ! With those parts out of the way, the Moon phase platform (75) had to come off. Assuming that the with the arrow highlighted screw was one of the screws holding the platform down, I turned the screw only to discover that it was the moon-phase corrector eccentric ....... Oops !! The setting of the eccentric has to be checked at the end anyway, but now I know for sure that it's set wrongly. Removal of the Moon phase jumper (69), Corrector maintaining small plate (66) and the Moon phase jumper spring (67). Still in the picture the Date & Month jumper (74) which should have been removed before this picture was taken. The original stem was replaced by a longer stem to adjust the Calendar driving wheel (61) which was holding the Date-star (63) down. Removal of the Date-star (63, shown in the previous picture) together with the Date-corrector (65) and the corrector maintaining small plate (66). Removal of the calendar platform (62). Slowly back to familiar ground; a standard ETA 7750 starts to appear ... Removal of the Hour wheel 24hrs H1 (59), the Calendar driving wheel (61), the Hour-wheel (60), the Day corrector (58) and the Day corrector spring (57). The removal of the Hammer-spring (56), Set hour-hammer operating lever (53 & 54), Hour counter lock (55), Hour counting wheel (52), Minute-wheel (51) and the free Cannon pinion (50). Pulling of the Driving pinion (49) has to be done carefully; either with a pair of hand-levers or two small screw-drivers. The upwards force on either side of the pinion has to the equal or you may break the pinion of the great wheel (16) (a previous experience has taught me so !! ) Flip the movement over and from here on I'm using a Bergeon 4040 movement holder. First the removal of the Hammer-spring (45). When removing this spring I had up till now difficulties avoiding making a small mark in the Automatic device bridge (44). It was our WRT-member "Nickelsilver" who tipped me off using a piece of Scott tape over the edge of the bridge. This worked very well and for the first time I was able to remove the hammer without leaving a mark! Thanks Nickelsilver! The hammer-spring (45) and the Clutch-spring (47) removed. Remove the Auto device bridge (44). Removal of the Reversing wheel; (43), Reduction wheel (41), the Clutch (40), Oscillating pinion (39), the Hammer (42), Chronograph wheel (37), Minute-counting wheel (38), Minute-counting jumper (46), the Lock (33), the Operating-lever (36) and the Minute counting driving wheel (19). Removal of the Chronograph bridge (34), the Friction spring (32) and the Operating lever spring (35). After the removal of the Ratchet wheel driving wheel (33) it's time to release any residual power in the main-spring. This can be done by holding the crown, lift the Click-spring (20) and slowly release the tension by letting the crown slip through your fingers. Removal of the Chronograph cam (29), Cam jumper (28), Detent (30), Ratchet wheel (23), Crown wheel core (22) and Crown wheel (21). Removal of the Balance Assembly (26+27), Pallet bridge (25) and Pallet fork (24). Removal of the Barrel bridge (18). Removal of the power-train; the Great wheel (16), Third wheel (15), Second wheel (14), Escape wheel (13), the Movement barrel (12) and the Stop lever (17). Flip the movement over for disassembling the keyless works. Removal of the Setting lever jumper (11) together with the Intermediate setting wheel (10), the Time setting gear (9), Rocking bar (8), Yoke (6), Setting lever (5), Winding stem (4), Winding pinion (2), Sliding pinion (3) and the Yoke spring (7). All the parts safely stored in a compartmentalized box with lid, ready for cleaning & demagnetizing. Regarding the "wear & tear" of all the watch-parts; it was clear to see that the watch hadn't seen a lot of use. The Oscillating weight ball-bearing (48) was good, reversing wheel (43) looked good etc. However, I decided to change out the main-spring. This type of barrel has a lid which cannot be "pushed" open. To open the lid, I place a sharp knife in the groove between the barrel and the lid and while pressing down on the knife roll the barrel, in my case on a "soft" leather underground to avoid doing any damage. This widens the groove into a small gap and with the smallest screwdriver one can pry, going around the barrel, the lid off. When done carefully you won't leave any marks. Barrel & Arbor cleaned, braking-grease applied ready for the new spring. Apart from a few (see "technical communication" !) the parts were soaked for 24hrs in Zippo lighter fluid and pegged; all the sprockets, pivots and jewels. Thereafter all the parts were checked for magnetism. Instead of using the unreliable compass method, I'm using an App called "Lepsi" on my iPhone. This App doesn't tell you how much magnetism there is, it only indicates whether there is any. The distance of the object above the screen, by which magnetism is detected, gives you some indication of the strength of the magnetic field, but nothing more. For me, when magnetism is detected, that's enough reason to "Zap" that part on my no-nonsense self-build demagnetizer. Of course, in reality the demagnetizer is not placed anywhere near my iPhone or the other watch-parts / metal-objects like here on the photo. Also, it may be a good idea to take your watch off during the "zapping” operations! Quite a few parts, particularly in the calendar works, were magnetized. With the main-plate anti-shock Chaton cleaned, pegged, cap-stone oiled and re-installed in the main-plate (1), the assembly of the 7751 can begin. Escape wheel (13), Second-wheel (14), Third-wheel (15), Main-spring barrel (12), Great-wheel (16) and Stop-lever (17). Installation of the barrel-bridge (18) (by a 7750 the wheel-train the and barrel-bridge are combined in one bridge). Make sure that all the wheels turn fine before tightening the screws; check, check and double check. Again, if you using the re-installed screws method, some screws may protrude the bridge. (I took the "warning picture" below a little later, so don't look at any additional installed parts) All the Lubrications as per the ETA 7751 "Technical Communication". These two re-installed screws do protrude the Barrel bridge (18). The one on the left will touch the Great-wheel (16) and the one to the right may just touch the main-spring barrel (12). Back them out far enough so they don't cause any trouble. The installation of the Crown-wheel (21), Crown-wheel core (22) and the Ratchet-wheel (23). With the movement turned over, installation of the keyless works; Sliding-pinion (3), Winding pinion (2), Winding-stem (4), Setting-lever (5), Yoke-spring (7), Rocking-bar (8), Yoke (6) and placing of the Time setting gear (9) before placing the Intermediate setting wheel (10) and Setting lever jumper (11) as a "combination". Keyless work completed. Check for proper working! Installed the pallet-fork (24) and the complete balance assembly (26 & 27). Cleaned, pegged the balance Chaton and oiled the cap-stone. Before going any further with the assembling, I tested the power-train and escapement for any irregularities. On the timegrapher the readings were looking a whole lot better than initially. Instead of picturing each position, here are the readings; DU & DD both 292-294 degrees, 0 ms and 0 s/d. CU: 244, 0.1, -14 s/d CR: 249, 0.2, -16 s/d CD: 252, 0.1, -6s/d CL: 262, 0.0, -5 s/d Even though I adjusted the Etachron as good as I could, that's to say centring the hairspring between the two regulator pins and thereafter reducing the regulator pins gap to the point that the hairspring could still, but just "breath", the positional deviation with max. 16 seconds is slightly higher than I was hoping for. Then again, it's not a chronometer grade and each position produced straight lines, so I think that with some daily-rate adjustments the watch will run just fine. Once satisfied with the running of the power-train and the escapement, the assembly of the chronograph can start. Cam jumper (28), Chronograph cam (29), Detent (30), Minute counter driving wheel 30 minutes (19), Lock (33), Operating lever spring (35) and the Operating lever (36). As said; lubrication as per "Technical Communication" and test the proper function of the start/stop and reset levers. Placement of the Ratchet wheel driving wheel (31) and the Friction spring chronograph wheel (32). Install the chronograph bridge (34); don't forget the lubricate the Reversing wheel jewel on the bottom of the chronograph bridge before placement. Also pay attention to the reset-lever, it has to be pushed in so the bridge can sit level & flush. Check the working of the Ratchet driving wheel (31) and the reset lever before tightening the bridge screws. The placement of a well lubricated Reduction wheel (41), Minute counter jumper (46), Oscillation pinion (39, biggest sprocket down), seconds recording Chronograph wheel (37), Minute counting wheel (38), the Clutch (40), make sure that the oscillation pinion pivot is engaged), Reversing wheel (43) and finally the Hammer (42) before the Automatic device bridge (44). Before installing the Automatic device bridge (44), lubricate the jewel for the seconds recording Chronograph wheel underneath the bridge. The installation of the Automatic device bridge can be very tricky. It's very easy to touch the Clutch (40) and the pivot of the Oscillation pinion comes out. Before inserting or tightening the bridge screws, double-check the placing and working of every component!! Once the bridge is installed and with the relevant lubrication done, before mounting the hammer-spring (45) and the Clutch-spring (47), all the functions of the chronograph can be checked & tested; the engagement of the oscillation pinion, the smooth running of the seconds recording chronograph wheel, the advancing of the minute counting wheel, the start/stop- and reset-levers etc. Next is the installment of the Hammer-spring (45) and Clutch-spring (47). To prevent scratches on the Automatic device bridge (44), as per brilliant idea of WRT member "Nickelsilver", a piece of Scotts tape was taped over the edge of the bridge. With the installment of those two springs, the assembly of the chronograph is completed Movement flipped over and placed in the 775x movement holder. Installment of a well lubricated Driving pinion (49), The Cannon-pinion (50), the Minute wheel (51), Hour counting wheel (52), Set hour operating lever (53+54), Hour counter lock (55) the Hammer spring (56), the Day corrector spring (57) and the Day corrector (58). The build-up, up till the Day corrector spring (57) and the Day corrector (58), was identical as to a standard 7750. The Hour wheel 24hrs (59) drops over the Second wheel (14) pivot. Attention: Sadly, no picture but when installing the Hour wheel (60) over the Cannon pinion, one has to lift the Minute wheel (51) slightly and to make sure that the hour wheel teeth do engage in the small minute wheel sprocket. Once they engage, both wheels can be lowered in place. Finally, before installing the Calendar platform (62) the Calendar driving wheel (61) with the "day finger" pointing as shown. From here on I pulled the winding stem to stop the running of the movement and thereby avoiding the advancement / altering of the positions of the wheels. The installation of the Calendar platform (62) can be a bit tricky. It's all too easy to dislodge the hour lever (53) and the Hammer spring (56). Make sure that the platform sits flush with the Main plate (1) before tightening the 3x screws. Place the Day star (63) as shown in both above pictures. Placing of Date + Month jumper (70), the Day + Month jumper (74) (Both jumpers are identical), Day jumper (72), Moon phase yoke (73), Day jumper spring (71), Date corrector (65), Corrector maintaining small plate (66), Moon phase corrector (68), Moon phase jumper (69) and Moon phase jumper spring (67). Installation of the Moon phase platform (75), the Combined maintaining plate (76) (Be aware that the top of the Combined maintaining plate slides in the gap of the Day Star) and the placing of the Month star driving wheel (77). Placing the Month & Day indicator disk (78) and the Moon phase indicator (79). Adjusting the Phase corrector eccentric (64) wasn't that hard as I feared. By adjusting the eccentric one determines the "depth" of the Date corrector (65), shown by the blue arrows. Set too high and the top-sprocket of the Date corrector (65) won't even touch the Moon phase corrector (68). Set too deep the top-sprocket of the Date corrector will jam the Moon phase corrector (68) into the Moon phase indicator. The "depth" has to set such that the sprocket of the Date corrector (65) pushes the Moon phase corrector (68) just far enough so that it will just advance the Moon phase indicator by one click before the top Date corrector (65) sprocket releases the Moon phase corrector (68). There is clear information about the Moon phase corrector "depth" setting in the ETA 7751 "Technical Communication". With all parts installed and tested as far as possible, the dial goes back on. Before re-installing the hands, I re-lumed the minute & hour hand with new high-class LumiNova. Both hands now re-lumed and drying before the installation. Placing the long Date indicator hand required a bigger size hand-pusher which I didn't have. The idea was born to cut a tweezer protector-cap from the top until the required size was obtained. Stuck to protector cap onto the handle of a diamond file for more stability / pushing-power. It worked like a treat Turn the date quick-set until the month indicator disk changes month, that will be the first (1) day of the new month. The rest of the hands (8! in total) to be set at 24:00 midnight when the day indicator disk changes. Detailed instructions about the "shift tolerances" are described in the ETA 7751 "Technical Communication". All the hands installed and correctly set on the month / day / date and moon phase. The 18th of January 2022 had a full moon. The German gentleman received the watch when he turned 60 in 1995, now I'll continue with his watch as from my (65th ) birthday in January 2022 I'm still awaiting new crystals and once the case has been restored, I'll add the final picture of the fully restored/serviced watch. I really enjoyed working on this watch and even though I sometimes feel that contributing to this current WRT-forum has sadly become a bit of wasted time, I do hope that my write-up, perhaps found via Google or some other search machine, will be of some use to somebody, at some point in time Endeavor, Denmark


 15 points
 -
I haven't done one of these for a while and as this is my 1000th post I thought I would do something a little less ordinary. As the title says it's one of those crazy Russians, a USSR Sekonda from the 70's sporting a Slava 2428 in all its quirky glory. This one came to me as a non-runner and a preliminary investigation turned up a broken balance pivot so it went into the "to do" box until I could source a replacement, which it turned out I had all along from another watch previously scavenged for parts a while ago, as I discovered during a recent tidy up. So here goes...... Looking a bit sad, a grubby face and a bit of corrosion on the hands, and as already mentioned, not running. Also the date corrector pusher which is above the crown is jammed in. It's obviously seen a bit of wear in its time as the plating to the rear of the case has started to go through. Inside doesn't look too bad. Dirty and dry for sure but I've seen worse. The stem however suggests that things may not be so good further in. Uncased and the dial doesn't look so bad. The hands may need a bit of a spruce up. Oh dear... with the dial off the hint that the stem was giving earlier becomes a grim reality and the reason behind the frozen date corrector is clear. Heavy rust around parts of the date quick set mechanics has seized everything solid. With the day and date wheels out of the way and safely bagged the full extent of the problem can be seen, and maybe it's not quite so bad after all so long as none of the screws shear off as I try to undo them. Success.... all the screws out and nothing stripped. The rusty parts have been carefully rubbed down and are now enjoying a strong cup of tea.....to stabilise the remaining rust deposits. And here is the first quirky bit, all of the date quick set mechanics are mounted on the movement ring, not the movement itself. Strange but true! The movement now flipped, balance cock and barrel bridged removed, and the second and third deviations from the everyday run of the mill design philosophy become apparent; that curiously asymmetric pallet fork, and those tandem main spring barrels. The first of the going train bridges removed .... ... and with the second train bridge and wheels removed, the replacement balance is installed without jewels ready for a spin in the Elma. And here we have all the bits nice and shiny out of the cleaner, with as much of the rust issue dealt with as possible. Is it me or are there a hell of a lot of wheels in this little baby? Both main springs are in good shape so they are greased and rewound into their respective barrels. I don't know if it was strictly necessary but I did take the precaution of keeping the barrels, lids, and arbors together as sets during the cleaning process so that the same bits went back together as came apart. Balance jewels inspected, lubricated, and reinstalled. The hair spring is pleasingly flat, parallel to the balance, and concentric, and once set in motion the balance doesn't seem to want to stop. A good sign... In goes the first set of train wheels along with the idler that couples the twin barrels together. With the first train bridge in place the escape wheel and centre seconds wheel are installed. Second train bridge goes back on followed by the tandem barrels Barrel bridge with all of those amazing coupling wheels to keep everything turning the right way all the way back to the crown wheel and its clearly marked lefty screw. At this point all of the pivots have been oiled and a quick test of the free running of the train is done. A couple of clicks on the ratchet wheel and the escape wheel spins nicely down and then back with just a little recoil. After that the pallet fork goes back in and the pallet stones are lubricated. Typical of many Russian watch movements, the balance cock has a shim. Whether or not these were available in different thicknesses so that end shake could be adjusted I have no idea. I've never had a problem swapping them between watches though which suggests that they are all the same thickness. Balance back in and that lovely moment when it starts to beat again. And then back into its big metal spacer ring come date quick set extension. Time to rebuild the dial side. It's a bit cleaner now. Keyless works back in place. Motion works reinstalled. Incidentally, as can be seen here 5 of the 26 jewels are vertical rollers for the date wheel and 4 are set into the main plate for the date wheel to ride over. Cynical marketing ploy anyone?? The date corrector mechanics are reinstated into the movement ring, all now free running. Most of the rust damage cleaned up reasonably well but there is significant pitting at one end of the spring. If I ever find a donor I will replace the worst affected parts but for now they work and the rust has been stopped. Calender wheels back in place. Date wheel back in place and the day wheel jumper and spring installed. Day wheel drops into place. Dial and hand back on following a clean up and a little fresh black paint in the hands where it was beginning to crack. This is the date corrector pusher and is I suspect the origin for the water ingress that caused the rust damage. It has a little neoprene seal on its back face so that the spring tension should seal it against the inside of the case. It was bone dry and all it would have taken is a little dirt stopping the pusher from closing properly and its an open invite for any contamination that comes along. Now cleaned and re-lubricated with silicon grease it will hopefully keep the water out. Re-cased and ticking away nicely. With the exception of the date corrector pusher issue these are well designed cases. Although they make no claim to water resistance they do use a design similar to that used in the Vostok Amphibia cases, with a thick gasket, a steel back that drops into place, and a threaded clamping ring to hold it all together. Looking a lot happier than when this all started. You can now see the date corrector pusher protruding from the side of the case above the crown so it is definitely sealing against the inside of the case. A new crystal allows the cleaned up dial and hands to look their best. And there is something about the dial layout and hands that just seems so Russian to me. I really like it. And of course the proof of the pudding.... This is dial down. DU was almost the same, only difference was amplitude which fell to 298. The vertical positions showed a tiny bit of beat error, up to 0.4ms, amplitude down to around 275, and slight rate errors, coming in at -5 s/d at one extreme and +3 s/d at the other, quite a respectable result. Maybe those crazy Russians aren't quite so crazy as they first appear. The little design quirks here all add up to a nice piece of engineering. The train wheel layout, and the asymmetrical pallet fork allow for a comparatively large balance wheel for this size movement (thinking about it without the date quick set and the extension ring). The use of 2 main springs running in tandem allows for a more even torque delivery as the springs wind down which should help to reduce isochronism errors, while also making good use of the available space. It all actually makes quite good sense in a kind of lateral thinking sort of a way. If you should be tempted to go for one of these then I would suggest that the earlier USSR ones are the better ones to go for. The later "Made In Russia" versions at some point were updated to a 21600 train, but weren't so well finished, and that date corrector/spacer ring became plastic with the mechanics riveted on, presumably to reduce costs. Bit of a shame if you ask me. If you made it this far then I guess I haven't bored you to sleep. Thanks for reading.
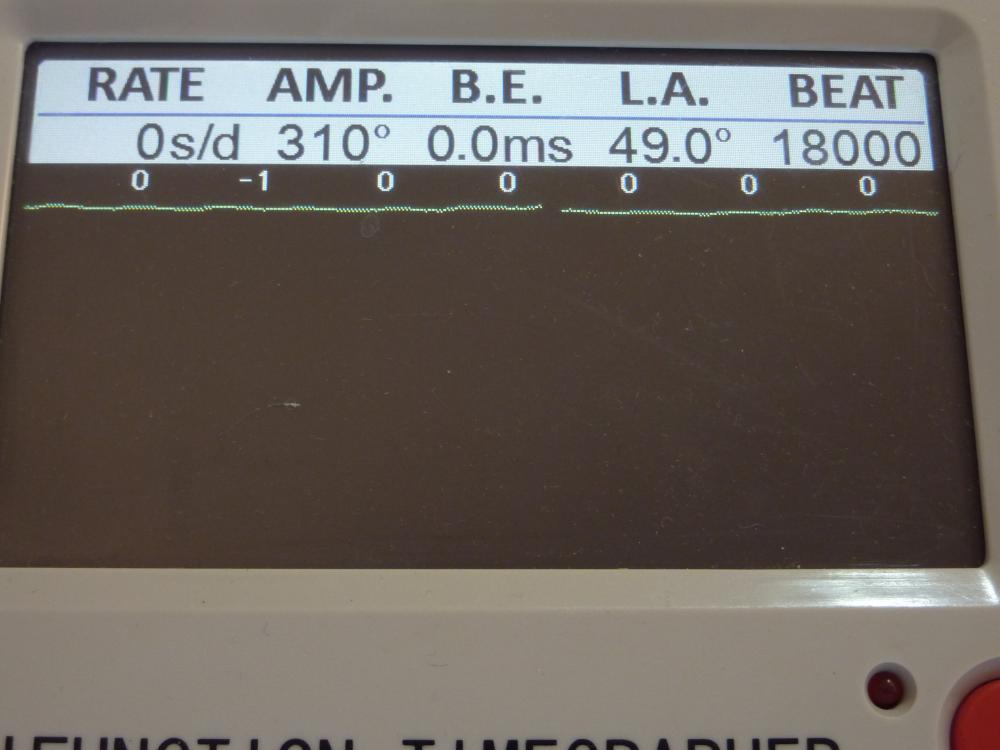
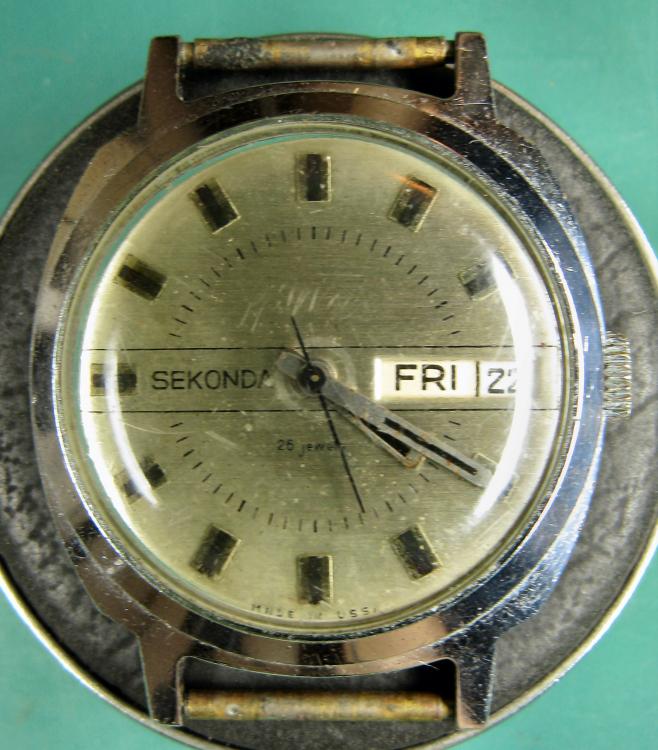
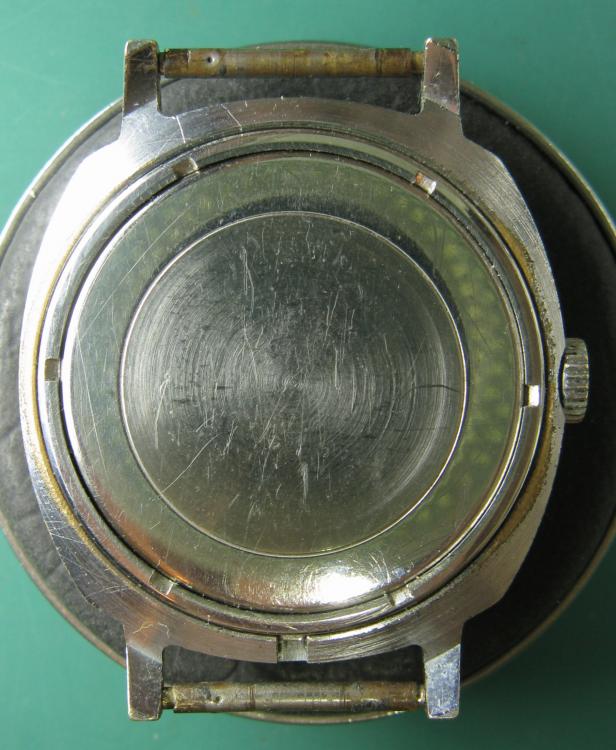
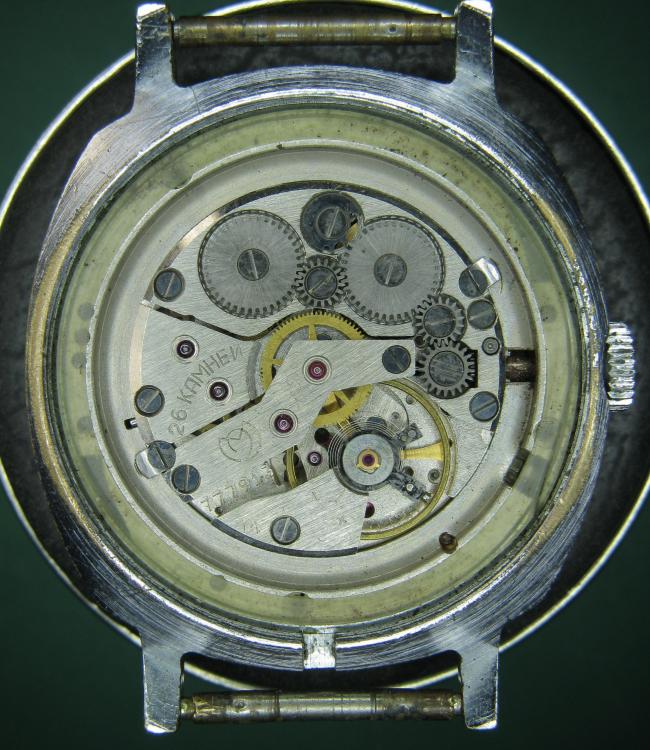
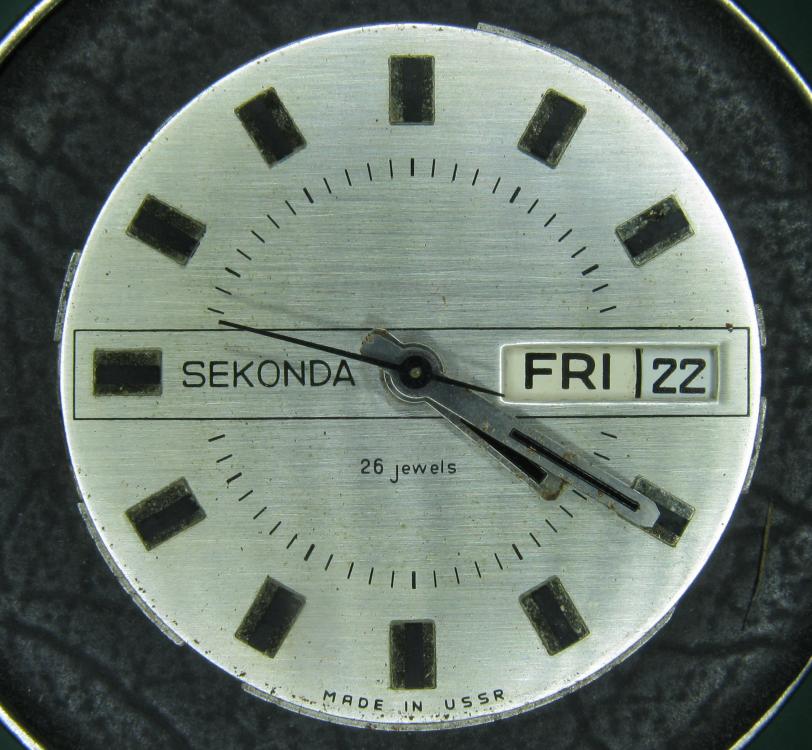
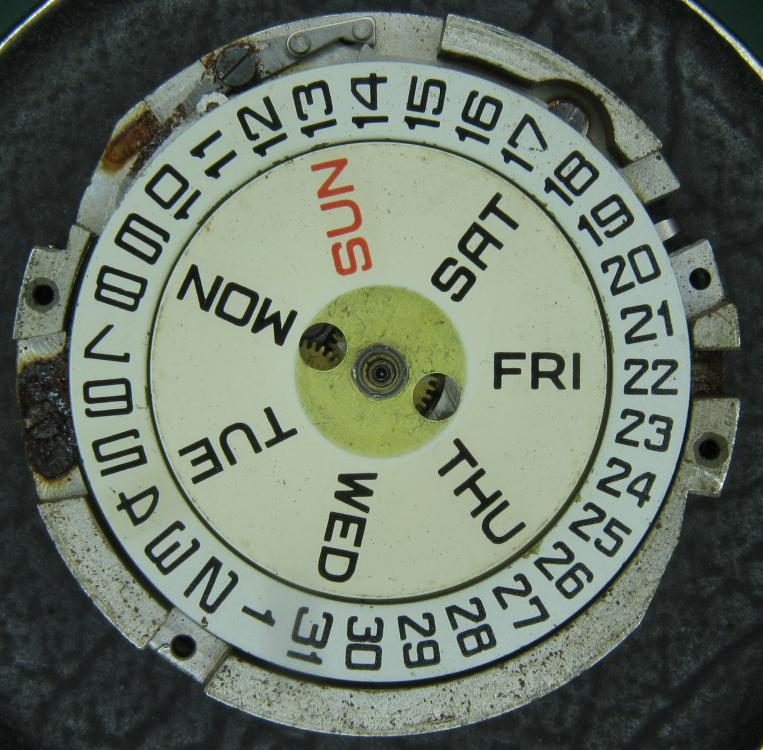
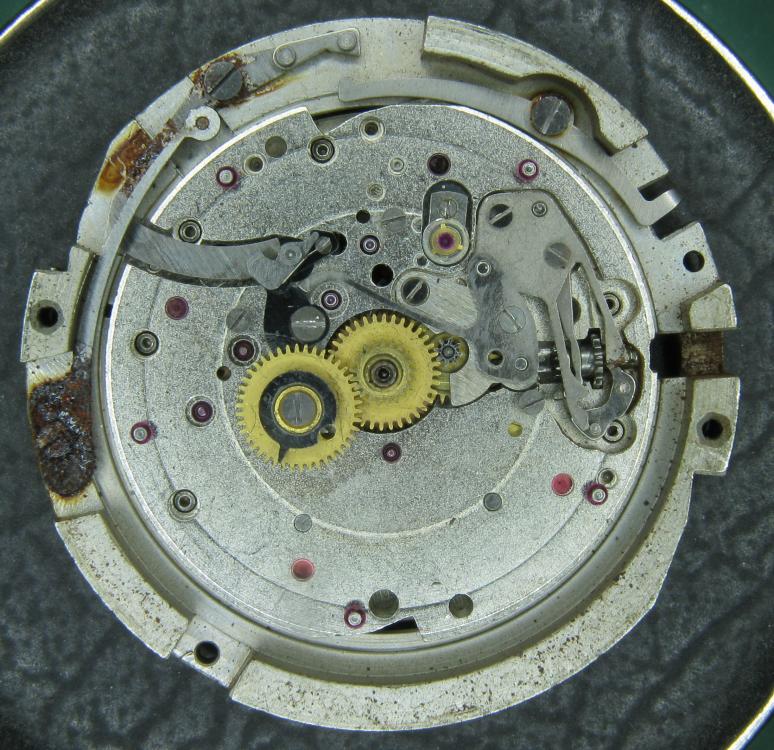
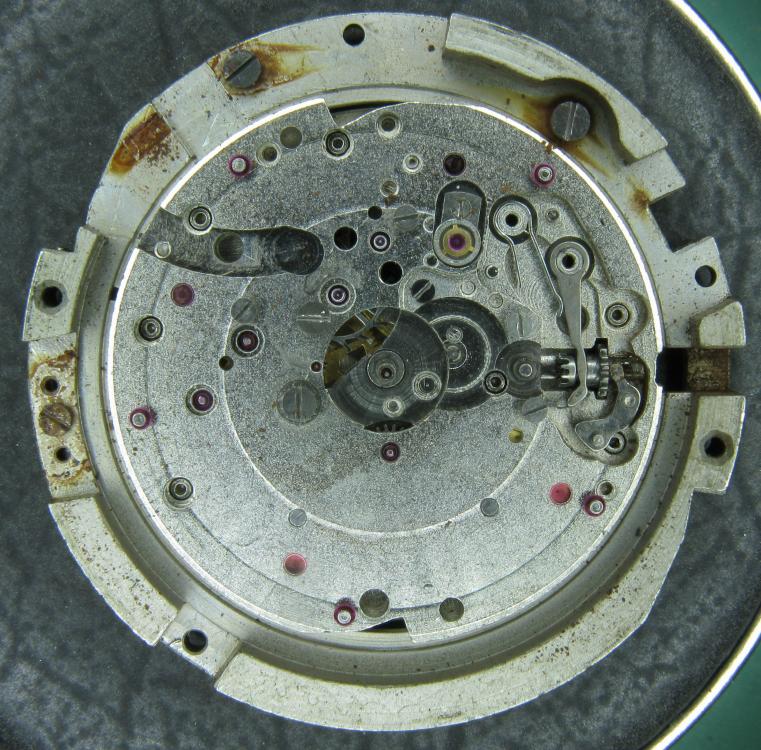


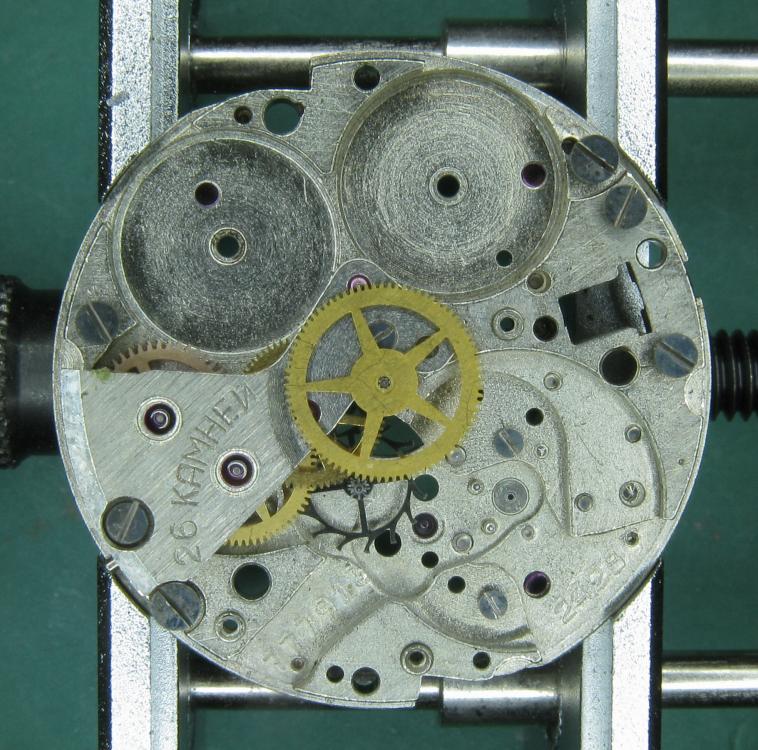
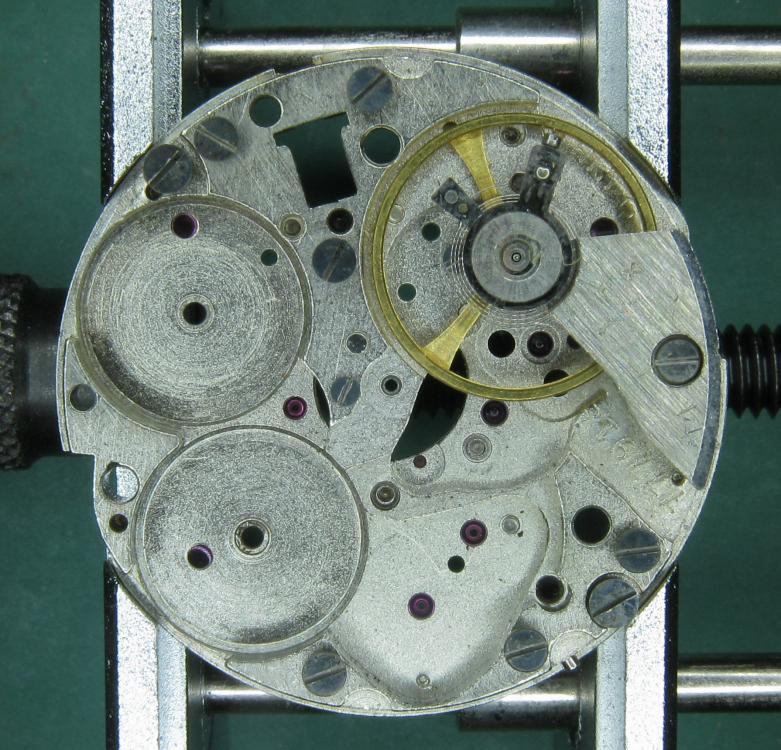
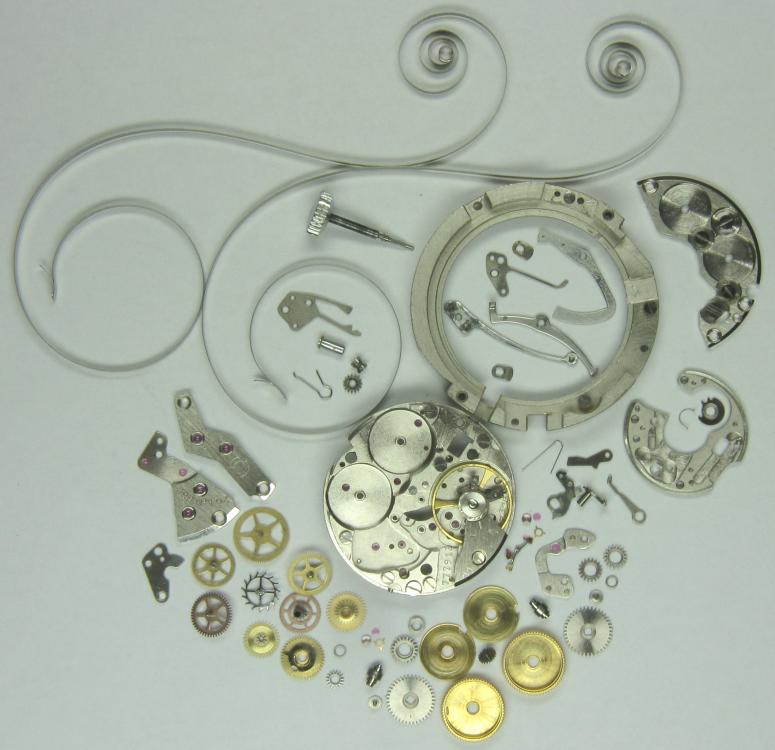
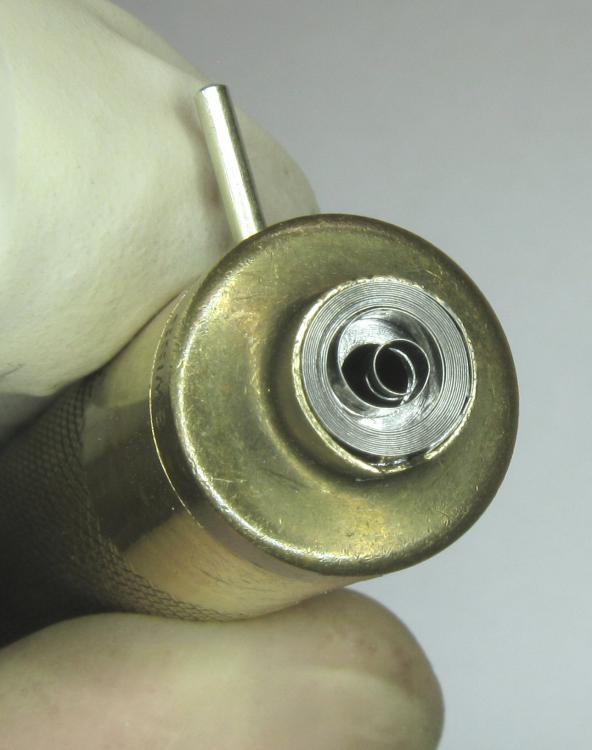
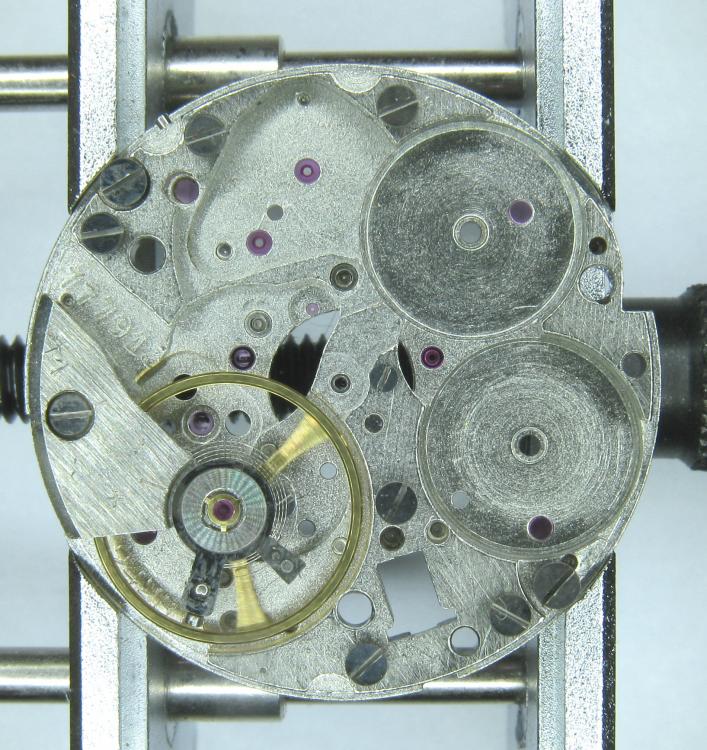
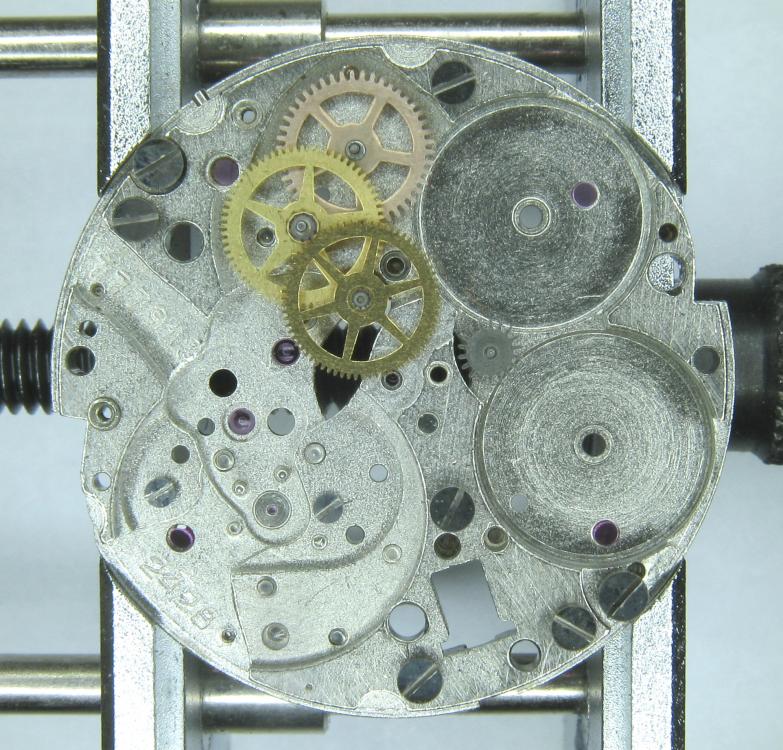
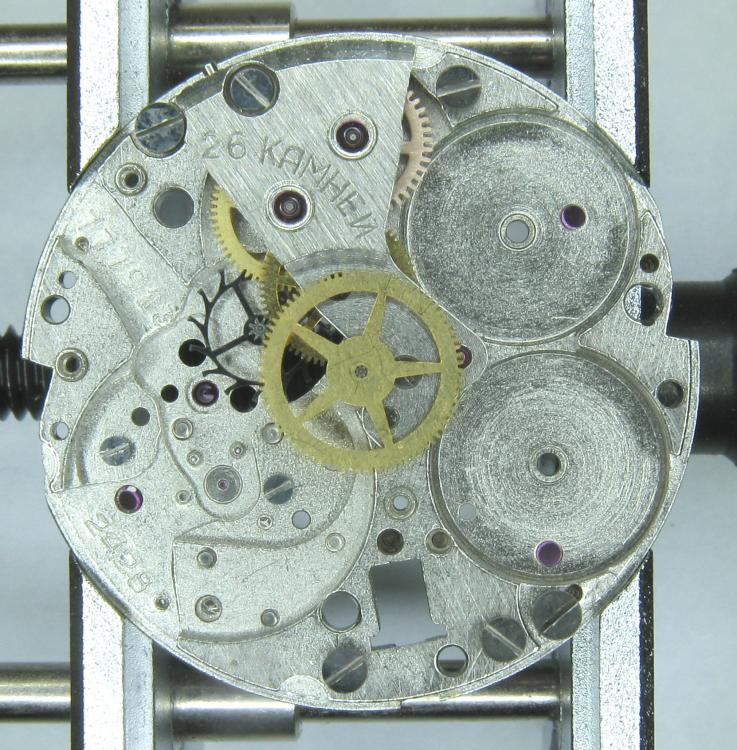

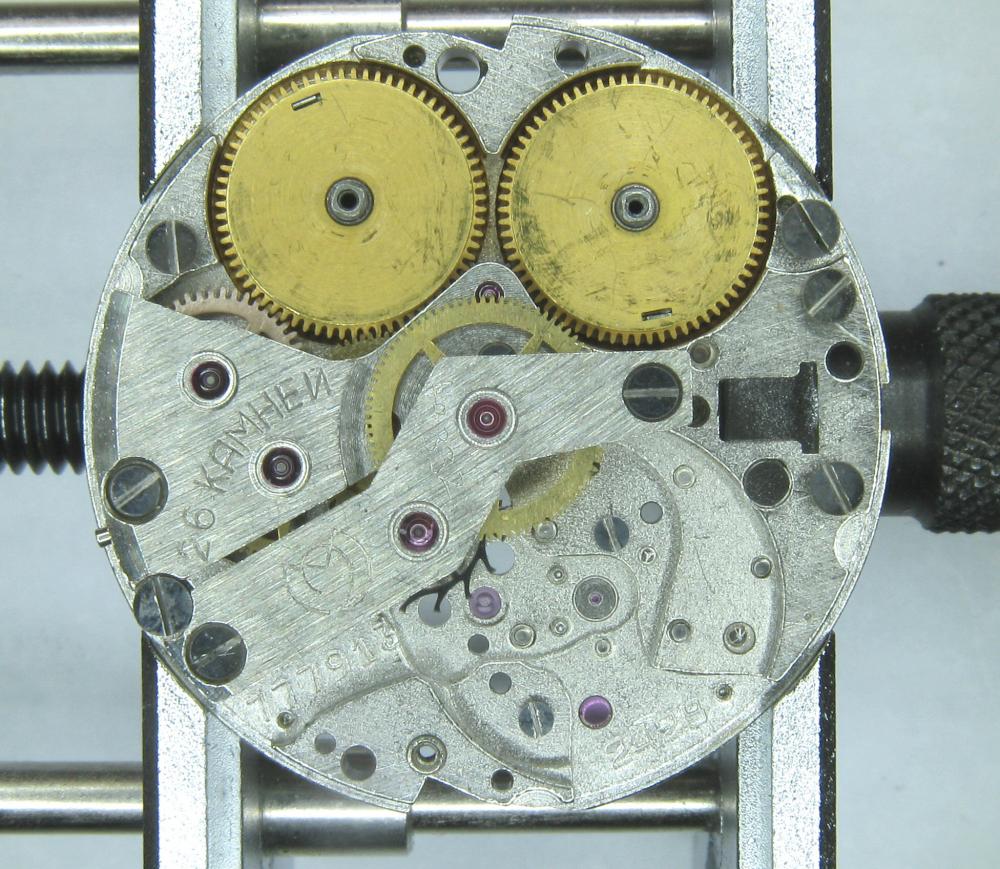
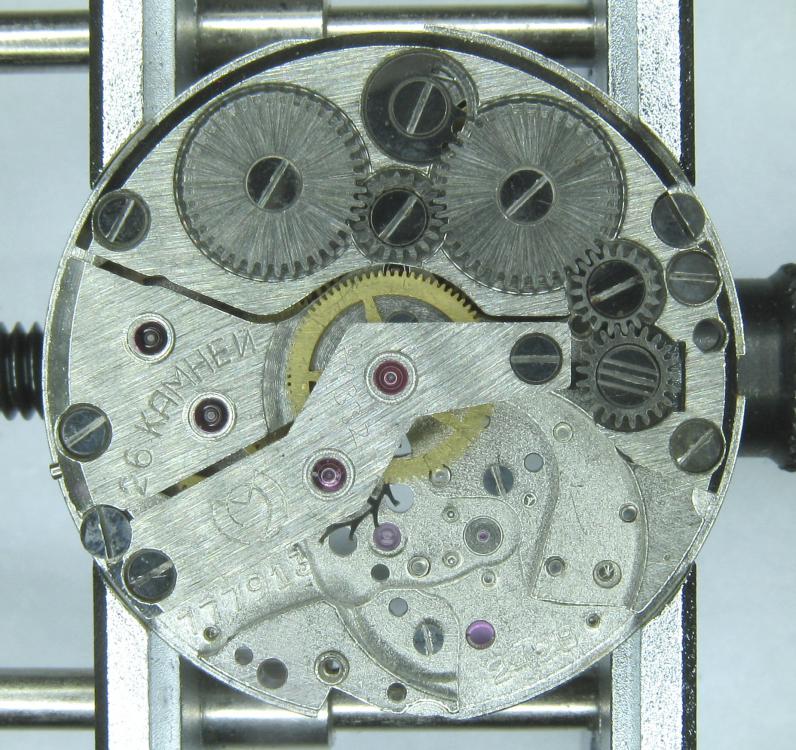
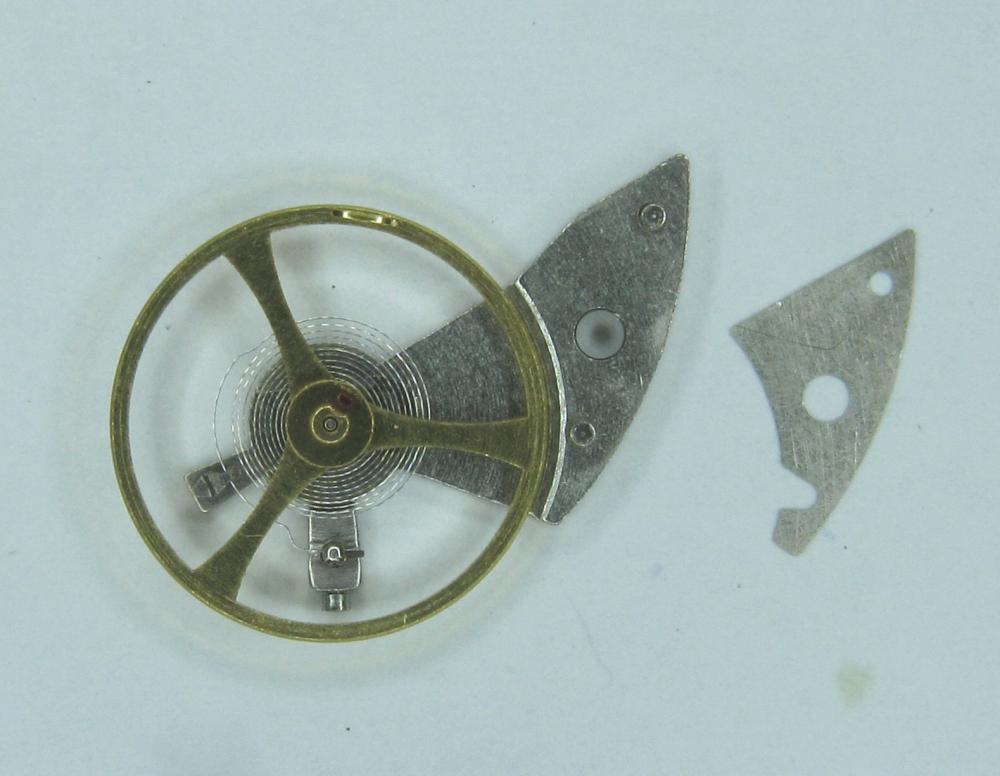
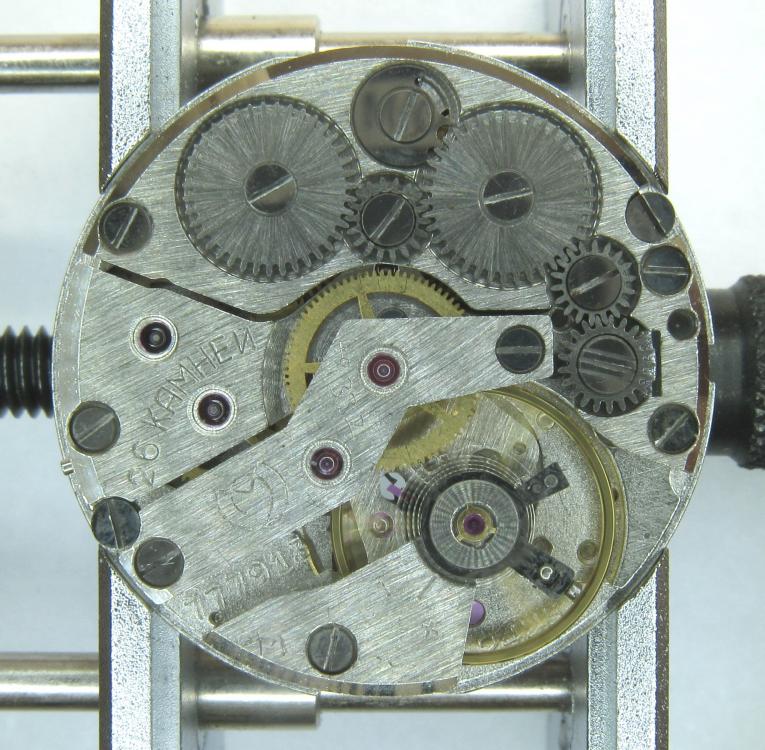
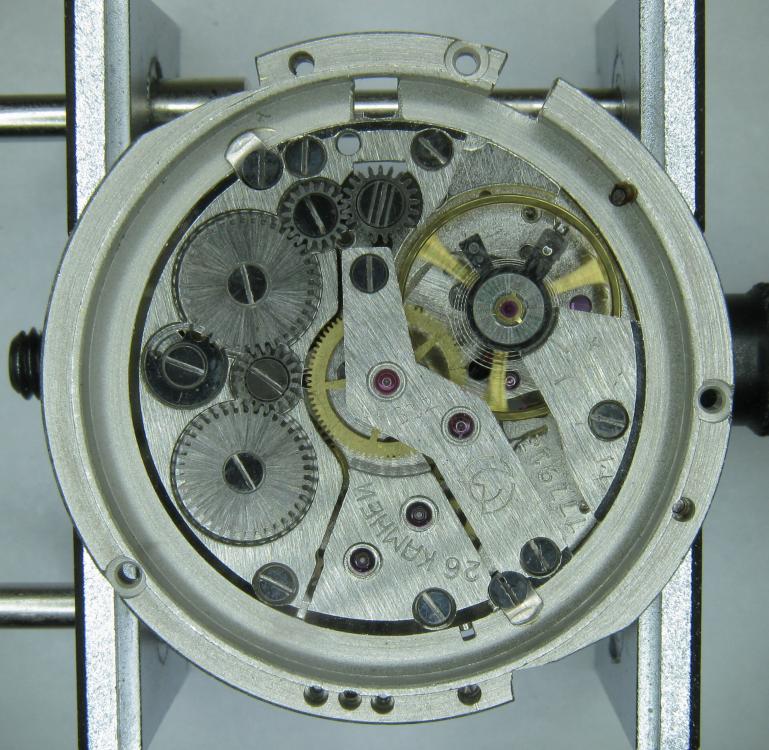


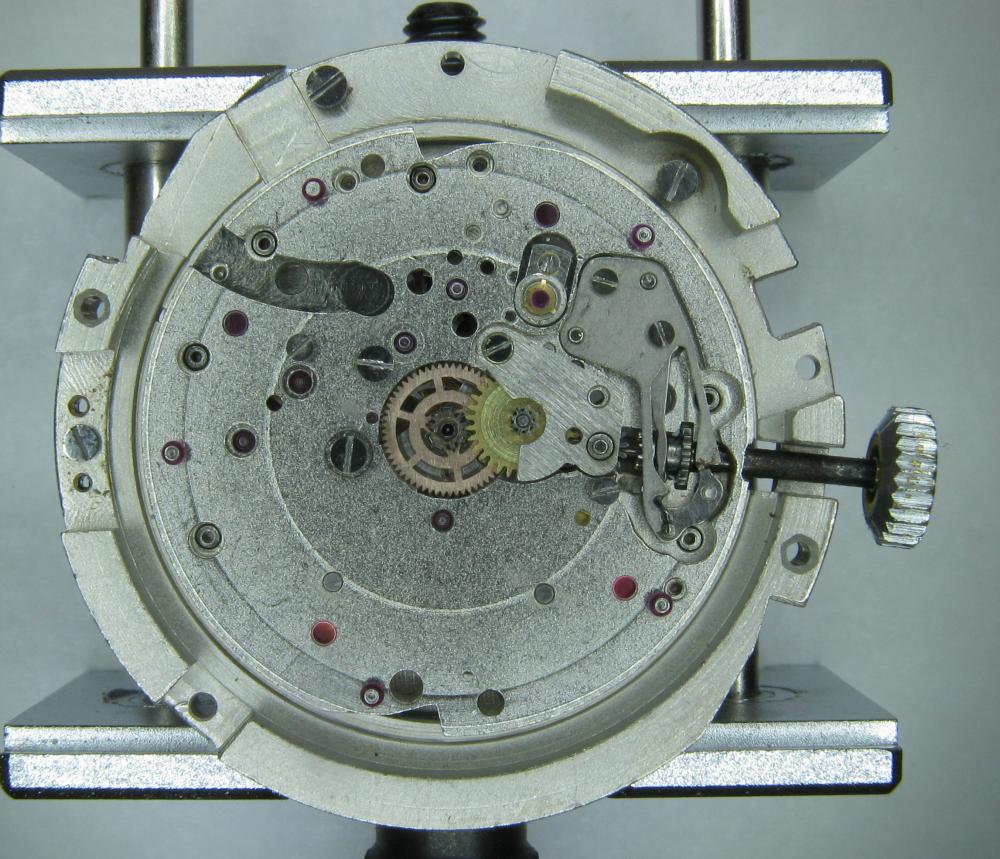
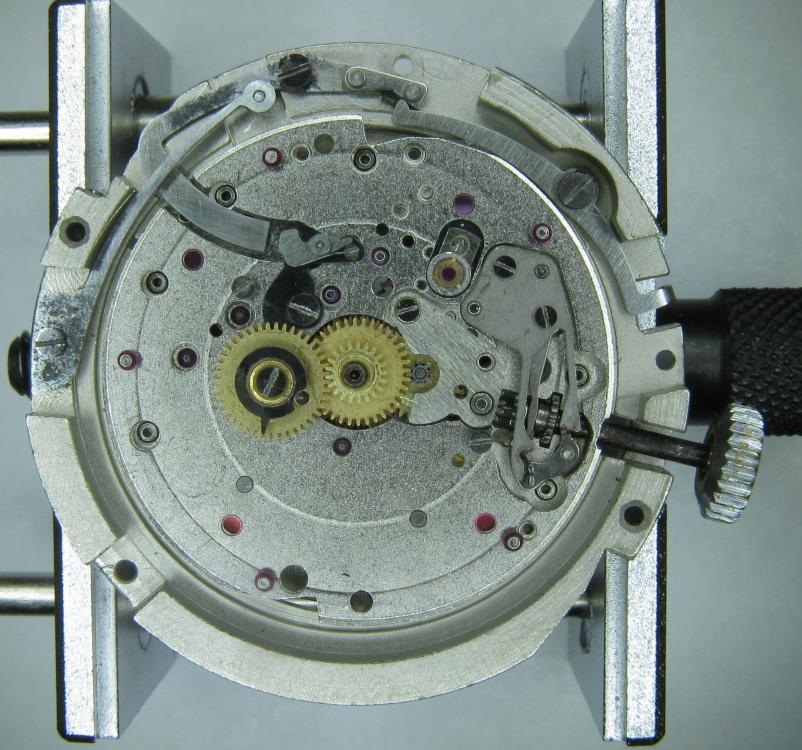
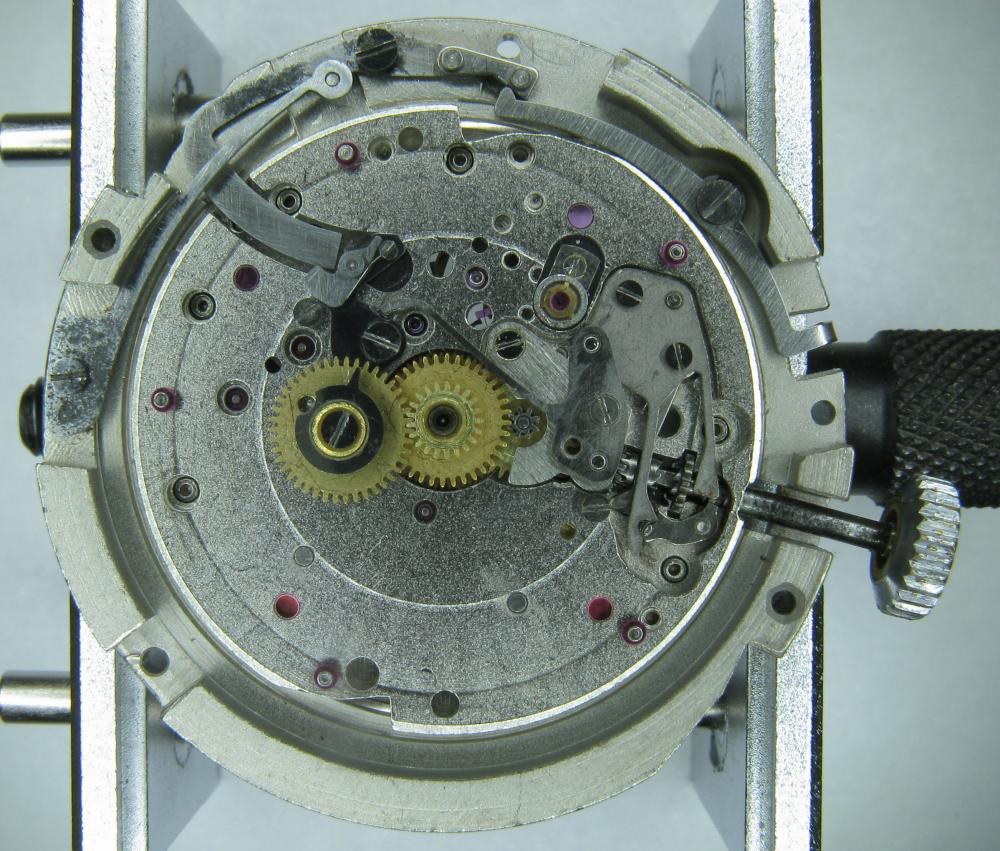

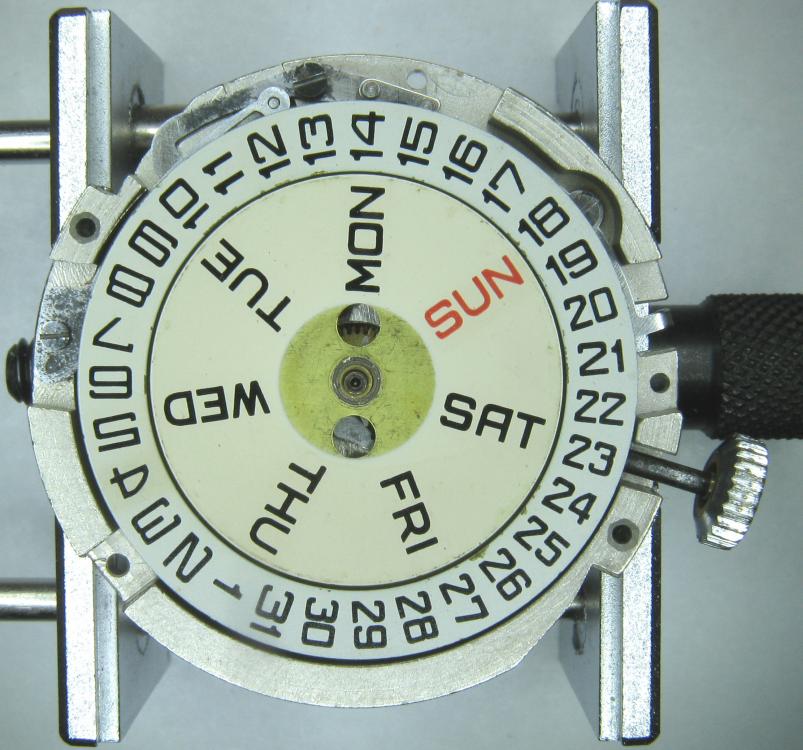

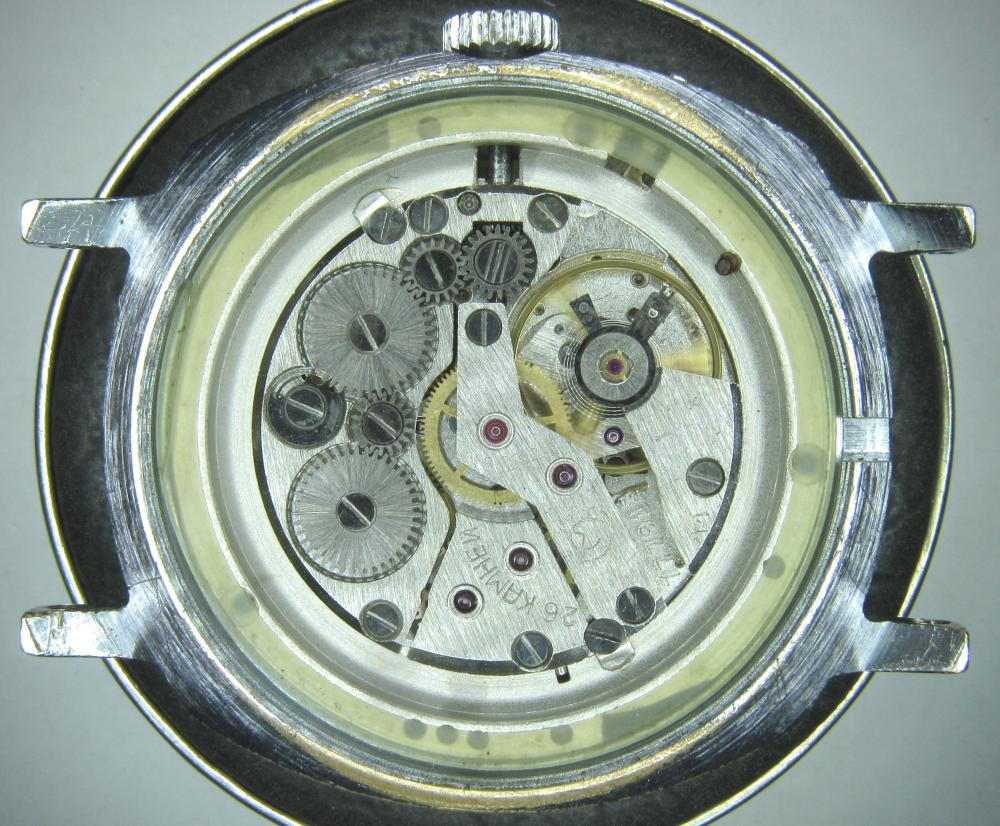
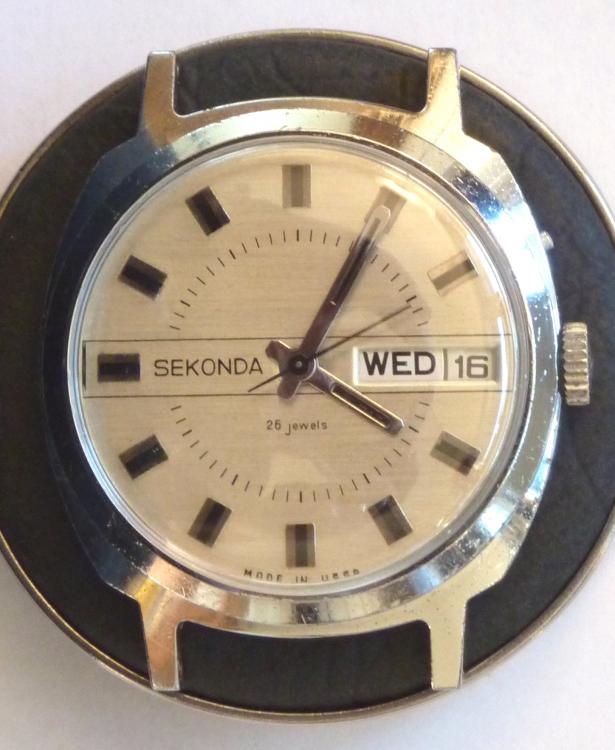 15 points
 -
Hi guys, I wrote this lesson for my second students to understand the theoretical aspects of the Swiss lever escapement in conjunction with the practical application of end-shake and setting jewels using a jewelling tool. Both Seitz and Horia-type jewelling tools were used. Although I talk about measurements using the settings on the side of the jewelling tools, it is more about what 'feels' right, especailly when gauging the end-shake of a particular component, such as the balance, pallet and escape wheel. Ideally, you wouldn't start by adjusting the end shake of the balance to suit your needs, but if the IncaBloc setting has been replaced or the Inca setting has been moved to replace the shockproof spring, then it is important to set the end-shake correctly. This presentation also looks at how to set the correct end-shake of the pallet in relation to the balance safety roller as well as other critical measurements, including the height of the escape wheel teeth hitting the impulse face of the pallet fork in both dial-up and dial down positions. The escape wheel and pallet have to have the exact same end-shake as each other for this reason. Unfortunately, the slides that contain videos can't be played as I converted the PowerPoint into PDF. I have used some diagrams from a WOSTEP handout on this subject, to show the vital measurement of the escapement in relation to the balance safety roller, so all credit goes to the author of that hand-out, which has been posted several times on this forum. All the students that set all the jewels after removing them and the balance end-shake to its optimum got a watch movement working with much improved amplitude than when they started. All ten jewels in the wheel train were removed as well as both IncaBloc settings. Another lesson was created just about the balance setting and disassembly and assembly of the EtaChron balance system which included removing a replacing that Inca setting. I haven't included that lesson. Not every aspect of this work is within the presentation, as it would be very long otherwise. I talk a lot and explain more as the lesson proceeds. This lesson was held over six to seven hours. If anyone is interested in learning more on this subject, please message me. Lesson 16. Balance endshake & Incabloc adjustment.pdf Lesson 16. Balance endshake & Incabloc adjustment.pdf14 points
-
Introduction This service walkthrough is not a tutorial on how to service a watch movement. I made it for myself because I think it's fun and because it will make it easier the next time I service a Vostok 2431. I also think it feels nice to be able to share this walkthrough considering all the valuable information that many very talented members on WRT freely share. Many, many thanks! There is a lot to learn when servicing a watch movement that is not covered in this walkthrough. Therefore, I recommend, for example, watchfix.com, learnwatchmaking.com, or timezonewatchschool.com. I feel like I got the most bang for my buck at watchfix.com (I'm not sponsored in any way) but I've also had a lot of fun and benefited from the other online schools. Links to photos on my OneDrive Vostok calibre 2431 disassembly walkthrough. Please sort the images by name in ascending order. Vostok calibre 2431 assembly walkthrough. Please sort the images by name in ascending order. Curiosities I think it was in 2014 or possibly 2015 that I bought my Sturmanskie Open Space. I had just discovered that there were watches where the hour hand only rotates one revolution per day and at that time I knew absolutely nothing about watch movements, service and repair. The idea that the hour hand of a watch only rotates one revolution per day seemed not only completely logical but also different and fascinating. The earth rotates one revolution around its axis per day, so it should be obvious that the hour hands of our watches do so too. The fact that the letters on the watch were also Cyrillic did not make the whole thing any less exciting. I just couldn’t resist it and I’m happy I didn’t! Vostok claims that their movements only need a service every 10 years, and I think that's true because the tolerances are pretty rough and therefore large amounts of dirt are needed to stop a Russian movement or even cause it to run badly. It has been said that the amount of dirt required to stop a Vostok movement is enough to stop a hundred Patek Philippe movements However, the price for this endurance is a movement that doesn't come close to the precision offered by high-quality Swiss and Japanese movements, but it's still quite easy to get these Russian movements to run accurately as long as they're worn and used consistently. About the movement Russian watch brands such as Vostok, Raketa, and Poljot, to name a few, are known for using their in-house movements, but not this Sturmanskie which is instead powered by a Vostok calibre 2431, which is a 24-hour movement. However, it is not a true 24-hour movement. That is, the movement is not originally designed as a 24-hour movement. Instead, Vostok has modified the movement in its calibre 2416B so that the hour hand only rotates one revolution per day. Calibre 2431 is otherwise identical to Vostok automatic calibres 2416B and 2415. The motion work(/dial train) in Vostok 2431 The way that Vostok modified the movement so that the hour hand only rotates one revolution per day is by modifying a) the minute wheel, b) the bearing for the minute wheel in the main plate, and c), adding an intermediate date indicator wheel. The minute wheel has been modified so that it has two pinions that lie on top of each other. The lower pinion drives what I call the first intermediate date indicator wheel while the upper pinion drives the hour wheel and has been adjusted so that the hour wheel only rotates one revolution per day. The number of teeth on the hour wheel itself may have also been adapted, but this is not something that I have investigated. Normally the minute wheel is mounted on a regular metal post on the main plate, but in this case, Vostok has replaced the post with a beefy, jewelled bearing. I assume that this has been necessary to get the minute wheel, with its two pinions on top of each other, to rotate sufficiently smoothly and stably. The added first intermediate date indicator wheel drives the second intermediate date indicator wheel which is part of Vostok's regular (non-modified) calendar complication. And this is what it looks like with the hour wheel mounted. Cleaning I have found that it is all too easy to underestimate the importance of cleanliness when servicing a movement, perhaps because the parts are microscopic and therefore it takes time to get used to thinking microscopically, even though I have been doing this now for five years. Cleaning of pinions and pivots A type of watch movement part that is particularly important but also difficult to get completely clean is pinions, but @nickelsilver advised me quite recently that in its pre-cleaning you can dip and rub the pinions in pith wood that you have impregnated with an effective degreasing agent, for example, Horosolv. I've done it several times now and it works amazingly well. Speaking of pinions, independent American watchmaker Josh Shapiro mentioned in a podcast that he considered pinions to be the most difficult part of a watch movement to make perfectly. Whether it's true or not I don't know but I think it's likely. To get the pivots clinically clean, I have also started using EVEFLEX, but you have to be careful because the material has an abrasive effect. It is important to choose the right polisher and to be careful. I have summarized my experiences with EVEFLEX in this post and I mention it because EVEFLEX is easy and quick to work with and gives me very good results. End-shake If there's one thing I've learned this time around, it is that a Russian movement cannot be converted to a Swiss movement because the tolerances in Russian movements are generally much coarser. Experimentally, I adjusted the end-shake to 2/100mm on everything from the pallet fork to the centre wheel, with the result that the amplitude and rate became extremely erratic. I created a thread about this: "Can end-shake and or side-shake ever be too small?" As you will see if you follow the thread, once again @nickelsilver, @Shane, and @JohnR725came to my rescue. Many thanks! My recommendation is to let the end-shake be slightly wider on Russian movements. After I increased the end-shake to approx. 4/100 mm, the amplitude and rate returned to typical, i.e., still somewhat irregular but perfectly normal for a Russian movement. Side-shake In this video, Kalle Slaap from Chronoglide shows an amazingly simple and effective way to determine if the side shake is correct. Since there was a crack in the third wheel jewel in the train wheel bridge, I replaced it, and when I then used Kalle Slaap's method, I could clearly see the 3rd wheel pivot jumping back and forth in the jewel hole. So, I replaced the jewel with a hole that was 1/100mm smaller and the visual difference, just changing it by 1/100 mm, was nothing less than dramatic. I am incredibly happy that I got to learn this simple and exceptionally clear method. Many thanks to Kalle Slaap at Chronoglide! Vostok reverser wheels If you Google “Vostok reverser wheels”, there is a lot of whining going on. I don't think there are any major problems with Vostok's reverser wheels, but they are unfortunately easy to damage during service or modification of the movement, and I think that is the real reason for the whining. Next to Seiko watches, Vostok watches are immensely popular to modify in terms of dials and hands, and in addition, many people want to fix the seconds hand that sometimes stutters on these movements. The latter is done by bending the second-hand pinion spring illustrated in this thread. To make these modifications, the oscillating weight/rotor must be removed and when it is to be screwed back on, it is easy for the rotor pinion to end up on top of the teeth of the reverser wheels. If you tighten the rotor screw in that position, even just a little, the reverser wheels will inevitably be damaged. The result is that the automatic winding stops working or only works intermittently. An easy way to check if the reverser wheels are working as they should is to manually rotate the oscillating weight alternately about 20 degrees in both directions with a piece of peg wood while looking at the 1st reduction wheel which is large and easy to see. If the 1st reduction wheel continuously rotates in the same direction (counterclockwise, if I remember correctly), no matter which way you rotate the oscillating weight, you can be sure that the reverser wheels are working as they should. If, on the other hand, the 1st reduction wheel rotates alternately in both directions when you rotate the oscillating weight alternately, then you can be sure that the reverser wheels are damaged and need to be replaced. Servicing the automatic mainspring I find it difficult to service the mainspring on automatic movements. It is, in my opinion, a construction that leaves room for improvement and that is why I generally prefer manually wound movements. If the mainspring in an automatic movement slips too soon, it reduces the amplitude and the power reserve, and if the mainspring slips too late, there is the risk of re-banking and that the movement runs much too fast when you are physically active, especially when you take a brisk walk swinging your arms, and the oscillating weight rotates constantly. The effect is like continuously turning the crown of a manual movement with high pressure when the mainspring is already fully wound. Not good! What I learned this time anyway, long story short is that you can be quite generous with braking grease on the rim on the inside of the mainspring barrel. Even if some of the braking grease ends up where it really shouldn't be, I don't think it will destroy or affect anything negatively. Also, and again from Kalle Slaap at Chronoglide, I learned that you should press at the end of the spring at the bridle when it is mounted in a spacer, and you are about to push it into the mainspring barrel. In this way, the rest of the spring automatically follows down into the mainspring barrel. You can see it in this clip. Very smooth, especially in combination with my highly rated Master Craft mainspring winder which I wrote about in this post. Lubrication of cap jewels For a long time, I have had trouble getting the oil to stay in the centre of the cap jewels and not flow out after I oiled them and installed them, despite treating them with epilame (Fixodrop). I think it's because (and now I'm going by gut feeling) that I previously always installed the shock assembly in the main plate before installing the balance and that I didn't treat the jewel housing (chaton) with epilame. After several failures in servicing this movement, I decided to treat both the cap jewels and jewel housings with epilame and mount the shock assembly after having replaced the balance. It did the trick and also made fitting the three-legged anti-shock spring much easier. My theory is that the balance staff pivots stabilize the oil in the centre of the cap jewels when the jewel housing (chaton) is dropped into place, and better hold the jewel housing in place, which will otherwise slide around while installing the three-legged anti-shock springs. Have I just written the longest post in the history of WRT? Anyway, hope you enjoyed it!
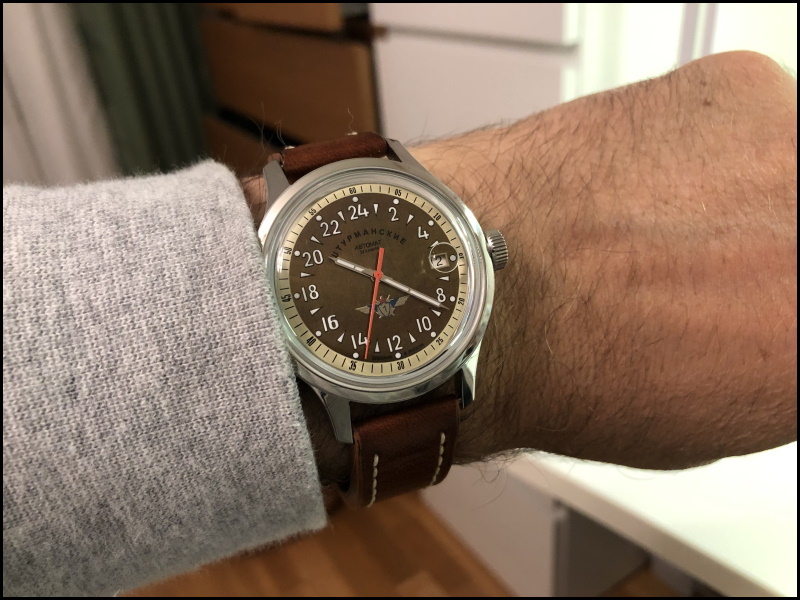
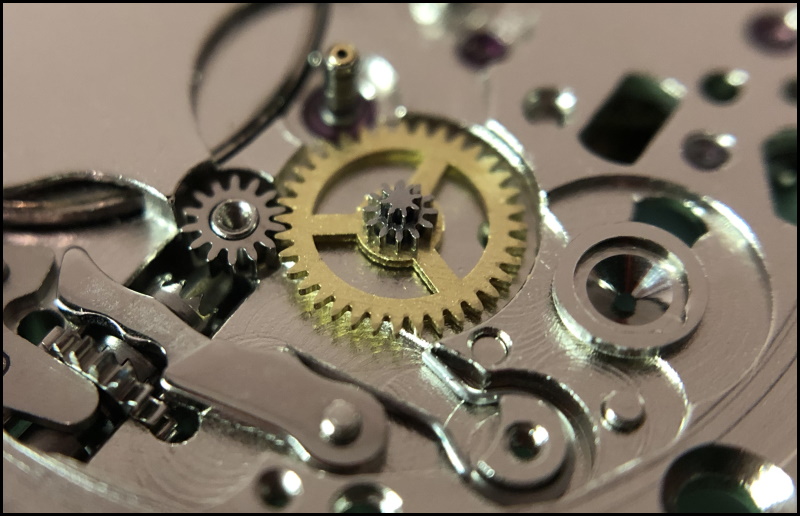
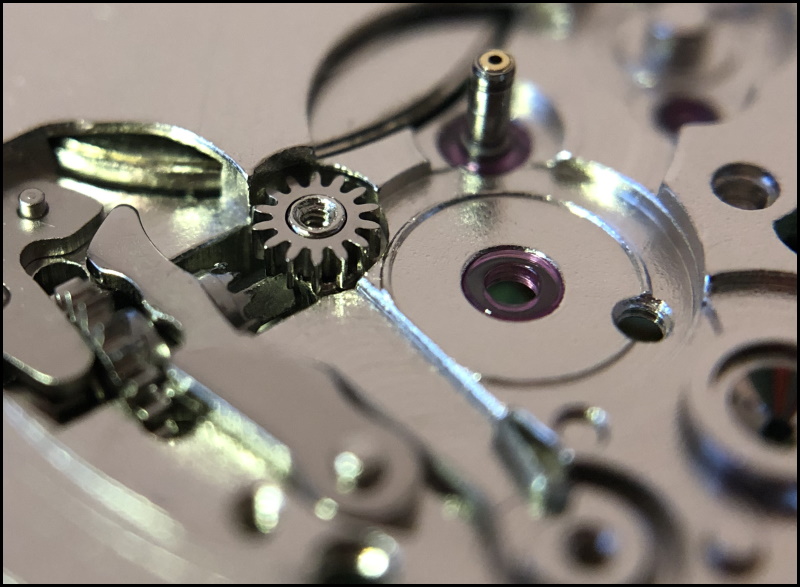
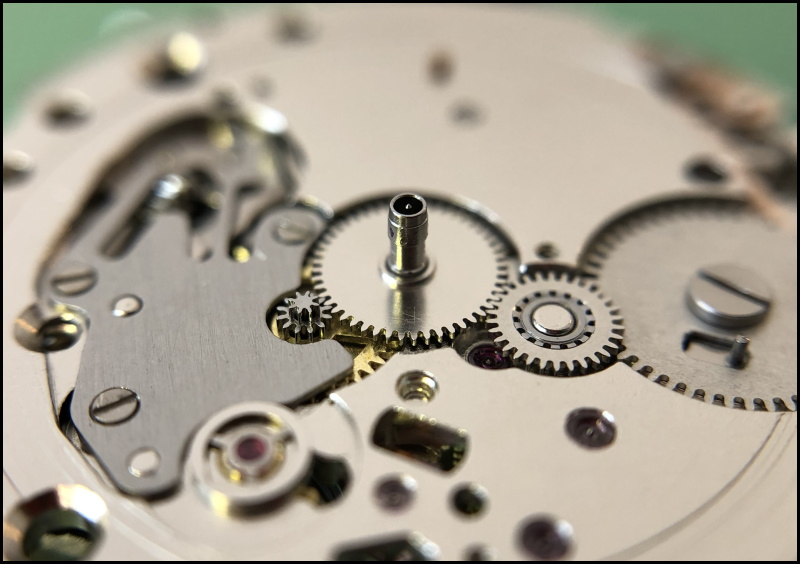
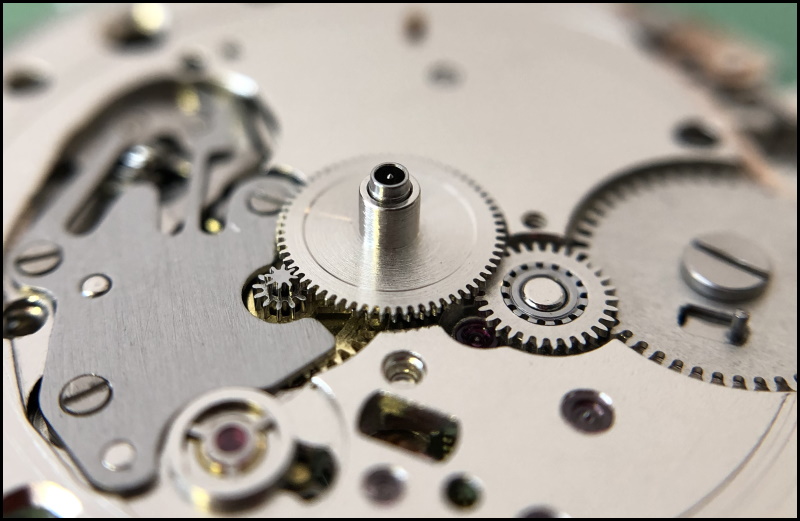
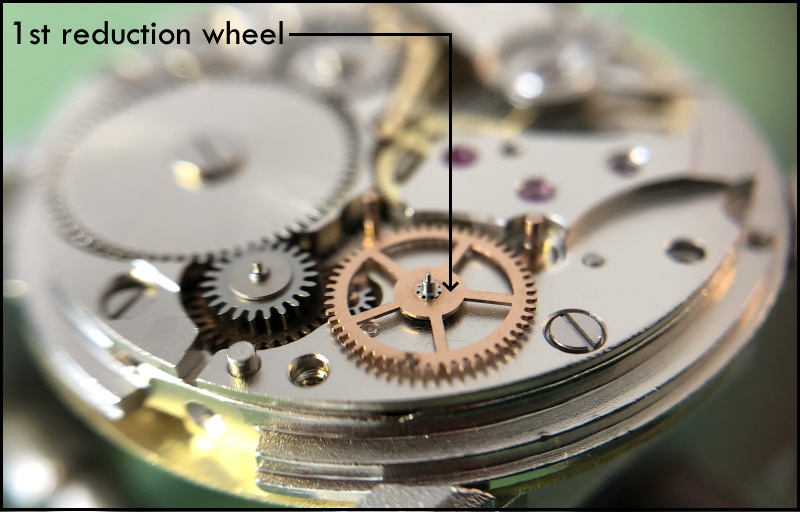 14 points
 -
We made a balance tack in school, but aside from that time I haven't really used it. A much handier tool is this one which was a standard tool made in watchmaking schools here. The "tack" is a threaded pin which can be placed in one of several holes (usually 2 or 3 sizes of tapers on several pins). Choosing an appropriate pin and hole location, the balance isn't hanging as it sits on the table, so no risk to the hairspring. The overarm presses down on the rim, which is supported from the inside by the little "V" so that work can easily be done on screws (it's a non-screw balance in the pic but you can see how it works). Access is also easy and safe for moving hairspring collets to adjust beat. Bergeon made a similar tool at one time but it hasn't been available for some time. If mine ever disappeared I would stop work until I had made a new one, it's that handy.
.thumb.jpg.796f86233d594b9944f4949506b5e439.jpg)
.thumb.jpg.9940a1cd9b1ec9e8f4a09d3a4445ddac.jpg) 14 points
14 points -
Hello All; On my desk landed a 1975 Omega Speedmaster professional Mark II. It was in a sorry state and water ingress was suspected. The last services were quite a few years ago, mid '80's towards the '90's. Those services were performed by a watchmaker working for a local highly reputable jeweler with a glossy facade. Instead of using the proper tools (a guide-ring) to replace the glass, for ease or necessity the official seal-ring was taken out and the glass was placed using a black sealing-kit. The back-cover received the same treatment, instead of the correct O-ring, the O-ring groove was filled with the same black sealing kit and the cover was thereafter closed. By a stroke of luck, the Omega was replaced by another watch and has for 20+ years been stored in a drawer; until recently. The owners current watch was sent away for a service and the Omega had to fill the gap. Unfortunately the Omega came in contact with water. The owner suspected water ingress and as soon as his current watch was back from servicing, the Omega was sent to me. Though time, the black sealing kit has eaten away the printed Tachograph-ring and made its way onto the edge of the dial. The task on hand; a full service of the movement, installation of a new mineral glass and replacing all seals. Perhaps some new luster to the watch-case........ Whether I show the full restoration of the watch-case needs to be seen, but I like to start off with a walk-through of the 861 movement. Two Omega 861 manuals were of enormous help; Omega 861 service manual.pdf Omega 861.pdf I printed them out and best is to read and cross reference both manuals before starting. Each manual contains important information, not necessarily mentioned in the other manual ! Once the information is combined, then there is enough information to do a proper service. For chronographs like this one, I replace each screw after the component has been removed. This avoids screw mix-ups, but can cause some problems too ...... read installing the pallet-fork bridge. Without any further ado; Here is the watch as I received it; Luckily the inside looked pretty okay and no visual signs of water. BTW, the black sealing kit on the back was already replace by a proper O-ring. Took some Watch-O-Scope shots (lift angle 50 degrees) Dial up: Dial down; Crown Up; Crown down, this one was harder to get due to a weak signal; All in all, not too bad.......... at least not "devastating" differences in the four positions. The movement is attached to the case with two clamps and a spacer ring. Remove those plus the winding stem and the movement can be taken out. Clearly visible is the black sealing-kit around the dial edges, starting from 5 till 10-o-clock. Pay special attention when removing the little hands, these have different tube sizes. I stored them separately, each in their own container; Left, Bottom and Right. Taking ample pictures was a great help to me as well. I had to consult them a few times during the assembly. Another remark I like to make is that the movement doesn't sit comfortable in an universal movement-holder. The movement-holder I used was a Bergeon 4040 and with great care it can be done, but later I've spotted on eBay Omega 861 movement holders for reasonable prices ..... On the picture below, the Joke 1774 has been removed. This exposes and give access to the click (see arrow). The main-spring can now be disarmed. Next is the hammer-spring 1734; it sits on two center-pins and has to be lifted at its heel. The hammer 1728 sits on a post and can be lifted straight off. Remove coupling spring 1731 and coupling yoke 1724. Be aware of the eccentric screw, it clearly has a different shape. I left the unit (wheel bridge 1716 and coupling wheel 1712) in one piece. Later I dismantled the unit and attention has to be paid which way around the coupling wheel is mounted. Removed the plastic blocking lever 1726 and blocking lever spring 1733: in the manuals different names and number are used for seemingly the same item. One end of the spring has a "hook". This "hook" has to face upwards against the blocking lever. Next to remove is the cam-jumper 1845. Next is the chronograph bridge 1037. The manuals are not very clear if one does this for the first time. Underneath and fixed to the bridge is a thin spring for the minute recording jumper. This spring will come together with the chronograph bridge. The spring pushes against the minute recording jumper 1767, which is attached to a post underneath the bridge. While lifting the chronograph bridge, the jumper 1767 may, or may not come as well. I my case, all lifted in one piece. By turning the bridge around, it all becomes clear .... Das "Aha Erlebnis" ;-) Remove chronograph runner 1705, minute recording runner 1708 and intermediate wheel for minute recording runner (1714); note which way around of the wheel ! Remove operating lever 1841, operating lever-spring 1842 and connecting lever 1840. Attention: The operating lever 1841 sits under tension. After I removed the screw and attempted to lift the lever 1841, the connecting lever 1840 had its personal launch ...... luckily not that far ...... Remove operating lever 1720. In my case, the "Glossy Facade Watchmaker" left a surprise; the top screw was sheared off right under the screw-head and screwed in by literally one thread (red arrow, picture above). I later attempted the remove the remaining stud, but no success. After consulting the owner and this being the second, more a guiding screw, the decision was taken to repeat the GFW-trick. The screw held for many years, so hopes are it will do it again. Remove (and note position) upper cam for hammer 1844, remove lower cam for coupling clutch 1843, remove stem for "Zero pusher" by undoing the screw, remove bolt-spring 1752 and bolt 1759. Carefully, use Rodeco, remove fragile friction spring for chronograph runner 1735. Carefully remove the driving wheel 1710; I managed to lift it using two hand-levers. I then removed the balance & bridge, the pallet fork-bridge & pallet and the escape wheel bridge & escape wheel. Flip the movement over; Remove bracket for operating lever 1784 (note position), remove hour hammer spring 1794 (not described in both manuals, note how it engages) and remove hour recorder stop lever 1750. Be aware: as soon as lever 1750 is lifted, spring for stop lever 1793 will jump free !! Remove spring for stop lever 1793, remove switch mounted 1779. Watch out !! Little screw at tail end is an eccentric (see arrow above) ...... do not touch !! Remove hour recorder bridge 1775; Remove hour hammer 1783, hour recorder runner 1788. Next is, according to the manual, removal of the friction spring for driving pinion 1792 and driving pinion 1791. I did this according to the manual, but found out that the removal of the friction spring 1792 and driving pinion 1791 can be done (much easier) later when the main-spring barrel is removed. Remove support bridge for dial 1776. Remove hour wheel and keyless works, note the two intermediate wheels. Remove canon-pinion. Flip movement over; Remove barrel bridge. Note crown wheel and click are underneath barrel bridge. Also note that ratchet wheel lays on top of the barrel. Remove wheel train; Open barrel and note spring position; Note arbor position; Install new spring; Install arbor, grease/oil and close barrel. Mount driving pinion for hour recorder 1791 and friction spring 1792. Grease as per manual. Service crown wheel and click. In my case the little screw of the crown wheel center was too tight and deemed not worth the risk. Applied some oil in the wheel groove. Now as for replacing the screws after each removed component; During the assembling I encountered a problem placing the pallet fork bridge and good pivot engagement of the pallet fork. After quite a few nerve-wrecking attempts, I noticed that a replaced screw on the other side of the main-plate stood proud of the main-plate and prevented the pallet bridge to seat. Once corrected, all fell in place ....... Assembling of the chronograph is the reverse of the above. Greasing / oiling is done as per attached manuals. Below; the movement is back together, running and all functions work ..... Tomorrow adjustment of the daily rate & bear error. As said, I may or may not follow up on the case restoration. Cleaning the dial is another challenge ....... Hope this walk through is to somebody of any use ....... ;-) Roland.
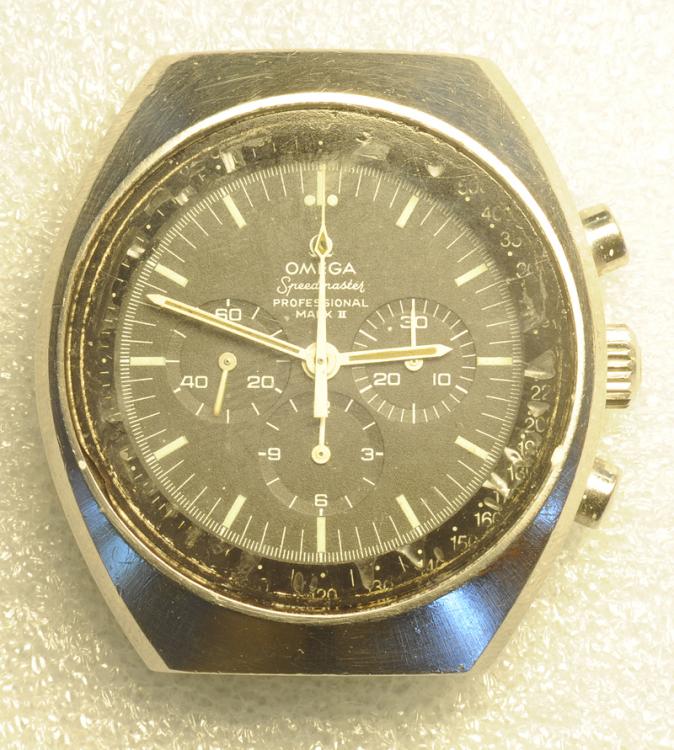
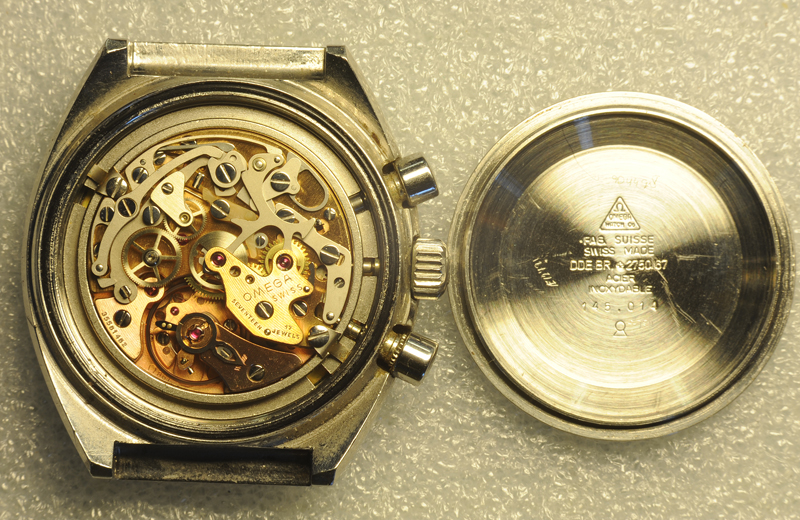
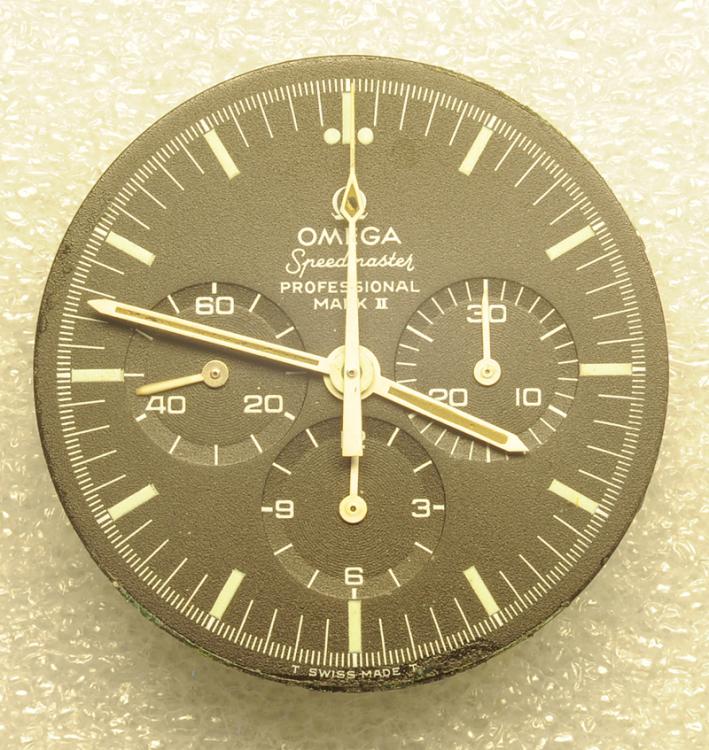

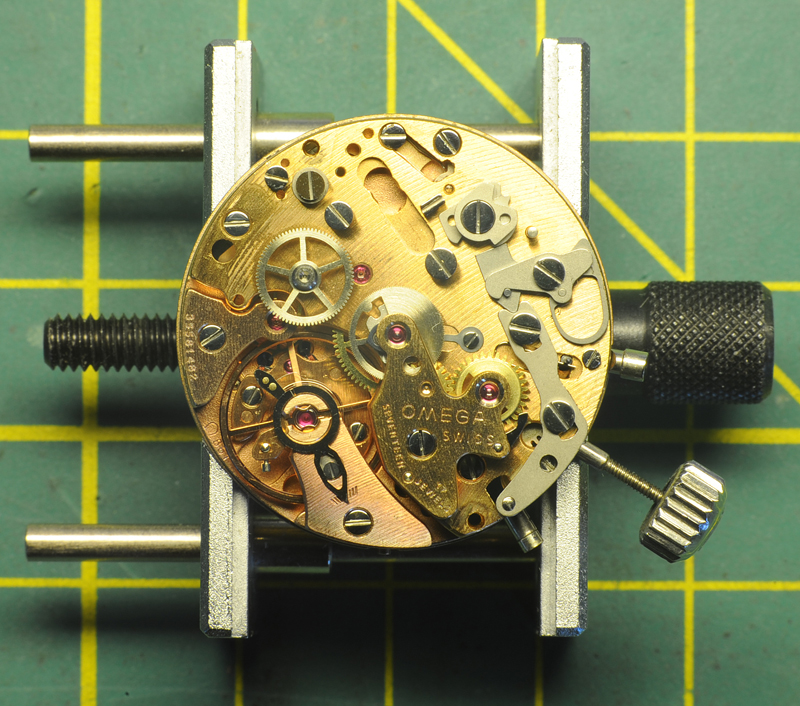
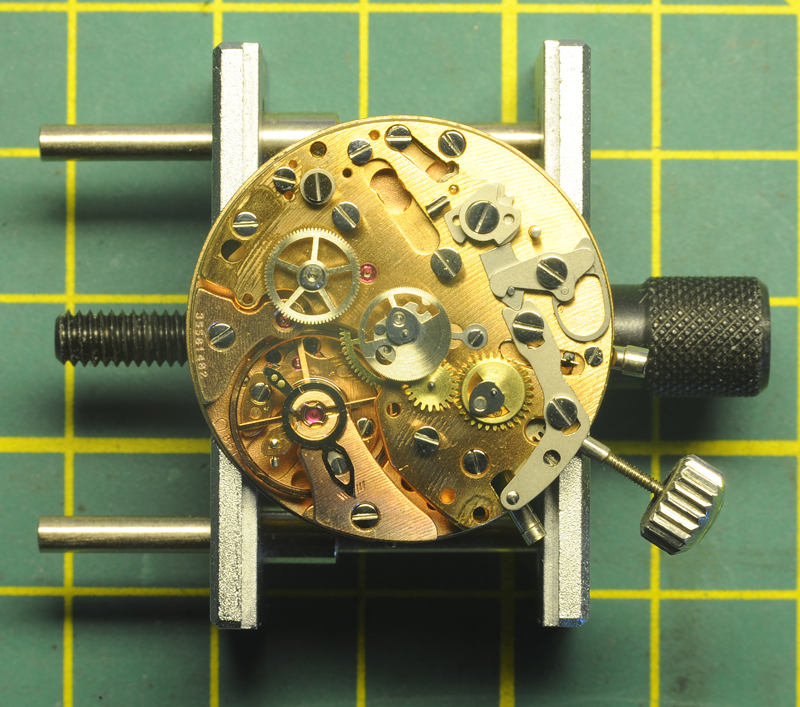
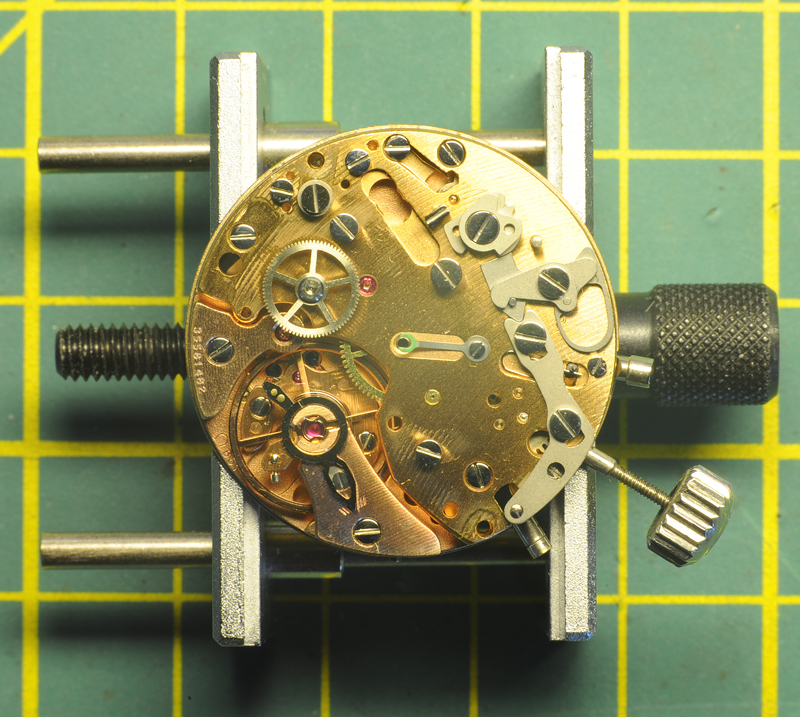
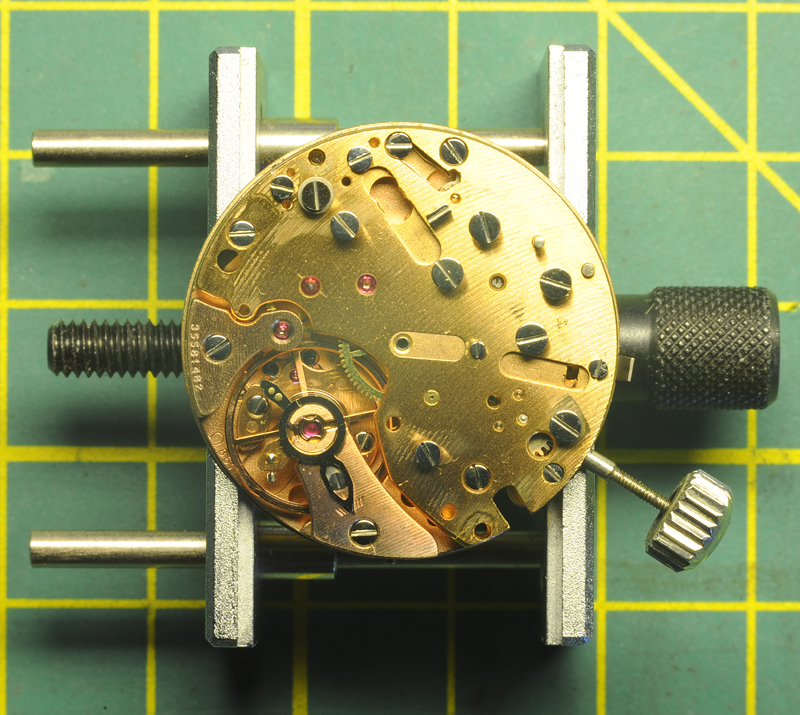
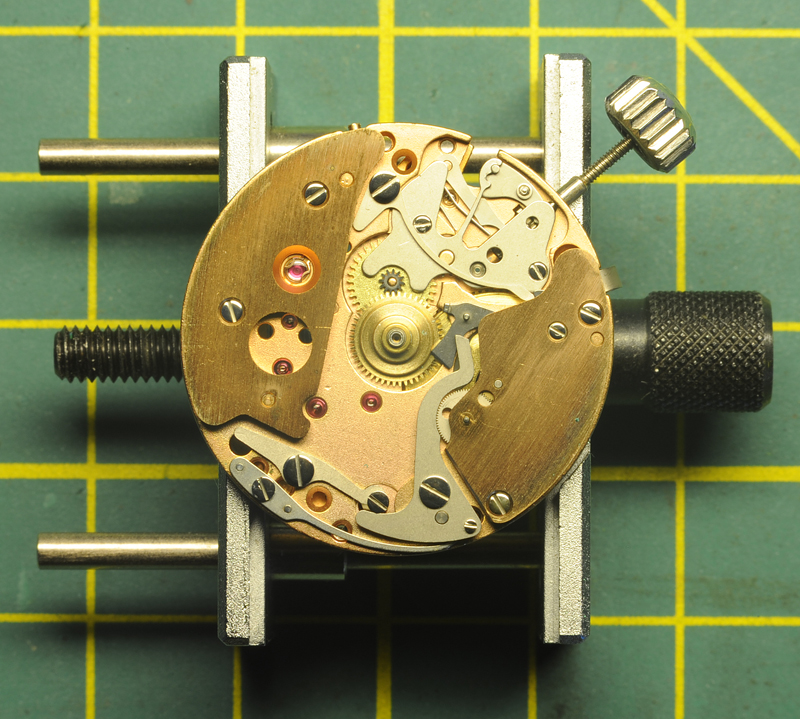
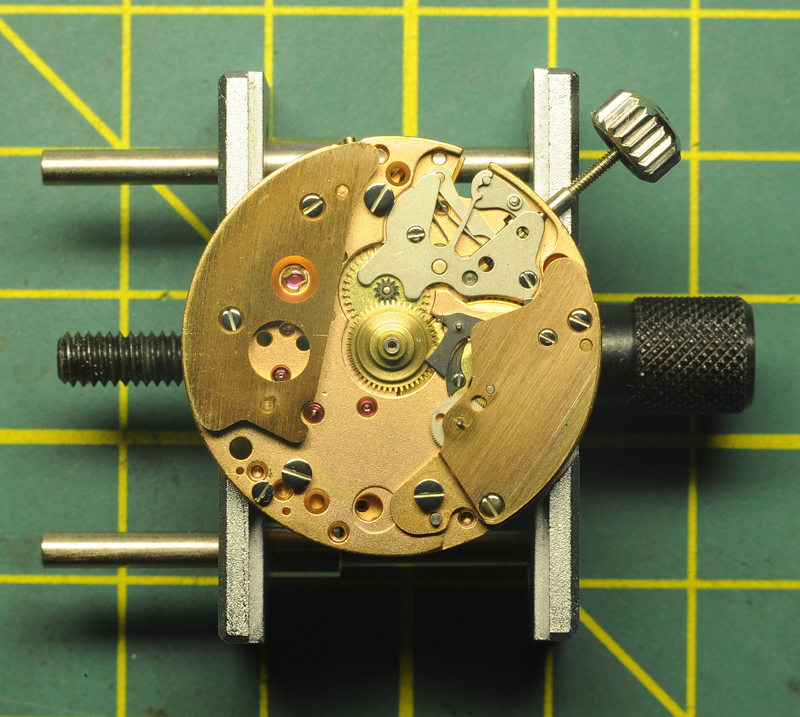
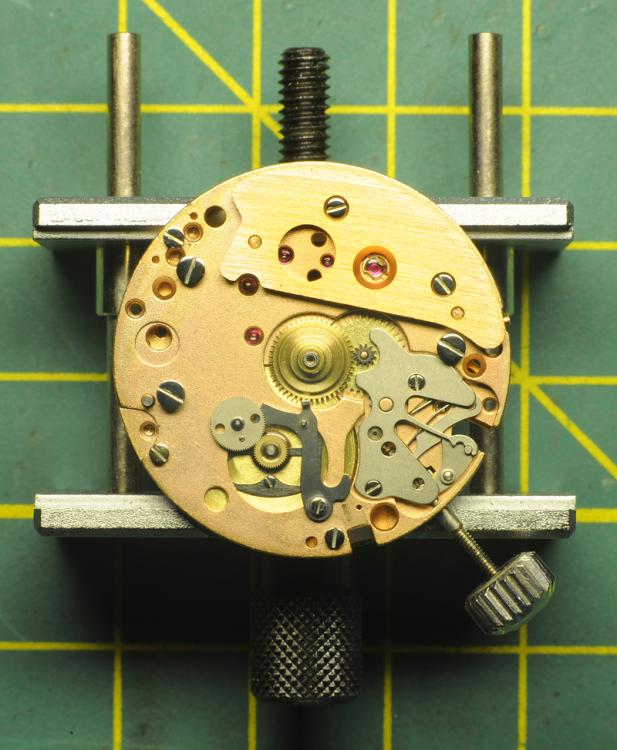

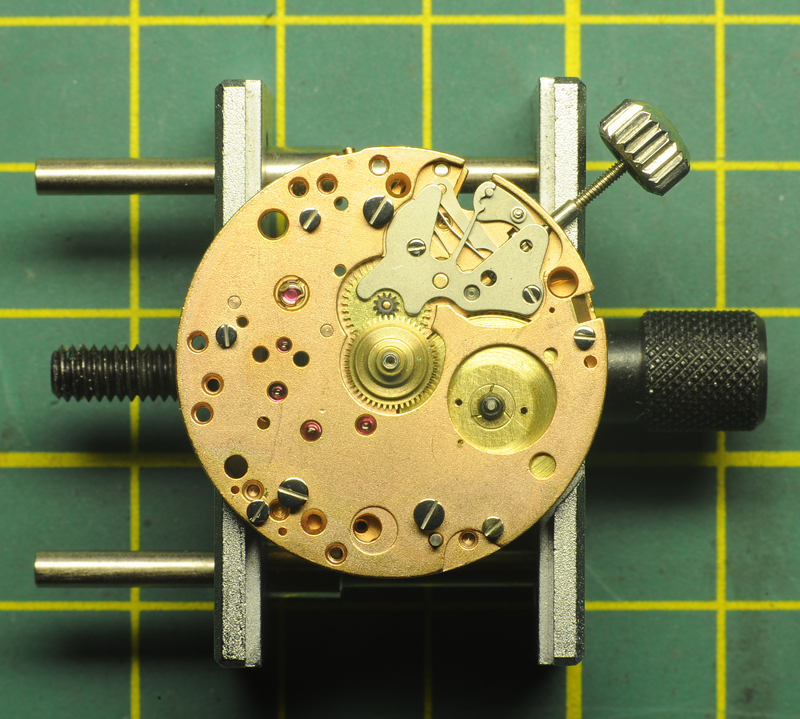

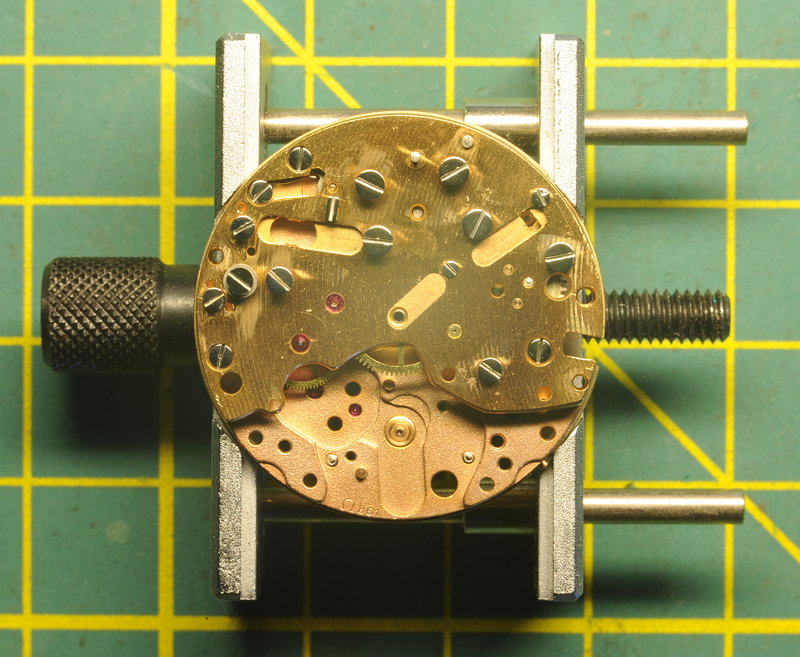
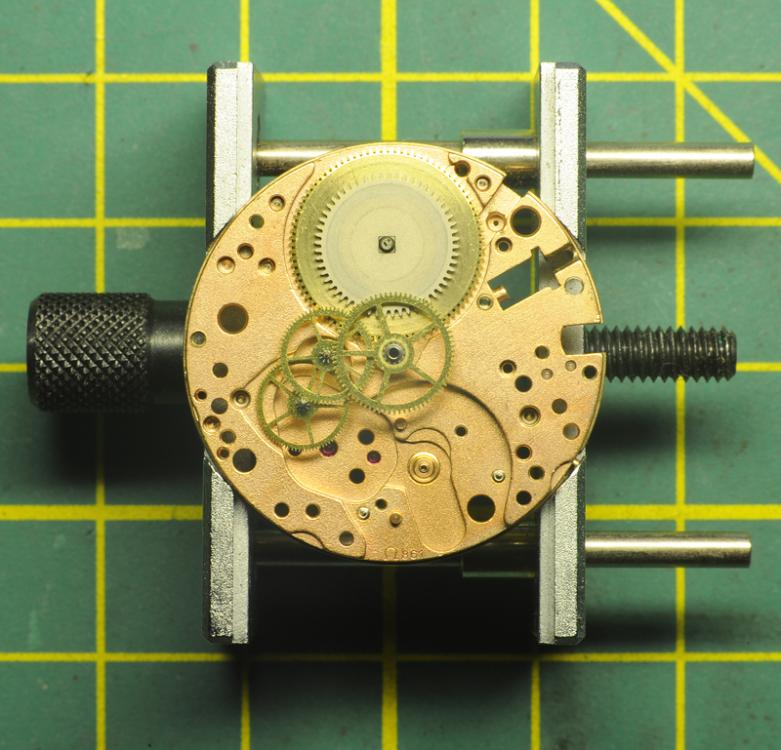
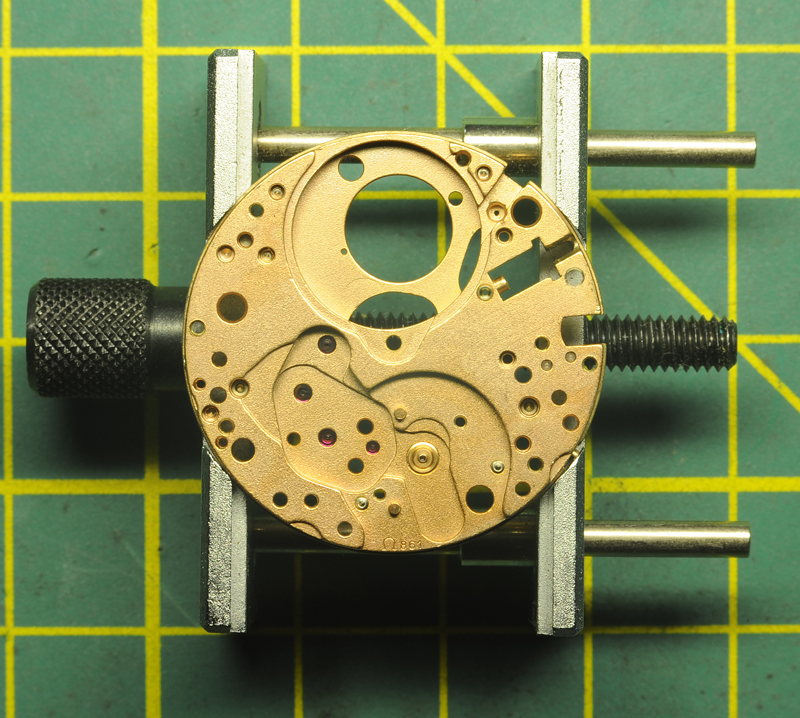
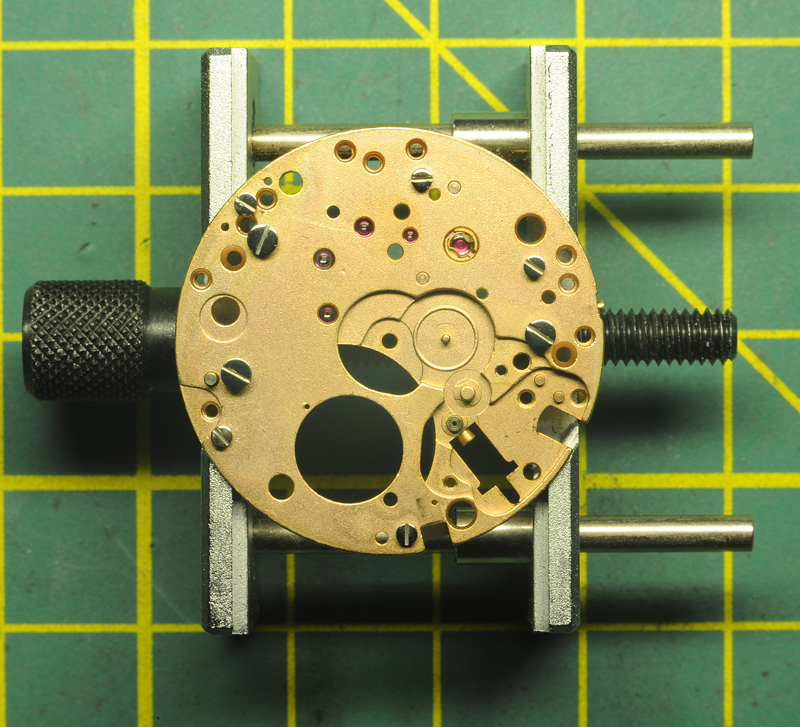
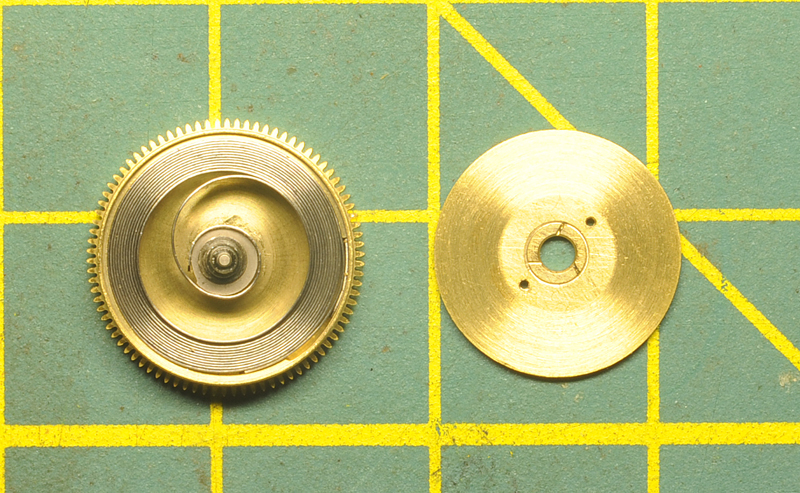
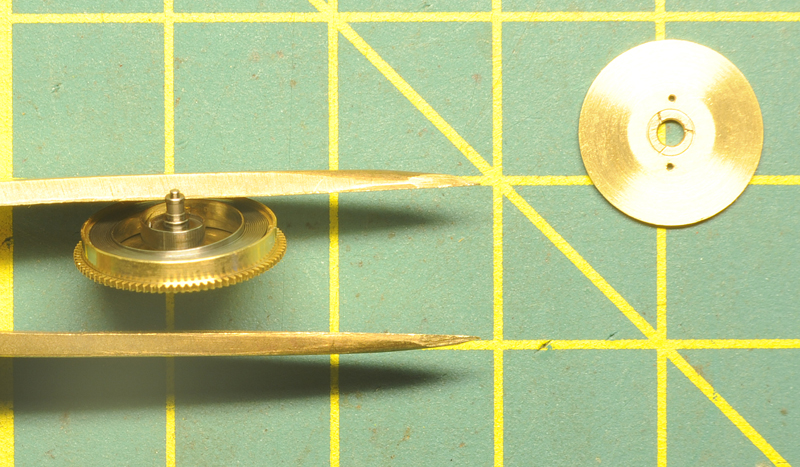
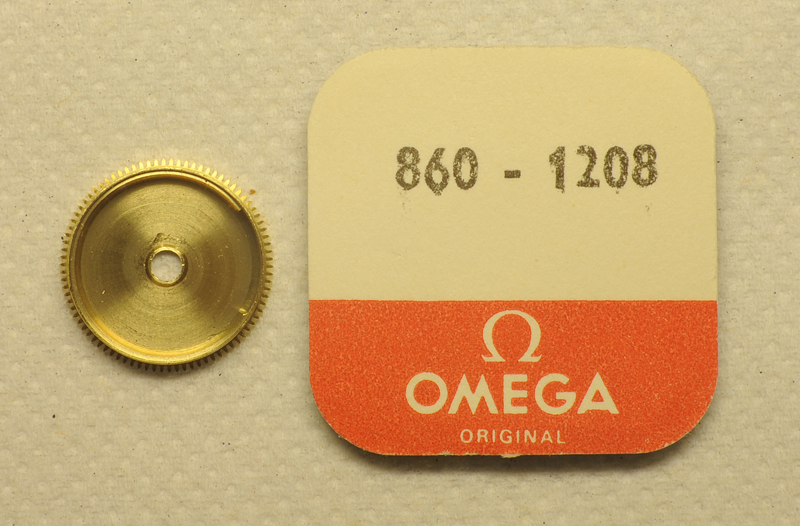
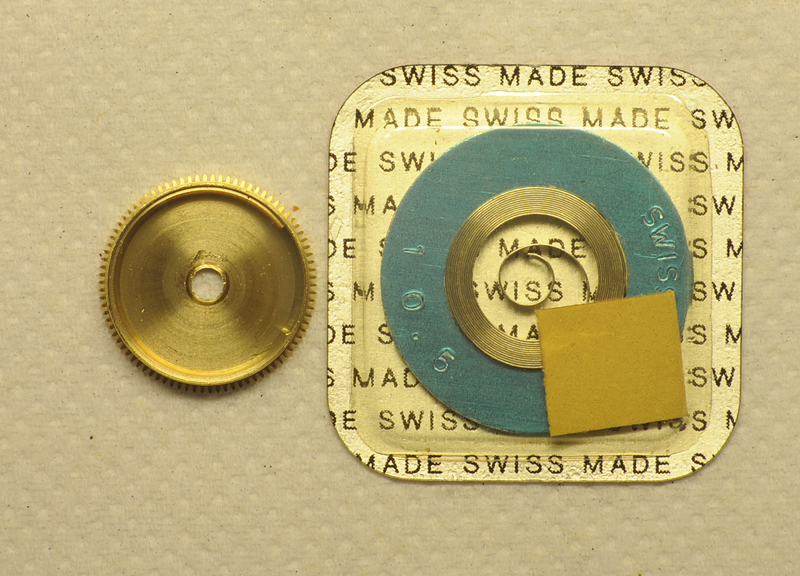

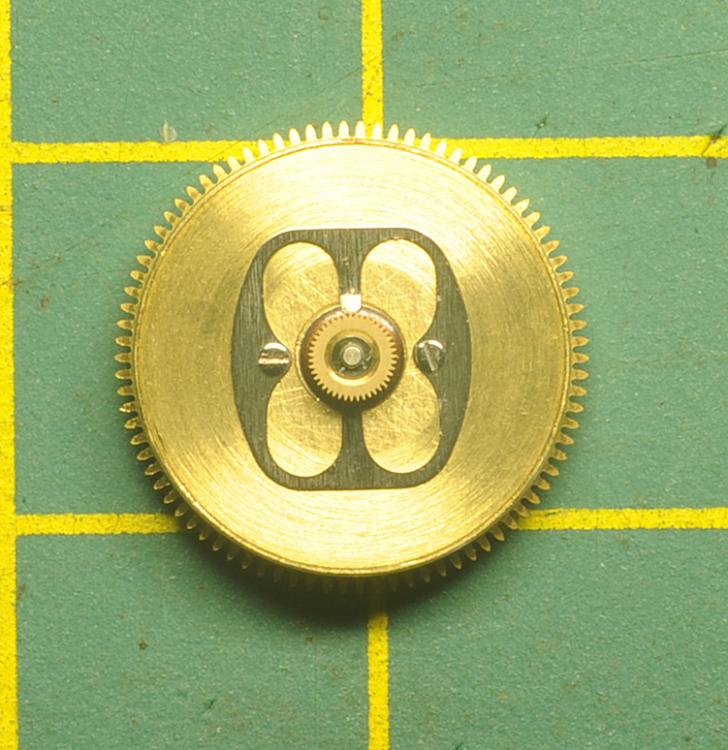
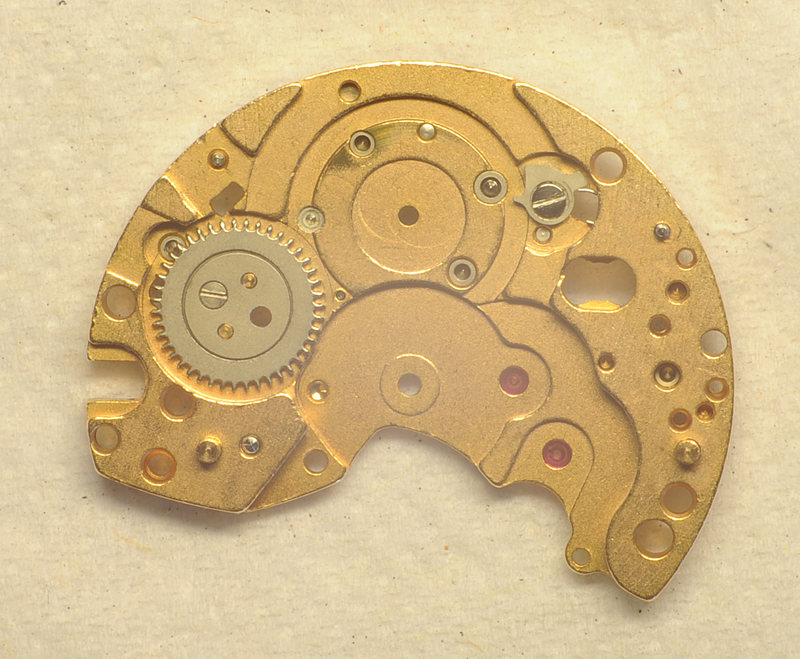

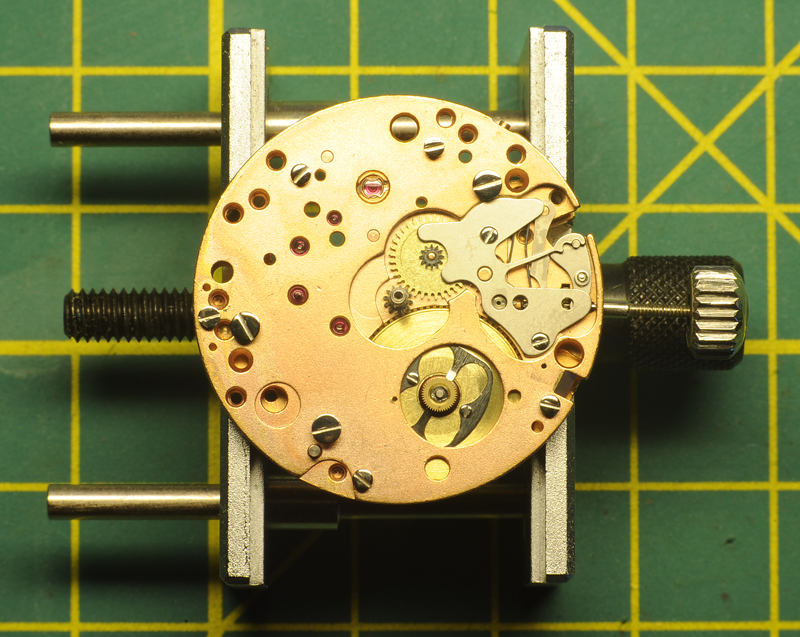
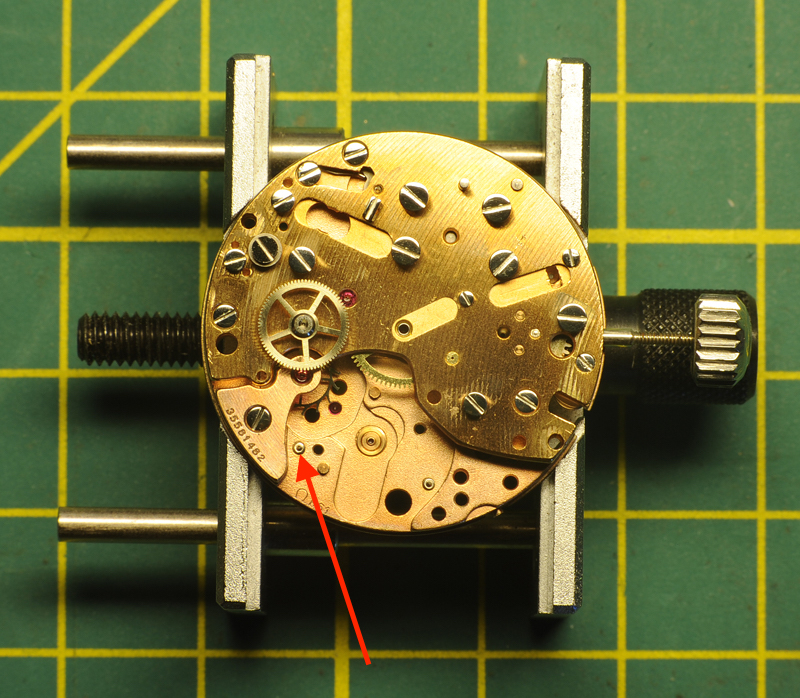


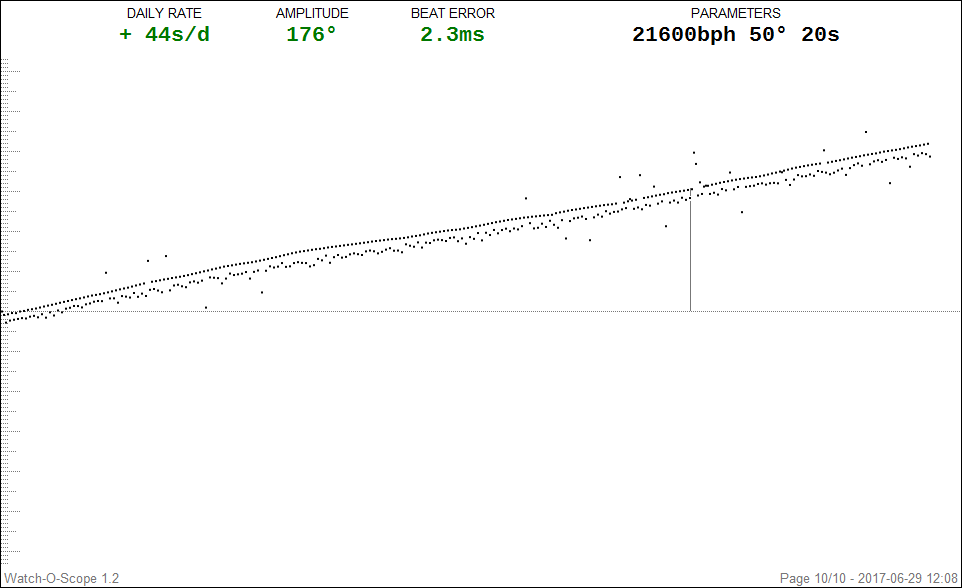
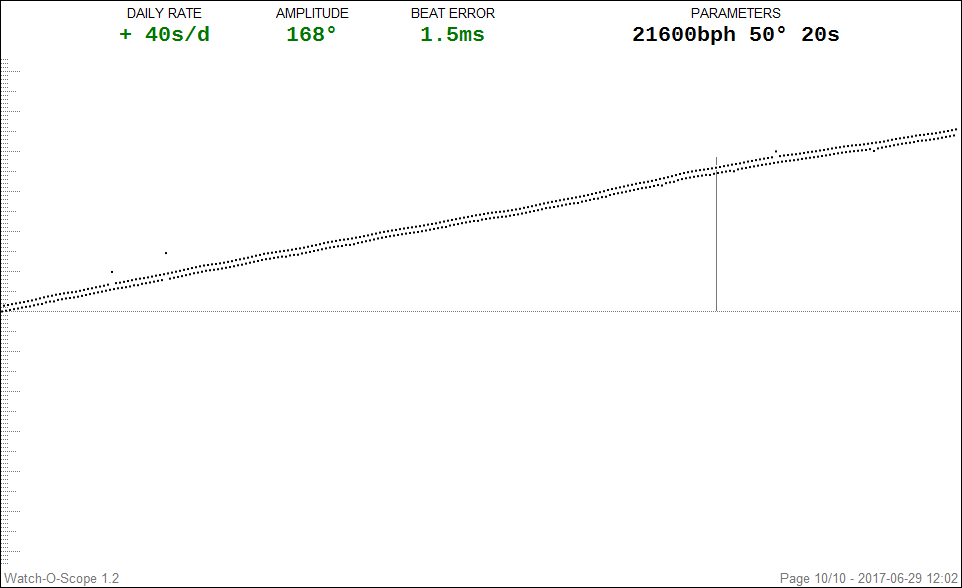
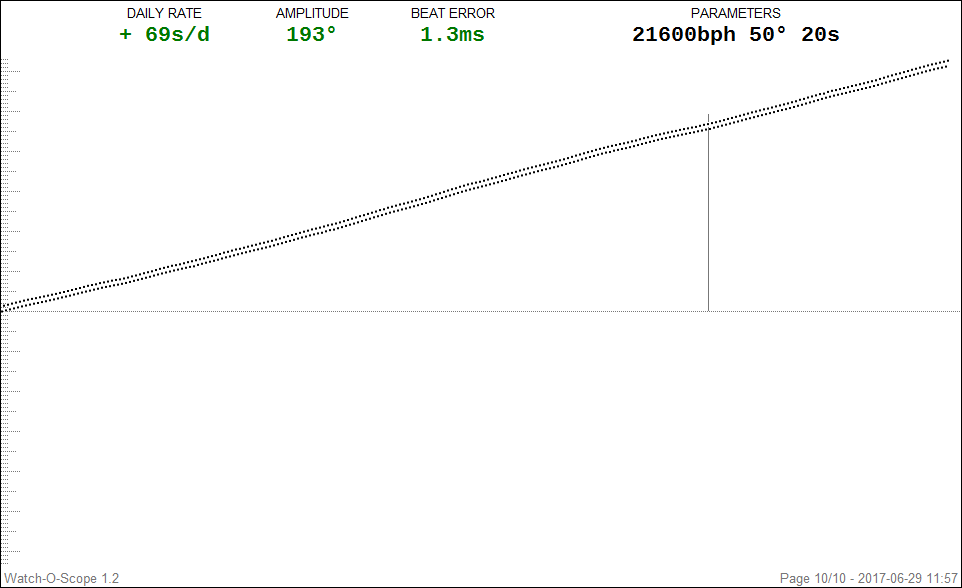

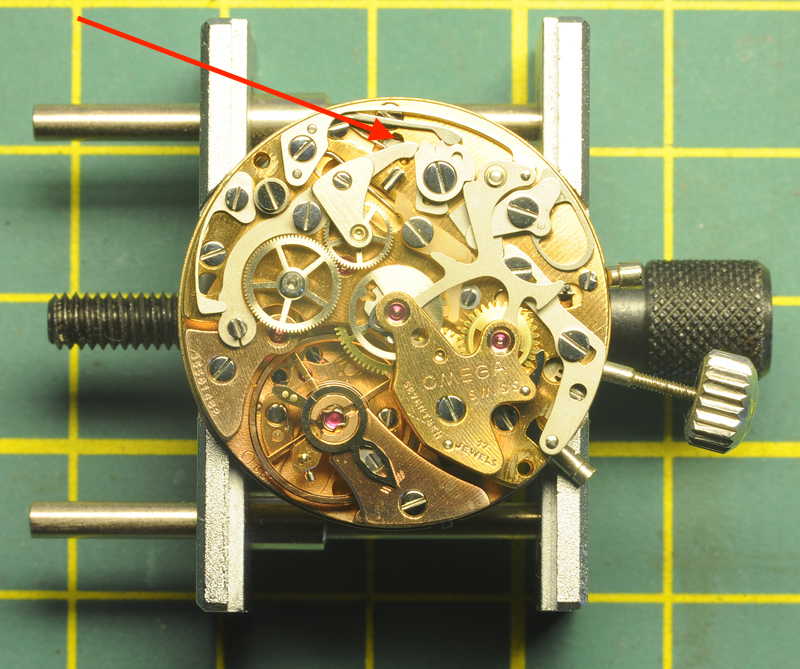
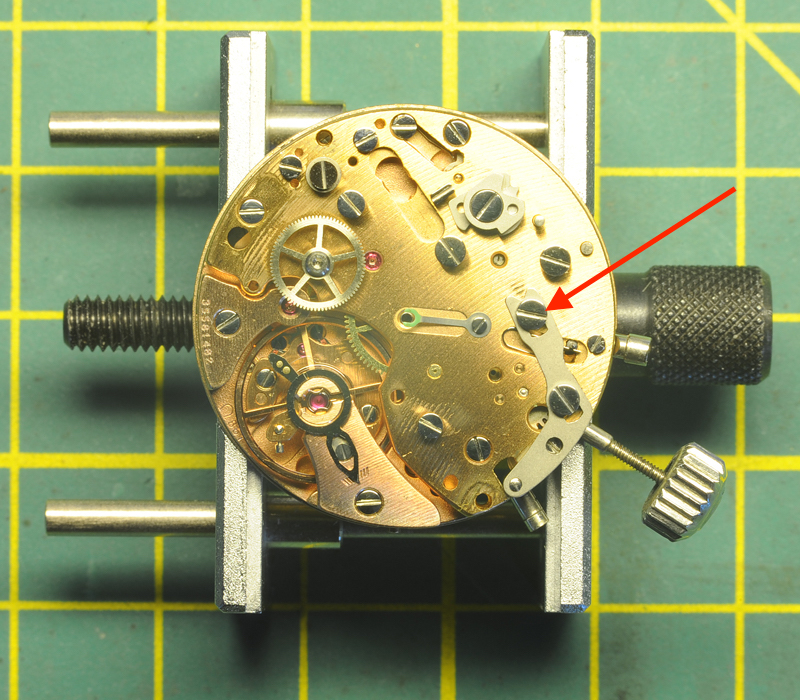
 14 points
 -
I would like to share a check list made up by a master watchmaker. I take no credit for it, only think it would be helpful for us hobbyists. Here it is! CHECK LIST I decided to write up what is called a 16 point check that is meant to be a guide to steps required to service a watch this is slightly bias towards a wrist watch but very relevant to pocket watches also: This is a guide and not the definitive answer after going through it a few times add you own additional tests and observations. This is of course for a basic time only non-automatic or any with additional features, I also leave out things like demagnetizing, actual cleaning procedures, a good chunk of common sense needs to be applied also as I say its meant as a good starting point to a correct disciplined procedure, This is version 1 may add or edit/delete later. Check number 1 a Check the winding to see if the mainspring is broken. b Check to see if the setting bridge or sleeve is broken by pulling the stem out and testing the proper snap of stem. A broken setting bridge/sleeve is easily detected c. The balance wheel should be oscillated to see that it is true and the balance pivots should be checked by looking through the upper jewel to see that there is not a flash on the pivot. d. The hairspring should be checked to see that it is not damaged. e Check setting of hands f. The watch should be looked over in every respect, paying particular attention to any rust spots that may appear on any part of the movement. When rust is evident around the stem or setting mechanism, it is most important to remove the dial and hands in order to check this mechanism to see if the rust is very extensive. Check Number 2 a. Examine each part as it is being removed from the movement. b. Check for rust on every part. c. Check every pivot to see that it is not damaged or bent. d. Check the jewels in the watch, to see that there are no cracked jewels. e. Check pallet stones to see that they are not chipped or damaged. f. When removing barrel cap, make sure that it snaps off only after sufficient pressure has been applied to it. g. In the examination of each part, a close check is not made at this time as many of the parts will not be clean enough for that purpose. a much closer check will be made on the parts as each part is handled in the assembly of the watch Check Number 3 a. Upon completion of cleaning and parts removed from the basket into the assembly tray, each part should be checked over with the use of a watchmaker’s loupe special attention should be paid to the jewels, because if there is gum oil still remaining on the jewels, the cleaning job was not done satisfactory . It is also worthwhile at this time to examine the pivots. If the jewels are clean, and the pinion leaves are clean, it is almost certain that the cleaning operation was performed effectively. Check Number 4 a. Examine the condition of the mainspring. b. Check the width, strength and length of the mainspring. c.. If correct, replace mainspring using correct mainspring winding tool, not by hand d. Check the lubrication of the mainspring if required e. Check the fit of the mainspring around barrel arbor. f. check the mainspring end for proper shape to catch in barrel. g. Check the snap of the cap on barrel and replace in correct position h. Check the end shake and side shake of barrel arbor is it also sometime recommended to do this without mainspring fitted to test for free run and end shake i. Check the cleanliness of the barrel and barrel teeth. j. Check the oiling of the barrel arbor after the cap is on. k. Check the condition of the barrel teeth to see if they are bent or worn. Check Number 5 a. Jewel holes must be cleaned with peg wood if necessary. b. Jewels must be checked for chips or cracks. c. Check the train wheel pivots for rust, polish, cuts and straightness. d. Check the pinions for rust’, pits and polish. e. Check the pivots for pitting check that clean pith wood is being used. f. Check plates for tarnish, fingerprints, and polish jewel settings. g. Assemble time train and check end shake and side shake. h. Check wheels for trueness arid upright. i. Lift each wheel with tweezers to check for end shake and to see if each wheel is free enough to fall back to its original position. j. Spin train to see that is spins freely, in dial up, dial down and a vertical position. Check Number 6 a. Replace barrel and barrel bridge and check the oiling of the barrel arbor upper and lower bearing. b. Check oiling of crown wheel. c. Replace ratchet wheel. d. Note: do not oil remainder of movement until after kick-back is checked or cap jewels are present oil those now e. Wind watch slightly to check kick-back and recoil. This check should be made in dial up and dial down positions. If the watch does not have kick¬back, this indicates that the train is not as free as it should be. First, however, before checking into the train itself to determine if there is some frictional error, it would be worthwhile to examine the mainspring around the barrel arbor. Many times the loose fit of the mainspring around the arbor will prevent kick-back from occurring within the train. In such instances, the arbor is simply slipped in the mainspring instead of the train receiving the reversal torque, that normally occurs. If the barrel is found to be satisfactory, then the train. should be checked to see if the trouble can be located. first, the train should be examined carefully to see if each wheel is free, and if no trouble can be found, then it is advisable to remove the train wheels from the watch and replace each wheel in the watch individually and to check the spin of each wheel. If each wheel spins freely, this indicates that the pivots and the jewels are in good condition and that one need not look further for defects or faults in those areas. Next, place two wheels at a time in the watch and check the spin of the wheels. Thus, any error of improper depthing or a badly formed tooth on a wheel or pinion will be detected. It is simply a process of elimination in order to locate the particular trouble, and of course, proper corrective measures must be taken to correct an error when one is found. Check Number 7 a. Oil all the train jewels in the watch, and at this point it is advisable to oil also the balance jewels. b. Check to see that there is a ring of oil around each train pivot and that the jewels are not over-oiled or under-oiled. c. Check the jewels that have caps to see that the globule of oil has been formed properly between the flat cap and curved hole jewel and no keyhole shape if so remove re clean jewels and check seating the re oil and repeat check for perfect ring. Check Number 8 a. Oil stem properly. b. Oil friction parts of setting. c. Oil wolf teeth of clutch wheel and winding pinion. d. Oil clutch wheel groove. e. Oil points on setting lever that contact the setting bridge or the clutch lever. f. Never oil dial train. Note: ‘dial train means all wheels following center wheel staff. g. Seek expert advice on some types of intermediate wheels connecting clutch at setting positions that require oil. Check Number 9 a. Check condition of pallet arbor pivots. b. Check for chipped or loose stones, shellac or gummed oil on pallet stones. c. Check guard pin for straightness and proper shape. d. Check polish of pallet arbor, pivots and fork slot. e. Check end shake of pallet fork. f. Check height of pallet stones in conjunction with escape wheel teeth. g. Check matching stones. h Check drop lock i. Inside and outside drop. j. Draw. k. Hang-up of stones on escape wheel teeth. Check Number 10 a. Check tightness of roller jewel in roller table - uprightness of roller jewel. b. Check the height of the balance wheel in conjunction with the fork bridge and the center wheel. c. Check the clearances. d. Check the height of the guard pin in relation to safety roller. e. Check the proper length of roller jewel and fit of roller jewel to fork slot. f. Check the guard clearance. g. Check the corner clearance. h. Check the jewel pin shake. i. Check the guard test, j. Check the corner test. Check Number 11. a. Check the hairspring in-the-flat. b. Check the hairspring in-the-round. c. Check the quadrant of the hairspring to see that it is formed properly between the regulator pins and stud d. Check for beat of the watch by equalizing the force to receiving and discharge pallets. e. Check for the collet wobble. f. Check for trueness of the balance wheel, and for the flash of the balance pivots g. Check for trueness of roller table. Check Number 12 a. Place the watch on the timing machine and take a rate in the dial down position, then turn the movement over to dial up position and take a rate. There are three things that should be observed from the rate that was taken: 1. Dial up should indicate the same time as dial down. 2. Observe the closeness of the lines to determine if the watch is in perfect beat. 3. Observe how the watch is running in reference to the time error over a 24-hour period. b. Adjust the mean time rate of the watch so that the dial up and dial down positions will record on time. Do not move the regulator more than one degree in adjusting the mean time rate. Any other alteration must be made by adjusting mean time screws or by adding or removing weight from the balance wheel in such a manner as not to affect poise, static or dynamic,. c. If the rates in dial up arid dial down are found to be different from one another, then this indicates a mechanical error in the watch which must be traced out before proceeding. d. If the watch is found to be out-of-beat, then of course, it should be put r in proper beat at this time. We might emphasize that if the watch was put in proper beat in accordance with the proper procedure at the bench, then an out-of-beat condition or minimal amount would not be indicated on the timing machine. e. When the above conditions have been satisfied, the next step would be to take a rate in positions and errors corrected. If everything has proved to be satisfactory, the watch should be tested for isochronal test be made on the timing machine, which consists of re-testing at different winding levels and rate in the dial up position. Check Number 13 a. Check for proper lubrication of cannon pinion on center post. b. When replacing the cannon pinion, be sure that the leaves of the cannon pinion do not come down on top of the minute wheel teeth so as to bend the teeth of the minute wheel. c. Check tightness of. cannon pinion d. Check to see that cannon pinion does not ride up when watch is being set. and smooth consistent operation. Check Number 14 a Make sure that the hands are fitted securely to the parts to which they are attached b. Make sure that the hands are adjusted so that there is equal space between the hands and the hands are set as close to the dial as possible. c. Check to be sure that the hands are shaped to the contour of the dial. d. Check to see that\ the hands are positioned so that they are synchronized with one another. Check Number 15 a. If there is no case for the movement, simply disregard this check and proceed with the next check, number 16. b. Check for proper snap/screw back of the case. c. Check for the clearance of the hands under the crystal. d. Check the crystal to see that it is securely fitted into the case. e. Check to see that the crown is next to the stem and reasonably close to the case. f. Check for tightness of movement in case. g. Check the spring bars to see that proper spring bars are used for the particular type of case so that the band is held securely to the case. h. Check the lug holes to see that they have not been worn badly by the spring bars to a point where the hole may break through and allow the spring bar to come out of place. Check Number 16 a. Set the watch on time with a master clock. b. Let the watch run for a period of 24 hours and check the error in the time repeat in several positions. c. Allow the watch to run until it completely runs down and check the length of run. The watch should run a minimum of 30 hours, preferably 40 hours, if it is in “A. I have no answers to any of the steps since I didn't make this up. Maybe Mark might.13 points
-
Hi guys, I joined this forum a few years ago now and have enjoyed reading the posts and offering help where I can, as well as learning things I didn't know. Although I am a professional watchmaker and watchmaking tutor: https://www.jonthewatch.co.uk/ I still learn a lot from you guys on subjects and watch movements I haven't come across before. I especially enjoyed a post this week by @eccentric59with his walkthrough of an ETA movement that had a plastic fork and escape wheel, which I haven't worked on before. All watchmakers, including professional watchmakers, are always learning something new. It would be incredibly arrogant to say 'I know it all'. Even WOSTEP-trained watchmakers with many years under their belts are always learning something new, even from those relatively new to the art of horology. I trained a watchmaker from Christopher Ward Watches recently and hopefully will be writing them a service manual this year for their in-house movement, the SH21 because they want the expertise I have to be able to train their guys how to service it, which I feel quite honoured about, as I am not WOSTEP-trained. I know I'm rambling a bit, but the point I'm trying to make is that we can all learn from each other no matter where we are on our horological journey, be it professionals, seasoned enthusiasts, or the weekend fettler. I would like to share something with you which is a word of warning, that some of you may not be aware of. This isn't a character assassination or a resentment I have, it's just a fact that might help some of you. Cousins UK: https://www.cousinsuk.com/ ONLY sell to what they call 'Trade Buyers' it is stated in their Terms & Conditions; that means that you need to be a professional watchmaker in the trade to have any real binding contract with them. They are happy to take your money as many are not in the trade, but if what you buy is defective, damaged, missing, or you want to return it to Cousins for whatever reason, you don't have a legal leg to stand on and you may not see your money again. So if you are planning to buy an item that is quite pricey keep this fact in mind if that item is not working properly or stops working a few weeks or months later, then you won't get any redress. Companies such as HS Walsh and Gleave and Co. sell a lot of what Cousins sells for a very similar price and sometimes cheaper, but at least you will have a chance to contact them and make a claim. I buy from Cousins from time to time, but wouldn't buy an expensive tool or item for this reason. Mainly watch crystals, gaskets, batteries, and the odd mainspring. I mainly buy from Gleave and Co in Clerkenwell, London, as they have the expertise to be able to help you on the phone and they are also a small family-run material house that I have trust in and would prefer to put my money their way. Gleave and Co. have integrity. Their website is getting better and sometimes what they have isn't listed on the website, but a phone call (8.30 am to 10.30 am) or WhatsApp message (anytime) will sort that out. Expensive equipment, such as Elma watch cleaning machines, or Bergeon case back removal tools 5700, etc. can be bought from HS Walsh or even cheaper from a German Company called Beco Technic: https://www.beco-technic.com/en/ You have to set up an account with them, but even with shipping and VAT thrown in, it will end up cheaper than buying from a British company. You get a 10 to 15% discount on their prices once you register with them. I was a consultant for watchmakers in Essex who saved about £25000 buying through Bec Technic. I can only tell you my experience and some may have had a good experience with Cousins getting a refund. It took me once over six months to get a refund for a £40 quartz movement that was delivered to the wrong address in an order that was several hundred pounds and after spending about £5000 with them, as I was the buyer of a watchmaking college. Only when I threatened to buy from elsewhere that they refunded me/the college for the missing movement. I hope this helps some of you in some way, as there are more material houses out there other than Cousins.13 points
-
Boy, did I ever get lucky! I went back to a local antique mall (more of a flea market, really) early this morning to buy something I'd seen several days ago. And it was still there! And this time, I had money! A Girard Perregaux Gyromatic. Not running, so they weren't asking much. I bought it and went straight home to my bench. Cleaned, inspected, oiled, regulated, and now it runs quite nicely. Fitted with a nice patent leather strap, and I've been wearing it this evening. I often turn about and sell many of the watches I rescue and repair, but not this one. Not this time. I took a liking to it rather quickly. Addendum: it has a 17j GP 21.19 plated with gold. It's a jem to look at. And a 14k gf case which took a nice polish. The original crystal is not too terrible at all, so I'm thinking of leaving it on.
 13 points
 -
In the "THAT NEVER HAPPENS!!!" category of watch repair, I have this new story to add: I picked up this old, dirty Helbros Invincible at a flea market because I liked the style and wanted to see if I could do anything with it. I got it home and took off the back...and it was like opening Pandora's box! Looking over the Helbros-branded Lorsa P72 movement, I could plainly tell that someone had been allowing a stray screw or metal component to just freely go romping about amongst the wheel train. Damaged wheel teeth, scratches, broken staff, messed up hairspring, a couple cracked jewels, but no sign of a loose screw or part - although!...there were two empty screw holes, one in a bridge and it was missing one of the dial foot screws. So I picked up another Lorsa P72 movement off Ebay that seemed to have everything I'd need (it had rust on the parts near the stem hole, but I was not worried about that). When the donor movement came, I just cleaned everything and rebuilt choosing the best parts of each. Ended up replacing the balance complete, center wheel, third wheel, two jewels, and the missing screws. Miraculously, the other wheels were undamaged; teeth, leaves, and pivots were fine. Once assembled and oiled, I set the stud carrier as close to where it should be as I could get it, and put the regulator dead center. Now, I only have a timegraphing app on my phone (limited funds you know). But the traces looked really good. So I've been wearing it off and on, and keeping it wound. Here's the dumb luck part - I haven't needed to regulate this thing yet! It's been two days, a shade over 48 hours, and it is now about 3 seconds faster over that time period. I need to read the specs on a Lorsa P72, to see if it can do any better but, so far, a gain of only 3 seconds over a 48 hour period doesn't sound terrible. I'm used to antique pocket watches and their eccentricities, so having a watch run this close to dead-on without having to regulate it six ways to Sunday feels a lot like a miracle to me. I'm starting to really adore this wrist watch.
 13 points
 -
Hello all, This build took me 2 months to finish; mostly due to the shipments delay from Europe. But here it is. A watch designed by me. Well at least put together by me. When I decided on this project it was very important to me that I used as many Swiss components as I can. This is just a personal preference. Searching for parts I found a NOS dial that at one time were used by Ollech & Wajs. I got super excited since they were used for vintage Unitas 6497s. The movement I planned to use. Speaking of which, I took a Unitas out of an old pocket watch from the early 60s. I found the perfect case for my project in Germany. As you can read on the case, it was a swiss made case also made for the Unitas. When I placed the dial on to the movement, it did not fit exactly into the case. I literally had to grind the edges using 600 grit paper until I shed enough around the edges to finally fit the movement flush. The hands finally arrived today. I chose these German made hands aviator hands as they were open blade hands. I wanted something that would allow the black of the dial come through. The Orange added a wonderful contrast. I think it all works. A watch that looks like I paid thousands for.
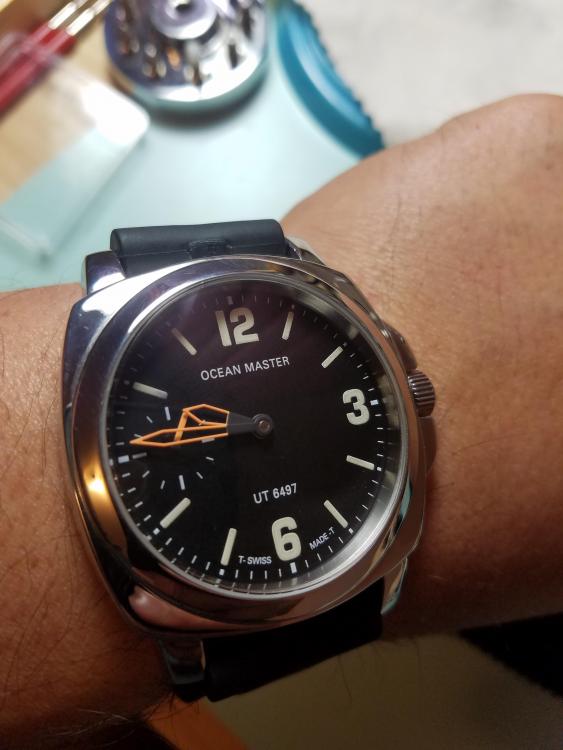
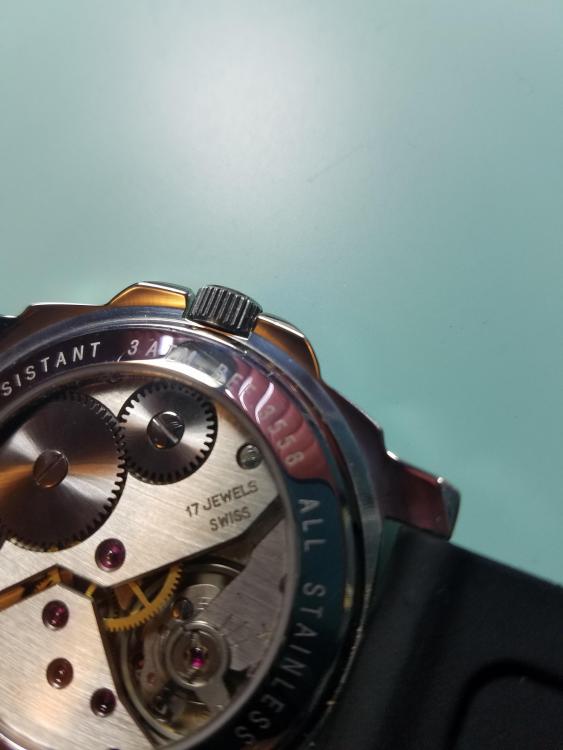
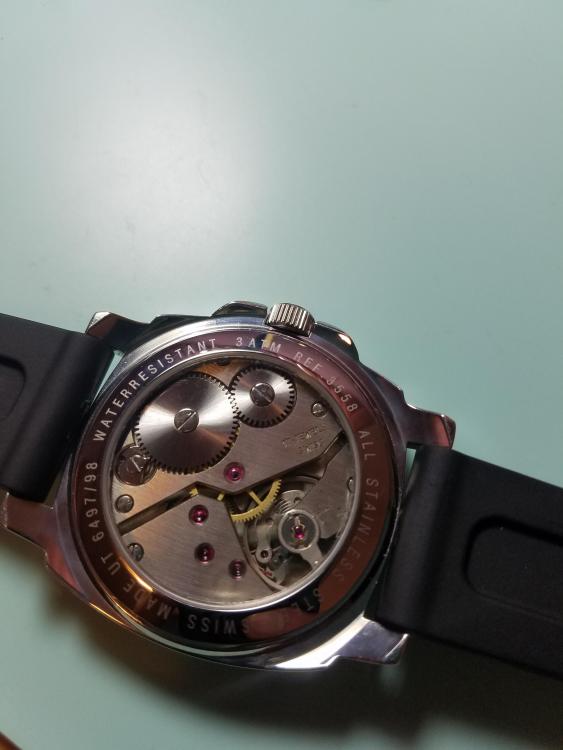

 13 points
 -
Thought it may be worth to share; I received a pretty beaten up, none-running 1890-1900 cylinder-escapement pocket-watch. It had all sorts of problems, a list too long to go into details. Among those problems was a bend/broken minute hand. It inevitably broke off when trying to straighten it. The center-hole diameter of the minute-hand was 0.5mm and the length was 15mm. The hour-hand had a hole diameter of 2.0mm and the length was 10mm. Searching the internet to find an identical set proofed futile. The watch is a heirloom so originality was a priority. The hands turned out the be made of bronze, a copper-tin alloy. Therefor it made sense to attempt soldering but the part that had to be soldered had a thickness of only 0.3mm. Both parts had to be fixed in place with a sort of clamp capable to fixing both parts, being heat resistant and "none-sticking". A soldering iron, even with the smallest tip, would be far too big for the job and to avoid touching the parts, I choose to use a hot-air gun used in electronics for soldering SMD-components to a circuit-board. A few test were made which tin to use and at which temperatures. 300 degrees C with tin used in electronics seemed to work fast and made the tin to flow nicely. I used a soldering flux-paste. The clamp consisted of two metal rails, slightly diverting from each other to give many clamping options, bolted on a plate of gypsum. Pulling over a #1000 grid sand paper, I made two 45 degrees chamfered edges on either end of both parts; The two parts were clamped in; Applied some soldering flux, heated it all up to 300 deg.C and applied a tiny bit of tin. Once cooled down, I removed some excess tin with a small diamond file. Here a picture of the back side of the minute-hand; And here the front; the tin didn't flow further away from the soldered joint or around the edges Most likely not the strongest repair in the world, but when not touched it should be strong enough to do the job. On the picture the hand color looks black, but that's due to the lighting. In reality the hand hasn't lost any of its shiny patina at the front ...... Anyway, I thought to share this repair as one of the many different possibilities
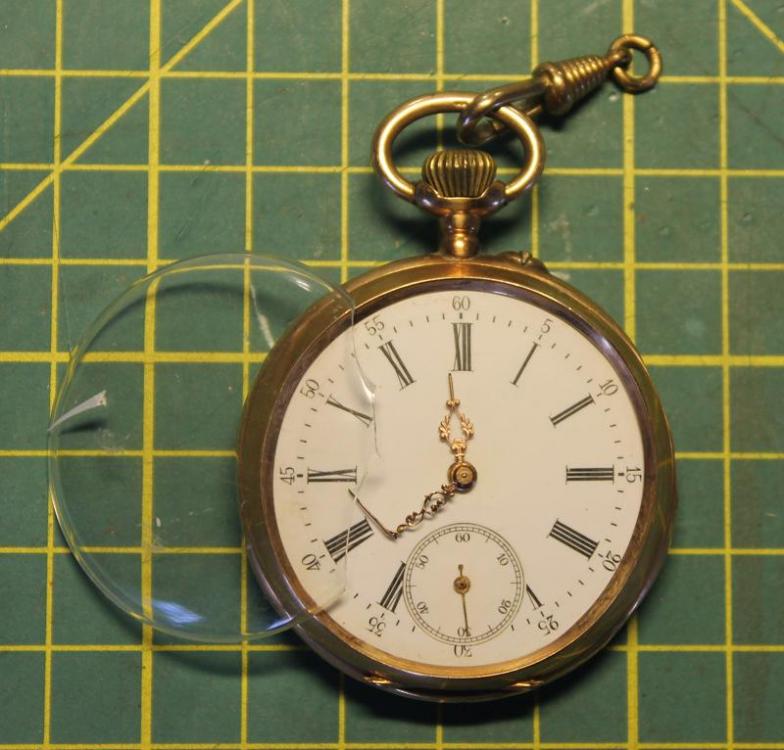
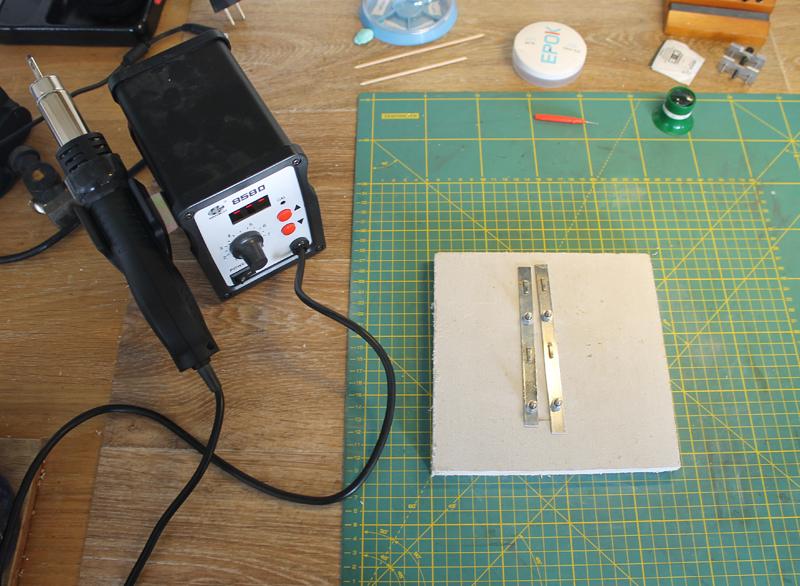
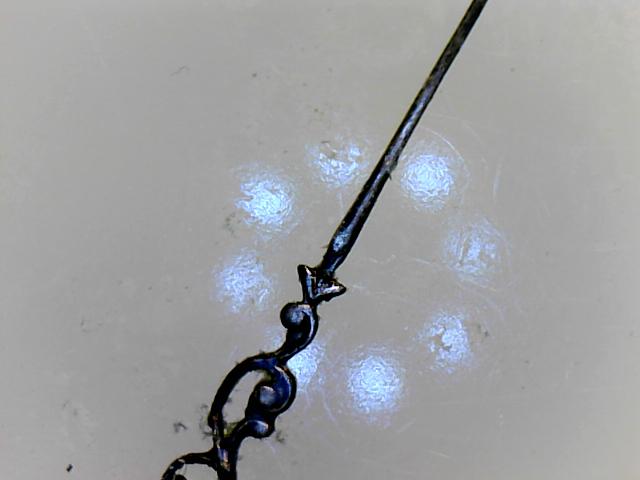 13 points
 -
First of all my apologies for not having documented the disassembling, but the watch arrived in a terrible condition and I stripped it down right away to get rid of all that dirt. If you have worked on some watches yet and think about entering the chronograph world with a 7734 let me give you 3 advices: Do it! The 7734 is a solid construction and not too complicated. Take your time and watch all the 6 parts of Mark's Venus 175-service on youtube. Of course the Venus is a column wheel system, but the basic movement is very similar and also on the chrono layer you can learn a lot especially about lubrication: https://www.youtube.com/watch?v=EI3T-IR3AgM Download the 7734 service manual. A lot of information here: https://strela-watch.de/valjoux-7734-7733-7736-technical-documentation/ Here we go. Some 8200 for the barrel and the new mainspring goes in (got it from cousins - what I'm gonna do after Brexit? ). The complete barrel. Some D5 for the arbor. Putting in the wheels and the bridges. Lubrication: 9010 for the escape wheel and the second wheel, D5 for all others. The keyless works. 9501 for the stem and the gears. D5 for the wheels and the lever axis, 9501 for the contact points of levers and springs. The click spring. D5 for the click and the crown wheel, 9501 for the contact point of click and its spring. Finally the ratchet wheel goes in. The pallets go back in, no lubrication for the pivots. Lubricating the balance jewels with 9010. The balance back in. The escape wheel and the pallets got epilame so I let run the movement with dry pallets for some minutes. After that 941 for the pallets (work from the dial side through the window). Now I start with the chronograph. First the bridge and the spring for the levers go in. Fly back lever goes in with some D5. Operating lever, again D5 for the axis. A little bit tricky, you must upline the integrated spring with the upper lever first (9501 for the contact area). The second pictures shows the final layering. The sliding gear goes in, D5 for the lever axis, no lubrication for the wheel! At this point I forgot to put in the minute recorder runner (no lubrication). You should install it here, later its going to be more difficult. The blocking lever (D5) returns. Some 9501 for the contact area to the sliding gear. The blocking lever spring. Be very careful, this one isn't just a flyer, its a damned Lockheed SR-71 Blackbird. The friction spring (gets a drop of 9010). The chronograph runner and its bridge (9010 for the long pivot and the jewel in the bridge). The minute recorder jumper, no lubrication. The hammer. D5 for the axis, 9010 for the lever ends that hit the hearts, 9501 for the contact areas to the sliding gear, fly back lever, operating lever, jumper. The hammer cam jumper. Before installing the clutch give 9010 to the pivots of the coupling wheel. D5 to the lever axis. The spring. 9501 for the contact point. Finally line up the driving wheel with the coupling wheel and the chrono layer is complete again! The dial side. Some 9501 and the cannon pinion goes in. Hour wheel with D5. The dial rest with its 3 screws. The date indicator. The date indicator driving wheel with some D5. The jumper with D5 to its axis. As there was no lubrication described in the manual between disc/jumper or disc/wheel and the parts looked well polished I didn’t lubricate. It works - let’s see how long. The guard with 2 screws. Finally the spring. The dial comes back and is secured with its 2 screws from the side. While disassembling I put the little hands into seperate trays to prevent mixing them up. Now I turned the crown in the setting position exactly to the point when the date switches and put on the hour hand to 12. Positioning the chrono-hand exactly on zero was that tricky that I forgot to take a pic. New springs and gaskets for the pushers. Unfortunatly I’m not good in restoring cases. So just refreshing the brushing a bit and some cape cod work. The movement back in the case and secured with 2 screws. A new gasket for the caseback and here we are. Thank you for watching.
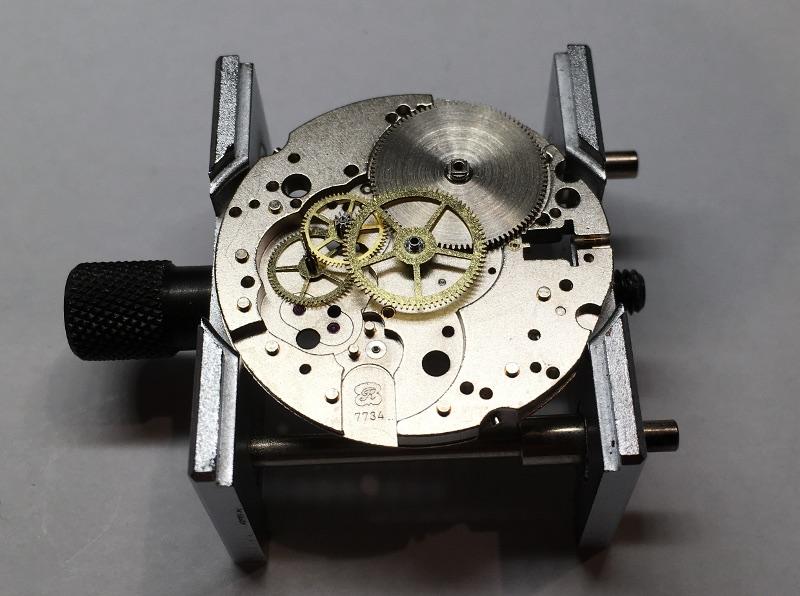
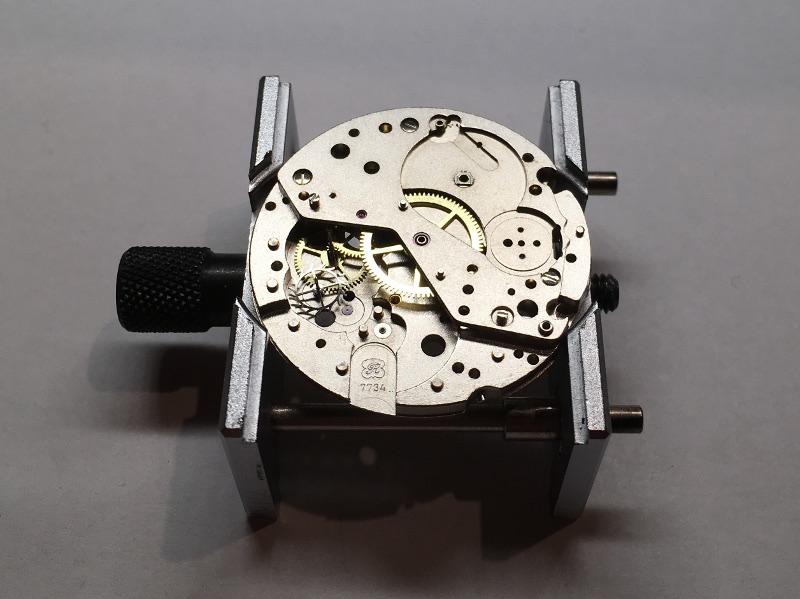
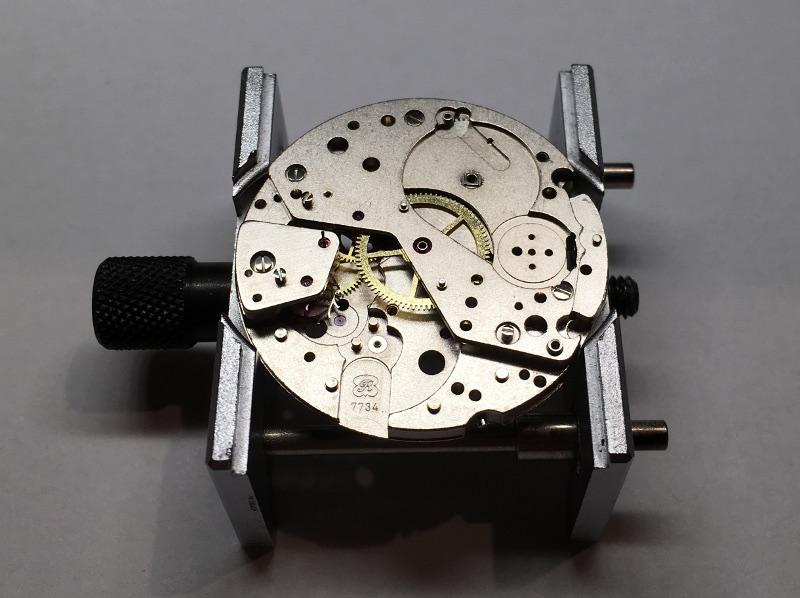

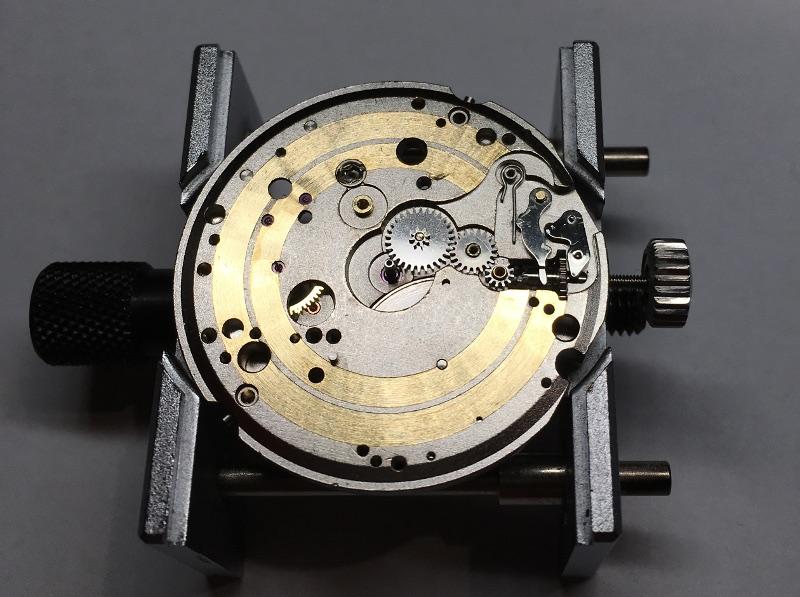
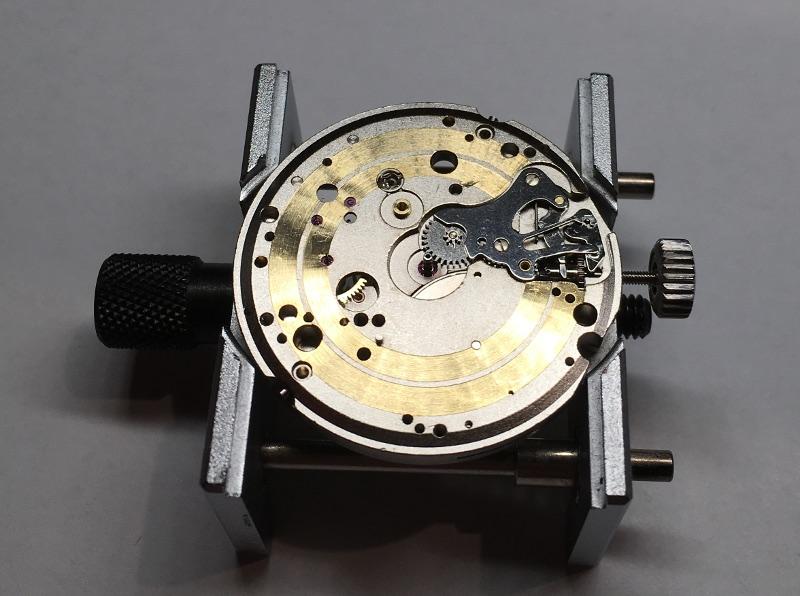
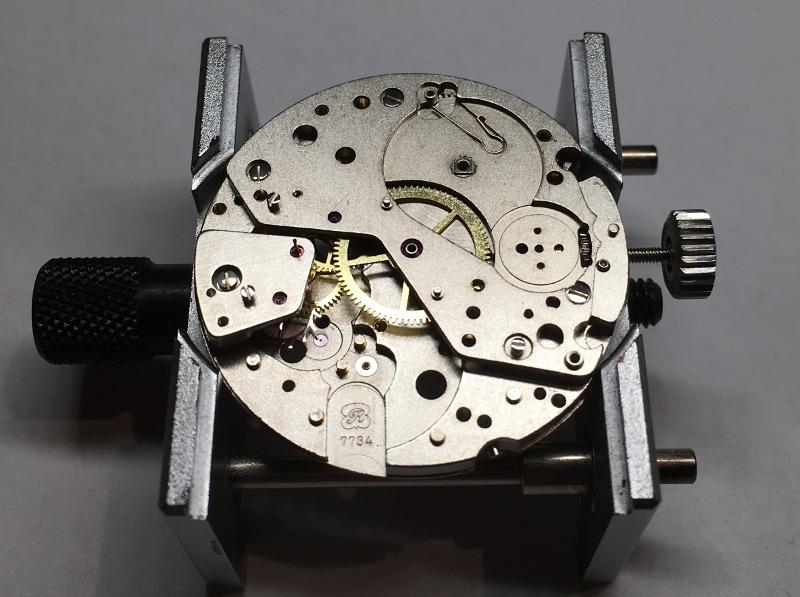
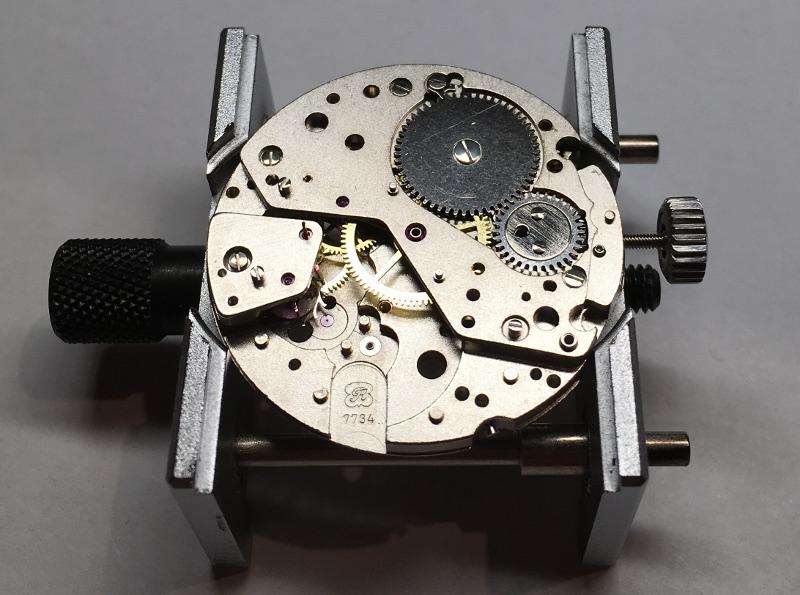
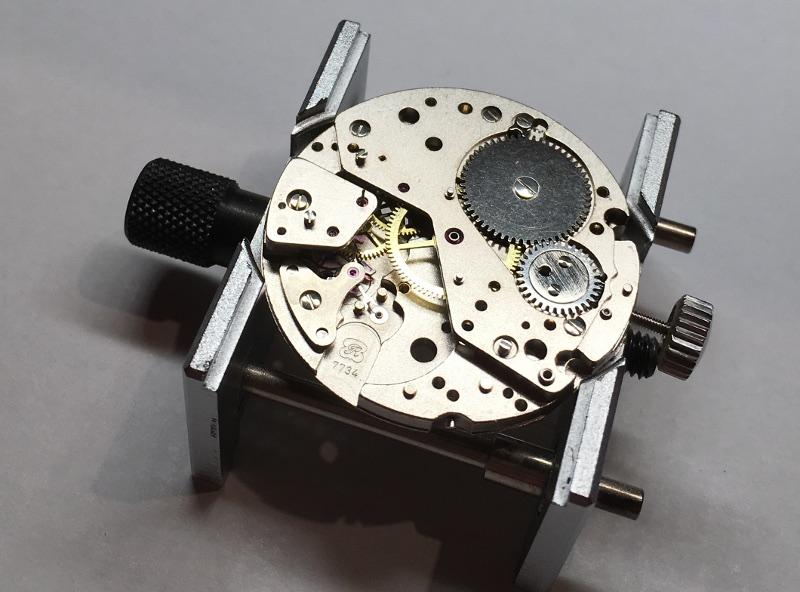

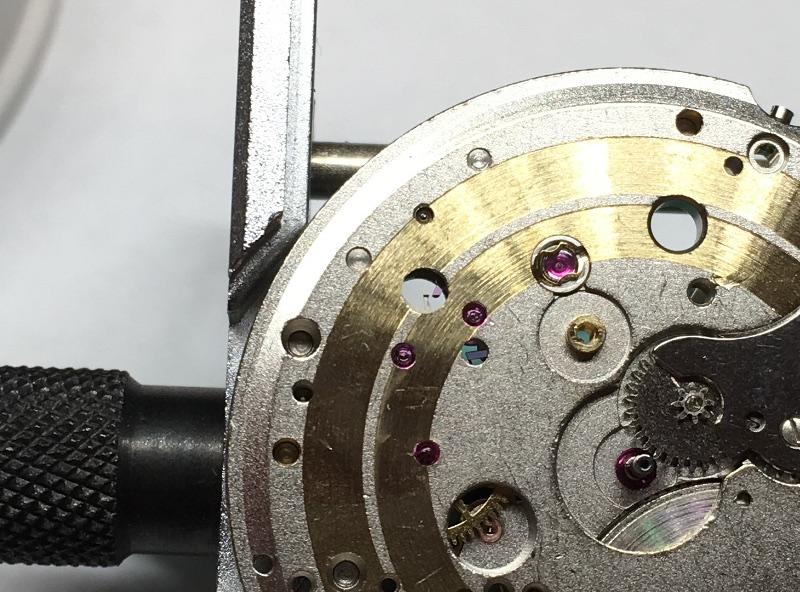


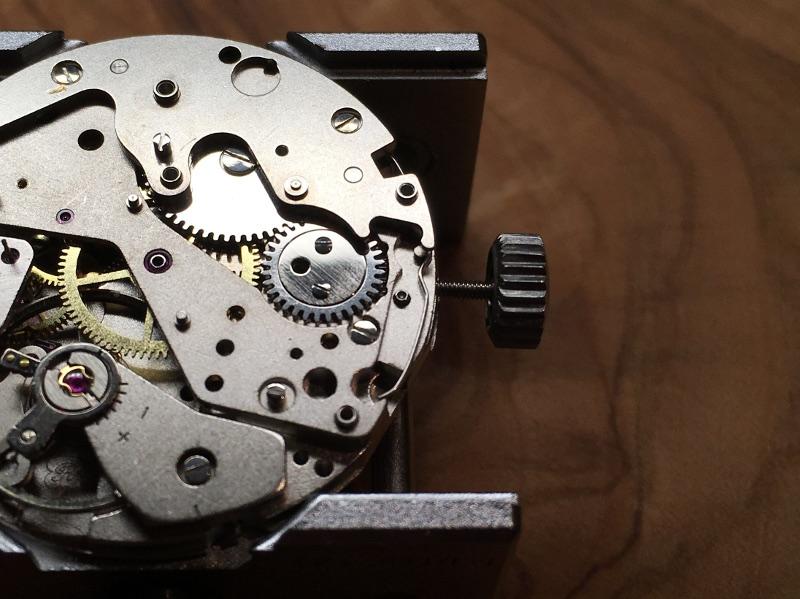
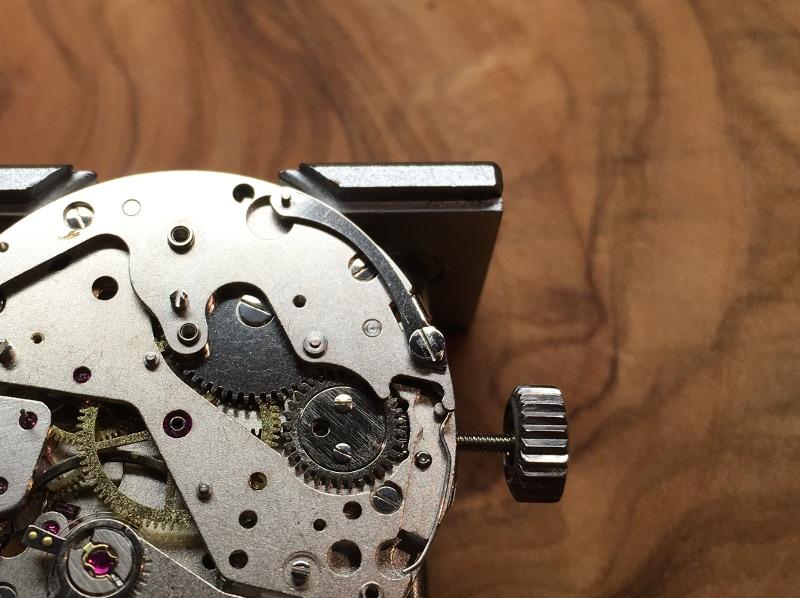

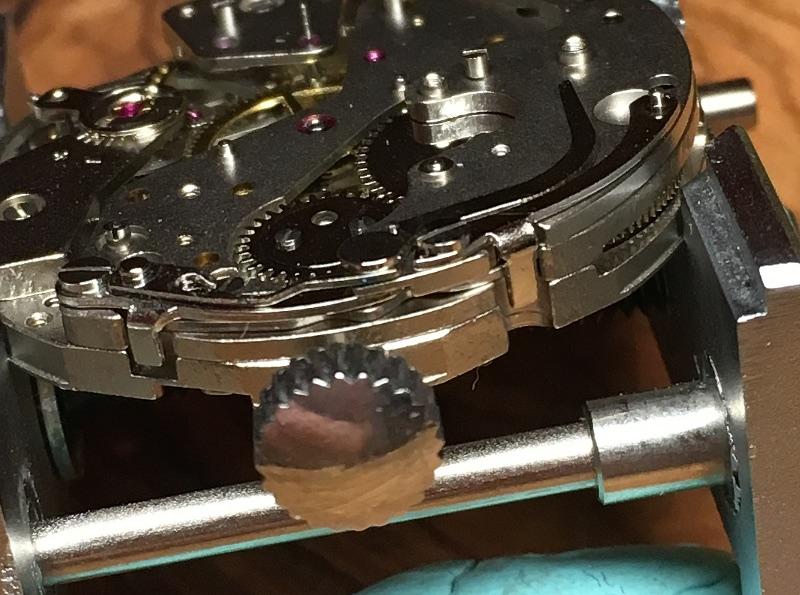
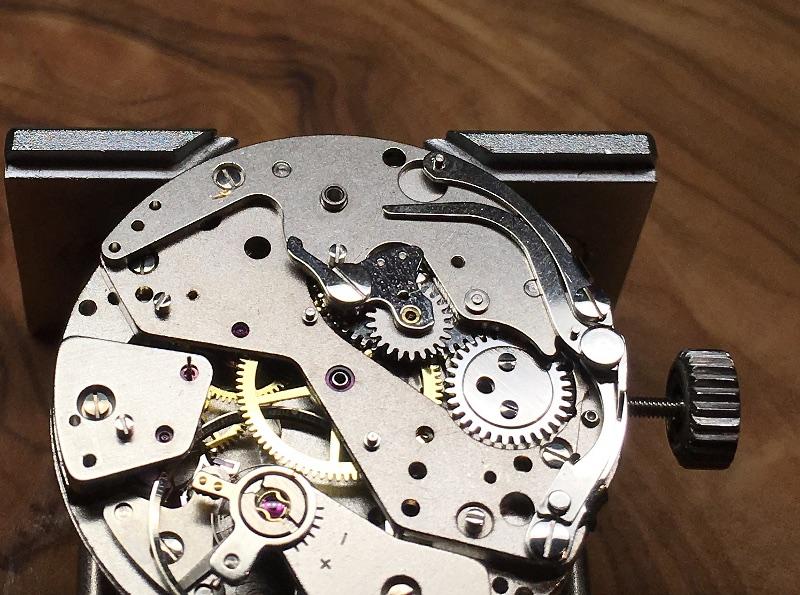
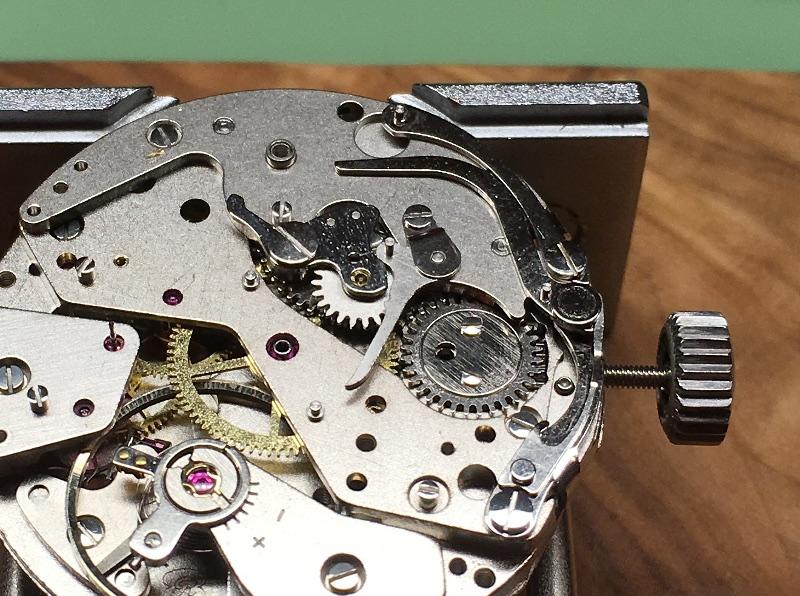
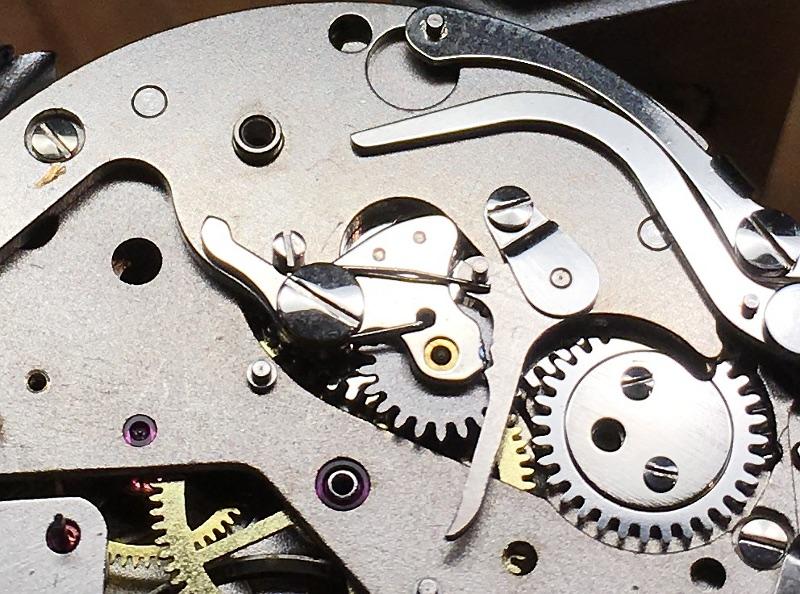
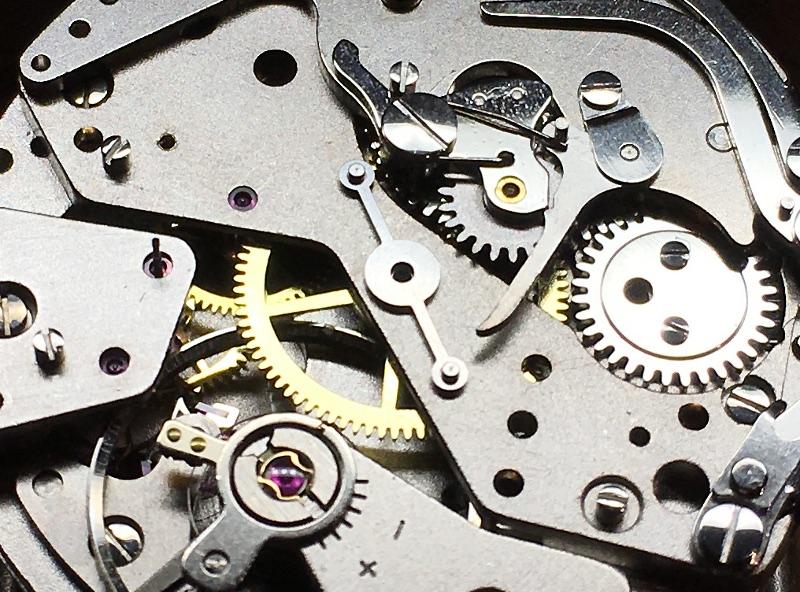
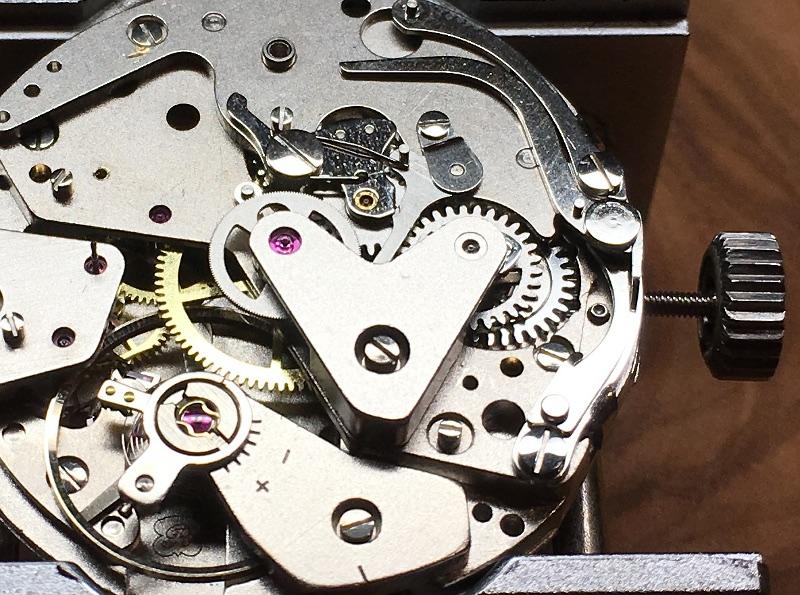
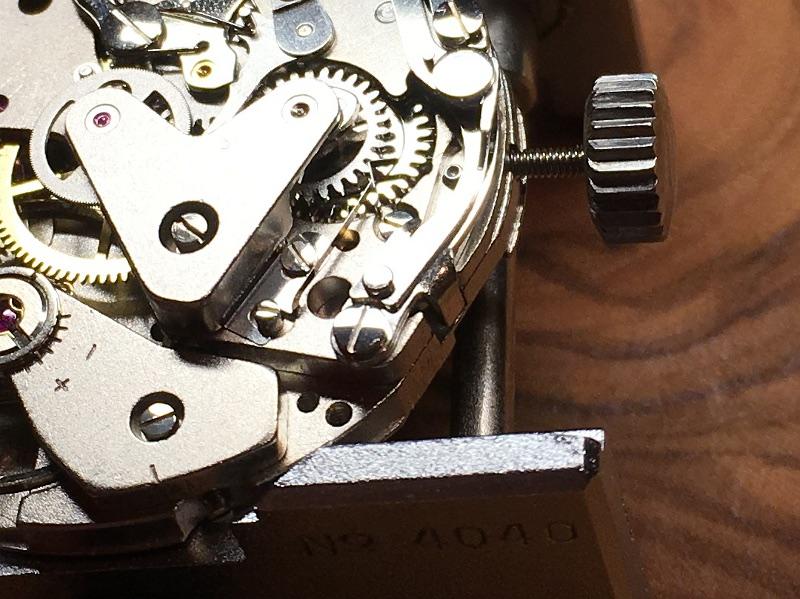
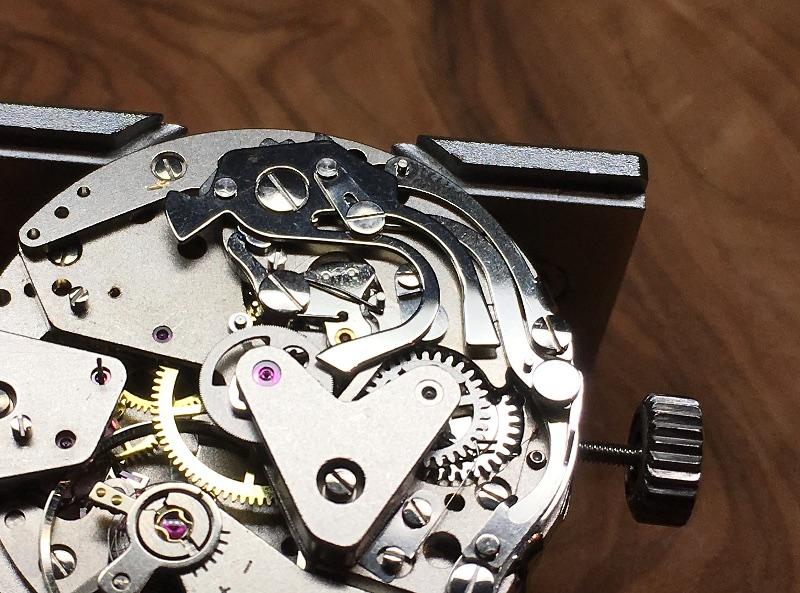

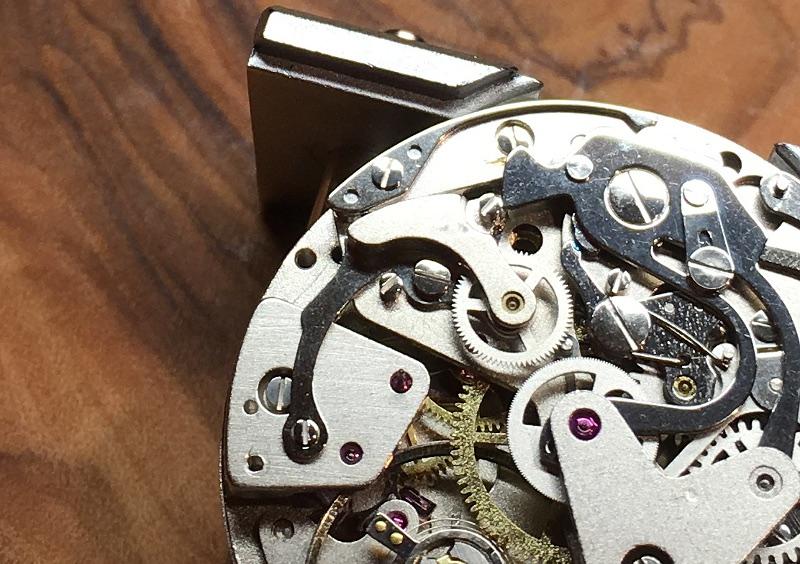

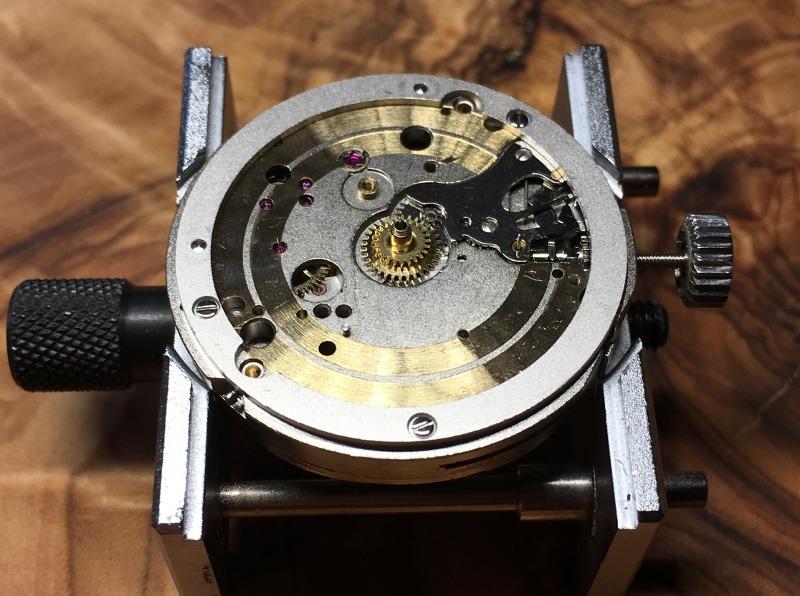
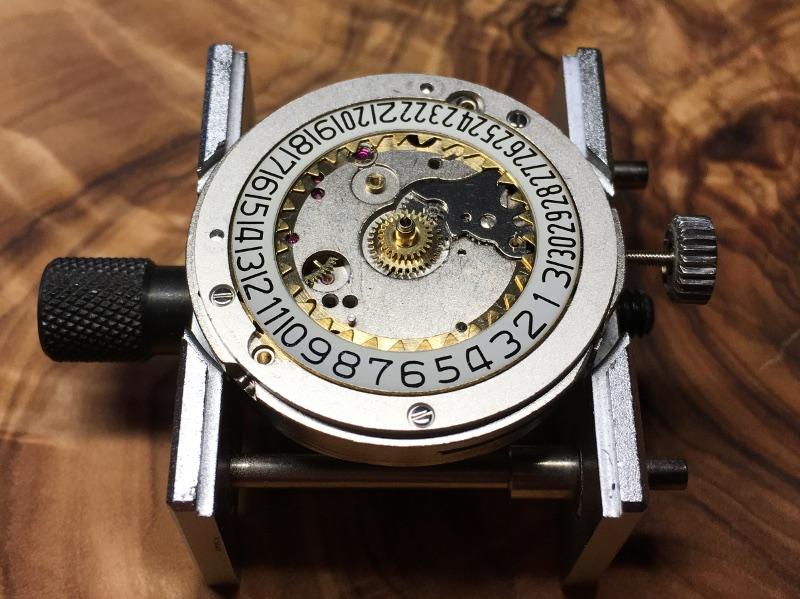
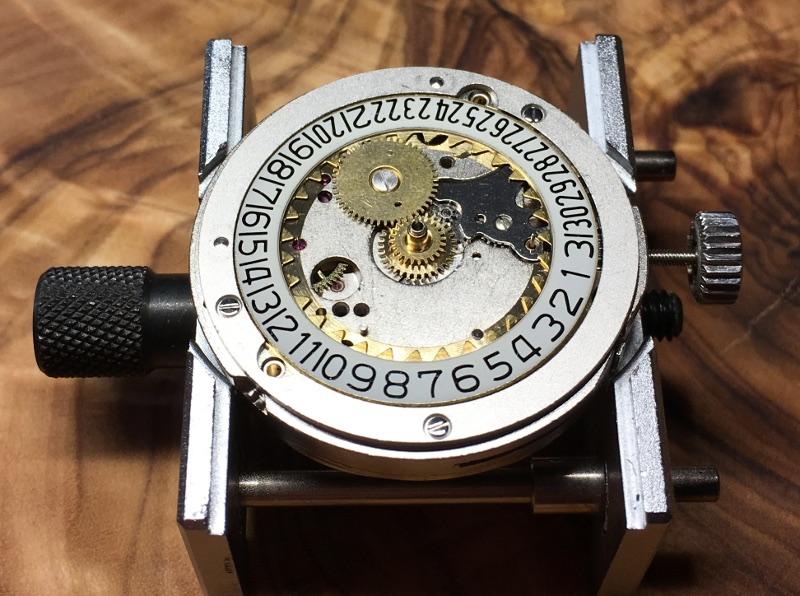
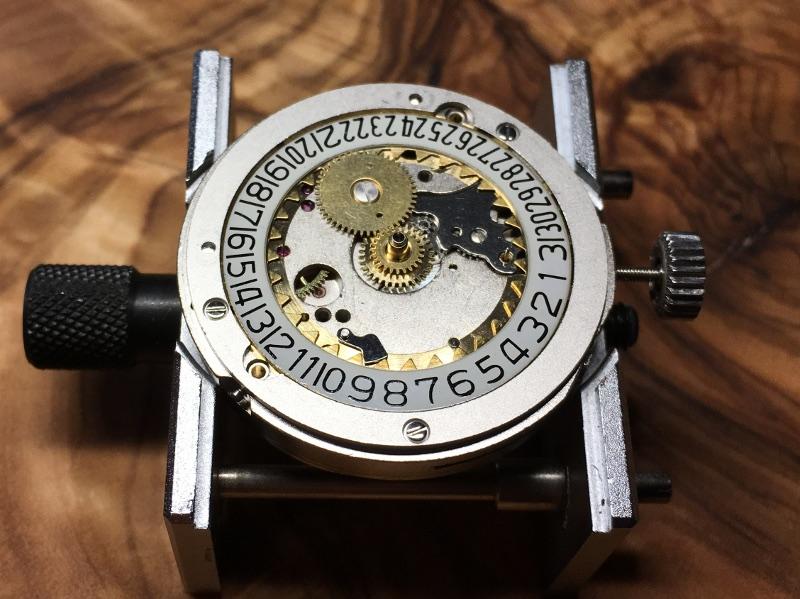

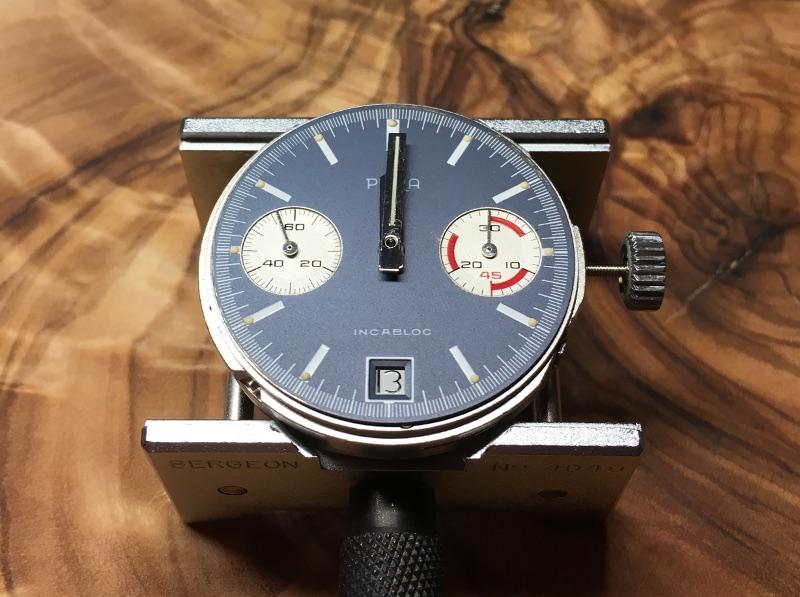
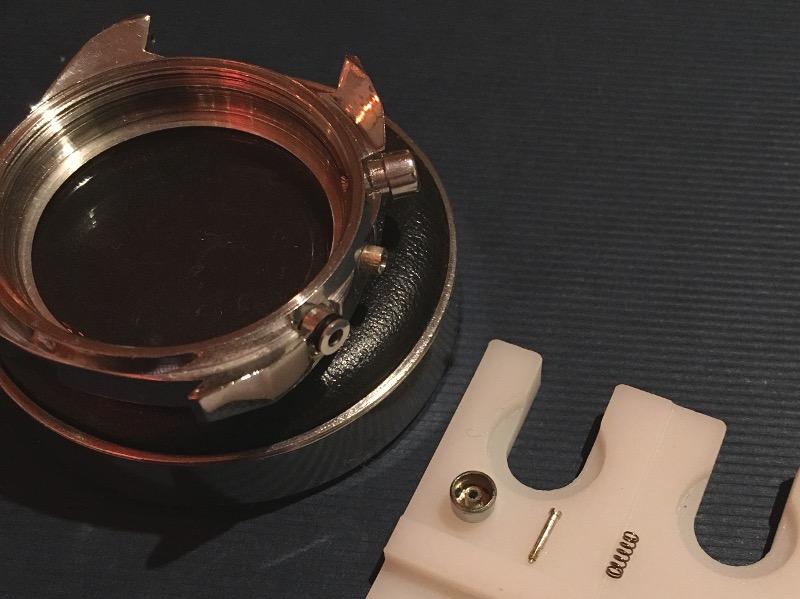
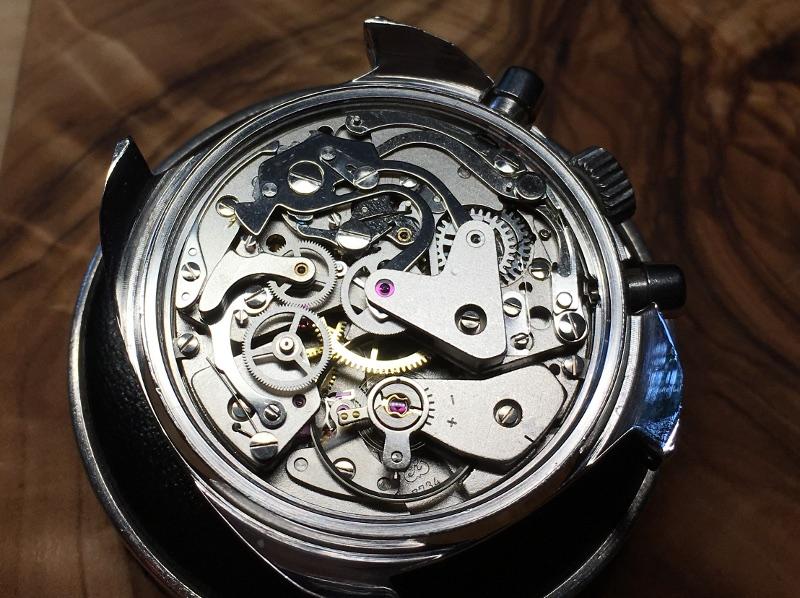
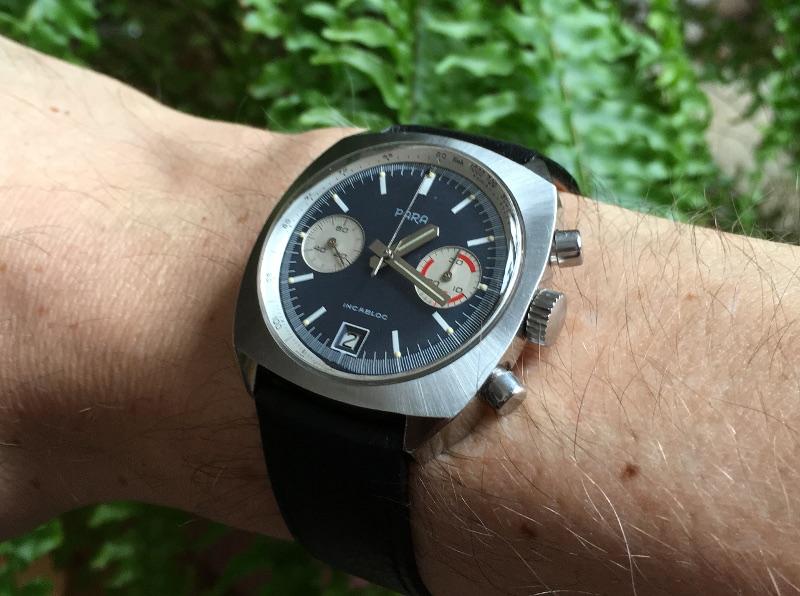 13 points
 -
The clock strikes Christmas 1975 and these two sister were each given a watch which they are, here on a picture, proudly showing off. Their last parent recently passed away and in the parents "jewellery-box" one of the thought long lost watches emerged again. Inside the back-lid was the name S.Kocher stamped, a Swiss company long gone, went begin 1980's during the "Quartz"-crisis under. The watch was in their line of the "Royce"-watches and had an undisturbed Swiss 21.600BHP, 17-jewels AS1726 cheased /non-running movement. I serviced the movement, which now runs with a 0.0ms beat-error and a 270 degrees amplitude (DU & DD), polished the acrylic-crystal and case. It gets presented back to the owner on Christmas 2020, exactly 45 years later, in a nearly as new condition ? I'm sure for her a happy X-mas with some old memories ? For me another fulfilling job done ? Happy X-mas !
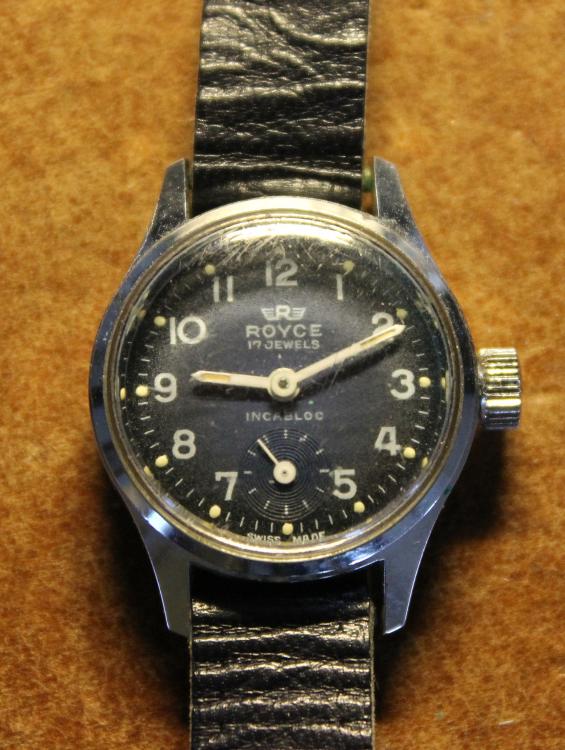

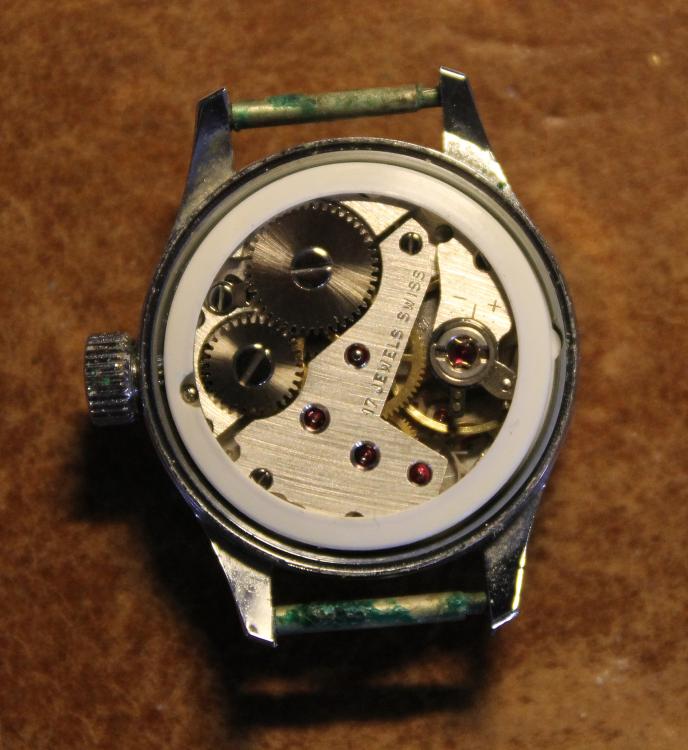
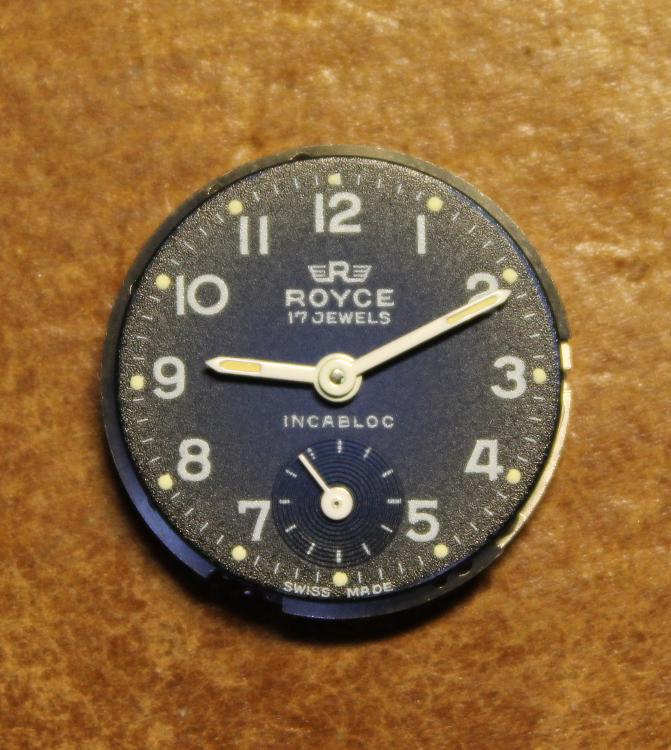

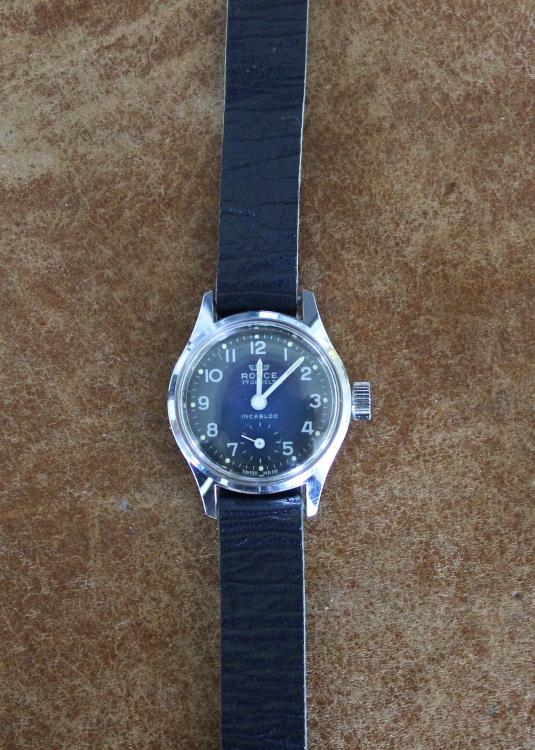
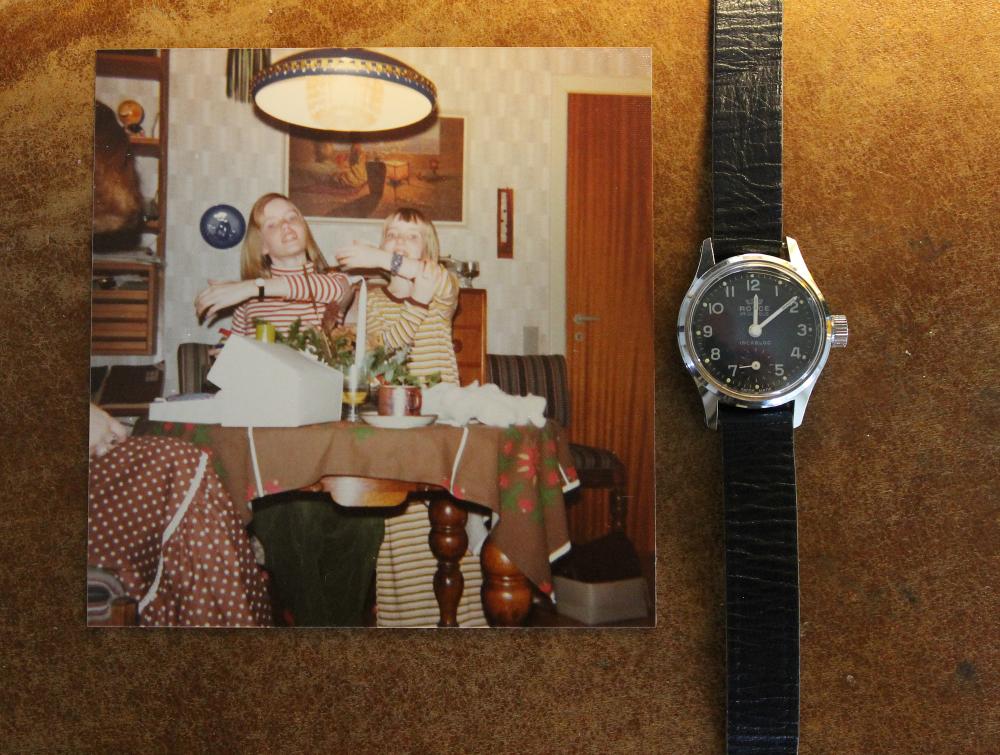
 13 points
 -
One of the great things about collecting and repairing is that feeling of taking a bunch of parts and making a working watch again. This restore begins with a scrap pile of cases from a former Timex repair center. I chose a late 1960's Marlin case that is missing the stem tube. So to the parts stash and one issue resolved. Off it than goes to get a bath in cleaning solution , polished, new crystal added along with correct case back. Next I service a used #24 movement also from the same lot the cases came with and the assembly begins. Since the hands are chromed, I just use an old eraser pencil to bring back their shine. The sweep comes from NOS stock. Grease the stem tube, set lever, insert a NOS stem\crown, snap on the case back and there ya go. Will give this one a wear to test its time keeping.


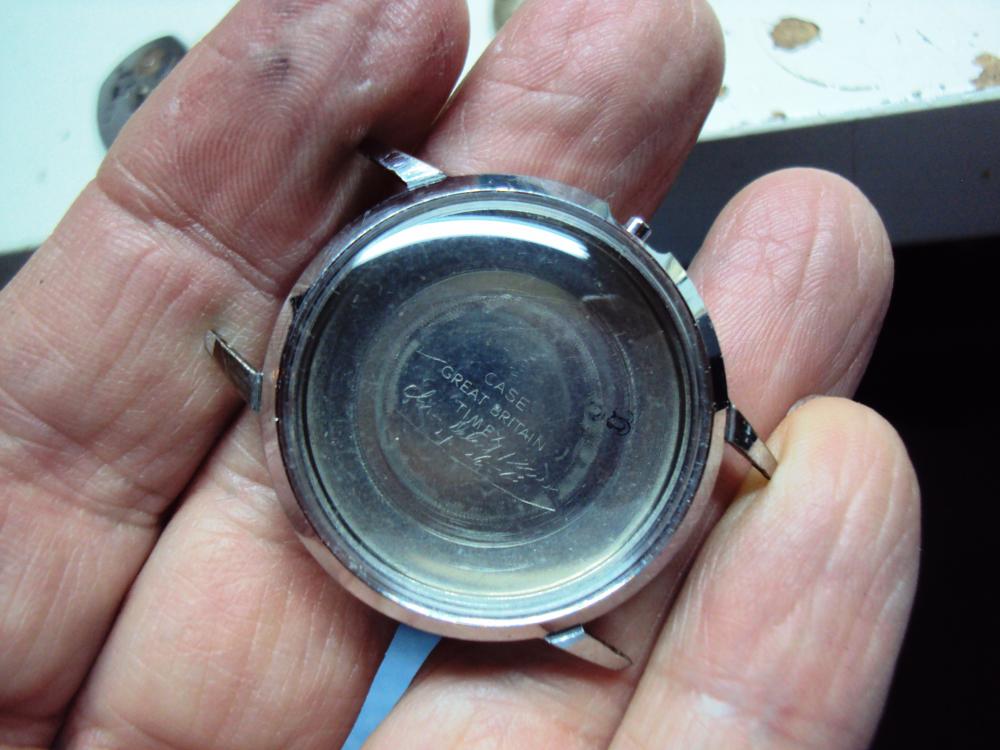
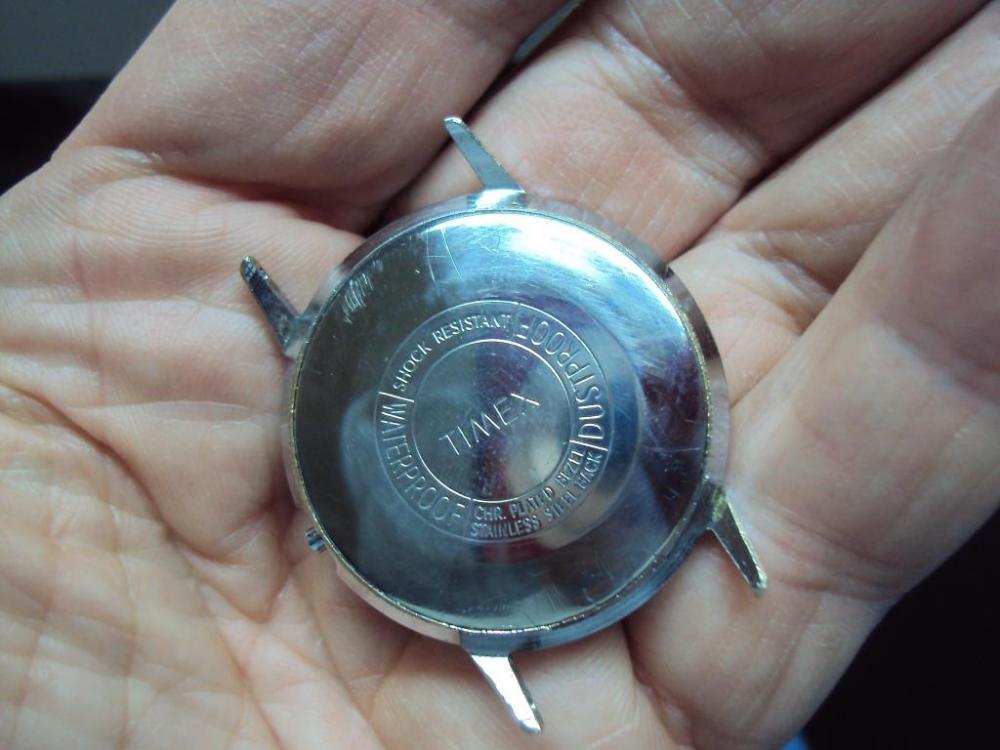


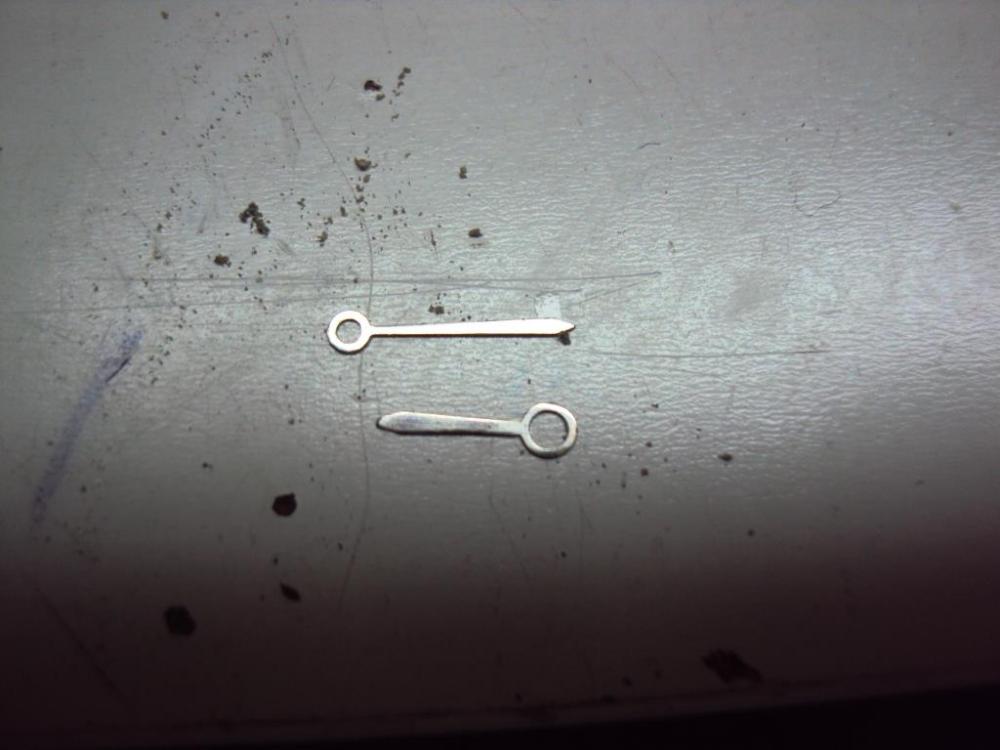


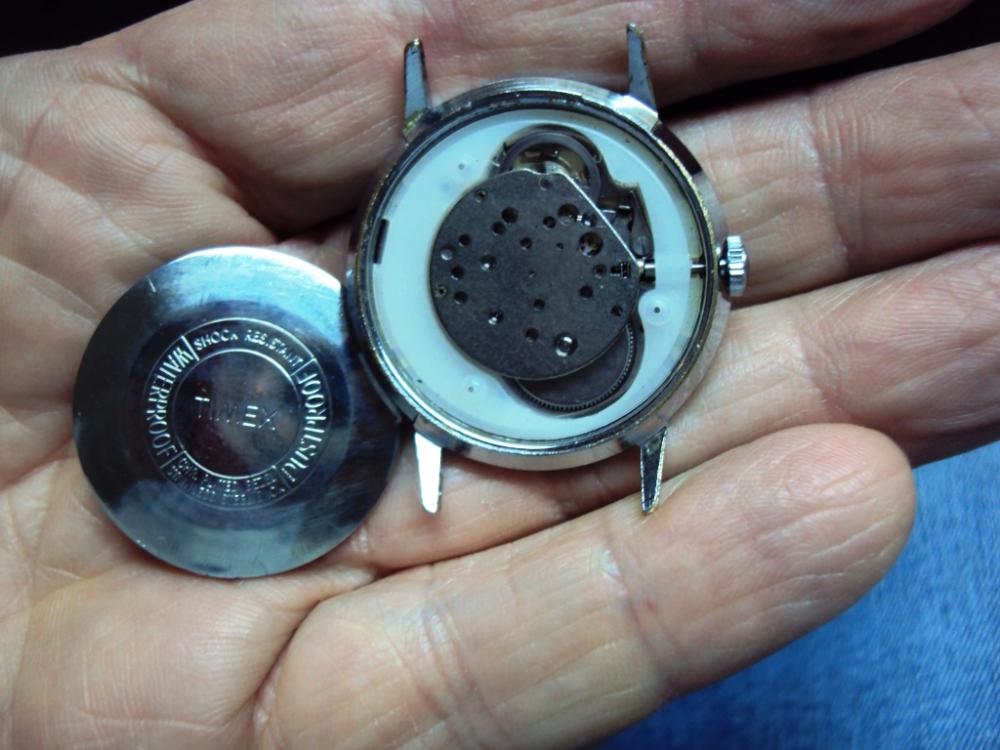

 13 points
 -
Greetings all! My first post here so I'll try to start with a good one... I've been fixing and servicing watches full time for a few years now but this one that came in recently is probably one of my biggest saves. It belongs to a guy called Paul who's a pretty serious Seiko collector and sends me a couple of watches each month for servicing. He spotted this 6105-8000 on ebay which appeared to be in good cosmetic condition but was listed as non-running / needs a service - There was no picture of the movement with the seller saying the back was too tight and he didn't have a case back tool. Paul took a chance on it but when it arrived the case back was only hand tight and this is what he was greeted with - Now obviously Paul wasn't happy with what he'd bought and was going to raise a case with ebay, but in the end he decided to keep it and send it to me to see if it could be saved. Now I mentioned that Paul is into his Seiko's but he's also a great customer. When he sends a watch that needs a new crystal for example he sources it first before he sends it to me which then saves me having a partially finished watch on the bench while I search for a crystal and then wait for it to be delivered. Most customers won't even think about this but if you fix watches or cars or whatever for a living and a customer comes in with all the parts needed it saves you so much time and hassle. With this one he had a good stash of 6105 parts so they were sent with the watch - So onto the strip down... The dial side wasn't too bad but pretty much all of the screws on the train side were rusted in place, so the movement was placed in a tub of penetrating oil and the tub was placed in the ultrasonic cleaner to agitate the oil. It spent about an hour in the cleaner like this and soaked in the oil for 24h - So after soaking for 24h it was time to start the strip down. The auto winding bridge came off easily enough but the train wheel bridge screws were very tight and I couldn't get enough grip on my Bergeon screwdriver, so I used an electricians terminal screwdriver and ground the tip down to size on an oil stone for a bit more torque on those stubborn screws - The click spring had dissolved with rust and turning the screw on the ratchet wheel only turned the mainspring so it was out with the Dremmel - The strip down wasn't totally straightforward as the heads on two of the screws had corroded away. One of the screws was on the train bridge but there's still two other screws holding it in place so not a problem and the other one was the dial foot screw, again not something that is critical to how the movement performs. The main thing was that the main plate could be salvaged as this is the one movement part that isn't readily available. With everything stripped it was back into the cleaner again and then inspection. Obviously a lot of parts would be replaced but it wasn't as bad as I'd initially anticipated. The parts above the mainspring in this next picture are all reused and below it are the scrap parts - From the state of the movement I suspect it had suffered a crown gasket failure, taken some water on board and was then left dial-up for the movement to soak for a few years, as evidenced by the back of the movement being a rusty mess and yet the front and dial were pretty much unscathed. The state of the train wheels would back this up with the top pivots being corroded yet the bottom ones were fine. The balance was the same and I thought I might at least be able to save the hairspring but there was some rust or rust residue on it and it was beyond mine and my cleaning machines ability to remove it. Not a problem I thought as Paul had supplied a complete nos balance but it wasn't going to be so easy - I tried straightening it out and got it looking like this - Not bad but far from perfect but when viewed from a different angle it looked like this - I've fixed a few bent hairsprings before but twisted ones are beyond my ability, so it was into my own spares stash to harvest a hairspring from a 6139. The only thing left to do now was to put it all back together - The movement scrubbed up pretty well cosmetically but the amplitude was only 200 degrees dial up and there was around 30s variation over four positions. I tried a different barrel and mainspring from a 6309 that was previously putting out around 230 but it made zero difference. I then went about pressing out the fourth wheel and barrel arbour bushings from the train bridge and replacing them with the bushings from the 6309 movement, and the third wheel bushing was replaced with one from a 6139 (the 3rd wheel bushing from the 6309 was a smaller o/d so not interchangable) but still no difference. At this stage I was getting kind of tired with it - I could have bought a new mainspring and/or complete balance in an attempt to improve the amplitude but it was running again and keeping reasonable time for a 47 year old watch, plus I'd already spent around 4x the time on it than I would on a regular 6105 service, so all that was left was to relume the hands and bezel pip (the dial lume was in good condition so wasn't touched), fit the new crystal and get it cased up. I also fitted the nos crown that was supplied and was glad to see it passed a 60m pressure test - If you know your 6105's you'll notice that the hour and minute hands aren't correct and are the same as what you'd find on a 6139-6002, but it appears that Seiko fitted these hands to 6105's when they came in for service. I know that Paul is currently trying to source the correct original hands and when he does then I'm sure I'll see this watch again for them to be fitted, but I'm pretty happy to see how it's turned out regardless. If you've got this far then thanks for reading! David.13 points
-
DIY Screw polisher. Inspired by Alex Hamilton, I have made my own screw head polisher. Less than £4 in parts. I hour to make. Chuffed. Additional photograph information Bottom nuts are tightened to make a solid base. Nuts below and above wood are to make the level set when using the polishing base. I will get a small picture frame with glass to insert the polishing paper. The screws can be altered to accommodate. I can now polish to 1 micron. I piece of wood 2" x 2 1/4". 2 x M4-30mm bolts. 6 nuts. 1 pin vice from set of 4.
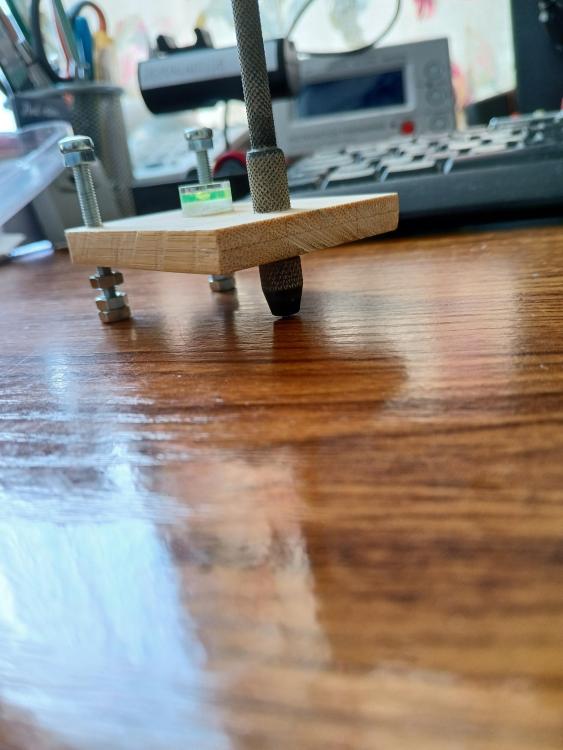

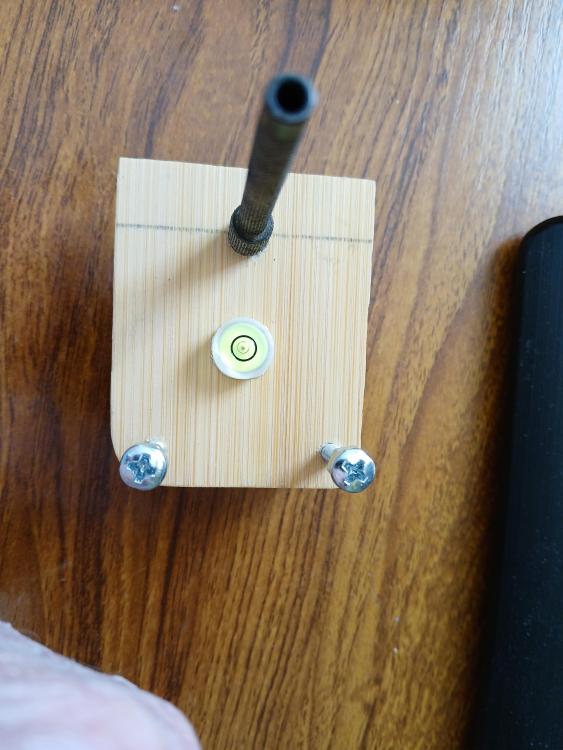
 12 points
 -
In order to start learning my Jacot tool and select the right size bed, I wished for a Seitz jeweled pivot gauge. Sadly, the prices asked for these gauges are astronomical. Currently on eBay from €350 and way upwards to over €500 !! Wild West prices In my Seitz jewel-box I had a "complete" range of jewels 8,9,10,11,12,13,14,15,16,17,18 & 19 in the OD size of 110 and 20,22,24,26,28, 30 & 32 in the OD size of 120. Marked 27x spots (1x1cm distance) on 10cmx10cm, 1mm thick copper-sheet and drilled them out with a 1mm drill. The holes for the jewel sizes 8-19 were reamed to 109 and the other holes reamed to 119. Cut the "to be jewel-gauge" at the size of 10x4cm, polished it and inserted the jewels; Left the holes open for the "missing" jewels; 21, 23, 25, 27, 29 & 31 and there are two more slots empty for 33 & 34; Whether I'll ever need these bigger sizes? They weren't in the Seitz jewel-box, perhaps for a reason? If I ever stumble over these sizes, I can insert them, the holes are already there. Those "missing" bigger sizes are also easy & safely to measure with a micrometer or gauge-caliper. For now, I have a jeweled pivot-gauge with a full range from 8/100 to 20/100 and from 22/100 to 32/100 in steps of 2/100, I think enough for making a start on my Jacot-tool Next, to finish this project off, is to find some small metal-stamps to number the jewel sizes.......
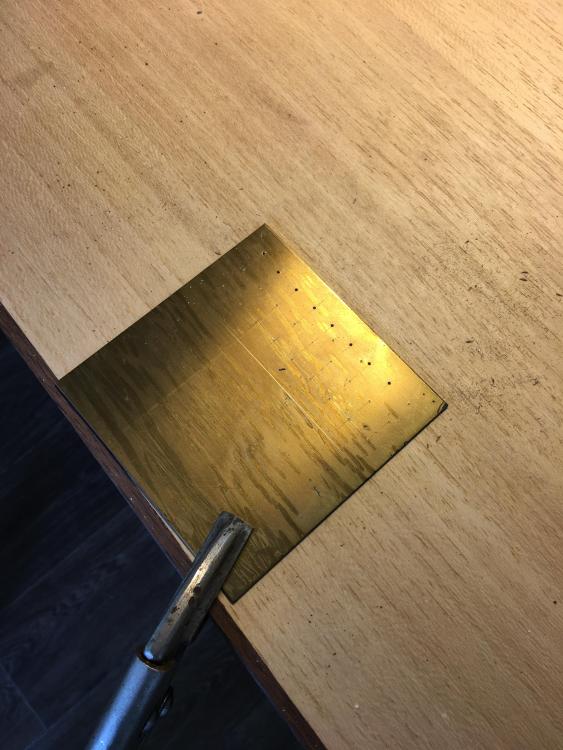
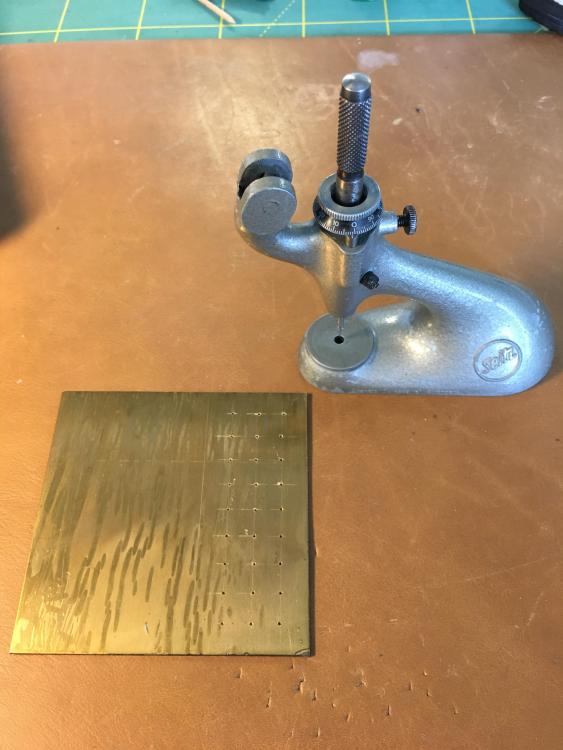

 12 points
 -
My wife took these pictures today. Not sure if there is a message that I am supposed to get The first bench is the one from my Dad. The second is the one I bought from Maine. The third I bought from someone in Wyoming. The last watch bench came from Dallas. The other bench is just a converted office desk. The last picture captures a portion of the room. This was not staged...and I am a little embarrassed about how it looks. That's me and Cromwell.
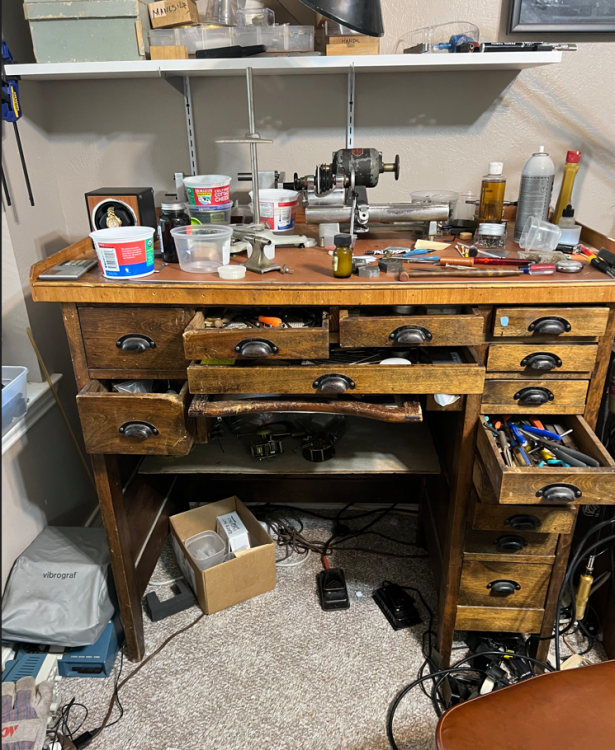
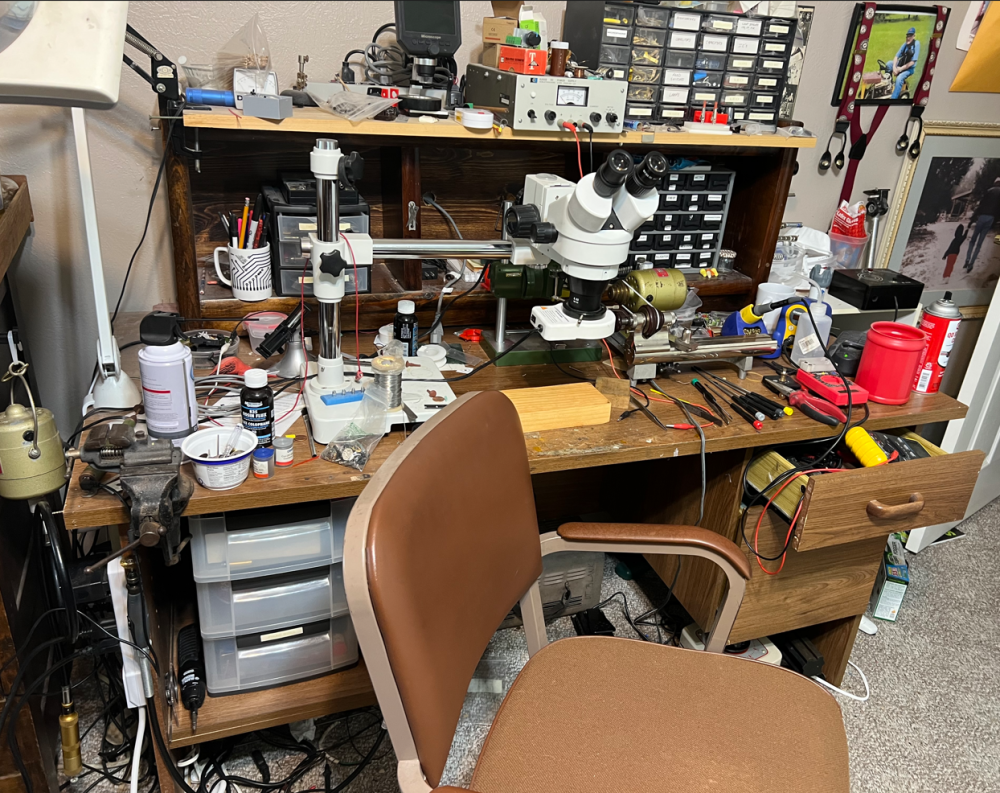
 12 points
 -
Ah ok- but only because you asked, John. That's my CNC. Put it together about 13 years ago, I figure it runs about 1000 hours per year, so it seems to have turned out pretty solid! Built on a Schaublin 102 short bed, with a Swiss X/Y slide with Rollvis zero backlash screws, DC servo motors, and a control built by a Hungarian guy (in Hungary). It repeats on location under 5 microns, which is plenty good. It has 100mm travels, which so far has been enough. The spindle is a Swiss Gepy, it can do 15k rpm but it's had a hard life, so I keep it at 11k. That's still a bit slow for the small cutters (down to 0.2mm) but it does OK. That's my Sixis 101 mill, I use it for all my gear cutting as well as general milling. There are 3 different dividing spindles, one for Sixis plates, another for the stacks of brass plates, and another that's universal. A Sallaz pivot burnisher; it's a production machine, and I found for the small runs I do it works better with a hand crank, like a Pivofix that went to the gym. Profile projector, mostly used for checking gearing and gear cutters, but lots of other things too. 10,20,50 and 100x magnification. That's a jig boring machine, which see lots of use but I include it as I often use it as a measuring microscope. Made by Dixi (another to the right by Hauser). Hauser measuring microscope, I have several lenses but use 50x all the time. And my most treasured machine (there are lots of others, haha), my 8mm lathe. It's a Leinen WW82, with a Levin cross slide, with the X screw switched out for one from a Schaublin 70. I use it several times per day, sometimes all day, sometimes all day for days in a row!
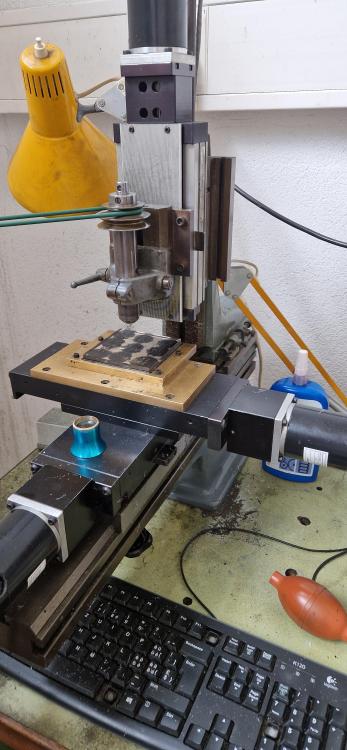

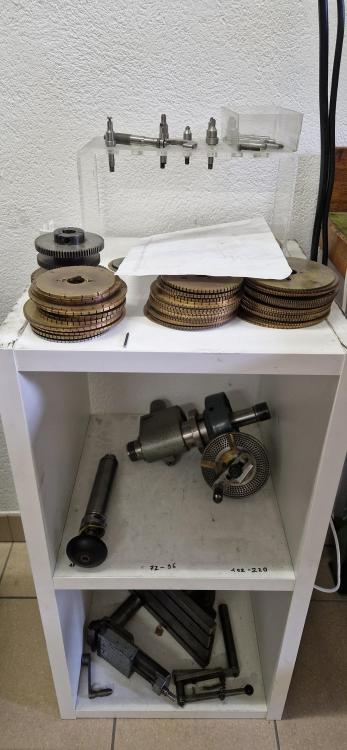
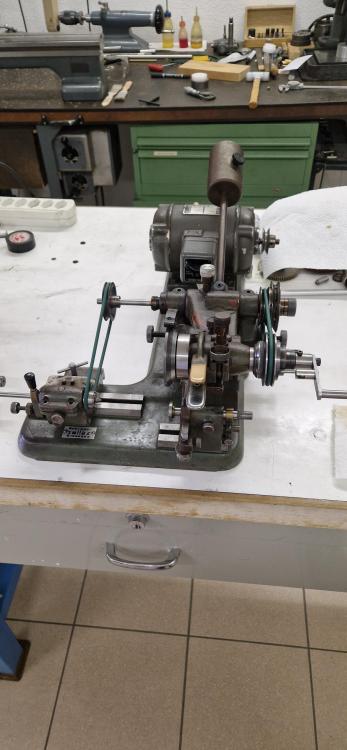
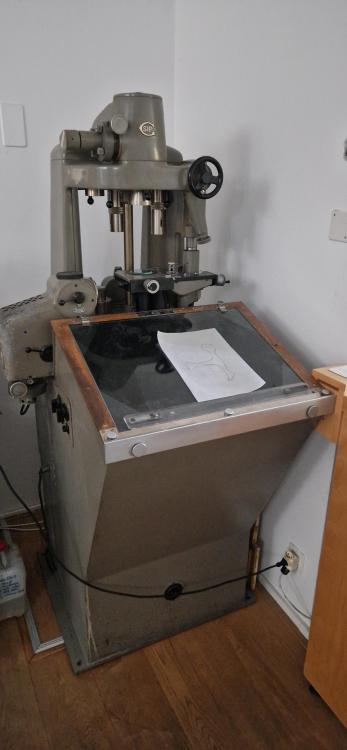
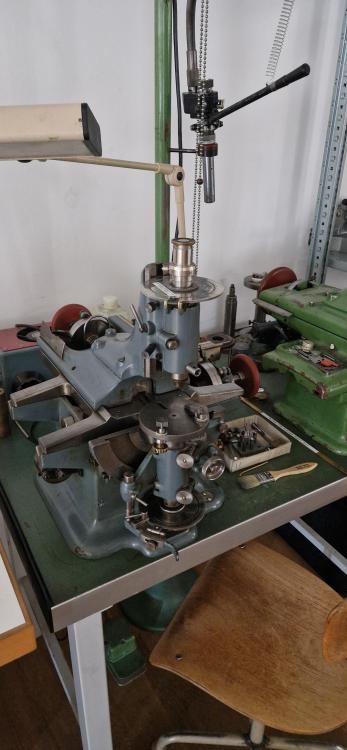

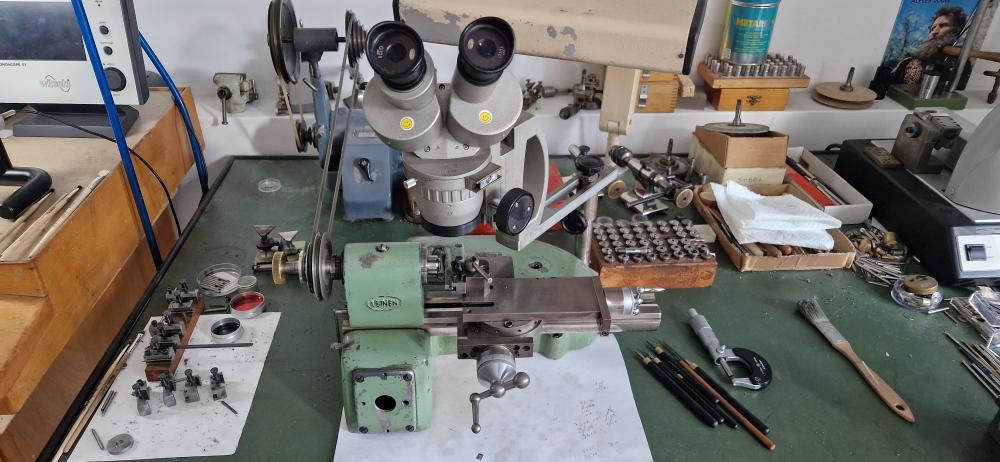 12 points
 -
ETA 955 Service Walkthrough "The Workhorse of Highend Quartz" The ETA 955 and 956 Quartz Movements are the most commonly found movement in high-end quartz watches with three hands and a date feature. You will find them in Omega, Tag, and many other brands on the market. For this walkthrough I will be using an 955.412 Movement as my example; but the 956 is so similar to the 955, that this walkthrough will suffice for both. Please note that the numbers after the decimal place only relates to the factory in which the movement was made, so yours could read 955.112, or another factory number ... regardless, the parts are identical and interchangeable. As with all movements, quartz or mechanical, they have a service interval that should be adhered to for longevity of the movement. With quartz movements when the lubrication becomes dried out, or the movement becomes dirty, they will draw more and more current from the battery in order to maintain accurate time keeping. The ETA 955/6, when in optimum condition should draw around 800nA ~ 1.5uA, if the movement is drawing more power than this, a service is required. If a service is not performed, the battery life with decrease markedly, and can go as far as drawing more power from the battery than it was designed for, and damage the battery and cause it to leak and corrode your valuable time piece. Service Manual for the 955/6 Movement CT_956412_FDE_493024_06.pdf.PDF Disassembly Remove the two Date Wheel Keepers. I always start with the one holding the Date Jumper Spring in place. Sometimes the Date Jumper Spring can ping out of place, so be careful when removing the keeper plate above it. Here is a reference photo in case it moves before you see how it's properly seated. Next remove the Keepers and Date Wheel. Then remove the Date Jumper Spring, Motion and Calendar Work. This will leave only the Keyless Work; remove the Yoke and the Sliding Pinion only. We need to flip the movement over, and disassemble the IC Board before we can remove the rest of the Keyless Work. With the movement flipped over, remove the 3 screws holding the Coil Protector. Note for re-assembly the Gold Screw in the centre. Now that the Coil Protector is removed, GREAT care must be taken not to damage the exposed fine windings of the Coil. Then to remove the IC Board, simply remove the 2 remaining screws that hold it. Do this slowly and carefully, as you do not want to slip off the screw and damage this delicate circuit. The same level of care needs to be taken when removing the IC Board from the Main Plate. Take your time and carefully lift it off and store it immediately out of harms way. Next remove the black Insulator Block, and Battery Insulator. This will expose the Setting Lever Spring Clip, which will enable you to remove the rest of the Keyless Work. To remove the Setting Lever Spring Clip, place both points of your tweezers on the locations where I've placed the stars and gently push down on the spring. Then with a piece of Pegwood, push the spring in the direction of the arrow until it moves to the larger opening slot. This will now allow the Setting Lever to be removed, along with the rest of the Keyless Work. Next remove the Stop Lever and Switch, and remove the one screw holding the Train Bridge in place. Then carefully remove the Gear Train and the Rotor. The movement is now completely stripped and ready for inspection and cleaning. There are some parts that you do not place in the parts cleaner, they are as follows: Date Ring Rotor IC Board The rest should be demagnetized prior to cleaning to avoid any metal particles in your cleaning solution from sticking to your parts. When cleaning I also including the Insulator Block, and Battery Insulator in the basket, normal watch cleaning solutions do not harm these items and it is essential they are completely clean to provide the best insulation possible. The Rotor should be cleaned by use of Rodico. As you can see from the picture below, it's surprising the dirt and old oil this will remove ... and it is sufficient cleaning for the Rotor. I hope this has been a help to you, and I will post the assembly procedure later today, if time permits.
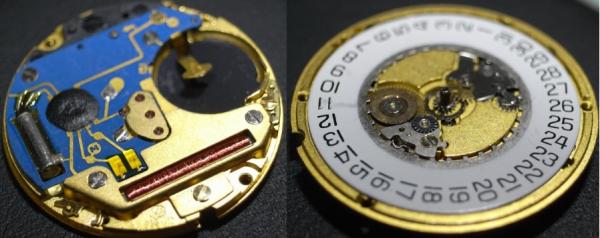

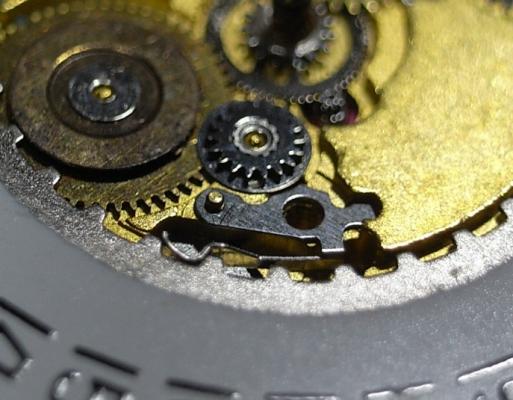


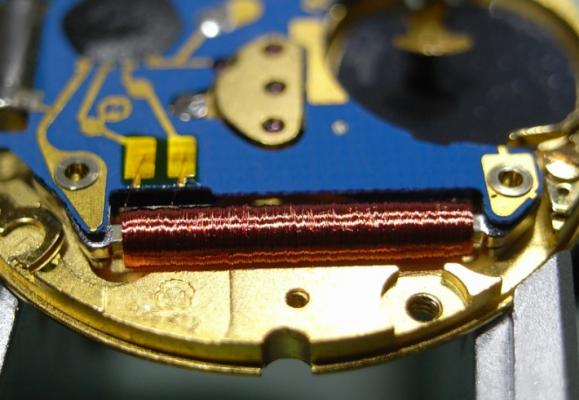

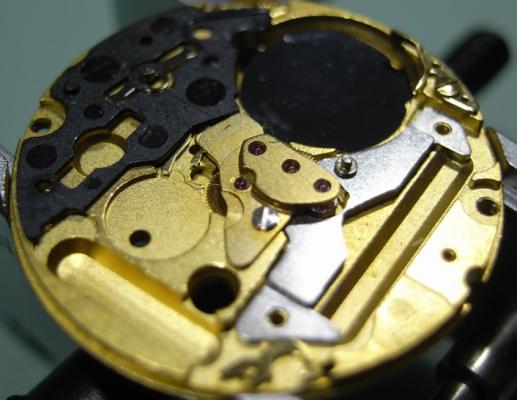
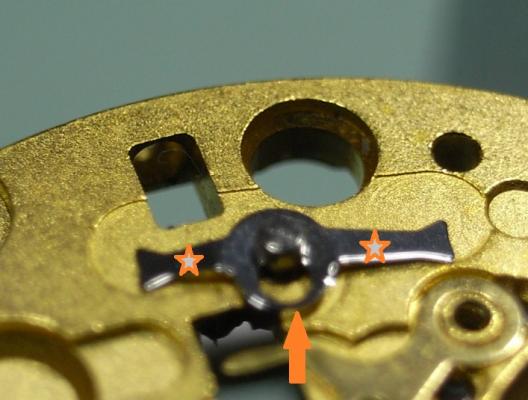
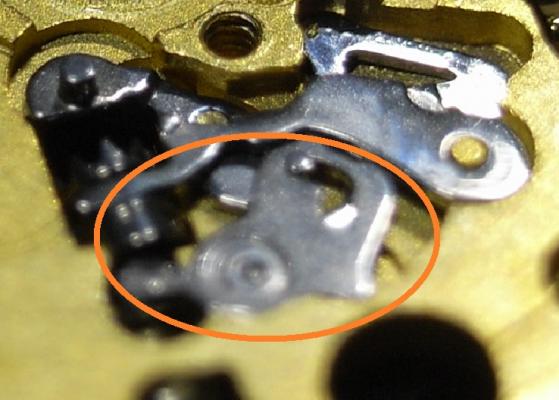
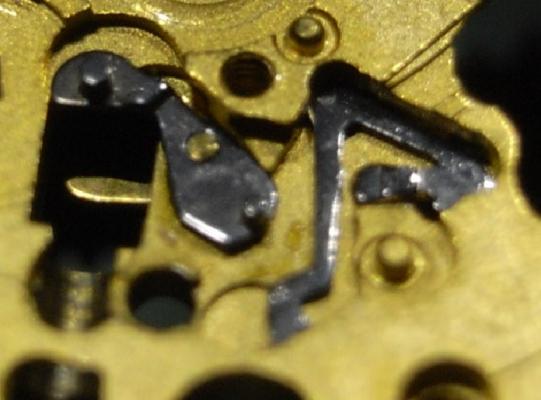

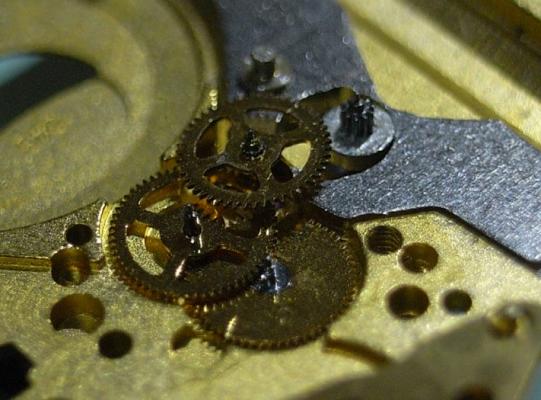
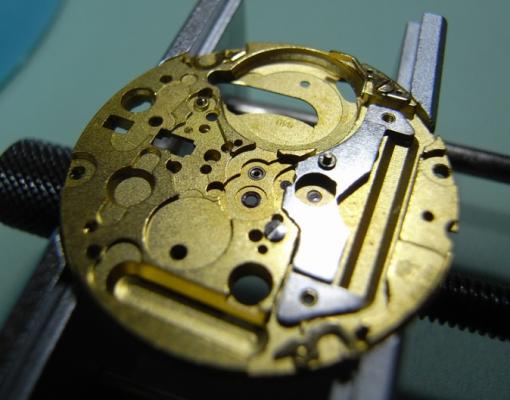

 12 points
 -
My son designed this and gave it to me for Christmas
 12 points
 -
I have been collecting and restoring these machines since 1970. david12 points
-
1970 Seiko 5606-7000 with hand made stamp dial. Running at 0 SPD and amplitude over 300 degrees at full wind.


 12 points
 -
Thought I’d show off a watch project that I have been working on. Wanted to create vintage inspired watches. Tell me what you think so far!
 12 points
 -
Hey folks, I'd like to share a watch I put together for my Brother's birthday. The movement is a pretty old Unitas 6497 which I picked up from the widow of a watchmaker a year or so back, the plates have been skeletonised and I'm pretty sure this was a once off job by the watchmaker. The mainplate is brass, and the decorated bridge plates appear to have been plated (quite crudely, when inspected under a loupe). The movement is keeping great time now that it is serviced. I made an attempt at a logo using the film-free transfer technique Mark has used in a couple of recent Youtube videos. The logo didn't adhere very well to the dial, not particularly happy with it. In person and to the naked eye it looks pretty good I think. The case is a 41mm case I picked up from Ofrei, who I sourced the dial and hands from also. Hope ye like it!


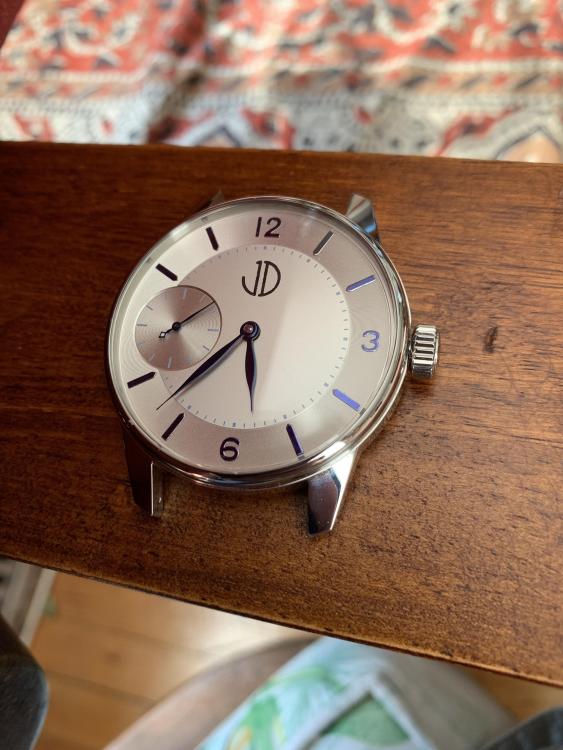
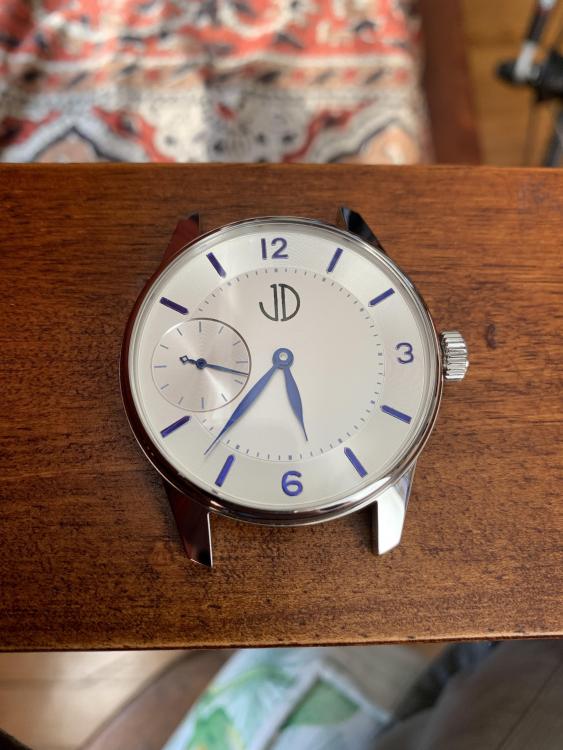 12 points
 -
Miyota Calibre 9015 Assembly


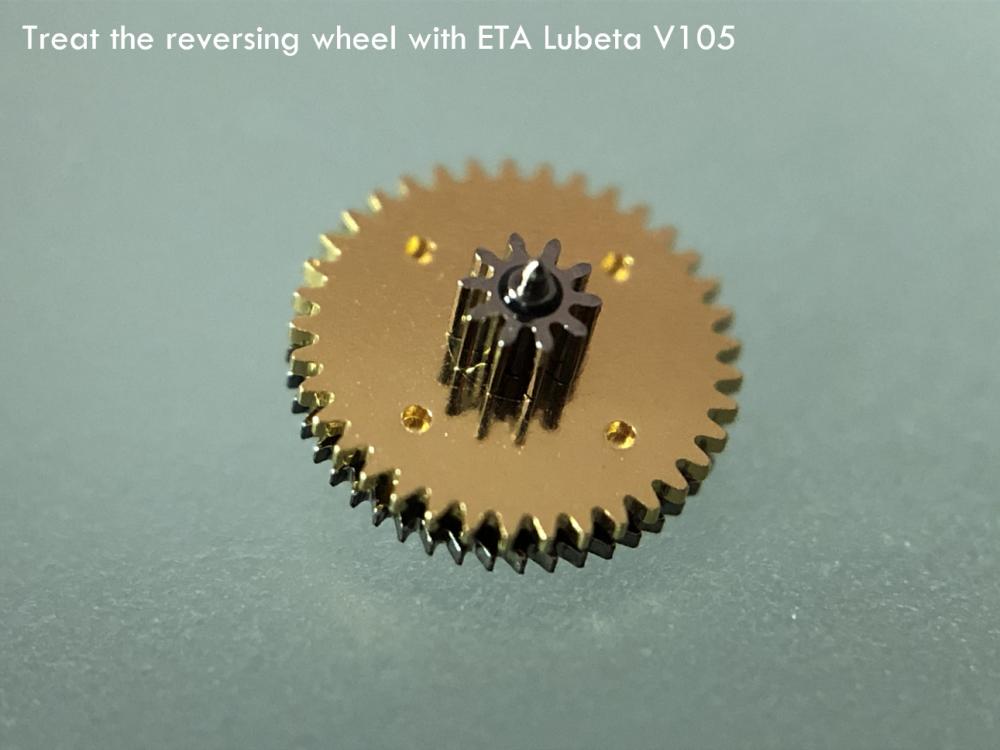
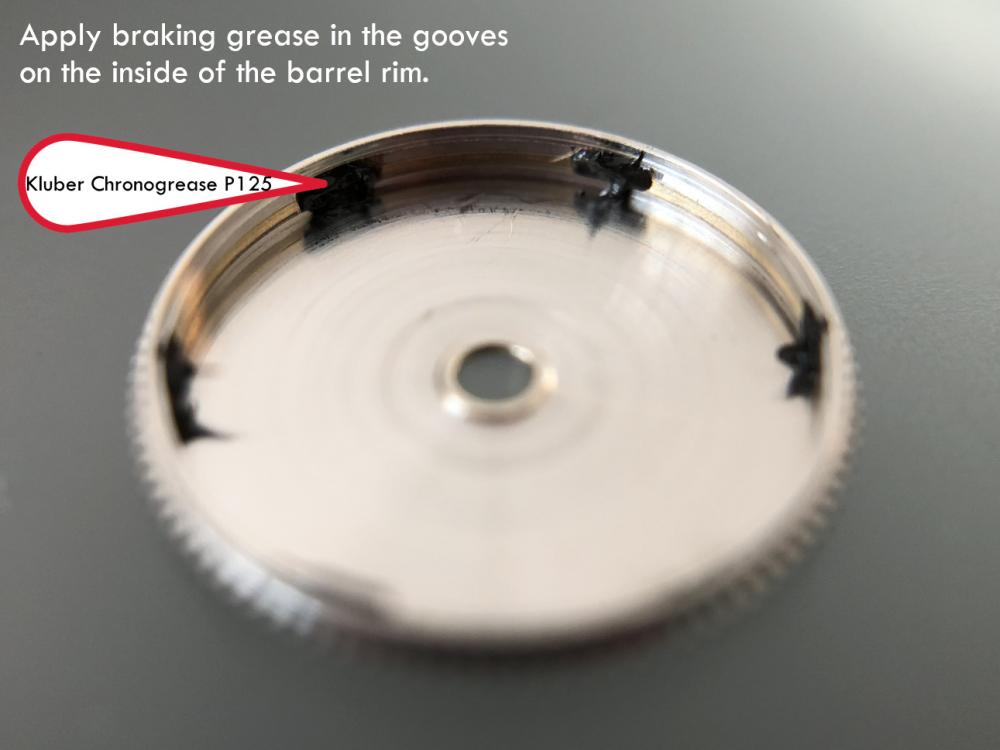
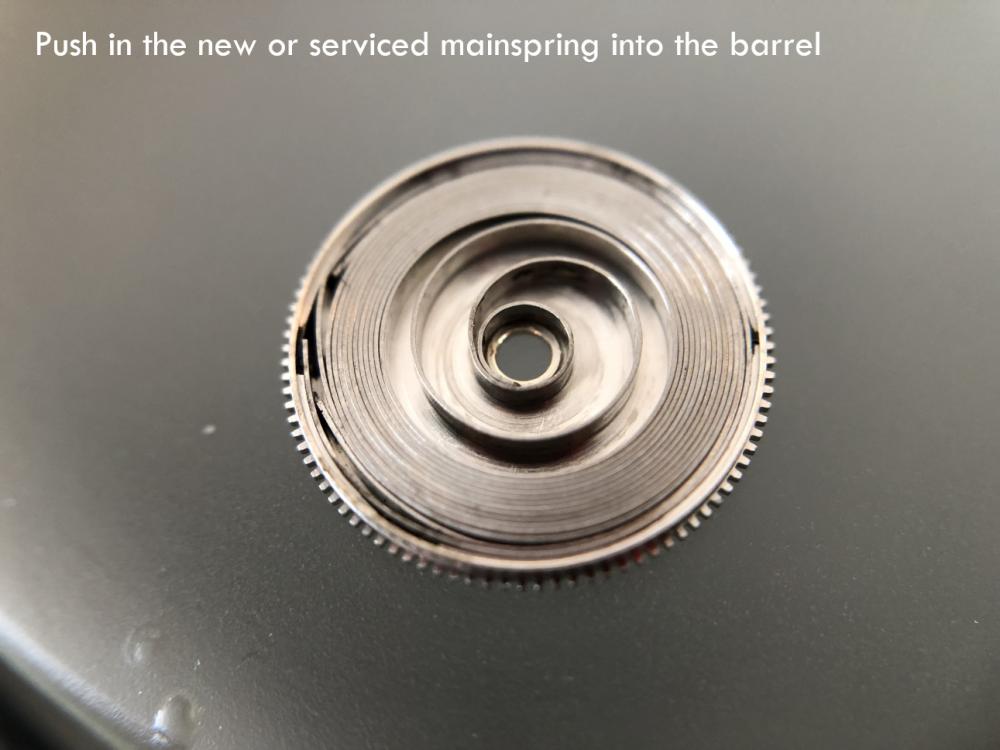
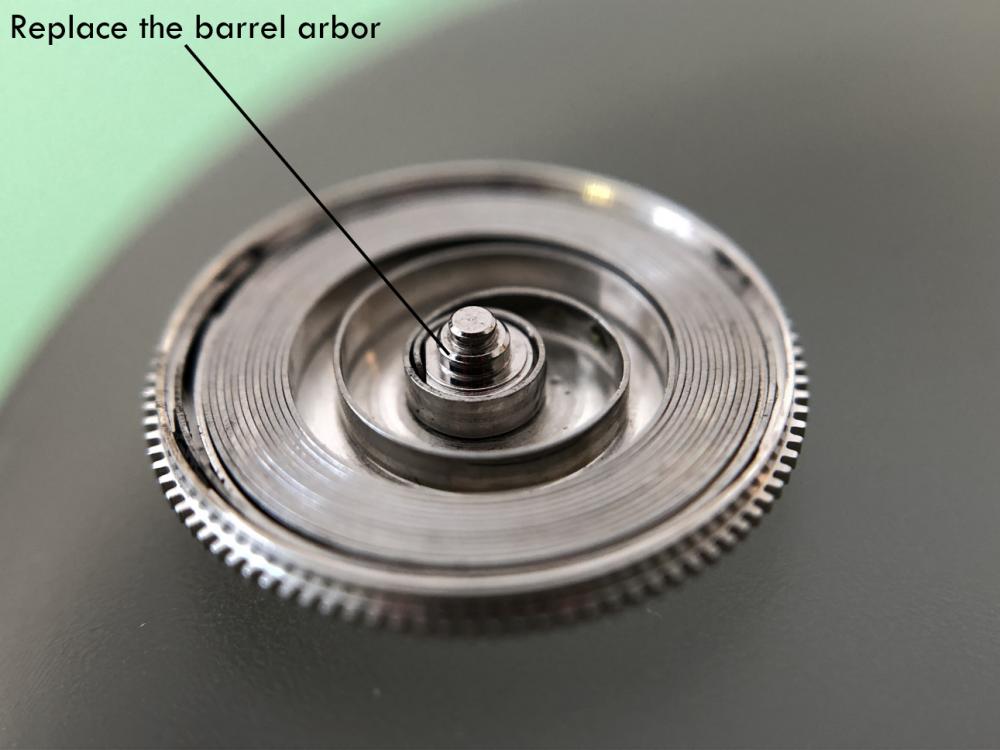
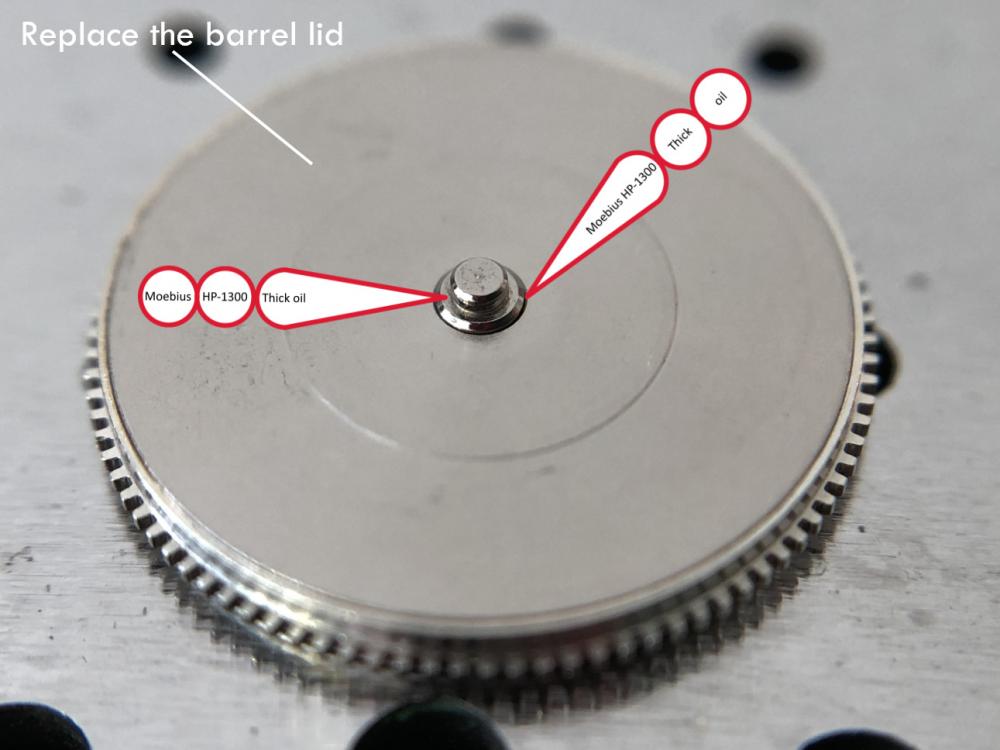
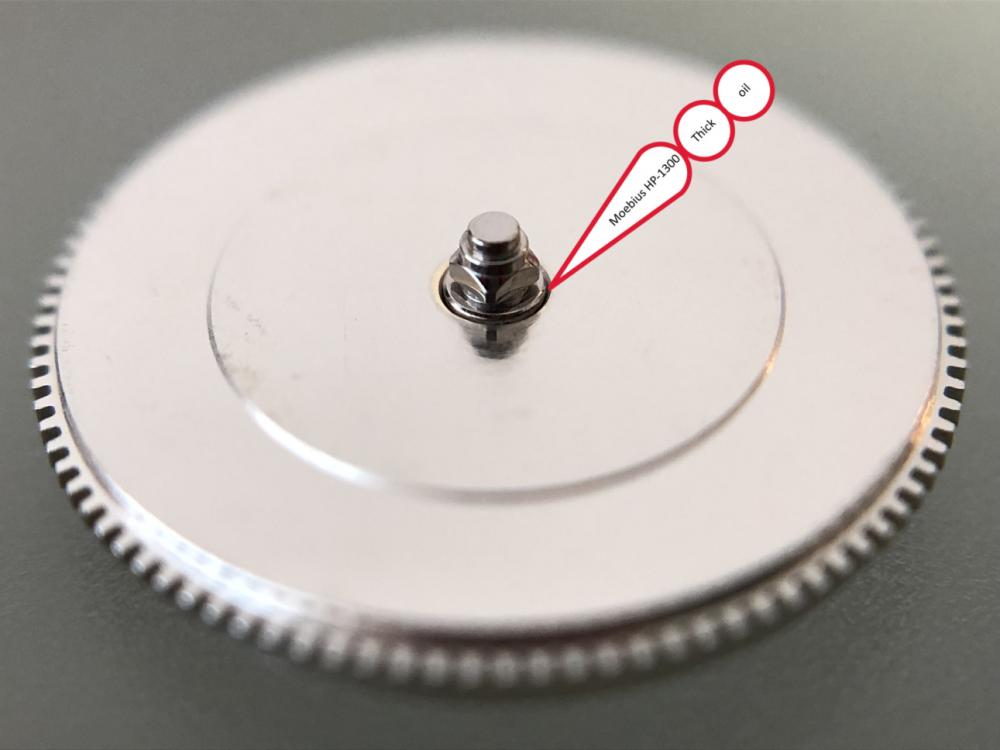
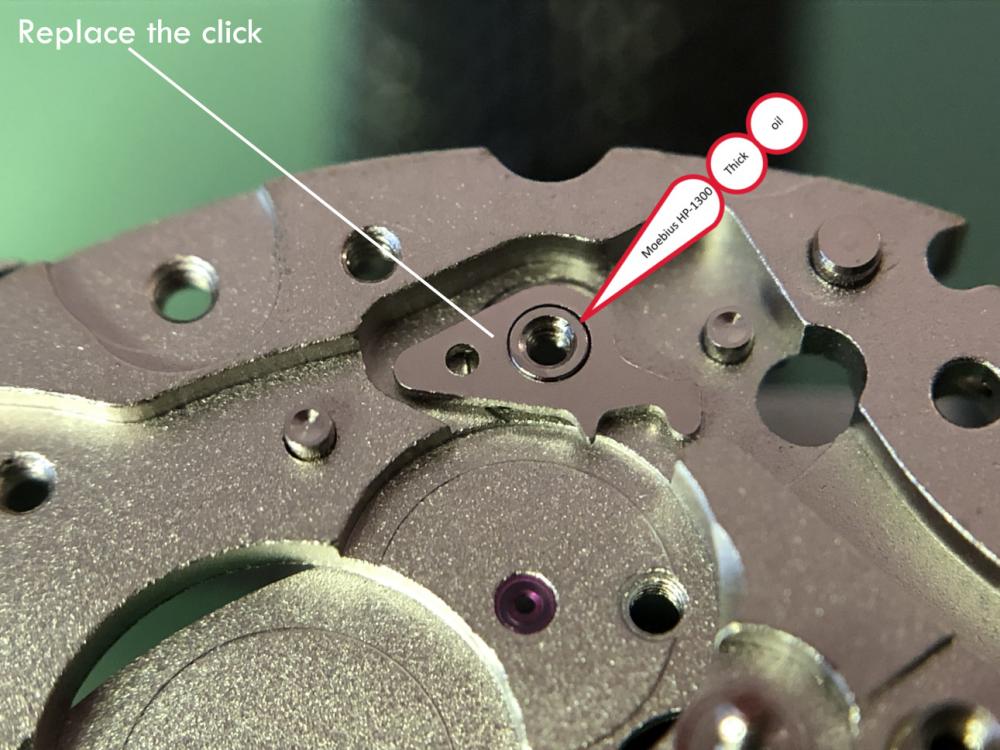


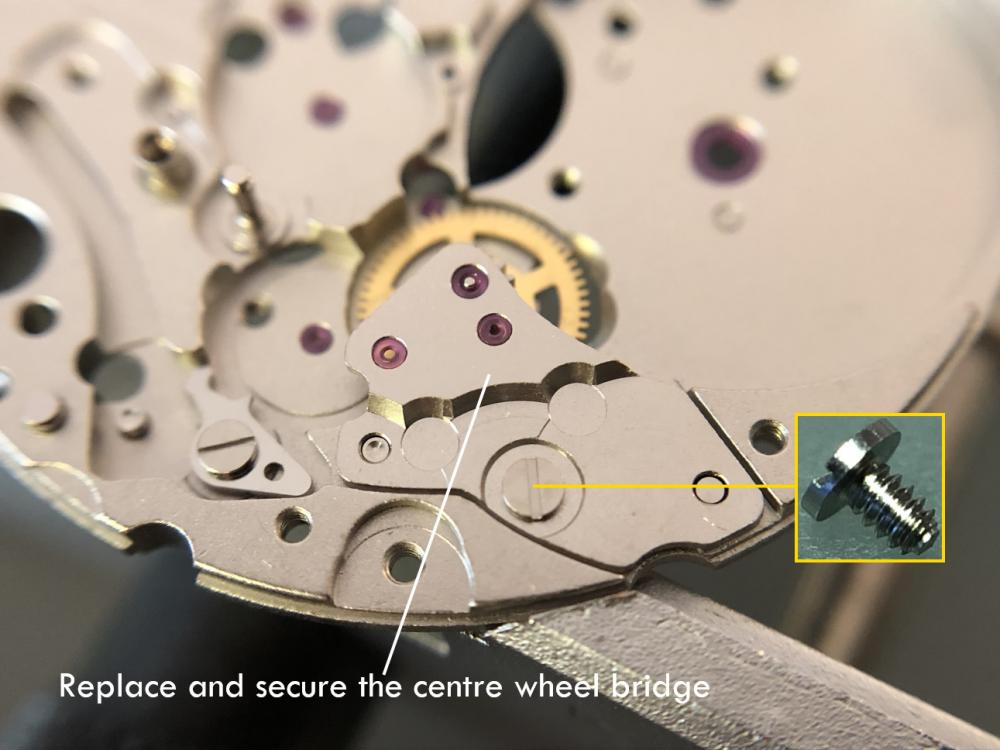
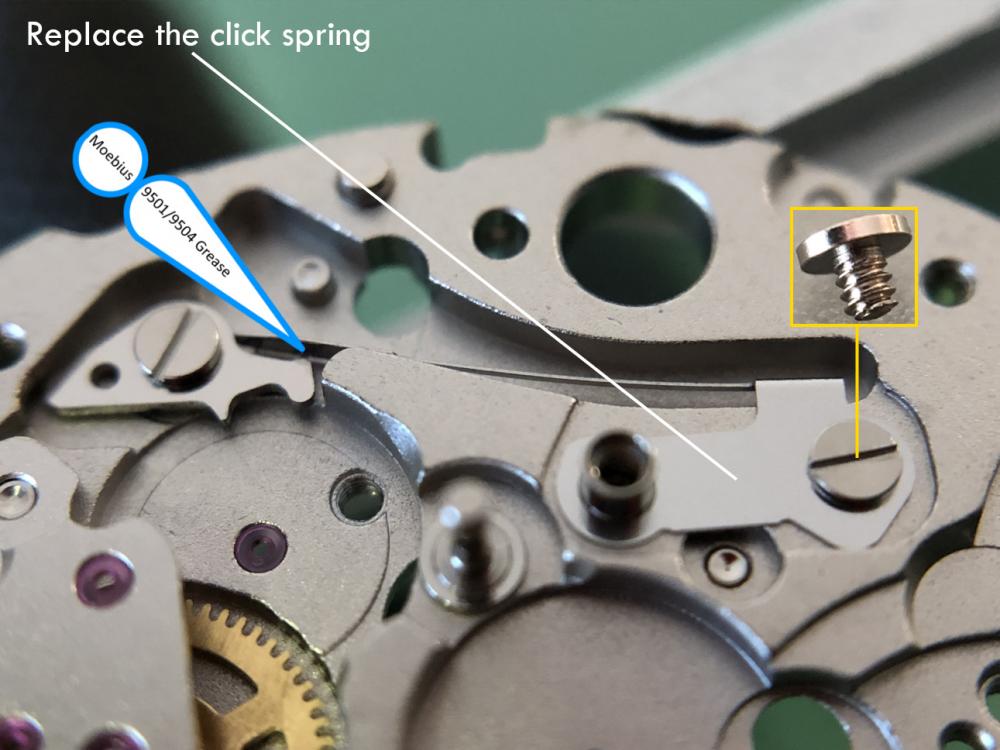

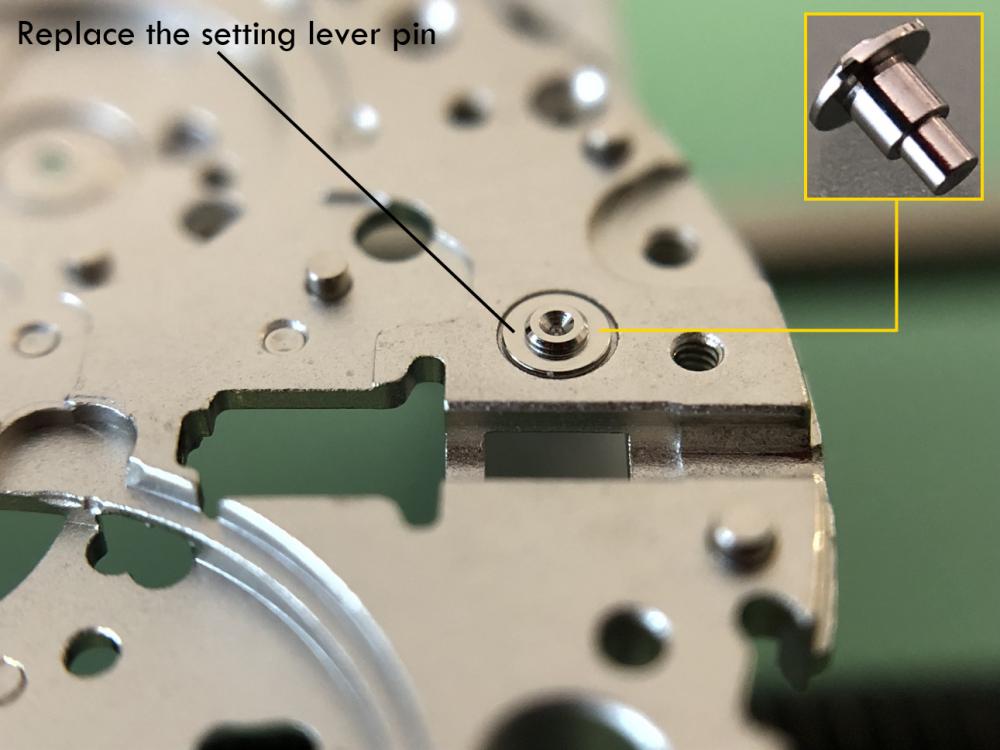
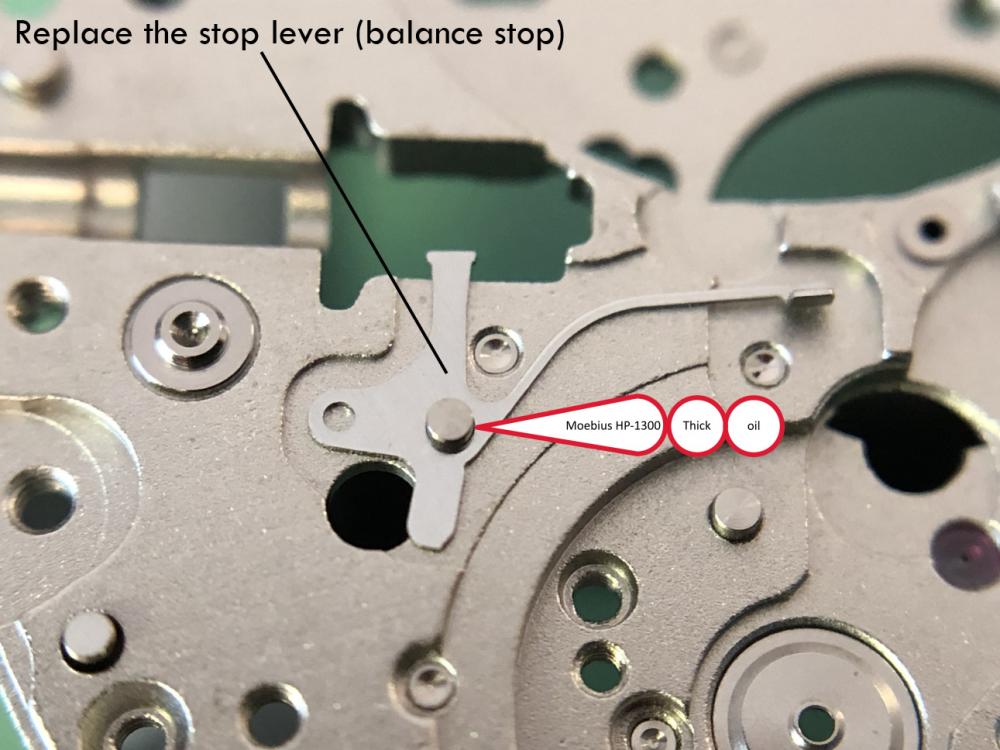
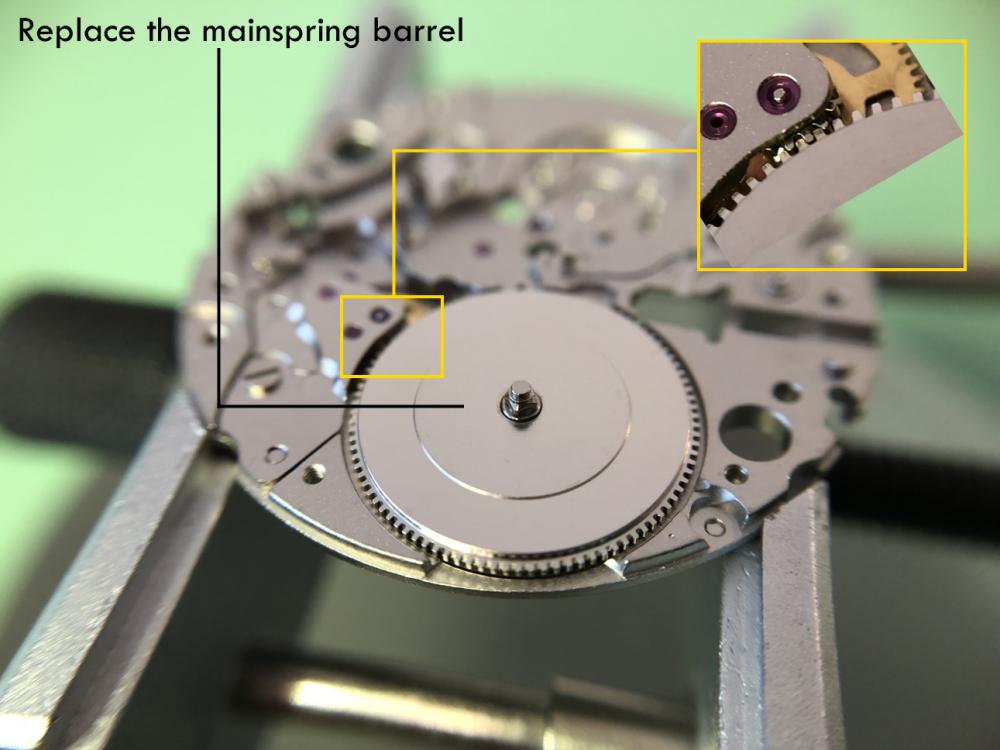
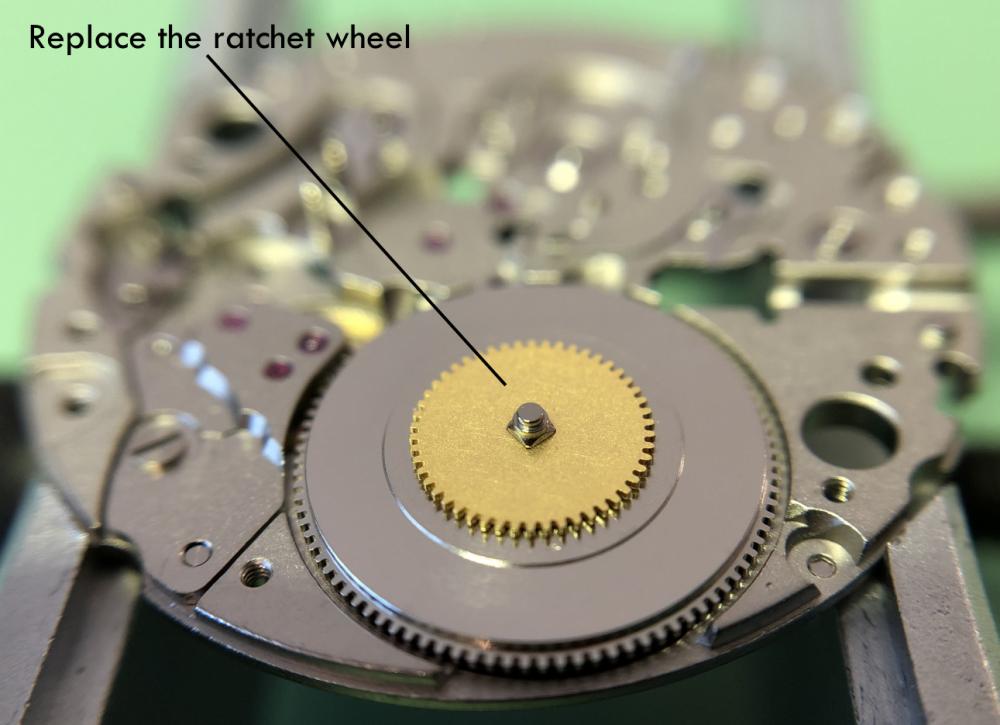
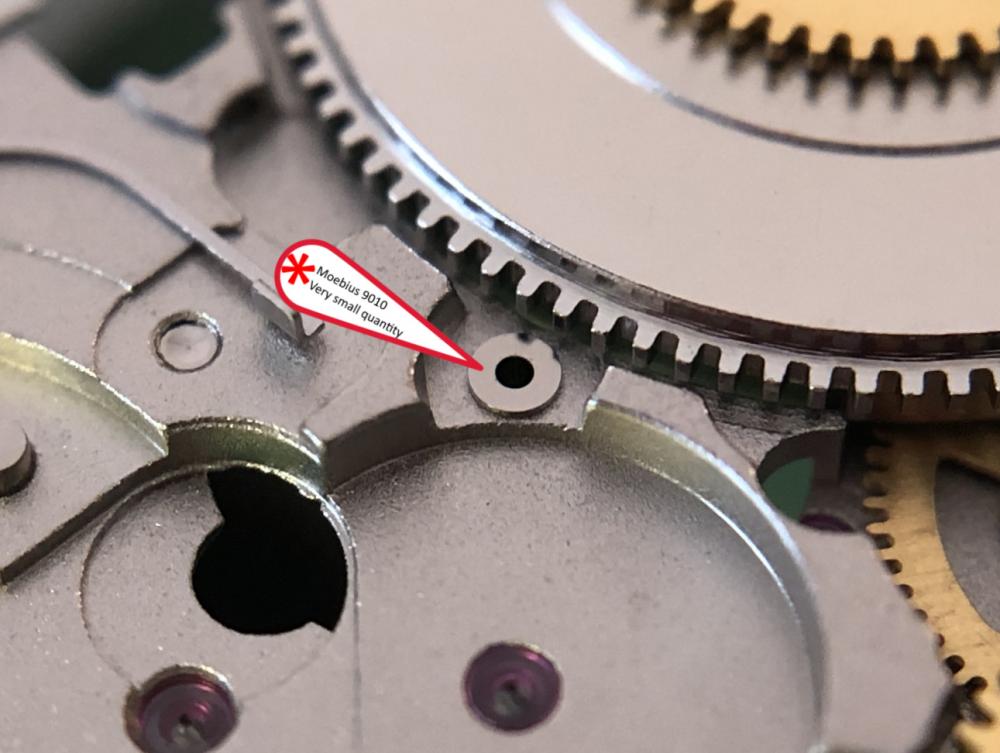


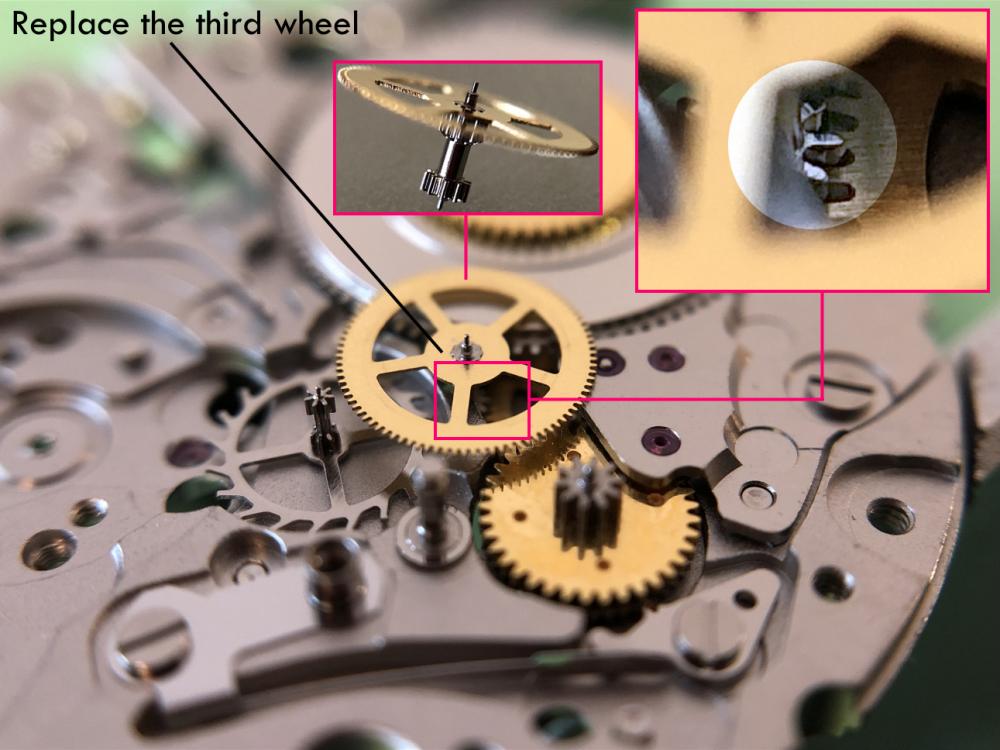


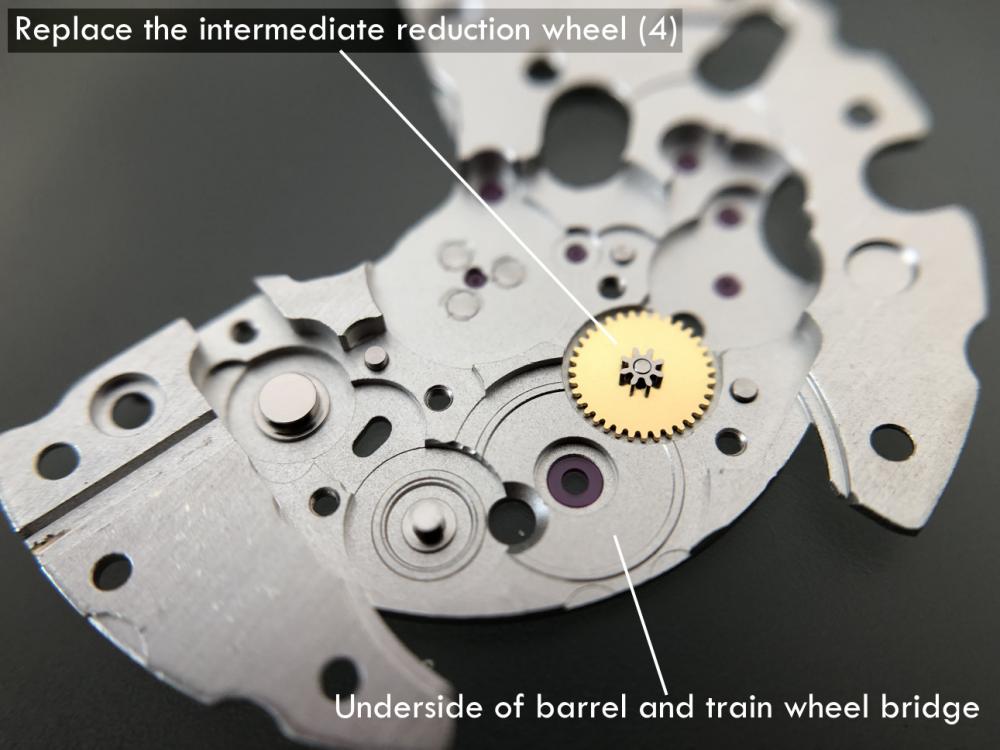

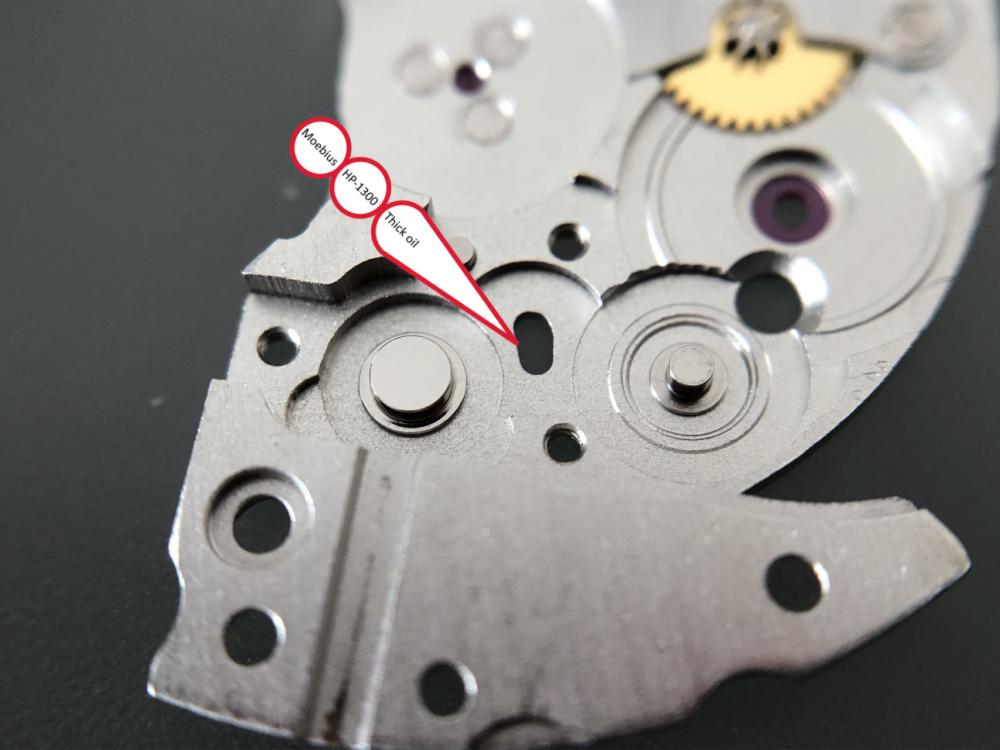

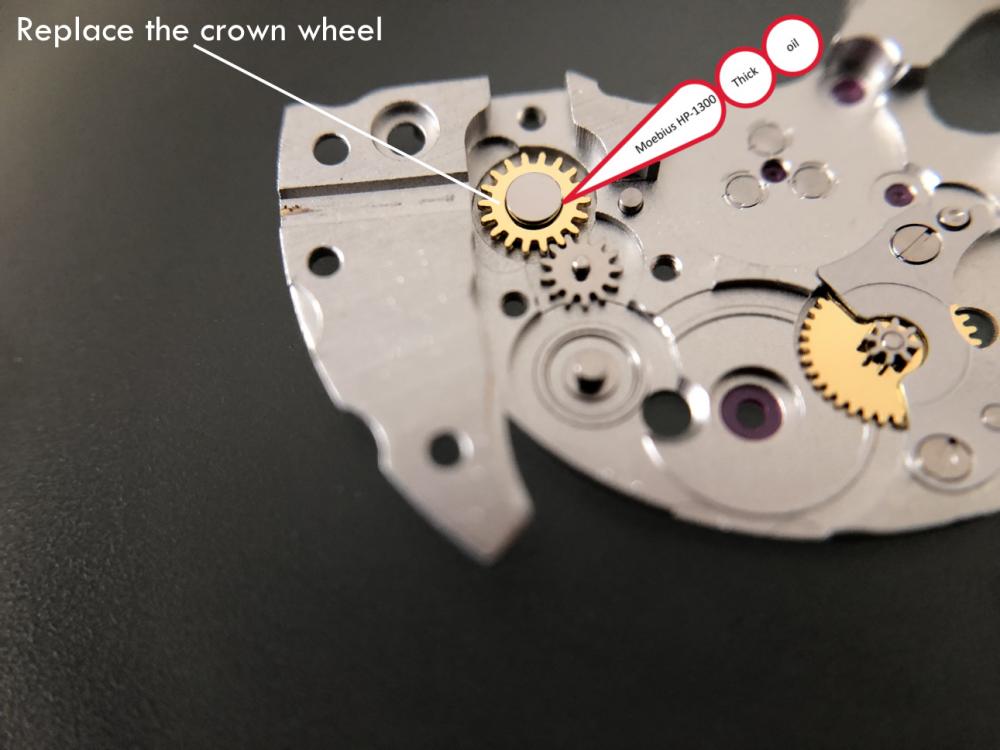
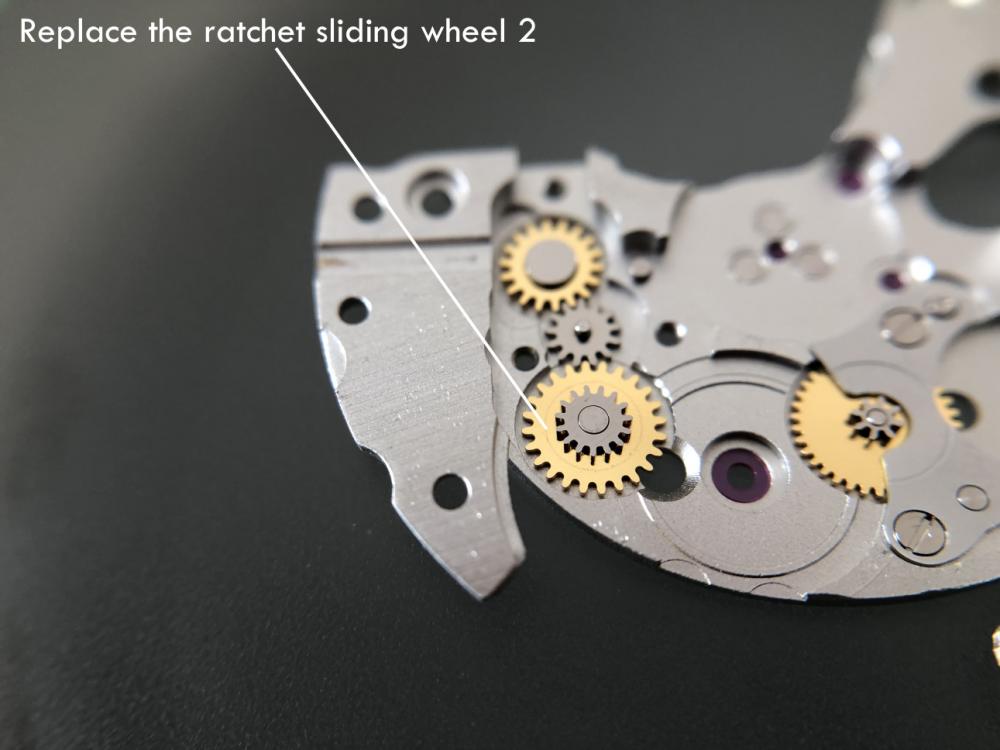

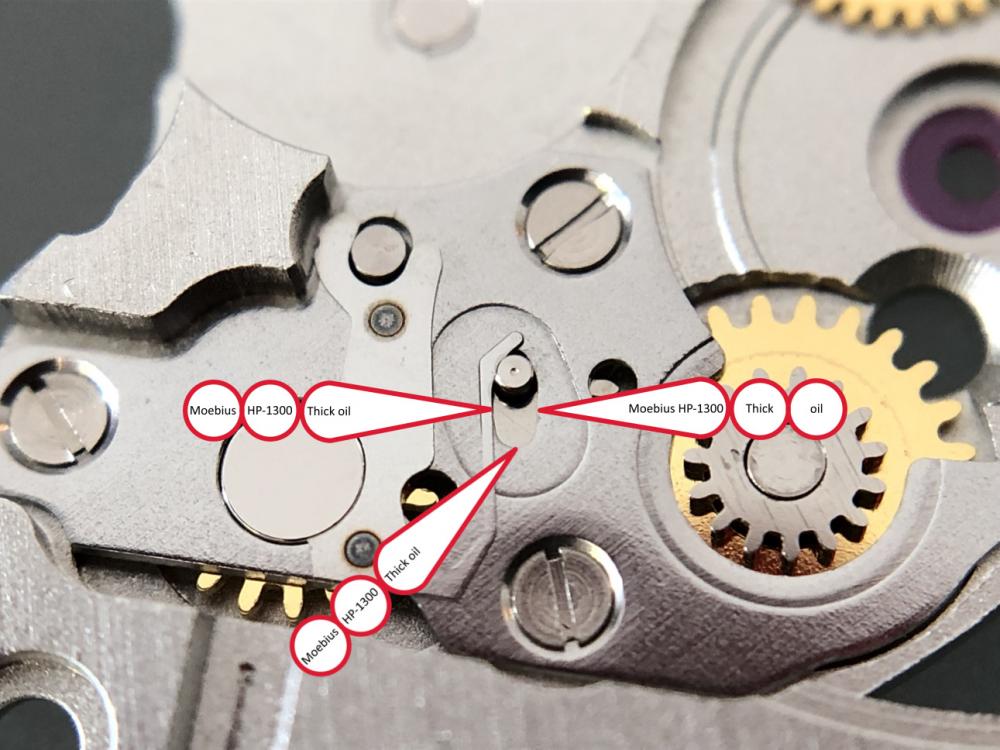

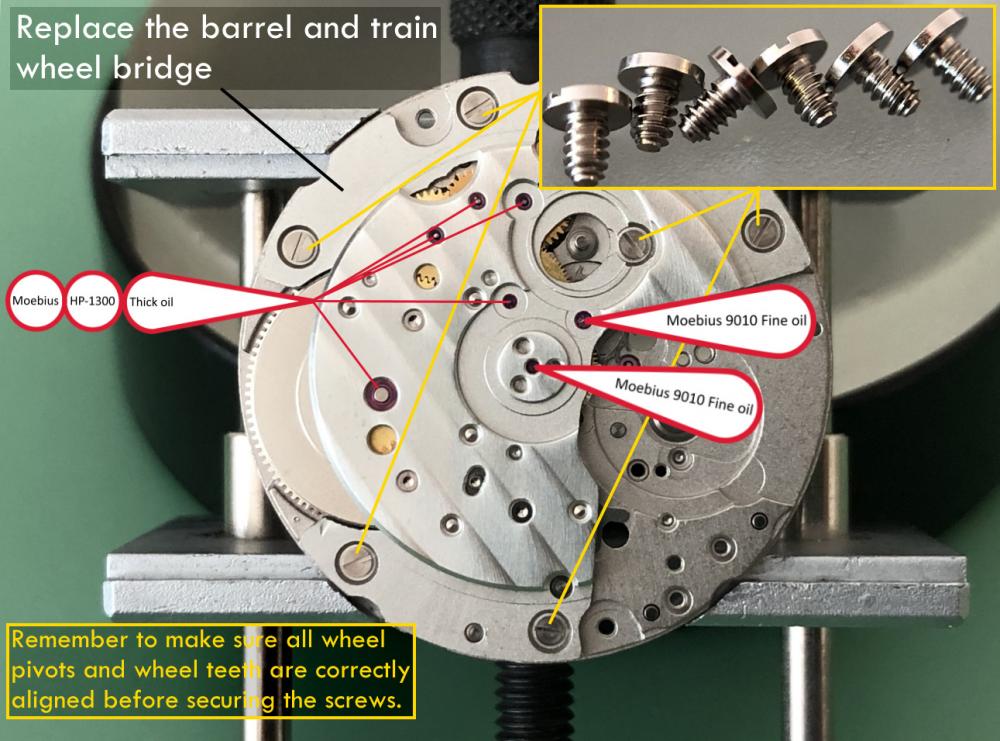


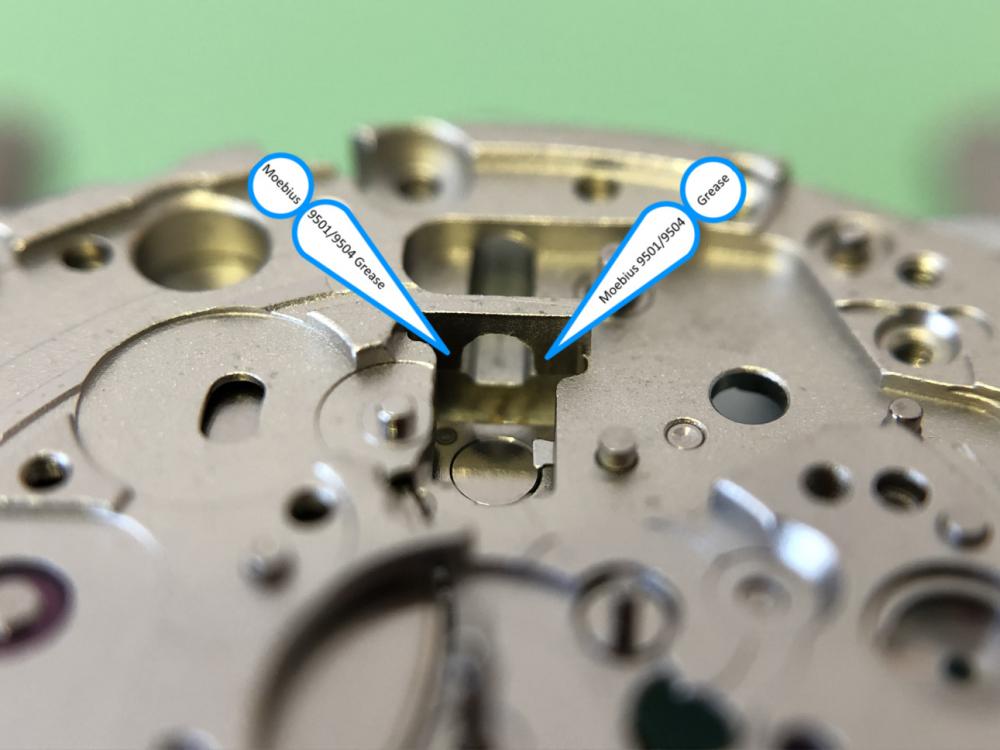

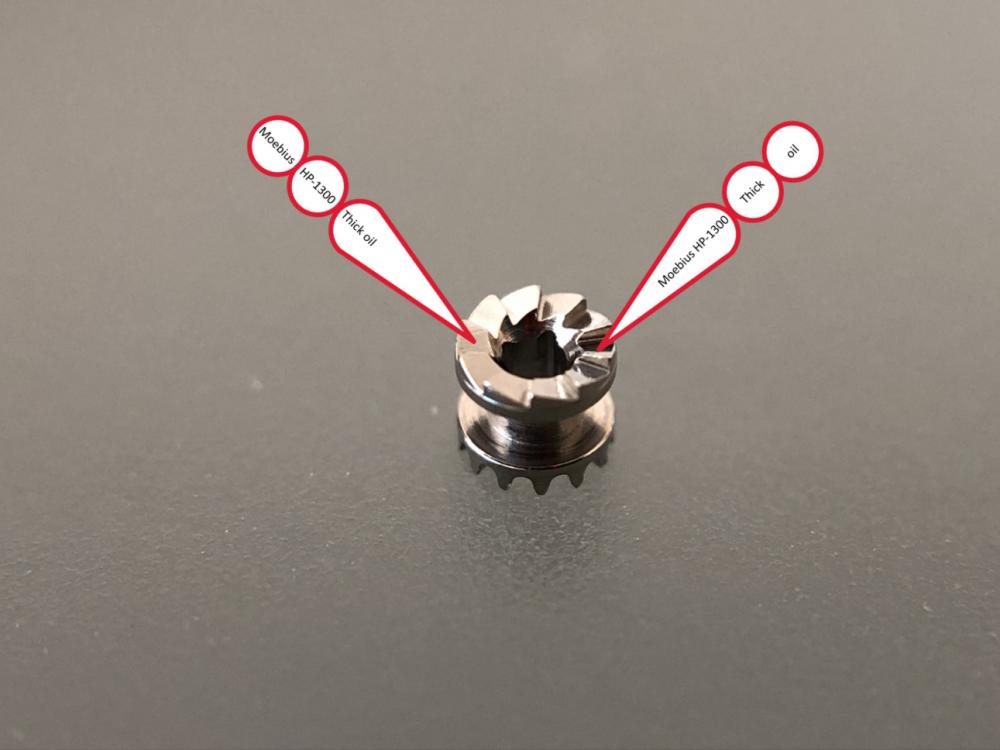

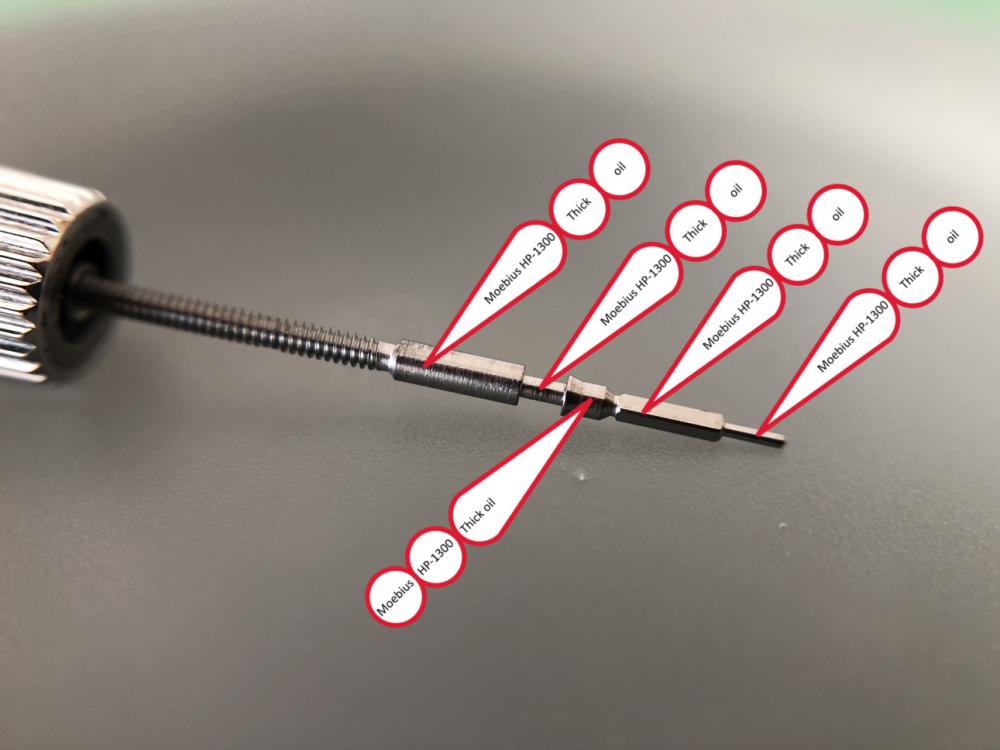
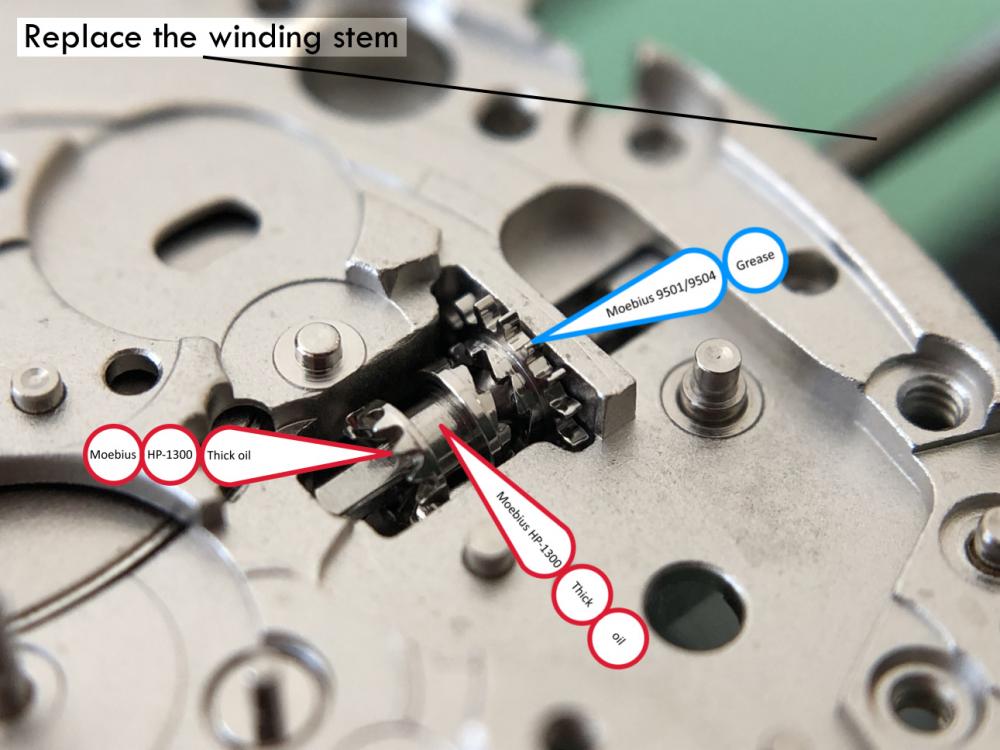
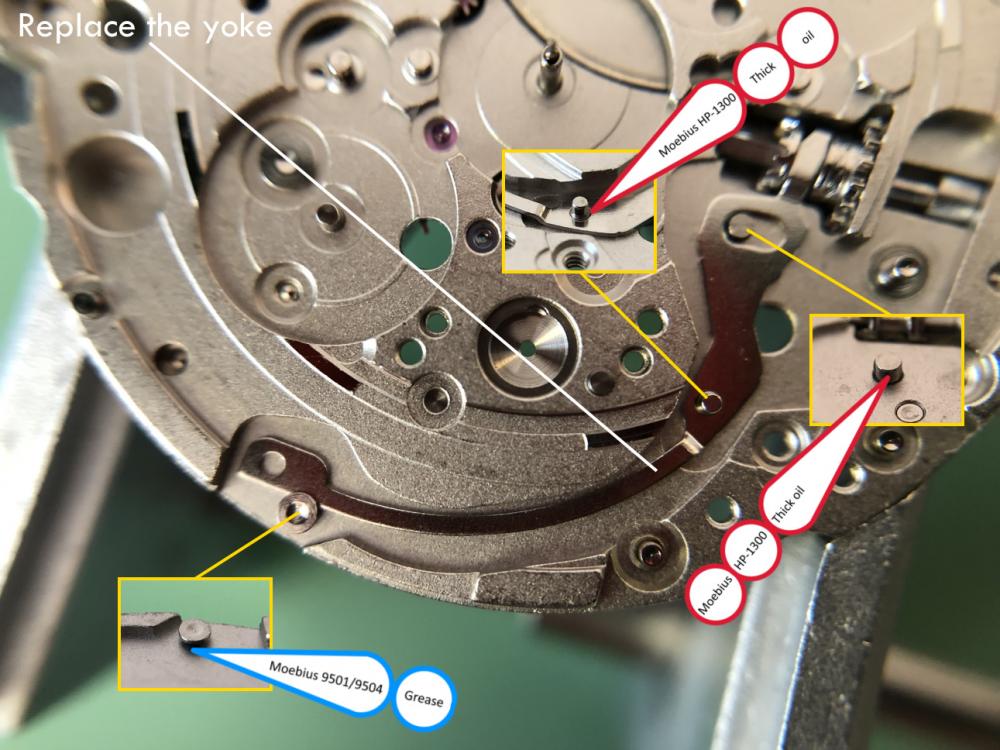
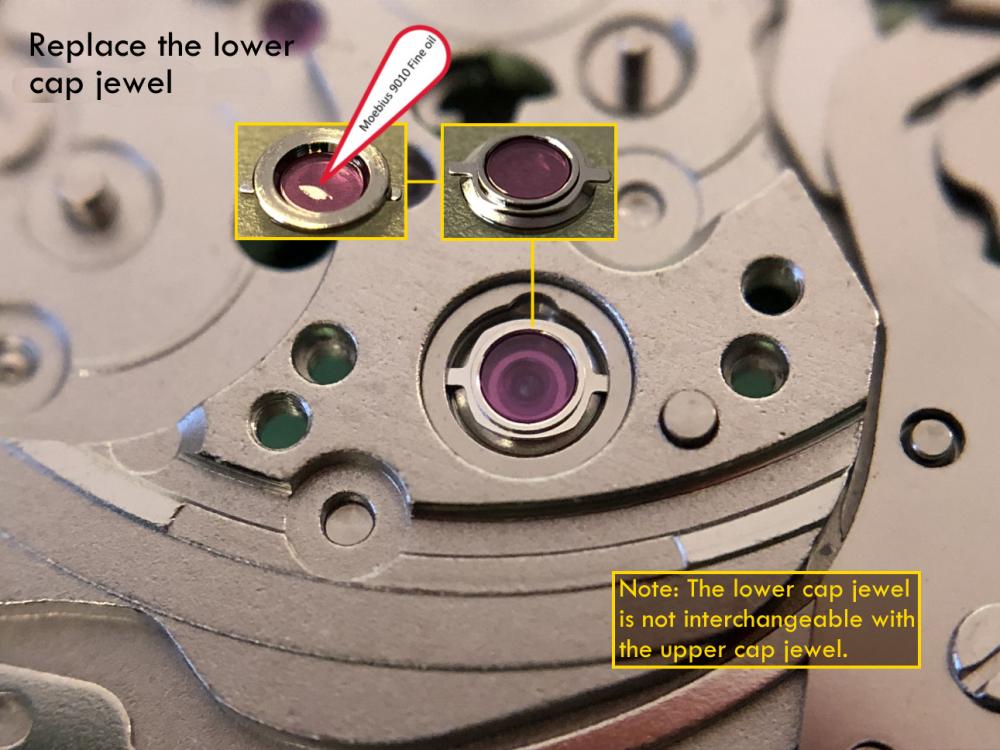
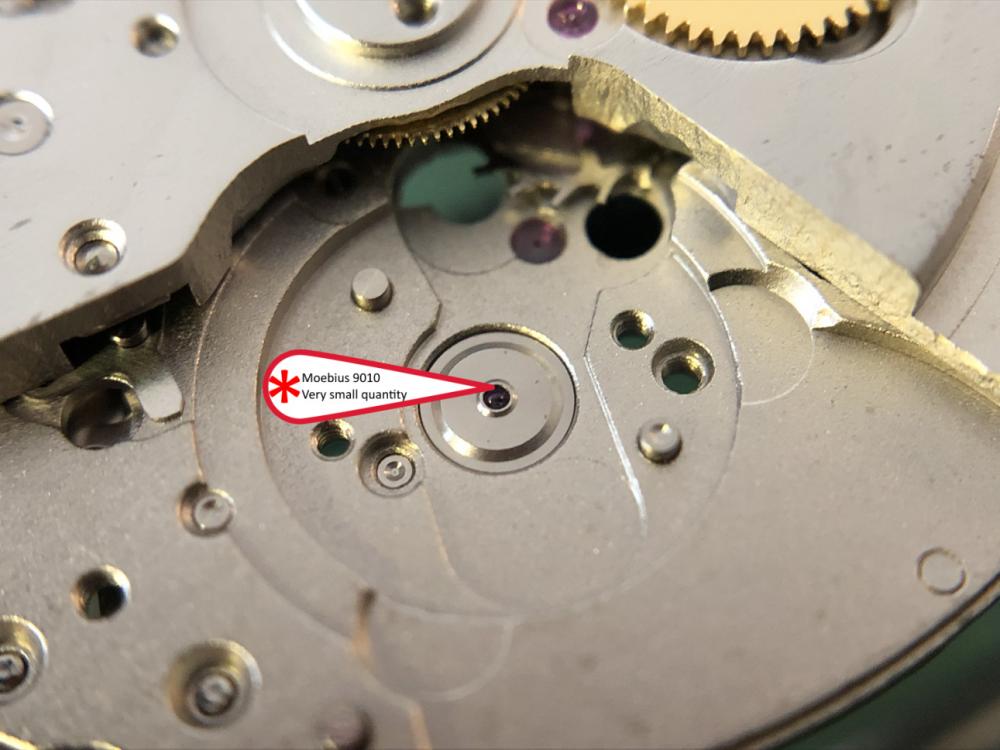
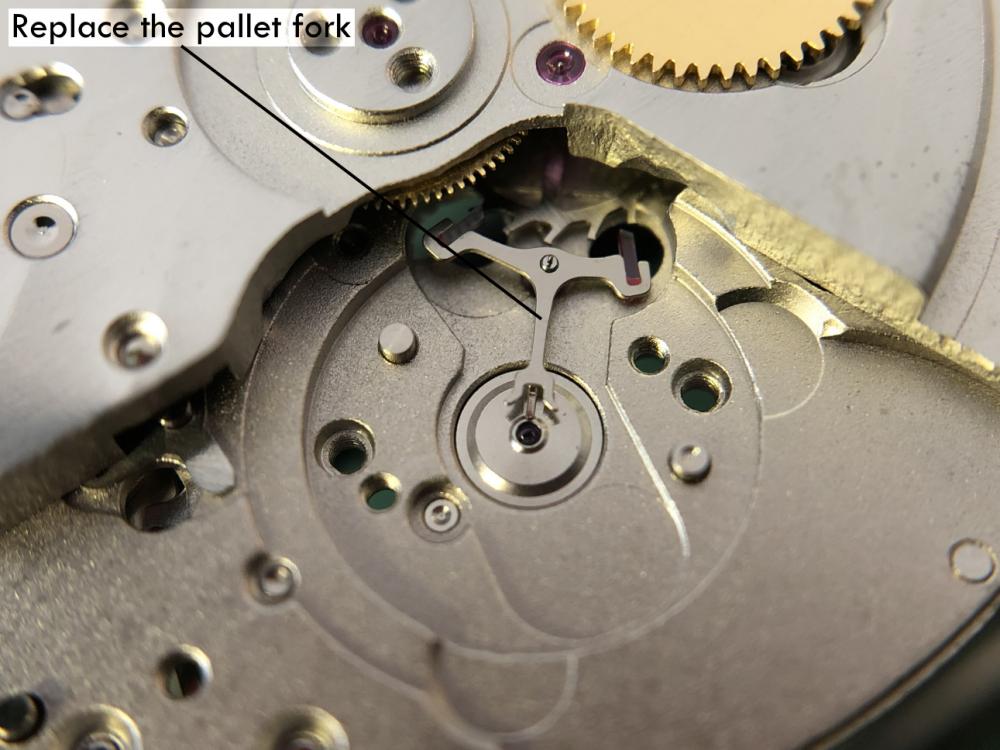
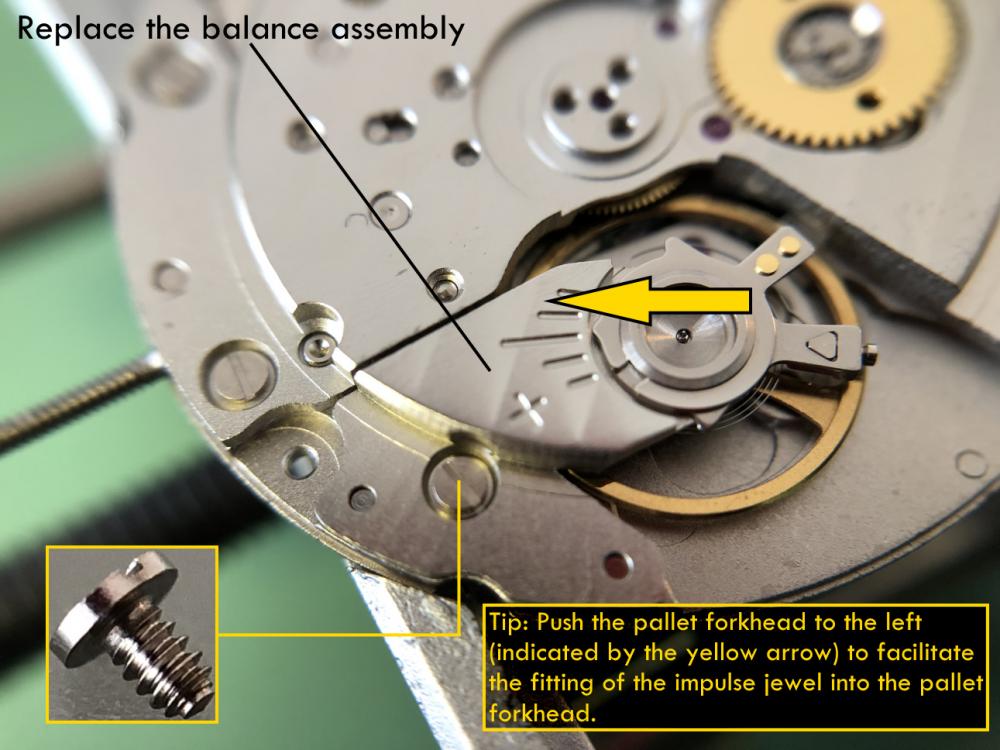
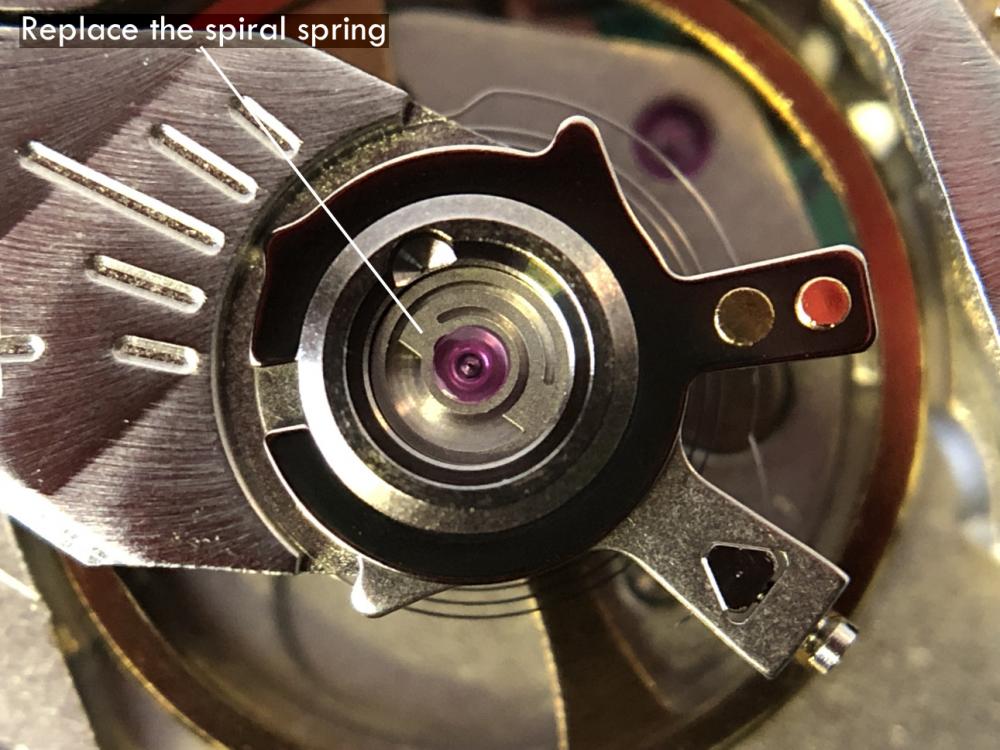


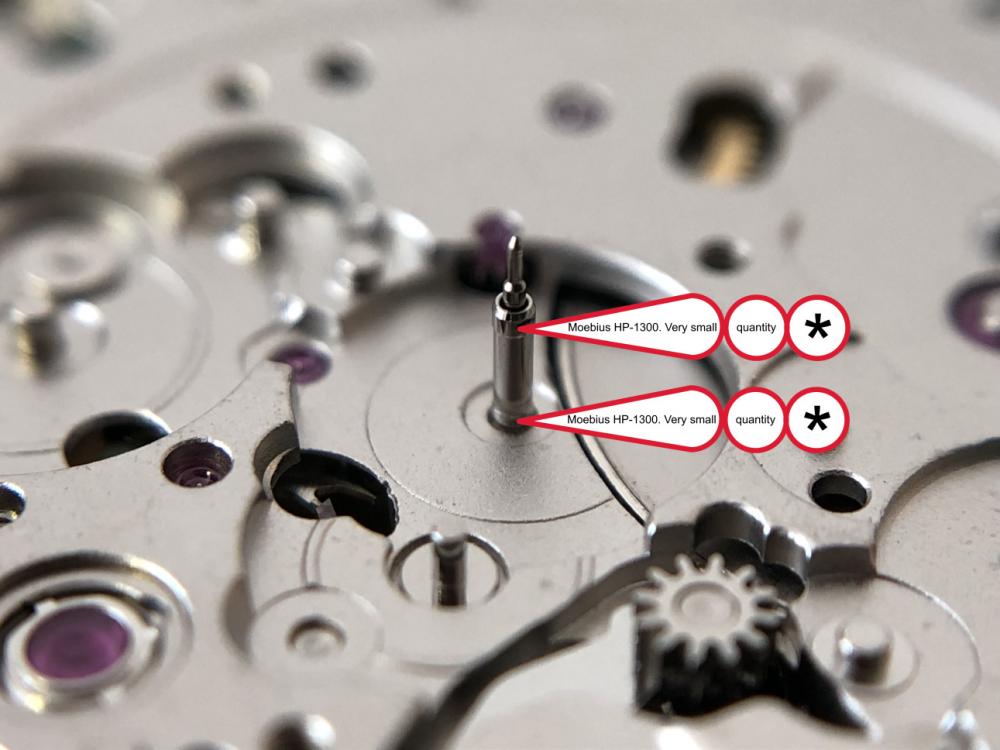
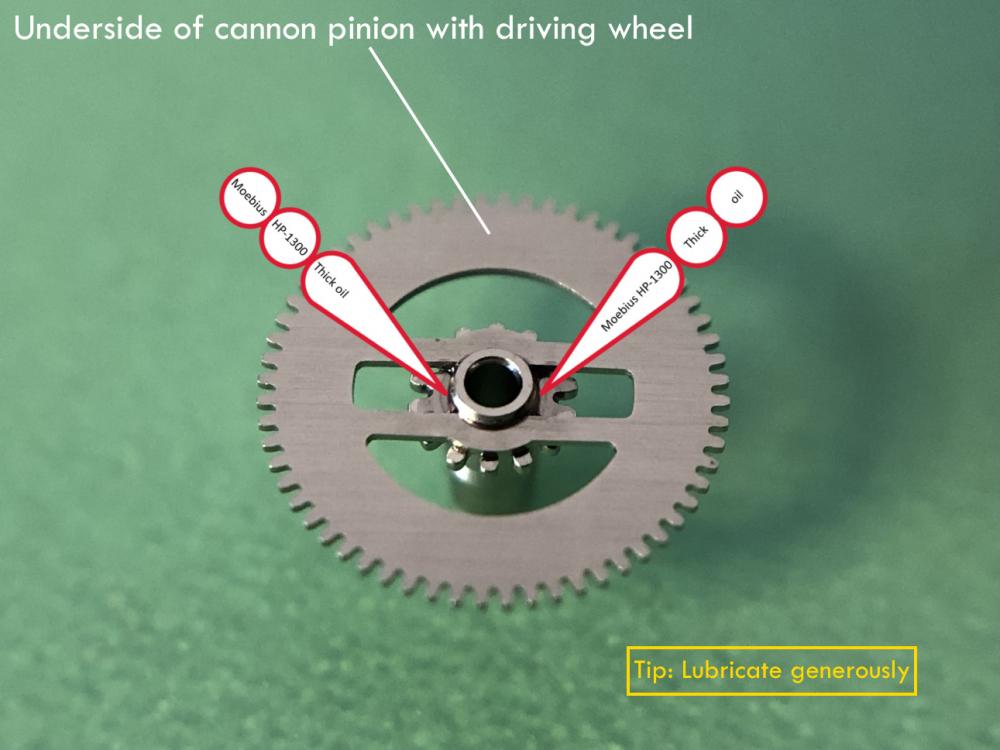

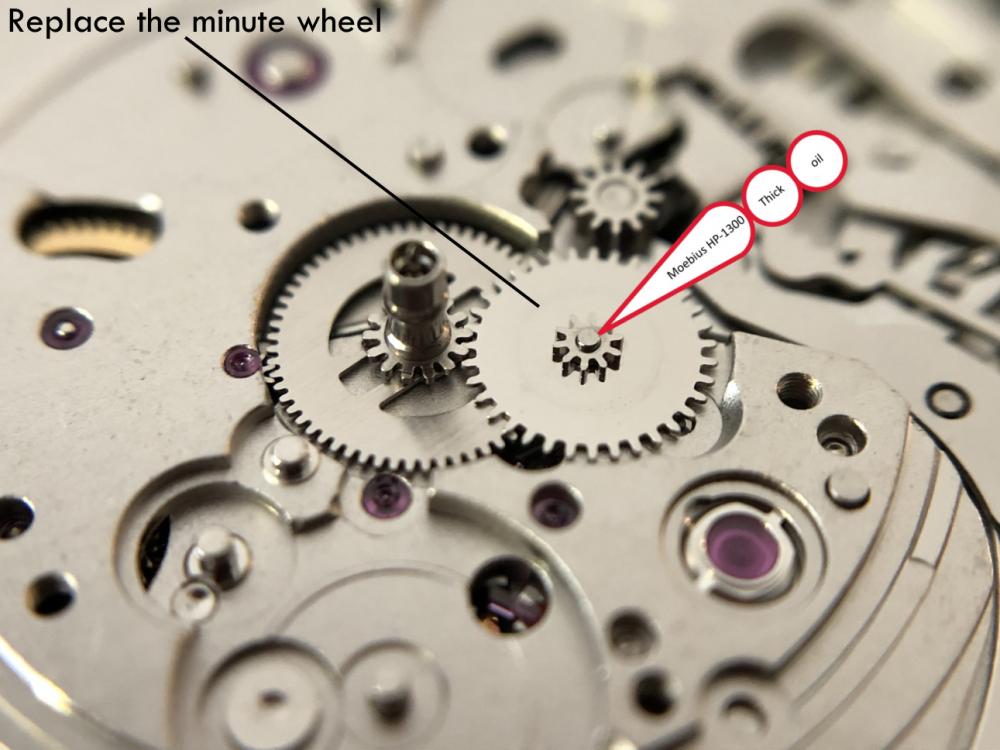


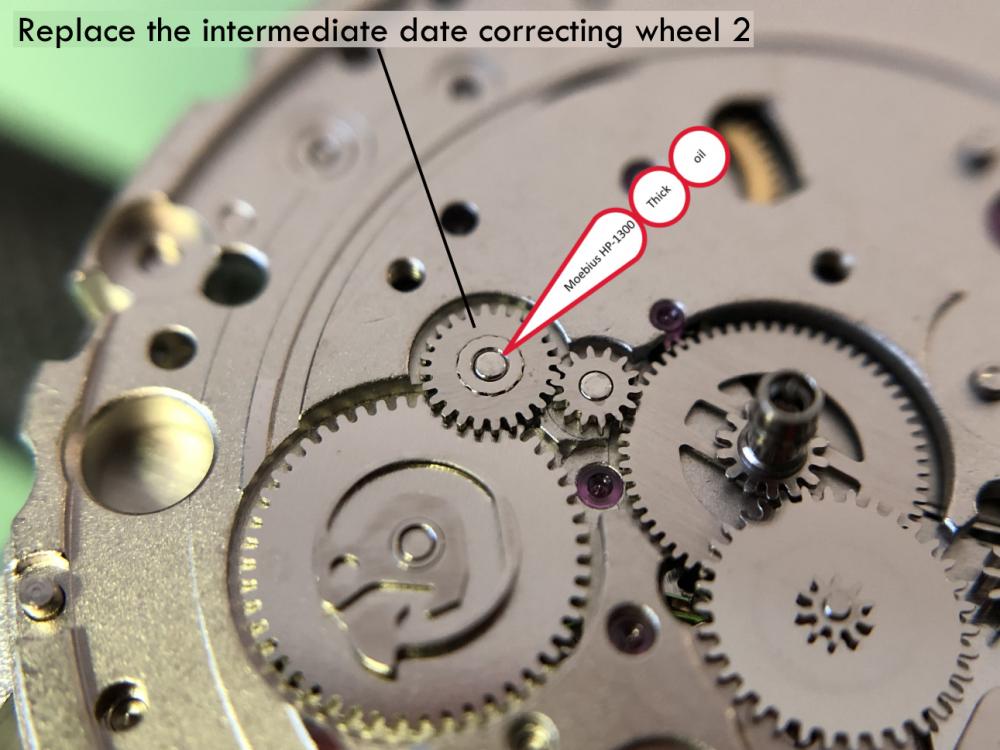

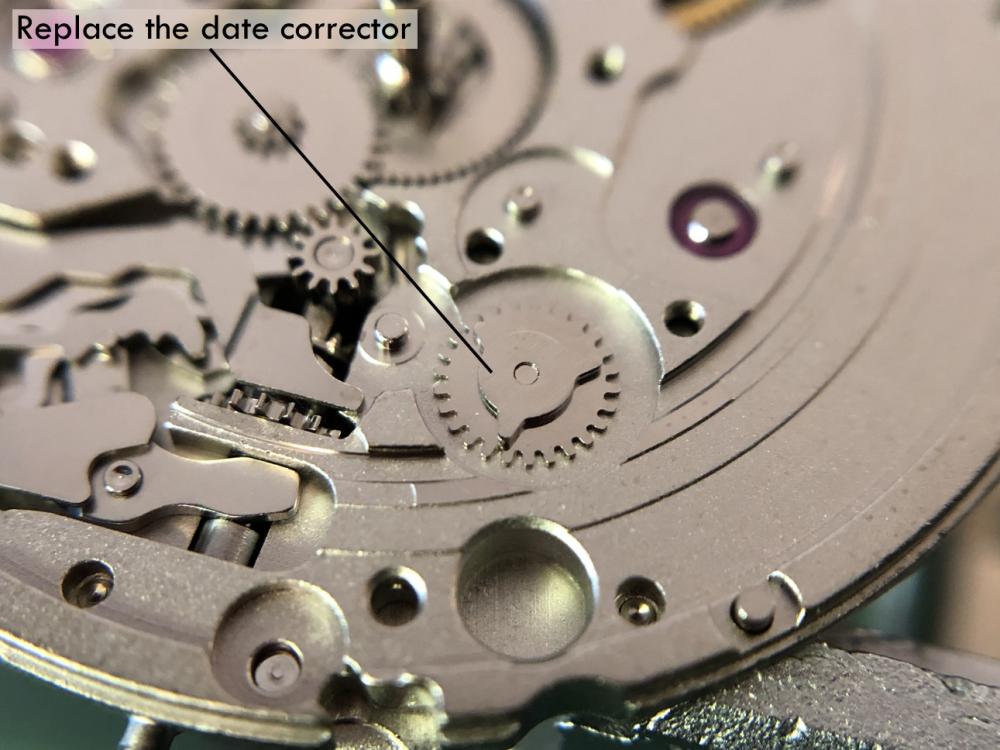

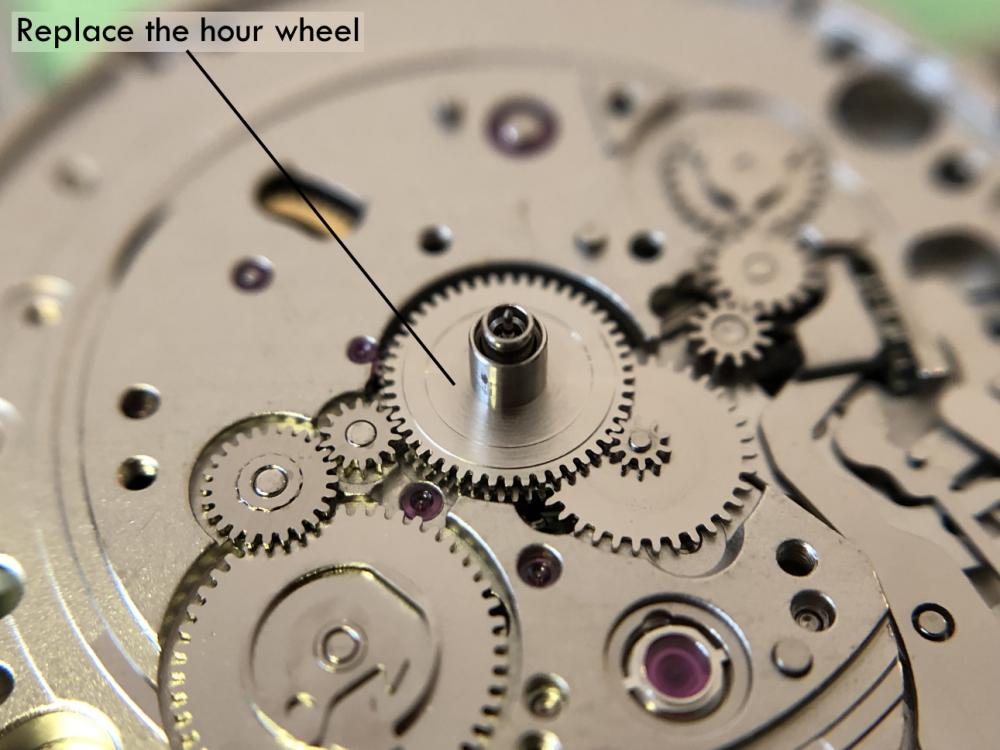
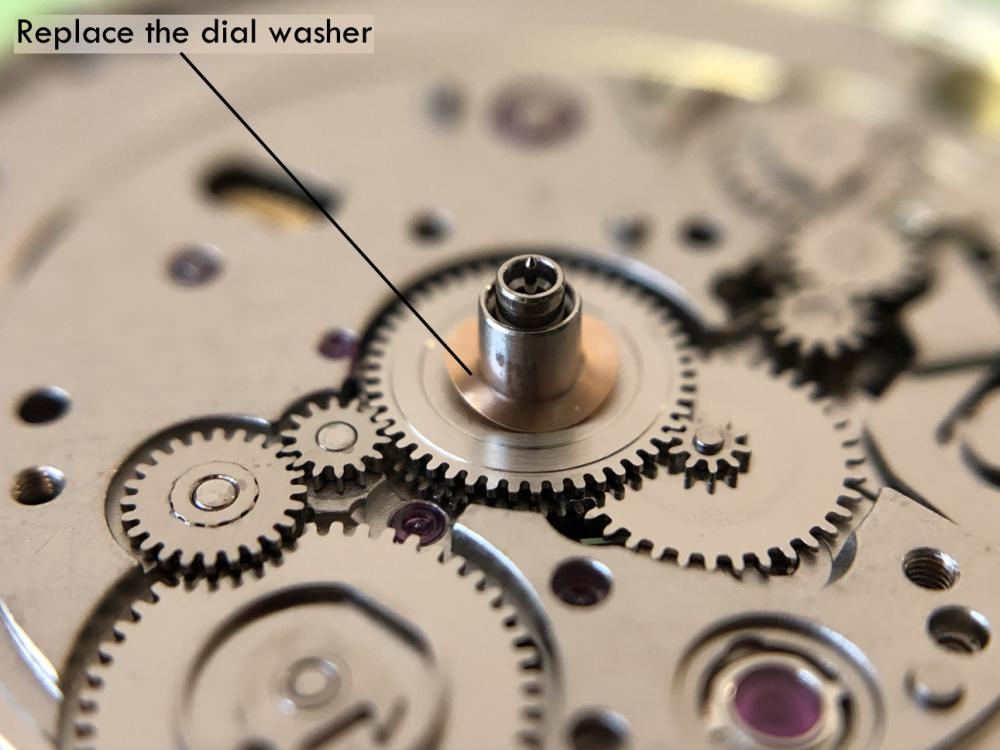
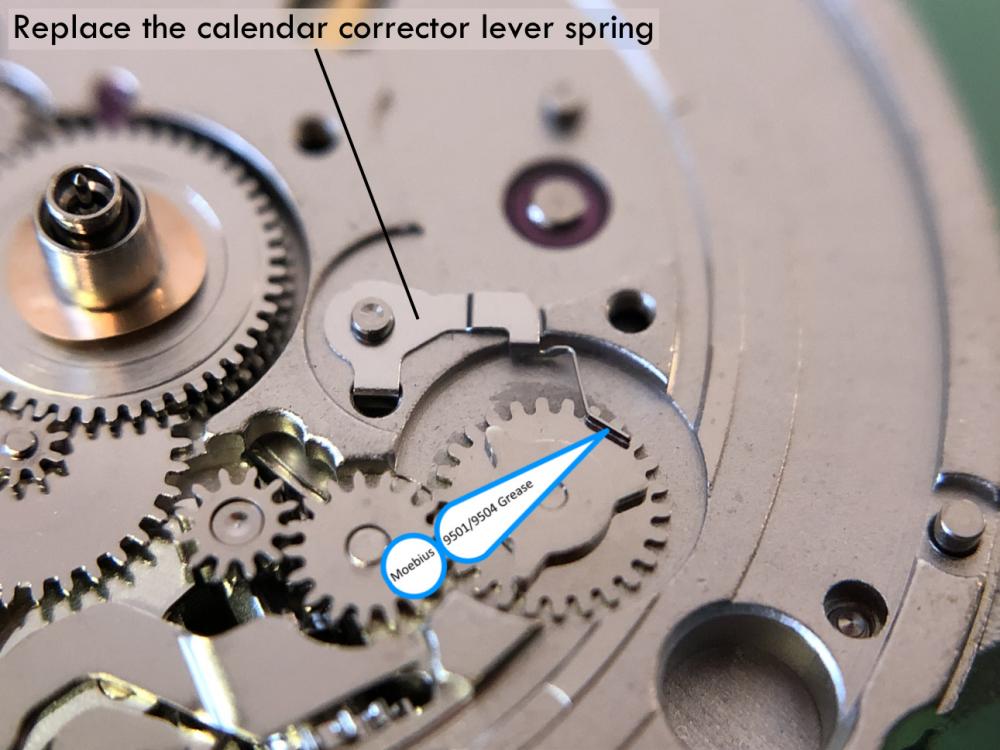
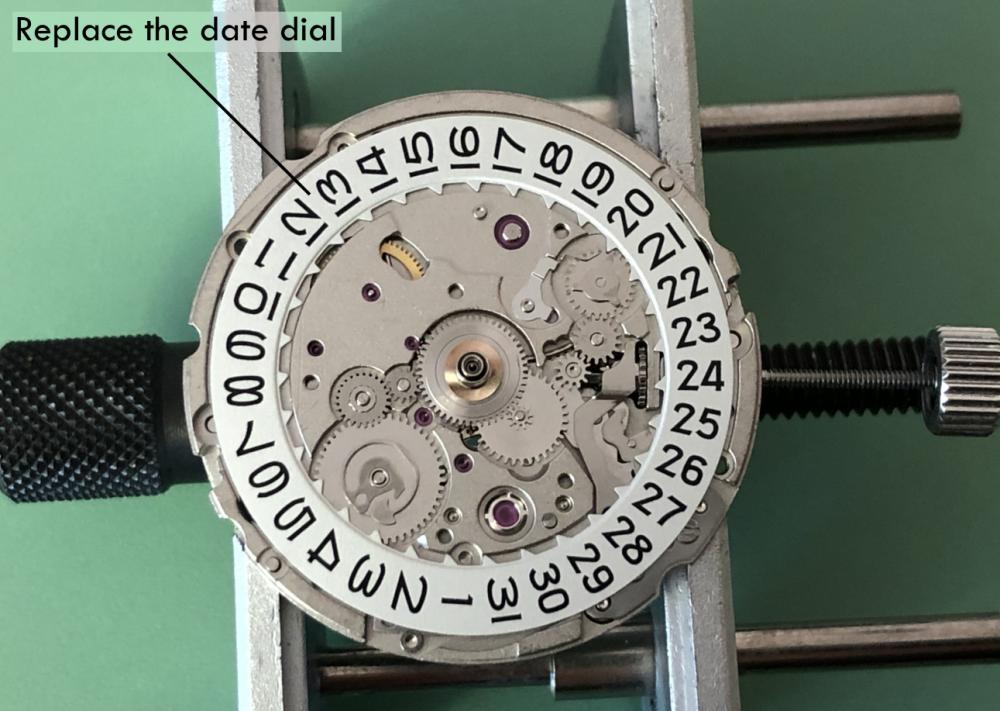


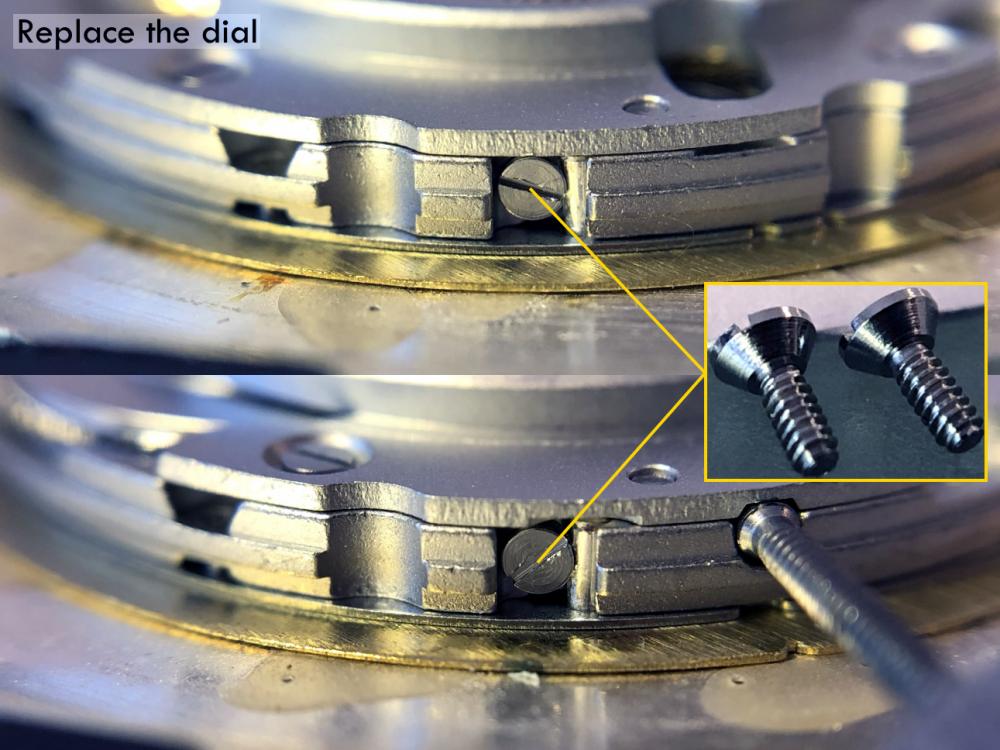

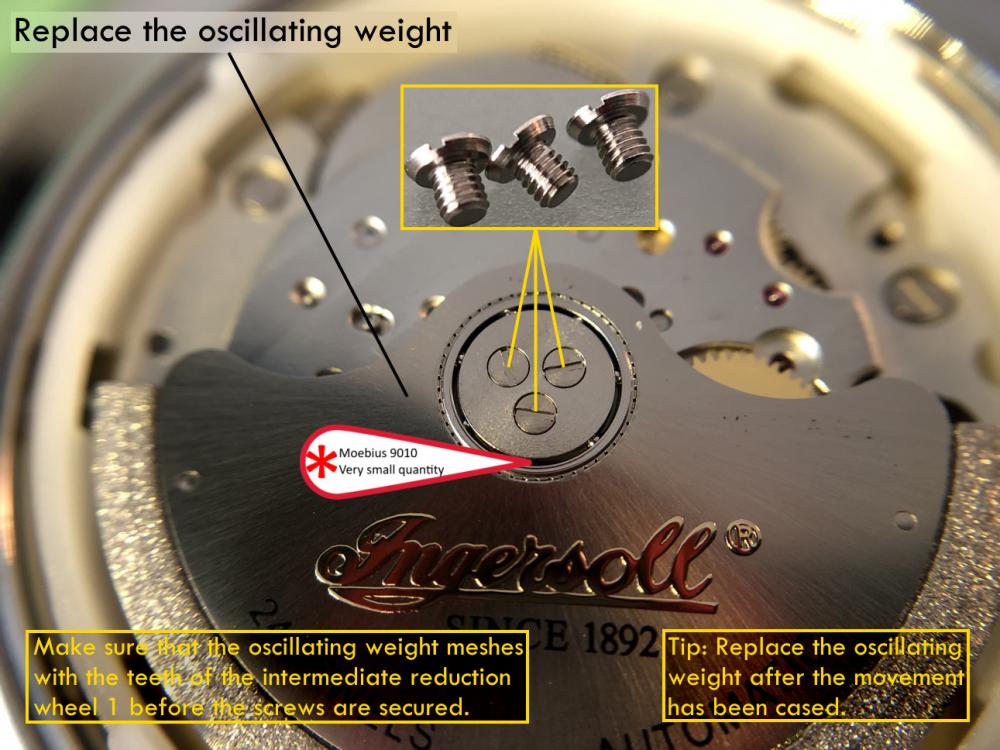
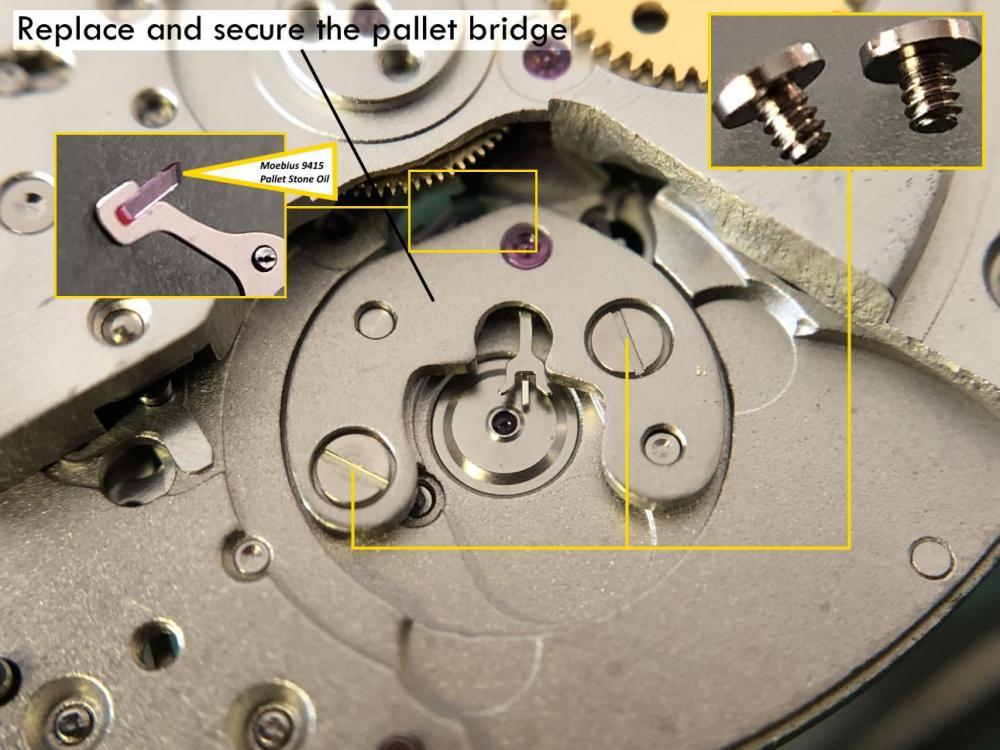 12 points
 -
The Little Watch Shop
 12 points
 -
Hello, everybody. I wanted to share my restoration stories that I have done for a long time and thrown into my archive. First I discussed the Atomic Mars 71 Brand using Valjoux 7734. As it was seen, scratch and dial is broken. To begin with, I tried to brush the Case as Brushed and make it the first day. If it is decorated, I polished and re-painted the indexes (with acrylic paint). I usually do this in three layers so that the paint is not deleted in a short time. I replaced the case buttons and tubes with aftermarket buttons. Since the condition of the dial was in very poor condition, I had it re-painted. The quality is not so good. In Turkey, unfortunately, not doing the job well. Caliber 7734 (Valjoux) is a special and robust mechanism for me. With good maintenance and lubrication, you can reduce deflection values up to 3-4 seconds per day. I added a short timelapse video about it :) As a result, such a result came before us. Thank you Taskin https://www.youtube.com/watch?v=XKH6yTKUfpM


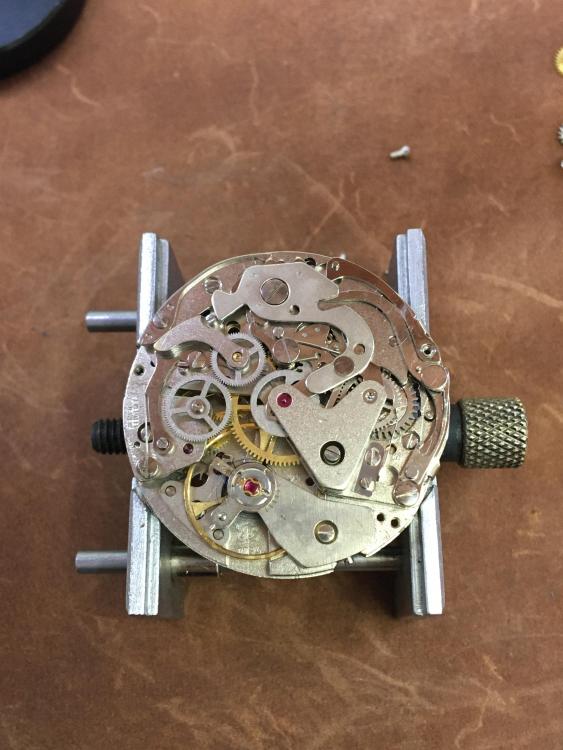
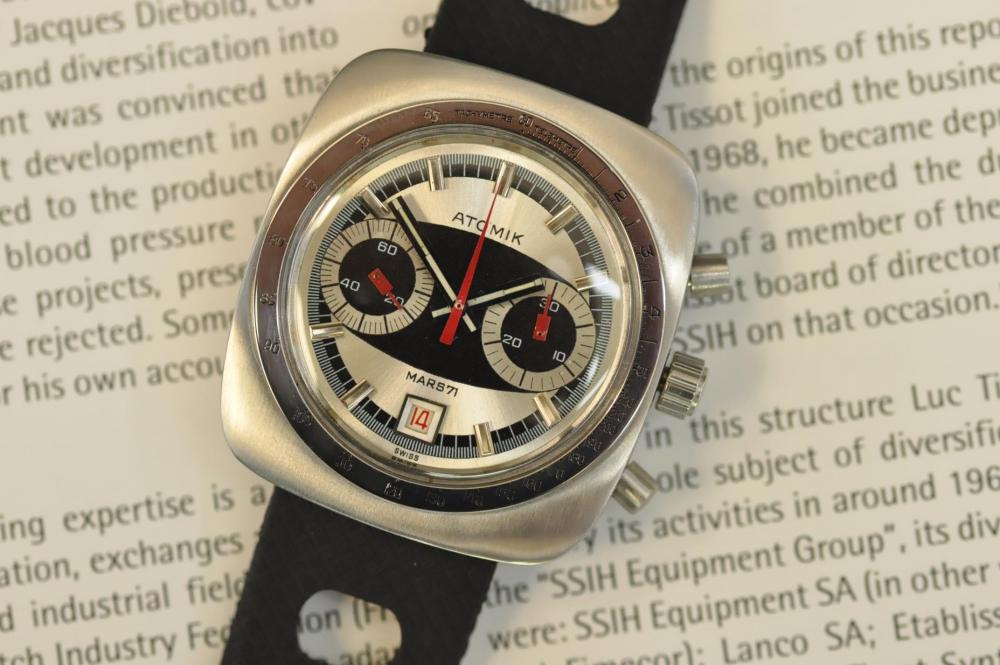

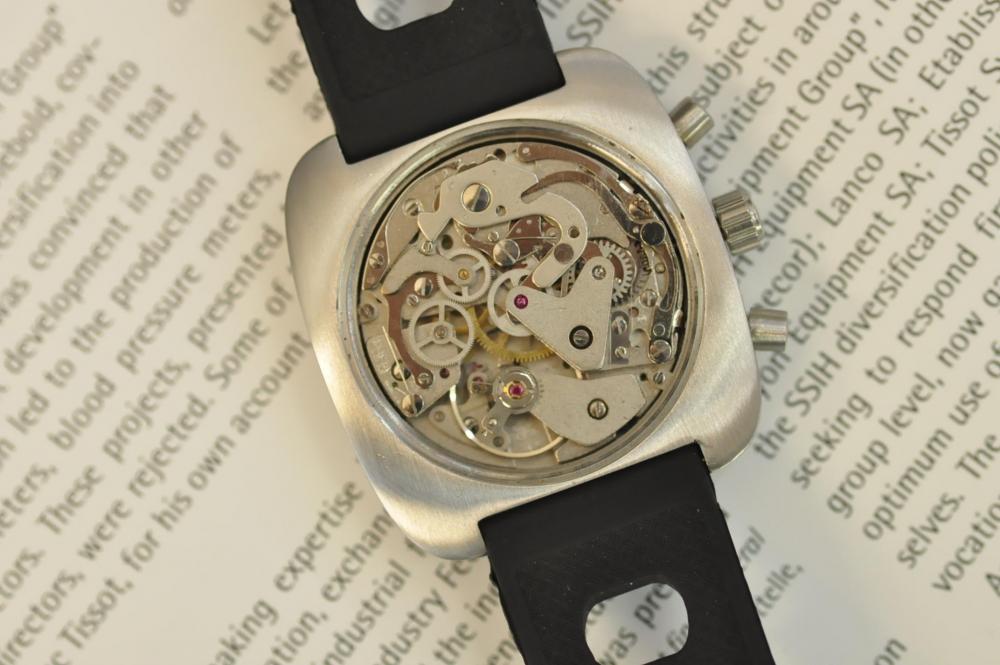
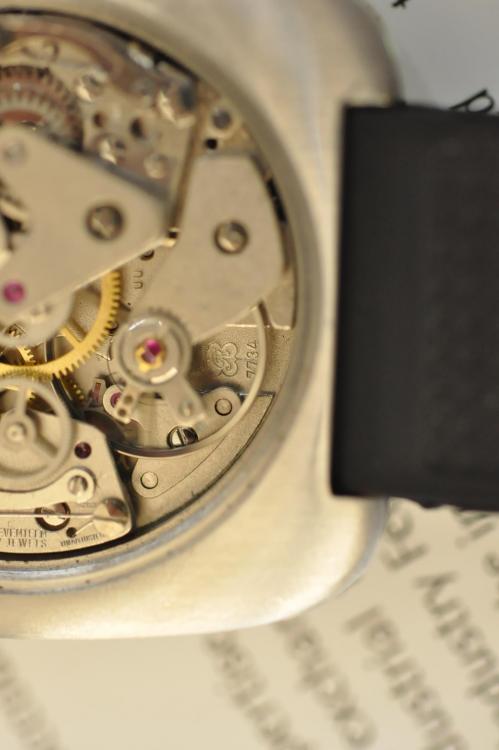
 12 points
 -
Part 3 is a sort of redemption, or at least some lessons learned. The donor arrived about six weeks later (thank you Covid) and I quickly transferred the balance complete. The wavy traces quickly returned. So I stripped the movement again, paying close attention to the barrel arbor bearings. Looking closely, I could see that the barrel had actually been scraping the bottom of the barrel bridge. Manipulating the barrel with the bridge on and the train removed, I could also see that, under torque, the barrel would foul both the bridge and possibly the mainplate. Swapping in the donor movement bridge, the wavy traces continued. The free running of the train was okay with the pallets removed, but, turning my attention to the mainplate barrel arbor bushing, I could see this was slightly out of round. Under torque, the barrel would still hit the bridge. So that was it. I could not close the barrel arbor bearing hole, so after repeated reassemblies and inspections, I became convinced that the original movement was a goner. Thankfully, I had the donor, which I decided to service and install in the watch. In truth, the donor looked to have very little wear - I am unsure what kielbosched it in the first place. I serviced the donor and prepared to install the balance complete. Here tragedy struck again, as it appears that one of the problems in the donor was that the regulator arm was improperly seated in the balance cock, or the pins were just too short. Closing the regulator pins, the hairspring caught the closing arm and became kinked in the terminal curve. Here I finally did Mark's video justice, carefully massaging the hairspring until it was again smooth throughout the curve. A final hurdle: the balance on the donor movement had no endshake - none at all. Having watched Mark's video on unexpected endshake problems, I looked for a shim under the balance cock. Sure enough, Minsk Watch Factory had indeed made a shim under the cock, near the screw, which I had flattened as I had rubbed the tarnished mainplate with pegwood. So I got my screwdriver, and made a painful jab into my newly-cleaned donor movement. Reinstalling the cock, it ran strongly! Hurrah. Here are the results, positive and negative. On the positive, the watch runs strongly and relatively straight in all positions. There is also relatively little positional error (maybe 5-10 seconds a day, but I can live with that). But here's the heartbreaking thing. This donor, this seemingly babied donor with no major signs of wear, has exactly the same problem of wavy traces and variable amplitude as the original movement! It's less pronounced, sure, but it's there - a 15-20 degree variability in amplitude at seemingly random intervals, with the associated wavy lines. A reflection on that below. Battle-ready once again, but not without difficulty. Another charm(?) of the Luch is that the dial does not sit flush with the movement, so you need to be extremely careful when seating the hands to make sure they won't hit the dial. And back on my wrist, at long last. So, a summary. Why should you, an absolute beginner, try to diagnose and fix a battered Russian watch that hasn't been opened since Gorbachev? Well, first, you won't break the bank. These are plentiful, and if you get a plain dial they are cheap as chips. Second, you will use a lot of Mark's lessons. Not just chapter 2, but 3 as well. I watched every single video repeatedly, and tried to apply them all. If not for his video on barrel arbor bearing wear, I would never have found the problem. Last, I practiced a lot - a lot - of skills. I'm still bad, but getting this Luch back on my wrist has made me feel like I'm on the road to being a real watchmaker, whatever that means. And why should you avoid articles like this? One reason: poor, inconsistent build quality. From the shim, to the regulator pins of incorrect length, to the badly-seated dial, it doesn't take a George Daniels to see that these things were absolutely slapped together. This makes them hard to work on and diagnose. And even when you find a good donor that was seemingly retired after only a few years in service, you may find that it has the same fundamental problems as the donor you thought was deeply, unusually defective. So just live with it, and know when good is good enough. Don't make perfect the enemy of the acceptable, because they sure didn't when they built these things in the first place. So that's it. If you're exceptionally patient or you didn't have anything better to do tonight, thanks for reading this far. And thanks to the people on this forum for helping me out with this project - I am very glad I joined. Cheers!
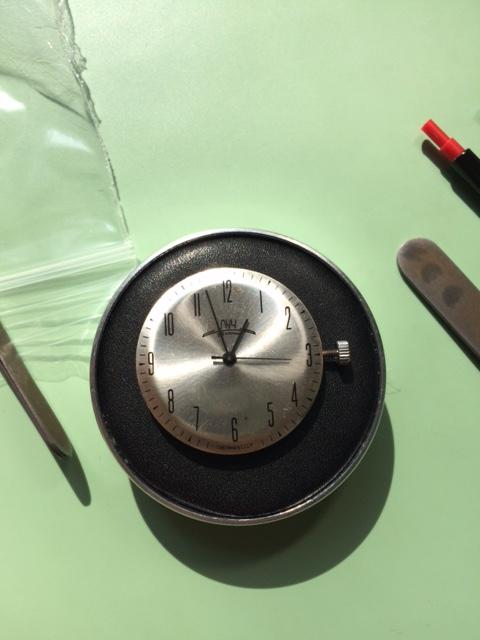
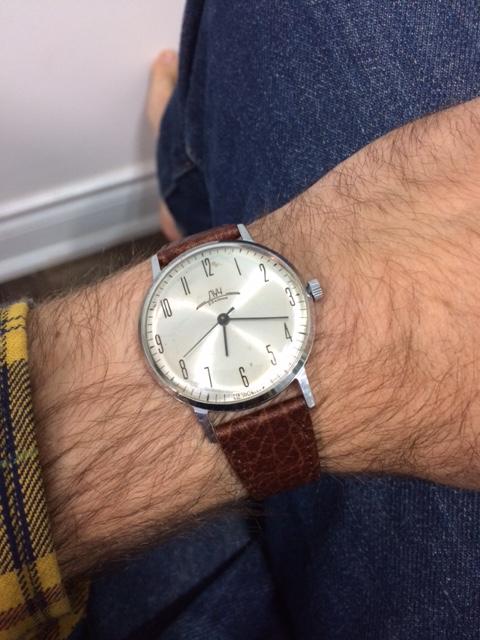
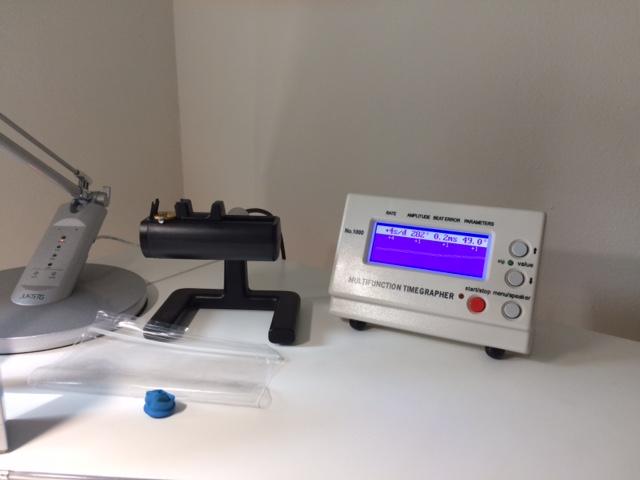 12 points
 -
I could not find a single video on how to wind a mainspring back into the barrel after cleaning. I purchased a three set tool and figured it out myself and then made a video for others to learn. Thanks Sent from my iPhone using Tapatalk12 points
-
So it's been a few months since I posted here...but I've been regularly checking in. Hi Mark and Geo! So as a few of you know, I have a hobby of building watches. The one thing I hated was relying on some of the very few companies that actually print dials. Here is the USA there are only a handful that do this type of work! I was lucky enough to find an antique dial printing machine on eBay. It was just a vessel to move the dial from printing plate to paint application. I found a willing company to "Fill in the Blanks!" I won't name them here because I don't want to seem like I'm Selling this company! Anyway, they were a very big help when it came to me having questions. The sales, engineering and billing staff were first rate! They helped me pick the proper printing pads, helping me design and then produce my printing plates and then help me choose the proper ink and also recommended how to prepare the inks, pads and thinners to get the best results! So, here I am....First try at printing a dial.... I designed the dial myself using a free online software. The dial is printed in 3 stages. The first step was printing the hour chapter. Then, the second step was to print the sub seconds chapter. Lastly, I printed the name of the manufacturer that I will be using for this build. This was more of a proof of concept to me...Now, I can't wait to try new designs and styles! And, Now I have more control of what I build! That's very important to me...Cheers!
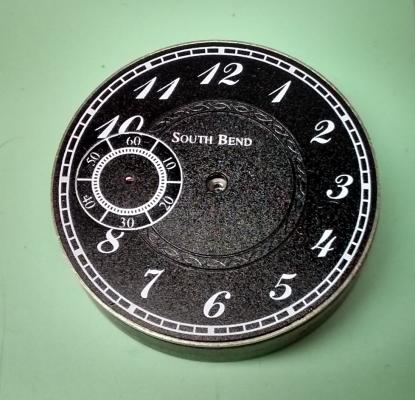 12 points
 -
Seiko 7S26A Complete Service Background I have a good friend, a brother in Christ Jesus, who I've known for many years. He knows I've embarked on retraining myself for a new career in Watchmaking, and seen my first two restored watches. He told me that his old faithful Seiko 5, which he's worn everyday for 12 years, has recently had issues. Occasionally it will advance rapidly in time (up to an hour in a few seconds) and then just keep ticking away normally. I told him I'd be happy to take a look at it, and put it on my ACEtimer Timegrapher. The pattern on the screen looked like a B-52 drop in Nam (stupid me forgot to take a photo), and I told him that his watch definitely needed an inspection and service. So started my research on what the problem might be. After reading a "Practical Watchmaking", and the many forums that I've read, I was pretty sure it was the Pallet Fork ... either very dirty or damaged stones, or a broken/damaged fork pivot. So onward to the service... Disassembly One unusual aspect of this watch is the crown ... or lack there of, more to the point. I suppose since this is an automatic watch, they thought it didn't need to be wound. This watch also has a display back, so extra special care not to mark any of the plates, or damage screw heads! The first issue you'll face when working on a 7S26A Movement, is how to get the stem out! It isn't obvious at all, and there is a little trick. The crown needs to be pushed all the way in to expose the push plate (it is hidden in the other crown positions). I took this photo once the movement was out to best illustrate where to push. Remove the Hands, Dial and Oscillating Weight (2.0mm Screwdriver). Gently lever up one end of the circlip and carefully work your way around. You then should be able to raise the circlip up the length of the shaft without it pinging off. Remove the Day Wheel and the four screws holding the Date Dial Guard. (Use a 1.40mm Screwdriver, and this driver is good of all the screws from now on; bar one.) NOTE ORANGE ARROW: Seiko Special Tool needed for the 0.98mm Philipshead Screw (Part Number: S-921) I had to journey down to my nearest Seiko Distributor and grab one ... cost was AU$24.00 Here's a closer look at the troublesome screw. Remove Date Jumper, and note that the Date Drivewheel lips over the top of the plate. Remove all the motion work, and pull the Cannon Pinion Remove the tension from the Mainspring. Remove the Ratchet Wheel and the Second Reduction Wheel and Pinion. (remember the Reduction Wheel has a reverse thread) Unscrew the Balance Cock and remove the Balance. Also unscrew the Pellet Cock and remove the Pellet Fork. BINGO! Found the problem with my friends watch. The top pivot on the fork is broken. Easy fix with a replacement fork :) Remove the Barrel/Train Wheel Bridge Remove the Click, then the Barrel. Remove the Fourth Wheel, Third Wheel and Escapement. Unscrew the Centre Wheel Bridge and remove the Centre Wheel Now to the Keyless Work. Remove the Setting Lever Spring Remove the Yoke and the Setting Lever Pull the Stem out, and the Clutch and Intermediate Wheel will fall away. Lastly, pull the black plastic location ring off. ... and now it's bath time!!! I hope this has been of help to you guys. I'll post the Assembly steps in this thread tomorrow morning.
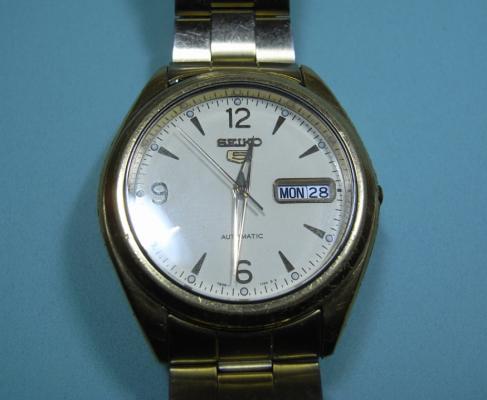
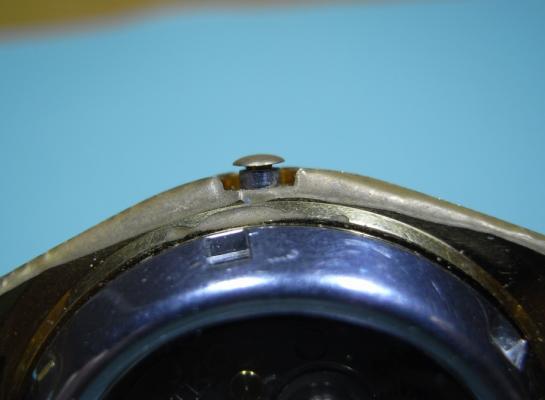
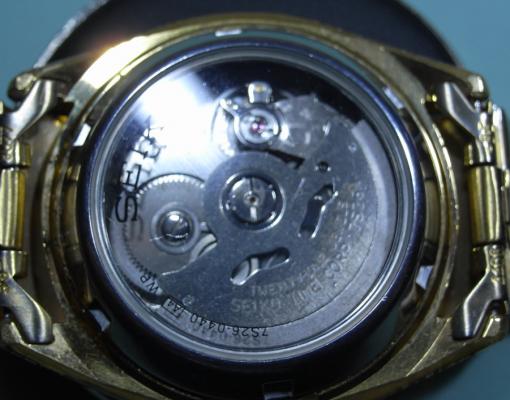
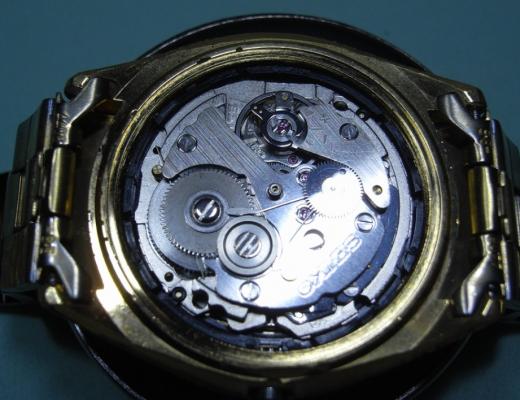
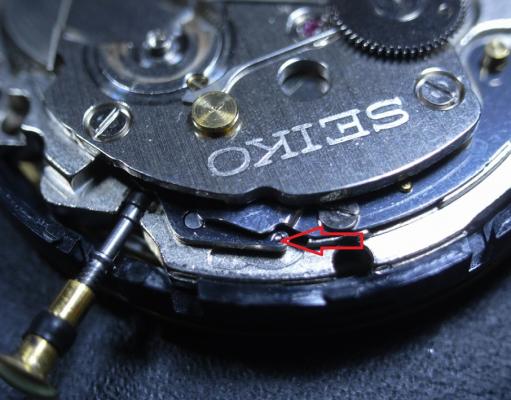
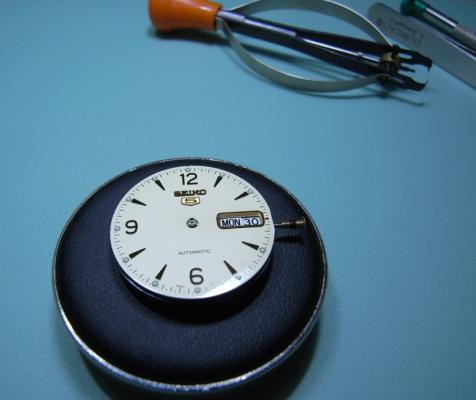
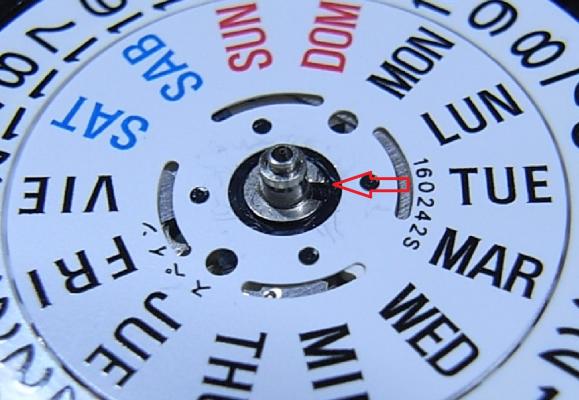
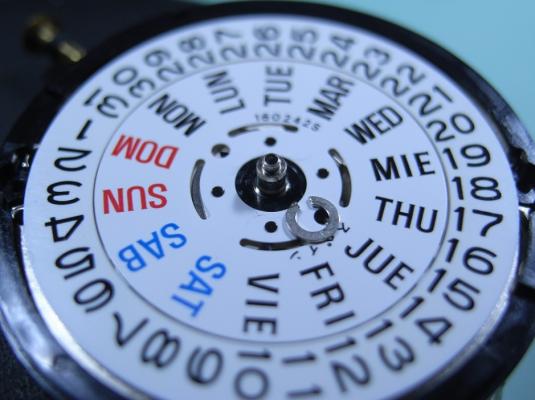


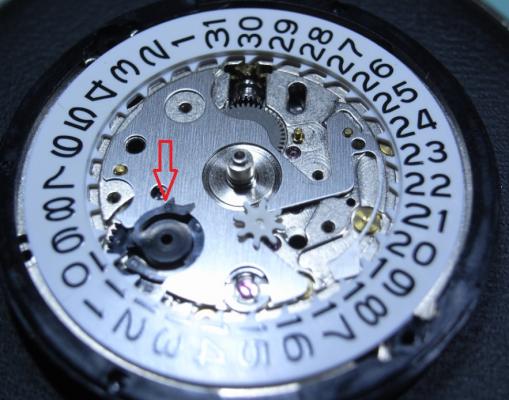


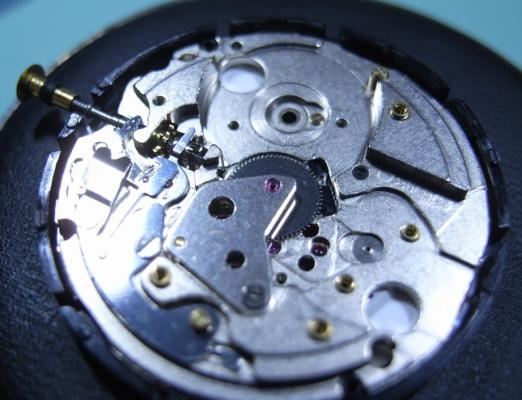
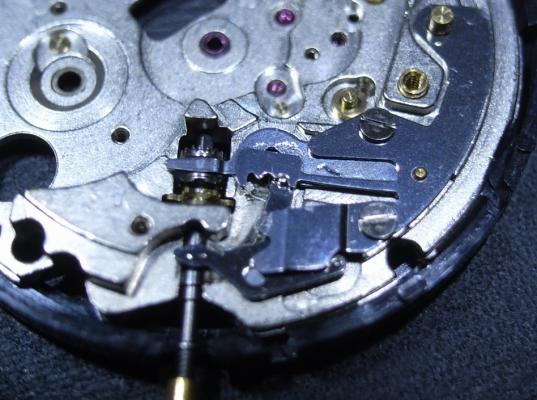


 12 points


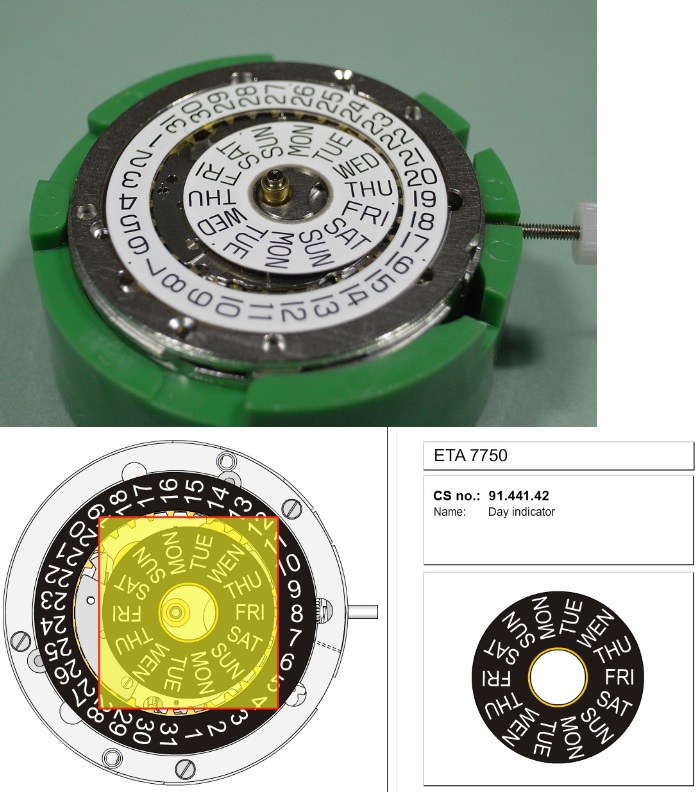
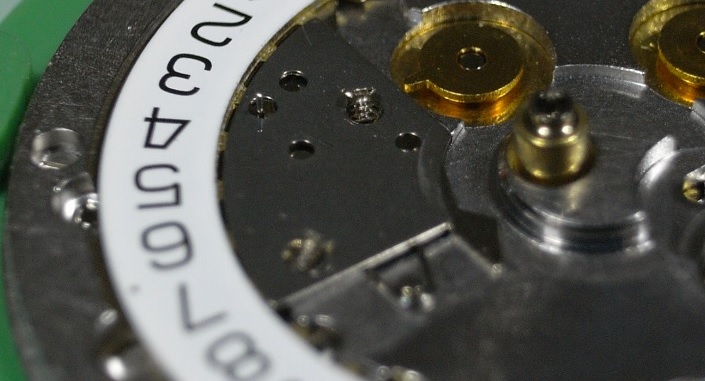

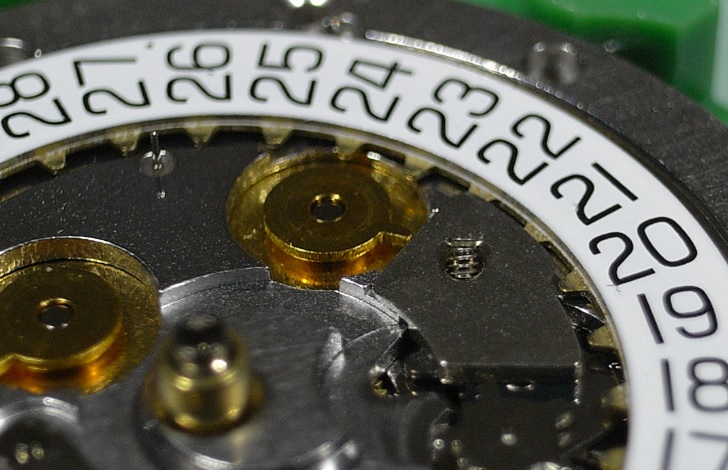


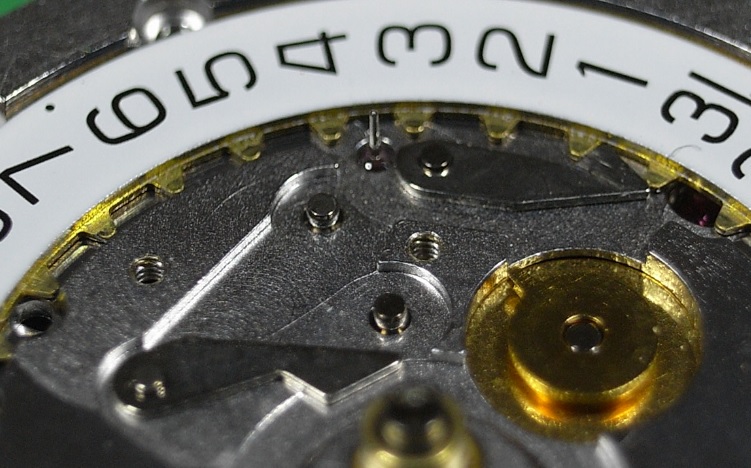
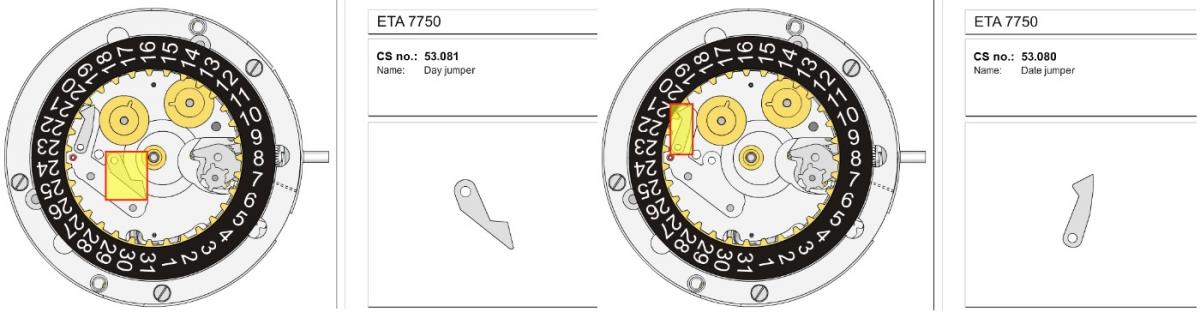
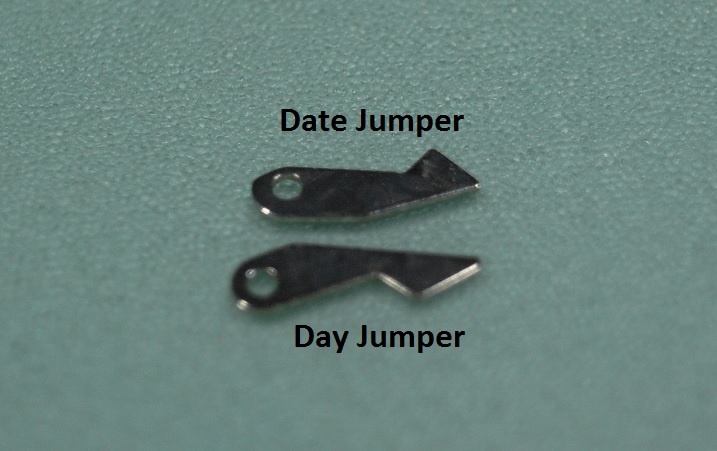


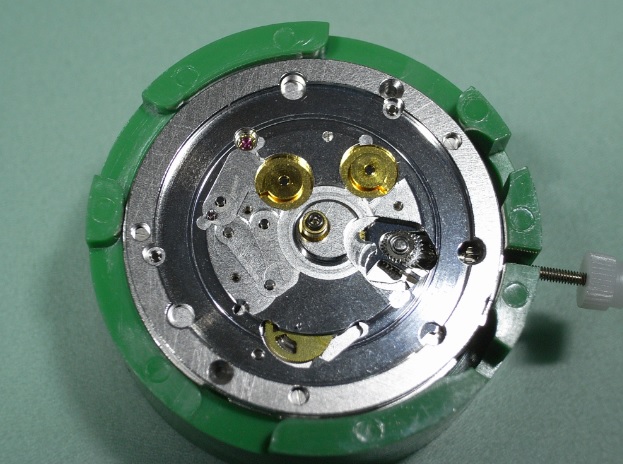
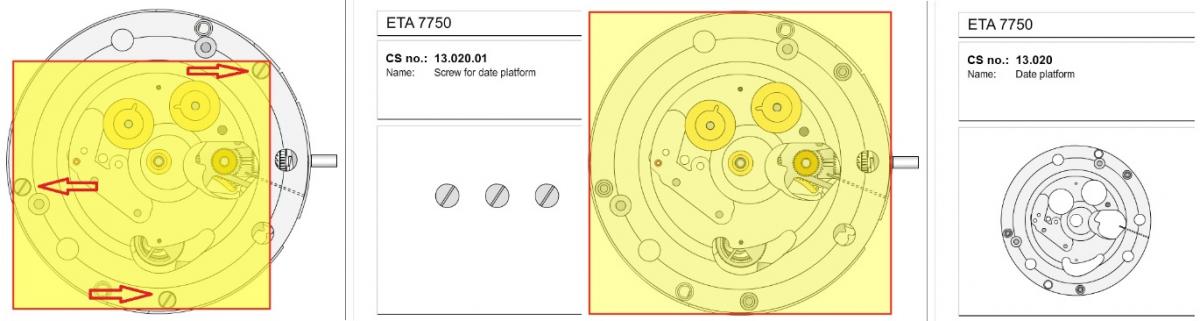
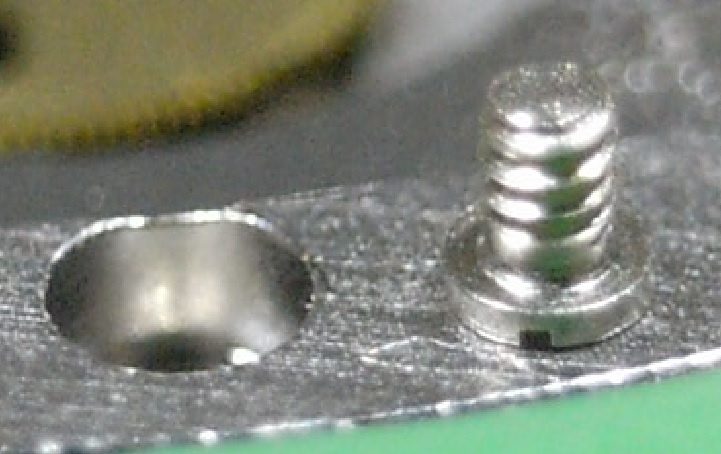
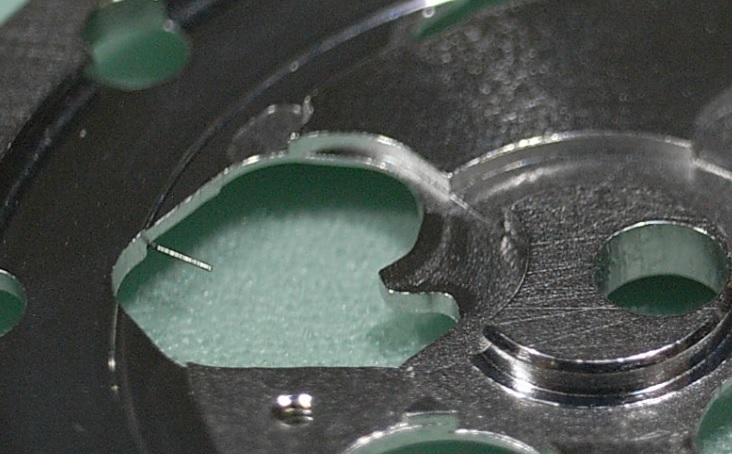
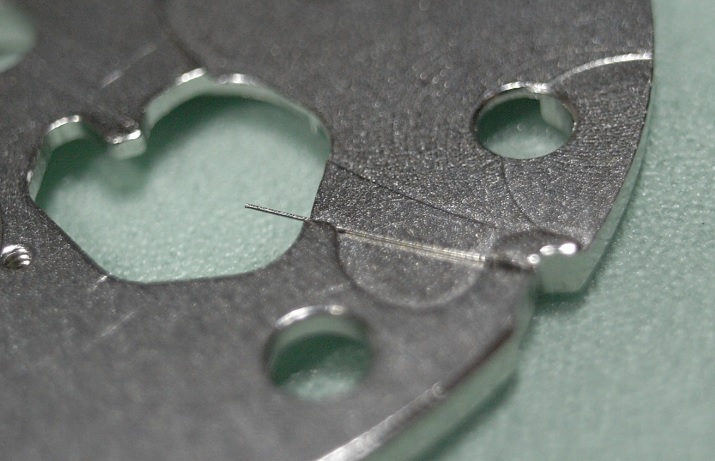
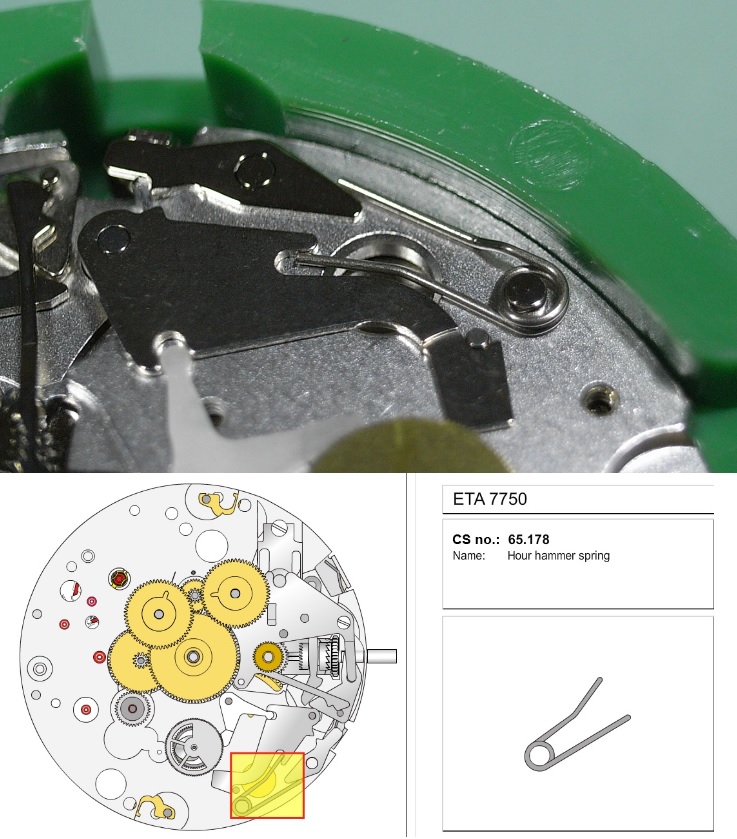
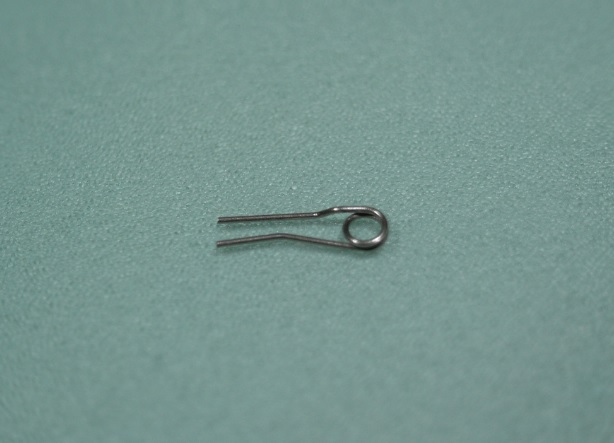

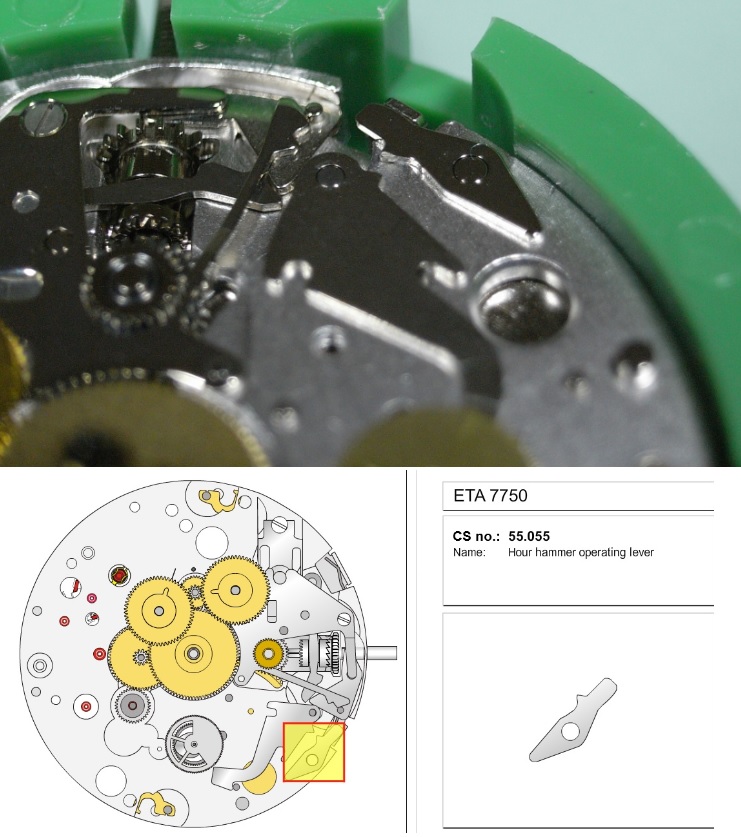

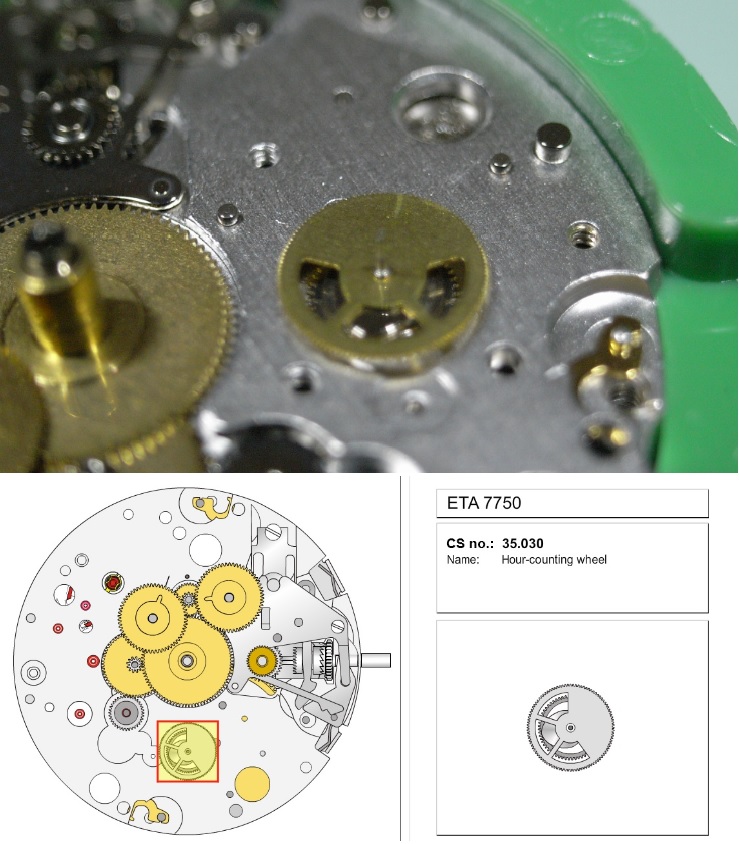
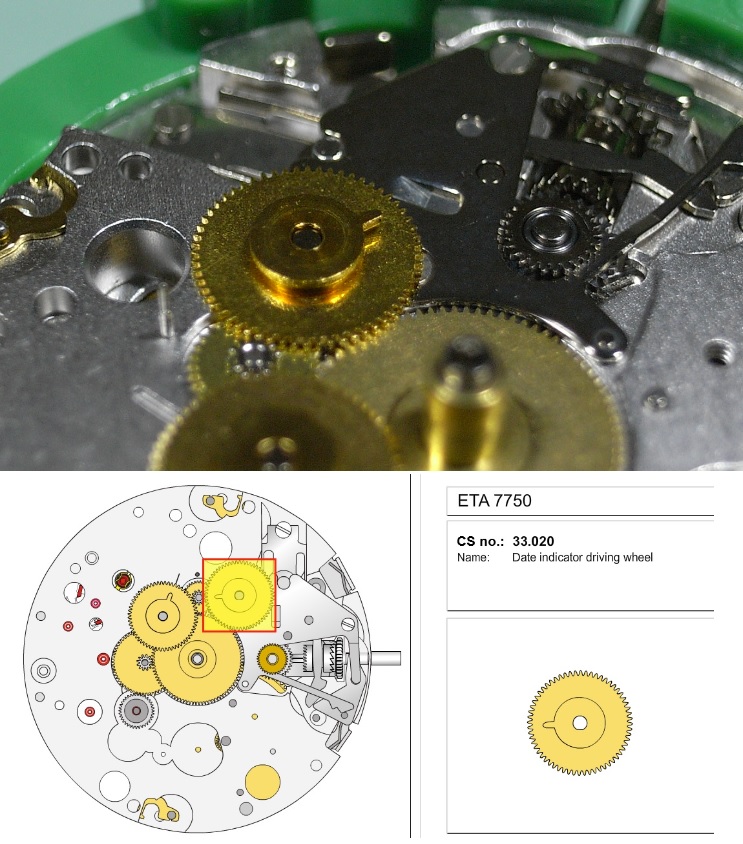
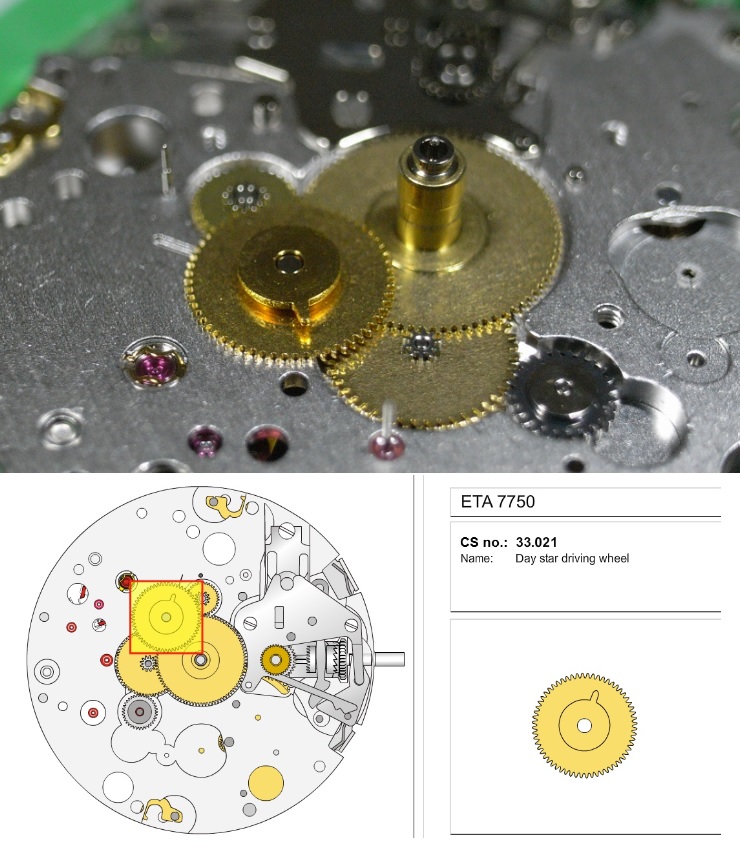
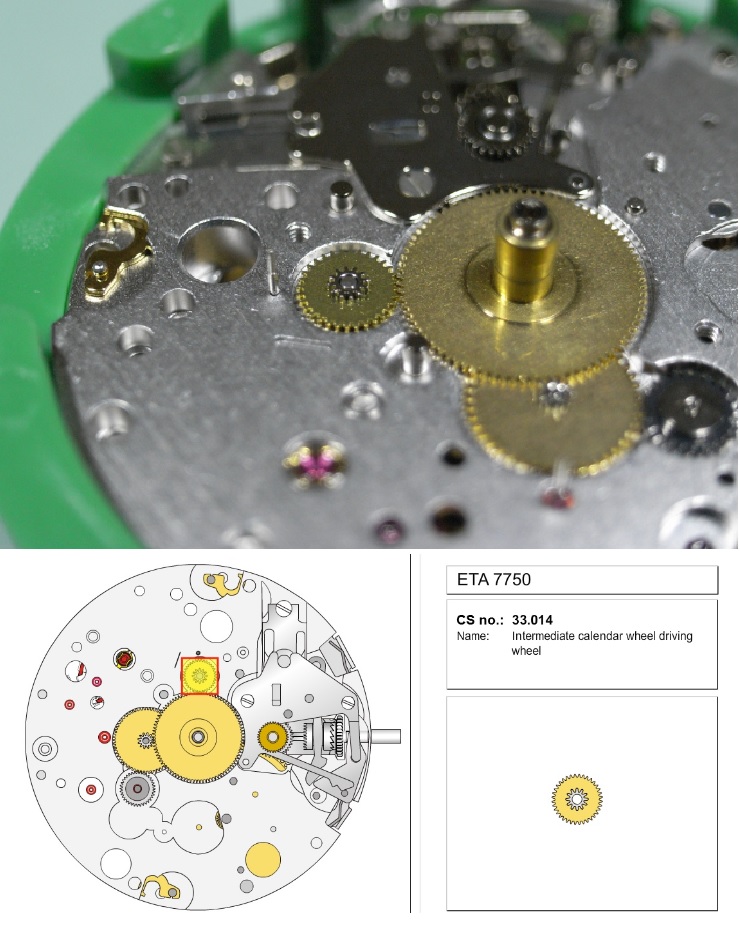
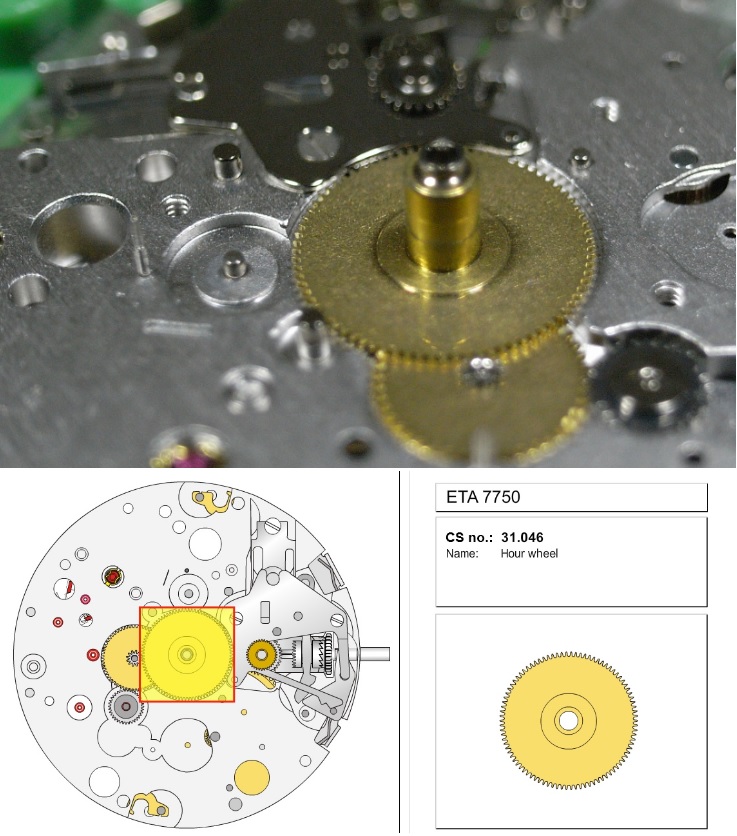
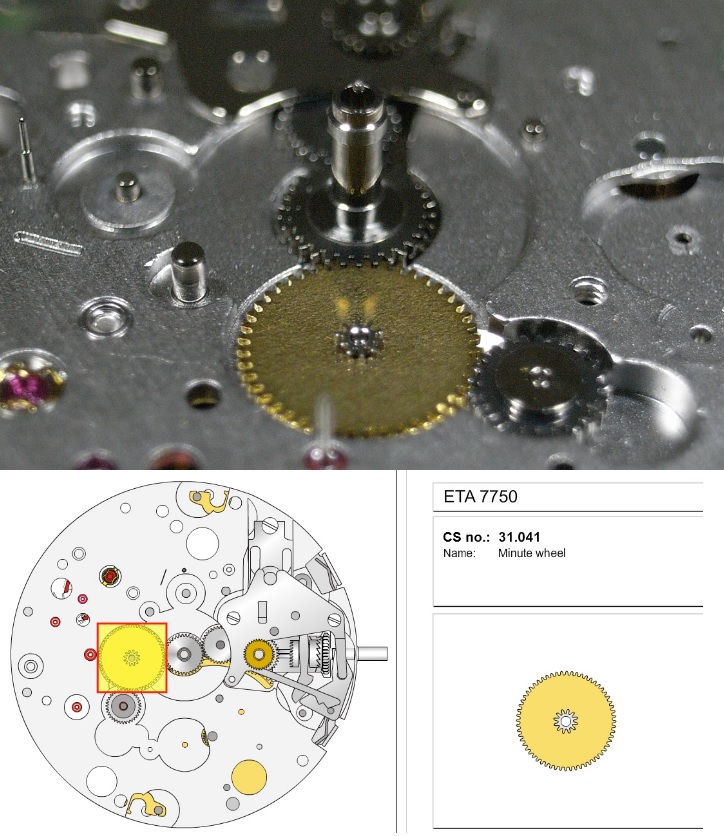
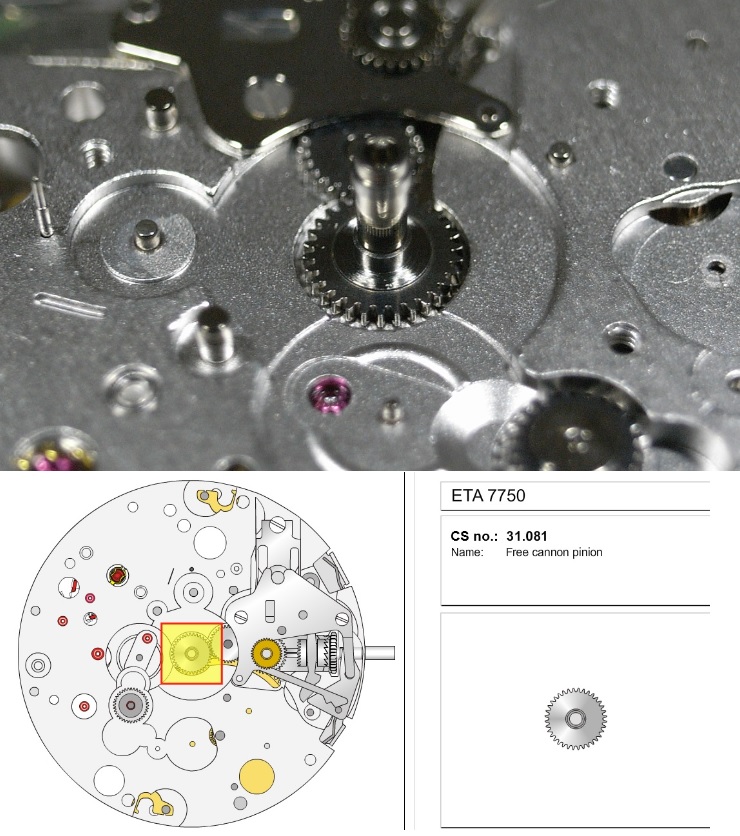
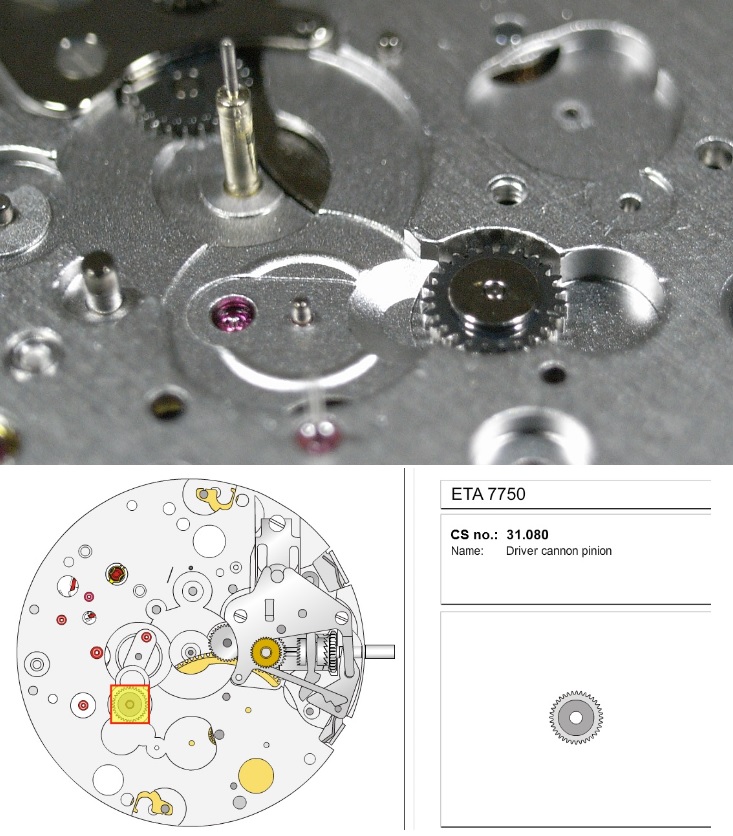
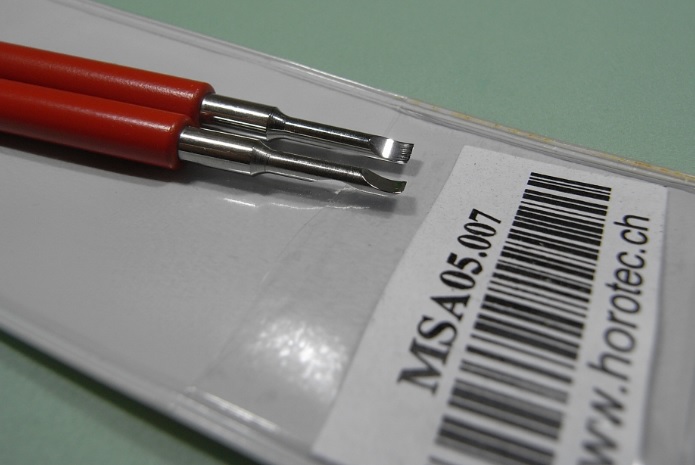

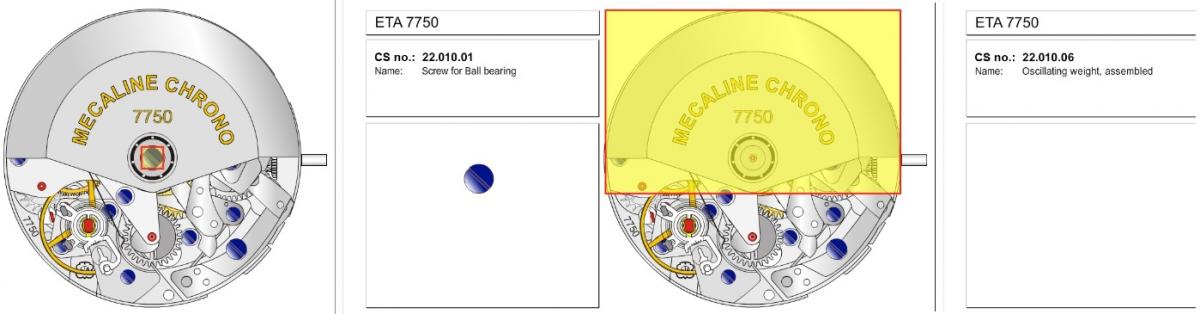

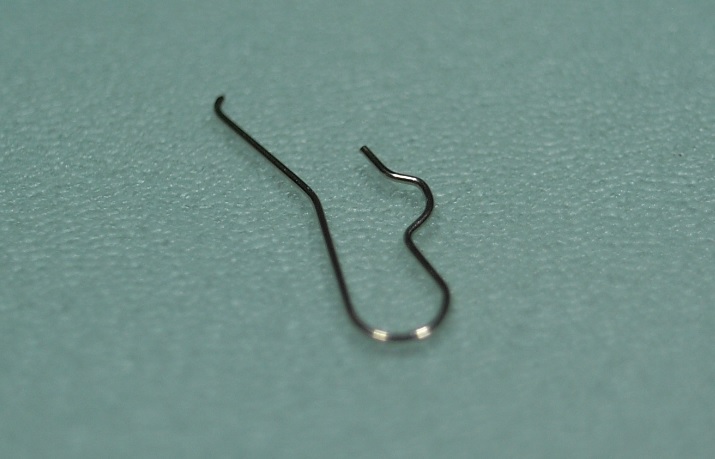
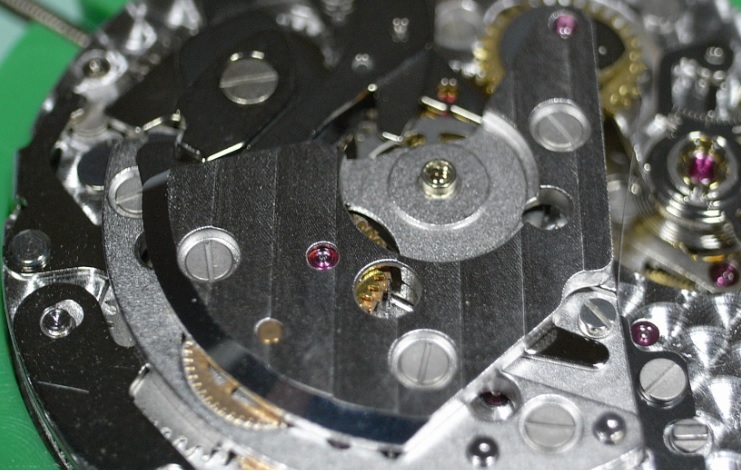
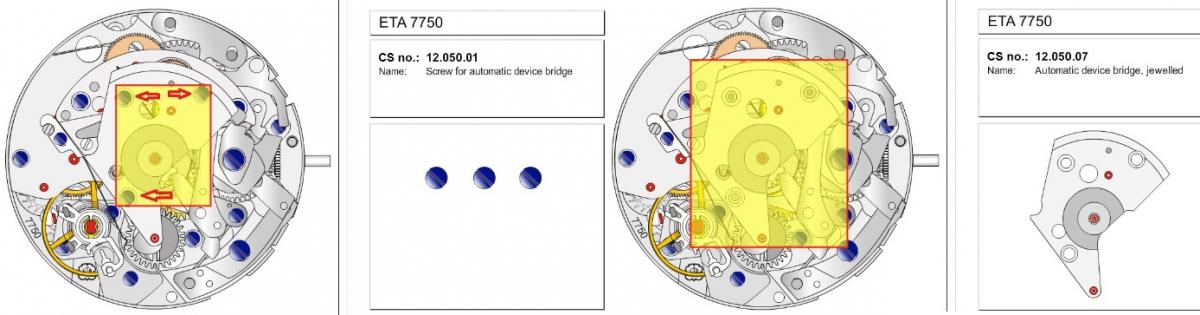


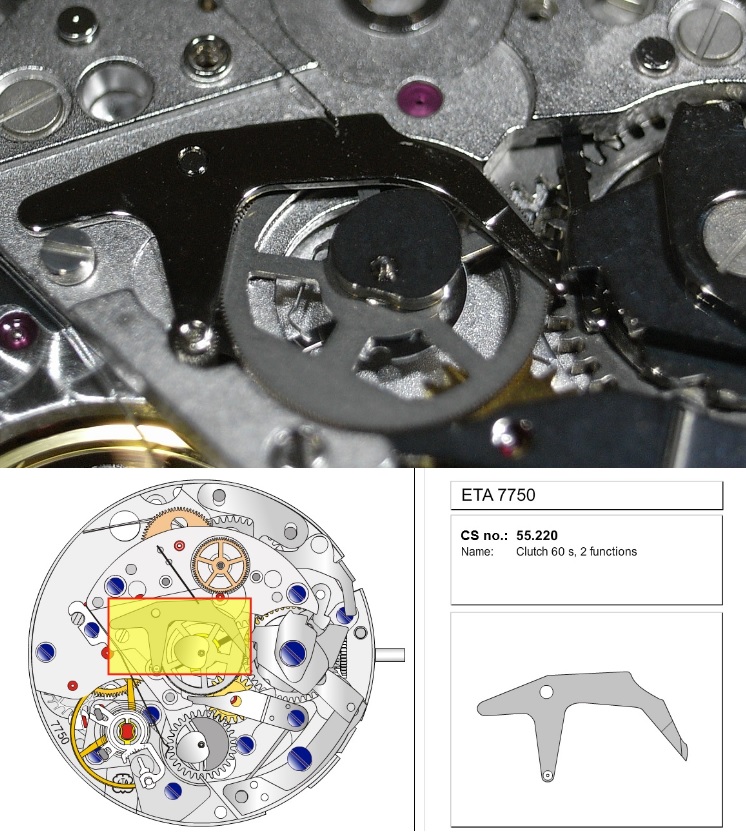


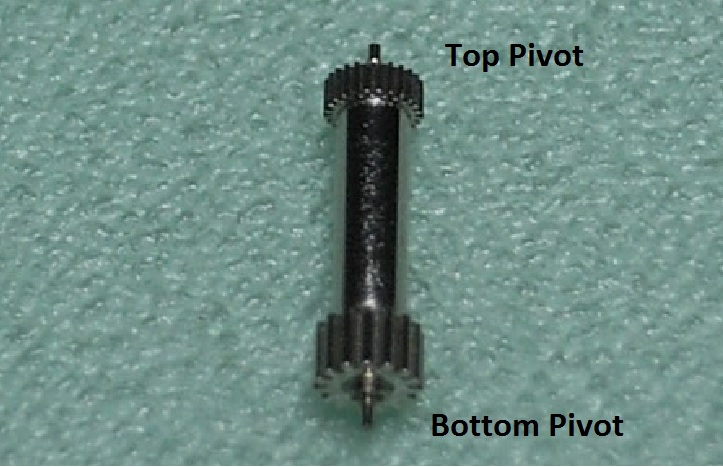

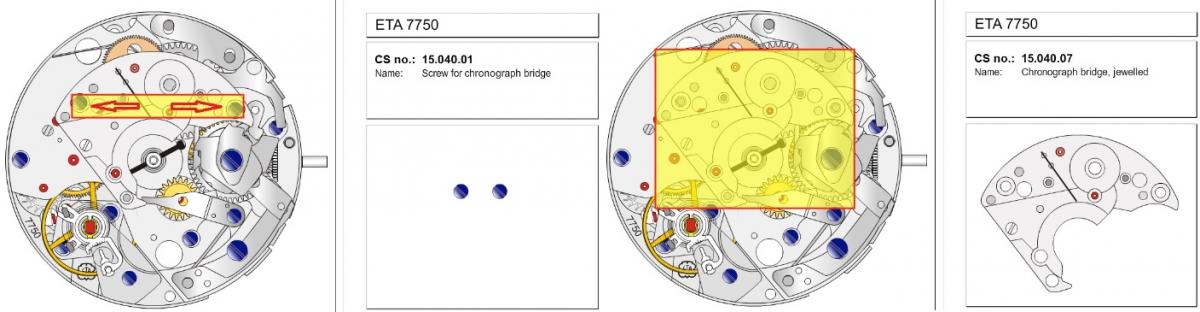
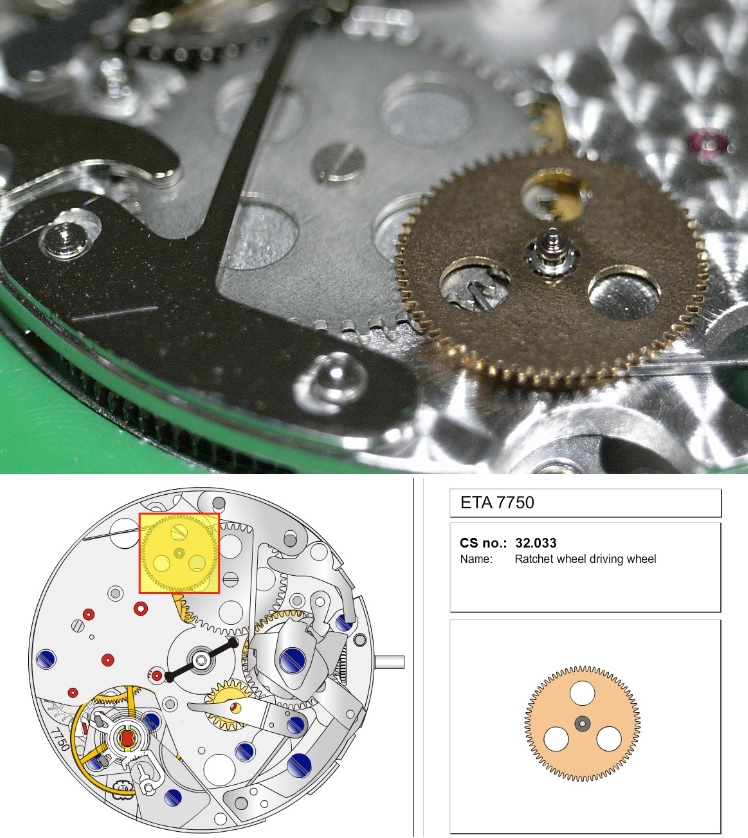
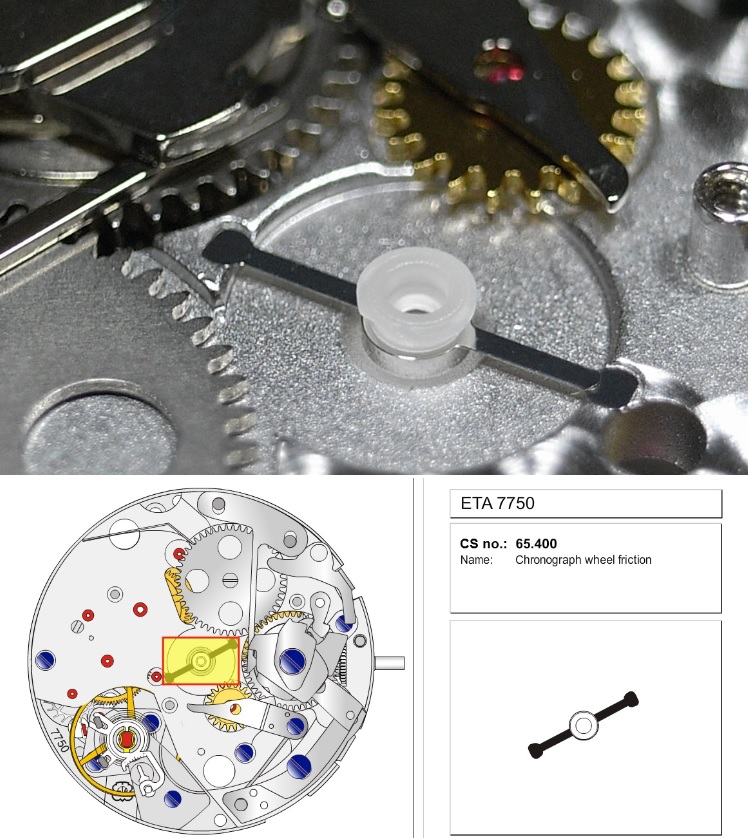
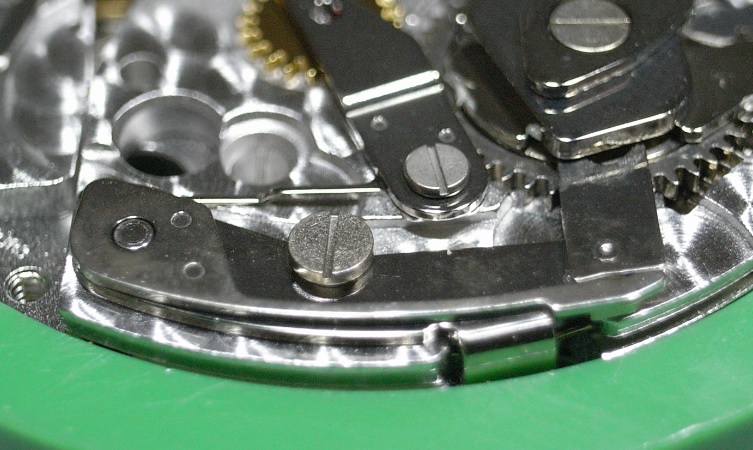
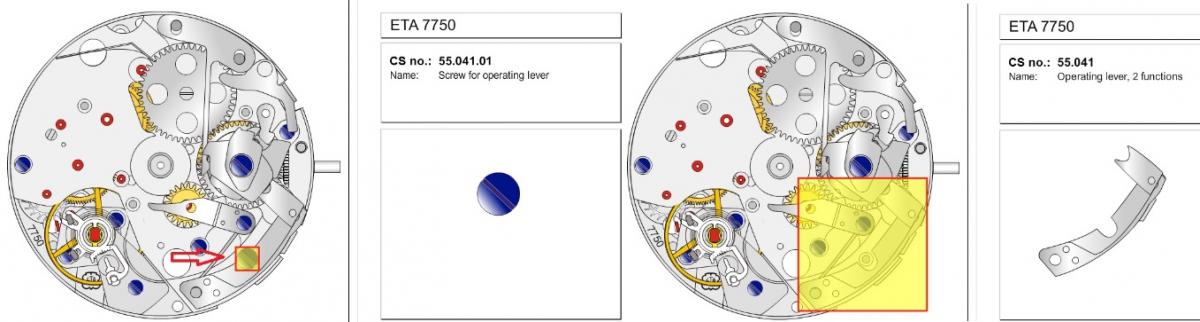
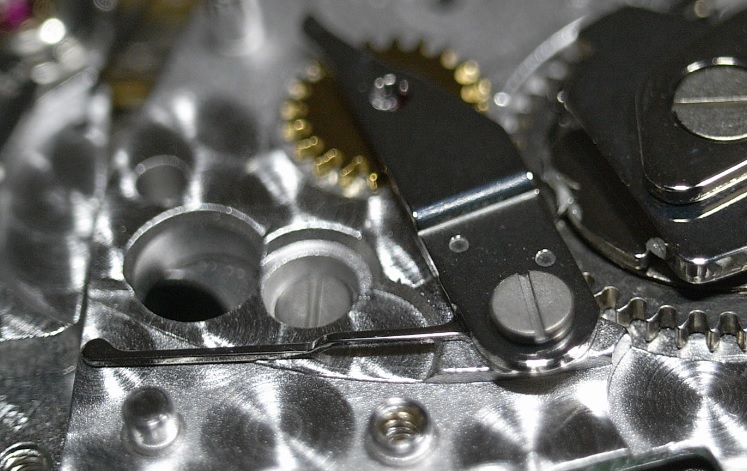
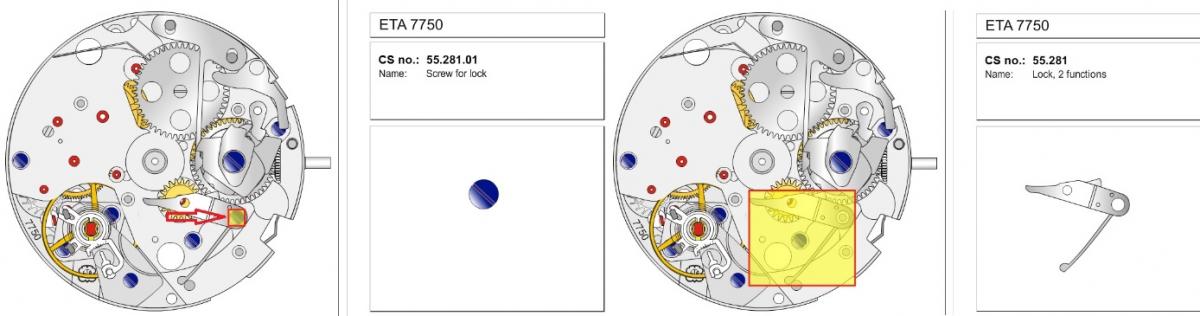
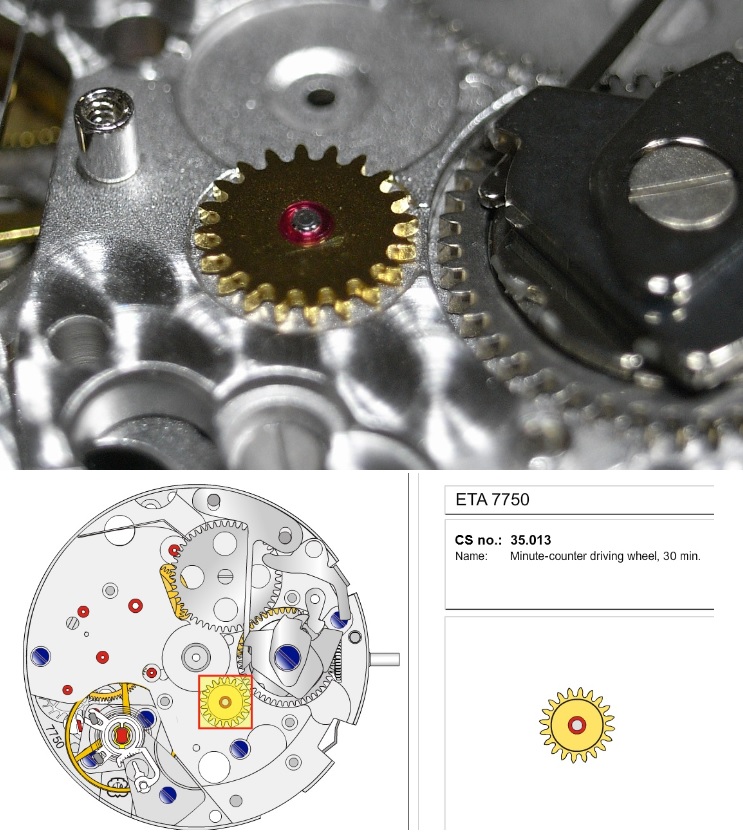
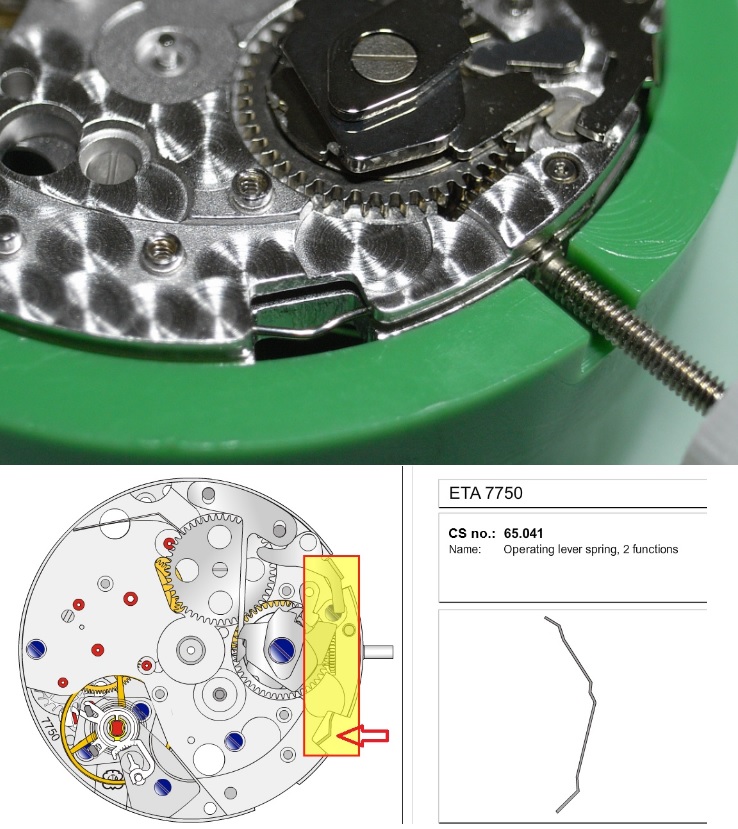
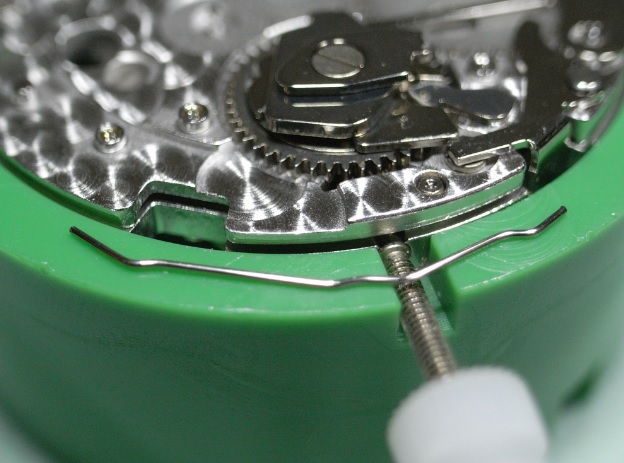
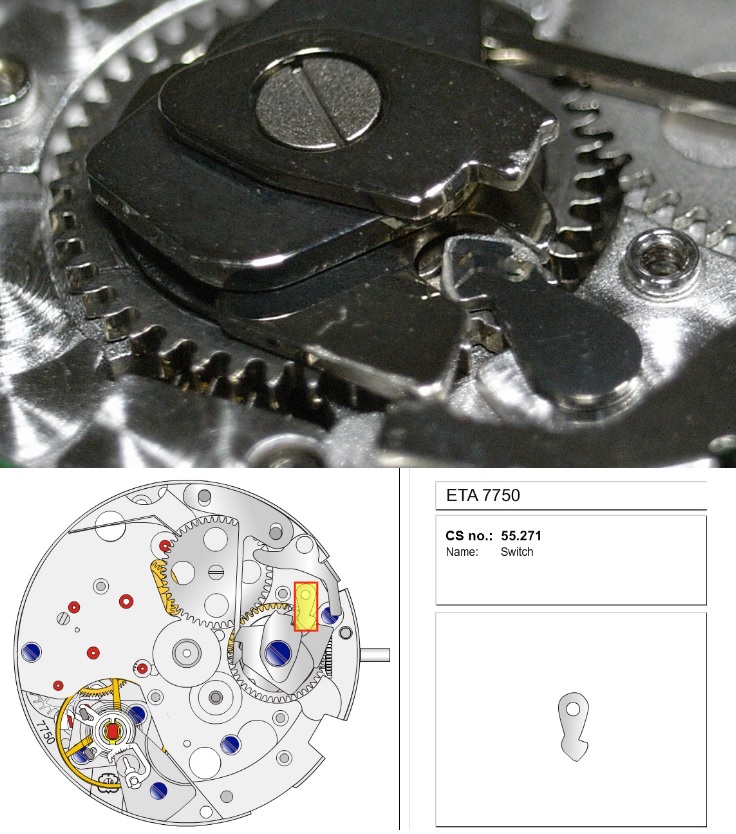
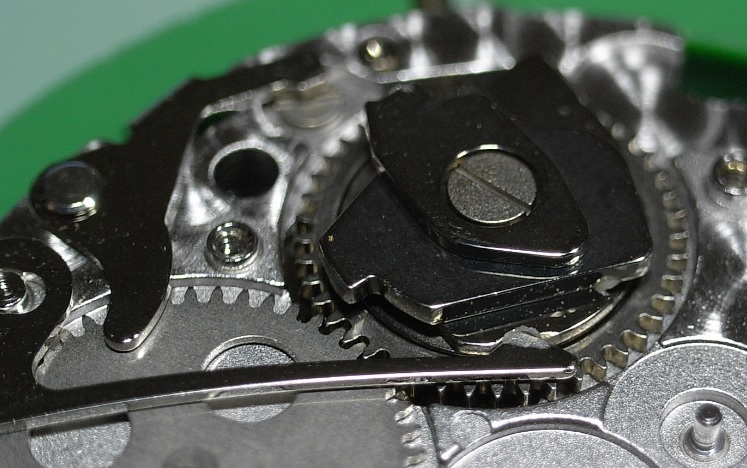
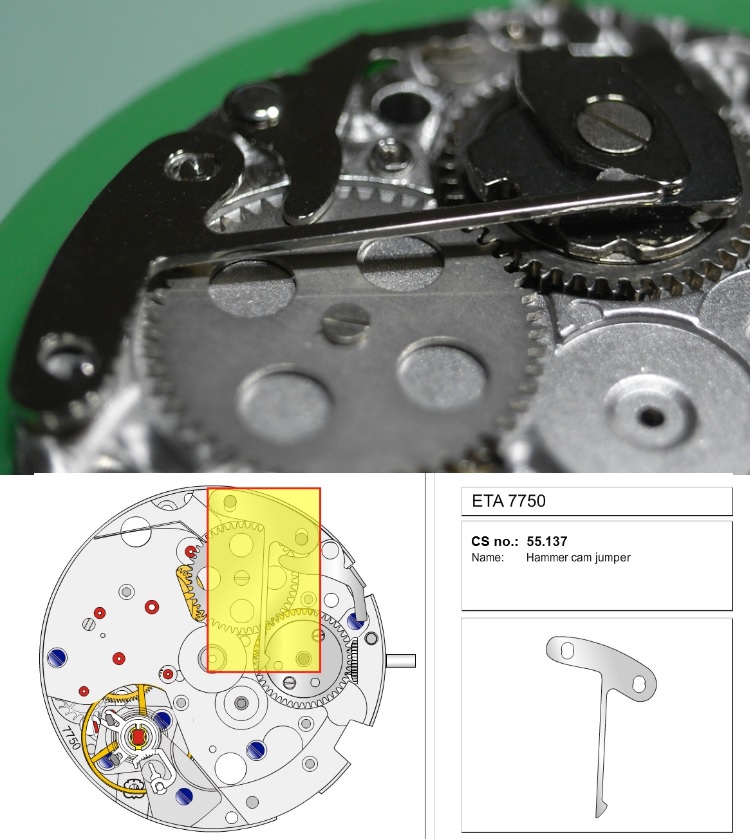


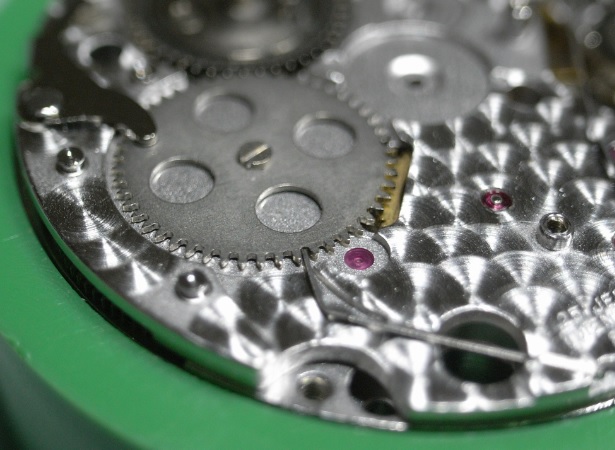
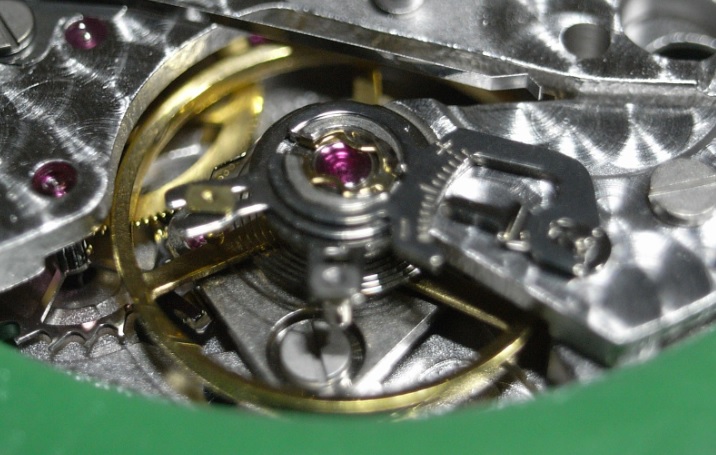
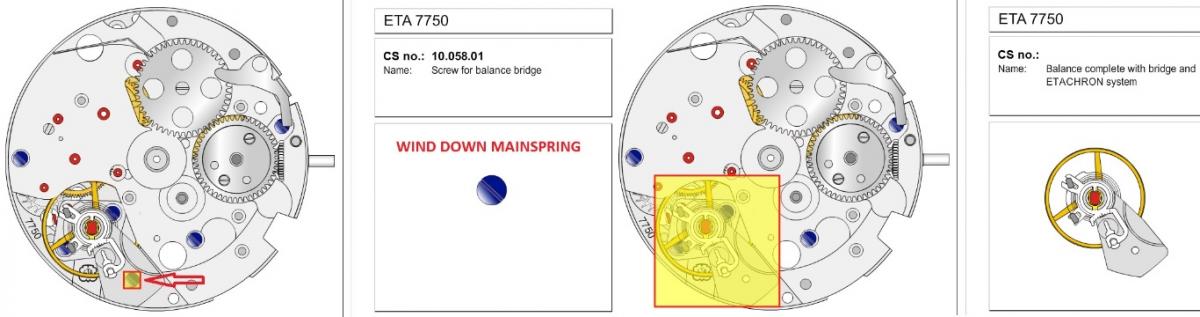
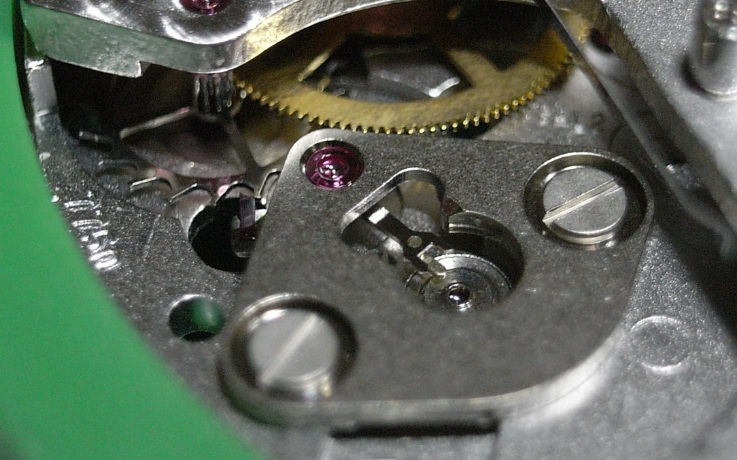
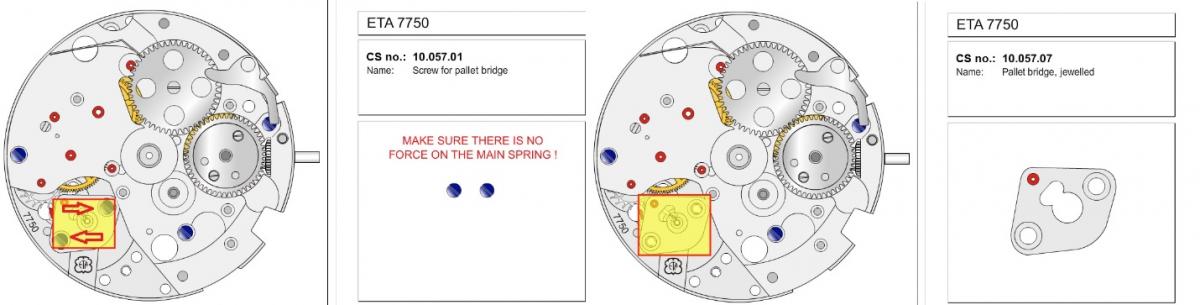

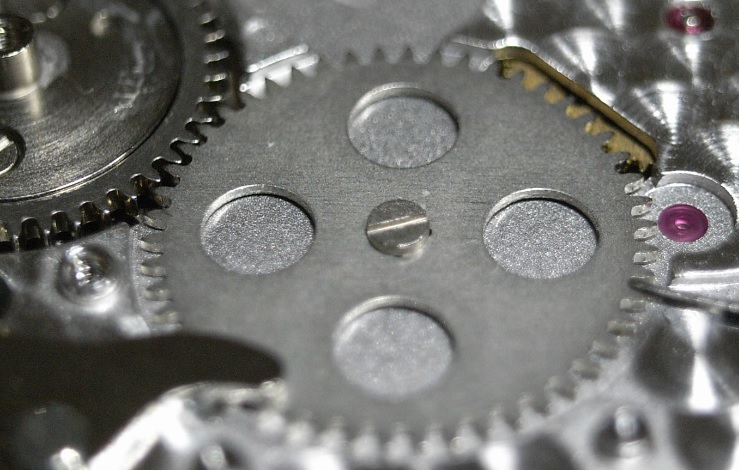
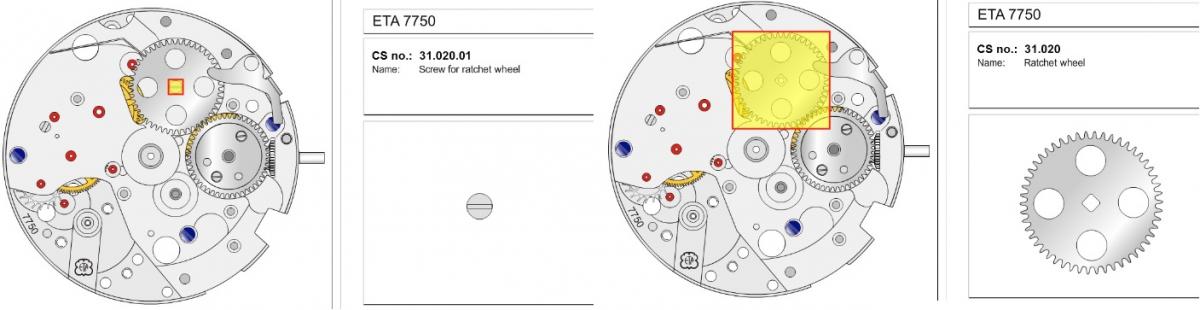

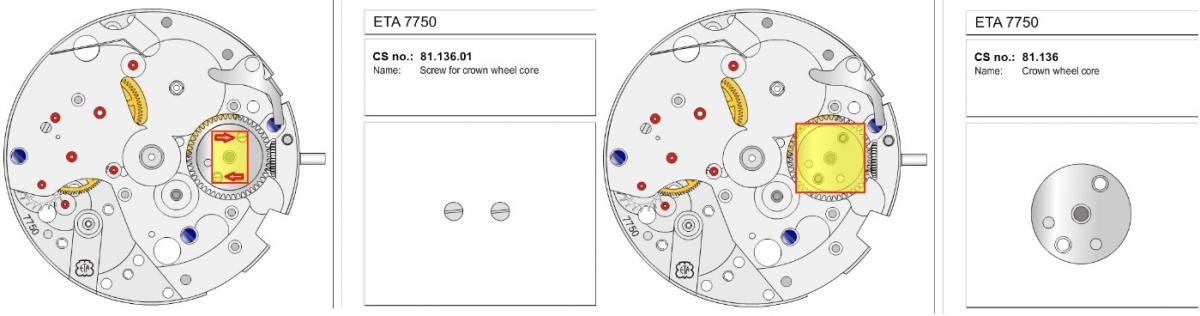
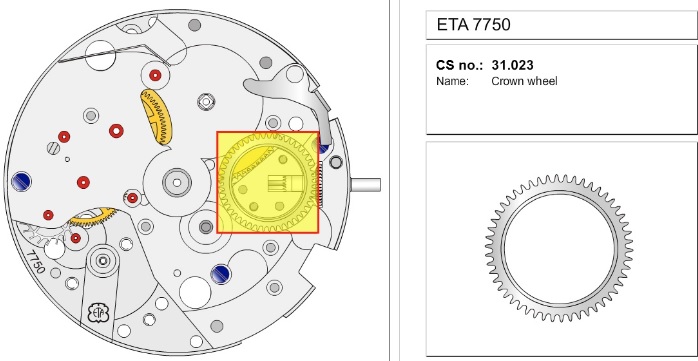
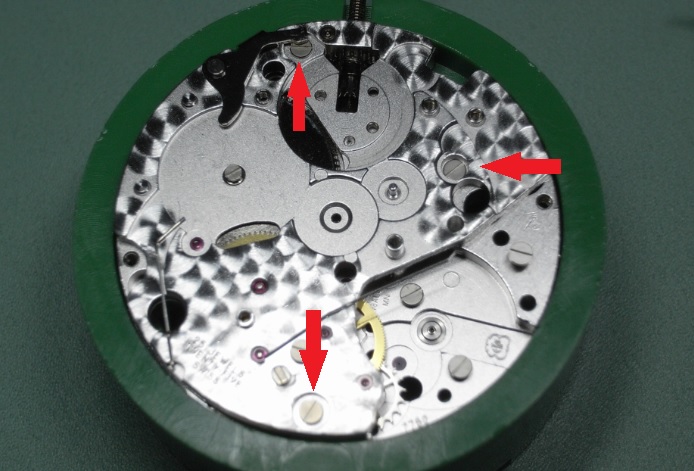
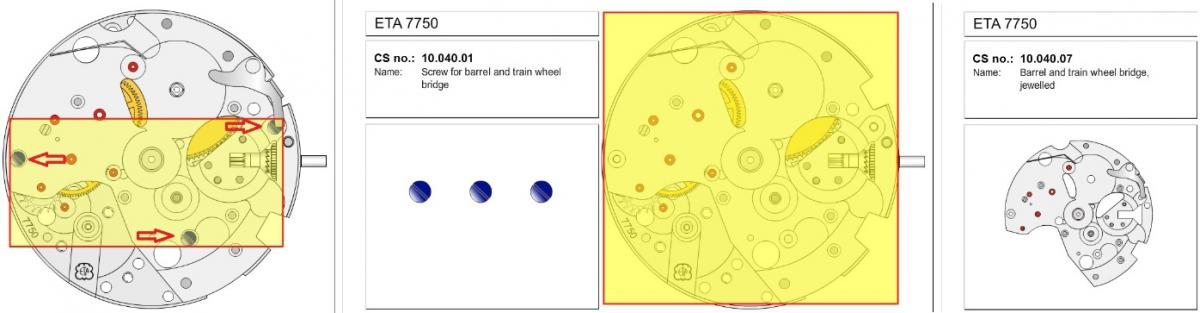
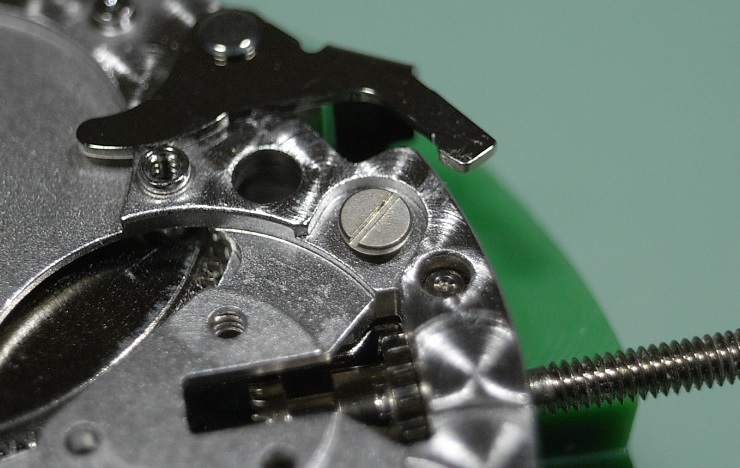

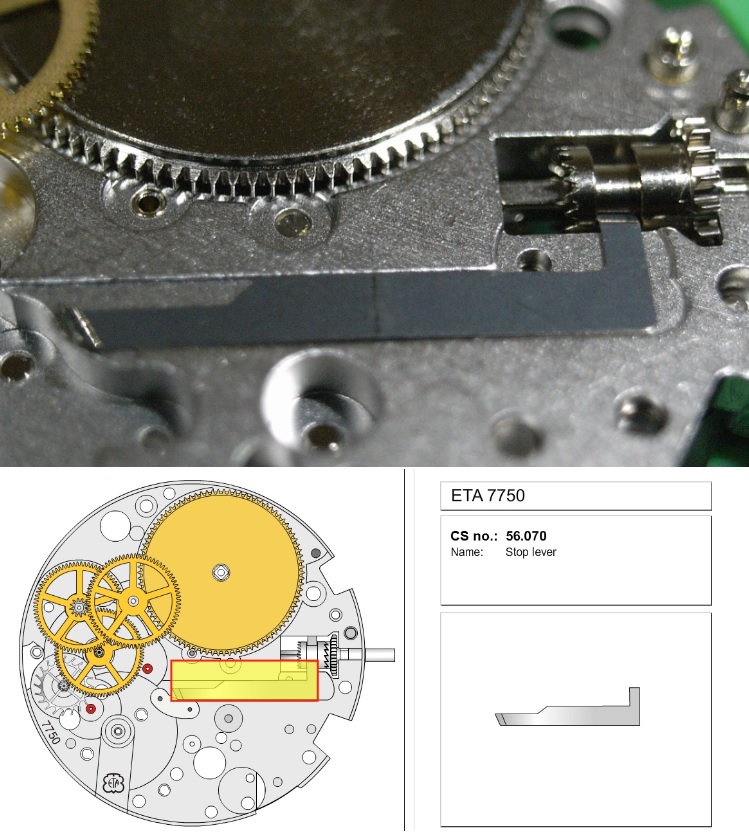
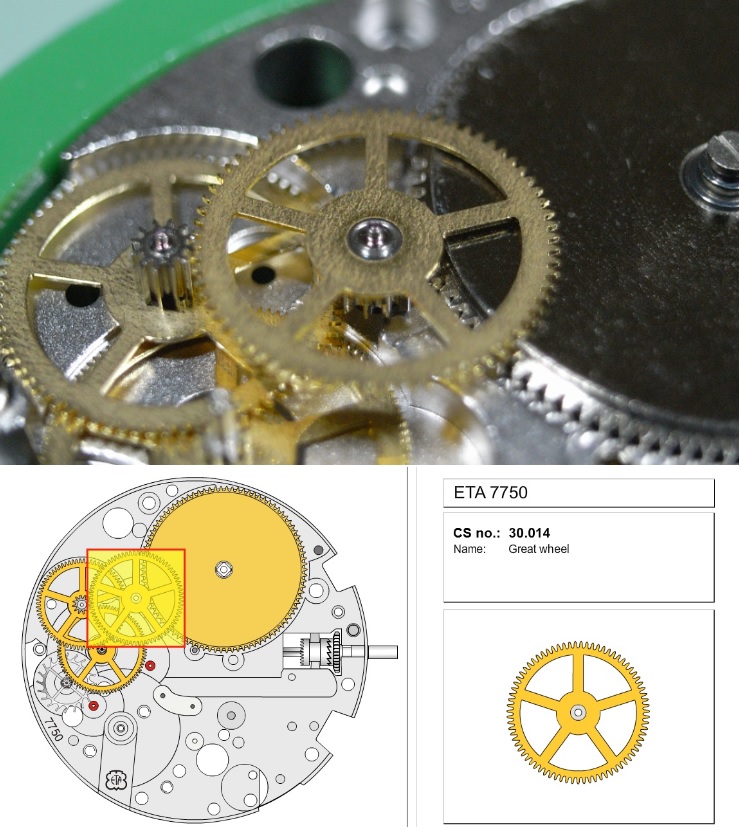
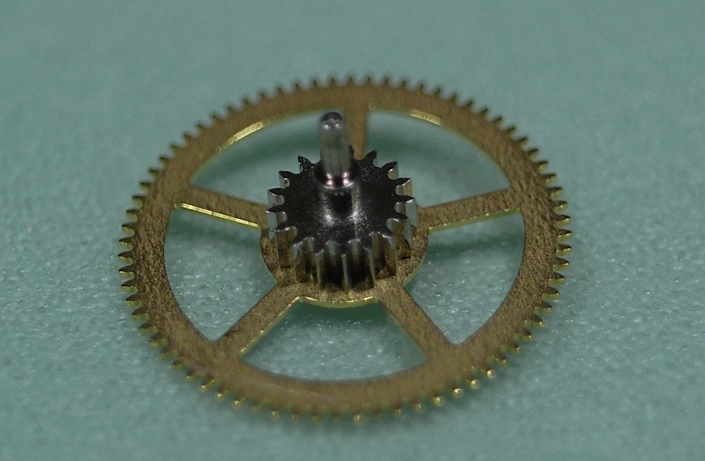
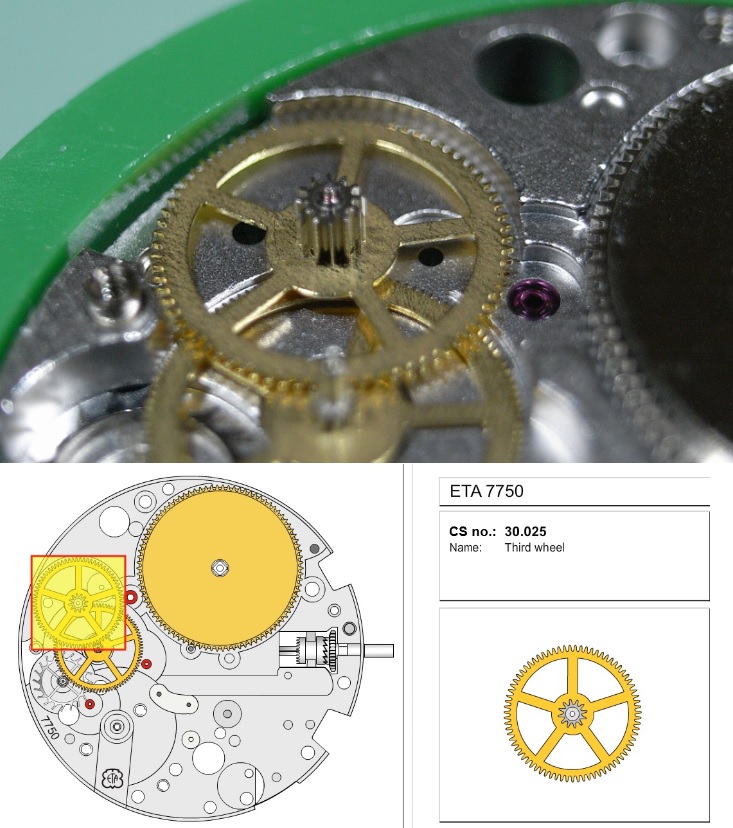
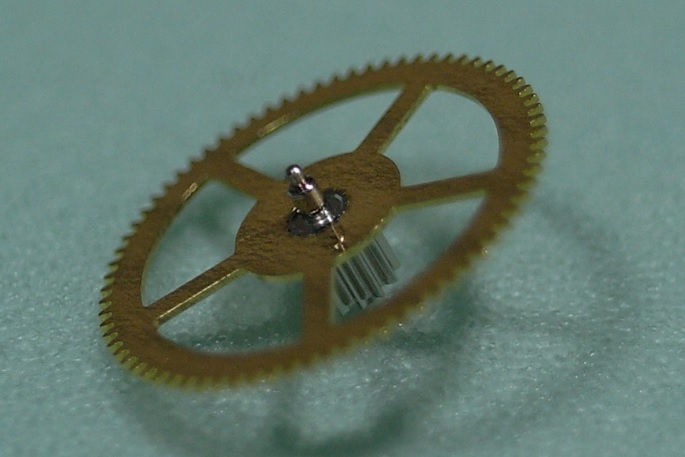
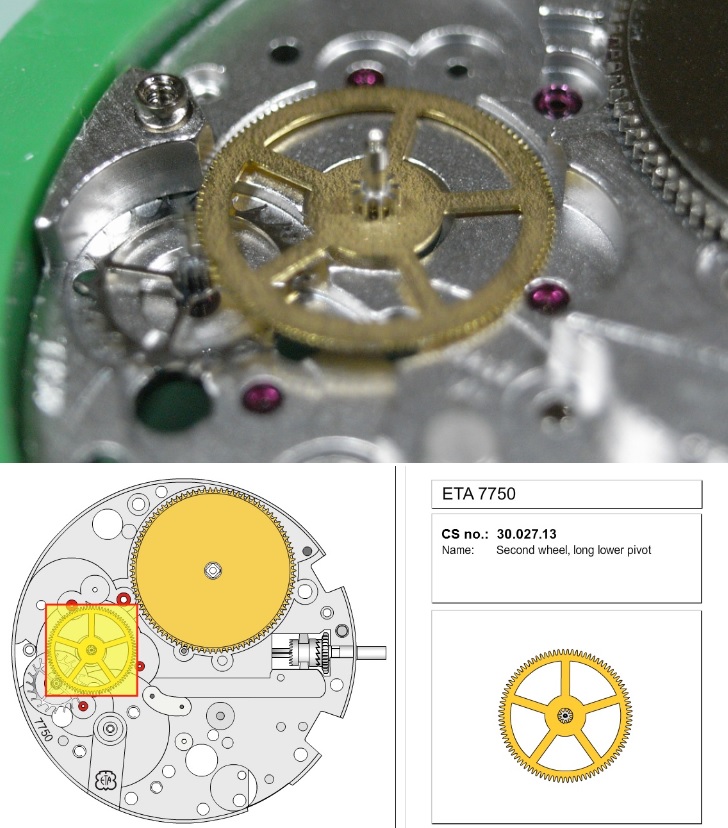
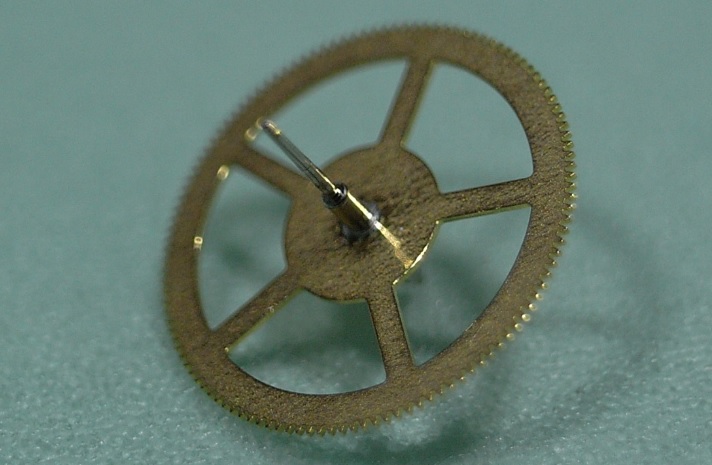
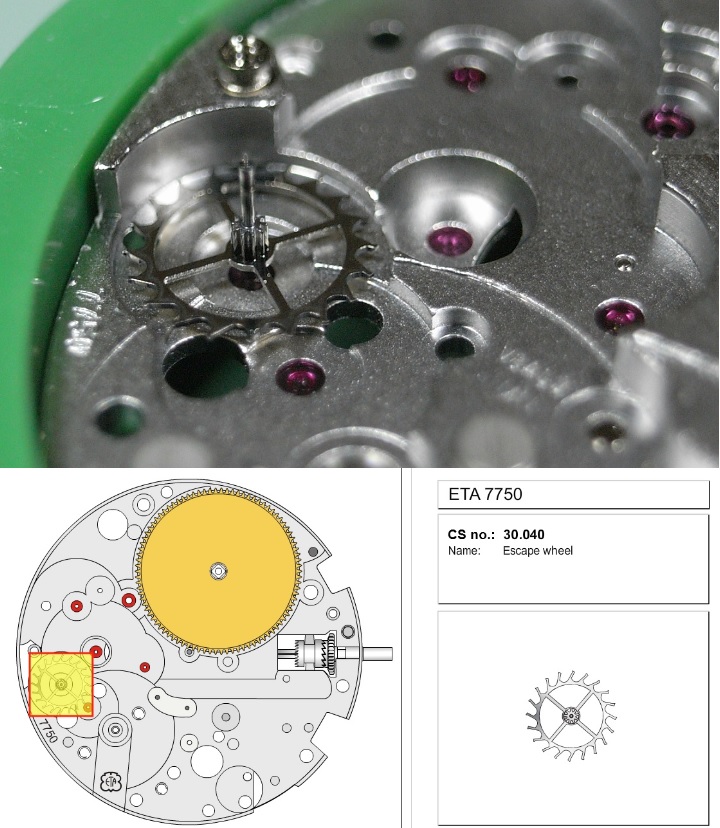

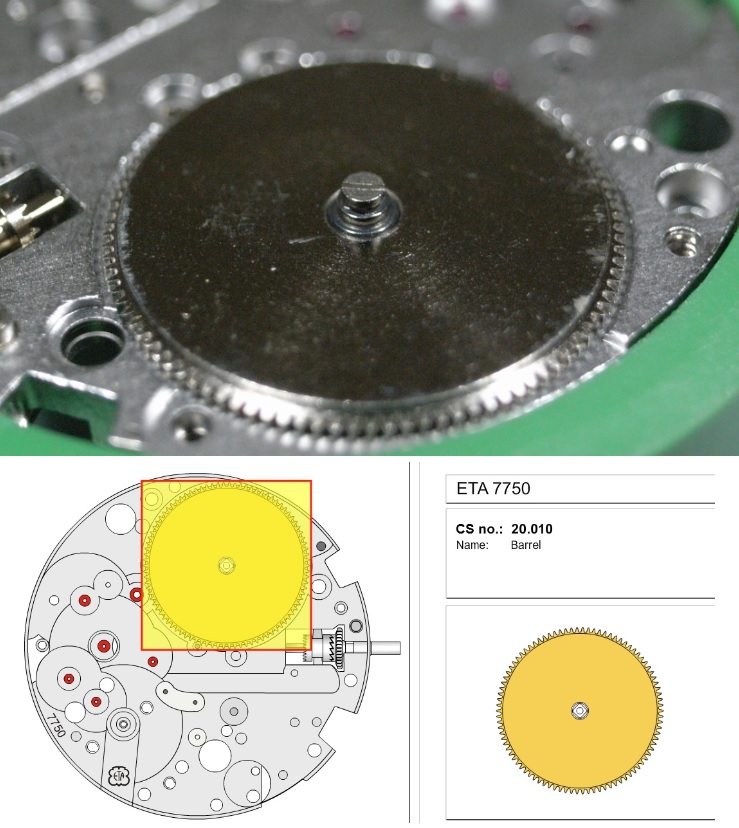
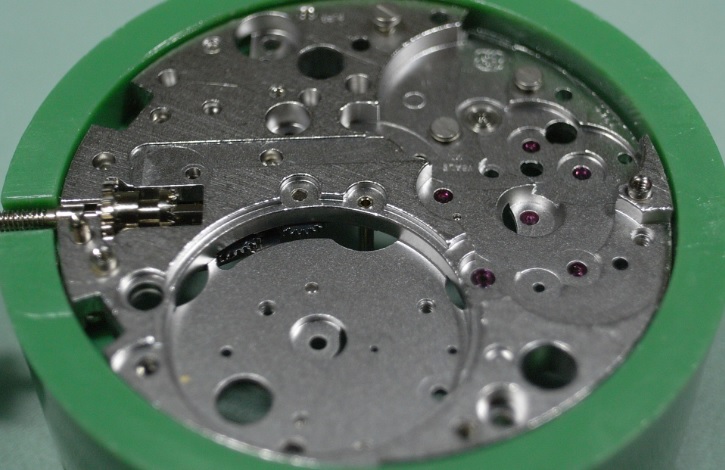

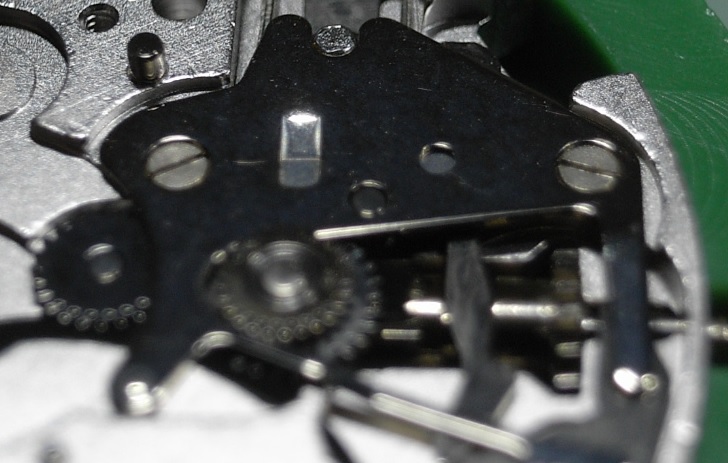
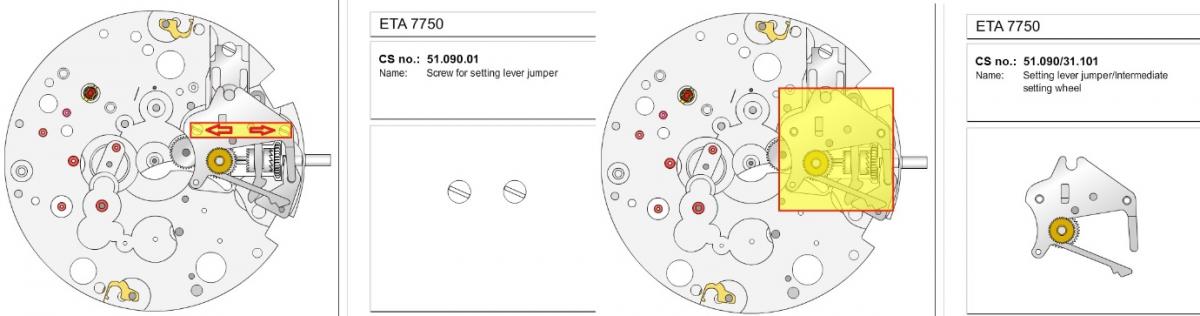

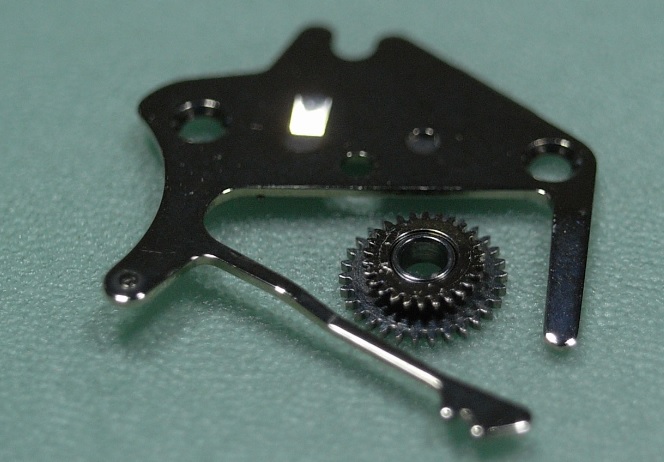
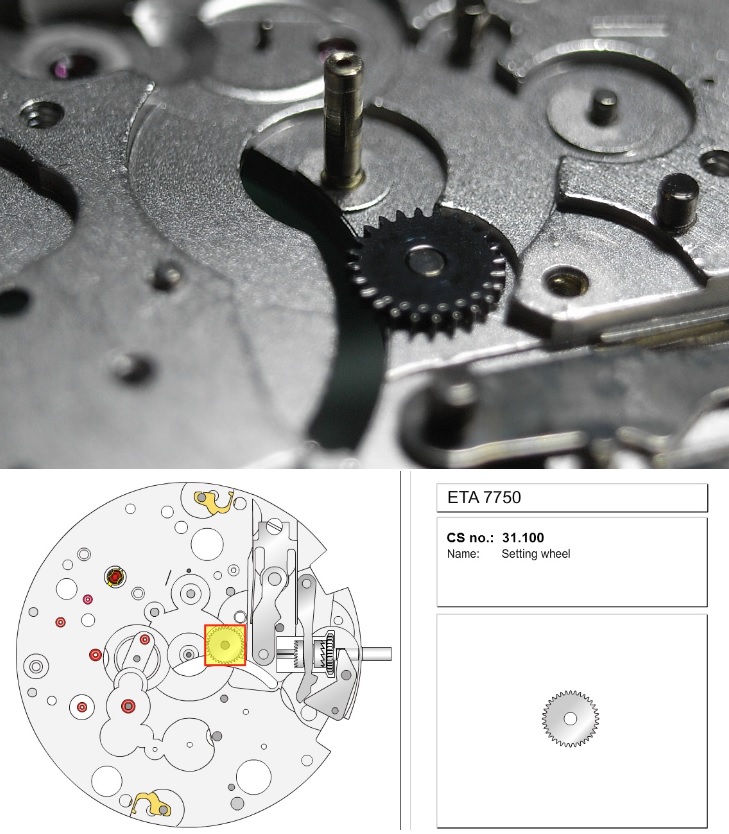


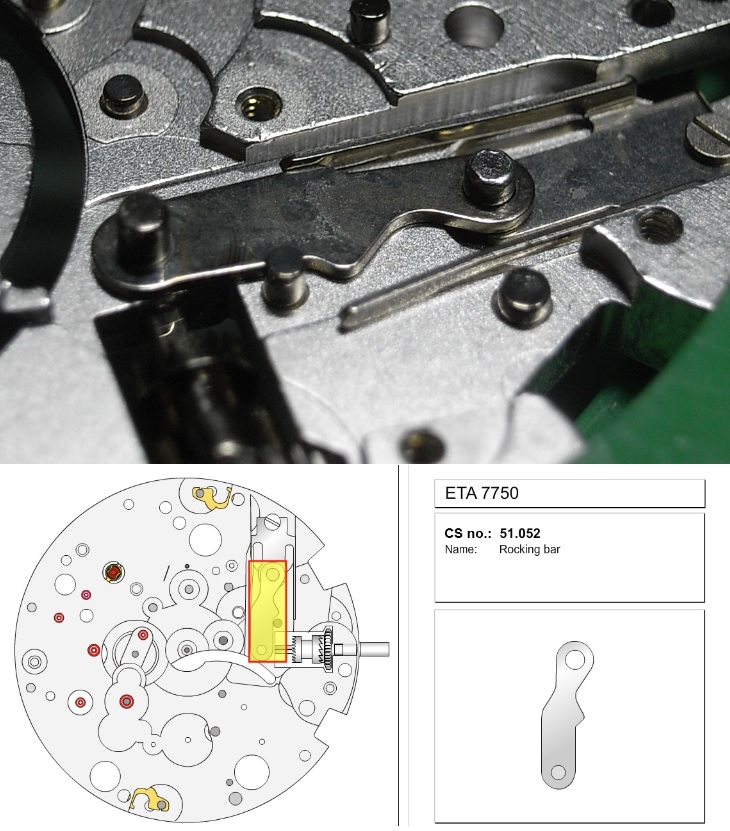

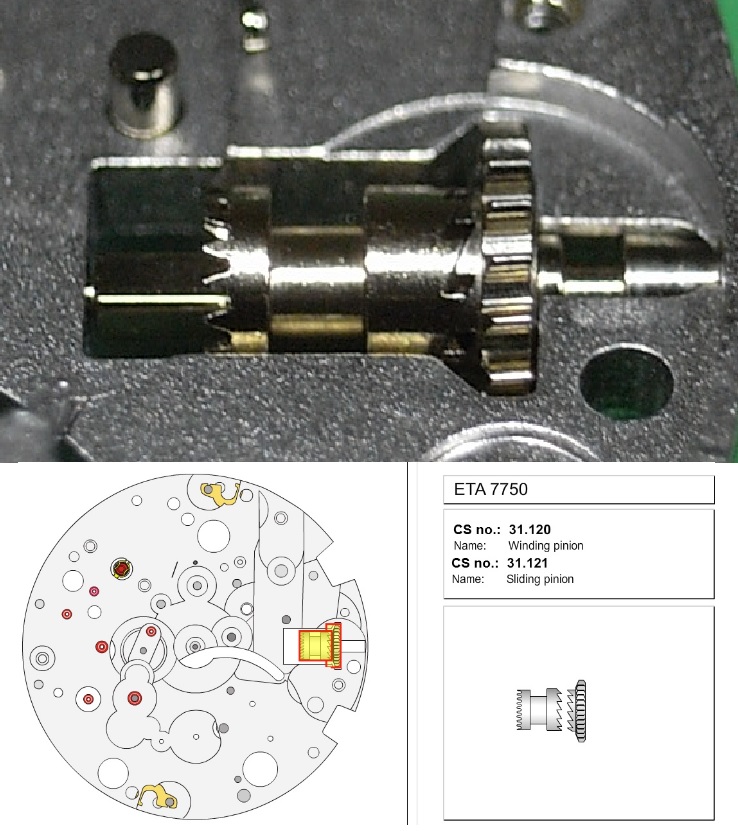
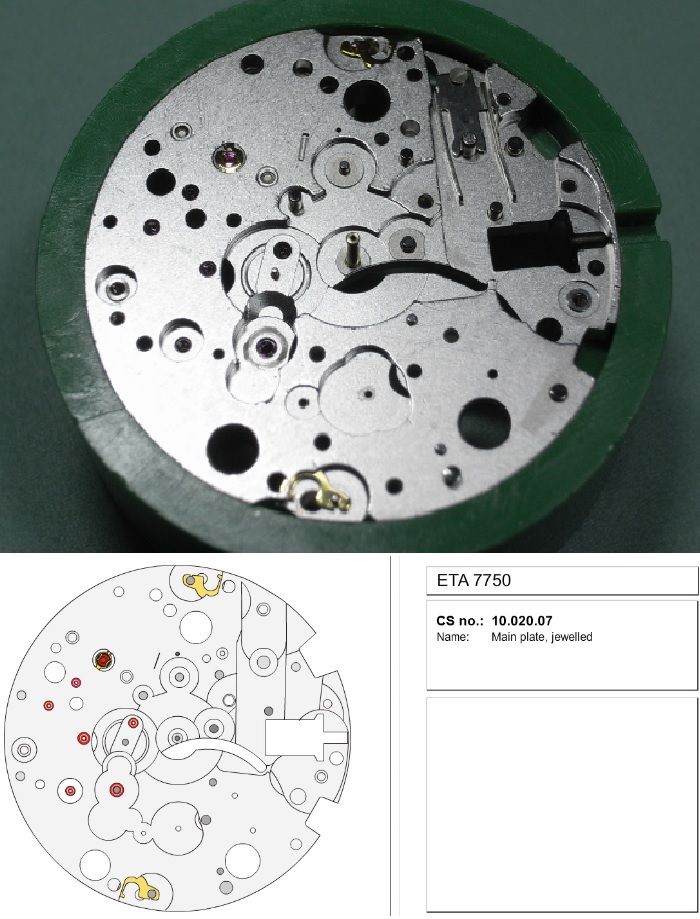
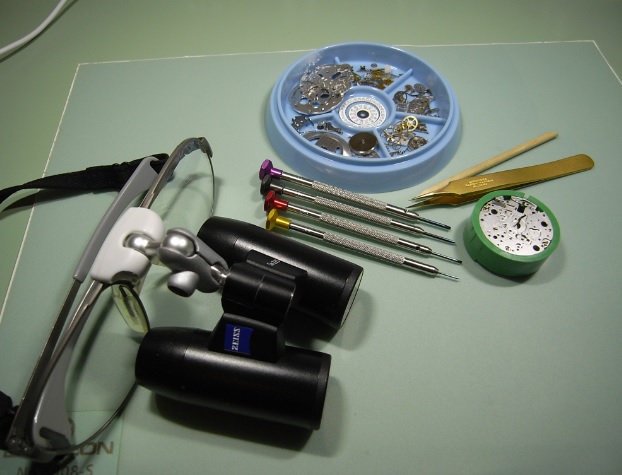


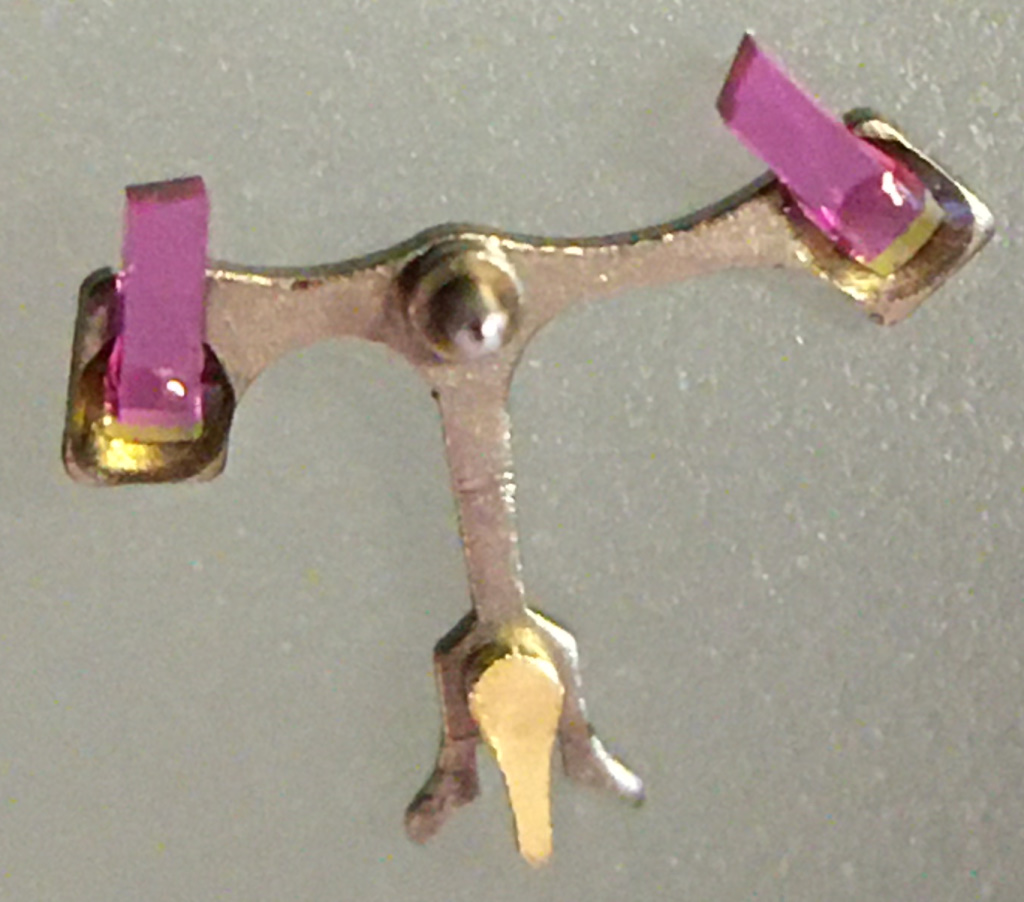

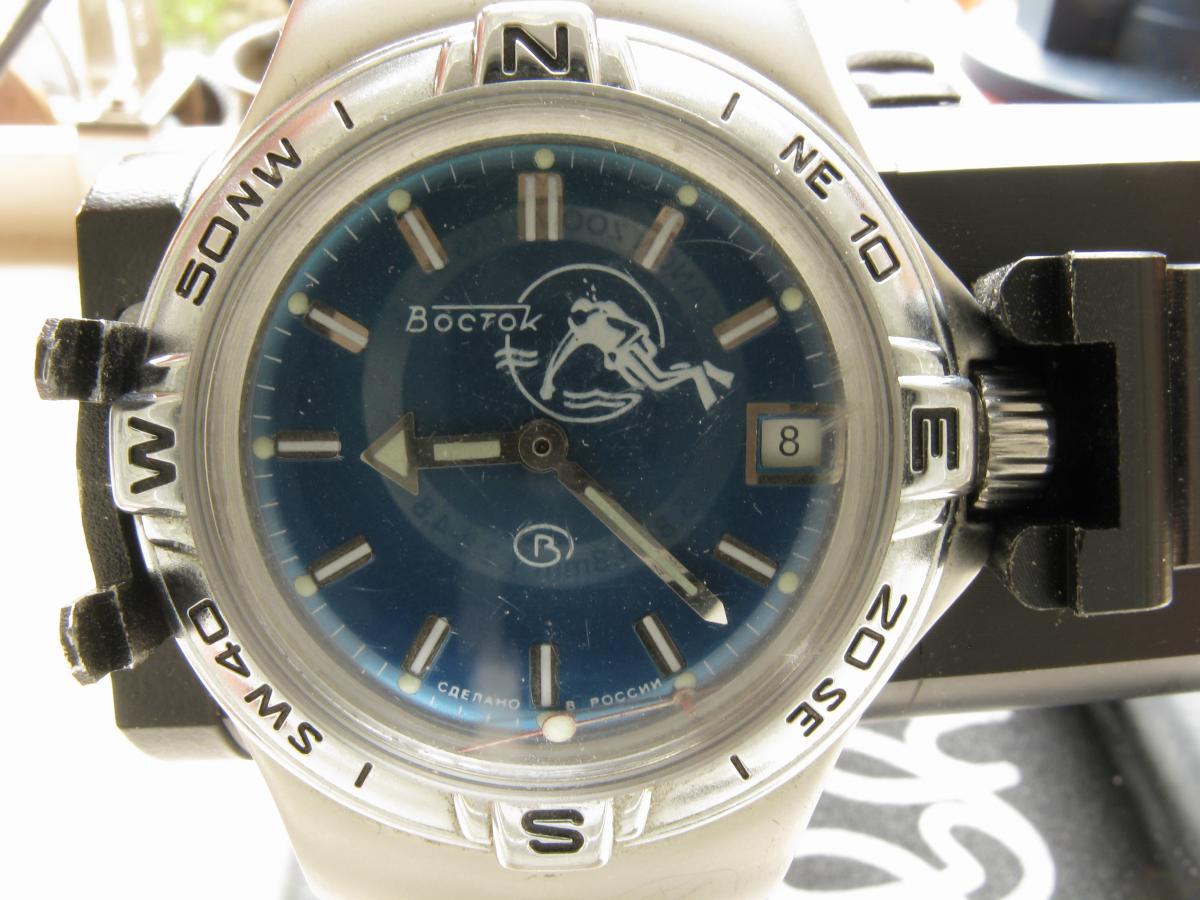

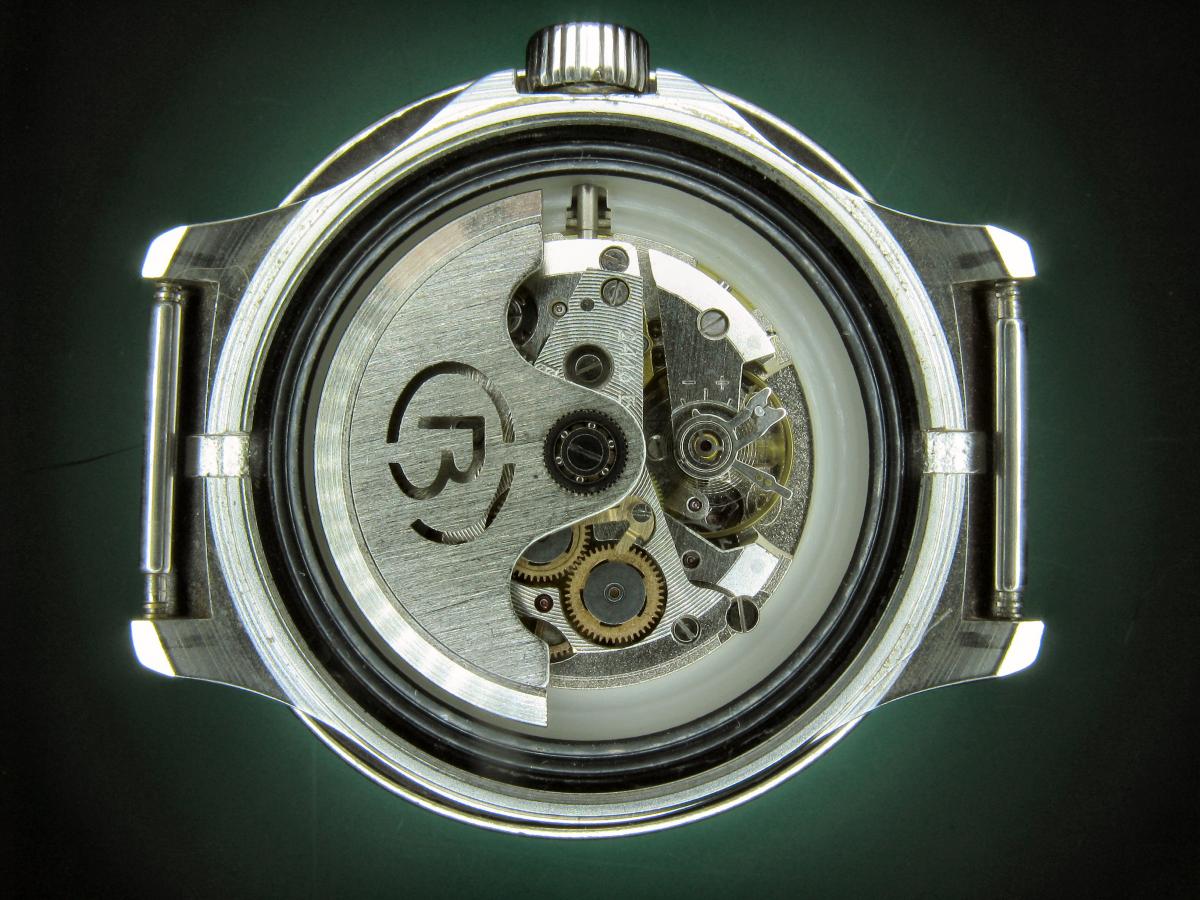


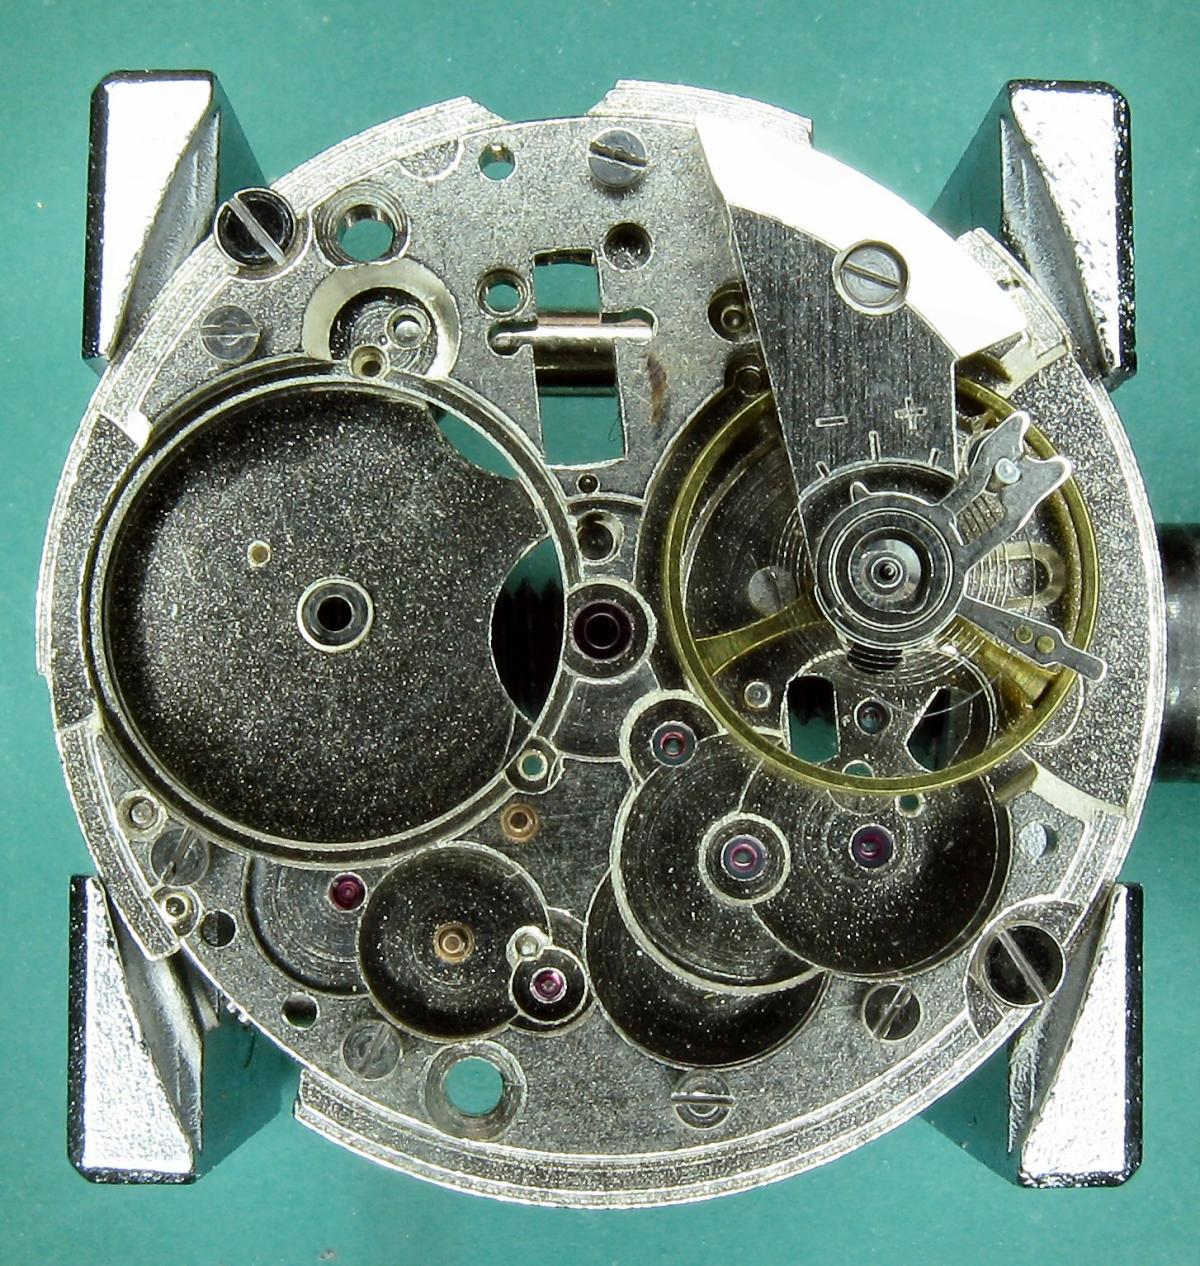
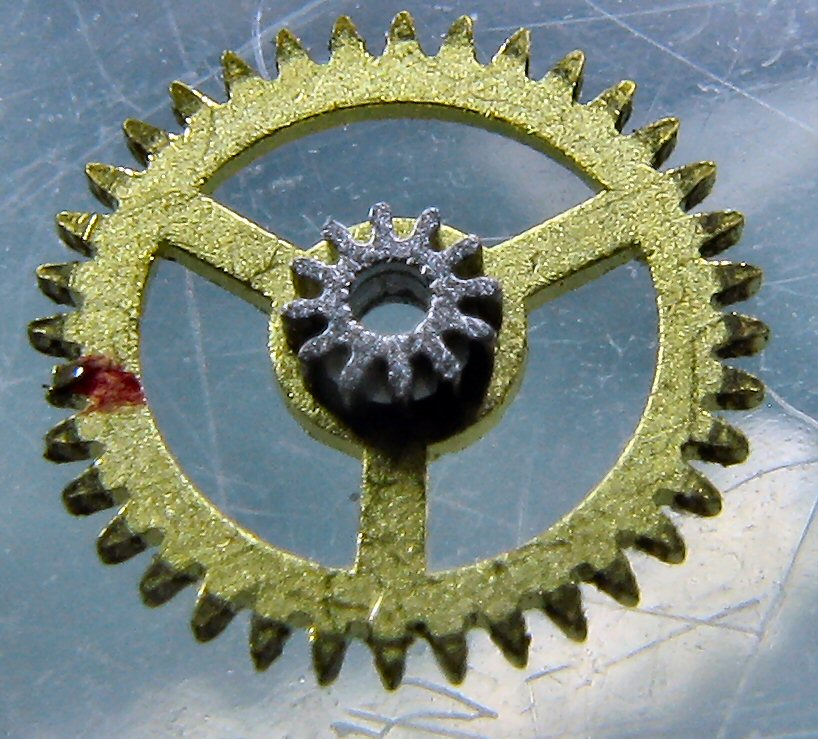
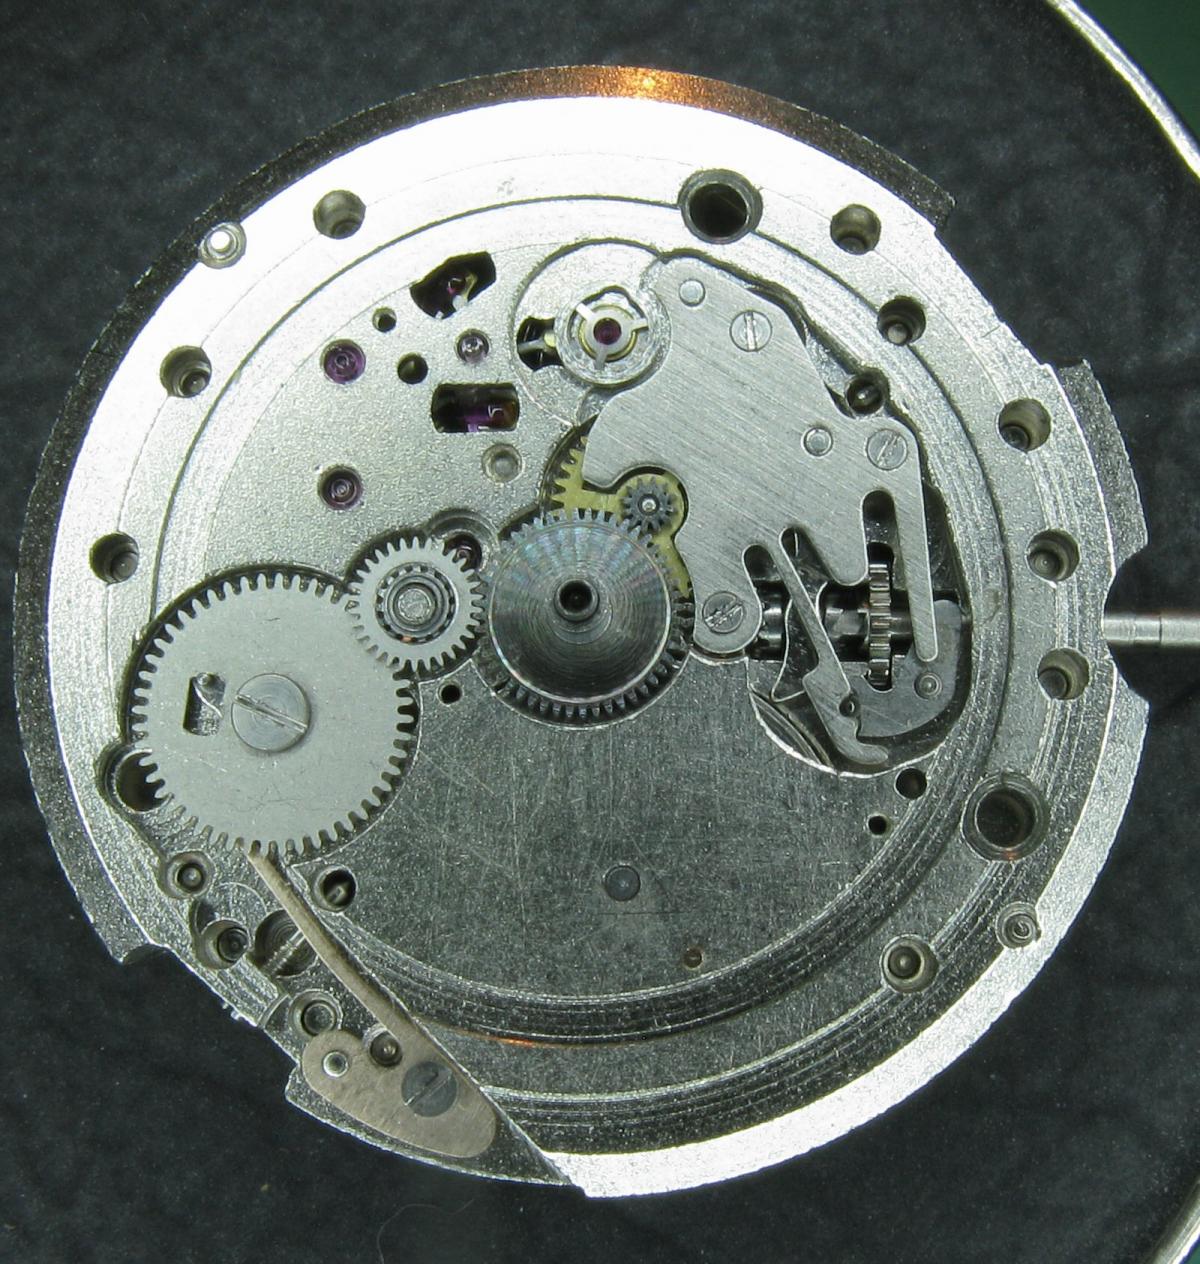

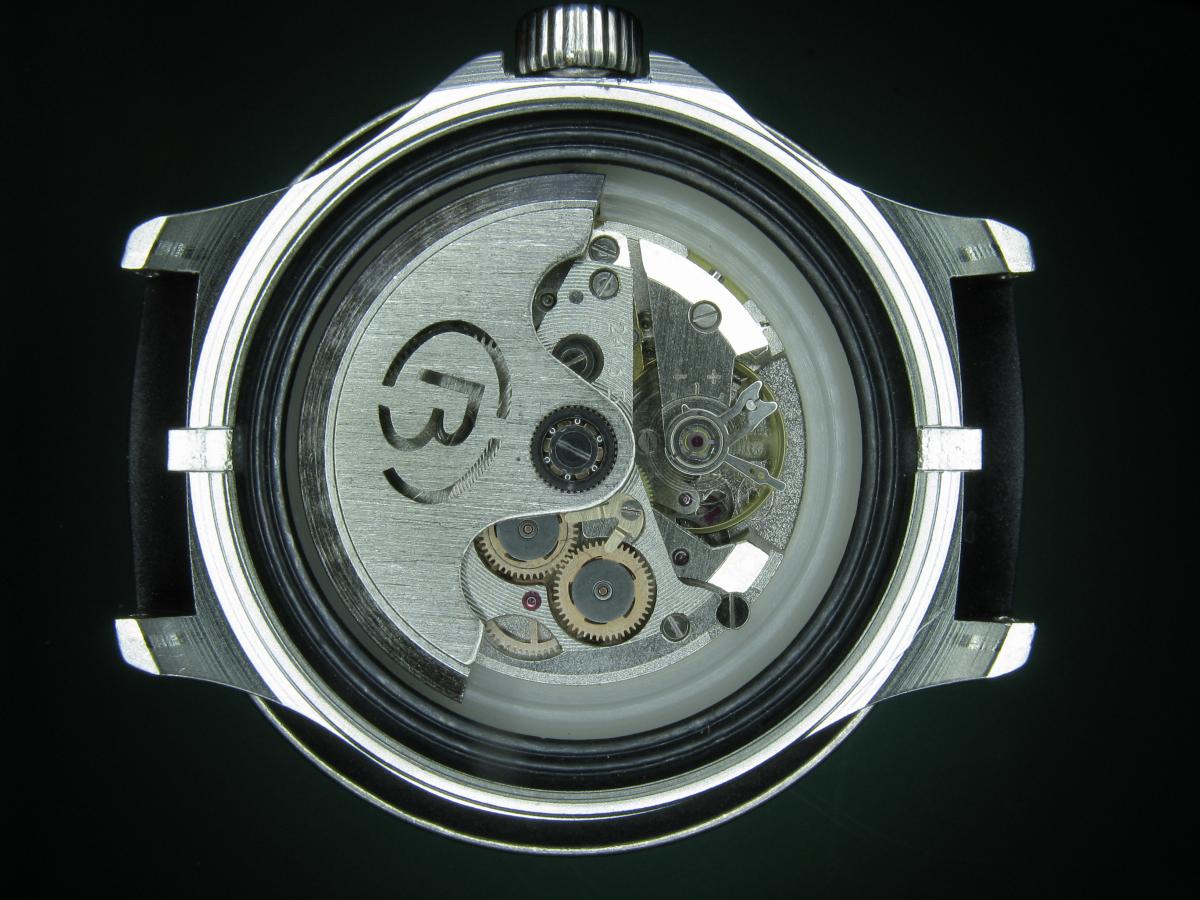
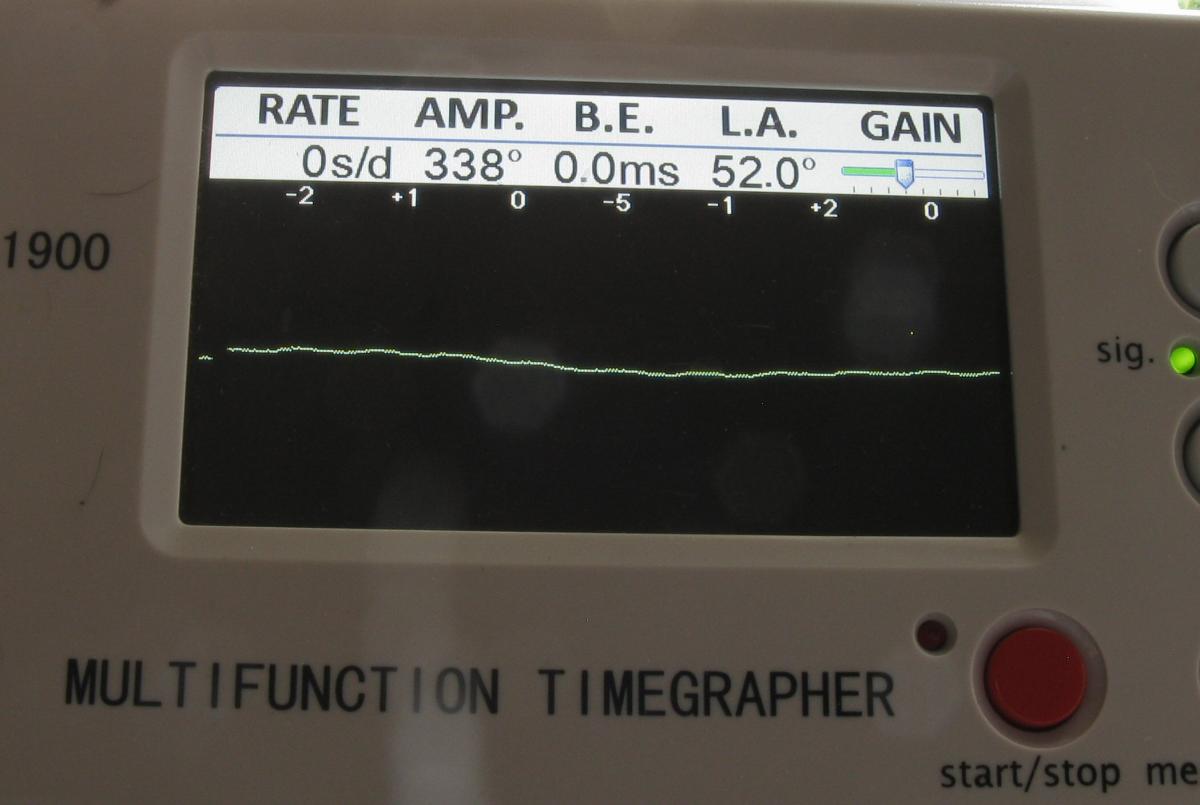

.jpg.6225a64433578a11e0218b27c20b13f5.thumb.jpg.d82b0cd1e370f3a3a59a06afa957d184.jpg)

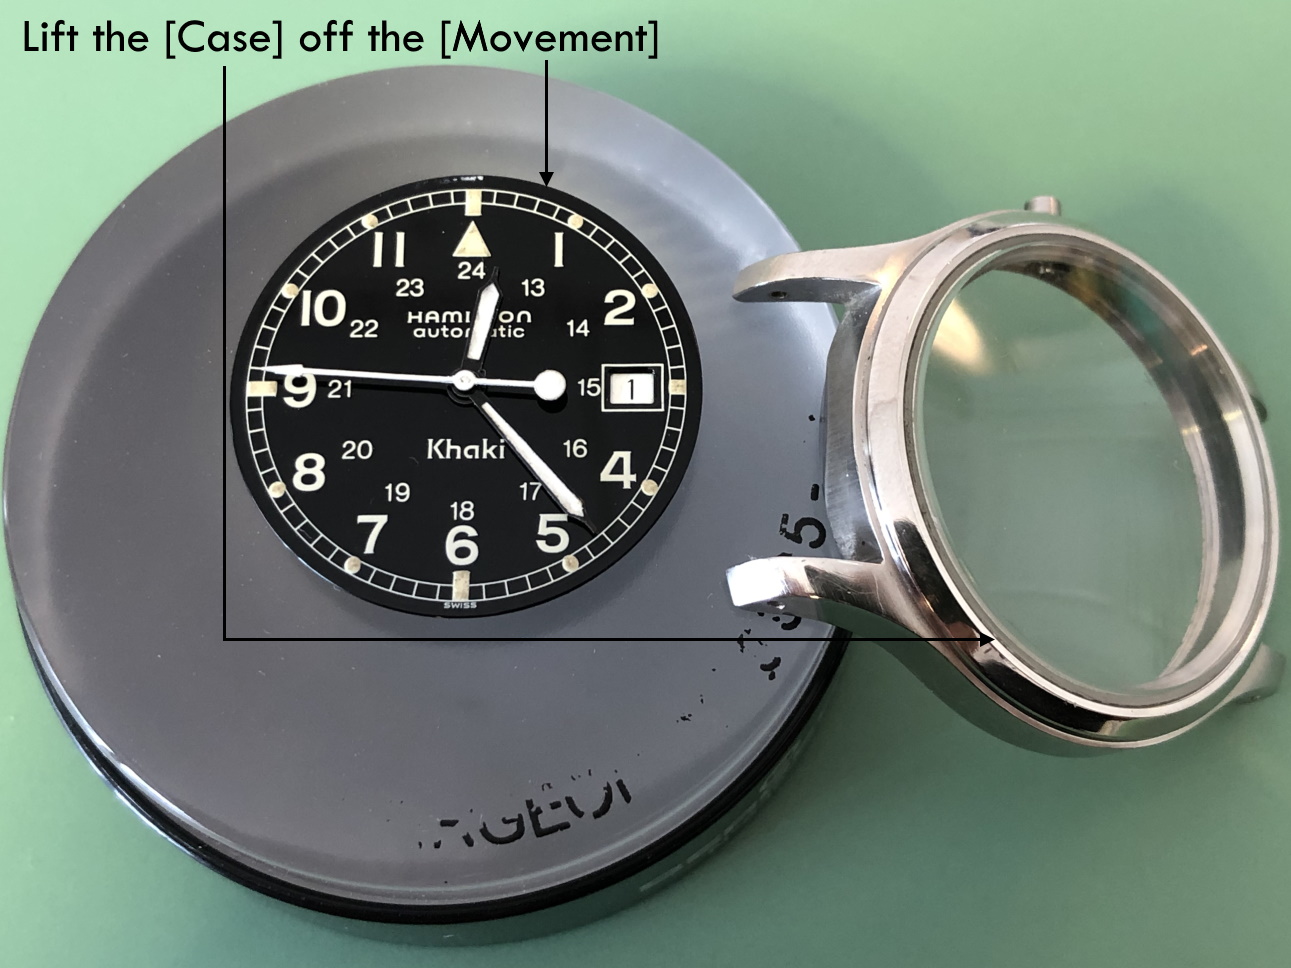
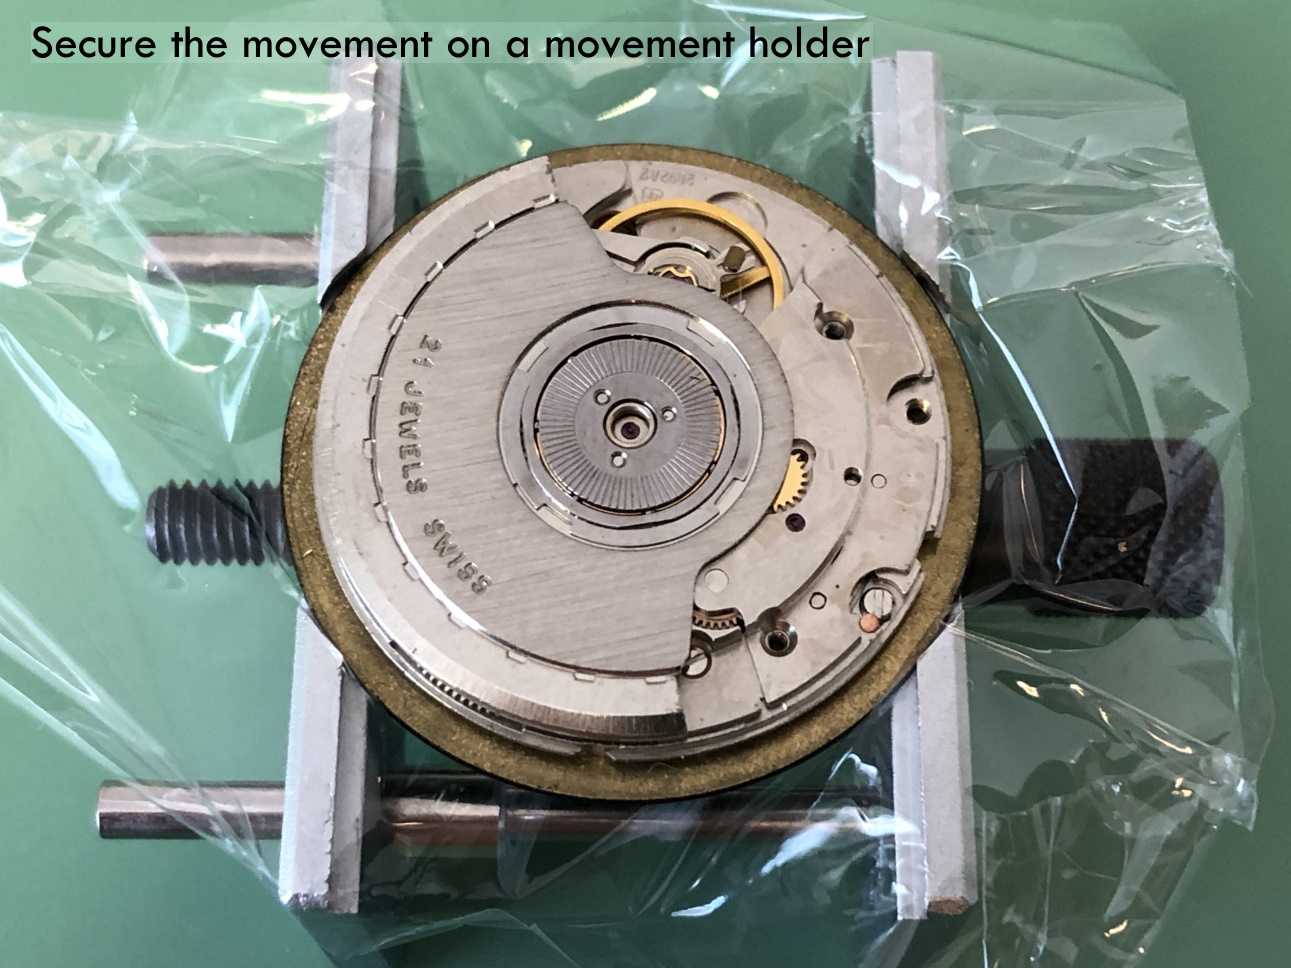


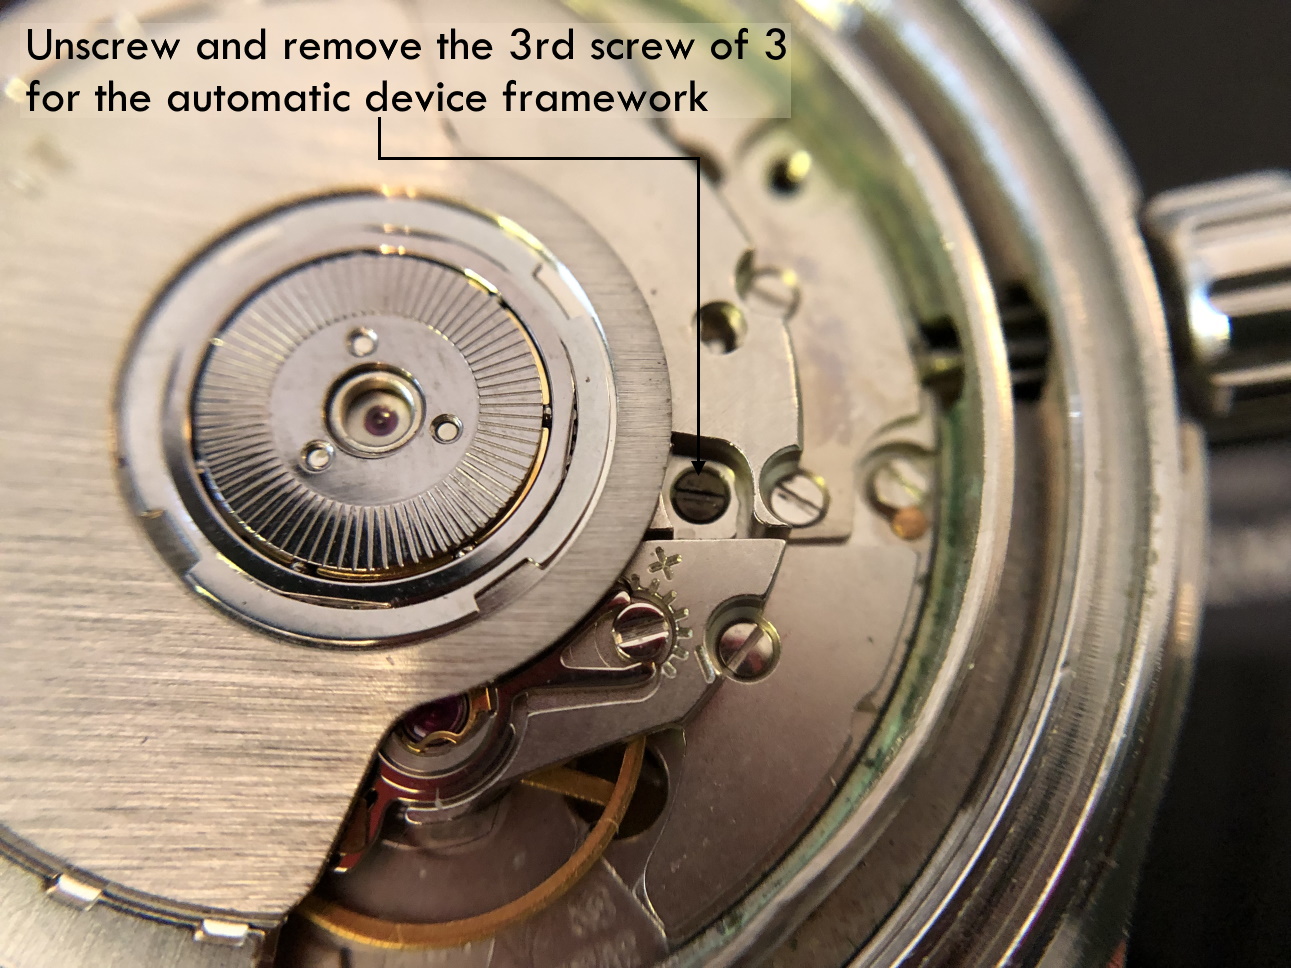
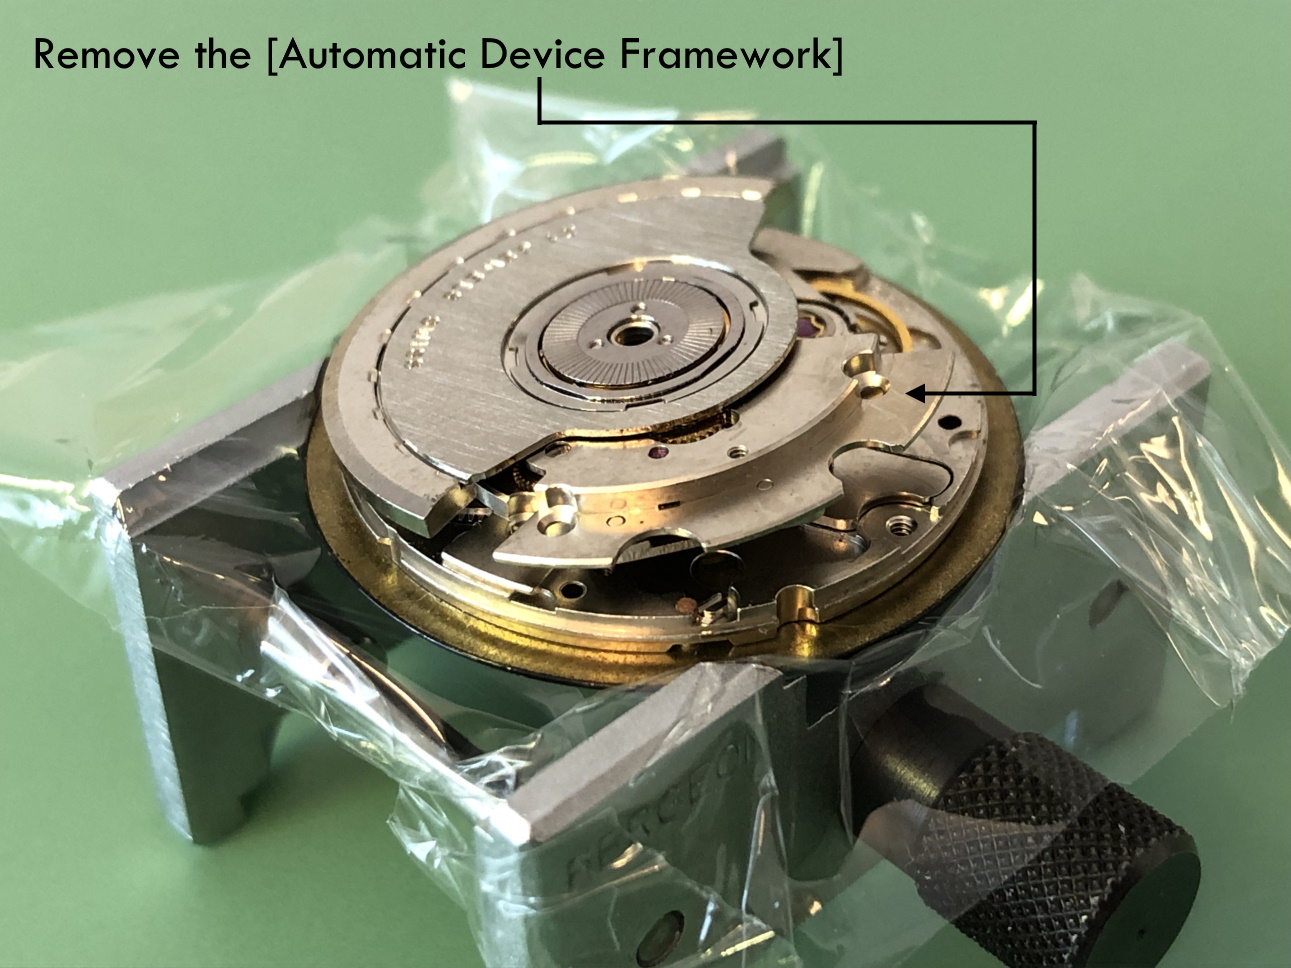


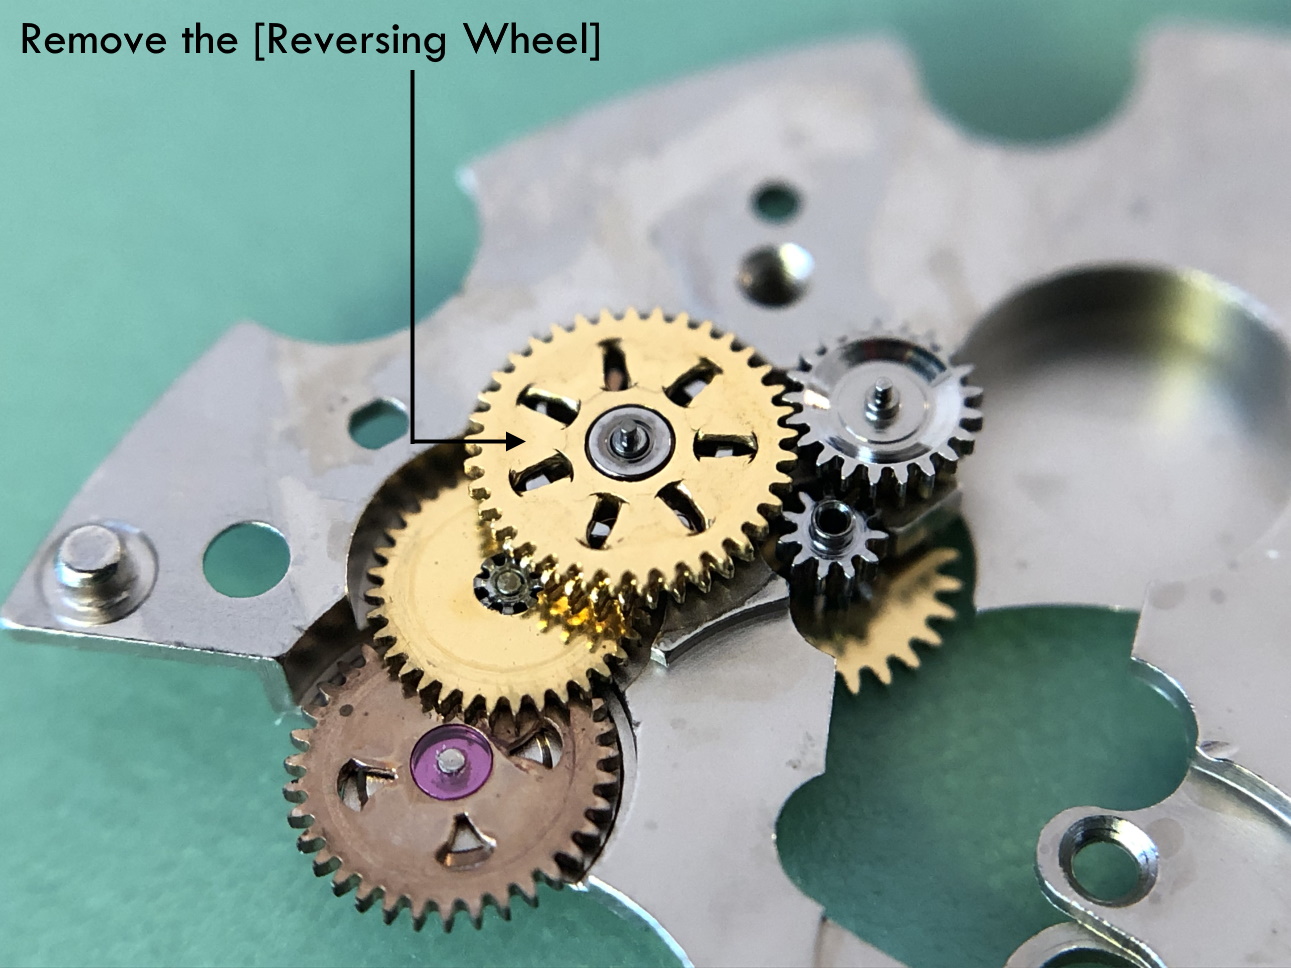


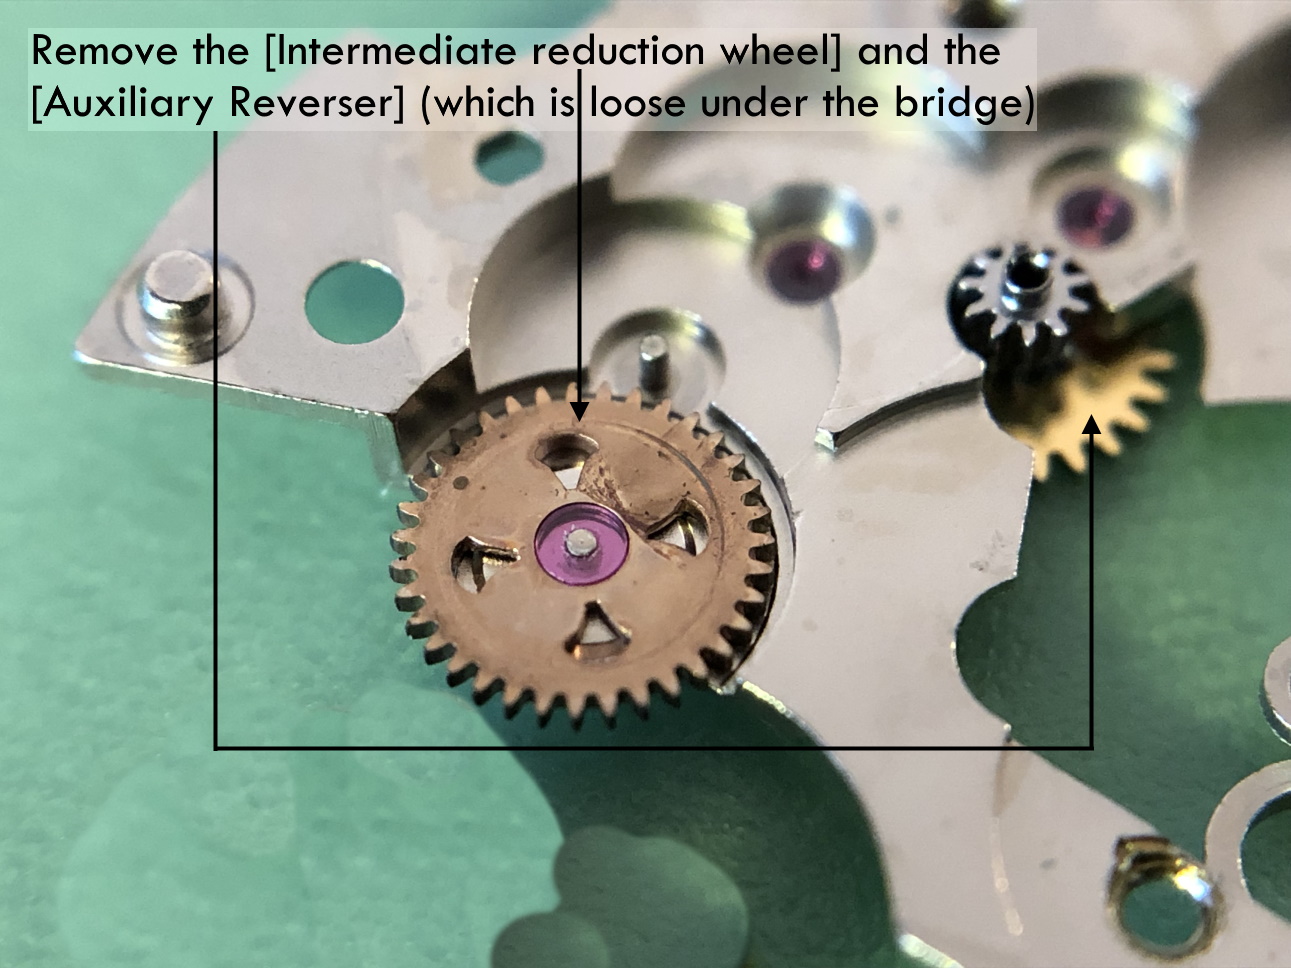
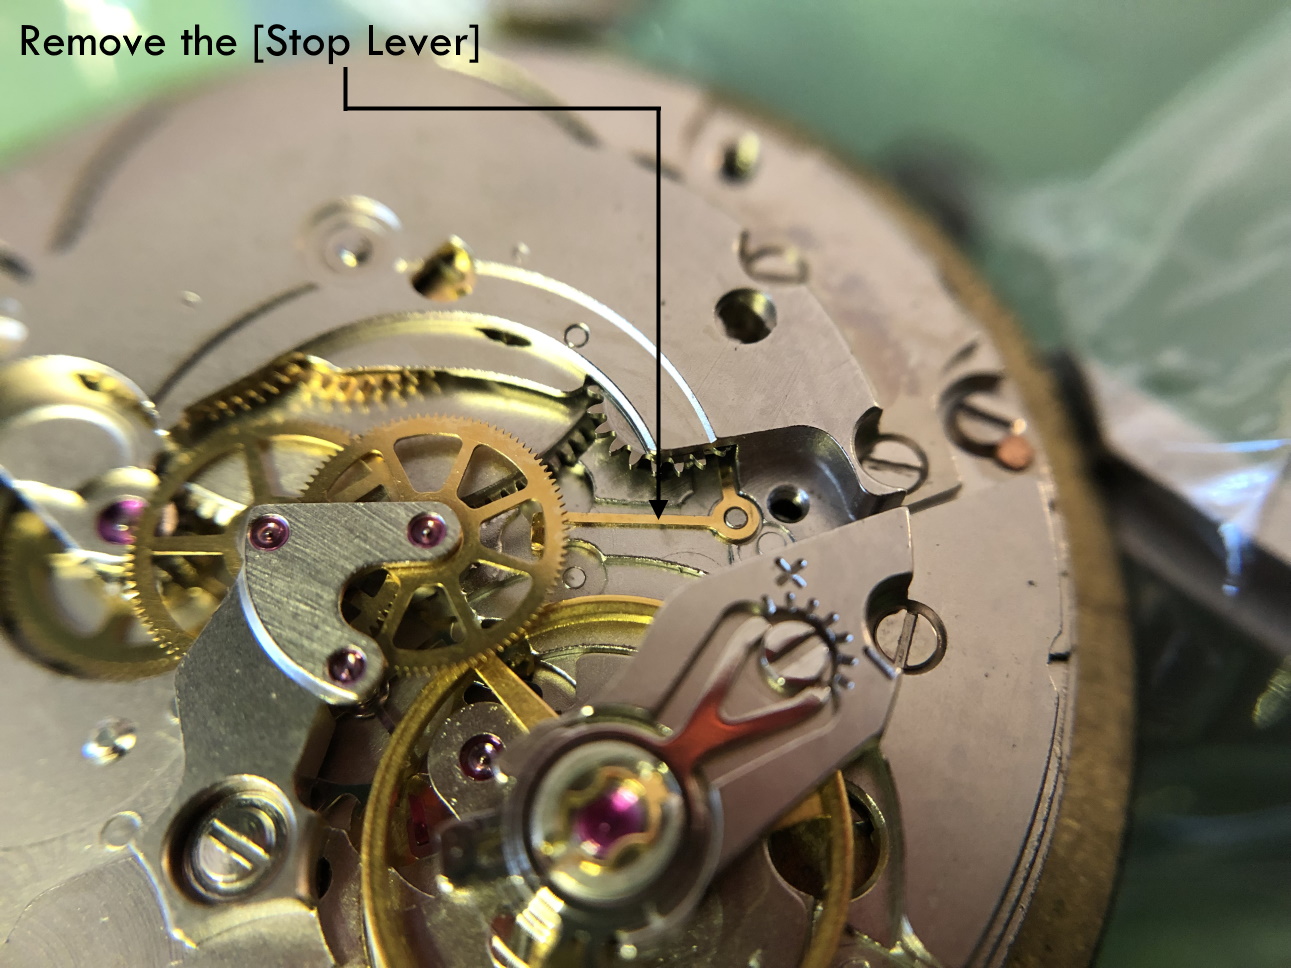
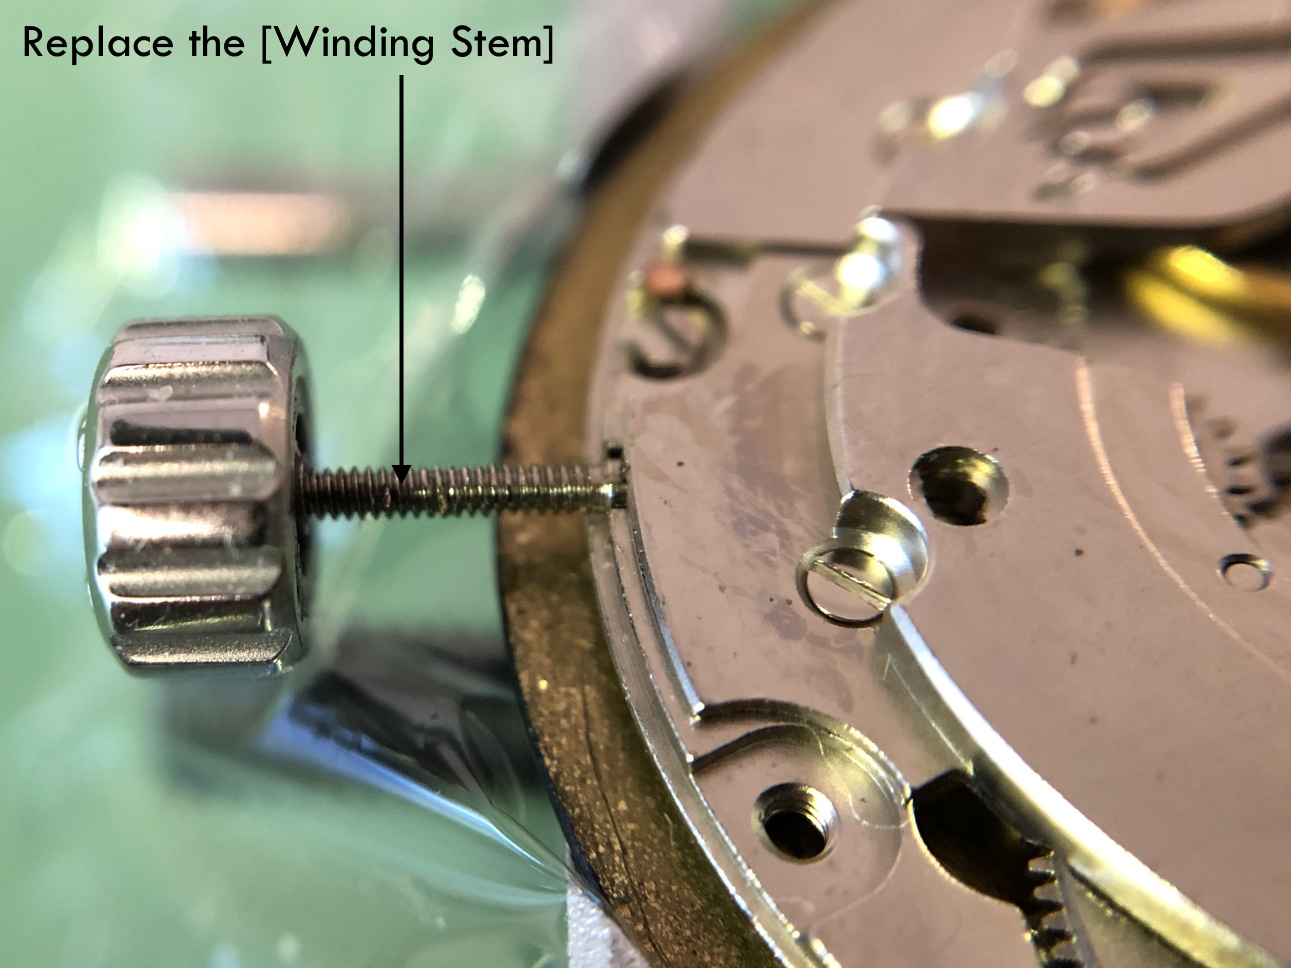
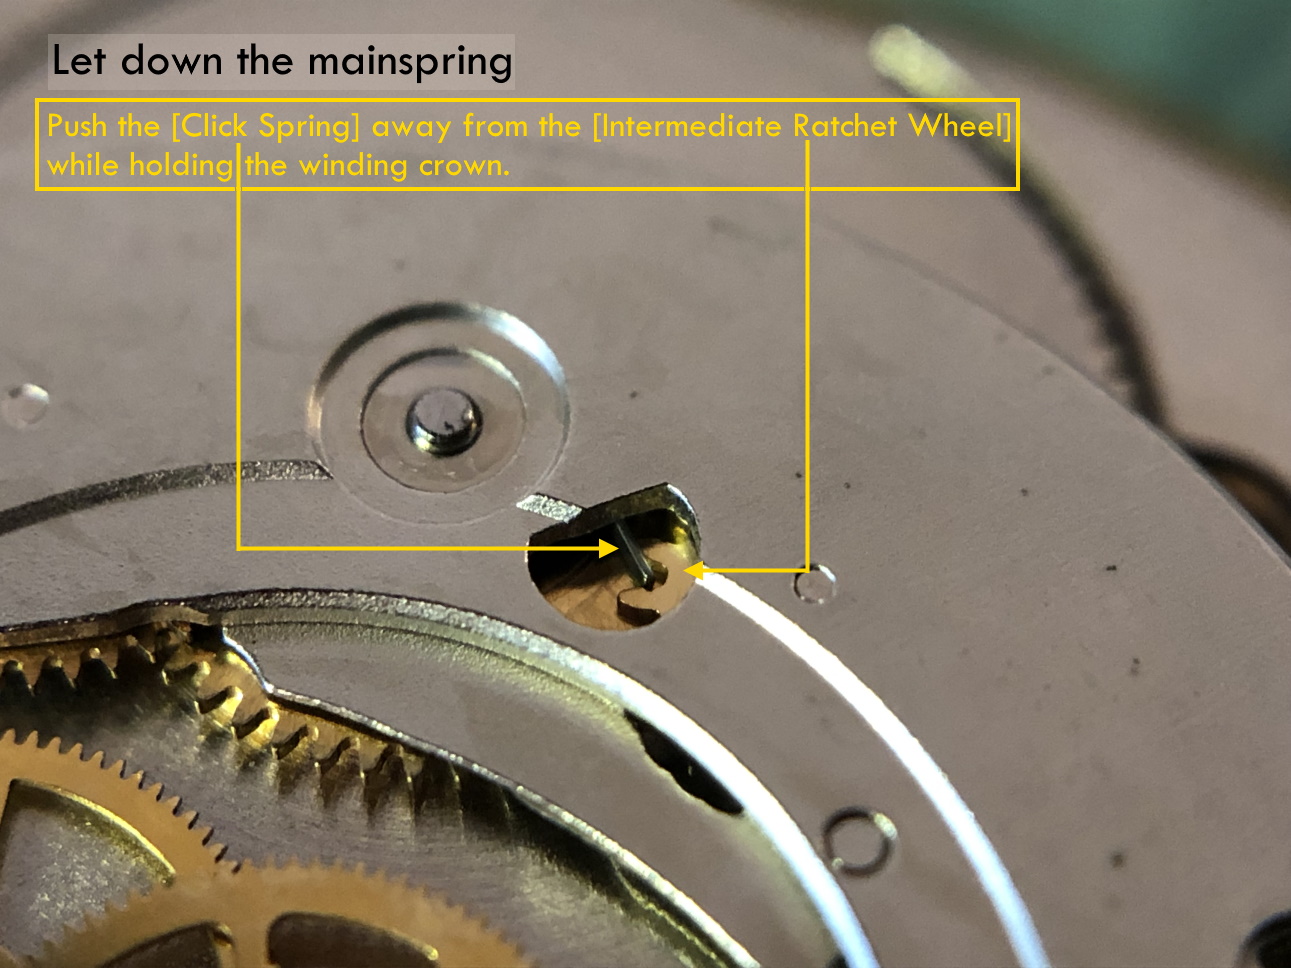
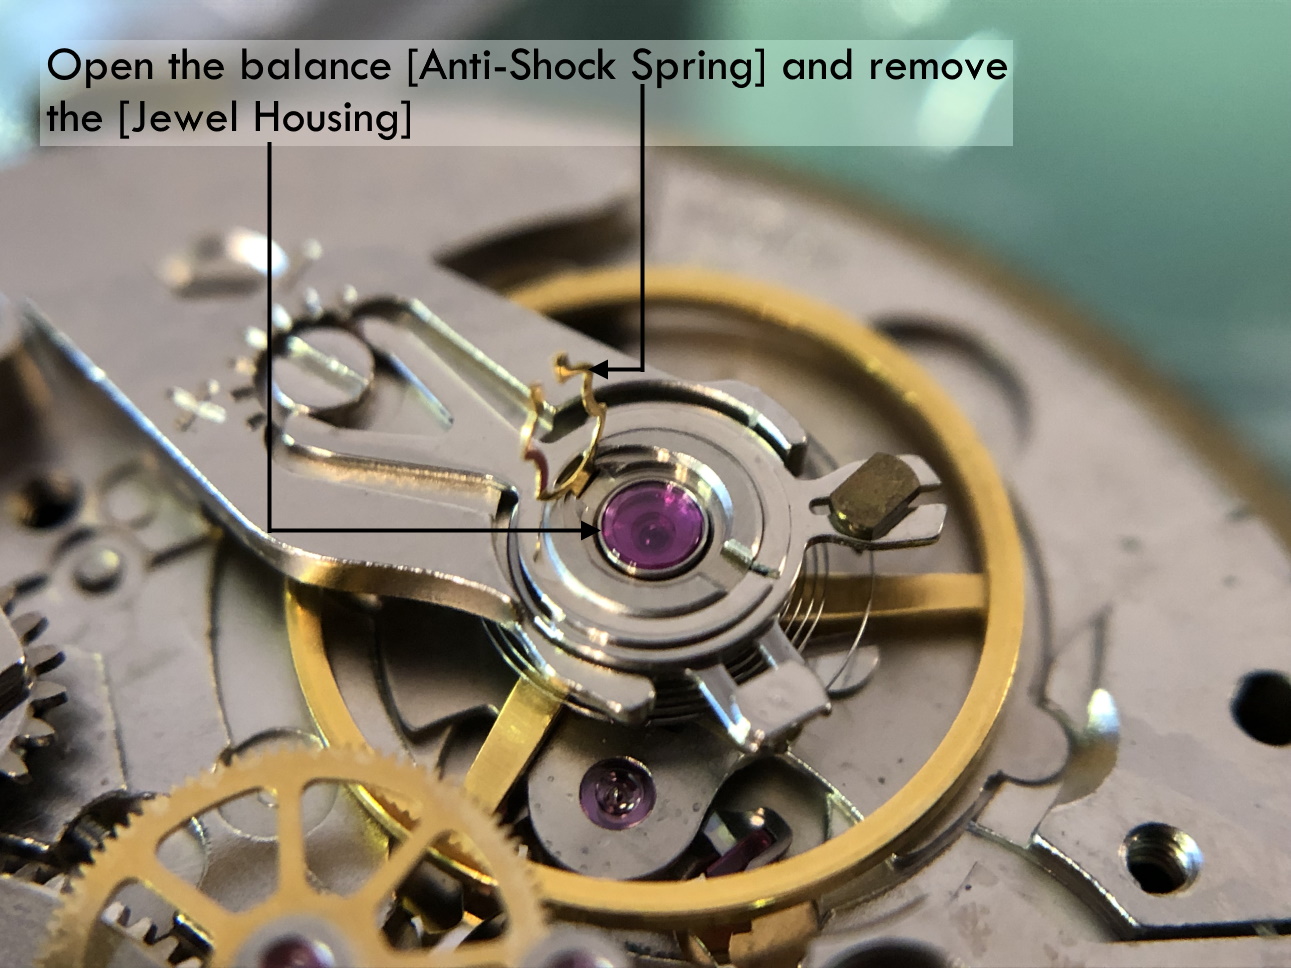
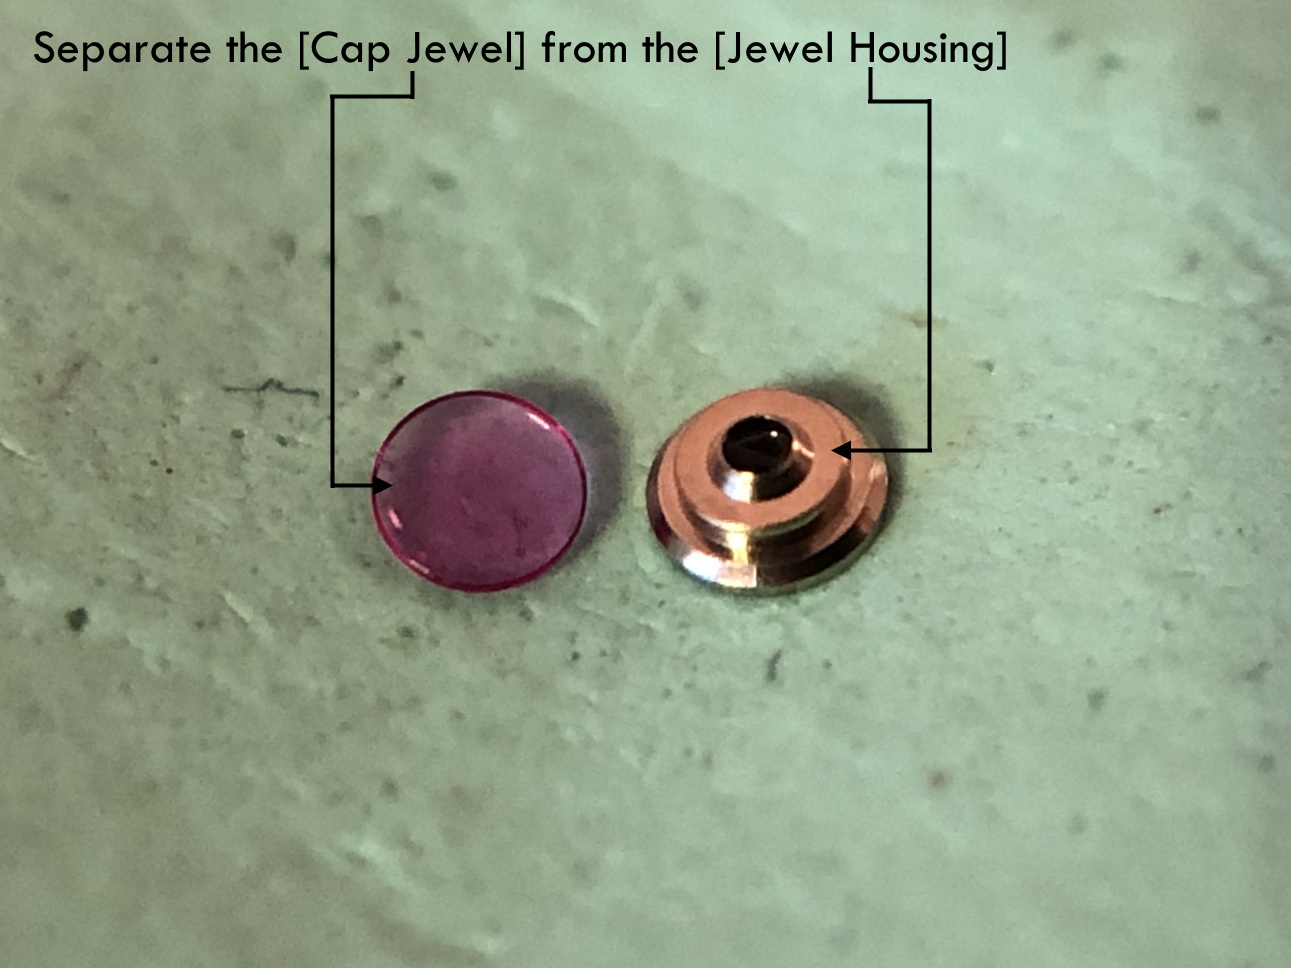


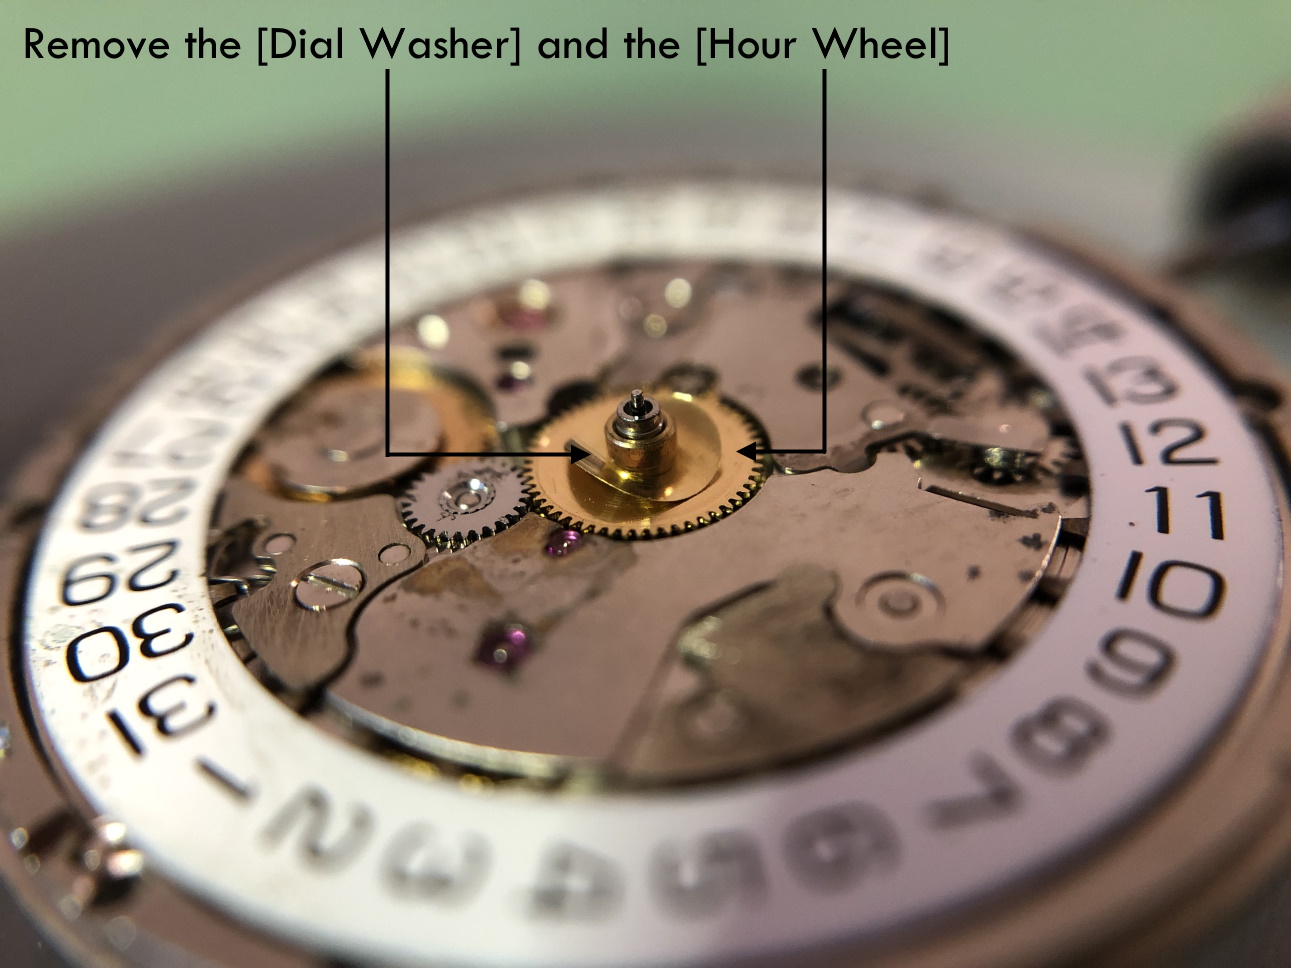
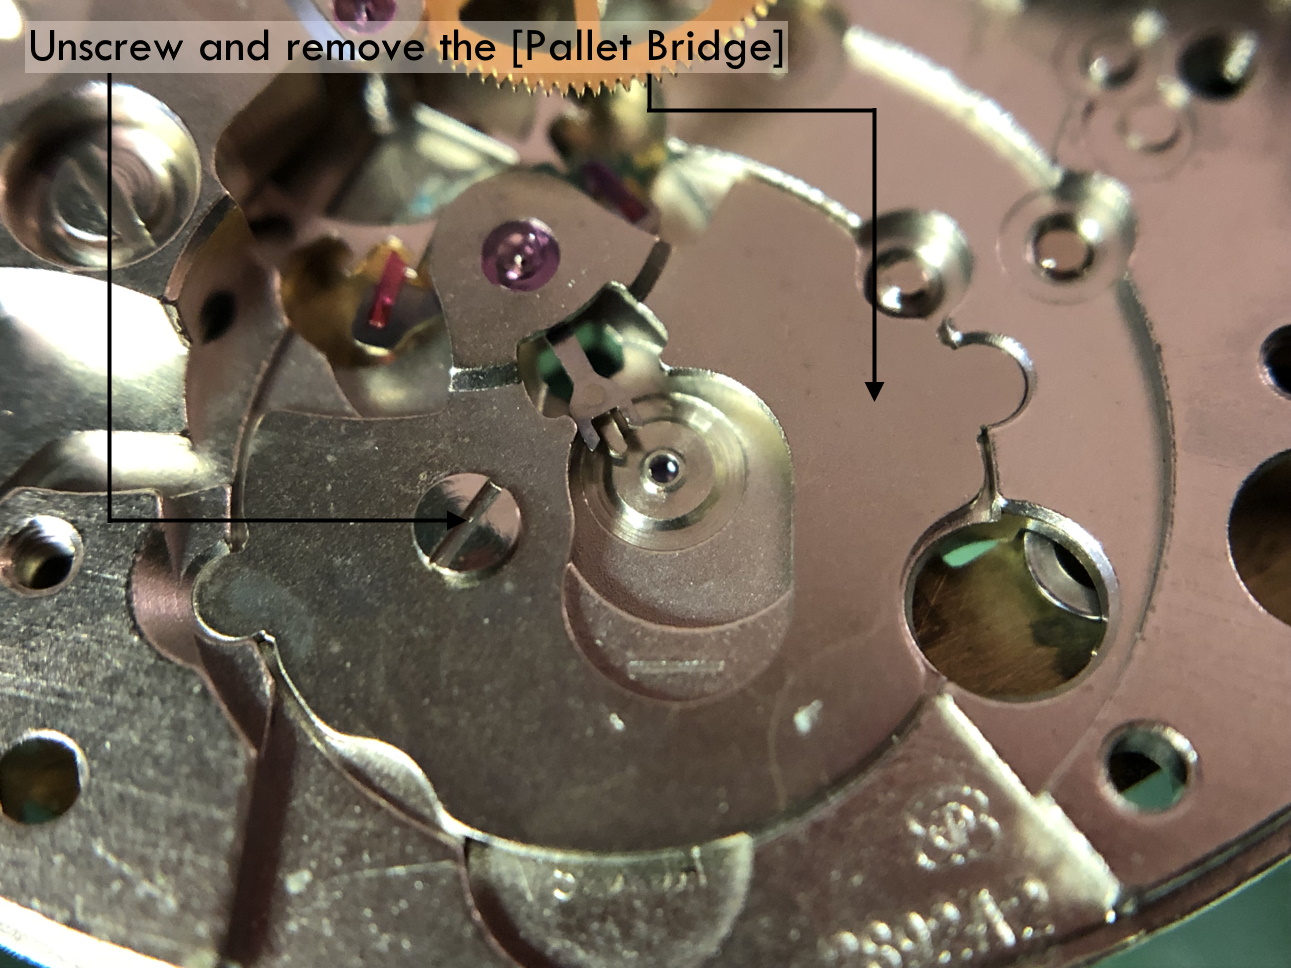


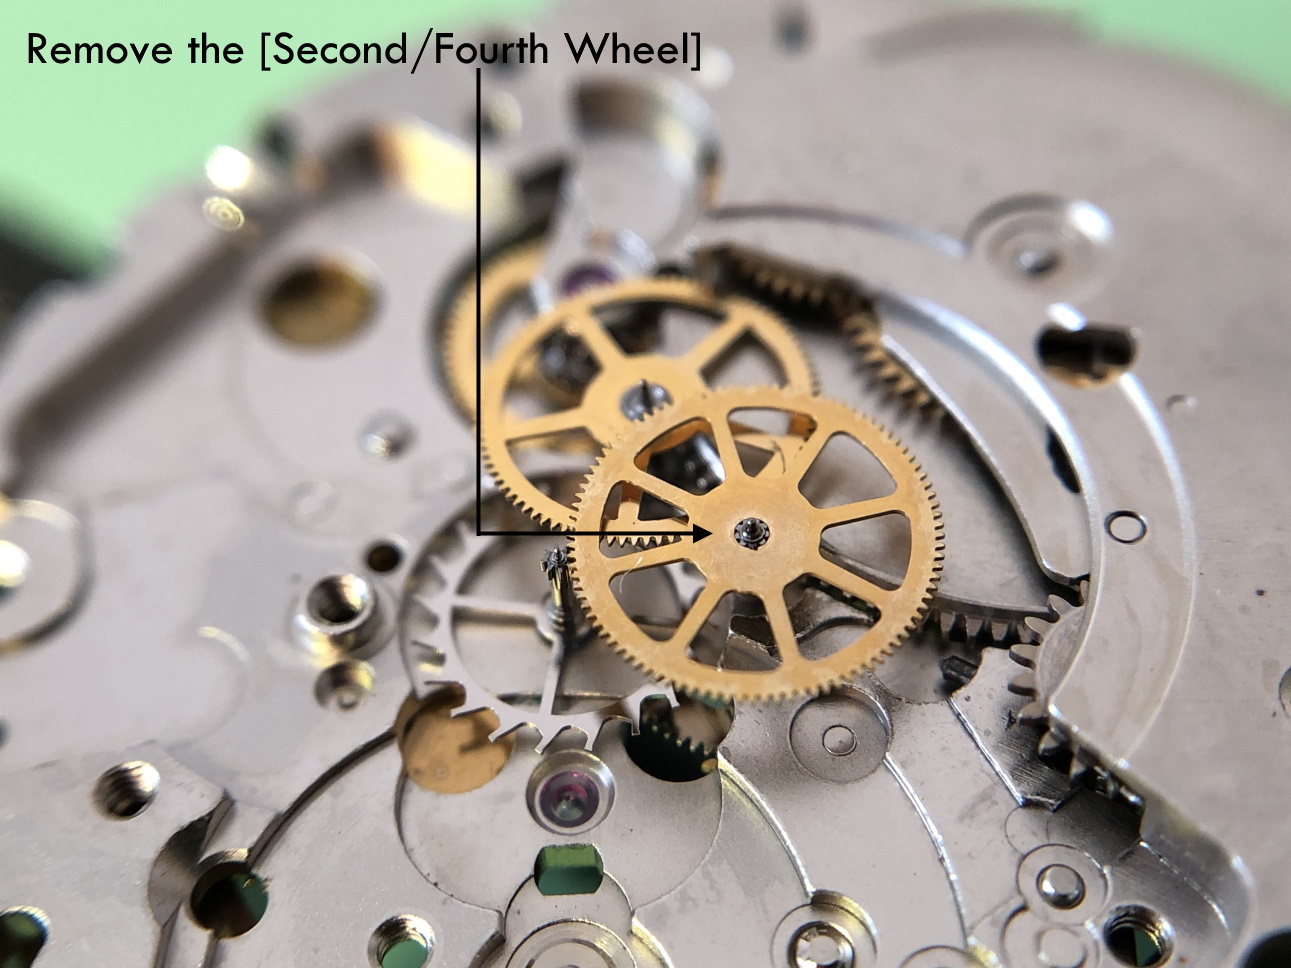
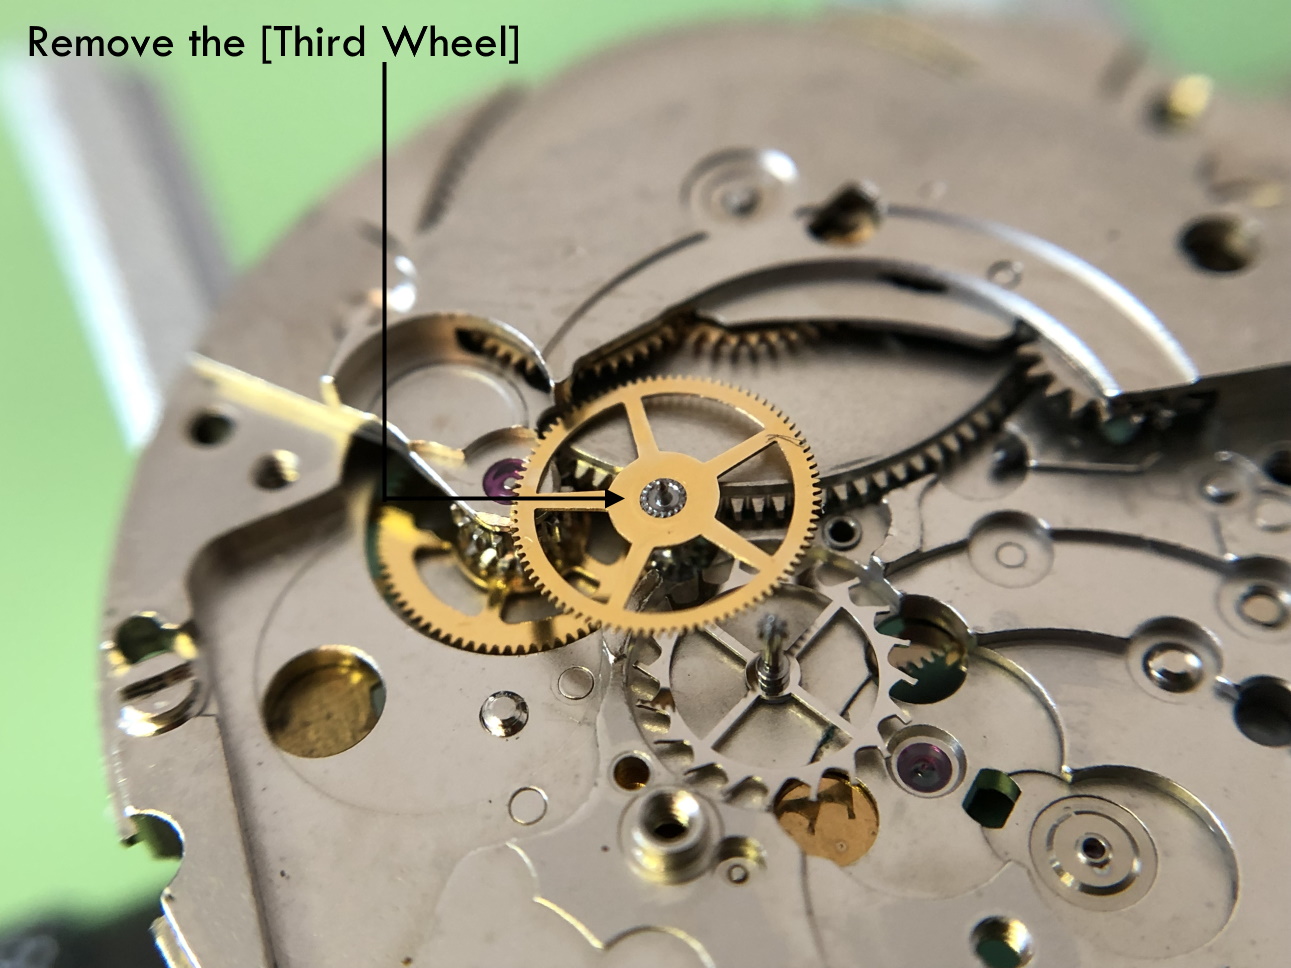
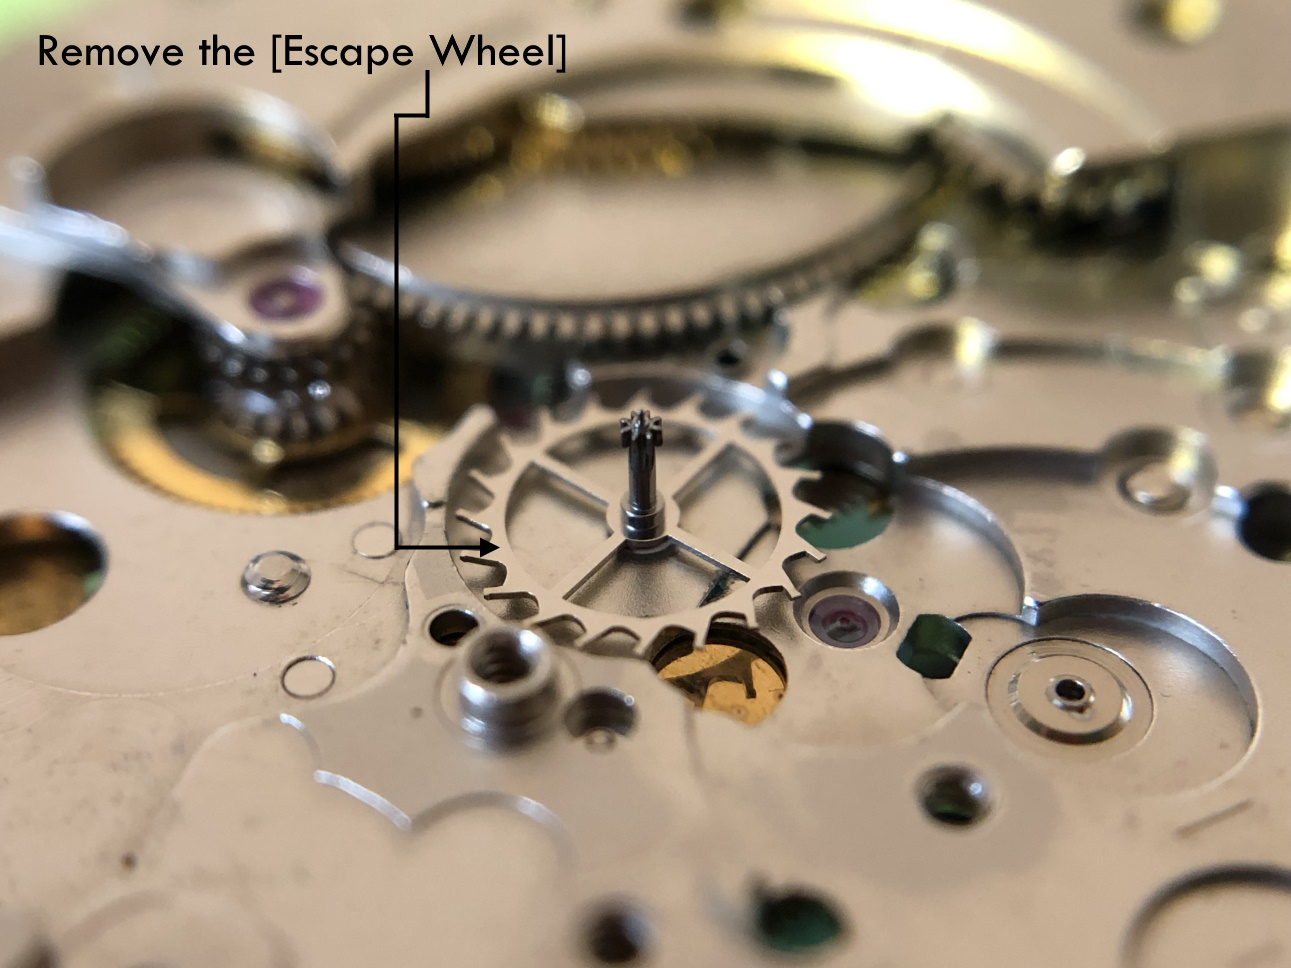
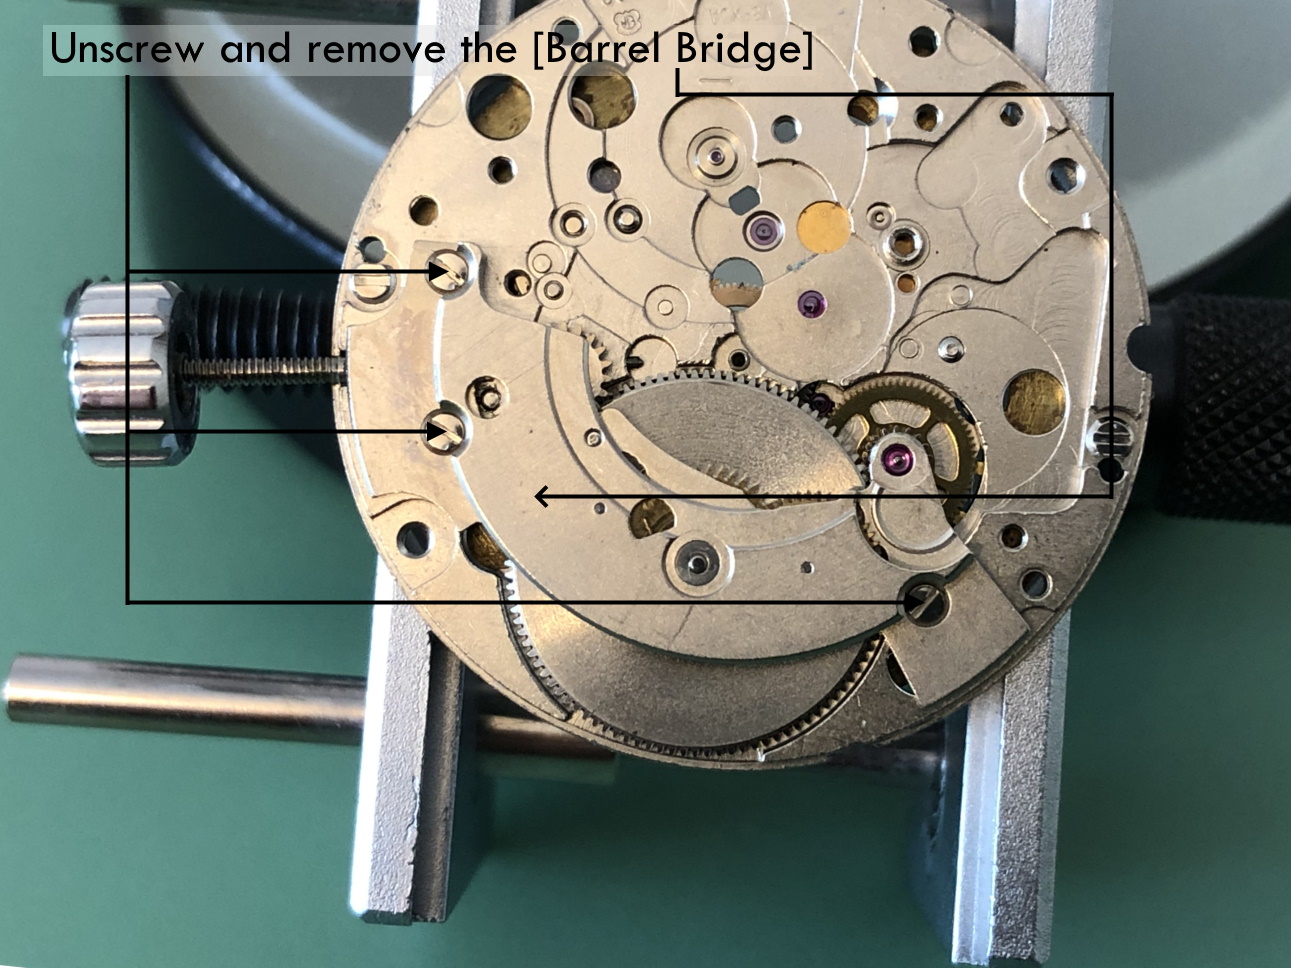
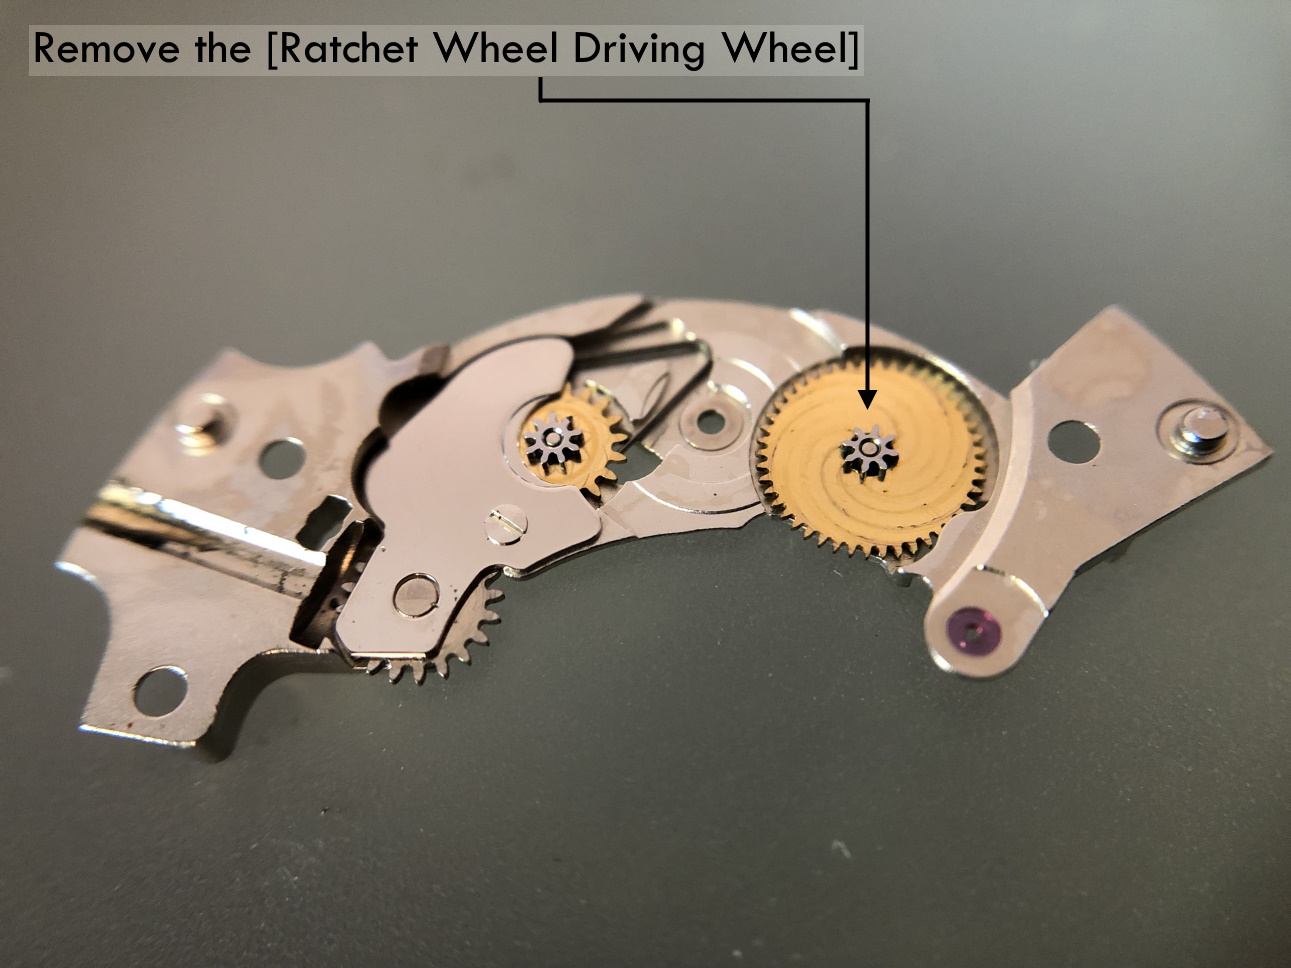
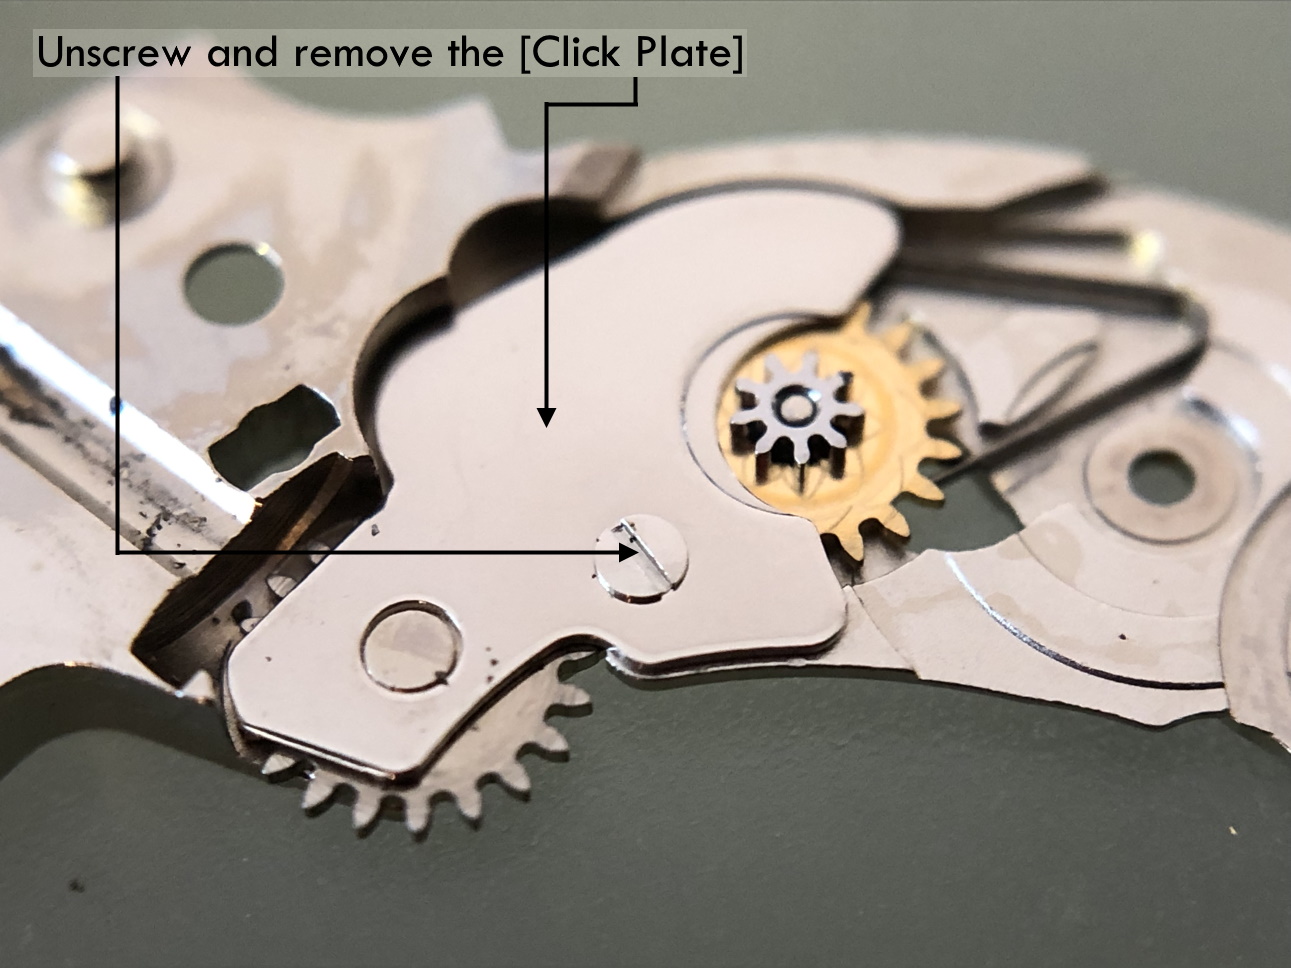


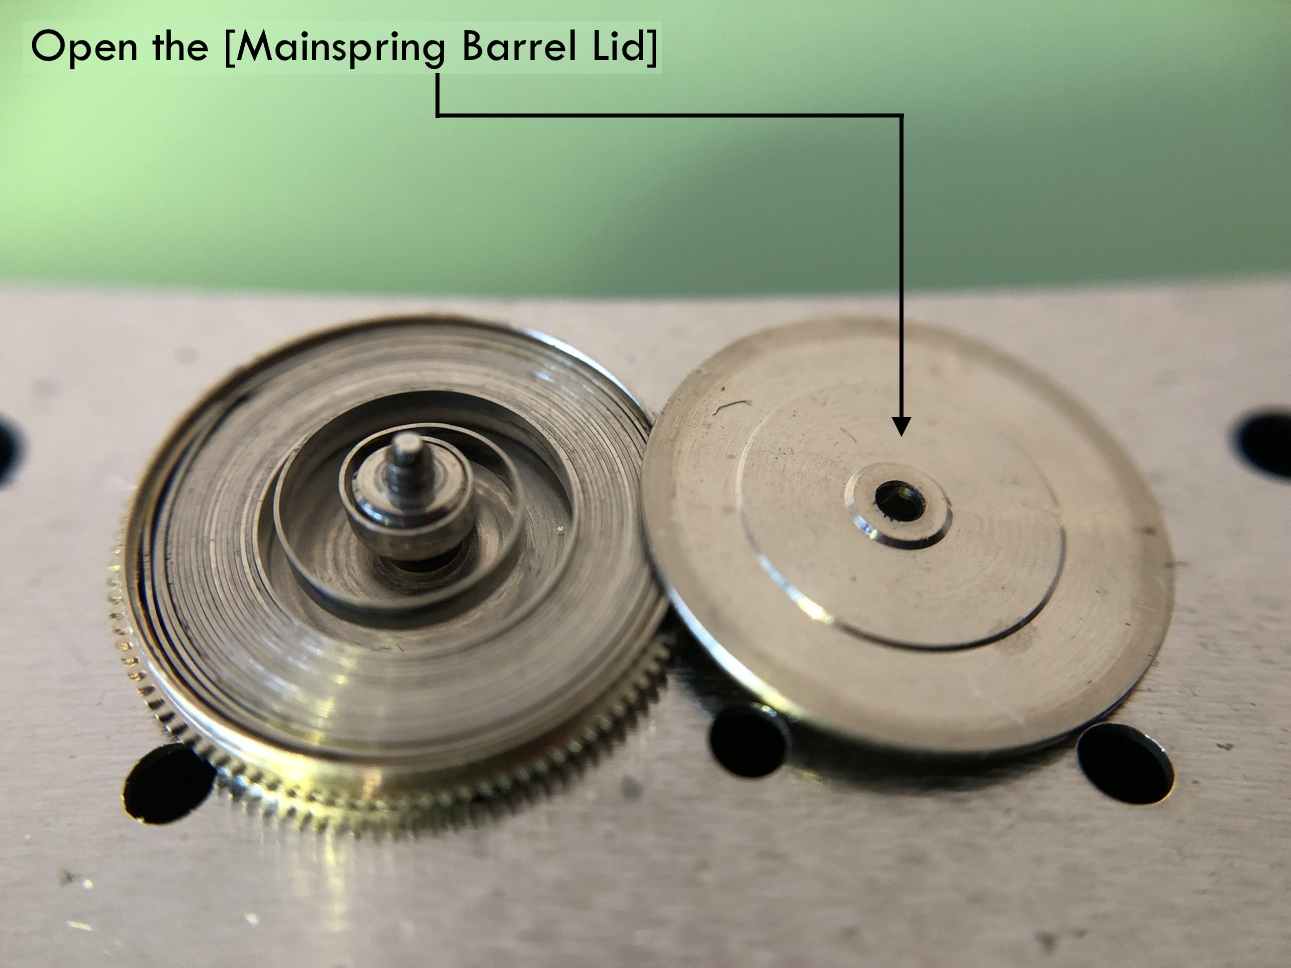

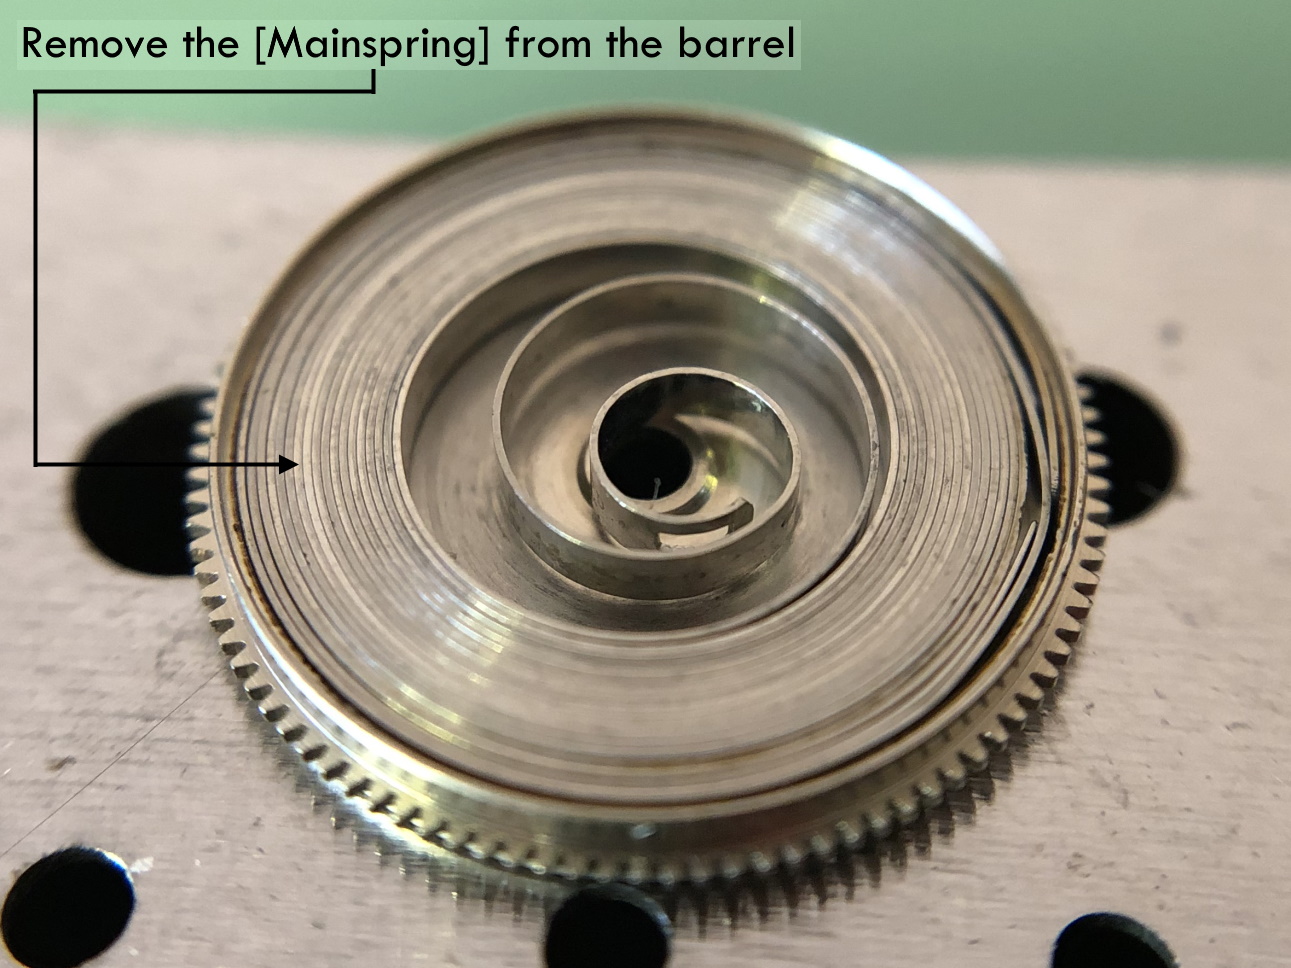
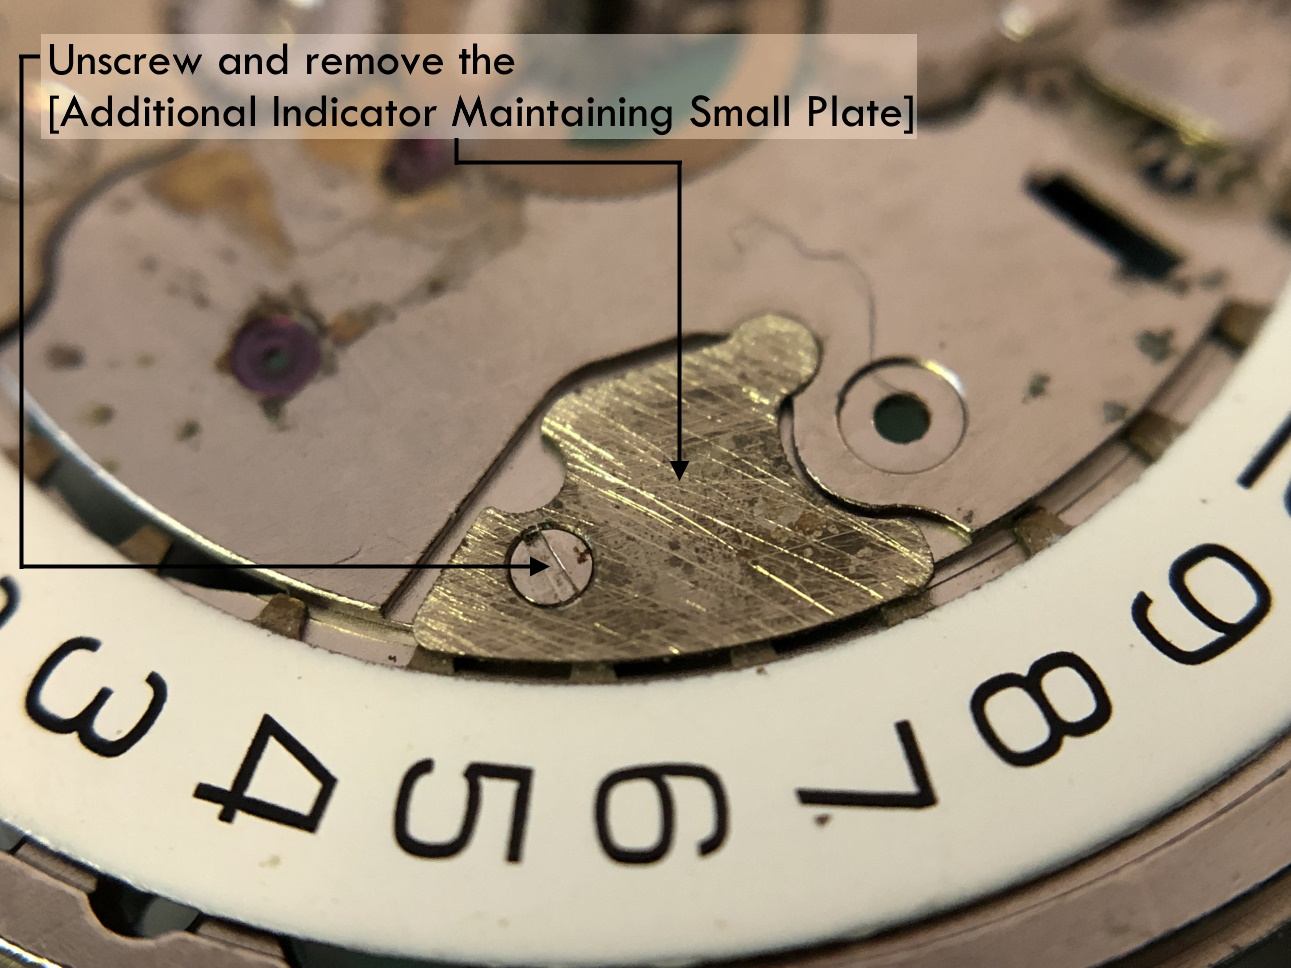
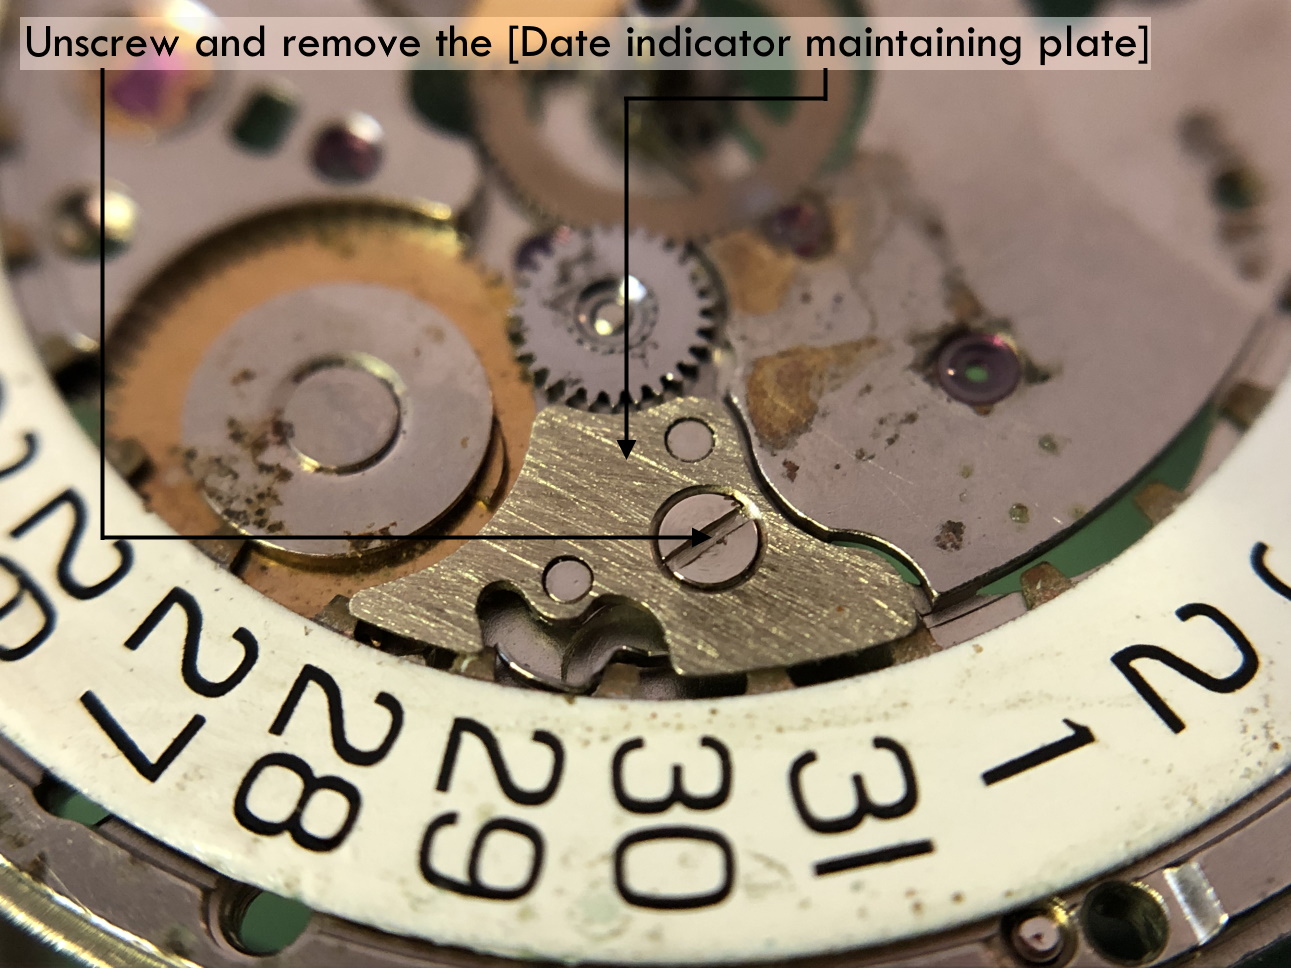
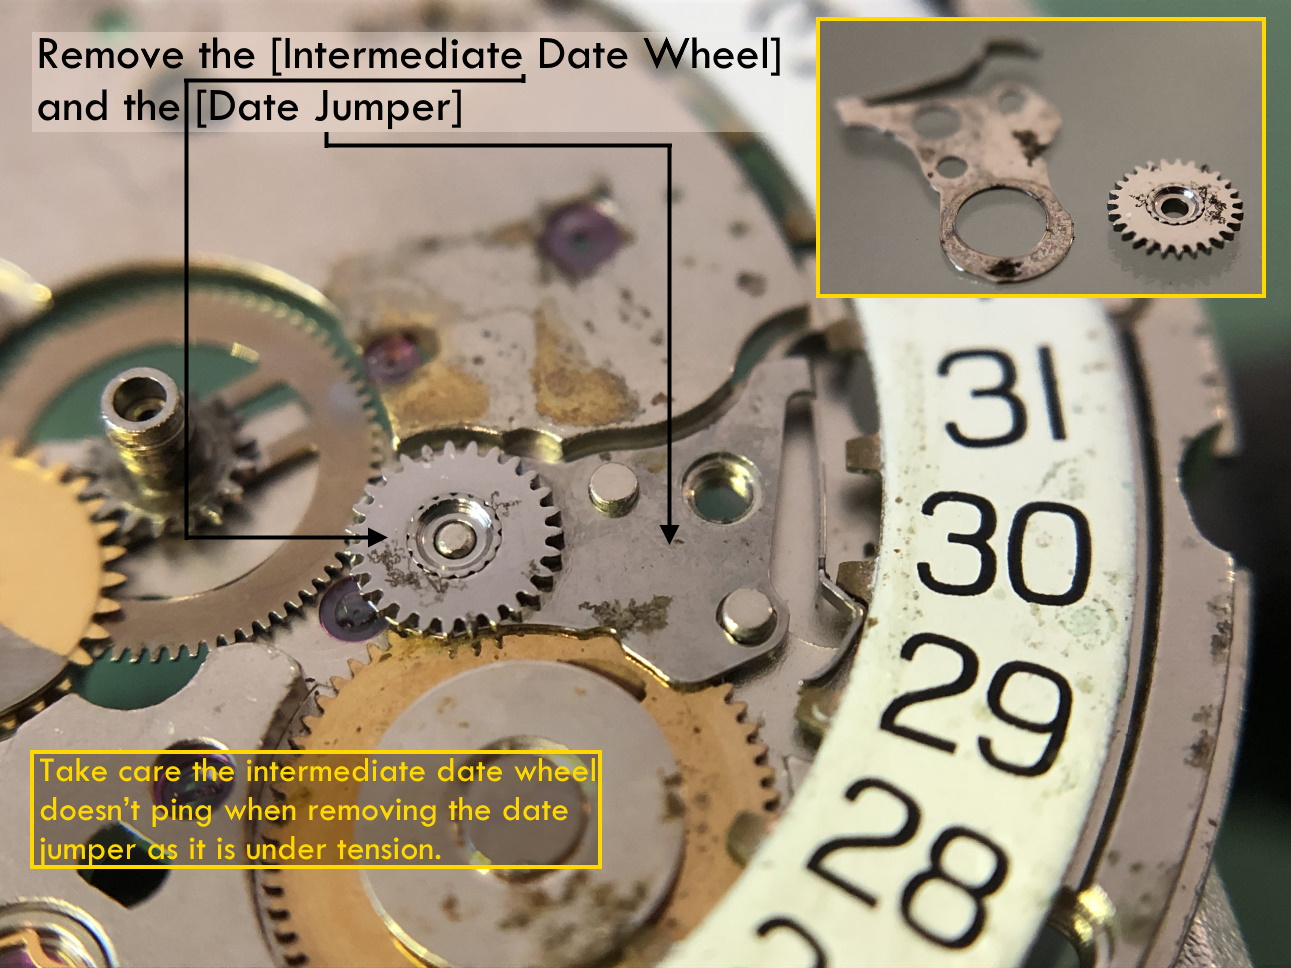


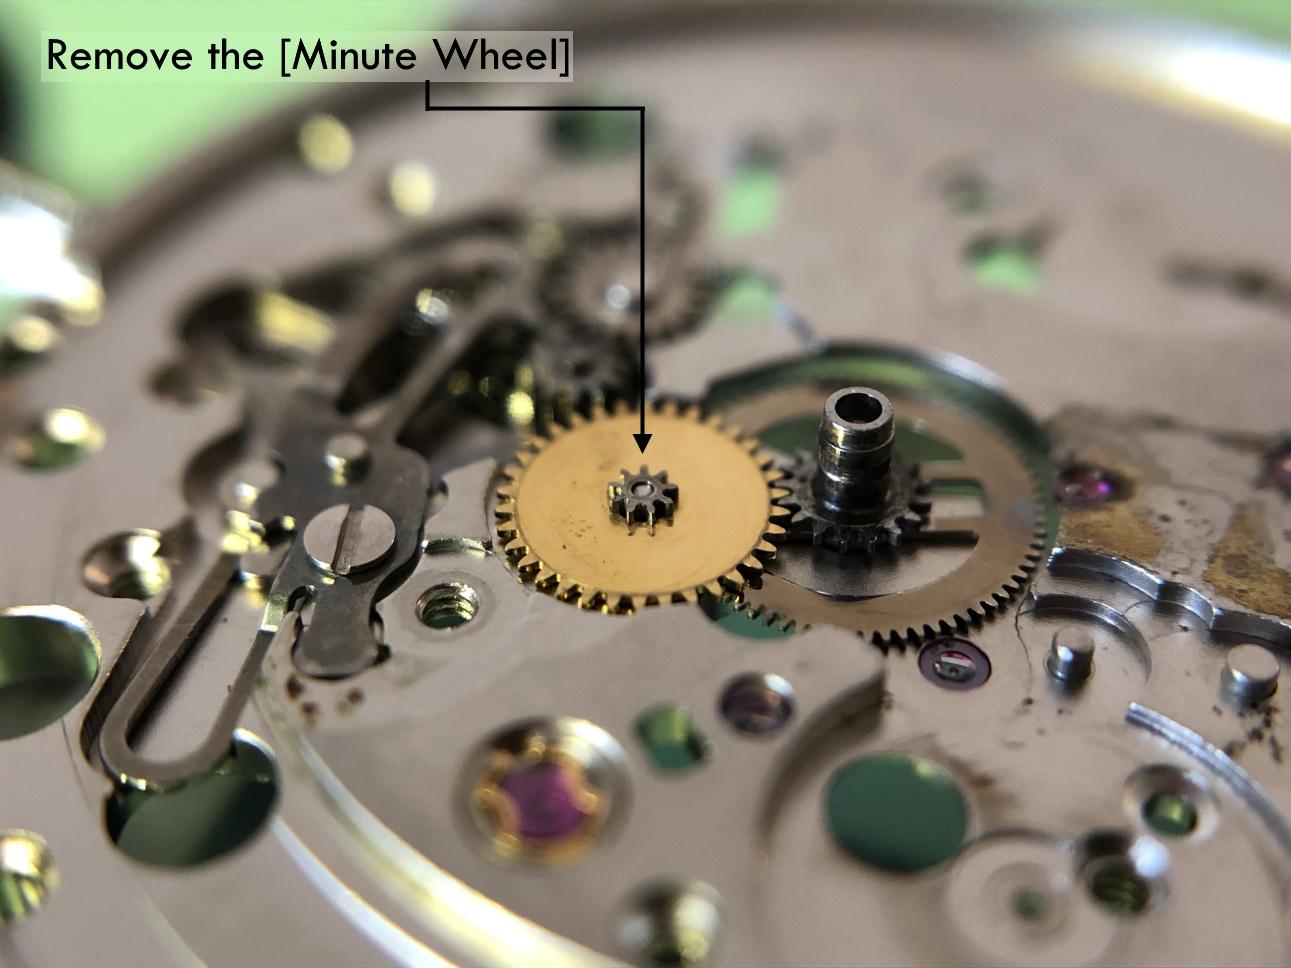


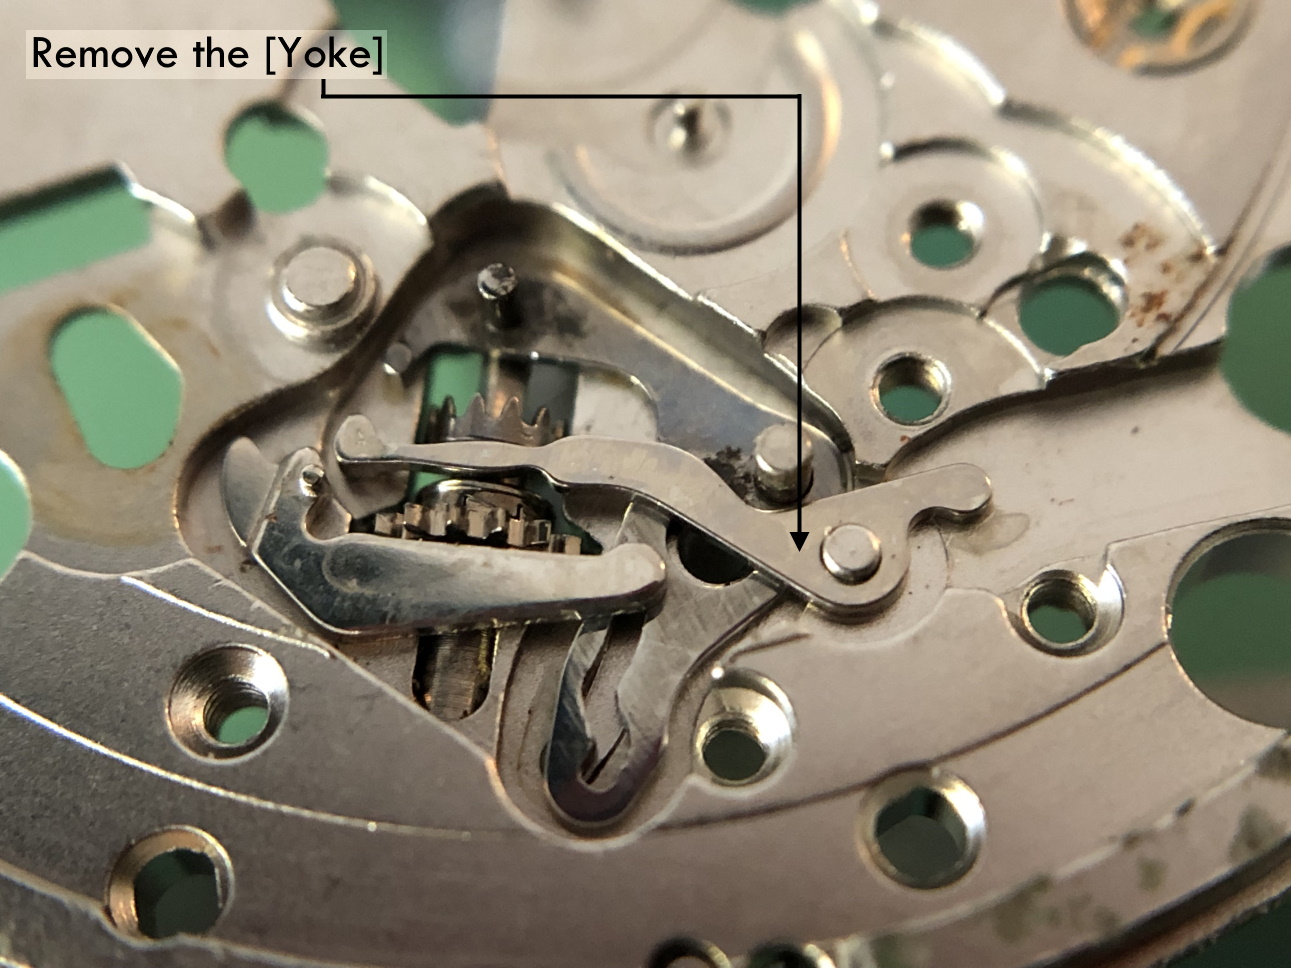
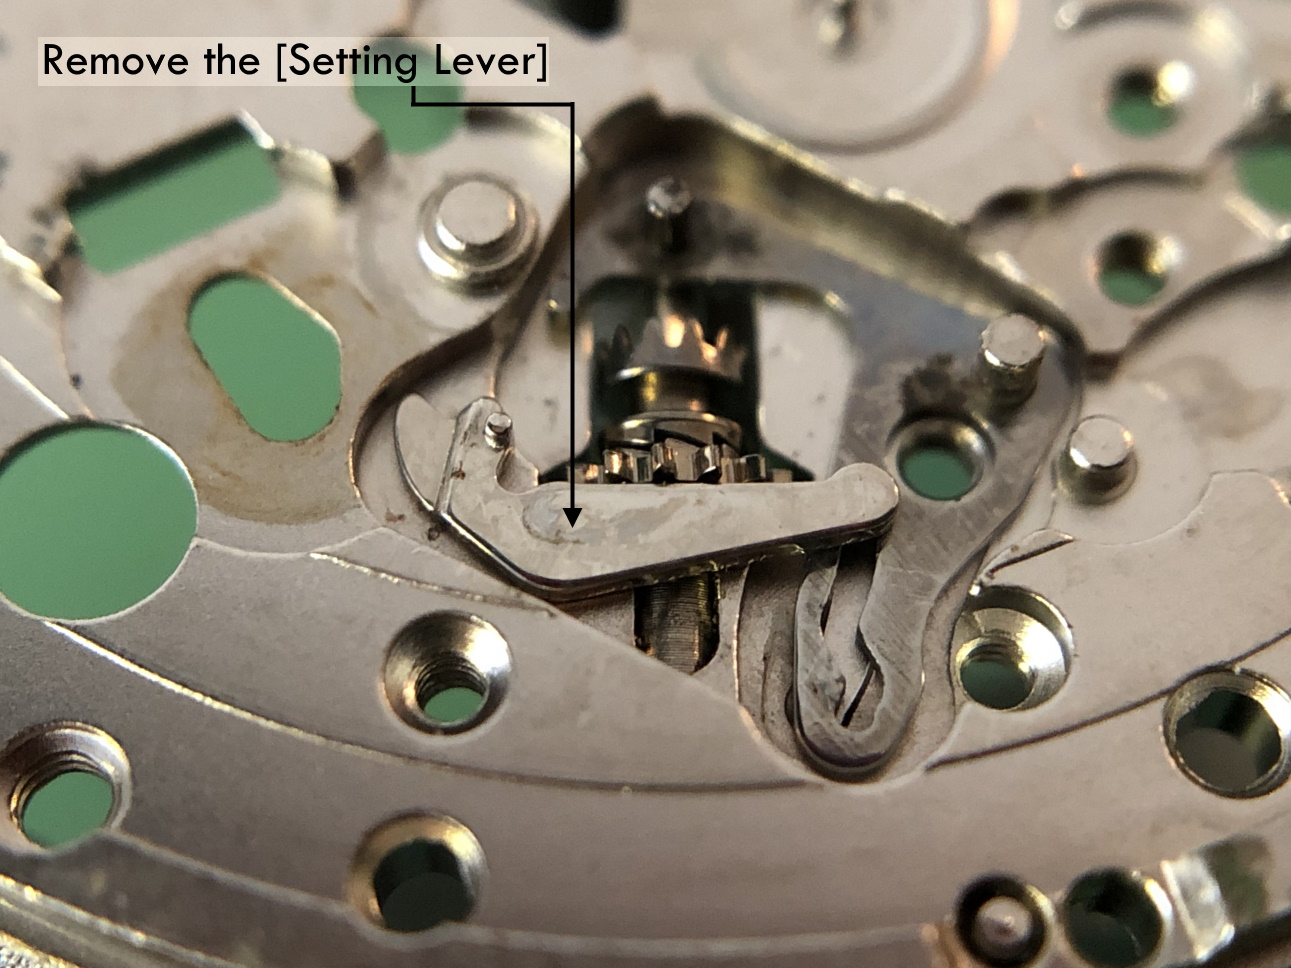

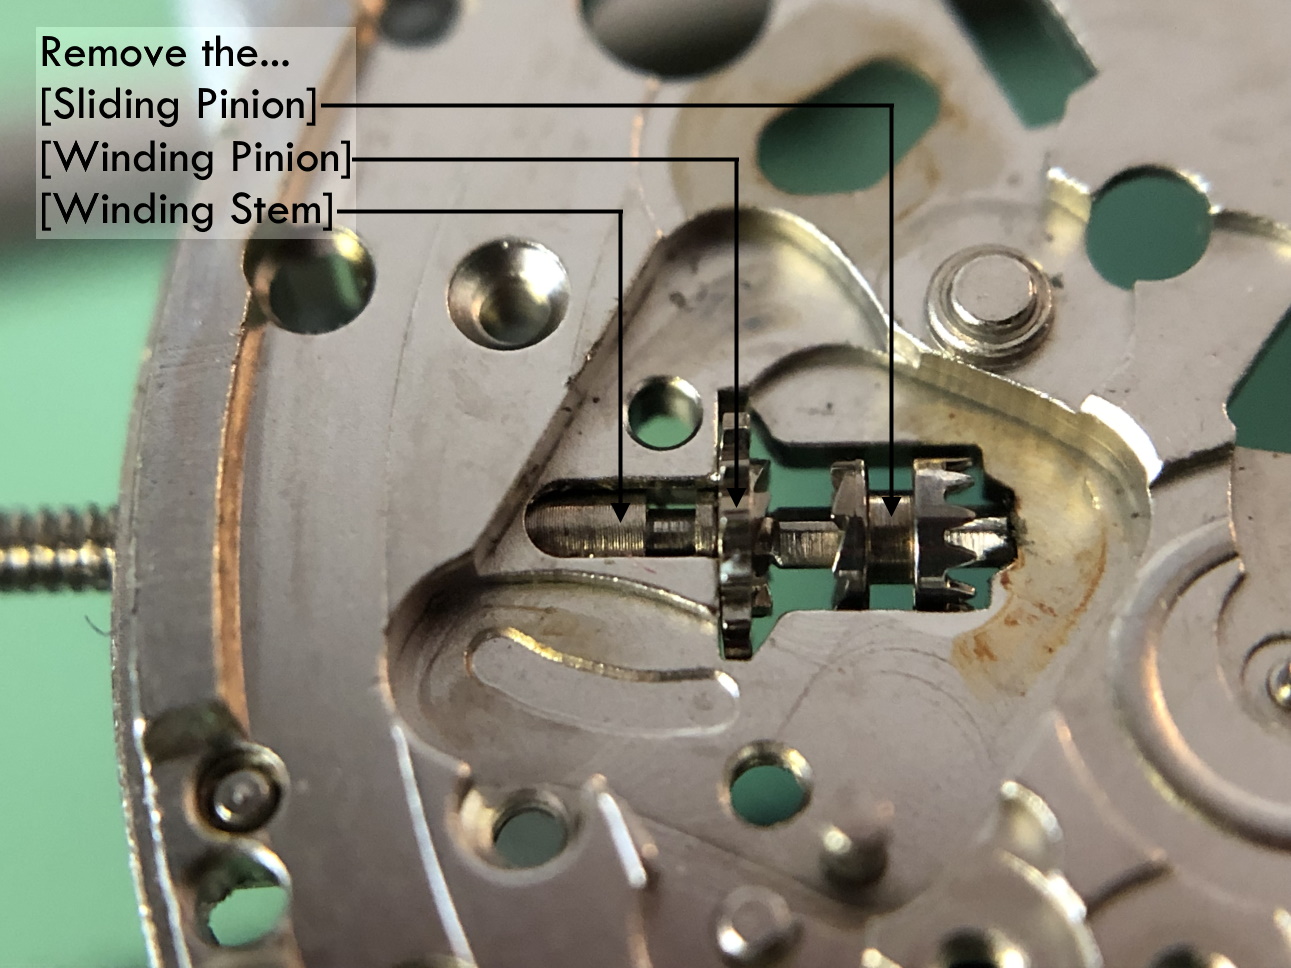
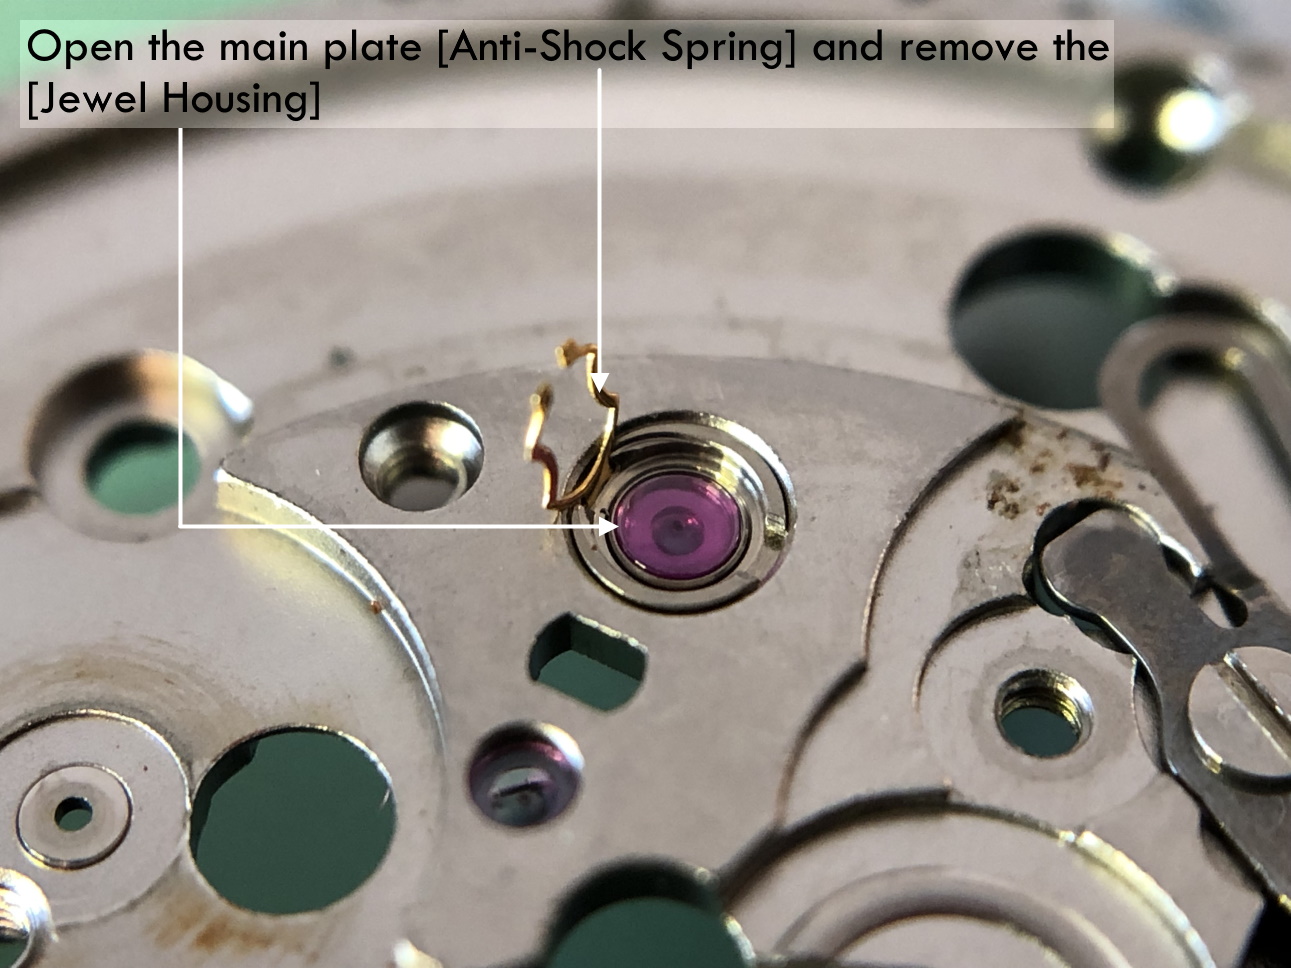

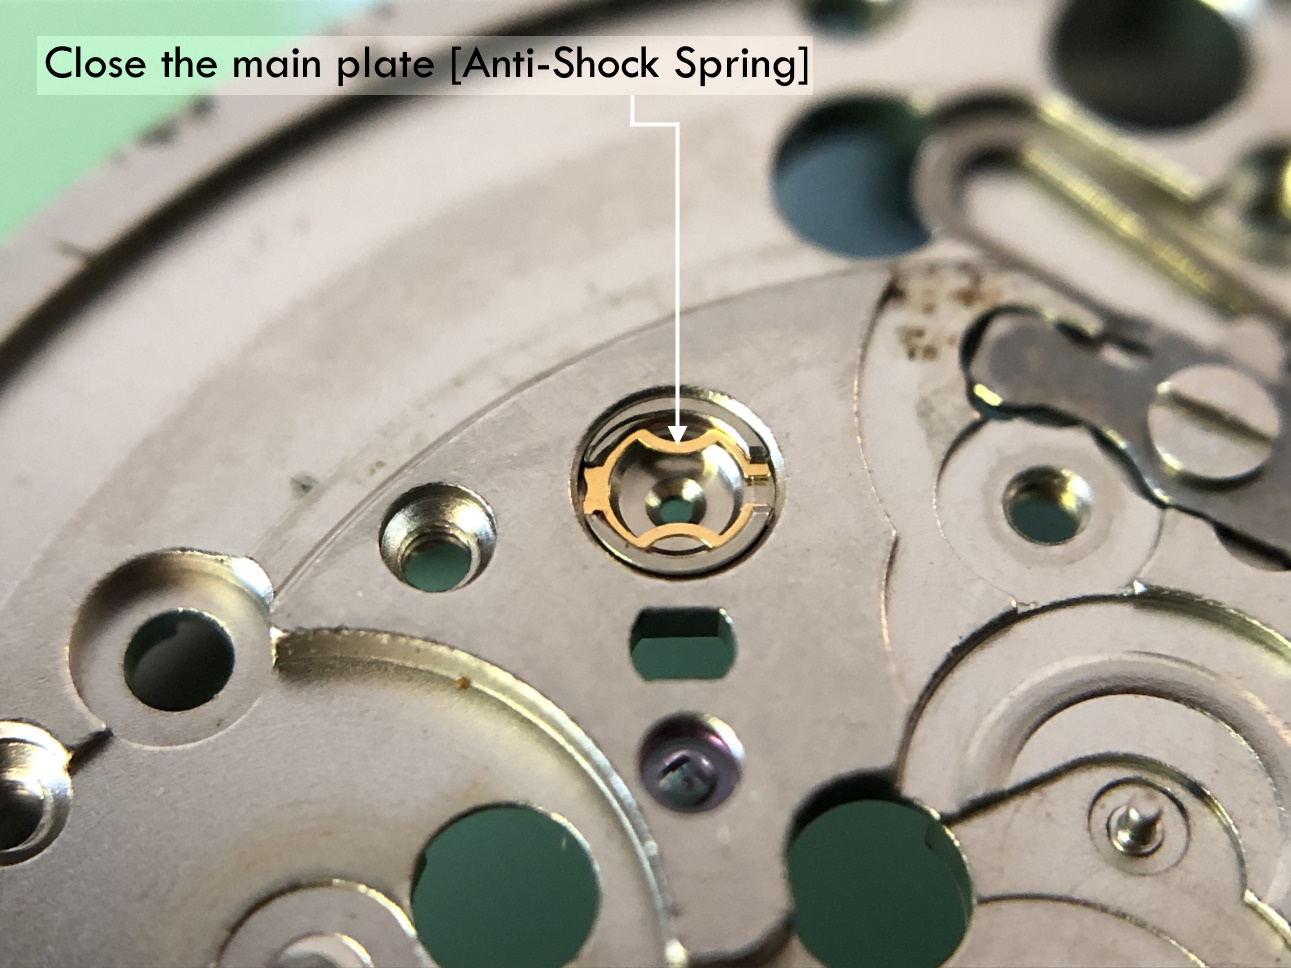
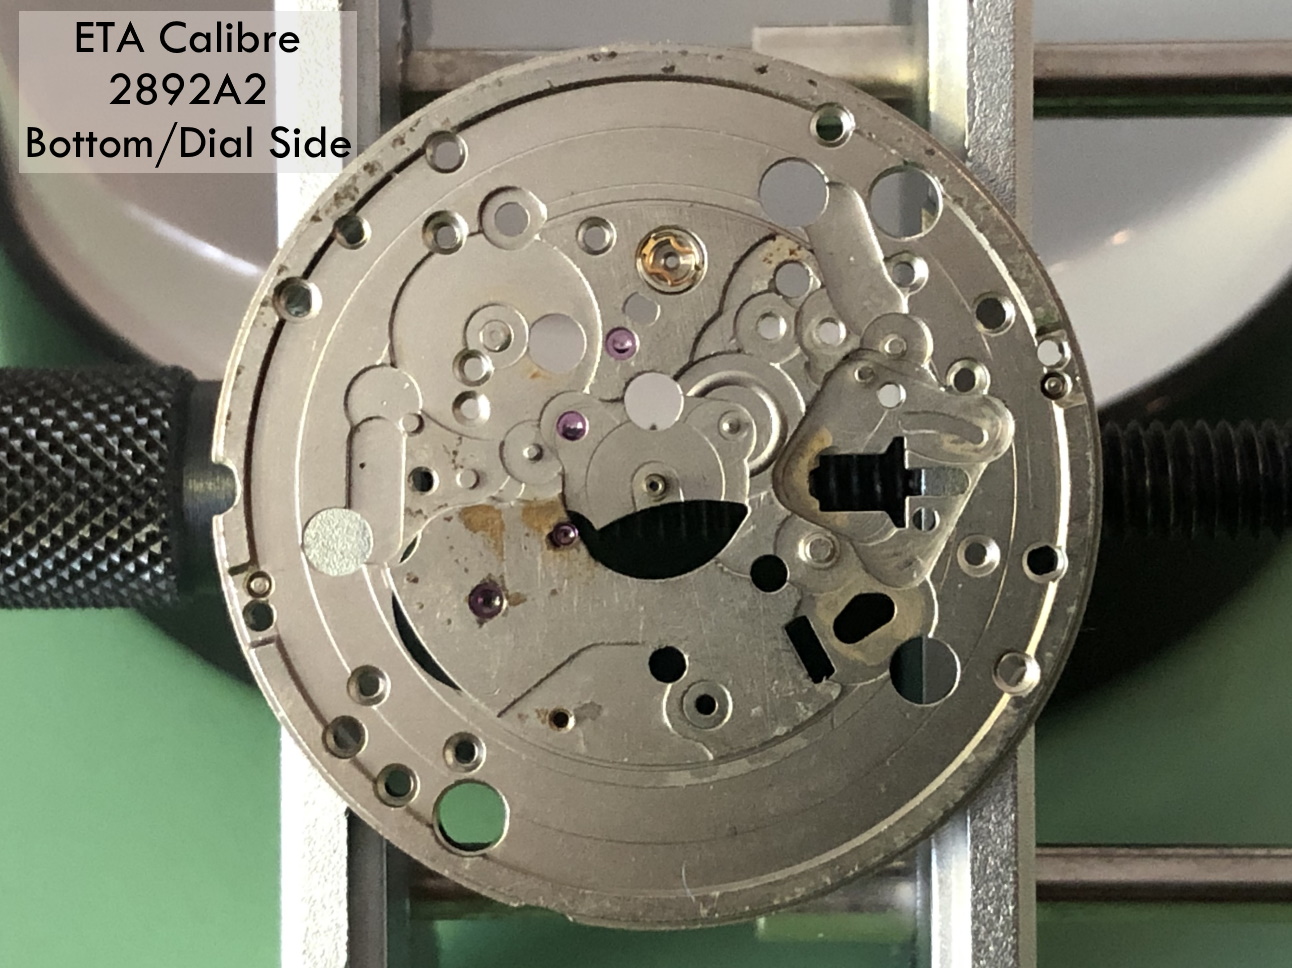

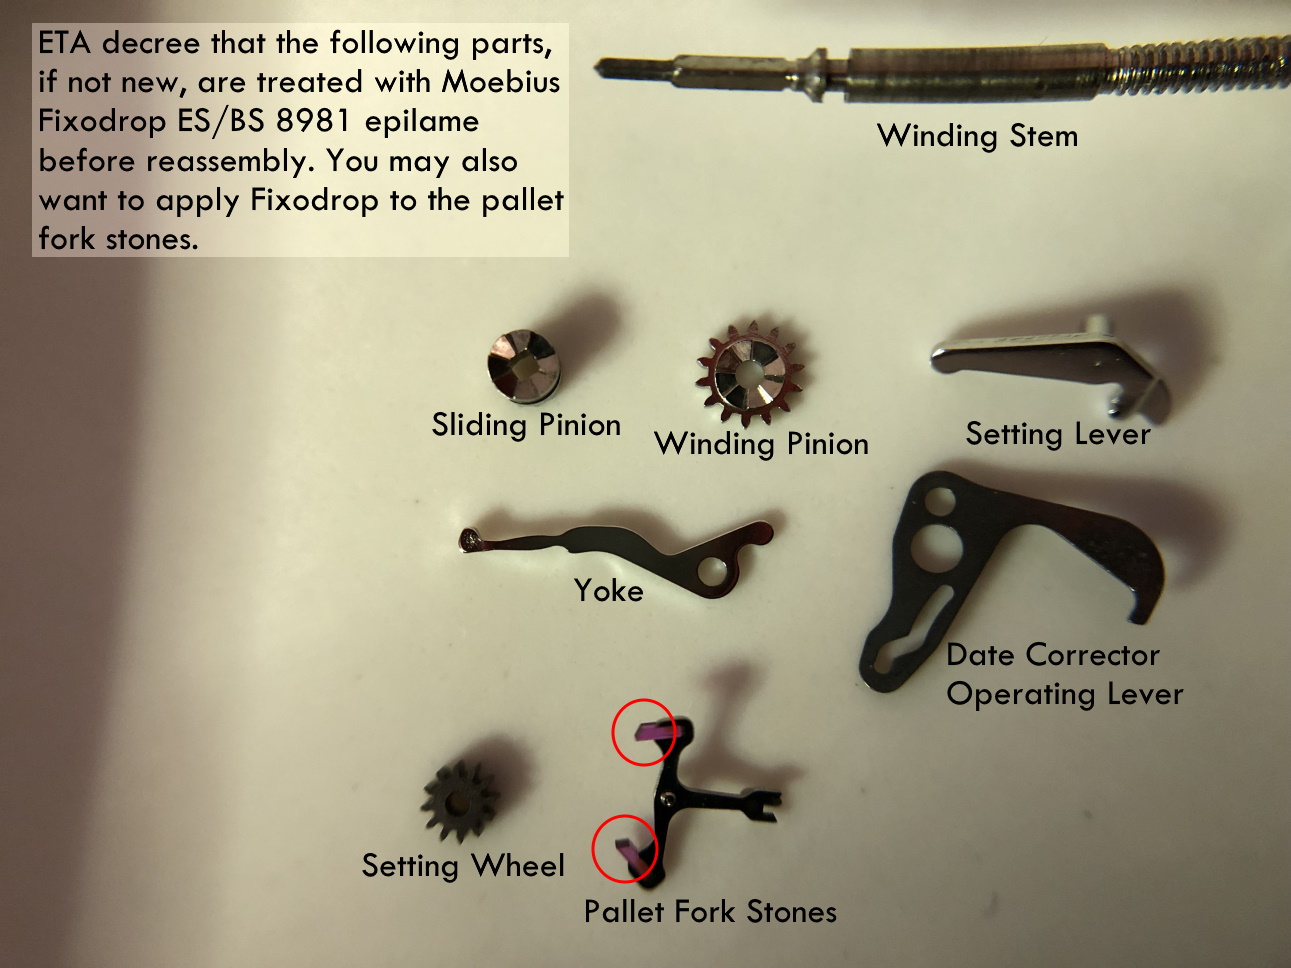
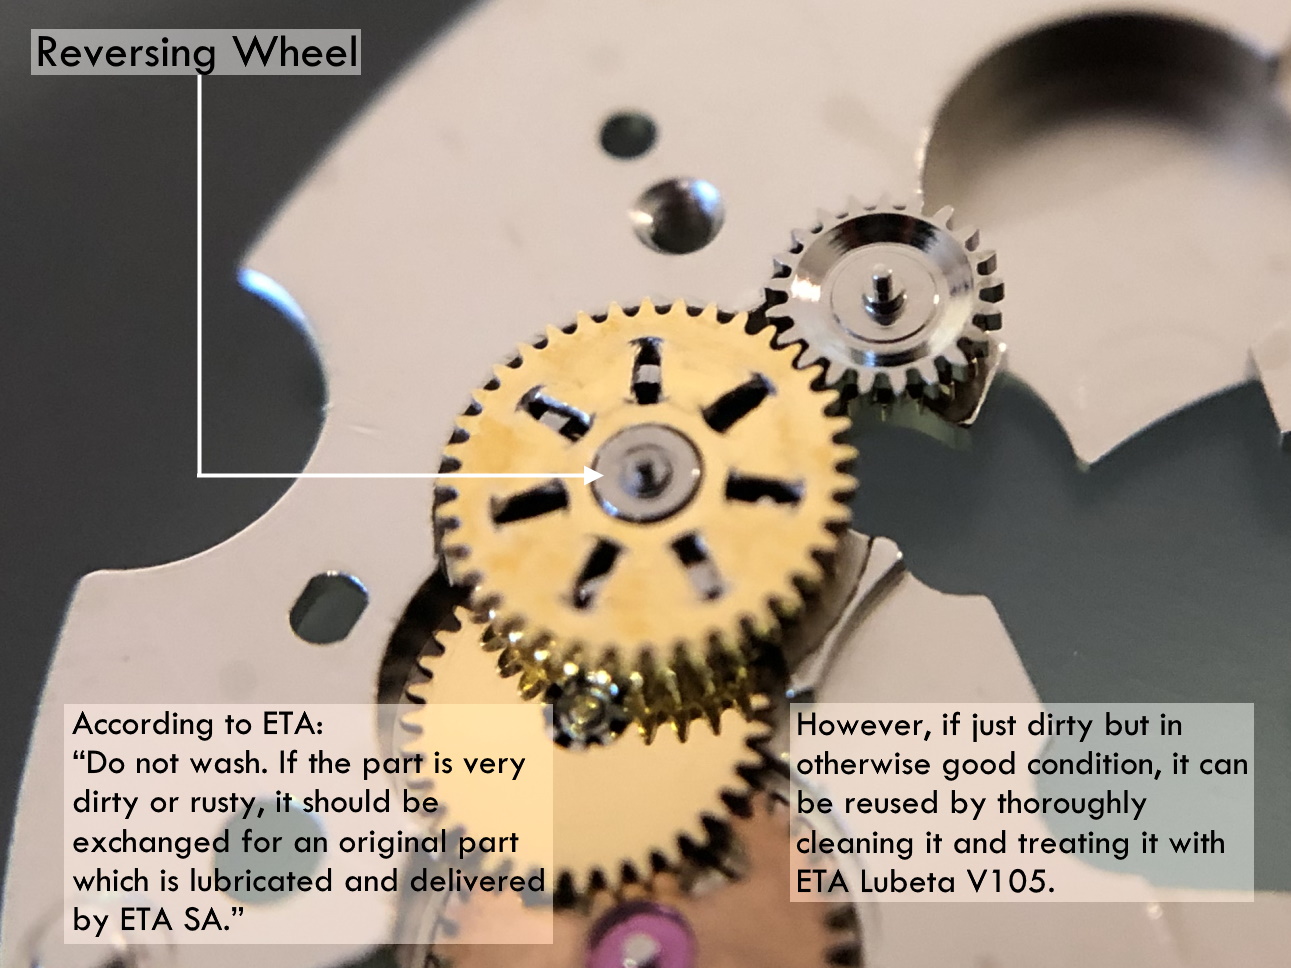

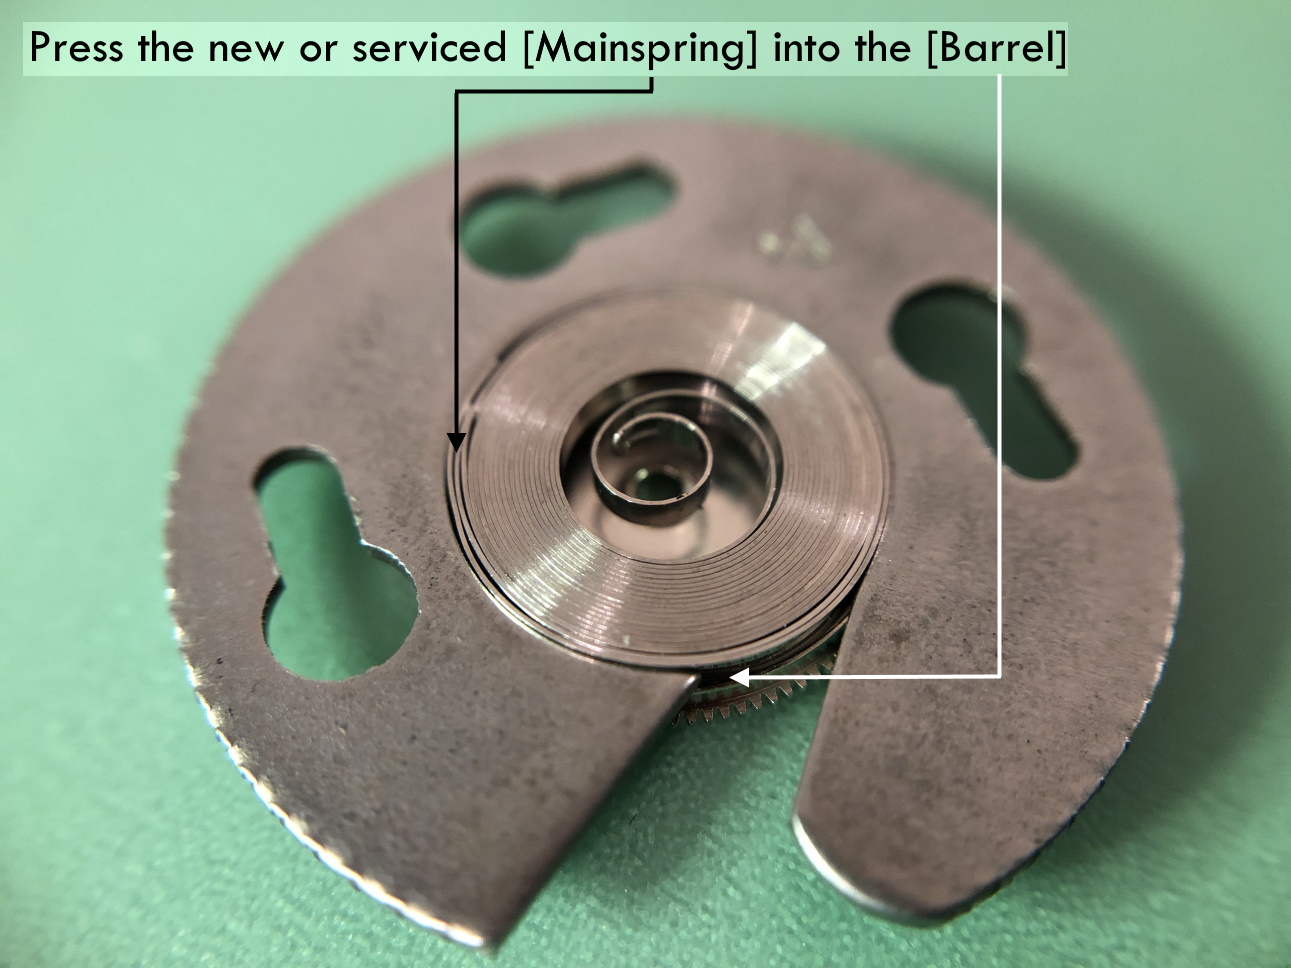
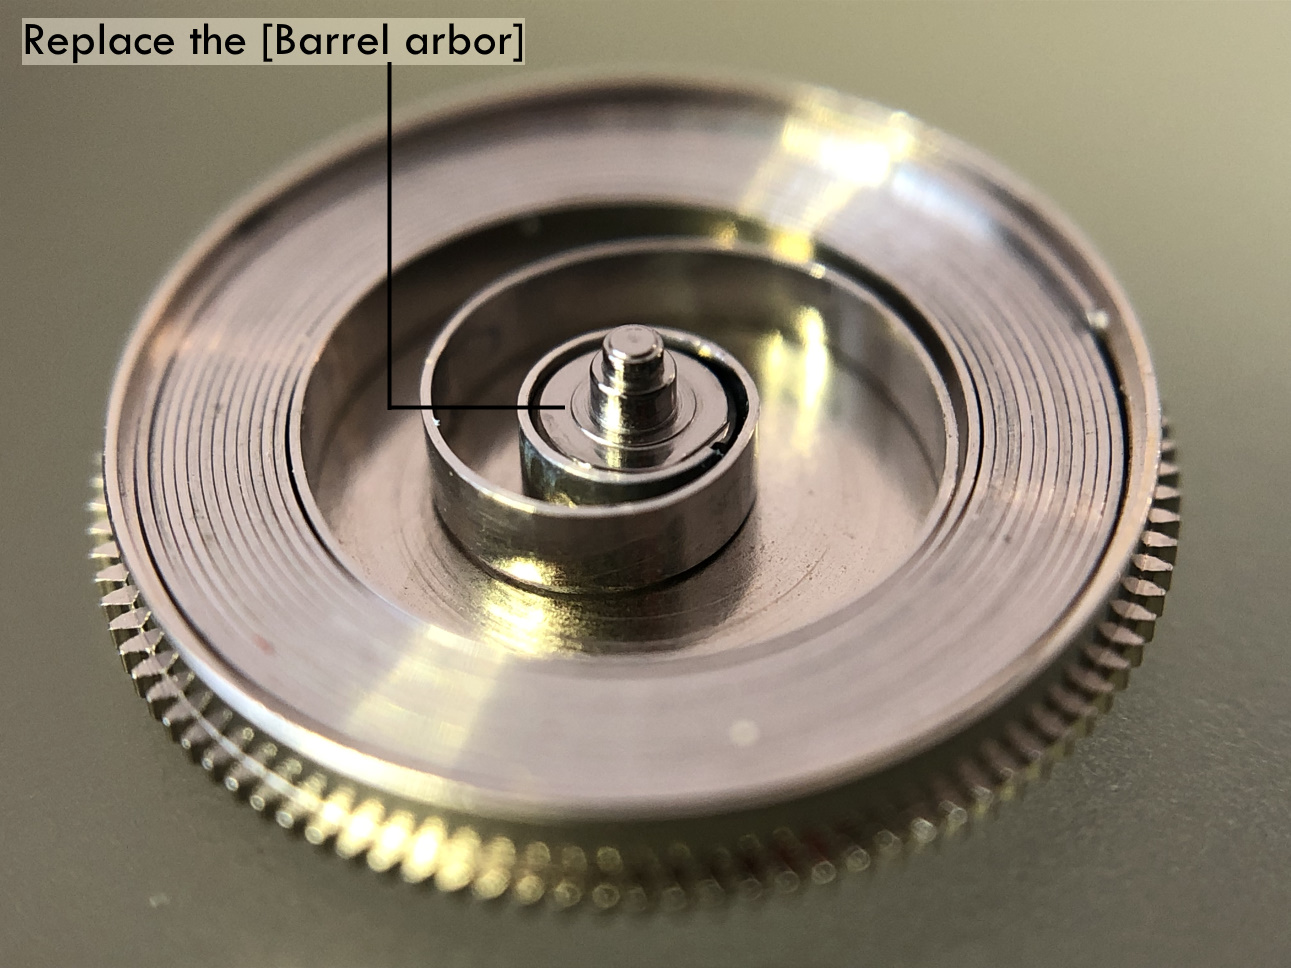
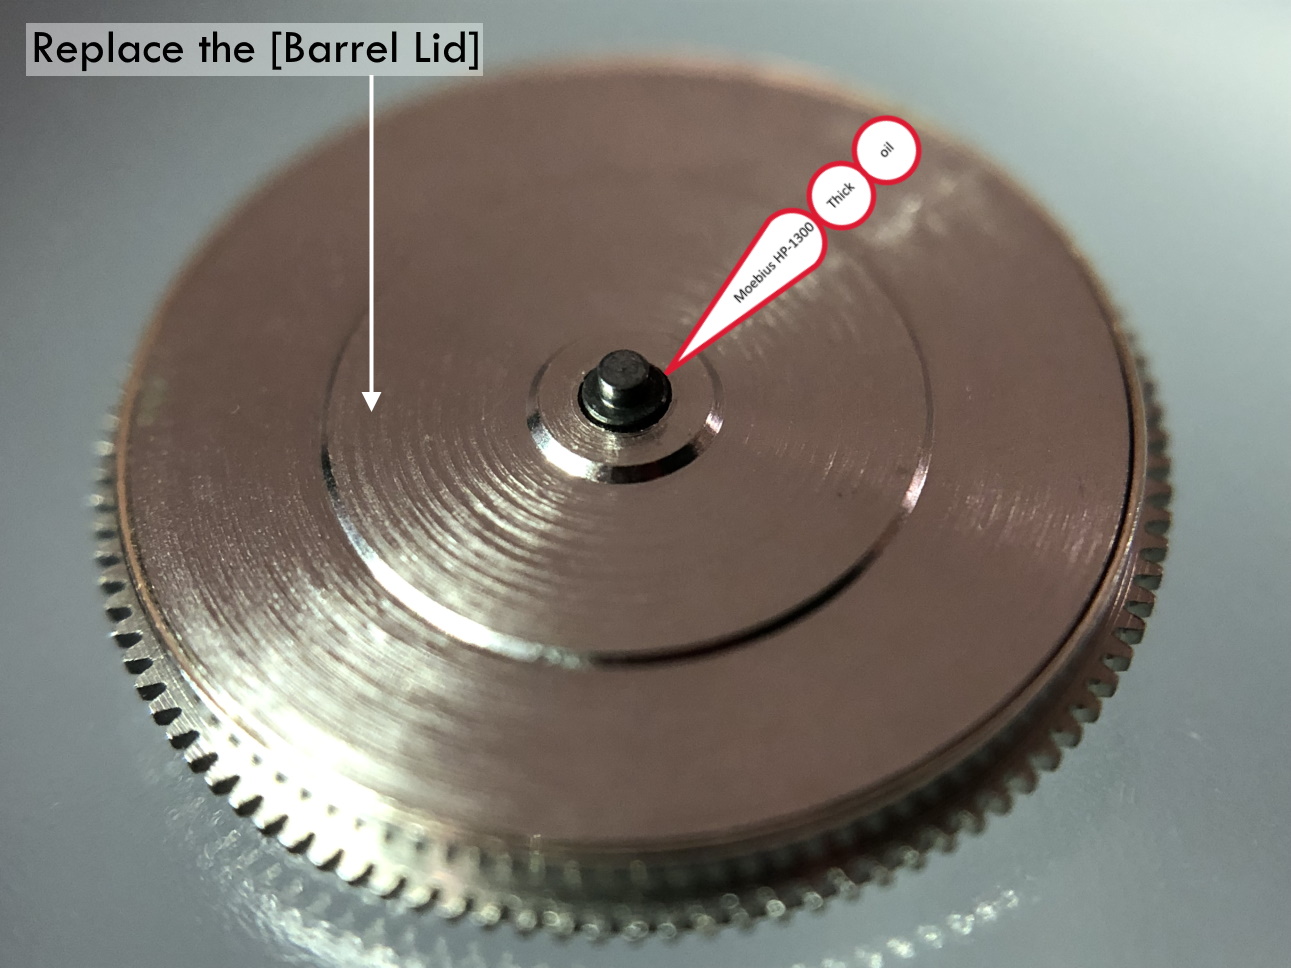
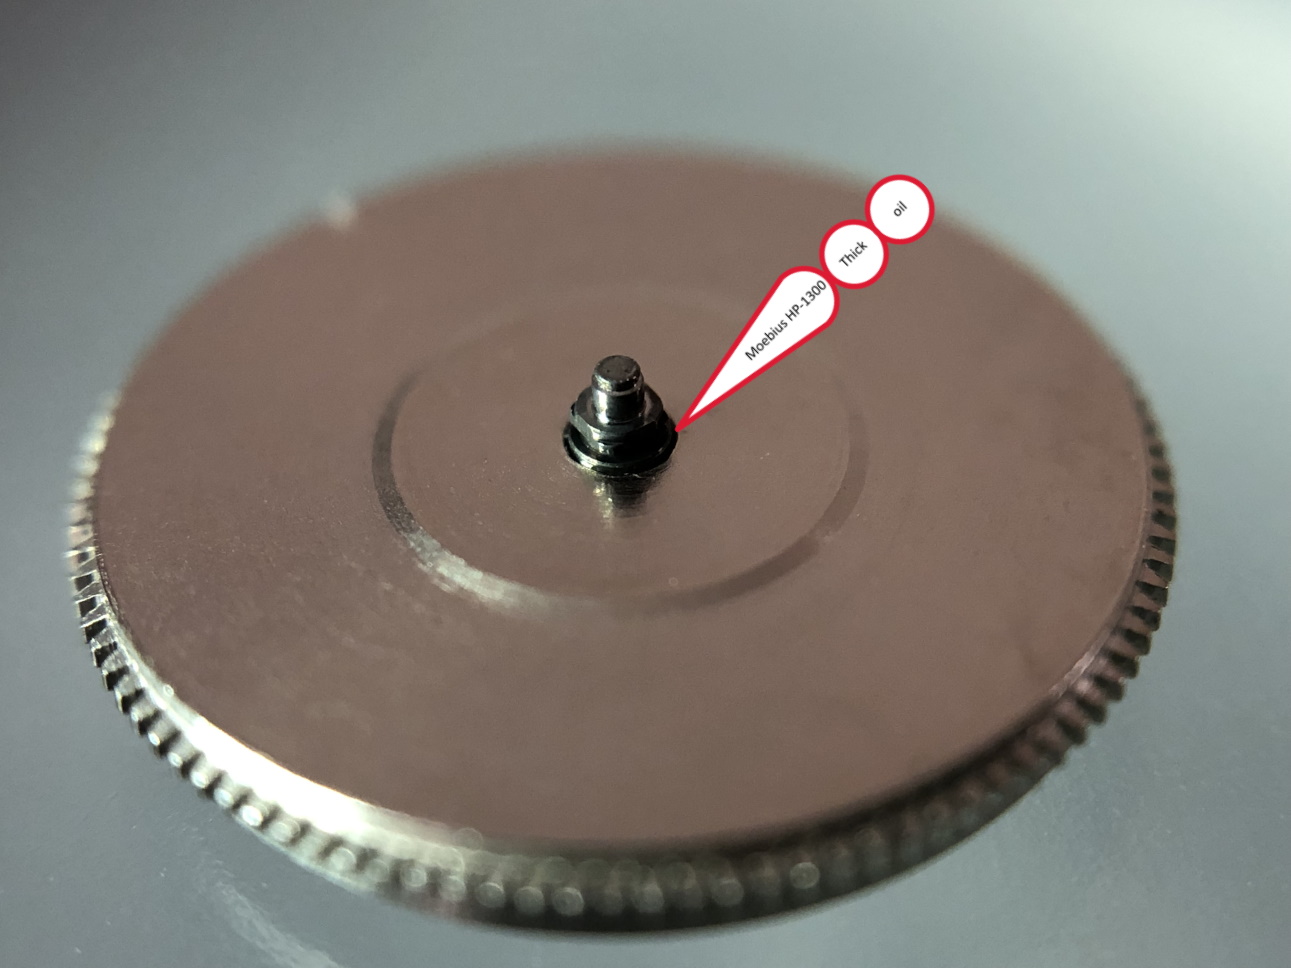

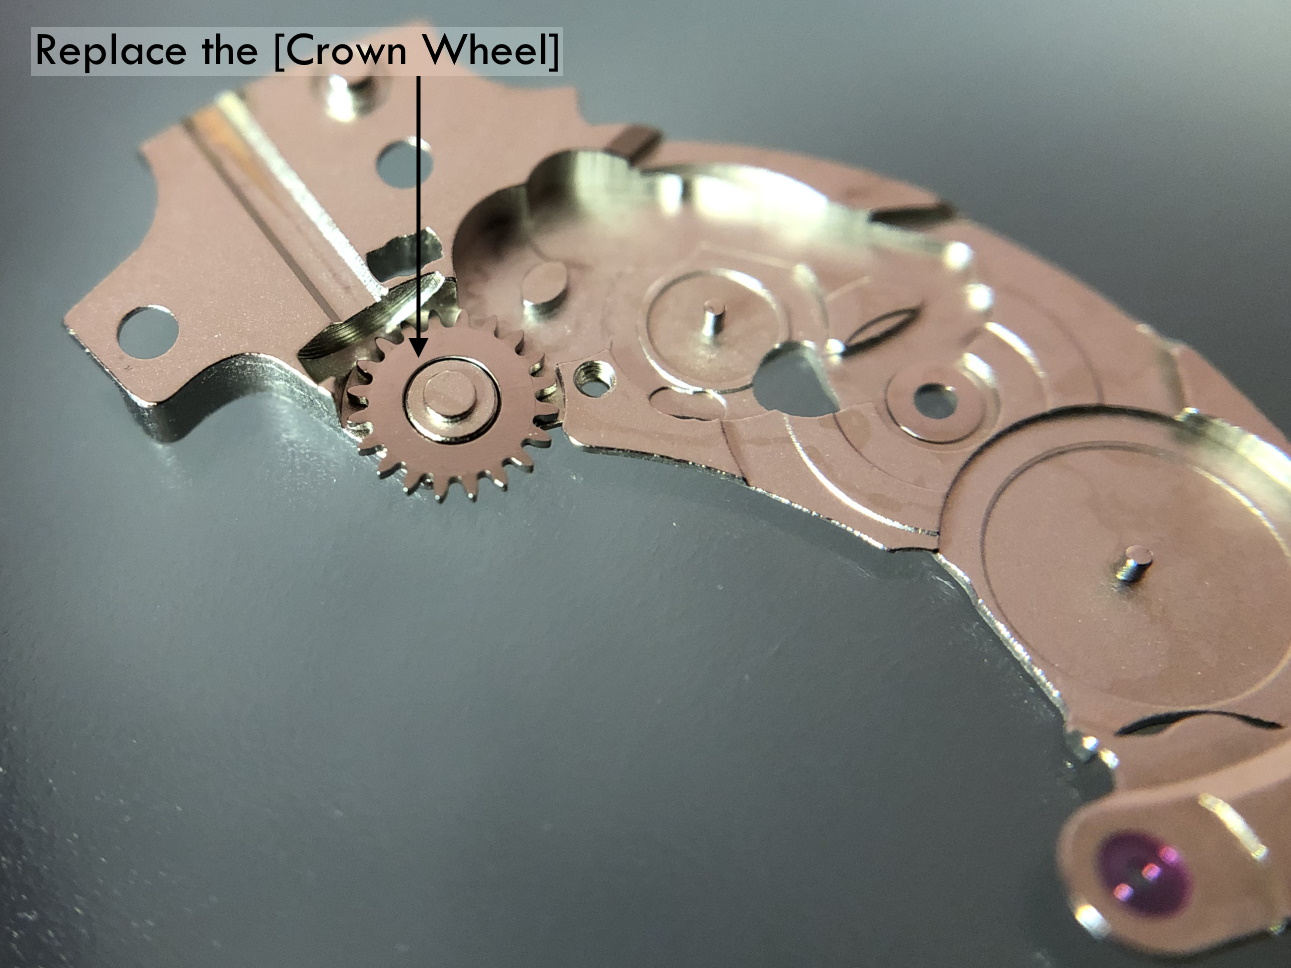
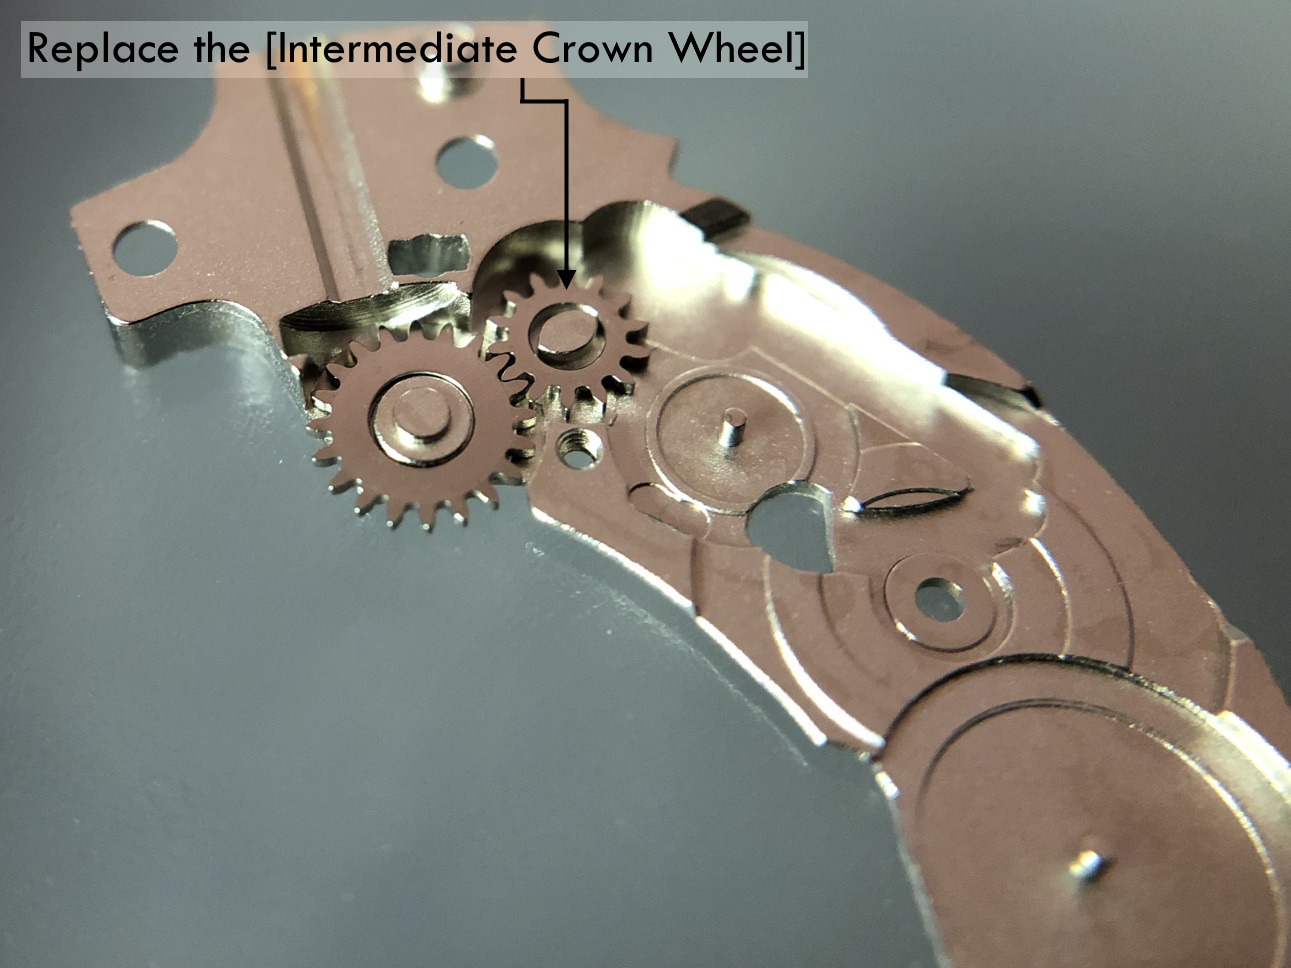
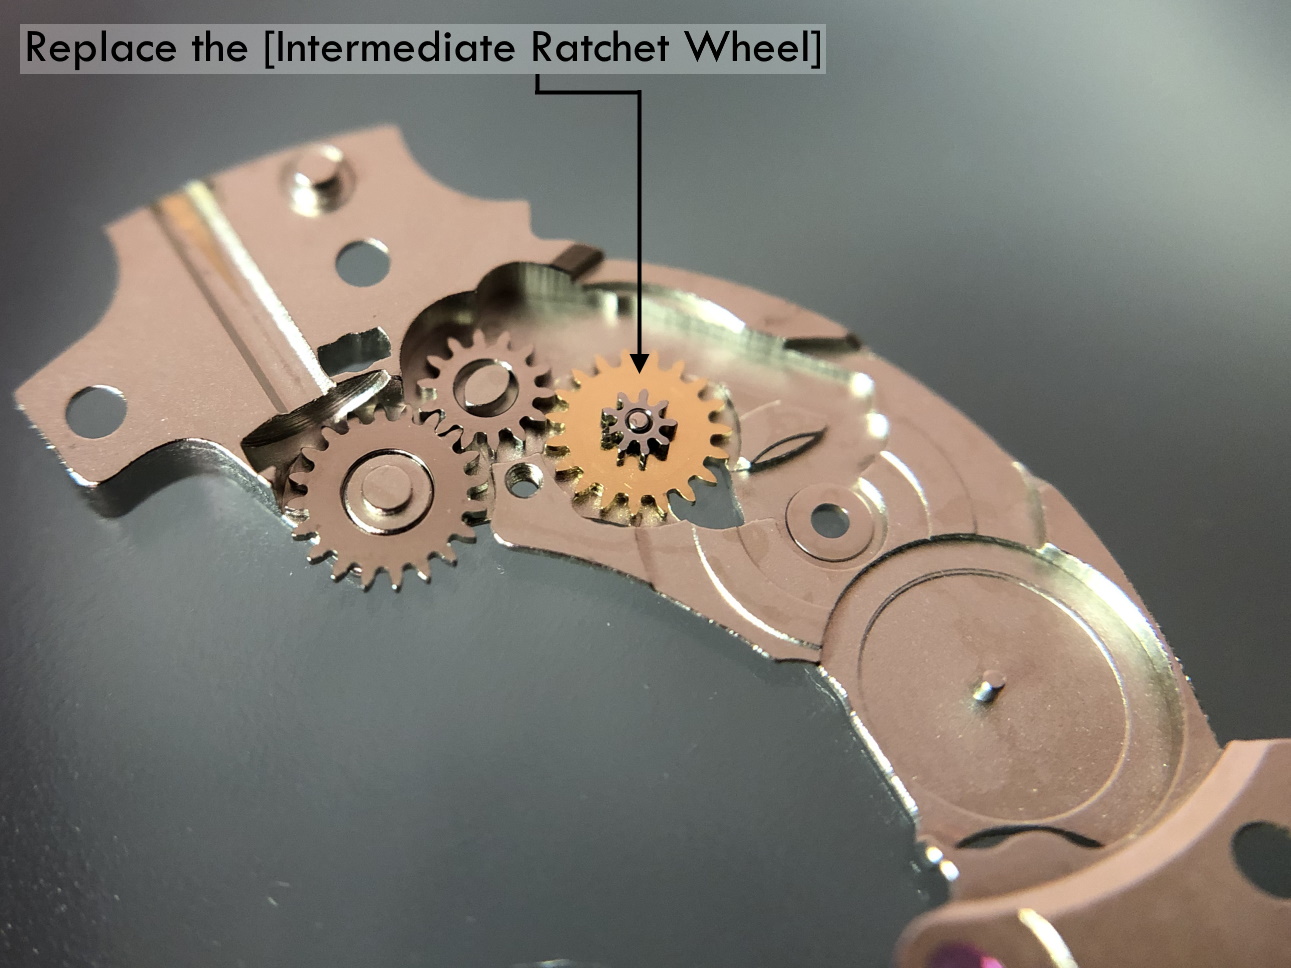


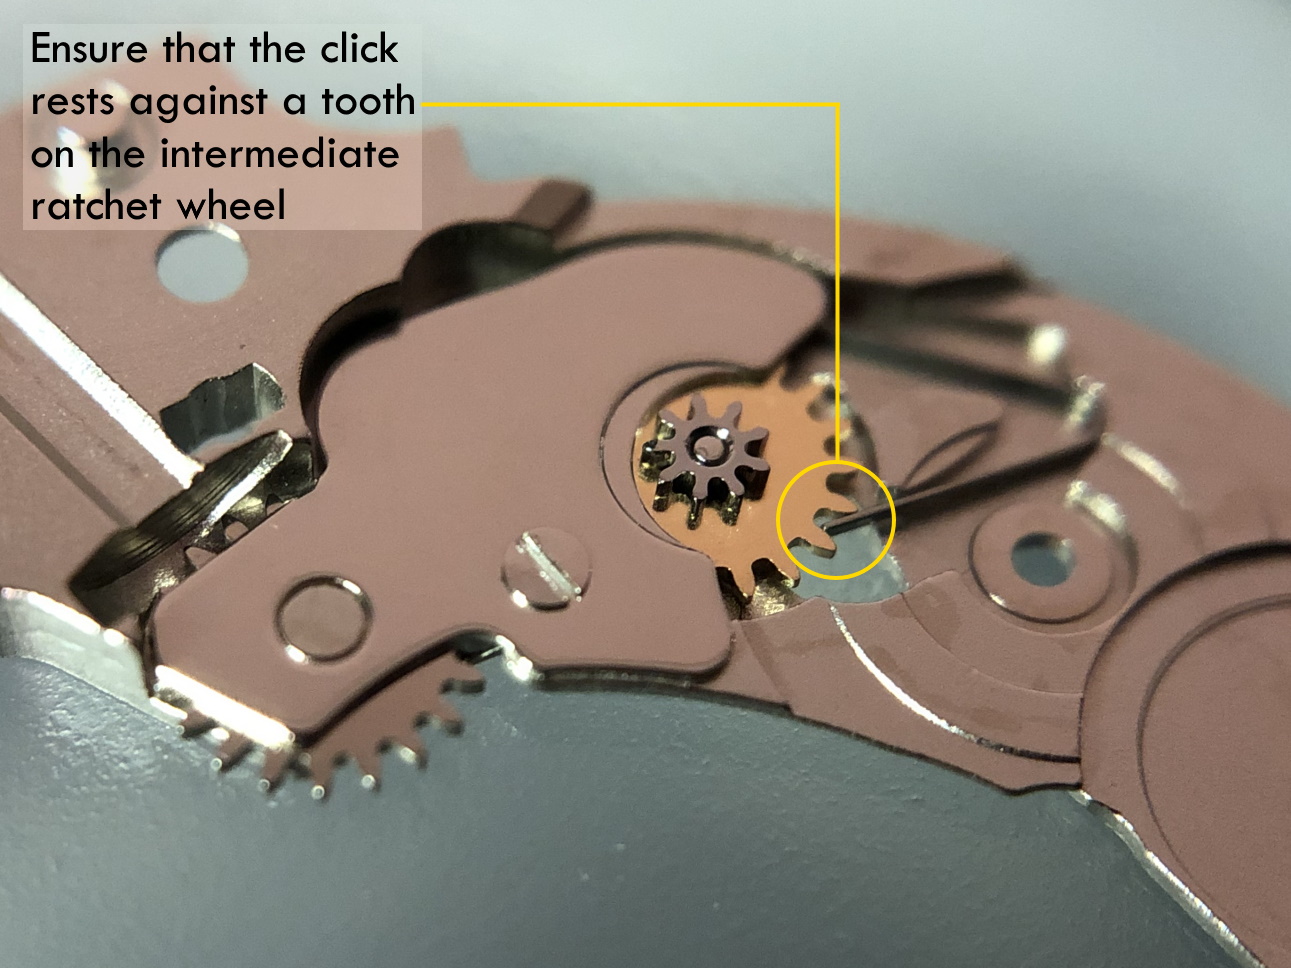

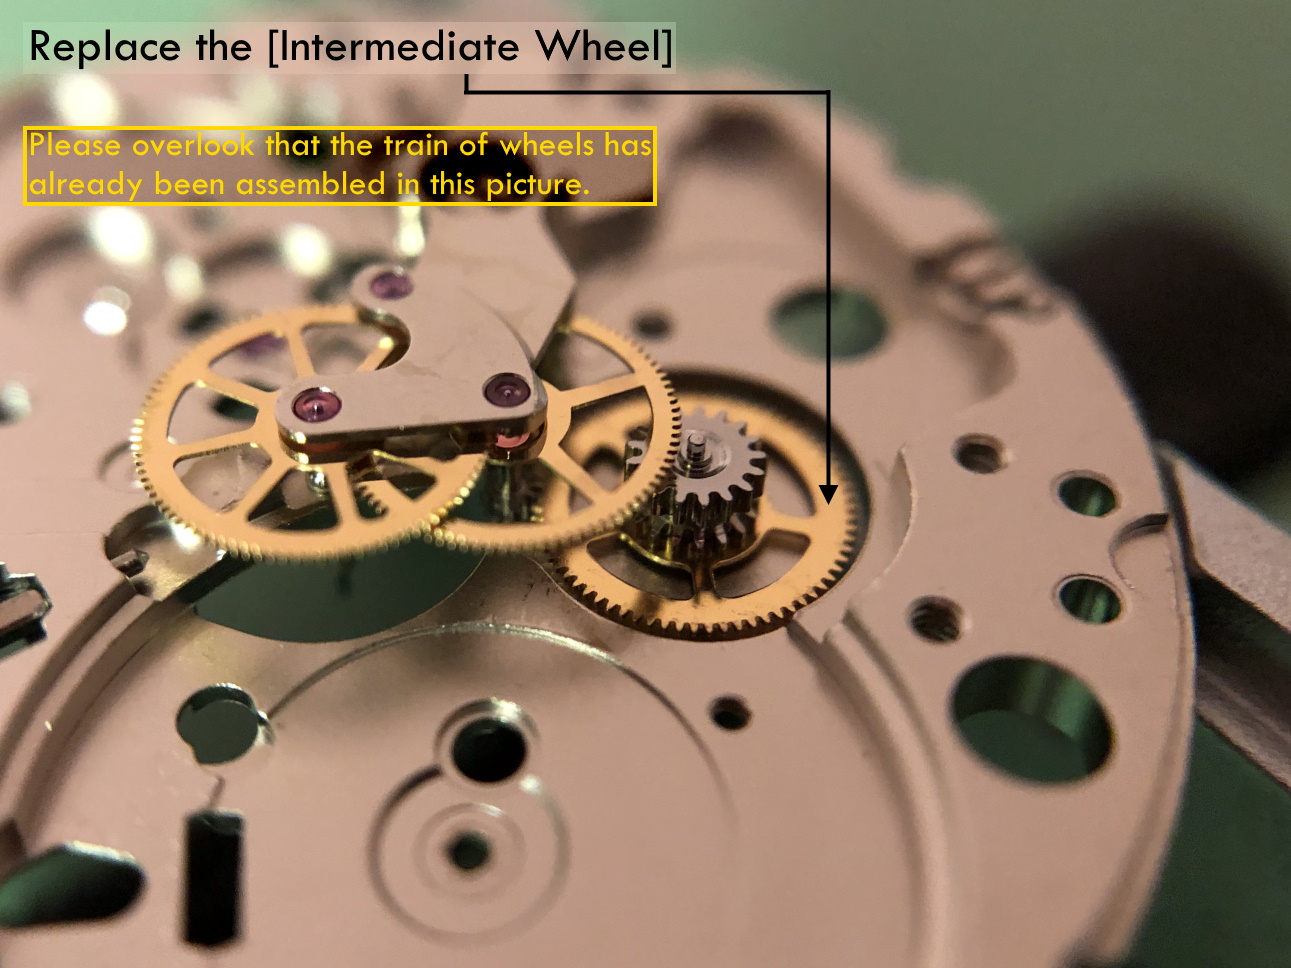
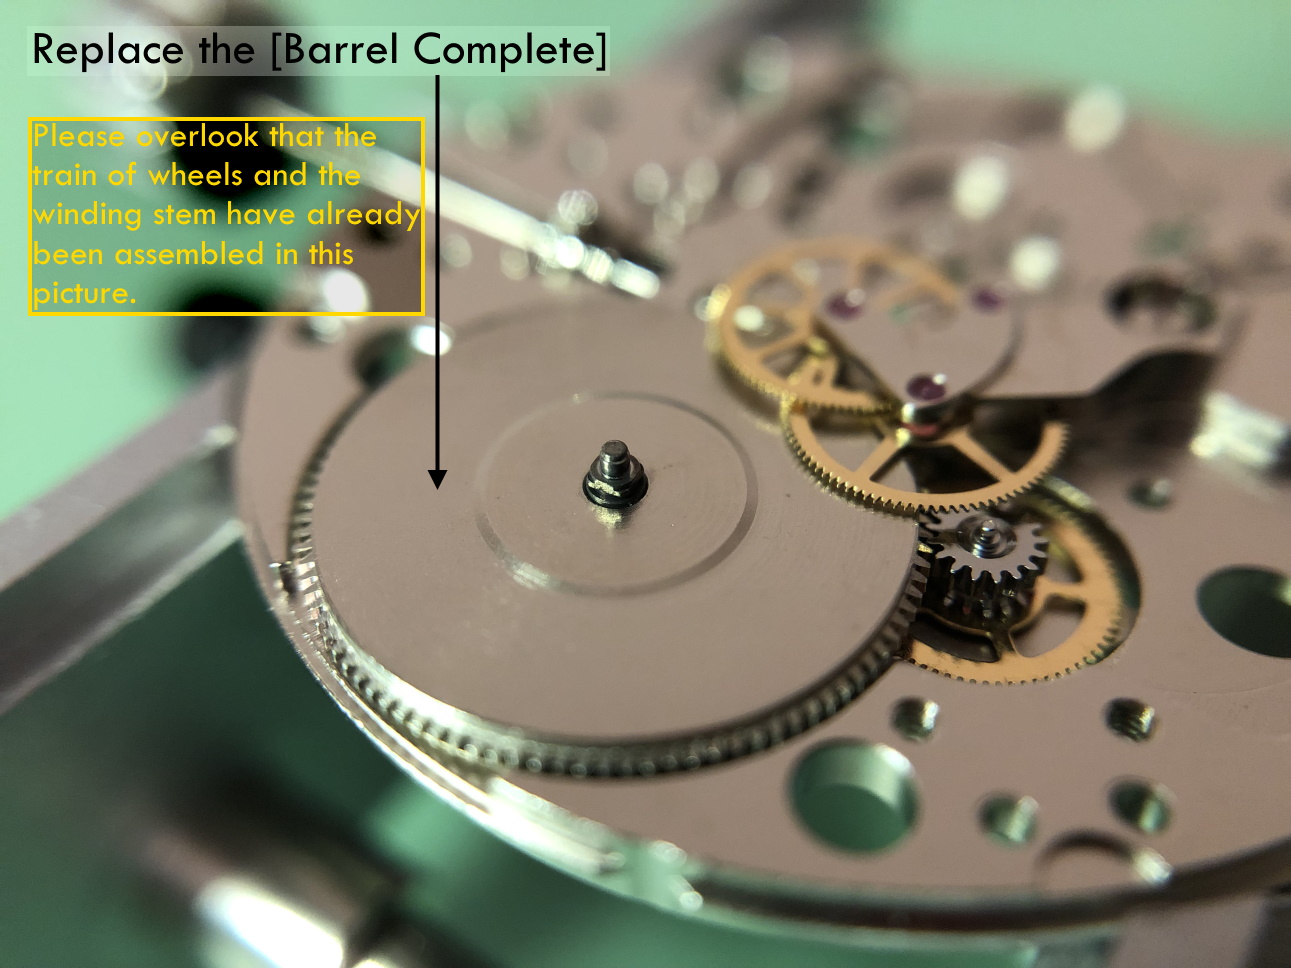
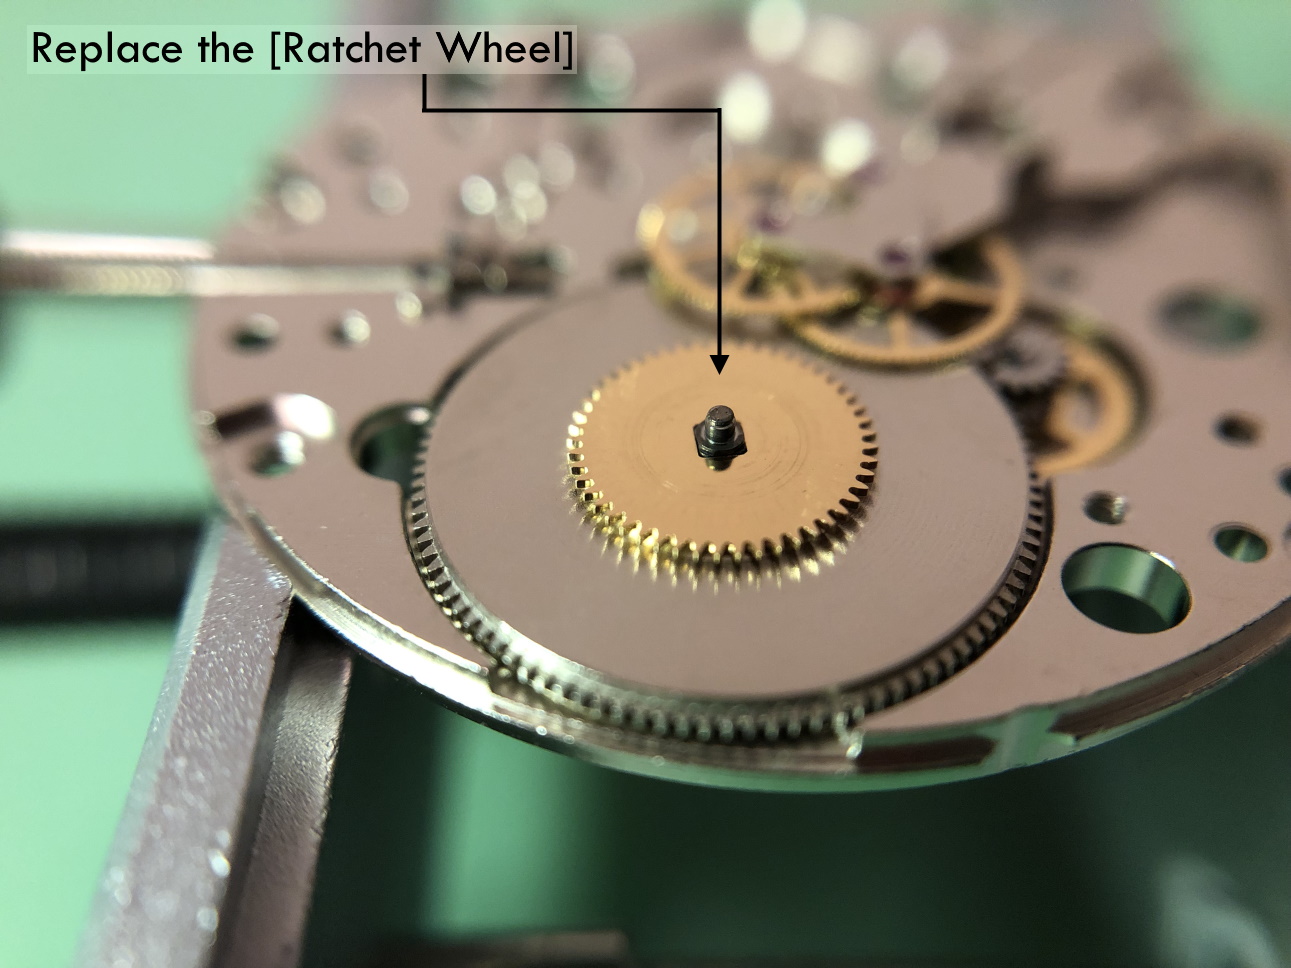
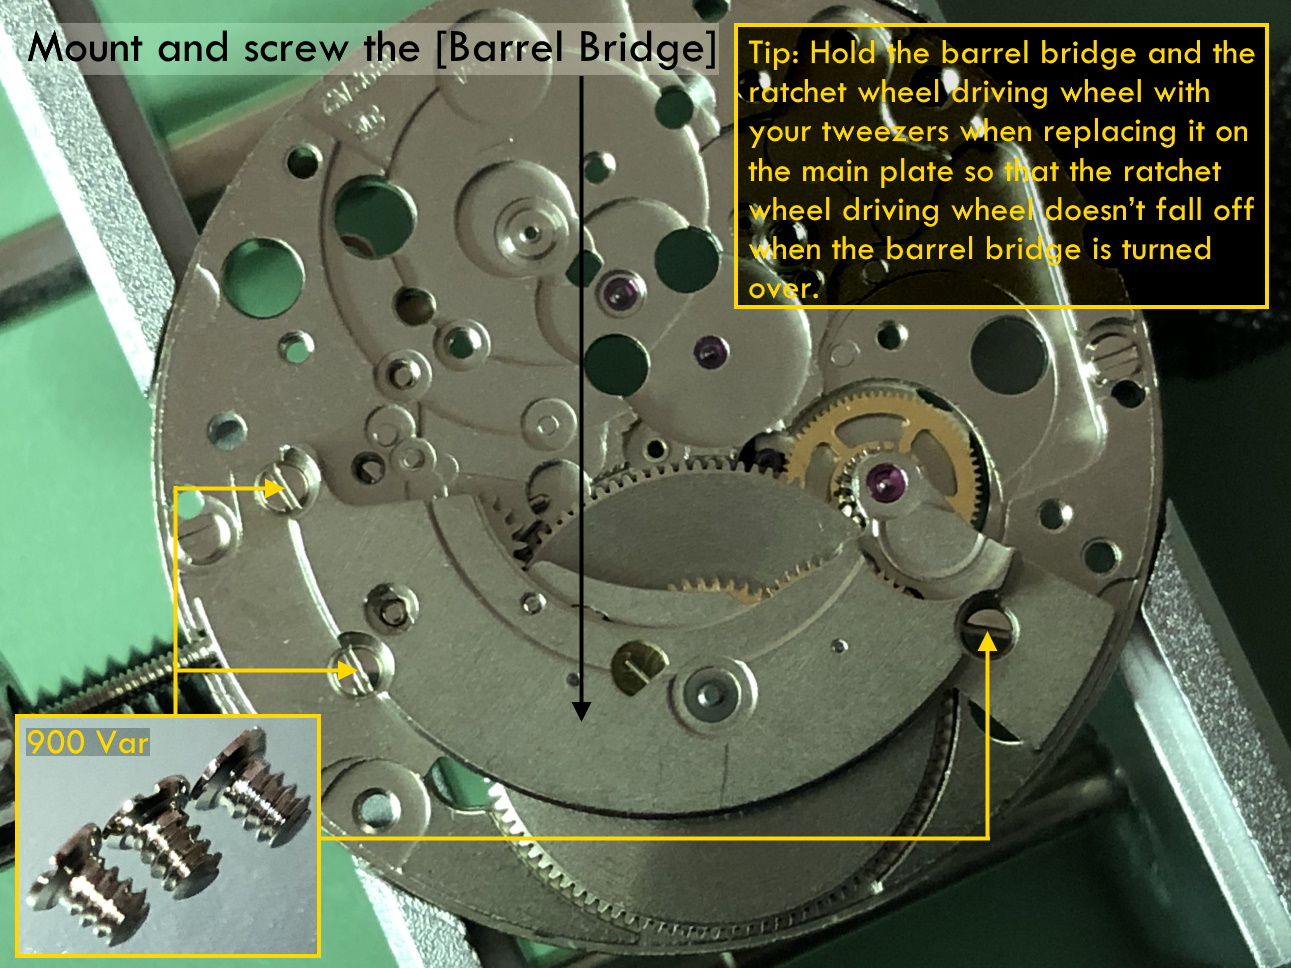


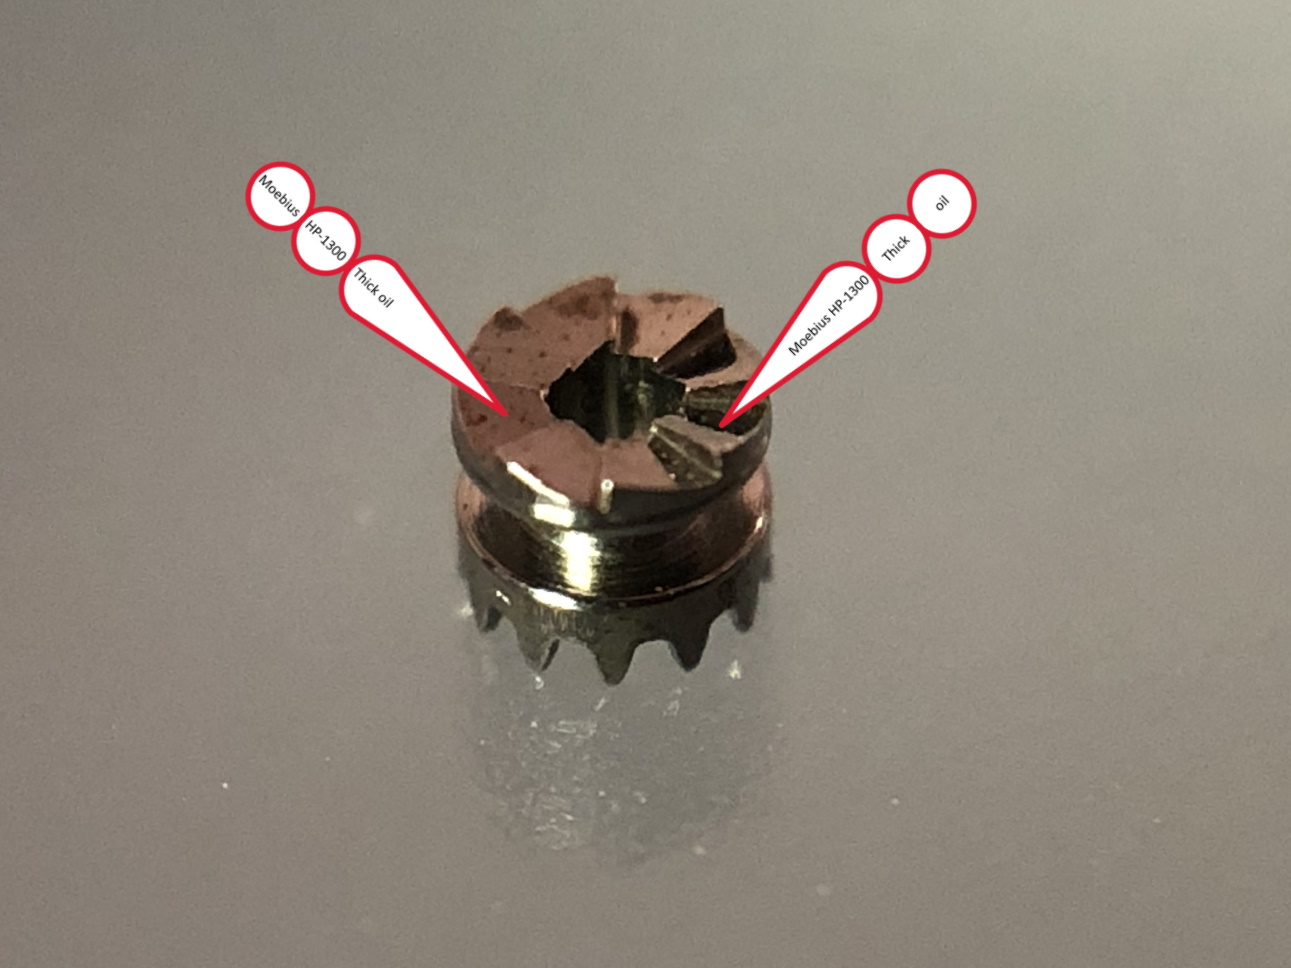
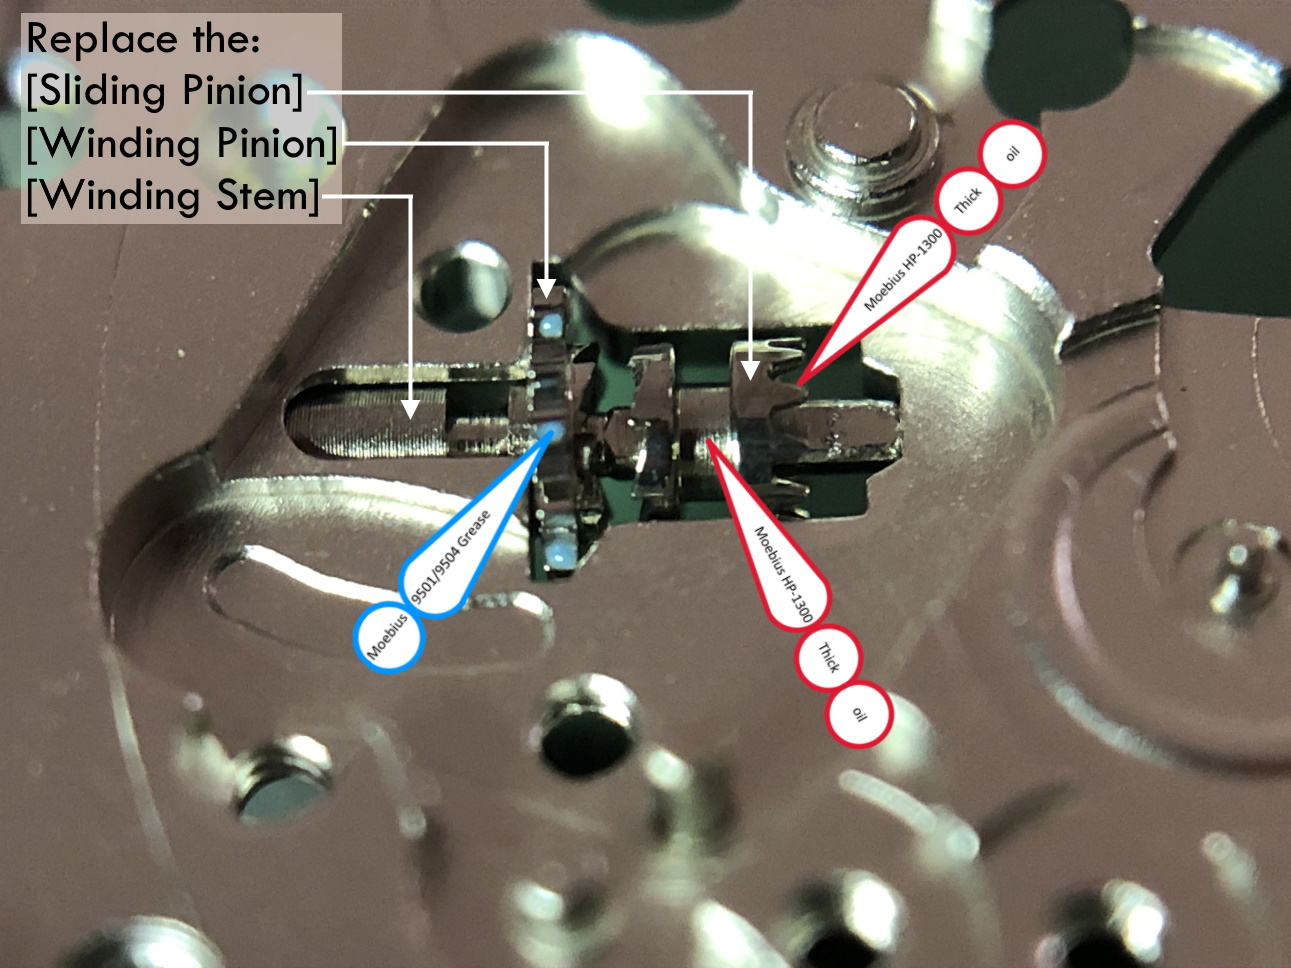
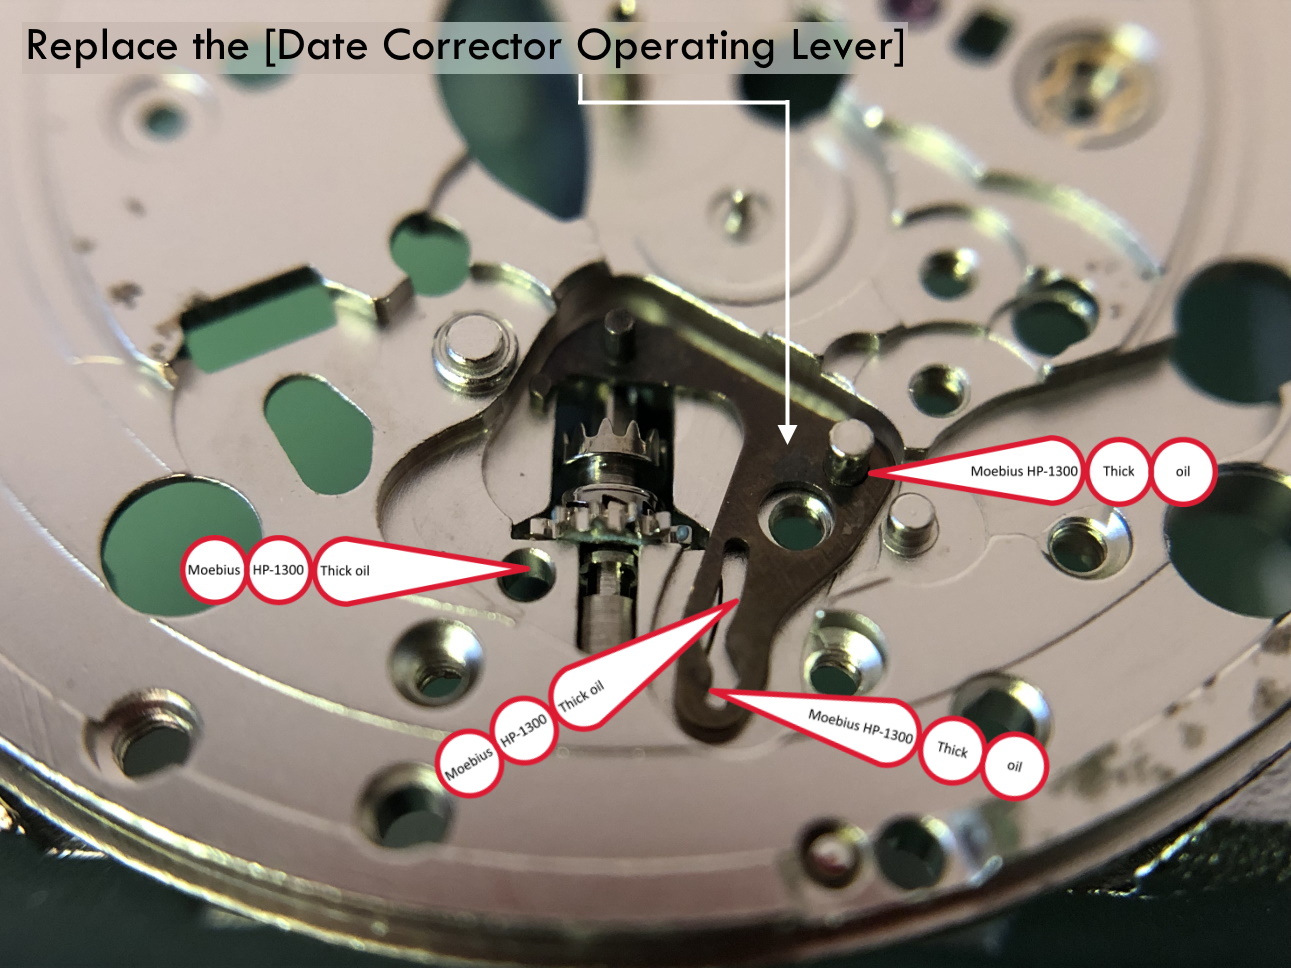
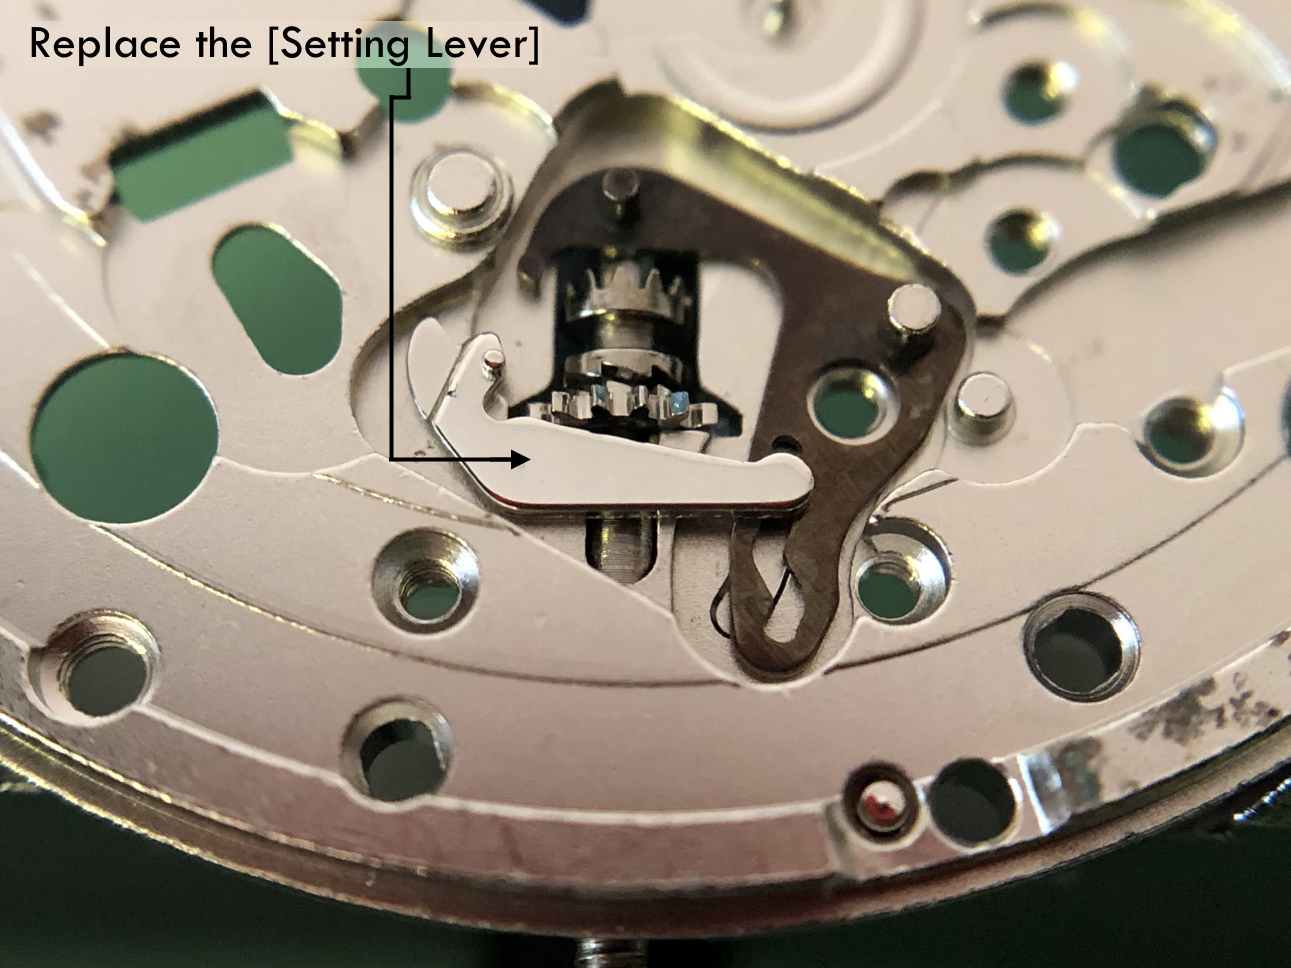
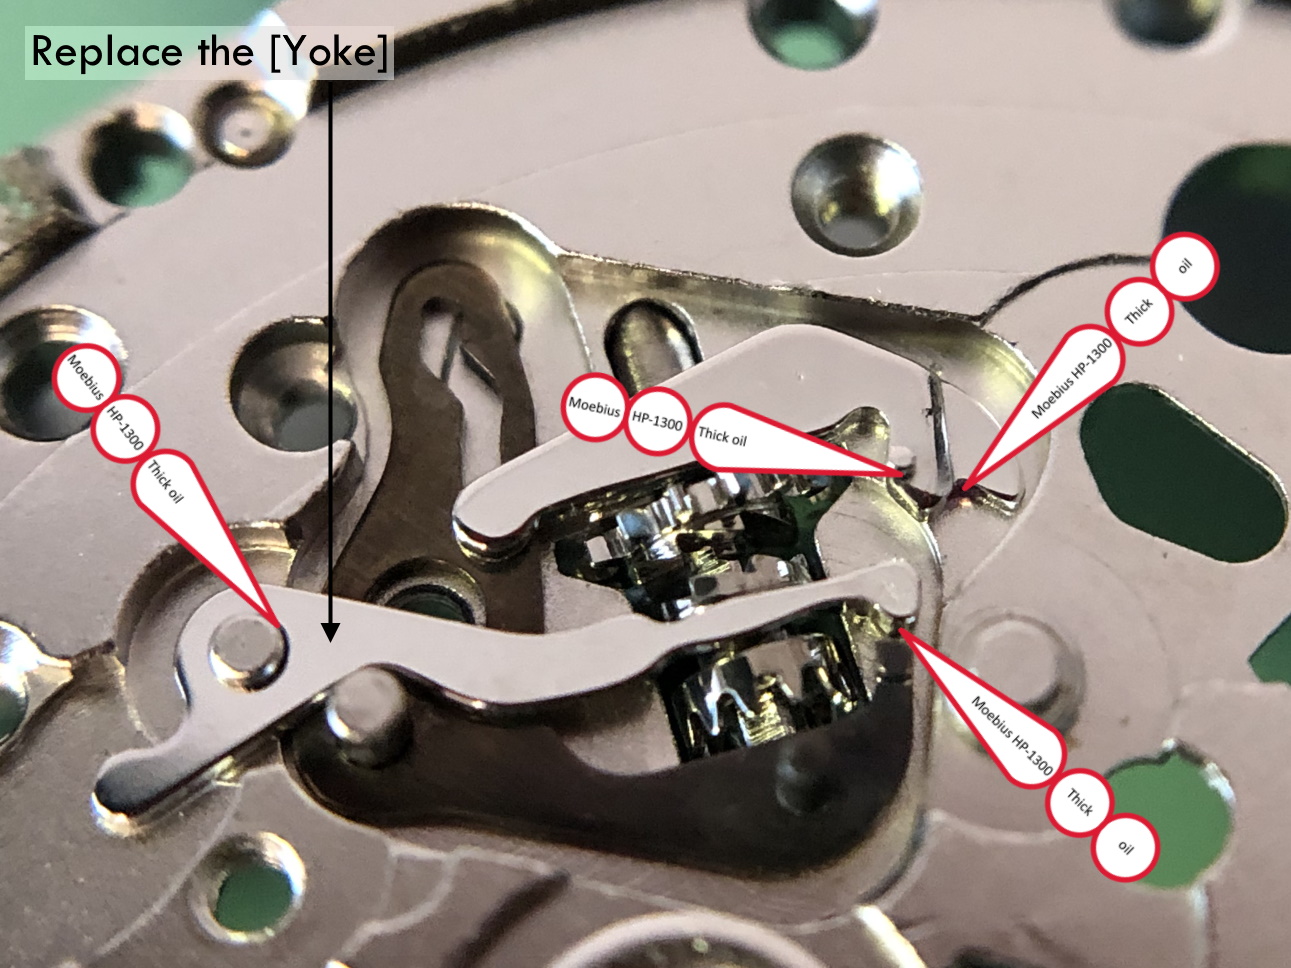

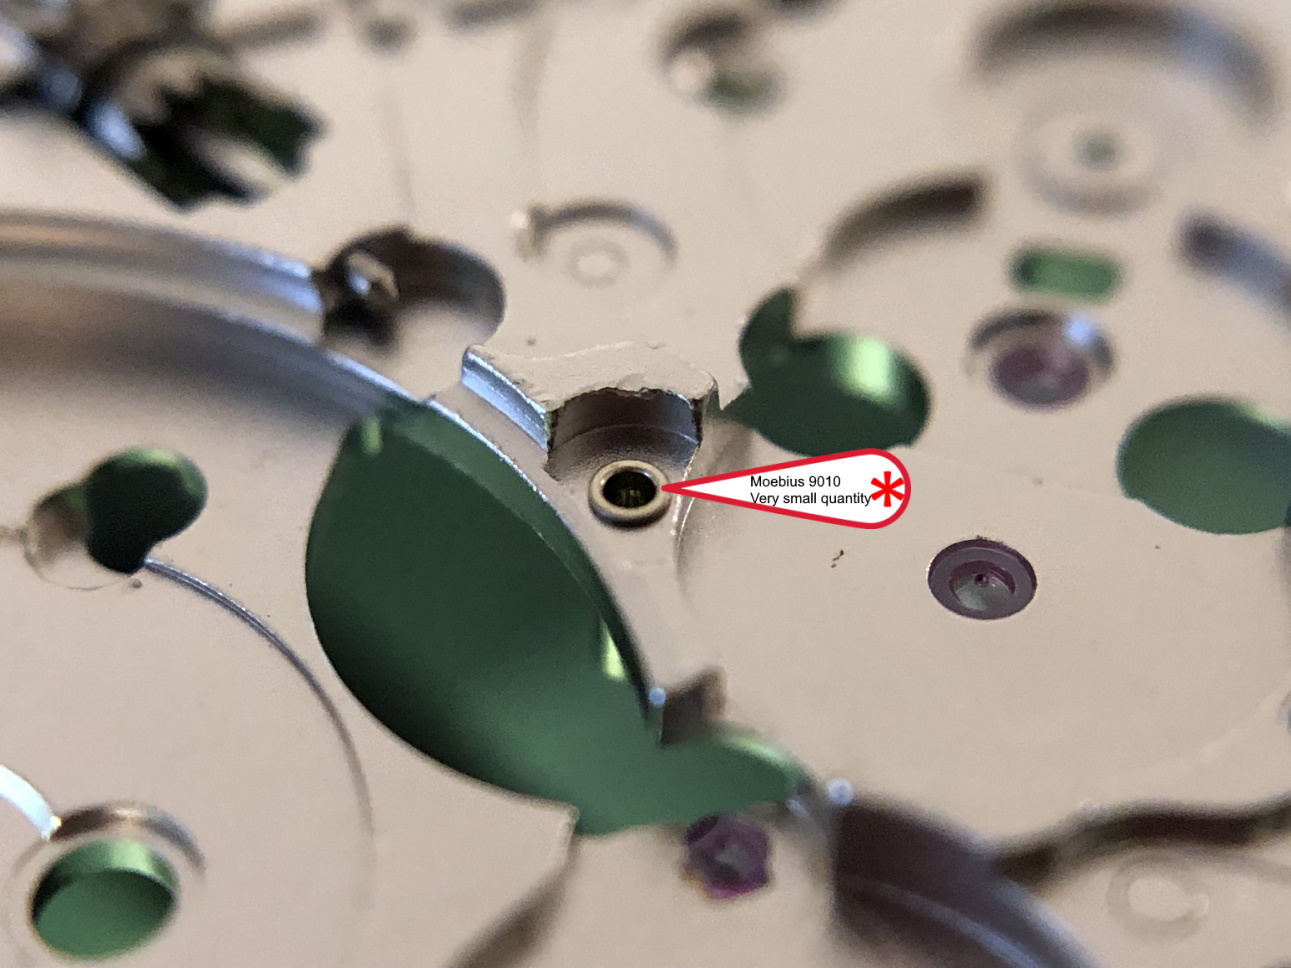
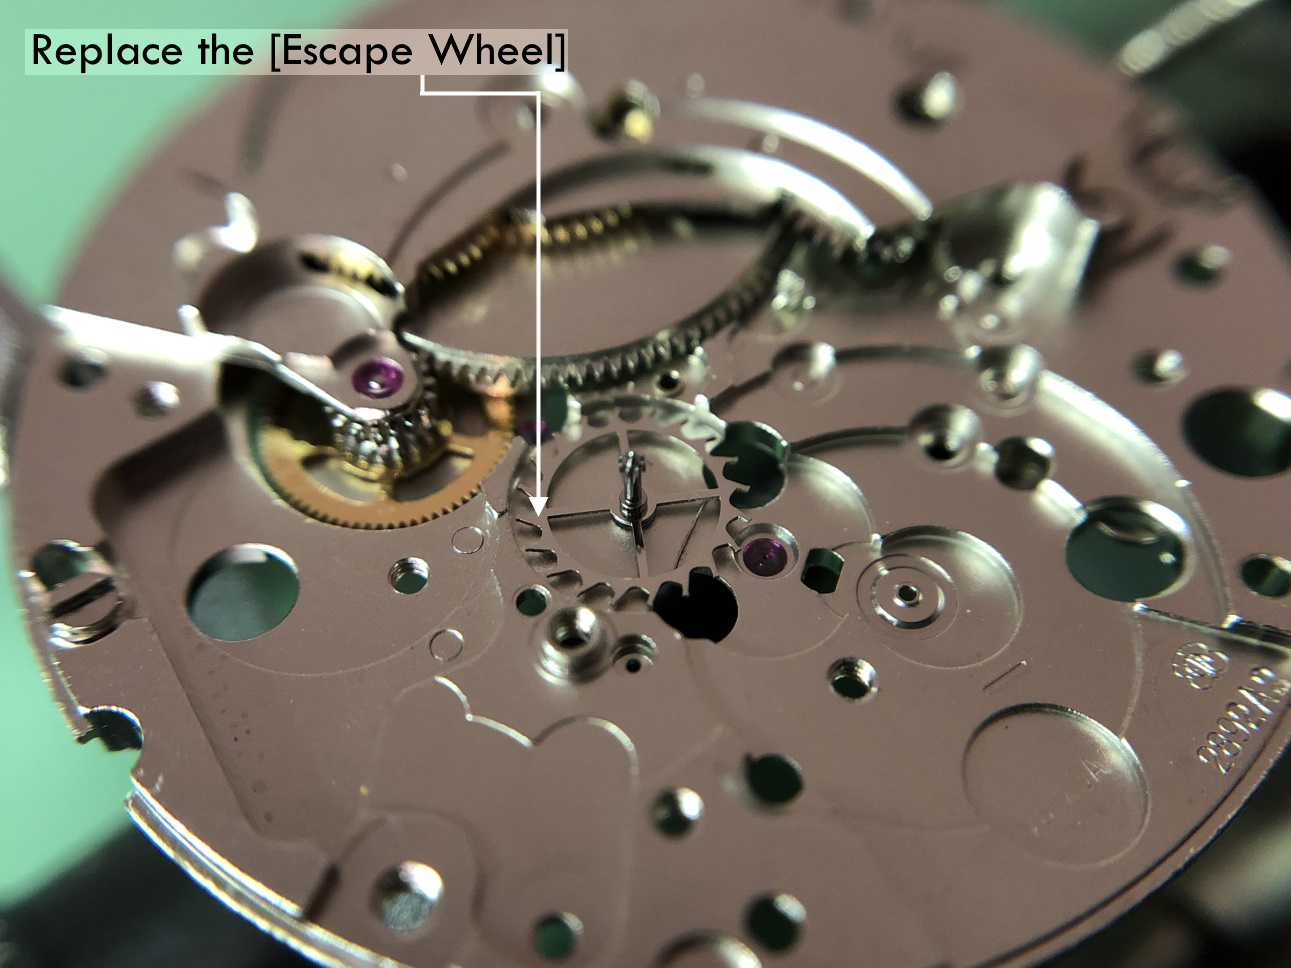
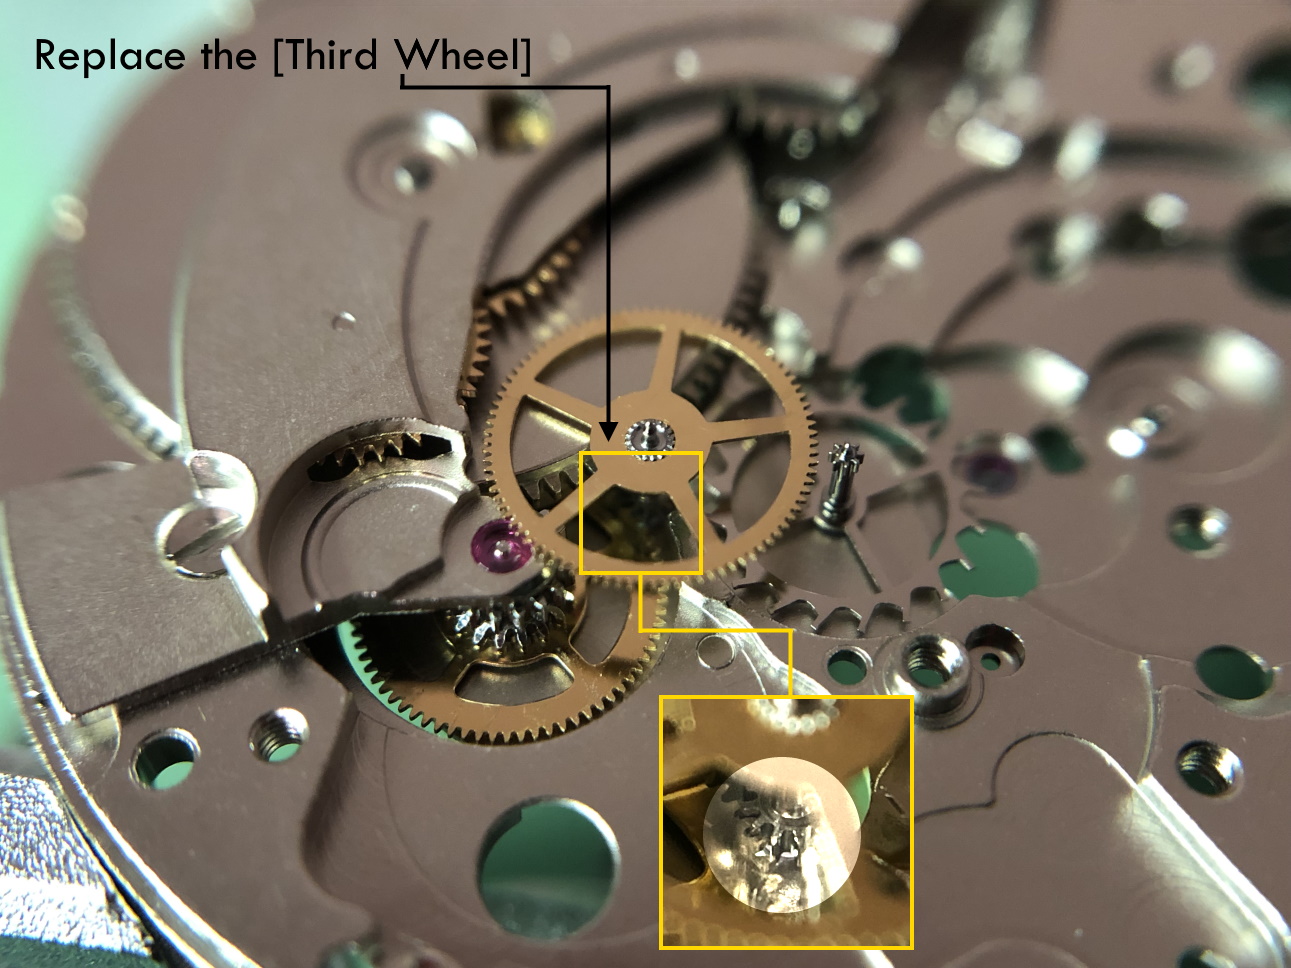


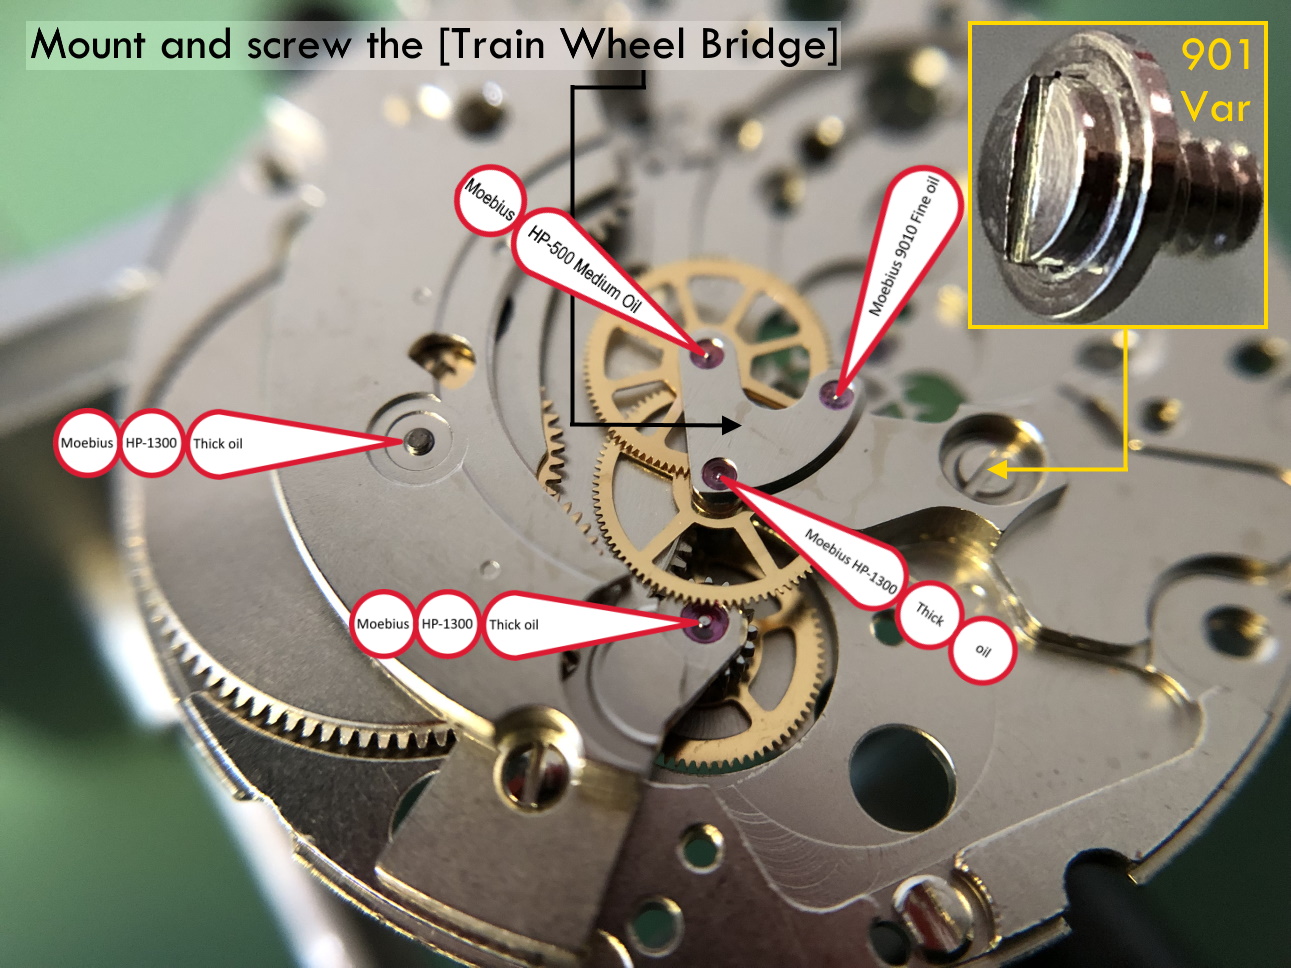
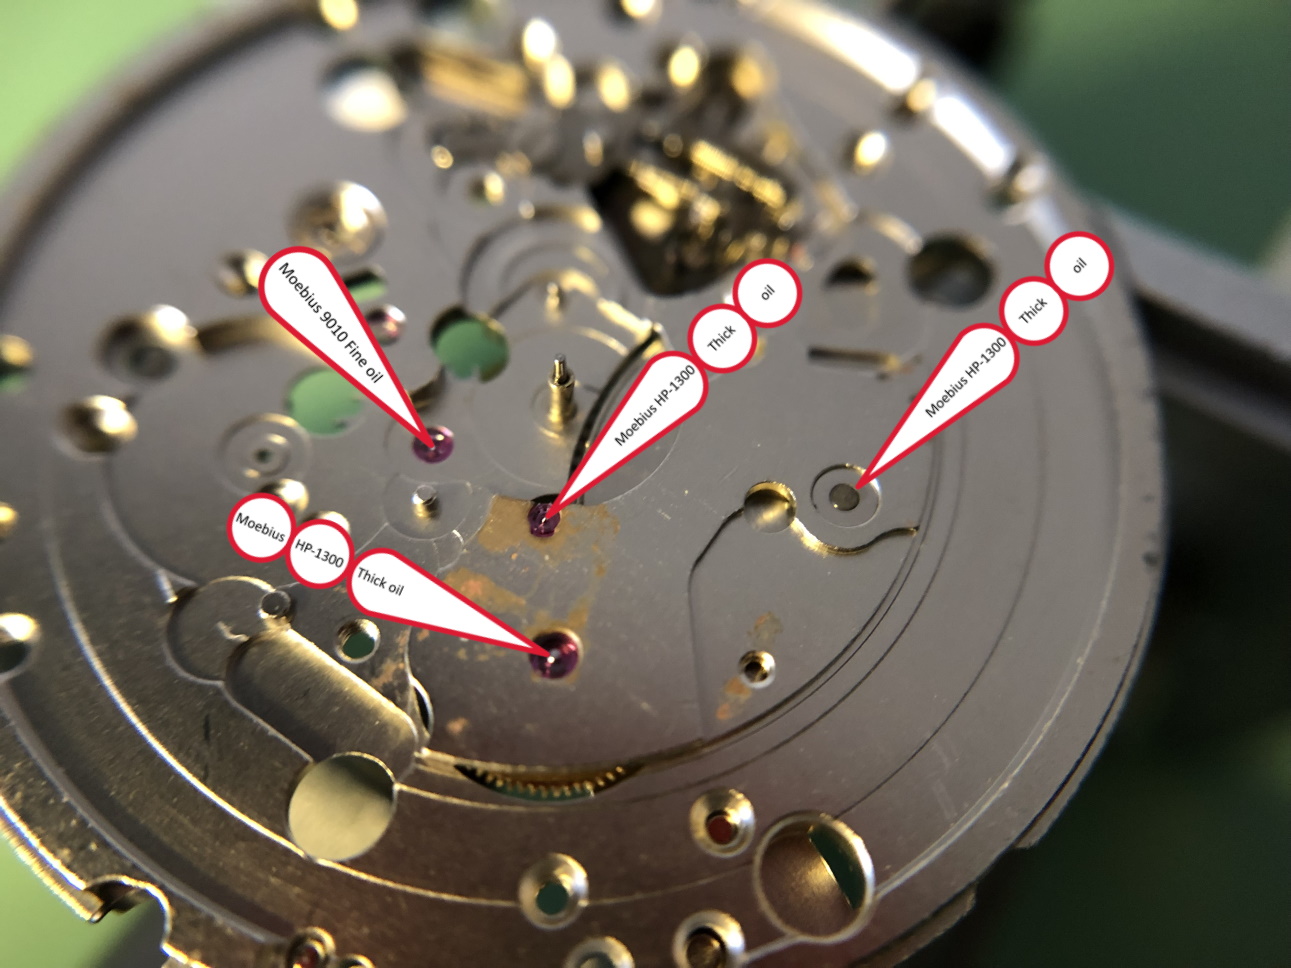
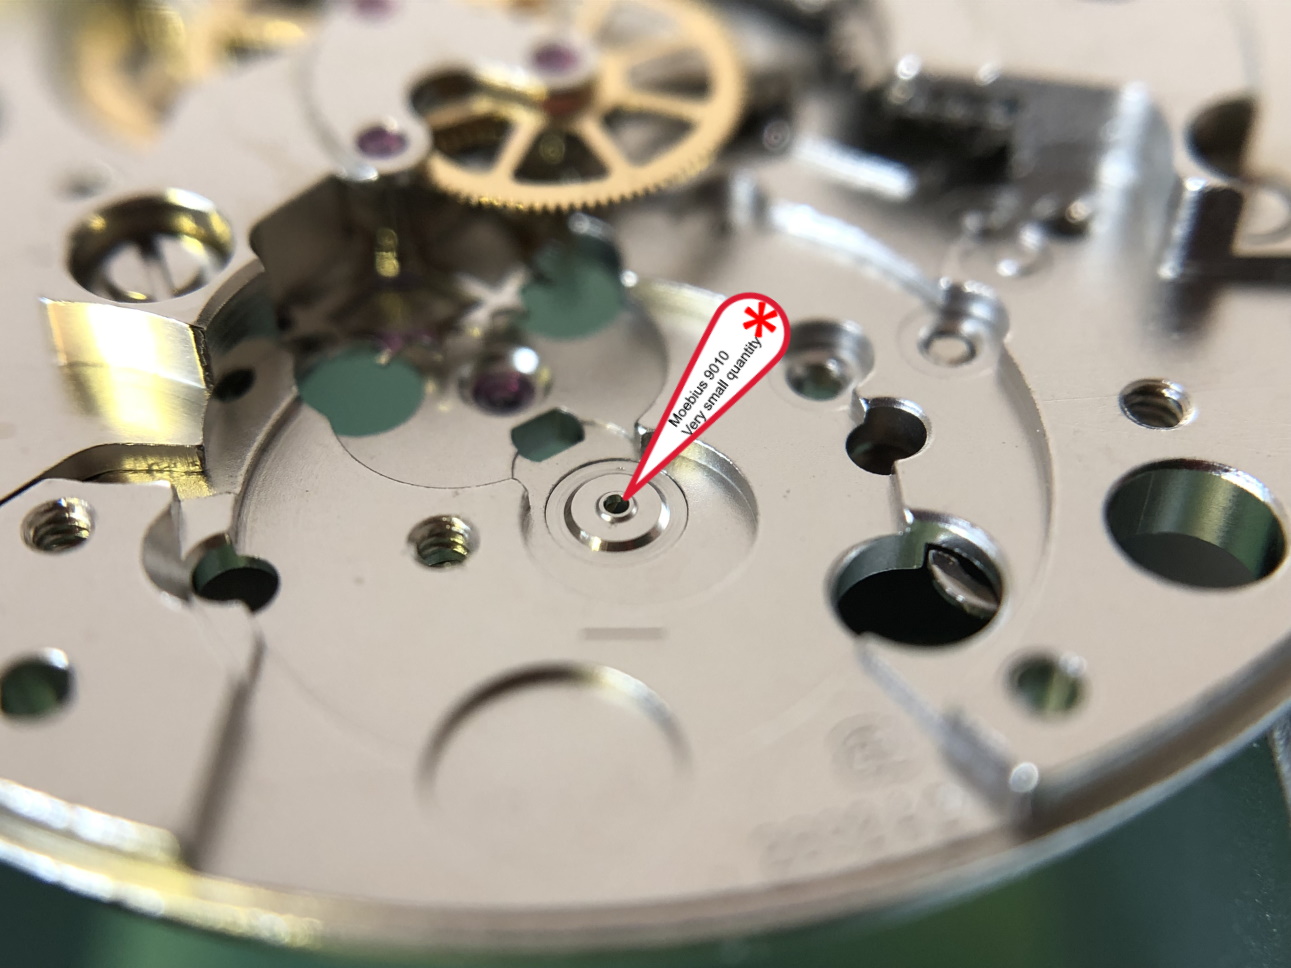
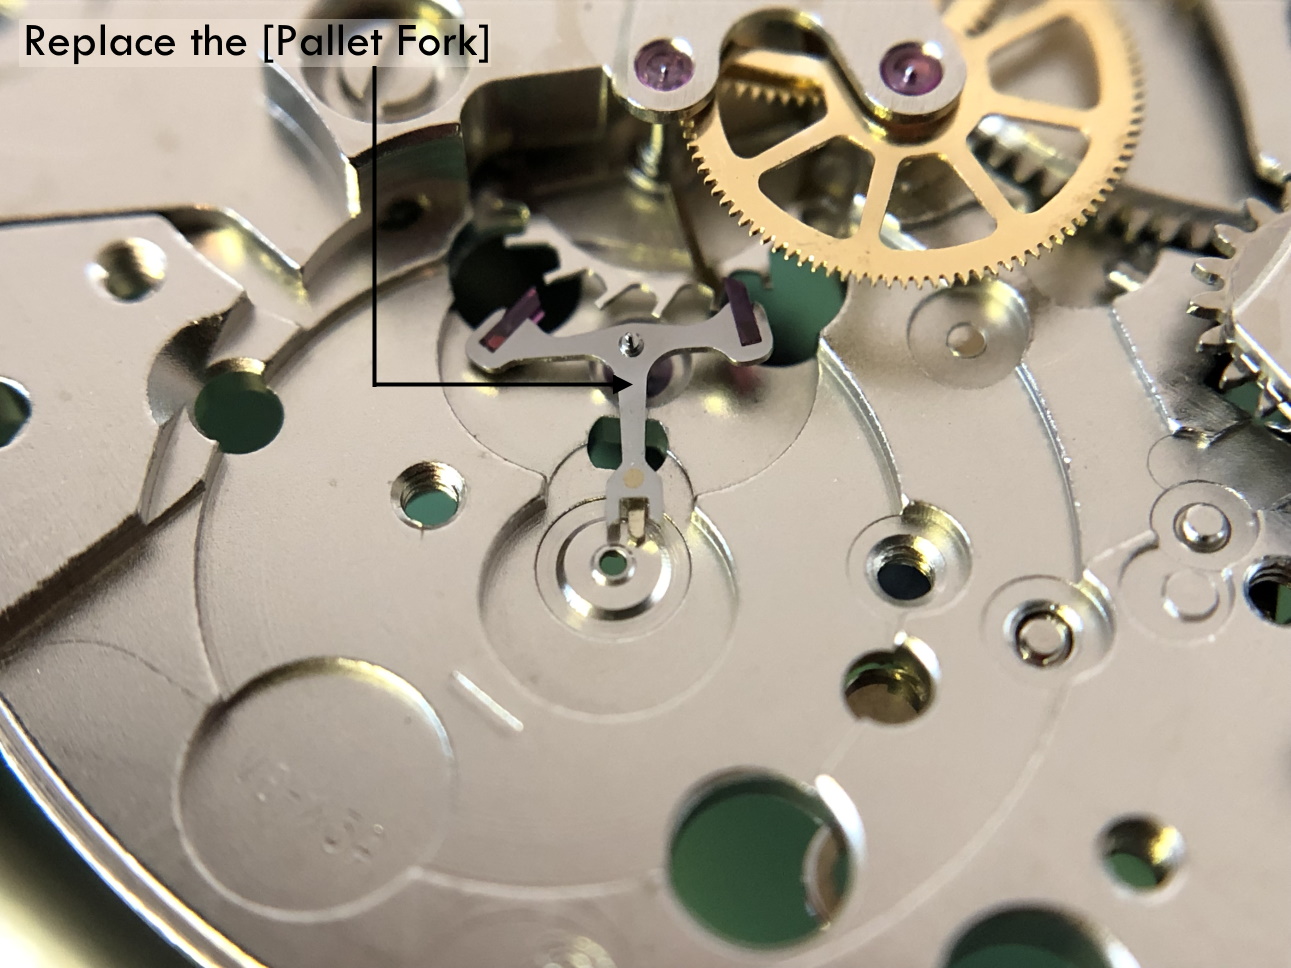

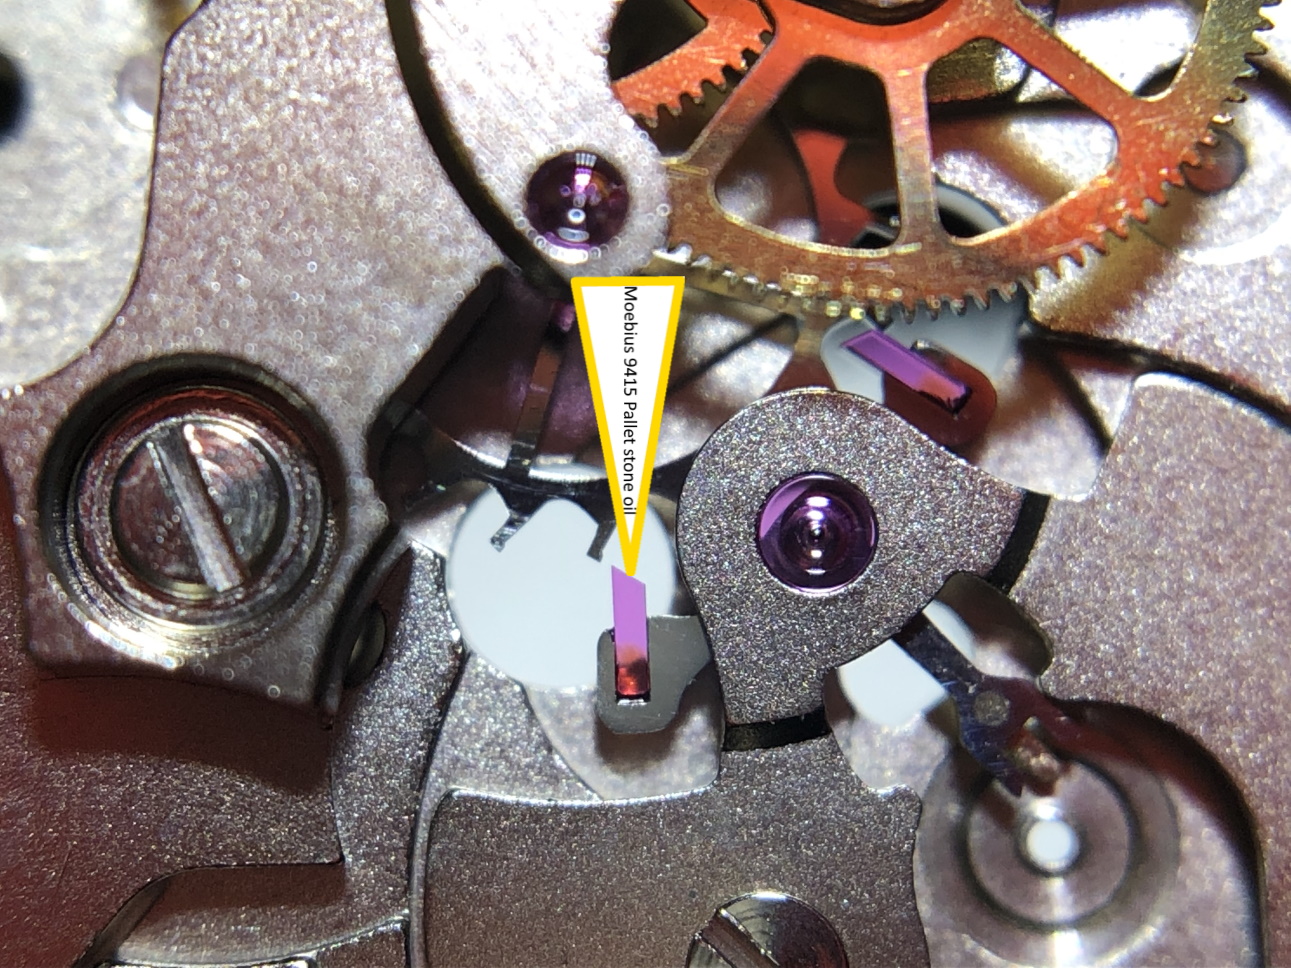


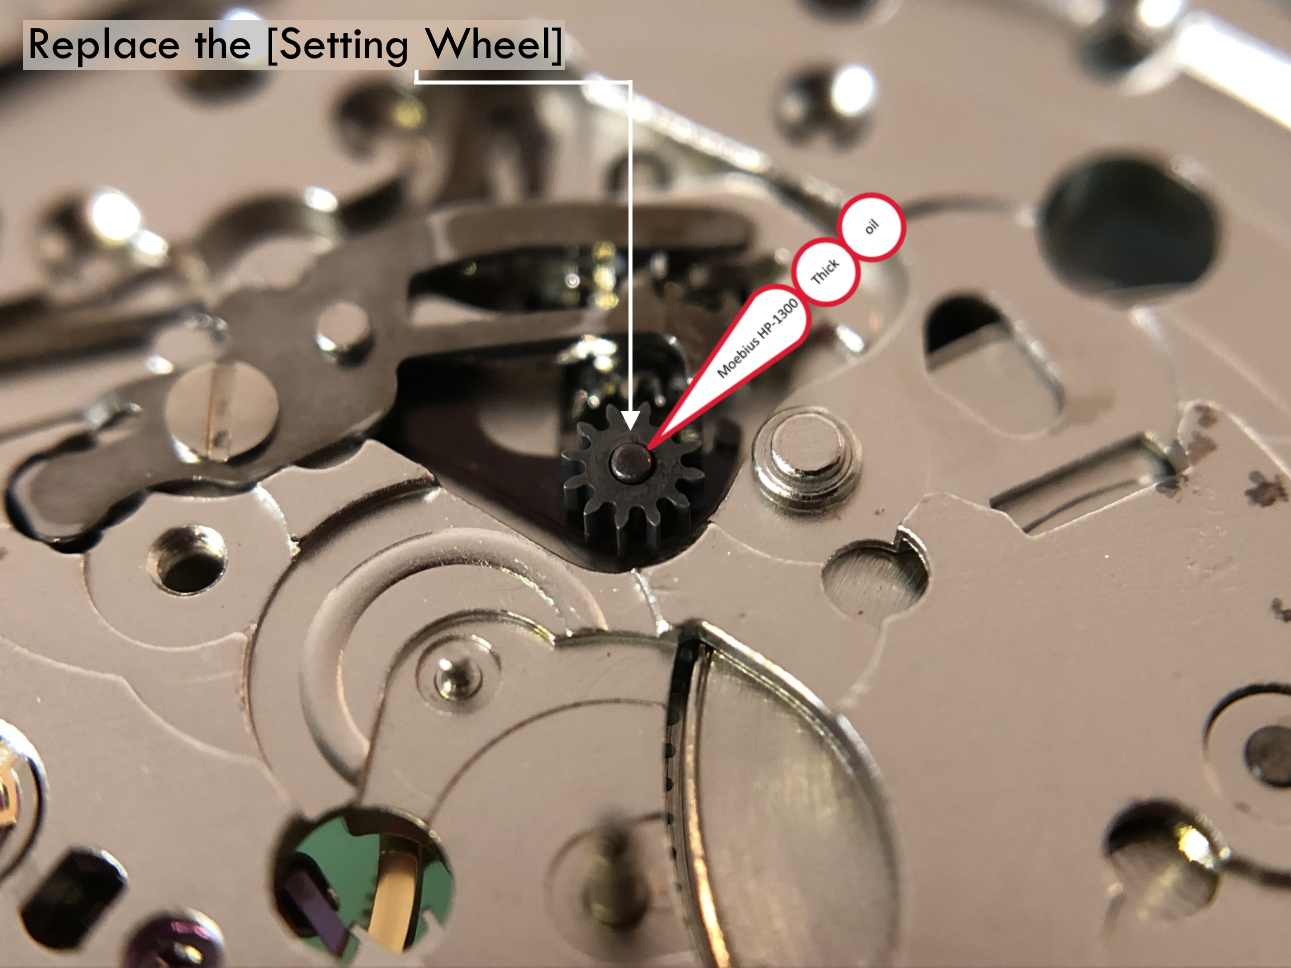
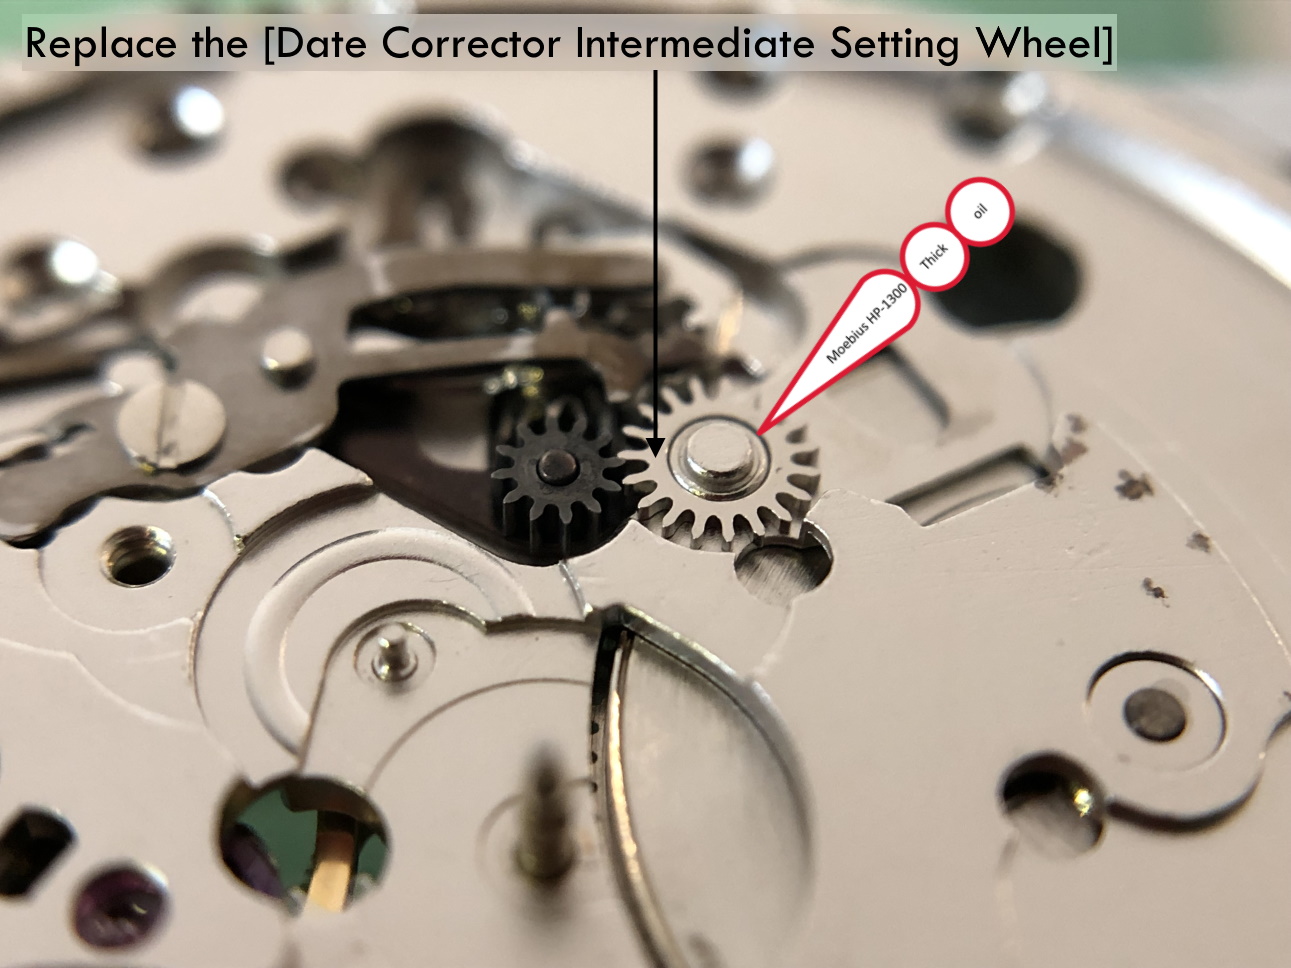
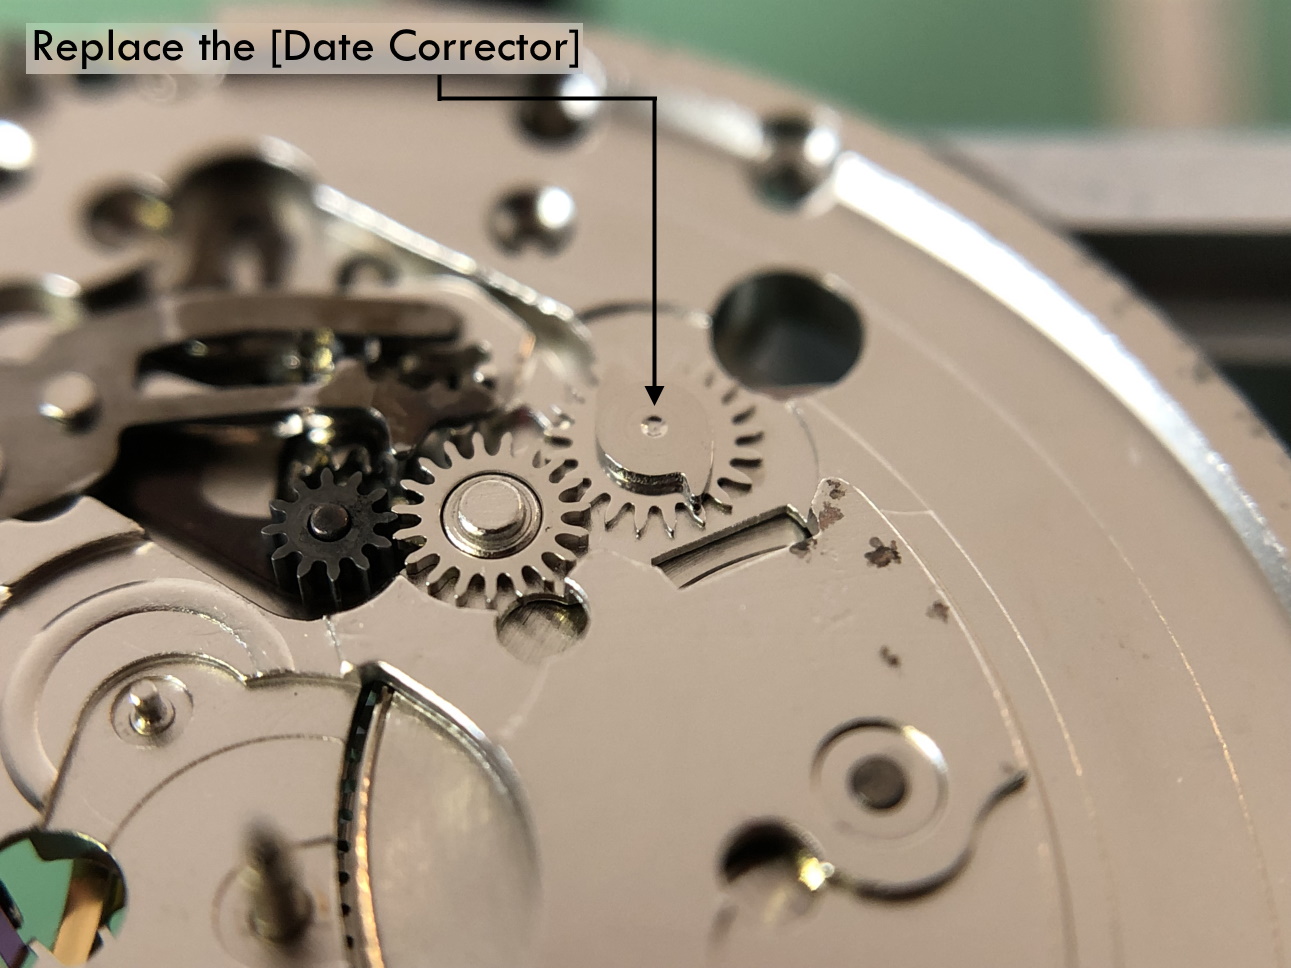
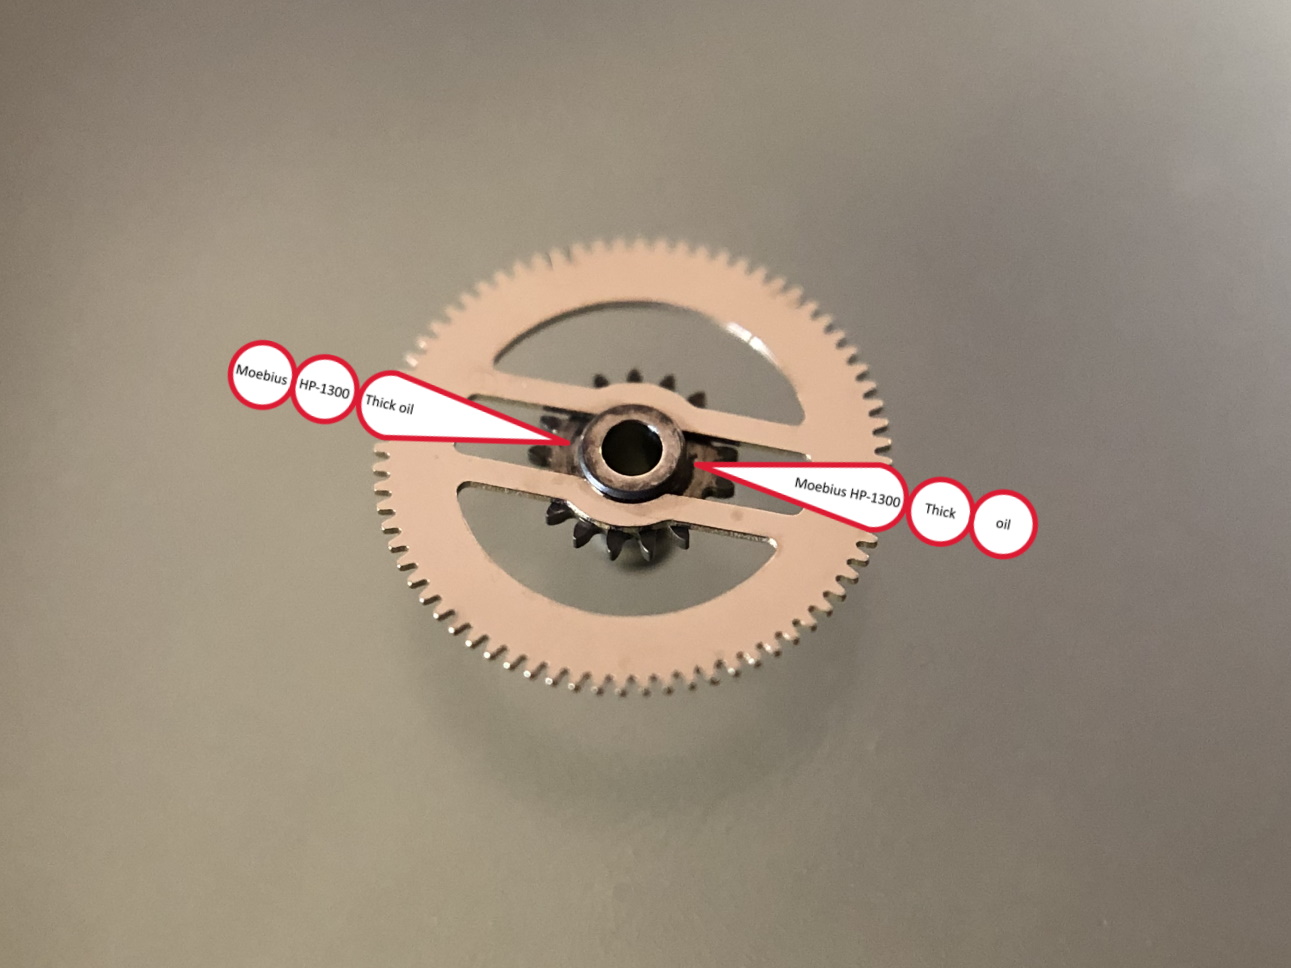
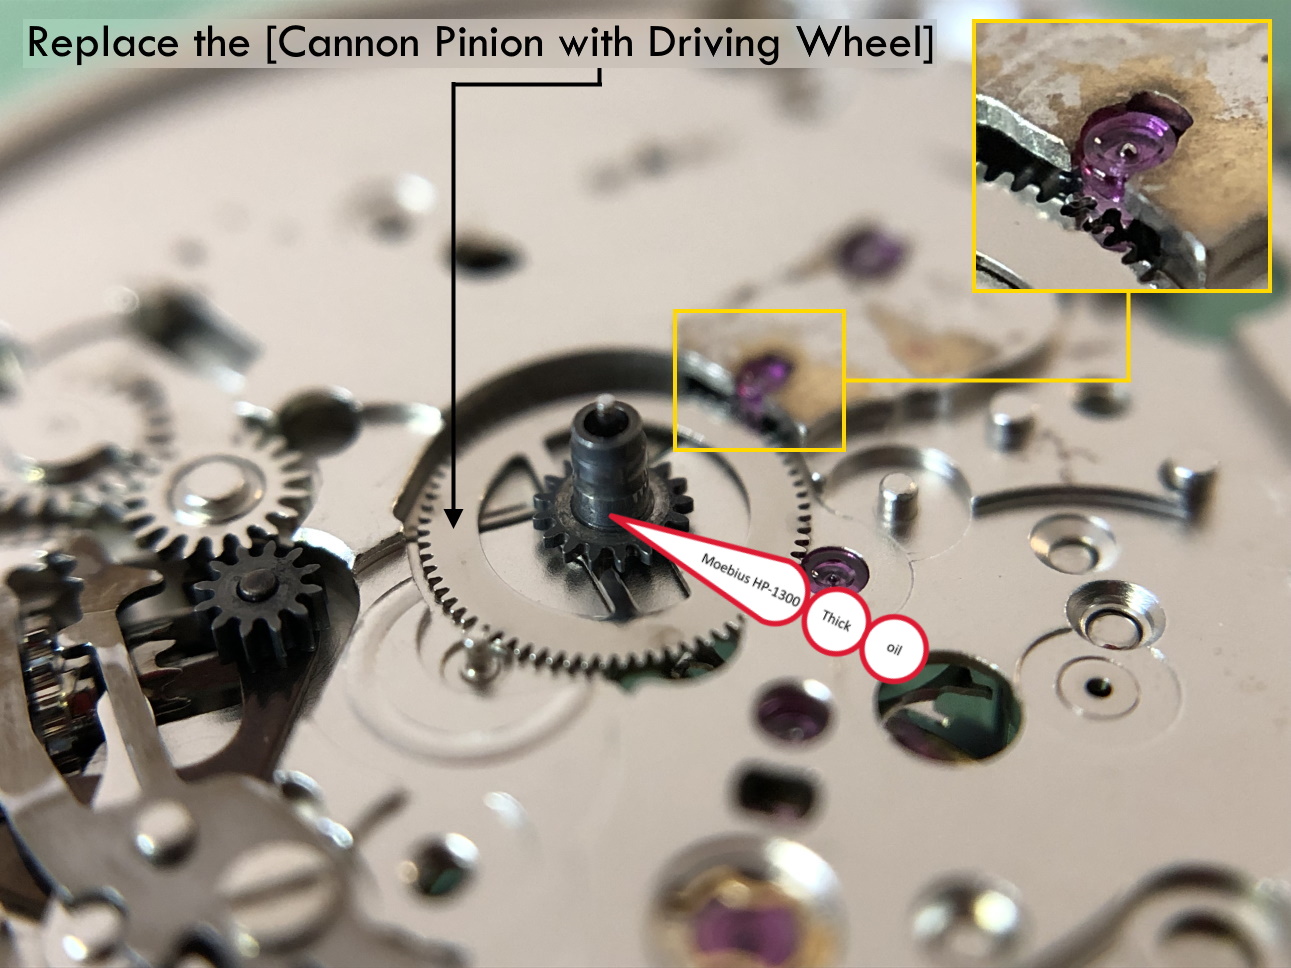
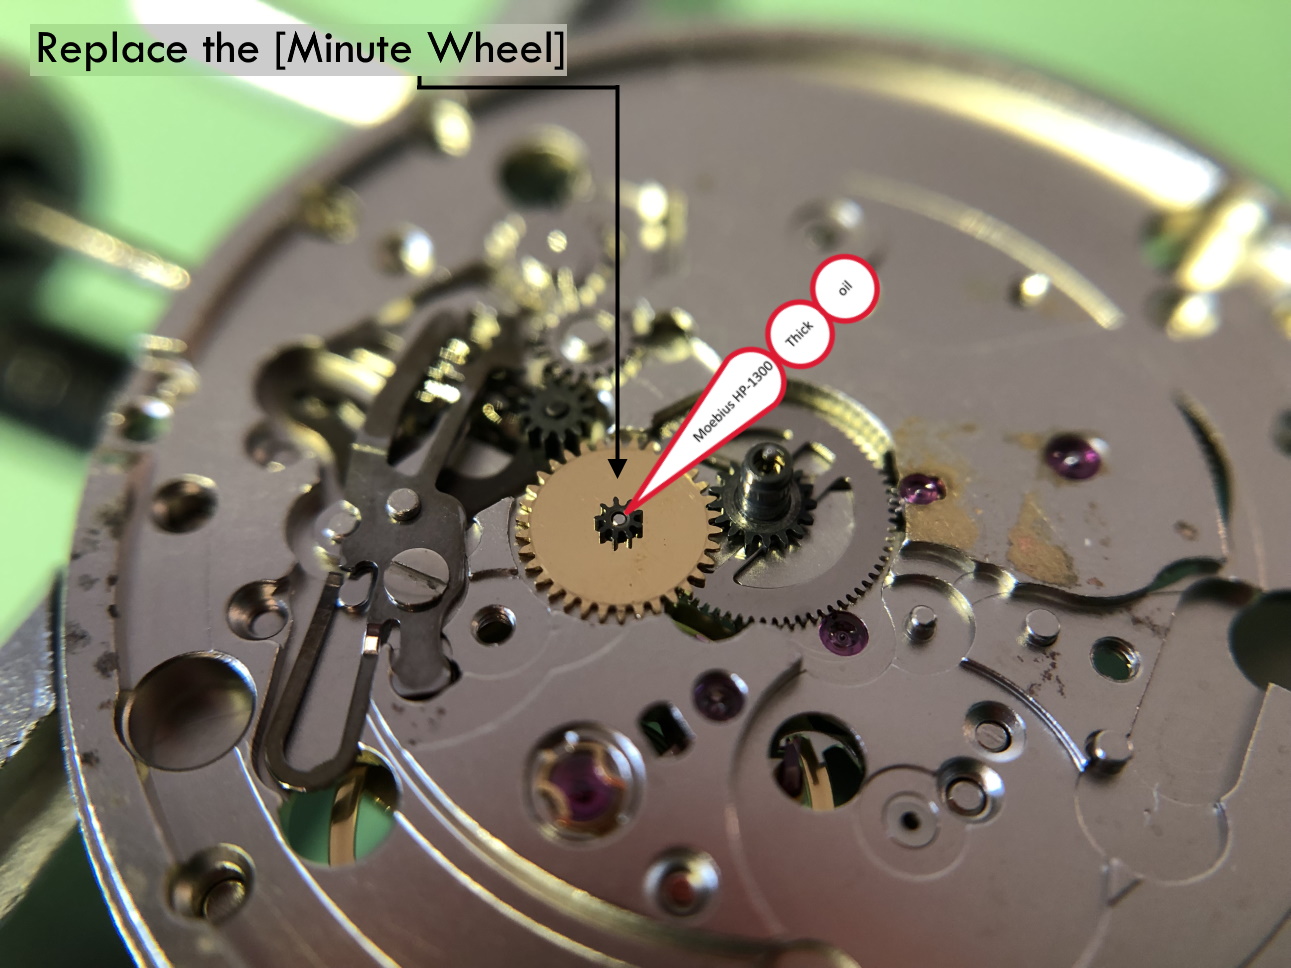
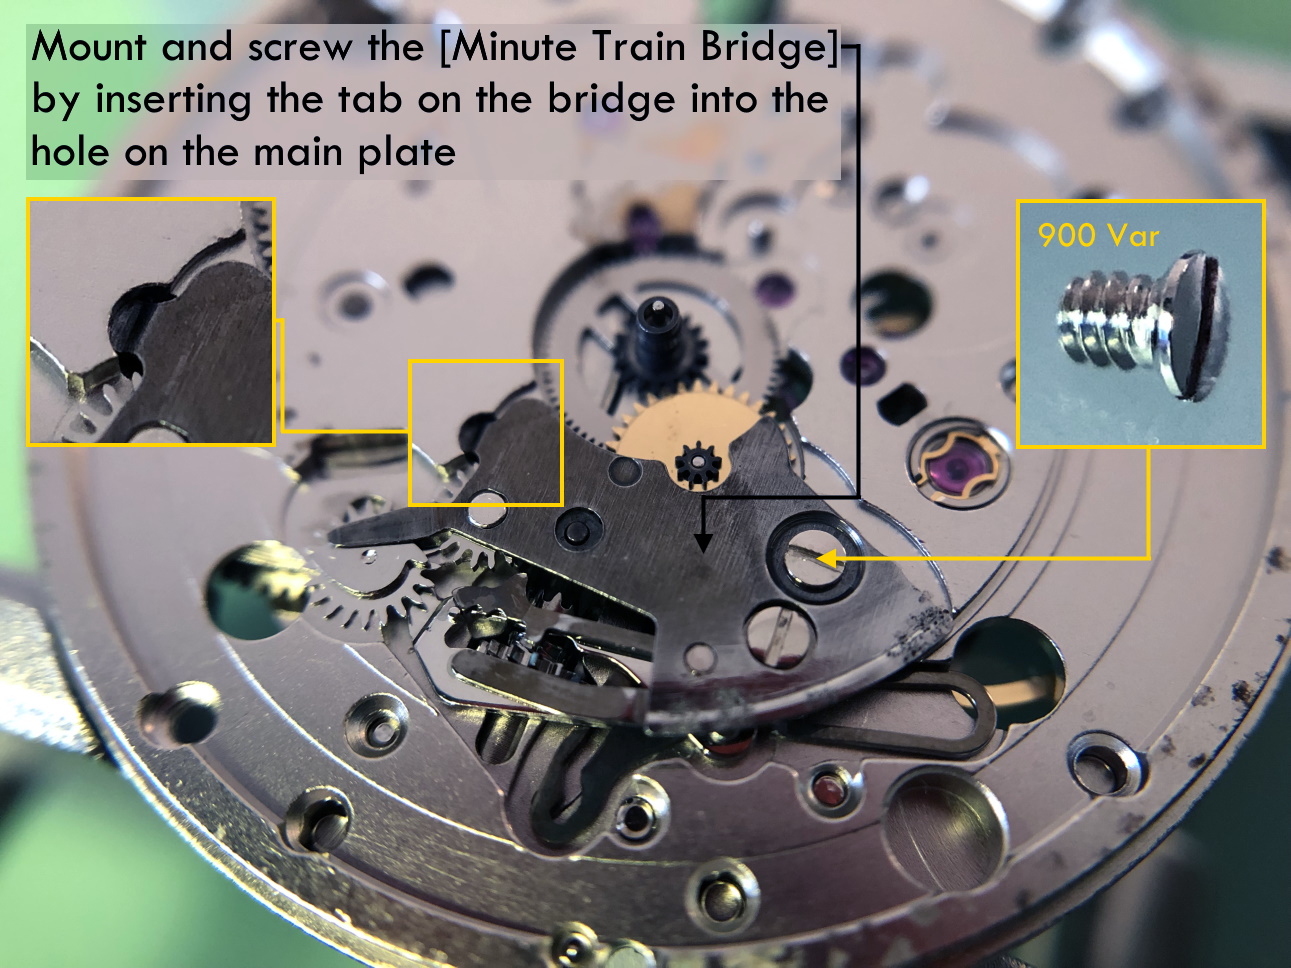
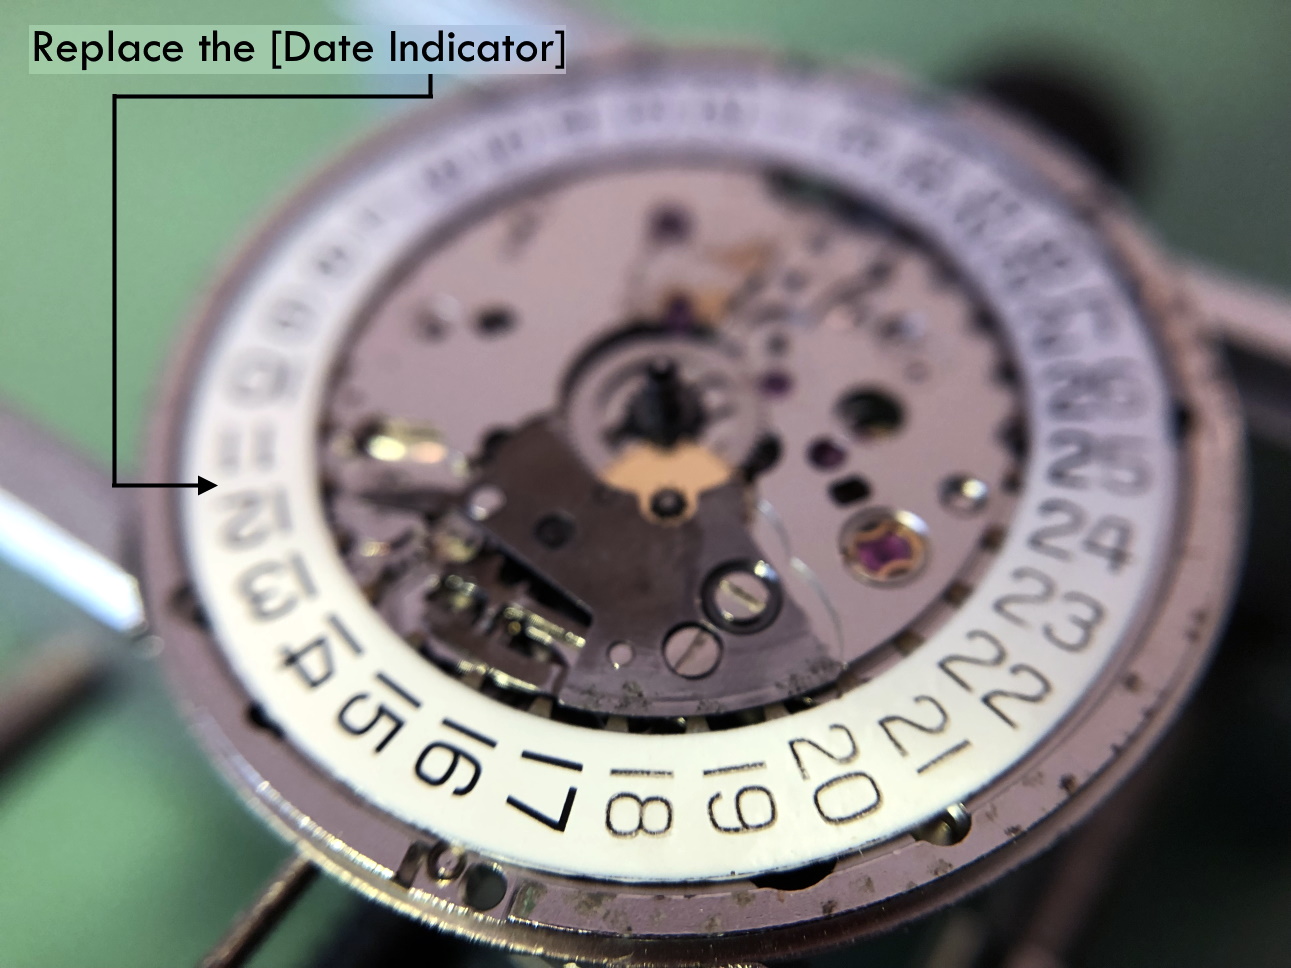
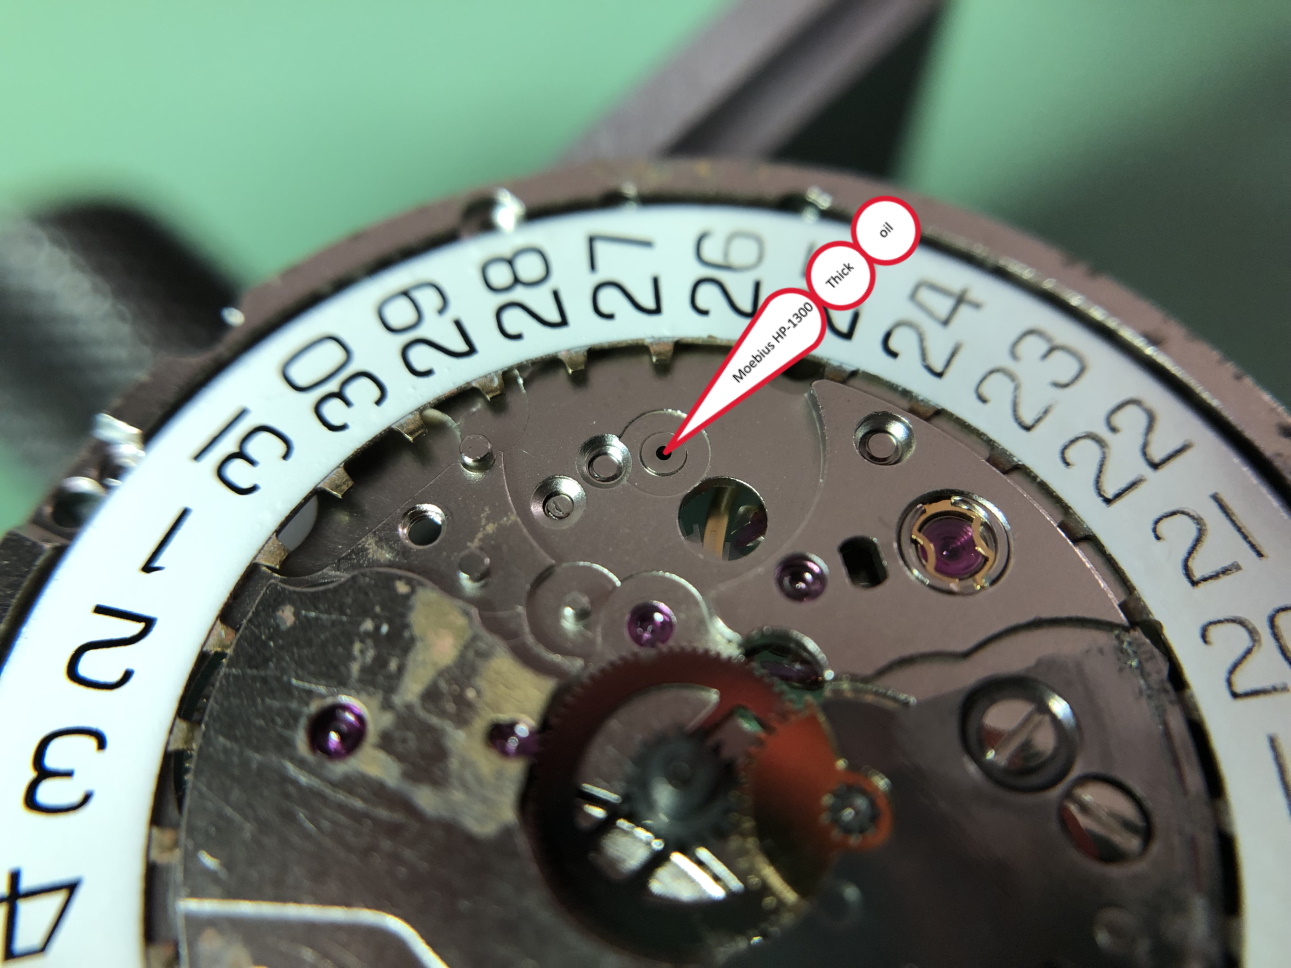


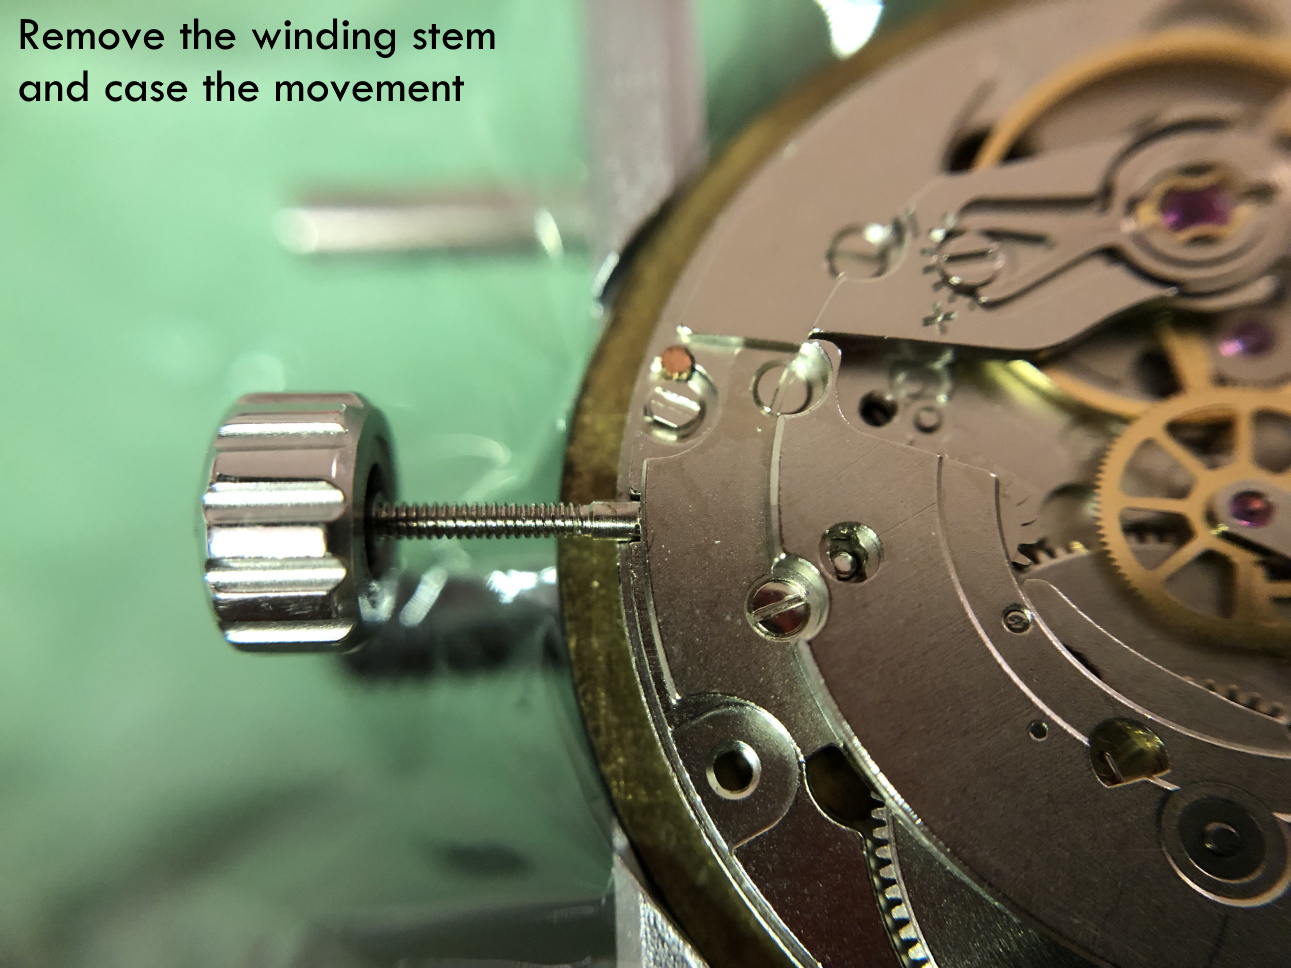
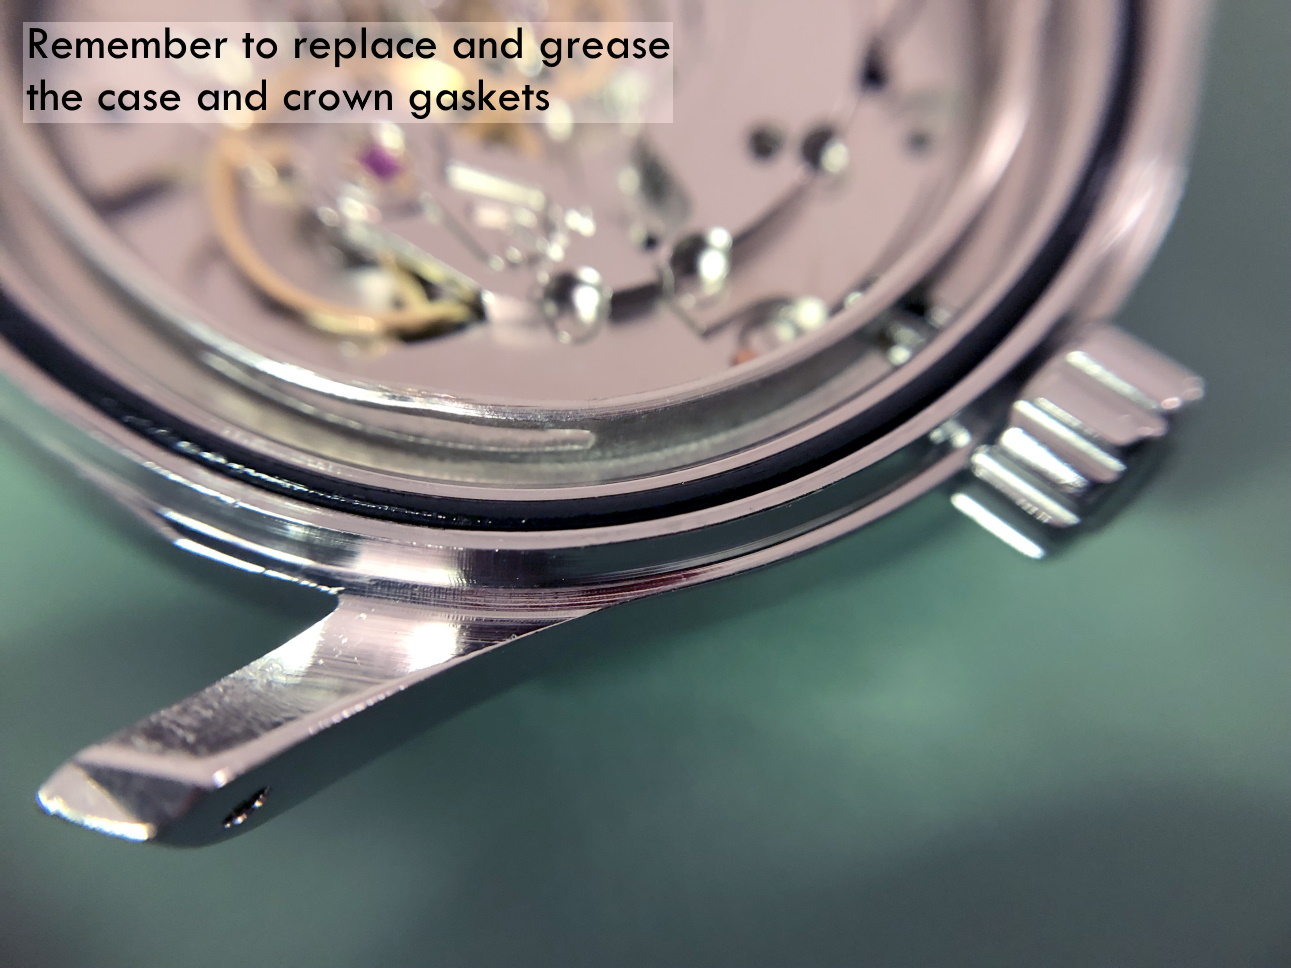
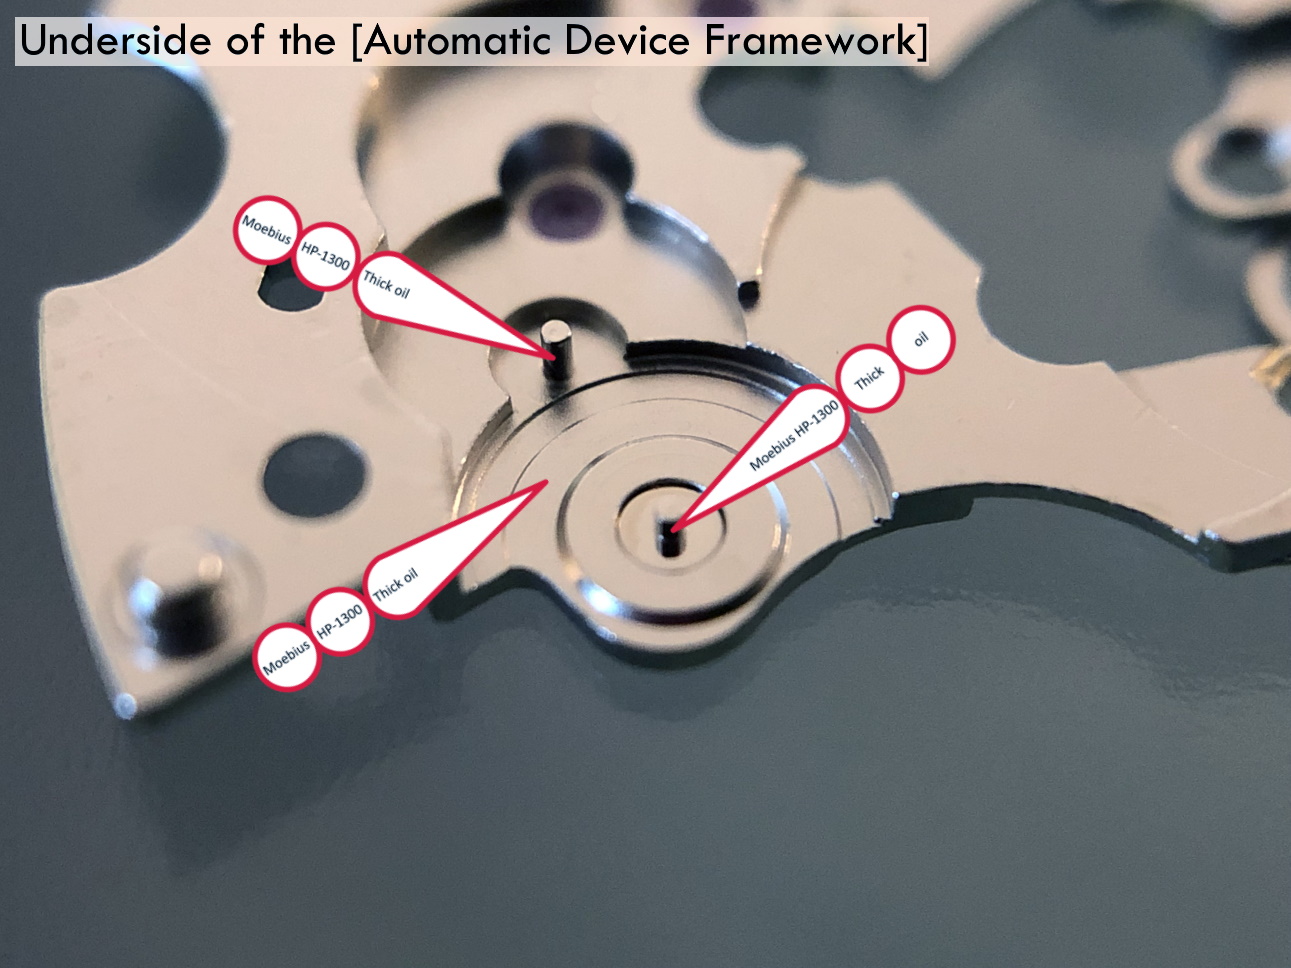
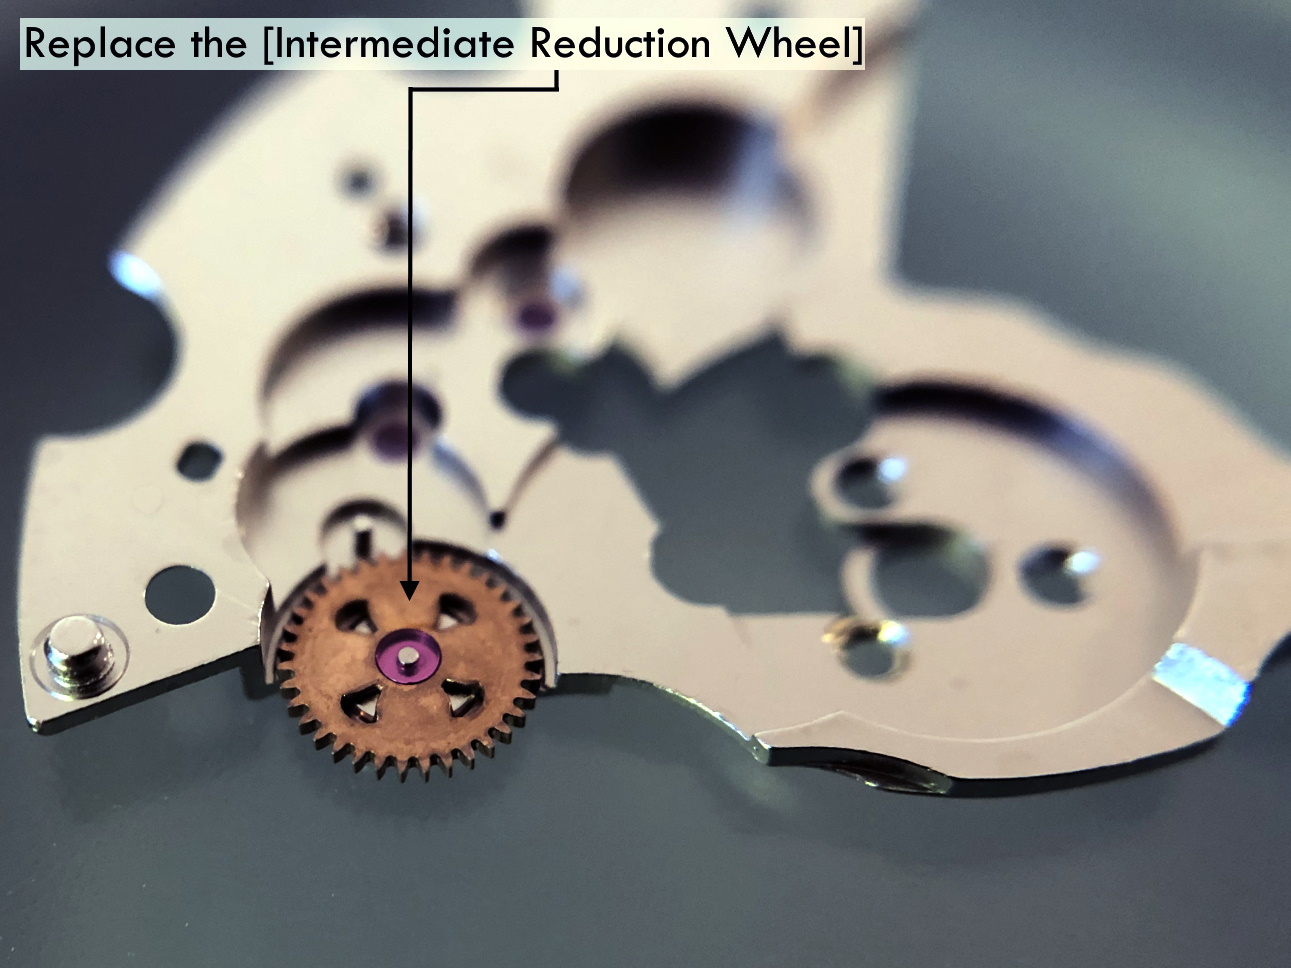


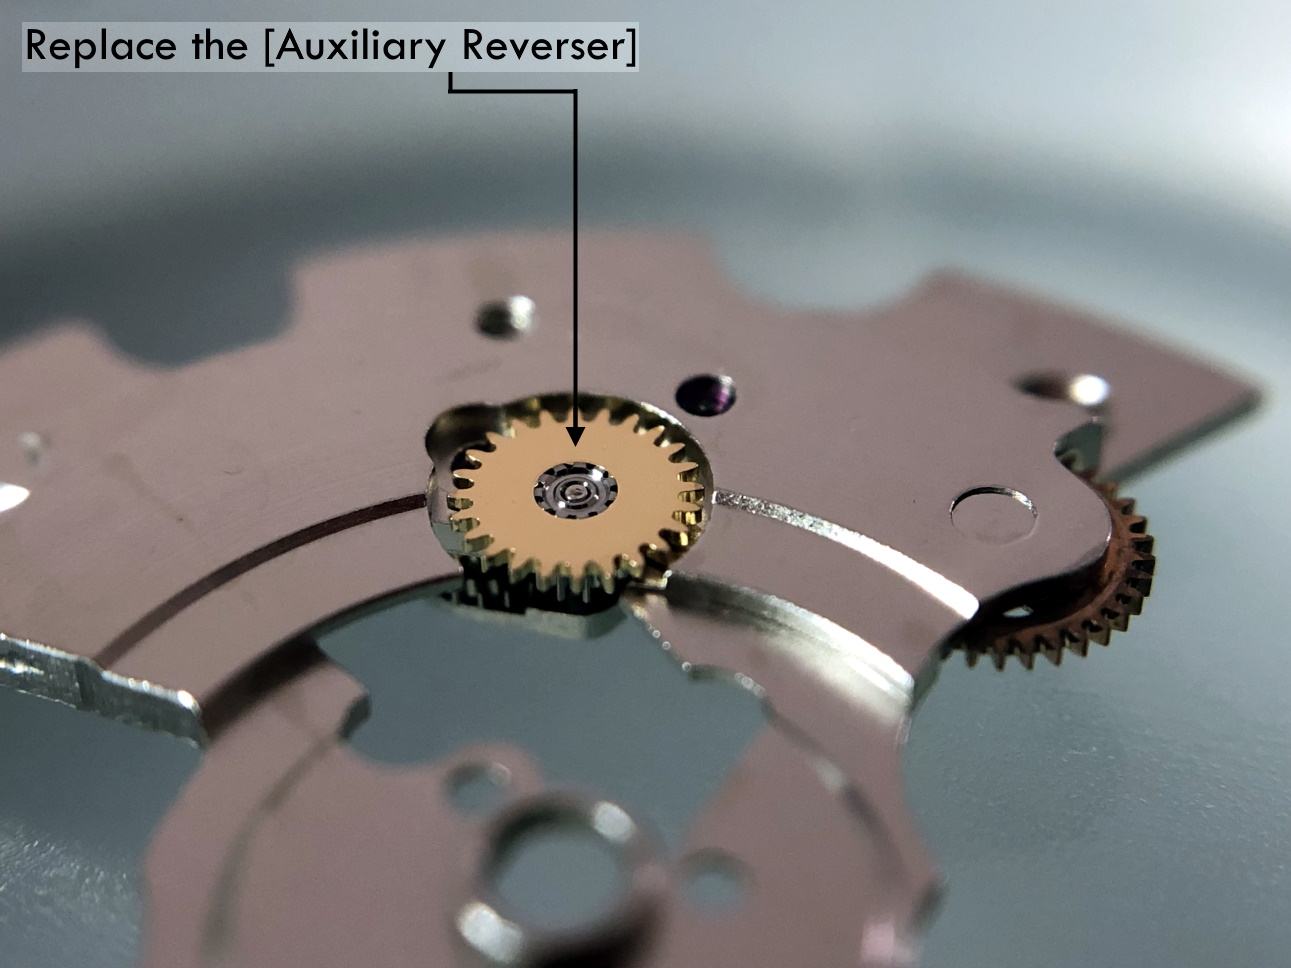
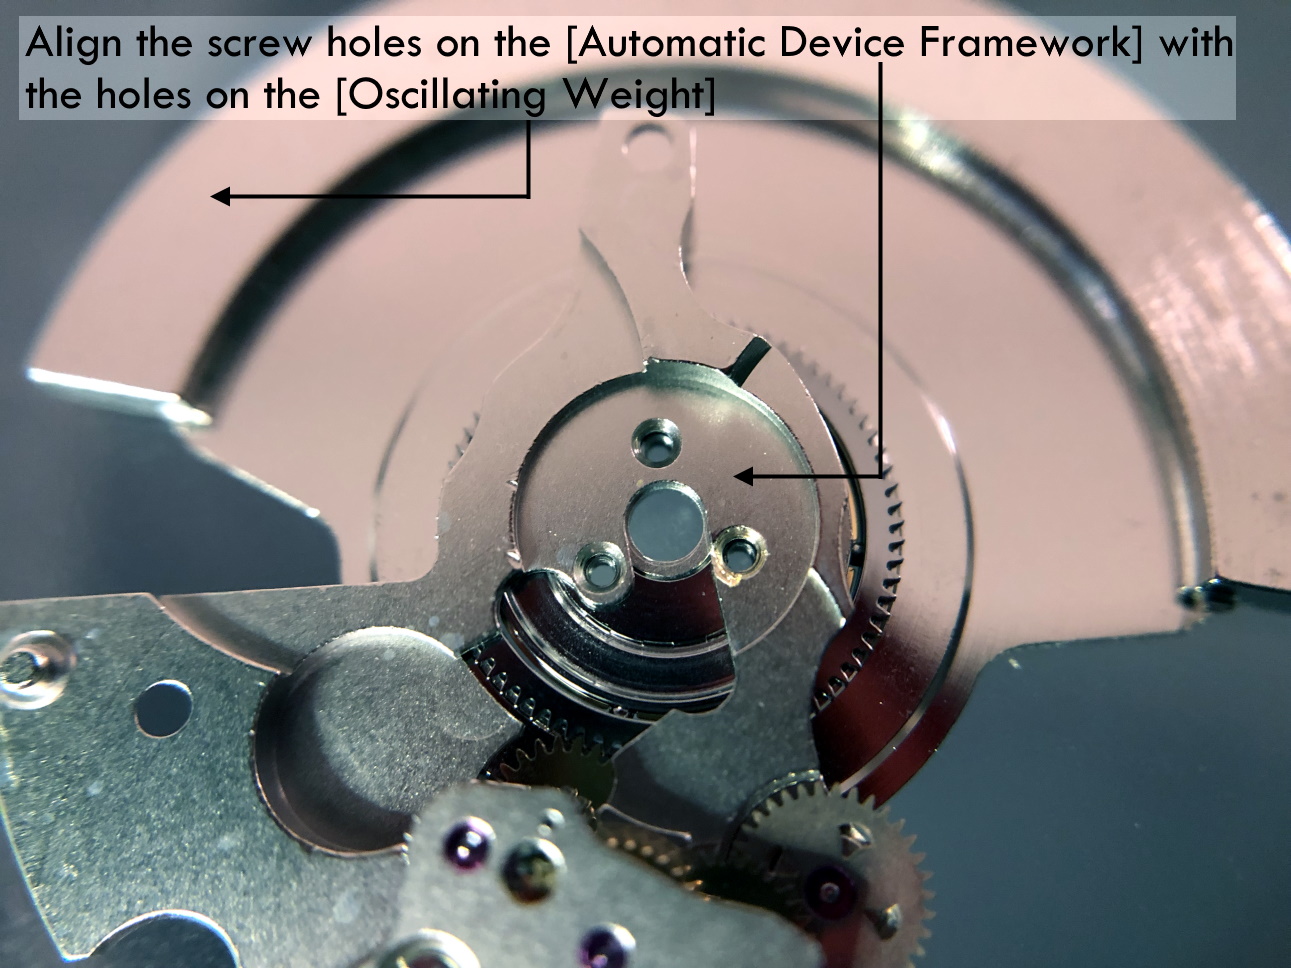
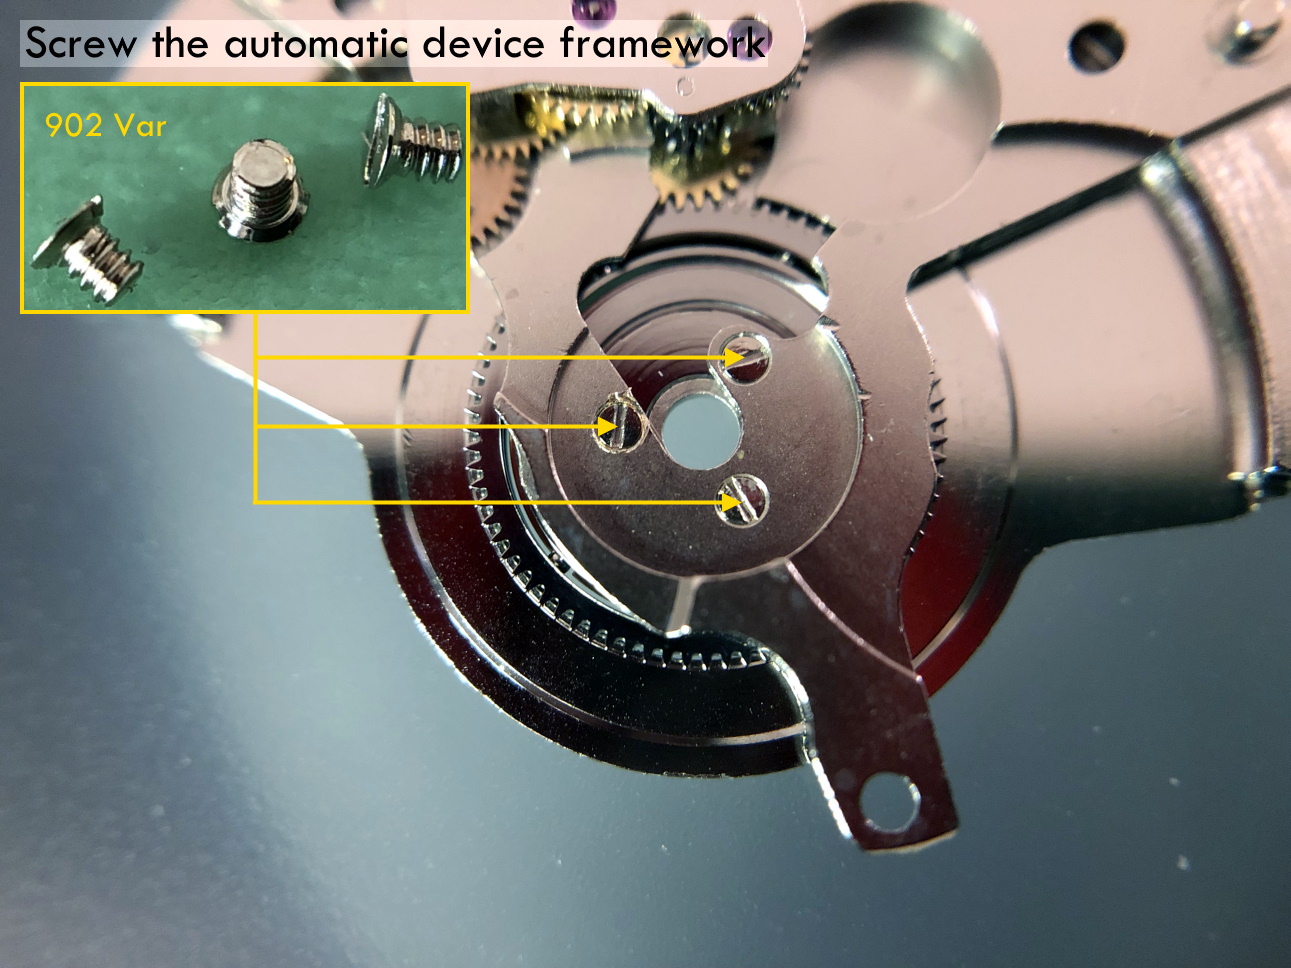

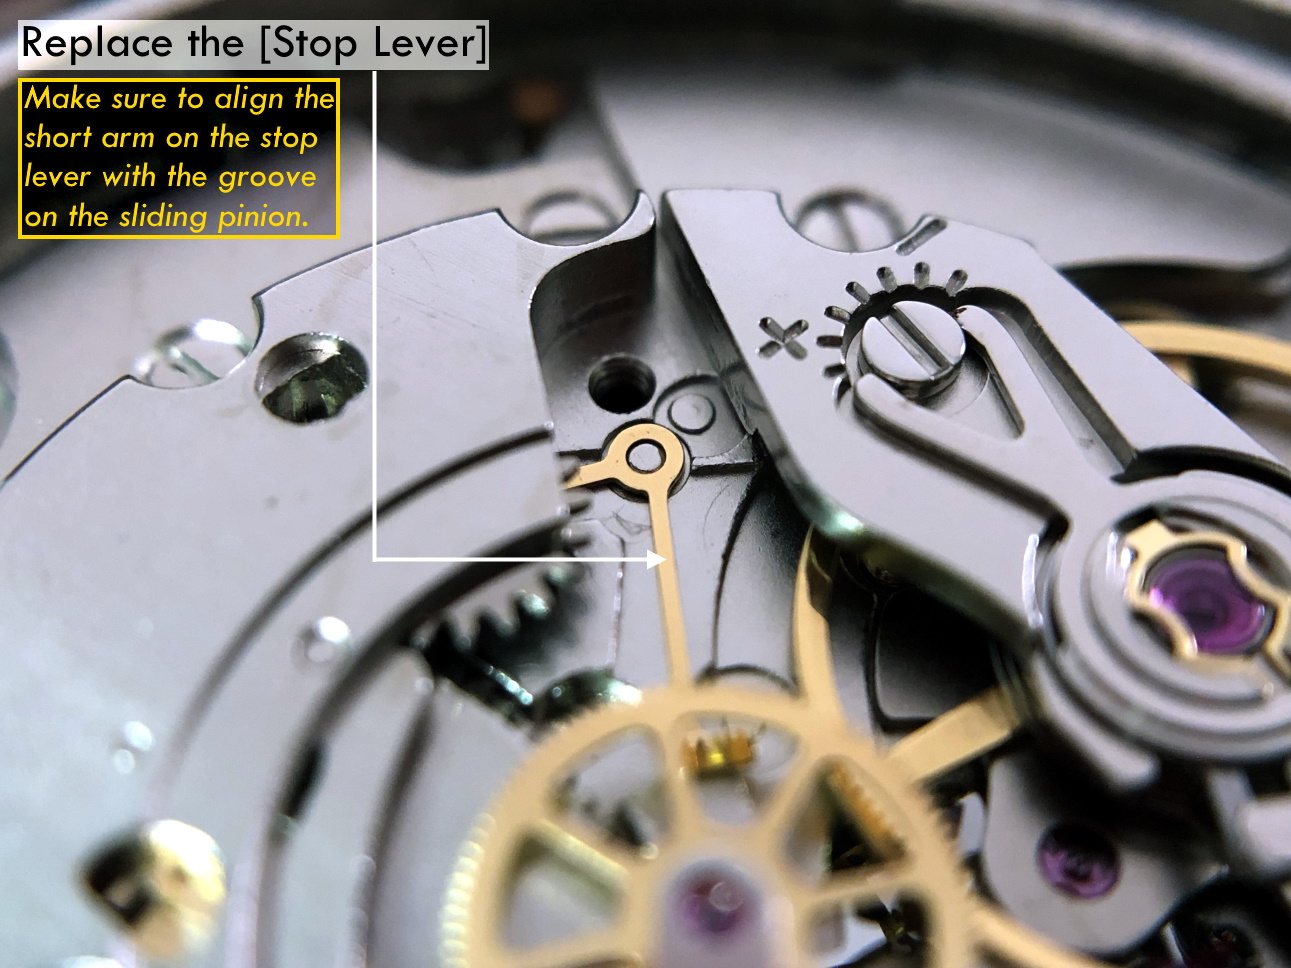

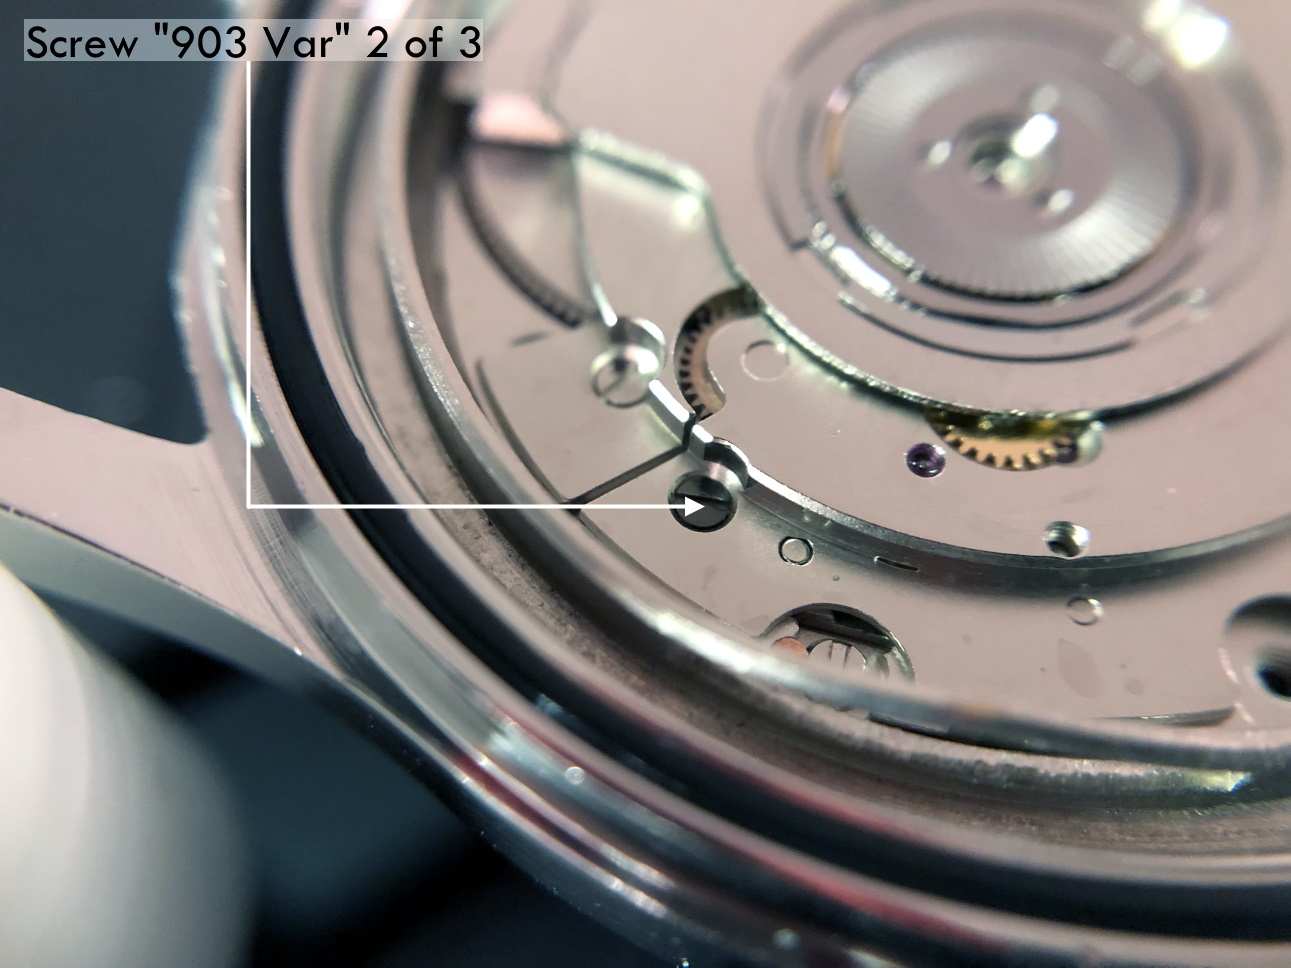
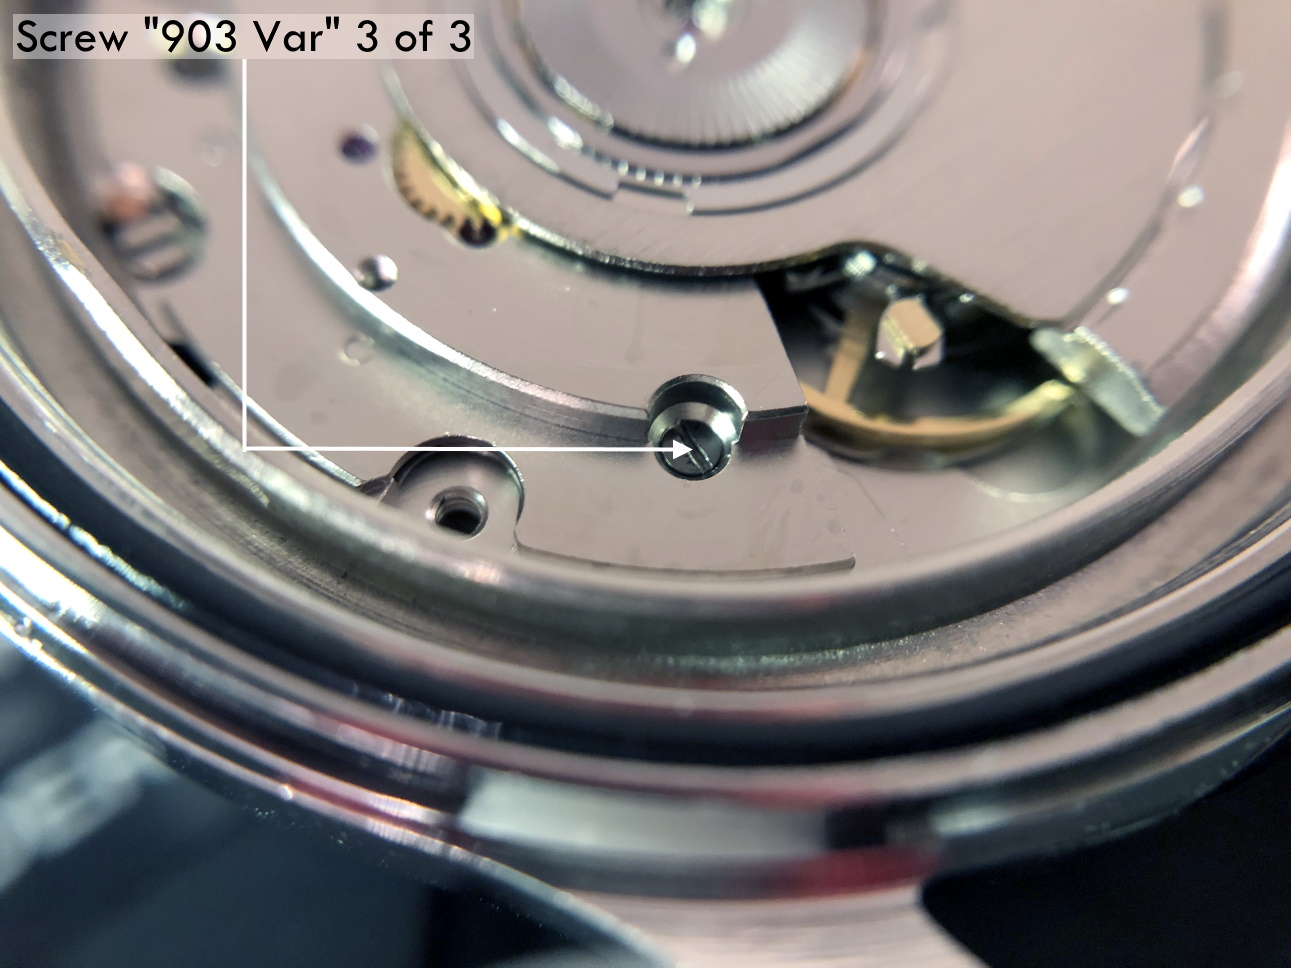
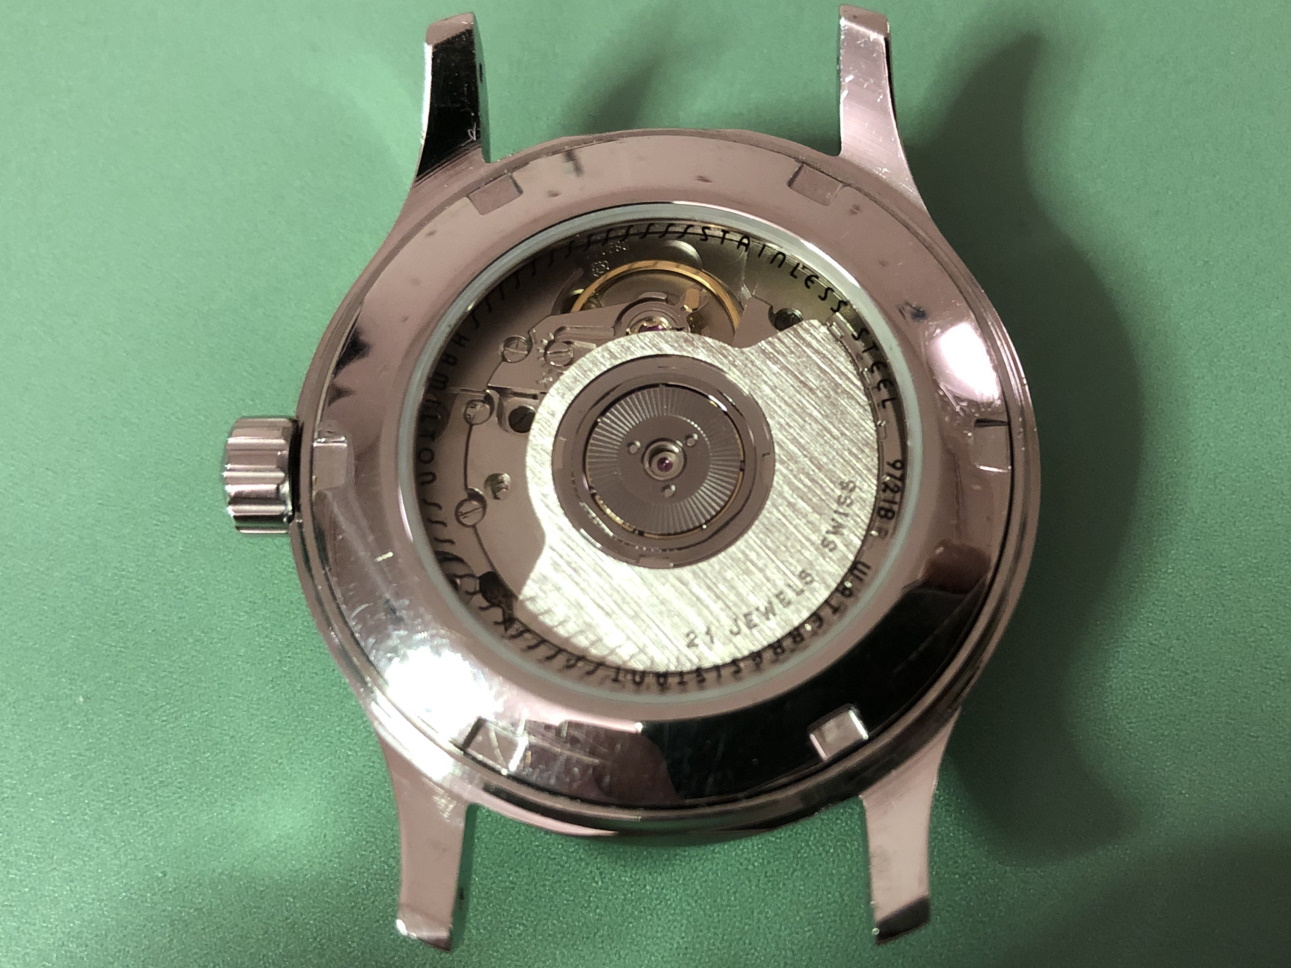
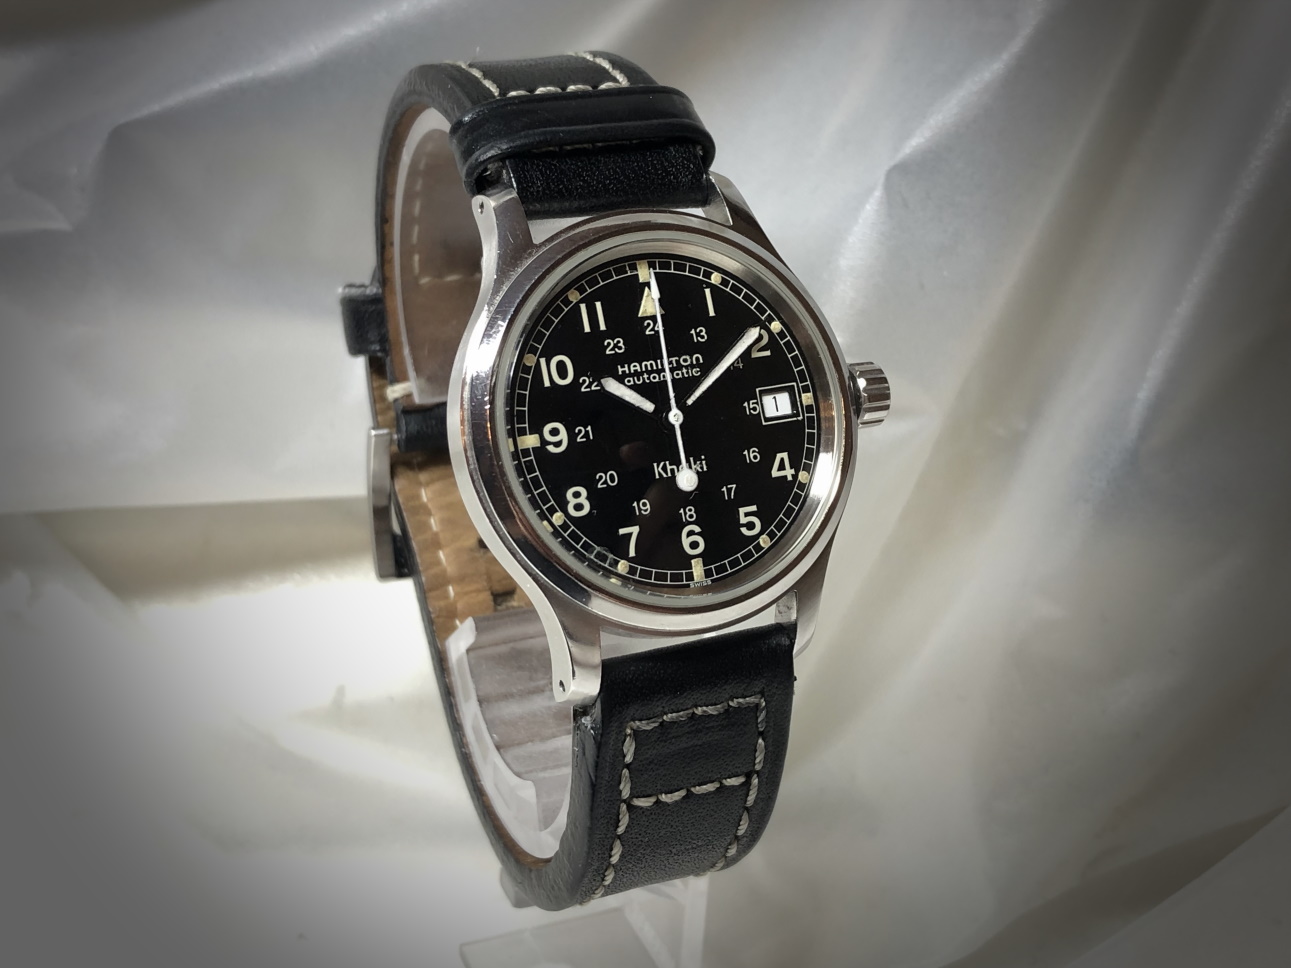


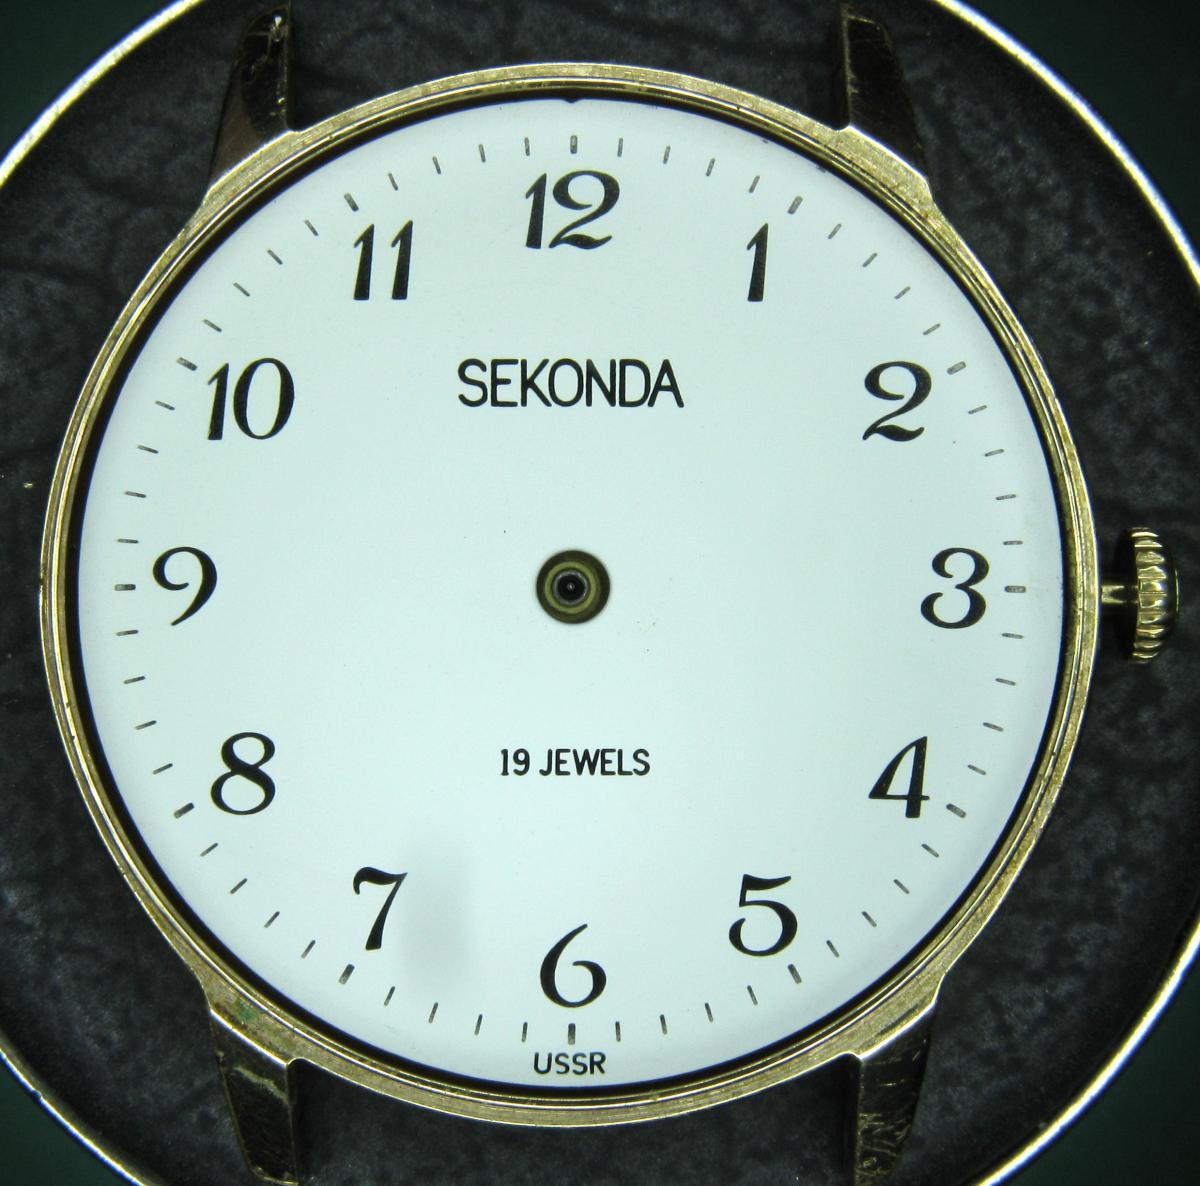
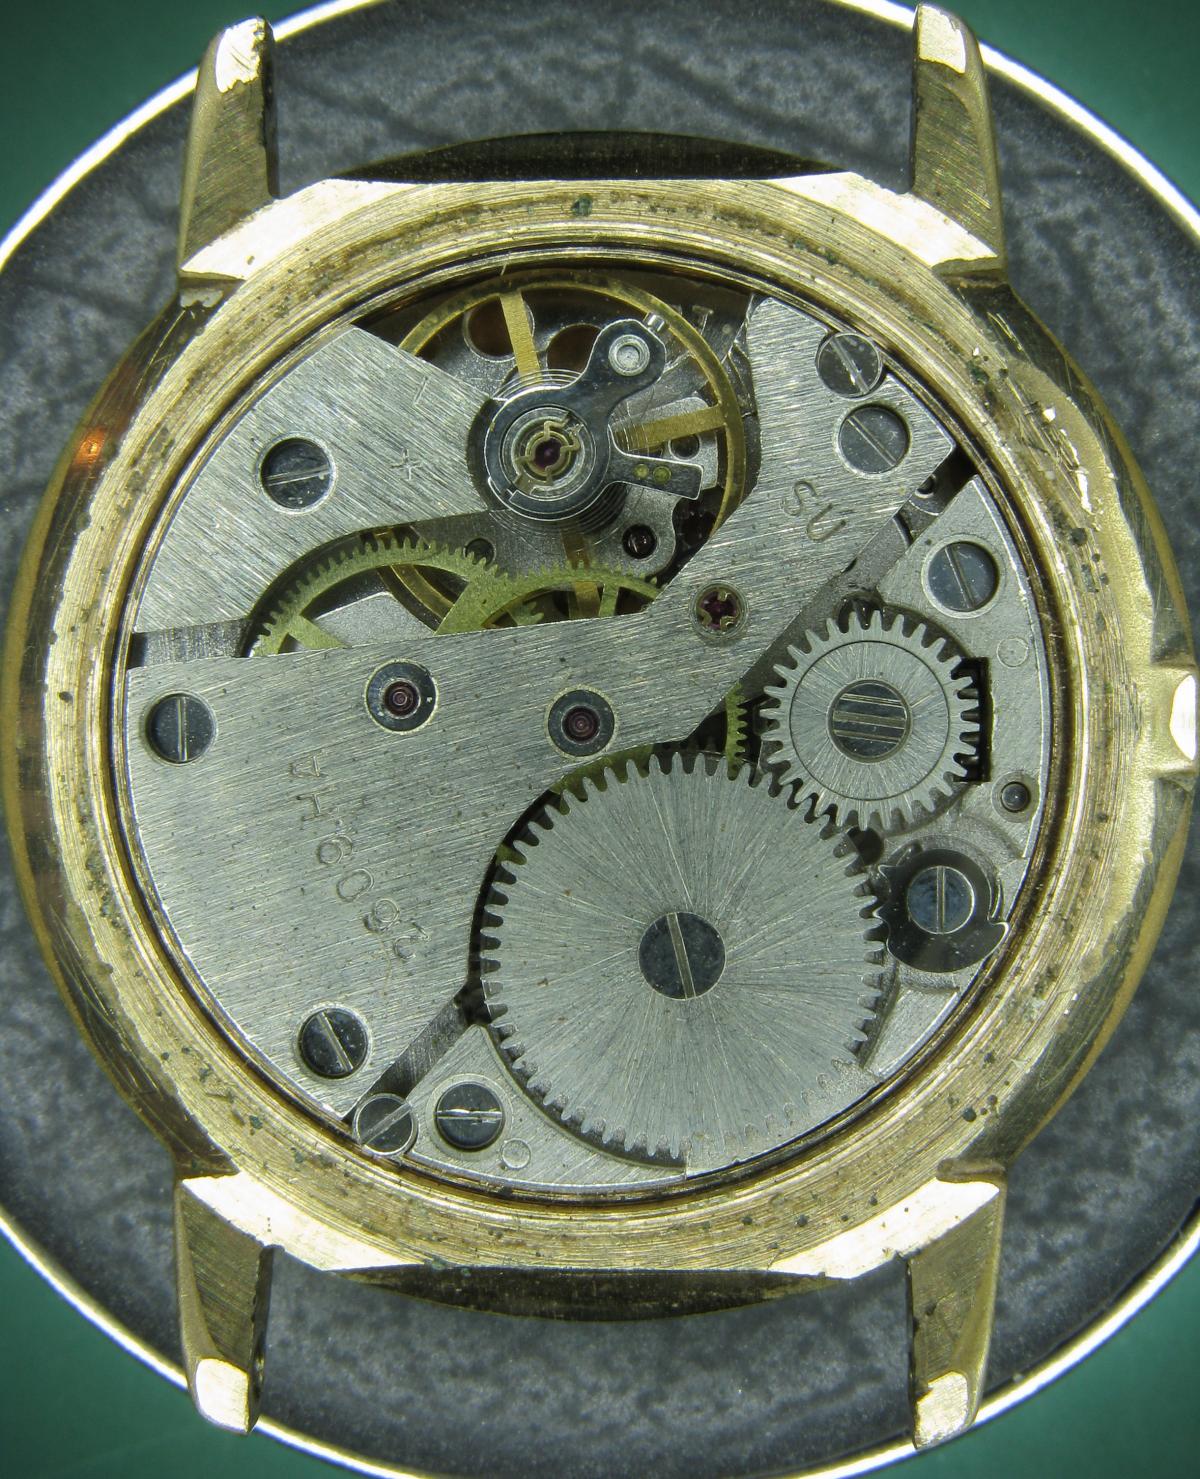
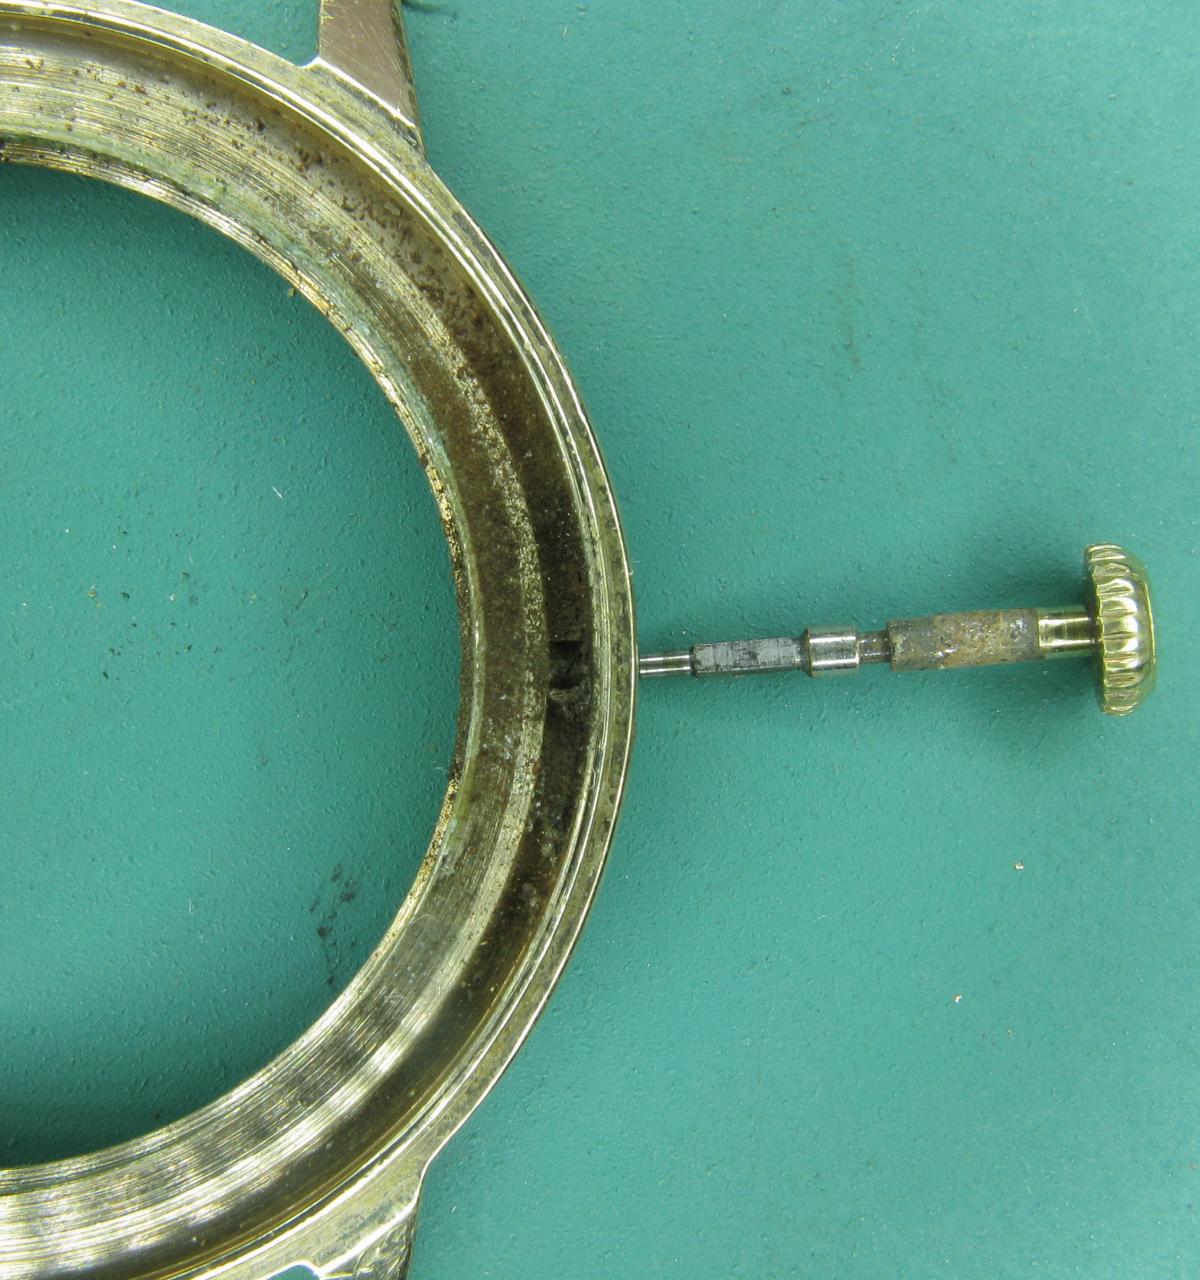


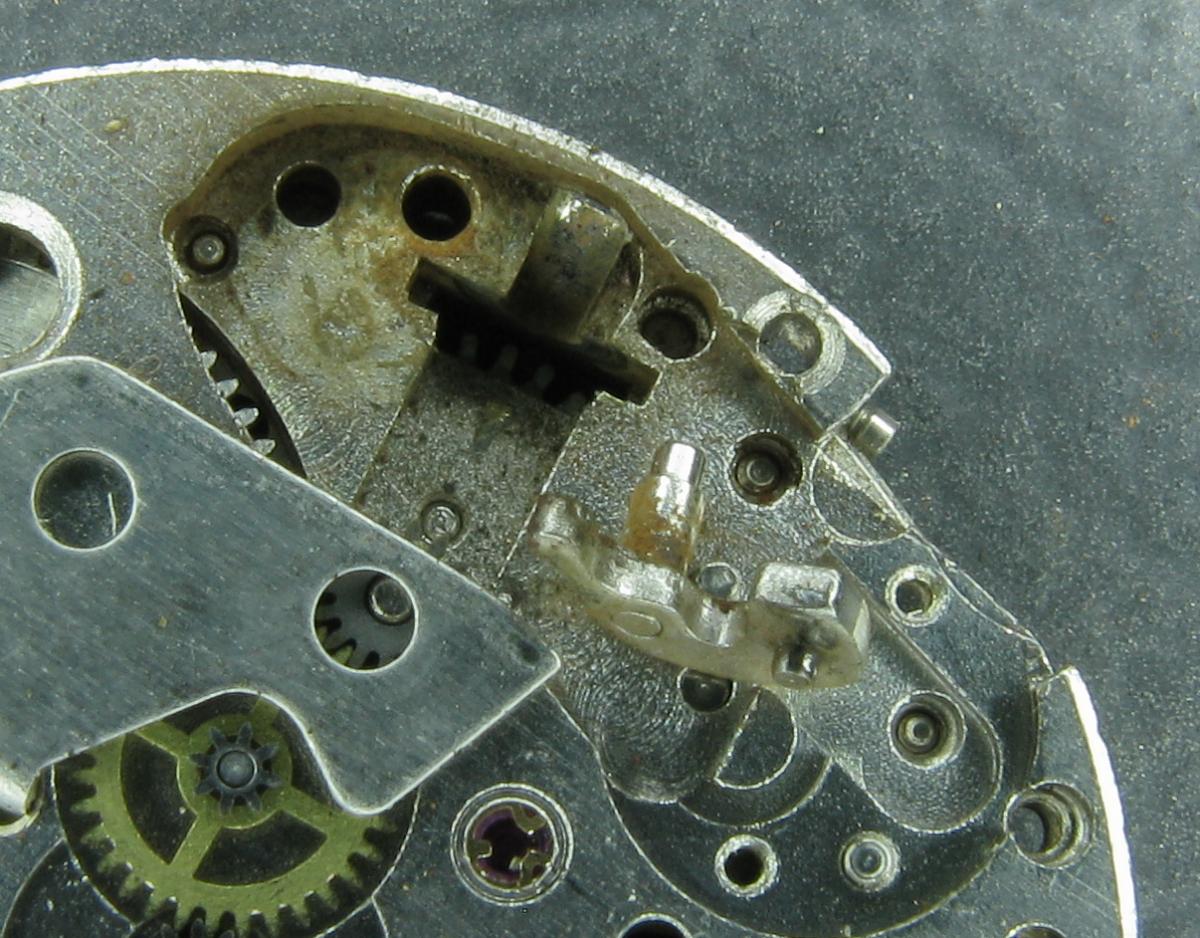
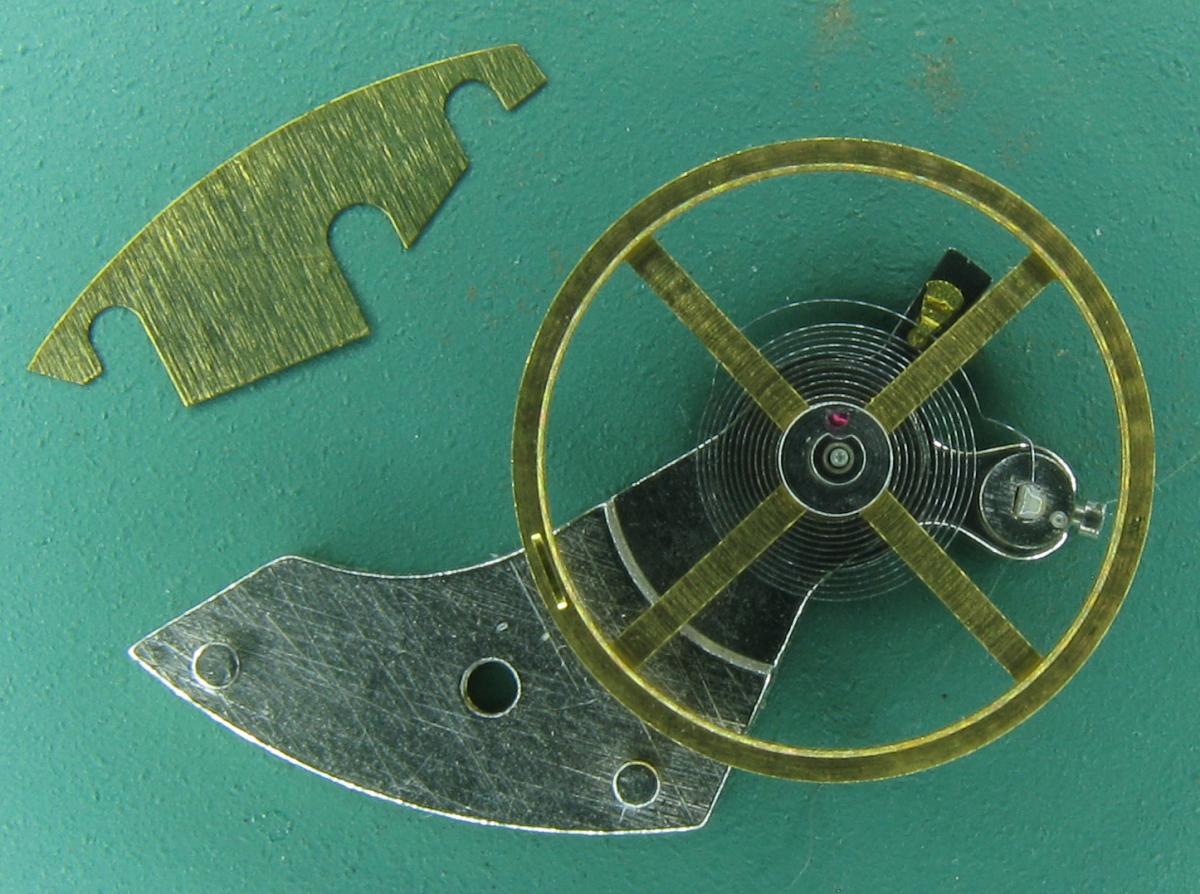

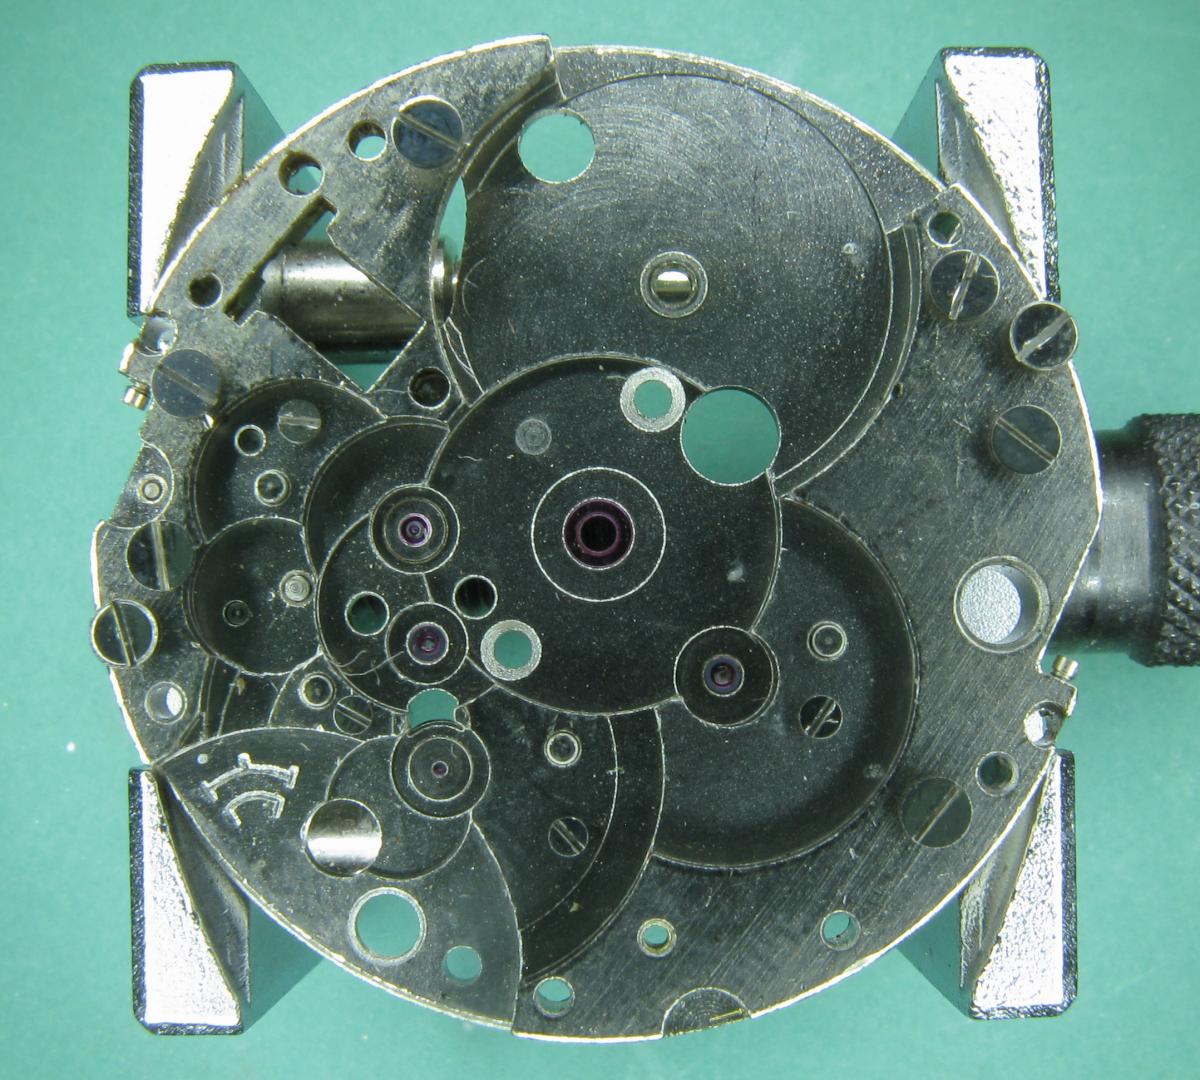
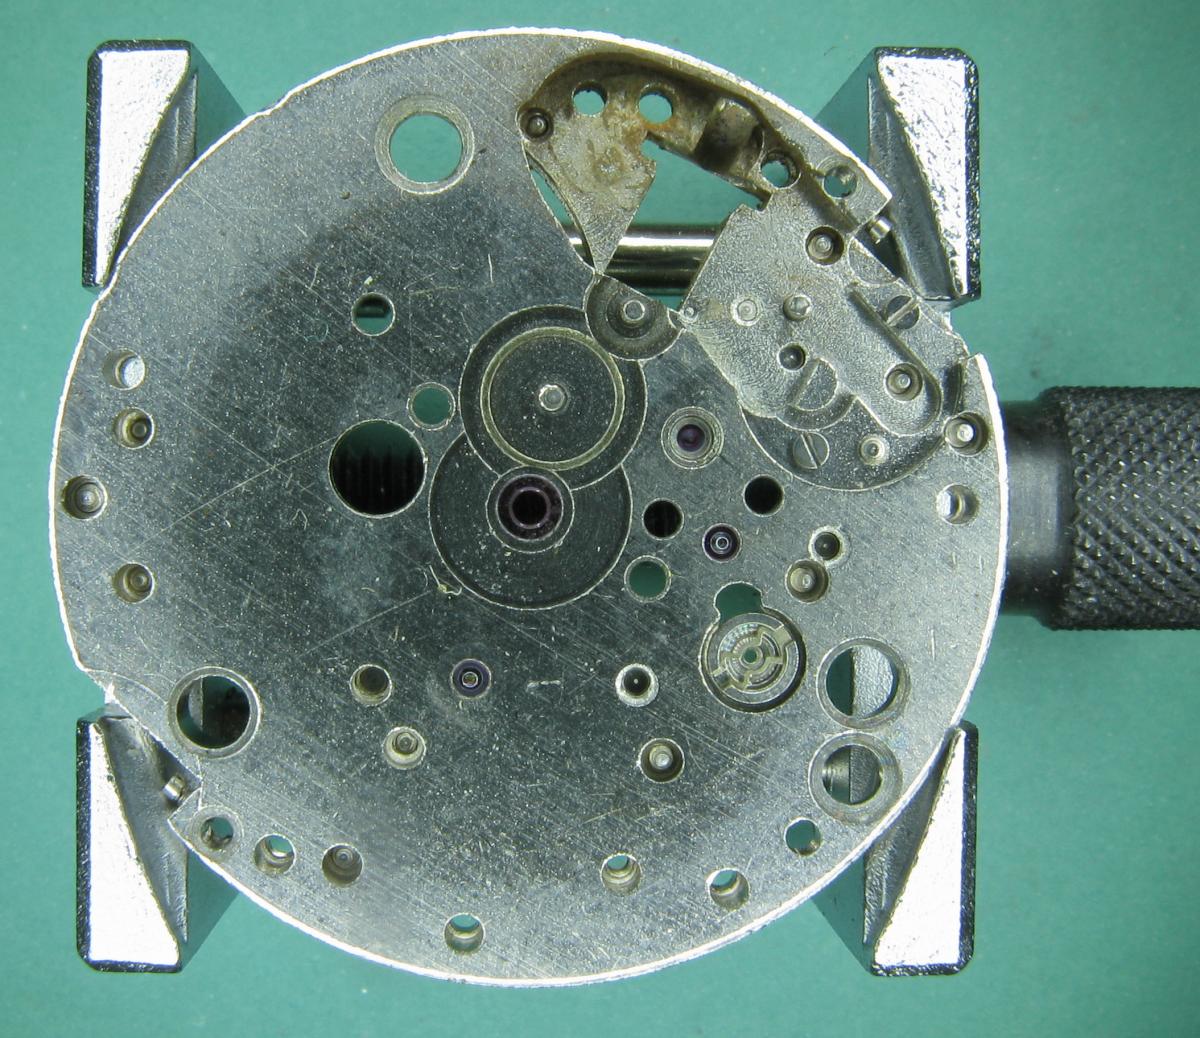
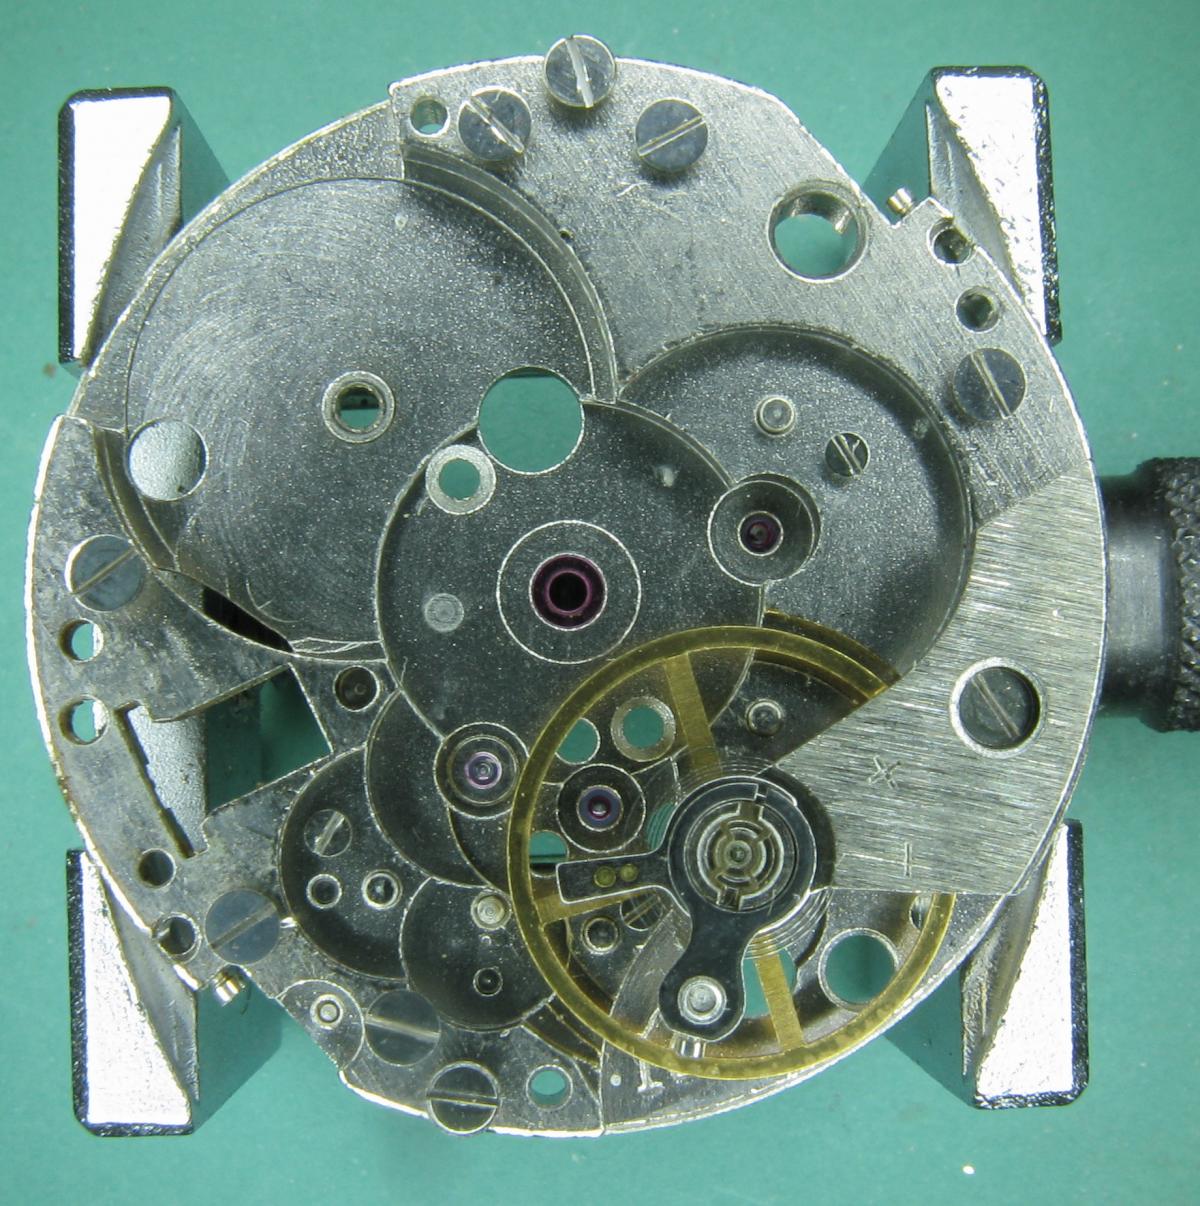

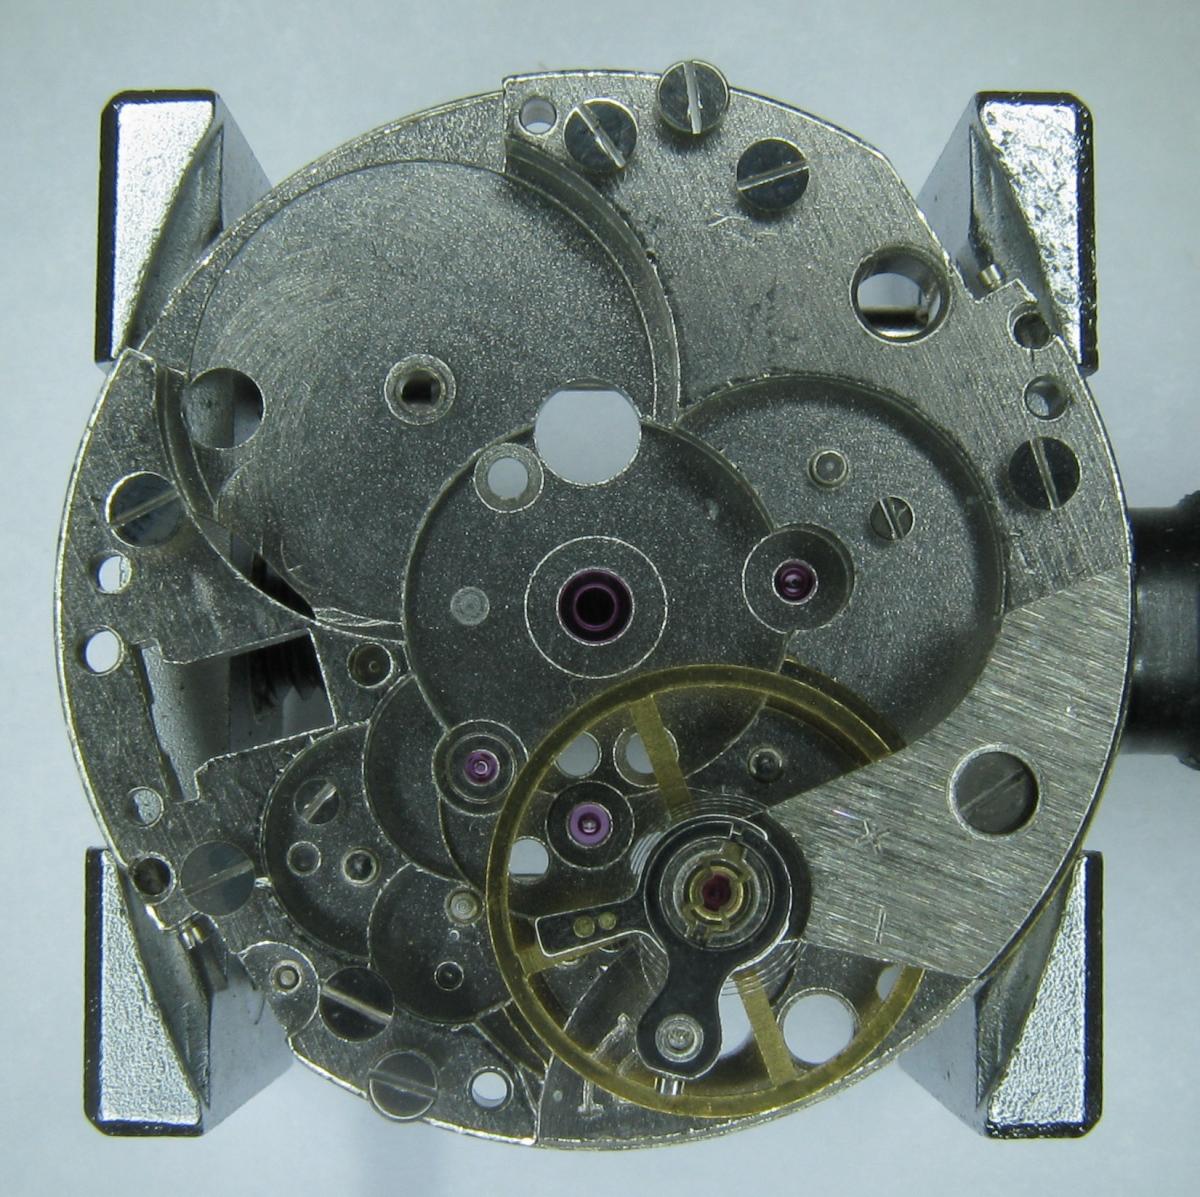
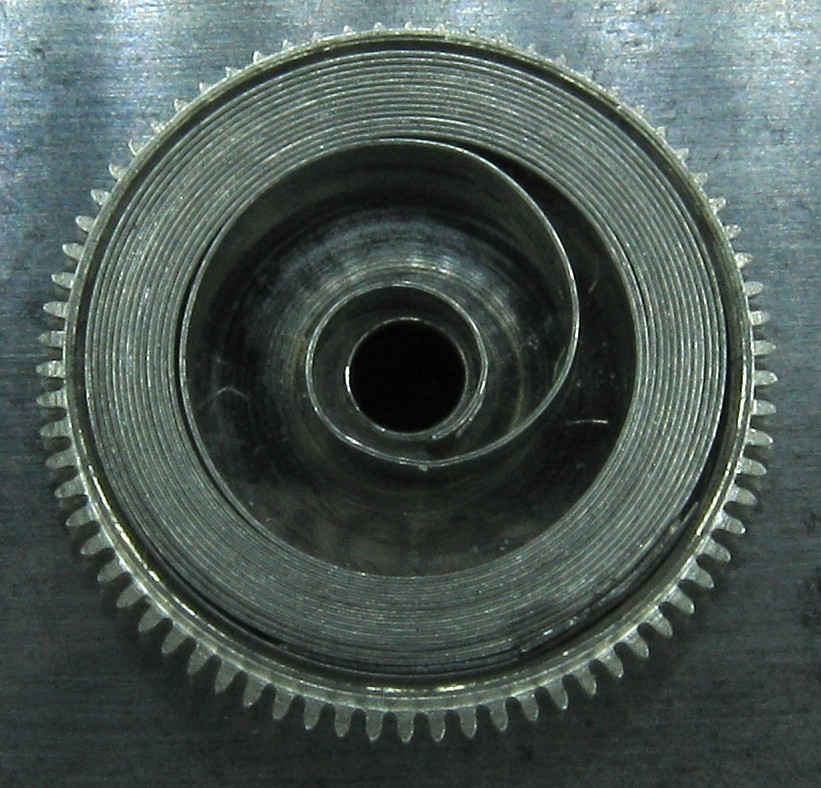
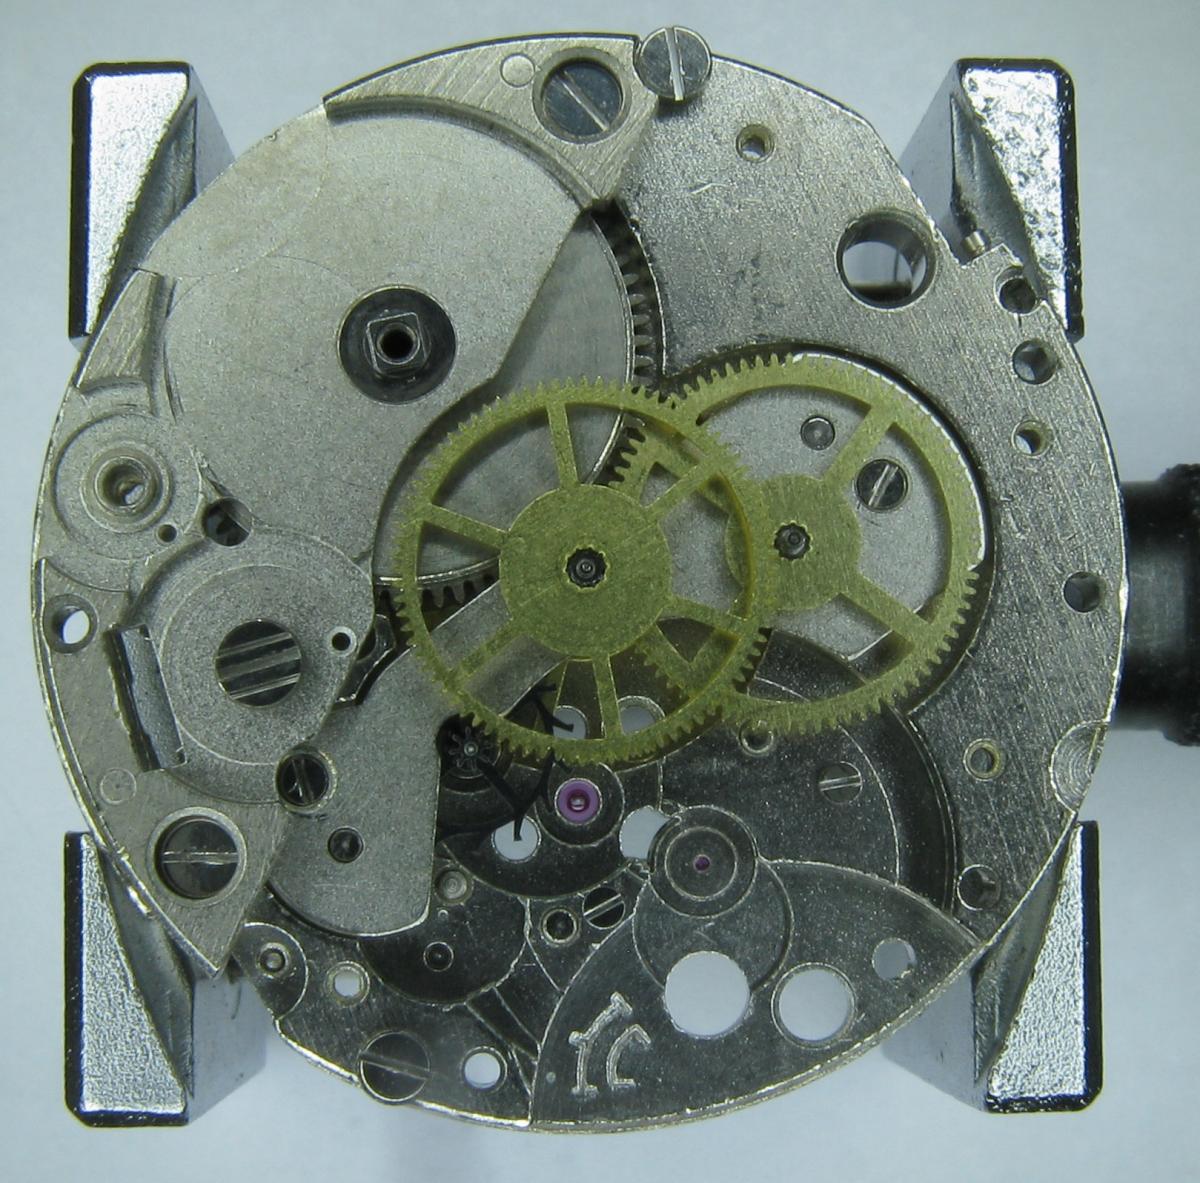
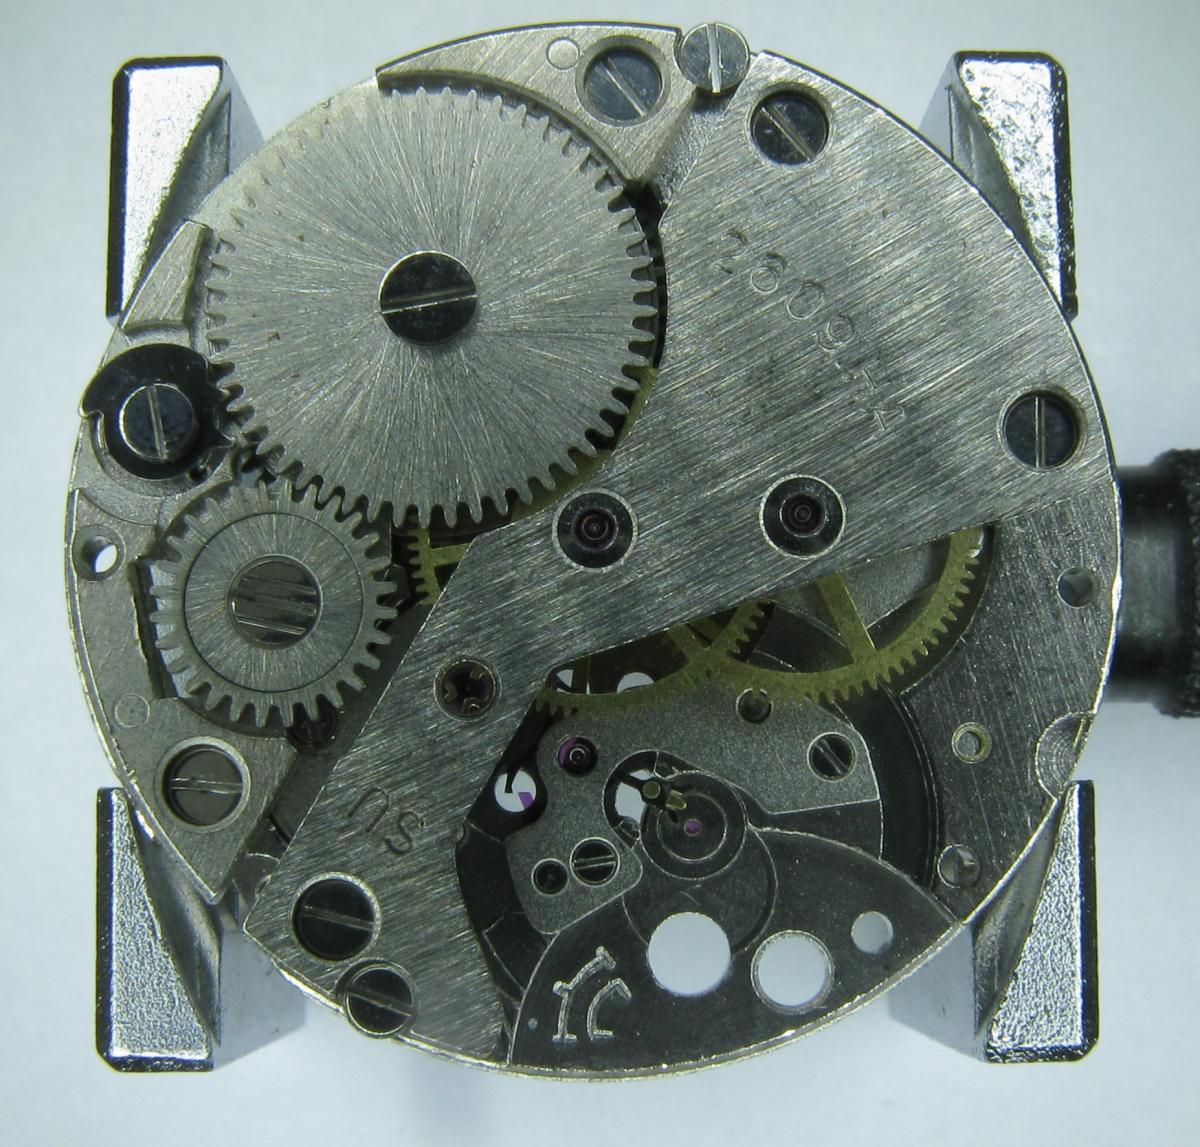

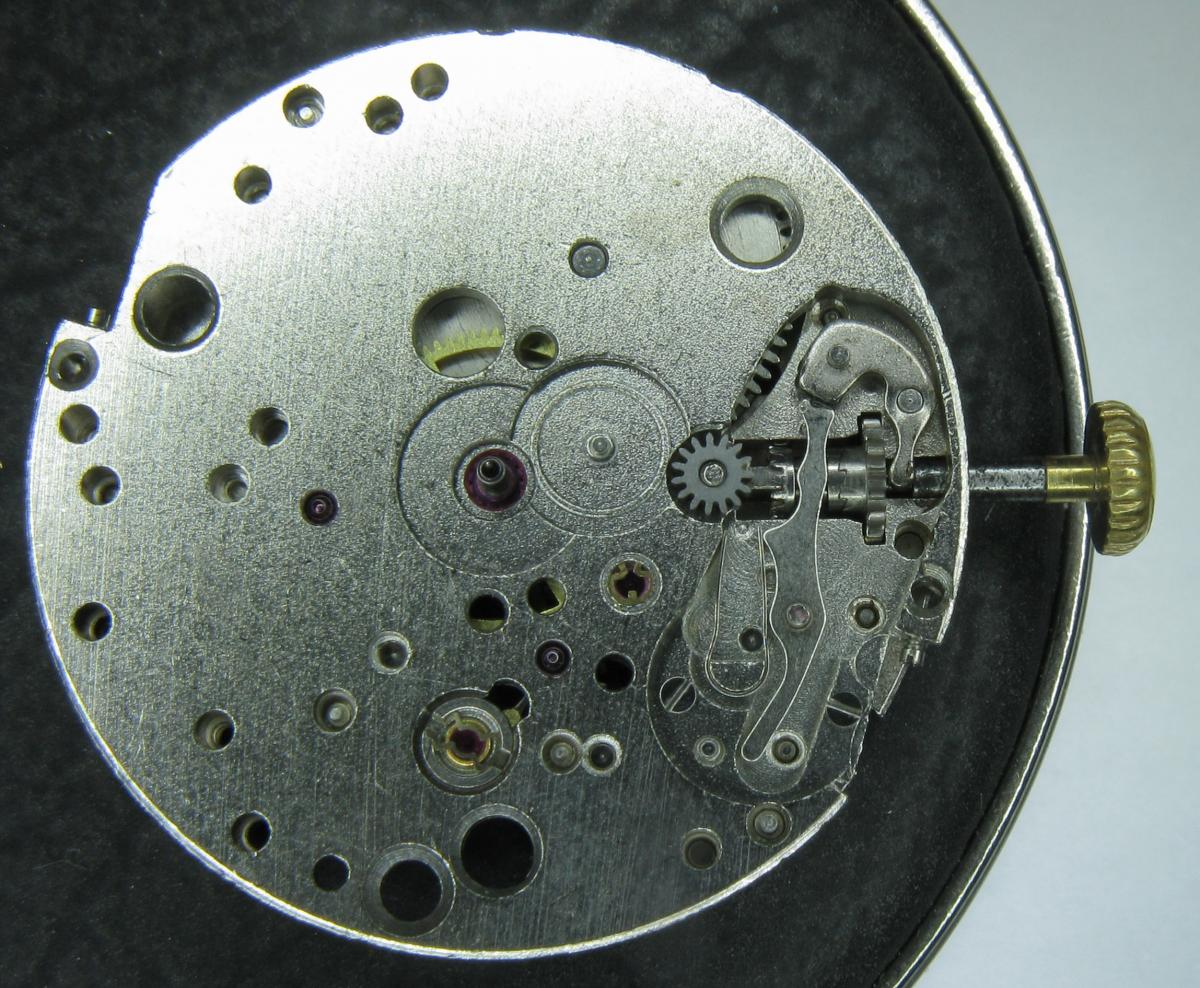
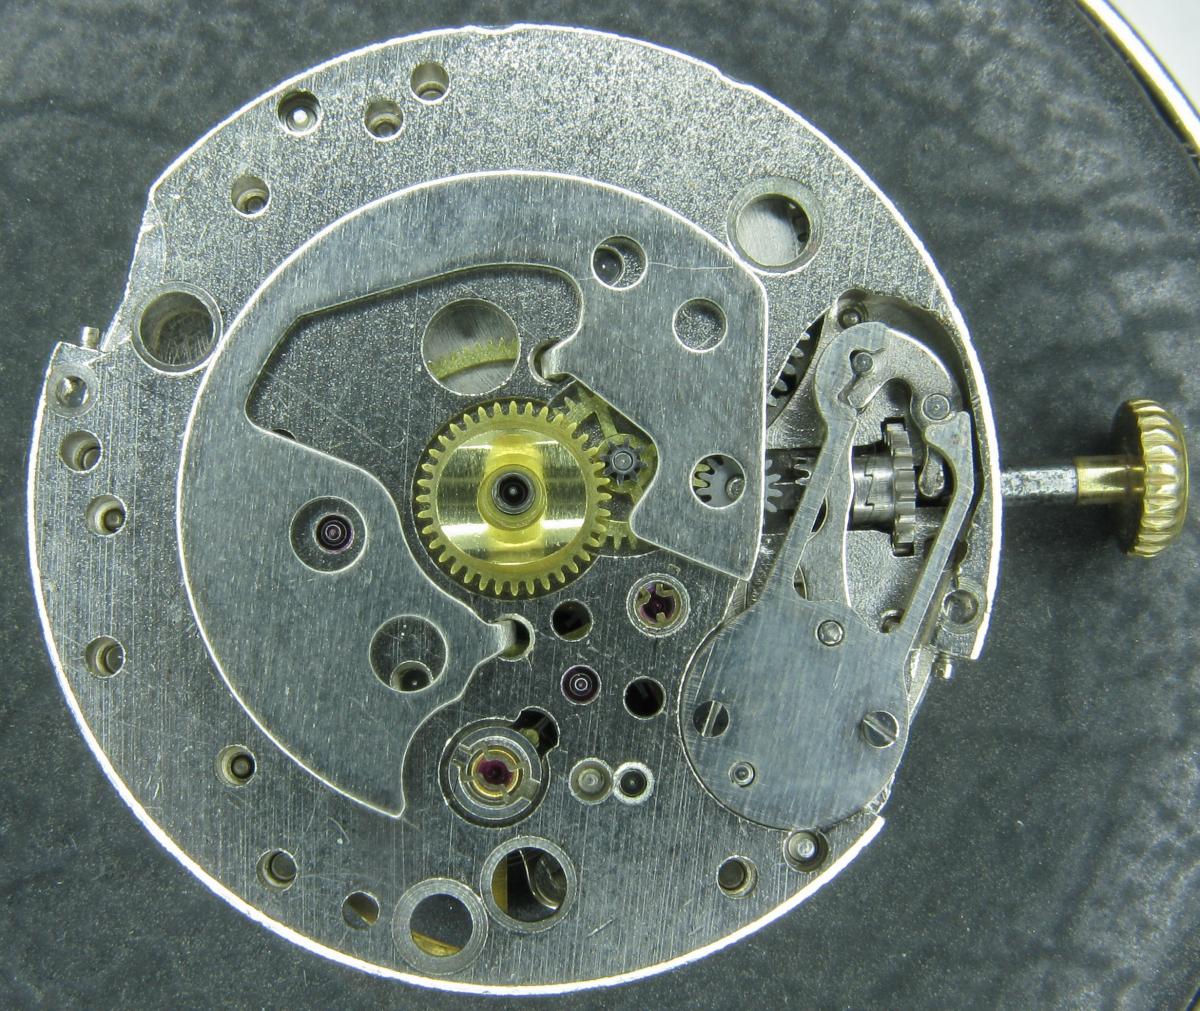
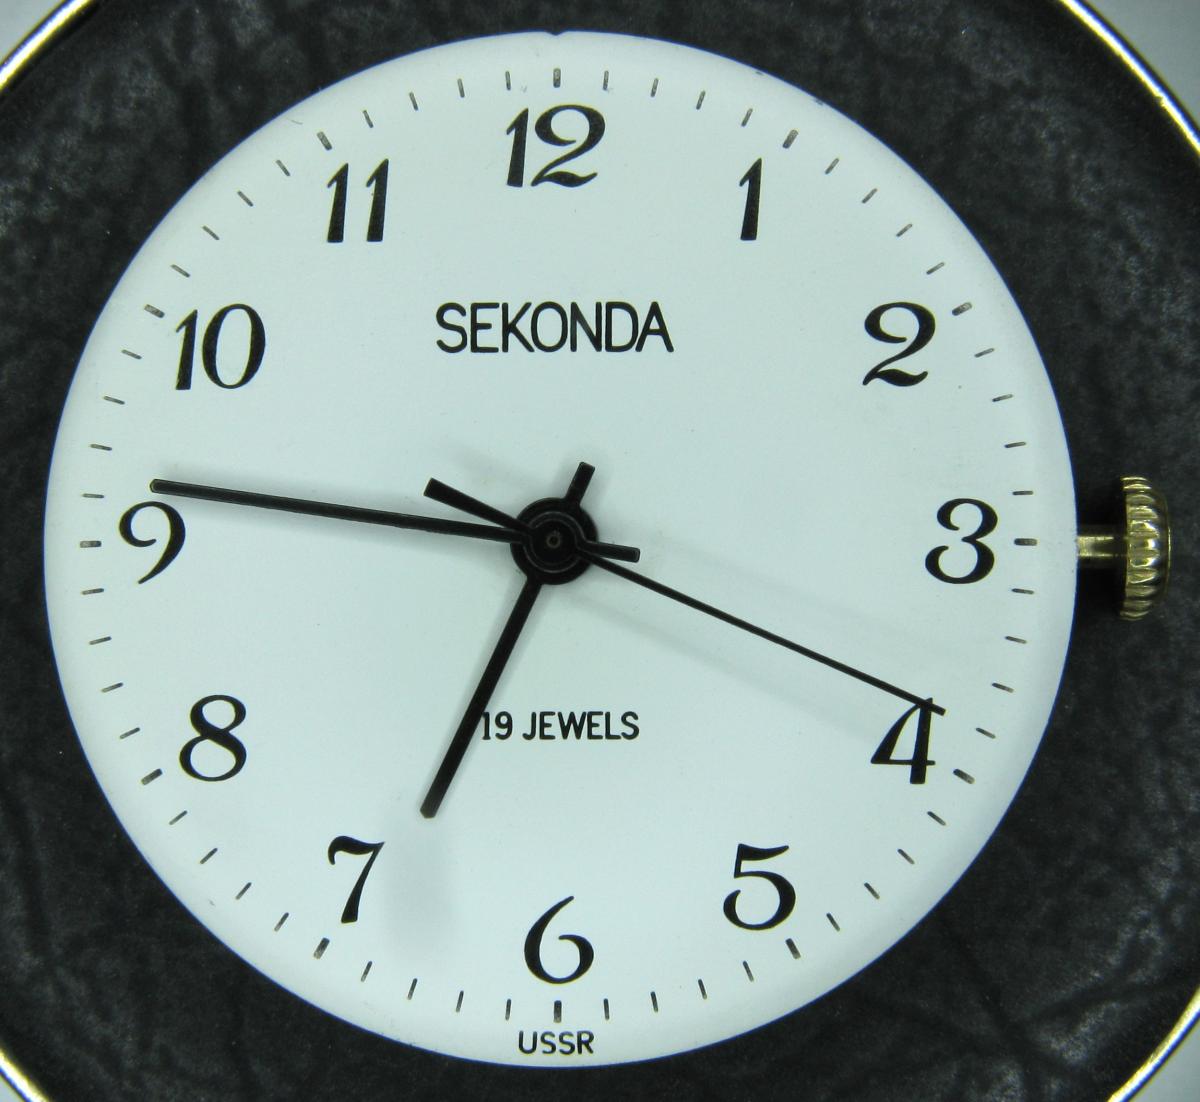


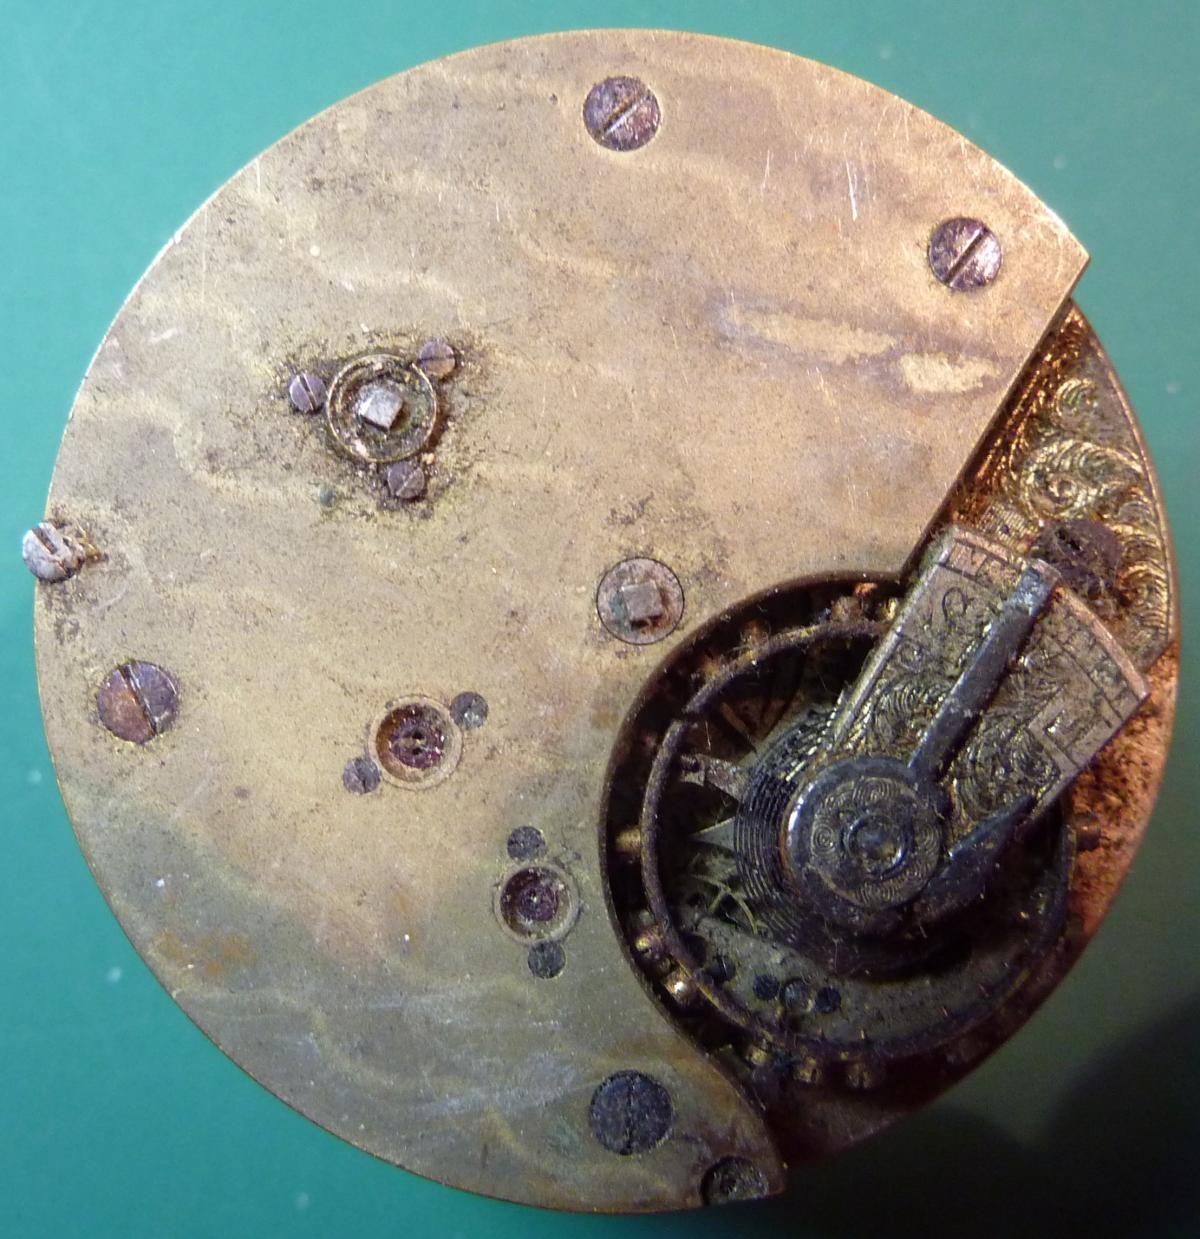

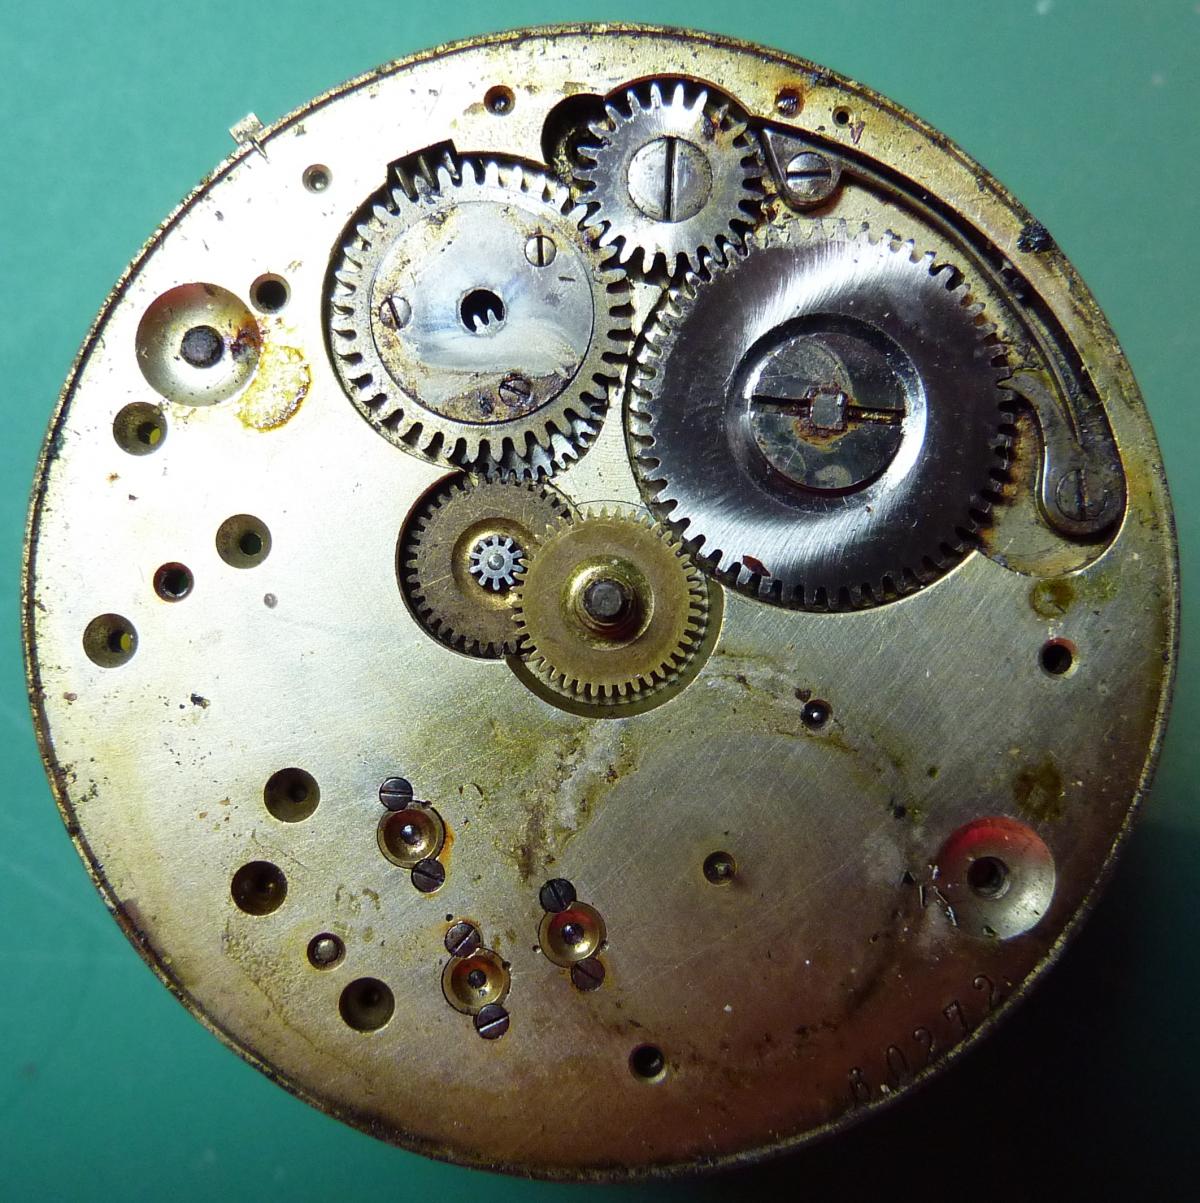


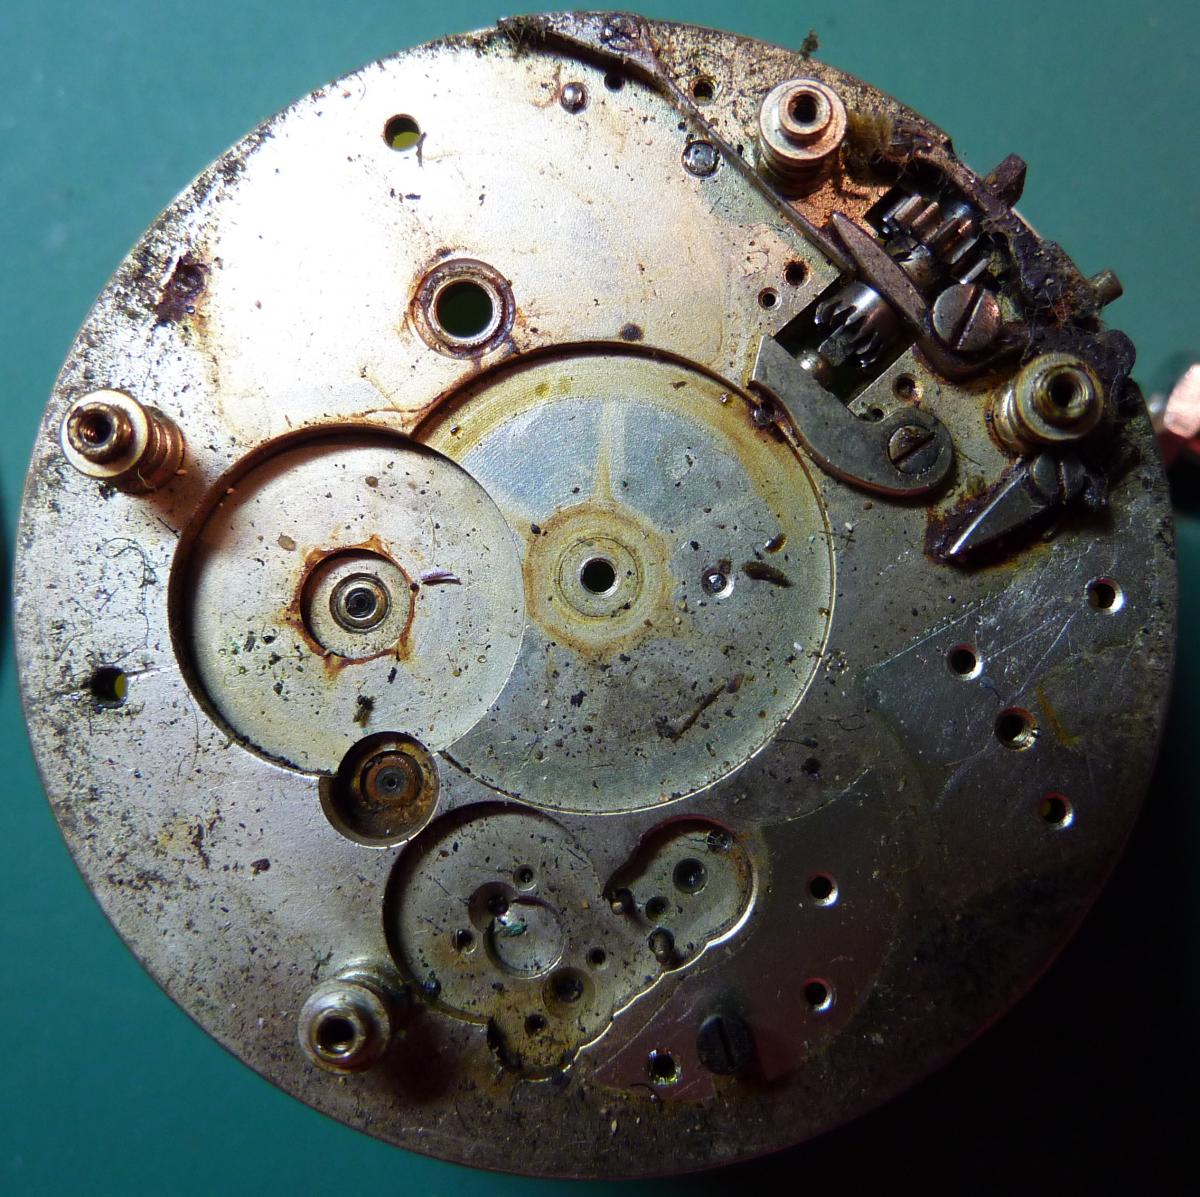
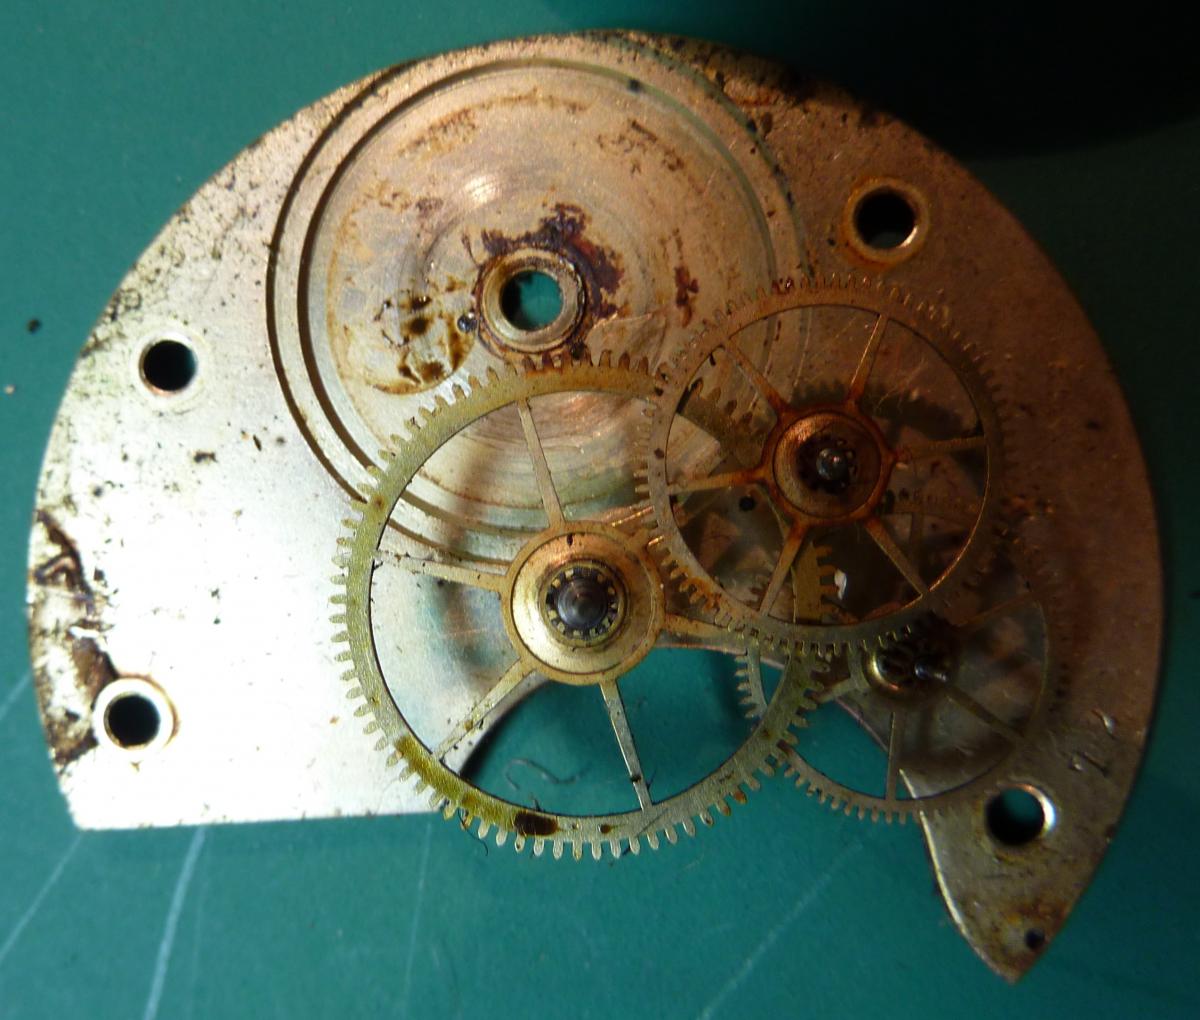
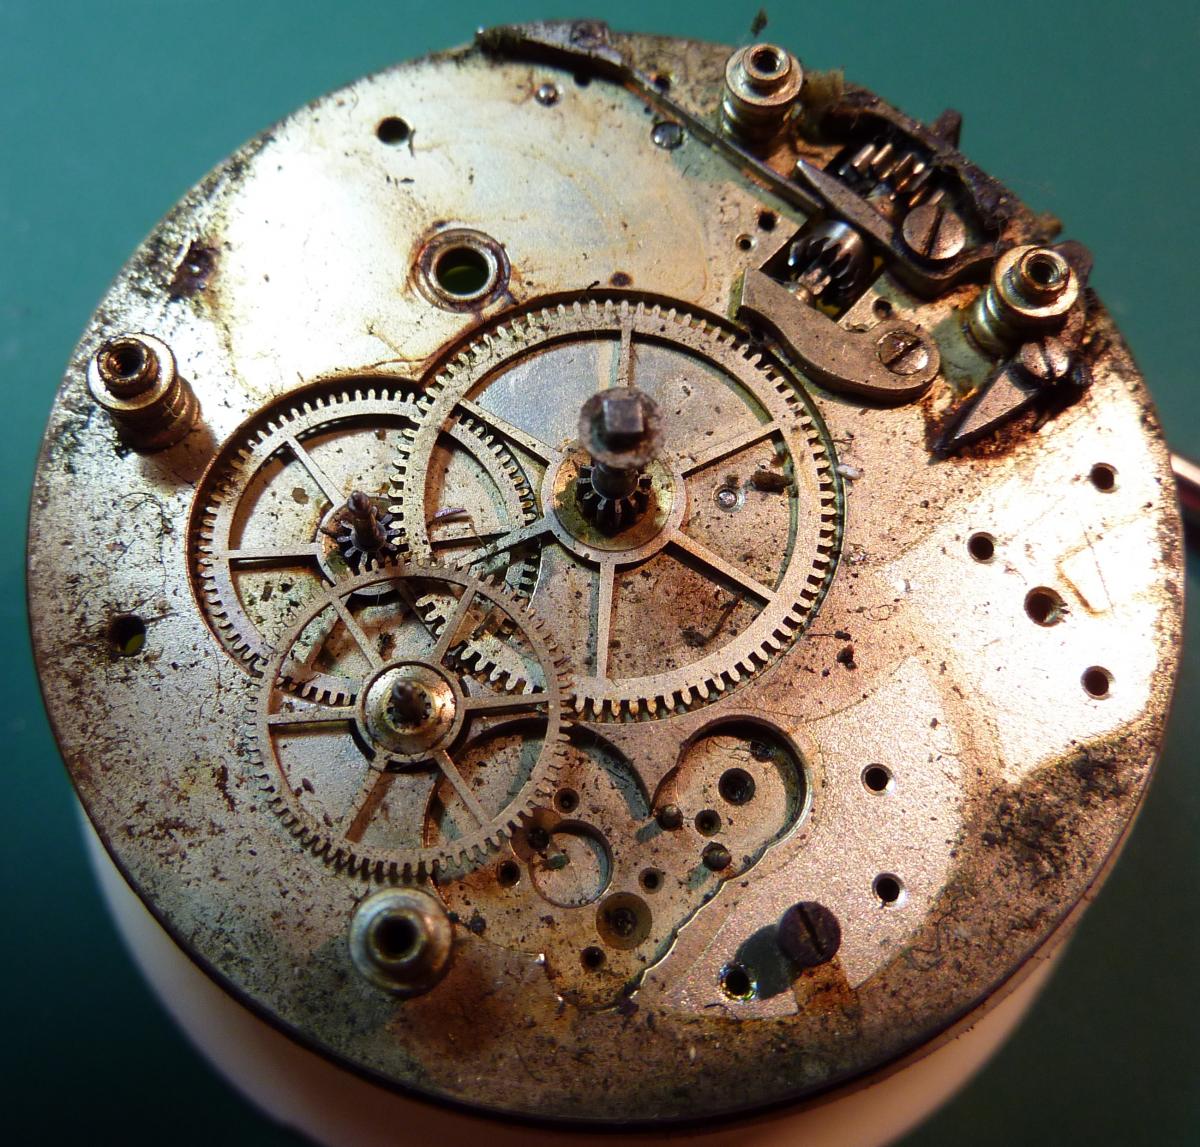
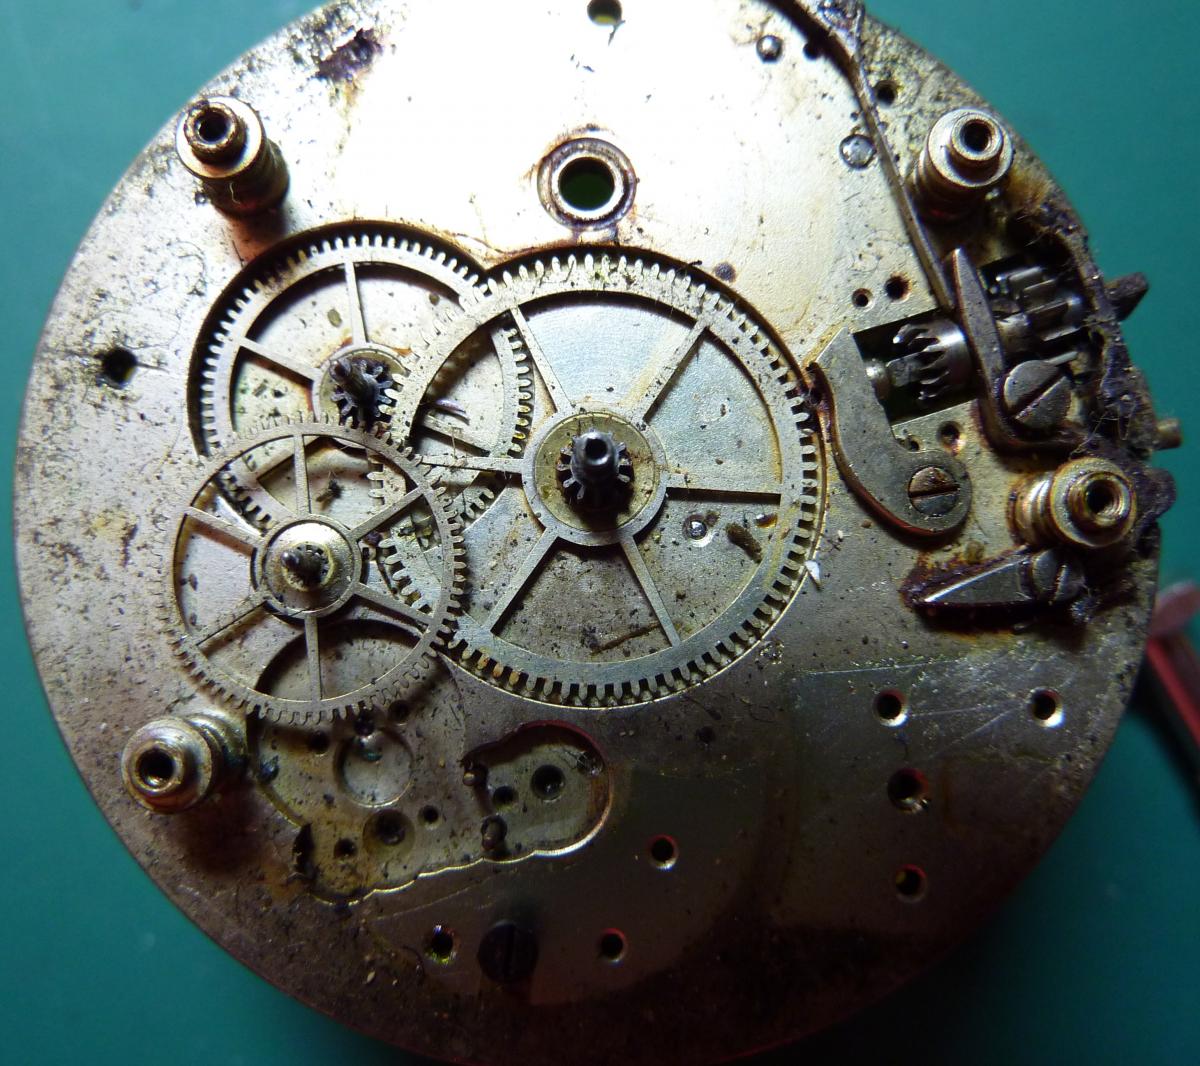
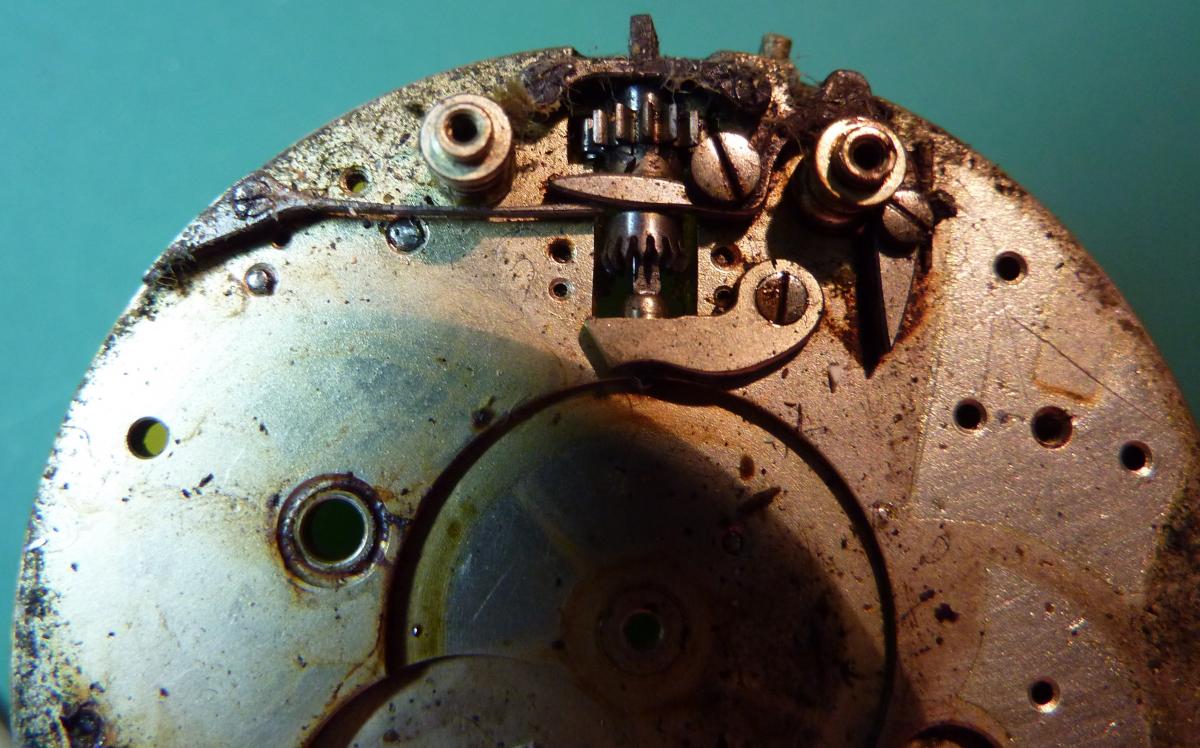

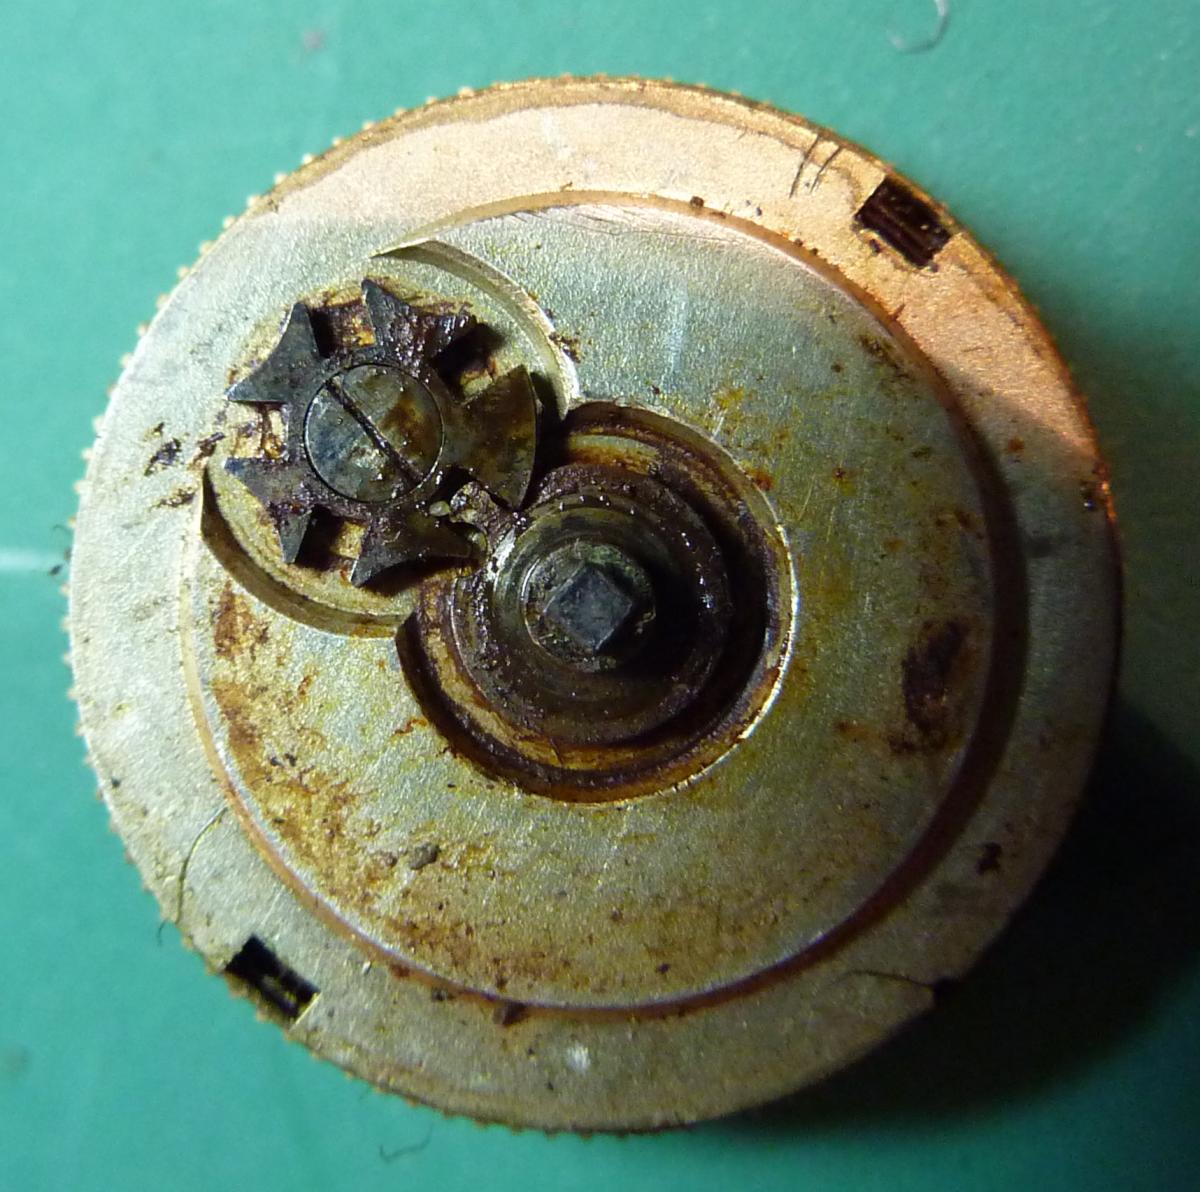

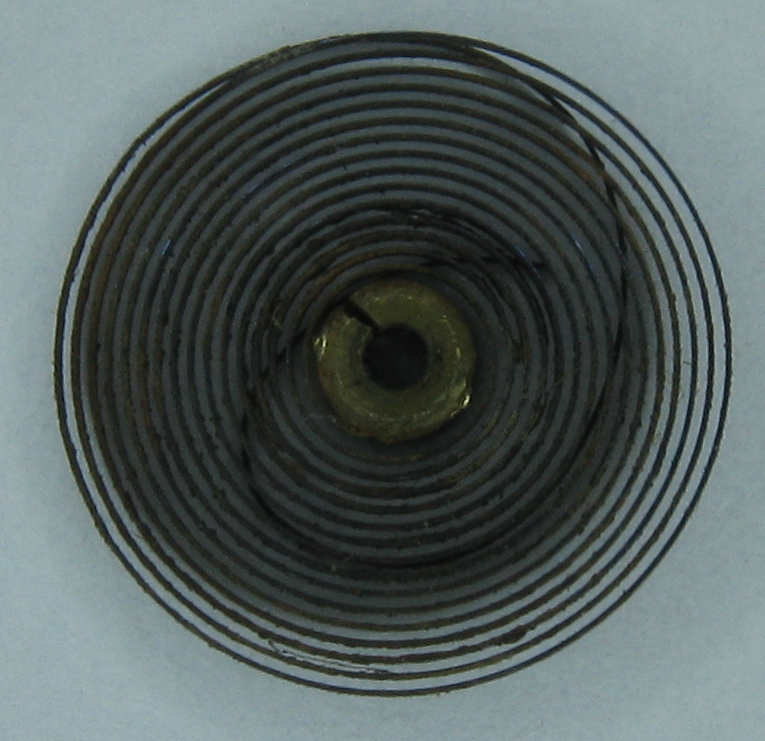
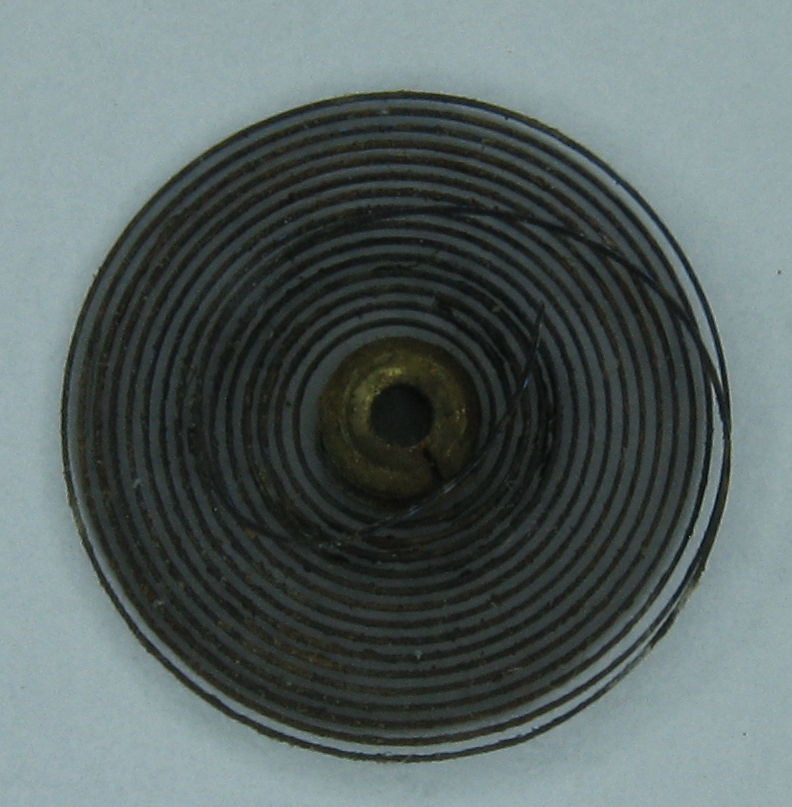

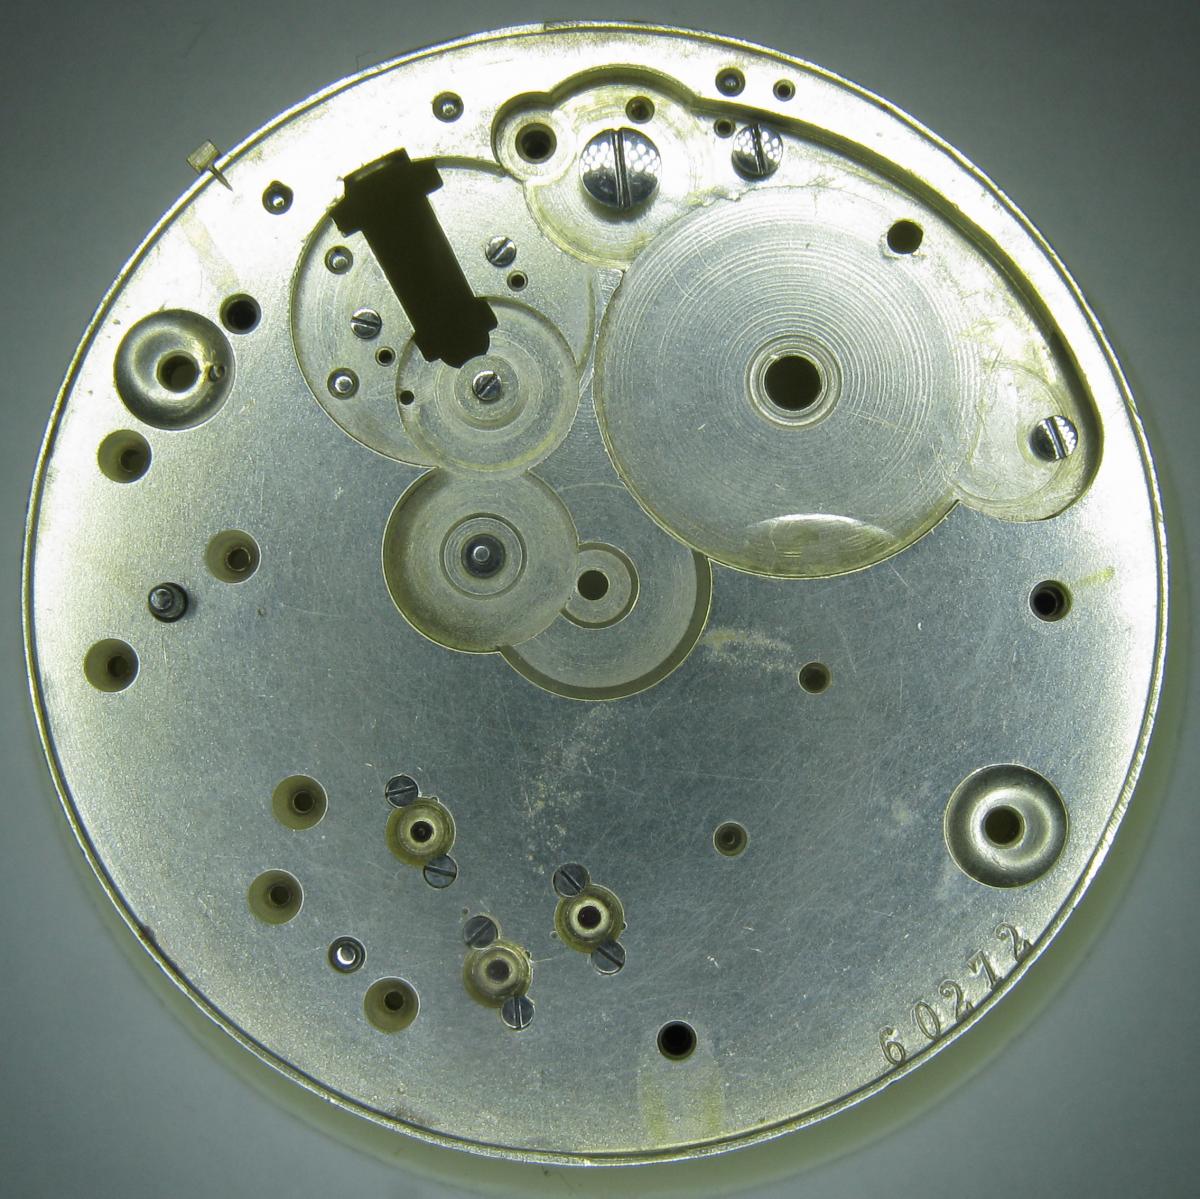
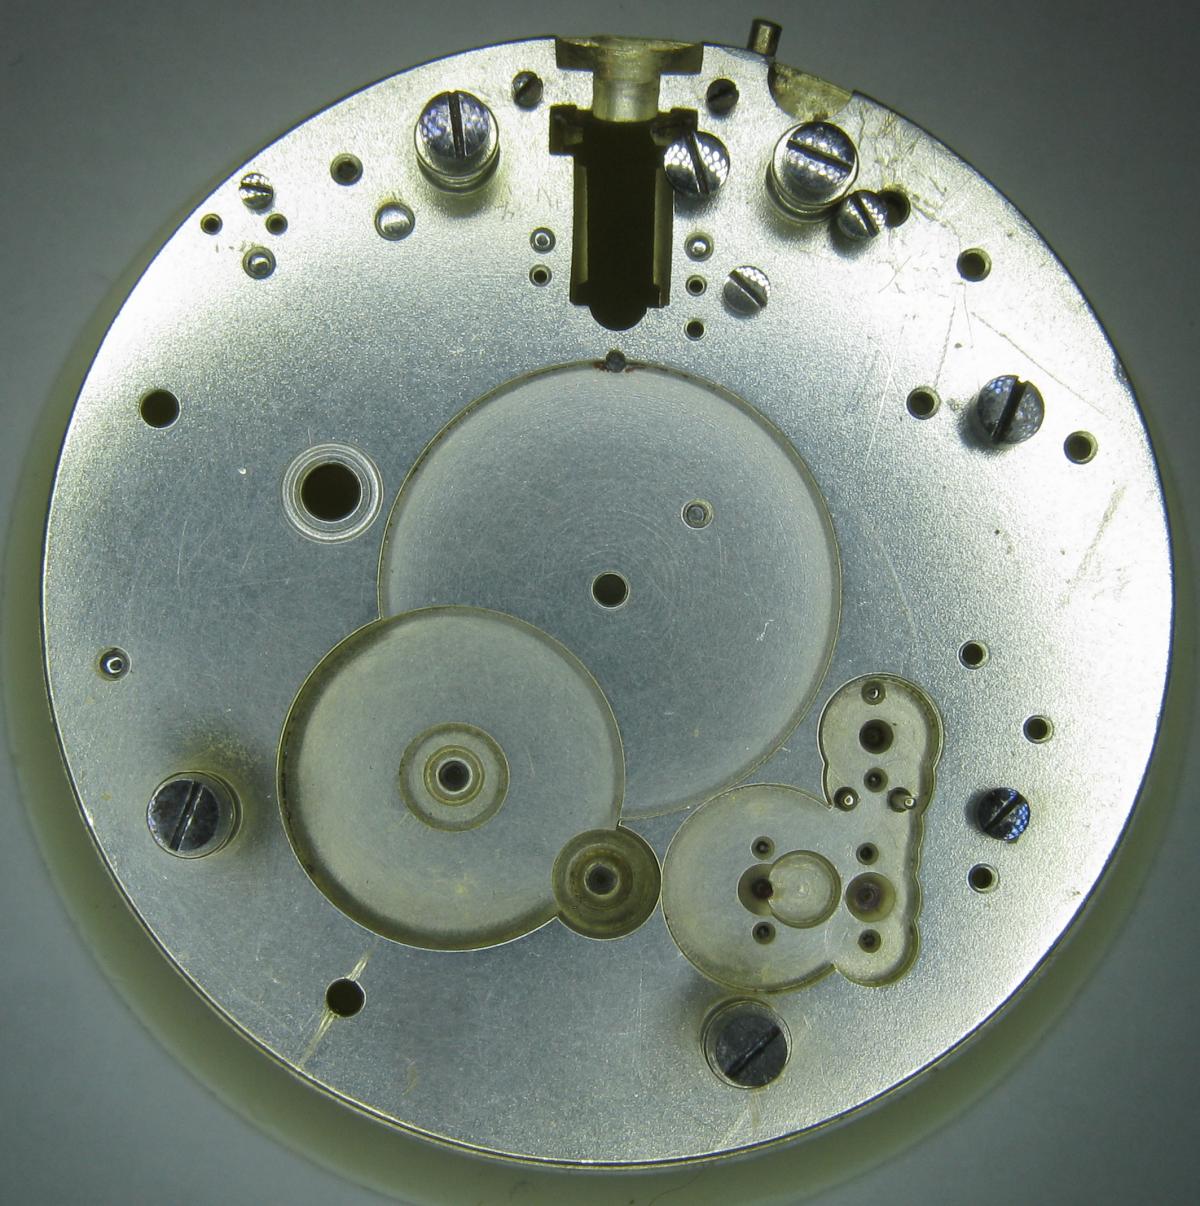

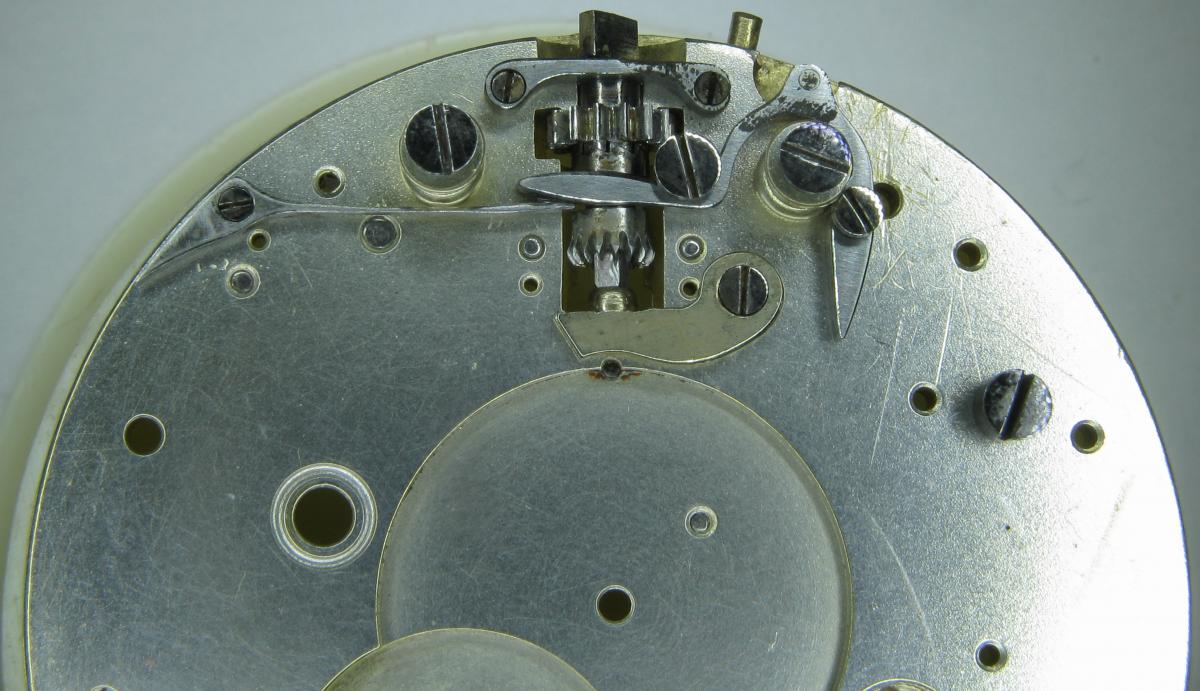
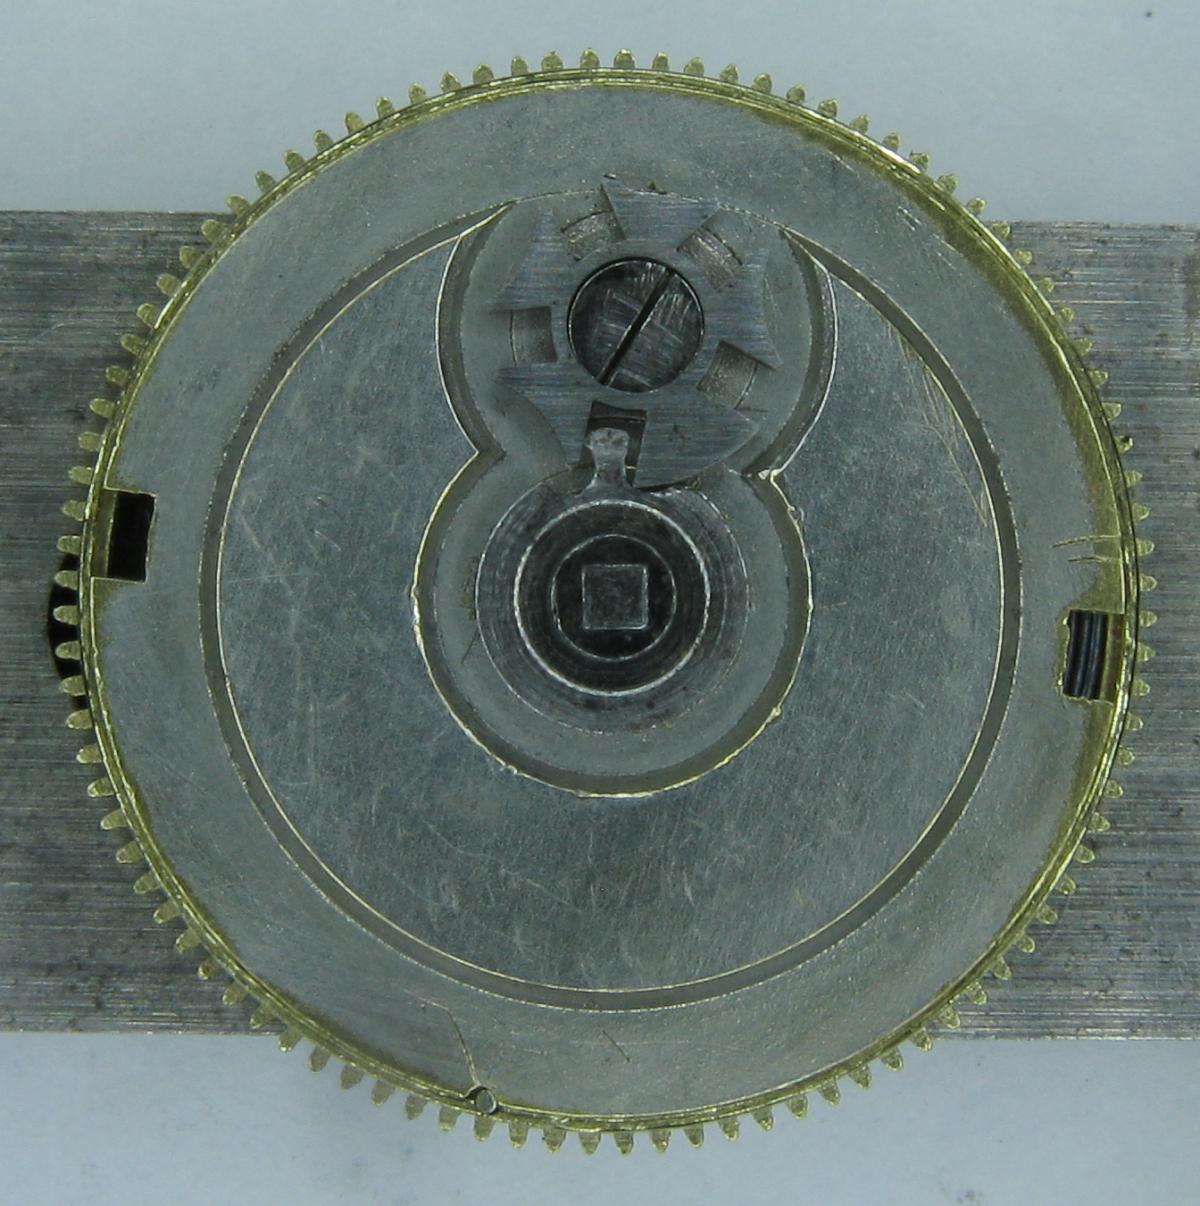
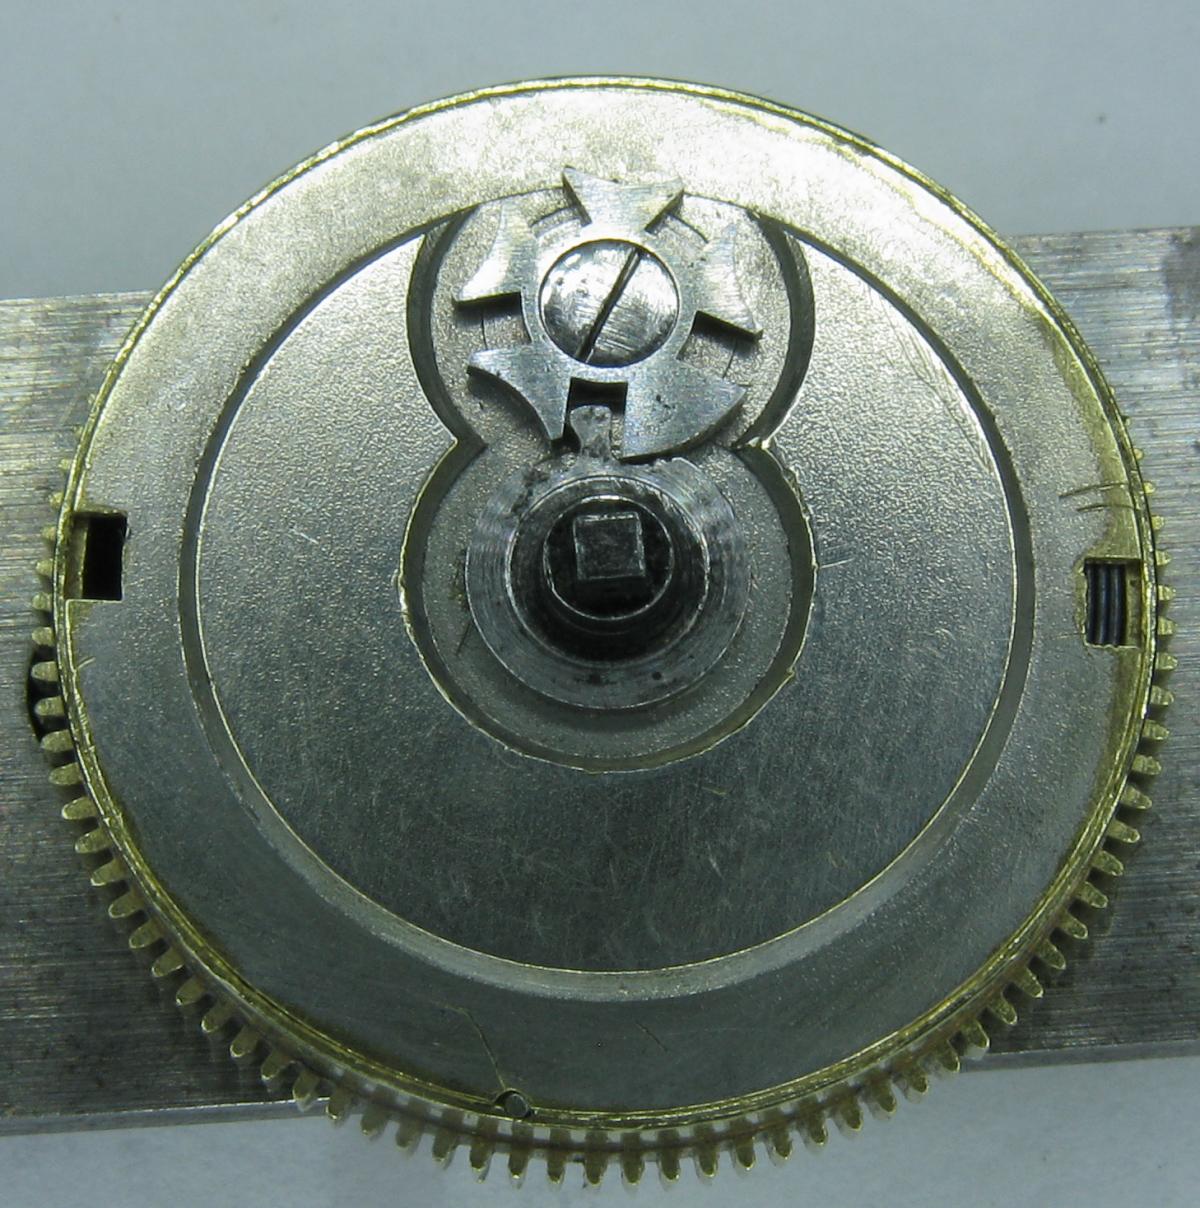
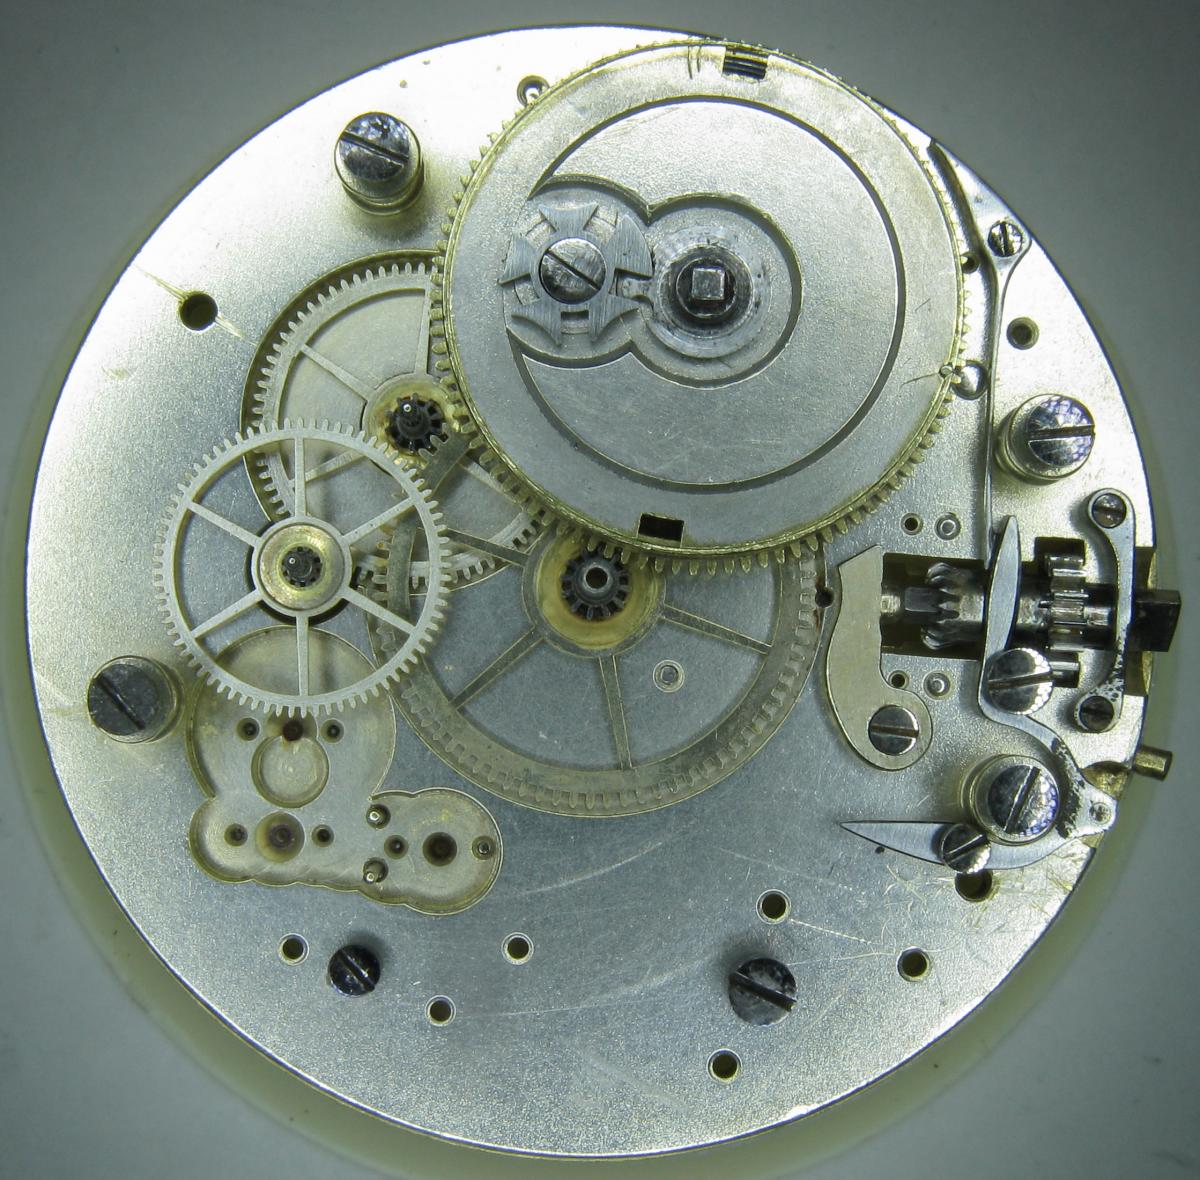

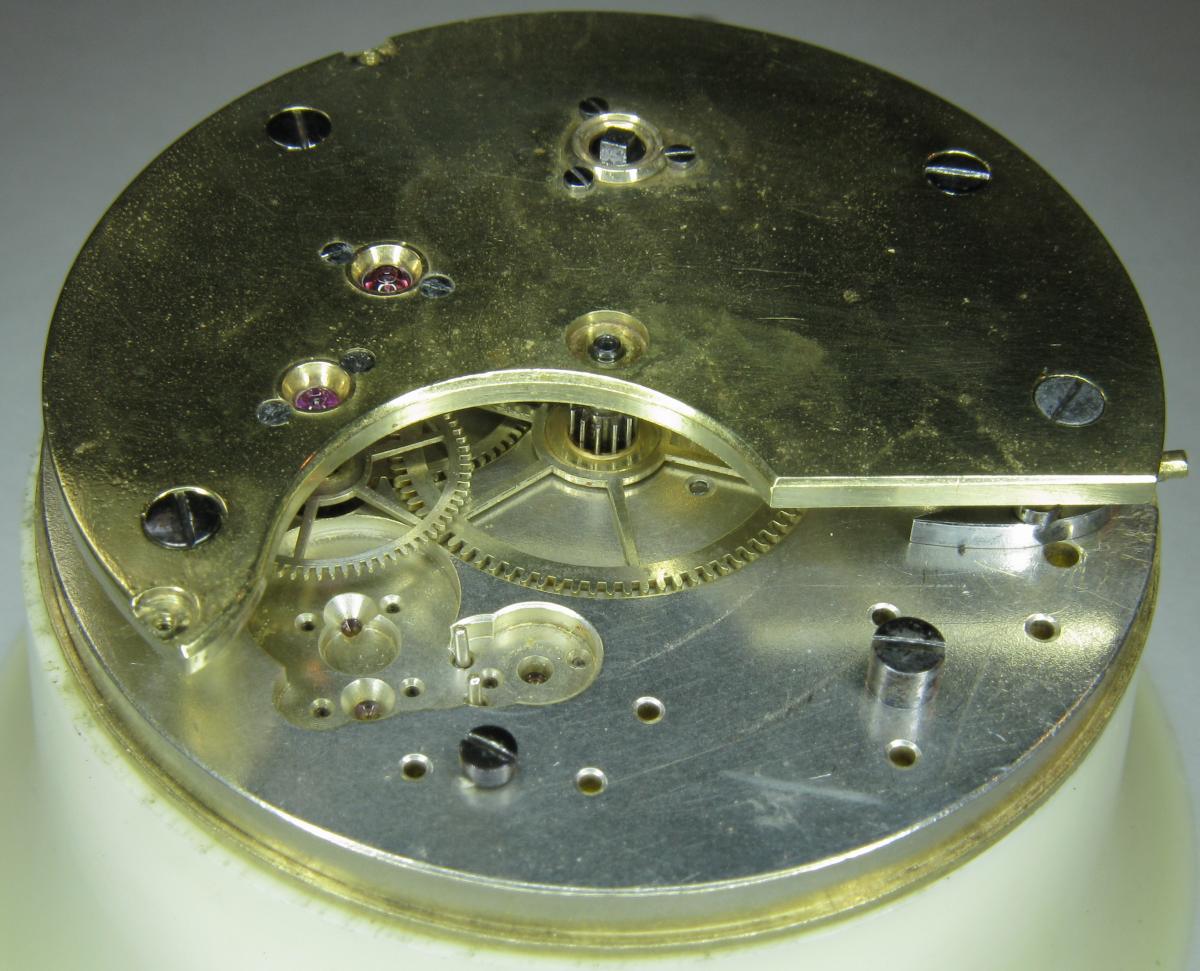
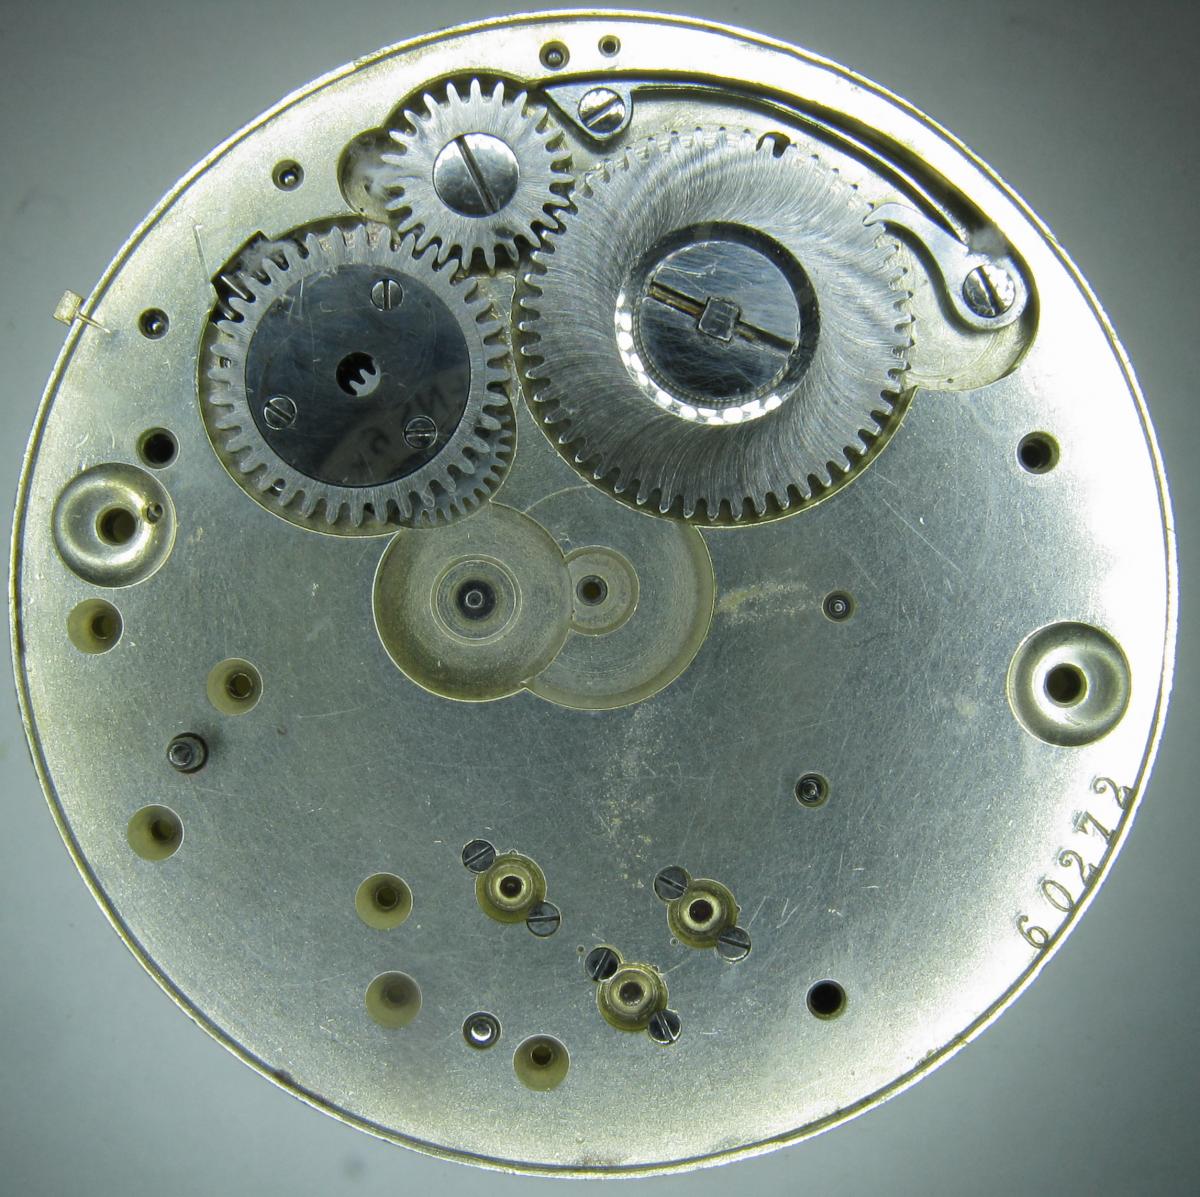
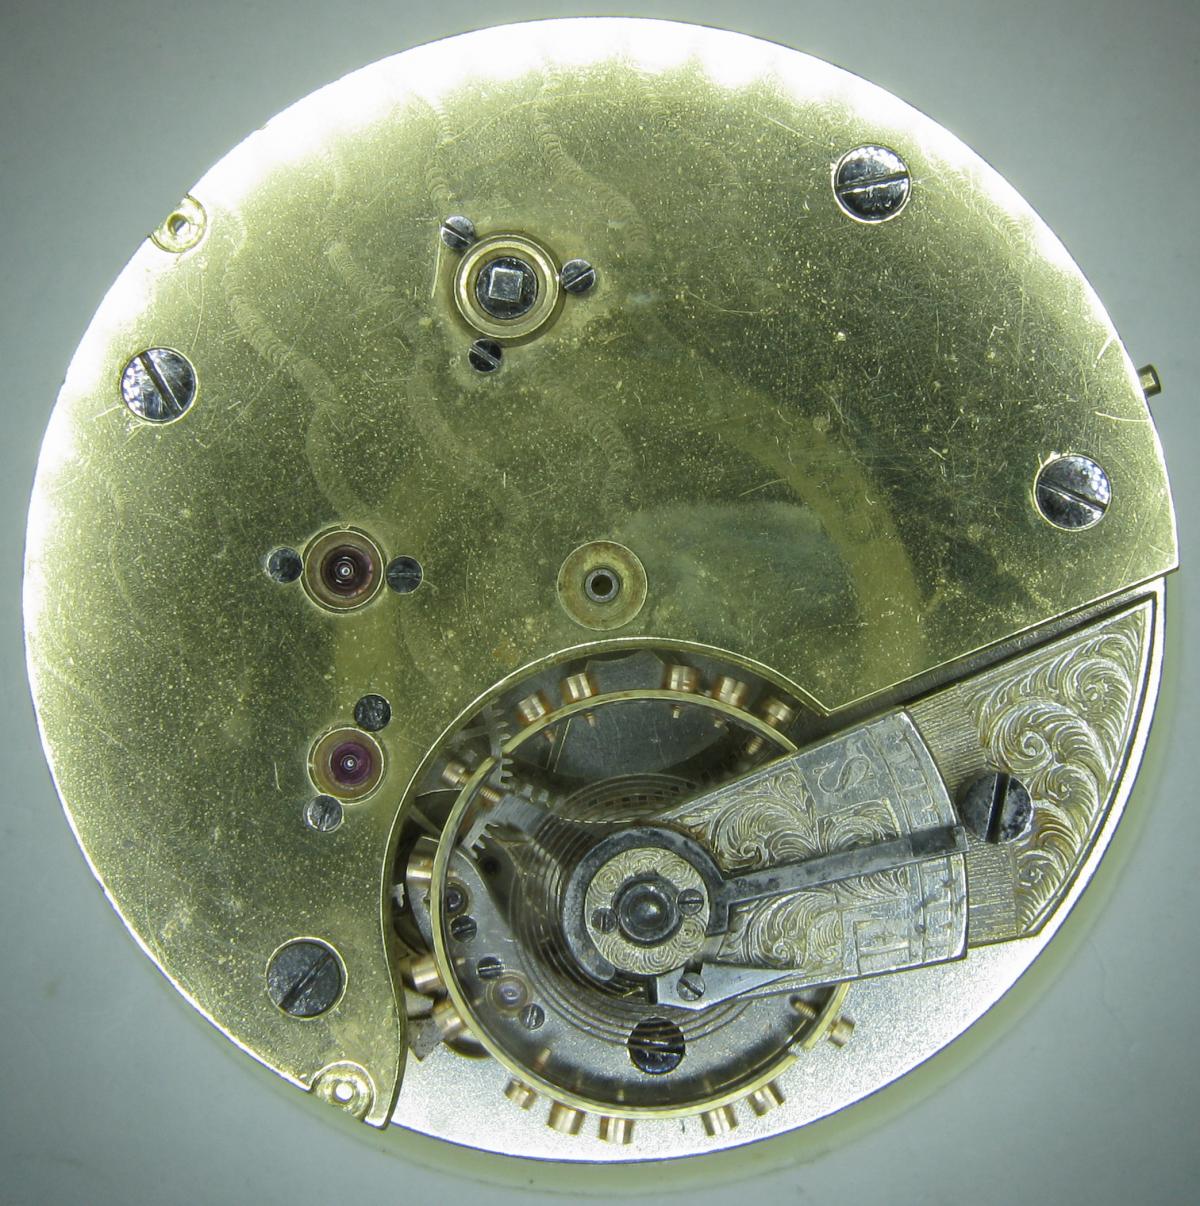
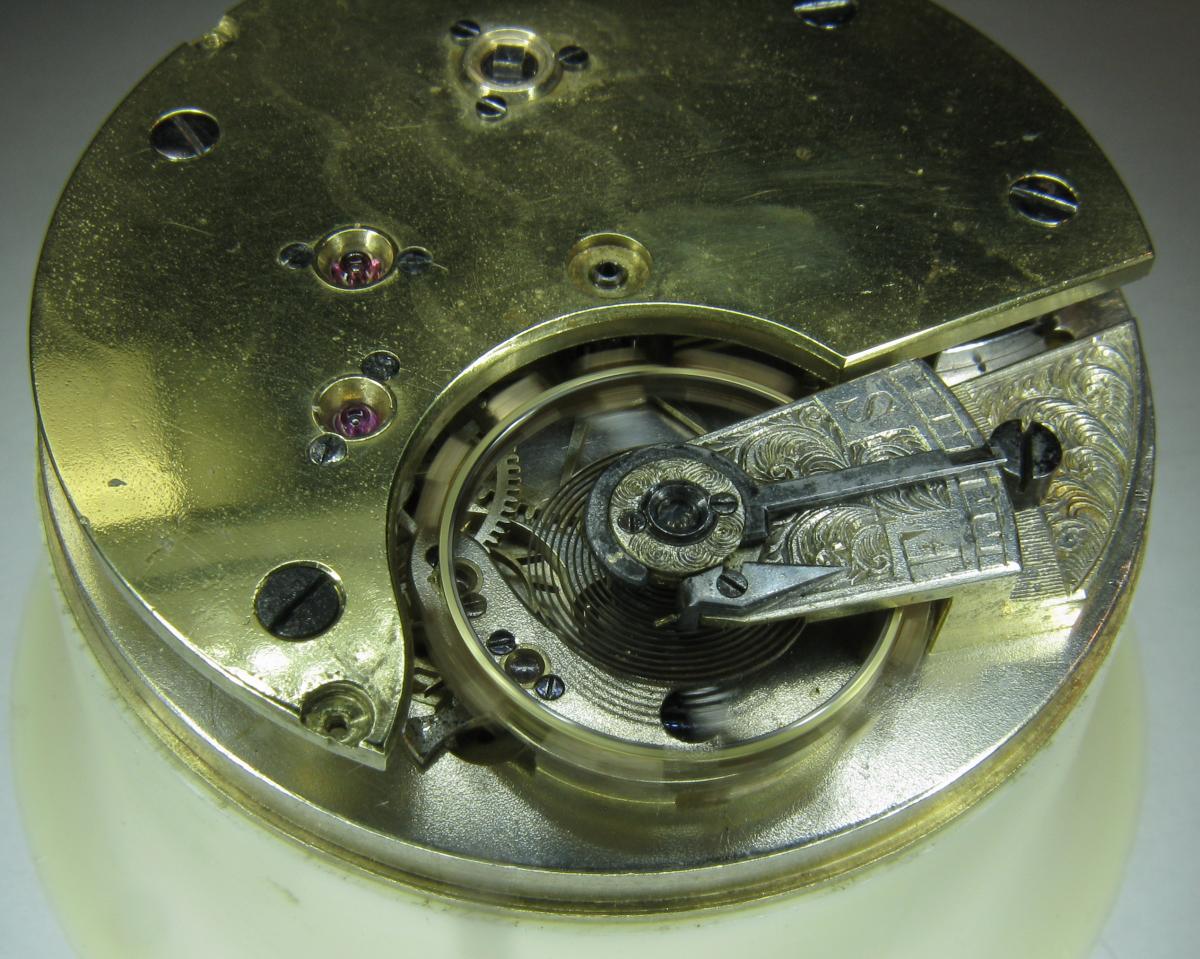
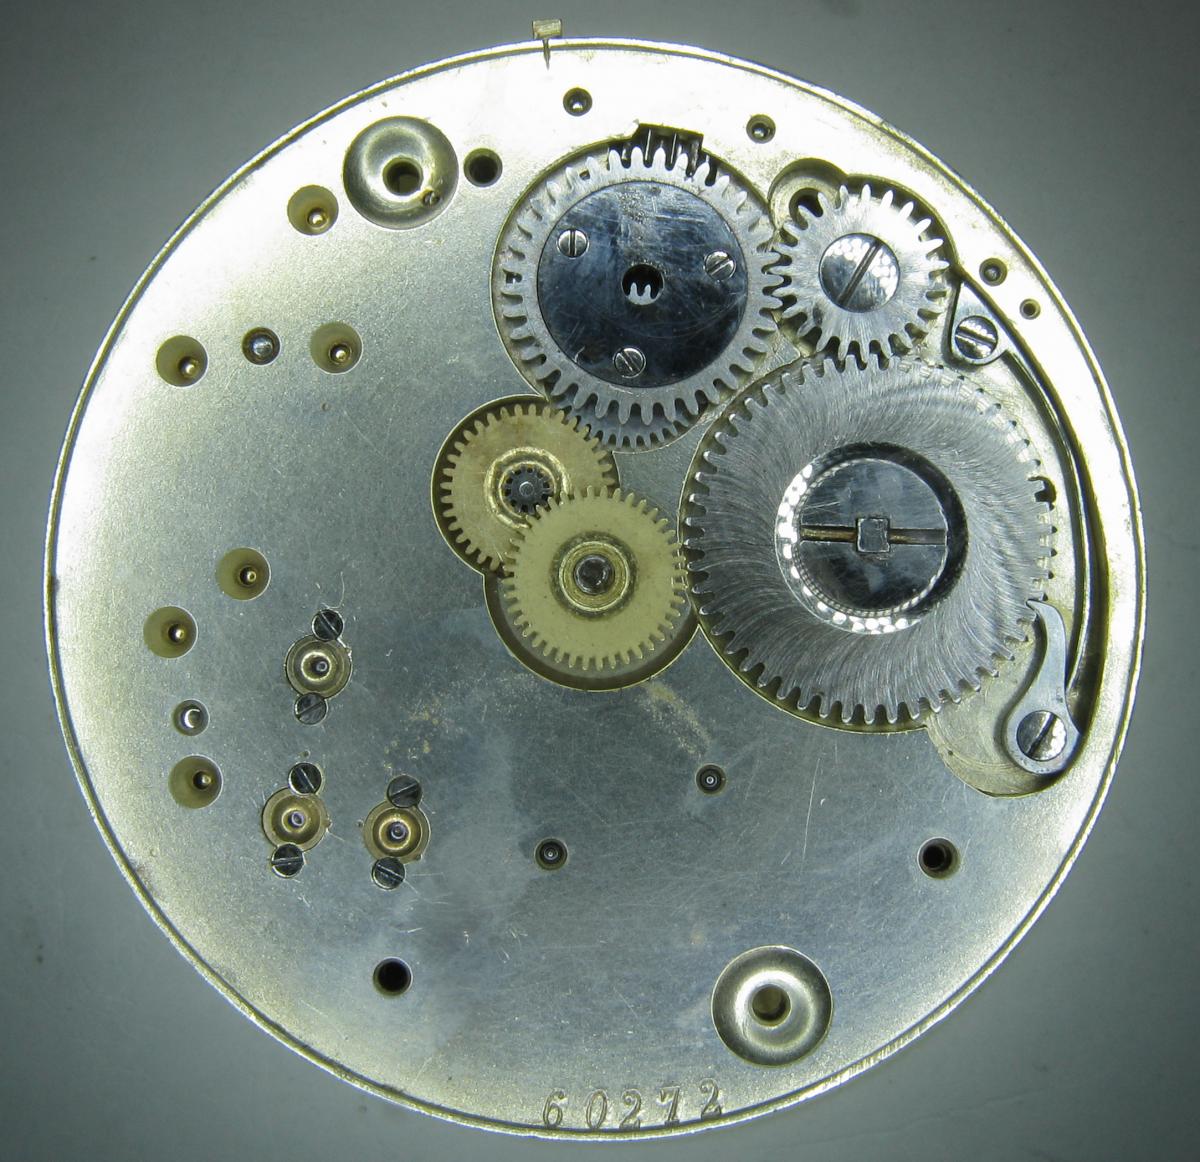
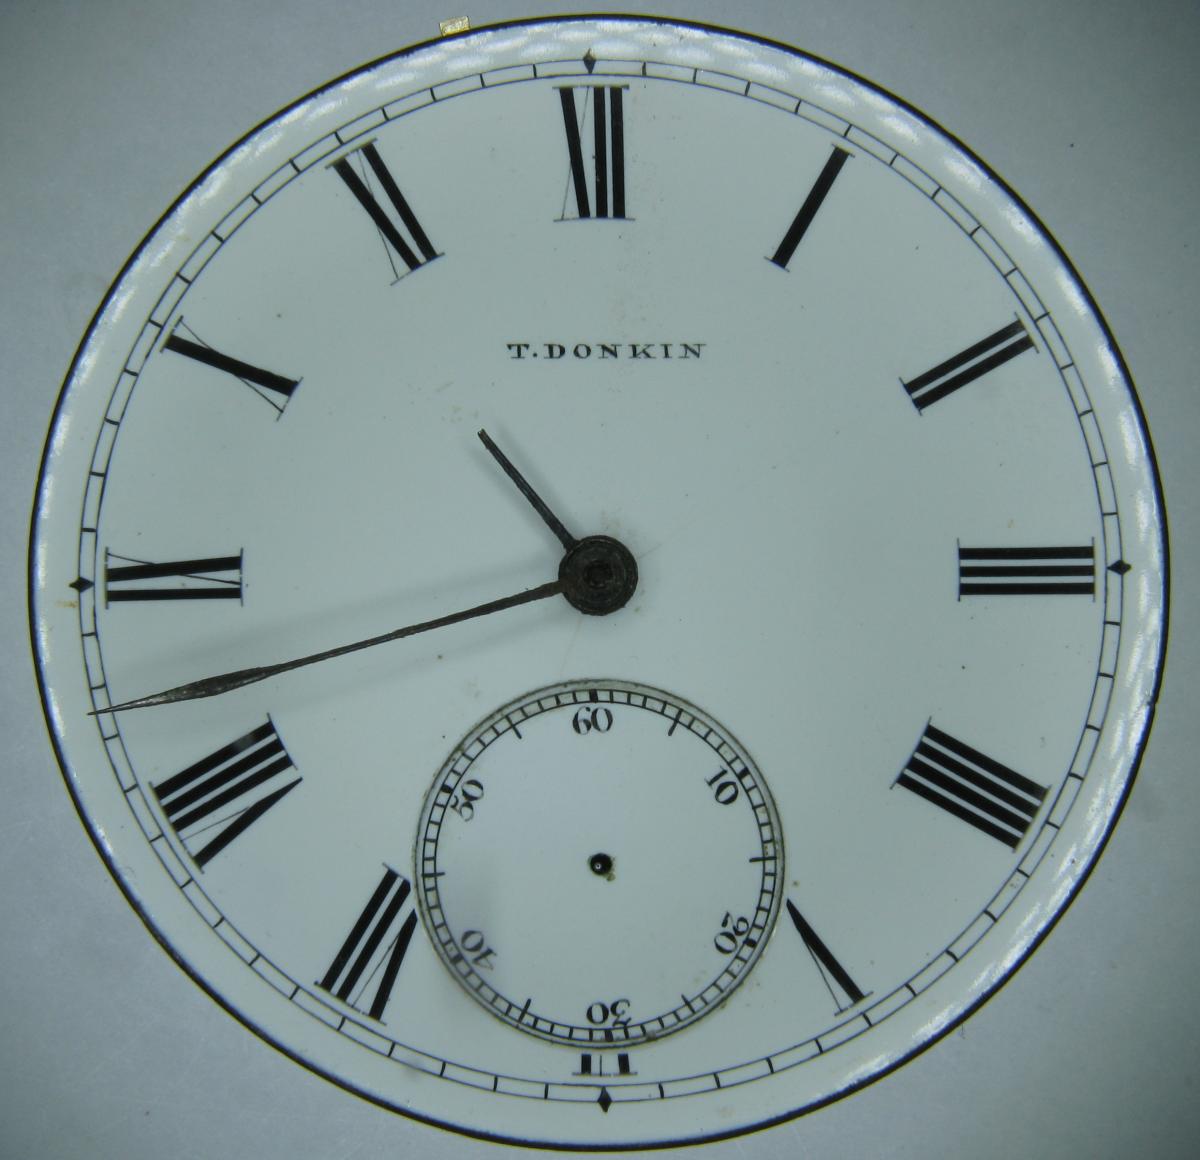
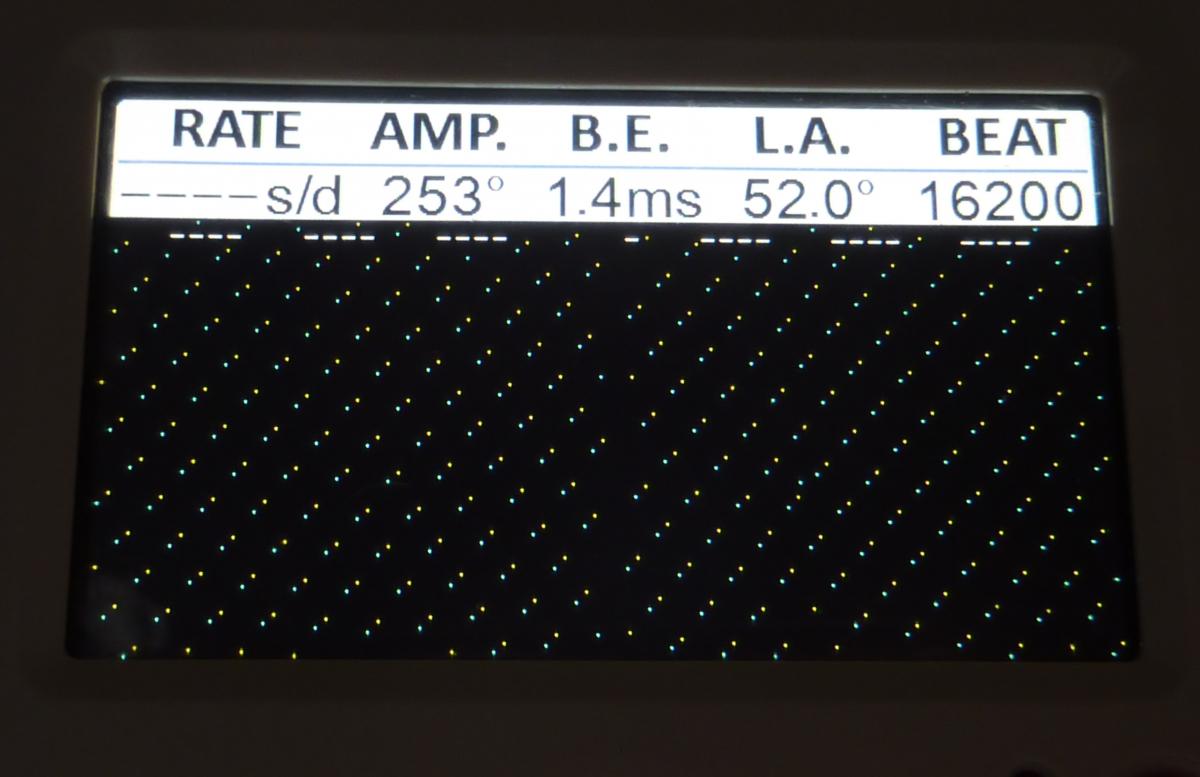

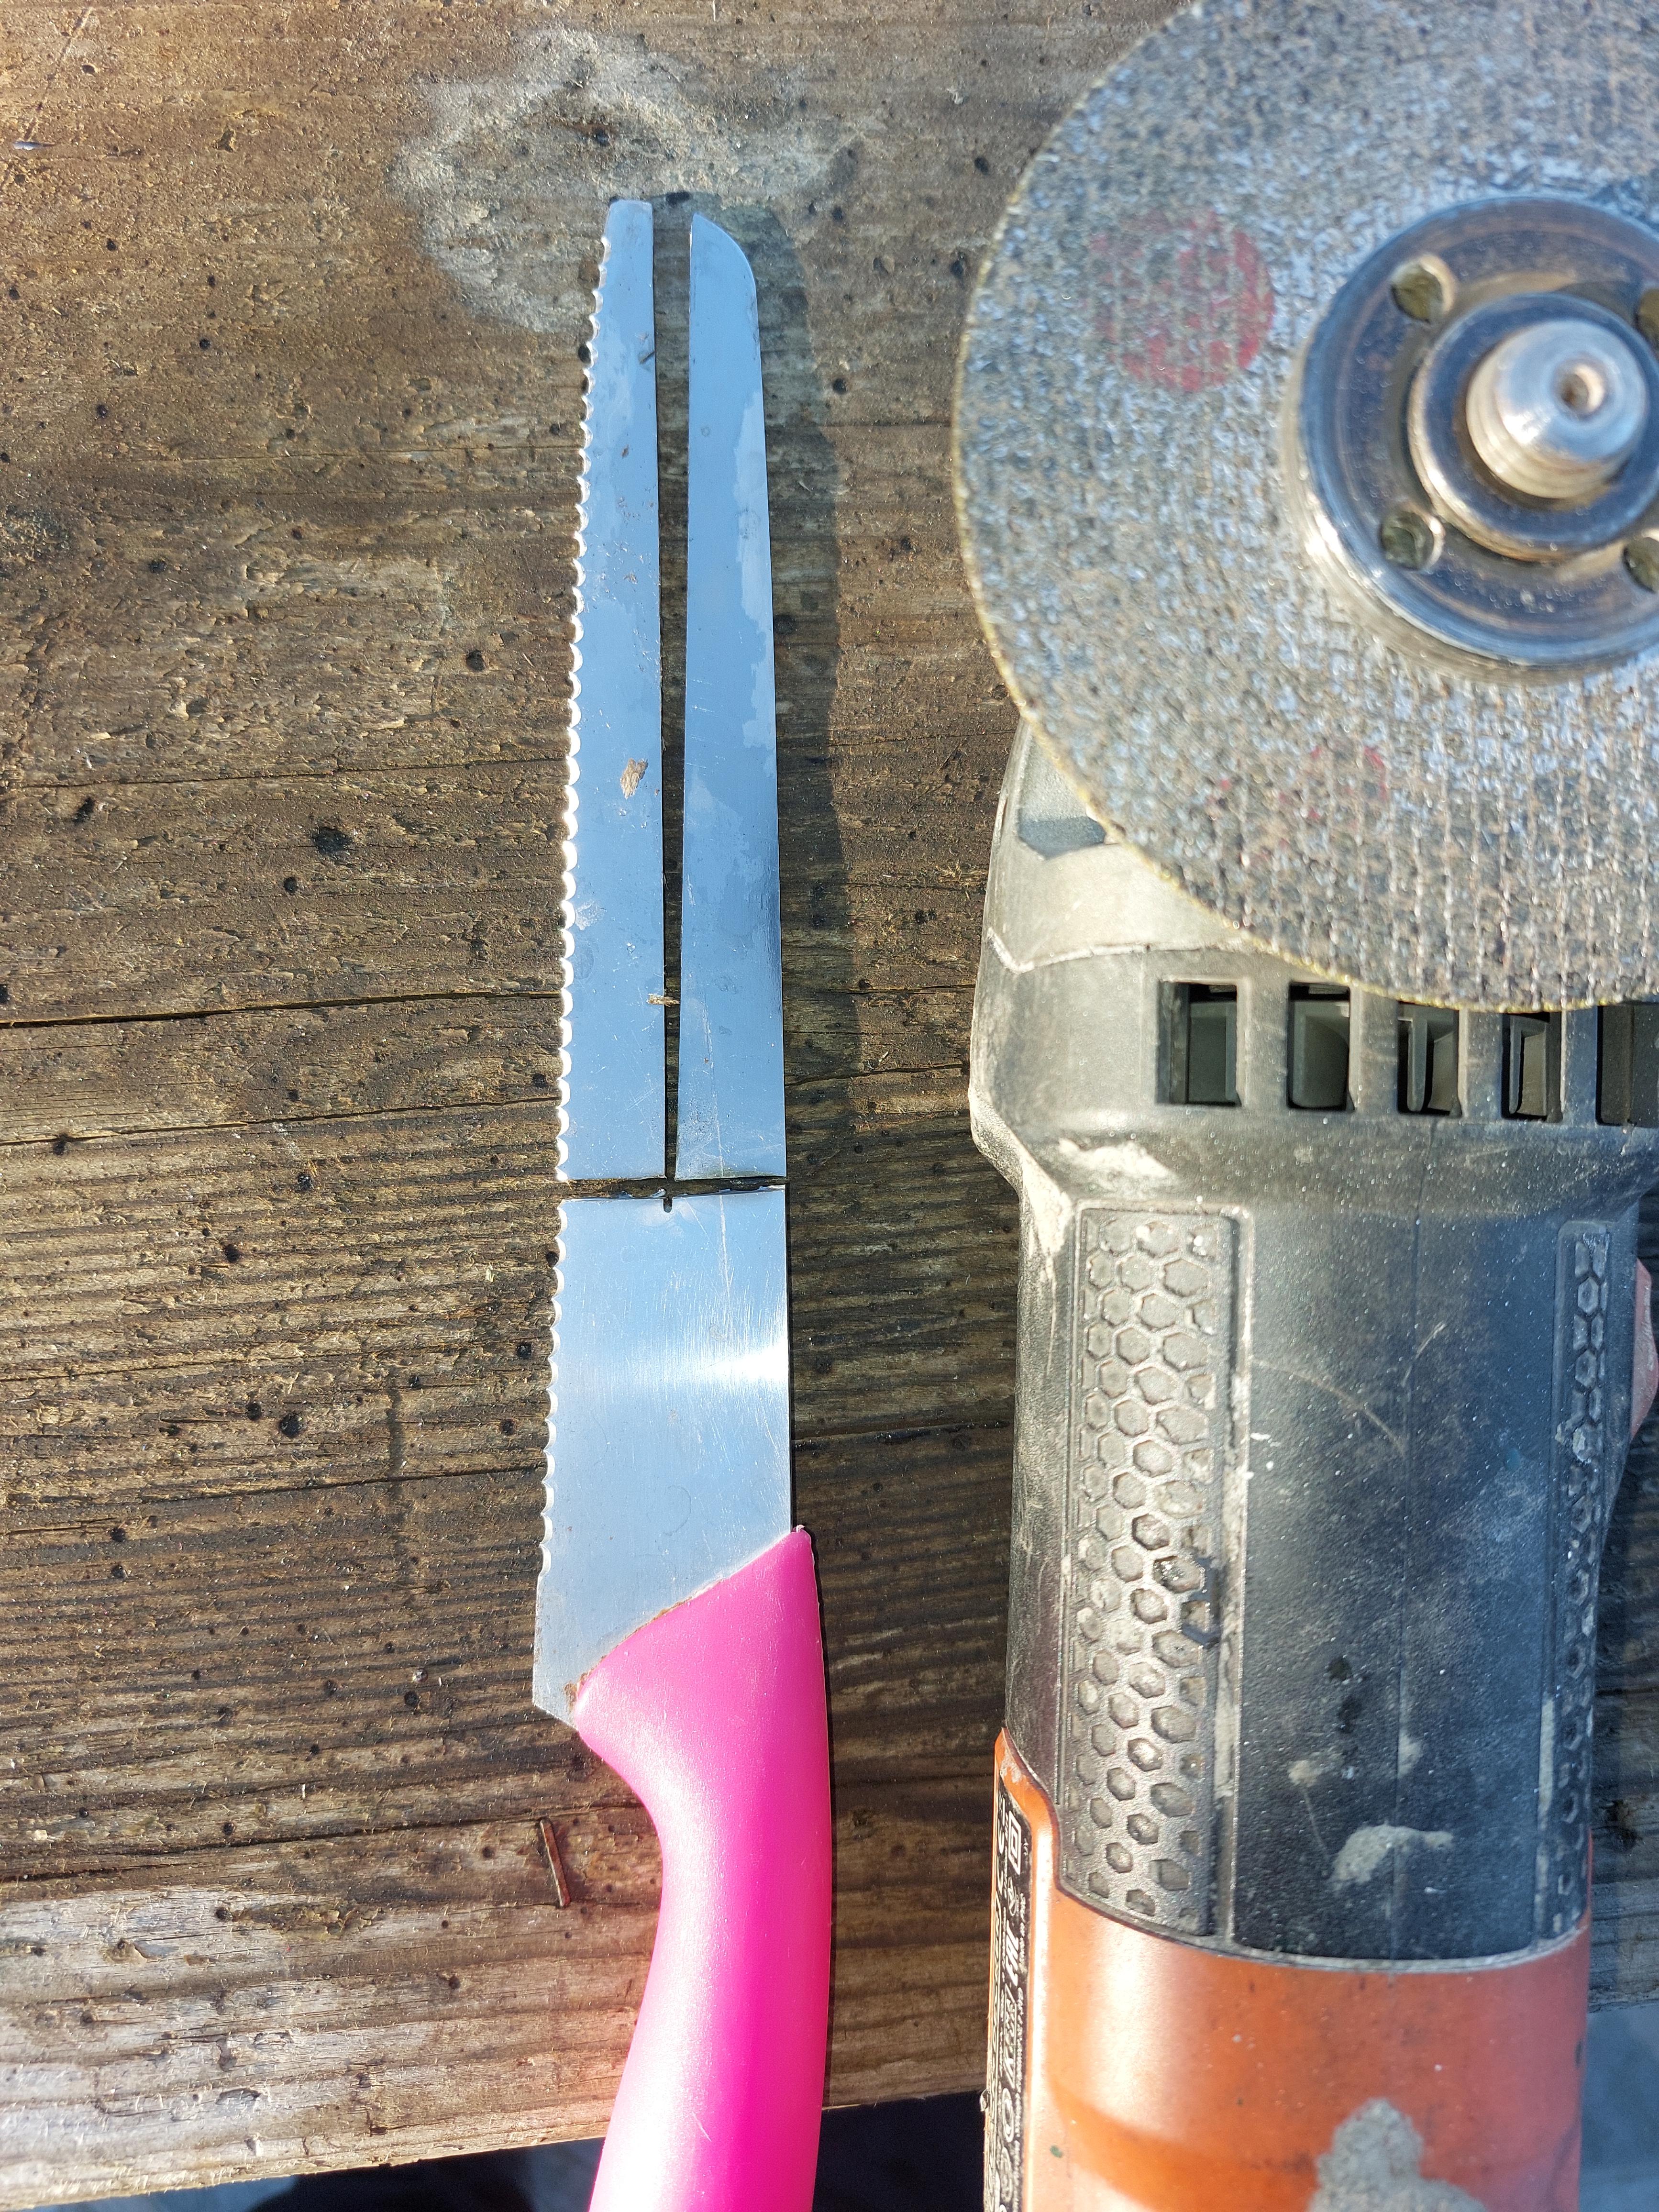
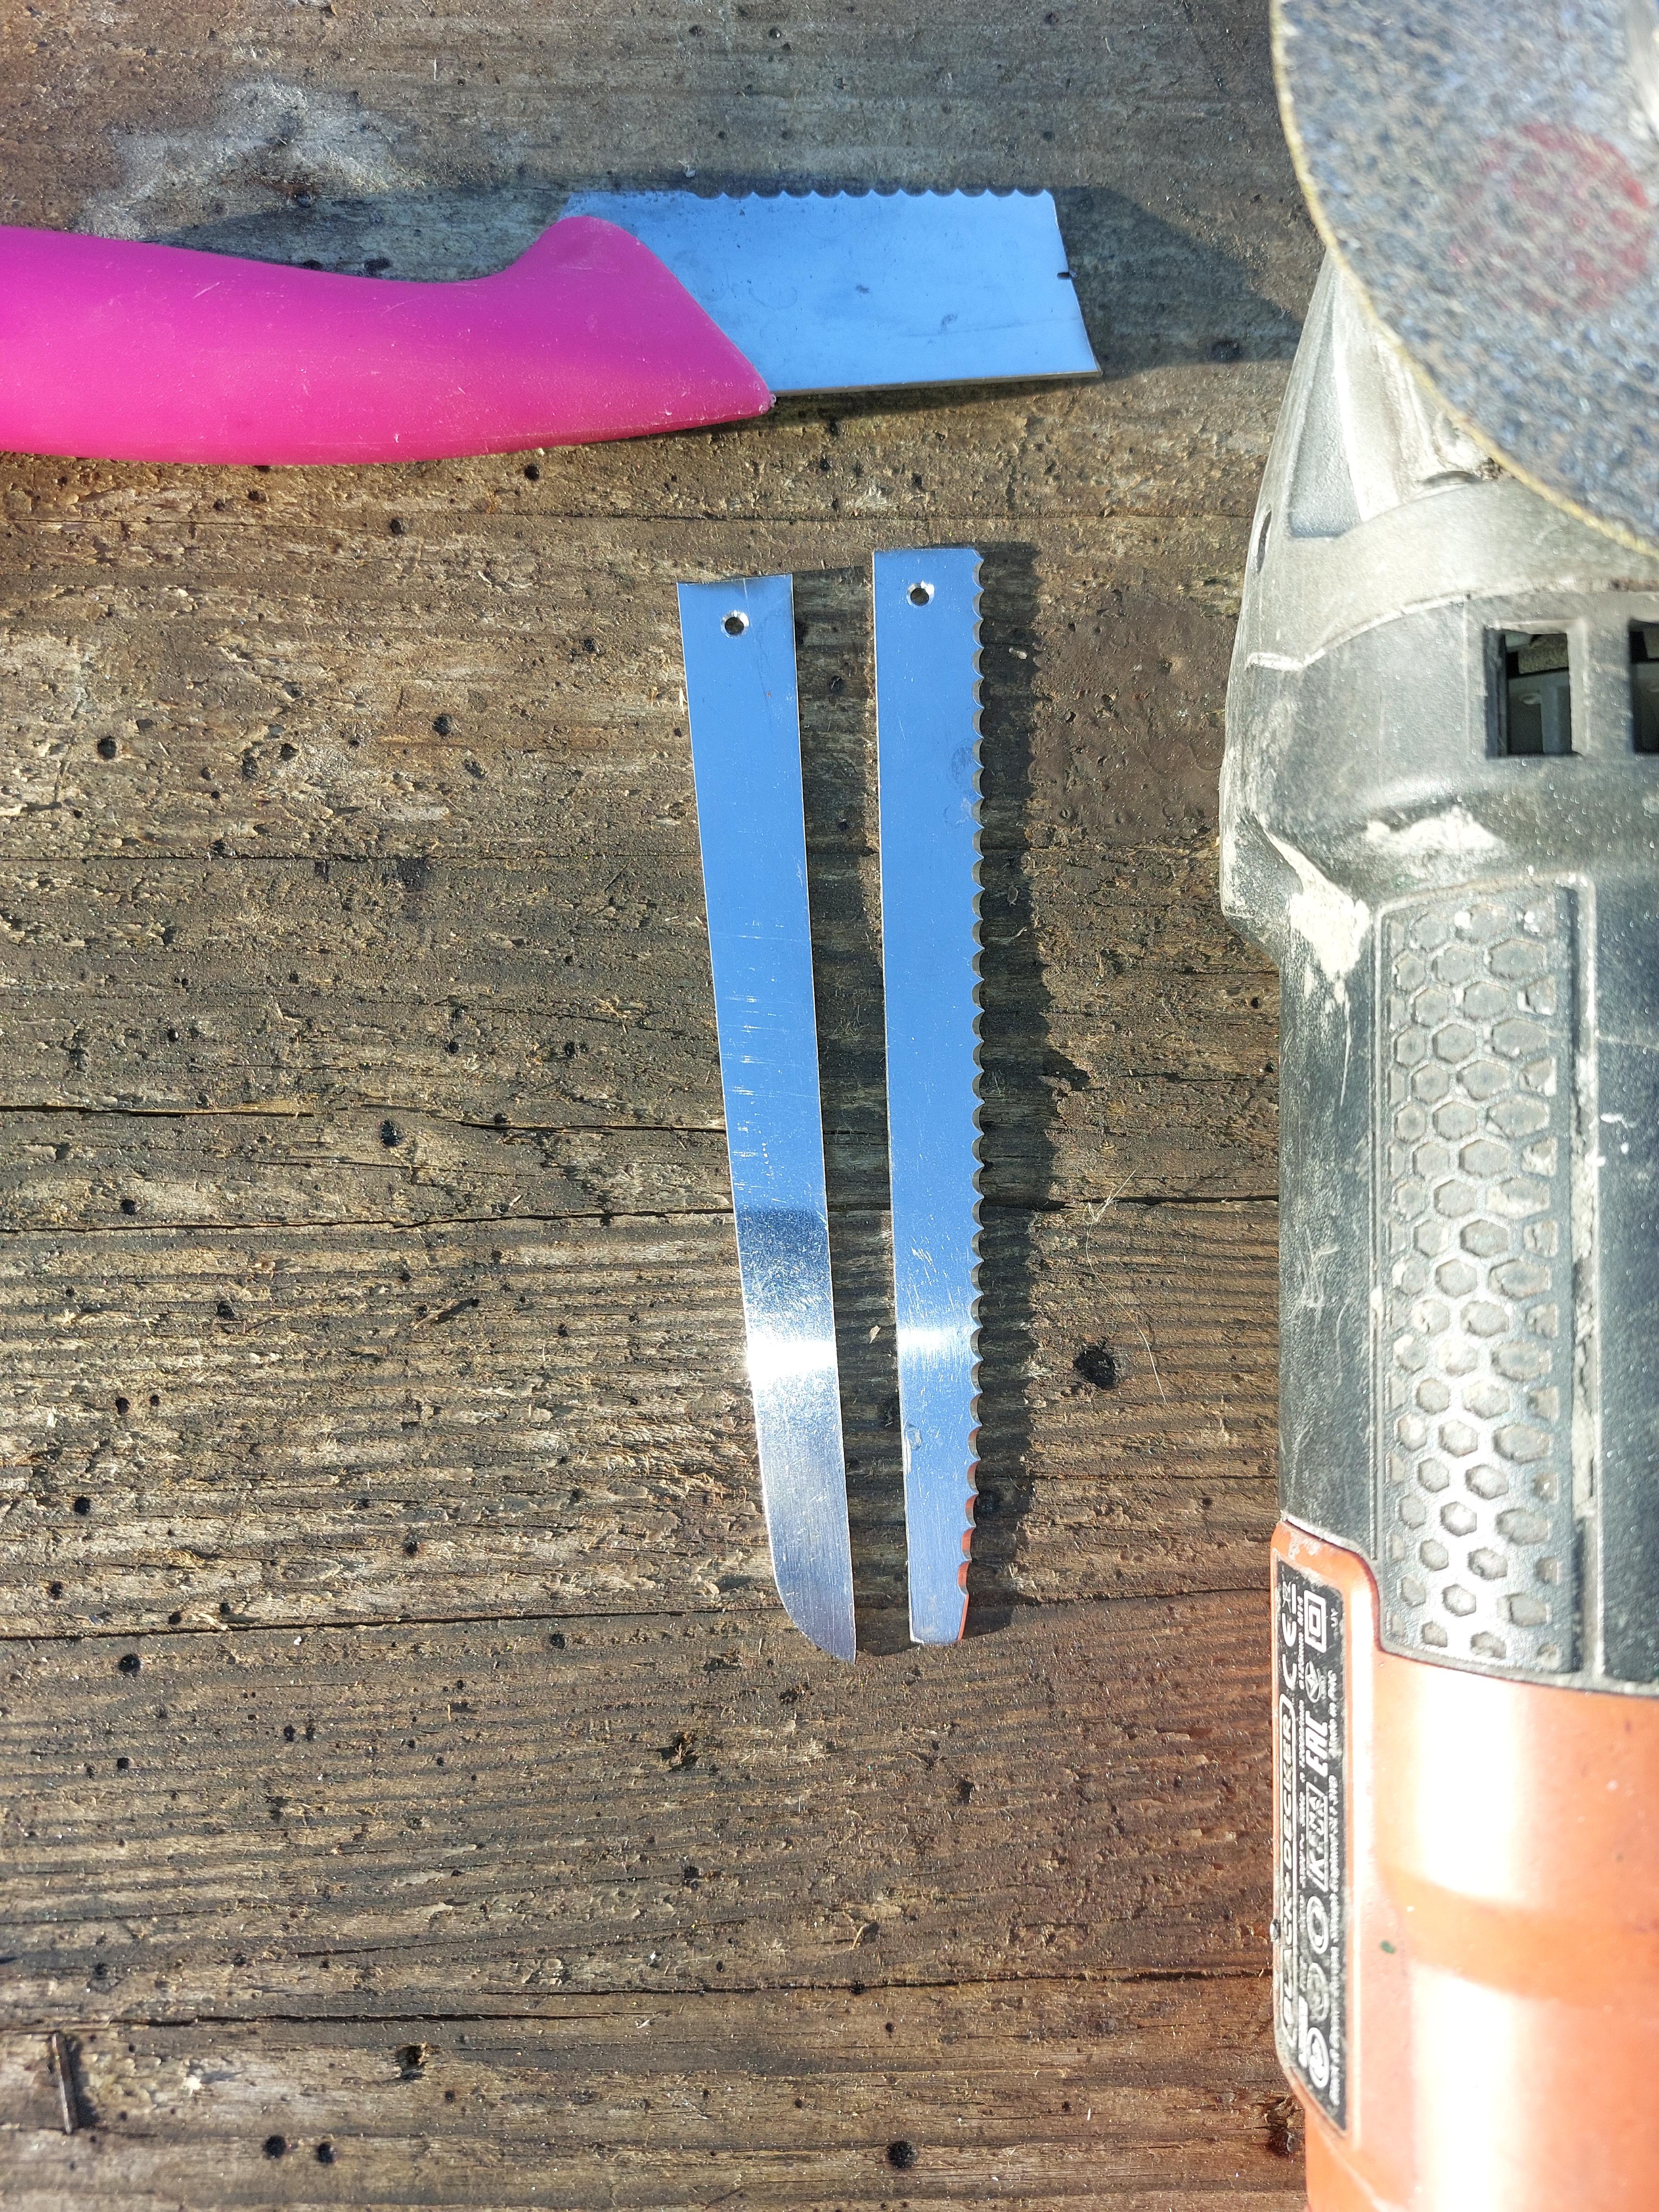
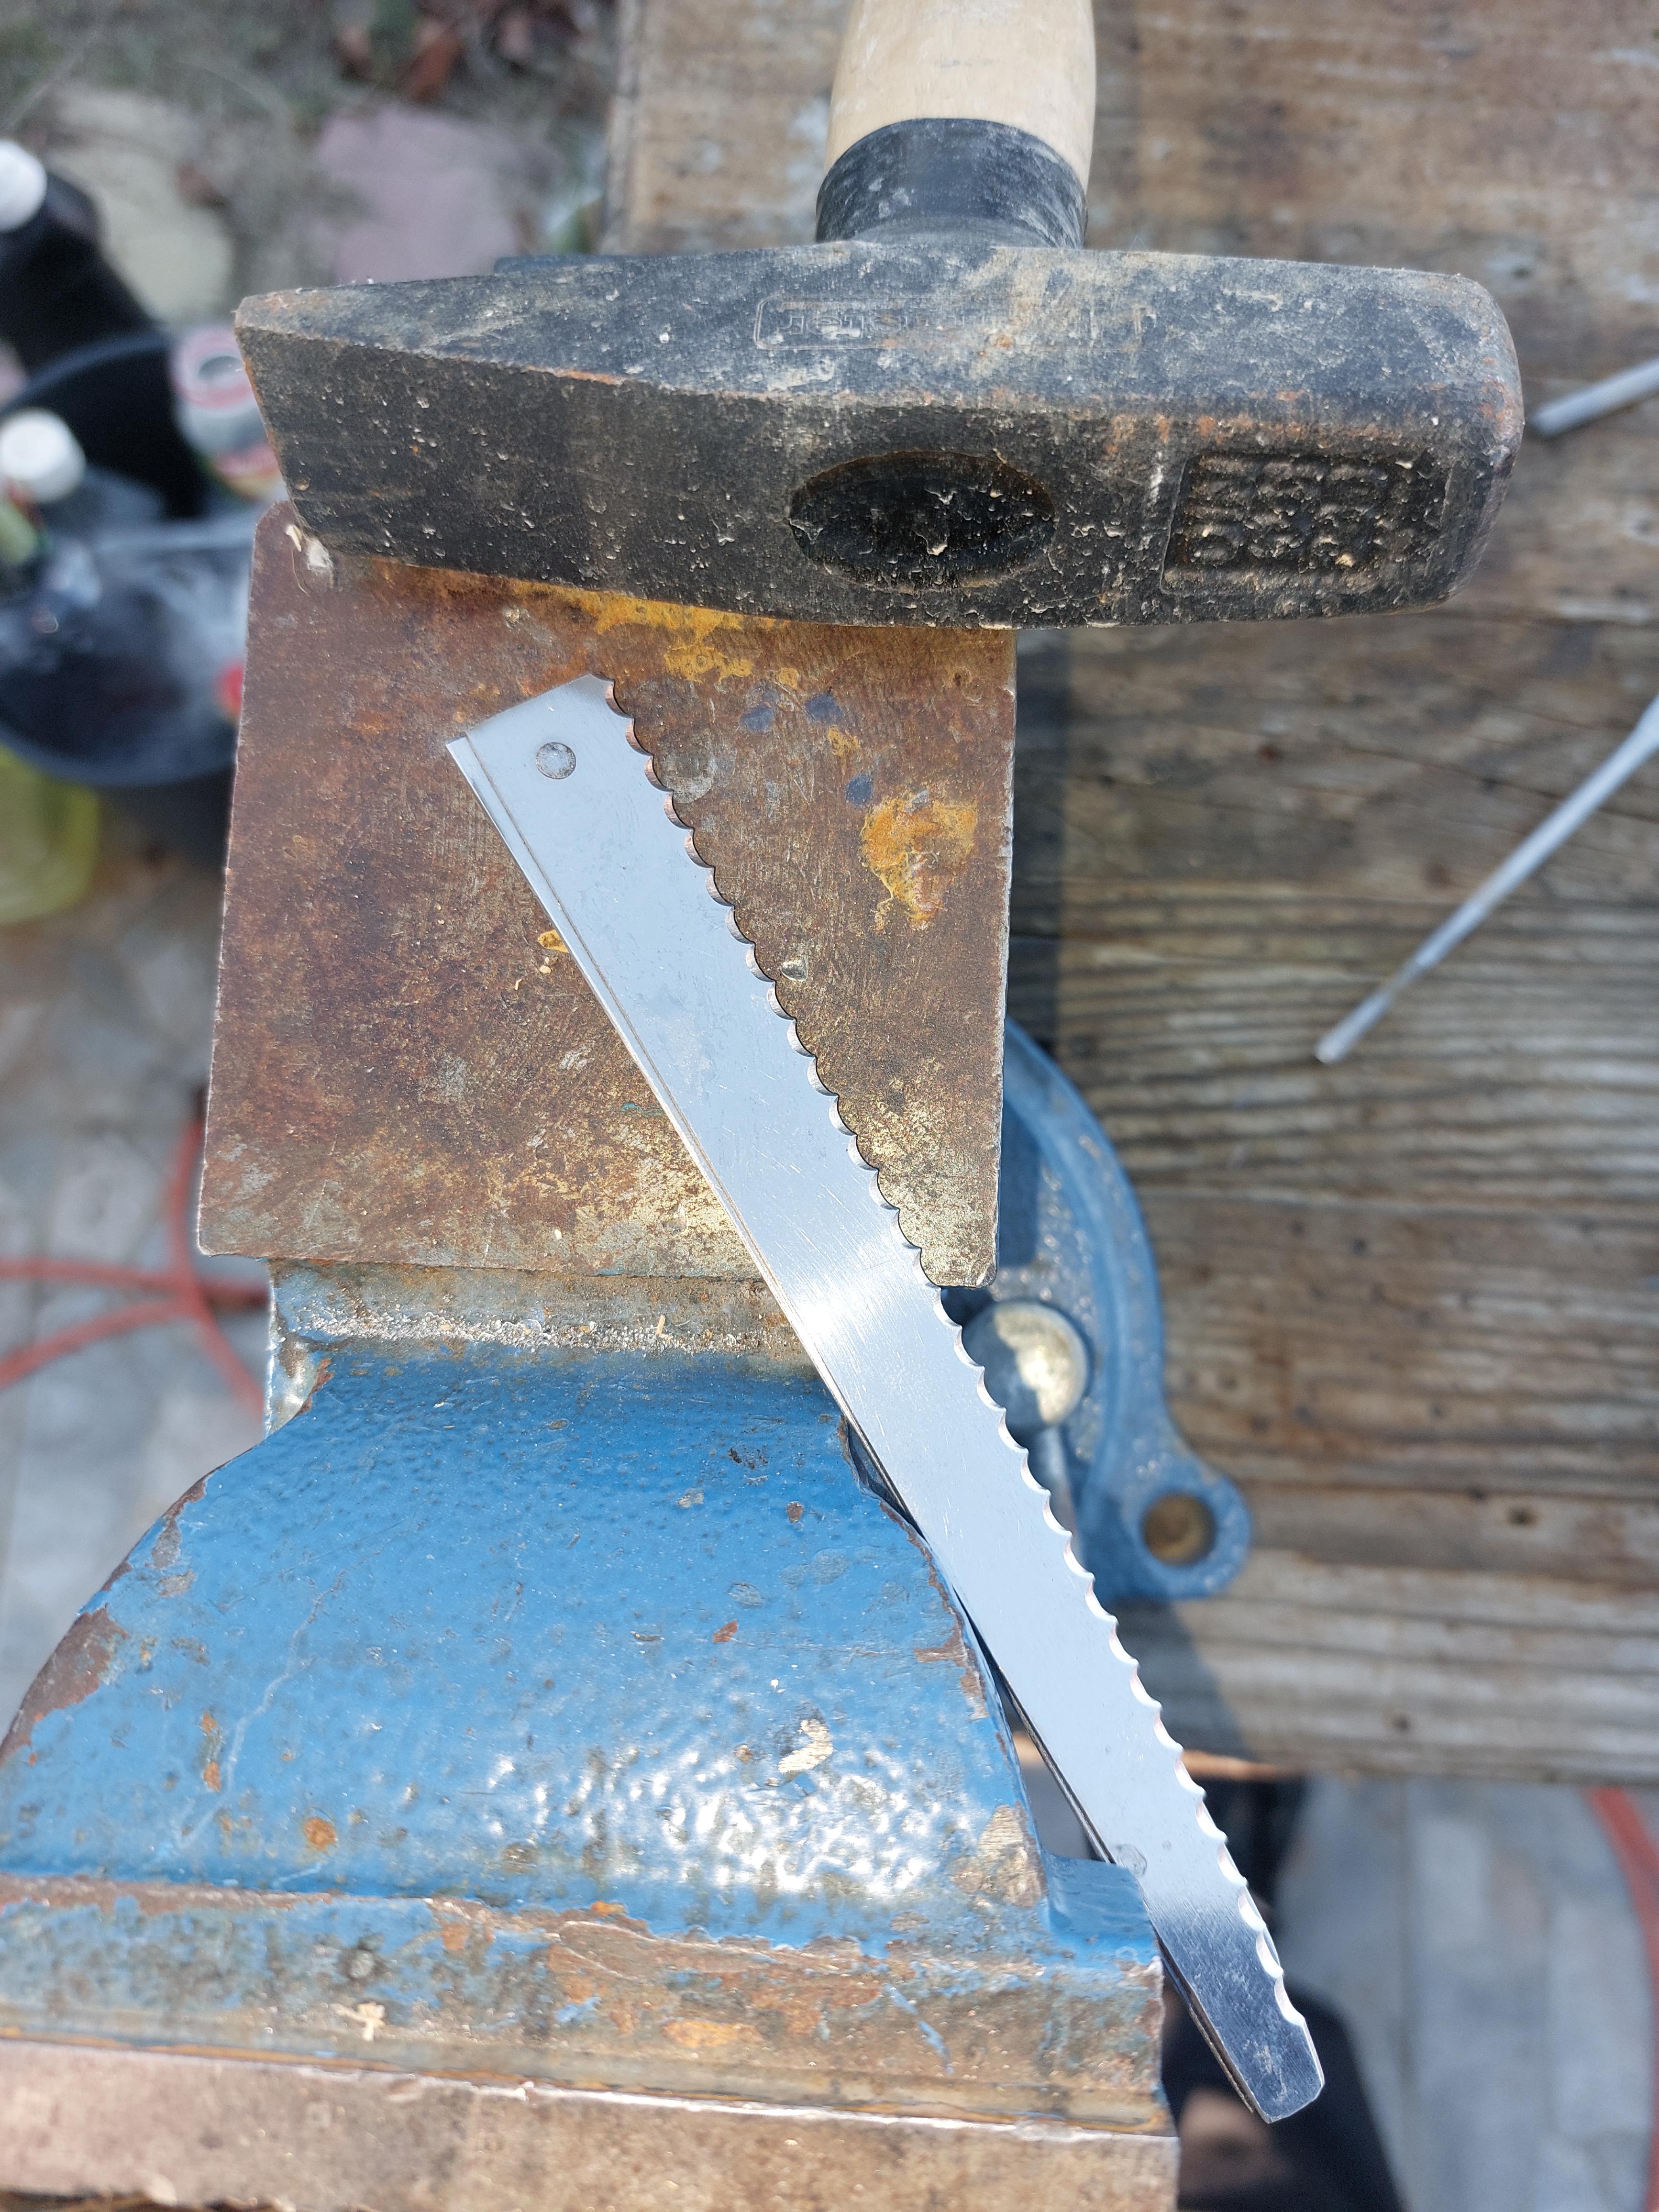
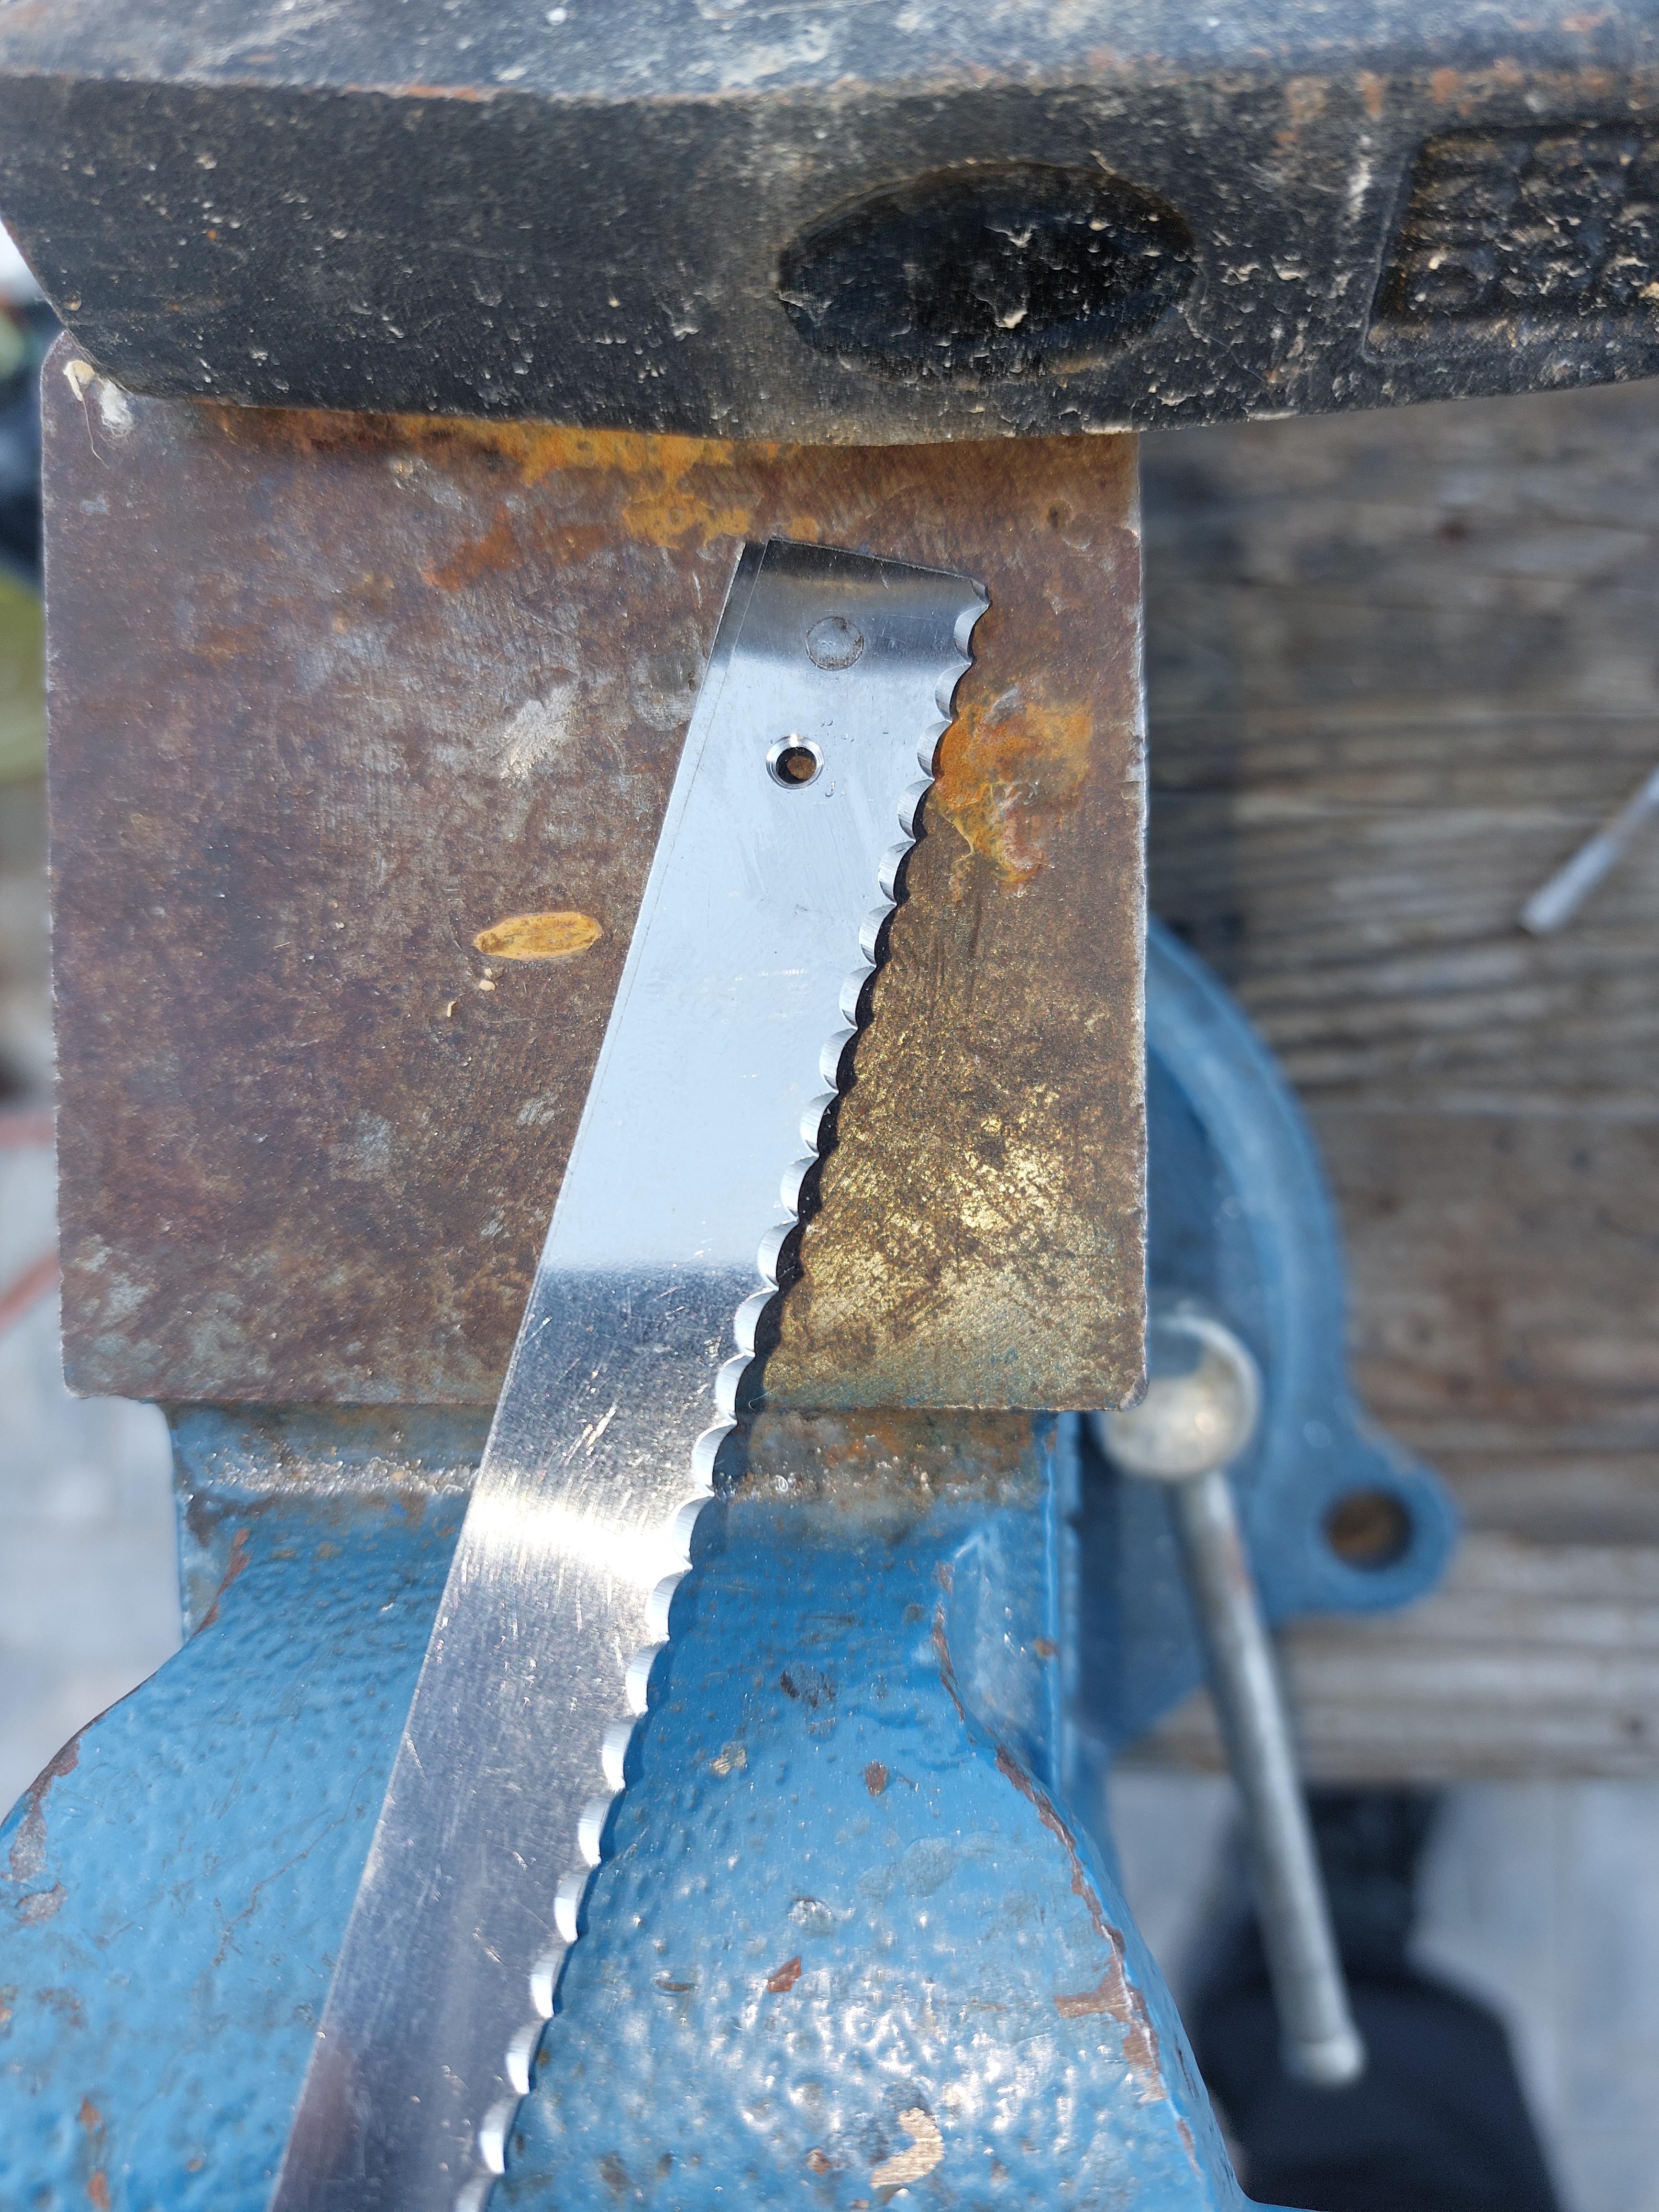
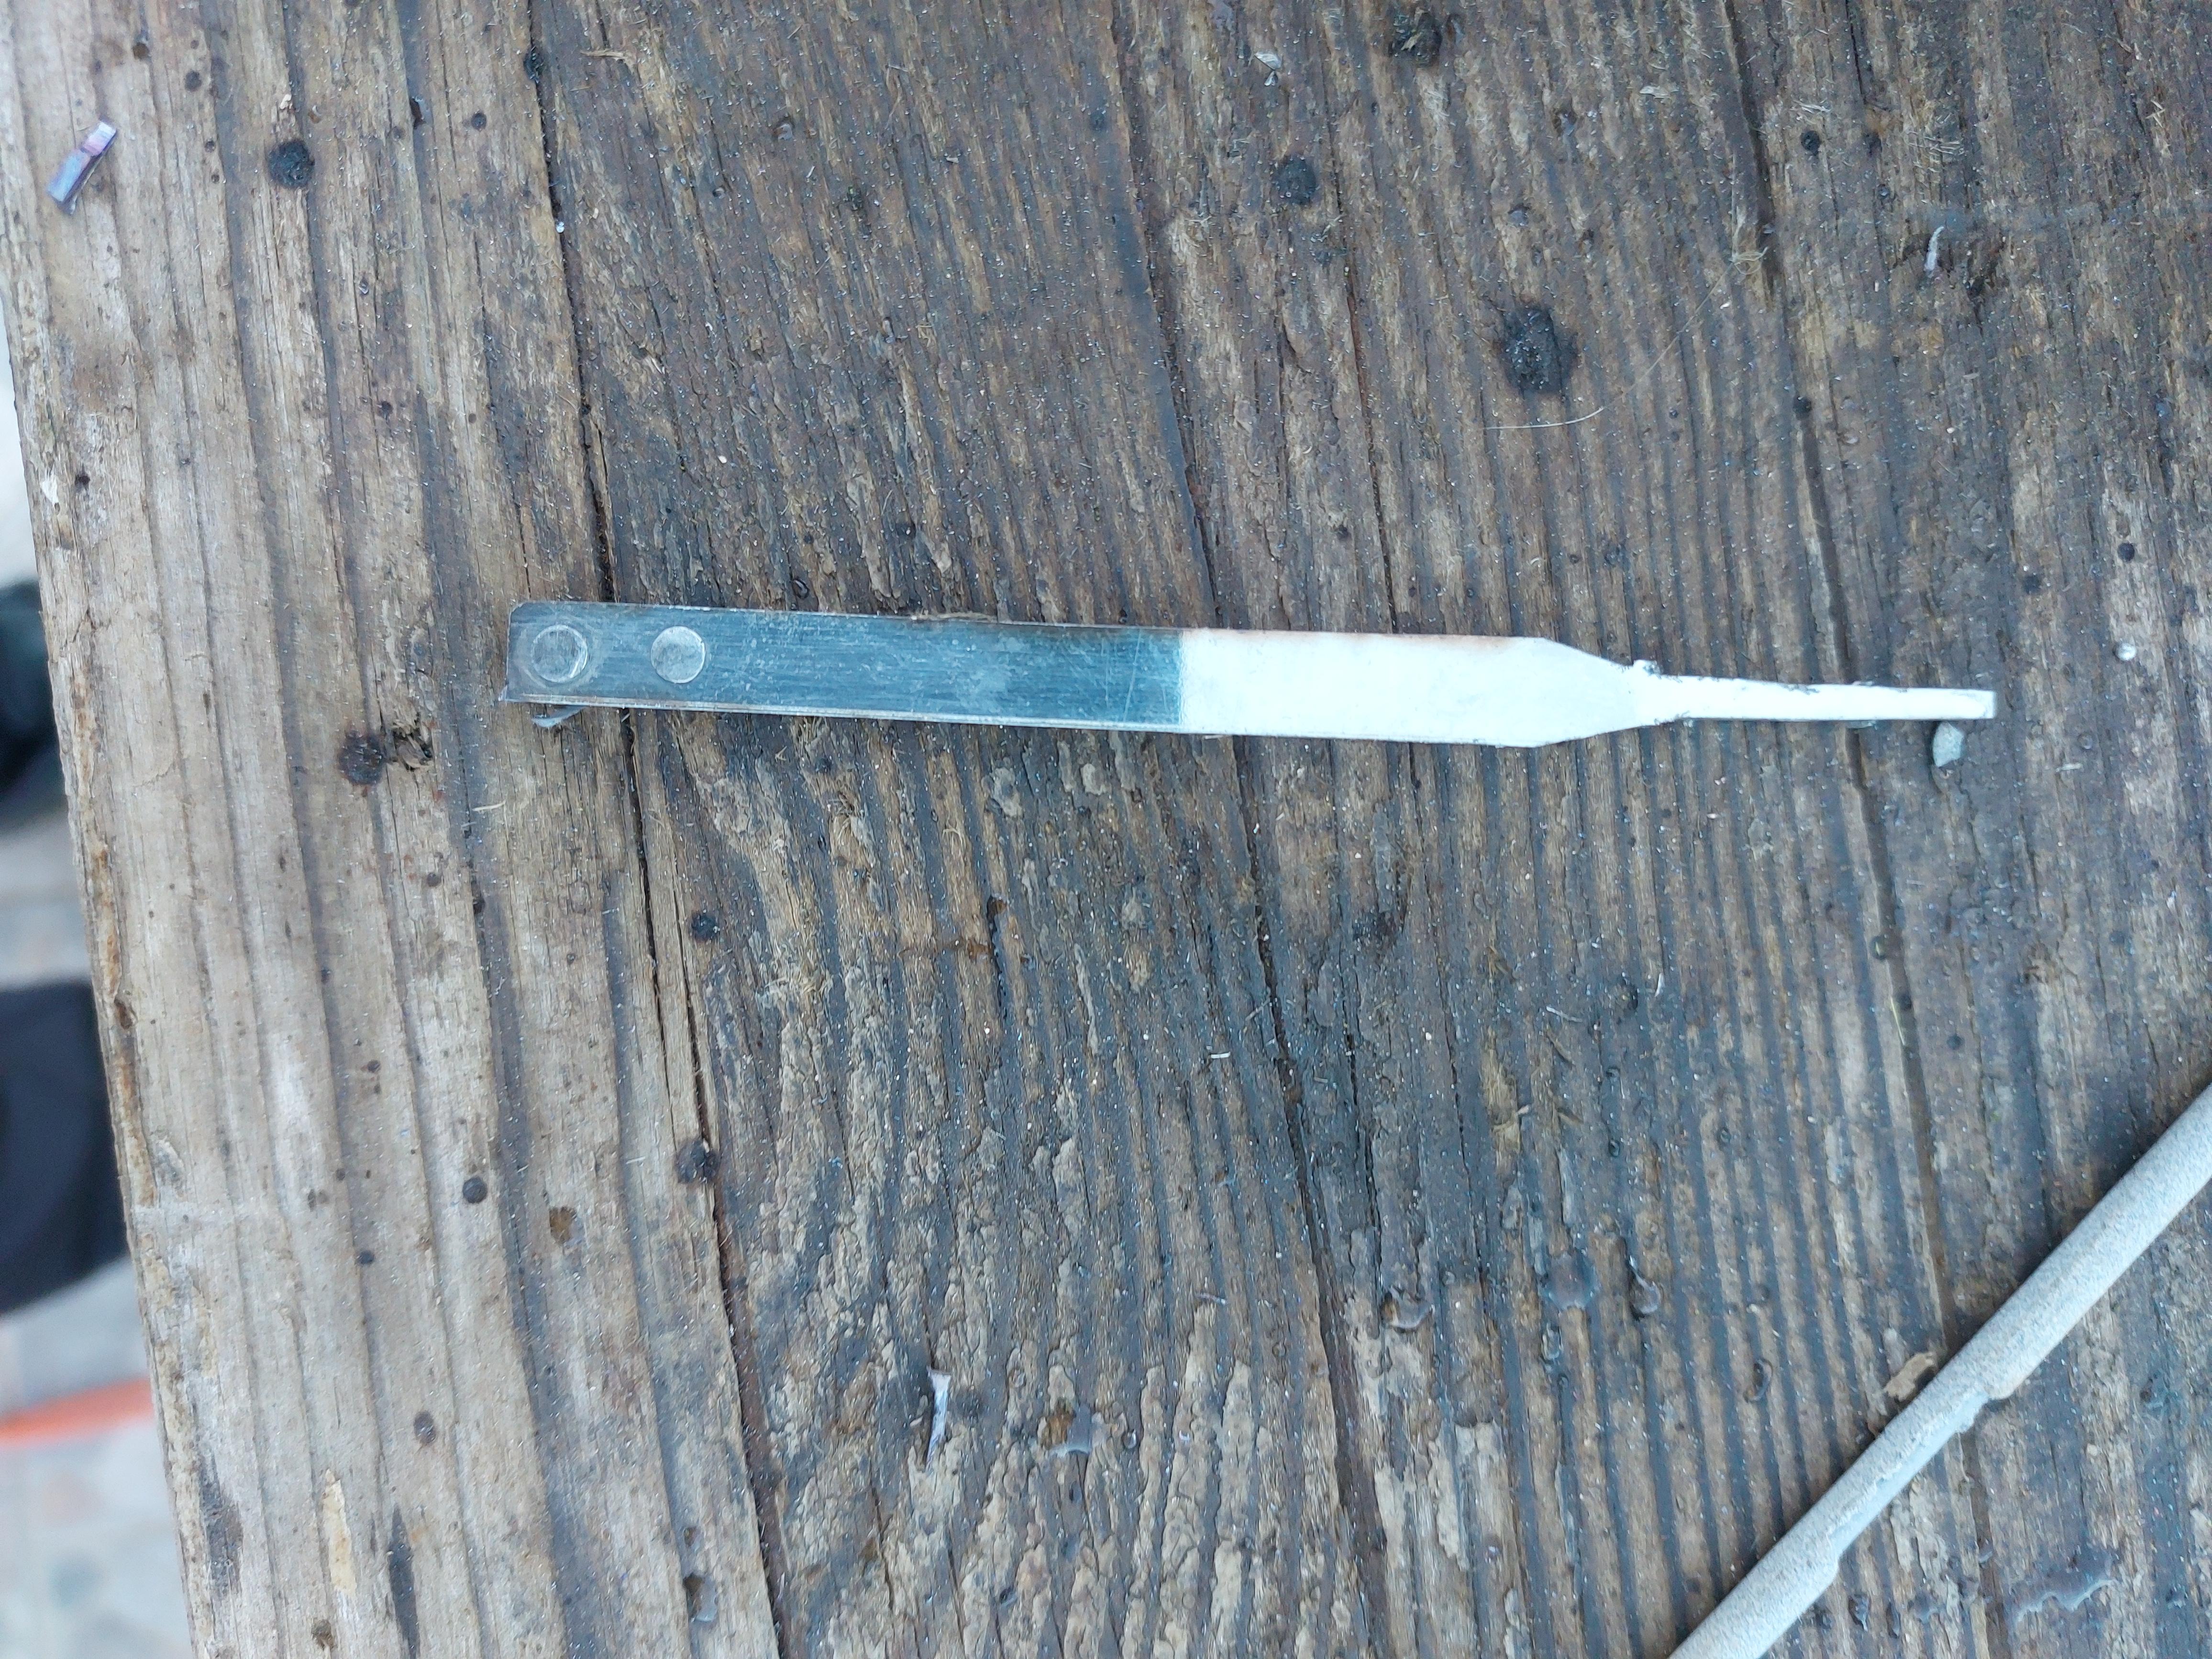
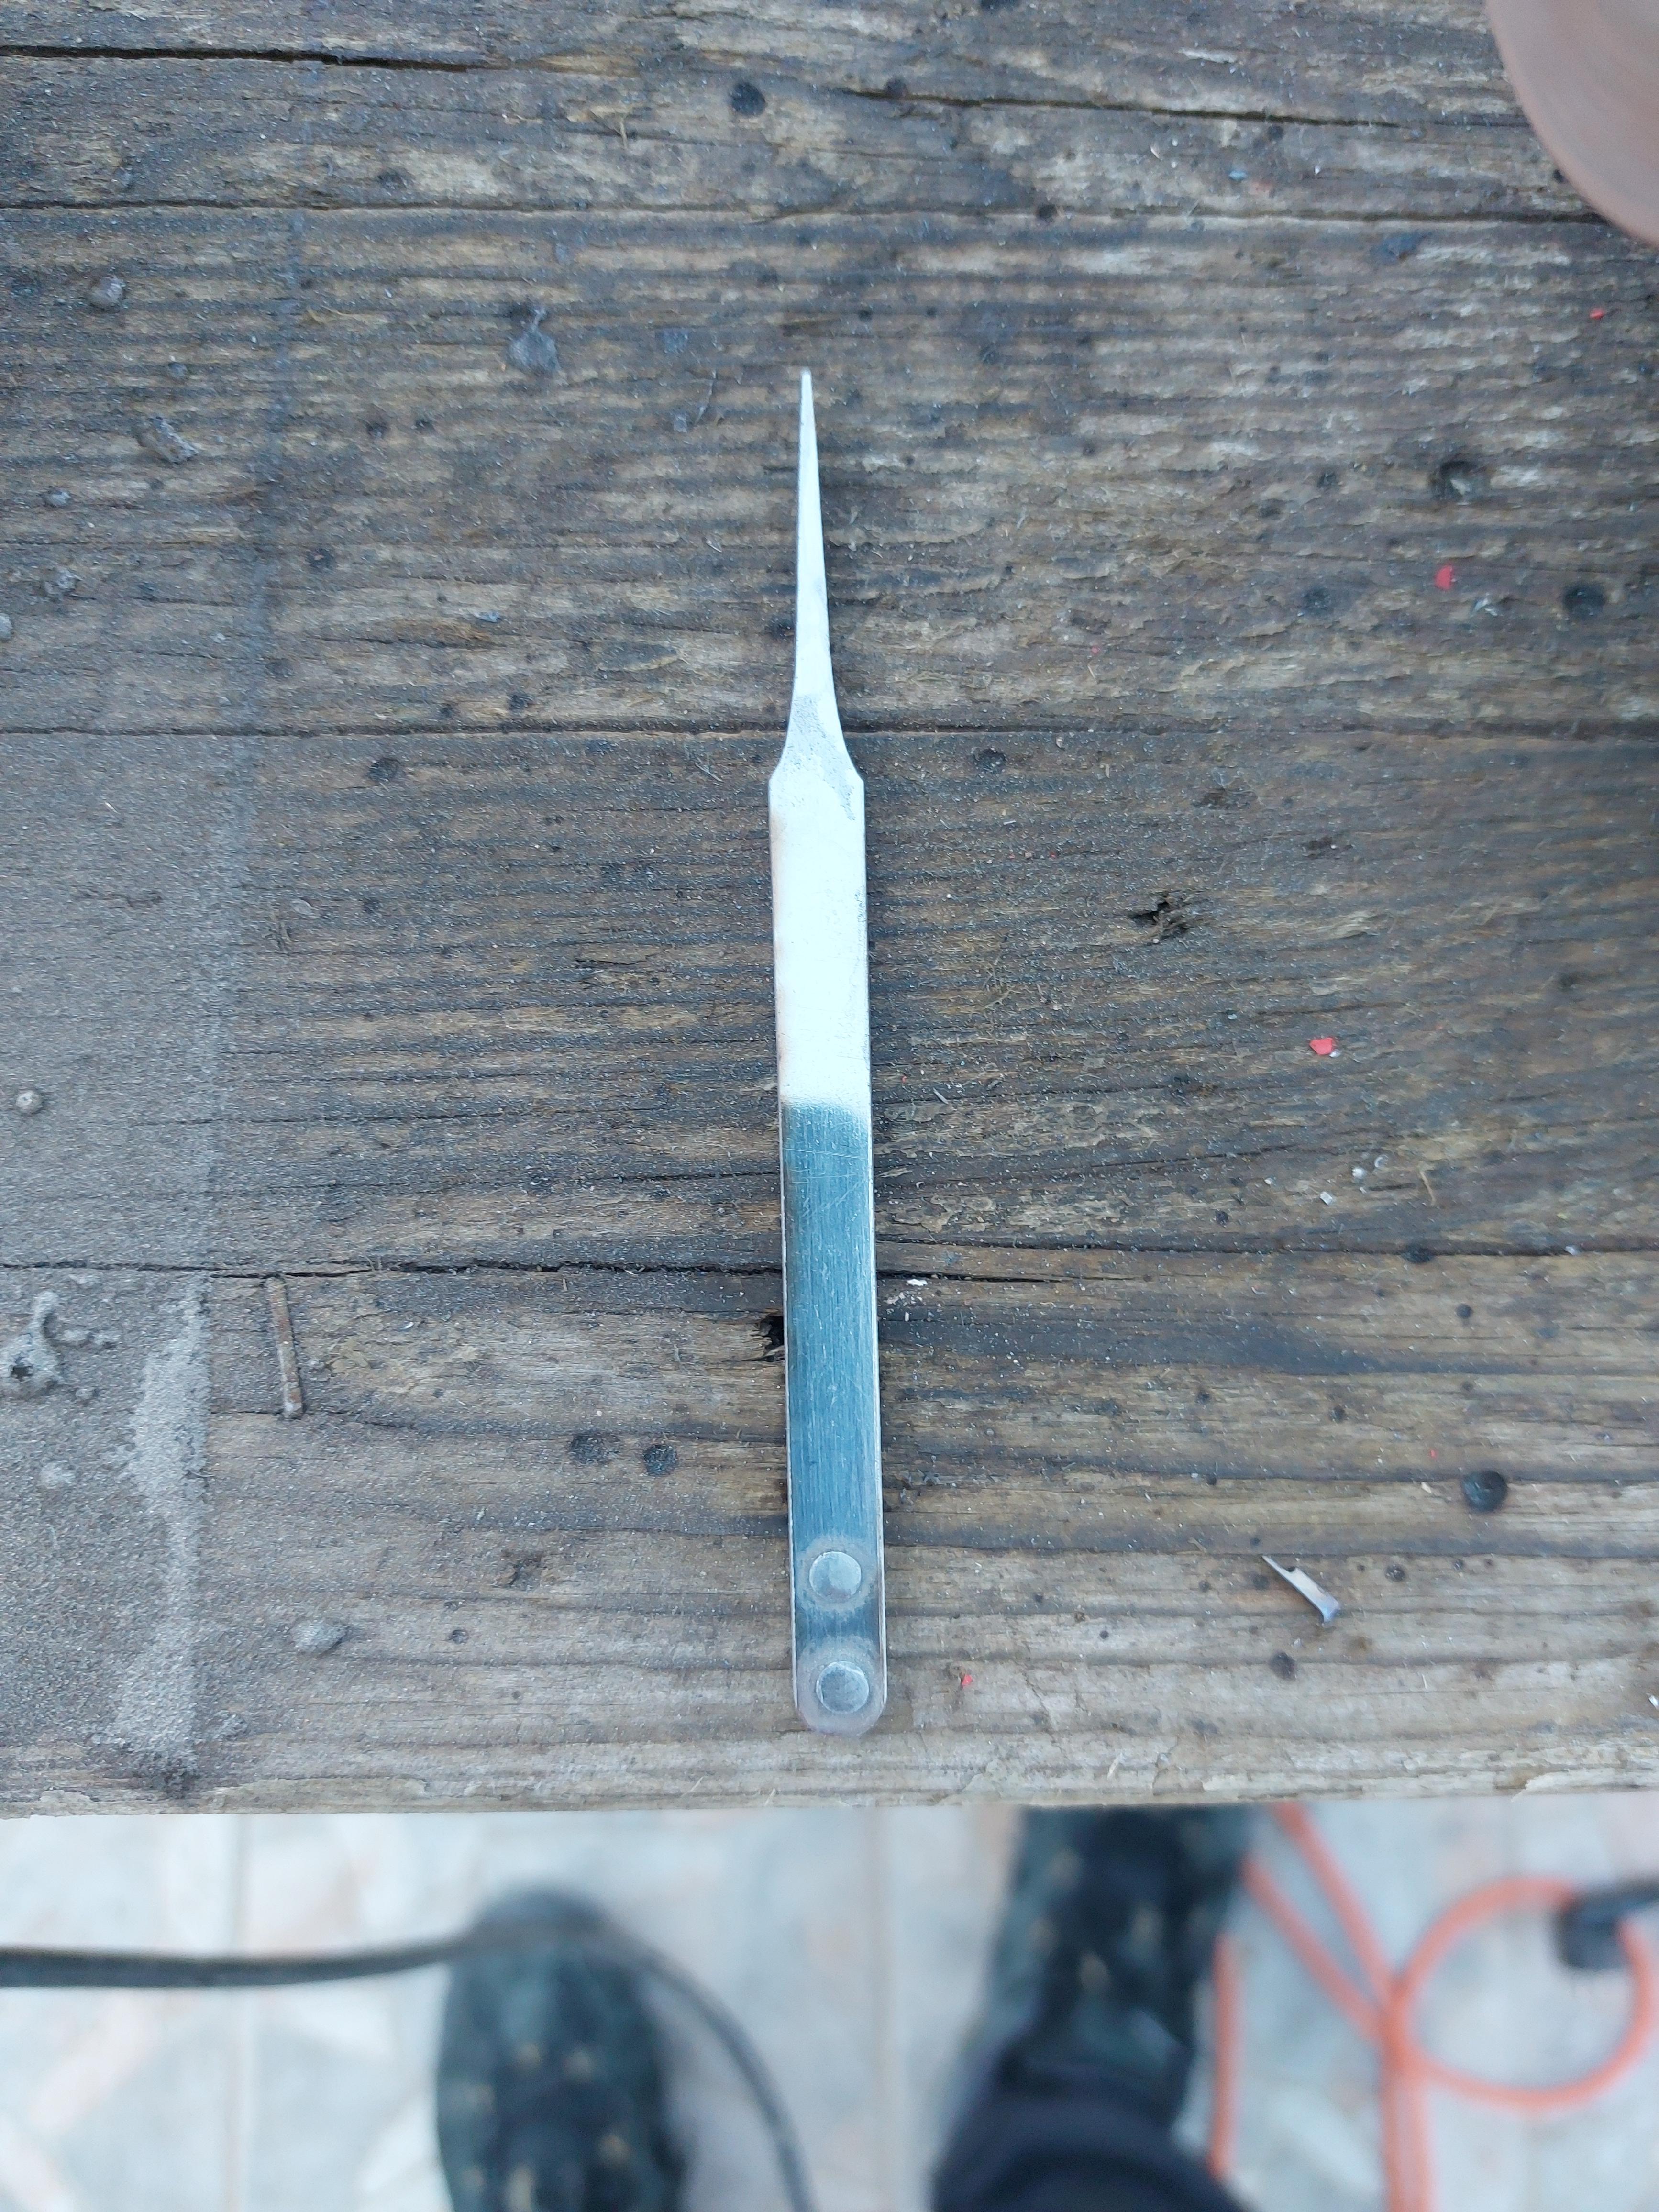
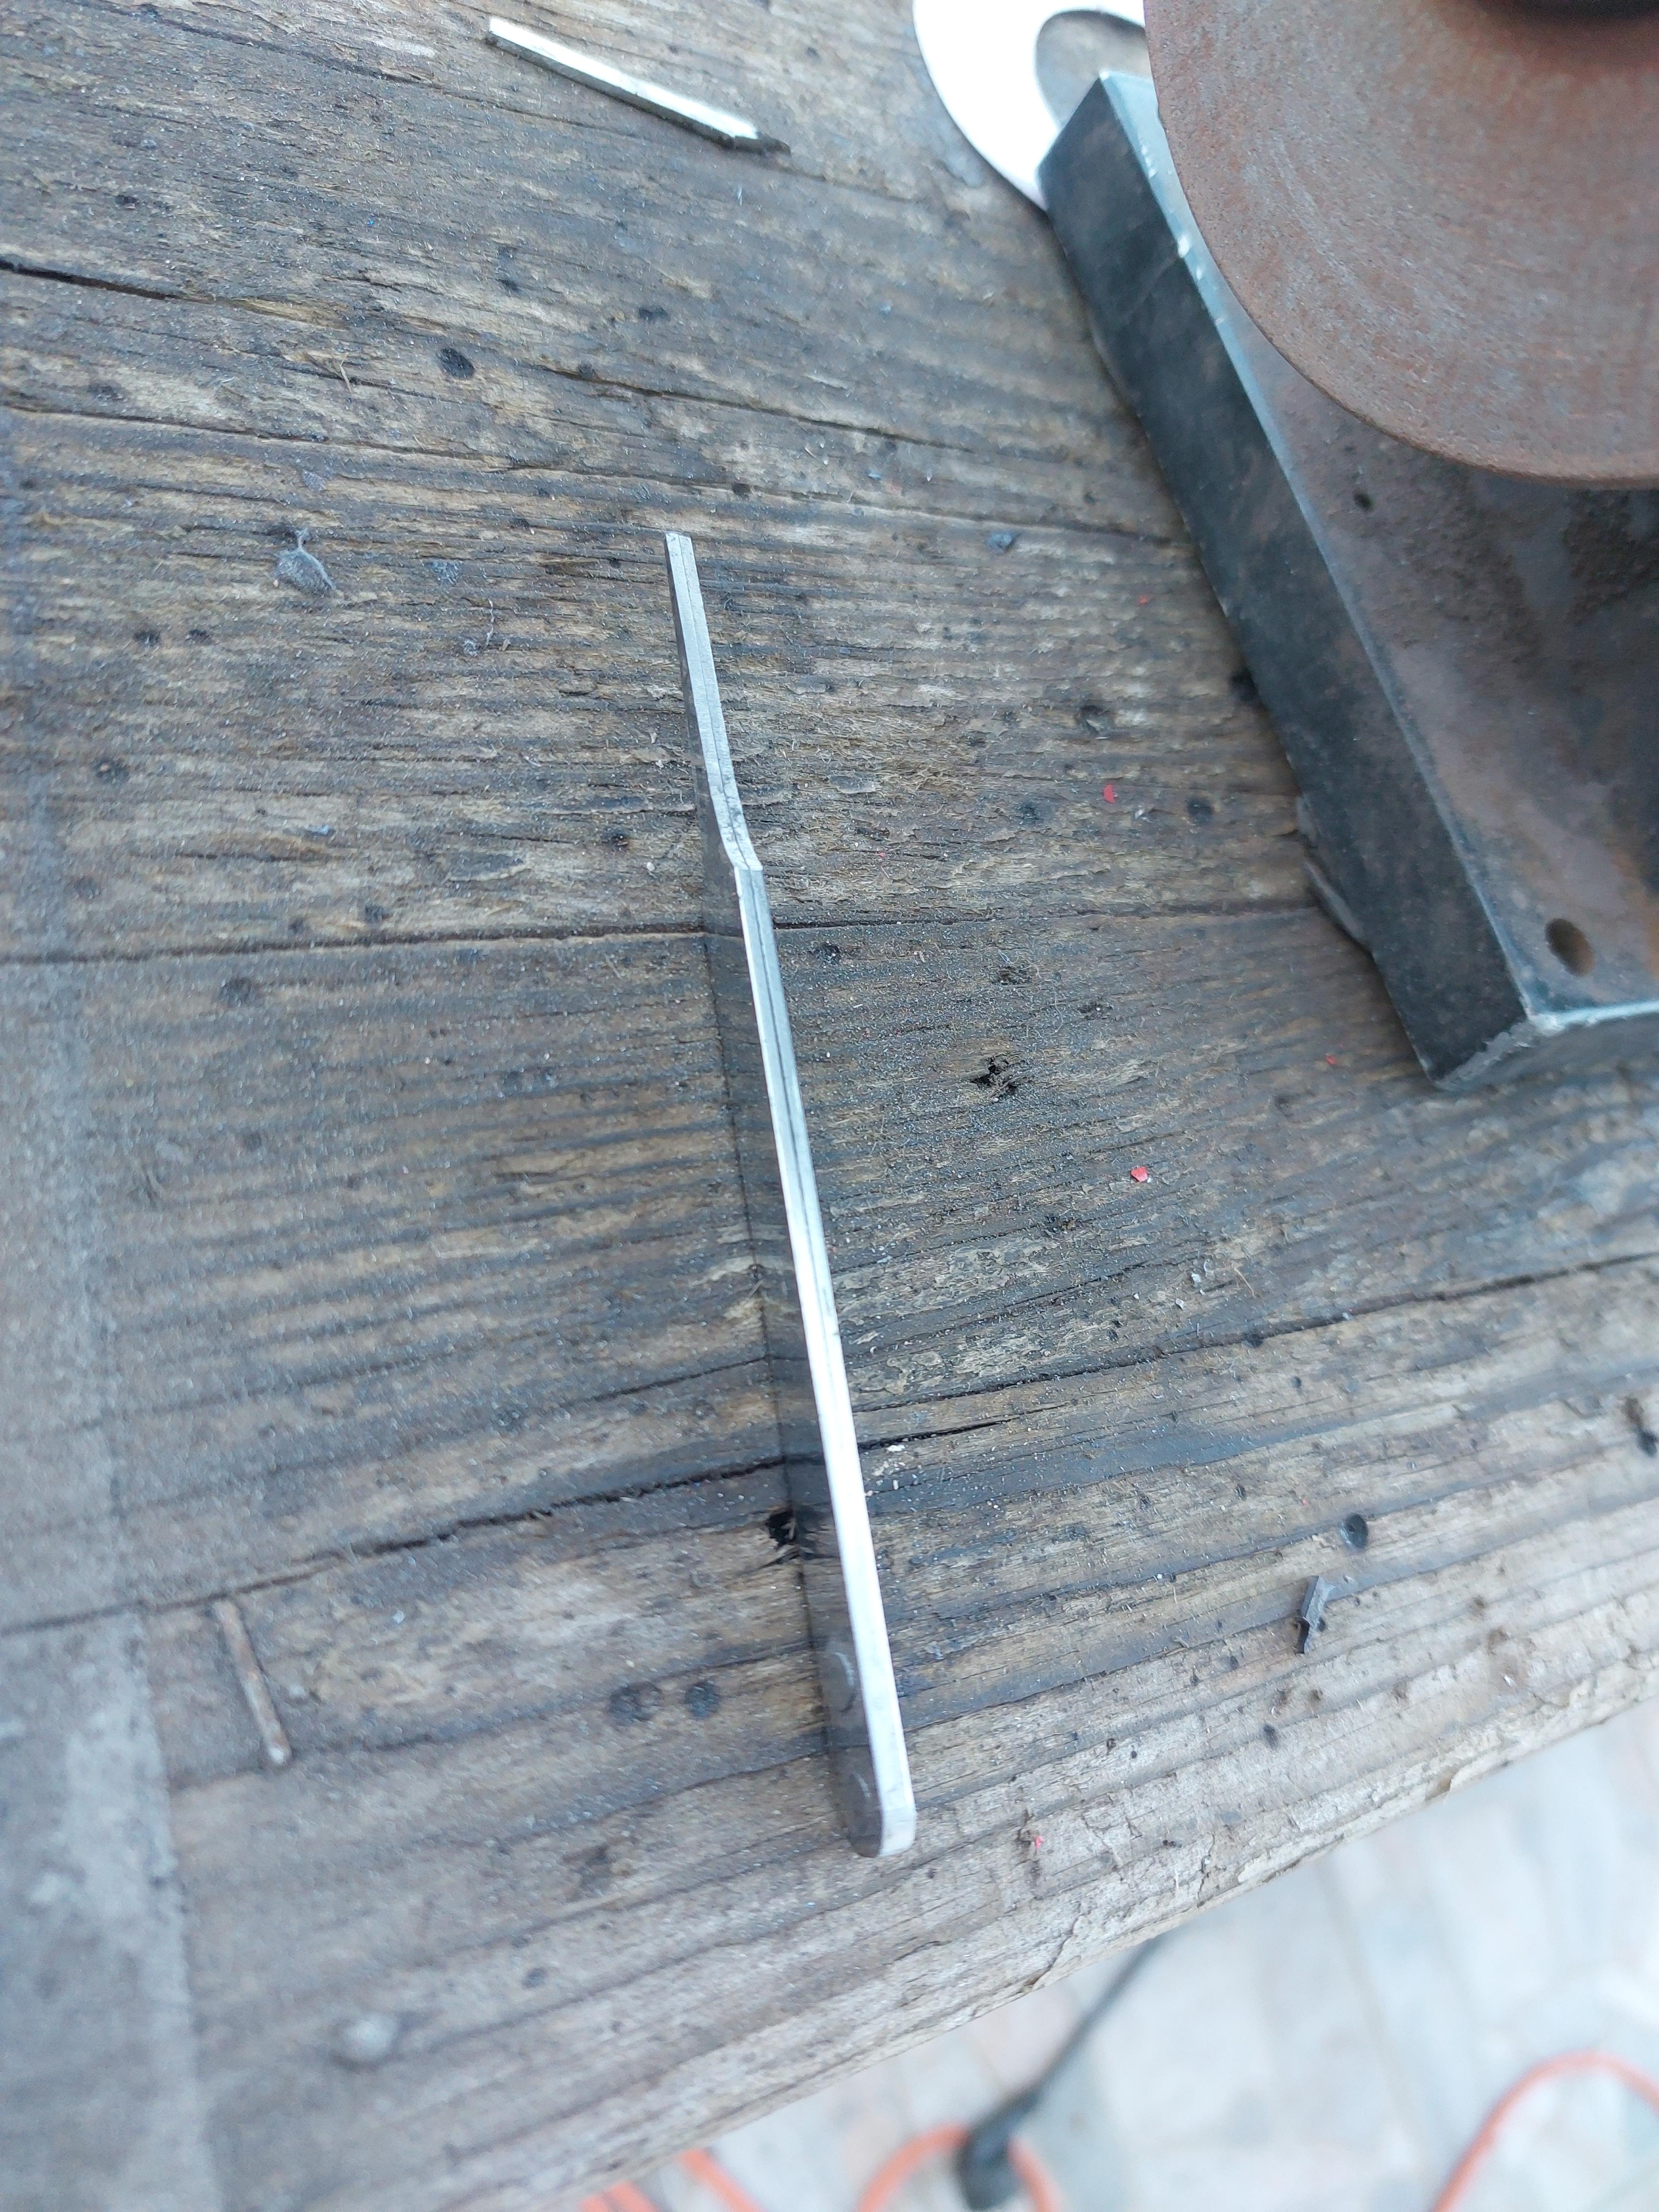
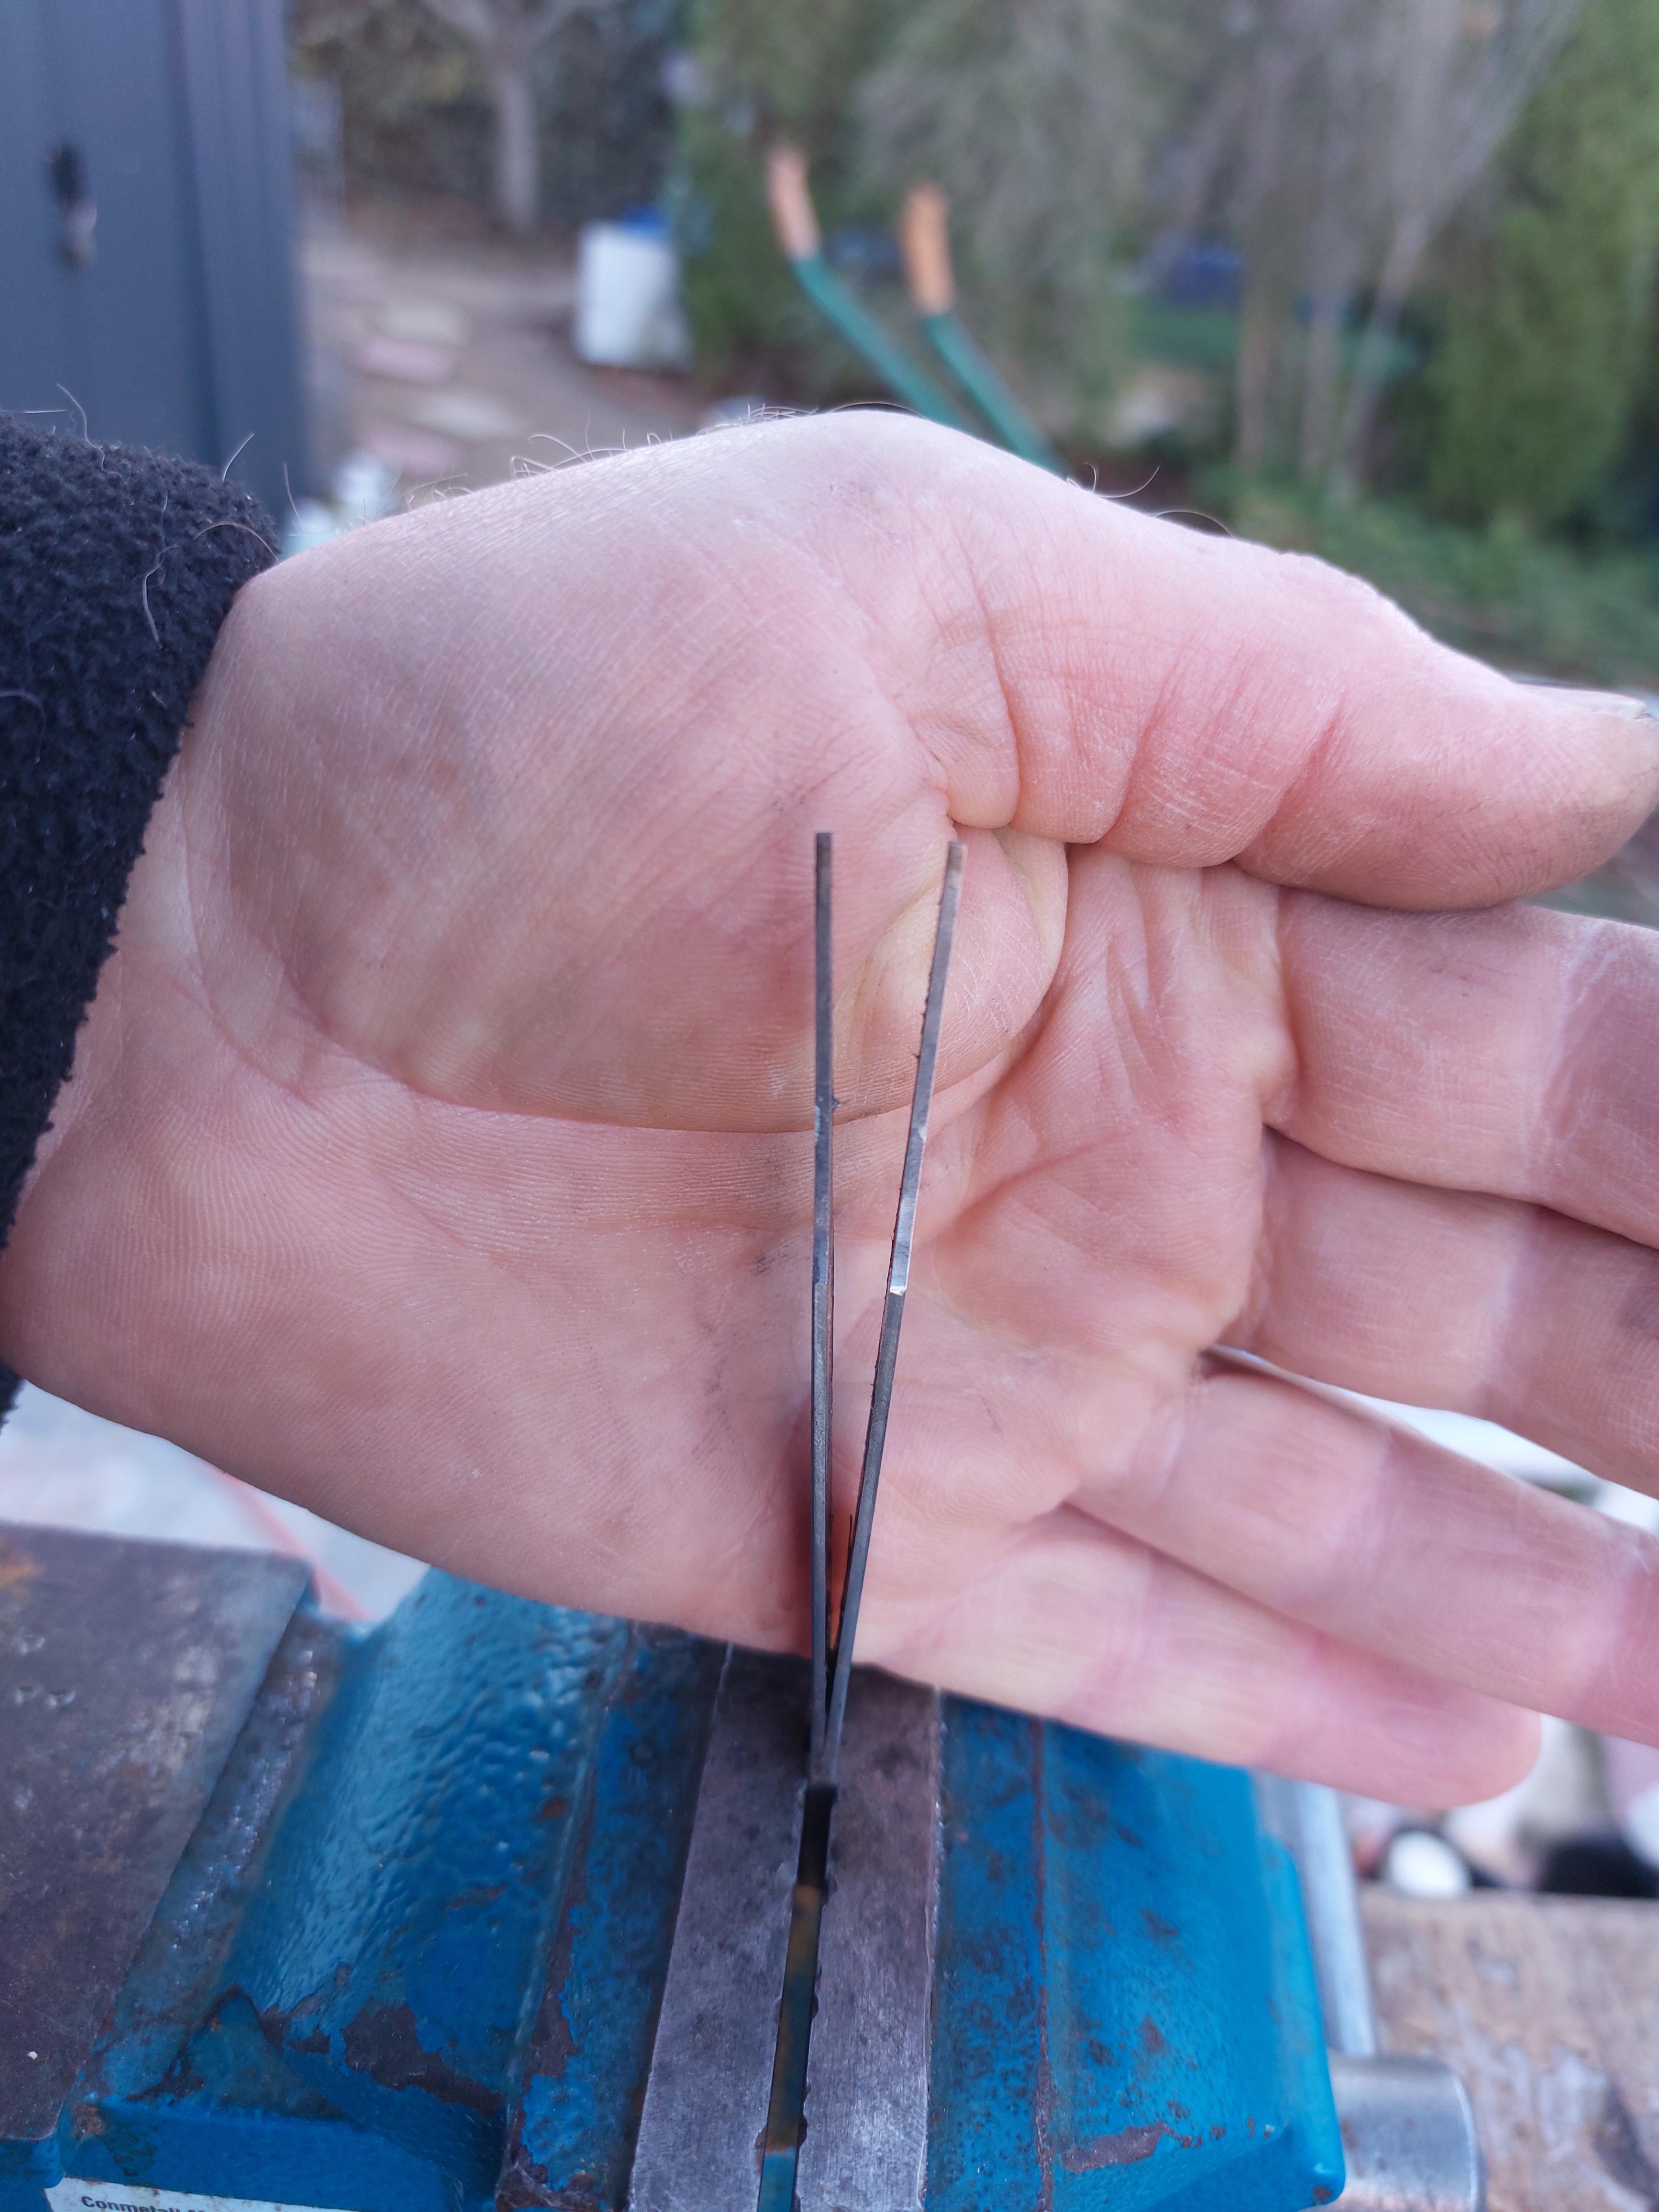

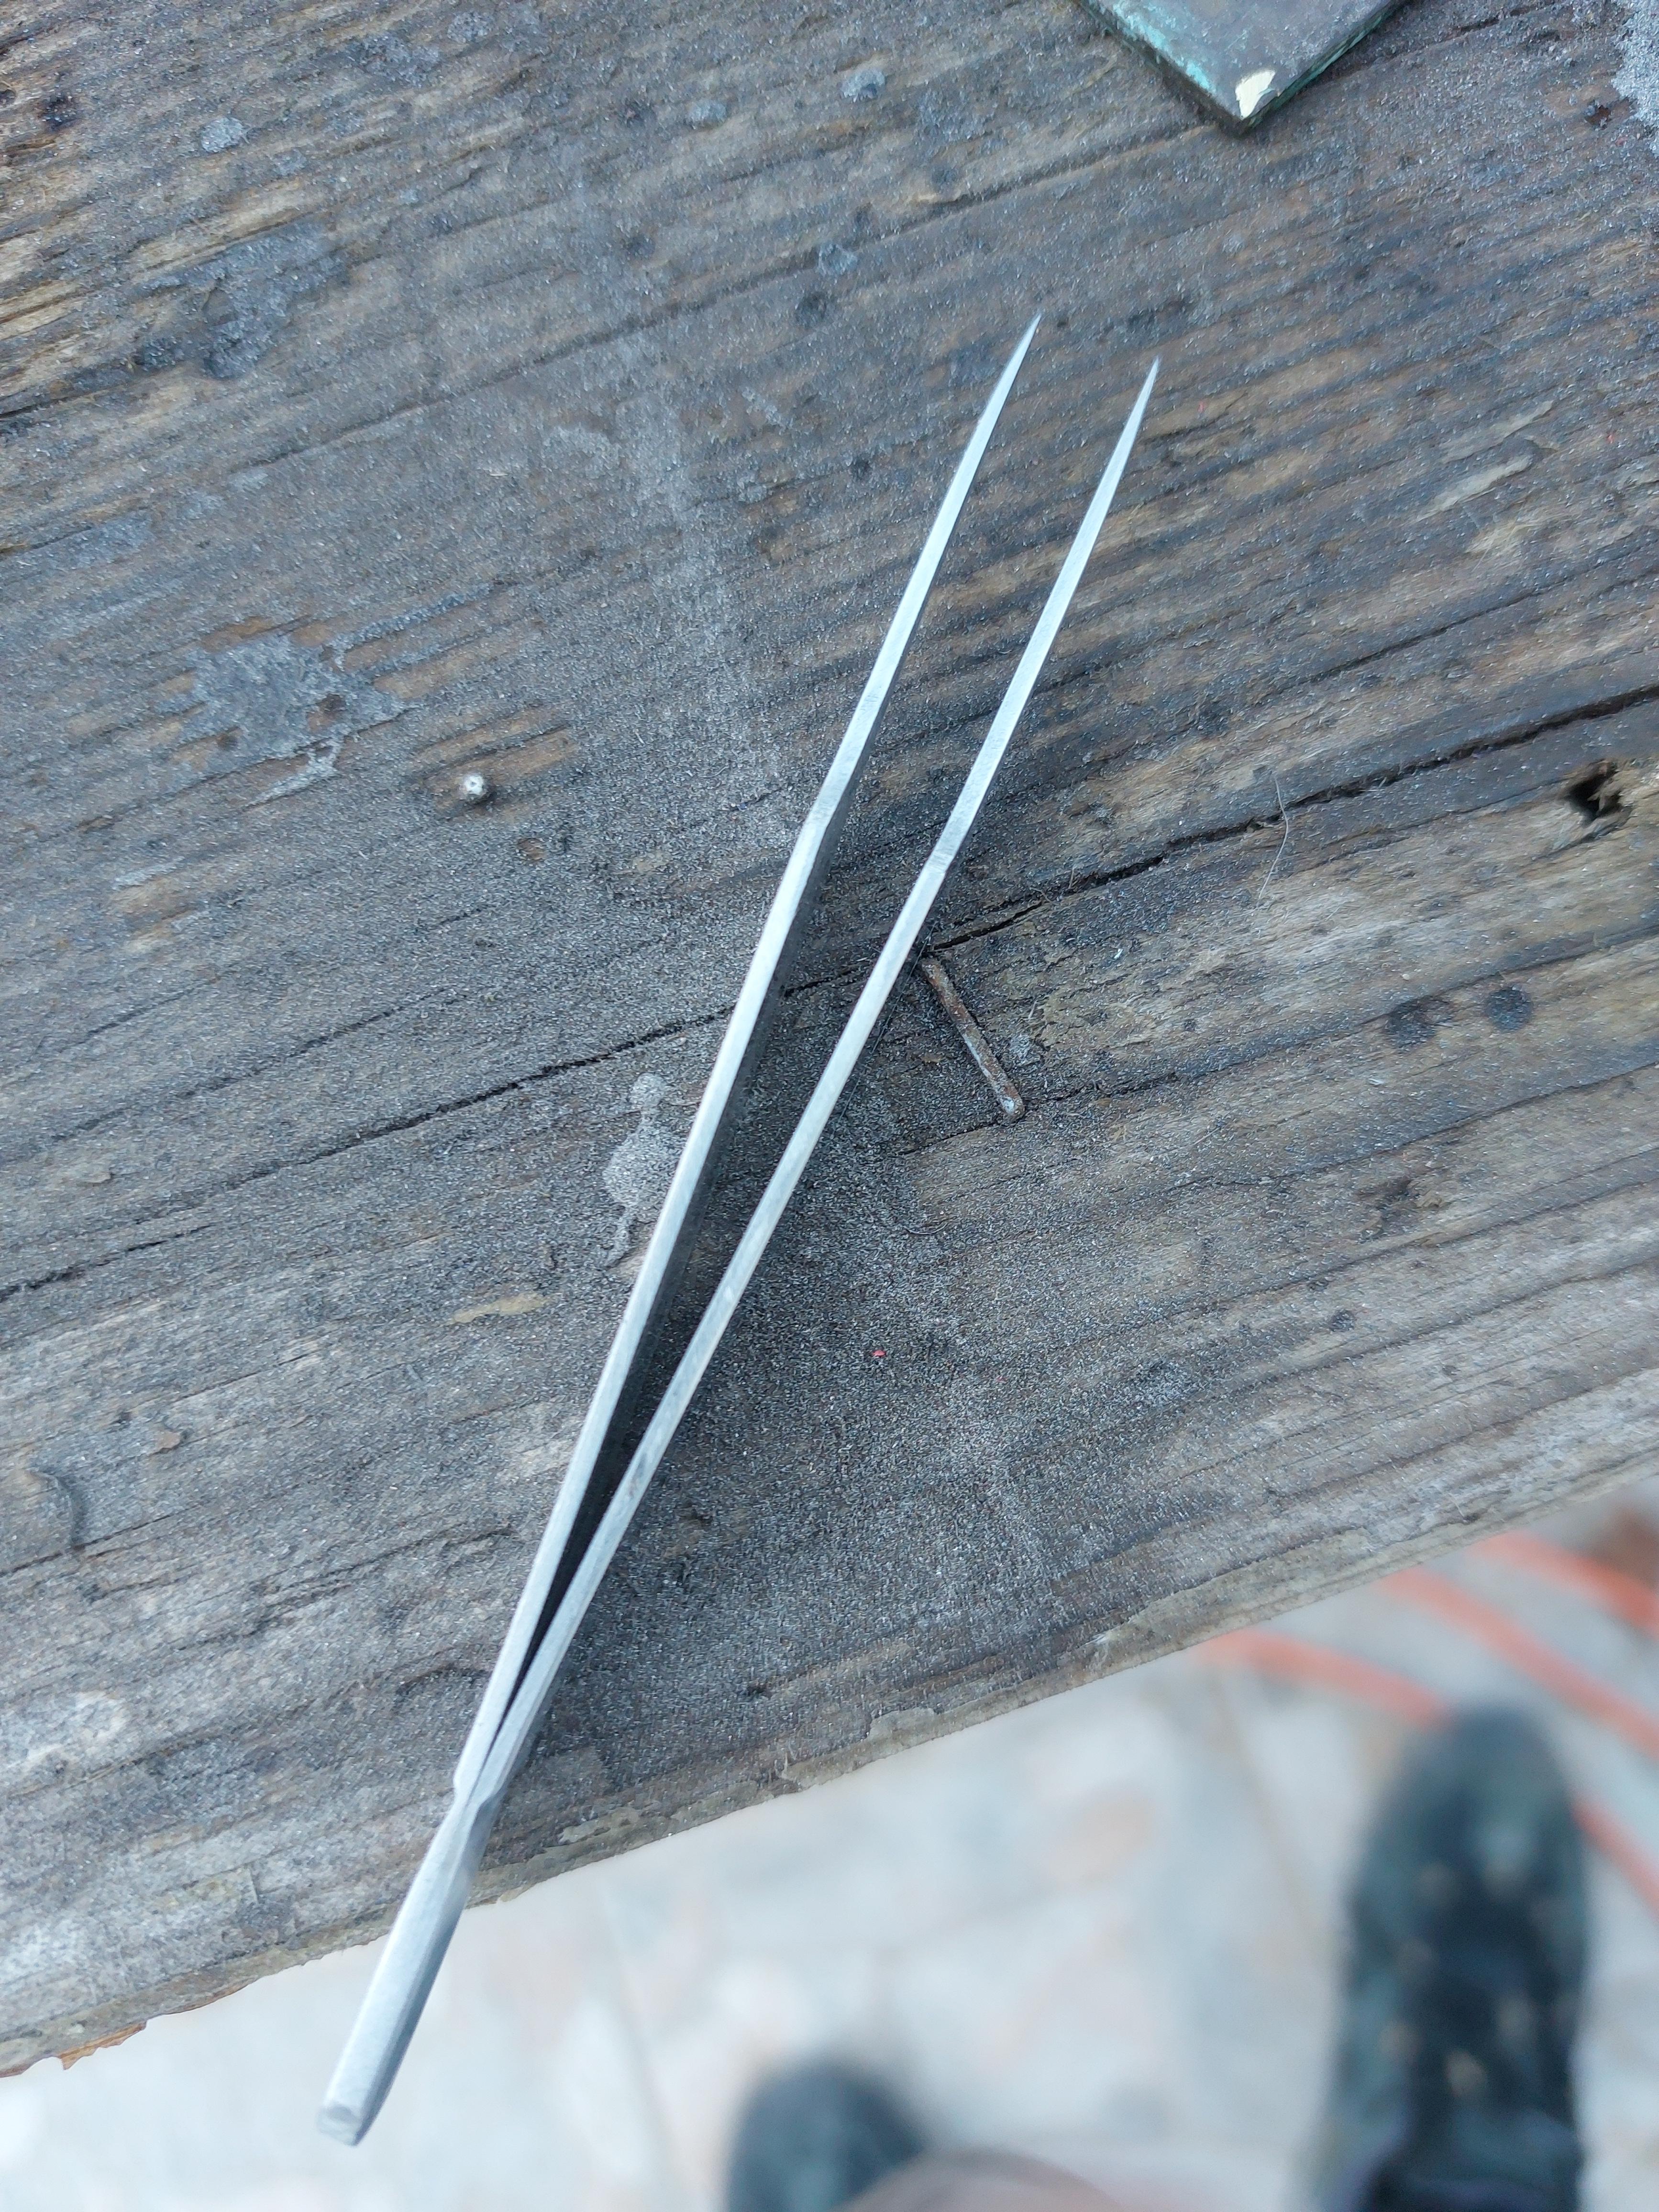
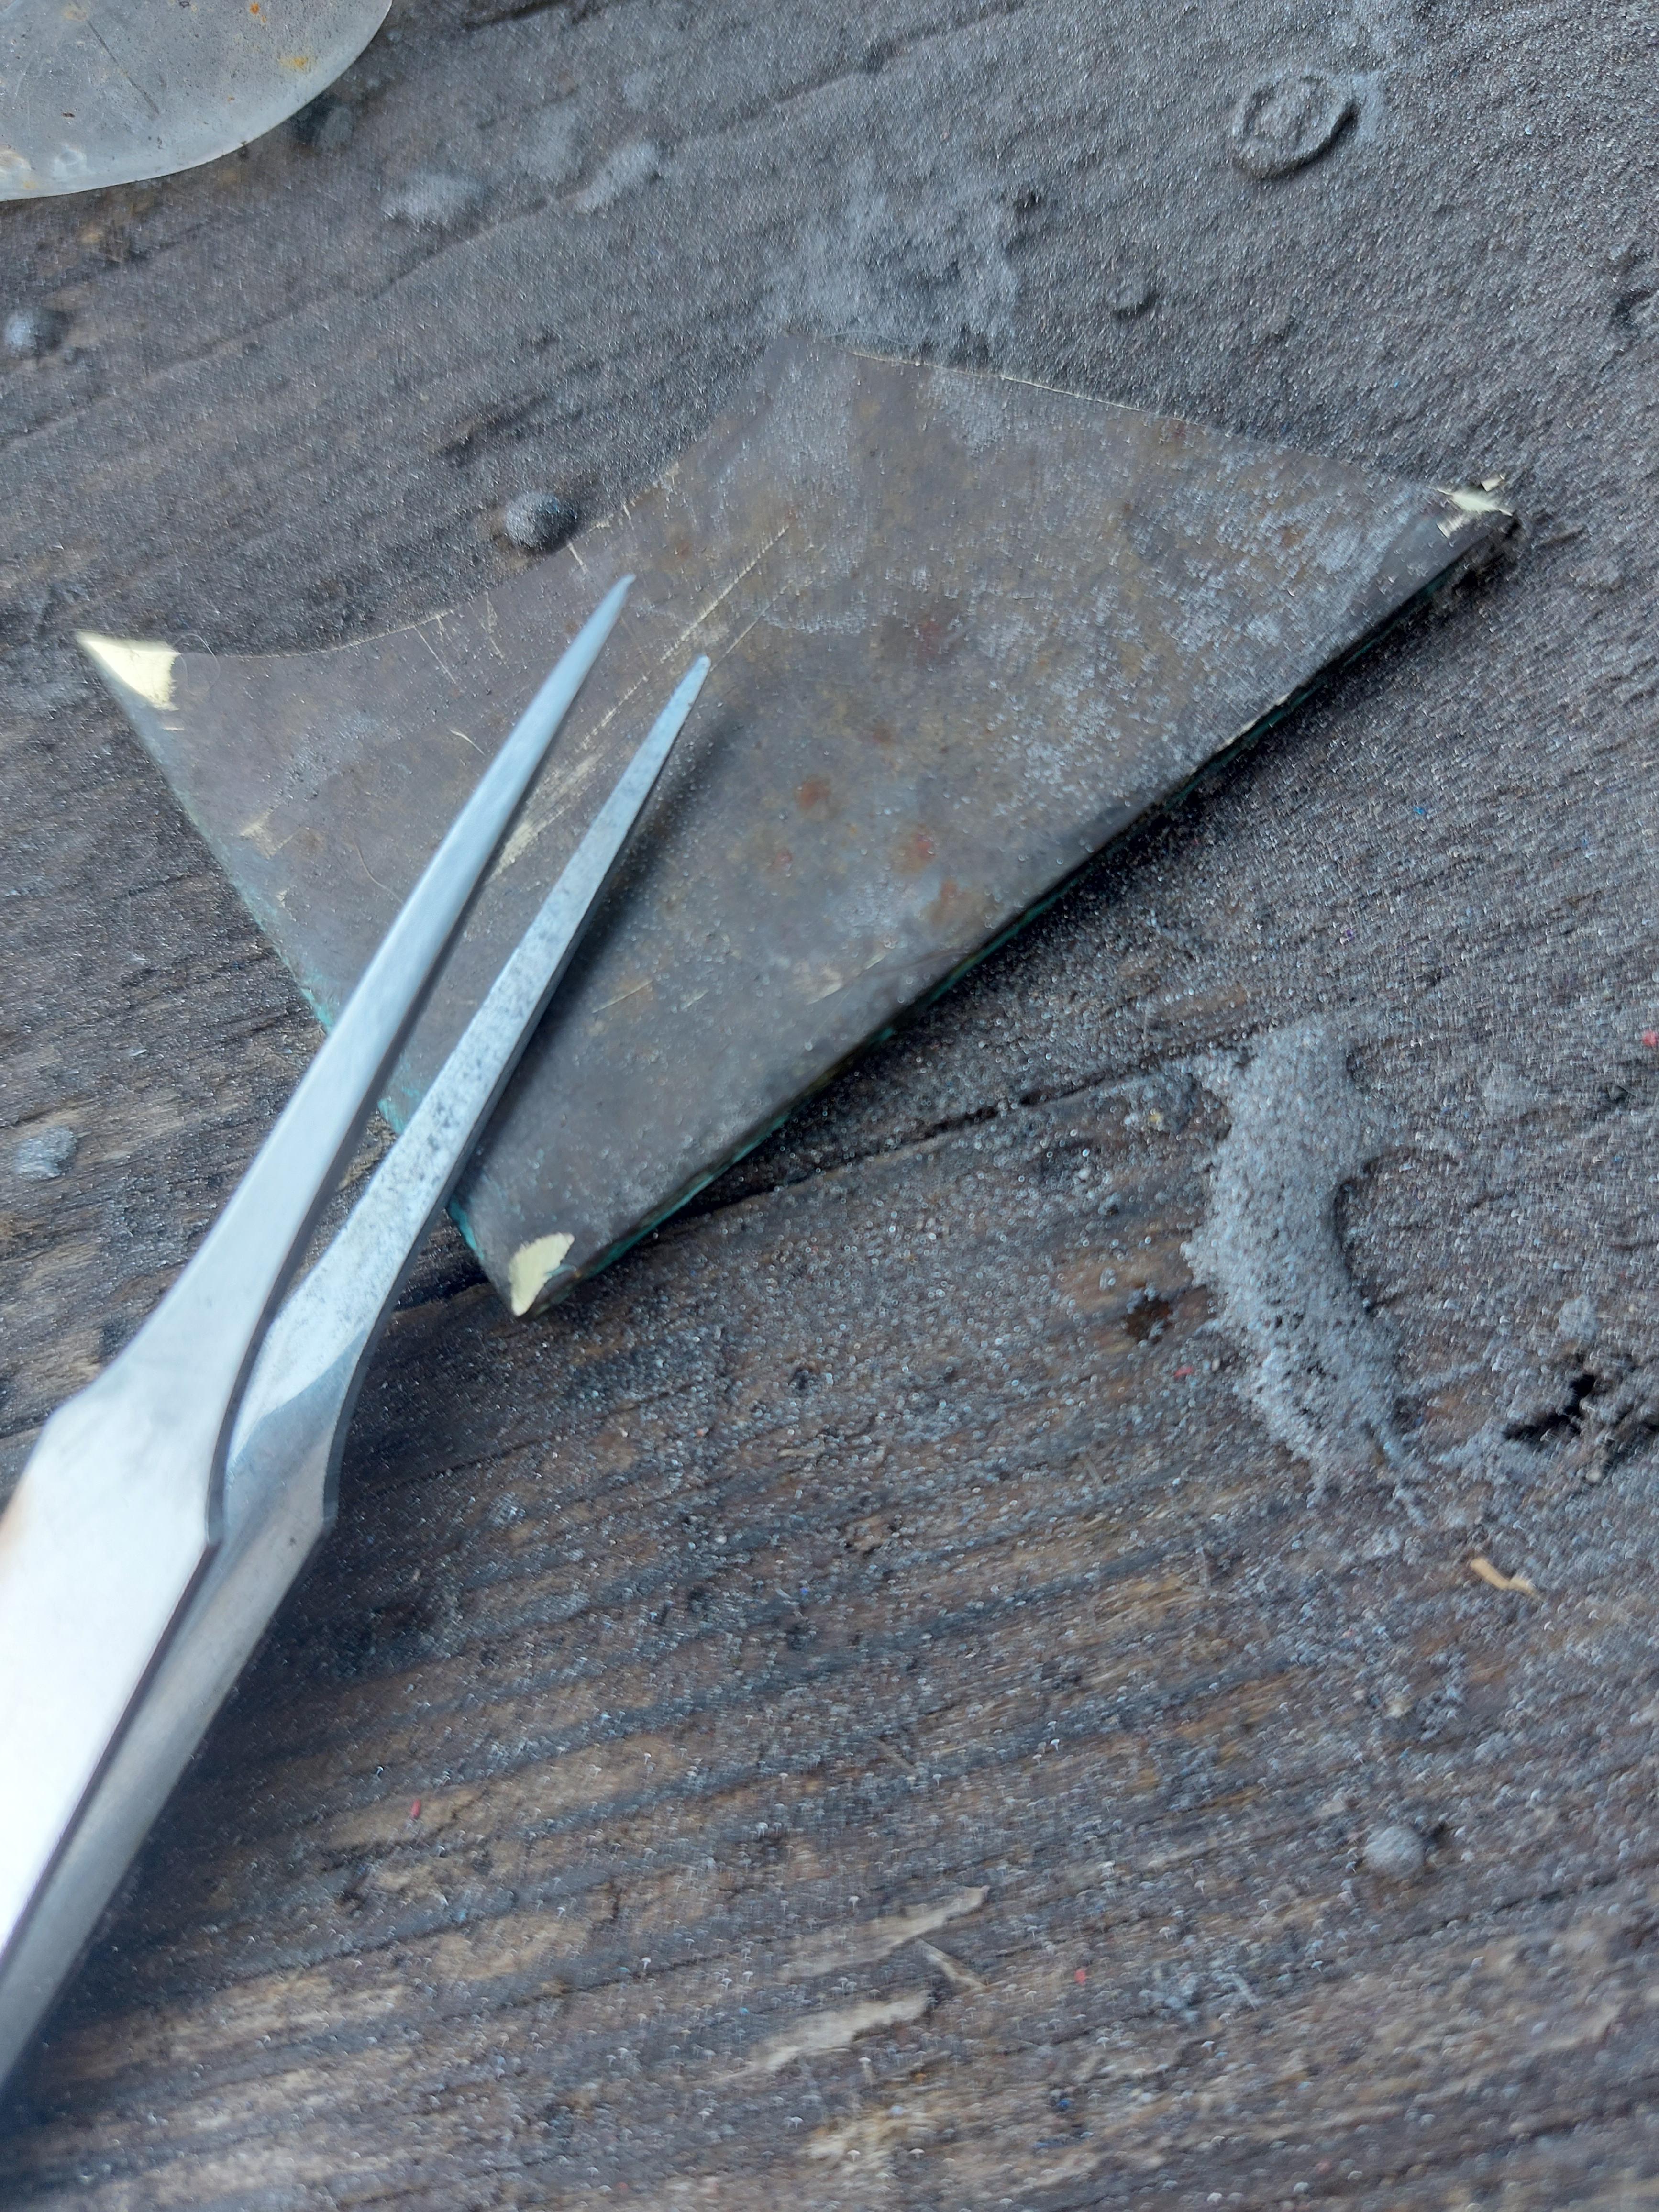
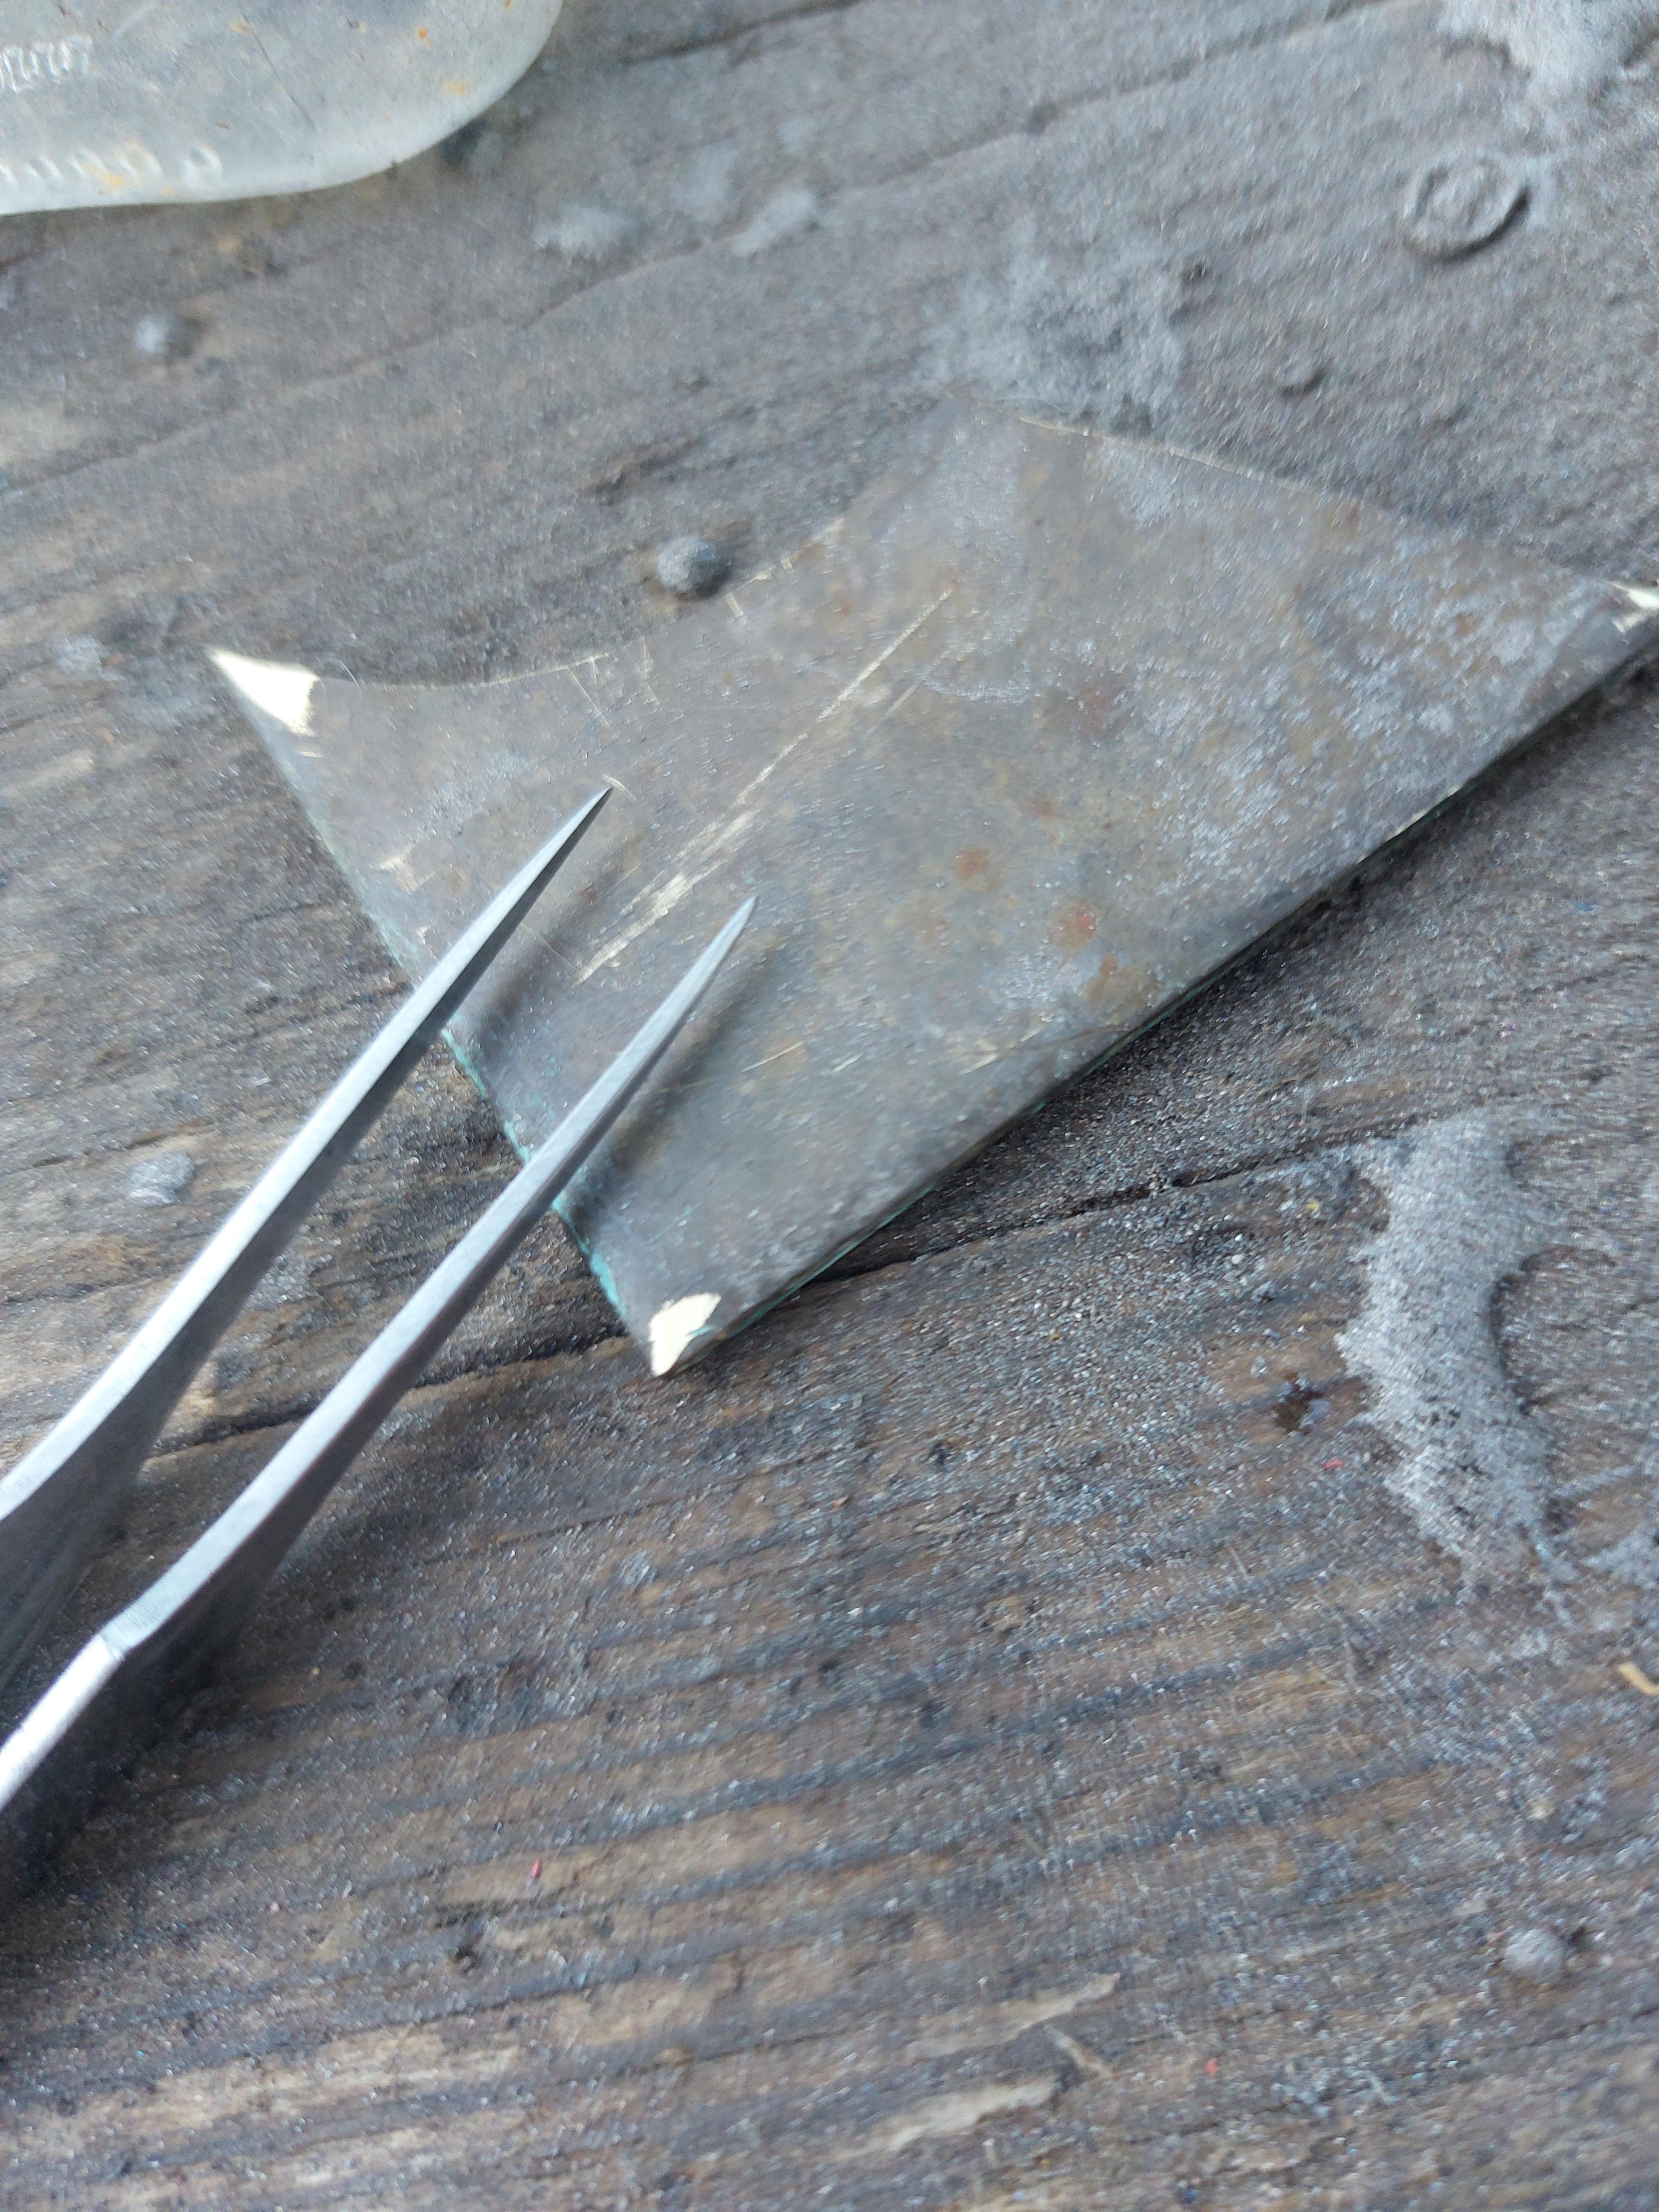


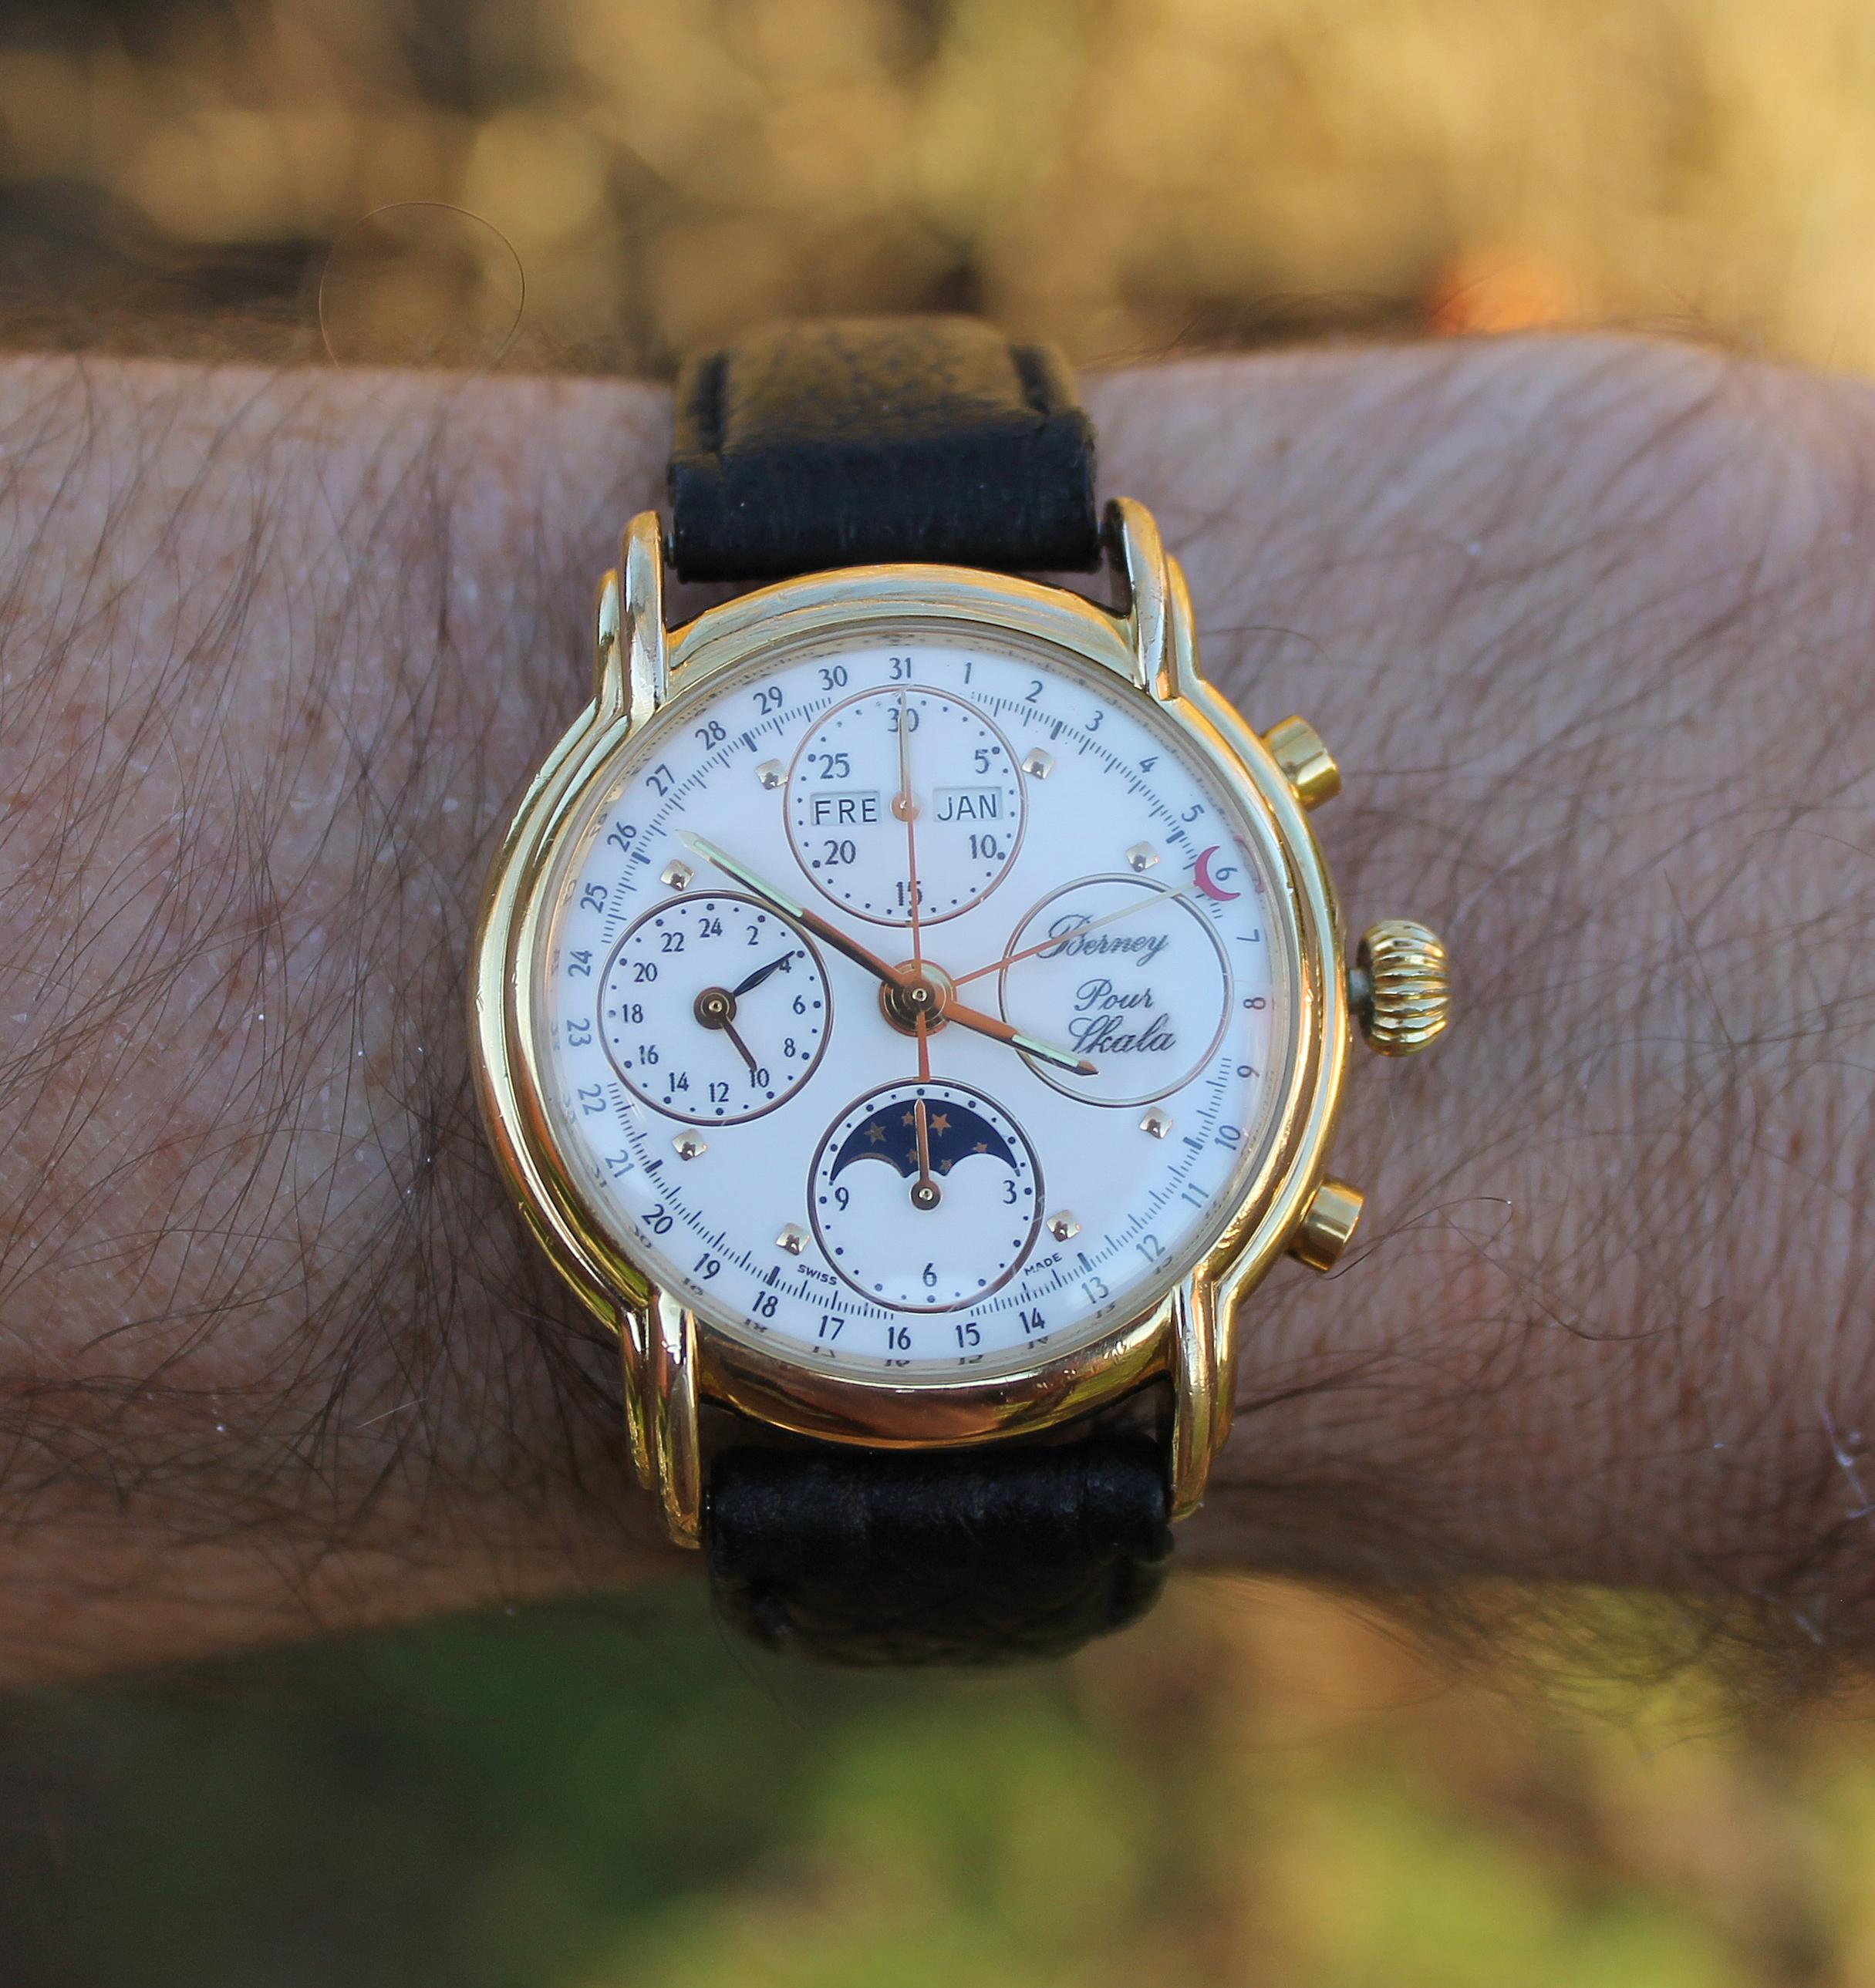


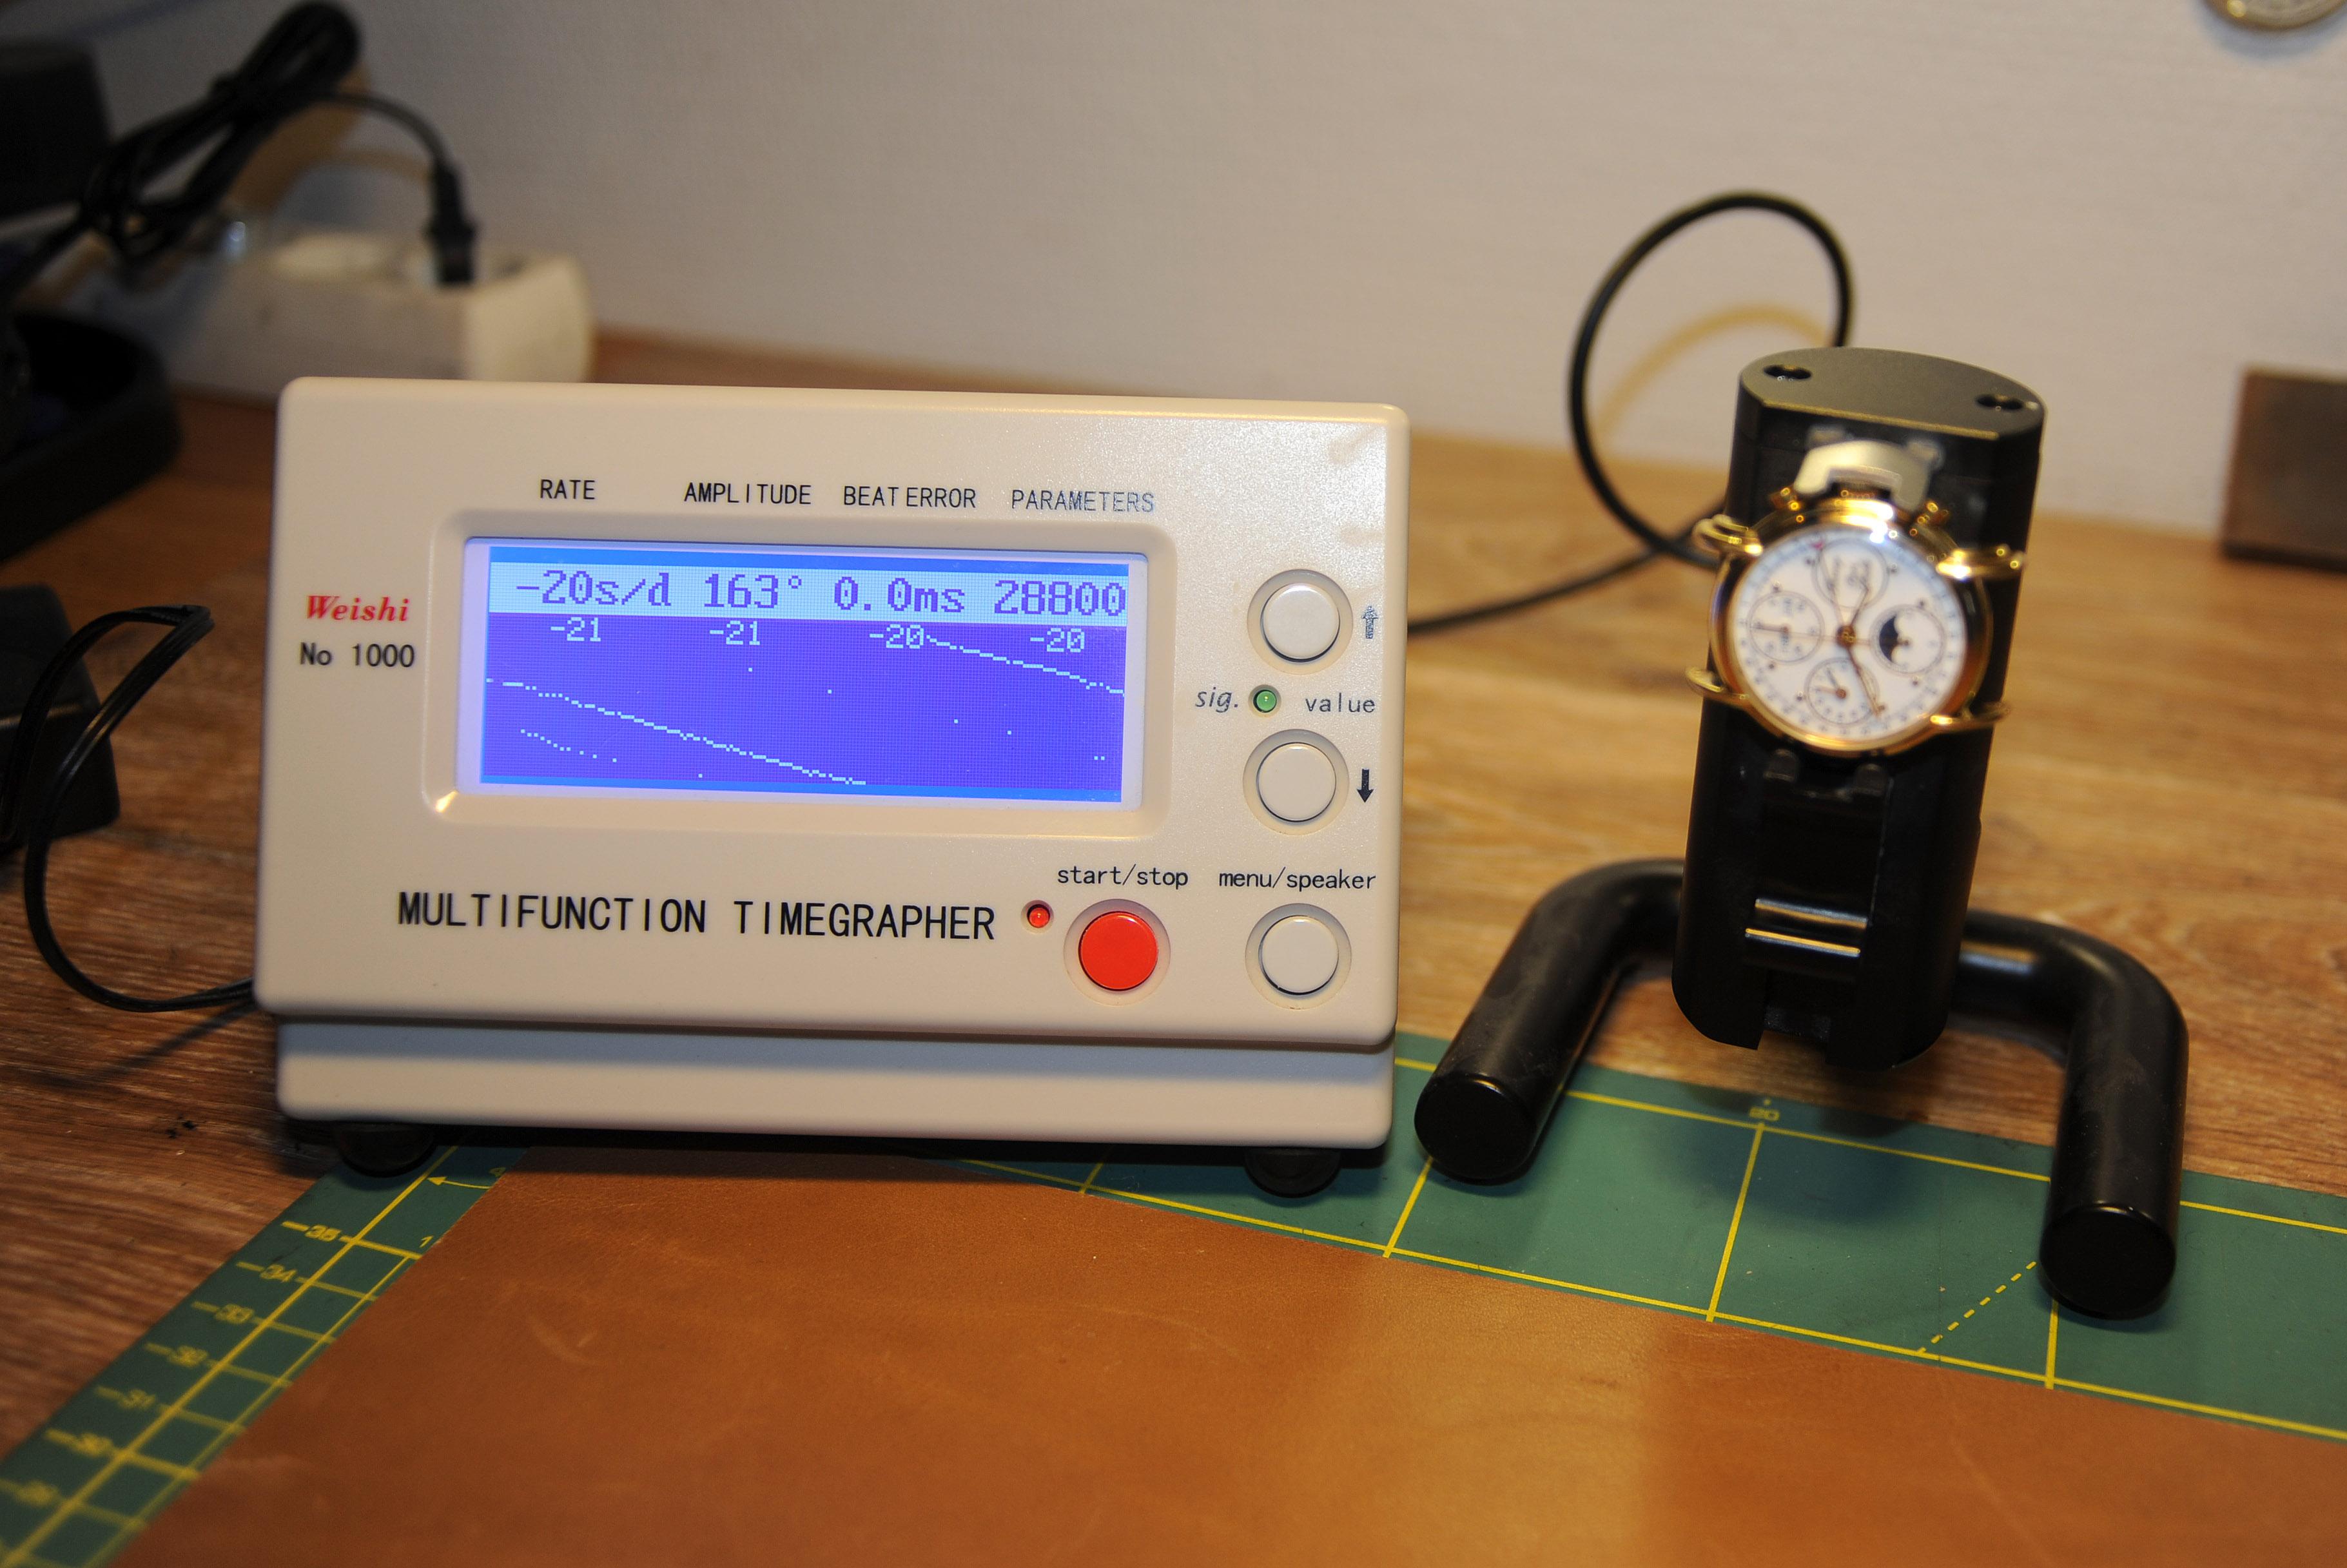
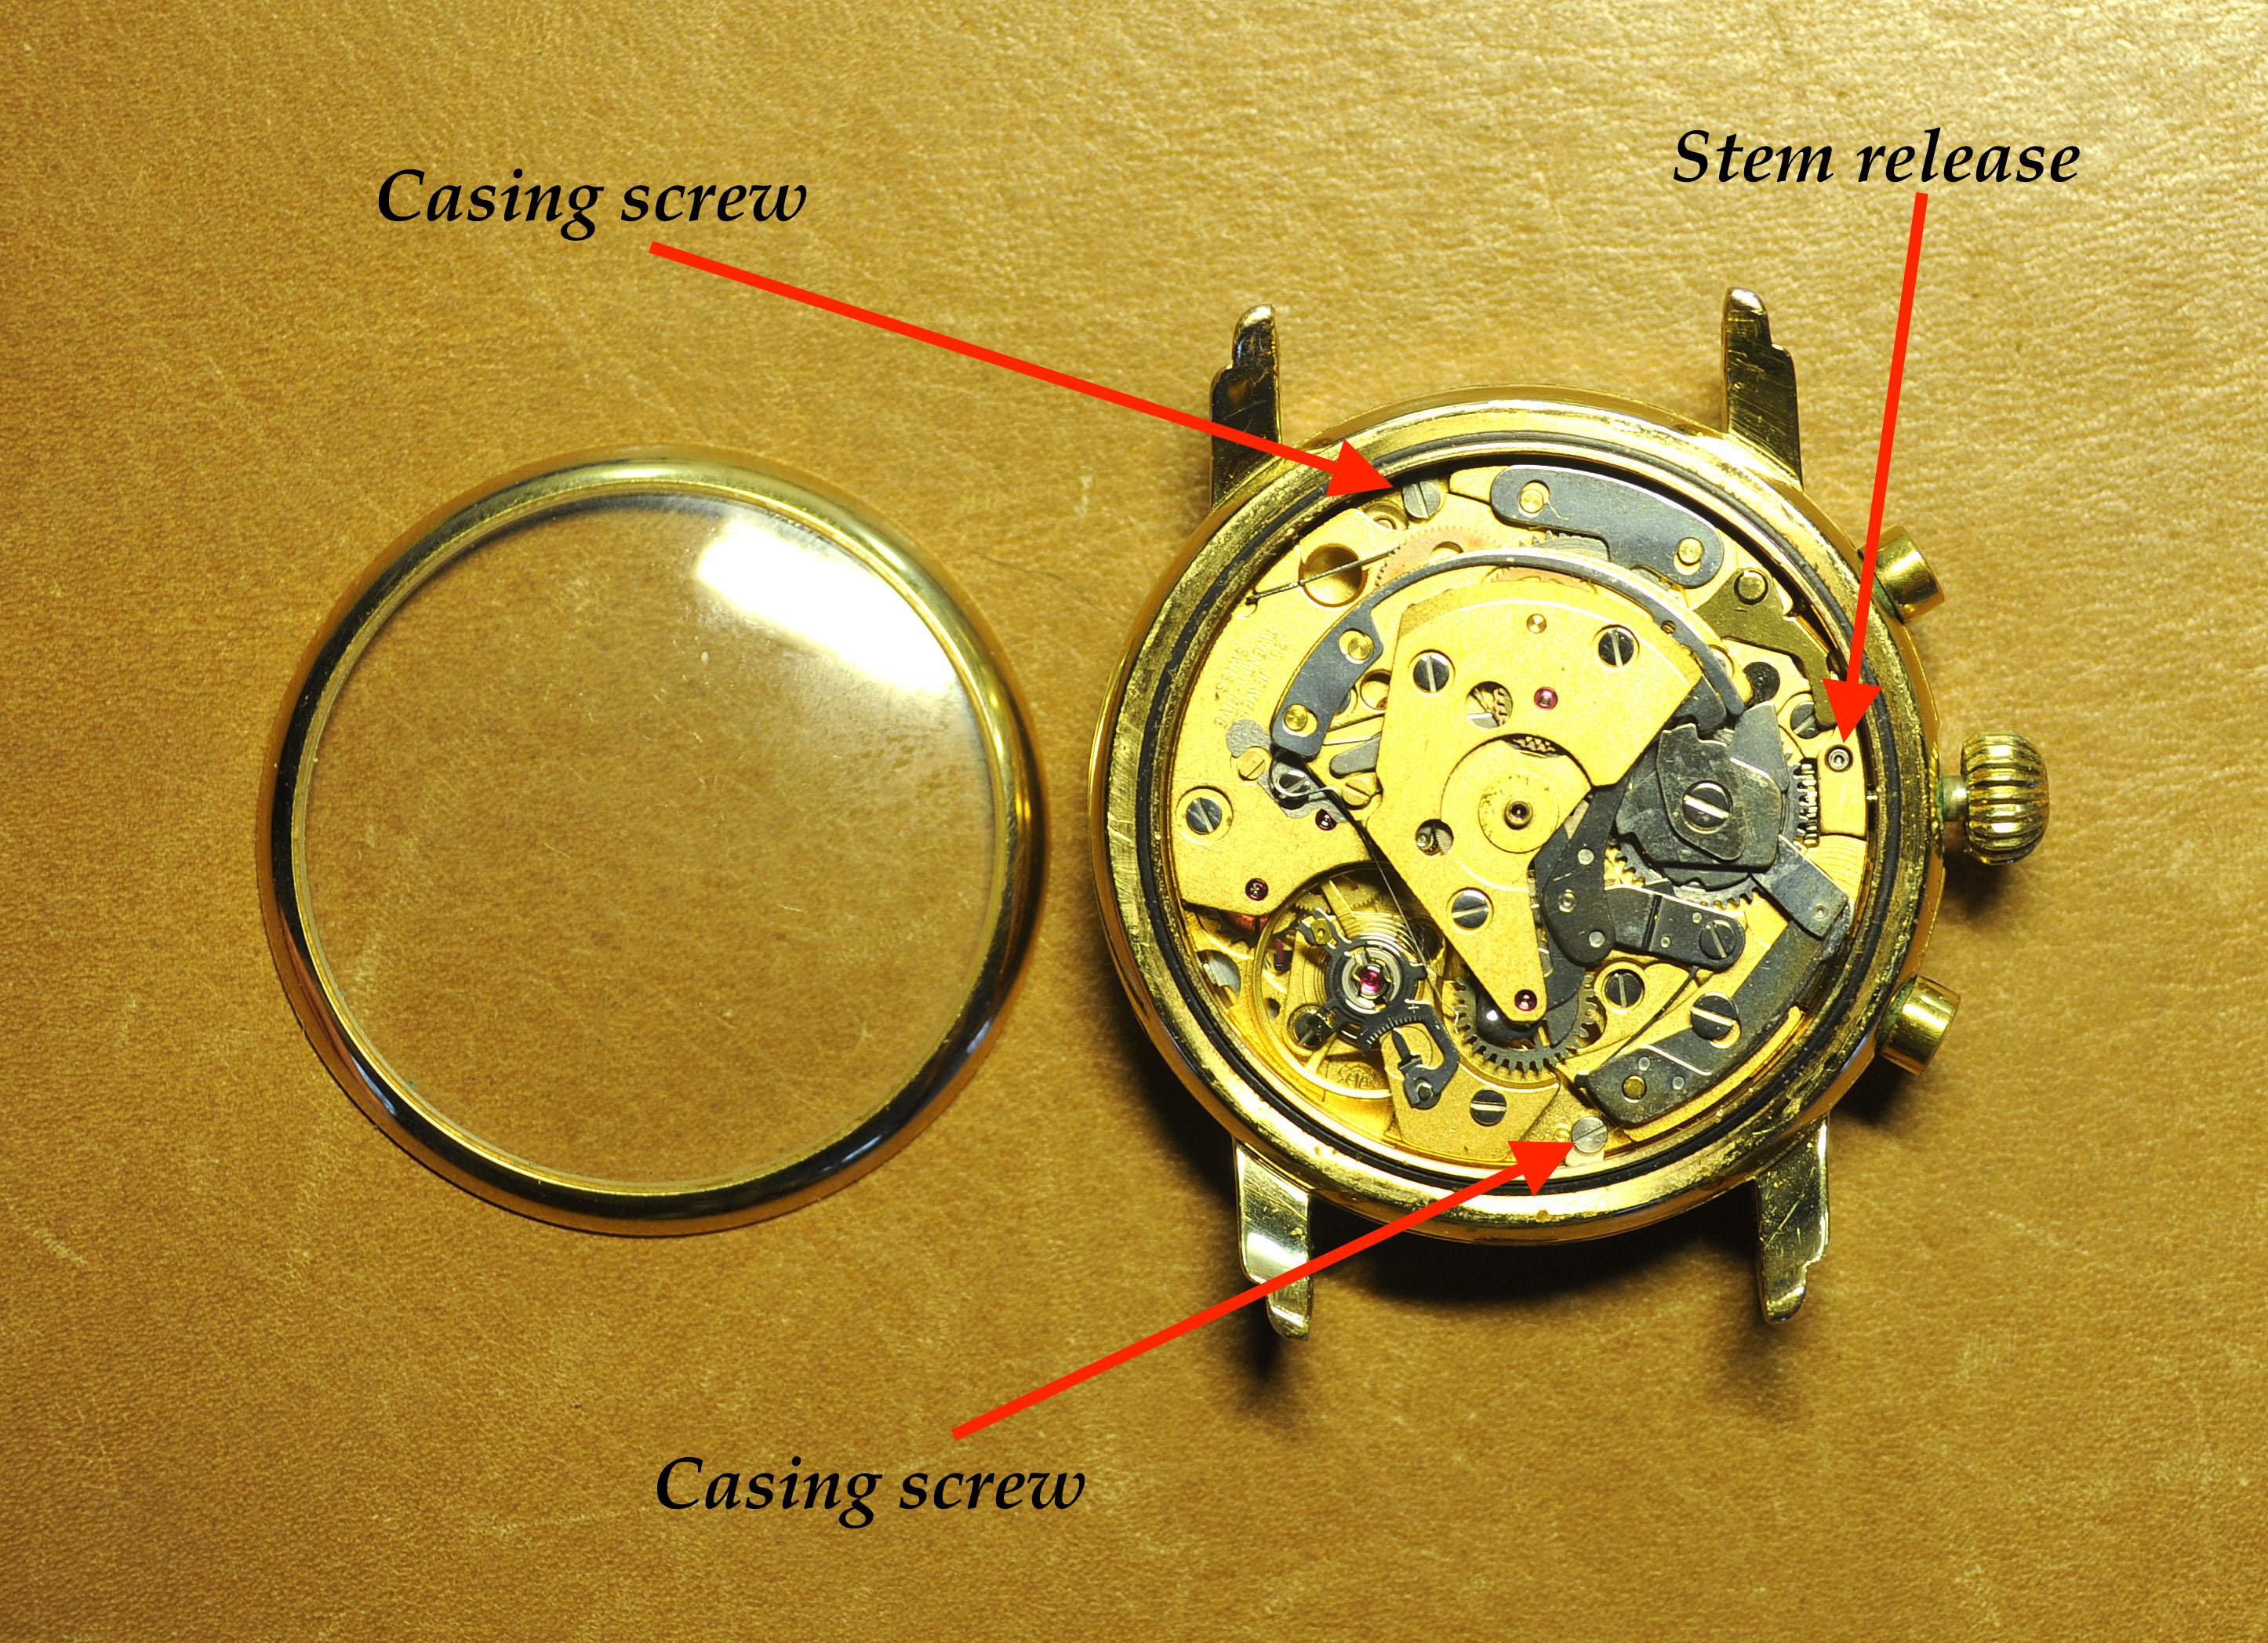
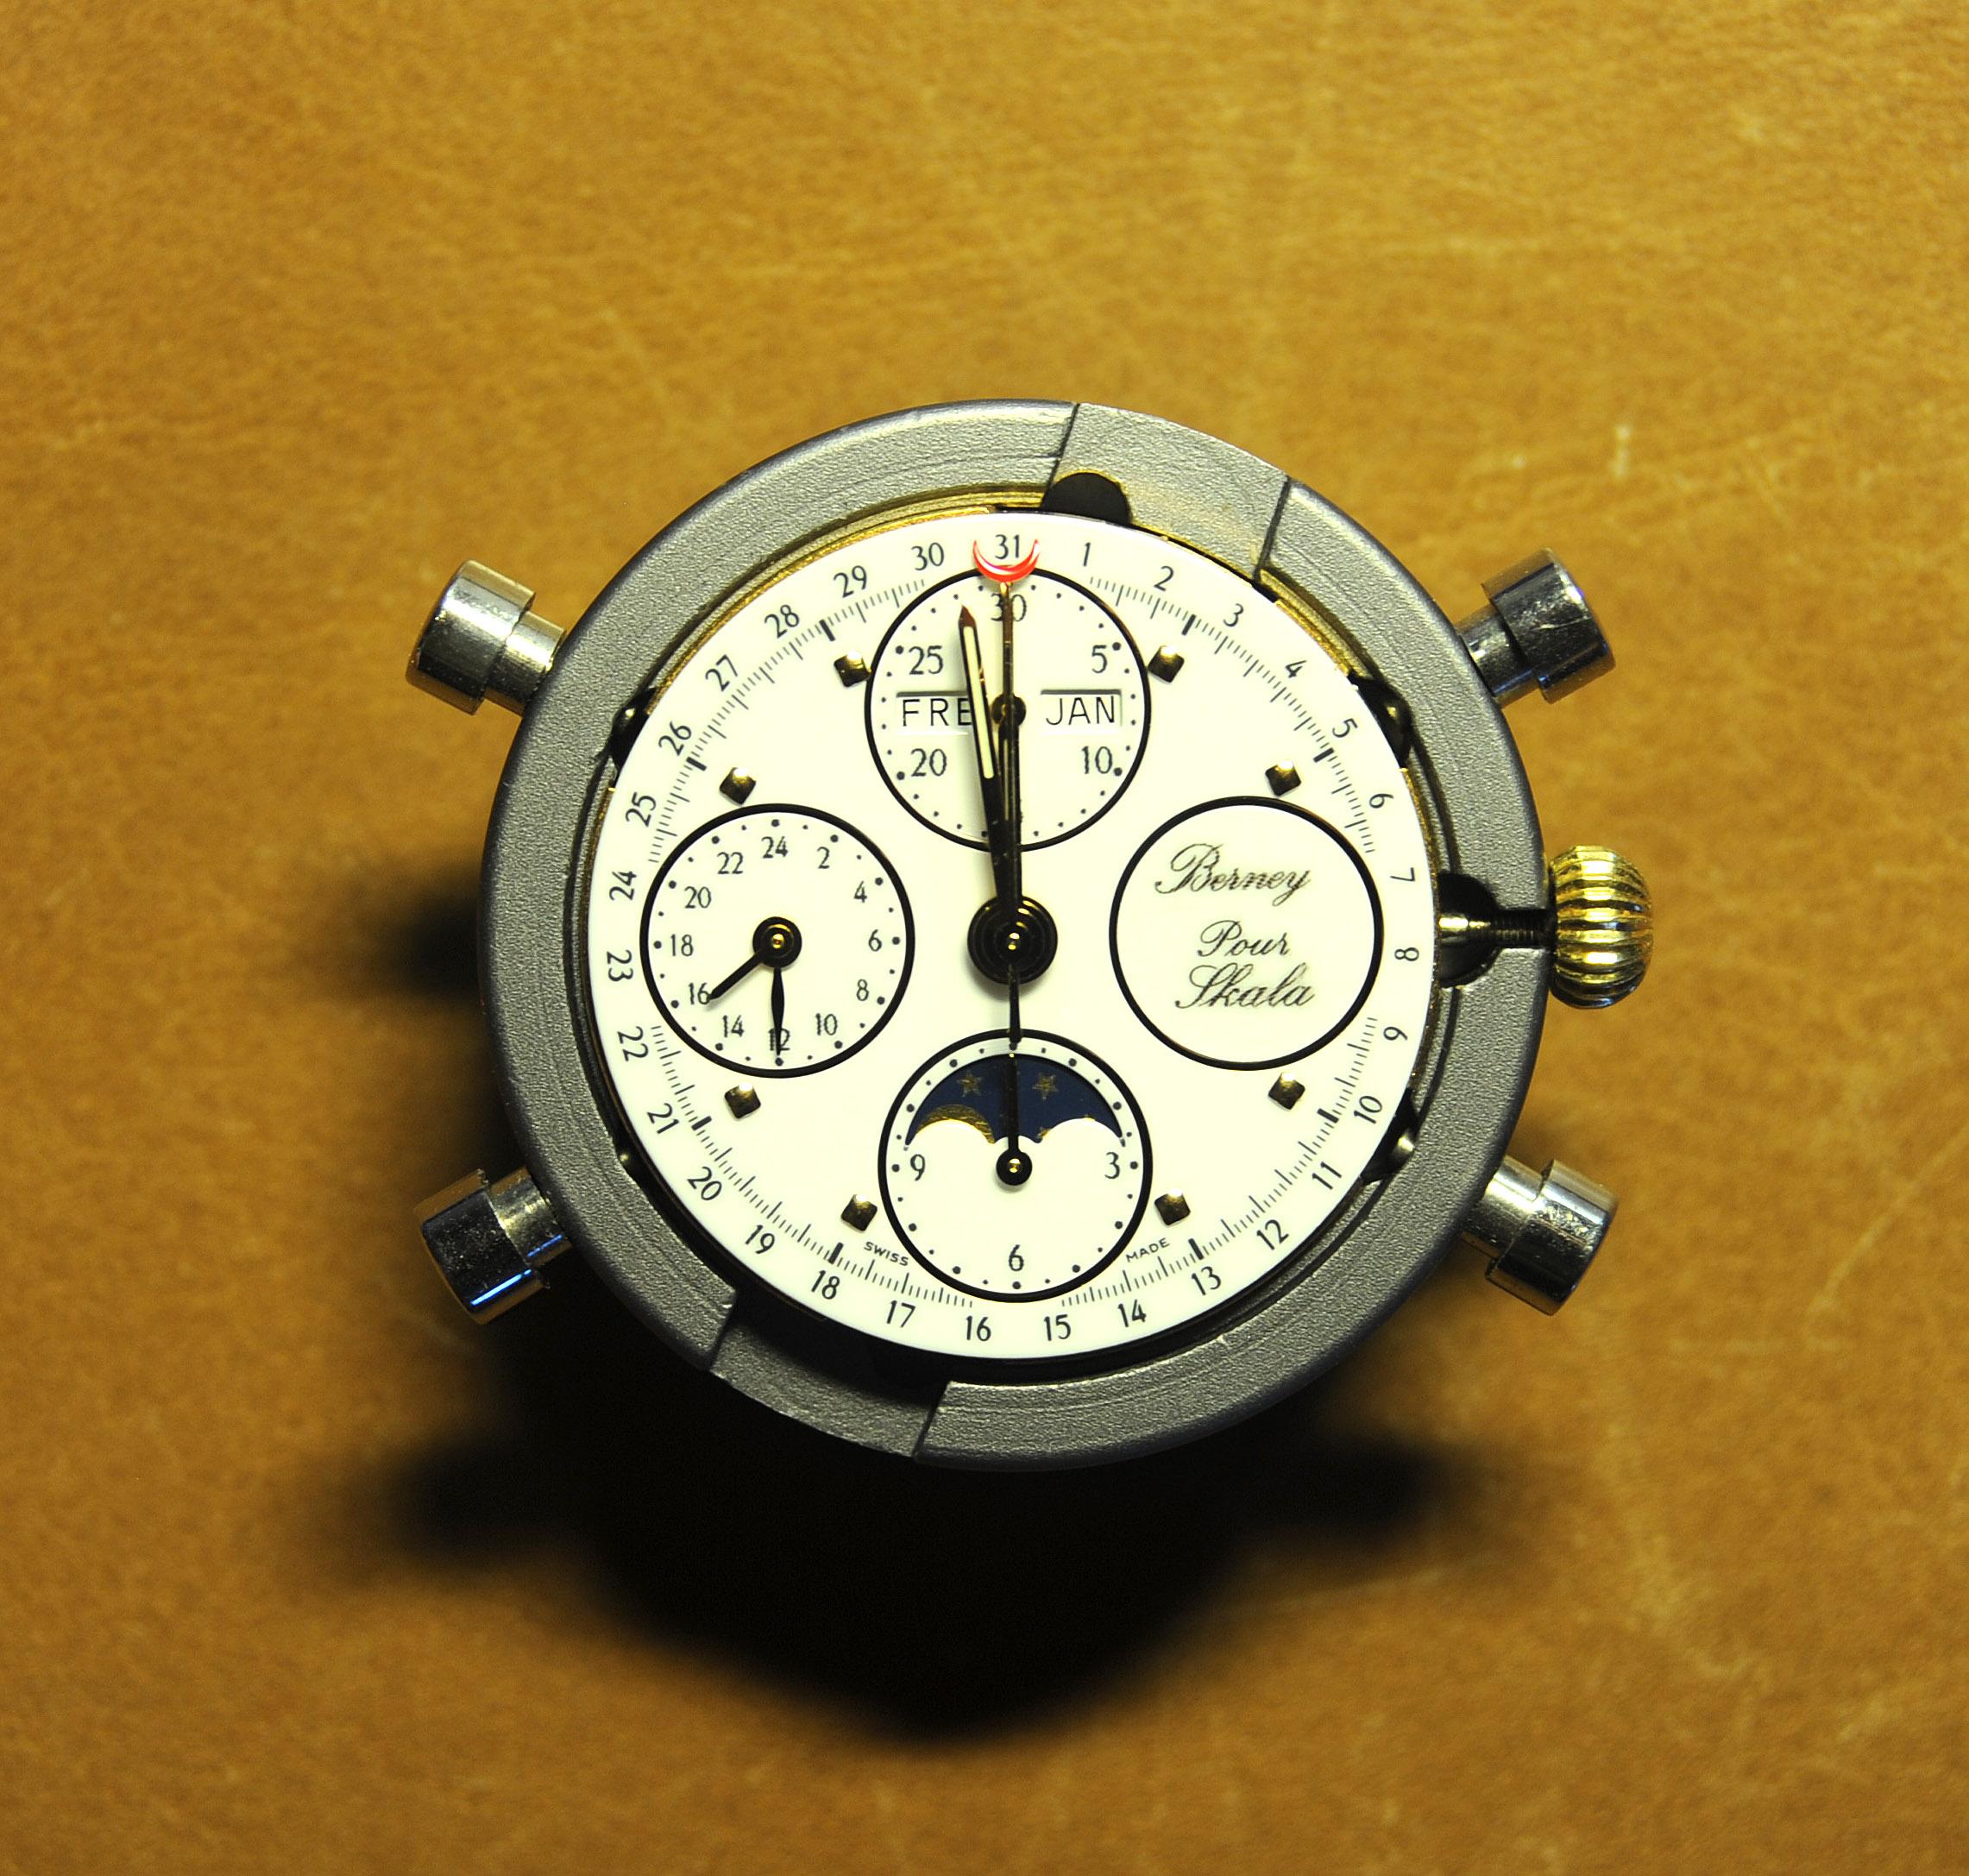

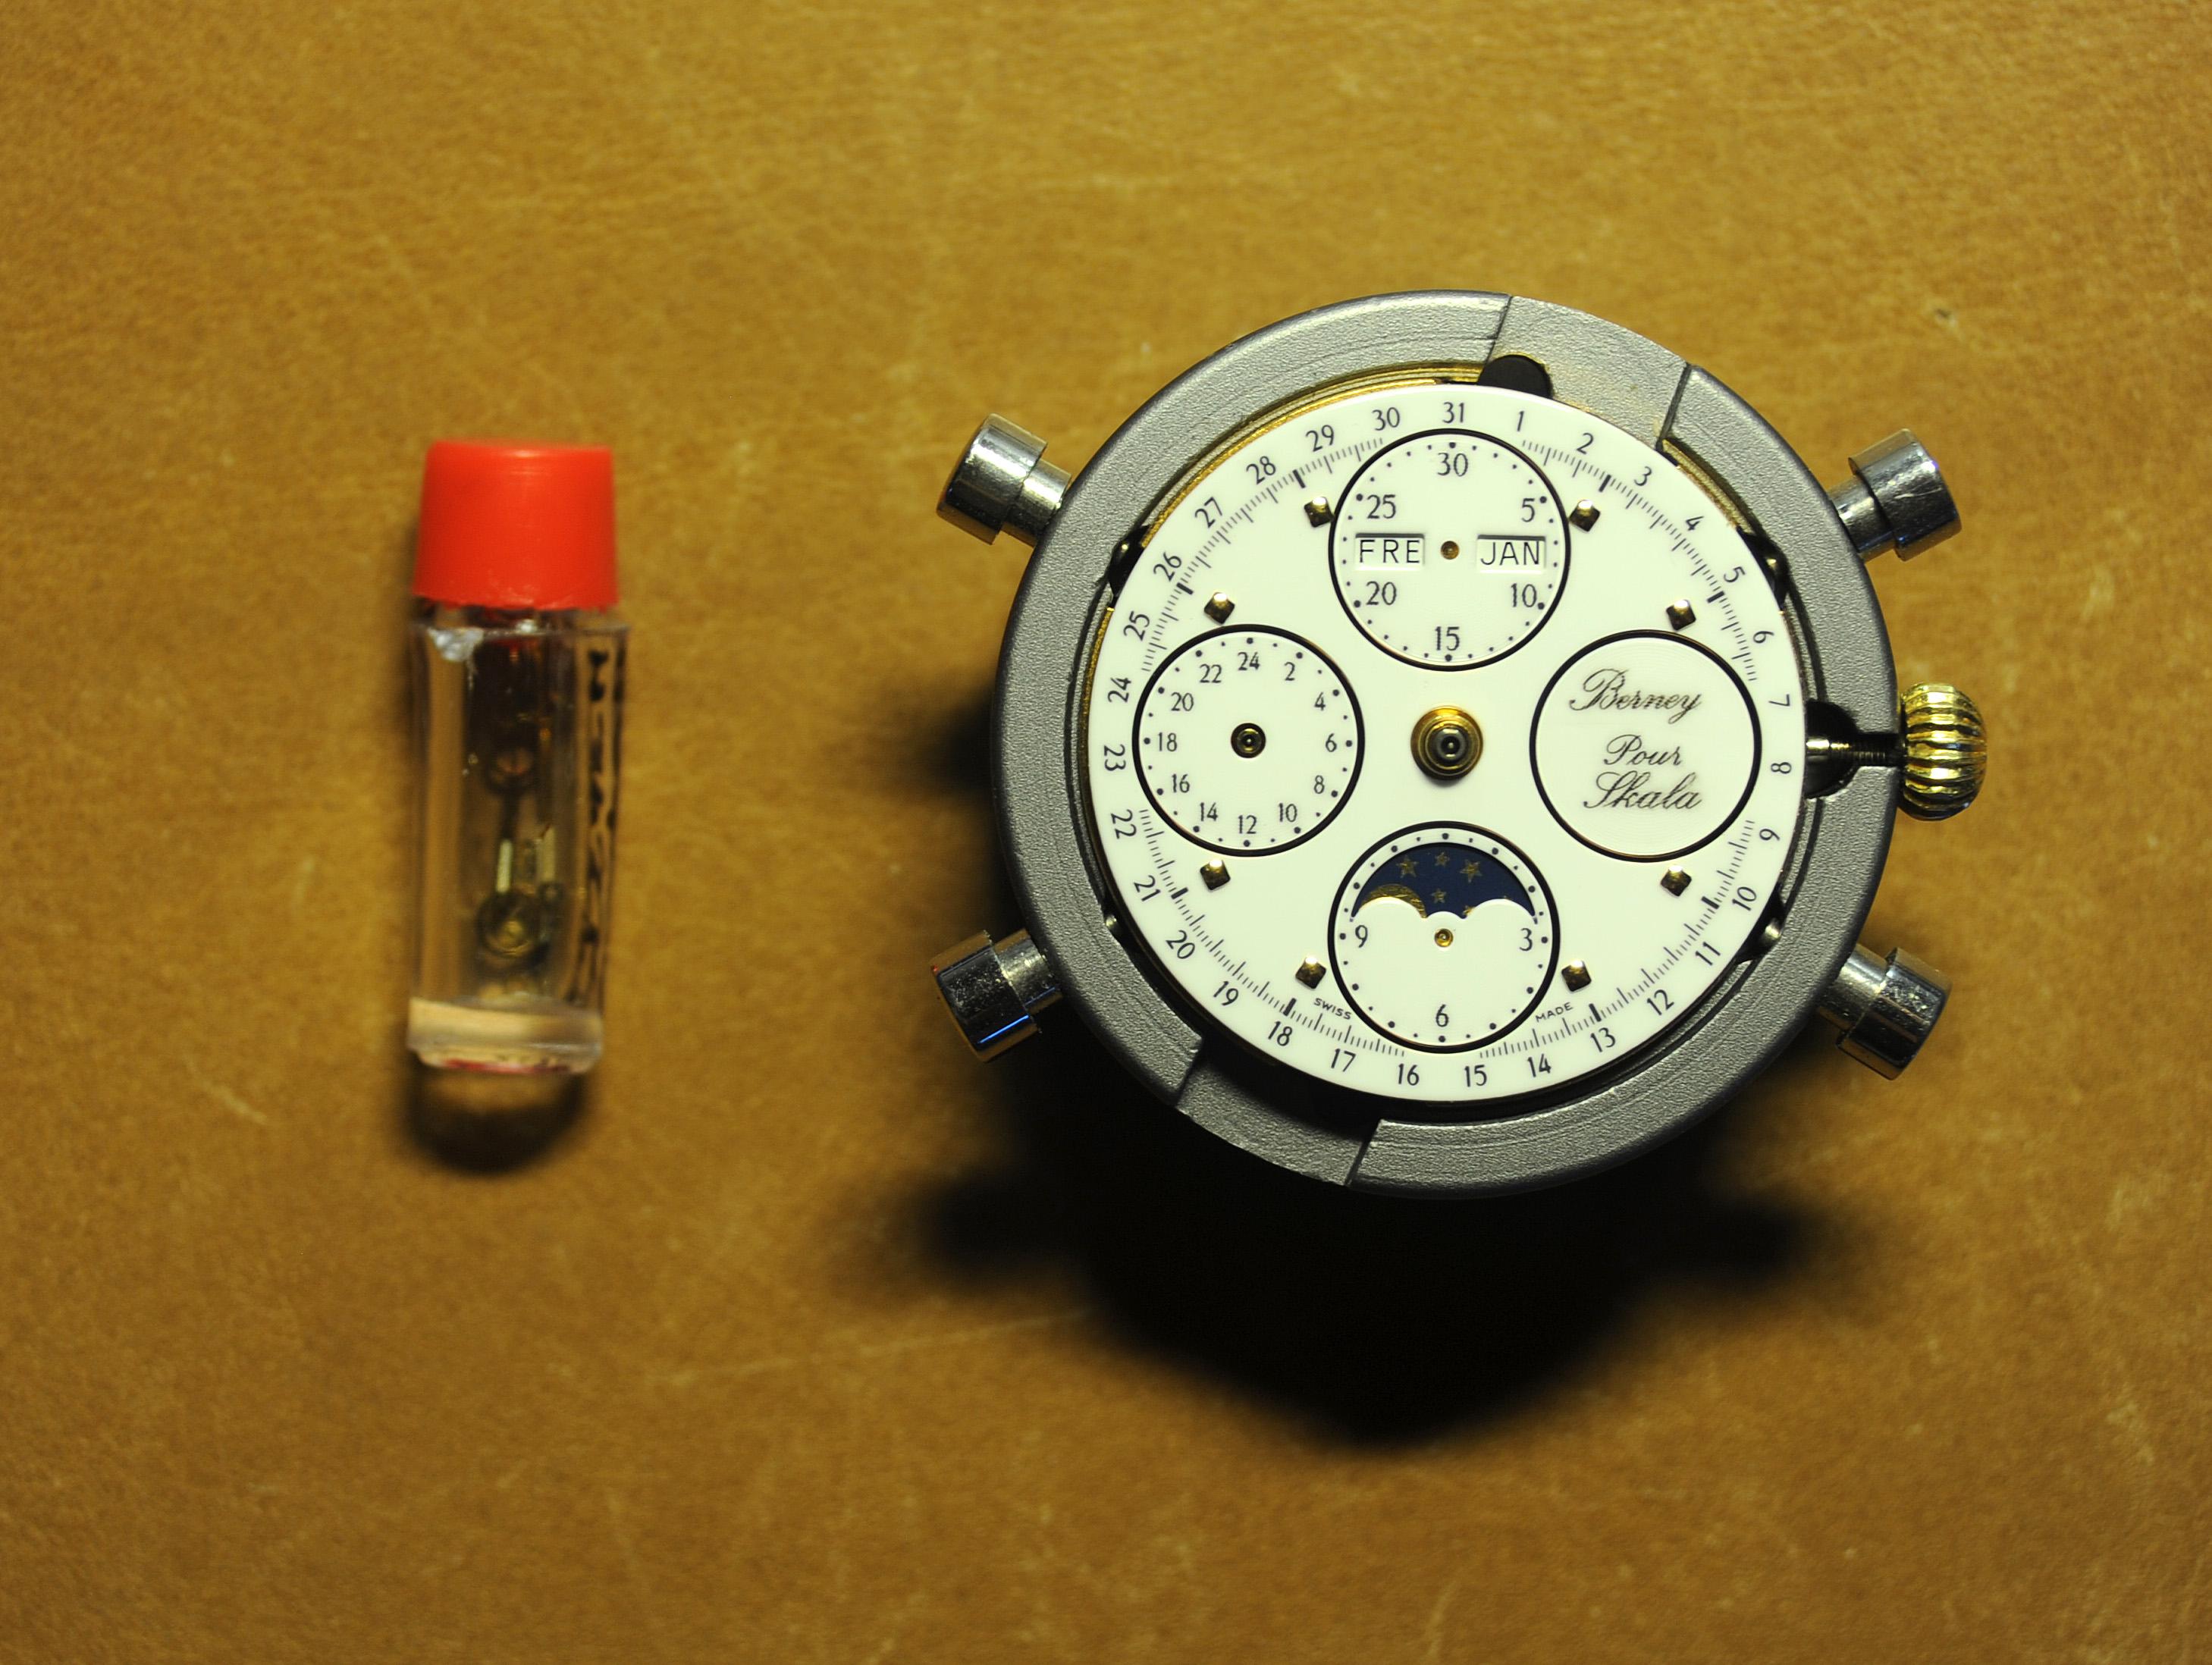
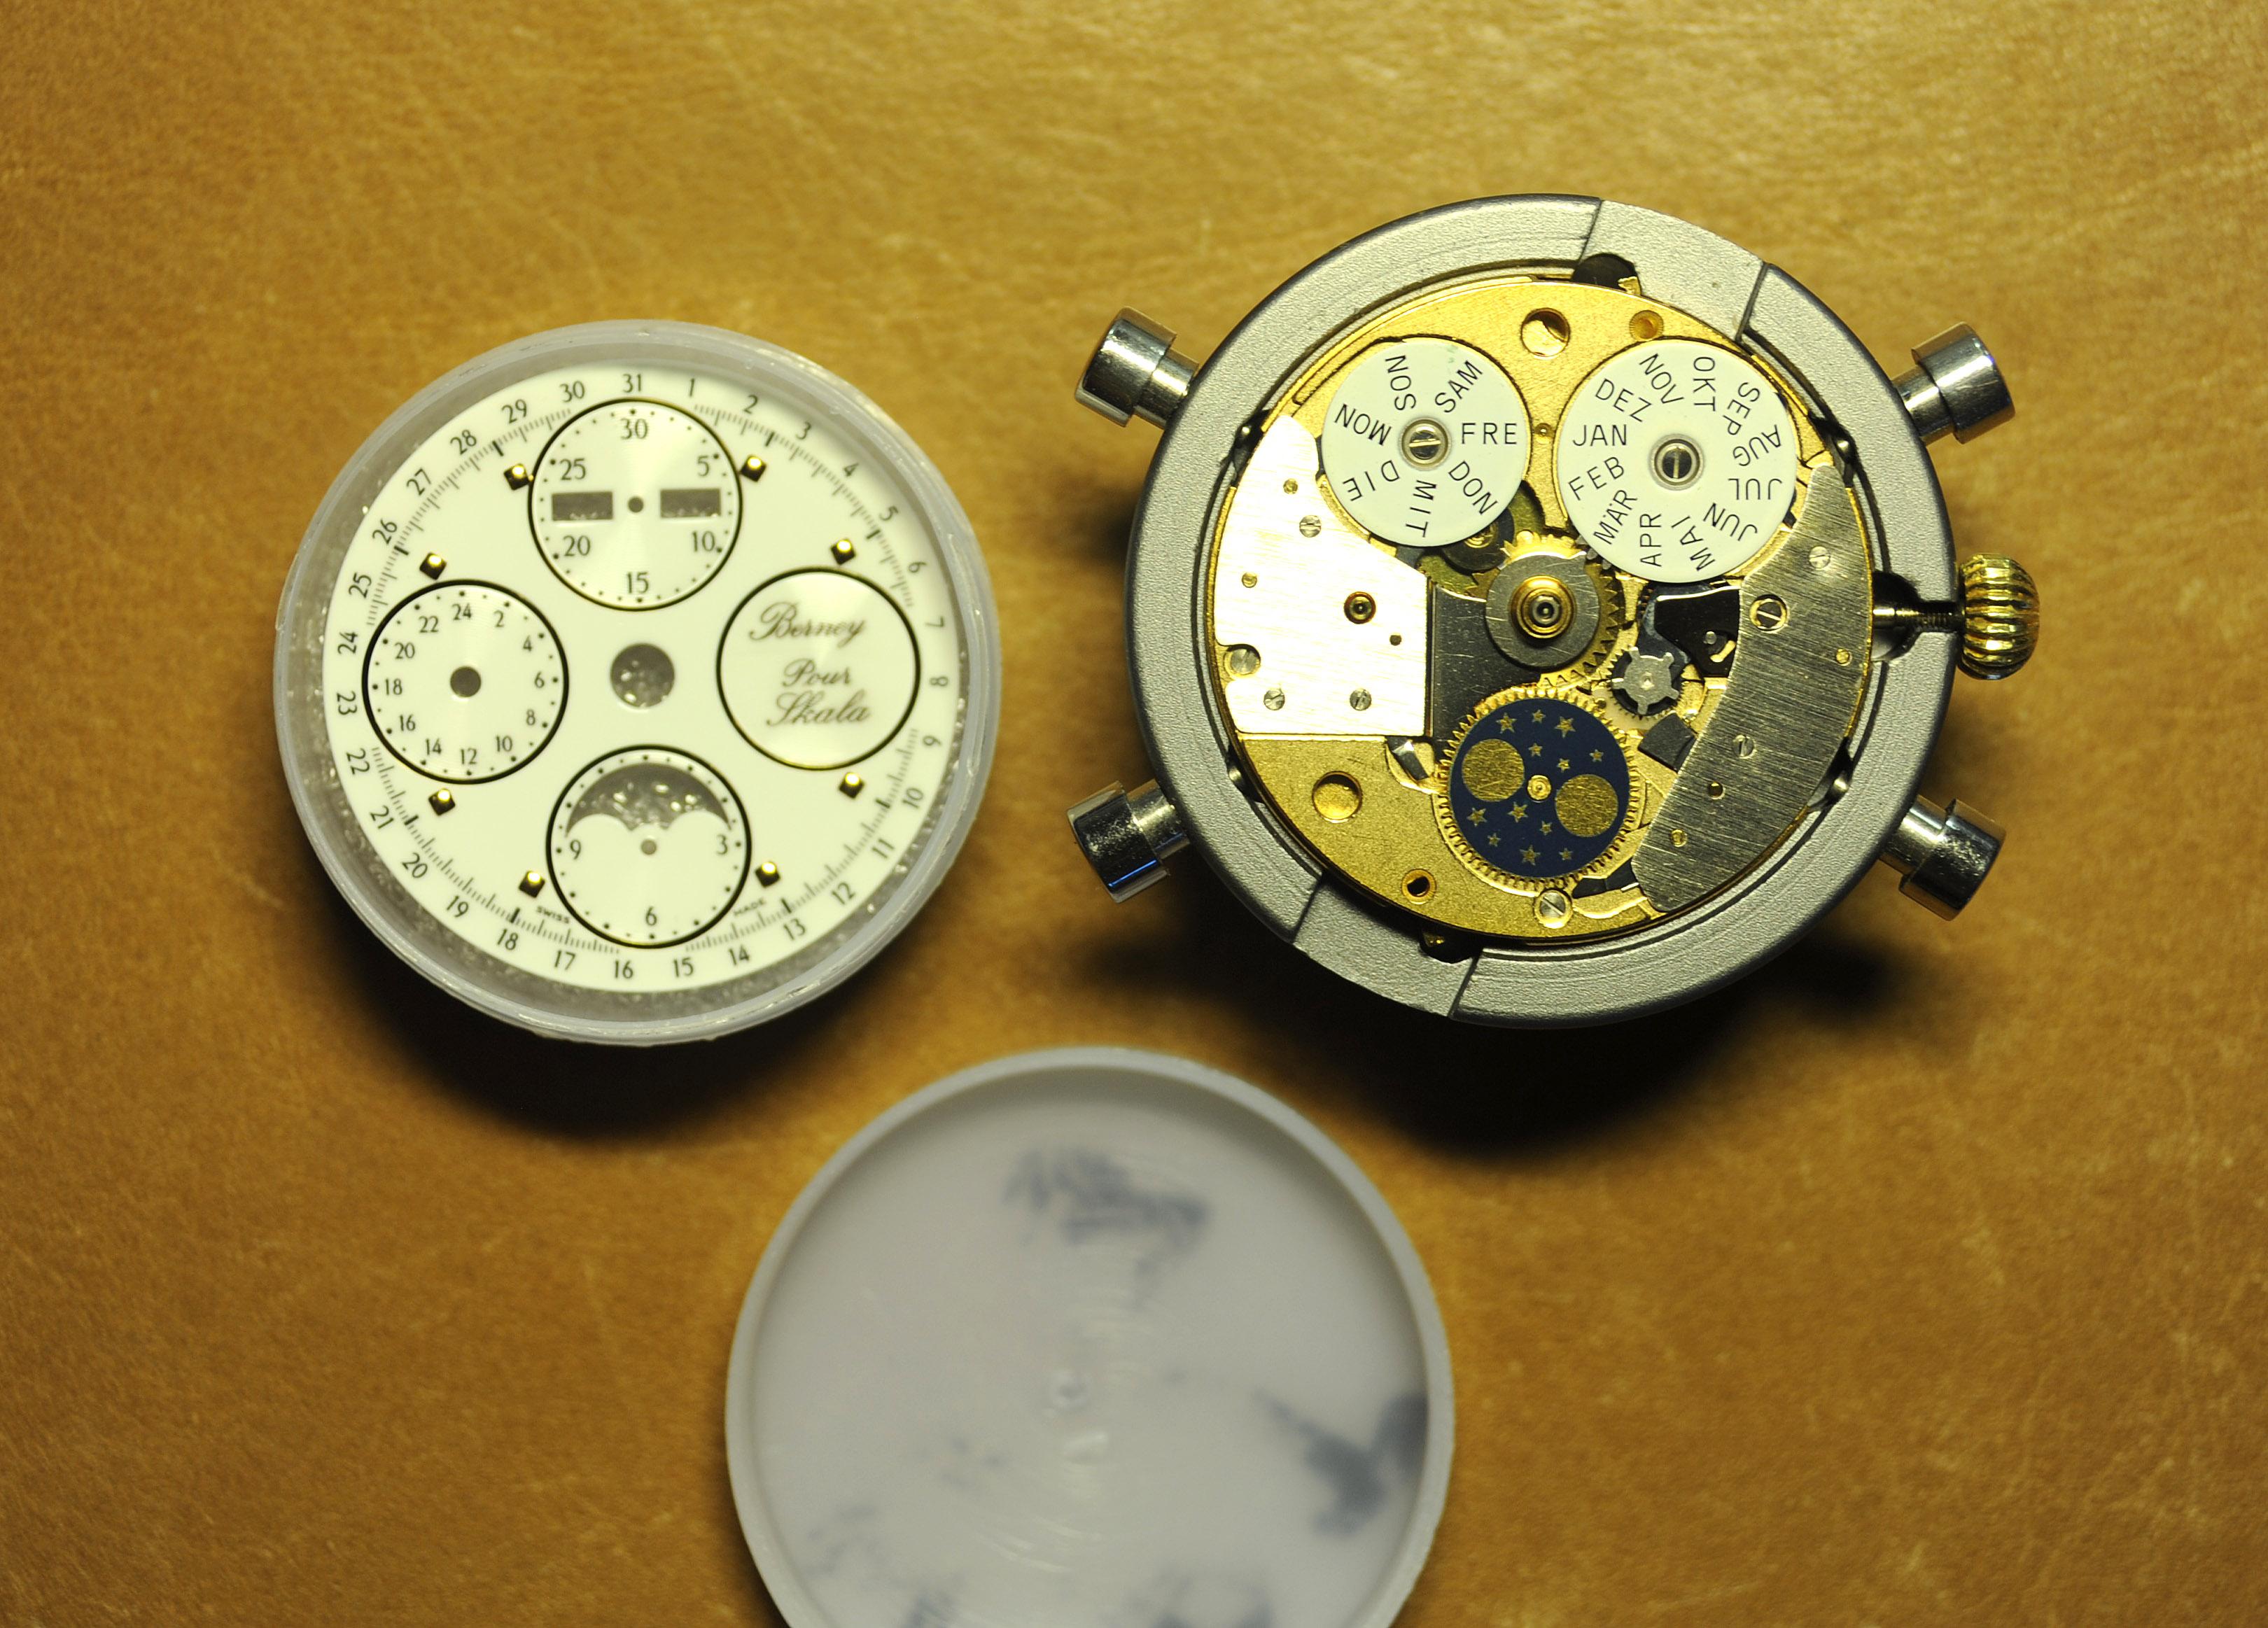
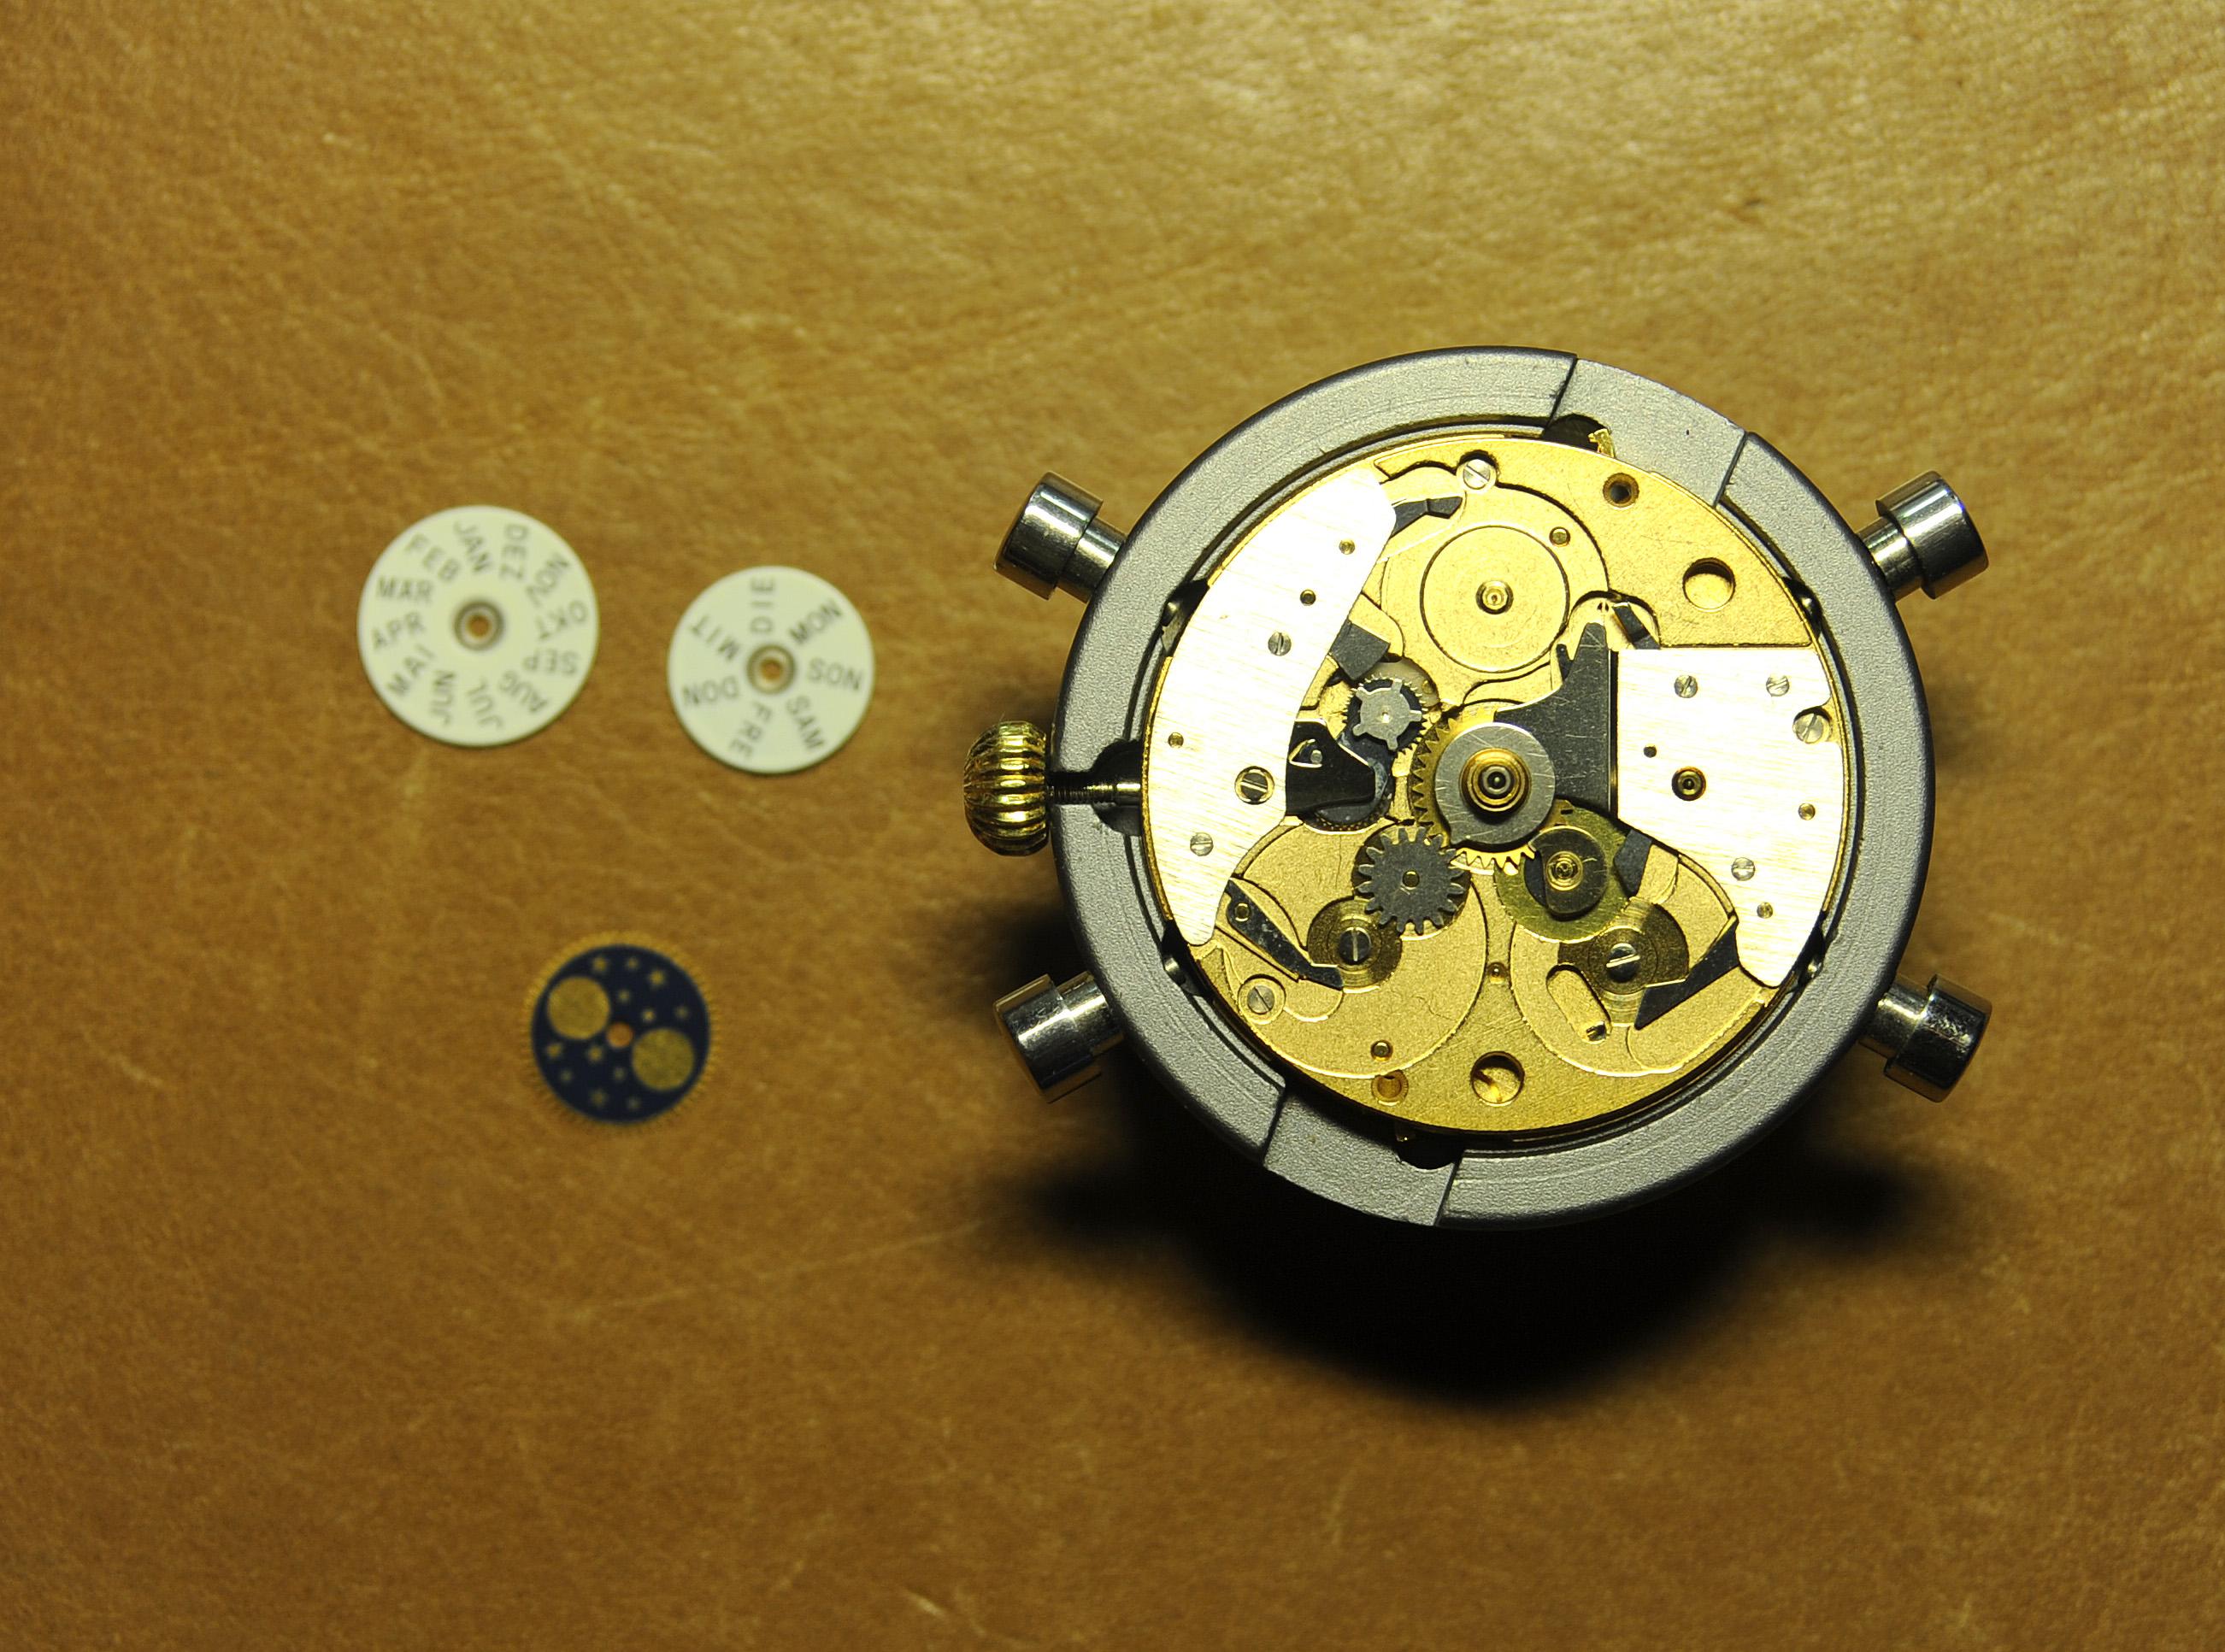
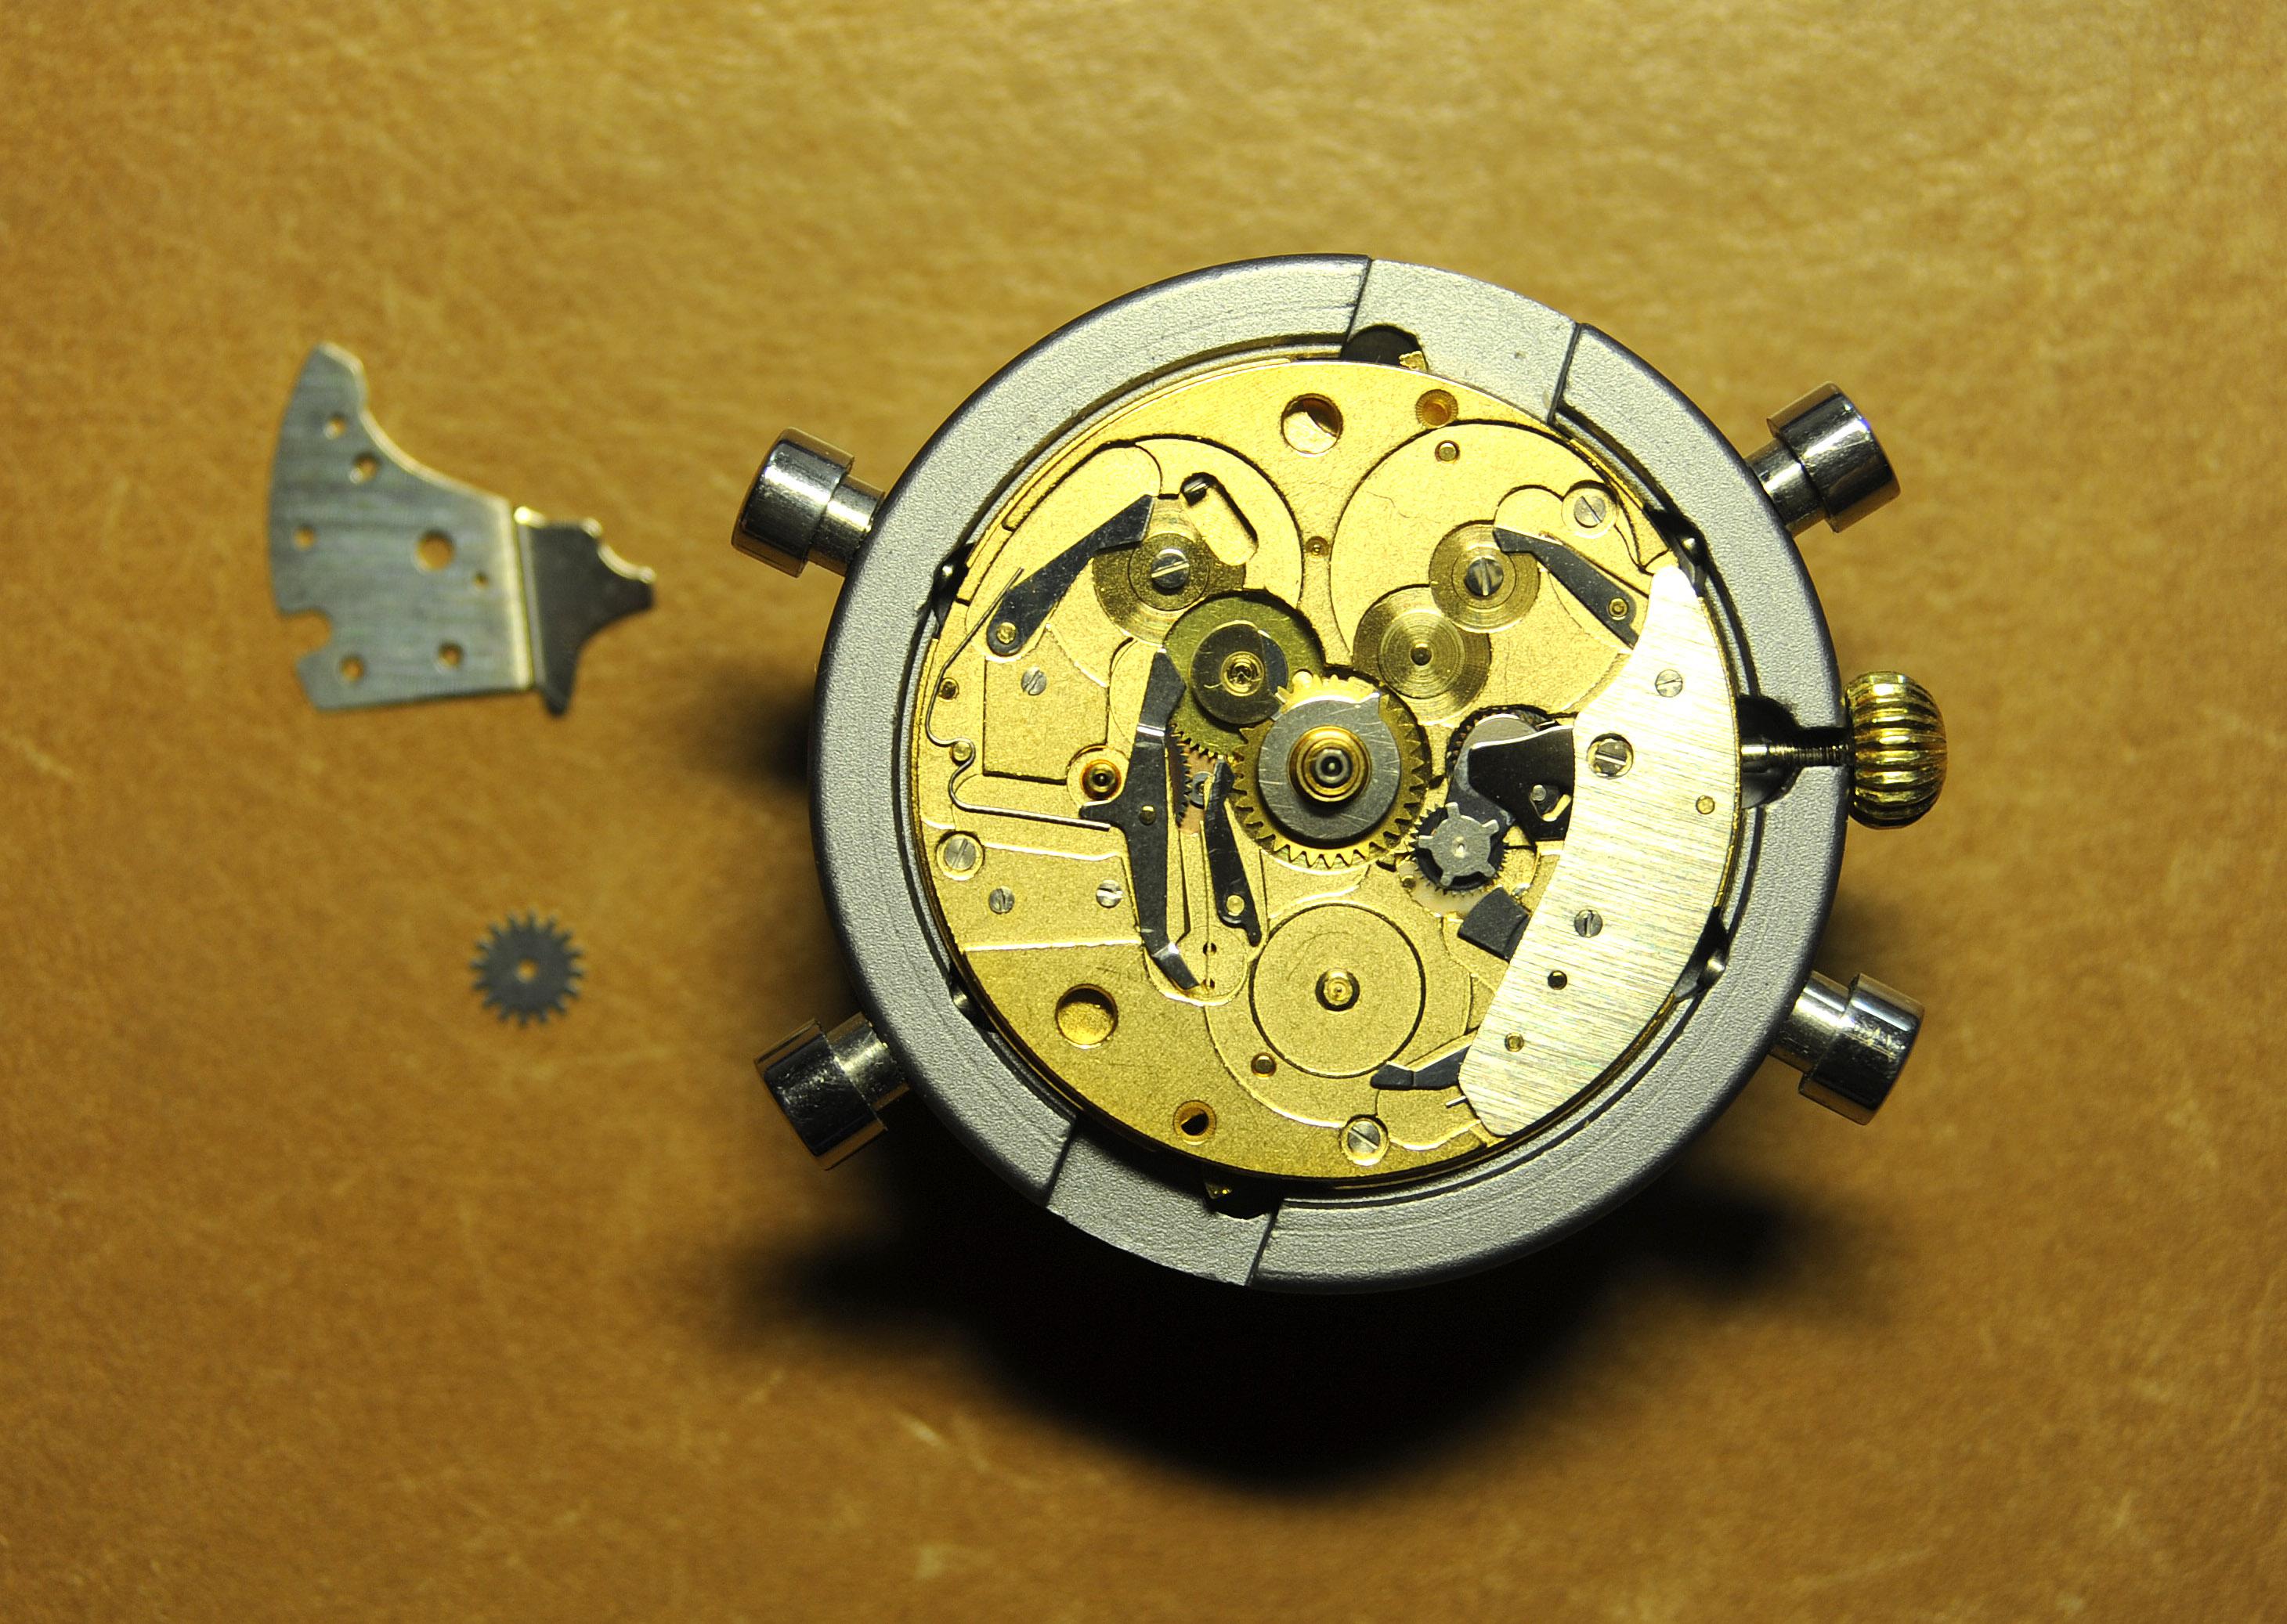


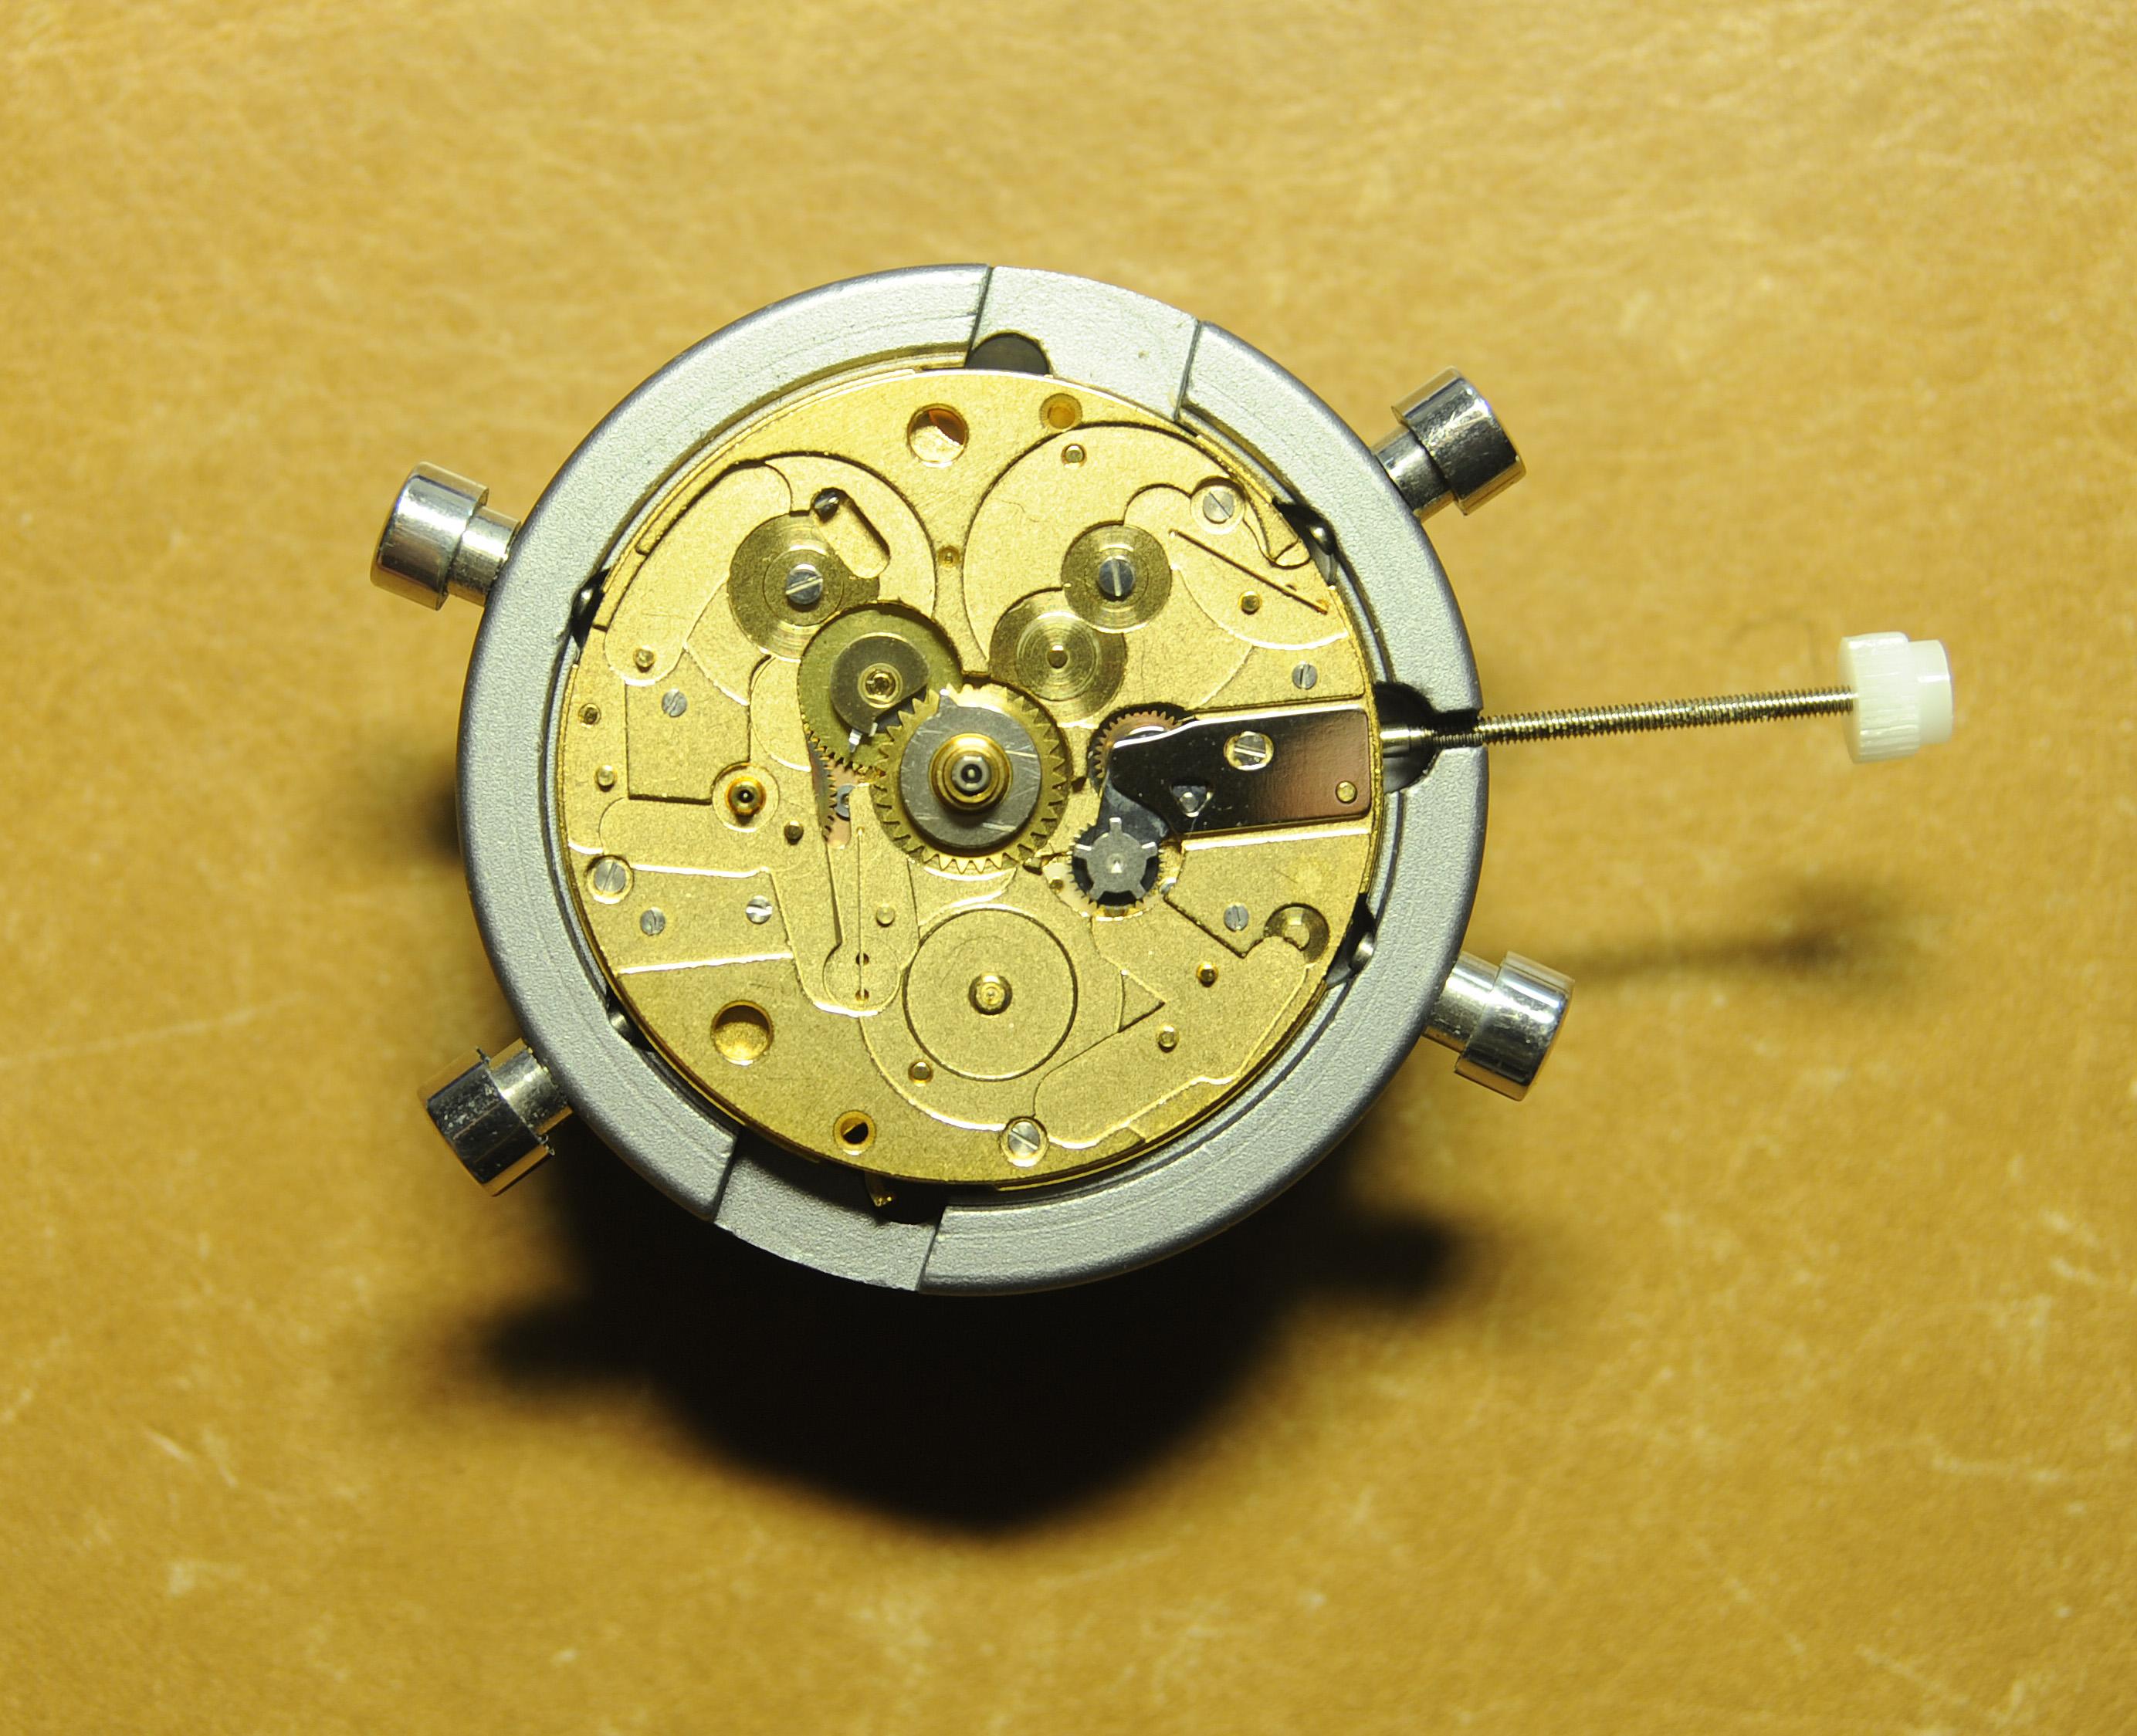
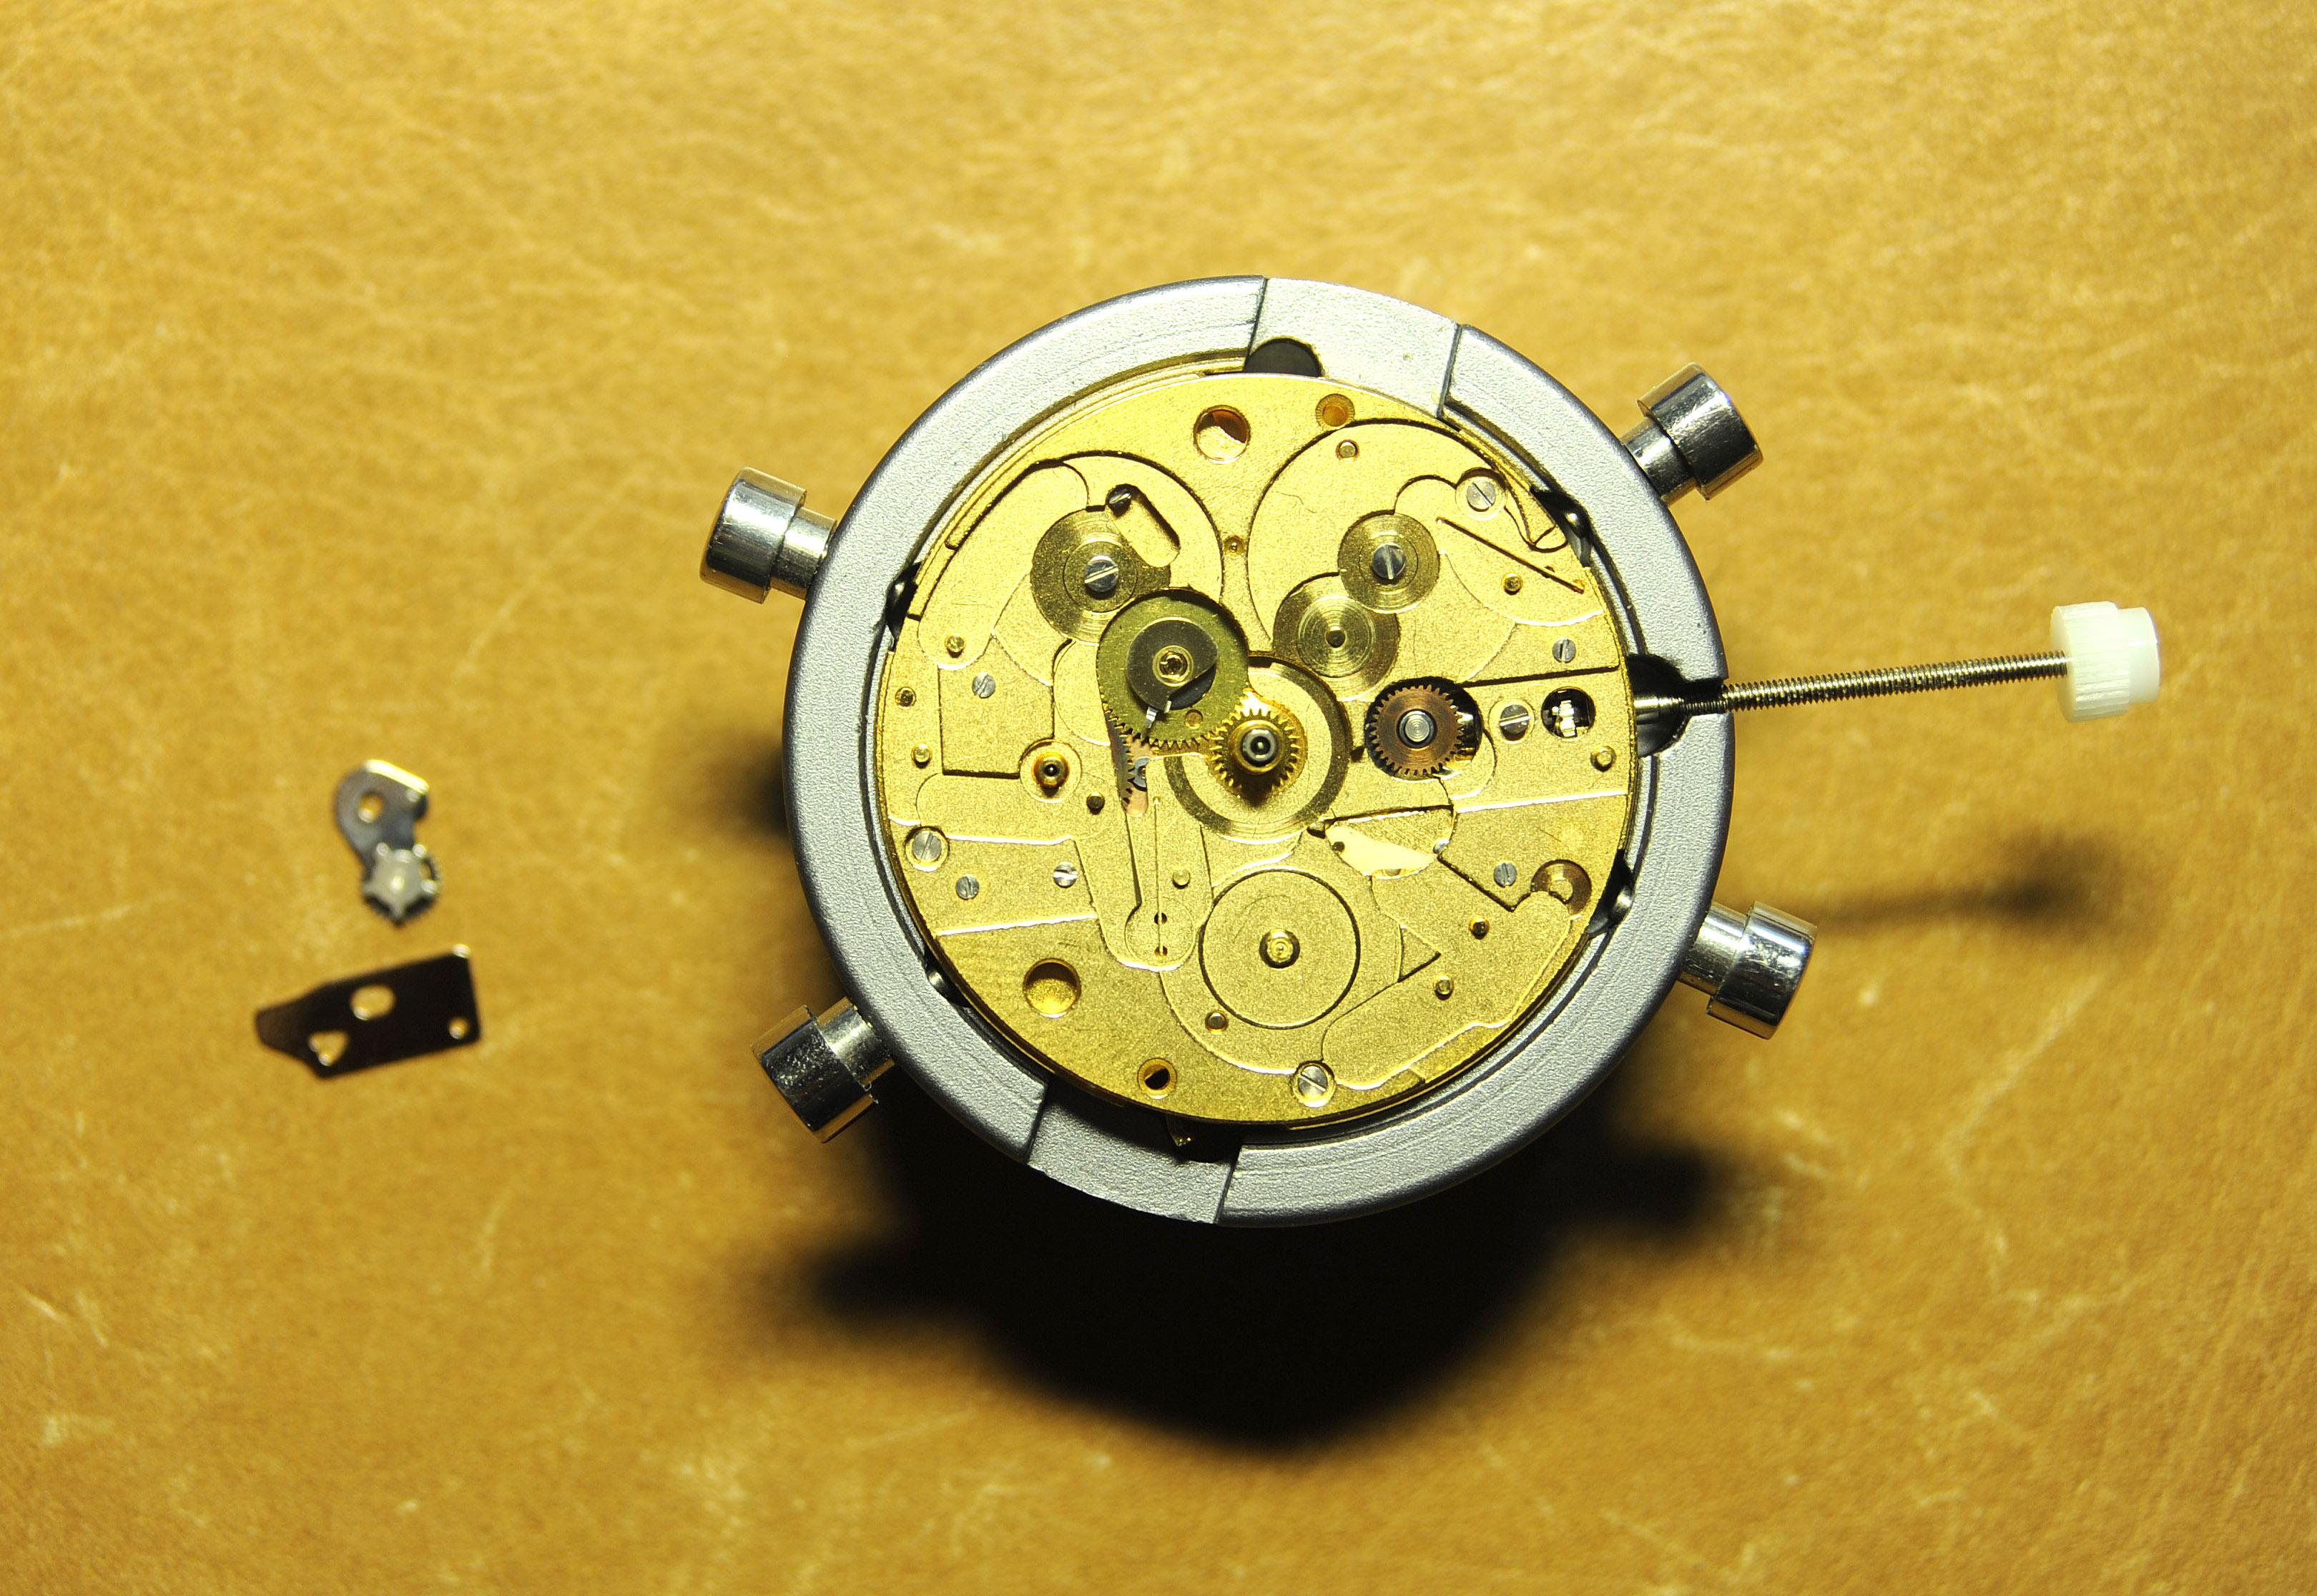
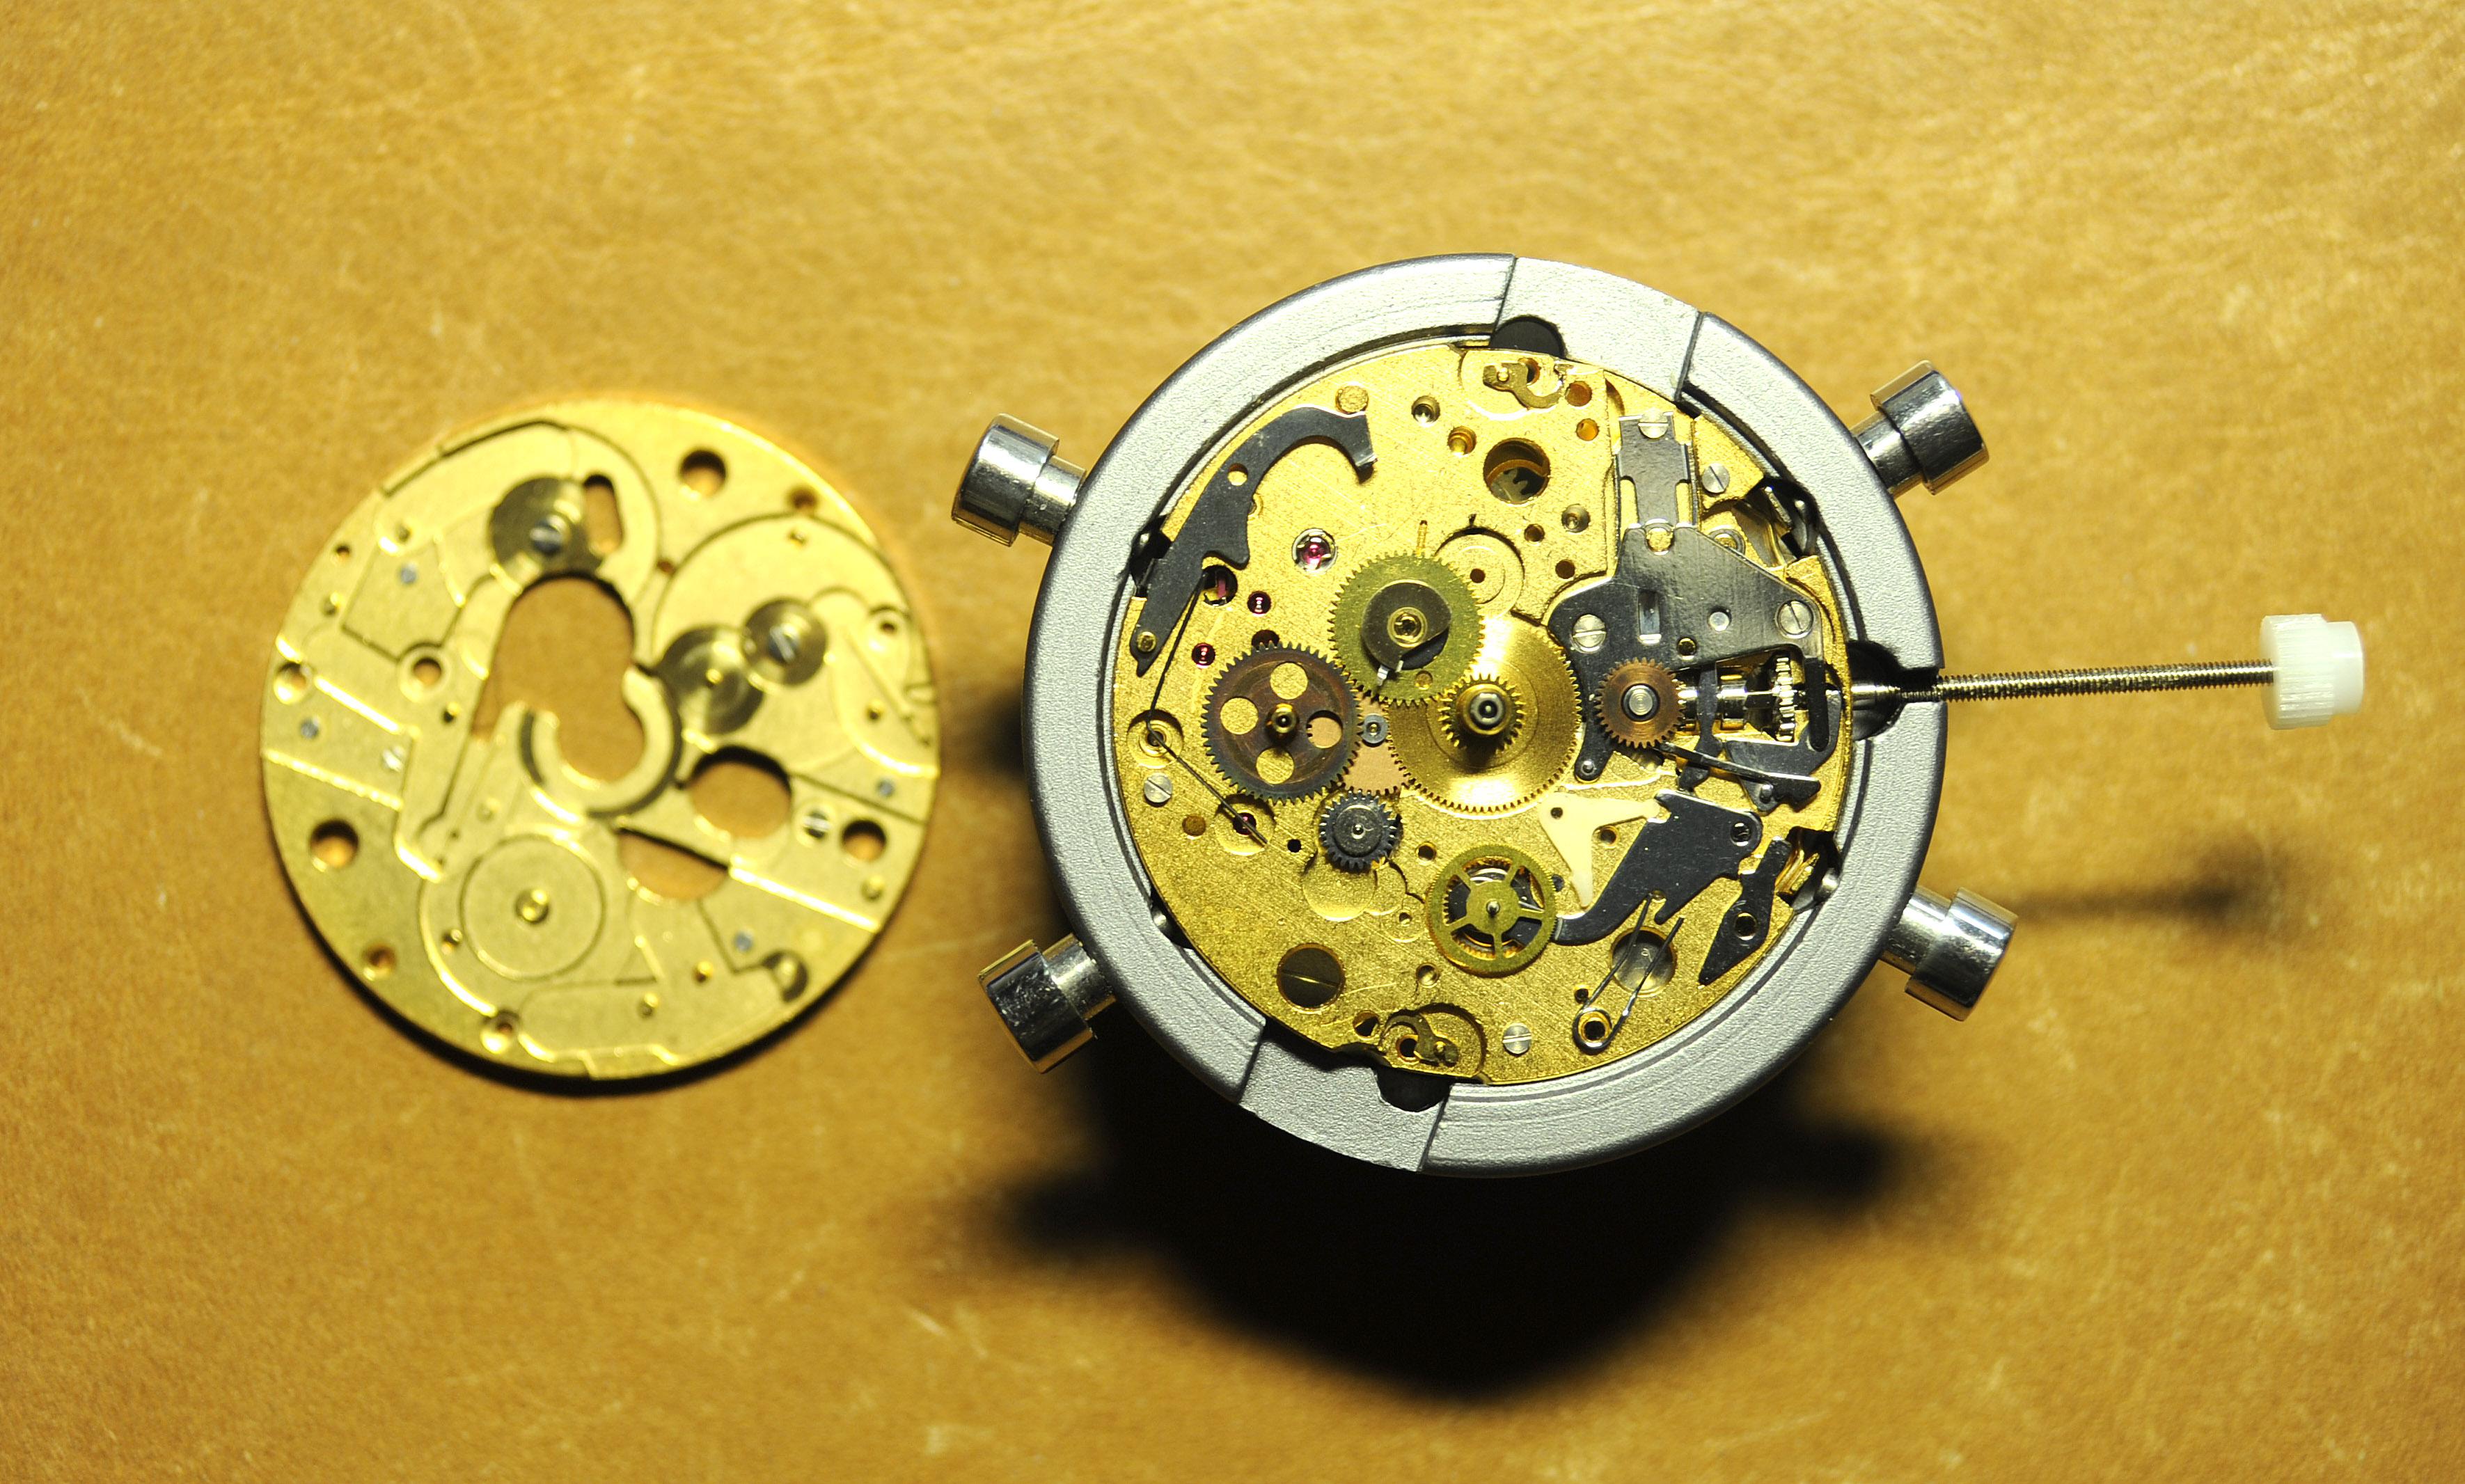
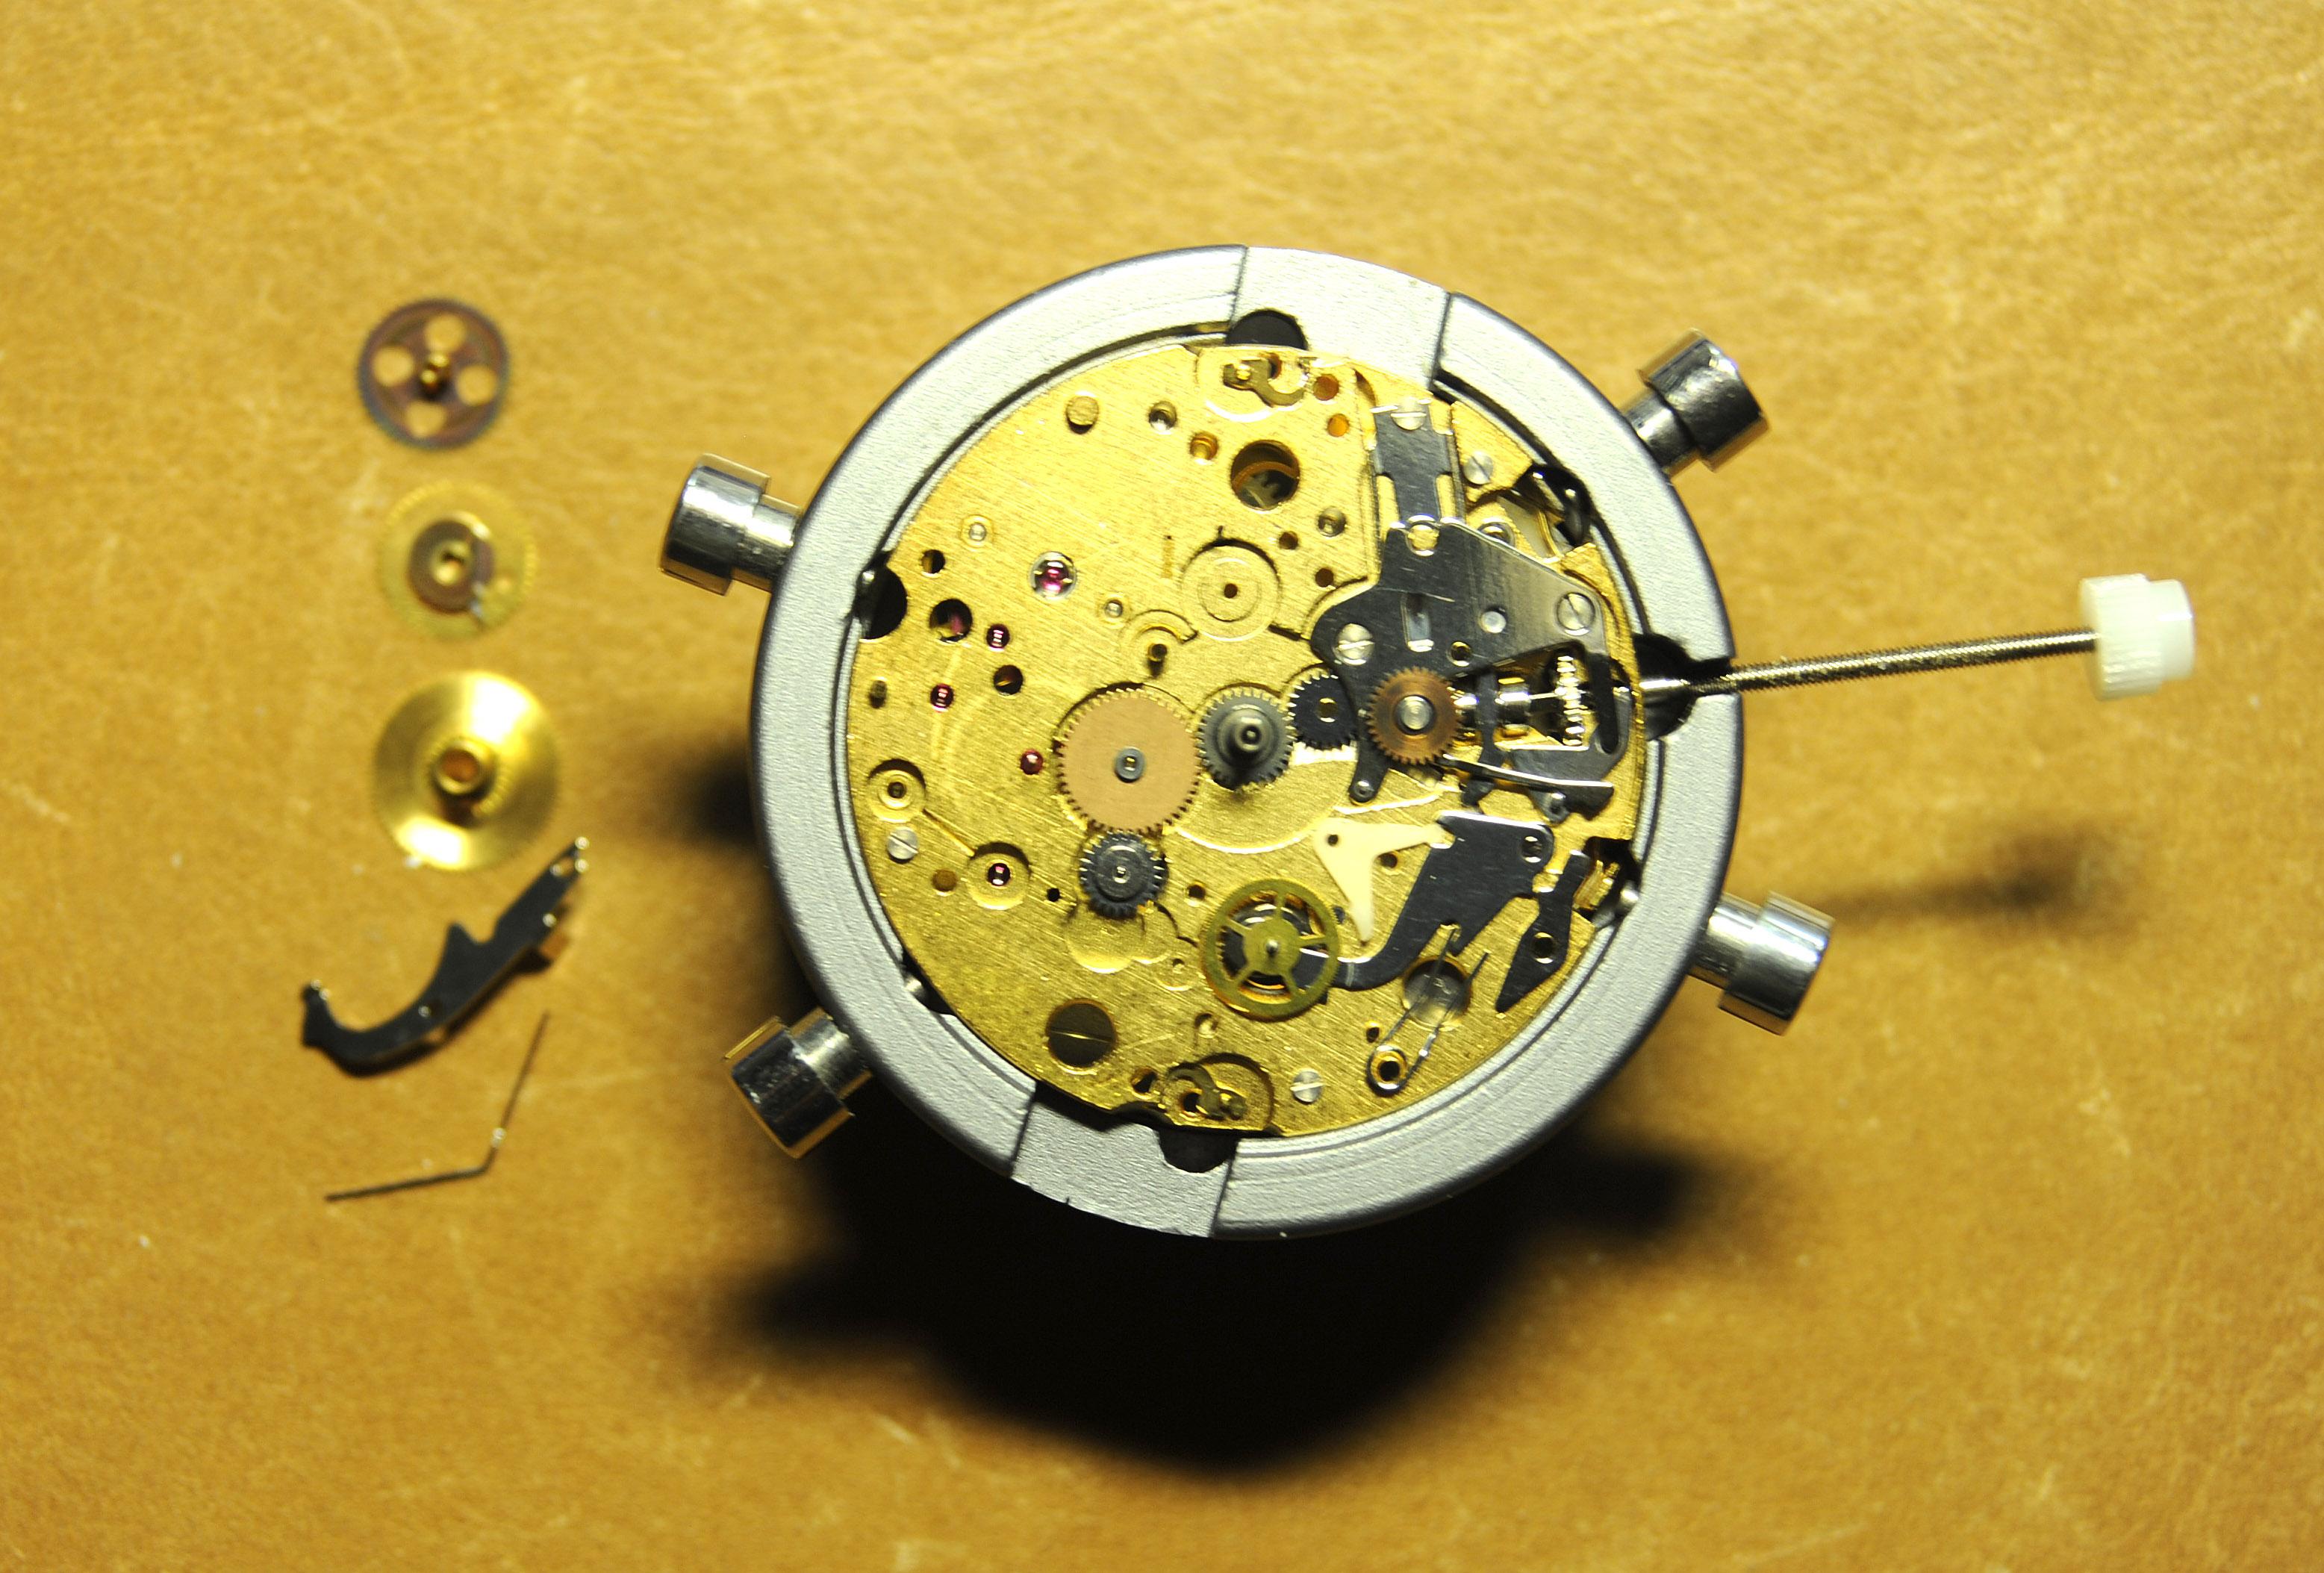
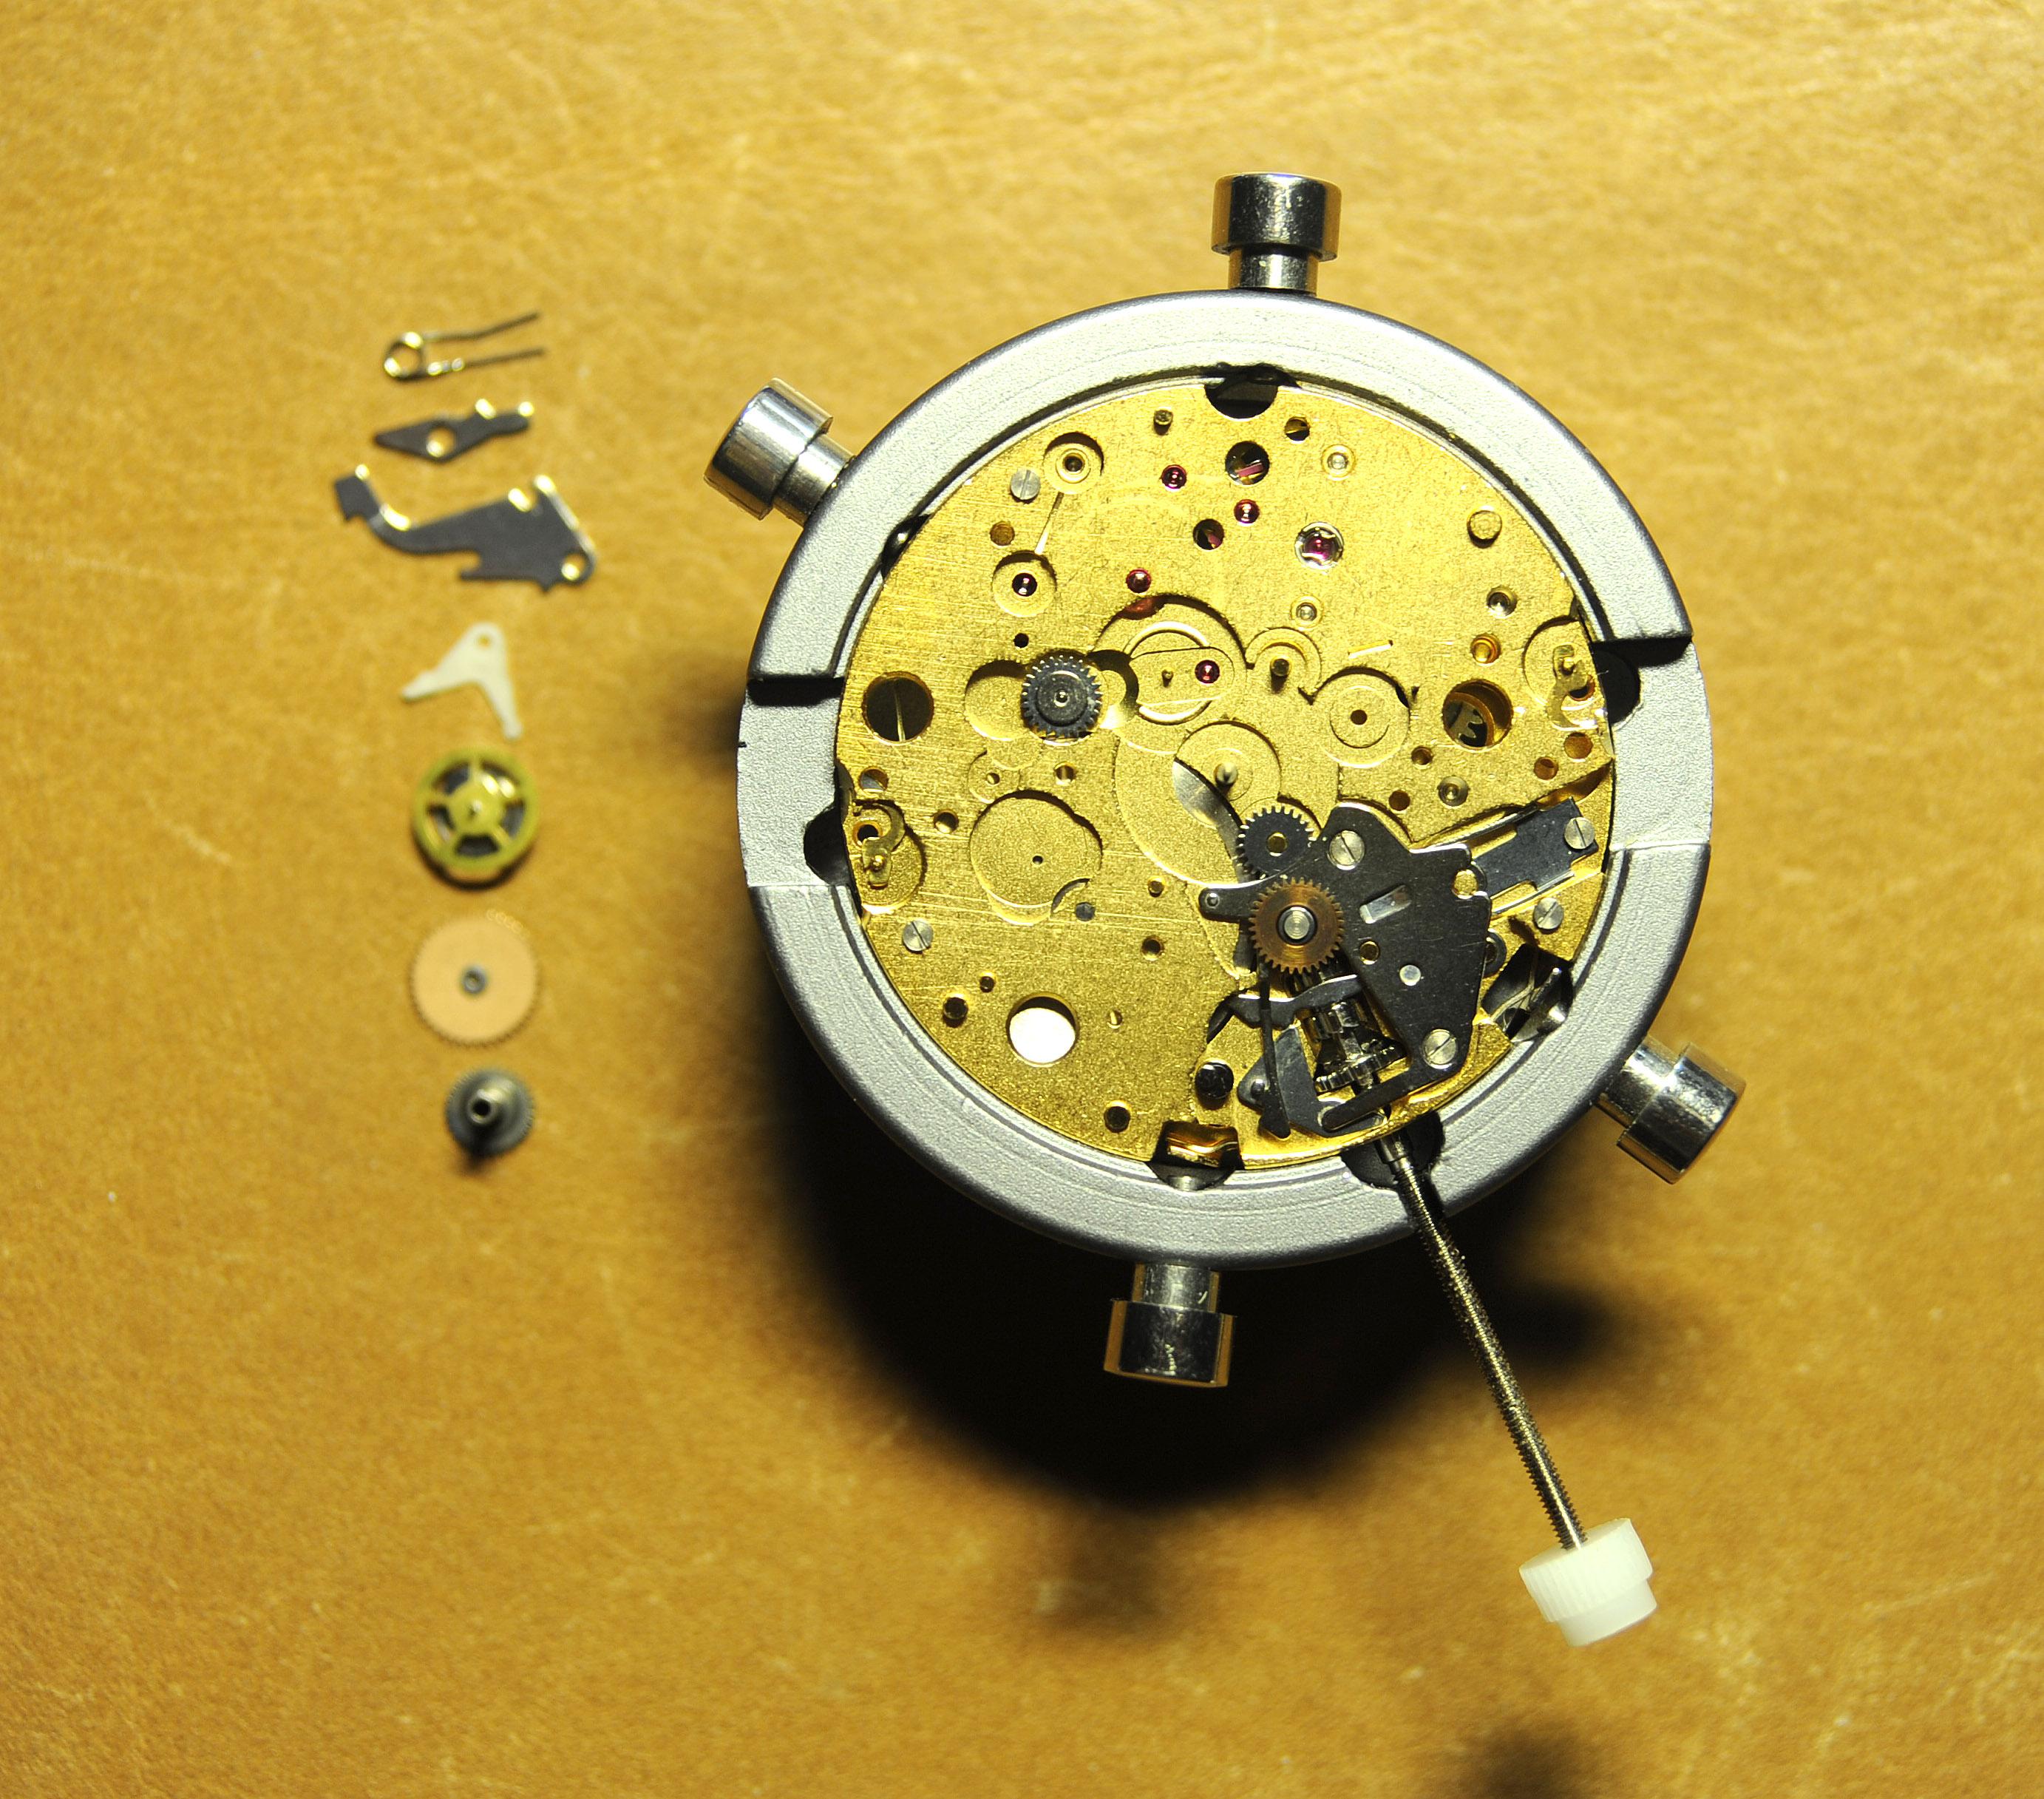
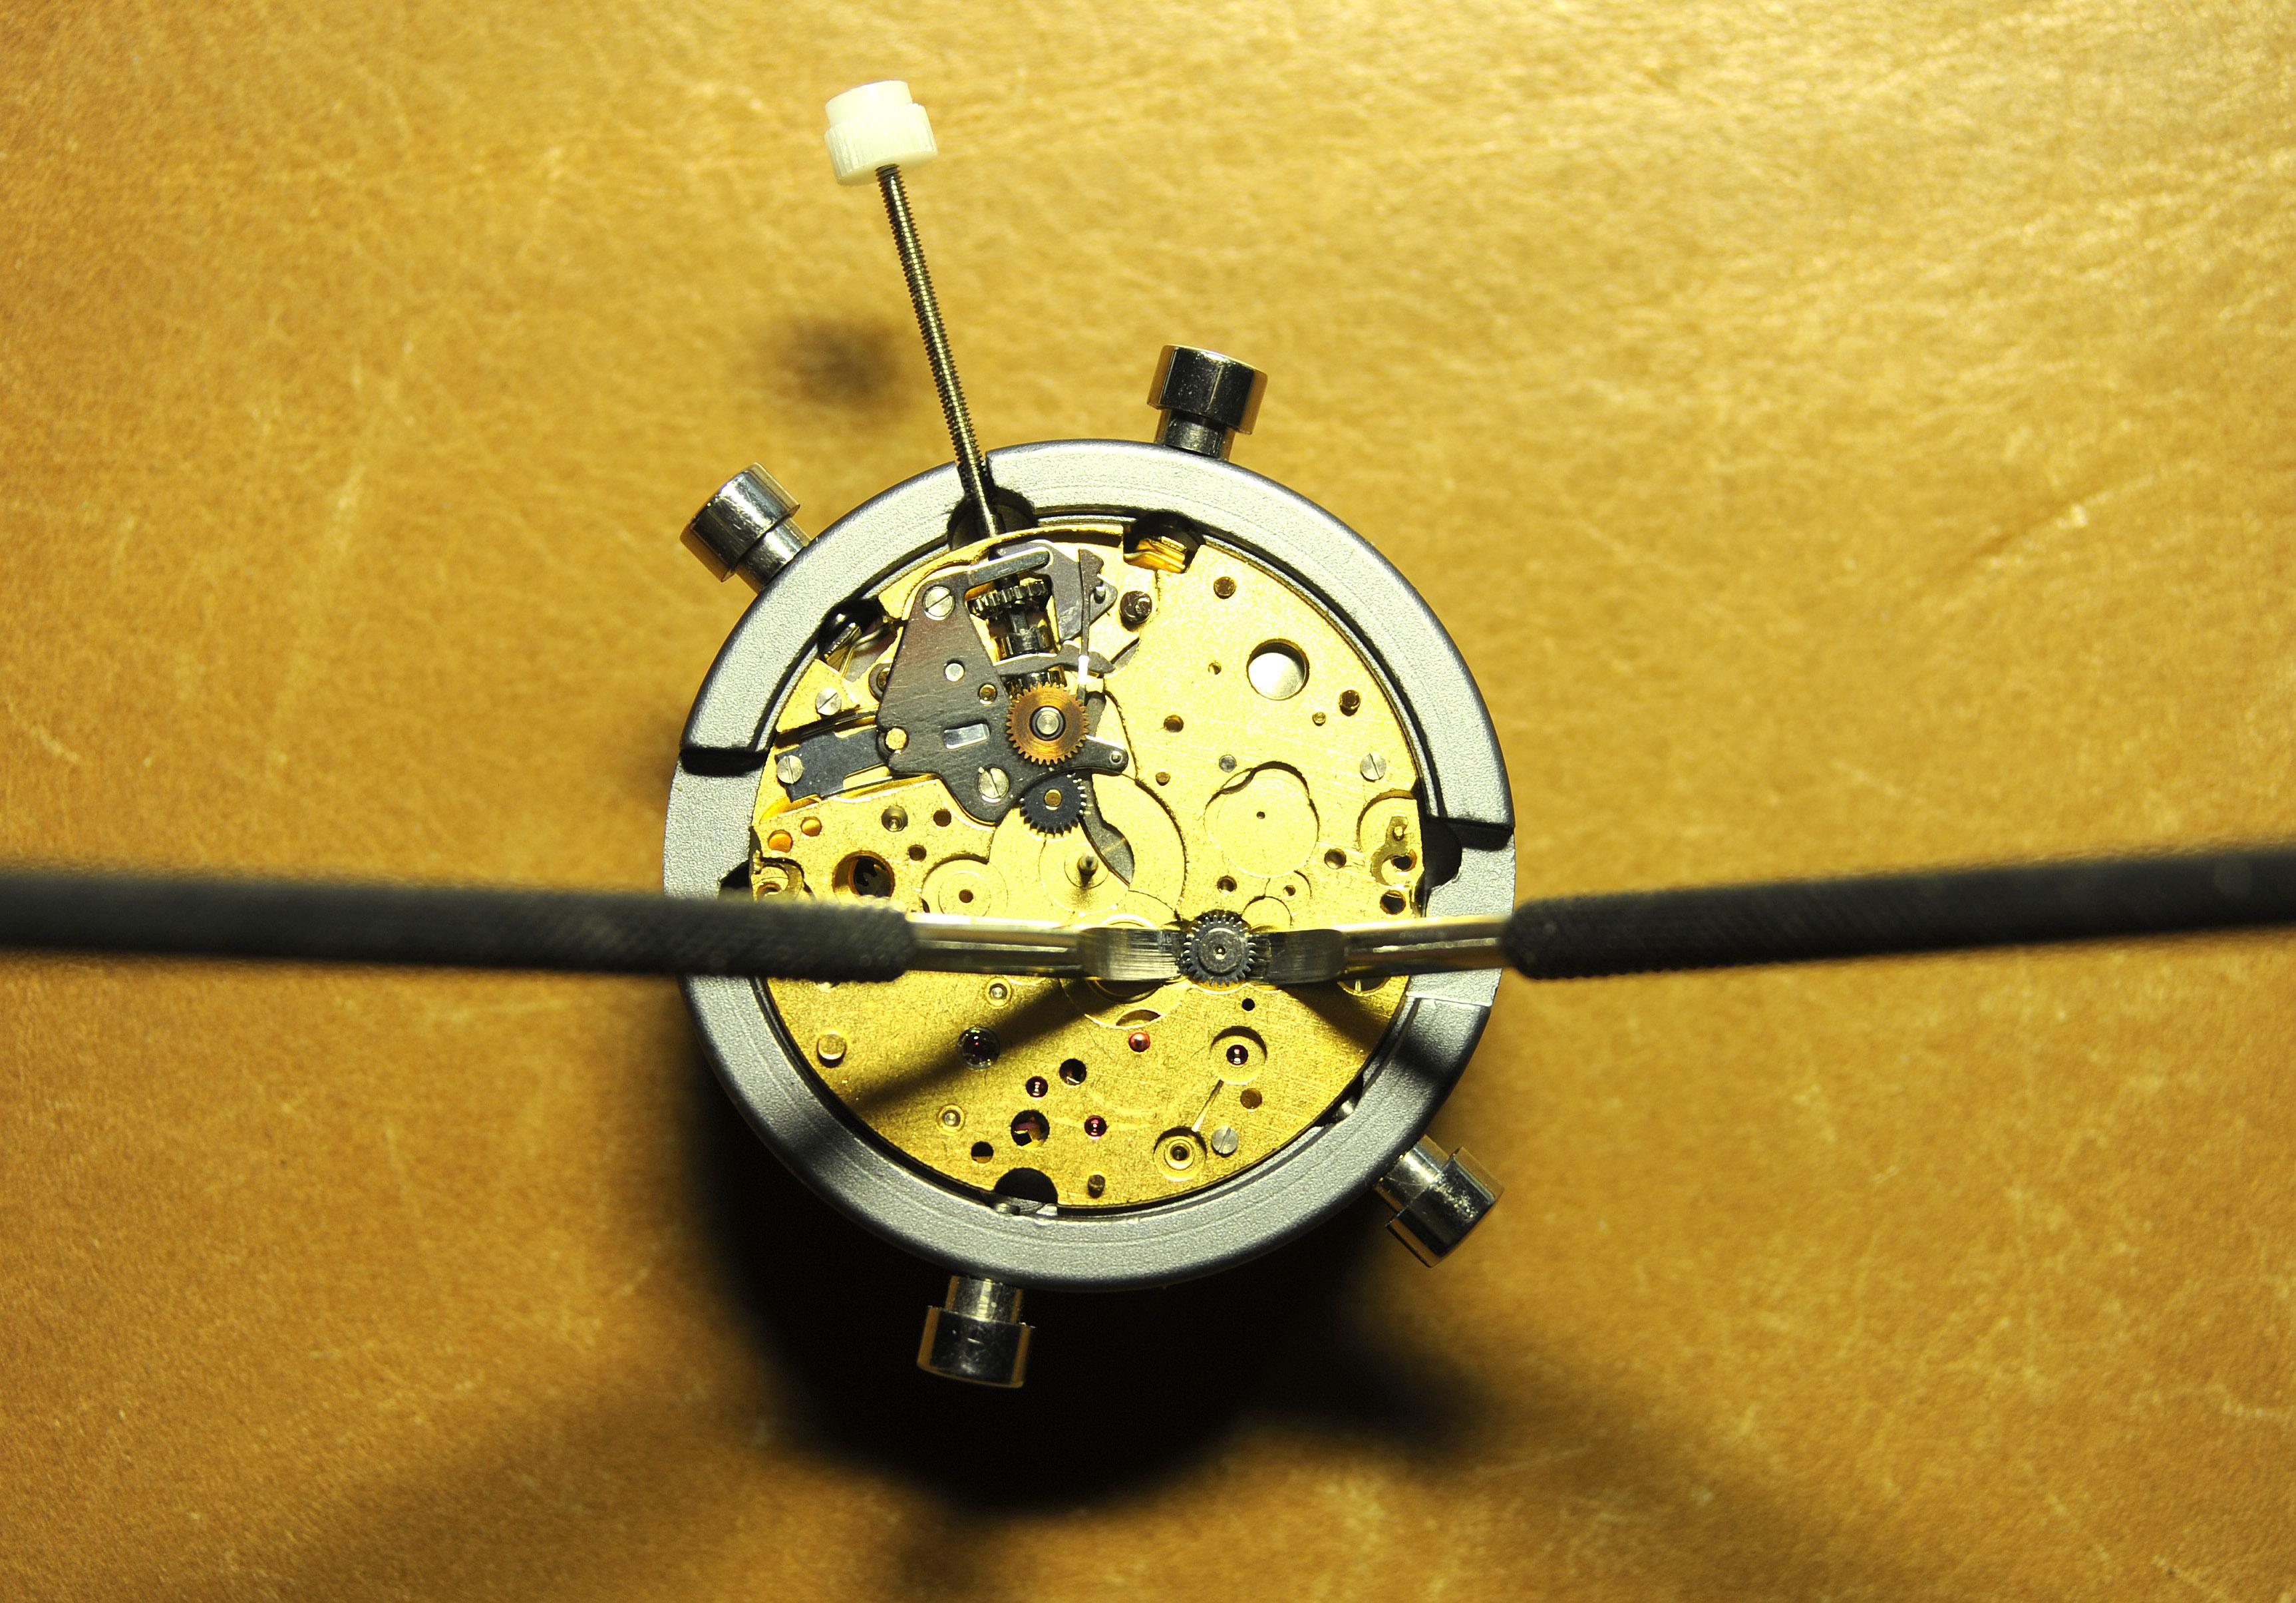


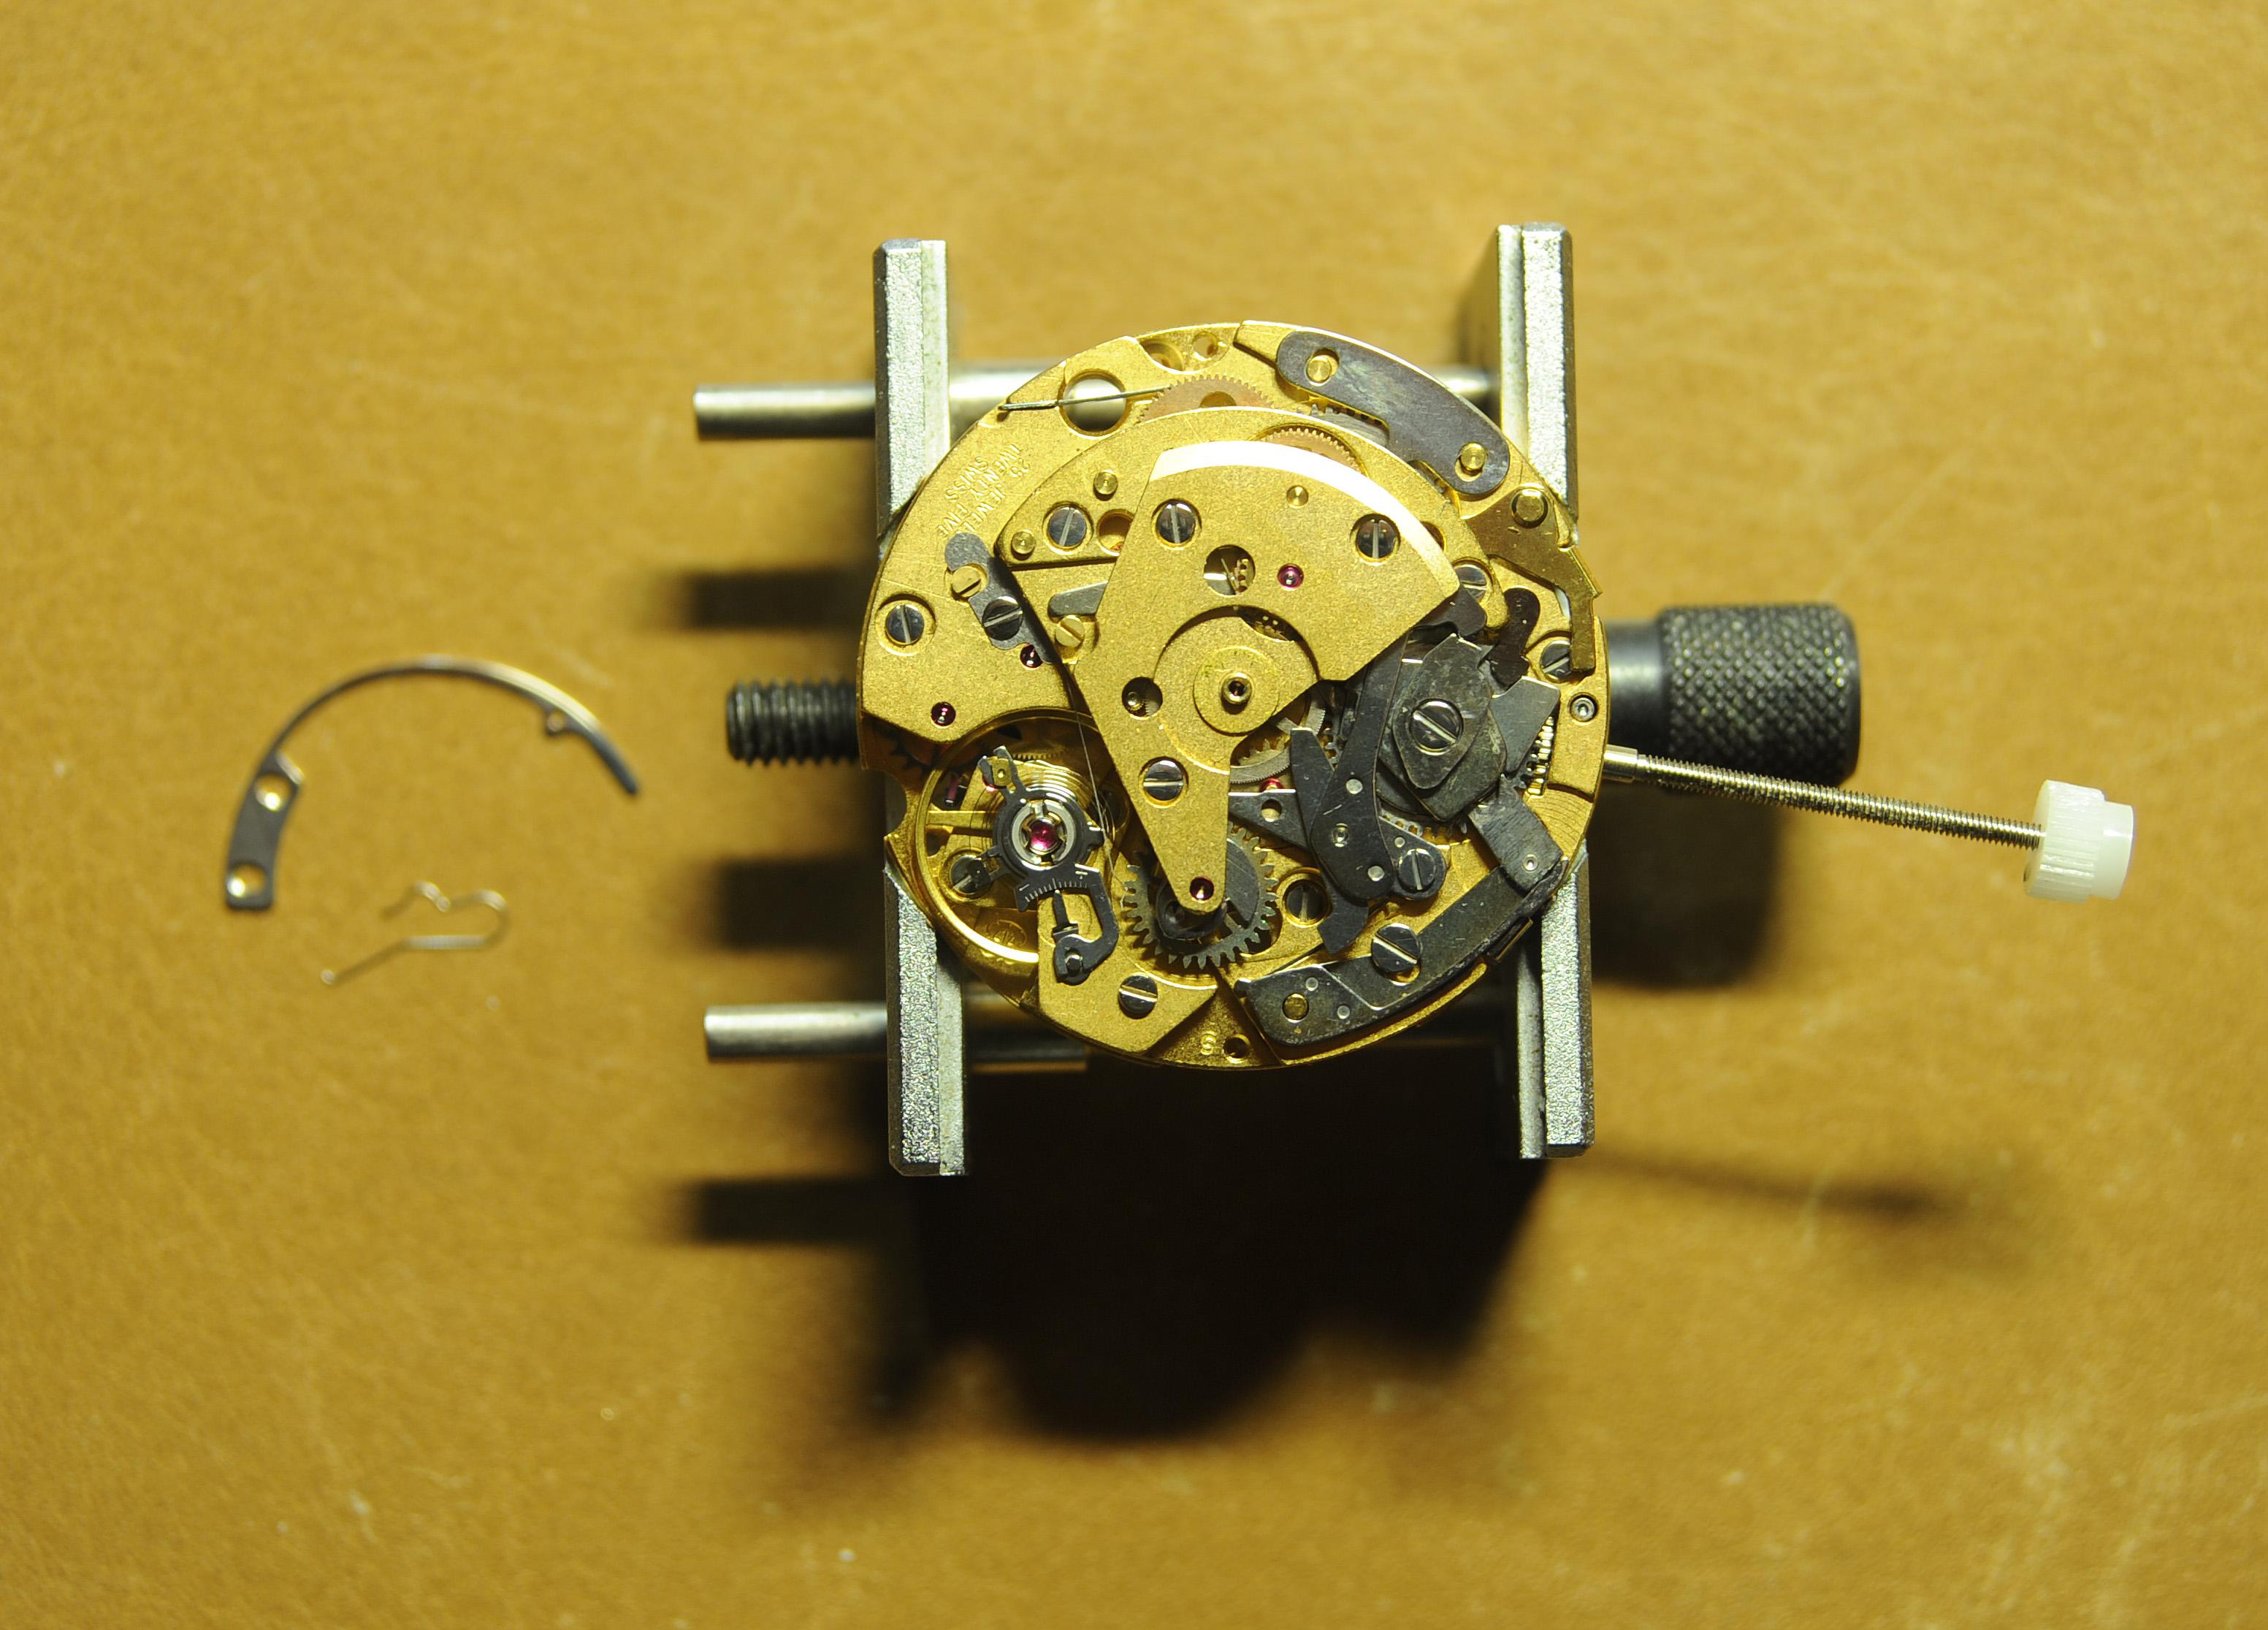

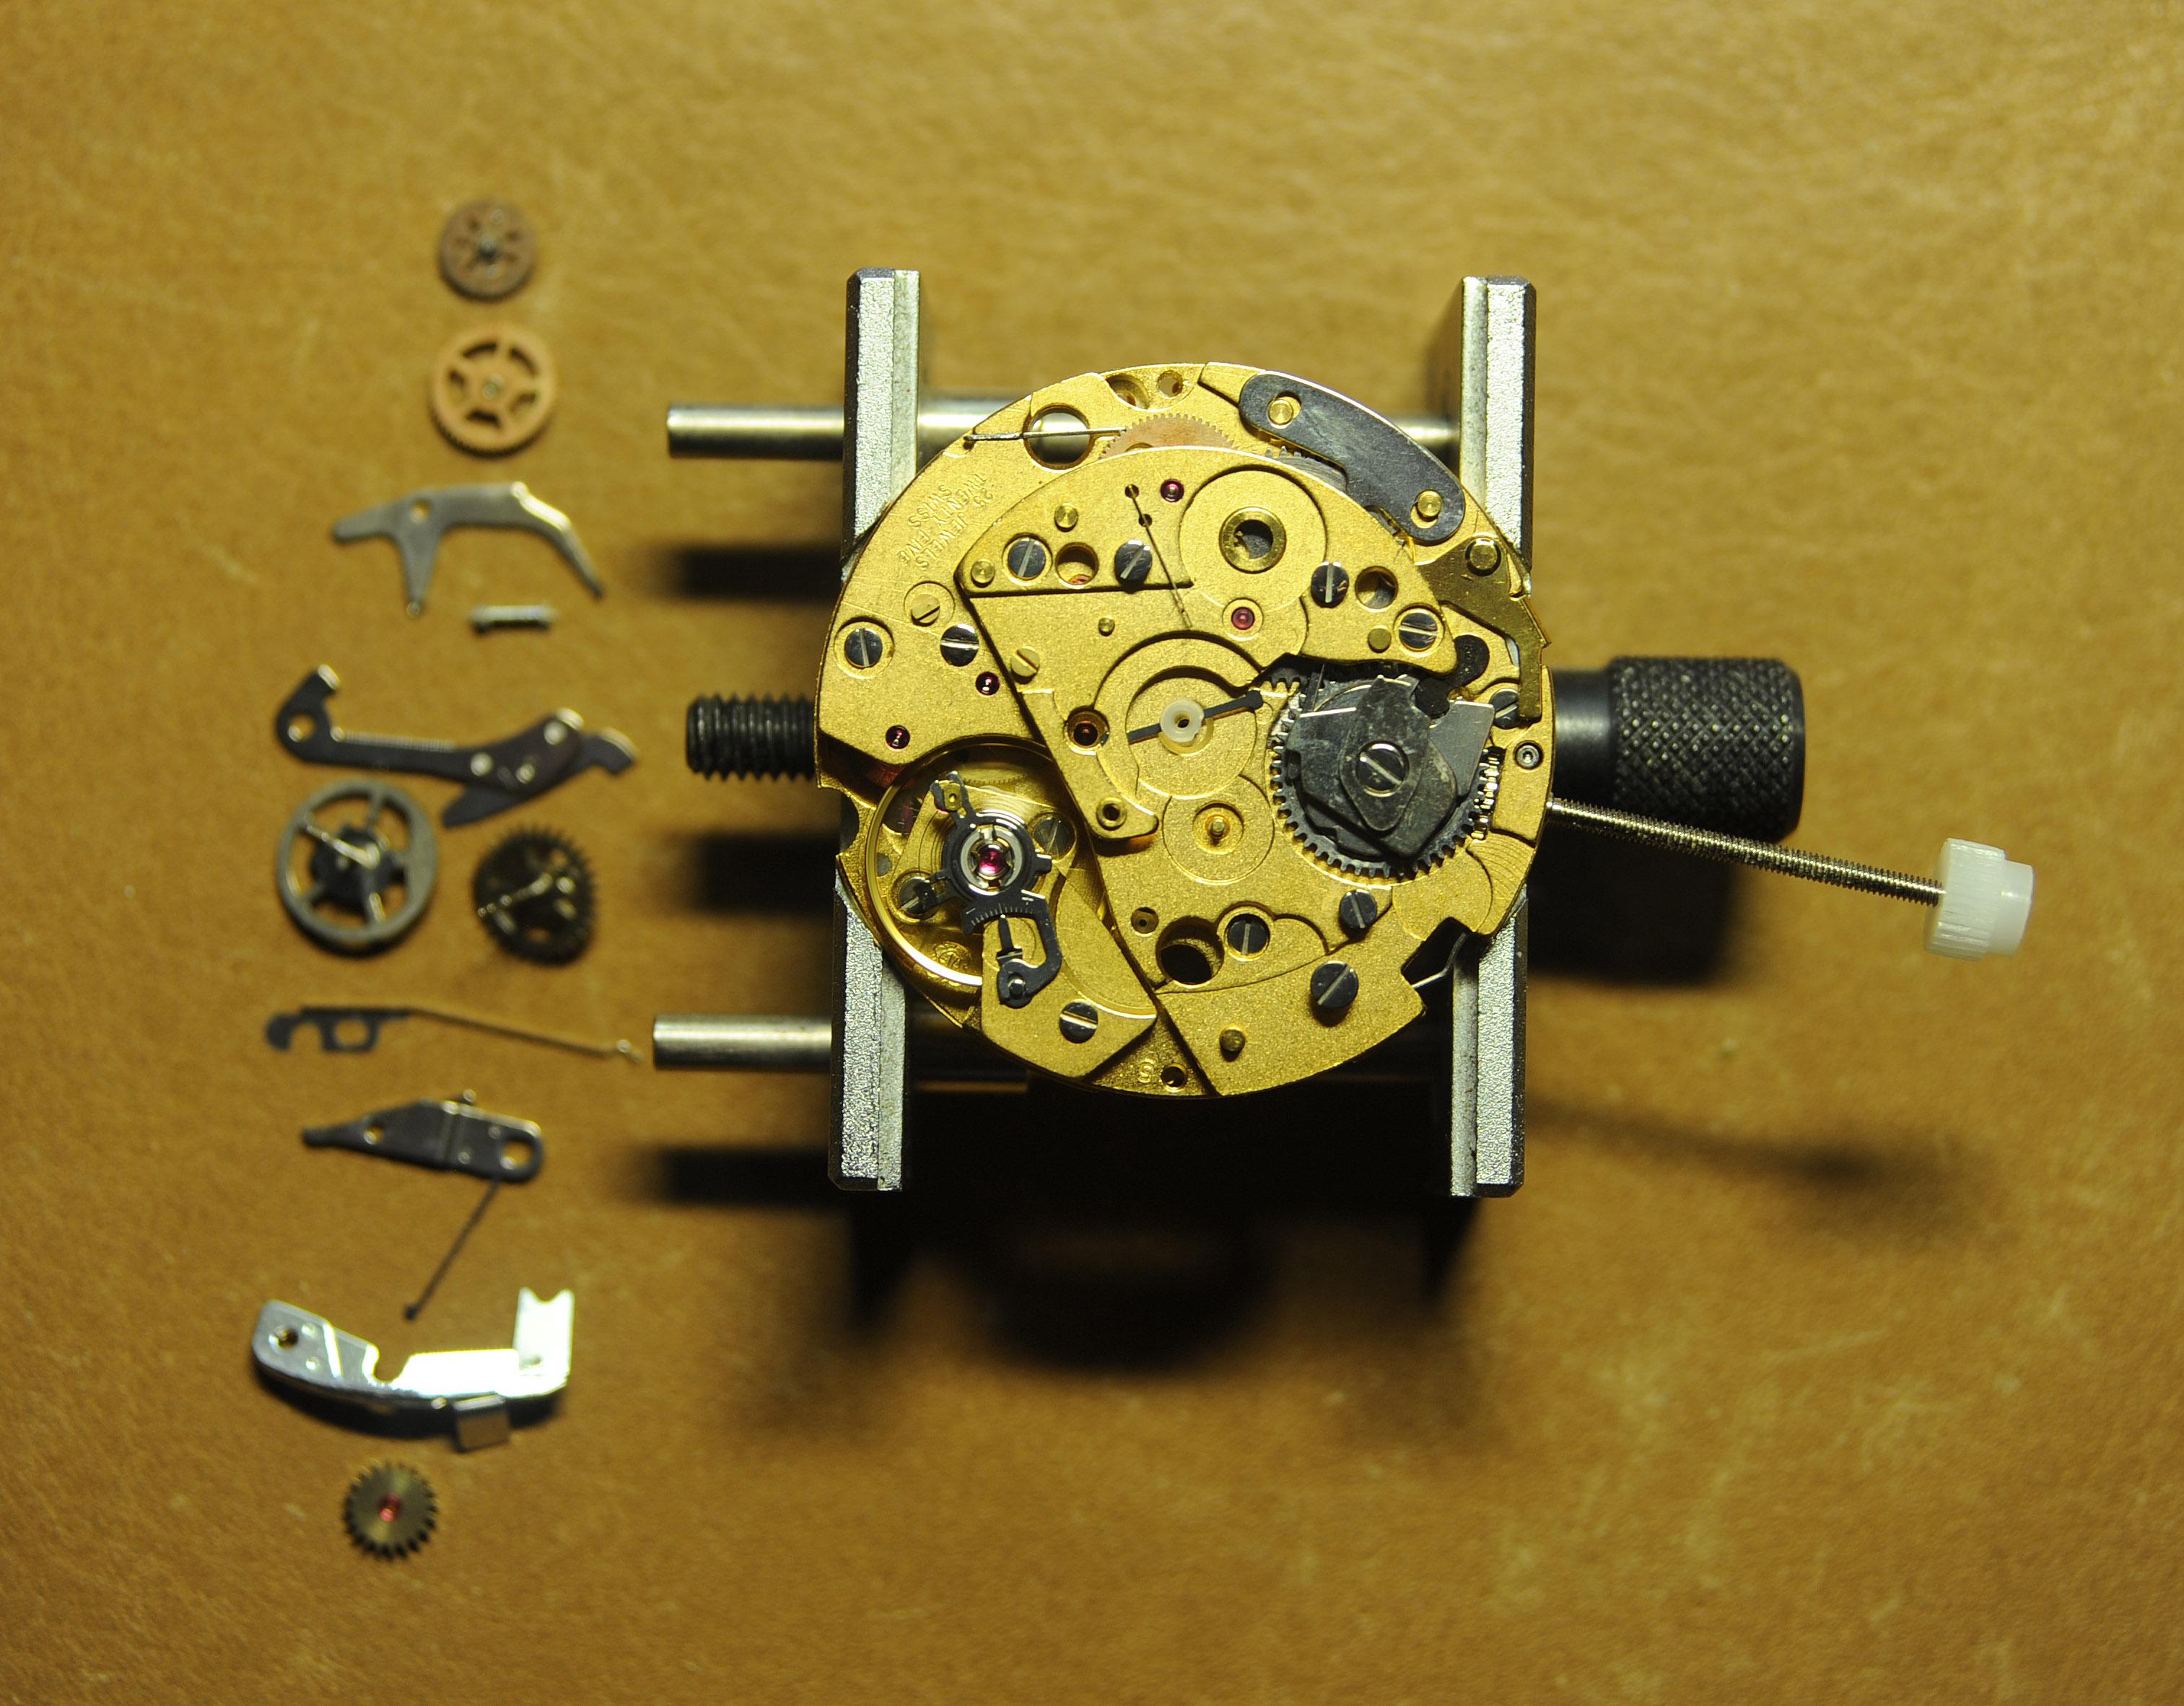

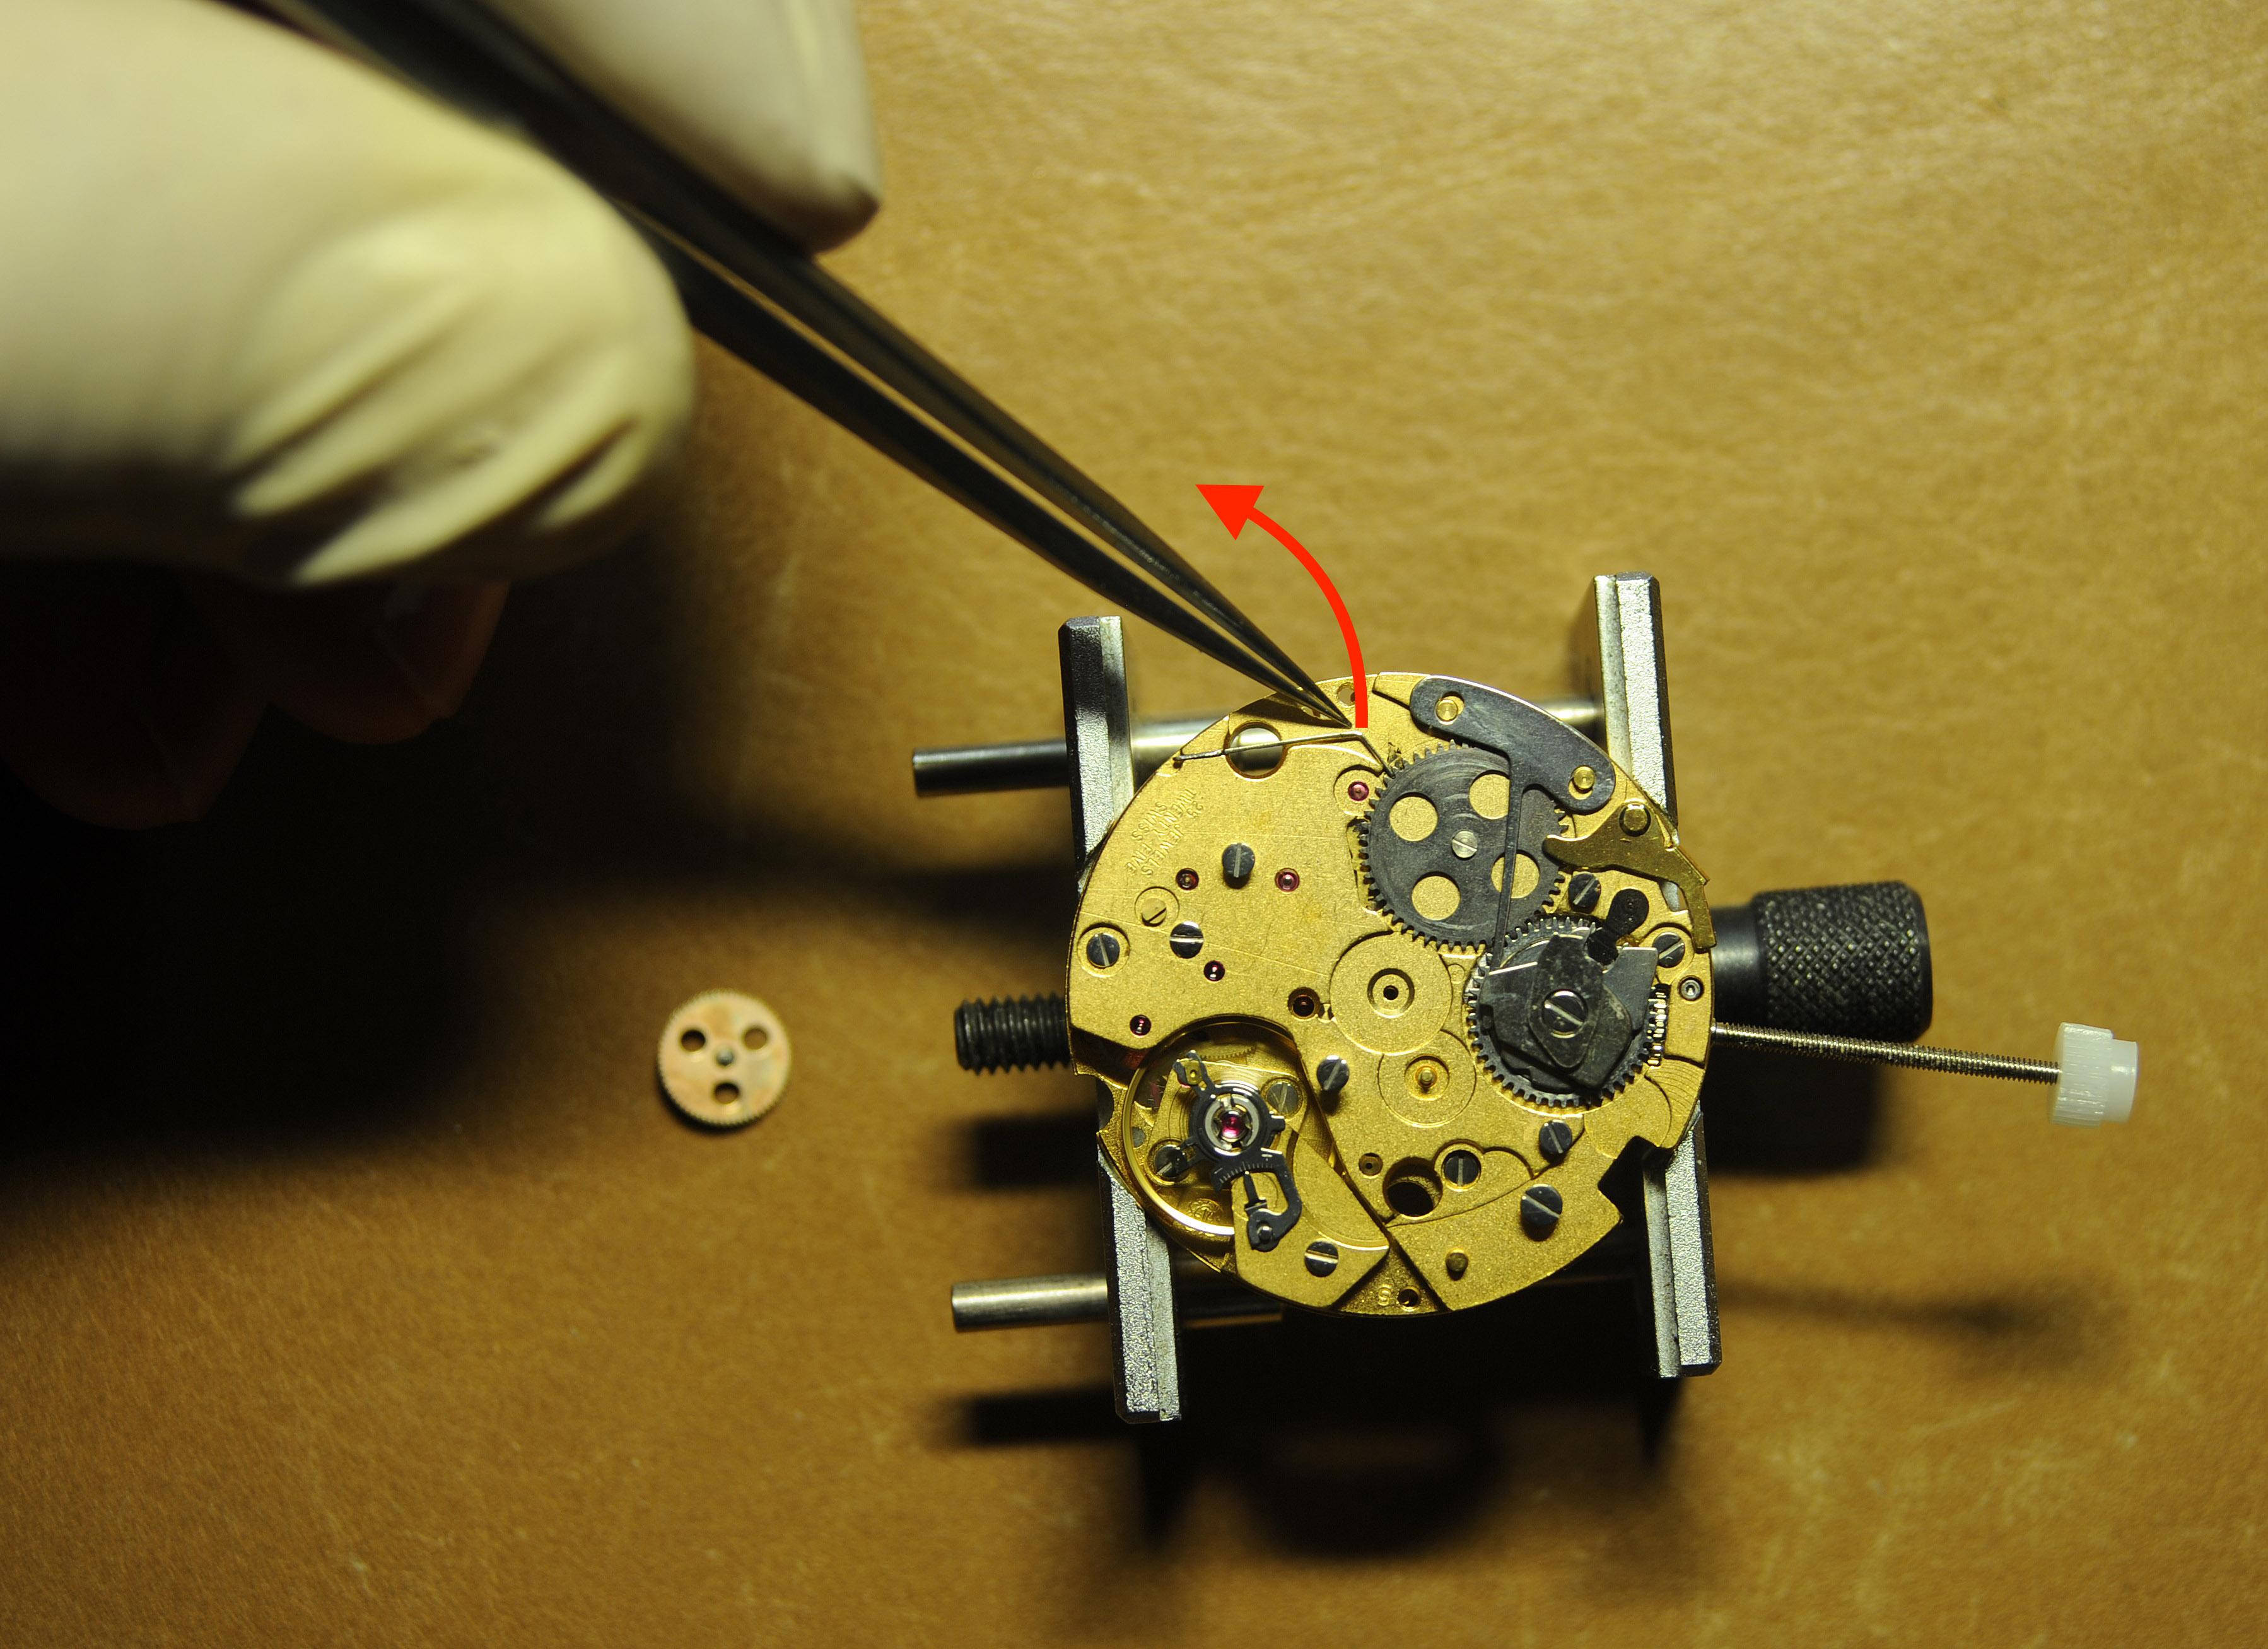

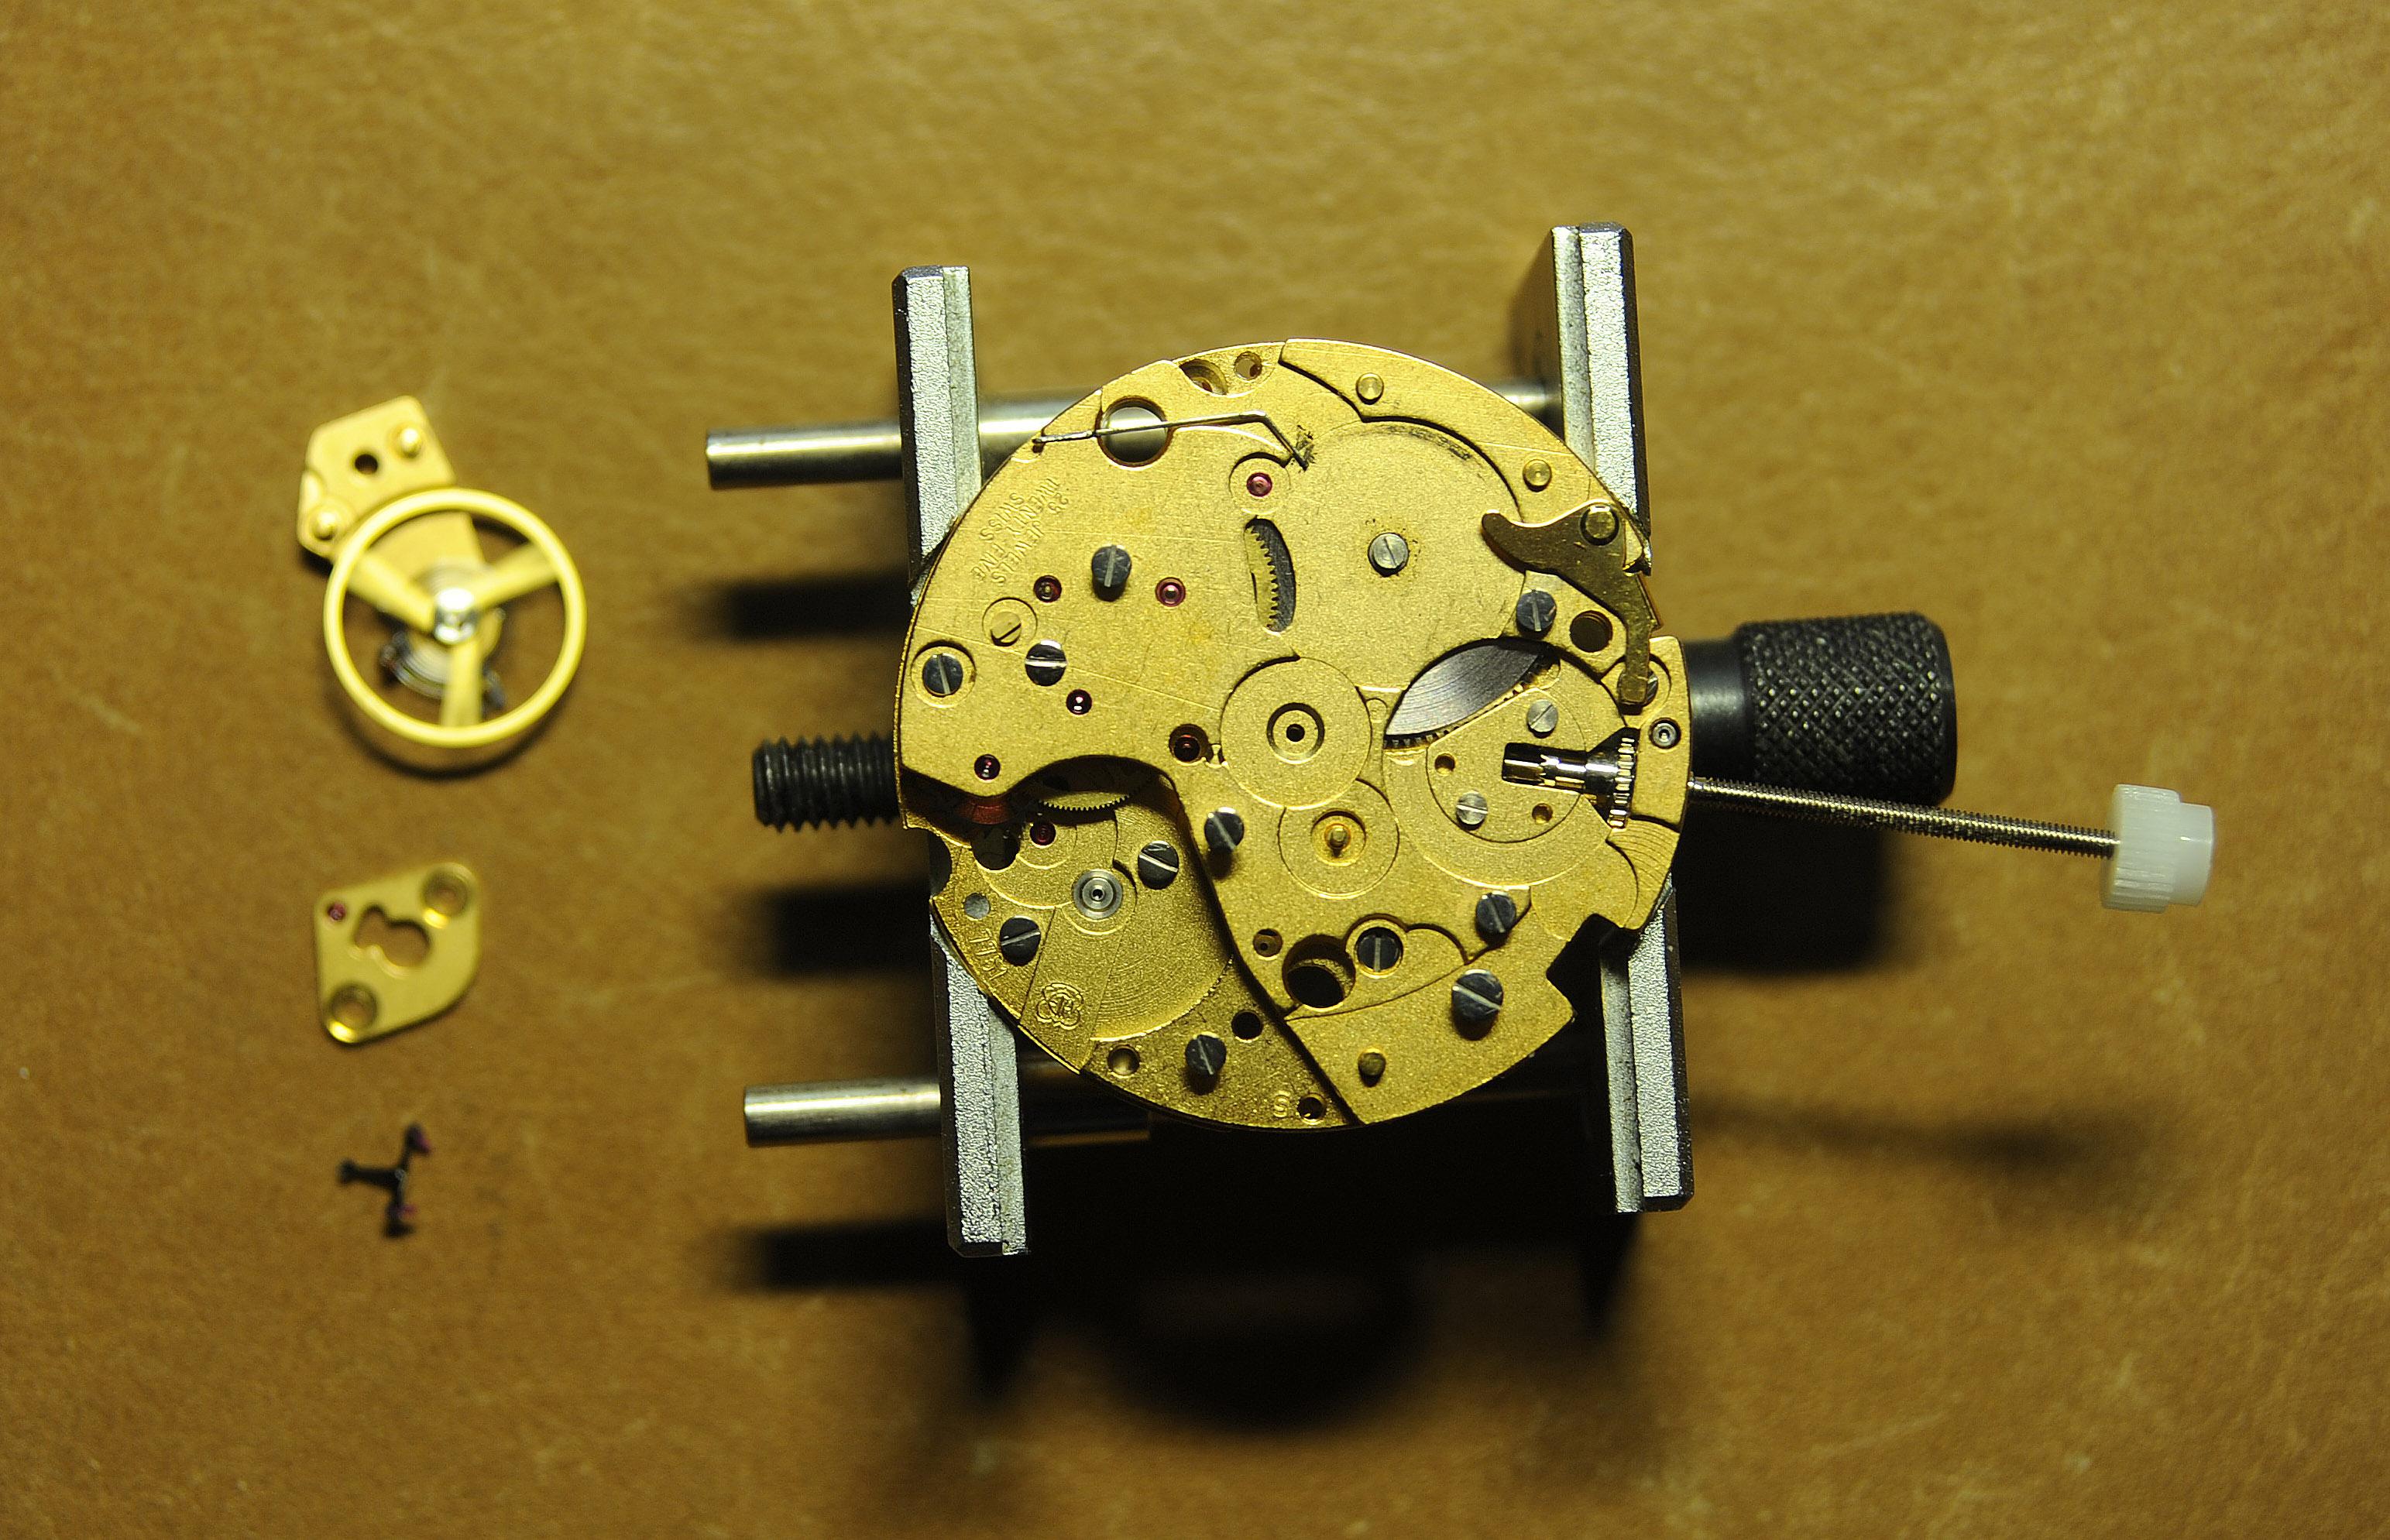
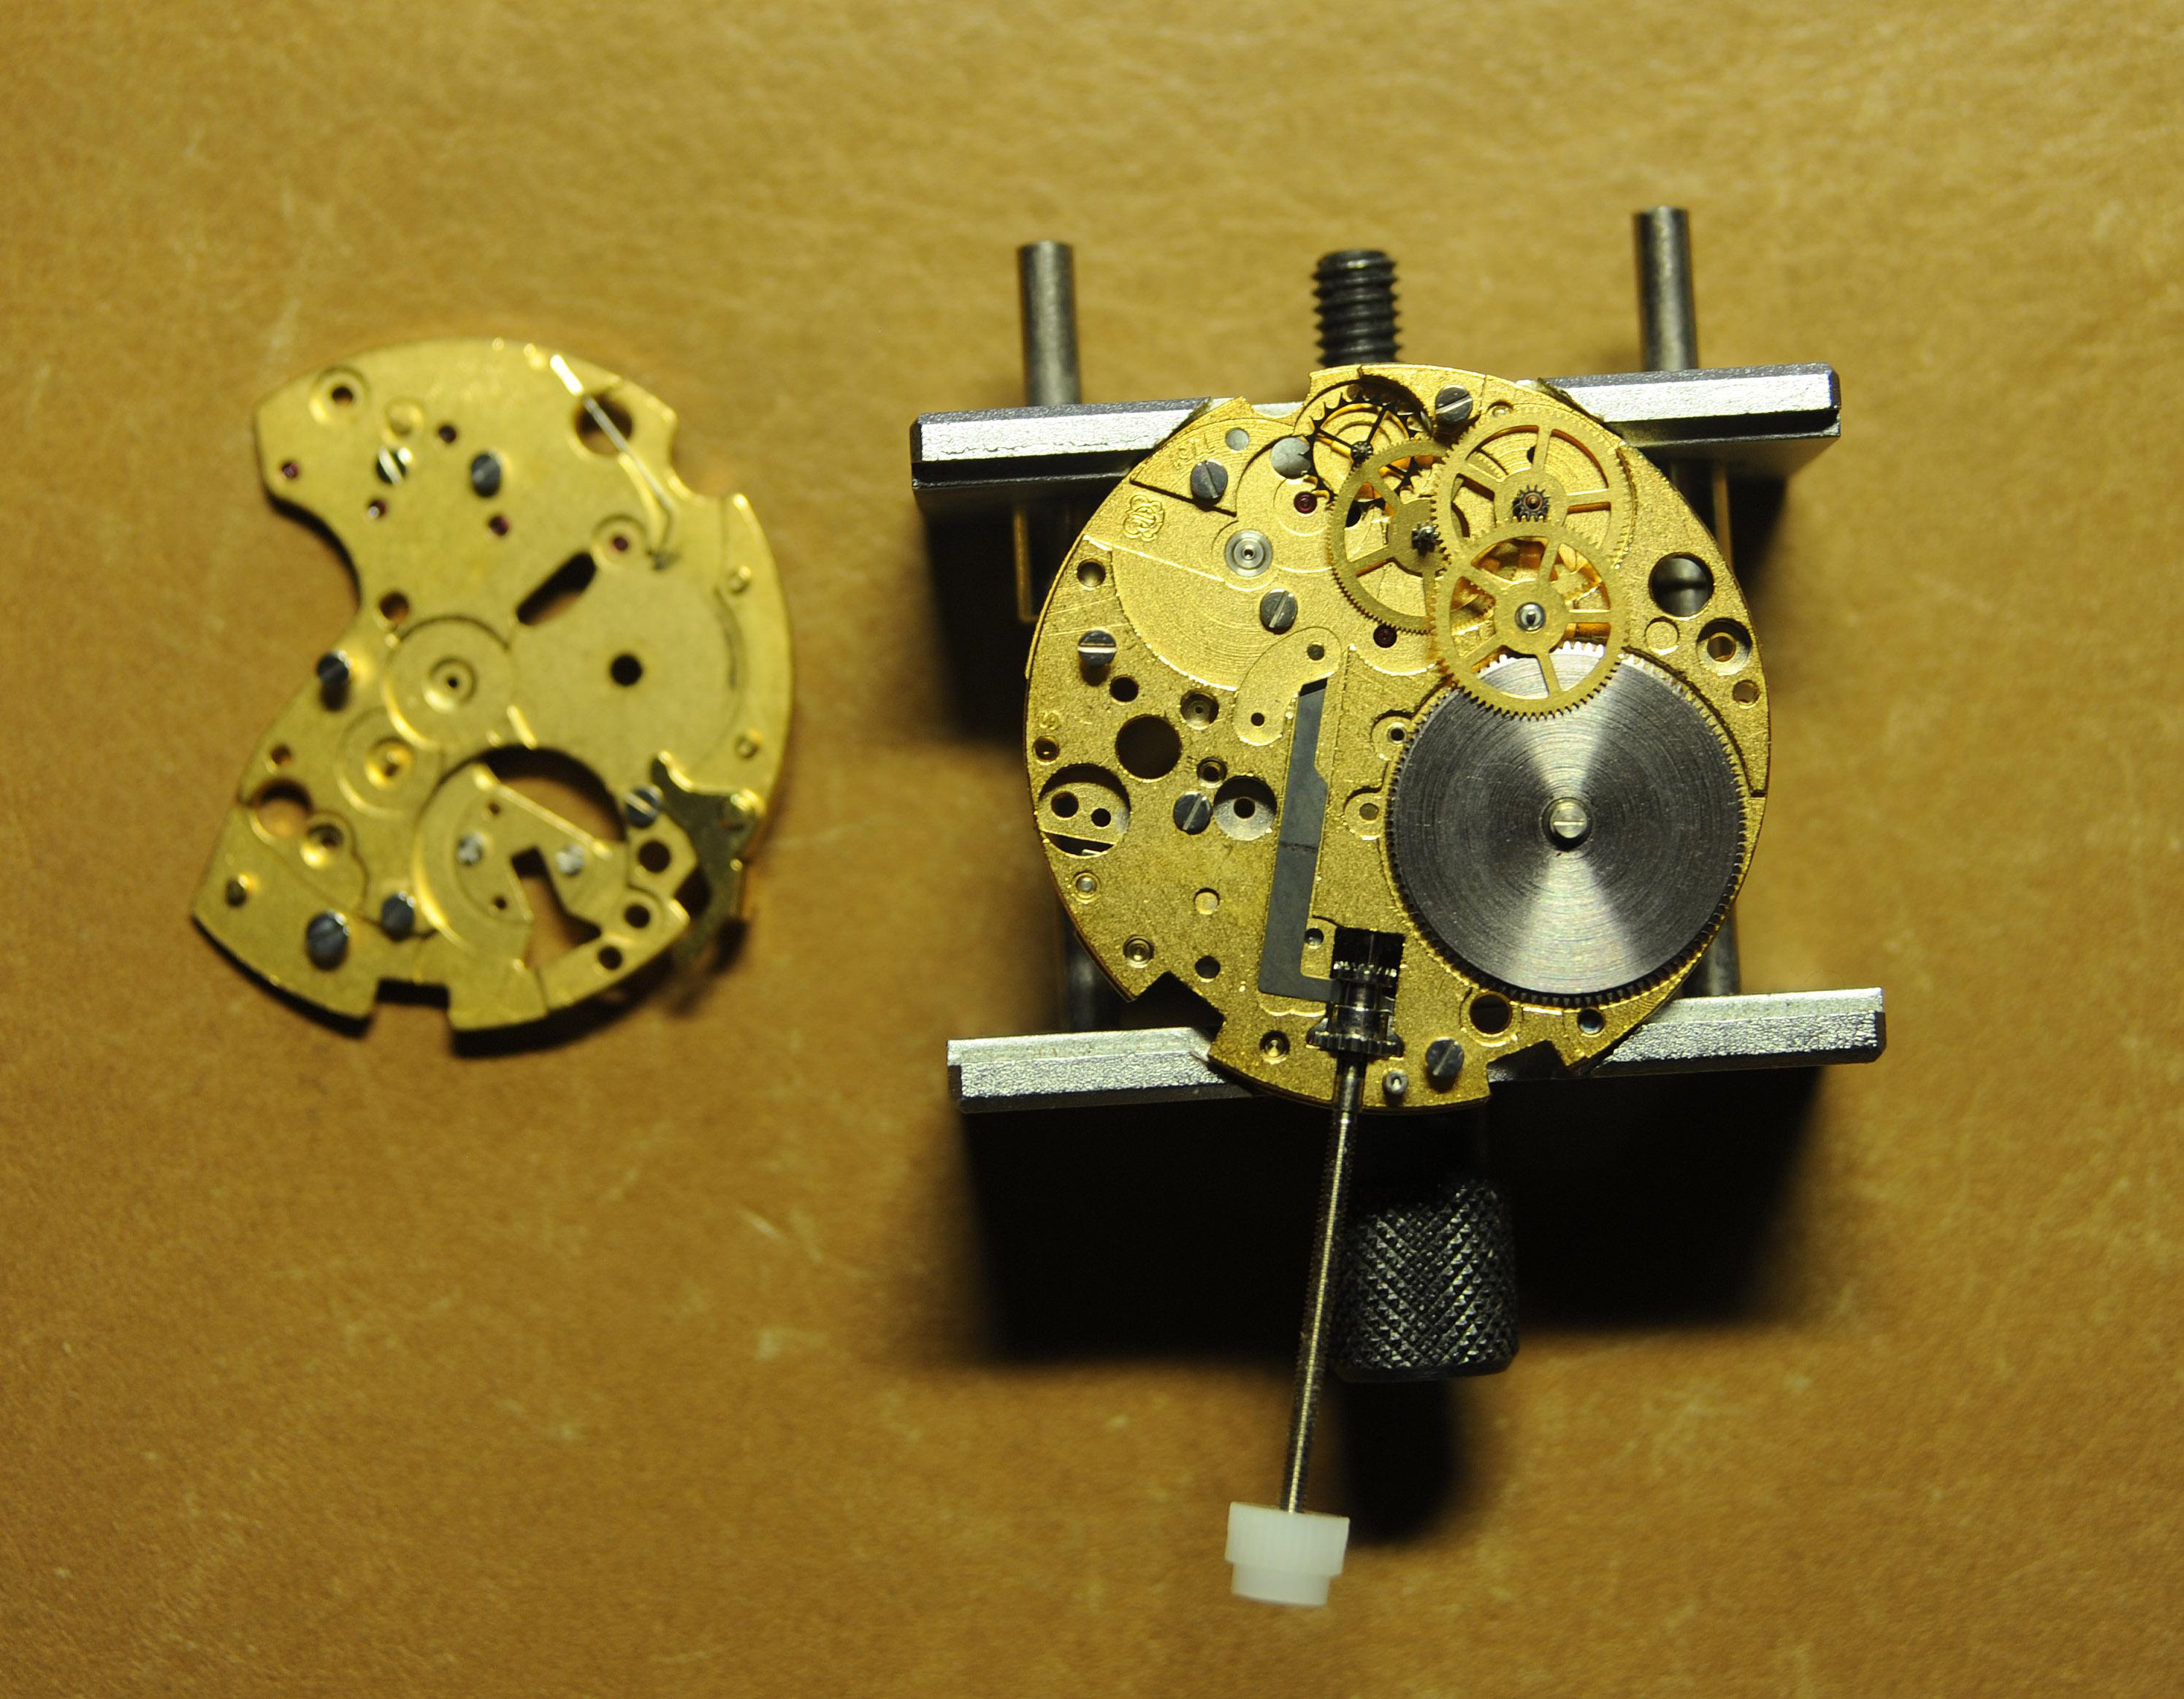

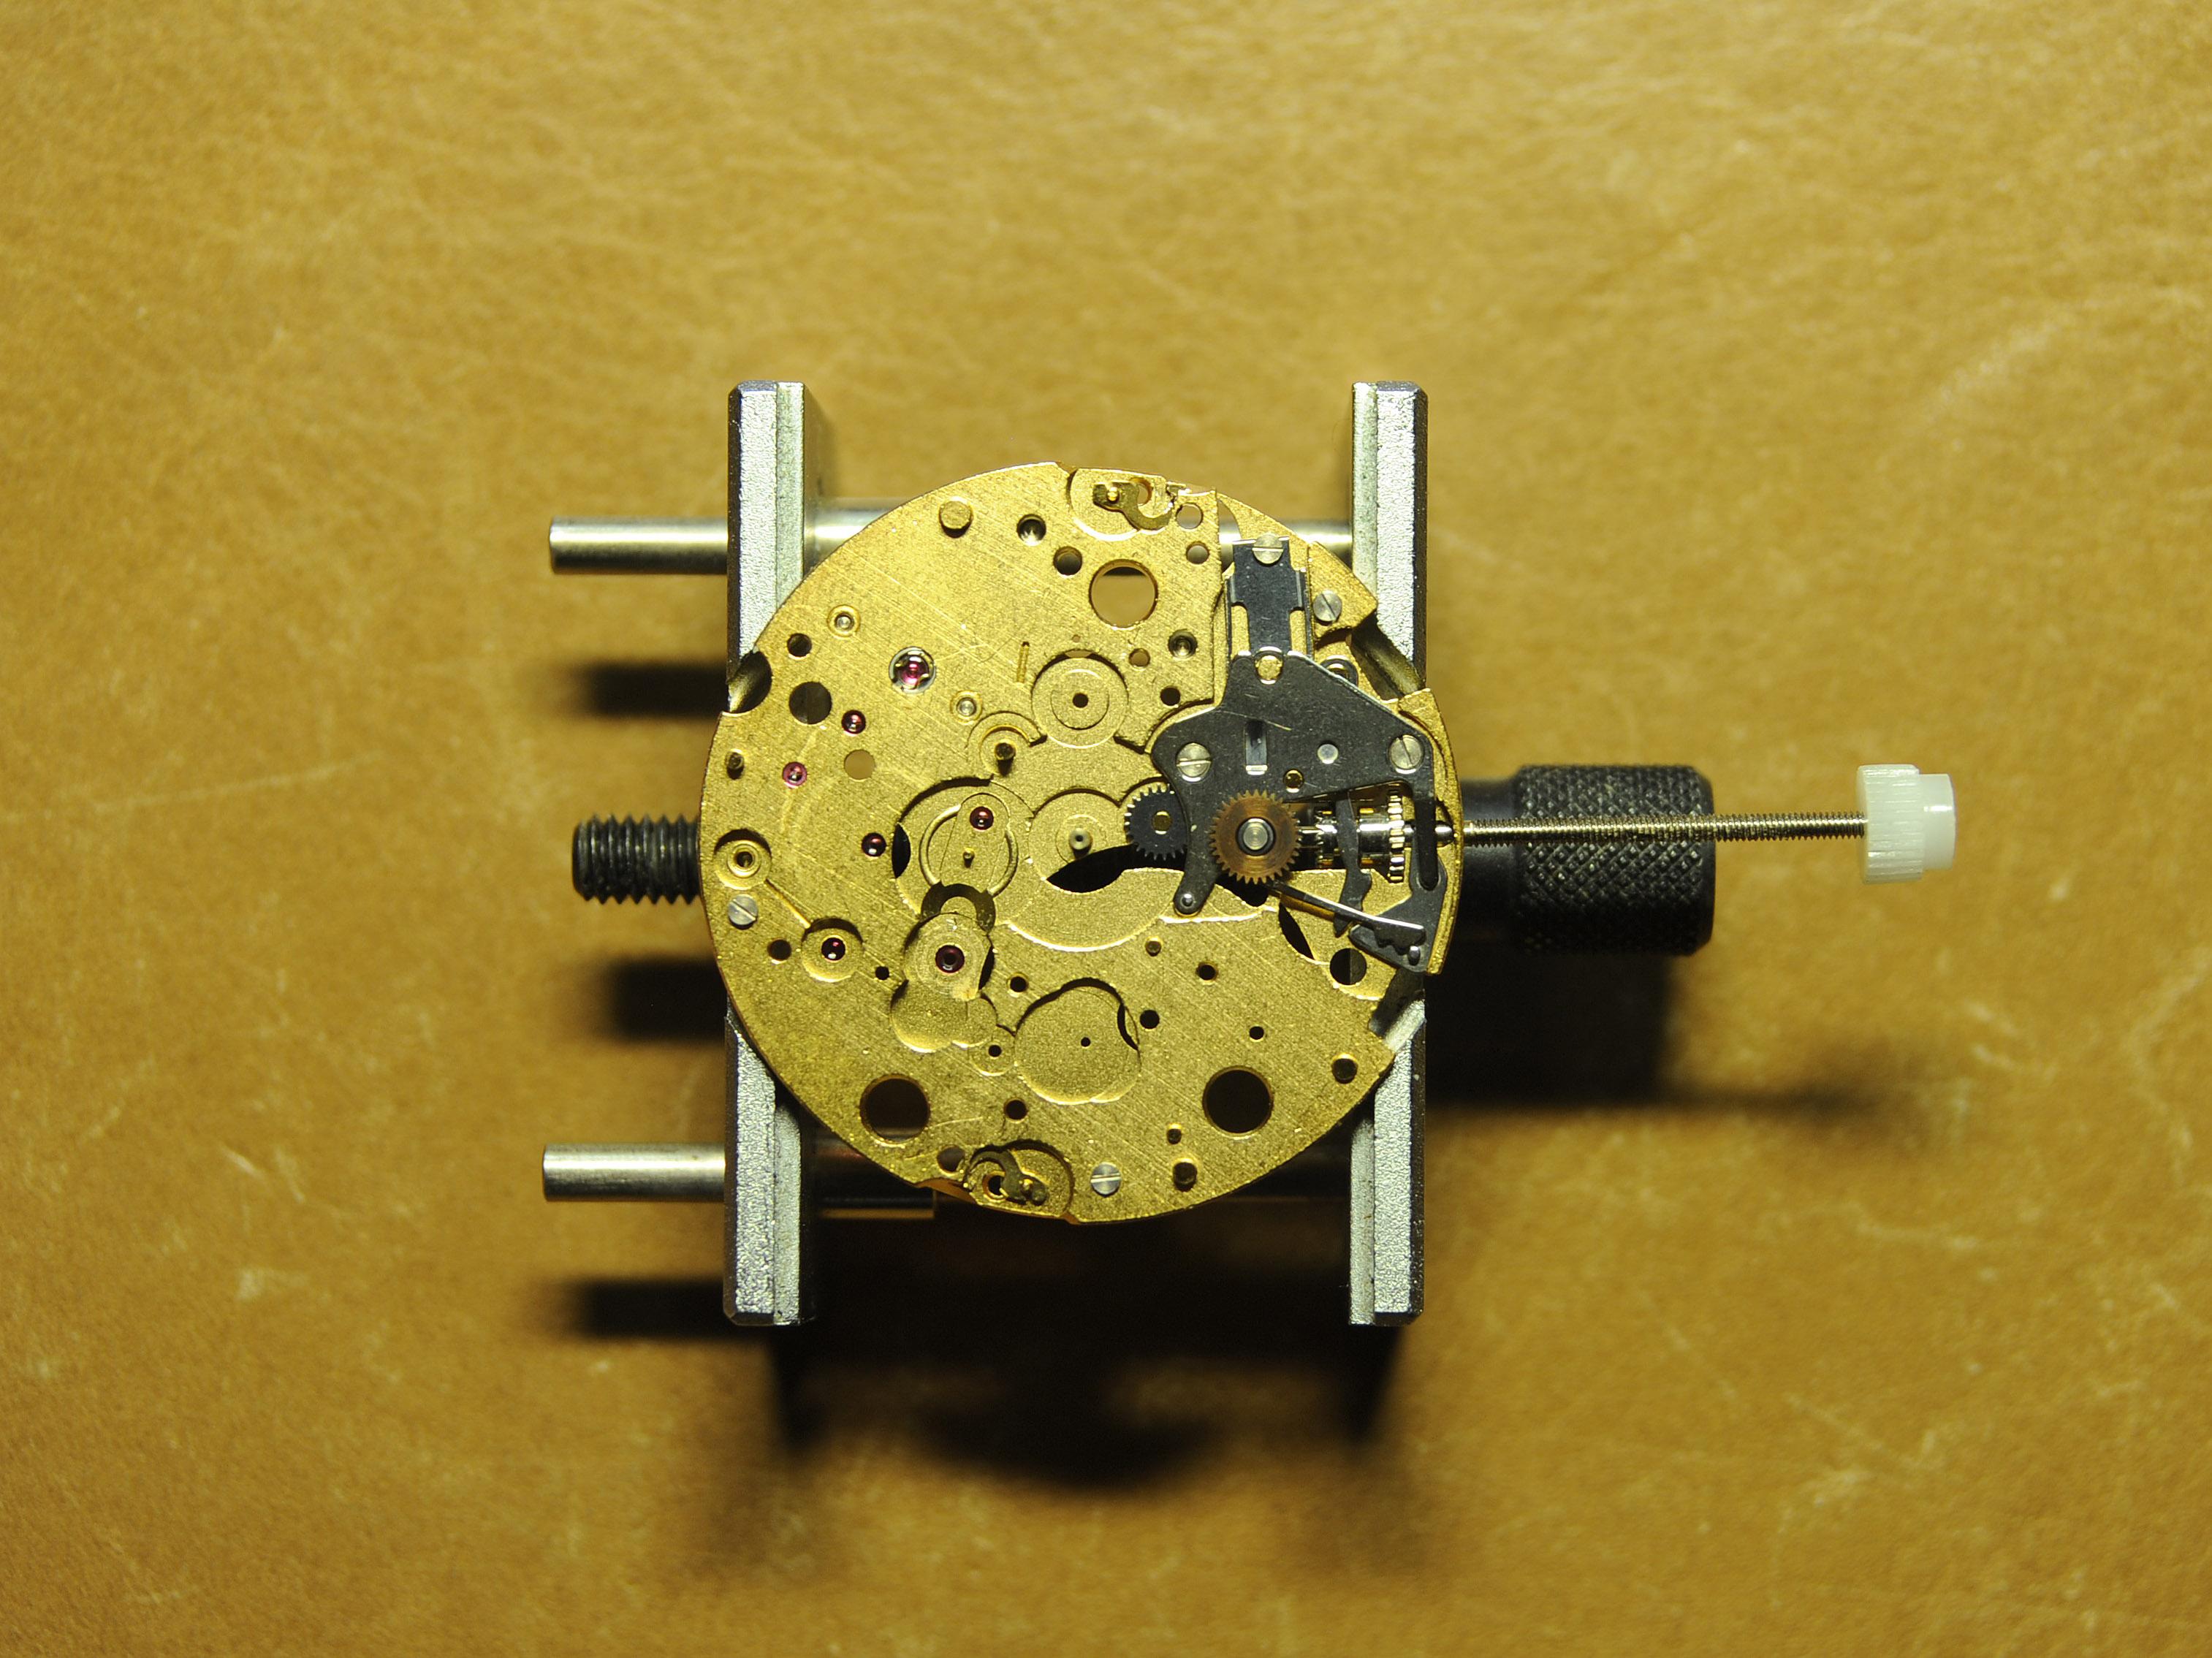
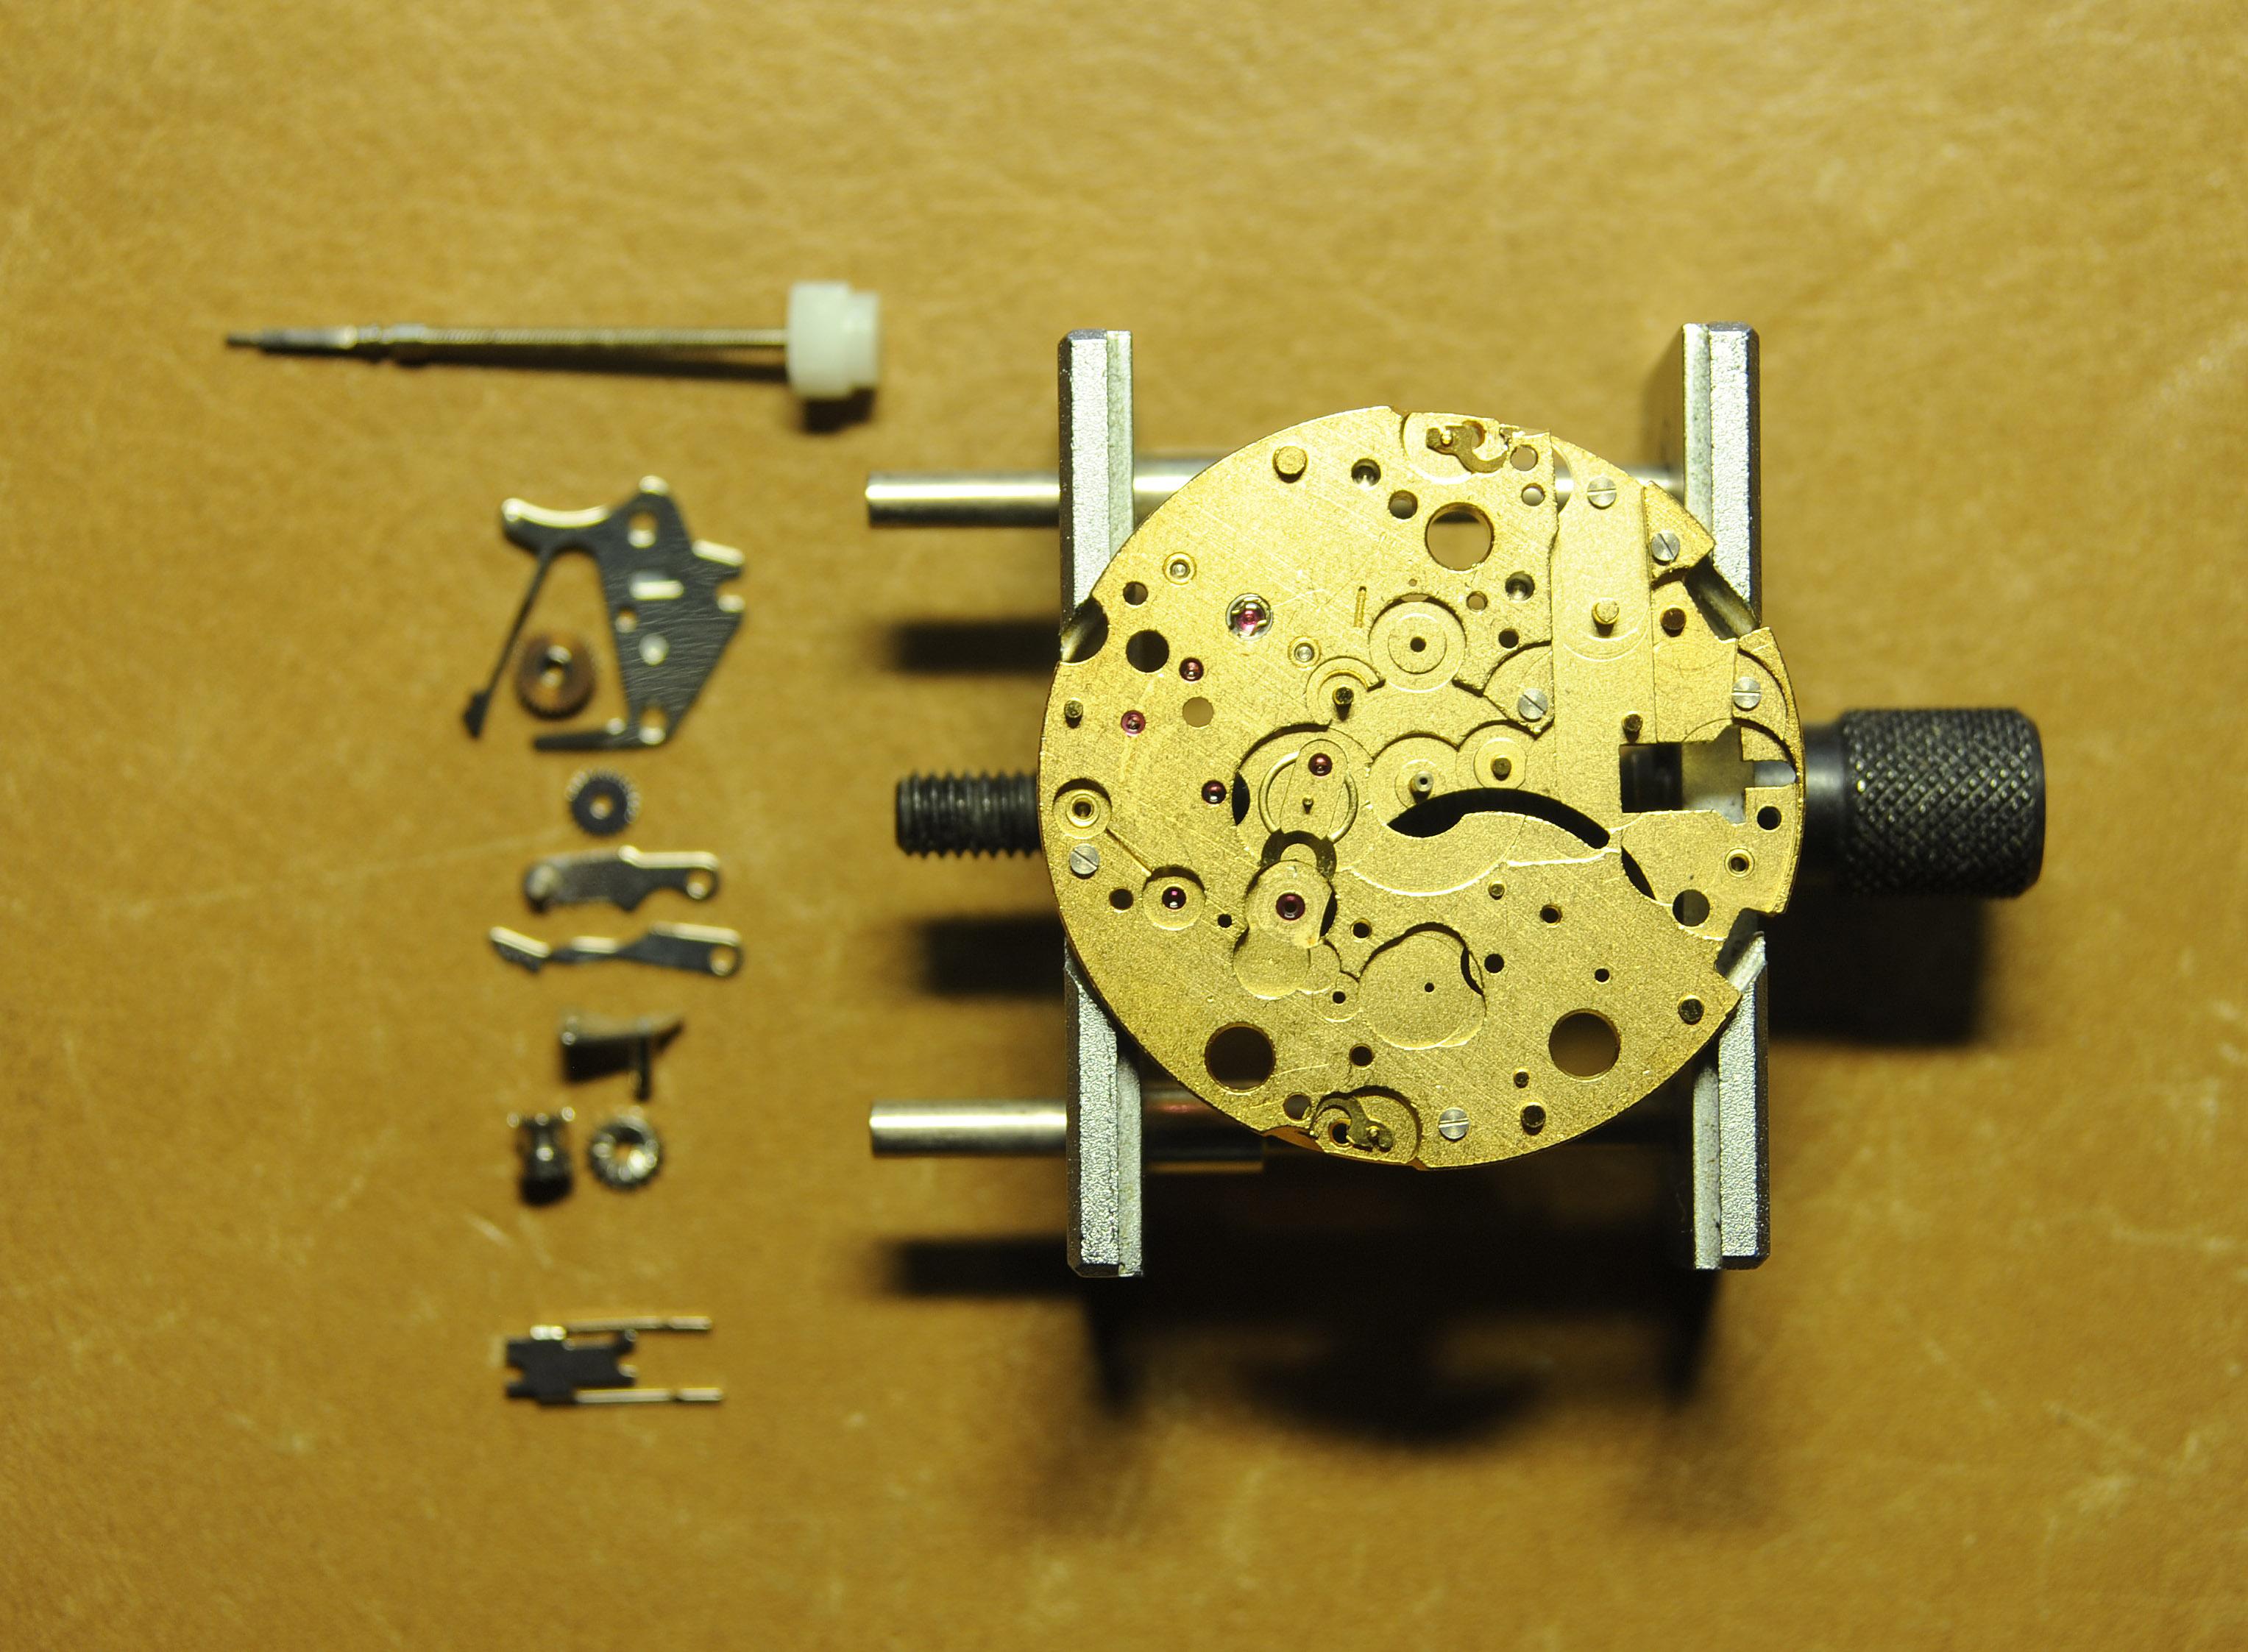
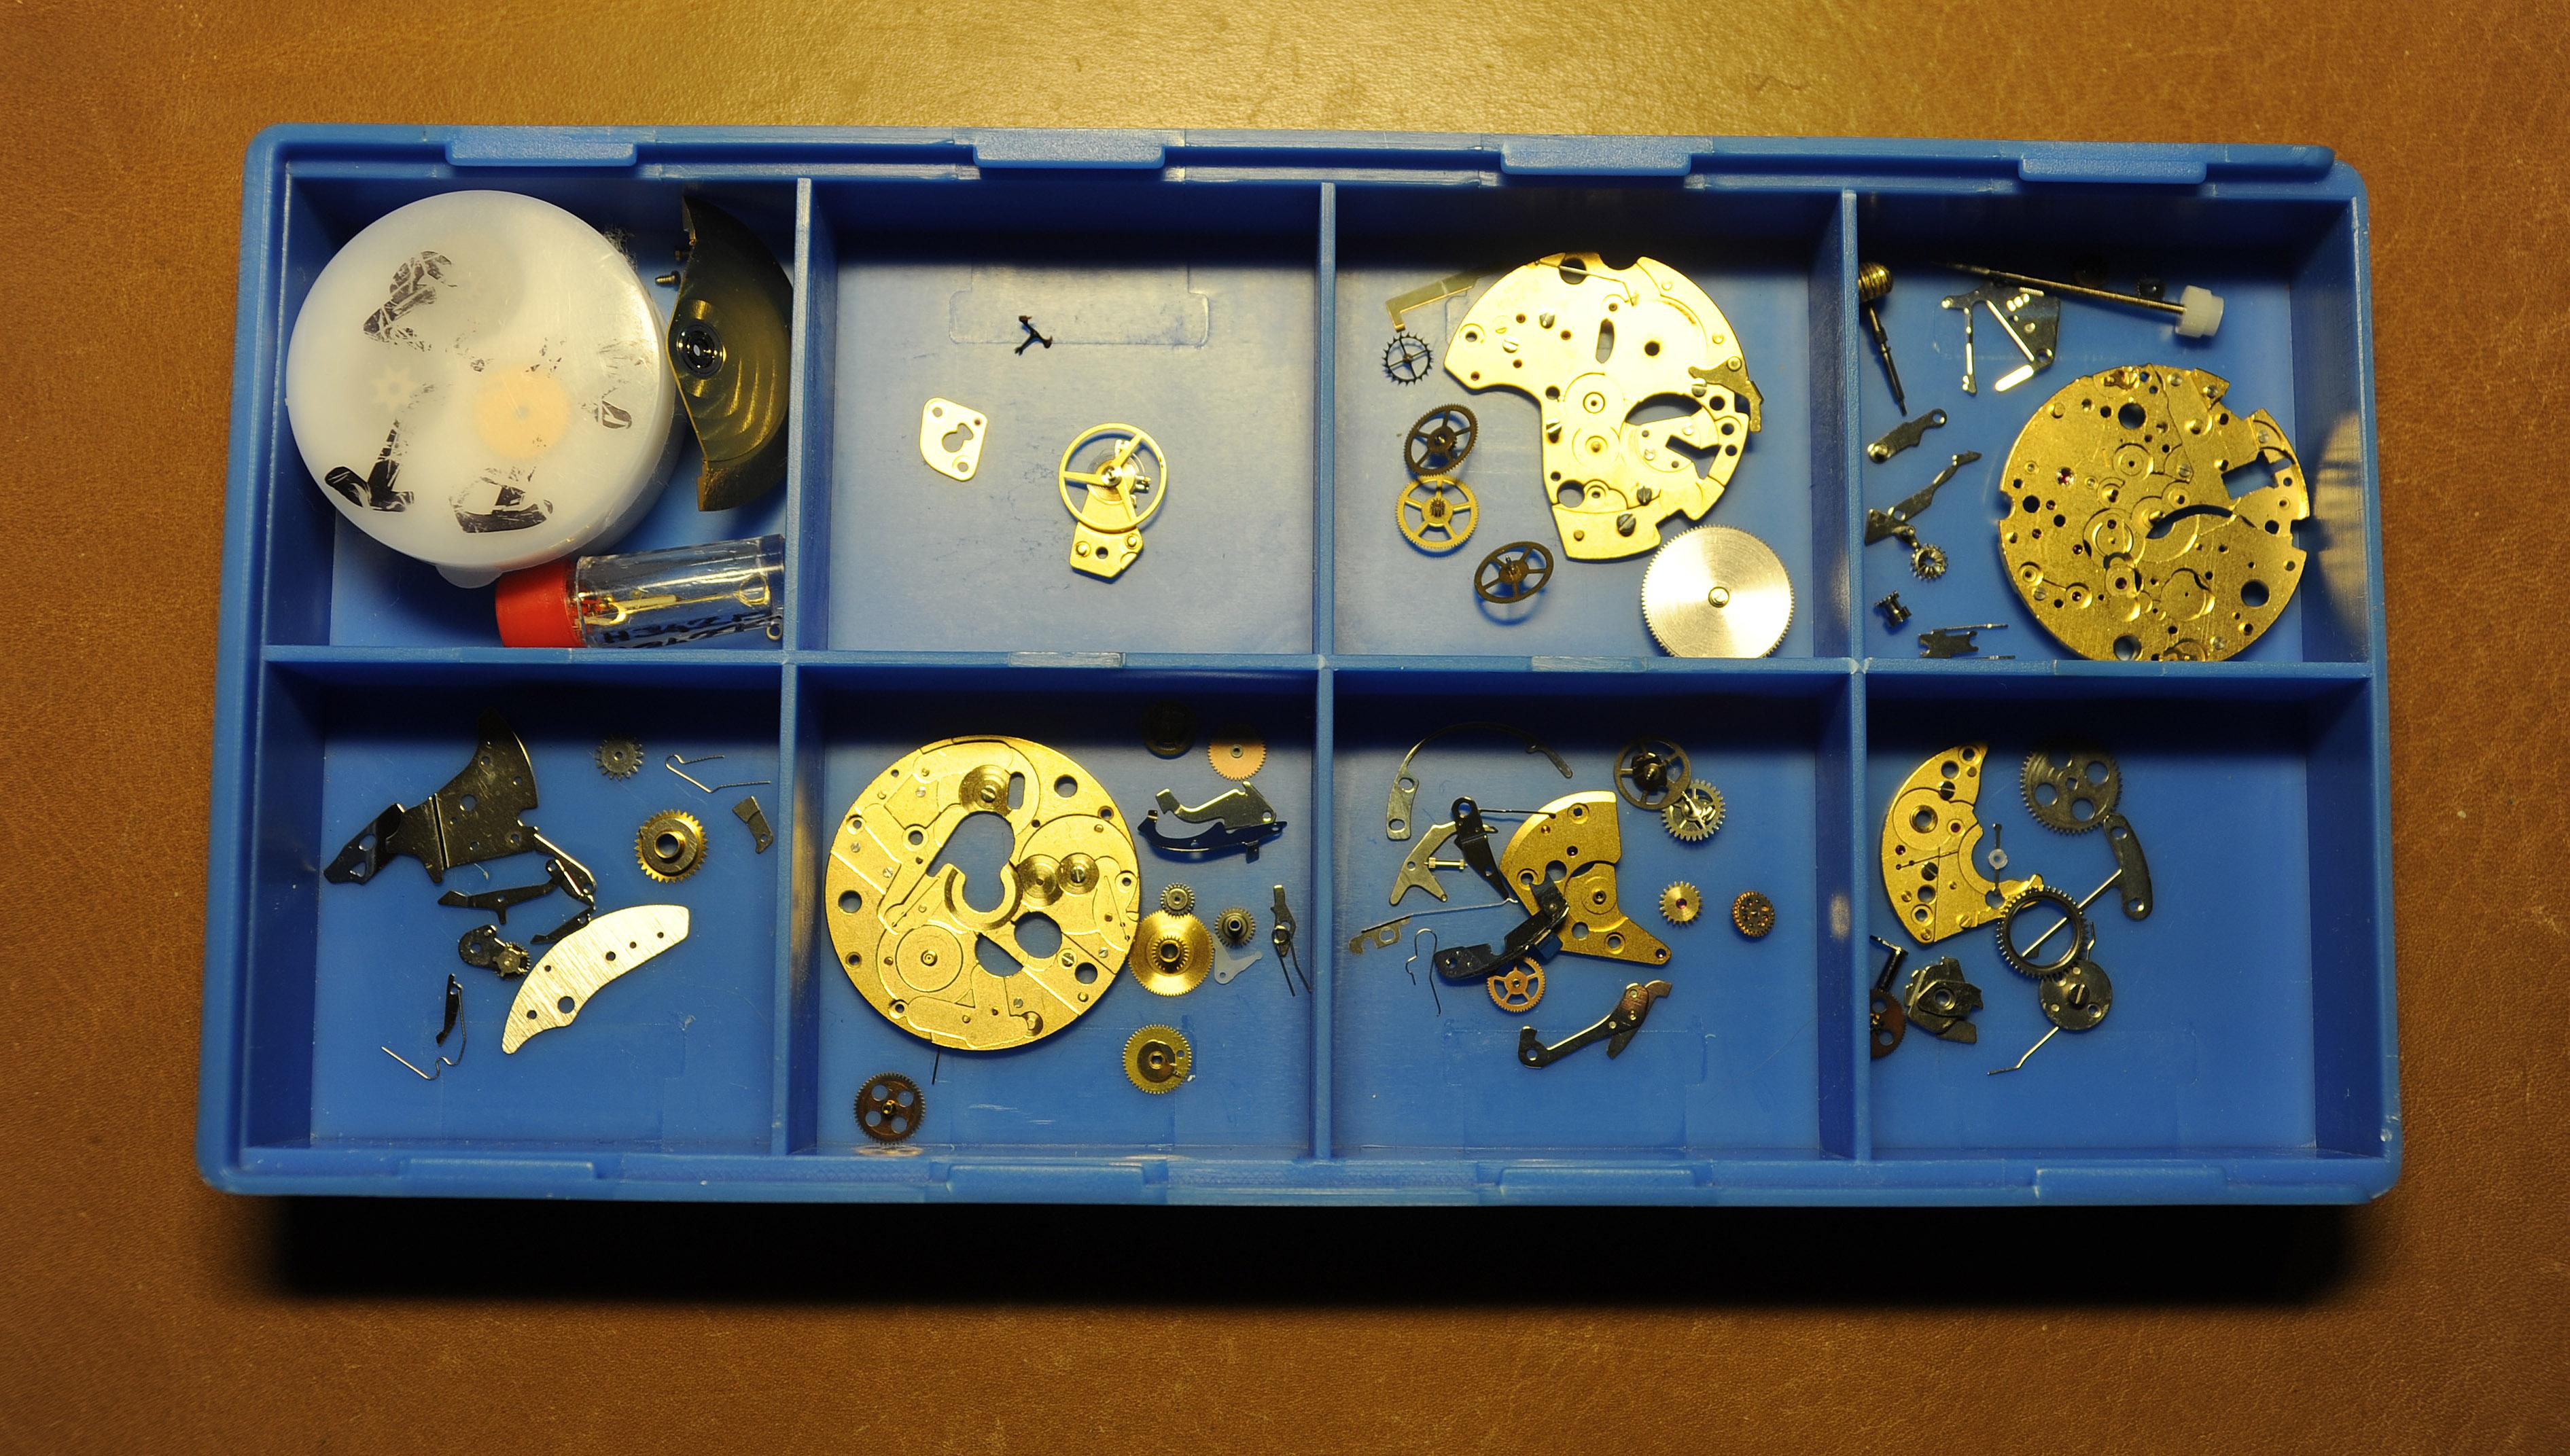
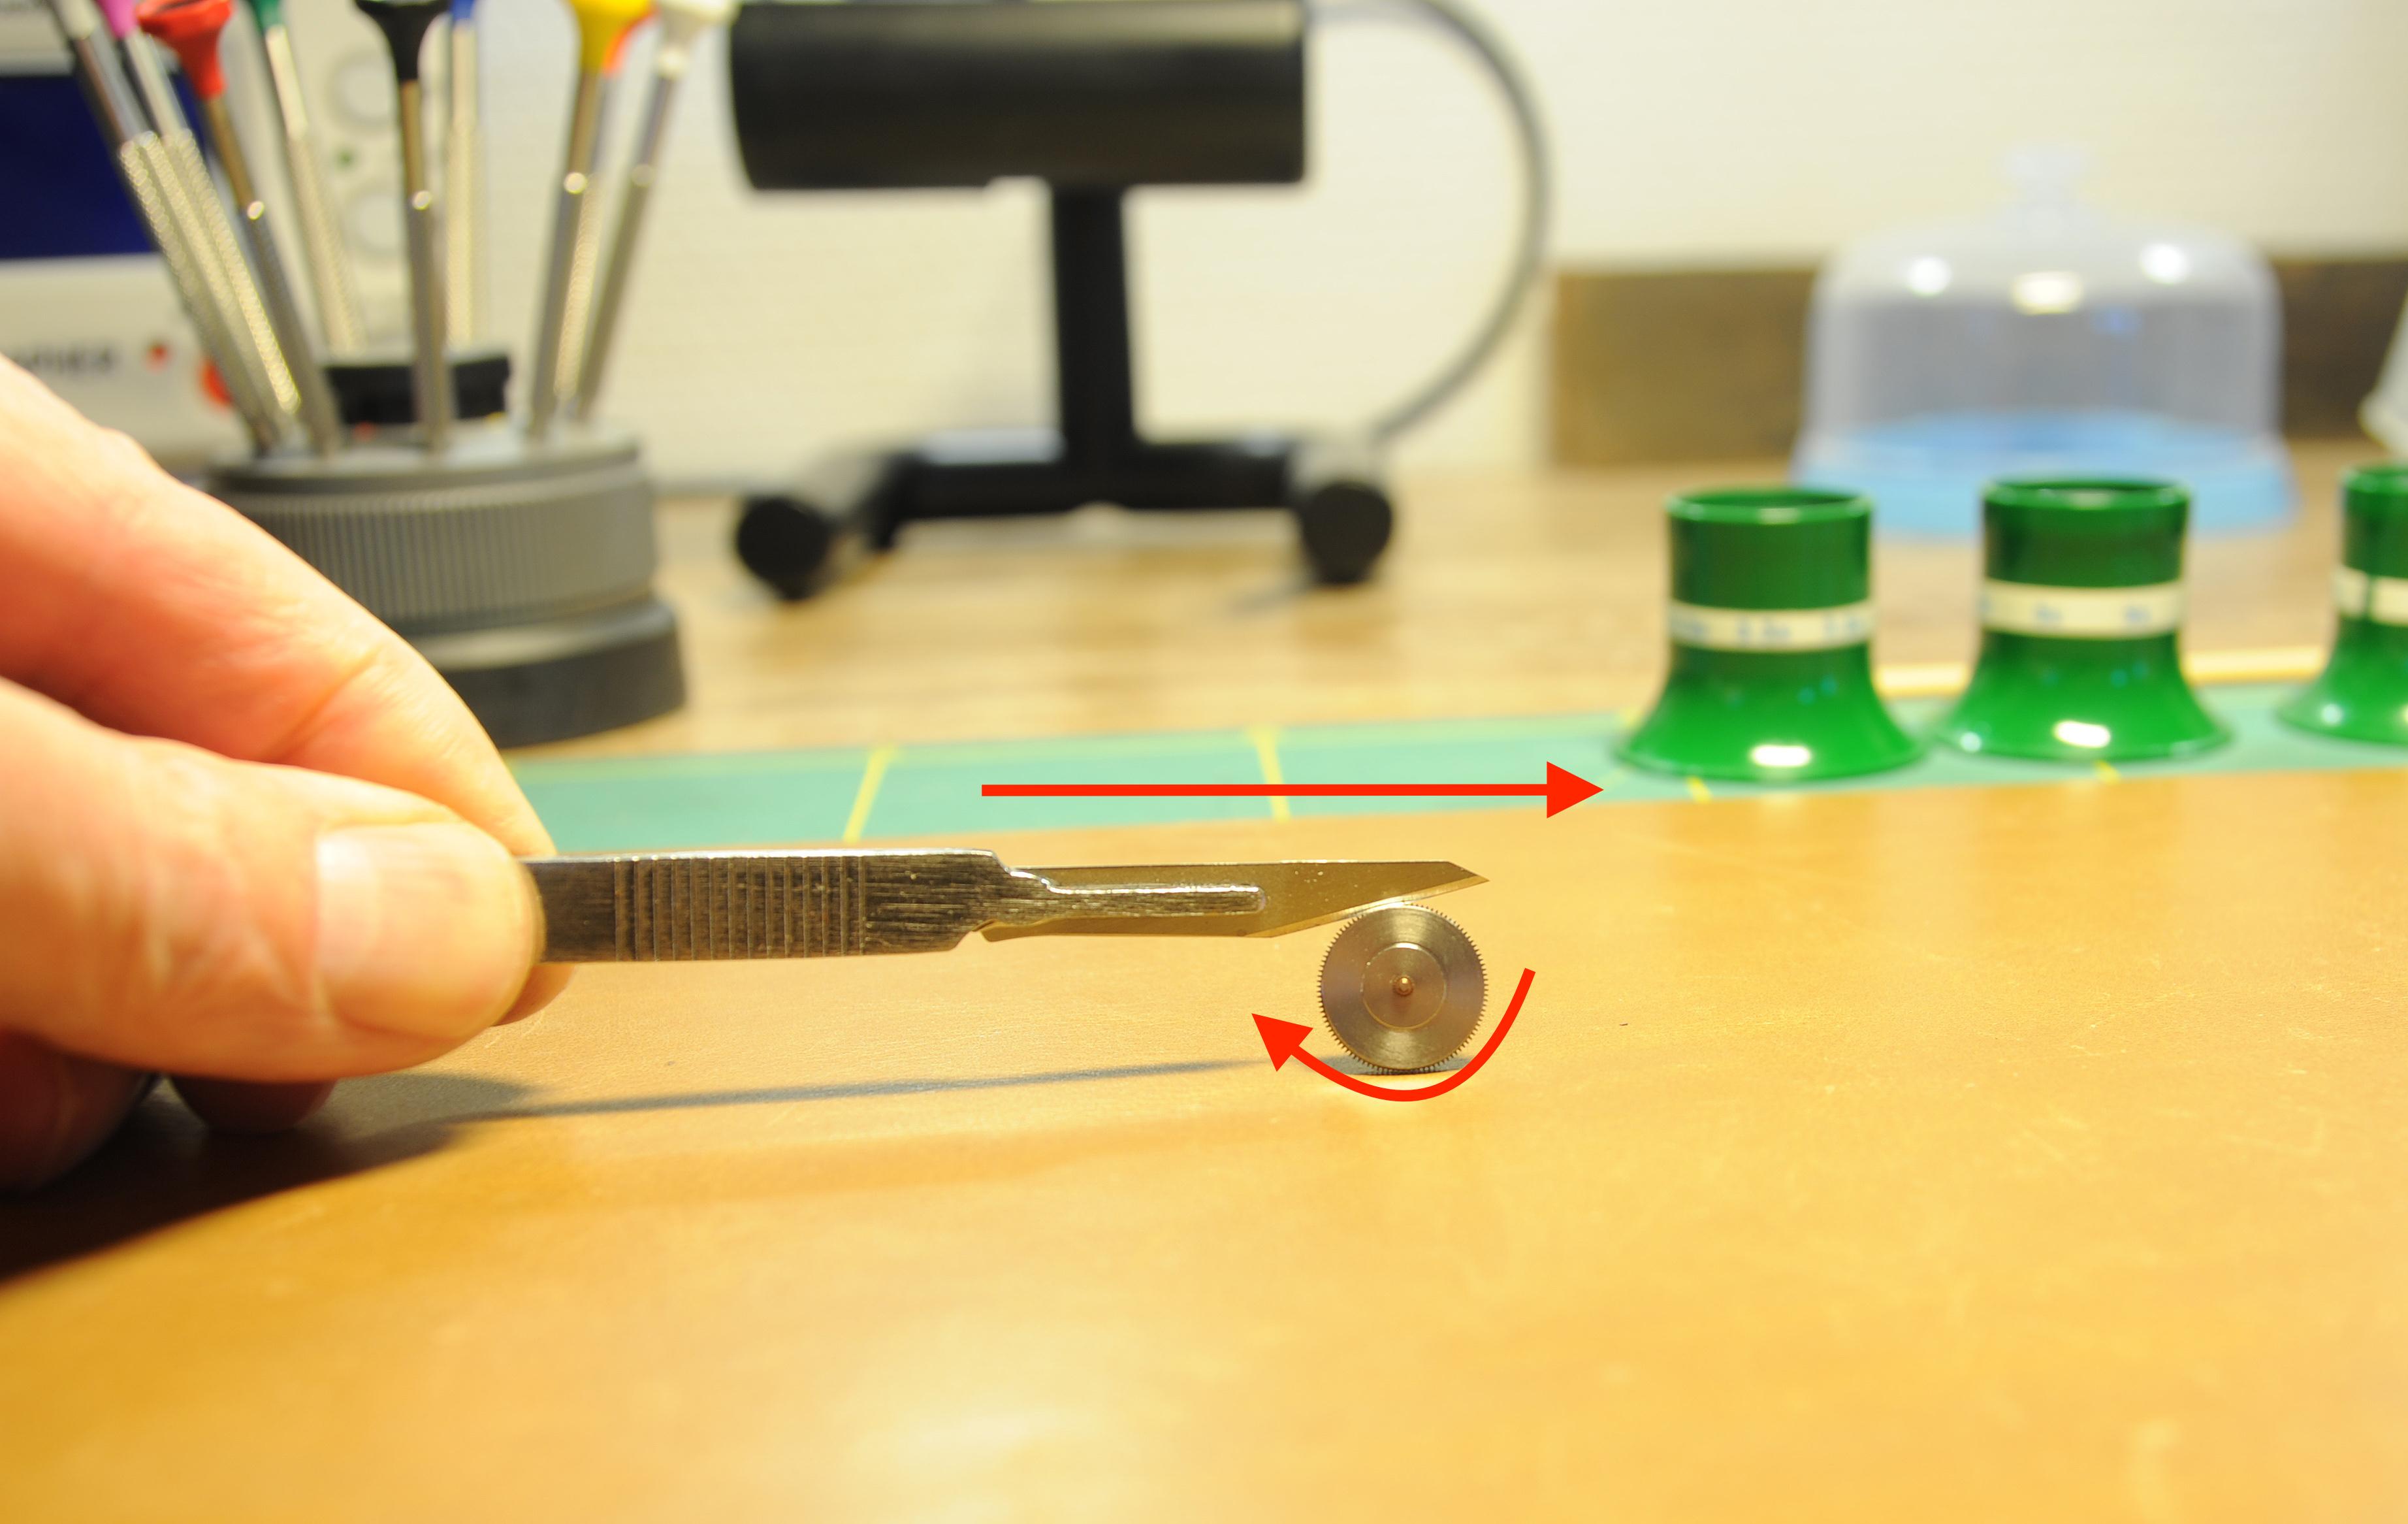


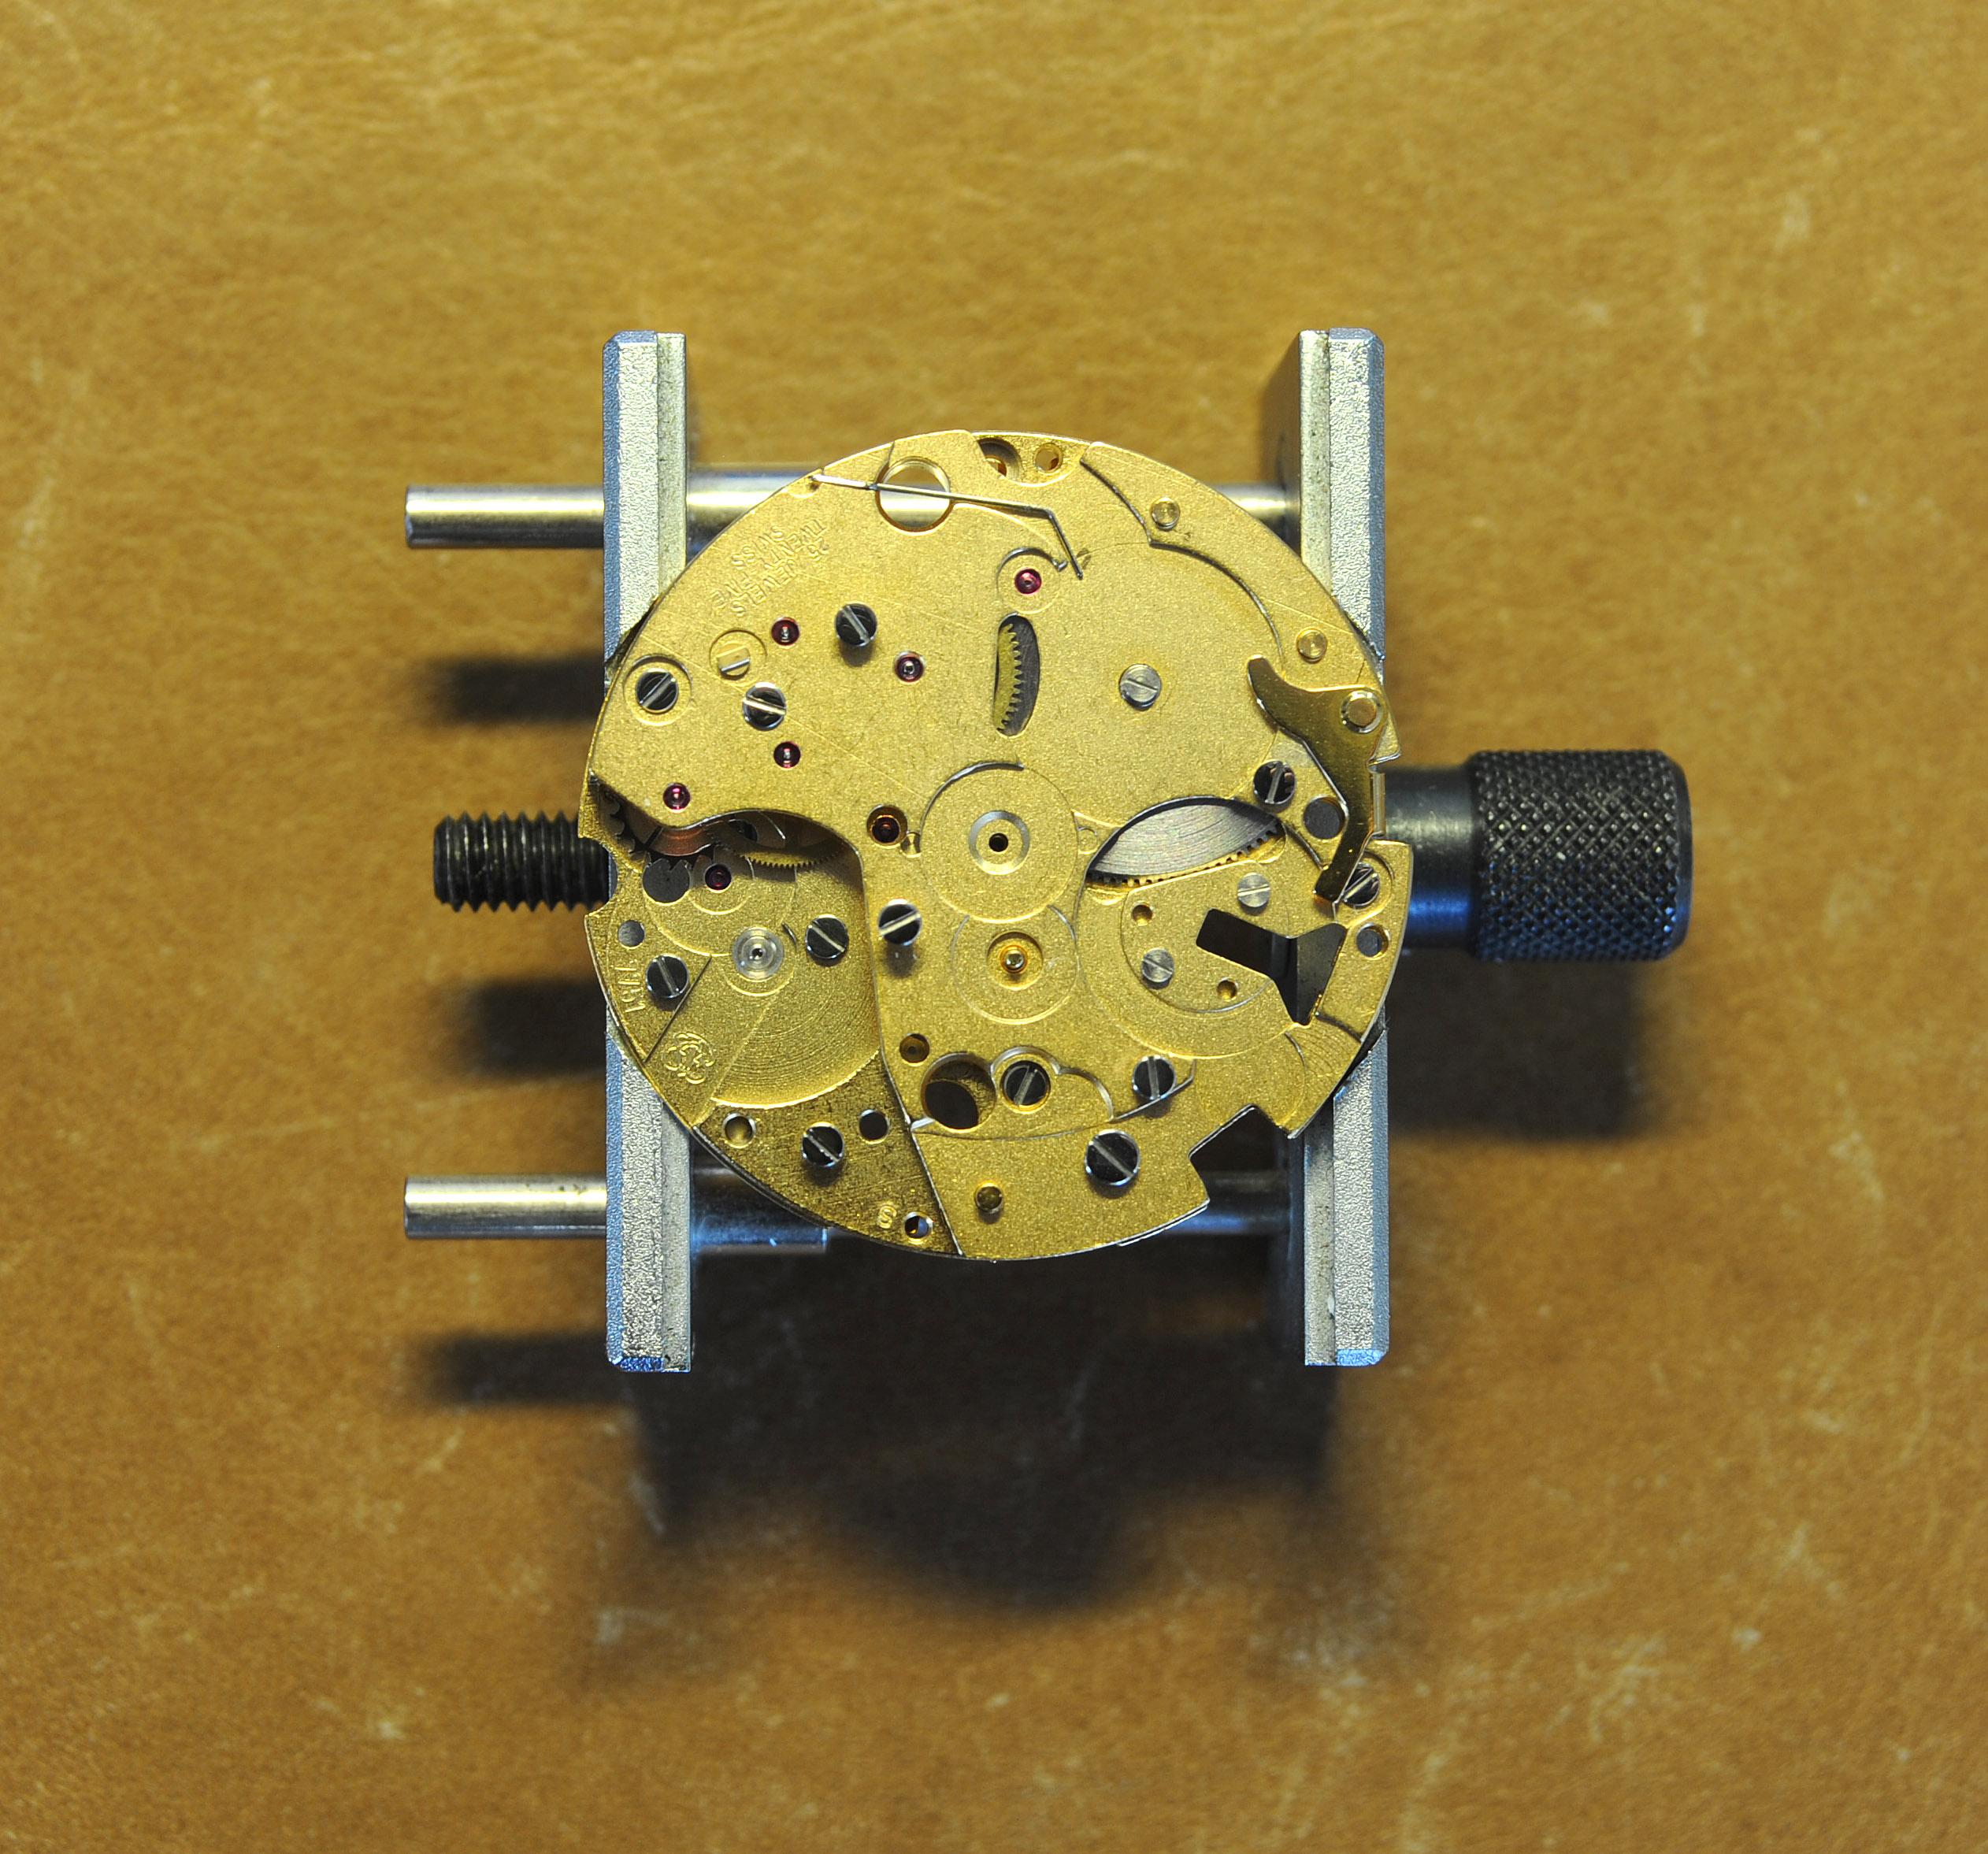
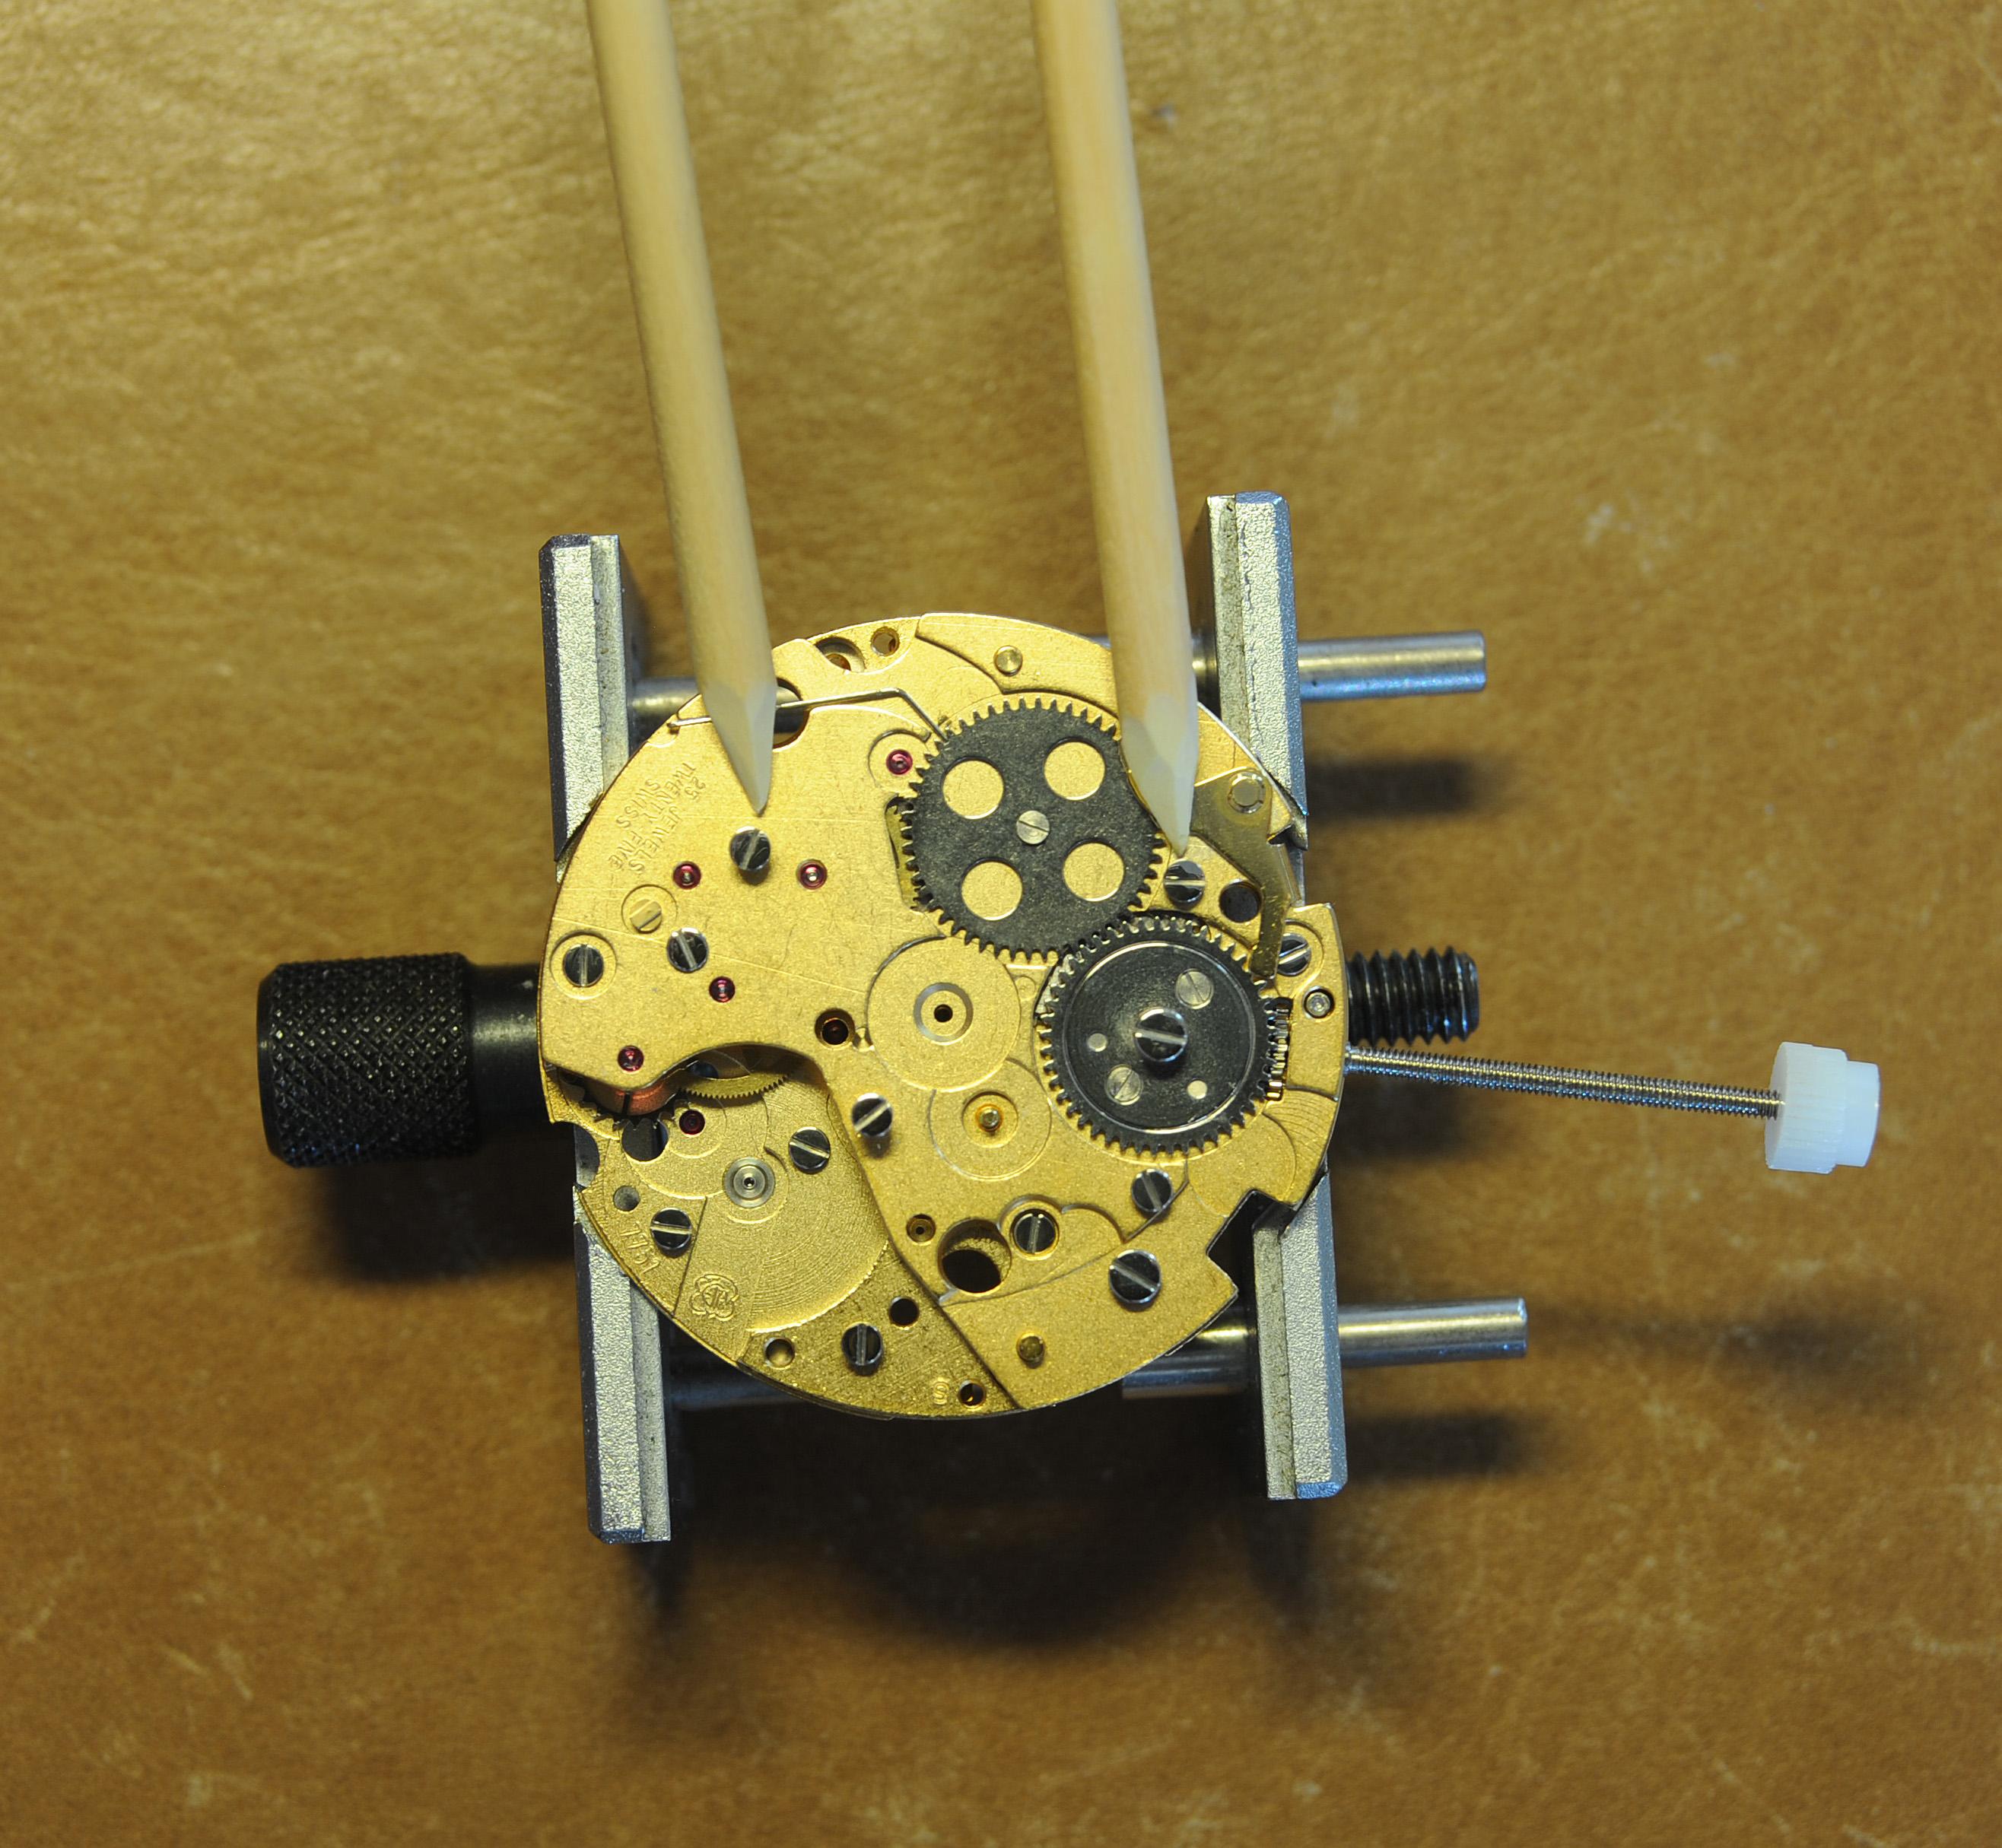
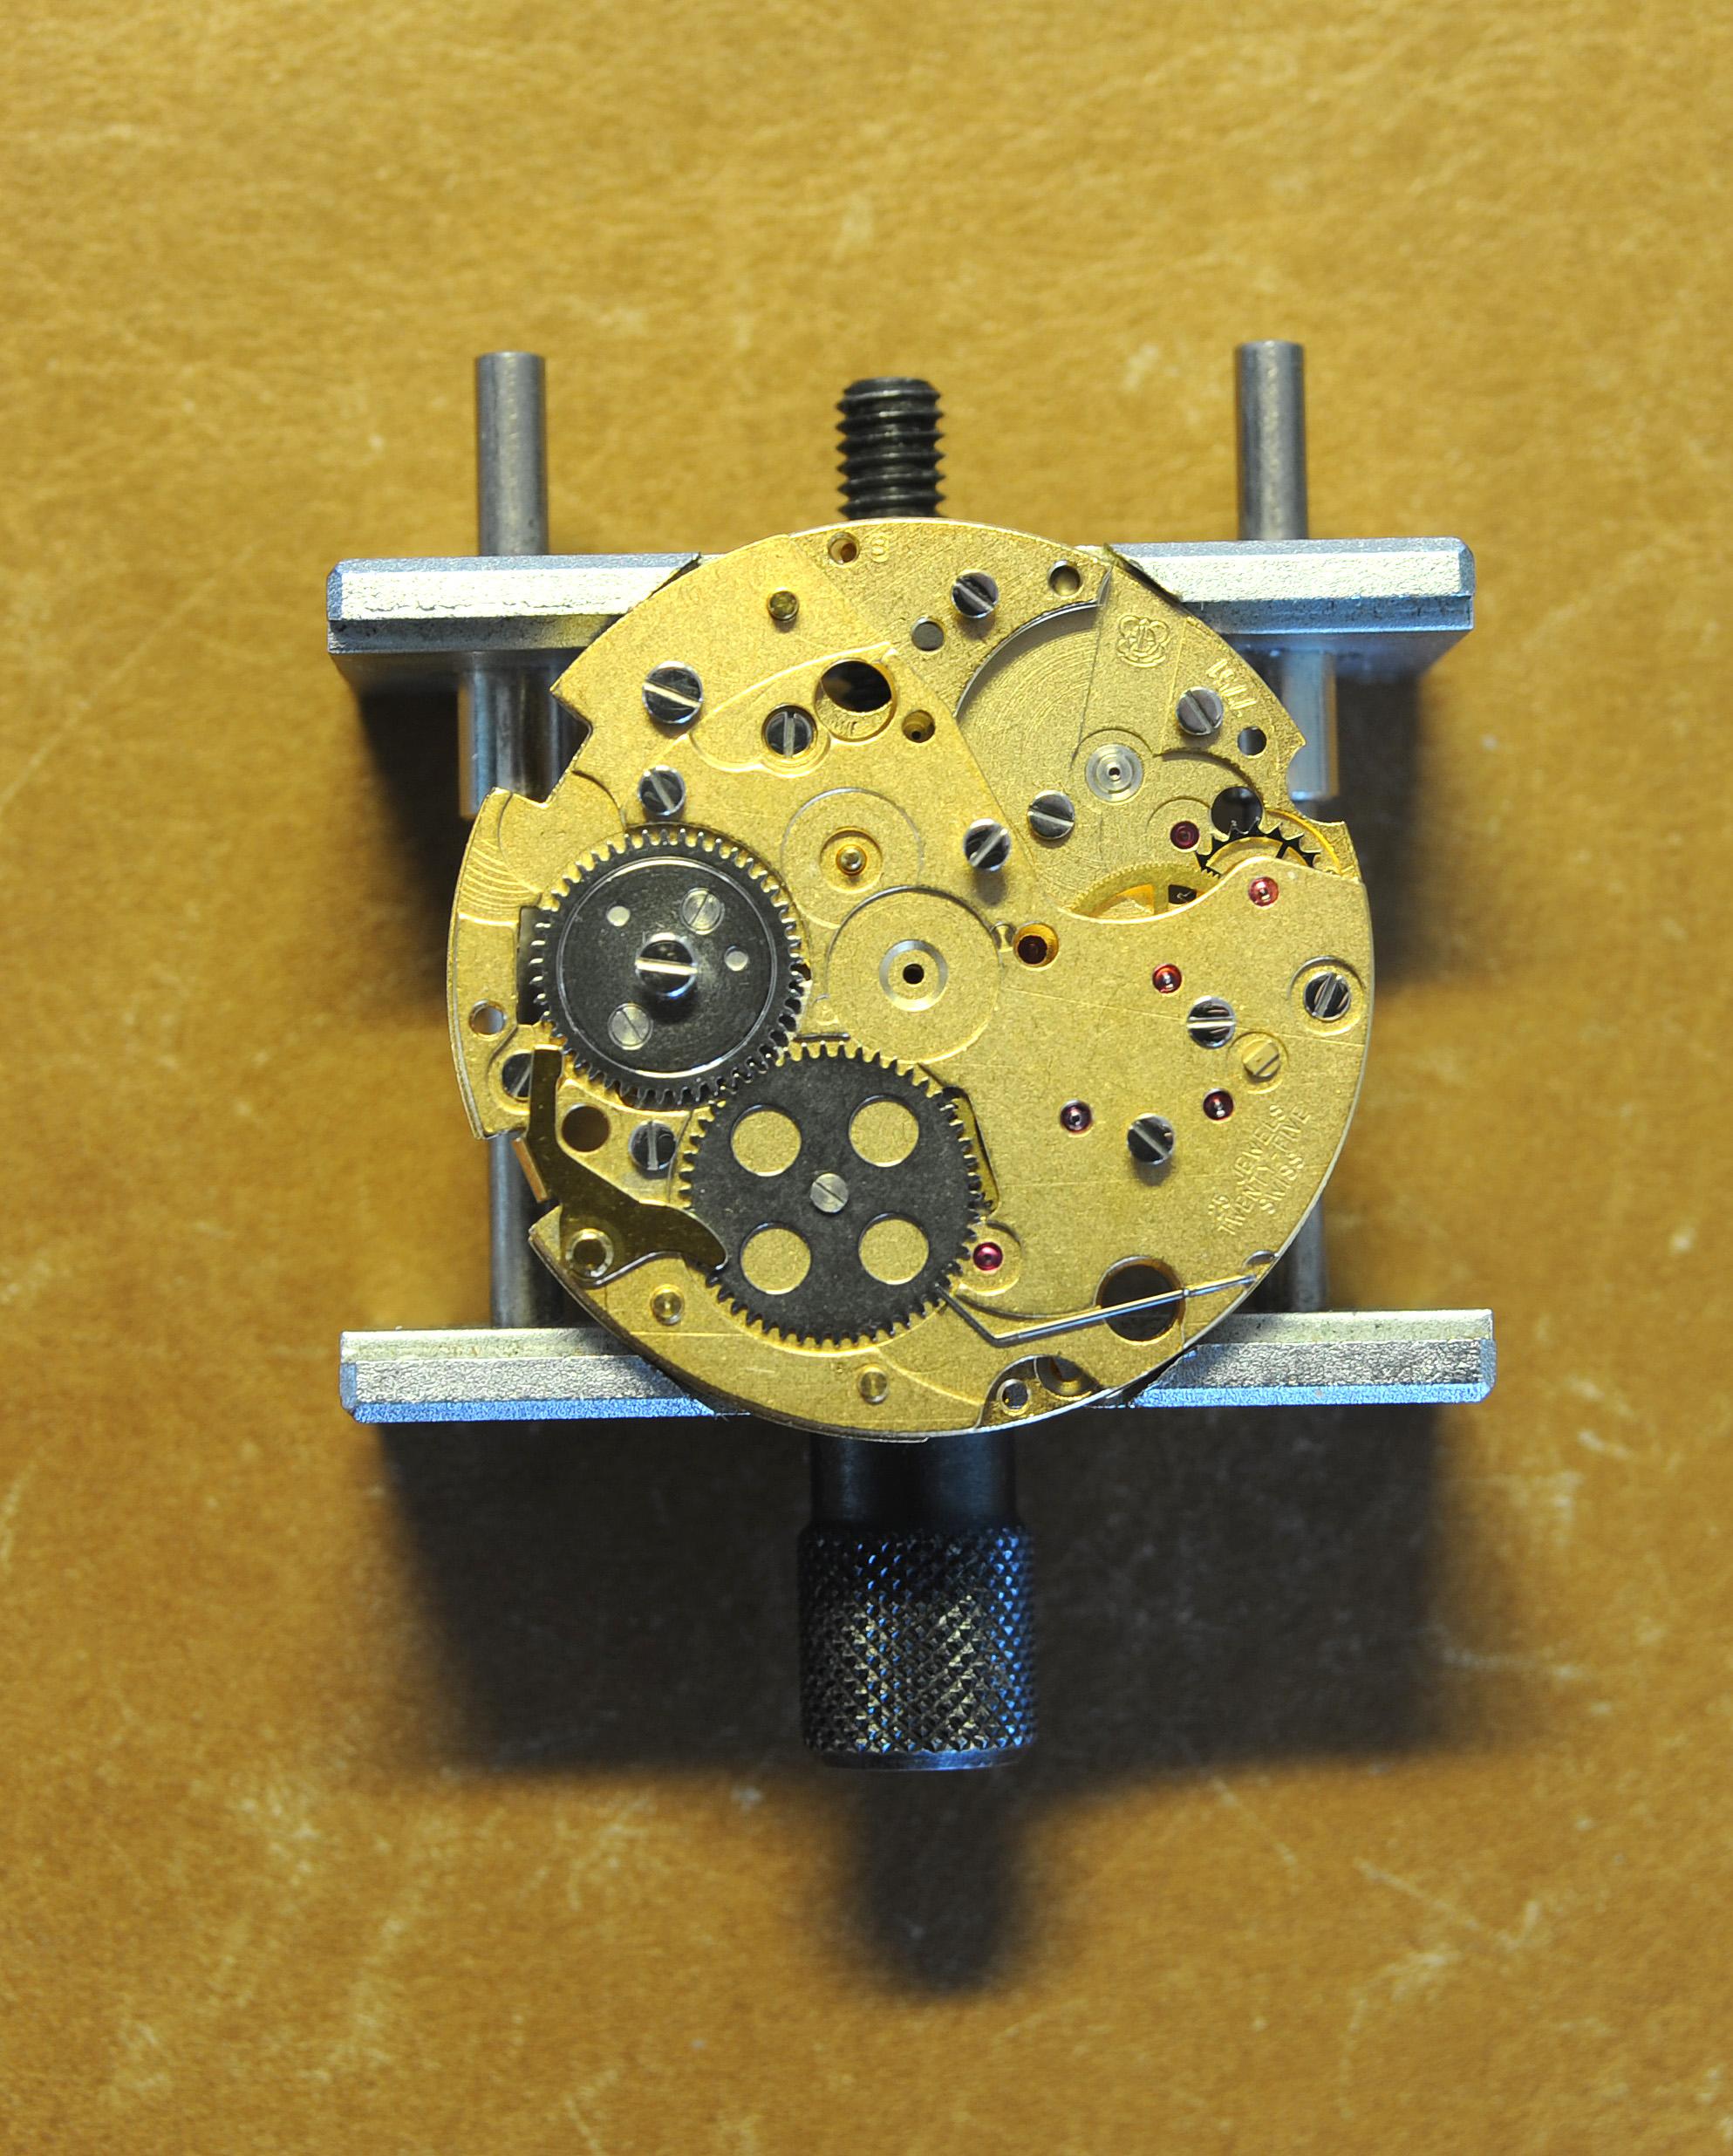
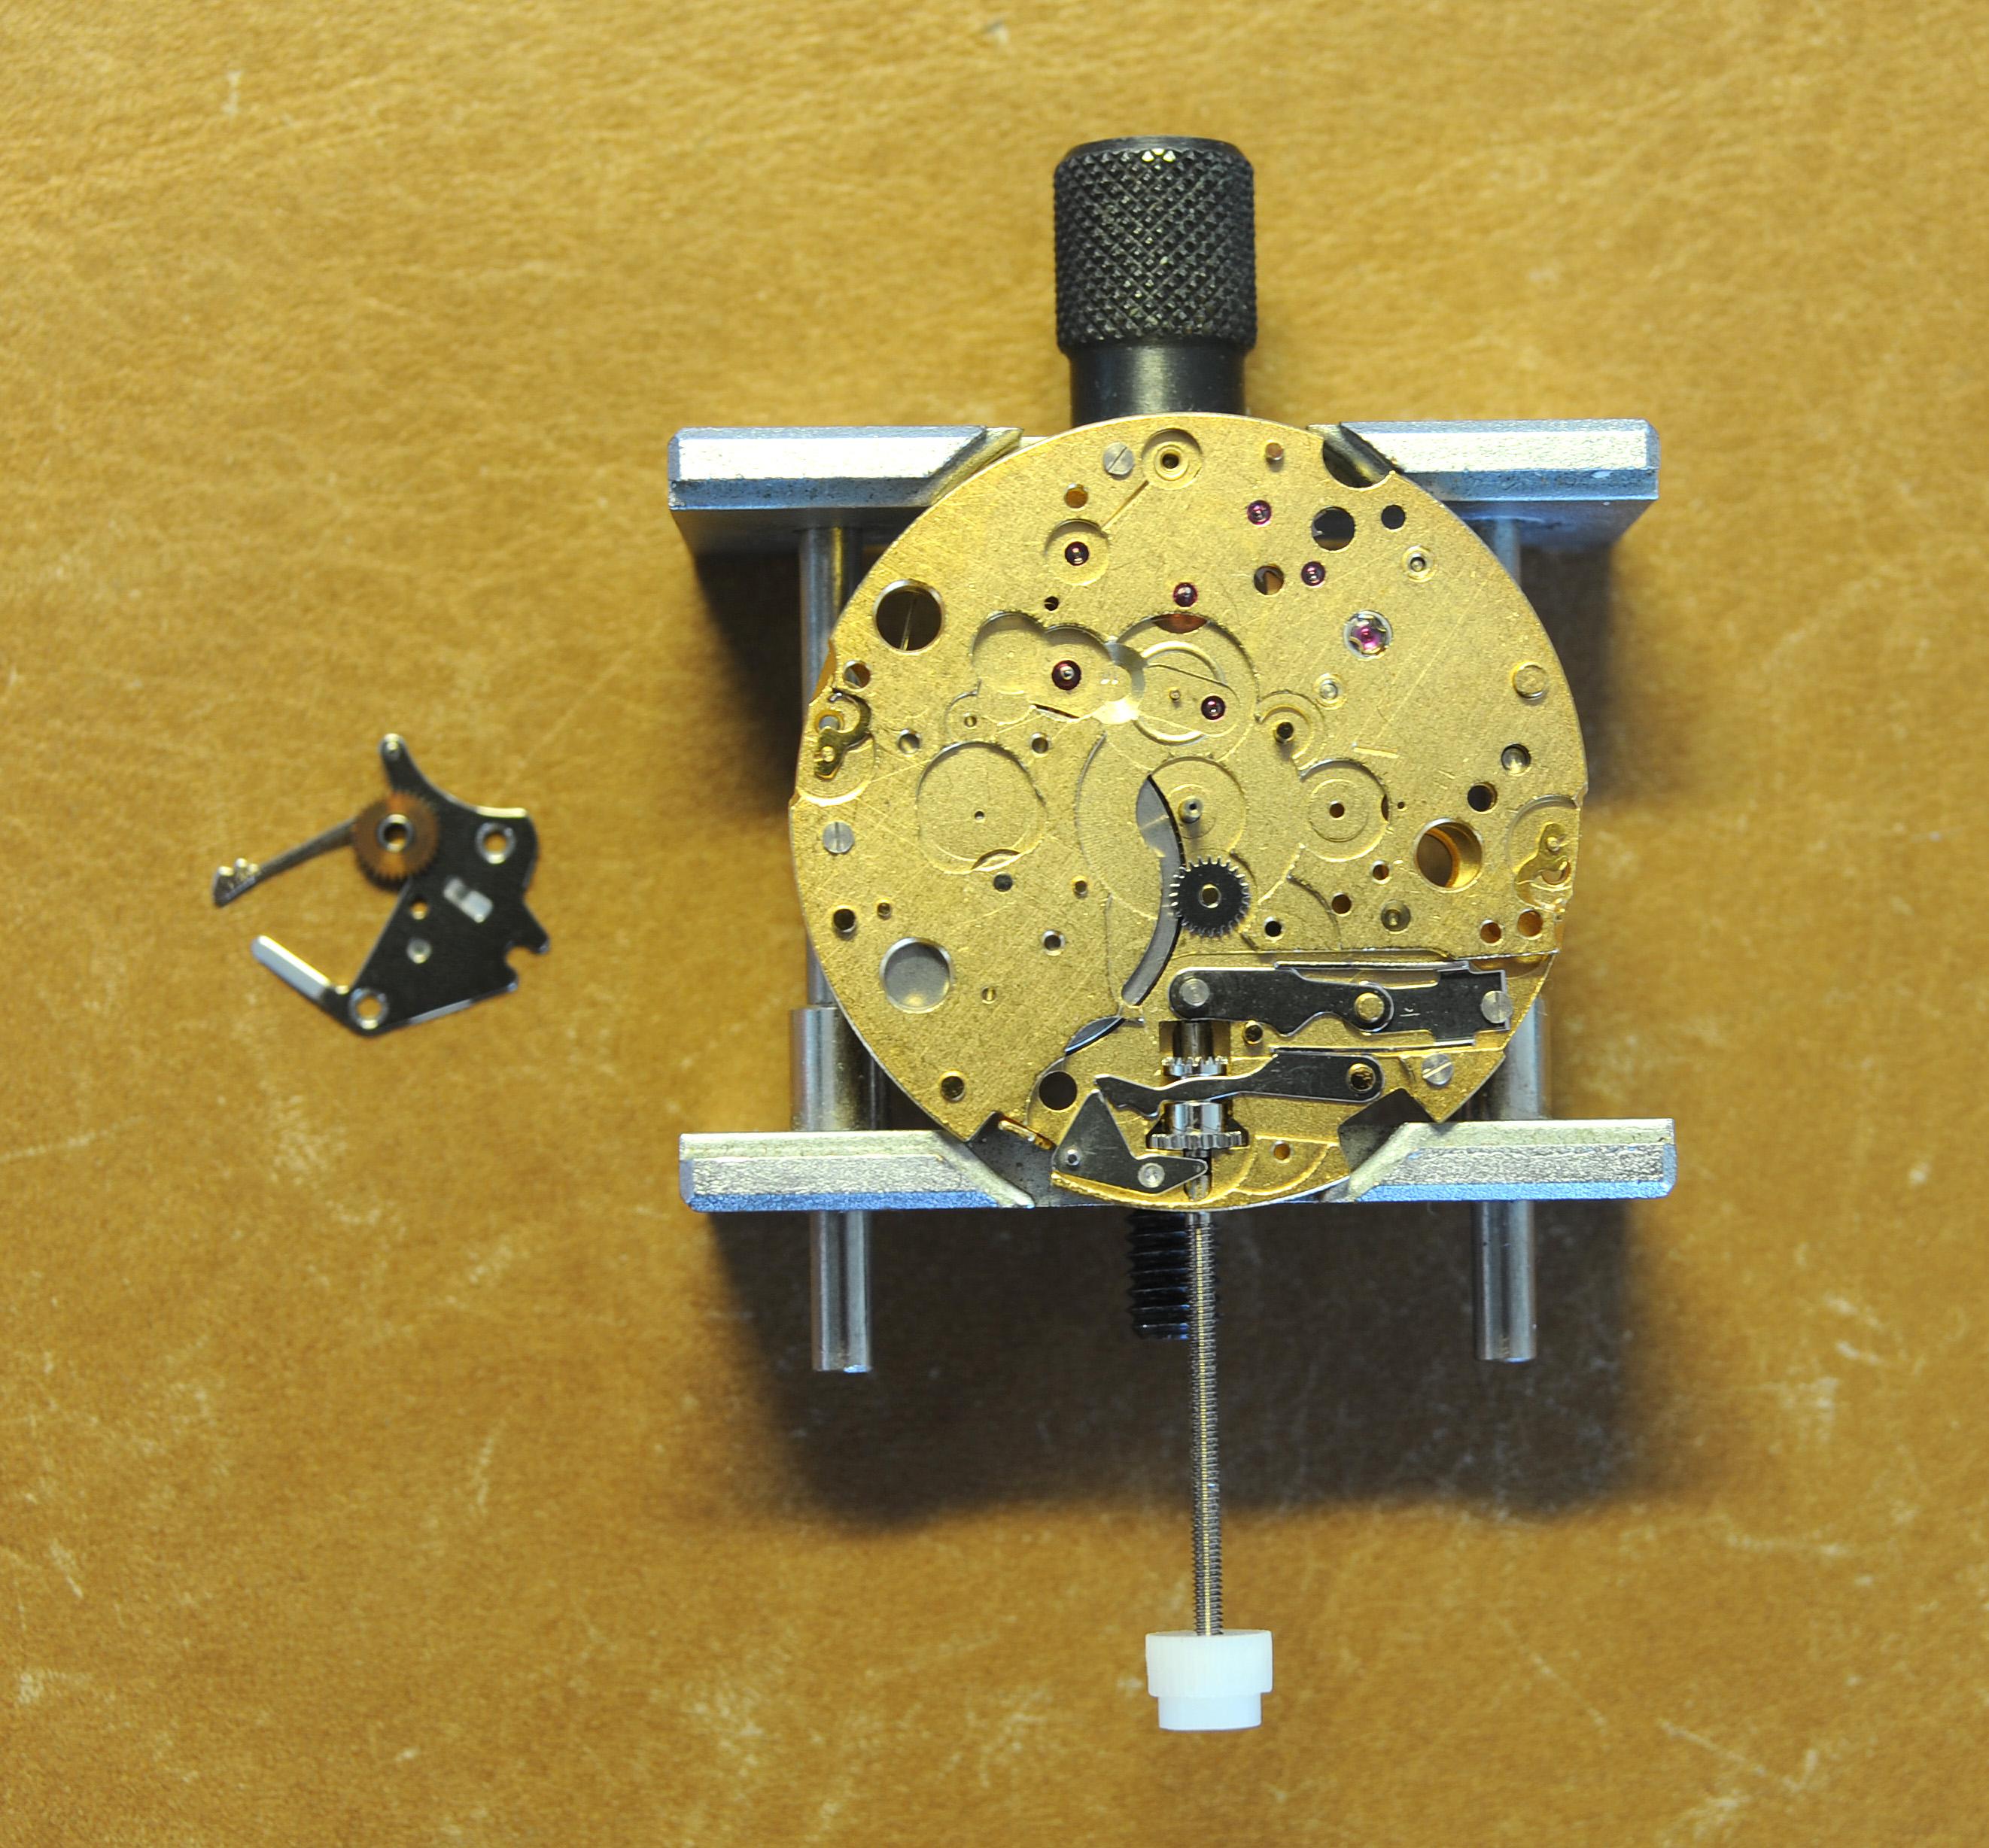


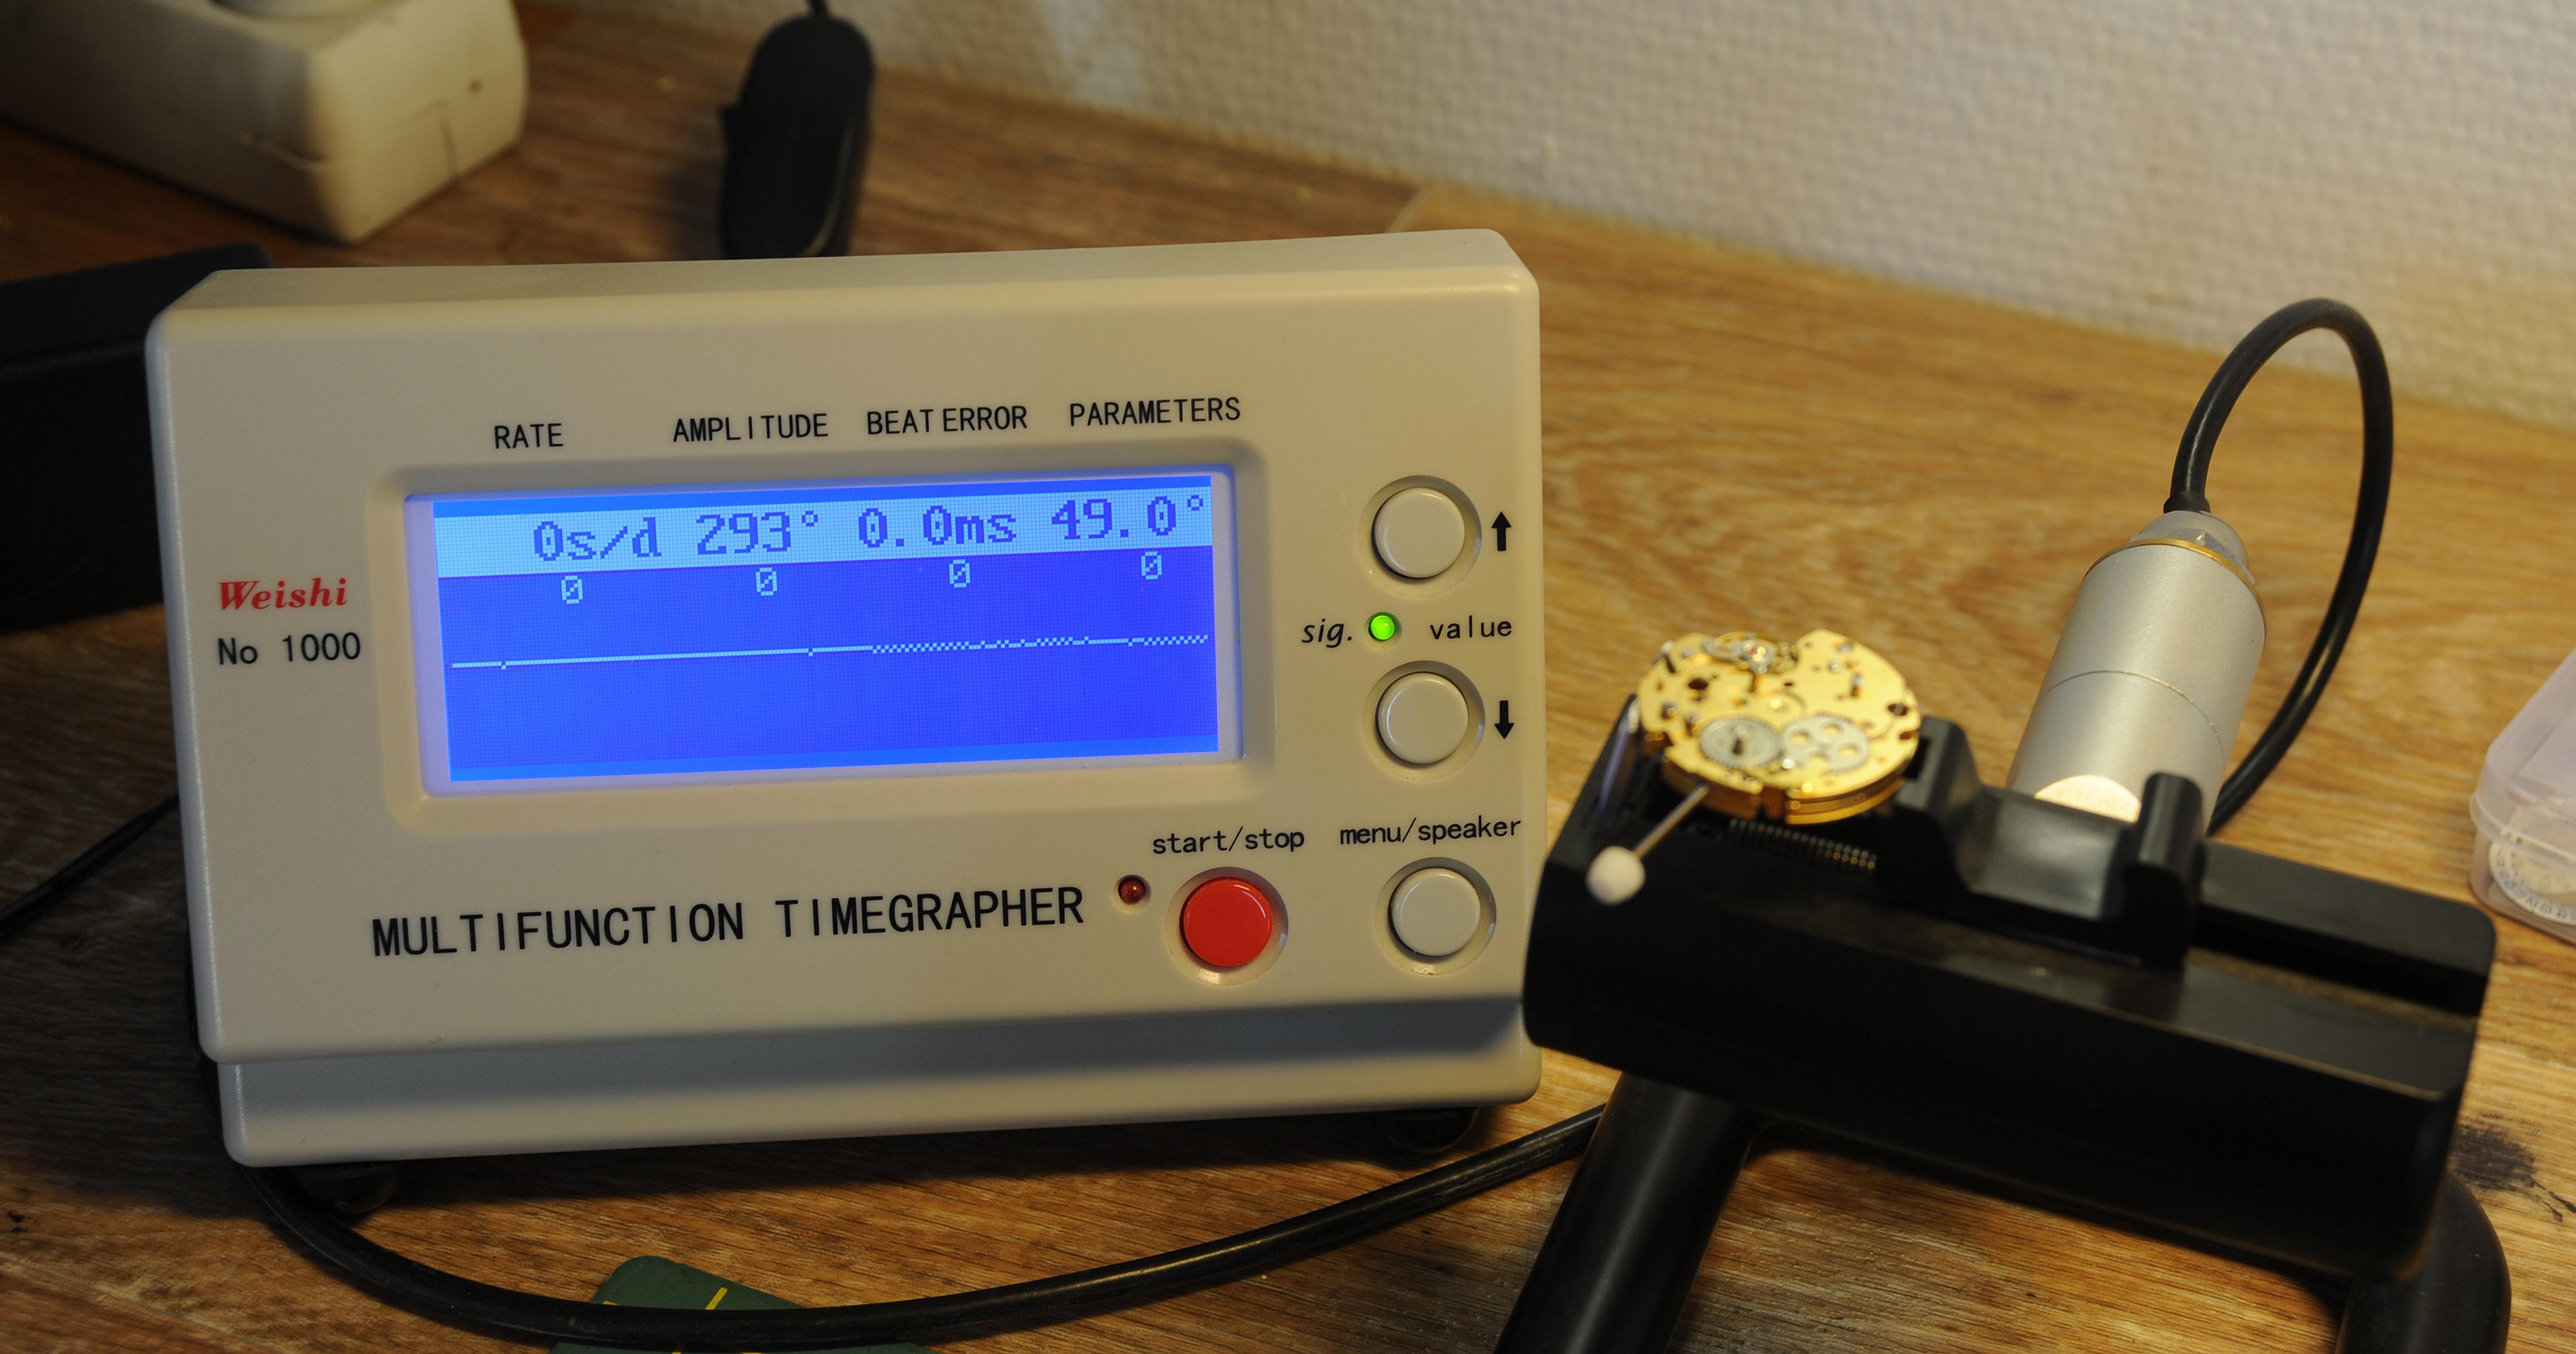


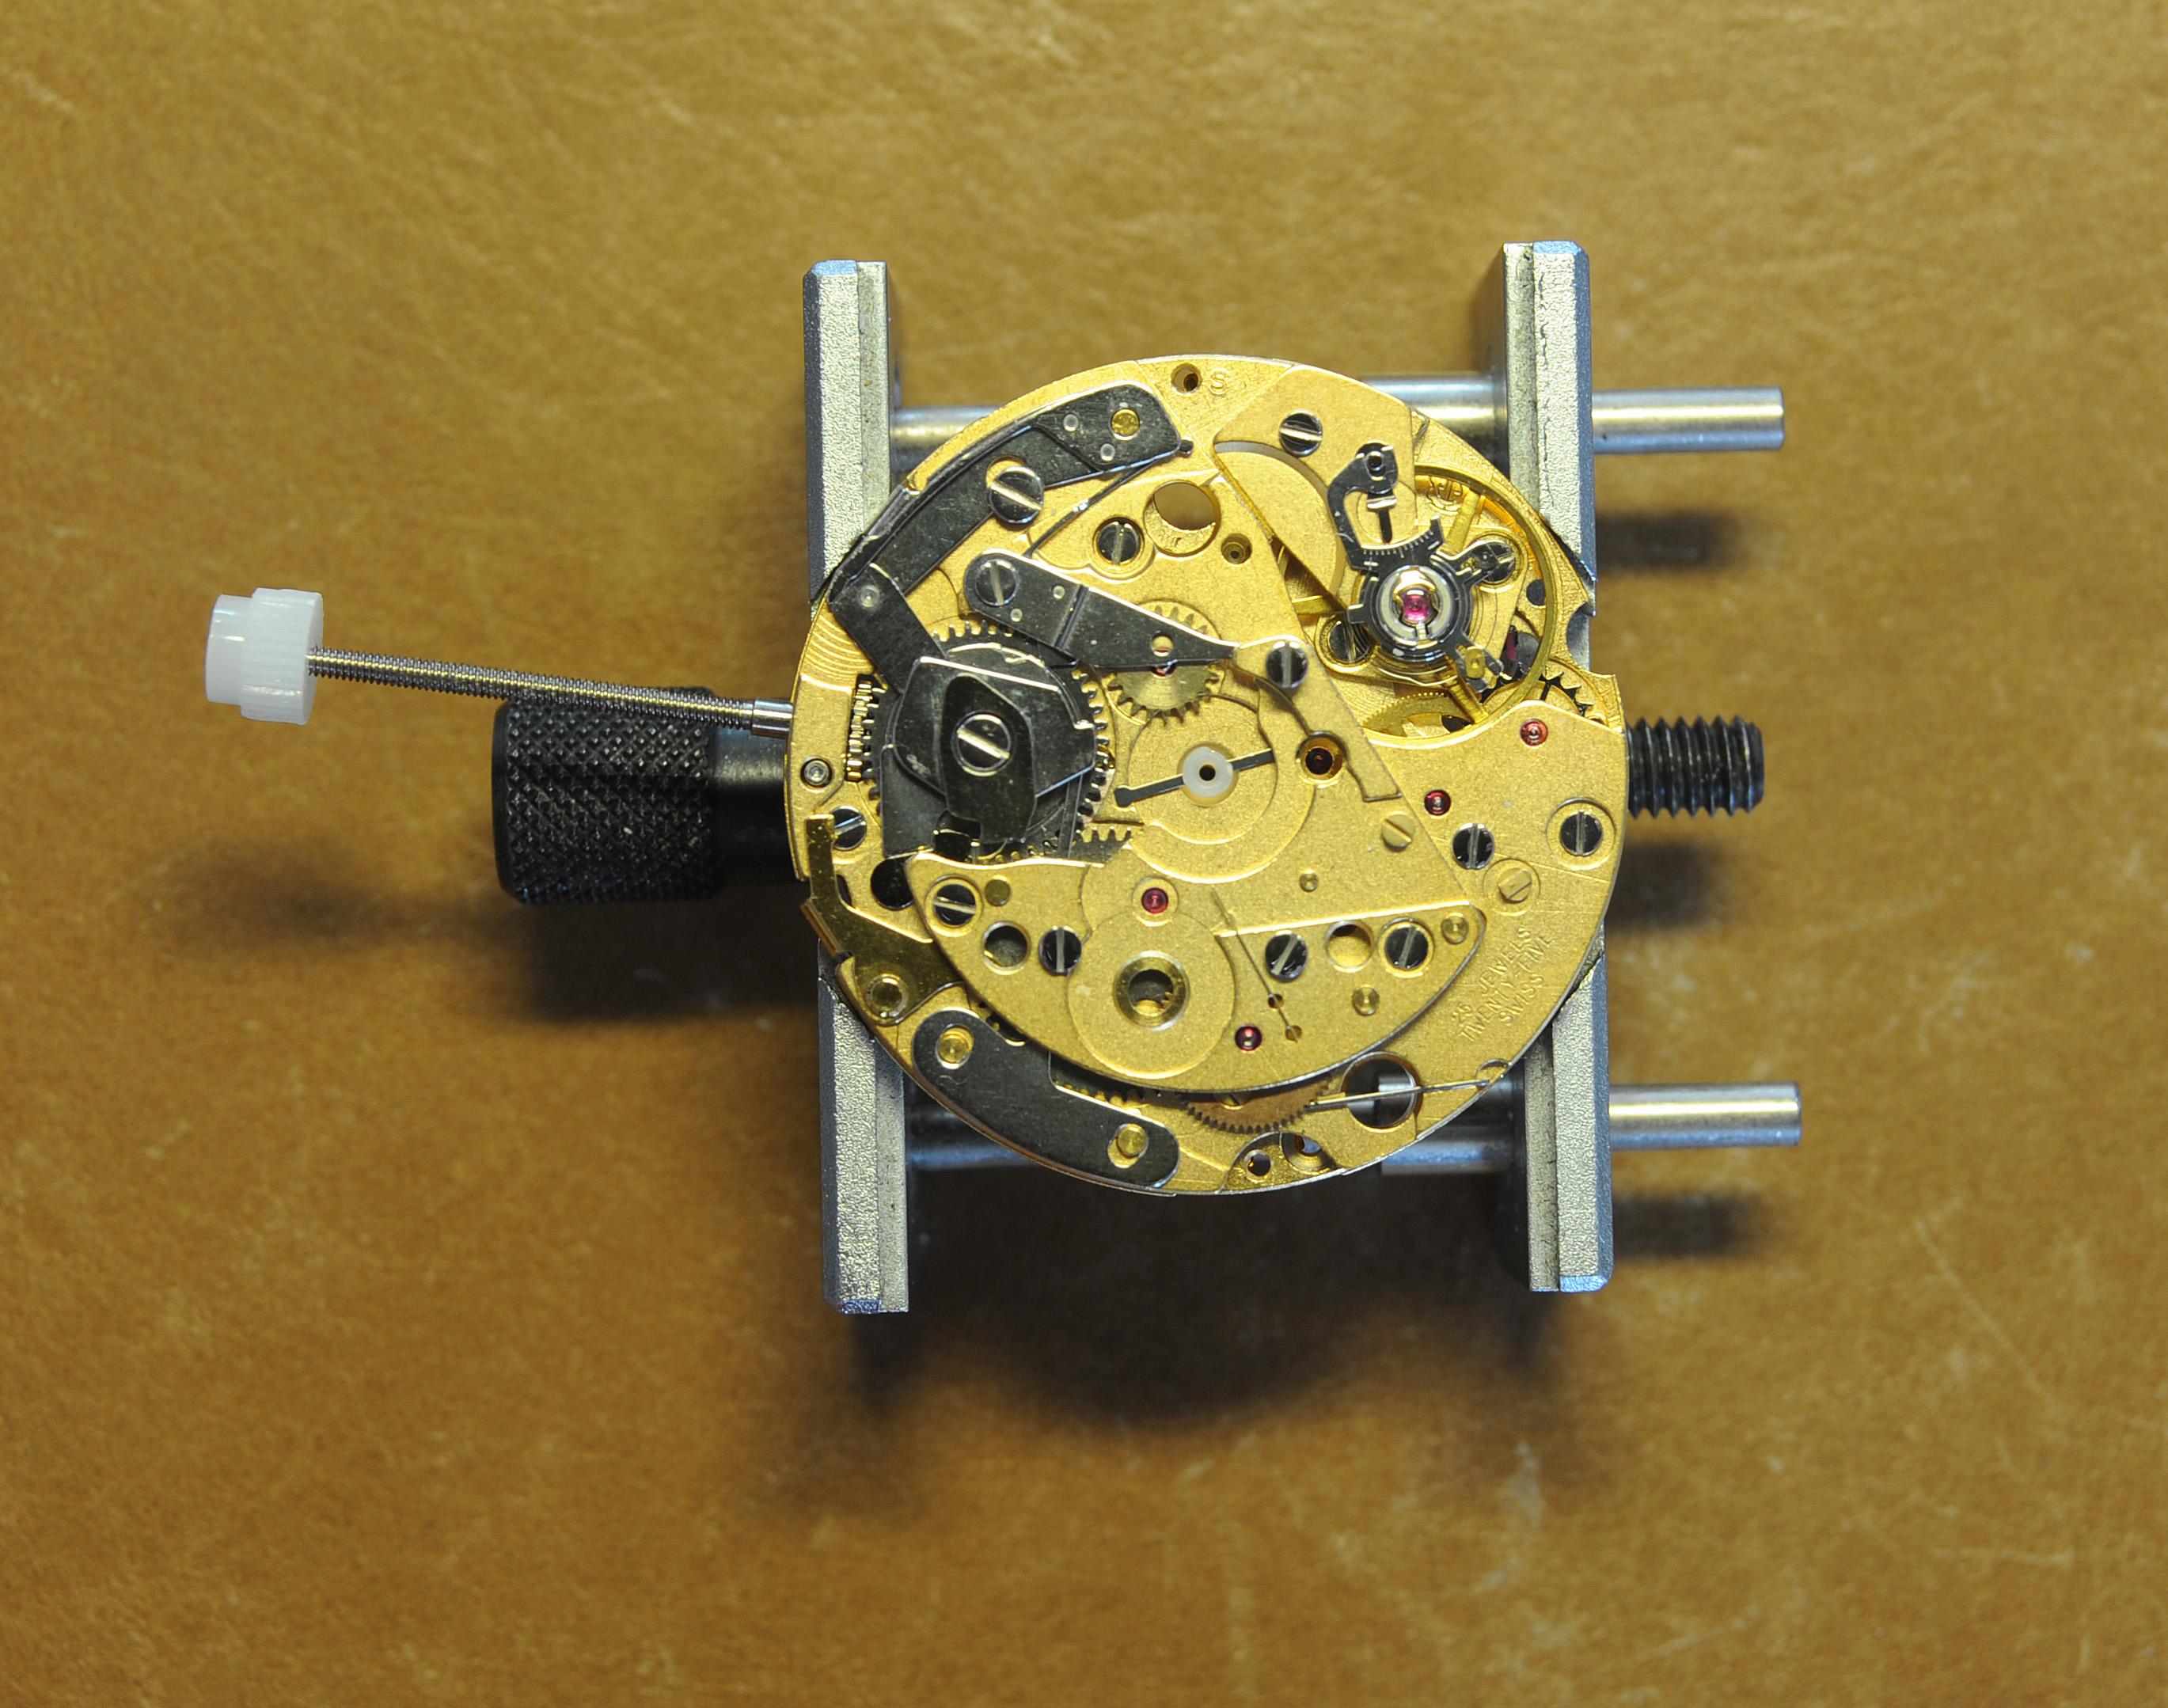
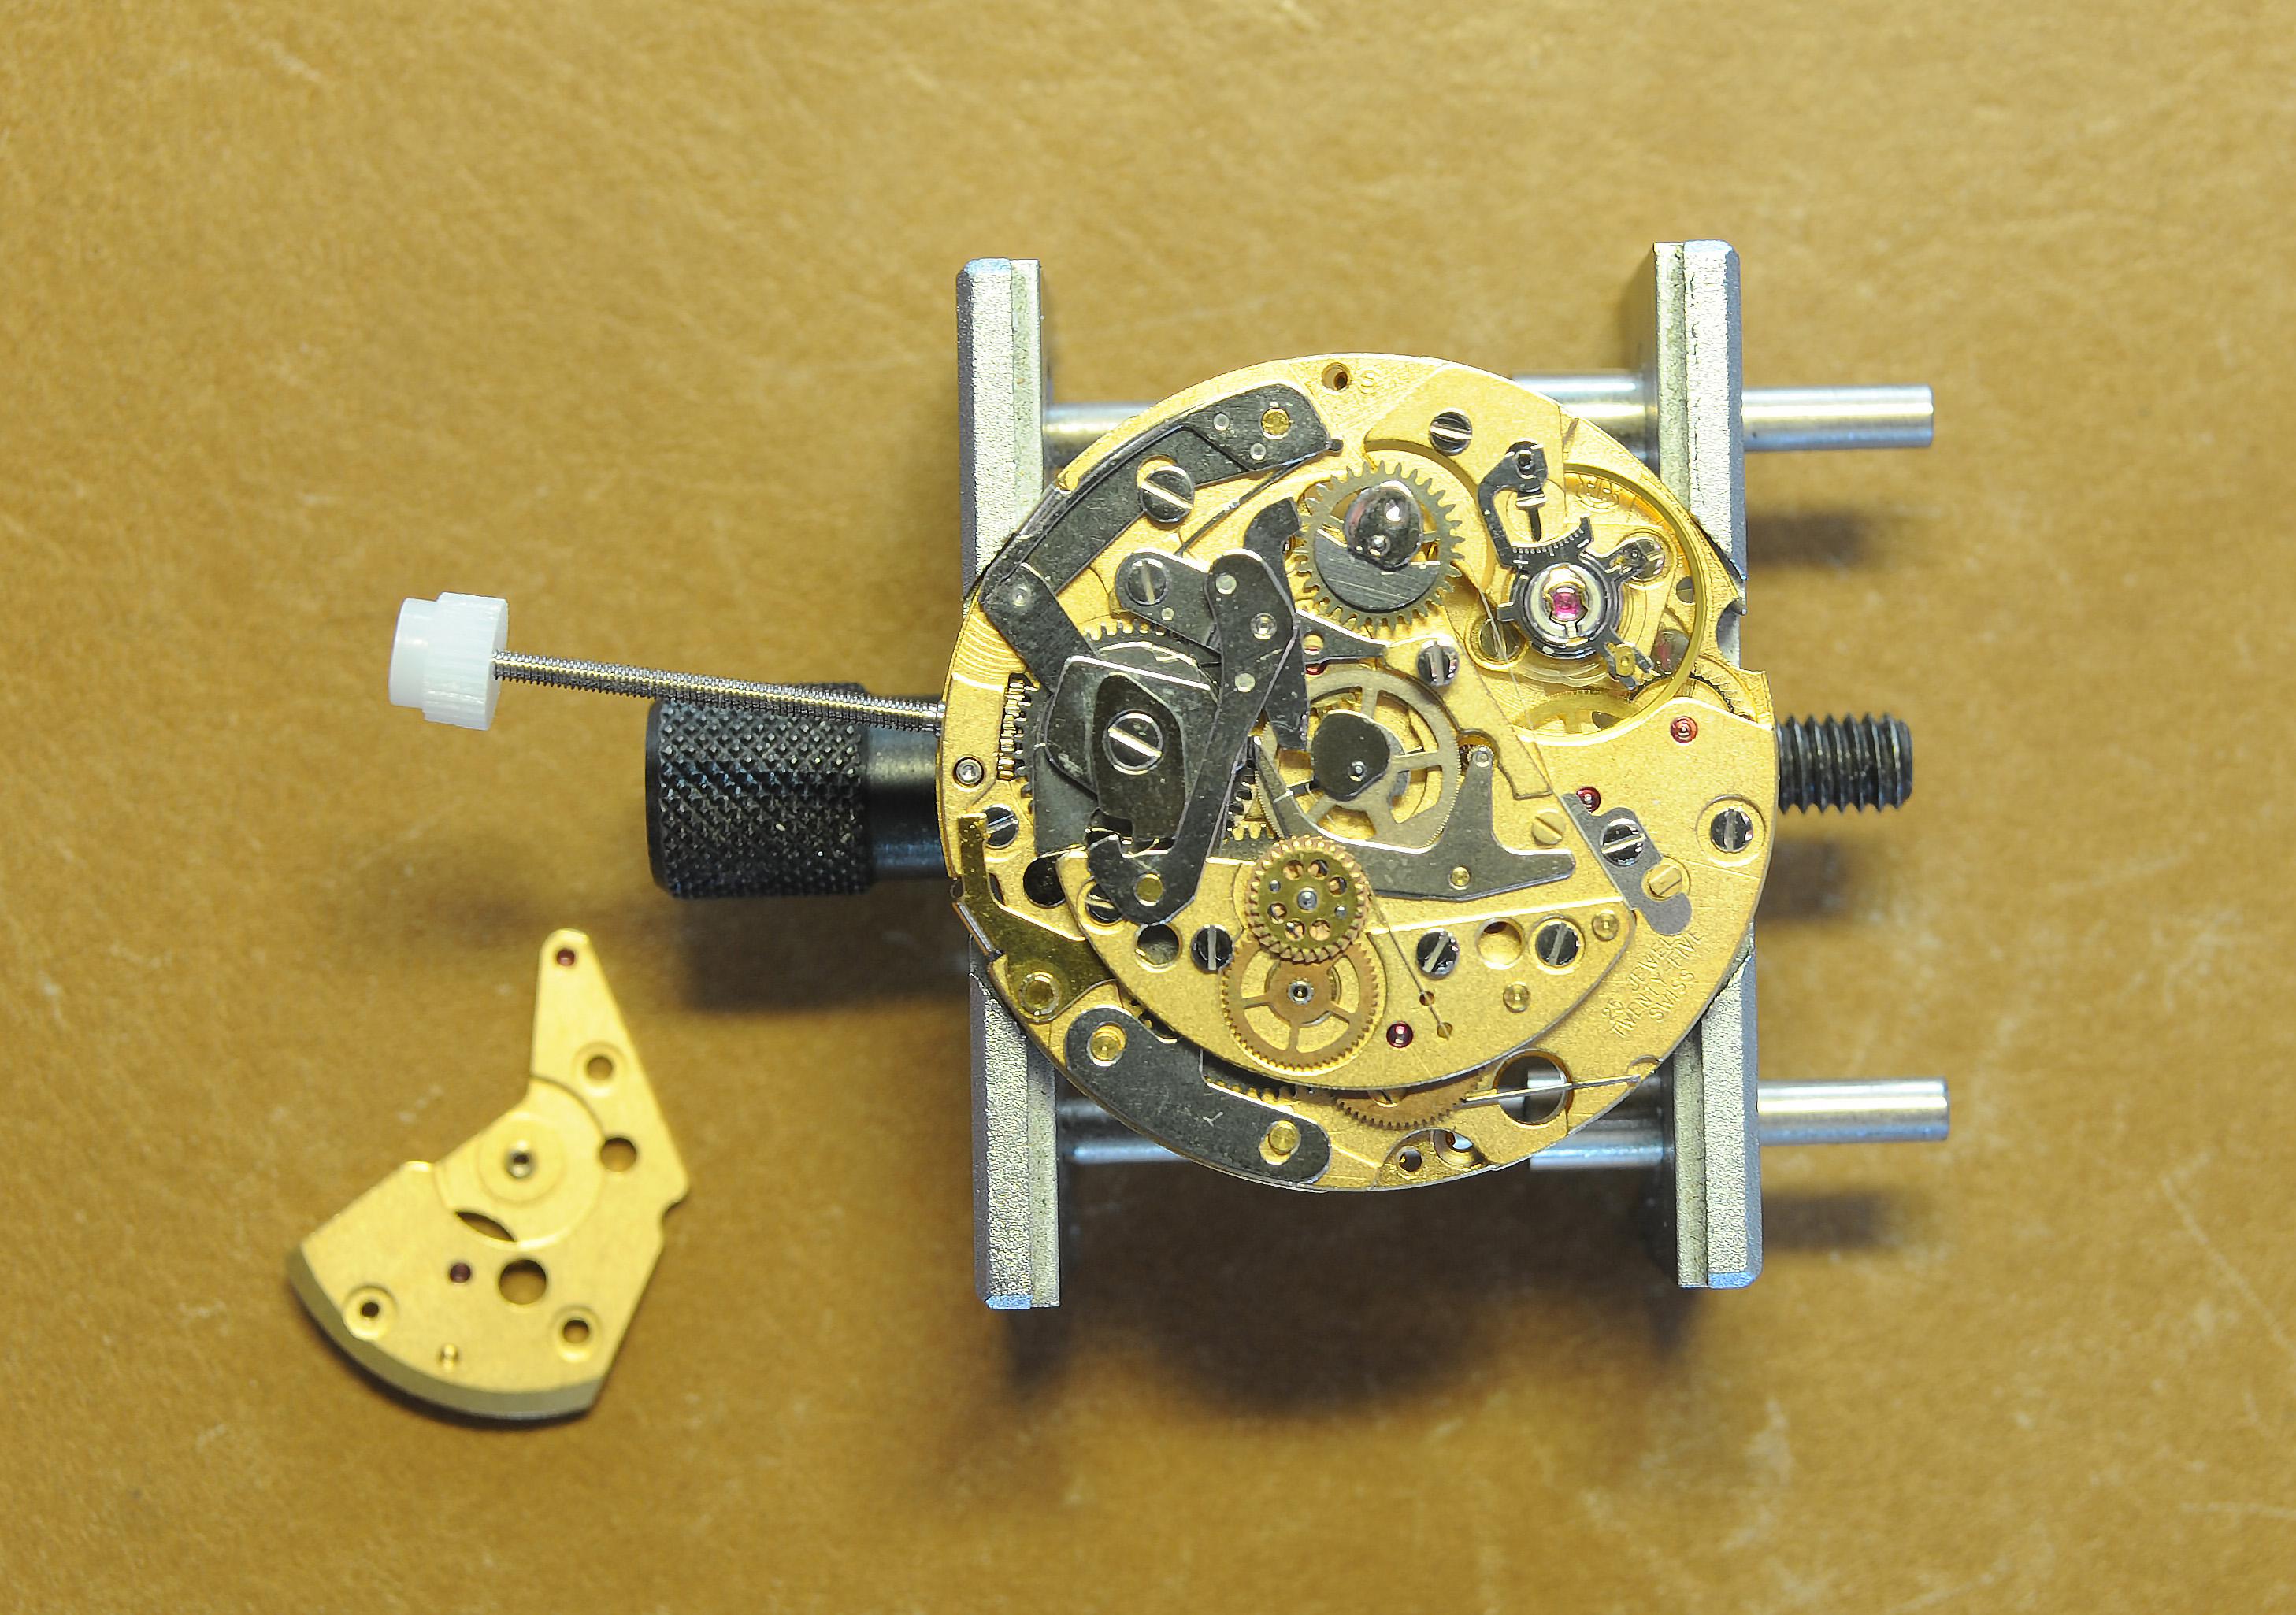
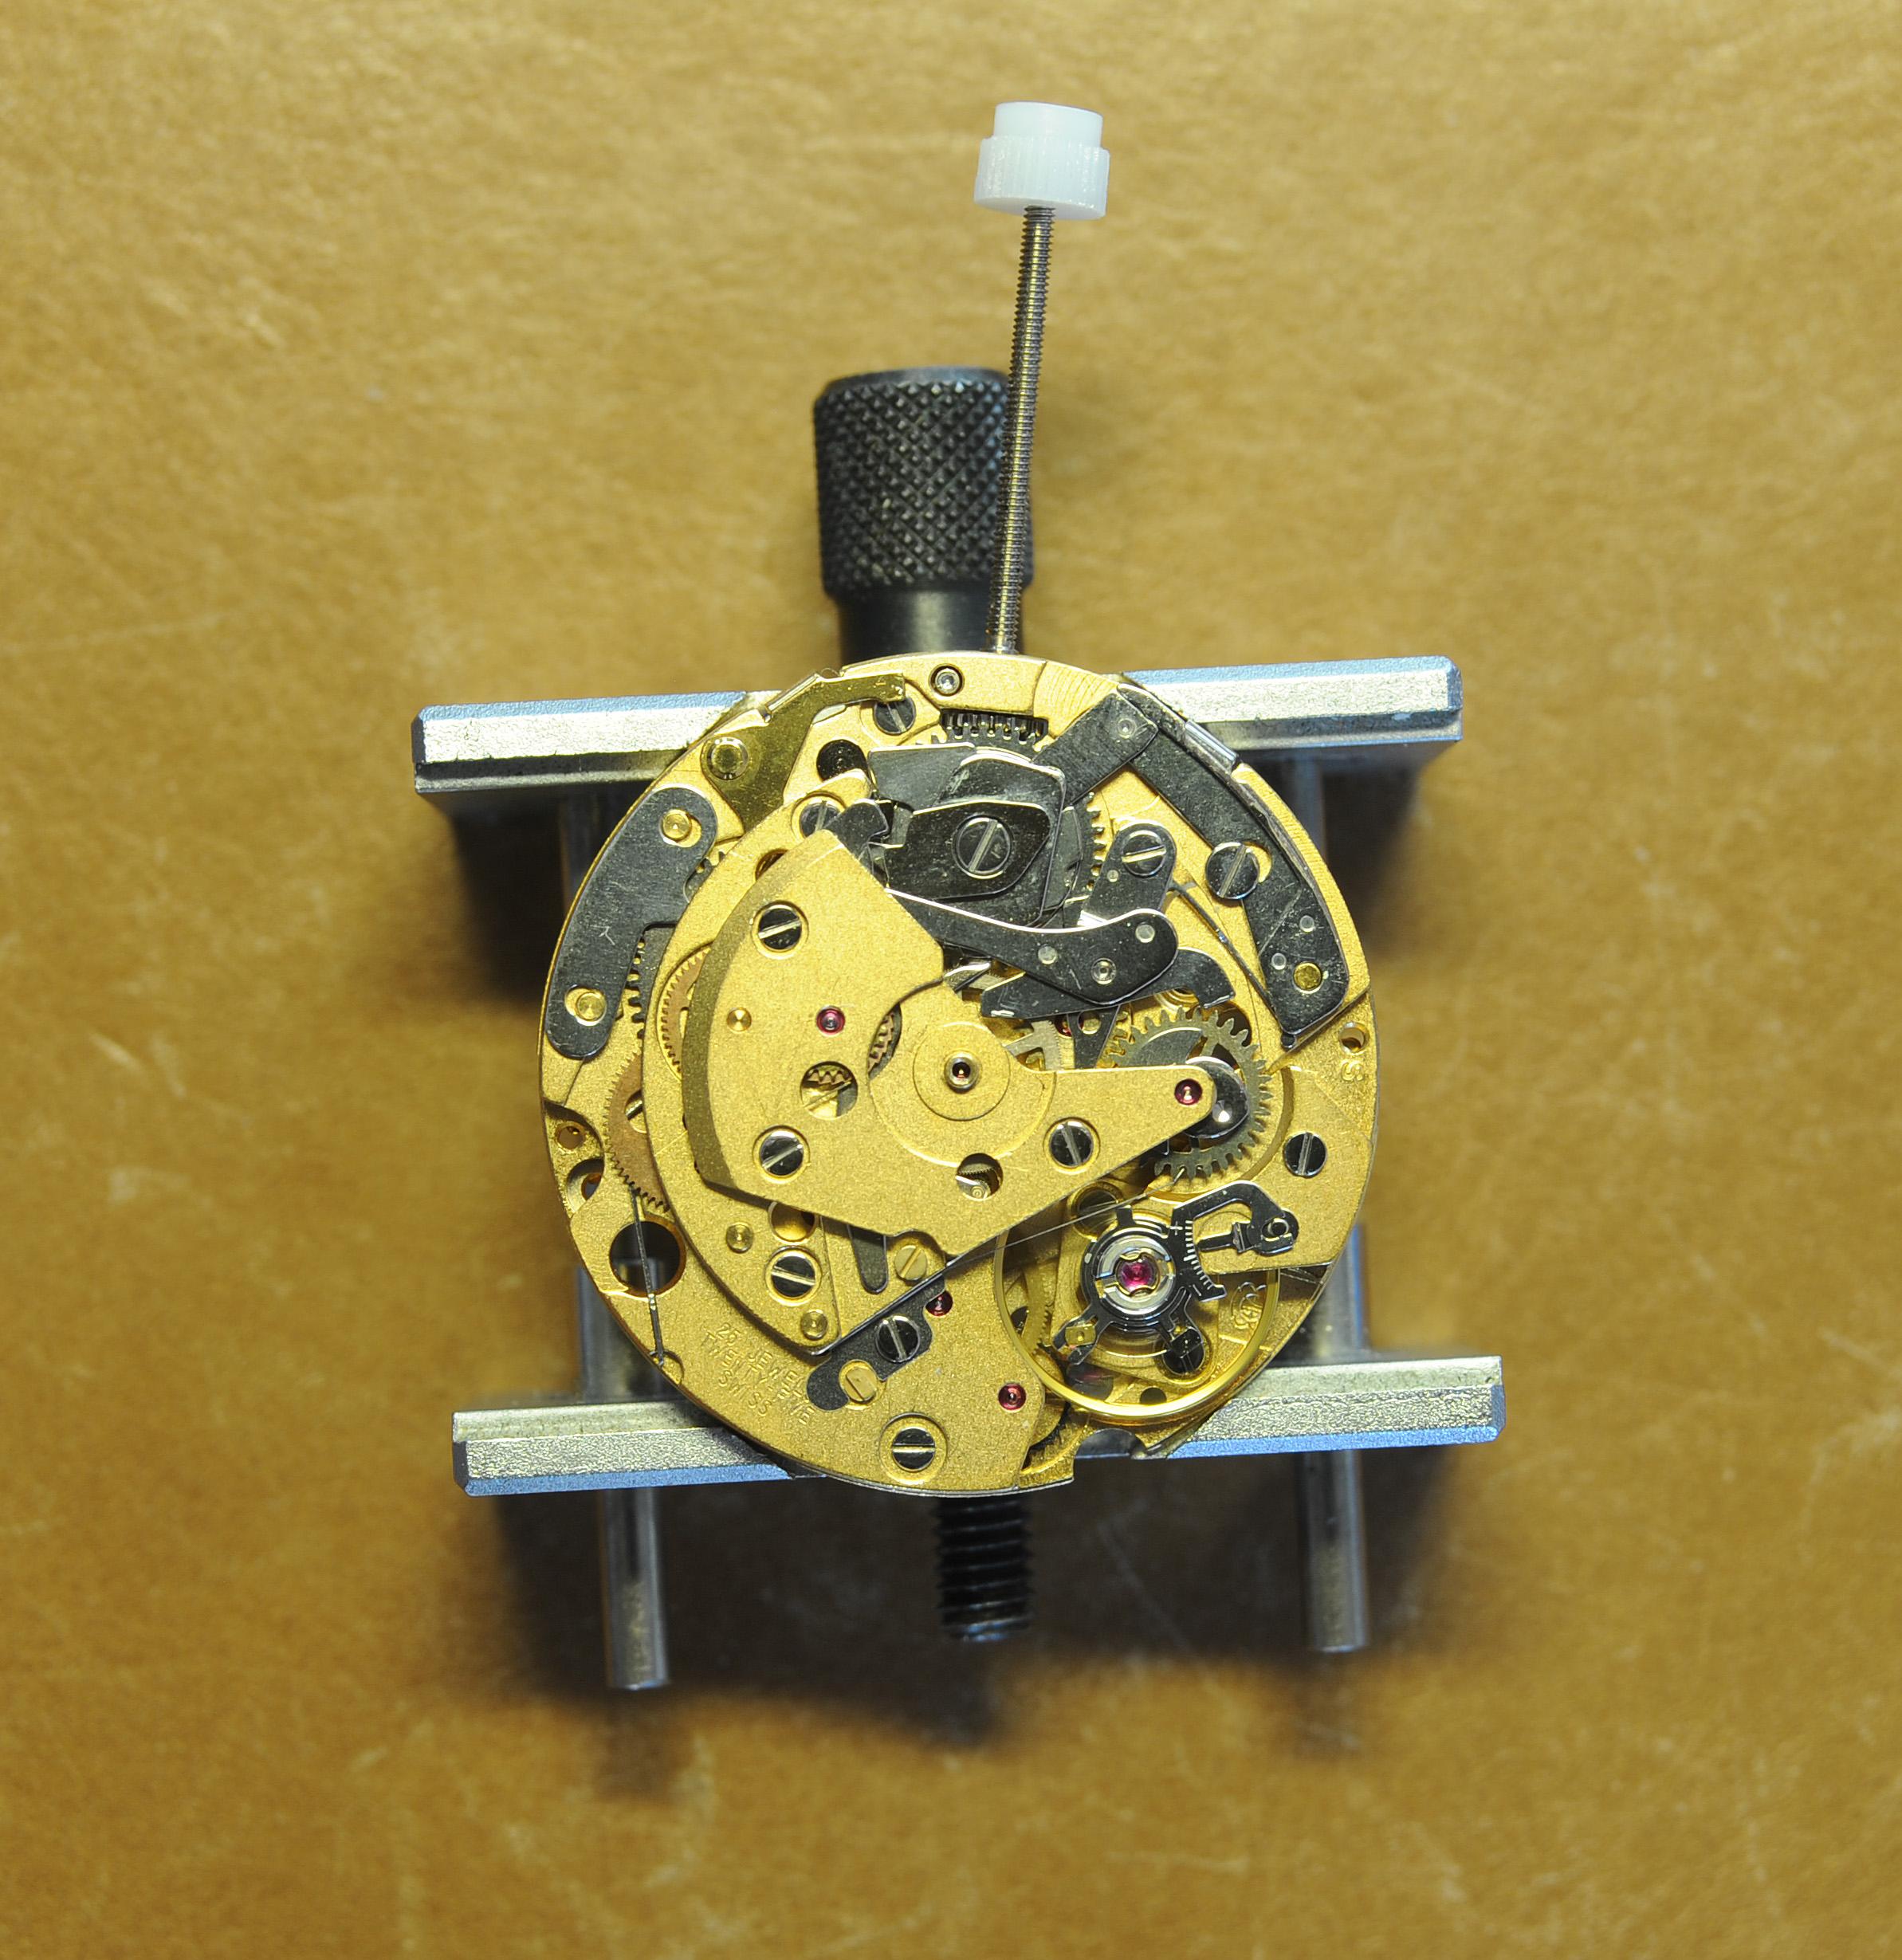
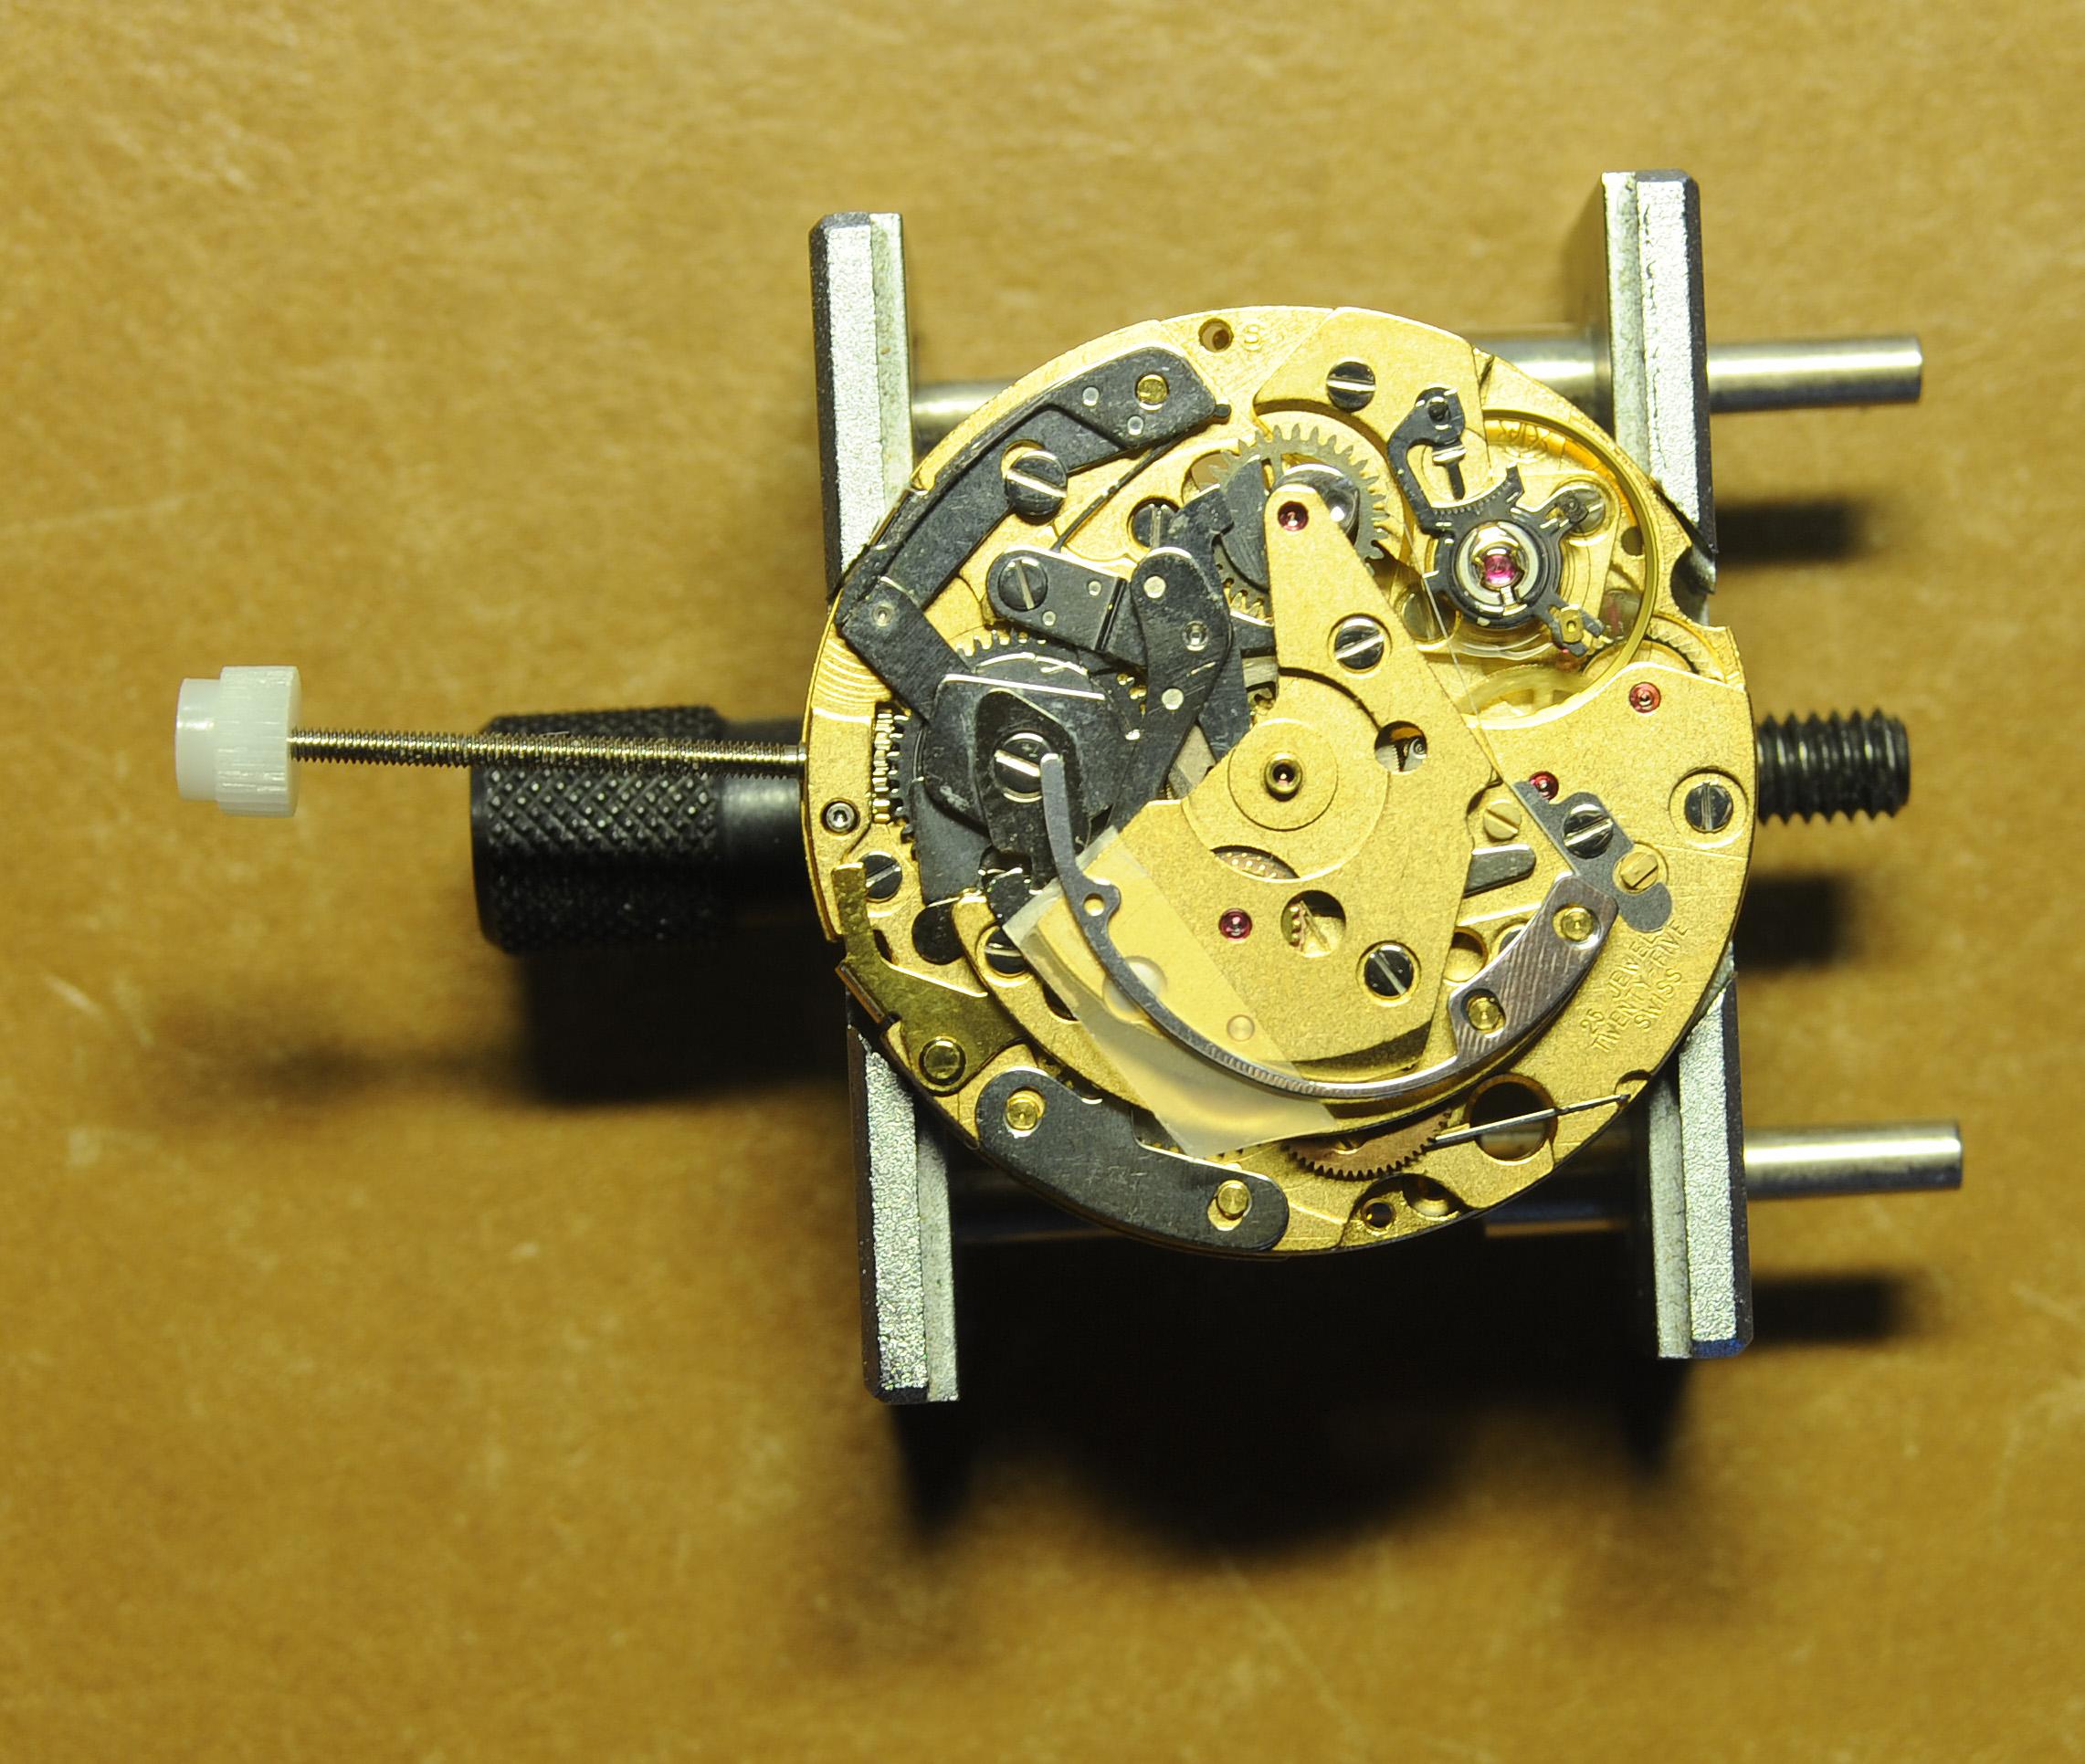
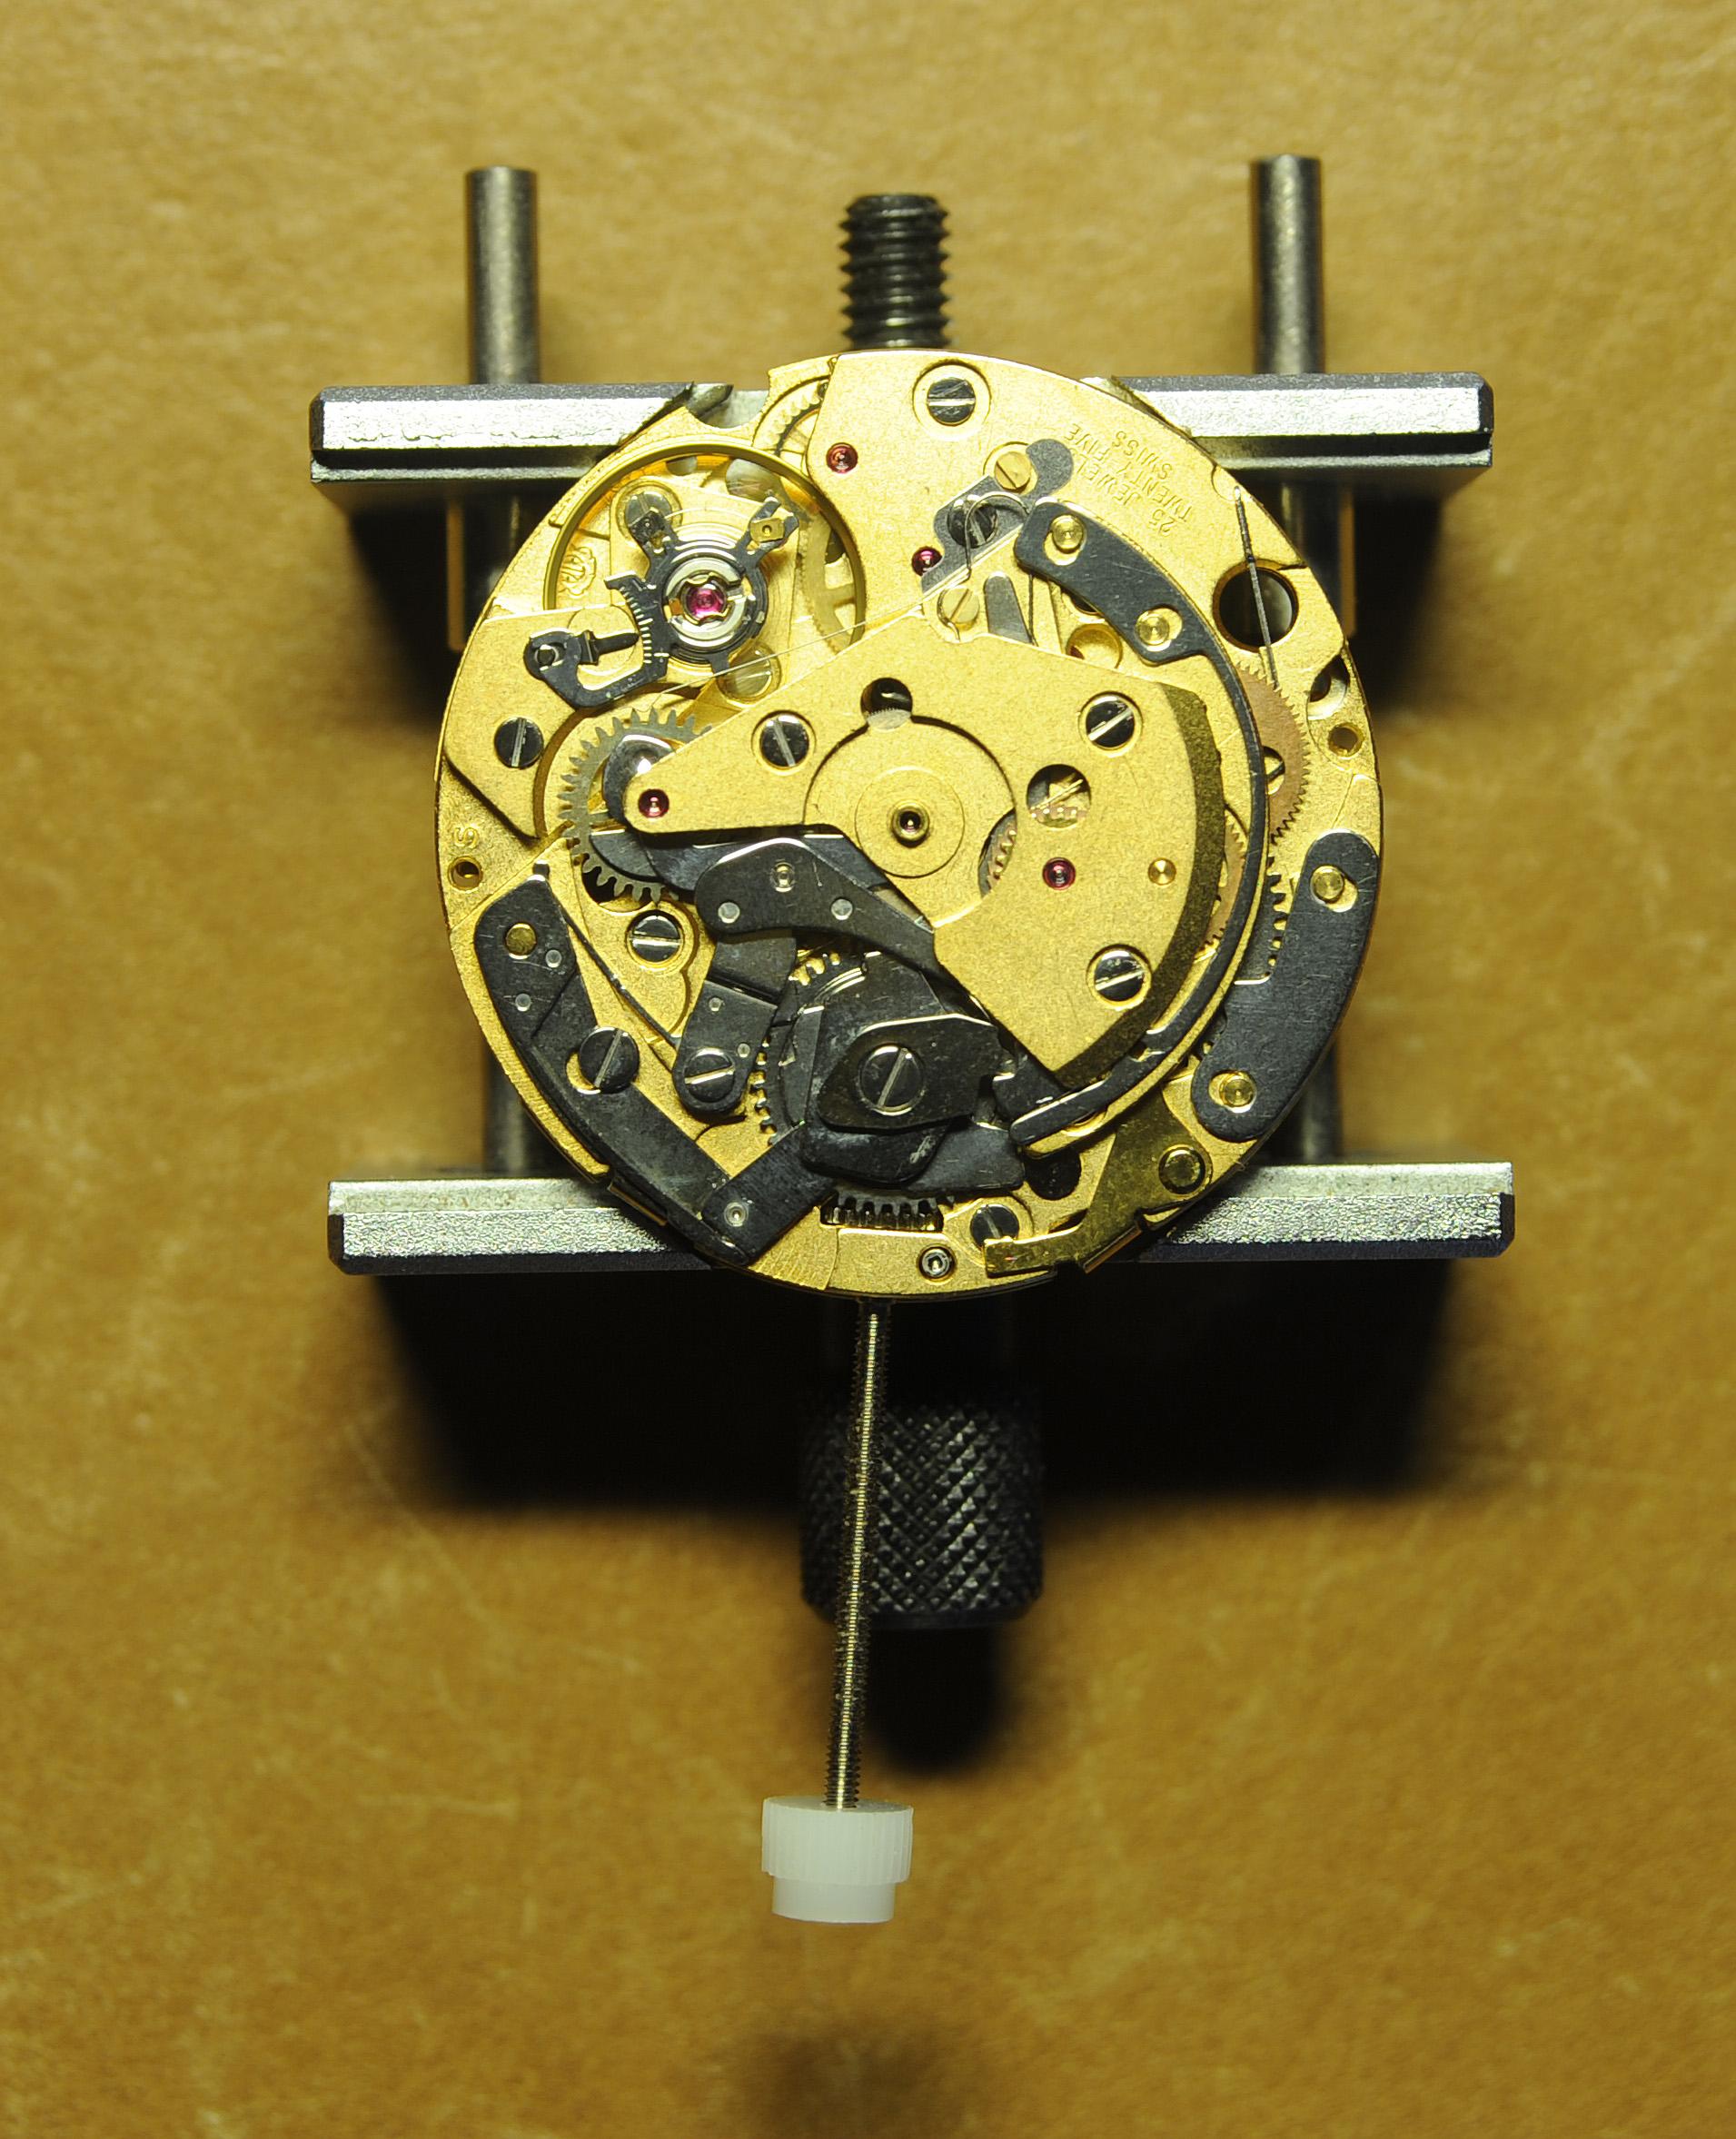
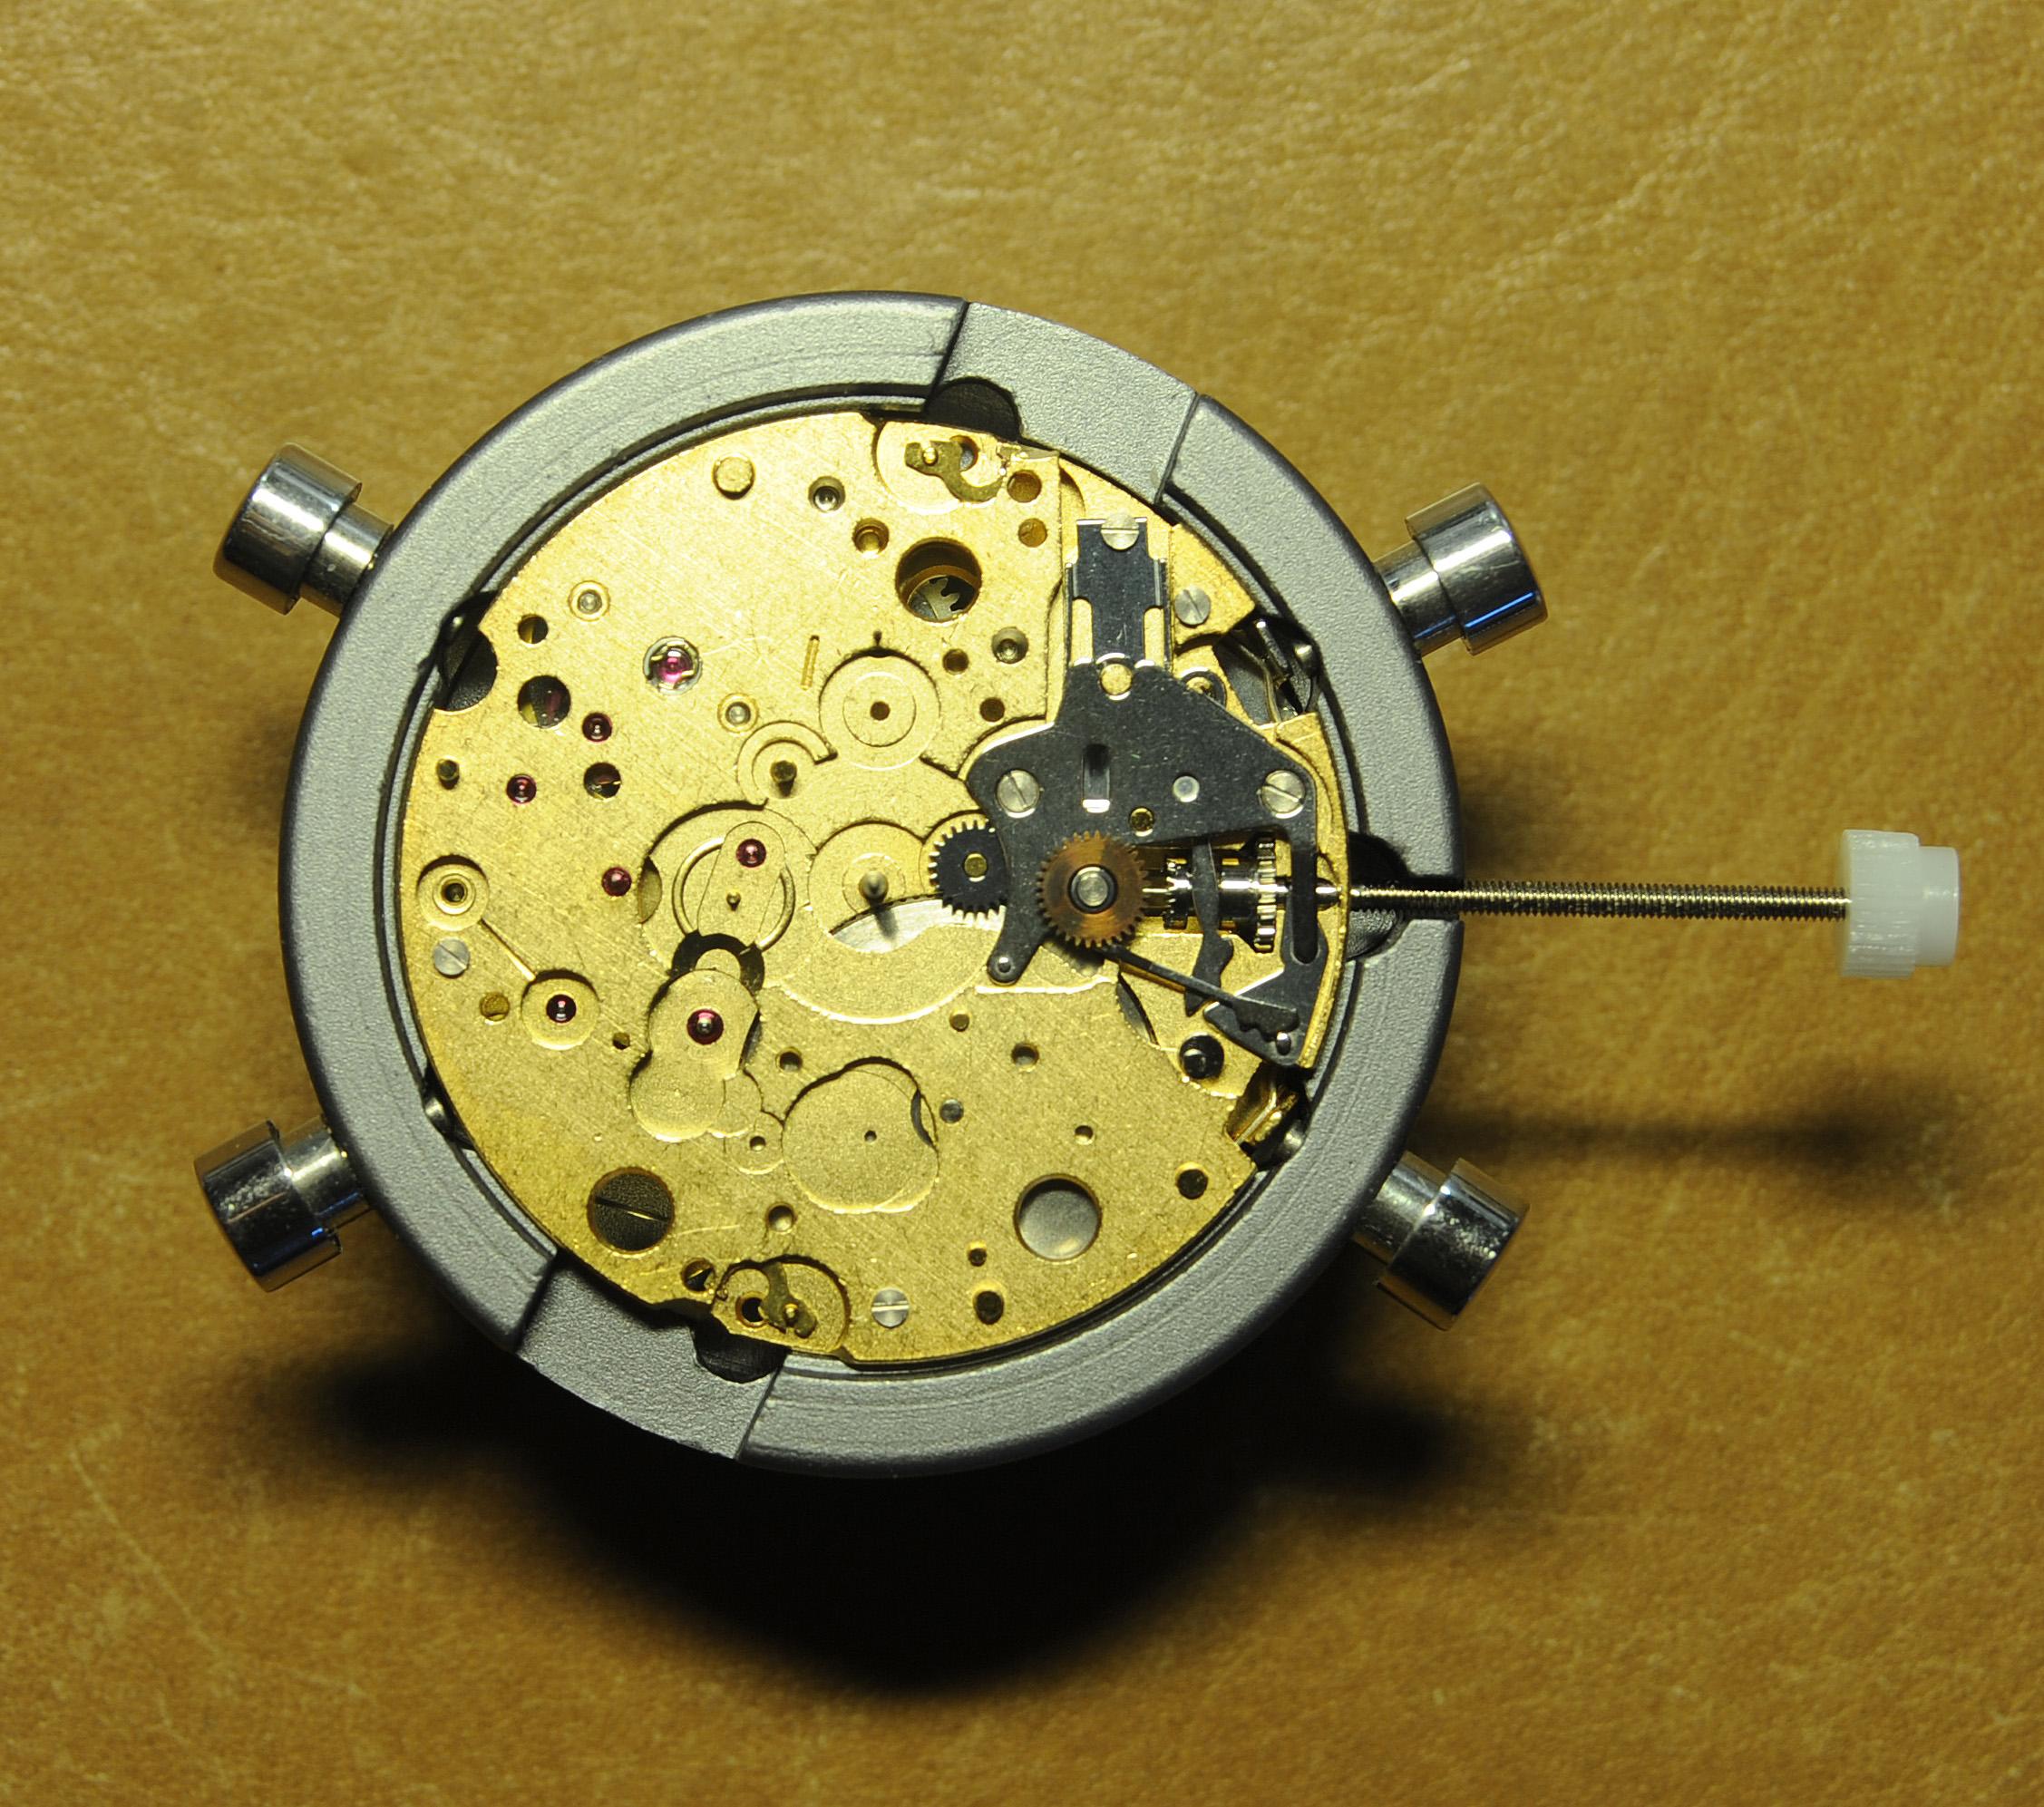


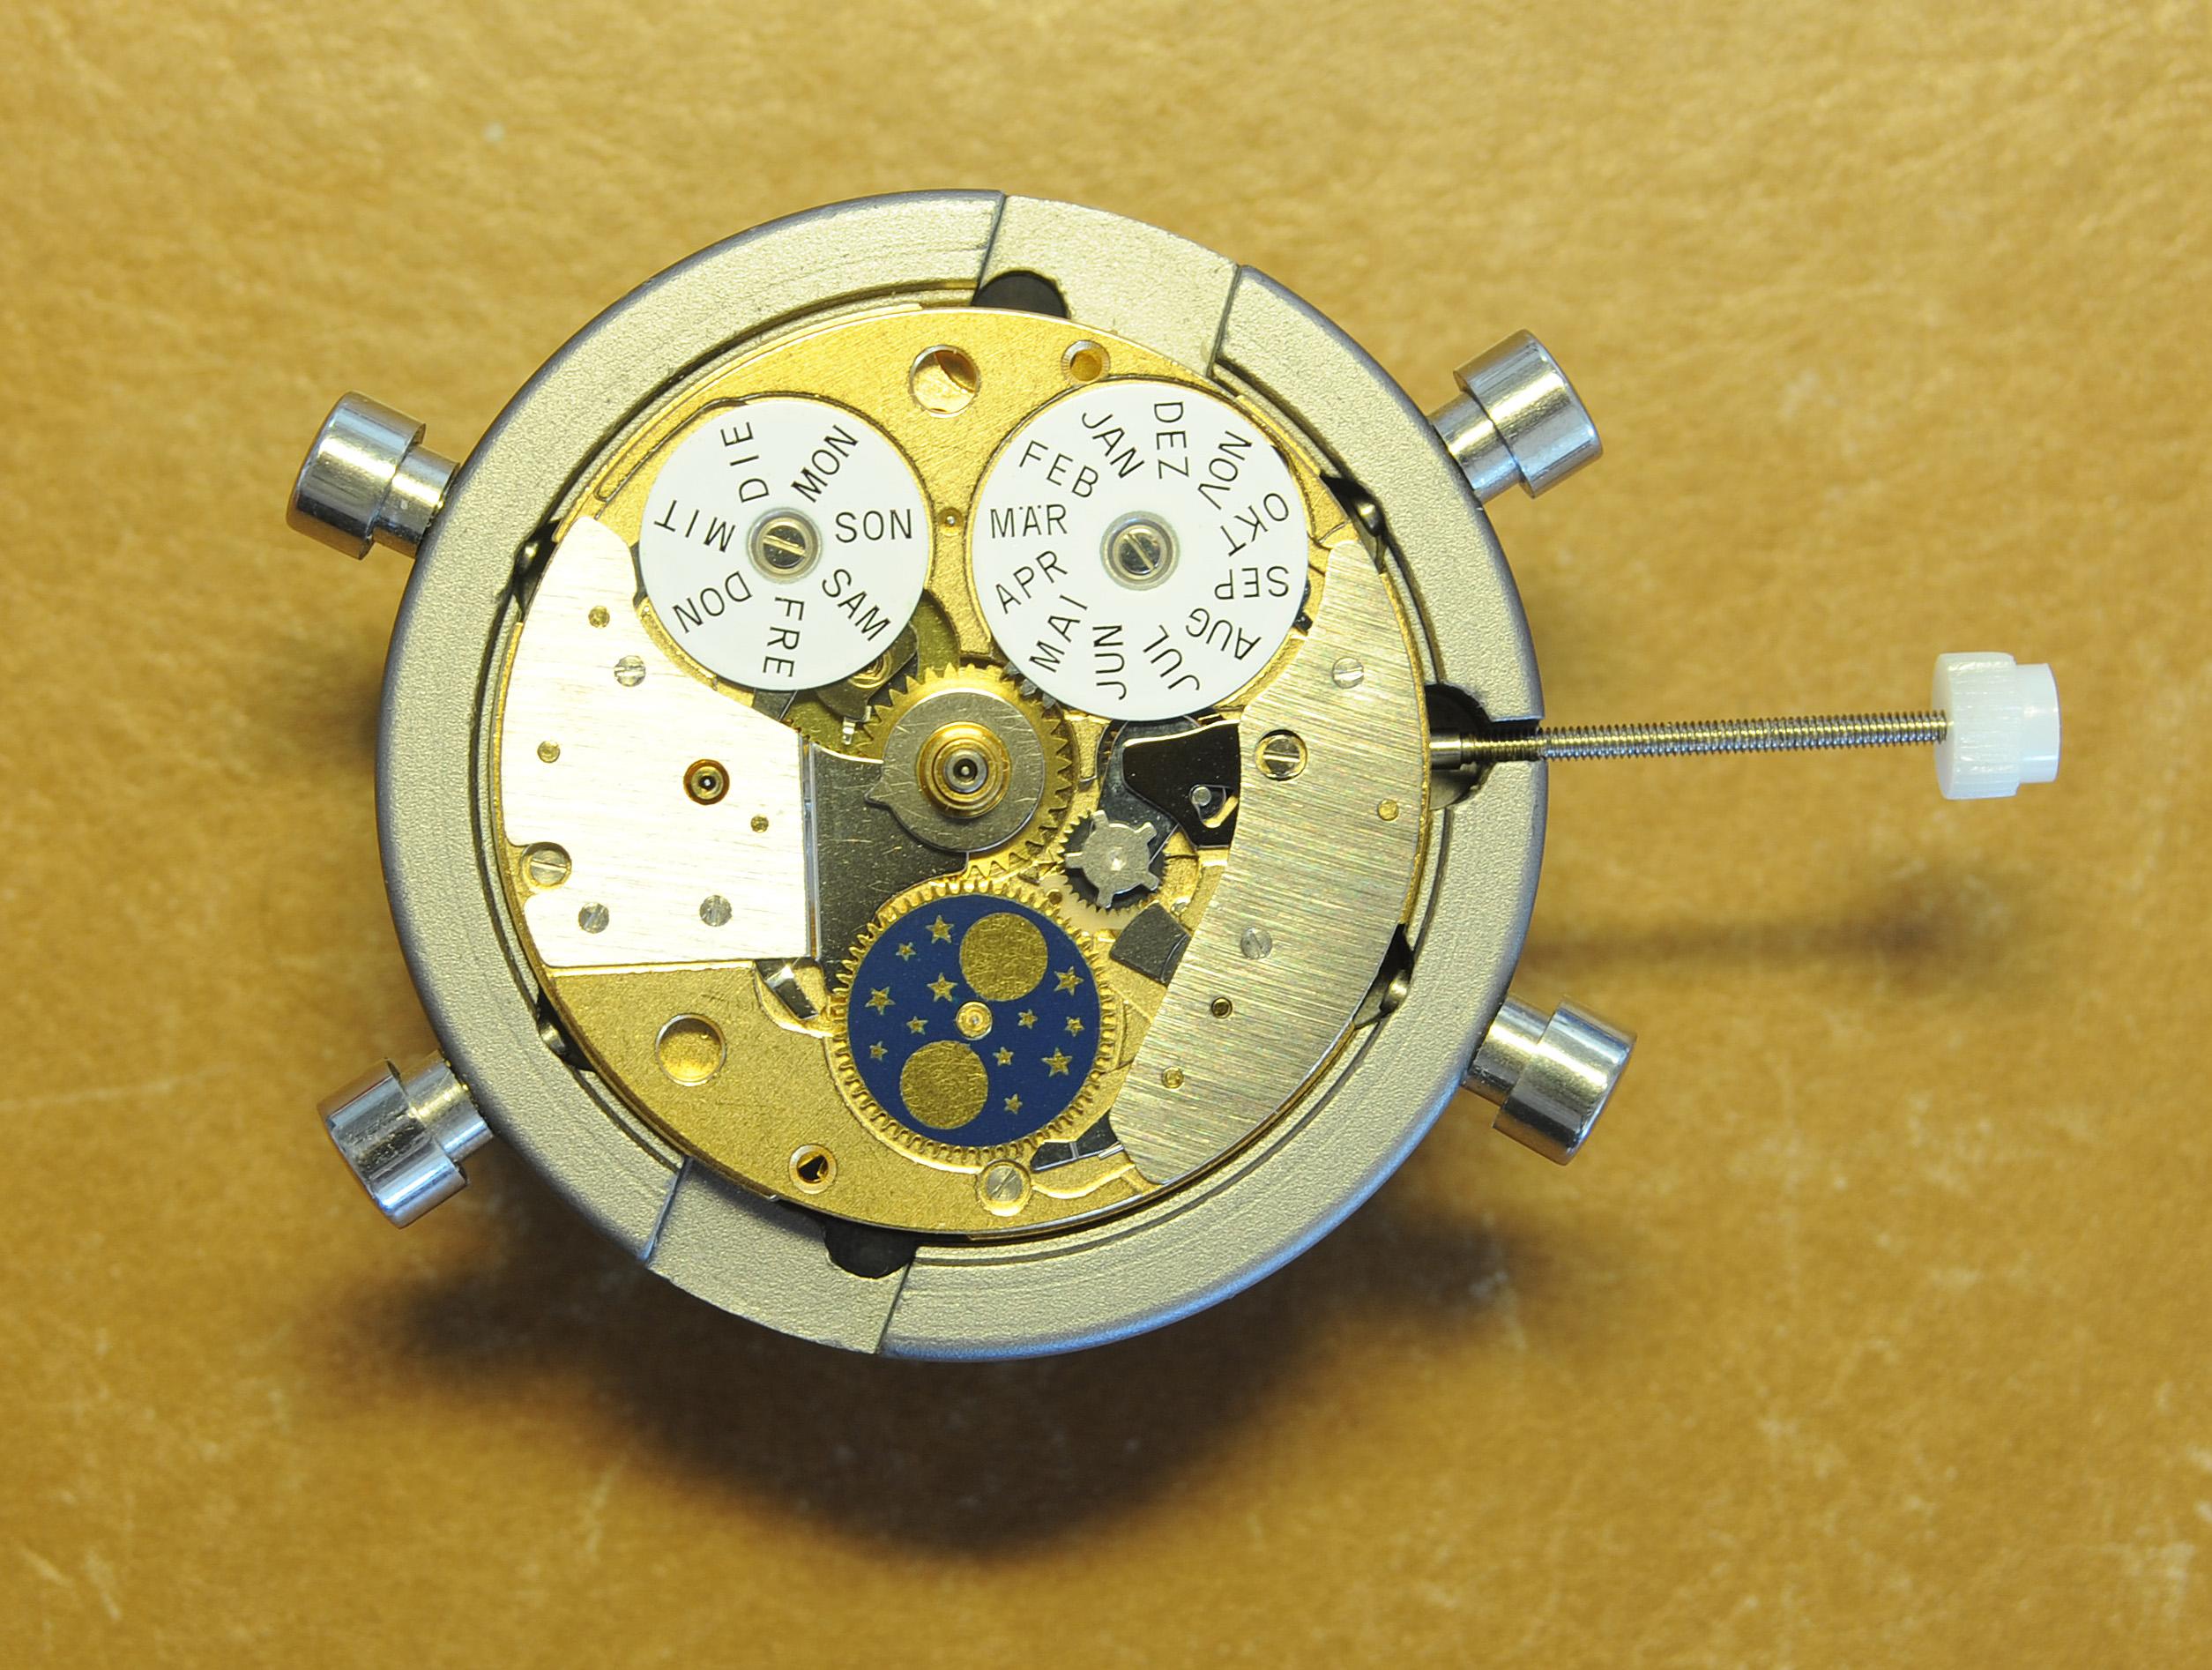

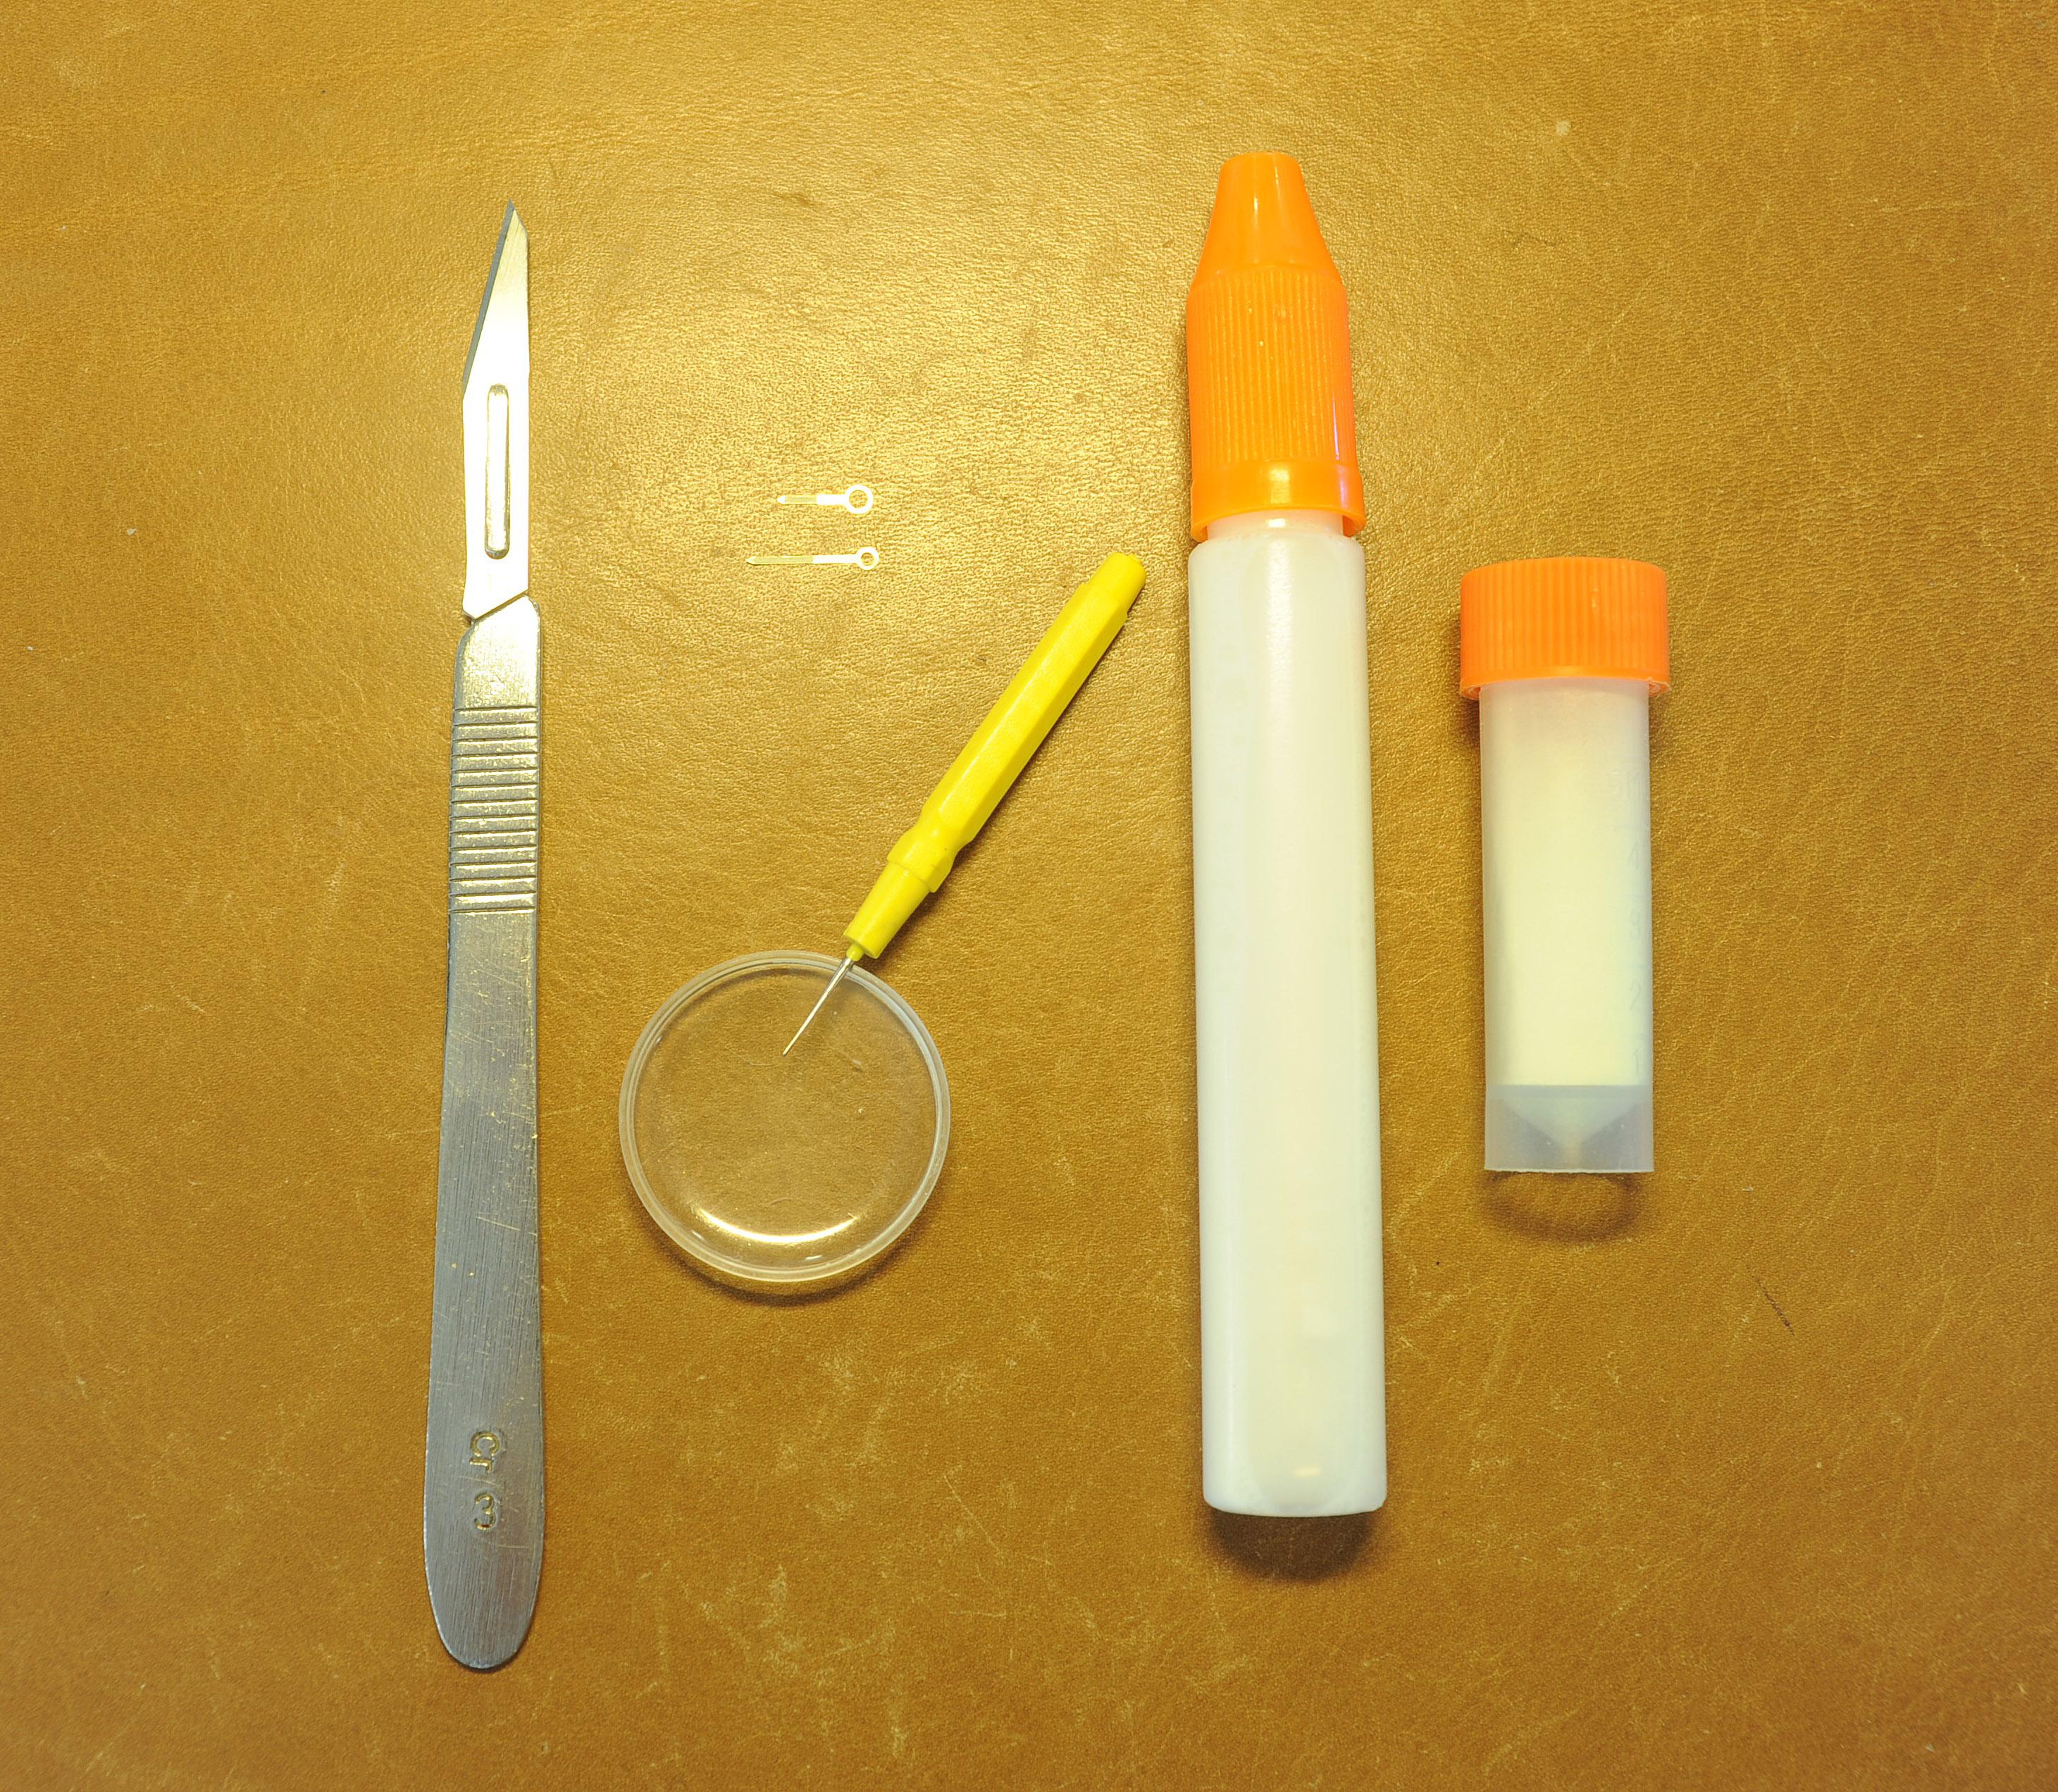
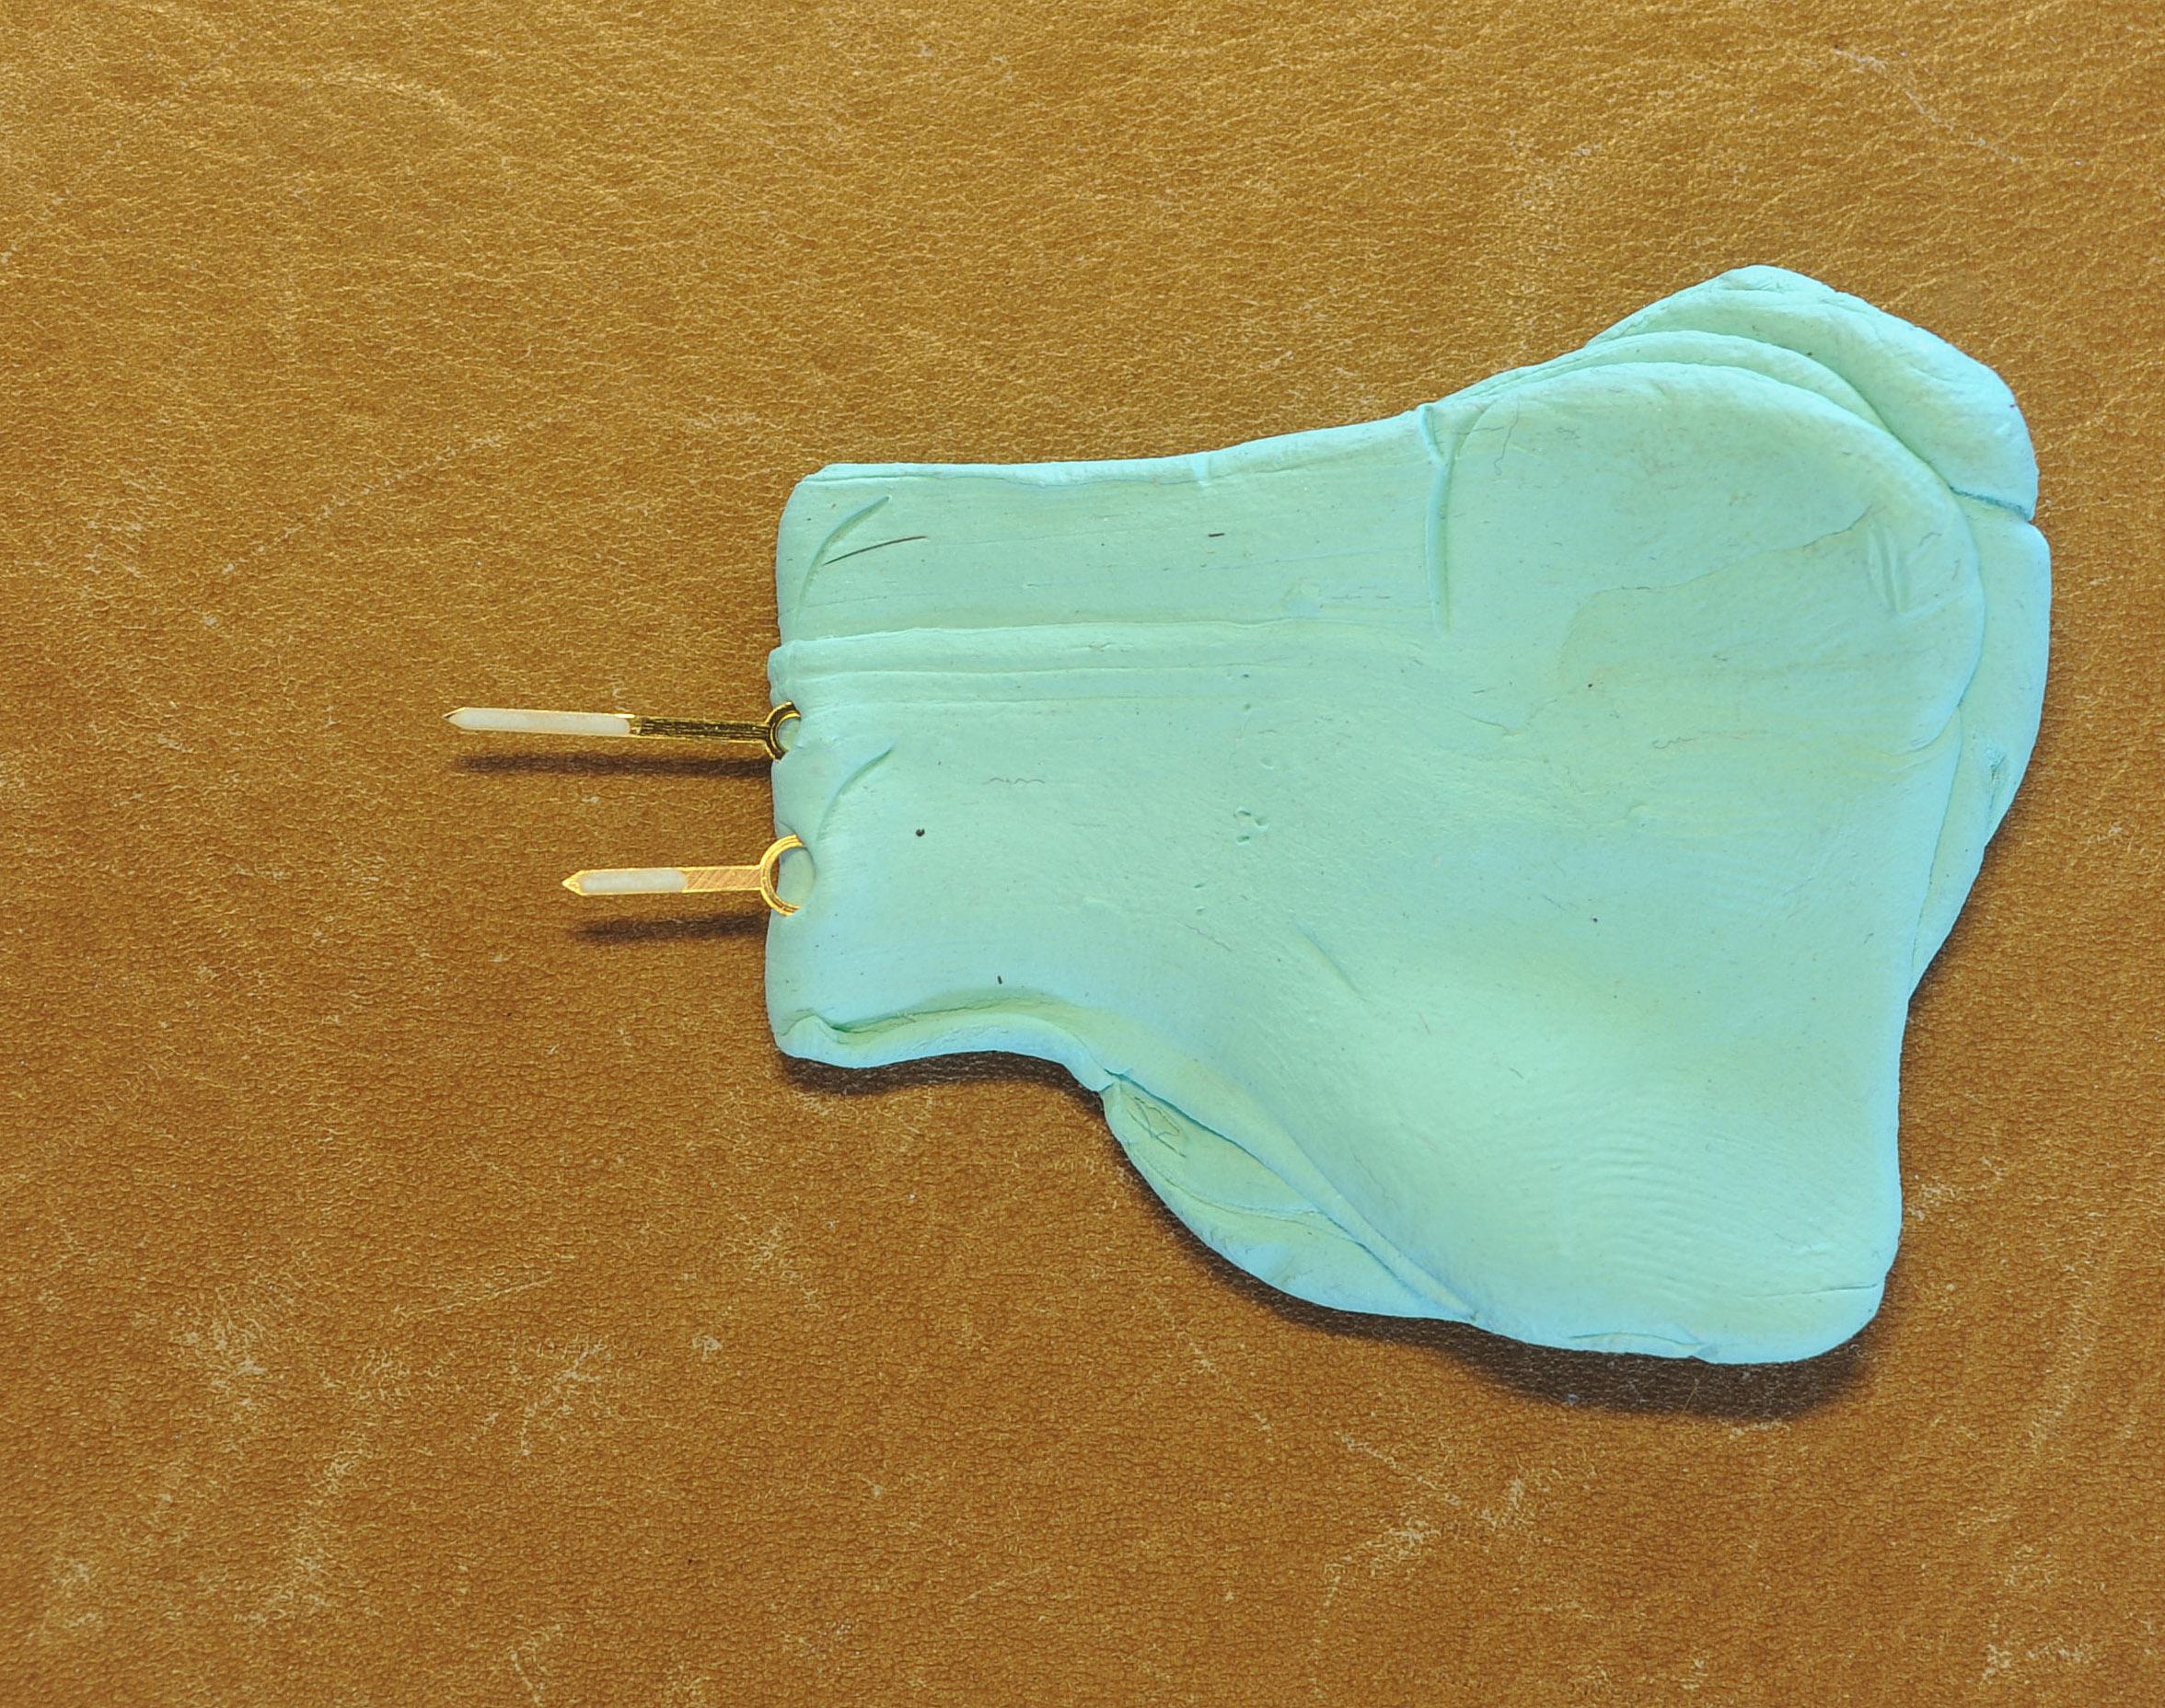
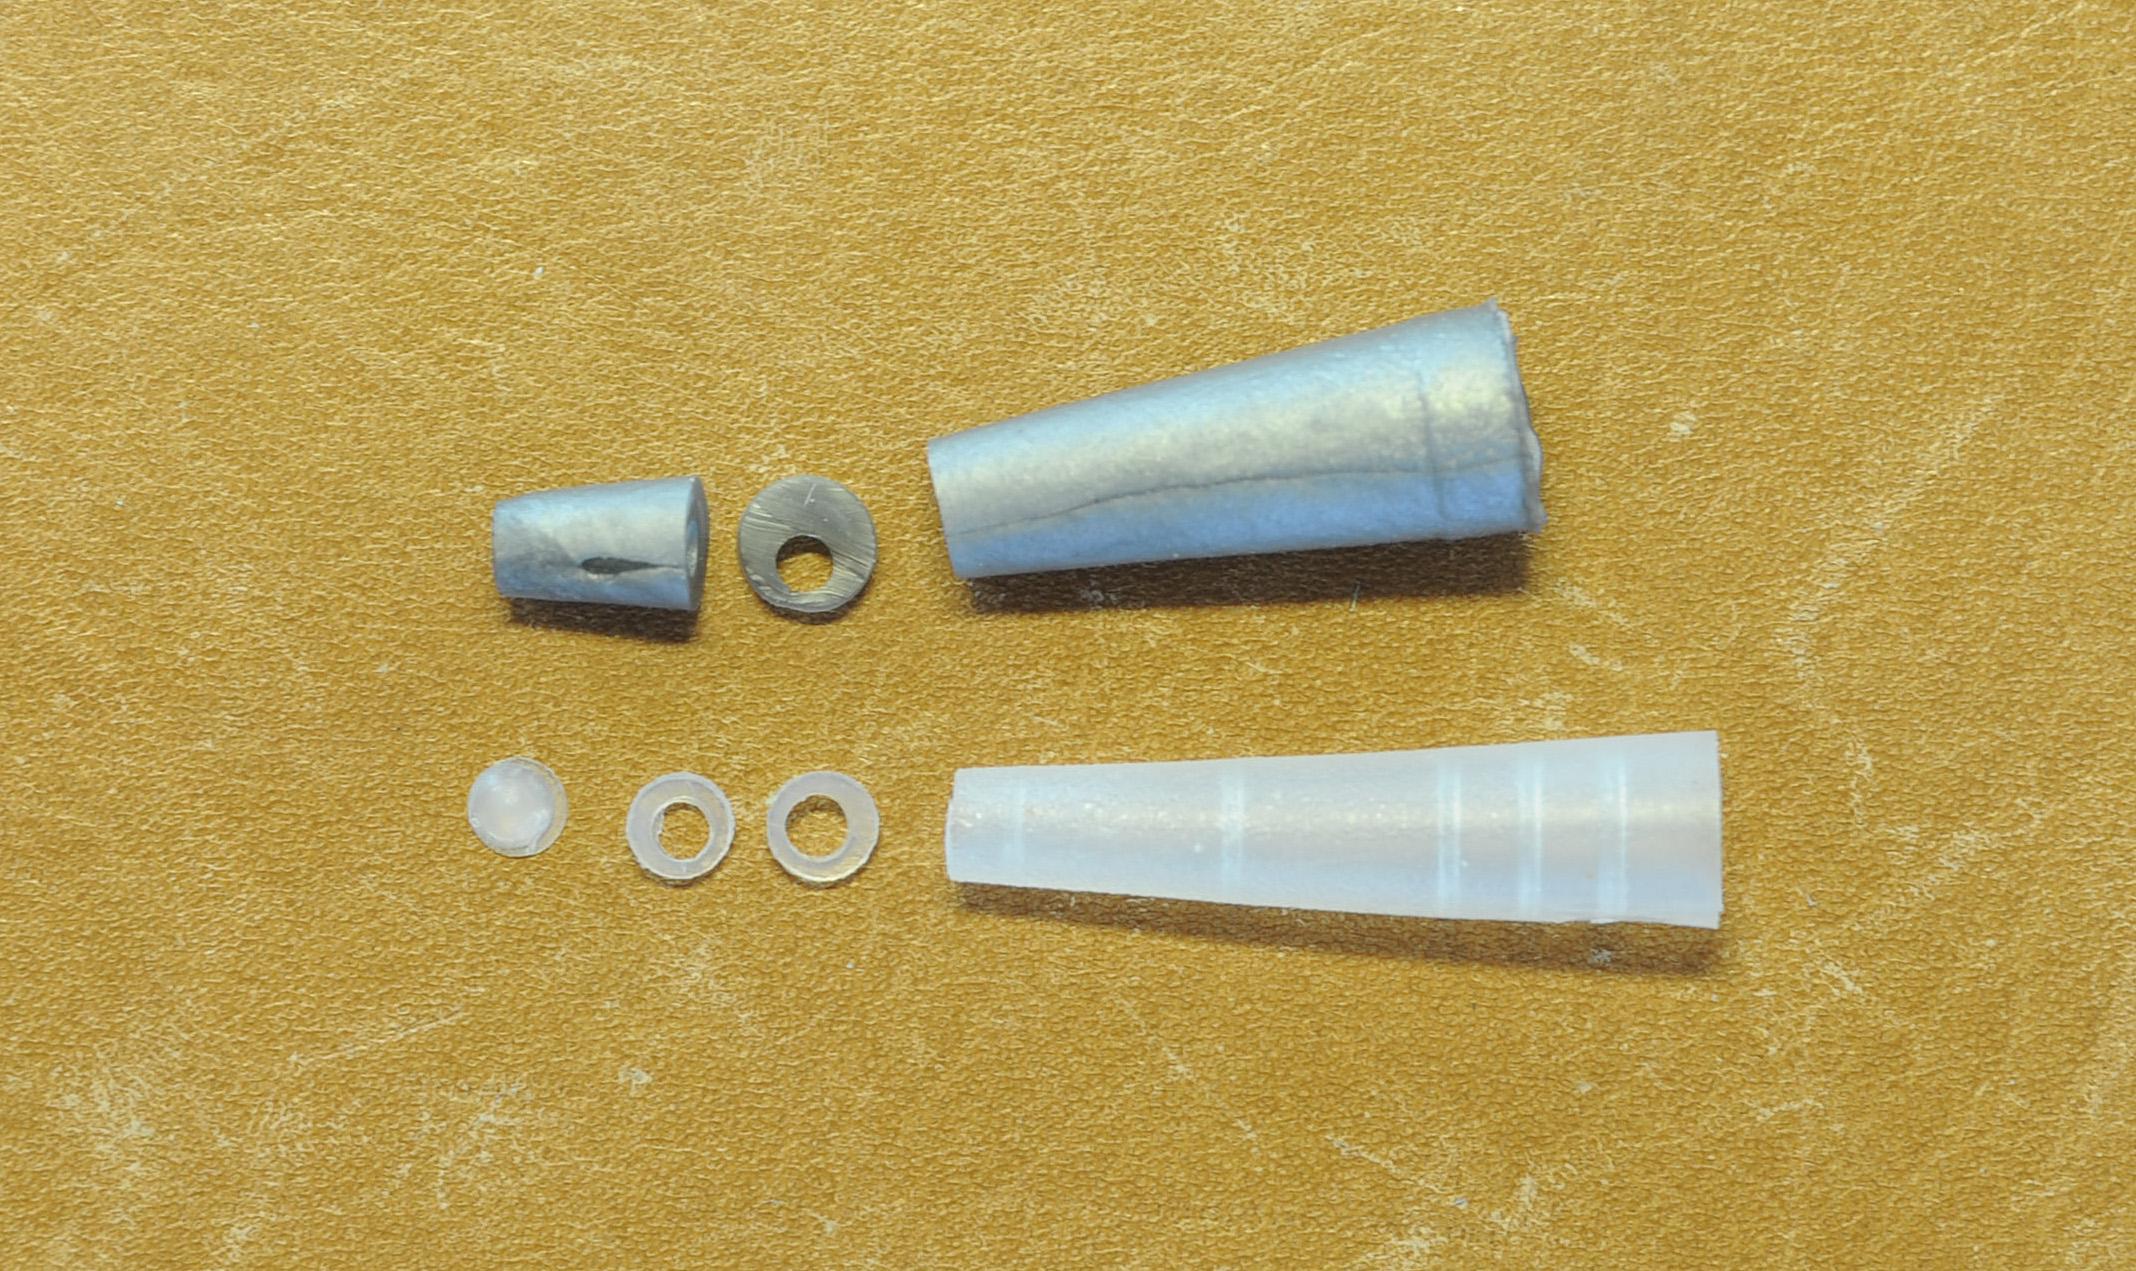

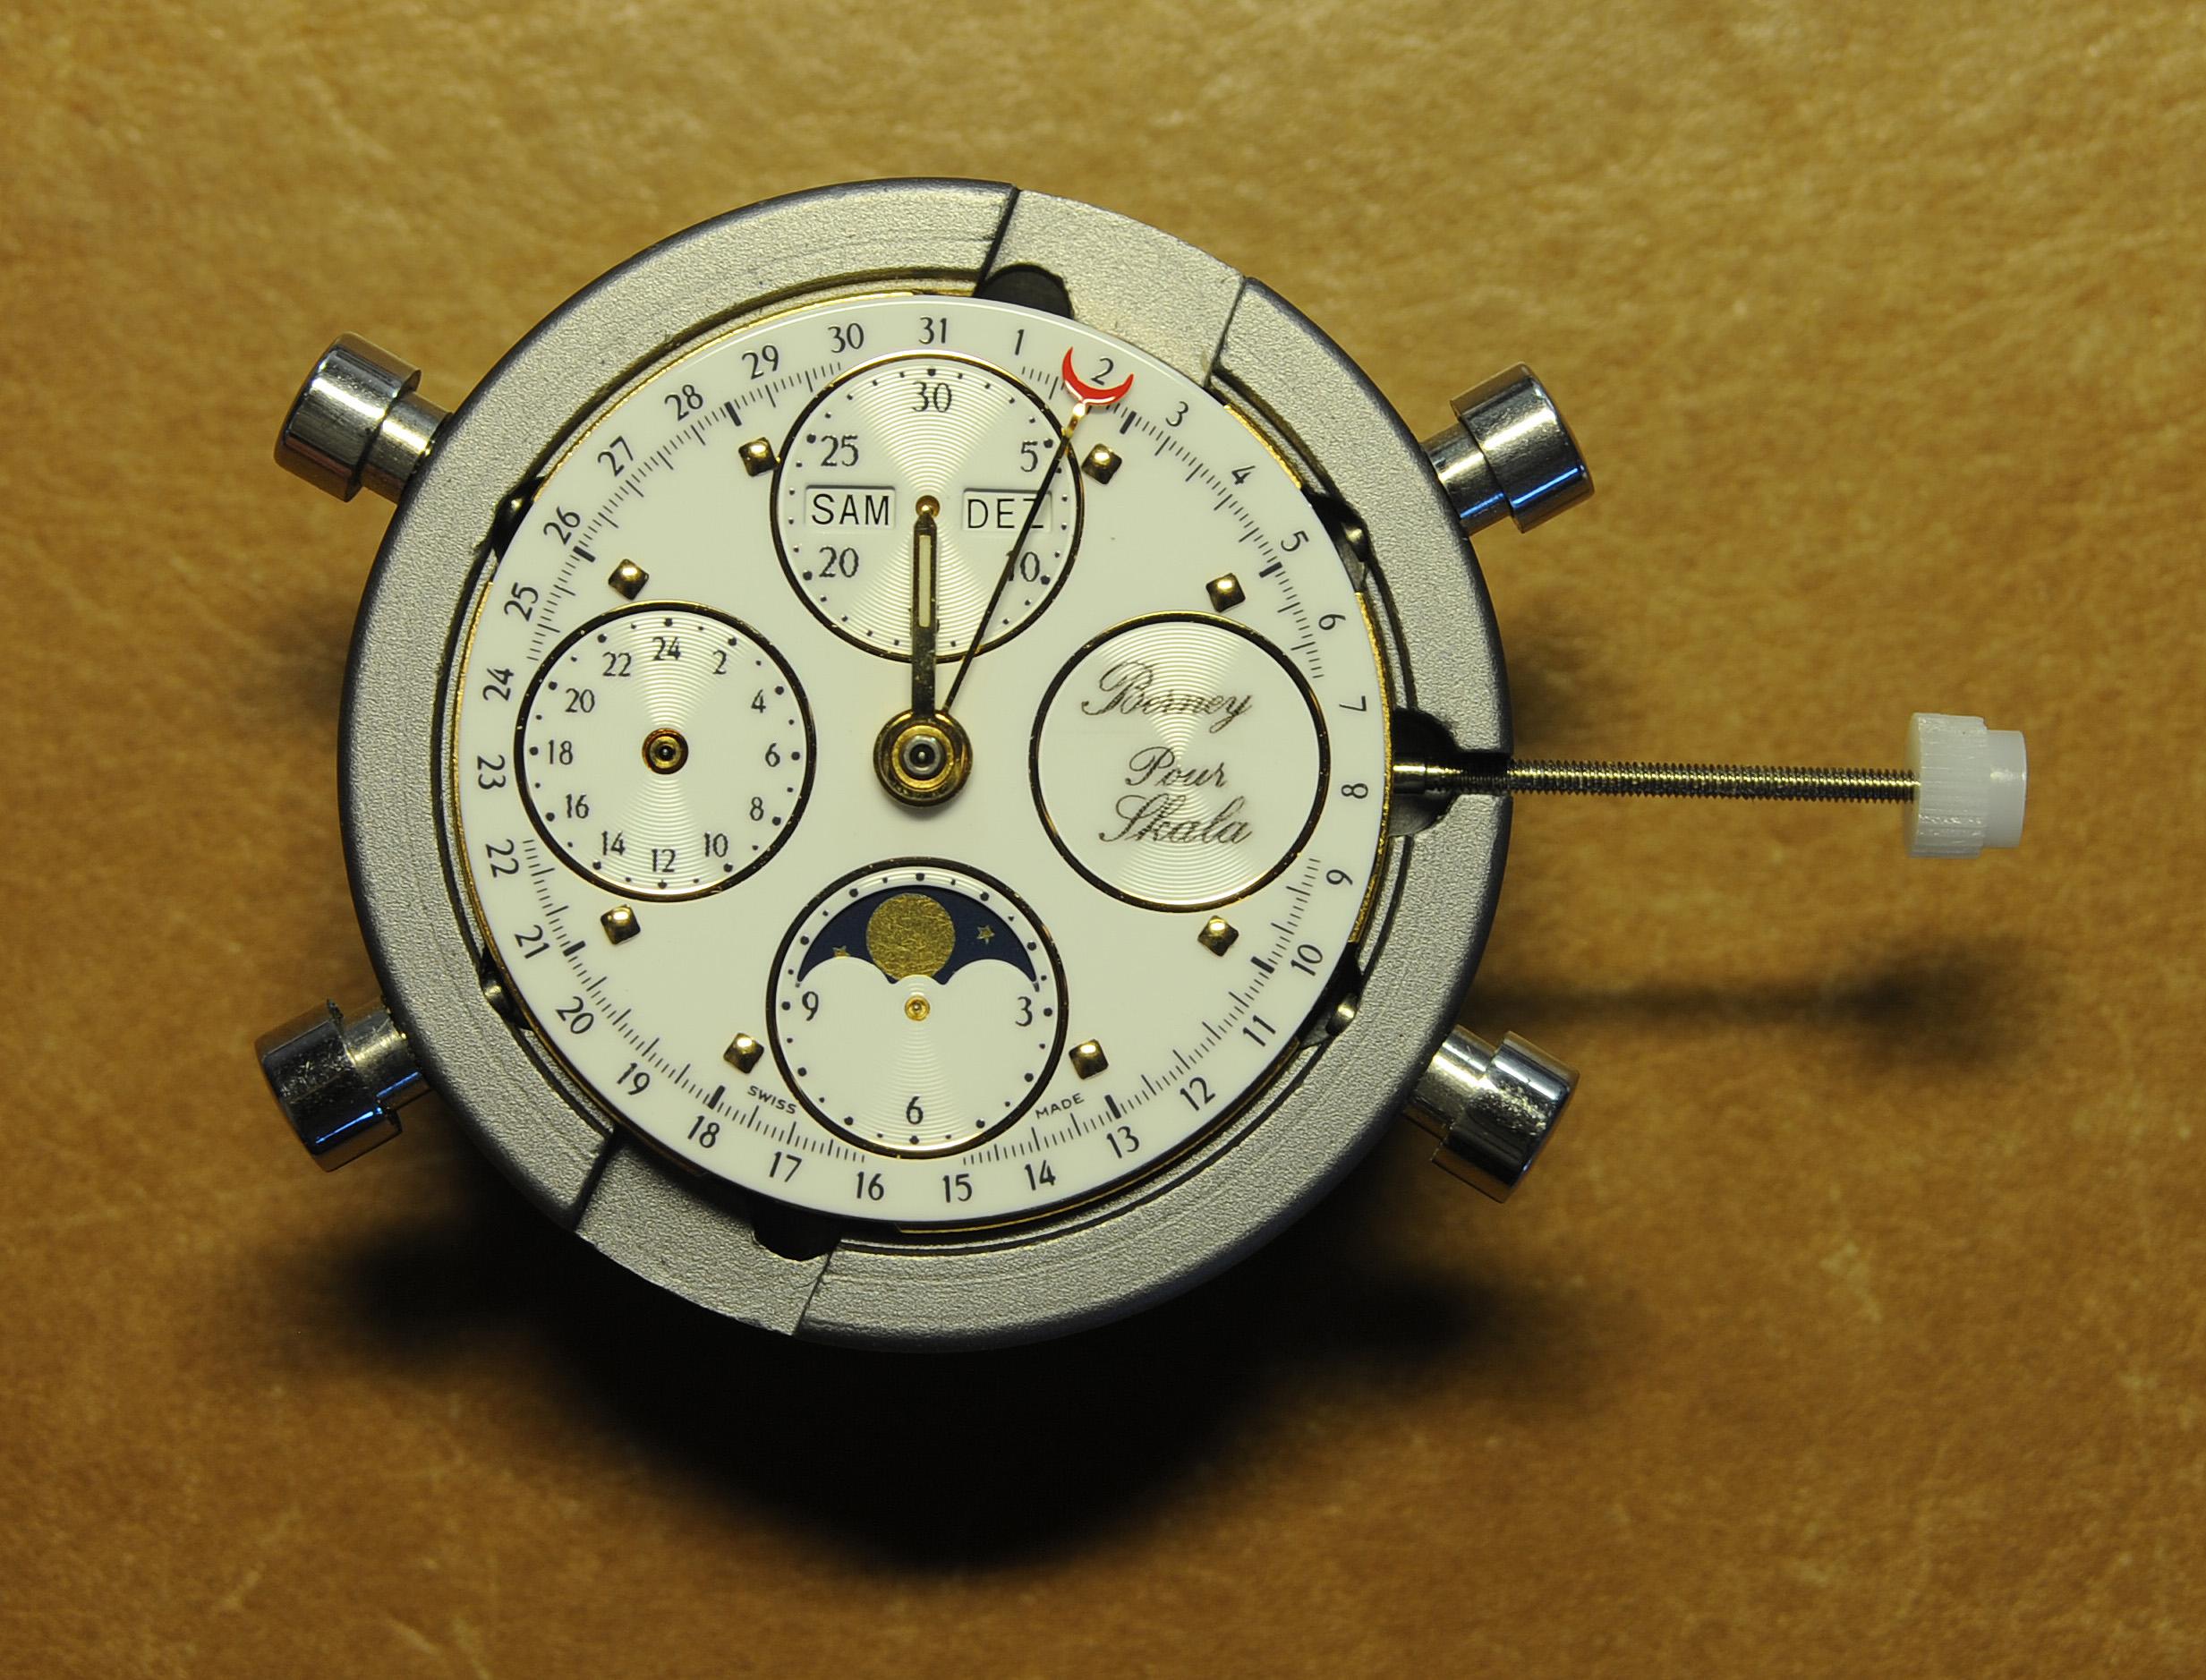
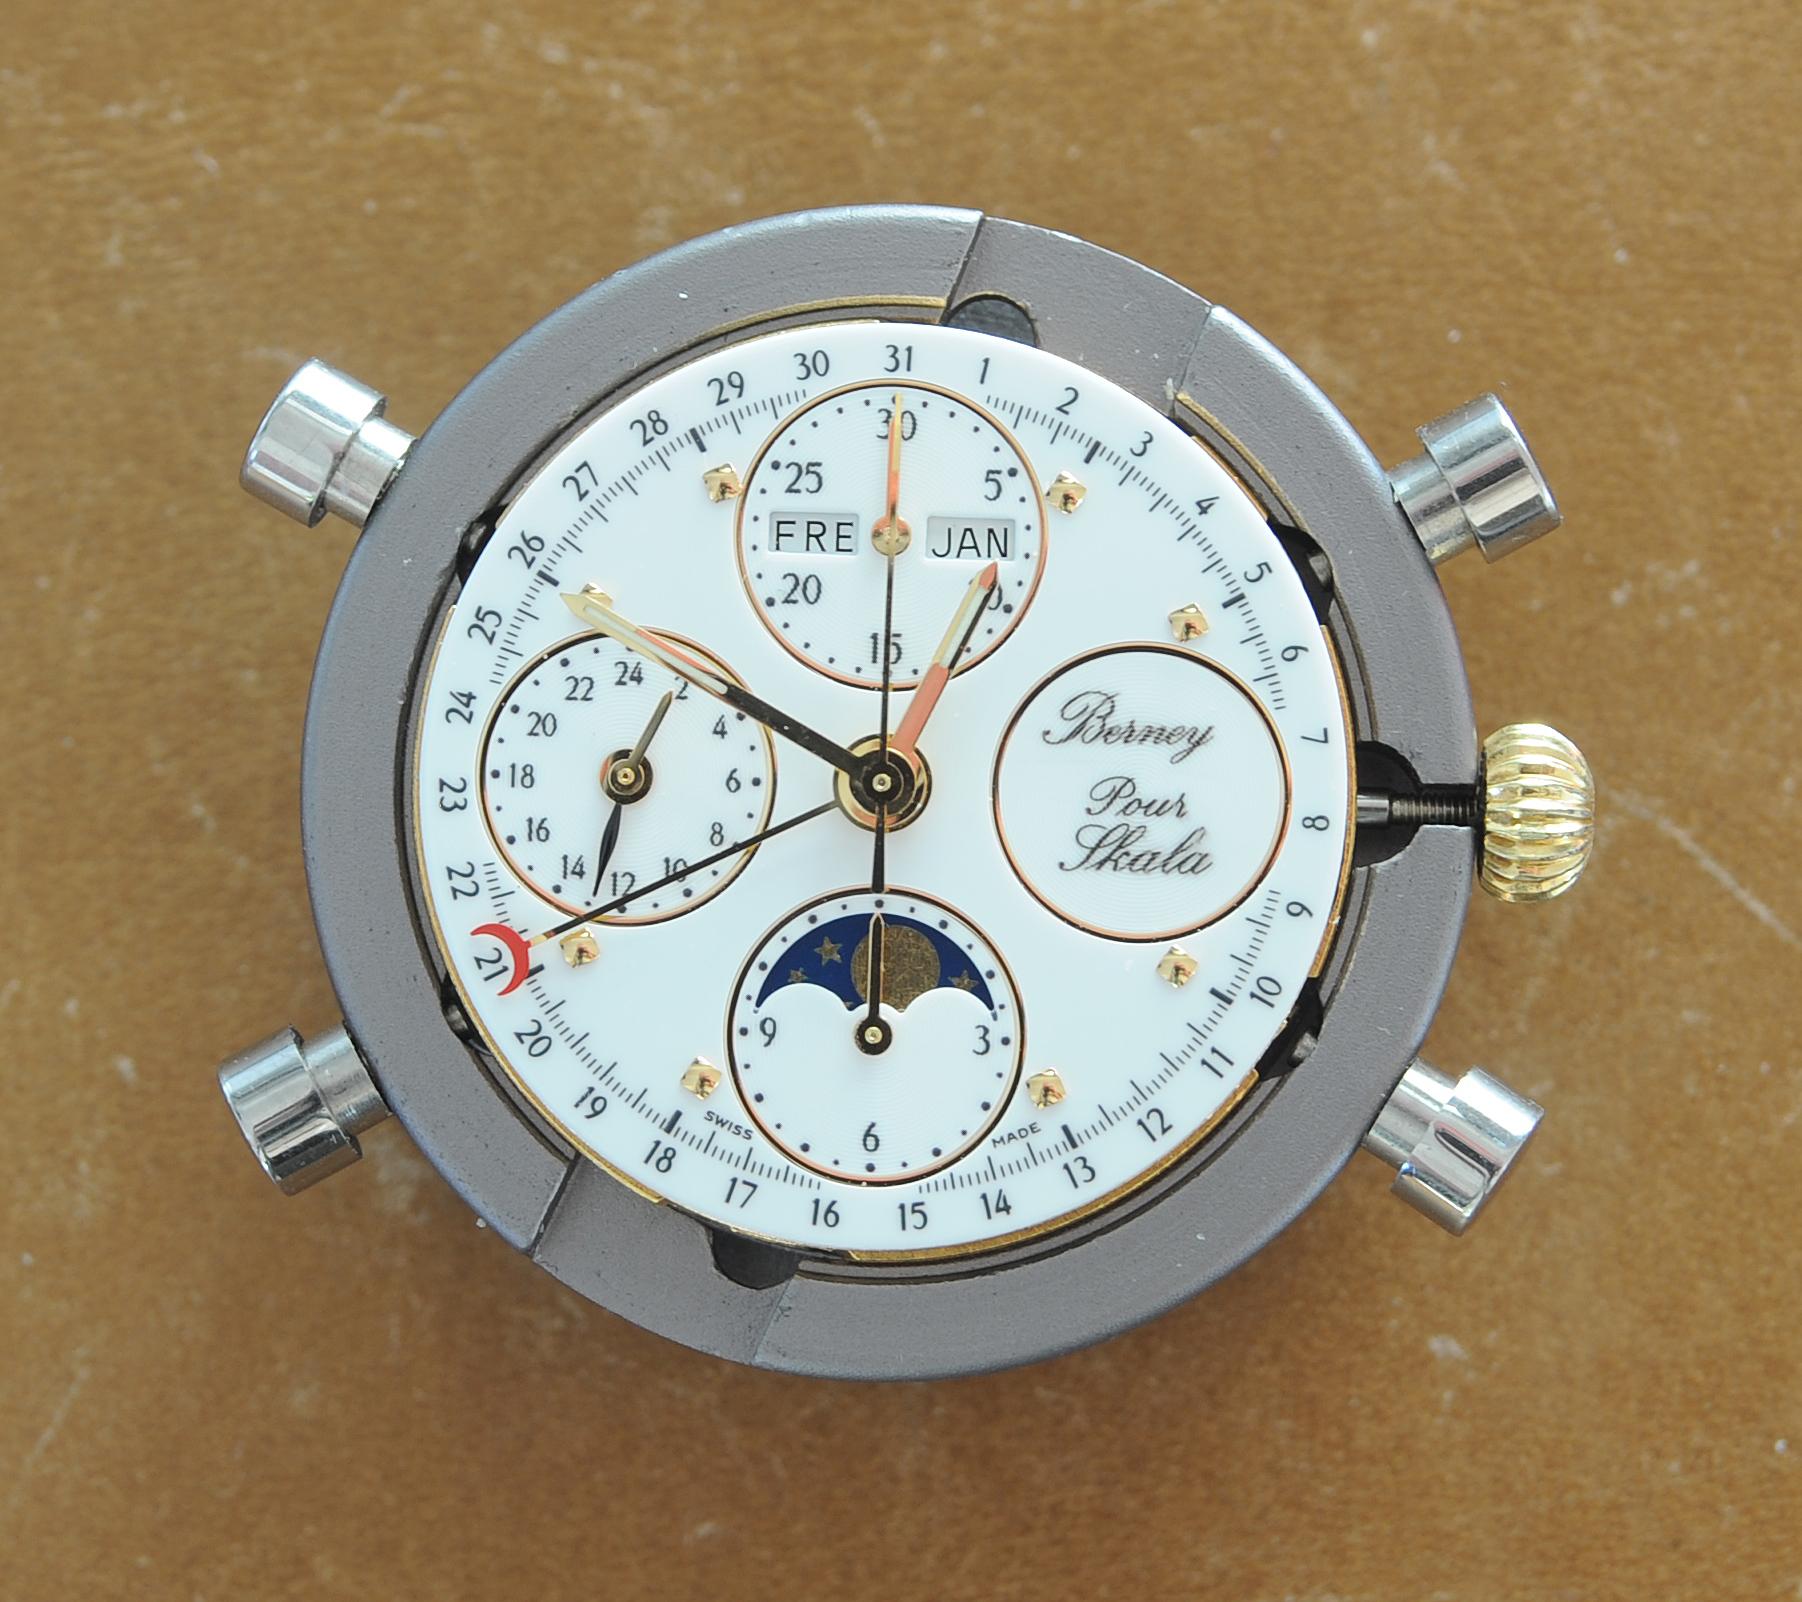
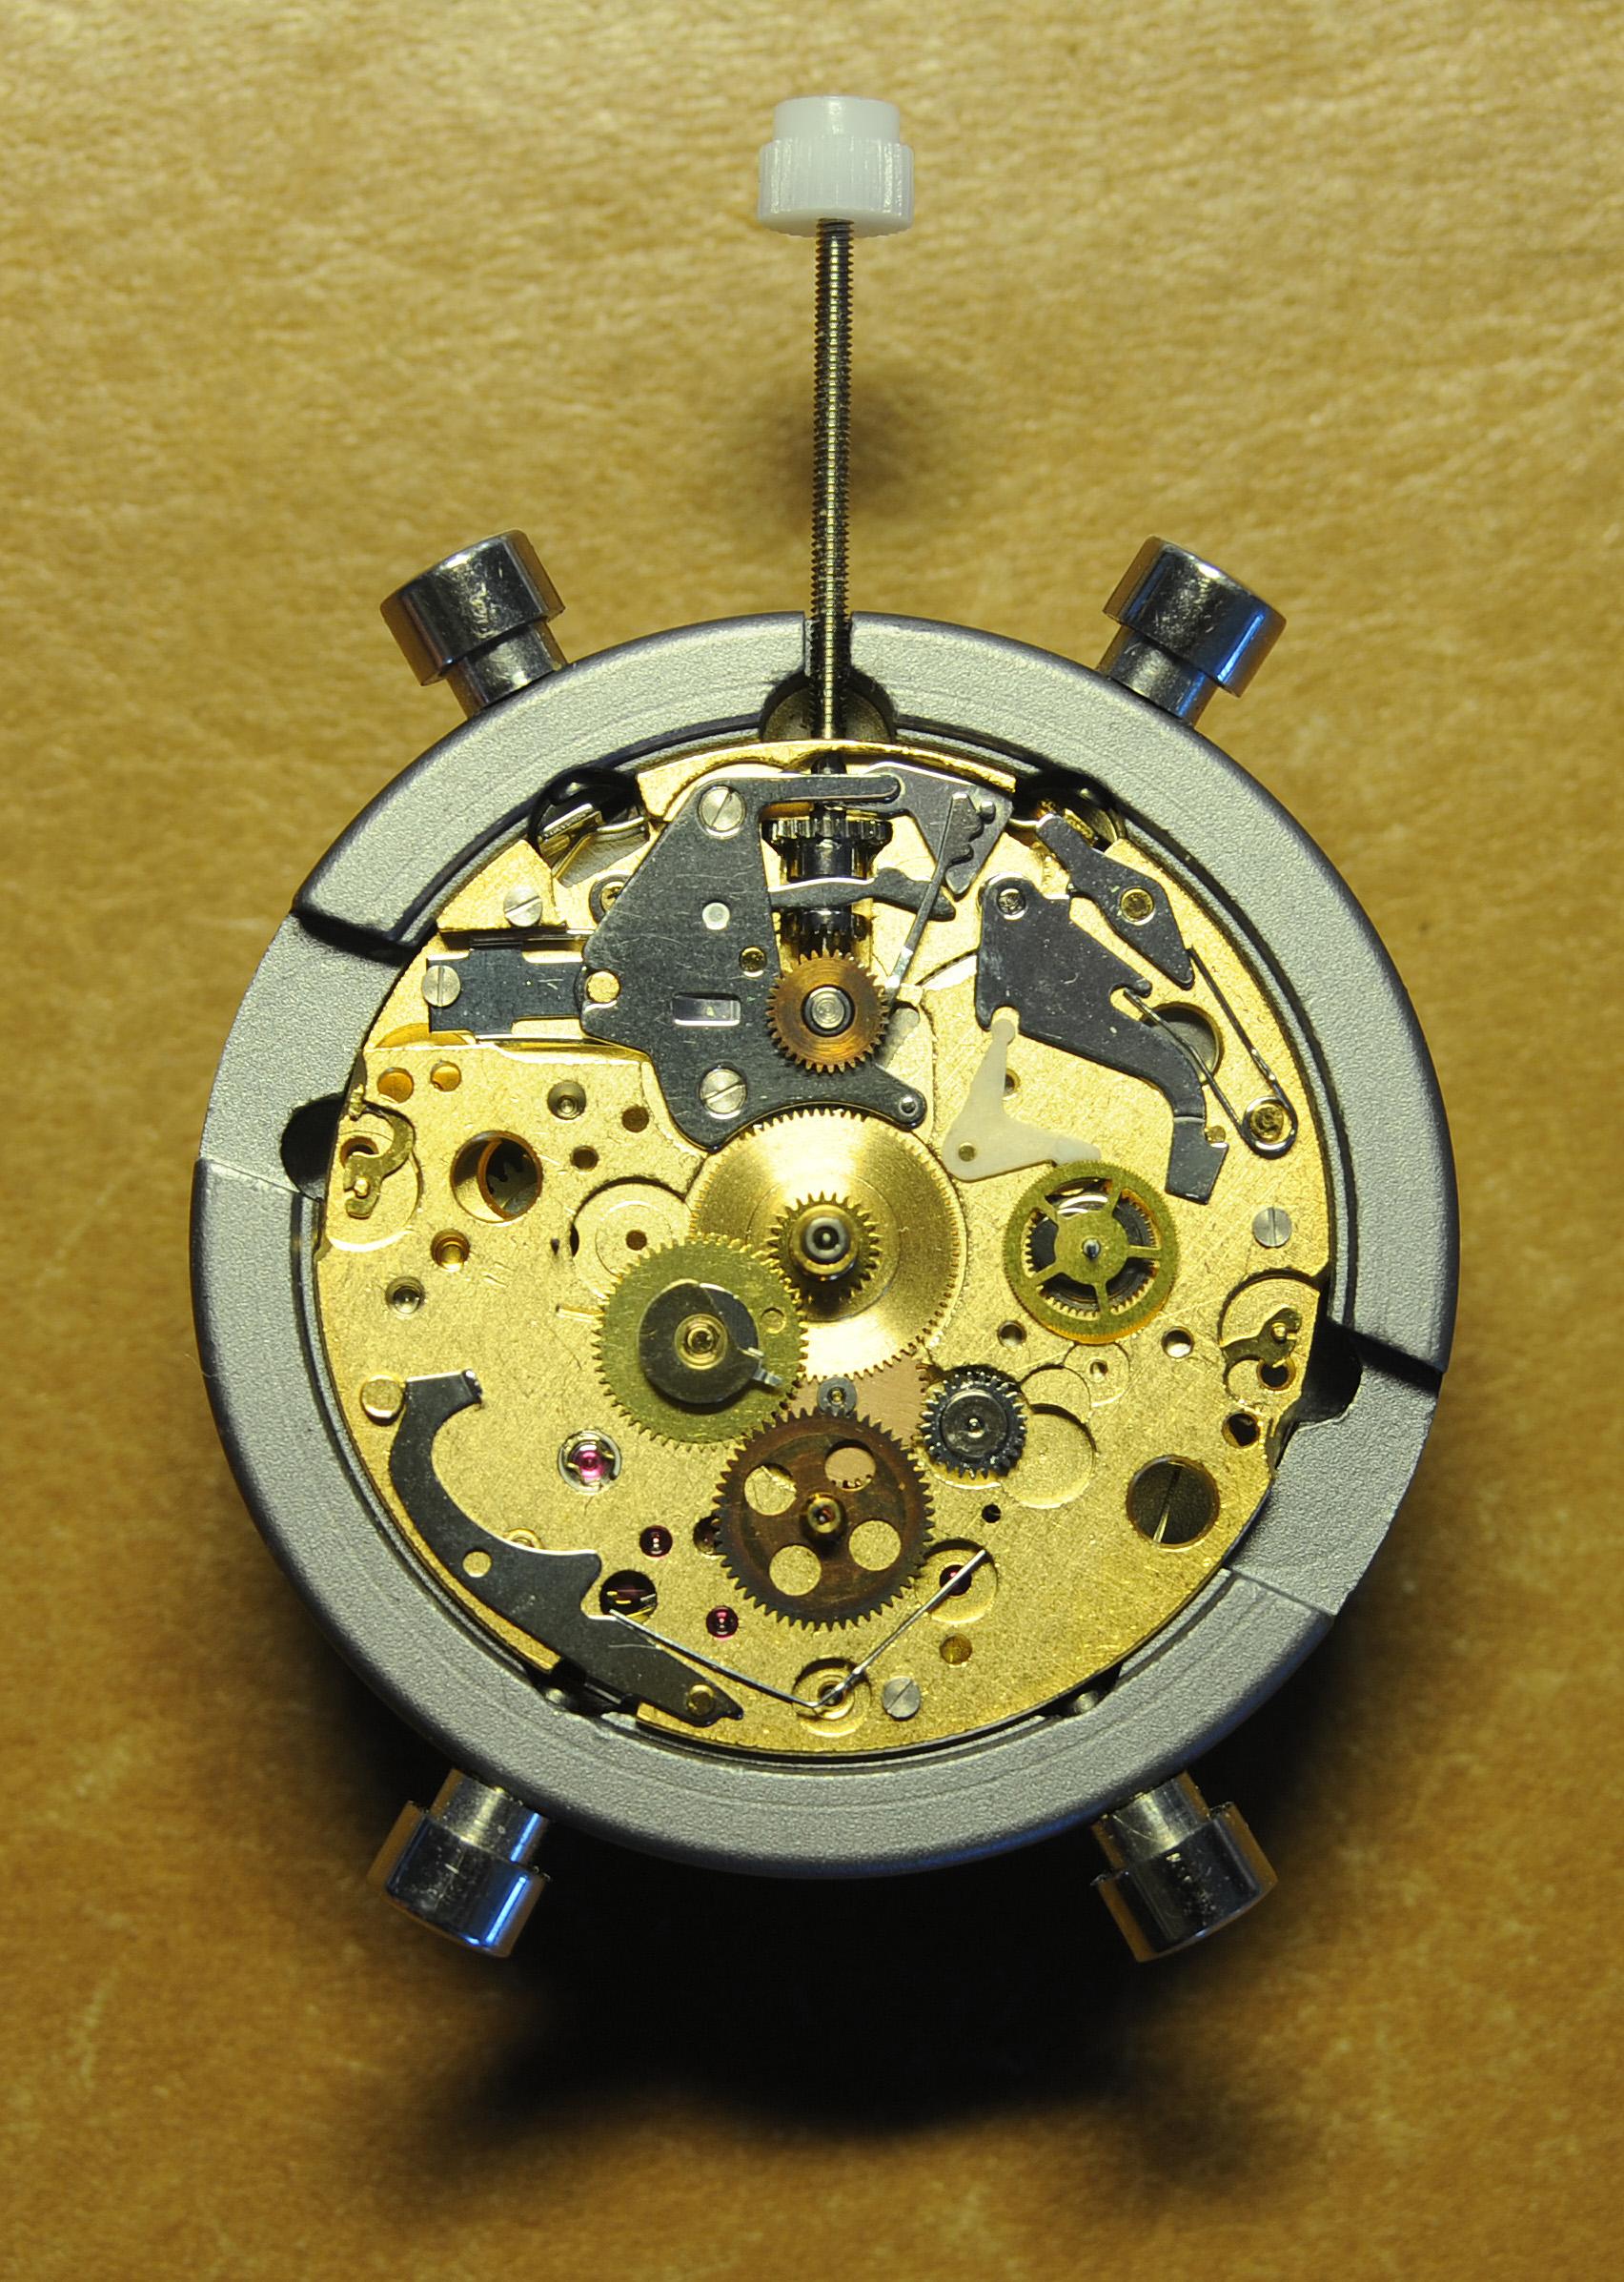

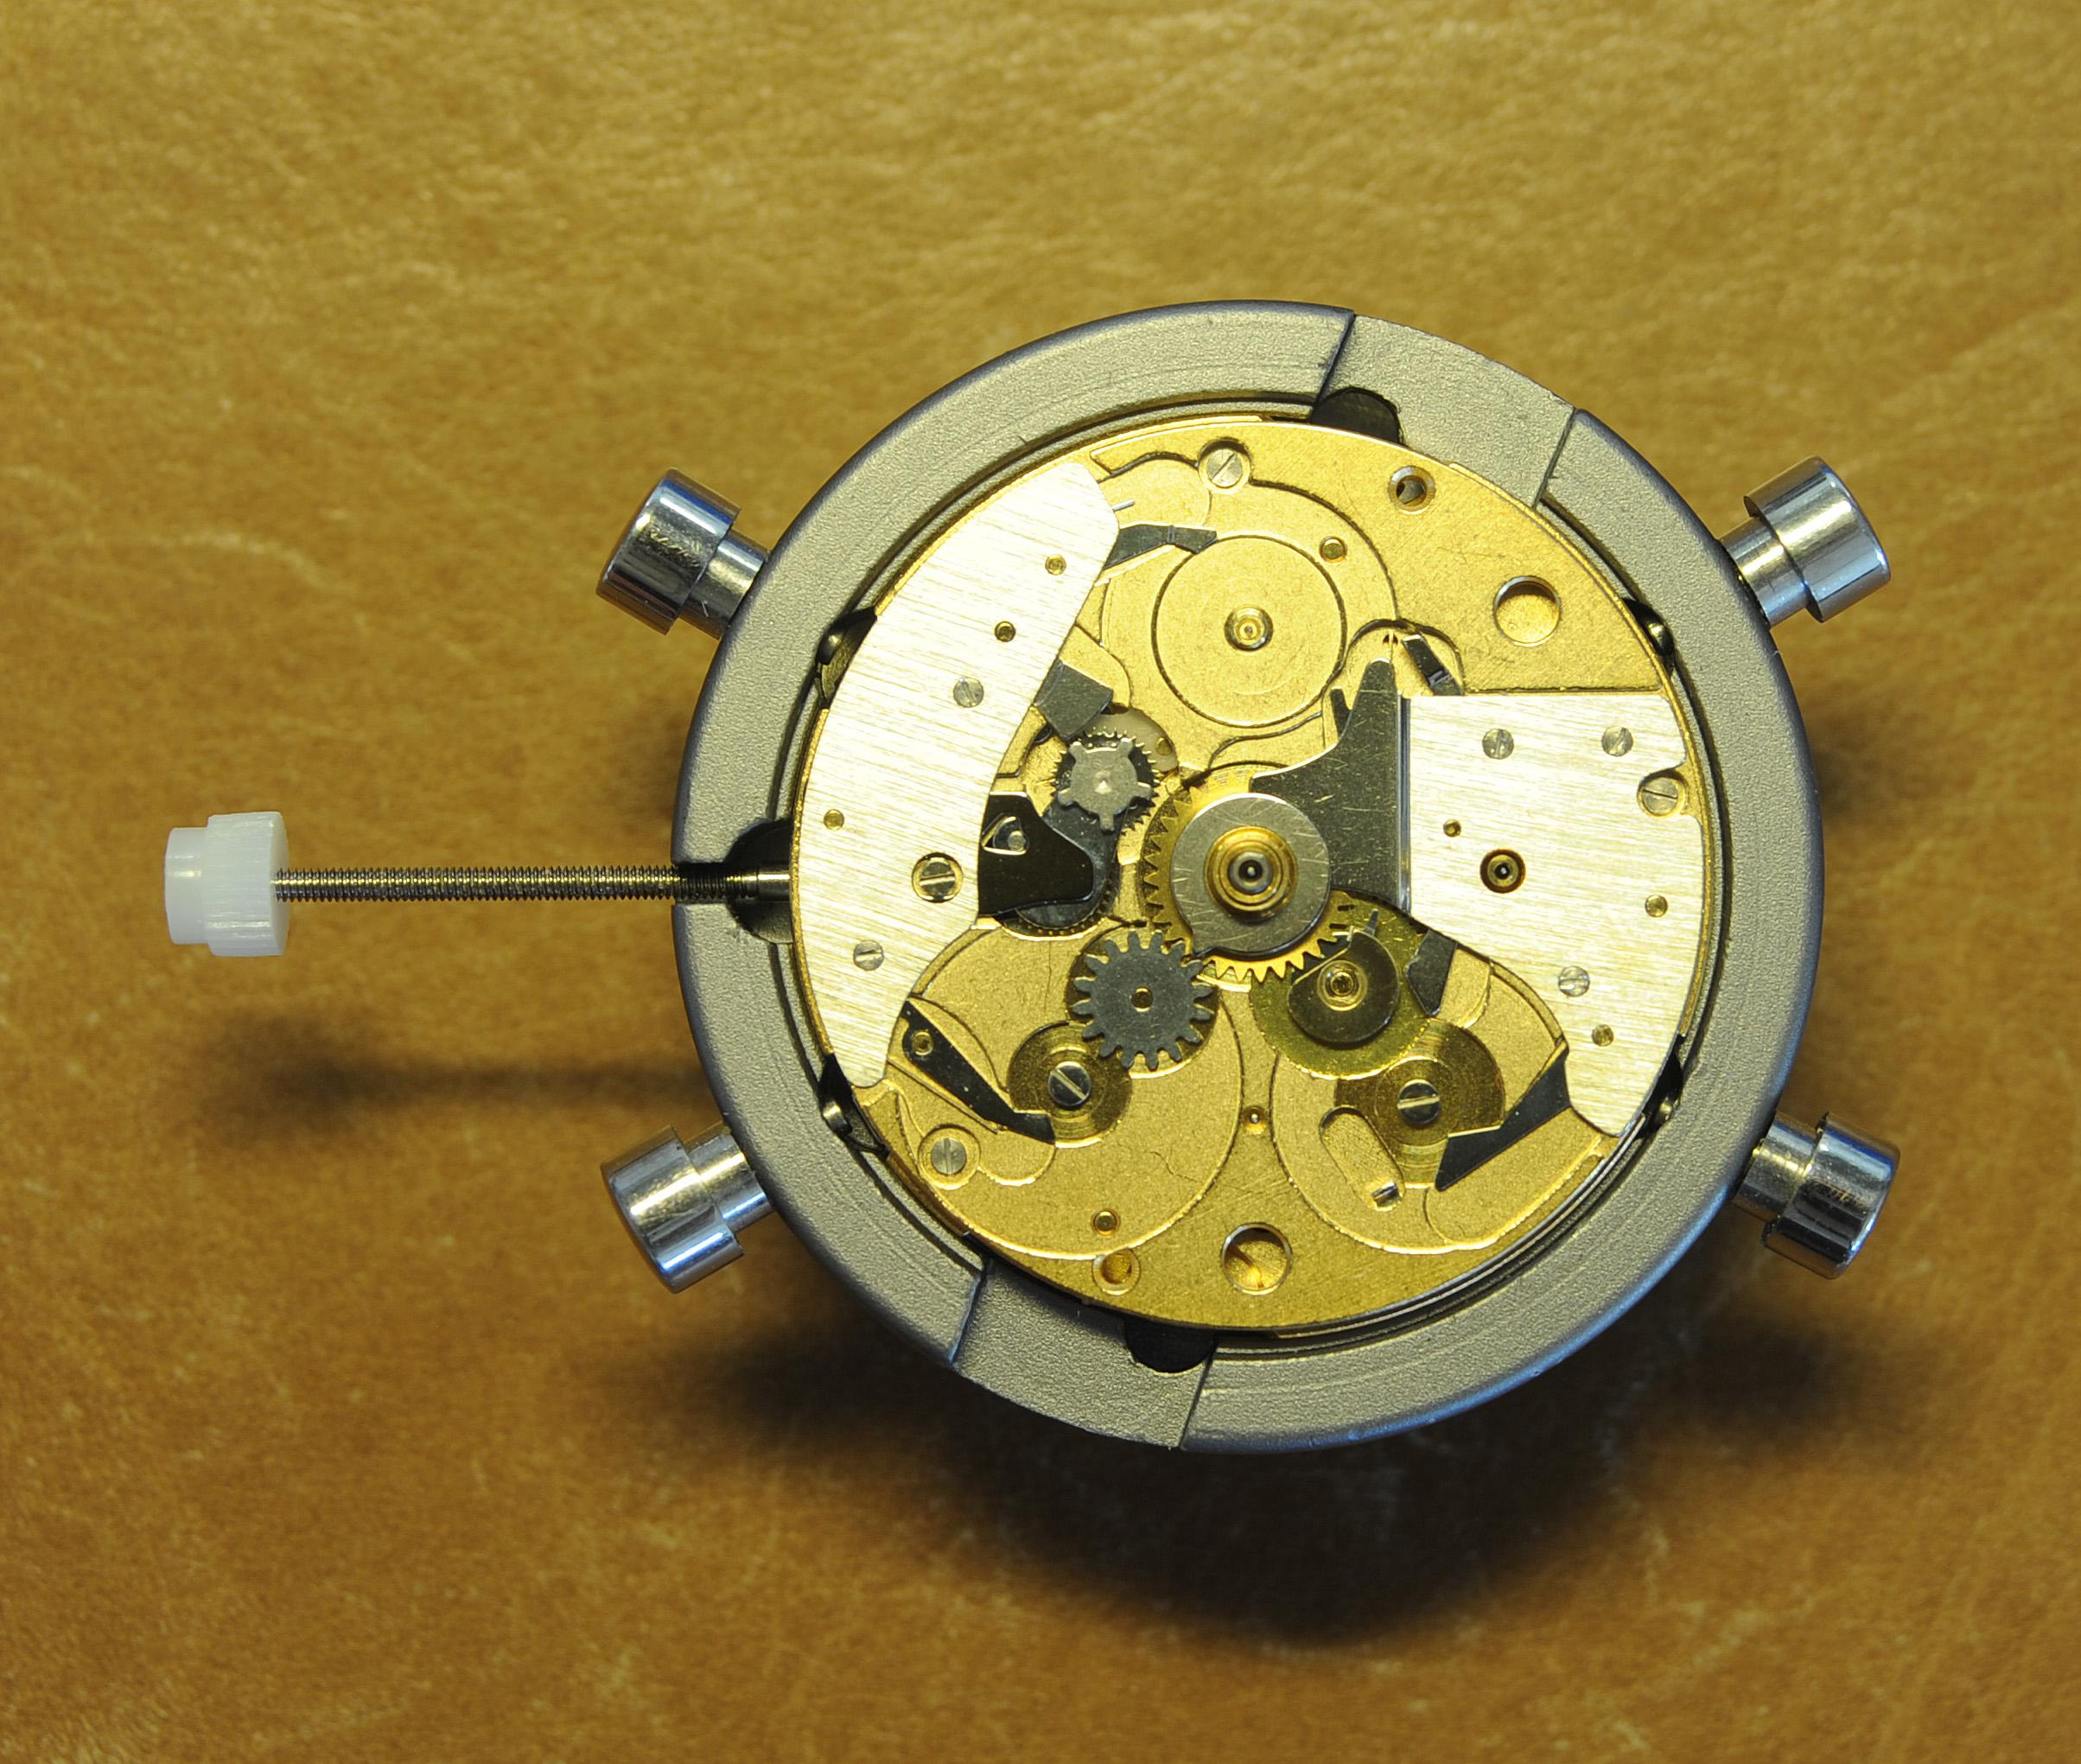
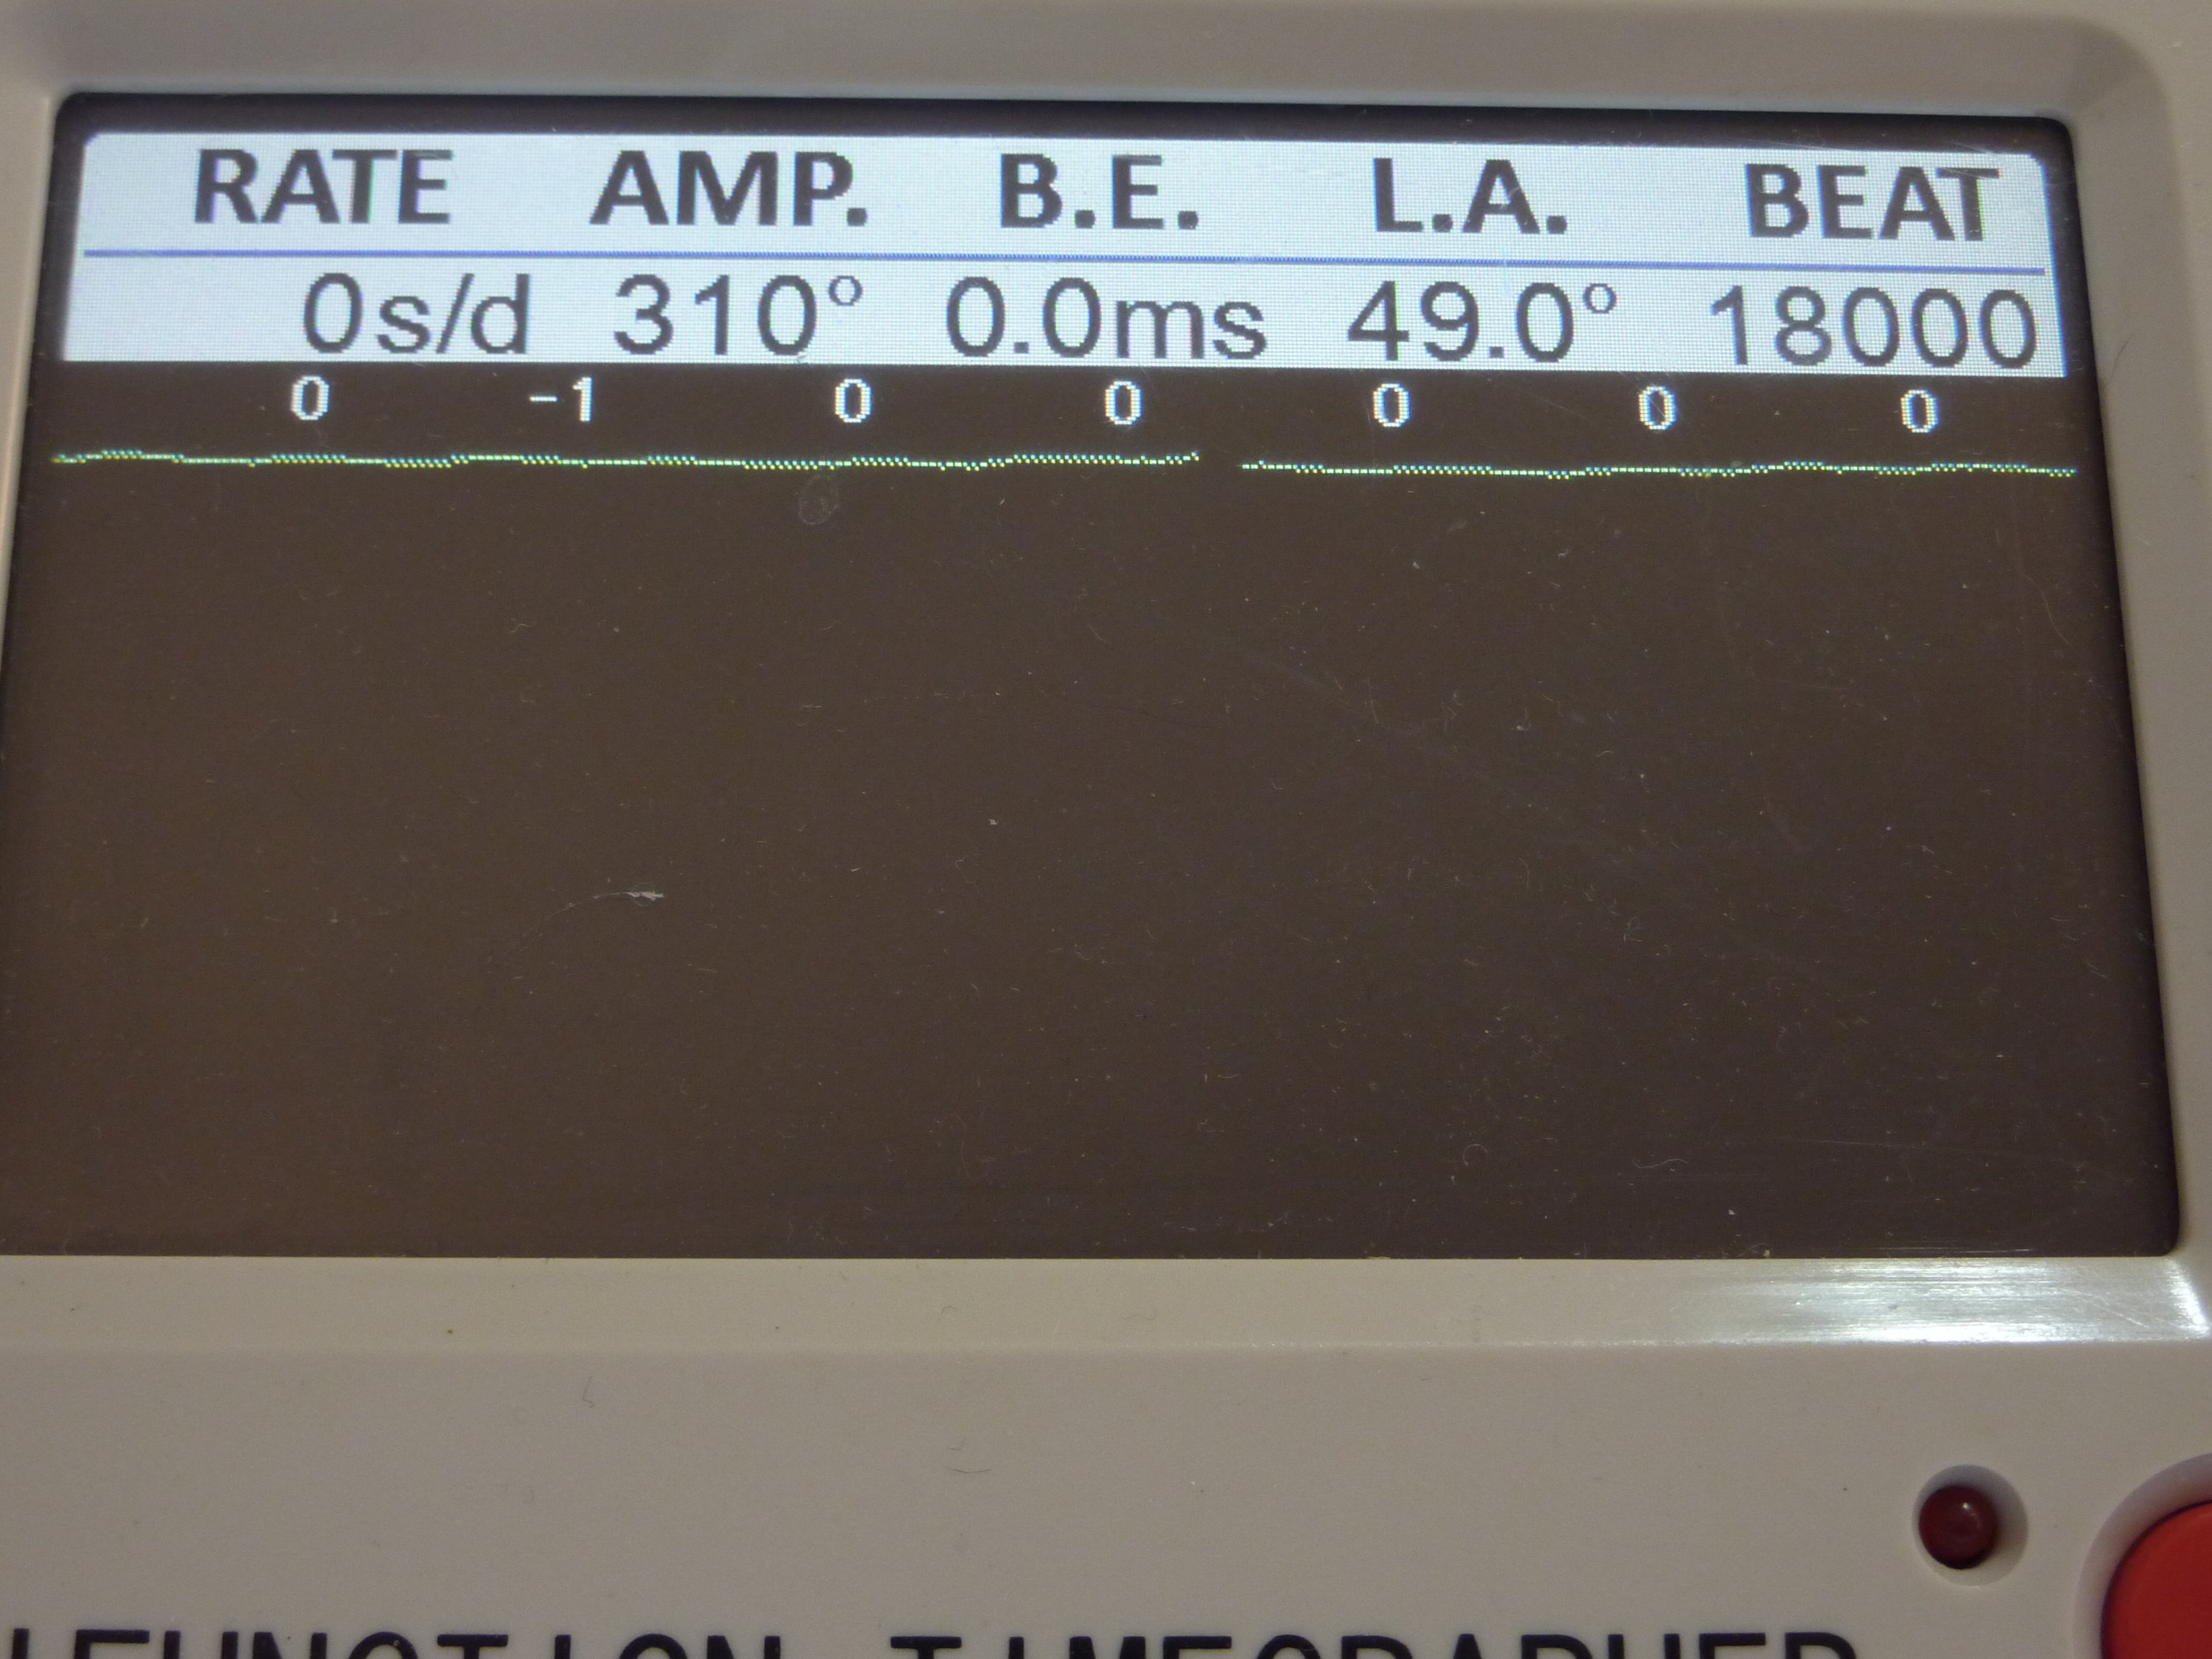


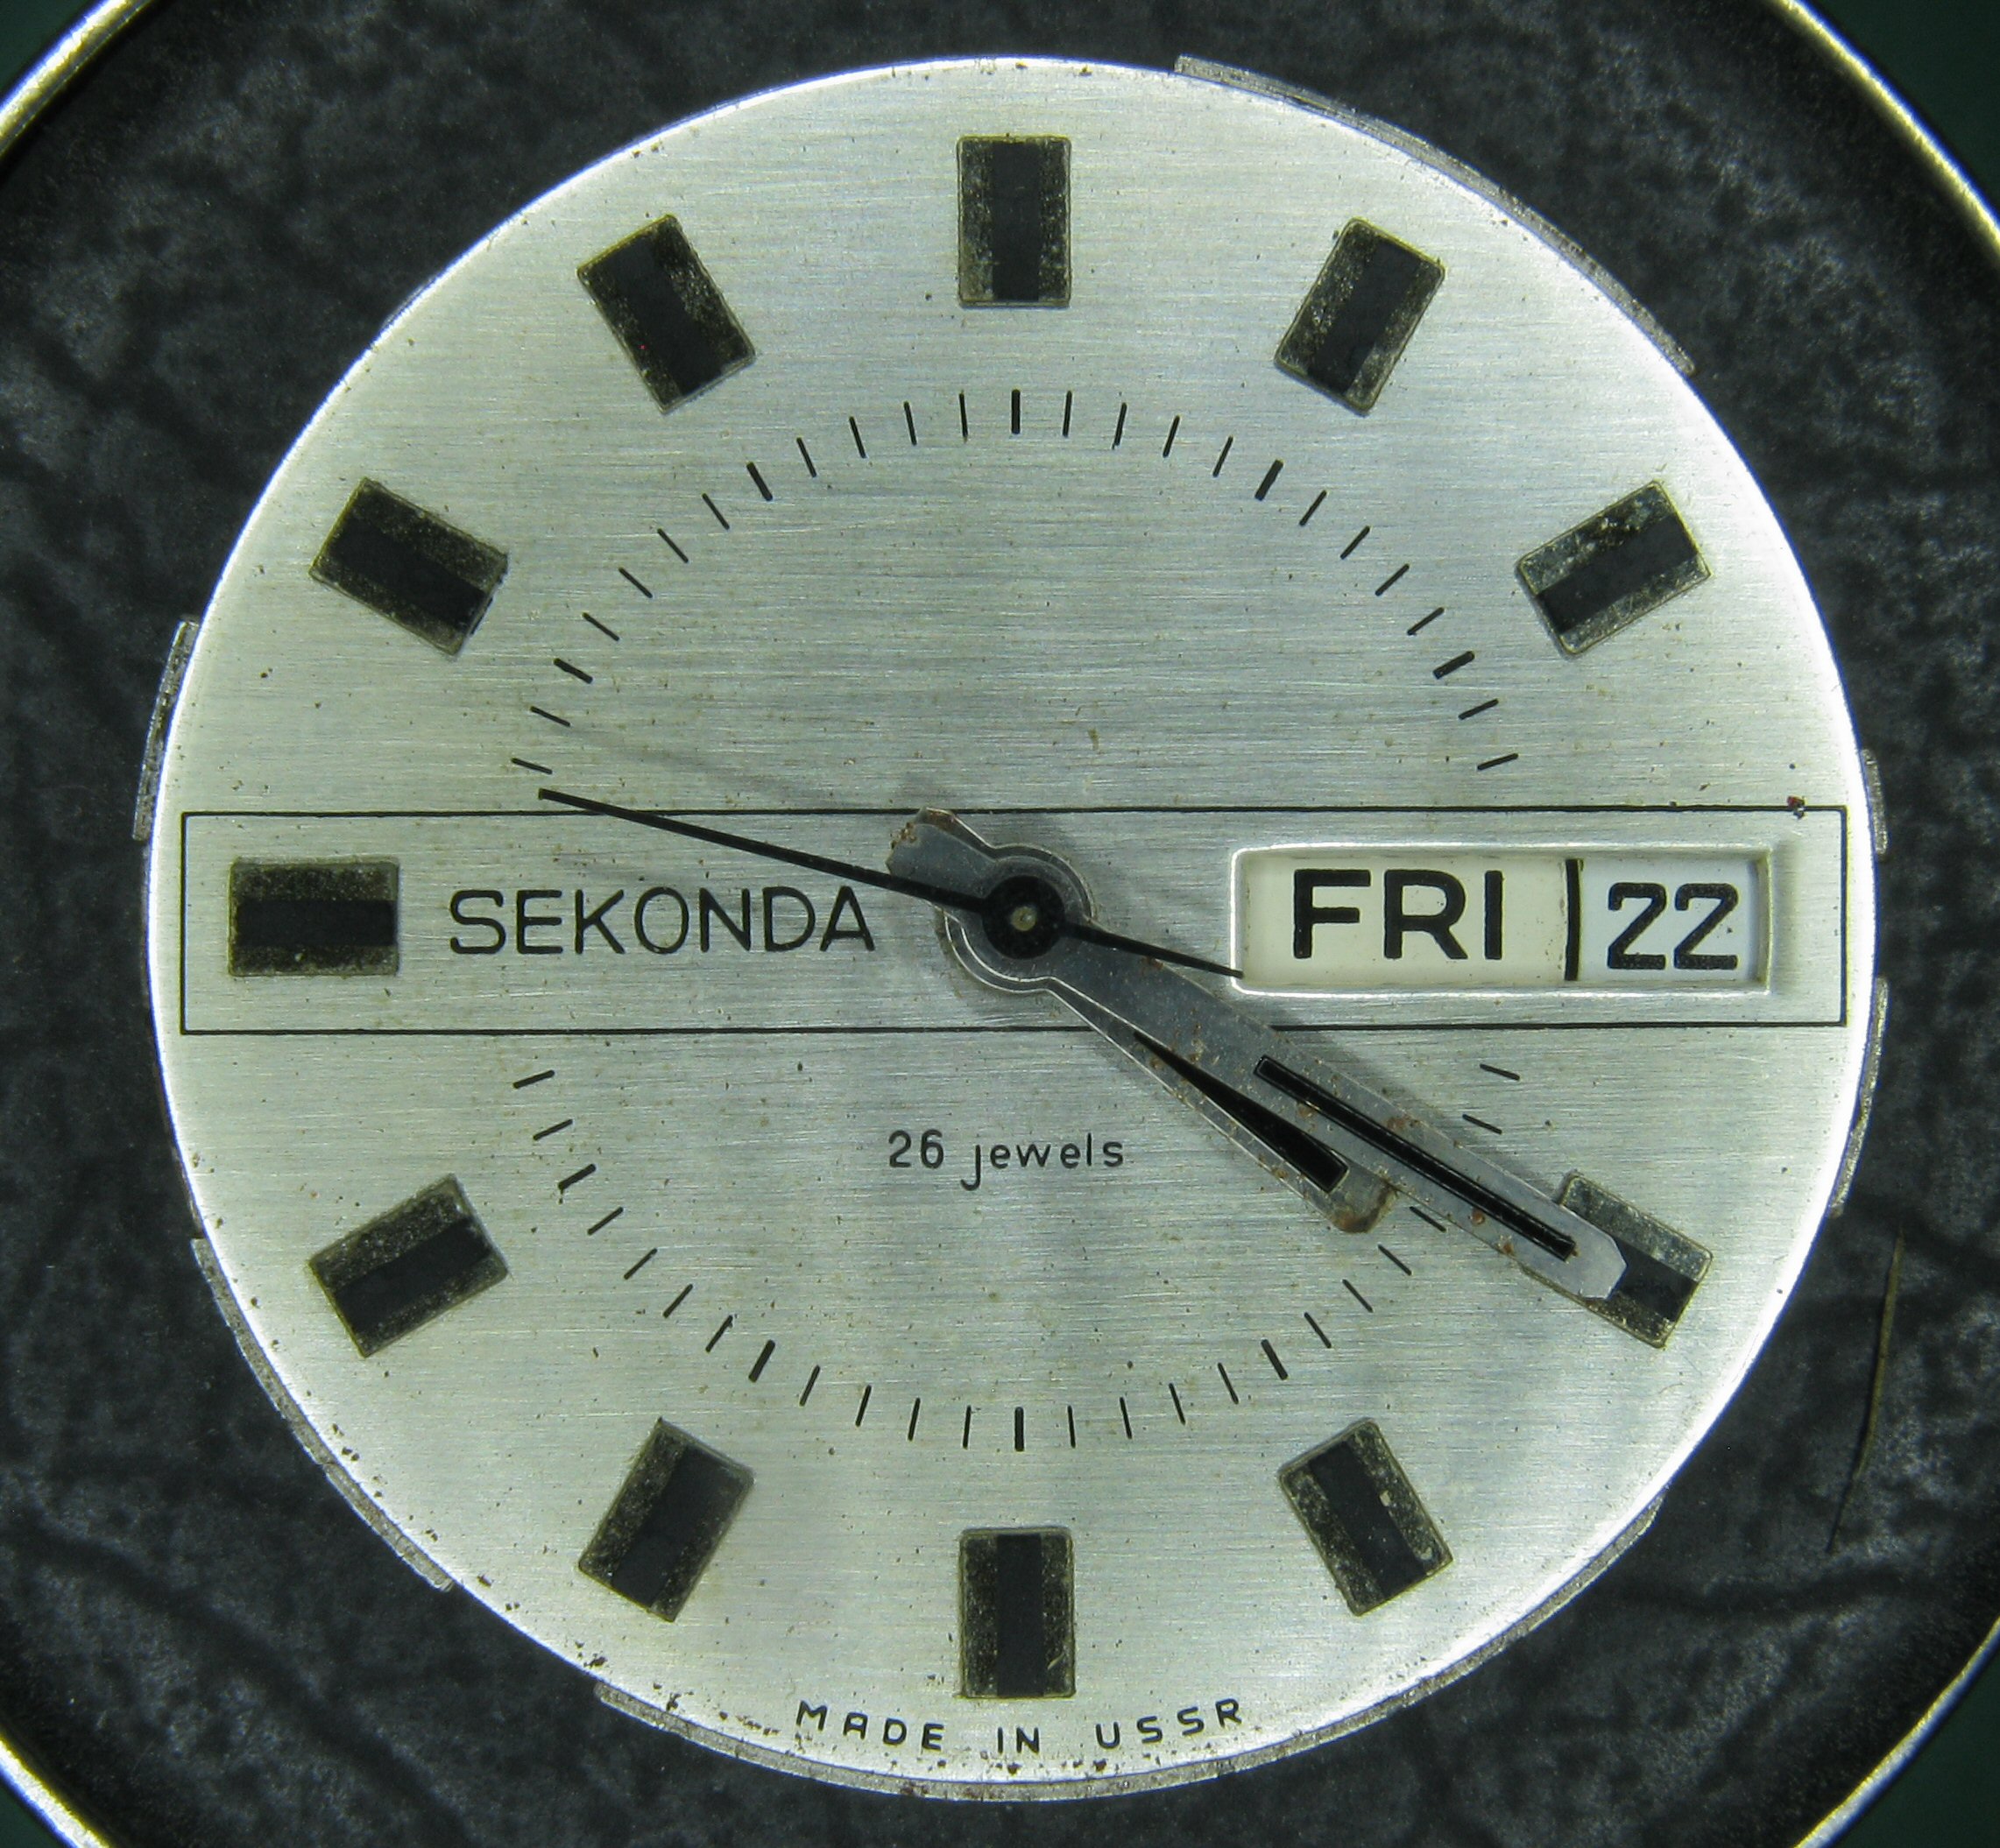

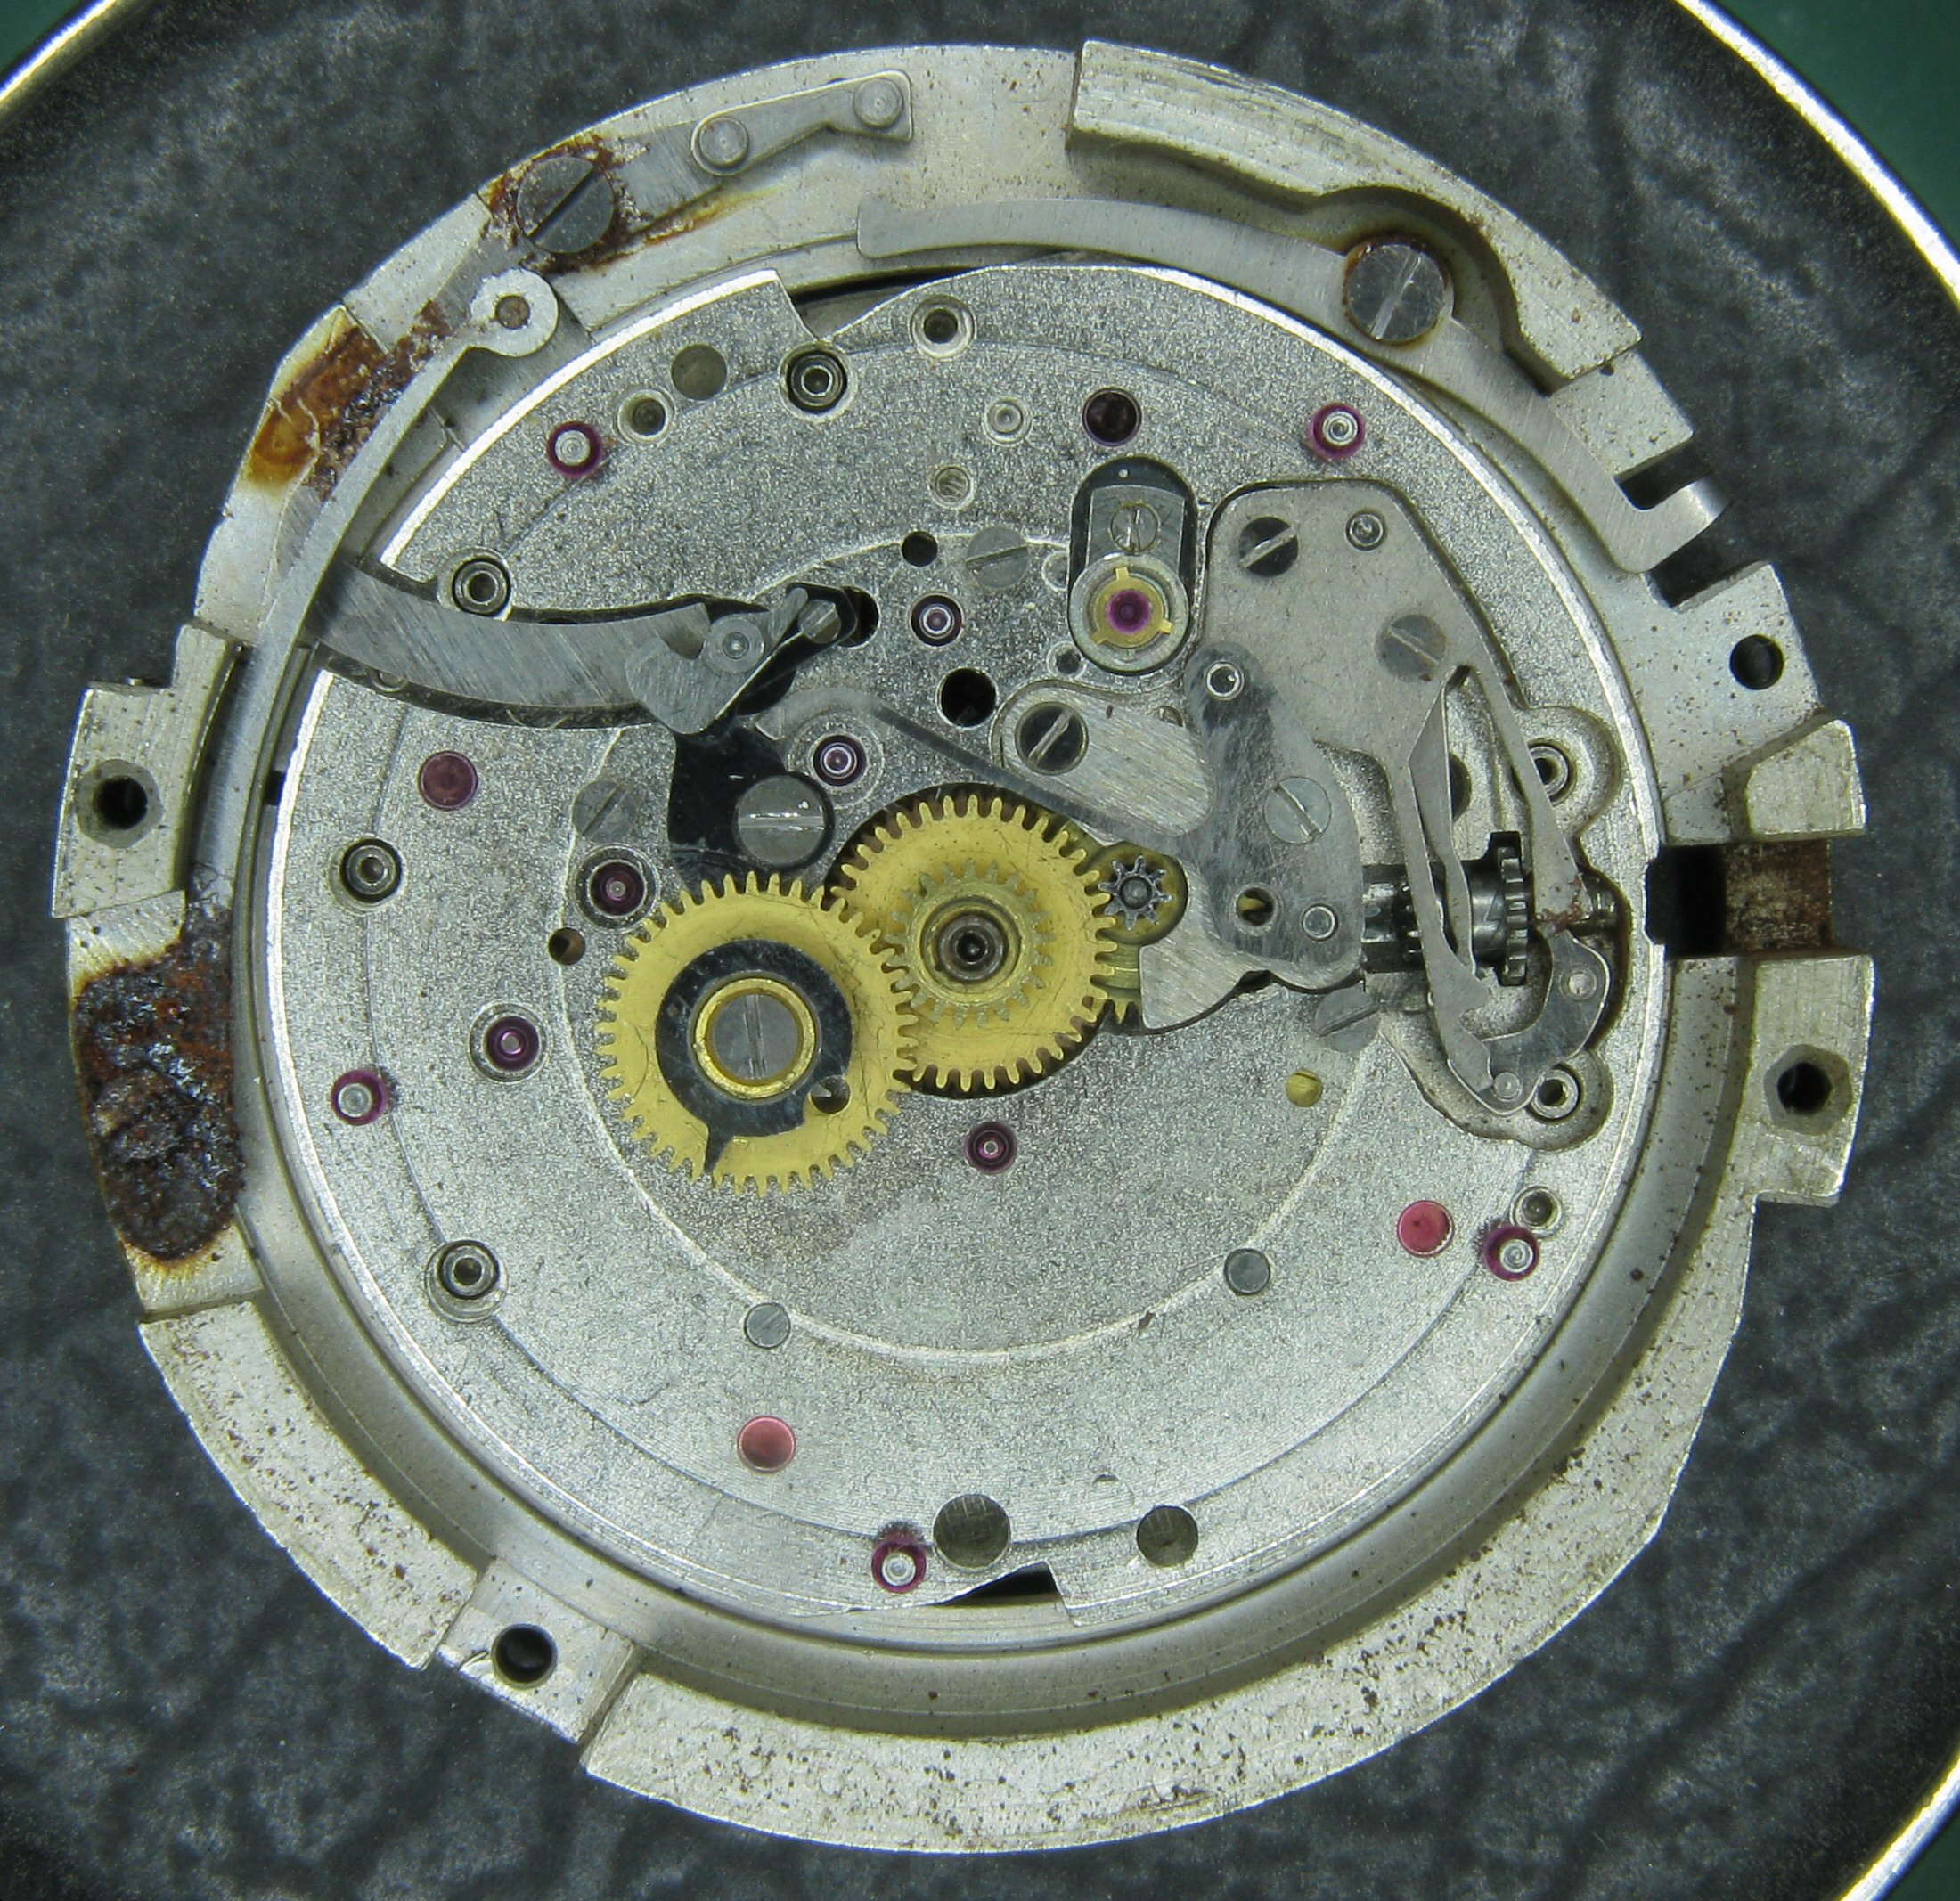
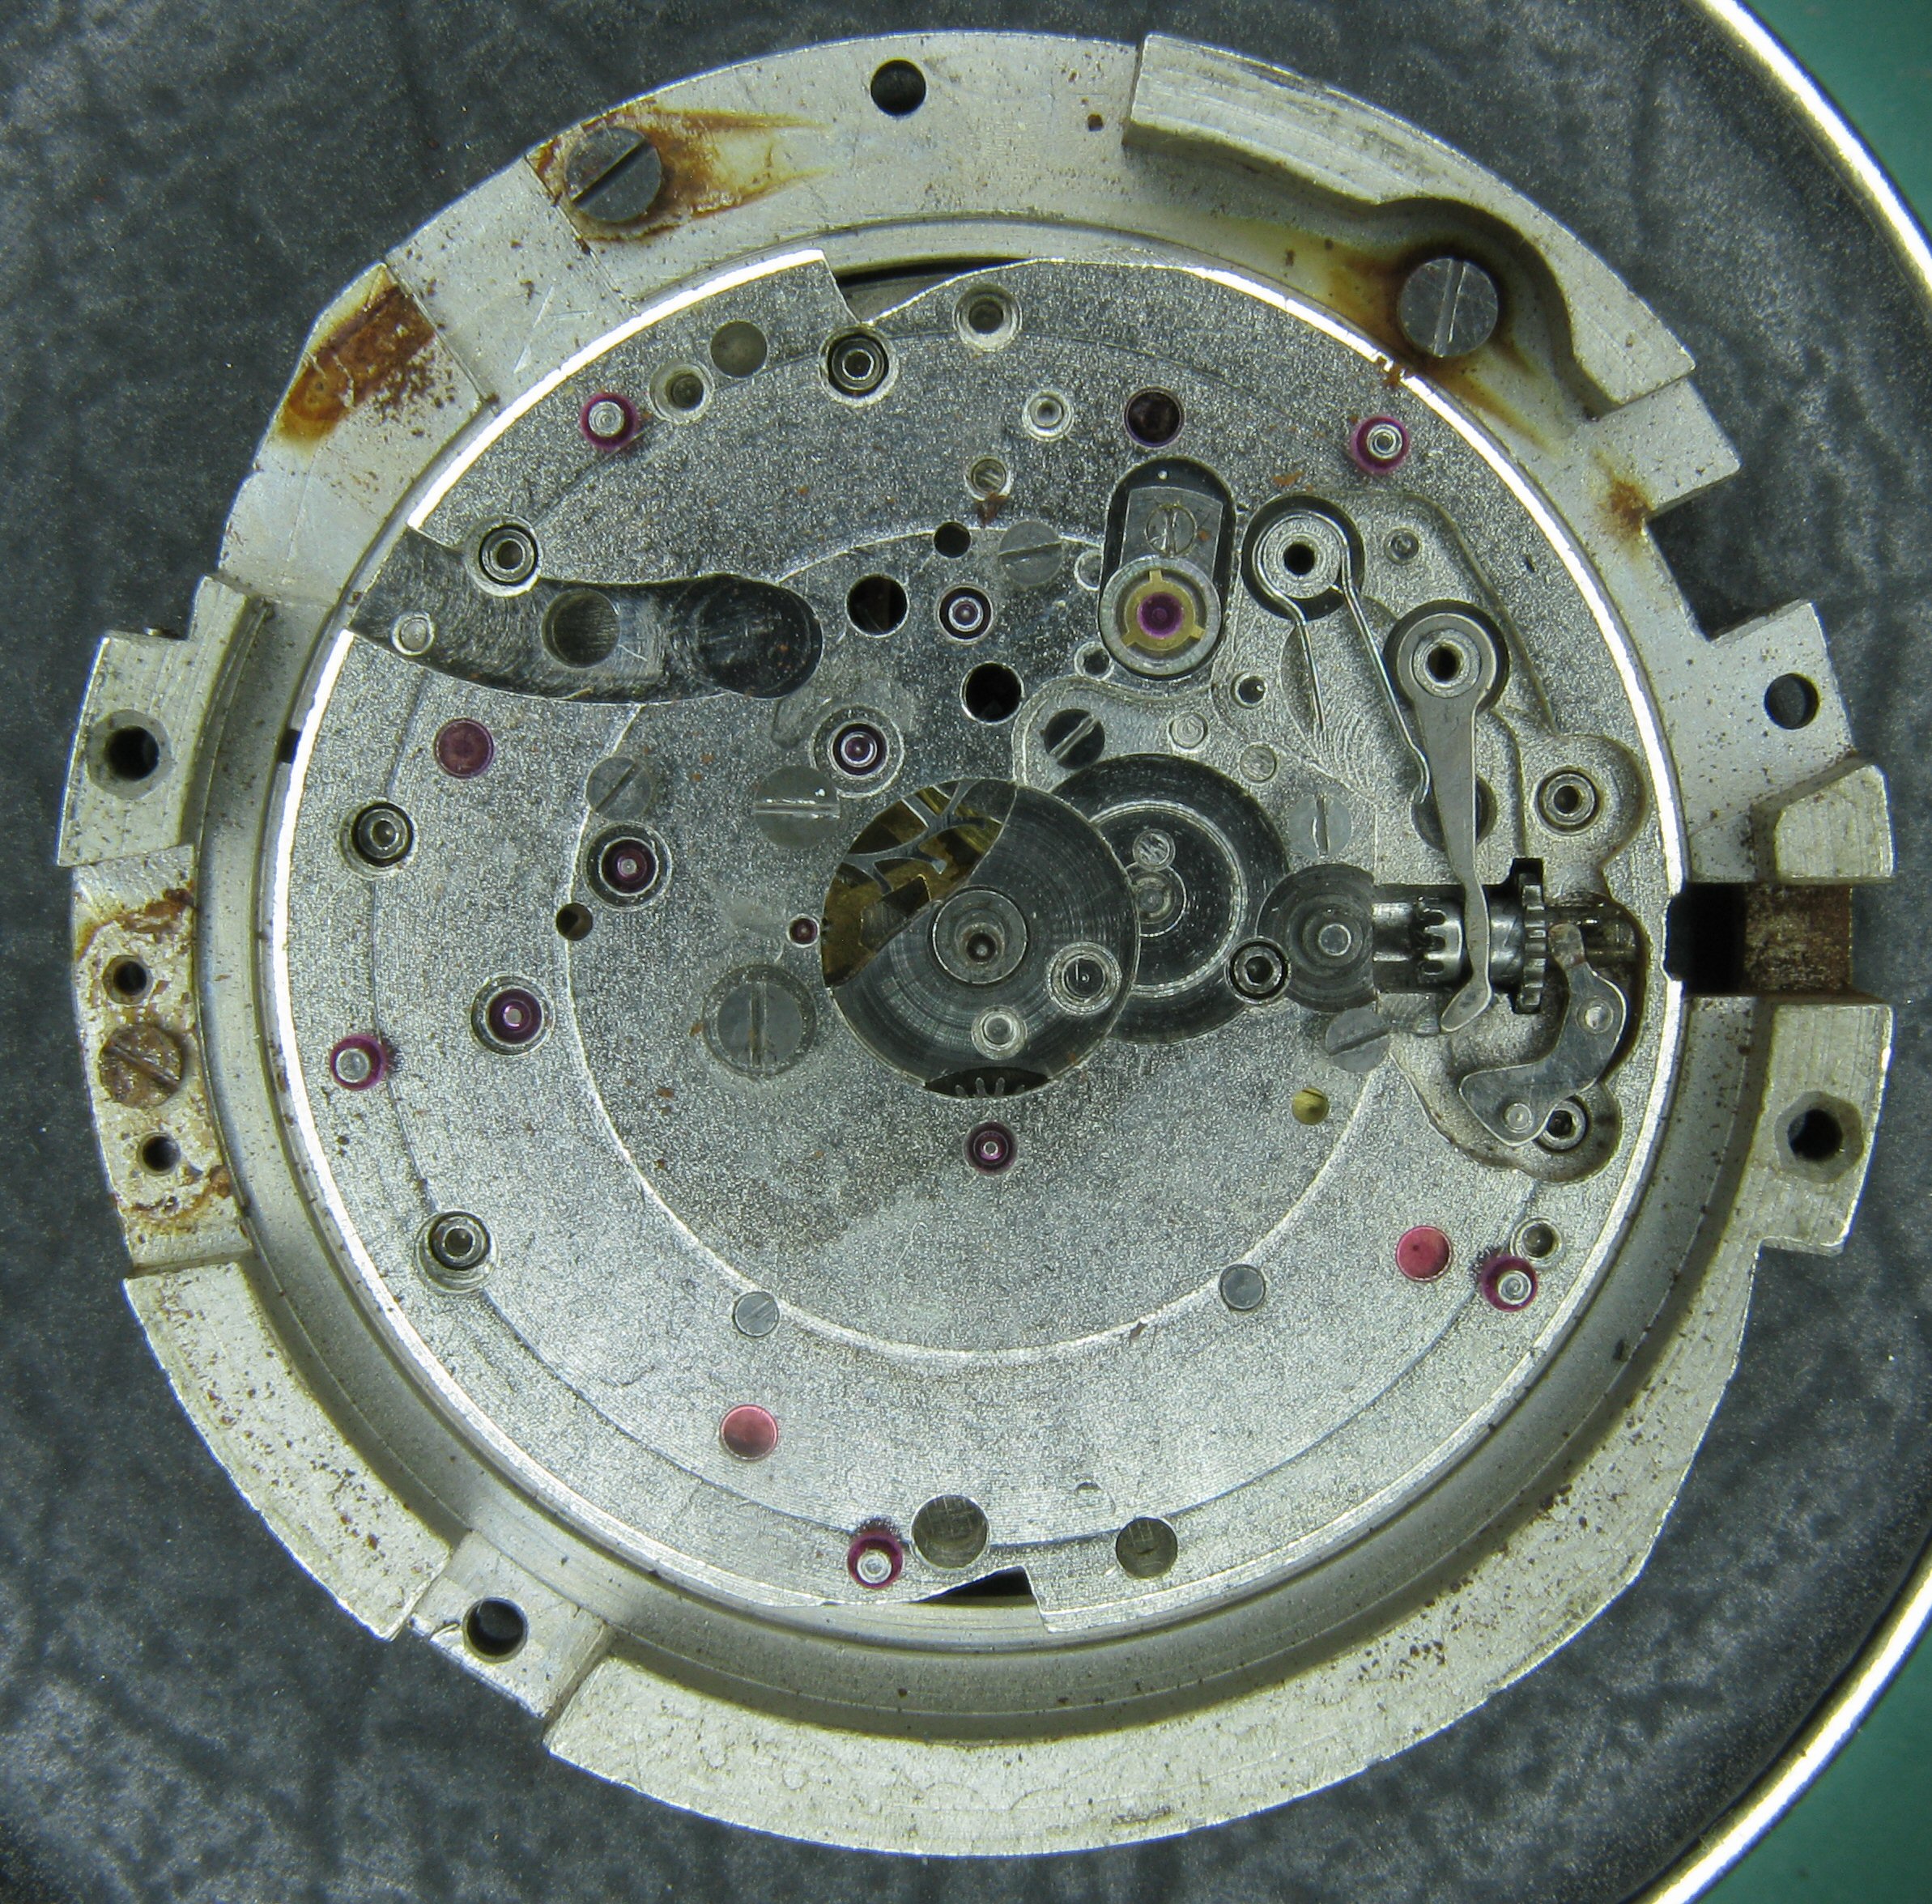
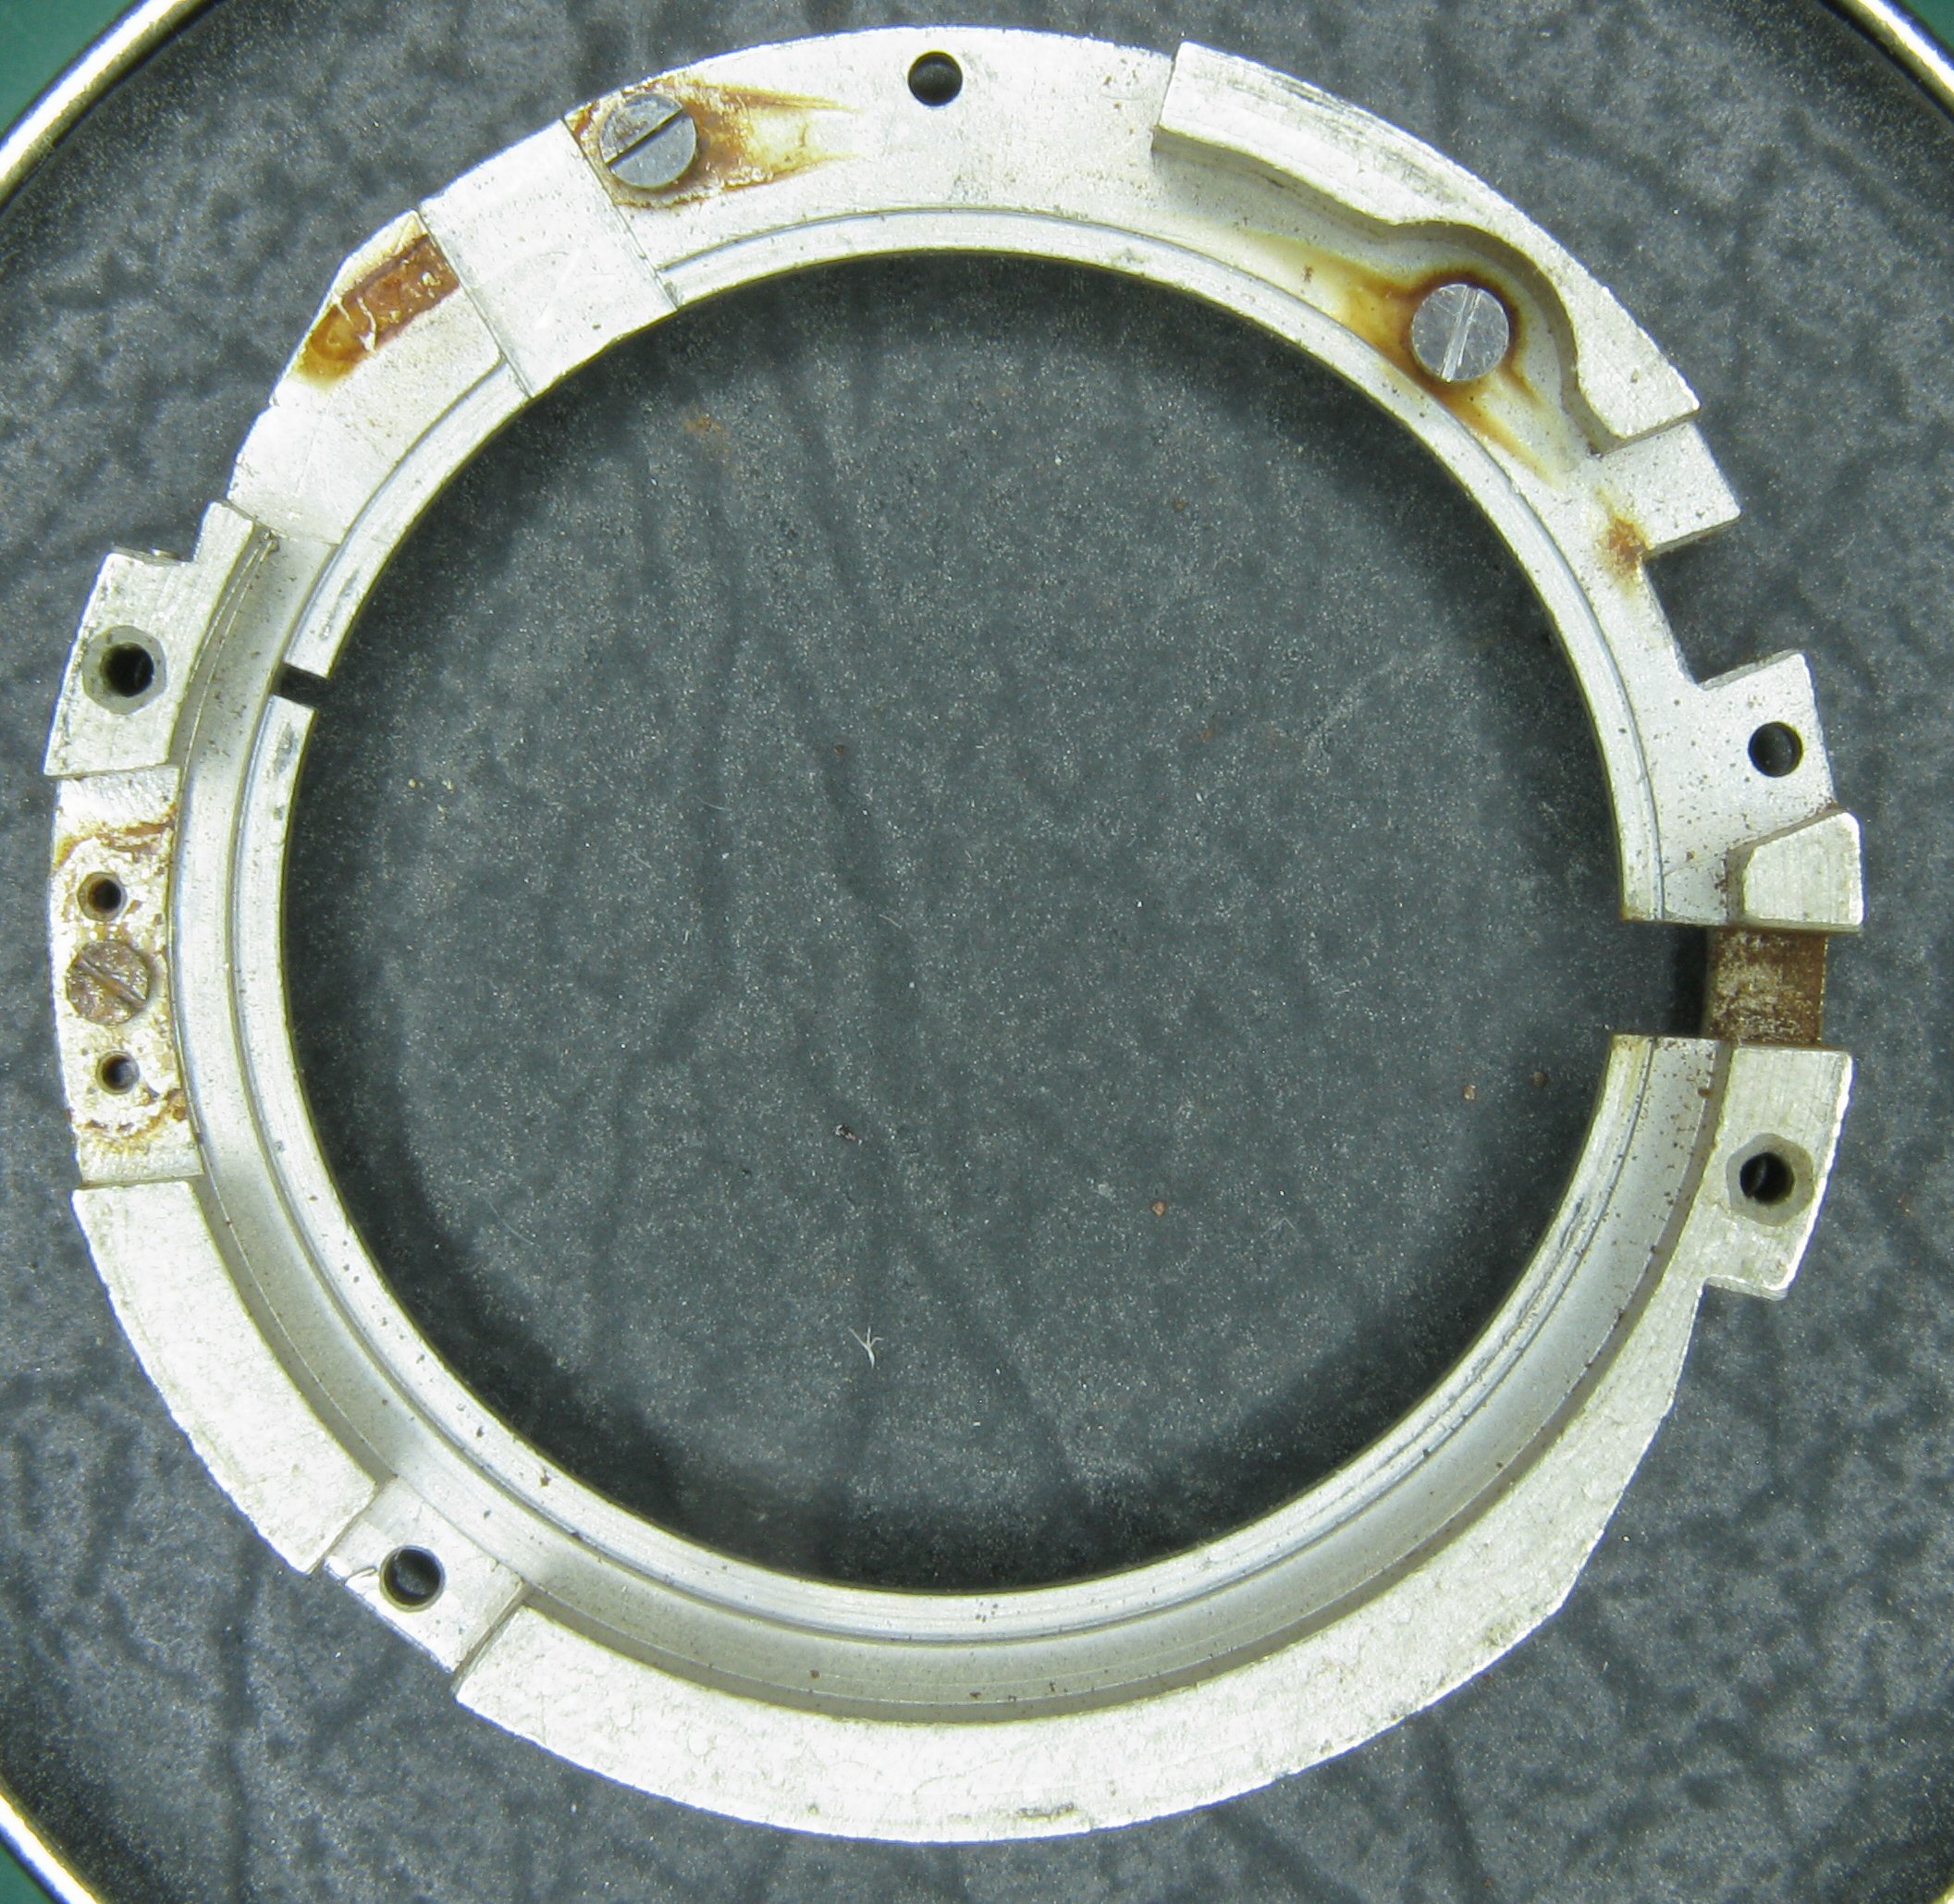
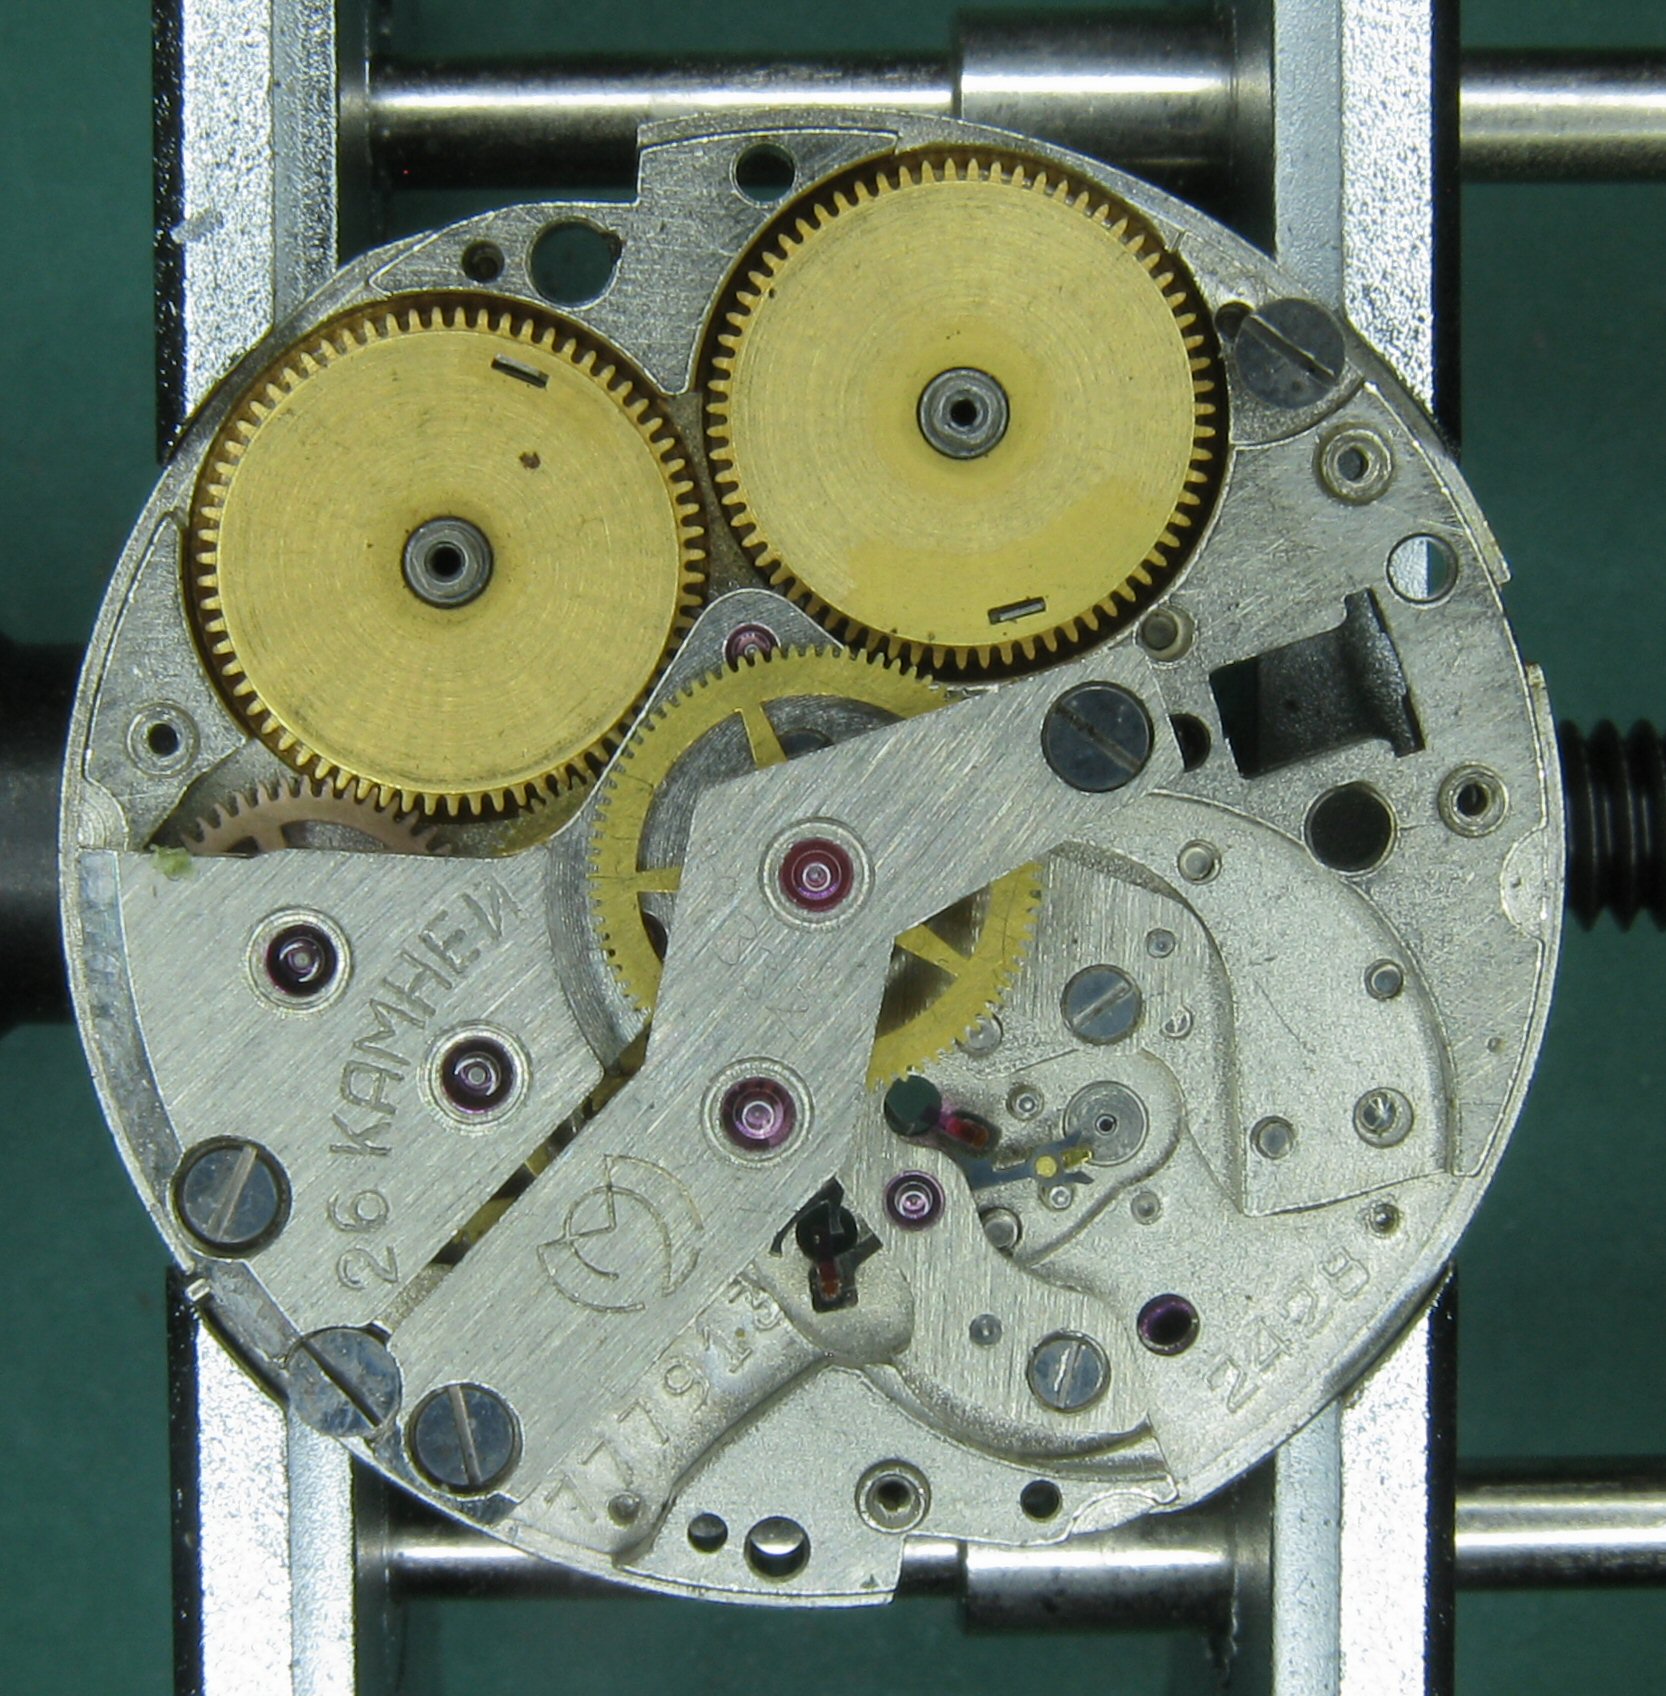


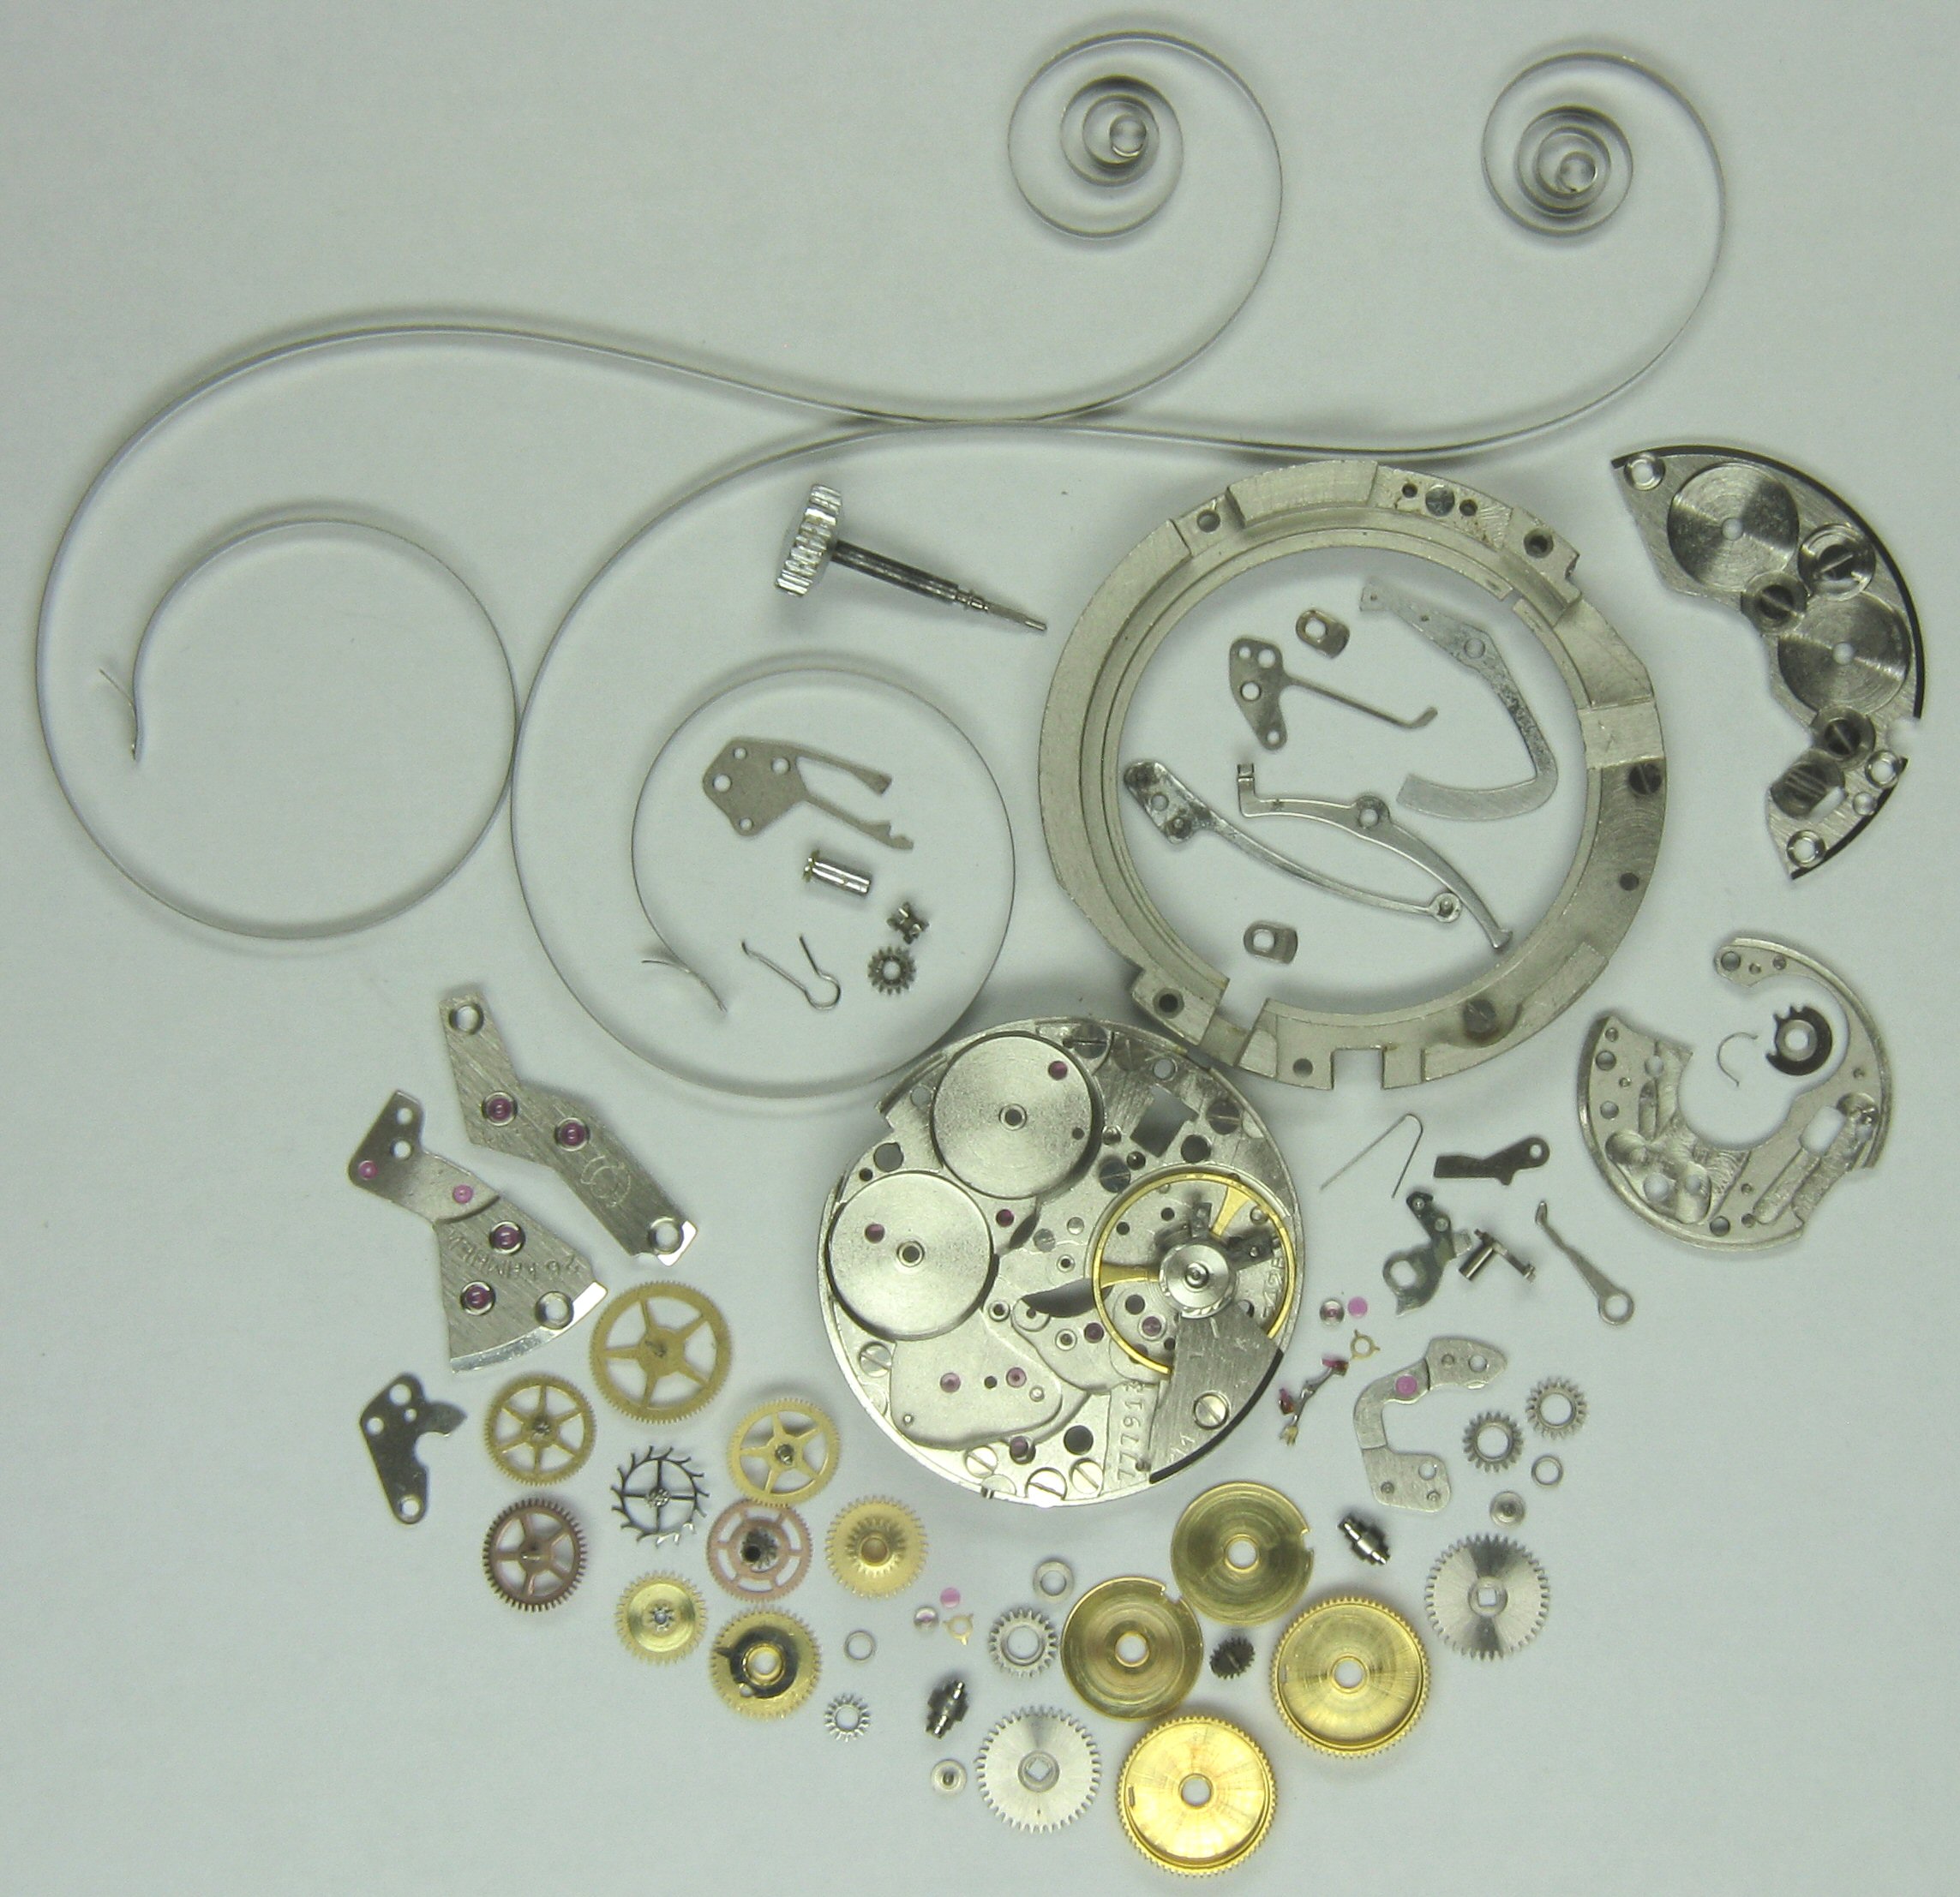
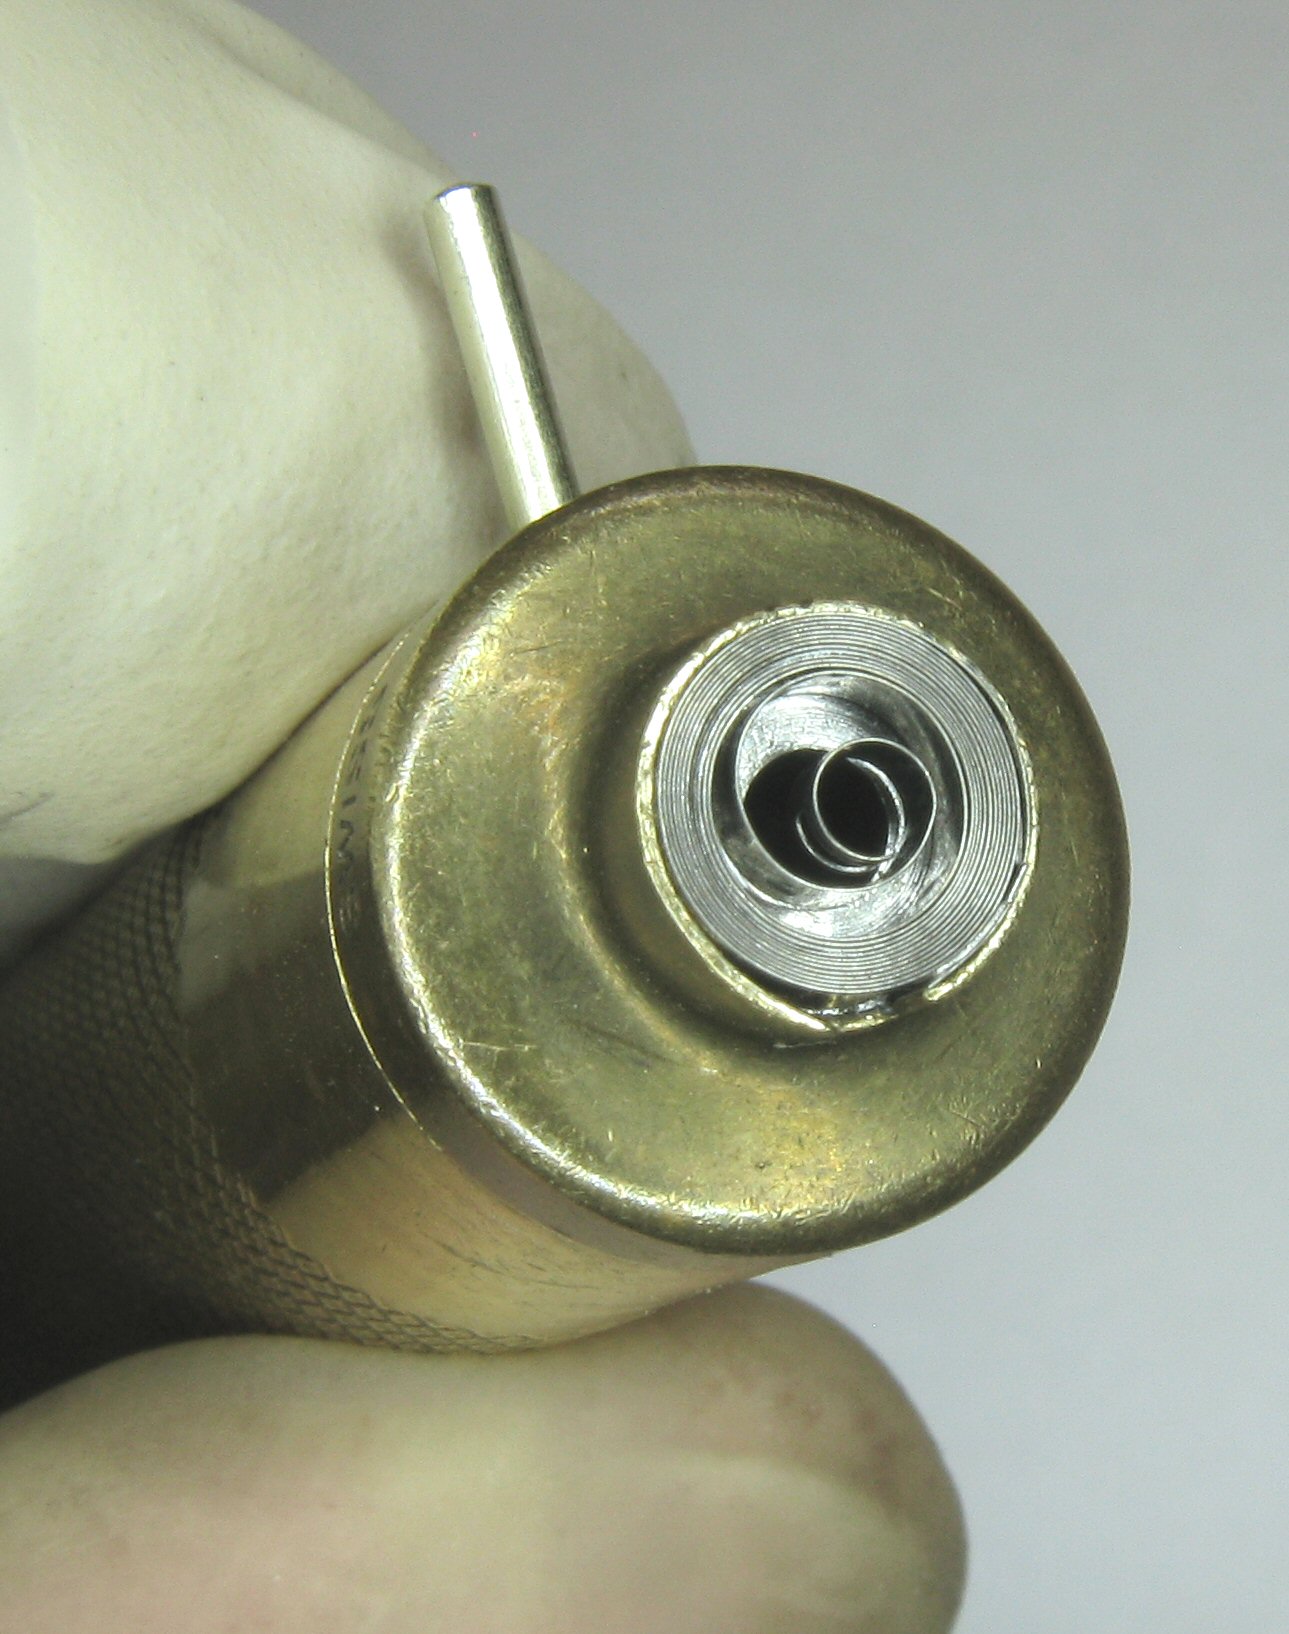


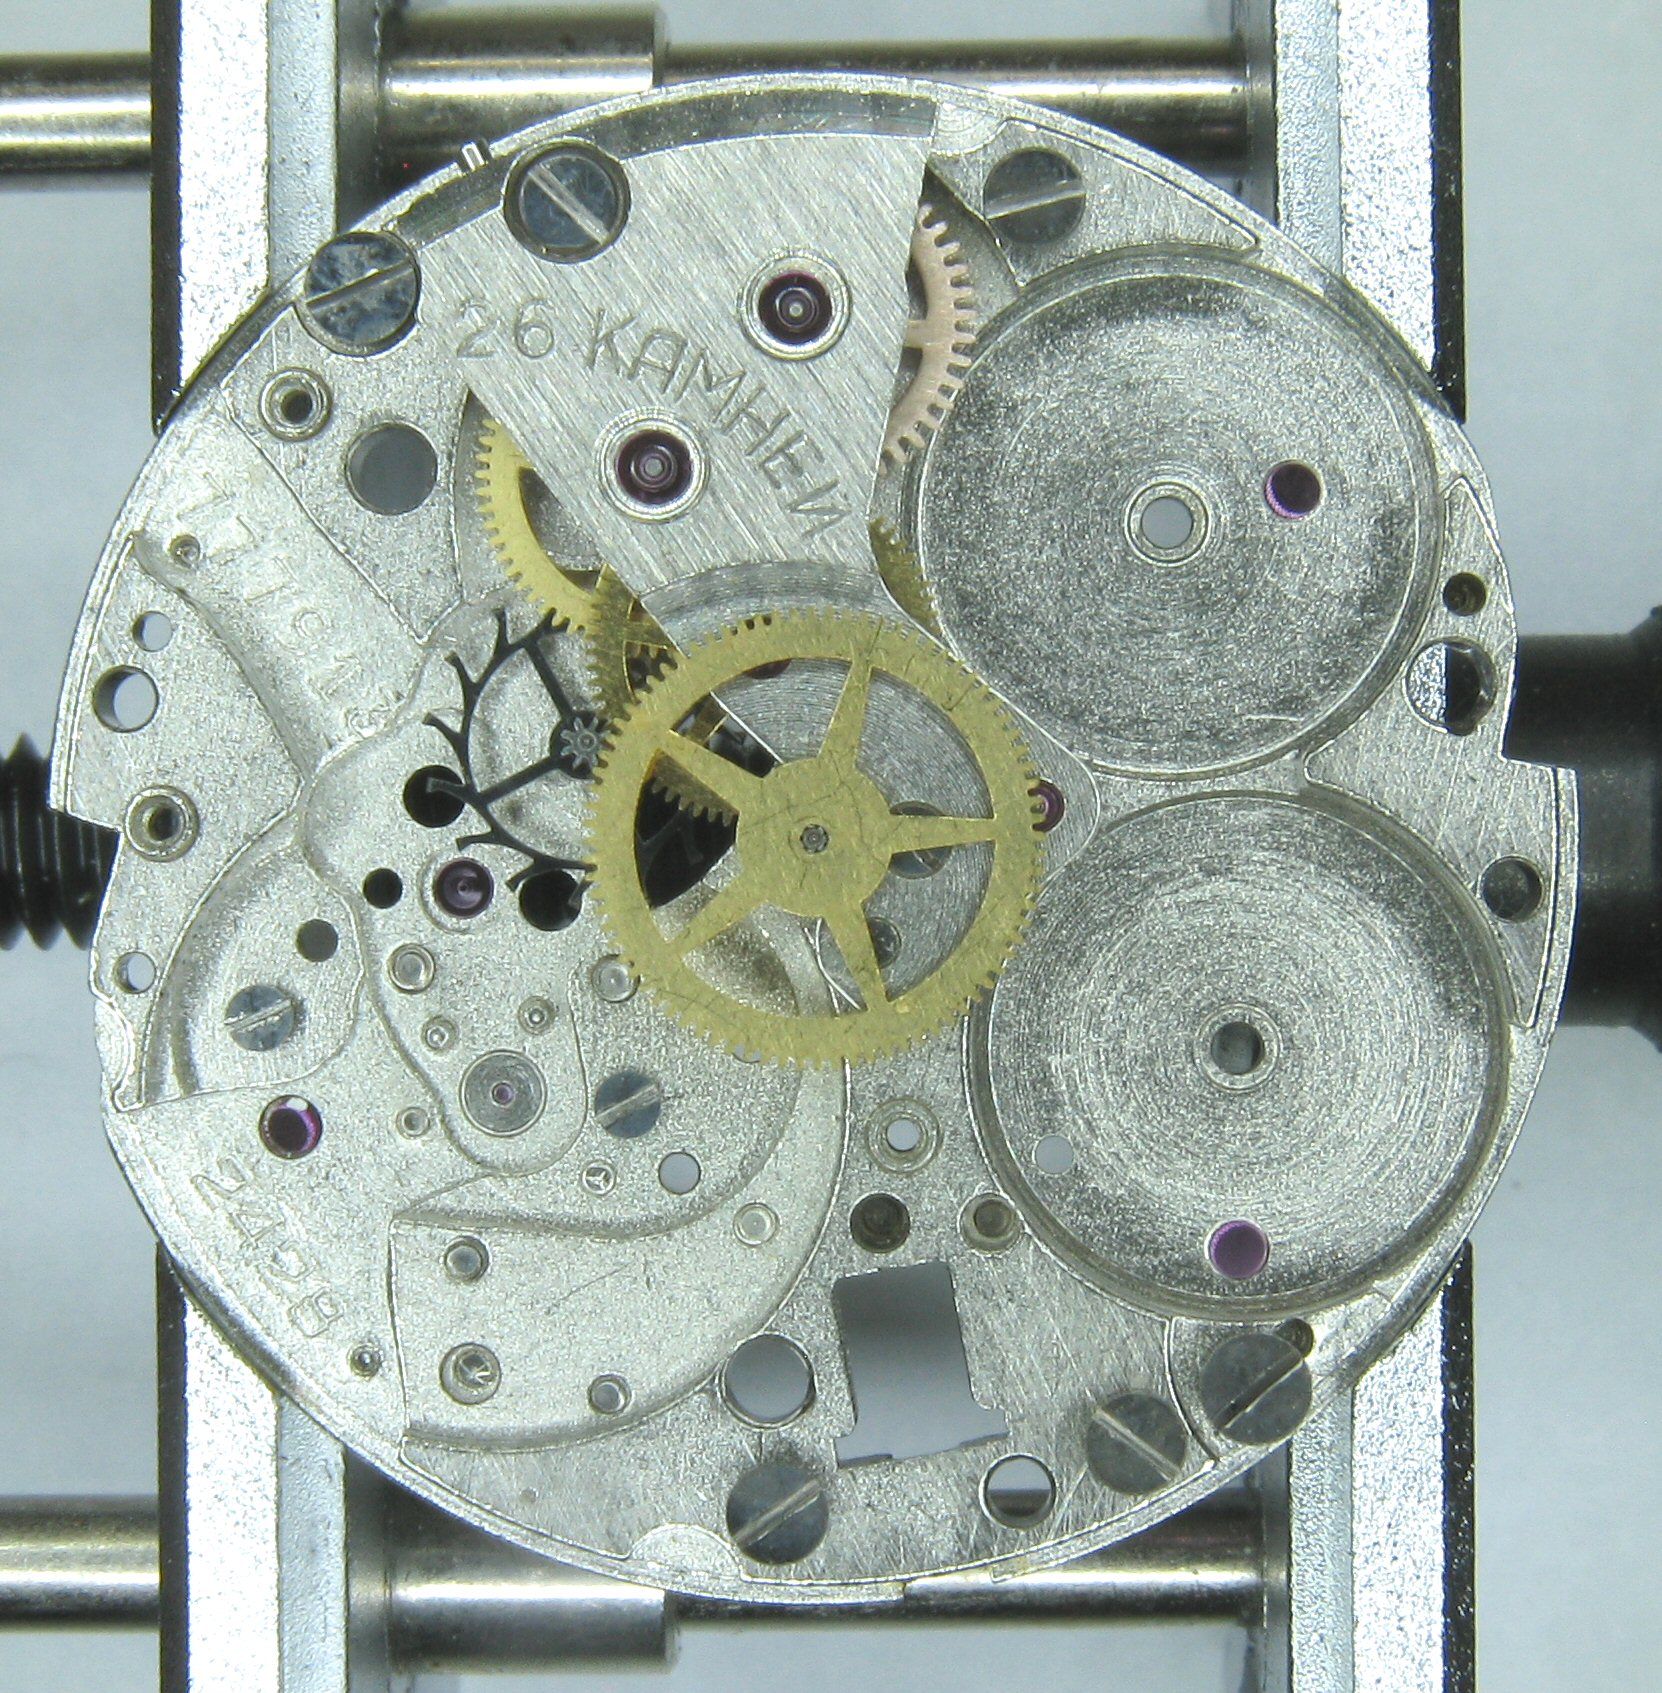
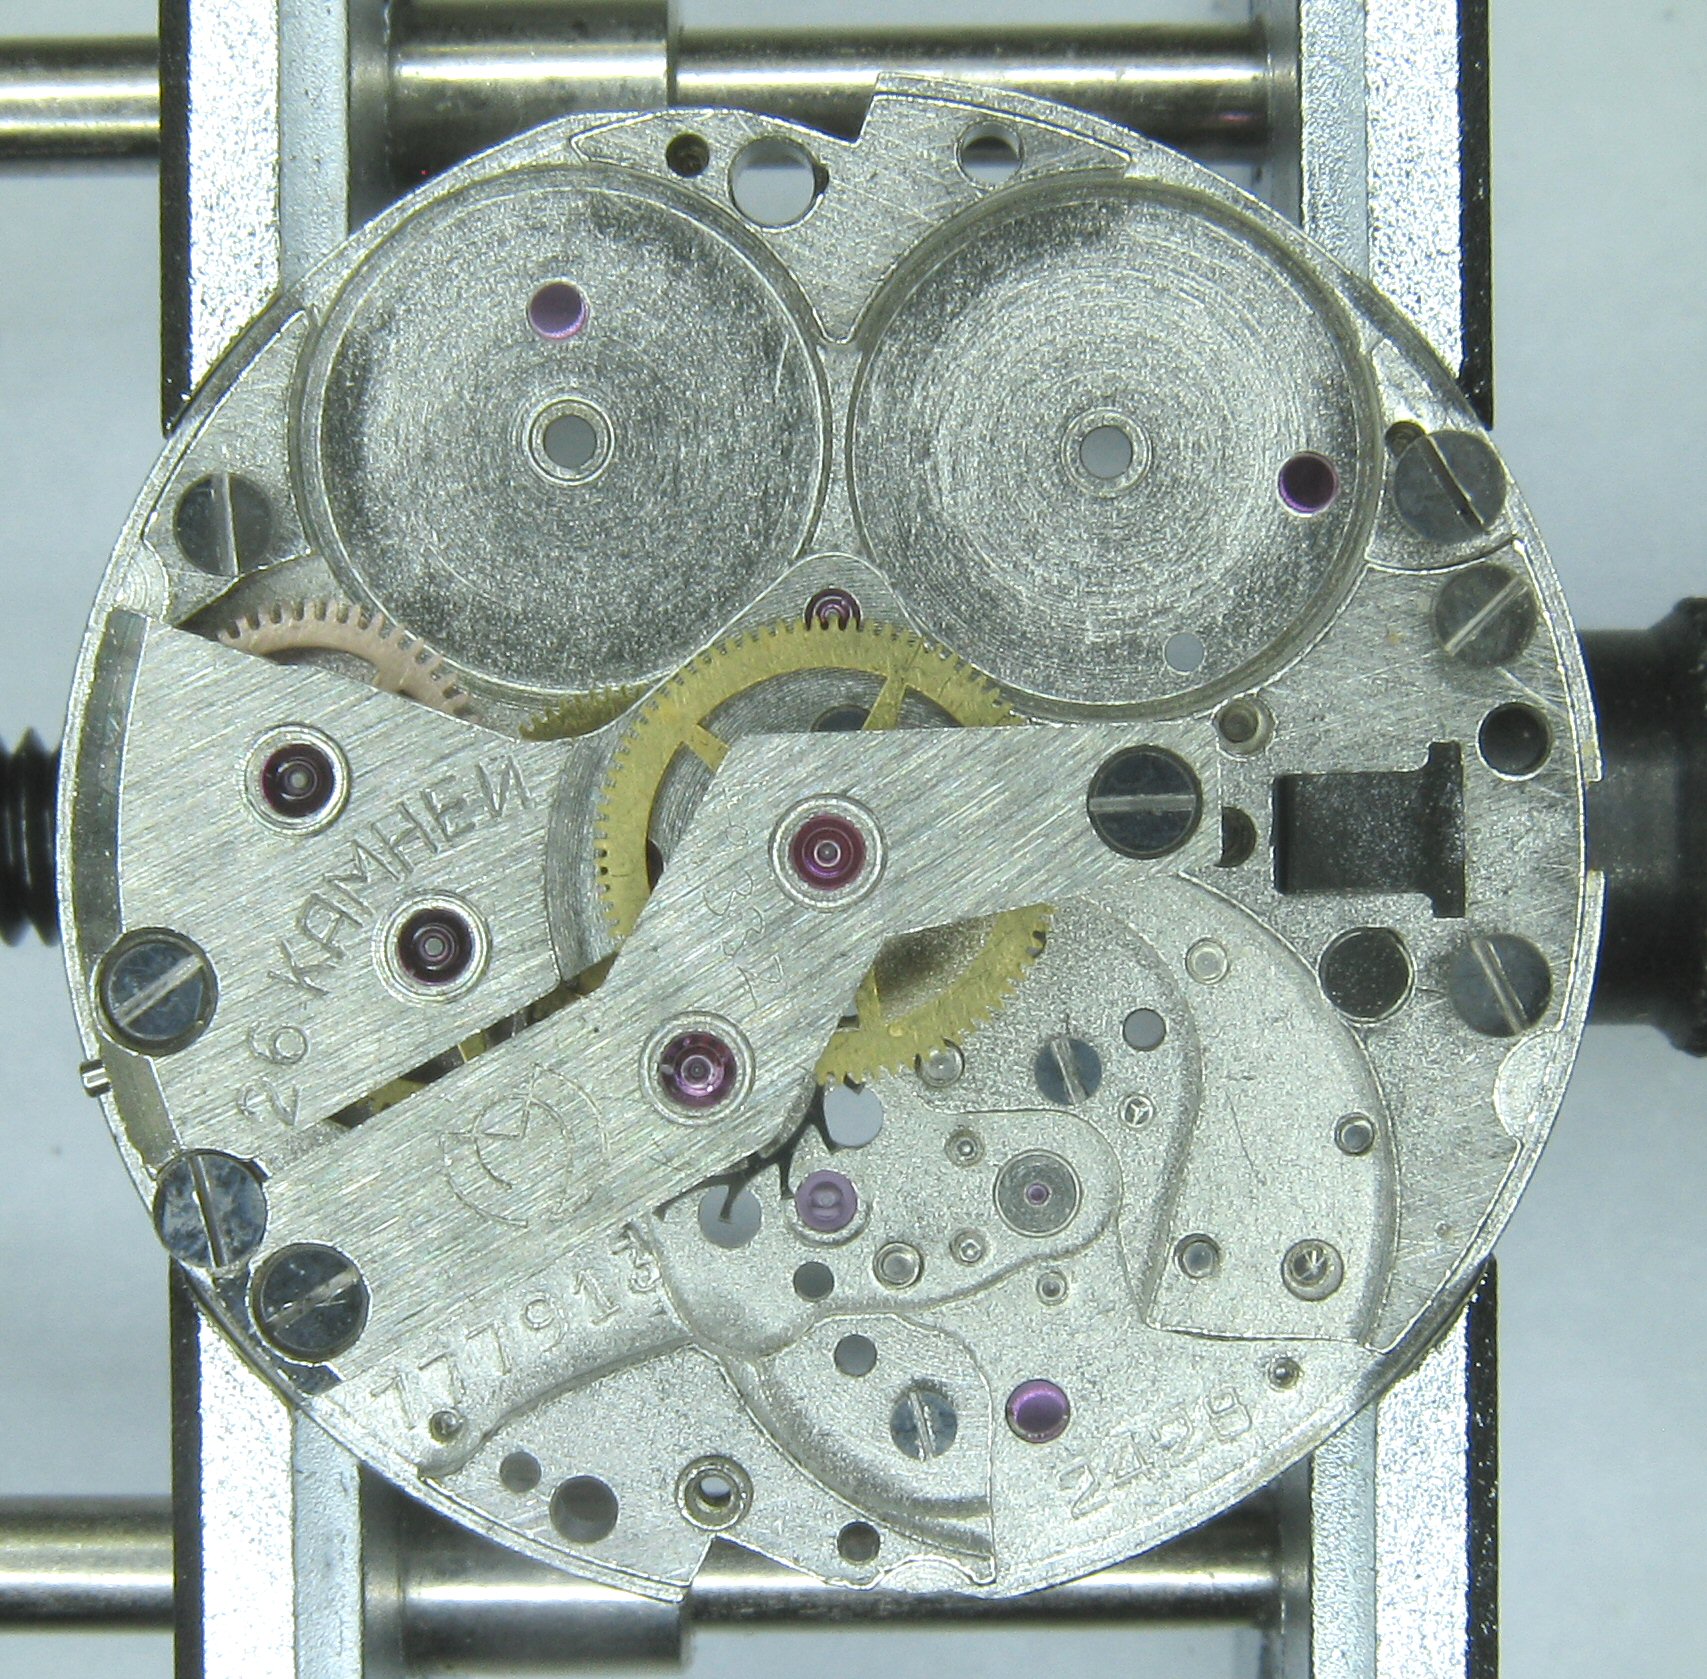


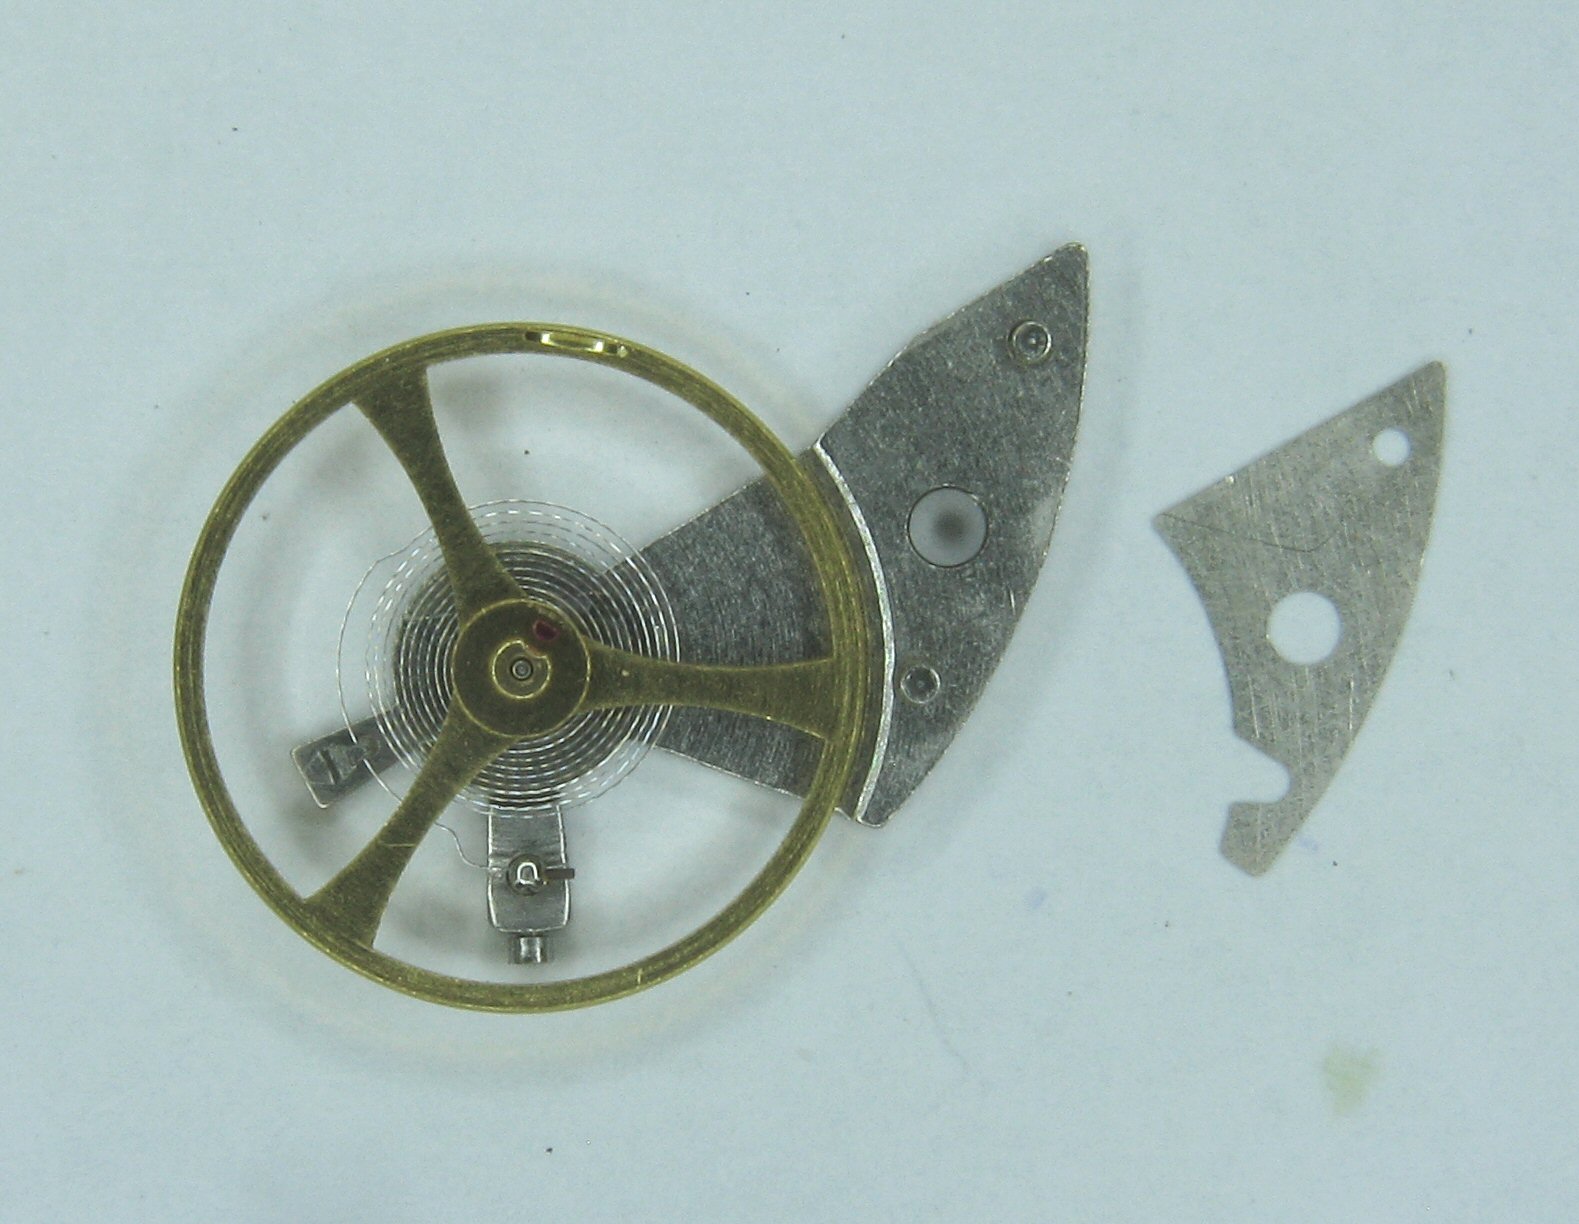


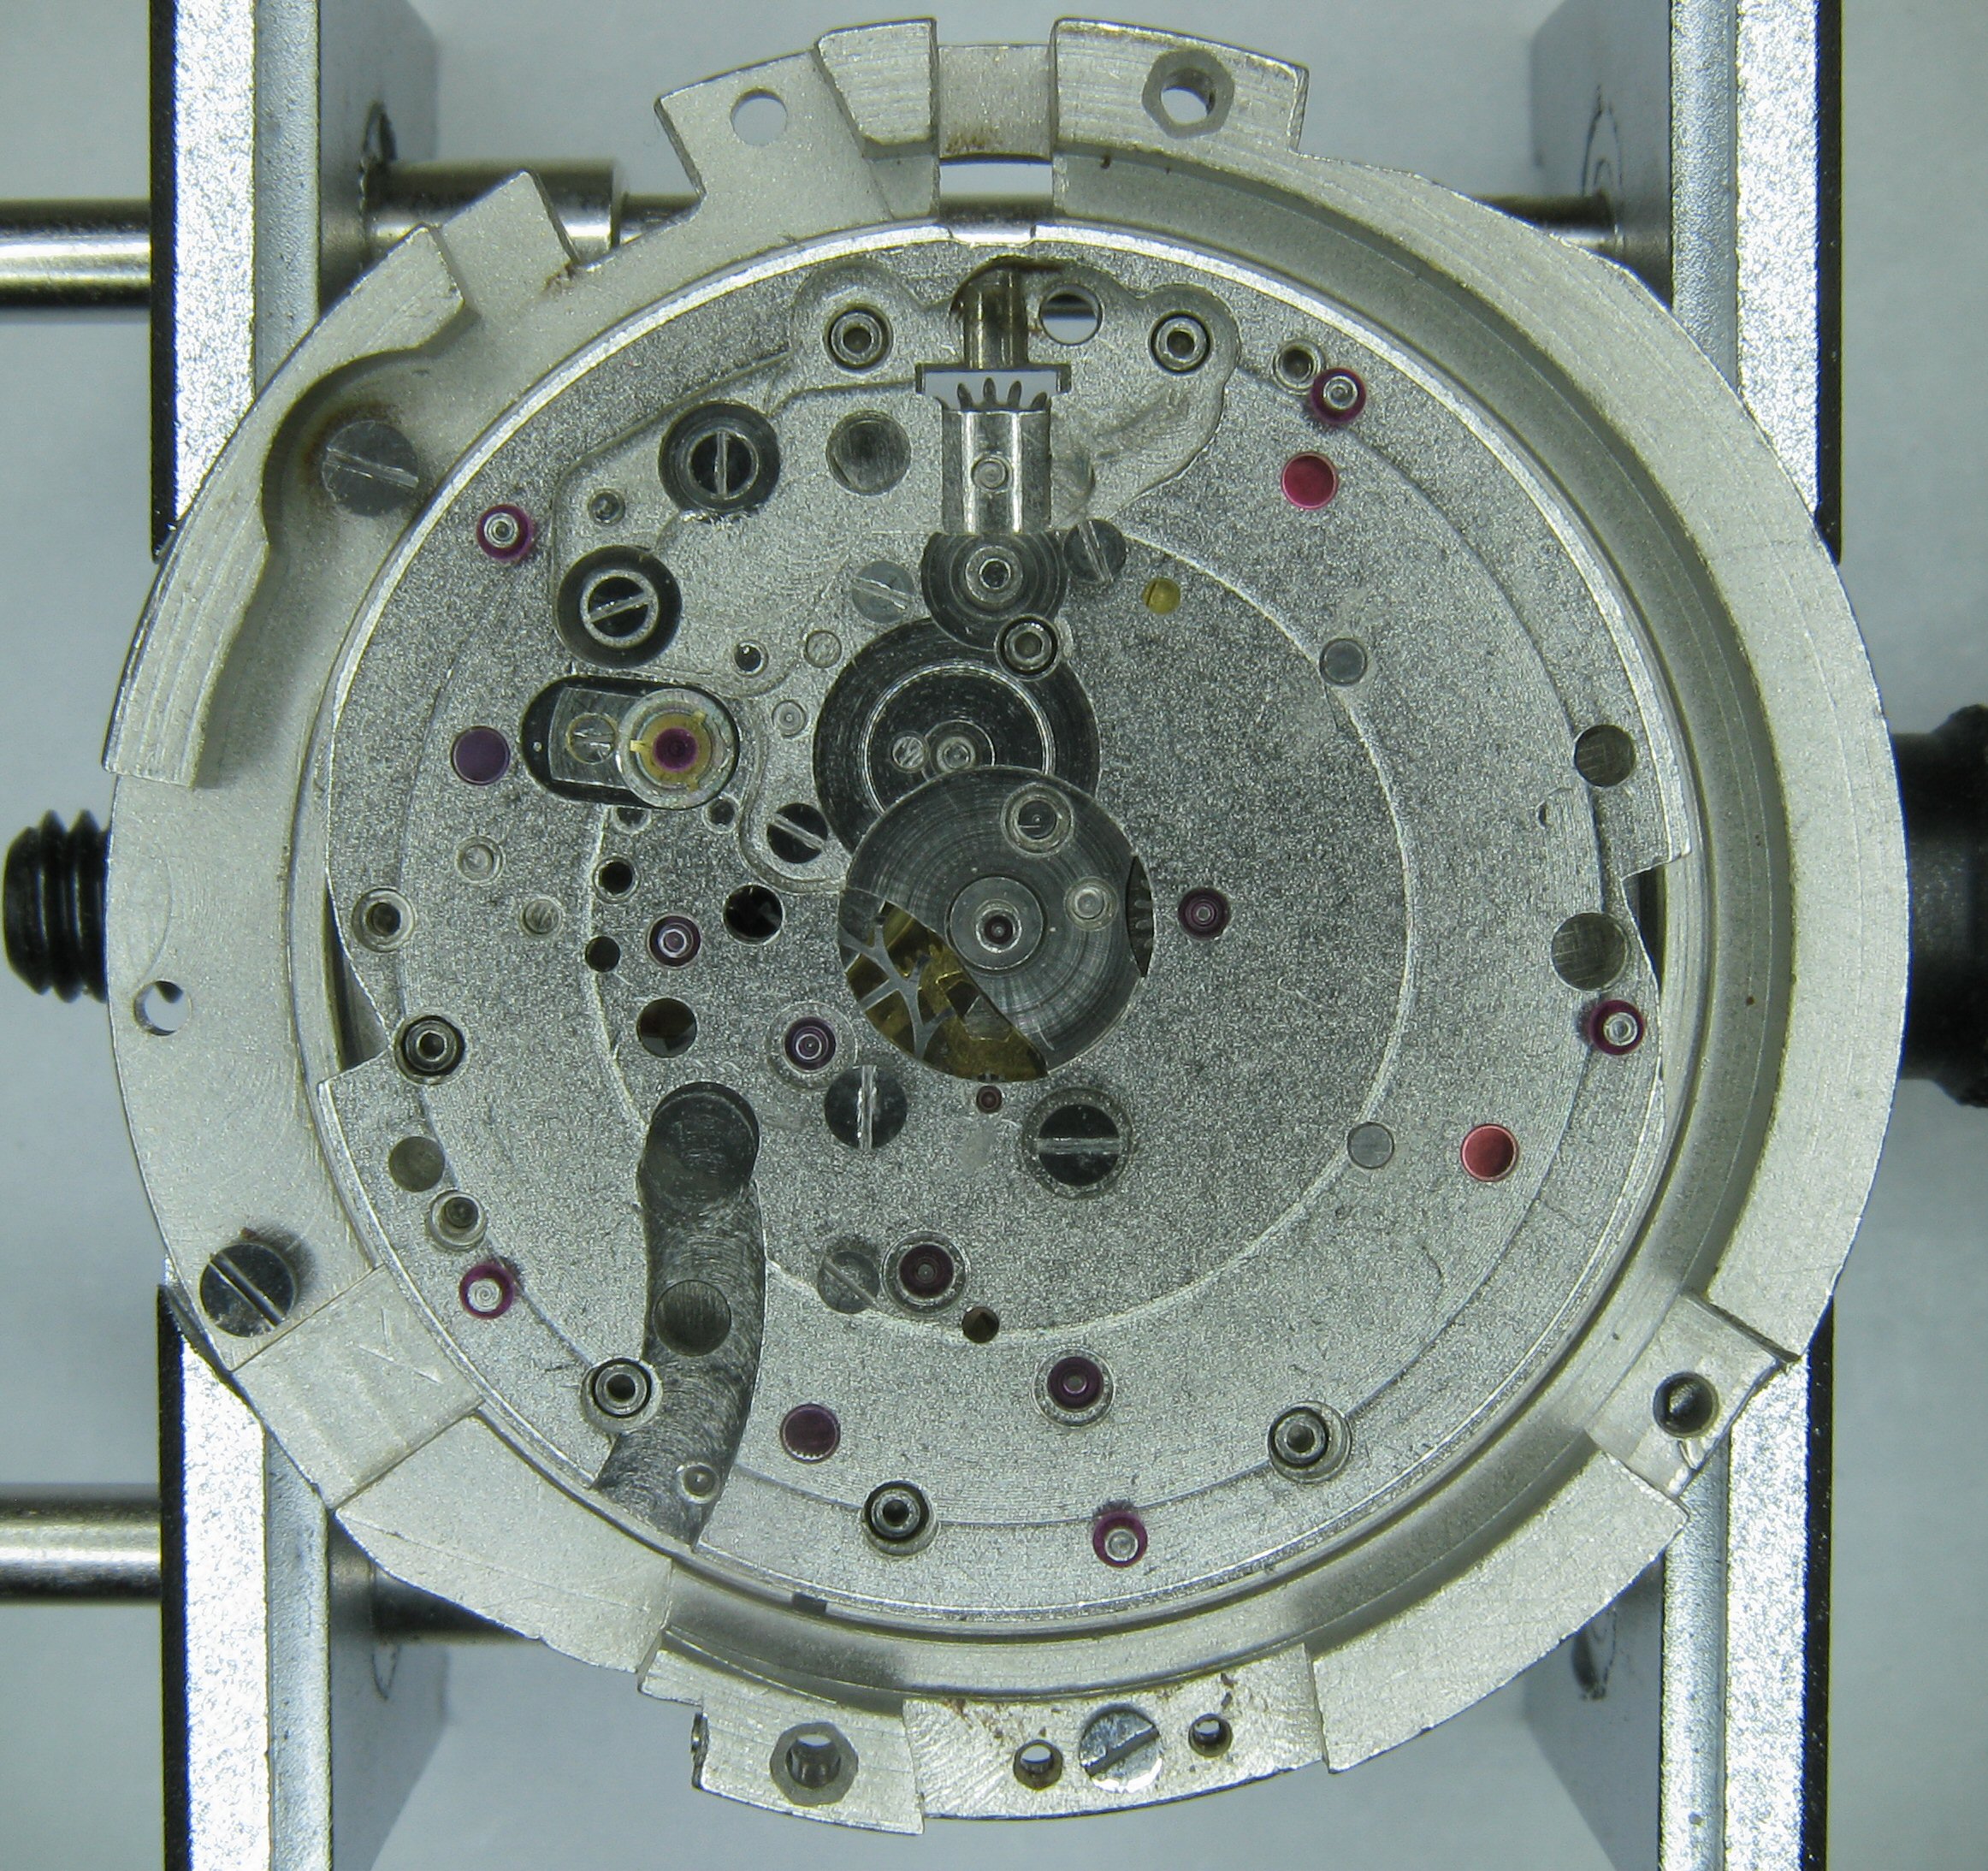
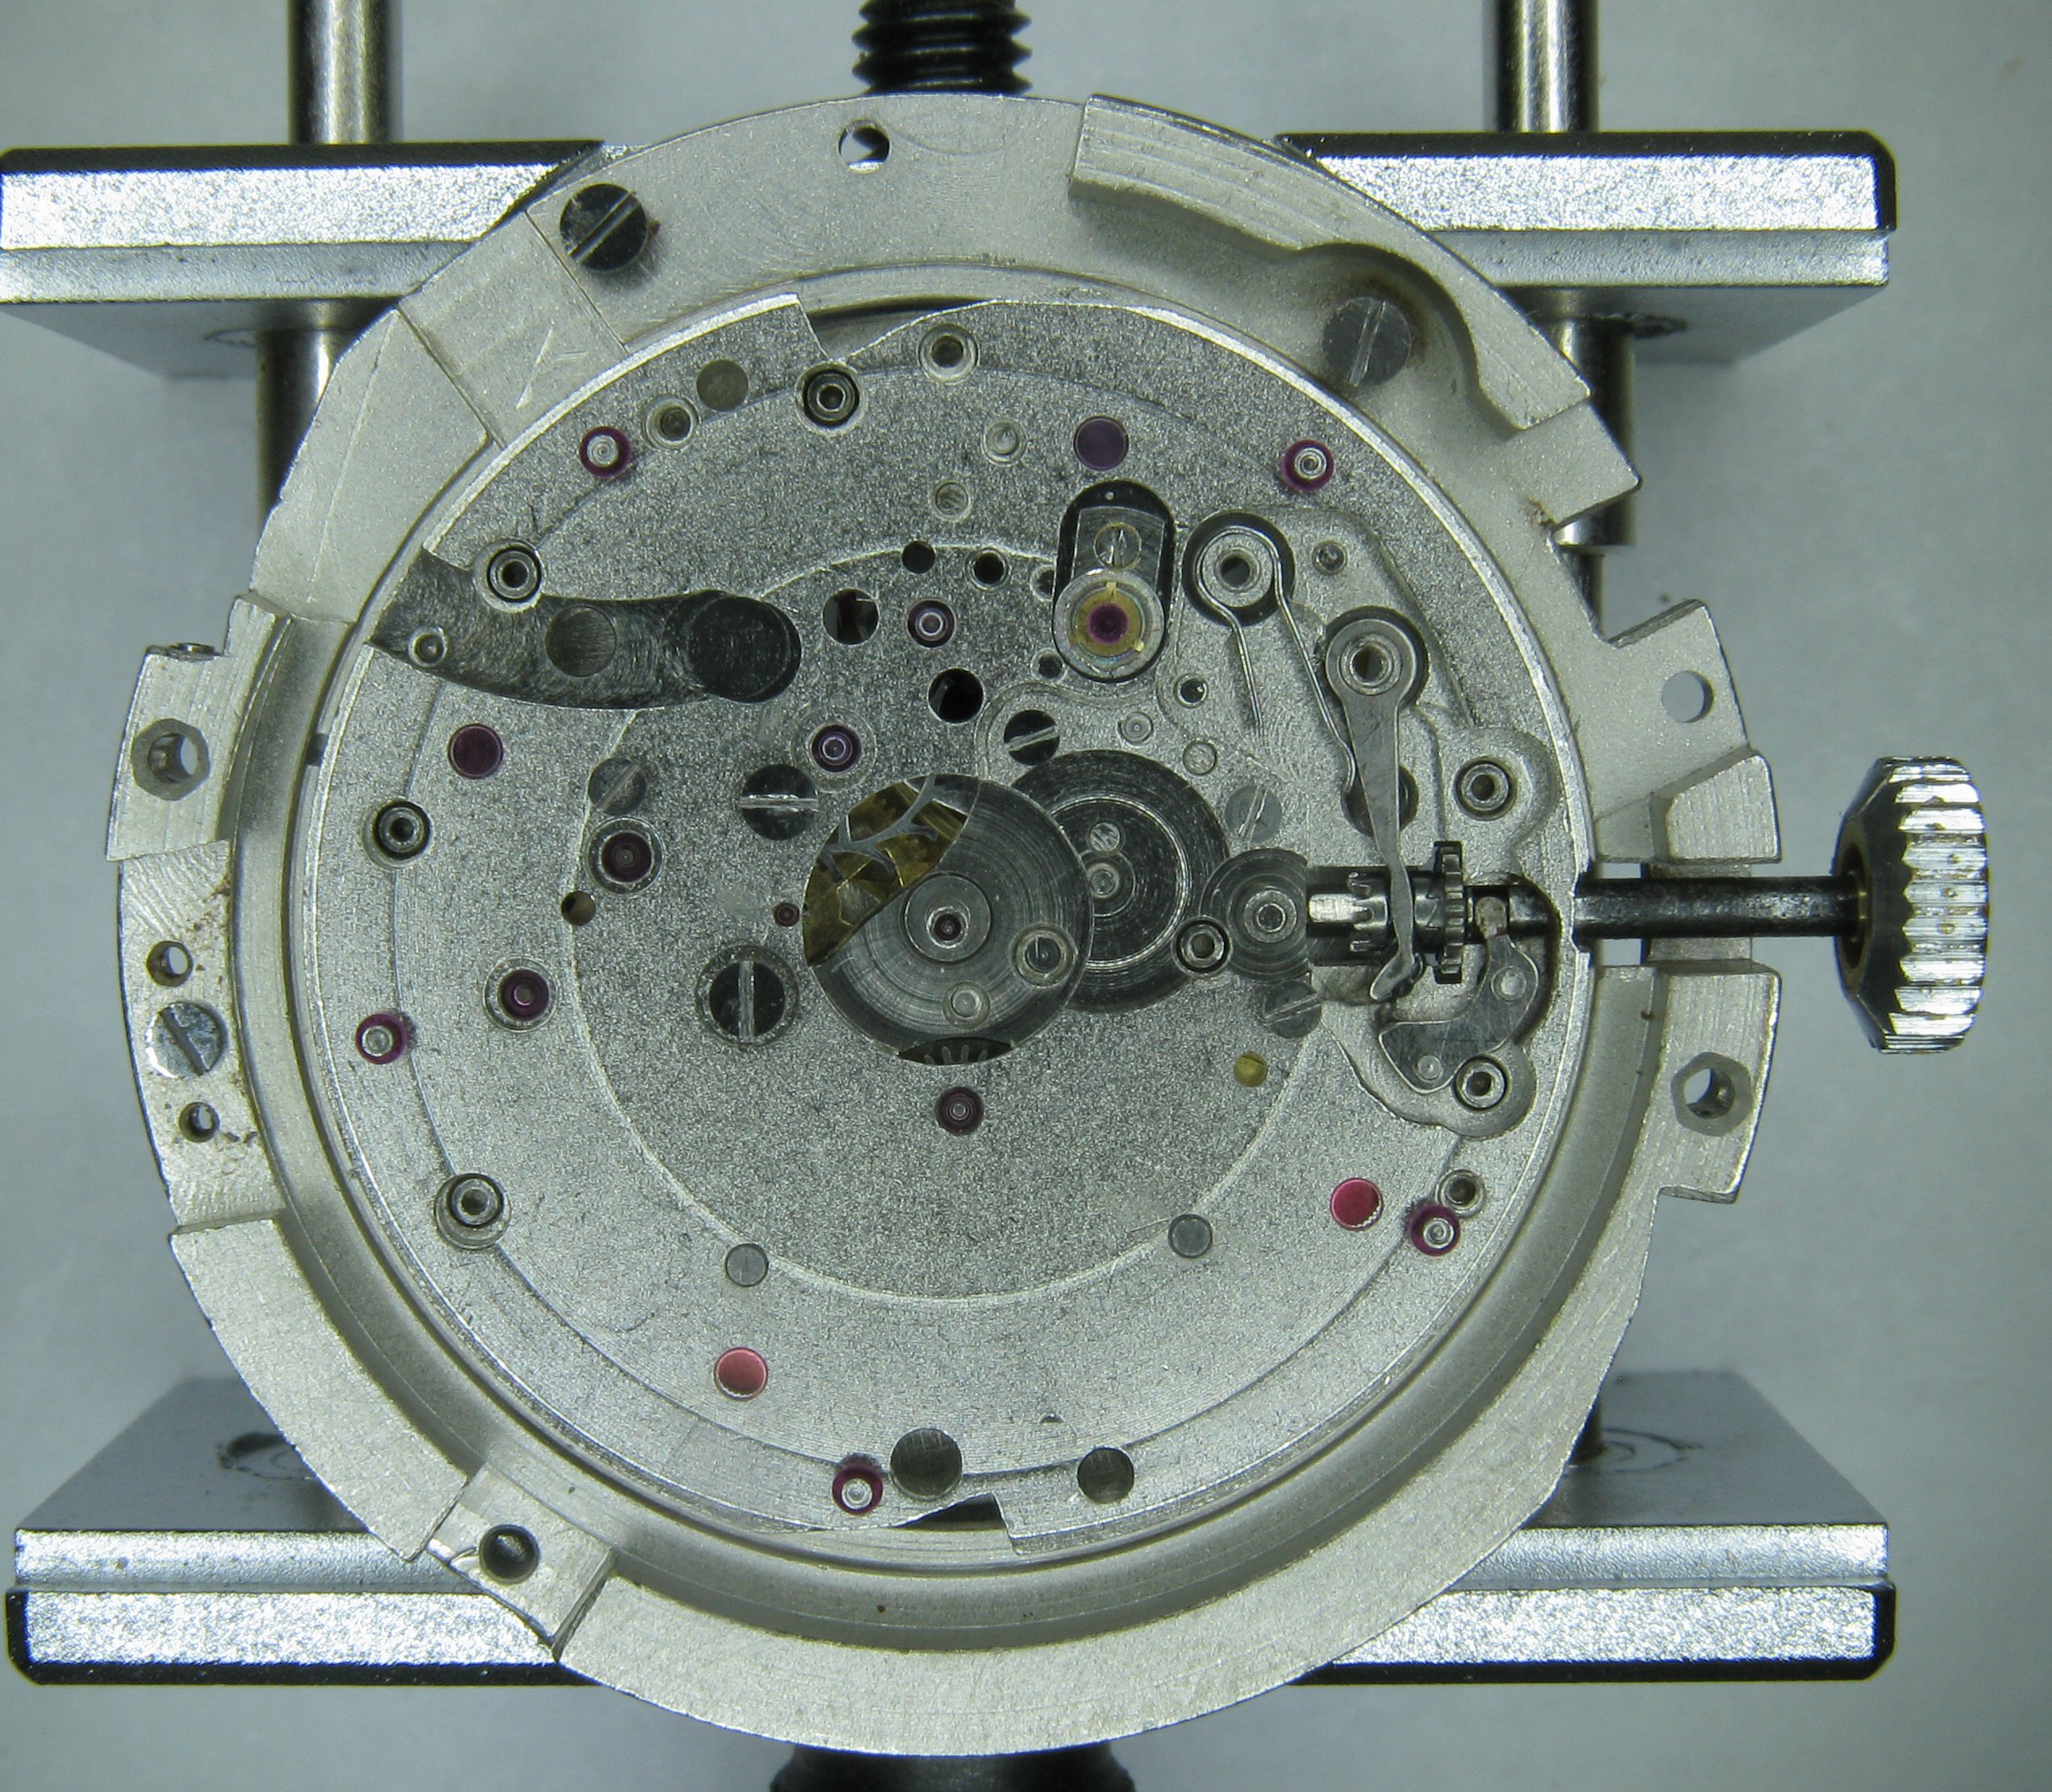
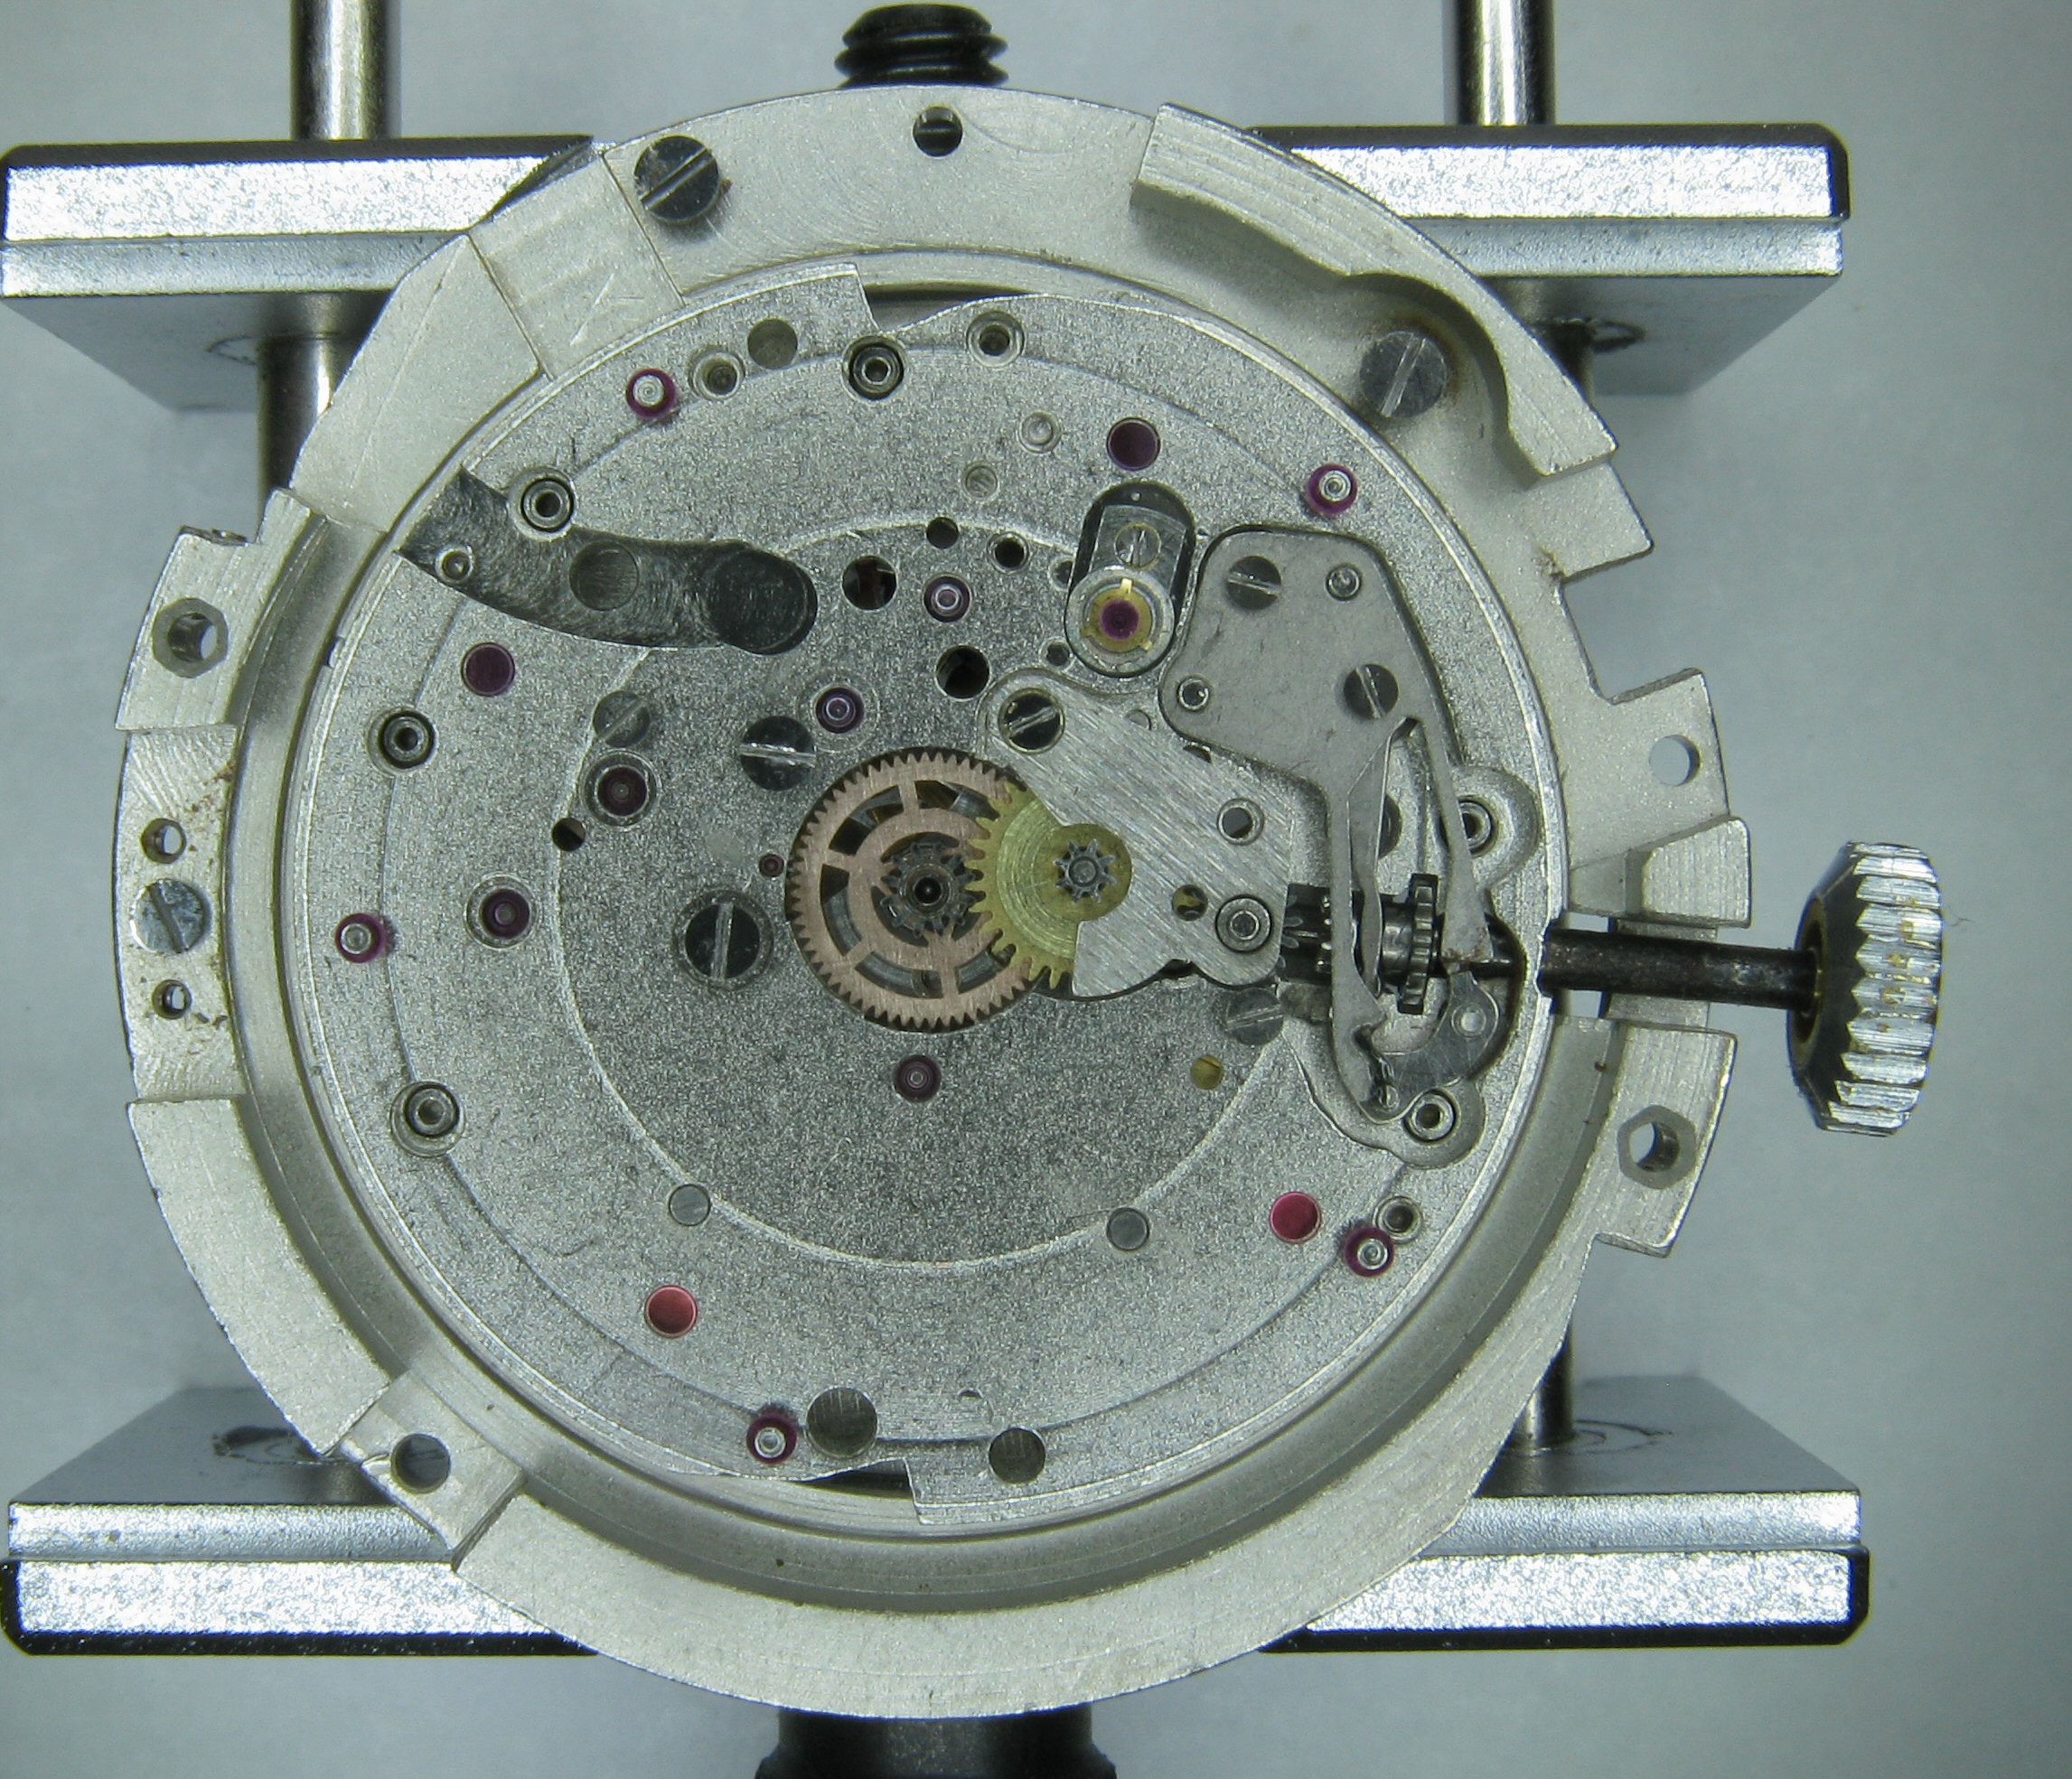


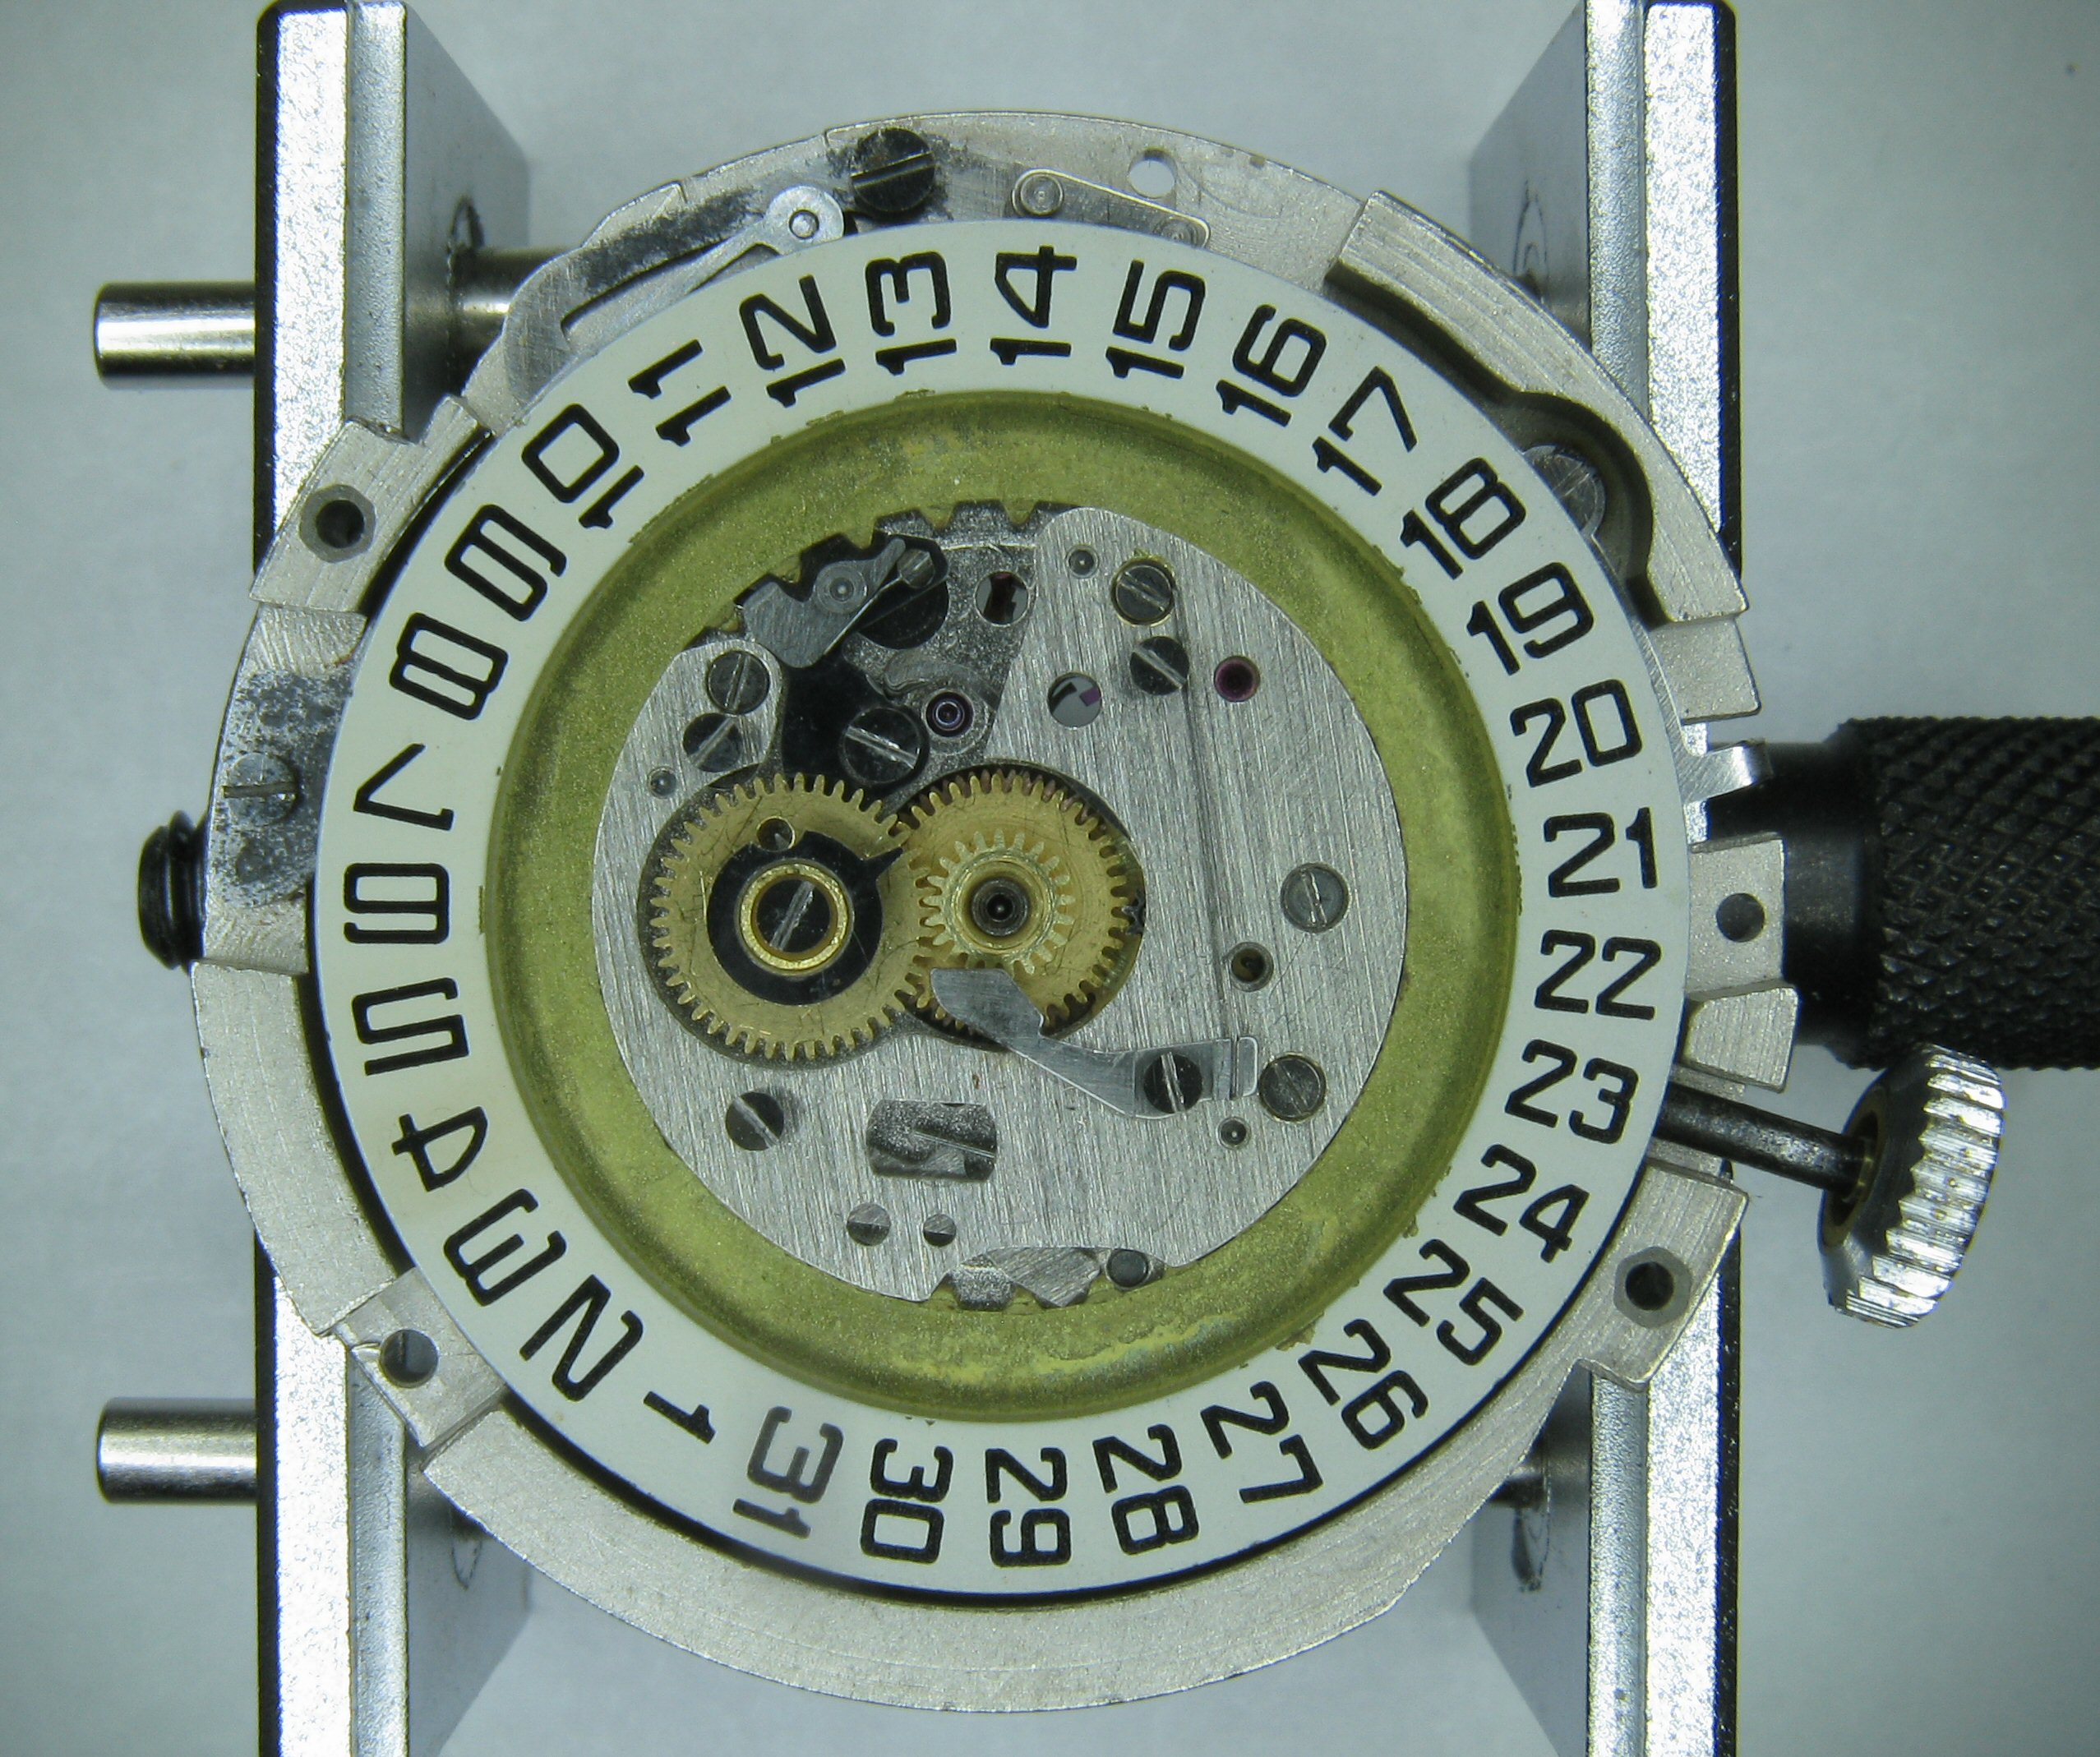
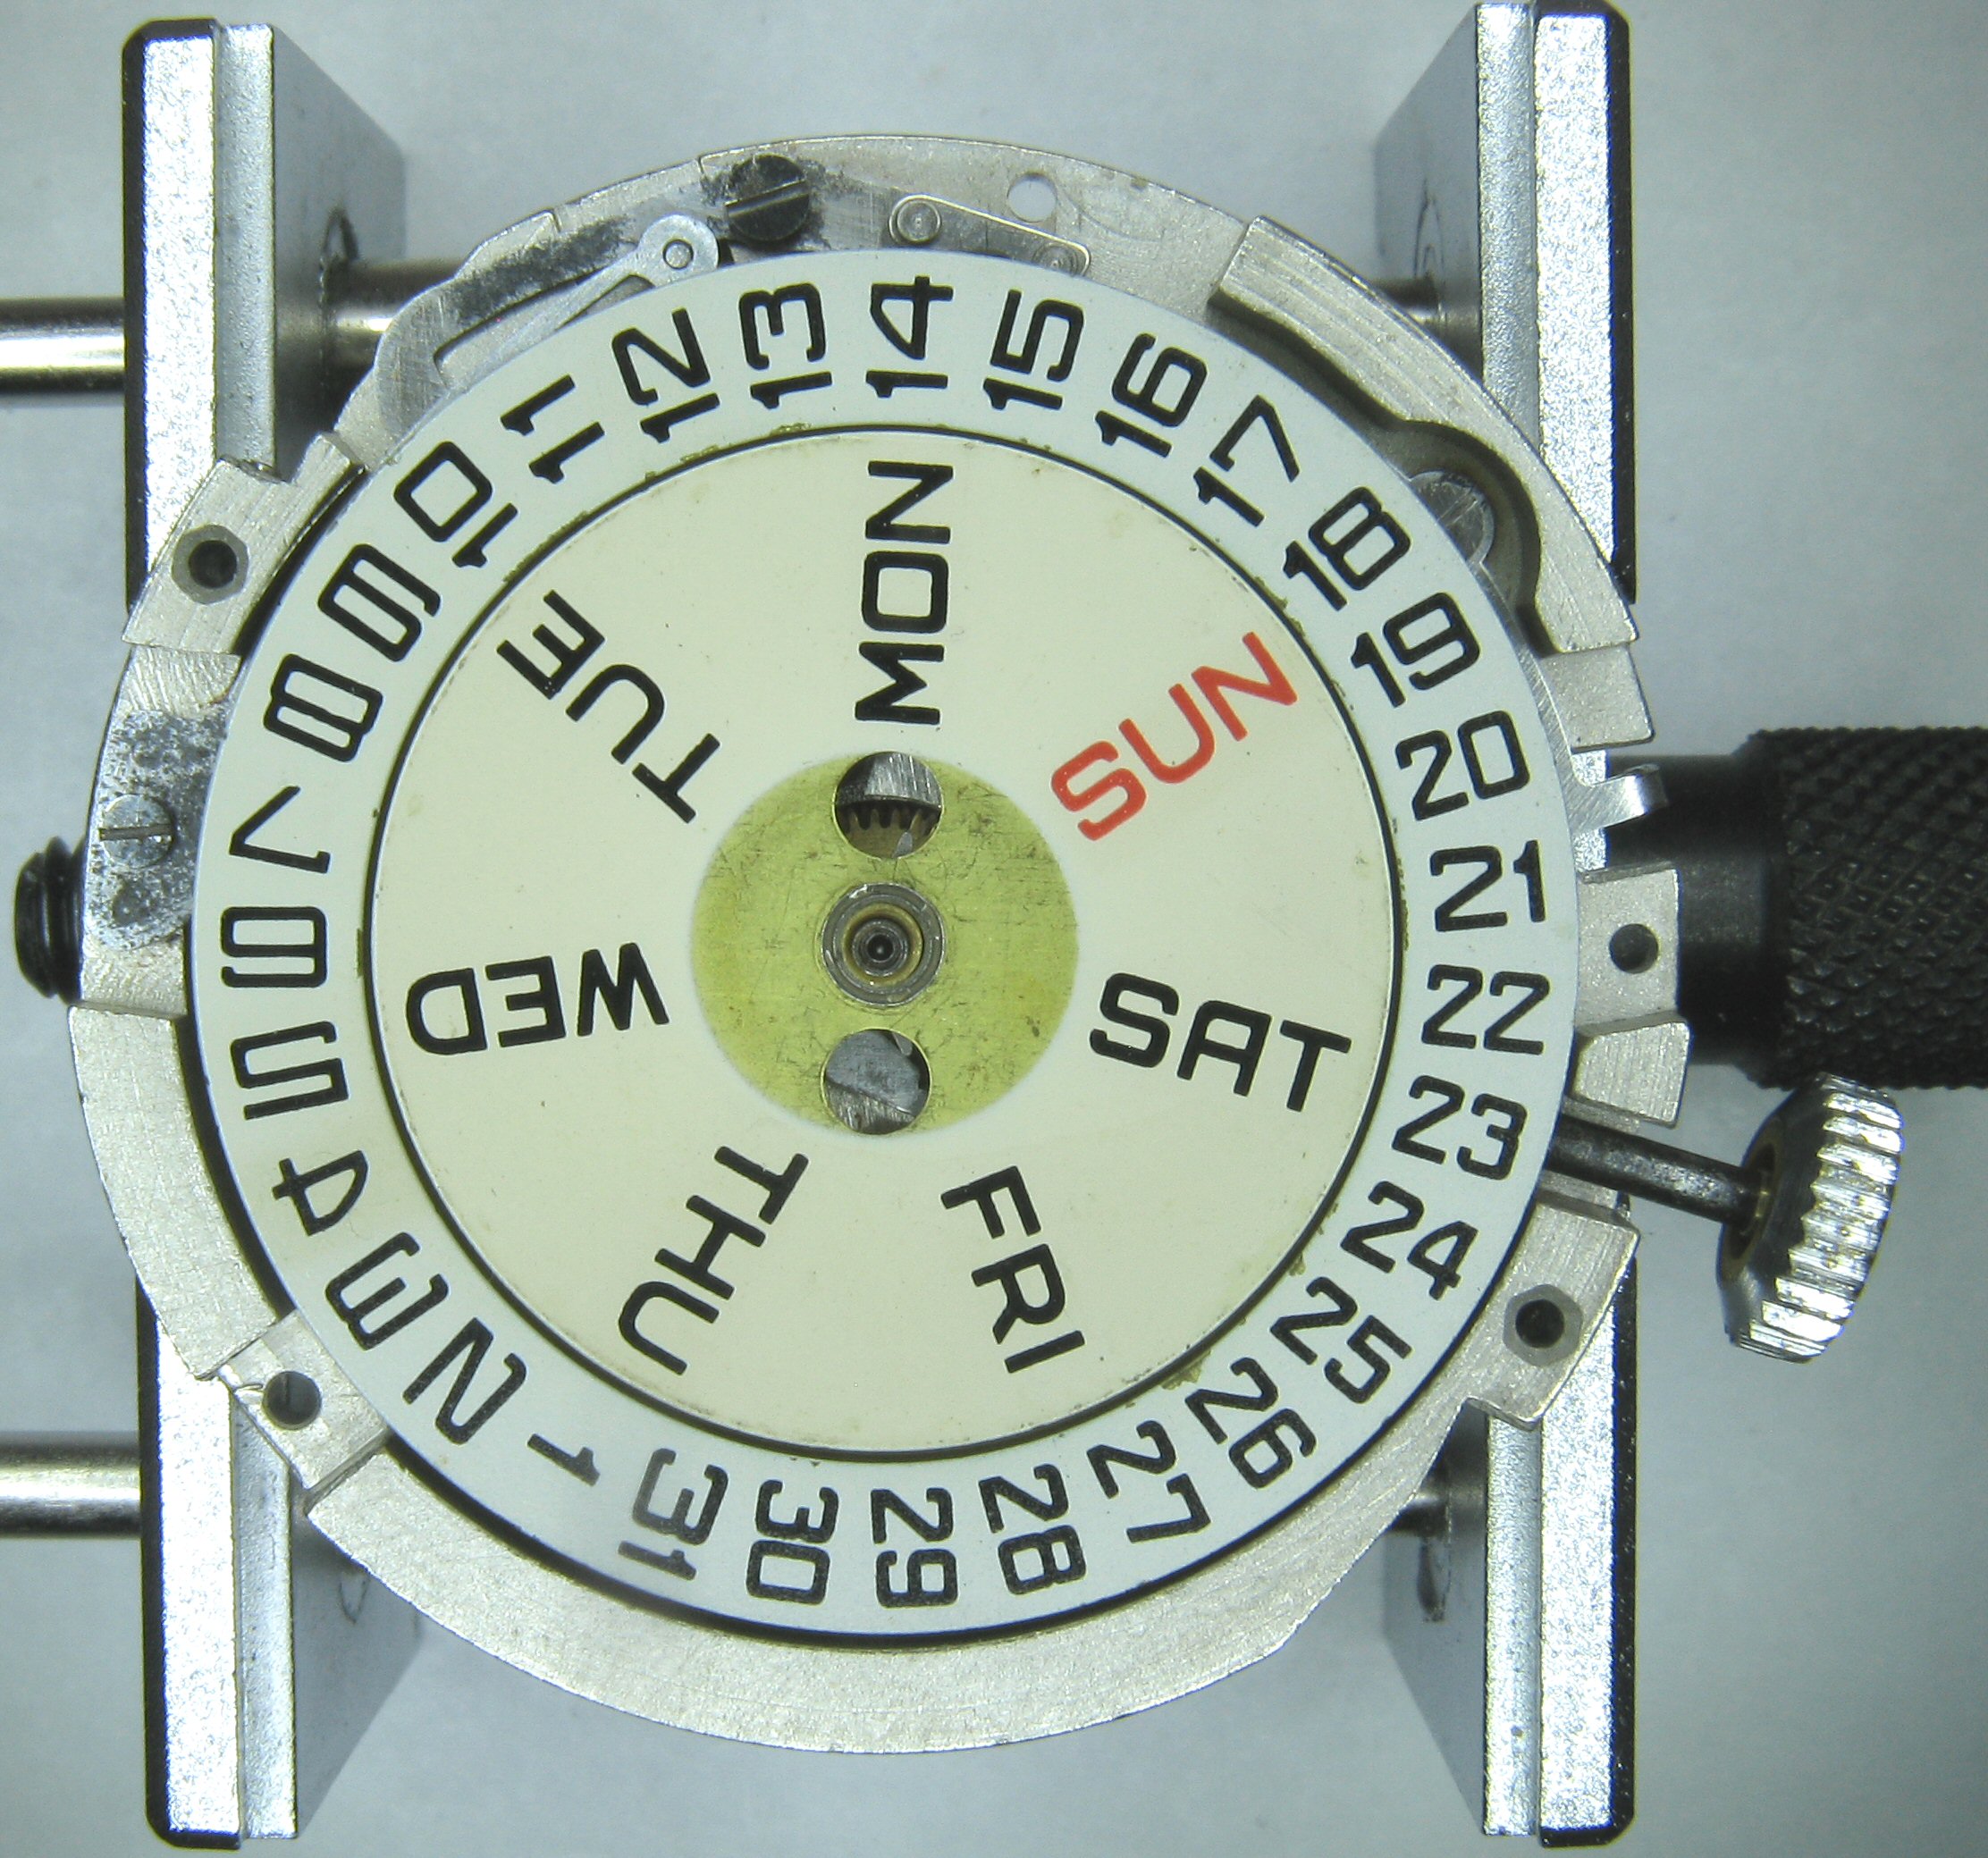
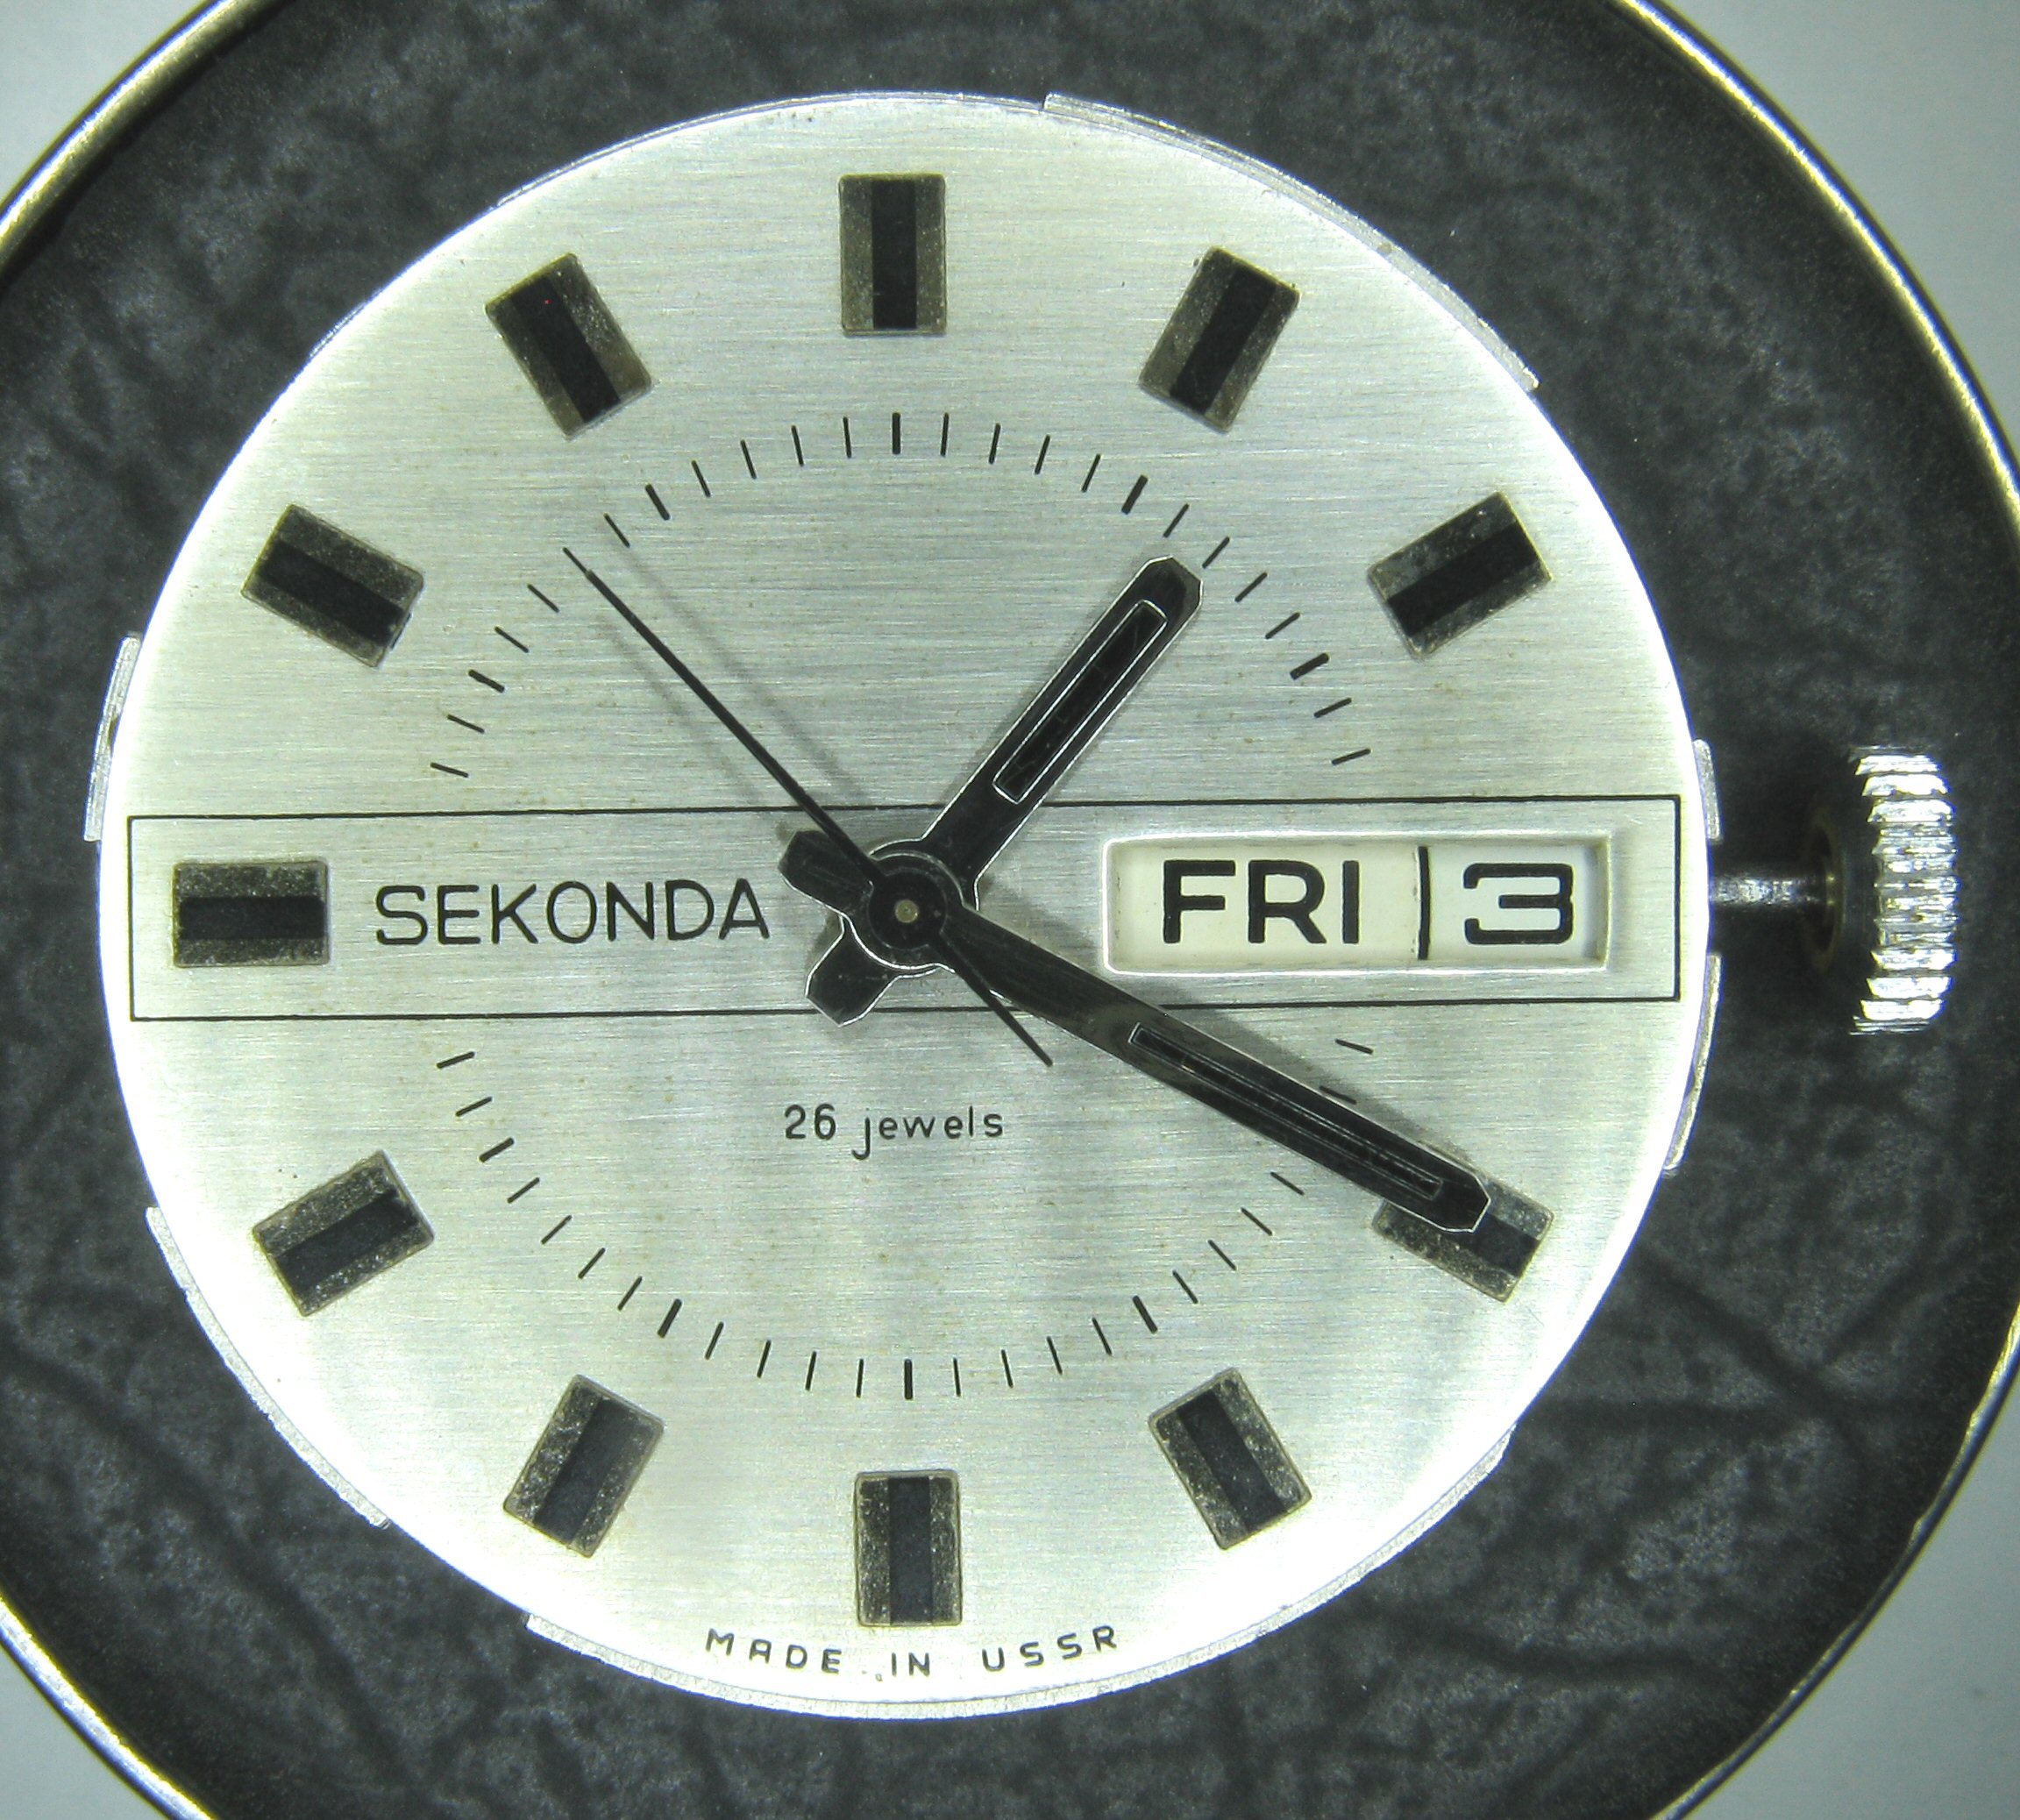
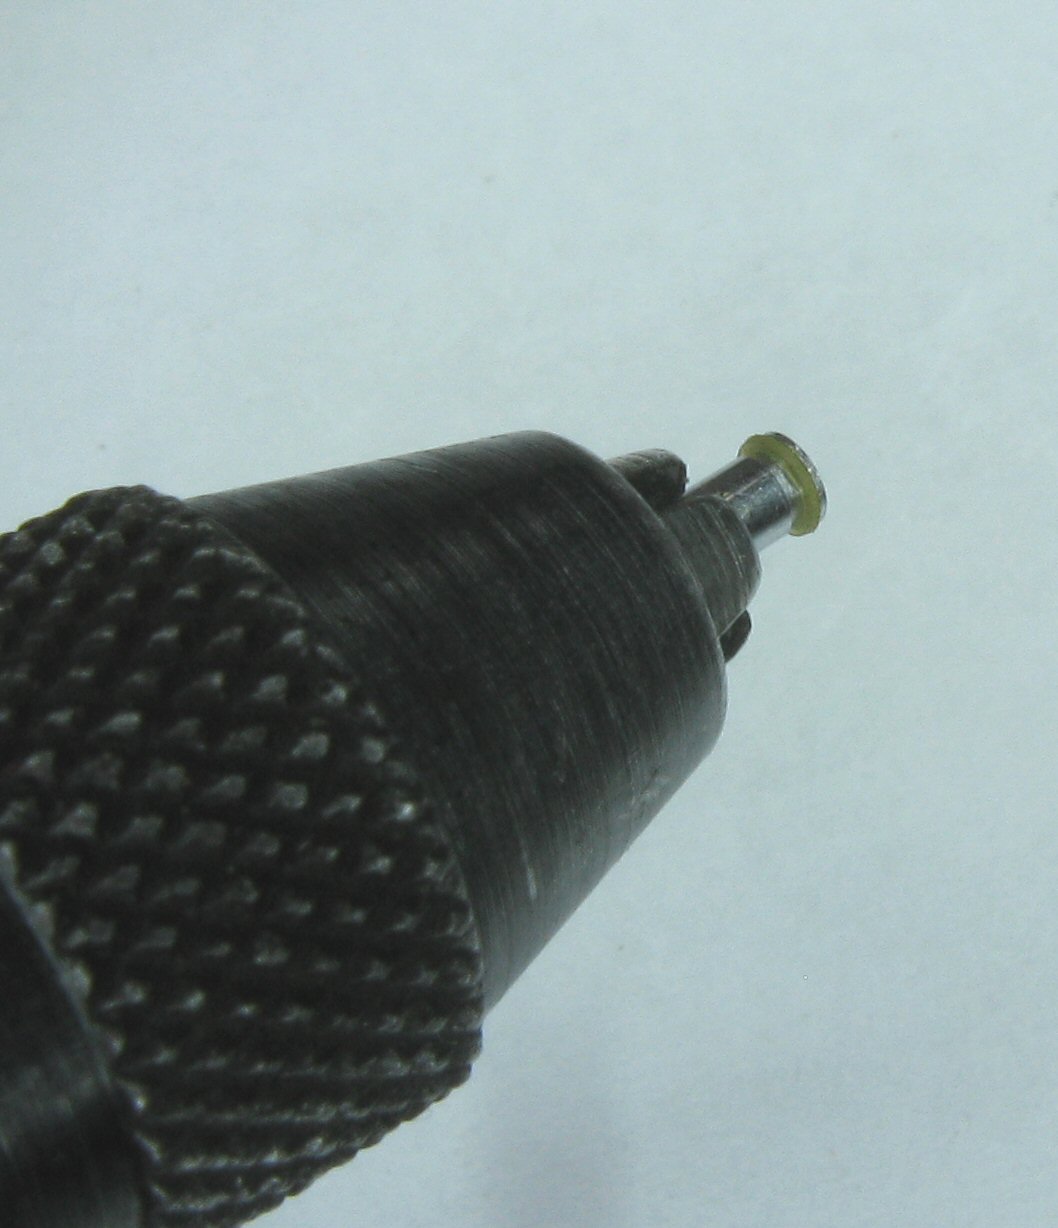

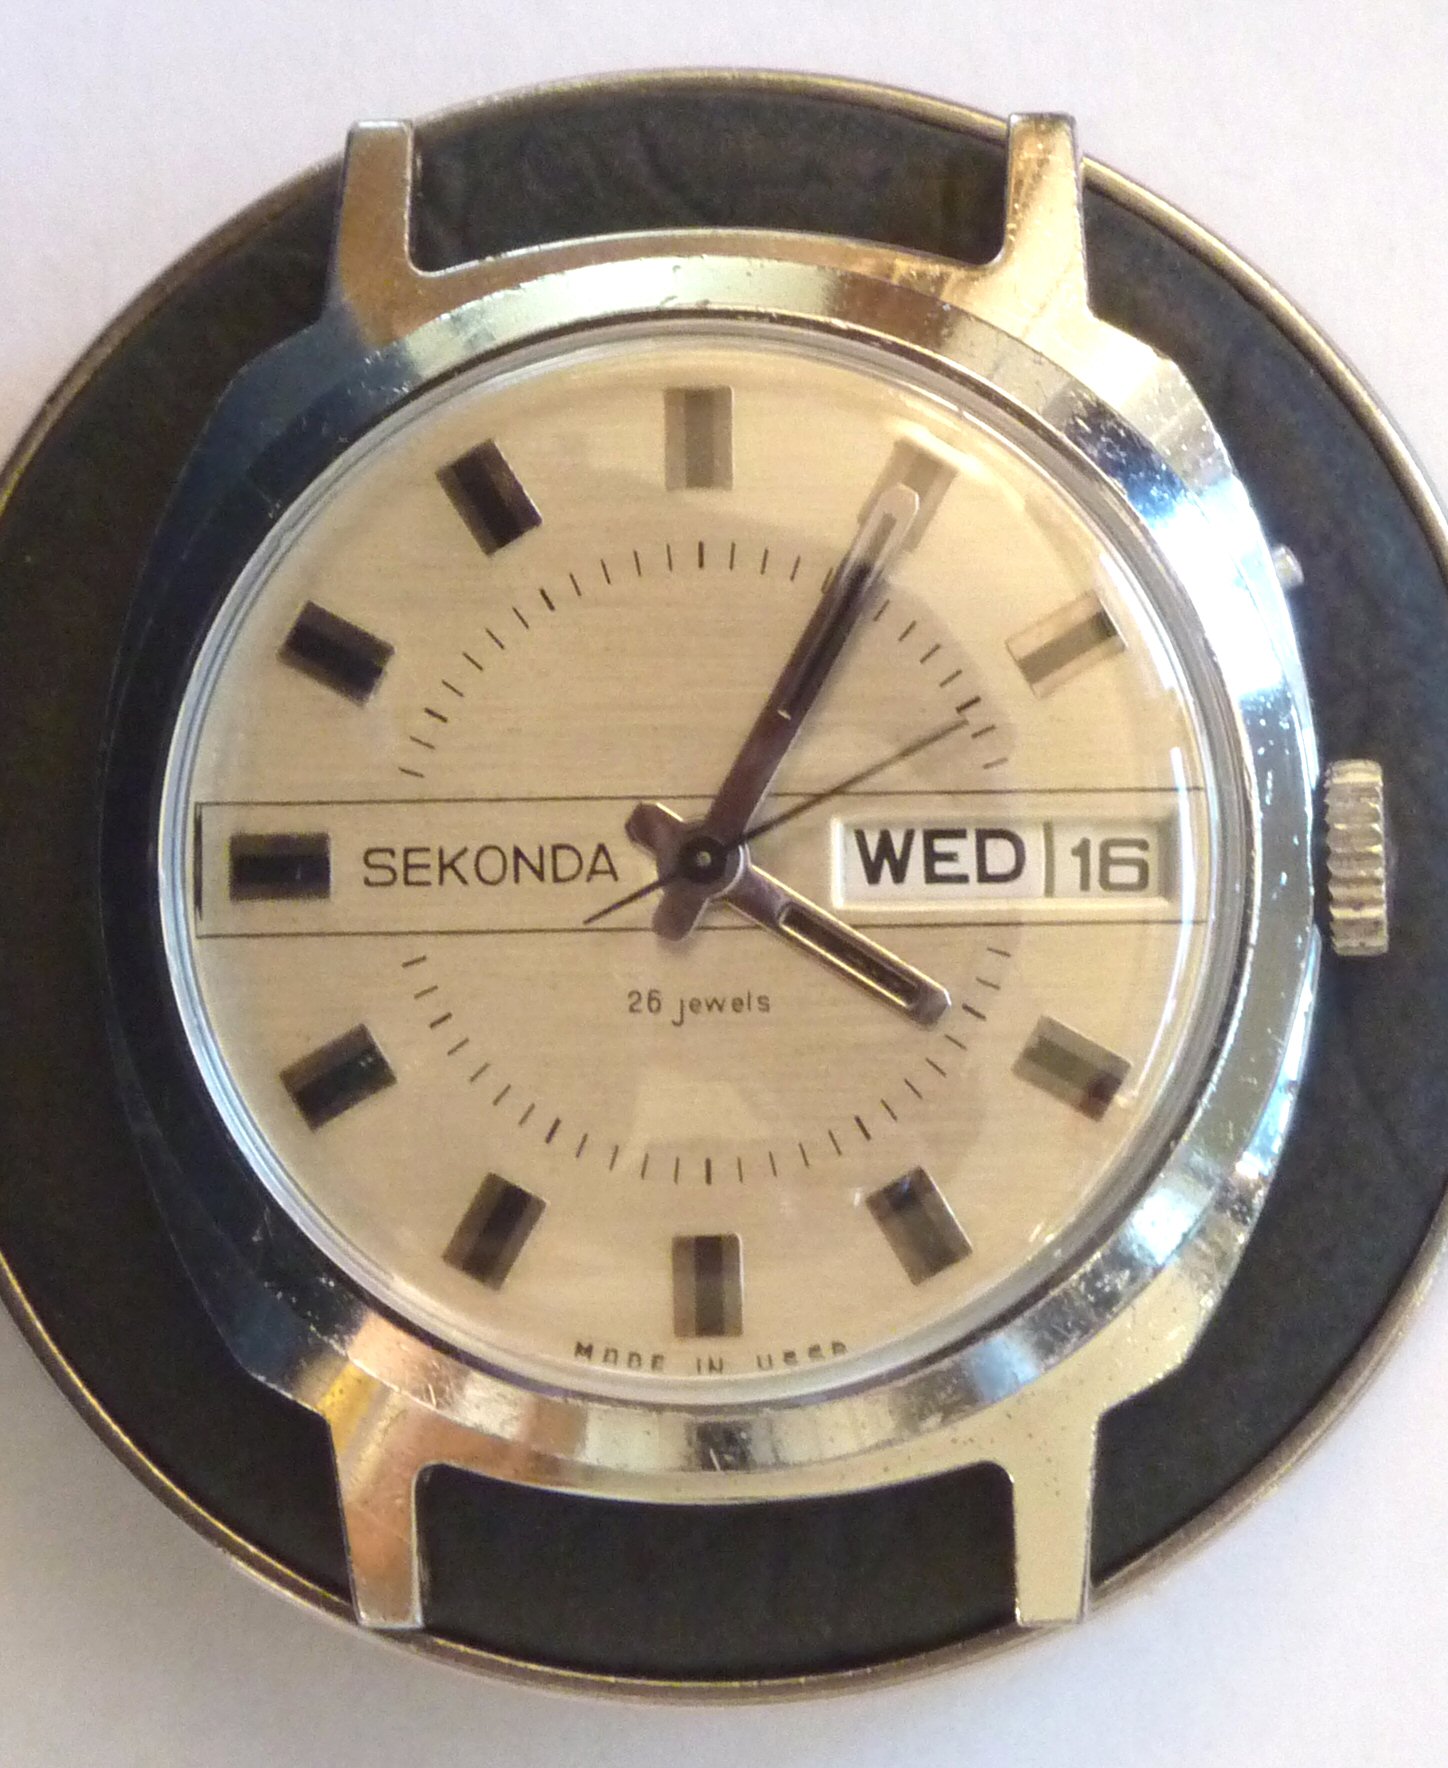

.jpg.d8087b1d80e2cb7343eaaa4f248d4f00.jpg)
.jpg.706c410a56585bdab9dea486821ee083.jpg)