
Leaderboard


Popular Content
Showing content with the highest reputation on 05/22/23 in all areas
-
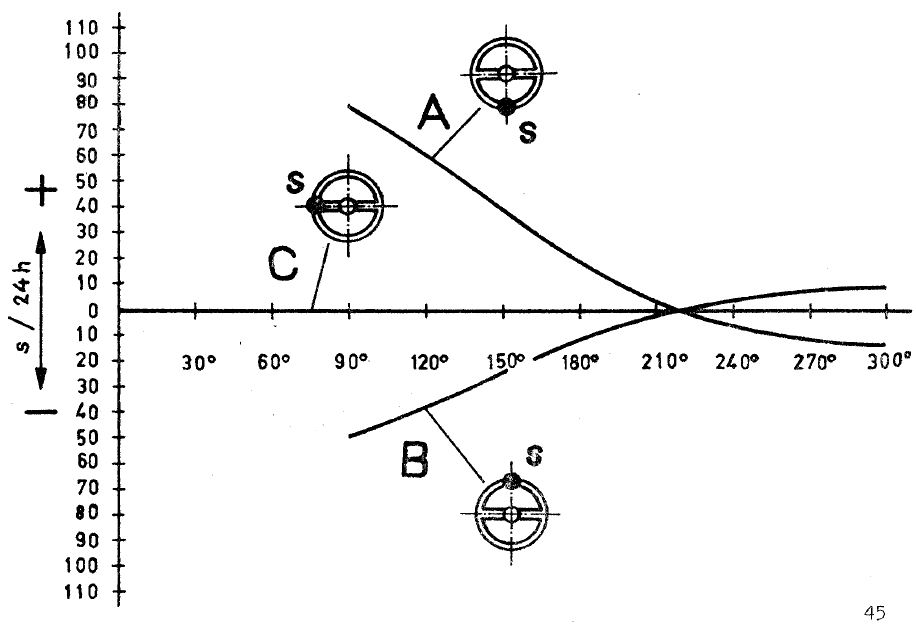
one of the places were amplitude would be more interesting and useful is. New watch you got it for the first time you run a timing cycle six positions you record all the amplitudes and rates. His service the watch you should see better amplitude. if you look at technical specifications from the Swiss for instance you will see that they typically do not tell you what a good amplitude is they've only tell you what a unacceptable yes. They usually have a maximum because of you go over 300 depending upon the watch that is undesirable but other than that they don't care about a high amplitude they only care about a low amplitude typically at 24 hours sometimes they'll specify which crown position it is other times it's more generic. Then it depends upon the watch watches can vary as to what is good and bad I think the lowest I've ever seen Omega have some other movements would go 260°. so how about an example this is a Rolex it was incoming know of valuation was done on the inside yet. We know for 3035 Rolex that and attends you little variation here currently it seems to be 200° at 24 hours is unacceptable some other tech sheets had 190. so first image dial-up fully wound up looks pretty good next we have crown down now here we can see the amplitude has dropped by quite a bit 24 hours later dial up and by the way this shows why when looking at a watch you should look at more than one positions the person who gave me the images actually had all of the images I only snipped out a couple of them because they were too many. crown down at 24 hours is looking below the 200 that we typically see but above the 190 that some of the tech sheets have all the other interesting thing with the obsession with amplitude on this group is often times people don't look at does the watch keep time? Then yes amplitude is a measure of performance but unfortunately each watch can be different. This means spending lots and lots of time trying to get something to do 300° conceivably is almost a waste of time because the factory never designed it that way. Look at Seiko watches typically lay have pathetic amplitude and they oil the pallet fork pivots which makes it worse. oh and the Rolex watch above a 3035 as an issue can you tell me what it is? all we know is the current owner wears it occasionally. Oh and this is where amplitude also has a problem if it's a watch you serviced if you documented your watch properly especially when you're learning. Example incoming watch check it in six positions write all the numbers down when it's fully wound up just for the fun of it wait 24 hours do it again service the watch see if you have an improvement. A year from now another year another year keep checking see how your watches doing. But is a minor problem to this? oh and is amplitude a problem on hundred-year-old watches what about out of beat? One of the watch keeps time are those other things important well they are where I work my boss gets annoyed if the beat is too extreme or the amplitude looks low I tenderly worry about if it runs overnight keeps time. one of the problems is what exactly was the amplitude when these watches were new? The theories of horology have changed with time for a variety of reasons things basically today more efficient. Back then there were more concerned about keeping time than amplitude. they didn't have a timing machine to please. then there is a problem of all the people who worked on the watch over time. All the strange things that have happened to certain degree it's a miracle if you gave it to get these watches running again. maybe a picture would help. if you look at the image below you'll notice something interesting poise of the balance wheel. the purpose the chart is it shows what happens when you have a heavy spot on the balance wheel. At various amplitudes depending upon where the heavy spot is the watch with a run fast or slow its how we do dynamic poising for instance. But as the amplitude increases hitting approximately 220° you no longer will observe any poising errors at all. Then as you go faster in noticed that the errors aren't as big. Which is why dynamic poising is easier at a low amplitude as it's much much more noticeable. So this is what makes 220° kind of a magical number as no poising errors suggest think if you watch could run a perfect 220° no poising errors.


 2 points
 -
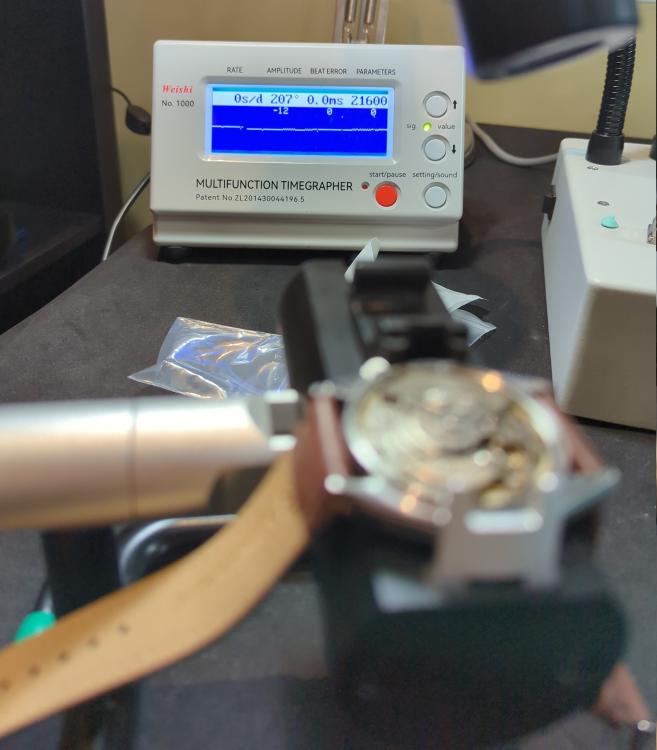
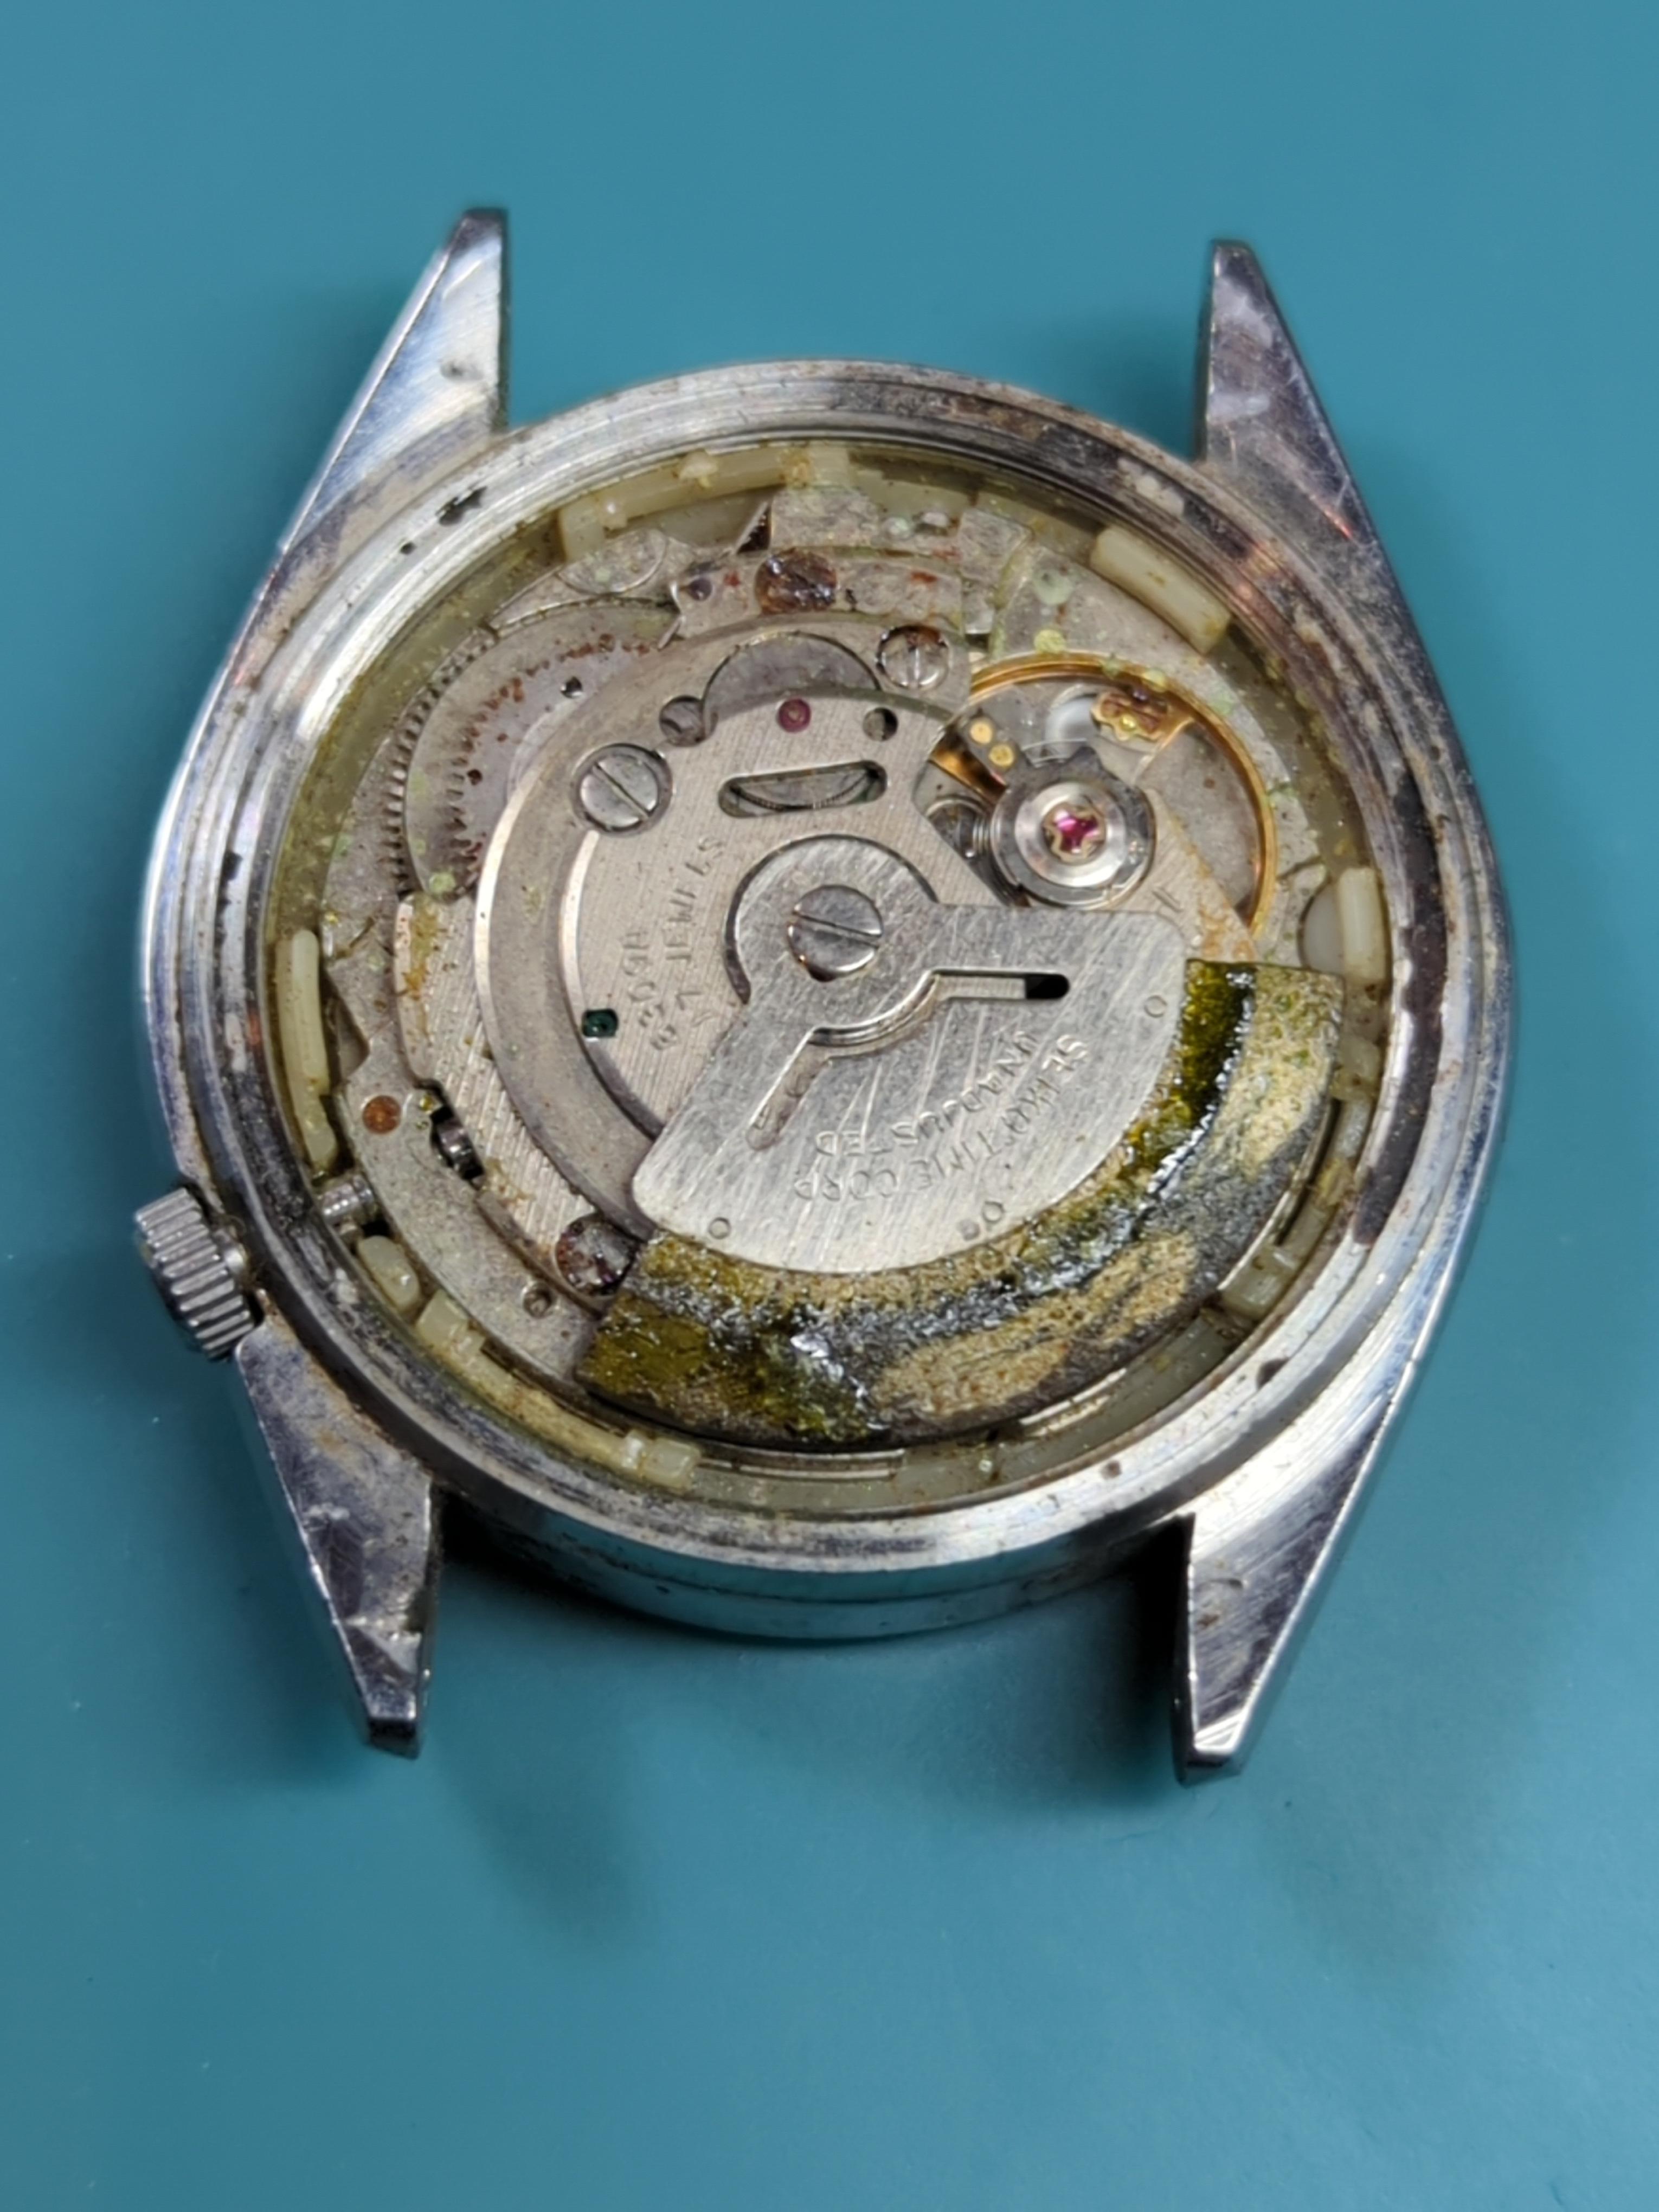
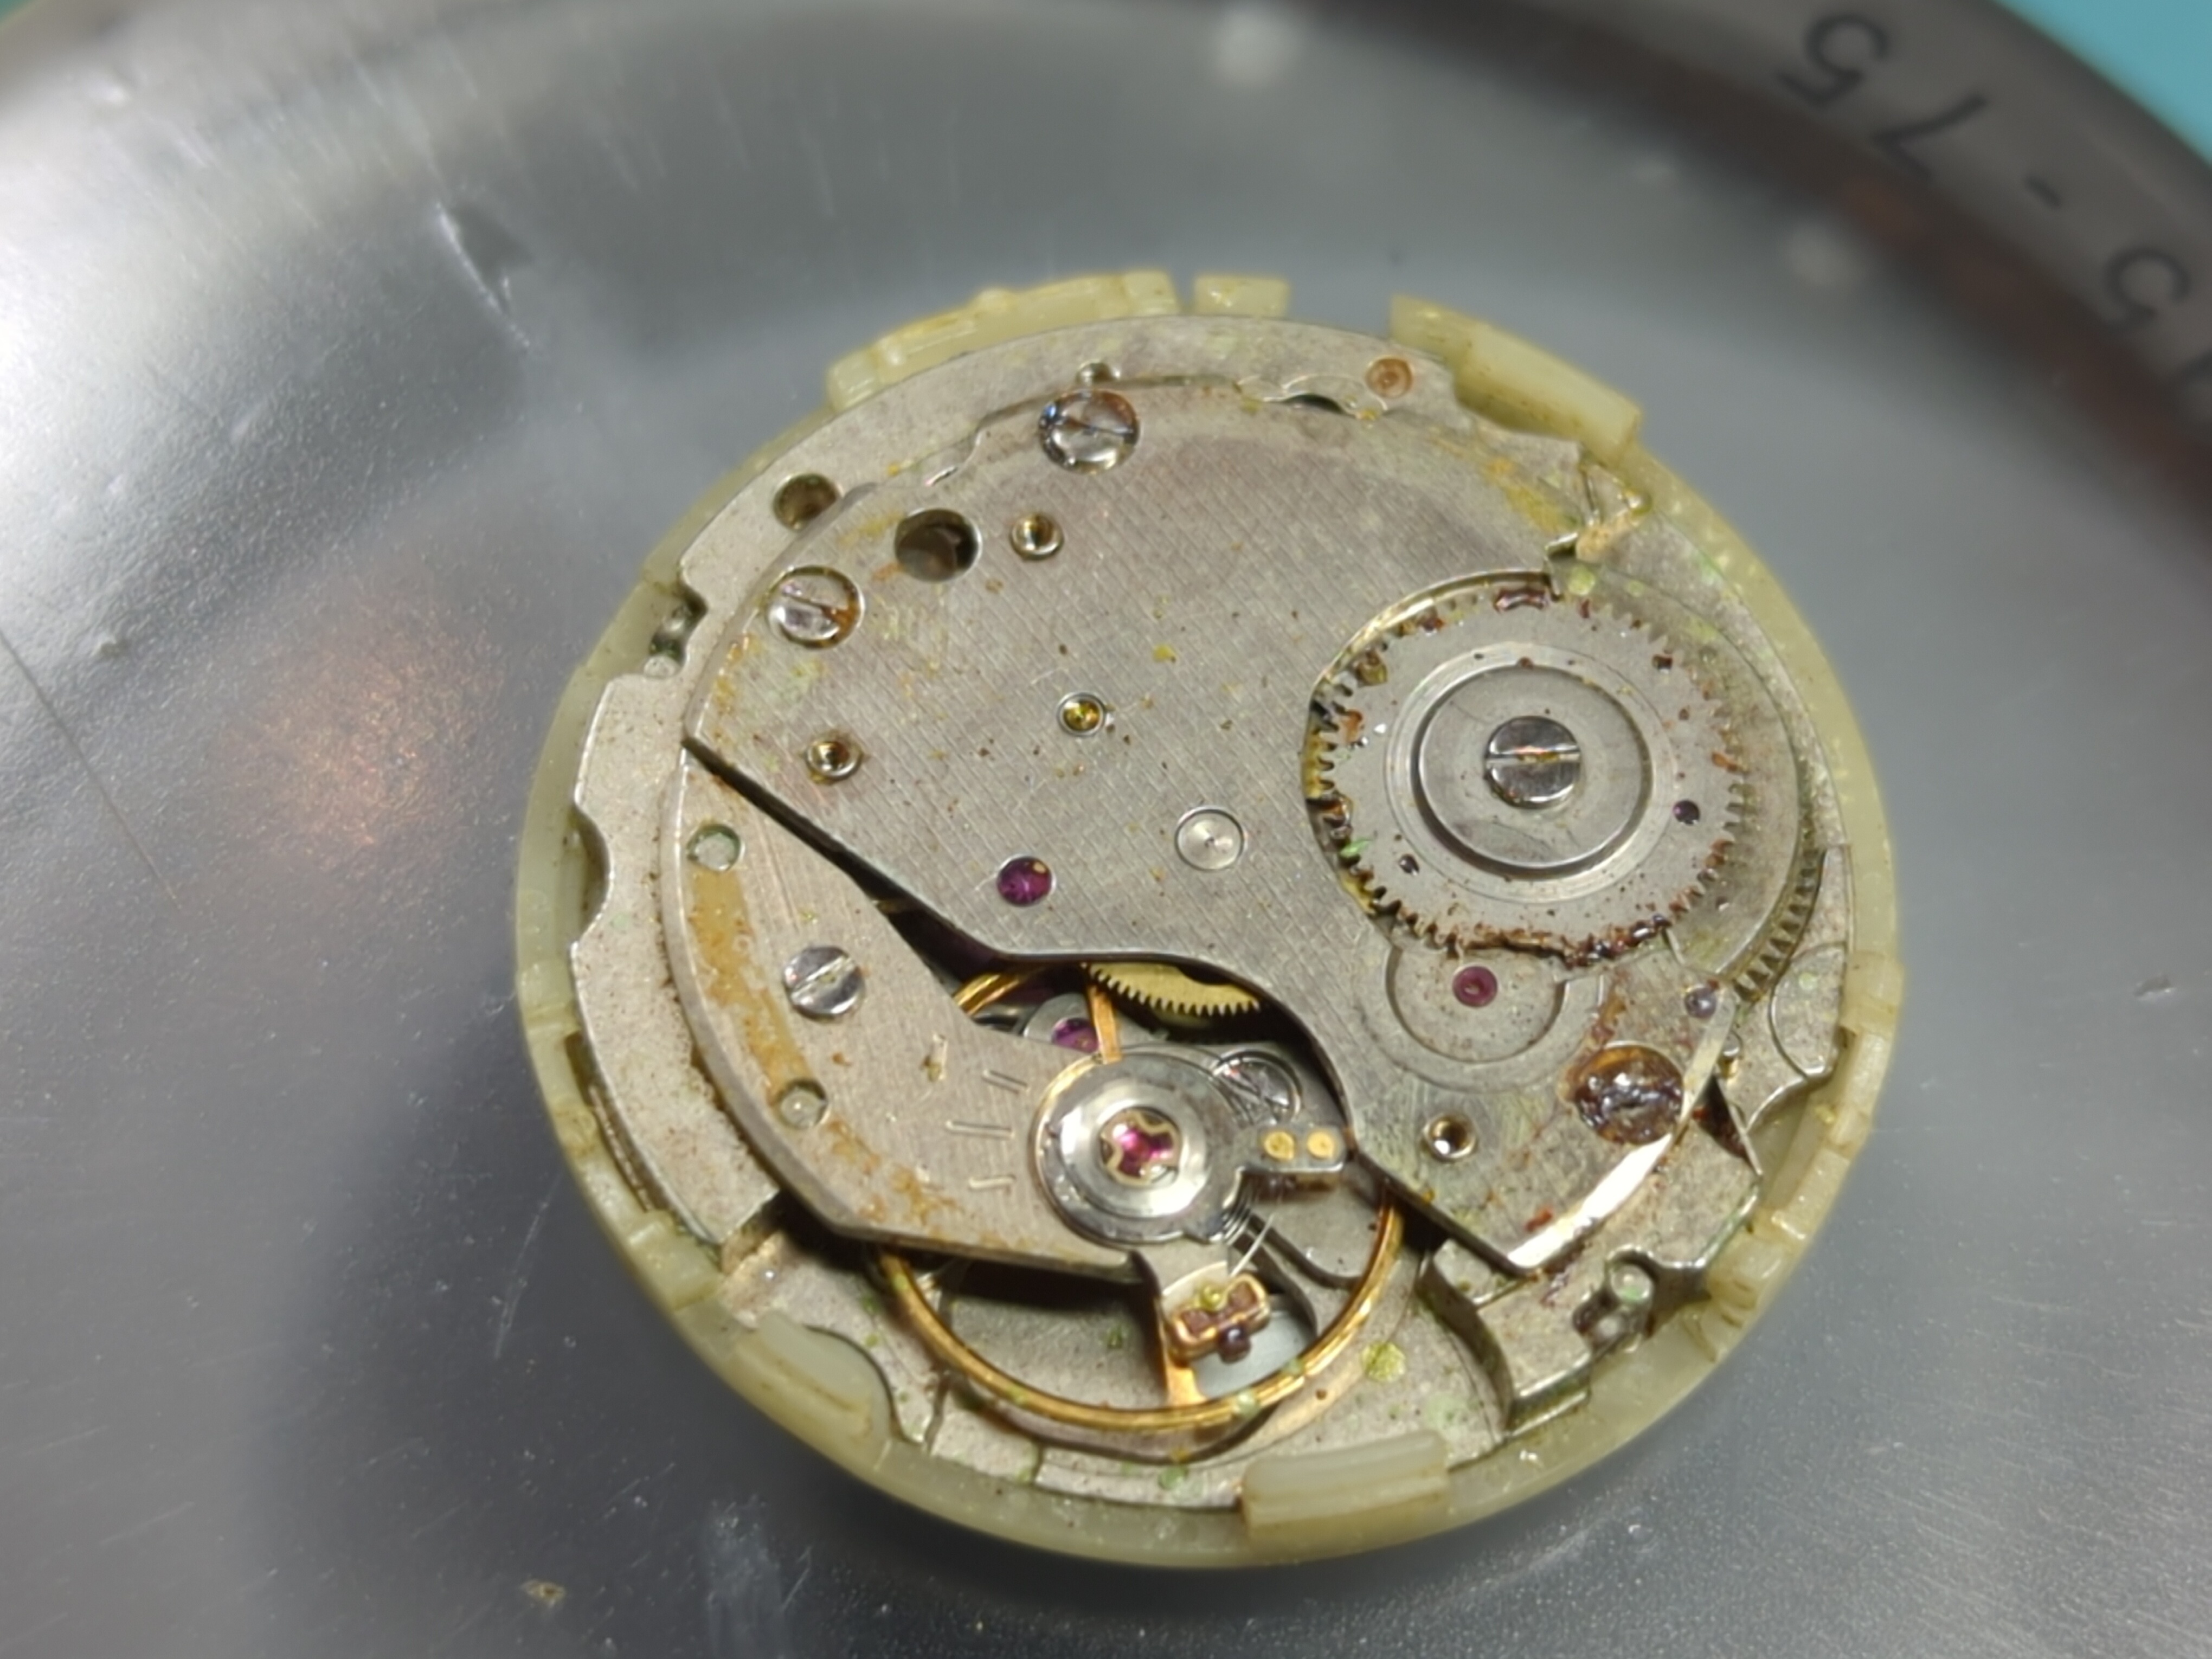
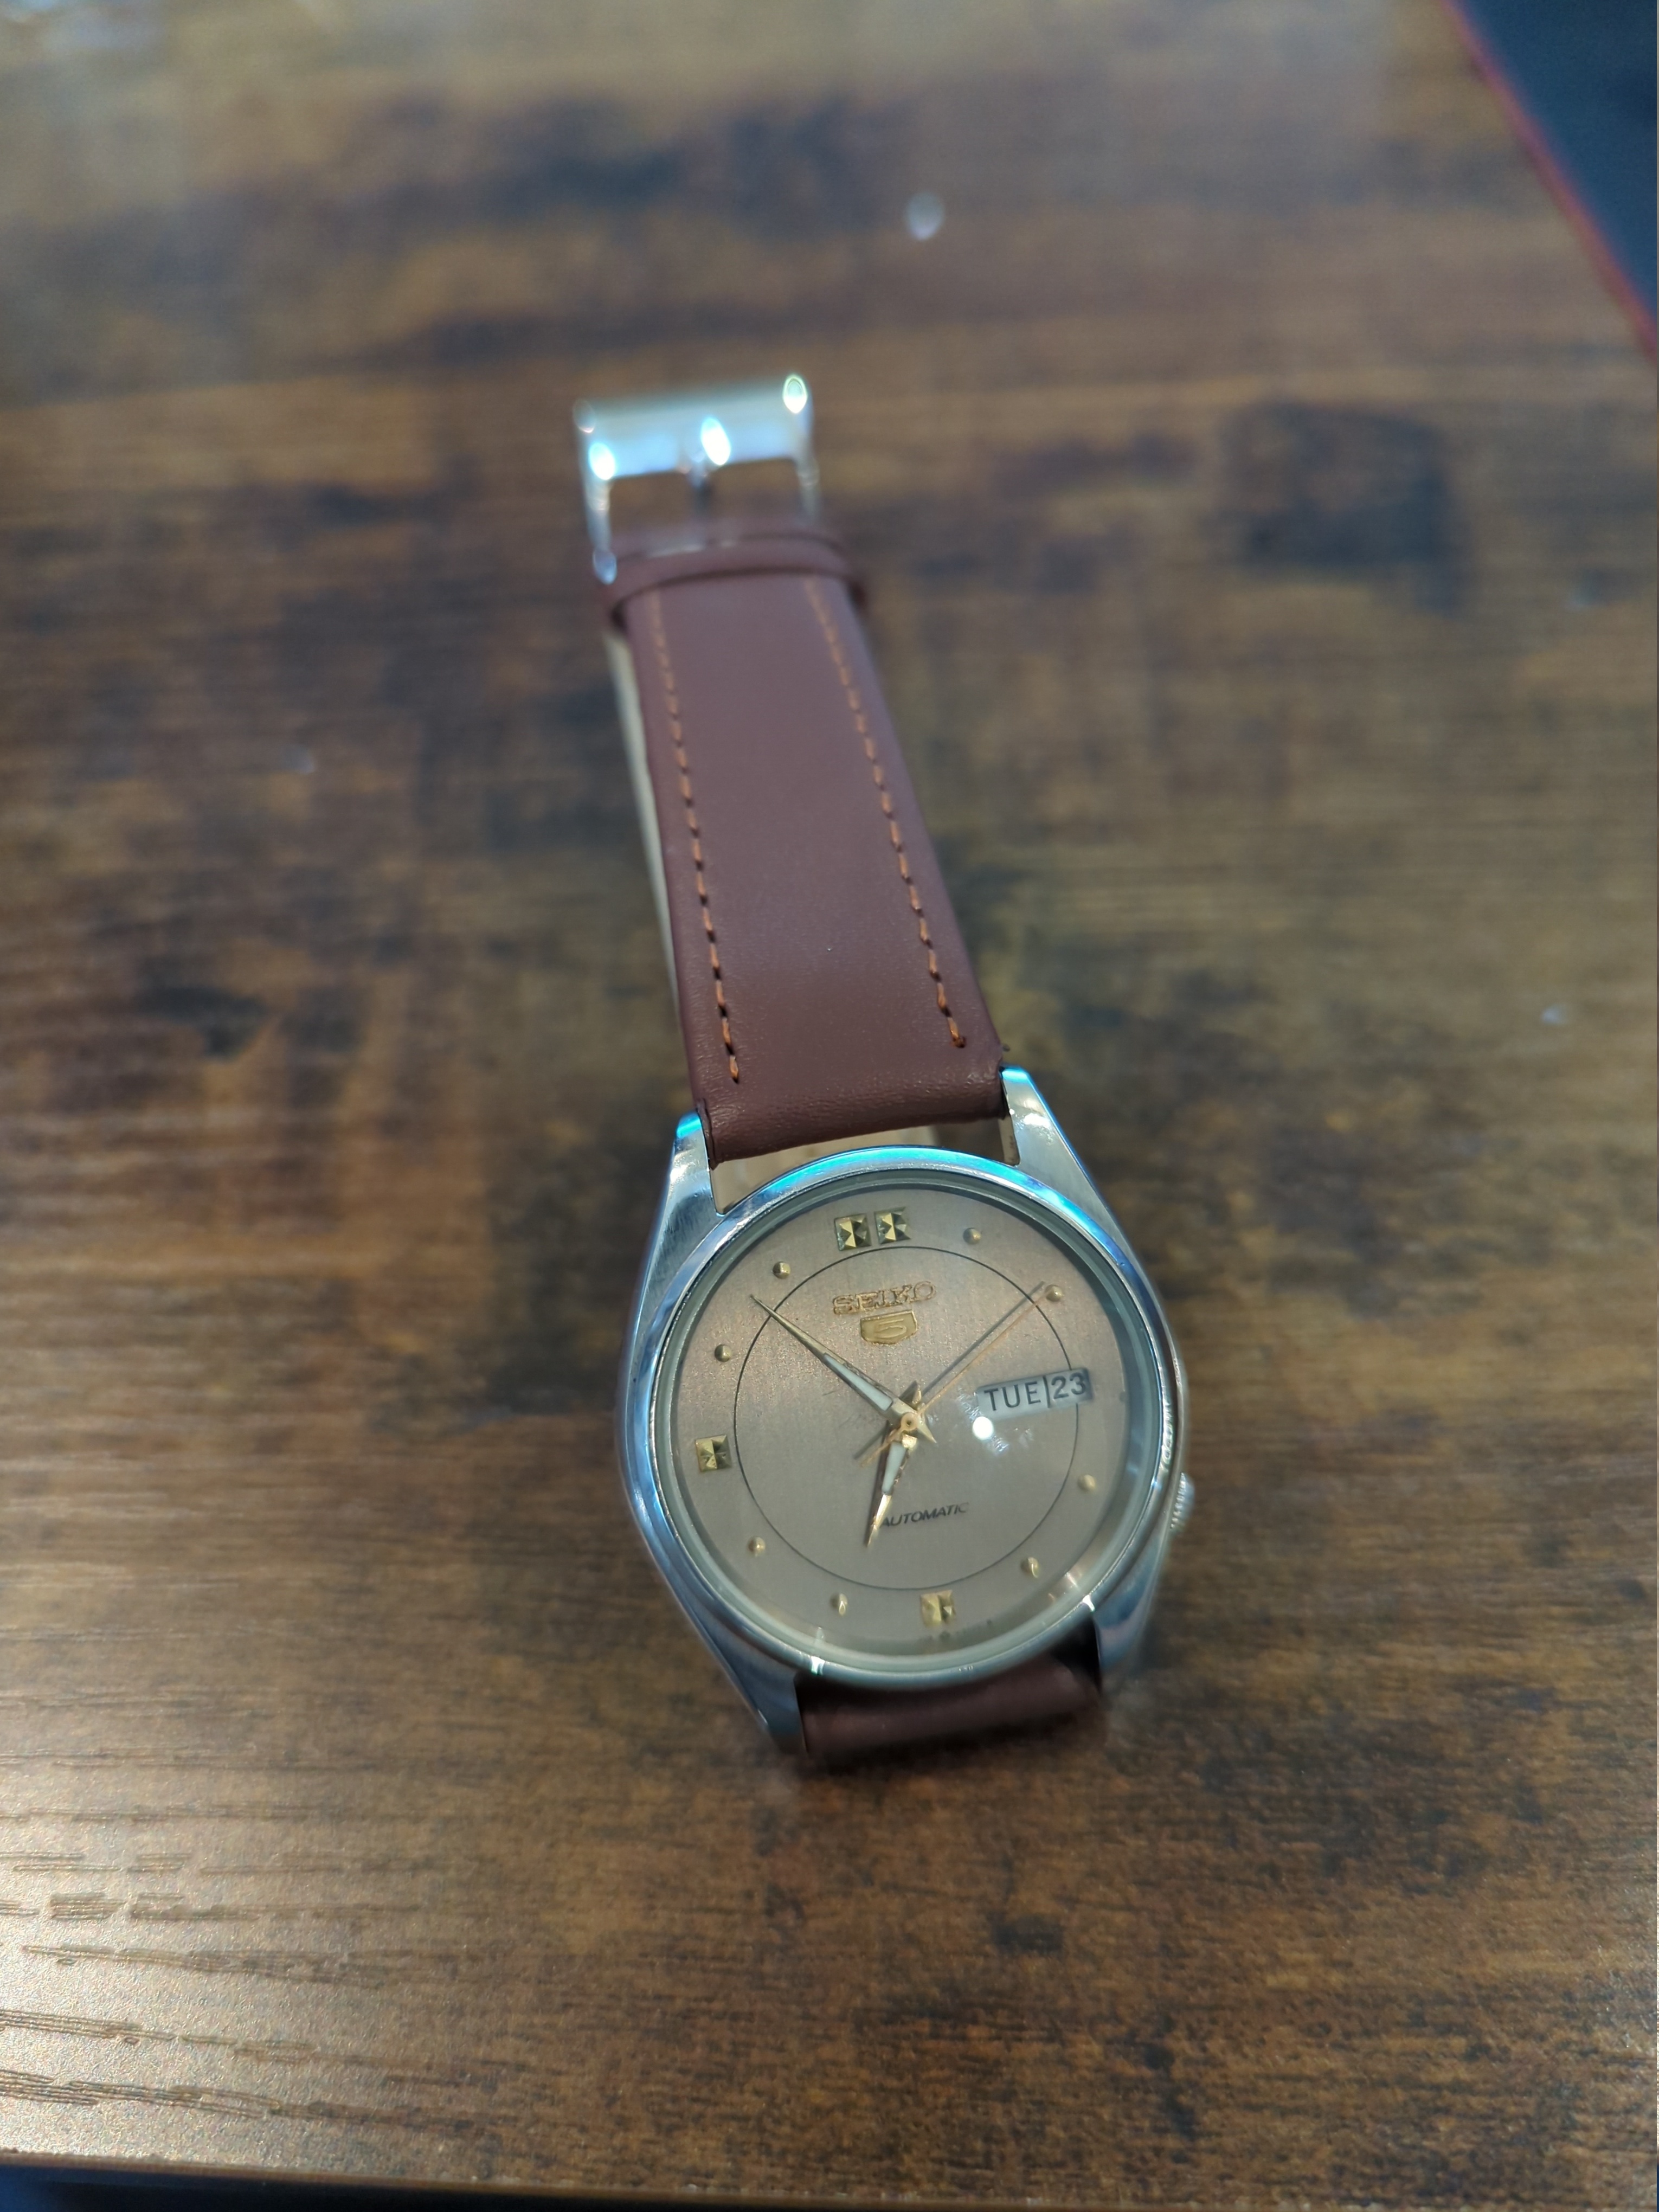
Good day everyone, I just completed a watch for my wife's uncle as a gift, its a Seiko 6309 which was in pretty poor condition and a non runner for obvious reasons. I had to replace the crystal and the ratchet wheel which was completely corroded (see pictures below) I also had to replace a screw and the cannon pinion. A quick lume on the hands and polish the case and it was good to go. Let me know what you think: Before Front: Before Movement: Corrosion damage to ratchet wheel and screw(s) Here is the finished watch along with the time graph after 24 hours:


 2 points
 -
You are discovering what we have been trying to tell you all along - it may look easy in videos, but in practice - you need practice ! If you don't mind the (highly likely) chance of wrecking it, carry on. But if you care about the watch and wish to save it - put it aside until you can improve your skills.2 points
-
2 points
-
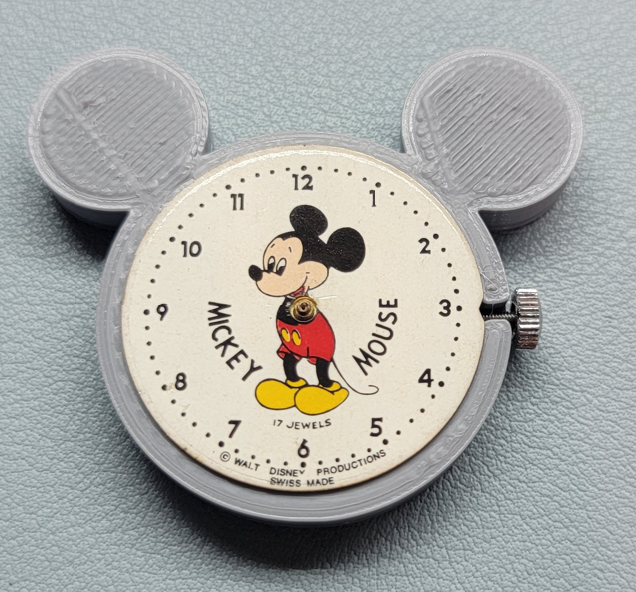
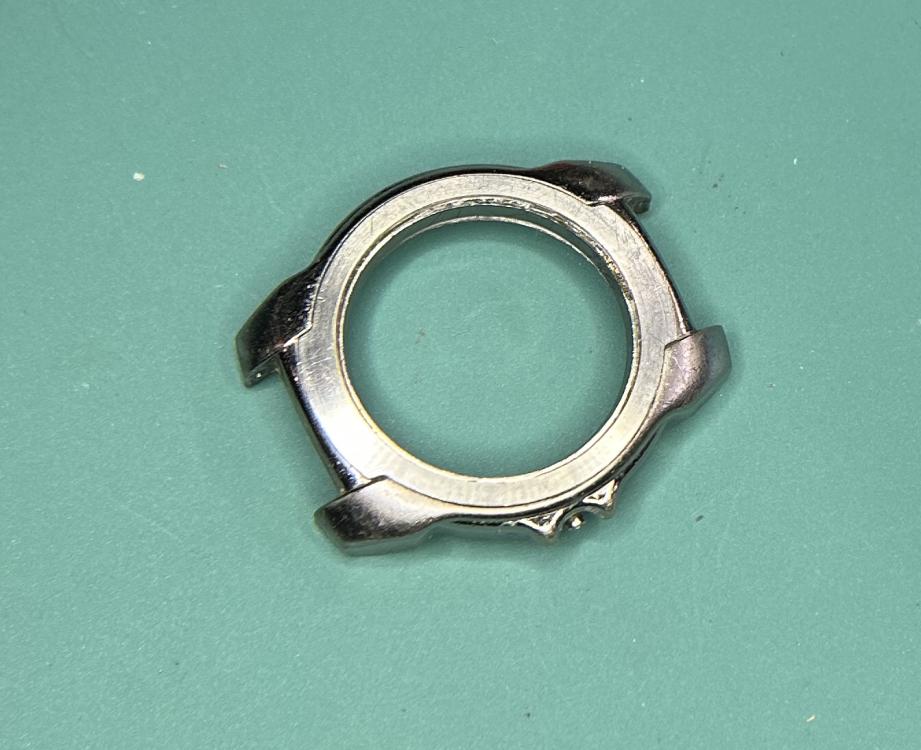
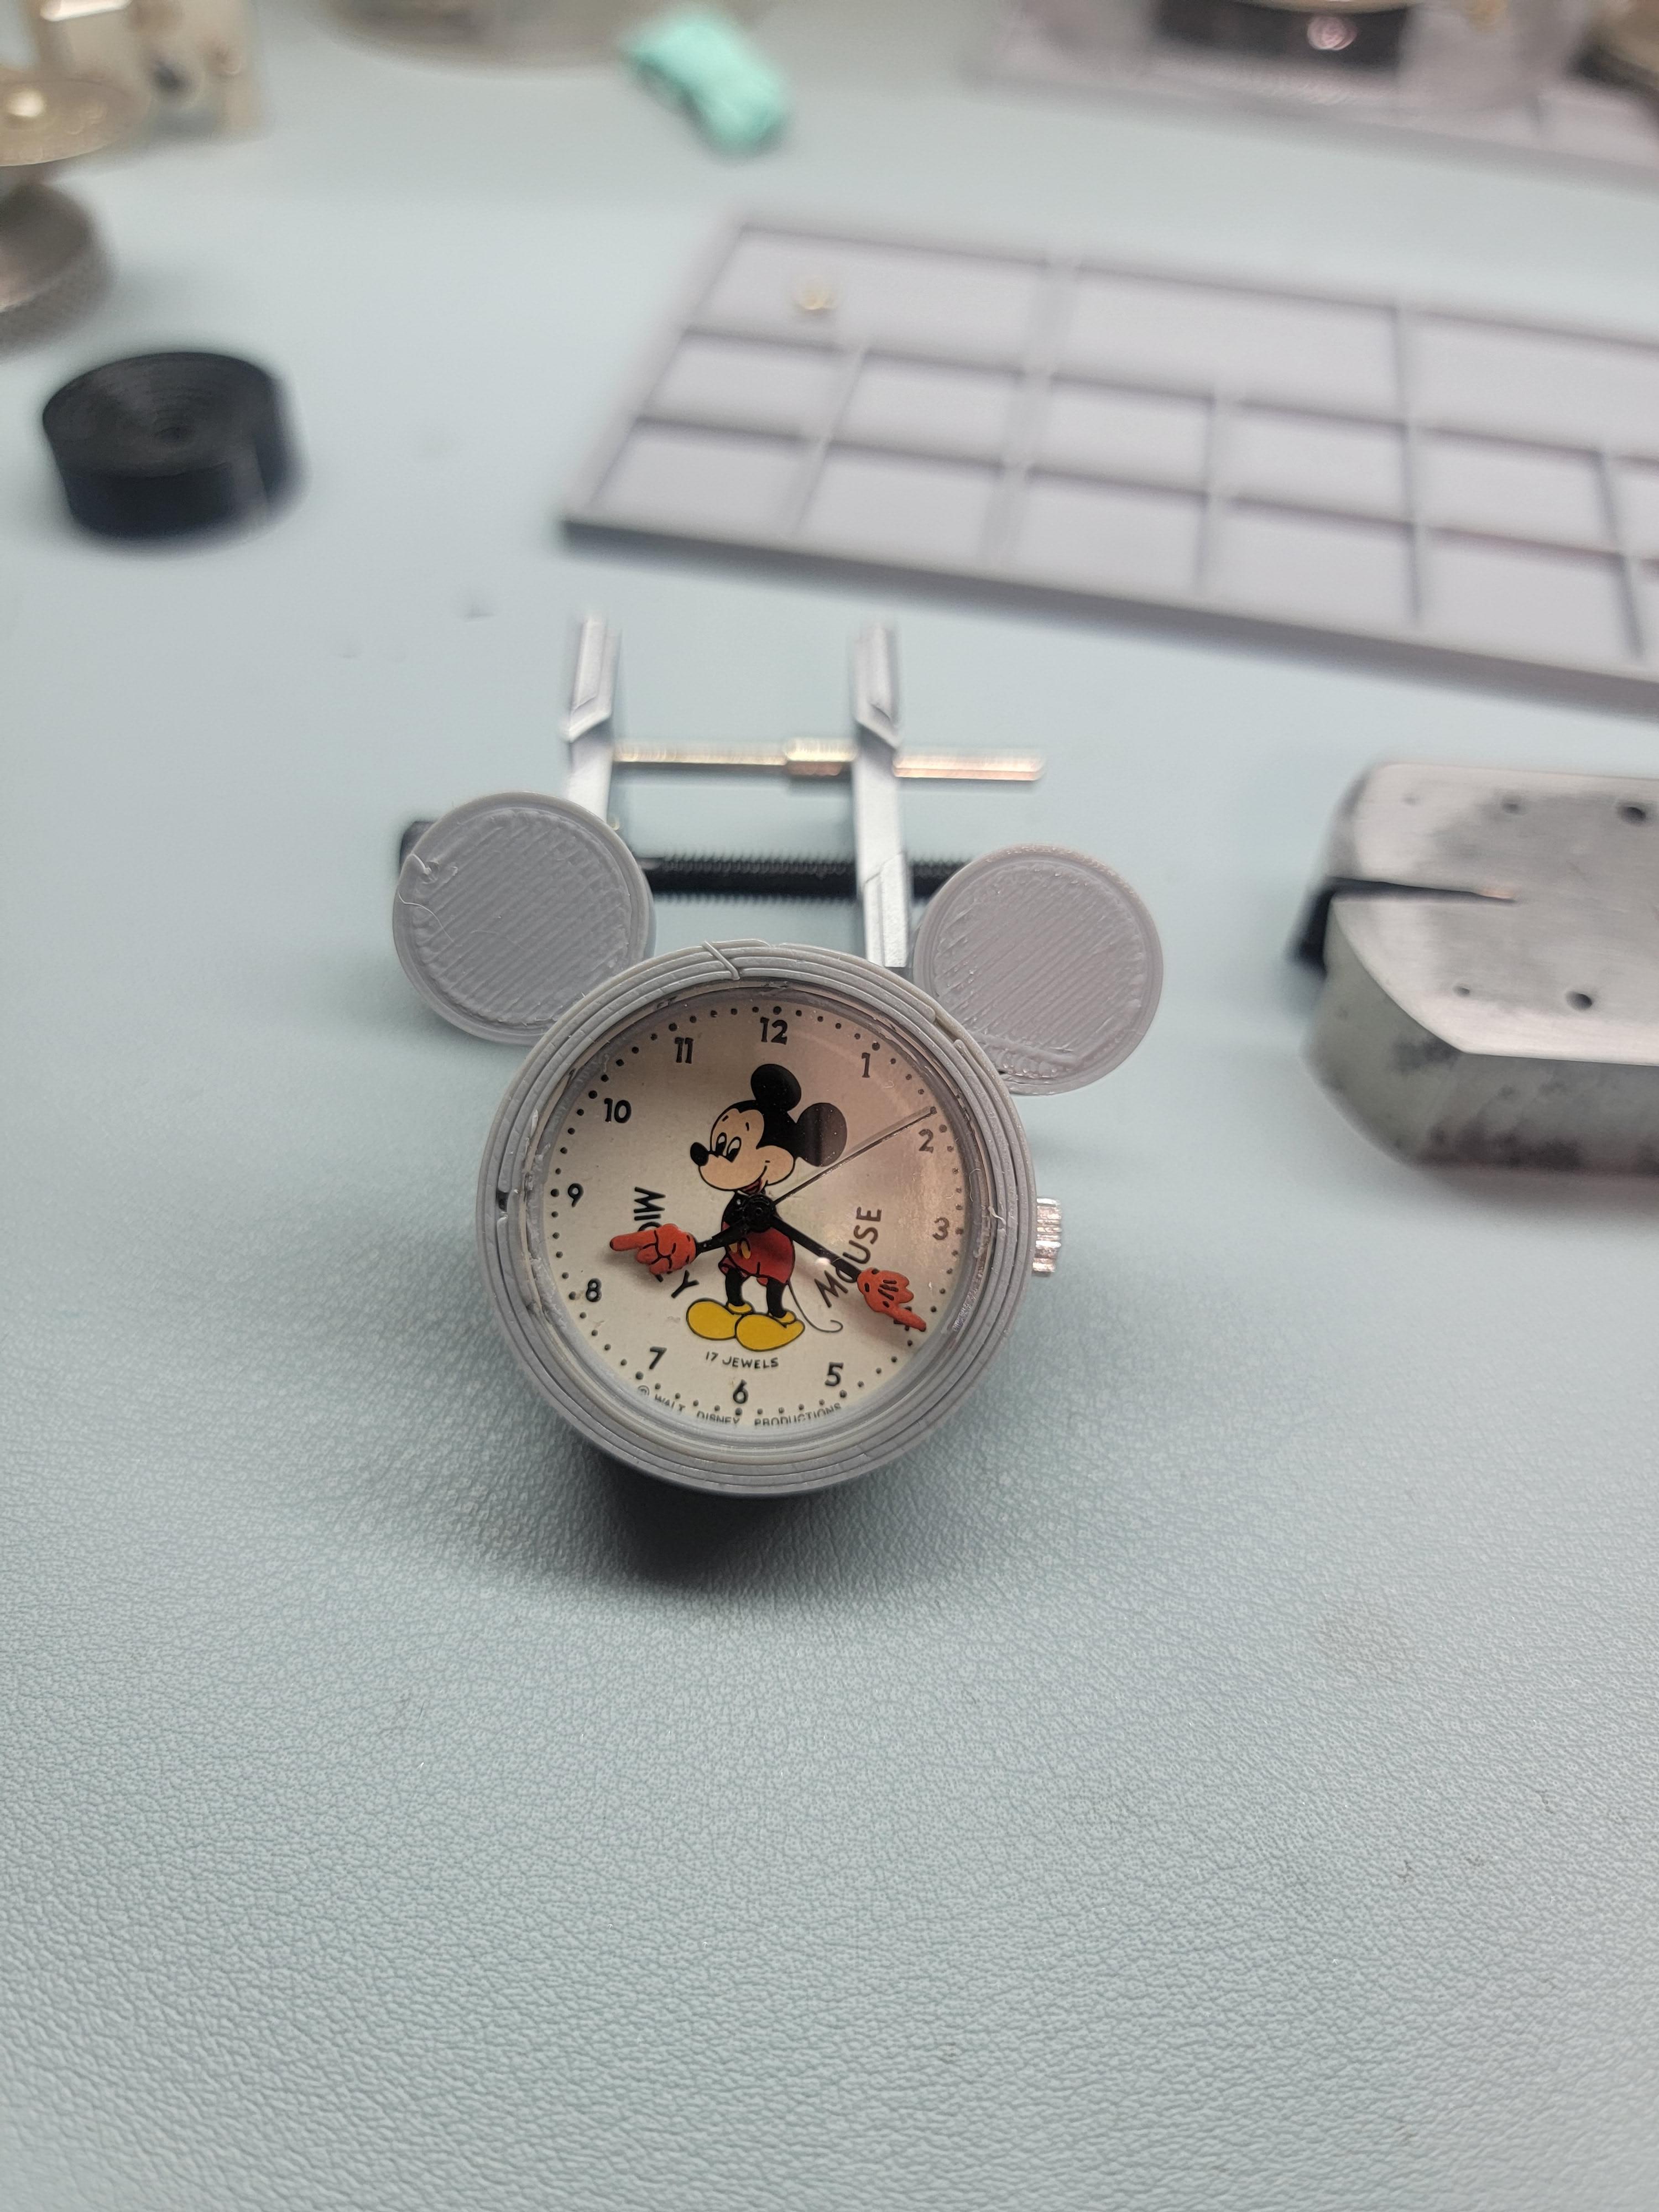
Here of late, I am running a real Mickey Mouse Operation!! After fixing a MM watch broken case with a donor, I have an extra movement left over with no case. So I had this crazy idea to make a MM case. Lots of details to work out, but here is the early stage. I don't know if I want to make it a pendant watch, or put it on a stand. That is TBD. One challenging issue is how to make the bezel and attach it firmly. 3D printing has its limitations.
 1 point
 -
In any system, there is noise. Some random, and some systematic. I will call the point where the balance crosses zero, in John's figure, the trip point. The faster the rate as the balance crosses the trip point the less susceptible it is to noise. So, higher amplitude (faster rate or slope) would seem to be better for at least that reason. I am somewhat amazed at low amplitude pin lever watches that keep pretty good time.1 point
-
All I have was the pucture1 point
-
definitely do not listen to this. Sometimes painful lessons are needed and it looks like in your case a little more pain is needed. this is one of the complaints or comments that a lot of people will say is when you watch the videos they make it look so easy. Even before the videos there's always been assumption that no real skills are needed for watch repair. But that's fine if you're working on watches were parts are readily available when you're working on something where parts are getting harder to find this becomes a big issue or an expensive issue. this is where this is a group of people that are helpful pictures then we can help you. Then this is watch repair you're going to run into lots and lots and lots of variations. So just because your successful with one watch doesn't guarantee success with another at least not right away. yes they like to go missing. This is where starting with a Chinese clone of the 6497 works good. Practicing practicing until you're better at things. Starting with a running watches nice because when you're all through if it's not running well I wonder why? Versus starting with a watch that needs repair where it's probably just a defective escape wheel versus unfortunately we've all been there. Pivots that mysteriously falloff escape wheel pivots pallet fork pivots are quite common that they just fall off all by themselves. trial and error works fine as long as you are learning? according to the parts list down below the escape wheel only works in that watch. Plus as expected because it's basically a vintage Seiko it has been discontinued. A lot of times when you go to the list of discontinued parts those the ones that have a habit of having issues like pivots falling off for instance. this is where eBay is your friend.. you want to start looking for watches complete watches preferably running. There a good source for repair components when they can't be purchased in any other way. http://cgi.julesborel.com/cgi-bin/matcgi2?ref=SEK_4006A_17J1 point
-
Wow! Looks like an abattoir.1 point
-
Excellent.1 point
-
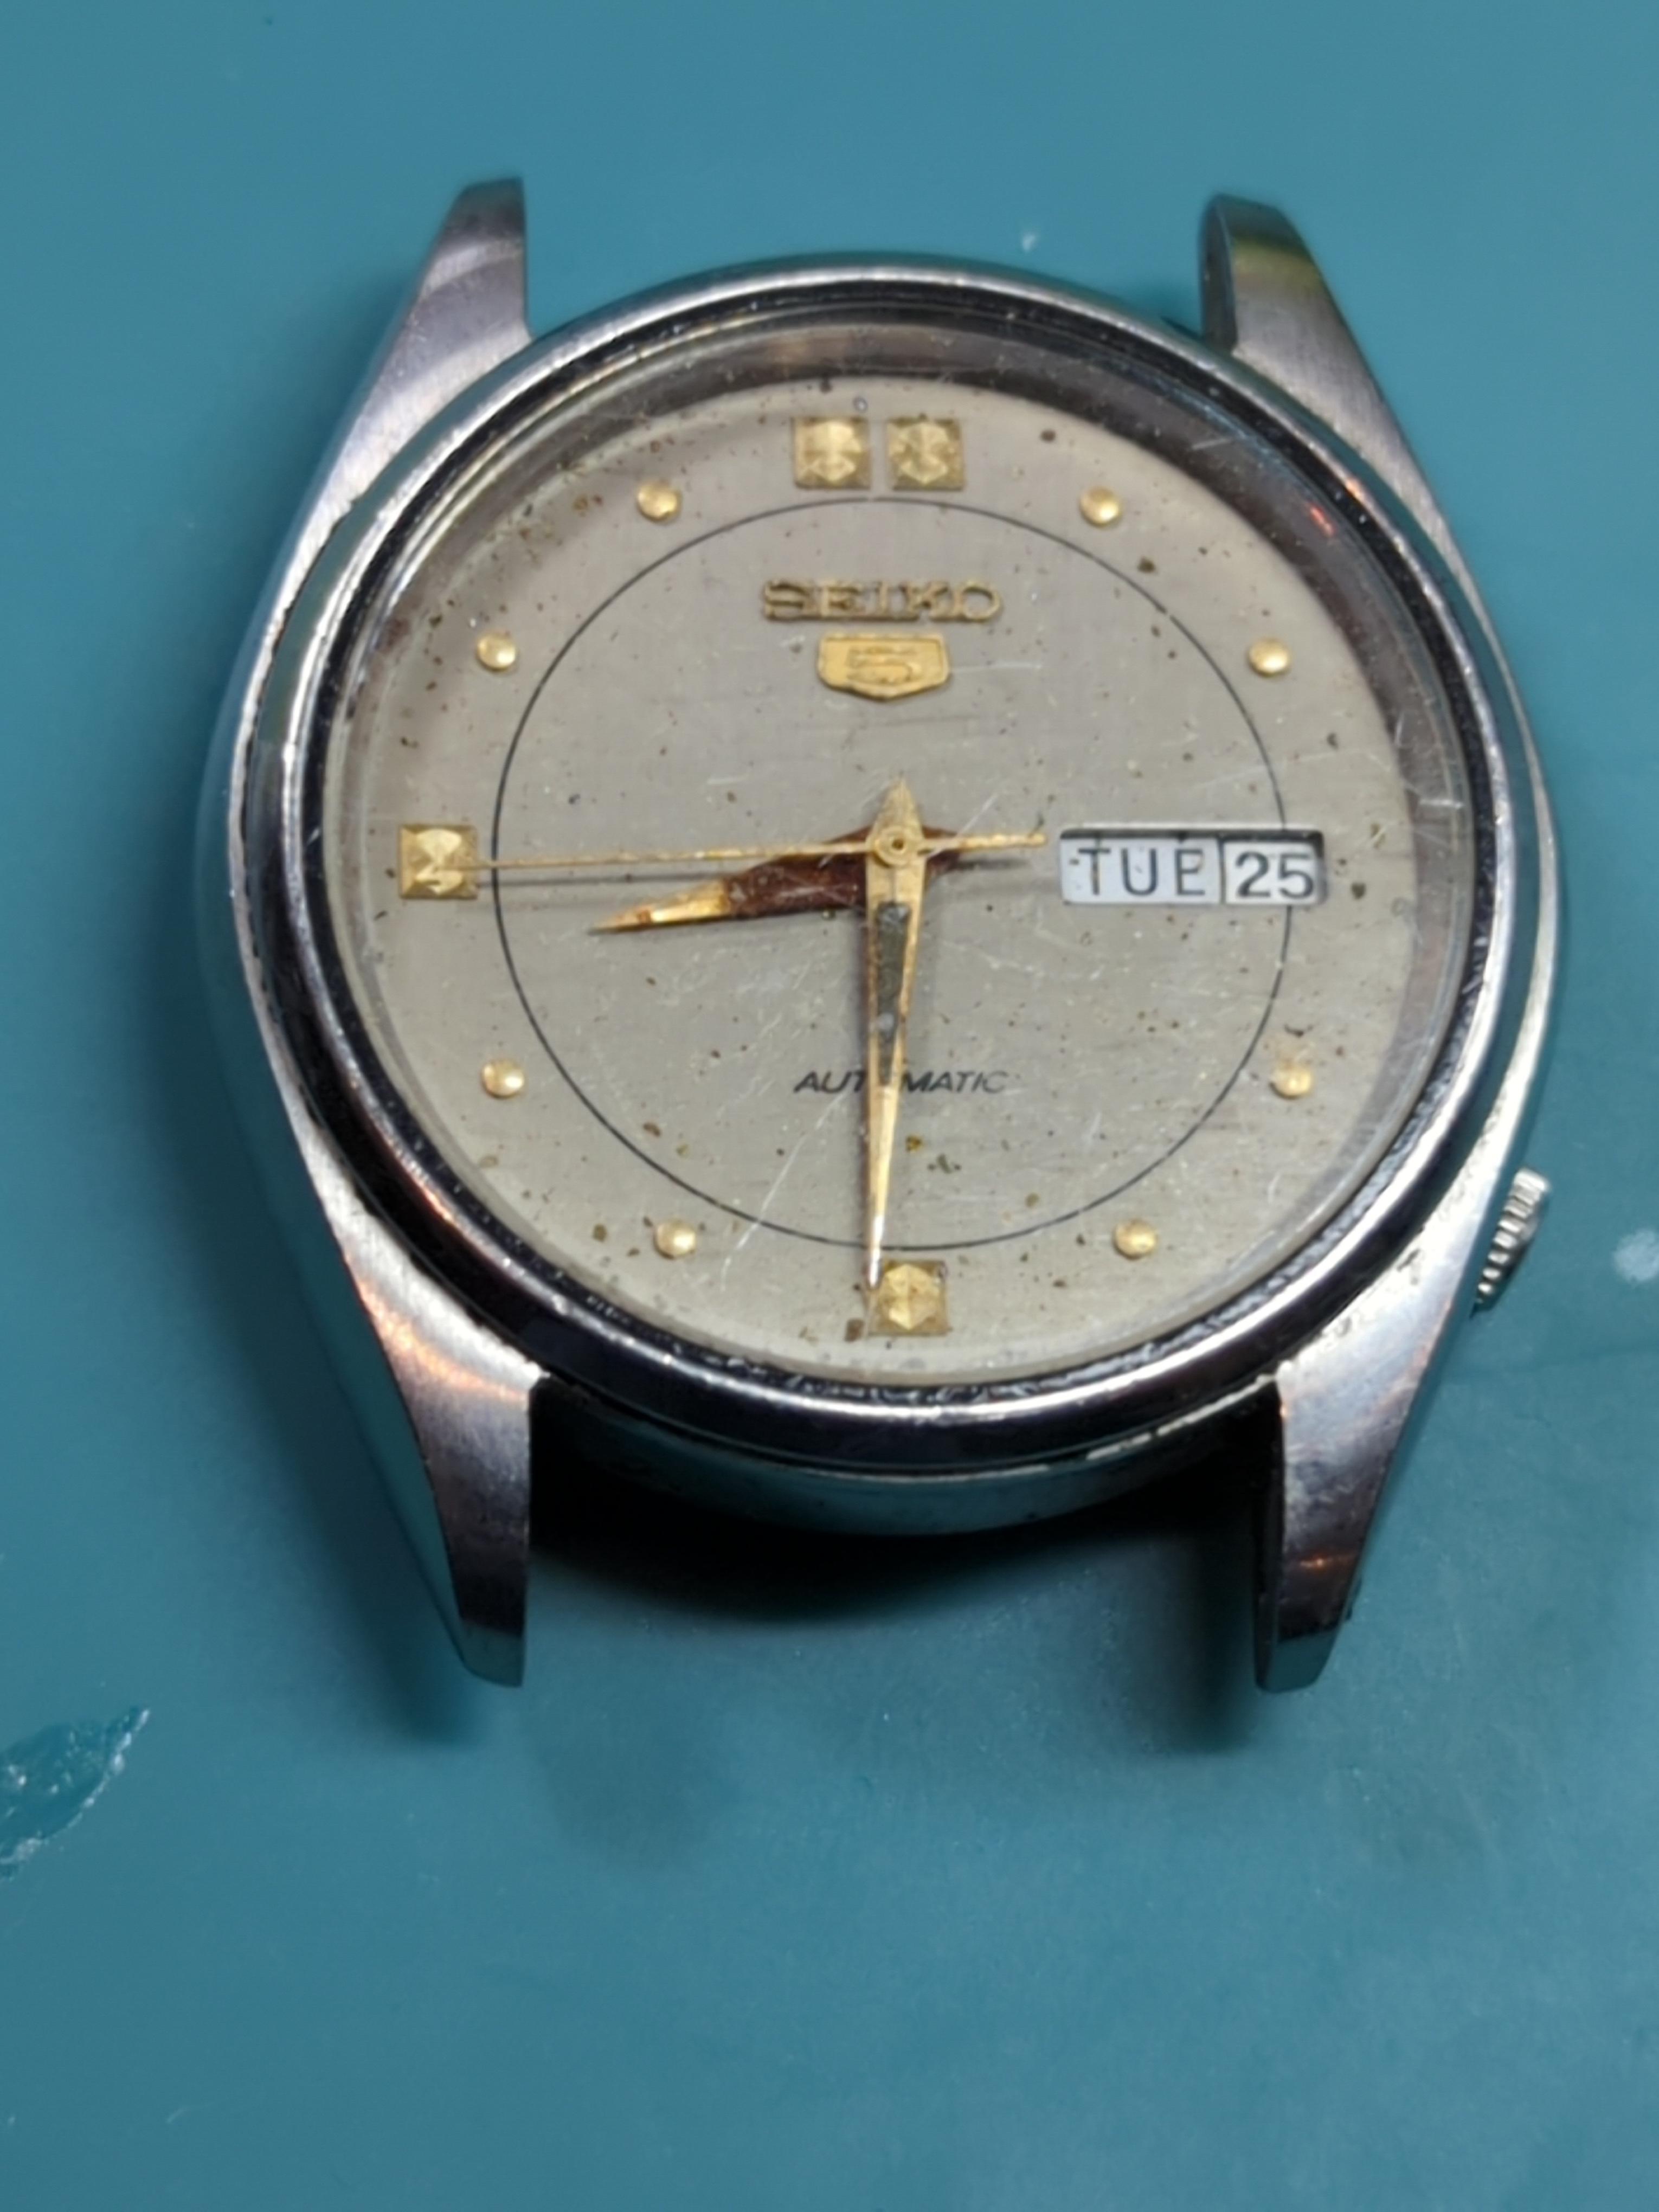
So, update on my first "have a Go". The mainspring barrel was devoid of mainspring so I had to open it and in so doing destroyed the barrel by trying to open the lid at the wrong end (where there was no lid). Feel really stupid, having previously opened a barrel successfully. I then proceed to rebuild the watch, pinging bits here and there but luckily not losing anything as yet. Then find that the Escape Wheel & Pinion is minus the pointy bit at the top so all is not well. Then when removing the Barrel and Train Wheel Bridge to recheck the other wheels I forgot to remove the Alarm screw and released the Alarm Mainspring and some other bits in all its fury... Managed to reload the Alarm mainspring successfully - if not quite in the correct orientation. But I carry on regardless learning by trial and lots of error. Hopefully I have made someone smile and that's a big thing in the current climate. So my question for today is "The Escape Wheel and Pinion - Seiko 251.805" the only fit for this watch (4006-6040) or is there another part number that can be used as an alternative? Cheers...1 point
-
Hello and welcome.1 point
-
Hi there, I just did something similar this weekend where I used a set of cutting broaches (generic, not Bergeon) to open up the hole in the seconds hand. I think there may have been a slight manufacturing defect in the seconds hand, so maybe the broach just freed the obstruction rather than opening up the hole? As @Paul80 says the broaches are relatively inexpensive, and you will probably need them at some point in the future anyway, so it's worth a try. Just remember to take it easy, you can always open up more, but it is much harder to reverse the process. I'm not sure if a cutting broach would be better for this application eg Bergeon 1896G, rather than the smoothing type Bergeon 1896H, maybe another member with more experience in this type of thing could provide us with some guidance?1 point
-
One thing I would check before broaching is do they actually fit, the used one my be slightly larger because its been stretched larger through use. Broaching my render the new ones unusable. Back to you question, the Bergeon set of broaches would probably not do what you want as they are designed to open a hole in a plate, not a hole in a tube although they could be used to open both ends, leaving the middle of the tube slightly tight which may help fitment. For a Bergeon tool they are not very expensive so it may be worth just buying a set and seeing if they will do what you are looking for.1 point
-
Hi there, I second the advice of @LittleWatchShop most times IPA will work, I usually just use a cotton bud (Q-tip) dipped in IPA and hold it on a small area, then after 30 seconds the glue becomes gummy and can be picked/scraped out with a tooth pick, sometimes you have to go back over the same area a few times. I think acetone would also work but may evaporate too quickly for the method above, also acetone can eat away at plastics in seconds so most of the time I only use it as a last resort. Looking at the picture it looks like there is no plastic to be damaged so you should be OK with acetone if it is all you have, but if you have the option I would try IPA first, and then switch to acetone if the IPA wasn't working. Once you have removed the glue/glass from the case, I would make sure you give the case and any parts which may have come into contact with the broken glass a really good clean as even a small fragment of glass the size of a grain of salt (or even smaller) can stop your watch dead in its tracks, or any dust could act as an abrasive and lead to excessive wear in any moving parts.1 point
-
Re-cased, running, and ready to go!

 1 point
 -
Thanks, I'll try acetone; I used lighter fluid but that didn't work. I don't know if you can make out the glass fragments it the upper right of the photo.
 1 point
 -
A very generous thought, but I find that when filling the house with "junk", you have to be careful not to fill it too quickly, lest the "authorities" find out. Otherwise you are liable to spend the next few days in the dog house.1 point
-
Something in metal with one of your several lathes? Tom1 point
-
I use lever type tools (Favorite, Chatons SA, Horia) for everything, and I have several of the screw-type (micrometric) Horia tools. I just find it easier and faster for the way I work. I do push in lots of pins and tubes and such doing prototype work; I like being able to come down in contact with the lever then raise the micrometer stop to touch, then descend and push- I think there's more feel. But both tools are great. True that with a lever type tool you can ream and drill and such with the appropriate spindles too. I know many pros who couldn't live without the screw-type Horia tool; it's all a matter of preference. But if you just want to get one, then a secondhand Seitz or Favorite is a good choice. I prefer the Favorite as it uses straight sided reamers held in a collet in their spindle, and a complete set will have several collets with sizes appropriate for holding drills. Seitz uses a taper fit to hold the reamers. Horia is like Favorite, with the collet holding spindle. If you have a Seitz the Horia spindle will fit if you want to have that too- the price is reasonable, but the Schaublin P4.5 collets are pretty pricy. I also collect pushers and stumps, and often make them for special jobs as well. Pic is of the drawer for those (main workbench drawer). It's messy but I know where everything is!
.thumb.JPG.d2834a63a7803edeb81a640b1b20317b.JPG) 1 point
1 point -
If it is a stone you are re setting you should note how far back it is, also look at the one on the other side. If you are starting from scratch meaning the stones are missing then yes that is how I used to start.1 point
-
I would not use mine that way. I doubt the pushers were designed to to be pounded as a stake is pounded. You need a classic staking set.1 point
-
Yes. Especially cooking videos. If you have tried YouTube recipes, you'll know what I mean. But funny cat videos....1 point
-
I have to agree whole heartedly with John and others comments. Been down that road. Paid the price. I'm now 19 month into the hobby. Could I do what you are going to do? Maybe, but it would be a heck of a struggle. I can disassemble, clean and reassemble. I now have a certain amount of expertise. Could I have done it in my first 6 month? First to admit it. No. Please take care. Please continue to read beyond this part. When I first started I was swayed by YouTube (I've started only two weeks ago) fibbers. Looking back on their tweezer skill, it is obvious they had many months, and a lot of money behind them judging by the tools they used. When I came to put the balance and escapement back together, as I did not have the light touch, I had to purchase new balances, and escarpments (yes, plurals) as a result of being so naïve. Learning to oil also caused problems. You'd be surprised what is the difference now between my oiling. Think barrel and thimble. Taking apart is easy. It is so cheap Reassemble is hard and expensive. I can now watch a YouTube video and understand why they do something a certain way and what will be the outcome. I can see the problems and know how they need to be fixed. I'm still learning. I am at the stage where I am attempting to perfect skills that need to be at a certain level. Mainspring installation and Hairspring adjusting. I need these, as to service my own watch is a dream for me. What I don't need is a nightmare. I bought my watch in 1966 for £23.50. It is now worth £1,750+. Everything I learn, and probably you, will be learned visually from the internet. I've learned by physical mistakes. You will learn what a 'Ping' is. Hold the tweezer too tight (I'm sure I was holding something). This is a great hobby. Very rewarding and satisfying. Without listening to the members, I would not have many of the skill I have now. Can I hold my own against a professional? Let's not be silly. Can I provide a professional standard? I'm getting there. Hope the above comments can help you. They are information, not requisites. Ross1 point
-
My Dad wore a loupe and sent me to college. I wear a loupe. So there. Yes, I have a scope used only when I have an escapement issue.
 1 point
 -
I acquired an L&R Master off eBay months back. It was dated 1954. It looked tired and after receiving it ran really poorly. So, I embarked on a rebuilding project. I am writing this because I found some sources for parts and services that may be useful to others, and it had taken me a long time (I’m talking many months) to find them all and get the work done. Link to pictures of before and after are attached at the end. Thanks to all on the forums and other sites for info, diagrams, and pics that helped me along the way. I cant recall where I got everything so a general thanks! The process was as follows (to help those taking this on): · Took the whole thing apart and stripped the paint down to the bare aluminum. I ground off some bad casting bumps while it was stripped. · I tried to crinkle paint it myself with VHT Wrinkle Paint but just couldn’t get it right, so I stripped it again and decided to send it out to have the body (including the motor housing) powder coated. So, the motor had to be completely disassembled before sending for powder coating. · All parts I was reusing were cleaned and polished where needed. So, you really need to have abrasives and both a workshop polishing wheel and Dremel. · The rheostat was not smooth and would cause the motor to jump speeds. But turned out it was just dirty with hard carbon build up so a good cleaning and some gentle scraping of the contacts and it was fine with smooth resistance all the way through the range. I also hit it with some very fine sandpaper (1200+ grit) lightly then cleaned with acetone. · Trying to get the rheostat knob off it crumbled into small pieces, but I found a good one on eBay. The knob as well as the motor brush housings are made of Bakelite on these old machines, and it doesn’t polish well nor necessarily hold up after about 70 years. · The heating resistor was good. Resistance was tested and was as marked. So cleaned it up. · The light bulb socket was good so just cleaning needed. Bad bulb but I found bulbs to fit on the internet and bought a box of #41 2.5V E10 base. · Then there was the motor. OMG. It ran but rattled, buzzed, and didn’t always turn. Bearings, wiring (I am lucky I didn’t fry myself when I turned it on after receiving it), and some burnt out armature winding wires on the rotor itself would cause it to not always start. Also cracked wire going into the stators. Finally, I decided to try to have it rebuilt. Very hard to find a company that rebuilds these Fractional Horsepower Motors. After searching for what seemed months, I found a company in California that would rebuild the armature and stator. · The brushes themselves were good and easy to replace if necessary. But one of the brush holders was cracked. I found a company that made brush holders that almost fit (larger by just about 1/32” with some slight enlarging of the motor housing brush holder hole. Drilled it out to 1/2” they fit perfectly. · I added a fuse and an IEC plug to the back. There is very little room on the back so finding an IEC outlet that fit was an effort. When getting new switches, I decided to get an On-Off-On switch for the motor Forward-Reverse. It’s normally an On-On switch. I didn’t want to rely on the rheostat to stop the motor. So I can leave it on a setting and switch the motor off. I also use a switched power line. I just never liked the fact you cant fully turn off all power to the entire unit given there are liquids and electricity in close vicinity of each other. · Grounded the whole unit of course. · The jars are original but had no covers so purchased on eBay both screw on and lay on replacements from someone that makes them via 3D printing. They are not as nice as the originals but work well and are lower cost and new. · The impeller had a crack, but I was able to repair it by brazing the crack and filing it smooth. You can easily braze aluminum carefully using an aluminum brazing rod and propane torch. · I did all the wiring and soldering myself. Those courses in collage in electronics helped Fitting the wires into the motor housing is a real challenge if you don’t have an original pic of the inside. Someone had already been inside the motor and the wiring was a real mess. Thanks to others on this and other web sites where I found wiring diagrams and wiring photos of the underside of the unit. · I used rubber coated wire between the motor top and the main tube because it just seemed softer and more flexible compared to some vinyl or PVC coated wires and that moves when moving the motor to the jars. The one thing I didn’t do is try to renew the motor and control panel labels. I have seen some others that look like they were able to do it but for me with the lettering and all it is just too detailed to paint by hand, so I just cleaned them and gave them a clear coat to protect them. Note that I did find a company www.dyna-graphics.com that could create duplicate overlays with all the L&R lettering, etc. (industrial decals) that could be applied to the control panel. Normally used for electronic control panels. But they had a minimum purchase, and I didn’t want to spend the money. Bottomline it was a long process and the motor rebuild was expensive. But with all spent its about what you might pay for one online that has been rebuilt like new and normally you don’t get a like new motor. Here is a list of companies that I used for parts and repair: · Gundy Powder Coating - Bayshore New York · Eurton Electric - Whittier, California. They rebuilt the rotor, armature, and stator (I put it back together myself and pushed on new bearings and fit the brush holders). · Motor Bearings - MiMotion https://www.motion.com/ Brand: MRC (SKF) Size MFR#: R6ZZ. The existing bearings were marked making it easier to replace. · Brush Holders - Phoenix Electric Manufacturing Co. (the bad part is they have a minimum order size. They come as a set, and you must buy 10 sets minimum. Each set includes the following parts: Part #1520-BC-660-895 (the holder), Part #AE-51-TP (the screw cap). · Switches – Gaynor Toggle Switches got them on eBay. Any good toggles should work ok. · Heater Light Bulbs - #41 2.5V Miniature Light Bulbs with E10 Base (purchased from Bulbtown.com but available multiple places). · Jar Covers – eBay sellers, 3D Printed. Link to Photos: https://1drv.ms/f/s!ArzY7G4e4SiEhe5TWmrNvCMc7vV9AA?e=TsAh9E Thanks bob1 point
-
I haven’t posted anything on the site for quite some time as I’ve been working very hard for the last two years. However, here is a video I made this weekend and reassembling a Hamilton pocket watch and specifically cleaning the hair spring and bounce cock jewels.1 point


.JPG.645bfb93af53e8fc8b91d50e52a2f82d.JPG)


