Leaderboard


Popular Content
Showing content with the highest reputation on 01/30/23 in all areas
-
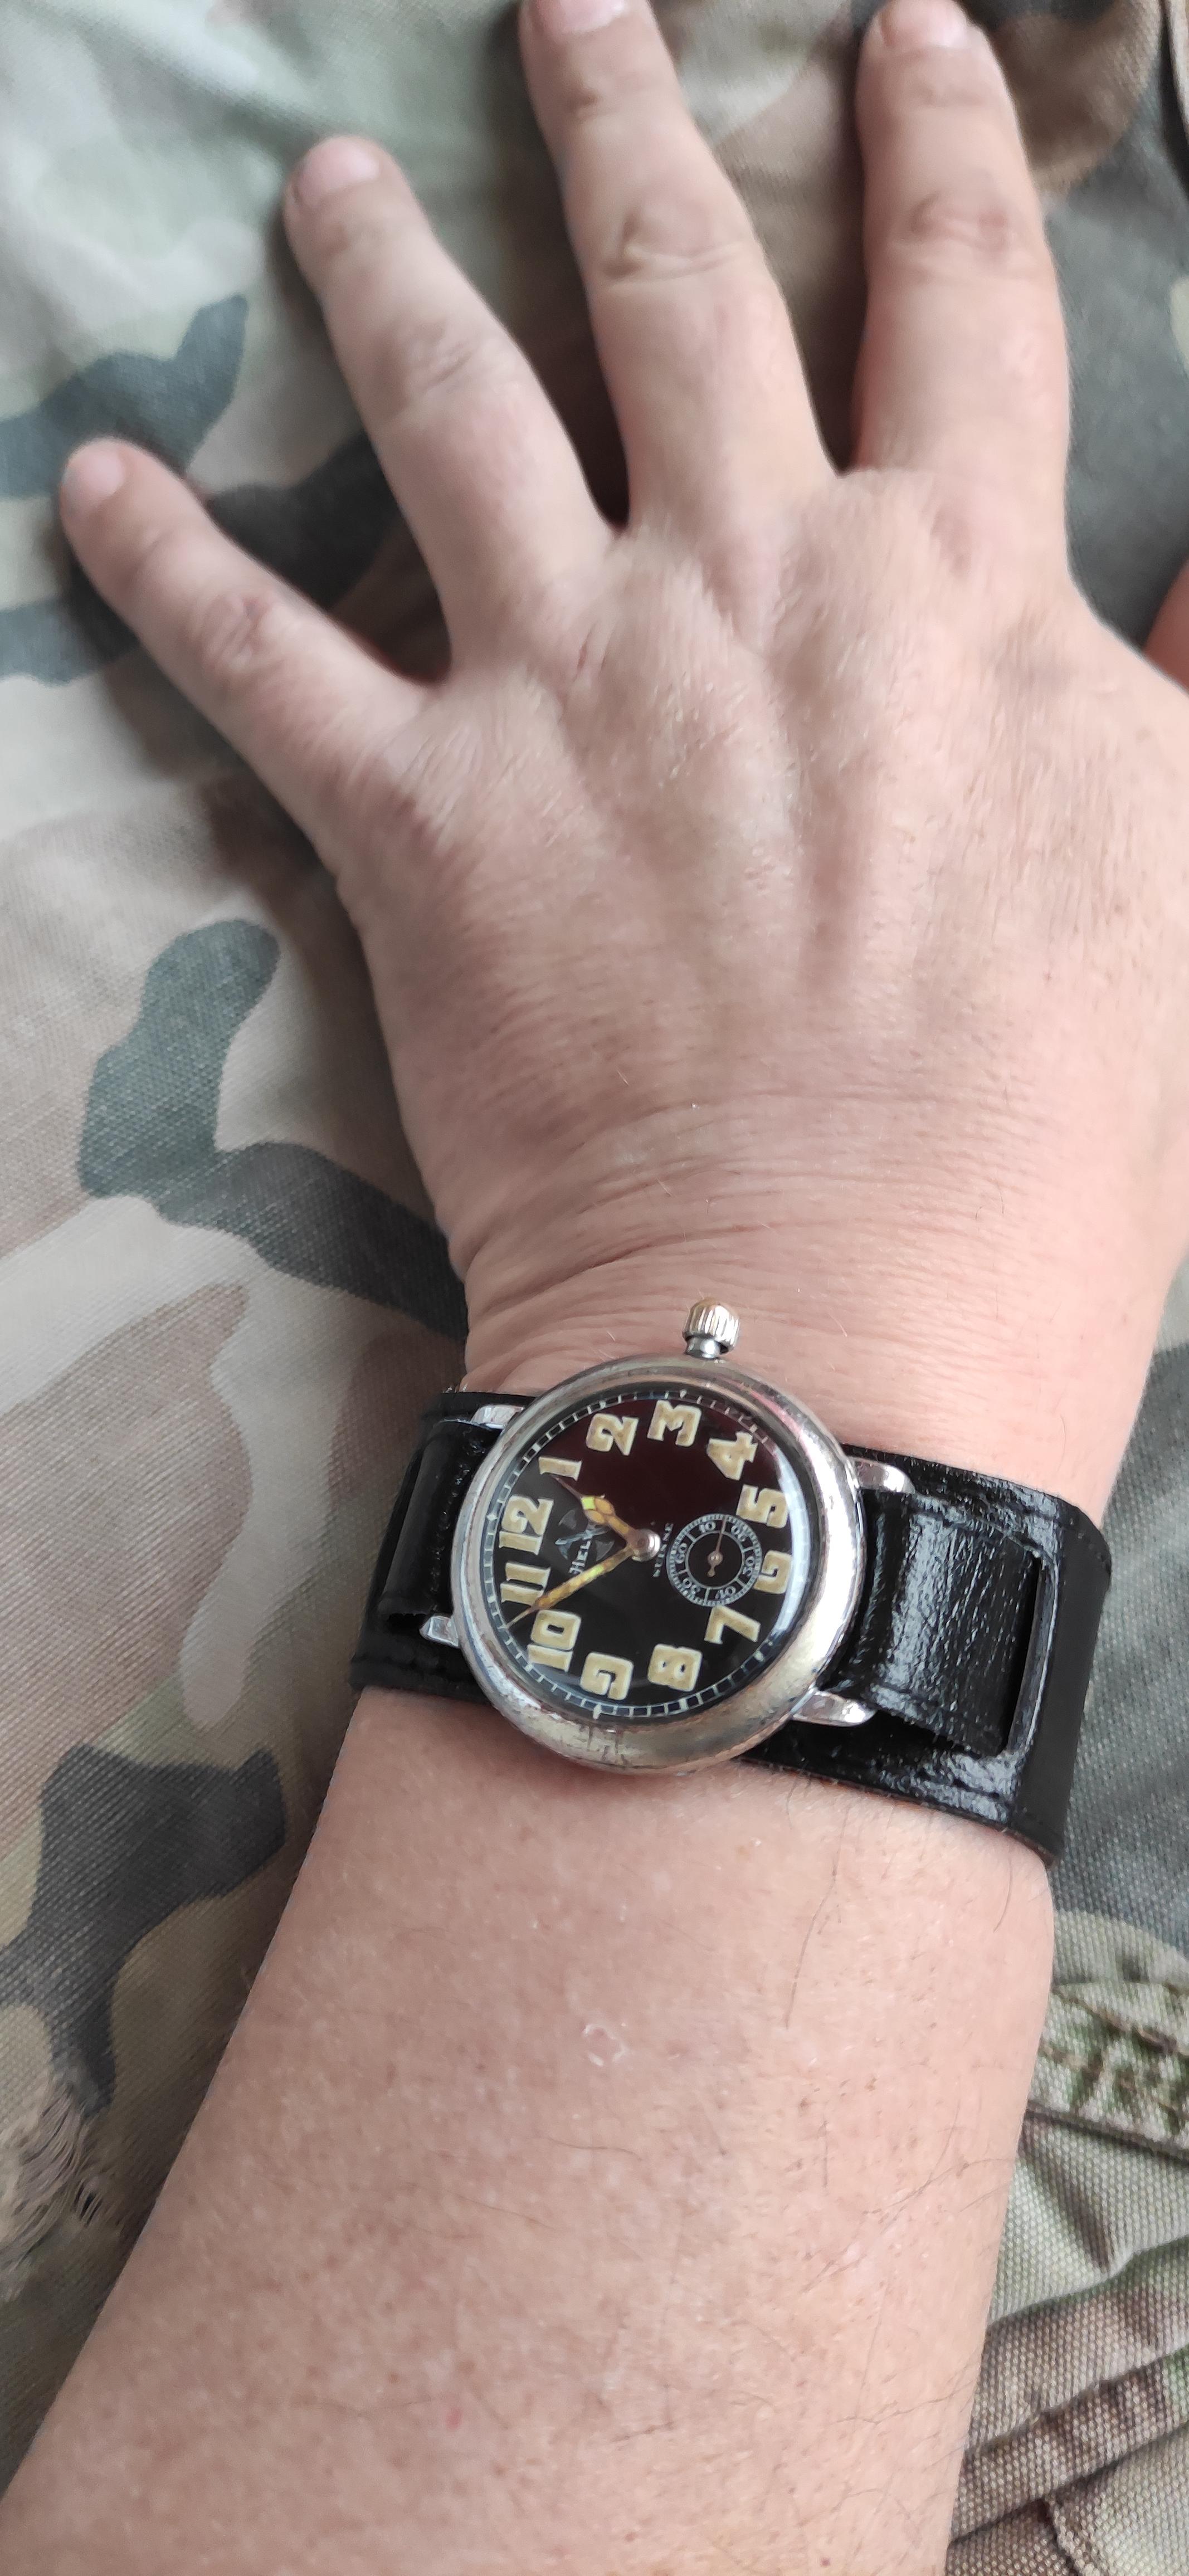
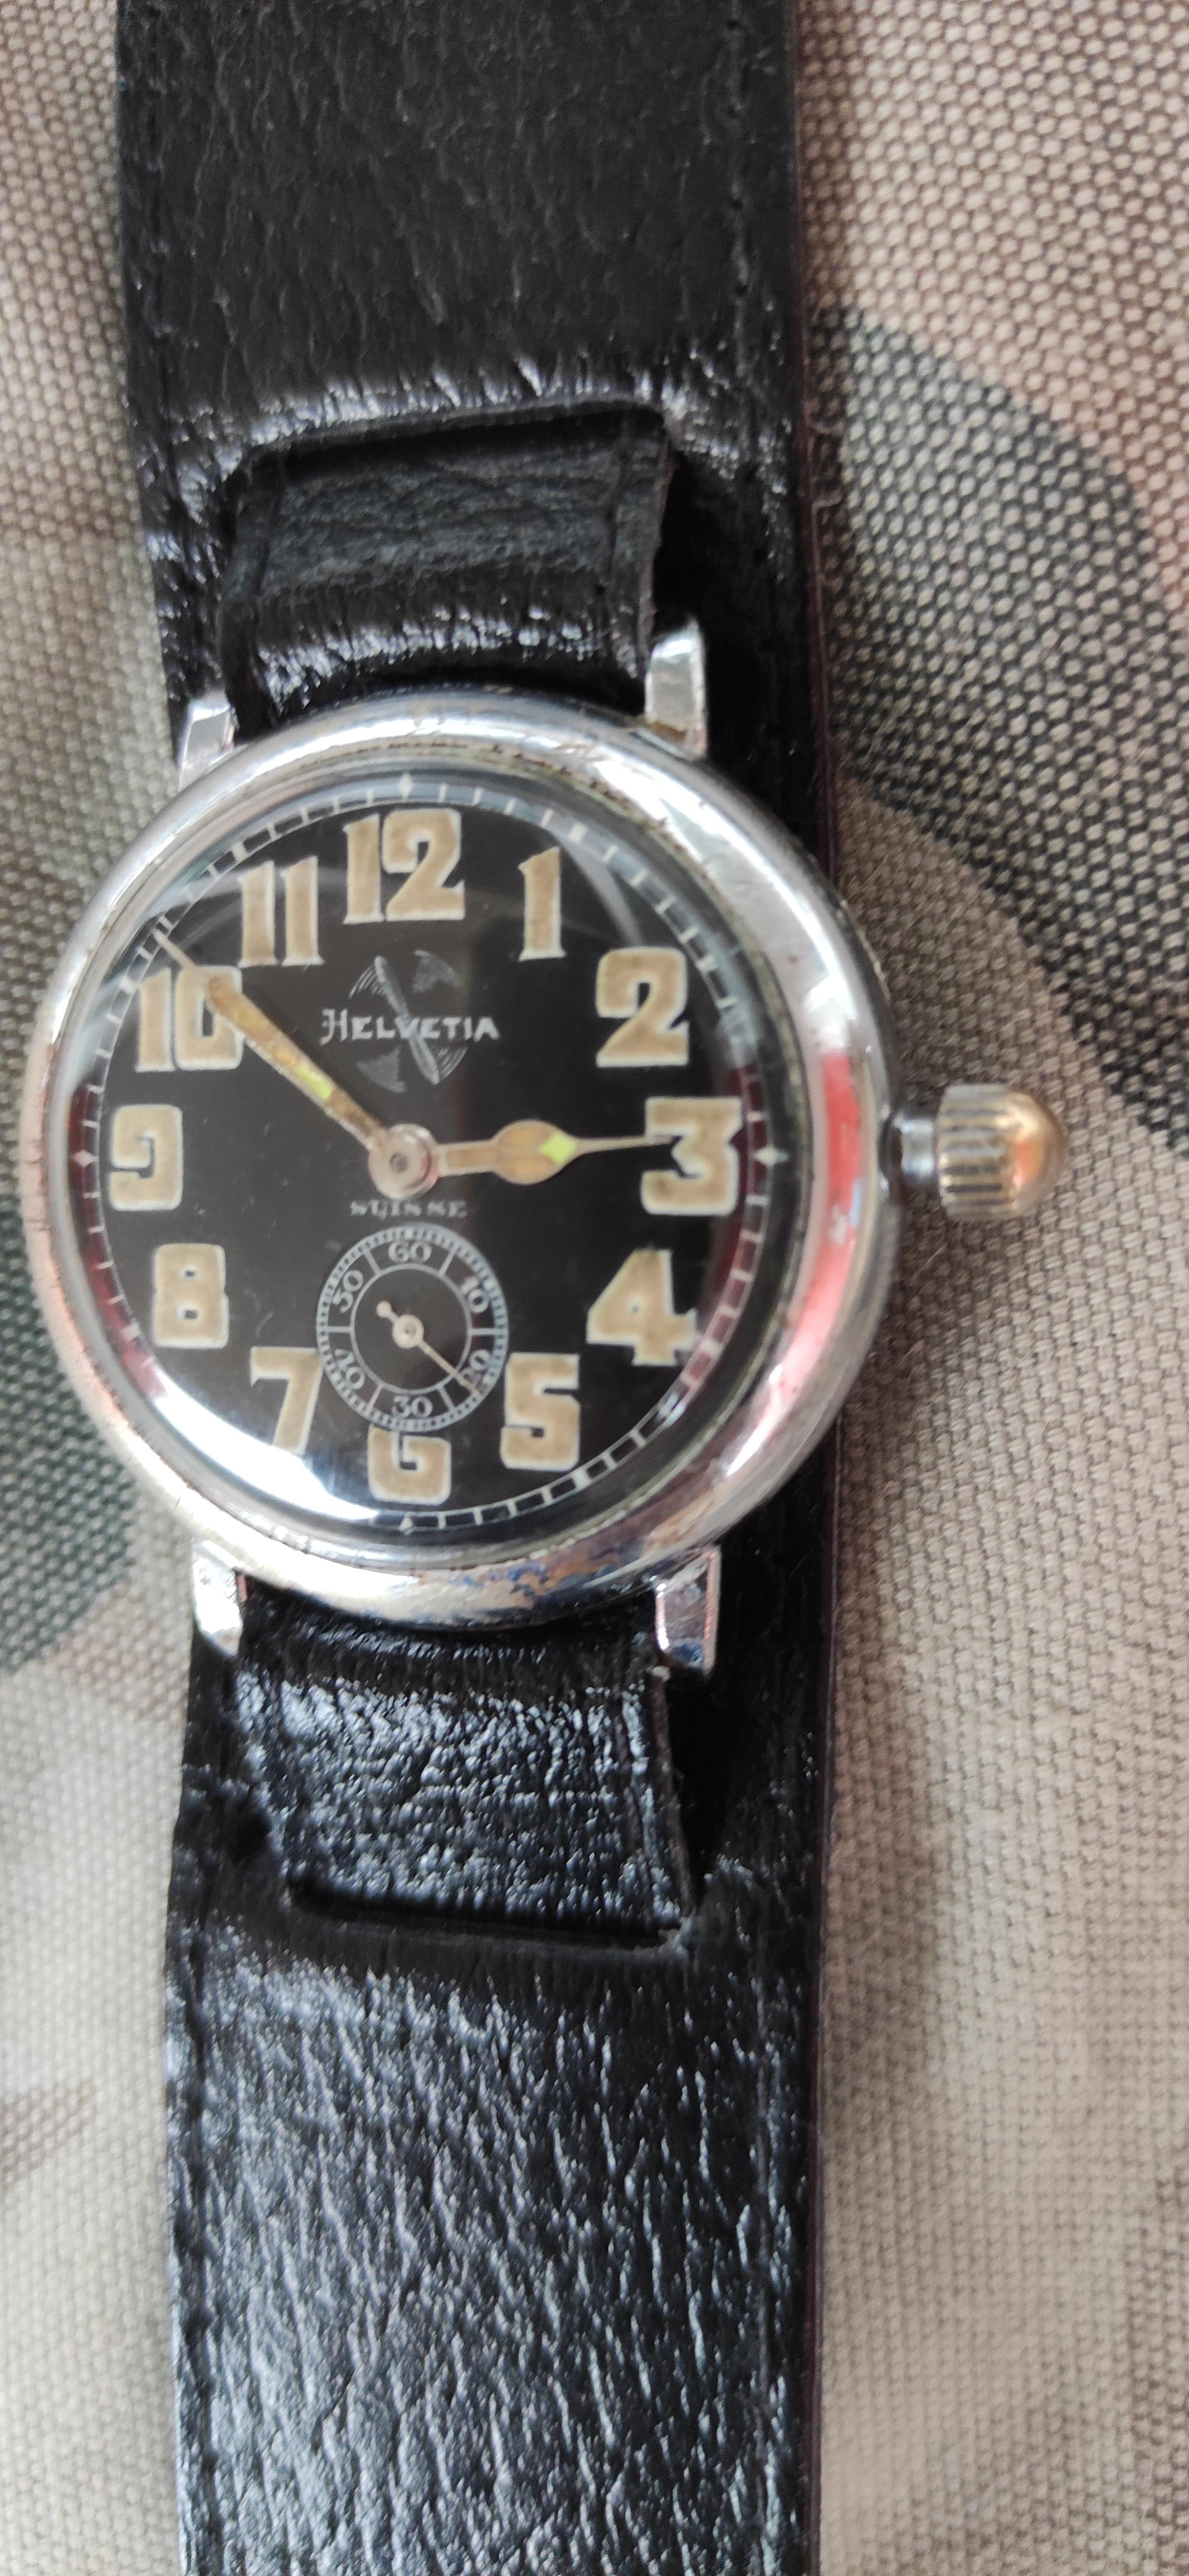
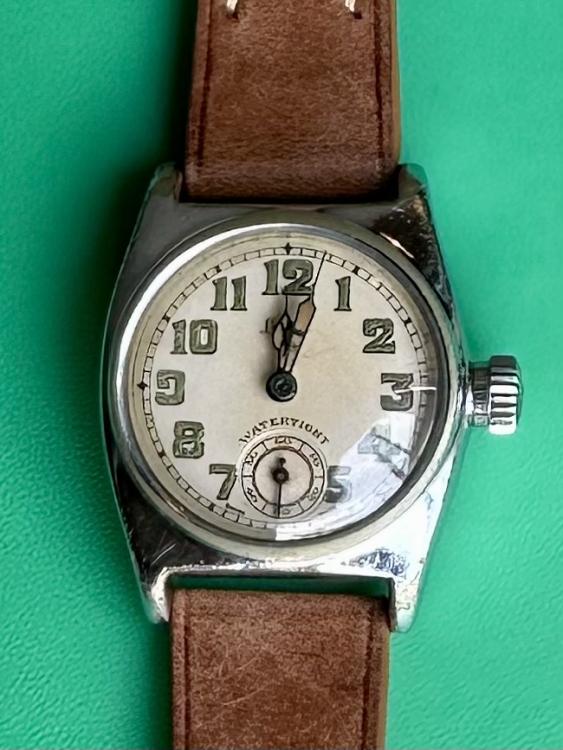
Google translator says: I received a functional watch, not in very good condition, but the movement is nice and functional Hel.81-26 watch as a gift, the wish came true and the Helvetia is already ticking nicely.3 points
-
Limit ‘junior’ model w/Revue cal 56. A little pricey for 404 but it was a no reserve auction non-runner I won for 8 GBP. The mis-threaded case back was fixed with a glued flange nut. Cleaned up and new main later it is running fine but a little fast. I may fiddle a bit with it later but the wife wants it and may not care it’s a minute off by days end…
 3 points
 -
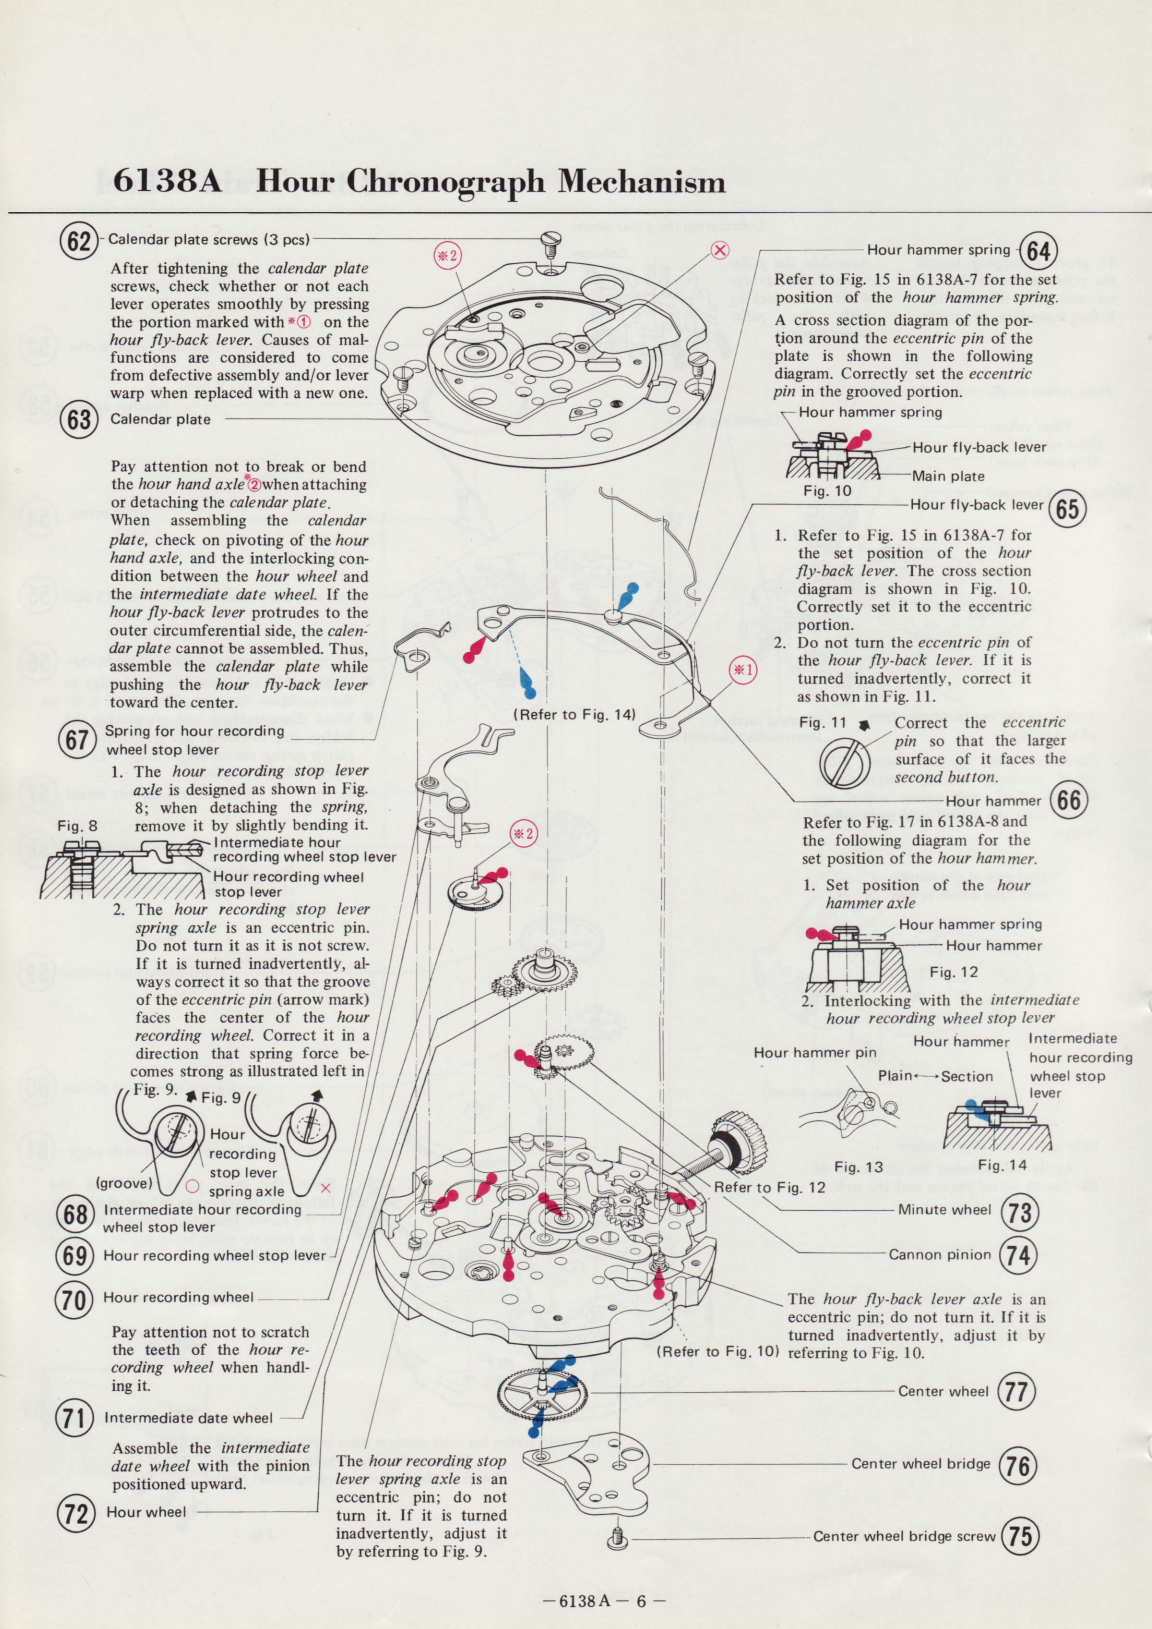
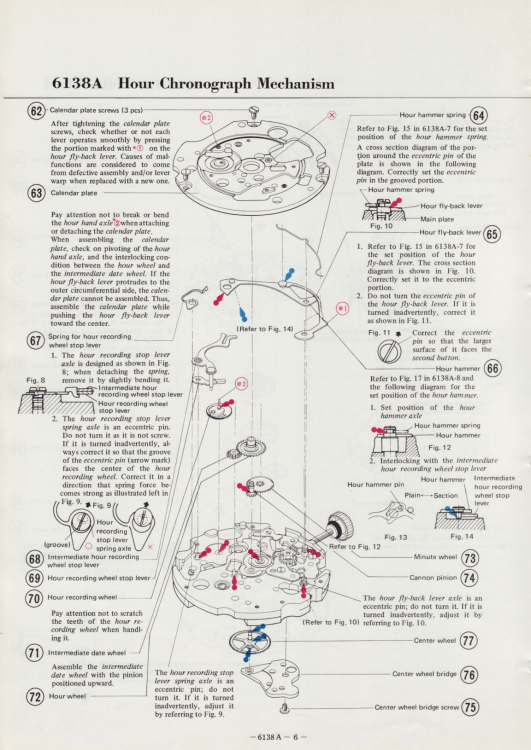
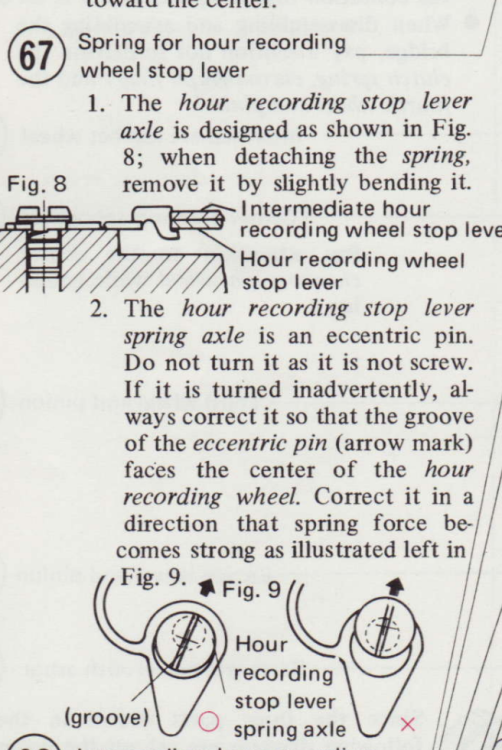
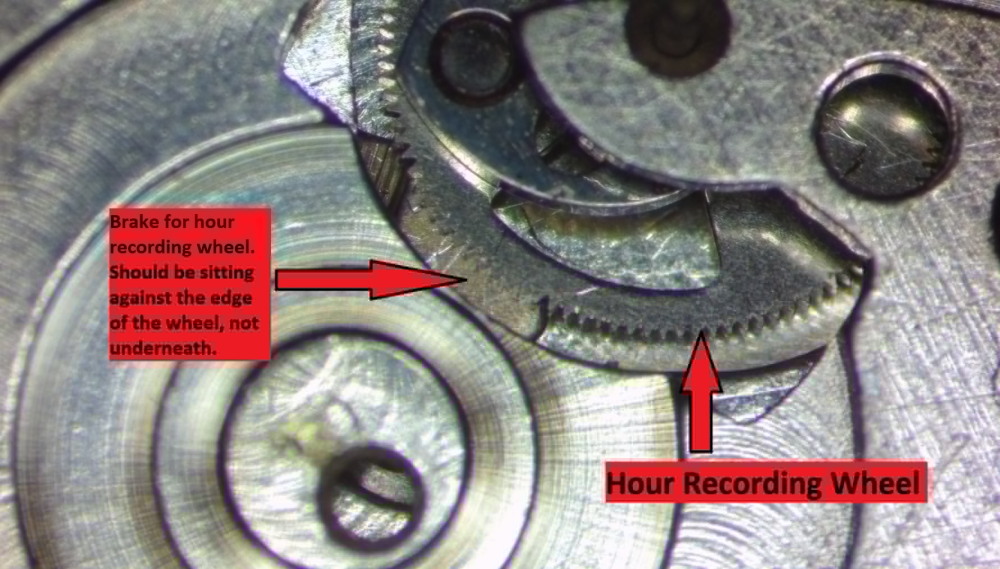
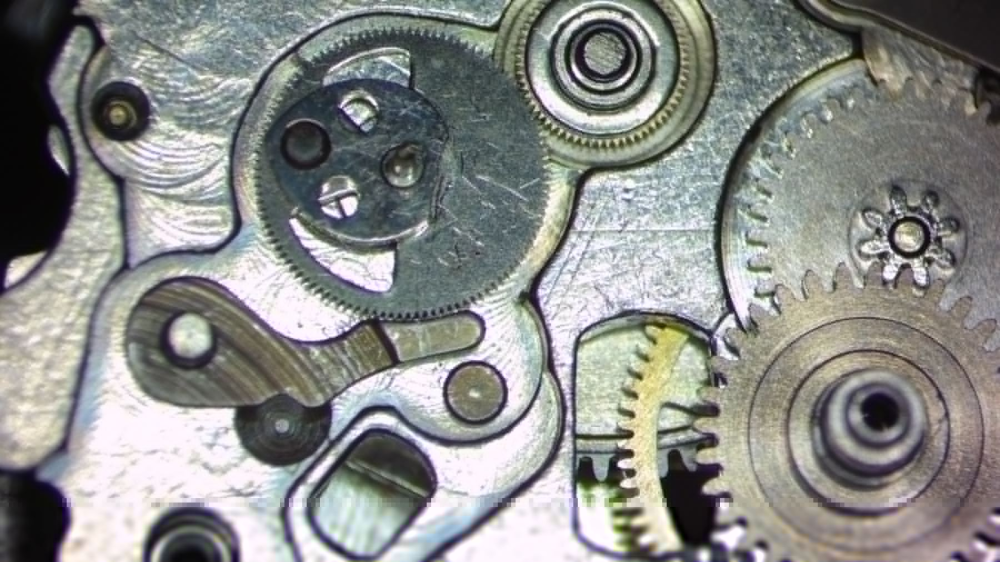
Couple of potential causes I'd think: 1. The spring for the hour recording wheel stop lever has come dislodged, broken, or the eccentric pin has been turned (see Fig. 9 in diagram below), causing it to not apply the correct amount of tension to the stop lever 2. The stop lever has slid under the hour recording wheel (I've seen this on two 6138's I've worked on), although this would probably cause the wheel to not function at all rather than always run. There's really only one way to find out though, and that's to take it apart and have a look. Thankfully you can check the brake without having to remove the front chrono plate. Pull the dial and hands off, remove calendar works, and there's a window that shows you the hour recording wheel and the stop lever meeting together. Here's one I recently came across where the stop lever was on the underside of the wheel (probably not your issue, but you can check): It should sit like this:
 3 points
 -
There isn't much information in your question but judging from your previous post, the movement was running before you disassembled it, yes? There are probably hundreds of reasons why a movement isn't running. I'd suggest you read through this checklist which should help you locate the issue. A couple things I would check right off the bat: Is the movement taking a wind? As in, if you turn the crown, do you see the ratchet wheel turn and held in tension by the click? Is the balance wheel rotating freely? Give it a gentle puff of air from your blower. It should swing without much resistance. Remove the balance and pallet fork and wind the movement up slightly. You should see the train of wheels spinning freely.2 points
-
The line is a visual depiction of the rate. Straight across is 0s, heading down, losing, heading up, gaining. A solid line means the watch is perfectly in beat, a double line is out of beat, with the spacing relative to how much beat error there is. You should ask Witschi for a manual if you don't have one; here is a link to their "training course" with all you will need to know (used to be on their website but not anymore). Play around with your machine in the meantime: it should be set to "aut",, so it detects and sets the freqency, or "man" where you tell it the frequency. There you have it set to frequency, so it isn't giving you what you really want here- that watch's frequency is 21,600. https://www.welwynwatches.co.uk/uploads/9/1/4/3/9143536/witschi_training_course.pdf2 points
-
Yes! In my experience, a somewhat lower amplitude is to be expected from Seiko movements and Seiko-like movements like Orient.2 points
-
...dostal jsem funkční hodinky, ne v moc dobrém stavu, ale strojek je pěkný a funkční Hel.81-26 jako dárek hodinky, přání se splnilo a Helvetia už pěkně tikají)

 2 points
 -
When you say dial left do you mean vertical? If so your amplitudes are not just normal but excellent. If you mean dial down then the amplitudes should be the same within a few degrees. In the first case amplitude drops because you are going from the balance resting on the tip of a pivot on a flat jewel to both pivots resting on two jewels. So more friction, less amplitude. In the second case, you could have a pivot end that is too flat, a cap jewel that is worn, or just some foreign matter in the jewel.2 points
-
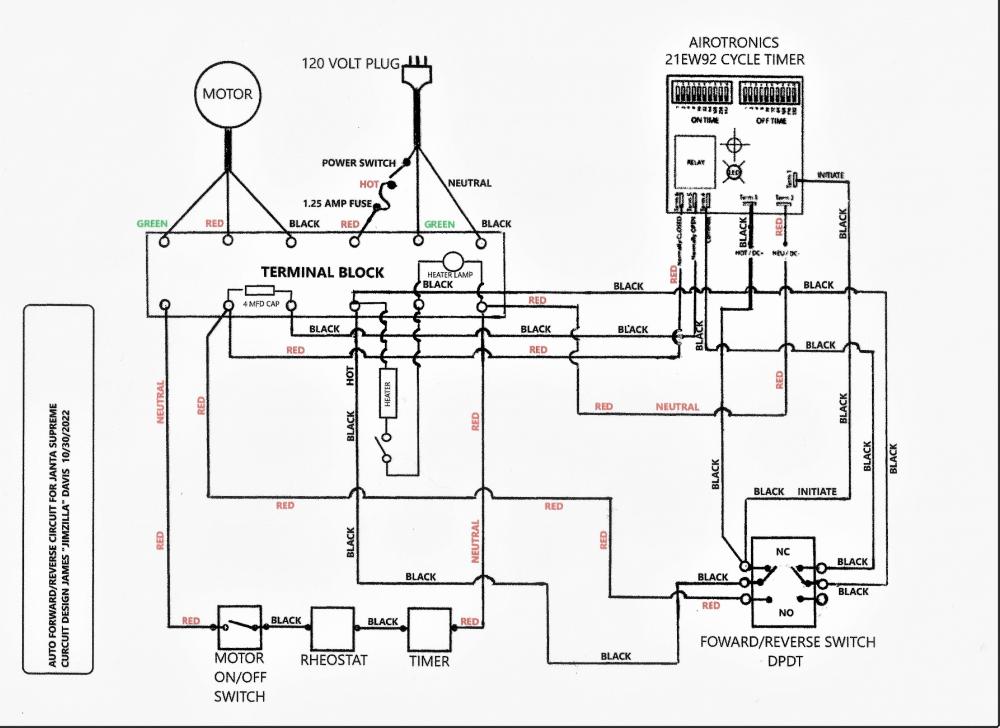
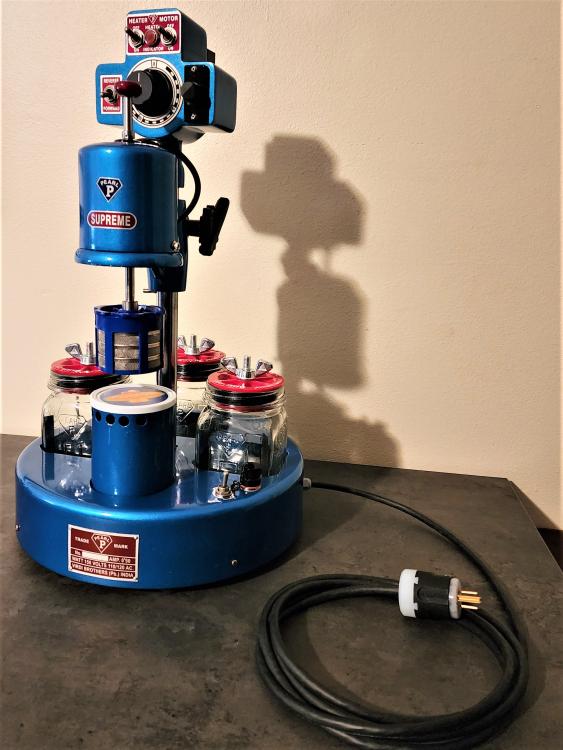
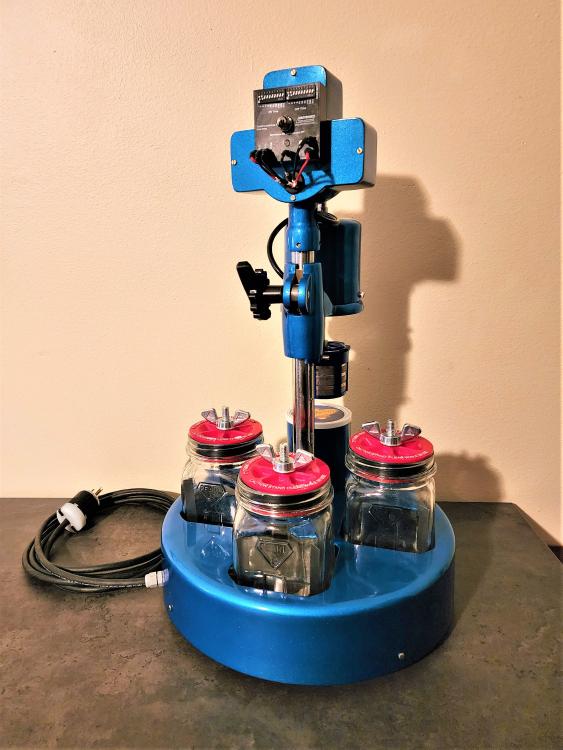
Hello all here is my Schematic to wire in the 21E92 Cycle Timer To get the Janta to "auto forward and reverse" This unit is purchased from Grainger here in the US It costs about $80.00 https://vk.com/video617204413_456239028?t=9s
 2 points
 -
I would like to share a check list made up by a master watchmaker. I take no credit for it, only think it would be helpful for us hobbyists. Here it is! CHECK LIST I decided to write up what is called a 16 point check that is meant to be a guide to steps required to service a watch this is slightly bias towards a wrist watch but very relevant to pocket watches also: This is a guide and not the definitive answer after going through it a few times add you own additional tests and observations. This is of course for a basic time only non-automatic or any with additional features, I also leave out things like demagnetizing, actual cleaning procedures, a good chunk of common sense needs to be applied also as I say its meant as a good starting point to a correct disciplined procedure, This is version 1 may add or edit/delete later. Check number 1 a Check the winding to see if the mainspring is broken. b Check to see if the setting bridge or sleeve is broken by pulling the stem out and testing the proper snap of stem. A broken setting bridge/sleeve is easily detected c. The balance wheel should be oscillated to see that it is true and the balance pivots should be checked by looking through the upper jewel to see that there is not a flash on the pivot. d. The hairspring should be checked to see that it is not damaged. e Check setting of hands f. The watch should be looked over in every respect, paying particular attention to any rust spots that may appear on any part of the movement. When rust is evident around the stem or setting mechanism, it is most important to remove the dial and hands in order to check this mechanism to see if the rust is very extensive. Check Number 2 a. Examine each part as it is being removed from the movement. b. Check for rust on every part. c. Check every pivot to see that it is not damaged or bent. d. Check the jewels in the watch, to see that there are no cracked jewels. e. Check pallet stones to see that they are not chipped or damaged. f. When removing barrel cap, make sure that it snaps off only after sufficient pressure has been applied to it. g. In the examination of each part, a close check is not made at this time as many of the parts will not be clean enough for that purpose. a much closer check will be made on the parts as each part is handled in the assembly of the watch Check Number 3 a. Upon completion of cleaning and parts removed from the basket into the assembly tray, each part should be checked over with the use of a watchmaker’s loupe special attention should be paid to the jewels, because if there is gum oil still remaining on the jewels, the cleaning job was not done satisfactory . It is also worthwhile at this time to examine the pivots. If the jewels are clean, and the pinion leaves are clean, it is almost certain that the cleaning operation was performed effectively. Check Number 4 a. Examine the condition of the mainspring. b. Check the width, strength and length of the mainspring. c.. If correct, replace mainspring using correct mainspring winding tool, not by hand d. Check the lubrication of the mainspring if required e. Check the fit of the mainspring around barrel arbor. f. check the mainspring end for proper shape to catch in barrel. g. Check the snap of the cap on barrel and replace in correct position h. Check the end shake and side shake of barrel arbor is it also sometime recommended to do this without mainspring fitted to test for free run and end shake i. Check the cleanliness of the barrel and barrel teeth. j. Check the oiling of the barrel arbor after the cap is on. k. Check the condition of the barrel teeth to see if they are bent or worn. Check Number 5 a. Jewel holes must be cleaned with peg wood if necessary. b. Jewels must be checked for chips or cracks. c. Check the train wheel pivots for rust, polish, cuts and straightness. d. Check the pinions for rust’, pits and polish. e. Check the pivots for pitting check that clean pith wood is being used. f. Check plates for tarnish, fingerprints, and polish jewel settings. g. Assemble time train and check end shake and side shake. h. Check wheels for trueness arid upright. i. Lift each wheel with tweezers to check for end shake and to see if each wheel is free enough to fall back to its original position. j. Spin train to see that is spins freely, in dial up, dial down and a vertical position. Check Number 6 a. Replace barrel and barrel bridge and check the oiling of the barrel arbor upper and lower bearing. b. Check oiling of crown wheel. c. Replace ratchet wheel. d. Note: do not oil remainder of movement until after kick-back is checked or cap jewels are present oil those now e. Wind watch slightly to check kick-back and recoil. This check should be made in dial up and dial down positions. If the watch does not have kick¬back, this indicates that the train is not as free as it should be. First, however, before checking into the train itself to determine if there is some frictional error, it would be worthwhile to examine the mainspring around the barrel arbor. Many times the loose fit of the mainspring around the arbor will prevent kick-back from occurring within the train. In such instances, the arbor is simply slipped in the mainspring instead of the train receiving the reversal torque, that normally occurs. If the barrel is found to be satisfactory, then the train. should be checked to see if the trouble can be located. first, the train should be examined carefully to see if each wheel is free, and if no trouble can be found, then it is advisable to remove the train wheels from the watch and replace each wheel in the watch individually and to check the spin of each wheel. If each wheel spins freely, this indicates that the pivots and the jewels are in good condition and that one need not look further for defects or faults in those areas. Next, place two wheels at a time in the watch and check the spin of the wheels. Thus, any error of improper depthing or a badly formed tooth on a wheel or pinion will be detected. It is simply a process of elimination in order to locate the particular trouble, and of course, proper corrective measures must be taken to correct an error when one is found. Check Number 7 a. Oil all the train jewels in the watch, and at this point it is advisable to oil also the balance jewels. b. Check to see that there is a ring of oil around each train pivot and that the jewels are not over-oiled or under-oiled. c. Check the jewels that have caps to see that the globule of oil has been formed properly between the flat cap and curved hole jewel and no keyhole shape if so remove re clean jewels and check seating the re oil and repeat check for perfect ring. Check Number 8 a. Oil stem properly. b. Oil friction parts of setting. c. Oil wolf teeth of clutch wheel and winding pinion. d. Oil clutch wheel groove. e. Oil points on setting lever that contact the setting bridge or the clutch lever. f. Never oil dial train. Note: ‘dial train means all wheels following center wheel staff. g. Seek expert advice on some types of intermediate wheels connecting clutch at setting positions that require oil. Check Number 9 a. Check condition of pallet arbor pivots. b. Check for chipped or loose stones, shellac or gummed oil on pallet stones. c. Check guard pin for straightness and proper shape. d. Check polish of pallet arbor, pivots and fork slot. e. Check end shake of pallet fork. f. Check height of pallet stones in conjunction with escape wheel teeth. g. Check matching stones. h Check drop lock i. Inside and outside drop. j. Draw. k. Hang-up of stones on escape wheel teeth. Check Number 10 a. Check tightness of roller jewel in roller table - uprightness of roller jewel. b. Check the height of the balance wheel in conjunction with the fork bridge and the center wheel. c. Check the clearances. d. Check the height of the guard pin in relation to safety roller. e. Check the proper length of roller jewel and fit of roller jewel to fork slot. f. Check the guard clearance. g. Check the corner clearance. h. Check the jewel pin shake. i. Check the guard test, j. Check the corner test. Check Number 11. a. Check the hairspring in-the-flat. b. Check the hairspring in-the-round. c. Check the quadrant of the hairspring to see that it is formed properly between the regulator pins and stud d. Check for beat of the watch by equalizing the force to receiving and discharge pallets. e. Check for the collet wobble. f. Check for trueness of the balance wheel, and for the flash of the balance pivots g. Check for trueness of roller table. Check Number 12 a. Place the watch on the timing machine and take a rate in the dial down position, then turn the movement over to dial up position and take a rate. There are three things that should be observed from the rate that was taken: 1. Dial up should indicate the same time as dial down. 2. Observe the closeness of the lines to determine if the watch is in perfect beat. 3. Observe how the watch is running in reference to the time error over a 24-hour period. b. Adjust the mean time rate of the watch so that the dial up and dial down positions will record on time. Do not move the regulator more than one degree in adjusting the mean time rate. Any other alteration must be made by adjusting mean time screws or by adding or removing weight from the balance wheel in such a manner as not to affect poise, static or dynamic,. c. If the rates in dial up arid dial down are found to be different from one another, then this indicates a mechanical error in the watch which must be traced out before proceeding. d. If the watch is found to be out-of-beat, then of course, it should be put r in proper beat at this time. We might emphasize that if the watch was put in proper beat in accordance with the proper procedure at the bench, then an out-of-beat condition or minimal amount would not be indicated on the timing machine. e. When the above conditions have been satisfied, the next step would be to take a rate in positions and errors corrected. If everything has proved to be satisfactory, the watch should be tested for isochronal test be made on the timing machine, which consists of re-testing at different winding levels and rate in the dial up position. Check Number 13 a. Check for proper lubrication of cannon pinion on center post. b. When replacing the cannon pinion, be sure that the leaves of the cannon pinion do not come down on top of the minute wheel teeth so as to bend the teeth of the minute wheel. c. Check tightness of. cannon pinion d. Check to see that cannon pinion does not ride up when watch is being set. and smooth consistent operation. Check Number 14 a Make sure that the hands are fitted securely to the parts to which they are attached b. Make sure that the hands are adjusted so that there is equal space between the hands and the hands are set as close to the dial as possible. c. Check to be sure that the hands are shaped to the contour of the dial. d. Check to see that\ the hands are positioned so that they are synchronized with one another. Check Number 15 a. If there is no case for the movement, simply disregard this check and proceed with the next check, number 16. b. Check for proper snap/screw back of the case. c. Check for the clearance of the hands under the crystal. d. Check the crystal to see that it is securely fitted into the case. e. Check to see that the crown is next to the stem and reasonably close to the case. f. Check for tightness of movement in case. g. Check the spring bars to see that proper spring bars are used for the particular type of case so that the band is held securely to the case. h. Check the lug holes to see that they have not been worn badly by the spring bars to a point where the hole may break through and allow the spring bar to come out of place. Check Number 16 a. Set the watch on time with a master clock. b. Let the watch run for a period of 24 hours and check the error in the time repeat in several positions. c. Allow the watch to run until it completely runs down and check the length of run. The watch should run a minimum of 30 hours, preferably 40 hours, if it is in “A. I have no answers to any of the steps since I didn't make this up. Maybe Mark might.1 point
-
Greetings all! I've been a lover of mechanical watches for several years and finally took the dive into tinkering. Started last week disassembling/reassembling a 7S26. Only lost one pivot jewel and the yawl lever clip! Absolutely loving it and ordered two pocket watches for restoration. What could go wrong?1 point
-
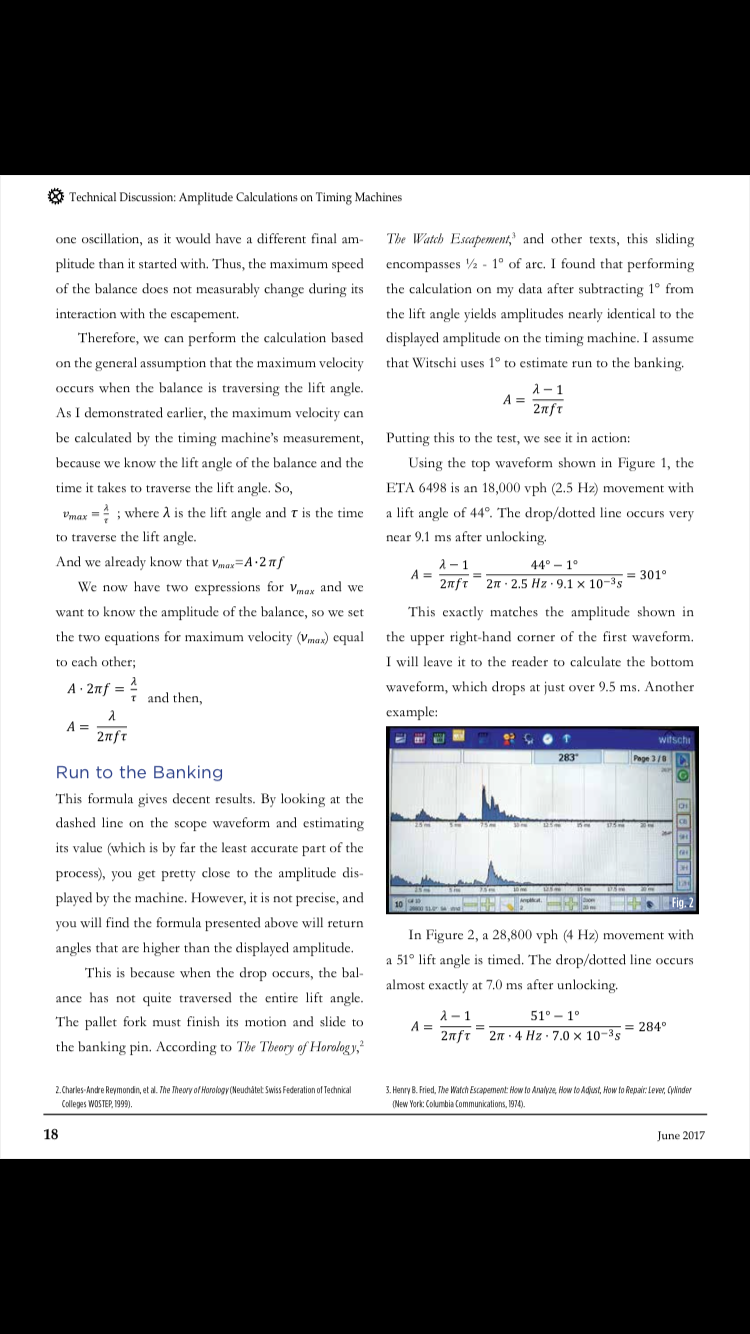
June 2017 issue has an interesting article on amplitude and inconsistency in timing machine measurements
 1 point
 -
Hi In what respect is "not moving" Is the balance not moving, the train wheels not rotating. First things first, You have dismantled and cleaned and re assembled the watch, Yes ? Was the watch working before treatment and not afterwards, Yes ? If so lets begin by removing the balance and checking the pivots and spring for damage, then remove power from the watch and remove the fork. Now put two winds on the spring. does the train run down and reverse at the end or is it stuck ? if stuck remove the train and check all pivots check mainspring barrel and spring, check the fork pivots are not broken. The common cause after reassembly is either a particle of dirt/hair in the train and or broken pivots. so when we have determined that they are all intact start to re assemble the watch from the bottom up checking as you go that all is well. then report back.1 point
-
I'm afraid not. I have a Weishi 1900. Even so, I take all TMs with a big grain of salt. You can find plenty of info on WRT by Googling: site:watchrepairtalk.com Witschi watch expert The most important thing is that you set the lift angle on your TM to the correct value or the amplitude reading can not be trusted.1 point
-
Set the voltage knobs to 5 V, and the current knobs to something like 0.500 A. The output will be limited to smaller of the two. If there is a short or near short, the C.C. light will be on and the power supply will limit to 0.5 A. The voltage will drop to whatever it needs to be to keep the current below 0.5A. What should happen is the C.V. light will light up, the voltage will be limited to 5V, and the current side will tell you how much current it is drawing. You don't need to use your meter, but that power supply will just give you two digits while a meter might give you 3 or 4. Thanks for posting that. I am glad to see on a working board everything is just as I said it would be and the things I called out on the working board as wrong, are in fact wrong. If the current powering the board is reading new zero, one might think it can't be a short, but that might not be the case. The CM108 regulator might automatically shut down if shorted. Possible shorts in REGV are C1 (C5 in the C108 example schematic), C12 (C4 in the schematic), and the USB connector itself. As well as the pins of the CM108 next to REGV. I don't see any solder bridges in the photo of the pins. The connector could be shorted, but we'd except to see a voltage drop across R2 (R3 in schematic) and there isn't one. Another thing to consider is the mic bias voltage. This is also sourced from the C108 and is also wrong. I don't know how much current the C108 can source on this pin. Depopulating R6 would stop it. It's connected to R6, C15, R7, and C16. And then it goes to the amplifier section of the PCB. VREF, right side C9, is also wrong. It's 0.12 V and should be 2.25 V. I don't know what would make that wrong if the chip is getting power. Too much power draw I assume could do it.1 point
-
But how smoothly are they able to spin? Can you get "backlash" when the wheels stop turning?1 point
-
Good for you John. Same with me. Enjoy I enjoy the chat and give help where I can. All the very best.1 point
-
Actually I'm here to have fun the same as you. I just do it by sharing the knowledge I've learned over time.1 point
-
I would remove the balance and check the pallet fork again. Then let down power and remove the pallet fork and check for any resistance. Then reinstall the balance without the fork and check how freely it swings. Is the motion works installed? If it is, remove it to eliminate all unnecessary possibilities. There is no escaping from working on shock protection jewels. Get a scrap movement and practice on that first.0 points