Leaderboard


Popular Content
Showing content with the highest reputation on 12/23/22 in all areas
-
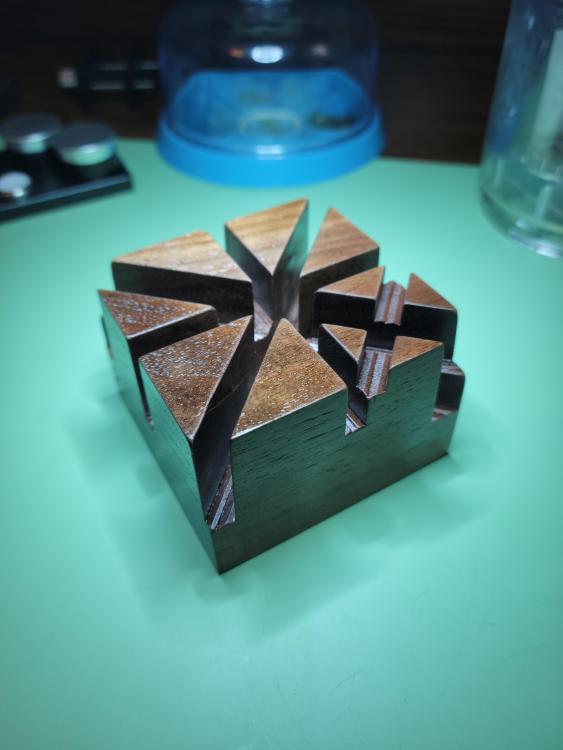
After struggling to put a Spidel band on one of my watches (and firing a springbar across the room), I ran to the internet to buy one of those watch band holder jigs. Then I remembered I have a woodshop! Found this chunk of thick walnut in the scrap bin, cut some varying width and depth slots, and sprayed it with some rattle-can lacquer. I love little projects like this. Fun and useful.

 5 points
 -
Hi everyone, I’m not exactly new member, but since after my short appearance here 2 years ago I’ve been silent to community I think a bit of update is good comeback. Yes about 3 years ago I’ve started watchmaking hobby due to lack of good quality puzzle. Few Amazon purchased tools and flea market soviet watch got me started all right. Number and quality of tools, new and ambitious projects eventually brought me up here. I have to say community here always helped me with my questions and I always remembered this forum as great knowledge resource. Eventually sign up for Distant course in BHI and decided to pursue watchmaking as my profession. Age 32 not easiest decision to make specially for my GF. Since all future plans and me wanting to move from Estonia to Slovakia because lack of watch interest and opportunity there. After longer talks we all were confident, this is way to go for both of us. For my surprise, took me 2 weeks to find a job in local watchmaker shop as apprentice. Basically they gave me poor salary and table under staircase (pure Harry Potter style). Long story short, I worked harder and longer then others and soon became shift leader, then mechanic watch repairer to junior manager of two workshops with team of 5 watchmakers. Meanwhile working on setting up my own shop, that consumes all of my money (honestly, learned to live of 2 digit numbers on bank account) I’m coming back here since all this time wanted to join community that I liked, helped me and inspired me to all this adventure. Cheers guys, glad you’re still rocking here! Jakub2 points
-
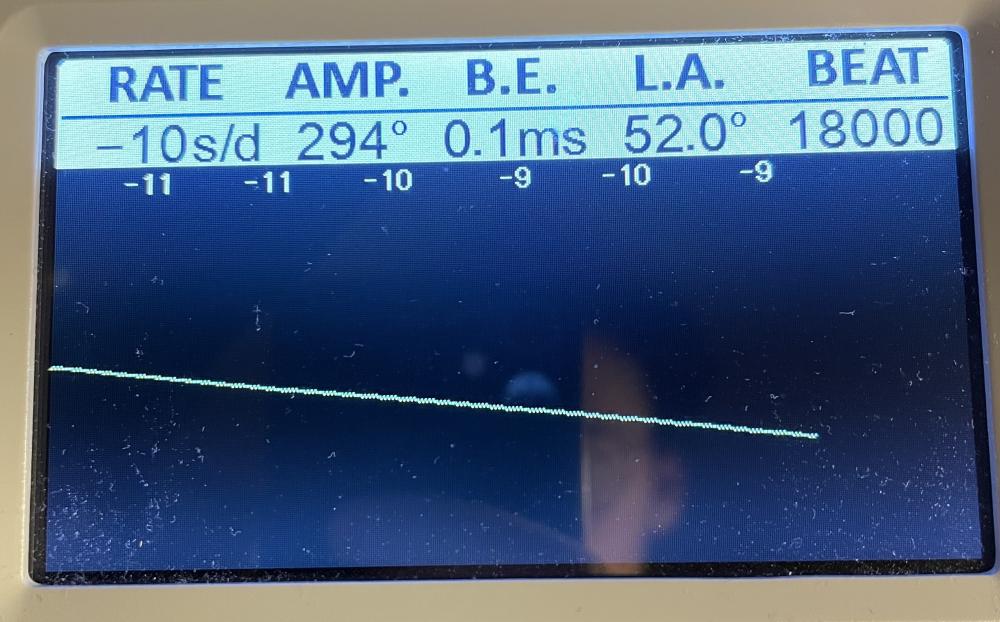
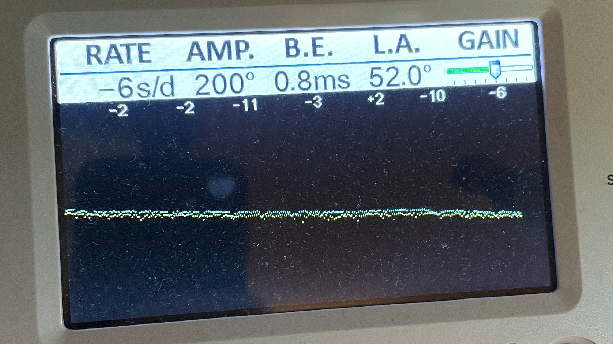
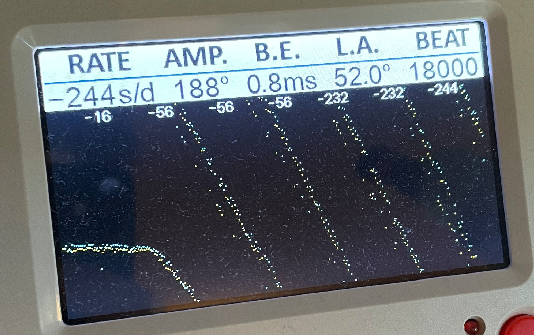
Okay wow, you are absolutely right. After oiling the train with 9010 and the pallet stones with 9415 (DD then CR) Apologies for my ignorance. I appear to have misunderstood all the reasons why we oil a movement. I really love this hobby. It seems rather simple on the face of it, but there are so many facets to everything. Thanks again @JohnR725. Now I really have to start packing... Edit: I don't know the correct lift angle for this movement so the numbers might lie. I'll look that up and do some proper testing after 24 hours when I'm back.
 2 points
 -
By the way you still haven't answered one of my questions I wasn't talking about the train for lubrication. The waveform going straight across looks a bit rough if somebody forgot the oil there escapement that specifically the pallet stones you will get an effect just like this. Even if you oil the escapement and like one stone is dry you can see it in the timing graph so if you don't oil the escapement you will see it will look war and you will not have amplitude. But yes when you switch the crown position your definitely losing power I would still oil the gear train oil with anything a half I don't care what you will with oil with Just about anything I don't really care but there should be oil on the train and definitely oil on the escapement that's the pallet fork and escape wheel2 points
-
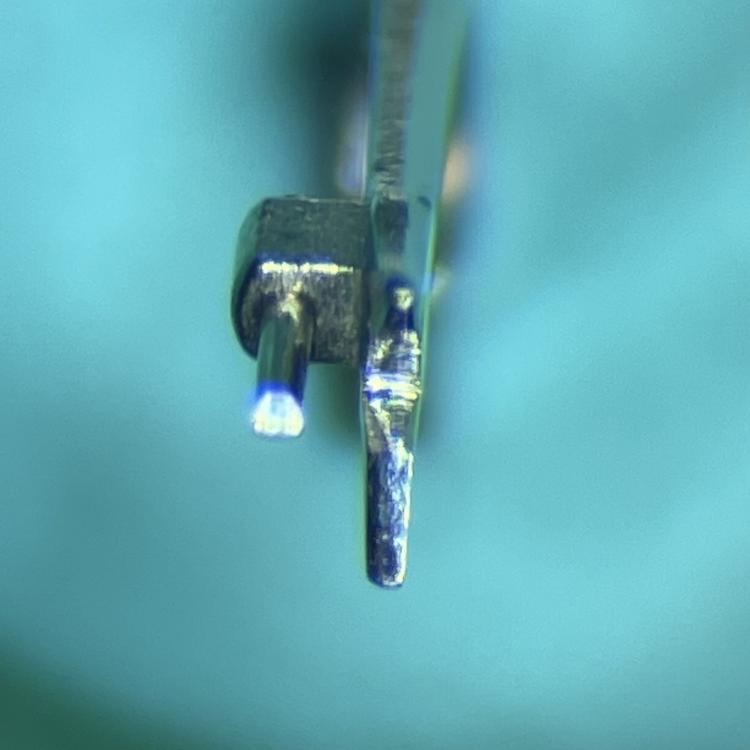
It's good practice to peg the hole jewels. As I suggested, most don't bother with the balance hole jewels, unless there looks to be hardened crud on them, or there's a problem with amplitude. The smaller holes are a real hassle to peg. It's hard to get the pegwood sharp enough, then it breaks off in the hole. I use an old sharpened oiler to push the bits out. The holes that are really essential to peg (thanks to info from nickelsilver) are the pallet arbor jewels. As they aren't lubricated, and tiny bits of dirt can kill the amplitude. Even if I don't peg any other jewels, I always try and do these. Happy pegging2 points
-
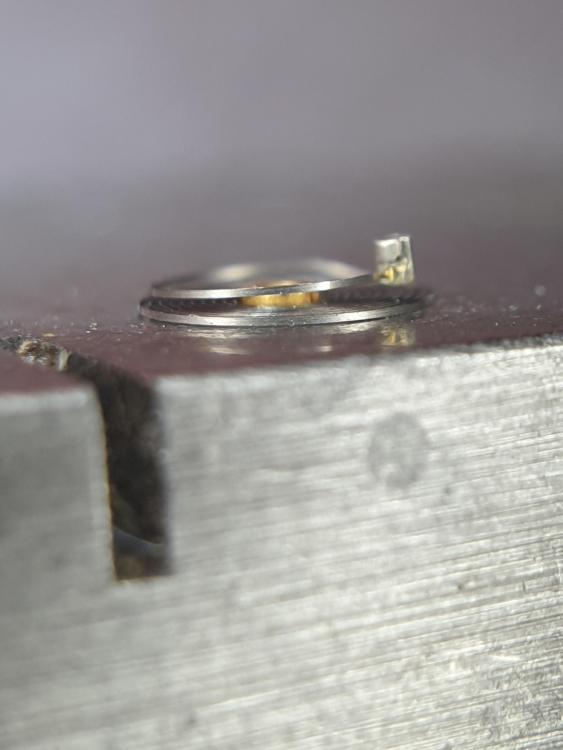
This is my latest purchase from eBay. It is supposed to be running well and keeping good time. The case was almost perfect and the dial only had a small blemish. When I put it on my timegrapher, it couldn't even get a reading. The first thing I saw when I opened up the watch was dirt everywhere. It was on the plates, the teeth of the wheels and pinions, the keyless.... literally everywhere. Then I saw the hairspring. At first I thought it was distorted but when I took a closer look, I was shocked and thrilled to realize that it was an overcoil hairspring. I'd been looking for a watch with an overcoil hairspring for some time but most of the known brands are unaffordable ( at least not for tinkering with ). But alas, joy turned to disappointment when I noticed that the overcoil was sagging and touching the 2nd loop of the hairspring. I took off the hairspring and managed to lift the overcoil off the 2nd coil. I also reshaped the endcurve and centred the collet. Everything seemed to be going well... until I broke the mainspring. It was one of those dreaded Russian "t" shaped endpiece mainsprings. I've done other Russian watches with these kind of mainsprings before but this one was particularly stubborn. I never had any success using a winder with this type of endpiece. Even when I got the "t" into the slot, it would alway jump out whenever I pressed the spring in. I was winding the spring in by hand and was quite pleased with myself for getting the "t" into the slot. But as I came to the end, I noticed that the hole end had broken off. Now my question is... should I get a new mainspring from Cousins or salvage one from a donor? Also, what is the best way to get a Russian mainspring into the barrel? Sorry for the long post. TIA.


 1 point
 -
Forgot to write that I solved this problem. The cannon pinion wasn't tight enough. Checked everything else before tightening it (spring, oiling, etc.) but only crimping the cannon pinion made a difference. Problem solved.1 point
-
It is 52 degrees as shown on your TM! https://watchguy.co.uk/cgi-bin/lift_angles1 point
-
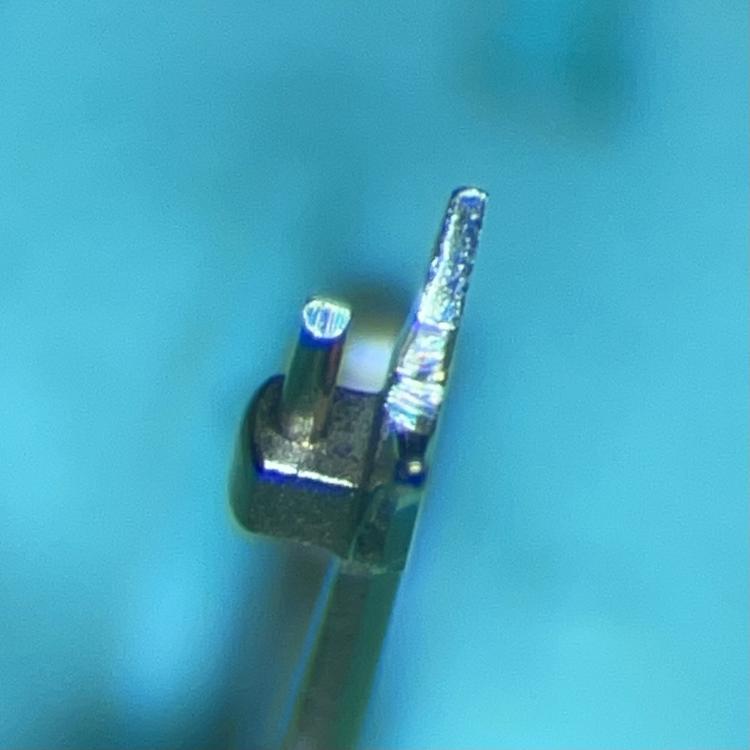
My advice with these clocks is every part must be perfect , the suspension spring must be absolutely straight with no kinks or twists. All pivots must be polished and it must be in perfect beat. Without it will not run for 400 days.1 point
-
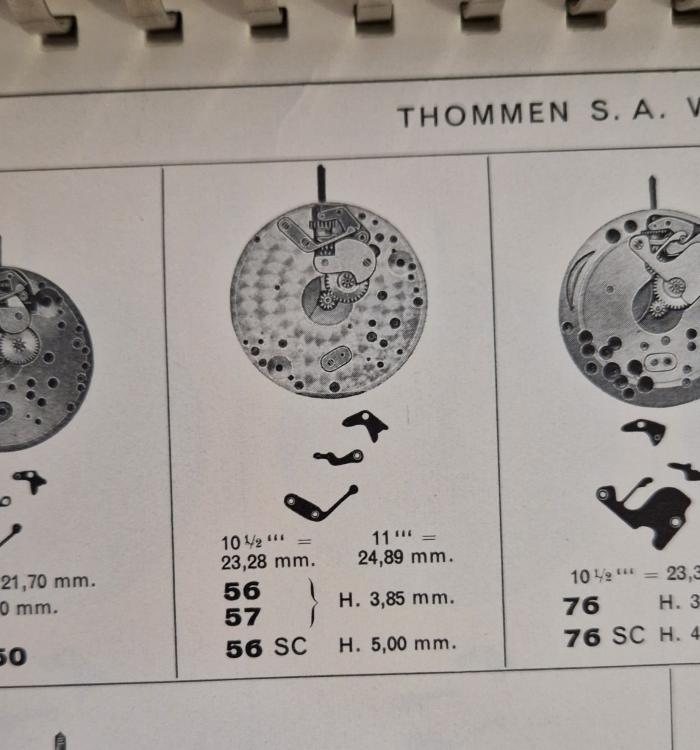
This looks to also be a Thommen, imagining it's 10 1/2 or 11"', which it looks like.
 1 point
 -
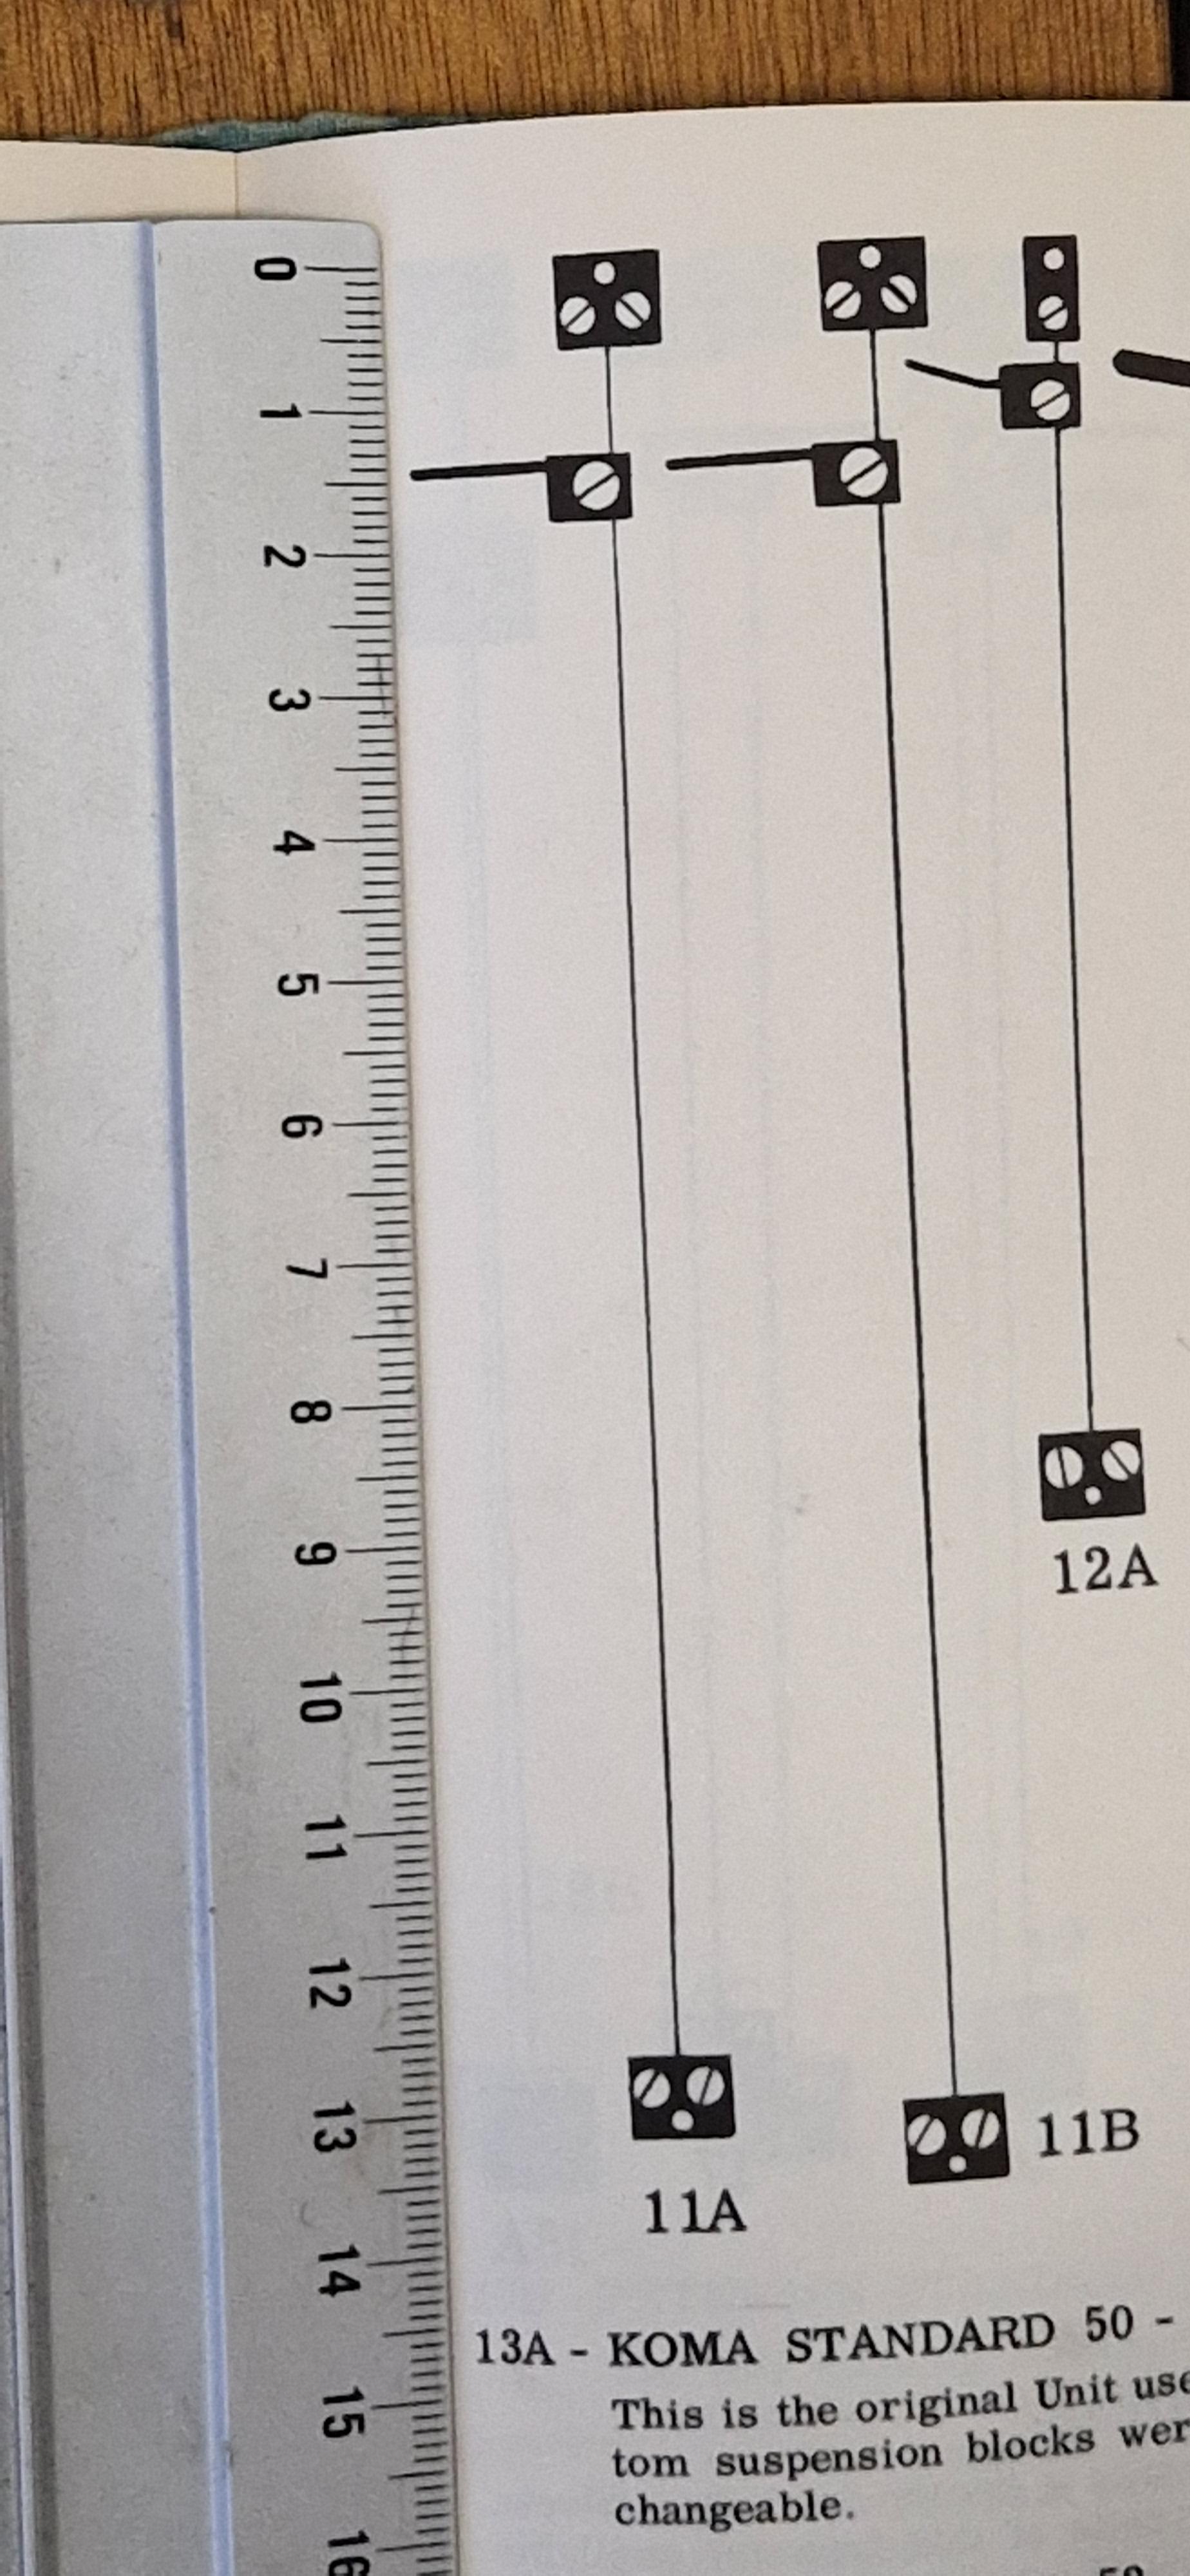
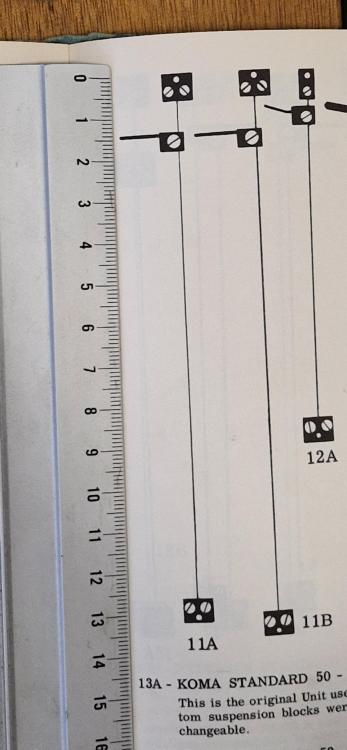
The Terwilliger book say it takes a 0.091mm spring, and (from the book) 11A is the configuration.
 1 point
 -
Looks like you’ve addressed everything I would have thought of, except for possible wrong minute/hour wheels? Might want to count teeth and compare to known examples of Elgin model 7.1 point
-
While you do a photo, do visit this page as well. FHF 150 ranfft Dr ranfft list a bunch of calibers which fit your watch. Rgds1 point
-
I don't know if you ever reached a solution with this. But I eventually resolved my problem with the differential wheel. Originally I was cleaning with just lighter fluid, as both a main wash and a rinser in an ultrasonic. I recently upgraded and now use L&R ultrasonic cleaner and rinser. This improved things a great deal. I then went the extra mile and bought myself some Lubeta v105 as ColdWind suggested, gave it a soak and it was even better. I am now fully satisfied with the results.1 point
-
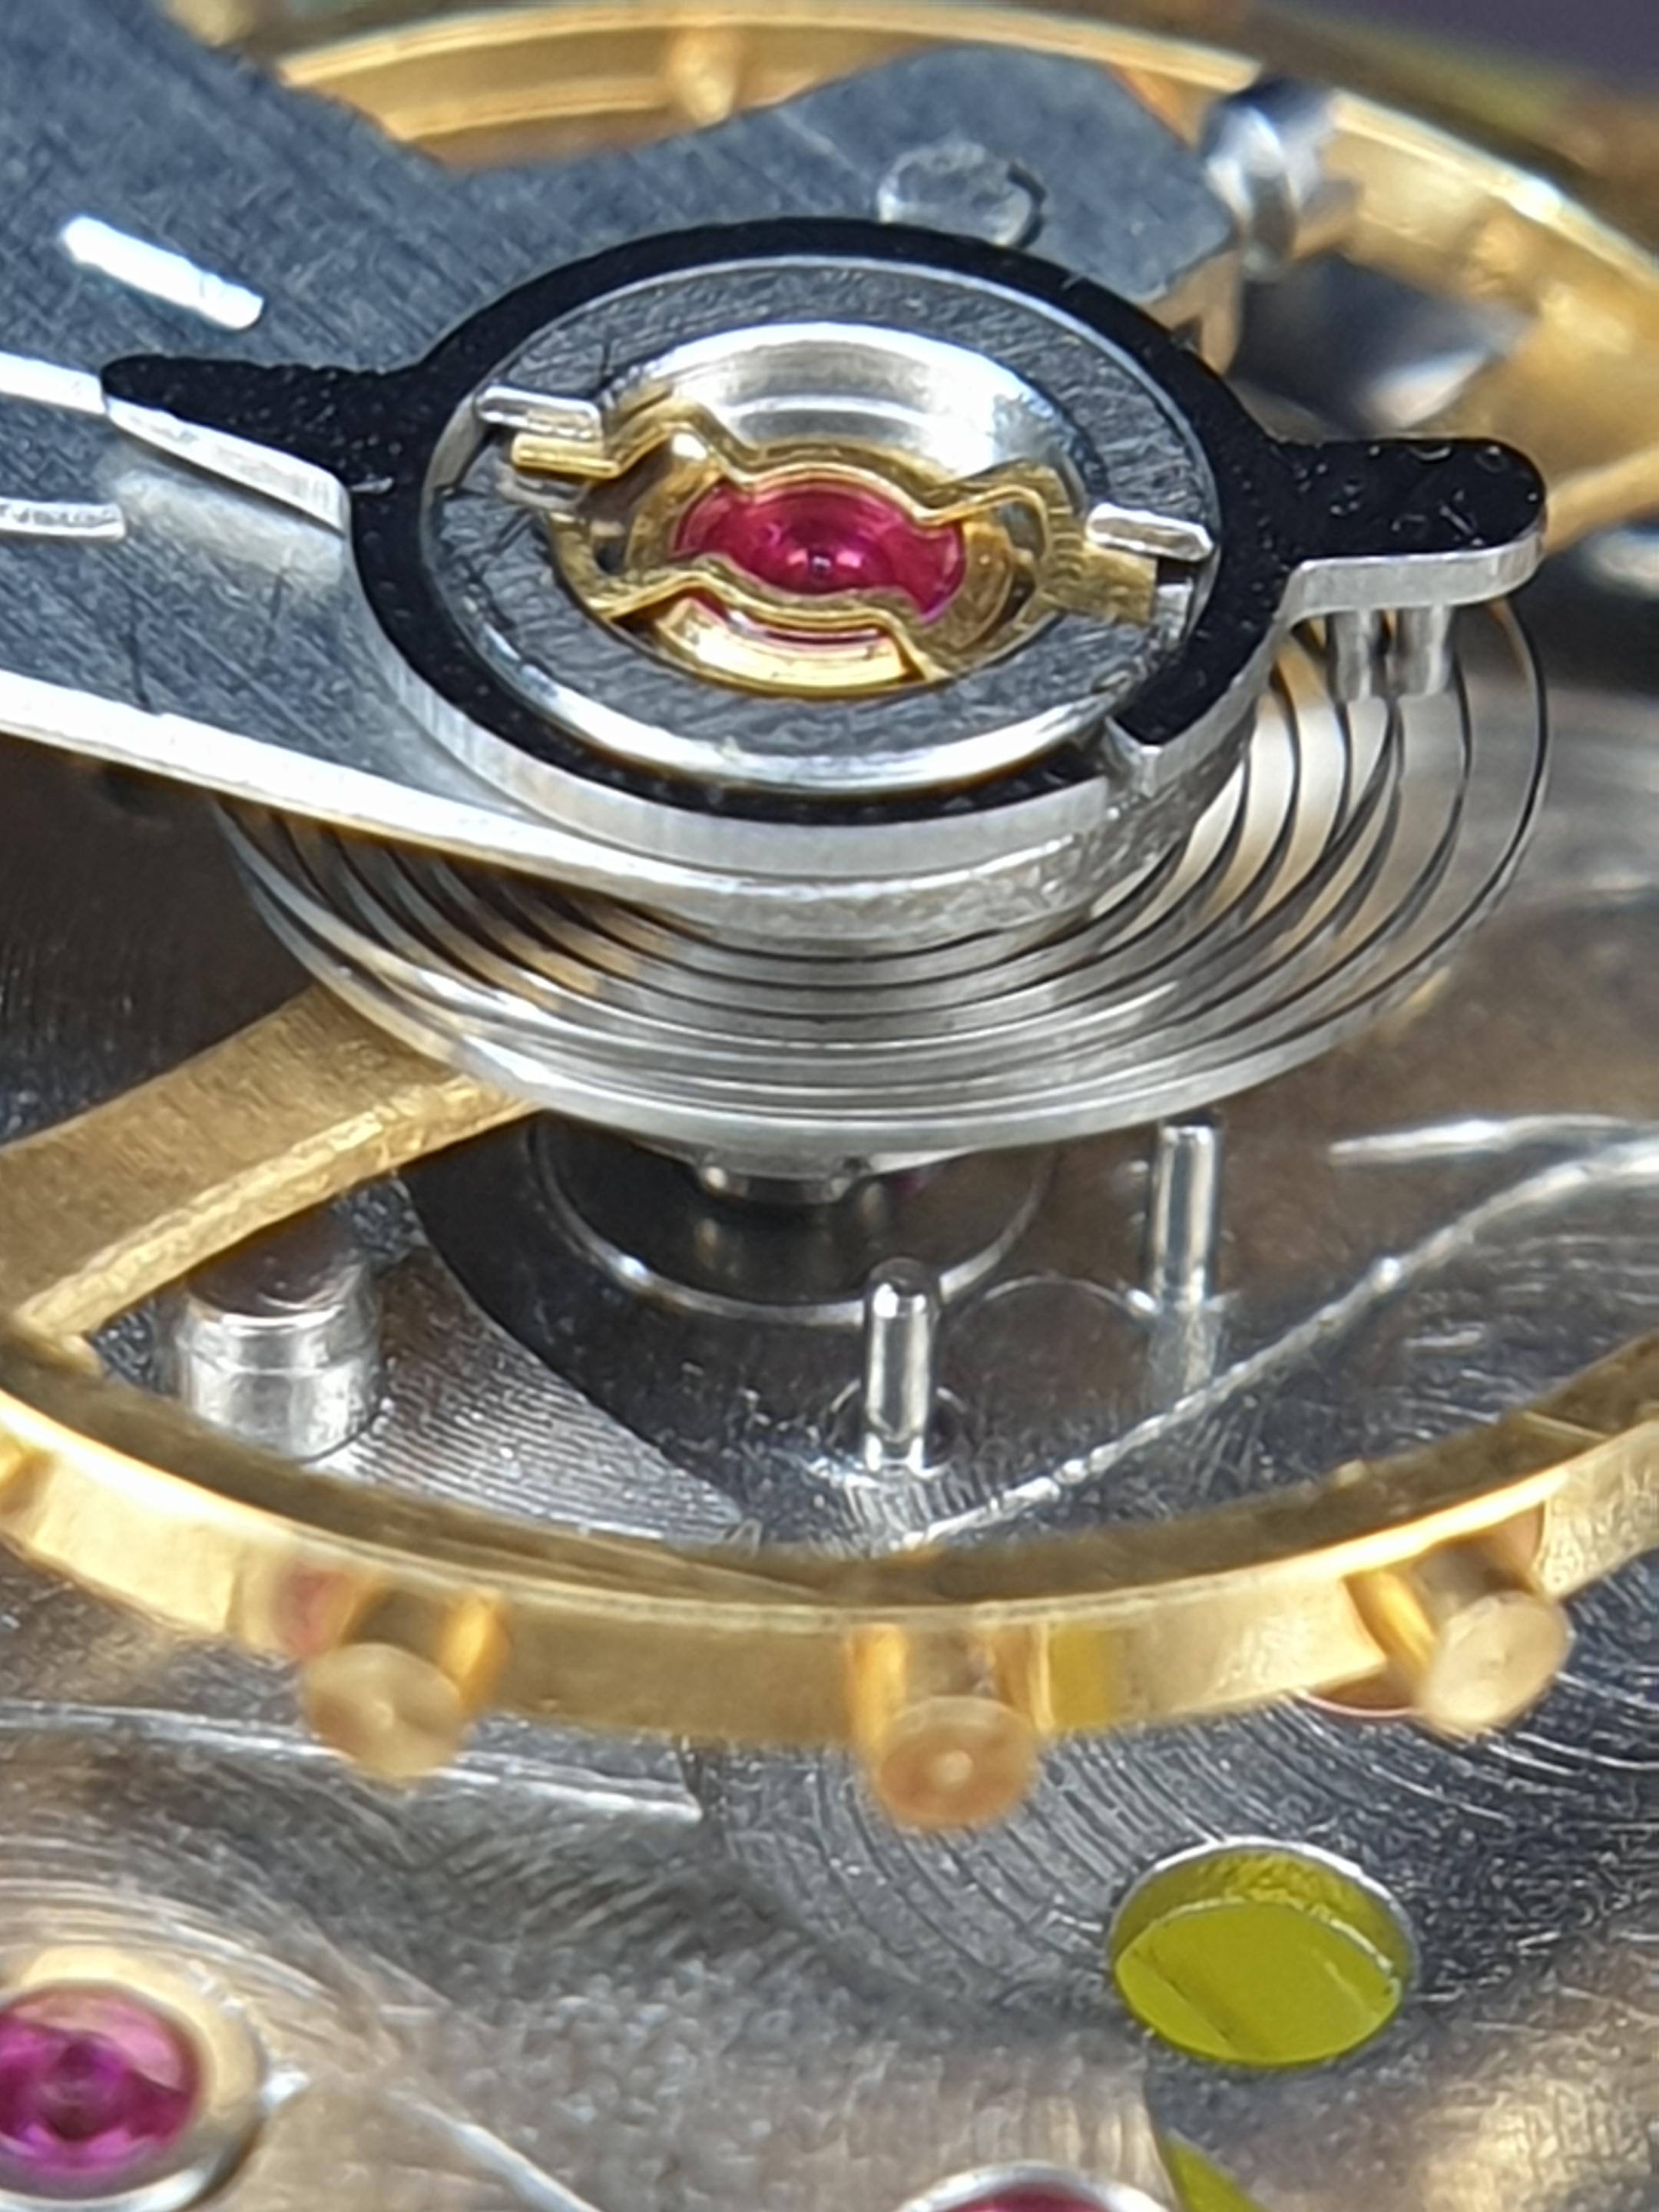
I think you are bang on here. I took the pallet fork and balance to the jar of naphtha with a brush for the third time, and now finally the balance is moving the pallet fork seemingly without undue resistance! I have a fairly powerful microscope and the surfaces looked spotless before cleaning them. Wow, I have newfound respect for what "clean" means, and I'll be sure to remember that for future tinkering. The surfaces that actually matter are in fact polished. Perhaps they could be even smoother though. While investigating I also compared the horn to the impulse jewel. To me it looks like the proportions line up and that there is enough clearance for the impulse jewel to rest in the horn. The guard pin does not foul the safety roller and neither do the horns, by the way. Unfortunately the timing graph tells me that I have yet more problems to tackle (here is DD then CR on a full wind): The train s still bone dry here. The escape wheel has a capped bottom jewel which I oiled. The balance cap jewels are also oiled. If the movement was clean and in perfect condition, I would get satisfactory results without oiling the train, right? I'm flying away to see family for Christmas tomorrow, so I won't be able to work on this until next year. When I'm back I'll give the whole movement a 2nd clean and then look closely at the escapement next. Thanks for all your help guys!
 1 point
 -
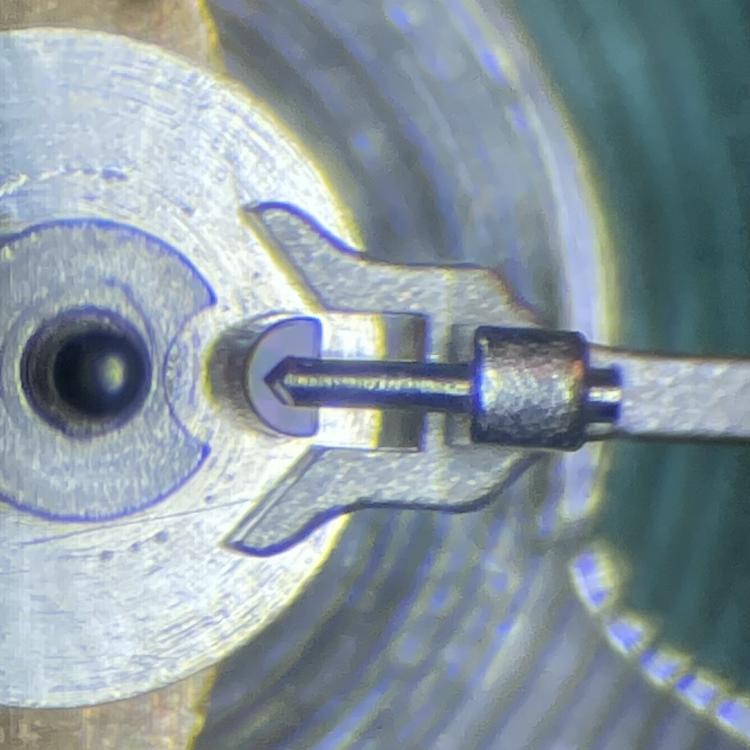
I thought you were going to get us sort meta-jewels in addition to the specifically sized jewels? Because of your lucky in the assortment may be something is thicker perhaps Also wishful thinking on my part but typically escape wheels like the taper their teeth so their axes dinner on the outside. That means you just have to get them to a lineup with wherever the jewels Are if you can. I'm not sure if it would be advisable to place two of them stacked on top of each other it probably be tough to keep them both exactly in alignment. Usually when you're doing jewels in a pallet fork you have it in a tool designed to hold it when you're putting the stones in. I'm not necessarily referring to the very expensive escapement meter which sometimes on eBay isn't necessarily expensive there was one the other day was actually quite reasonable in price which I found quite amusing is normally there almost 1000 and whatever your current C is. But even just a simple brass plate with holes drilled in it C can put the pallet fork arbor into the hole would allow you to put the stones in and have them parallel to the pallet fork itself and then you can warm that in the alcohol lamp being careful not to get the pallet fork in the lamp otherwise the pivot can turn a pretty blue color. But I'm Going to deny all knowledge of how that could actually happen.1 point
-
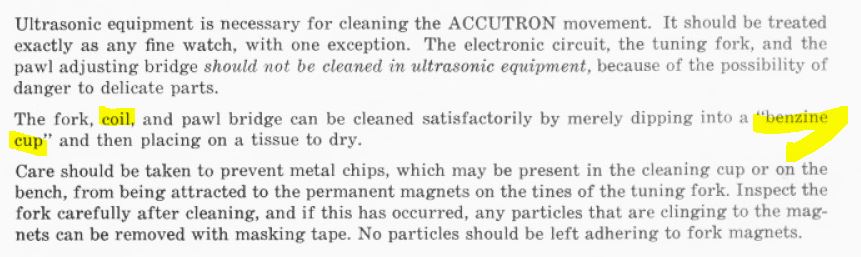
We could pretend this is a Tektronix oscilloscope in which case you can run it through a dishwasher. I used to belong to the Tektronix users group and they were designed that you could Literally hose off the entire oscilloscope run the whole thing to the dishwasher run the boards through the dishwasher everything was meant to be washable in water with soap. The only catch here is were those coils designed to get wet? Looks like I'm wrong? Checking both the 214 at 218 service manuals I snipped out the relevant sections. They're both identical you are supposed to use ultrasonic cleaning for the watch and you can clean the coils in your benzene cup. I have an aversion to benzene or even the phrase because one of those will kill you eventually and the other one probably won't. So today we probably don't have anything that's called benzene in our cup I would check whatever you're using though to make sure it doesn't attack the plastic and or the protective coating and I definitely wouldn't leave it in there very long.
 1 point
 -
Hello all the component parts seem to be there including the suspension , so what is the problem? Have you tried the springs to see if one is broken, Is the suspension spring (although there) in one piece and serviceable. All things considered for some one with zero clock experience a Hermle 1051-020 is not the place to start. As you will appreciate they are quite complex. These are triple chime movements. I repaired one of these for a friend a while back and he was quoted £350 pounds so $125 dollars is cheap. I doubt its a stripdown and re build more like replace the broken spring and a bit of oil. What you can do if you feel up to it is remove the movement from its case and check for the broken spring, from memory I think each barrel is removeable without dismantling the movement (picture of the front plate) to be sure. Then we have the problem of removing power from all springs before attempting to do anything and without the correct tool its a bit dodgy to do. Then we come to the obtaining a spare spring or barrel complete(best option) without tools replacing the spring is all most impossible for some one with no knowledge. If we put things into perspective the cost of parts/tools and time etc makes the quote $125 look inviting.1 point
-
Well quite a success story and long may it continue. Determination pays off, being prepared to start again at the bottom and learn. Great that you can go to work whistling and happy. All the very best.1 point
-
Wow what a story. Welcome back are you sure you will have enough time to visit us.1 point
-
Welcome back and what an inspiring story. There was a book written years ago by Marsha Sinetar called 'Do what you love and the money will follow', all about finding the right work that inspires and fulfils you. It appears that you are one of the people that is lucky enough to go to work every day doing something you love.1 point
-
Welcome back Jakub and good luck with setting your own watch shop.1 point
-
Good for you.1 point
-
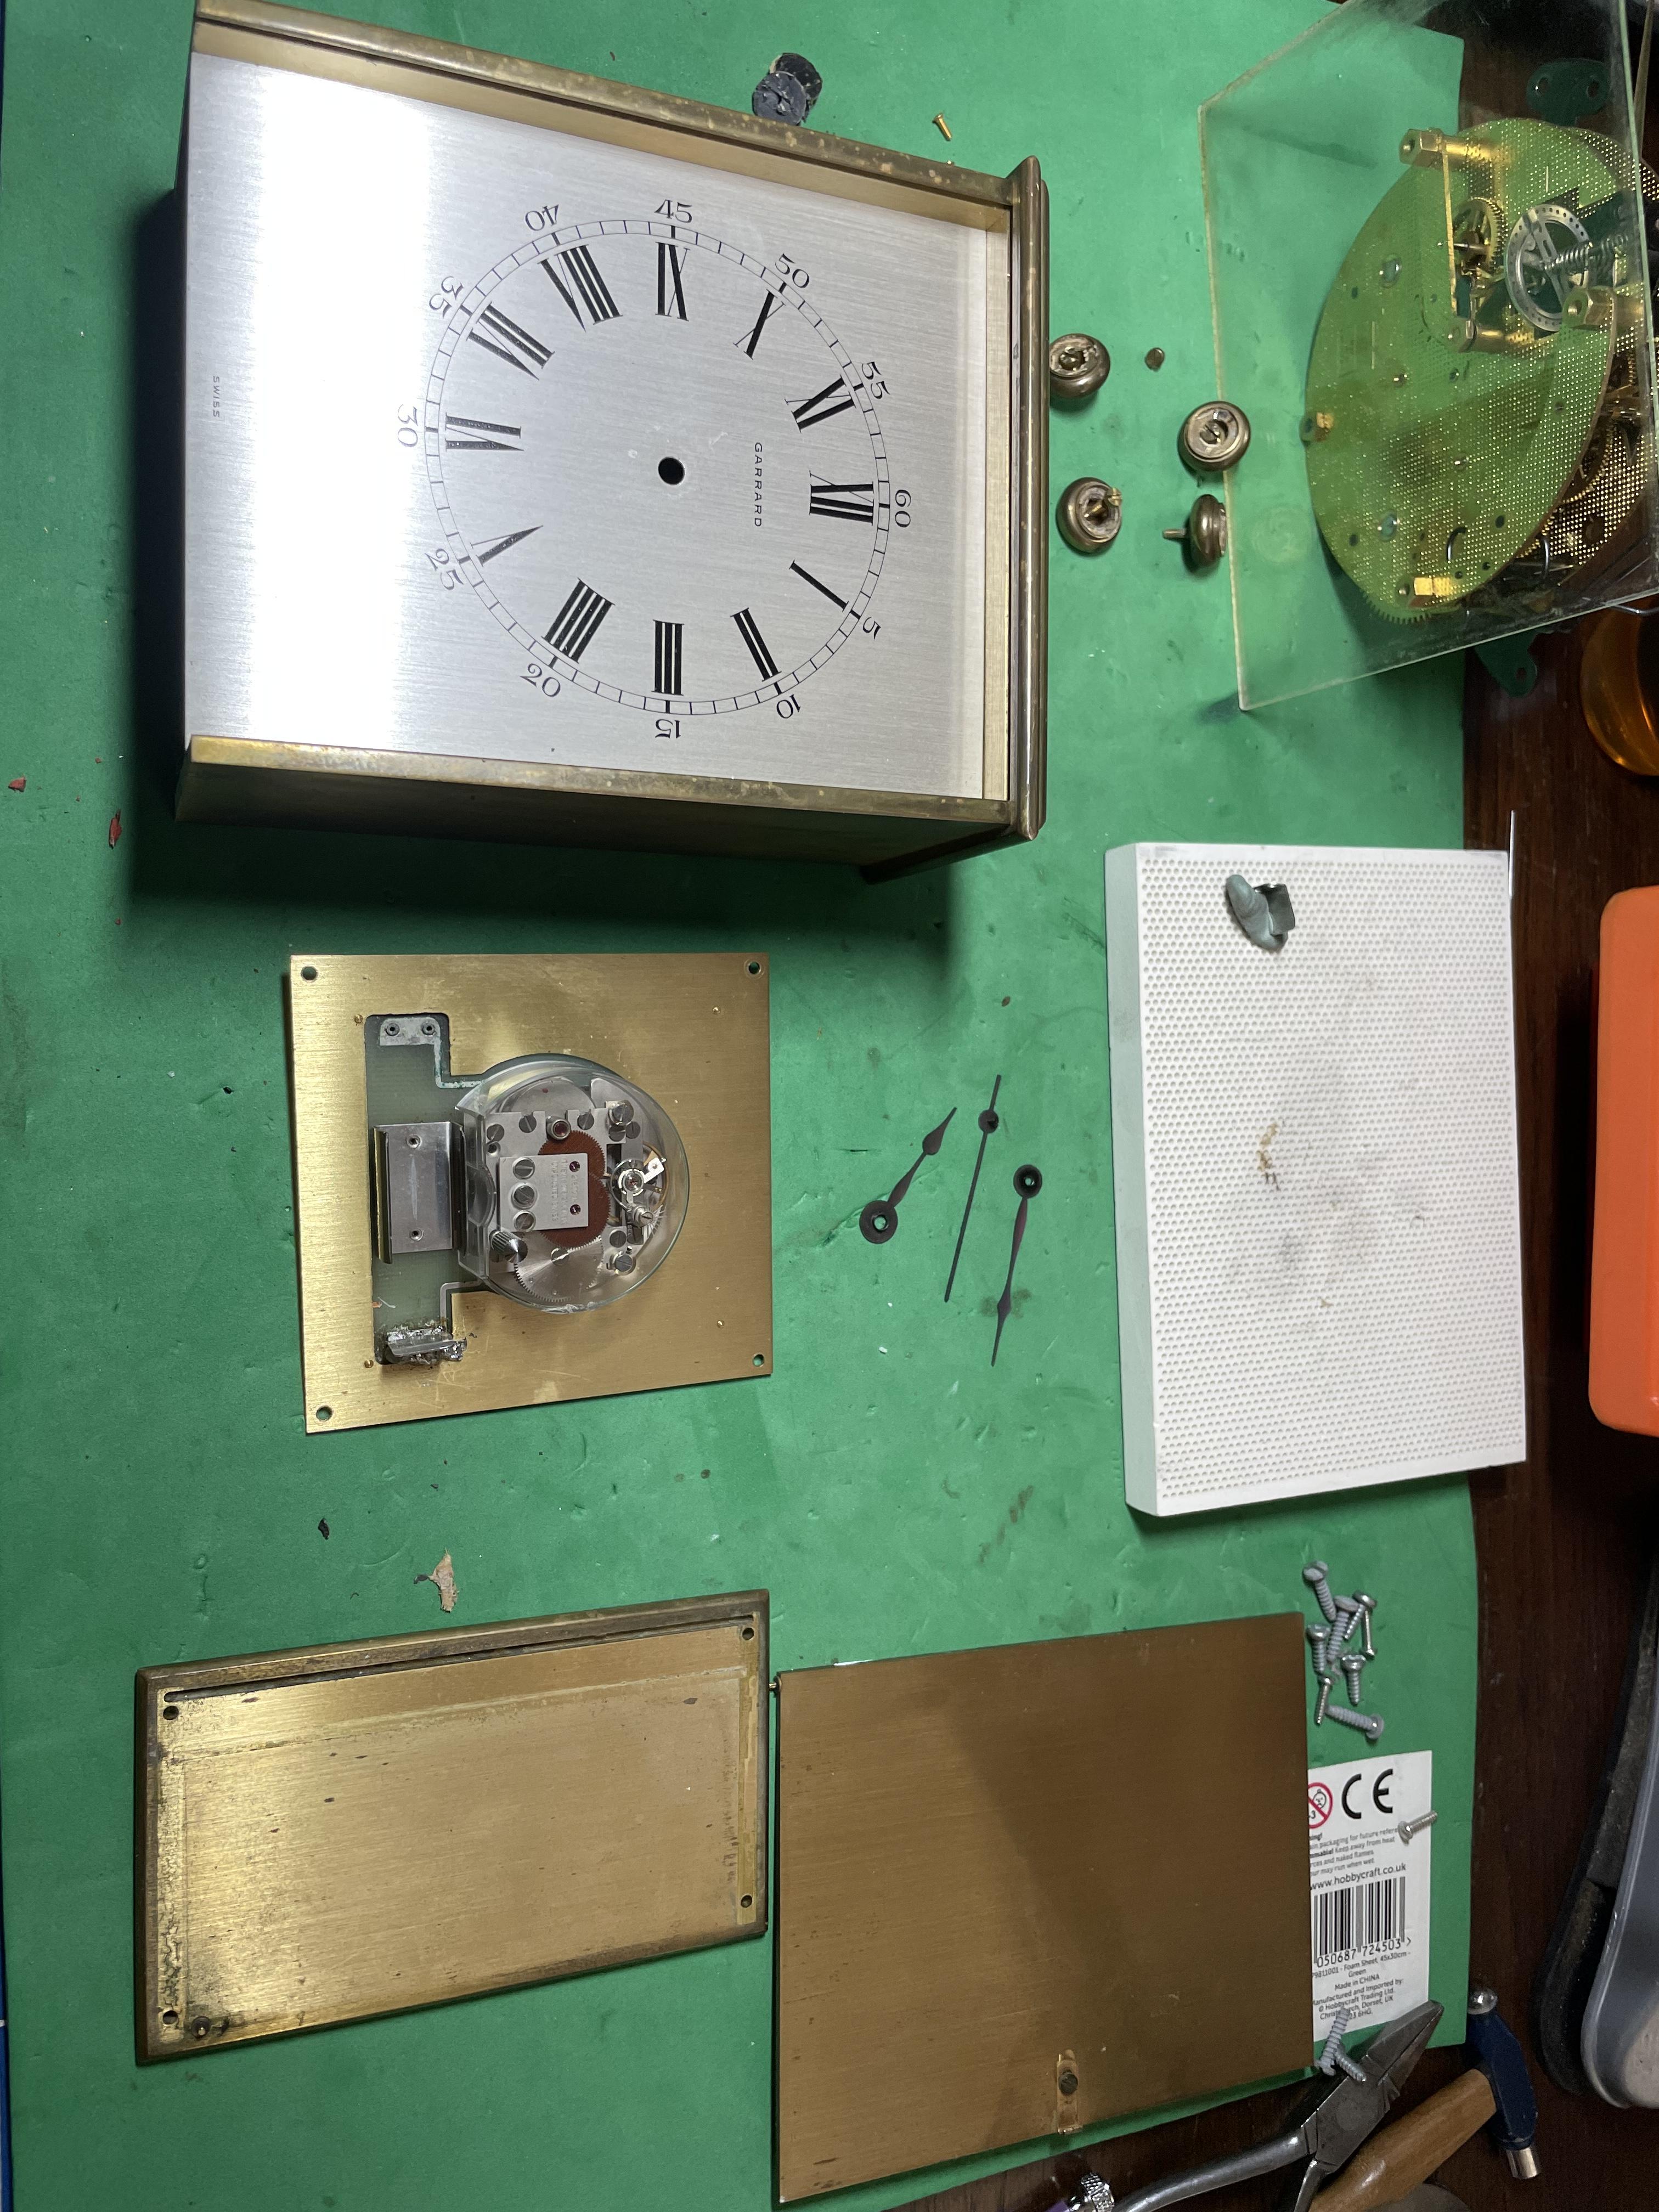
Well today I affixed the battery tabs to the circuit board. I used screws as solder alone just wasn’t man enough for the job. I’ll post a picture tomorrow but when I put in a AA battery it ran fine but the positive end of the battery got pretty hot after about 10 seconds of running. My thoughts are that the screws may be touching the back of the dial which is metal, I’ll file theM down some more and put some insulation tape over them to see if this helps. Still not identified the movement yet though.
 1 point
 -
Maybe this Unitas logo? Looks a lot nicer than just "UT". https://www.watch-wiki.net/doku.php?id=unitas1 point