Leaderboard


Popular Content
Showing content with the highest reputation on 11/14/22 in all areas
-
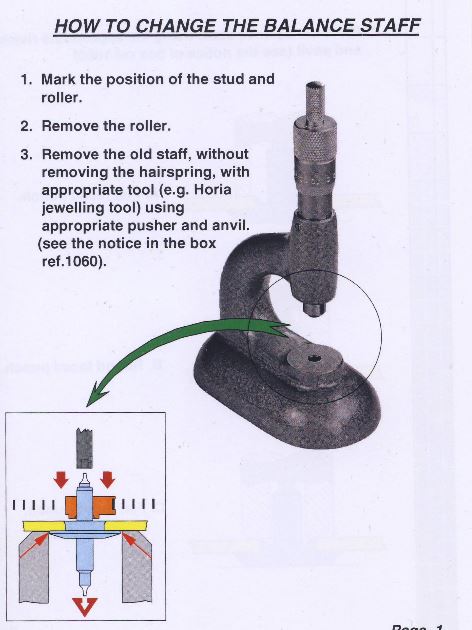
one of the problems with this discussion is there are too many variables that will affect the outcome. Then we have all kinds of examples of things for instance Elgin, Hamilton and Rolex made balance staffs that are supposed to be driven out without a problem. before I continue one of the nice things about where I live is the remnant of a AWCI chapter. We once were AWCI but we split so over the years I've had really interesting lectures and knowledge gained. including from memory three separate lectures on replacing balance staffs of interest in this particular discussion. One of the lectures given by somebody who is Rolex trained. He brought the Rolex tools the jeweling tool and demonstrated and explained why Rolex pushes the staff out. I have some pictures down below that show this. So is explained that the roller table was removed with whatever method you like. note was extremely long time ago so I don't remember sort of how he removed the roller table. One method was to grab it with a lathe collet and just rotate the thing off but he might have used razor blades I just don't remember. then we all gathered around for the procedure. The interesting aspect was he asked everybody be super quiet because when the river broke it made a very distinctive sound. Then he picked up the rivet and put it on his hand and brought it around and show dusters is beautiful shiny ring of the rivet. Then I'm assuming he restaffed the watch I don't remember that aspect I was just finding how to remove the staff interesting and of course you need all the special tools that come in the fancy Rolex box that none of us is ever going to have. not a lecture given by the same person and somebody else was on modern vintage staff replacement. Both of them discussed knocking the staff out were driving it out by a minor clarification here. When you go to knock the staff out if there's any sort of resistance in other words it doesn't just instantly pop out were instantly want to come out then you will have to do some cutting. When I was in school the instructor George showed us how to use the k&d tool and his procedure was to weaken the rivet just a little bit and claim to never have a problem. Then the most recent lecture was based on another discussion somewhere in the universe that resembles this one the sins of driving the staff out basically. Don't remember the watch for his example was a wristwatch it to the wristwatch a whole bunch of balance staffs that he had for that particular watch and what he did for his lecture he and do it they are you get a PowerPoint buddy put the staff in the history of the staff out you put it in drove the staff out and I don't remember how many times he didfive or 10 just don't remember all the see if there was any damage at all the conclusion was there was none. then thinking of pushing the staff out I remembered once seen the article in a magazine. the magazine is a horological times published by AWCI rather than quoting I discuss snip out a tiny section for you. Oh and on the next page he has a reference to not thinking this is a good idea for a nickel balance wheel which I assume is the white colored metal ones. Kinda like in the video above for the person says this is what Rolex taught us except here somebody thinks nickel would be bad. In other words if you going to do this you need a hard balance wheel and is staffed it's hopefully going to break. oh and then in the lecture of worry restaffed the watch a whole bunch of times yes there were some people unhappy with that. There is also discussed if the balance wheel is not made out of steel another method would be to just dissolve the staff out. Another was dissolve at the same way out as you would a broken screw in a plate is just use alum as that would cause no problems at all. Then back to too many variables. All the methods are good and conceivably all the methods are bad. For any of us who been around for a while we've seen bad. people I got carried away cutting the rivet often cut the balance arms and also of course cutting the hub often cutting the balance arms. All the methods that rely on rivets breaking relies on a very hard staff what about a staff that's cut from softer metals? Or maybe things were a little bigger than they should abandon somebody really hammered down hard and mushroomed out the metal and know that is not going to drive out really nice and clean. so I just thought I'd add to the controversy of whatever it is you're doing that's controversy of removing staffs
 4 points
 -
Got this clock for free and found that the coil was open as the connecting wire had broken from the enameled wire. It is riveted together so I had to cut one of them to get it apart. Had to soak the coil assembly in water and IPA so that the paper would come off. Then I found the end of the coil that had broken. Unwound a few turns so that I had plenty to work with. Then I made a bobbin for the coil so that it set firmly in the case. 3D printed. Now to assemble, I had to drill out the rivet and tap some 440 threads. It is all assembled and working. However, I need to make a connector piece to mount some metal tabs so that there is no stress on the enameled wire. I have some ideas working in my head.

 3 points
 -
Hi Rob If you start with Fried, Donald De Carle, you wont go wrong. I have attached one for your interest. The Chicago one is in bits but its all there 1156193141_JosephBulovaSchoolofWatchMaking(1).pdf chicago lesson 1.PDF chicago lesson 10.PDF chicago lesson 11.PDF chicago lesson 12.PDF chicago lesson 13.PDF chicago lesson 14.PDF chicago lesson 15.PDF chicago lesson 16.PDF chicago lesson 17.PDF chicago lesson 18.PDF chicago lesson 19.PDF chicago lesson 2.PDF chicago lesson 20.PDF chicago lesson 21.PDF chicago lesson 22.PDF chicago lesson 23.PDF chicago lesson 24.PDF chicago lesson 25.PDF chicago lesson 26.PDF chicago lesson 27.PDF chicago lesson 28.PDF chicago lesson 29.PDF chicago lesson 3.PDF chicago lesson 30.PDF chicago lesson 31.PDF 588239796_chicagolesson32Part1.pdf chicago lesson 32 Part 2.PDF chicago lesson 33.PDF chicago lesson 34.PDF chicago lesson 35.PDF chicago lesson 4.PDF chicago lesson 5.PDF chicago lesson 6.PDF chicago lesson 7.PDF chicago lesson 8.PDF chicago lesson 9.PDF 468703549_ToolsMaterialsoftheTrade.PDF2 points
-
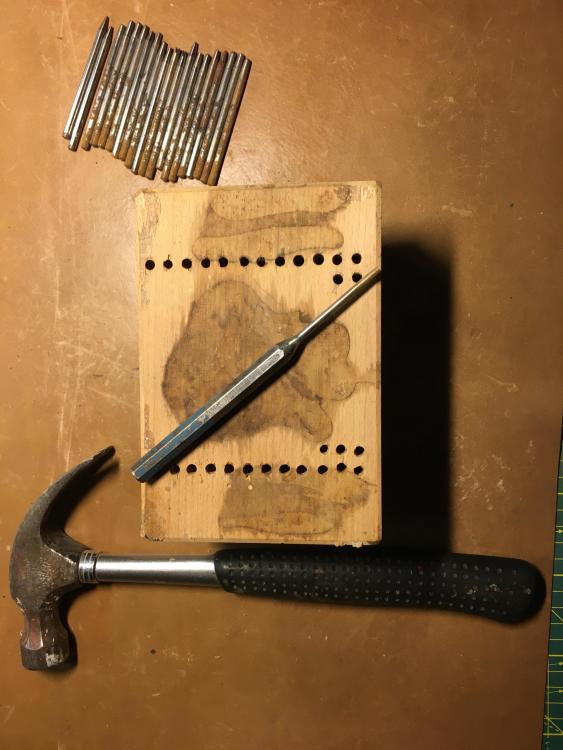
Hi they were well rusted in, once cleaned up and waxed run a drill through the block to remove any rust adhering to the wood. Asv suggested either vinegar or Coke will soften the rust prior to wire wool and wax. If you have a lathe or a drill put each punch in it and spin using the wire wool to clean. Once its tidied up and the box fixed it will make a good set. there is nothing missing. good luck.2 points
-
Thanks for that summary @JohnR725. It's a topic as contentious as oiling. Us "amateurs" can only go by what we read, see on the internet etc. It's good to hear from "the pros" like you and @nickelsilver to find out what you have been taught, and learnt from experience over many years.2 points
-
Hi Guys I have salvaged my workshop computer for the time being and have loaded it up so we are back online with restricted data but back al be it a bit slower but its ok as long as I keep the boiler full and plenty of coal. cheers2 points
-
All I can think of is "Wow"! I can't think of enough words that haven't already been used. Angrybear, your design is just beautiful! I've always said that when form closely follows function, it'll bring its own beauty; that watch is about as good an example as anyone will find.2 points
-
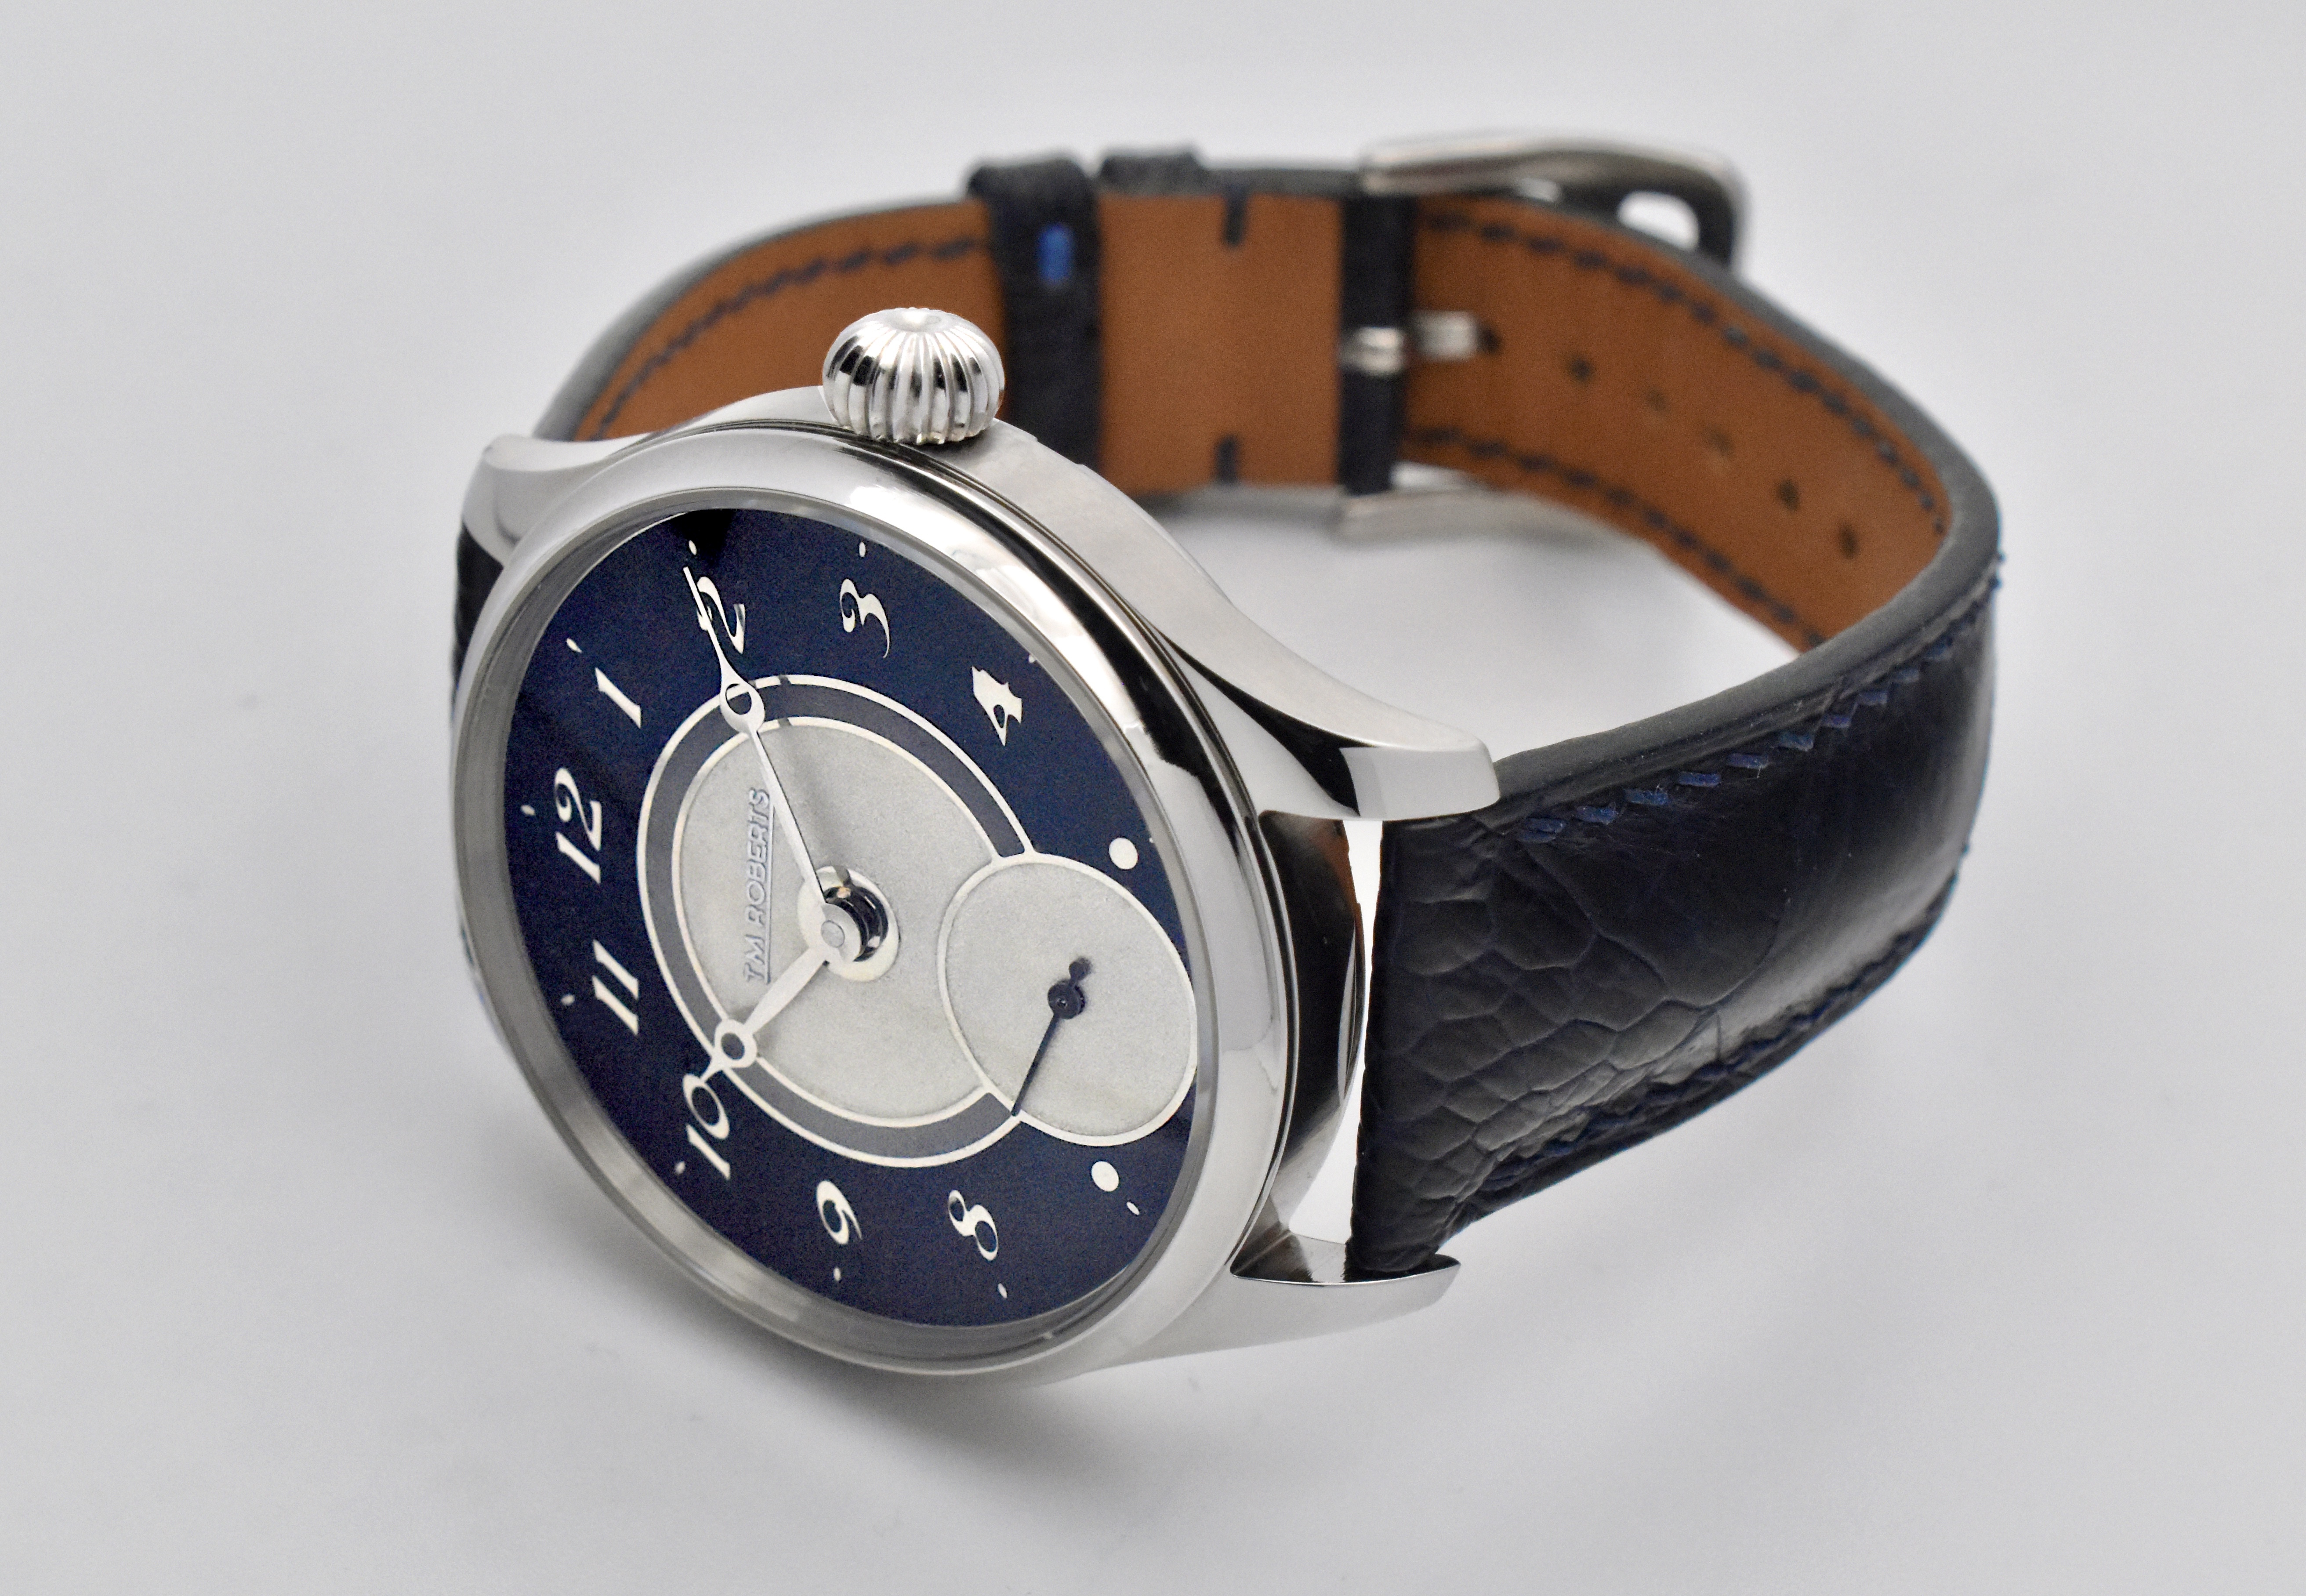
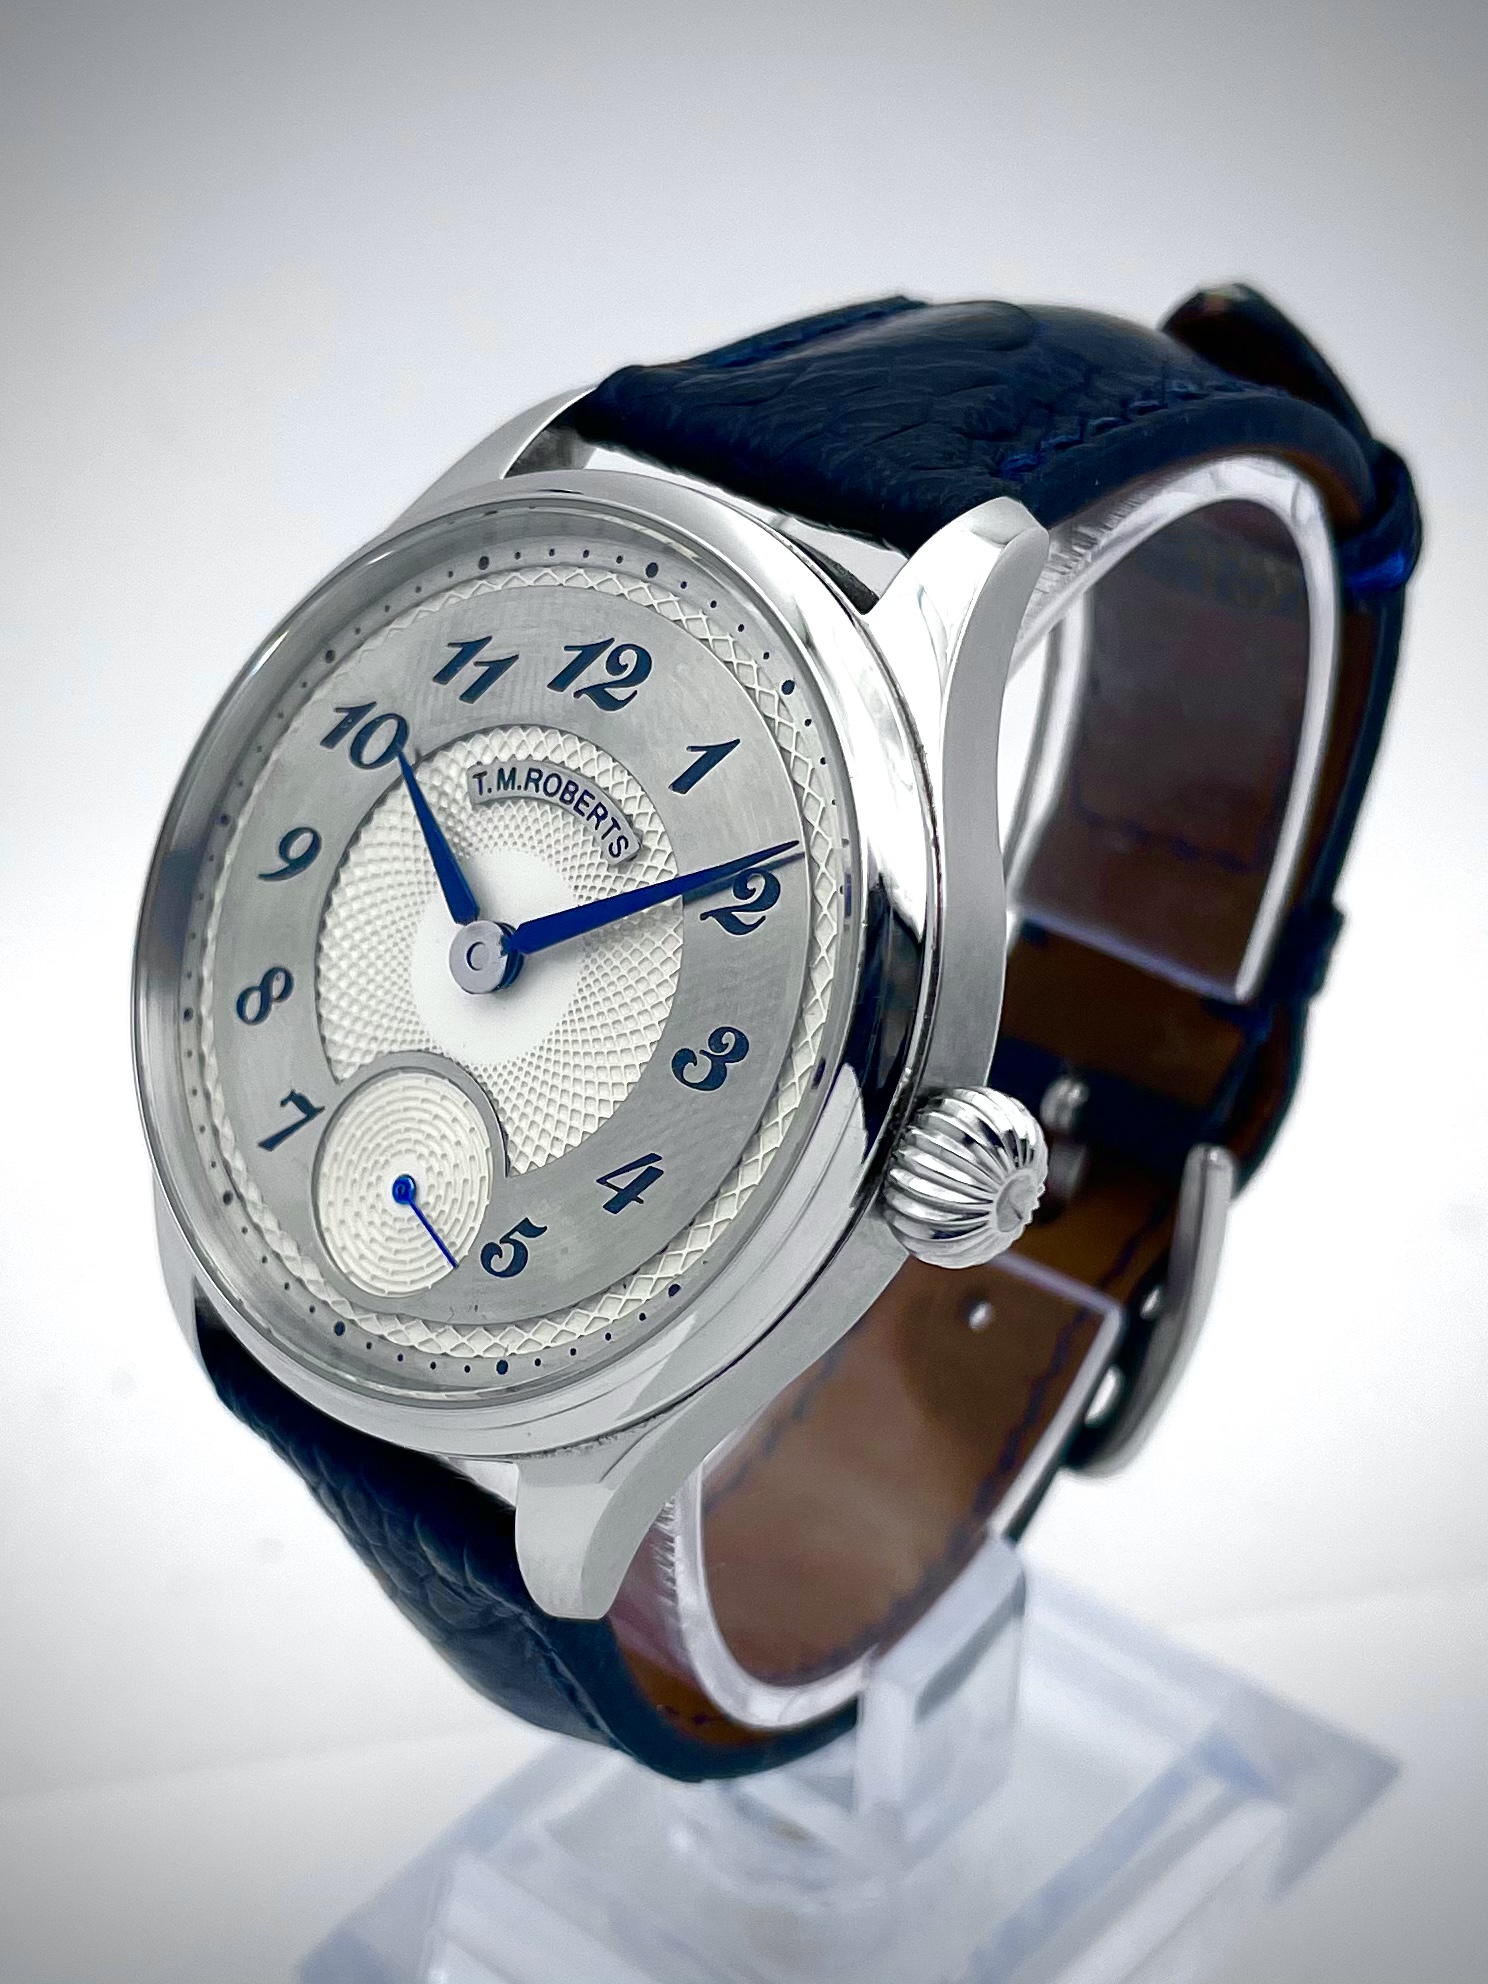
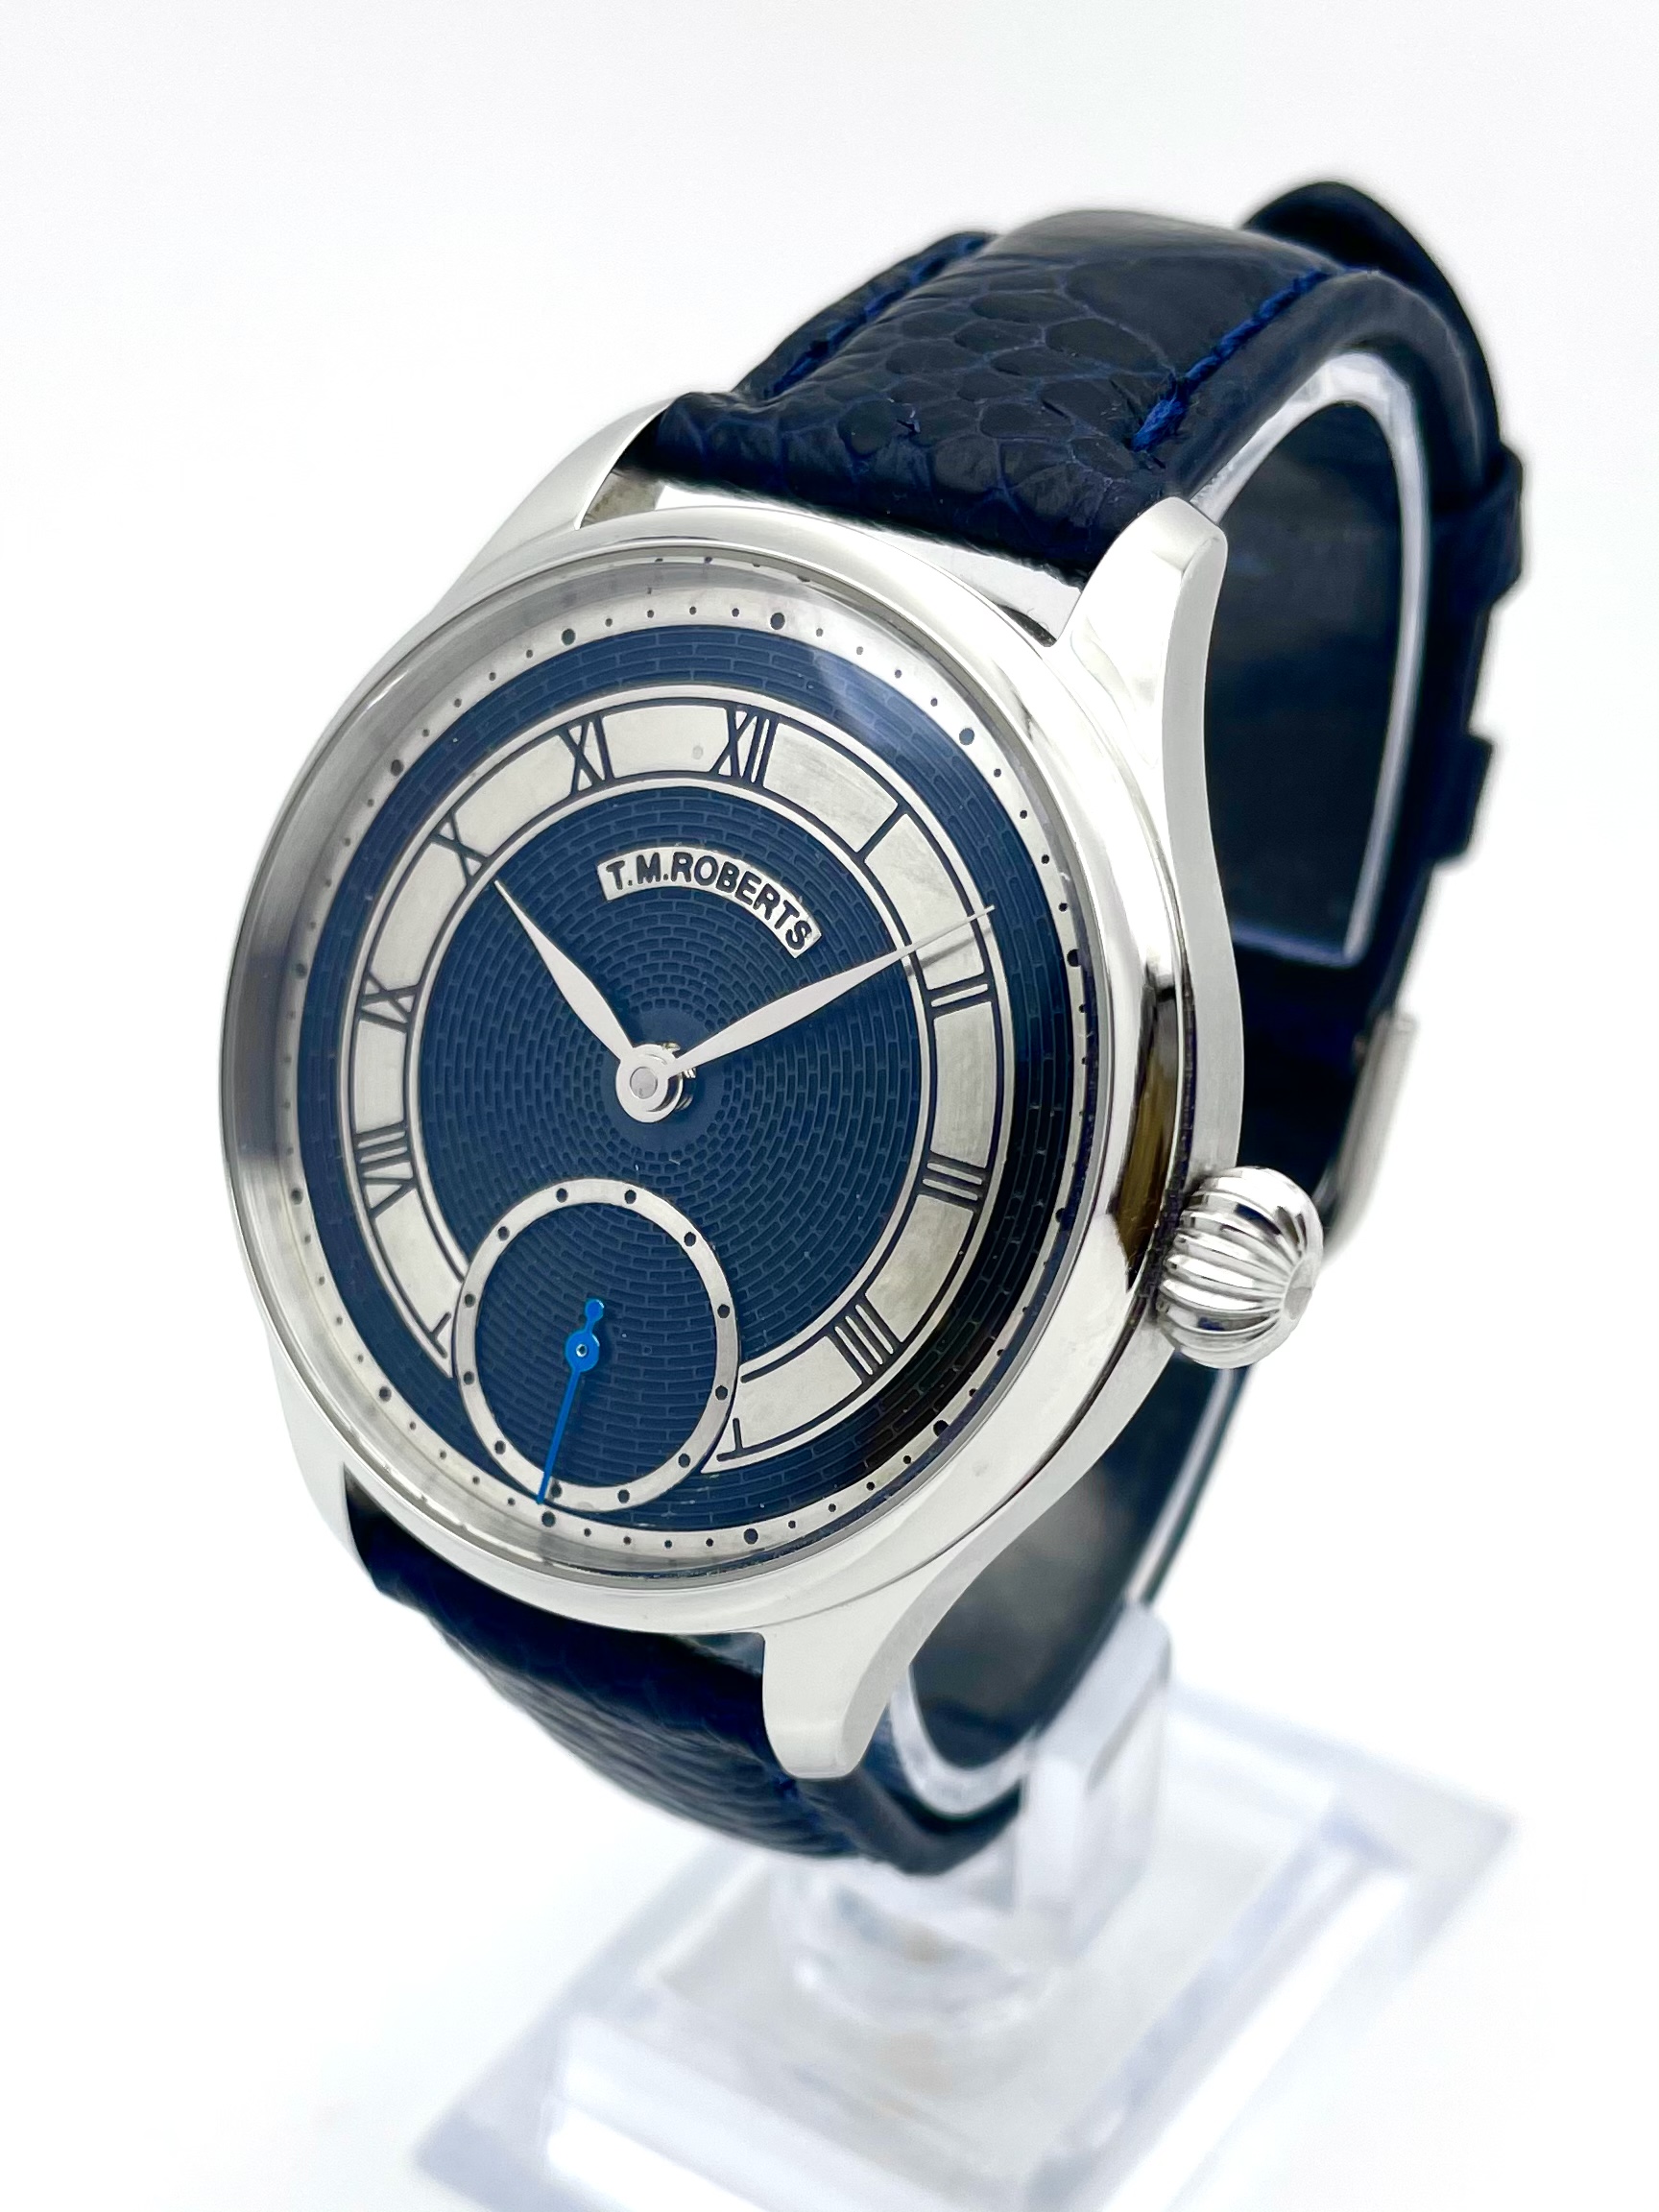
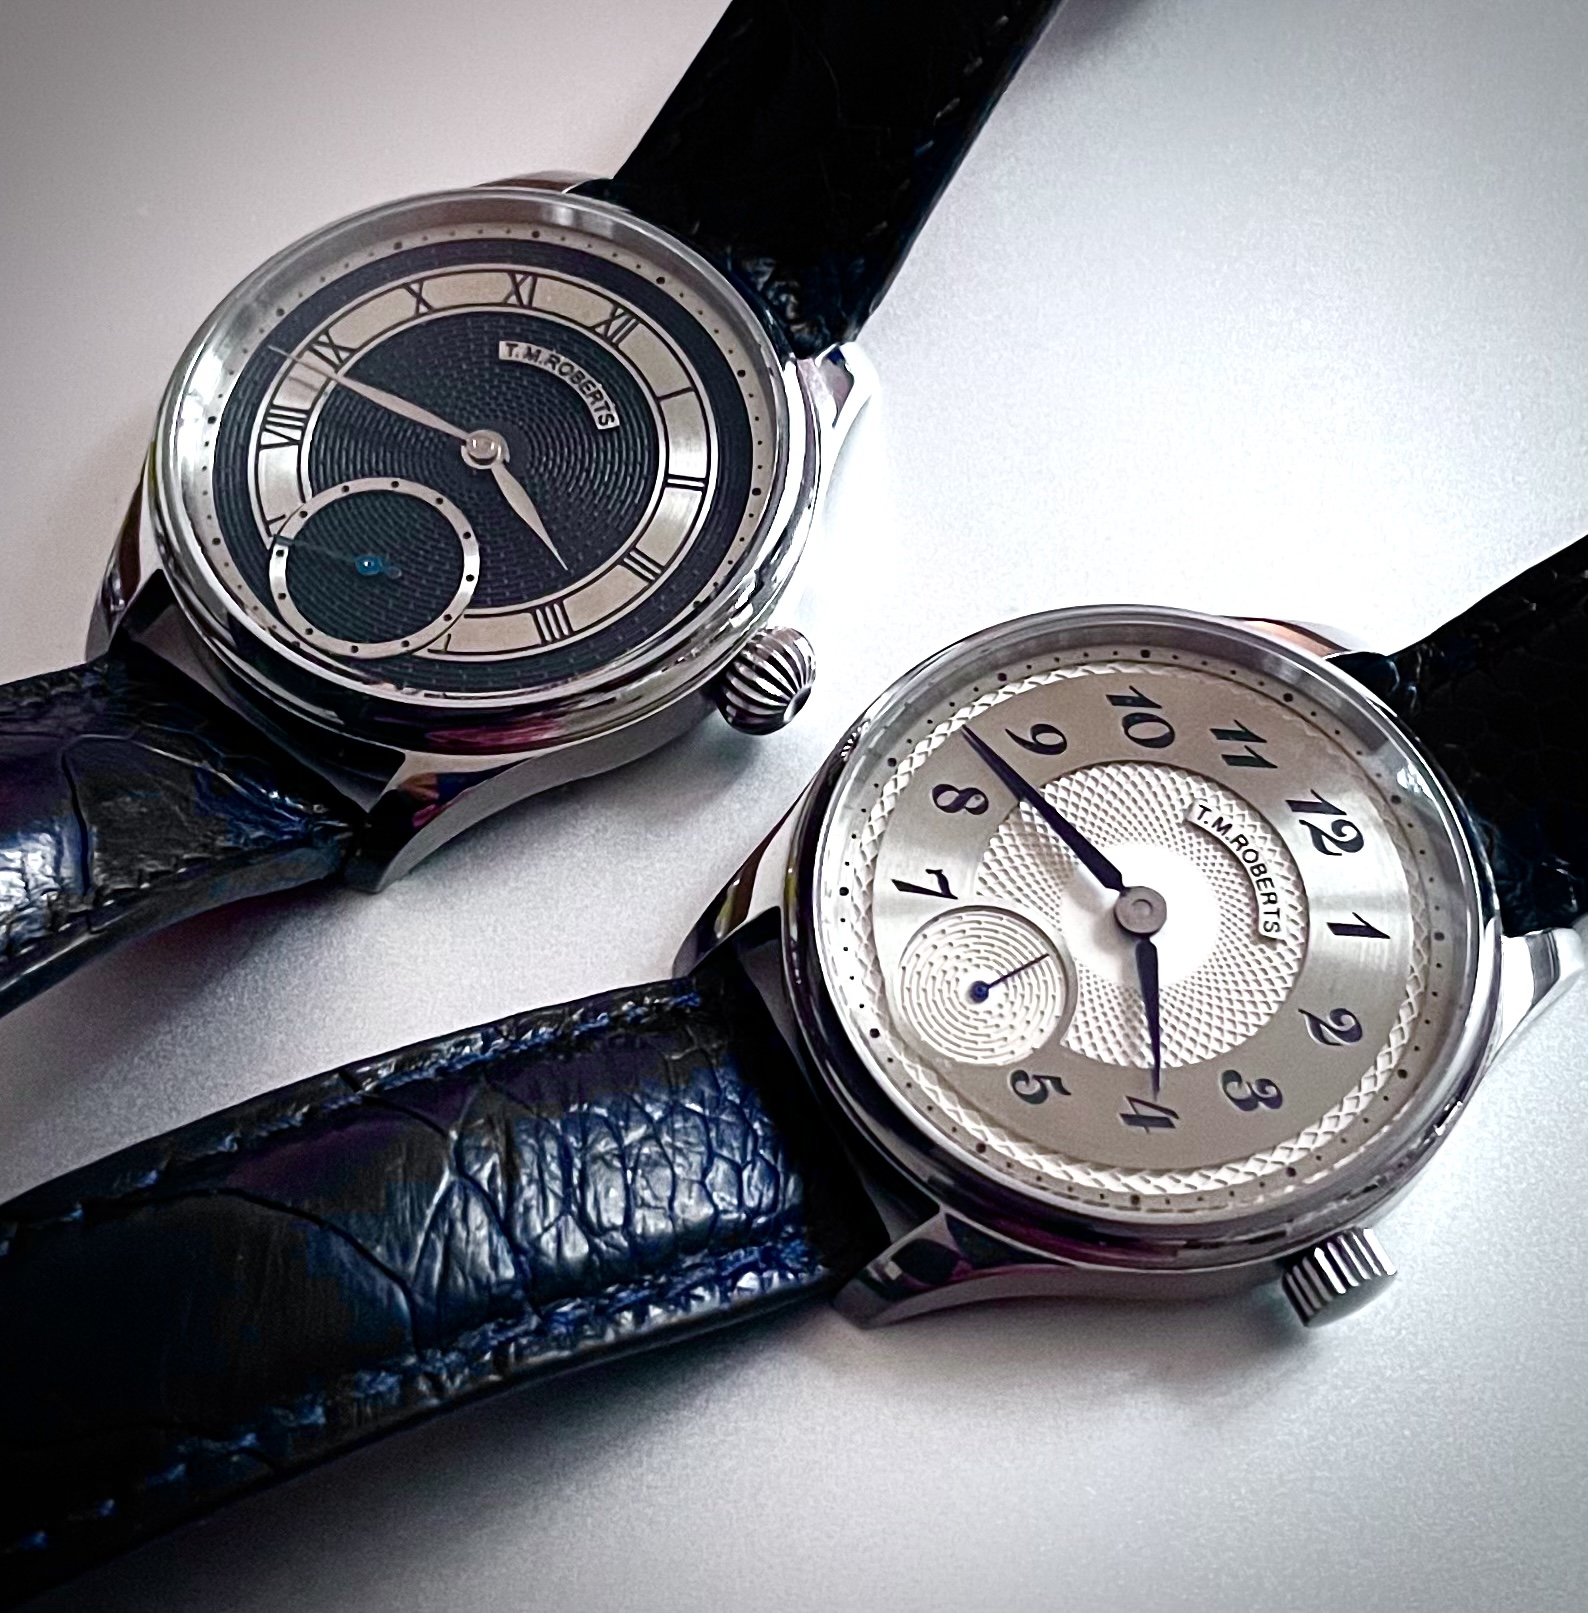
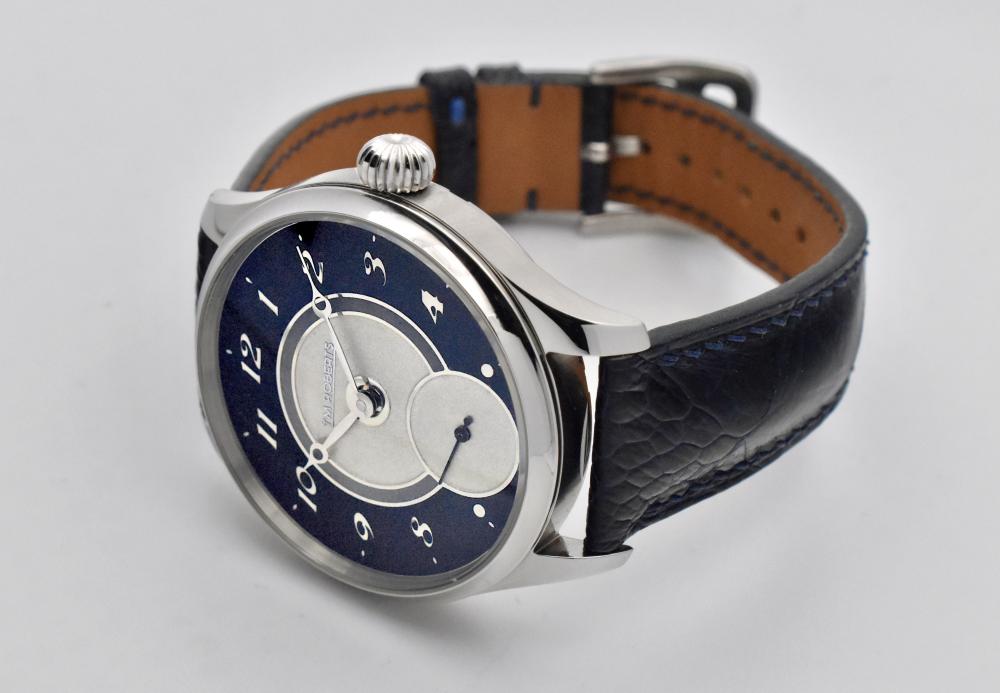
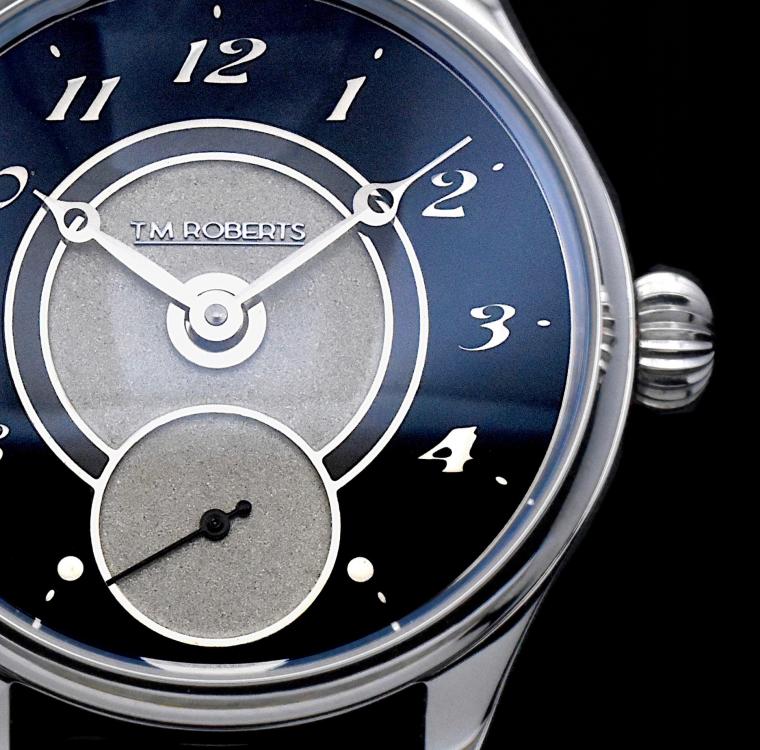
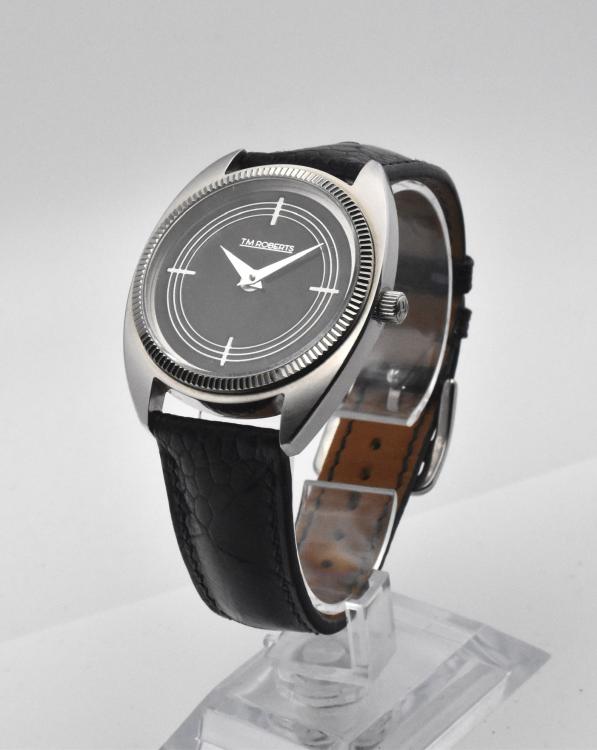
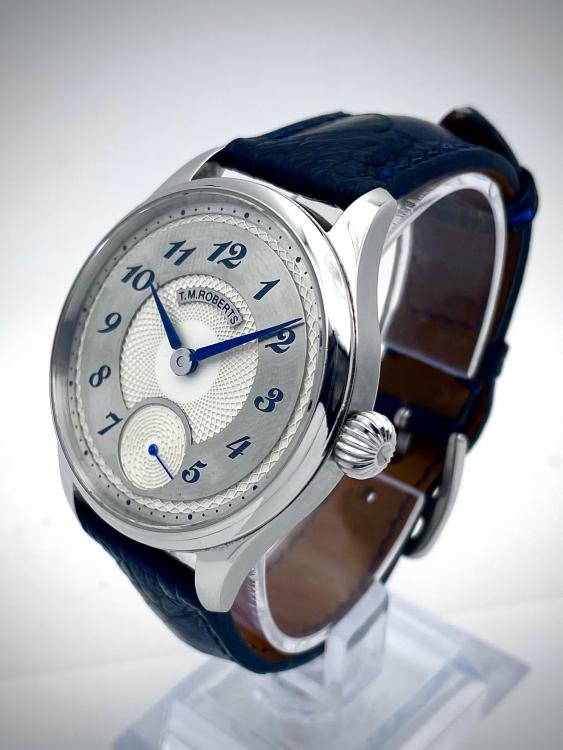
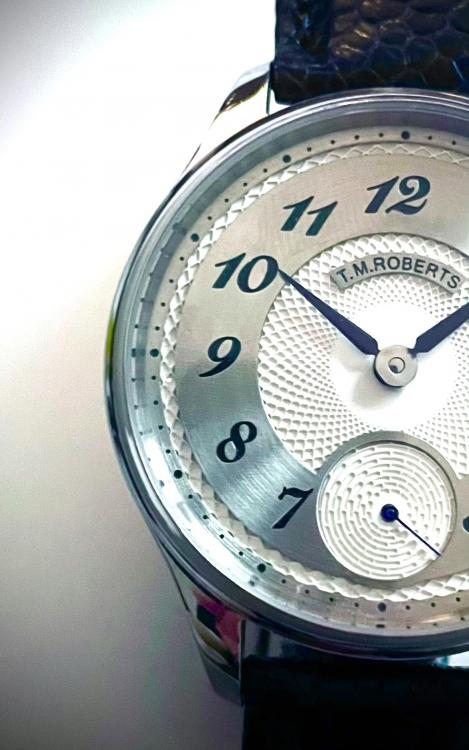
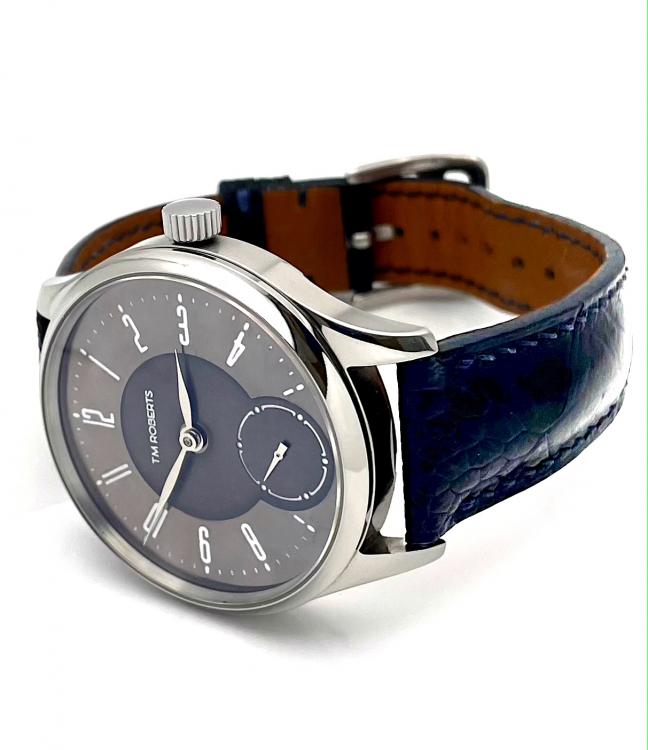
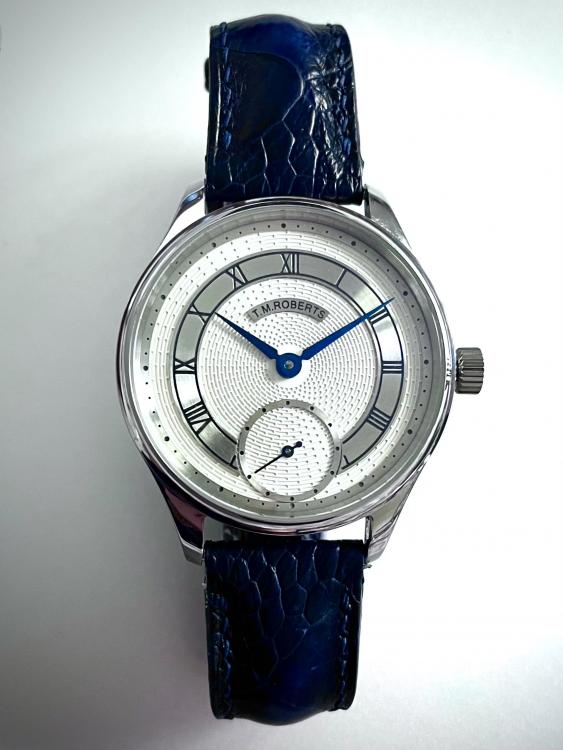
Hi All, Its good to be back, and I have missed you all tremendously. I haven't posted on the forum since earlier in the year. Since I was last on a lot has happened. Lots of life changes have taken place spurred on by various health issues (bl**dy covid!). I have given up my day job and focused entirely on making watches. Not for profit I might add, but really as a type of happiness therapy. I won't go into details here, but will happily discuss if anyone is interested. Ive learnt a lot of new skills and techniques in the last few months, and now look back at my earlier creations with a certain embarrassment. Anyway, these are a few of my latest creations. As always all feedback is appreciated. Constructive or otherwise.

 1 point
 -
There's no fix for this that won't involve a lathe at least, and some skilled work on that machine. Any type of glue will definitely not hold up, and even very careful soldering would never come close to the strength of the original material. If I needed to do this, I would bore the bridge out in a faceplate in the lathe, to the diameter of the broken off tube, then (from underside) make a small additional recess a little bit larger, perhaps just 0.10mm deep. This would accept a tube of the original diameter, which has a corresponding lip on it to fit the recess, that gets pressed in. Would need a left hand tap to thread the tube*. The press fit should hold up to the stress of tightening the screw, and the lip would prevent pullout under load from winding (the winding pinion pushes up on the crown wheel while turning it). *For those without a full selection of left hand taps, which is pretty much everyone, on a piece like this in brass you can take a similar left hand screw from an assortment and file 3 flats at 120 degrees and make a tap that will work fine for a use like this.1 point
-
Well, without doing anything but putting it in in a box I’ll give you 150 euros and carriage Tom1 point
-
Well done for that, do some time with them in vinegar with an ultrasonic and rinse them off with IPA followed up with a coat of renaissance wax. Tom1 point
-
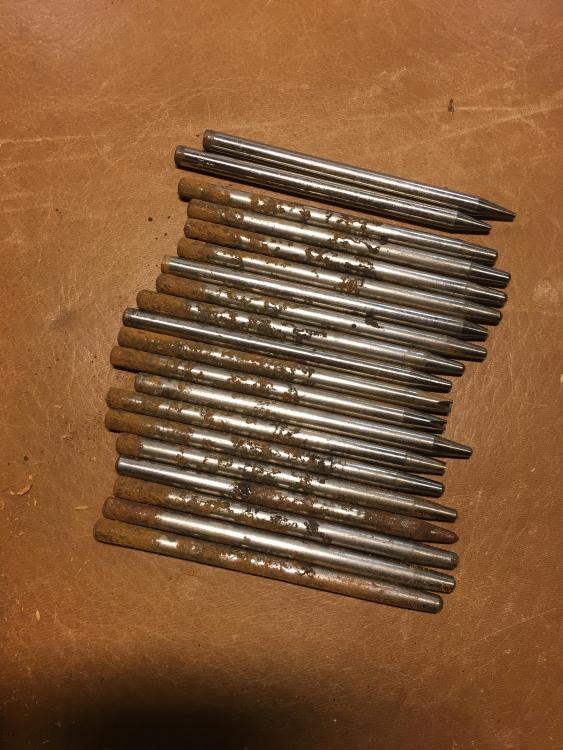
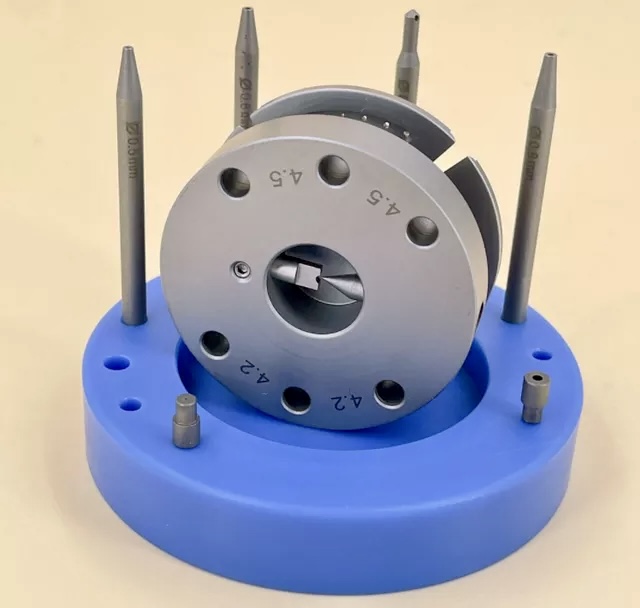
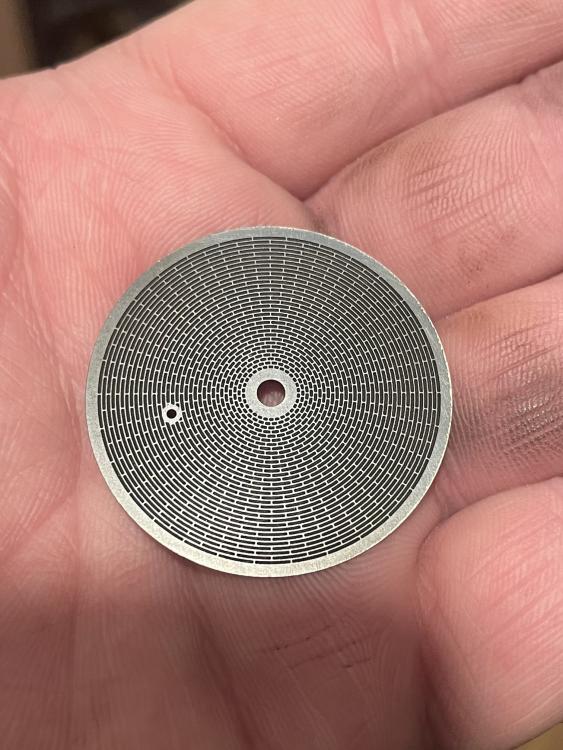
On its way from the Middle Kingdom. Note there are two versions of this tool. The ‘updated’ one has four additional 2.x diameter holes. Bought nine Seiko 1104a non running movements for practice (about 2 USD apiece) from Speedtimer Kollektion, two working 1104 watches on Yahoo Japan auction (850 Yen each), and some NOS 1104a parts - balance staffs, rollers, barrel and arbor etc. Planning to learn balance staff replacement, hair spring manipulation etc on them.1 point
-
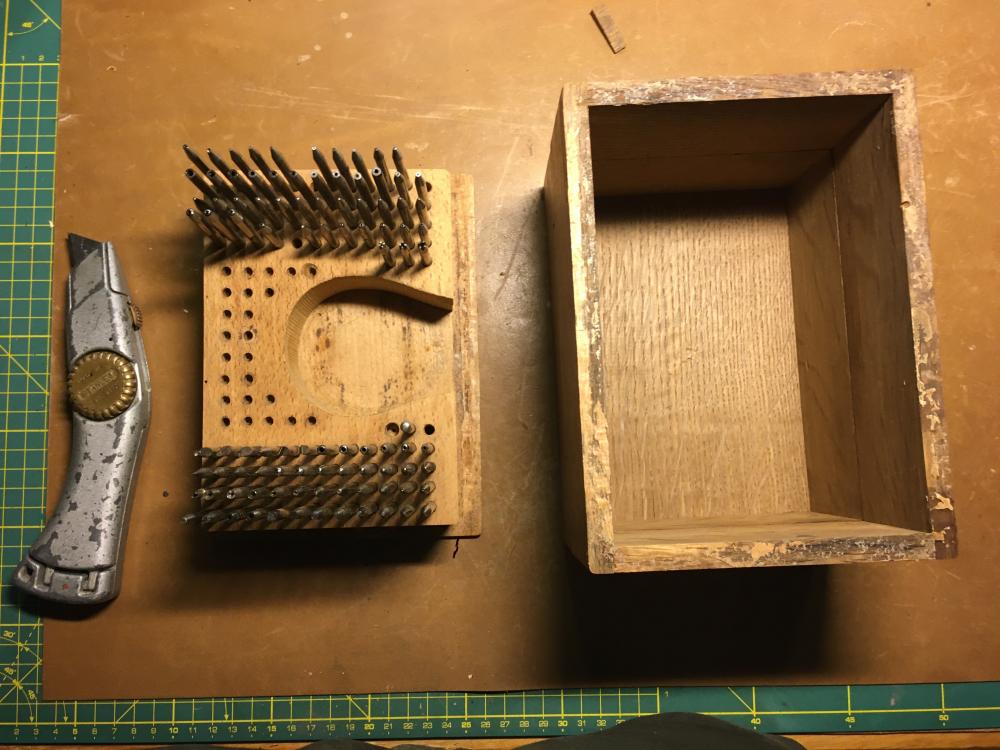
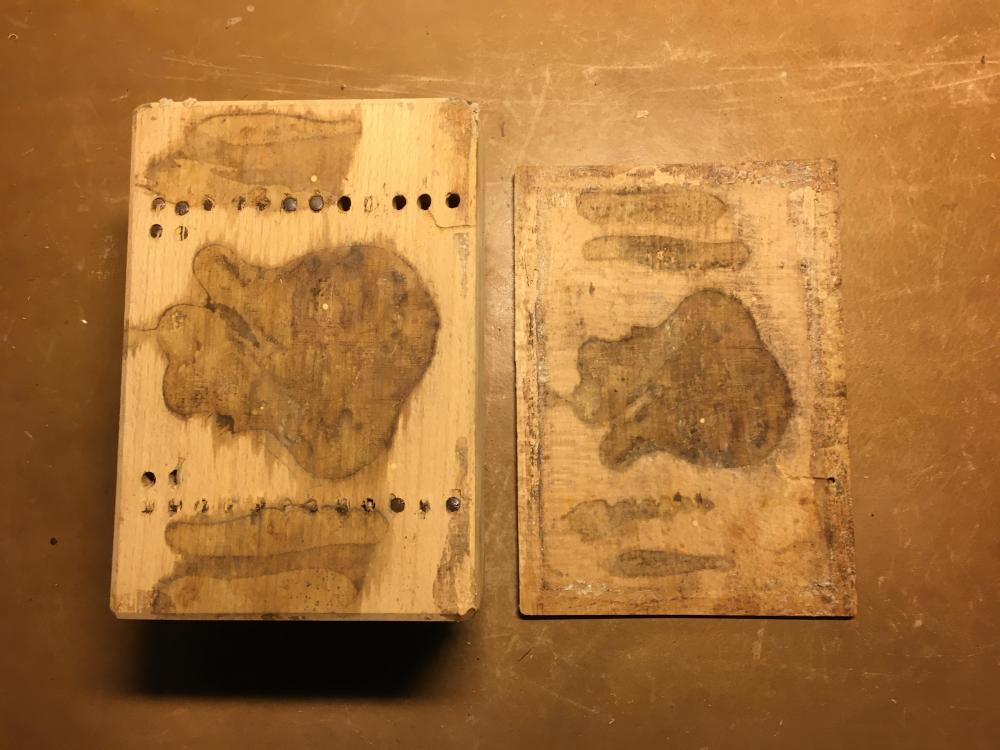
I had a look at that. It seems that the wooden block containing the punches is glued onto the bottom of the box. The bottom of the box seems to be the same type of wood as in which the punches are situated, but they are for sure two separated pieces of wood. The sides are made of a different type of wood. So, my suspicion is that the, let's call it the "punch-block" is glued onto the bottom plate and the sides of the box are glued onto the bottom. It also seems that the holes, in which the punches are situated, are fully drilled through the "punch-block" and that the bottom of the box acts as an "end". I was also thinking of trying the free the bottom plate of the box-sides, destroy the bottom plate which would than give me access to the "punch-block" and knock the punches out from underneath. A rectangular bottom plate can be easily constructed again. That's an option, perhaps a bit further down the line ?? ***UPDATE*** I decided to pursue the idea of trying to separated the bottom with the sides of the box and had some suc6 ! Now trying to separate the box-bottom from the punch-block ....... perhaps the sun comes up tomorrow after all? *** 2nd UPDATE *** Oh Lordy, no wonder that they were as stuck as stuck can be. They are slowly coming out one-by-one and quite some work ahead to save this set ...; Not such a good idea to store tools in an unheated garage or on the attic
 1 point
 -
Does the wooden insert come out of the box? Maybe the holes for the stakes go all the way through and you could knock the stakes out with a parallel punch? Tom1 point
-
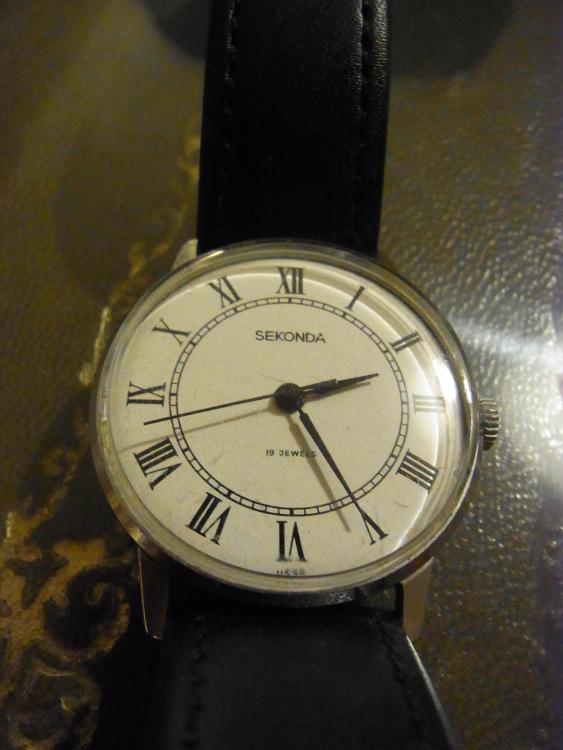
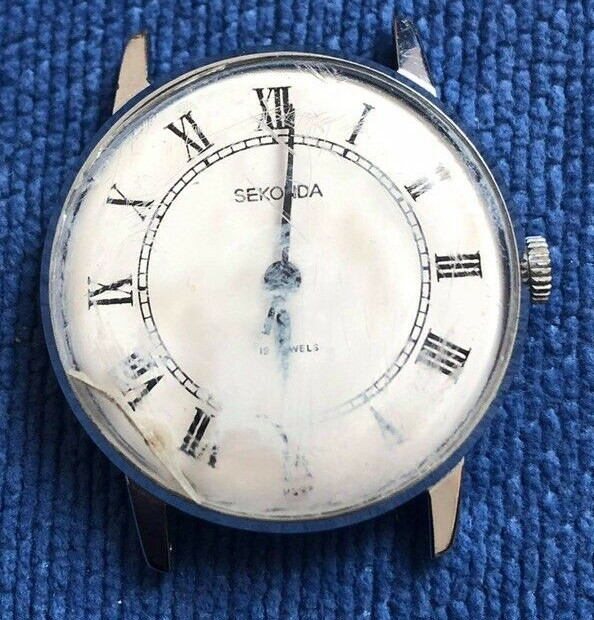
@Neverenoughwatches I did a little more Sekonda research over my lunch hour today and turned up a bunch of Sekonda watch catalogs on Archive.org. This one from 1968 shows a very similar watch with a slightly different Roman dial on page 10 https://archive.org/details/Sekonda_Catalog_1968/page/n9/mode/2up I also found this link by translating Raketa Catalogue into Russian with Google translate. "каталог часов Ракета" according to google translates Raketa Watch Catalaog. https://ussr--watch-com.translate.goog/watch-catalogues/?_x_tr_sch=http&_x_tr_sl=auto&_x_tr_tl=en&_x_tr_hl=en&_x_tr_pto=wapp So it seems these watches may just as likely to be from the late sixties as they are from the late eighties or early nineties. I'm not sure if this is a good thing or a bad thing, but it is certainly... a thing. One other thing I spotted, one of the Raketa catalog PDFDs called "Каталог часов Ракета, 1967-71 — Машприборинторг.pdf" lists models which it suggests are based on the 2609A but there is no mention of the 2609HA, so perhaps this pushes the date past 1971, but how far past, I have no idea. Of course they may simply have used the same catalog from 1967 to 1971 and whatever caliber was available during those years, without revising the catalog.1 point
-
A bit of a non-sequitur...recently I distorted a balance wheel when removing a timing screw. It was tight and by pressing against the wheel while turning the screw, I compressed it just a bit. Who knew? Well...I didn't. This is a great idea. I have done them both ways...and since I am new at this...I have not done but a few. I am fearful when doing it on the lathe because bad things can happen...which reminds me of a famous quote by Derrell Royal, coach of the University of Texas football team. Someone asked him why his team never used the forward pass. He said, "With the forward pass, three things can happen and two of them are bad."1 point
-
@Birbdad hopefully this will help top part outside diameter 25mm inside diameter 22mm arbour hole 3mm overall height 14.25mm depth of central cavity 9.75mm base part core outside diameter 21.5mm base outside diameter 25mm base height 4mm overall height 16.5mm arbour hole 3mm top of core is convex, centre is approximately 1.3mm lower than overall height measured to the edge of the top of the core Tom Sorry, autocorrect gave me convex, it should of course be concave1 point
-
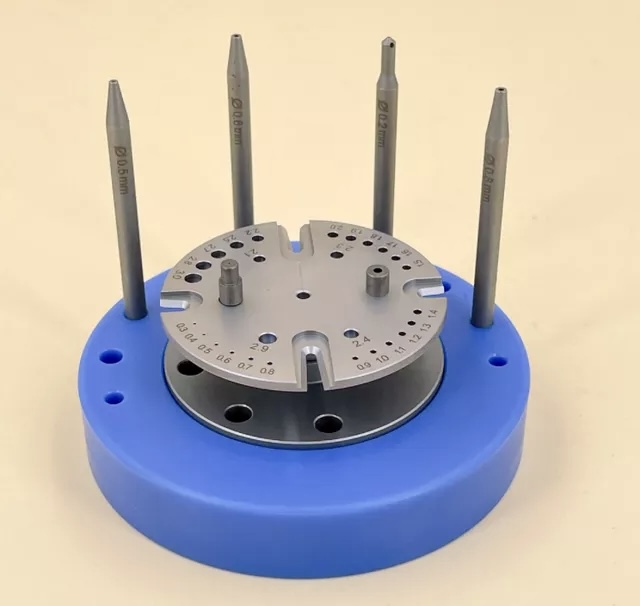
AliExpress balance tool (50 USD) - roller removal, staff riveting etc
 1 point
 -
It does look identical Andy the dial on mine was a little grafted and after inspection of the chip at the side of mine i came to the conclusion it was enamelled. Either that or very thick hard paint. So i took a risk and went at it with piece of foam and some brasso ( not as crazy as i make it sound ). It removed some minor scratches and came up like new. Yes the lift angle is 42 ' yours have better power than mine. Absolutely Andy, more that happy to send you anything i have that helps you out. We're all here to help each other and like i said before i appreciate the time and effort you put into helping me date the Sekonda. I wondered the same also when its release year was. Just finished going through the ones that are labelled. Also found a few calibers I've never heard of, the seller has slipped up, some high end watch staffs in there and also a few record 022k calibre to repair my DD, well chuffed. Still around 400 staff calibres to identify, unlikely i will get all of them, some are really old so I'm not expecting to be able to aquire the dimensions for all of them.1 point
-
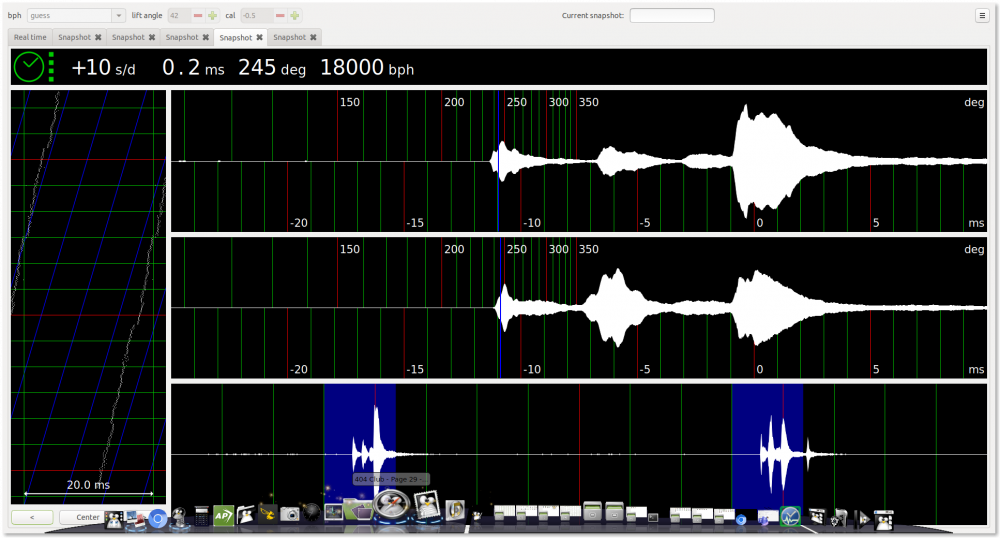
Actually you don't need to wait, since as I said, I already have this one in the collection, which is very similar to yours. Lift angle I think is 42° and I serviced it a while back (some time around May 2020, since that is when I saved the above "as purchased" ebay auction picture). It looks to be still in good running order as you can see below. The swing is OK at 245°, but could be a little better. I do enjoy wearing it from time to time (as you can tell by the slight scuff on the crystal) as it has a nice simple classical and very readable Roman numeral dial. I had assumed it was from the mid 1970s until we looked in to it. I wonder when they actually first produced this design. I may take you up on that. That is quite an interesting haul you have there. It also reminds me I need to sort through some of the recent purchases. Some mainsprings and crystals for starters. EDIT: Those scuff marks on the crystal were bothering me, so I just spent the last 10 minutes buffing them out, and shining the thing up like new. Guess what I will be wearing tomorrow. I forgot to say, the case back number on mine is 186063, not that we have been able to make much sense of the case back numbers so far.
 1 point
 -
@Angrybear i don’t know how I forgot this company https://anordain.com . Based in Glasgow creating there own dials and hands. Sellita movements, prices are £2000-2500 +vat. For the level of effort they put into their dials I think that is fair and would think on a par with the level you are currently producing. Have a look and see if you think the prices would fit what your ambition’s are. Tom1 point
-
Well done patience is a friend in watch repair. A stiff needle mounted in a handle works well for poking the wheels also if you get a good stiff needle and stone the eye back so you have a "V" shape again mounted also acts to push the wheels around, cheap to make easy to use. enjoy.1 point
-
Looks like a nice tool. The three shafts are the runners, the short one is specially made for working on long 4th wheel pivots. The slotted ends are the beds, and the markings on the beds should correspond to pivot sizes; as I understand it there were some tools made where the numbers are arbitrary, but generally not. Depending on the tool the number might be the actual pivot size you will make when the burnisher stops contacting the pivot, or it might make the pivot slightly smaller to fit a jewel of the marked size. These are intended for use with steel or carbide burnishers. Neither will appreciably wear the tool beds even with frequent use- but- often in the past they may have been used with stones or other abrasive tools (like sapphire tools). You should be able to discern grinding marks on the beds that are "factory", in which case you can pretty much rest assured the tool wasn't abused. Using abrasives on this tool is a big no-no. The discs are called lanterns, and are used when working on the pivot ends. A chip here or there isn't the end of the world, as you just need a hole that will pass the pivot through enough to access it with the burnisher. Yours should be fine. These tools were made as matched sets, and will almost always have a number on the frame and then numbers on the runners that correspond. In some cases the runners might just have the last digit or last two from the frame number. You will need a burnisher and a means to drive the pulley, I highly recommend the Bergeon carbide burnisher model 2933G. G is for gauche, or left in French, but it is actually for right hand use on a Jacot tool. They aren't cheap, so if you look for a secondhand one beware that some older ones have a rather large radius for conical pivots and might only be useful for large pocket watch staffs. The current ones (and ones made in the last 20-30 years for sure) have a 0.2mm radius which is small enough for even tiny staffs and still works well on larger pivots. To drive it, traditionally you would use a bow. I use a bow, with light fishing line. Another fine way to drive it is with a piece of elastic, with fishing line attached, and a ring at the end of that. Attach the elastic back on the bench behind the tool (which will be in a vice), wrap the line around the pulley, and pull on the ring to drive it.1 point
-
I totally agree with you, and really appreciate the support. Thanks Nickelsilver. I do understand the economics involved, although as a consumer it can be hard to swallow. Ive had a couple of businesses and really do understand just how expensive they are to keep going, and how the cost is passed onto the customer. When I had the car workshop which I consider to be a very small business, it cost me many thousands each week just to open the doors. Customers sometimes struggled to understand why an hourly rate could possibly be so high, but it was very carefully calculated so we could keep the doors open. What I don't like is the disingenuous nature of some of these brands. Trying to tell you, you are getting something special when you aren't. The aforementioned brand made a big deal of their special stamped brass dials! it felt like they were taking advantage of their chosen market. I really can't stand that. Wow. Im not sure what to say! Thank you Claypipe. Im not sure I can take the credit for this. This is a very special forum that brings out the best in people from my point of view. But I am very pleased you like the watches, and would love to see your work. Welcome to the forum. Today is my 45th birthday and I’m very happy to have completed the watch I will be wearing for the rest of the year. I’ve finally got the brushing on the chapter ring exactly where I want it, the bleached silver just the right shade of white, and an even blue on the hands. Definitely making progress.
 1 point
 -
That is always the last thing I do. I like them uncut in case I have to pull the movement for some unexpected reason. I don't either, but I don't tell customers that their baby is ugly. It is all made of wood. I see that these are called faux marble cases.1 point
-
Hi Spectre, apologies. I don't think I explained the process very well. I print the designs onto acetate to create a photo resist. The photo resist is used to etch the designs into German (Nickel) Silver. The German Silver dial is filed and polished to get the gradients I want. This can then be relatively easily electroplated. I clean the dial ultrasonically in benzine, and then in a soapy bath. Then I electro clean and activate the dial. I electroplate a gold strike layer so the silver plating adheres properly. It took me about 6 months and a lot of money and practice to start getting satisfactory results. Very interested to hear more about your woodwork and luthiery. I had a fully kitted out wood workshop until I had to get rid of it a couple of years ago. Ill hunt out some photos for you. If you ever visit the UK a beer would be great, im sure we could chat for hours about watches, cars and guitars. Ive done some research since you mentioned this. Garrick watchmakers appear to be doing something similar to myself using bought in movements. Their cheapest watch starts at £6000!!!!! I can understand why. It takes me upto about 200 hours to make a watch start to finish, and about £700 in materials. They seem to have quite a long waiting list as well, so maybe there is a demand for it.1 point
-
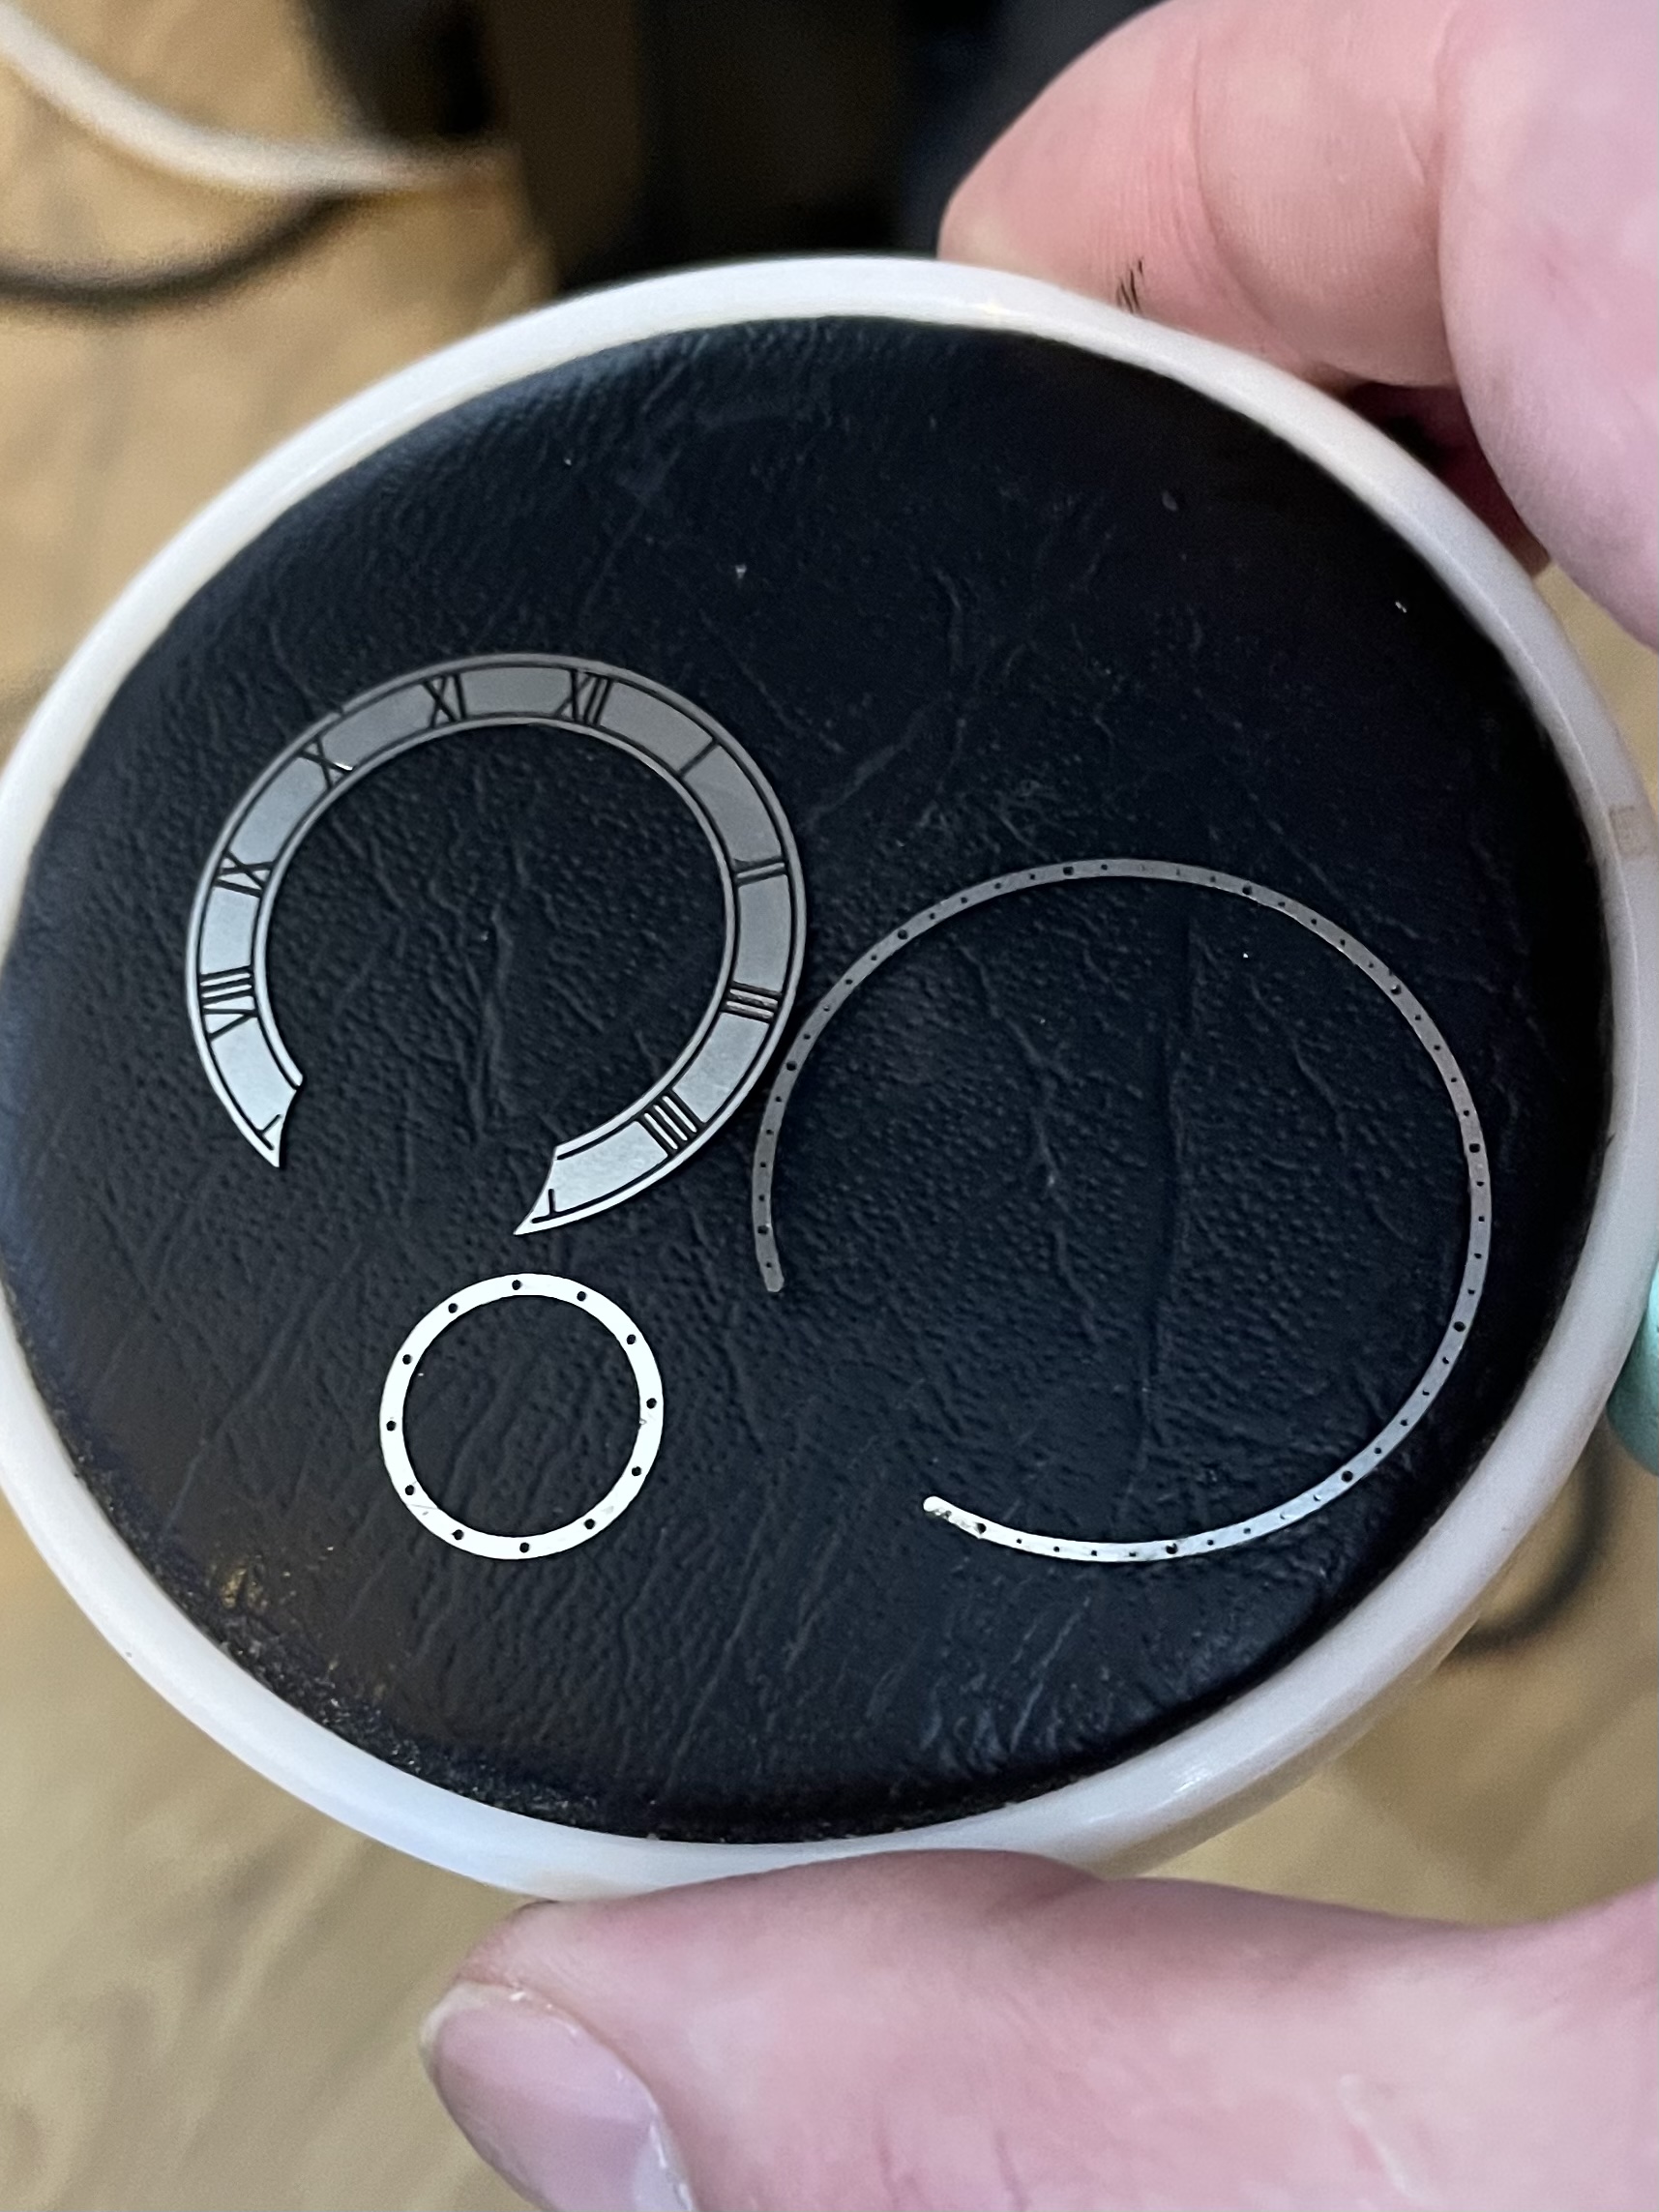
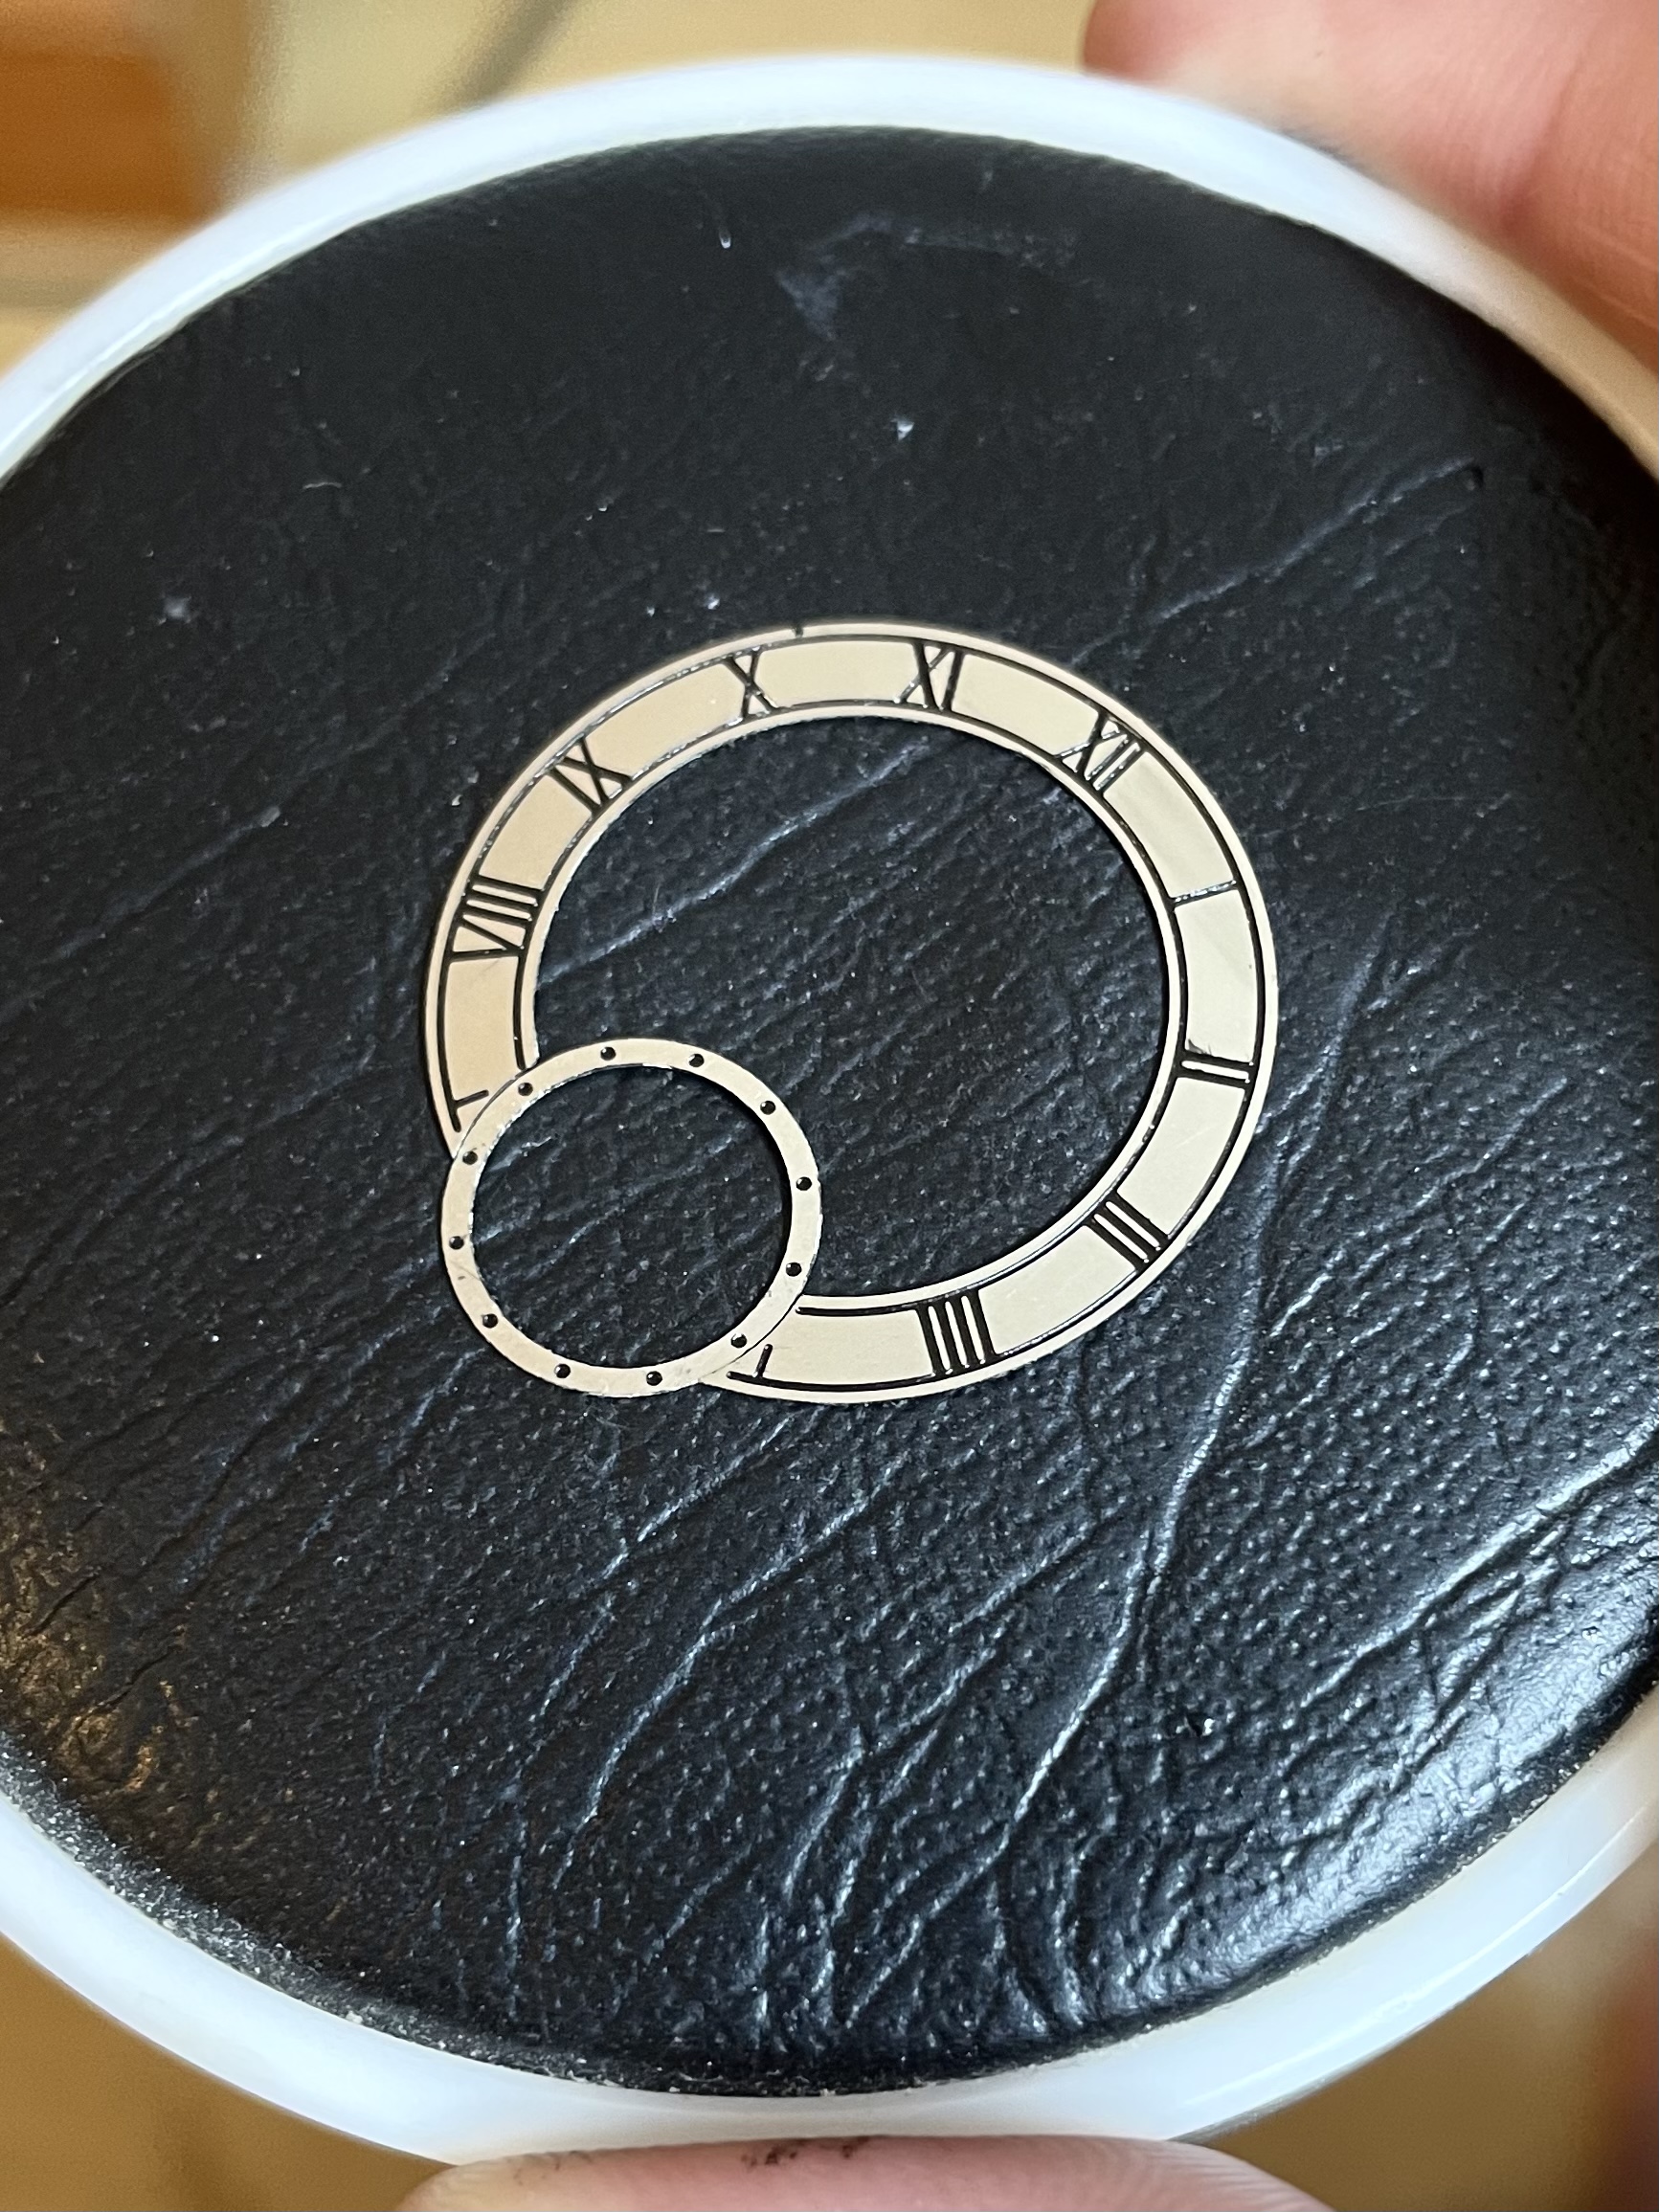
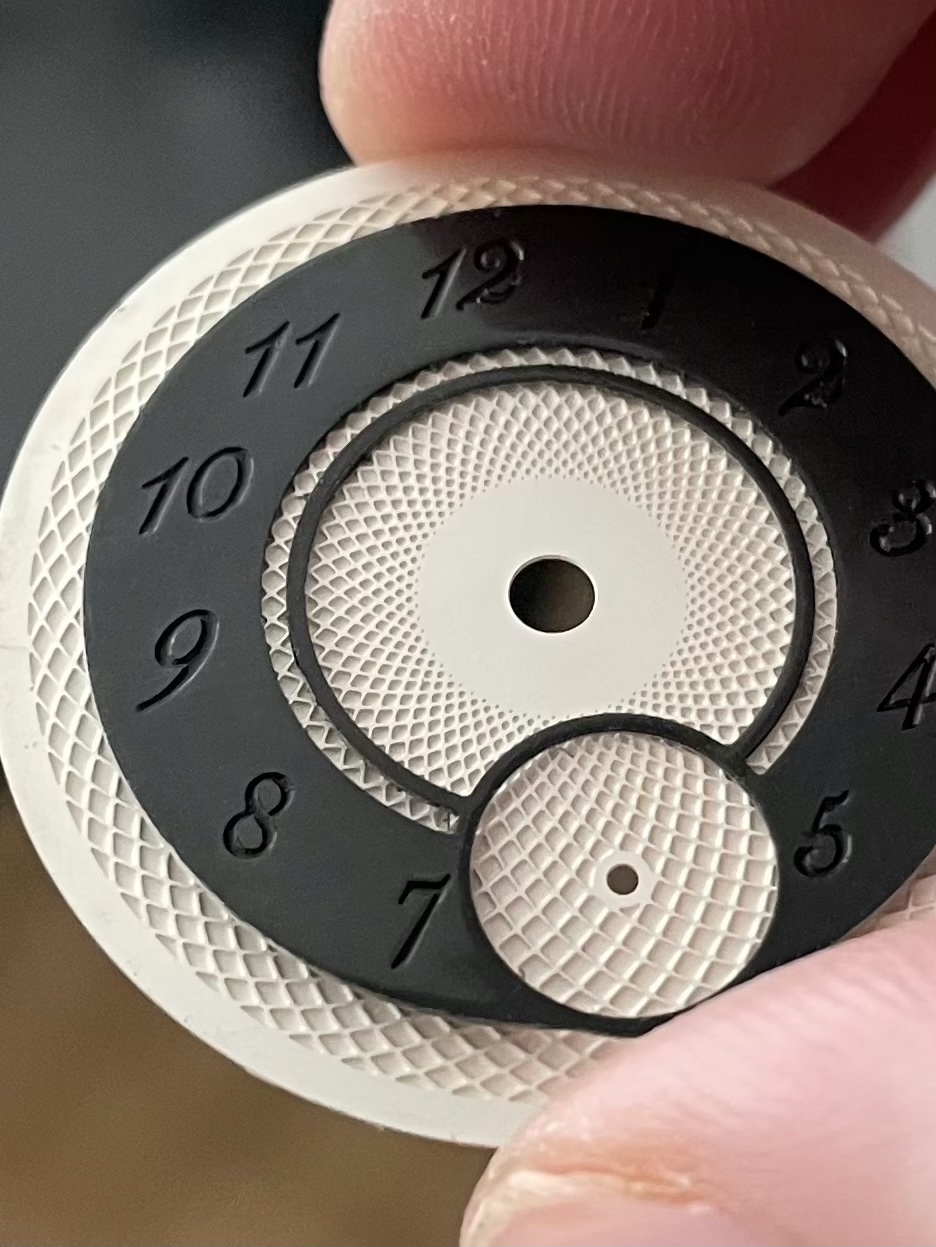
Thanks guys, Its taken about a year of working 4-5 hours a day to perfect the process for making the dials. Ive made over 100 dials now, most of which have gone in the bin! Most of the dials start with very precise detailed designs done in a vector graphics program and a sheet of 0.25mm German Silver. I print all the components to make the dials out of on transfer paper and fix this to the German Silver. Each component is cut out with a jewellers saw, following the lines on the transfer paper, filed and polished. The Guilloche type patterns are printed onto acetate to create a photo resist for etching. Once the pattern is etched they are filed and polished. Then any electroplating that needs doing is done. Eg, if im after a white colour I will gold plate the dial, then silver plate, and then heat bleach and pickle (usually multiple times as any mistakes here are costly) the silver to a pure white. The dial will then be lacquered for protection and to prevent tarnishing. Black colours are either oxidised to the correct shade, or black nickel plated. A similar method is used to etch markings and finish chapter rings, sub second dial rings etc. All numerals and markings are infilled with Indian ink and the the component is either repolished or brushed to create the finish im after. The part is then lacquered. Once I have the dial components finished, everything is put together to complete the dial. Individual components completed, and testing the fit. Guilloche style pattern ready for plating. Various components being prepared. Checking the contrast between front and rear of dial. Is the white bright enough? Is the black dark enough? Etc


 1 point
 -
According to Dr ranfft AS 1207, 1263, 1266, 1267, 1311 and 1314 wiould interchange with 1203.1 point
-
I don't recall what you're working on, so accept my comments knowing that there will be individuals here who absolutely could/would attempt to fix that hairspring. I assume that when you say: ...you are in fact removing/replacing a worn or broken balance staff with one that wasn't originally part of the balance of this particular watch. Depending on the movement, I would have opted to try to find a "balance complete" (cock, hairspring, balance) to replace the whole thing. If this is your first service (and perhaps your only service) it seems that you're doing a rather deep dive for a beginner. Did your watch work before you started? If so there is no reason to think that using the pictured hairspring won't continue to "work". If your watch was having trouble before you began your service there are aspects of the pictured hairspring that would lead one to think replacement would be a good idea. I'm not that far along so I would have tended towards trying to find an entire balance that would have a good staff and hairspring - I'm not yet comfortable with disassembly of a balance and replacement of parts and the subsequent adjustments needed to get it back in good poise and running order.1 point
-
I am struck by the video quality shown by an Asian hobbyist and maker of the Youtube channel „Magic of Wheels“1 point
-
Hey guys. anyone know what happened to watch repair channel? Mark haven't post anything on Youtube and IG for months.1 point
-
That is, https://www.watchfix.com/1 point