Leaderboard


Popular Content
Showing content with the highest reputation on 09/25/22 in all areas
-
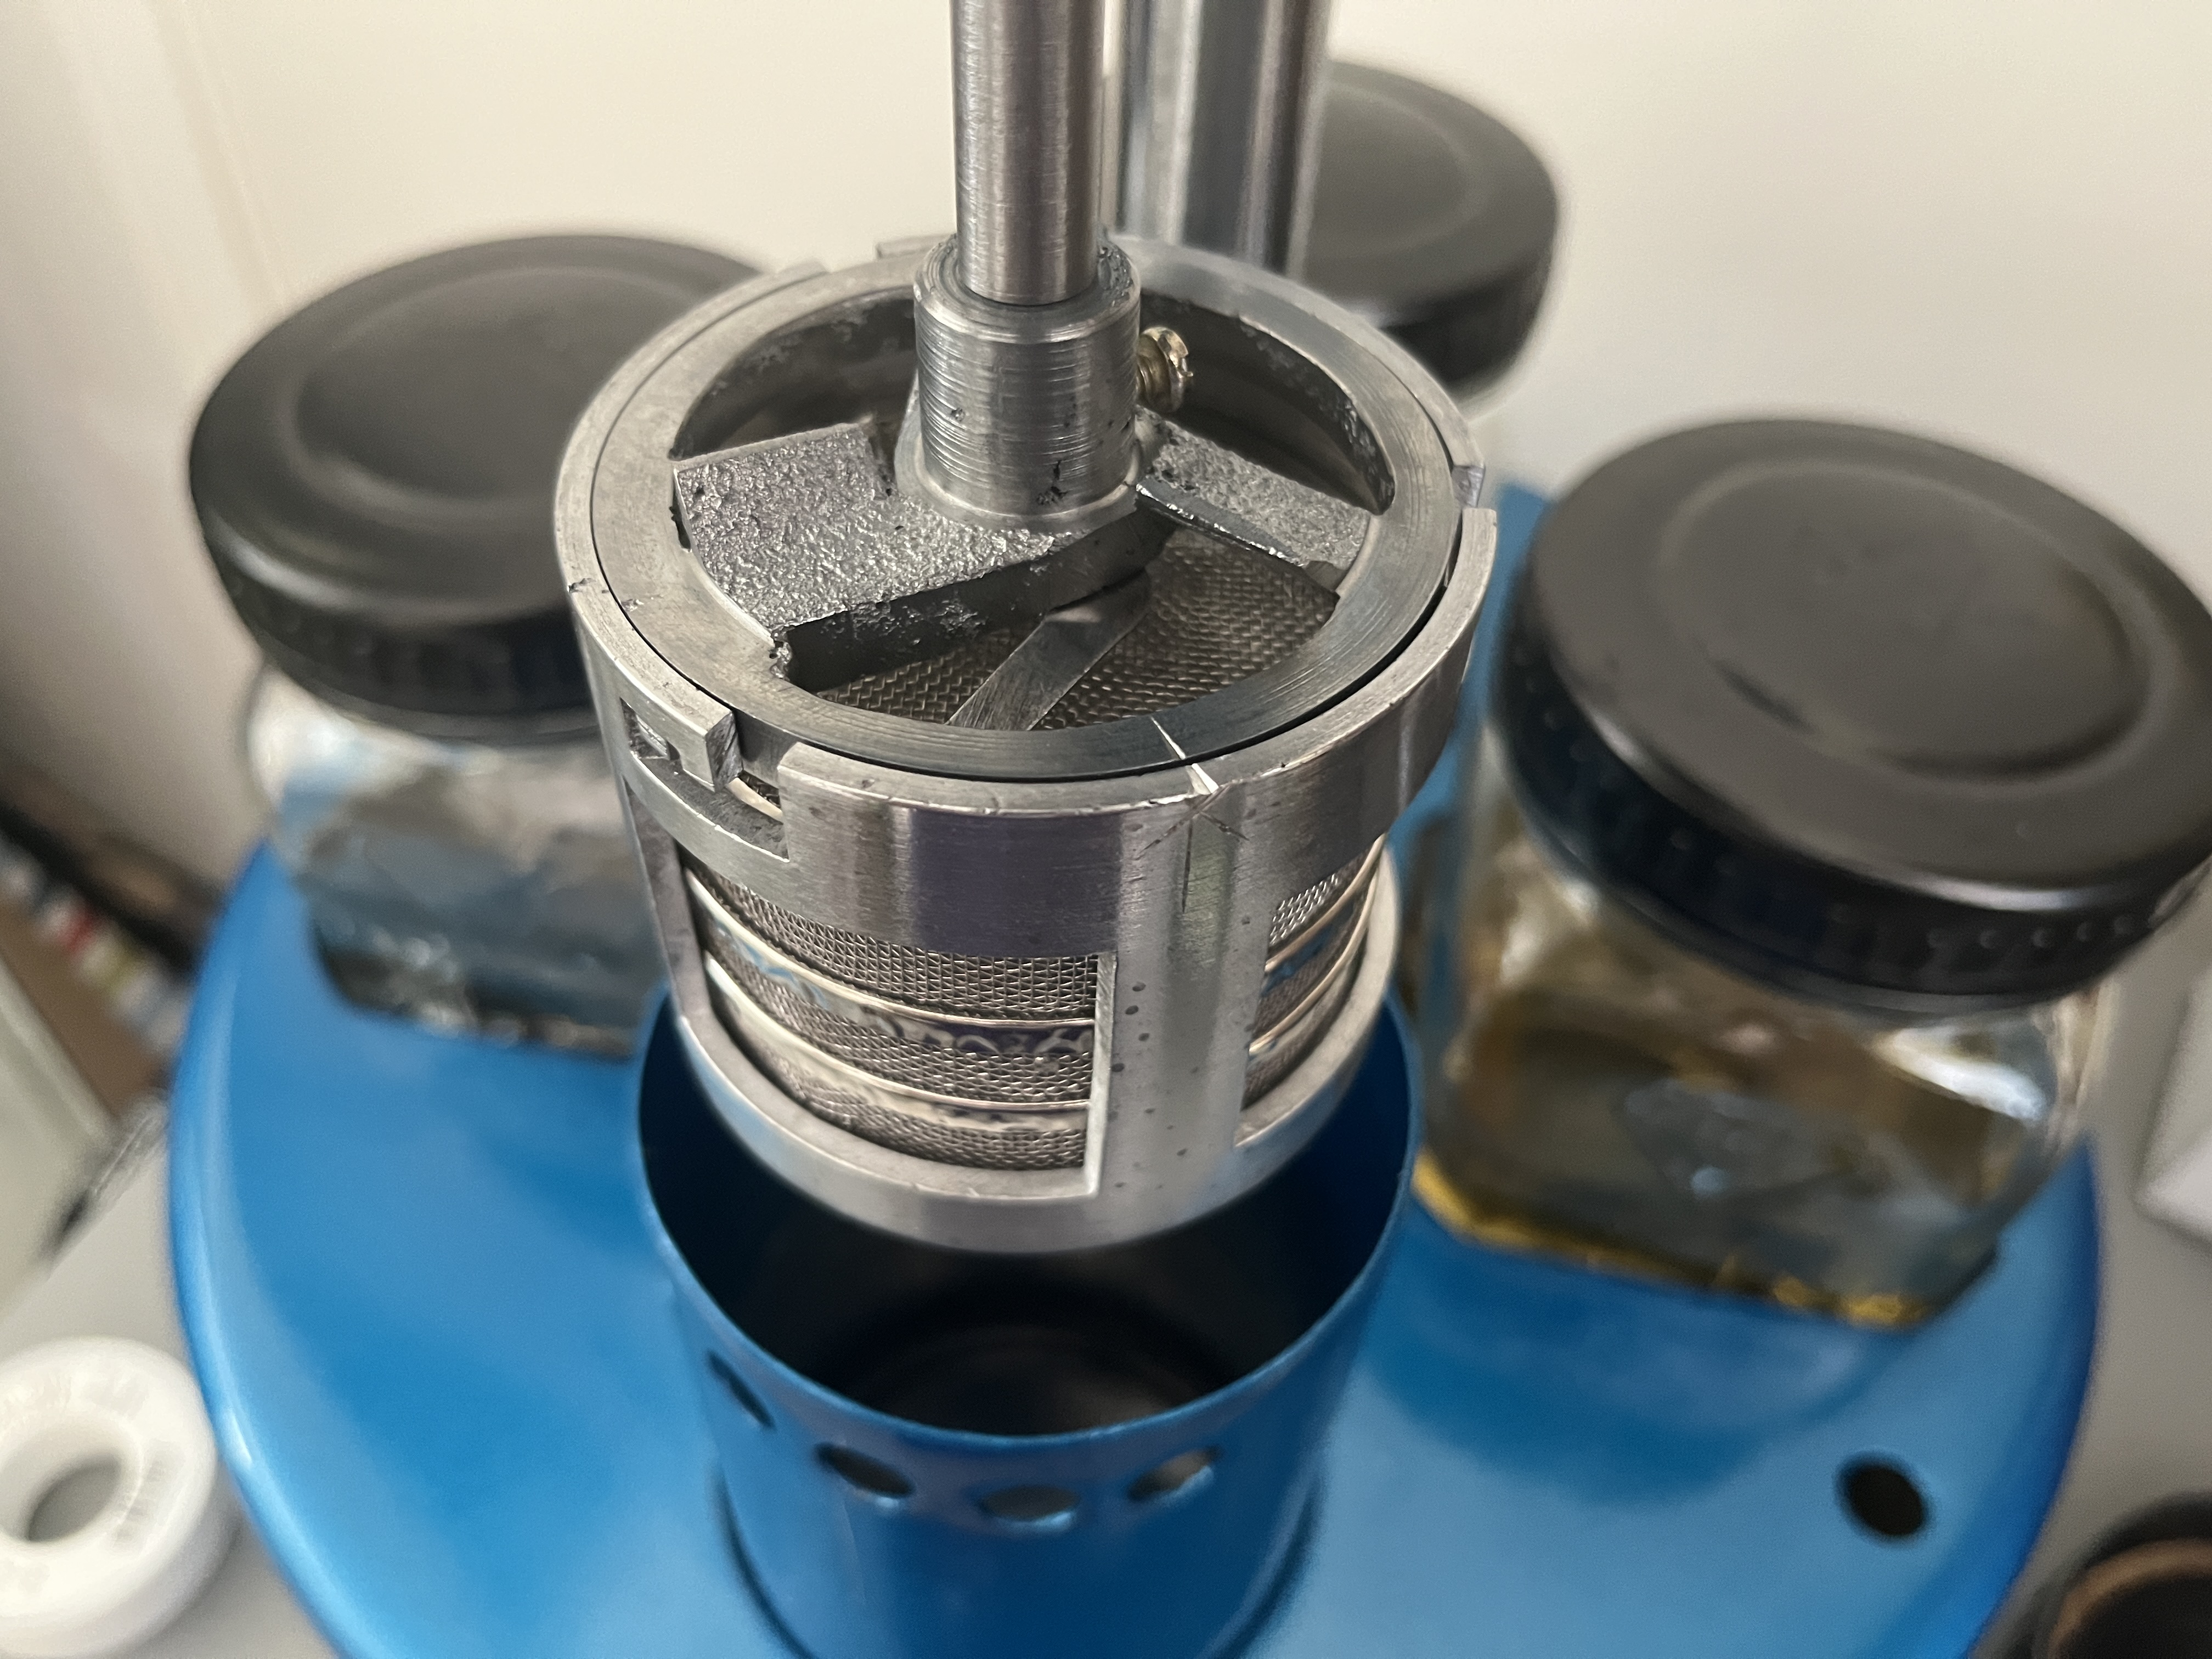
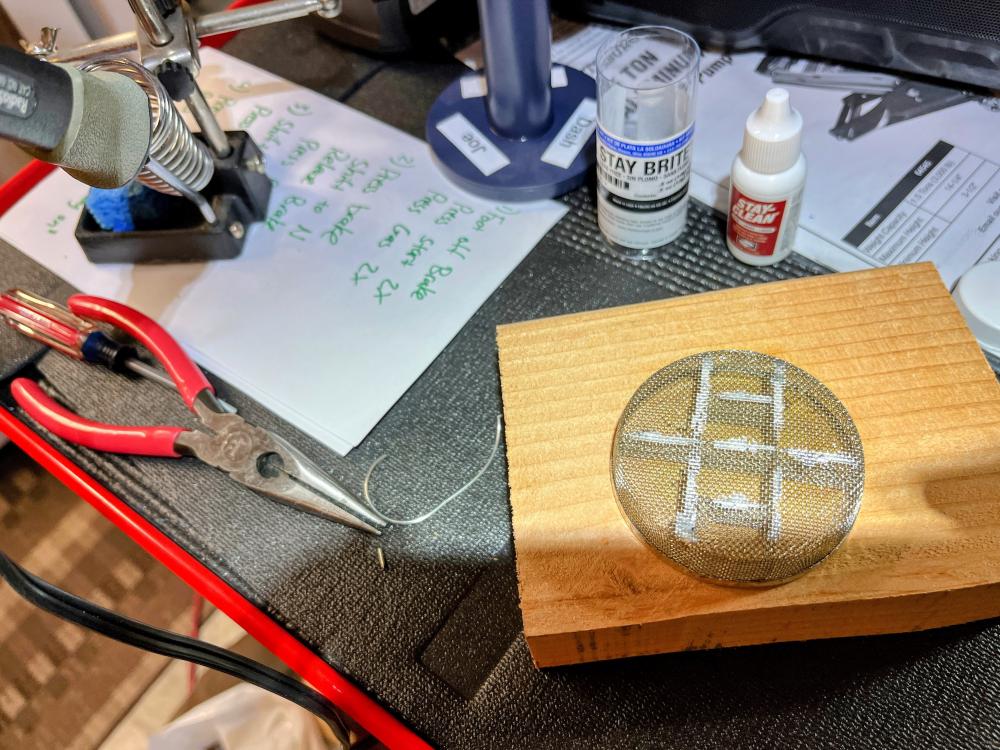
Weekend project of upgrading the cheap baskets. I found that sometimes parts could slide under the dividers. Got this STA-Brite kit from Amazon. Comes with some flux and wire. Just slide a drop of Stay-Clean across the line you want to solder on. Dab some solder on the end of the iron and then brush it across the line. Flux is supposed to help the solder flow over stainless. Rinse baskets afterwards to wash away acidic flux. Seems to work great.
 4 points
 -
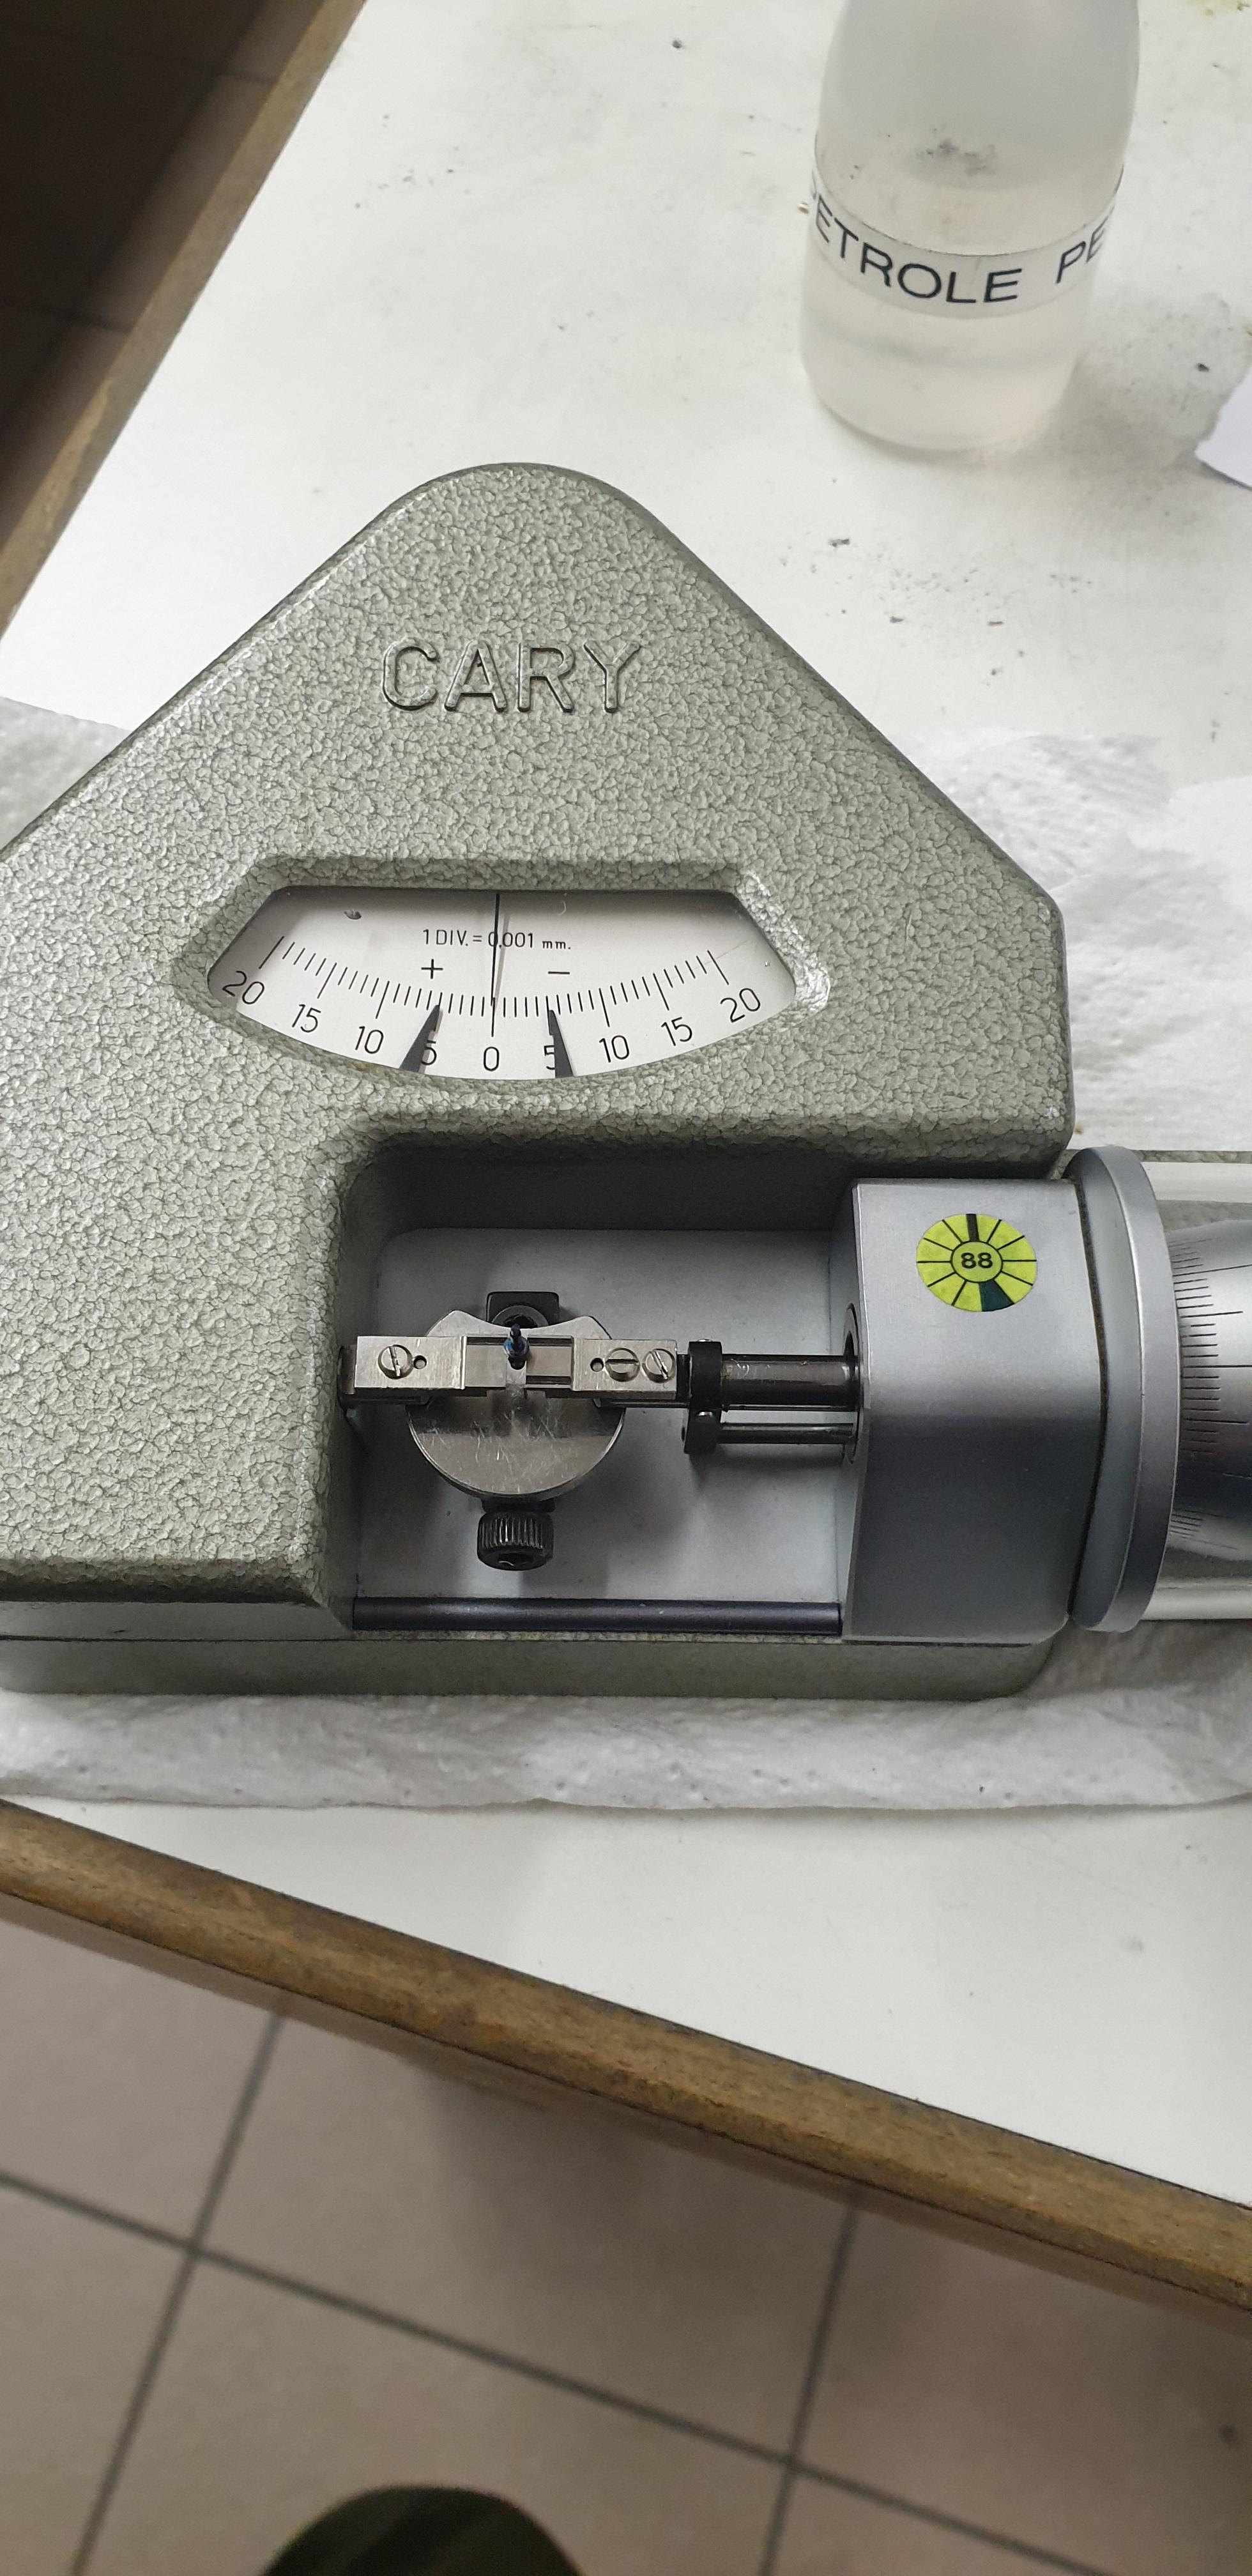
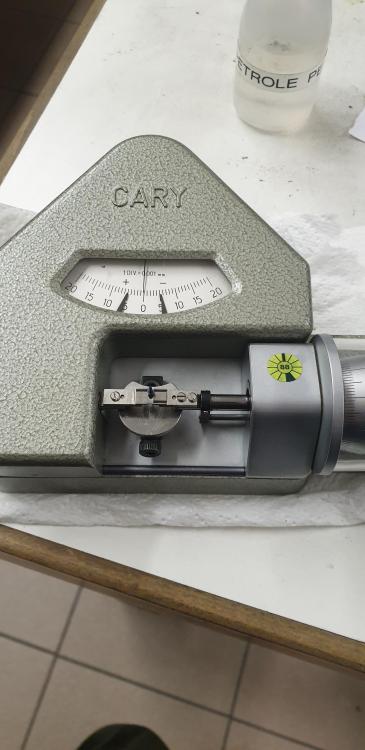
Yes, nice long strokes of both burnisher and bow! On the texture thing, just the last few days I was doing some special barrel arbors for a client. Drawing specs roulage on the diameters that contact the barrel as well as pivots (+-2 micron tolerance haha). Roulage is the same as Jacot but with a wheel rather than straight burnisher- and I have a roulage machine, basically an industrial Pivofix, with a variety of wheels. The drawing calls out 1.70mm pre-roulage, 1.69 +- 0.002mm post. With my fine wheel- and this is a motorized machine- I could get about 5 microns off but no more. Finish was mirror though. With a rougher wheel no problem to take off as much as I wanted; finish was equal to other high grade arbors I've seen, but not perfect mirror. Client is a maniac and will complain if not "perfect". After a lot of messing around I went with rough wheel, then quick hit in the lathe with wood and polishing paste to give them the shininess they want. 15 pieces total; started with 25, ended with 17 hahaha. But you can really hit microns with that machine (and with a Jacot tool). Trick is measuring that. Pic is of an arbor in a Cary indicating micrometet set to 1.69mm. Graduations are microns.
 2 points
 -
9415 is perfectly fine for a pin lever escapement of any size. I would say it's the best escapement lubricant period; I use it on everything from tiny ladies movements* to platform escapements, nothing works better. *On something ultra-microscopic like a LeCoultre 101 I do use the smallest amount imaginable of 9010, with pallets and escape wheel epilamed. But 9415 does work here- just with a bit of an amplitude drop. As usually do those movements for companies, and they "must" see 270+ amplitude, I use the 9010. My feeling is that long term the 9415 is still better. On reasonably sized movements (5x7"' and up haha) definitely 9415 is the best for performance and longevity.2 points
-
There are some tips I've learned that make it easier - still takes 2 or 3 tries each time (or more). They cant be installed from the ring AFAIK. I let the spring out into a "parts barrel", since the tab will scratch the bottom. Then I remove the usual way before winding. This is the way I learned - leave the bridle out of the drum plus a little bit extra when winding. Line up the tab piece with the slot in the barrel, then hold in place with screwdriver (in between the tab and the winder) before depressing the button. It's the same procedure for the t end springs and the springs without a hole. The hole should line up right if the tab is in the correct spot.2 points
-
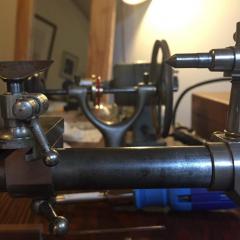
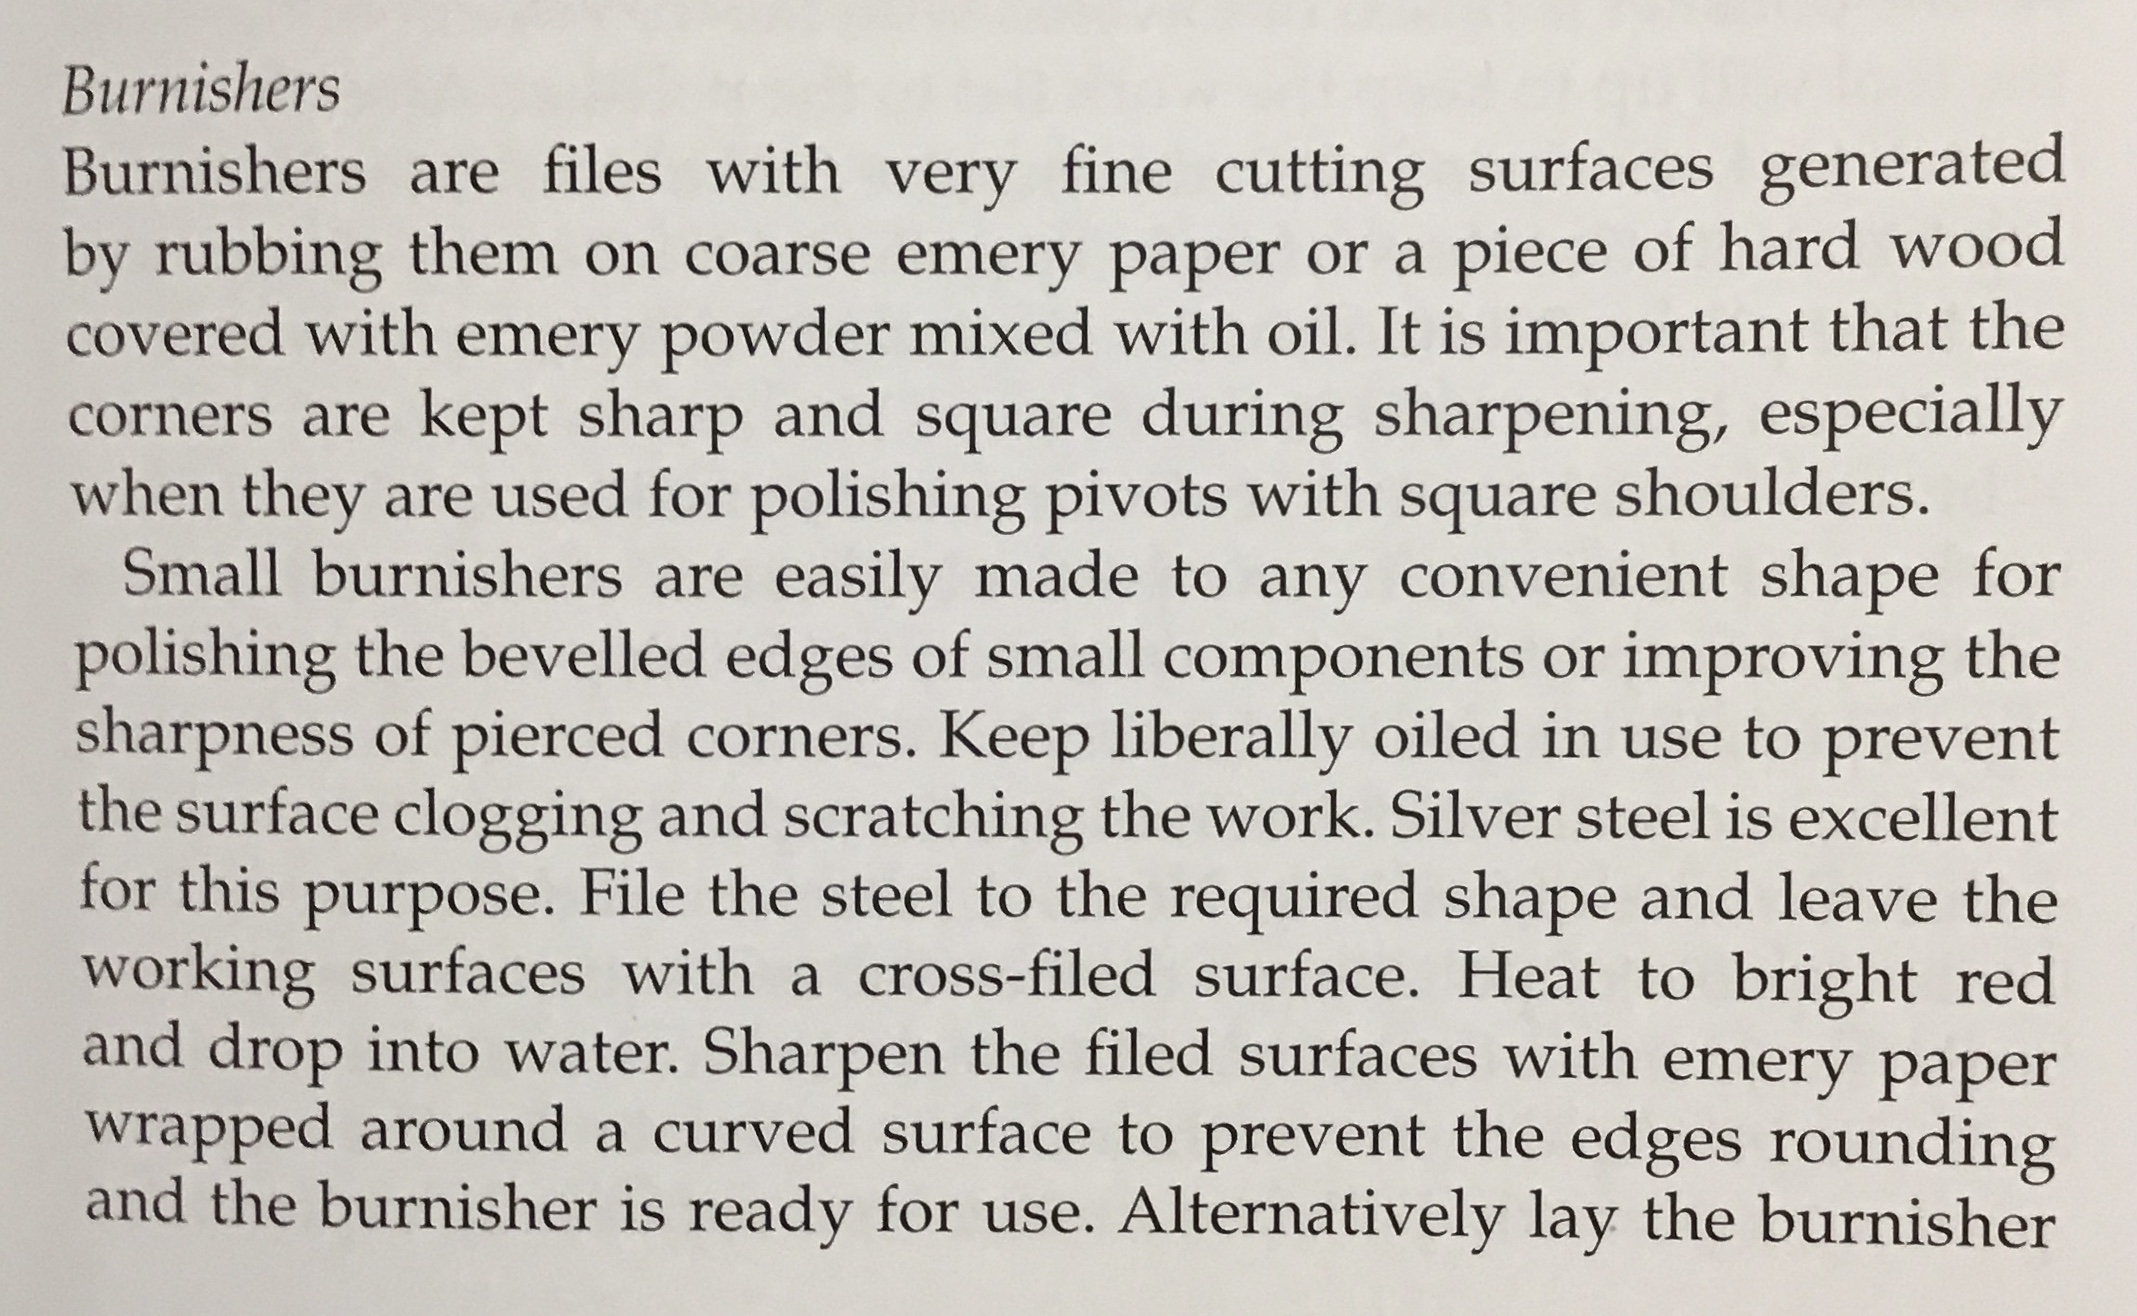
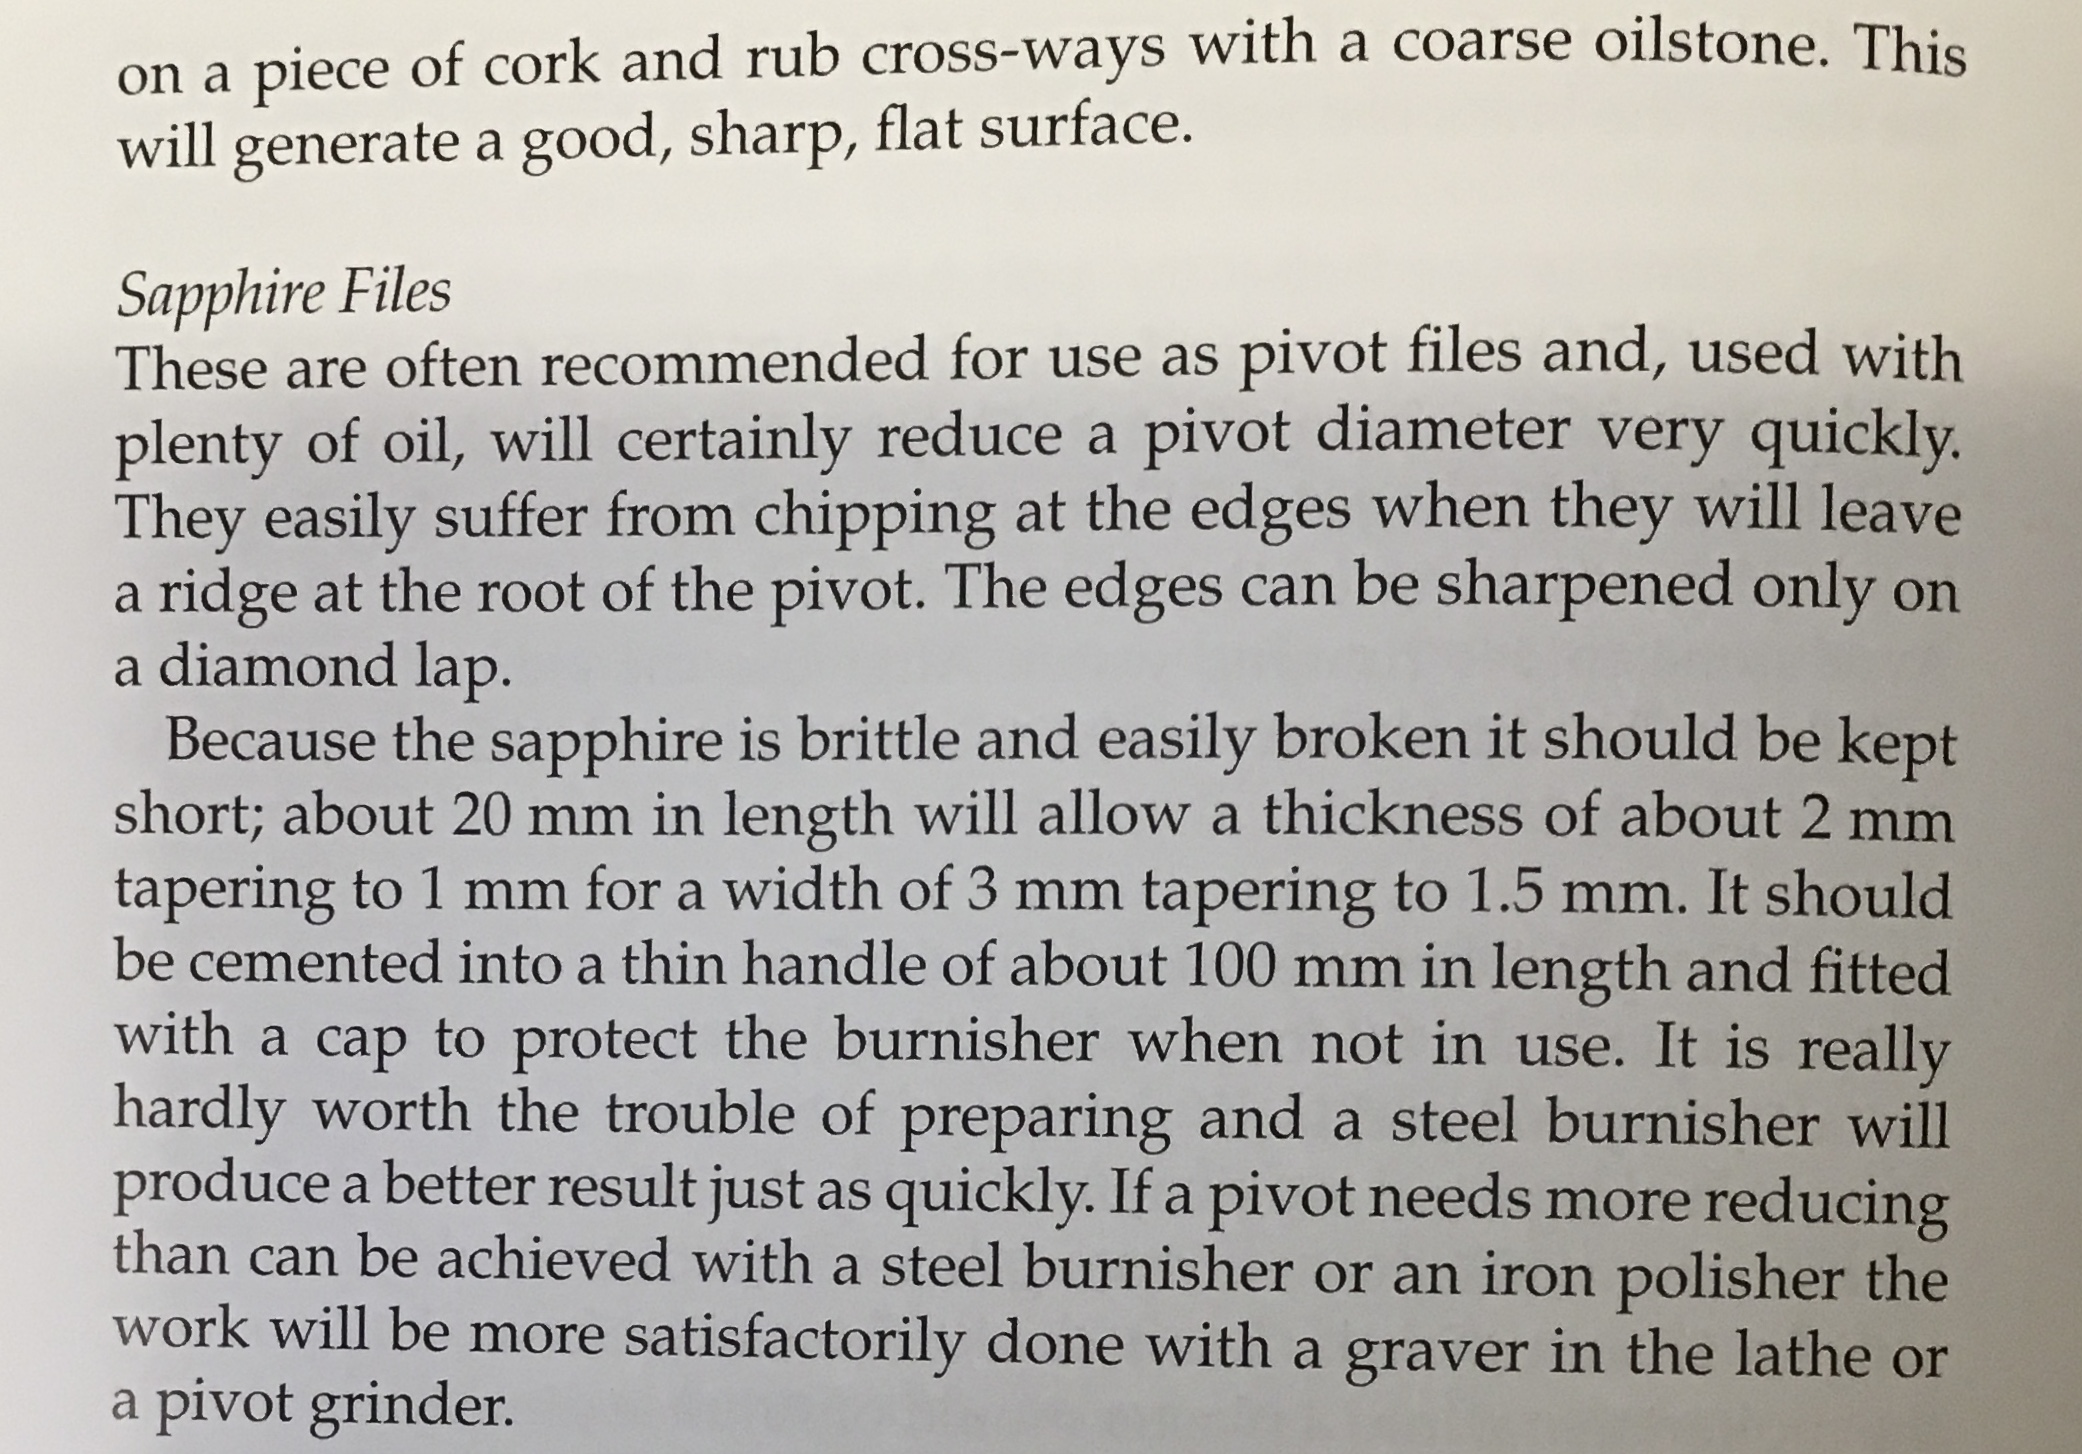
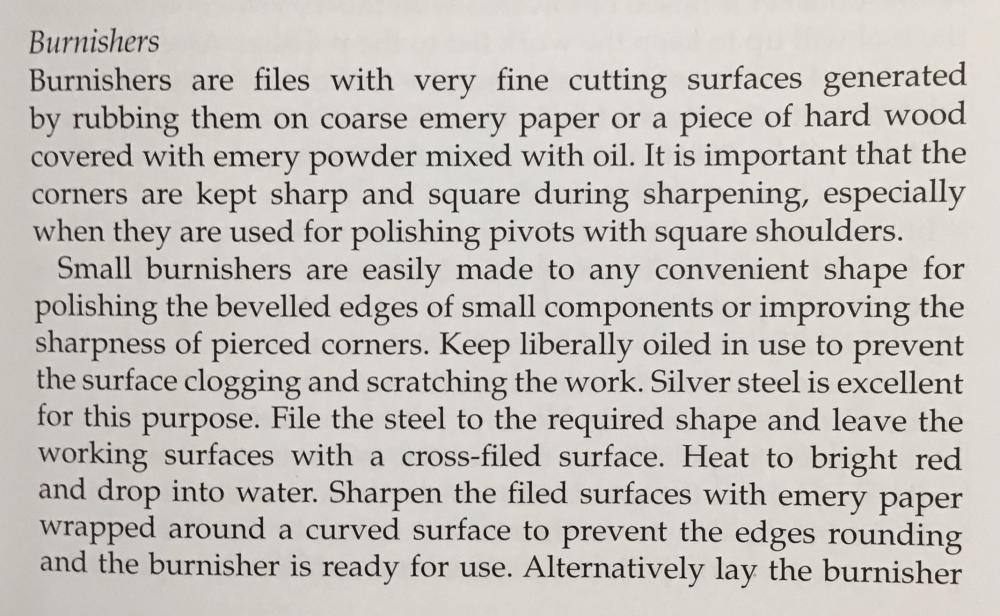
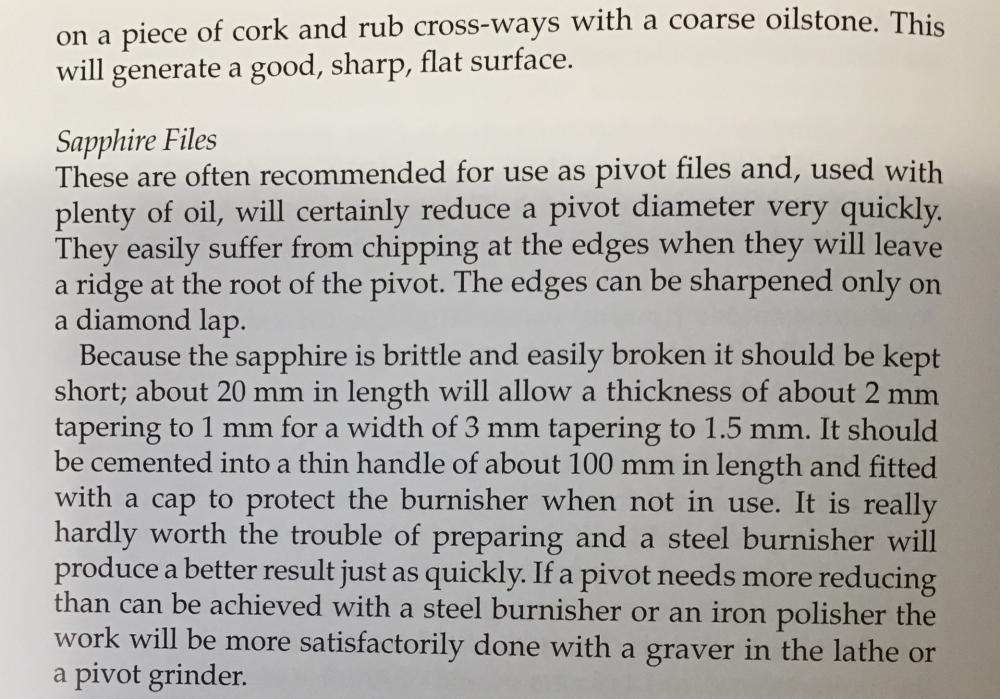
Depending on how long you want to spend on making a burnisher, it may actually be cheaper to buy a ready made Bergeon one. Daniels has written in “Watchmaking” on how to make a burnisher, but I suspect it may take a number of tries before anyone can make a burnisher that is even close to a commercial Bergeon one. Take a look:
 2 points
 -
The burnishing that I am familiar with outside of watchmaking is cold working of a metal, non abrasive. There is such a thing as "roller burnishing", there is almost no abrasion when doing that. Work hardening causes similar changes to metal as heat treatment, deforming the metal with pressure changes the grain structure. The goal is to create a hard, smooth surface. Again, the burnishing that I know about deforms the metal so that surface defects are removed, and in the process hardens the surface of the metal. The hard layer is sort of like what you get when you do "case hardening". Cheers!2 points
-
When I was in school we had a guest teacher (who became my main mentor) who had worked in Switzerland with the likes of Dufour and Derek Pratt. He was a major fan of using a piece of elastic from the sewing shop attached to the back of the bench, with a bit of around 7-10lb test fishing line at the end to go around the pulley, with a simple split keyring at the end to drive the Jacot. Sounds pretty much like what VW has. I like that method, but ended up needing to be more mobile with my Jacot work around the shop for a couple years and just got used to a bow. Either works great1 point
-
Everything wears, so eventually, I guess it will need to be restored. Now, I've only used my Bergeon burnisher to work on perhaps about a bit less than 100 pivots (practice included), and I can't detect any wear whatsoever. Anyway, I'd be very interested to see @nickelsilver's reply as well (I think it's in already, as I type!) I would like to have a bow but haven't found any yet. In the meantime, I've been using a retractable line (keyring yoyo). The ones having a line made of fabric seem to work the best. Not sure, but I think you need to burnish the pivot in both directions, back and forth. Of course, a motor wouldn't do that, but perhaps it's a good idea, I wouldn't really know.1 point
-
Hi and welcome to the forum, looks like what you have got is a five bar cylinder movement, getting spares is a tough one, You may be able to fine a repairer who can replace the staff tampons (pivots) as they can be removed and replaced a task that requires skill and the correct tooling. You may be able to Identify the movement through the bestfit books. They are nice watches non the less.1 point
-
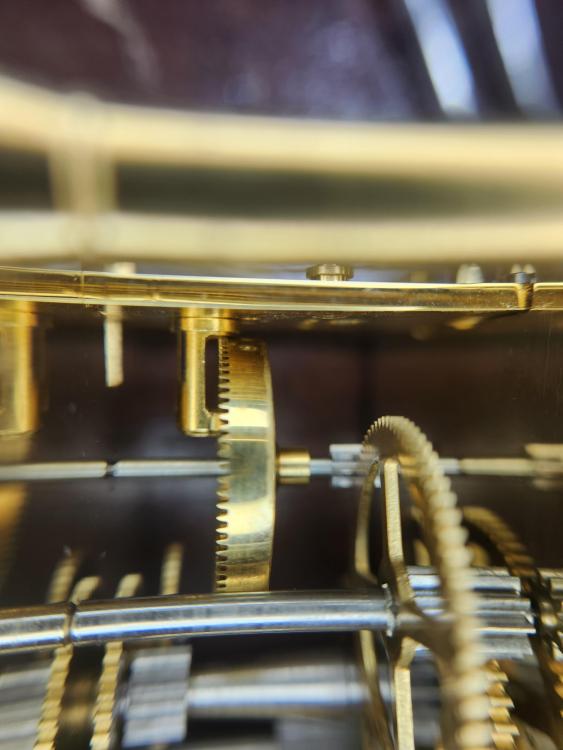
I managed to fit the new escapement platform and get the clock running again this evening. But it was fraught with all sorts of problem along the way. When I tightened the platform all the way, the escape wheel tube pressed on the contrate wheel and siezed up the gear train. The only solution was to cut away the bit of the window that was impinging on the contrate wheel. Then when I tightened the escape wheel/pallet bridge, I noticed that the escape wheel was very tight and there was no endshake. The escape/pallet bridge was also lifted and the teeth of the escape wheel was high on the pallet jewels. So I had to push in the lower jewel. I tried pushing out the chaton holding the lower jewel in the tube but it simply refused to budge. So I decided to push out the escape tube by 0.03mm. When I finally got enough endshake on the escape wheel, I was close to celebrating. Then when I screwed down the platform, the tube was impinging on the contrate wheel again. So out comes everything on the platform and I cut back more of the escape tube. I'm just glad that I didn't make a pig's breakfast of the tube.
 1 point
 -
Always worth asking Tadas, better than being caught out. I've been there, not with fakes but mislead condition. Rather frustrating having your leg lifted. Always check the location. This may come across as harsh but if it comes from India then be prepared for something of poor quality.1 point
-
That would do the job :
 1 point
 -
Cousins offer search by size. The nearest they have is GR2436X which is a touch under strength and length.1 point
-
I think Mark could be right. Only thing is chrono pusher screws tend to have a finer thread (what a pain if you have to make one...). Or they're for bracelets? They don't have a proper shoulder after the thread, so not for detents or the stem bar on old pocket watches, and they'd be too long on the unthreaded part for even a really old pw.1 point
-
Ah ok, you can put the spring in after the bridge is in place. See photo.
 1 point
 -
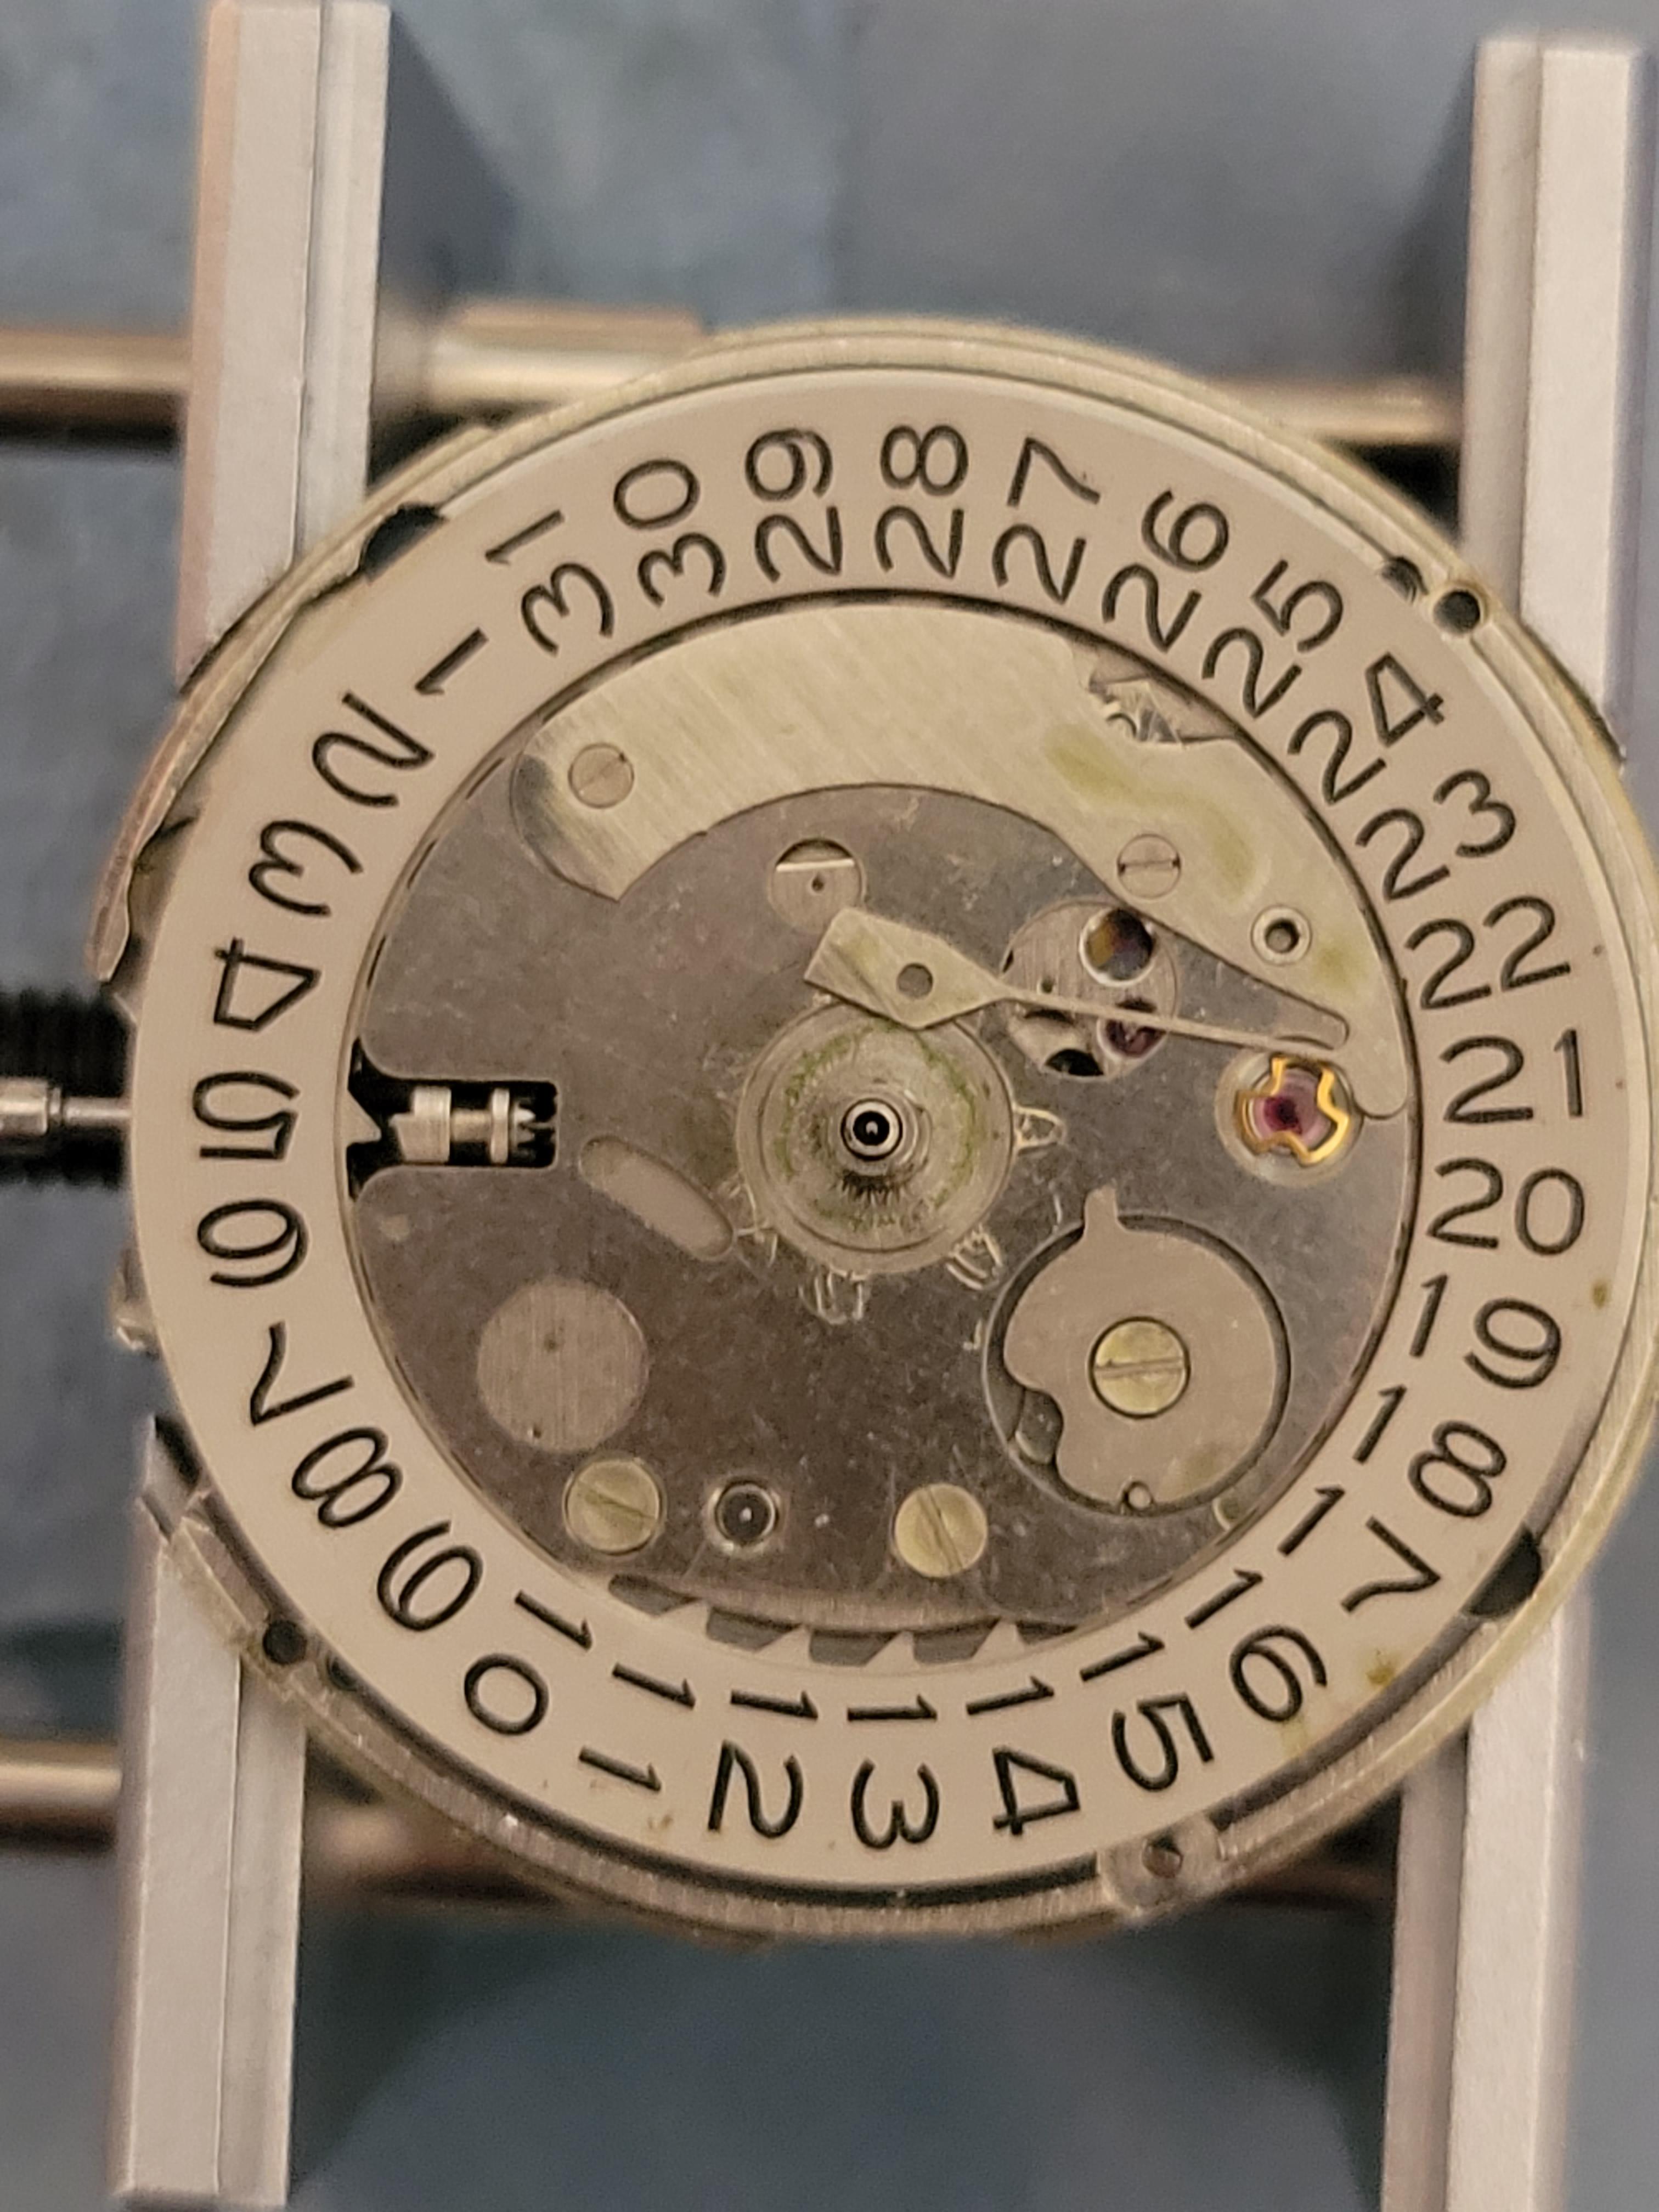
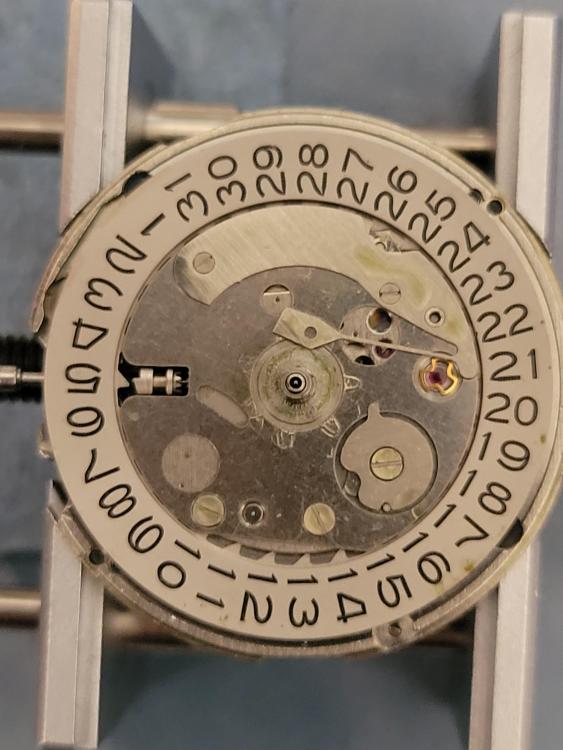
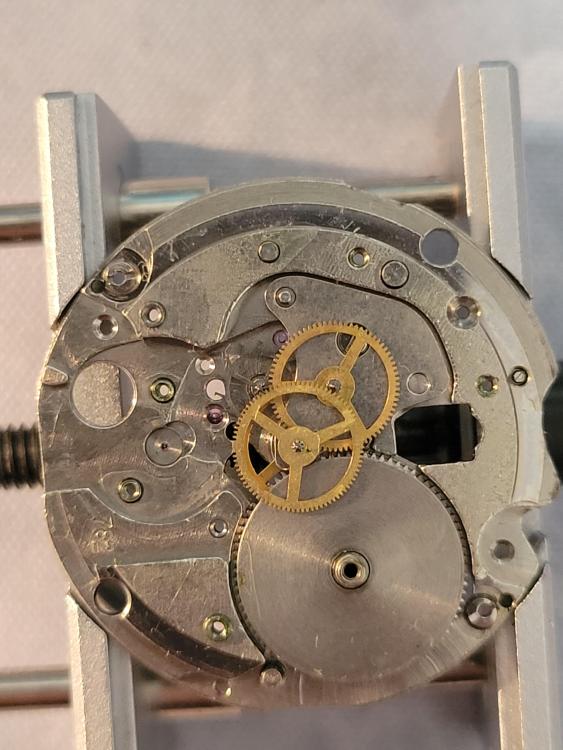
it probably depends upon the background of whoever wrote the book. If you've ever met anybody influenced by modern watch repair training there very obsessed with checking end shake. Rolex actually specifies how much end shake all the wheels in the watch have to have. but there's a big difference between making sure the end shake is correct for Rolex watch versus having your escape wheel end up either under the pallet fork spinning uncontrolled or perhaps not meshing with the fourth wheel. it's hard to tell in the picture it's kind of an optical illusion the escape wheel never meshes with the center wheel but looking at the picture again it does look like the wheel it meshes with its down a little too low. Hard to tell in the picture it be better if wit a picture with the main plate off so we can see how the wheels all the wine. sometimes it's nice to have other pictures like here's a picture where we can look down at things. here we can see because it's a sweep second which makes things more complicated sweep second wheel which I'm assuming is the fourth wheel but not necessarily notice that it meshes with the escape wheel so the optical illusion of it being the center wheel is really least sweep wheel/fourth wheel http://www.ranfft.de/cgi-bin/bidfun-db.cgi?10&ranfft&0&2uswk&AS_1904 but does bring up an interesting question from that picture looking at the picture at the link above there is definitely an end stone on the top and we can't see the dial side on this watch but there's probably one of their. We can also see the jewel count is 21 so extra jewel sprinkled here and there basically we need better pictures of the watch in this discussion. then I suppose it would be nice if we used proper terminology. Unfortunately were never going to find a service manual for watch like this but you can get a parts list. so part number 227 is the sweep wheel there is no fourth wheel in this watch but it's basically in the place or what we would think of as a fourth wheel. Then it still slightly misleading in the picture as to whether the escape wheel is low enough down that the pinion made no longer be engaging the sweep wheel. So basically somebody has to take the watch apart to figure out why their escape wheel is not supposed to be. 2508_AS 1904,1914.pdf1 point
-
with anything that has a protruding T type end they cannot be inserted from the ring they come in they will never ever catch. The only way is to use a mainspring winder as described above. then in addition to the largest screwdriver you have the hold it in place you can also use the end of your tweezers just something to hold it in place when pushing it out as a heck of a lot of force. https://www.watchrepairtalk.com/topic/7137-placing-a-t-end-mainspring-back-in-the-barrel-how-to-line-the-t-up/1 point
-
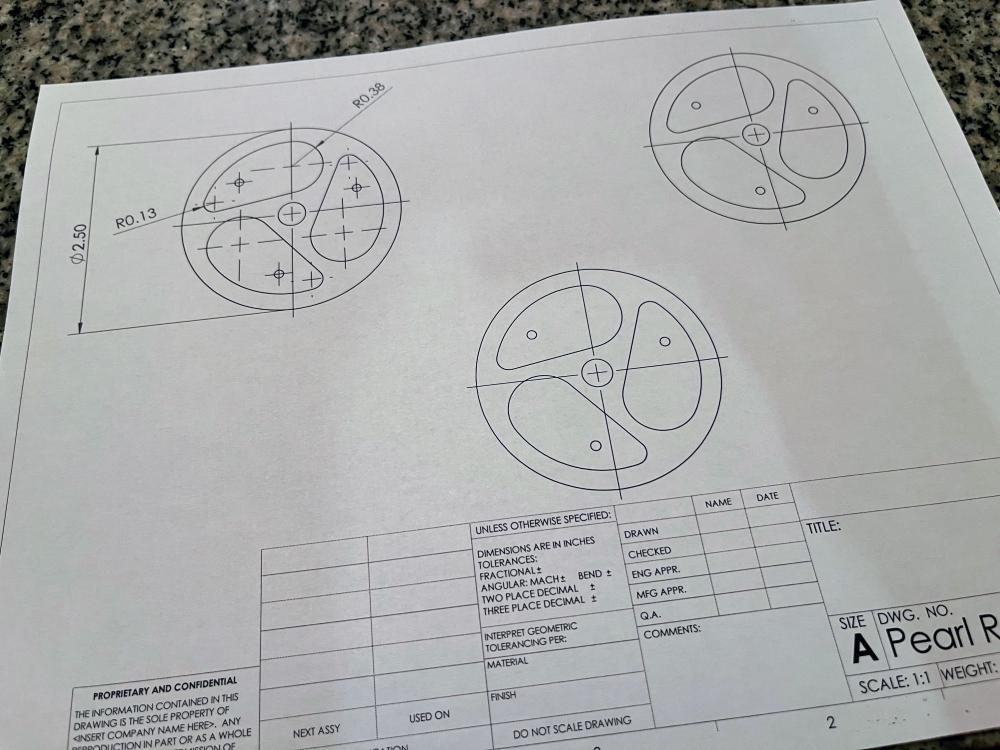
Everything helps a little bit, but the fact that the rotor runs off axis really seems to prevent it from running like butter. I think it could run as is and it would work just fine, but I want to go one more step and see if a trued up rotor would really make the difference. I've been spending some time trying to design a rotor I could machine with the tools I have. I'll probably try to get to it this week and see if it makes a difference. rence.
 1 point
 -
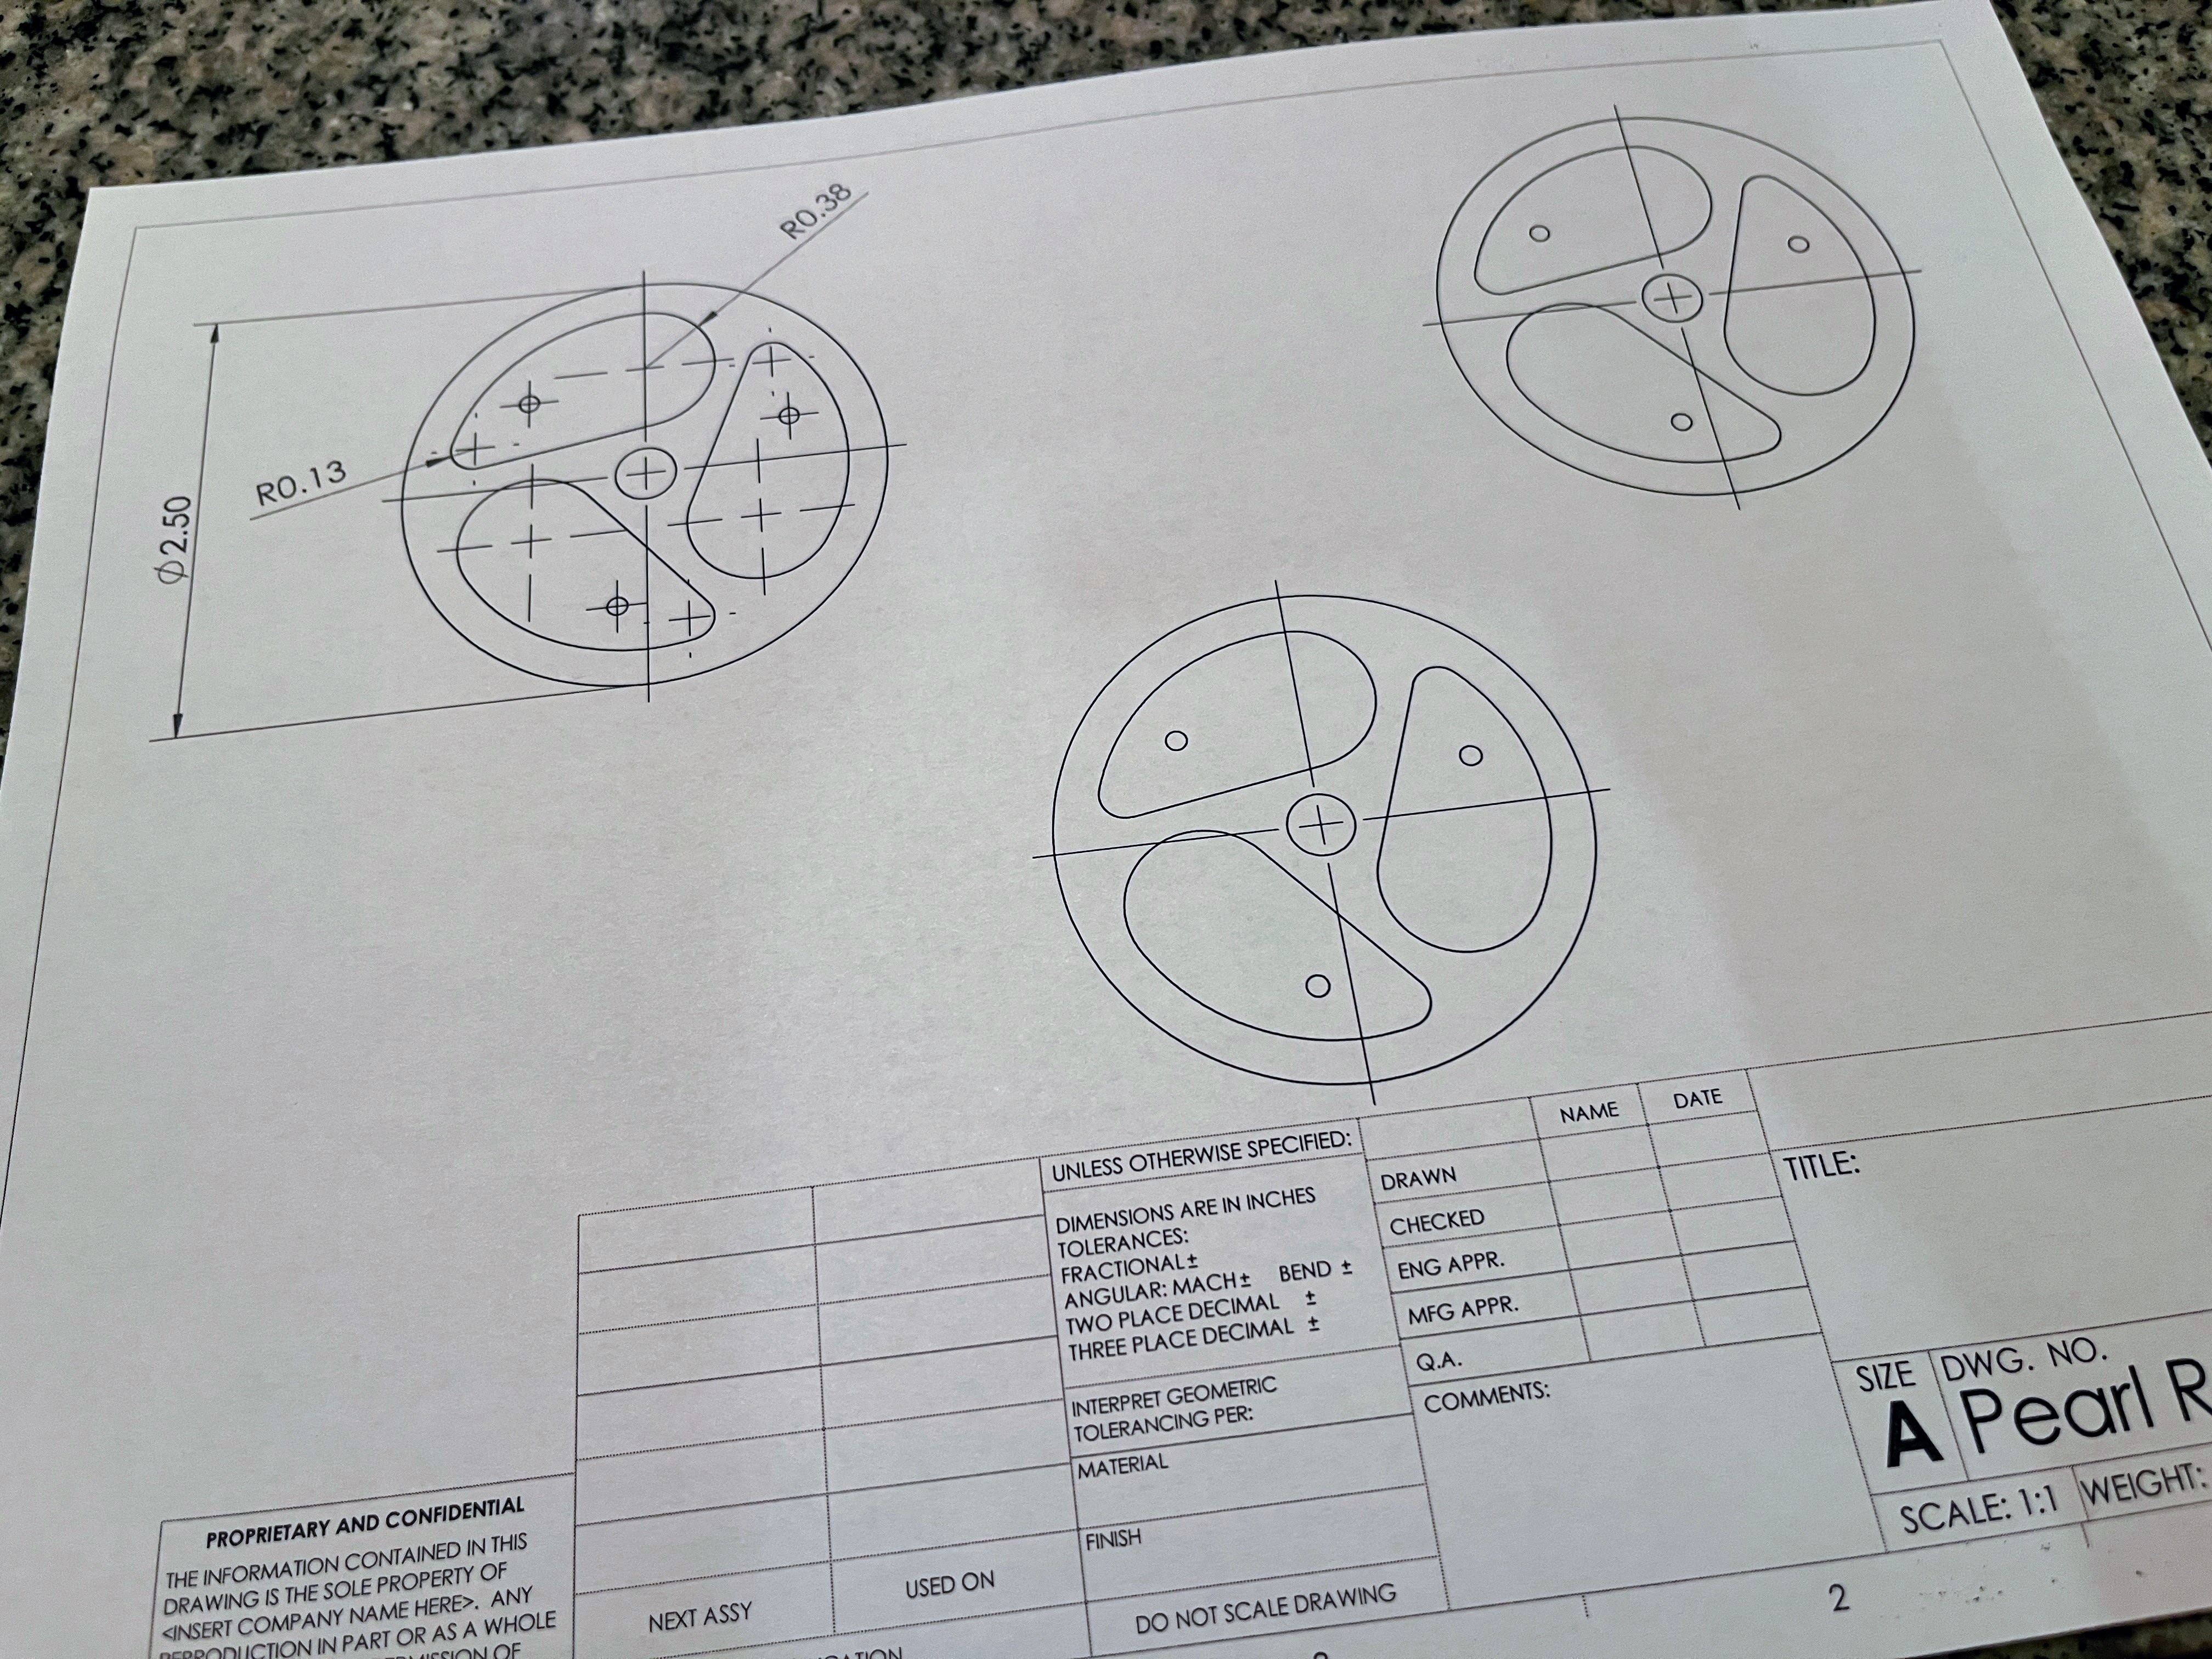
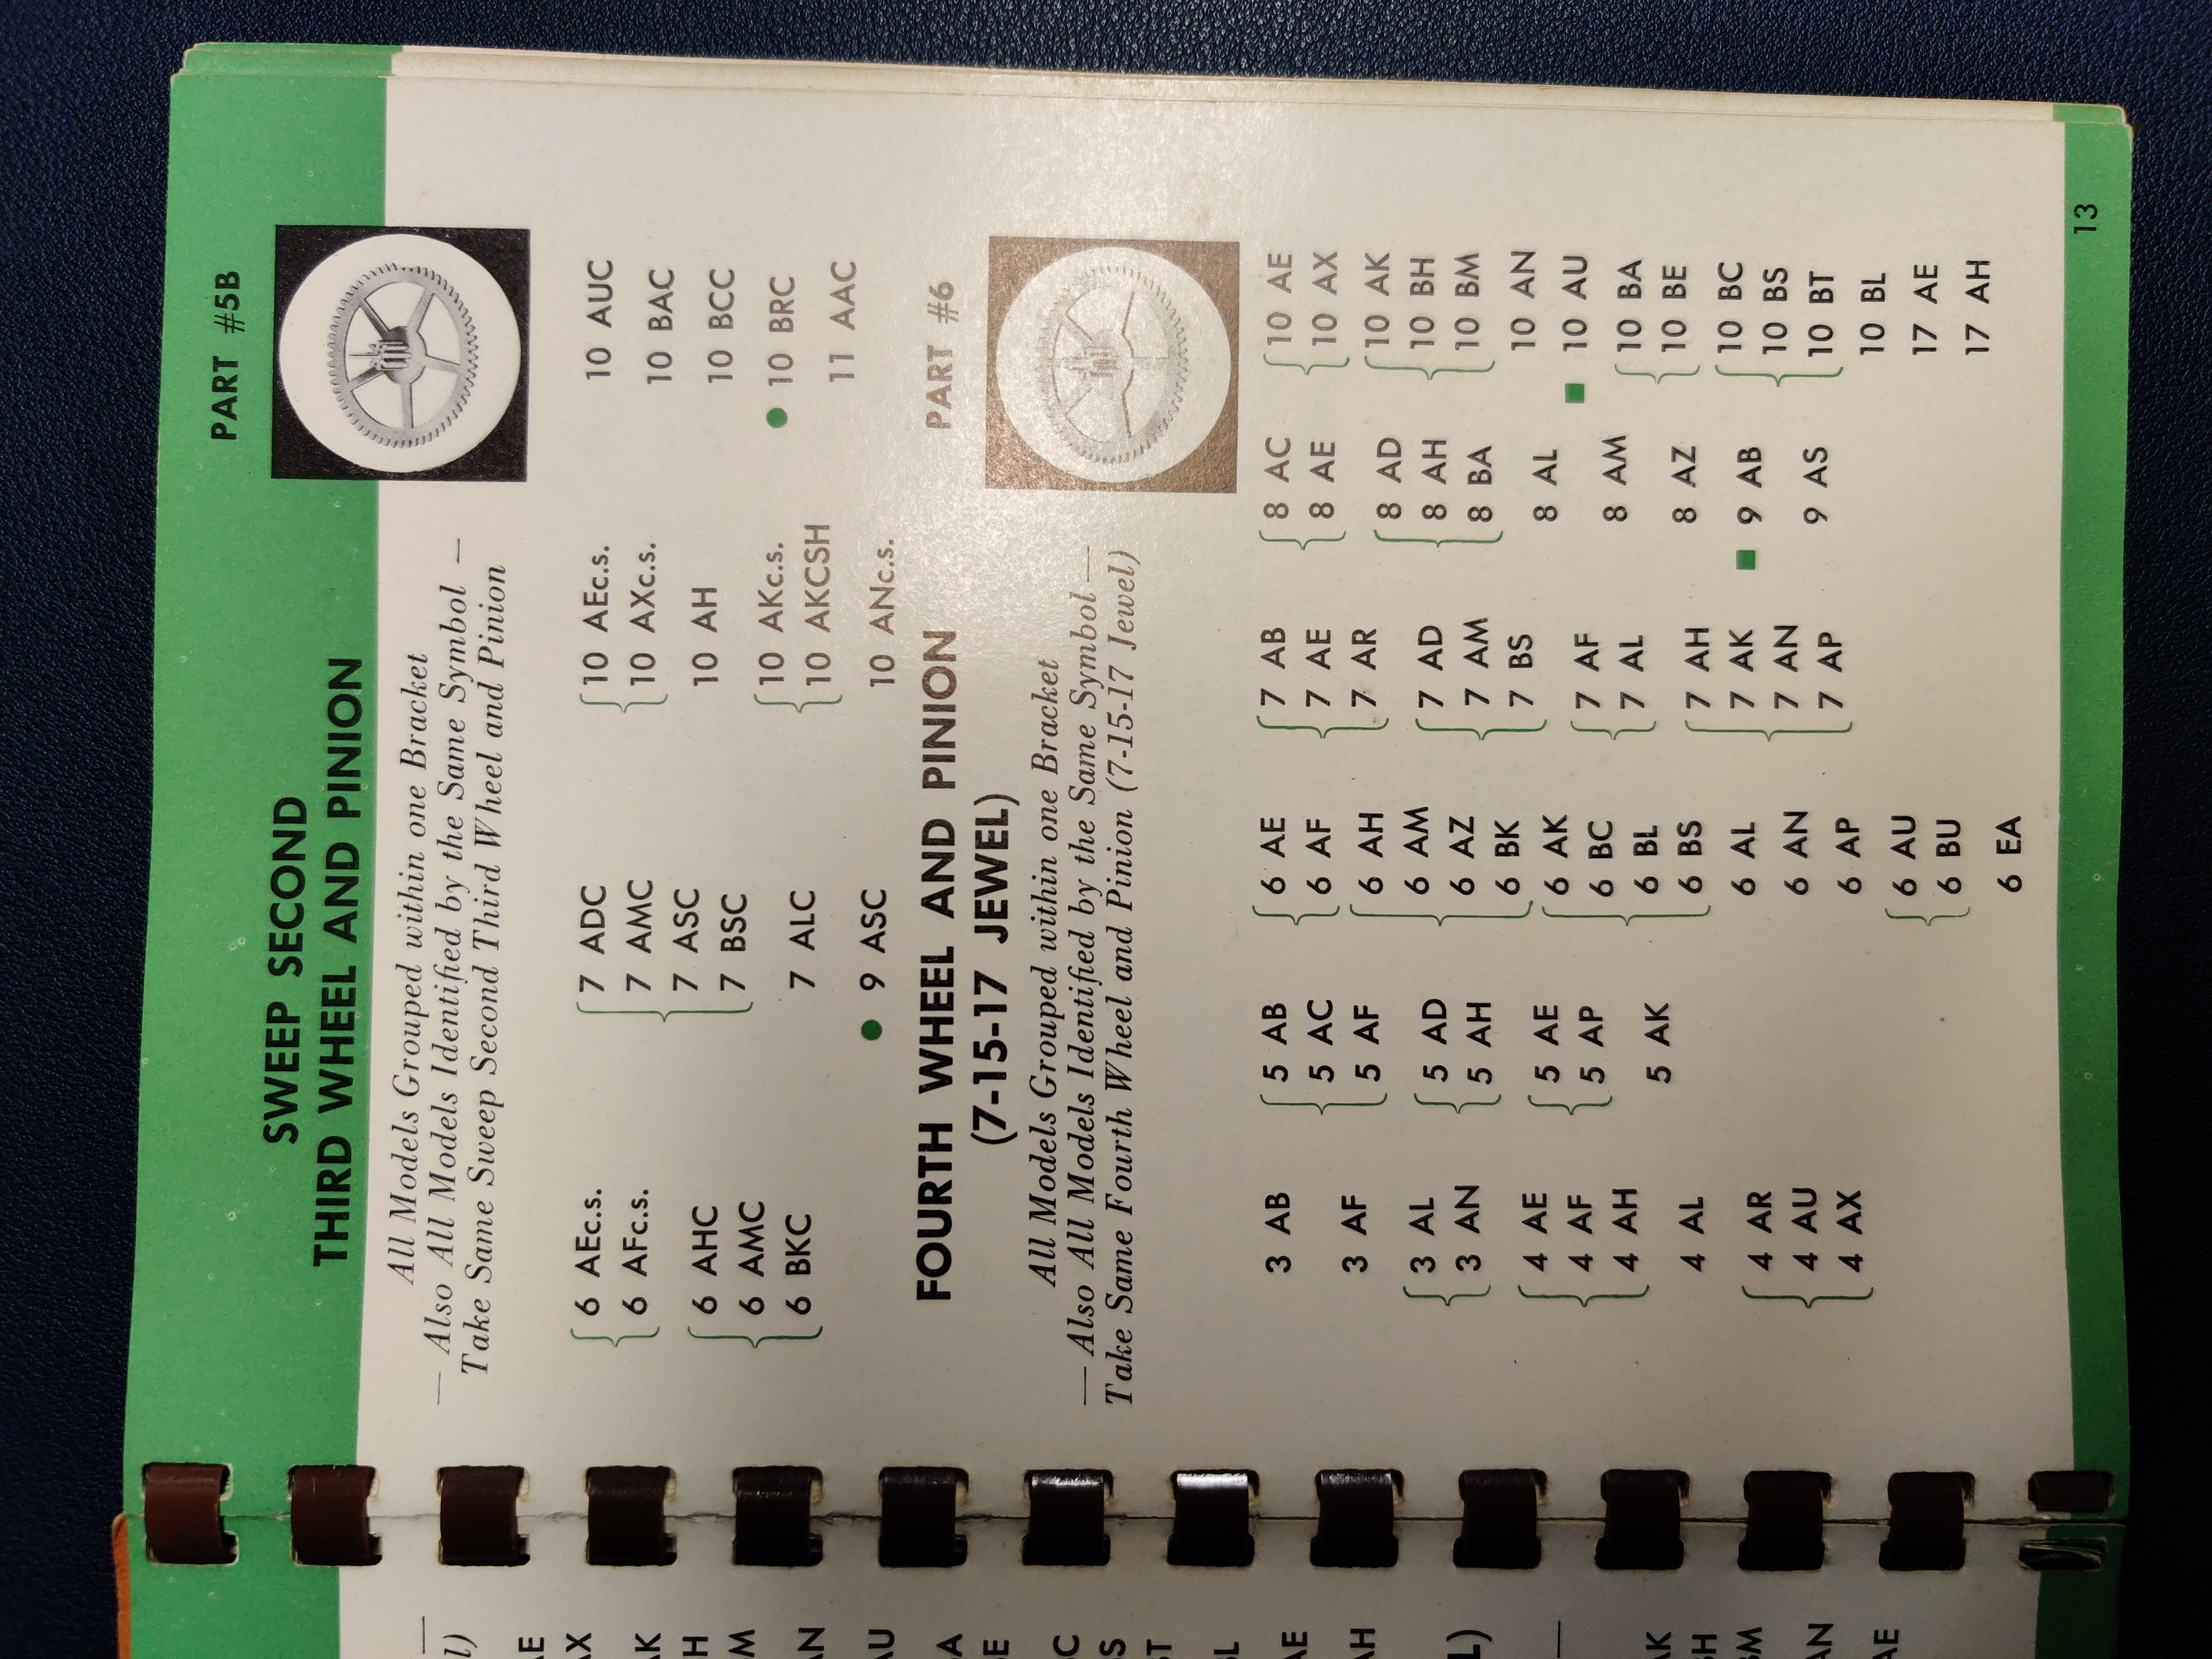
I've attached a page from a Bulova parts catalog, I think you're looking for part #5B It doesn't look like that part is shared with any other calibres, just the AKc.s. (center seconds) and AKCSH (center seconds, hacking). That will be a tough part to find, most likely source will be a donor movement.
 1 point
 -
Yup. Today was St Andrews. A quick stop off at the start of Old Course for pictures and then on to the front of the Old Course Hotel where there was a collection of Netherlands registered super cars. Somewhere around 25 of them, and if we guestimate that the average price was north of 100 grand a pop, there must have been easily a cool 2.5 million in shiny poser mobiles in the car park, not including the scattering of other fancy price machines that belonged to the hotel guests. From there we took a quick round of the town and sat outside in a cafe next to the bookshop and had coffee in the warm windless sunshine. Not bad for late September on the east coast in Scotland.1 point
-
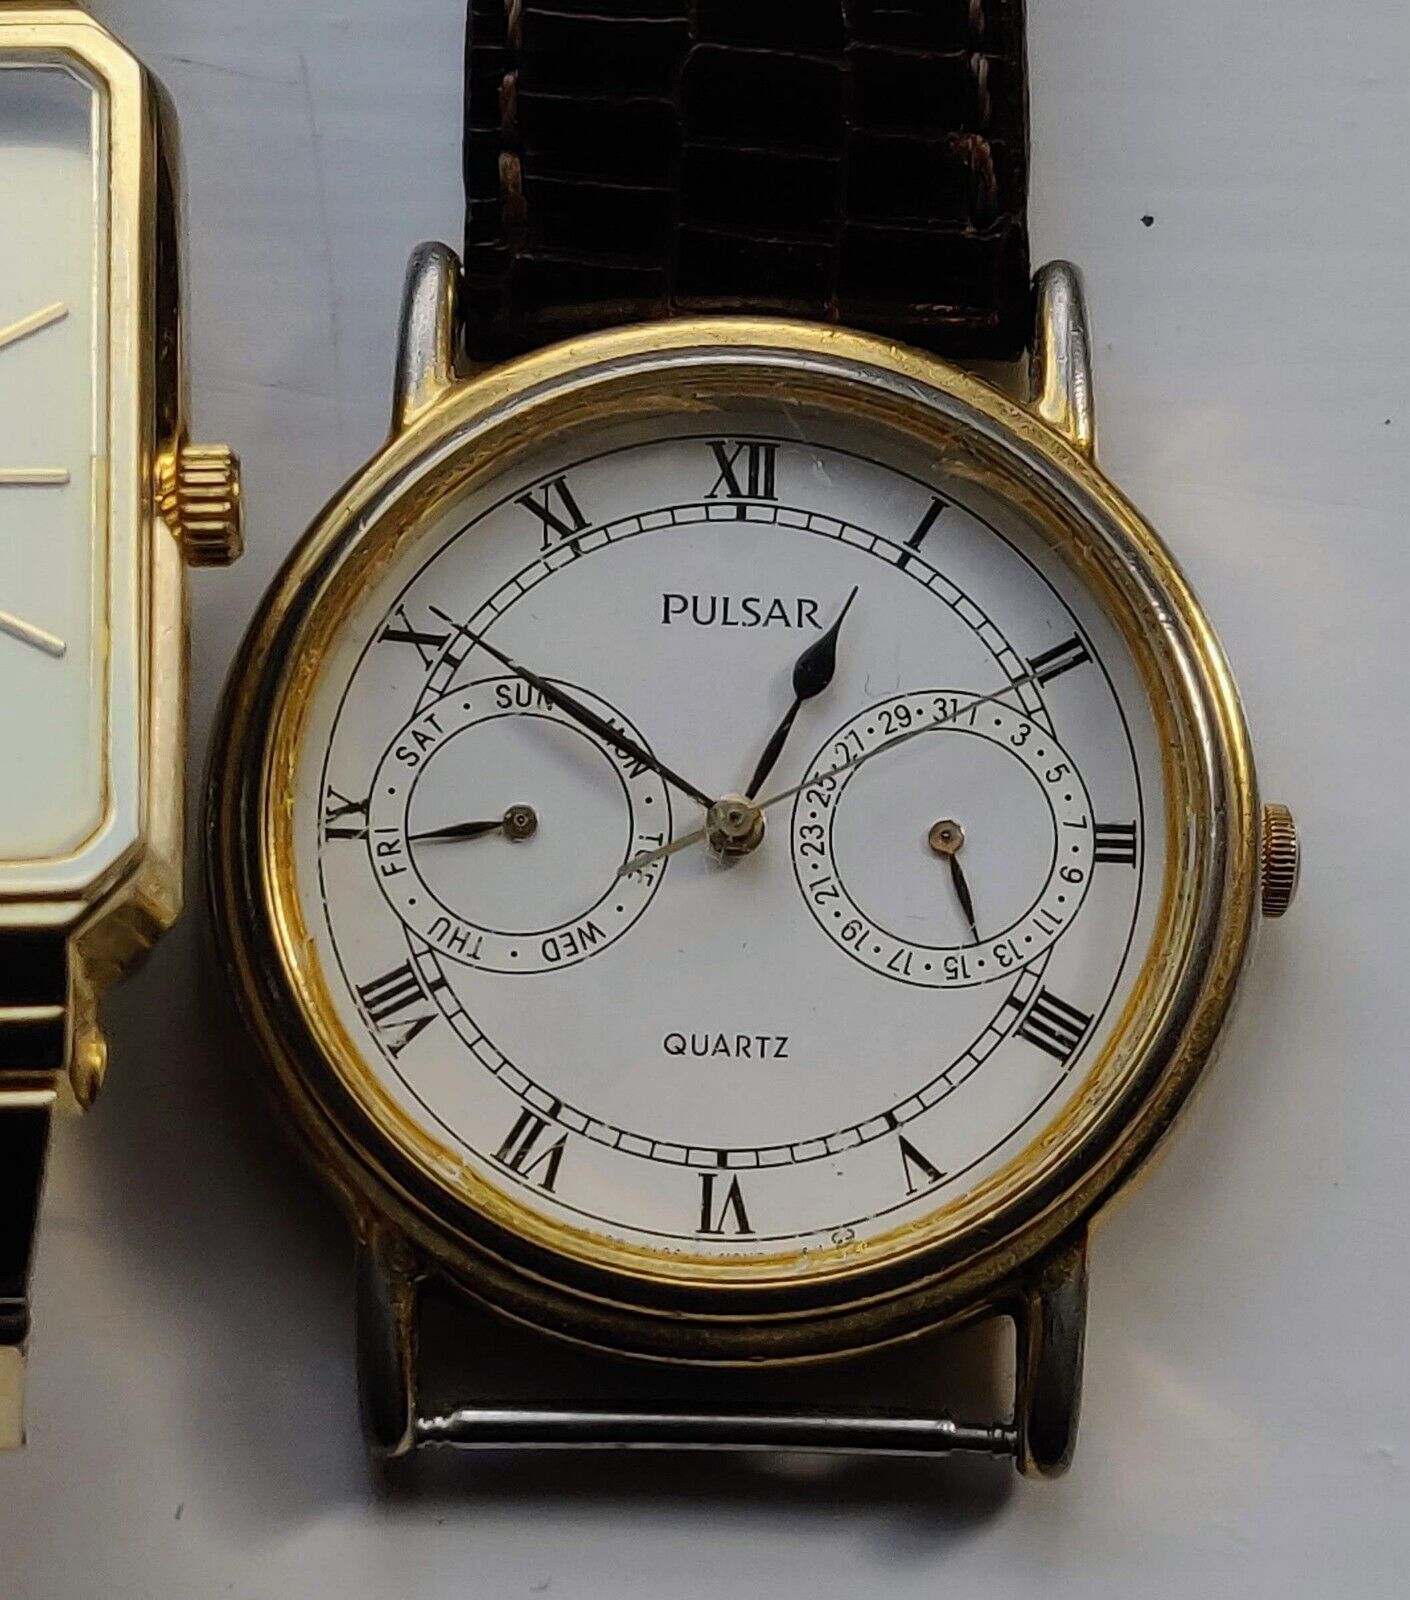
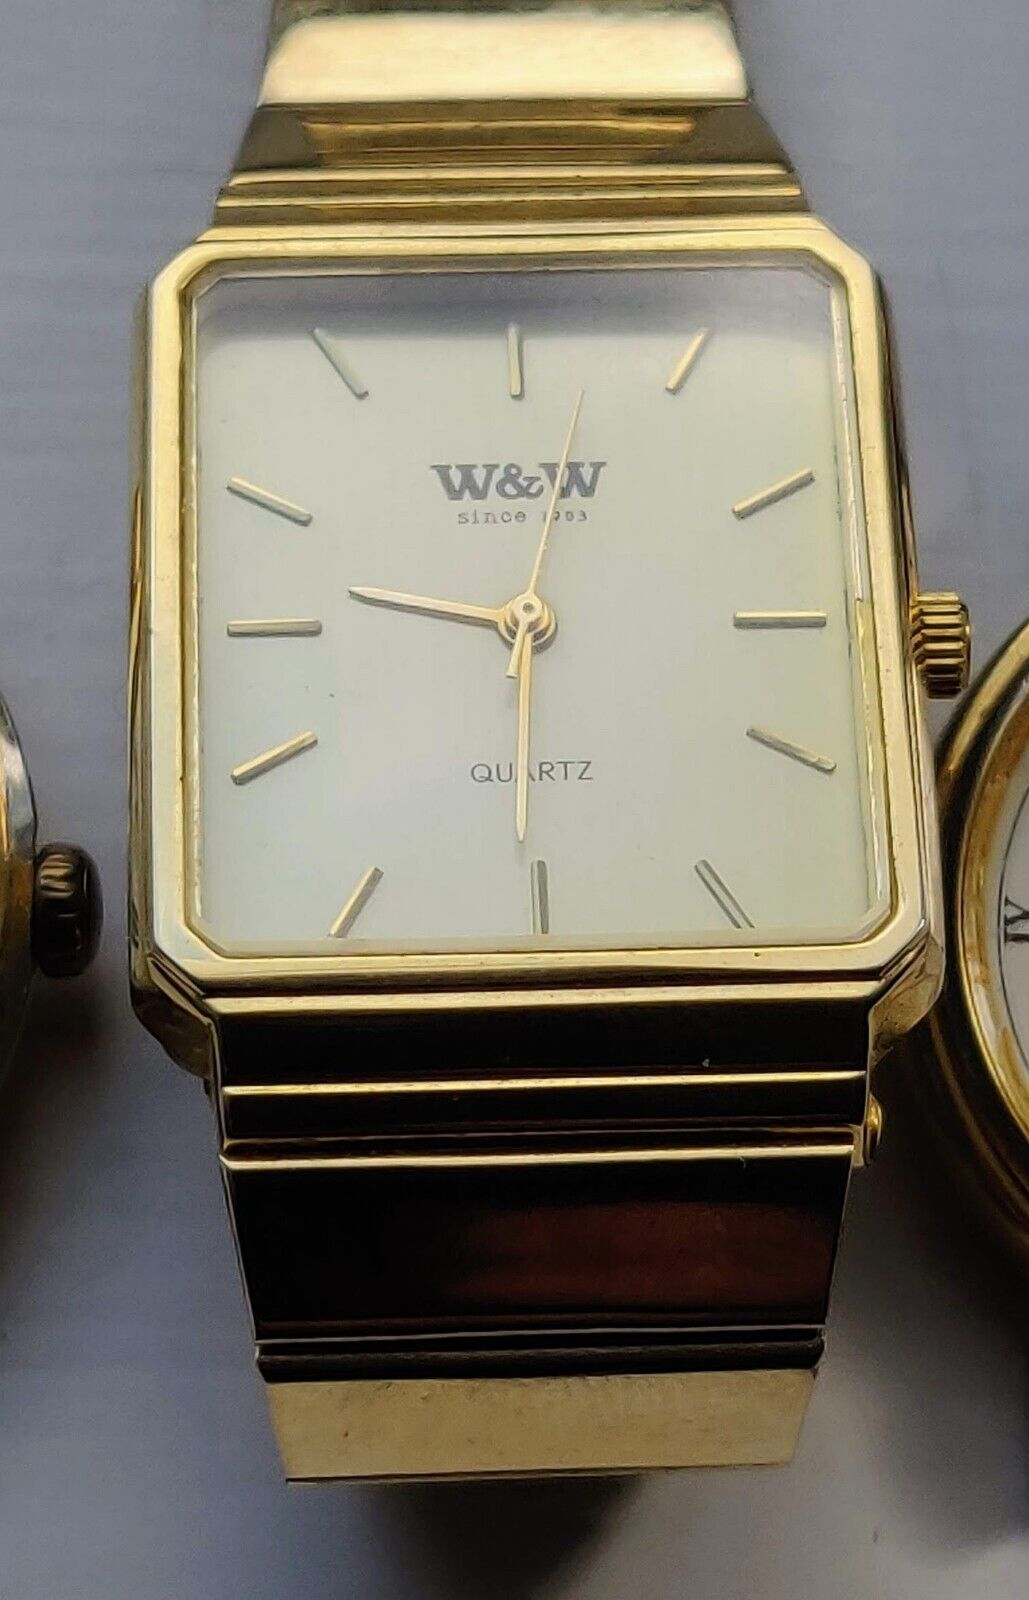
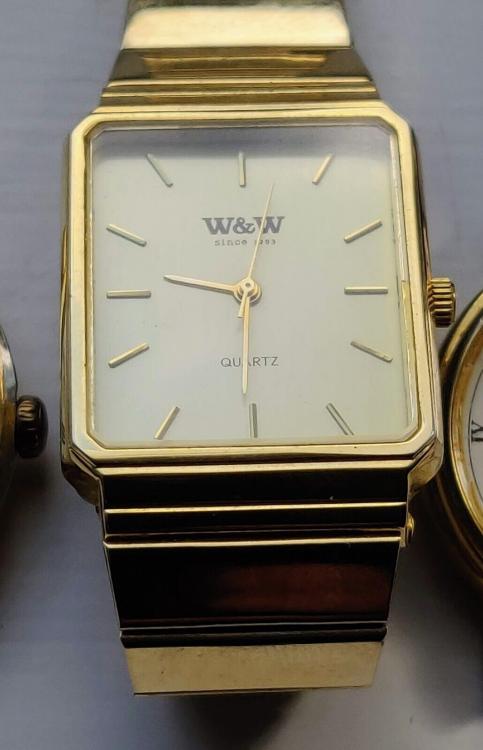
Three for 99p - The 1977 Marlin was the one I was interested in, but the Pulsar looks wearable too. Not sure what the W&W contains. Time will tell.


 1 point
 -
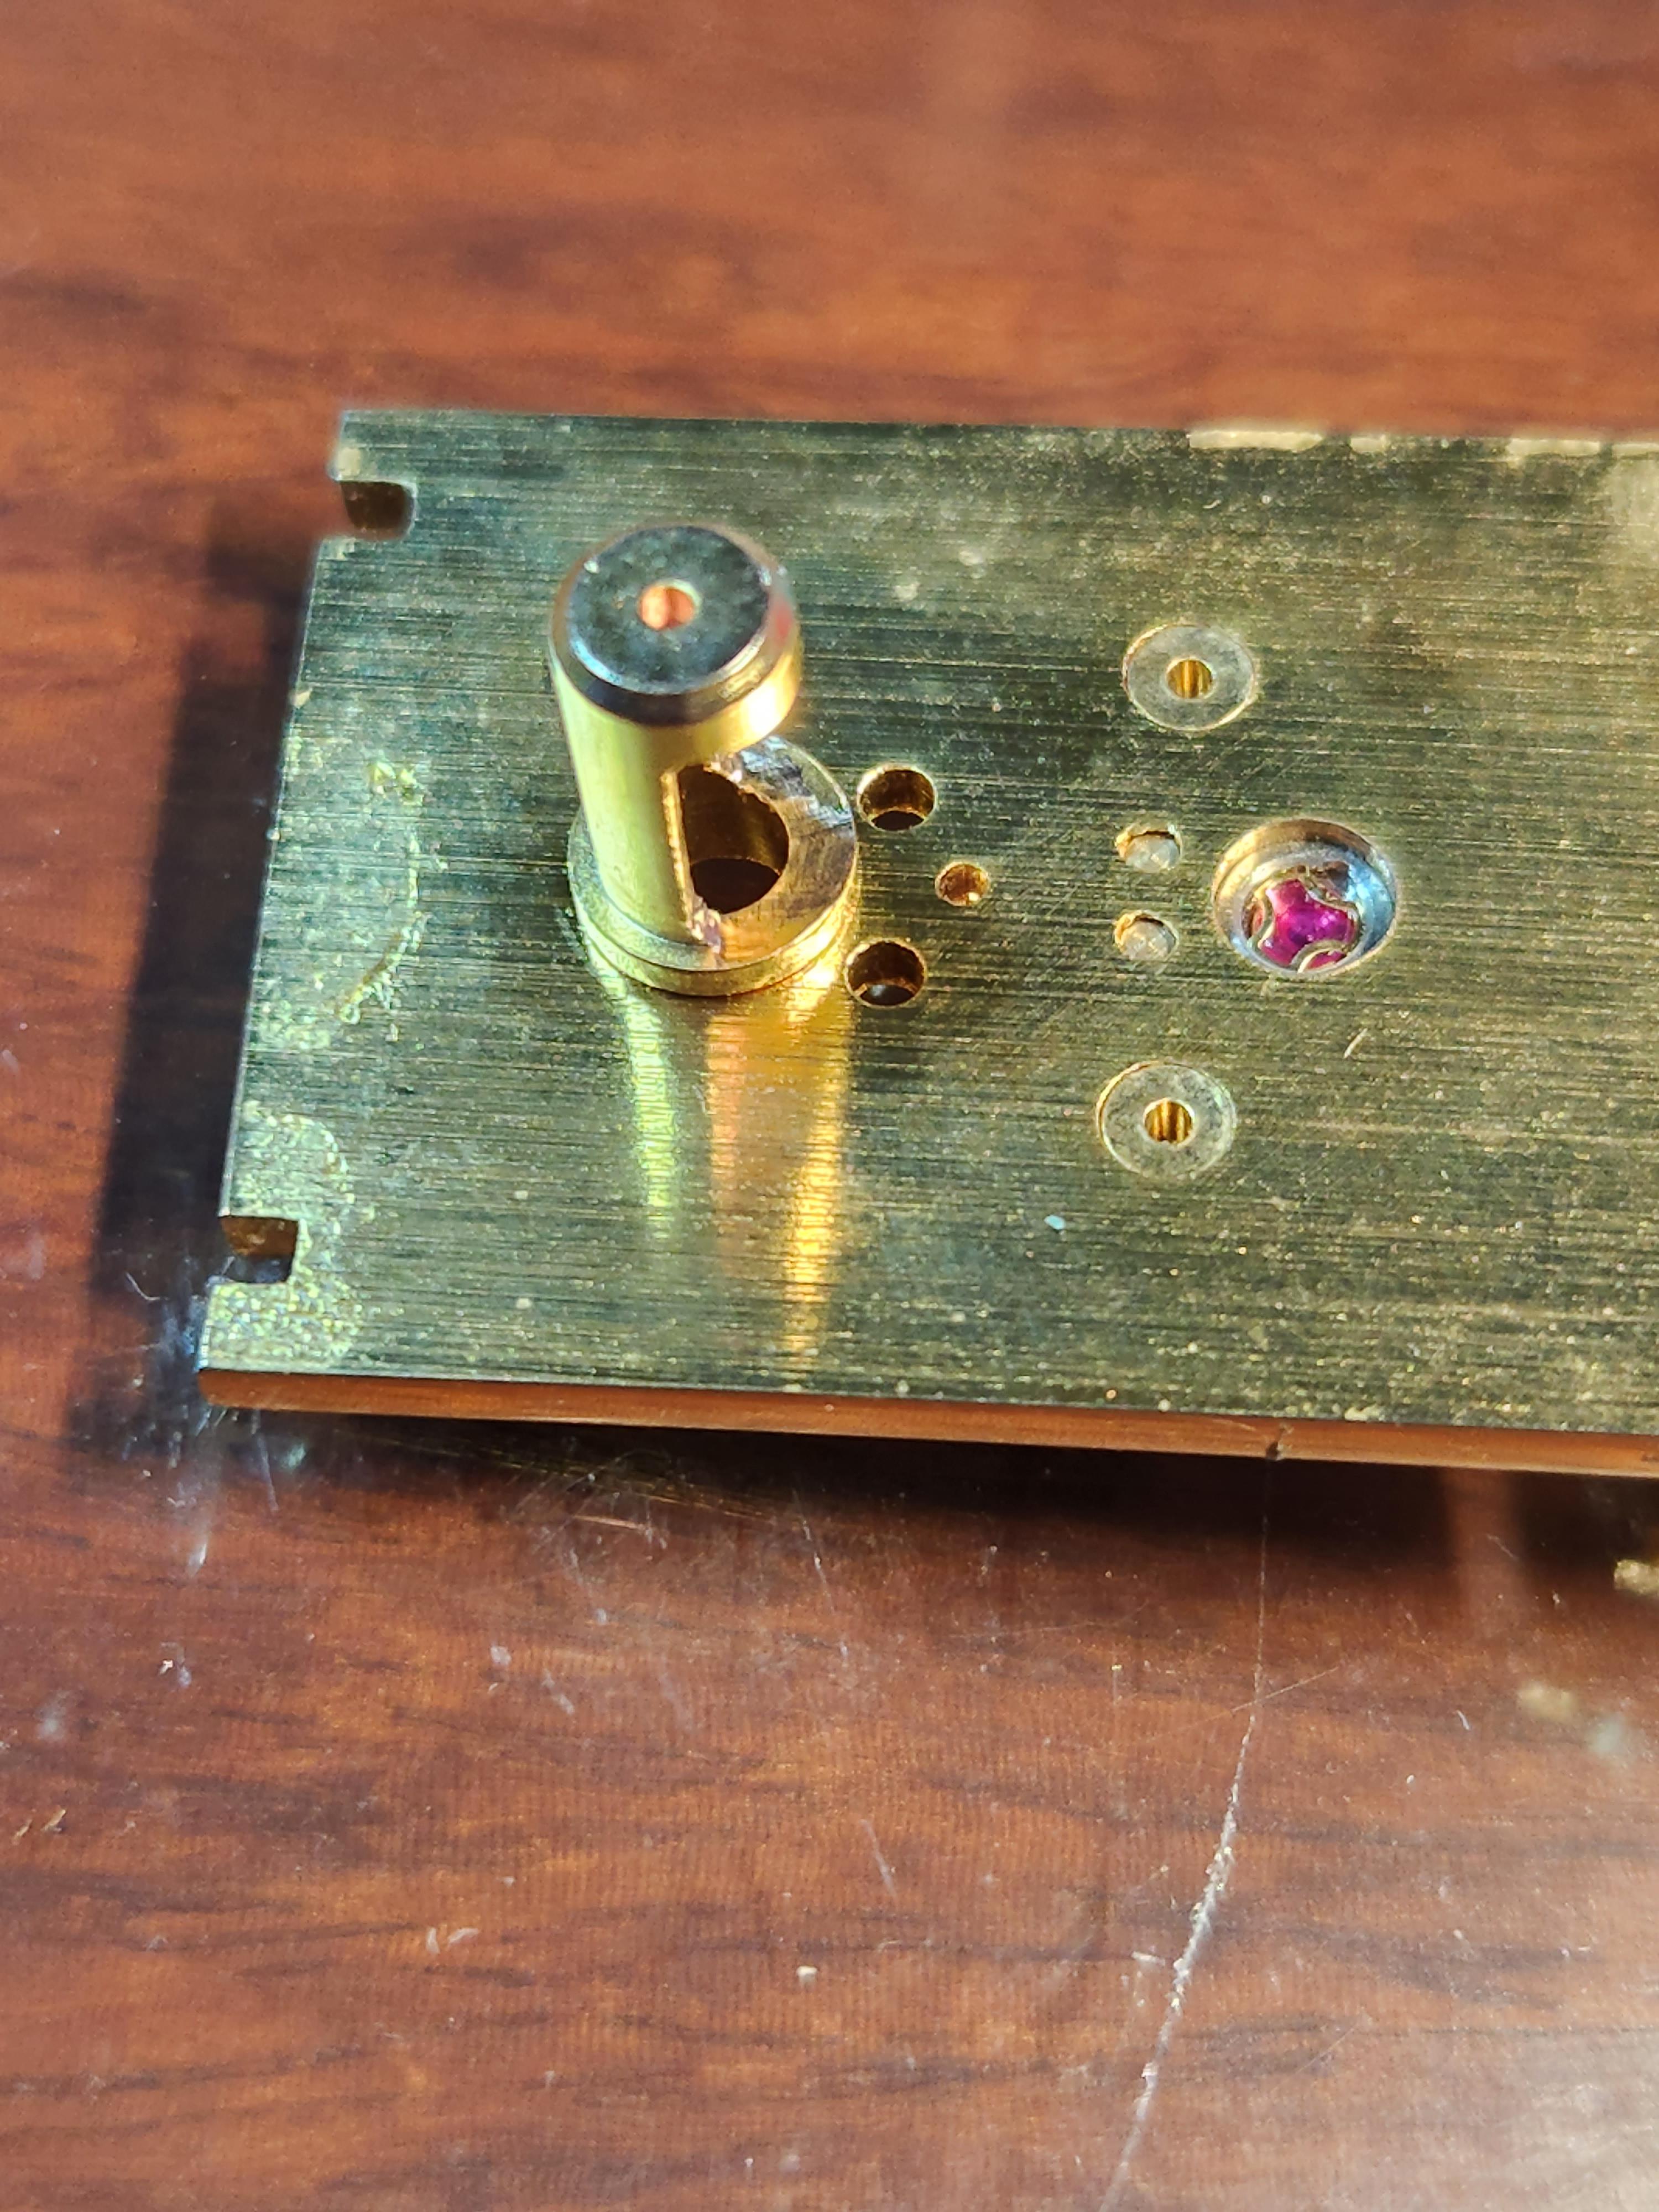
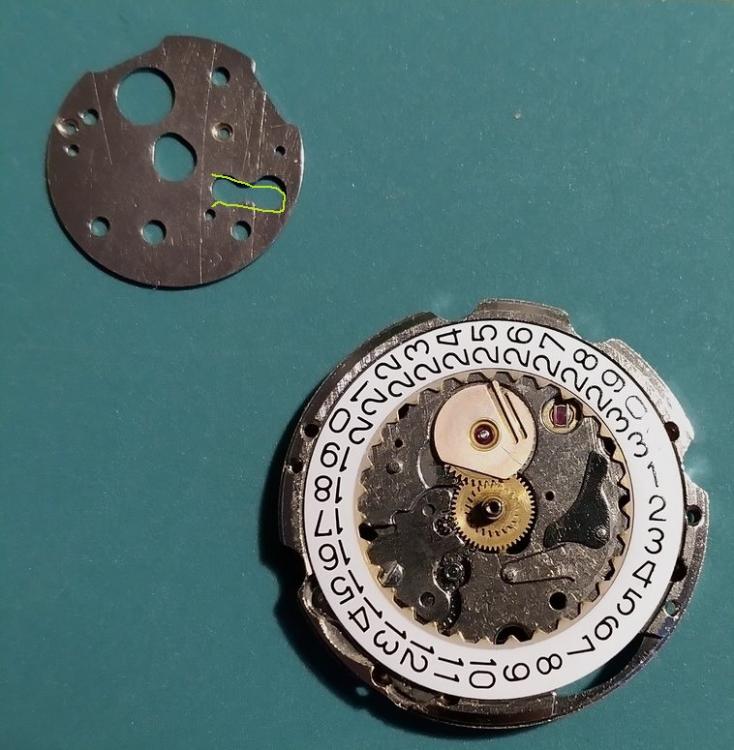
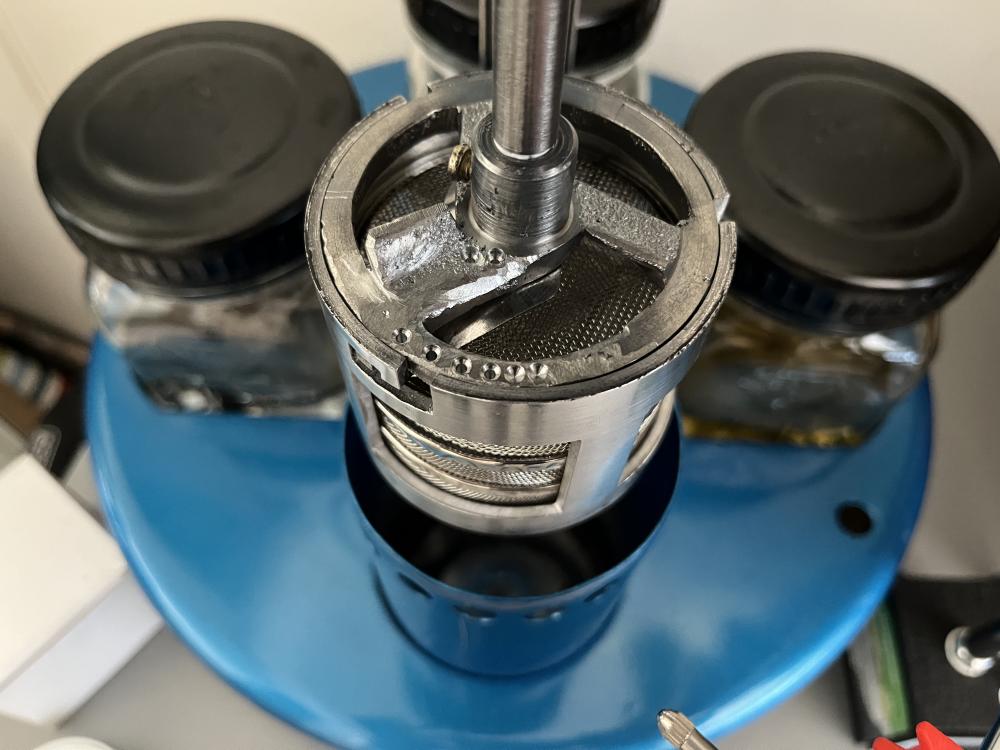
Well this is what I've been messing with: 1) The shaft itself is true (Video). The problem is definitely in the rotor being off axis. 2) Bending the spring that presses against the basket as the seller demonstrated in his video above does indeed help. It is just a bandaid to the larger issue though. 3) The comment from the seller about something about an arrow turned out to be true (picture). When I inspected one of my baskets there was an arrow that lines up with a scribed mark in the rotor. The assembly did indeed spin better in this position compared with the other two positions. The second basket it came with didn't have an arrow, but I found it also performed better in one of the positions. 4) I found that the rotor was heavily weighted to one side so I spent some time removing material to balance the weight more (picture). Although I feel like it did help a little, the problem with the rotor being off axis still proved to be the main culprit. I really wish I had access to a lathe so I could center the rotor better.

 1 point
 -
Well I got a video from the seller.1 point
-
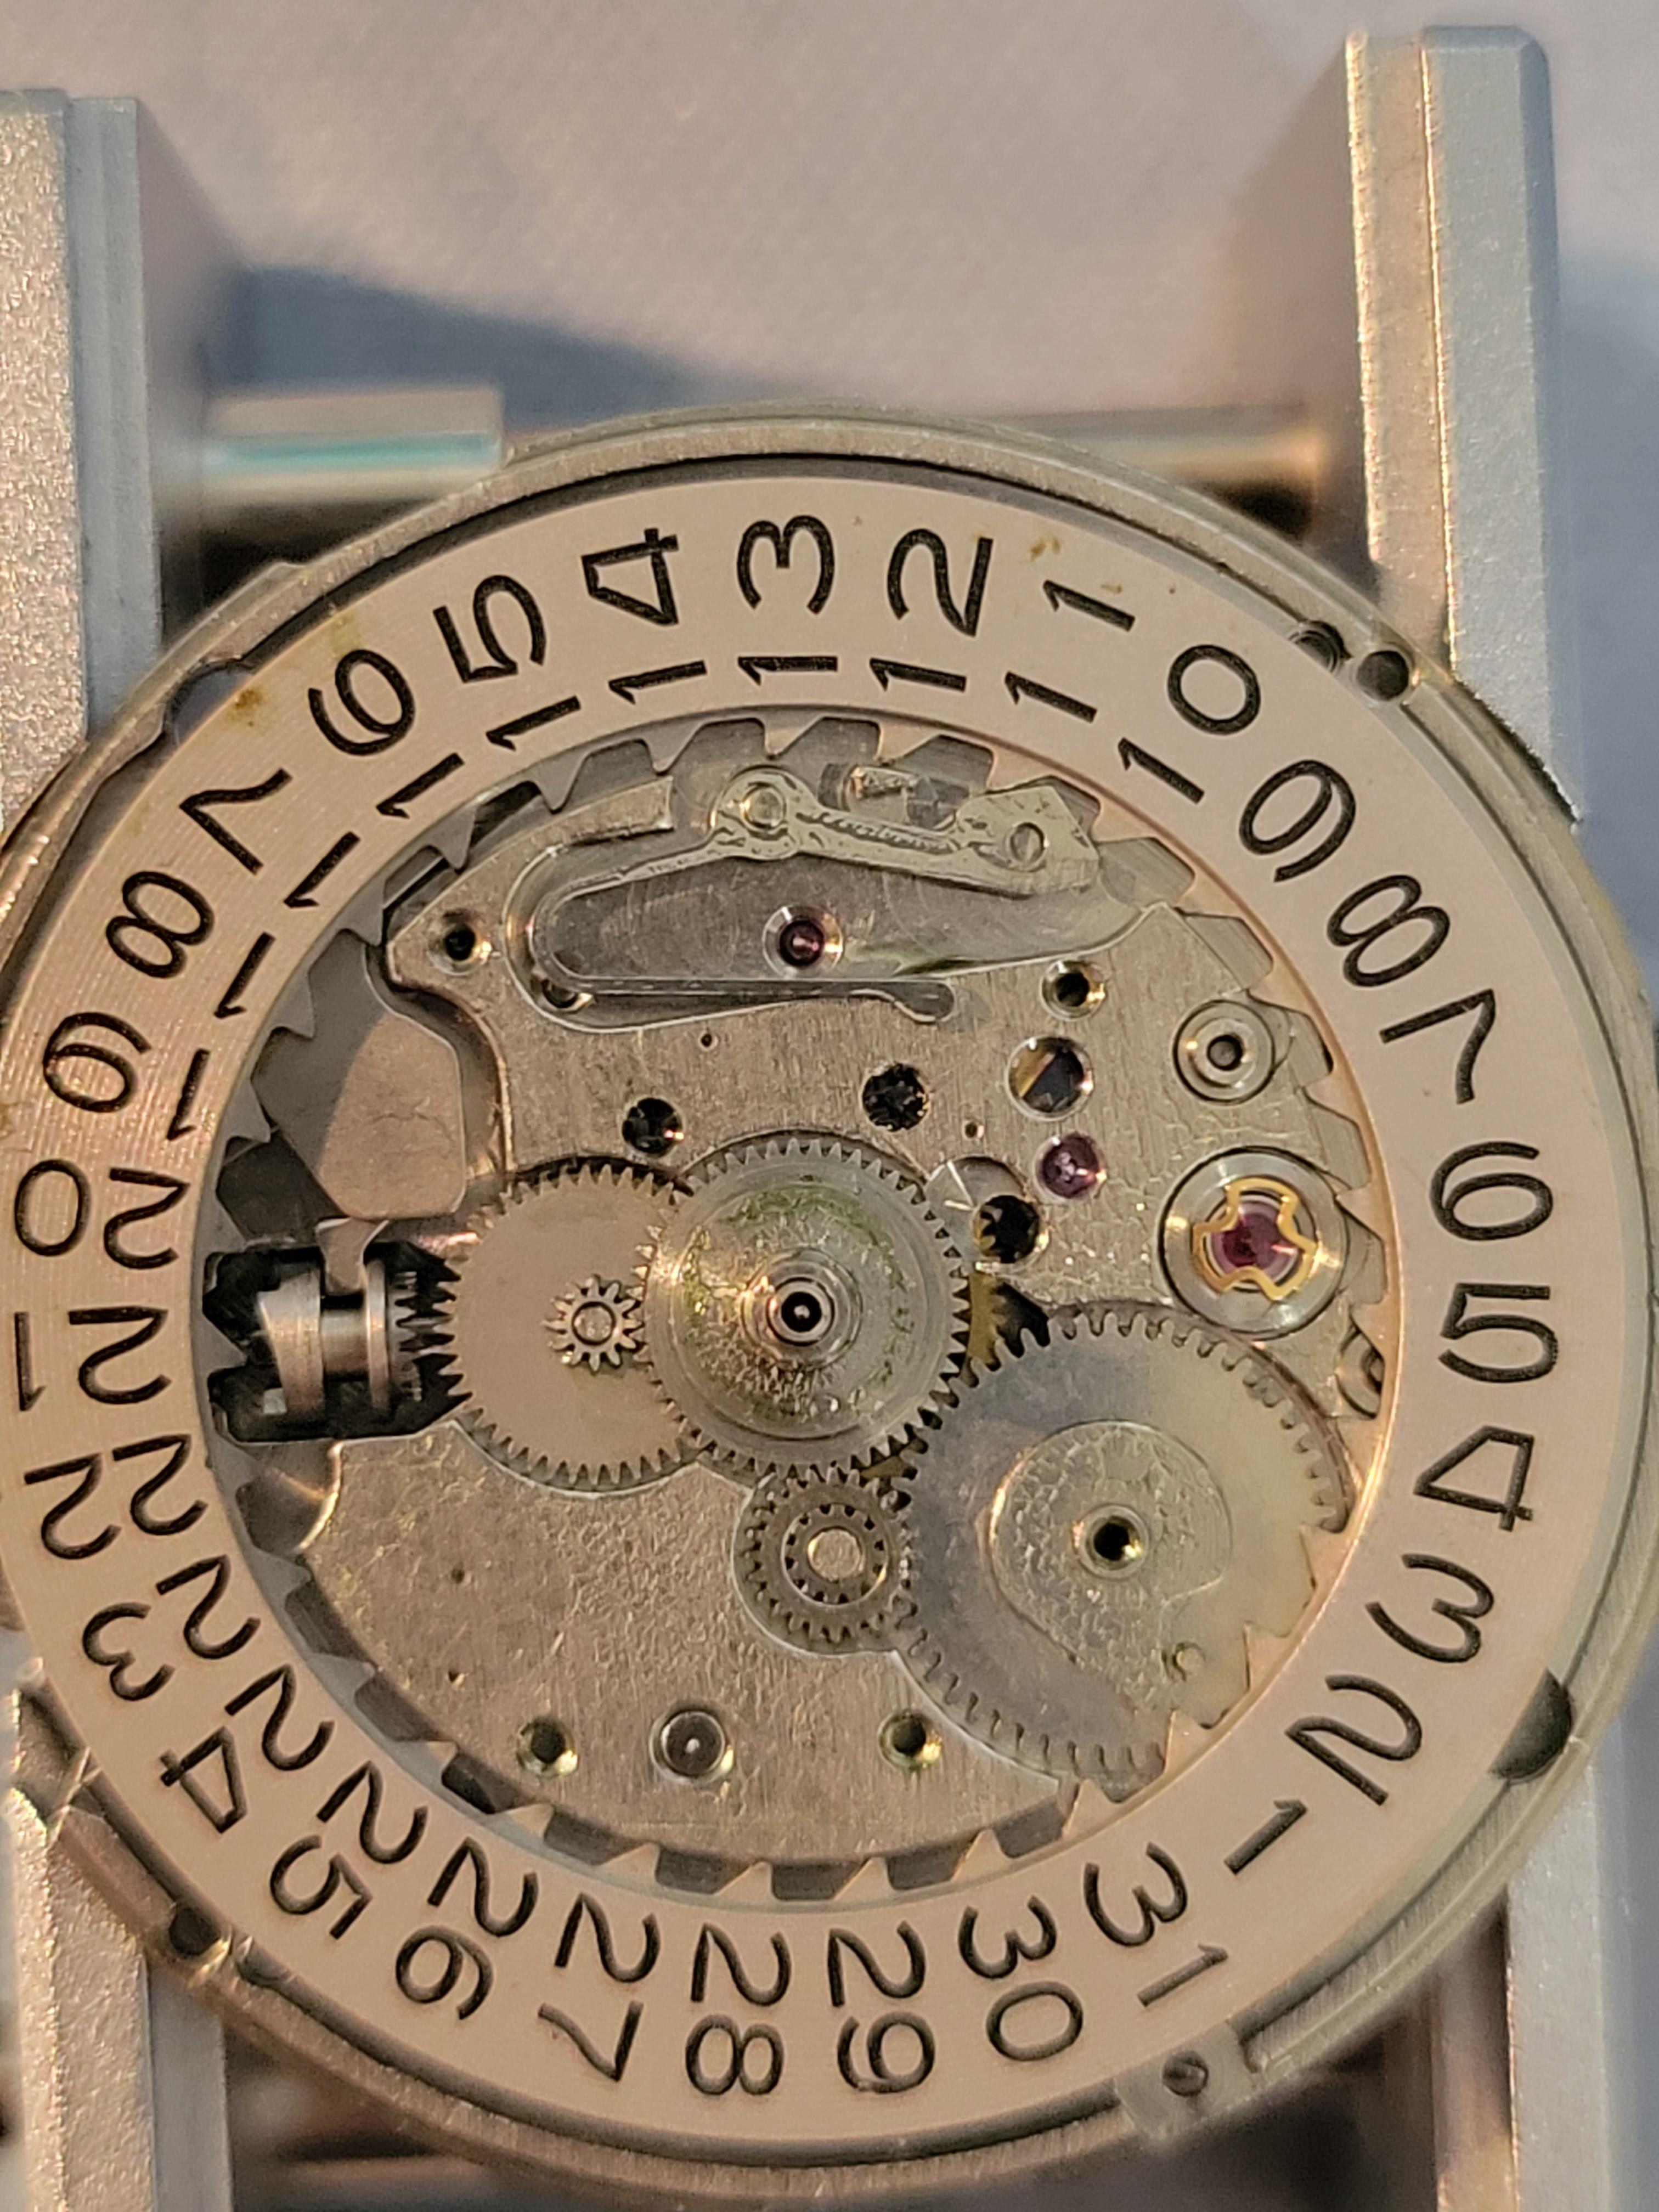
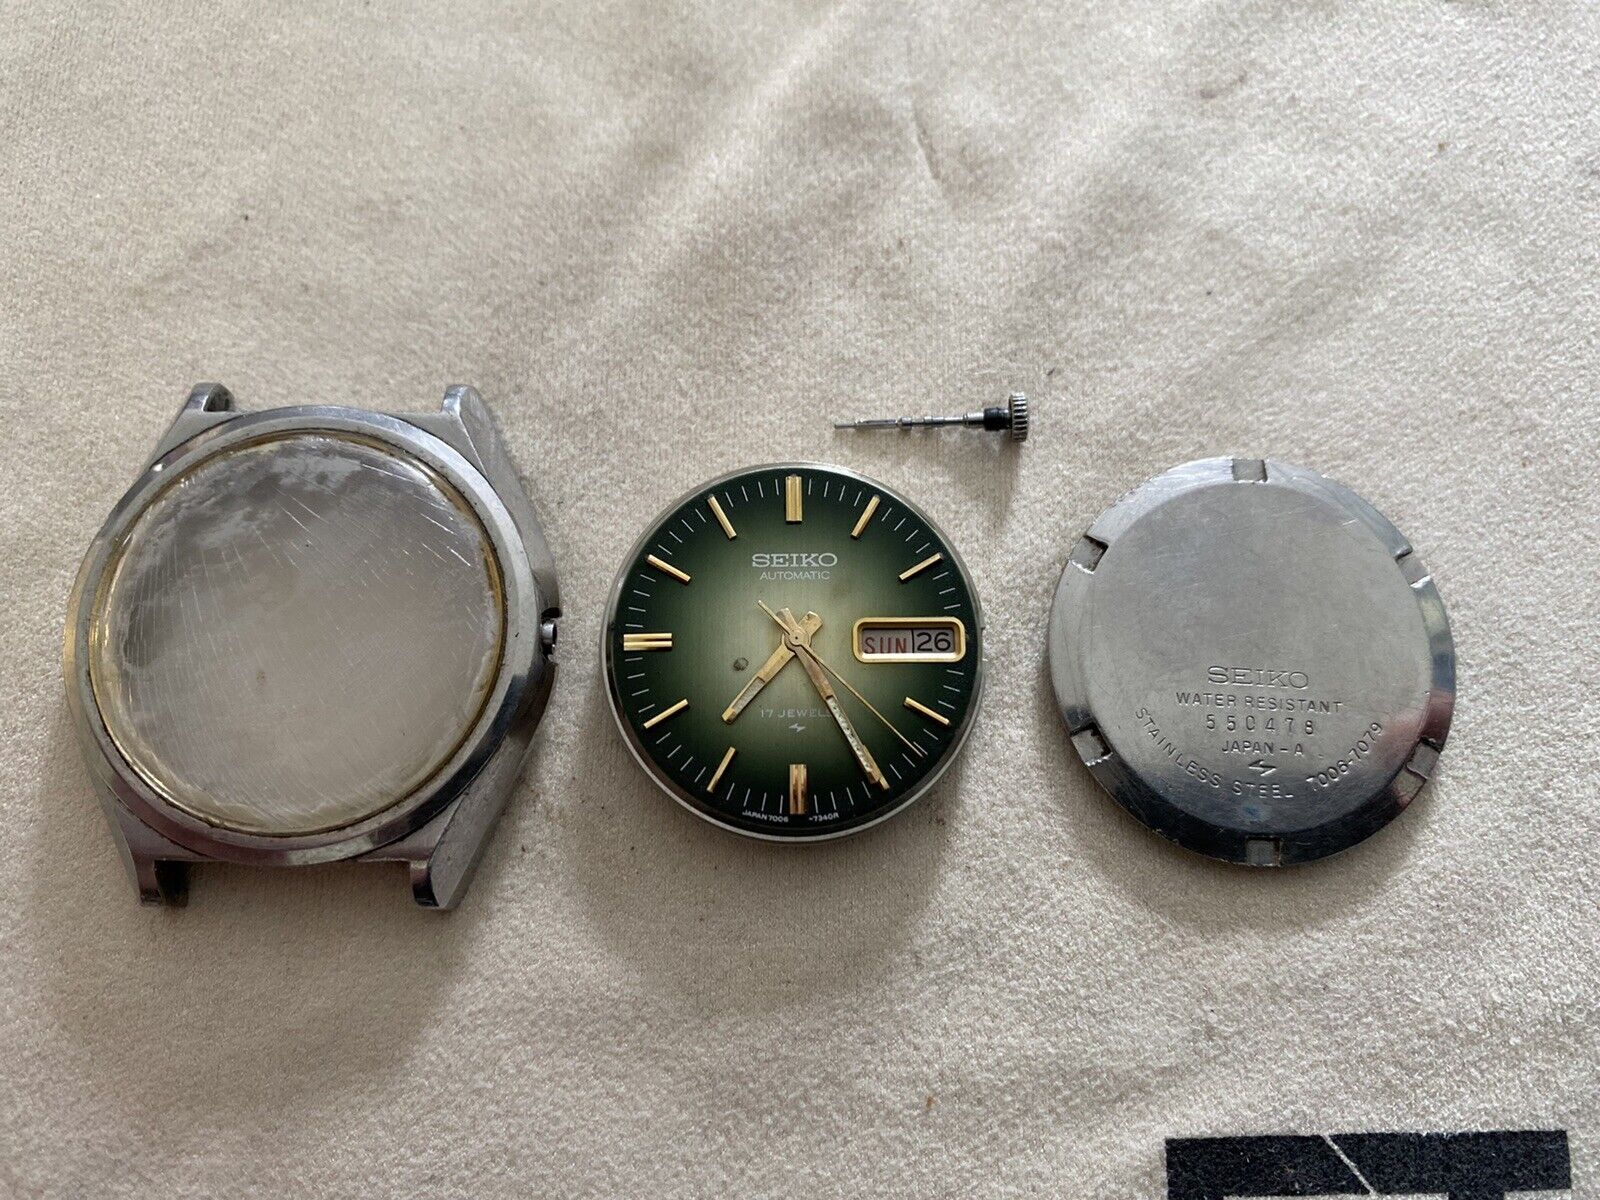
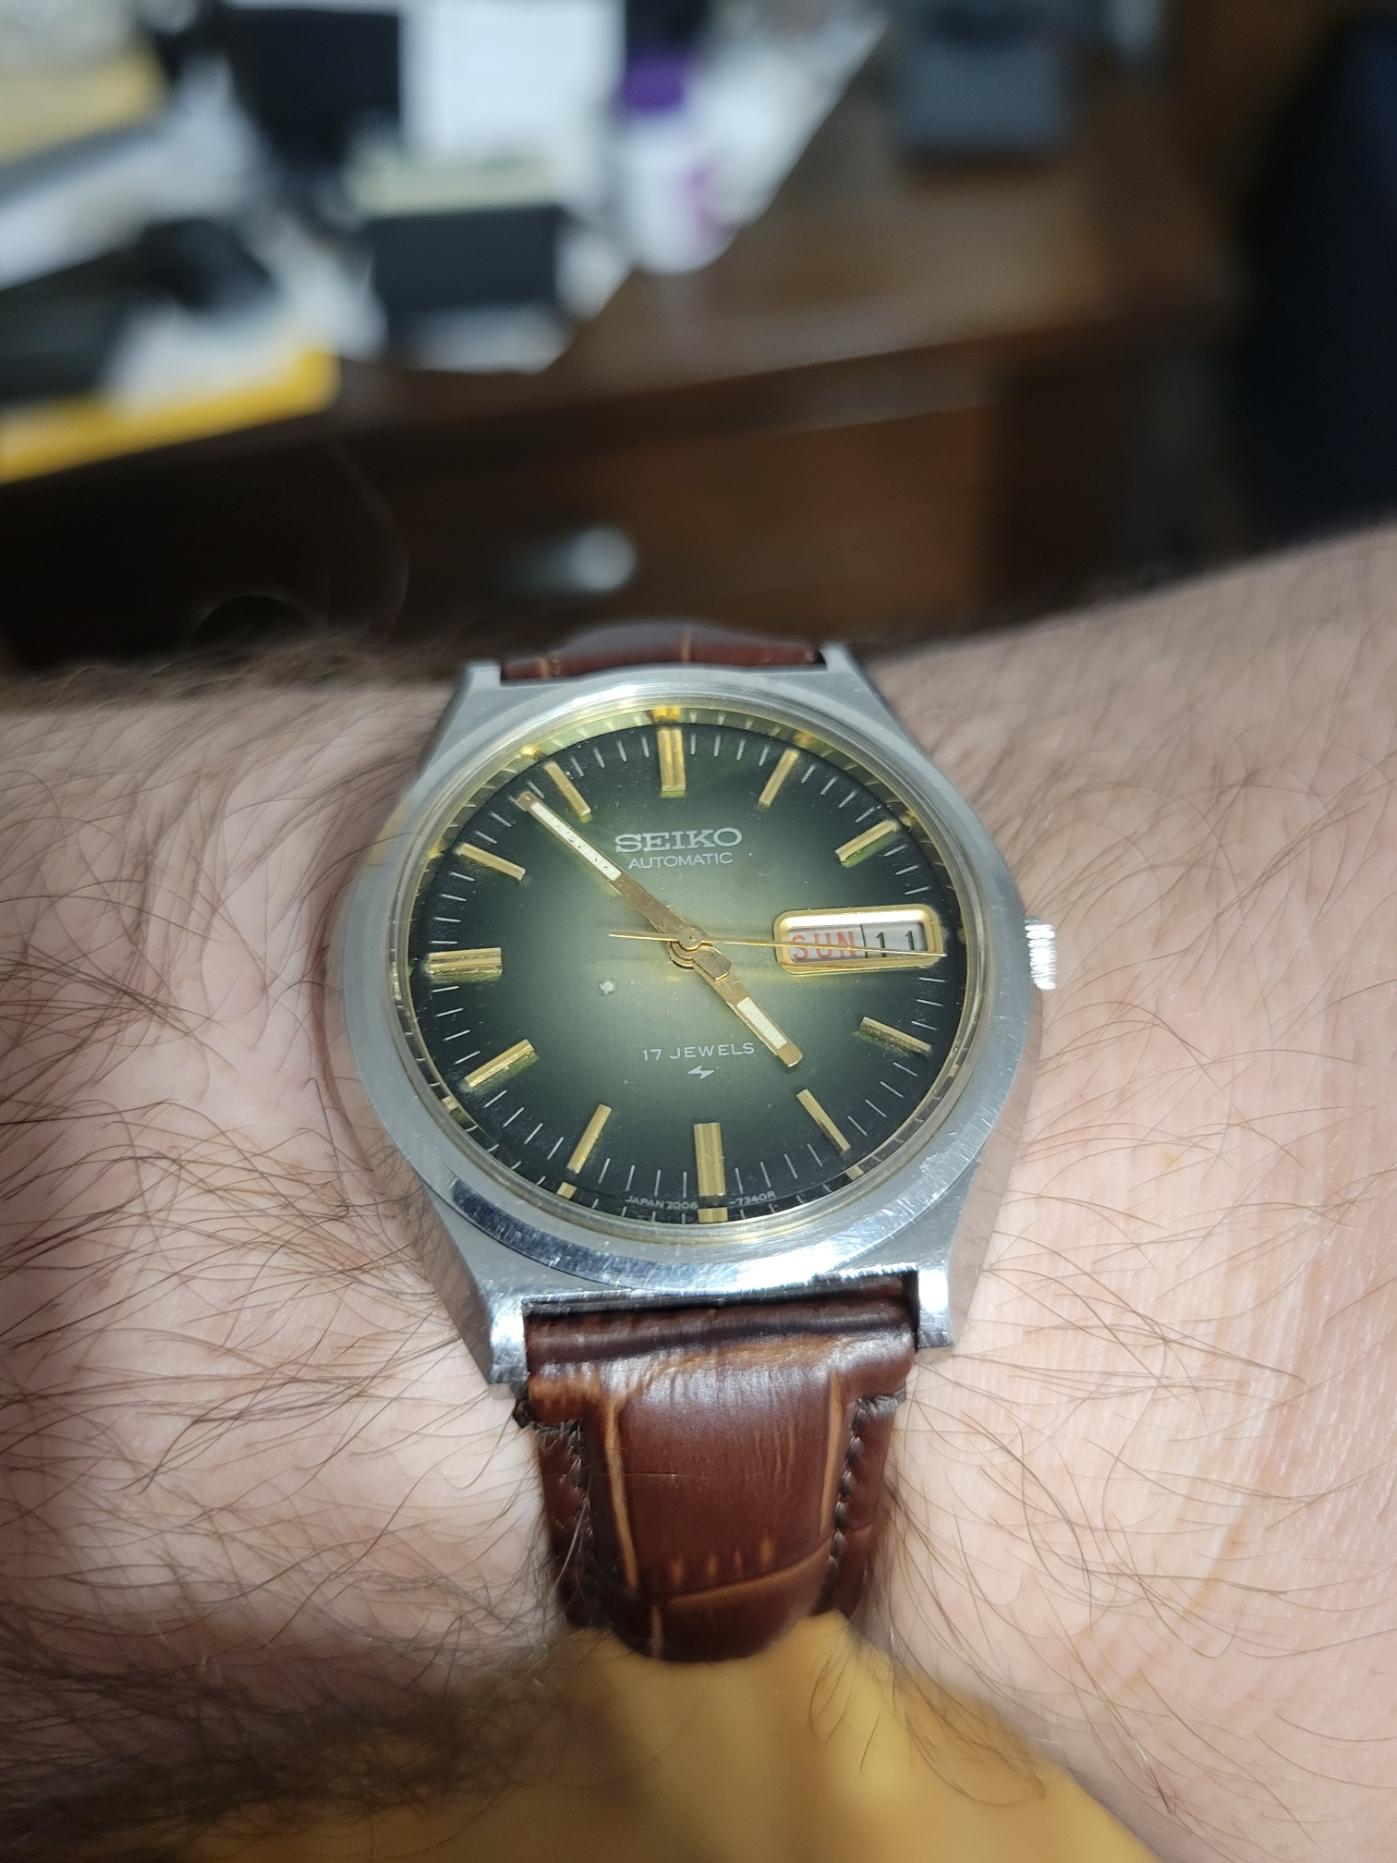
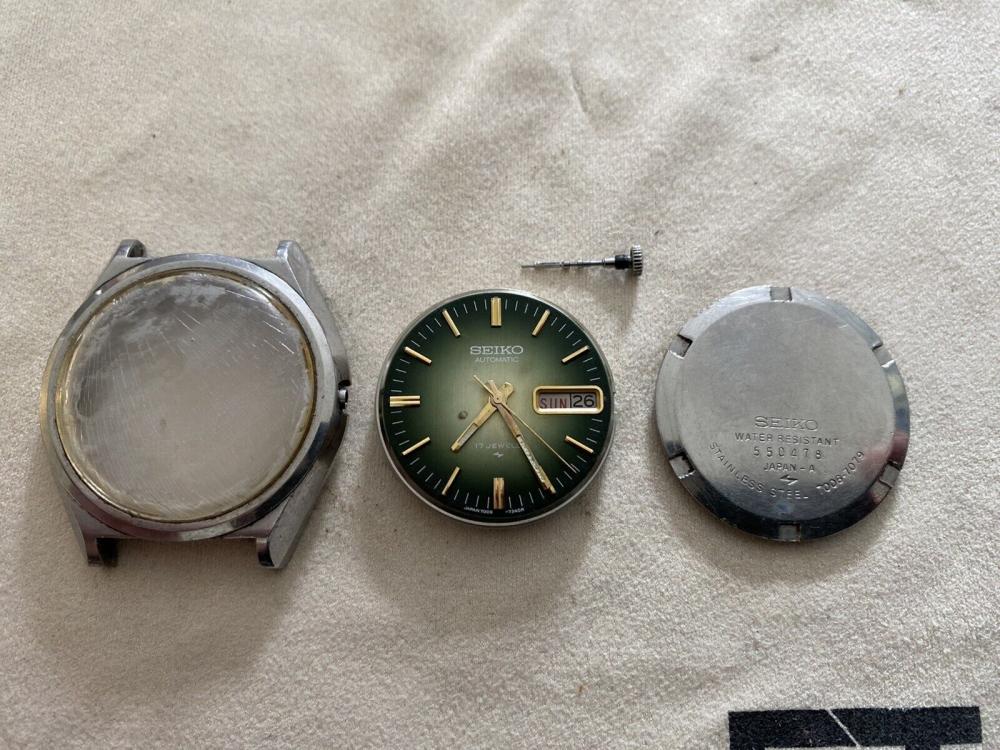
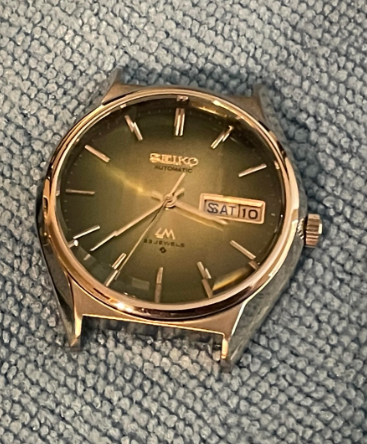
I bought a 1975 Seiko automatic with a really nice emerald green and gold dial, and the entire watch was so sticky with old oil that I almost wonder if whoever serviced it last just dunked it in oil to try to get it working. I thought at first that the hairspring was kinked, but removing the balance and a close inspection under the microscope revealed that it was just caked with old sticky oil, and most of the coils were sticking to each other. I tried cleaning it in lighter fluid three times before I ultimately gave up and ordered some L&R 556 fluid and an ultrasonic cleaner. With the movement given an actual proper cleaning, the balance swung free and clear and I had high hopes that I would get a usable watch in the end. On the plus side, I have an ultrasonic cleaner now, and it made cleaning up the watch case much easier. The crystal was completely destroyed so I had to source a new one along with a new band, but the dial only had a few spots where oil seemed to have seeped through from behind. I didn't want to touch it much, but was able to gently dab up most of it with some rodico. Unfortunately there was one spot where a small drop of oil had gotten under the clear coat and destroyed the paint underneath. As soon as I touched that part it all came away leaving a spot of bare metal. The rest of the watch looks good enough though that I can ignore this small blemish, and with everything cleaned up and a bit of regulating it's running really nicely. Here are a couple of shots I took for reference before the cleaning (didn't take any of the sticky balance, sorry)

 1 point
 -
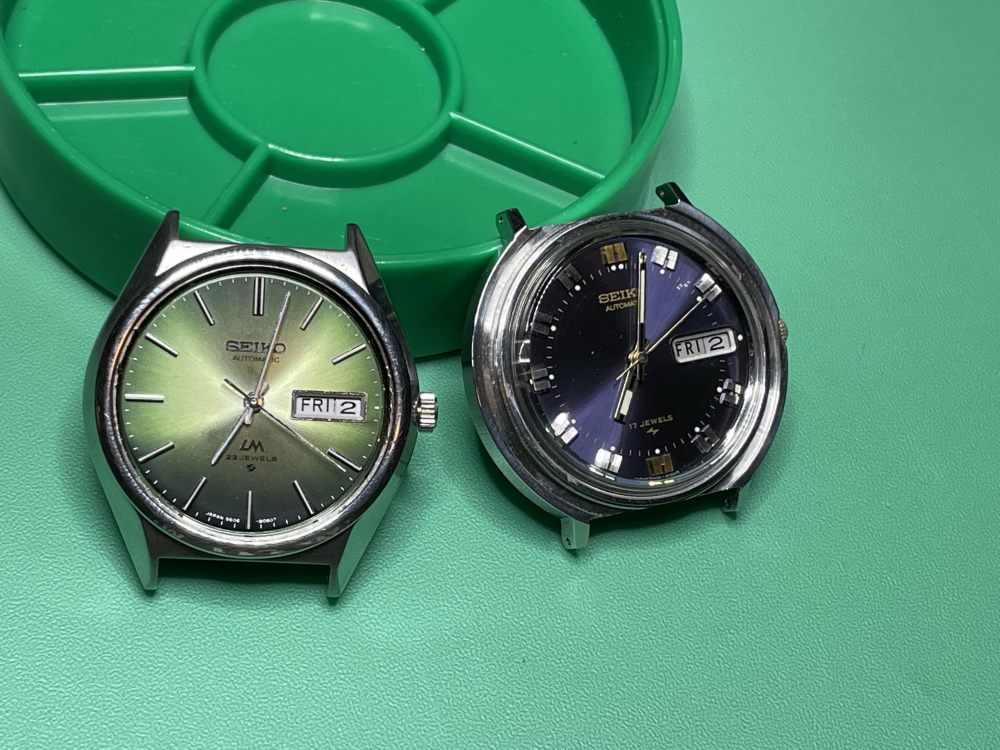
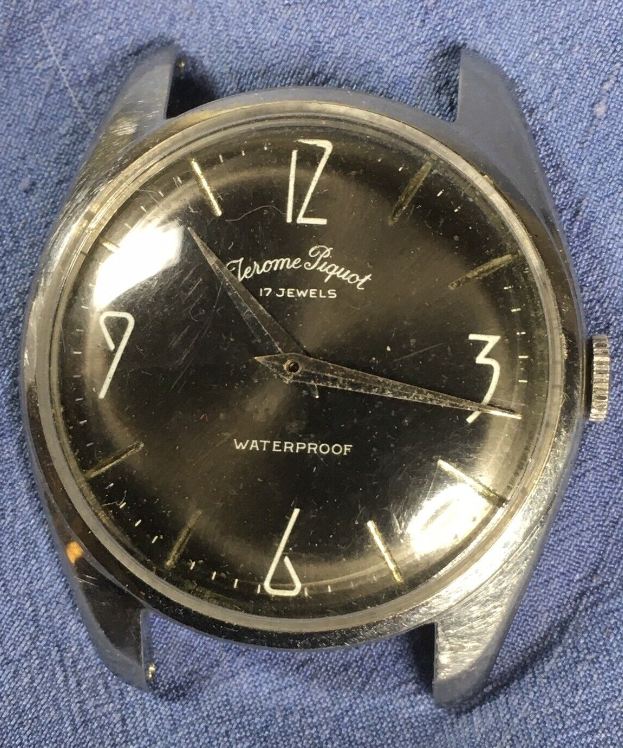
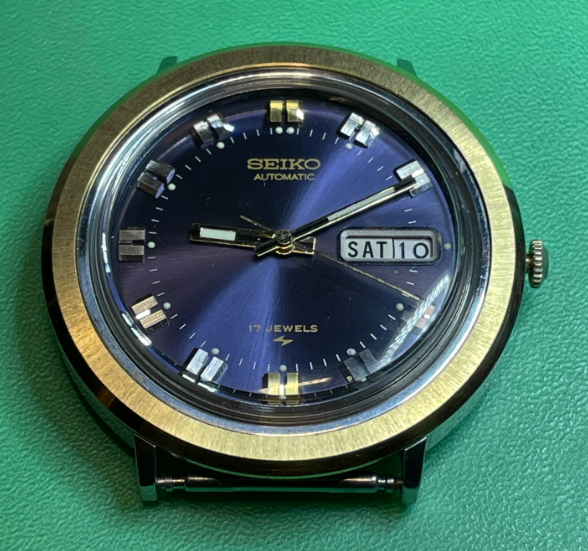
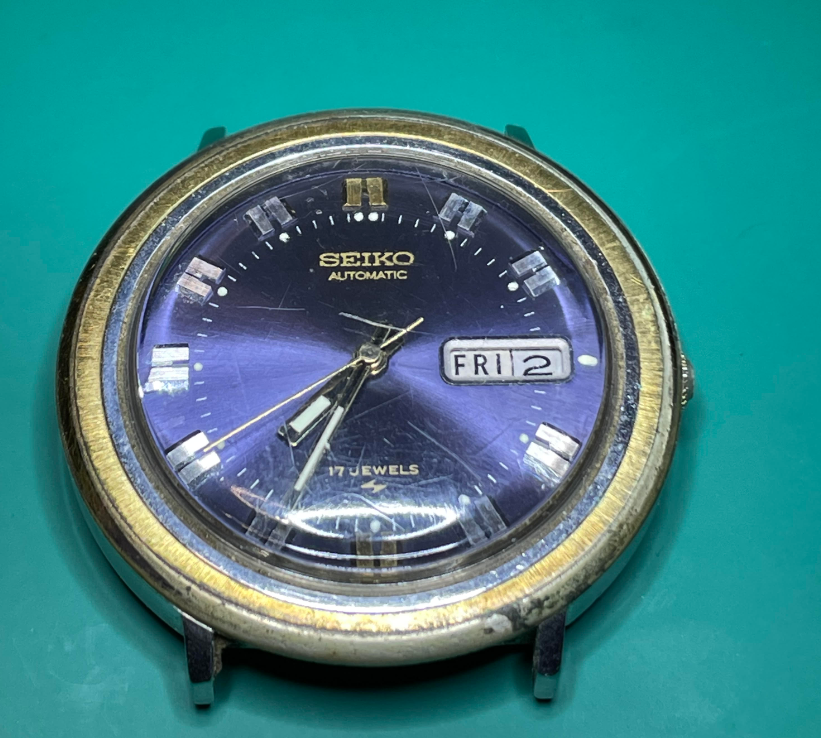
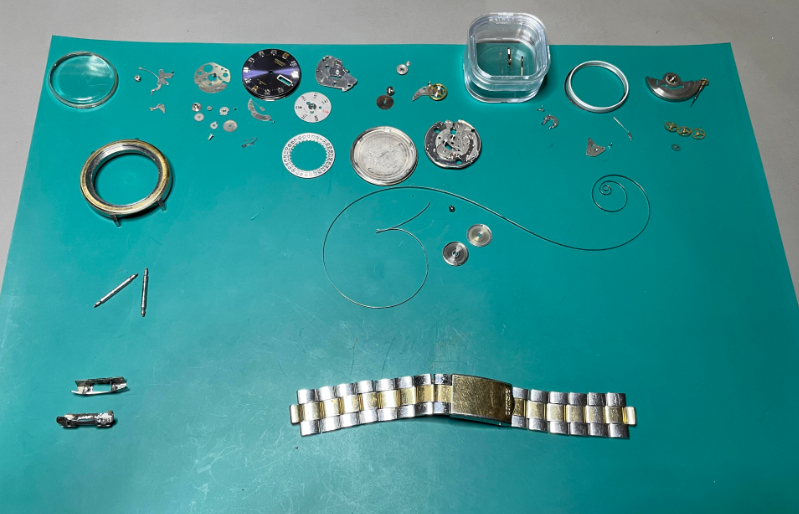
I have my first full service project, a 1974 Seiko with a purple/blue dial now only waiting for a replacement bezel. For what it's worth, in every picture I took of this watch it appears deep purple. When looking at it in person, there's much more blue in the dial. Regardless of what I did I could not get a picture to show it how it truly looks in person. It's repair was lengthy, and quite a challenge for being my first top to bottom watch repair (as previously documented on this website). The bezel is shipping from Denmark to central USA. It was shipped on August 17th, and the last bit of tracking info I received was the that it was in foreign international dispatch on August 18th. It's been 2 weeks, so hopefully it will be arriving sometime soon. While waiting for that bezel to arrive, I decided to start on my 2nd full service project. I found an interesting green dial Seiko Lord Matic from 1972 on eBay and picked it up for a pretty good price ($38 before shipping). It was listed as a non-runner. It had a bent tooth on the barrel and a broken tooth on the 3rd wheel. A donor 5606A movement provided me with the needed parts, and after a full service I 'lightly' polished out some of the minor scratches in the case. I did not want to get out the sanding sticks and really start to move/remove to much metal in an effort to remove some of the deeper scratches. The case still shows some honest wear, but it looks much better in my opinion. I also taped off the flats on the top and sides of the case and ran it over some 3M Scotch Brite pads. I found a great looking pattern by using the 'Very Fine' for a few passes, and finishing with the 'Ultra Fine' pads. This one is ready now as well, minus 1 part. The faceted crystal in this Seiko Lord Matic was beyond saving. I had a difficult time trying to find a NOS replacement, and I believe I've identified a potential replacement via an old Seiko part number, but could never find an available picture anywhere. Cousins showed to have one in stock at a very good price so I decided to gamble on it and placed the order. The crystal should be arriving next week, so we'll see what it looks like when it gets here. Hopefully it will work, because the one NOS faceted crystal I did finally locate is quite expensive, so I'm pinning my hopes on the Cousins part doing the job so I don't have to order the other one! With the 1974 Seiko (on the right), I probably have a few dollars more into the repair of the watch than it is worth, but I don't see that as an issue personally. It was my first watch and turned out to be a very educational experience, well worth the cost of repairs. The green 1972 Lord Matic I believe is worth more now than what I have invested in it. These watches seem to command a little bit of a premium over the regular Seiko's of that time (at least the working ones on eBay do). I really like the look of this watch, and while both are a bit small for me in my opinion, having a 20.5cm wrist, I'm going to order some straps and wear them proudly. Once these are finished, next up on the list is a Jerome Piquot watch I picked up on eBay for $19. I know nothing about the watch, other than it was very inexpensive and I thought the dial had character. It has an AS 1686 movement inside, and from first glance (without disassembly) one of the case screws has a broken head and it is missing the seconds hand. It is so filthy inside the amplitude is basically non-existent. All of that aside, I think the dial is really unique. At first I thought the indices aside from 12, 3, 6 and 9 were all missing, but in fact they are cut into the dial. Close inspection shows that the dial is polished in those hour marker recesses. I think that is a pretty unique way to showing the hour markers. The movement looks simple enough to disassemble and parts seems to be somewhat available on eBay so I think I'm going to give this old $20 Swiss watch some attention in the coming weeks.
 1 point
 -
The final parts for these watches arrived on Thursday and today. I documented the adventure I had with the Lord Matic crystal yesterday in another thread. After 4 weeks of shipping time, the bezel for the 1974 Seiko arrived today. I so happy to see these running. I'll order some straps for these this weekend, and by the time I return from my work trip next week, hopefully they'll have arrived. The 1972 Seiko Lord Matic: The 1974 Seiko 7006-8190R There was some surface spots on the bezel, which I was able to remove by using some glass cleaner and a microfiber cloth. It took quite a bit of scrubbing, but I was able to clean it up pretty well without damaging any of the plating. There is only a hint of a spot visible around the 10 o'clock position on the bezel. Aside from the few marks on the dial that I could not remove with Rodico, this thing is in great shape now. Now that I'm looking at the photo I realized that I never pushed the crown back in after setting the time when I took the photo. It's bugging me now, but I don't want to go and take another picture!
 1 point
 -
Actually the most controversial subject is should you buy Chinese made tools from China or Chinese made tools packed into made in Switzerland boxes with the price hiked ten fold. I also would not be surprised if we found out Moebious etc do not actually make the oils they sell as watch oils but buy them from an existing oil maker in bulk for a lot less than they sell them for to us fools to pay exorbitant amounts for. Hat coat door bye.1 point
-
Eyup matey. I use 50:1 red lube synthetic petrol mix in my old brick cutter with an additional lead additive to stop any pre ignition . I thought just dipping the whole watch, case, dial hands everything in a jar full of the mix pop some anodes in there and connect up to the mains and bingo . One cleaned, fully lubed and lead lined watch ready to wear. Problem is i wont be able to read the dial with my superman eyes. Graham sorry mate, Gert has made me think i may have been a little hard on you. Having a shitty time at the moment my father in law passed away at the week . This is how i deal with things.1 point
-
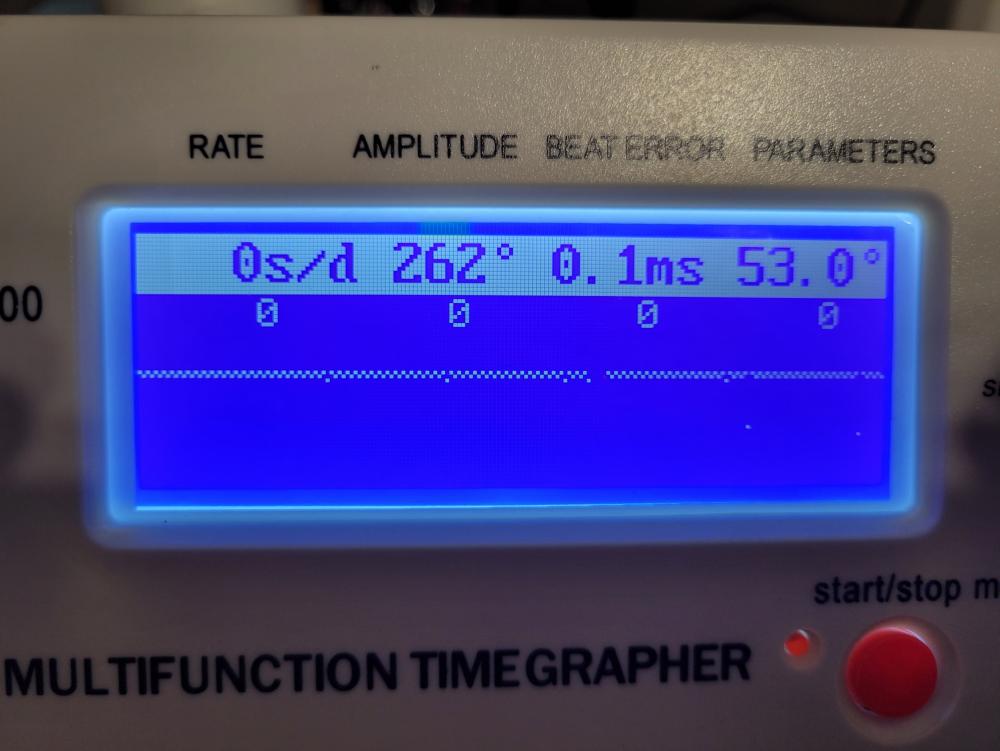
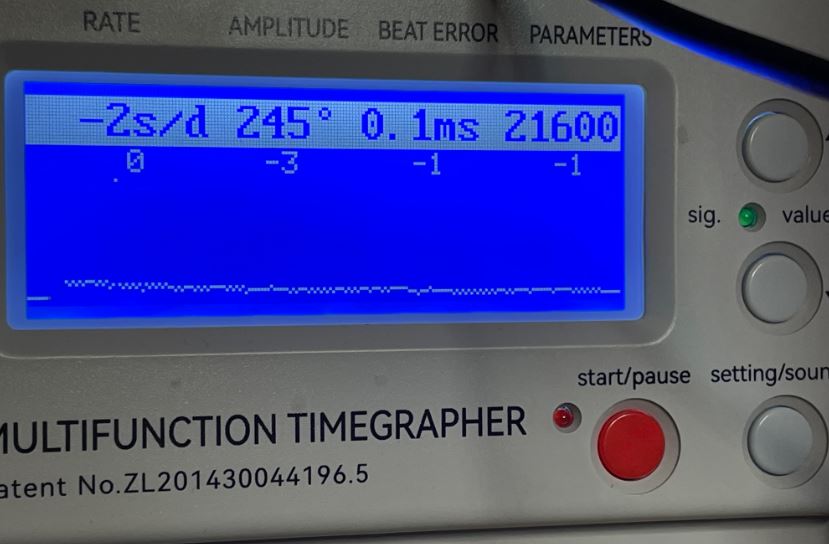
As I've documented briefly on here previously, I've been put through the gauntlet with my first full service/rebuild. I had a great looking purple/blue (depending on the light) Seiko dating to 1974 that I chose as my first candidate. It has a Seiko 7006A movement. The mainspring taught me a lesson when I tried to wind it by hand, the hair spring had a kink in it, which I failed in my attempt to repair, among other things. I purchased a 'balance complete' which I learned afterwards only consisted of the balance wheel and spring assembly. I just assumed 'complete' meant the full bridge, etc. Well I had a heck of a time getting the replacement spring mounted. The balance complete I received had a twist towards the end of the hairspring, causing the stud on the end of the spring to not line up correctly with the arm on the bridge. My feeble attempt to re-align that mounting stud taught me another lesson about the word 'delicate'. While trying to take the twist out of the end of the spring I put the spring out of flat, and did not have the skill to correctly align that spring either. I could not find a donor 7006A movement without buying a full watch, so after some research I ended up purchasing a donor 7009A movement which uses the same balance bridge, wheel, etc. That donor movement came in. I fully disassembled my watch again, swapped the balance from the donor to my 7006A and did a full cleaning once again. Now I finally had all good parts on hand to get this thing going! Assembly was going well until I tried to use some peg wood to clean the jewel on the top of my donor balance assembly. It went flying, never to be found. Thankfully the jewel from my original 7006A balance cock was the same so I cleaned it, and moved forward with the reassembly. I ended up replacing the barrel, arbor, and mainspring with a NOS Seiko unit, the balance assembly was swapped with a 7009A donor movement, and I ended up swapping out the date wheel because my donor movement had one in better condition than the original. I put a full wind in it and It's been running for about 45 minutes. I did a quick adjustment to get the beat error and S/D somewhat close to where it'll end up, and have just been letting the watch run. I will come back tomorrow and see what the numbers look like, but I am so happy that this one is finally up and running. What a humbling and rewarding experience! I will be doing a bit of work on the case in the coming days and hope to have this watch ready to wear soon. The only thing left will be to find an 'XL' length strap, as the factory bracelet is woefully short of fitting on my wrist. Yes I know there are a ton of scratches! After the 2nd disassembly I finally figured out a screwdriver technique that works for me, and afterwards did not add any additional scratches to the watch. It's something I'm going to take special care to avoid moving forward. Here's a couple of photos from my previous post on this watch. I don't have the dial and hands reassembled so I figured re-posting these would help you remember the watch I am referring to. I have a replacement crystal on hand, and replacement bezel on the way. The bezel currently on the watch has well over 50% of the plating gone. Once received I'll be able to finish with the full assembly. I'm really glad I didn't give up on this watch. For a short while I was telling myself that this had too many issues and was above my ability to repair. I'm glad I stuck with it, as I don't think I could've gotten over having to quit on my first project. Lastly, I am so completely enamored with this new hobby. I have been trying to keep my eyes out for some future project watches and I went a little nuts on eBay over the weekend. I purchased 3 watches that should be here soon. I'm looking forward to getting them in and having them ready to work on once this one is fully finished.
 1 point
 -
Using a mainspring winder with T end Springs works great if you remember to leave a little bit of the spring out. so insert starting with the little bit of spring sticking out first in the barrel followed by the winder. Rotate until the T is over the hole. Then using, I usually use a large screwdriver push until the T is in the hole. Because if you don't get it in first it will not just magically pop in place all by itself. Then pushing on the T holding it in place you can now push the spring out and it will stay word supposed to be.1 point