Leaderboard


Popular Content
Showing content with the highest reputation on 09/21/22 in all areas
-
Hi To test the rotation remove basket and the impeller, now you have the bare motor shaft. Spin up the motor and check the shaft for any deviation. If the shaft is ok then fit the impeller and repeat the test and watch the assembly for being true, and then fit the basket and repeat the test again. To tighten the clamp take out the brass key and substitute it with a hard wood one and tighten down the clamp. As you tighten down the wood will compress a little and grip the shaft. It mat be that the brass key is too thick and not allowing the clamp to grip properly. Just a few Ideas to consider. cheers2 points
-
Eyup Gert. I'll be doing just that. Starting at the barrel and working towards the escape. Sounds very much like the things i used to do 30 years ago.2 points
-
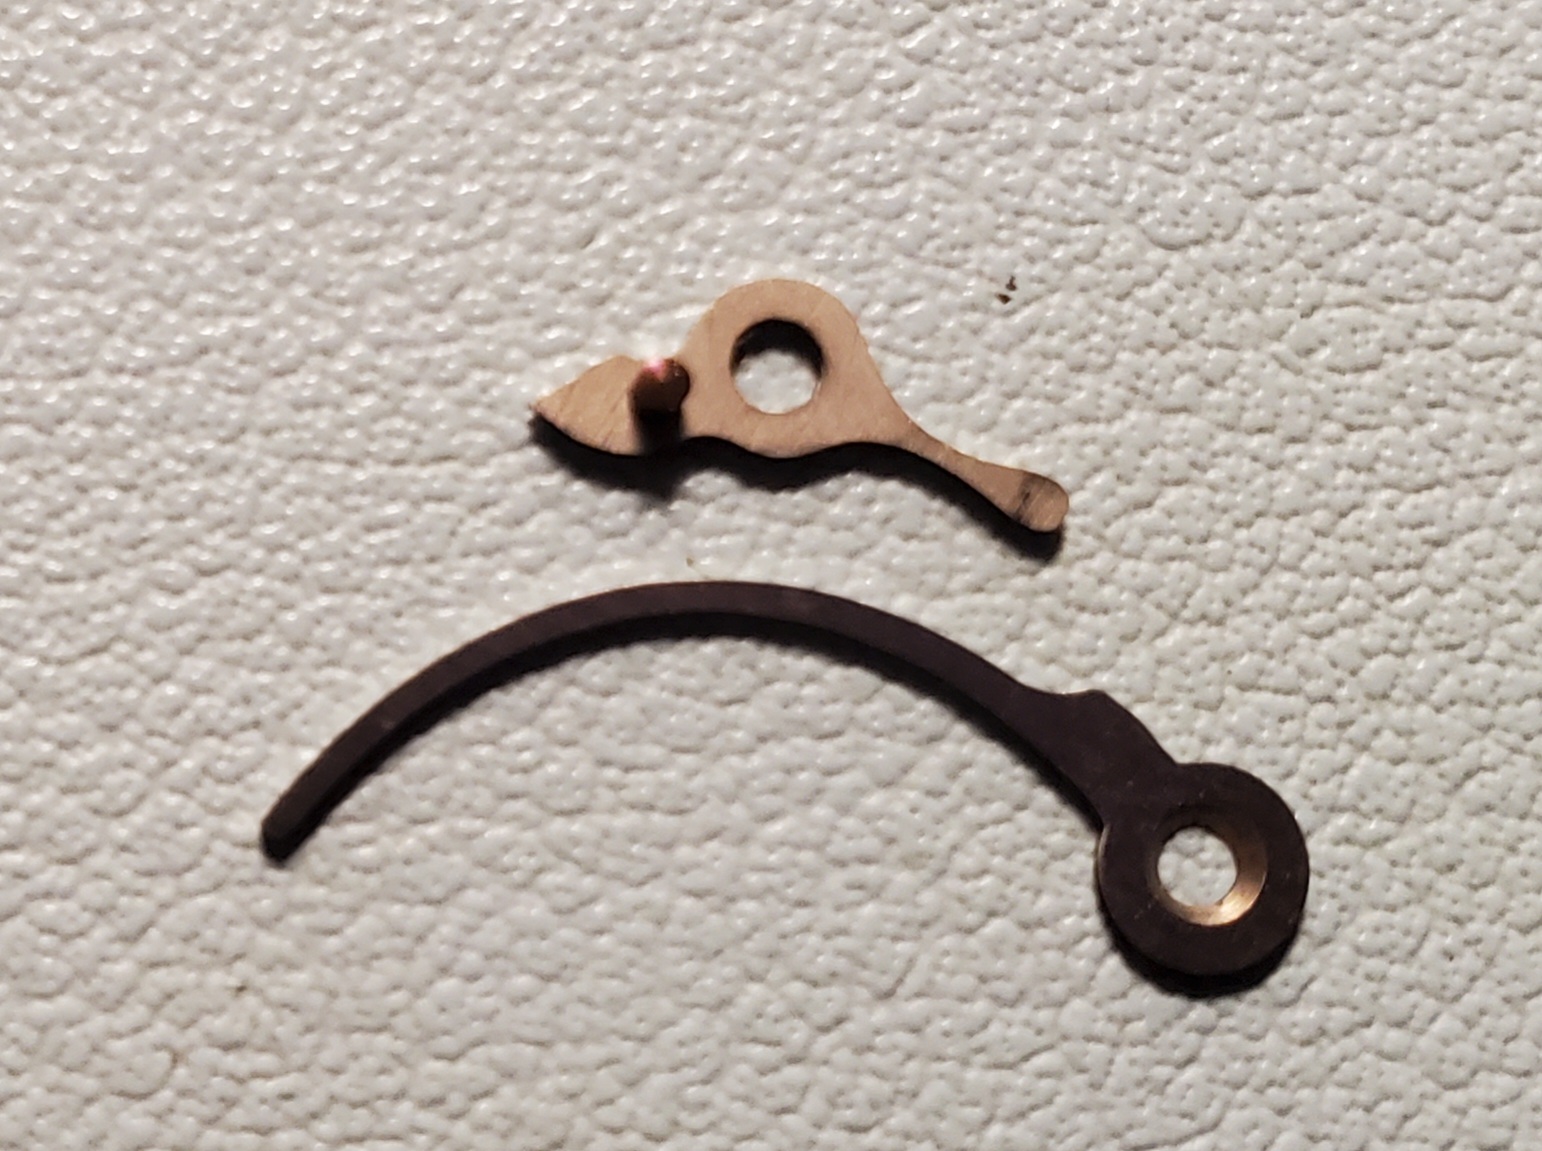
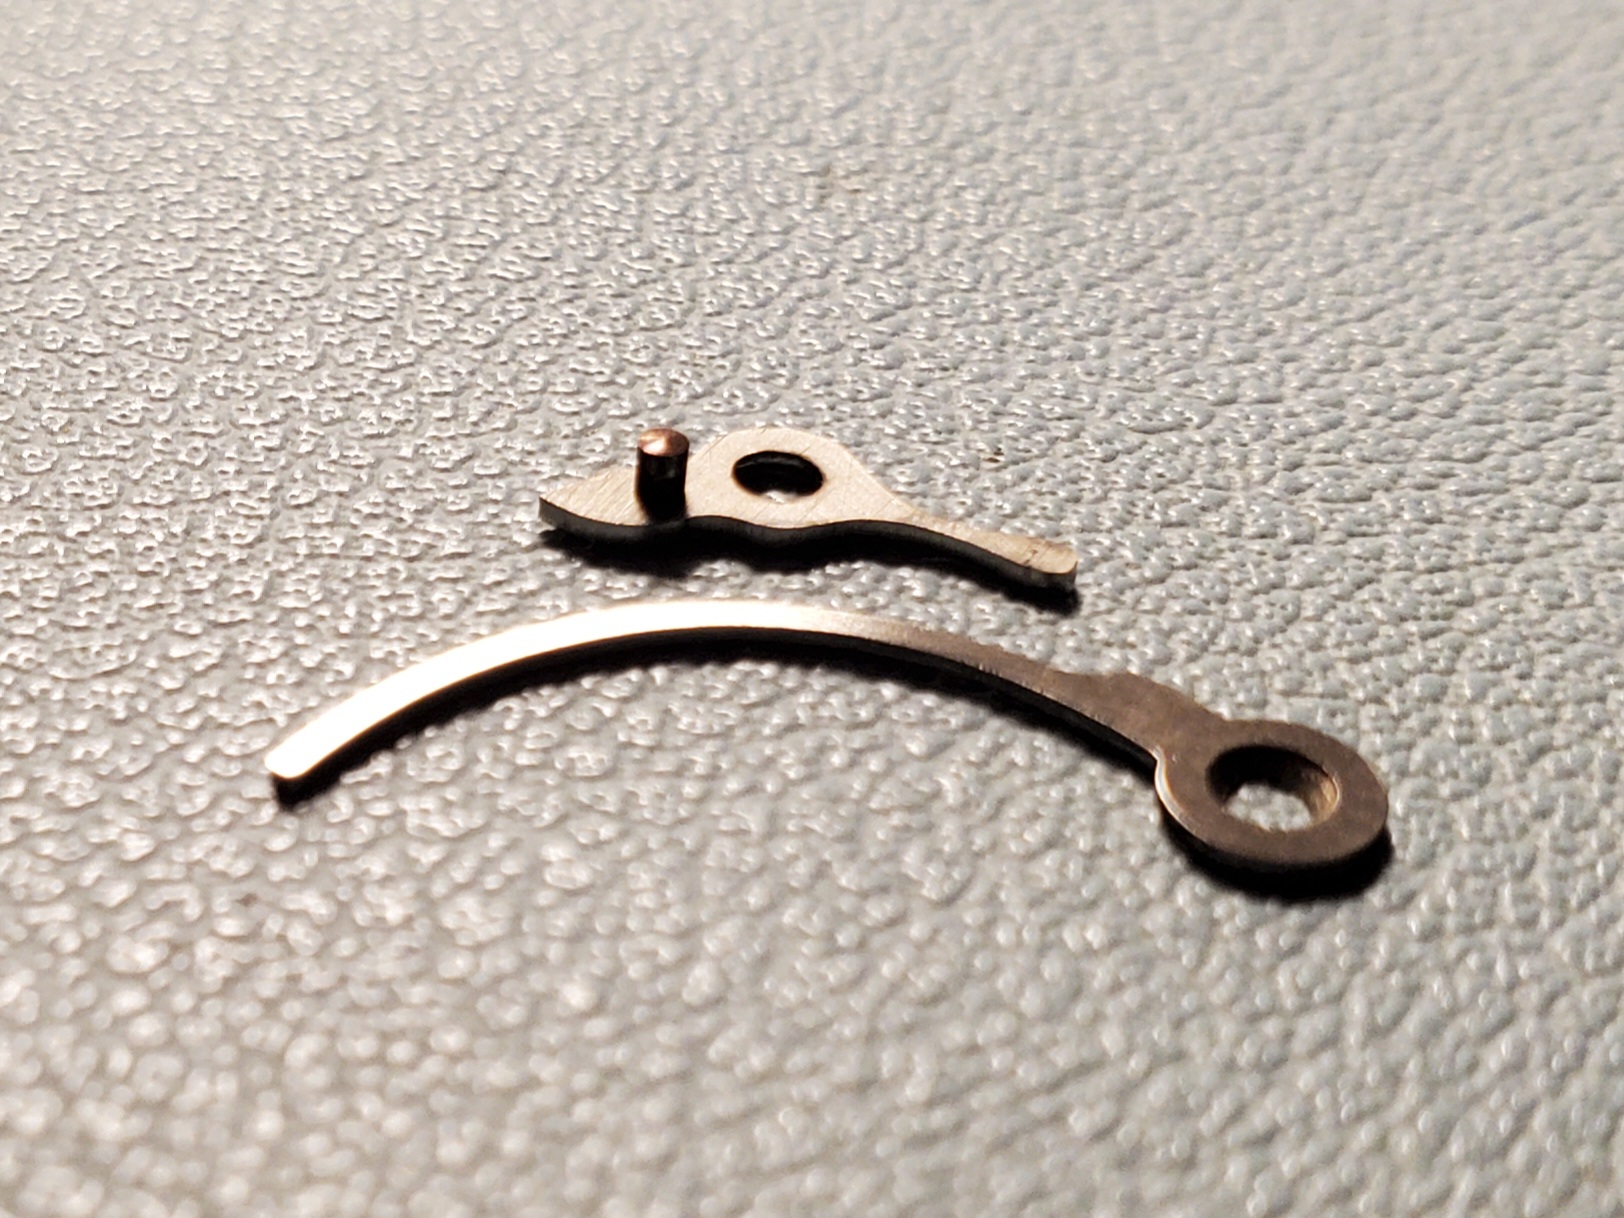
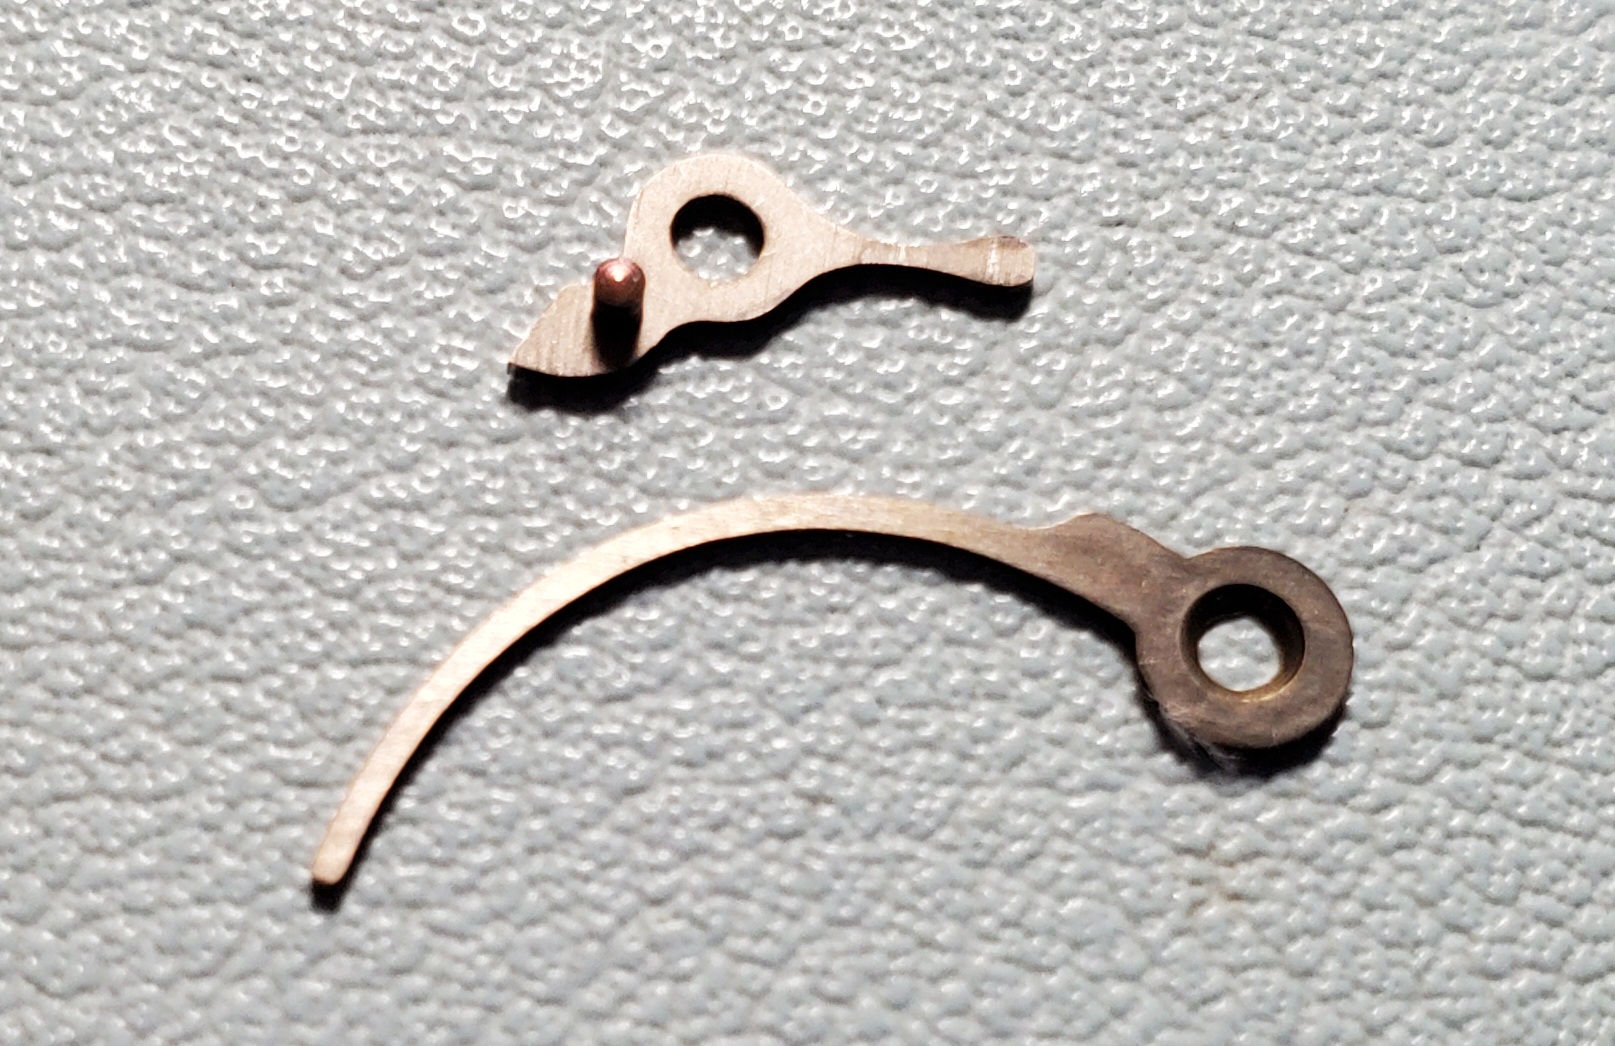
I worked through this refinishing issue and decided to post my solution for forum readers who may end up in this situation. During a routine watch service, I noticed a little surface oxidation on a pocket watch spring. It wasn't a lot, so I tried removing with a glass fiber brush. That removed some of the rust, not all, so I decided to go further. Then after some light work on a coarse diamond plate, the rust was gone, but it left a reflective, polished looked instead of the dull finish originally that all the other steel parts under the dial had. The two pictures below show how the spring looked after rust removal next to a part (yoke) with finish I was trying to match. It looked almost passable from one angle but from another (direct on top) not very close. I hadn't come across the situation before. Typically when I refinish steel it is to mirror finish. Never tried to match a dull or grey finish. First guess was that it would naturally dull over time and I shouldn't bother but after some thought I came to the opposite conclusion. I did a test to see if I could dull the metal to at least get something with less luster. Having some experince removing rust from old tools with vinegar, I knew that it changes the appearance- usually darkening steel. I decided to try it so placed the part in white vinegar. Perhaps a short soak would dull but not darken the metal? A few minutes gave the grey that I was looking for. The after photo is below. Looks pretty darn close to my eyes.
 2 points
 -
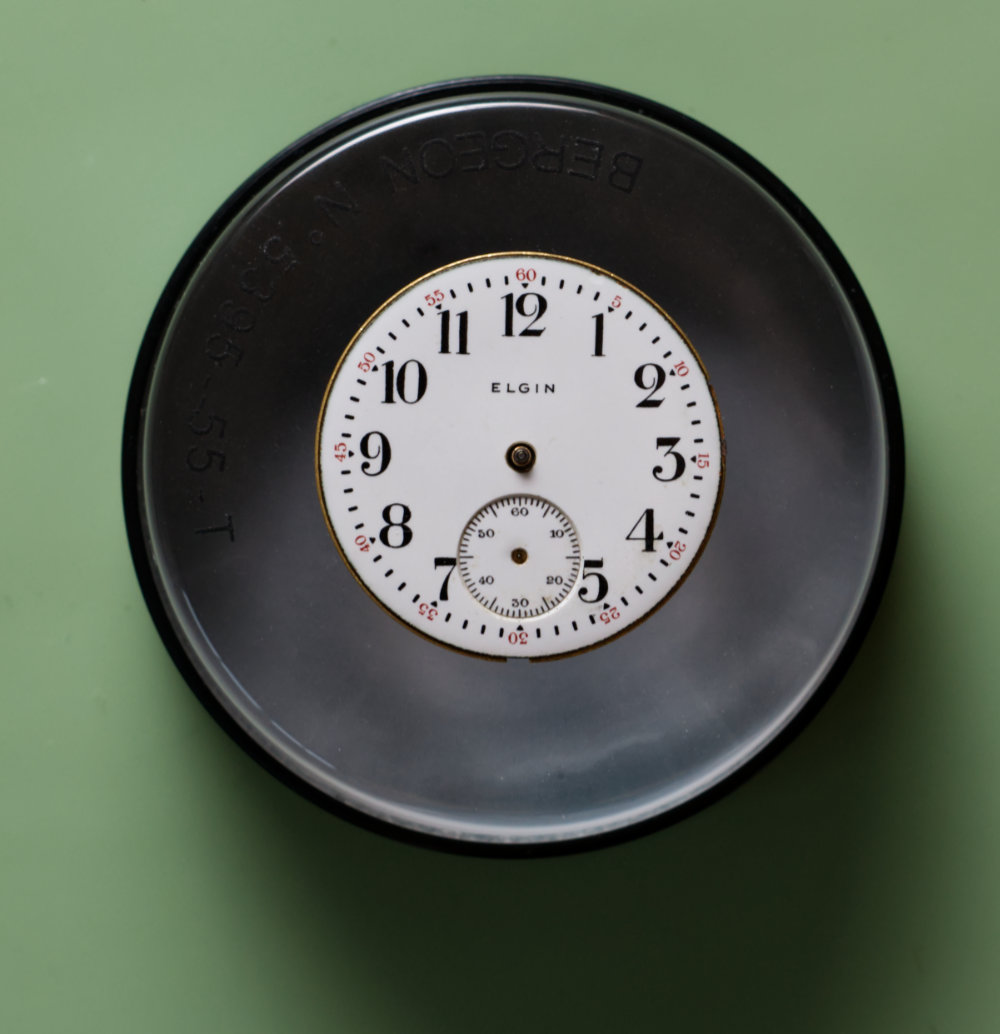
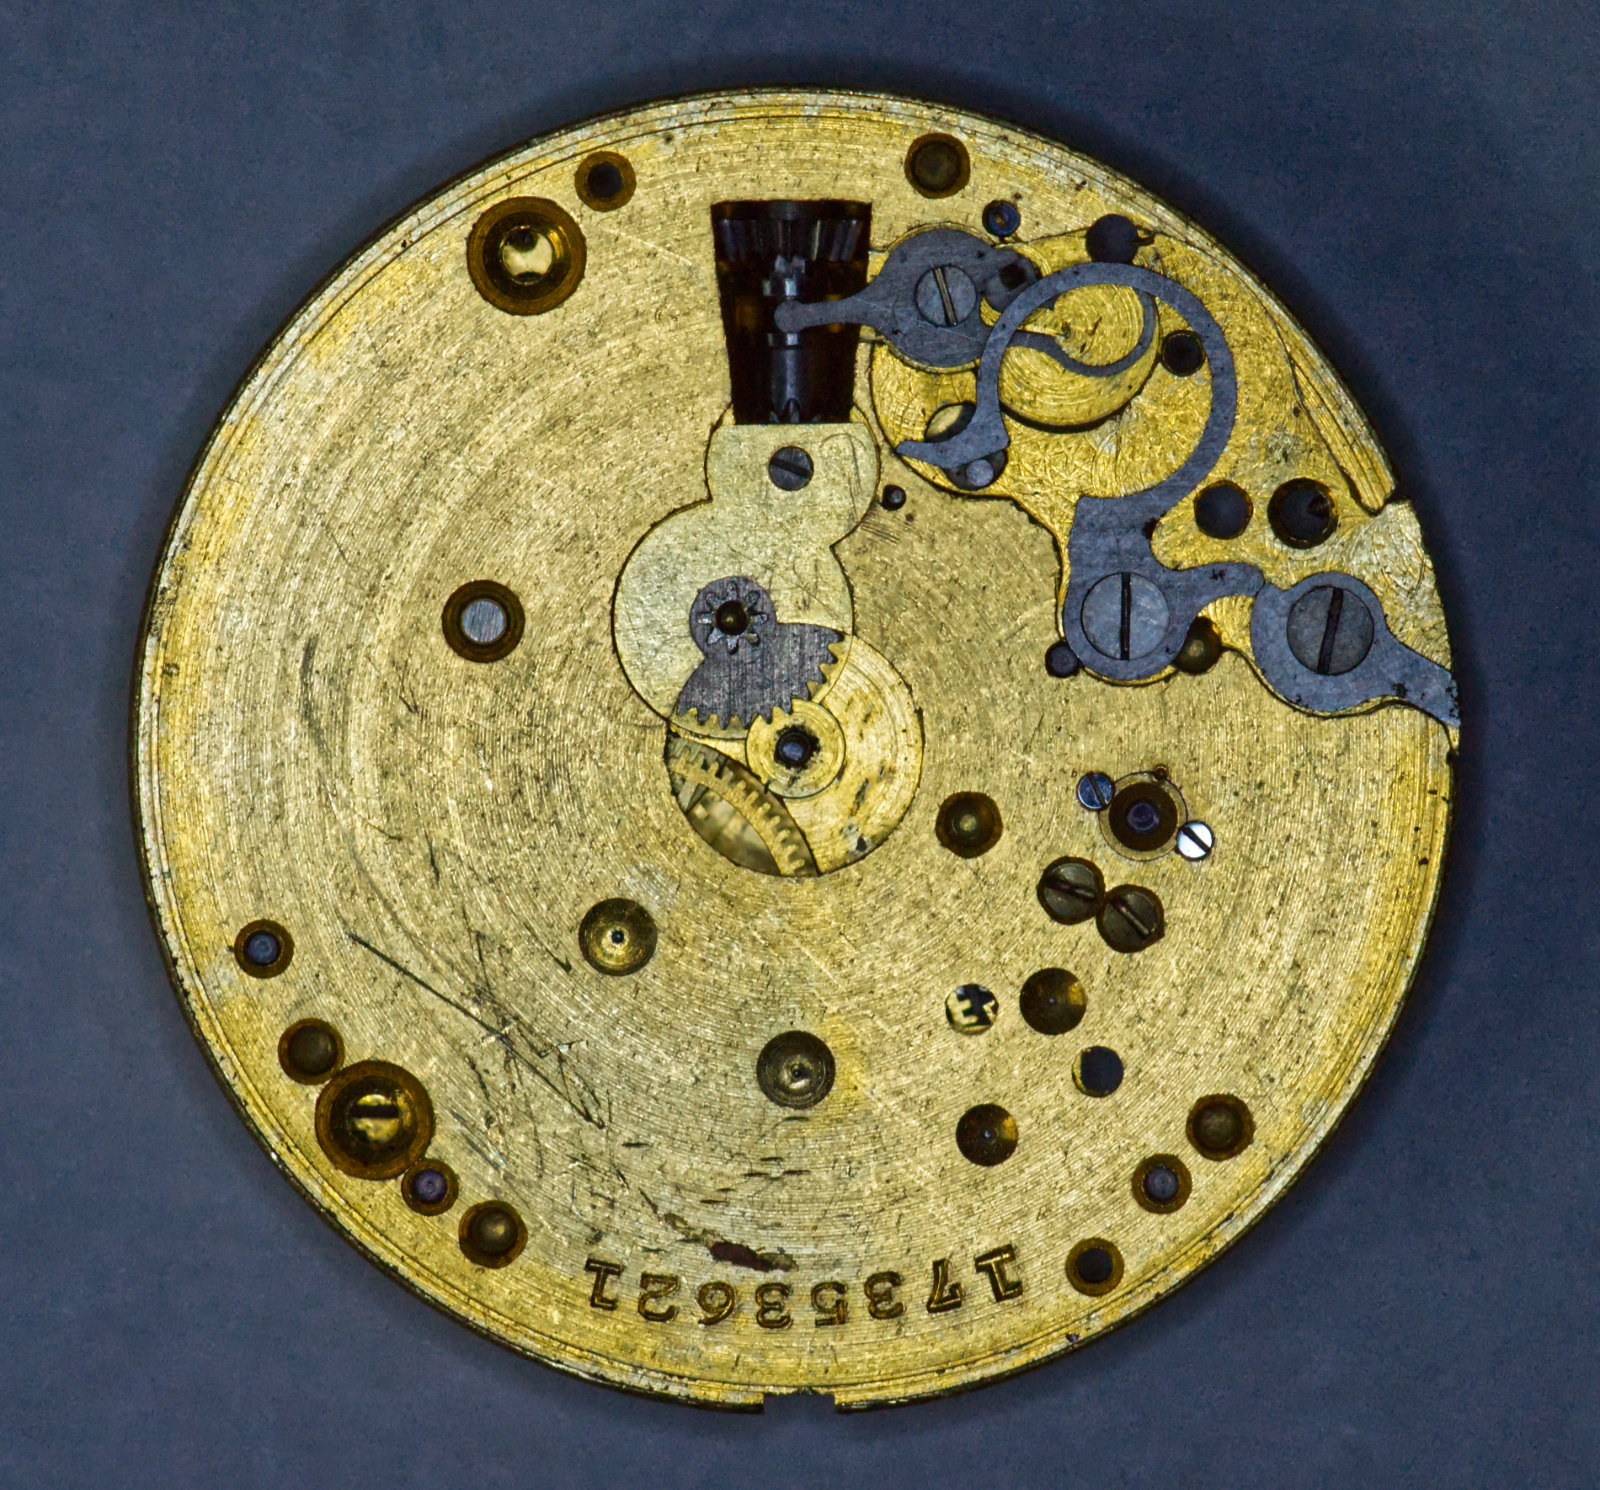
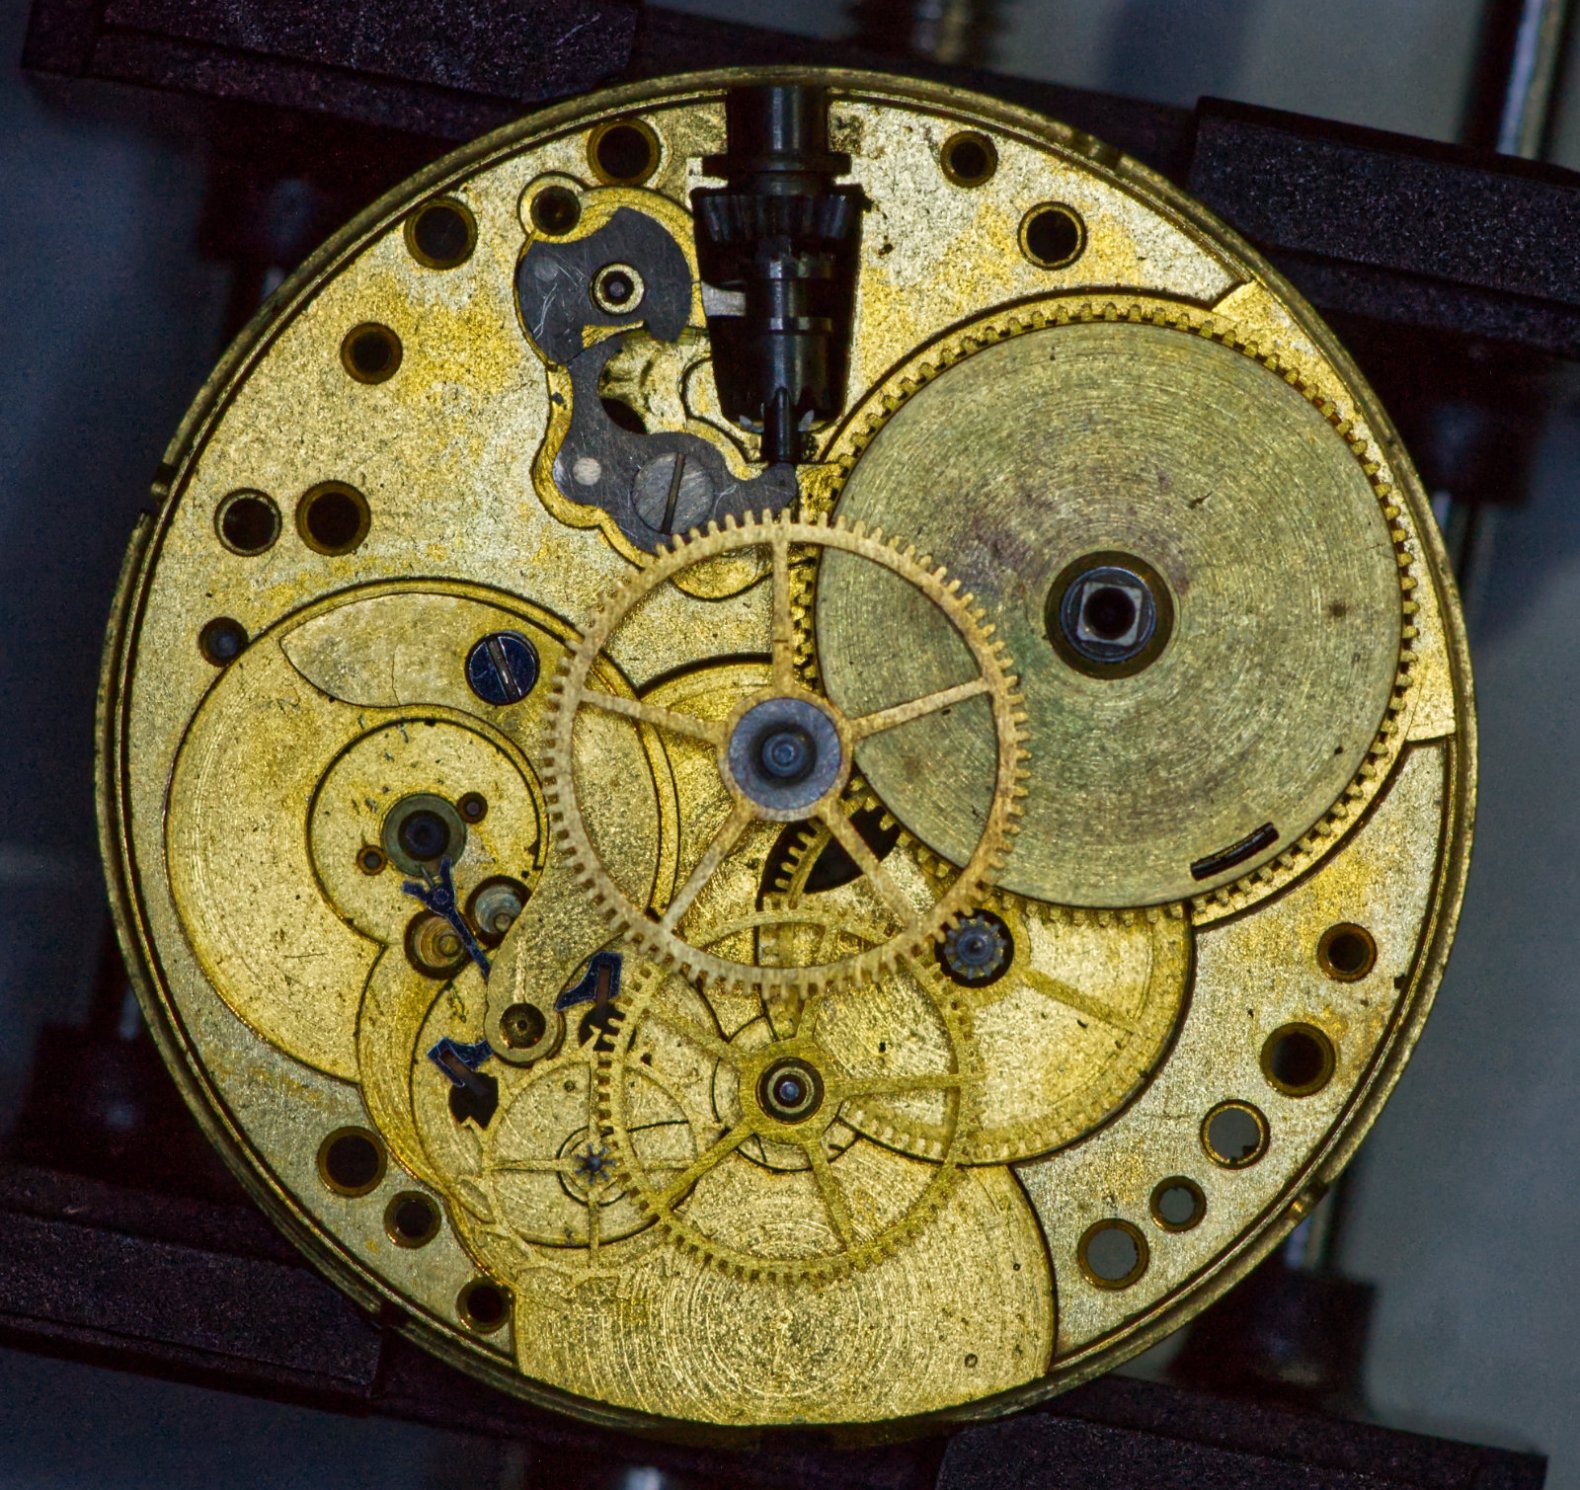
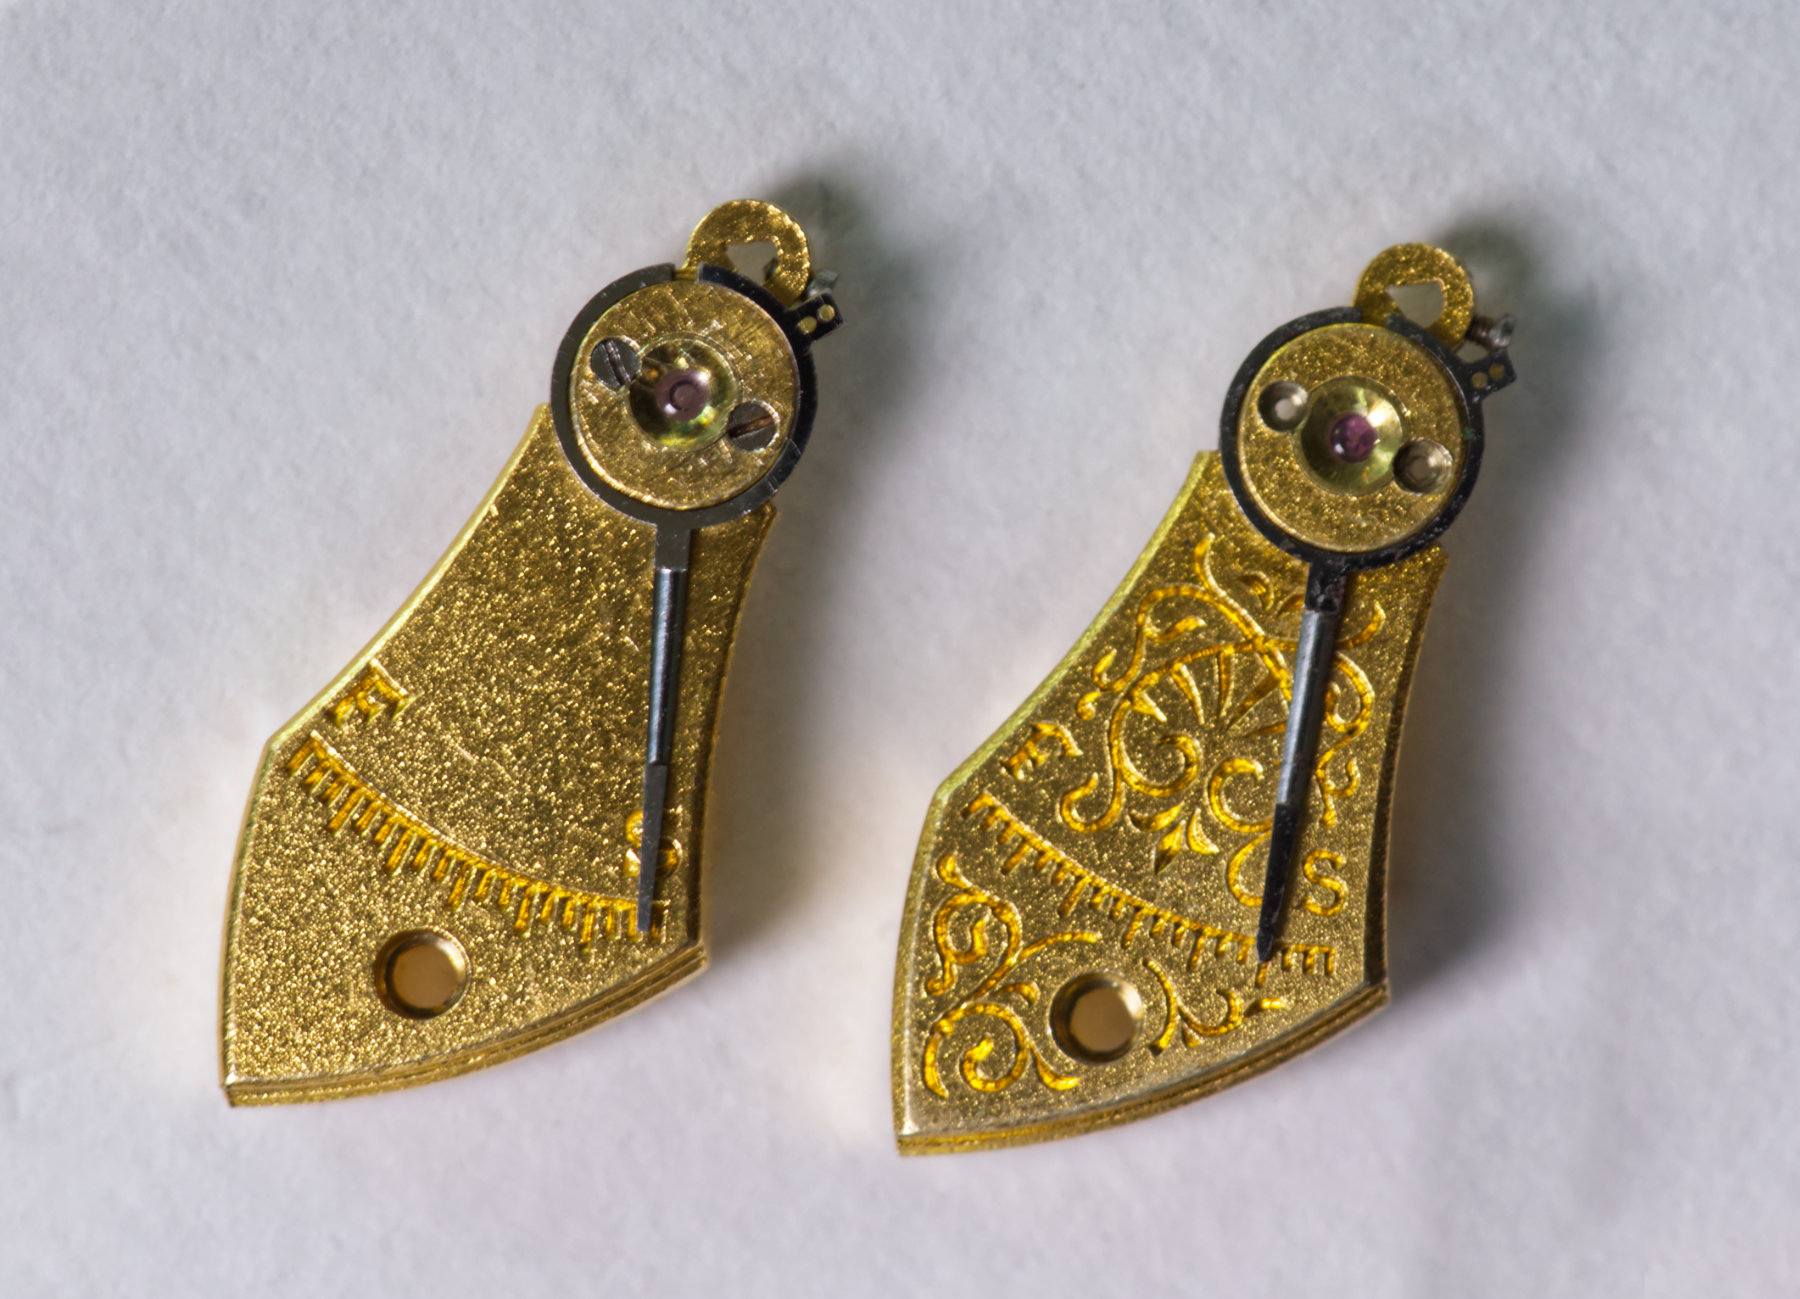
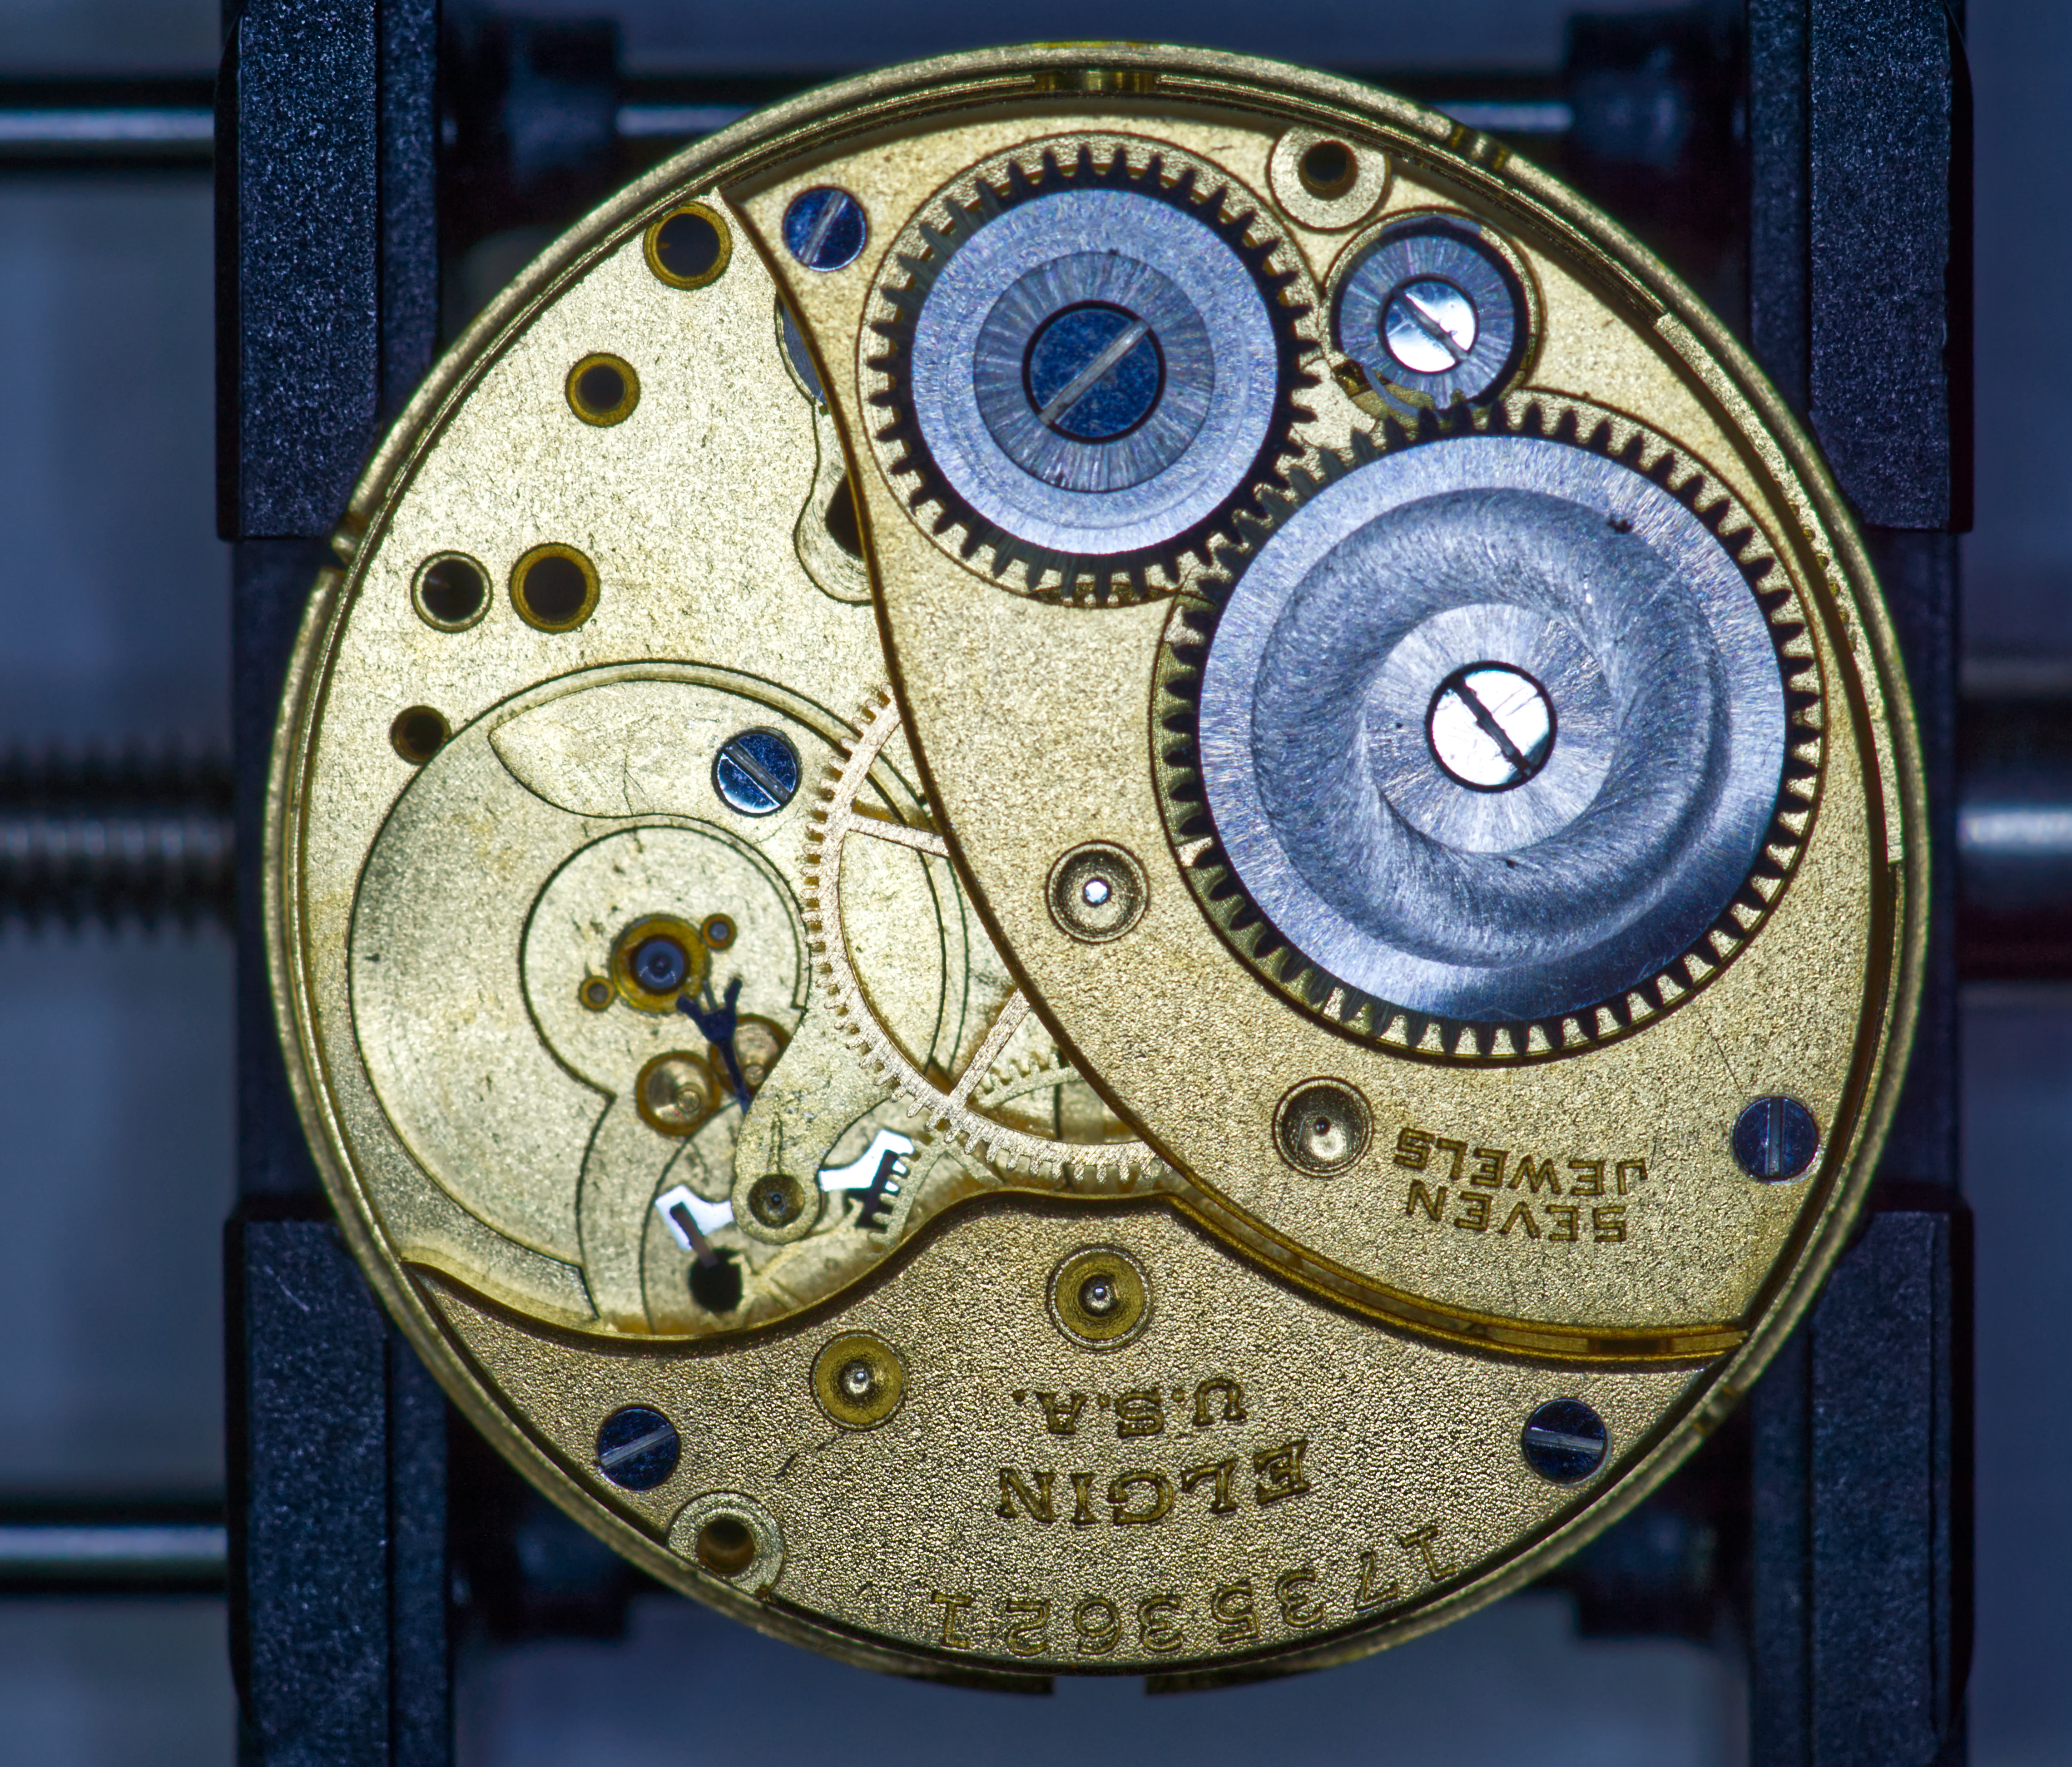
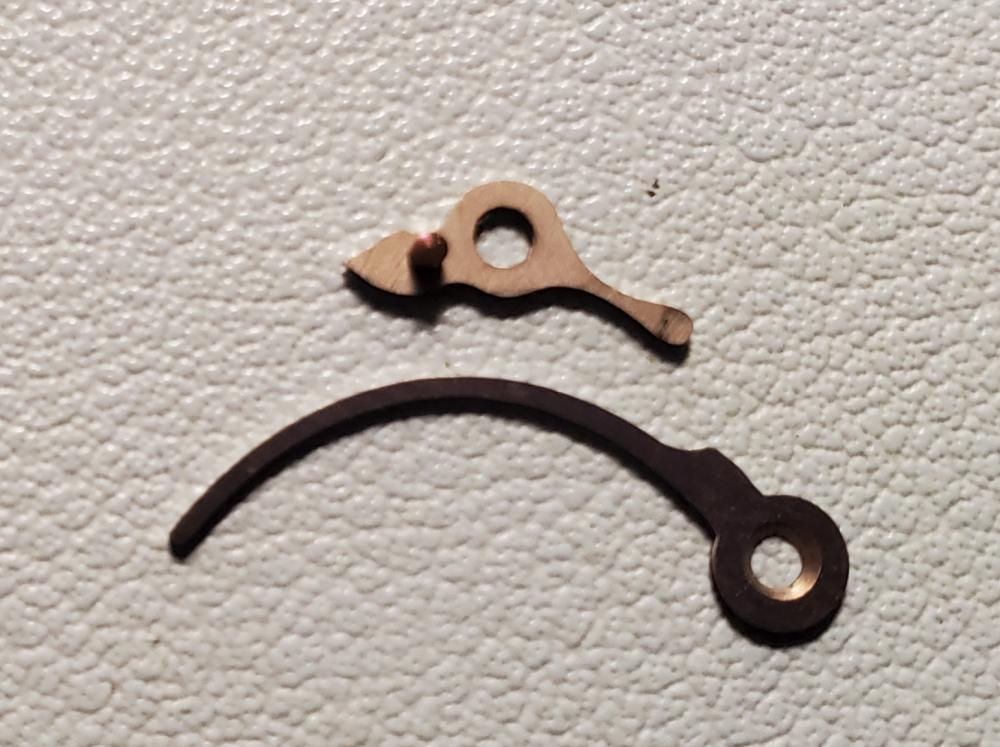
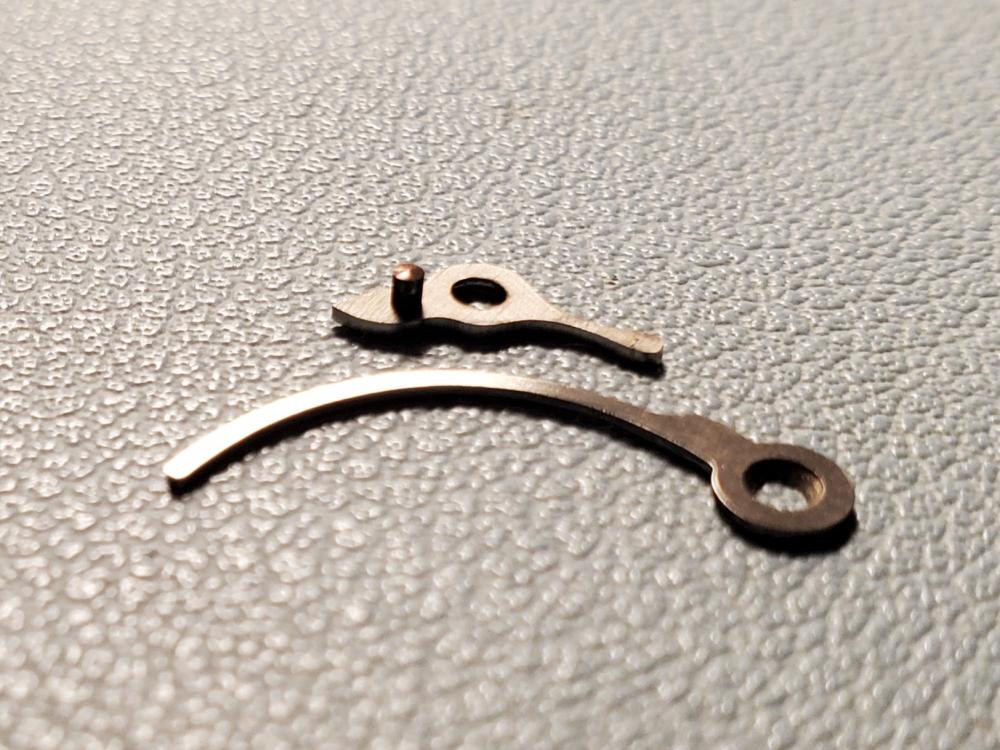
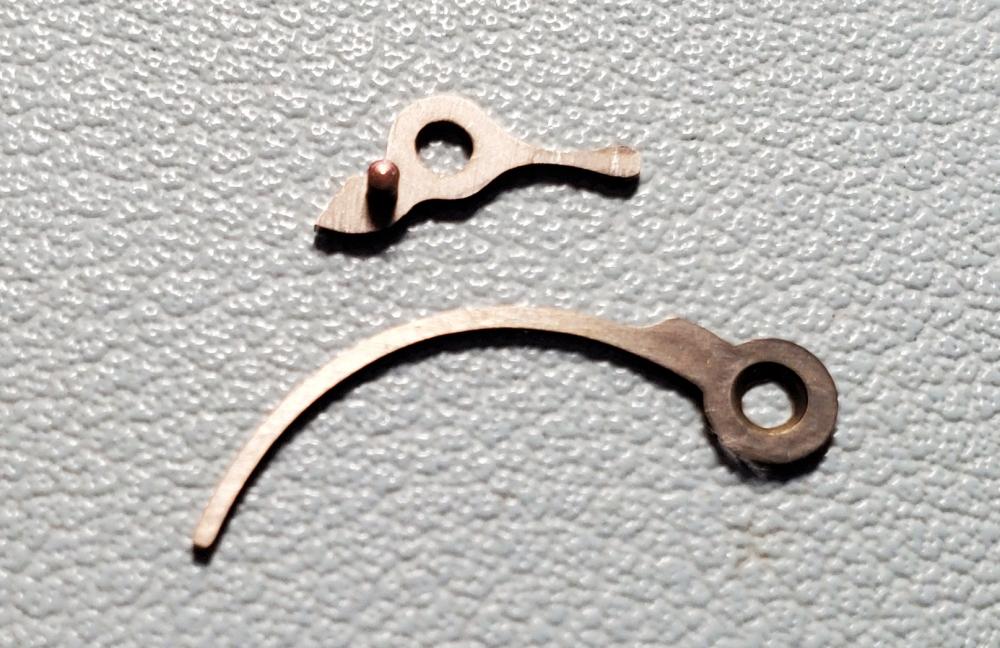
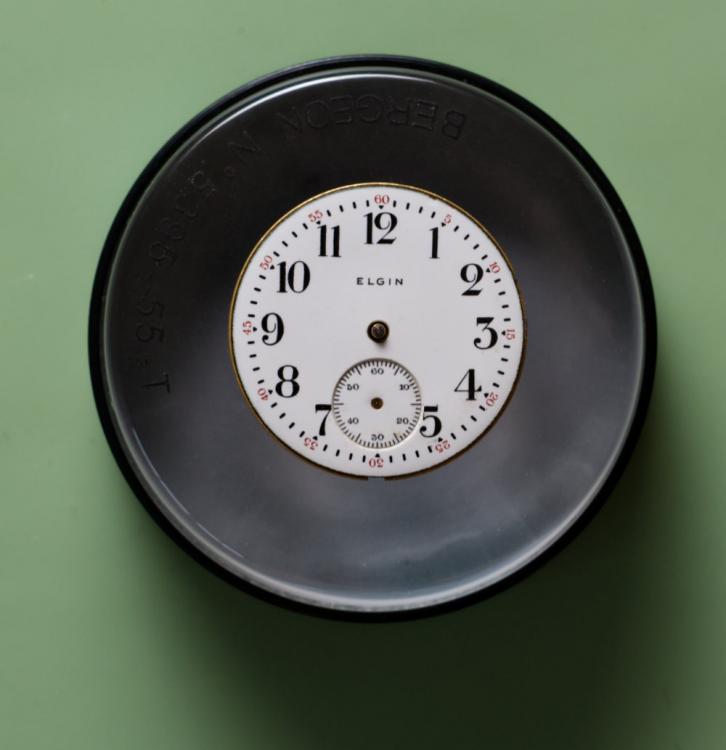
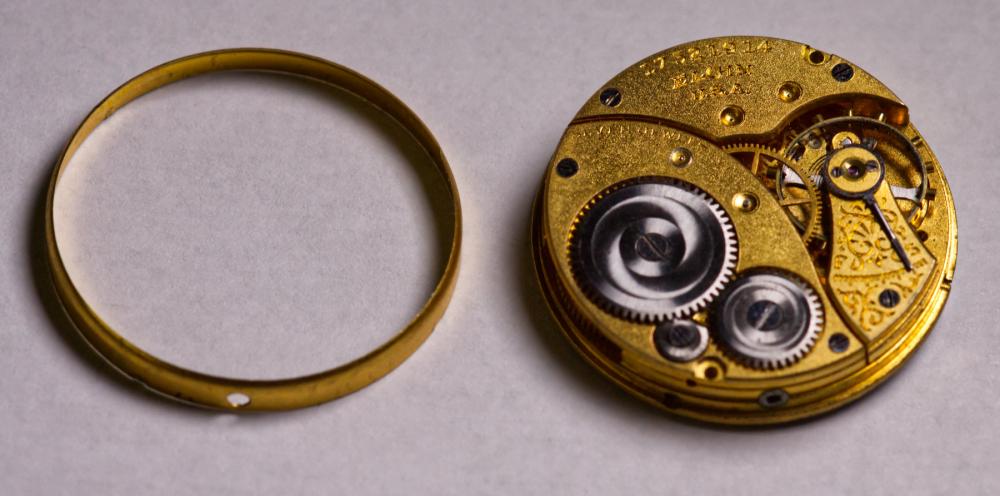
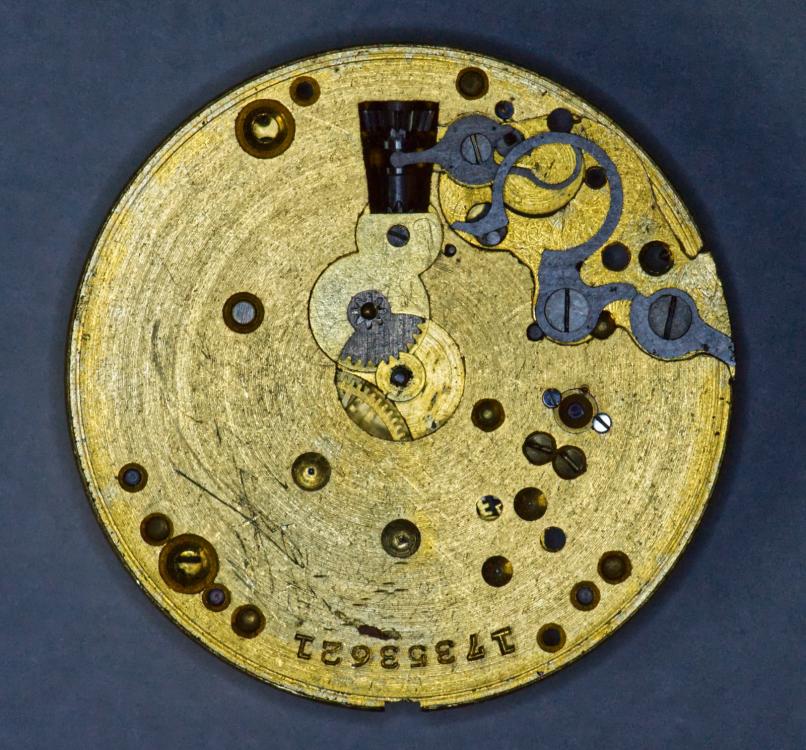
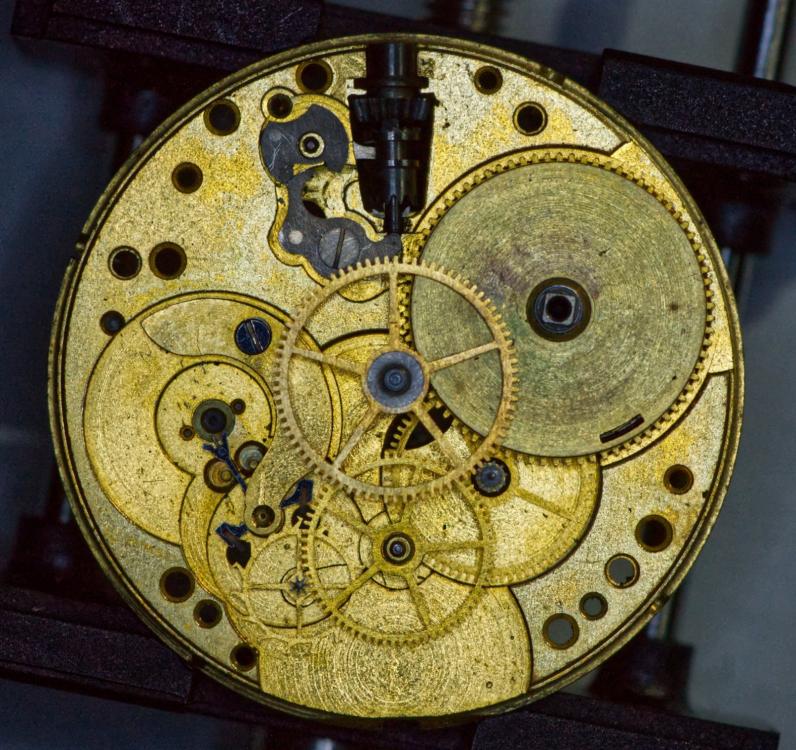
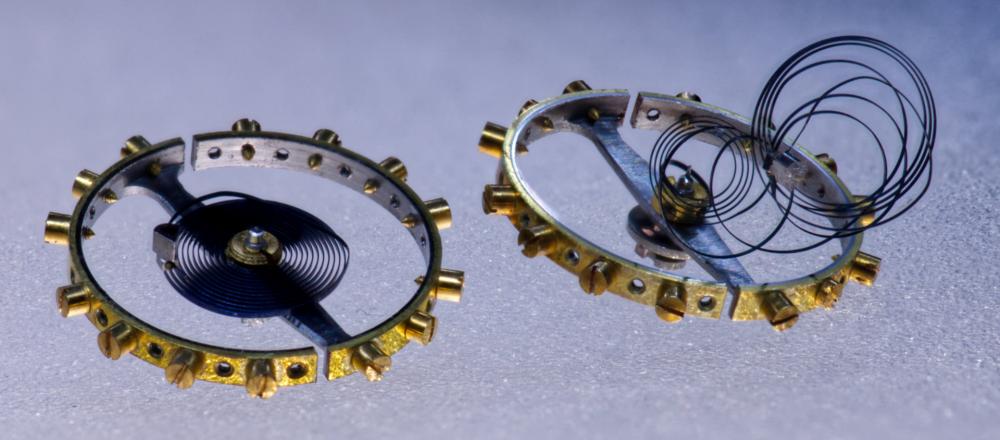
My very first efforts were on an Elgin grade 313 (of which I had two built 22 years apart). In keeping with the Elgin brand I also picked up an Elgin grade 409 which was a smaller sized ladies pendant watch. Like the 313, I only purchased the movement which had a dial and three hands. When the time came to start working on this, I realized I needed another bench key and I discovered that the balance didn't move when hit with an air jet from my rocket blower, so I ordered a second movement. When It arrived it was from the same year (1914) and I also discovered that these had a sleeve around the main plate and bridge portion of the movement. It turned out that the balance staff from the first movement (17521914) had a broken top pivot. Originally I thought that I'd just take the balance complete from the second movement (17353621) and drop it into ...914 however @diveboy suggested that collectors would frown on a balance from one movement in another so I decided to work on ...621. While Elgin manufactured 21,000 of these I never expected the one that I worked on would ever end up in anyone else's hands but I kept the balance with the right main plate. Here's the front and back of ...621 I washed everything and began my reassembly. I had taken the balance apart to clean the upper jewel and had a bit of a time getting the setting re-seated. The two tiny screws kept me on my knees looking through the carpet as they didn't seem to want to stay put. Finally I got the upper jewel back in place. Oddly enough the balance cock of ...621 was pretty plain compared with the balance cock from ...914 Everything was going great and I had everything back together and only needed to finish assembling the balance to the cock. That's when it all went to hell. I was tightening the screw holding the stud in the balance cock when the balance complete zipped off into never-never land and the hair spring became twisted through the split in the balance wheel. On the right is the balance from ...621 with the good balance staff. On the left is the balance wheel and hair spring from ...914. If you look closely you can just make out the broken pivot on the left and the good pivot on the right. Unfortunately I need the spring from the left on the wheel and staff on the right. At this point I'm closing the books on the 409 Elgin. I know that some of you would be able to take the spring from ...914 and repair the balance of ...621 but that is clearly beyond my capabilities. At least I've become somewhat proficient at researching movements even if my physical skills are sorely lacking. I struggle with being able to see. I find that I'm always either putting glasses on or off, switching to my magnifying visor or the microscope. I probably ought to pick up a Barlow for the microscope that would allow me to actually work comfortably under the scope. In any event, I still have 2 Buren Grand Prix movements (one that I started on but ran into a broken setting lever, so I picked up a second) as well as a small Omega (that I don't really want to touch until I've gotten one running). So, that's where I'm at.


 1 point
 -
I think I know what the problem is. Watch this video. The motor head should be lowered until it touches the rim of the bottle to reduce splashes and evaporation of the cleaning solution.1 point
-
Is the impeller held on by just the one screw on the side? I removed it and the thing was still stuck on the shaft.1 point
-
Watchmakers have for generations used loupes in a single eye, you would think that without binocular vision that there would be no depth perception. Not strictly true! Our depth perception relies on many cues other than our binocular vision, and learning to see "depth" and the relationship between things in our field of vision is certainly possible using primarily one eye. It takes practice, though. It took me a long time before I could use a loupe effectively, and one of the things I had to work at was not closing the other eye. Amazingly enough, having both eyes working is better than just one, even though the second one is not magnified and in my case out of focus and distorted. It takes practice, real watchmaking requires serious physical skills, and you don't get there by just watching videos Cheers!1 point
-
Sorry to hear, but I understand your vision issues, I truly do Definitely get the Barlow lens. Being able to work directly under the microscope is a game changer. I have glasses optimized for close work (Zeiss Office Book lenses), B&L visor I wear over those, loupes, and my microscope. I'm used to a routine that would probably seem quite cumbersome to someone else, but it goes like this for most work. Start with glasses on . If I'm moving a part, like from tray to movement, I put on the visor, otherwise I might not see if I drop the part. Once the part is under the microscope, I take off the visor and glasses. I have a cord so the glasses just hang around my neck. The microscope has diopter adjustment on the eyepieces so I can work without the glasses. This has become habit. When working with my staking set, for instance, I don't try and change the microscope setup. I have an adjustable table, so the microscope swings out of the way, and I raise the table to watchmaker bench height. I use glasses and visor to move parts to the staking set, and then a loupe as I use the staking set. Seems to work OK so far. I haven't used my jacot tool in a while, I think the next time I do I'm going to experiment with the microscope, as I have several different barlow lenses I can try, to see if I can get a good setup for that. I do change the microscope setup when using my lathe, the whole workbench gets changed when I'm turning. Some folks have a bench just for the lathe and a dedicated microscope, I'm not there yet. Don't have the space, and I have other tools I need before I invest in a second microscope. I my case, my vision problems are caused by macular degeneration, but in some respects I am lucky. There are now treatments that can arrest the progression of the disease, and in some cases reverse it. Unfortunately, the treatment consist of injections into the eyeball, which is downright creepy My current opthamologist is really good, there is no pain and only mild eye irritation for the next day or two, so I deal. Previous doctor, not so easy. Anyway, I'm just trying to illustrate that it is possible to continue even with challenges, just have to double down on the vision assistance and develop habits to compensate for less than ideal vision. Cheers!1 point
-
I like your strategy mate! You're always told to go the other way around (start your fault-finding with the escapement), but I'm a firm believer in the closing words of this article: "Good amplitude starts at the mainspring barrel, so scrub and spin that sucker."1 point
-
Did your machine have that awful vibration when you first got it or is that a recent development? Does it vibrate without the basket attached to the spindle? There should be a way to increase the amount of friction on the motor spindle to prevent it from creeping up but I think you should address the vibration issue first.1 point
-
Read through all of this thread Watchie and all of the links from it, watched all of the videos some of which i had seen before. Has kept me quiet for a good 2 hours. Learnt from it and inspired me also in the process. Mine will be coming back out of the watch tomorrow and be having some more checks made. Its power reserve is down to around 20 hours. Power trapped inside and not releasing. A full wind was around 40 turns of the crown when it was finished but uncased it is only taking around 20 now cased up. I did notice after fitting the train there was a little friction, i couldnt decide at the time if it was enough to investigate. It may also be a tight canon pinion or hand issue. A bit disappointed about having to redo but also looking forward to playing Mr. Holmes.1 point
-
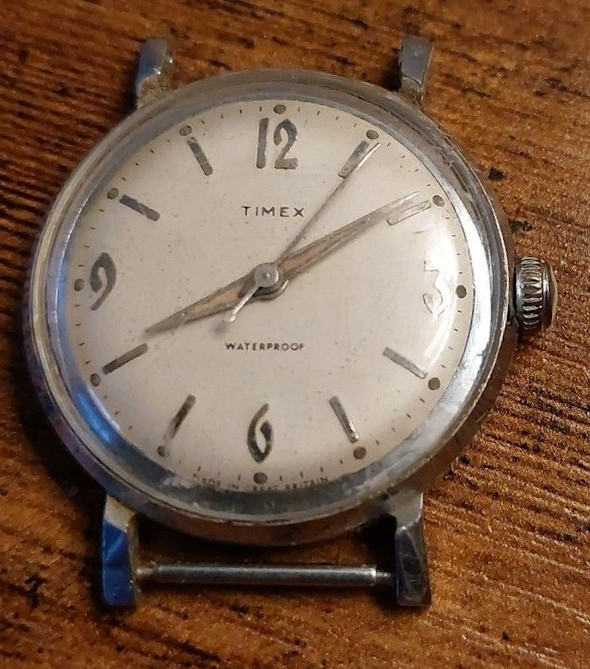
Hopefully this early "Made in Great Britain" Dundee Timex will respond well to a service and a good scrub. I'm unsure of the exact date, but if there is an ink stamped clue inside I'll let you all know. Somewhere between 1956 and 1963 would be my initial guess.
 1 point
 -
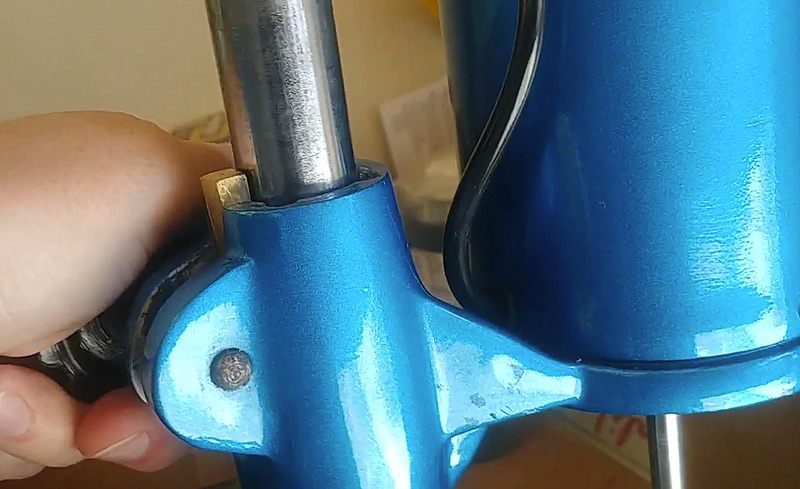
Yea that little brass colored thing. Sometimes it doesn't drop back down when I loosen the knob and it won't grip the shaft well the next time I tighten it.1 point
-
I need to analyze all the images but in the meantime if you're up to it another experiment? I don't suppose you have another running watch? Go for a walk take another watch see what happens. even another watch the same type would be arresting or you take several watches at the same time as long as you get them in the same place more or less.1 point
-
This is from the video in my previous post, is this what you mean by the brass piece creeping up? Yeah, my rheostat wires are also just taped together.
 1 point
 -
Mine has a little brass piece that the knob clamps on to. That piece can move up and down. Sometimes if i don't watch that brass can ride up if i don't loosen the knob enough and I don't get good clamping force. Maybe your brass is riding up by the time you get to the 3rd position? Otherwise, I'd check your wire connections. Maybe something came loose. Like the photos above, my rheostat was just twisted together with electrical tape on the outside. The other connections are easy to check cause they're just screwed to a block.1 point
-
When you said it died on you, what exactly happened? Did the coils burn? Was there a burning smell? Or did the motor sieze up? You can tell the difference by listening to the motor, if there is a humming sound, then it might be just siezed up.1 point
-
Slow motion at 25% speed. Can clearly see the imbalance of the holder. You didn't pay on PayPal with a credit card? Sucks that you got a bum machine.1 point
-
It could control the speed while in solution to a small degree and not at all when out of solution. It was the correct voltage and I replaced the plug for a US plug. I bought mine from Etsy too. The seller only accepted paypal so Etsy said that the item isn't eligible for Etsy Payments Support and Paypal won't help if it is 180 days after purchase.1 point
-
Just want to say that I am blown away to be in the exhaulted company of such YouTube superstars as Mark Lovick and Stian... Your videos have been a real inspiration to me and got me started on my interest in horology. Thanks for all your hours of time spent for making such fantastic content. Definitely what Youtube was made for, the visual swapping of knowledge...1 point
-
Possibly a National Semiconductor or TI module. There is nothing in the images to give the game away. Usually there are some clues on the circuit board, but you would need to disassemble the module to see, which is not without risk. Its fairly early as the circuit is on a ceramic substrate with printed silvered traces, and the later ones typically used copper clad fibreglass or even cheaper srbp (synthetic resin bonded paper) PCB construction.1 point
-
By the way, I see quartz adjustments all the time on Spencer Klein's channel. He specializes in Seiko servicing, and he uses the Seiko QT-99 quartz tester that someone linked above. He adjusts lots of the Arnie divers from the 1980s using that tester, typically getting them down to a quarter second per day or less. Here's an example. I don't know if those kind of adjustable movements are still used – those were H558 and H556. That Seiko QT-99 tester was released in the 1970s. In the 1990s Seiko followed up with the QT-2xxx series with higher resolution (models were something like 2400, 2500, 2600). I think the difference was going from hundredths of a second with the QT-99 to better than milliseconds with the 2xxx models. It was all about the frequency of the oscillators in the testers. I don't know how they worked though – mechanical watch timing machines are acoustic, with microphones, but I'm not sure what the mechanism is with quartz watch timing machines (I don't think the cheap stuff cited on this thread are timing machines, just juice testers). I get so confused by the way people talk about tax deductions and "write-offs". You're not getting any of that money back. It's not a tax credit. If you spend money on equipment, that money is gone, as is the case when you spend money on almost anything. Writing it off just means you get to treat it as a business cost, but I don't know why we wouldn't start with the assumption that anything we spend on a business is a business cost – why wouldn't we be able to treat it as such? All it does is feed into your profit/loss calculation, reducing your taxable profit, which is the nature of a business expense. The previous poster said it could be amortized as though this was a good thing – that just means you don't get to write off the full expense in the year you incurred it, which is a bad thing. It means that you could actually lose money in that year, but you would be taxed on "profit" that didn't exist because you weren't allowed to write off your purchase of, say, a Witschi. This is partially offset by amortized deductions in subsequent years – years where you don't have that purchase expense – but it drags out the write-off, which creates additional expenses and cash requirements. If you buy a Witschi the only way to get the money "back" is with any revenue it generates. No government gives you that money back. It's a cost like benches and loupes and ultrasound, and you get to treat it as such in profit calculations, but your out-of-pocket is 100%.1 point
-
When you unscrew the screw, there will be a cap stone and a pivot jewel in a setting. They will come apart. You should wash both to clean off any old, gunky oil and put a (small) drop of 9010 on the bottom side of the cap stone and then place the fitting over that and replace both into the location on the bridge and screw back the cover plate. What you want is to end up with a sandwich where the fresh oil is on the bottom of the cap stone and the wheel pivot will go through the hole in the pivot jewel and be lubricated by the oil between the cap stone and the inside of the pivot jewel.0 points