Leaderboard


Popular Content
Showing content with the highest reputation on 06/27/22 in Posts
-
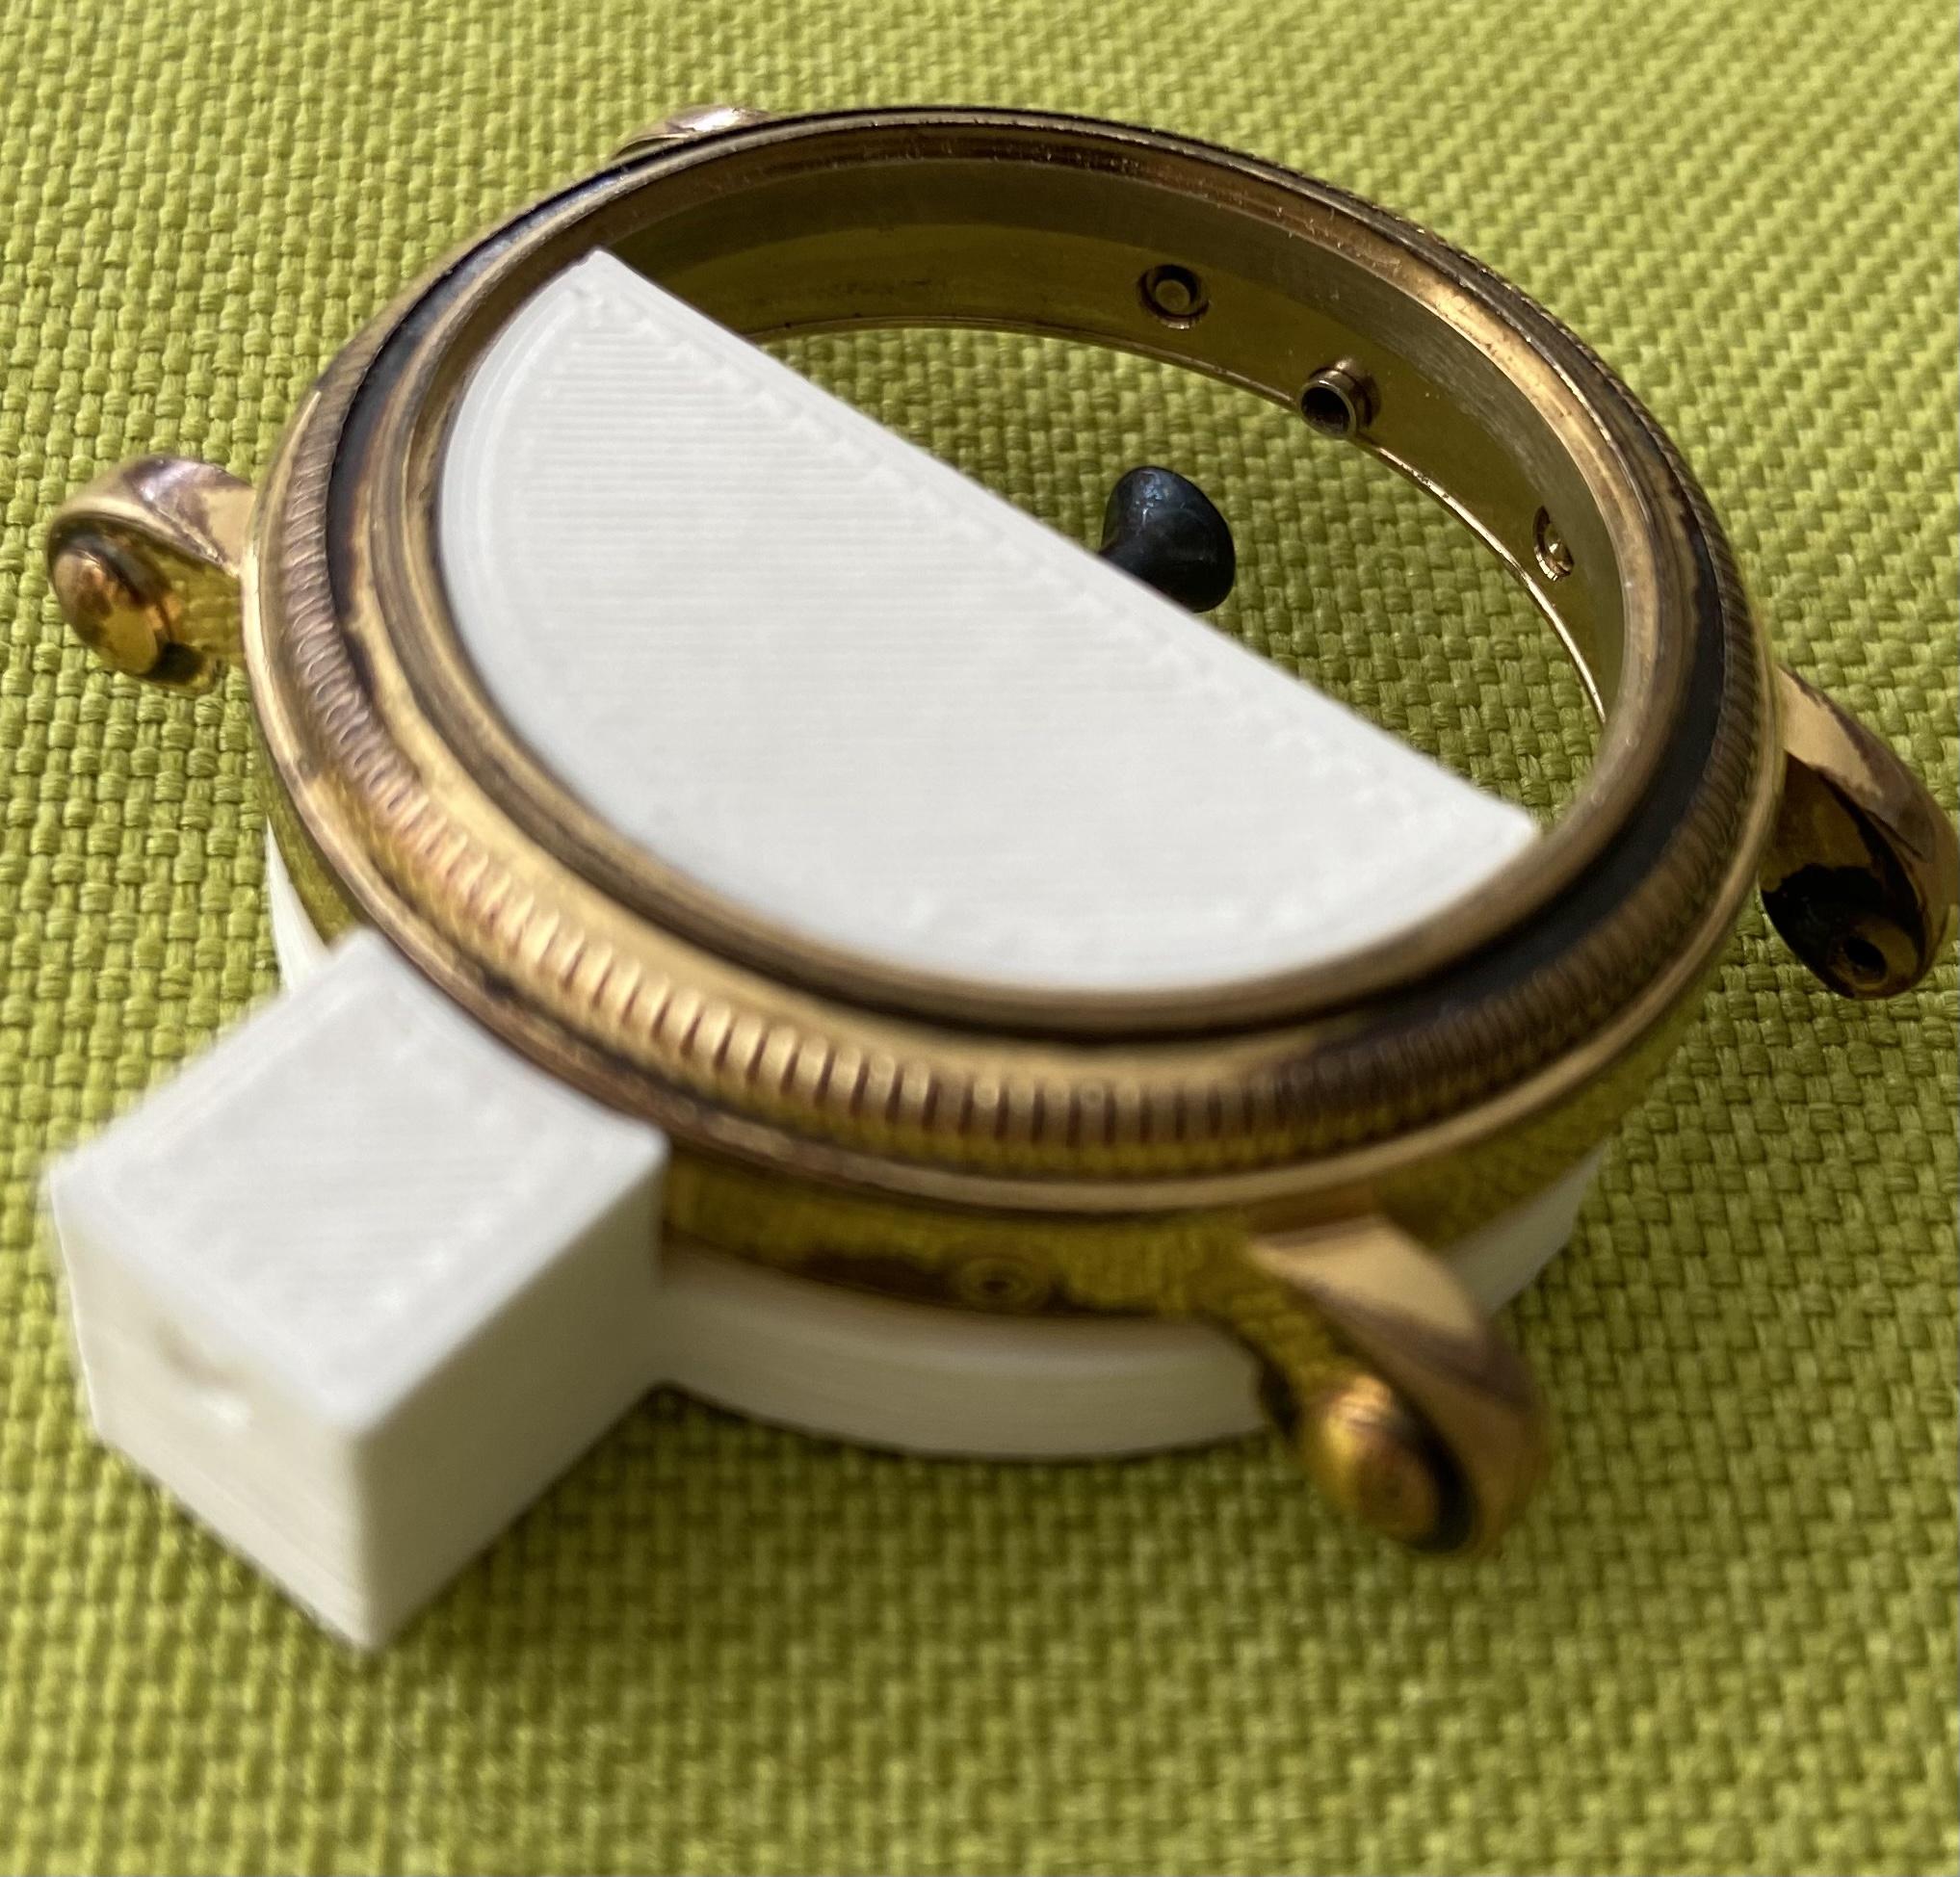
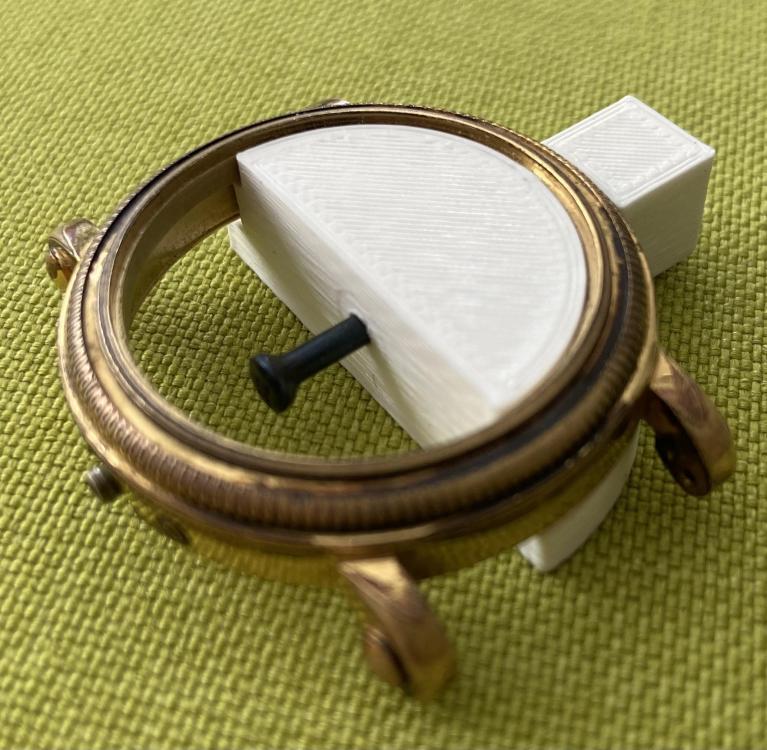
I assumed that these correctors have to be pushd out from the inside of the case and 3D-printed an appropriate tool which I used in combination with a pair of parallel plyers. It worked!


 7 points
 -
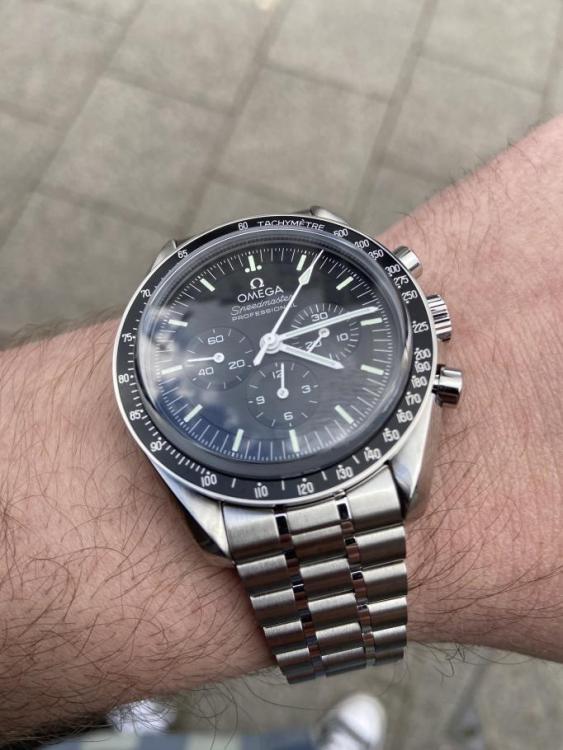
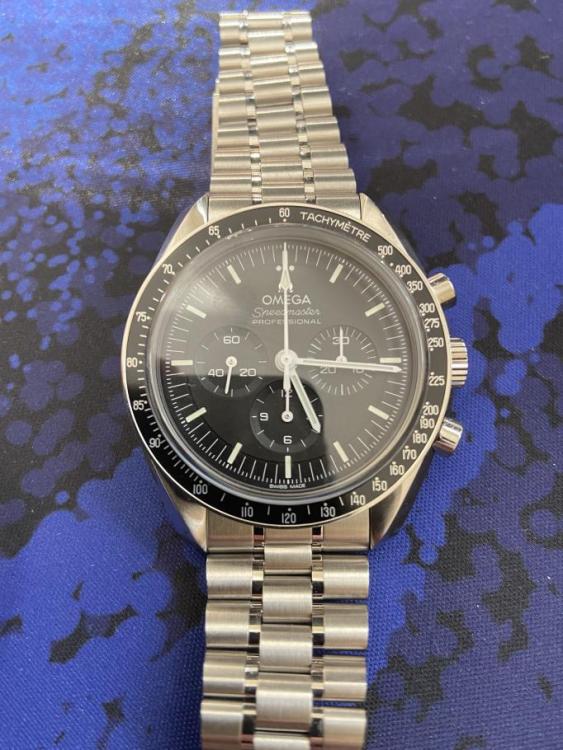
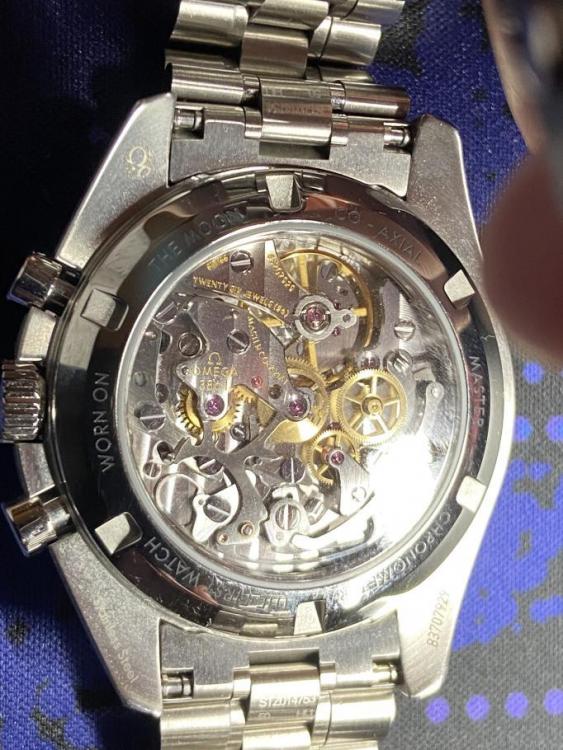
Late to the party, but this is my first proper luxury Swiss timepiece that I've owned. Only picked this up last month. An Omega Speedmaster Moonwatch Professional Co-Axial Master Chronometer Chronograph 42mm (The sapphire sandwich version). I’m over the moon (no pun intended) with it and wear it almost on a daily basis. I love the Co-Axial Master Chronometer Calibre 3861 and the open exhibition style case back to see it in all it's glory. Never, ever, ever going to even take the case back off this watch! Before any of you have thoughts of the horrors a newbie like me could cause this masterpiece of craftsmanship and engineering.
 6 points
 -
An interesting tour of the Vostok factory. The watches are assembled without gloves! When you get a brand new Vostok, you better do a thorough clean.4 points
-
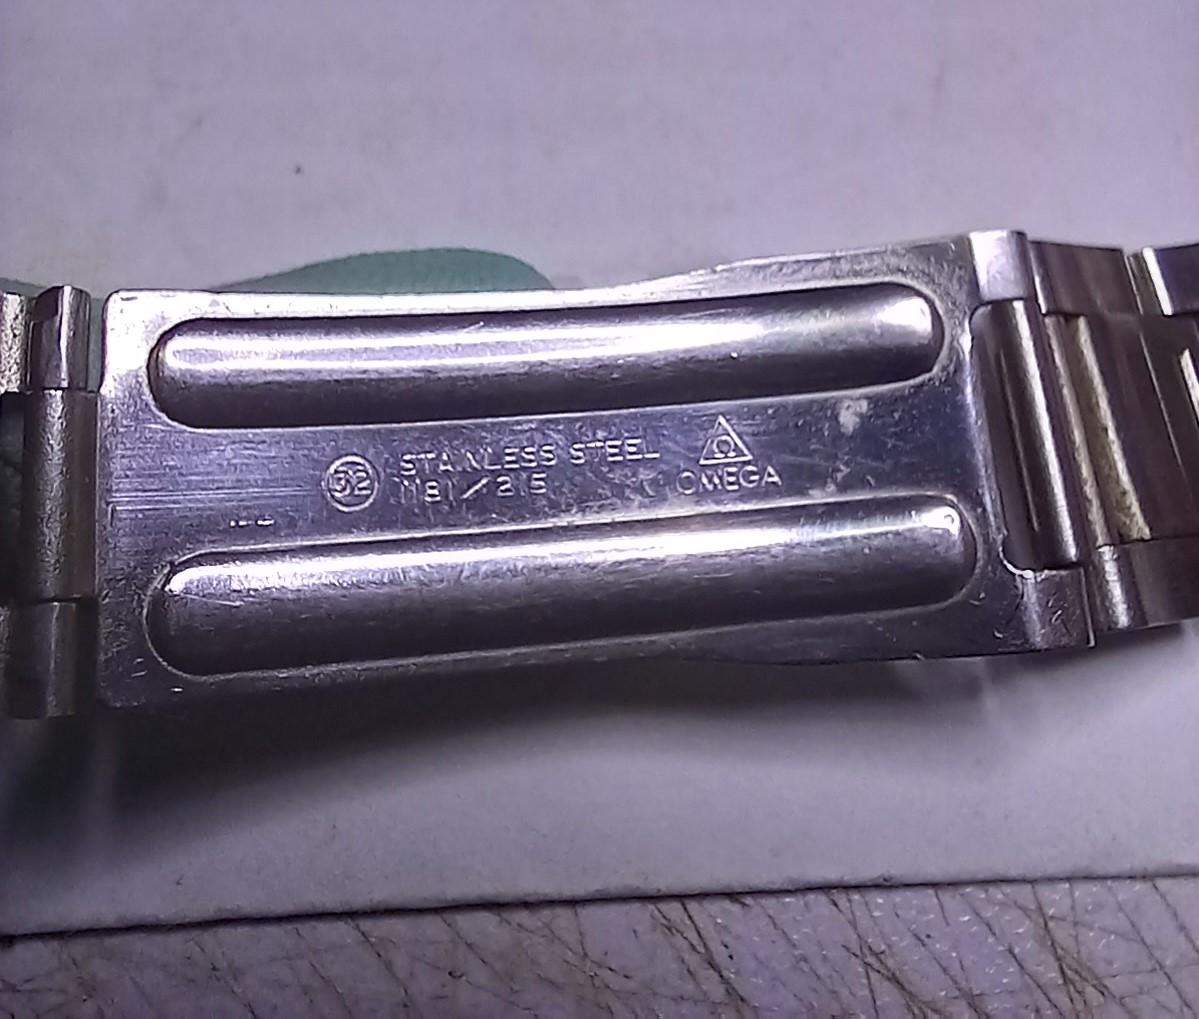
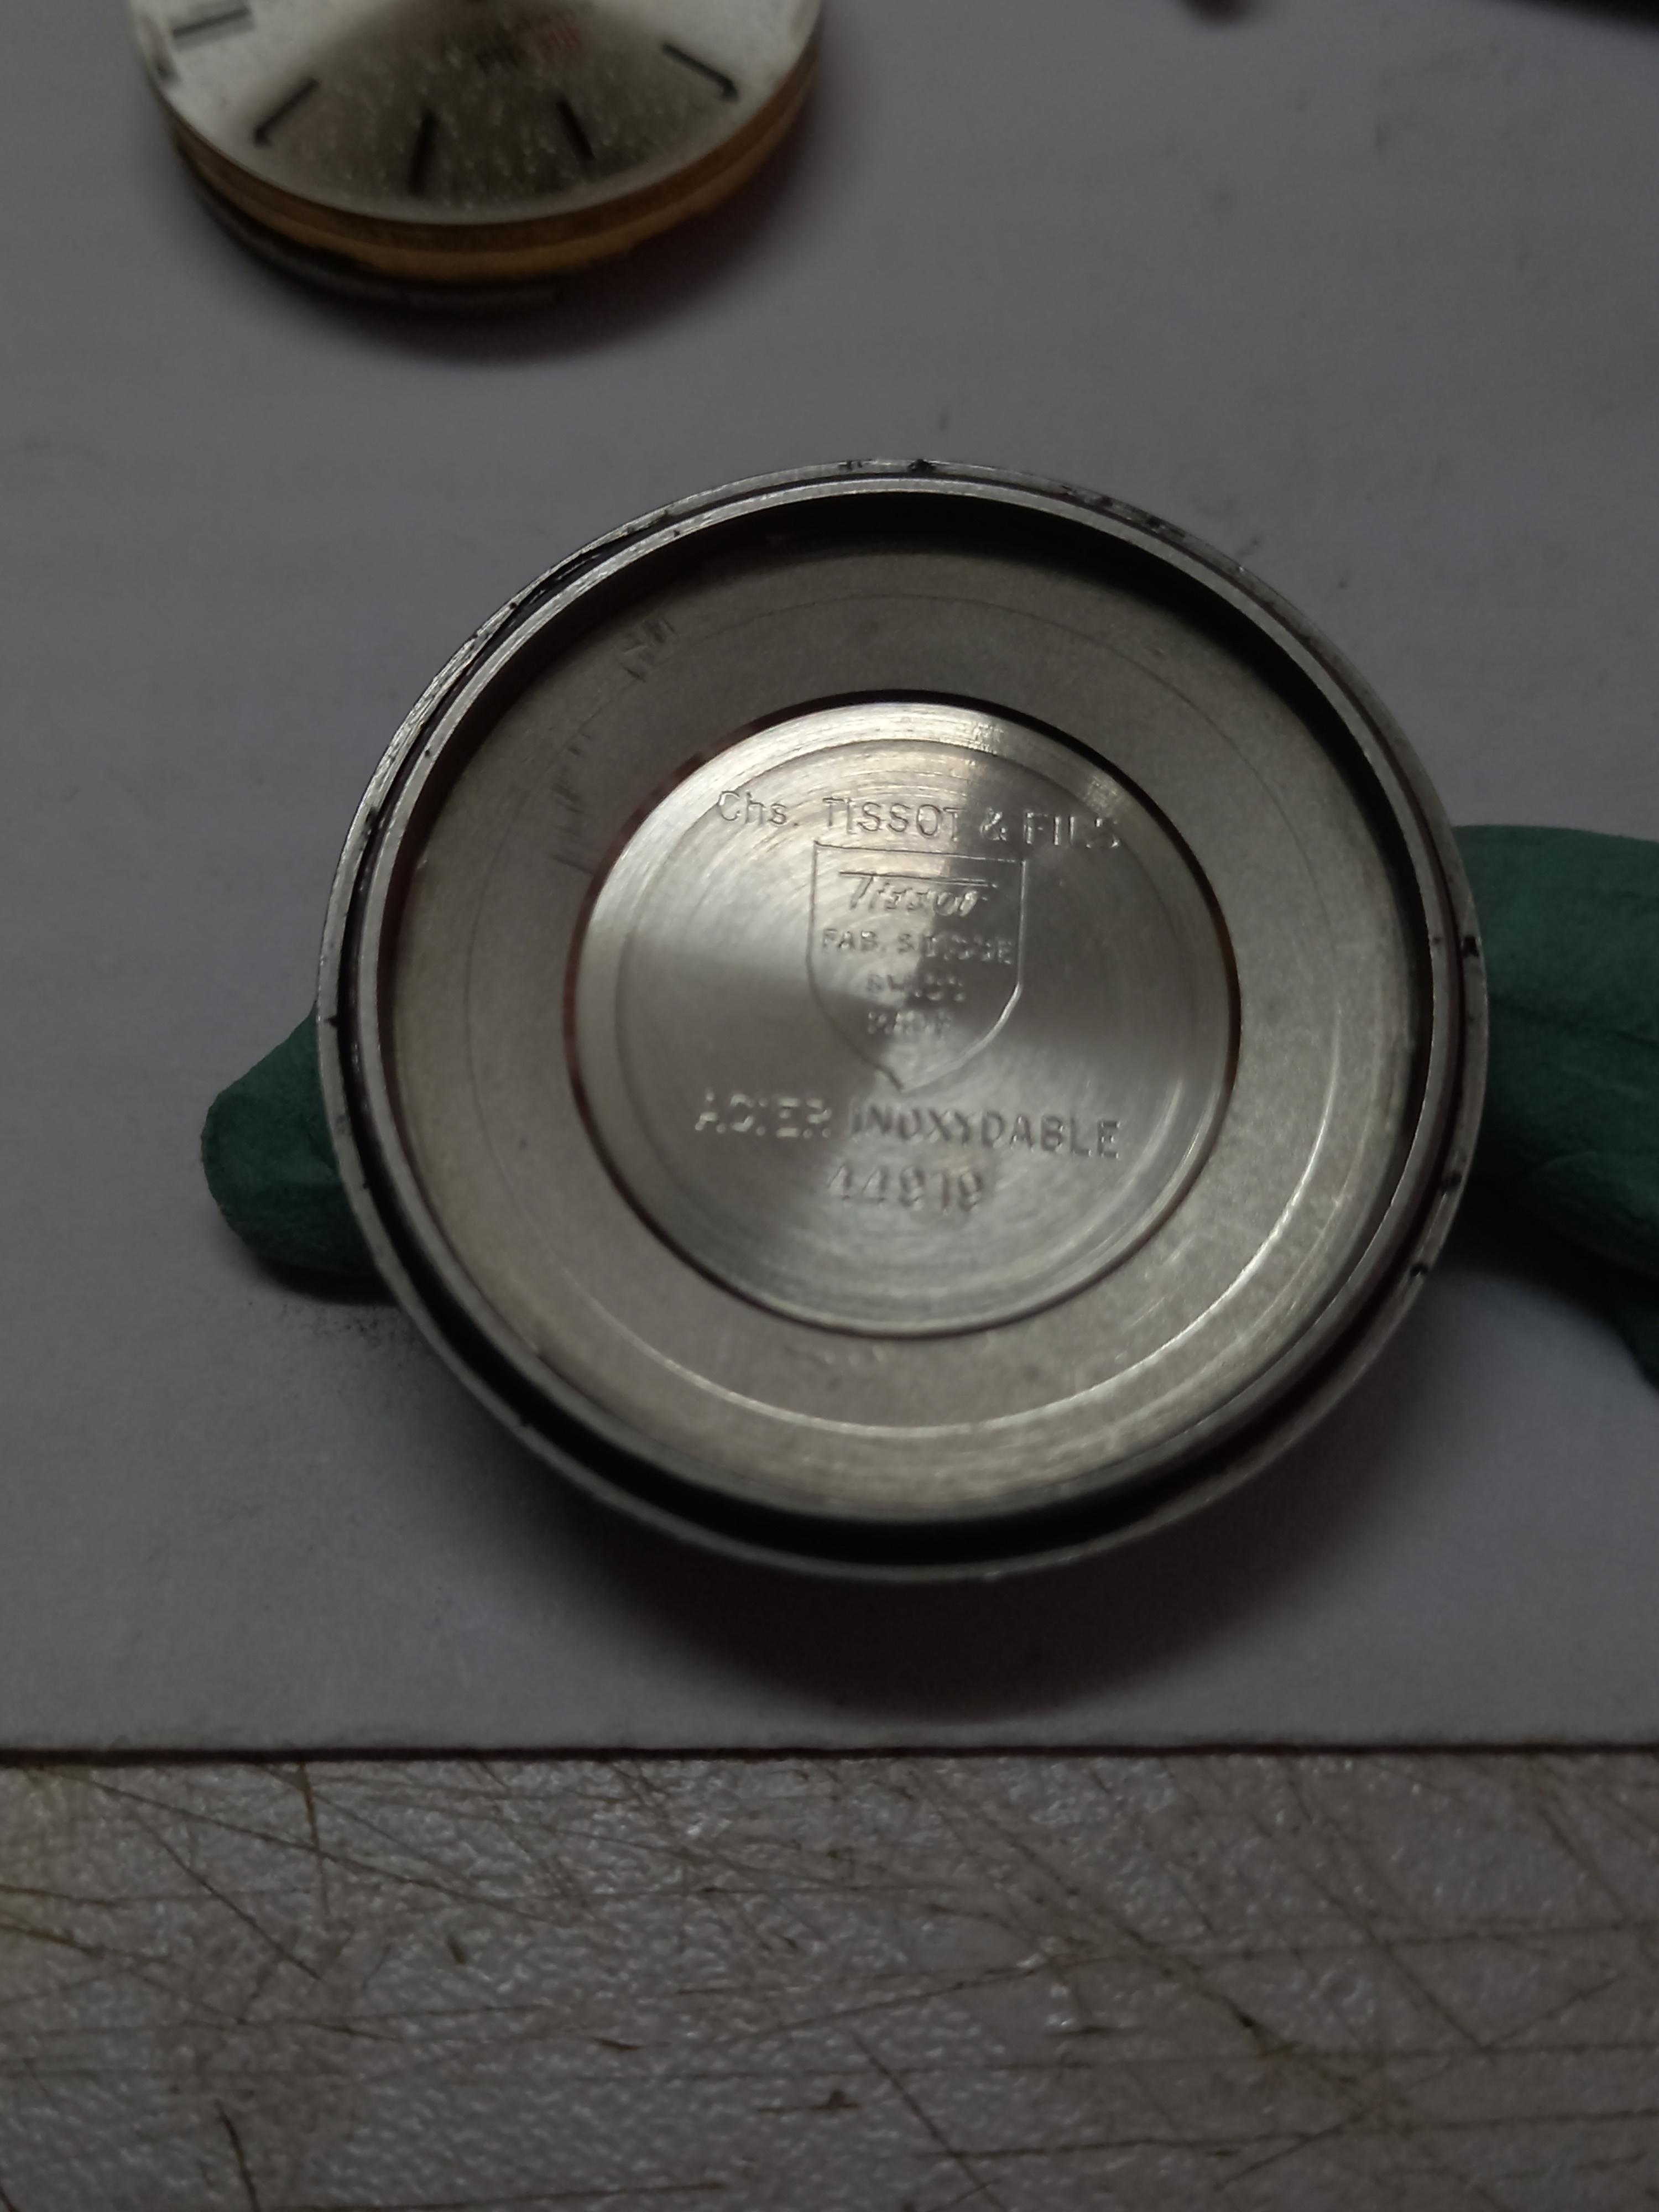
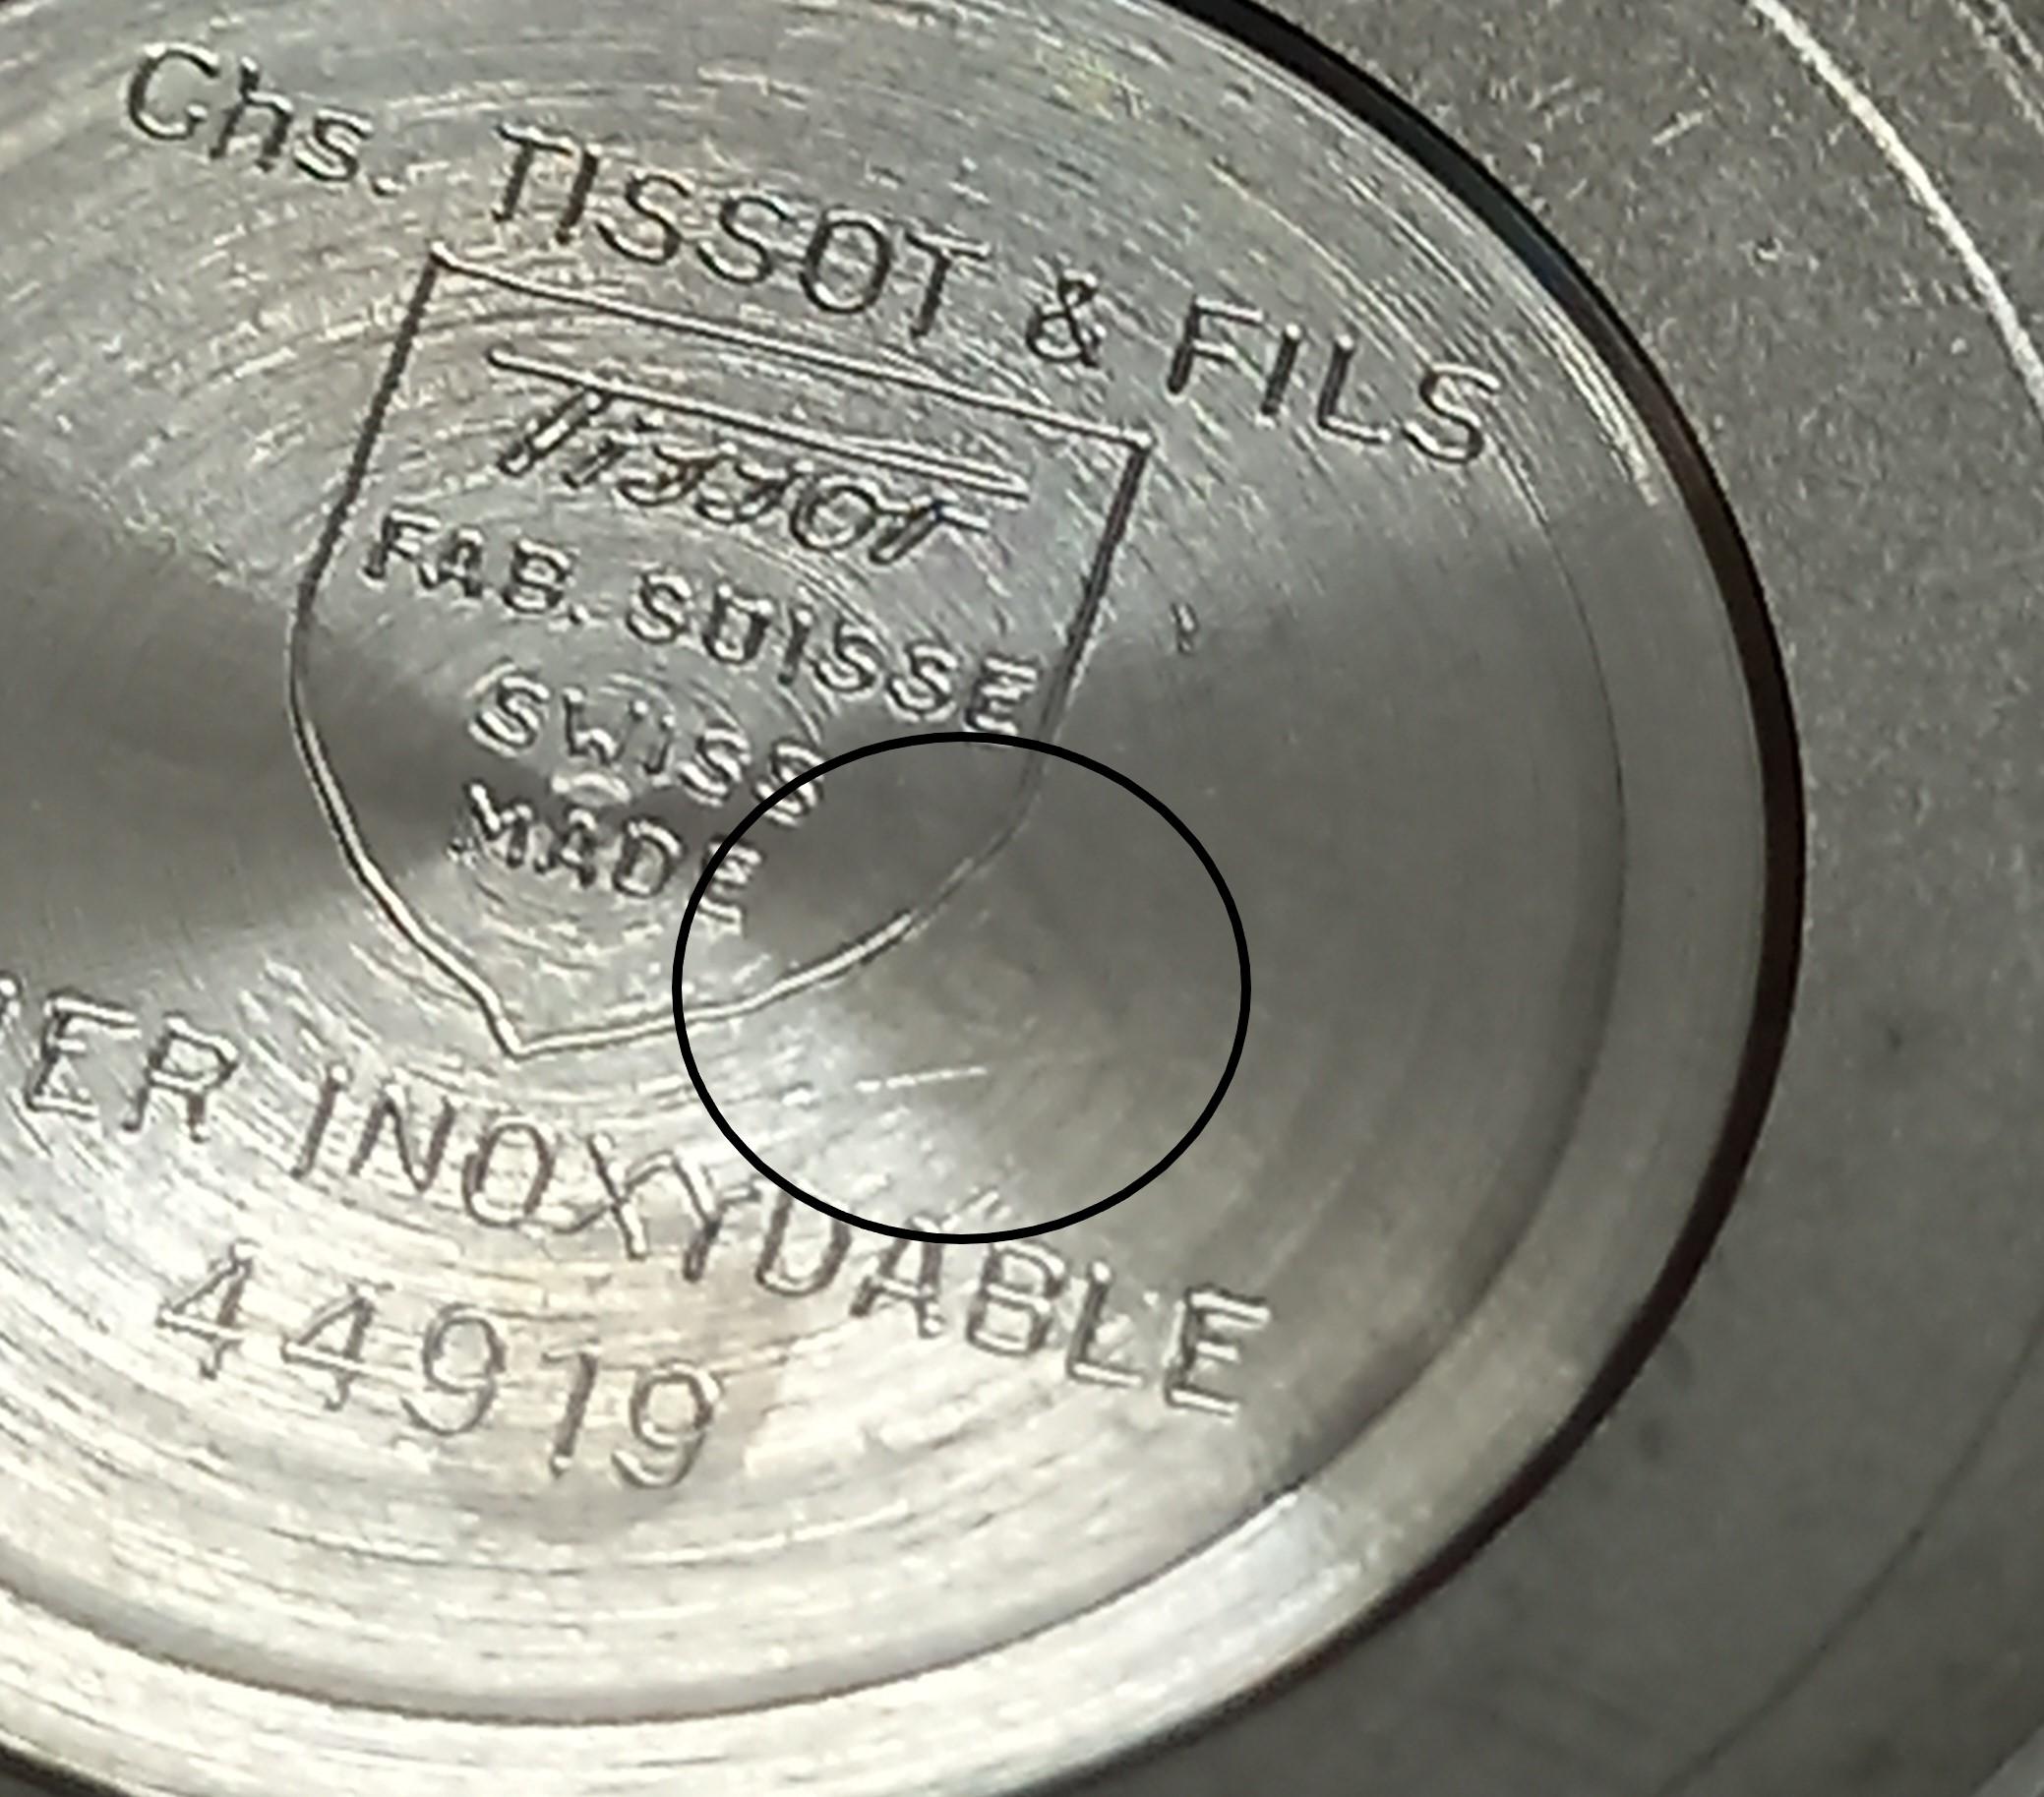
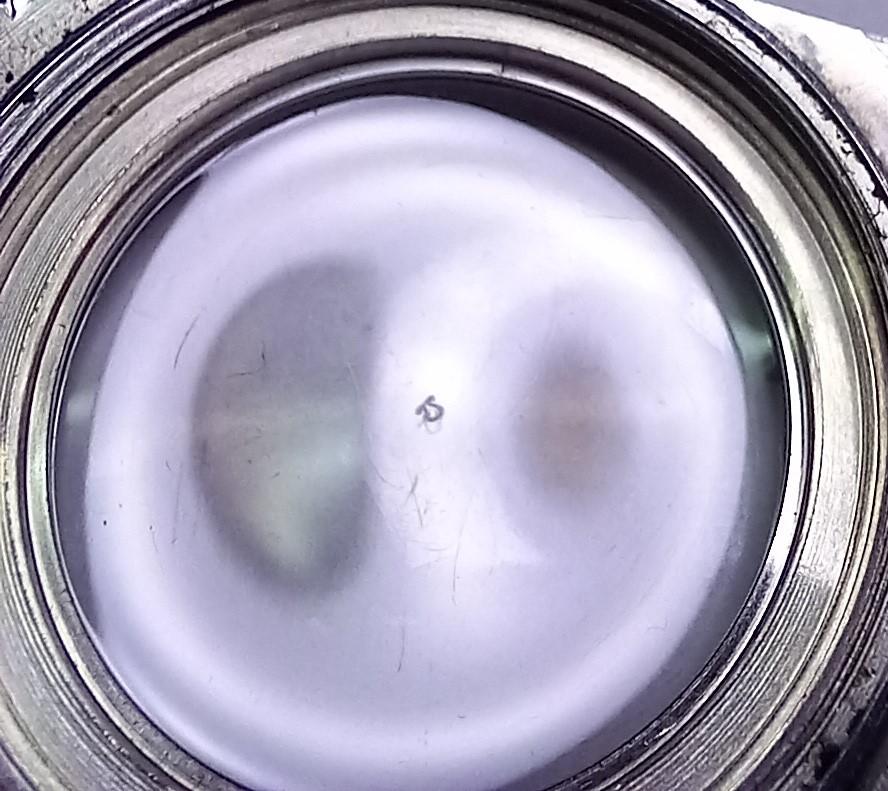
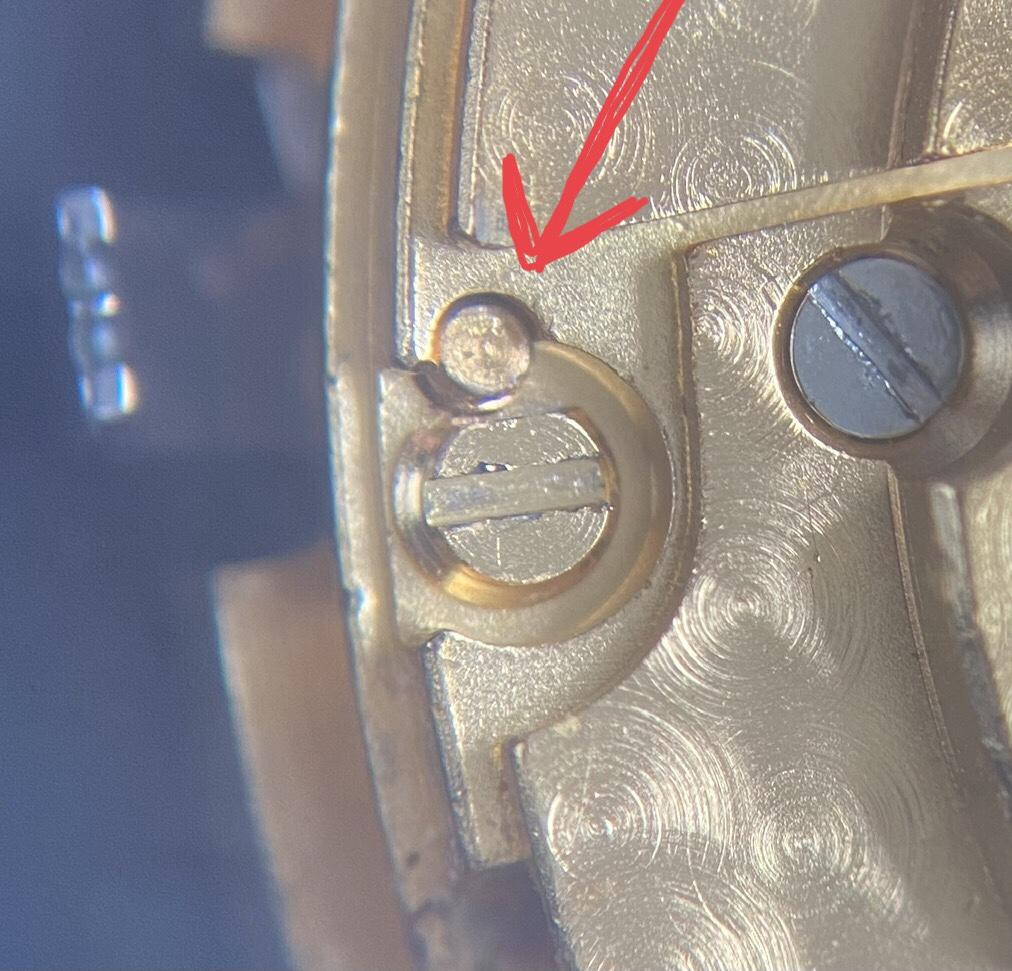
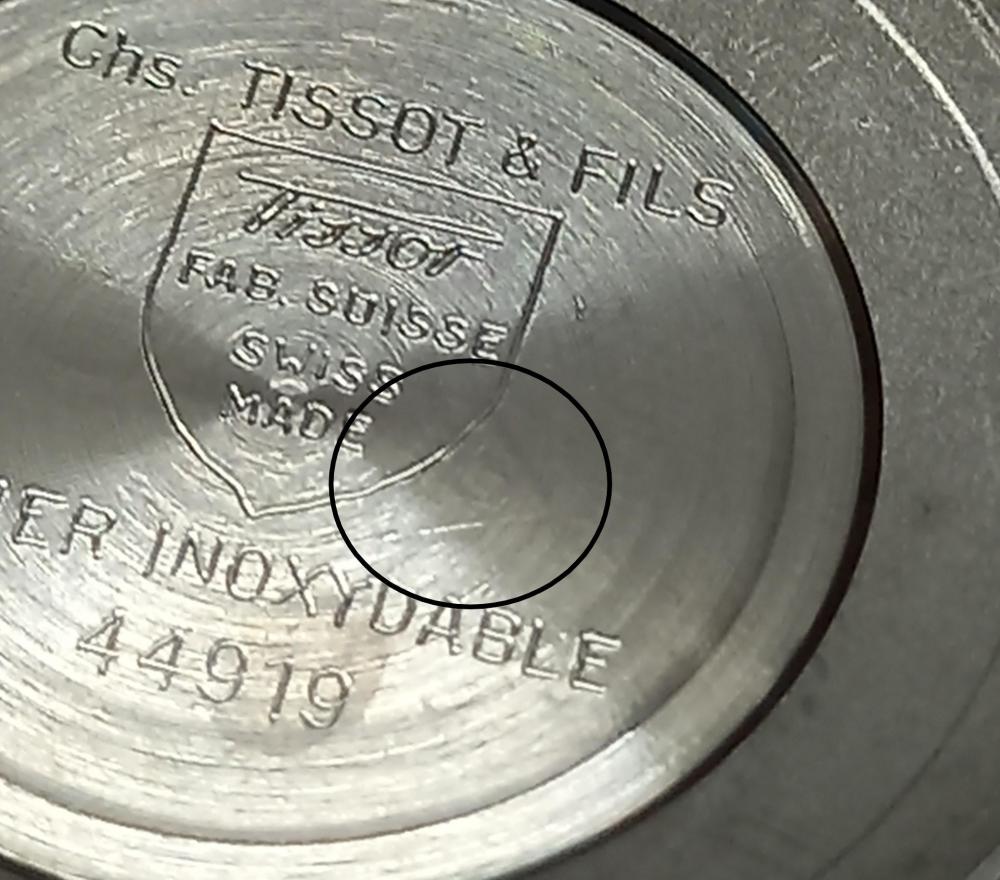
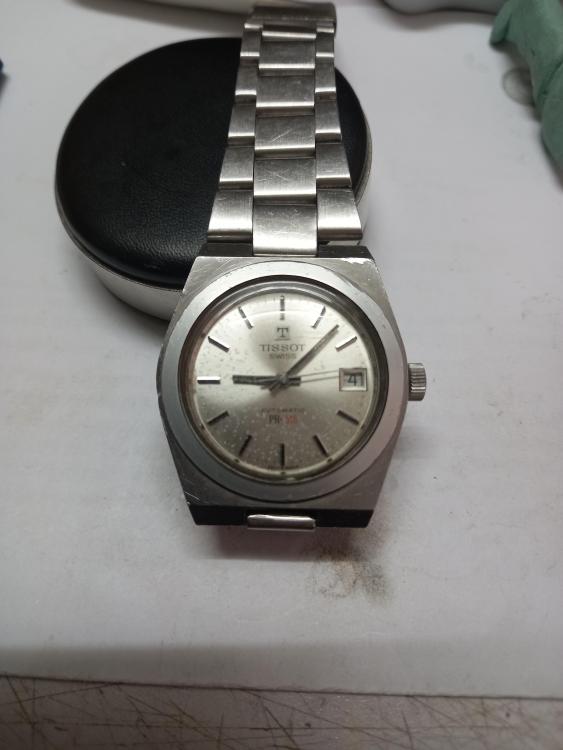
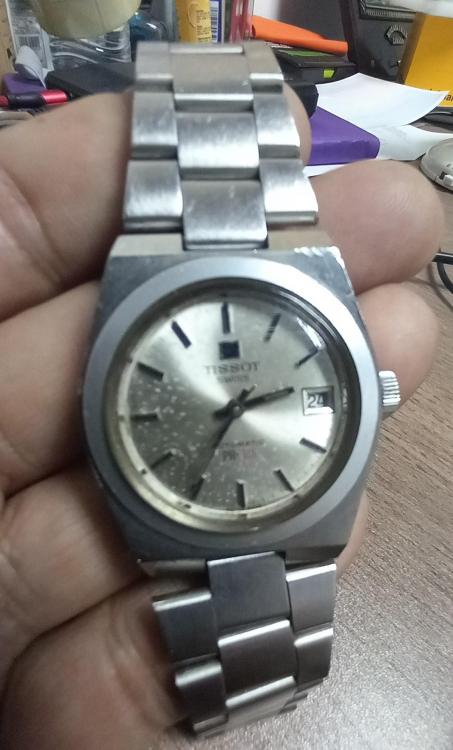
A lot of us in the watch hobby are aware of the fact that Tissot and Omega are quite closely related, one good example is the Tissot 2481 which is the same movement as the Omega 1481. Even the 10xx Omega's can sometimes be found branded as Tissot. I have this Tissot and while handling it recently I noticed that its bracelet clasp is signed Omega. Cool but I did not think anything about it... watch straps are easily swapped. Over the weekend I decided to look into the quickset which wasn't ...quicksetting. On this calibre, the quickset is by pushing in the crown. I decased the movement and cycled the quickset, my initial guess was that the stem was cut a hair too short and the crown did not have enough travel to activate the quickset. With the movement out of the case and the crown having unrestricted movement the issue with the quickset remained so it needed some further investigation under the dial. As I am a bit swamped with watch work I decided to reinstall the movement and come back to it some other time. On blowing the inside of the case out with my puffer, I happened to notice this, the little Omega cartouche in the middle of the crystal inner. You will find this on most original acrylic crystals. I've never seen this before on Tissots. Next I re-examined the caseback... Normal Tissot at first glance but it looked a bit unusual. It seemed like it had been machined and then restamped. On closer examination, I can make out a mark in the area circled below, can you see it? Its a bit hard to see in the pic and even with the caseback in hand you really need to have the light at the correct angle but the Omega logo can be faintly seen! My guess is that there were a surplus of cases/bands which was diverted to Tissot which then machined off the existing markings and engraved their own logo and numbers. Anyway hope you guys enjoy this insight into the Tissot/Omega relationship! Anilv


 2 points
 -
Hello everyone, new beginner from Zurich, happy to join this friendly forum. I always had a passion for mechanical watches but only recently understood what I really like about them. It's the clever ingenuity of their hearts! Thanks to Mark's videos, I developed a genuine passion for watch mechanisms and finally subscribed to his courses to learn the basics. I procured the movement suggested as training platform and some basic tools. I will go through the material of the course a couple of times and then start to do some damage! Despite leaving in one the right countries for watchmaking, I don't have at this moment the chance to attend any apprenticeship or course in person (german is also a roadblock for me!). Therefore, I find the combination online course + access to a skilled community the right approach for my personal needs. All my efforts will go towards gaining experience and improving hands-on skills. I've already got some useful hints and explaination from the community: I hope I will be soon able to give back. Thanks Mark and all of you for the support you already provided at the beginning of this journey of mine!2 points
-
This would be one issue with buying these Chinese tools, they sell a full set but nothing on their own, so if you wanted one pusher you may have to go looking for a Swiss version, mind you new they want almost as much for one pusher the the Chinese are asking for the whole set of pushers and the Anvil so it would be cheaper to just buy another Chinese set. £99 for a full set including Anvil from China or £935 just for the pushers from Cousins is a no brainer to me2 points
-
There are many cumbersome and tedious tasks in watch repair, this is not one of them in my opinion Try removing the black tar gaskets from a 1970s Omega for example2 points
-
Just ordered from AliExpress. Been waiting for a good Swiss one to crop up on epay but they often have pushers, anvils missing and if not then really expensive. Sorted now though. Thanks Watchie and Gert for your info on this. Thanks john, i just wondered why Watchie hadn't tweeked them to fit better.2 points
-
Never say never ....... once you have had a serious amount of watches through your hands and you became good at watch repair, I'm not so sure about your "never-ever" anymore Congrats with your watch !!! A timepiece for life !2 points
-
if you're new to watch repair you're going to break things. If things like plates are hard to go on in other words you took all the wheels out in just put the pieces together they fit tight then you're going to break things. That's because you're not going to have a good feel for what's happening in a be really easy to break things. this is where he usually the recommendation is to start with the Chinese clone of the 6497 pocket watch and get a good feel for taking it apart and putting it together a whole bunch of times just to get a feel for things rather than jumping in with a watch that you want to keep because you're going to break things. we need a better picture of this to see if you did any damage or not. I can't tell from the pictures how the jewels are held in whether they just friction the or whether that's old enough there burnished in and popping those out wouldn't really be a desirable thing to do. Okay read the rest your message looks like putting it away yes that's a good thing to do. I start getting frustrated things then really bad things can start to happen. As the costs the replacement escape wheel? The problem when you're dealing with anything of vintage the problem is obtaining the part. At some point in time it comes down to if this is the only part you can get then the price will be good if that's what you're willing to pay if you're not willing to pay than that's bad but you don't have a part you can't make your watch run.2 points
-
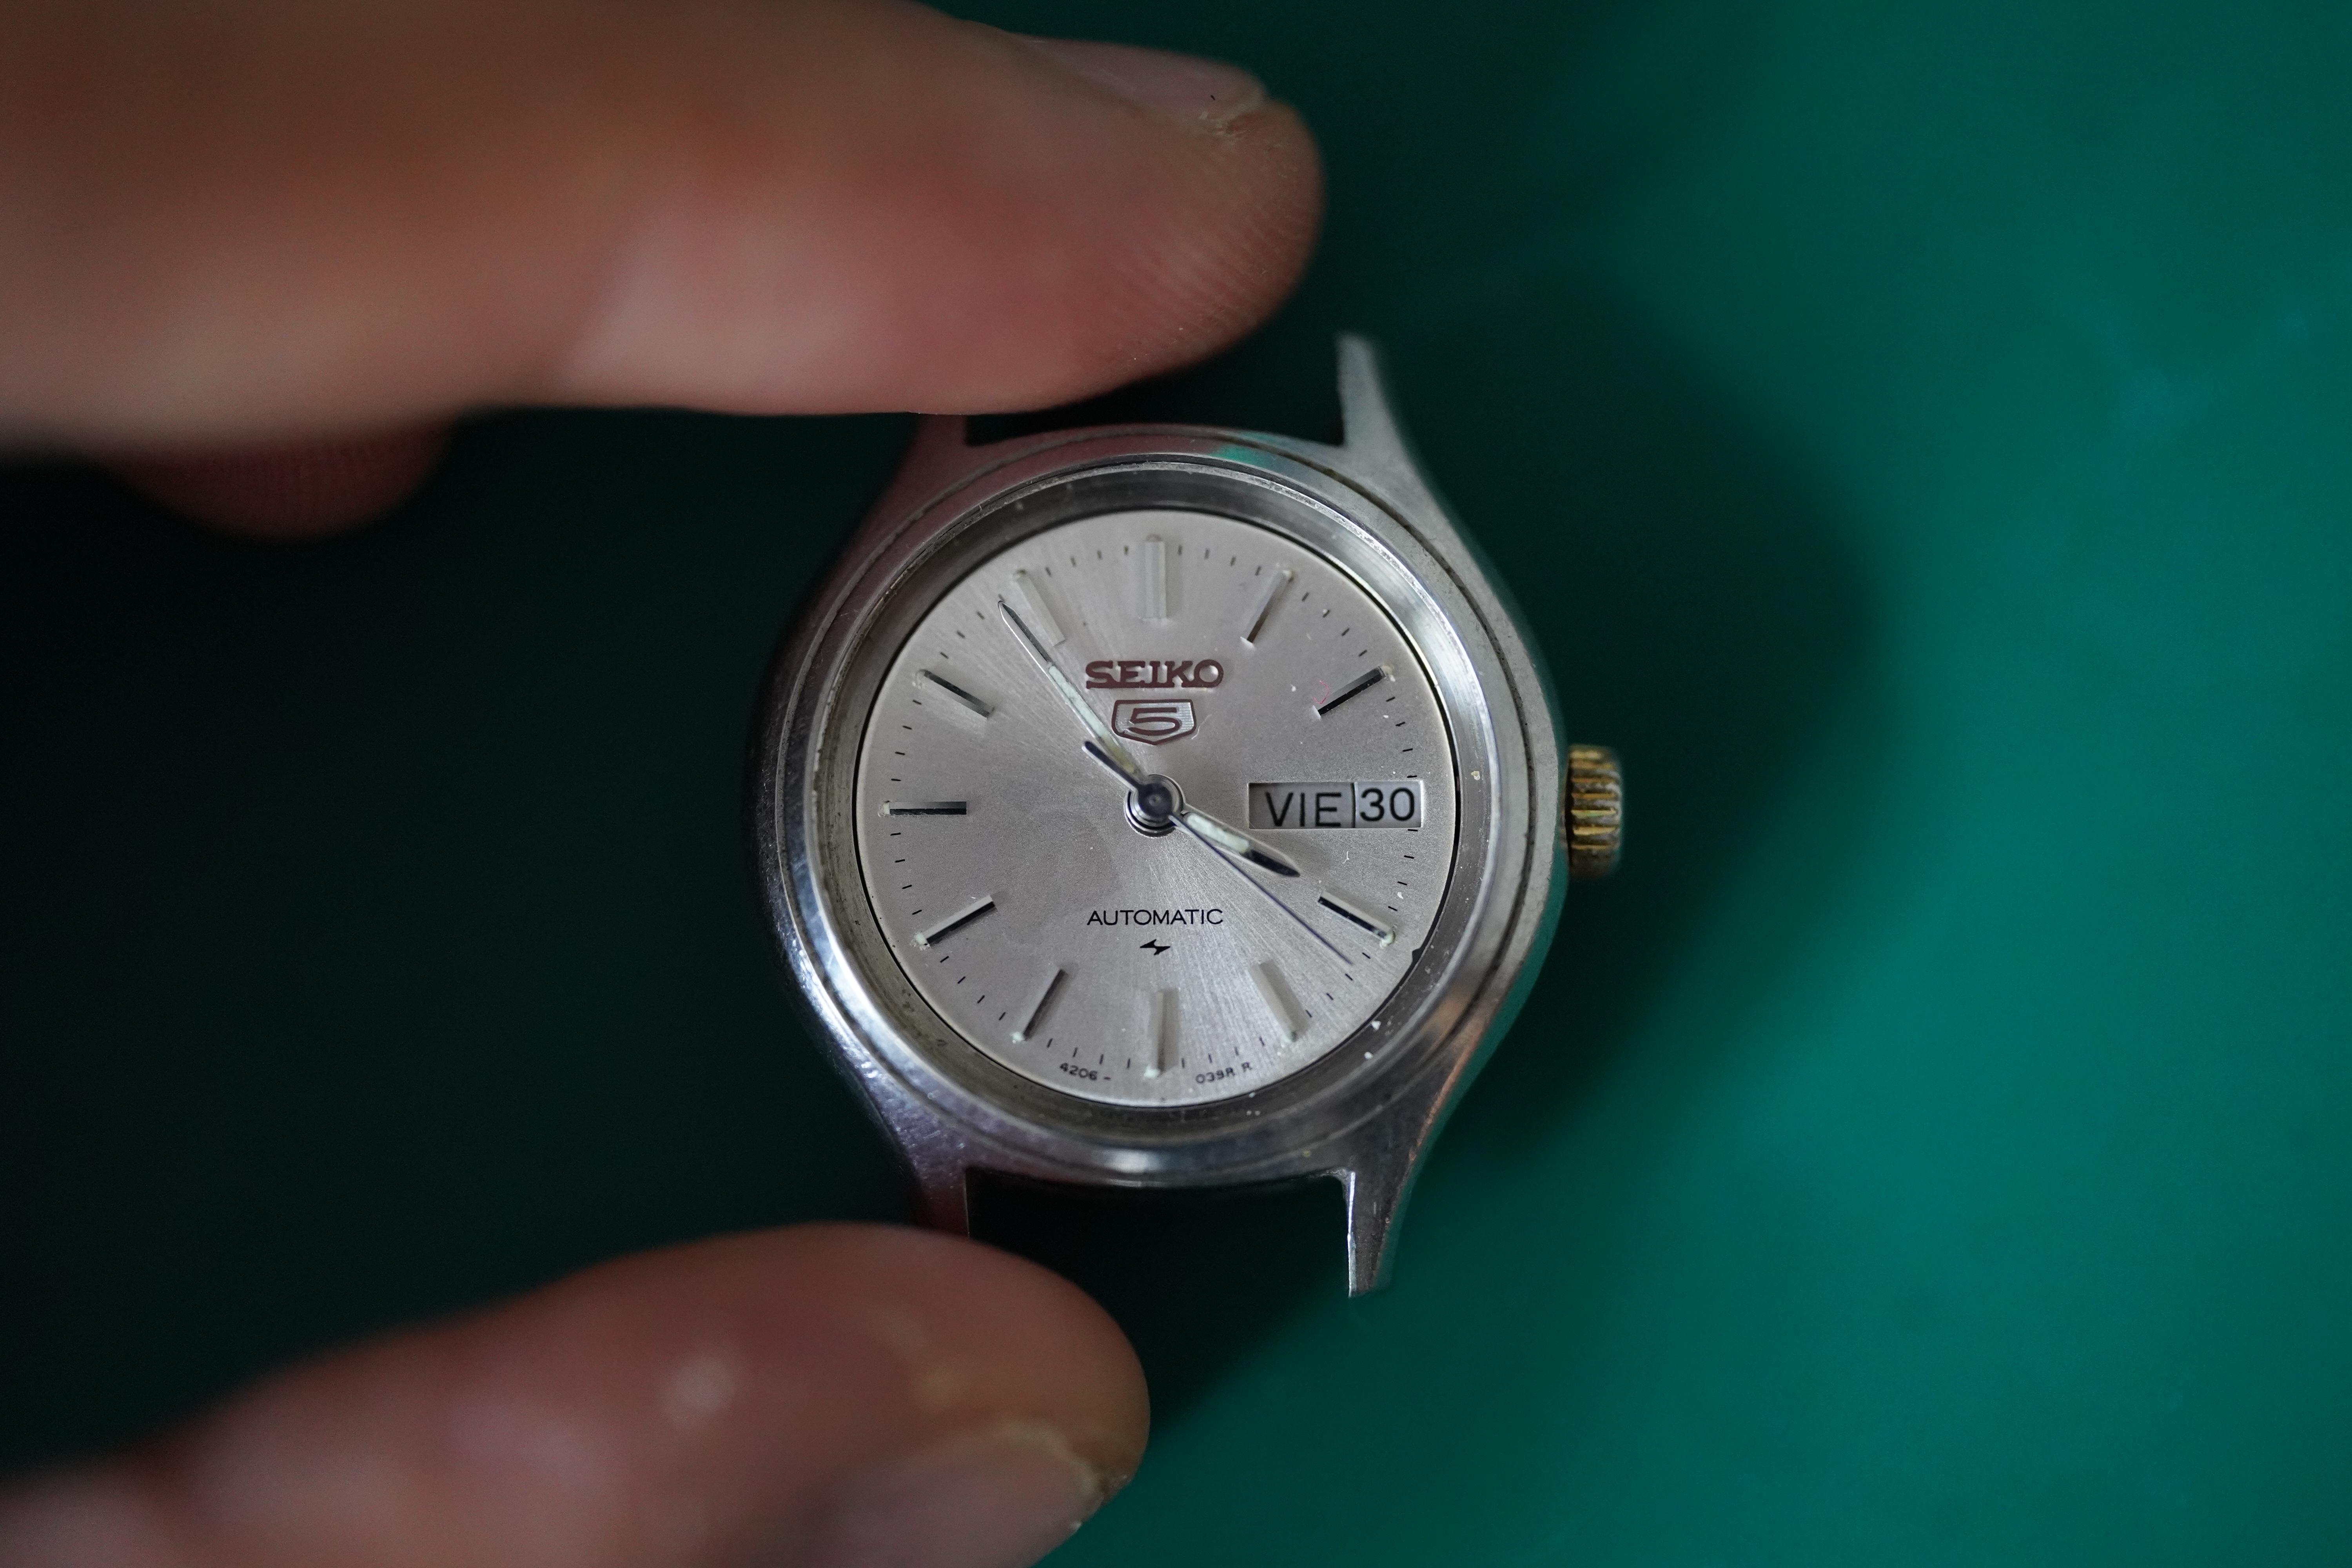
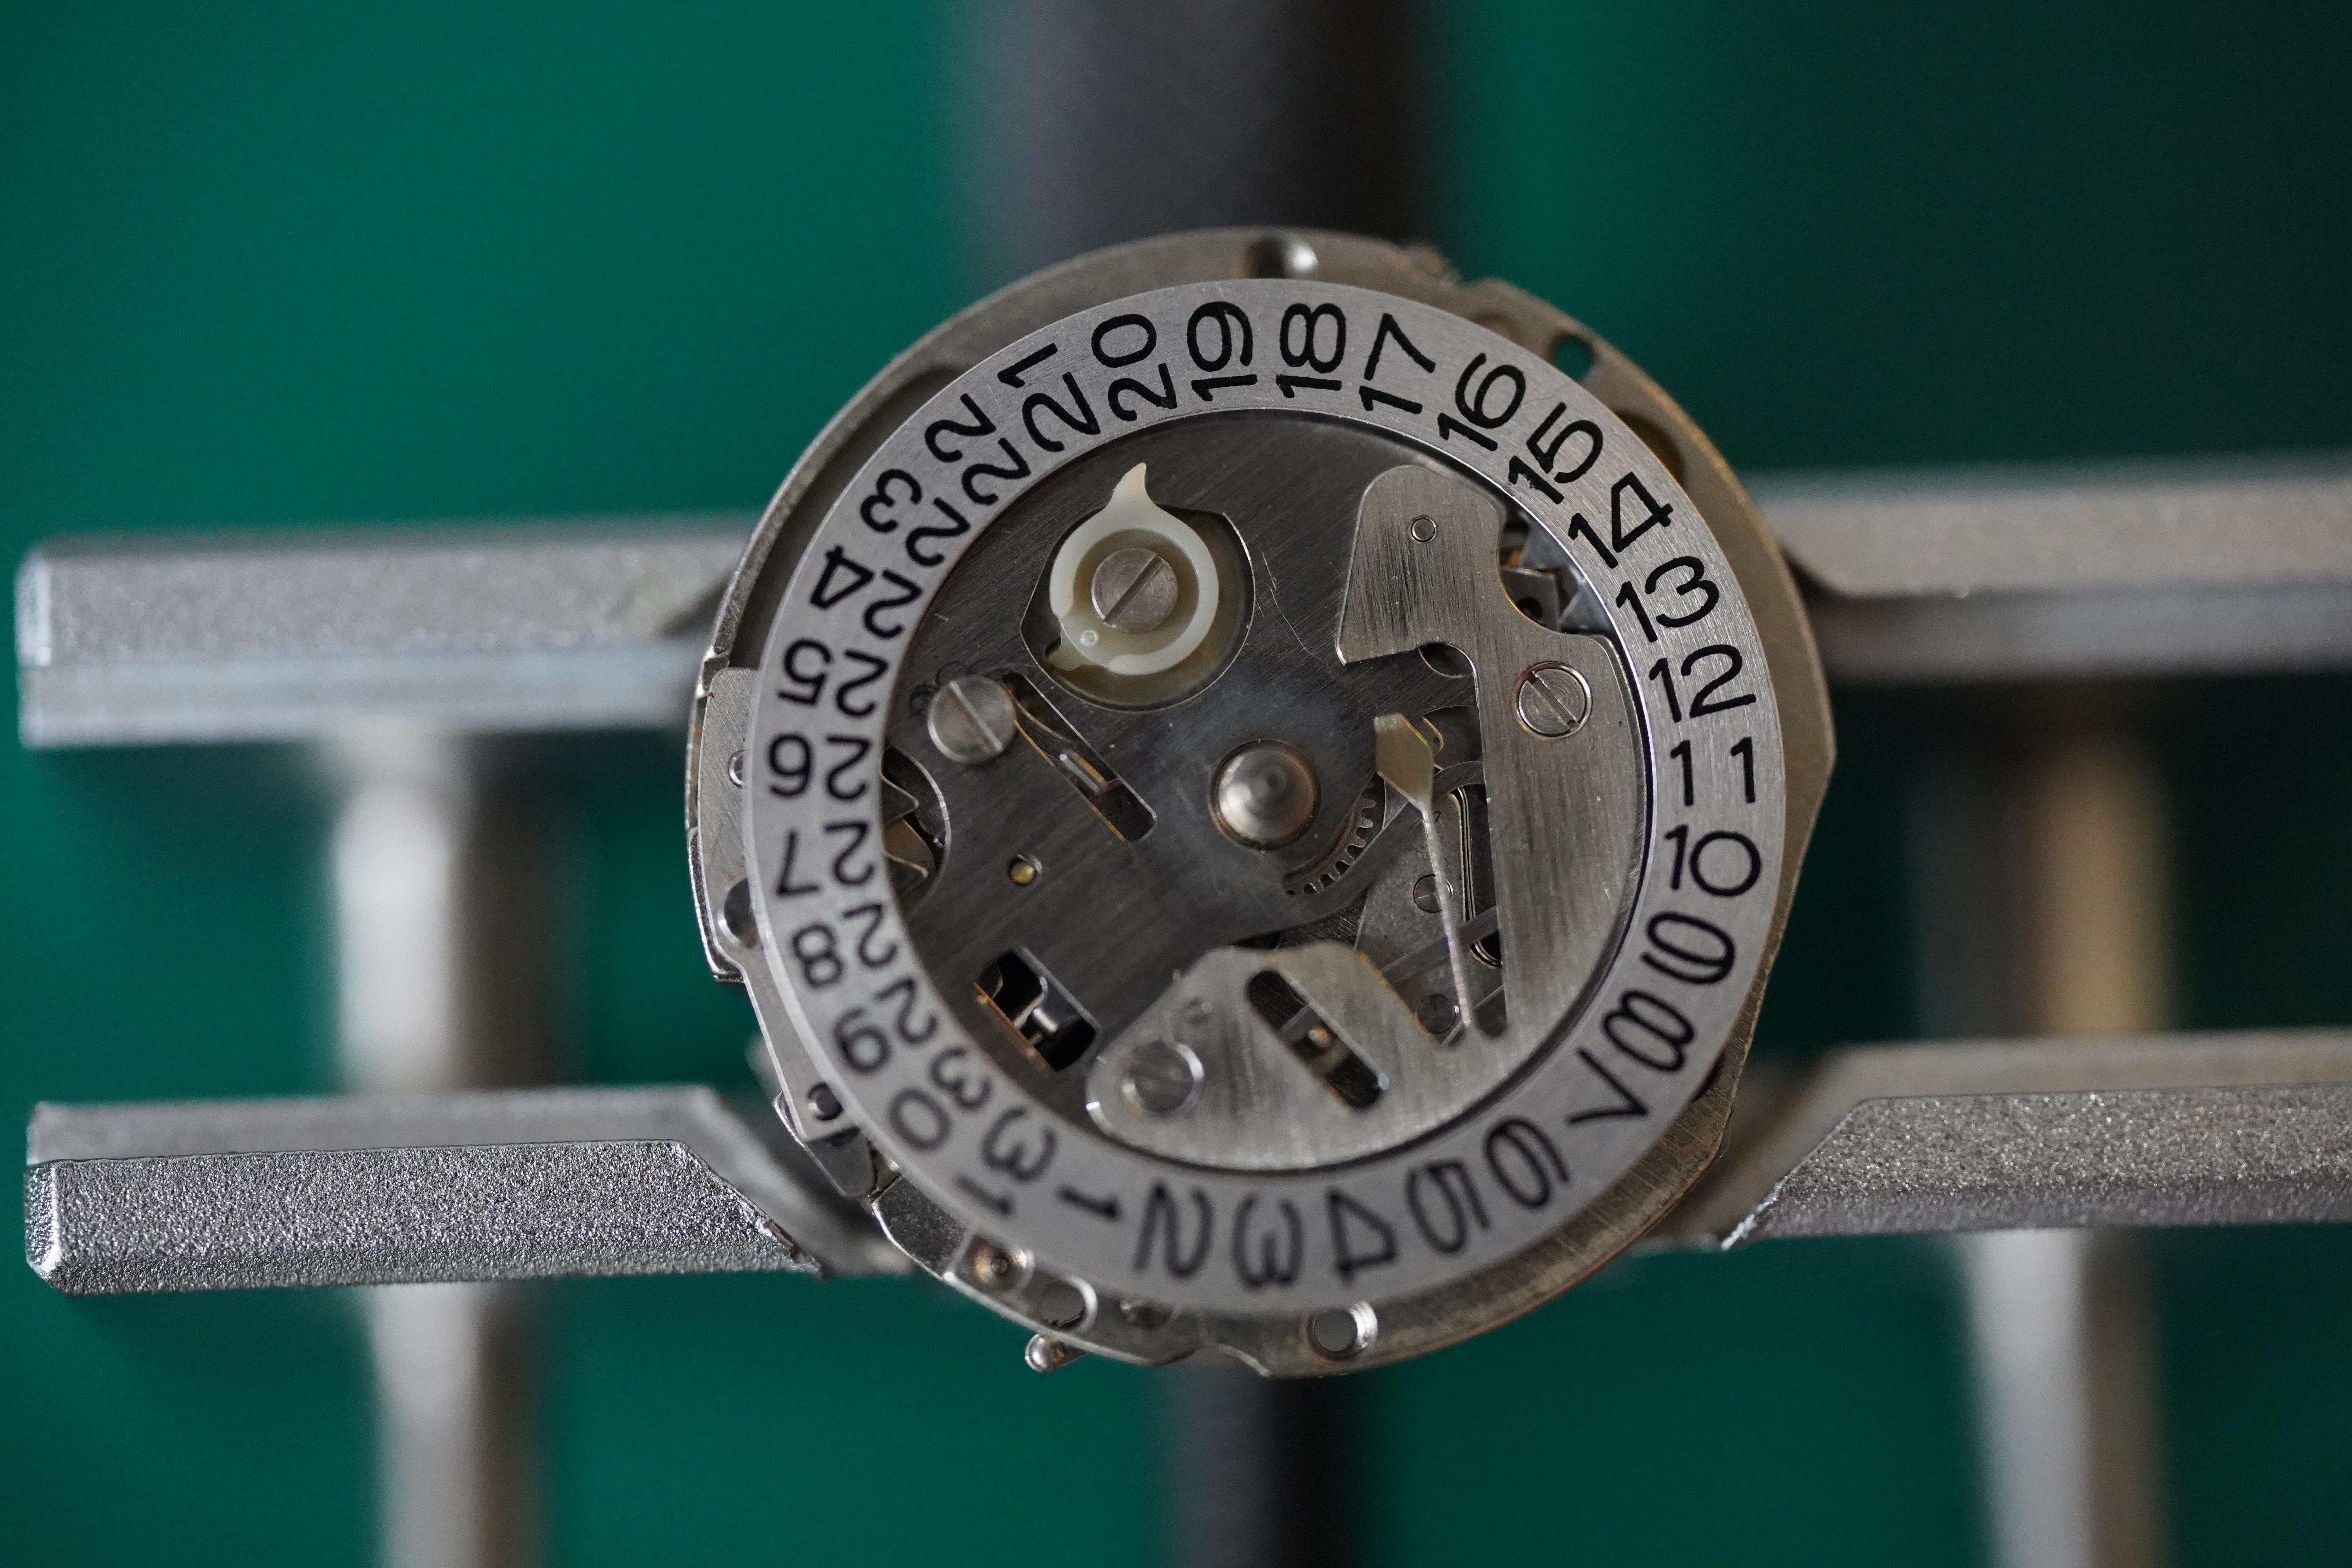
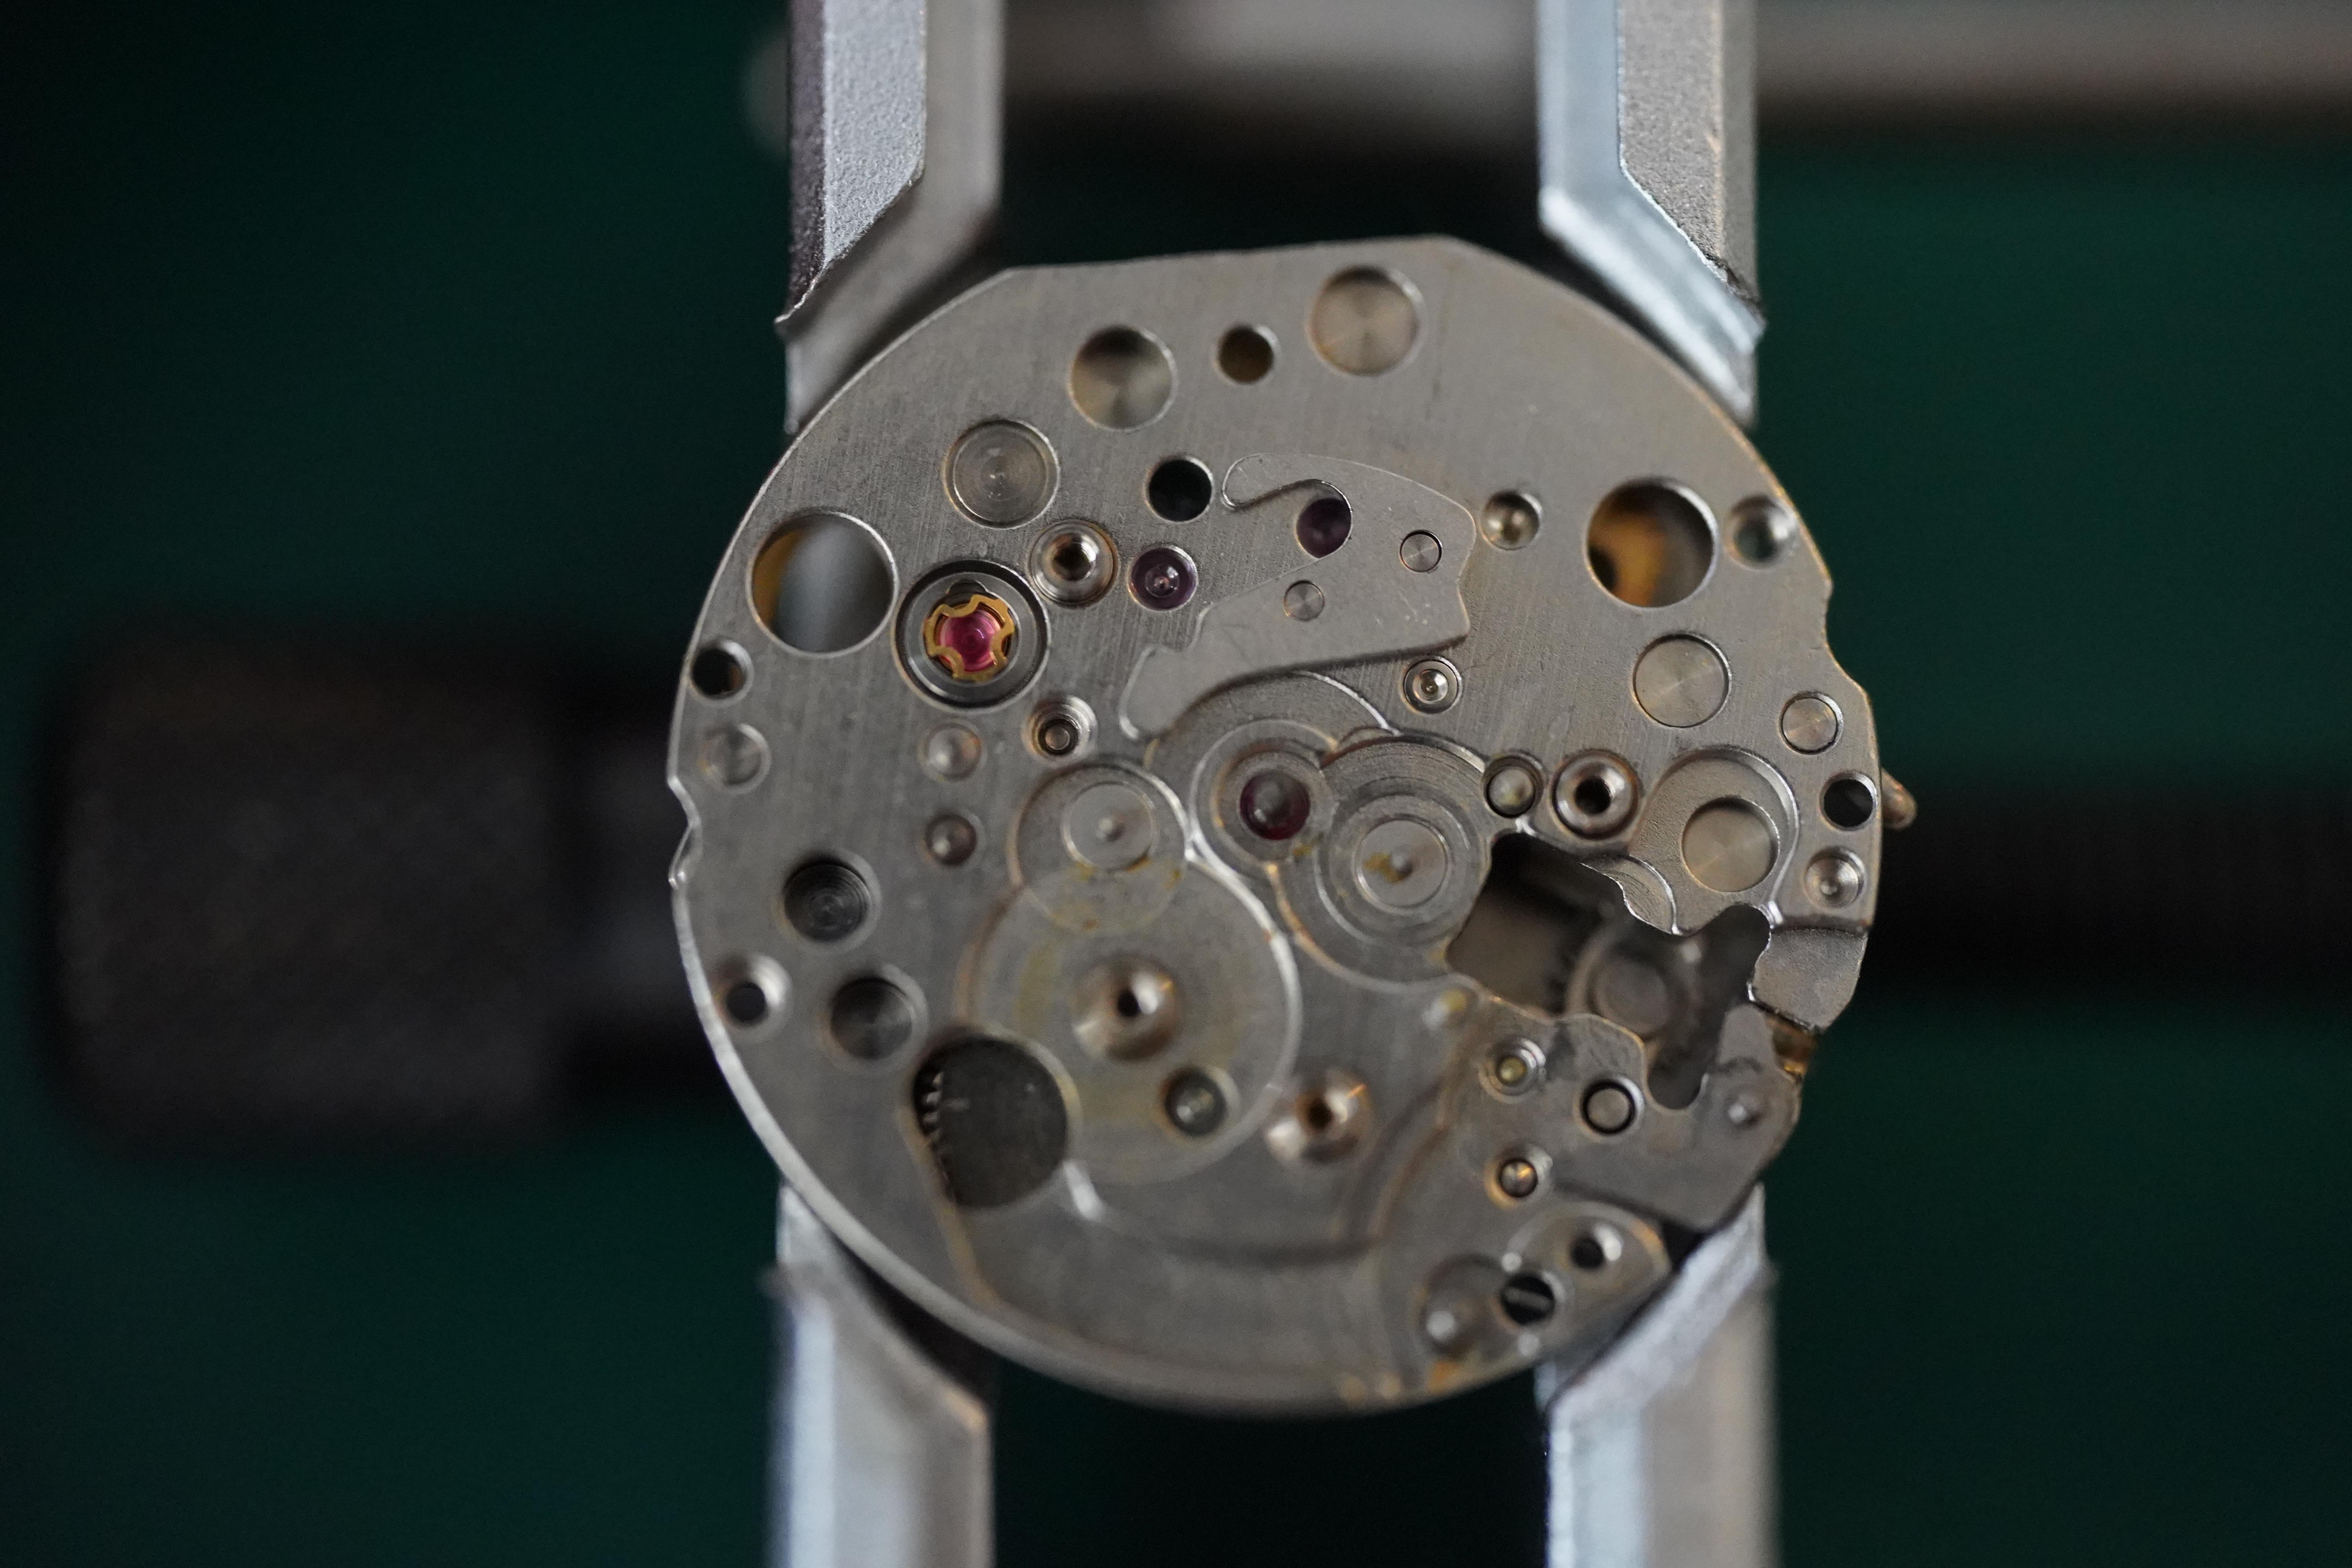
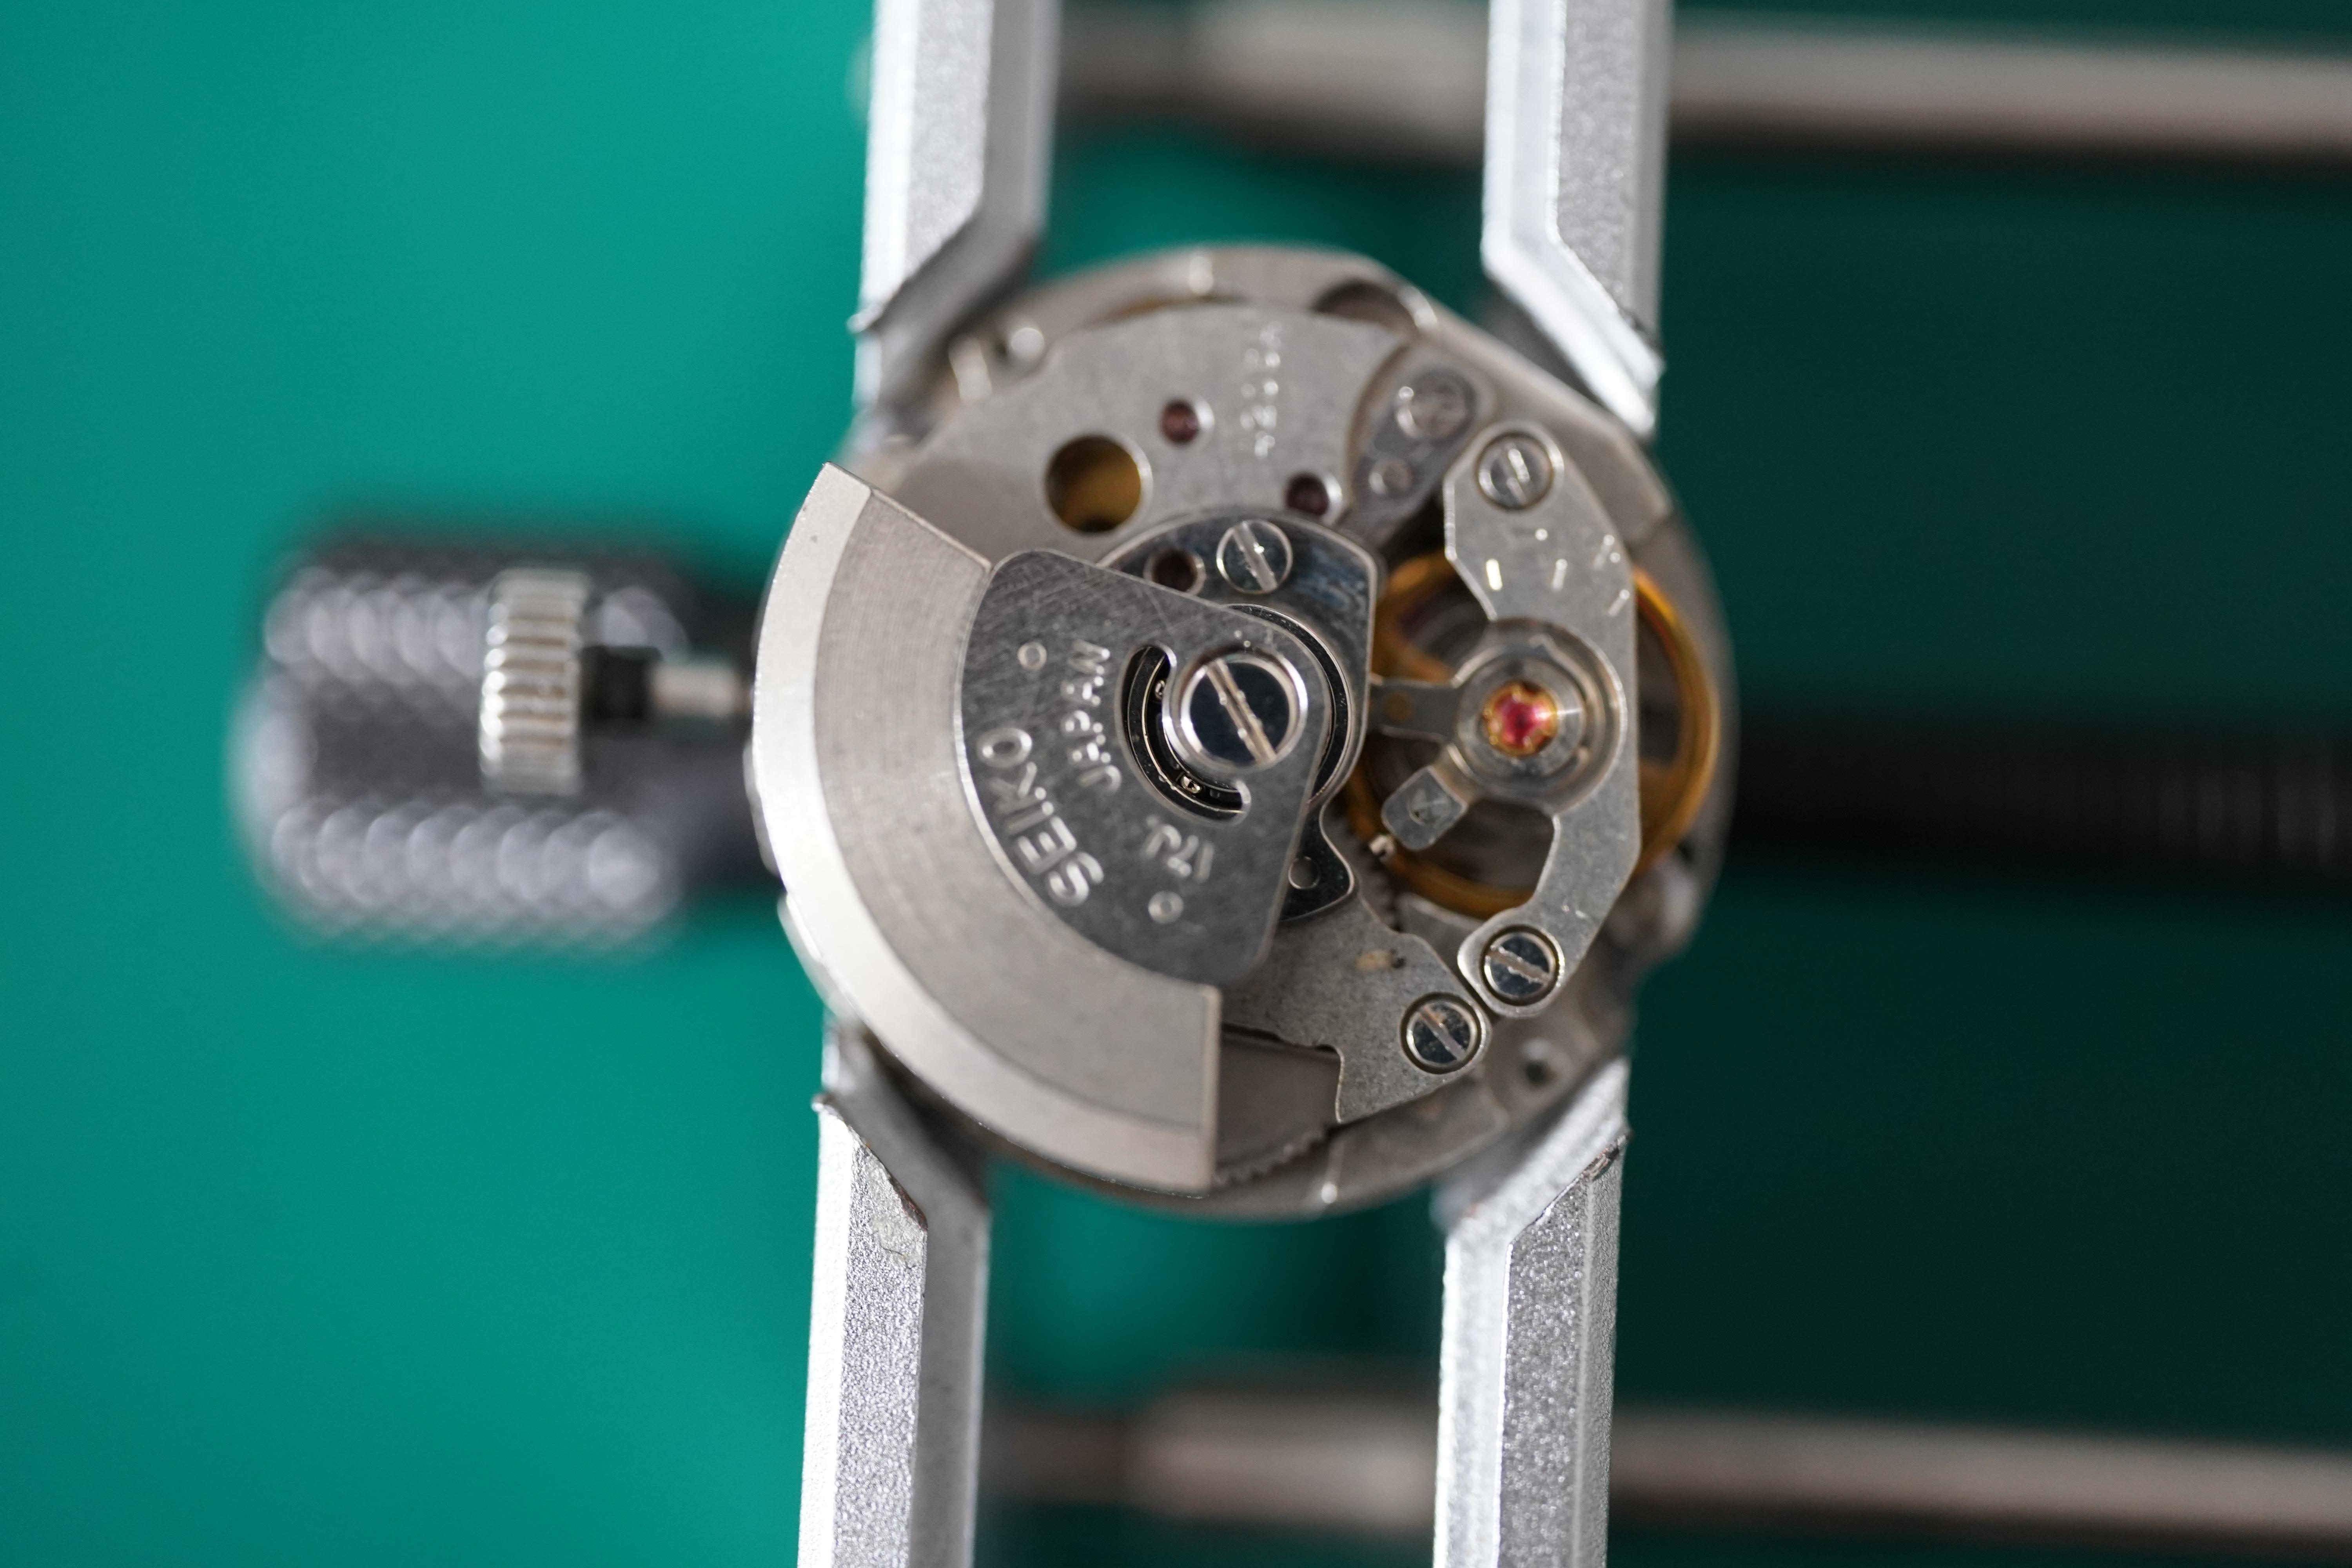
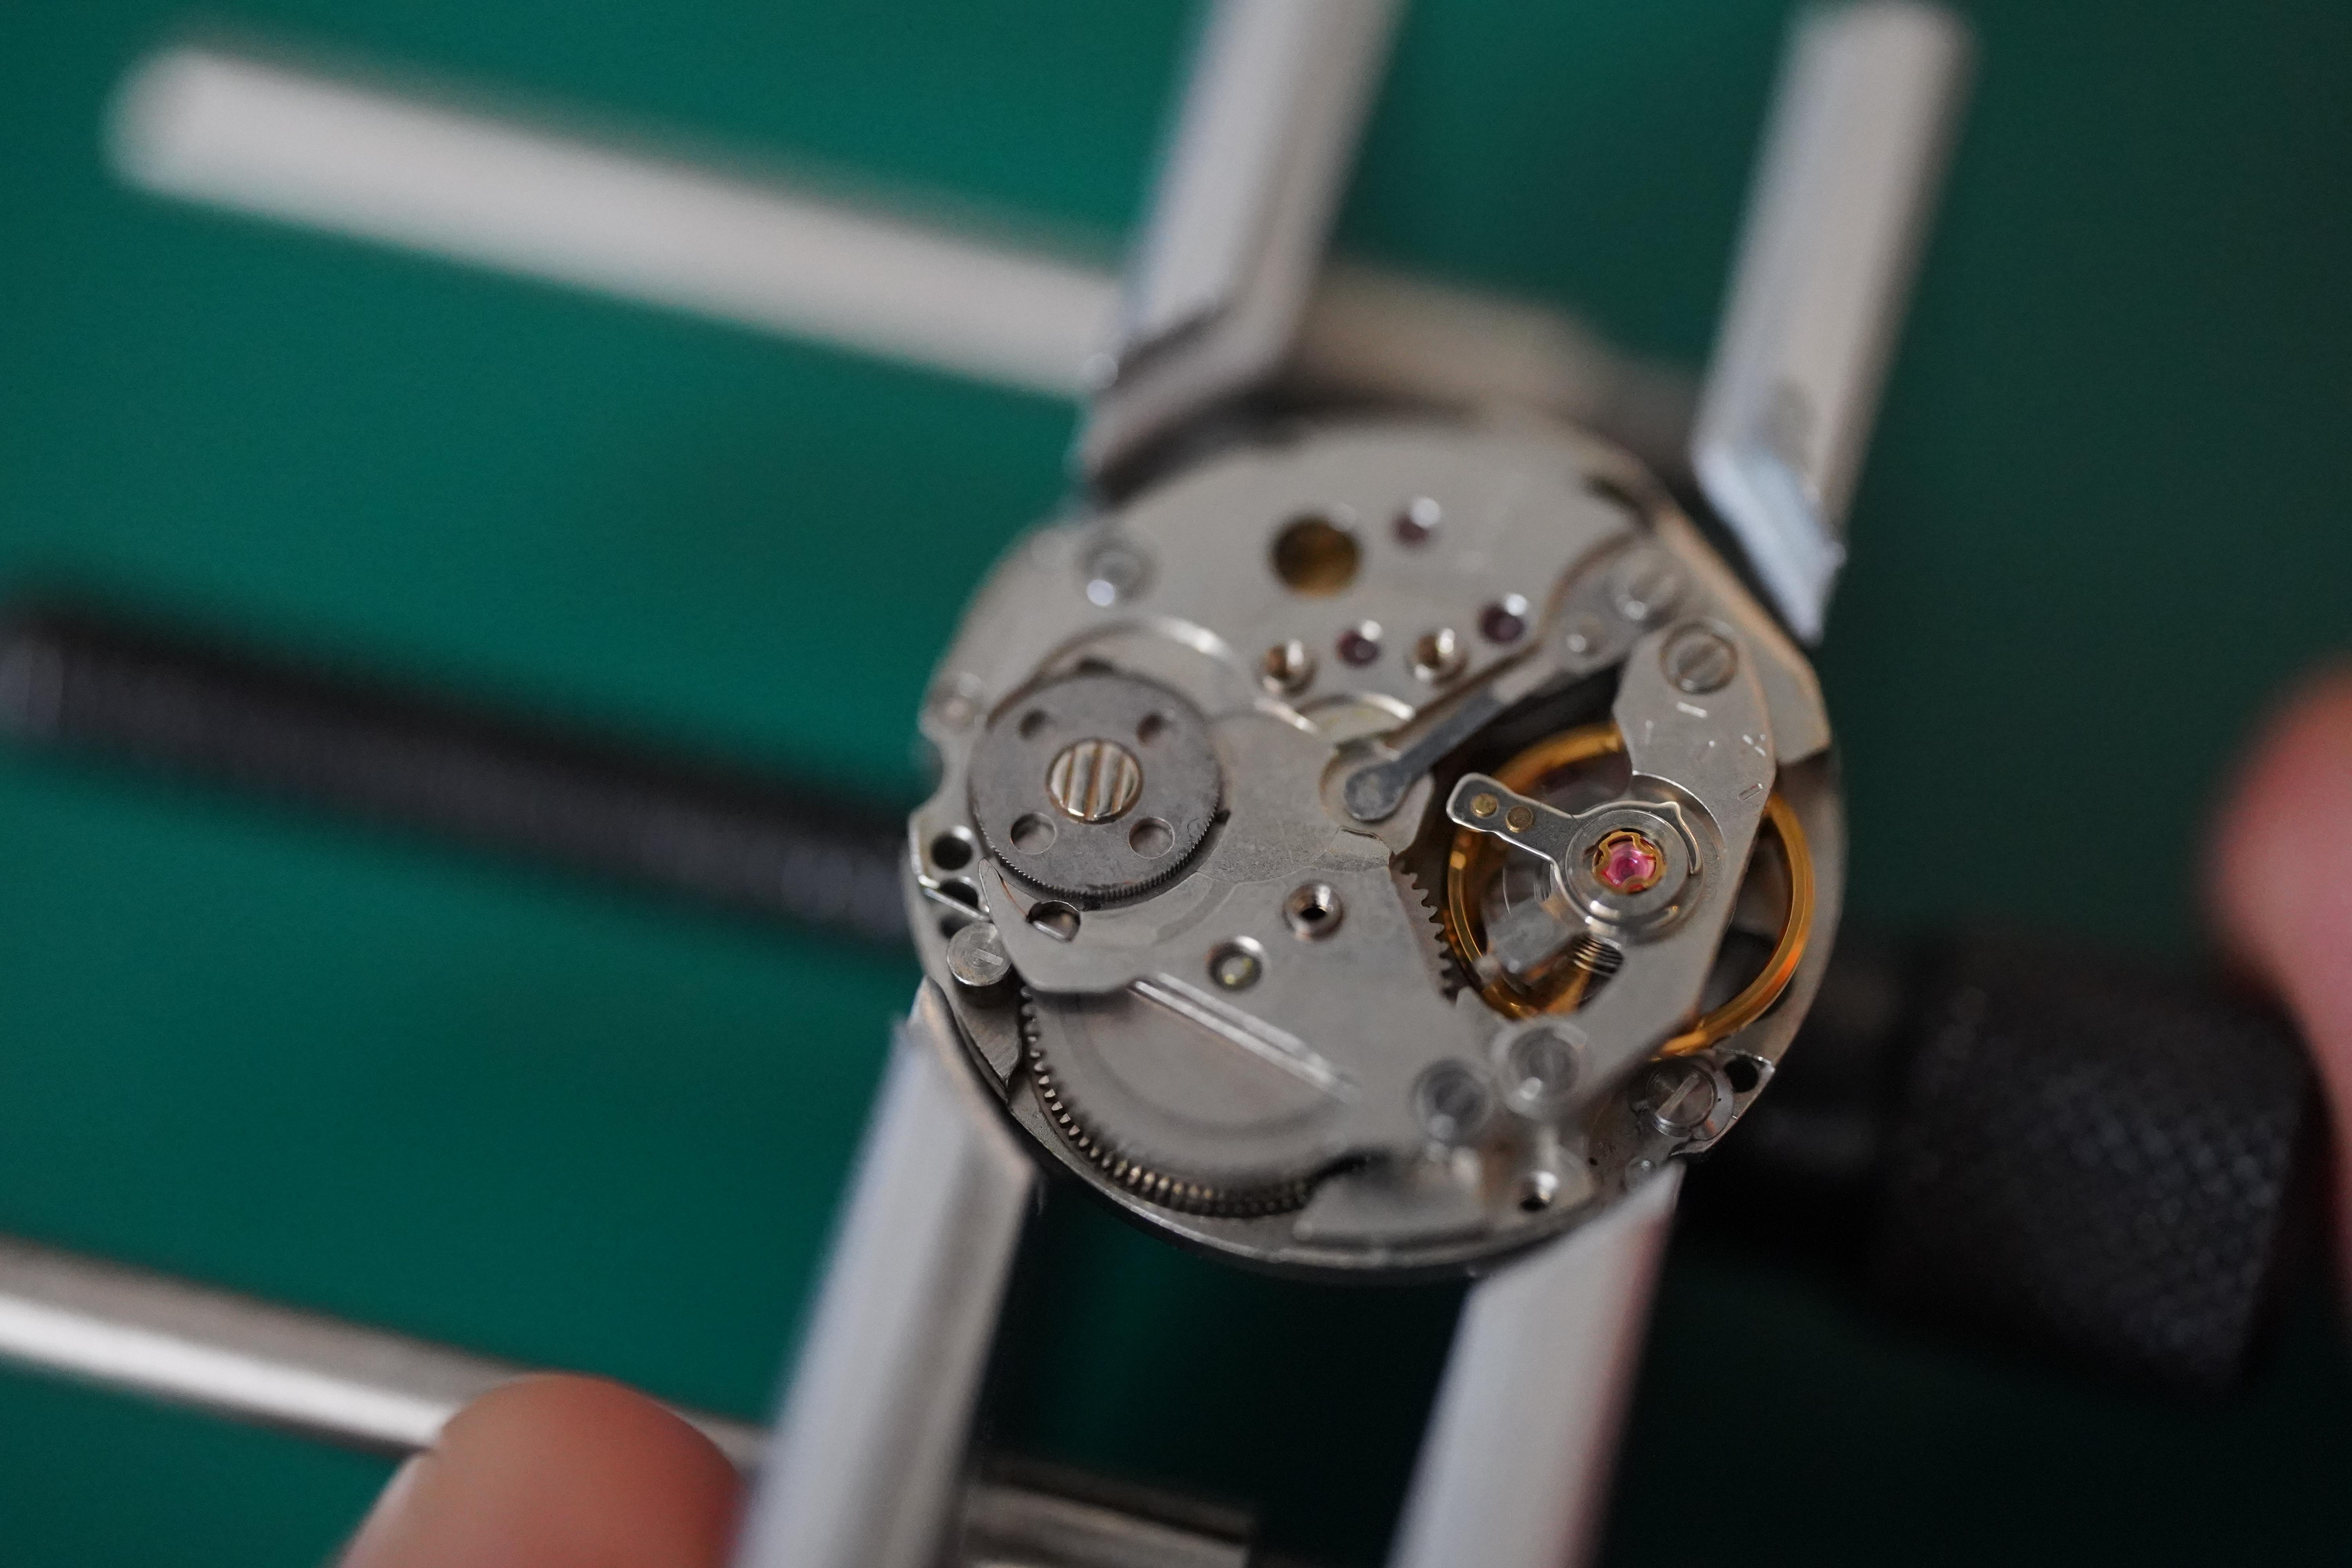
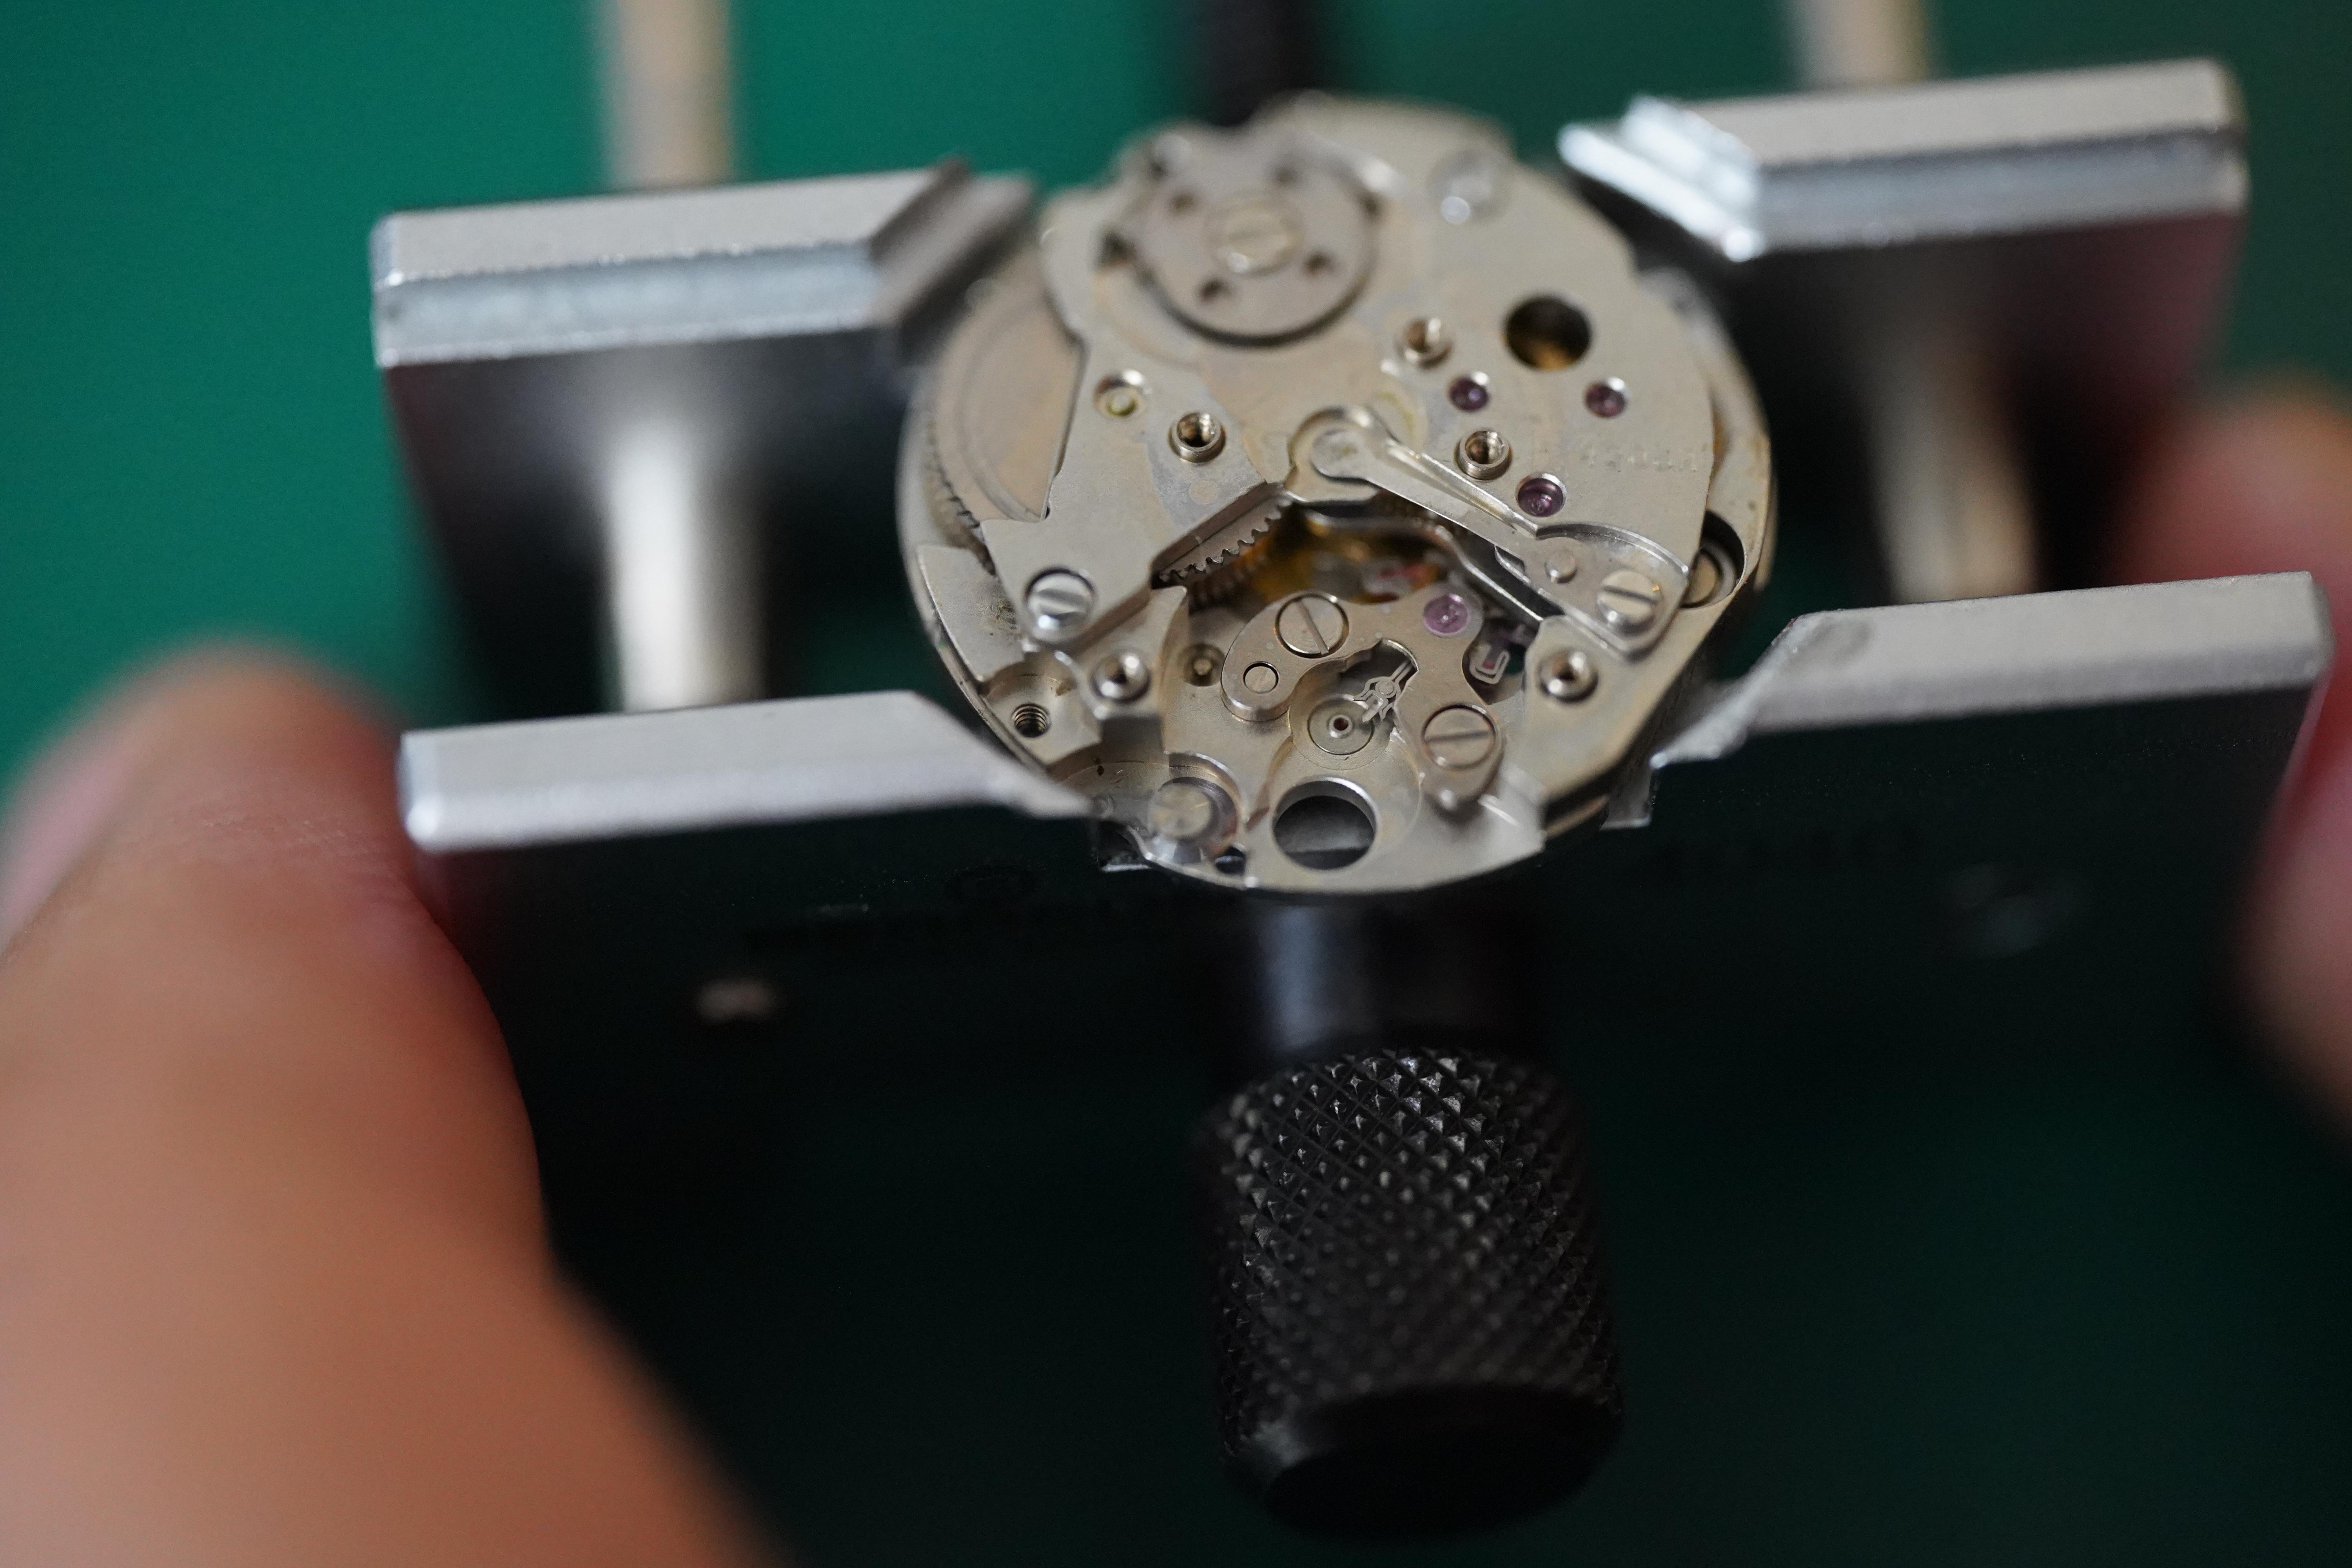
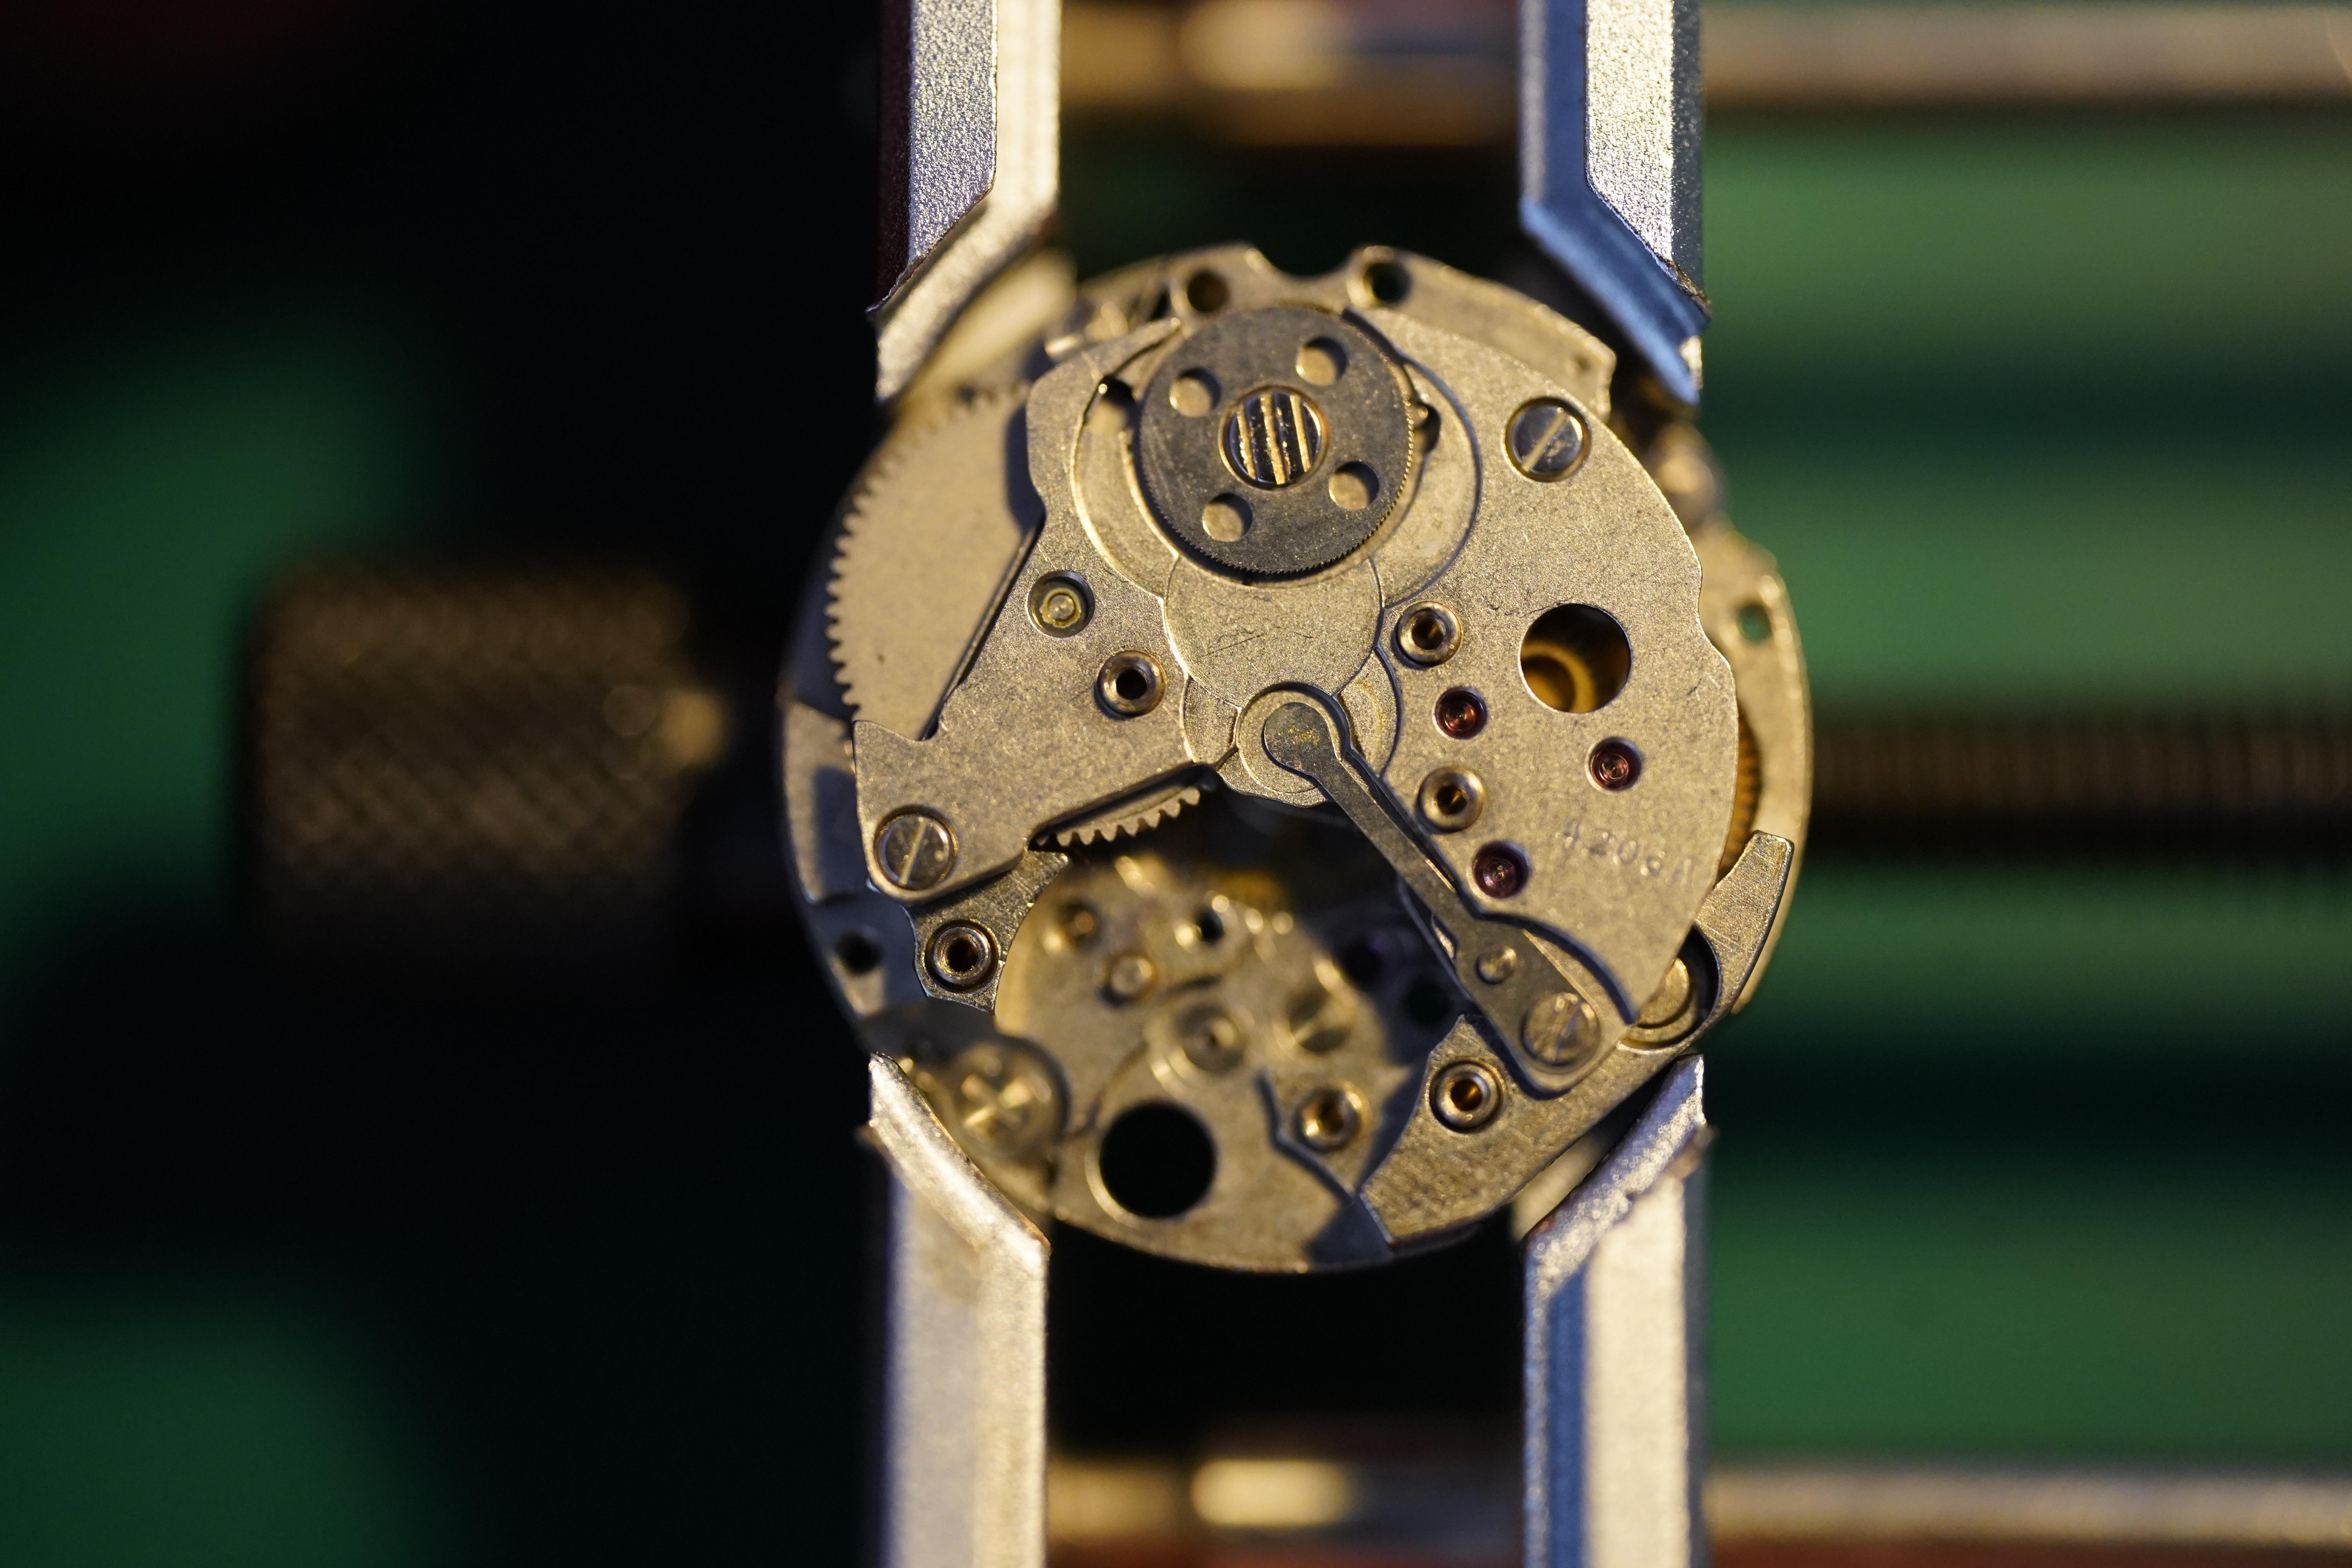
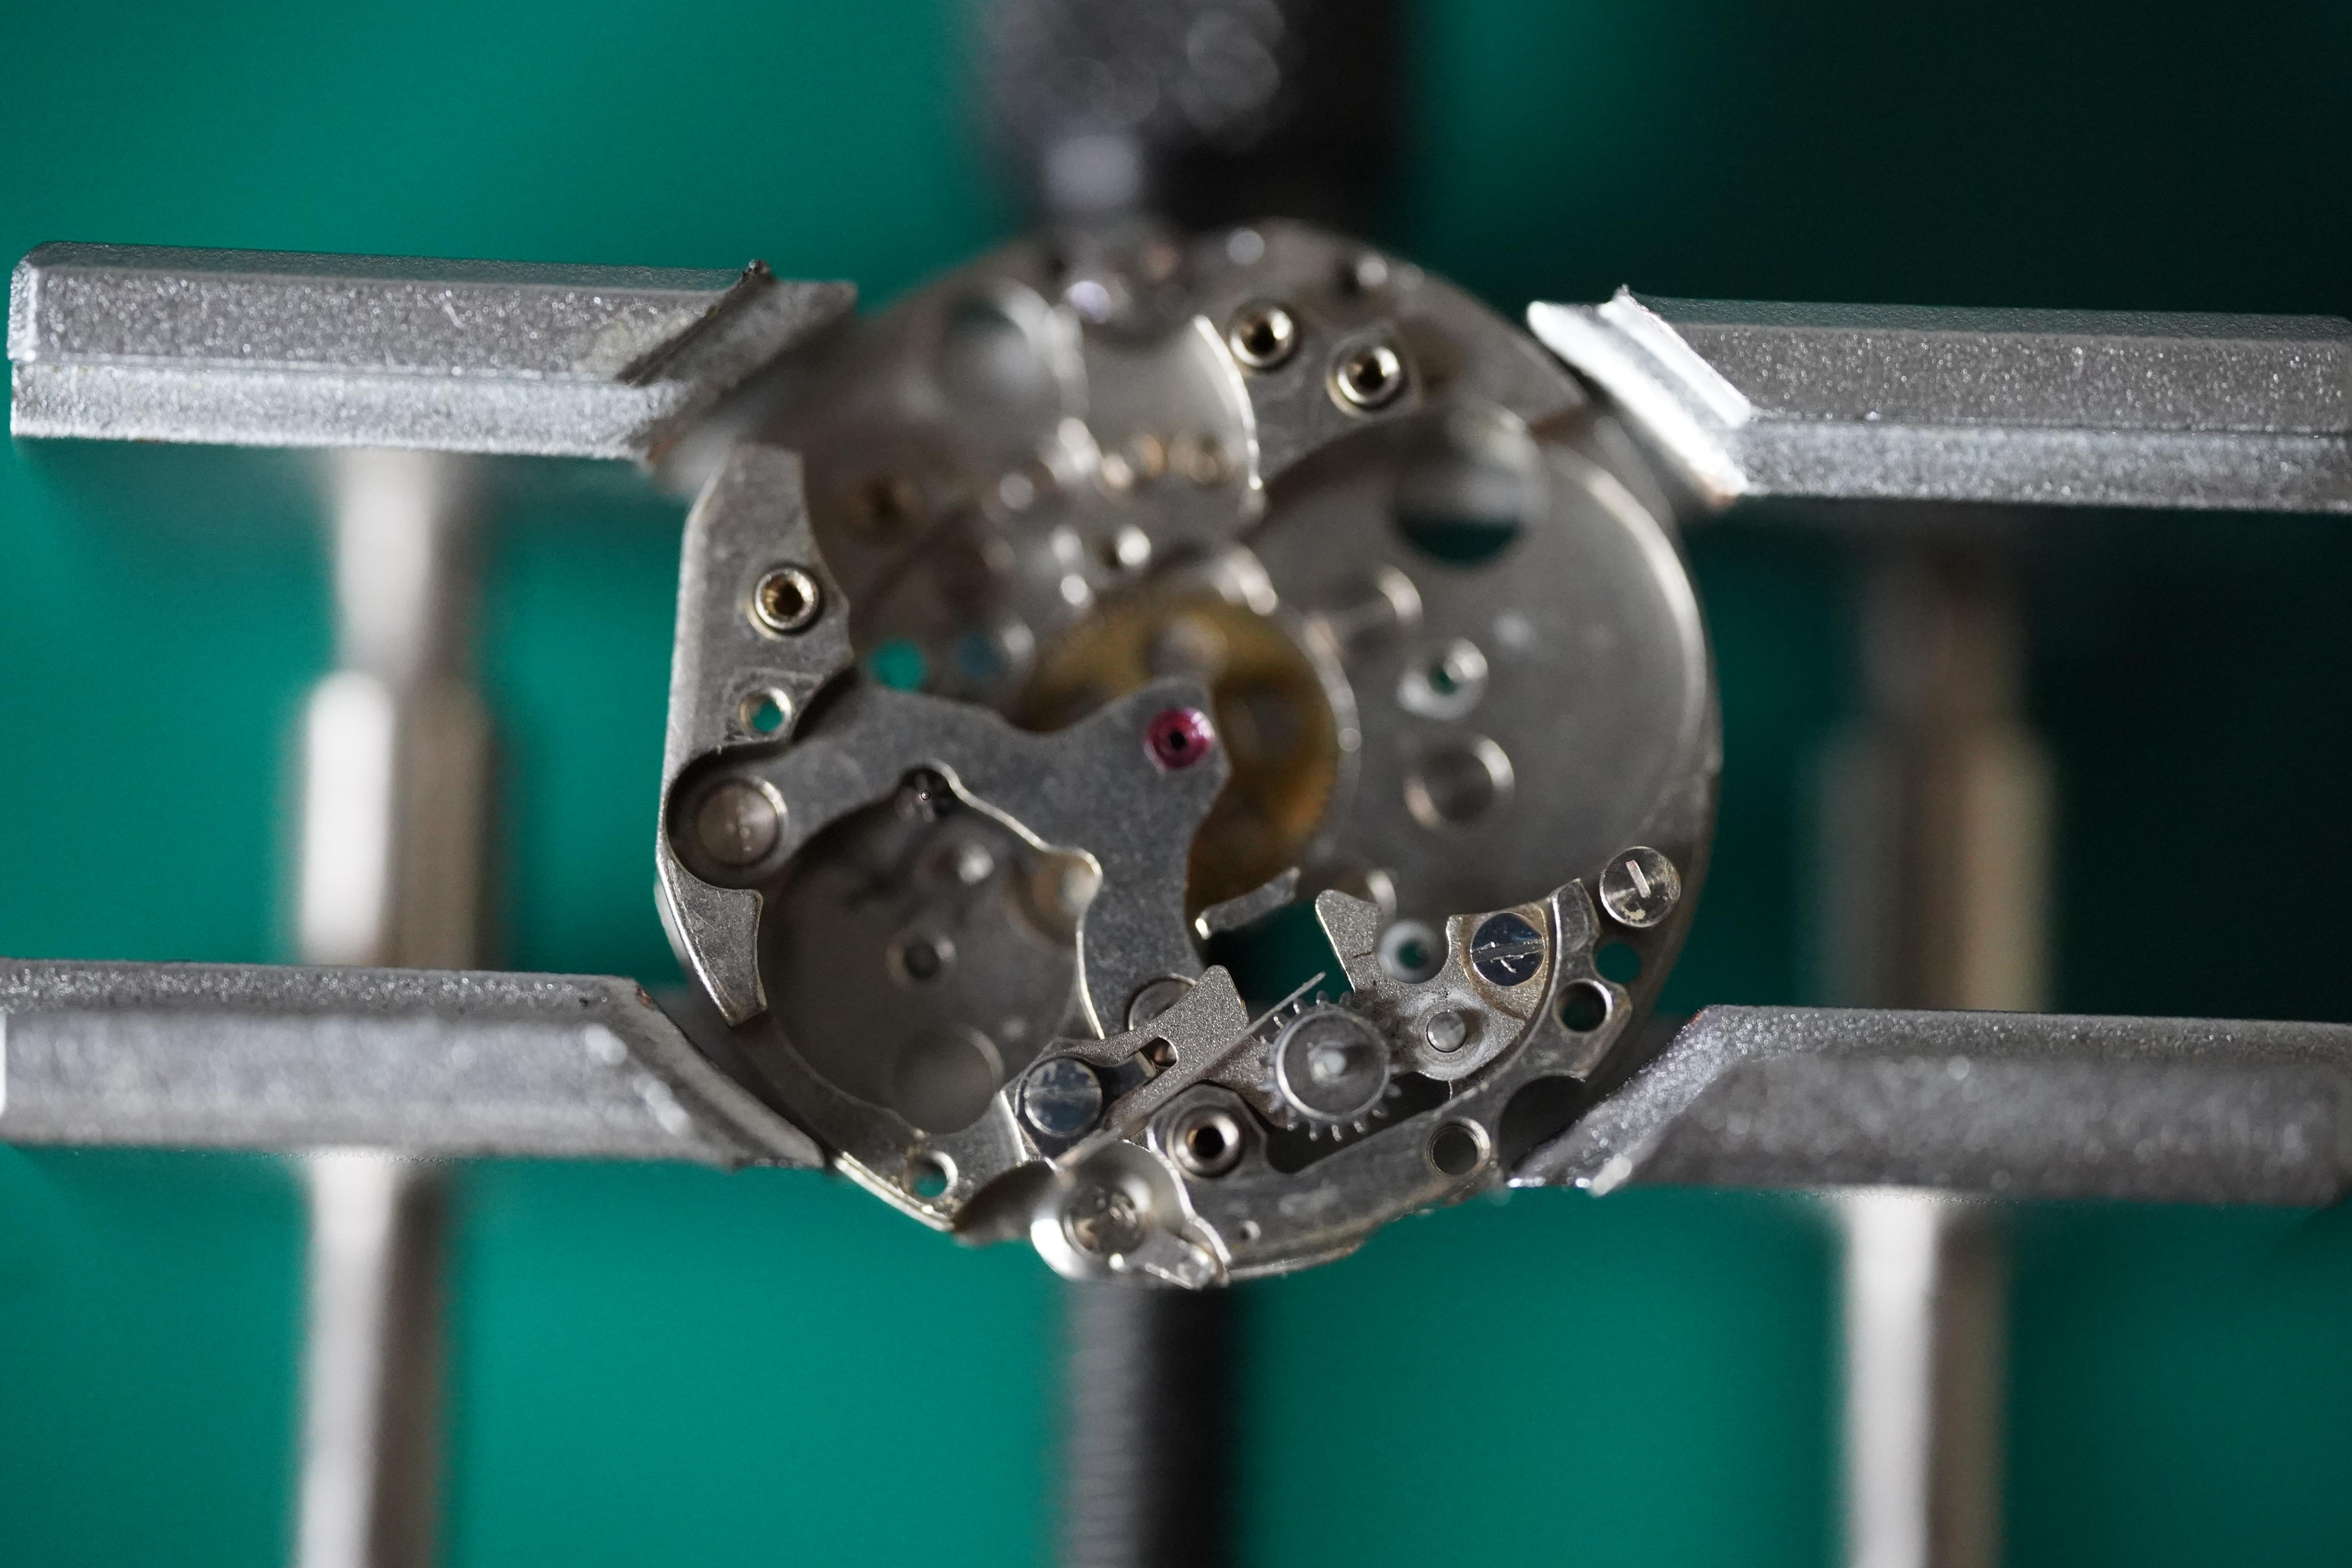
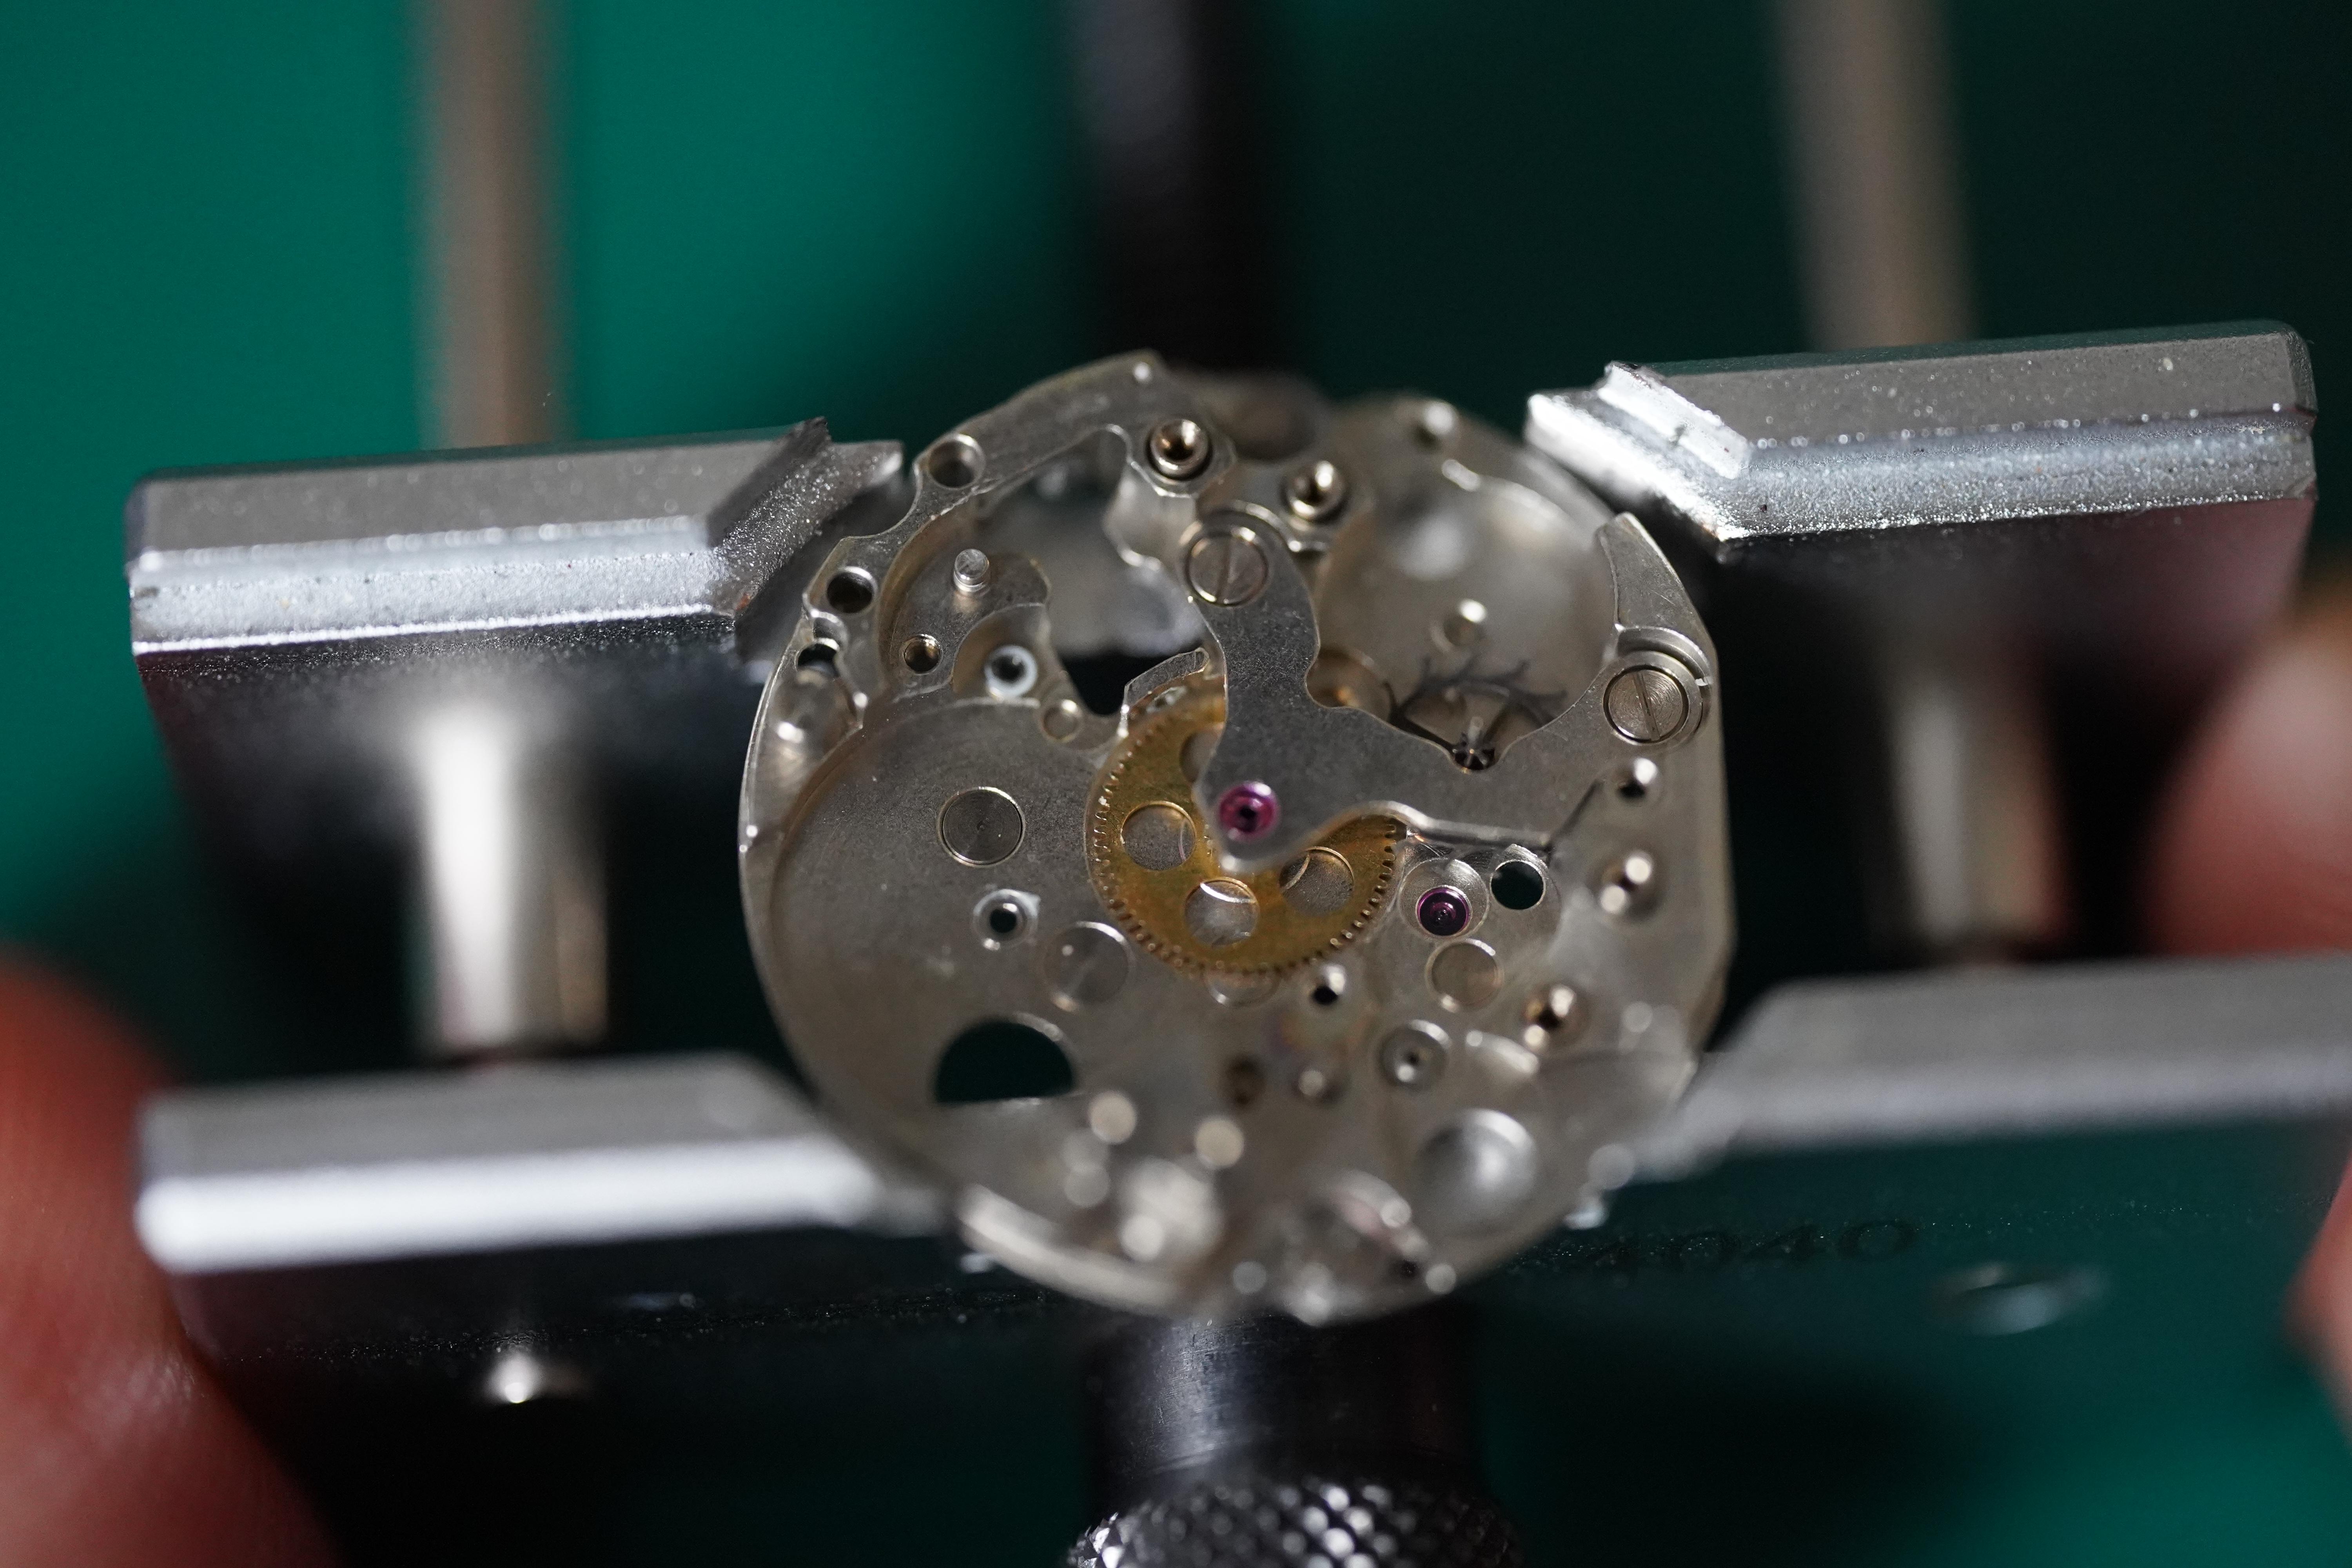
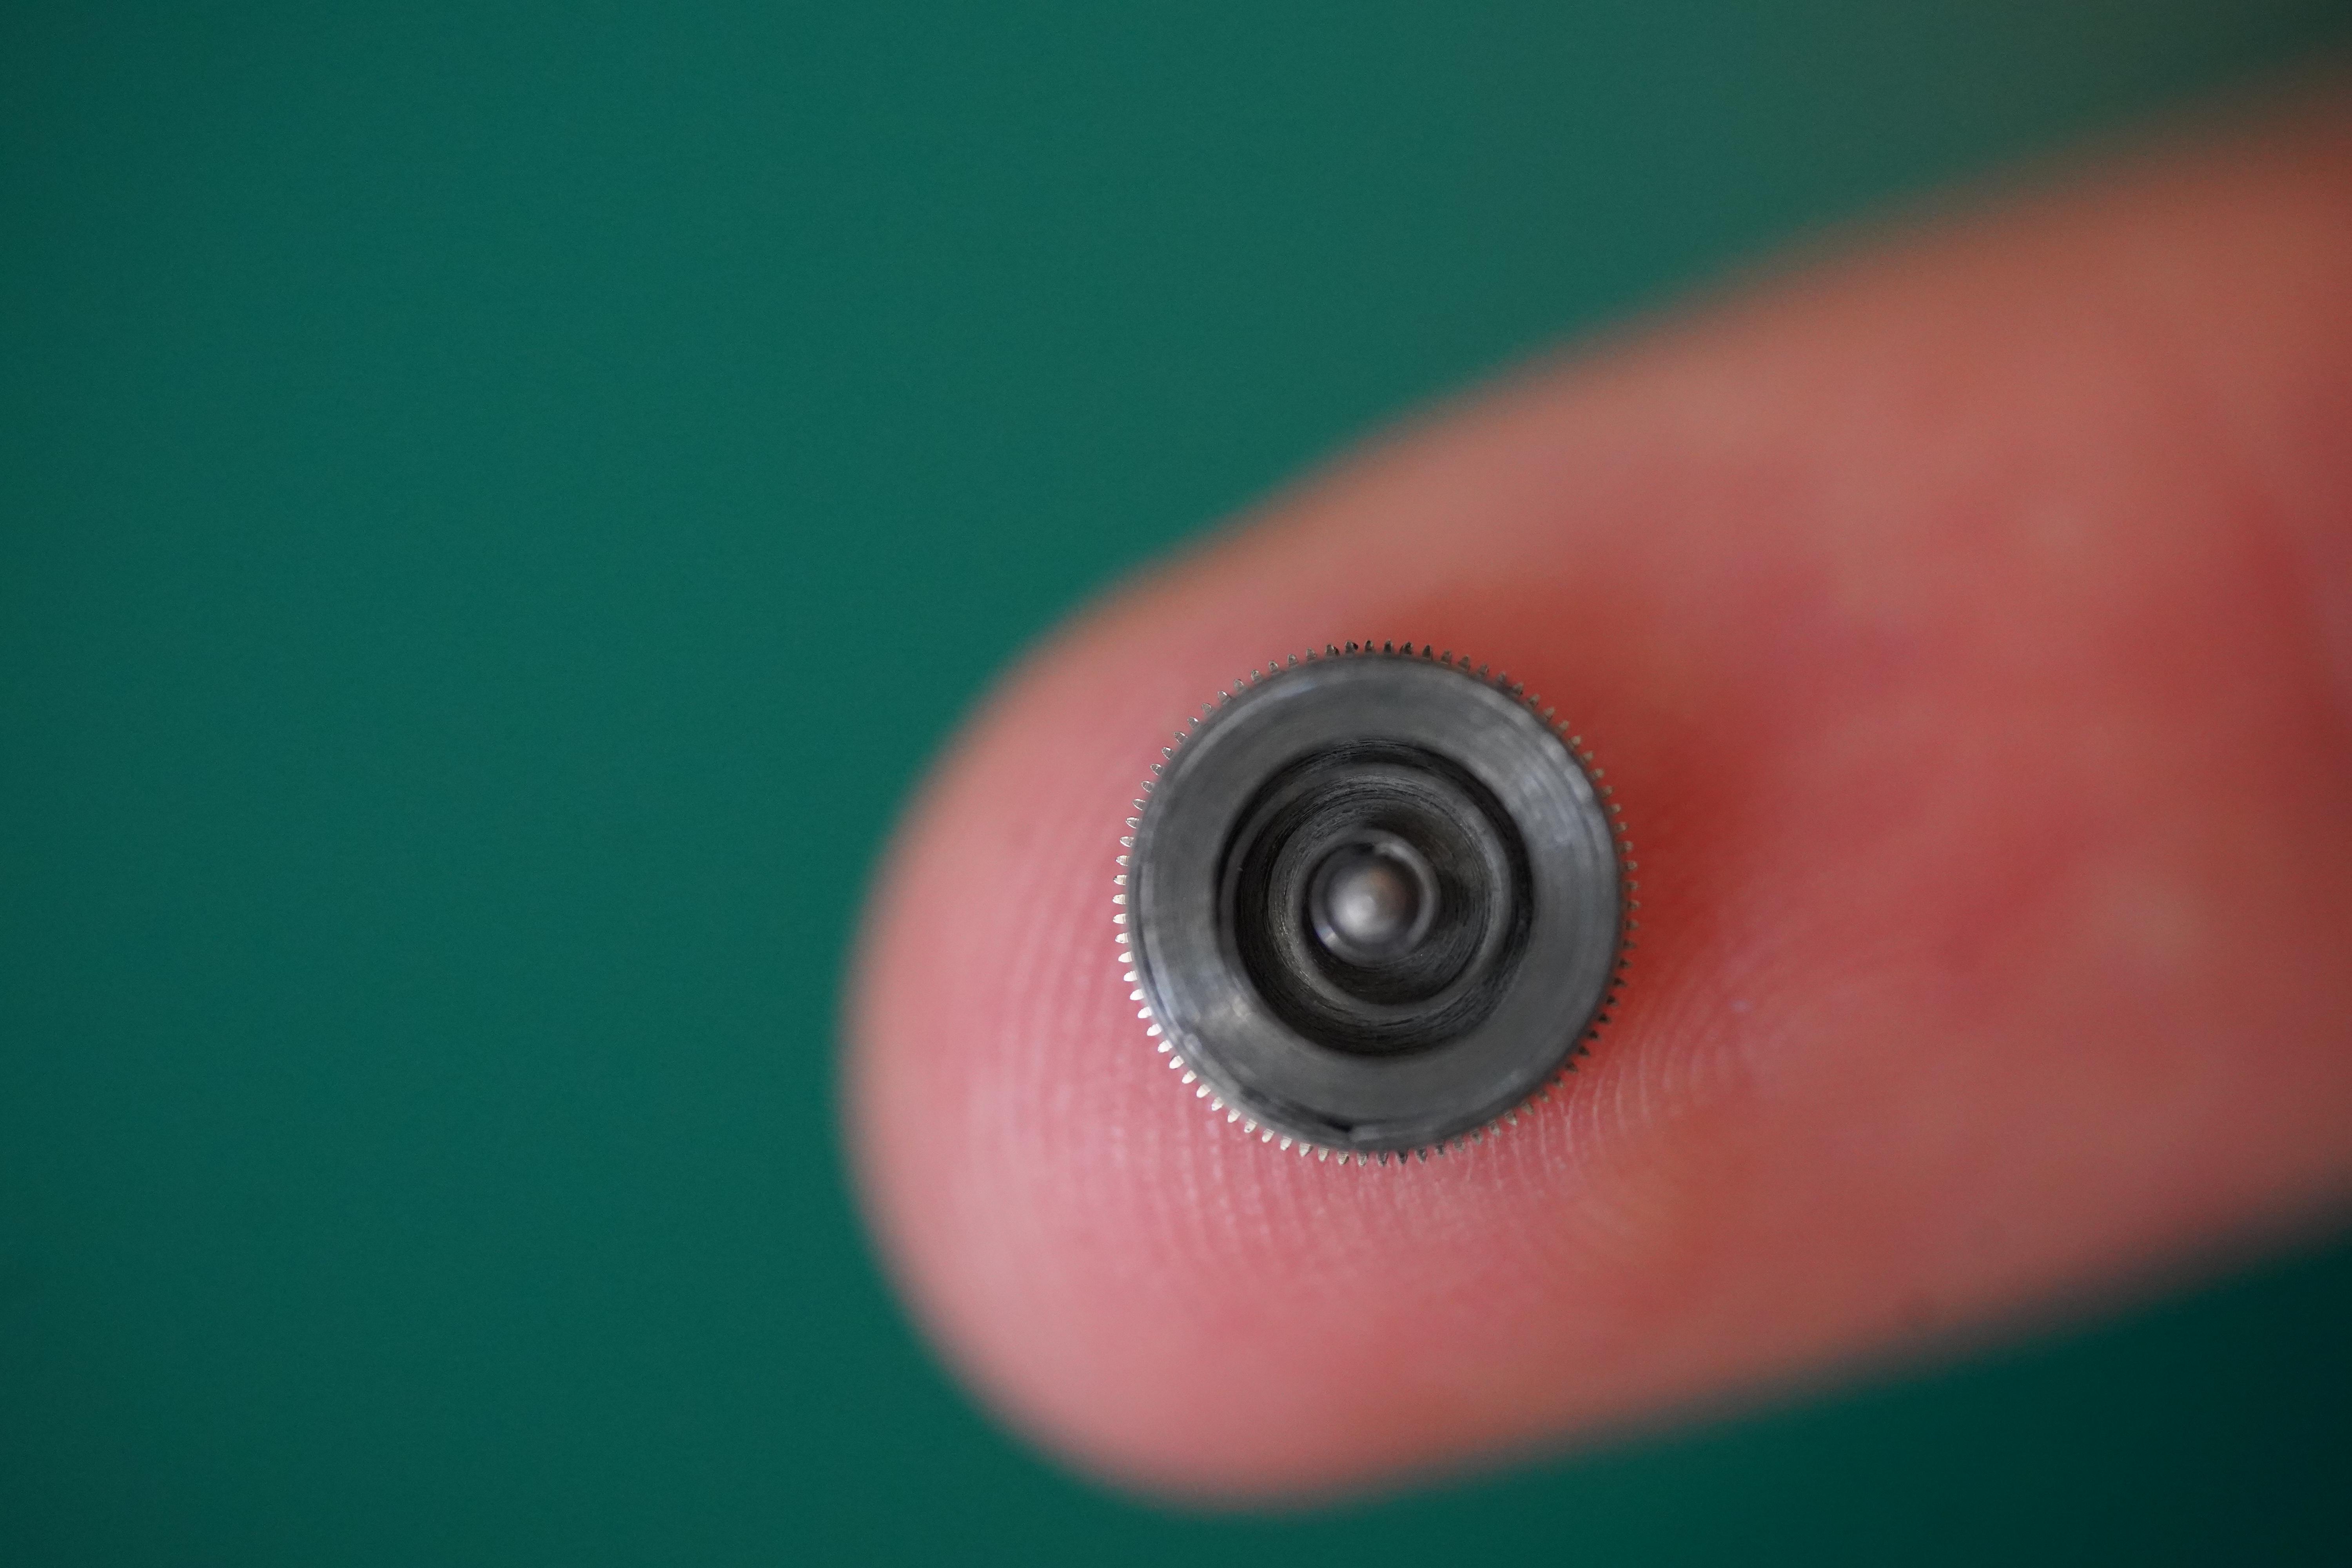
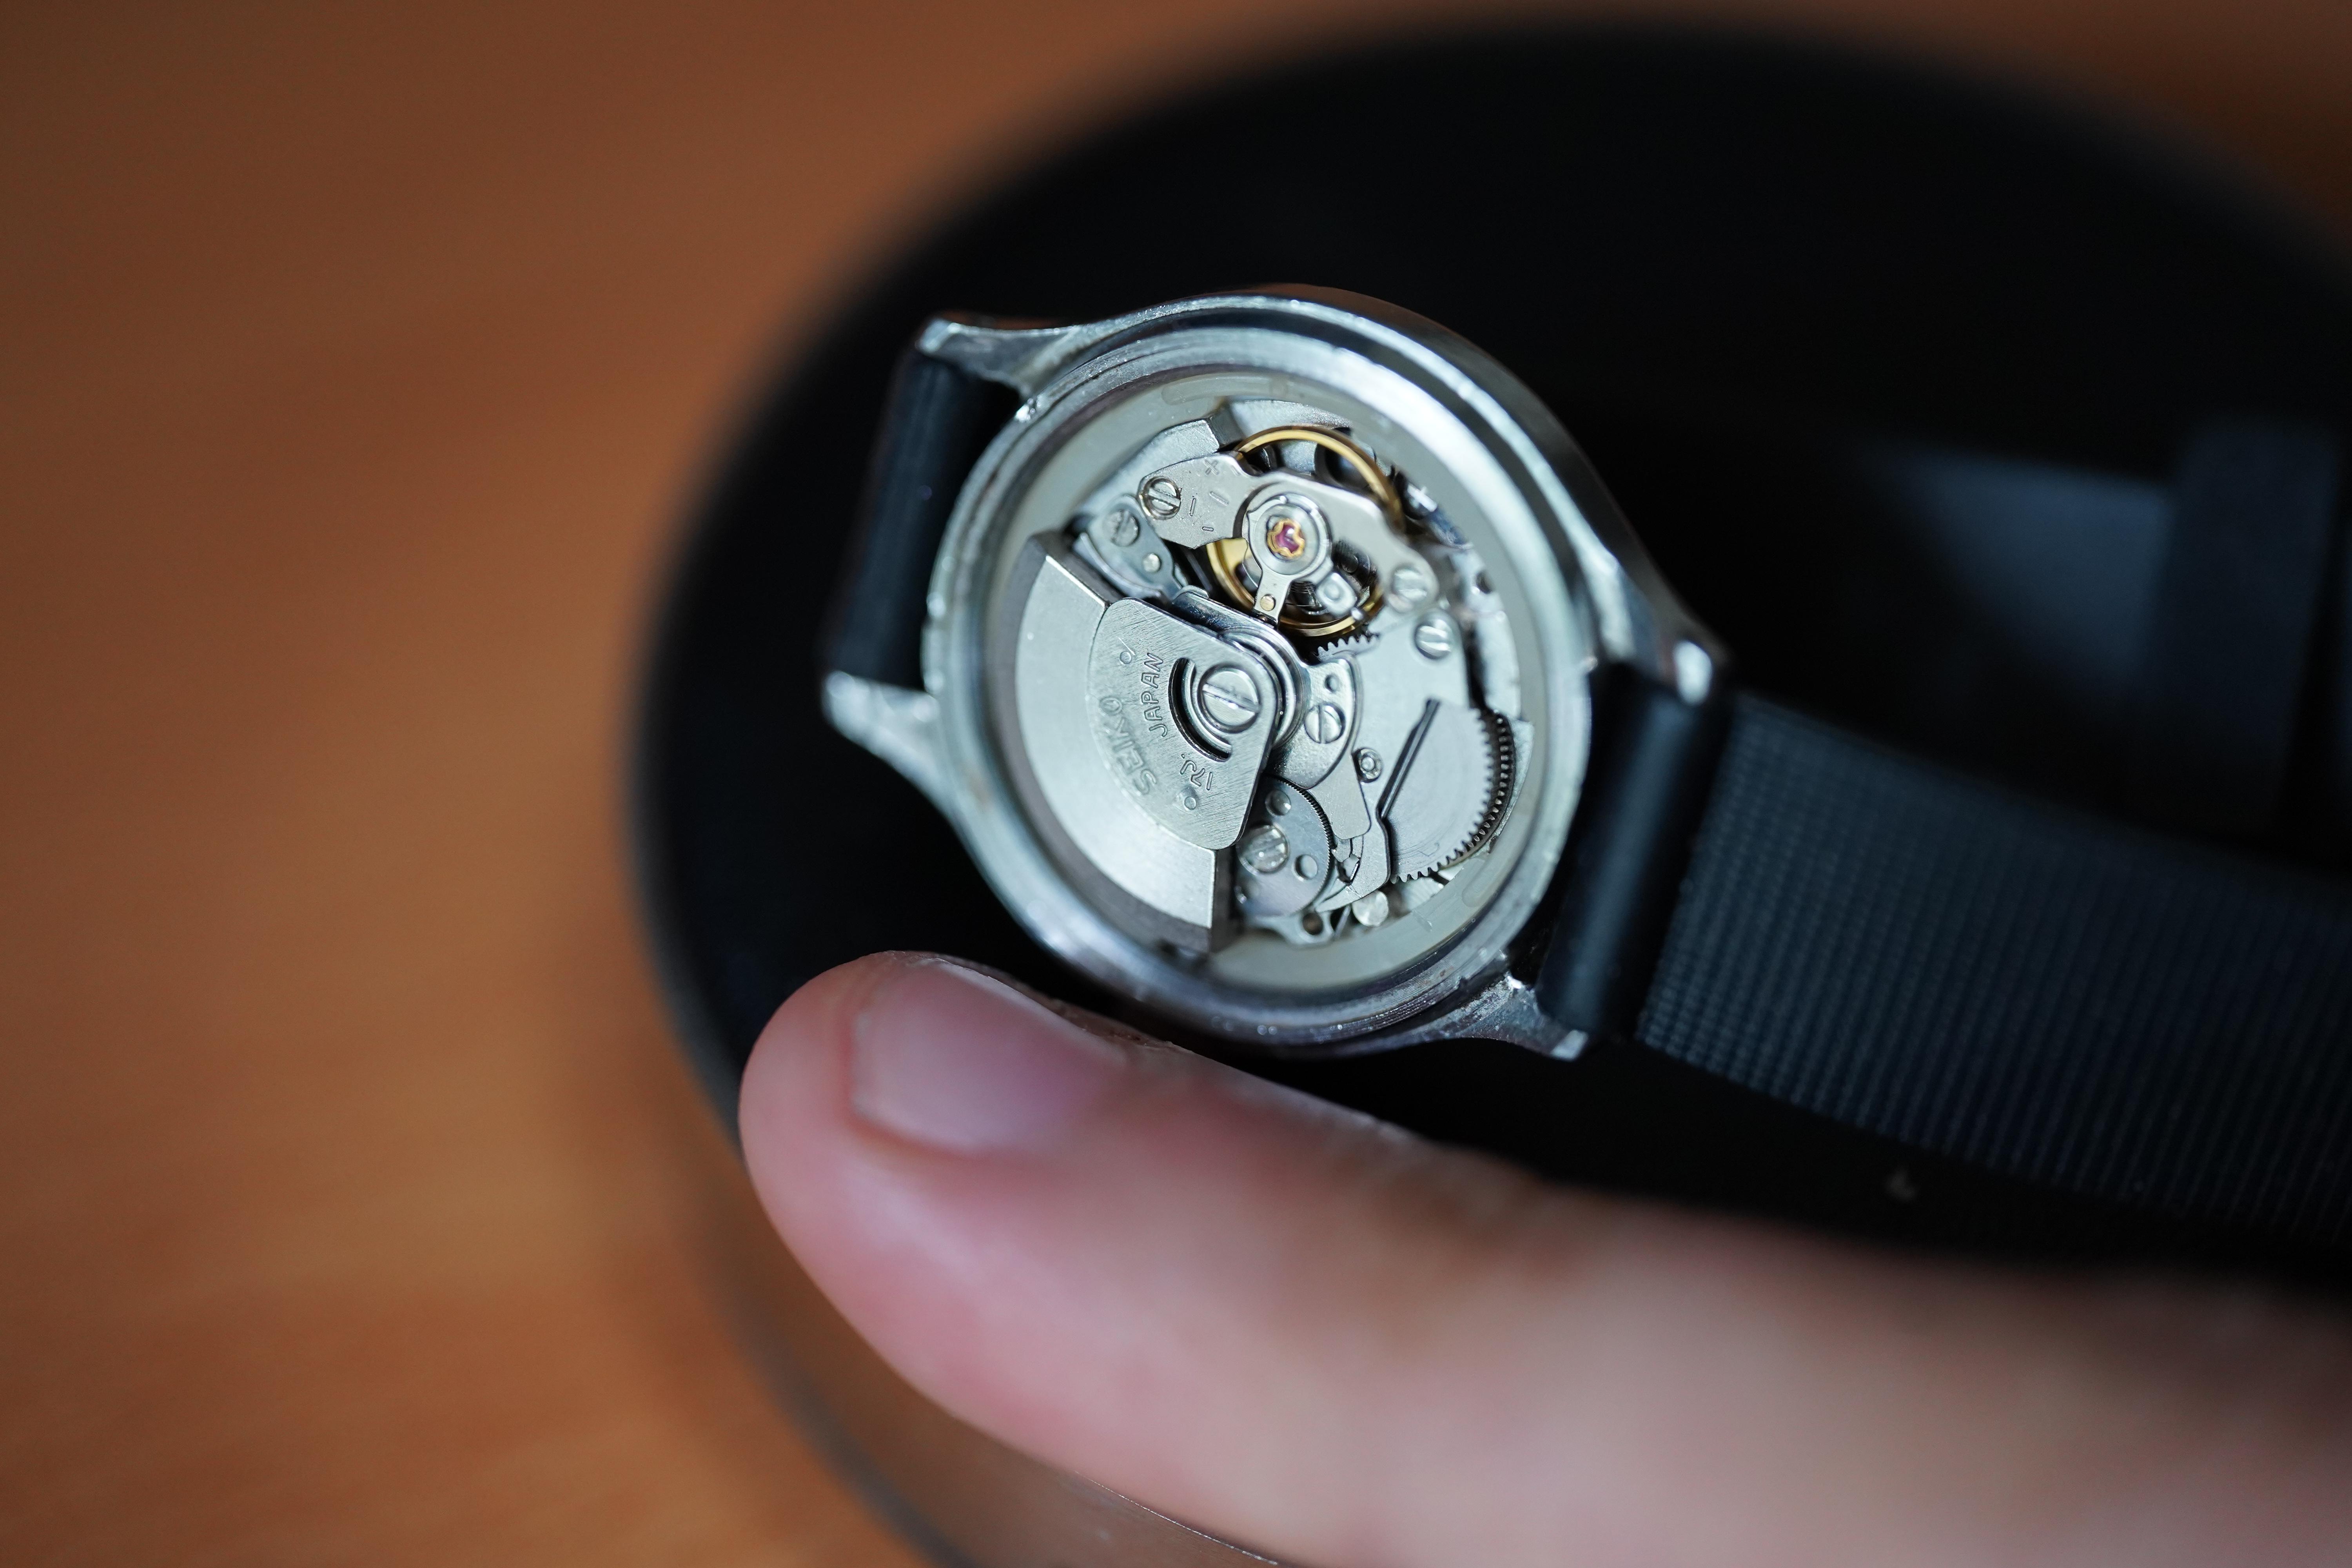
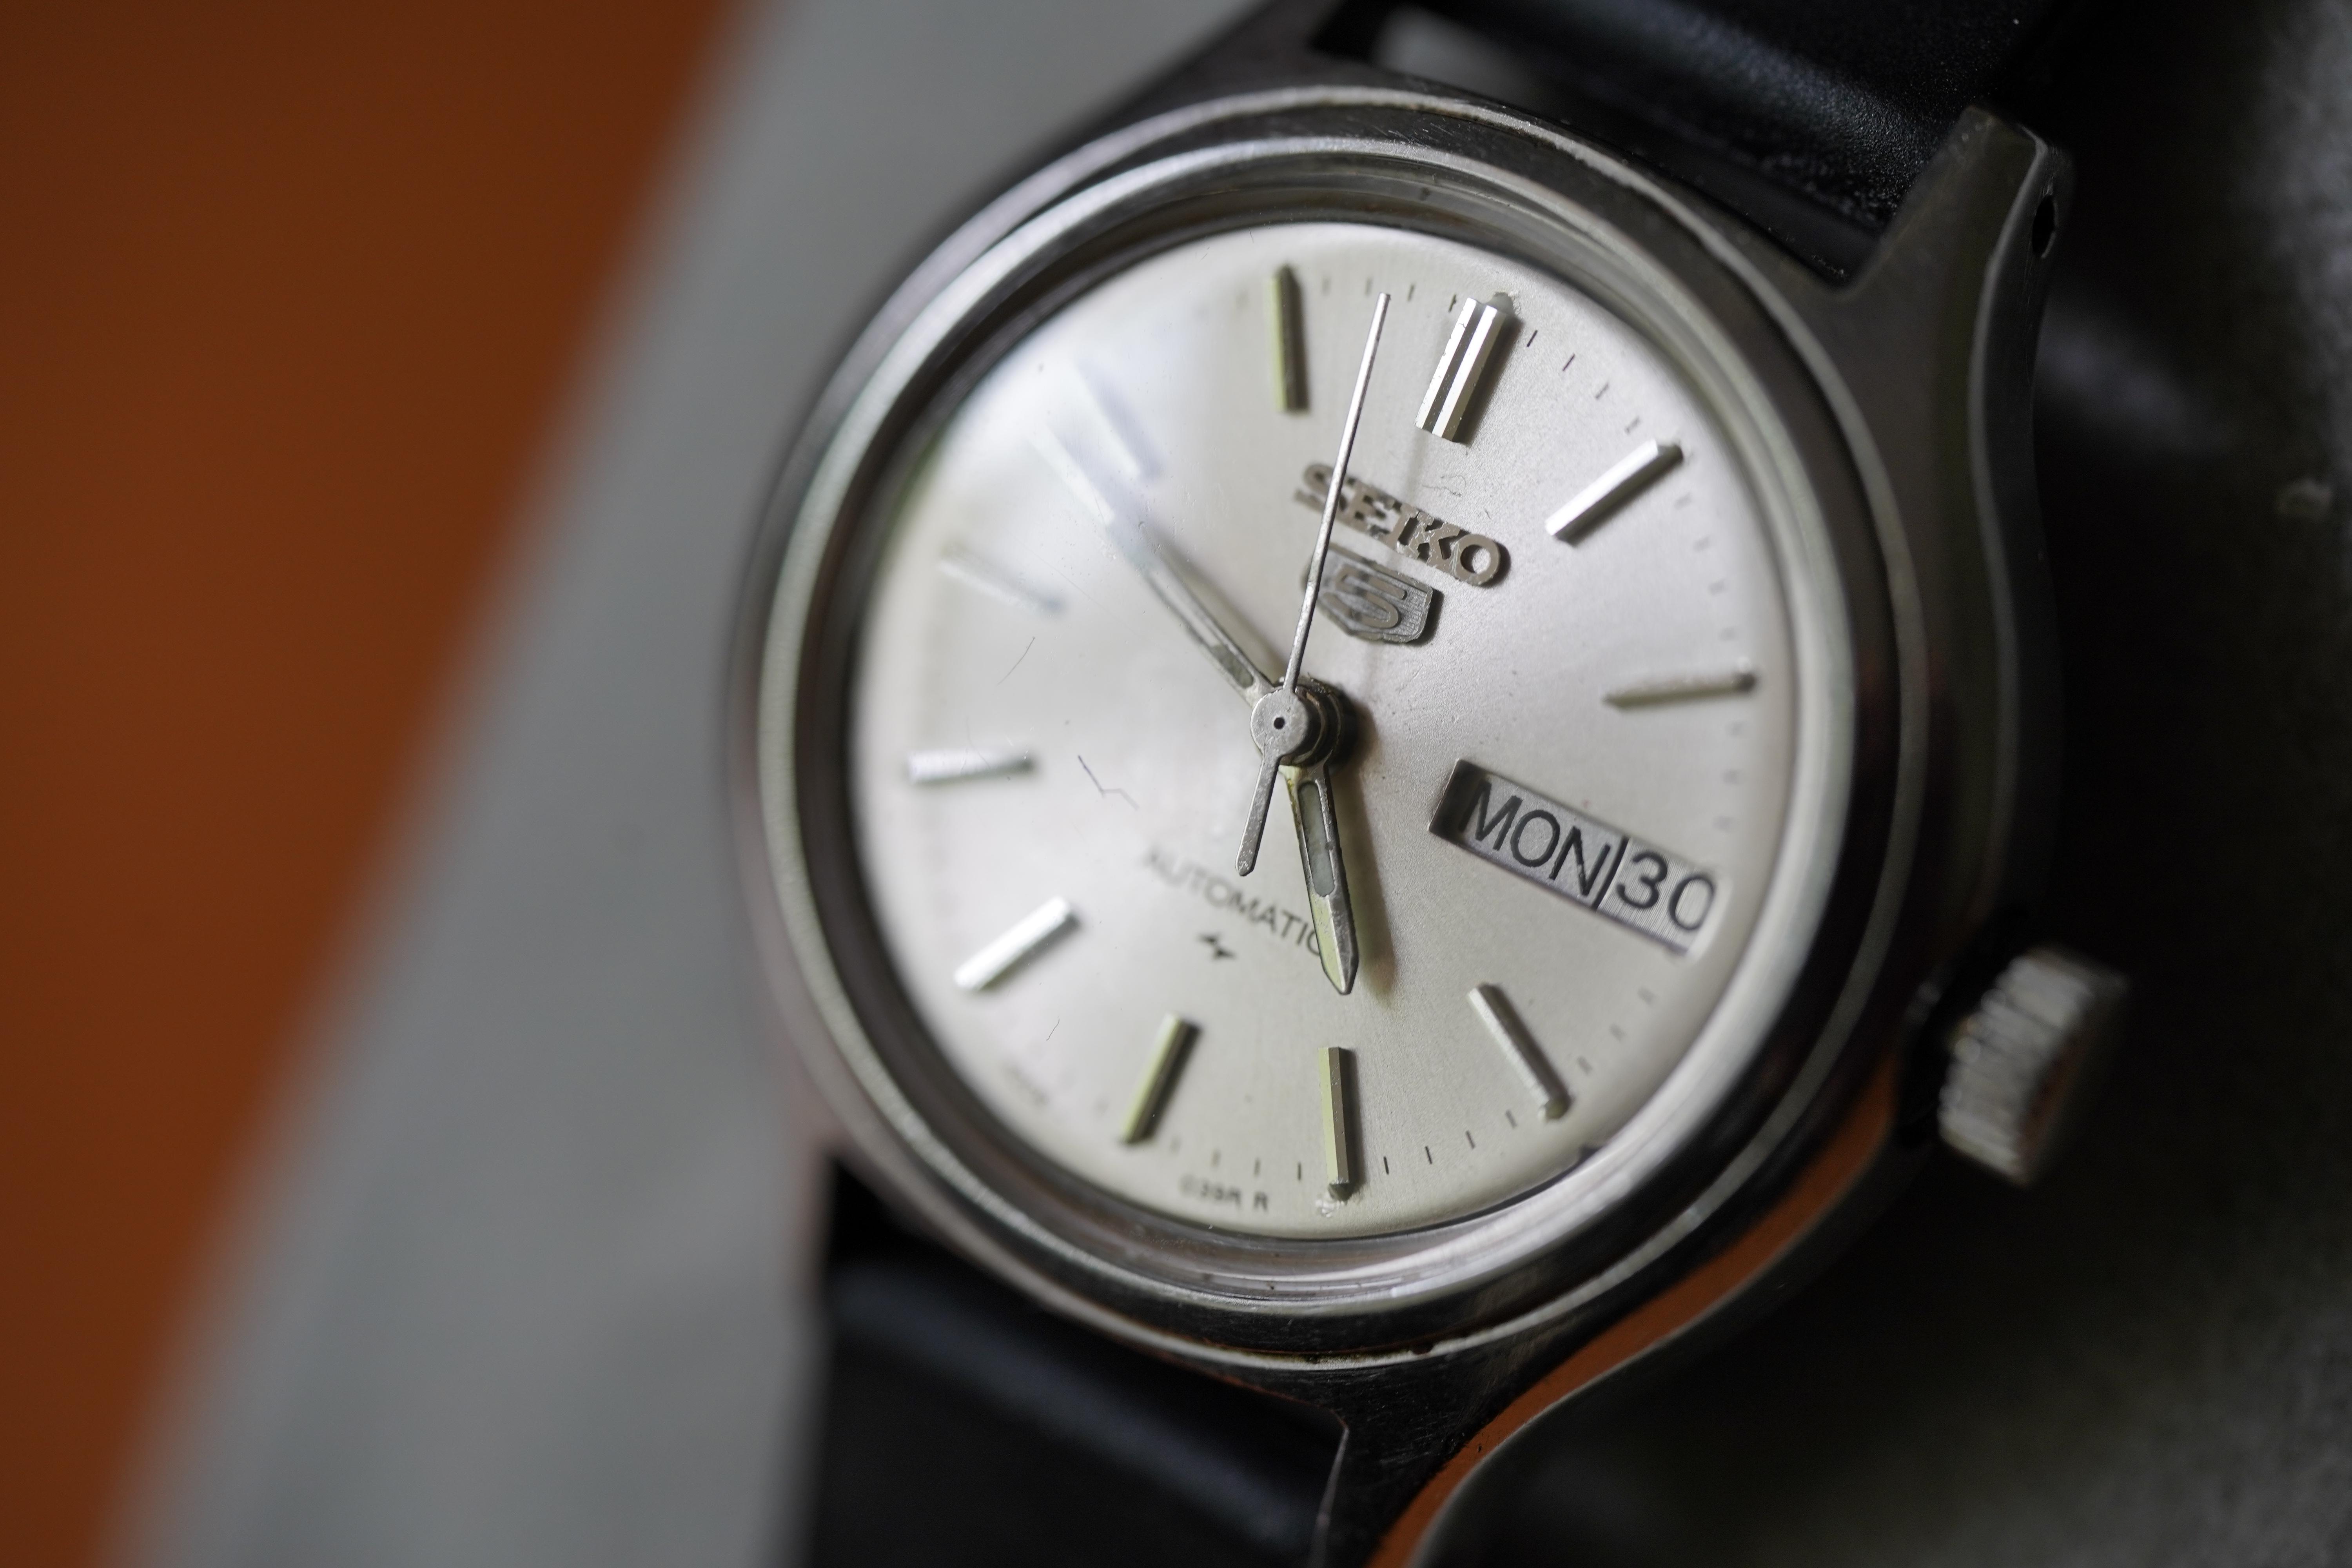
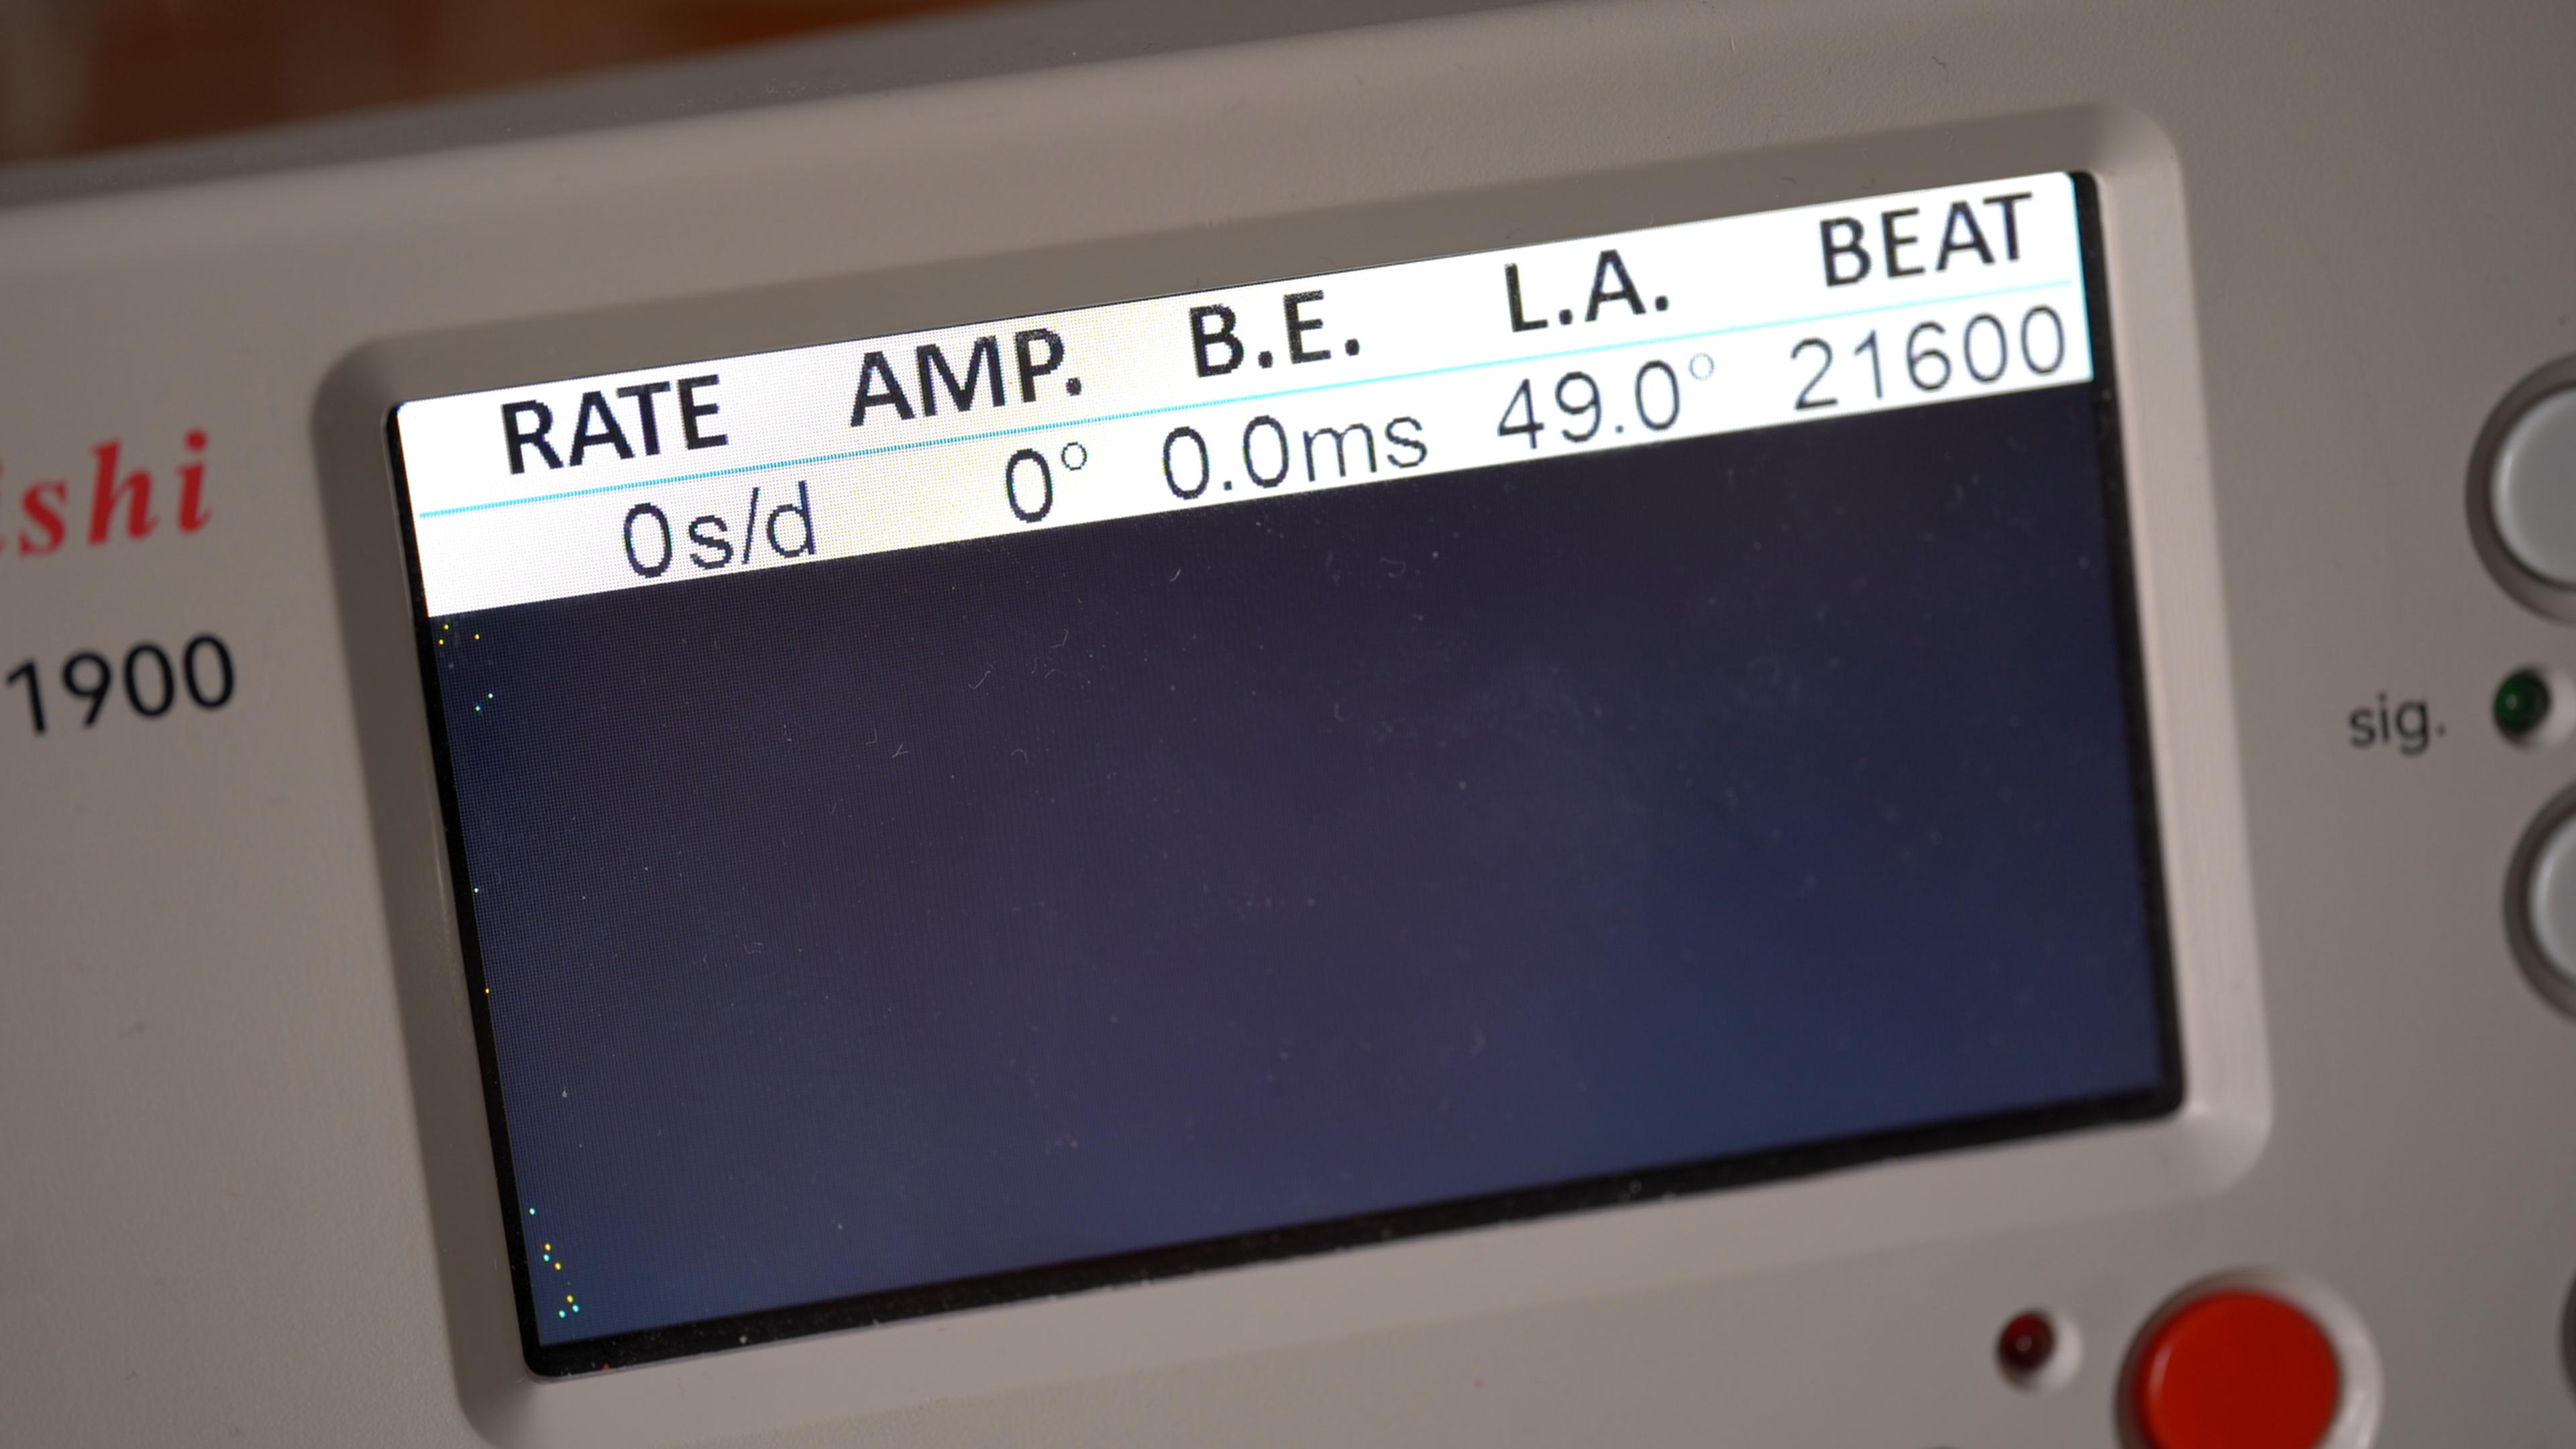
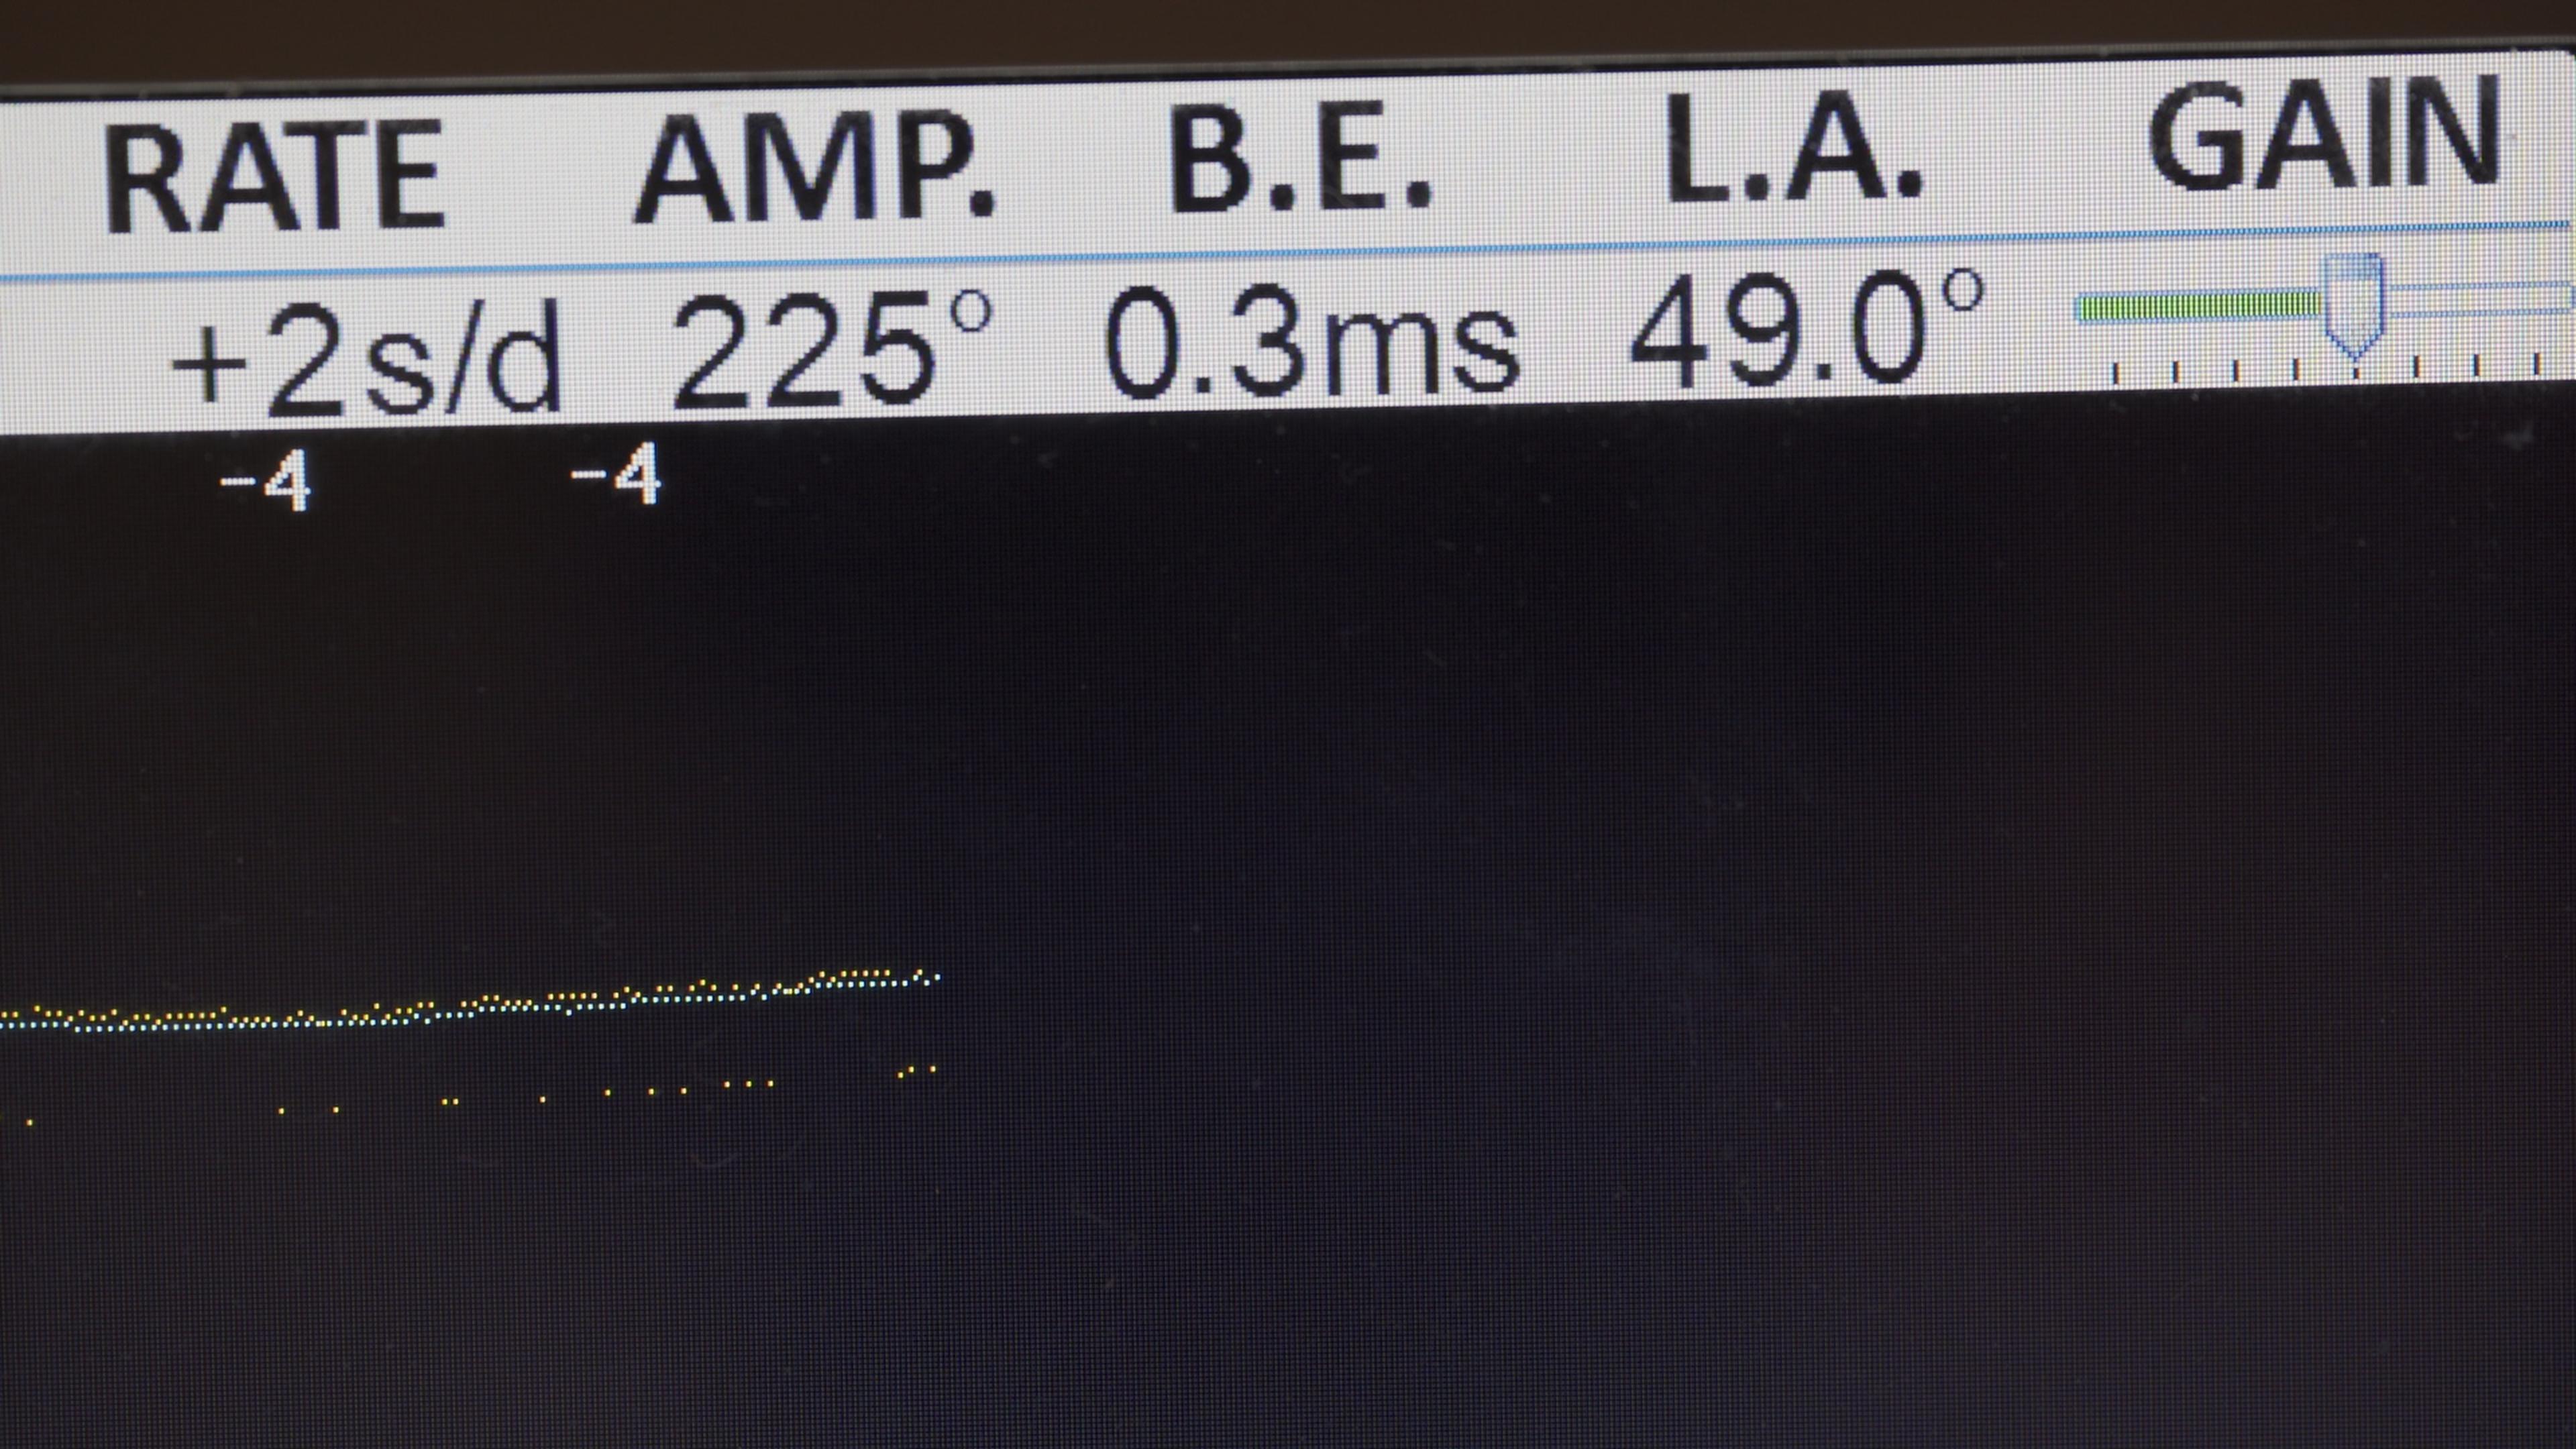
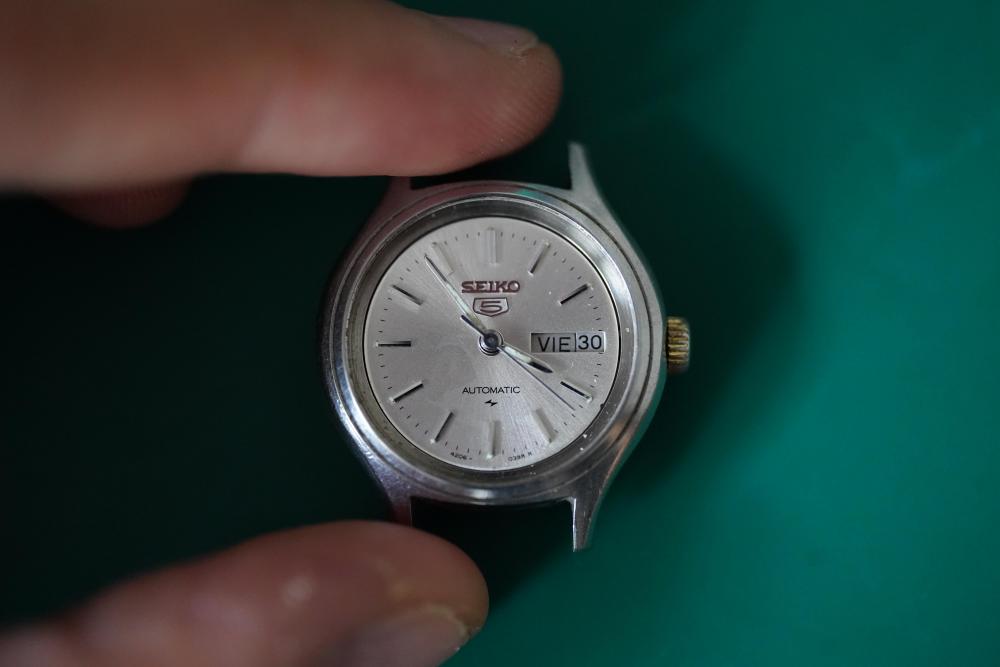
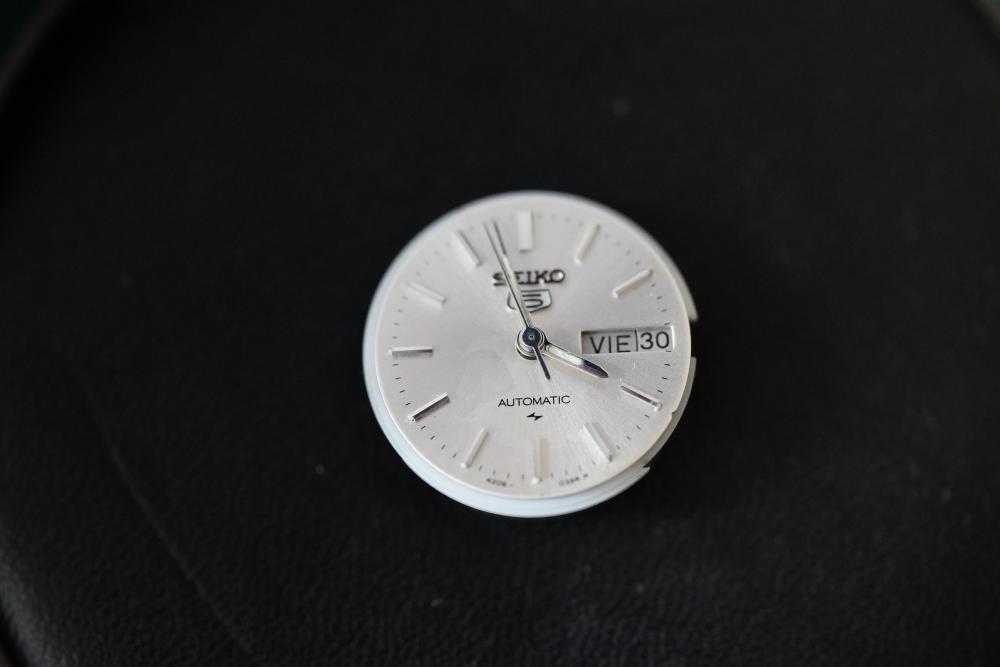
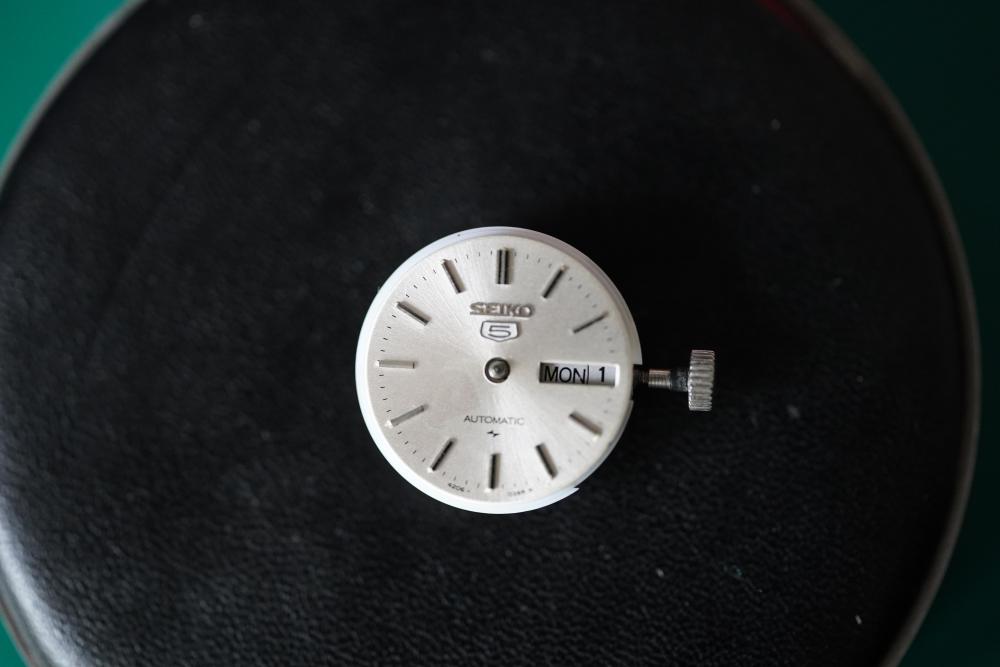
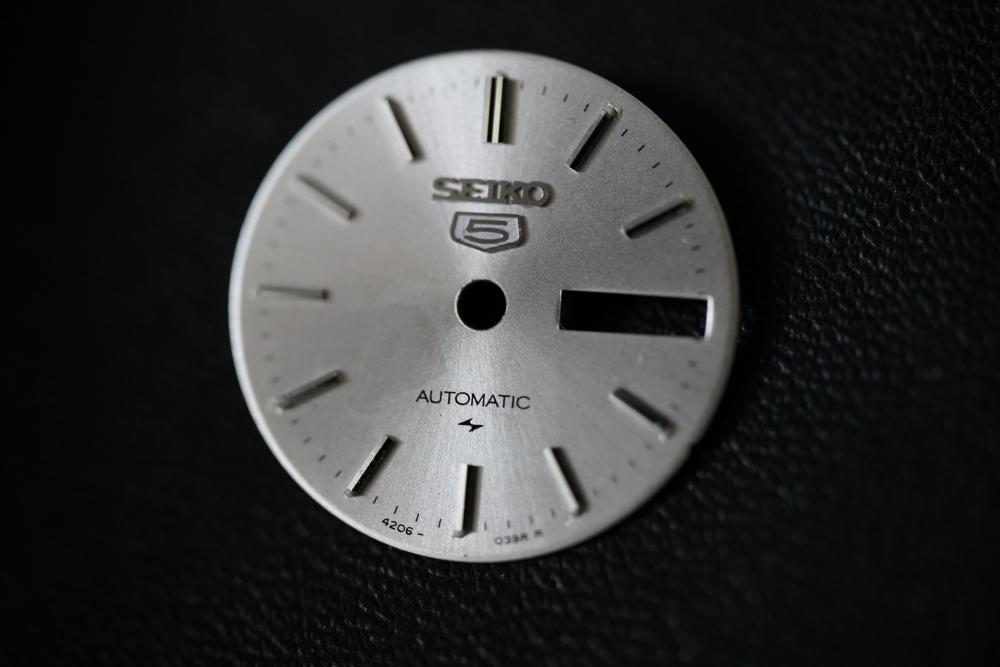
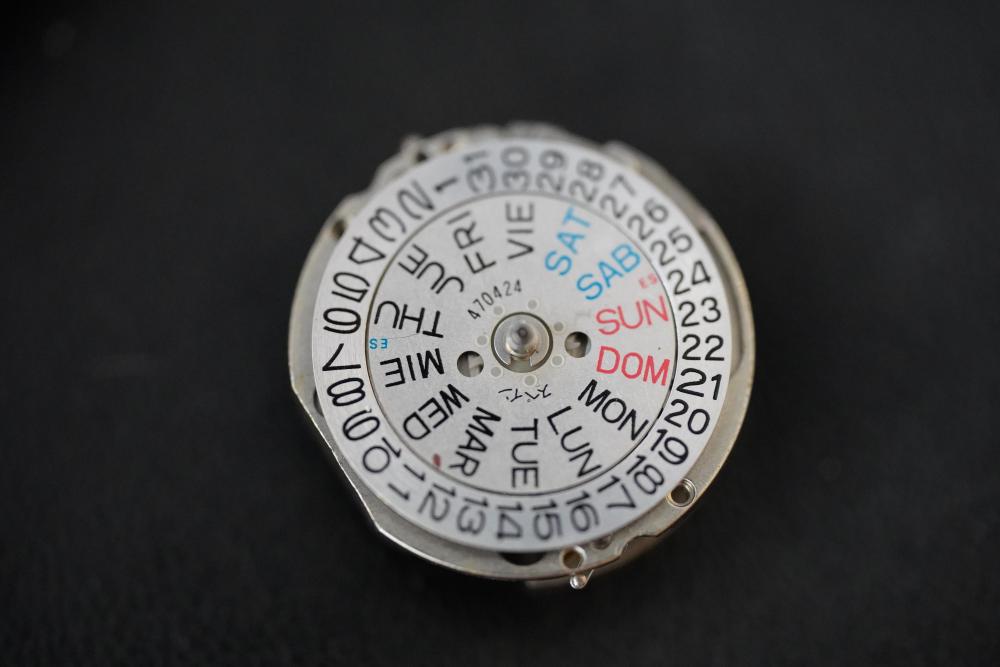
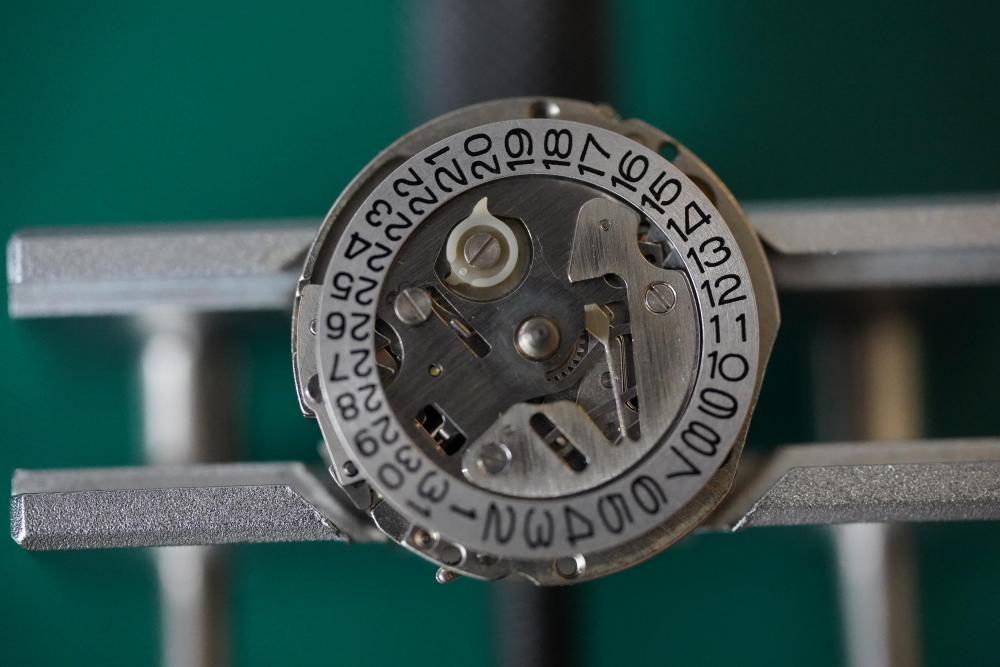
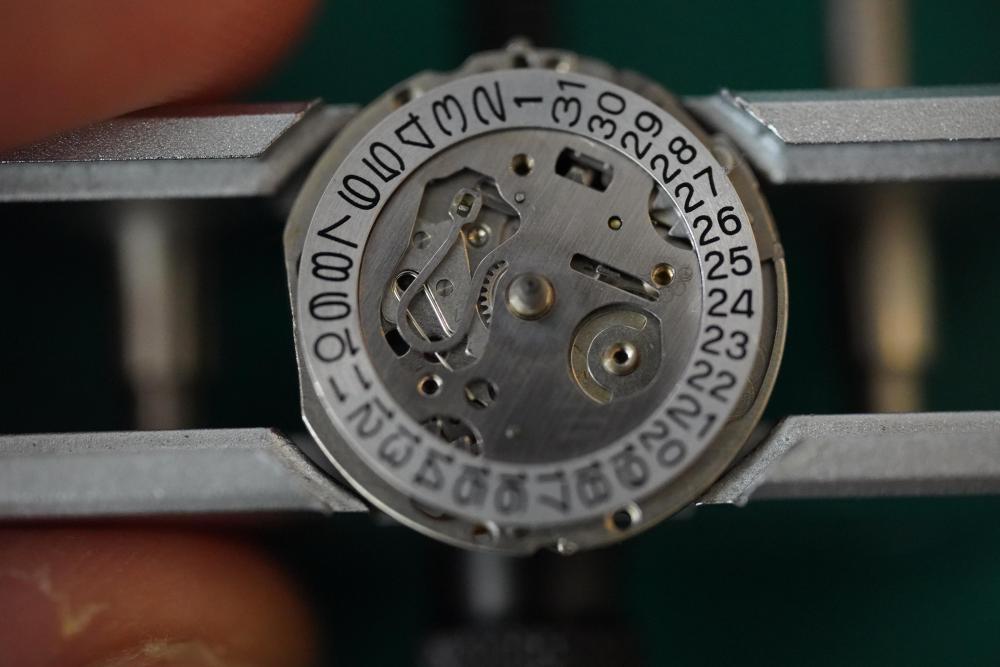
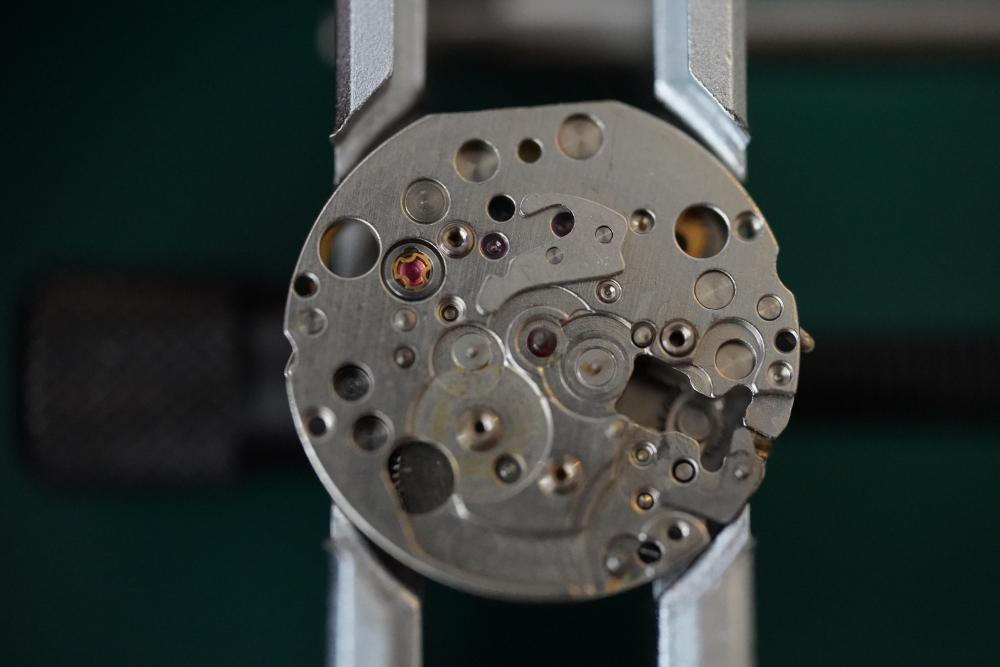
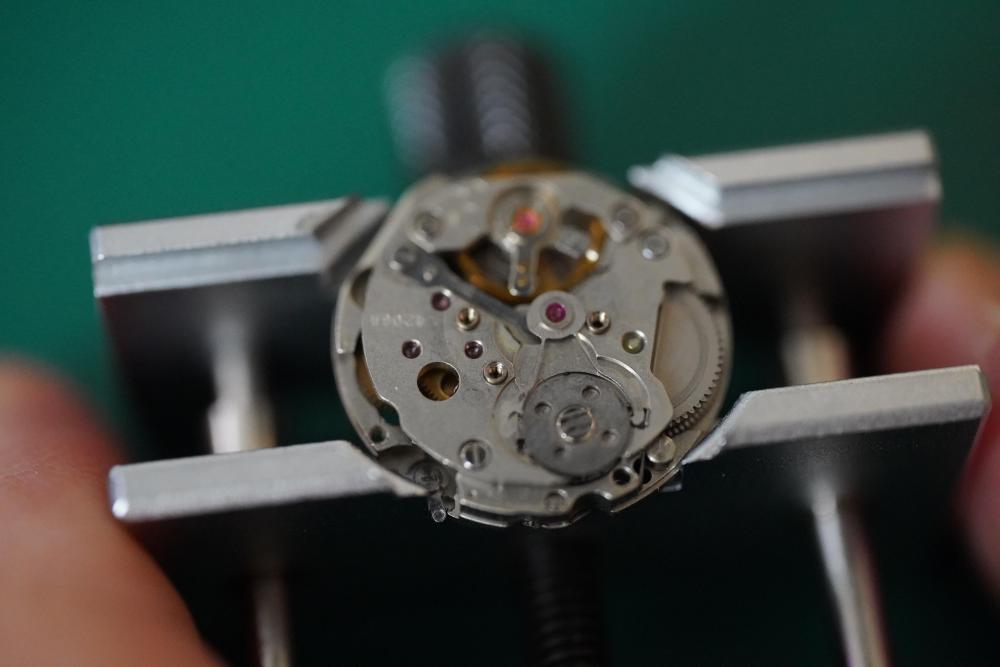
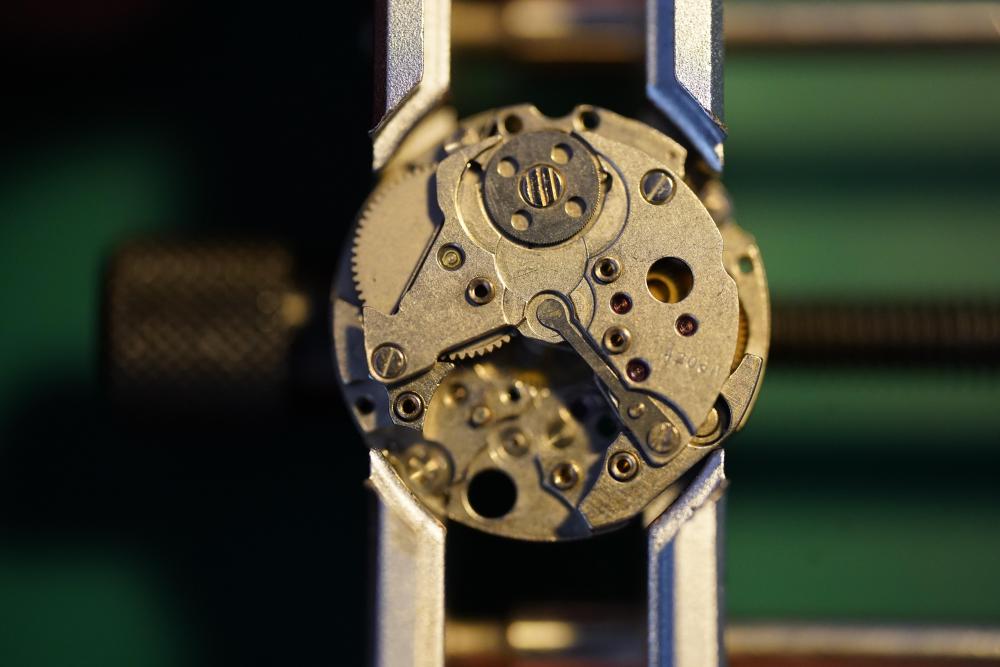
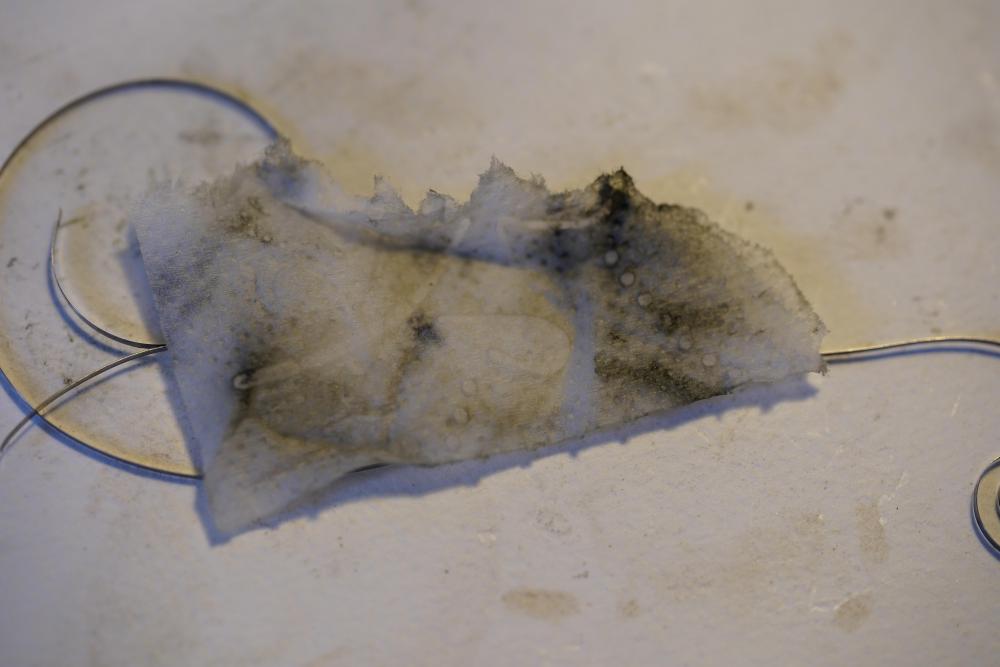
Hi Watch bangers! I did actually make it a personal goal of mine to present a watch every week but real-life caught up and ive been busy helping people move around haha. Bit nevertheless I am a week late but have another beautifull watch and project report for you guys! This watch was one of a few which I presented my Mother for her birthday to let her decide which one I should fix for her. She chose this vintage Seiko 4206A which I got from Ebay and so I sat down and got to work. Now I bought this watch online because I was really surprised at the remaining quality of the original dials and how there where still so many of them. After purchasing one and reading up a bit online it turned out that this movement line was particularly prone to behave irrationally or to repair so I kind of messe dup but nevertheless, I faced my challenge! The watch on arrival: Disassembly 1. Remove the watch case by unscrewing the back and removing the stem 2. Remove the Watch hands 3. Release the Dial feet from the back with the small levelr at the 10 and the 4 Position I think and remove the dial. As you can see it is in pretty good condition and has a very pretty sunbust effect. There is a slight stain though around the “ Automatic” text which left me kind of clueless since it is a metal surface and I wouldn’t really know what would stain it in such a way. I decided to leave it be to minimize the risk of further damage. Heres a close up picture: 4. Remove the Day clip and the Day wheel underneath it. This revealed a very interesting sping-like swan neck system for the day-wheel quick set system. Never seen that before! 5. Then remove the Day wheel spring and the 24 Hour day turning wheel. 6. Now you can unscrew and remove the main setting cover plate and the attached date wheel. 7. Take away the ( im not sure what this part really is called) but it is part of the quick set system which hooks into the second clutch wheel. 8. Now remove the Date Spring and lever, the bottom day wheel and the hour wheel to remove some more from the front side. 9. Remove the one translation wheel and the setting system sub cover which also separated the two clutches. 10. And finally take out the clitches and the yoke, setting system to completely disassembly the front side. Now you can turn the movement so we can work further on the back side. 11. Remove the Rotor 12. Take off the Automatic module 13. Remove the Winding wheel Y ratchet. I did try to remove the winding wheel in the first run but for some reason the screw did not watch to budge so I left it in for the picture. Off camera however I eventually did make. 14. Remove the elegant arching balance wheel. I was really surprised to see this in this kind of movement since I thought that this kind of design was only present in really high end watches. Interestingly enough the 4206 B however has the classical one winged balance. 15. Remove the Pallet fork system ( sorry for the blurry focus) 16. Take off the main bridge and and the small spring attached to one of the screws. 17. Pick out the Barrel, its ratchet and the 4th and 5th wheel. Interestingly enough the gears wheels have as many holes in them as the number which is kind of cool! 18. Now focus on the little winding module on the bottom right. Remove the translation wheel, the spring and the small bridge to take it out completely. 19. Almost done! Take of the final bridge which holds down the 6th wheel and the escapement. 20. And finally remove the 6th wheel and the escapement wheel. With that, we have completed the disassembly of the Seiko 4206A. Cleaning For cleaning im still sticking to the good old hand cleaning method. So this means that I let the individual parts marinade in lighter fuel for a while before giving them a scrub and rinsing them of in Isopropanal alcohol. I was thinking about dipping my toes into the ultrasonic cleaning branch but im unsure what fluids to buy and what parts I cannot drop into the cleaner so I think ill stay with what works at the moment. Additionally im broke haha. Mainspring service Now as always I did not have a spare Mainspring at hand so I removed the spring by hand and checked it out: As you can see it is / was absolutely disgusting haha so I gave It a good rub down in lighter fluid and isopropanol and the paper used for that was absolutely nasty in the end, see for yourself: However, I did clean it nicely I think and lubricated the spring with Moebius 8200 and the barrel wit Moebius 8217 before winding the spring back in carefully. After closing the barrel I did a mainspring wind test with the winding wheel and it had tension on it so it seems like I did a decent enough job. Lubrication Moebius 9010 – All jewels aside from the pallet fork jewel pivots Moebius HP 1300 – For parts which turn a bit slower. Between the arbour and the watches wheel, the barrel pivot in the main bridge or the metal pivots for translation wheels for example. But that’s just my personal tase Moebius 8200 – Used to lubricate the mainspring Moebius 8217 – Braking grease for automatic barrel wall Moebius 9415 – For the tip of the pallet fork jewels. Molycote DX Paste – Any strong friction contact points. So the setting and winding system basically Reassembly For the reassembly of course you just follow the above given steps and pictures from the disassembly backwards. Ive been thinking about making reassembly pictures as well, it would make the report way more comprehensive and would show more difficult nifty parts for example shock and balance jewel lubrication. However it would be way more annoying to take the pictures and it would cost me a lot more time. What do you all think? Timegrapher Test Okey, so once I’ve cleaned everything it was time to put my work to the test and I strapped the watch into the timegrapher. And this is the catastrophic result: This was the start of the snowstorm like reading which followed. It couldn’t really pick anything up and I was just devastated. Because I did not have any replacement balance on hand, I was desperate and opted to measuring the Rate my eye and stop watch. As you can think, this did not end up well so I ordered a lot of a few spare movement to butcher them for the balance. After placing in the 4th replacement balance however, I managed to get a decent reading. The Amplitide could be better, but this is the way I left it in the end haha. Final Results: After the timegrapher drama I closed the back up and attached a basic rubber strap for testing purposes. And from here on its basically B-Roll pictures! Here is a comparison of the movements size to my pinkie finger! And here the final satisfying shot: So yeah all in all a stressful but also fun little project which I could conclude by gifting the watch to my mother. I was very surprised to see the winged balance as well as challenged by working on a movement of this size but in the end I managed! I hope you all enjoyed reading this and that the guide may help other hobbysts or even professionals ( haha who am I kidding) in the future. Any comments, questions or criticism is of course welcome! If you guys would like the full commentated 4K Macro video of the whole process, ive uploaded it to my Youtube channel here and it would bring me great joy if you would watch it! And so as always watch bangers... Stay safe and healthy and till next time!


 1 point
 -
I can say that those hand-operated presses wouldn't be allowed in the USA with all of the OSHA safety regulations. Too exposed.1 point
-
Hello and welcome from England.1 point
-
Thank you for your introduction and welcome to this friendly forum. We all look forward to your contributions and continued involvement.1 point
-
Even in Russia I would imagine there's a double switch so unless one has been disabled no danger.1 point
-
because the age of the watch that's not a friction jewel at least it doesn't look like it. It's hard to tell from the angle we need a angular review to see better but that looks like a burnished in jewel. As long as you didn't break the burnished in setting you should pollution it in and probably just smooth the burnishing down to hold it in place and if you're lucky you'll be okay.1 point
-
That's what I got. Haven't given it a go yet. I did dress my tweezers the other day.1 point
-
Wow! What an incredible contrast to the promotional videos of Swiss manufacturers!1 point
-
You are a brave man putting benzine/ watch-cleaning chemicals in the freezer!1 point
-
Depending on how thick the walls of the pushers are, you MAY be able to use a lathe to turn down the pusher to size, as long as it’s not too different in size. May be worth a consideration?1 point
-
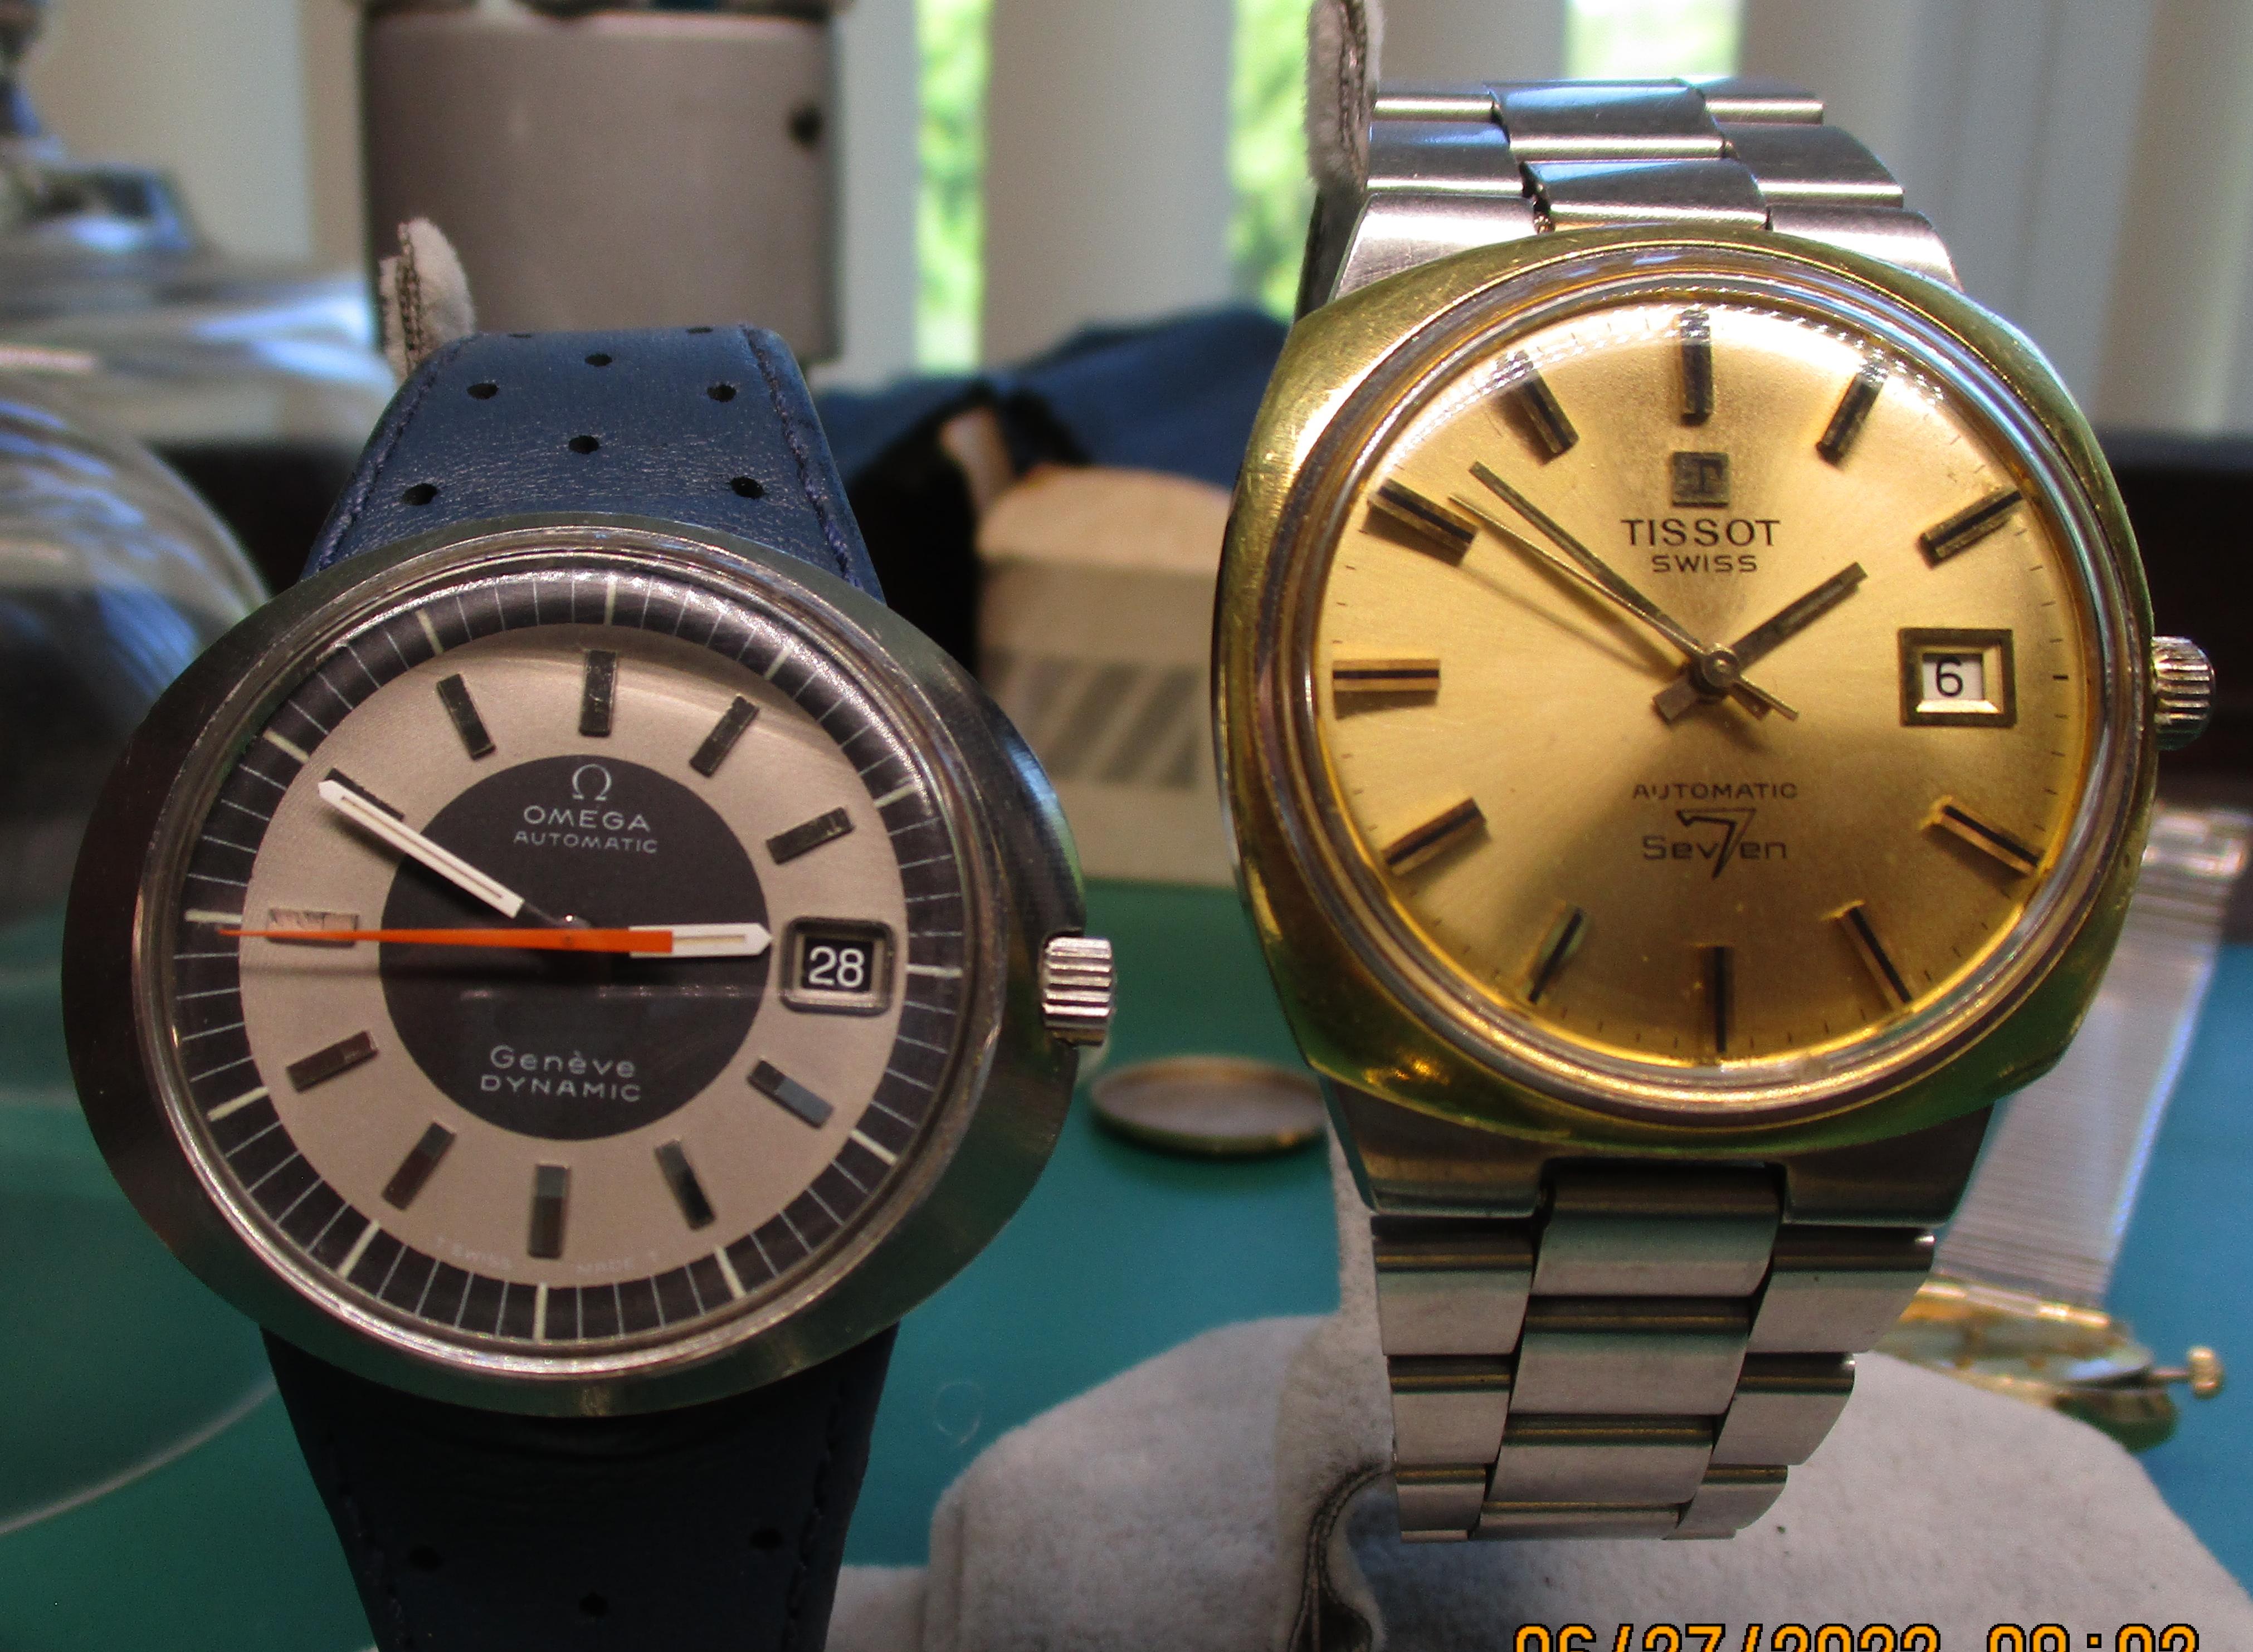
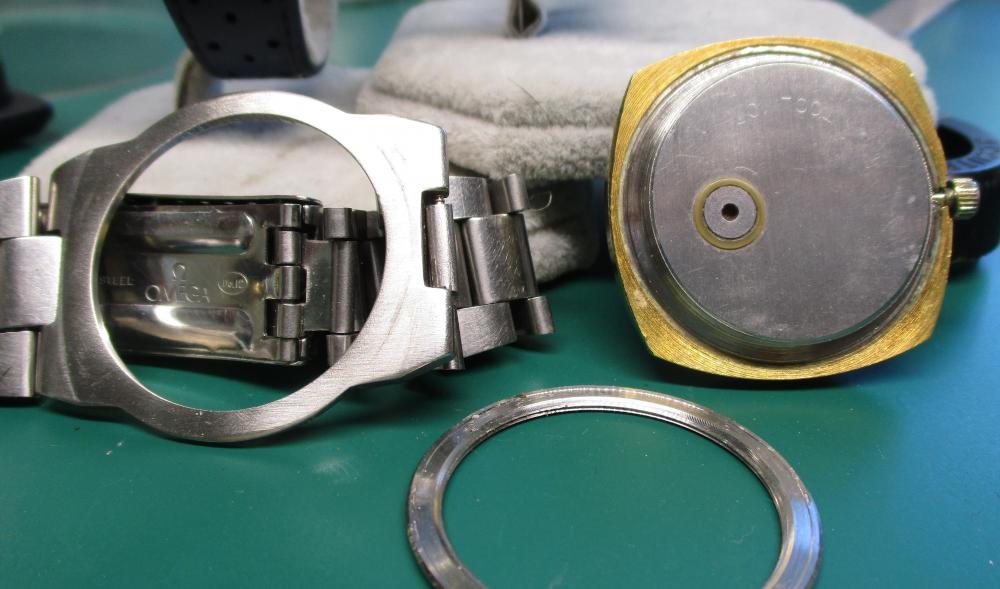
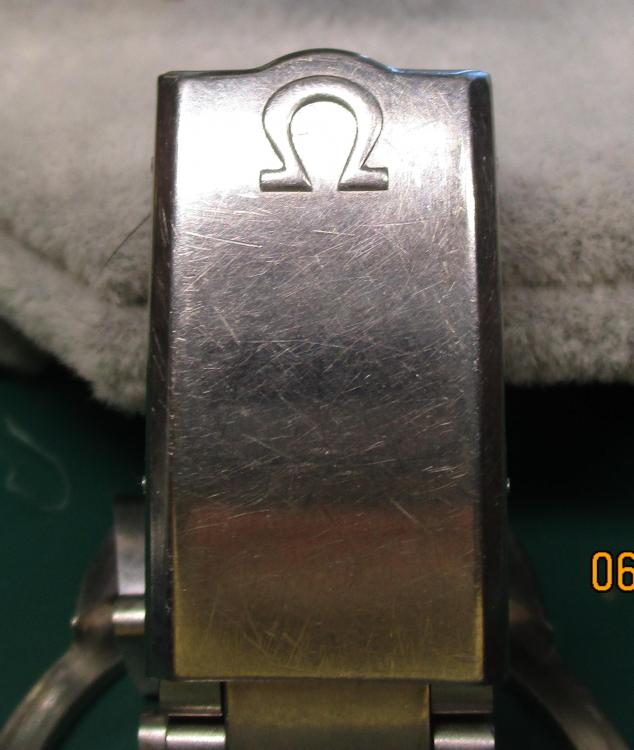
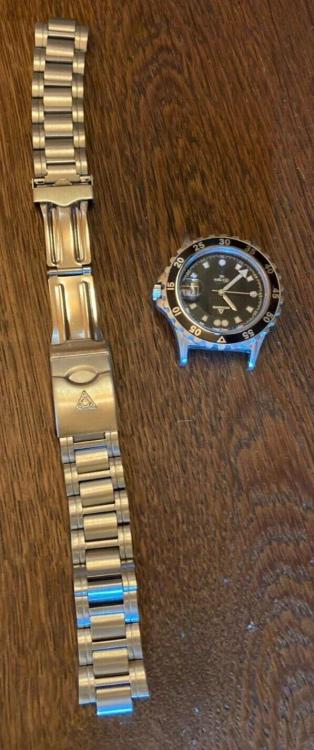
Here is my yard sail find front loader Tissot with a Tissot marked Omega movement and bracelet. Bracelet being SS does't belong on a gold plated watch but it's the same style as the Omega next to it.

 1 point
 -
Oh, I didn't see the spring...that makes it a bit of a challenge1 point
-
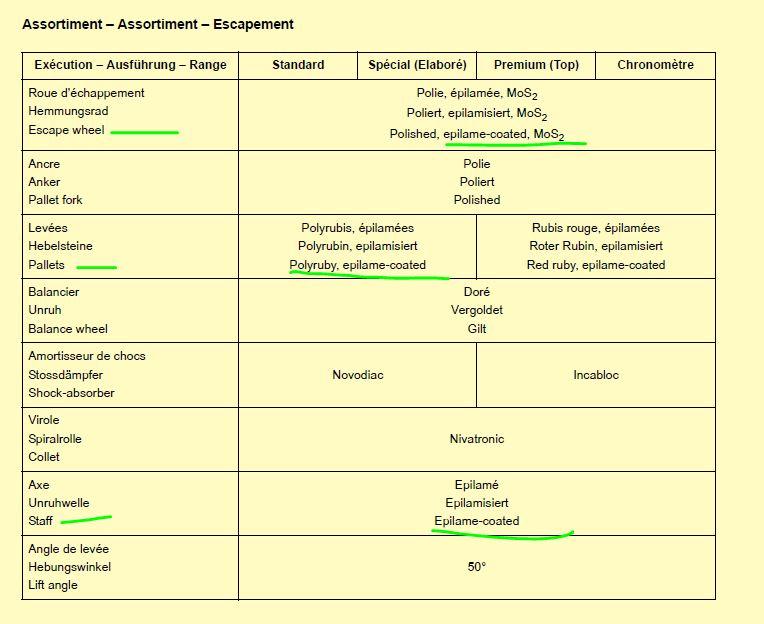
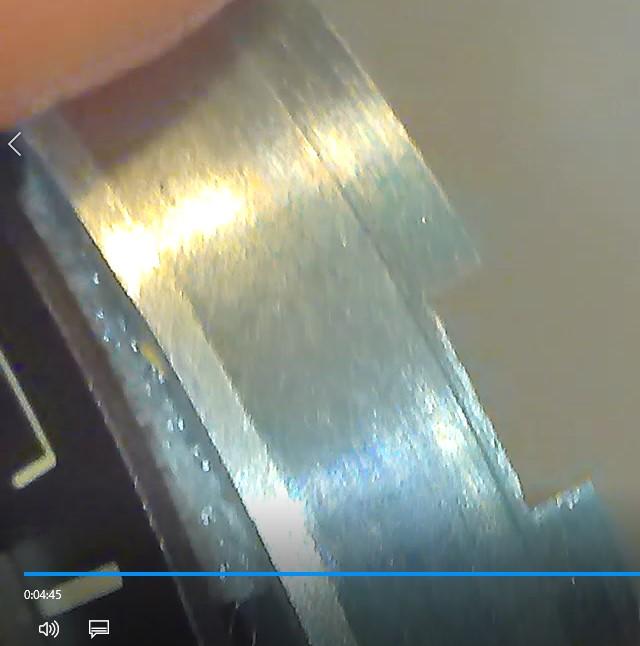
you need to know where to look in the tech sheet as they do put it on the escape wheel and the pallet stones. Swiss service guides are interesting in that they don't always show everything. They are getting better which is why the newer ones will show where the epilam goes the old ones will not. As because previously there would have been probably a separate document. Now they're trying harder to get in one place sometimes. So as you can see from the image out of the technical document they do put epilam on the escape wheel and the pallet stones and the balance staff. Yes they always put on the balance staff.
 1 point
 -
I would attempt turning one on a lathe. I turned a pusher for a Vulcain Cricket. Nice work 3d printing thectool!1 point
-
I found a lot of (as he called it) „inexpensive“ mesh baskets searching for „spice basket stainless steel“. I‘ll order one.1 point
-
I have just found an old and needing case work, strike only Enfield that is up in the Northern Territory. The ad says chimes, but I thought if it doesn't have the Westminster chimes, it would be a strike only clock? 'Strike' announces the hour etc, 'Chimes' are well, chimes. I have sent the seller a message asking if they still have it. They are not prepared to parcel up and send the clock, but my brother lives in the NT and would happily do that for me. Case may need to be reveneered and the photo that I could see of the movement, it is quite dirty, but that is the NT for you.1 point
-
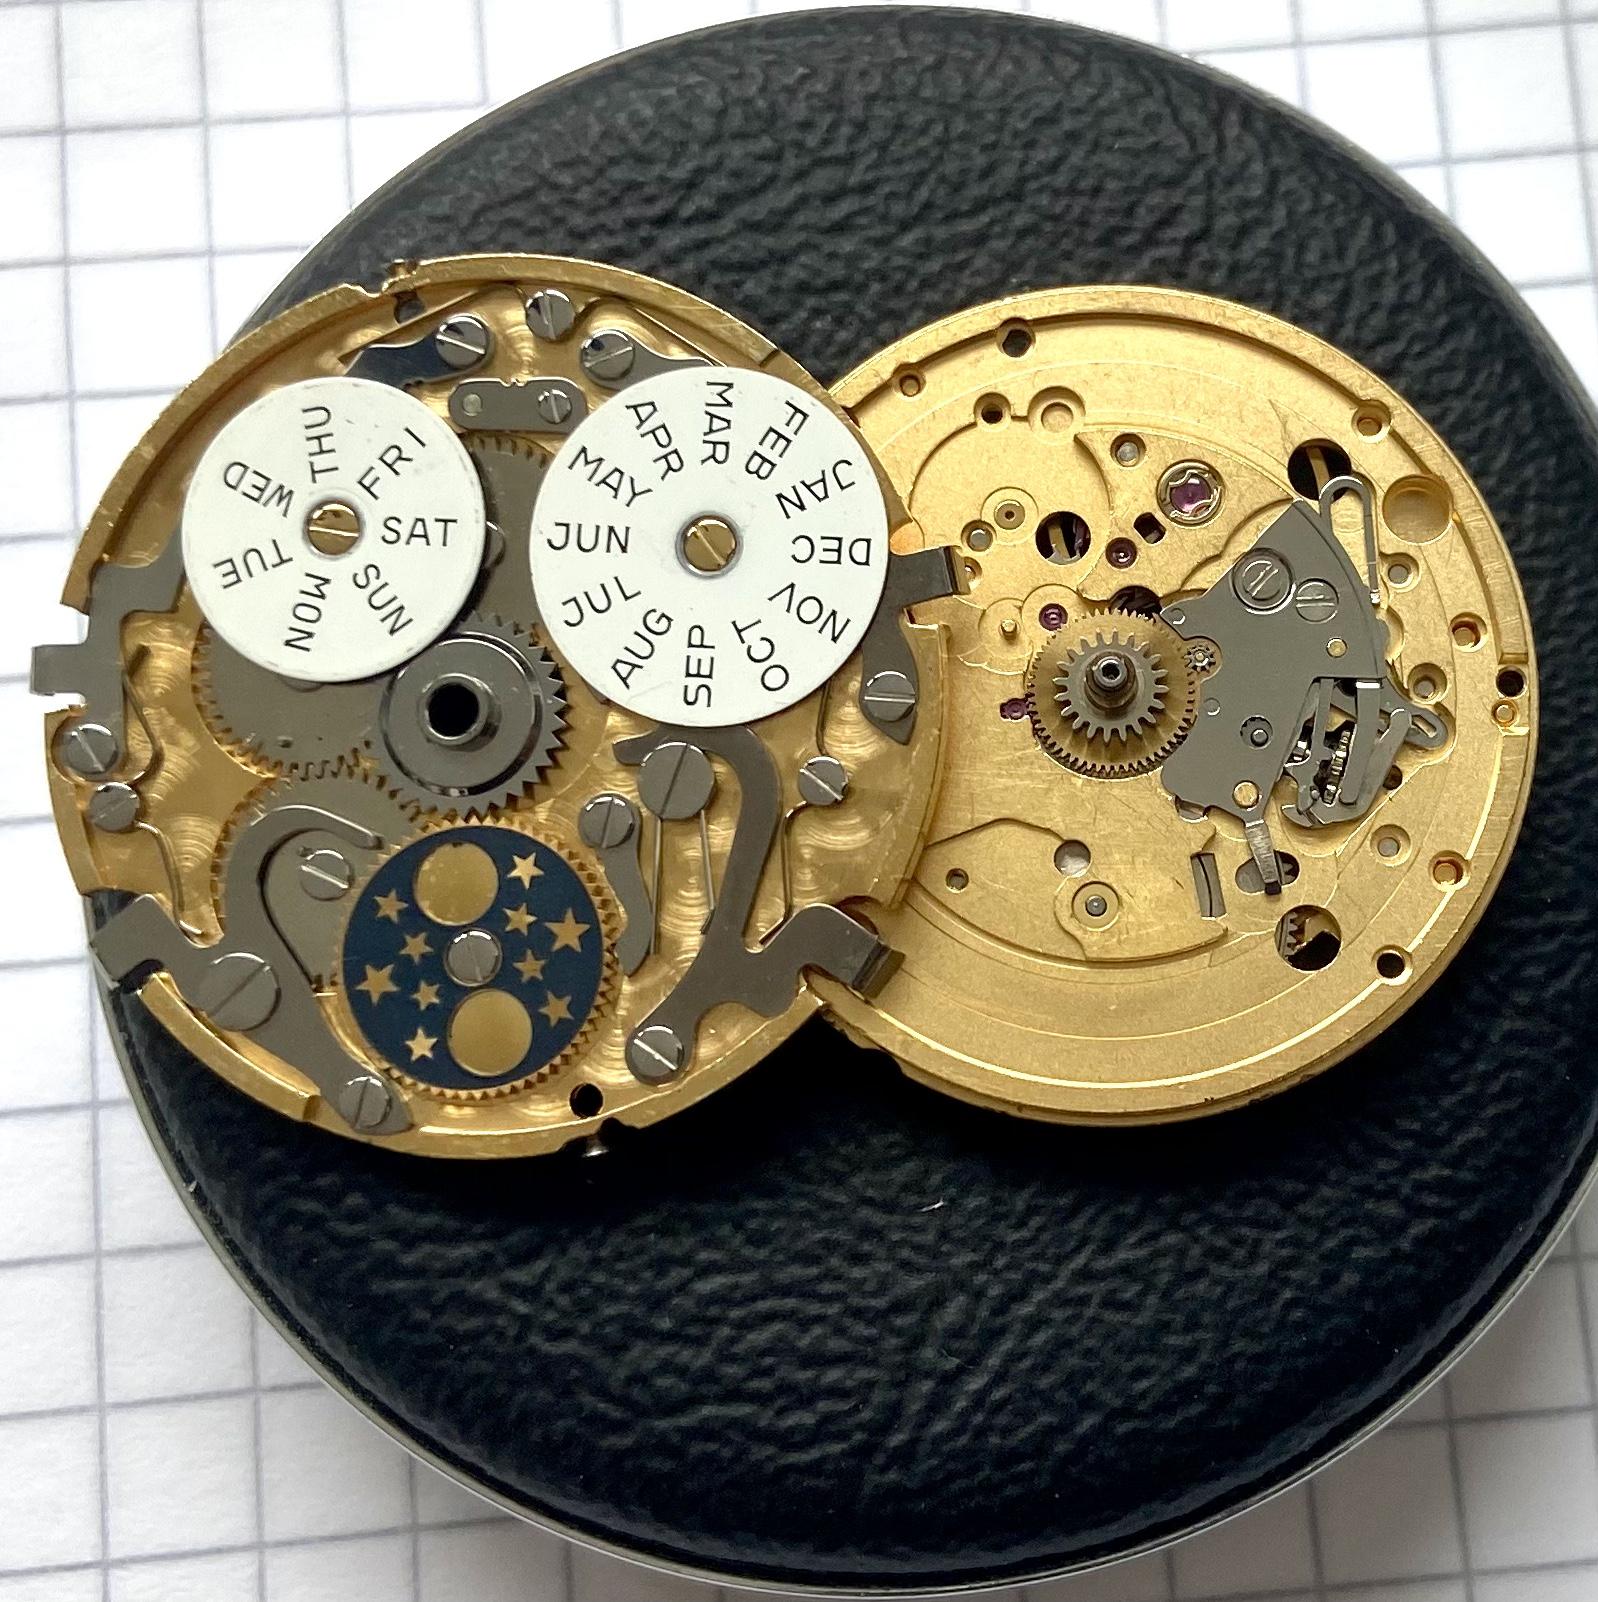
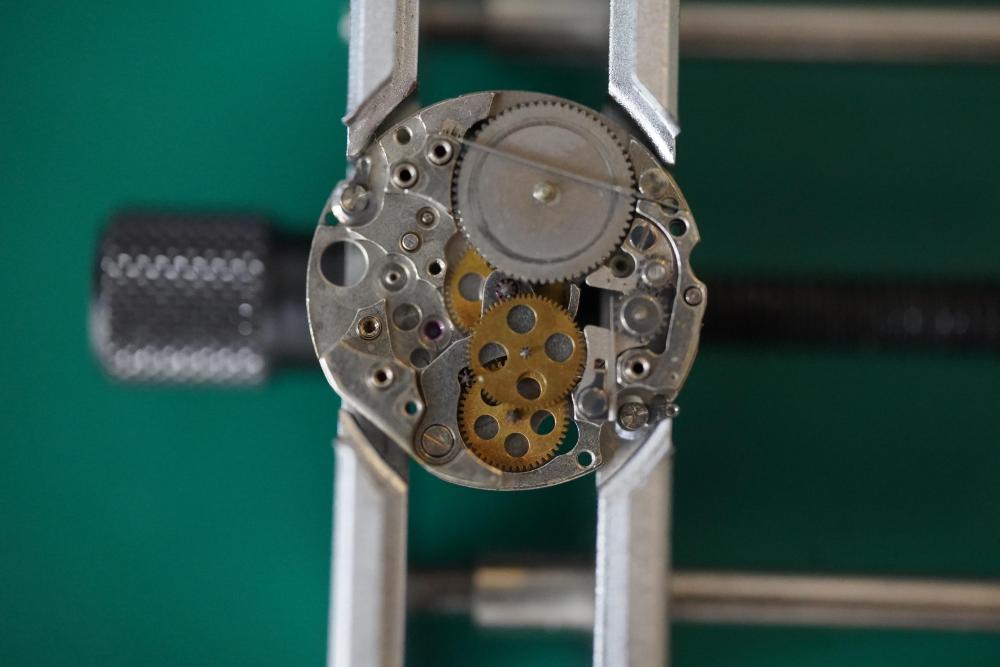
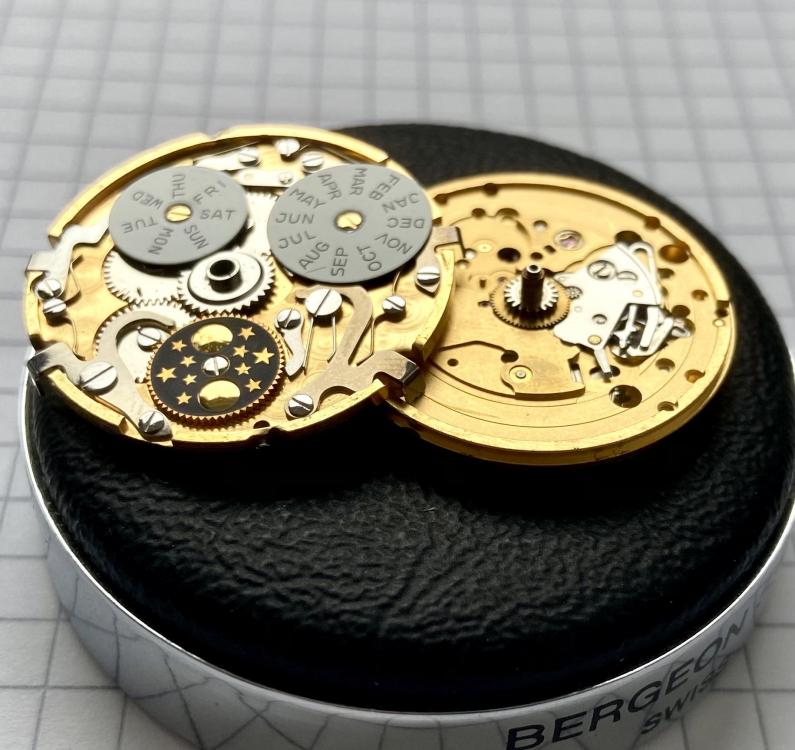
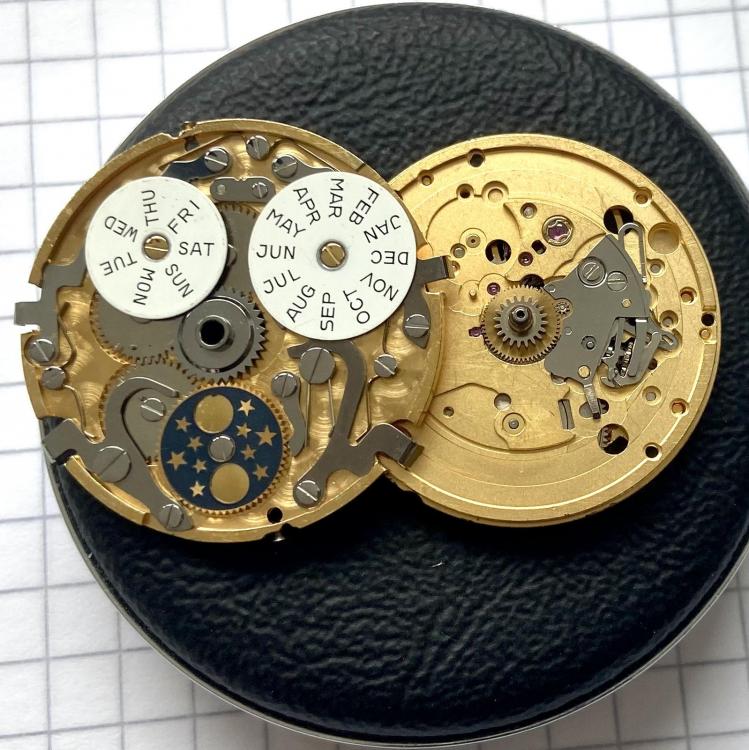
I would like to report that removing the triple-date-moon-phase module from the ETA 2892-2 was more than easy without the necessity of any disassembling on the module. It is held by the dial feet screws of the ETA’s main plate and can just be lift off (The dial is tightened to the module by two other screws).

 1 point
 -
if you have a watchmaker's lathe reducing shouldn't be a problem. I suppose if you're really careful with some sandpaper1 point
-
I have Seiko but all new so never repaired you may be converting me here. I Only way i can see from stopping you buying so many and saving your wallet matey.1 point
-
Hey Gary! Boys are 10 and 12. They’ve completed level 2 - taking apart a standard movement and putting it back together - on their own without help. It’s a good way for us to bond before they have to leave home in a few years. Howdy! Class of 2000. We live in College Station. You?1 point
-
My case knife popped that sucker open like an oyster!1 point
-
That, is some seriously valuable information! Thanks! I will give the Seikos another chance now. I had no idea! Do they really get clean enough? This information definitely makes me inclined to try. Thanks! I have the Bergeon 1A automatic oiler (the size usually used to oil the balance cap jewels) but if I recollect correctly the needle is actually too wide for these minuscule Seiko cap jewels which made me invest in a Horotec Incabloc Oiler. An old oiler sharpened to a point should work equally well, but I guess I'm just crazy about tools EDIT: Here's my video review of the Bergeon 1A automatic oiler.1 point
-
Its made by Japy Frères with a cylinder platform its 8 day duration dates around the 1890. The problem with this type of movement is the great wheel the design has it so close to the edge of the plate and as the springs are so powerful that pivot hole wears and always moves to the edge, and in some I have seen it wears so close to the edge that it can't be repaired with out altering the plate. Nice barley twist decoration on the case which looks like oak.1 point
-
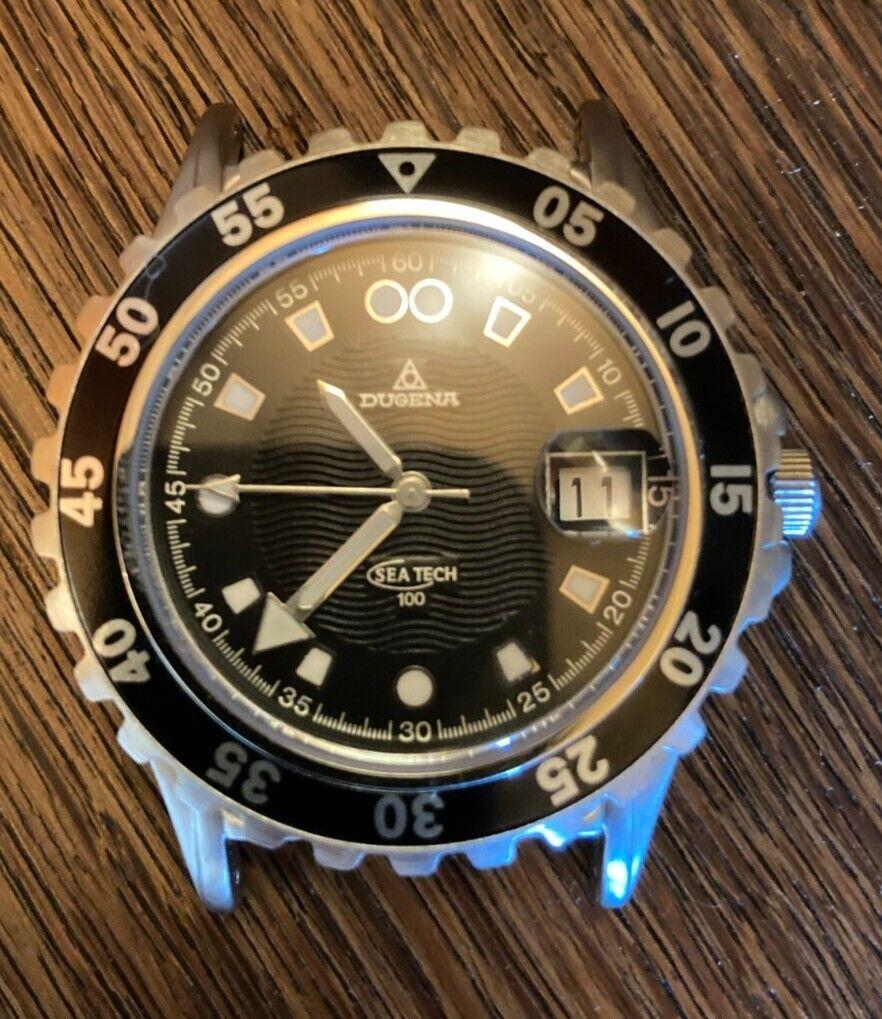
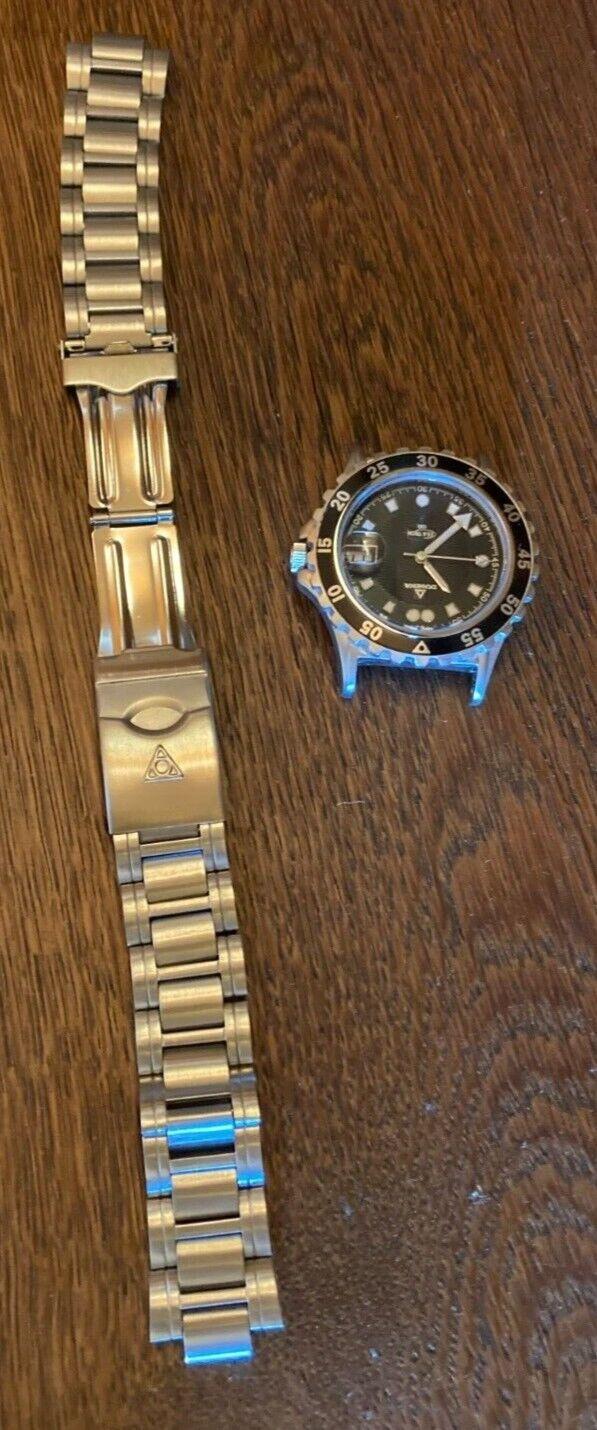
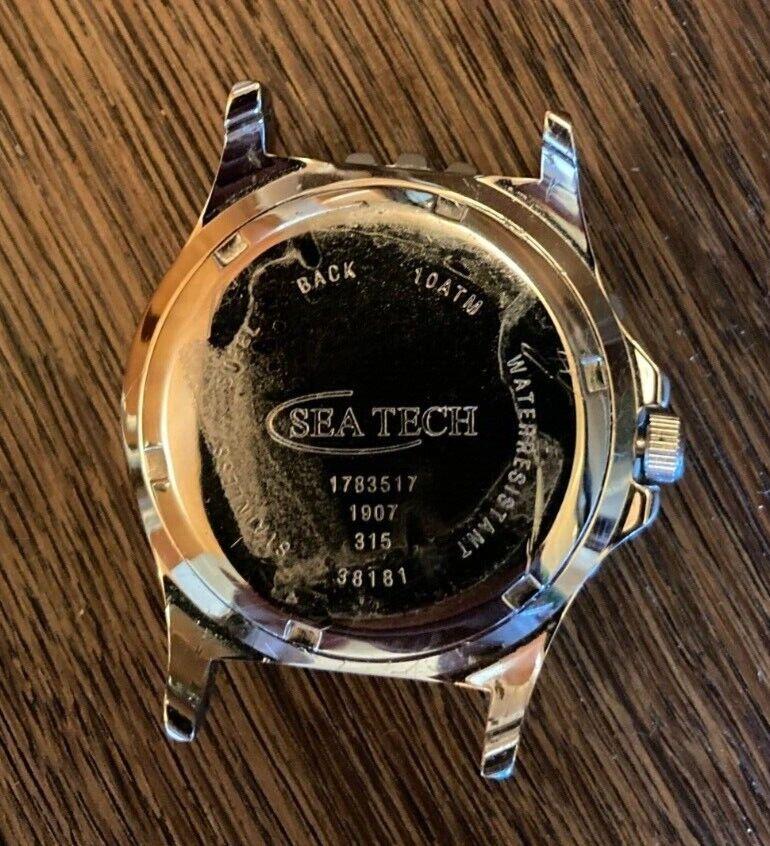
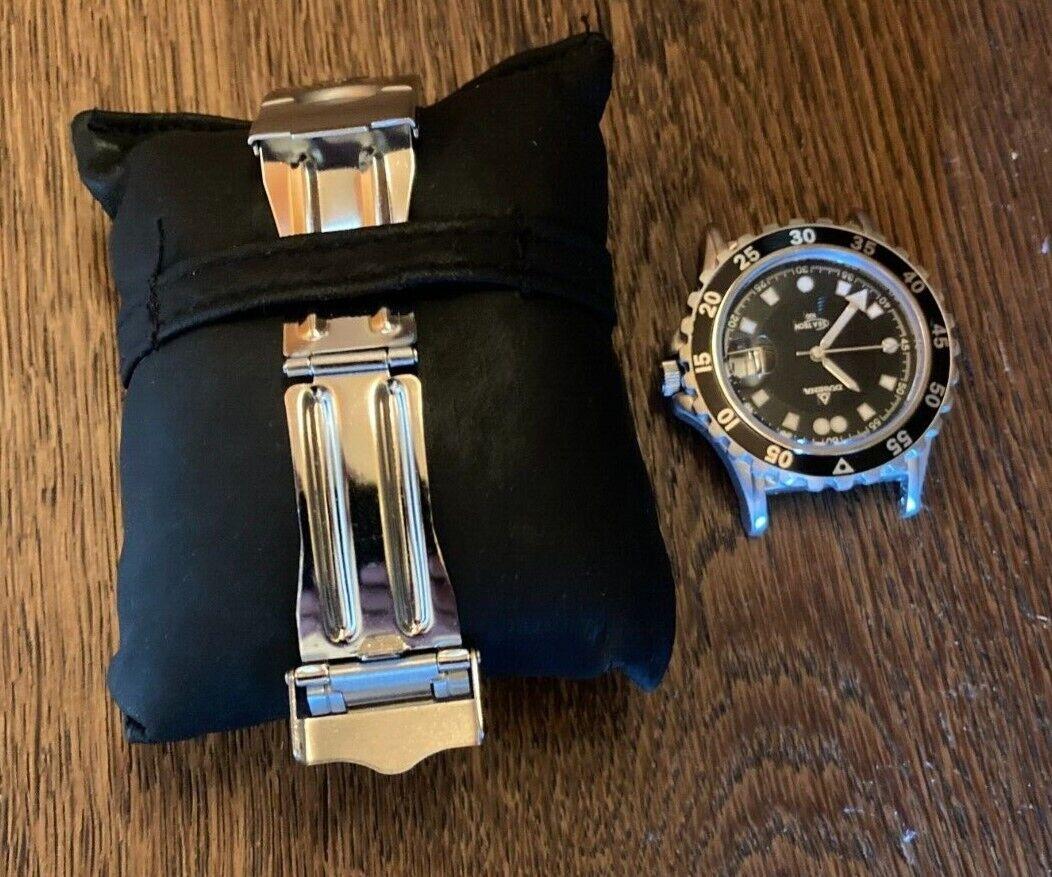
Perhaps a bit more expensive than the thresholds set on the first page of this thread, but ever since we've had lots of inflation ..... so I do hope that a defect €50 watch counts as a 404 ?? Inspired by a Swedish watch enthusiast I was looking for cheap, but good looking diver for "rough" activities, preferably with a mechanical movement, however ...... This just on eBay listed Dugena quartz diving watch was described as DEFECT, but with the overall condition (seemingly undisturbed), the slightly special shaped hands and the nice textured dial, I just couldn't help myself to take the gamble. I don't know what the casing-size is or what kind of movement sits inside. I haven't been able to find another example or the specs. What do you think? Recoverable ? Wasted money .... a real 404? Sellers pictures;


 1 point
 -
Yep, it happens, but be aware that the CNC man isn't always! I've read about other minor glitches in QC for this tool, but hey, for the money, it's a no-brainer.1 point
-
Make sure you don't have the movement on those brackets too far back, it is better to bend the hammer for it to have a nice sounding strike. Also the movement doesn't want to be too forward because you might not be able to close the door. Good luck.1 point
-
No it's not that type. The manufacturer know well that plastic parts gets to be cleaned with the others during service. They are resistant to all cleaning fluids including petrol based, alchool and ammonia. Same for synthetic rubber (nytrile) gaskets.1 point
-
The above are movement holders for assembly and disassembly of the movement, not support for fitting of hands - although sometimes they can be a combined tool, this is not always the case. It's more of a concern when fitting new hands which will be tight fitting. Hands previously fitted and removed for service do not generally need to be forced down so hard to the extent that a jewel would be pressed out of position. However, if I felt it does need support and I did not have a dedicated hand support holder for my Bergeon 8935 for a particular movement (not all calibers have a specific one available) then I would use a jeweling tool or staking set to support the jewel whilst pressing down, I prefer to use my staking set as I have a particular punch with a soft flat tip which is ideal for the purpose.1 point
-
Well, that depends, but out of principle - being a Seiko fanboy - I'm going to disagree They're no less repairable than any other brand. In fact I'm working through a batch of 13 of them as we speak. Granted, I strip parts from donor movements (as that's cheaper than sourcing new parts) but they're so prolific that it's hardly an issue to get spares. It's a hell of a lot cheaper (and easier) than buying parts for swiss watches.1 point
-
Have you given a look to the comprehensive topic below. It has answers to all your questions and then some. In short, petroleum ether is availabile on Ebay UK, it's a proper horological products of guaranteed purity, and it cost less per quantity than fuels that are made to burn, not to clean.1 point
-
Mechanism look as if it's mounted the wrong way round on the support bracket. Bod1 point
-
I suspect he will be dedicating a video solely to lubrication, hence why he hasn’t brought it up yet. I get the impression that he’s compartmentalising each subunit of a movement per video and focusing only on that. Would be a great resource as well down the line: “I’m battling with a balance, oh yes it was such and such video”. Easiest way to get to the important stuff, as opposed to skipping through an hour long video with every thing in it.1 point
-
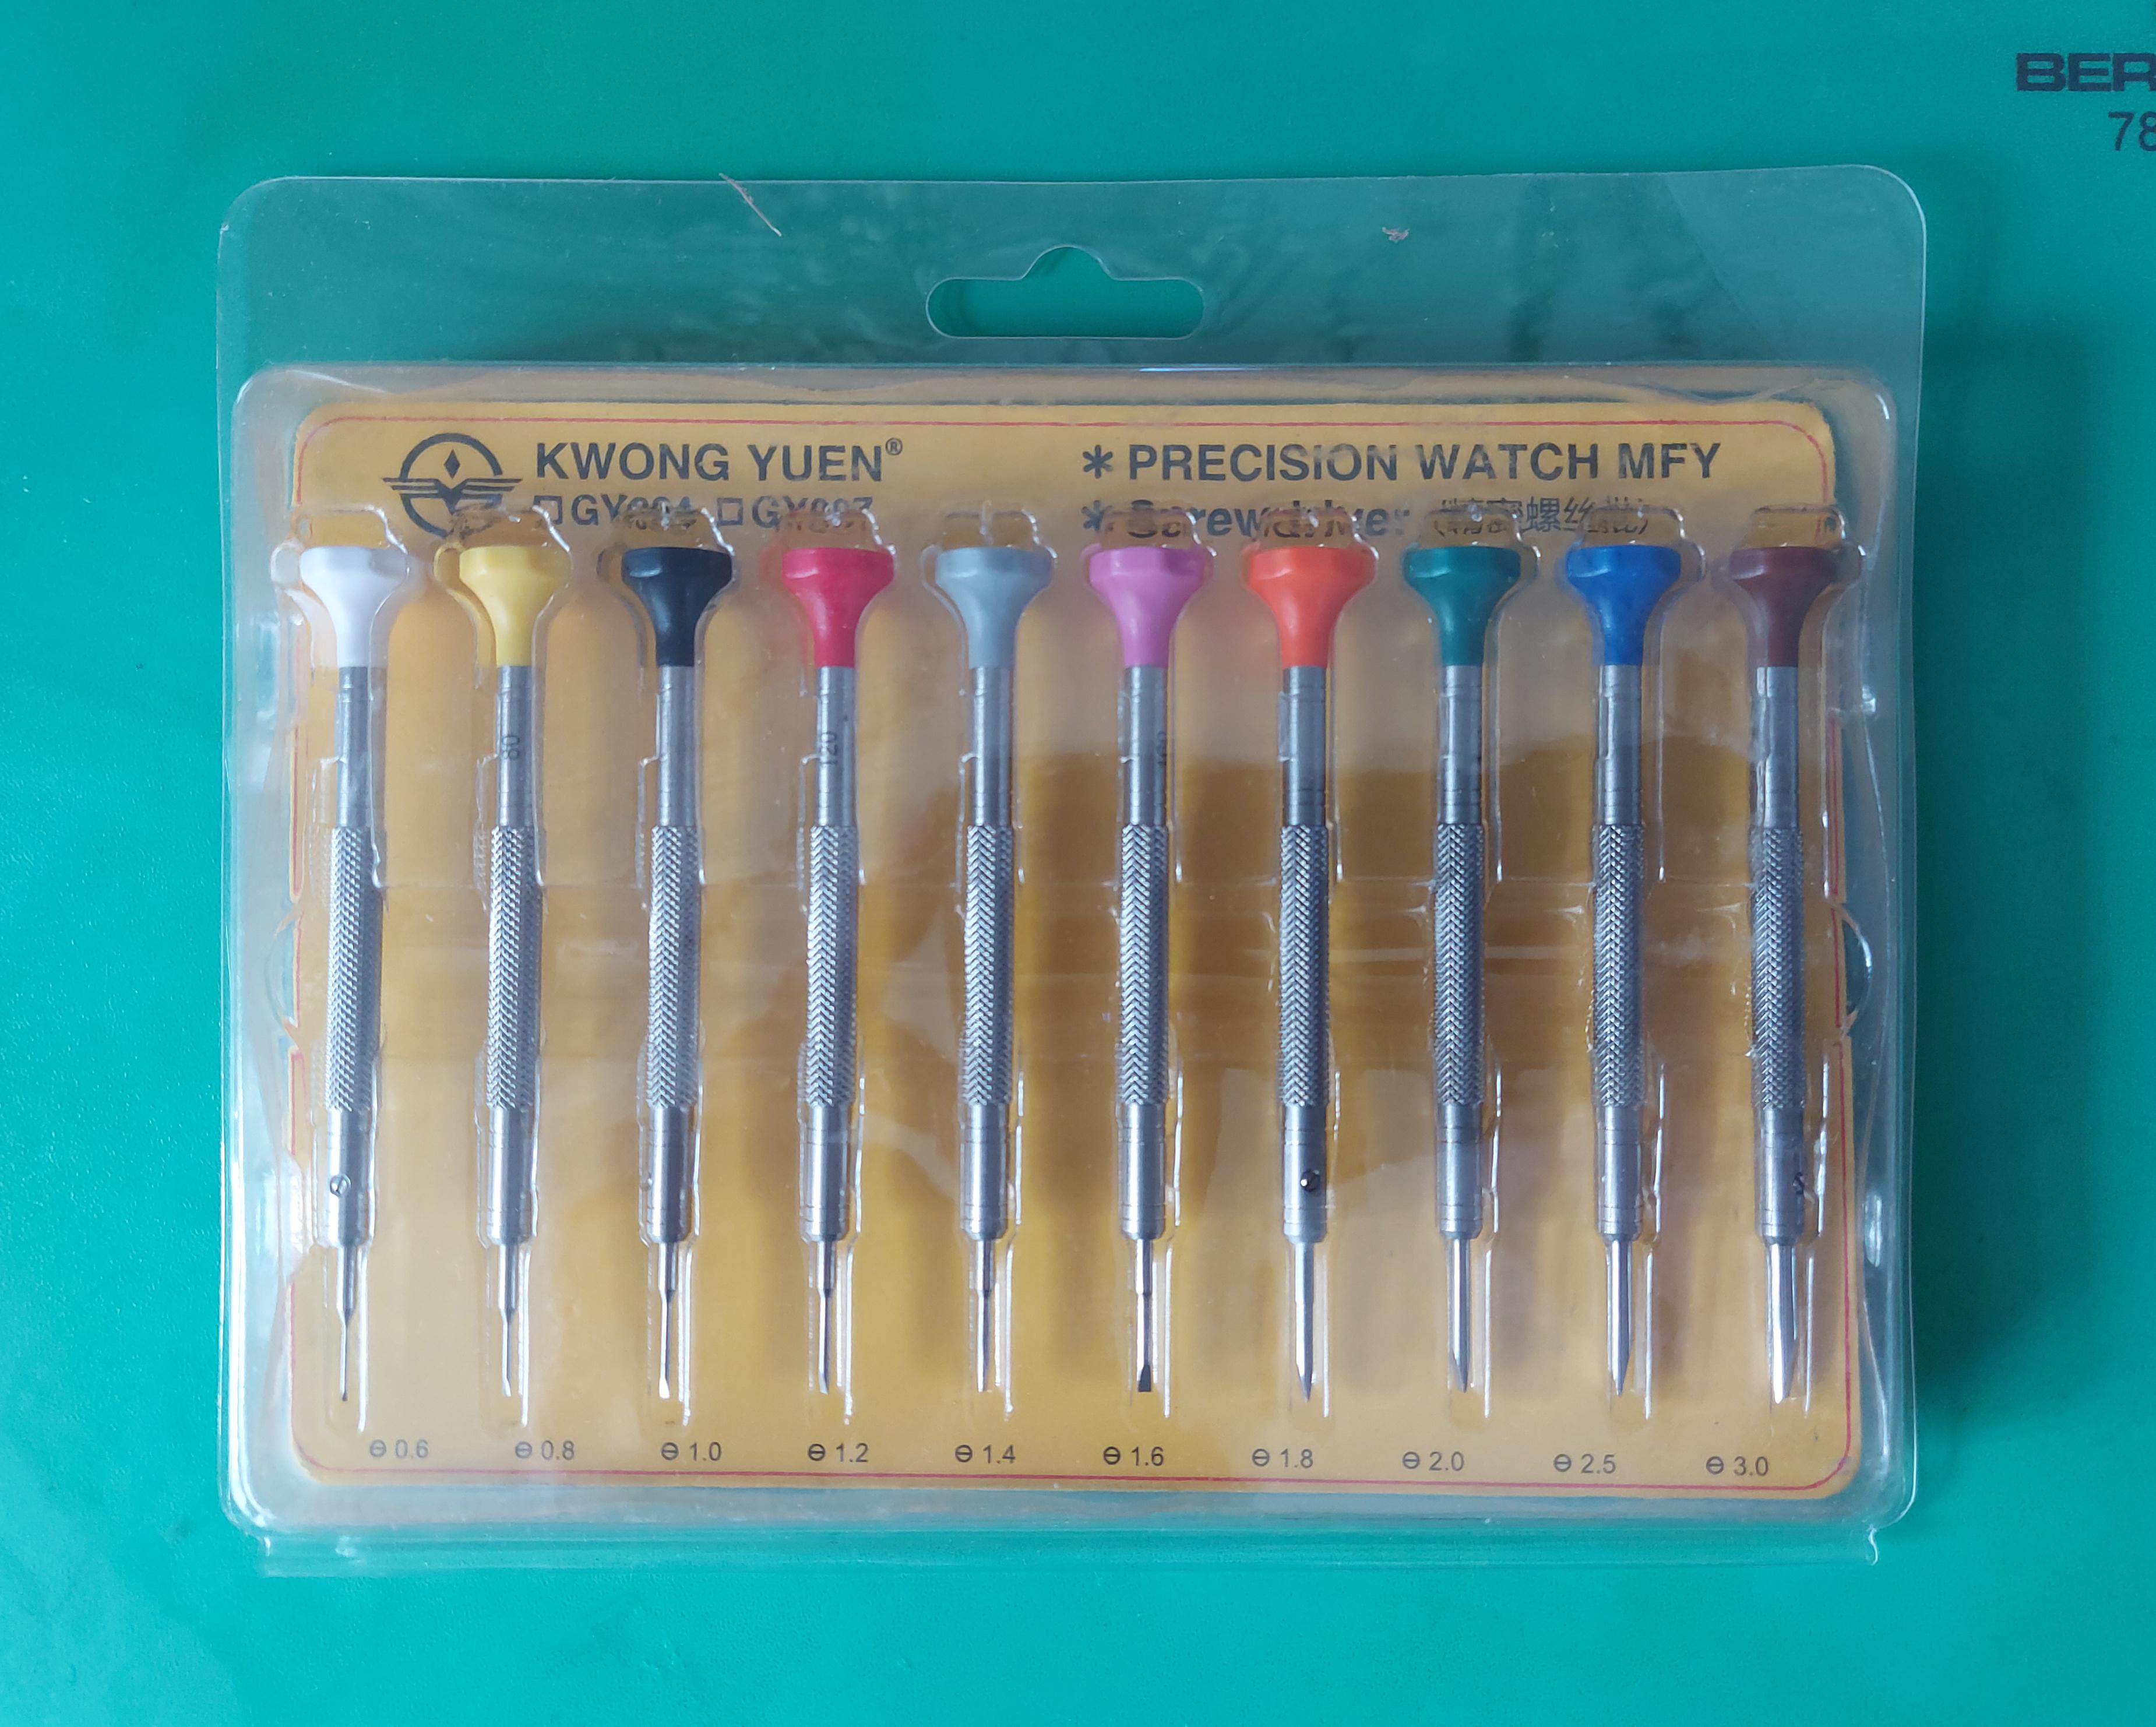
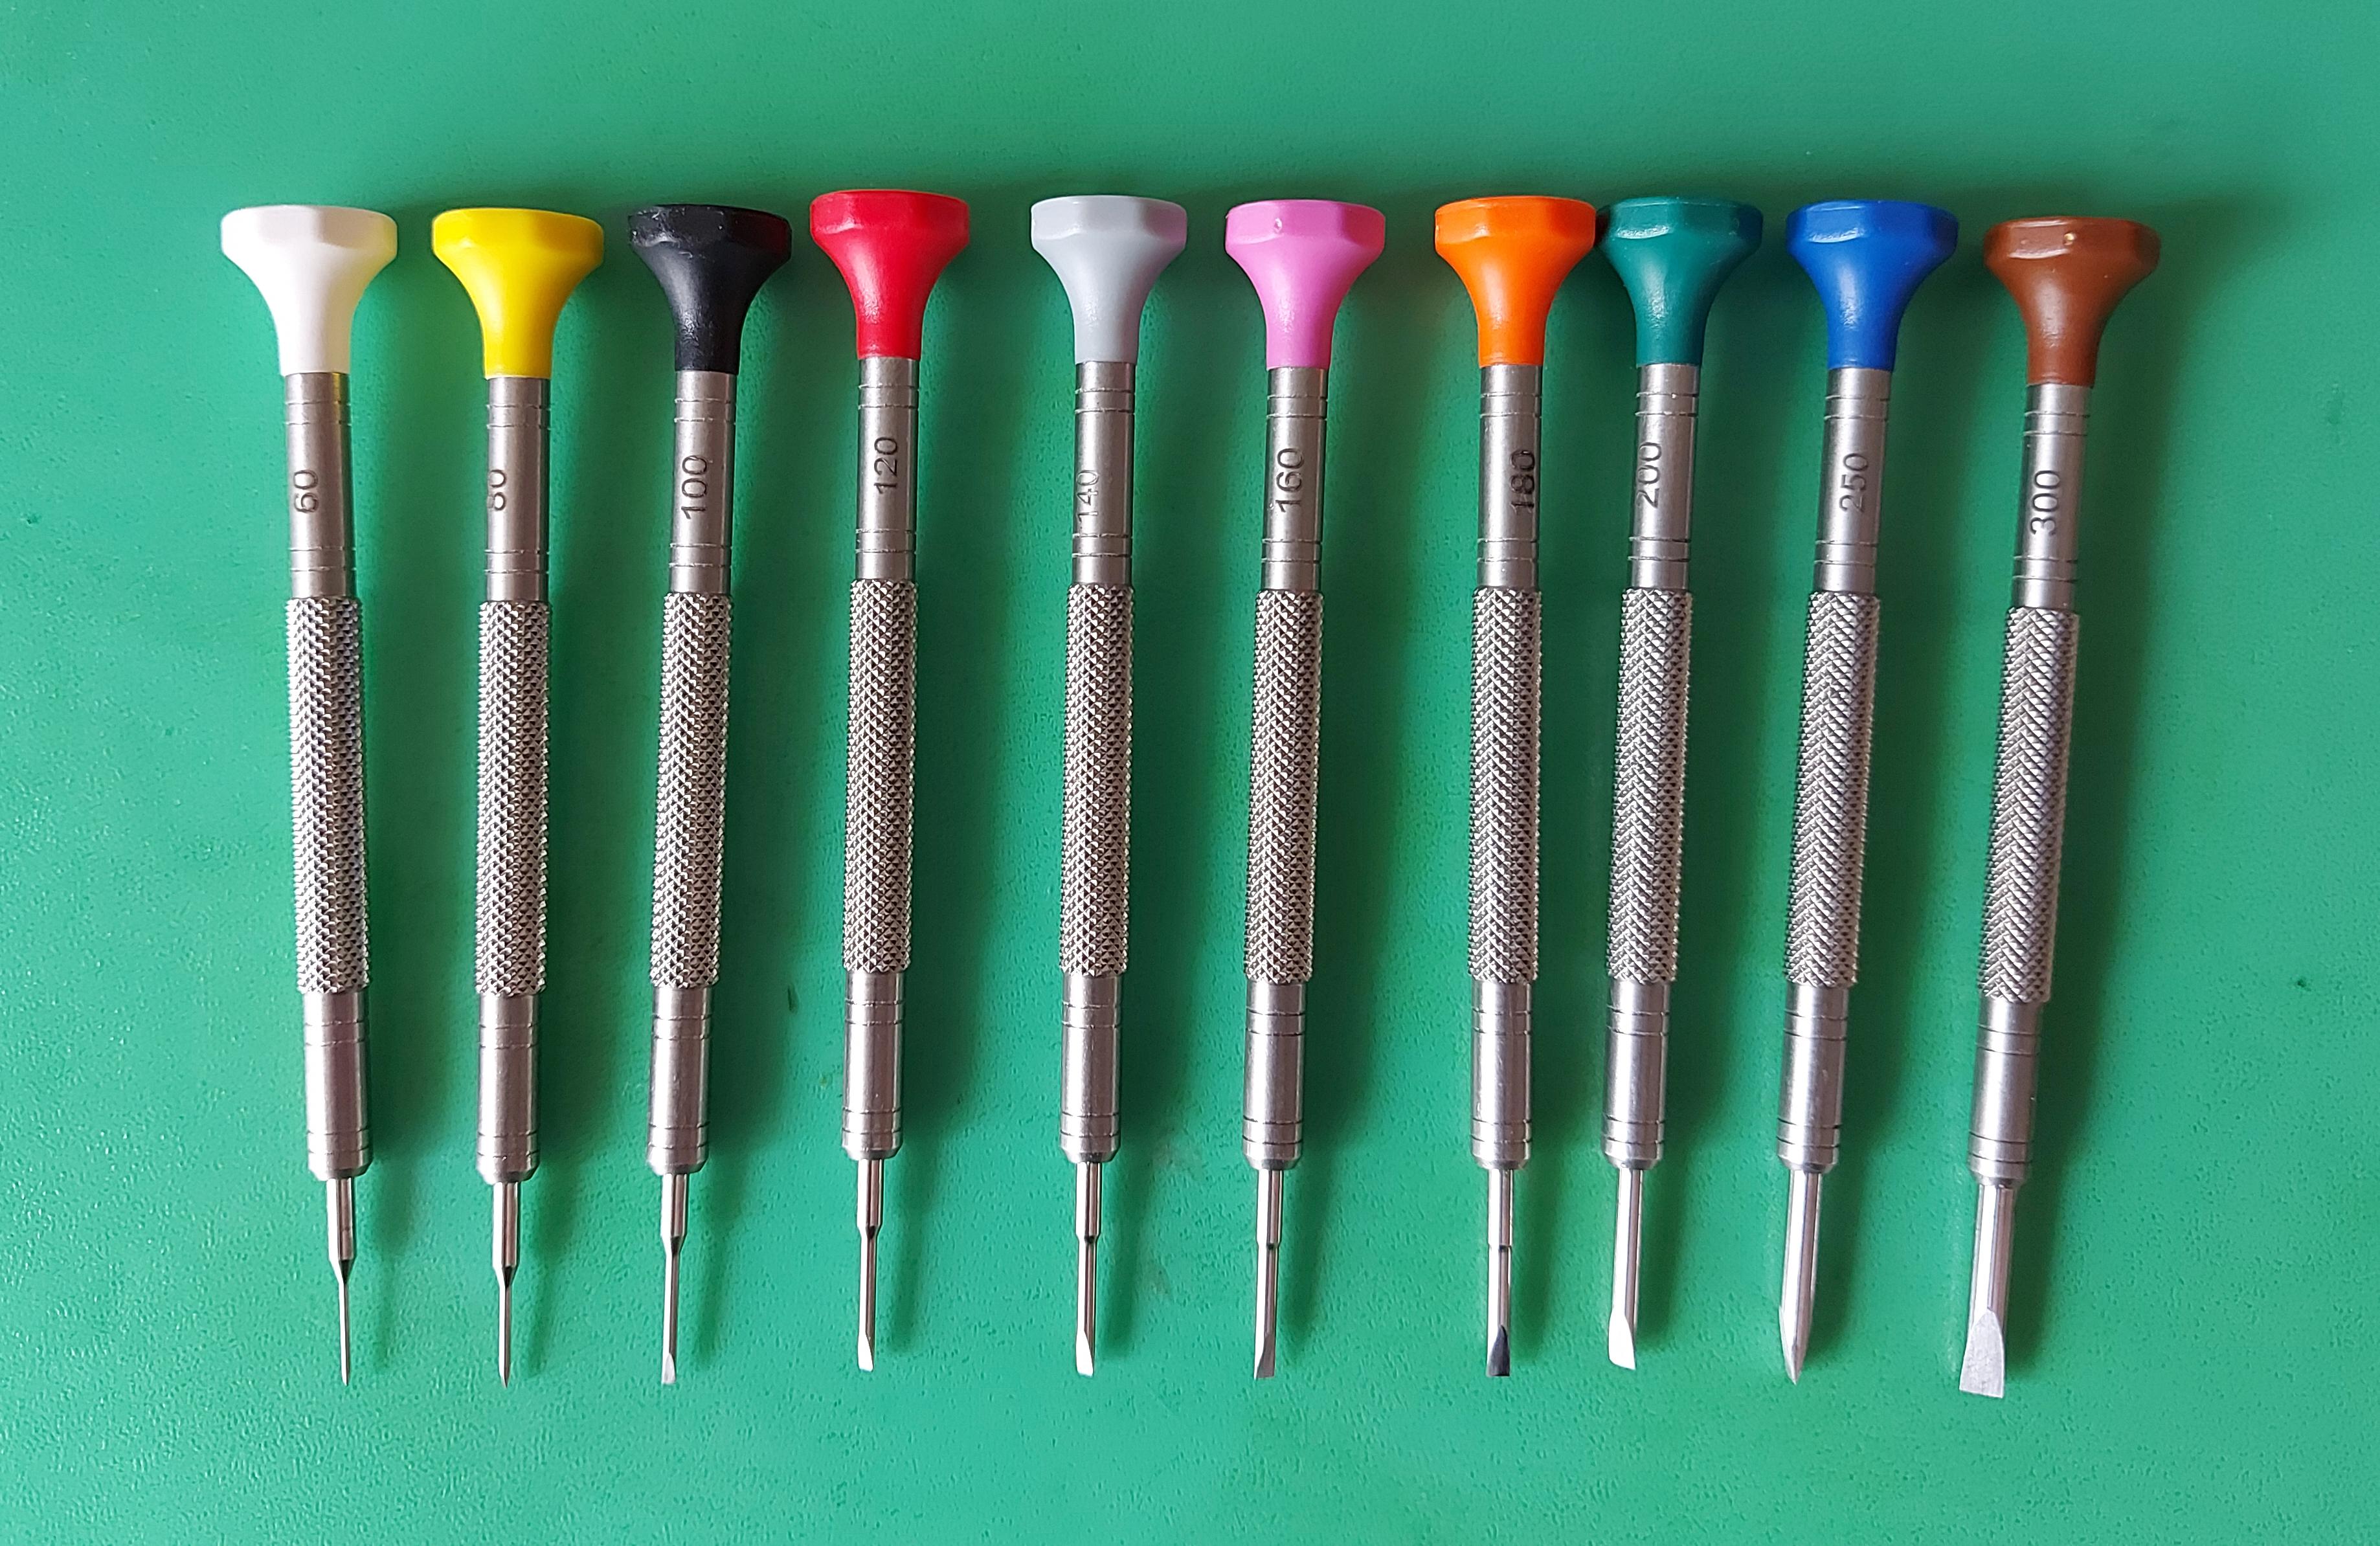
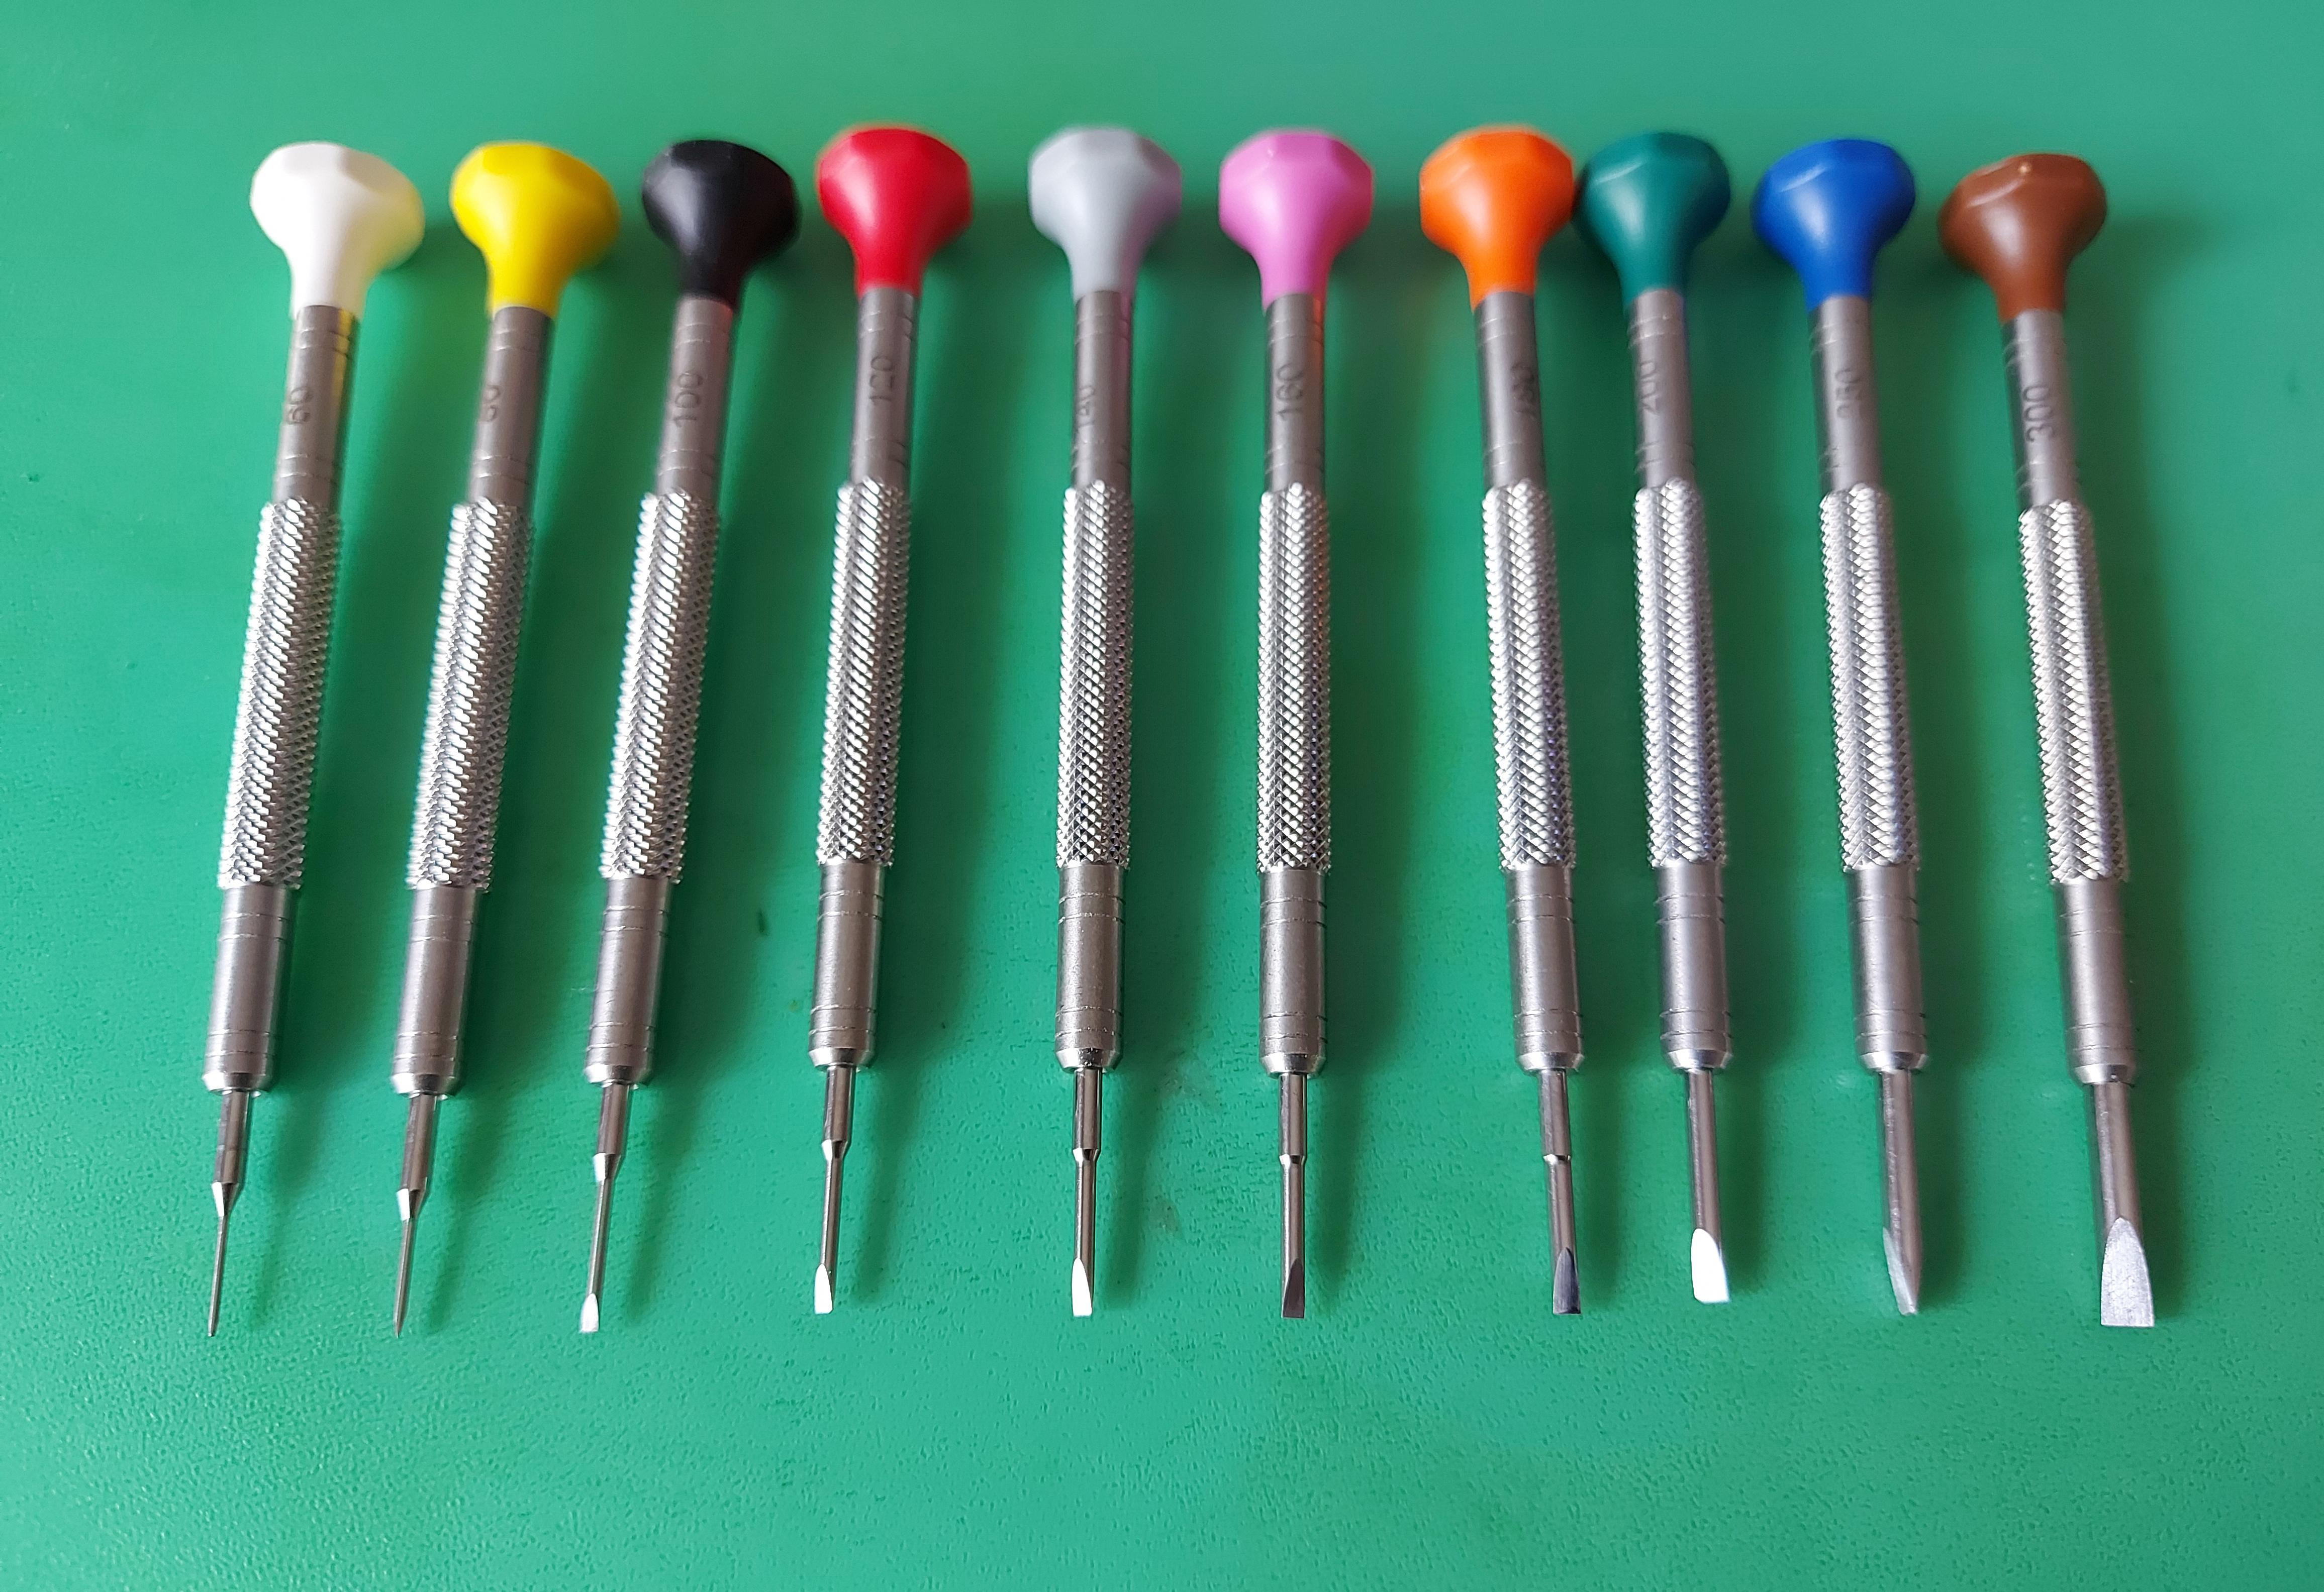
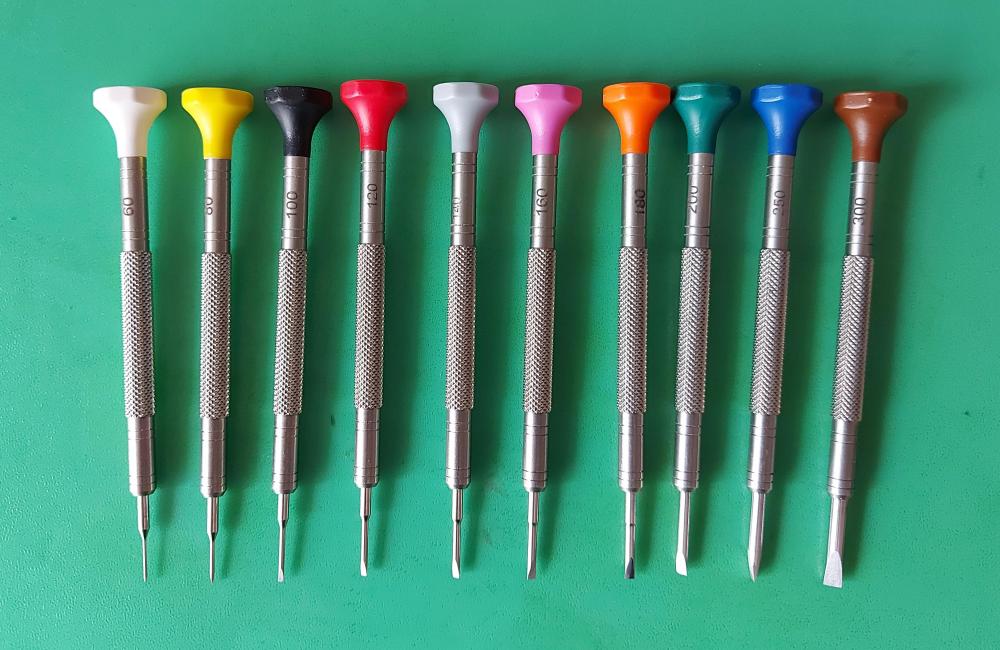
Hi all Time for the next tool in this series and this time we introduce a little controversy Yes we are now talking Chinese Watchmakers Screwdrivers, could there be such a thing as quality watchmakers screwdrivers from China, I think so. I had in the past tried some low cost drivers from China and to be honest after a little bit of work, hardening and tempering and honing the blades they worked quite well, although in the end I settled on the French (A*F) set that Cousins sell, these were an excellent set but my only gripe would be that the thinner blades where a little to bendy and it was quite easy to bend them if applying pressure on a tight screw. This led me to these. https://www.aliexpress.com/item/1005002528364614.html?spm=a2g0o.order_list.0.0.56751802D1Kqw7 These turned out to be a very high quality set with very rigid hard set of blades. Replacement blades are also available from the same seller should you need them. For £23 plus VAT & P&P they are quite a bargain. Again like some of the other tools in this list their similarity to some well known Swiss drivers may or may not be totally coincidental . I can highly recommend these, so much so I have just bought a second set, just in case Stay tuned there are some more controversial tools to be added to this list soon.

 1 point
 -
Just plunked down $94. We'll see how it goes - but to answer your original question: I won't be going to Dayton. Maybe they'll have something out my way (although until my wife tells me that Covid is gone, she probably won't let me go anywhere).1 point
-
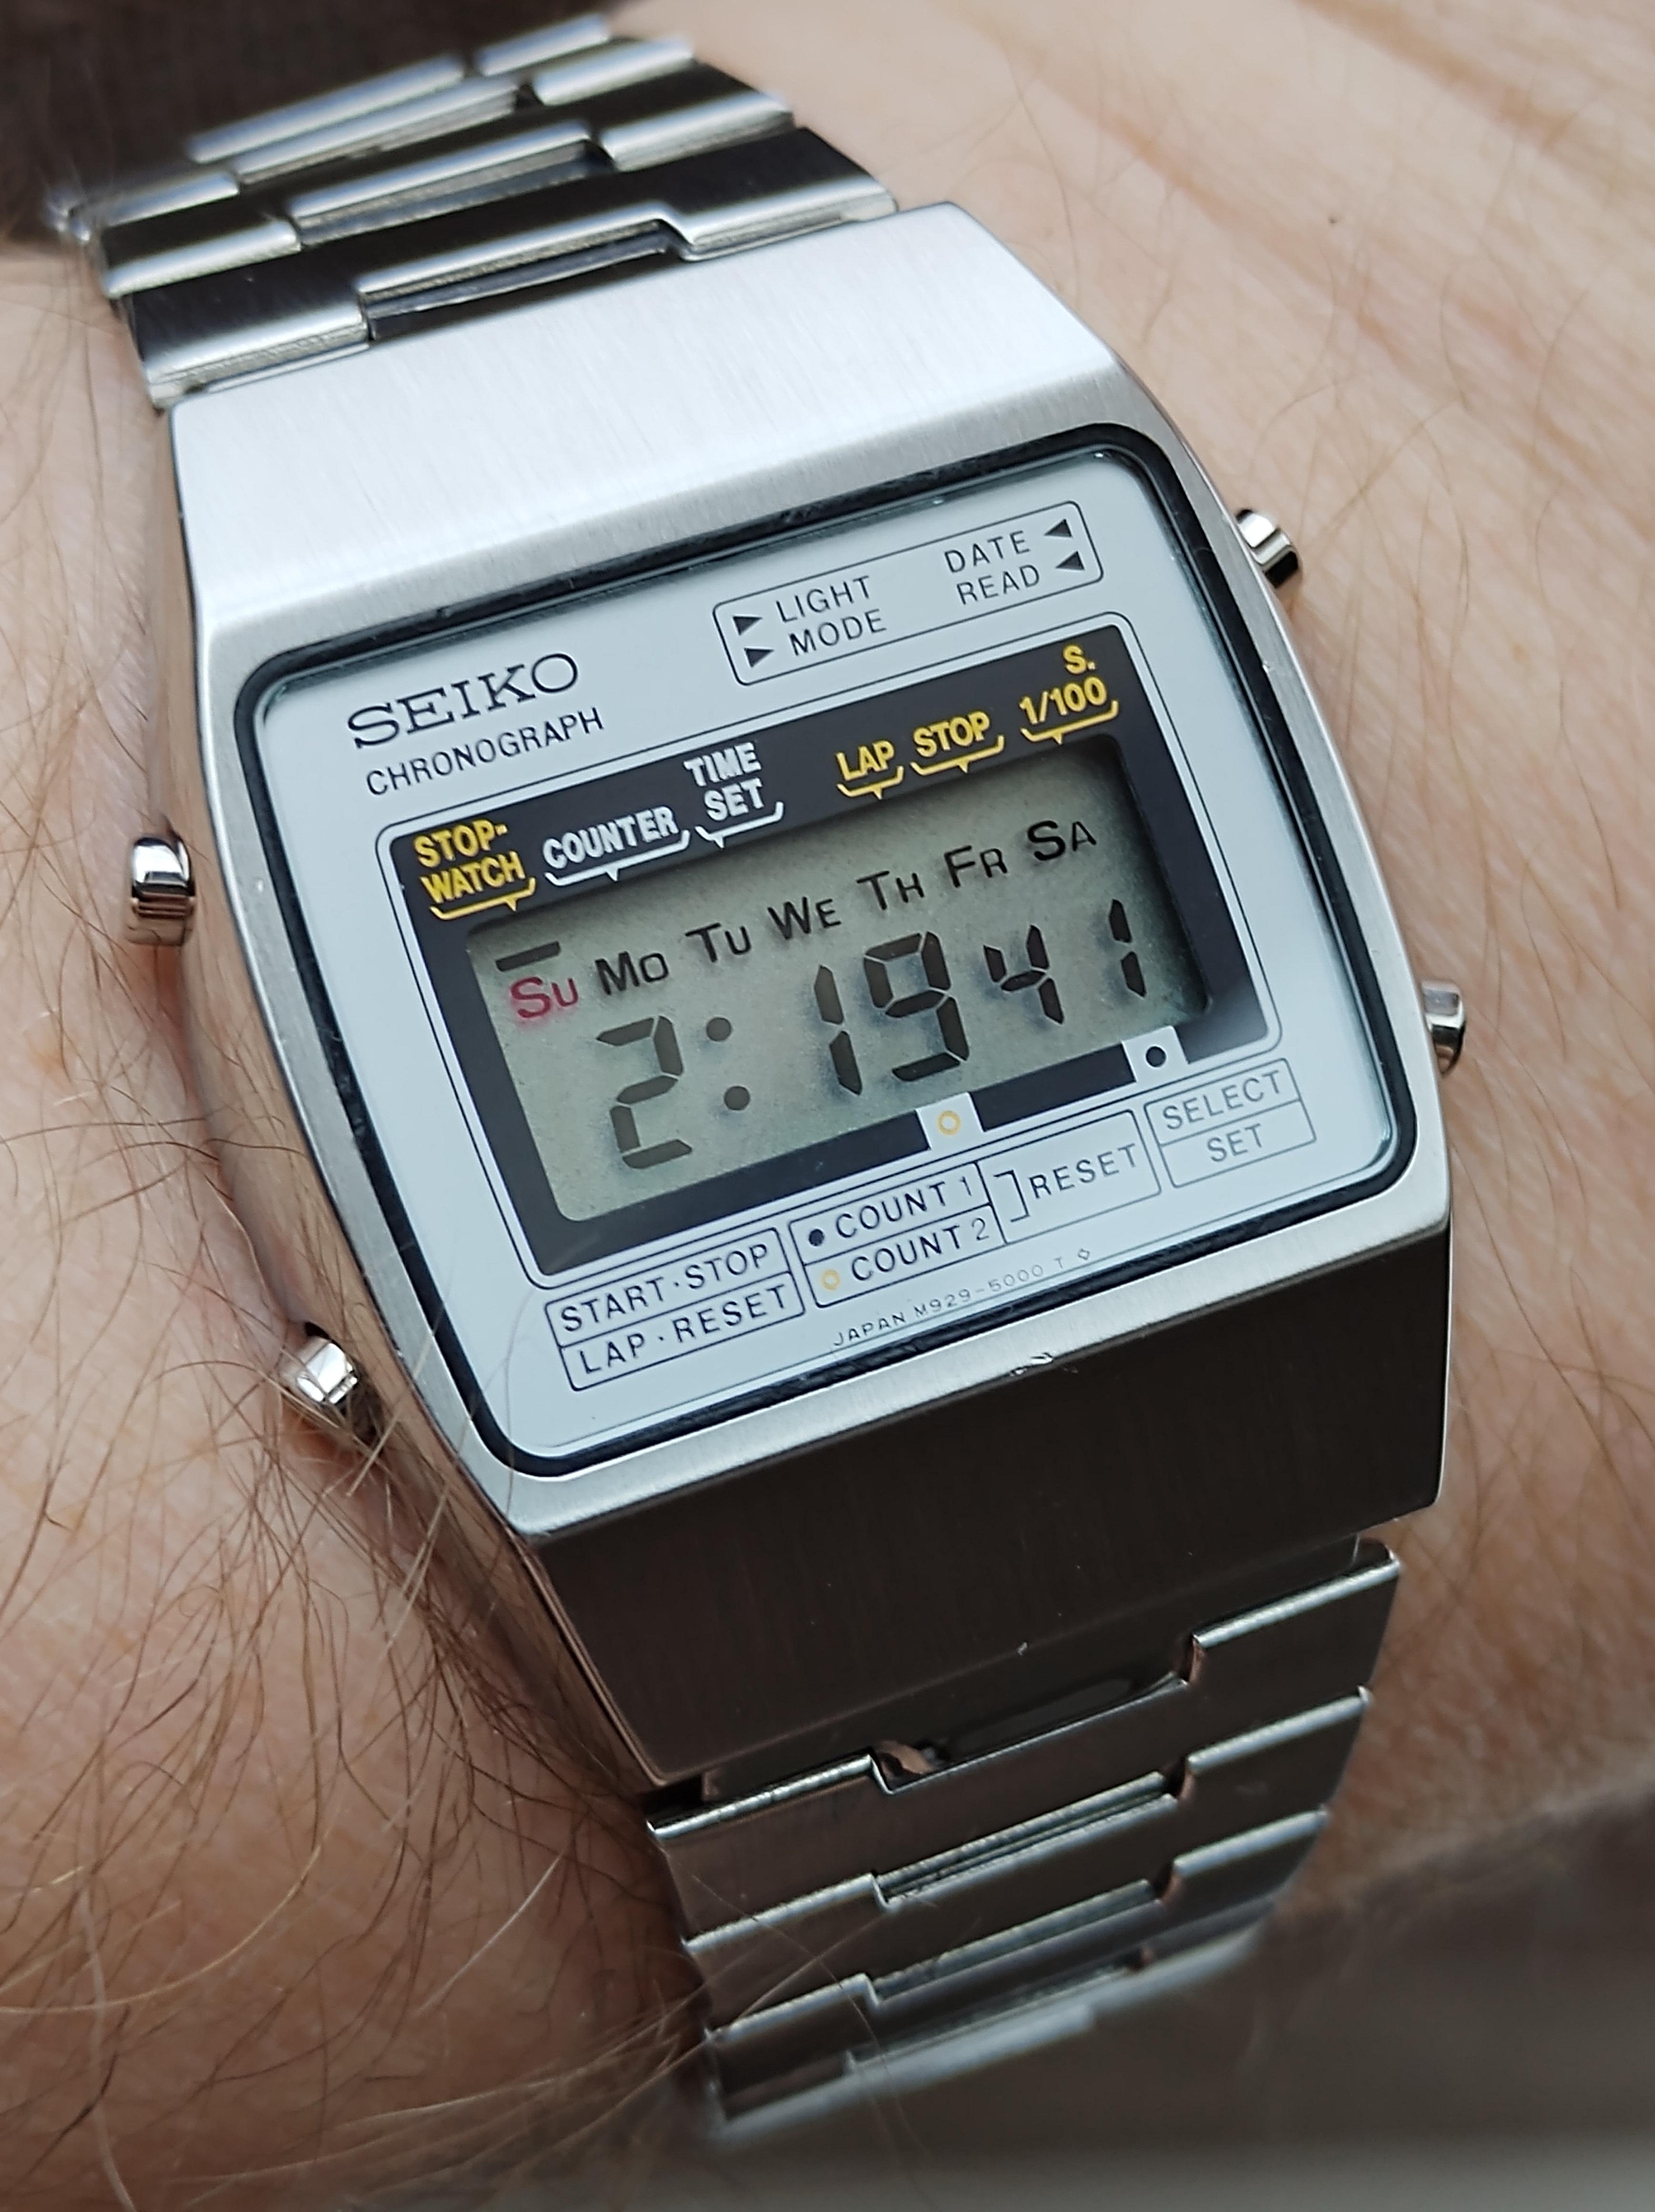
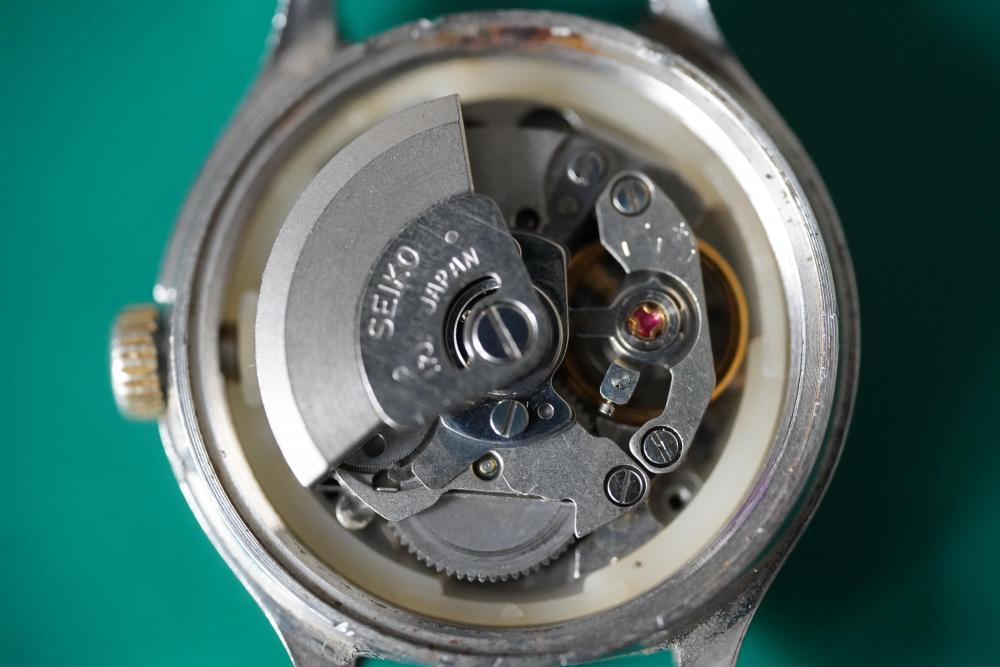
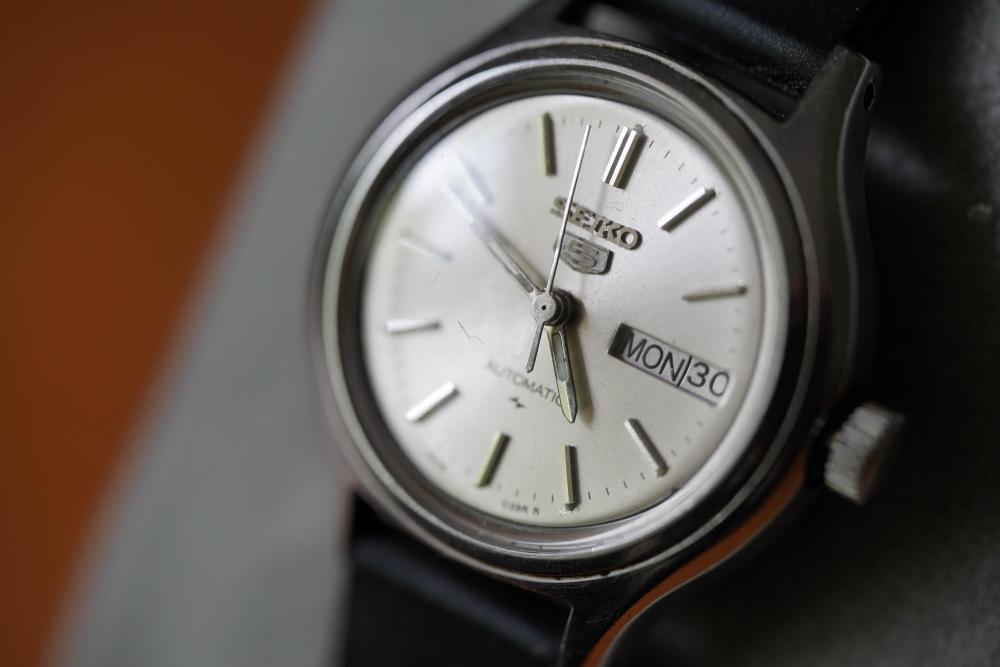
Seiko M929-5000 (September 1979) With original bracelet. Worked out a nice way to install the rubber seals on the pushers using the end of a cocktail stick. Will share that soon. Looking for an M929 LCD so I can finish up another one.
 1 point
 -
I also had a similar issue with the clone tool that some of the pushers were a little oversize. I should actually check and compare if it’s the same ones you had an issue with. That being said, I’ve already used it twice to replace jewels and it worked a charm. Someone should do a video on using this type (hint, hint @VWatchie), it took me a while to figure out exactly how to use it.1 point
-
I, for one, found this thread incredibly helpful. So at OP, keep it up please1 point
-
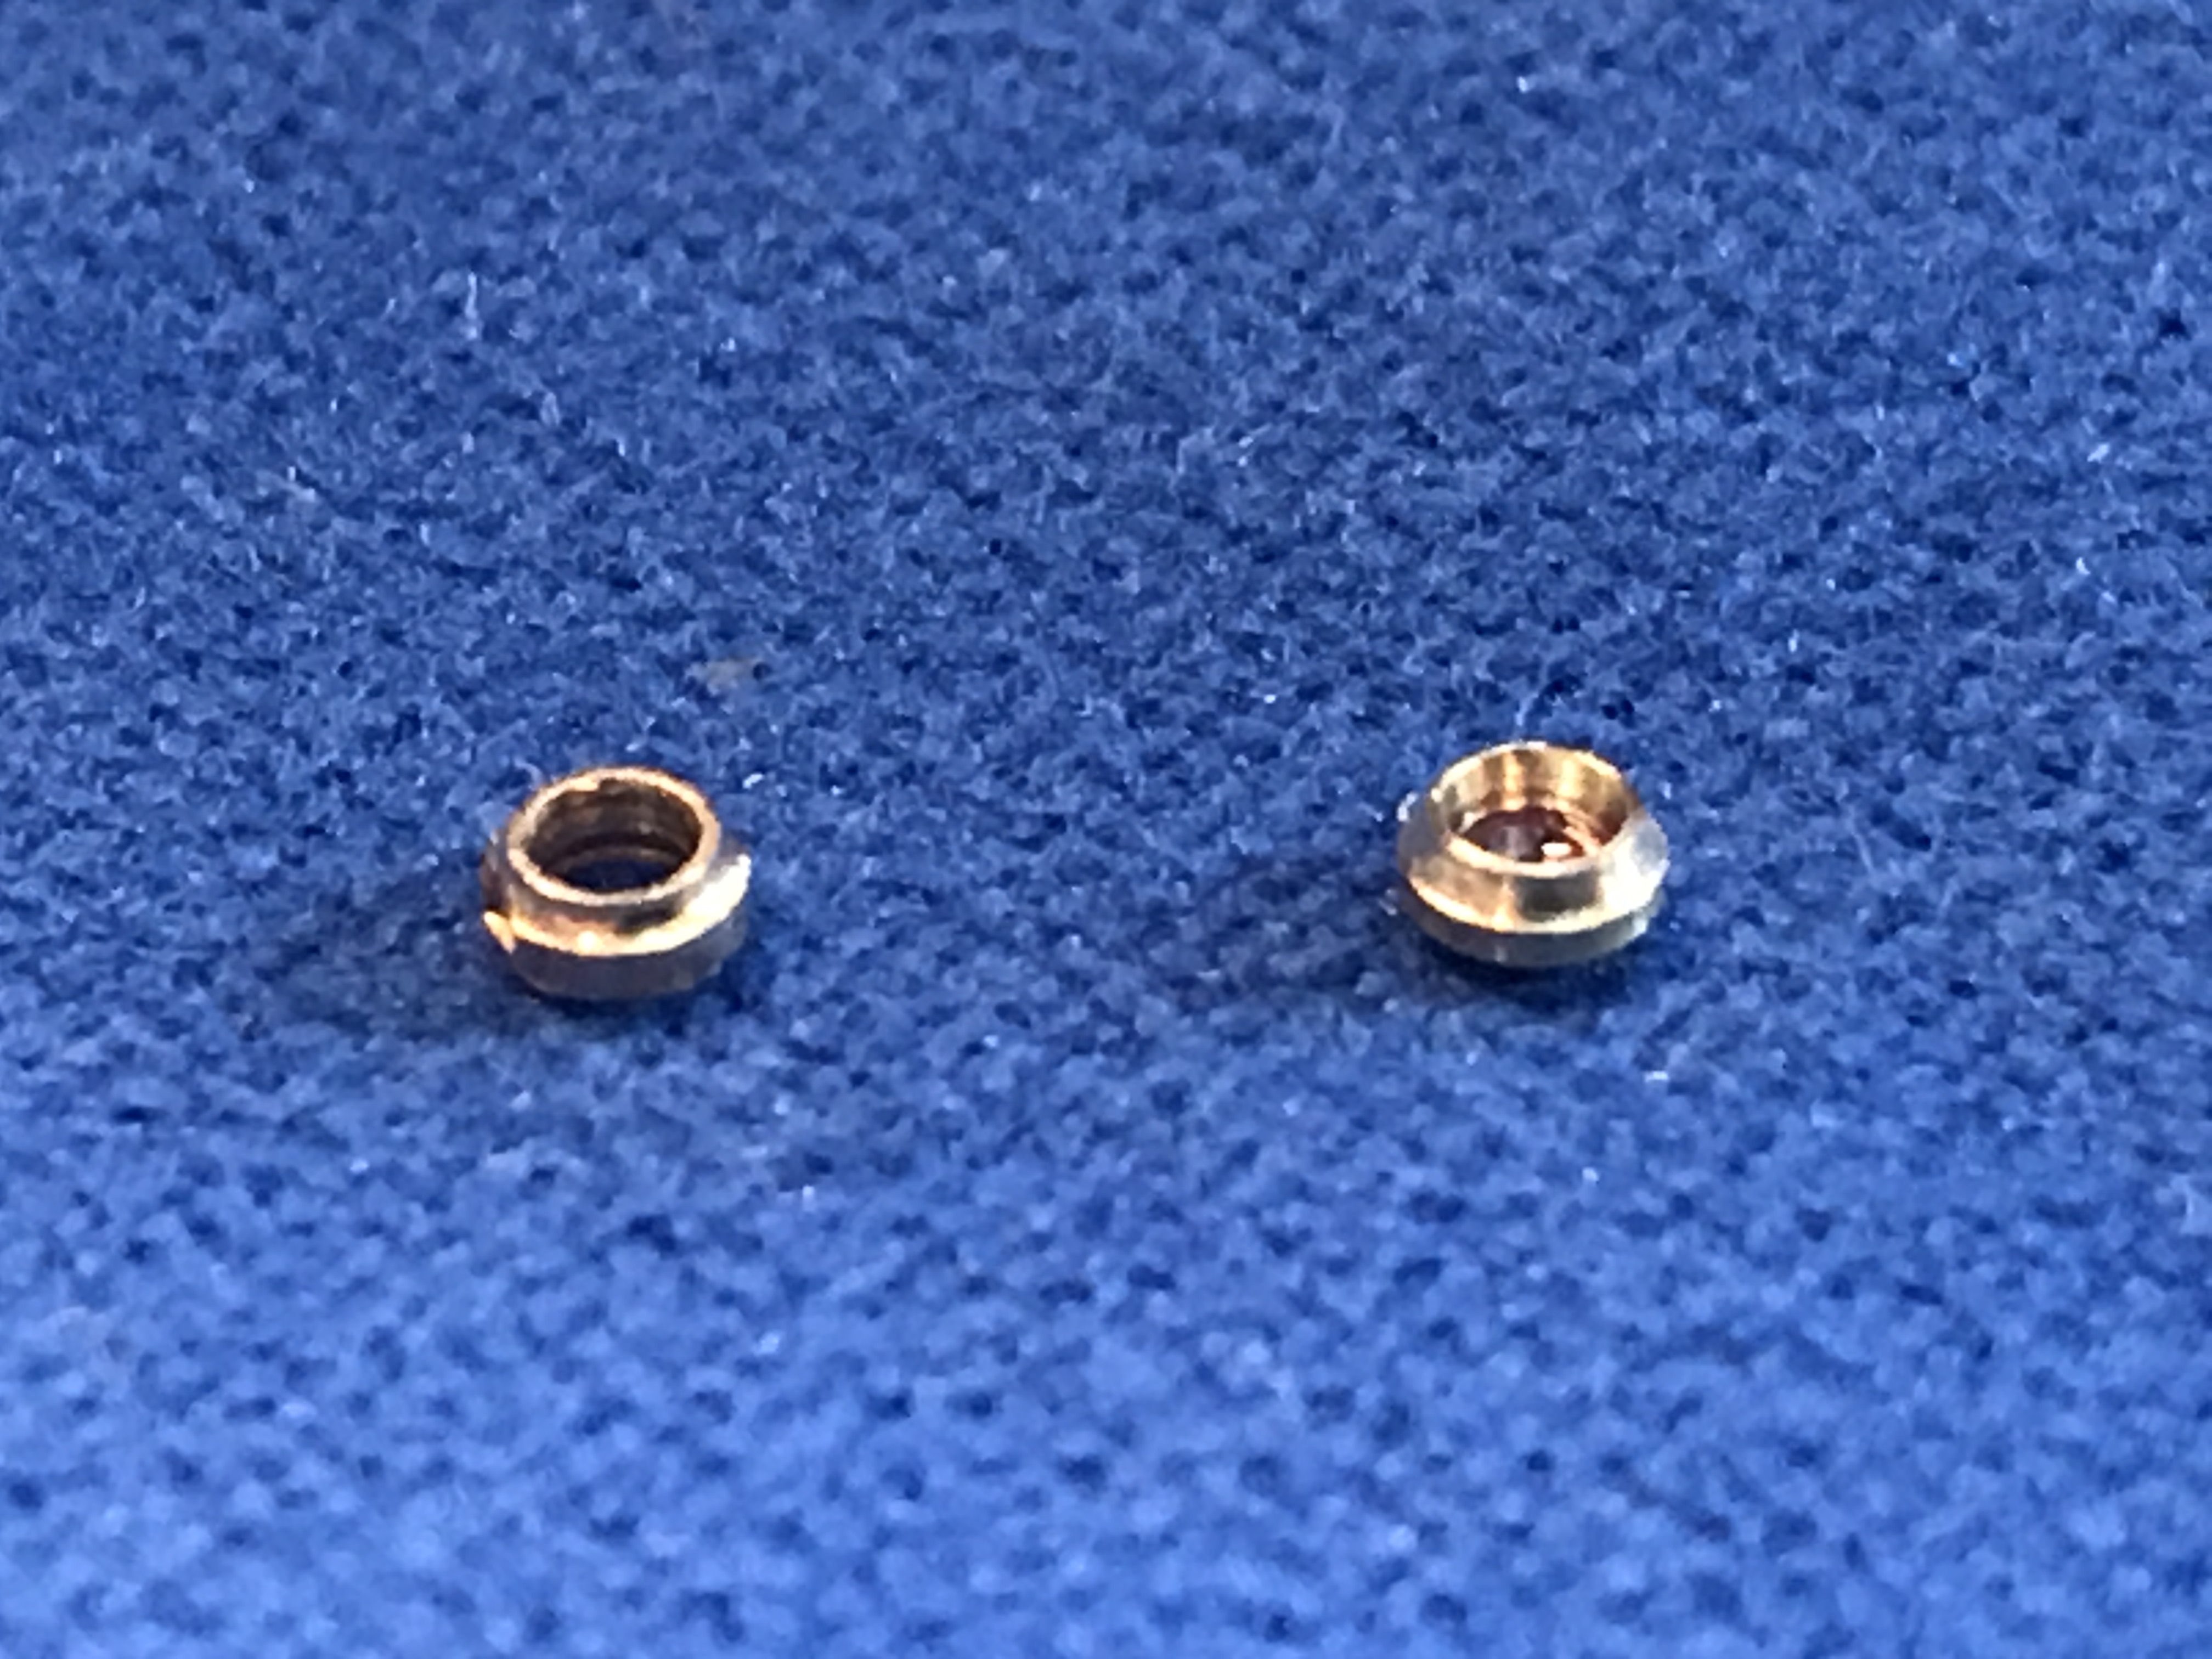
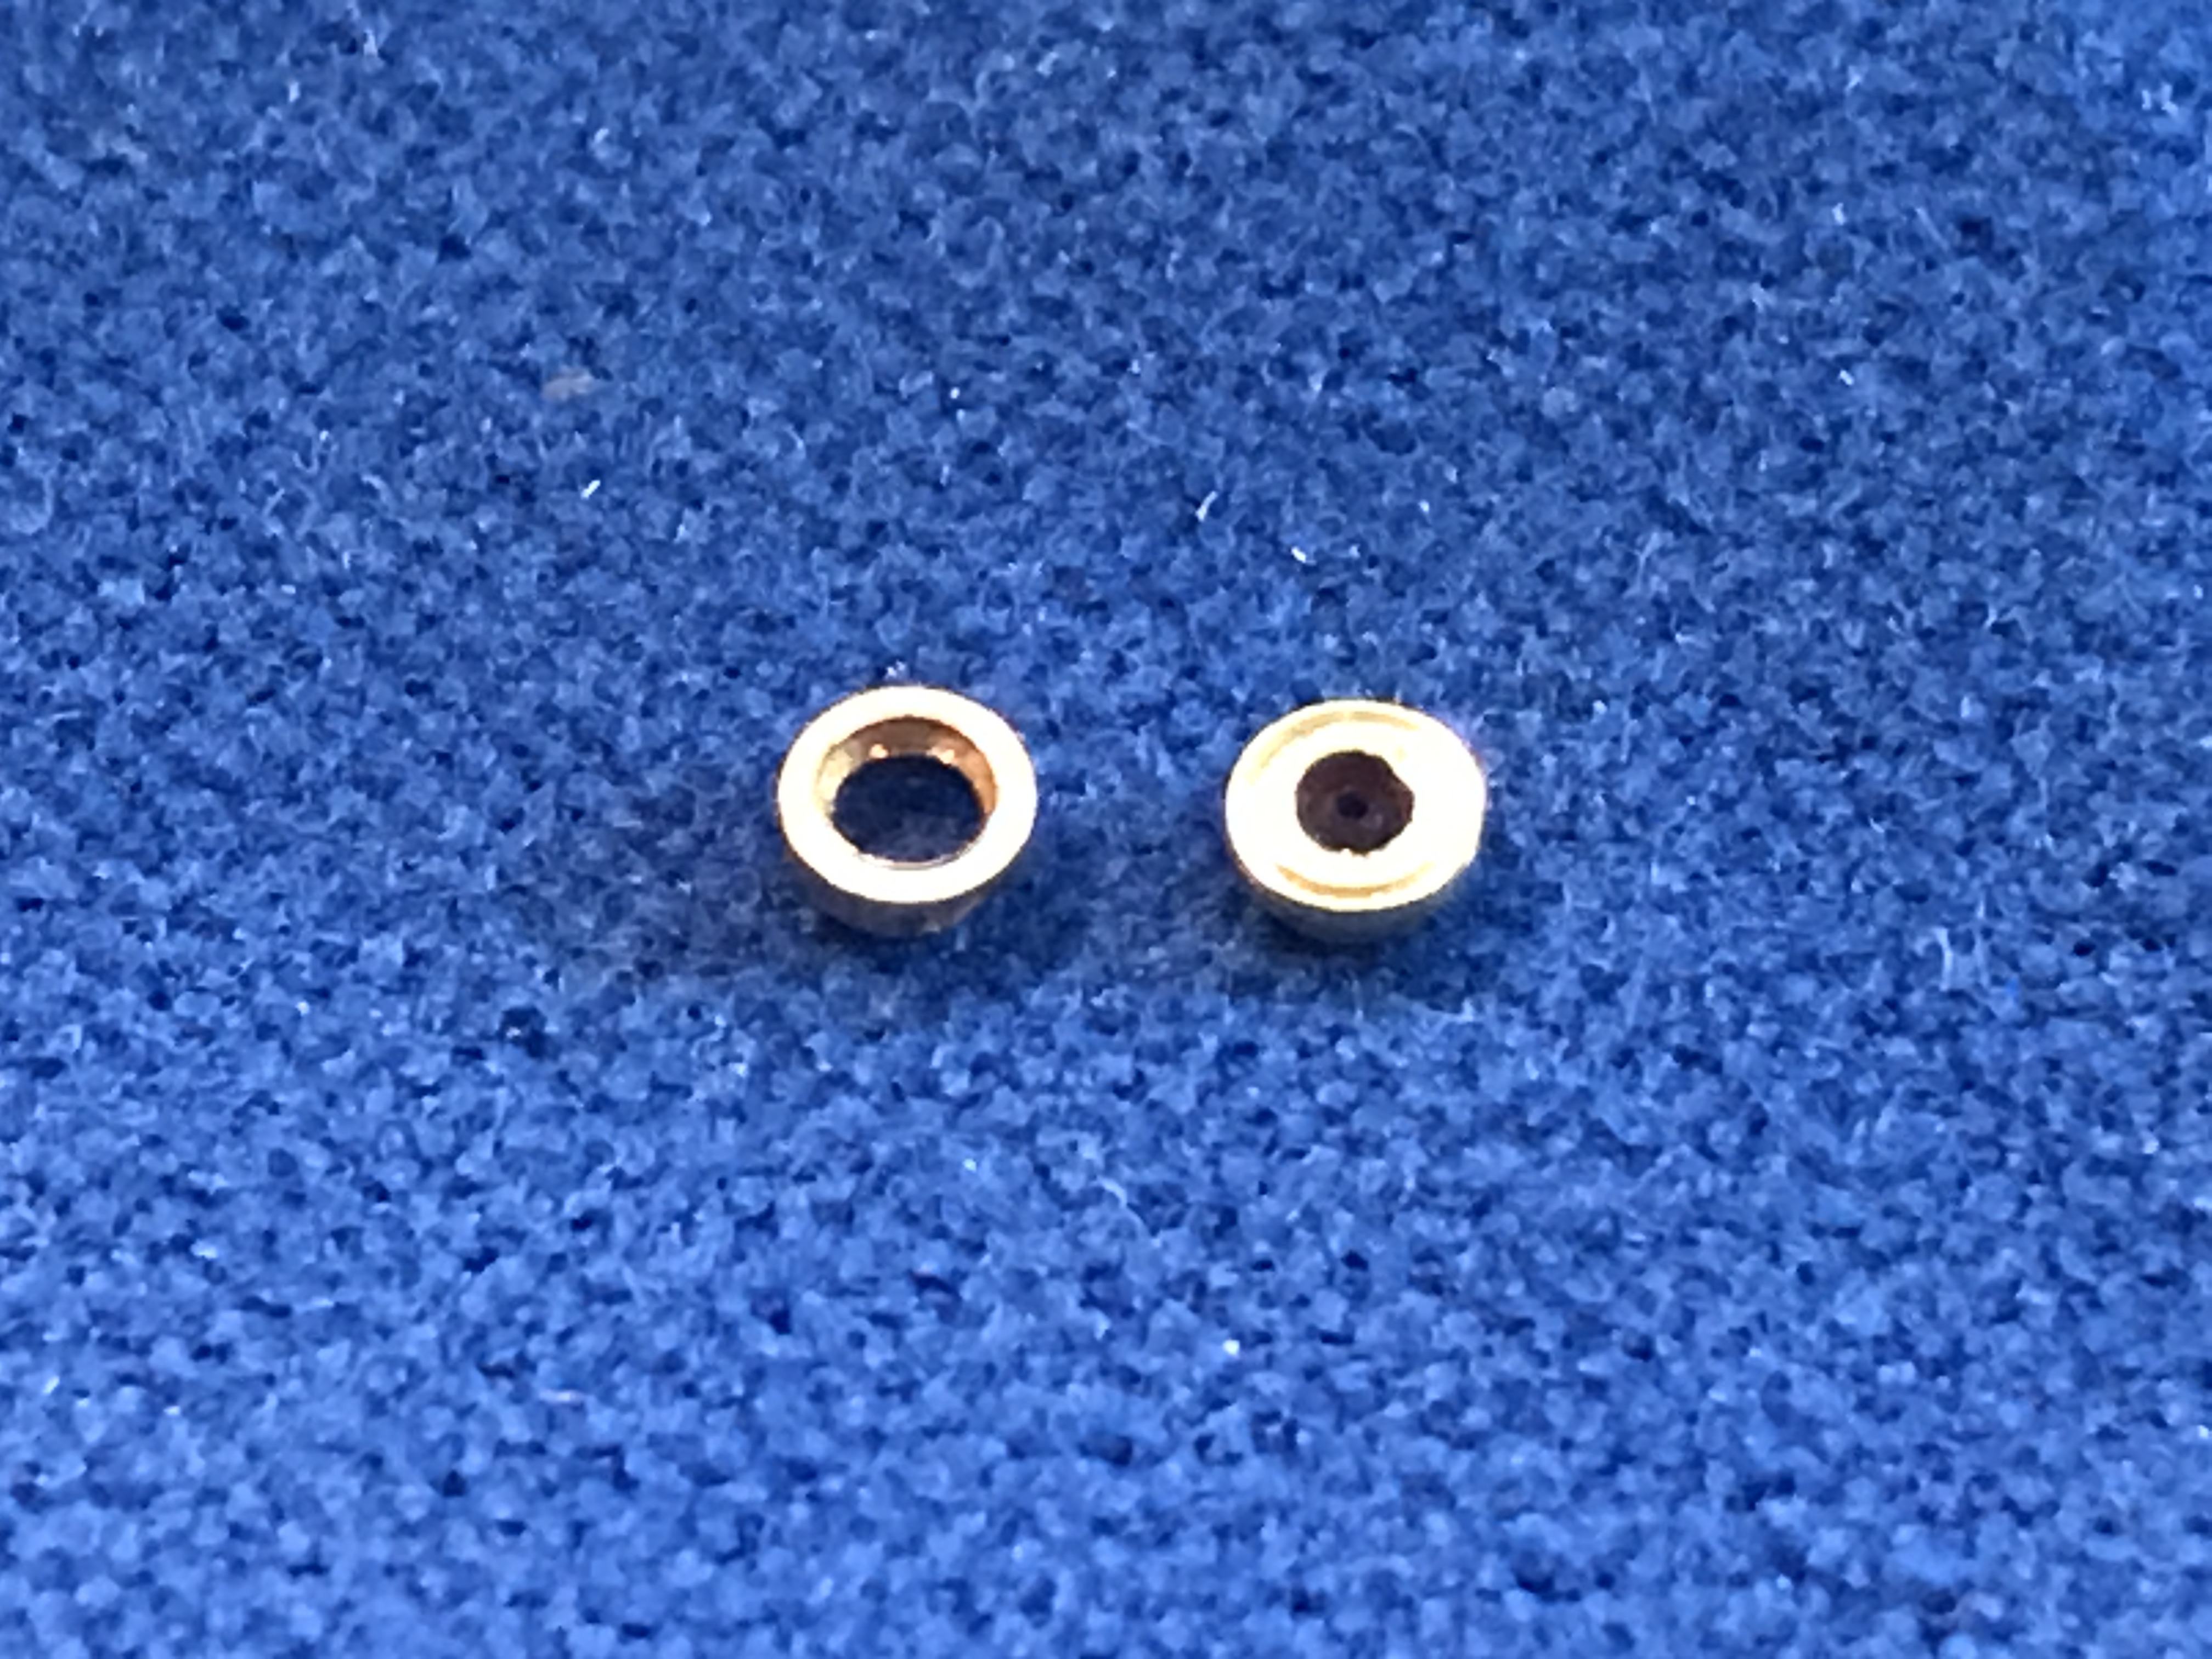
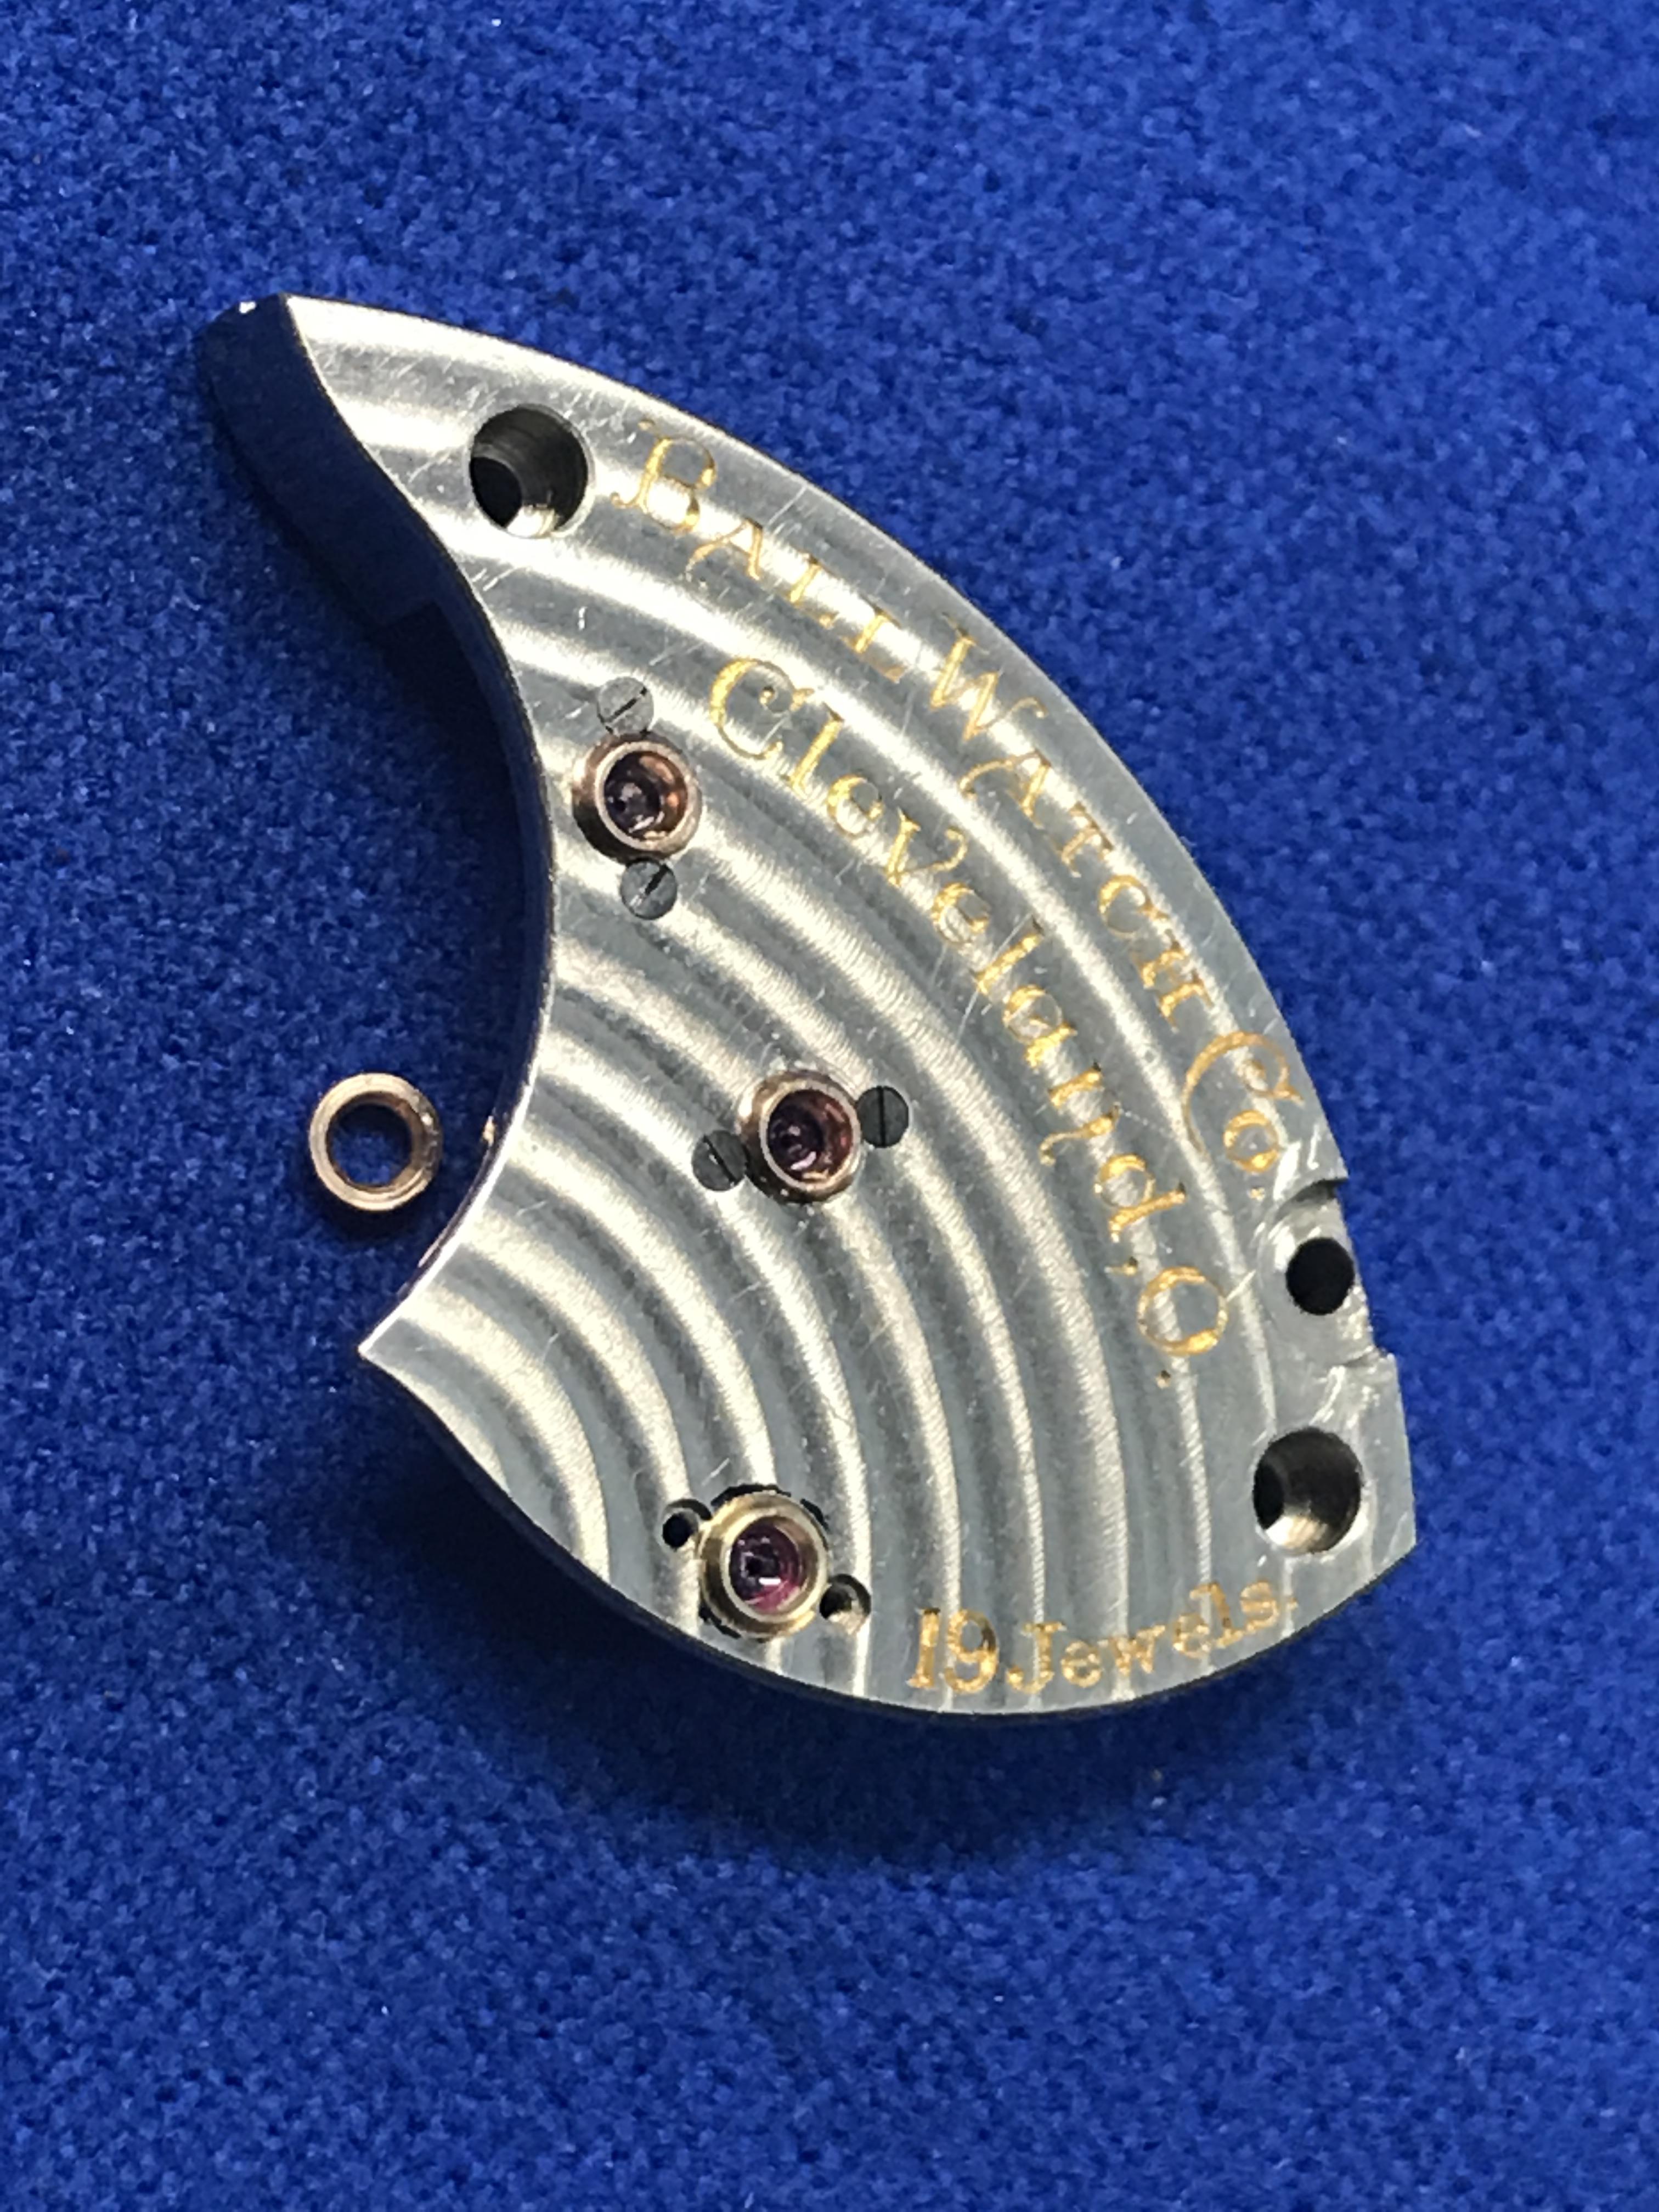
Following the Chicago School of Watchmaking Manual, somewhat, I made from scratch a raised jewel setting for a Ball Pocket Watch. I did this because the old setting had a broken jewel and the material to burnish was cracked on one side. I also put a video on YouTube and will share the link. Steps 1. Source, size and chuck the stock material 2. Pick the jewel and using peg wood, stab it to hold it on the peg wood . 3. Drill a hole in the brass slightly smaller than the jewel. Make the hole long in case of do-overs. 4. Size and drill a straight hole just deep enough for burnishing lip. 5. Place the jewel in the hole with a little spit on the end so it stays in place. 6. With a very sharp needle like graver, cut a small trench just beside the hole and only to the depth of reaching the jewel. This will be your burnishing material. 7. Burnish in the material over the jewel. May need to make a tool for this. 8. Face off the setting up to the bent burnished material. 9. With a flat stake, lightly tap the burnishing material flat over the jewel. This is to just make sure there are not any raised edges. 10. Measure the old jewel setting diameter and then cut the Brass rod to a length twice its’ height and to its diameter. Hand fit the plate hole on the brass rod until it fits snugly. 11. Mark the height of the setting on the brass rod and shape the material to look like the old setting. Work slowly. 12. Cut away the new setting just above the height mark. 13. Place the setting in a jewel chuck, top side out and face off the setting to the right height. 14. Cut the inside material of the setting removing enough material and shaping to look like the old setting. Do not cut too deep or you will remove the top material holding the jewel in place. Using a polished steel rod, carefully burnish the inside of the setting until it shines. 15. Fit the new setting in the plate for final look and fit and adjust the top if needed again in the lathe. That’s it. Thanks. His a link to my 90 min video showing all the detailed technique. Making a Complex Raised Watch Setting https://youtu.be/gkXw-JPnNPA1 point
-
1 point
-
OK - so definitely a chinese thing - the face was freaking adhesive taped to the case ring. geez. The dial feet holders had to be disengaged as well as getting the adhesive tape to release. You can see the white adhesive in the photo. The movement was definitly a skeletonized 2824-2... I'll be replacing that.
 0 points