Leaderboard


Popular Content
Showing content with the highest reputation on 06/19/22 in all areas
-
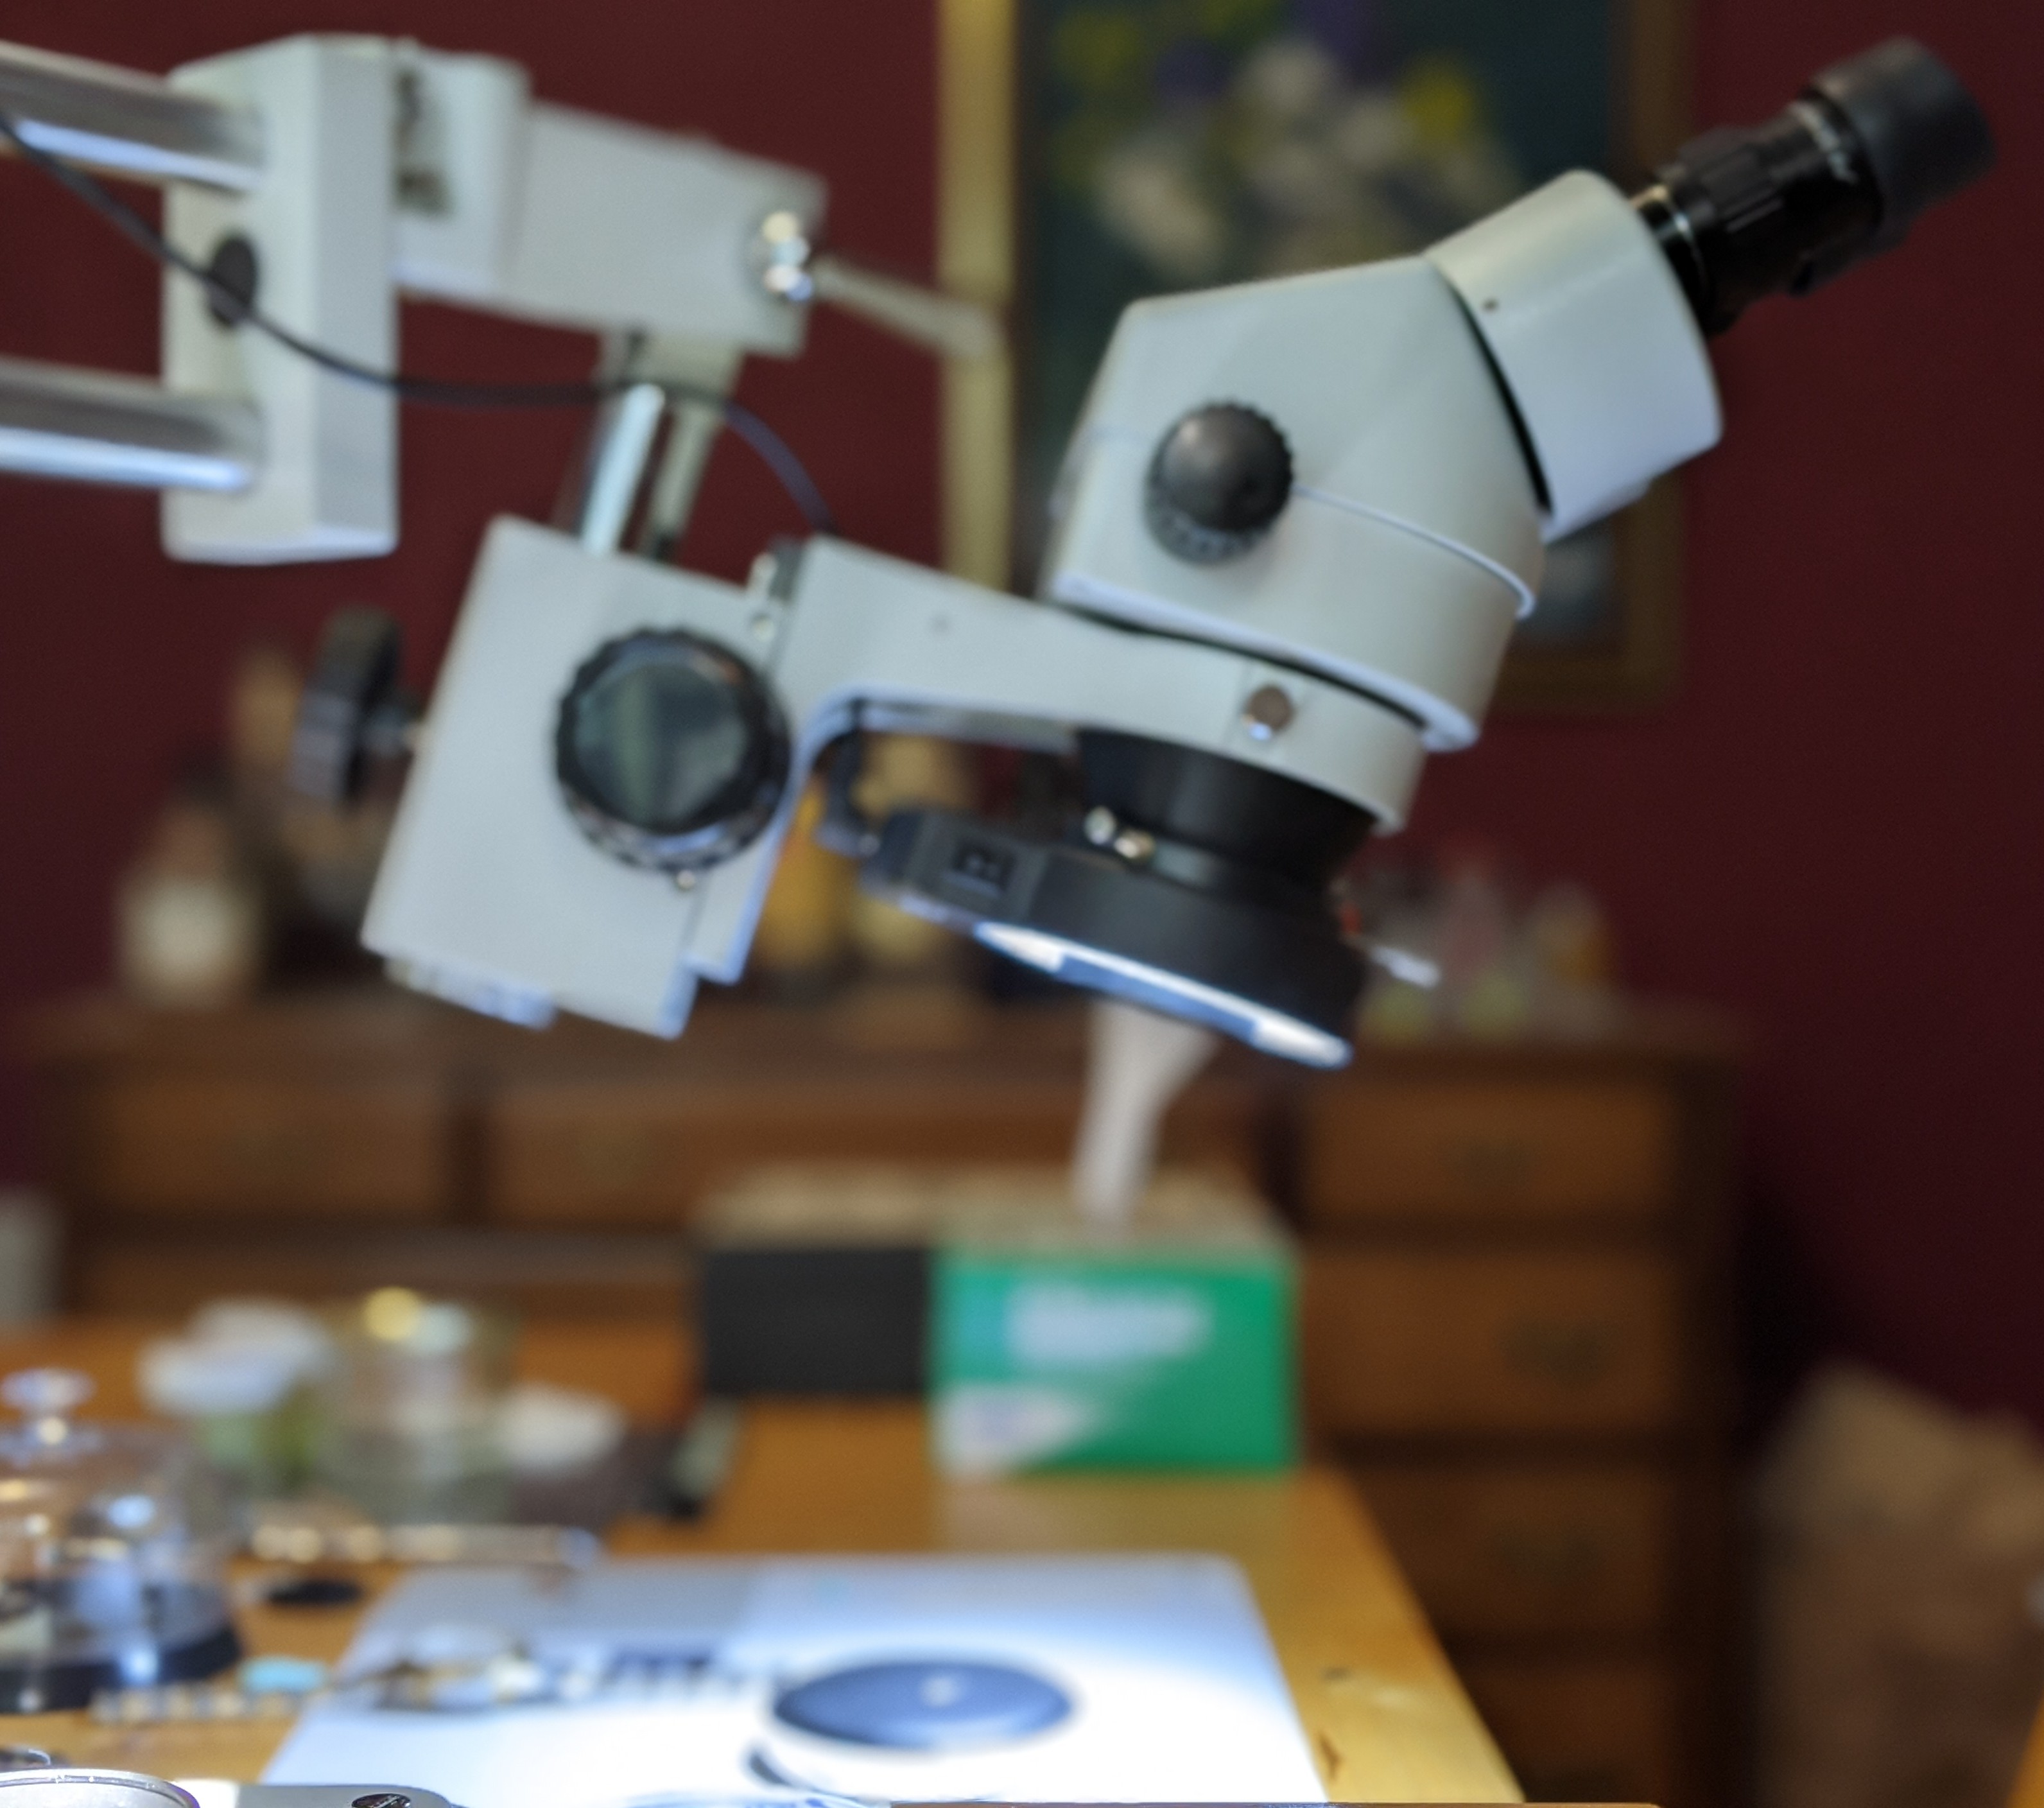
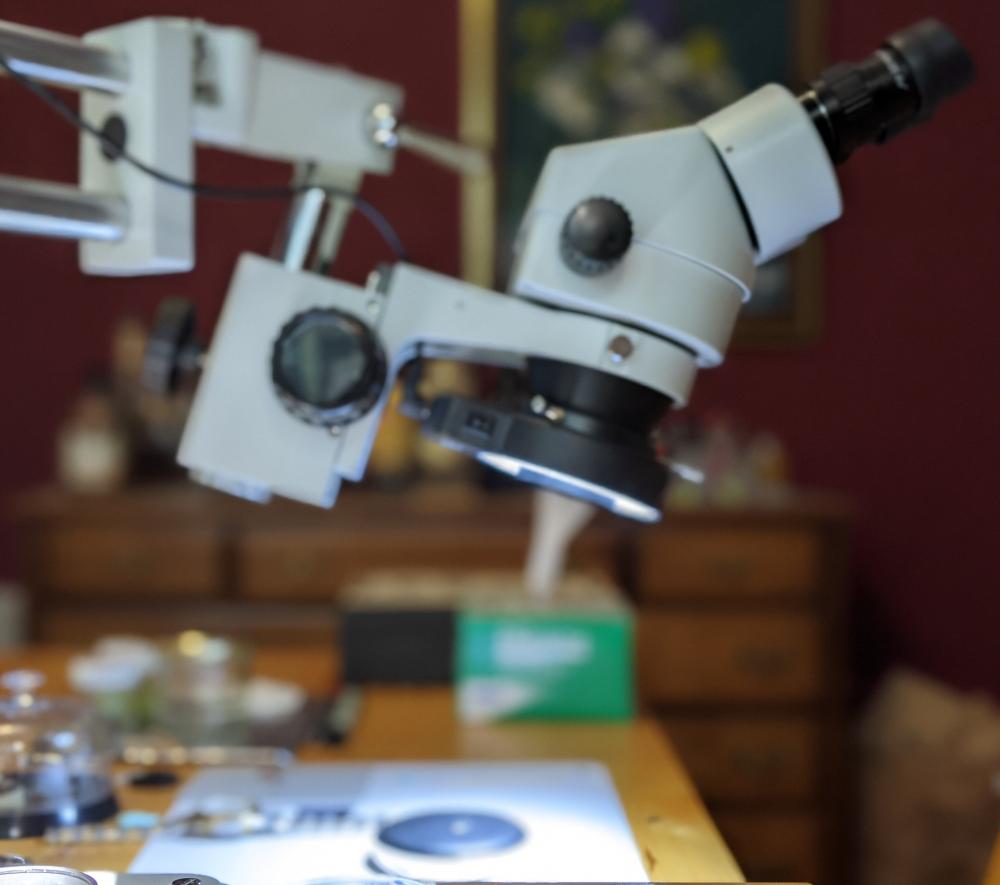
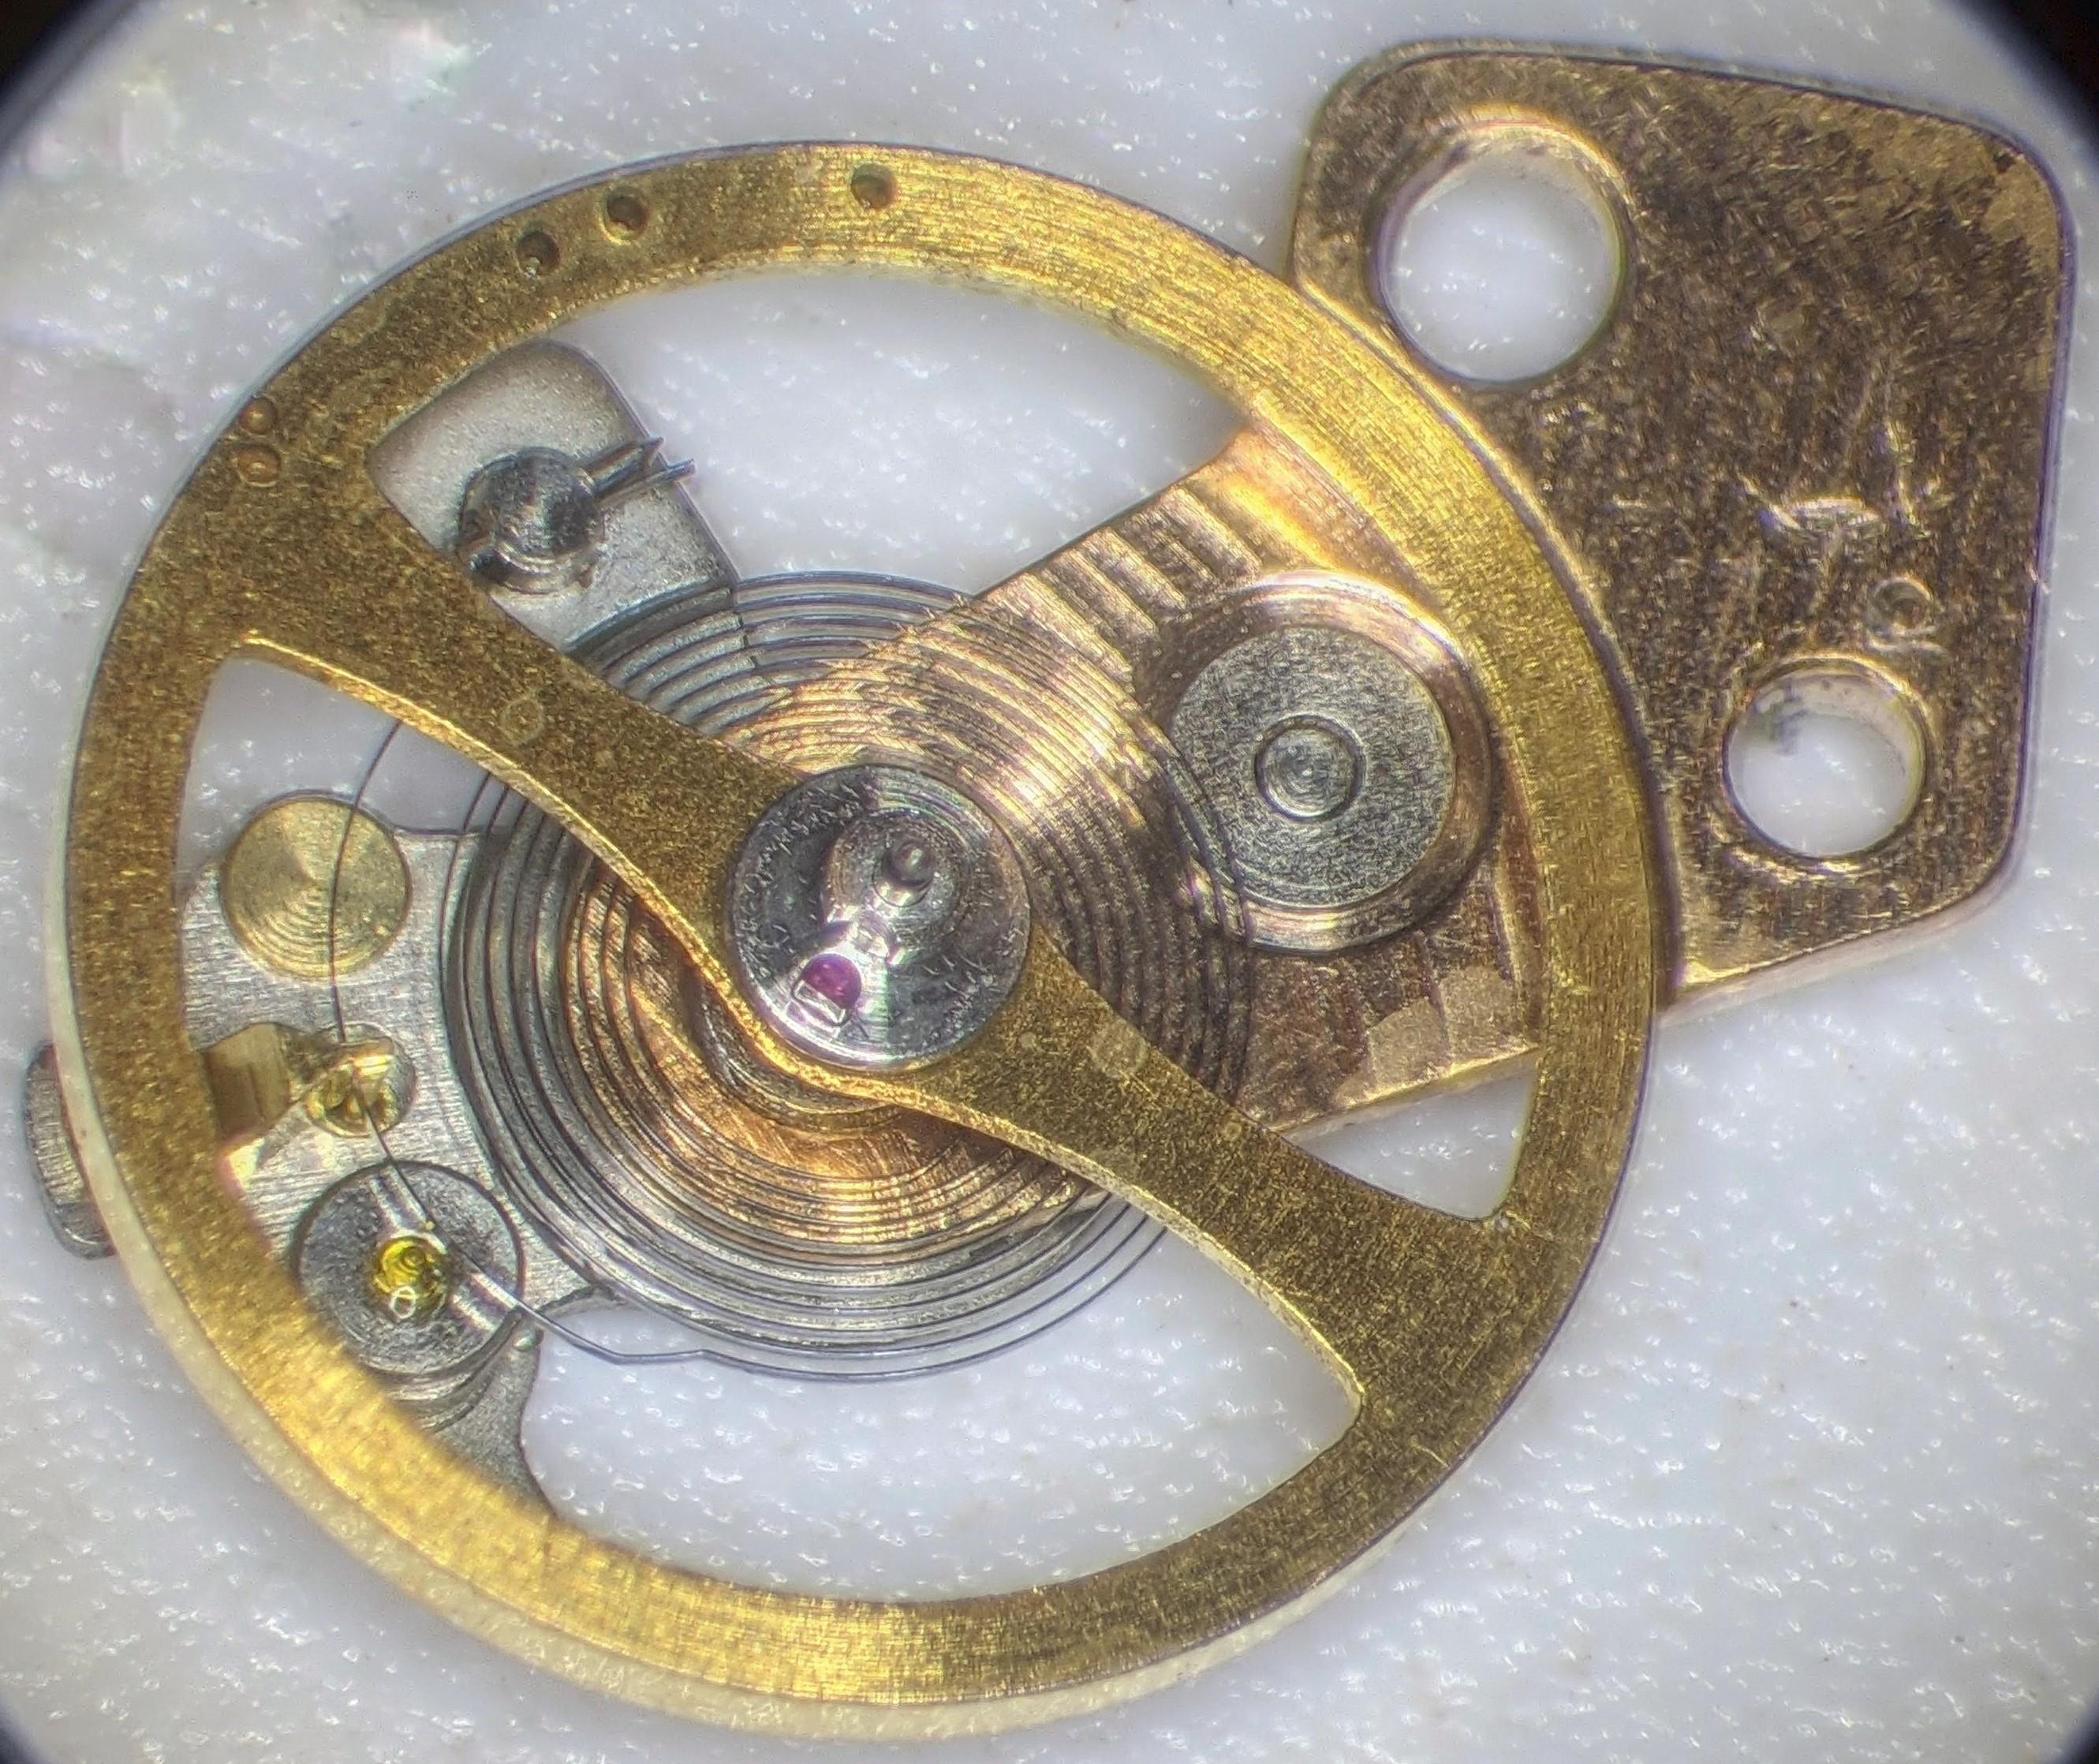
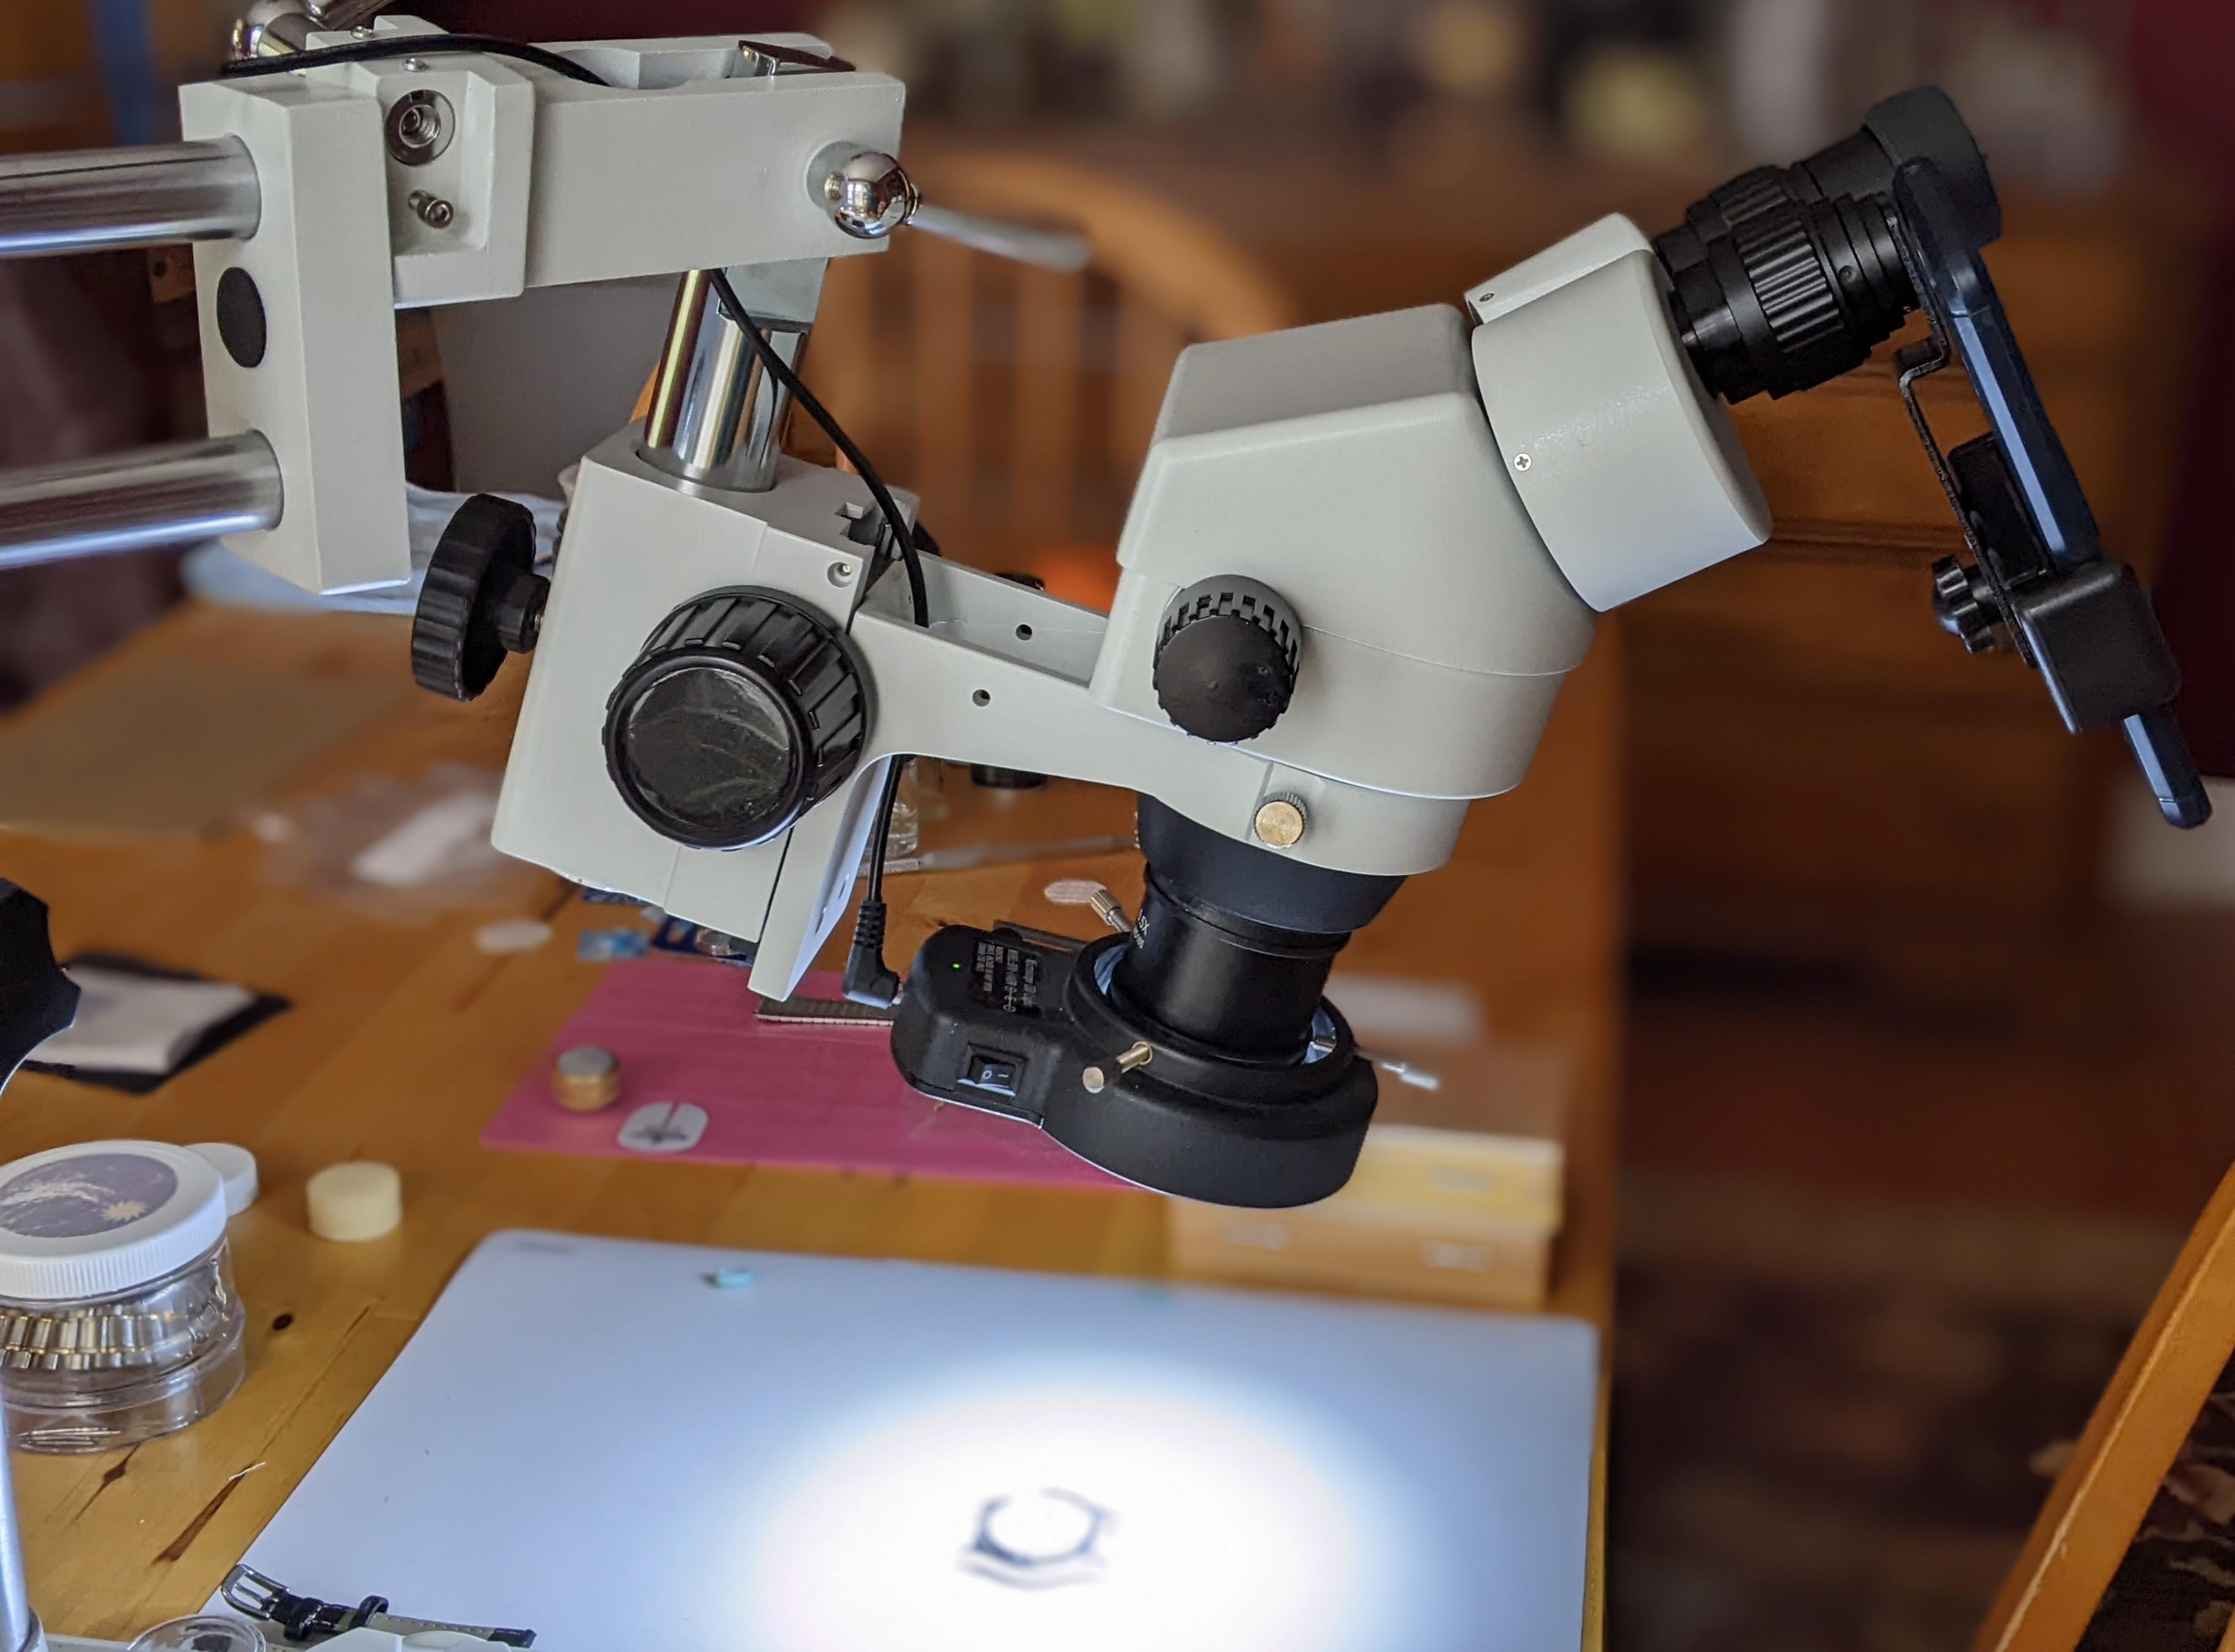
I don't have a trinocular scope so I got a cellphone to eyepiece adapter. It works pretty well, other than I can only use one eye while I have it in place. So I have to take it on and off for pictures vs working. Picture from the phone and what the setup is like.

 3 points
 -
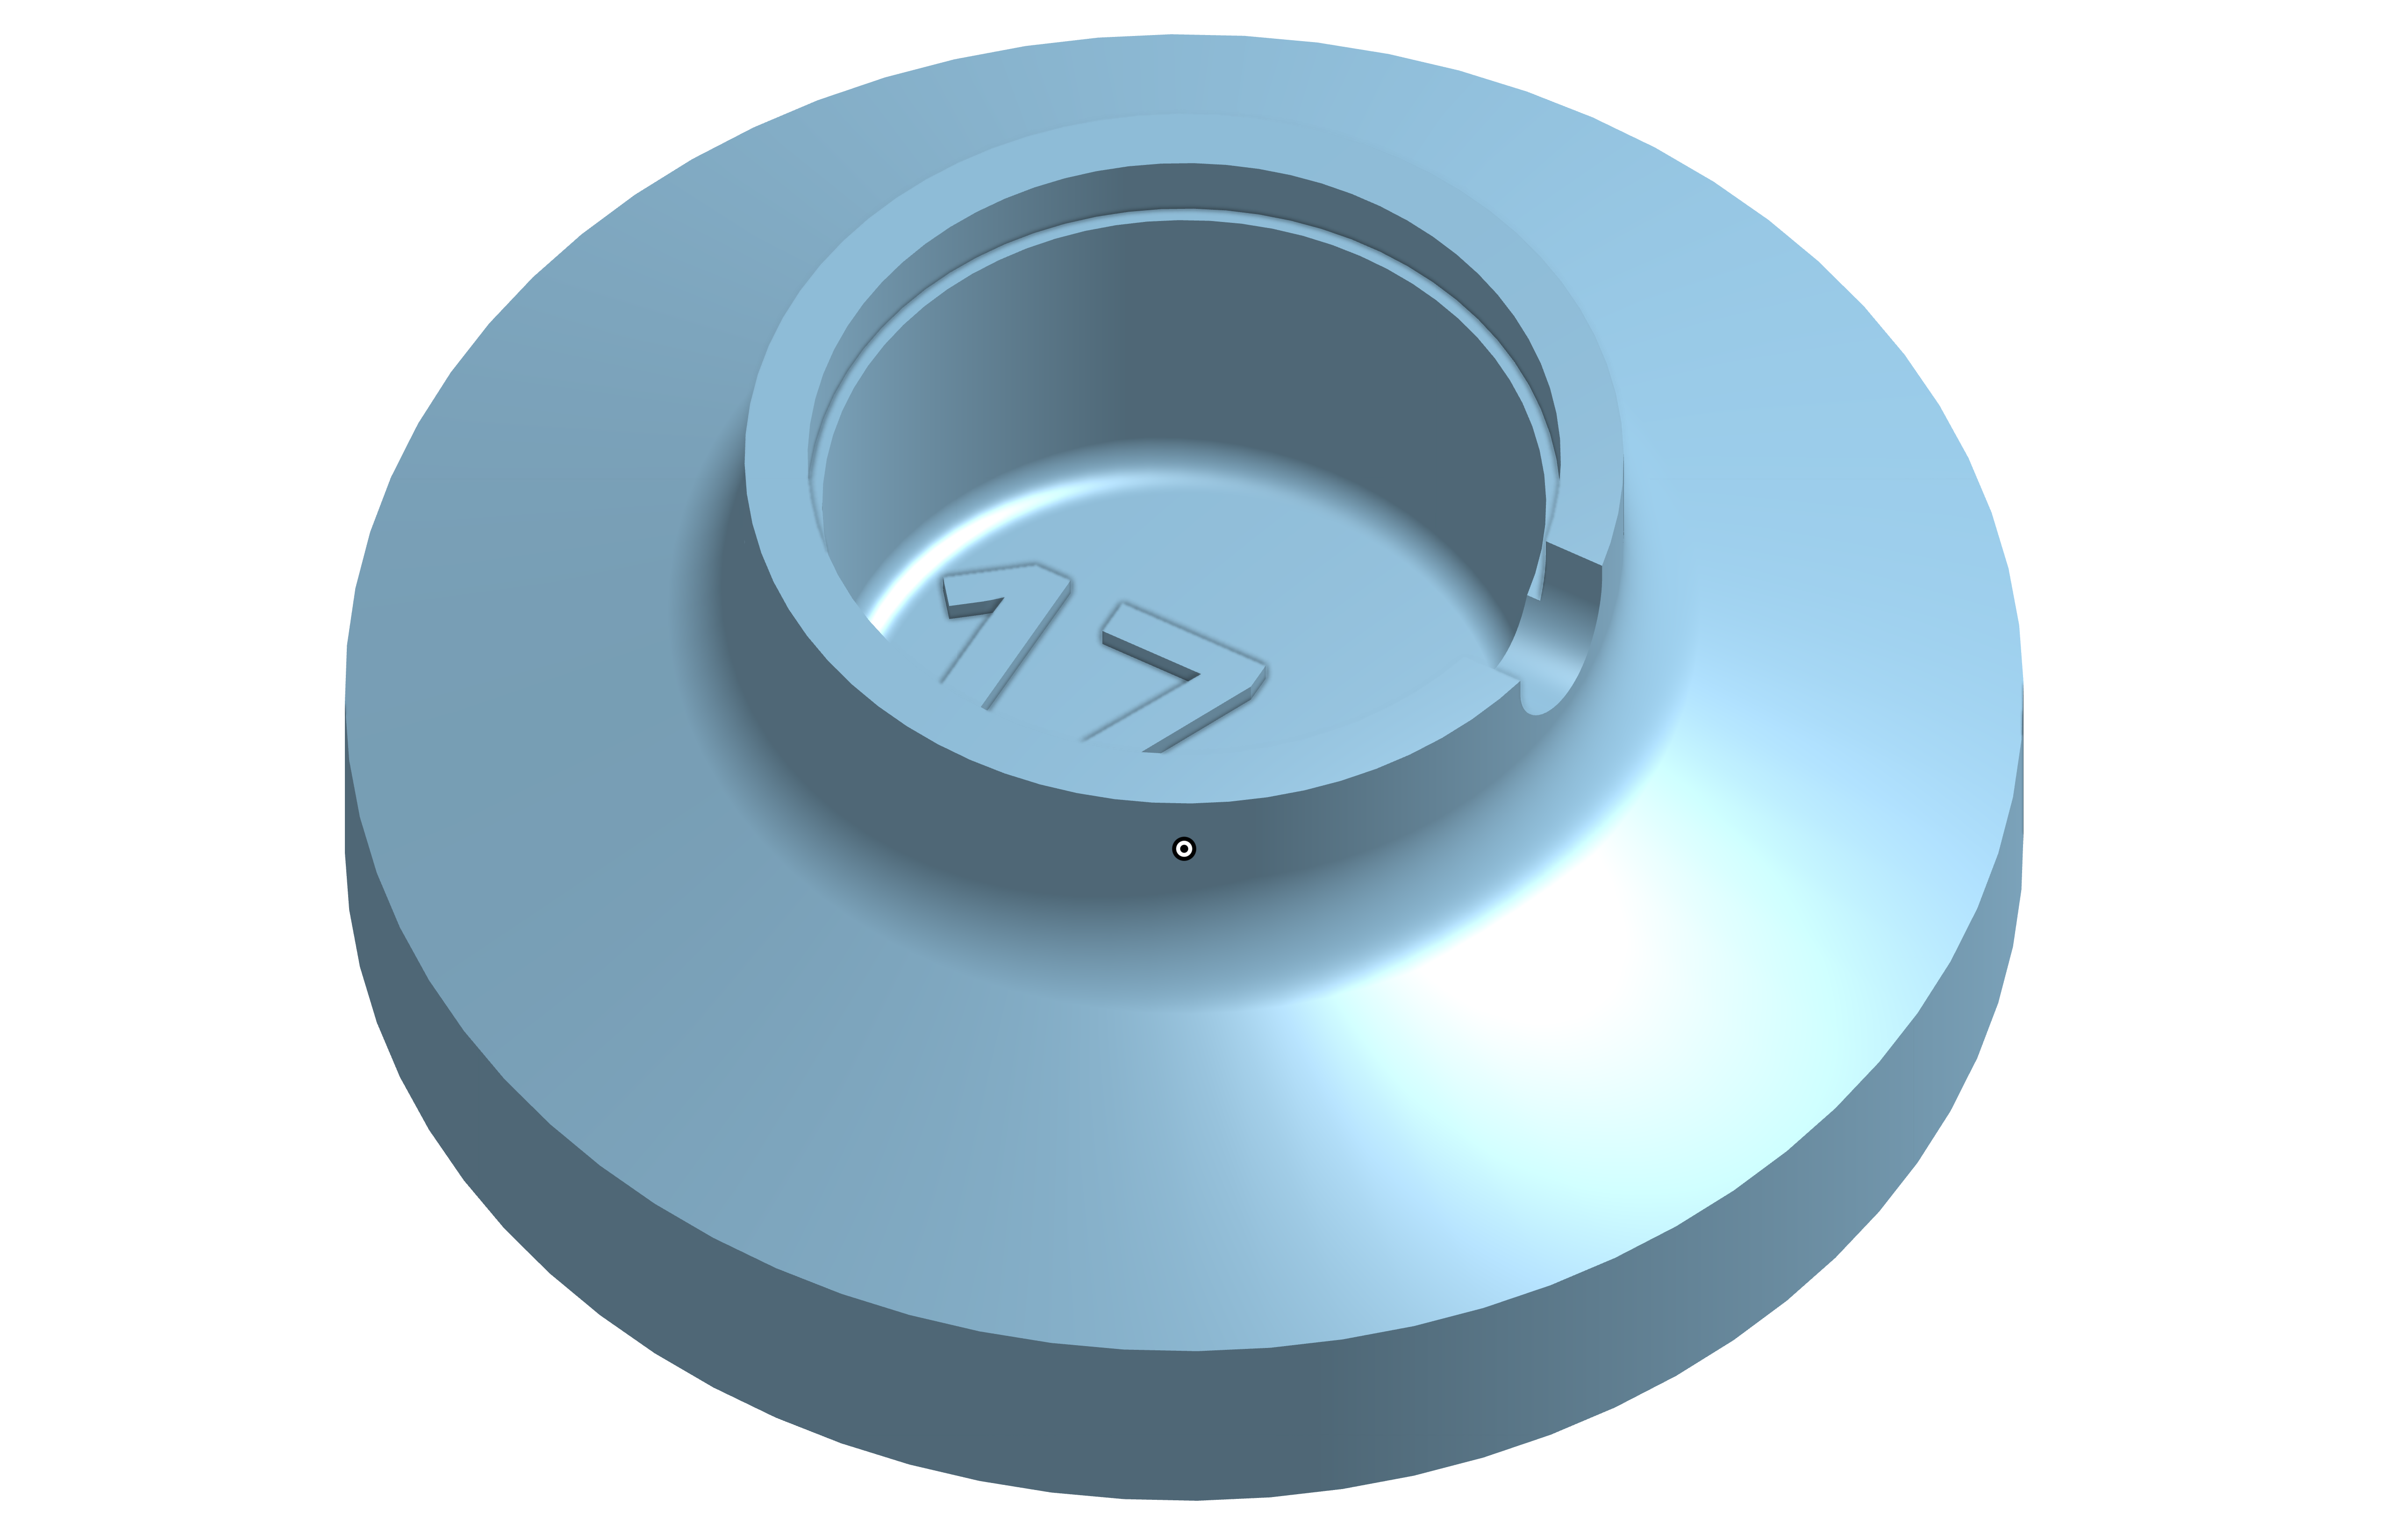
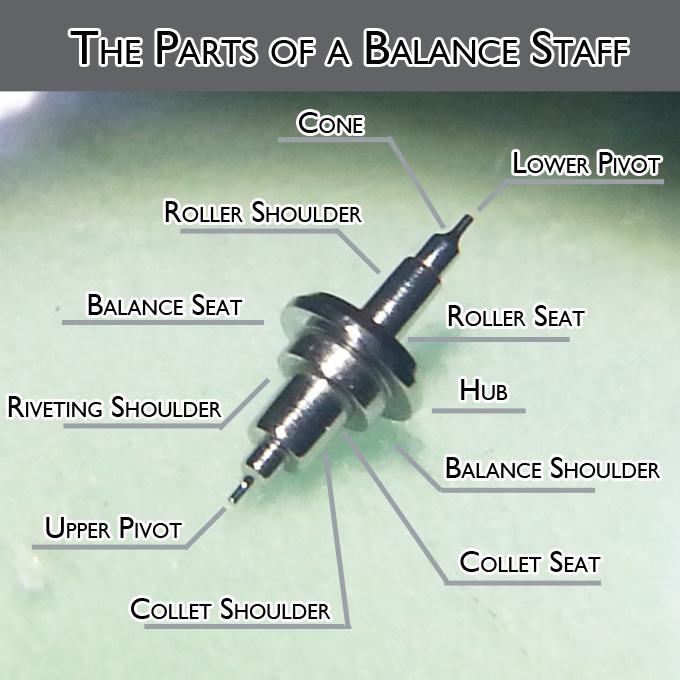
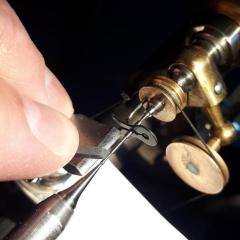
Eyup lads. A relatively easy and cheap way to measure the jewel hole. Done under a scope, a fine smoothing broach inserted until full thickness of jewel hole reached, mark the broach depth and then measure the broach thickness at that point. The pivot on a staff will be same thickness throughtout until it reaches the cone ( conical staff ) . Hope this helps chaps.
 2 points
 -
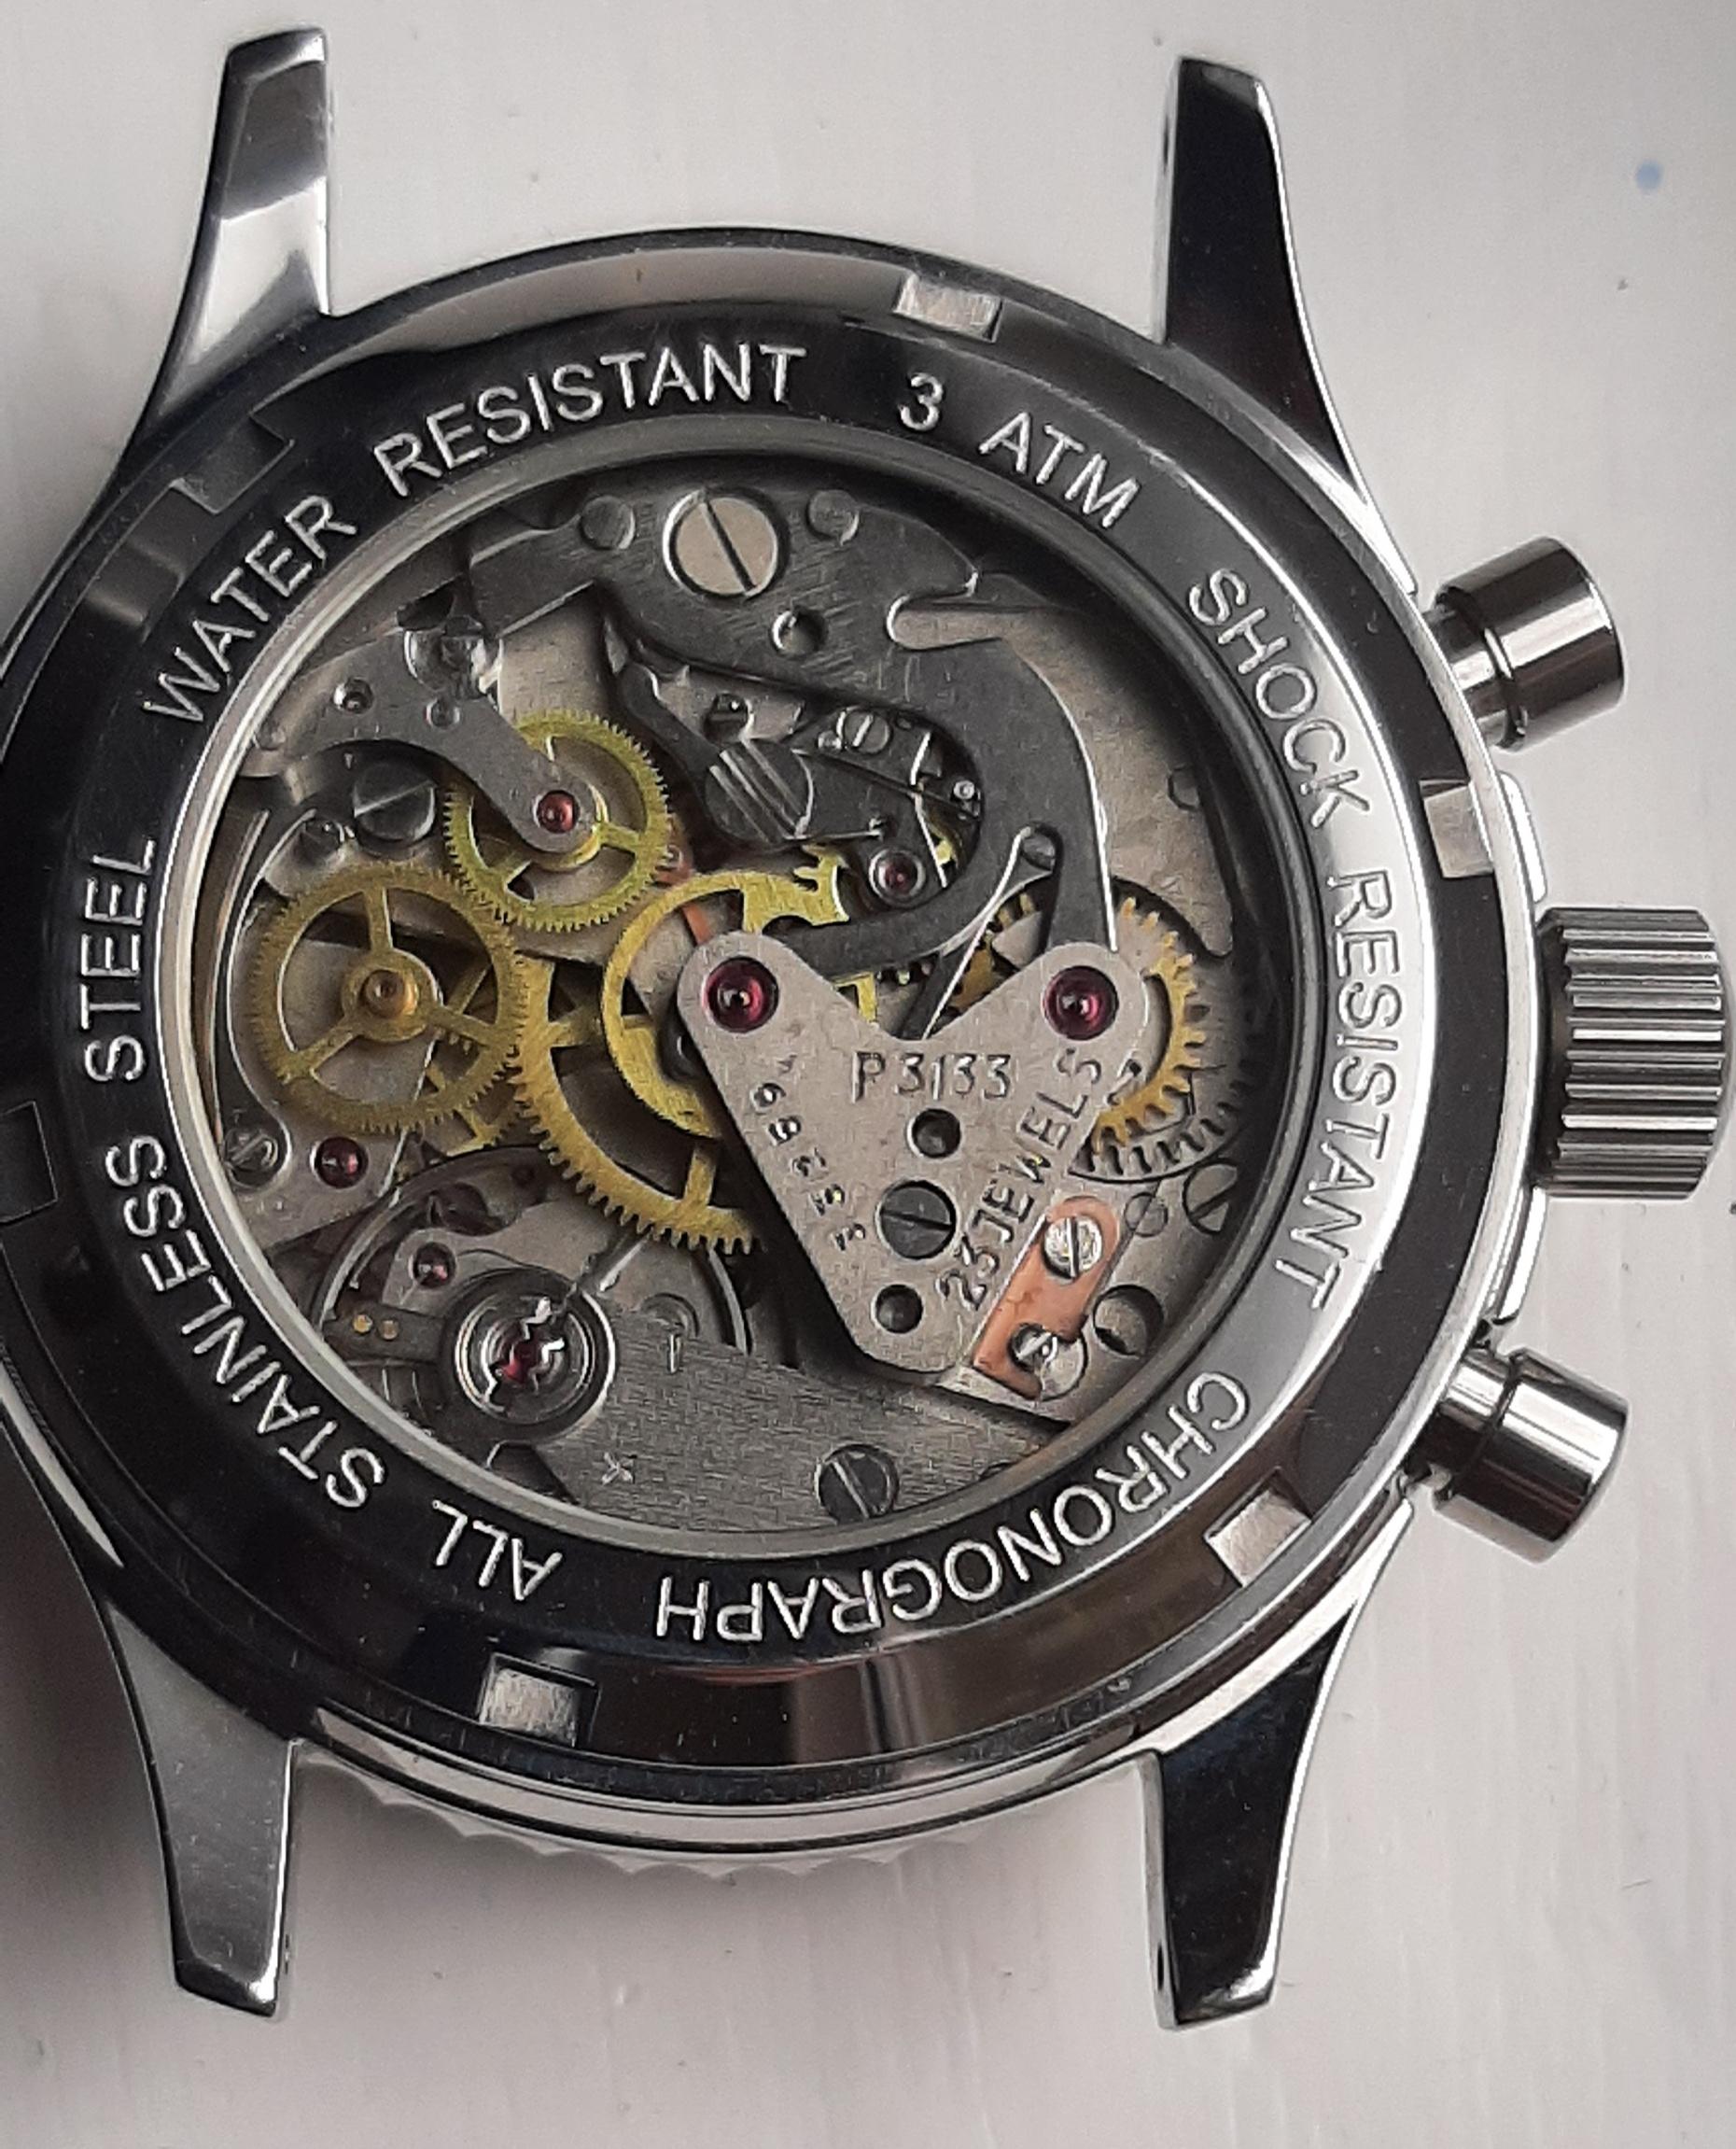
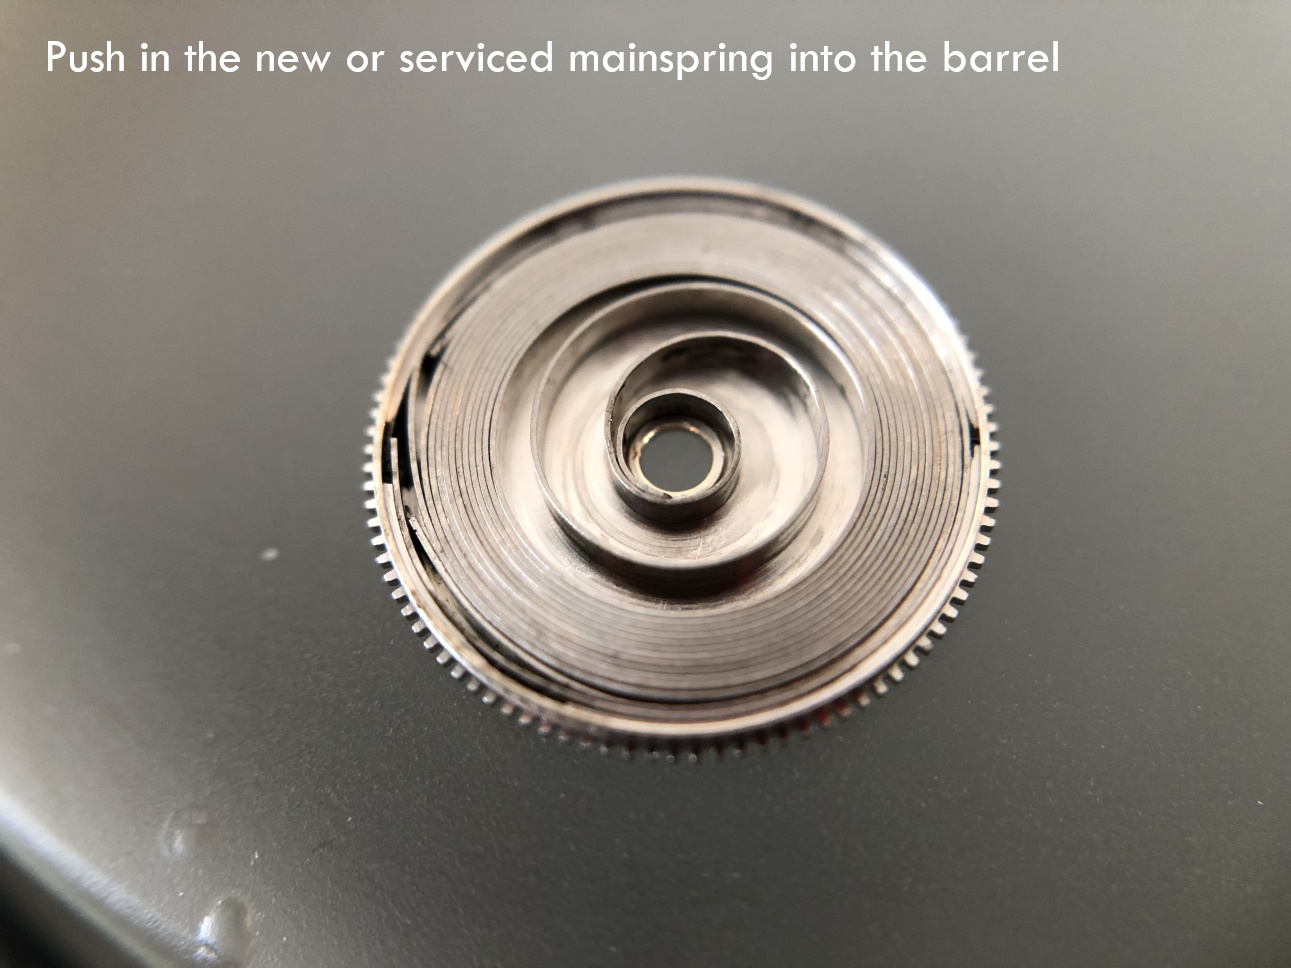
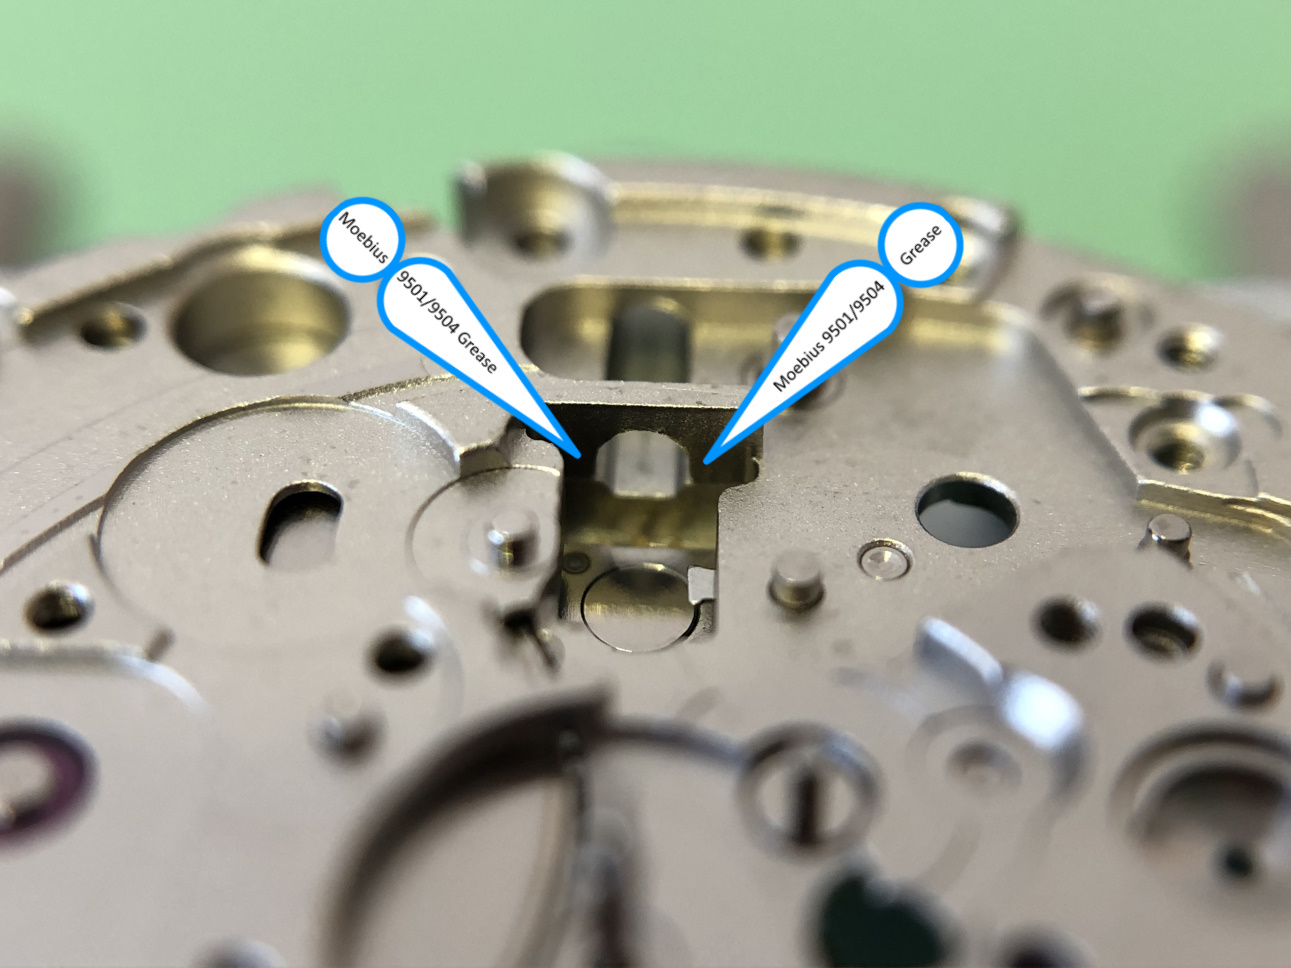
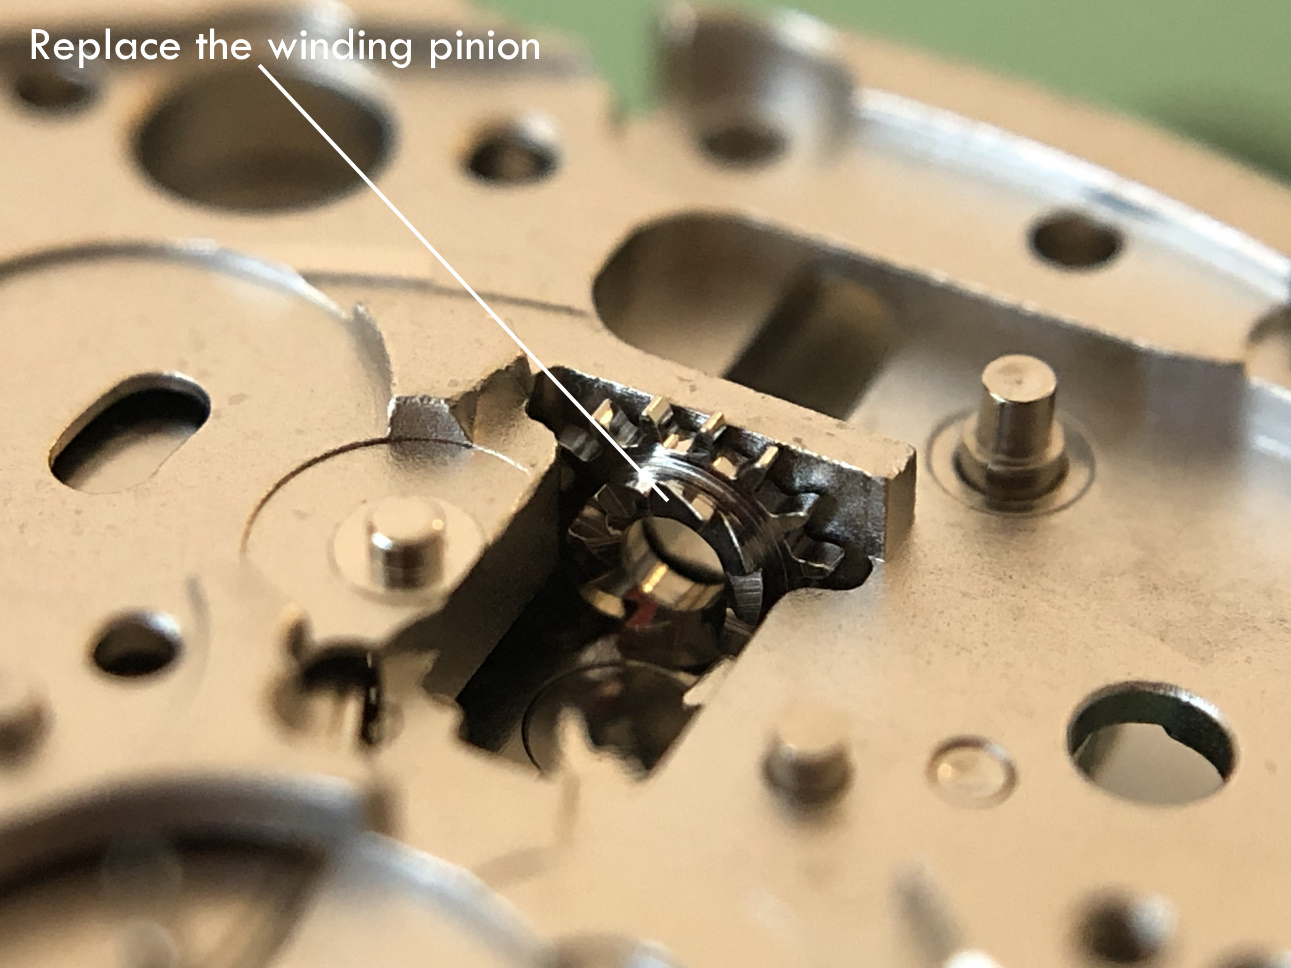
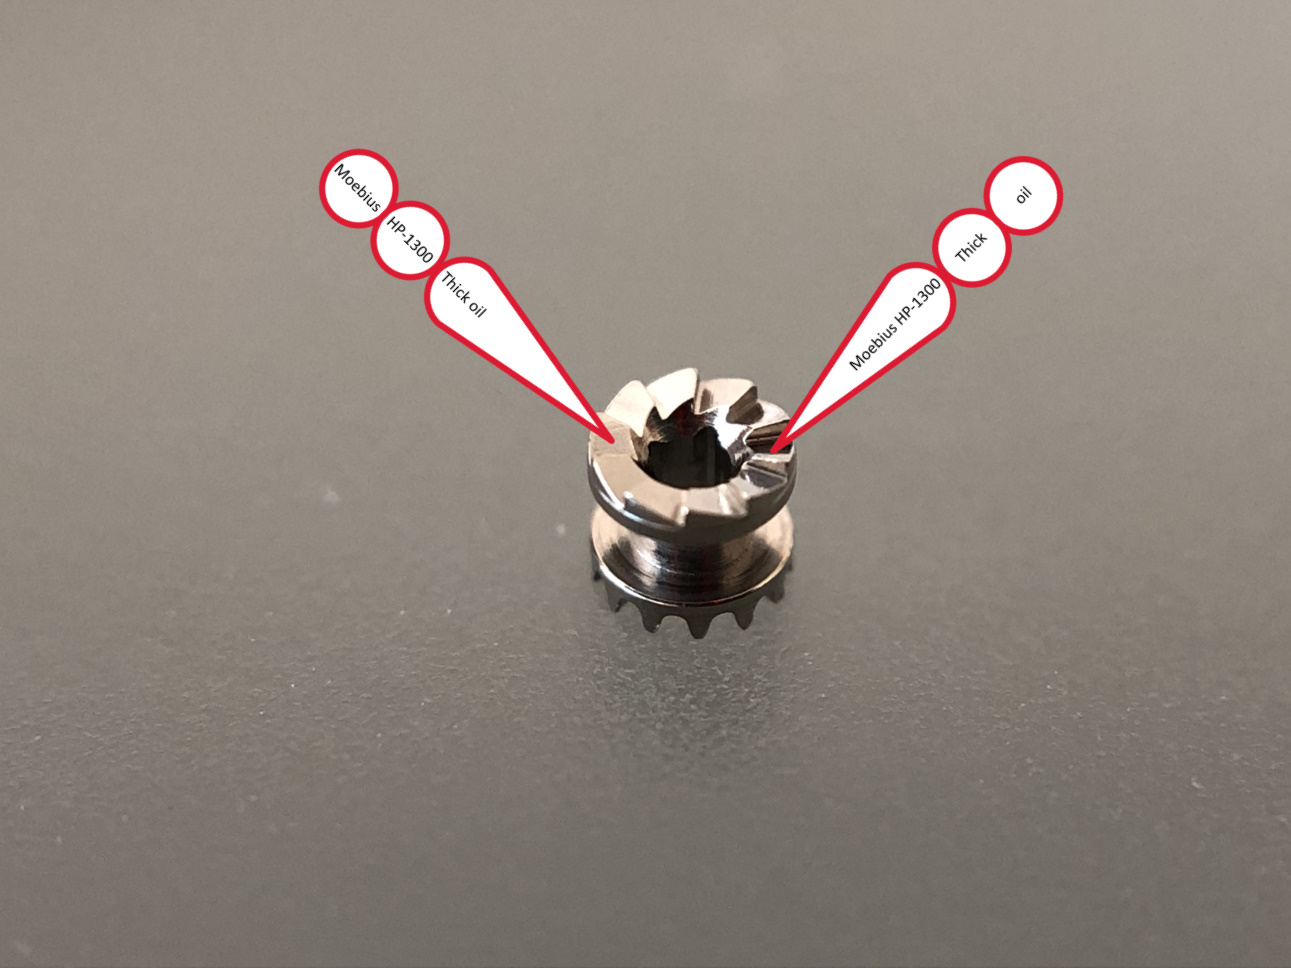
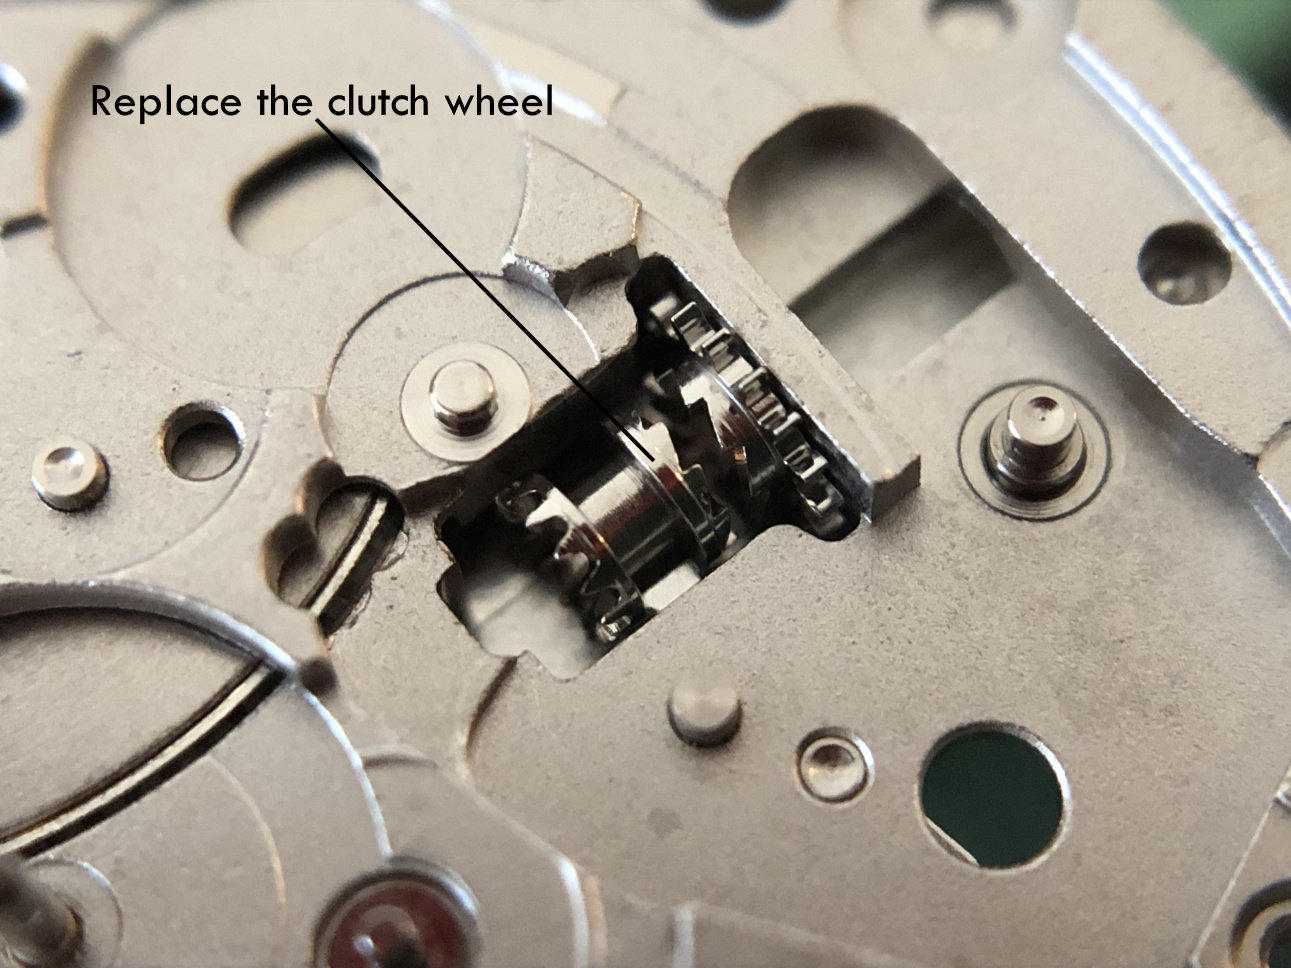
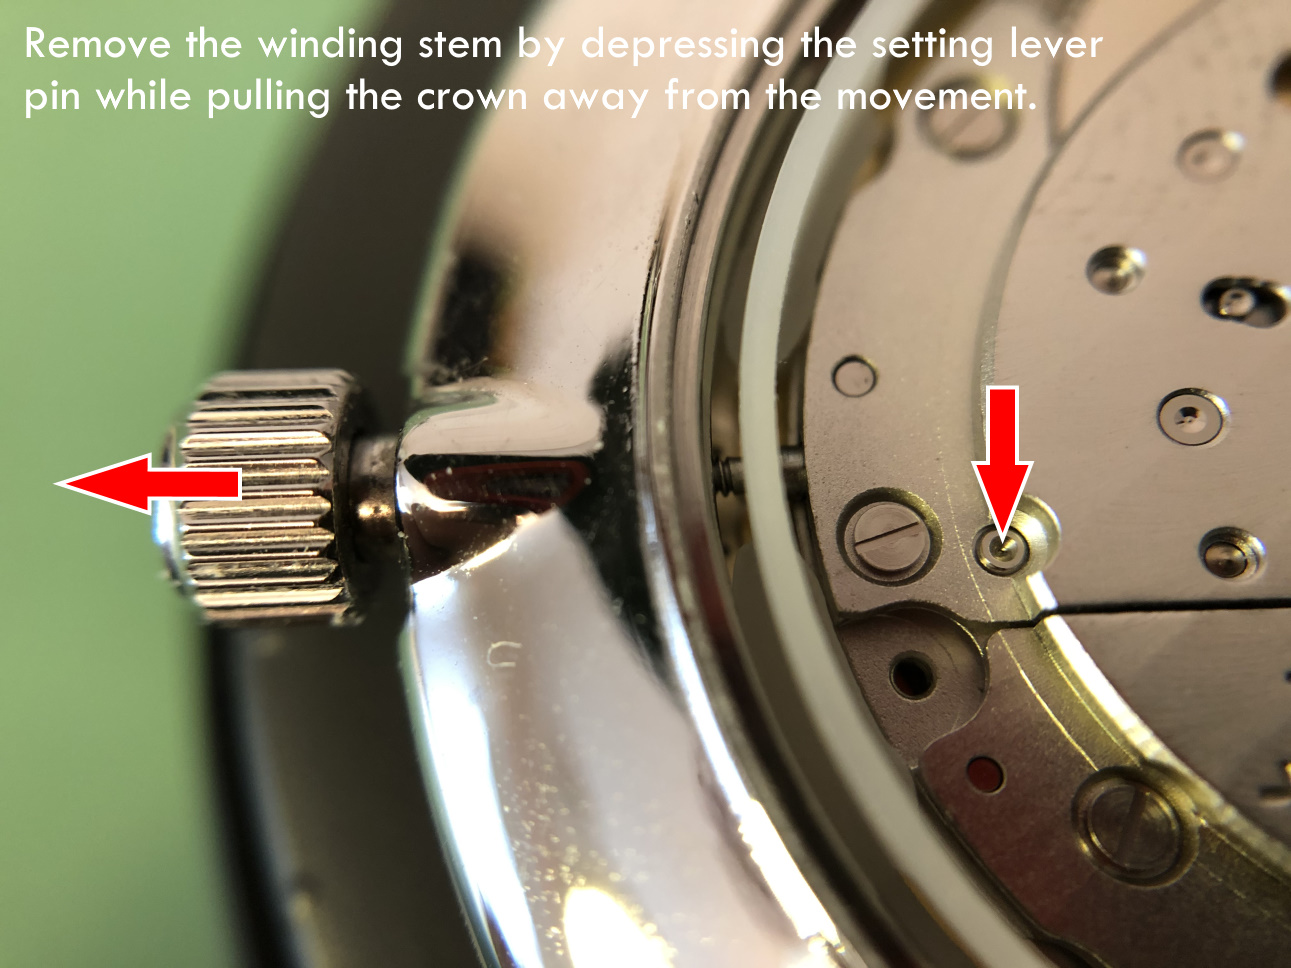
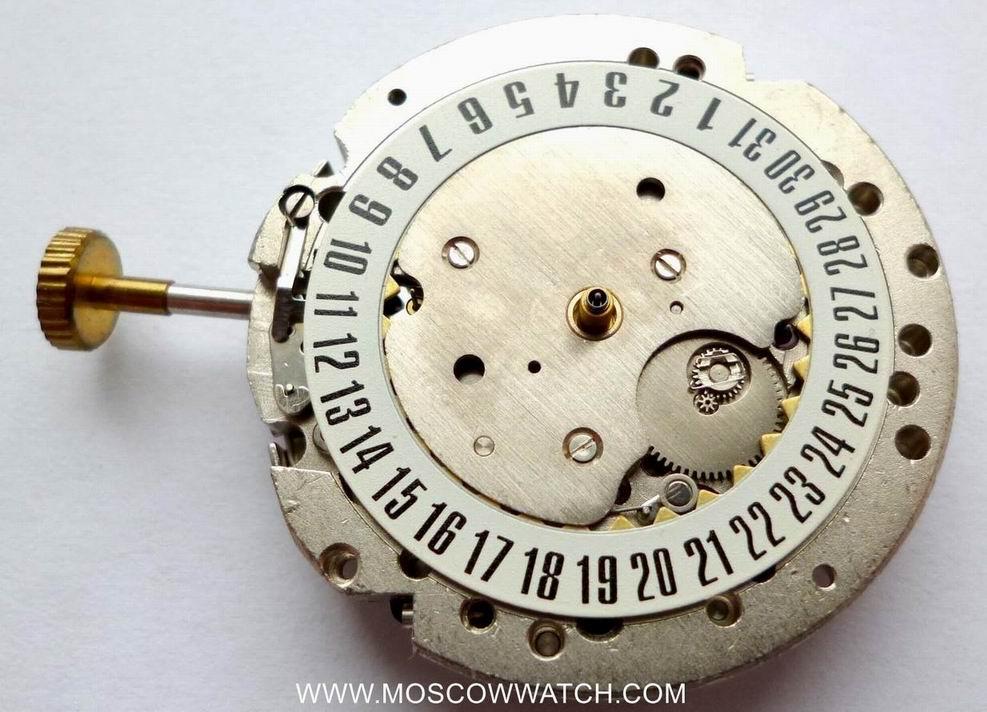
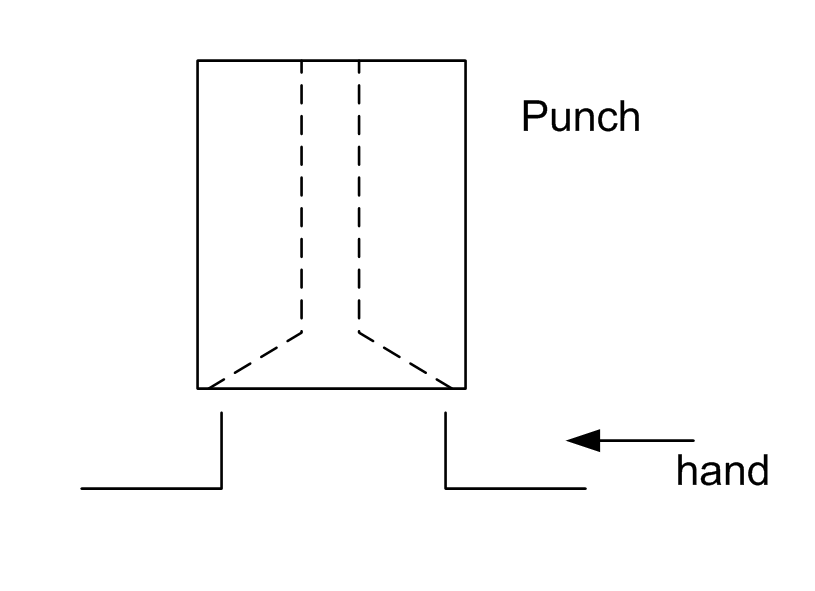
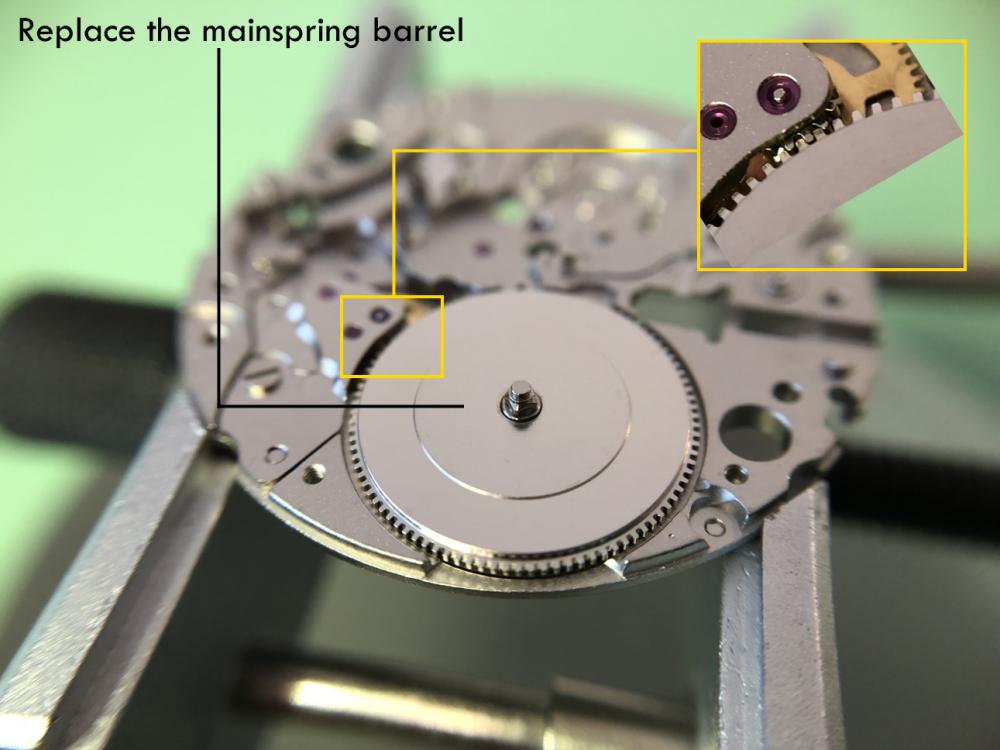
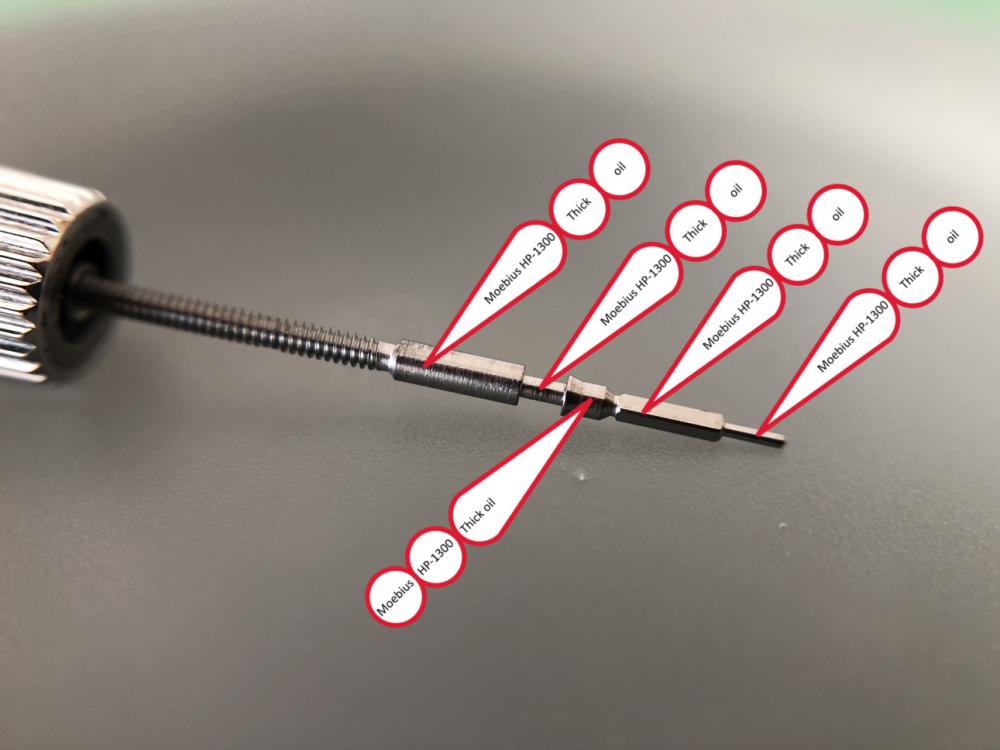
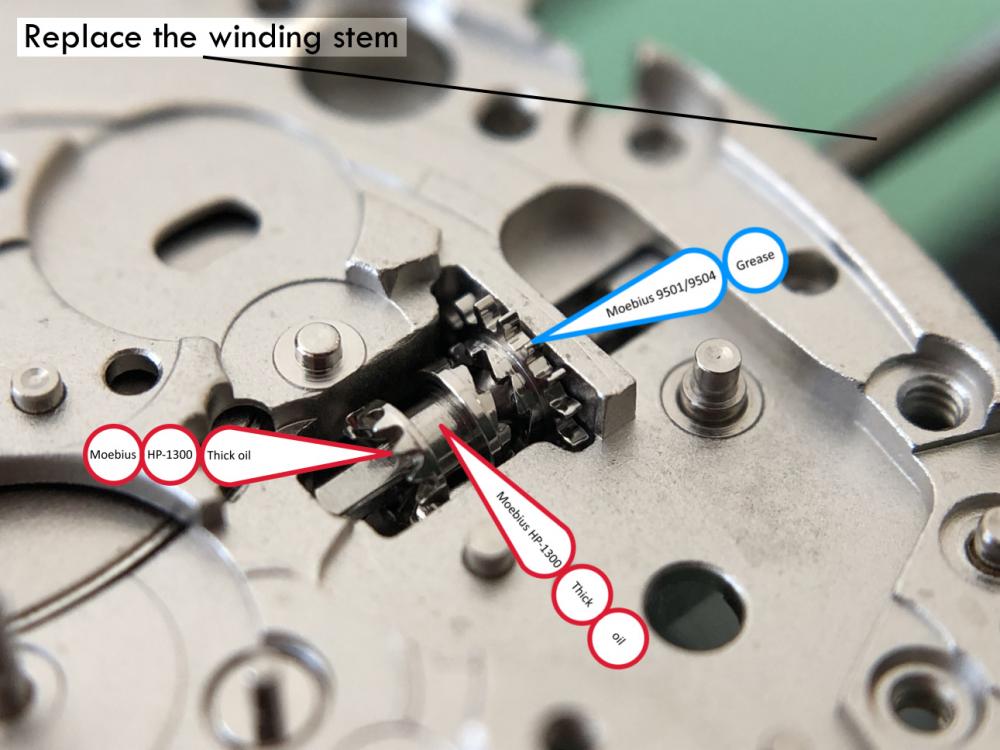
@Klassiker Sorry for the late reply. For some reason I don't get a notification via my email(?) I never worked on a 7734 and I'm not aware of that the 7734 has the same problem. It is clear to see that the Russians made a "modification" to the date mechanism. Unless the 7734 has the little spring underneath the wheel? Perhaps somebody can enlighten us ? Poljot 3133 Valjoux 7734 @mikepilk Yes, that's a thing you need to know, never ever pull the winding stem of a 3133 in the winding position. In the time-setting position the sliding clutch slides over a brass bushing, giving the clutch more stability and reduces the risk of the clutch-lever to jump out of the sliding-clutch recess. One has to be careful when inserting the winding-stem too, to not disturb the sliding clutch / lever. Luckily I was warned about this phenomena early in the game. With some movement you have to pull the stem in the winding position, some in the setting position and by some it doesn't matter. Trick is to know which is which ..... As for the main-spring; I usually position the "T" a few millimeter before the slot (I always hand-wind any main-spring in or out). Than I insert a few laps so that the inner-laps are starting to push out the outer lap. Pulling carefully on the spring (keeping your thumb on the laps inserted) the "T" will position itself above the hole and you are able to push it in. If you pull the "T" past the slot, not to worry, you just add an inner-layer and pull another round I've no idea what you get with a spring-winder, never used one.
 2 points
 -
You need a Barlow lens to get more working space, I found the 0.5 worked well for me but some prefer the 0.7 version, they are not too expensive so you could try both and see which one works best for your setup.2 points
-
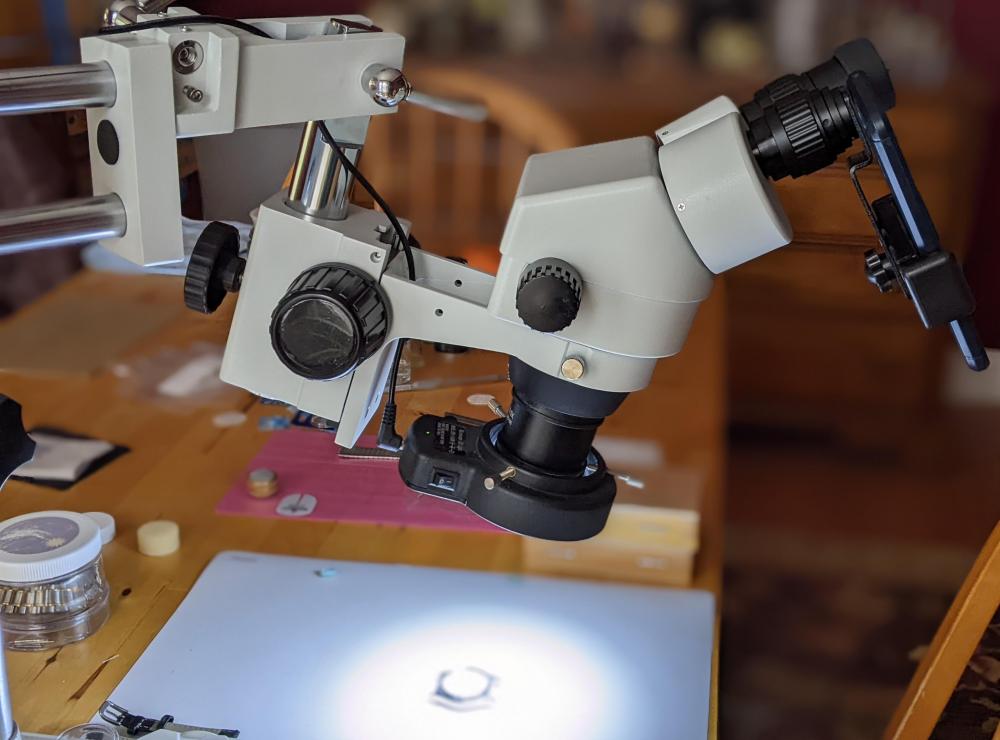
I described the stand (much) earlier in this thread. It does indeed have an extra degree of freedom over the single arm stand. https://www.watchrepairtalk.com/topic/294-stereo-microscope/page/17/#comment-164809 The rotation and transverse movement of the boom vs the post are also both free, with a linear bearing for transverse. So you can freely move the head in the X-Y about your workspace, while maintaining a locked angle and Z distance, which means it stays in focus.2 points
-
Is that a plastic key?2 points
-
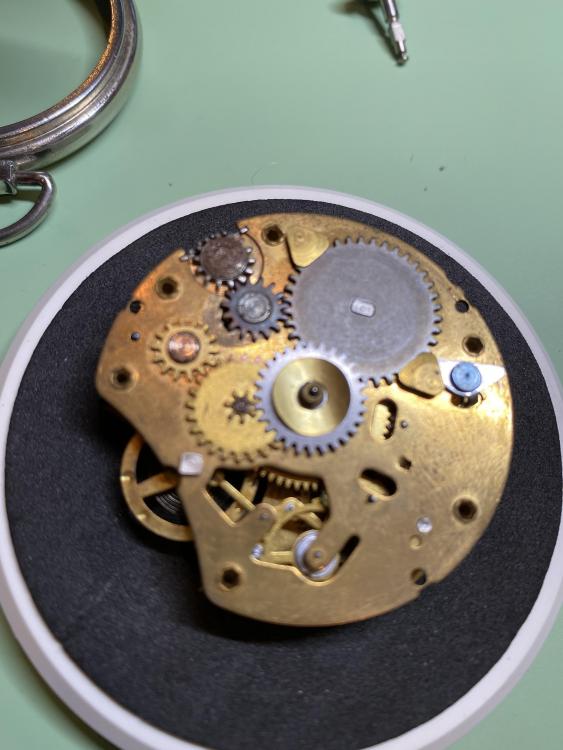
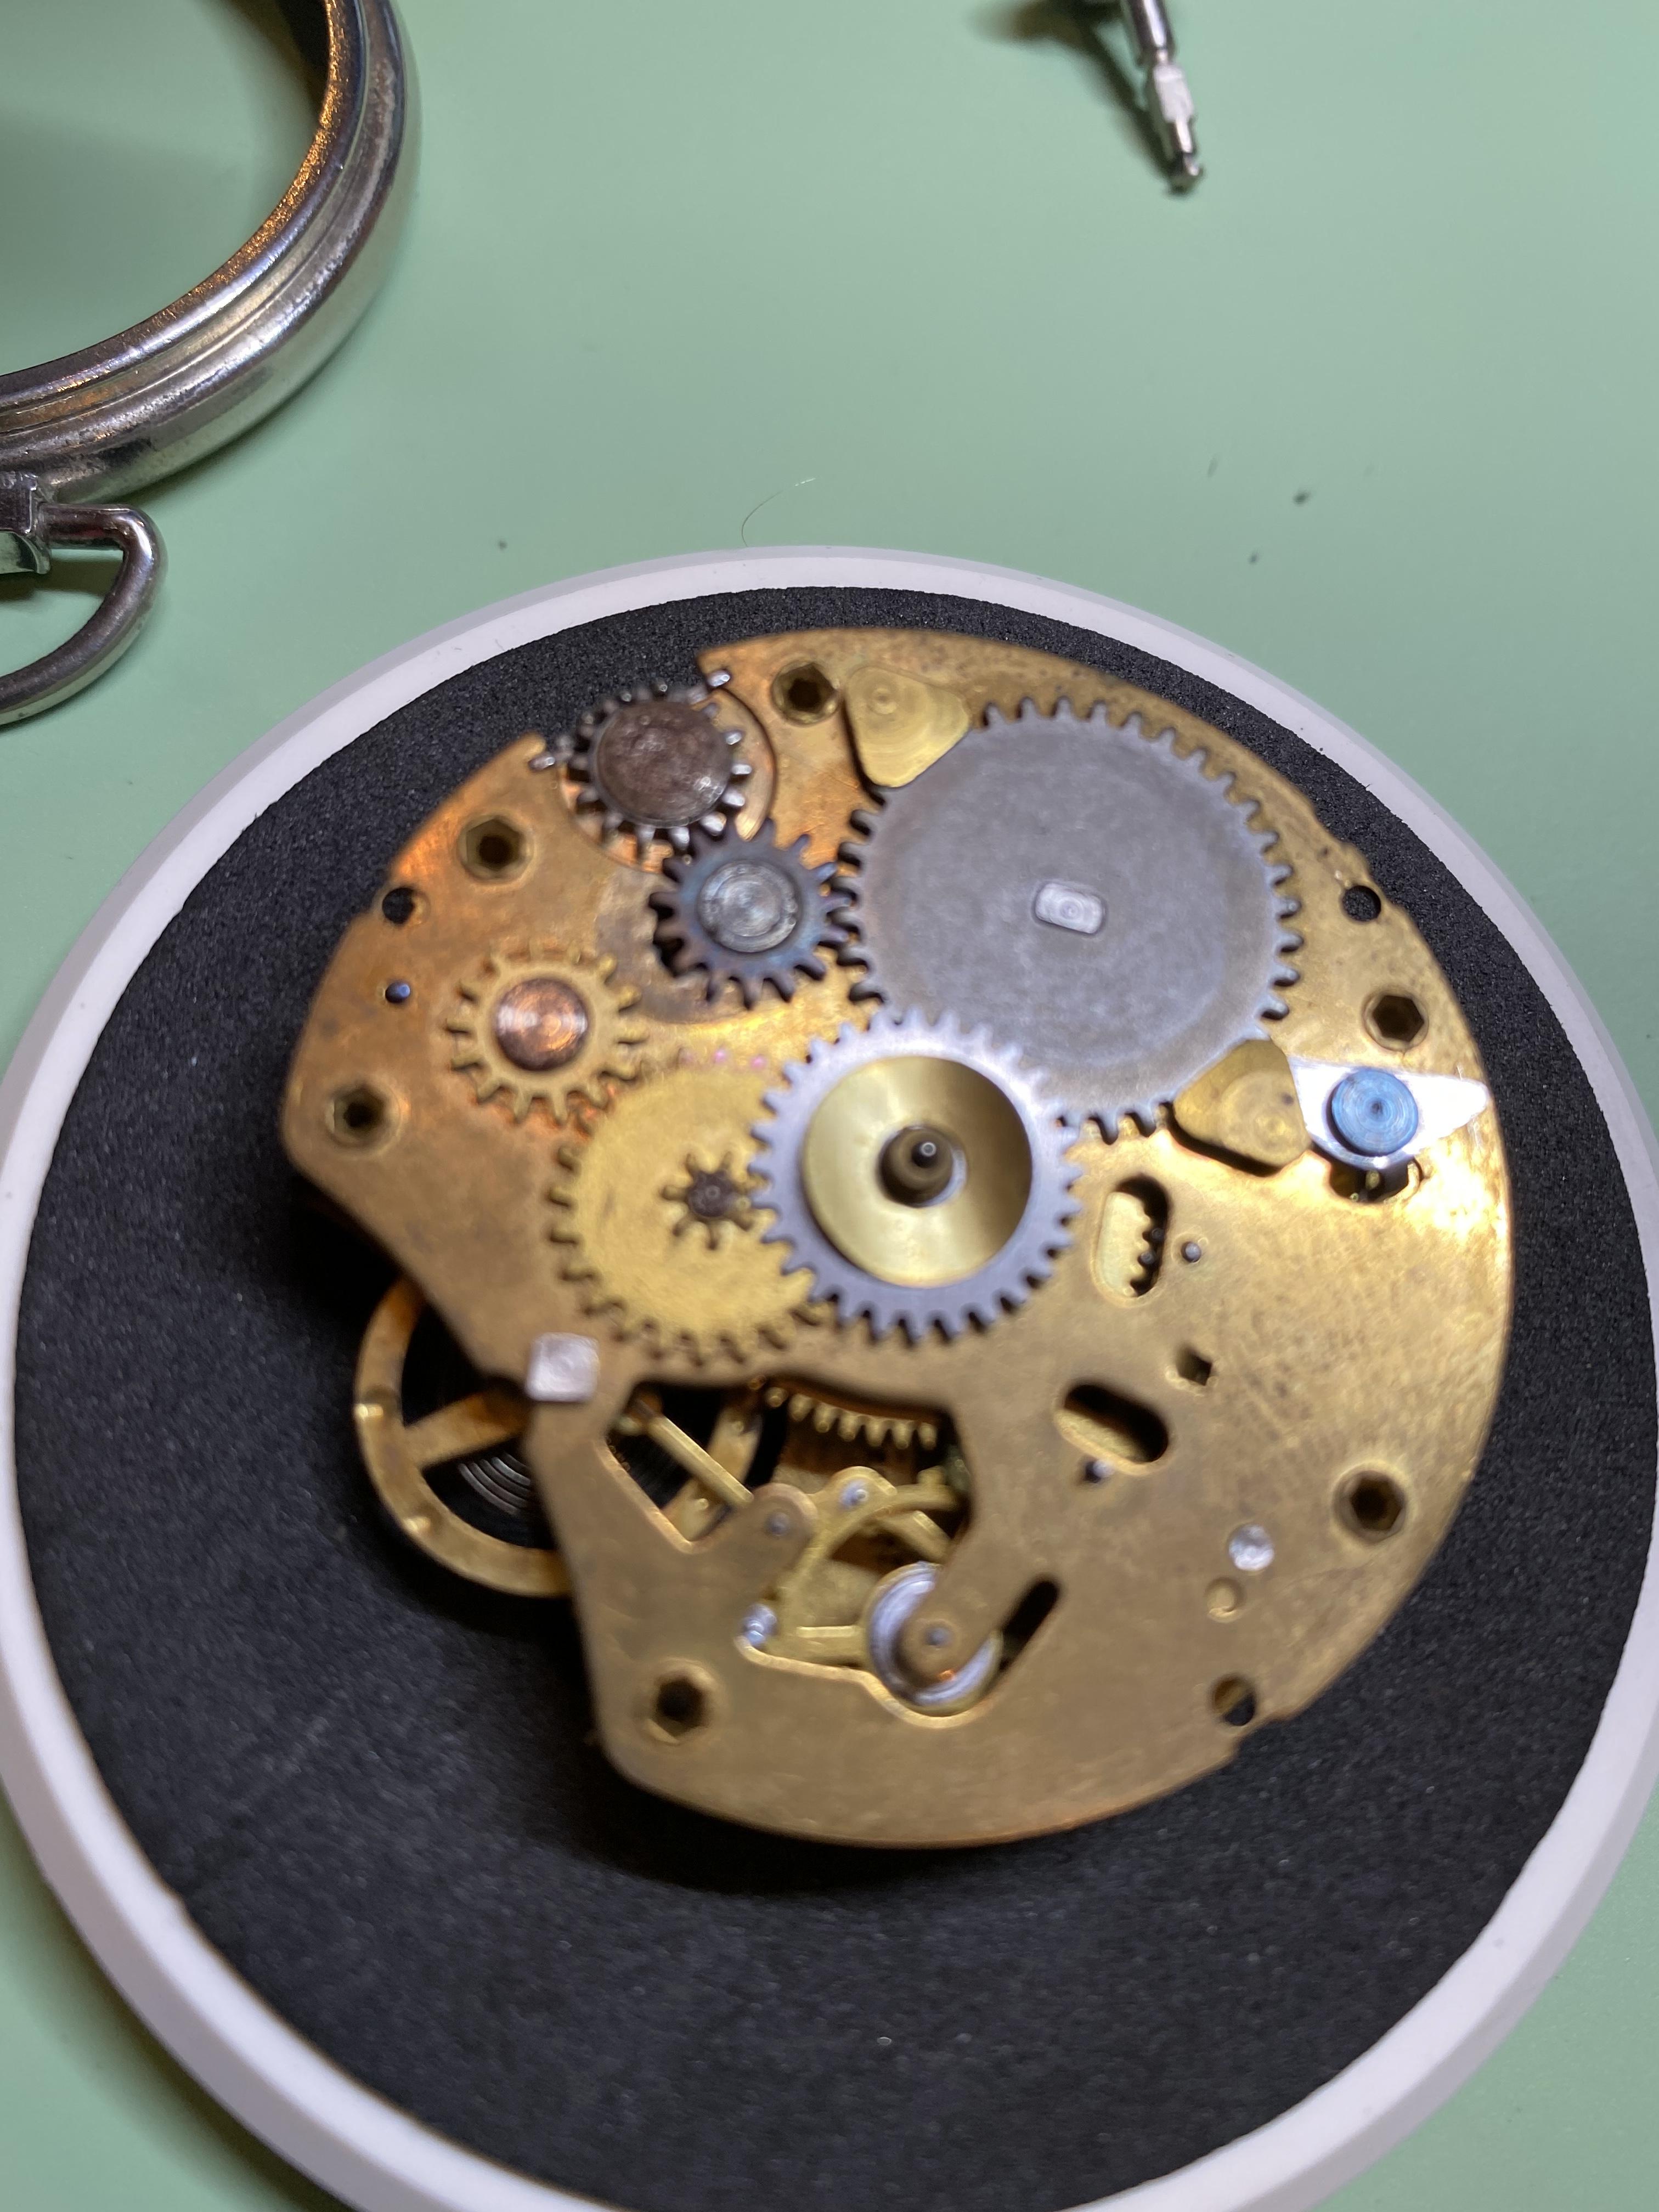
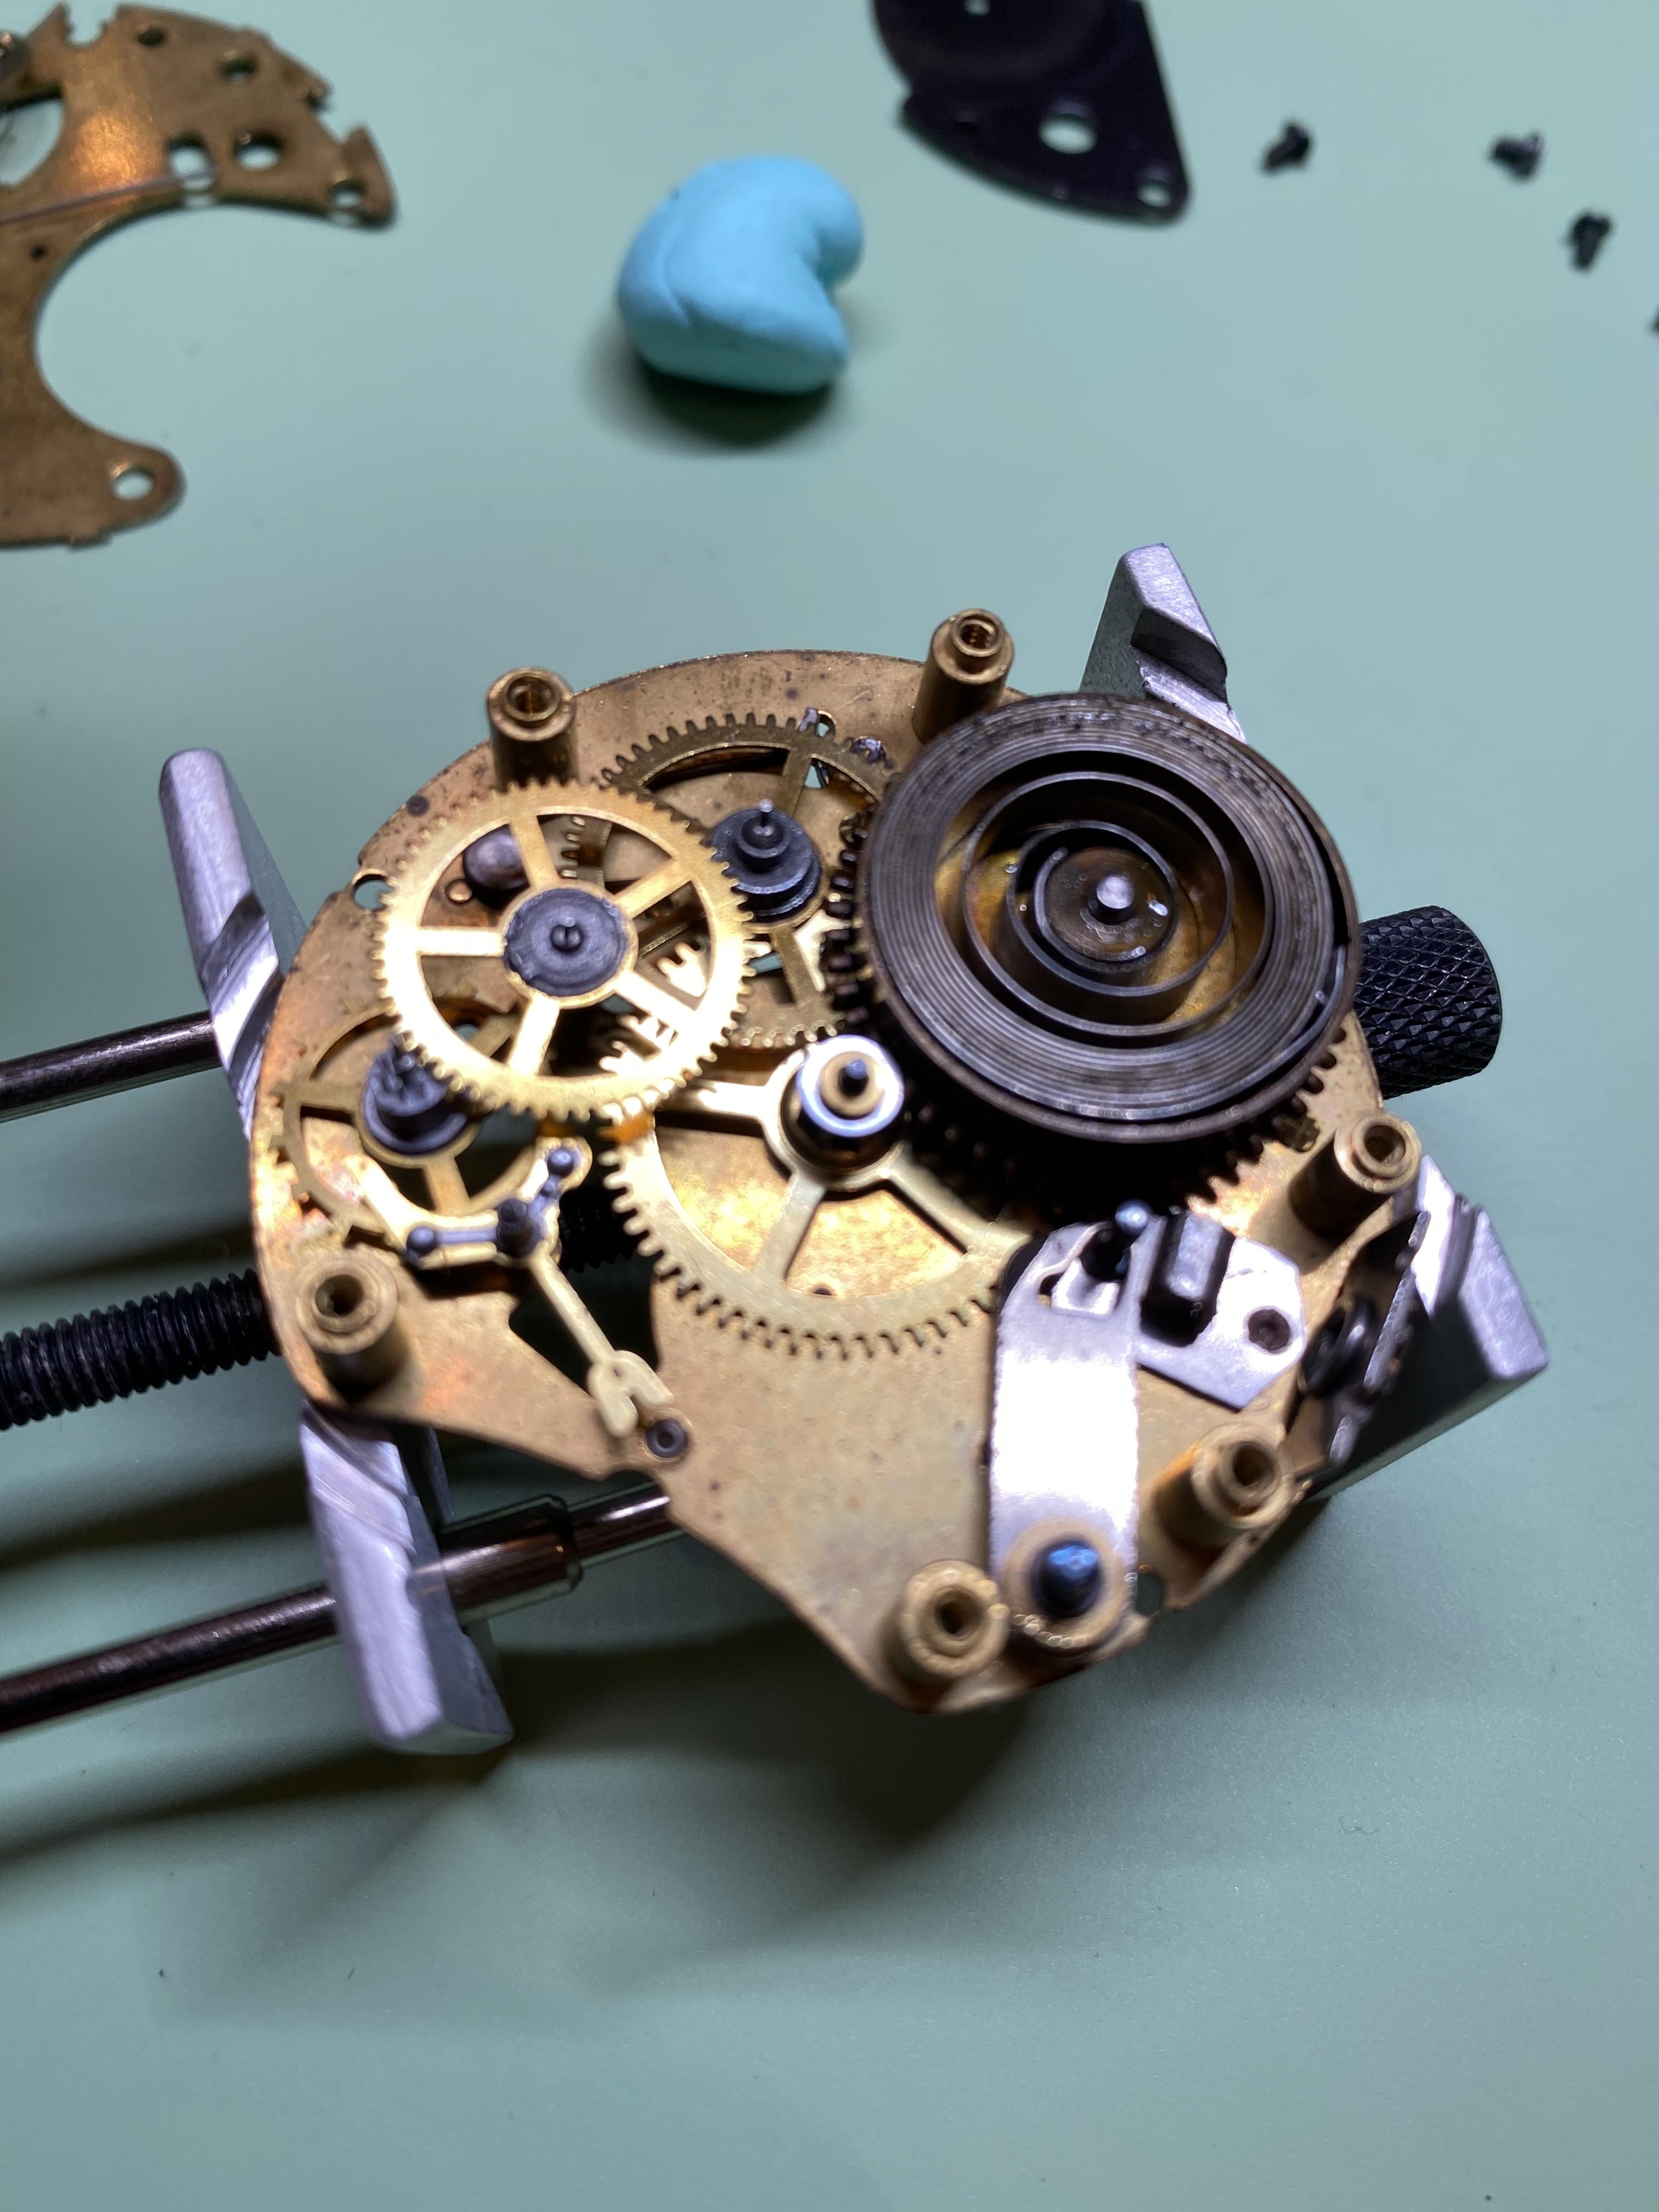
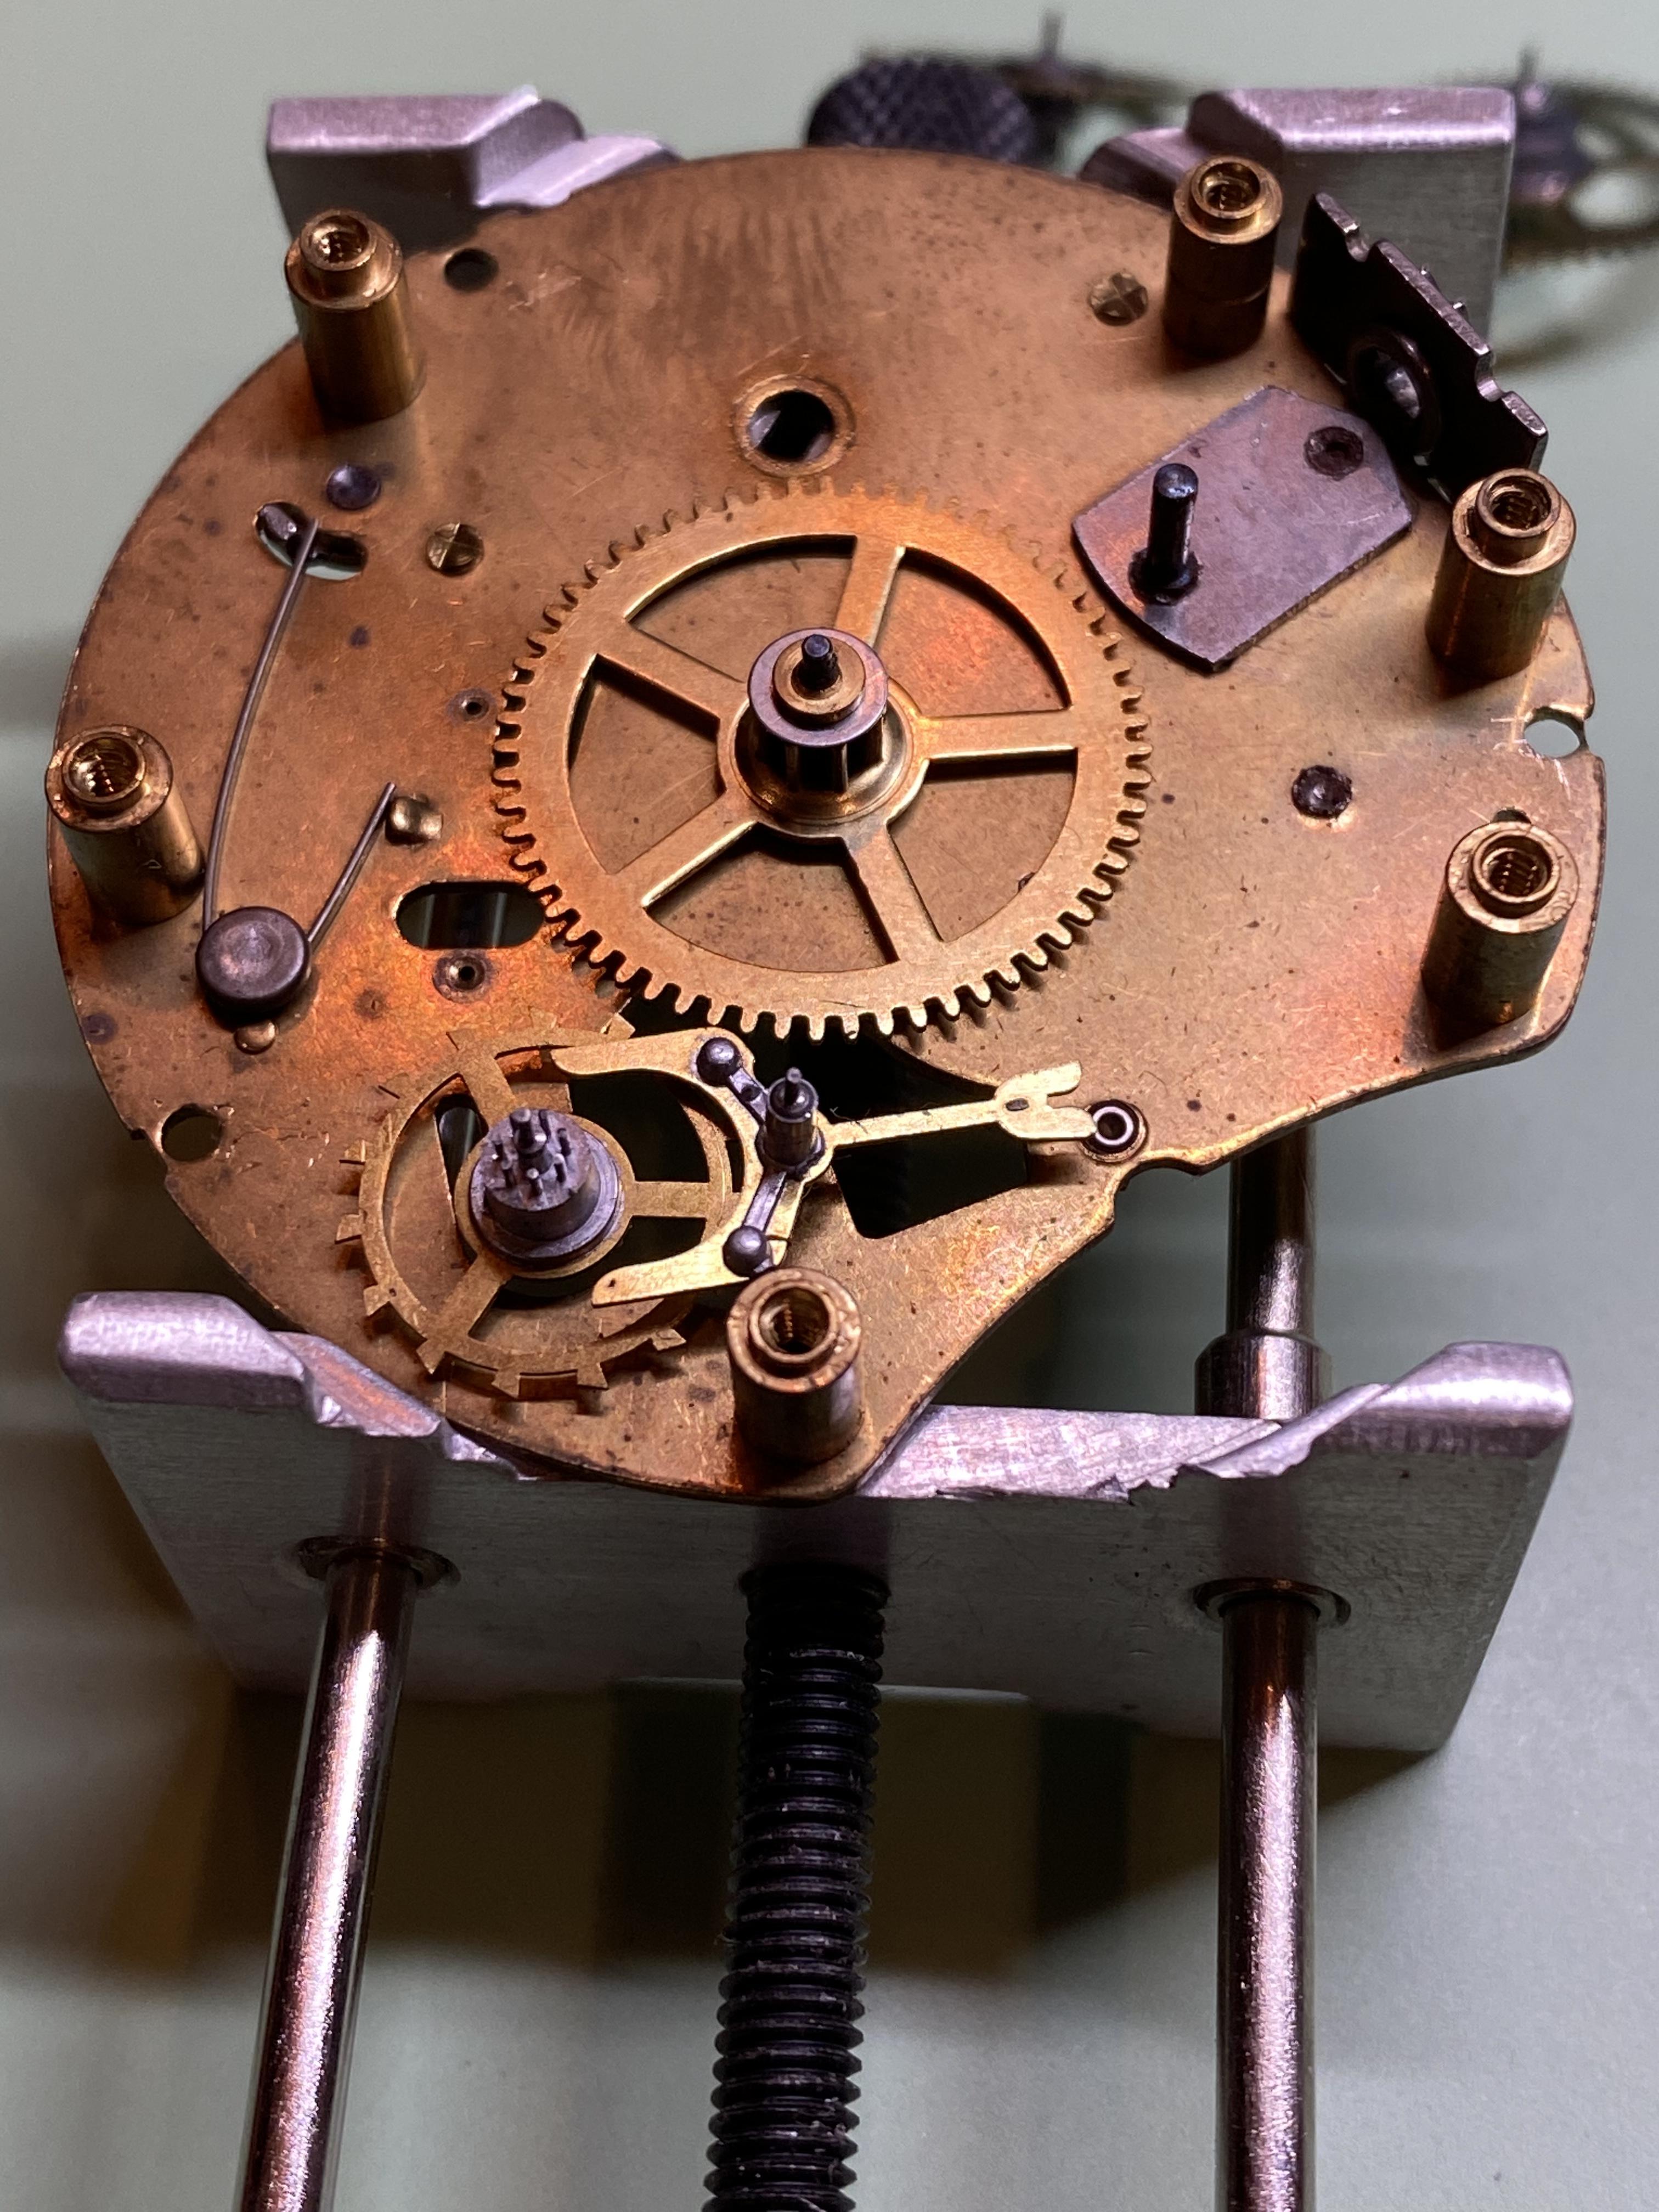
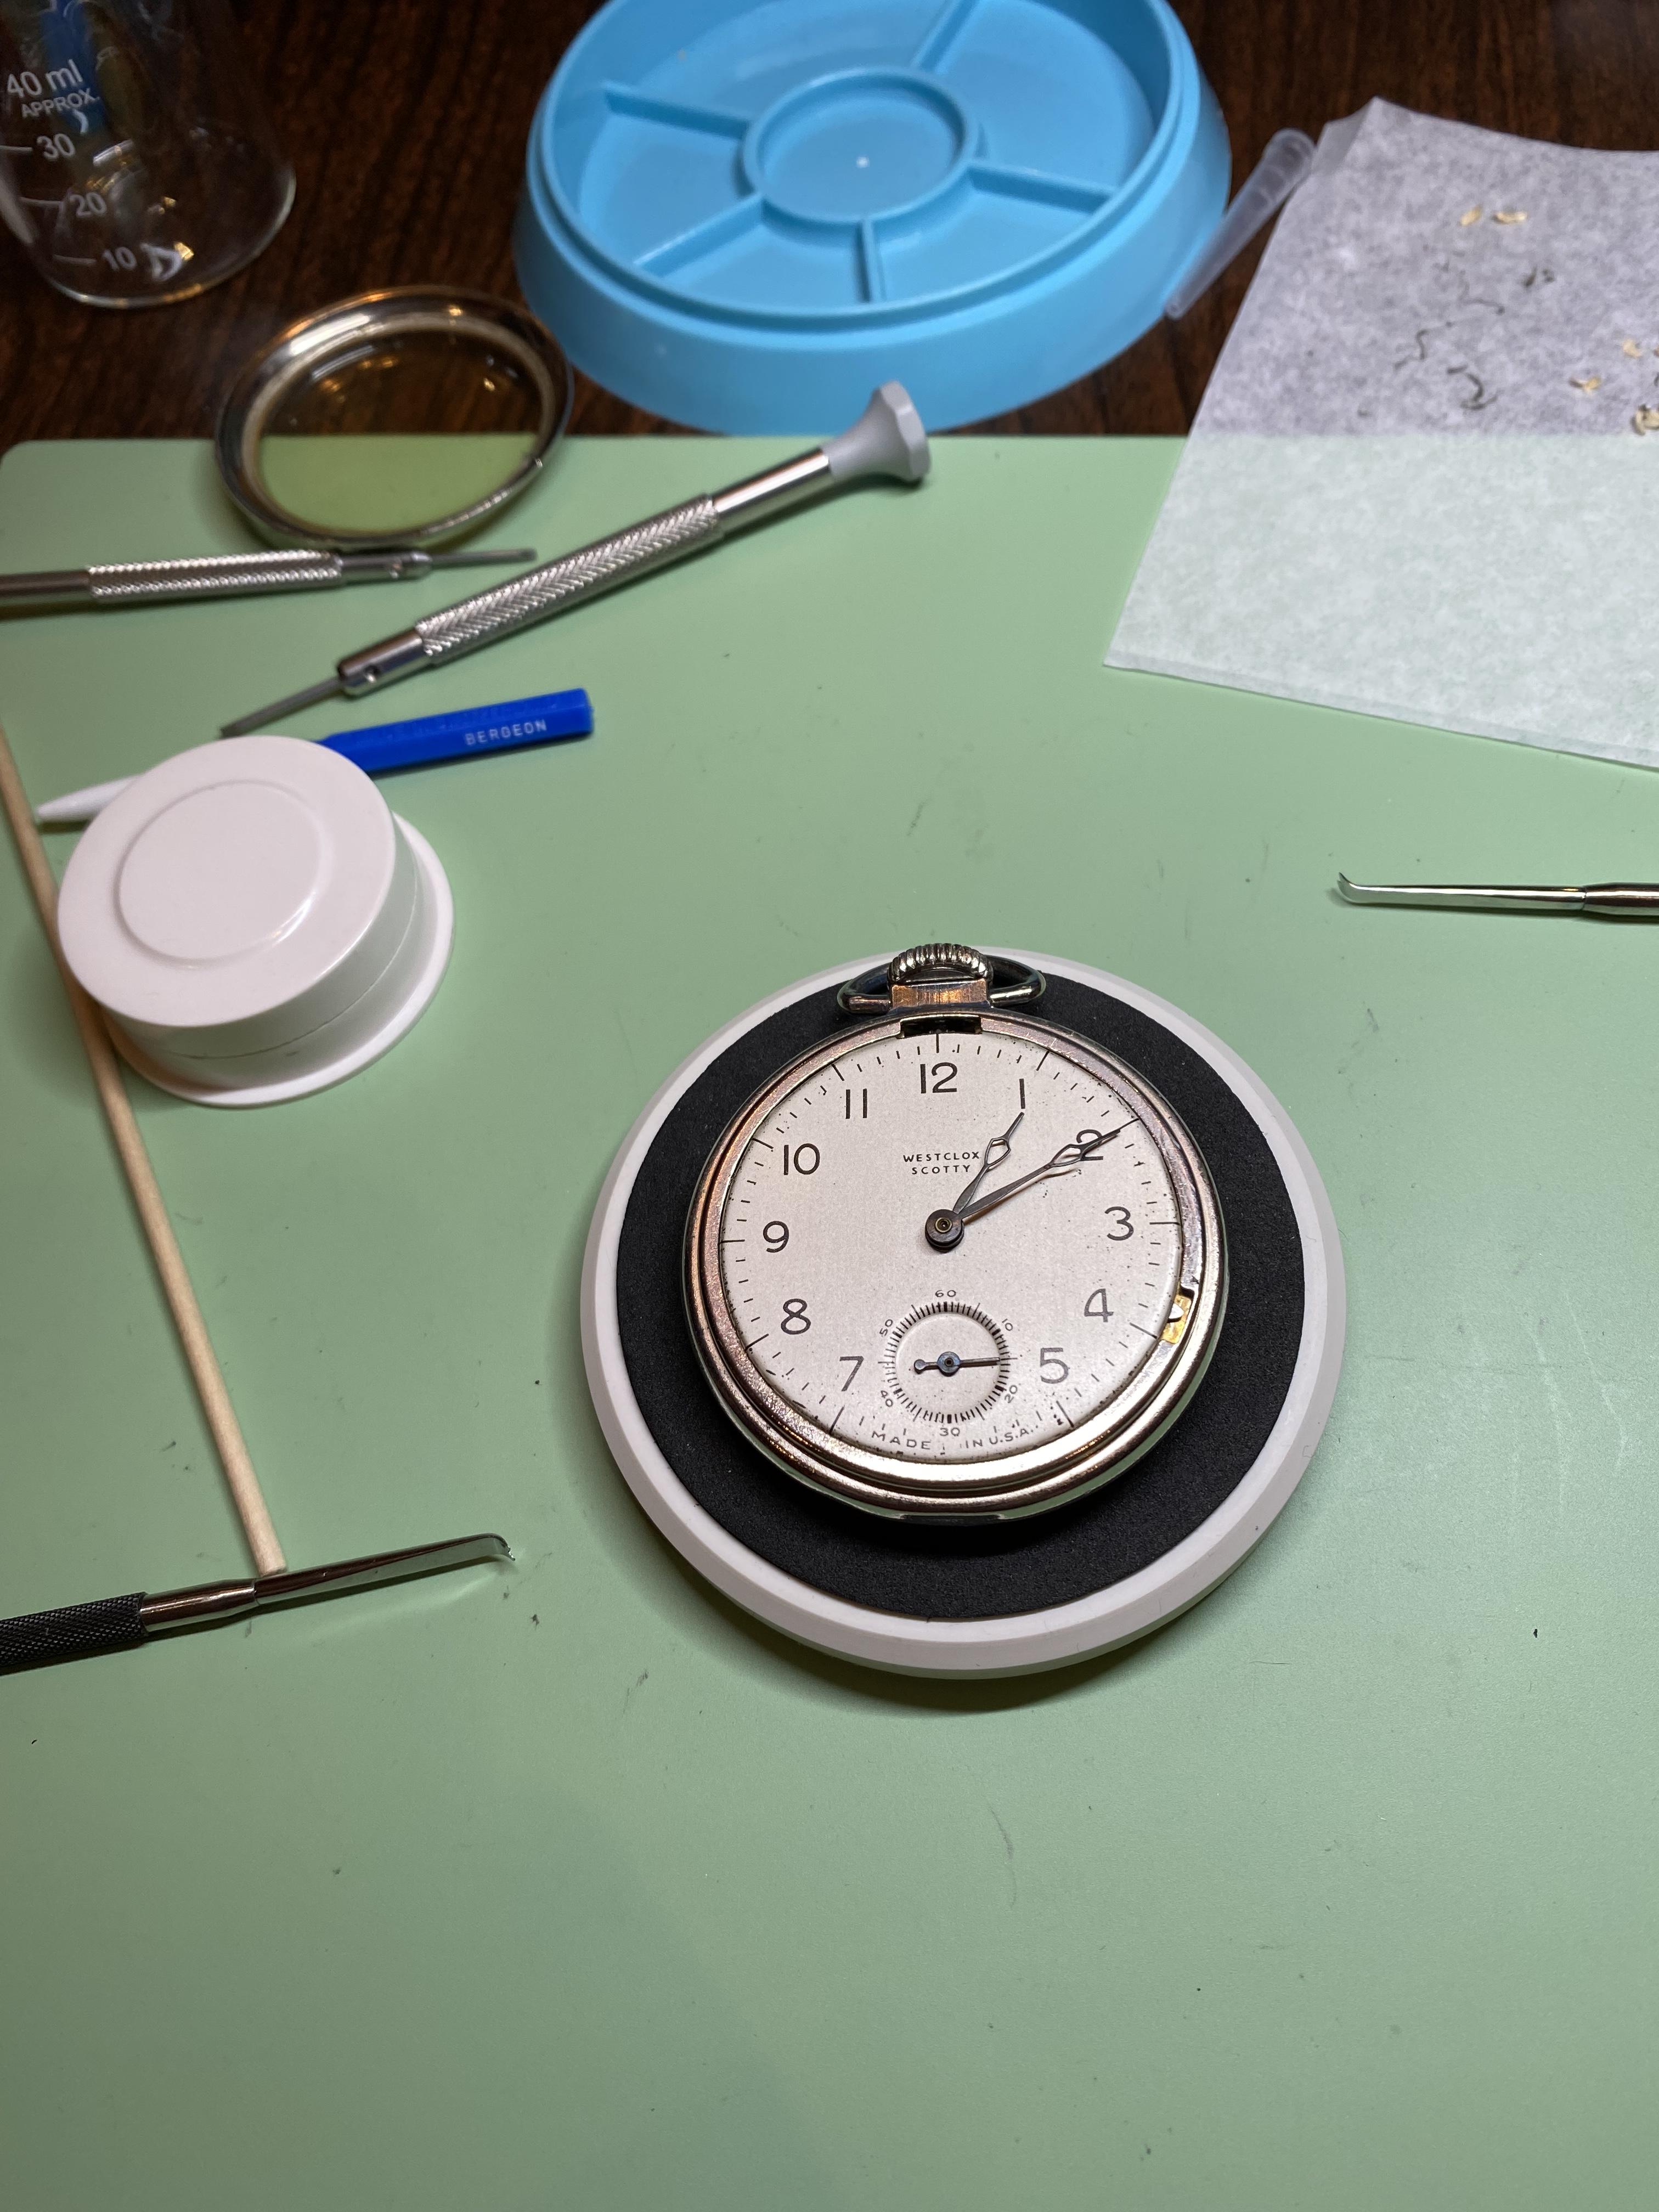
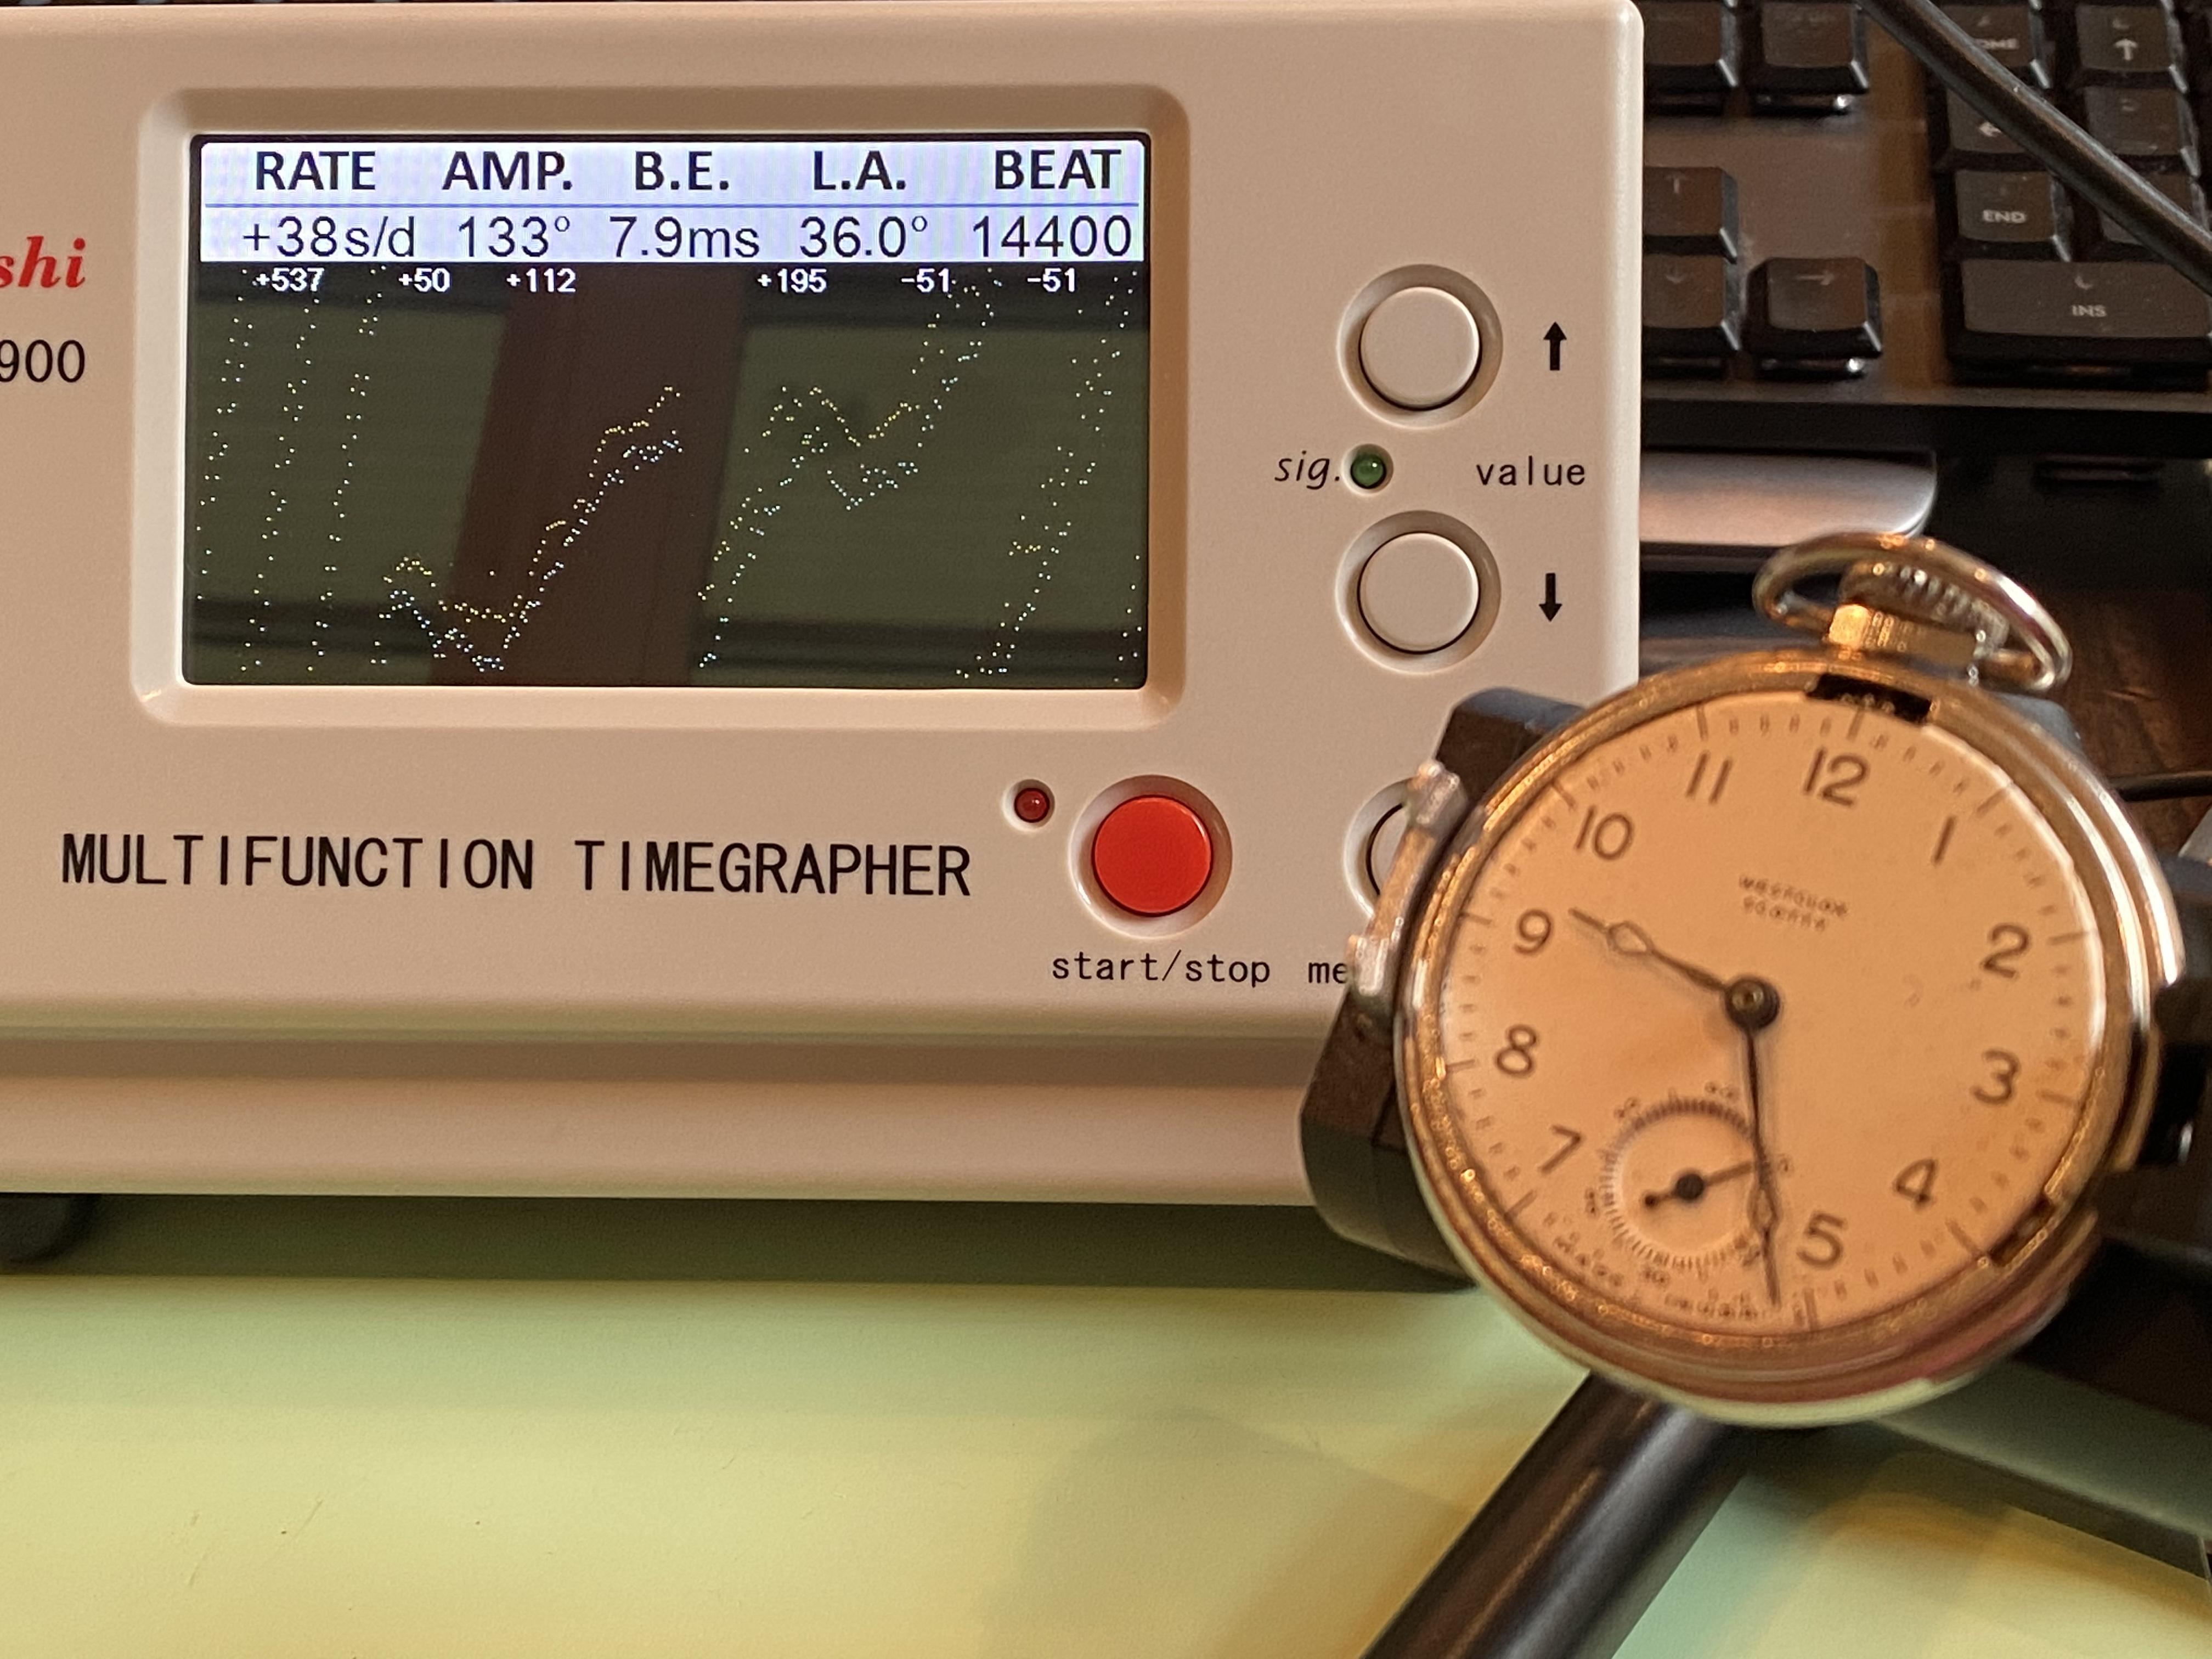
While I wait for Coca Cola to hopefully free the ratchet screw on my Elgin movement, I tried my hand at servicing a 66 year old dollar pocket watch that certainly wasn’t made with being serviced as a goal. Tore down the movement, cleaned and lubricated. Rather fidily getting it put back together given the poor quality of all the parts. Thought I’d share some pictures and the result.


 1 point
 -
One of the things would help is size. Yes I know it's a pocket watch the pocket watches range and variety of sizes so what's the size measured on the dial side of the main plate. Because otherwise their books that we can look up the setting components but we have to have a size to start with.1 point
-
From what I can tell, your watch was produced around 1923. As for the caliber ? Maybe a 35.5 L ? I think that many of these earlier Omega's movements were "defined" by the size of the movement,...possibly in Lignes, which is an older European method of measure1 point
-
According to Rannft the ETA 980 is a a 1940 approx. mov.t, back then there was no such thing as the service manual we have today that show exploded diagrams, what lubricants to use, etc. That is because watch repairers were supposed to know their trade well, and that kind of info was trivial for them. So, all you can find is an illustrated parts list, for example on Cousins UK for the ETA 1010, which is very similar to all other of same age and type.1 point
-
If I look at mine it’s not anything special. I’m thinking any smooth steel rod would work as a pusher? Maybe a spring on top between the holder and maybe a knob? Looking at my actual tips, it does look like they were 3d printed out of something softer than PLA, maybe teflon’ish. They’re certainly not precision tips and look a little flimsy. Which I suppose is good as a sacrificial interface to a priceless set of hands. Turret would be cool but wow, that’s like hitting a nail with a ten pound hammer. I personally don’t mind replaceable tips on one pusher, but then again I got the impression somewhere you were an engineer and would probably like to design something OTT1 point
-
Loose stem, doesn't wind. Remove the stem and tickytocky maybe an easy fix. No hands or crystal but I have a s£%t load of them.1 point
-
Its mine too if i had to be truthful. Ok It does wind me up though. I dont feel it is necessary, its no effort to be kind and considerate, just nice even, if neither of those then only civil at a push would be better than hints of sarcasm. Some folk would be far better individuals if they just chilled out and removed that wooded implement from up their waste disposal orifice. It means i can spend a lot more needed time learning and repairing instead of me having to mention it every time i see it1 point
-
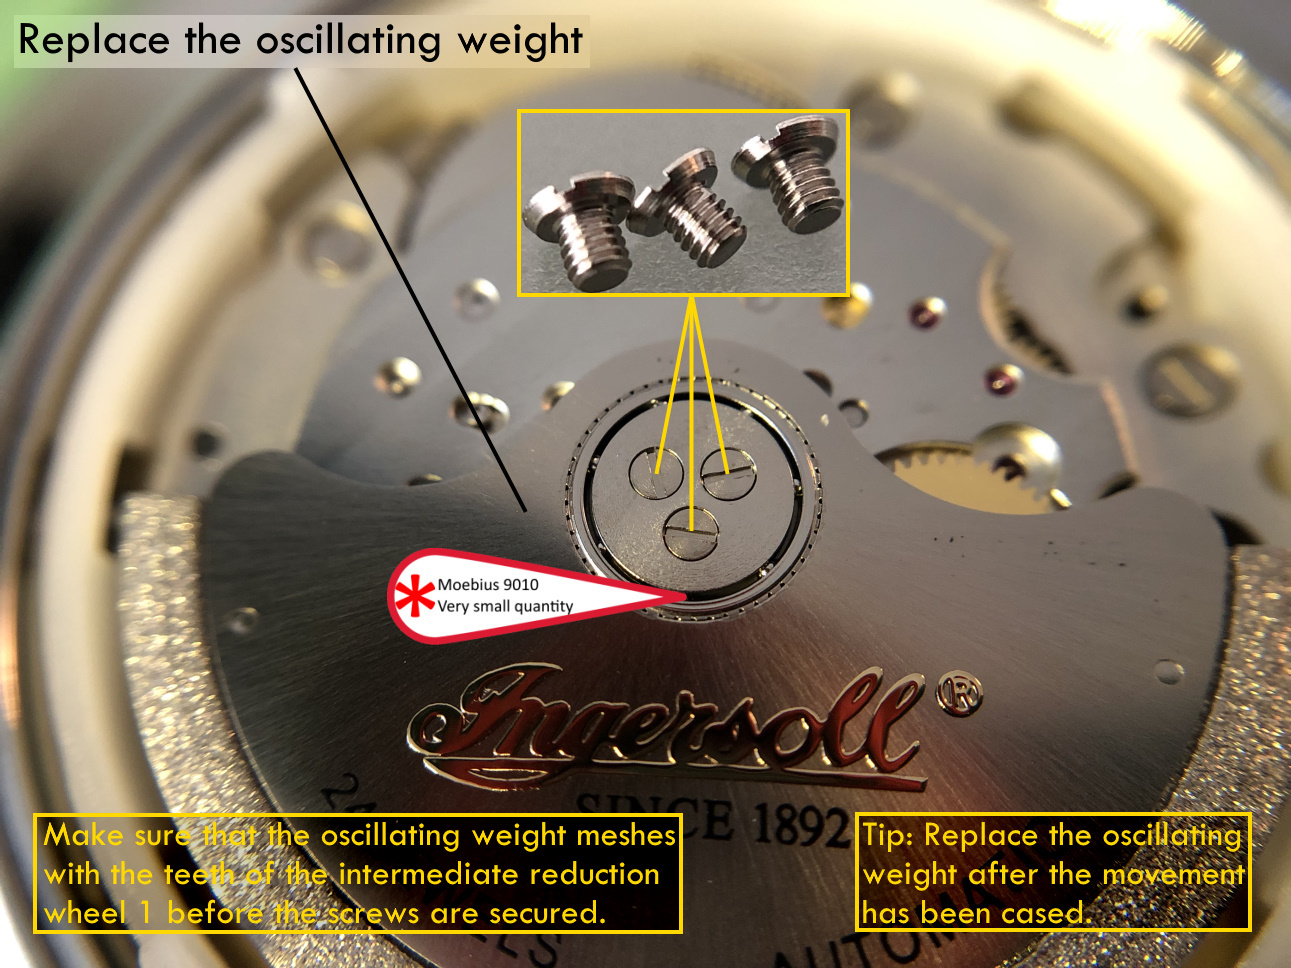
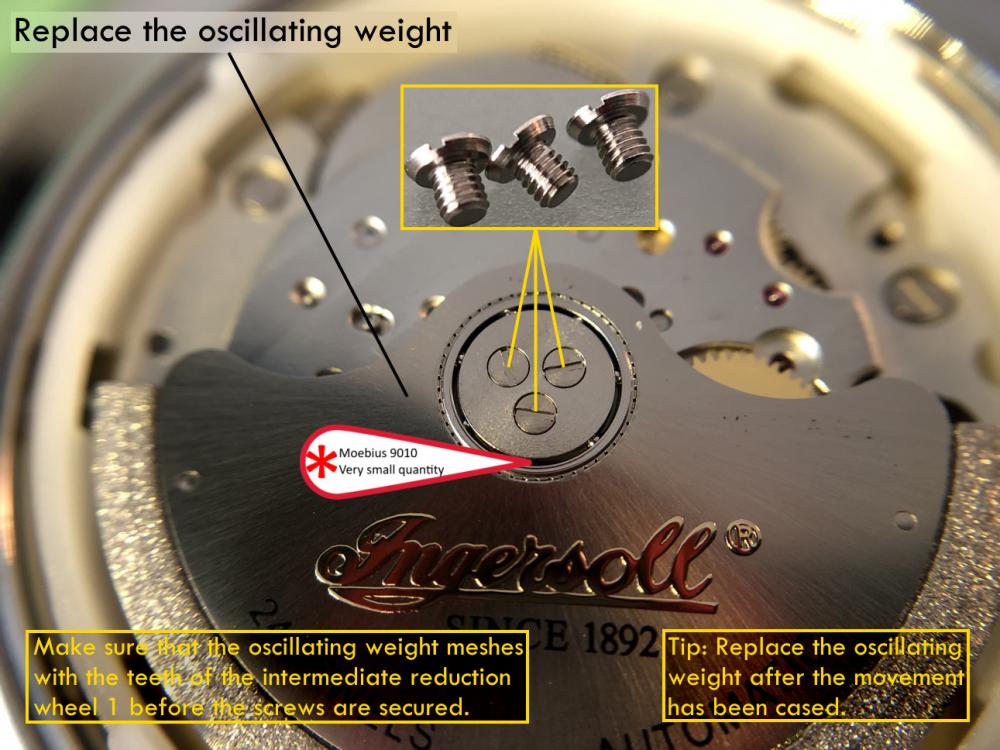
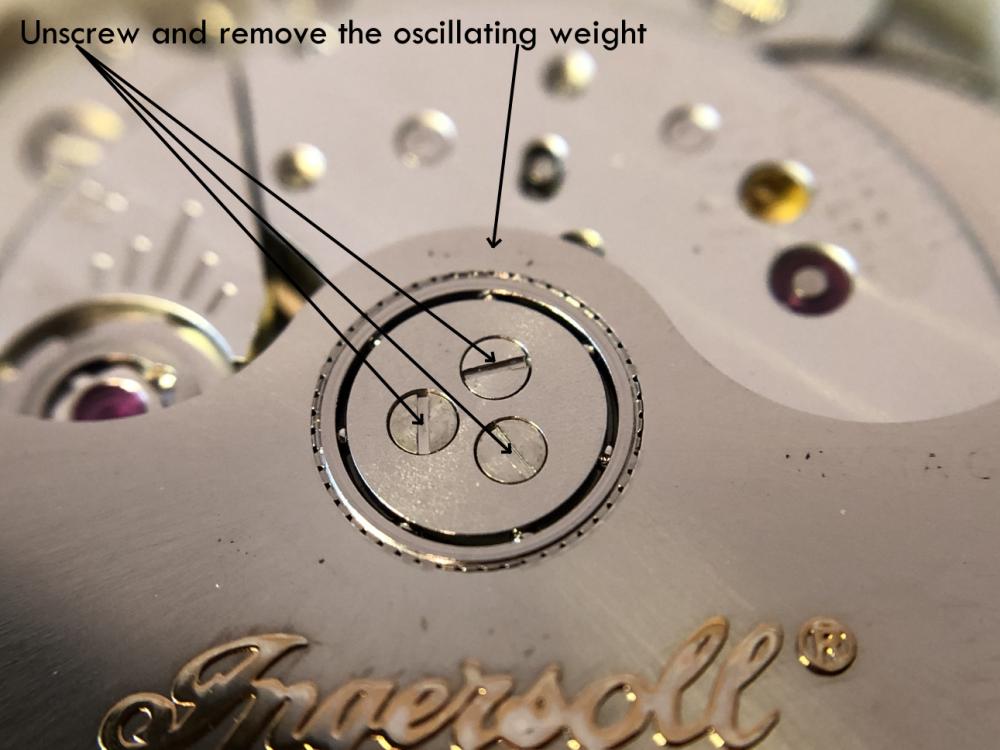
This type of oscilating weight is heavy enough to easily turn on the post even if unlubed, which causes wear on the post and the bushing. Thats another culprit with this design. In F4007N variant FELSA put jewels in the rotor instead of brass bushing, which came in 30 and 41 jewels version, those are real good winders, one would expect to see a culprit with the jewel breaking too often but I am yet to see a broken jewel in said rotors. Best wishes1 point
-
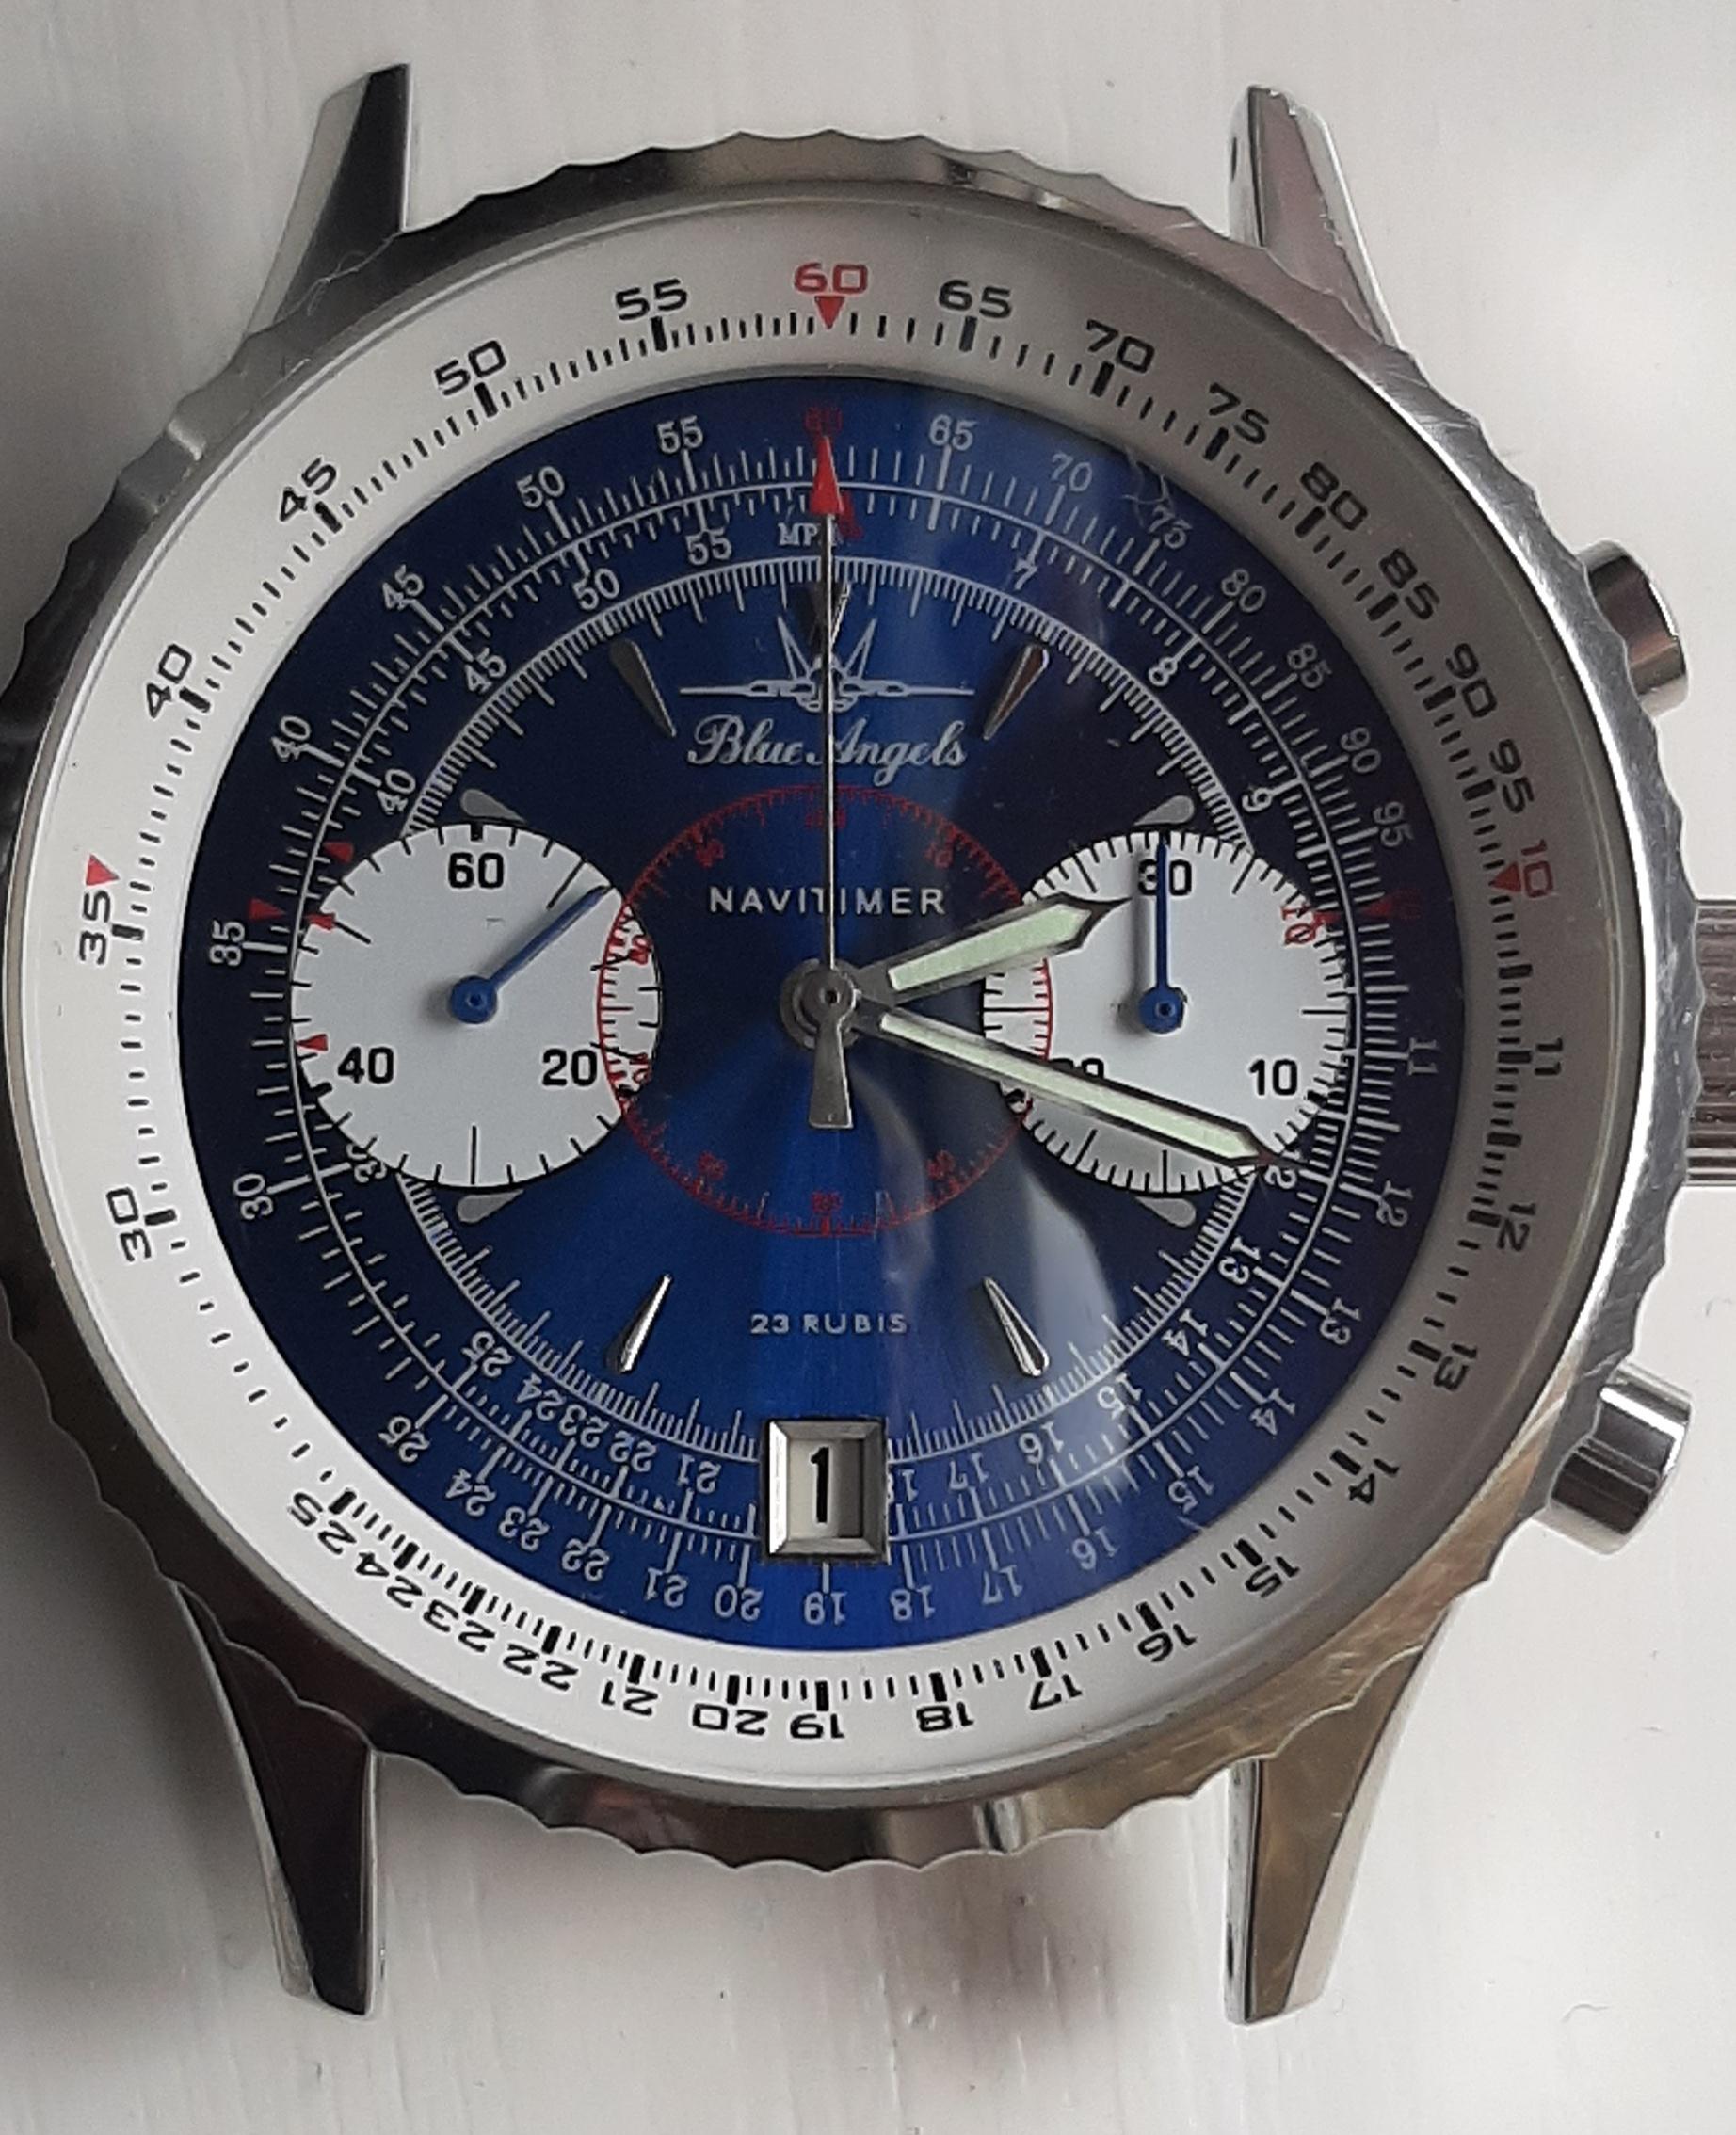
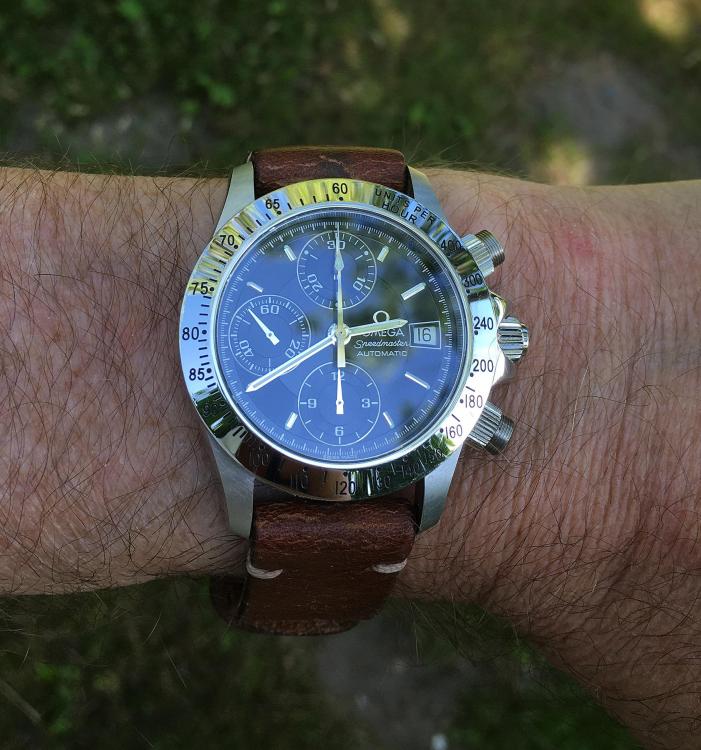
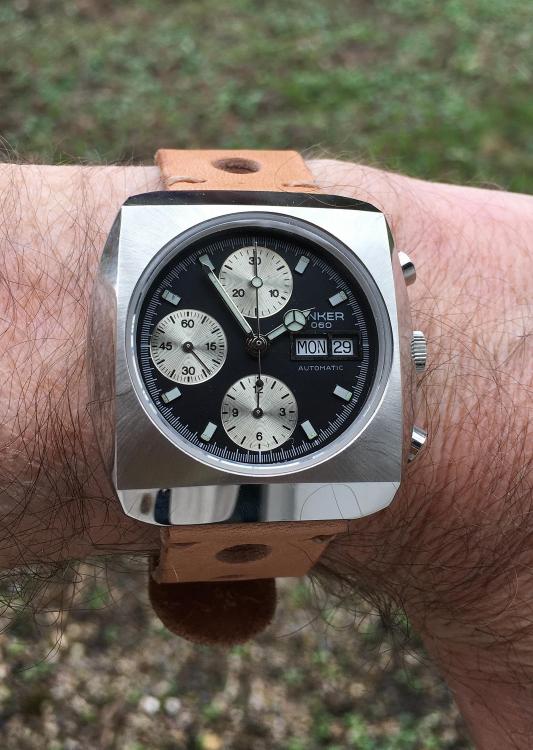
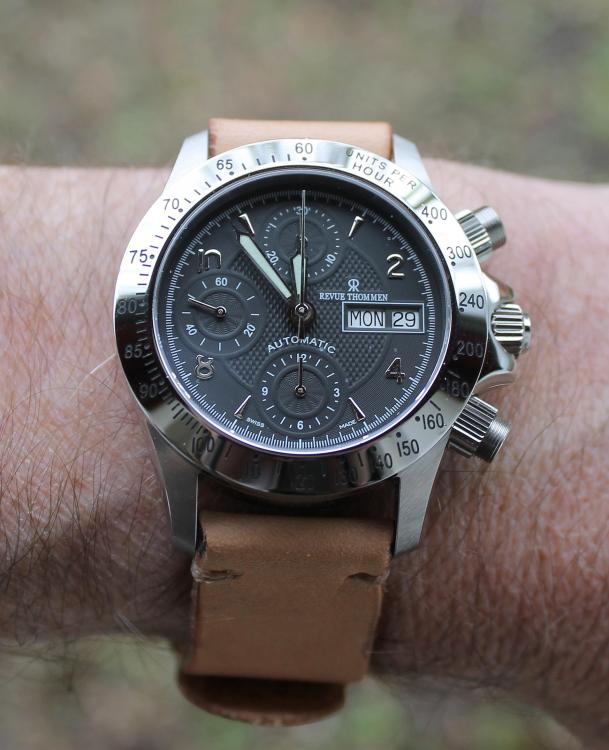
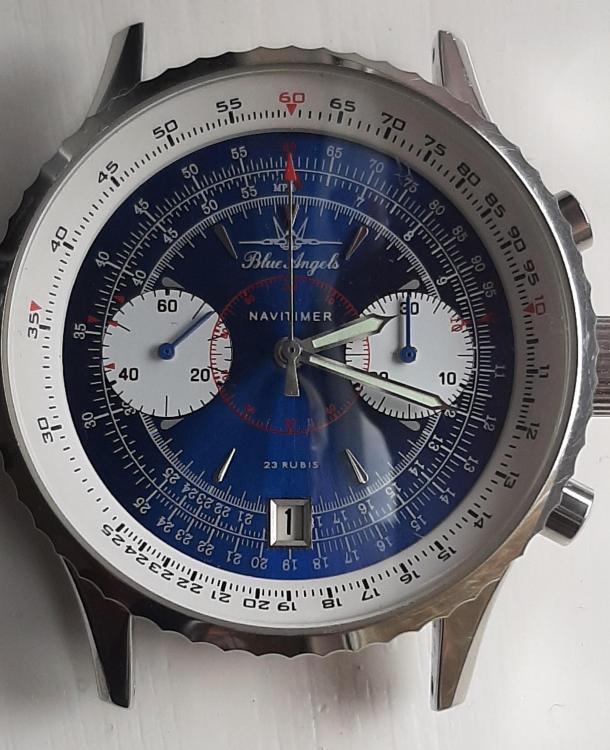
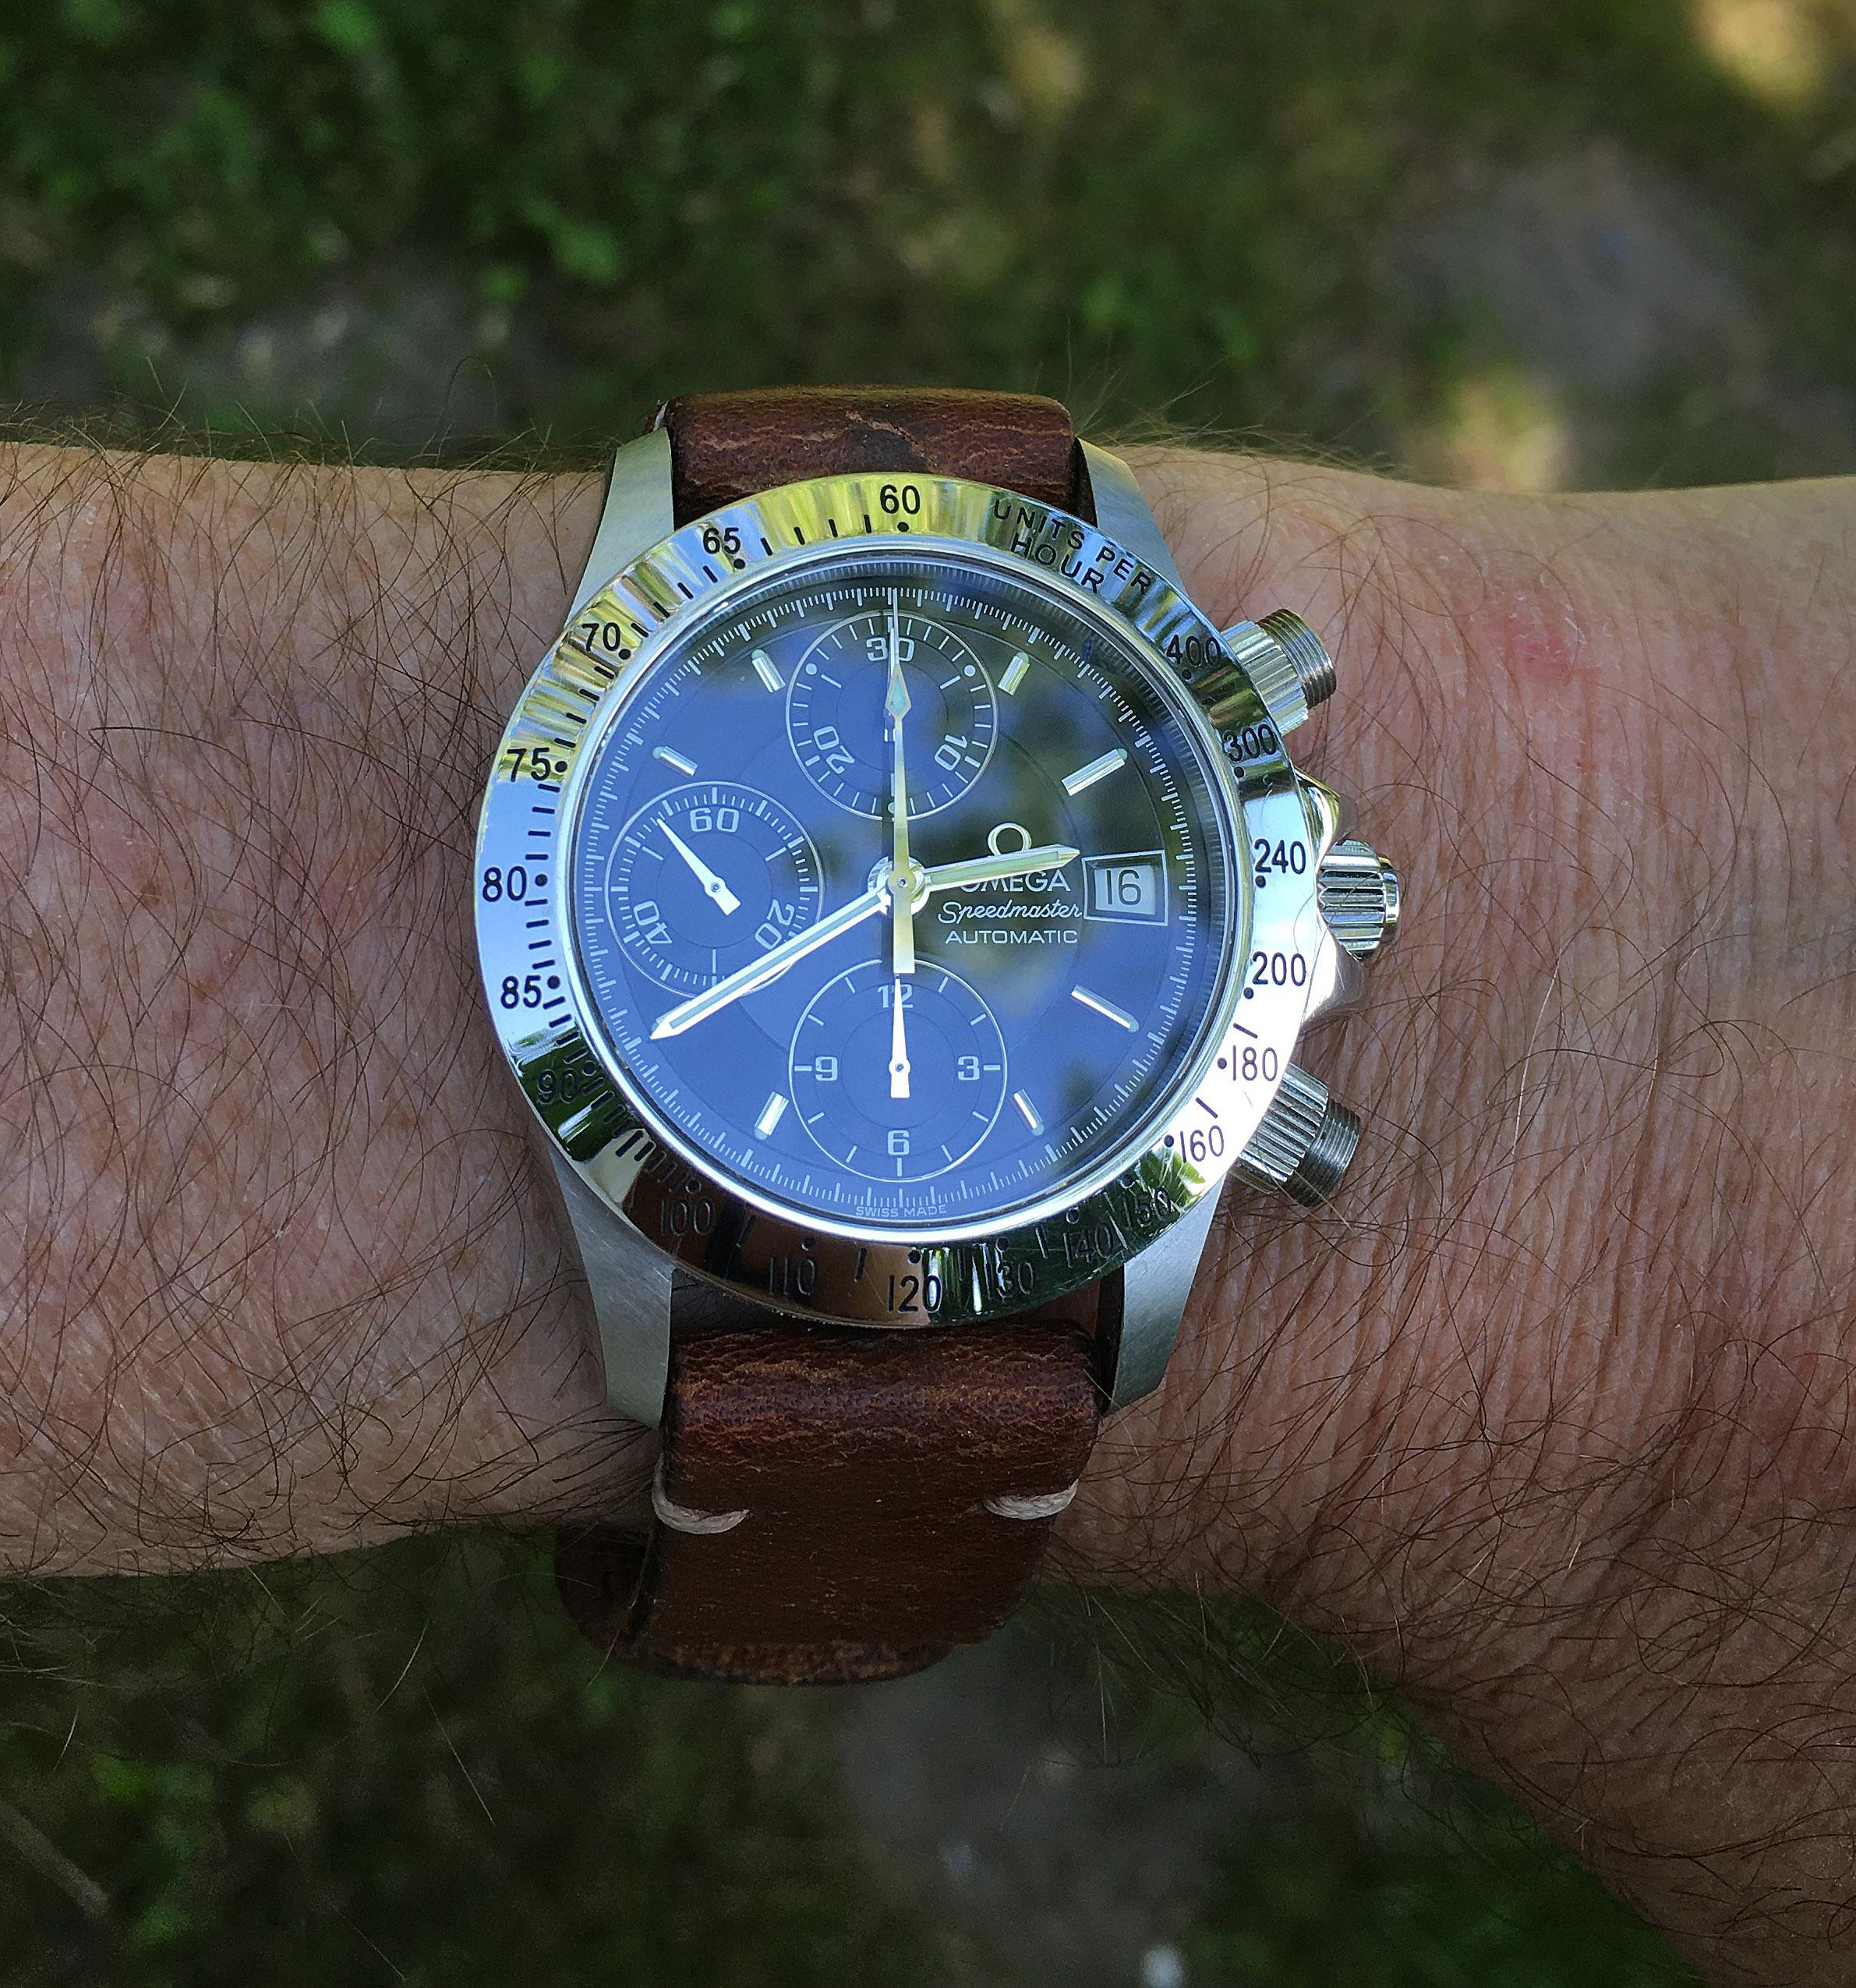
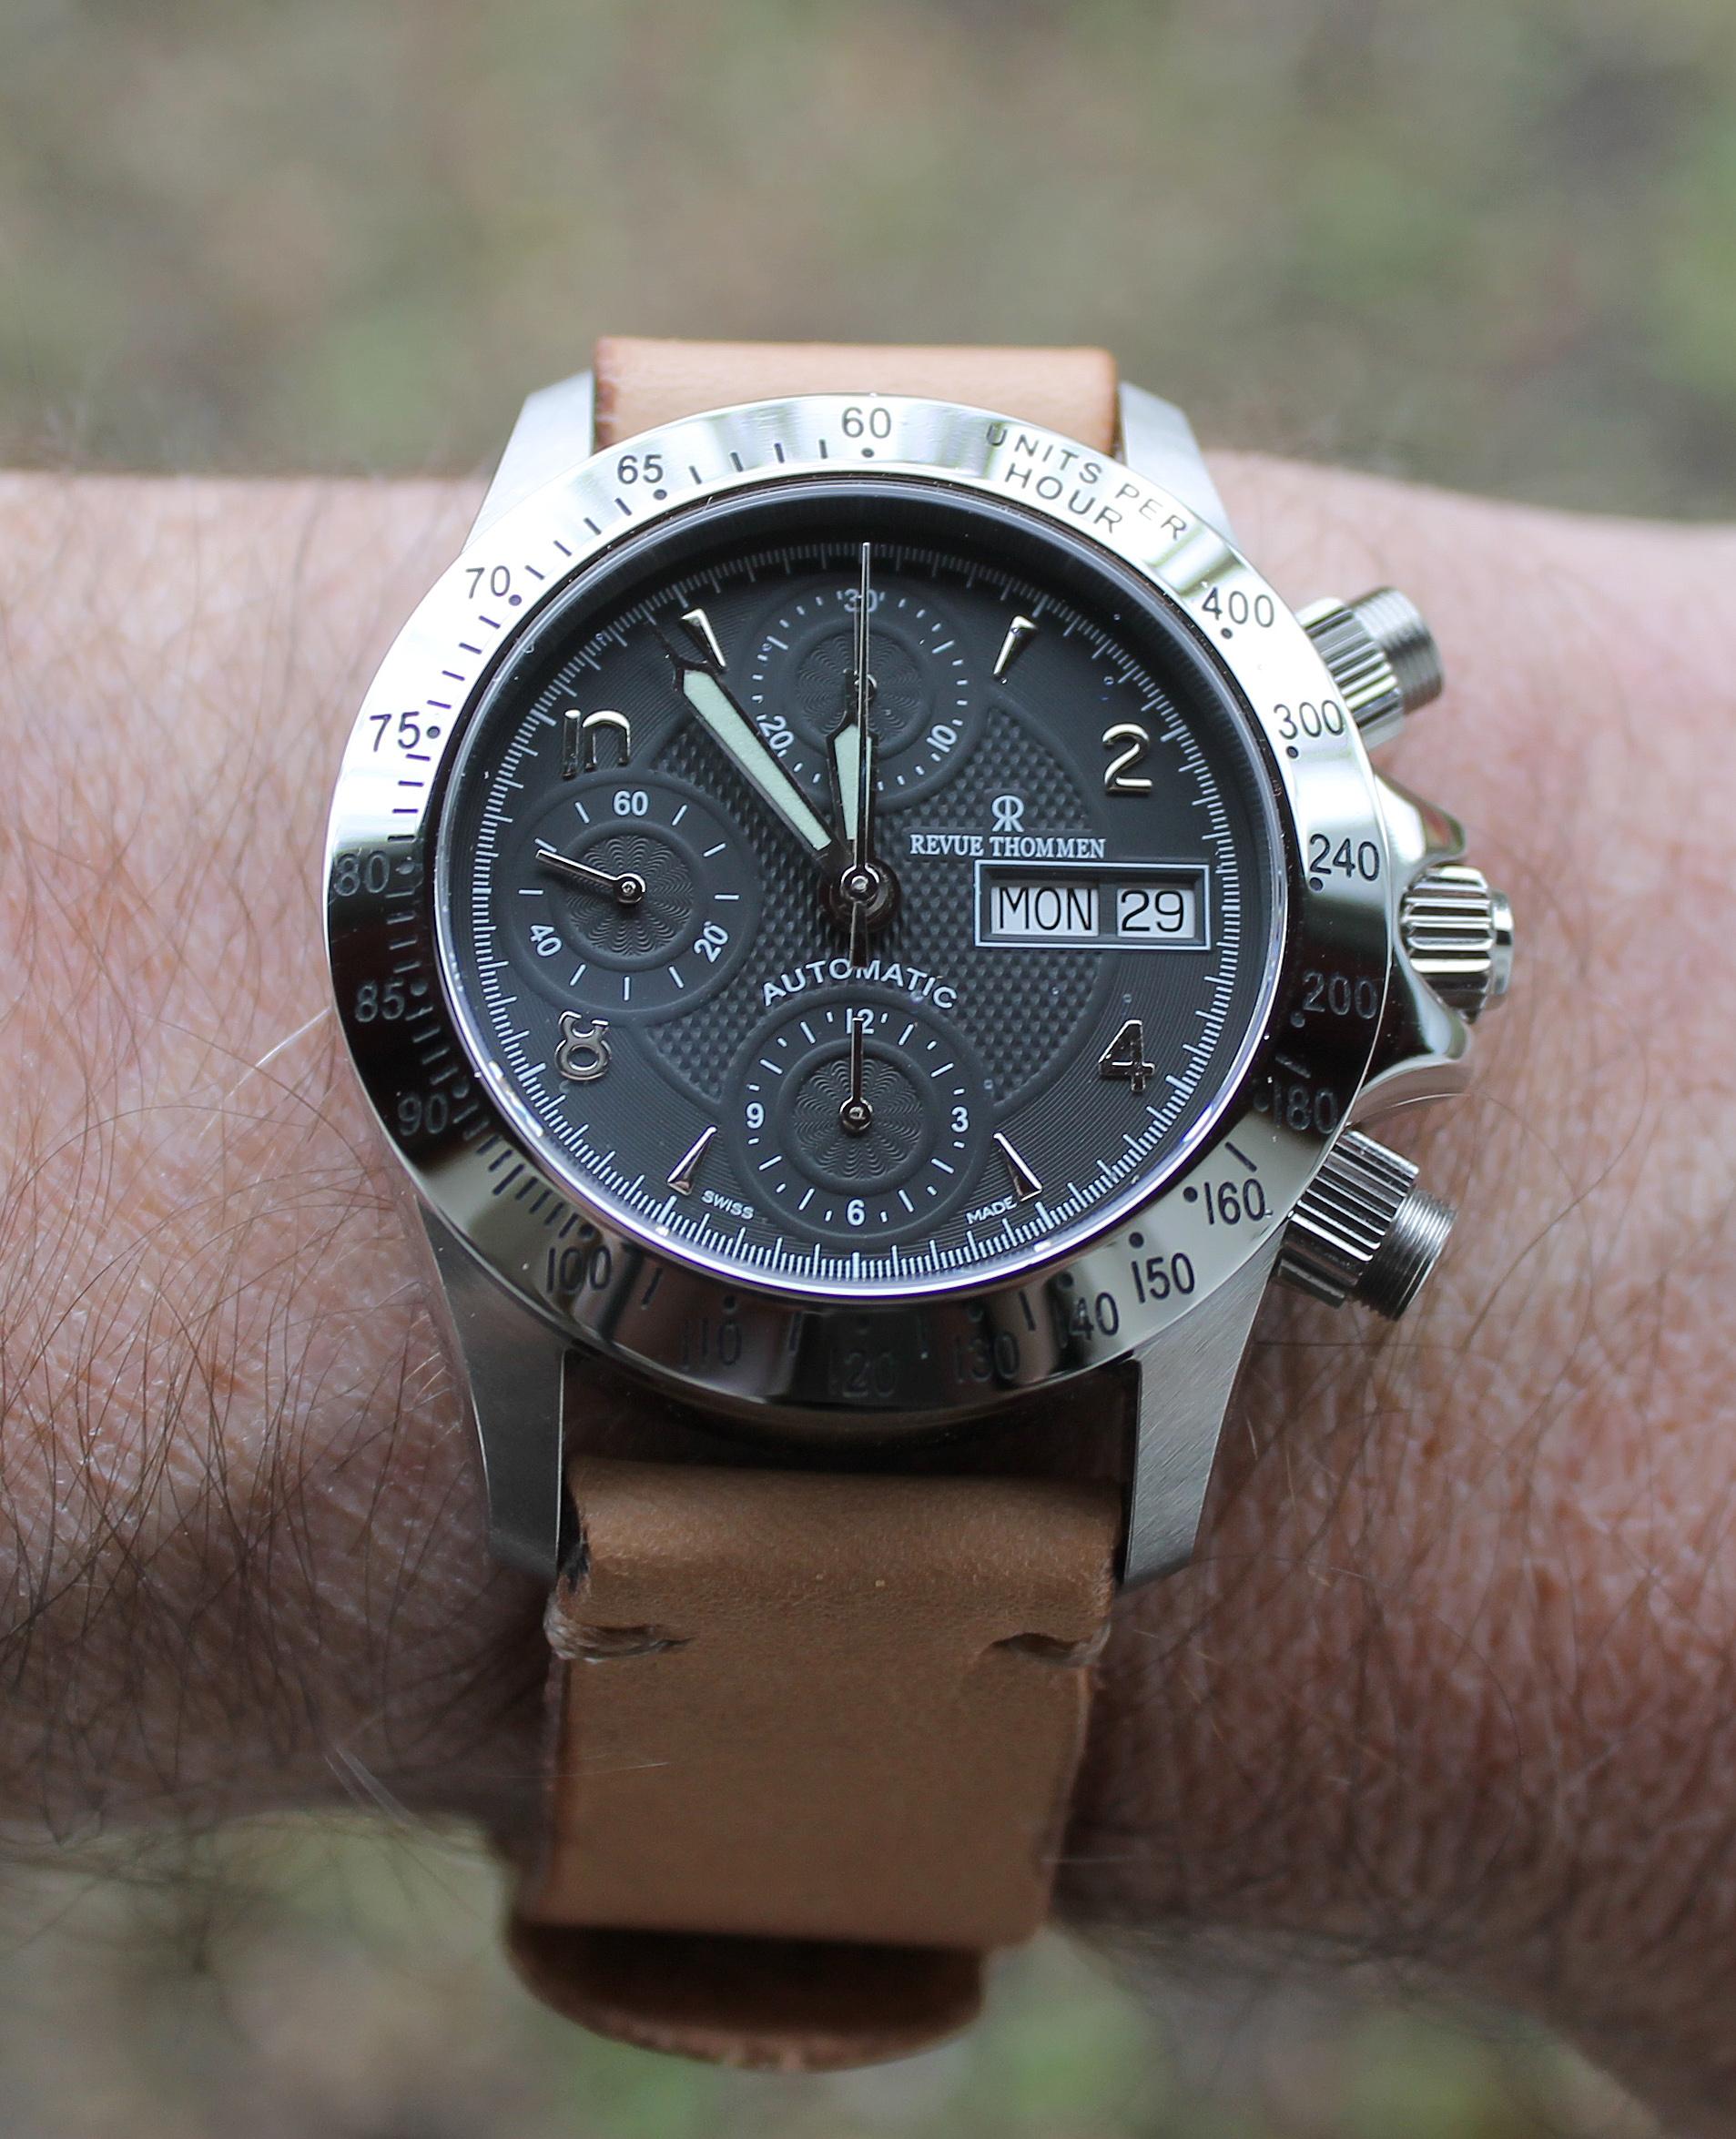
BTW, congratulations with your first chrono Now that you got the drift of how many chronographs are put together, a recommended next could be an ETA 7750 (28,800bph). They are plenty around, indeed more expensive, but it's a nice movement to work on and you will wear it with joy. Try to get a 25 jewels with an Etachron regulator, these are very nice to adjust and can run very accurately. Just be patient and check eBay, or other sources, regularly. You may stumble over the right watch for the right price. Alternatively, like what I've done, source just the 7750 movement and later a case / dial and hands of your choice. These are all self-builds; A 1980's case / dial & hands (changed to sapphire crystal) with a 17-jewels ETA 7750; Next a "Festina" 25-jewels 7750 (with Etachron regulator) with a modern dial & hands in a very high quality Swiss diving case; Next; a NOS Omega 1164 (chronometer) with a separately sourced new original Omega Speedmaster dial & original Omega Speedmaster hands. Again in the same high-end Swiss diving case as the Swiss case shown above. Needless to say that this nearly authentic "Omega" came a whole lot cheaper than the original Omega Speedmaster date, which btw has a "normal"-grade Omega 1152 caliber. Both, the Omega 1152 and the 1164 calibers are based on the ETA 7750; Anyway, once you know the 7750 you can create many "middle & high-end" watches yourself. Your own imagination is the limit This one goes another step further, but below all the bells & whistles sits a normal 7750. Since the internet is "stuffed" with 7750 walkthroughs, there may be some tips in this write-up ? Suc6 with your endeavors !!
 1 point
 -
Rather a face full of pebbles than a face full of volcanic rock the beaches in the Mediterranean holiday spots are full of. Give me soft pebbles anyday. We do have some fine sandy beaches, but they tend to be the ones that are so windy the stones have been blown away.1 point
-
Holy crap, that was quick!!!! Thank you thank you! I've seen VTA's holder but I honestly prefer your design because of the large base. Seems like it'll be much more stable with your design ************************************ Edit: Forum somehow merges threads and it's driving me bananas ************************************ You, sir, are an absolute legend!! It all fits nice and snug. Brilliant! In other news, I dusted off the printer for the first time in maybe 2 years and it all went pretty smoothly. I certainly don't remember it being this easy before where things just, well, worked. Maybe it's the new filament I used.

 1 point
 -
Ok, I had the spec sheet from Seiko on that movement and I grabbed the wrong casing diameter. There are two sizes for that one and I picked the larger one. I saved another file. Give this one a try: link Also, VTA has one on Thingiverse here.
 1 point
 -
https://www.aliexpress.com/item/3256803011714552.html ø30mm version.1 point
-
Ouch, and I was complaining about the tiny 4205's I've been messing with.1 point
-
You may need it for that one . A very worthwhile investment my friend. Your abilities will make leaps and bounds on its first use.1 point
-
This isnt actually my modification, its a prezzie my lovely missus bought me for xmas, she has good taste and it was a fantastic surprise. A guy in the Uk that specialises in modding Vostoks, a bit controversial now but it was a present and she did say its ok if im not comfortable wearing it. Its a cracking watch, quite accurate and a very healthy amp. A tad too big for me but i love its style, and solidly built. A bit like i like my woman built. I may edit that later as she often pops her head into the forum to make sure I'm behaving. I hate to disappoint her . She has a keen interest also and is quickly developing a good skill for repairing, it looks as if i may need to set up another bench soon as she's starting to hog mine lol. Tired a little go at hs manipulation a week ago and her delicate approach i have to jelously admit i think shes going to be better at it than me. .1 point
-
Thanks, I look forward to it! The next best thing when you are free and do not have access to the workbench! I'll likely be in the same situation next summer for six weeks. I'm going to miss the workbench badly.1 point
-
Haha, different strokes. I love modded watches (tastefully done of course). I wouldn’t go and mod a prestine watch, but I do pick up a lot of watches destined for the landfill and these get modded to hell sometimes. For unmolested SKX’s you can go to SpeedTimerKollection. I bought two from them for around €160 each and they were in pretty good, unmolested condition (there are cheaper horrors though, so spend time looking at each photo carefully - the price usually is an indicator of condition). I only serviced them and they see weekly wrist time. That being said, it’s still a bitter pill to swallow when that was their price brand new just a few years ago.1 point
-
I sent him a massage telling him the country that the clock was made in. I'm in a good mode today1 point
-
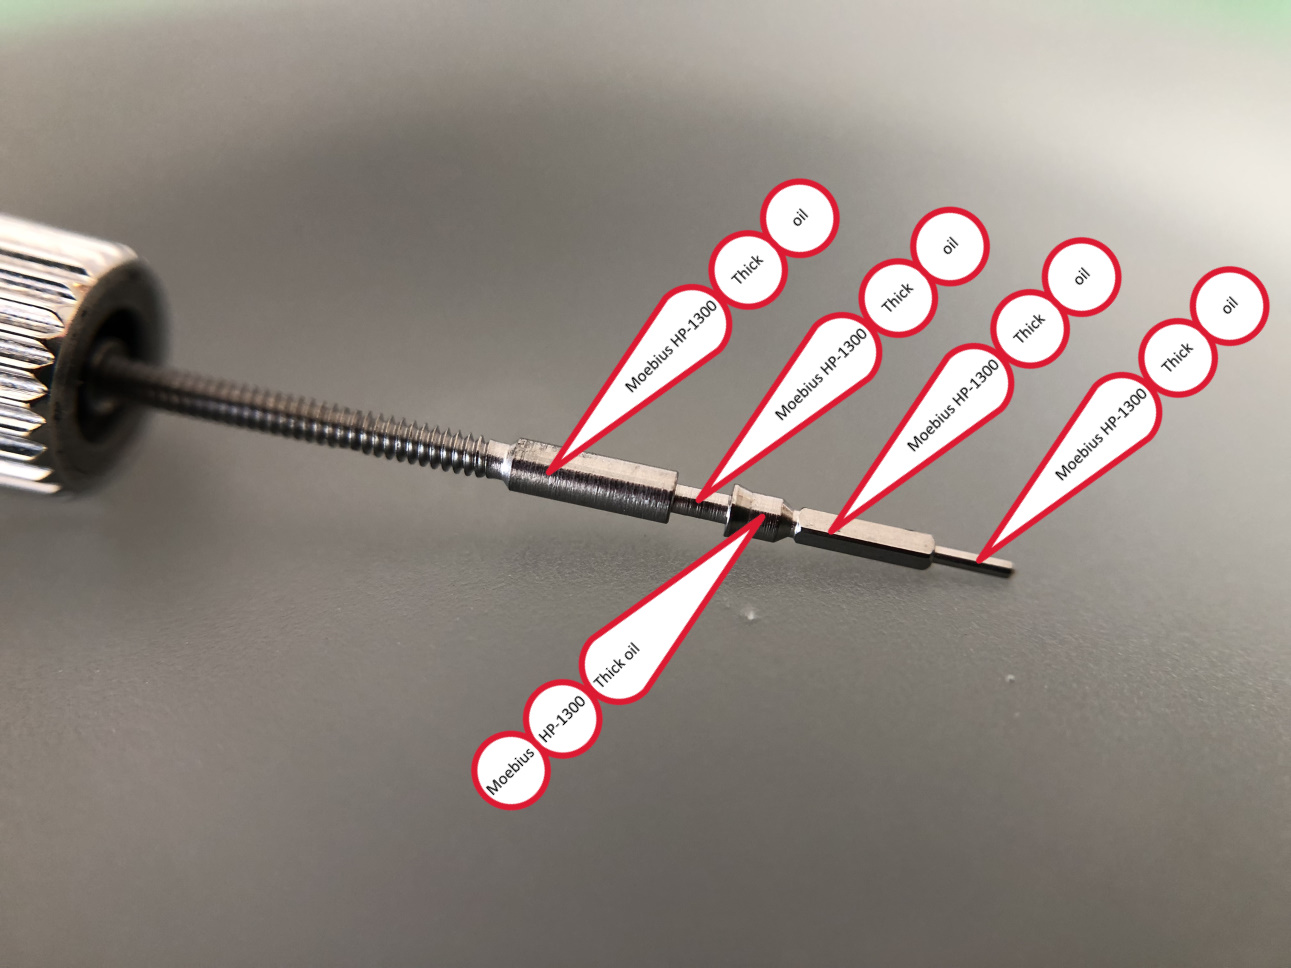
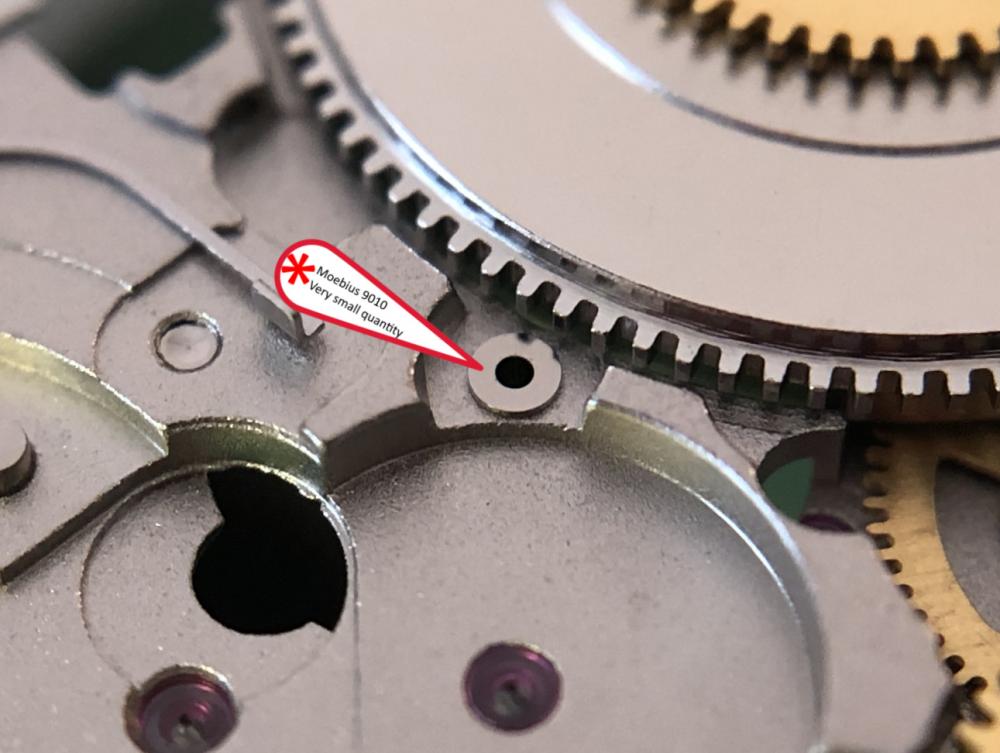
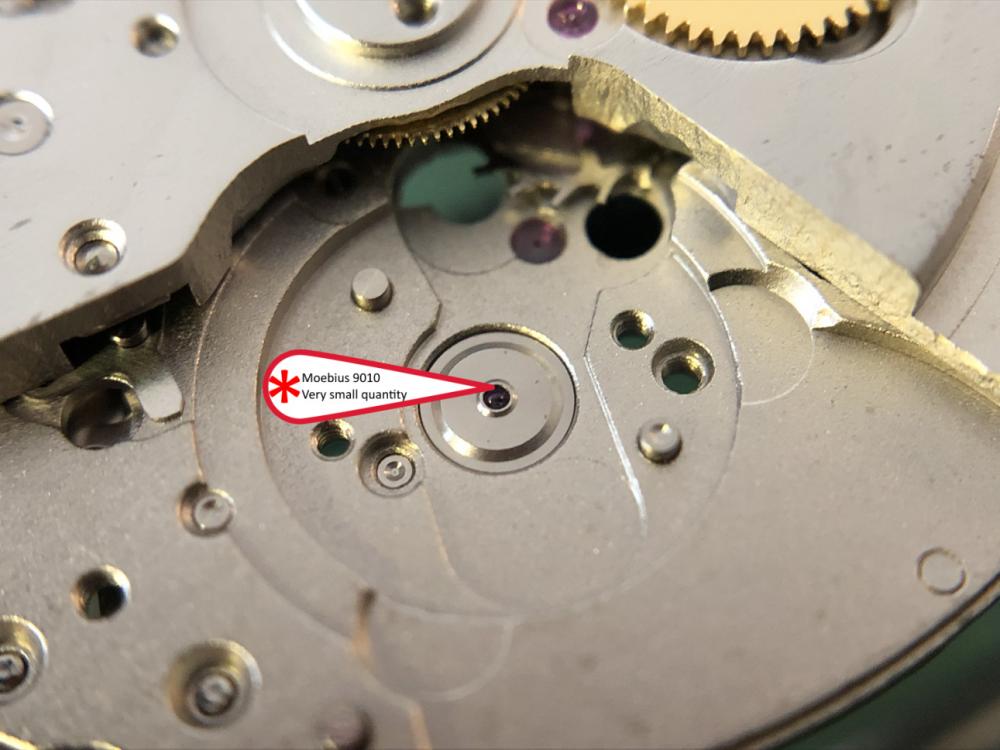
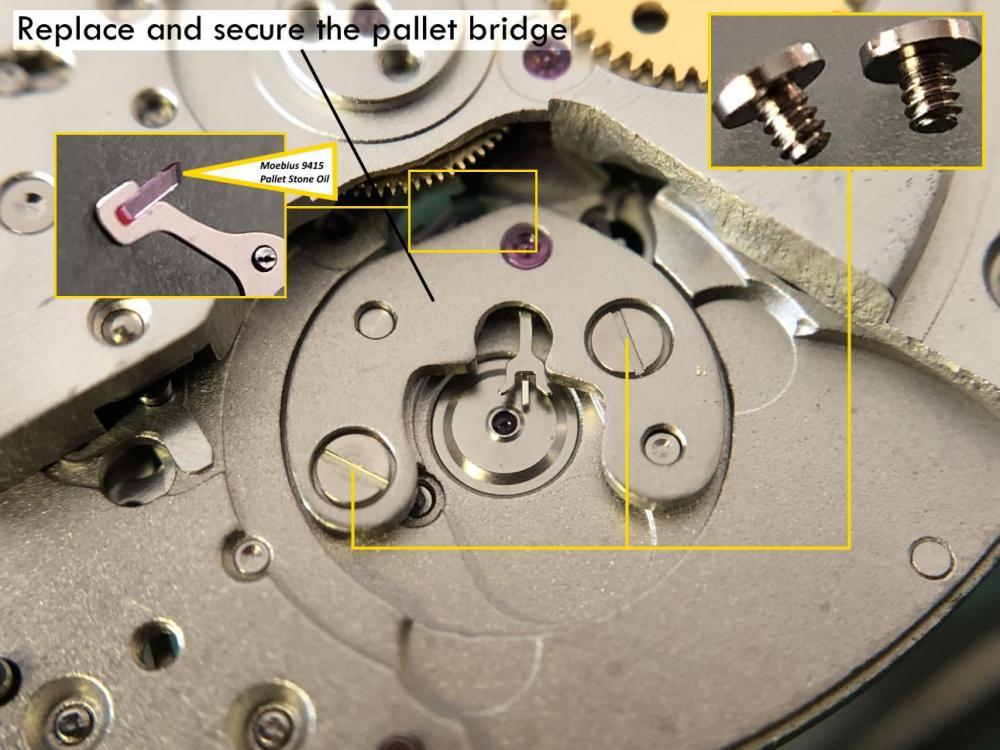
I don't know how you could be sure if the epilame has been removed. In the past when I've gotten it on a pivot by accident* I take a piece of pegwood, flat end, and press it down on the pivot while turning it. Again, not sure if it really removed it, but- years ago I did some watches for a small manufacture that had a reputation of the balance pivots eating in to the cap jewels. The watchmakers there told me to do the above with pegwood; it seems there was some invisible abrasive embedded in the pivots of these staffs, and the pegwood trick did work in sparing the cap jewels. It used to be that the manufacturers and Moebius said treat the whole fork. Somewhere along the line they changed that and say just treat the jewels. I know some watchmakers who still treat the whole fork, and they don't seem to have issues. I've also seen examples of forks with wear in the fork horns, apparently from having epilame there. So I err on the side of caution: I grab the fork in one set of tweezers, then dip some closed #5s in the Fixodrop, then dip the stones in the Fixodrop that's been sucked between the tweezer tips by capillarity. A friend of mine uses a tiny artist brush to apply it to the stones.1 point
-
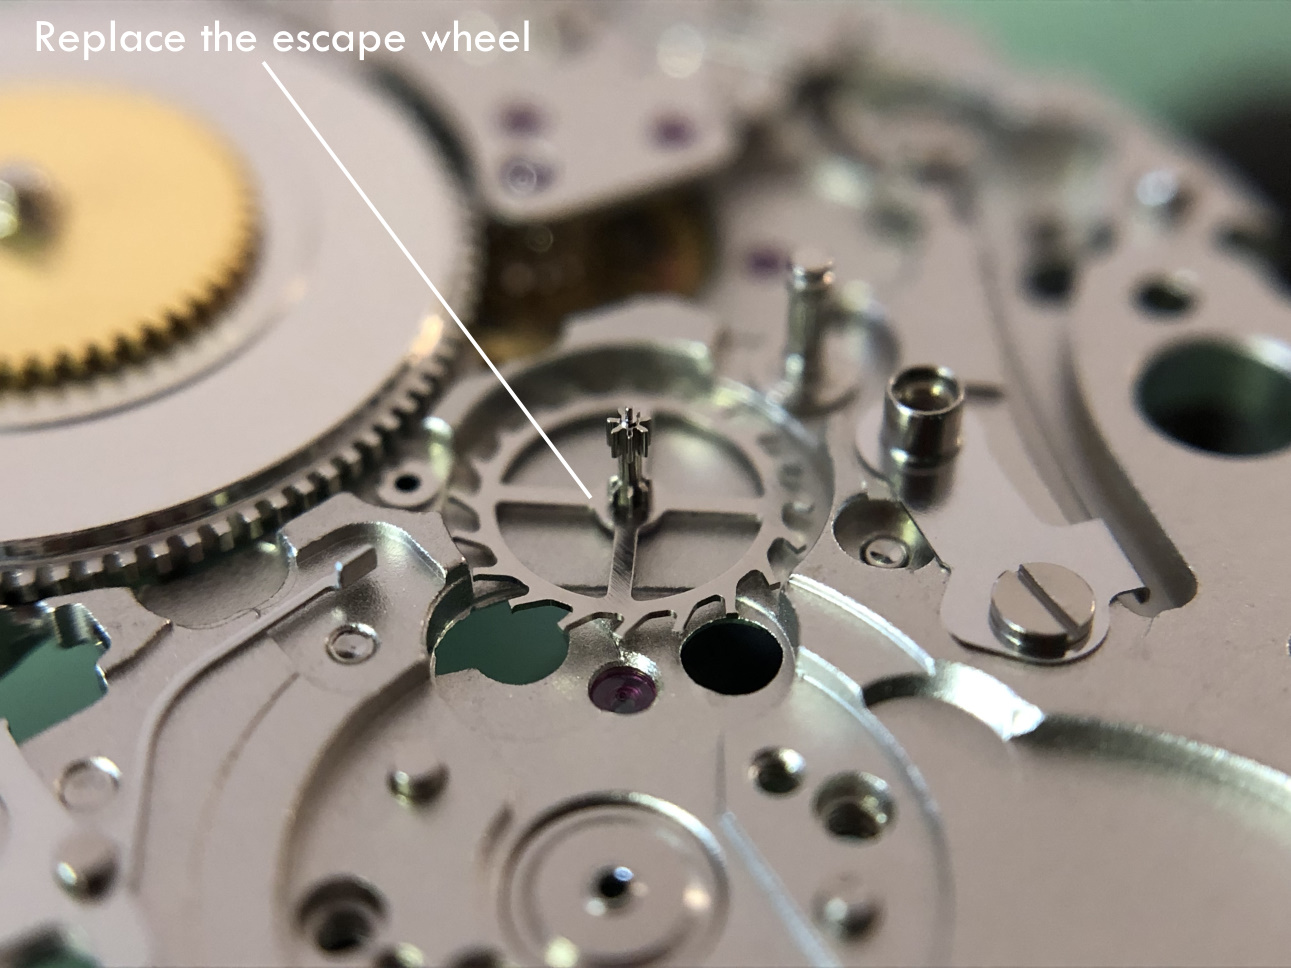
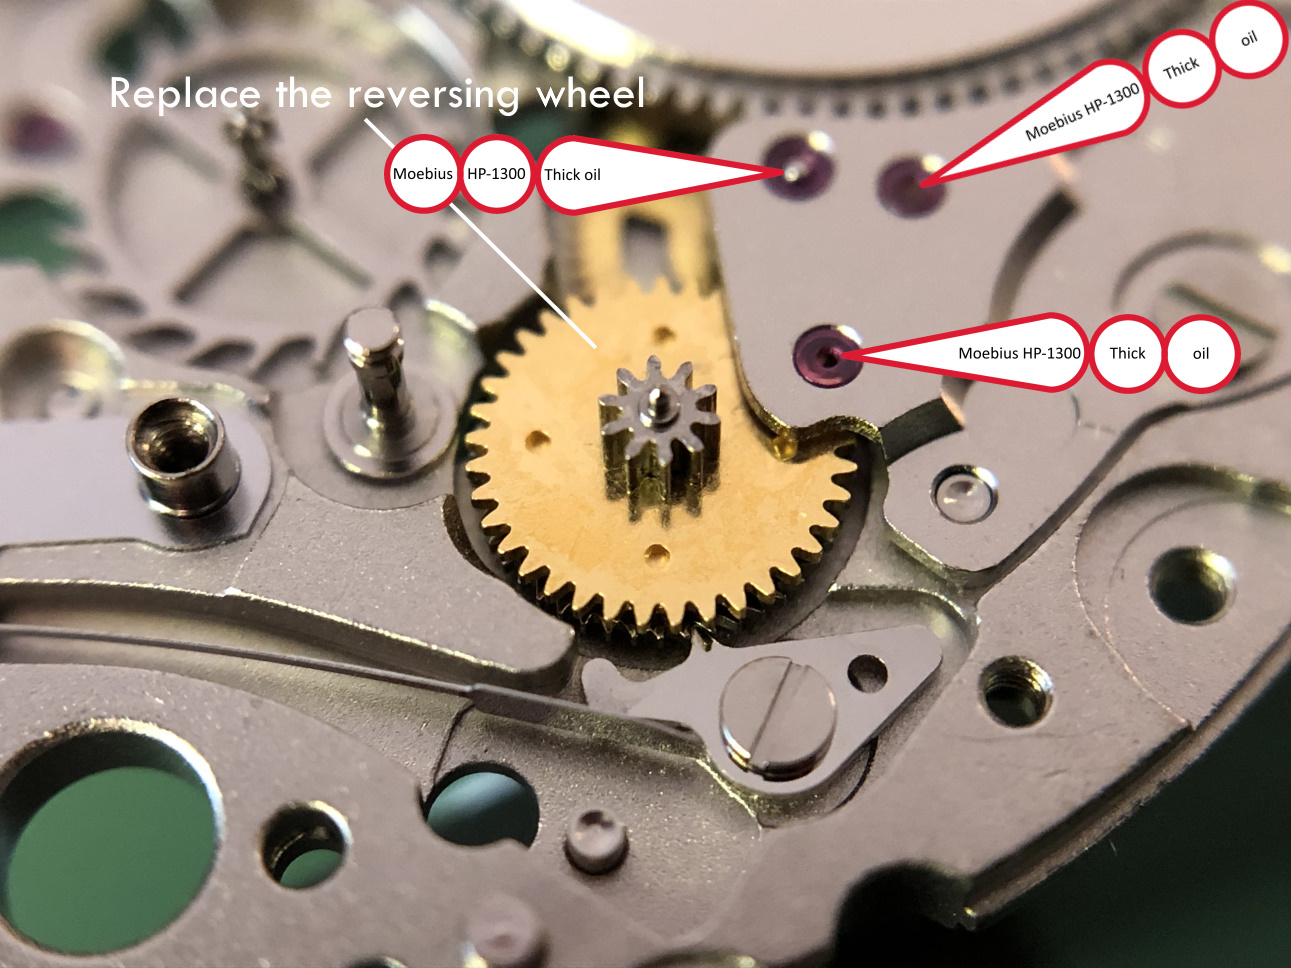
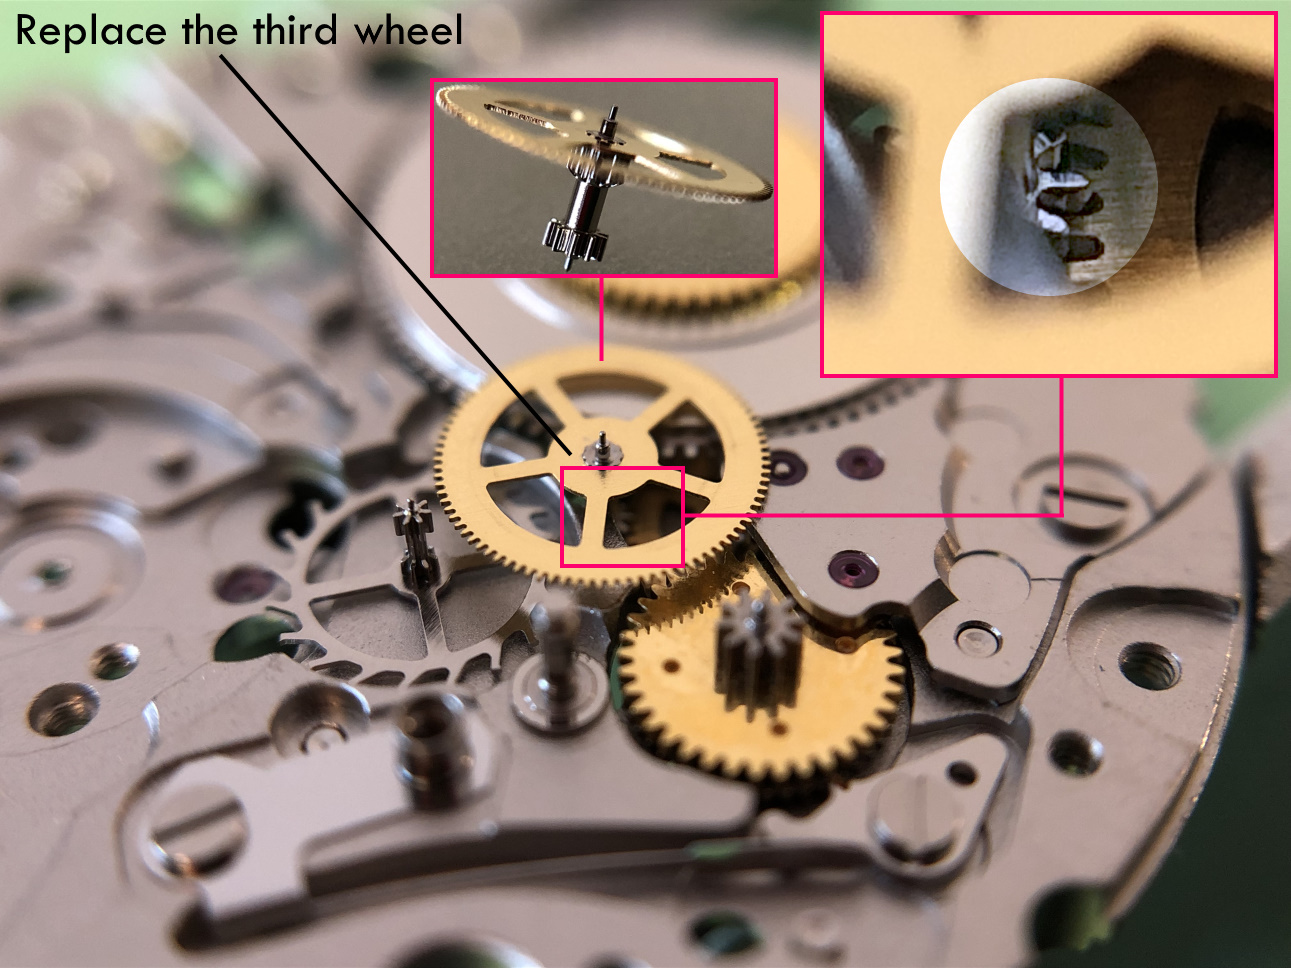
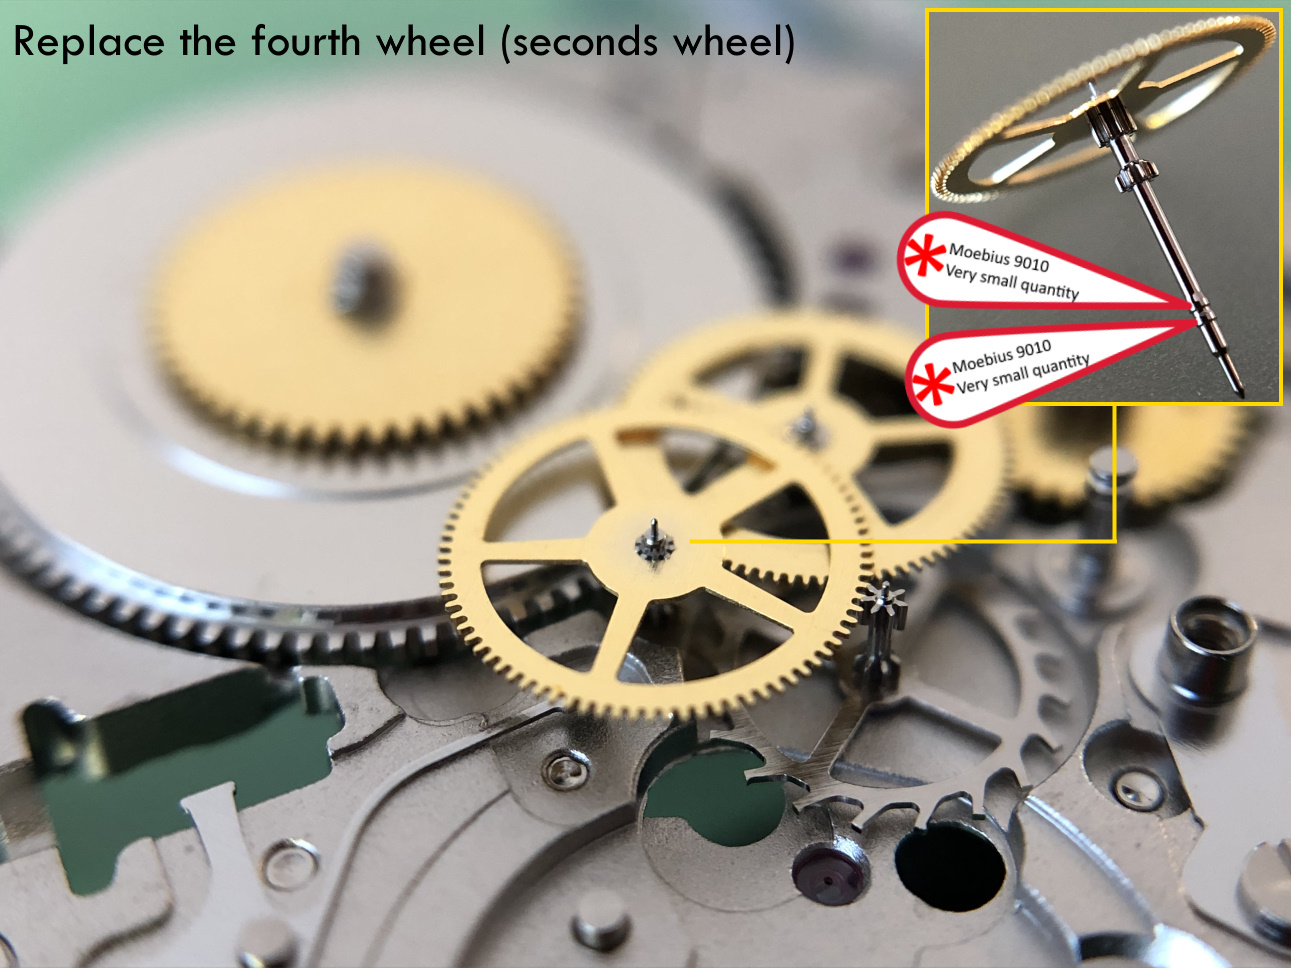
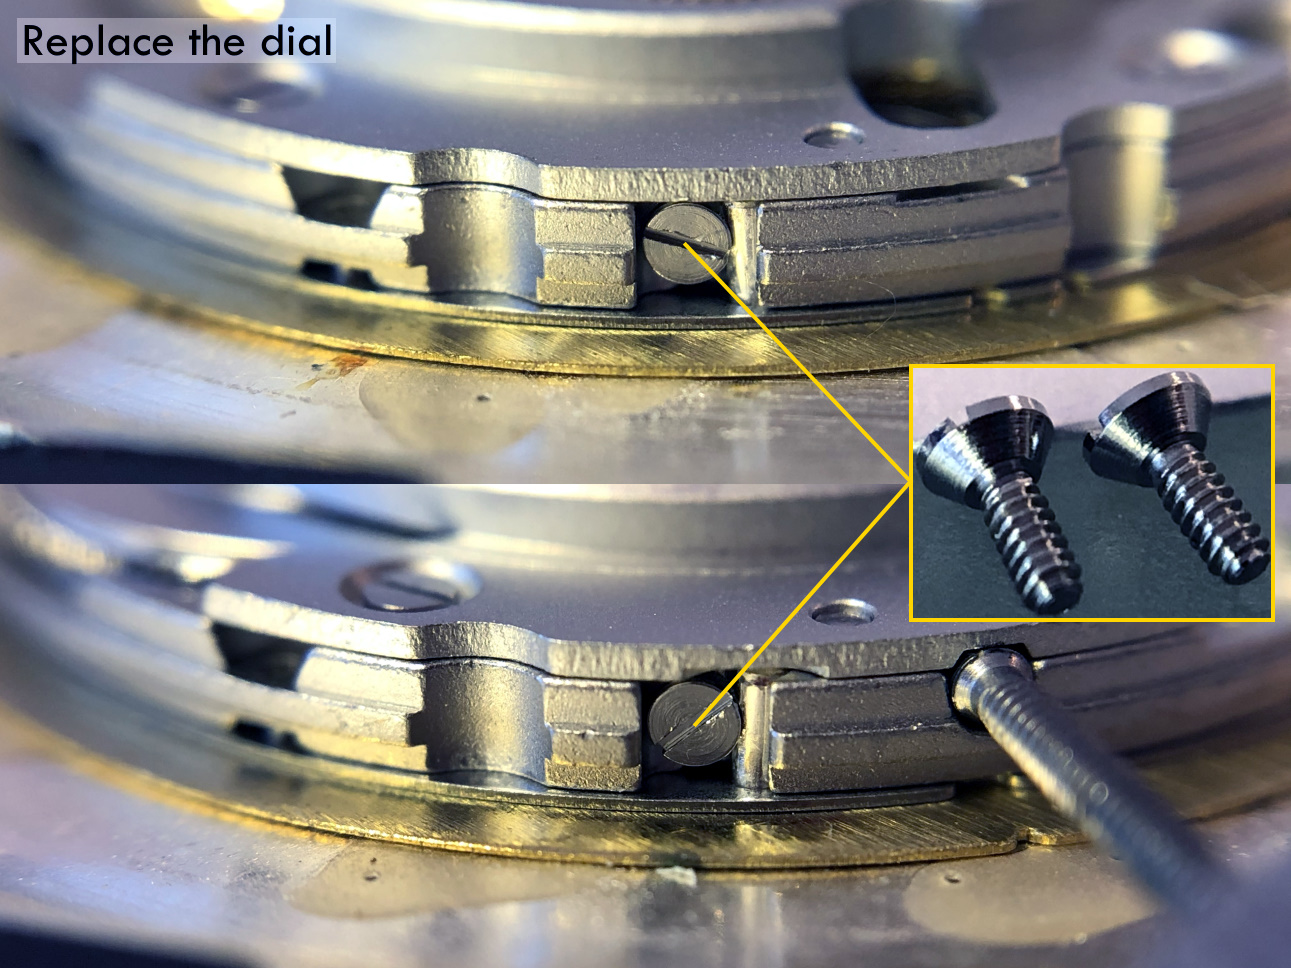
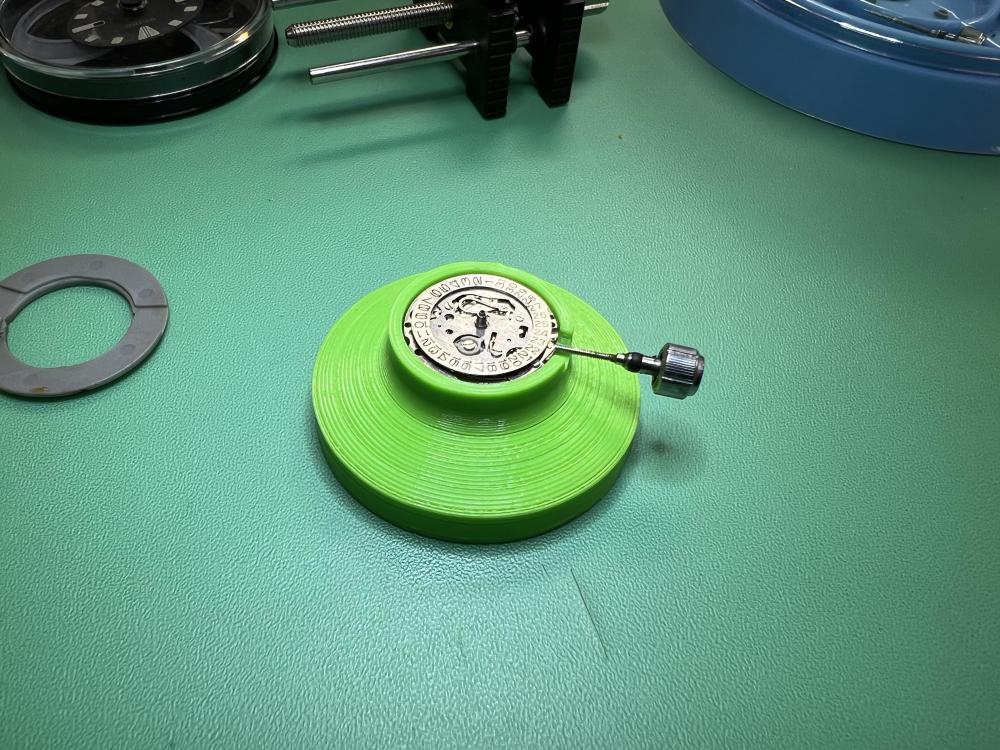
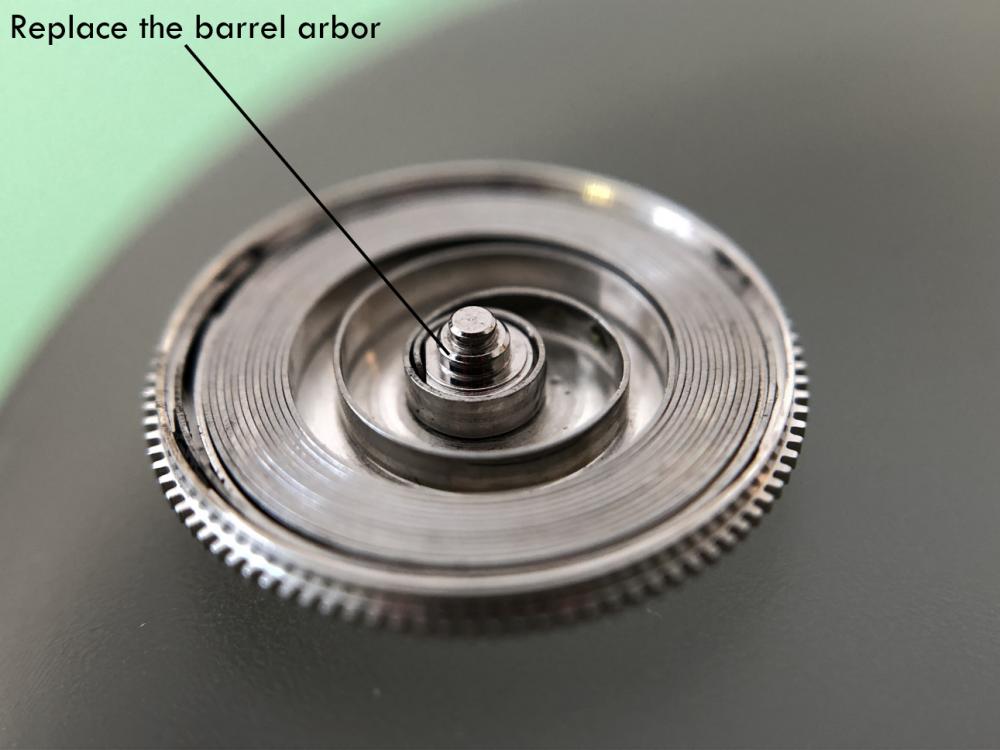
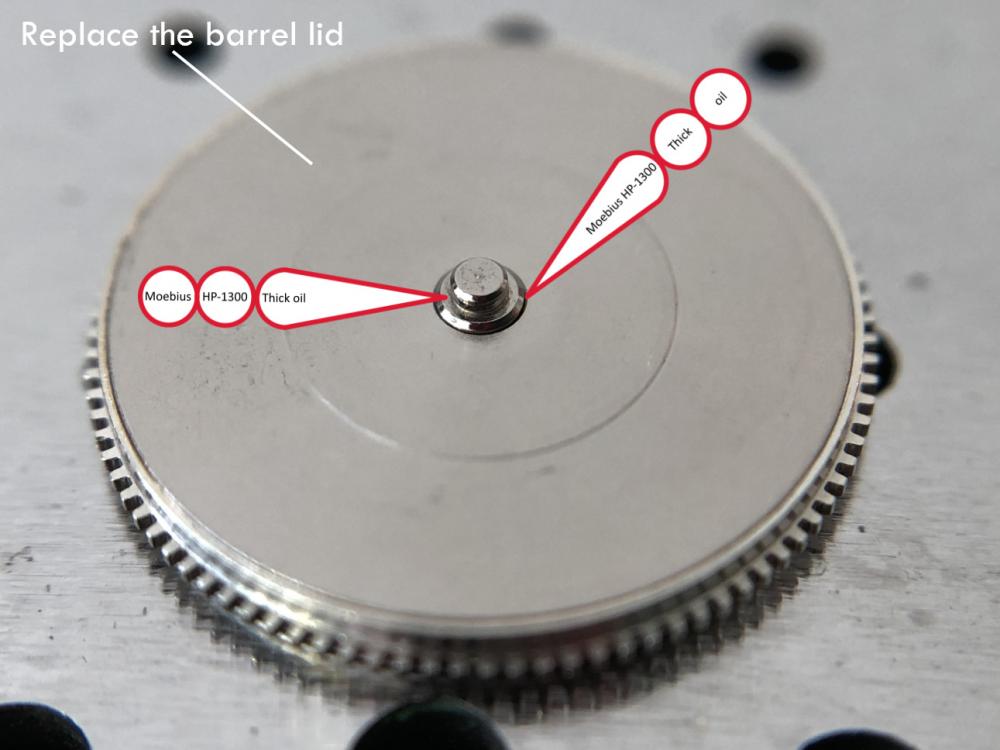
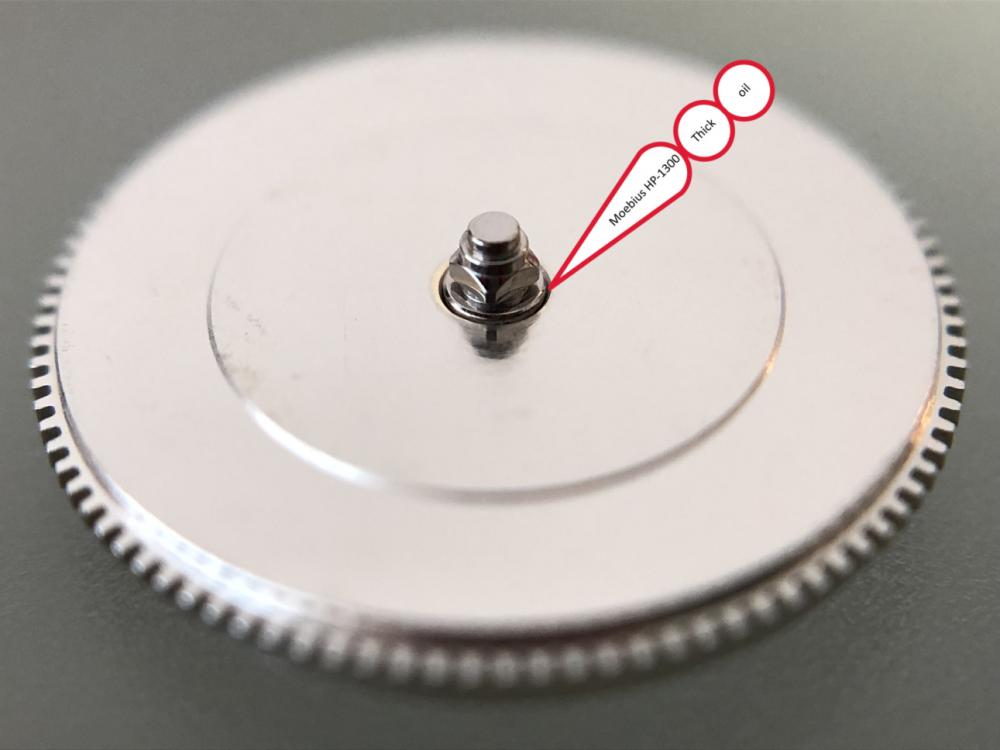
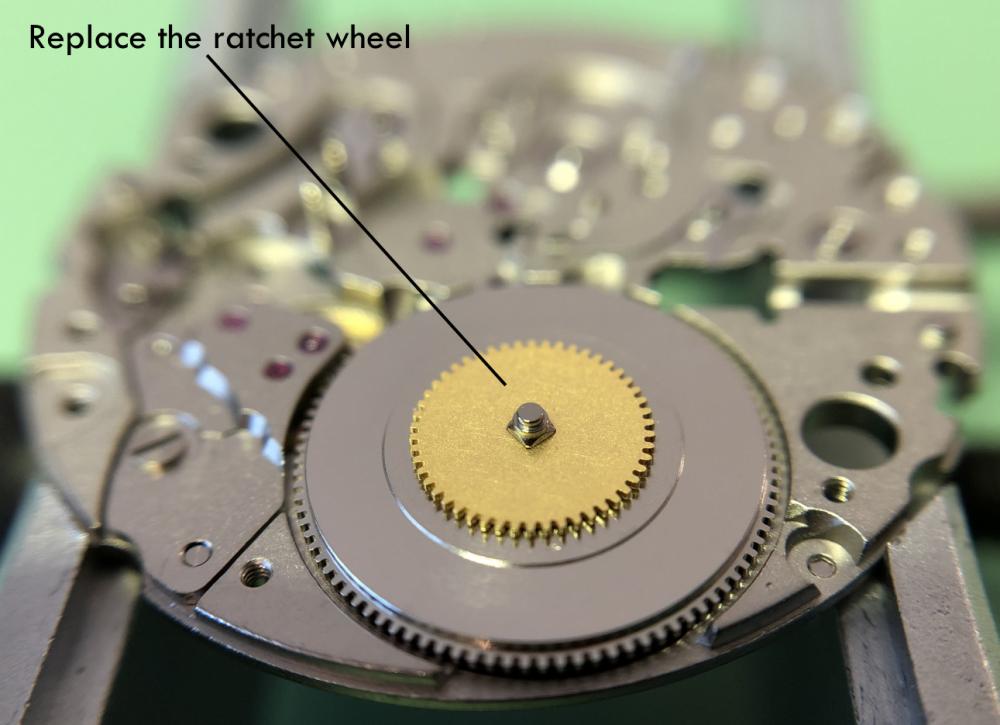
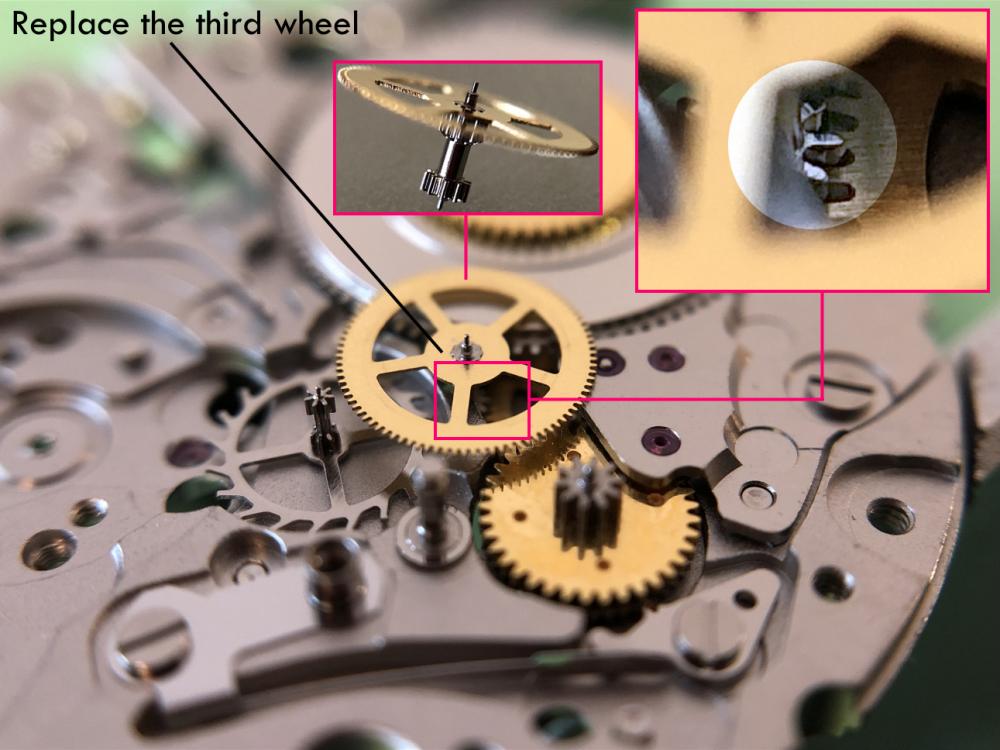
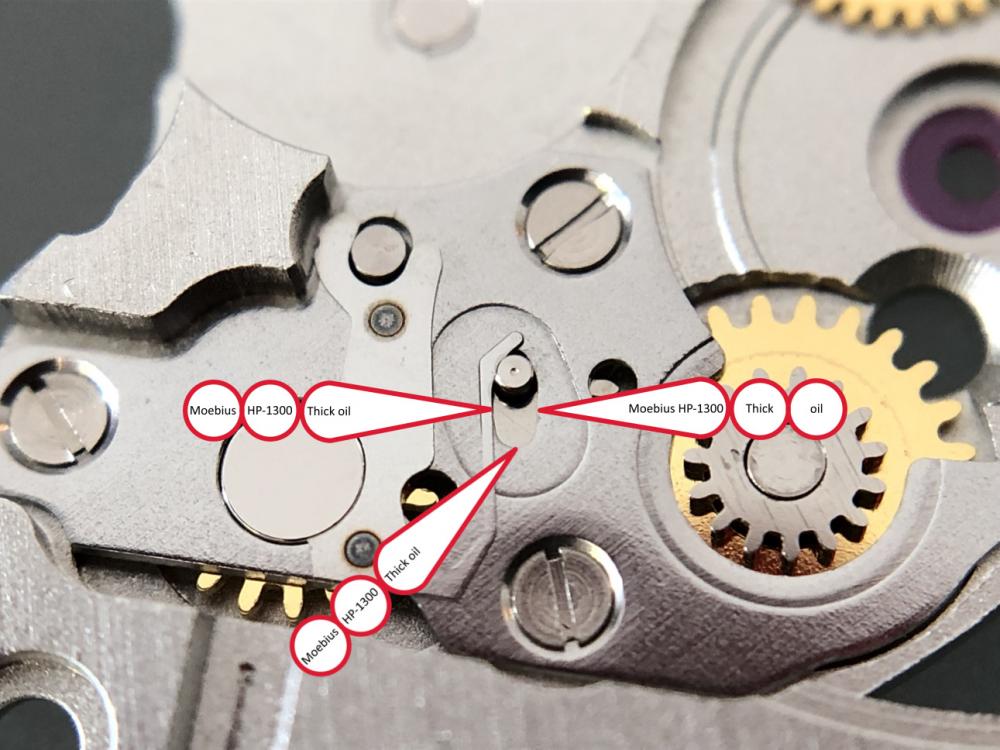
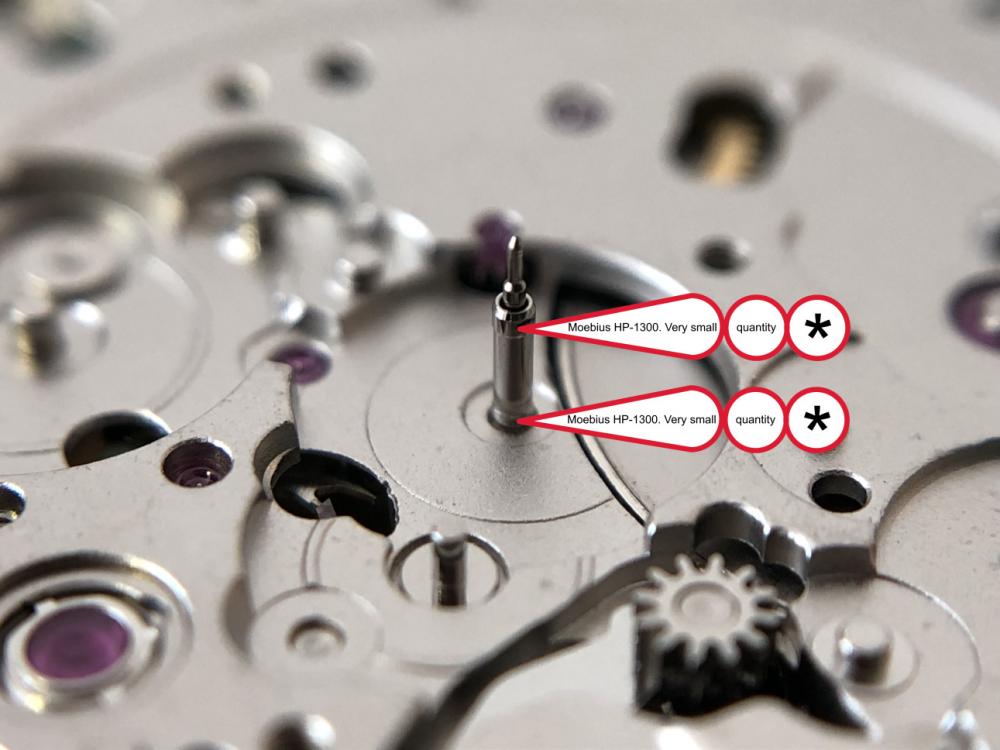
Finally got the watch working well. Thanks to the above thread, thanks @Endeavor It was pretty straightforward for my first chrono. A couple of further notes, which may be of help to anyone starting out on one of these : The complete movement does not sit well in a "normal" movement holder - when you are pressing the chrono buttons it can ping out (they take quite a bit of force when not in the case). Next time I'll look to adapt a plastic holder. With my movement, I found that unless I removed the stem in the setting position, the clutch lever would slip out of the slot in the clutch, thereby stopping the stem from going back in. VERY annoying when finally casing and trying to get the stem back in. I had to strip the dial off to reset the clutch. As the chrono is driven from the 4th wheel, there is very little torque. The chrono wheels must be spotless as the tiniest spec of crud will stop them. As I found out, the smallest bit of dirt on one tooth of the seconds wheel, which took some spotting even under the microscope. I hate mainsprings with a T end - such a pain to get them to sit in the slot correctly !1 point
-
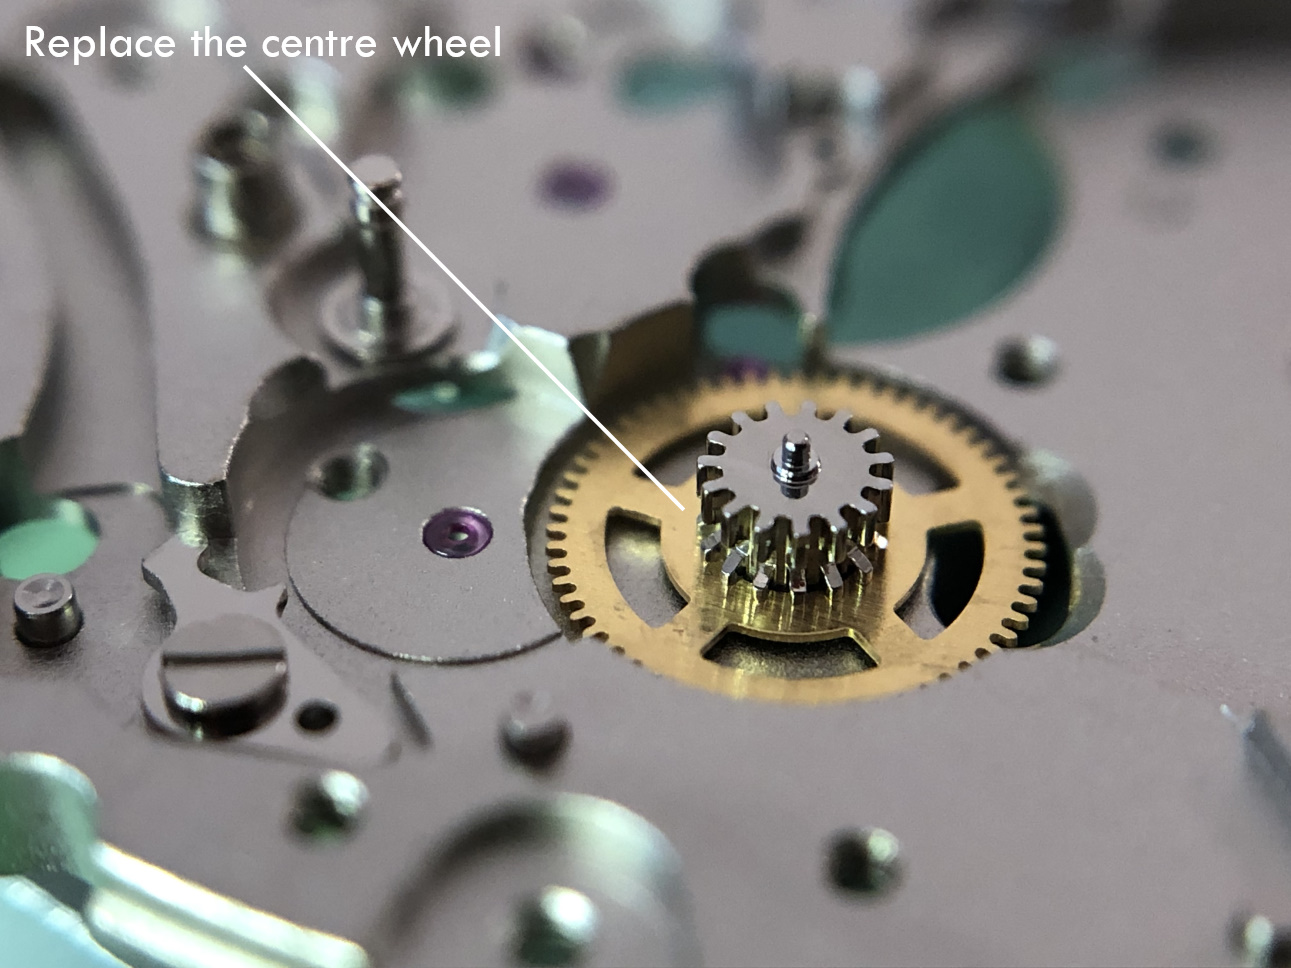
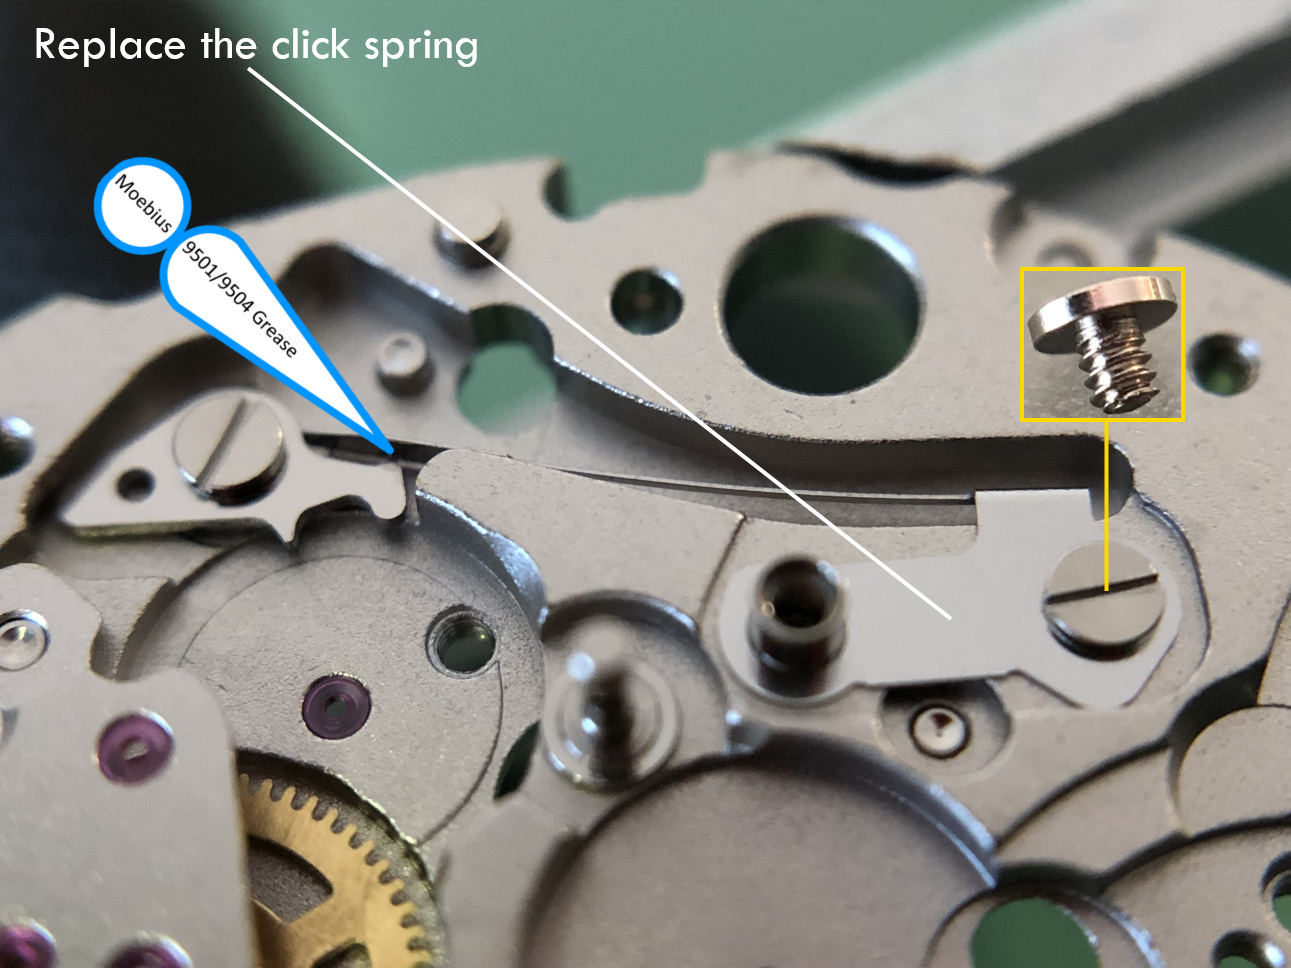
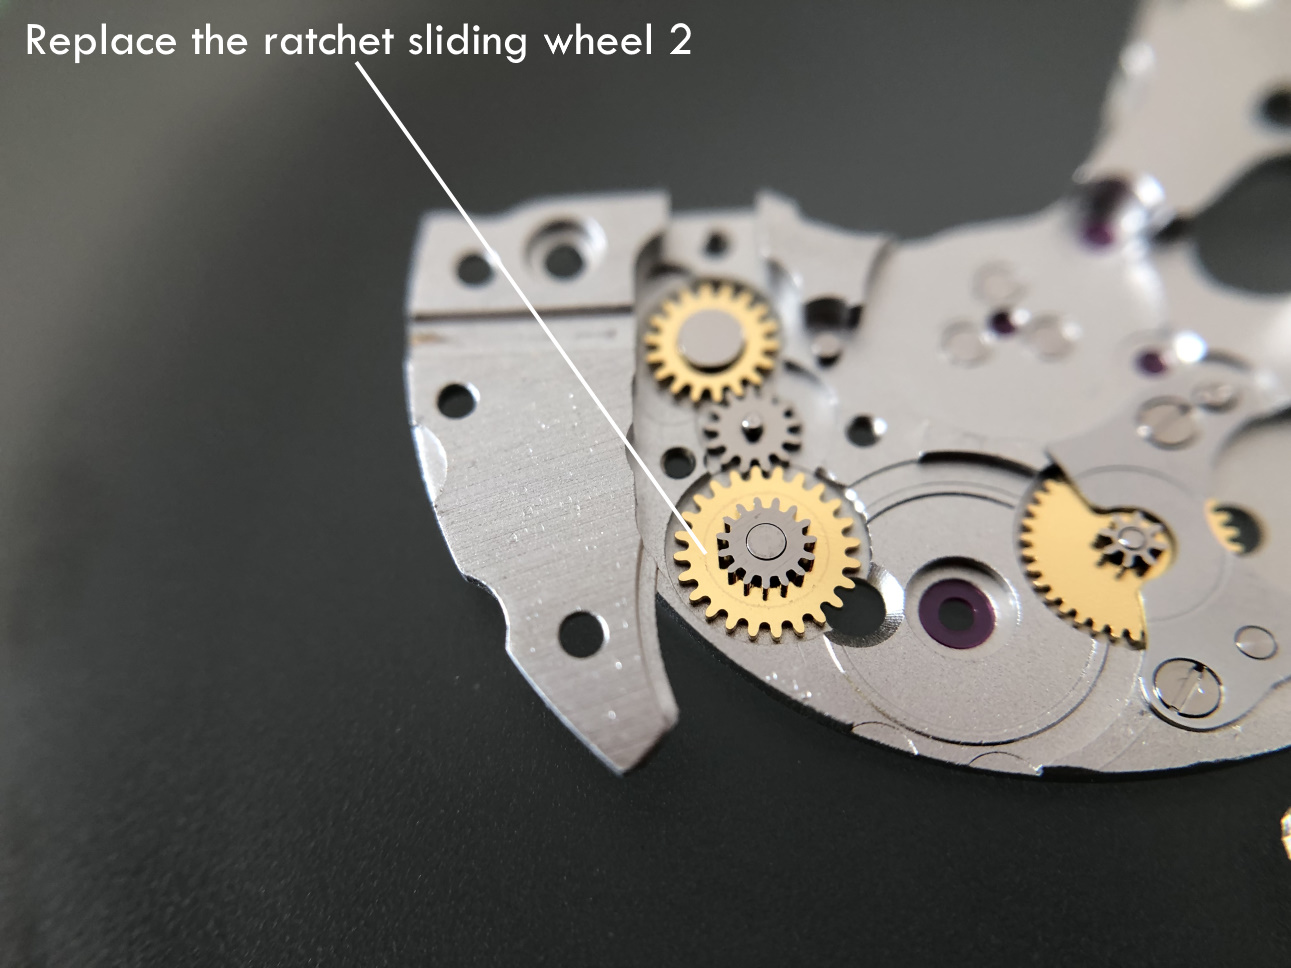
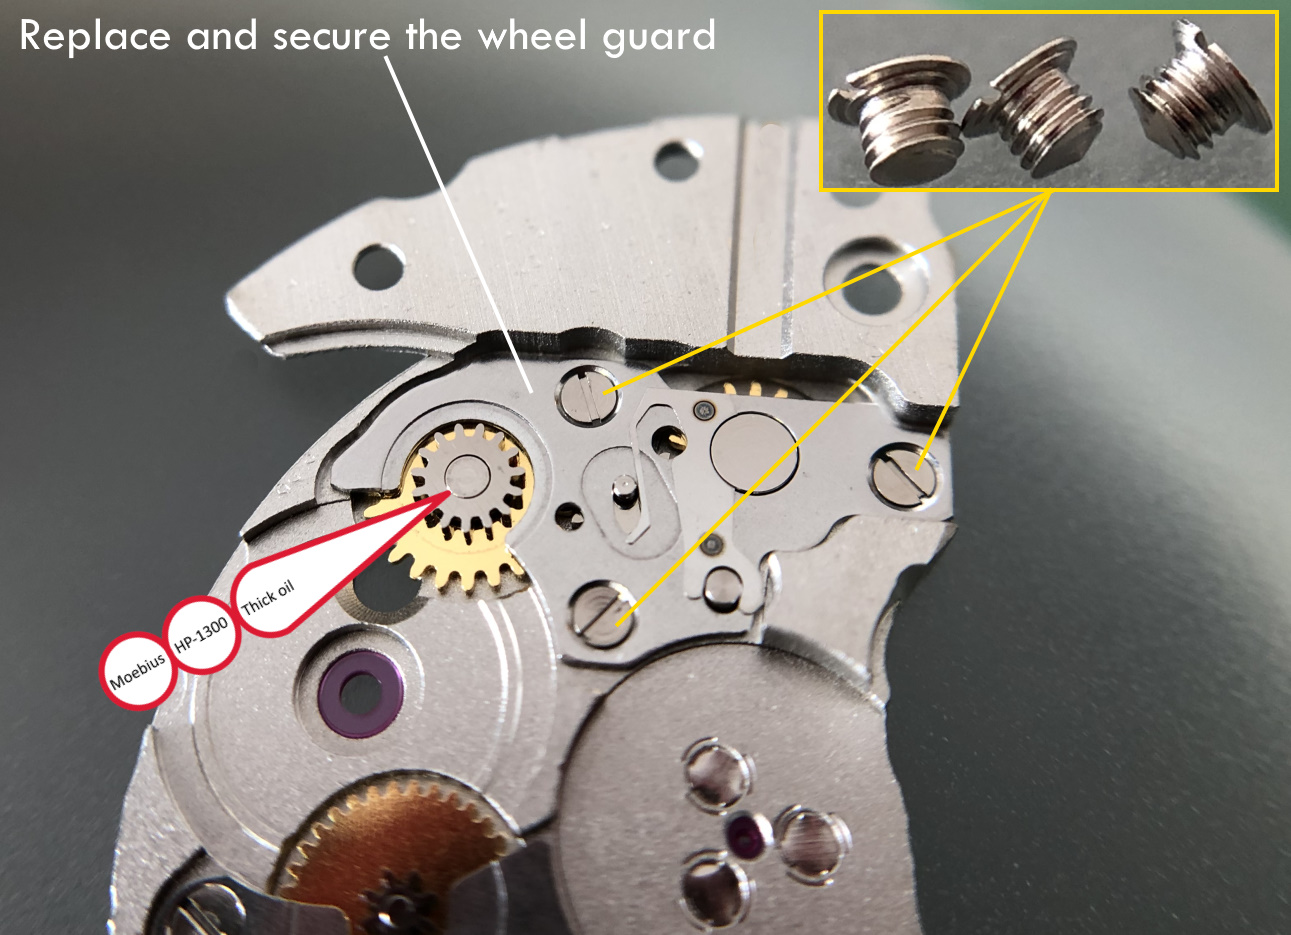
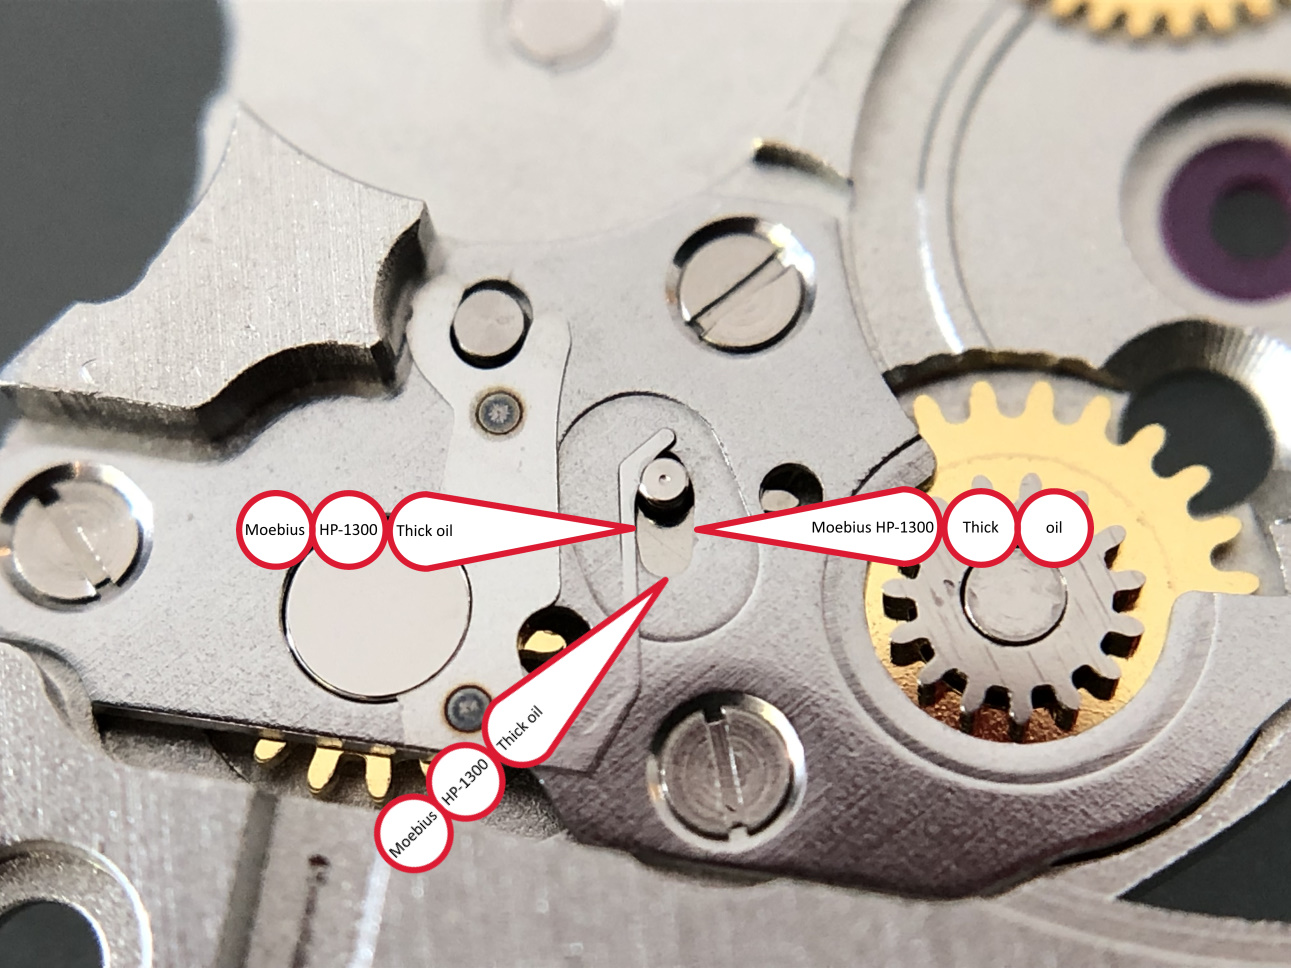
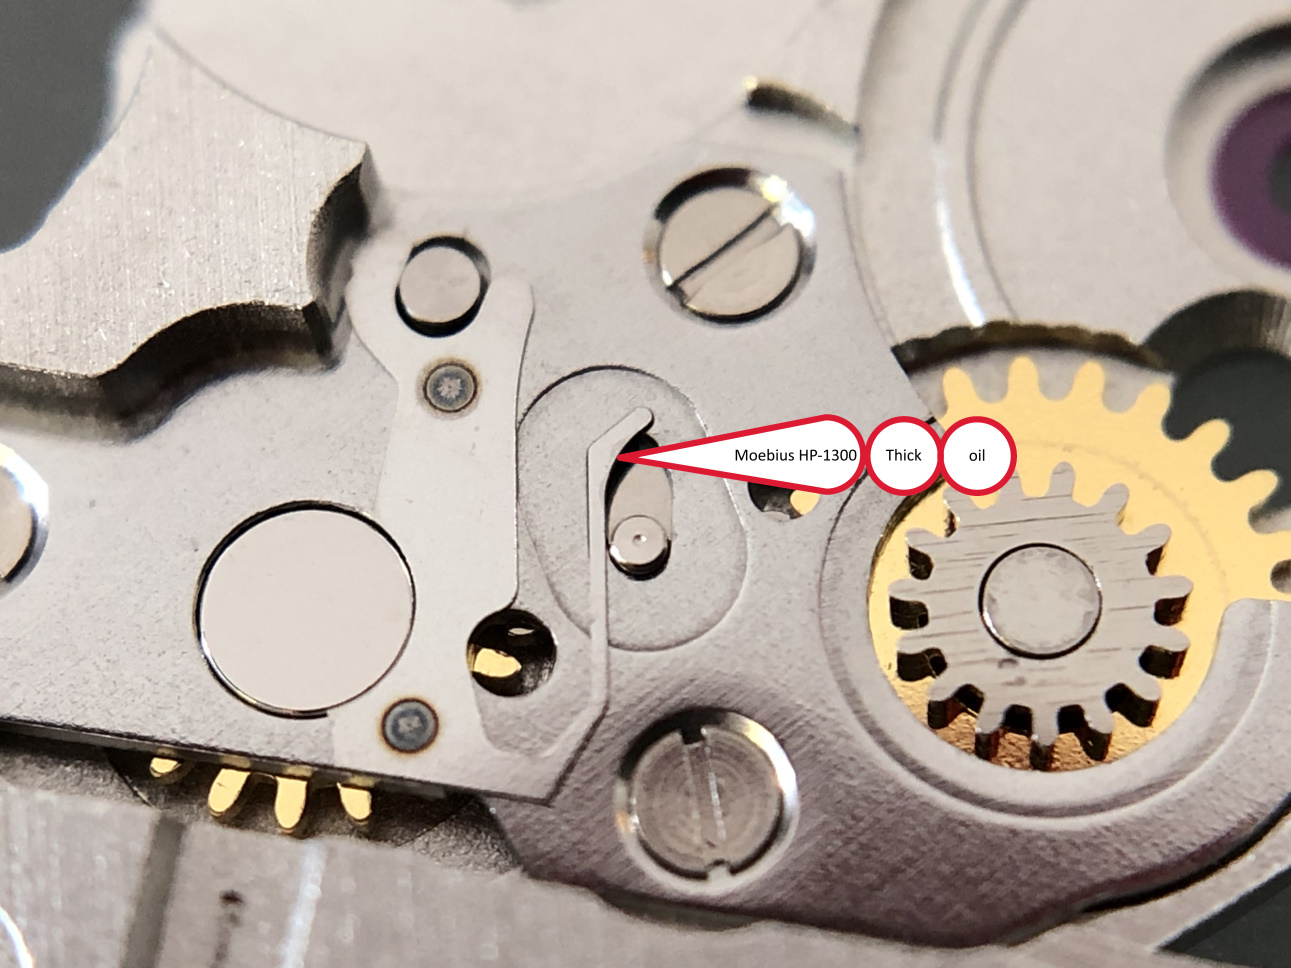
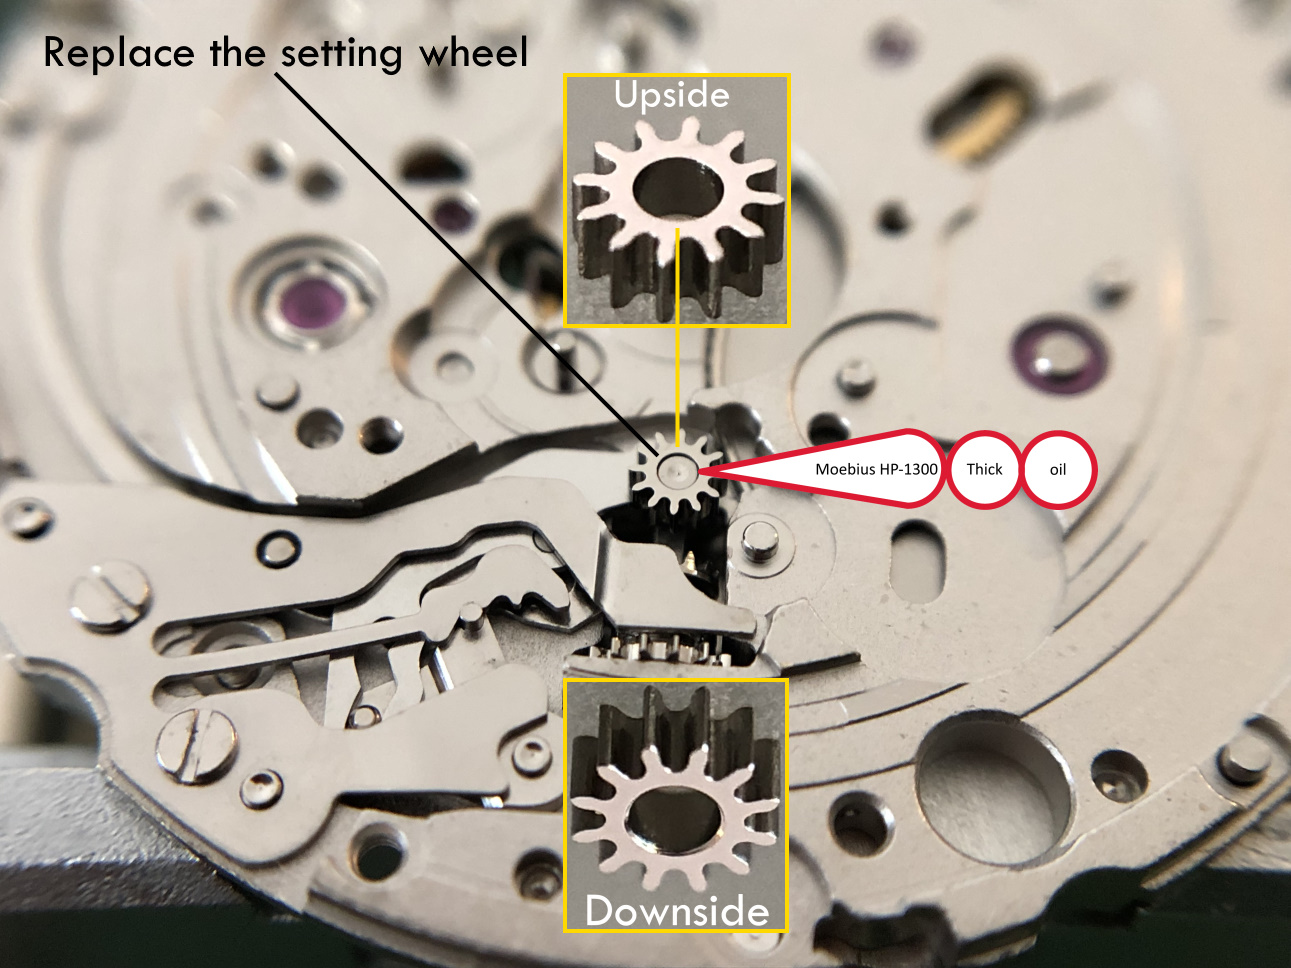
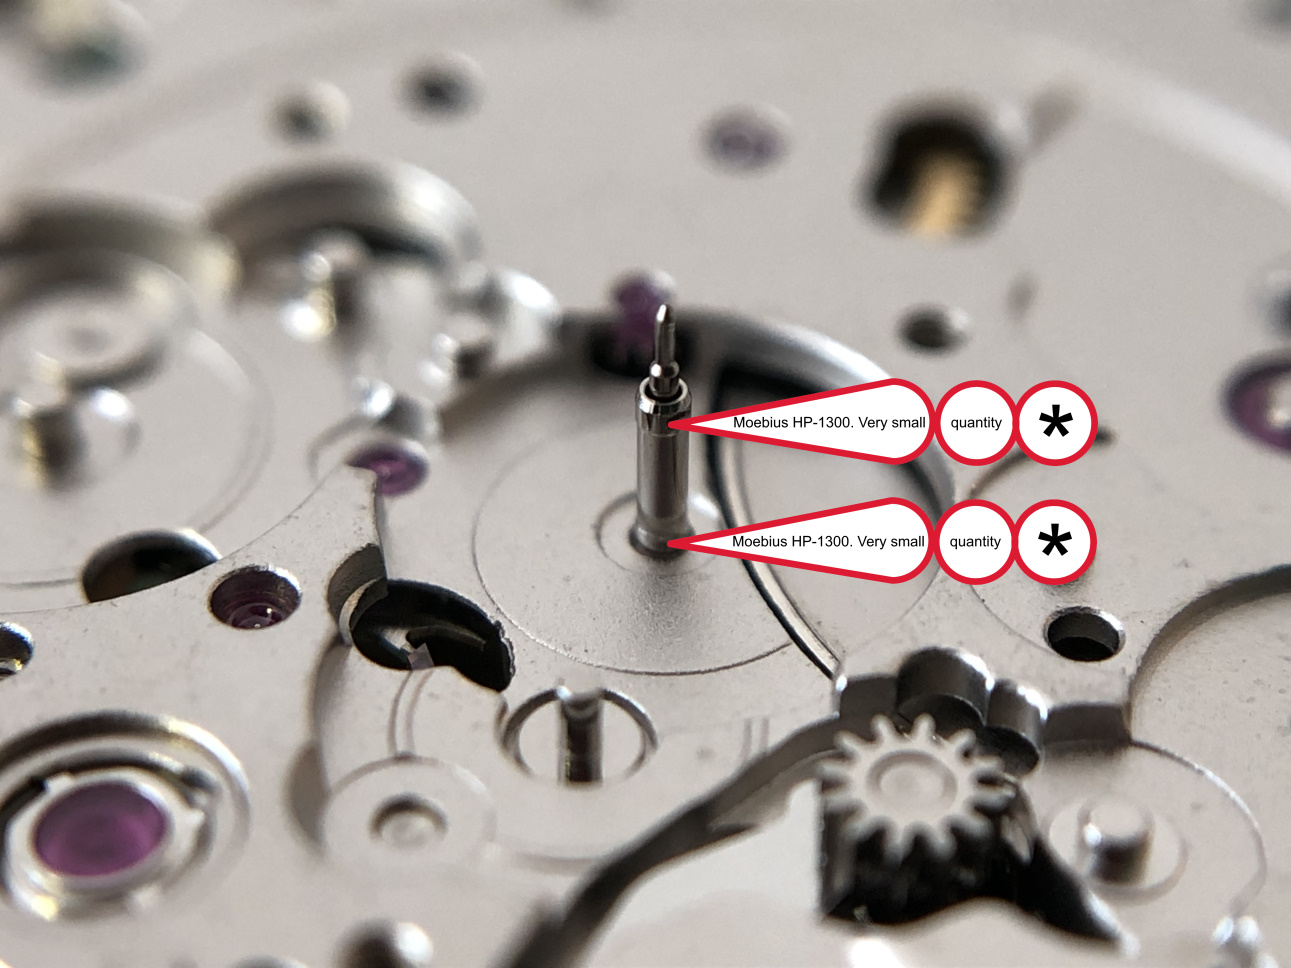
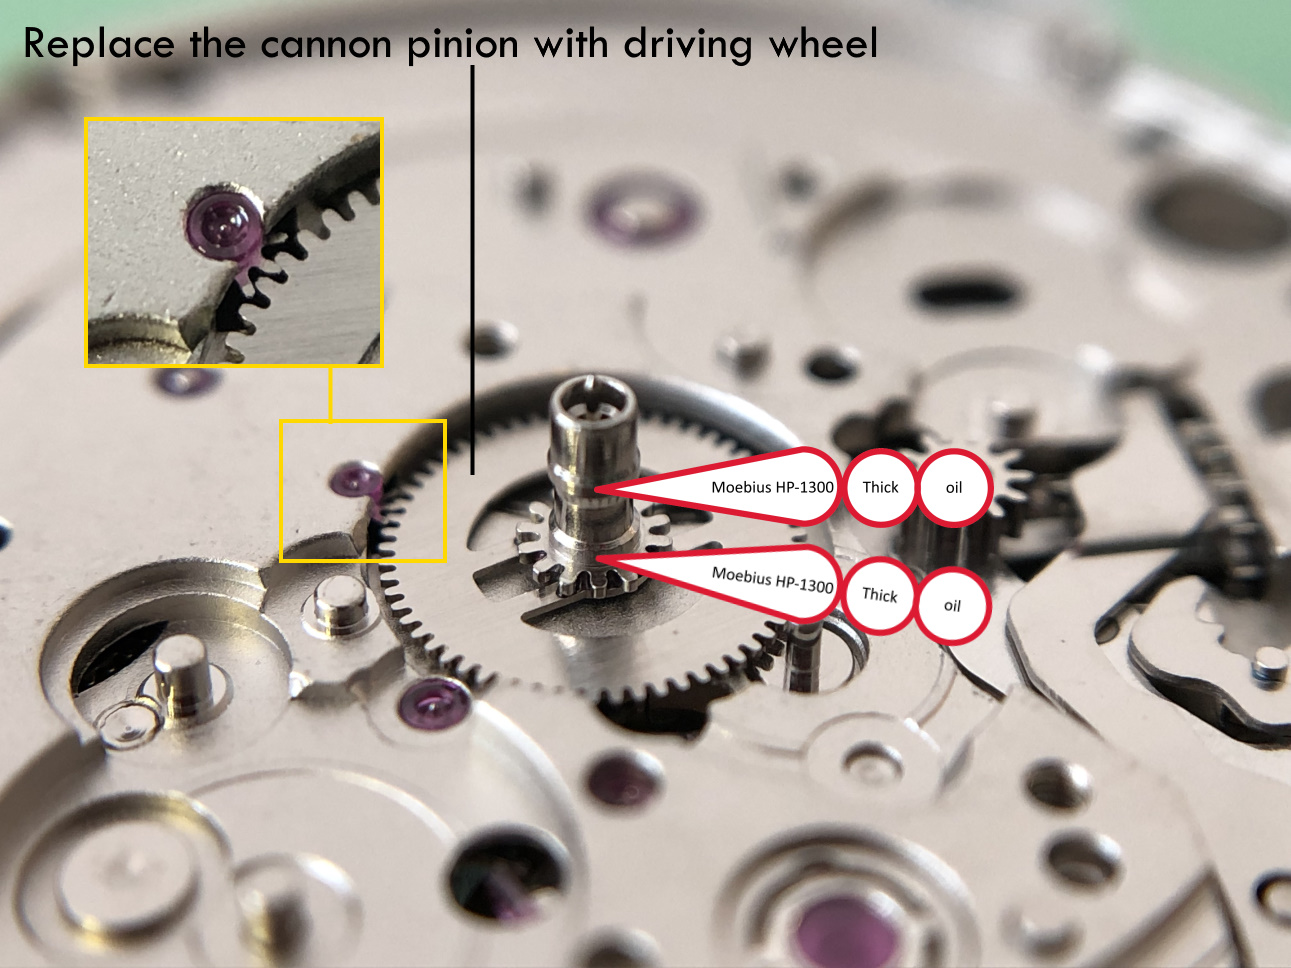
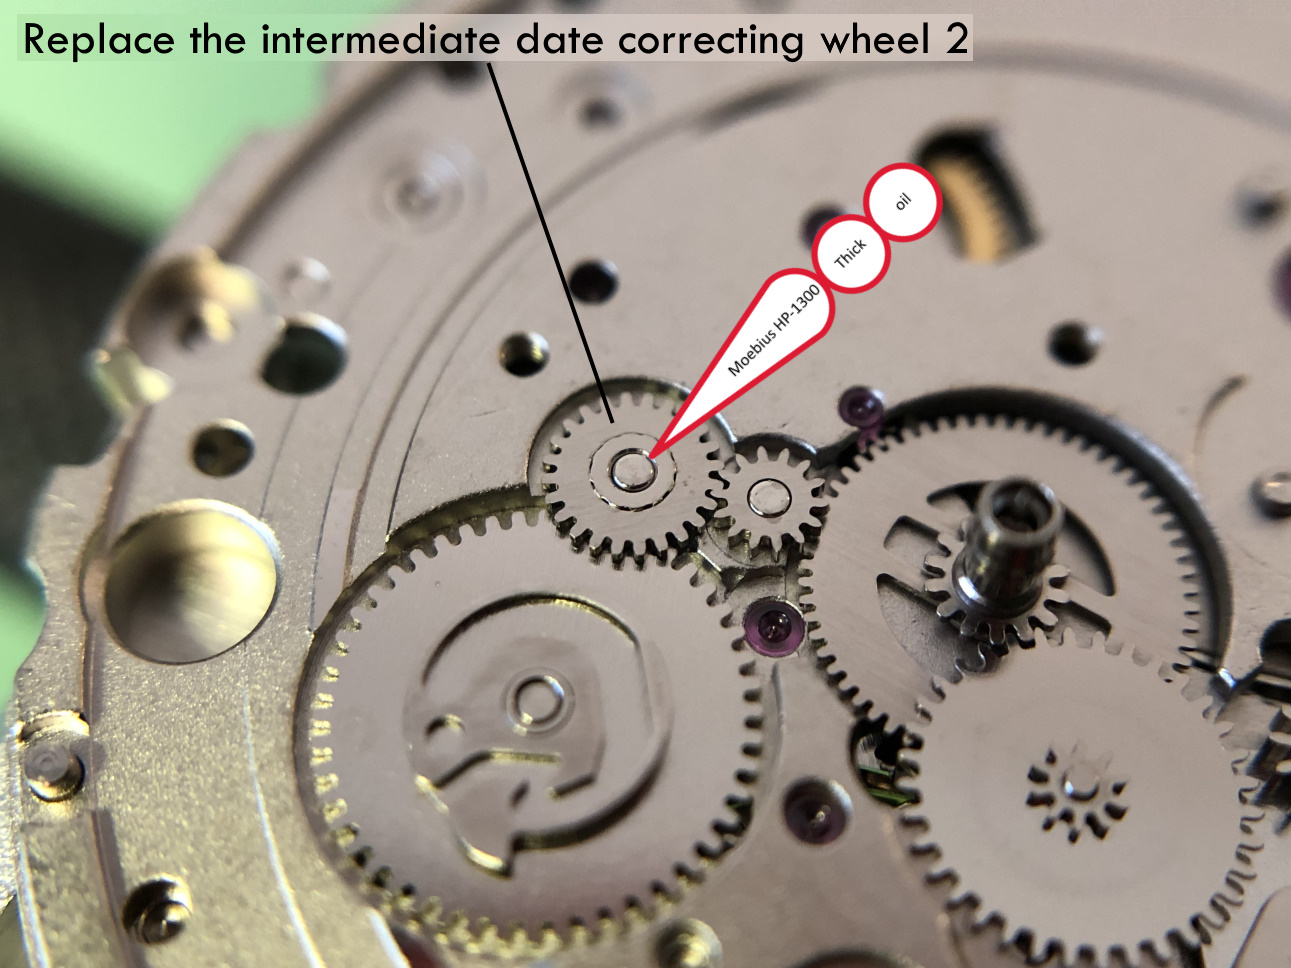
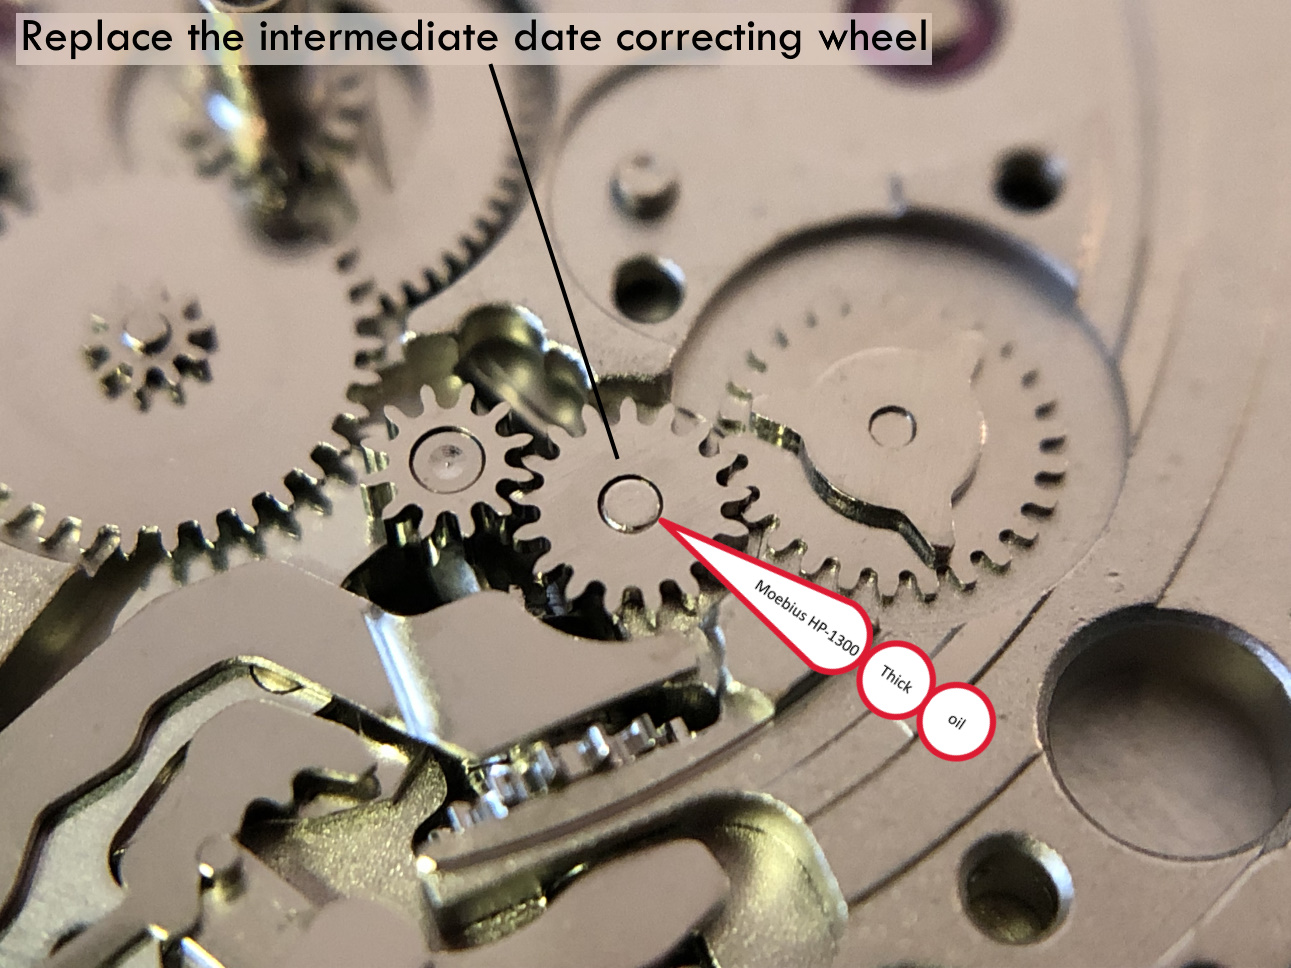
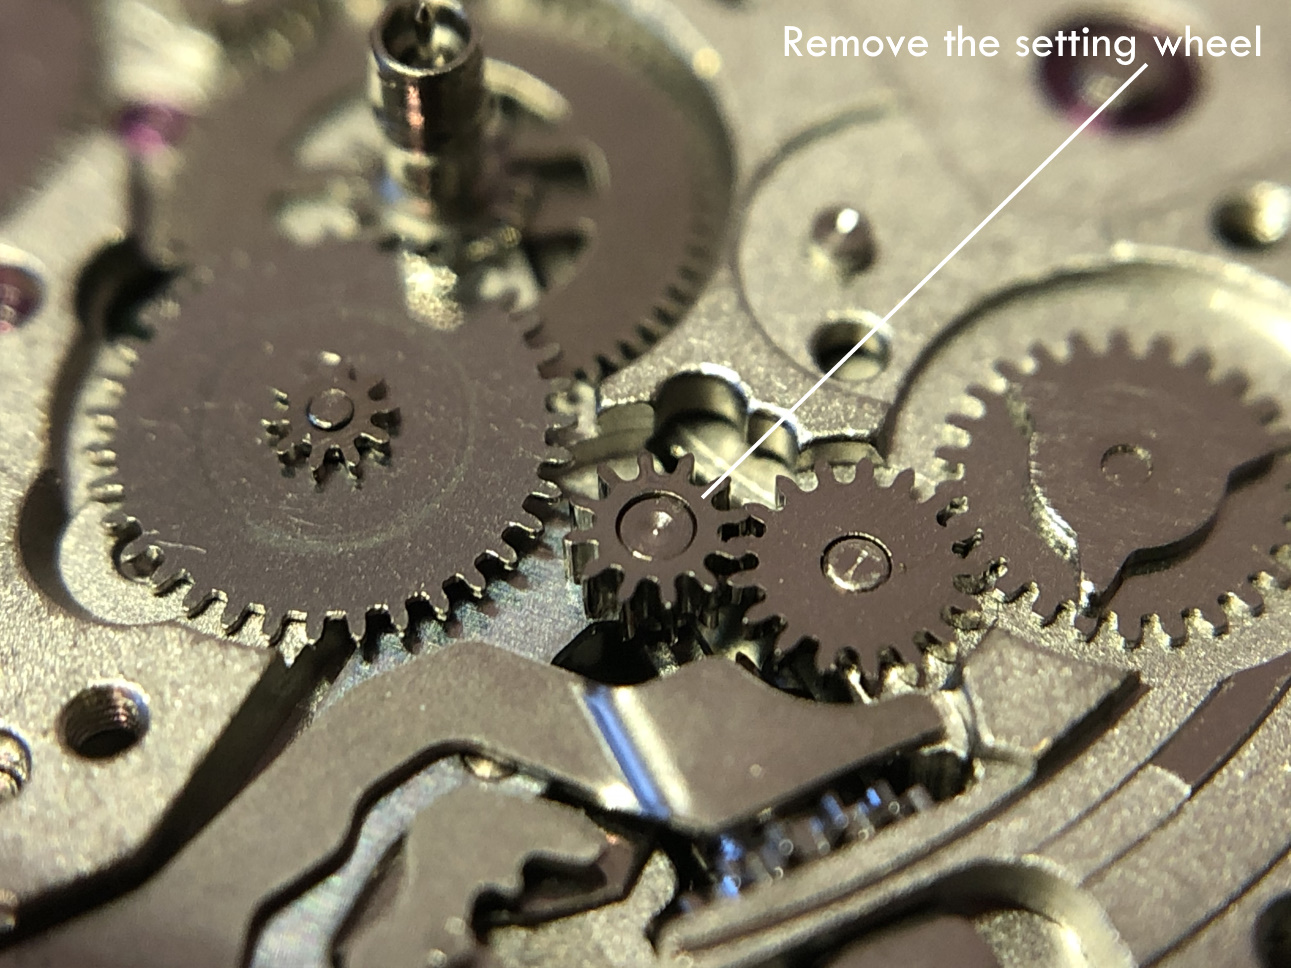
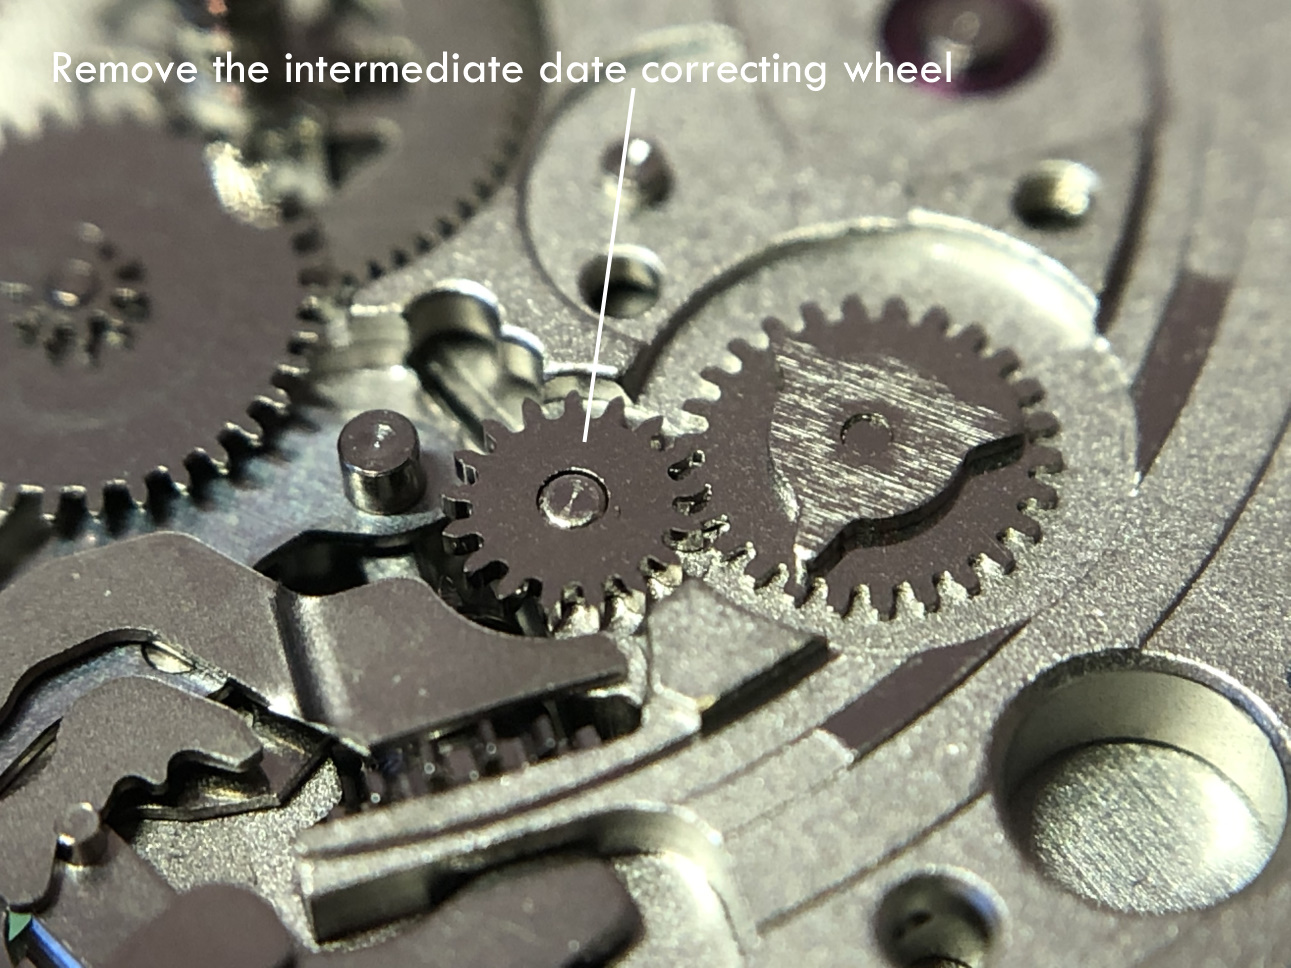
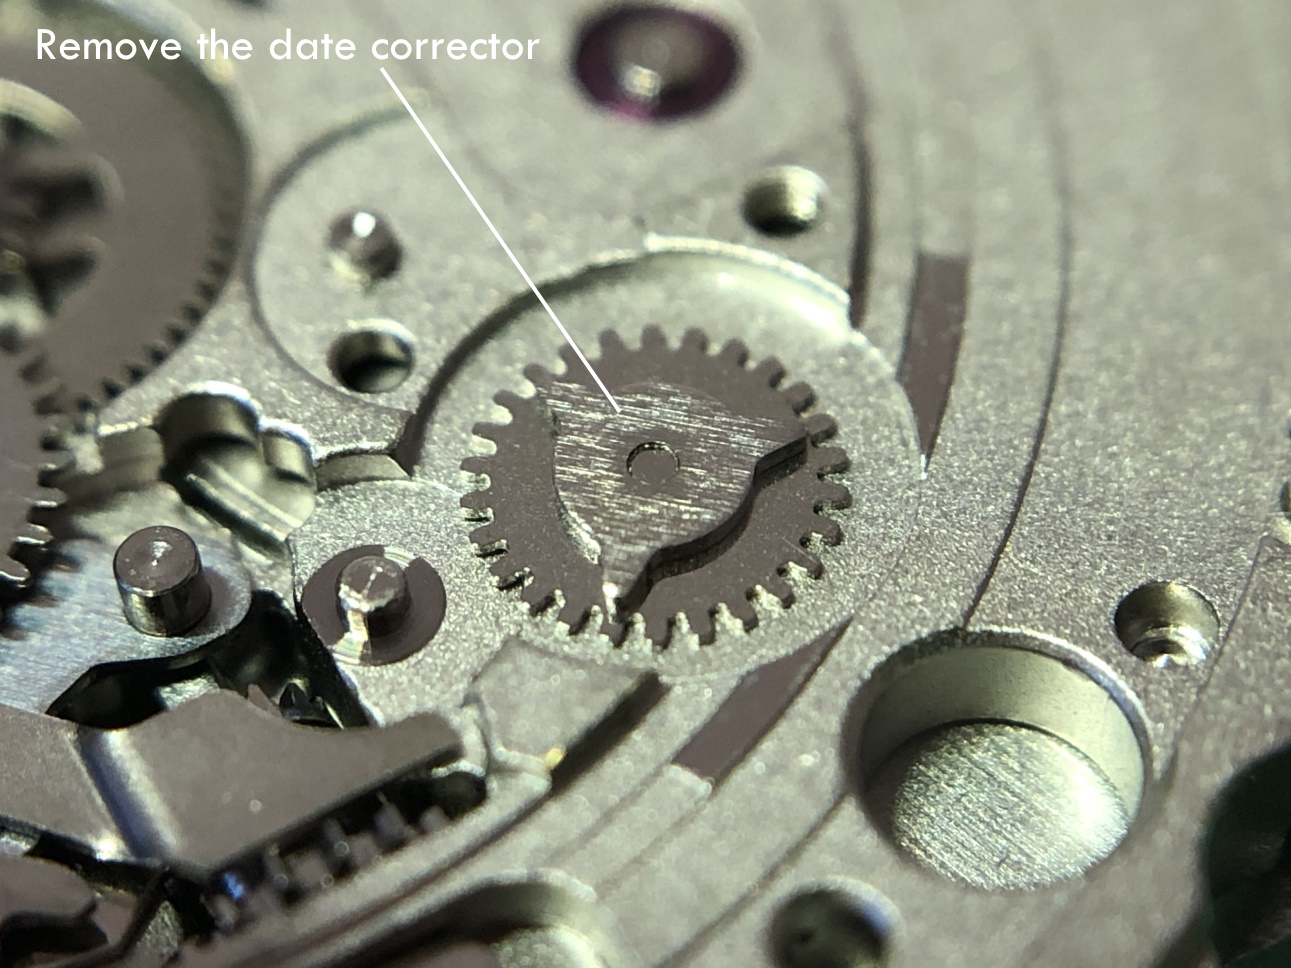
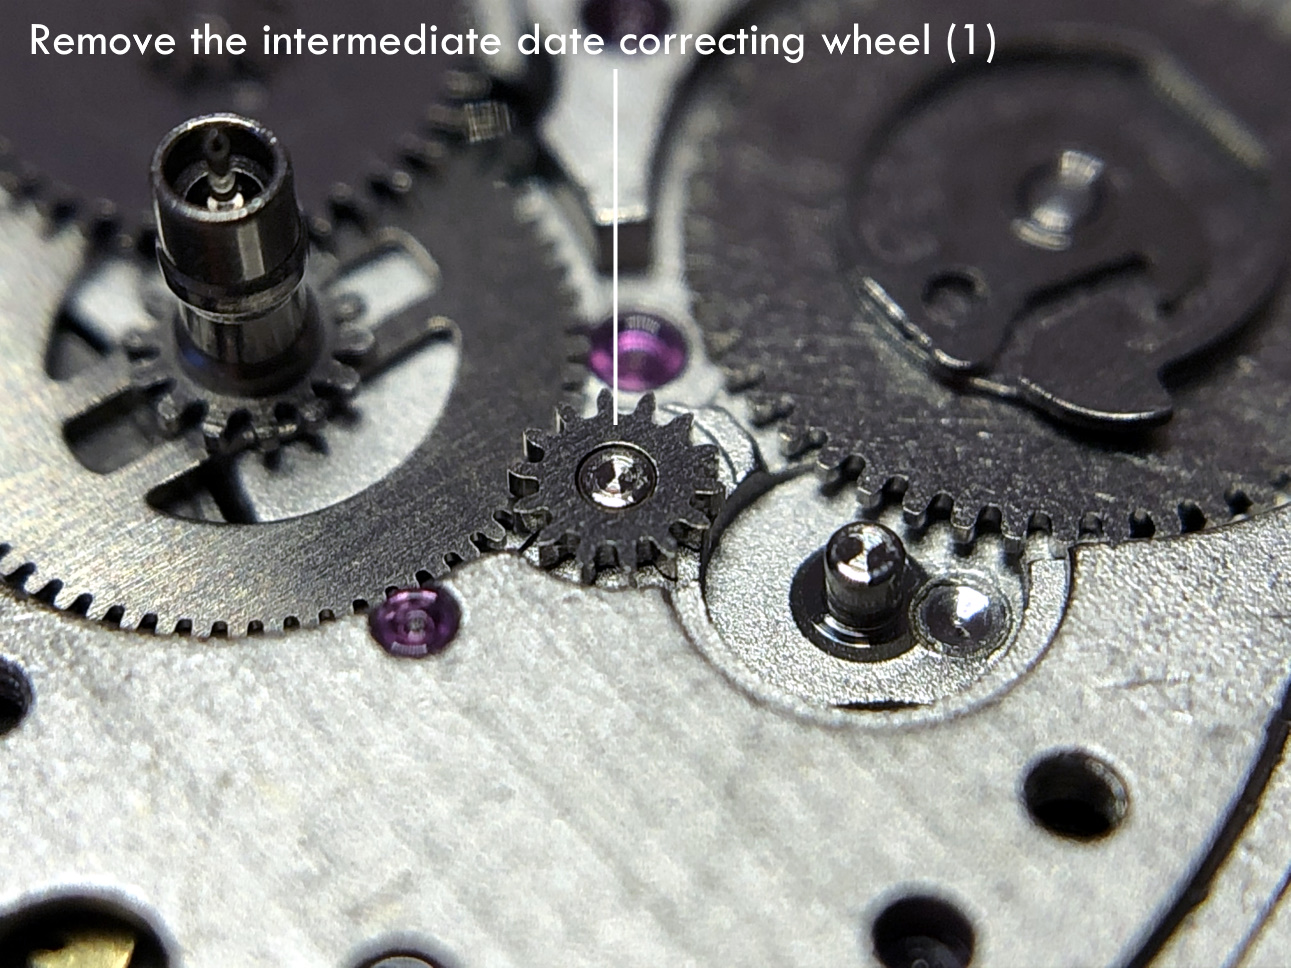
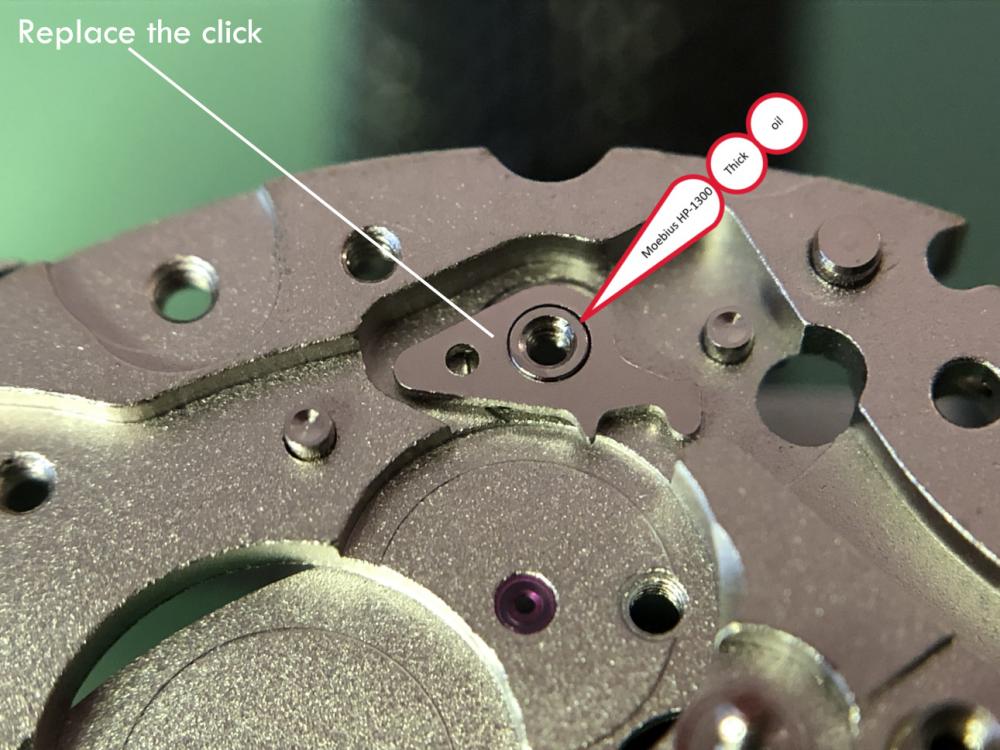
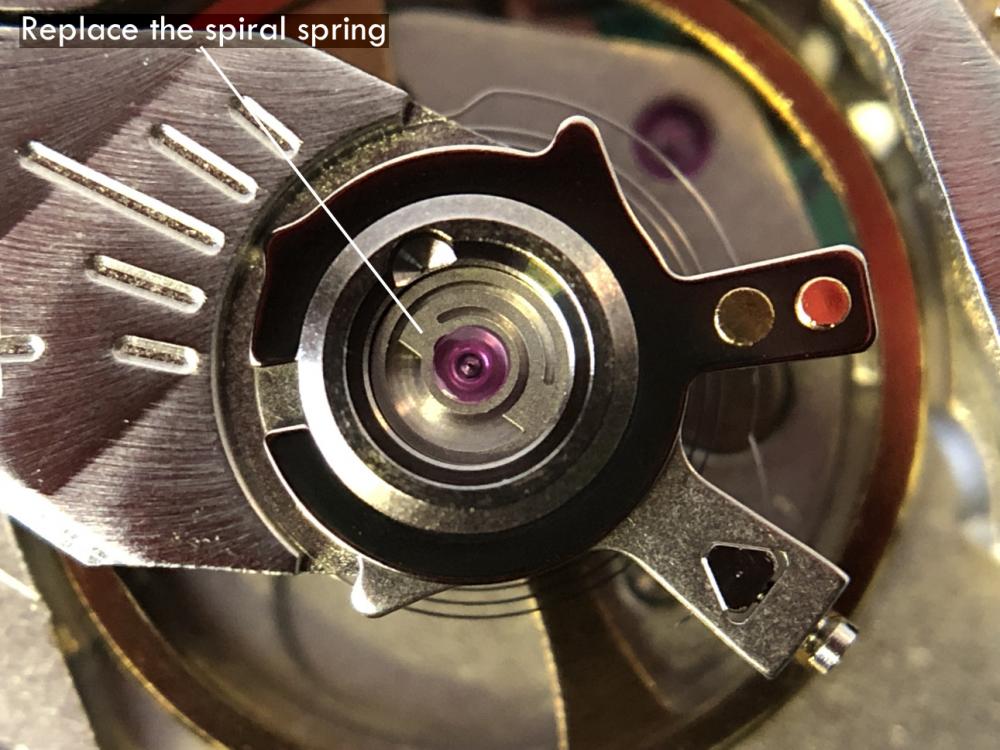
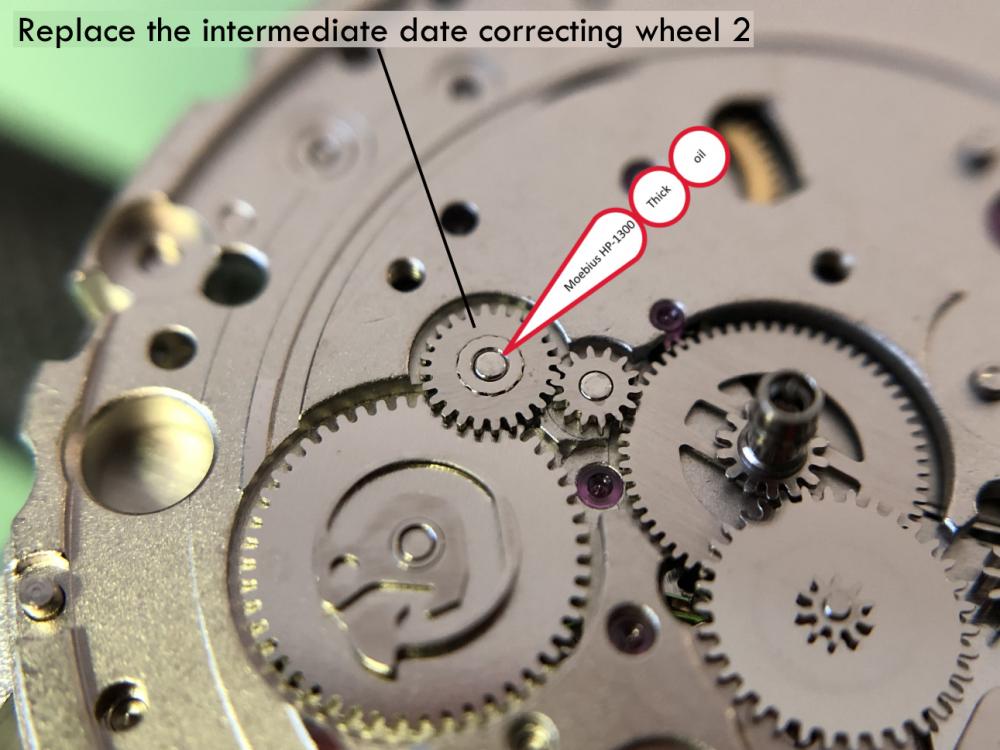
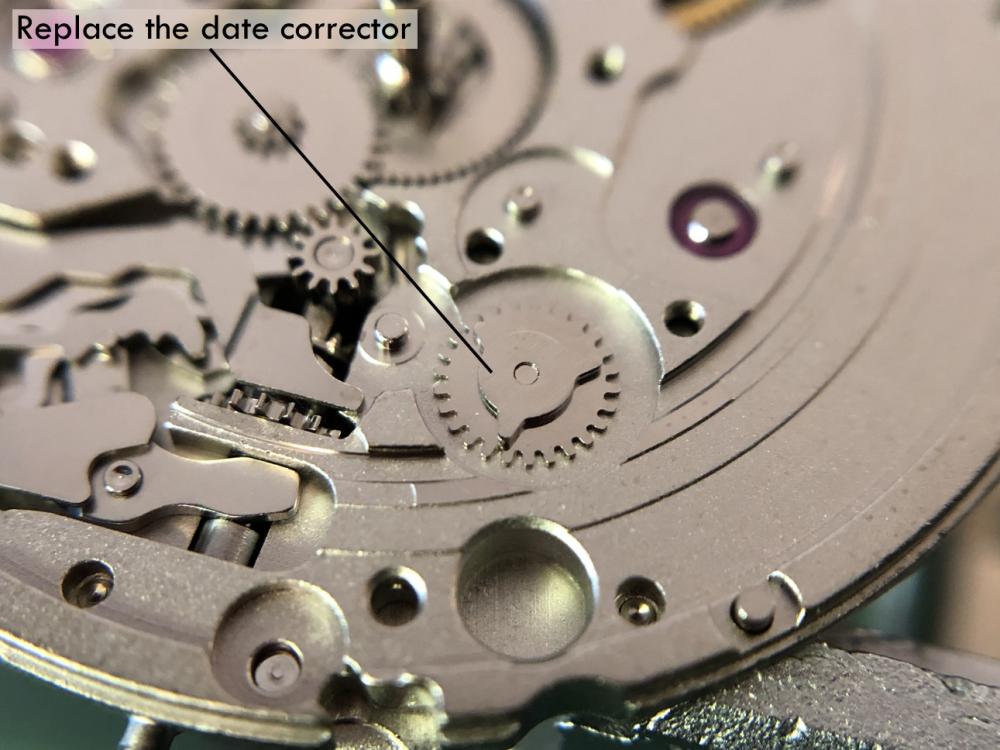
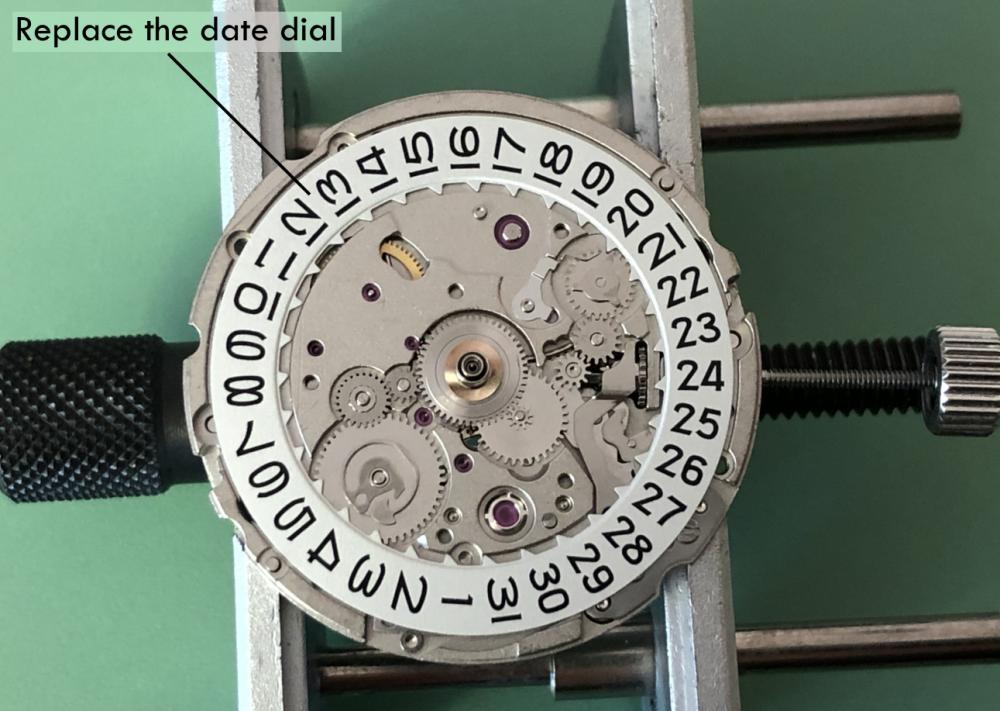
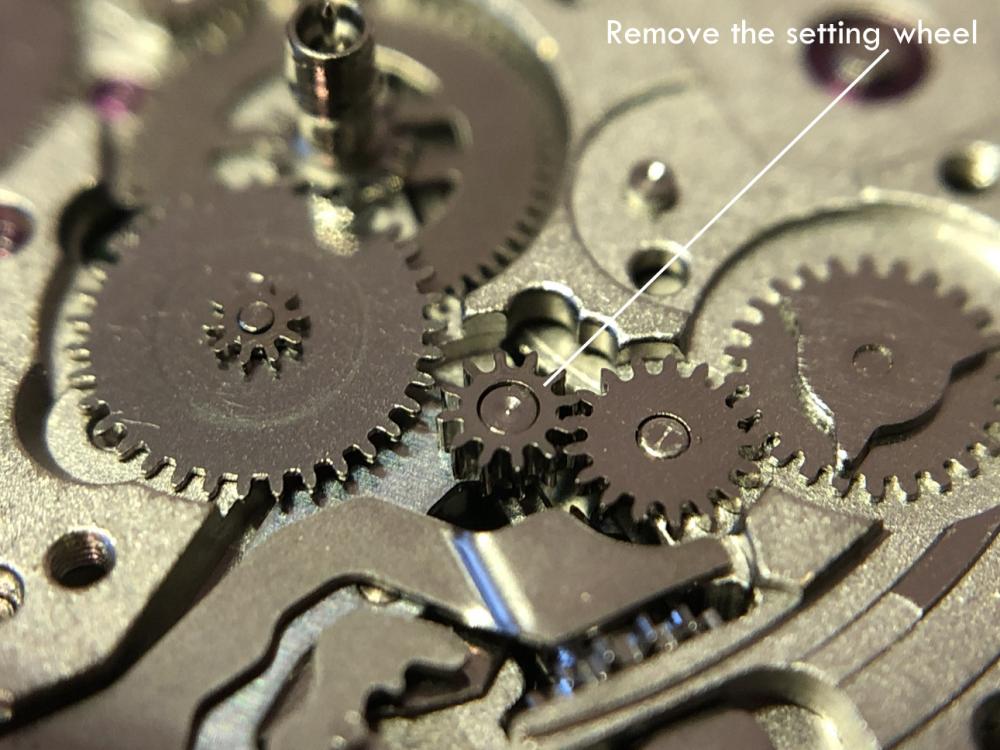
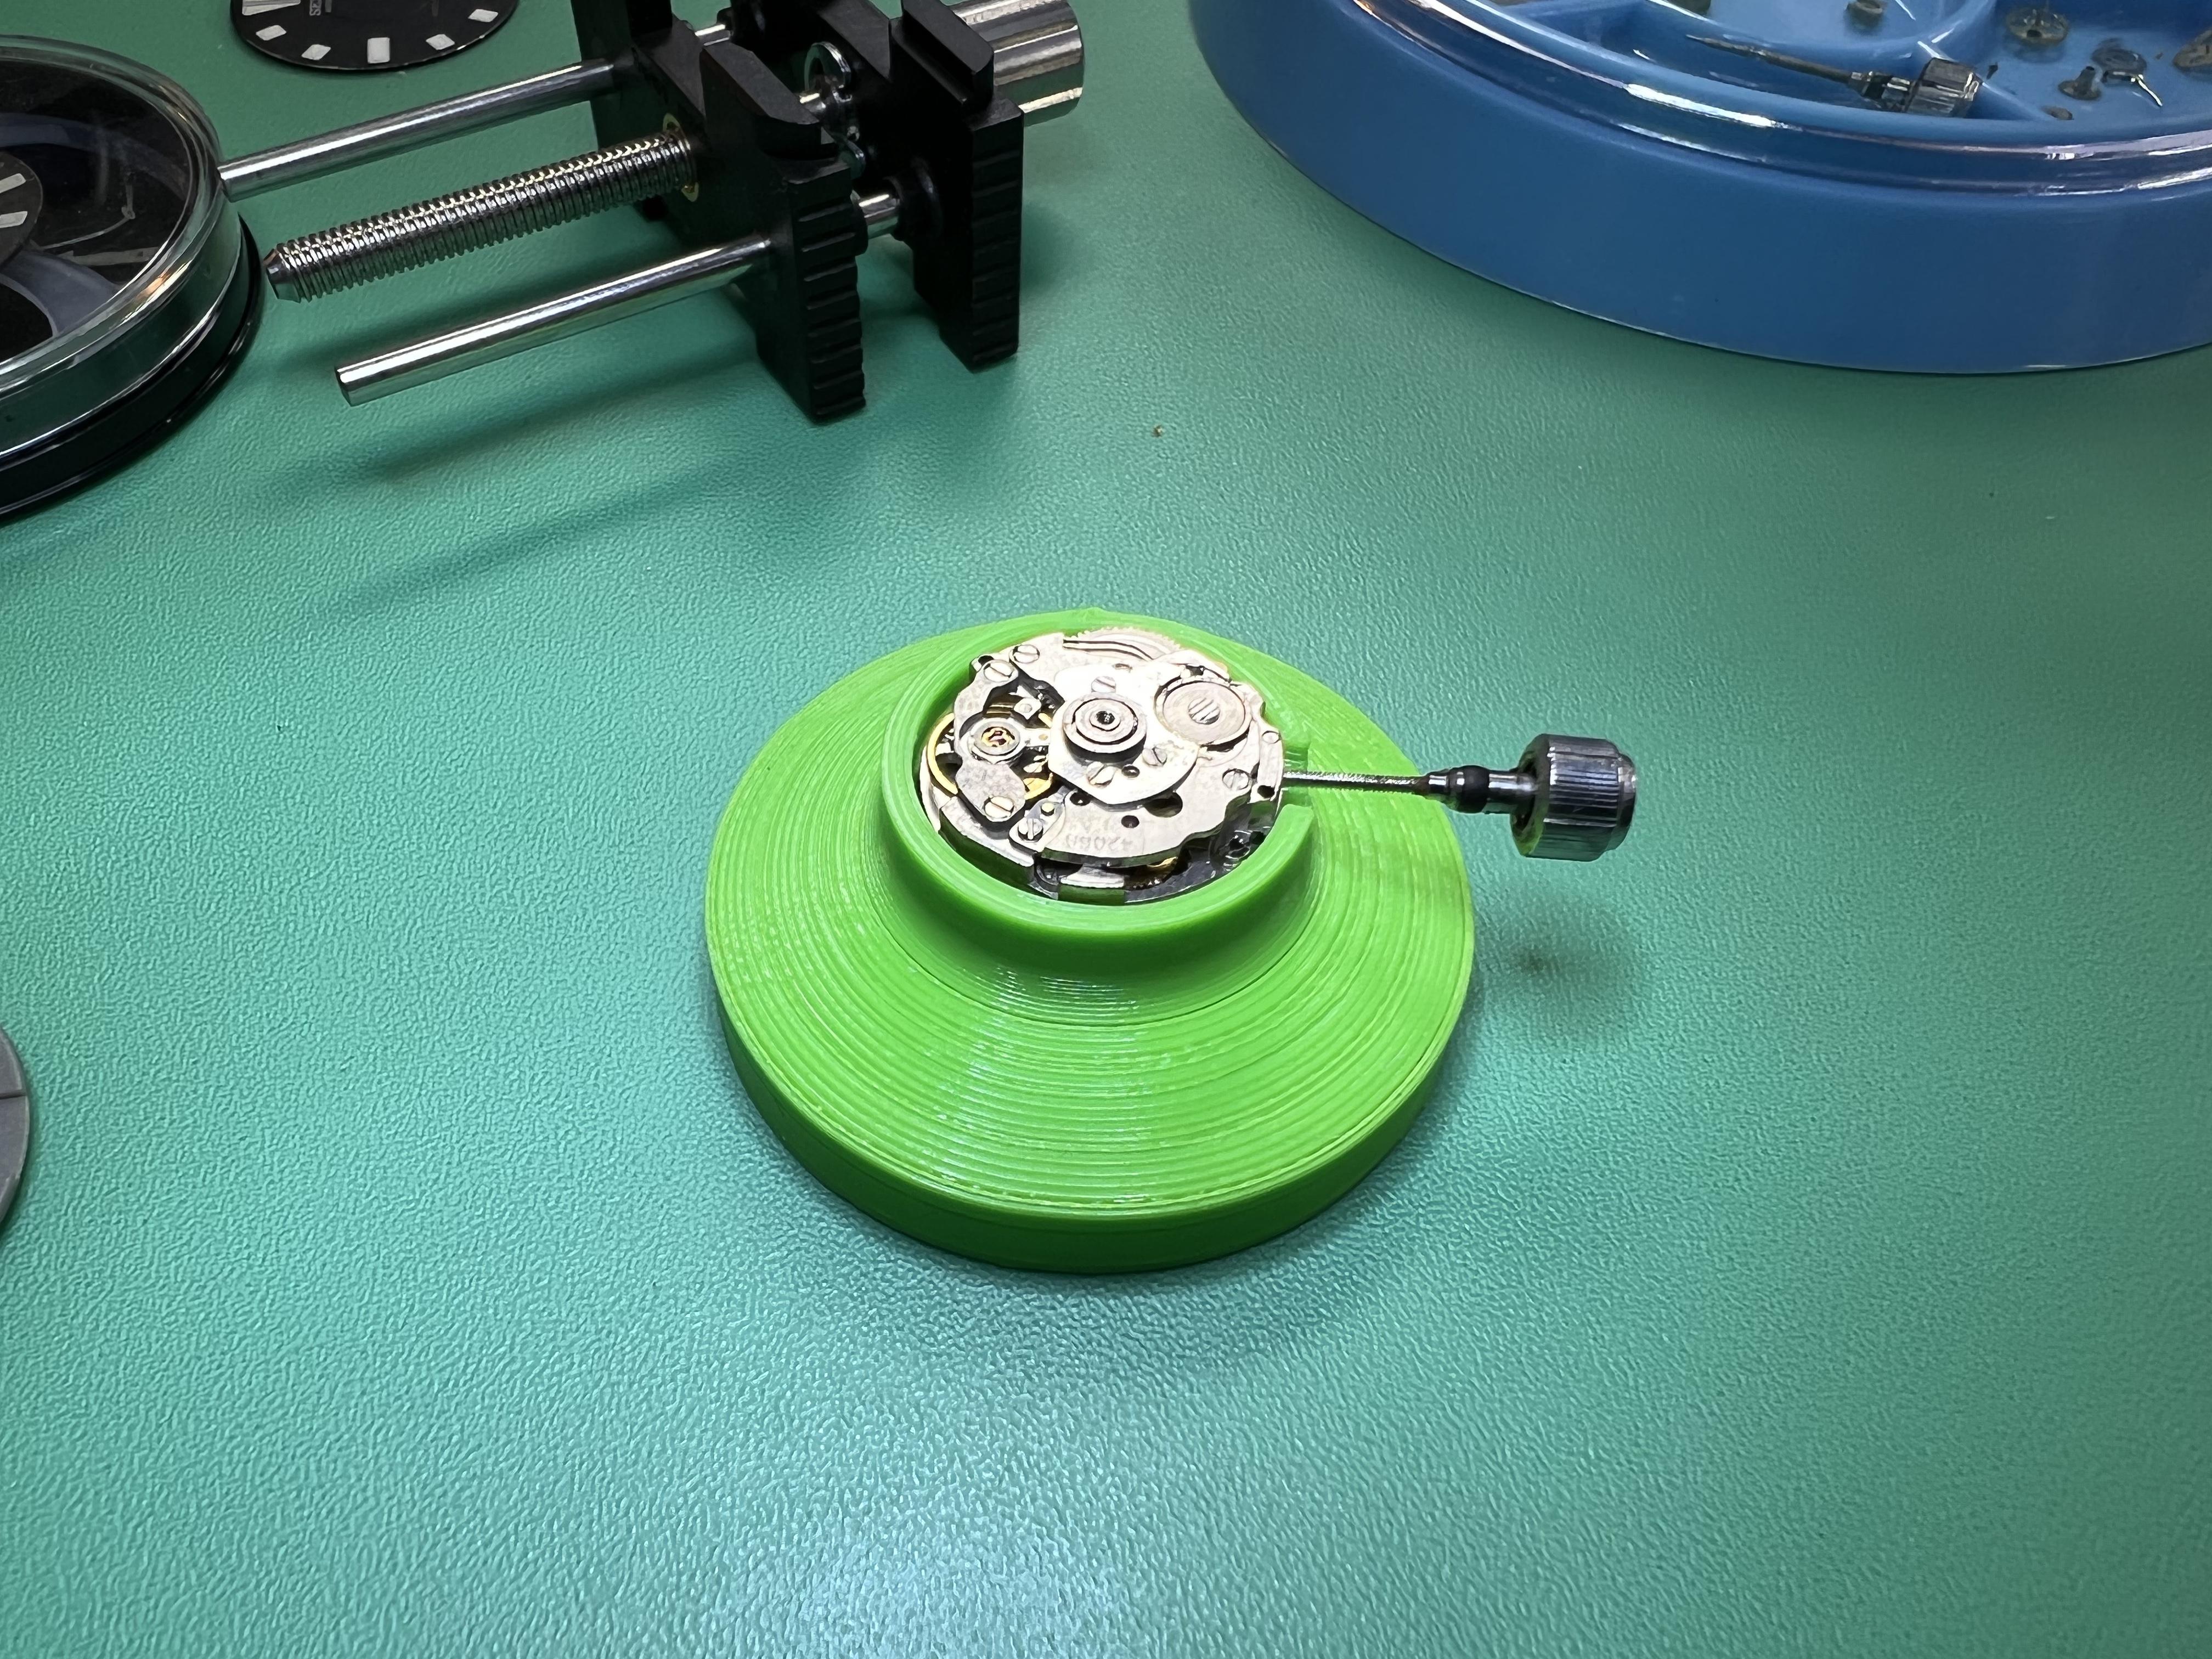
I just finished putting my watch back together, but the quick date setting technique would not work - change from 12-11-12 should advance the date. Once mine had advanced the date, turning the time back to 11 would turn the date back also. What I discovered is that the date setting wheel has to be in a particular position to work properly. The tab on the wheel needs to start pushing slightly past the centre of the wheel, as in the pic - I just turned the small wheel one tooth on the fixed central pinion, and it worked


 1 point
 -
Welcome to the forum @Fabz1 point
-
Thanks for the introduction and welcome to WRT @Fabz ! I'm stalled partially through my first watch movement restore due to waiting on oils and tools (all of which should be on their way). At this point I still don't have a network of resources to draw on and that's one of the great thing about places like this: it's filled with information. I have several Bulova quartz watches and suppose I should start looking for a mechanical one.1 point
-
Thank you for your introduction and welcome to this friendly forum. We all look forward to your contributions and continued involvement. The Eta 980 you can download from here https://watchguy.co.uk/cgi-bin/files?subdir=ETA&dir=Technical Manuals&action=documents Bulova 5BA from here https://www.cousinsuk.com/document/search?SearchString=bulova+5ba1 point
-
Wow! @Reloadeddoes not realize what a wealth of knowledge lie in the heads of those who frequent this forum. Members are always eager to help and have been a great asset to me, for sure!1 point
-
Essentially
 1 point
 -
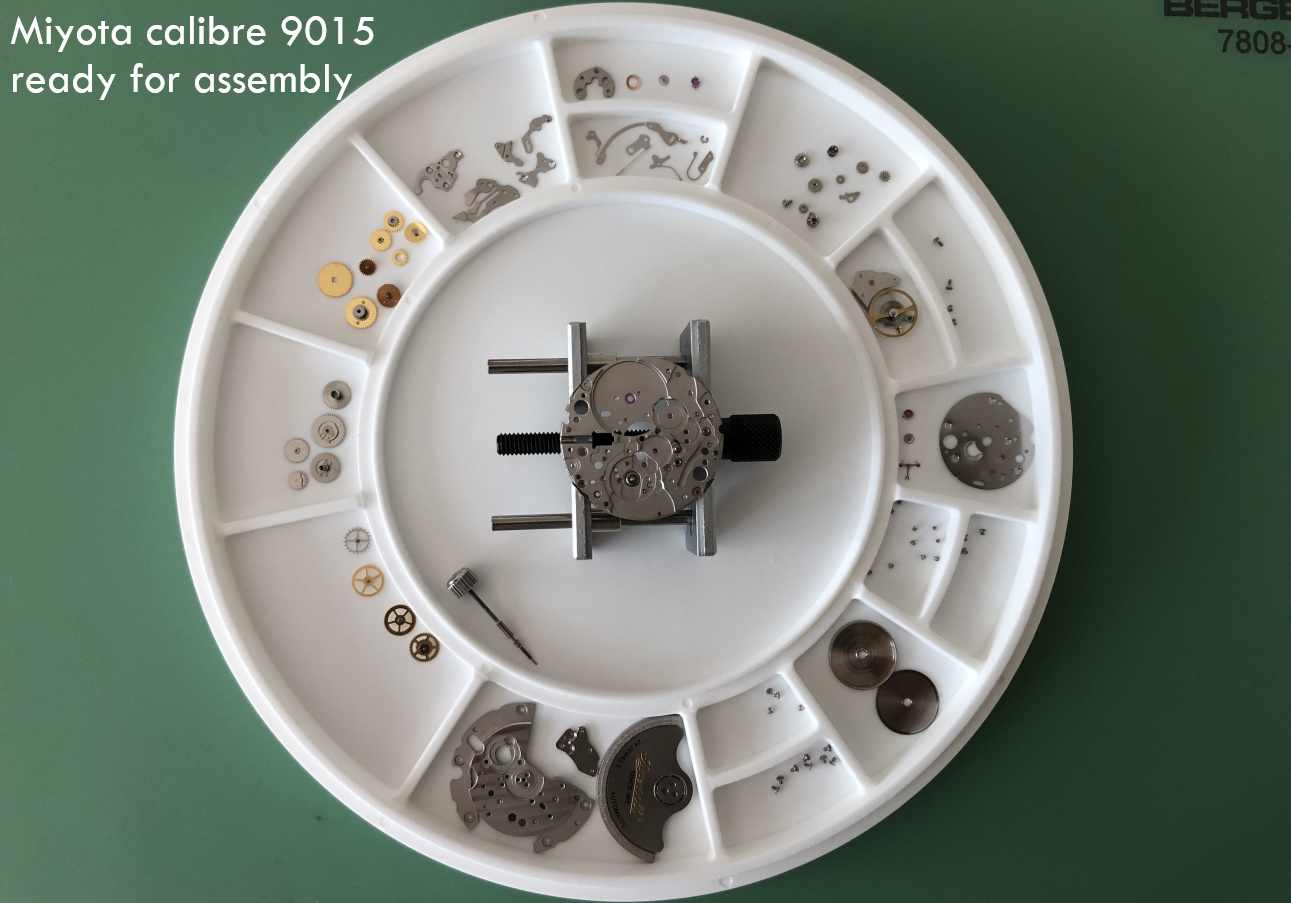
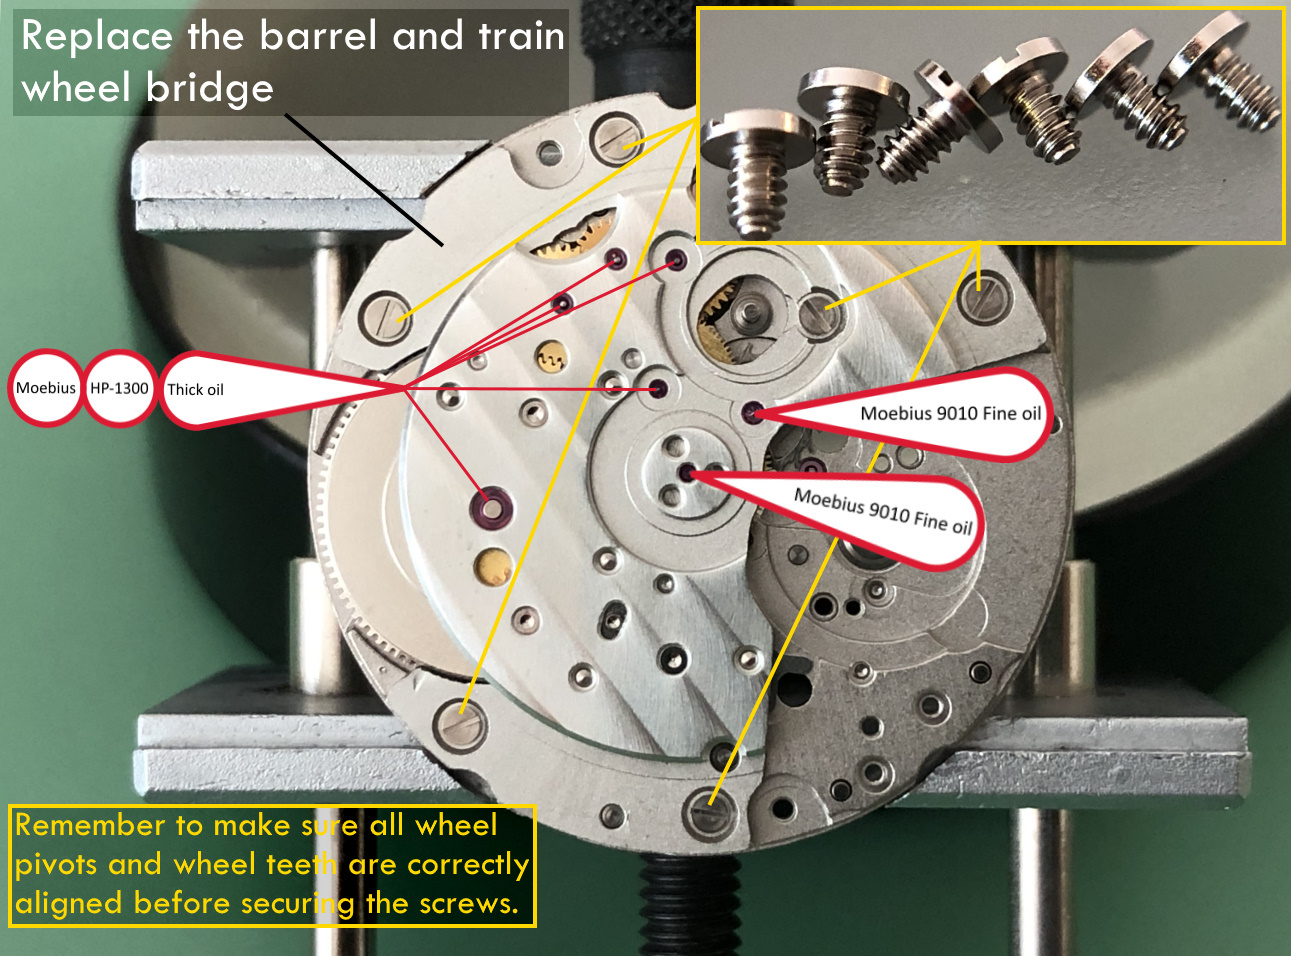
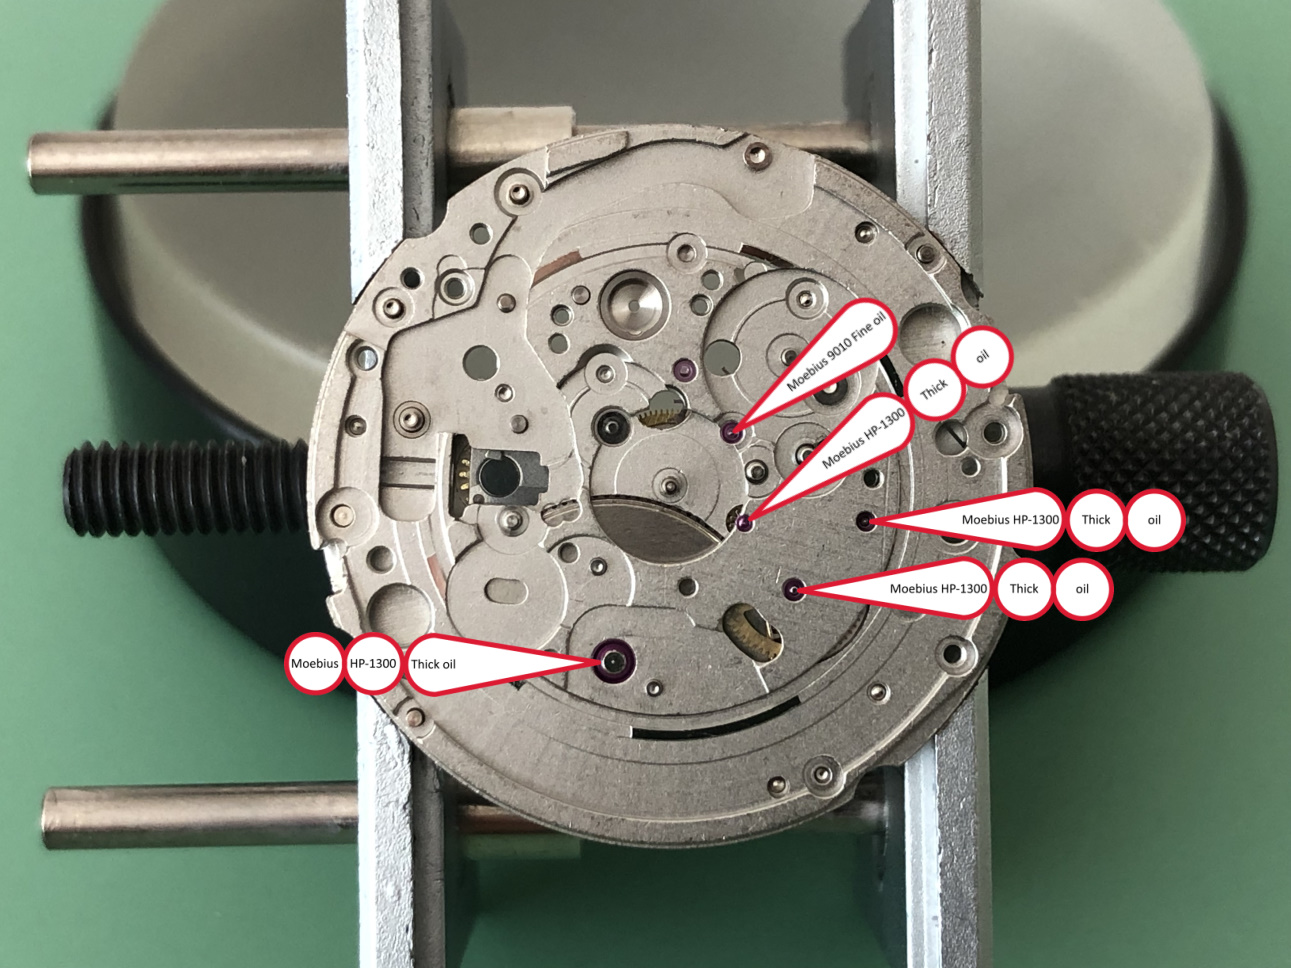
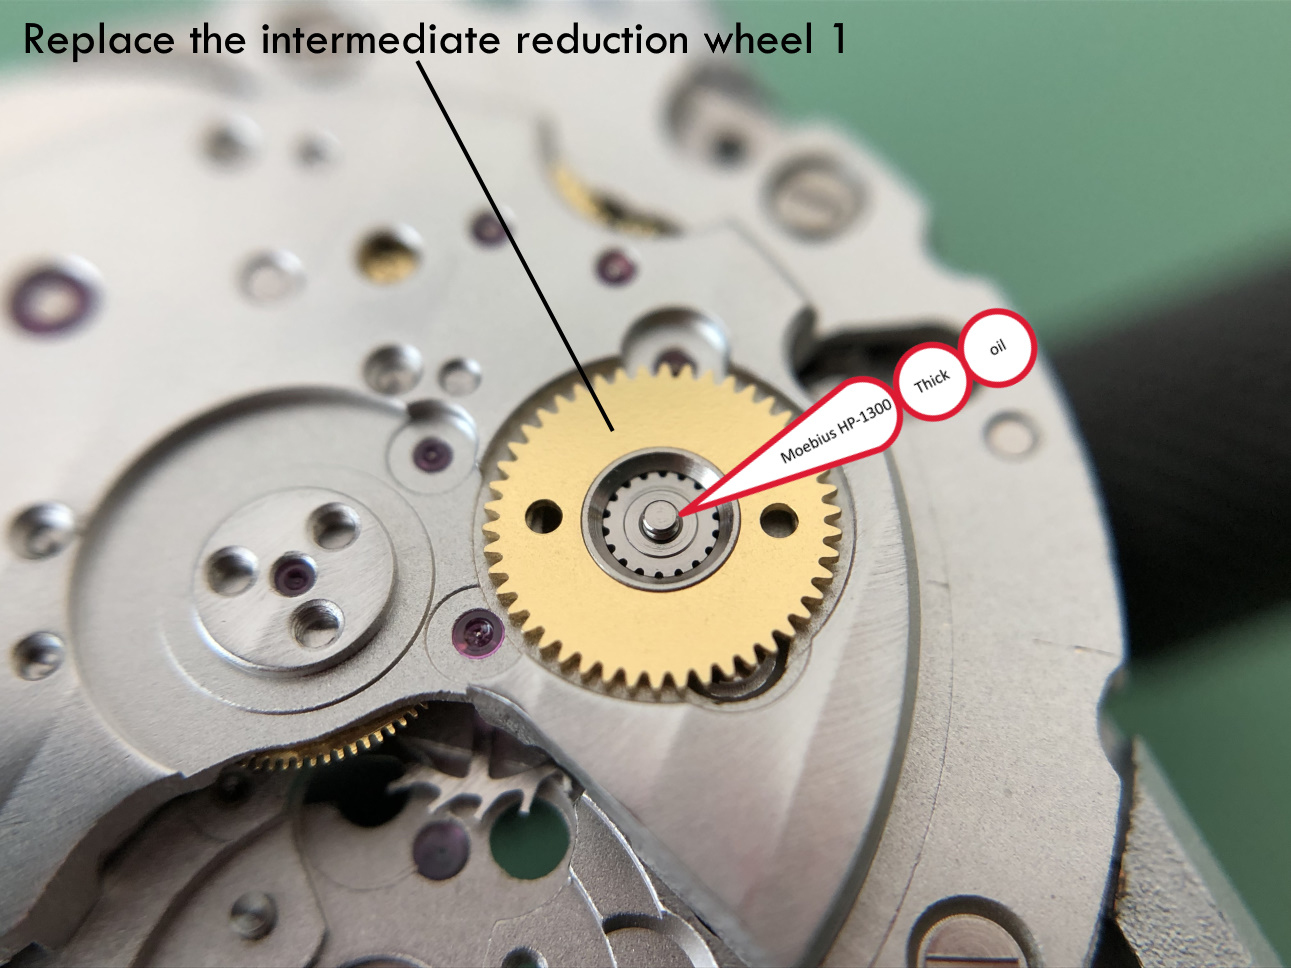
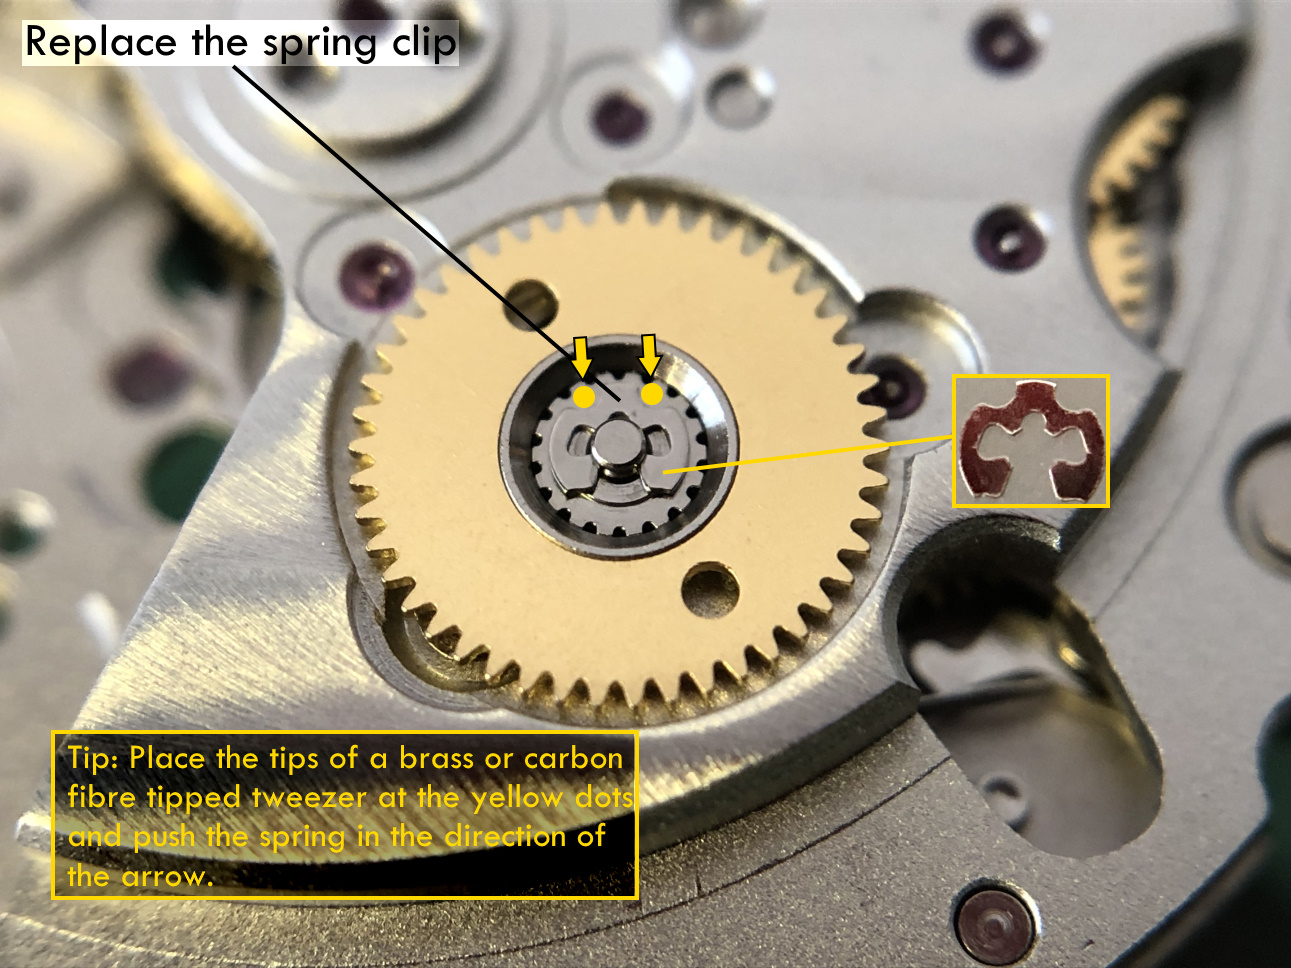
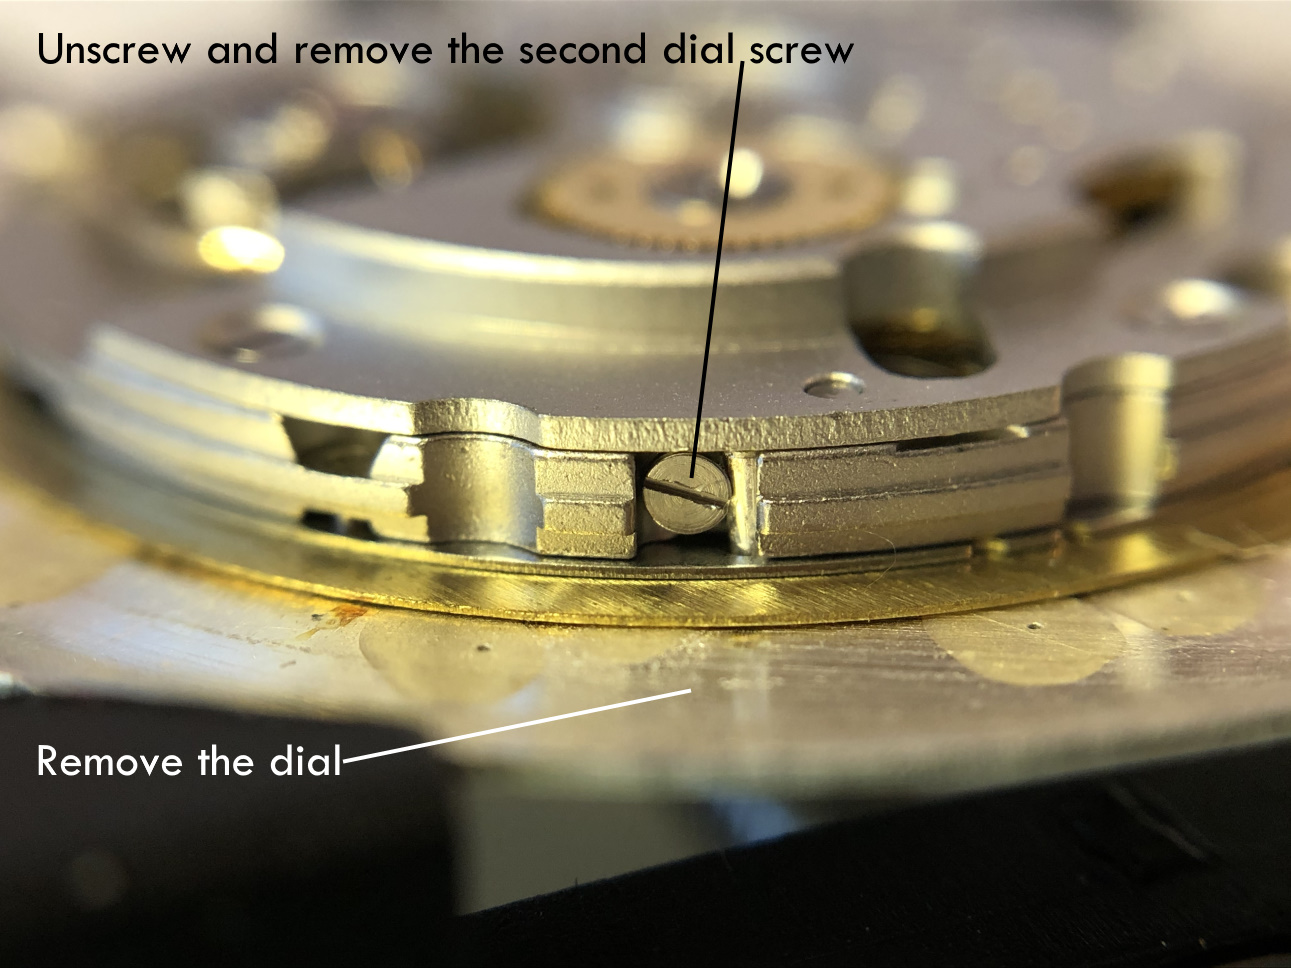
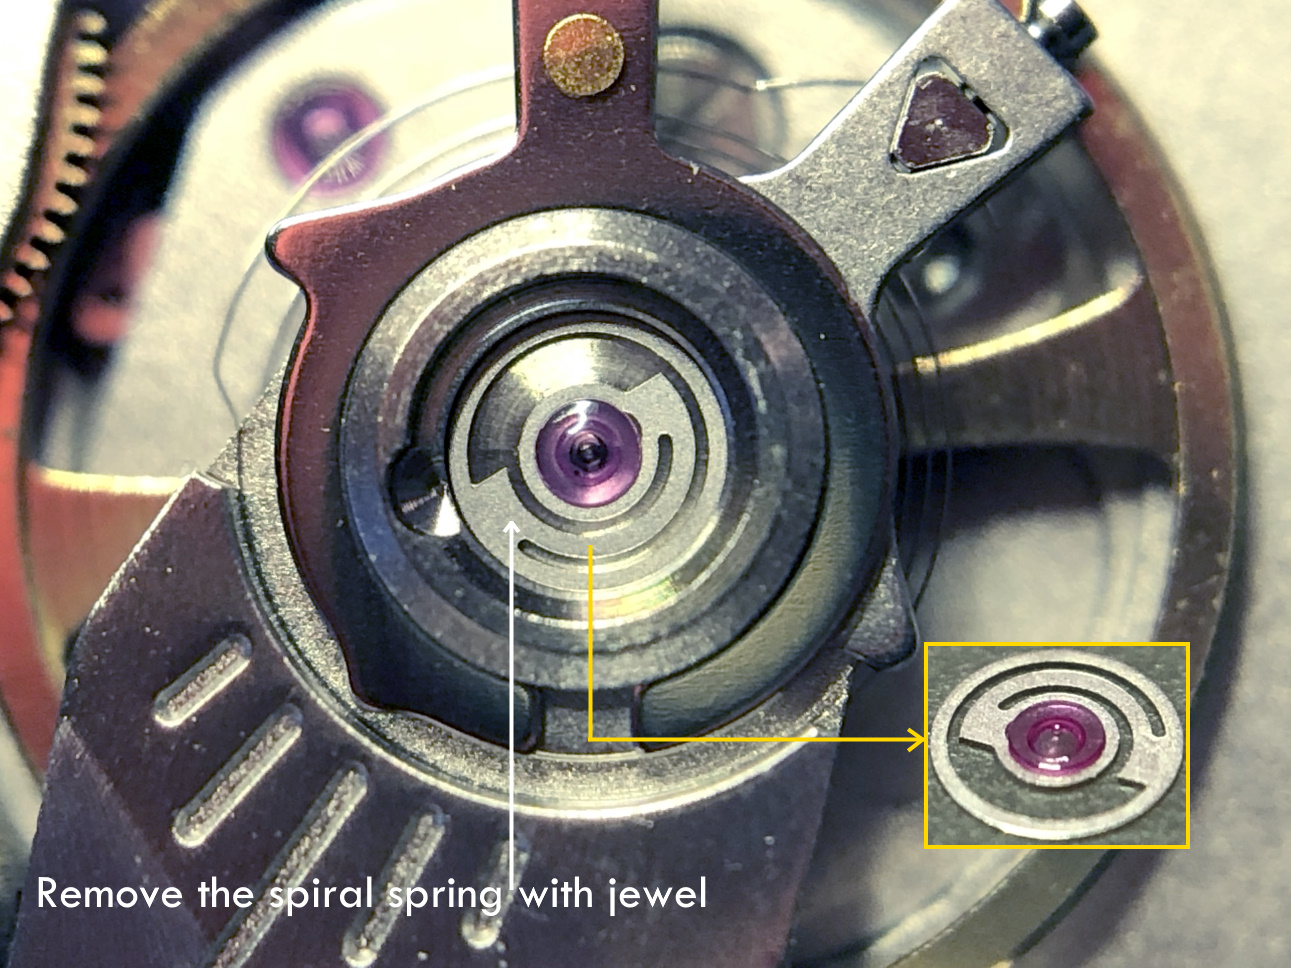
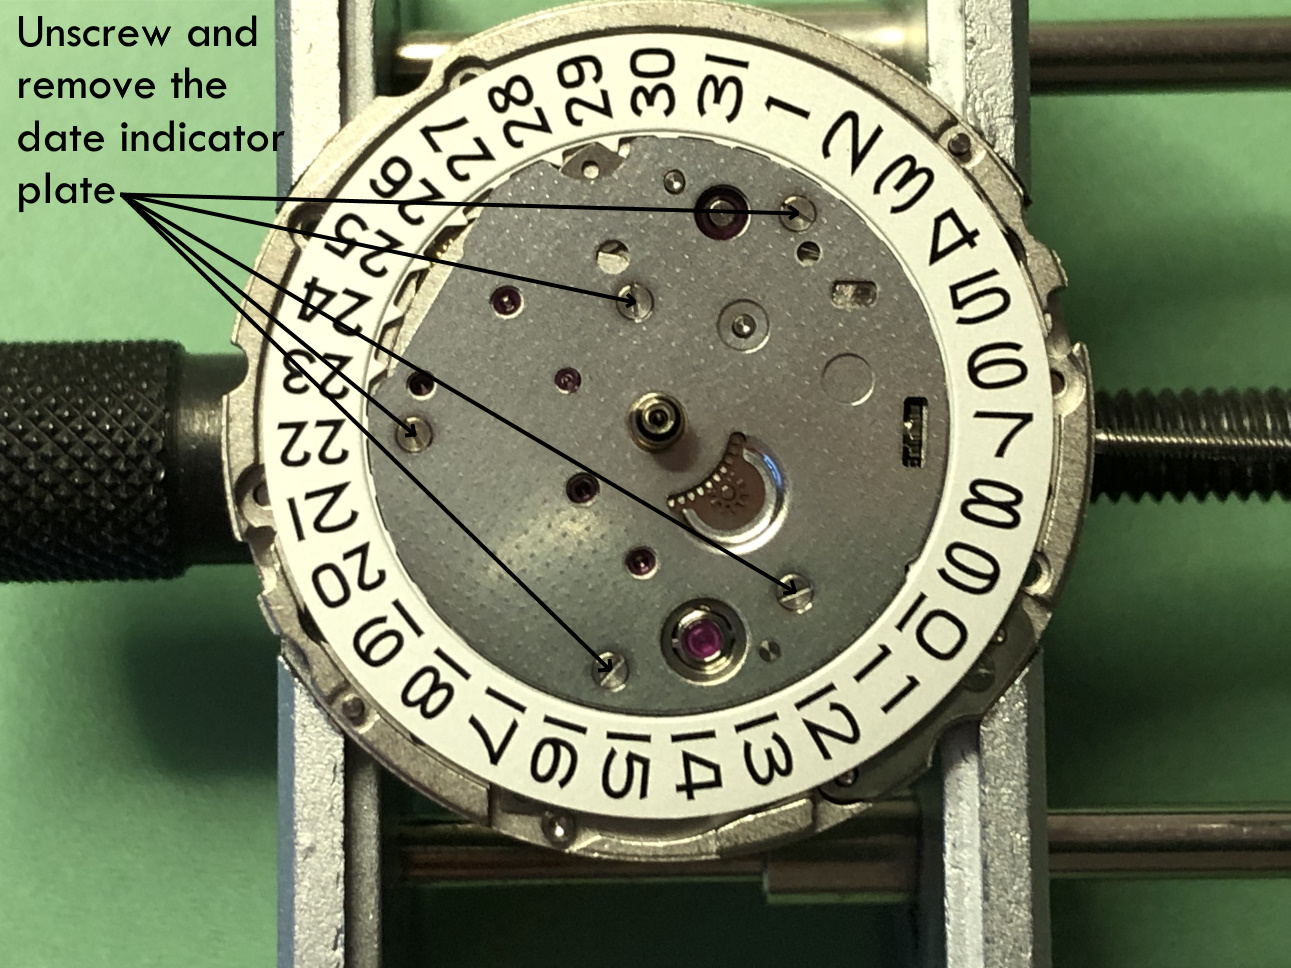
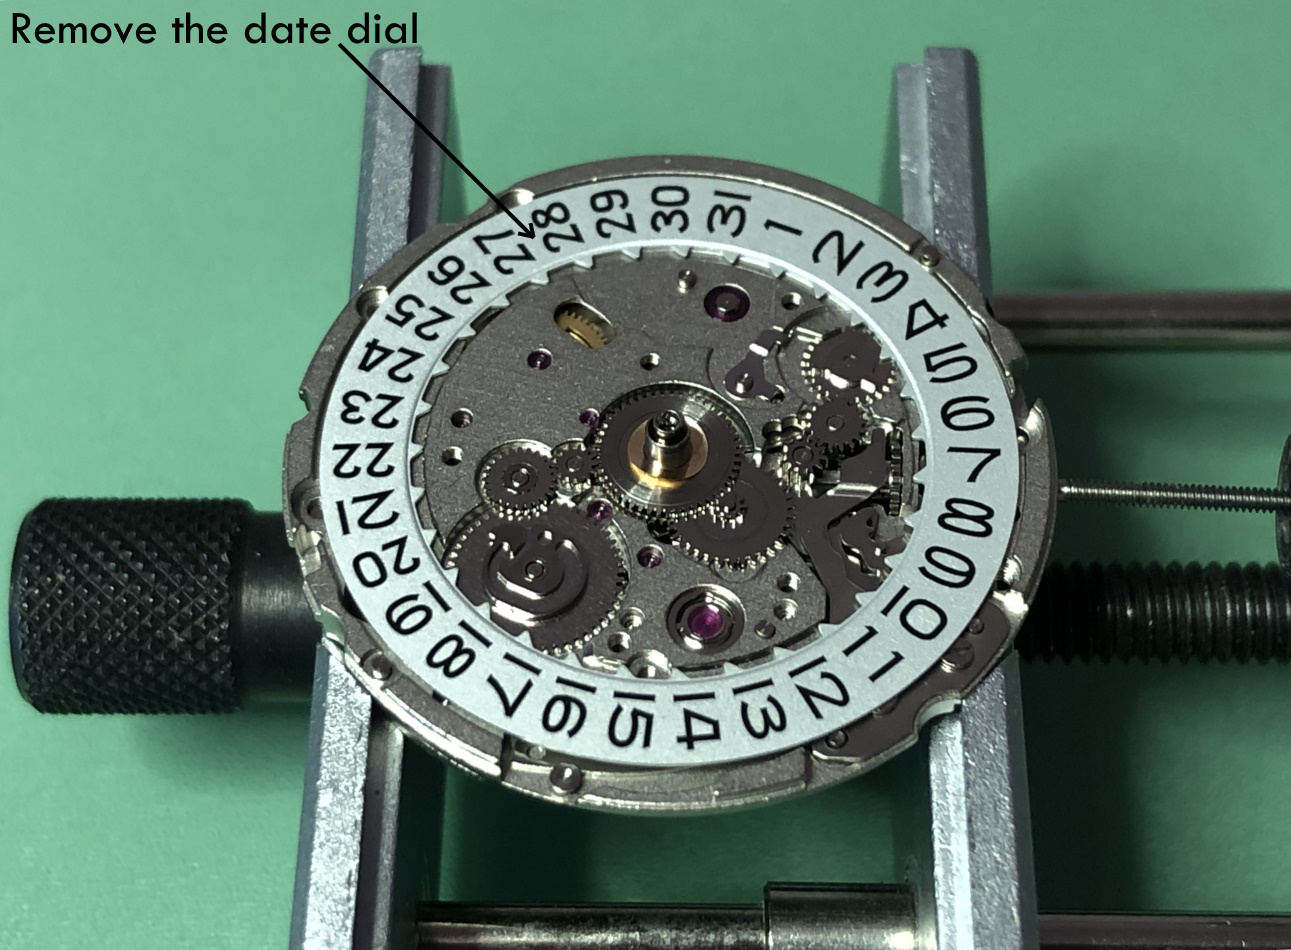
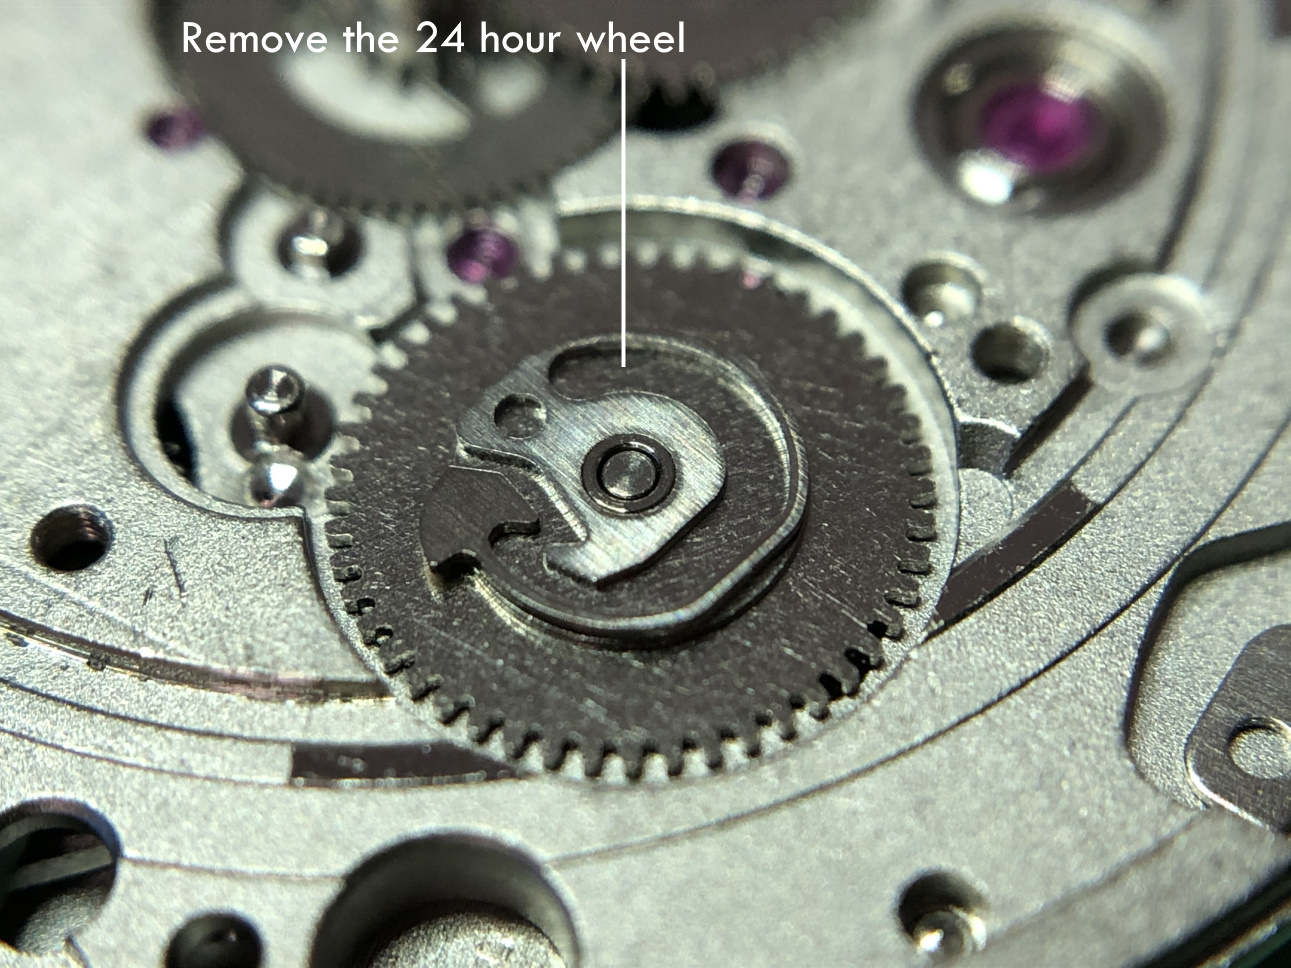
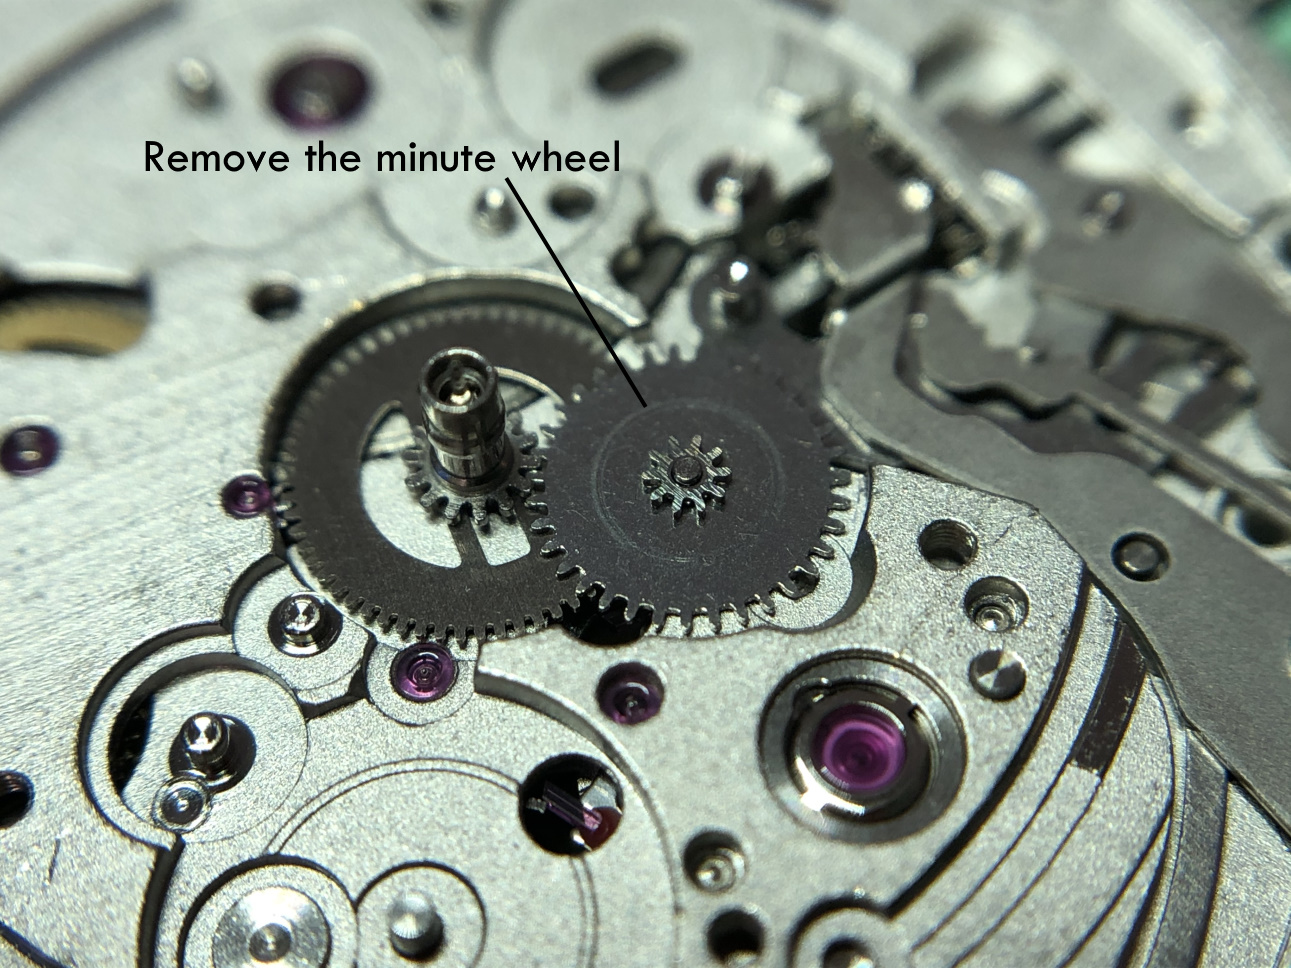
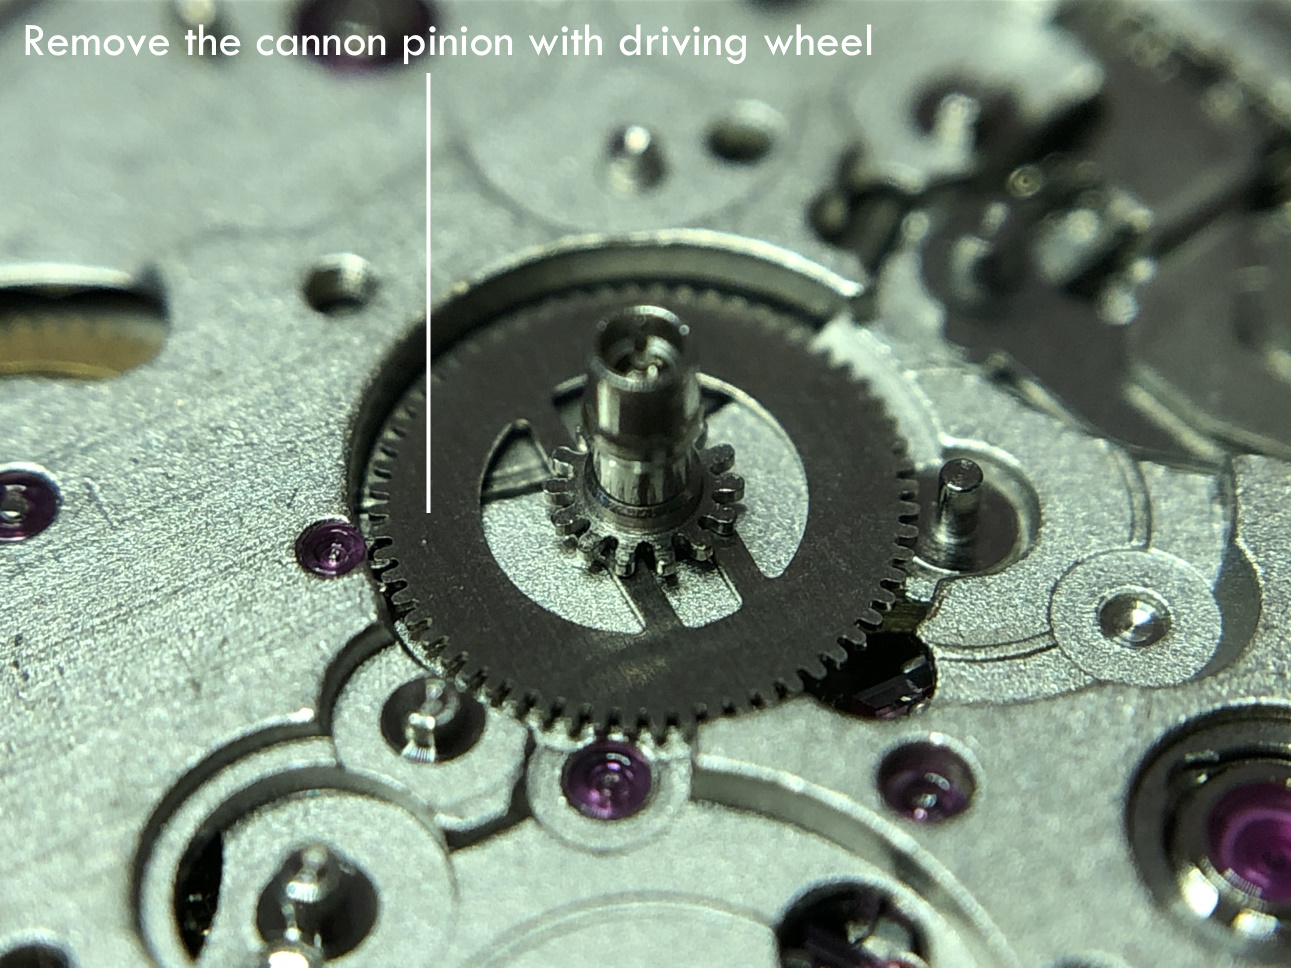
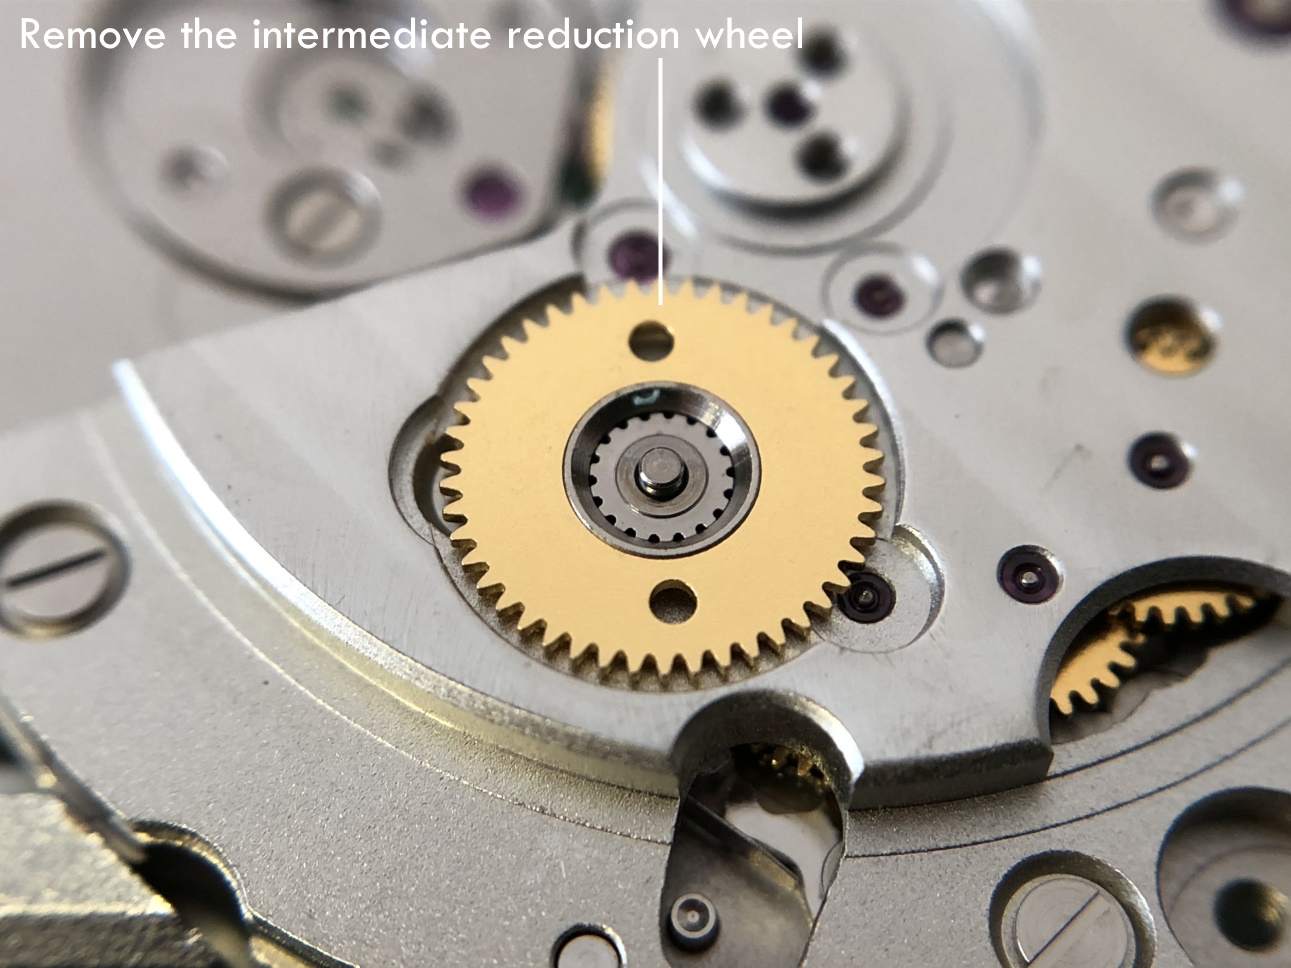
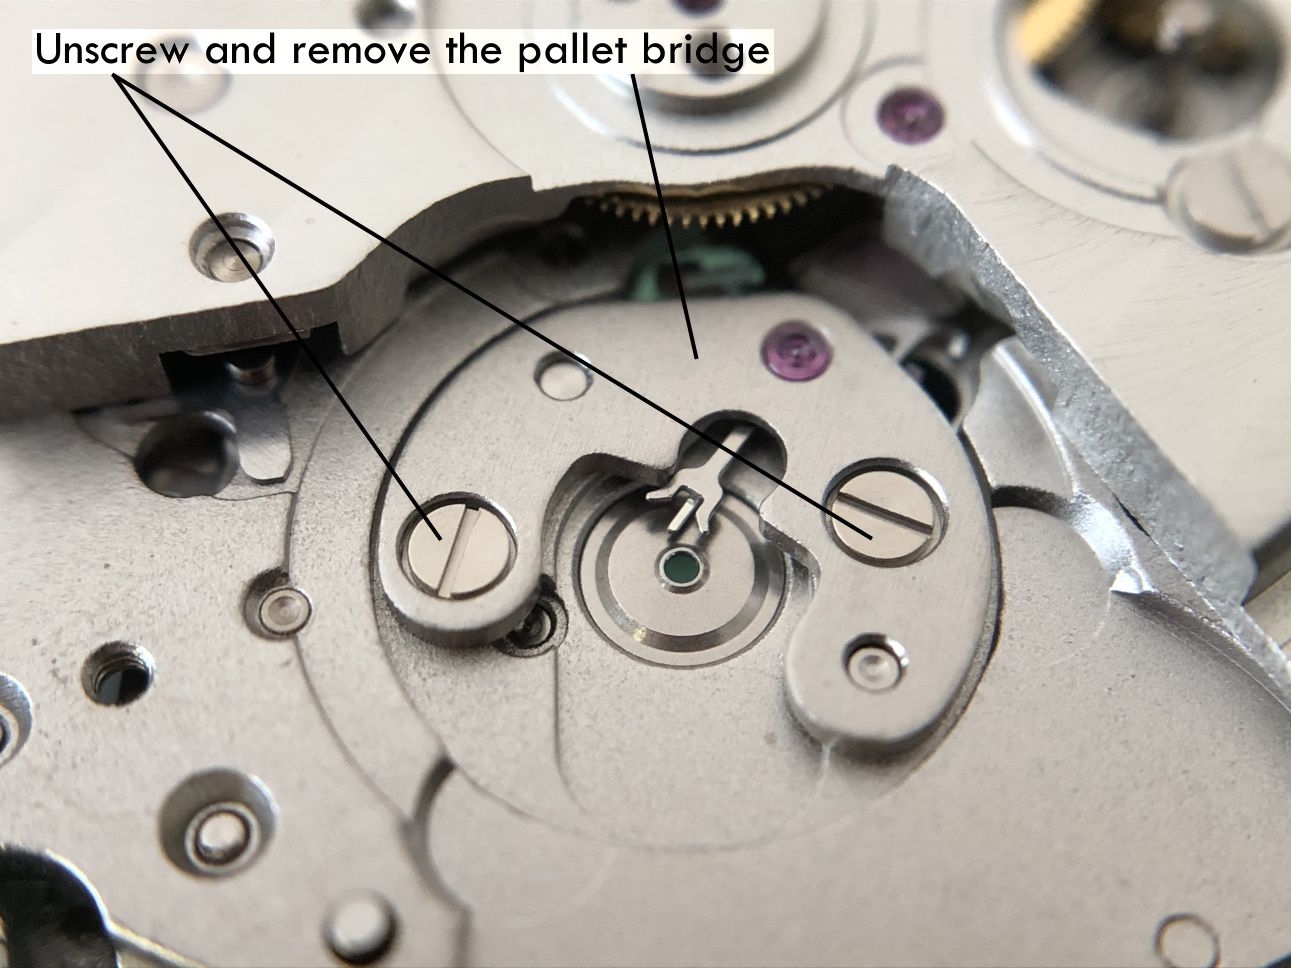
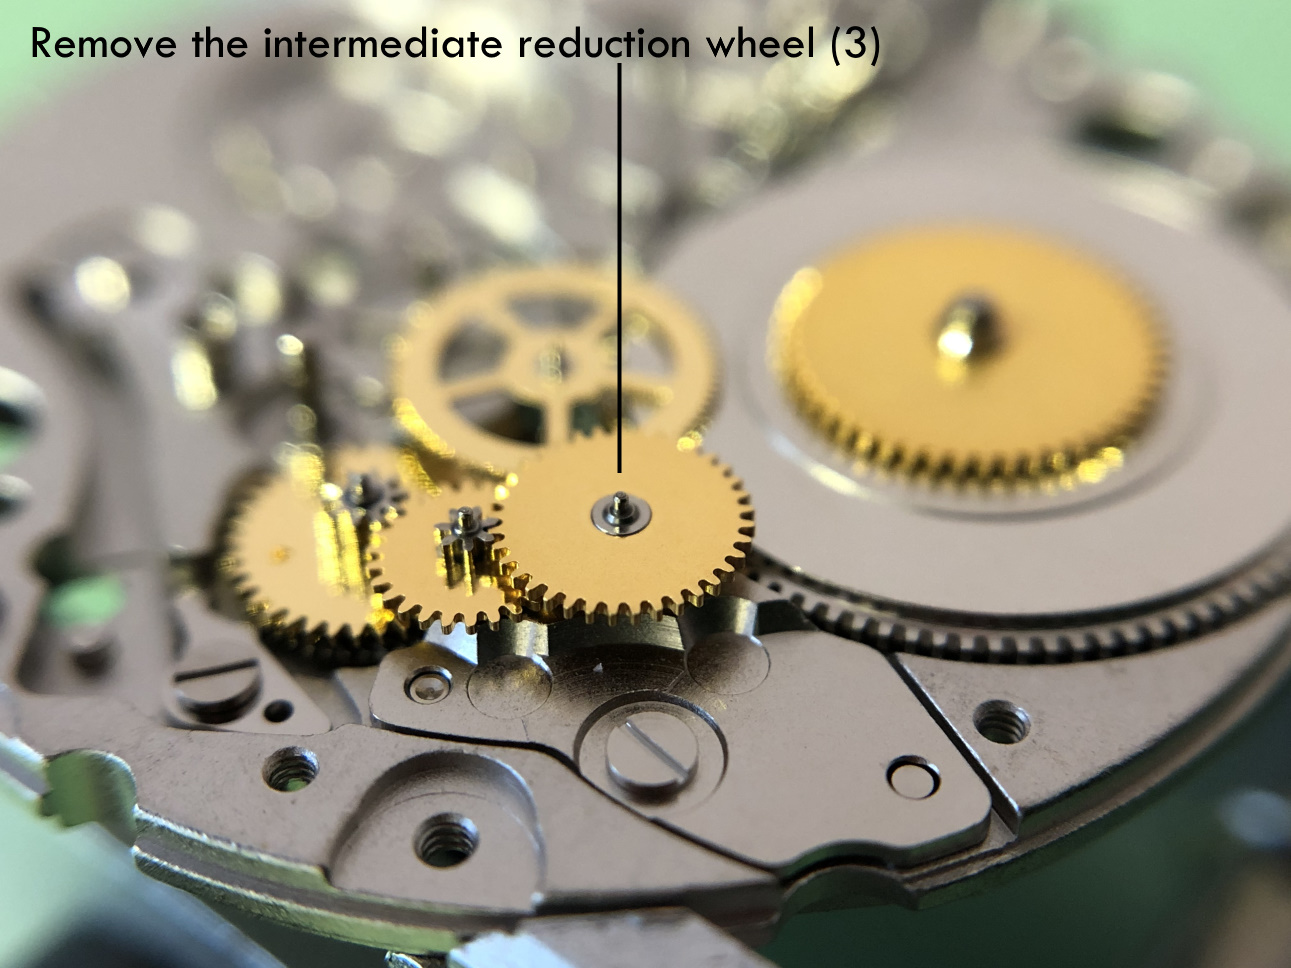
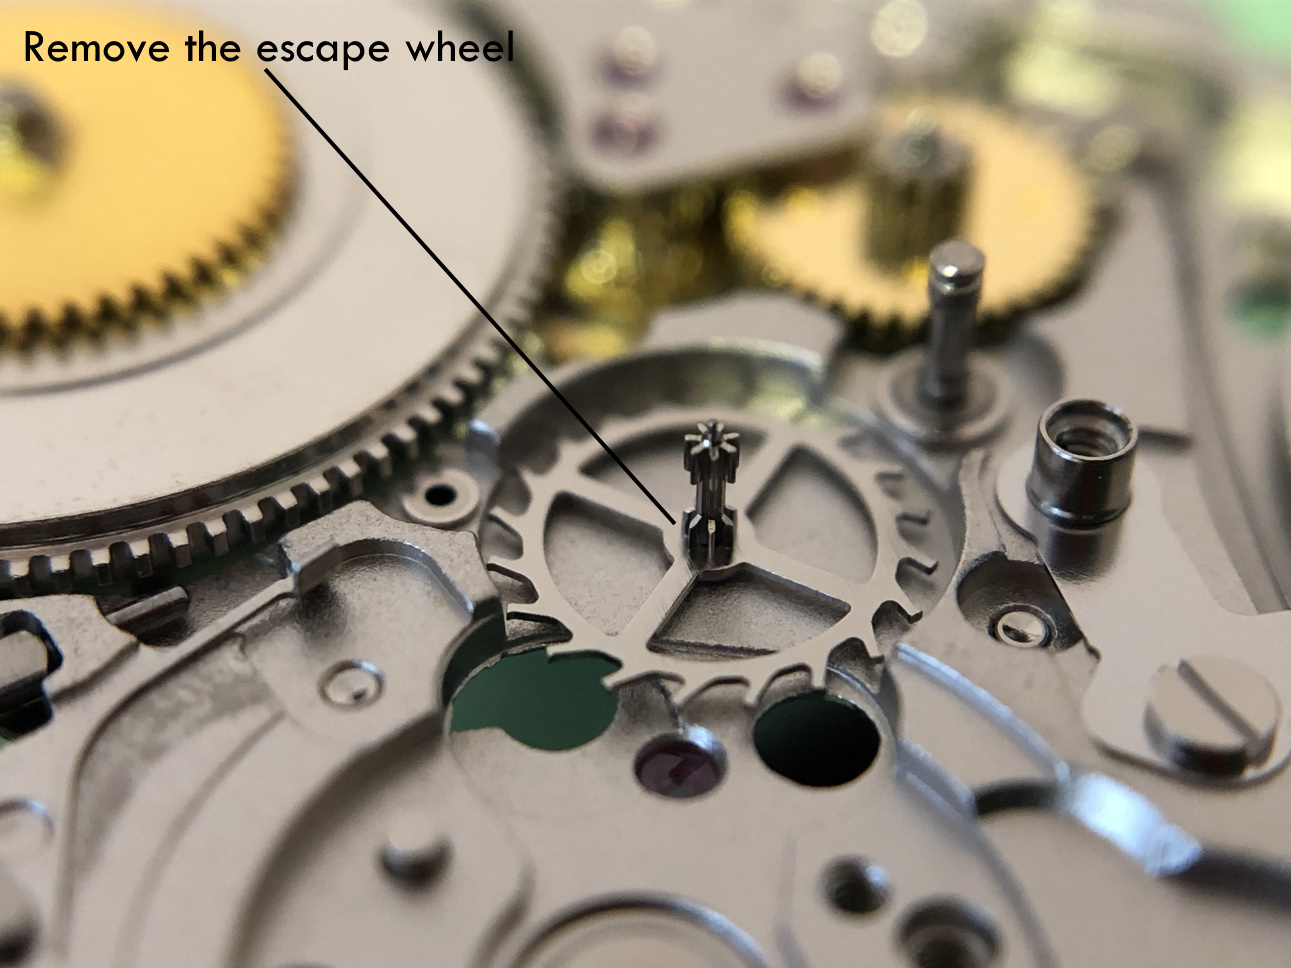
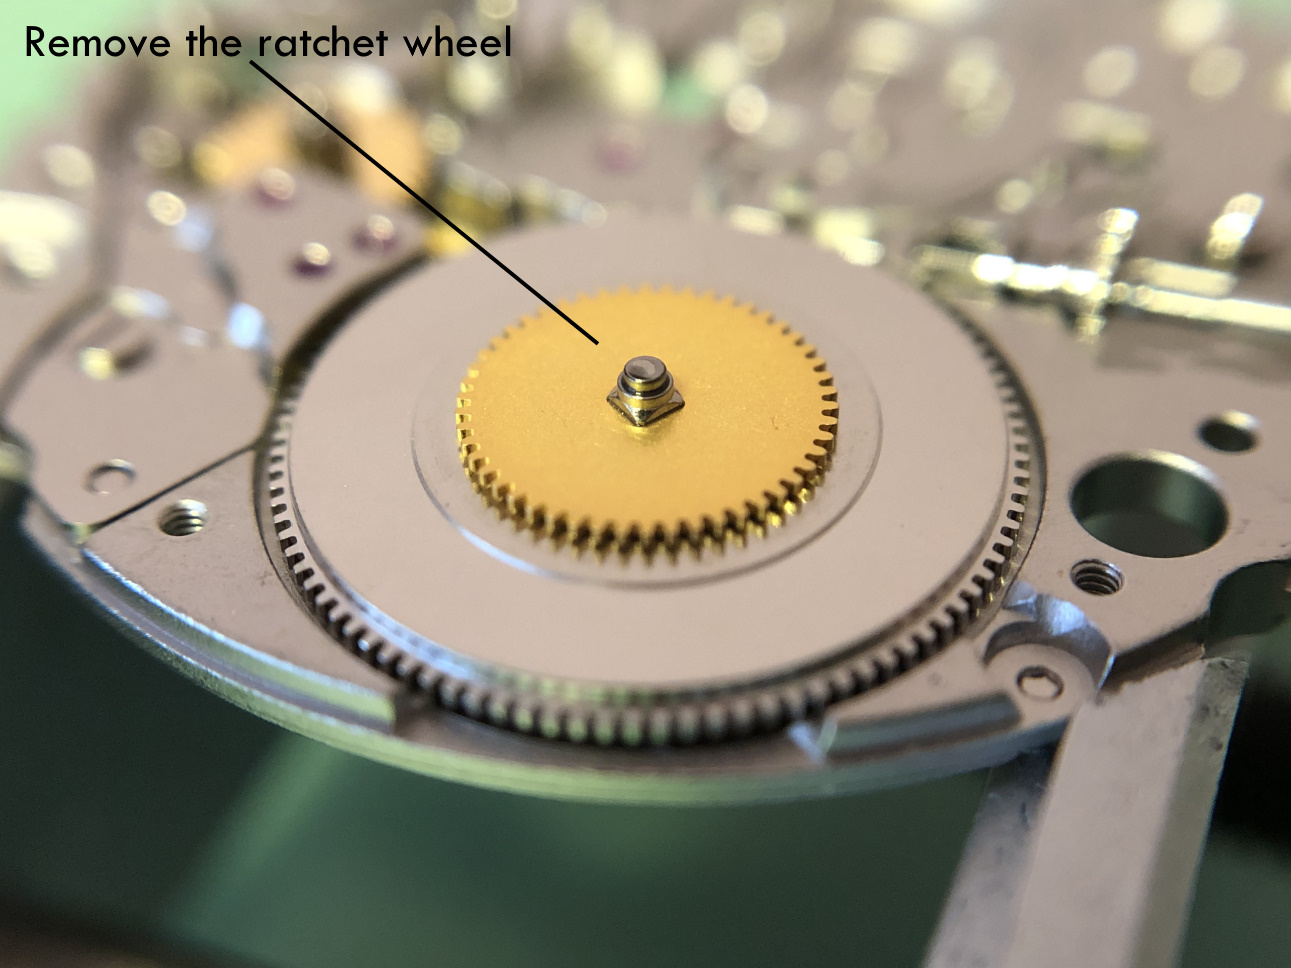
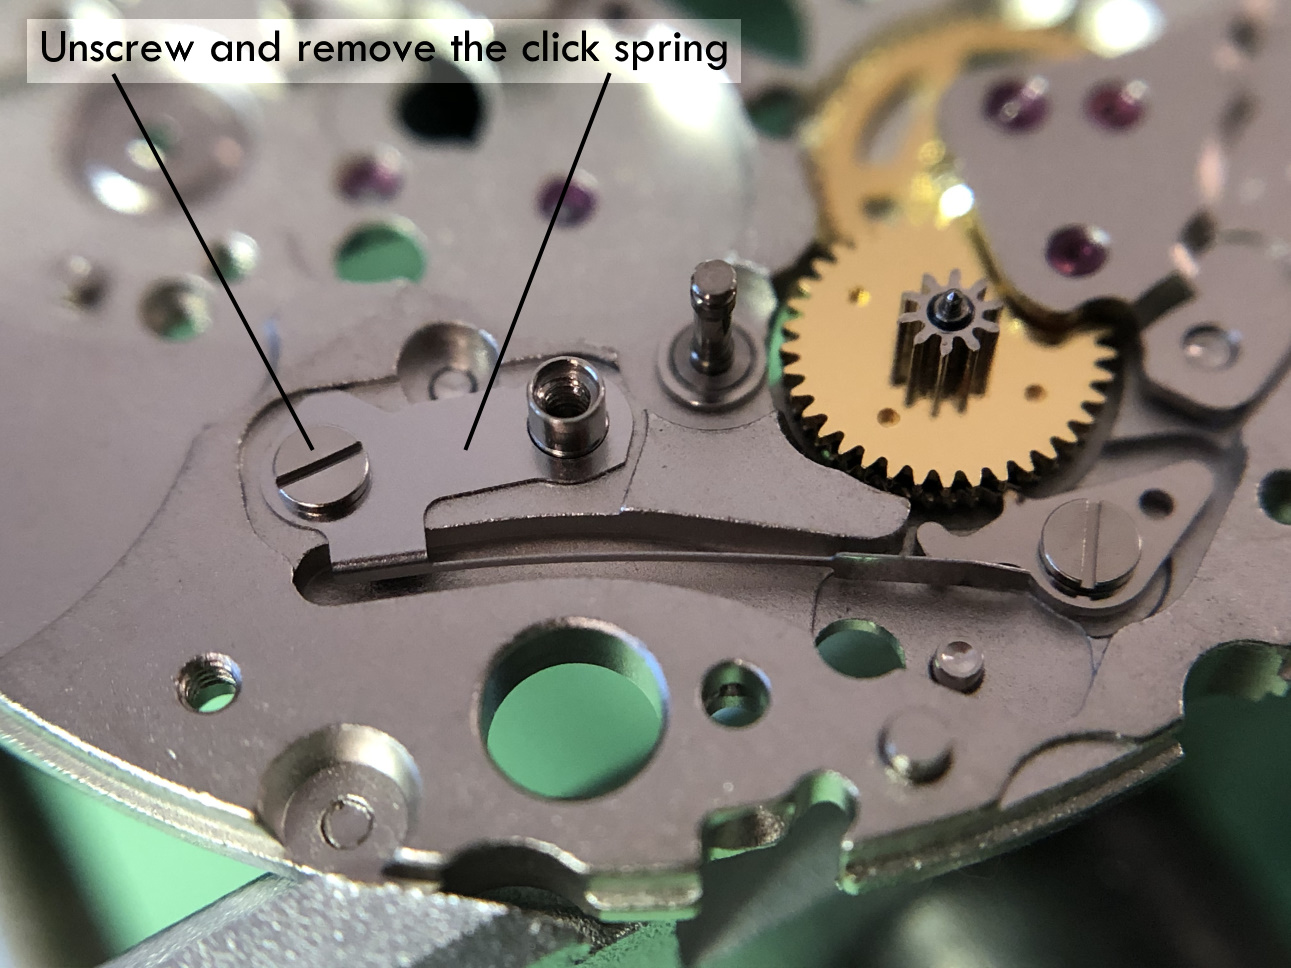
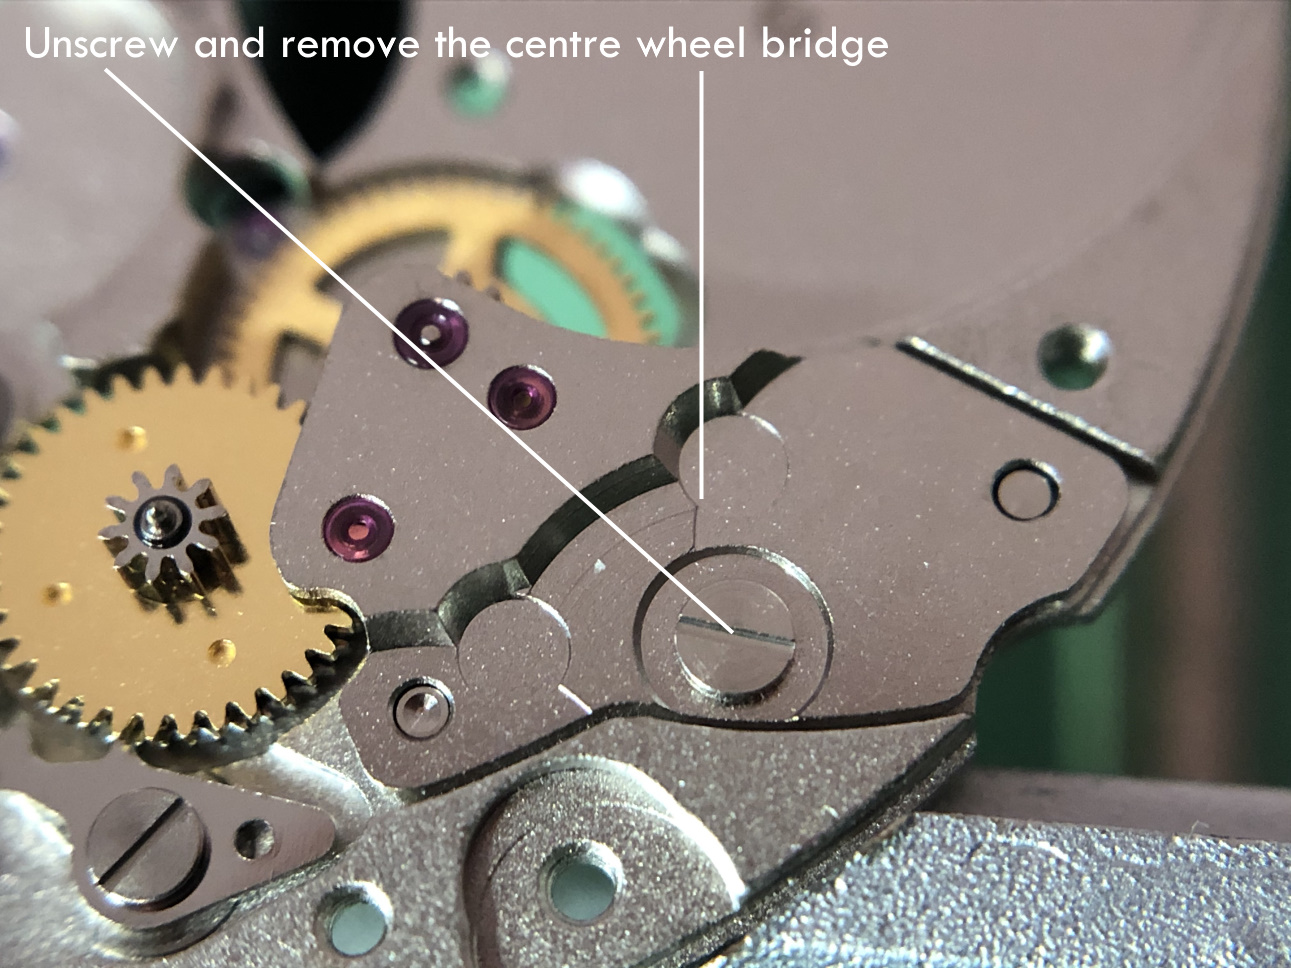
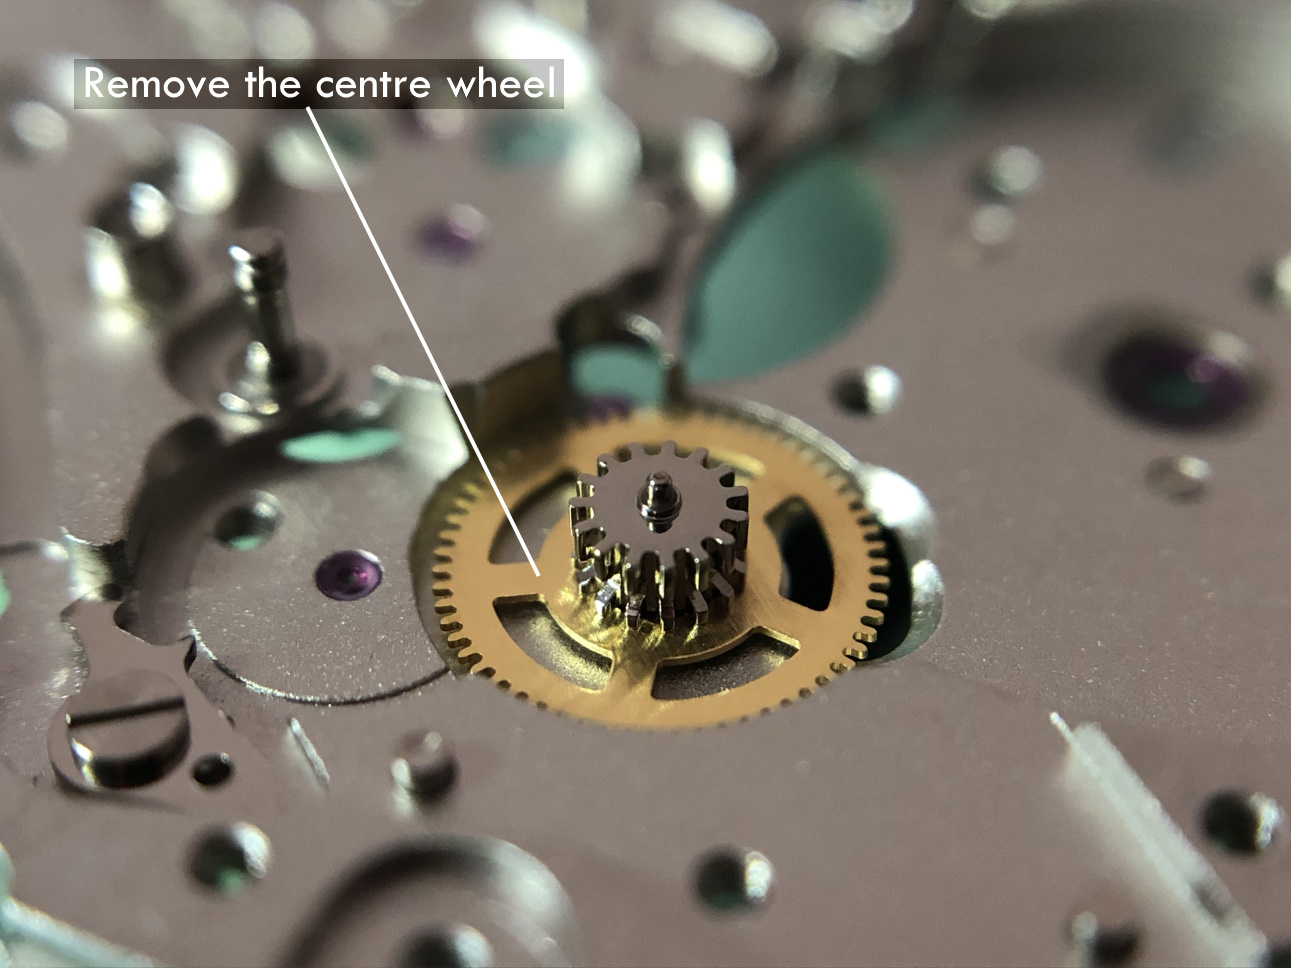
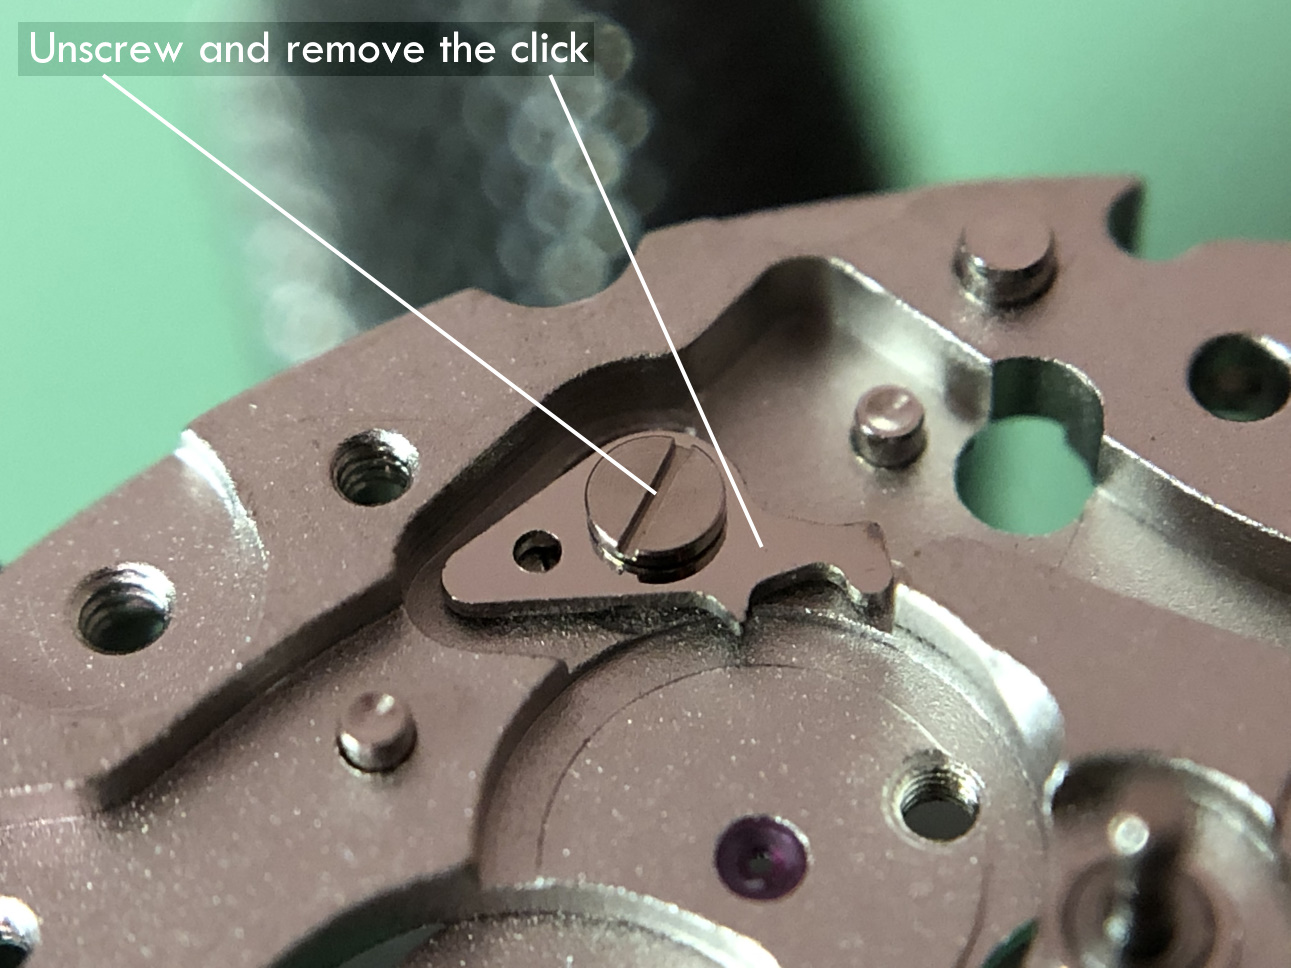
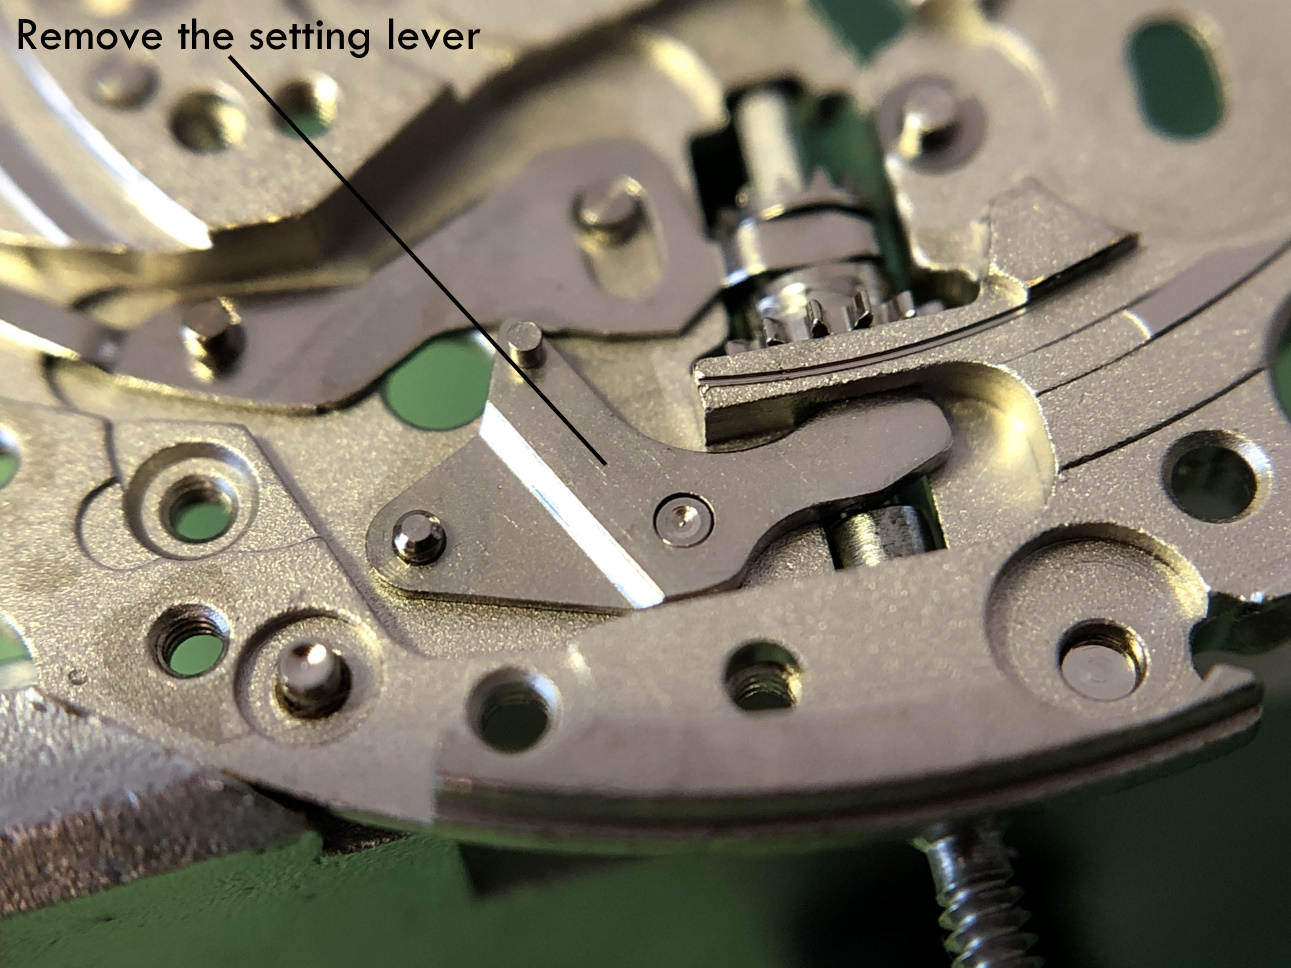
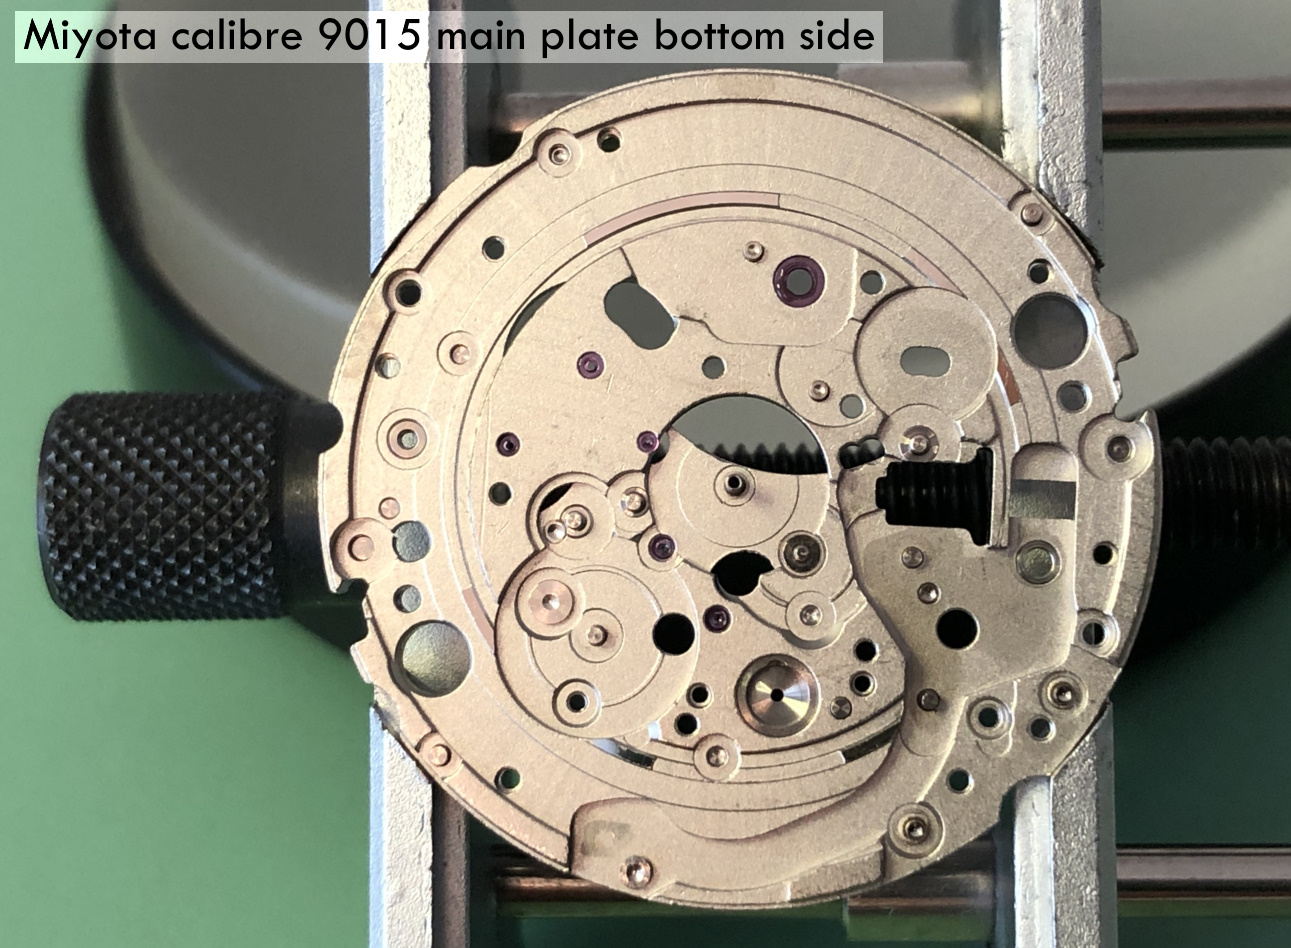
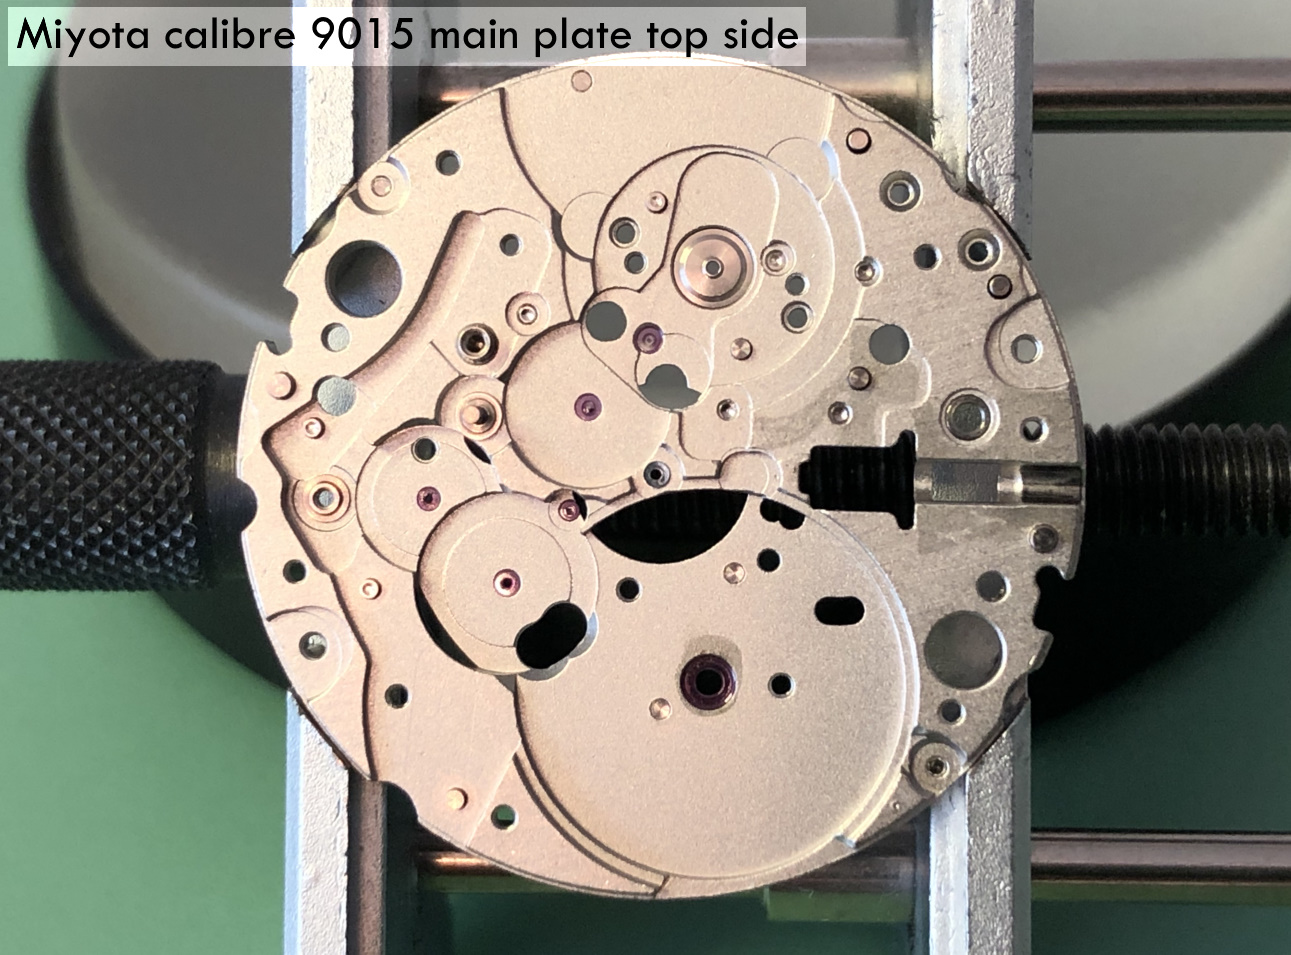
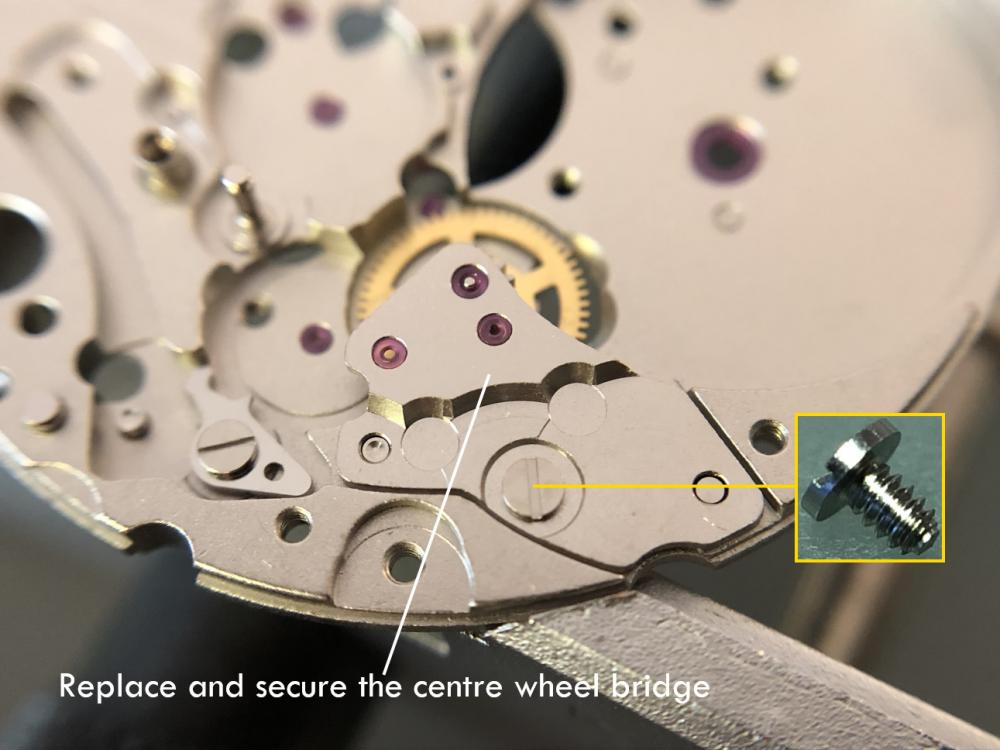
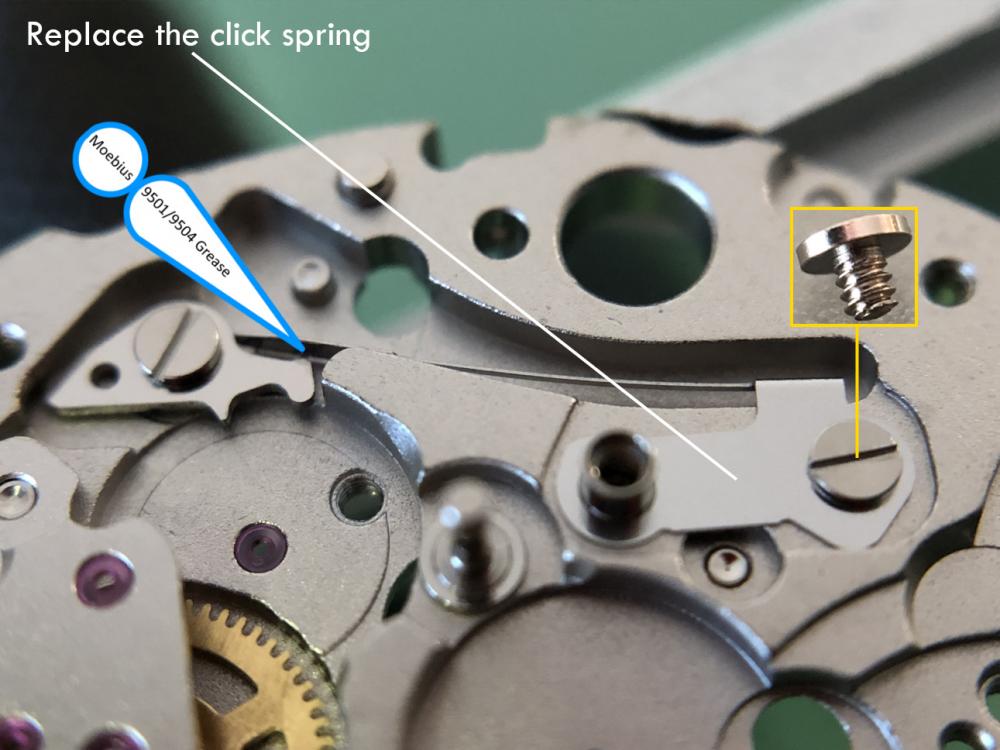
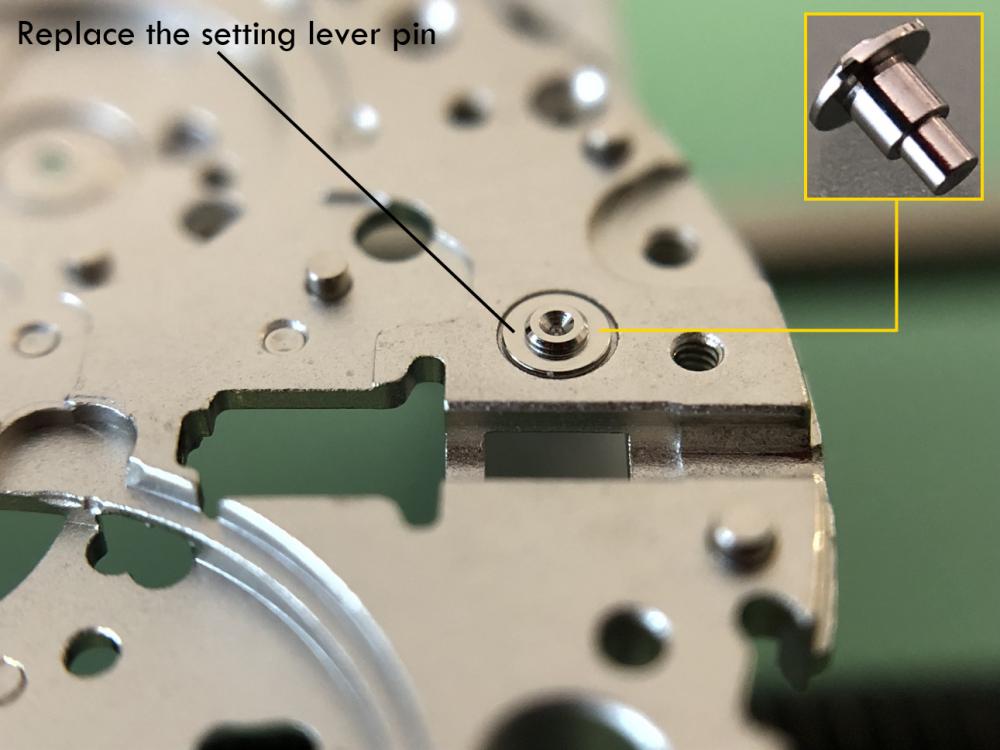
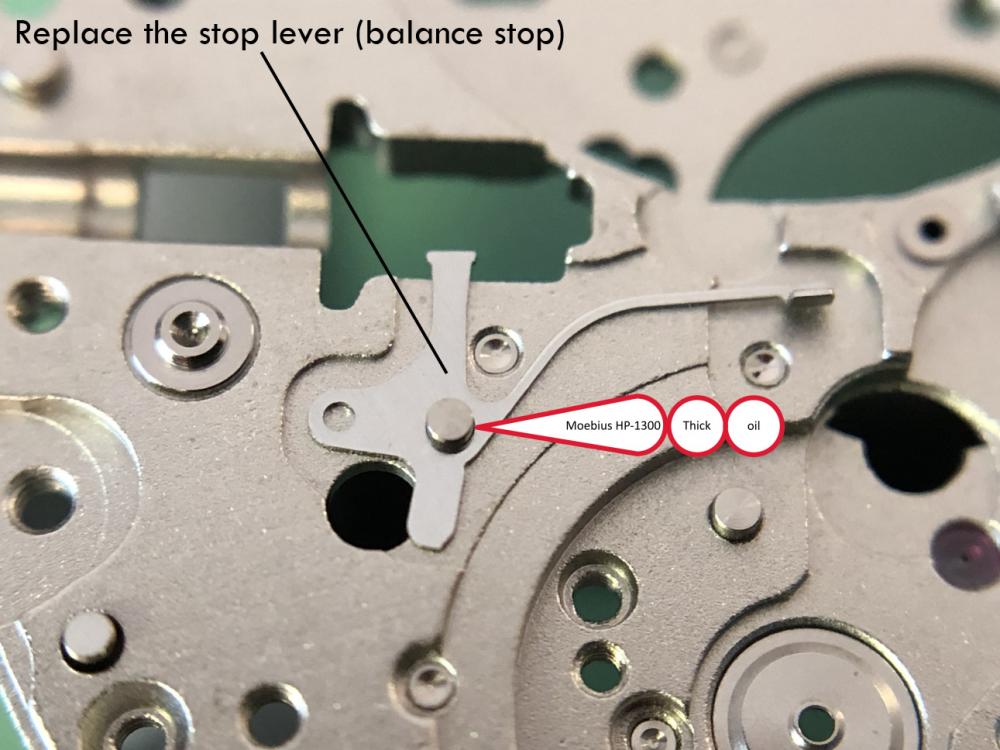
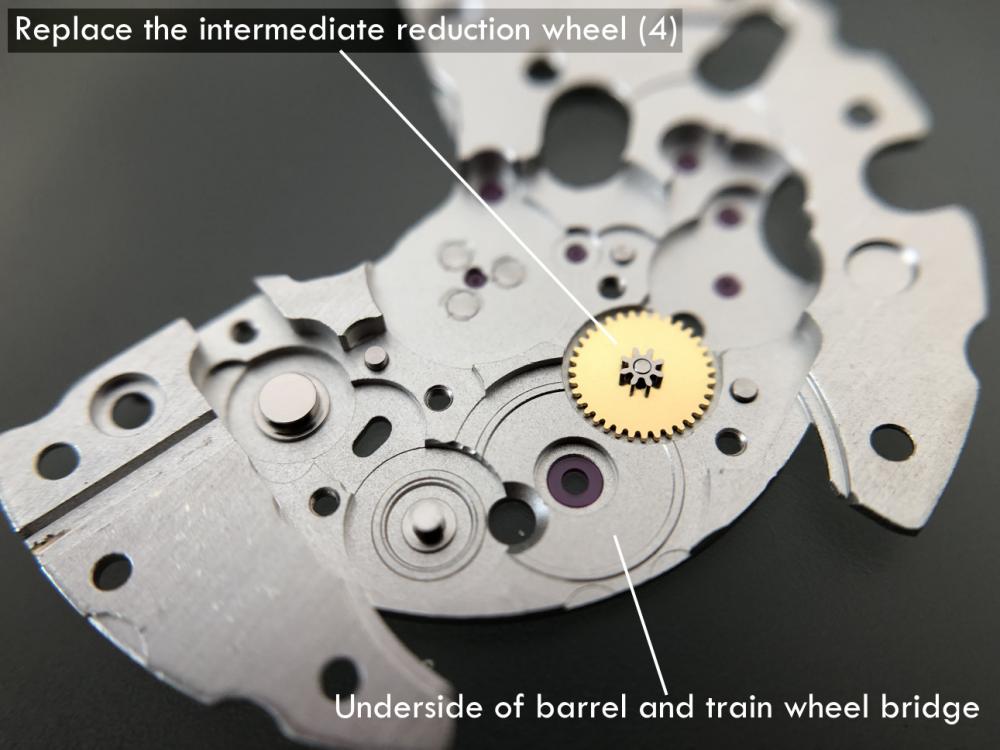
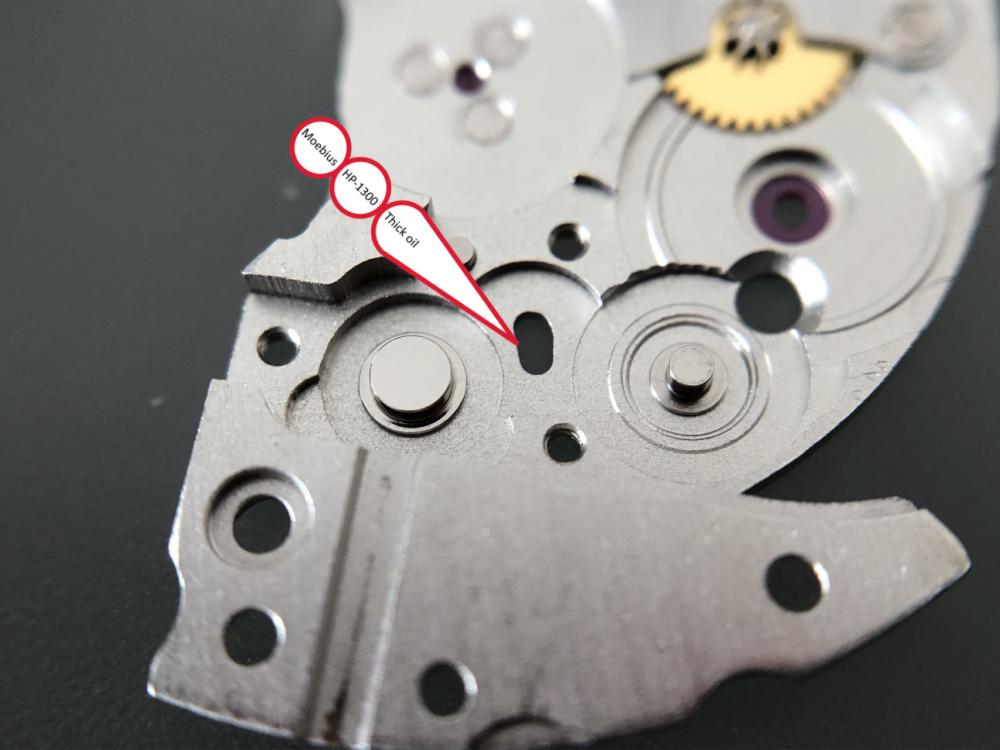
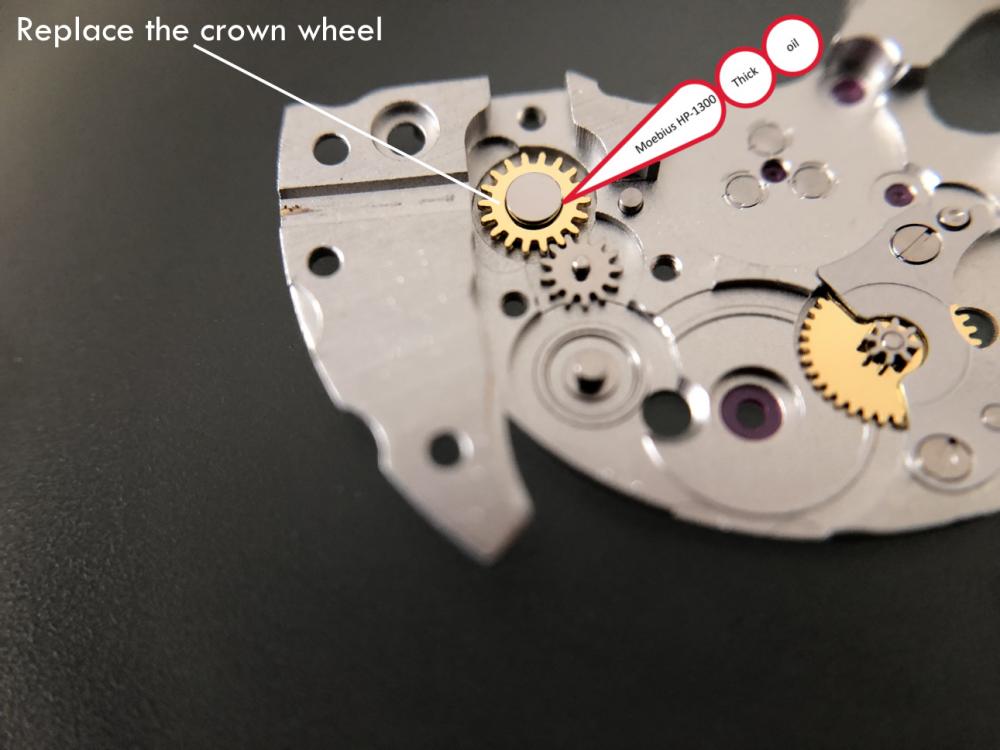
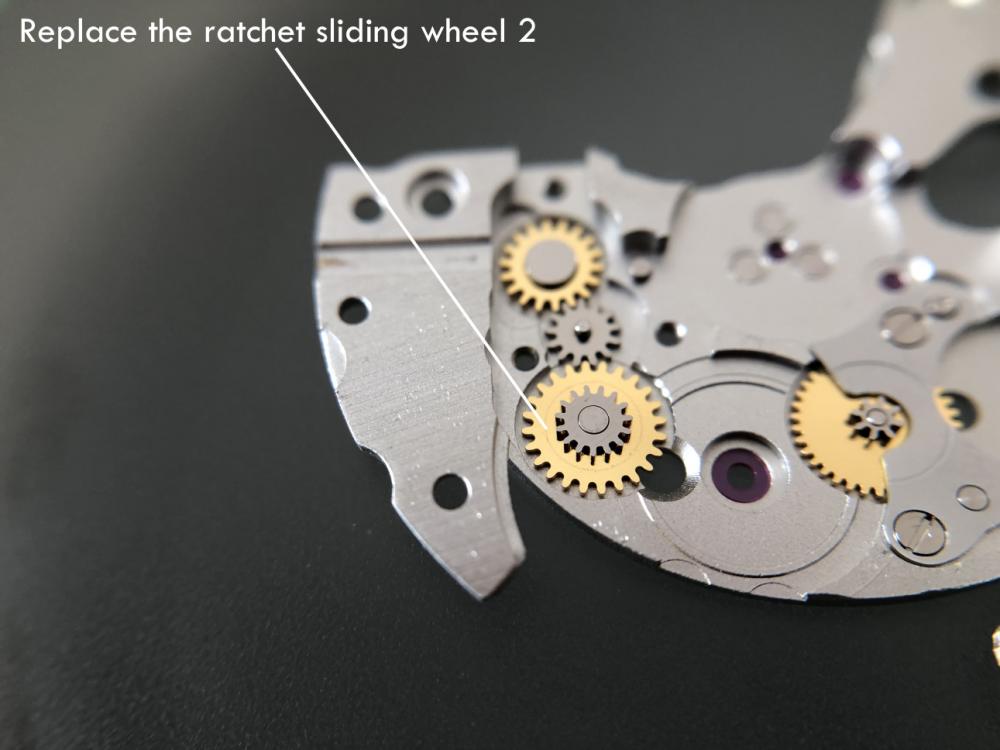
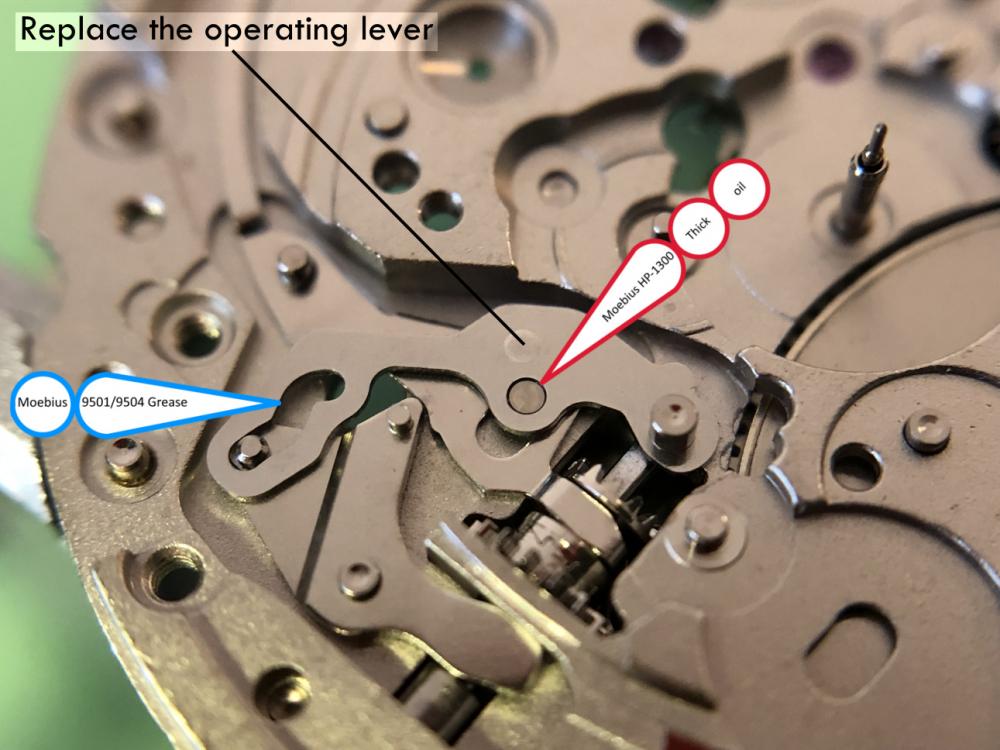
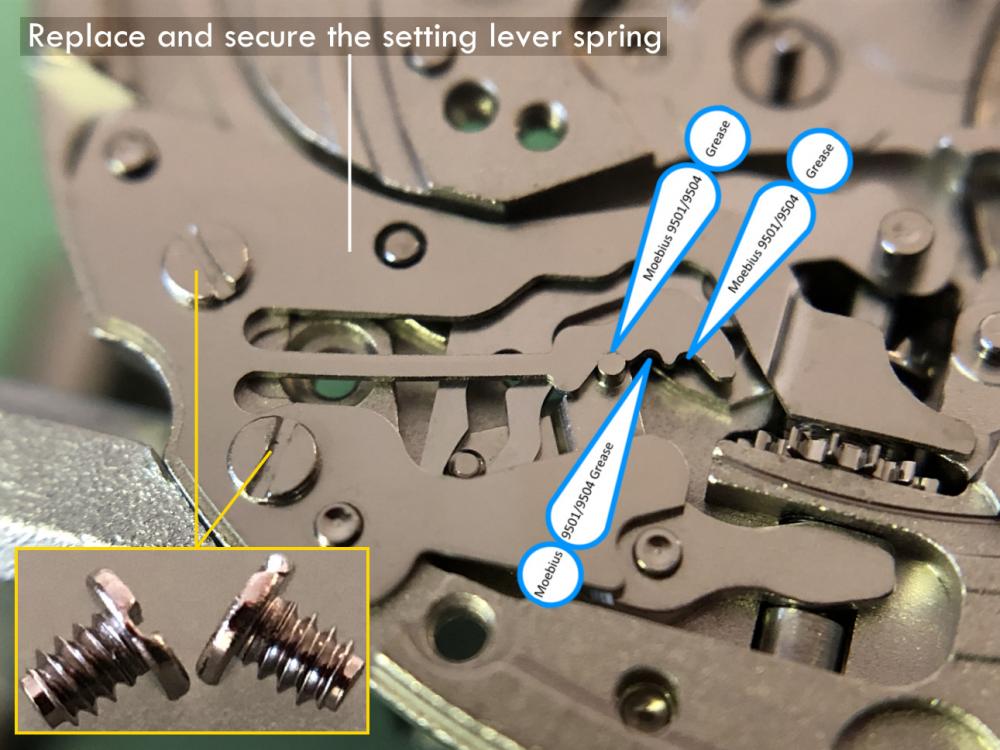
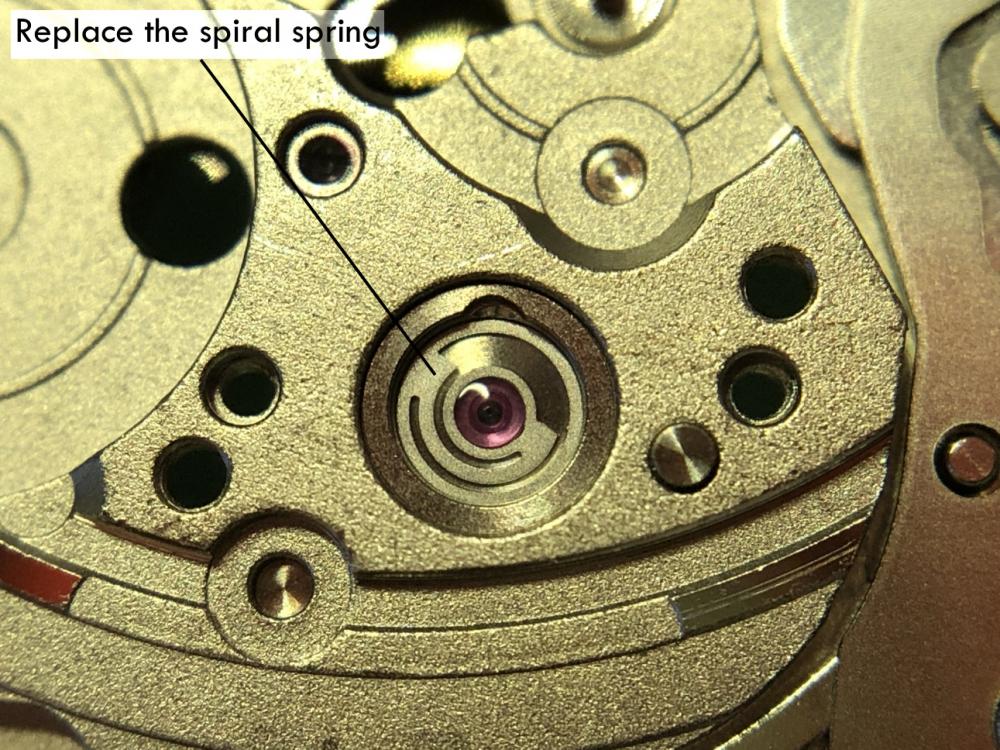
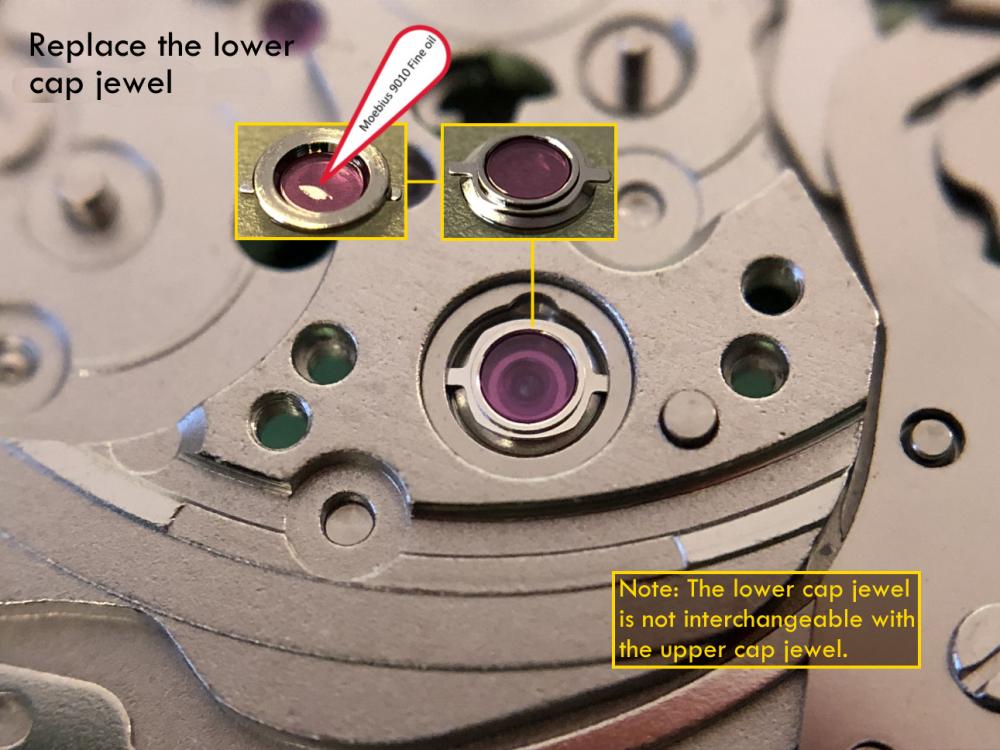
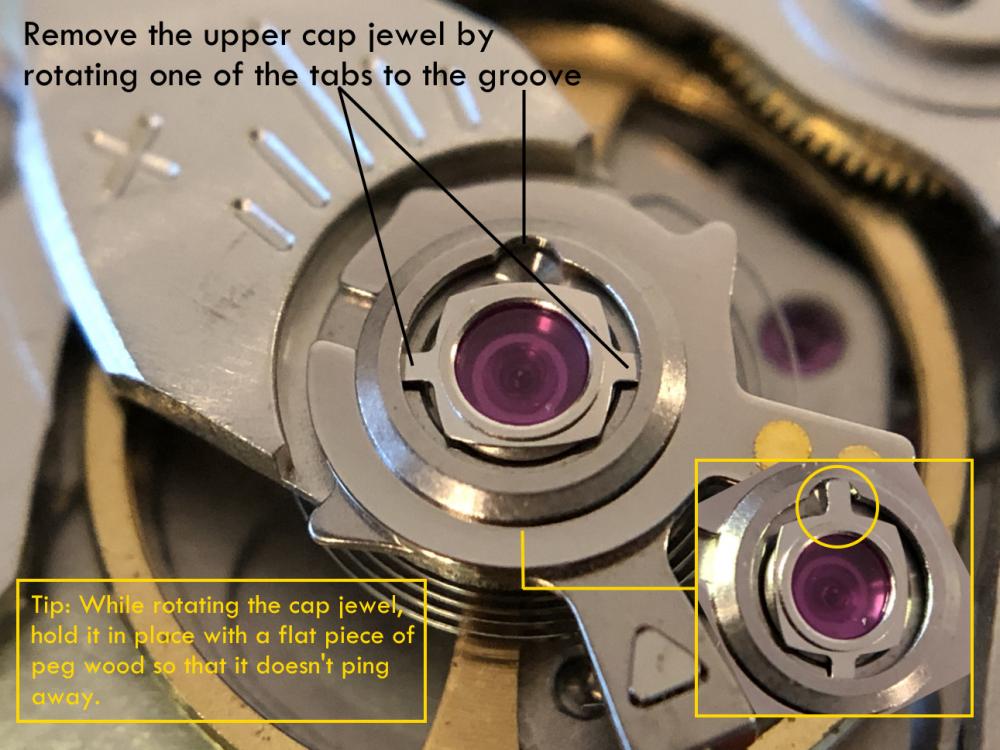
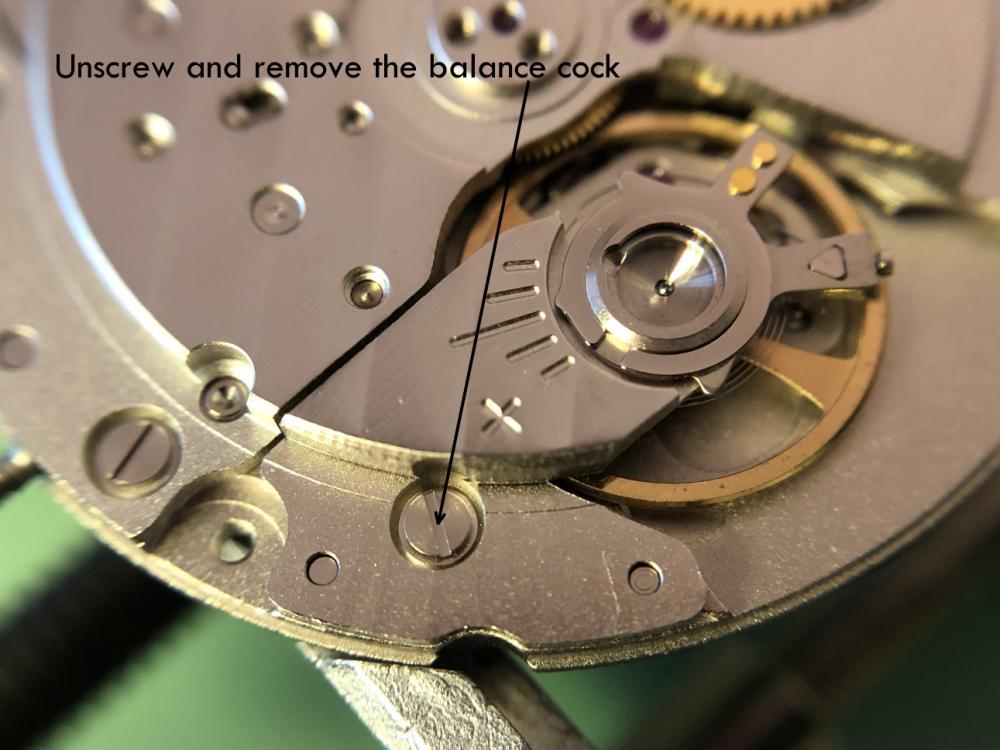
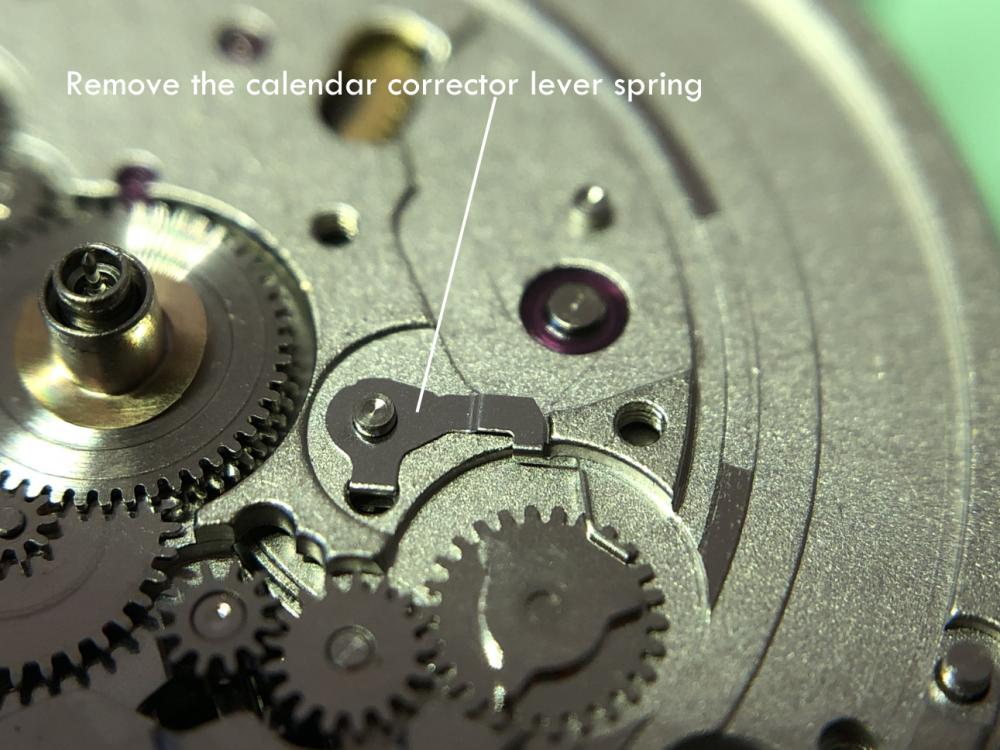
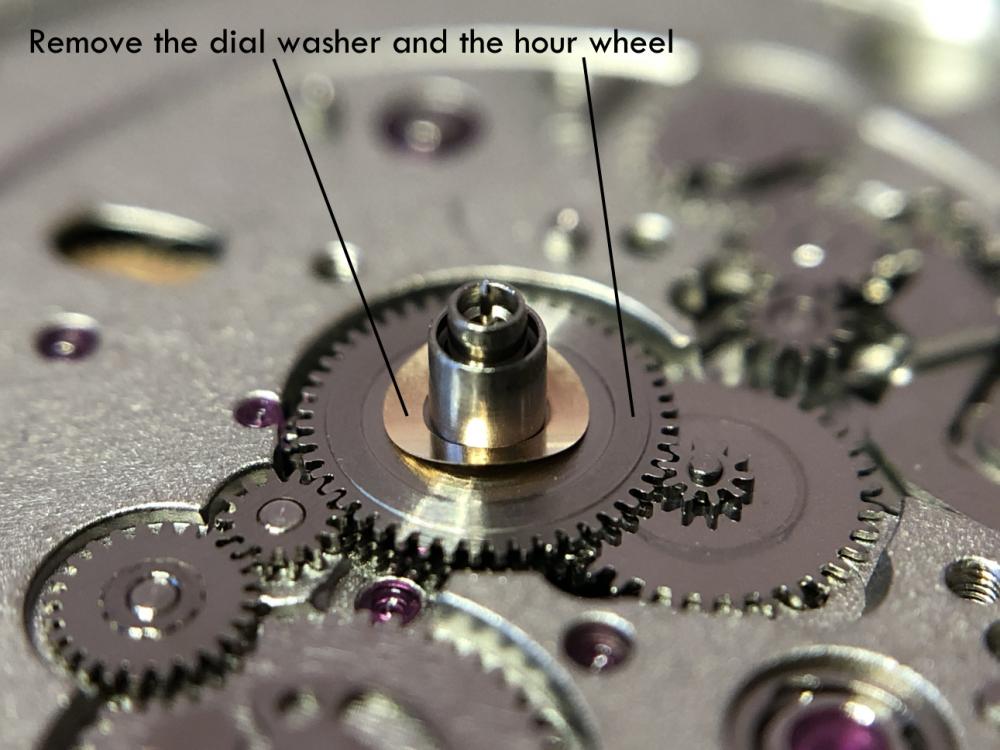
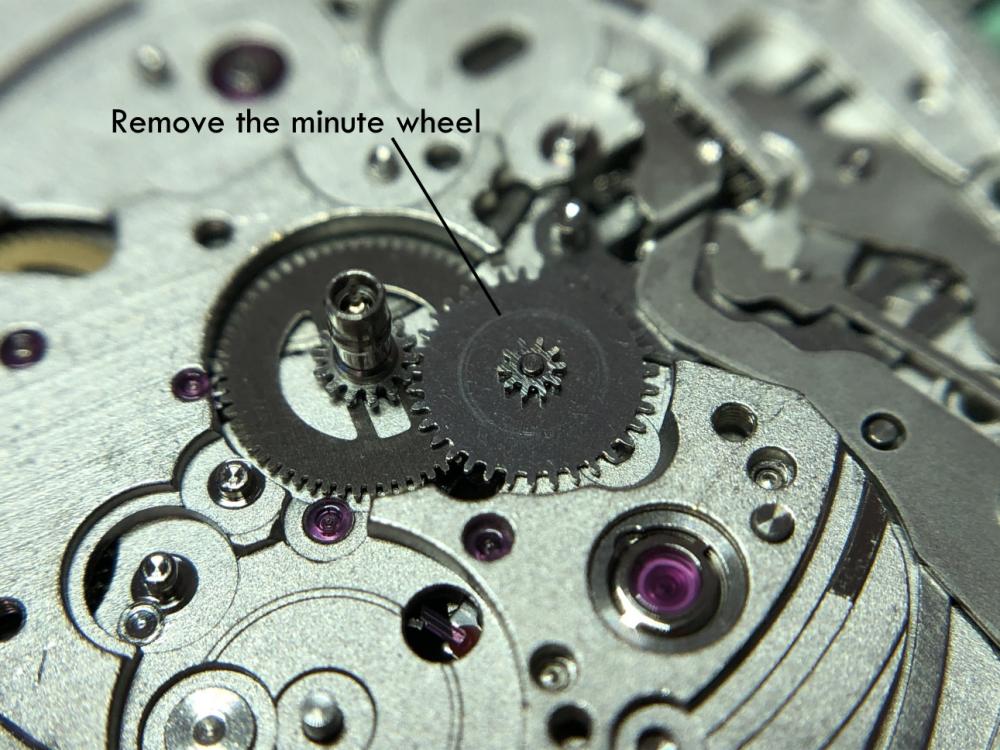
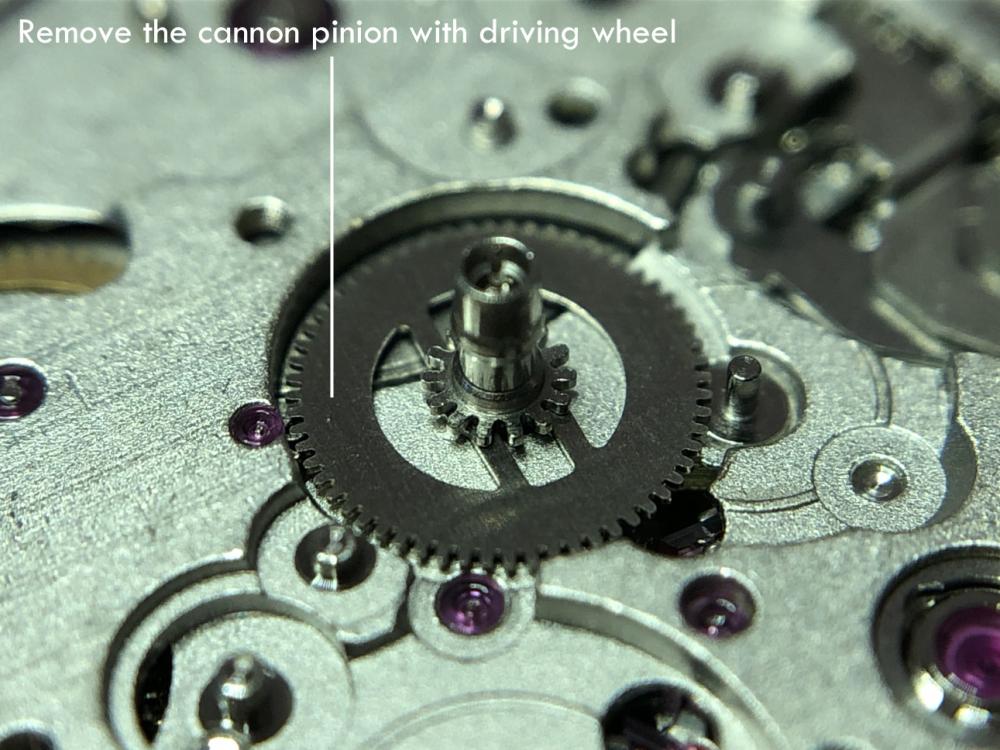
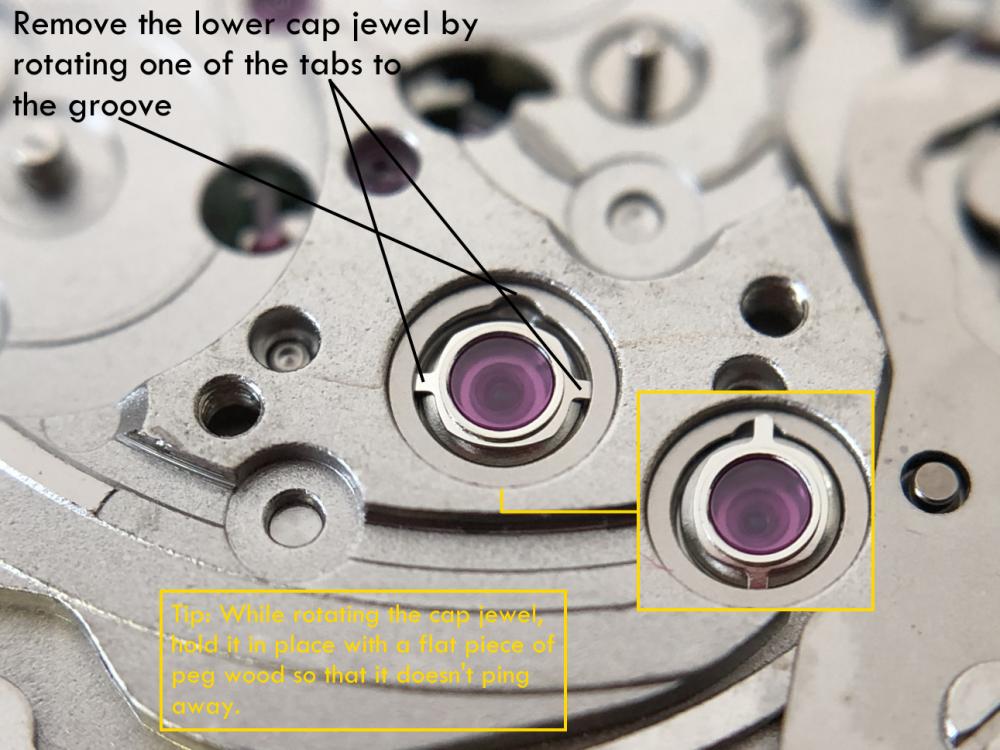
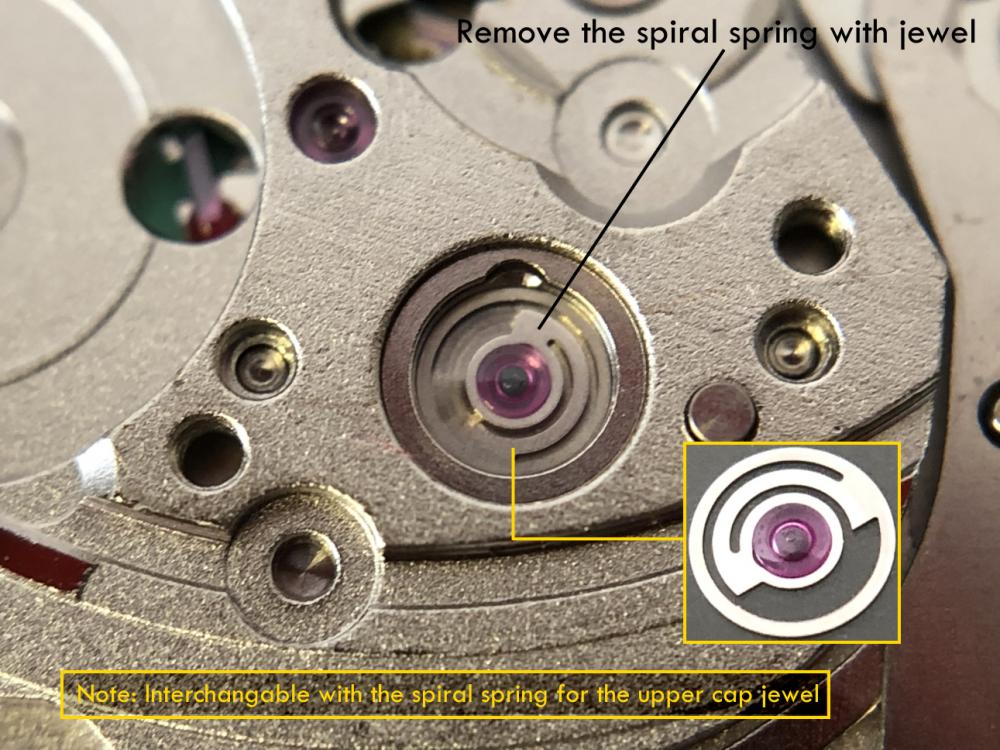
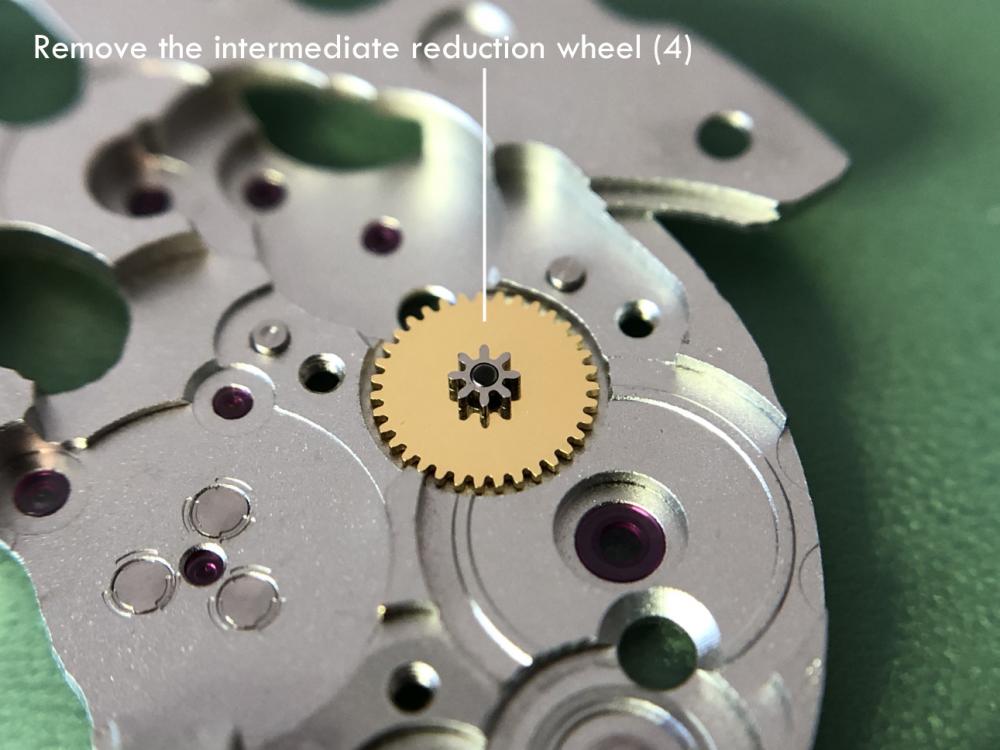
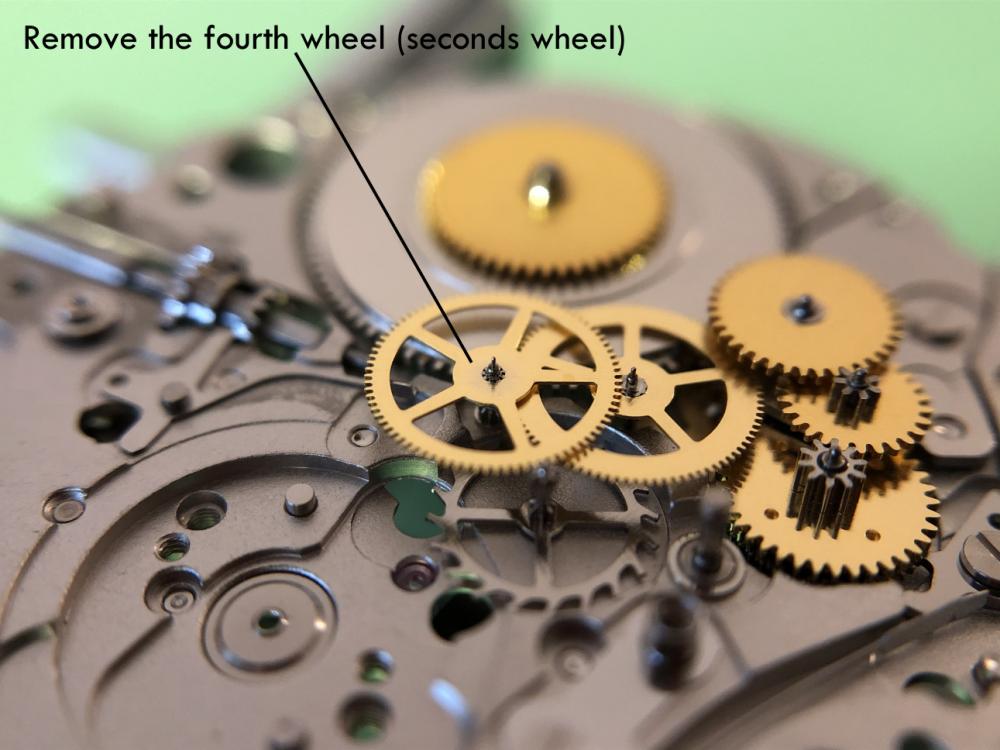
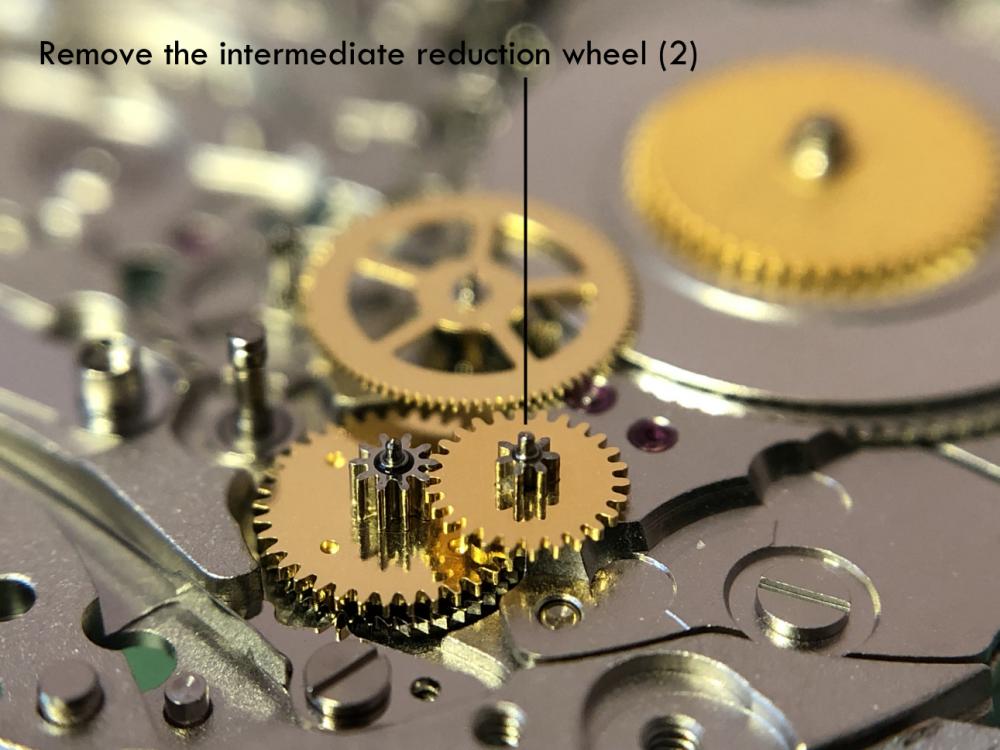
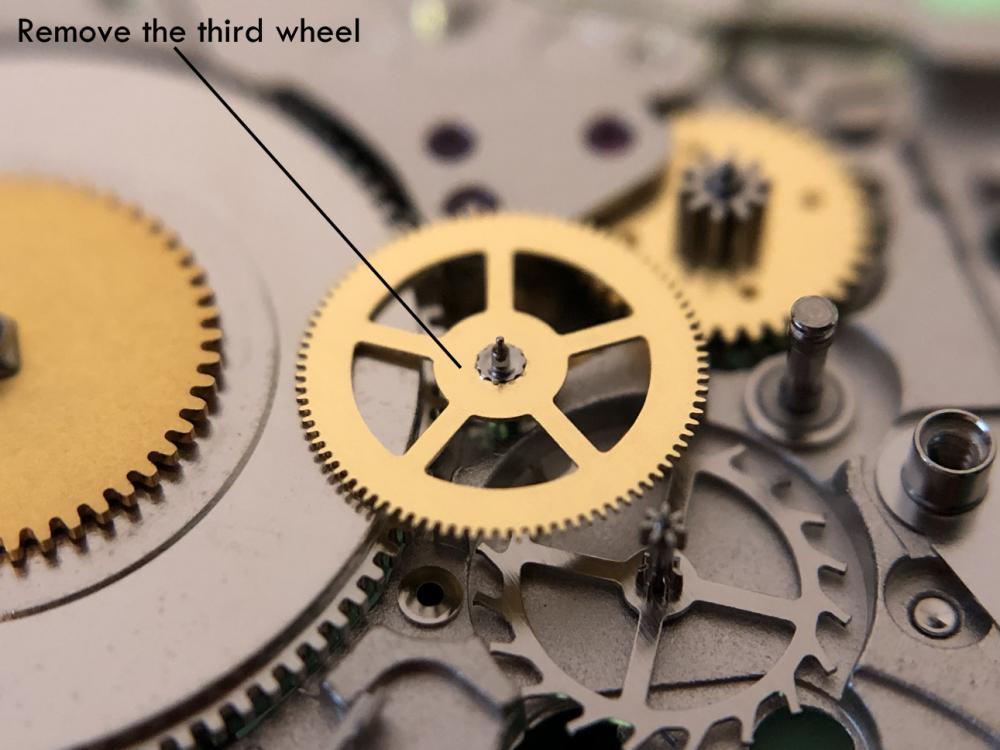
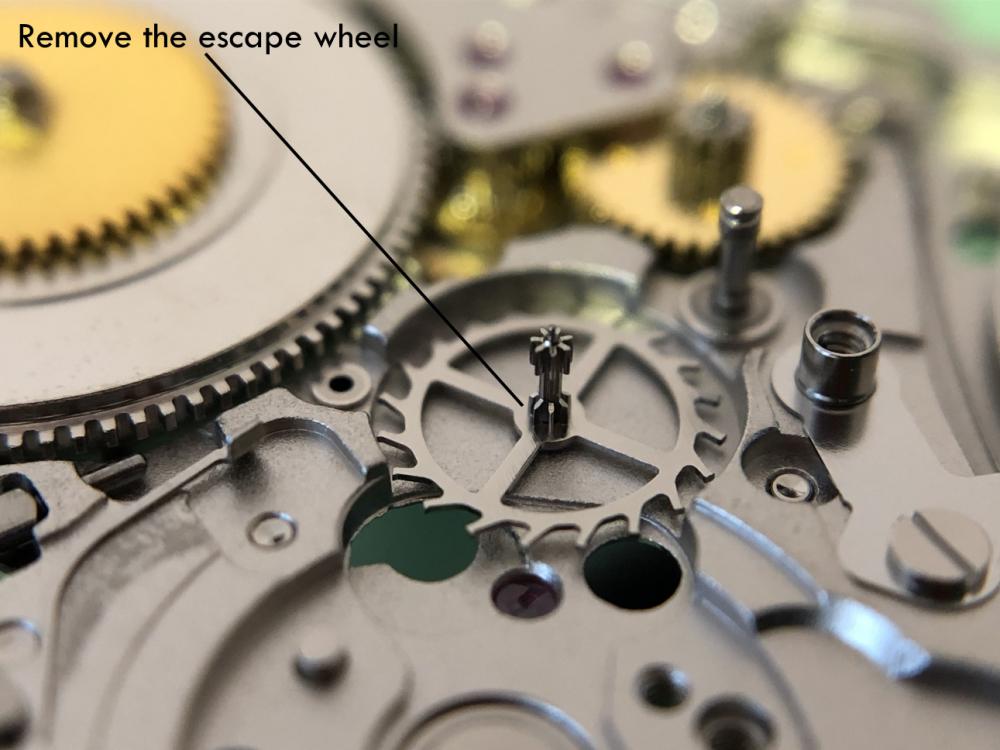
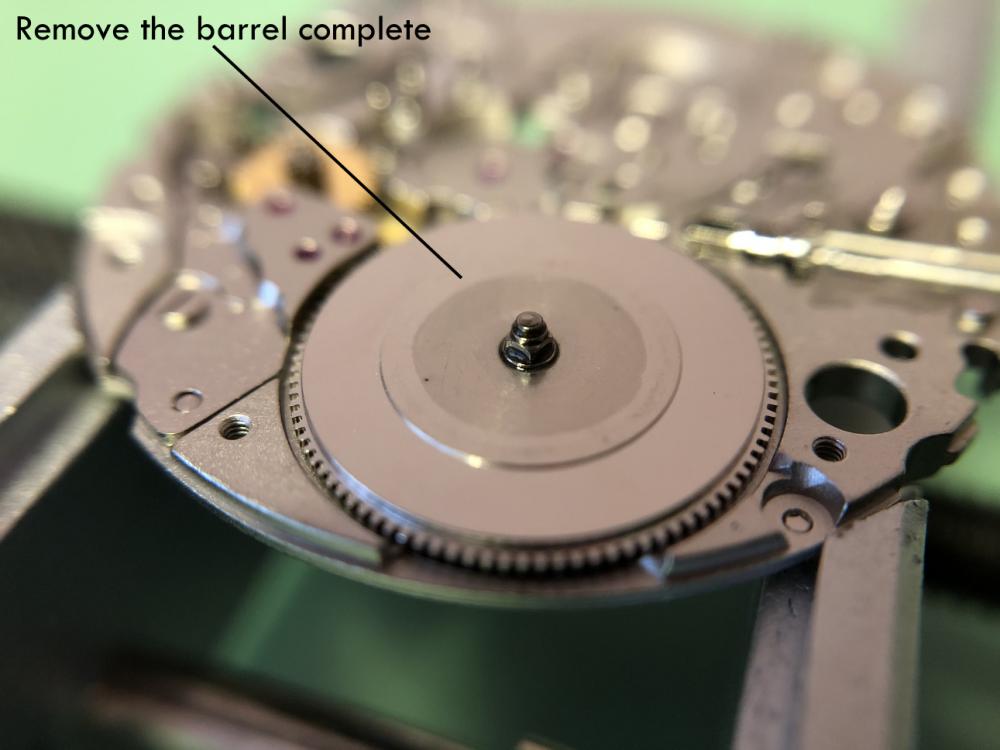
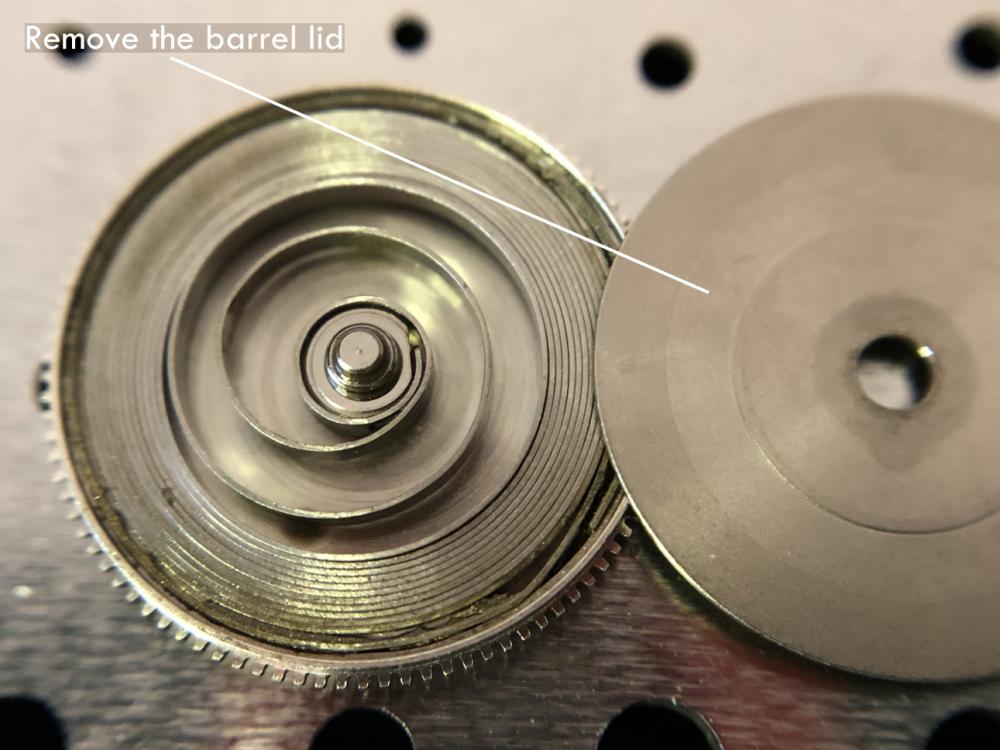
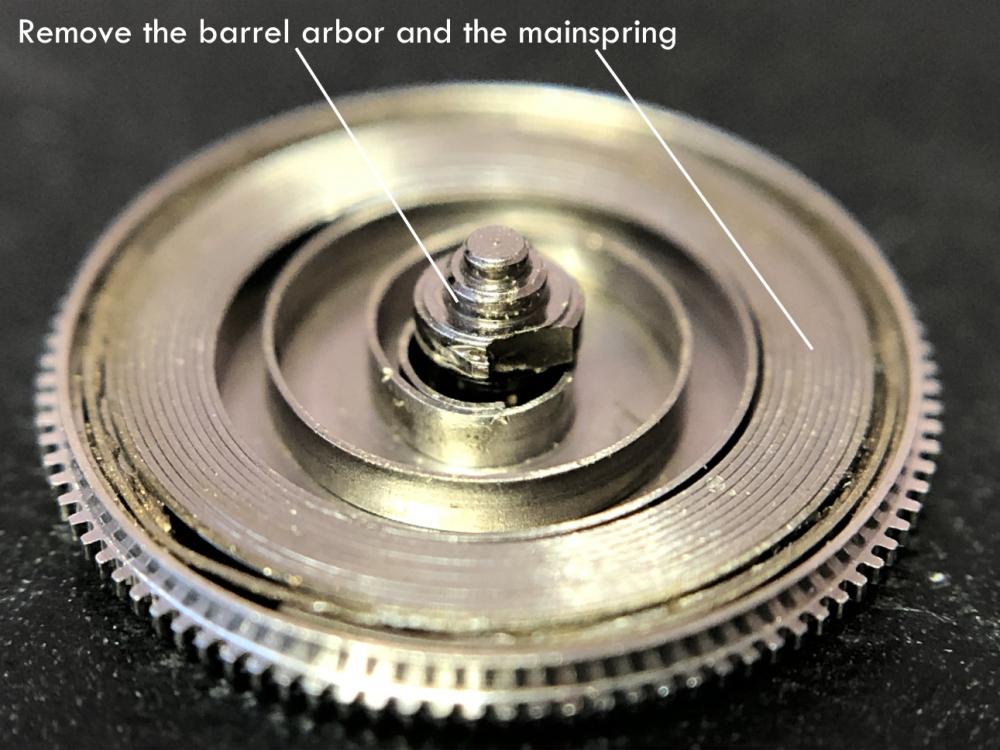
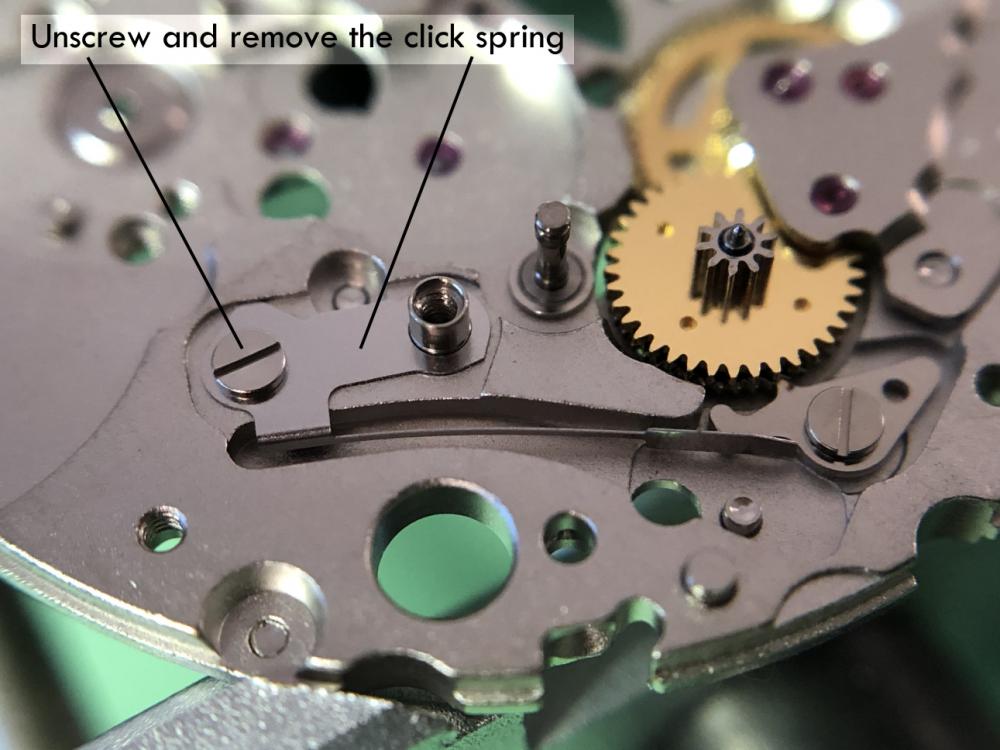
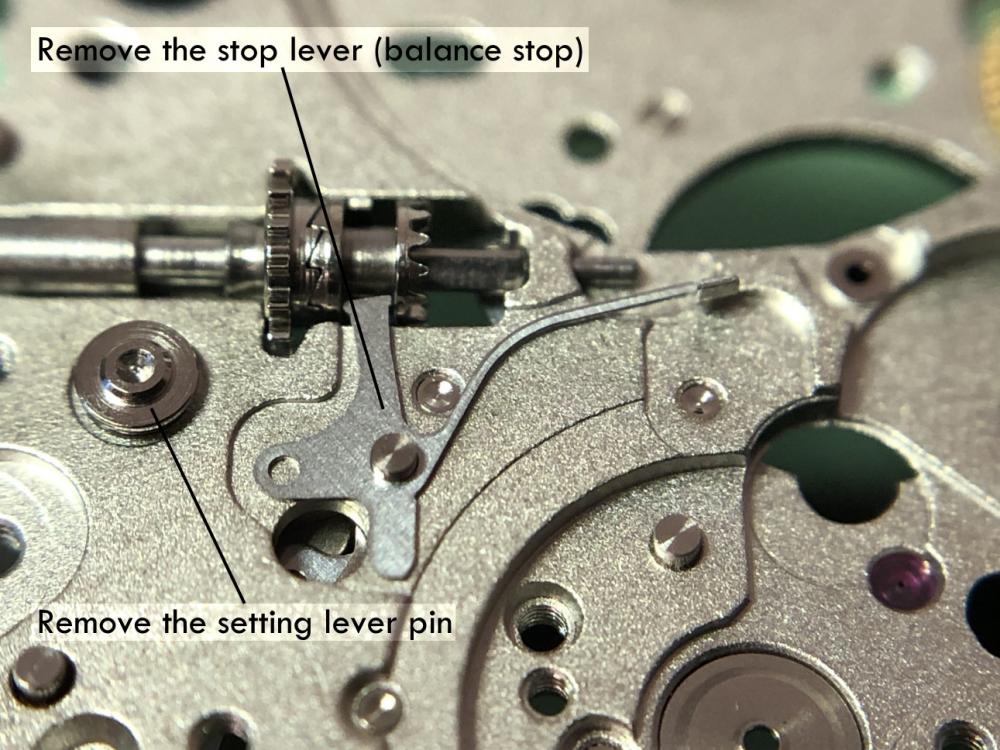
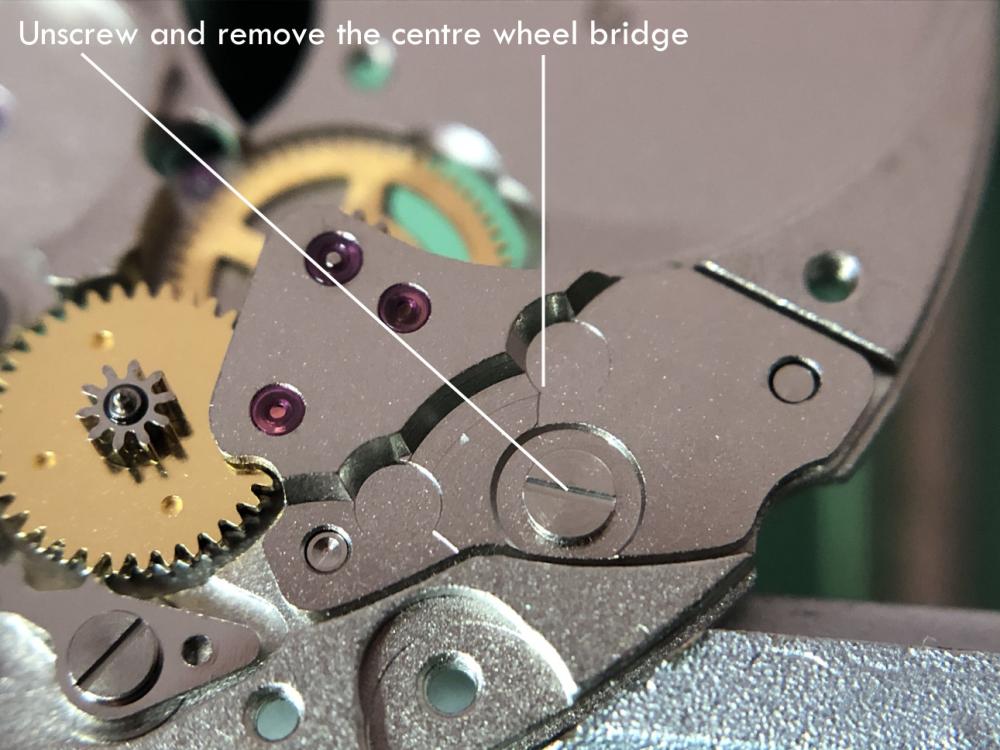
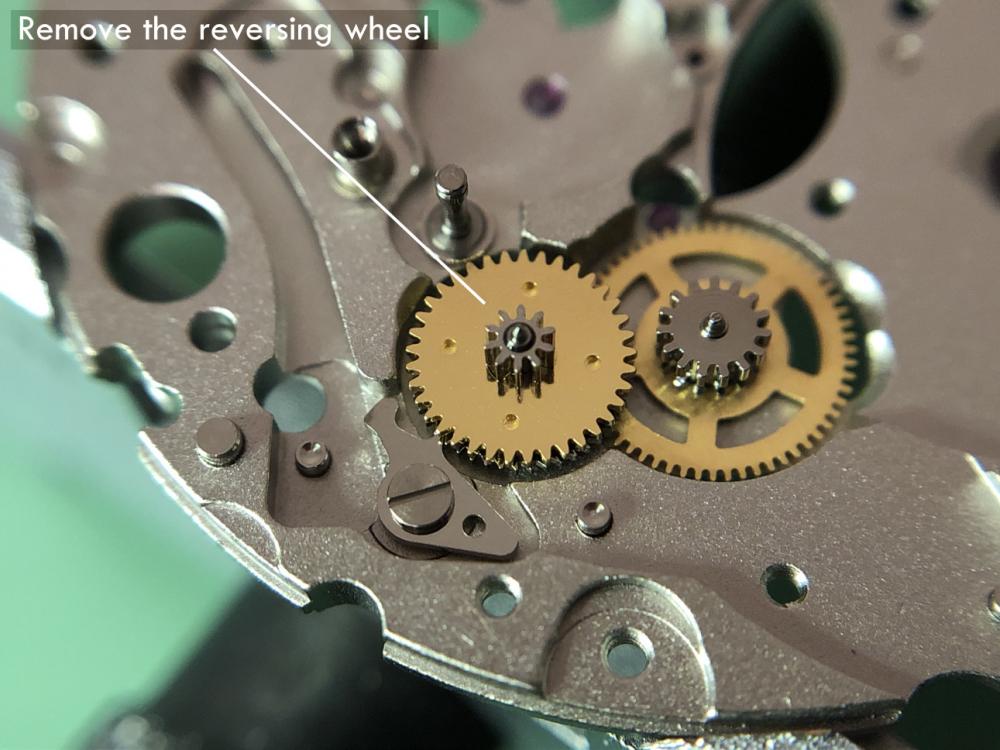
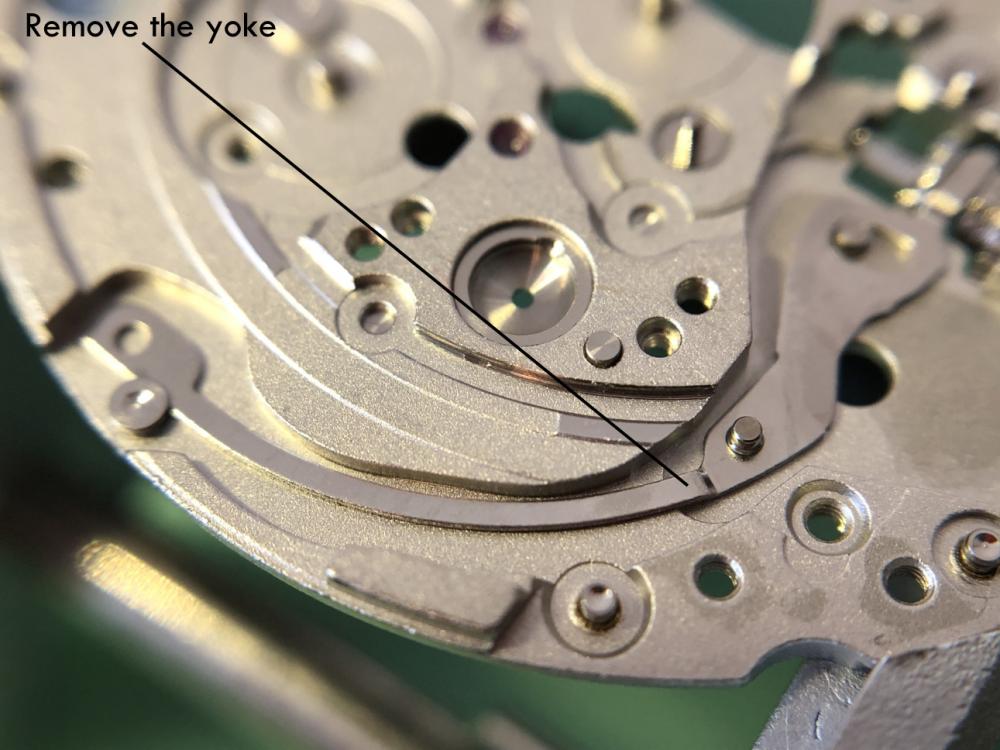
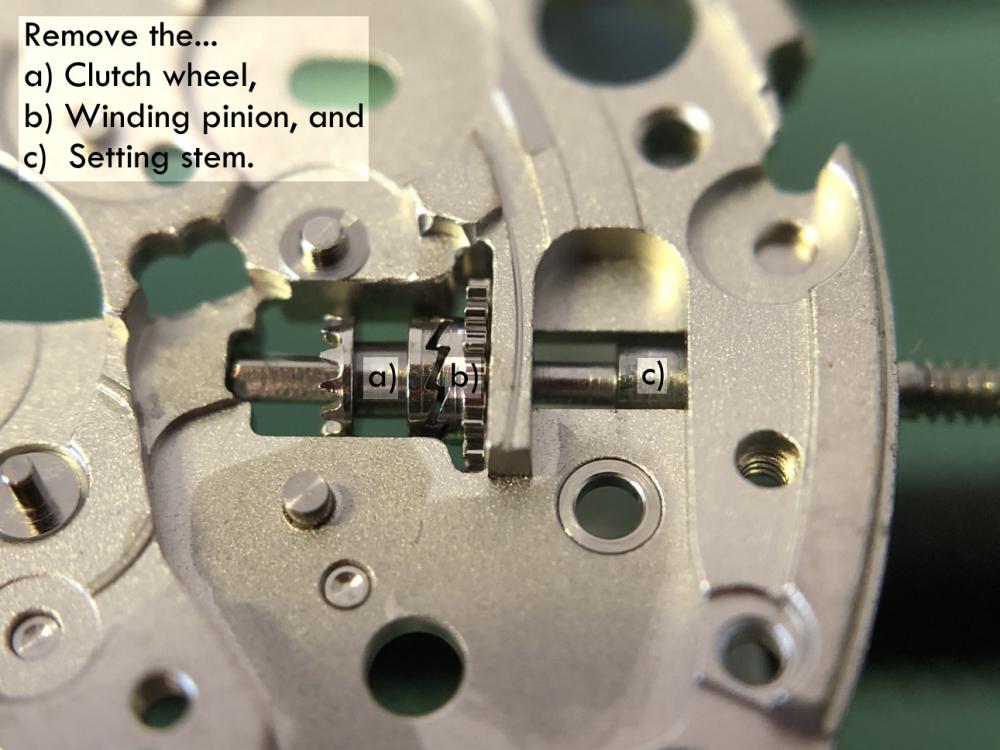
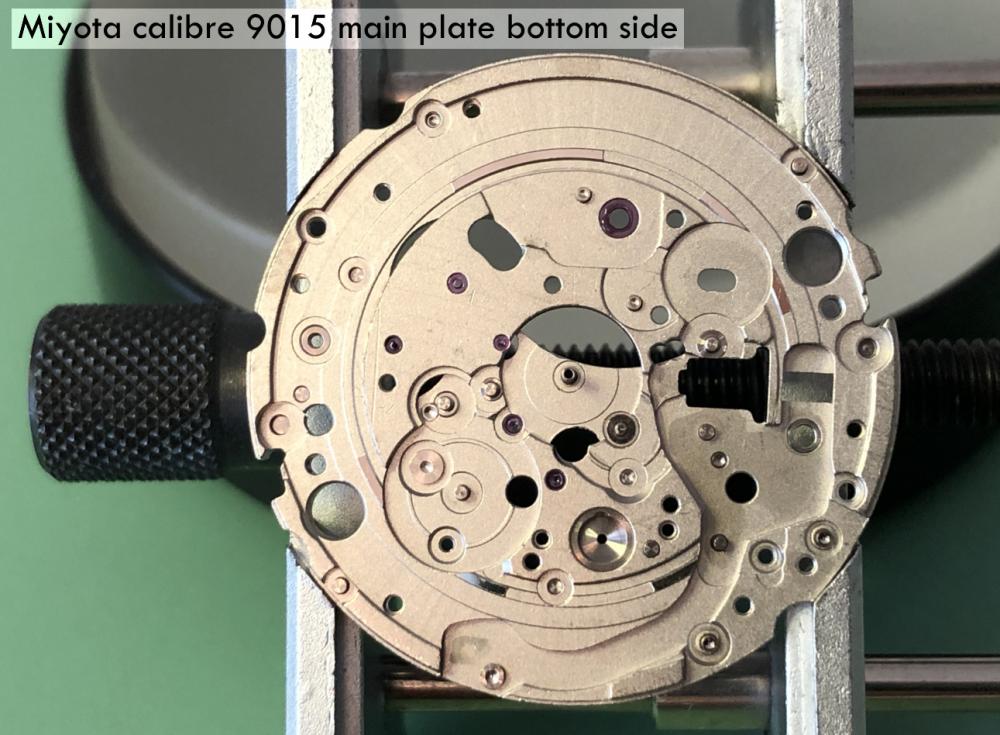
Miyota Calibre 9015 Assembly


 1 point
 -
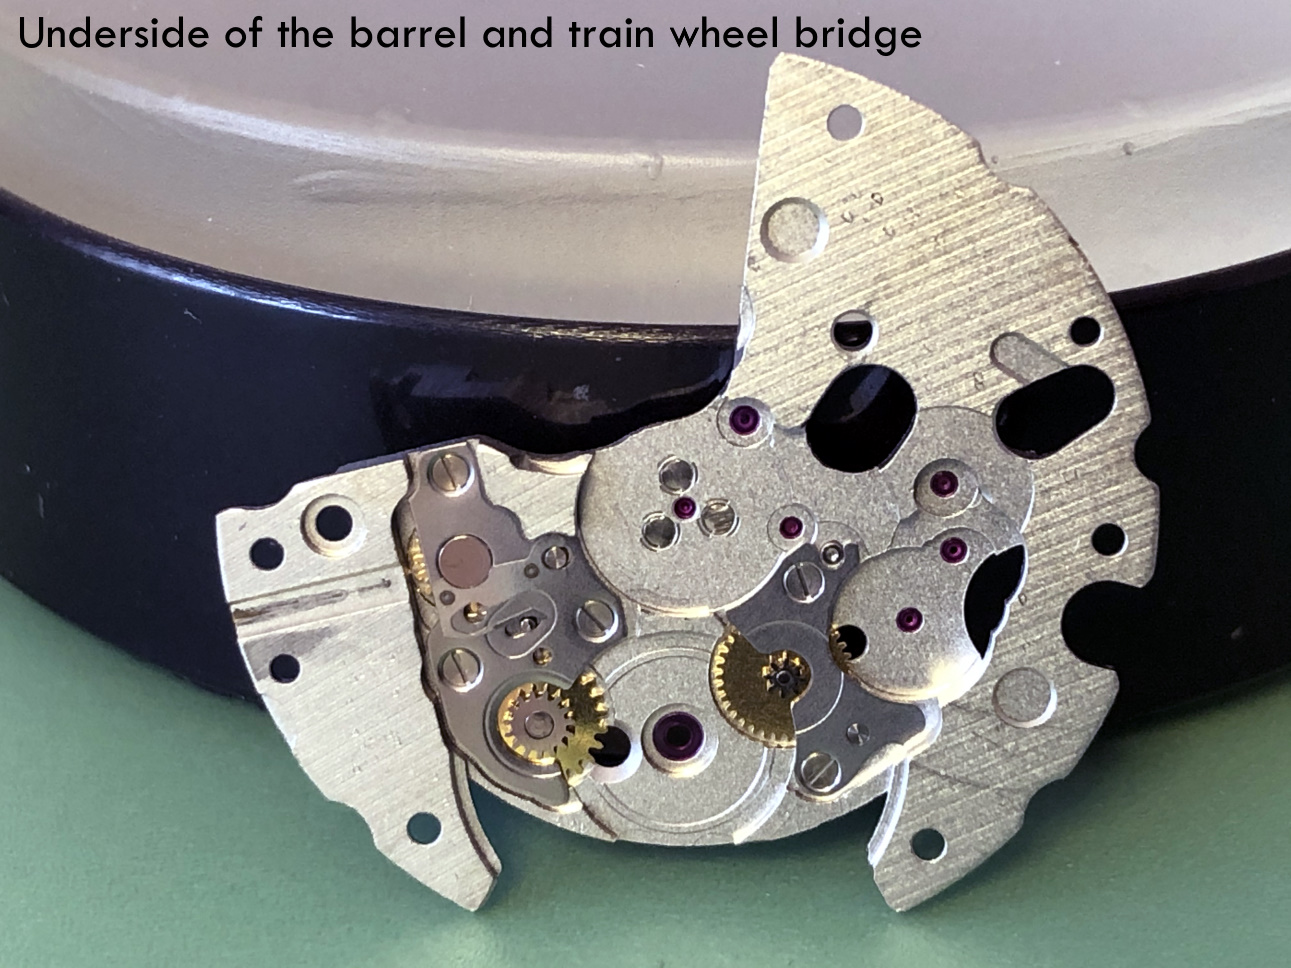
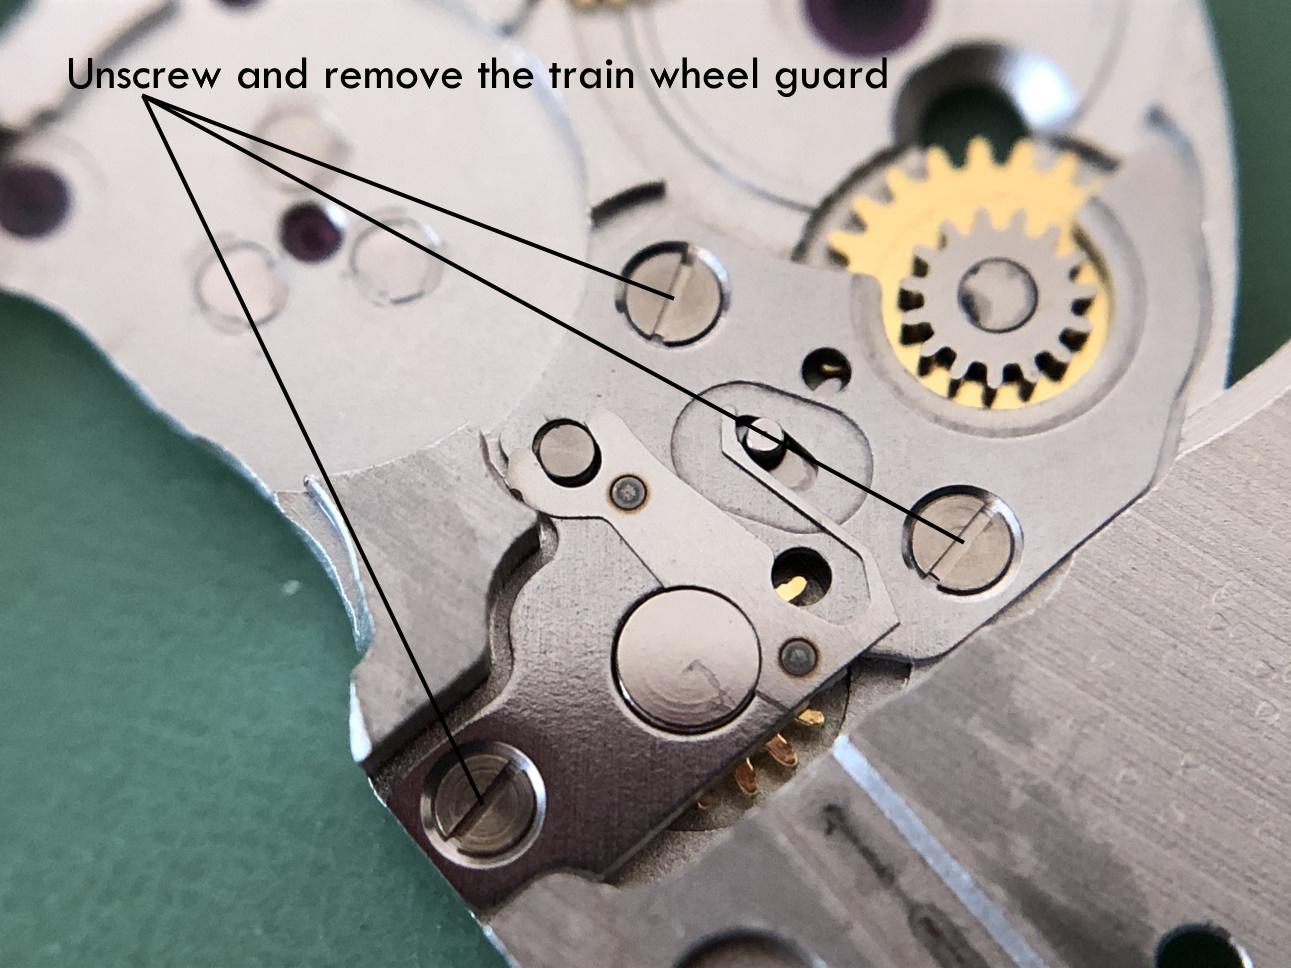
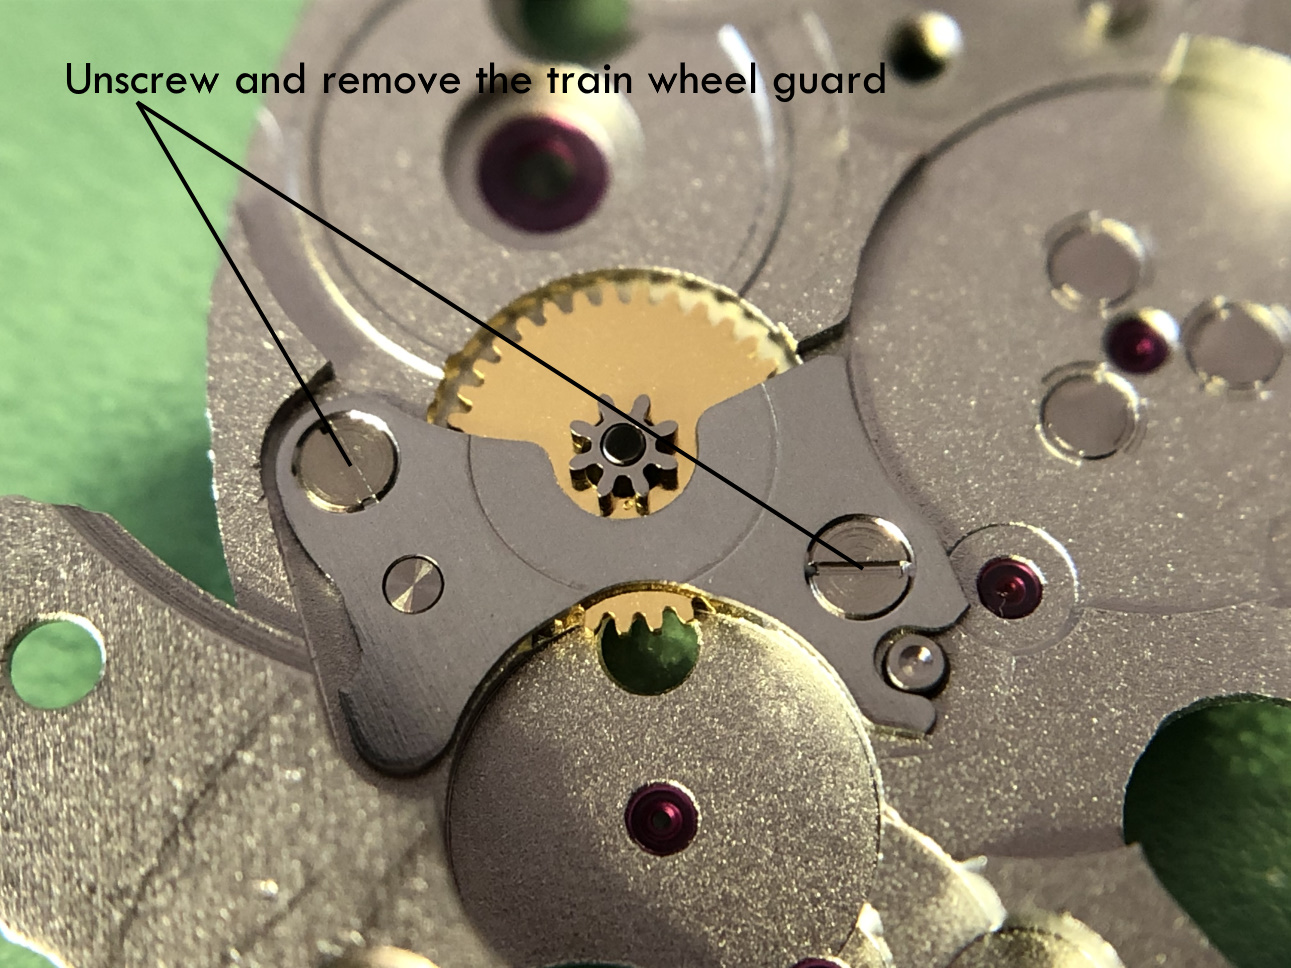
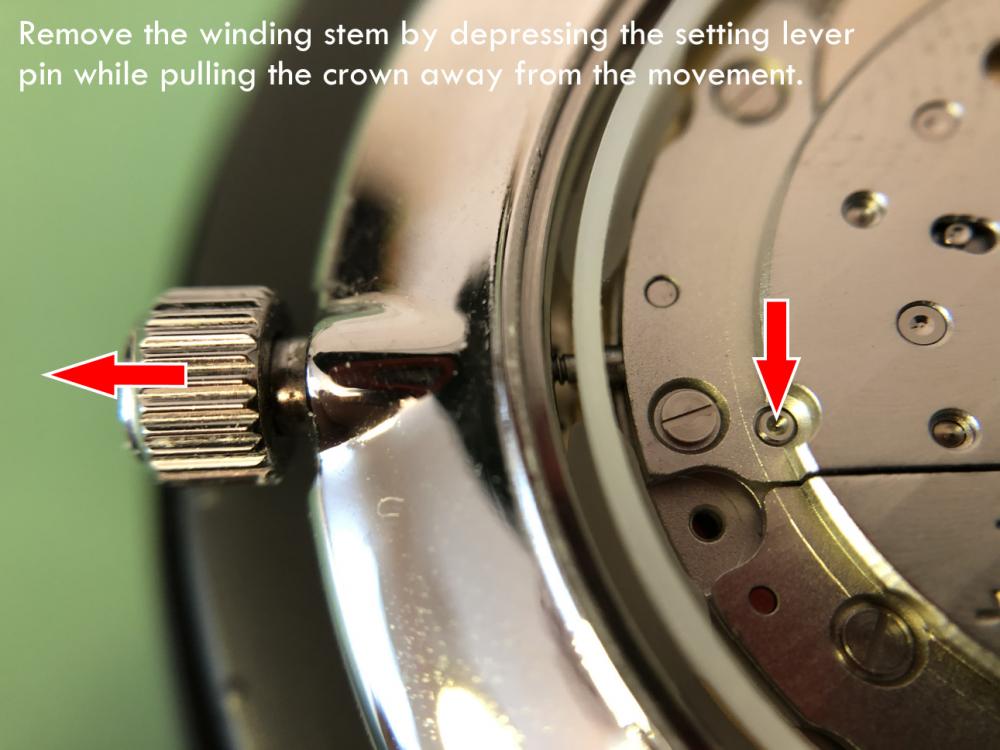
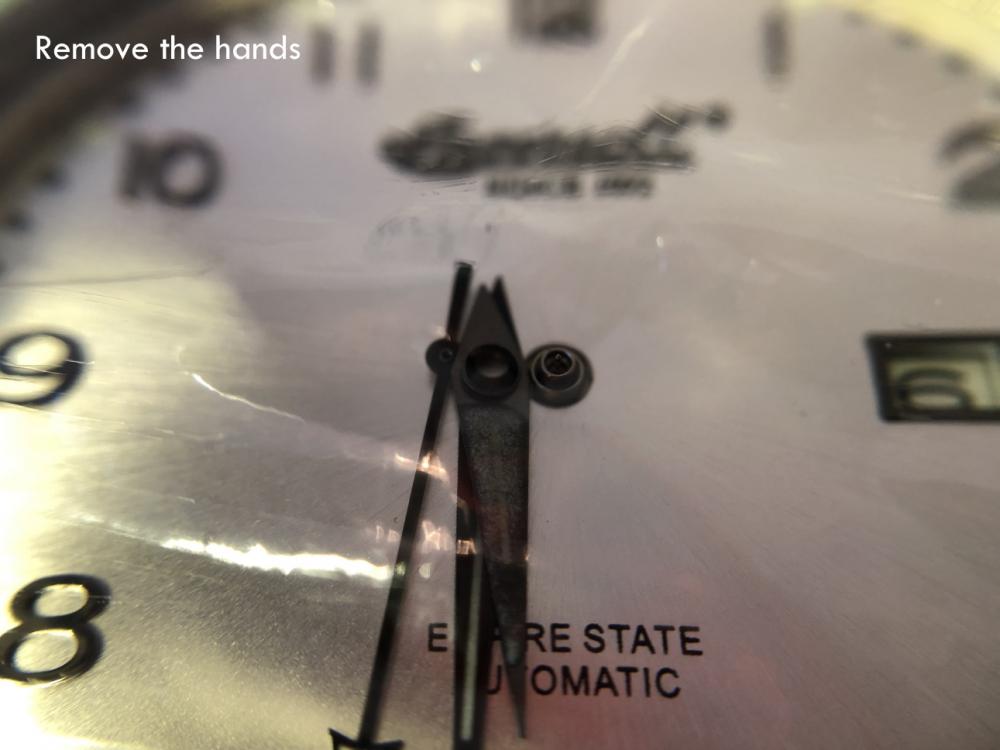
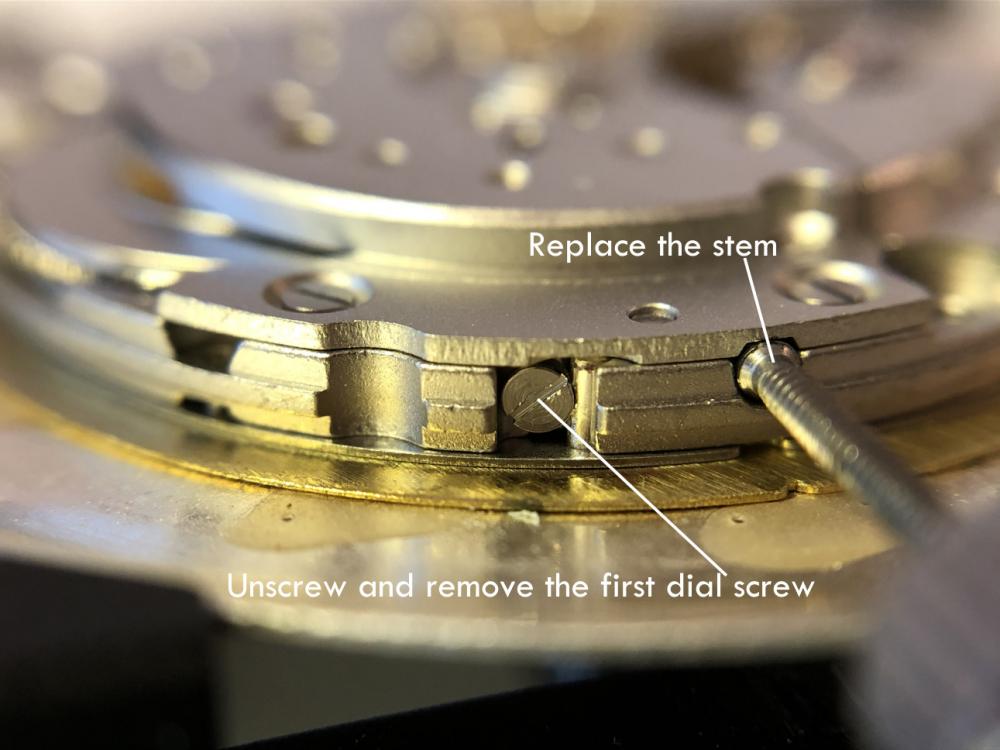
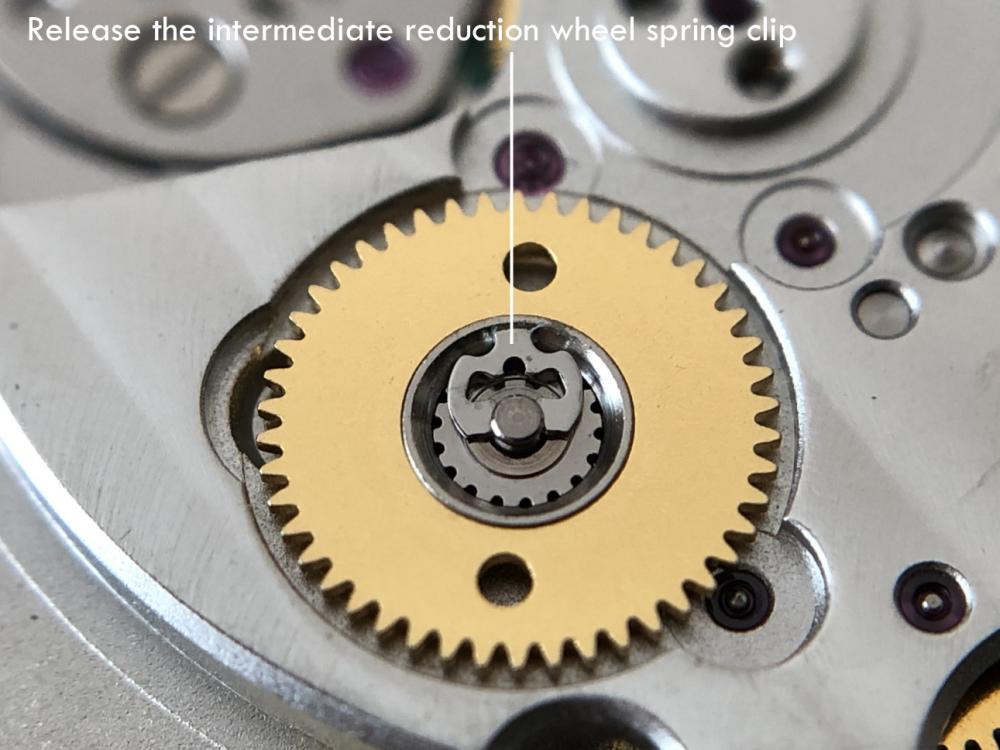
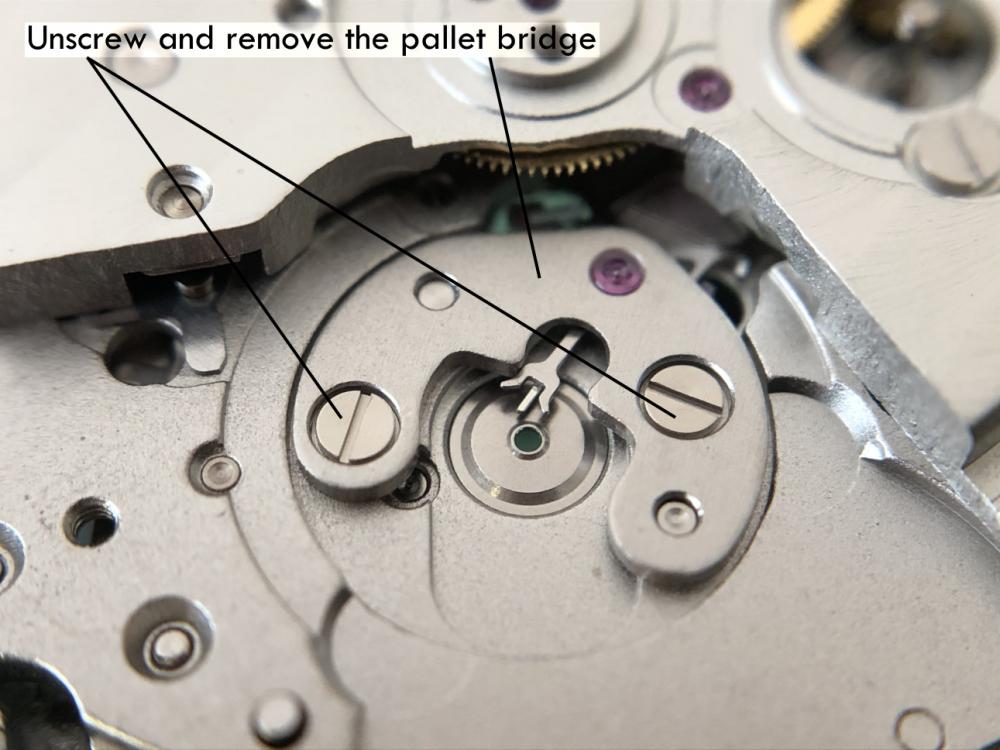
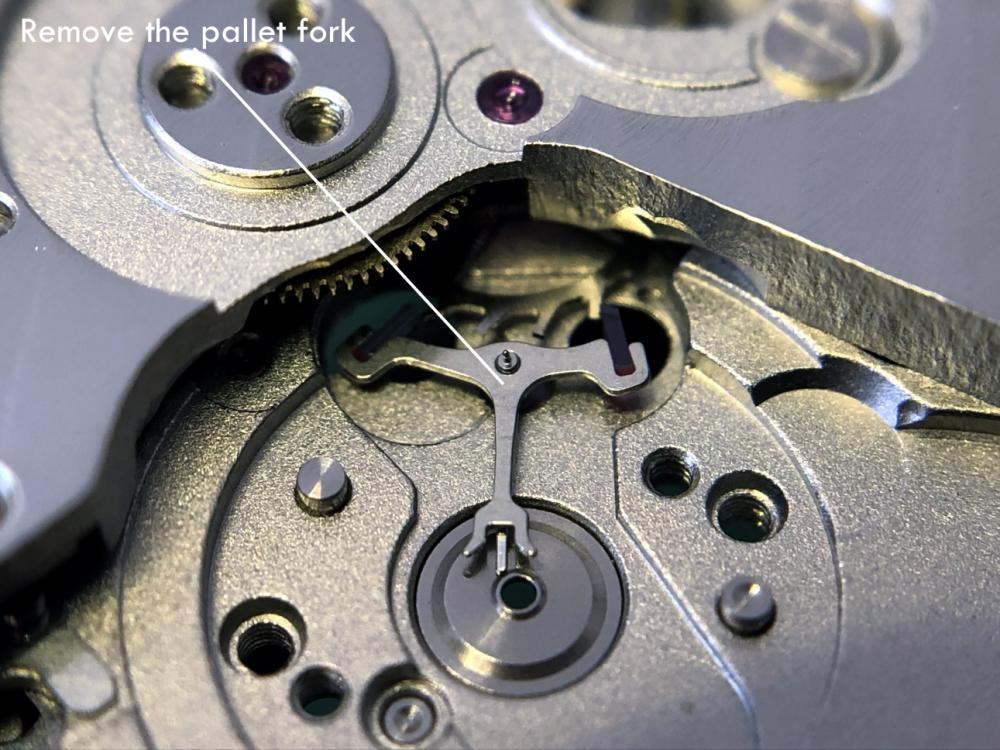
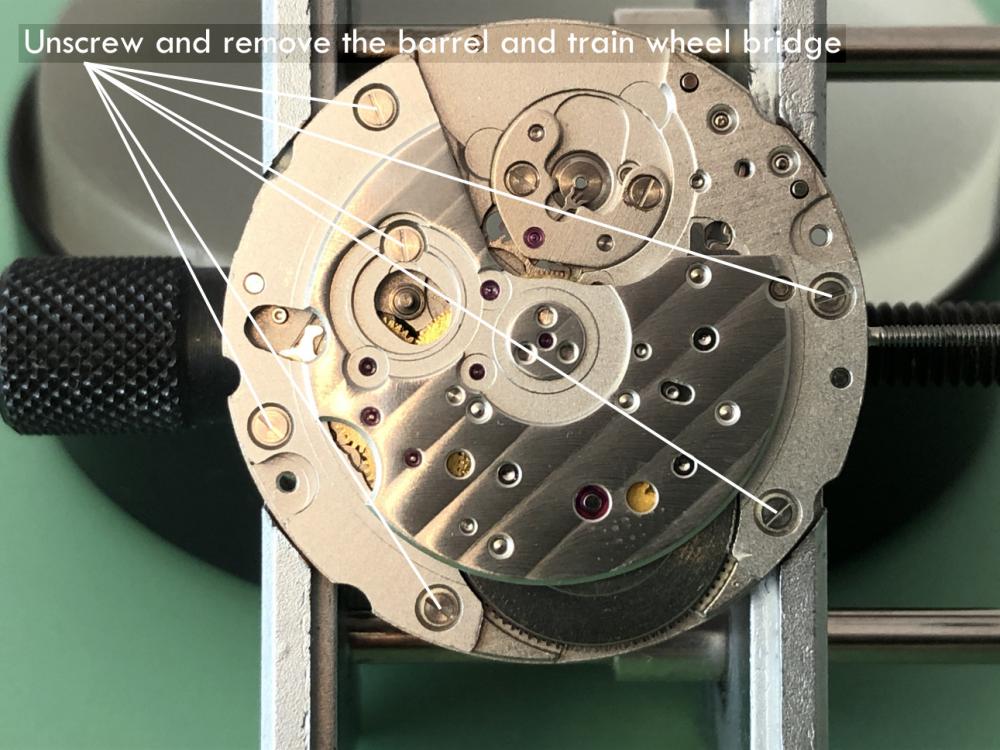
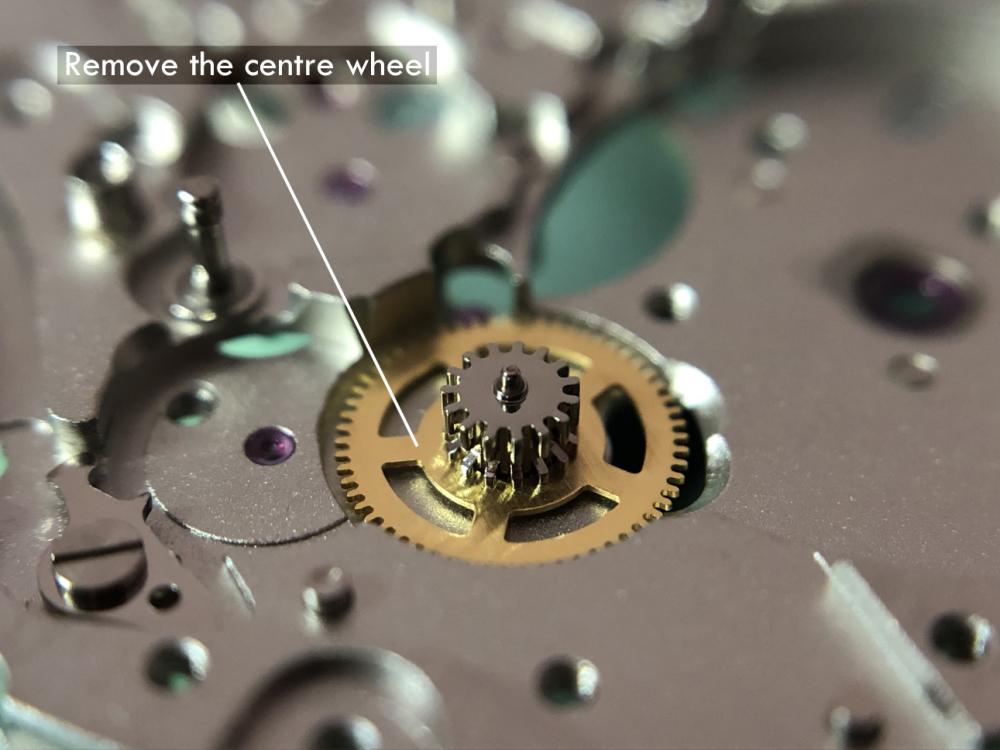
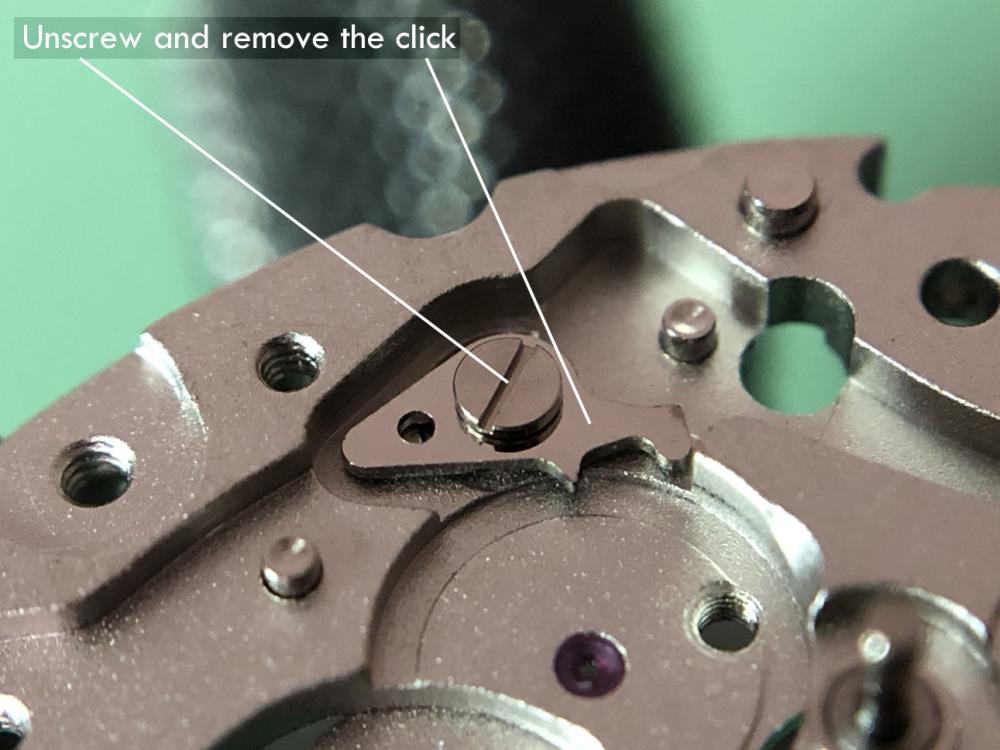
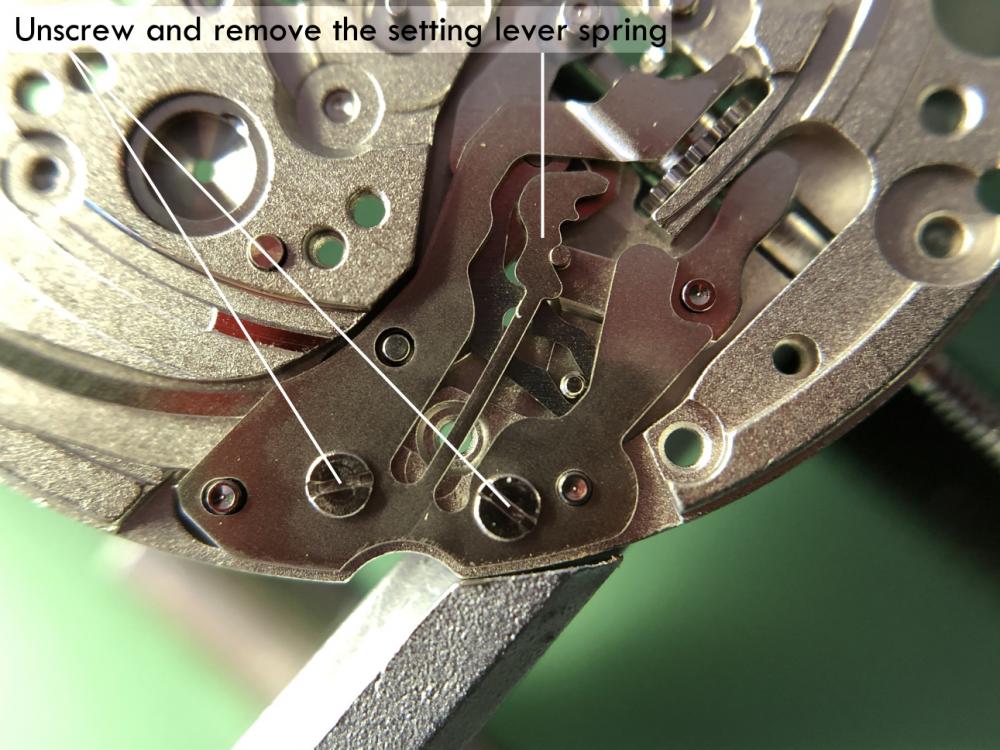
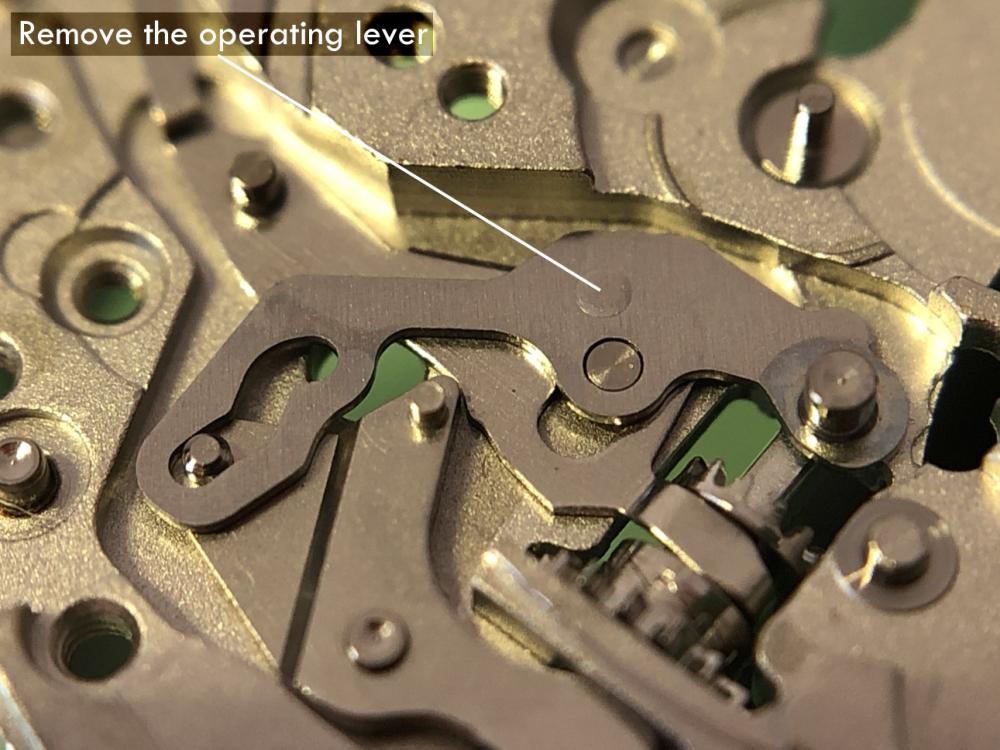
Miyota Calibre 9015 Disassembly


 1 point
 -
Here's a picture of my scope setup. The scope is correctly focused on the small part on the movement pad. There is plenty of room to get in with a screwdriver and see the screw and screwdriver without your hand blocking the view. Without the angle, there would be space (with the 0.5x barlow as is shown) for the screwdriver, but all you would see is a blurry out of focus closeup of your hand. With a 0.7x barlow, the scope is closer, and angling it and rotating the ring light out of the way gives just a bit more space in the that lens-stand gap. The part after the block where the dual boom ends pivots about a horizontal axis which is inline with the boom. One the single arm, you need to rotate the entire boom arm about this axis, which means you need to tighten the boom's knob that prevents rotation and sliding. I can slide the boom in/out on the bearings and rotate the boom about the stand without loosing anything since the head maintains it's orientation without needing to tighten those controls. Then after that control, there is another pivot where the horizontal block meets the short vertical tube. This pivots about an axis orthogonal to the first pivot described above. It is the primary means to angle the scope head forward as is done here. Through one needs both of these two pivots in tandem to both angle the scope forward and make both eyepieces level vertically at the same time, unless the boom is directly in line with the scope, and it's not, since off to the side of the work area is better. The single-arm stand does not have any pivot on this axis. The large block with the two big black knobs rotates about a mostly vertical axis. It also can move up and down to extend the focus range without needing to adjust the boom height. The large knob facing the camera is the focus. The scope head itself then rotates in the holder (to point it at you), held by the tiny silver knob. The small black knob on the head is the zoom. Both focus and zoom are on both sides.
 1 point


.thumb.jpeg.47a54c96c07cb7d64b695e5ff6c0bcf0.jpeg)