Leaderboard


Popular Content
Showing content with the highest reputation on 06/13/22 in all areas
-
My advice with shock springs is remember they are springs and will fly without control.. Always, always support when releasing. I see pros releasing springs on YouTube without support but trust me even they can get caught with a flyer. Replacing or even finding a replacement can be a nightmare.2 points
-
Yes, that is exactly what to do. But with rates as close as yours are already, it's a very minute adjustment, and the small change you are seeing between full and half wind could be from something else (still thinking the hairspring could be centered better). With the Etachron, when twisting the stud to close the gap, always do it so the inner pin comes closer to the stud (depends on caliber, and which way the hairspring comes out of the stud- on a 2824 you would turn the stud clockwise). I haven't figured out why it really matters, but they know what they're talking about. The Hamilton book is focused more on older high precision timekeepers, more along pocket watch size, with overcoils; as you've noticed there are fewer adjustment you can make with a flat hairpsring.2 points
-
I took a quick look at the 218 service manual as I thought it actually said that I don't see it. But I do know that they were specifically designed not to come apart. The notches are specifically for the cleaning fluid to get in. They have some other versions that have little spring is on top that look like their shock protected but the spring is only to hold the end stone in place and they Not were meant to come apart either. This is where if a service manual existed for the watch it would probably tell us don't take this apart because. But then we end up with a lot of watches that don't have service manuals and somehow you're supposed to know what you're supposed to be doing even if you do not. Basically stuff like this represents a problem for everybody.2 points
-
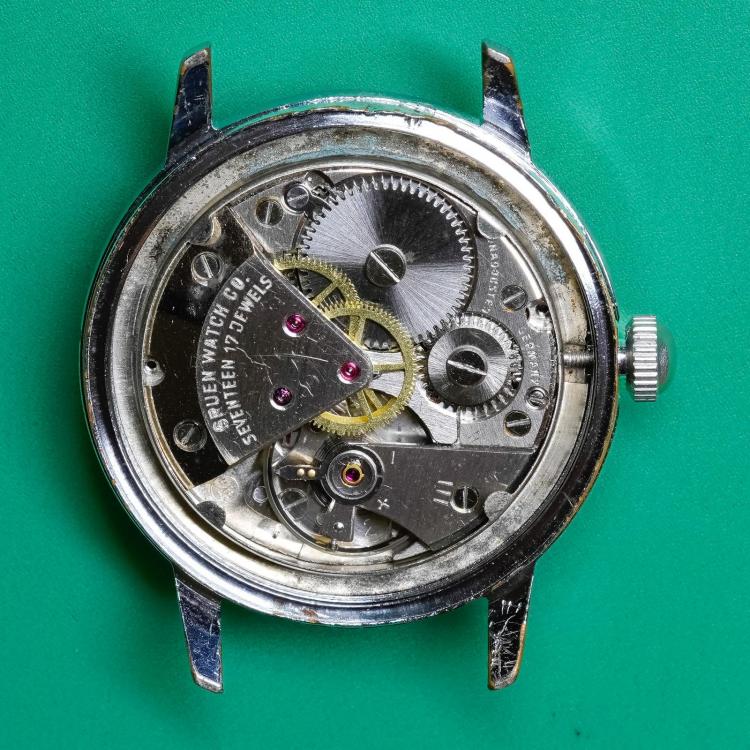
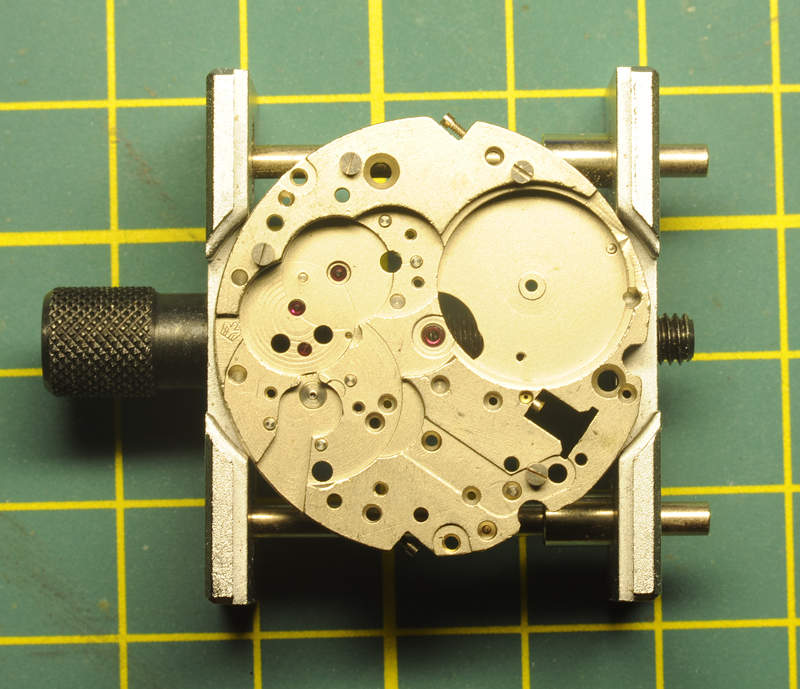
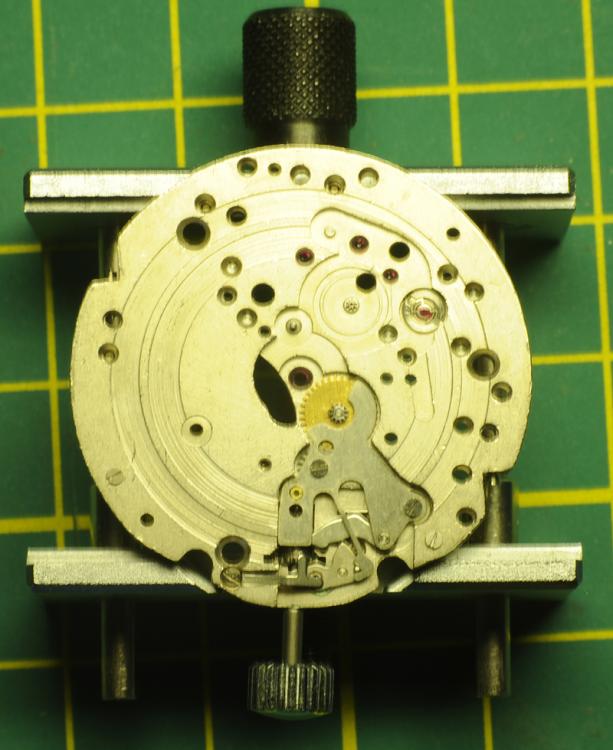
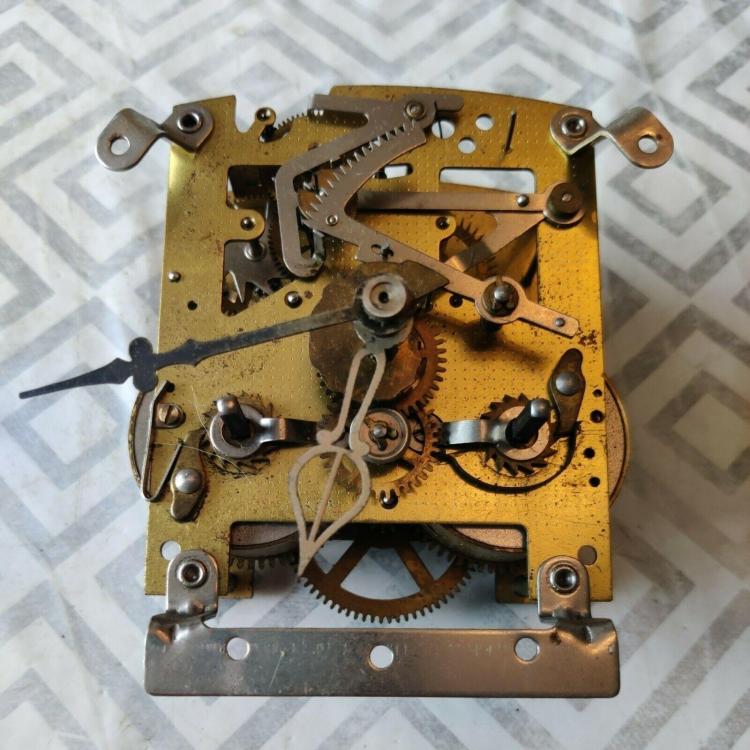
Got this nice little Gruen with a Hermann Becker 1161 movement. After servicing it's keeping good time. First time working on that style of shock spring but it was pretty straightforward.

 2 points
 -
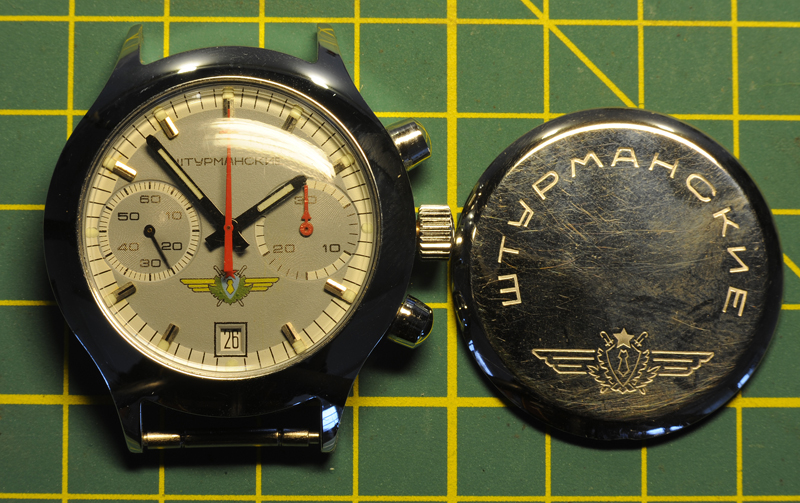
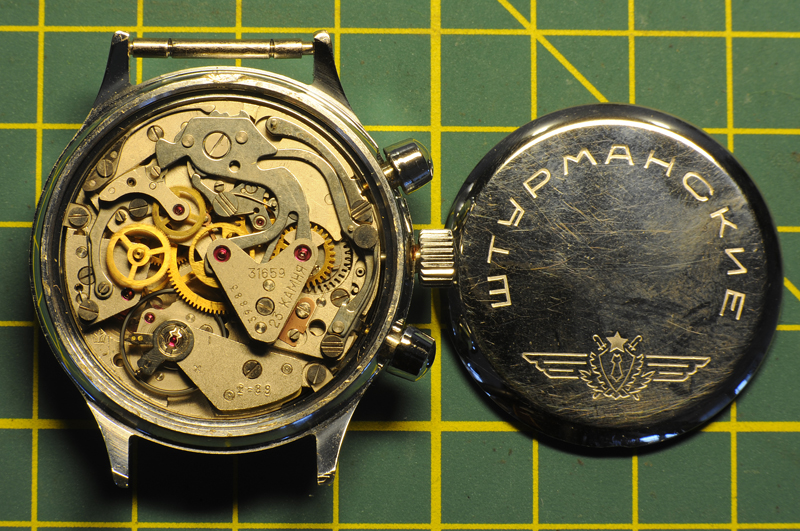
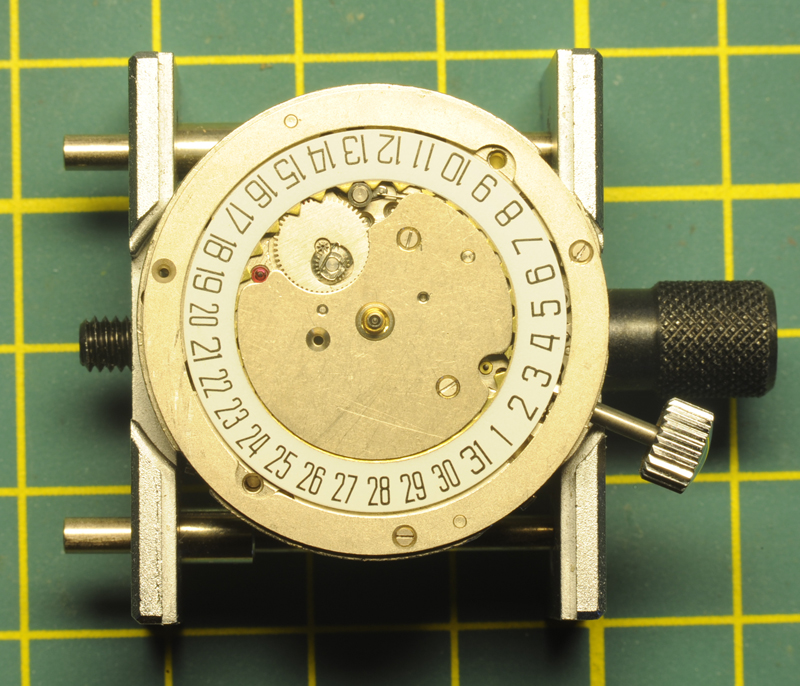
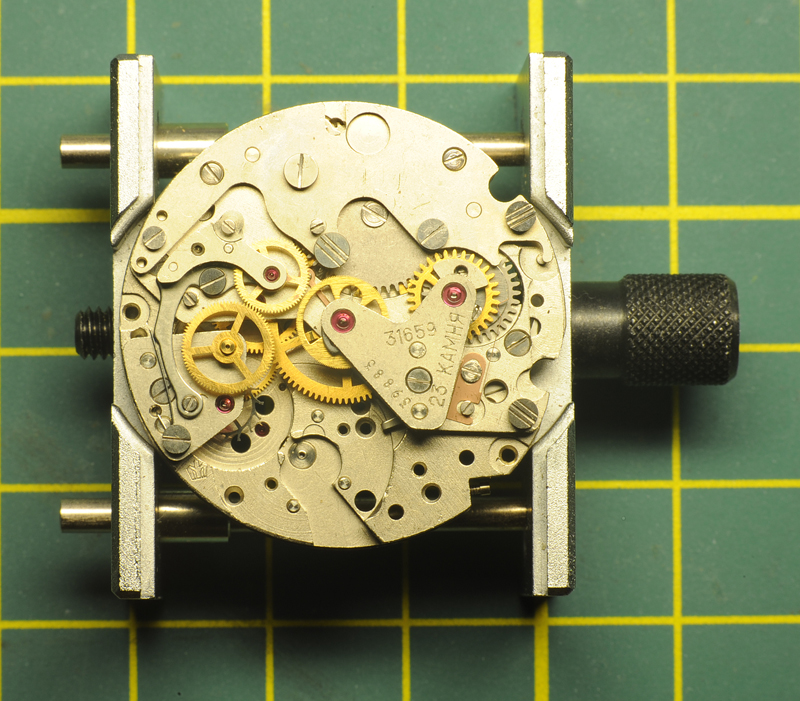
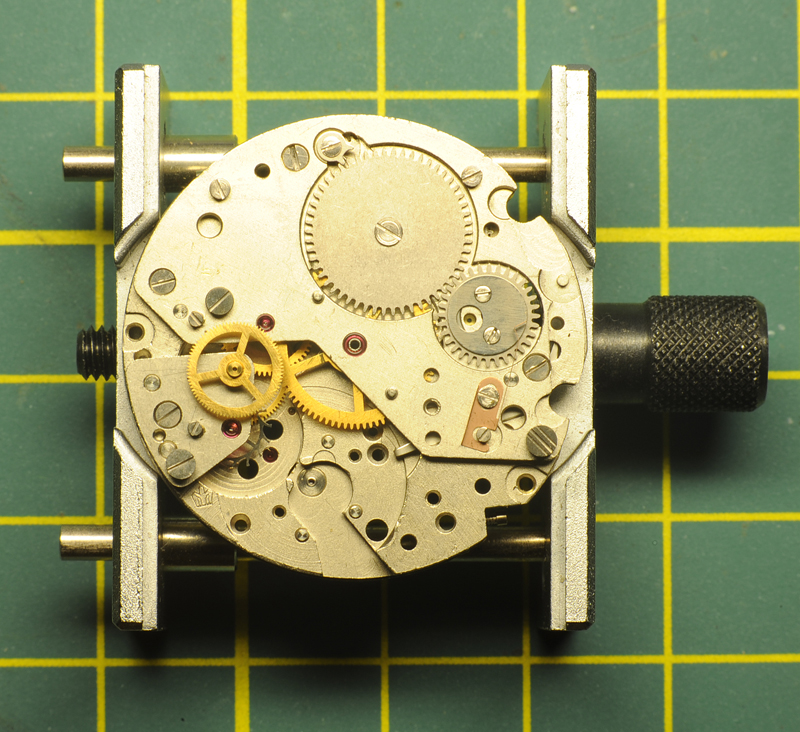
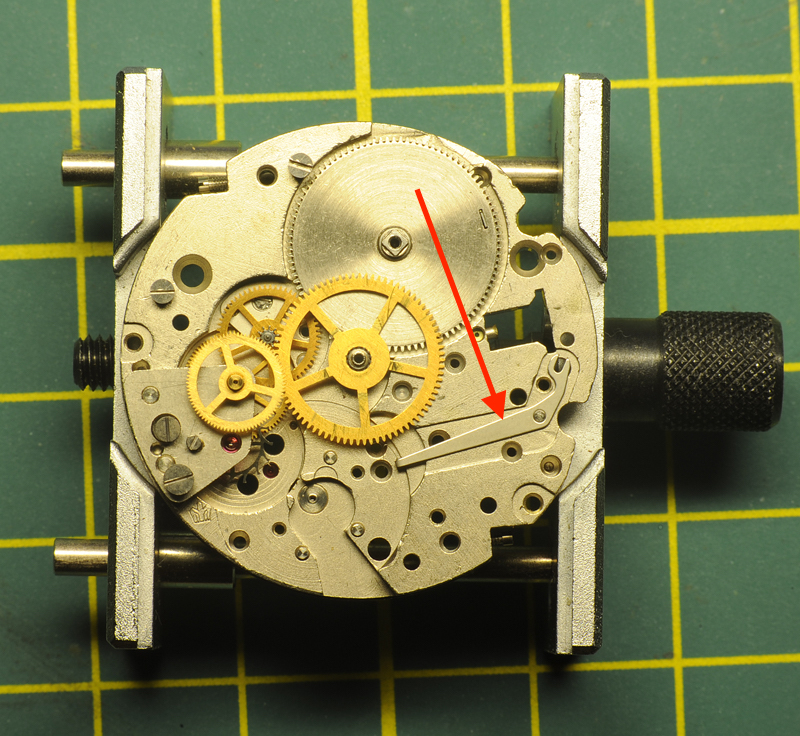
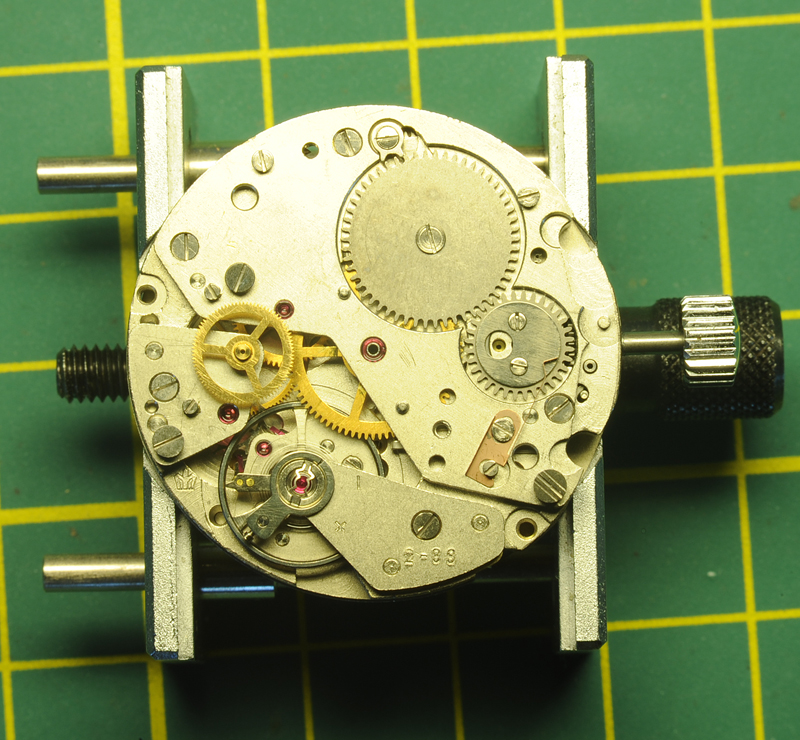
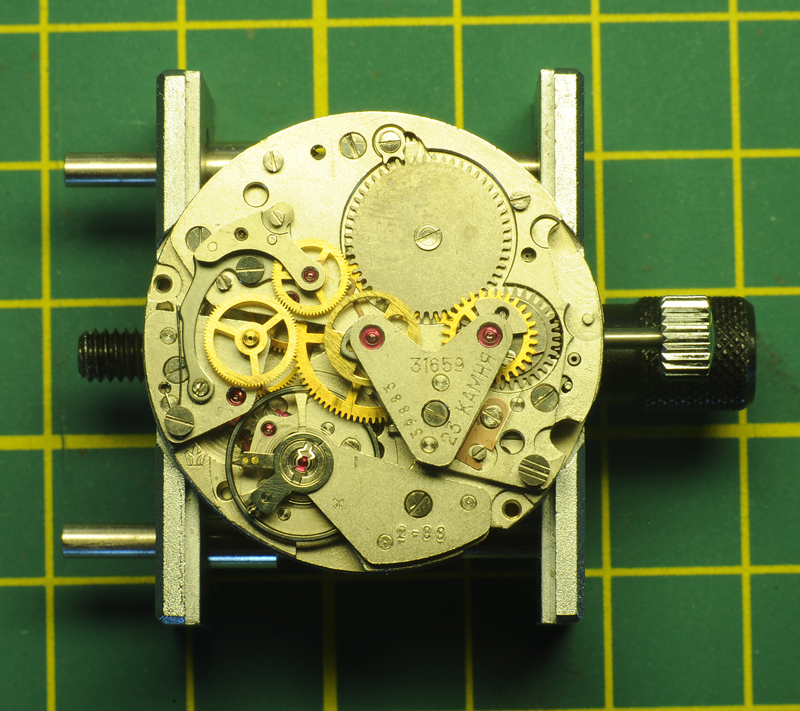
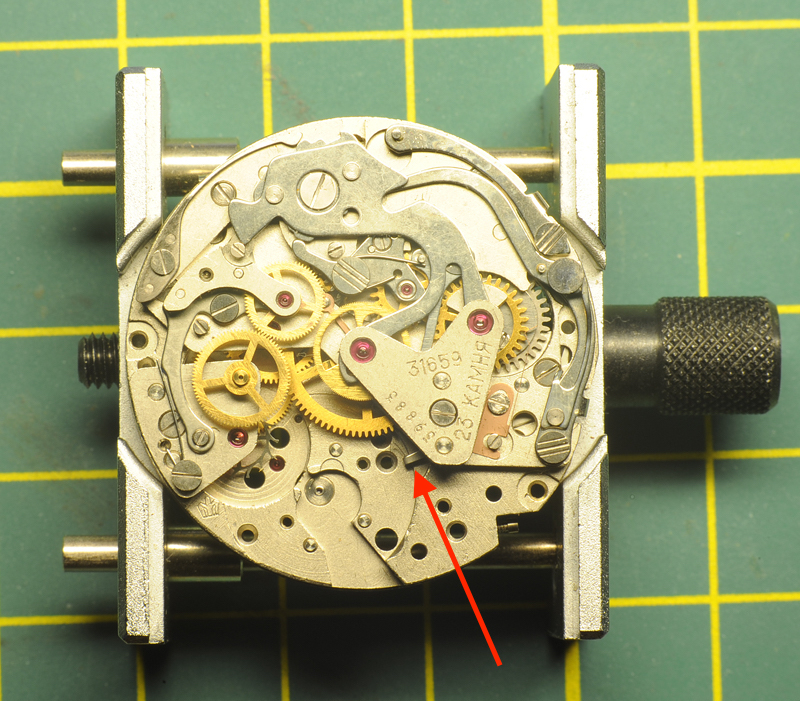
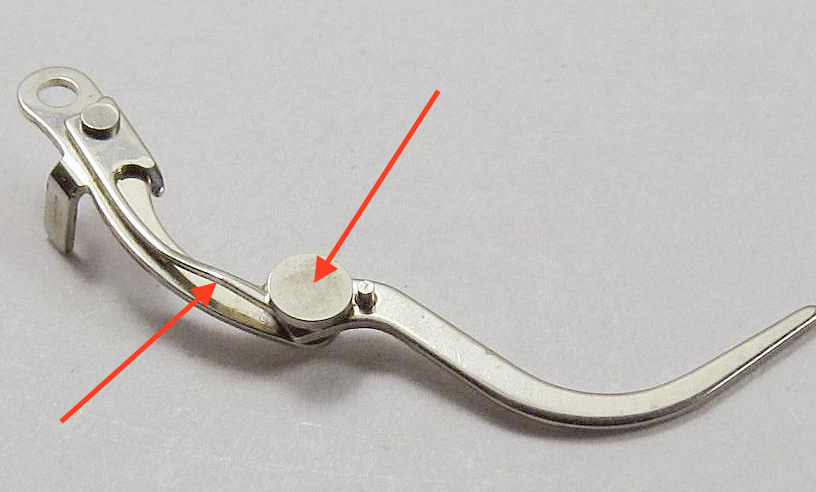
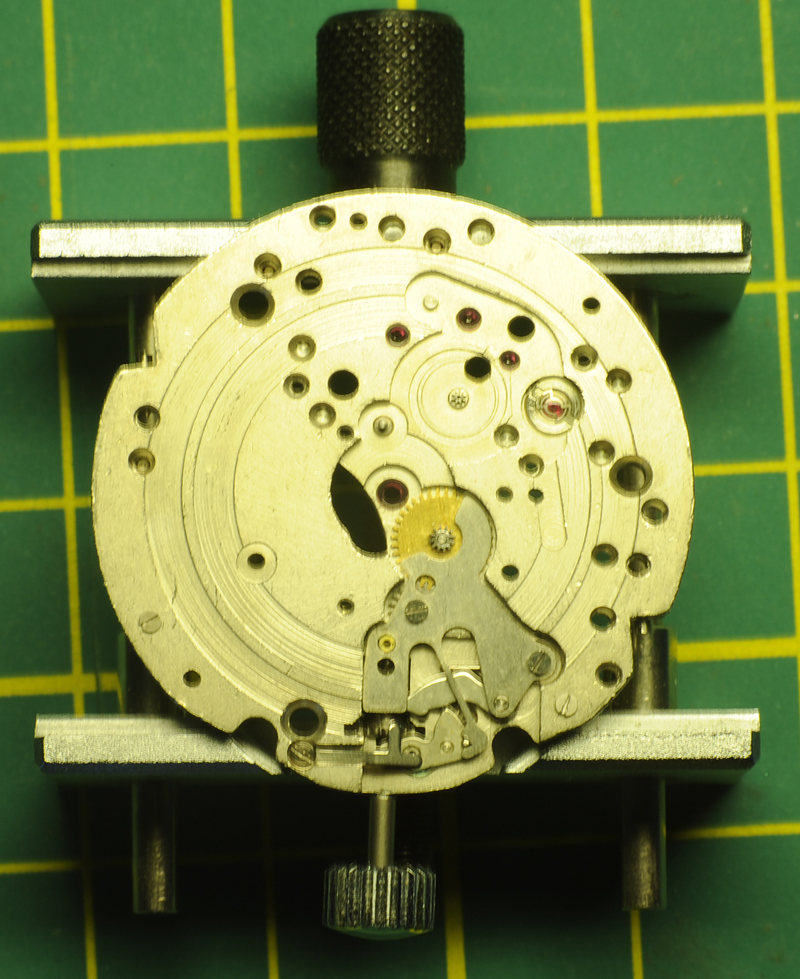
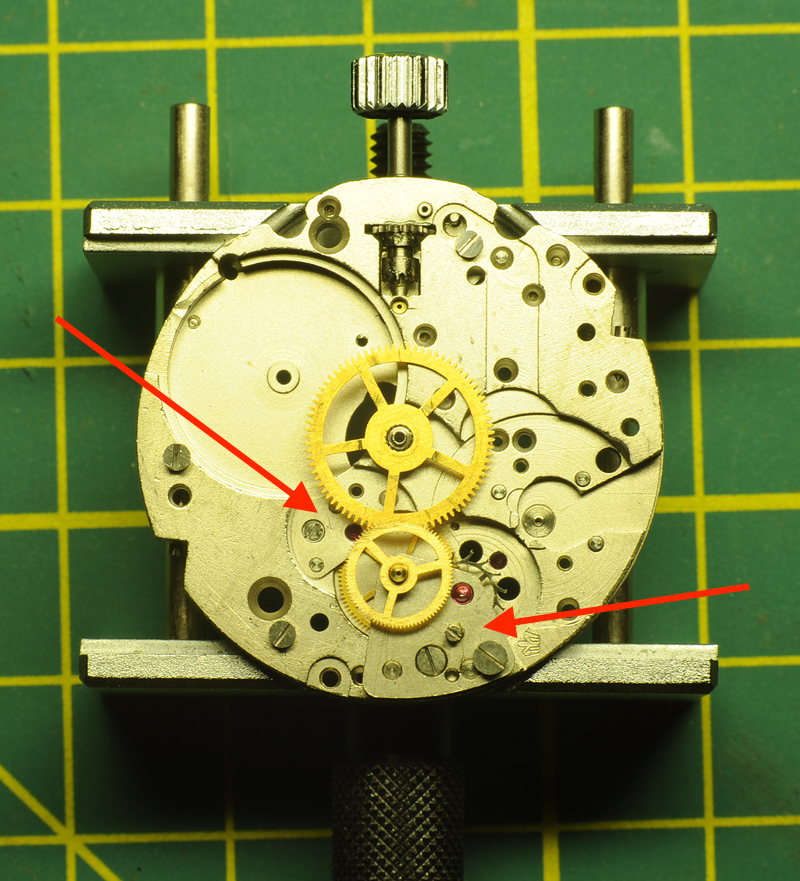
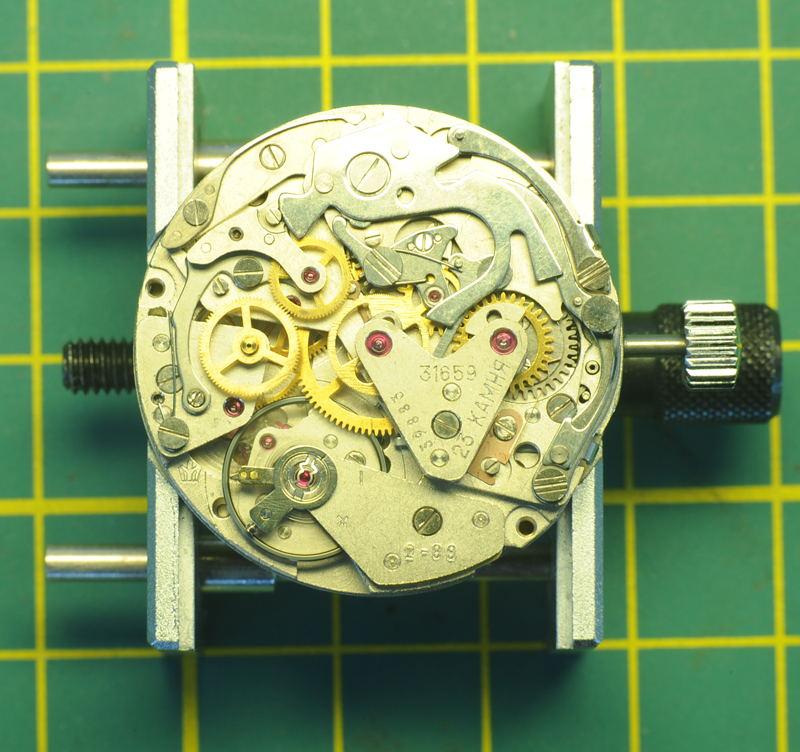
I bought from an ex. Poljot salesman, this undisturbed Shturmanskie "classic" with a Poljot 31659 movement. The Poljot 31659 movement is almost identical to the Poljot 3133 movement, but it has an additional balance-hack. The watch has never been used, never been worn, just sitting in a drawer waiting to see, after all those years, daylight again. Before it gets wrist-time, a service was overdue. The "pop-off" the back-lid was anything but "pop-off". The provided slot was of not much use and I ended up driving carefully a scalpel-knife in between the lid and the housing seam; slowly creating a gap big enough to insert a blunt knife. Even then, it took a huge force to get the lid to "pop-off". Needless to say, the nice, nearly virgin lid has now its first unavoidable marks. The light surface scratches on the lid are very minor, but appear more severe on the picture due to the light reflection. The Plexiglass crystal is scratch free, but has some minor aging-cracks. The inside reveals an undisturbed 31659 movement, with 2-88 stamped in the chronograph bridge. February 1988, that's to date exactly 29 years. I took the movement out, removed the hands and dial. This time the small seconds- and minute recording-hands came off unharmed. However I wasn't that lucky with the big chronograph seconds recording hand. It was so tight, that even with great care, in the end the hand stripped off its pipe-bushing With the hands and dial out of the way, I managed to get the pipe bushing of the pinion without any further damage. As you can see on the picture, The outer ring has one screw missing, so has the calendar center plate ....... I guess the factory worker in 1988 didn't feel like it that day!? Can we still find out ? Stripped the calendar works; Stripped the keyless works, flipped movement over and removed balance assembly and pallet fork. One can just see the hack appearing from underneath the barrel bridge; see arrow; Time to disassemble the chronograph components. Even though for a 31659 one has to deviate from the guide slightly during assembly, I can highly recommend this service guide made by WUS member SLLS on June 2015. Click on the link below to download. Thank you very much SLLS for you excellent and clear servicing guide Service Guide Poljot movement 3133.pdf Remember to re-insert all the screws in their respective holes after removing the component. A bit more work, but it makes life during re-assembling so much easier !! See service guide for part-numbers, additional pictures and guidance. First the Hammer (8220) followed by the hammer-cam-jumper (8356). Before removing the operating lever (8140), I lifted the spring on top of the rivet. This prevents the lever from popping out after the LH-screw is undone, but also makes the installment much easier. Obviously, the spring has to be put back after re-installation. Removal of the operating and fly-back lever-spring (8335), fly-back lever (8180), blocking lever (8200), Blocking lever spring (8335) and sliding gear (8100). Left is the chronograph plate (8281) with all screws inserted in their respective holes. Next the chronograph plate (8281), the Chronograph bridge (8500), the seconds recording wheel (8000), the friction-spring (8290) and the minute recording wheel (8020). According to the guide, the very delicate minute recording jumper (8270) is removed, but I left it in place. If you also leave it, be very aware during subsequent handling of the barrel-bridge !! Next is the coupling clutch spring (8320) and the coupling clutch (8080). This has stripped most of the chronograph components, apart from the chronograph drive wheel (or wheel over 4th wheel if you like); Next is the ratchet wheel (415) and the barrel-bridge (105). Now the hack-lever can be seen. The little spring at the end is very delicate ..... Next is the 3th wheel (210) which has to be carefully manipulated from underneath the center-wheel. This reveals a plate (no number) for the 3th wheel which has to be removed. Instead of pulling the chronograph drive wheel (wheel over 4th wheel), to reduce risk I removed the whole assembly; the train wheel bridge (110), 4th wheel (225) and driving wheel (8060). Be aware of the long pivot on the 4th wheel ! As soon as the train wheel bridge is undone, the escape wheel (705) comes free. Spring barrel, cannon-pinion and center wheel as last. Left is the bare main-plate. The main-spring seemed in a good shape; Time to clean all the parts and lubricate the balance cap-stone in the main-plate. I use Rodeco as a support. Once to small droplet of oil is on the cap-stone, I turn the Rodeco top-down and insert the cap-stone in the chaton. Works very well for me As far as I can see, next to an additional recess in the main-plate, the only difference between the 31659 and the 3133 are these two components. The setting lever has an additional post and the additional hacking-lever. To the left of the hacking-lever the tiny spring which pushes against the balance wheel when engaged. Next up the servicing of the barrel-bridge with click (425) & click-spring (430) and crown-wheel (420). The little screws holding the crown wheel core (423) are known for shearing off, so be careful if you decide to proceed with this step ... Now I had to deviate from the guide. Due to the fact that the hacking lever engages onto the additional setting lever post, I installed the keyless works first; Flipped the main-plate over and installed the center wheel, the complete 4th wheel assembly with escape wheel and 3rd wheel plate (left arrow). Before installing the 3rd wheel, it is now to lubricate the jewel of the 3rd wheel; Install 3rd wheel, barrel and hacking-lever; Make sure the hacking lever is engaged onto the additional setting lever post; Install barrel bridge, make sure 3rd wheel finds its jewel and ensure all the gears are running smoothly before tightening the screws. Lubricated pivot jewels and pallet stones. Install pallet fork & bridge, check correct working and install ratchet wheel. Thereafter I did the calendar works and check functionality. Now a little lesson I've learned: I left the keyless works in the time-setting mode. Later I couldn't get the balance wheel to seat properly ?? So, if you later, during assembling of the balance assembly, wonder why you can't get the balance wheel to seat, better is the retract the hacking lever by setting the keyless works in the winding position. That does help ! After some scratching my head (see above), the balance wheel was back in and the movement came alive Lubricated the balance-bridge cap-stone. No parts reference number mentioned for re-assembling; Replaced the coupling clutch, the coupling clutch spring, minute recording wheel, friction spring, seconds recording wheel and chronograph bridge; Re-installed the chronograph plate, sliding gear, blocking lever spring, blocking lever, fly-back lever, fly-back lever spring, operating lever (remember to put the spring on top of the lever back under the rivet after replacement !), hammer and hammer cam jumper ....... Tested and all chronograph functions are working fine. The initial amplitude is a bit low, around 270 degrees dial down (?), but I'll let it run for a while to see if that improves ..... I managed to get the chronograph seconds-recording-hand back on its pipe-bushing, but time will tell if that holds. Also closing the watch case will require a hand-press ...... not a simple "pop-on" ........ this phenomena has been reported by more people .... Hope that this Poljot 31659 movement walk-through is of any use? ....... else it will be a nice reference for myself That was enough adrenaline again Regards: Roland.


 1 point
 -
Haha sorry G. We accidentally gatecrashed your post. My bad . Hope the missus enjoys her restaurant evening1 point
-
I think you have to determine what your own personal goals are. Like you, I don't see myself EVER getting a professional cleaning machine. I'm also not likely going to worry about ever getting any movement that I take apart back to chronometer standards. I'm also not likely to ever work on a watch that belongs to anyone other than me or (at least) charge anyone to service a watch (most wristwatches are quartz anyway and I don't expect to go there). You just need to be aware of what IPA can do to shellac if your components stay in it too long. My problem seems to be letting the parts go through a 20 minute US cycle in IPA without thinking that I had tossed in the pallet and balance.1 point
-
Hi I think it all depends on the required useage, If you are doing a handfull of watches a week The ultrasonic is ideal. There has been many discussions on what fluids to use from members, some using their own recipe. As stated By Paul80 he uses Elma red with the Ipa rinse and it does what he wants and is happy with the results others advocate Naptha, Benzine, Lighter fuel so its a case of trying out various fluids, comercial or otherwise to acheive the results you personaly are happy with. Its a whole can of worms.1 point
-
I‘ve got a Chinese dial gauge for my engine work. In my understanding the gearset of these devices guarantees a correct reading as long as the gear ratios are calculated and machined correctly (which is easy enough). The difference between high and low priced devices should be the play and the friction in the train of wheels. While the play is made zero by spring loading a higher friction has to be compensated by a stronger spring. So the main difference between cheap and pricy is most likely the force which is applied to the object being measured.1 point
-
There are a lot of professionals who only use ultrasonic cleaners, the ol rotary cleaners you see used by some do not clean any better than U/S. I use a dedicated cleaner by Elma then two rinses in IPA, never had any issues with what I use. The cleaner I use is Elma Red so needs to be mixed with distilled water hence the two ipa rinses to get rid of all traces of water from the cleaner. There are quite a few options available as the cleaner some commercial and some diy. Simple mineral spirits or lighter fluid an be used at a push.1 point
-
Nice watches, oldhippy will be able to tell you about the clocks.1 point
-
welcome and yes would be nice to see some photos of the case and the movement please good luck.1 point
-
Hello and welcome from West Yorkshire.1 point
-
Thank you for your introduction and welcome to this friendly forum. We all look forward to your contributions and continued involvement. What clocks do you have? Post some photos I'd love to see them.1 point
-
I would take the movement out of its case. Wind it up, put the minute hand on and move the hand from the center (not the end as you could bend it) around and watch the action, make sure none of the hammers lift on the warning action. Try putting the clock into silent take the hand around a few times then switch the silent off and watch as it puts its self right and see it it games up. As you say your is a Smiths, even the action is like that with the Hermle it is not the same, so don't bother with that. When you have gone through what I have instructed get back to me, note any problems you encountered.1 point
-
Hi there is a lot of information on this site apertaining to chiming clocks https://r.search.yahoo.com/_ylt=AwrIQhznB6diwCsAagx3Bwx.;_ylu=Y29sbwMEcG9zAzEEdnRpZAMEc2VjA3Ny/RV=2/RE=1655142504/RO=10/RU=https%3a%2f%2fwww.davewestclocks.co.uk%2f/RK=2/RS=.x1C5AESjws8LeSd9bVfx1_n21o- Some basic questions. Have you had it to bits and cleaned it ? or is it as is. Remove the clock from its case and put on a stane , refit the hands and move the clock hands to the striking position. then re fit the hands to correspond to the strike. move the hands through the quarters two rounds for 1/4 past 3 for 1/2 past and 4 rounds for 3/4 hr, then full chime and strike on the hour. Three train clocks have an autocorrection mechanism to synchronise the chimes/strike if the hands are moved out of sequence. All need to be considered.
 1 point
 -
Hi As a tool they look very good, and the digital readout is clear. I think its true that the term "watchmakers what ever" counjours up some magical idea of precision not used any where else and attracts a premium price. My opinion is that the ones you have displayed are equally as goos as any "watchmakers" micrometer.1 point
-
What makes a micrometer designed for "watchmaking" so special? Is it that the measuring faces are larger than standard micrometers? I have a nice set of Insize micrometers I use for precision ammunition reloading with 0.001mm precision and they're more than enough for any jewel I've ever tried to measure. They even fit into a nice base so my hands are free and, of course, the convenience of being digital. Genuine question. http://www.insize.com/page-27-893.html1 point
-
Those are actually acupuncture needles. SG$ 2.31 34%OFF | ZHONGYAN TAIHE 100 Pcs Acupuncture Needle ALL Size Disposable Sterile Sharp Acupuncture Beauty 1 BOX Massage Sterilze Needle https://a.aliexpress.com/_mLc55021 point
-
I can see myself dressing these into fine oilers. Nice one matey1 point
-
Hey Gary, Theres a lot of traditional watchmakers that scoff at the idea of a stereo microscope but as you’ve just realised, it’s a pleasure to use and more comfortable than dealing with the frustration of eye glasses or loupes. And as you stated, you now have depth perception as well, which isn’t possible with eye glasses. Sure, you need to have a lower bench to use it, and viewing/working on things at an angle is less convenient, but in those cases you can still use your traditional eye glass / high bench arrangement. I work on a stereo microscope every day for hours on end for my day job, so I was pretty used to it when I started messing with watches. It probably the reason I never really bothered with eye glasses to begin with, hence my bias against using them. Anyway, getting back to the thread. I must admit I didn’t follow this from the start but, as you found out, IPA is a risk with Shellac; there was a thread on it just the other day. As you’ve seen, it ruined your pallet fork but you did receive another so all is good. As far as impulse jewels in a balance, I’ve seen many that appear to be press fit rather than being held in with Shellac. Your balance might be such a case and if it feels sturdy enough without signs of shellac then I would just run with it. The worst that can happen is the impulse jewel can come loose and you can fix it. Or it will be perfect for years to come. I wouldn’t stress about it too much as this is your watch, not a customer’s. Ah toys, and the creative ways men have found to acquire them inconspicuously. The idea is to have so much random stuff that the SO doesn’t realise it when you get something new. All they see is a wall of gear which they don’t care to understand, so they don’t realise when the collection grows. The big trick is to keep a stash of old packaging packed somewhere, so they also don’t realise that that there’s a new parcel haha1 point
-
The Seitz and Horia pushers/anvils are interchangeable so I'm guessing the Favorite tool will use 3mm or 4mm sizes too. Ask the seller to measure the diameter; if they refuse, don't trust them because they're either too stupid or untrustworthy.1 point
-
Order 2 and replace both pushers, it's unlikely anyone will notice the difference.1 point
-
The scope will make life so much easier for you. Great viewing ability and working room capacity. Breakfast in bed for your good lady, a lovely bunch of flowers and a nice evening meal at her favorite restaurant tomorrow and she will forget all about your new toy. Then just keep a cover over it and use it when she goes out with her friends.1 point
-
So, last night I set up my AmScope SM-3T stereo trinocular microscope and inspected the balance that fell apart on me a week ago as well as the balance of the replacement ST36 movement that arrived the other day. I saw the large blob of glue/epoxy that holds the hairspring to the balance cock on the "new" balance. I inspected the impulse pin on the balance that fell apart and oddly enough it seems to remain firmly fastened however both pallet jewels on the movement that spent a total of 40 minutes in IPA were loose/fell out. I don't believe that the adhesive used to hold the h/s to the cock is shellac since it isn't brown/amber in color. I can't tell what they're using to attach the jewels. It also does not look like shellac although to be honest, there didn't seem to be much evidence that anything was holding the pallet jewels in place other than a friction fit with the fork. I wasn't able to move the impulse jewel despite pushing on it with some force - more than I used on the pallet jewels but I suspect that with all of the other degradation it would probably not be worth assuming that it's OK. I have to say that I'm impressed with the microscope and that I'm able to see depth after all. The scope is rock solid and I'm not worried that it will hold the camera once/if I'm able to use the AmScope adapter (which will hopefully arrive this coming week). My wife didn't seem very happy that I received yet another toy but she has had a 11" Celestron telescope for 20+ years so she was at least interested in peering through the microscope.1 point
-
The parts are availabe on ebay at around £7 odd apiece from America so depending on how many require replaceing could be an expensive exercise.1 point
-
Hello All, I’m relatively new to watch restoration and repair. I live in Australia. FWIW, over the past months I’ve been experimenting with approaches to ultrasonic cleaning. I wanted to avoid Naphtha and other volatile organic solvents as much as possible, especially in combination with ultrasound. I found a product manufactured by an Australian chemical company - it’s a sodium metasilicate based powder marketed specifically for water-based ultrasound cleaning of small machinery parts, electronic PCBs and jewellery. It’s economical, odorless and rinses without residue, leaving a nice shine. It removes dried, old lubricant very well without pre-soaking. Here’s my cleaning flow: US with the sodium metasilicate based ultrasound solution Rinse in warm water US Rinse in 99% IPA Hand dry with blower while I inspect the parts. The balance and palate fork I clean by hand in Naptha, with special attention to the pivots. I’ve found pushing and twisting the pivots in to a “magic block” white foam cleaning block/eraser to be effective and gentle on the pivots. This is simple, cost-effective and works well for my hobbyist needs. Watch industry standard cleaning products are expensive to source down here. Just though I’d share. Cheers, John in Tasmania.1 point
-
1 point
-
Man you are right! I just realiced that I lost the track while searching the net… It‘s not exactly the caliber 10 but should be the caliber 67 about which I haven‘t found details yet. The NAWCC forum is a good source for information about the Junghans Joker too.1 point
-
The thing with the regulating pins, is the basic logic is if you open them, the rate drops, and drops more as amplitude goes down. You could have them open enough that after 24 hours the spring is barely hitting them, so the rate goes way down. But if the spring isn't centered you can get very interesting results, including an increasing rate as amplitude goes down. Imagining a normal gap on the pins, if the spring favors strongly one side due to poor centering, the spring might pull away more at higher amp, and stay totally or almost totally in contact at lower amplitudes. As you change position, gravity is affecting the spring as well, and so in certain positions it might pull away still (your 12), but stay more in contact in the other ones, including the horizontal positions. This is just one possibility in your case. But the thing any school will hammer and hammer and hammer into students heads is before doing dynamic poising, every thing else must be perfect first. Otherwise, even if you had what looked like a clear poise issue, you can be embarking on a wild goose chase. I'm quite sure you can get your 24h delta lower, and without resorting to some of the techniques in the Hamilton book (which is a truly fantastic book). The pinning points, the way the hairspring leaves the collet, and the terminal curve on an ETA or Sellita has been intensely studied and should need no manipulation, and with the Etachron system you have a very easy way to get the hairspring really behaving top notch between the pins. It could be that in the end your best route is to do some dynamic poise, but do check and recheck and adjust any and everything else first.1 point
-
When hardening it's good to protect the part from direct flame. This is often done by wrapping in iron wire and coating with pure soap, or sometimes borax, or sometimes a commercial anti-scale powder (a great one is available from gunsmith supplier Brownell's). I have a slightly different technique, using 20mm iron tubes on a handle, in which the part is placed the tube then filled with fine wood charcoal powder. Whatever the technique, even heating and avoidance of oxygen is the goal. The part, when at proper temperature, is then quenched. For blueing his method is very good. I also put the part (which when done with the above anti-scale measures should be a clean grey, otherwise the black scale must be cleaned off to see the color change [and it should be clean of oil]) on brass fillings in a pan, over an alcohol flame. From the quench the steel is at its maximum hardness, and is very brittle. Heating to a lower temperature is called tempering, and blue is pretty much the standard color for watch components. The steel changes color at different temperatures, from a light straw to brown, then purple, dark blue, blue, light blue, then almost grey again. For a cutting tool you would temper to straw. Using the pan with filings helps ensure an even heating, and prolongs the process so that the temperature reaches into the part as well. For parts larger than watch-size you would need to do it in an oven for a specific amount of time for a given cross section. The thread pitches on the Habegger rolling dies are the modern standard pitches according to NIHS. If you look at the Asco Schurch catalog, on the taps pages, they list the pitch for each diameter- as well as the tap drill size for both steel and brass which is great. From memory, the Martin B (Bourgeaux) plates are quite close to the modern norm in pitch for a given diameter. Also from memory, the L or Latard plates are slightly finer pitch. As a bit of trivia- and this is from my observation, not a book, the Martin B holes correspond to the seemingly oddly-backward "tap size" for watch stems.
.thumb.JPG.f662b729b9ad764e5bf6074ea5e7e5f0.JPG) 1 point
1 point -
I rinse both the pallet and balance in IPA but only dip them. No problem's so far but time will tell.1 point
-
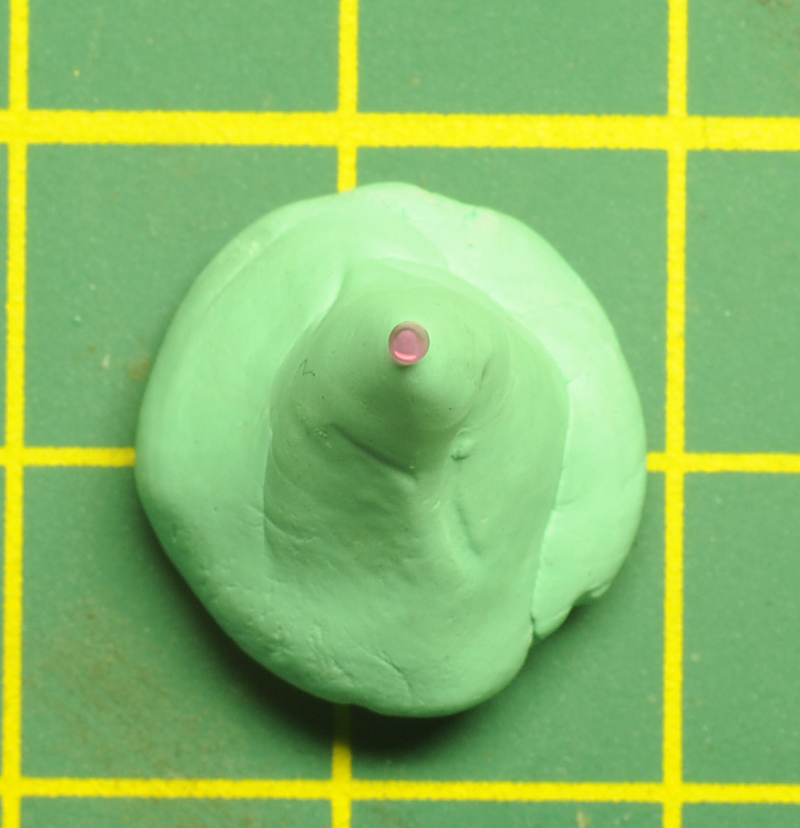
Epoxy five works but how you apply it and your approch greatly affectes the outcome. To keep the coil perfectly level and unstressed, do as following. 1-Install the balance complete on the mainplate and the cock as normal ( no other part on the mainplate) 2- Fill the stud slot with glue, you can put a bit of glue on tip of a screwdriver and apply it to the slot. 3- Turn the balance to bring the end of the spring near the stud slot and slide its end into the slot. 4- Place the whole assembly cock down on bench. ( cock down because the glue then wont get on the spring in case any of it drips down before it hardens) Let the glue dry . you will have a perfectly level and unstressed coil. The reason you want the balance complete and cock installed as the glue hardens , is because glue hardens around the spring when the spring is level so no need to try leveling the coil after glue hardens. I have done this at least a hundered times, I gurantee you be surprised to see a perfectly level coil Once dried you can scrape off any glue that might have run out of the stud slot. A clean in mineral spirit and quick dip in ISP or one dip. Done. Good luck pal1 point
-
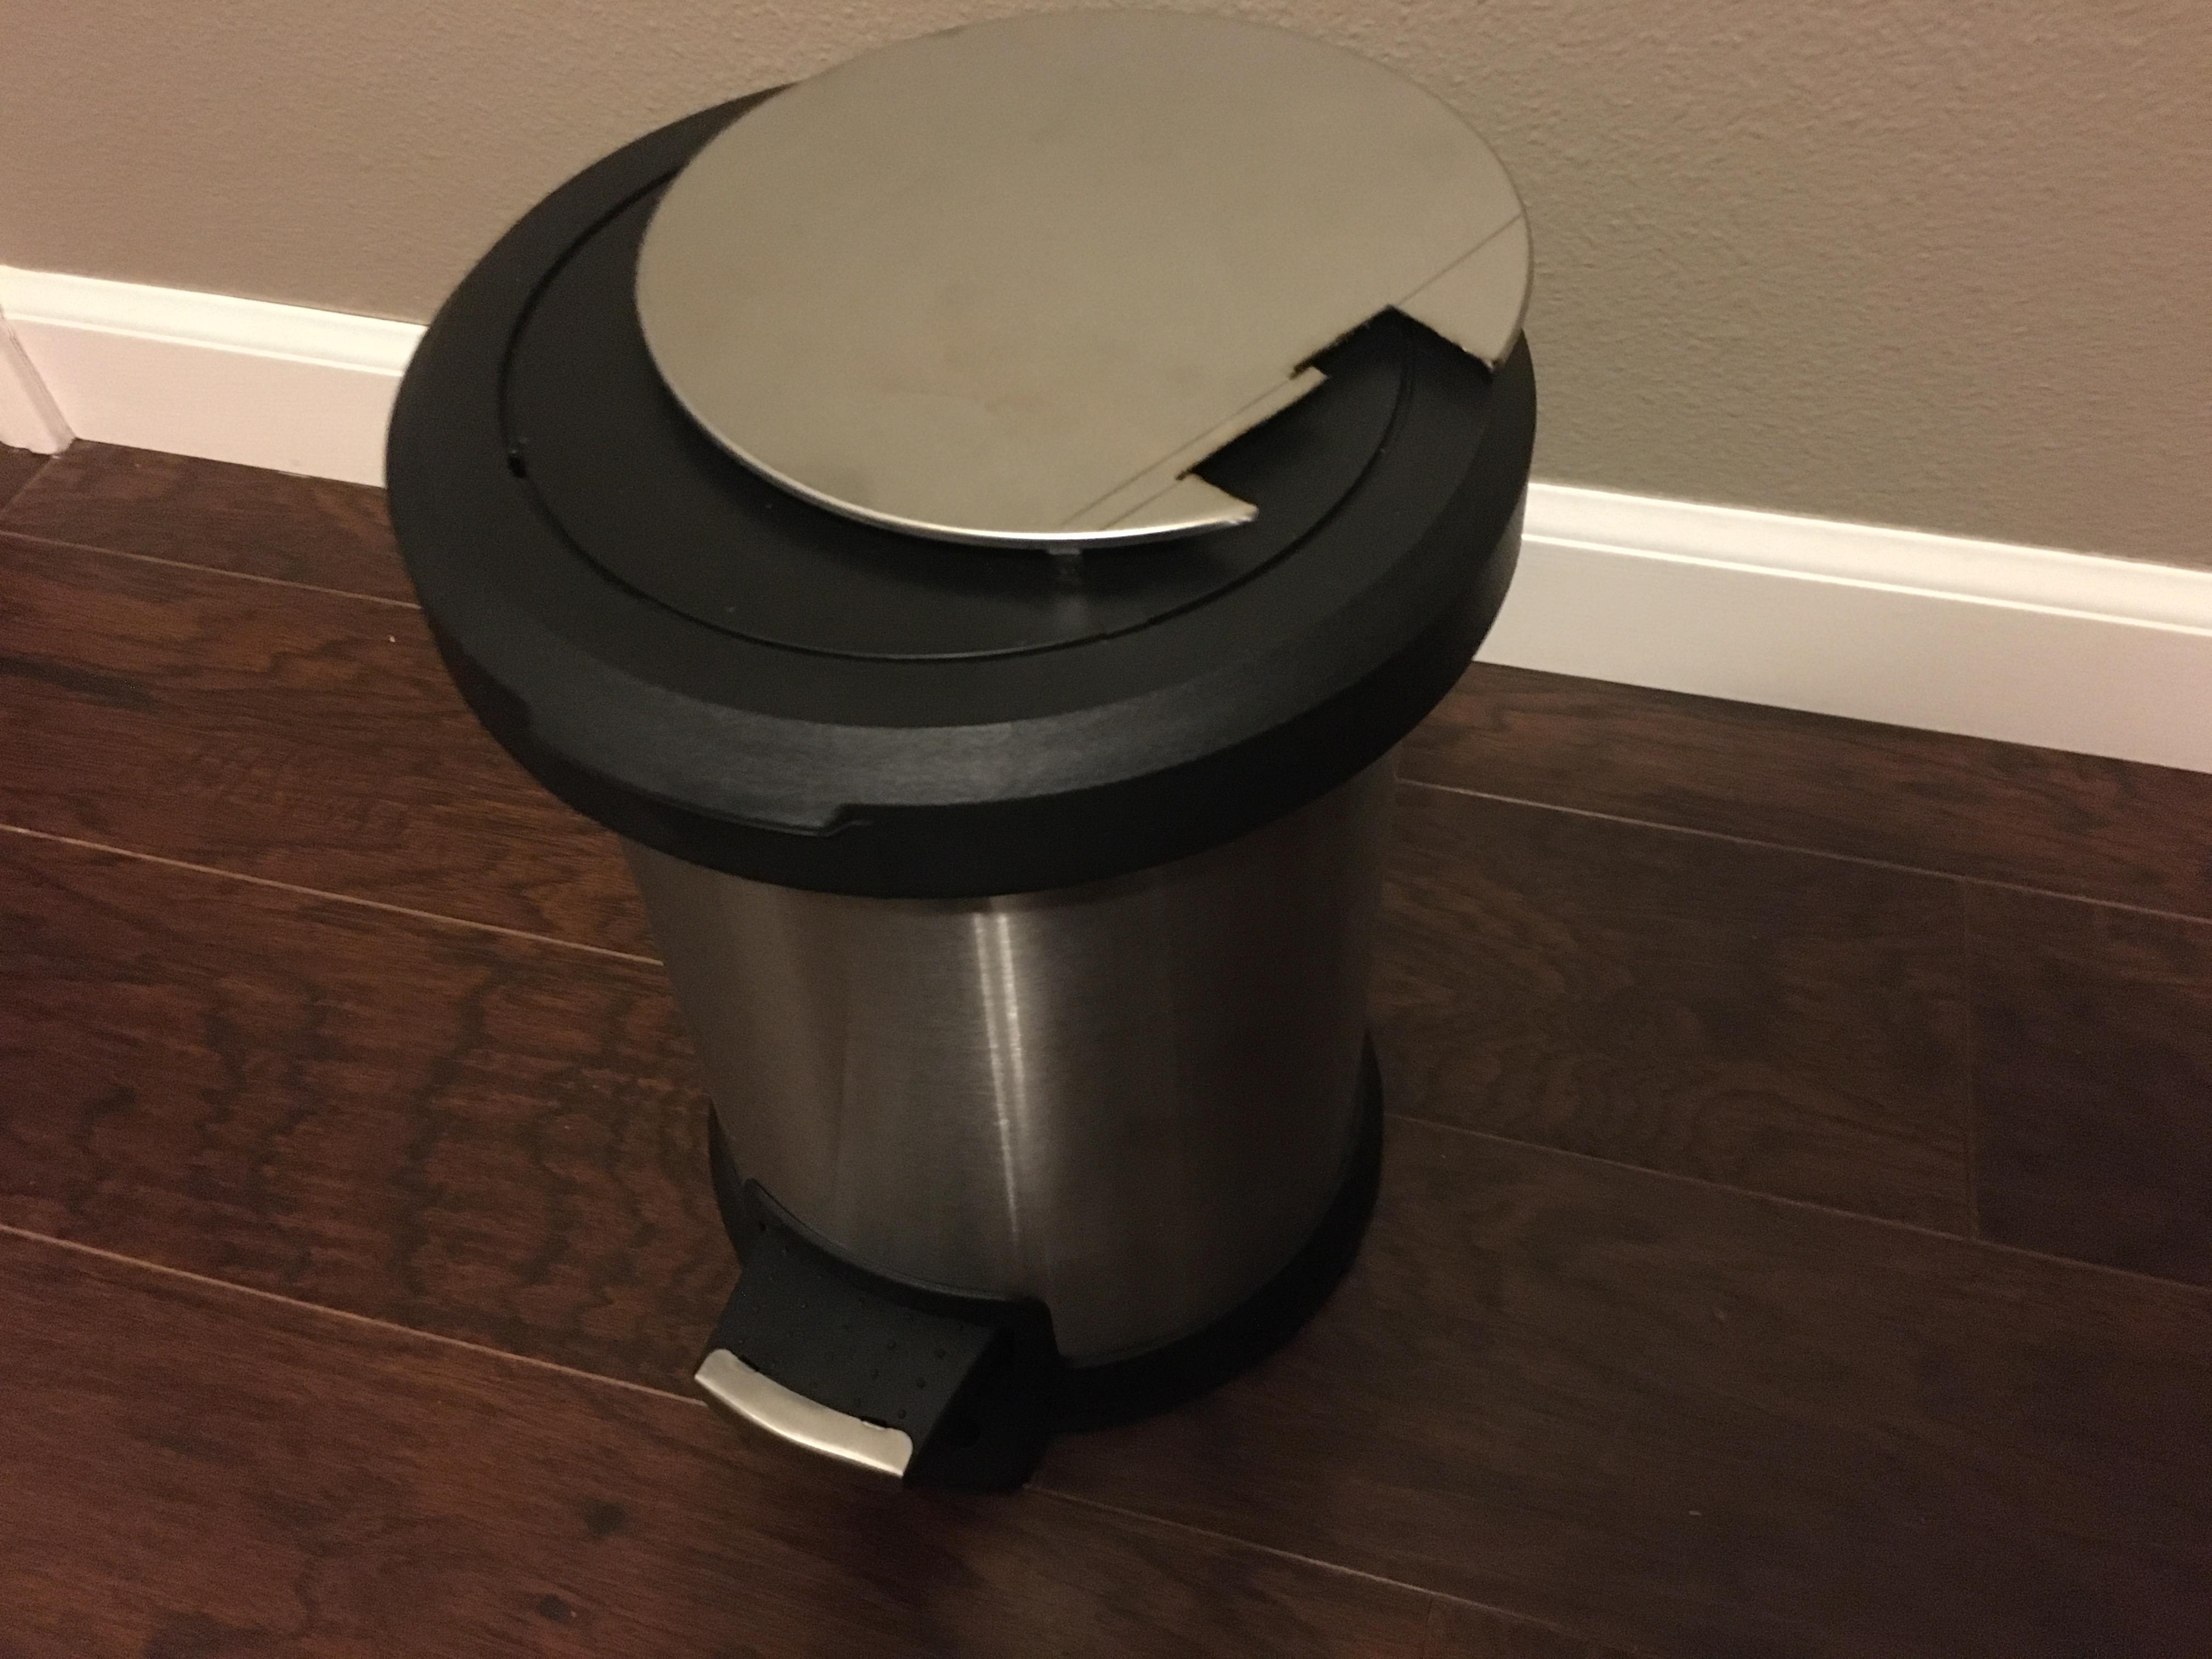
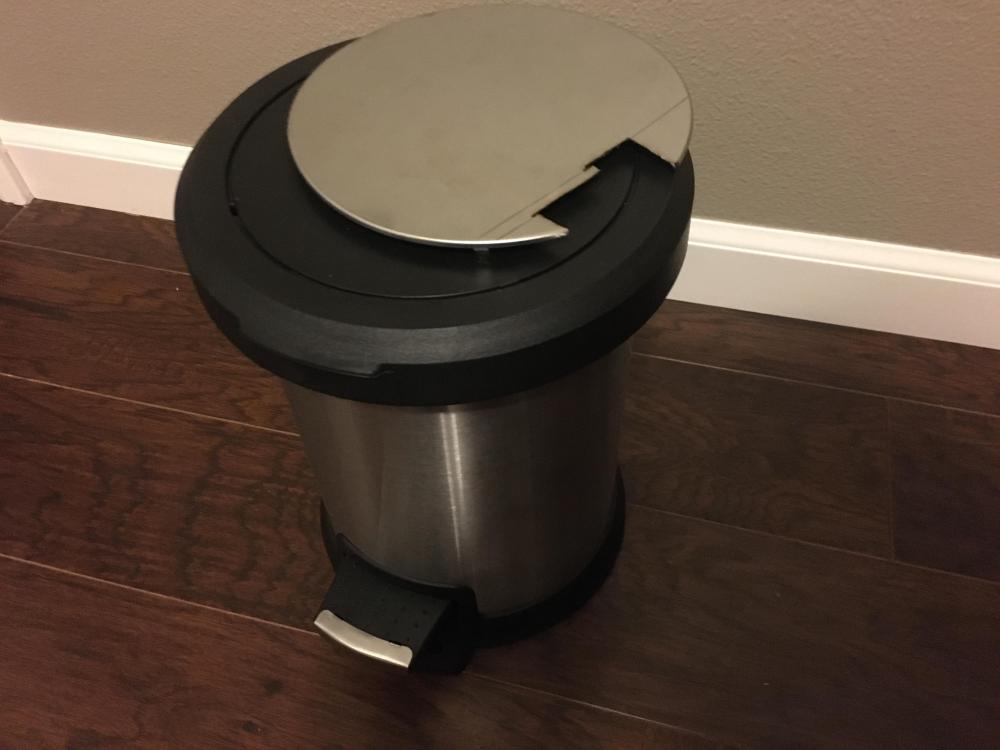
I just did this on a whim the other day and am a bit embarrassed about my “tools and supplies”. The square stock was purchased at Lowe’s for around $2 per piece and the SS I found at...ummm...Walmart. I just walked around with my calipers in hand looking for SS. Found lots of nice, low cost stuff that I’ll be able to make my own rally bracelets out of. The SS I’m using here came from a $7 small trash can (it was a 0.3mm veneer on the lid, so the can is still useable = free SS). I’d had the idea for a while, but was finally motivated by my sad looking Pencron end link staring back at me.
 1 point


.JPG.1d76ffc9053a753697e3af2d4ebeab9f.JPG)