Leaderboard


Popular Content
Showing content with the highest reputation on 06/04/22 in all areas
-
Finally had time to finish editing the video diary of this watch. I’m pretty pleased with how it turned out to be honest. There’s something for everyone: buffing and polishing, DIY Nickel Plating, using the new economy sized FixoDrop and, of course, bringing a dead timepiece back to life. I love all comments, good and bad, I love them all!4 points
-
Have you lost your setting lever screw ?3 points
-
Hello, I was formally known here as JGrainger but had some time off due to the intention to next post once a certain watchmaking project was somewhat further, then life changes, and my old laptop gradually functioning too slowly to make browsing this forum a practical proposition. my old watchmaking project is still ongoing, essentially I keep doing a bit towards further work in it, but it will be some time before there’s anything to report.. though I have been servicing a few watches and making a few bits and bobs since, not to mention, recently starting a new job with better prospects. Lately I’ve started looking at rounding out my tools and knowledge with a view to offering paid services along the lines of realistic scenarios in servicing as opposed to making staffs and performing other nice but obscure micro-machining horological tasks. Jonathan2 points
-
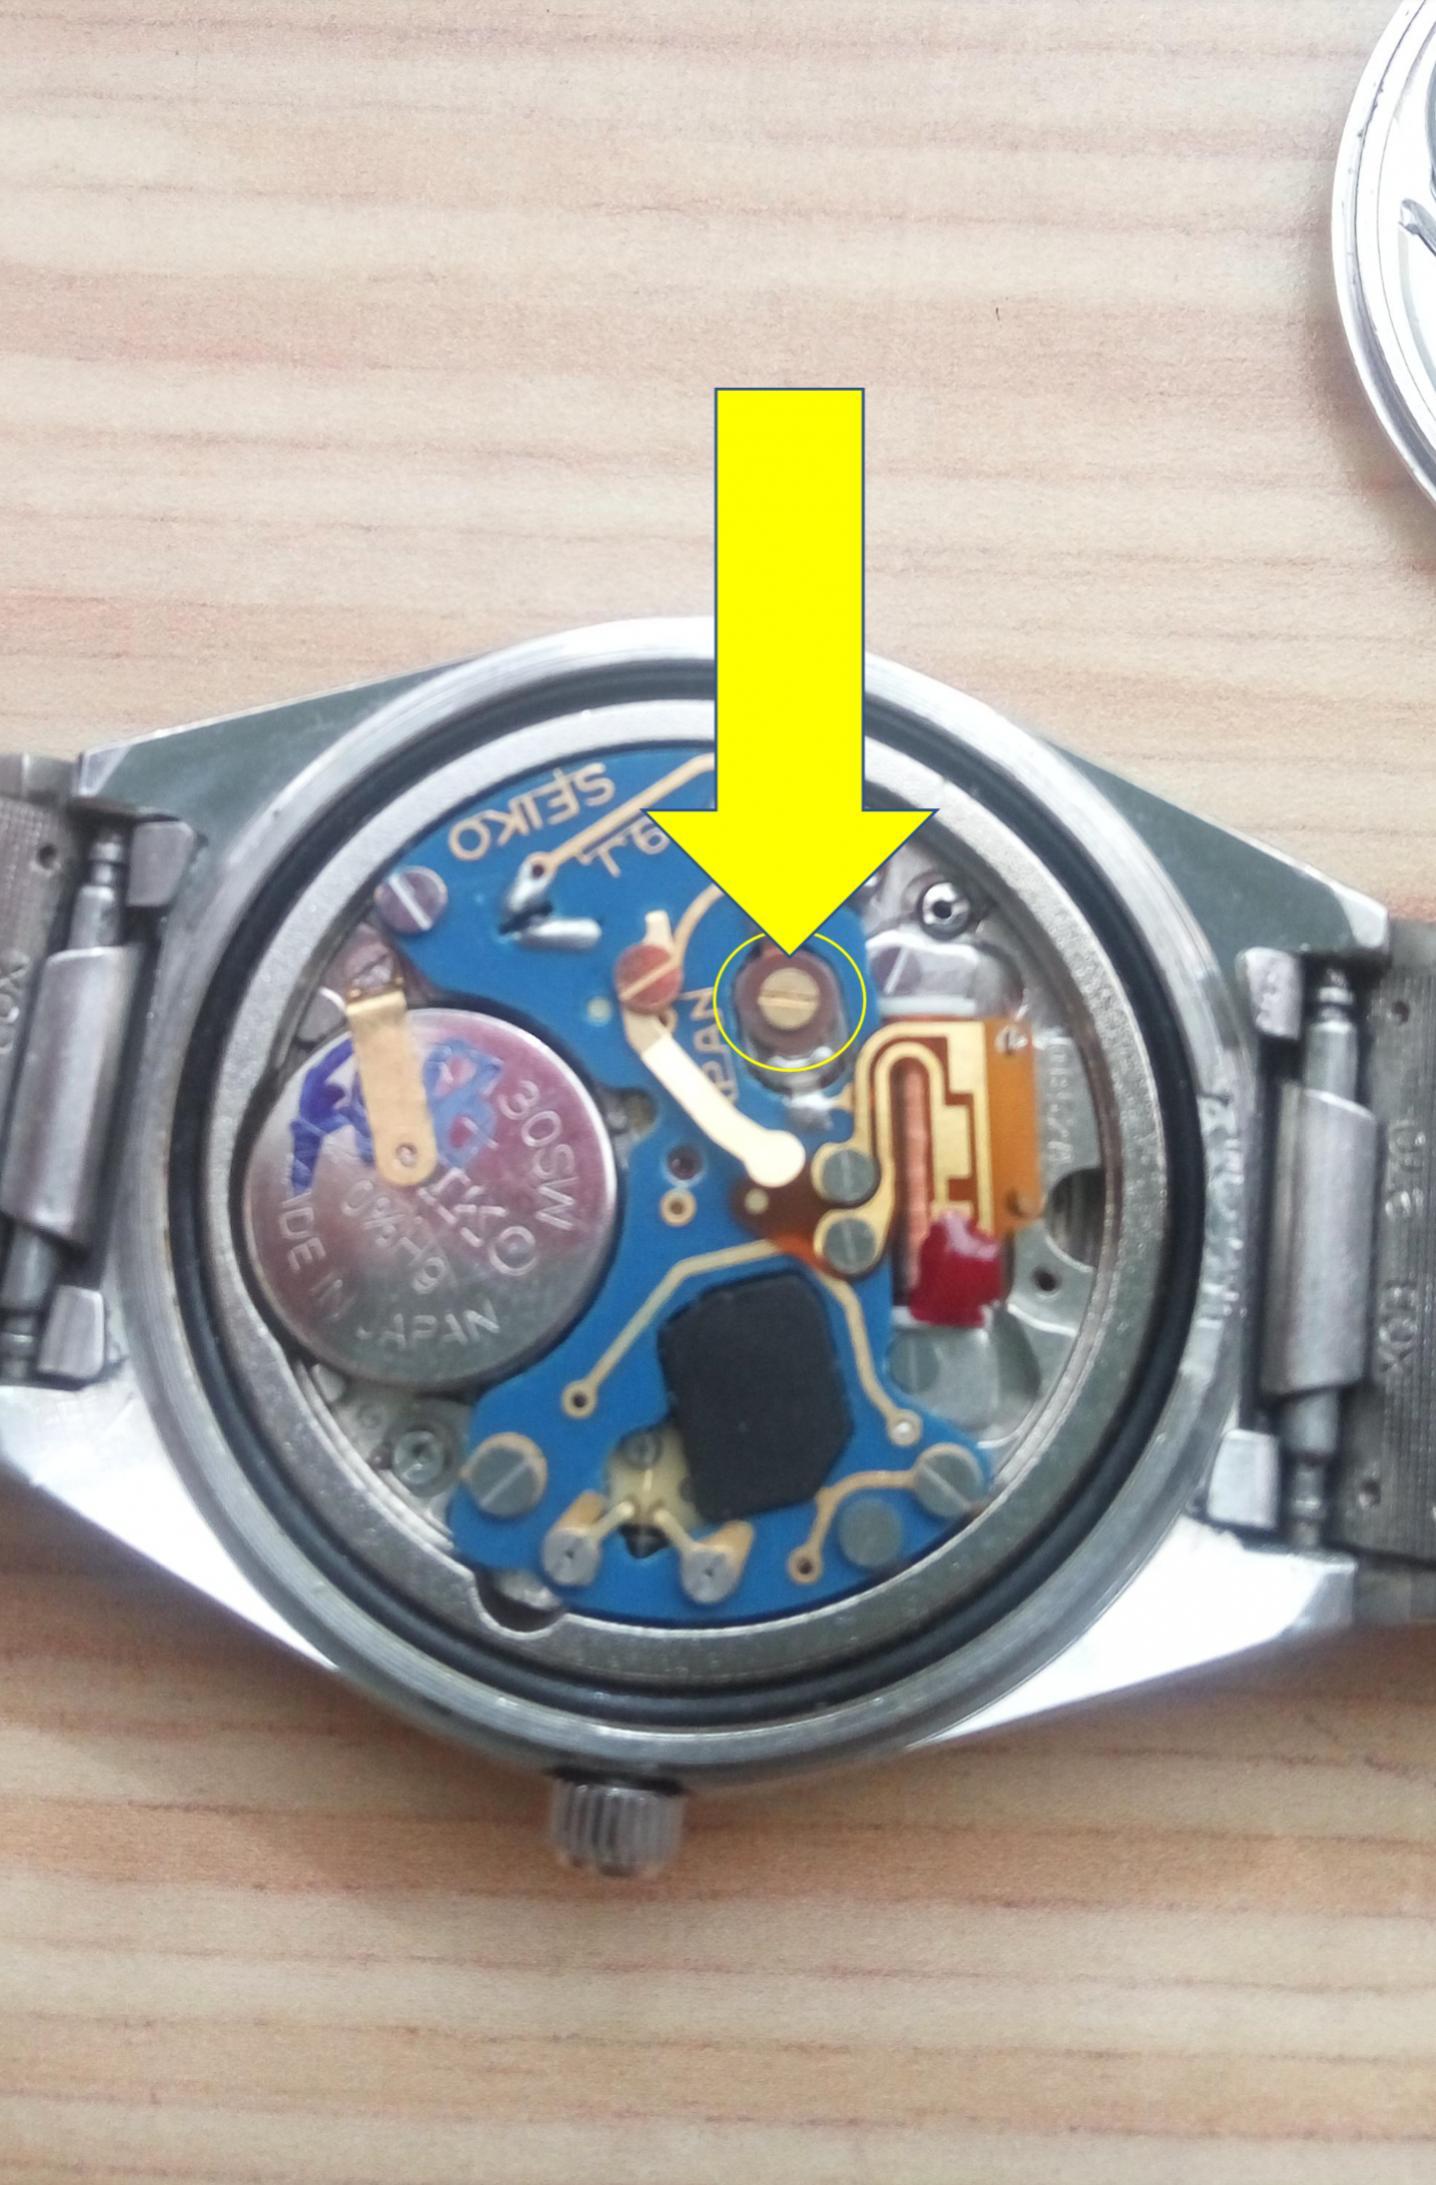
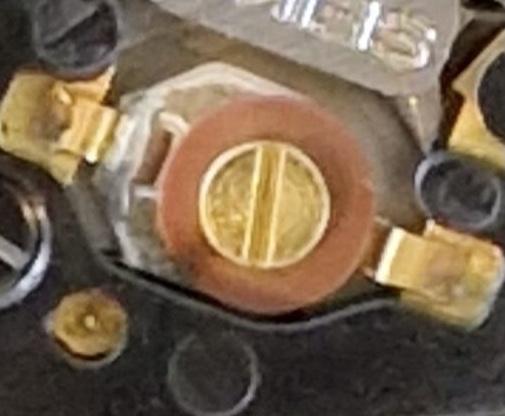
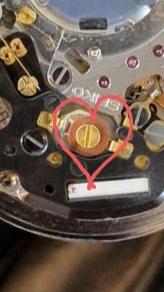
This is the only screw with which you might be able to fine tune the timing. It‘s a trim capacitor:
 2 points
 -
Good ideal for flat glass - mine wasnt't I tried a similar technique to put brush marks on a stainless steel back cover2 points
-
if you look at the website that selling it seems to have all sorts of nifty features in fact way too many features for the price? It be really nice if somebody would do a review. here is a video of an older version still looks really impressive for the price though. Although it still doesn't do or have a variable voltage power supply or any way to measure microamps things that I like to do when testing quartz watches https://youtu.be/VBnZk8Ly8gk it's amazing what you'll find on YouTube. This quite a few videos on the older style here is one showing the newer one and it almost seems just too good to be true. https://youtu.be/j8958_MV8eI2 points
-
Just a side note: I‘ve been using this vintage Zeiss setup for decades. With a 8x20 pocket binocular it gives a crystal clear x16 magnification. I got it as a gift in the early ‘80s.
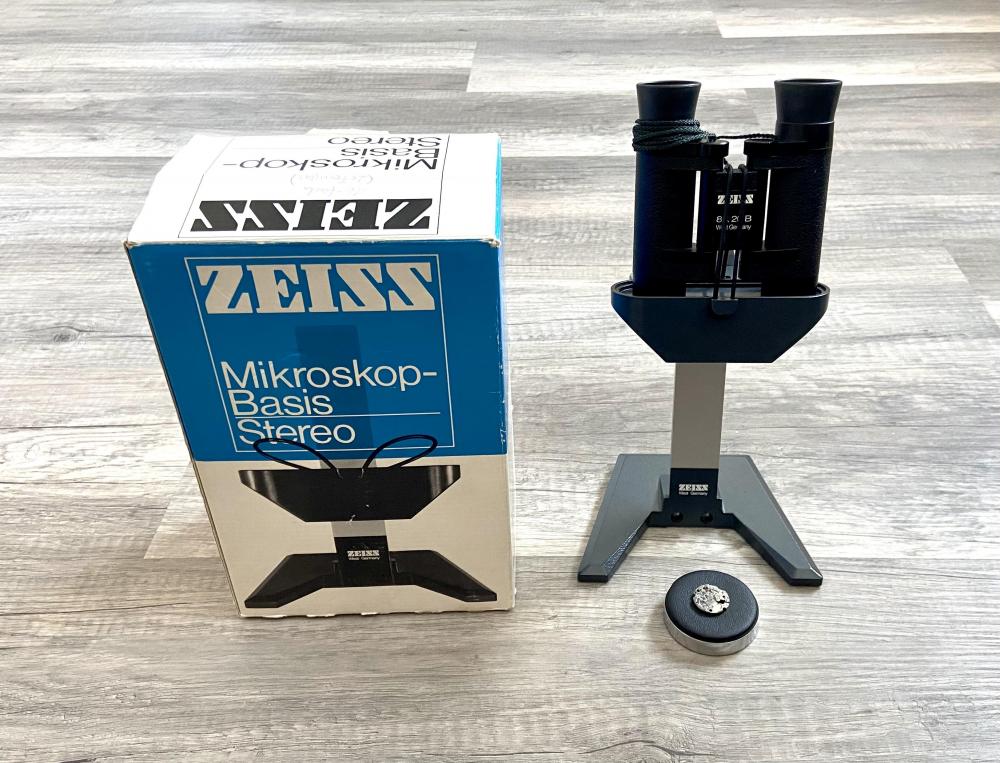 2 points
 -
I would like to share a check list made up by a master watchmaker. I take no credit for it, only think it would be helpful for us hobbyists. Here it is! CHECK LIST I decided to write up what is called a 16 point check that is meant to be a guide to steps required to service a watch this is slightly bias towards a wrist watch but very relevant to pocket watches also: This is a guide and not the definitive answer after going through it a few times add you own additional tests and observations. This is of course for a basic time only non-automatic or any with additional features, I also leave out things like demagnetizing, actual cleaning procedures, a good chunk of common sense needs to be applied also as I say its meant as a good starting point to a correct disciplined procedure, This is version 1 may add or edit/delete later. Check number 1 a Check the winding to see if the mainspring is broken. b Check to see if the setting bridge or sleeve is broken by pulling the stem out and testing the proper snap of stem. A broken setting bridge/sleeve is easily detected c. The balance wheel should be oscillated to see that it is true and the balance pivots should be checked by looking through the upper jewel to see that there is not a flash on the pivot. d. The hairspring should be checked to see that it is not damaged. e Check setting of hands f. The watch should be looked over in every respect, paying particular attention to any rust spots that may appear on any part of the movement. When rust is evident around the stem or setting mechanism, it is most important to remove the dial and hands in order to check this mechanism to see if the rust is very extensive. Check Number 2 a. Examine each part as it is being removed from the movement. b. Check for rust on every part. c. Check every pivot to see that it is not damaged or bent. d. Check the jewels in the watch, to see that there are no cracked jewels. e. Check pallet stones to see that they are not chipped or damaged. f. When removing barrel cap, make sure that it snaps off only after sufficient pressure has been applied to it. g. In the examination of each part, a close check is not made at this time as many of the parts will not be clean enough for that purpose. a much closer check will be made on the parts as each part is handled in the assembly of the watch Check Number 3 a. Upon completion of cleaning and parts removed from the basket into the assembly tray, each part should be checked over with the use of a watchmaker’s loupe special attention should be paid to the jewels, because if there is gum oil still remaining on the jewels, the cleaning job was not done satisfactory . It is also worthwhile at this time to examine the pivots. If the jewels are clean, and the pinion leaves are clean, it is almost certain that the cleaning operation was performed effectively. Check Number 4 a. Examine the condition of the mainspring. b. Check the width, strength and length of the mainspring. c.. If correct, replace mainspring using correct mainspring winding tool, not by hand d. Check the lubrication of the mainspring if required e. Check the fit of the mainspring around barrel arbor. f. check the mainspring end for proper shape to catch in barrel. g. Check the snap of the cap on barrel and replace in correct position h. Check the end shake and side shake of barrel arbor is it also sometime recommended to do this without mainspring fitted to test for free run and end shake i. Check the cleanliness of the barrel and barrel teeth. j. Check the oiling of the barrel arbor after the cap is on. k. Check the condition of the barrel teeth to see if they are bent or worn. Check Number 5 a. Jewel holes must be cleaned with peg wood if necessary. b. Jewels must be checked for chips or cracks. c. Check the train wheel pivots for rust, polish, cuts and straightness. d. Check the pinions for rust’, pits and polish. e. Check the pivots for pitting check that clean pith wood is being used. f. Check plates for tarnish, fingerprints, and polish jewel settings. g. Assemble time train and check end shake and side shake. h. Check wheels for trueness arid upright. i. Lift each wheel with tweezers to check for end shake and to see if each wheel is free enough to fall back to its original position. j. Spin train to see that is spins freely, in dial up, dial down and a vertical position. Check Number 6 a. Replace barrel and barrel bridge and check the oiling of the barrel arbor upper and lower bearing. b. Check oiling of crown wheel. c. Replace ratchet wheel. d. Note: do not oil remainder of movement until after kick-back is checked or cap jewels are present oil those now e. Wind watch slightly to check kick-back and recoil. This check should be made in dial up and dial down positions. If the watch does not have kick¬back, this indicates that the train is not as free as it should be. First, however, before checking into the train itself to determine if there is some frictional error, it would be worthwhile to examine the mainspring around the barrel arbor. Many times the loose fit of the mainspring around the arbor will prevent kick-back from occurring within the train. In such instances, the arbor is simply slipped in the mainspring instead of the train receiving the reversal torque, that normally occurs. If the barrel is found to be satisfactory, then the train. should be checked to see if the trouble can be located. first, the train should be examined carefully to see if each wheel is free, and if no trouble can be found, then it is advisable to remove the train wheels from the watch and replace each wheel in the watch individually and to check the spin of each wheel. If each wheel spins freely, this indicates that the pivots and the jewels are in good condition and that one need not look further for defects or faults in those areas. Next, place two wheels at a time in the watch and check the spin of the wheels. Thus, any error of improper depthing or a badly formed tooth on a wheel or pinion will be detected. It is simply a process of elimination in order to locate the particular trouble, and of course, proper corrective measures must be taken to correct an error when one is found. Check Number 7 a. Oil all the train jewels in the watch, and at this point it is advisable to oil also the balance jewels. b. Check to see that there is a ring of oil around each train pivot and that the jewels are not over-oiled or under-oiled. c. Check the jewels that have caps to see that the globule of oil has been formed properly between the flat cap and curved hole jewel and no keyhole shape if so remove re clean jewels and check seating the re oil and repeat check for perfect ring. Check Number 8 a. Oil stem properly. b. Oil friction parts of setting. c. Oil wolf teeth of clutch wheel and winding pinion. d. Oil clutch wheel groove. e. Oil points on setting lever that contact the setting bridge or the clutch lever. f. Never oil dial train. Note: ‘dial train means all wheels following center wheel staff. g. Seek expert advice on some types of intermediate wheels connecting clutch at setting positions that require oil. Check Number 9 a. Check condition of pallet arbor pivots. b. Check for chipped or loose stones, shellac or gummed oil on pallet stones. c. Check guard pin for straightness and proper shape. d. Check polish of pallet arbor, pivots and fork slot. e. Check end shake of pallet fork. f. Check height of pallet stones in conjunction with escape wheel teeth. g. Check matching stones. h Check drop lock i. Inside and outside drop. j. Draw. k. Hang-up of stones on escape wheel teeth. Check Number 10 a. Check tightness of roller jewel in roller table - uprightness of roller jewel. b. Check the height of the balance wheel in conjunction with the fork bridge and the center wheel. c. Check the clearances. d. Check the height of the guard pin in relation to safety roller. e. Check the proper length of roller jewel and fit of roller jewel to fork slot. f. Check the guard clearance. g. Check the corner clearance. h. Check the jewel pin shake. i. Check the guard test, j. Check the corner test. Check Number 11. a. Check the hairspring in-the-flat. b. Check the hairspring in-the-round. c. Check the quadrant of the hairspring to see that it is formed properly between the regulator pins and stud d. Check for beat of the watch by equalizing the force to receiving and discharge pallets. e. Check for the collet wobble. f. Check for trueness of the balance wheel, and for the flash of the balance pivots g. Check for trueness of roller table. Check Number 12 a. Place the watch on the timing machine and take a rate in the dial down position, then turn the movement over to dial up position and take a rate. There are three things that should be observed from the rate that was taken: 1. Dial up should indicate the same time as dial down. 2. Observe the closeness of the lines to determine if the watch is in perfect beat. 3. Observe how the watch is running in reference to the time error over a 24-hour period. b. Adjust the mean time rate of the watch so that the dial up and dial down positions will record on time. Do not move the regulator more than one degree in adjusting the mean time rate. Any other alteration must be made by adjusting mean time screws or by adding or removing weight from the balance wheel in such a manner as not to affect poise, static or dynamic,. c. If the rates in dial up arid dial down are found to be different from one another, then this indicates a mechanical error in the watch which must be traced out before proceeding. d. If the watch is found to be out-of-beat, then of course, it should be put r in proper beat at this time. We might emphasize that if the watch was put in proper beat in accordance with the proper procedure at the bench, then an out-of-beat condition or minimal amount would not be indicated on the timing machine. e. When the above conditions have been satisfied, the next step would be to take a rate in positions and errors corrected. If everything has proved to be satisfactory, the watch should be tested for isochronal test be made on the timing machine, which consists of re-testing at different winding levels and rate in the dial up position. Check Number 13 a. Check for proper lubrication of cannon pinion on center post. b. When replacing the cannon pinion, be sure that the leaves of the cannon pinion do not come down on top of the minute wheel teeth so as to bend the teeth of the minute wheel. c. Check tightness of. cannon pinion d. Check to see that cannon pinion does not ride up when watch is being set. and smooth consistent operation. Check Number 14 a Make sure that the hands are fitted securely to the parts to which they are attached b. Make sure that the hands are adjusted so that there is equal space between the hands and the hands are set as close to the dial as possible. c. Check to be sure that the hands are shaped to the contour of the dial. d. Check to see that\ the hands are positioned so that they are synchronized with one another. Check Number 15 a. If there is no case for the movement, simply disregard this check and proceed with the next check, number 16. b. Check for proper snap/screw back of the case. c. Check for the clearance of the hands under the crystal. d. Check the crystal to see that it is securely fitted into the case. e. Check to see that the crown is next to the stem and reasonably close to the case. f. Check for tightness of movement in case. g. Check the spring bars to see that proper spring bars are used for the particular type of case so that the band is held securely to the case. h. Check the lug holes to see that they have not been worn badly by the spring bars to a point where the hole may break through and allow the spring bar to come out of place. Check Number 16 a. Set the watch on time with a master clock. b. Let the watch run for a period of 24 hours and check the error in the time repeat in several positions. c. Allow the watch to run until it completely runs down and check the length of run. The watch should run a minimum of 30 hours, preferably 40 hours, if it is in “A. I have no answers to any of the steps since I didn't make this up. Maybe Mark might.1 point
-
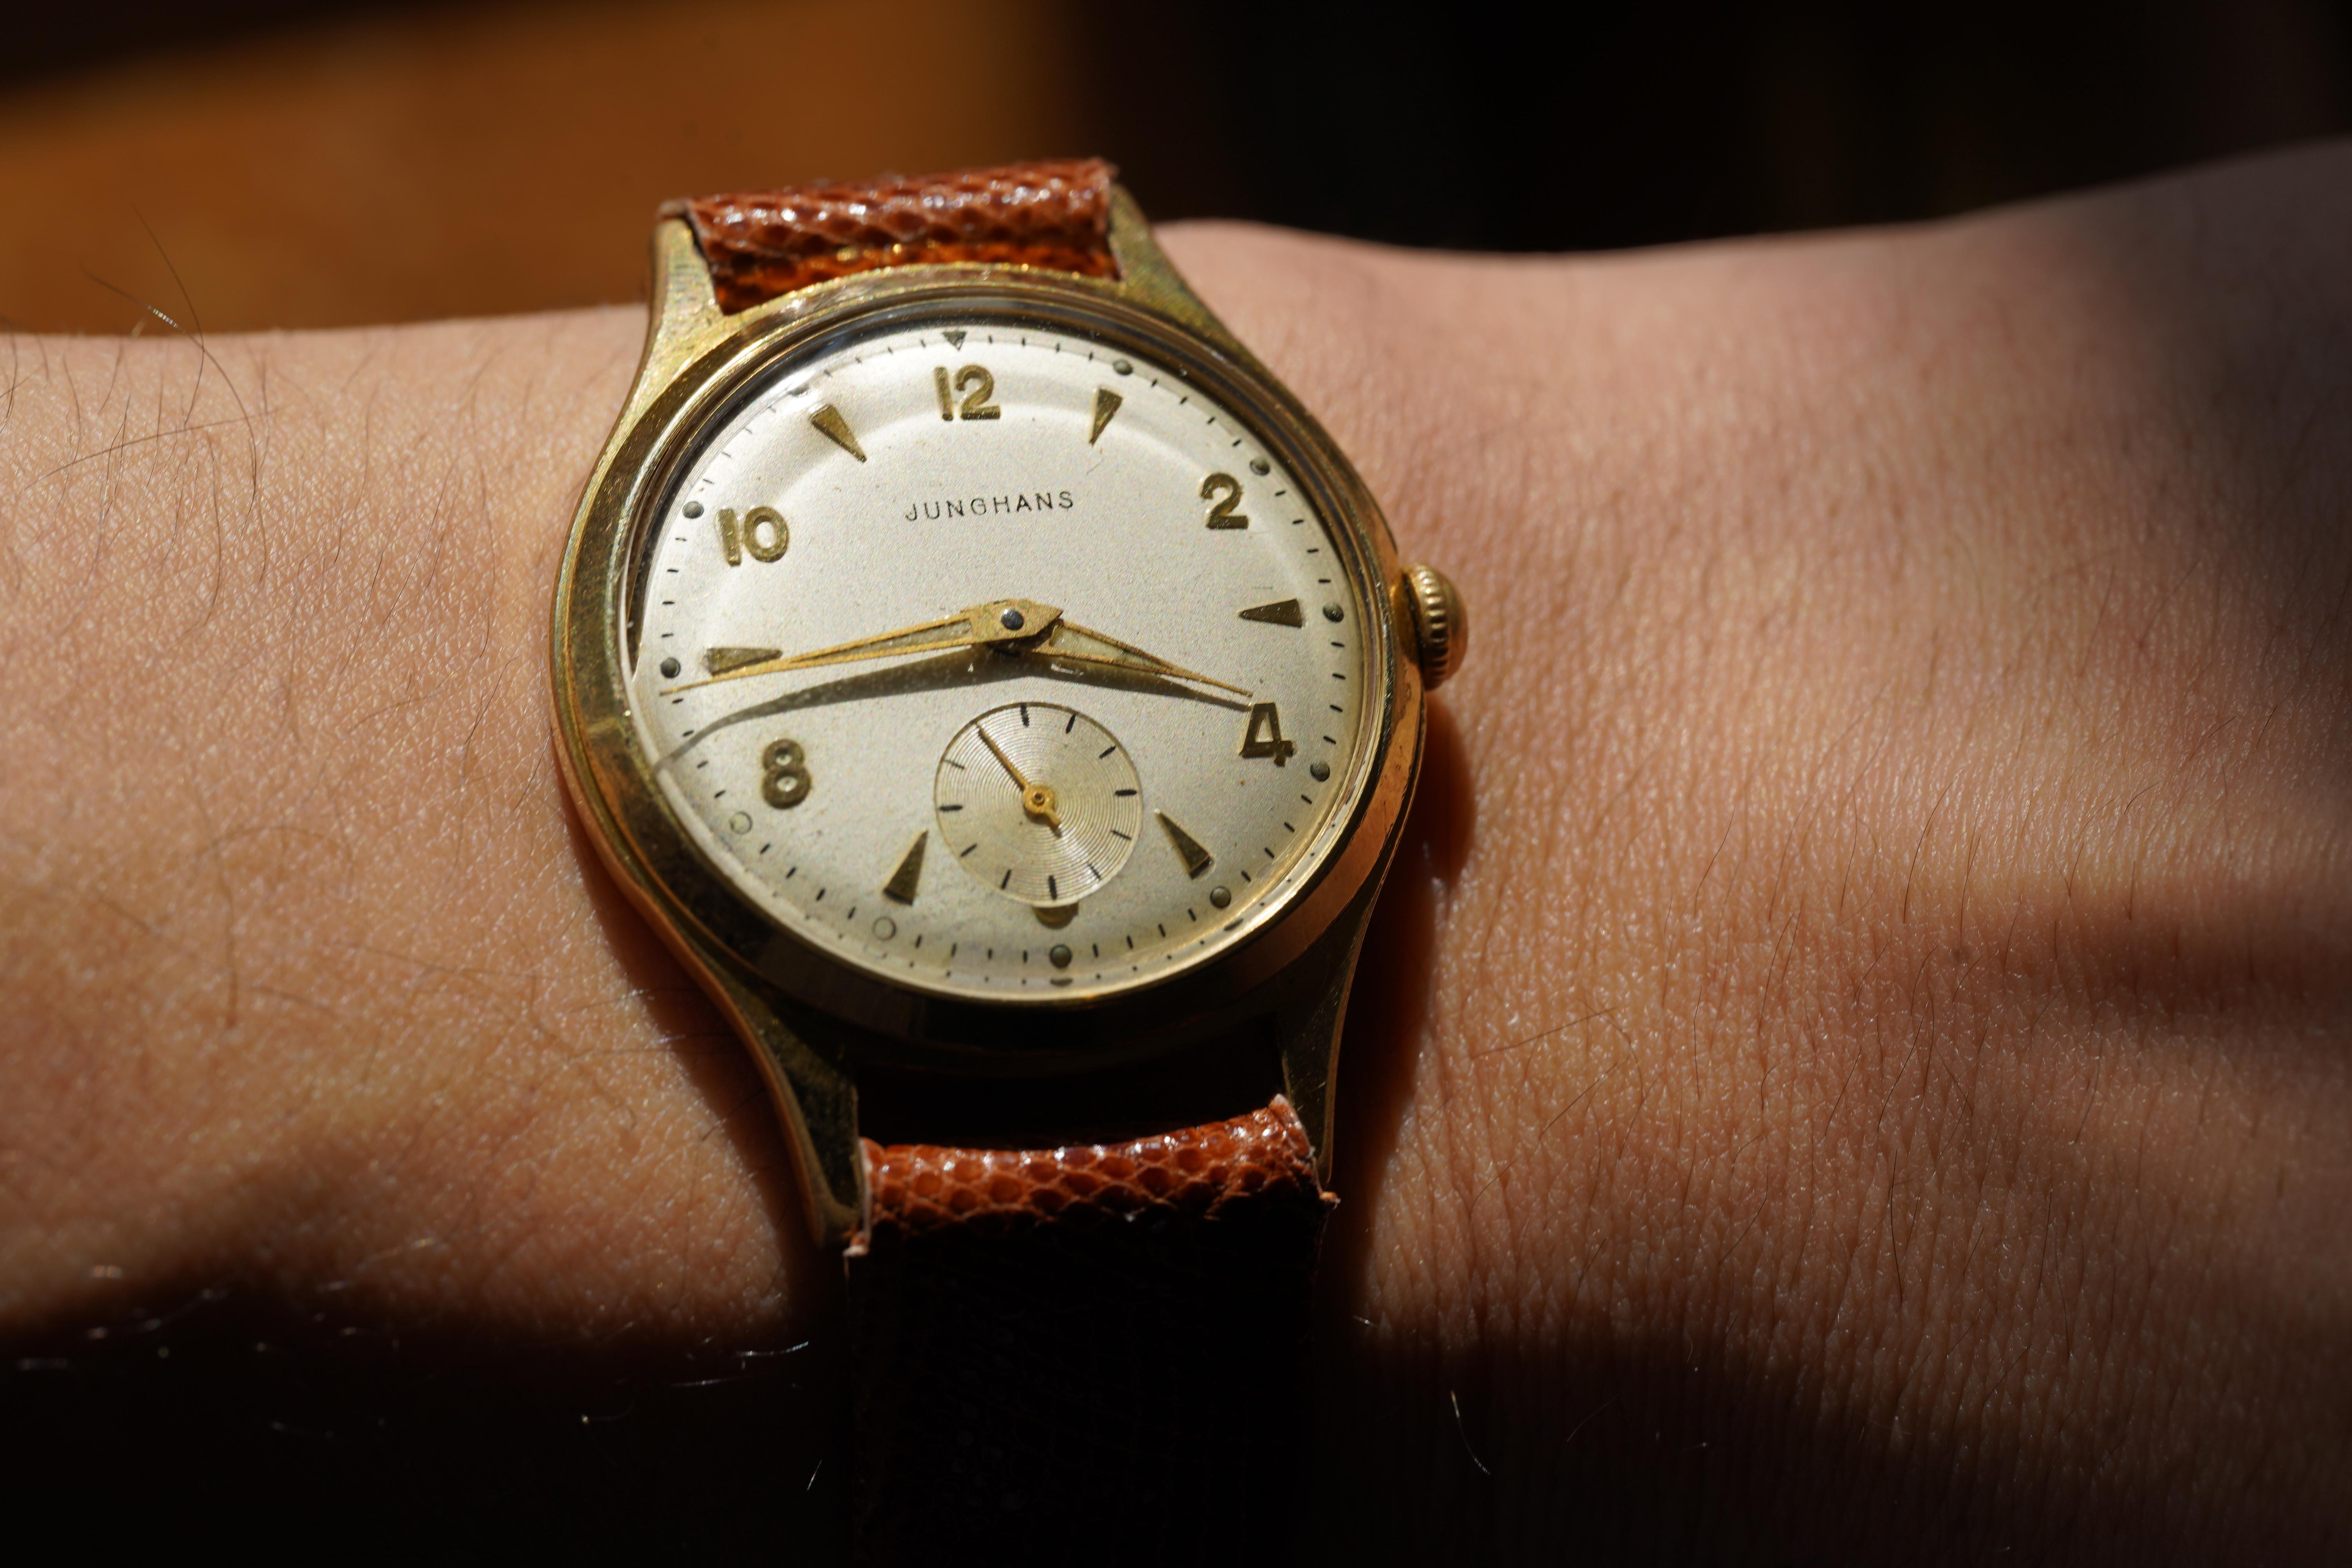
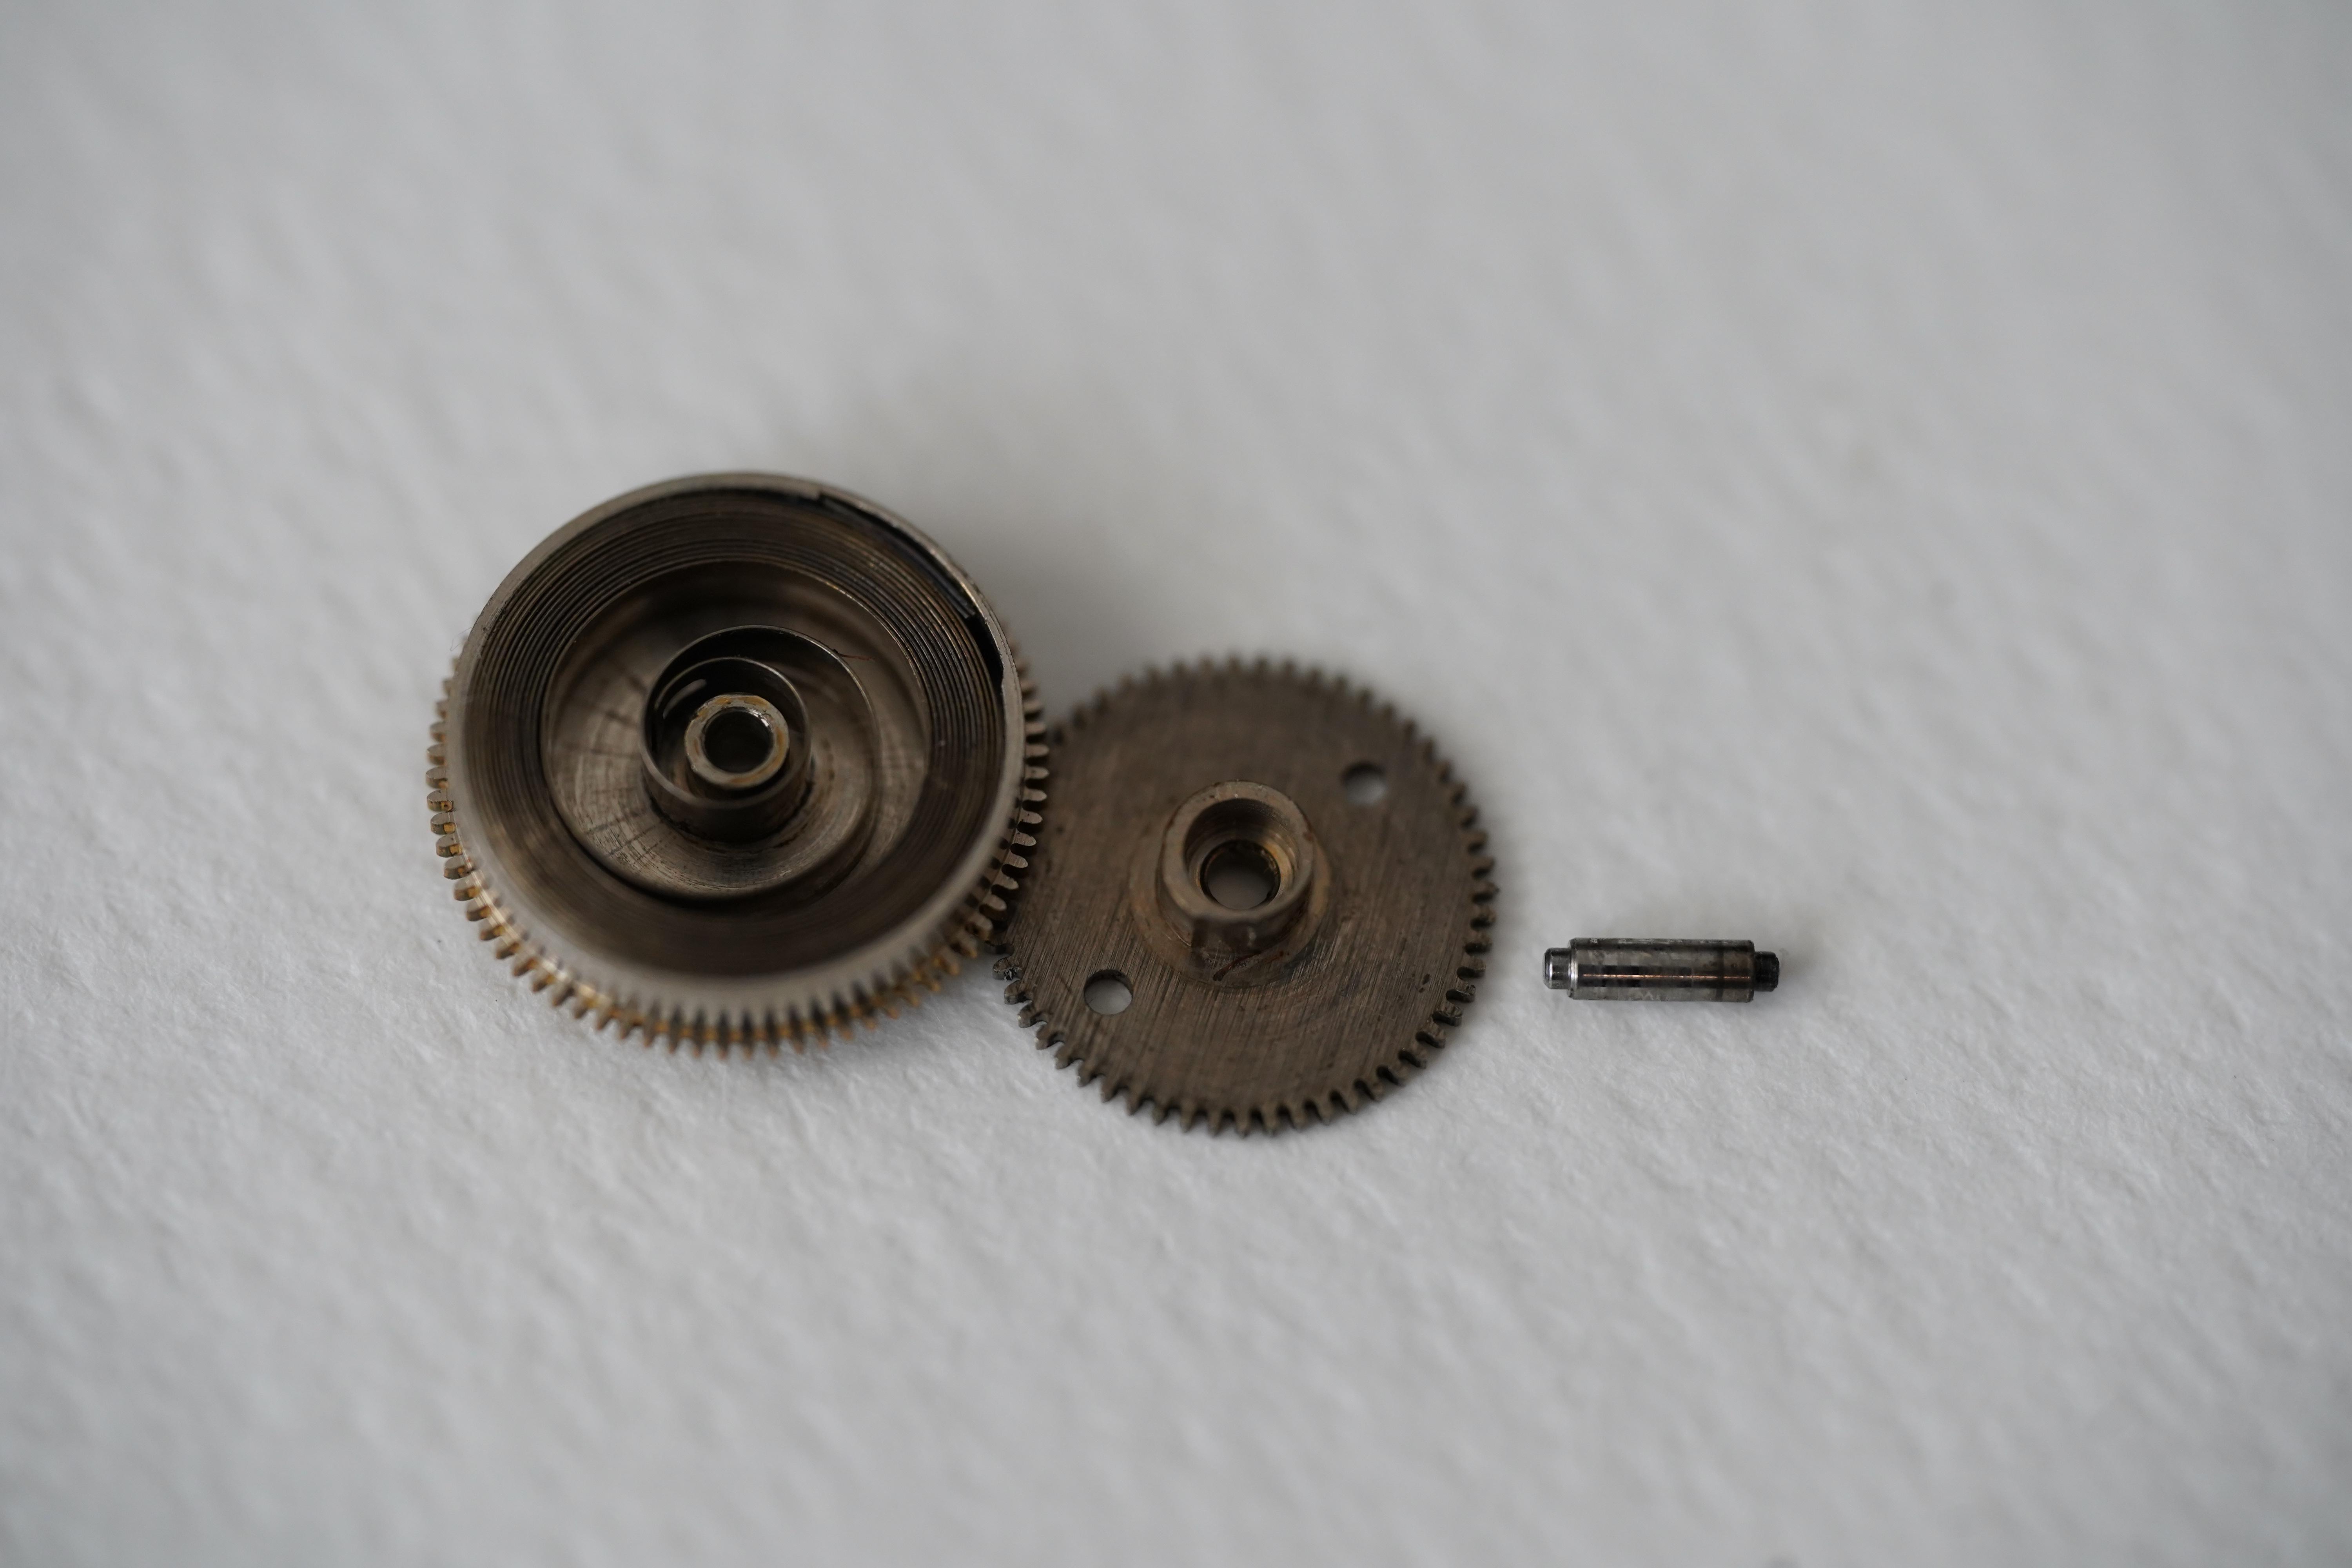
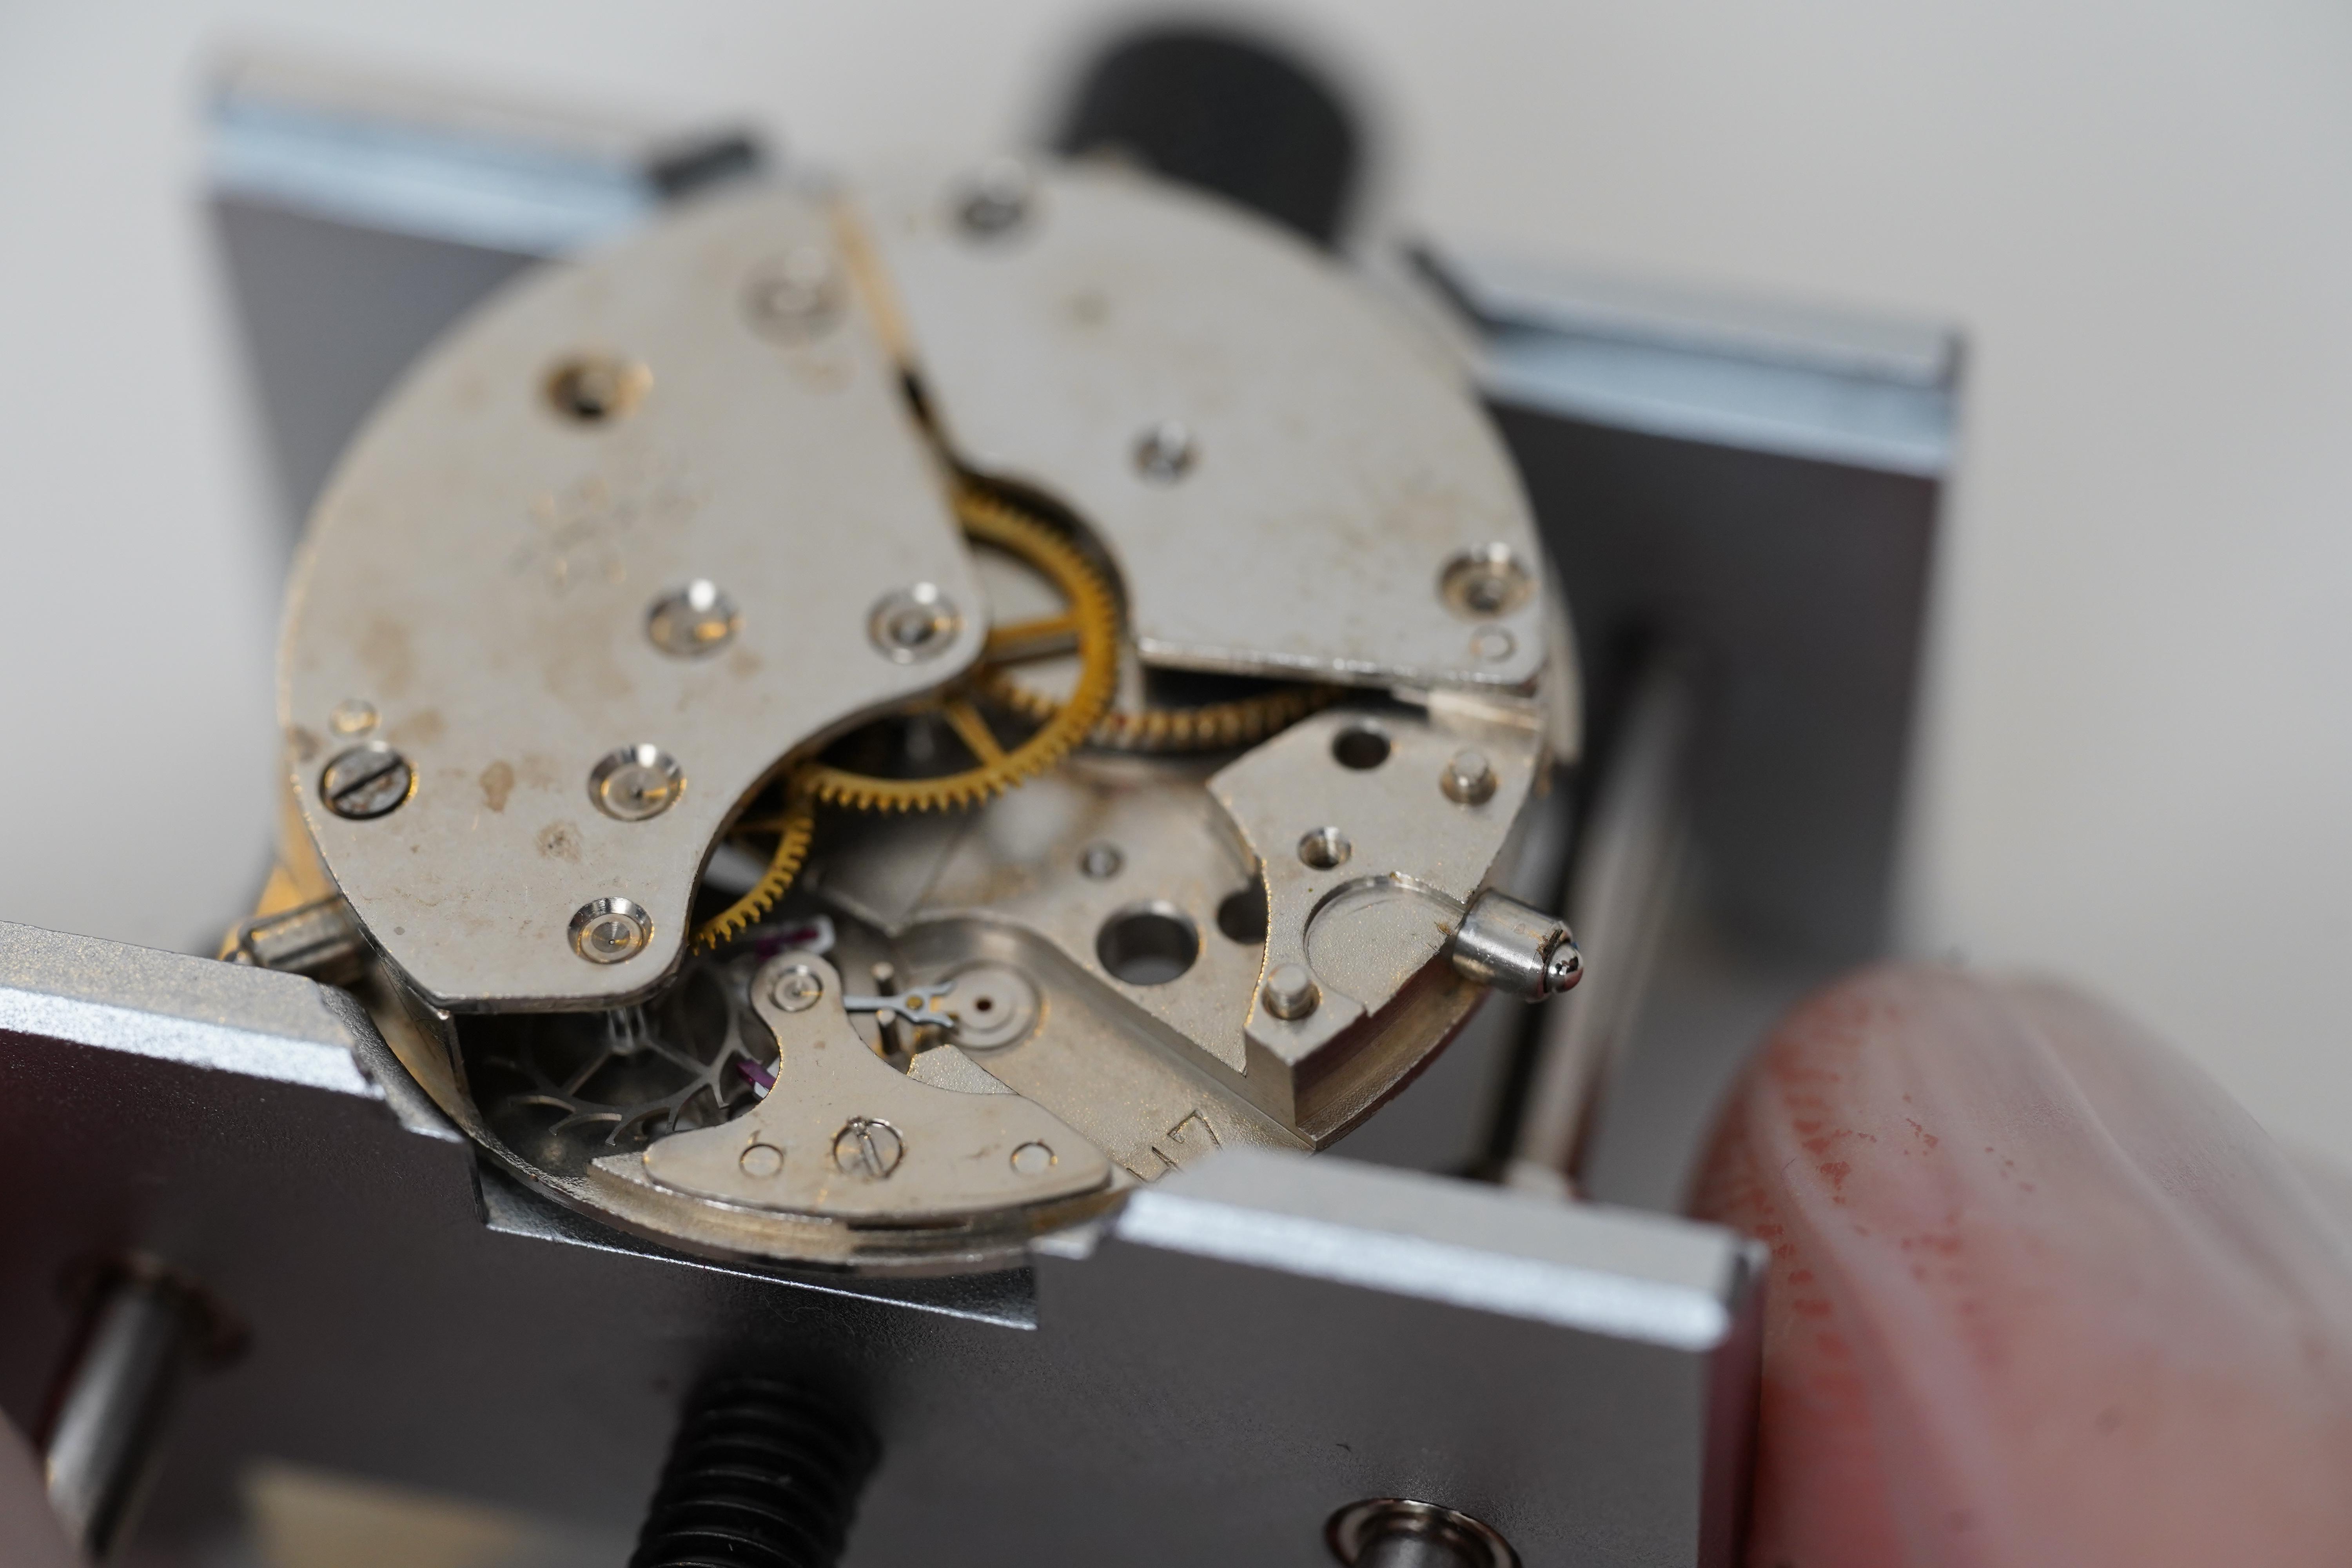
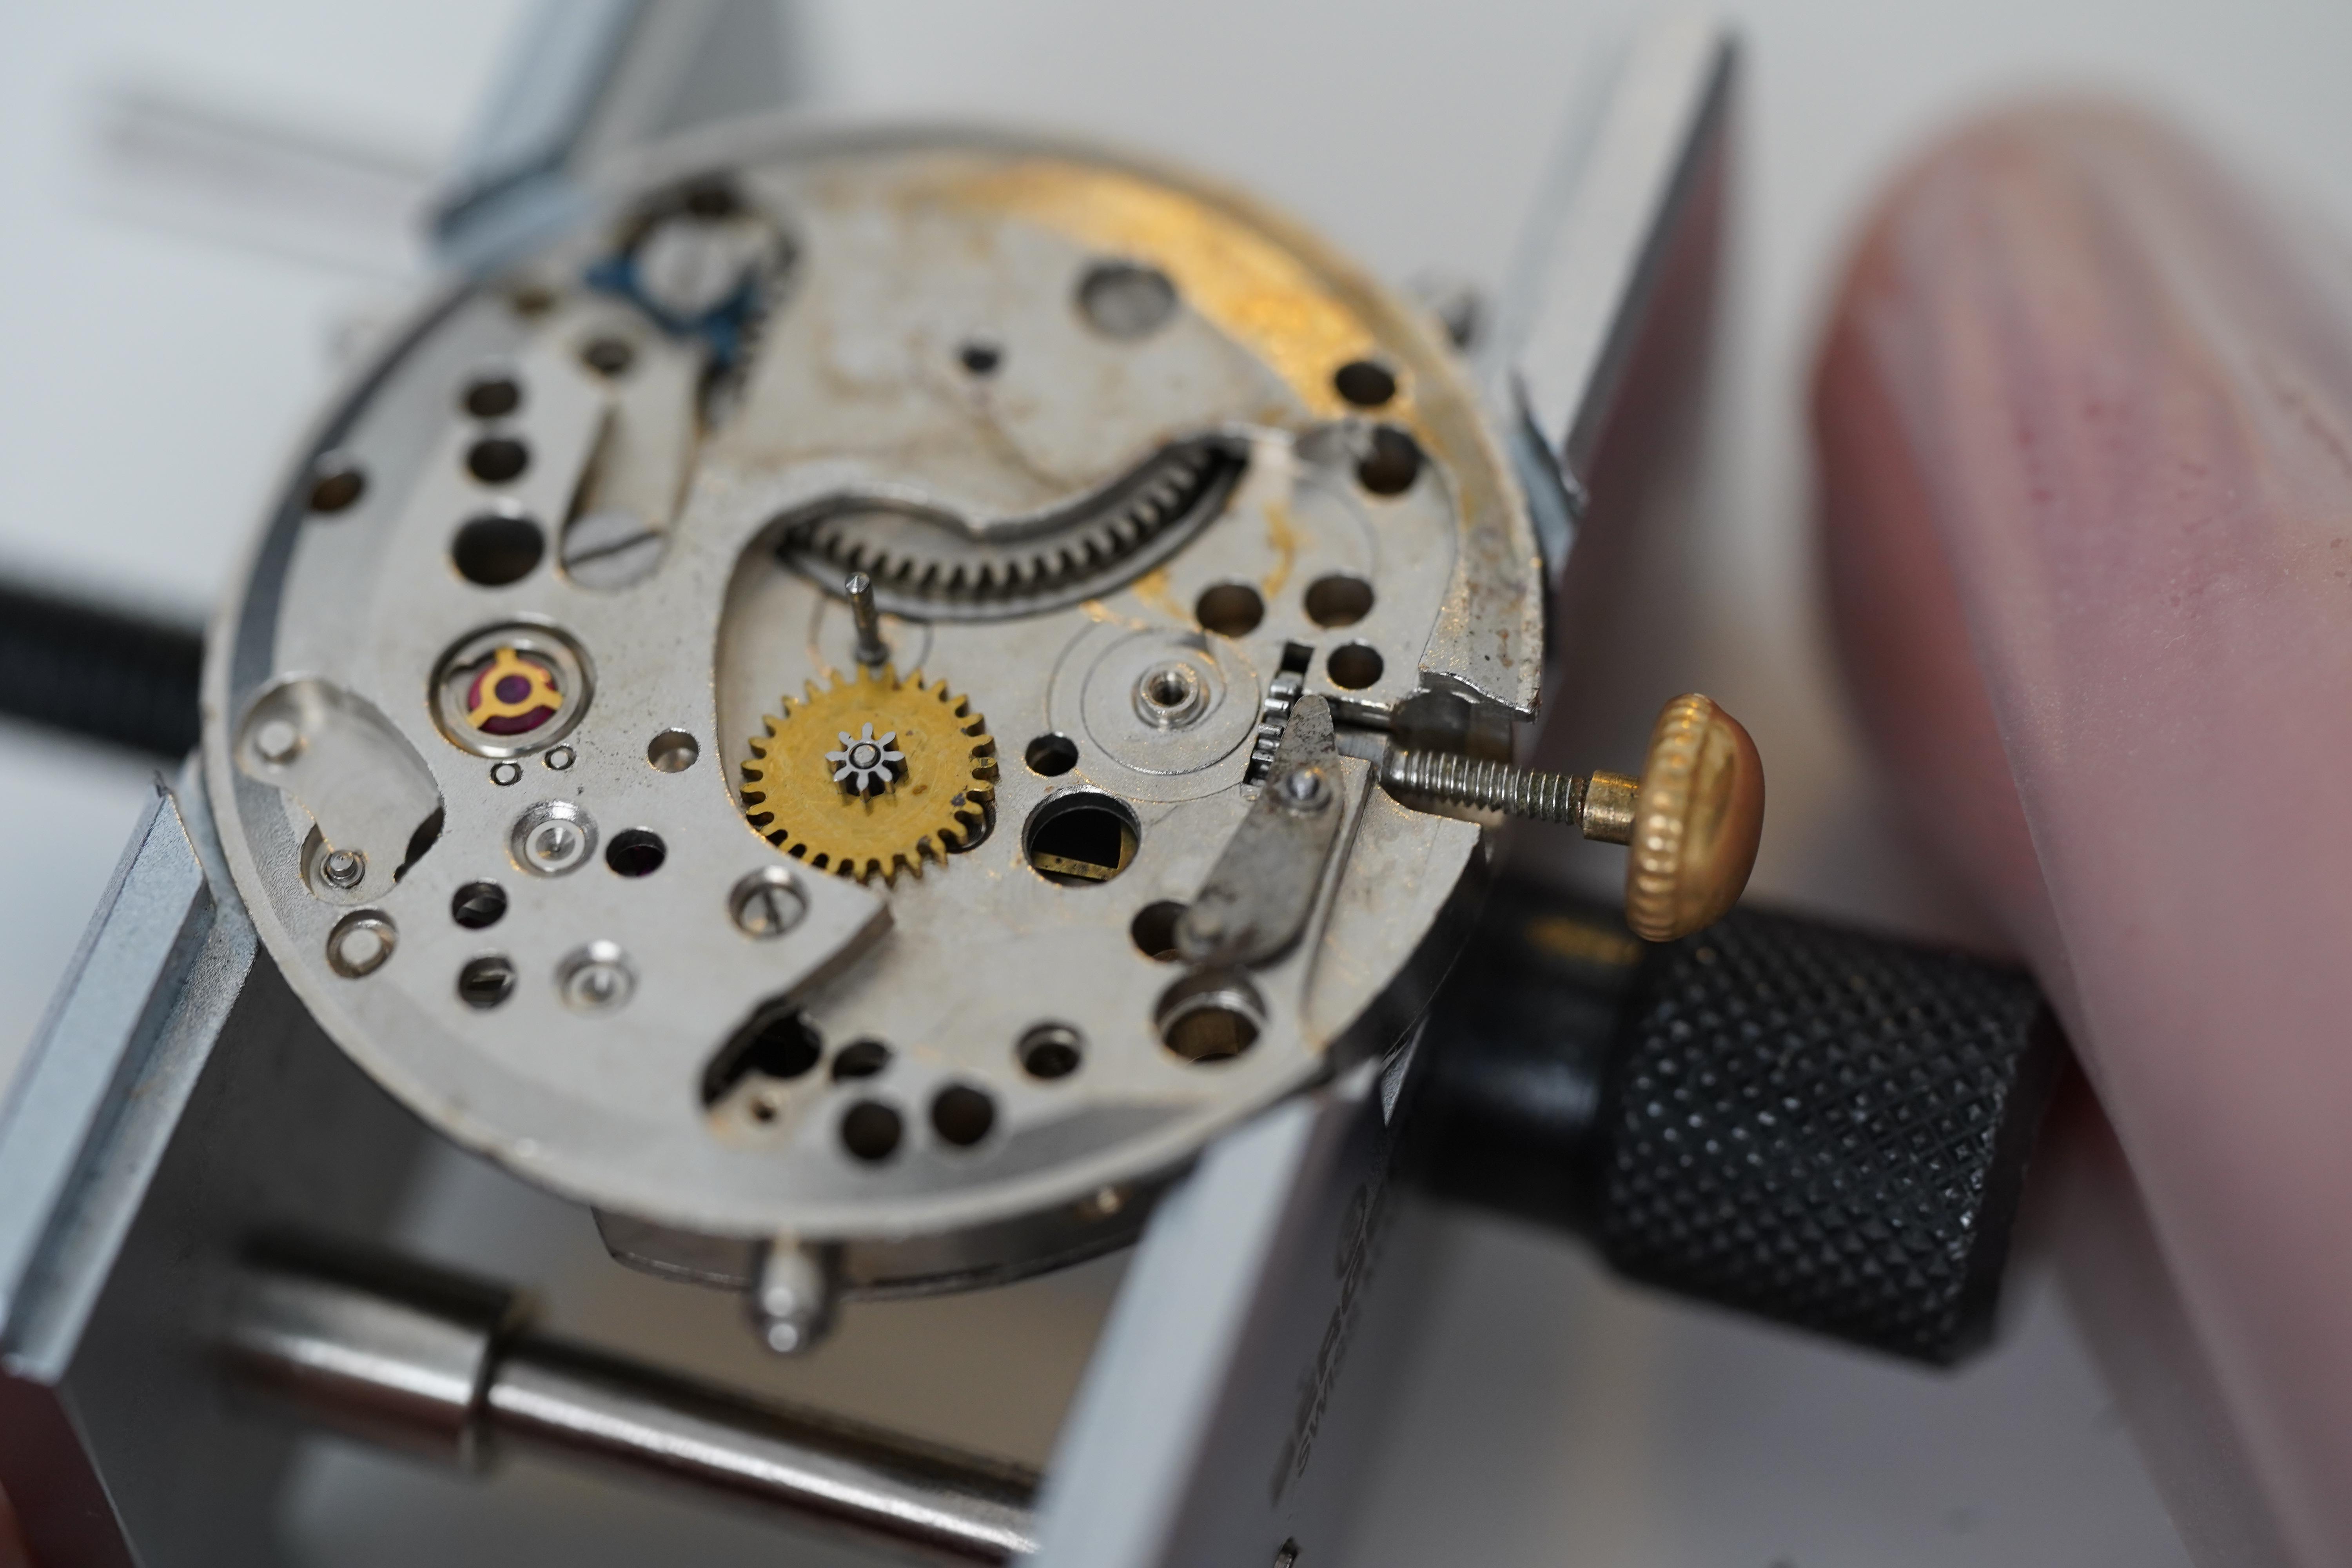
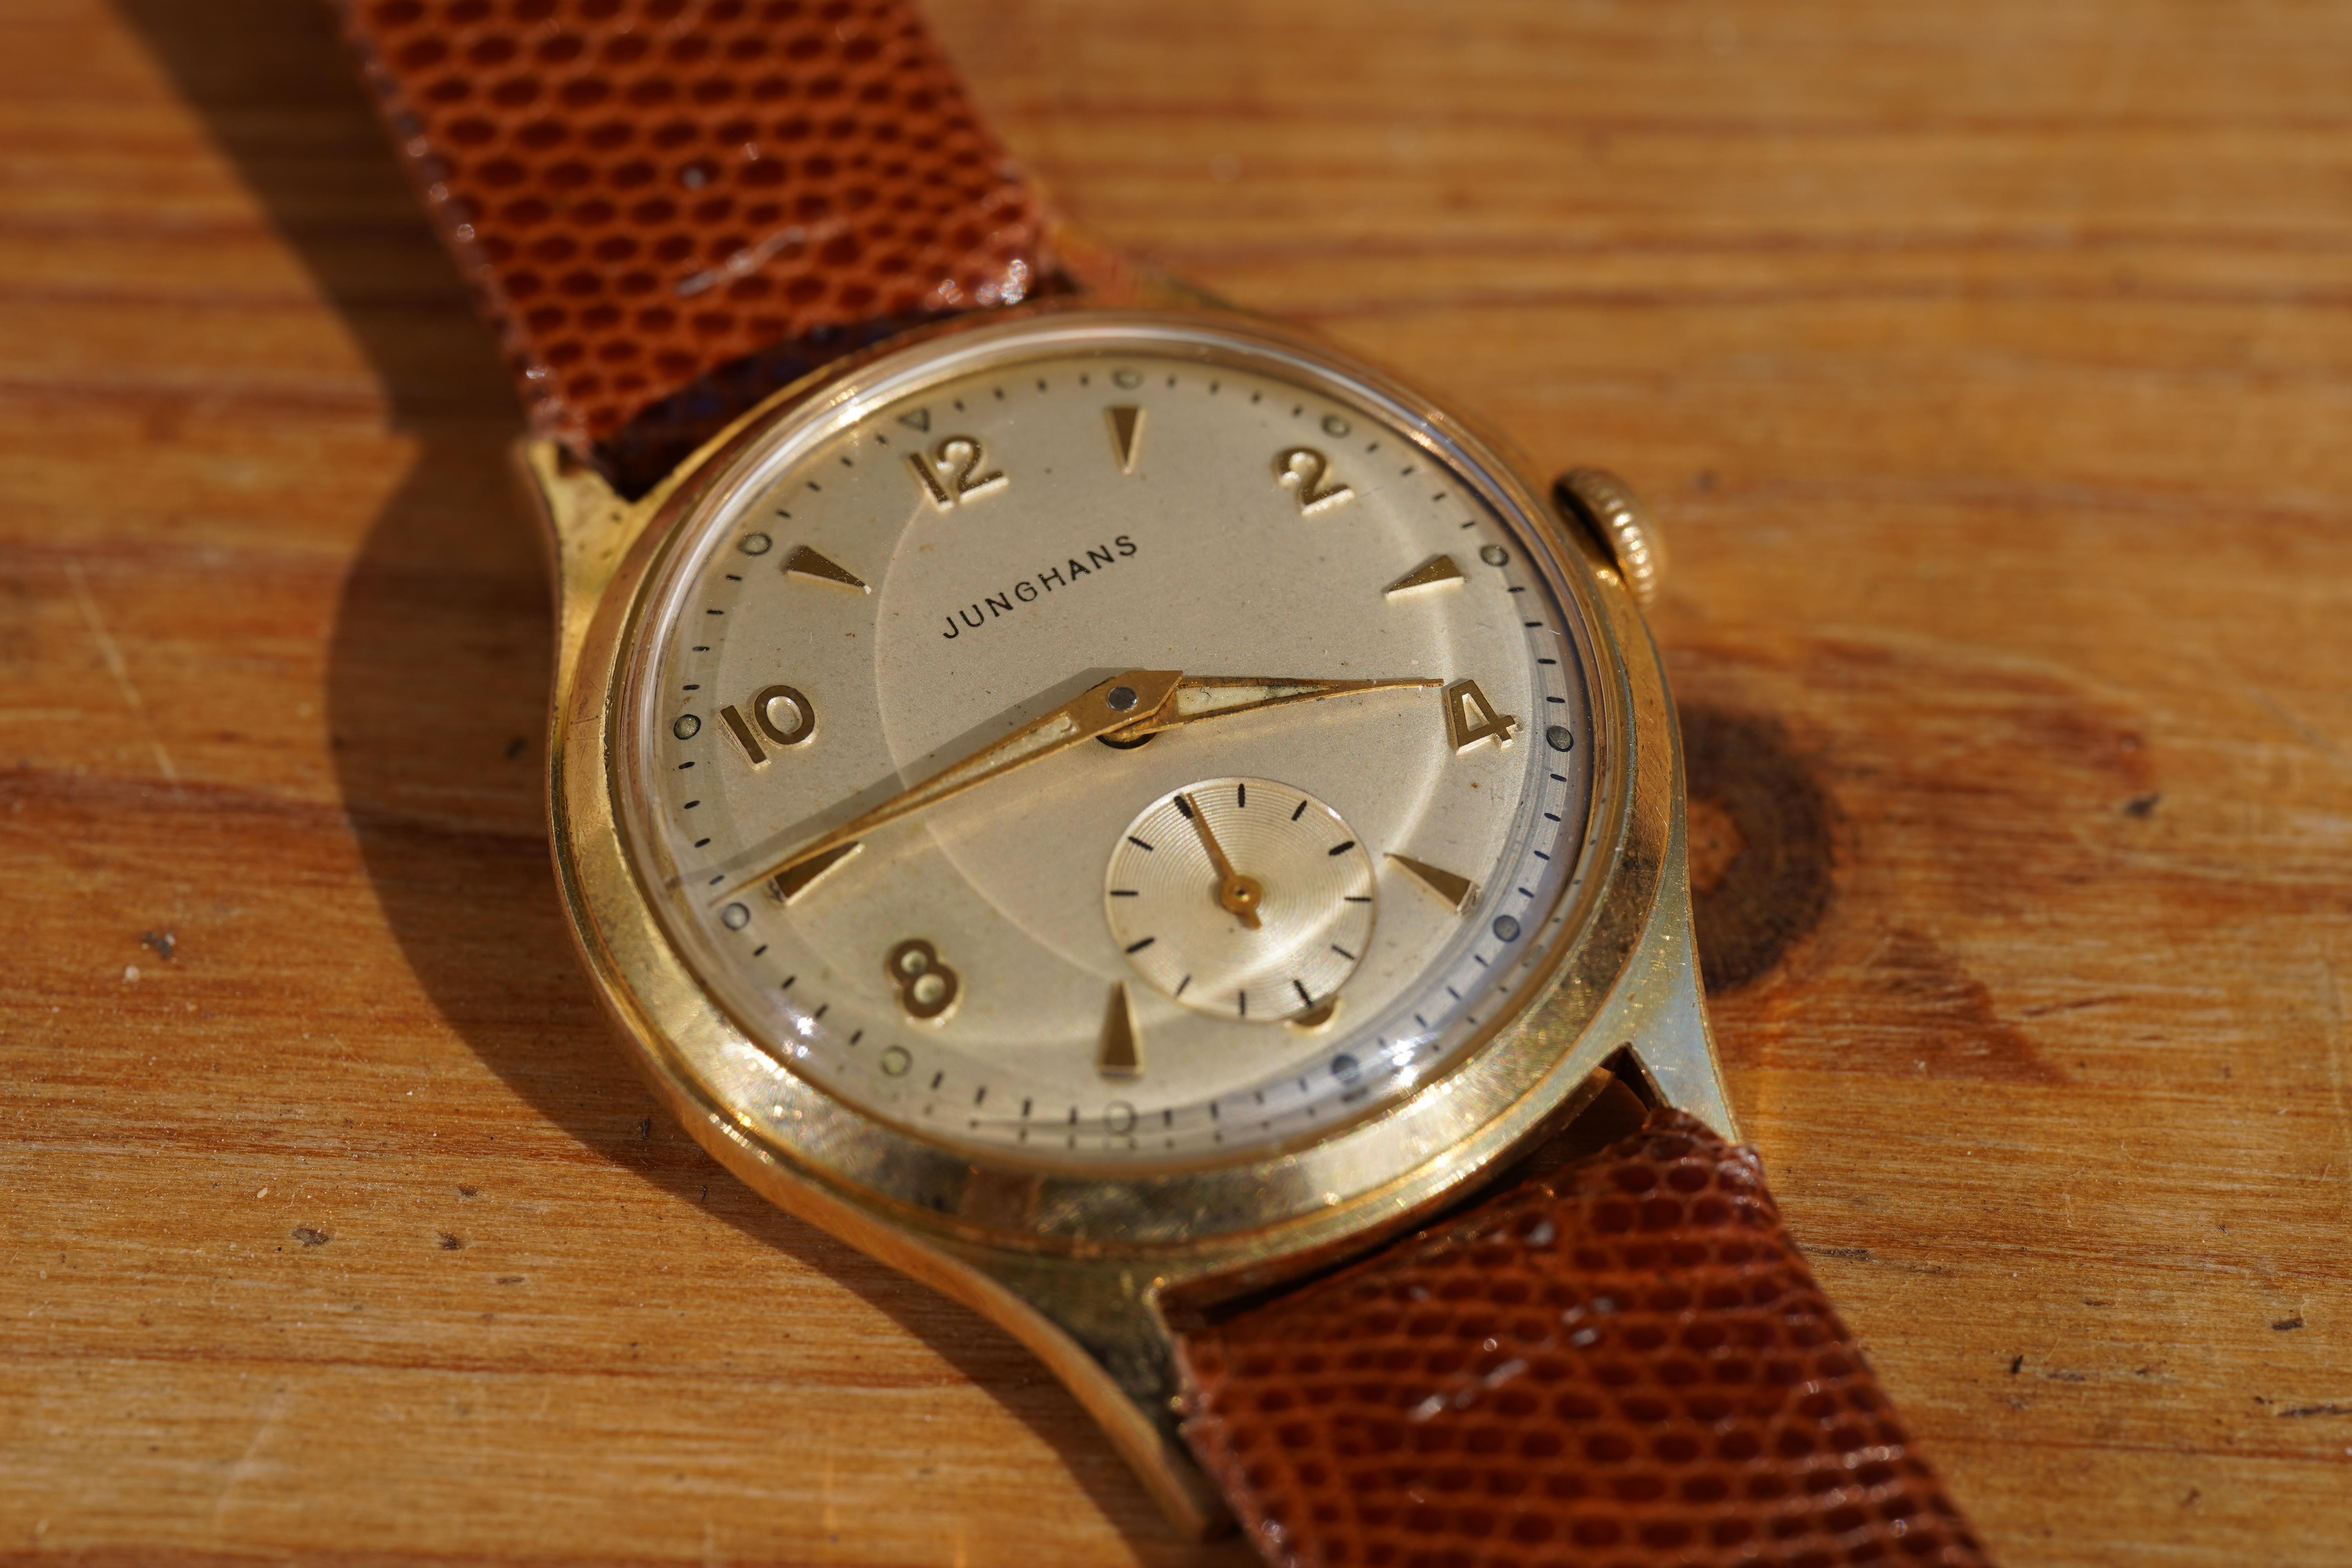
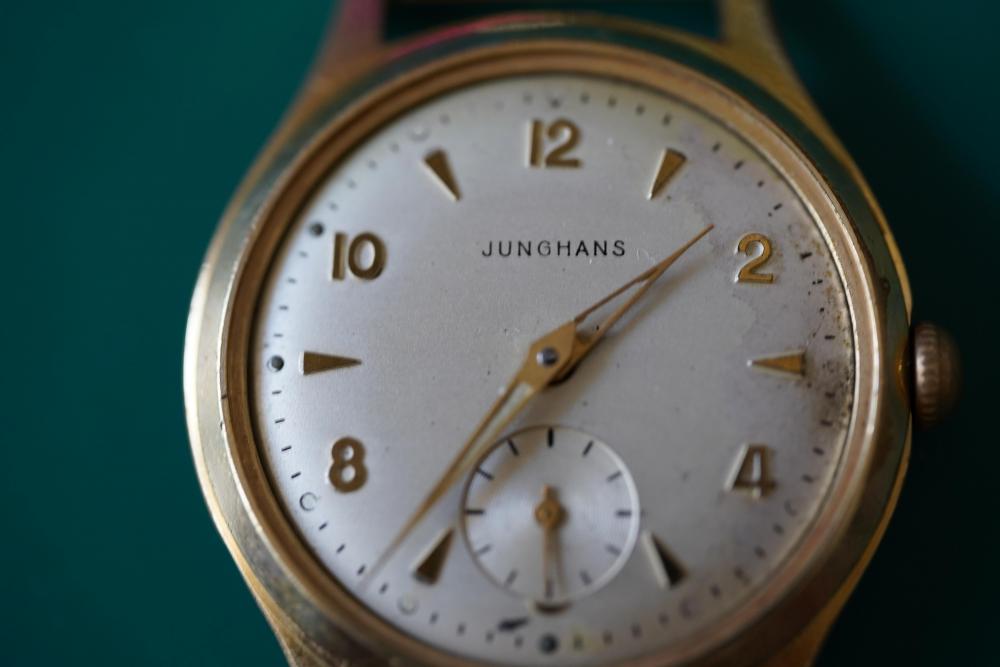
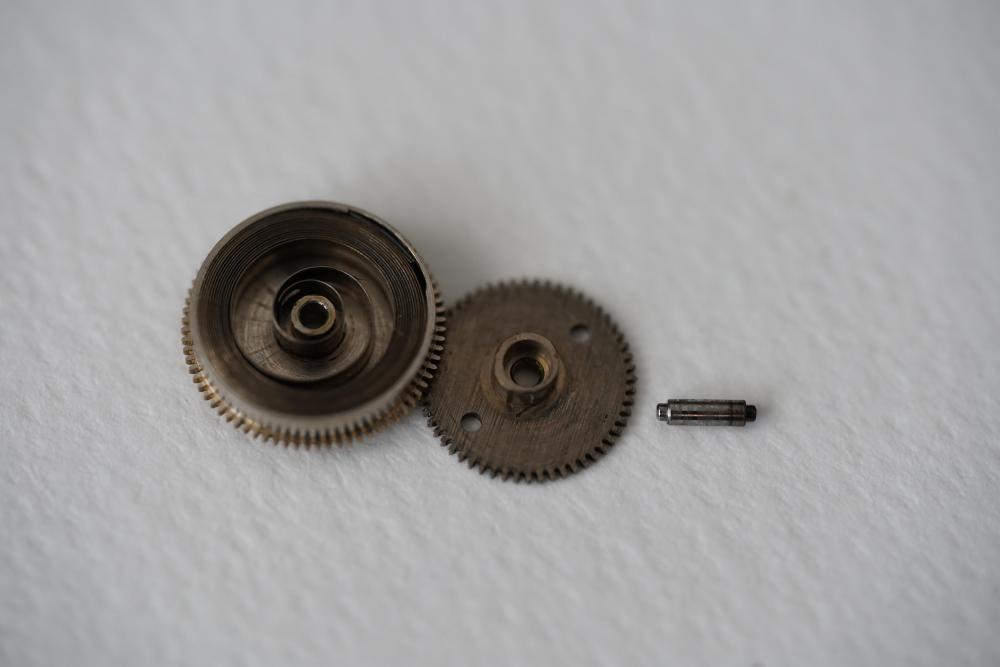
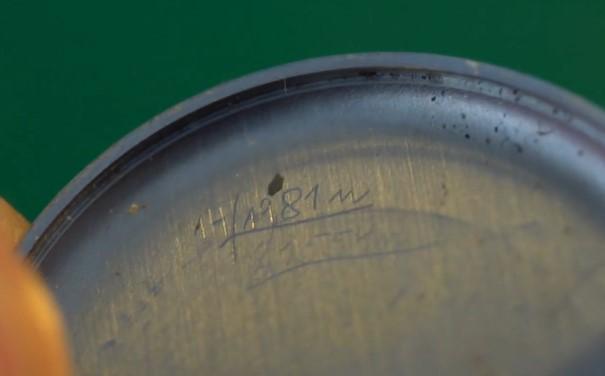
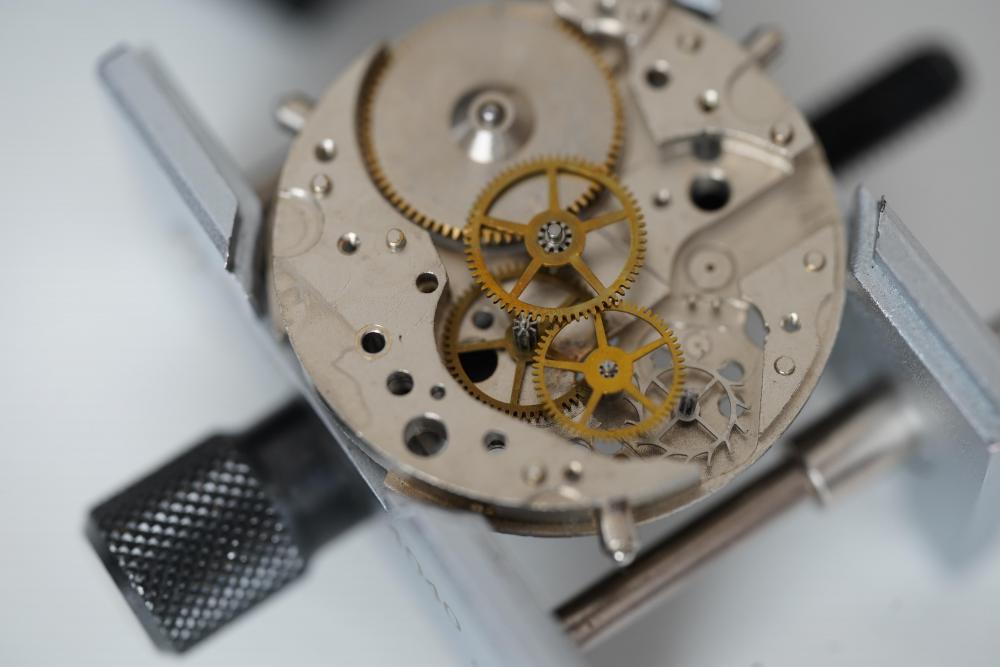
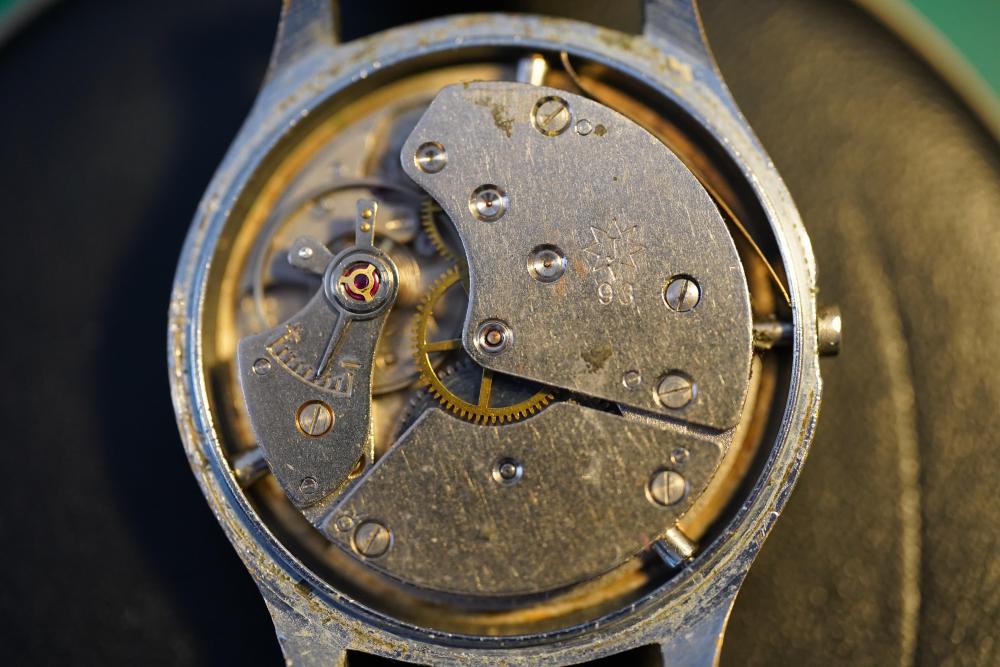
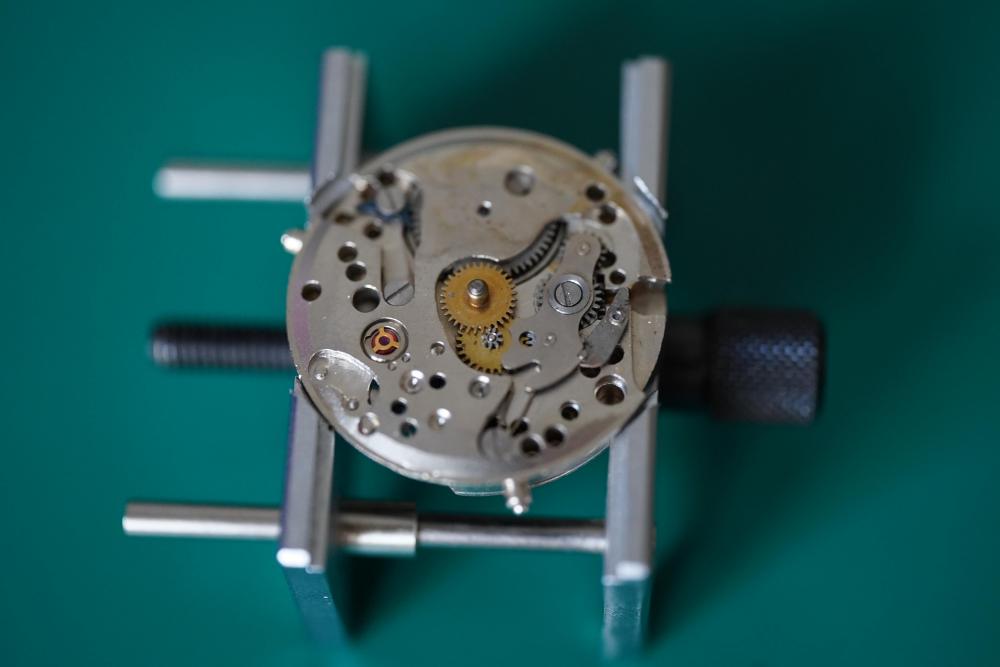
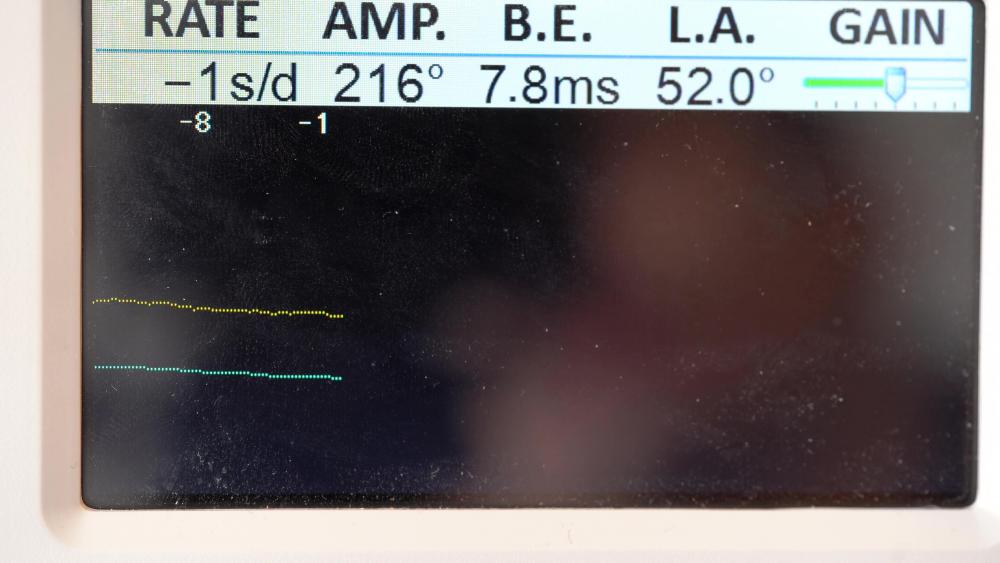
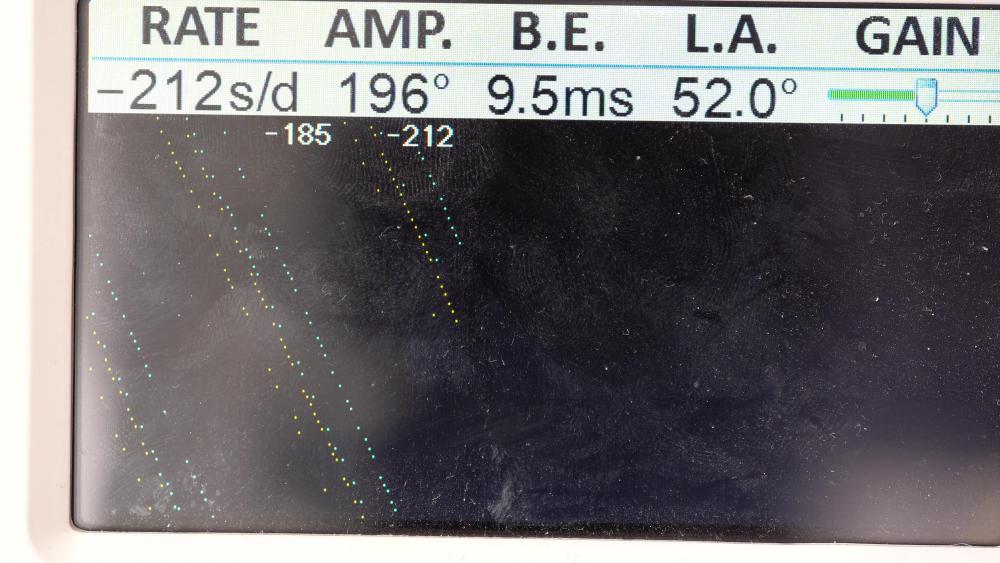
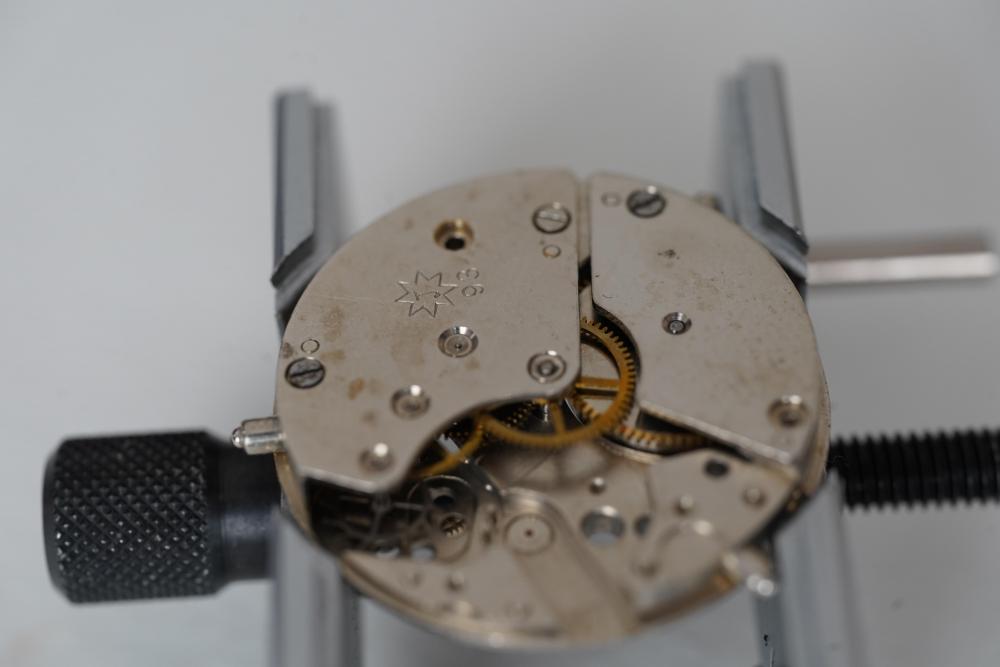
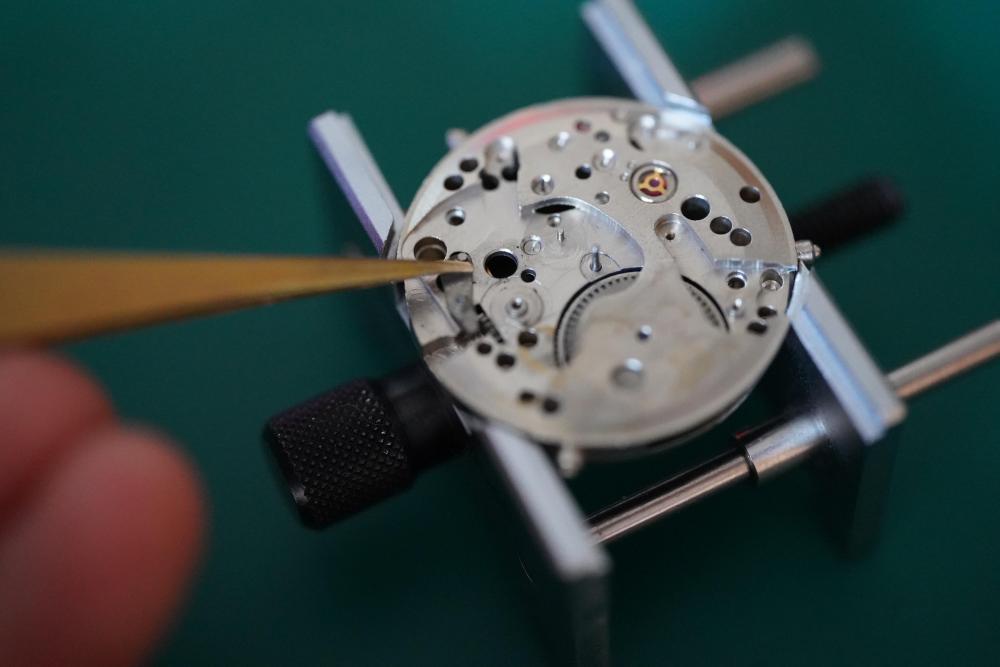
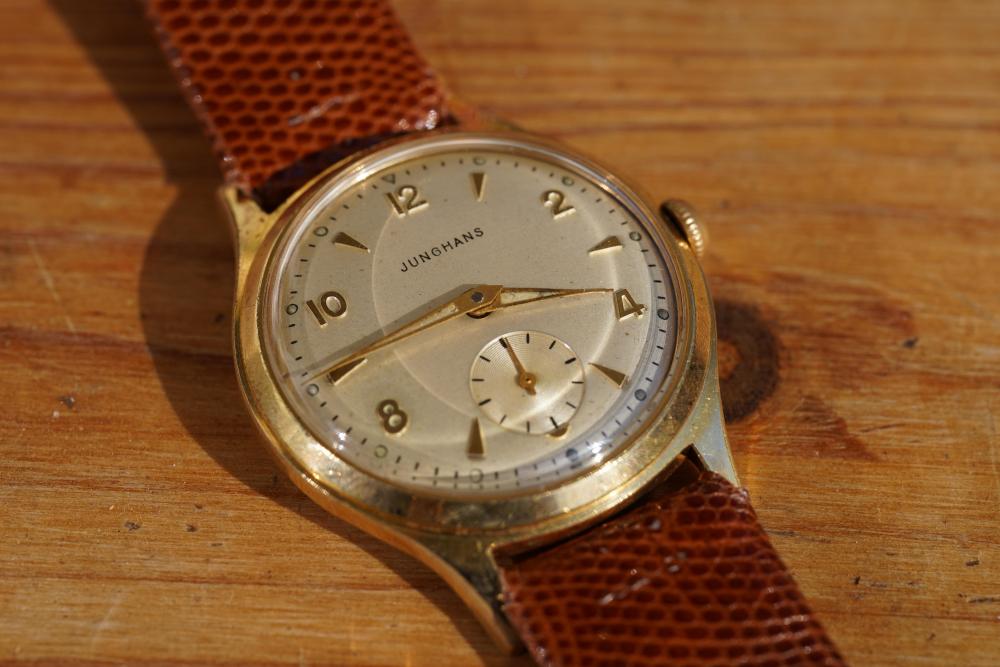
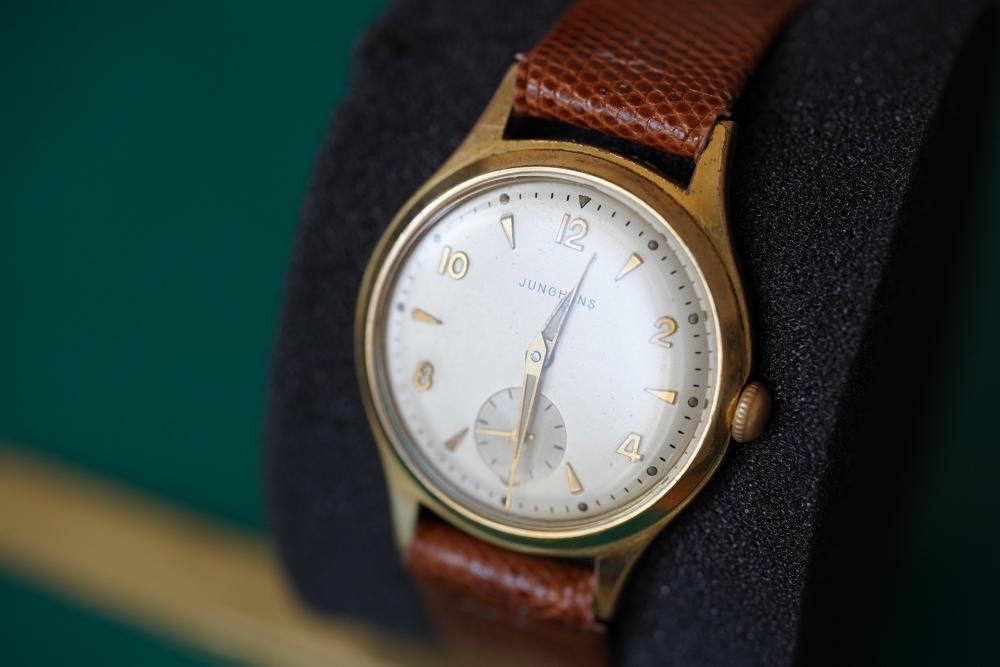
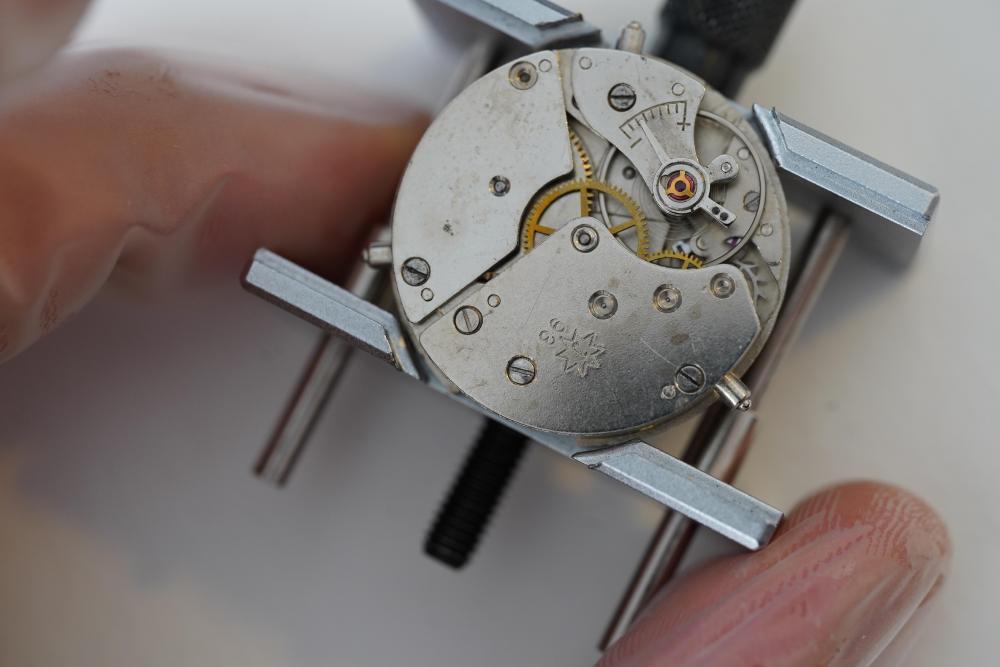
Hi everyone! This time I'm back again with a little something which turned out to be something of a hybrid project. I had repaired and planned a video on a Junghans watch with the 93 movement caliber to give to my younger brother ( which young adult doesn't need a nice looking watch) and had it all set out, planned and executed. The only downside was that the dial was slightly discolored on the right side due to bad cleaning on my part. Here you can see what I mean by that: But I happened to be at a local fleamarket on the day when I wanted to finalize the video and surprisingly found the exact same model! Even though the crystal was pretty scratched up, I was confident that the dial was in a good condition so I bought it for 10 Euros. And yeah, it looks like I hit the jackpot: So.. I got lucky and changed the dials in the end. But enough rambling around and here is the actual process of working on the watch movement: 1. Removing the movement from the case. This movement was from the “trilastic” model line of junghans and it got its name from the tri-legged support beams which held the movement inside the case. Just pop those up and remove the movement. Fun fact: While checking the inside of the caseback for marking I found one from 1981, thats so coooool! : 2. Remove the hands and and then the dial by unscrewing the dial feet clamps ( Forgot to take Pictures sorryyy) 3. Strap the movement into the holder and unwind the watch if needed. Then I removed the broken watch stem. 4. Remove the blued ratchet and the click spring 5. Remove the hour wheel, minute wheel, canon pinion and the very interesting looking yoke and its spring. 6. Then remove the clutch and flip the movement. The leftover lever will be released from the backside later on. 7. Remove the balance wheel and the pallet fork system. 8. Then remove the two screws holding down the mainplate and lift that. You can go ahead and unscrew the screw in between as well since that will release the left over lever on the front side. Do the same for the mainspring cover. 9. Remove the gear train and the mainspring And that's about it with the disassembly! Now moving on to the whole cleaning, lubrication and servicing part! Mainspring service: This Mainspring was something new to me since it had a very interesting arbor! Instead of the traditional small arbor inside the barrel, it extended outwards and acted as a lid and a wheel at the same time. While this is definitely cool, it also brings some negatives such as faster exposure to dirt and etc with it im sure. It looked fine so I just recleaned, lubricated and reinserted the whole thing: Lubrication: Here is a list of lubrications I used Moebius 9010 - All jewels Moebius 8200 - Mainspring and barrel lubrication Moebius HP 1300 slower moving parts such as canon pinion Moebius 9415 - Pallet Fork hooking jewels Molykote DX - Gearless works and high contact/friction zones (Front side only really) Oh and of course don't forget to clean and lubricate the balance shock jewels! Reassembly: Just reverse the disassembly steps or watch (no pun intended) the video for a step by step walkthrough. Timegrapher Test: Before Regulation After Regulation: Now i'm very happy that the rate is so much better. The amplitude can definitely be better however I would blame the old mainspring for that. The one thing that puzzles me really is the Bear Error. I've tried virtually every combination on the balance but the beat error does not improve. Maybe something is wrong with the hairspring? Final Result: After attaching the more aesthetic dial and recasing the watch and adding the straps, these are the final result pics: I must say I'm very happy with the whole process! Of course there were some up and down moments like when I destroyed the balance ( don't even ask) and had to get a replacement and such things but it all worked out in the end did it not? I was not sure how the beat error and the lower amplitude were going to show themselves while wearing the watch so I did a test wear for a week and the time only deviated by a second or two so I'm relieved! Now I apologize for the lack of pictures for a smooth documentation, I forgot and yeah, the rest is history. However, I have uploaded another fully commentated video so If you want explanations, more information or just a smoother experience go check it out: https://youtu.be/ZDXKiNnrmMk Any criticism, questions, comments and tips are always welcome and i'm happy to talk to you all! Hope you enjoyed it and until next time! Stay Healthy!


 1 point
 -
The hammer has 3 positions determined by the cam its attached to and the jumper that positions it. On some of these cam chronos you can get it to leave the zero position and rest in the stop position when moving the operating lever slowly, but in the watch it just (almost always) doesn't happen when using the pushers. I wonder if that has something to do with what you're seeing? Otherwise, chronos can be finicky; some, like the Omega 321 or Valjoux 72 just work fantastically even though the finish on the functional areas of components is often surprisingly rough. Others really need some finesse, a bit of finishing here, some adjustment of spring tensions there, etc. I haven't worked on the Poljot version of this caliber, but have worked on a number of 7733s, and I'm always happy to see them as they just tend to work and run great. Could be there was some finesse lost in the transition to the East.1 point
-
Hi Turning an end stone is usually used to remove excessive end shake from the balance. If the watch was working in this configuration its best to return it to the status quo.1 point
-
Those rolling dies are great, but the initial diameter is crucial as they form rather than cut the thread. Made by Habegger, available from www.schurch-asco.com, surprisingly affordable.1 point
-
If i told you I'd have to silence you lol Seriously if you decide to strip down and service the movement i can talk you through it .1 point
-
This will regulate the timing. Servicing it will also help, the rotors can get quite clogged up with wear debris. The train wheels are very tiny so be careful, also the rotor can be a real shite to place back with being magnetic. They want to stick to everything and jump around. There is a little trick that helps with that though.
 1 point
 -
Mark or photograph the current position and then try. These trim capacitors typically can be rotated all way round and have one position for maximum capacitance. Either way you go from there will reduce the capacitance and speed up the watch.1 point
-
Found this.Different calibre but for sure it’s how to trim.
 1 point
 -
It probably needs a clean and lube. Check this for more info.1 point
-
Hi Tom, Thank you! I used 2x Rustoleum Matt Black. It contains a primer and colour in one. It was a bit of a pain to try paint such a small piece on a flat surface to be honest. I think next time I’ll use modelling enamel as there’s less risk of too much paint and the part flying away. Yeah, figured I’d keep my trap shut this time around. I don’t know too much about Tissot and it was my first time working on one. It felt a little insulting to the audience to ramble on about a piece I know nothing about. I’m happy to jabber on about Seiko’s as those I’m fairly intimate with. Plus I figured I’d try something new and see how popular that is. Looking at the comments, seems like the lack of talking was the top theme Thanks again my man. Yeah, in hind sight that would’ve been a good idea. I think I was just in too much of a hurry to get the video out. You live and learn1 point
-
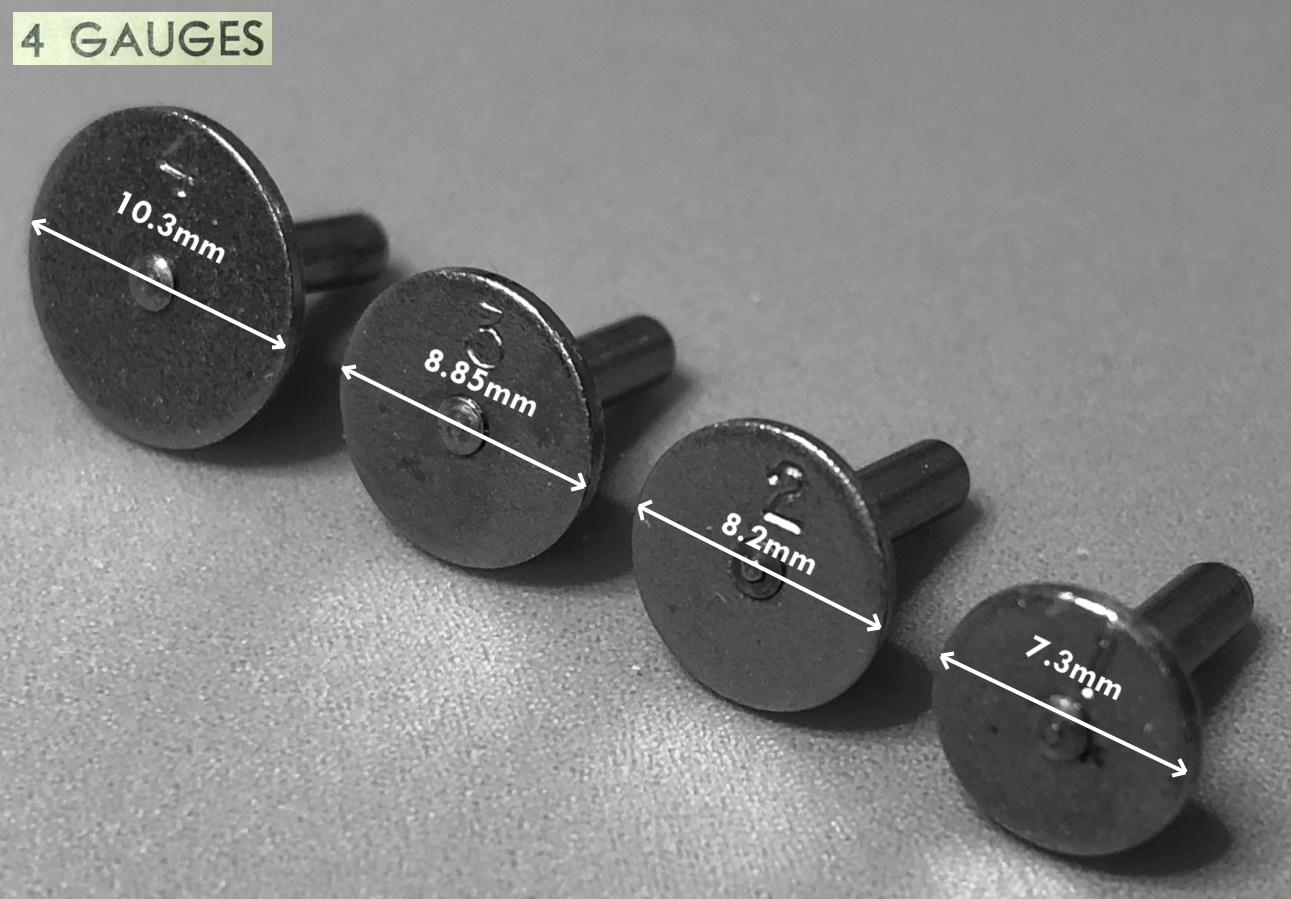
one of the problems with databases for watch repair parts are they can become incredibly huge. American pocket watch staffs narrow things down and staffs like Hamilton 992B are easy to spot because are unique. plus quite a few American pocket watch staffs are unique enough 30 spotted assortment when you're looking. When you get to the Swiss stuff then it becomes more challenging as there are so many varieties and variations. Then yes there are all kinds of reference books out there. like for instance ego here search for the word staff and on the second page either get staffs listed by size it's basically in the end of the book if you have the entire book https://www.cousinsuk.com/document/search?SearchString=staff or there's this website where you get both staff and stem dimensions https://www.balancestaffs.com/about.php1 point
-
yes you do seem to find staffs with broken pivots. But there also assortments of staffs that are brand-new. Trick is to find an assortment of usable staffs. Where I work somebody gave us a bunch of tools including an assortment of American pocket watch staffs. All of them brand-new and it's a shame you can't buy that assortment anymore? basically every single staff in there was usable several were Hamilton 992B. a lot of Waltham friction staff's and just basically a lot of really usable staffs. On the other hand have also seen Bergeron packets of Swiss staffs.1 point
-
That happens good idea though. I would want some evidence before i bought one though. Just in case anyone thought i was kidding about my current address . Its actually my postal address Btw the S isn't an S. Its the family EL symbol . It stands for HOPE. My daughter is my Supergirl i tell her she can do so much more than me. X
 1 point
 -
I used plate glass and carborundum powder to dress oil stones back to flat years ago. 6mm plate glass is about as flat as we can get and easy to aquire. And i was thinking as a kid playing cowboys and Indians, i was always a cowboy, my sisters would be indians which gave me a chance for any revenge i had been planning. The arrows had little red suckers on them, i wonder if they would suck onto the back side of a crystal ? I have wierd ideas like this and sometimes they actually work . Flat face crystal only for obvious reasons.1 point
-
I was getting the blurb on these mailed to me. For some reason, I think they said that they were going to be able to use metal from a Spitfire to make these watches. Though that might be something I made up after too many hours of internet looking at YT videos and browsing forums and looking at ebay to find watches that I wanted to buy and little sleep.1 point
-
The lists I have don't include your model. I can't remember where I downloaded the documents from. Try googling "Seiko casing parts". I just did and found this https://www.thewatchsite.com/threads/seiko-casing-parts-list-1977.245634/ As @JohnR725points out, often just searching ebay with the full calibre-case number will find the parts. Thanks to John, the above link gives the glass code 310W32GC0F, which if searched for in Cousins, finds :
 1 point
 -
it's good that you're still learning because all of us are still learning unless of course you're not the watch repair than you stop learning watch repair. Seiko a long time ago use the published casing reference books which may be out there in PDF form perhaps. I know there was another company that published the casing book for several brands conveniently am not sure where mine has wandered off to otherwise I was going look up the number. on the other hand even without a nice database through a handy reference book is amazing what happens if you just search online. when looking for Seiko case parts you need to express the case number in the proper form like this 6319–8120. The other number is the serial number which if you do a search somebody will explain online what those numbers mean. Once you get the case number express properly can do a search online and then at some point time grasp that you can just search on eBay and find this. this just happened to be the first one I found conceivably there is other sellers and other sources but you do get a crystal number that you can now search for that. https://www.ebay.com/itm/2948252572861 point
-
Welcome back Jonathan.1 point
-
But before going off to buy a replacement stepper motor or pcb, it would be best to follow protocol and use a quartz watch tester to check for a pulse and use the "line free" function to spin the gear train. Sometimes dried up lubricants can gum up a movement enough to stop it. SG$ 35.16 38%OFF | QD-20 Watch Maintenance Tool Quartz Movement Tester Made in China Watch Movement Tester Can Measure the Battery https://a.aliexpress.com/_mtjhhPU1 point
-
Is this any help for you. https://watchsupplyhouse.com/lr-varimatic-watch-cleaning-machine-operating-manual I had one of these and it was the best watch cleaning machine I ever had.1 point
-
Lol. It was my daughter's idea, when she was a little girl she used to say "daddy you can do anything cant you", she's now 28 and still says "dad you can do anything" bless her ❤
 1 point
 -
No problem John we've all been there, learning by our mistakes helps us remember how NOT to do things, one of my first experiences taught me how NOT to remove a crown wheel screw. Before you start to tighten down bridge screws gently spin the train wheels this can help identify any roaming rogue pivots and occasionally will place them if you are lucky that day.Use a thin rolled up piece of rodico to do this if you are worried. I've taken to using rodico as a probe for train and escape test more frequently, it can have just enough strength to move parts but will give if any resistance is present. Good for bending into different shapes and ideal for checking power at the escapement side.1 point
-
Maybe diminishing grades of diamond paste on a sheet of plate glass could work. The crystal suckered onto a shaft and spun ?1 point
-
yes it's definitely not your normal glass. because normal glass crystals can be polished relatively easy these always just seemed much much harder. But fortunately they're still soft enough you can still polish them a few really careful and diamond grinding compounds are readily available is necessary.1 point
-
It depends how deep the scratches are and how hard the glass is. I have a Citizen Crystal 7 which had a badly scratched glass, and I couldn't find a replacement. The glass was very hard, Wet and dry barely scratched it. I used a diamond knife-sharpening stone and then diamond paste on a Dremel. Took a while, but did the job.1 point
-
Basically you have to pretend your new hobby is lapidary because this is basically a form of glass. Then some of the scratches looked pretty deep. See may not build take them out 100% usually the crystals are relatively thick that are glass. My favorite used to be people who did arc welding because little balls of flying whatever would hit the glass actually burn into the glass. Fortunately those were the days we could get new crystals easily.1 point
-
You could just refinish the crystal to remove most of not all the scratches. I did it on one of my Seiko 5's that was badly scratched but couldn't be replaced as it had a ring of numbers applied to the back of the crystal and a replacement was no longer available, I tried a standard crystal without the numbers but it looked wrong, so improving the existing one was a necessity. It was not too hard. Just the usual decreasing grades of wet and dry paper, going from 240 down to 1200, then it was polished to a nice gloss with some polishing compound and a felt wheel on a Dremel type tool, took less than an hour and looked as good as new when finished. Obviously just a simple crystal replacement is easier but it might be worth doing just because you could.1 point
-
If you give the case number, we can look up the glass code1 point
-
Very nice and functional design. Personally not a fan of the fancy rotating stand as you have to keep track of the colors. Picking screwdriver on the back side of the stand is somewhat annoying as you have to rotate it 180 degrees, and for this reason you will feel lazy to place them back on the stand as it is hard to recall the positions at a single glance. Your design may actually work better for some of us, as it makes it easier to discern position. For improvement ideas, maybe round the sharp edges on the top side, or add a slot to store the extra bits?1 point
-
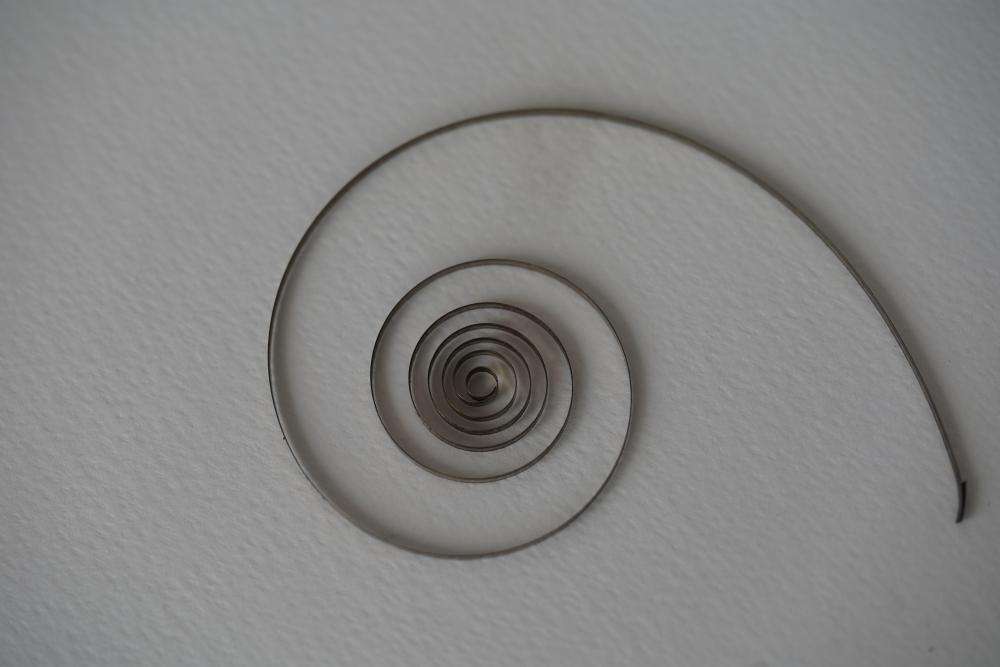
That is never necessary. The formula for MS (or any other regular spiral) length is accurate https://www.engineeringtoolbox.com/spiral-length-d_2191.html Applied to watchmaking http://theindex.nawcc.org/CalcMainspringLength.php So you can keep the original part in case no replacement is available after all, future reference, or just out of respect to for non-destructive science.1 point
-
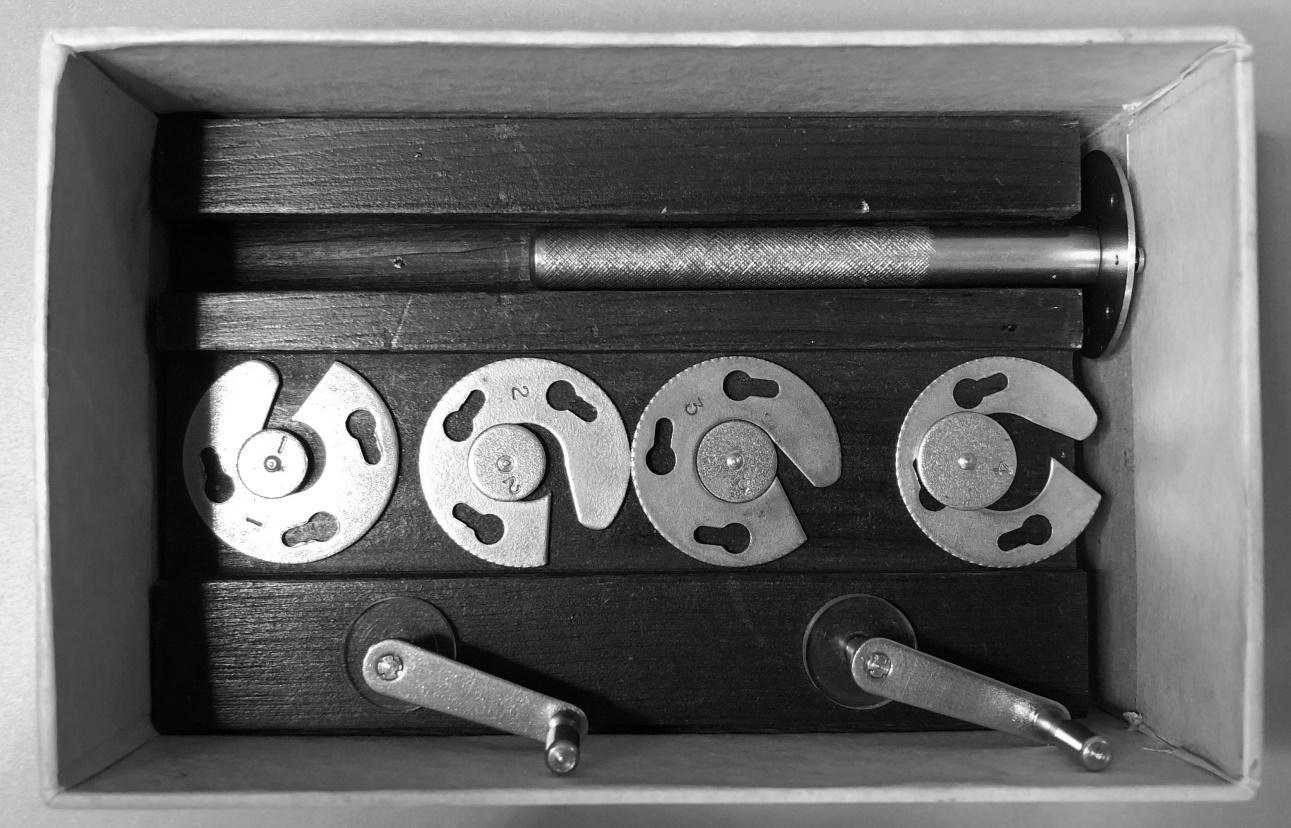
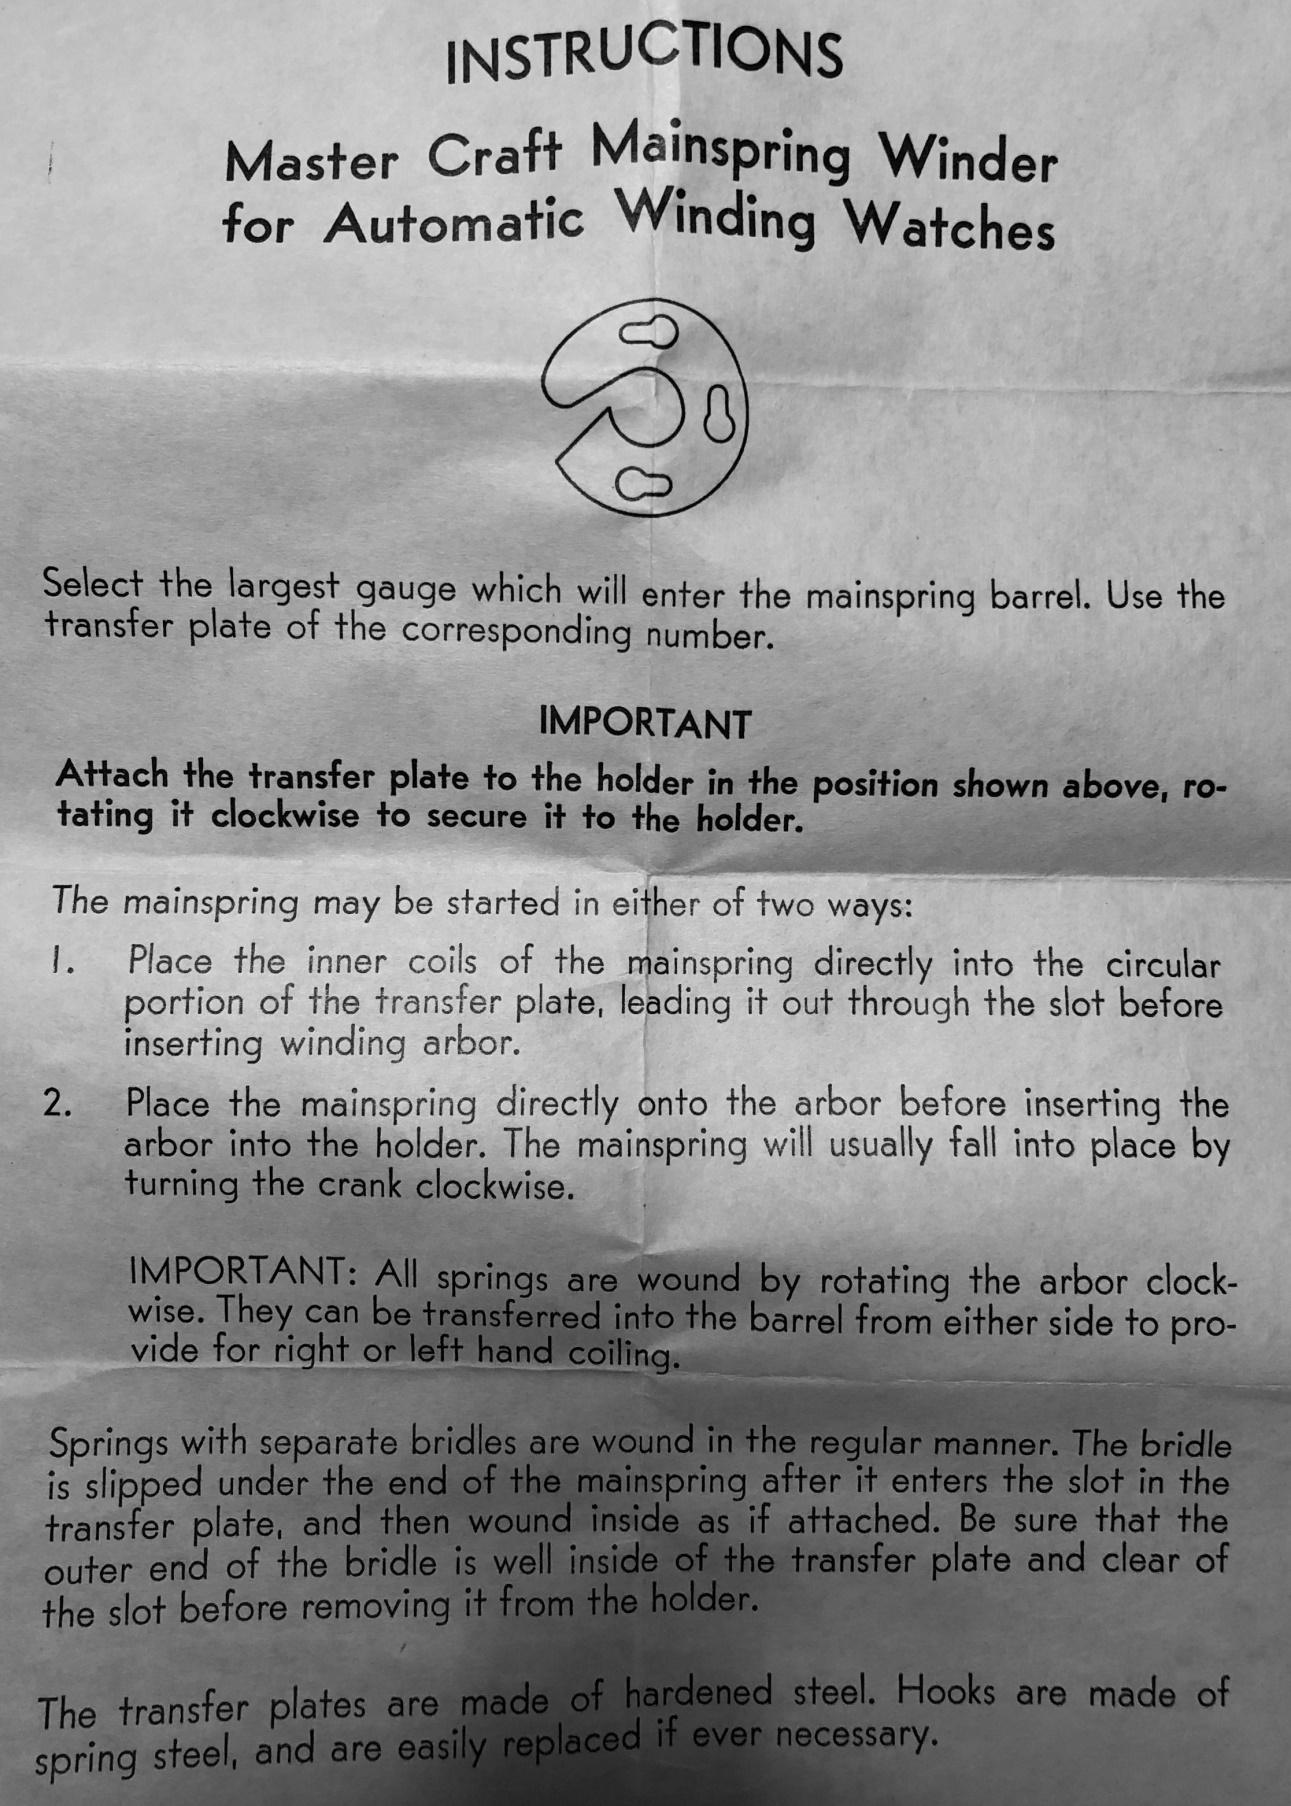
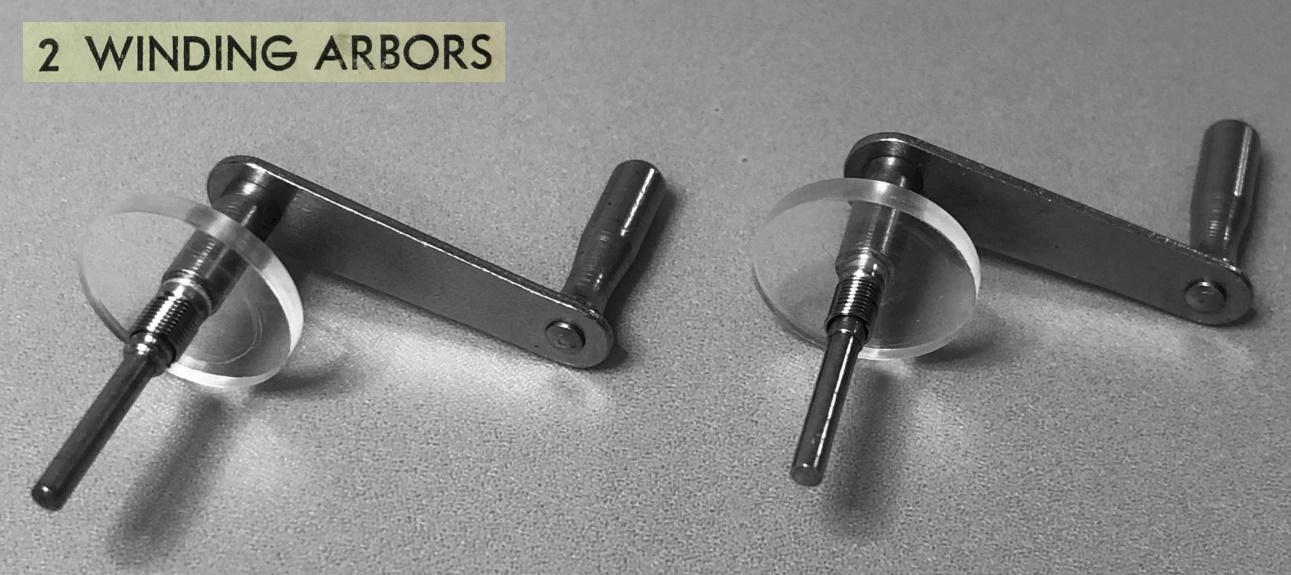
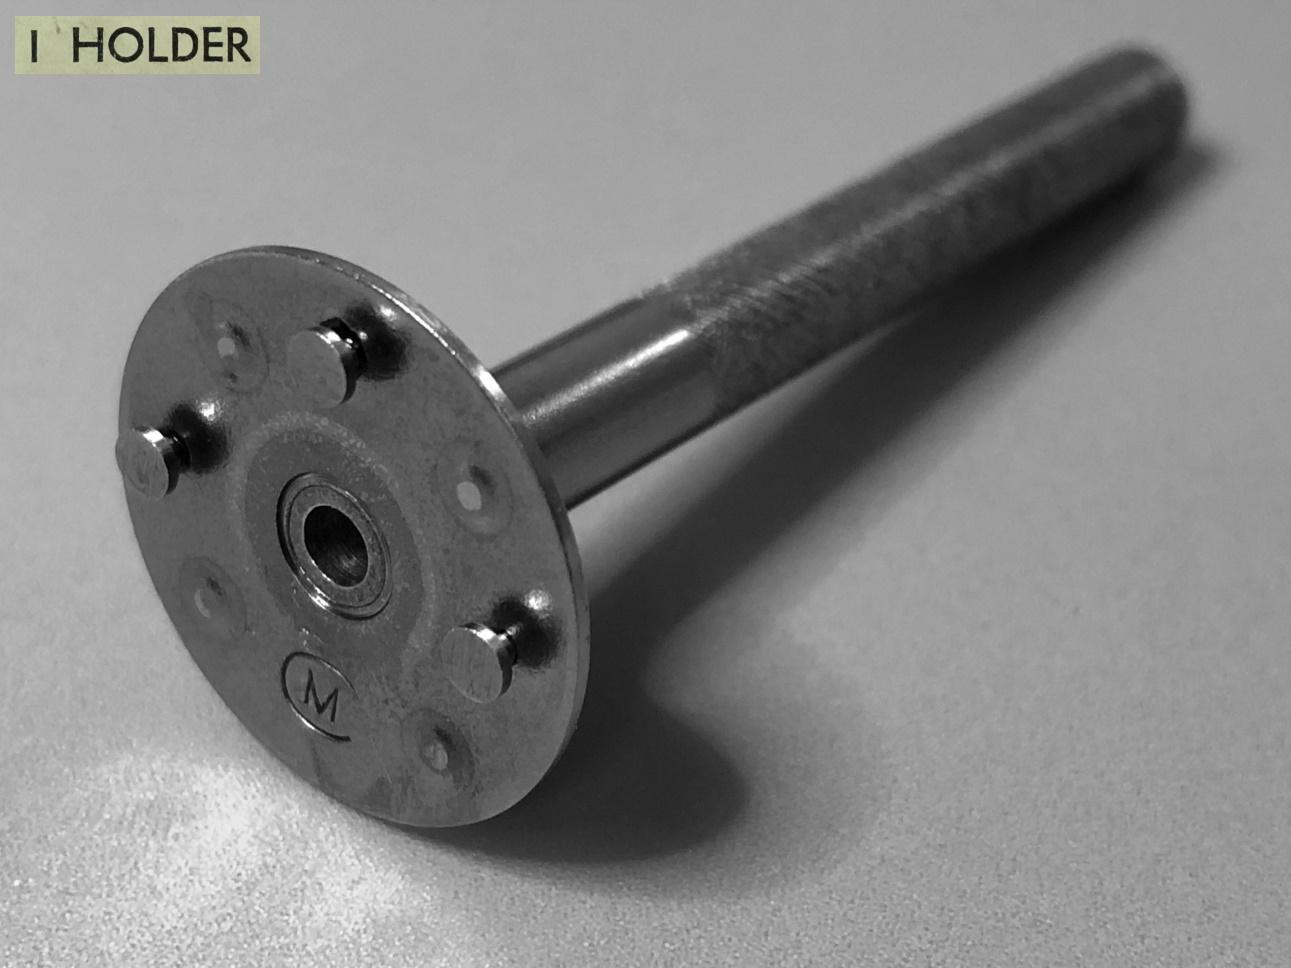
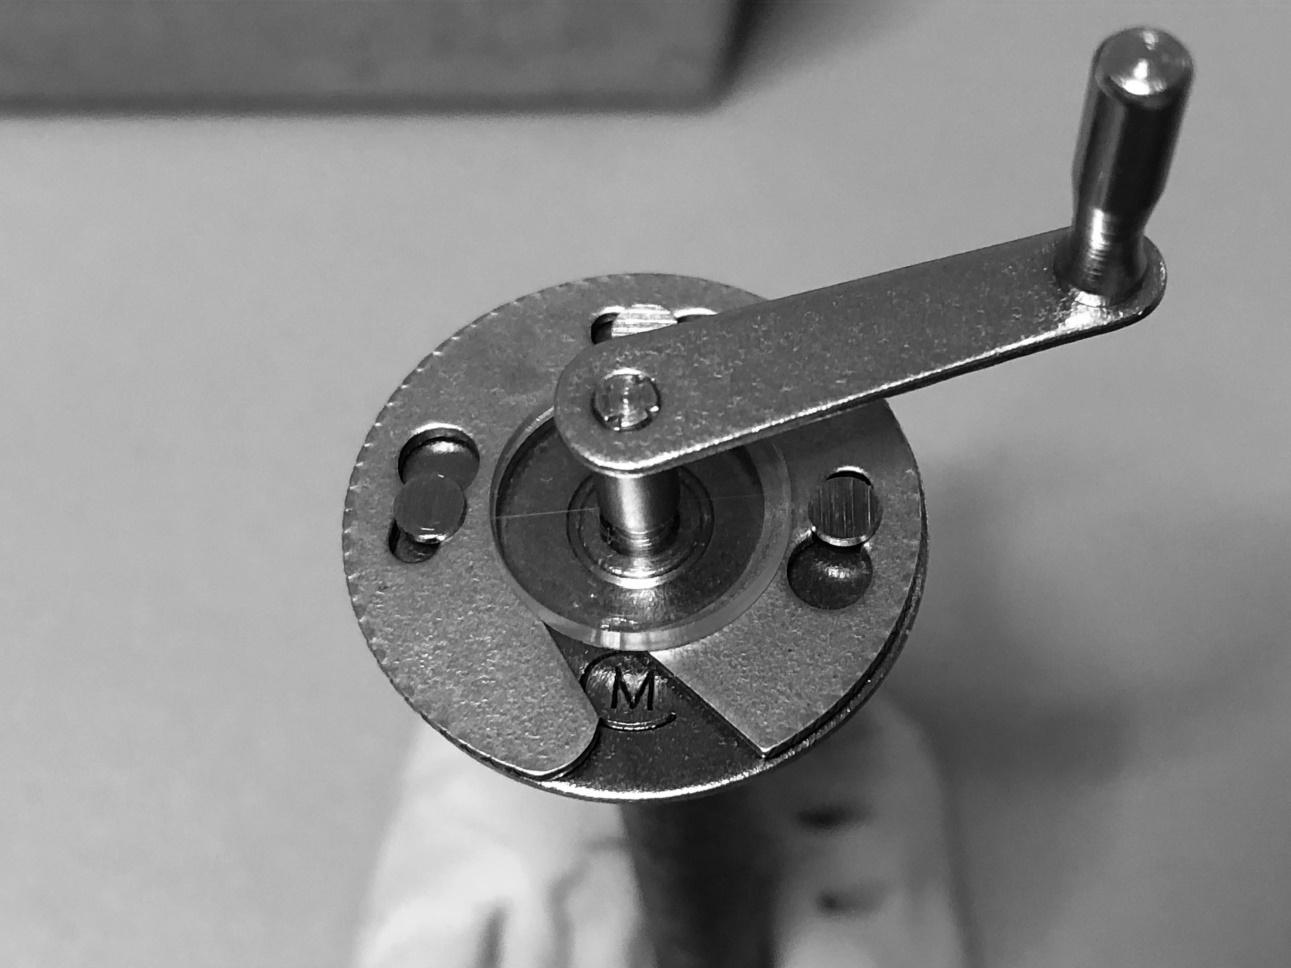
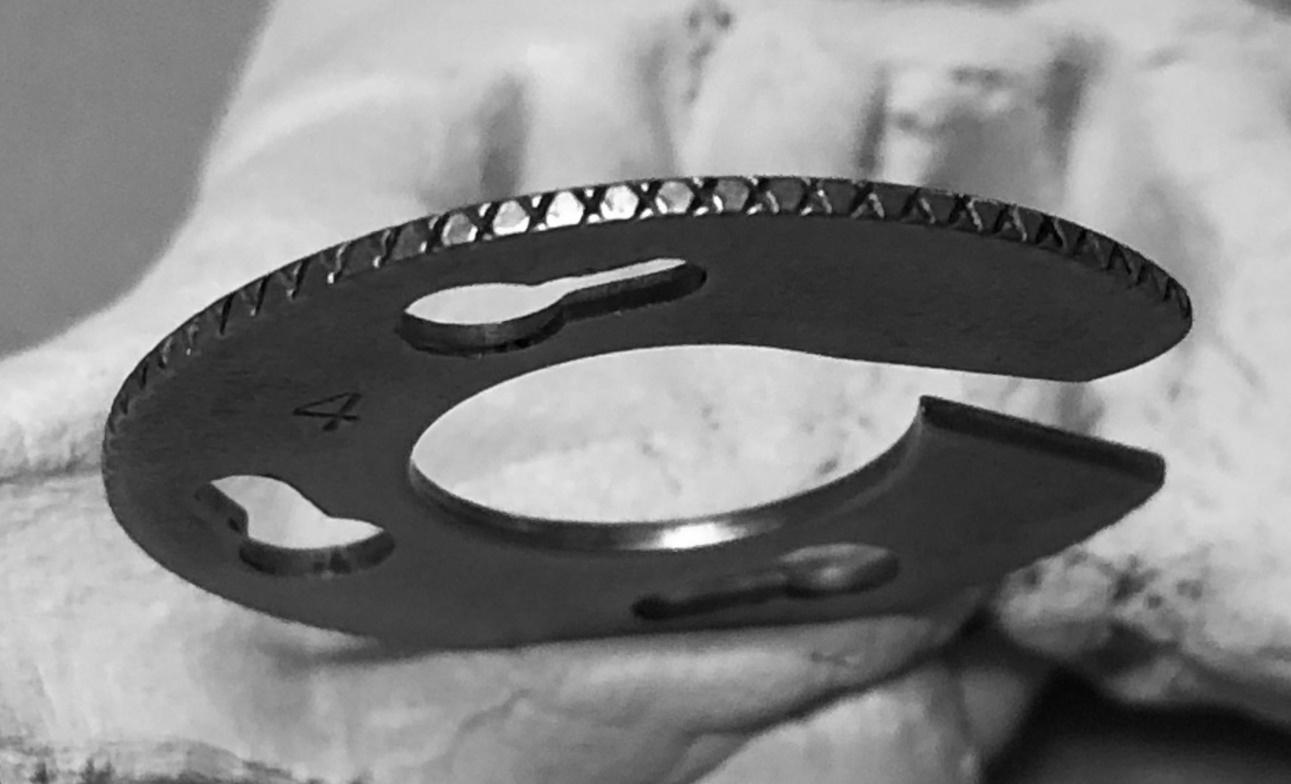
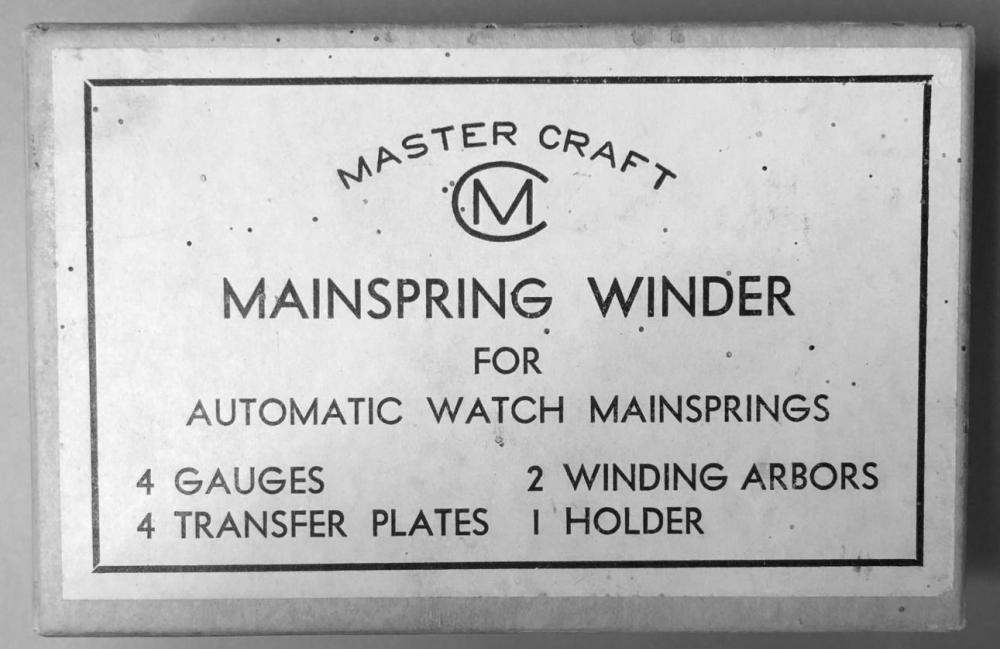
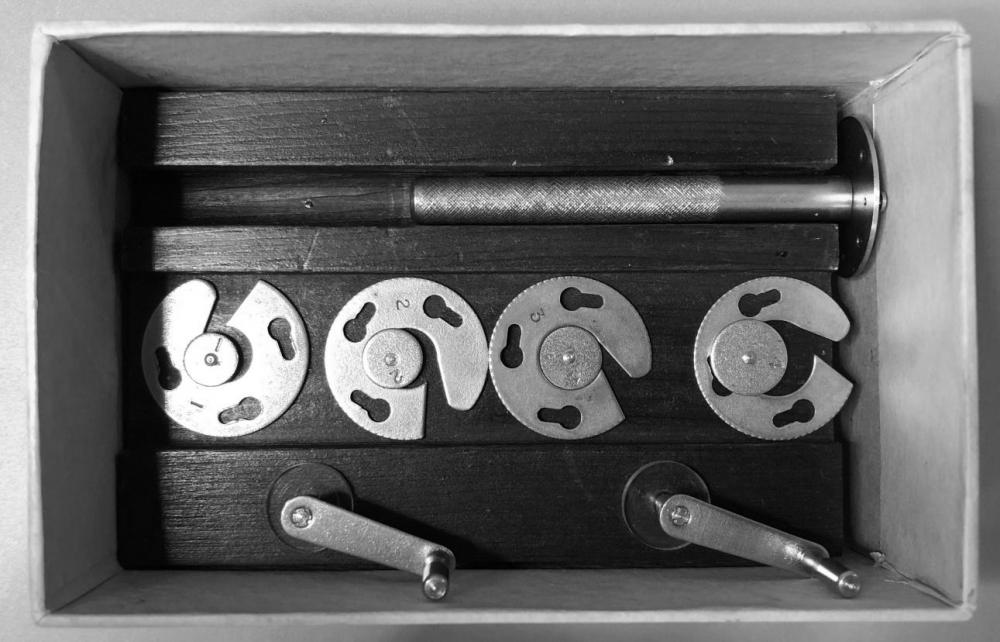
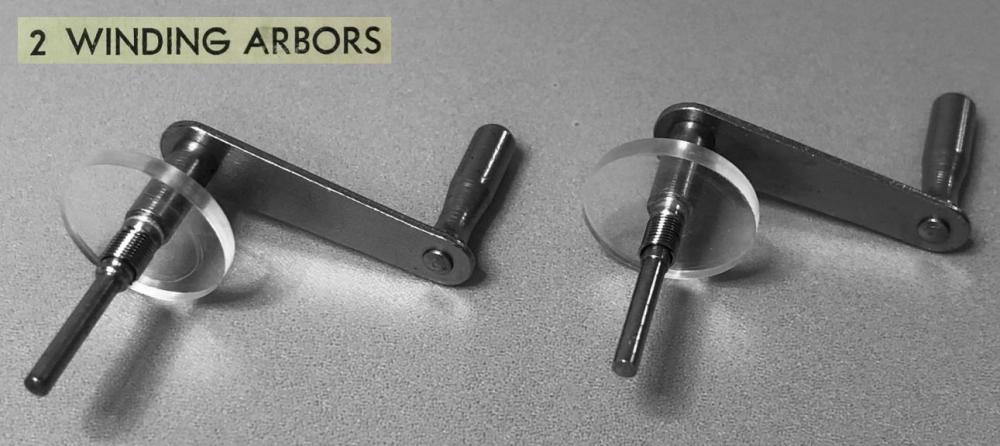
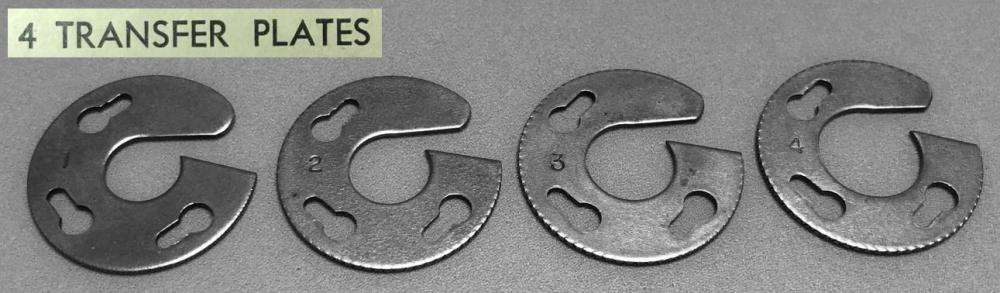
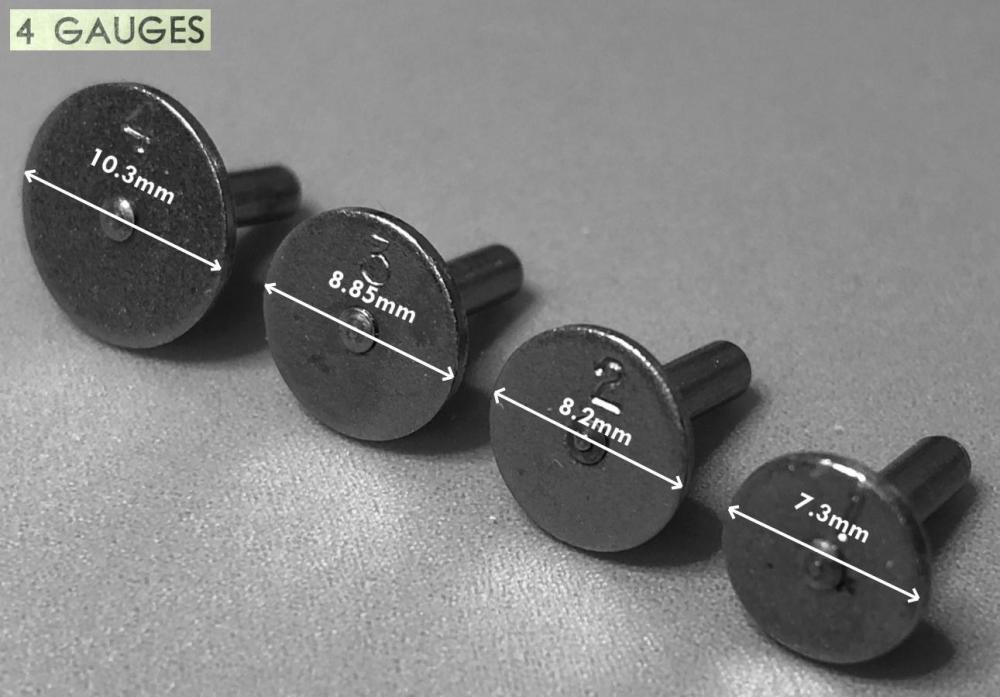
This Master Craft Mainspring Winder has been recommended and praised several times by @clockboy and I’m so happy that I, after several years of trying to acquire one, finally found a copy in very good condition on eBay. The Master Craft mainspring winder is surprisingly easy and convenient to use, and of the mainspring winder variants that I have tried so far, K&D 128, and Bergeon style winders, I must say that the Master Craft winder is the one that I now prefer with a good margin. Maybe a bit exaggerated, but I always dread and feel tense using my other mainspring winders, especially the K&D 128, but with the Master Craft I feel perfectly confident every time. It’s simply a joy to use and handle! There are several things with the Master Craft mainspring winder that I especially appreciate: The transparent discs of the winding arbors that make it so much easier to understand what is going on with the mainspring, both when you crank it in and especially when it’s to be detached from the winding arbor. The gauges that make it superfluous to measure the inside of the mainspring barrel. Instead, you can just try out which gauge best fits in the mainspring barrel and that’s it. That the mainspring can be transferred into the mainspring barrel from either side of the transfer plate to provide for right- or left-hand coiling. A nice feature too is that these transfer plates are coin edged making them easy to attach and detach from the holder. That the mainspring is so easy to crank into the transfer plate as the contact area between the mainspring and the transfer plate is so small. It almost feels as if the spring has lost 50 % of its tension. It also makes it quite easy to pull out the mainspring a bit from the transfer plate if you happen to crank it too far to get the bridle in. That it’s so easy to get the hook on the winding arbor to attach to the hole/eye in the inner coil of the mainspring. Using the suggested "method 1" in the user manual, I just push the winding arbor down in the inner coil of the mainspring while I crank it and the arbor hook automatically finds its way into the hole/eye in the mainspring. Conclusively, I must say that I’m super happy with this cleverly devised mainspring winder. It exceeded all that I was hoping for and was expecting! So much that I felt an obligation to write this post.


 1 point
 -
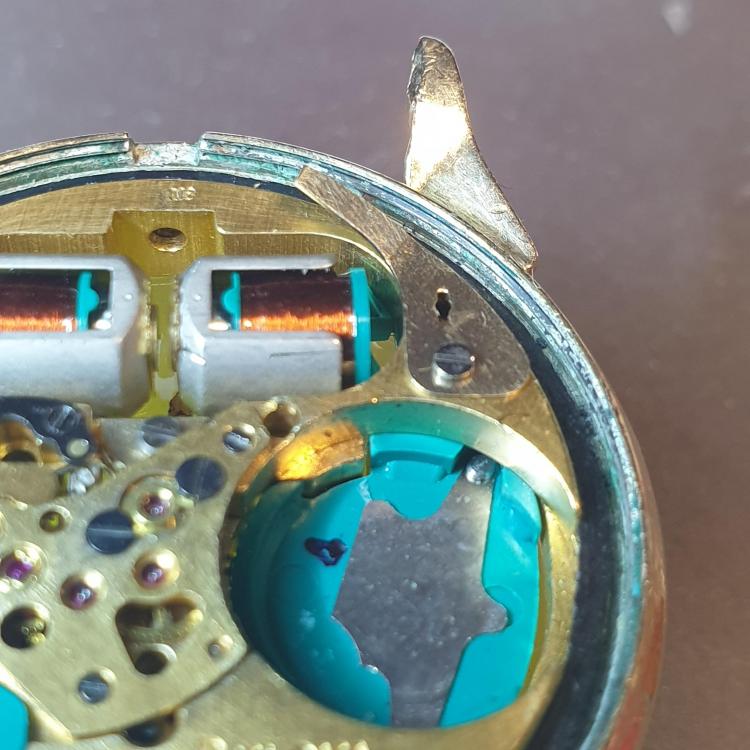
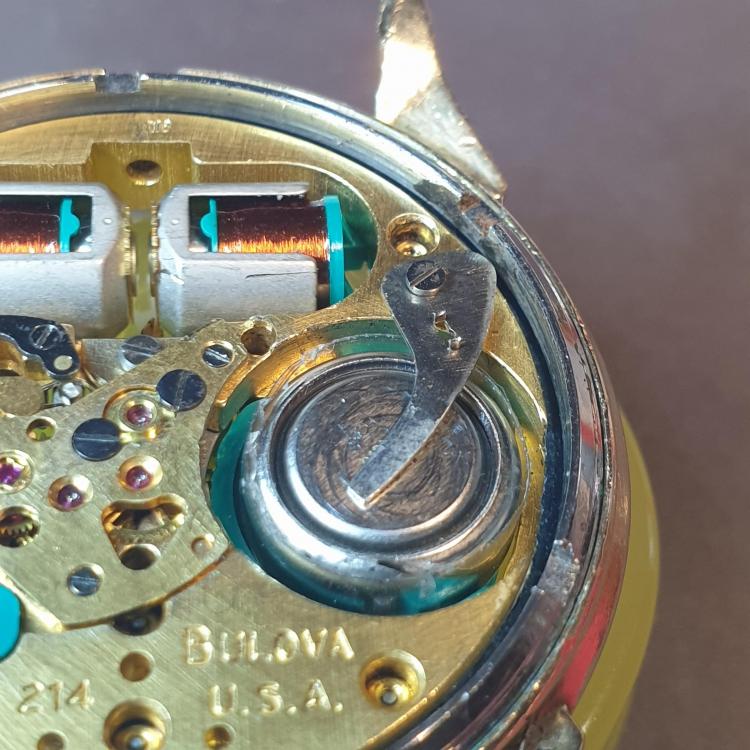
I've been servicing Accutrons for some time now. But yesterday I just had an AHA! moment. When phasing the 214, I had been using the power from my Accutron 700 test meter to supply voltage to the watch. I would clip one lead to the ground strap and used one hand to press the positive lead to the battery terminal. This leaves only one hand to adjust the pawl finger. I was thinking of a way to make a battery clip hold the battery in place to make this procedure easier. Then it hit me.... All I needed to do was to flip the ground strap upside-down and use it as a battery clip!
 1 point
 -
Hi all, I have uploaded a pdf copy of the Generale Ressorts catalogue. So that you can make yourself a hard copy. Handy to have in the drawer. (sometimes!). Even the pdf seems to be hard to find. Cheers Graziano. GeneraleRessorts.pdf1 point