Leaderboard


Popular Content
Showing content with the highest reputation on 09/21/20 in all areas
-
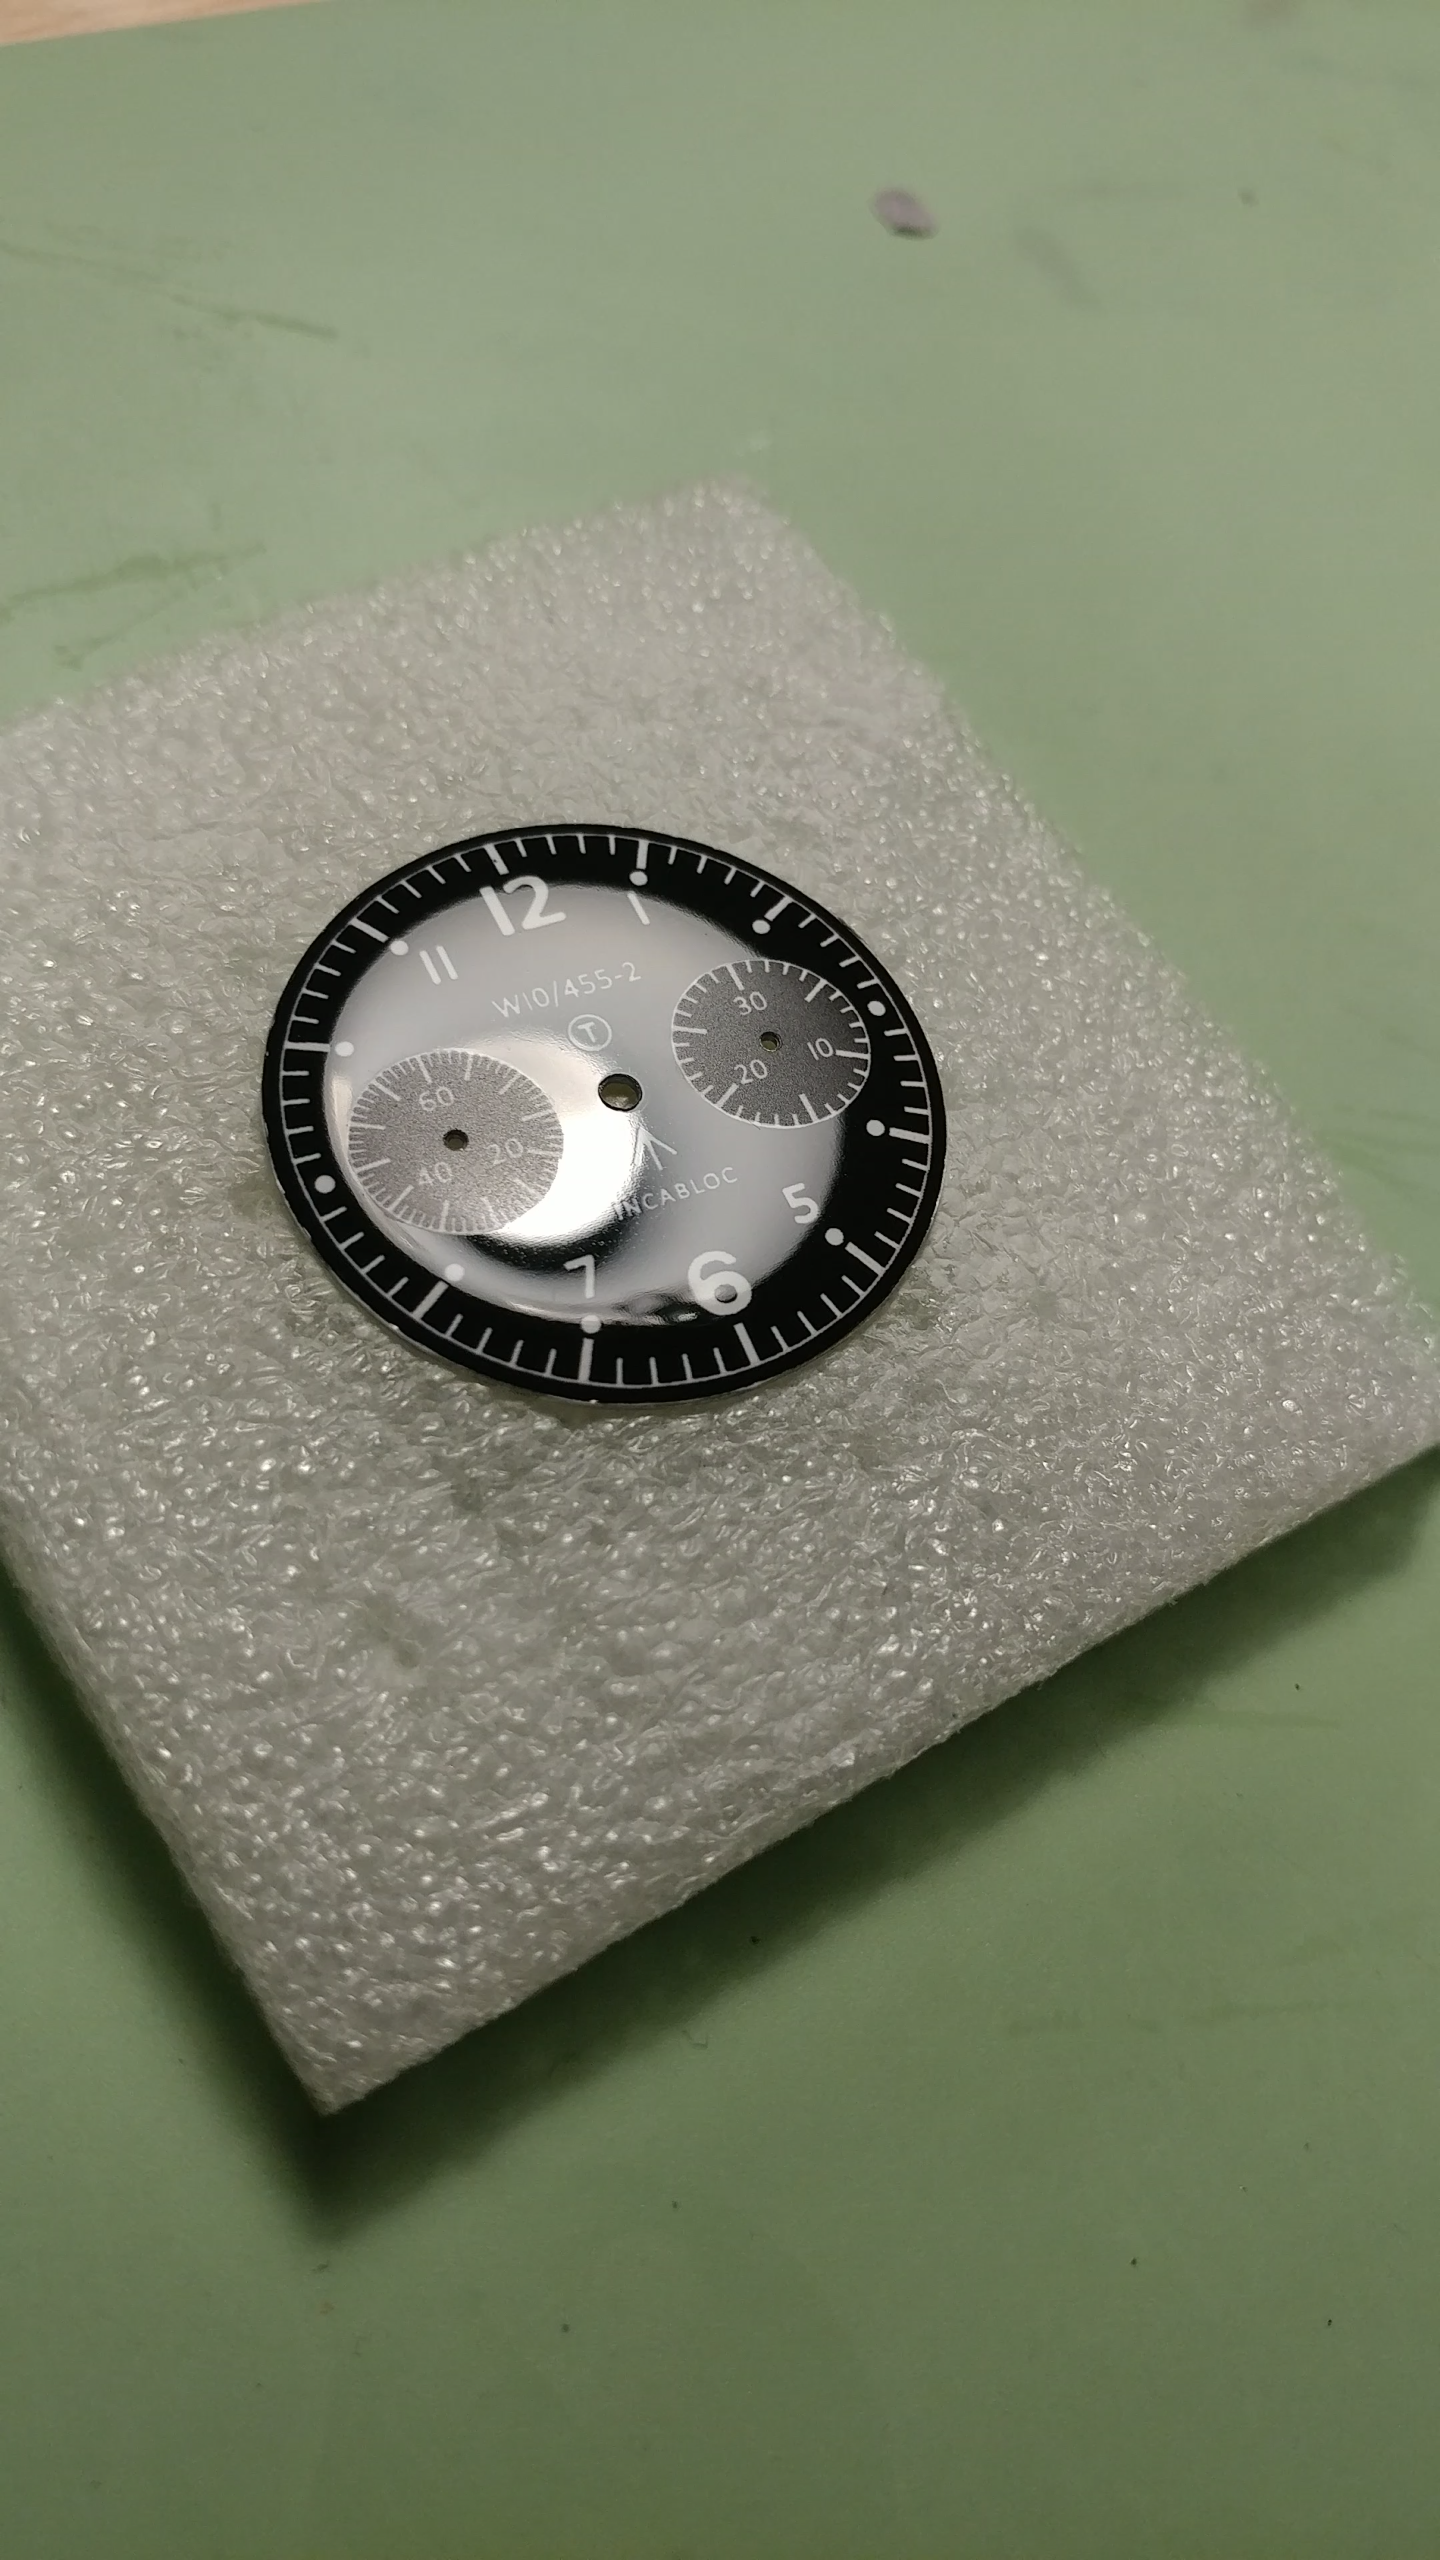
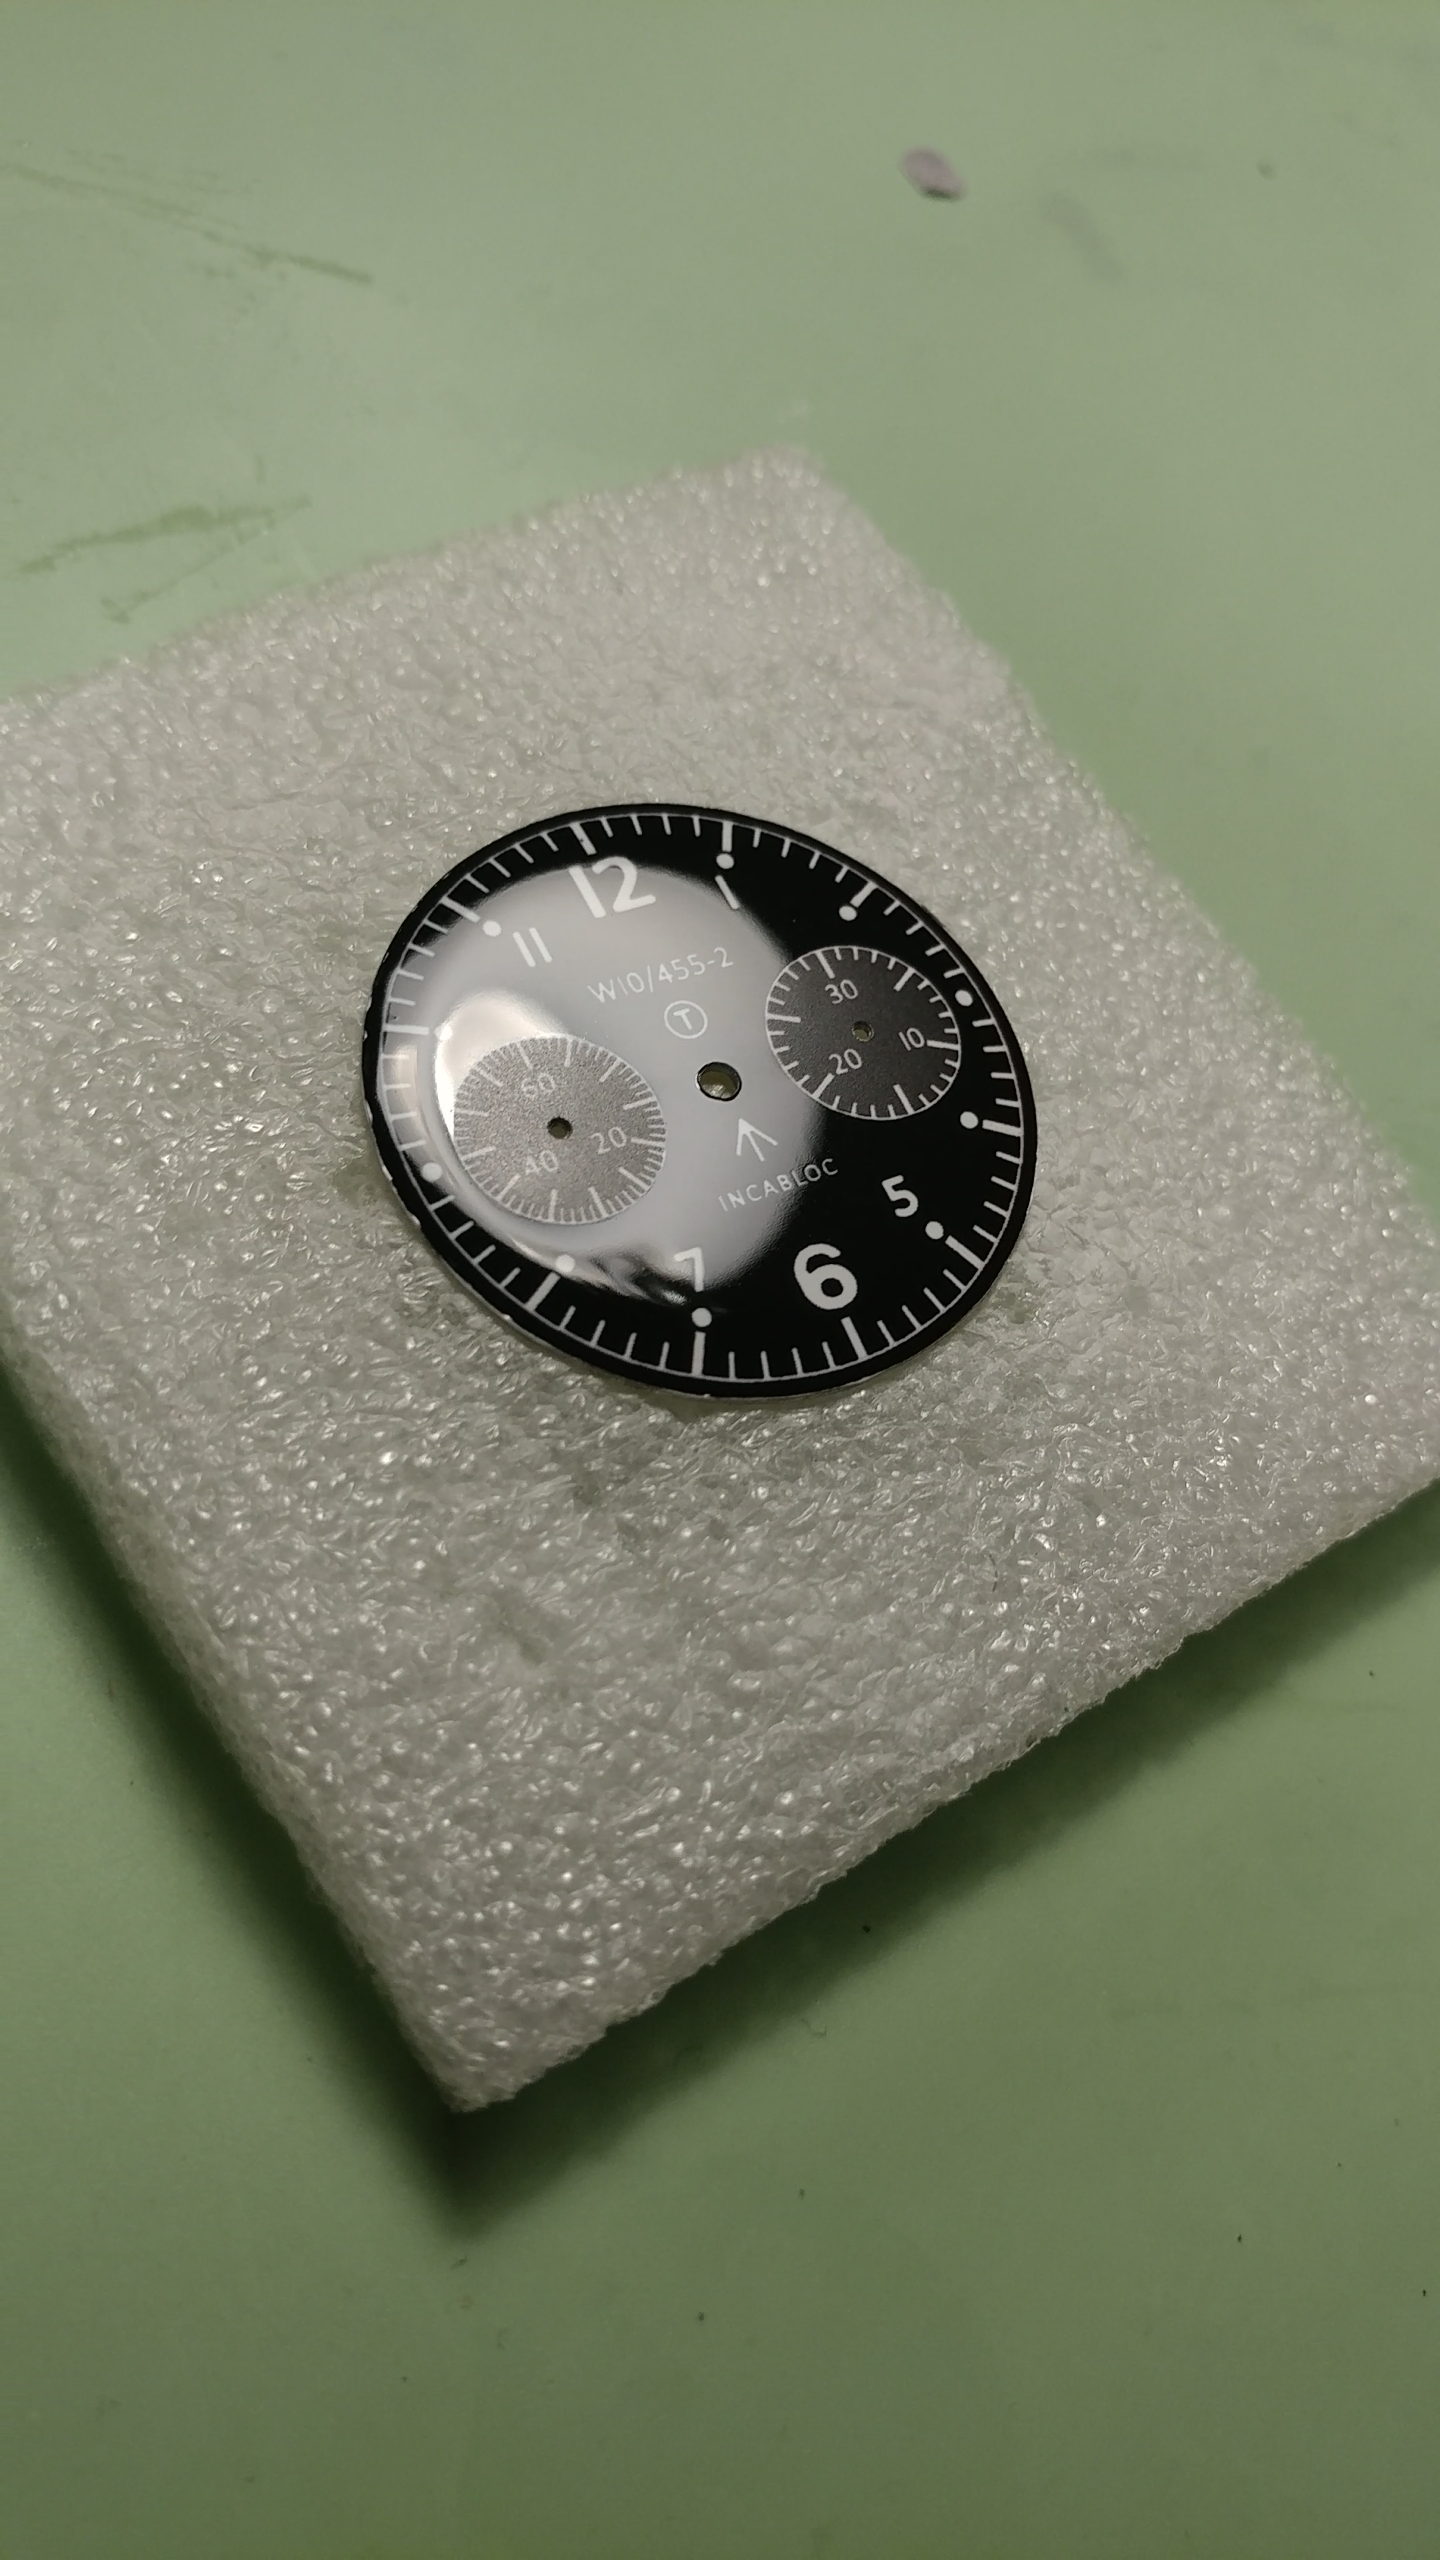
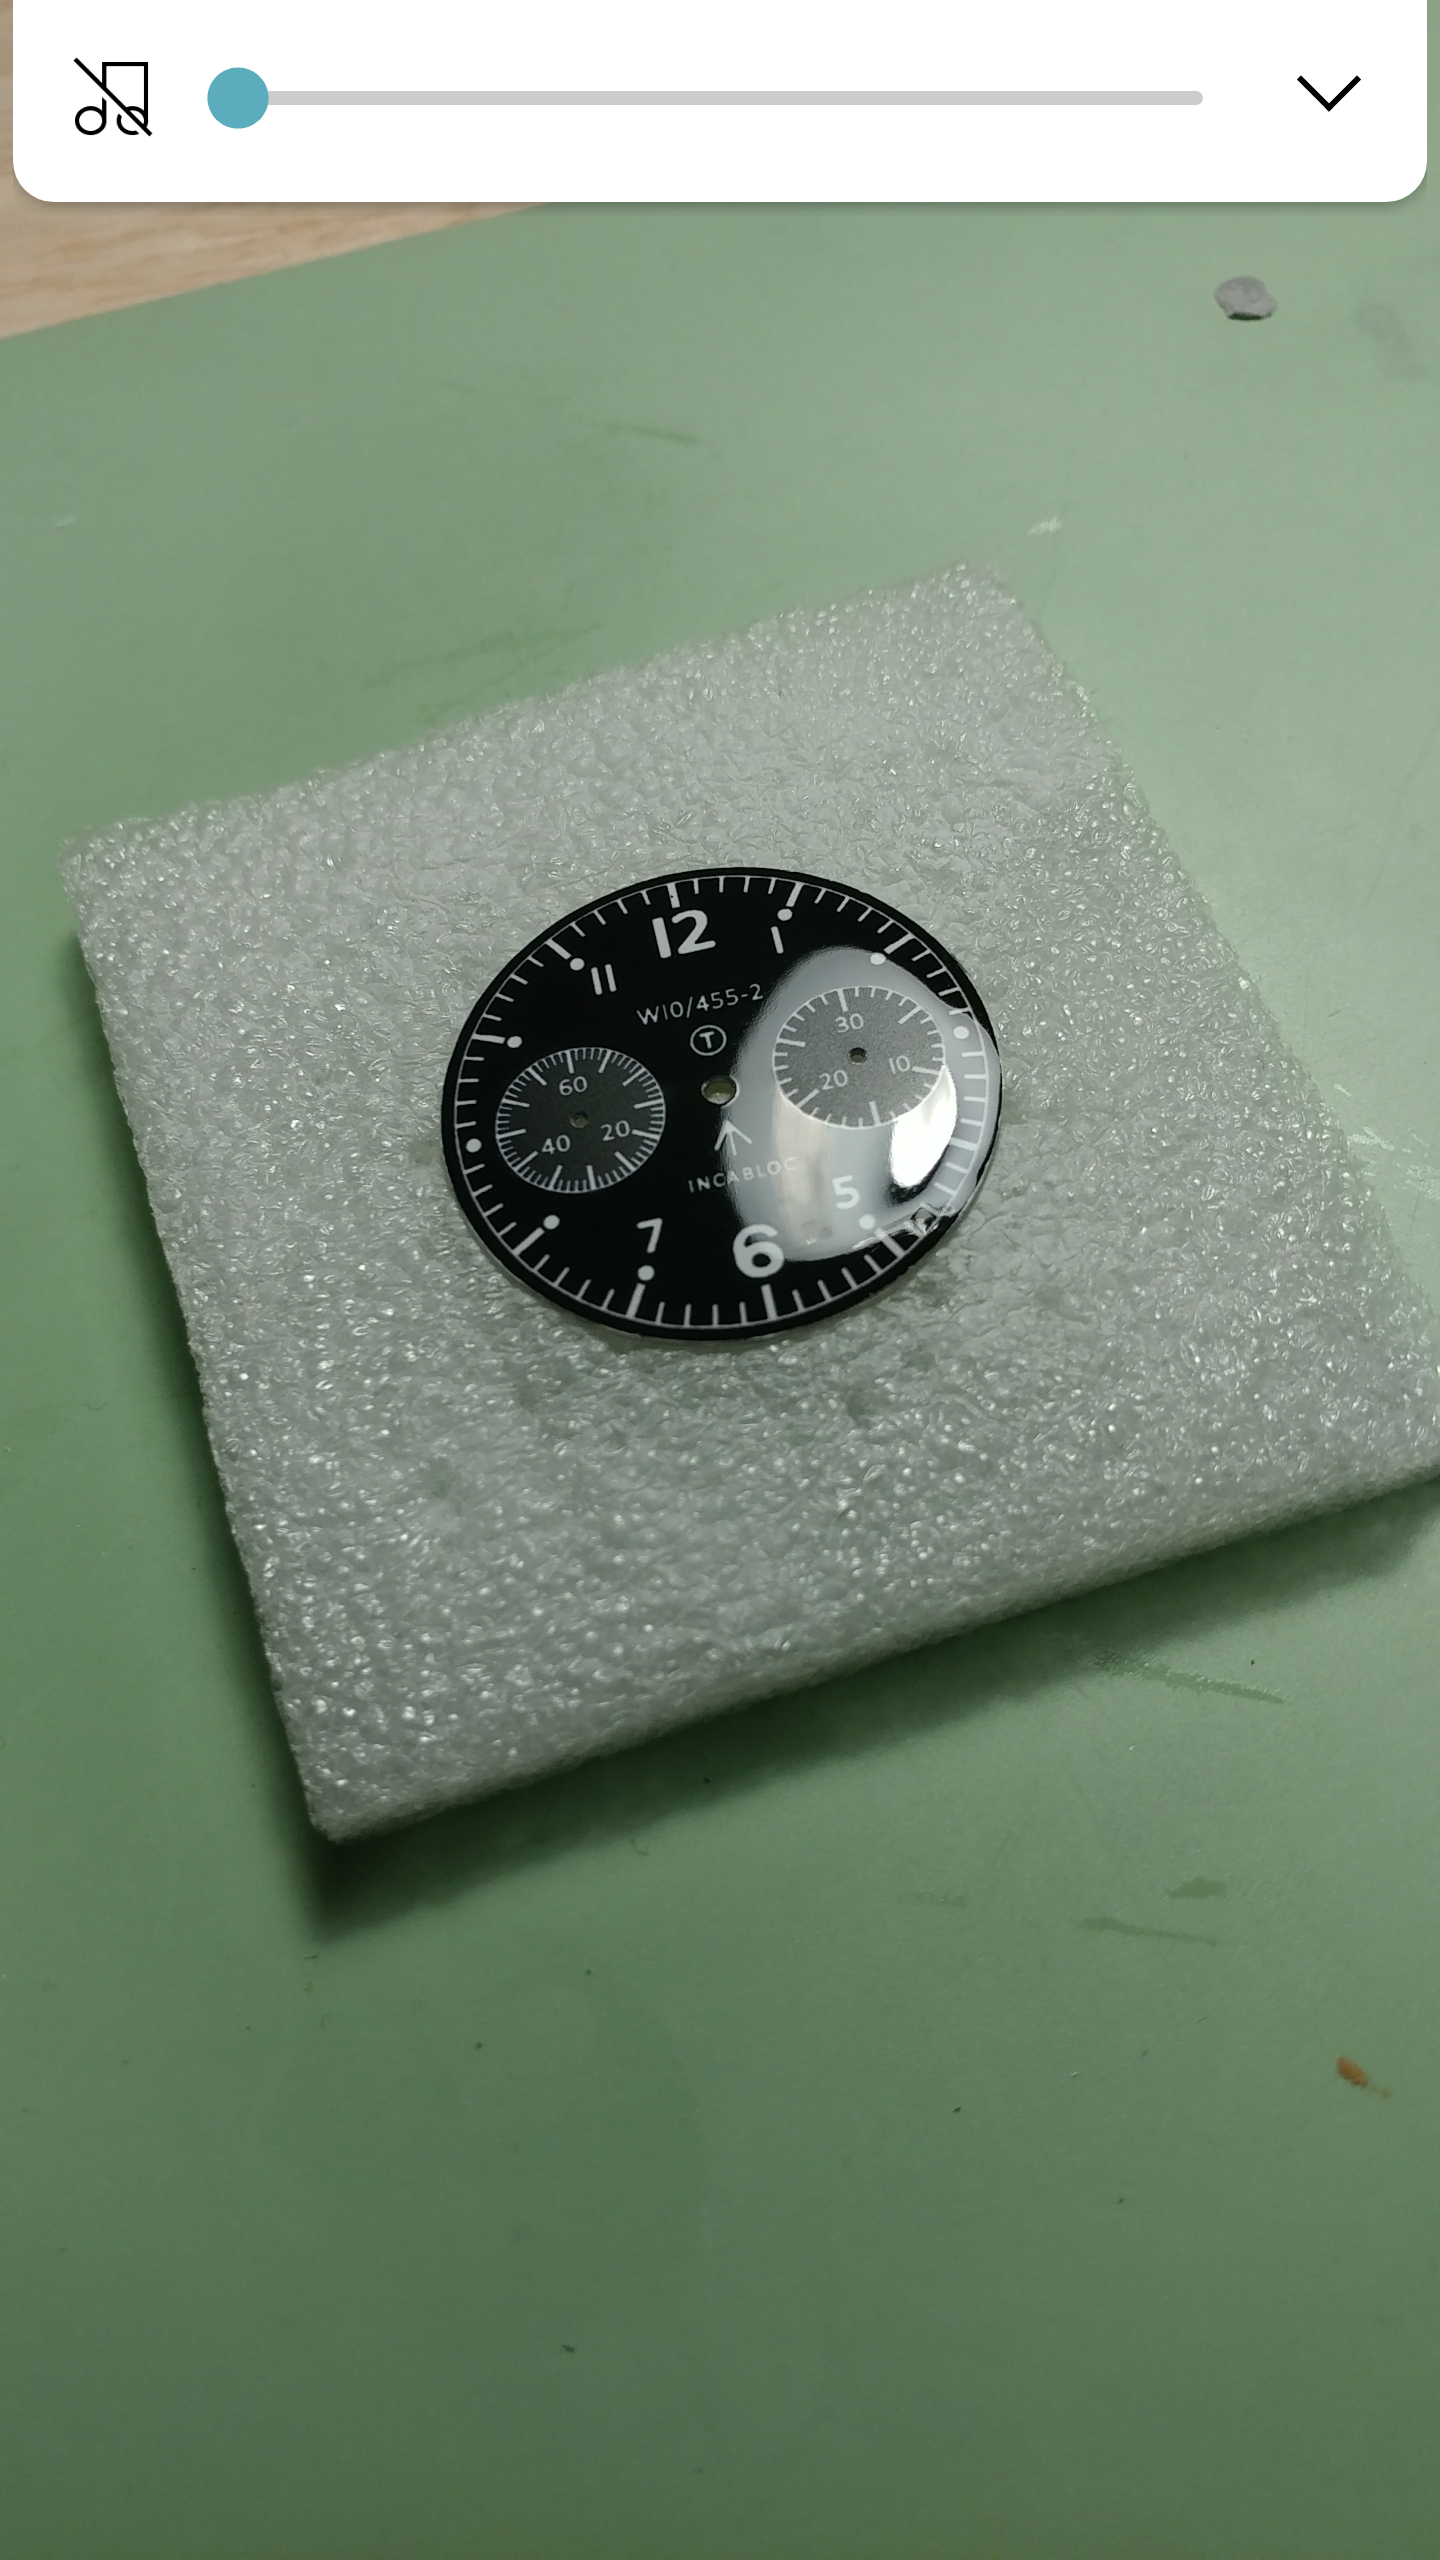
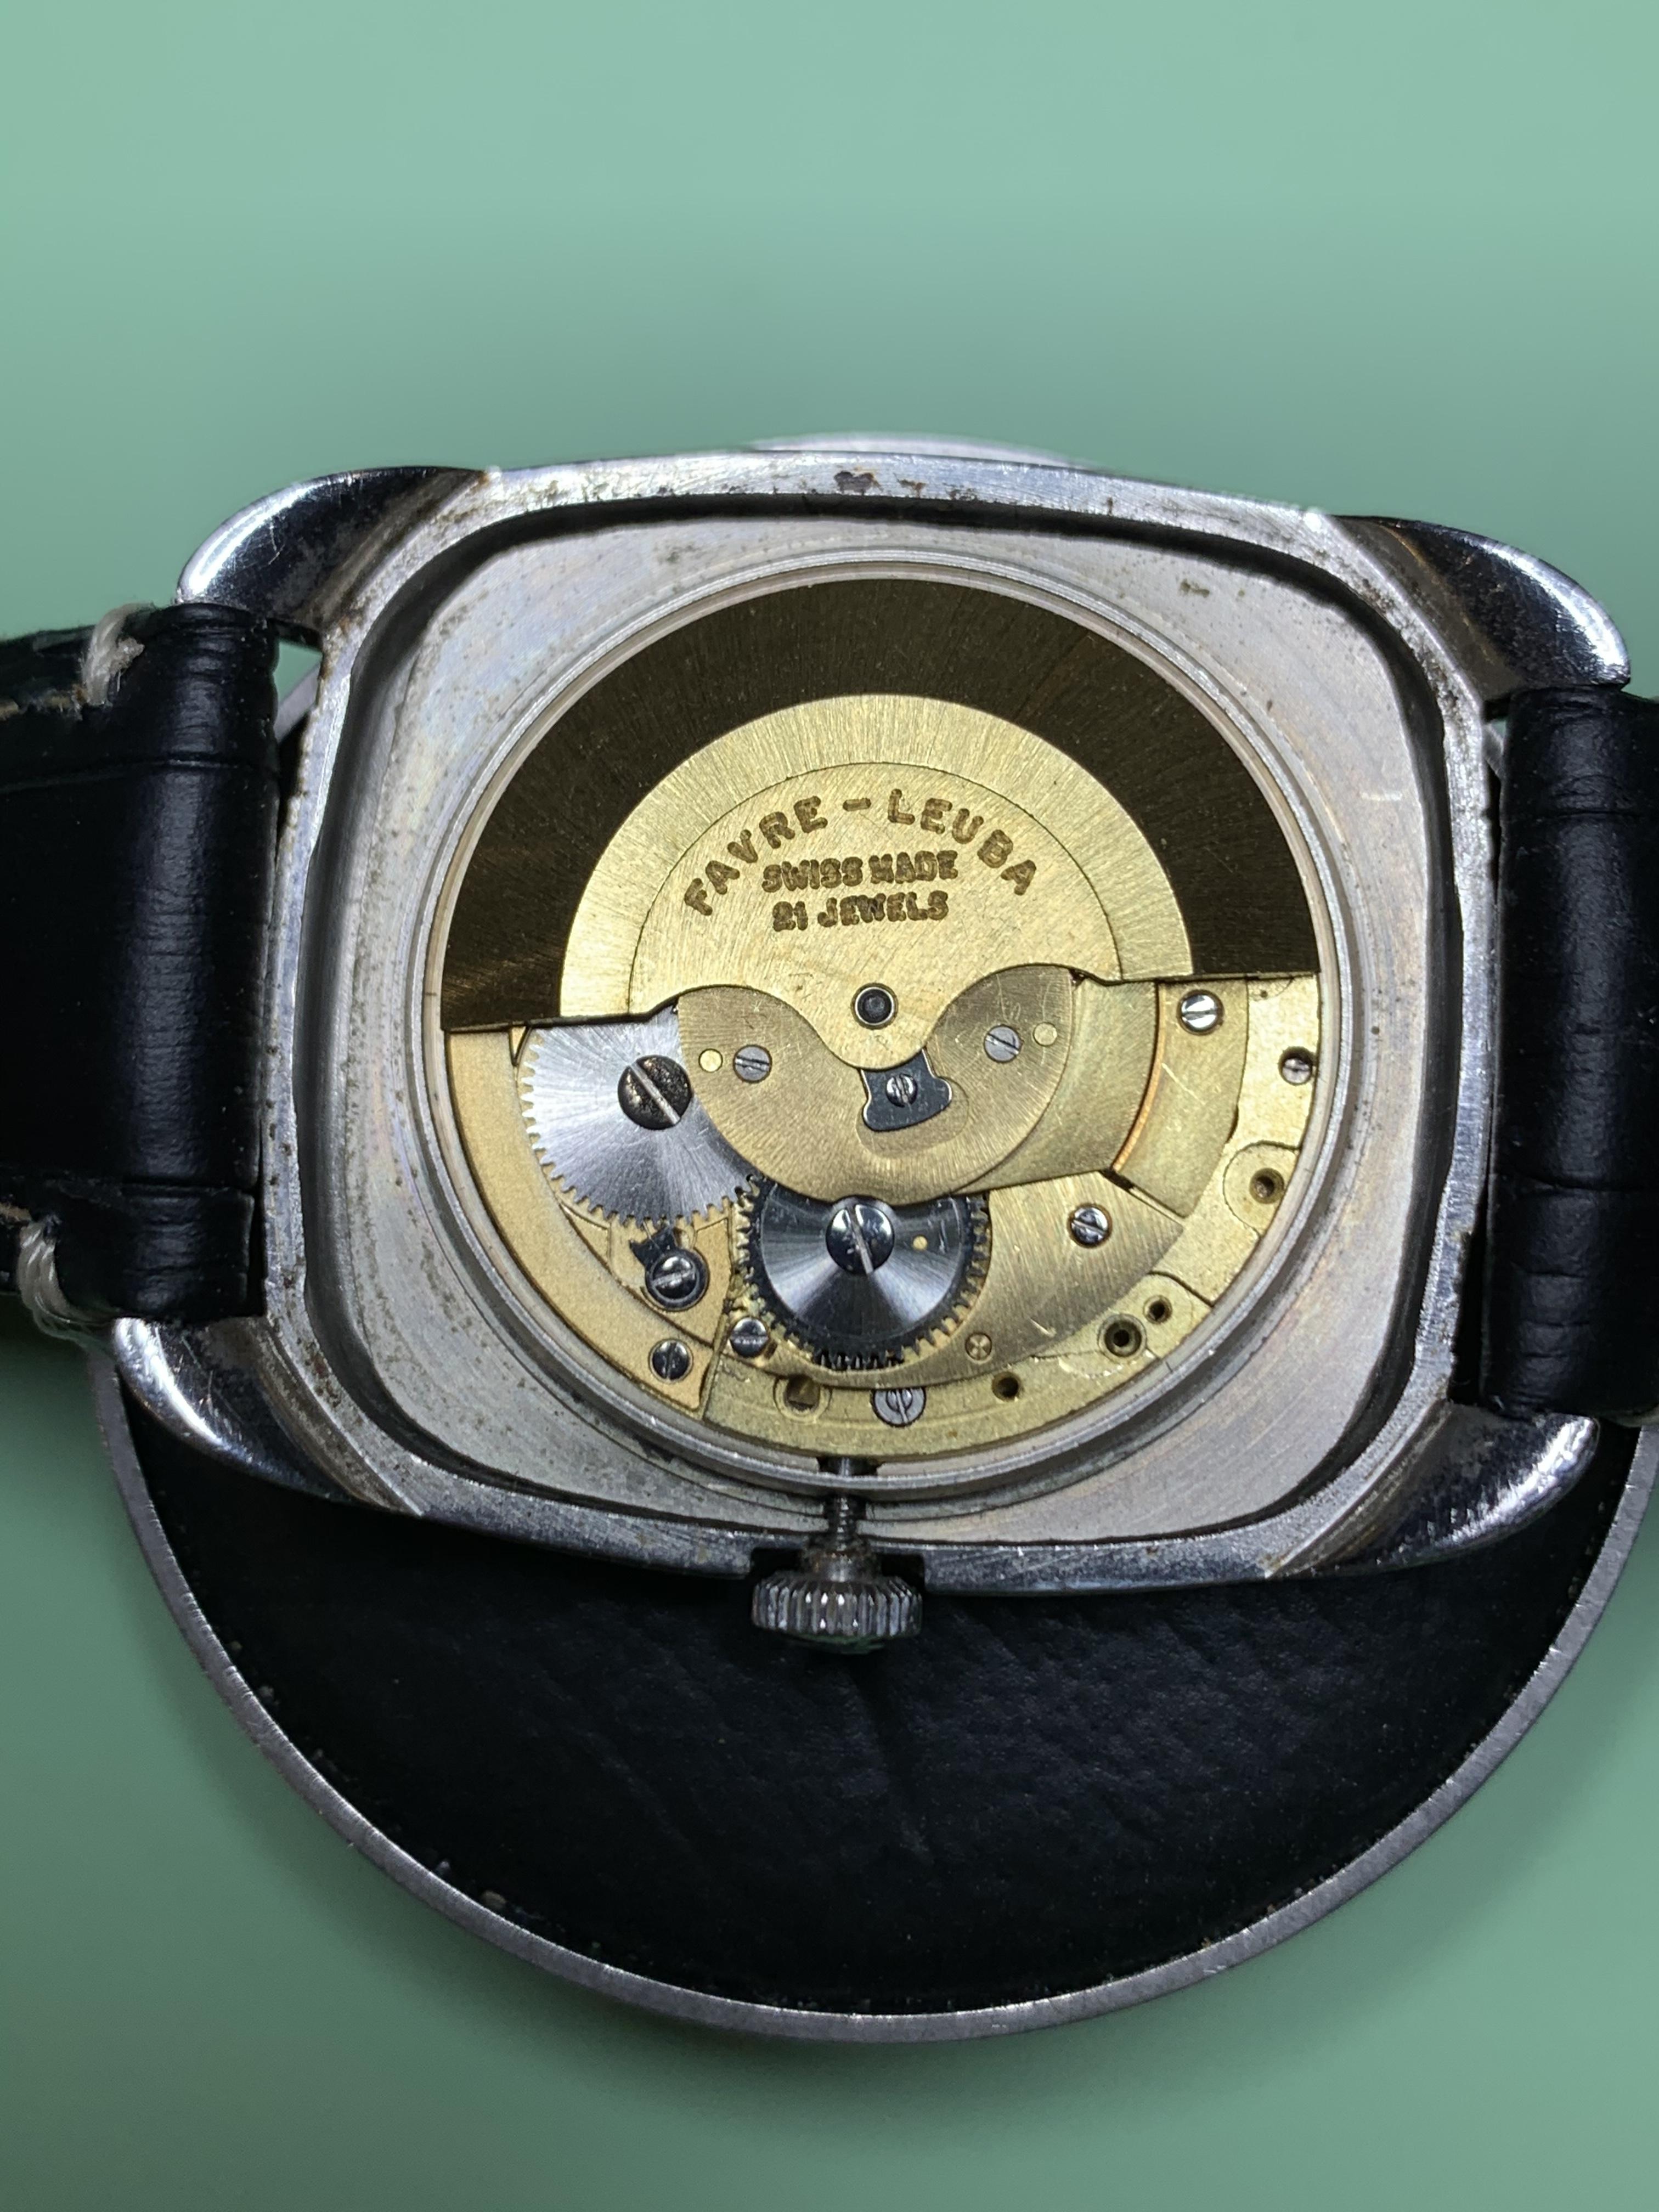
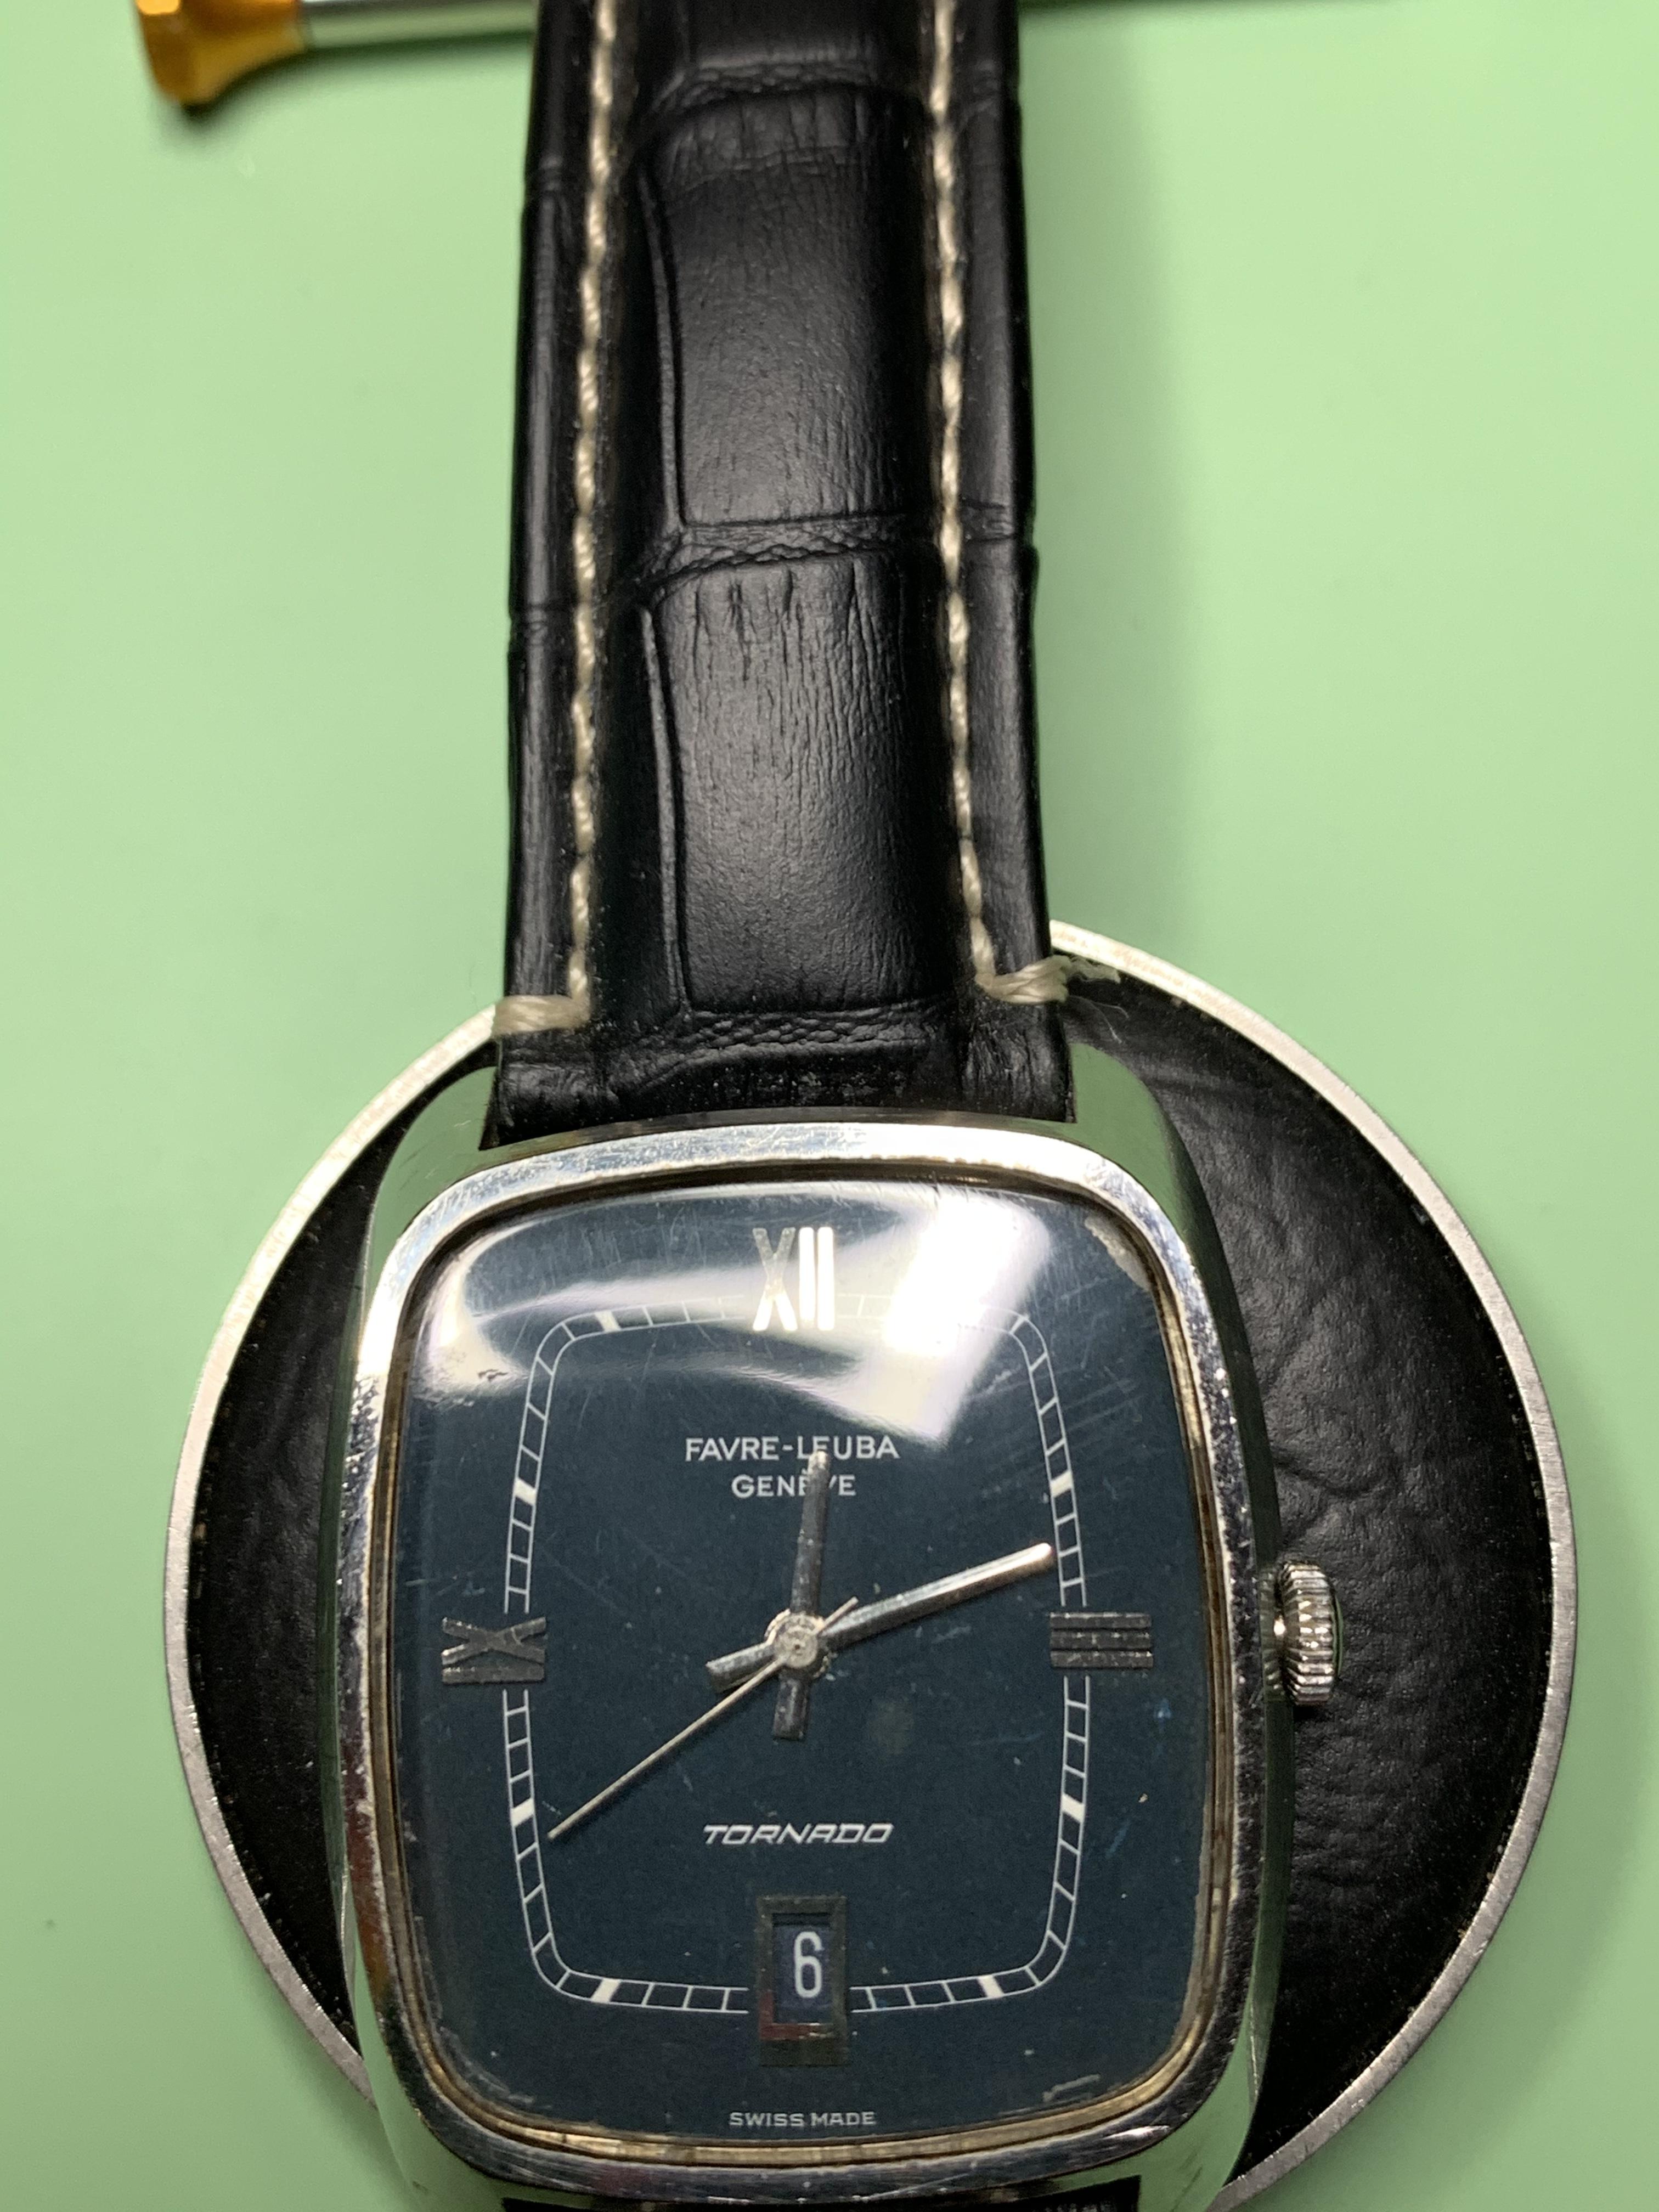
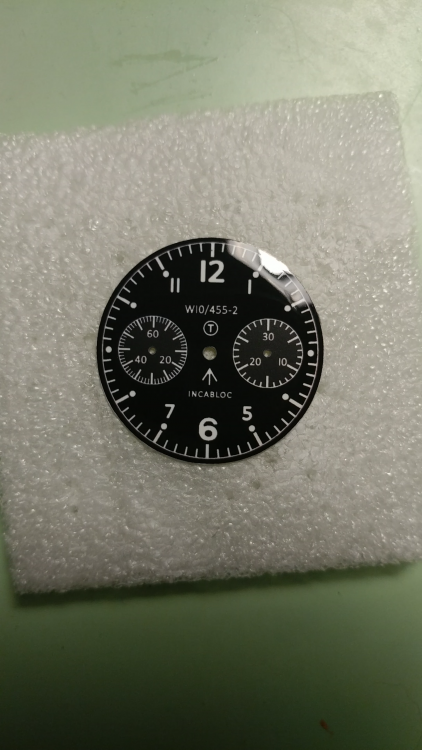
Hello fellow watch enthusiast, I have been working on a new dial and would like your thoughts on it. Created from bare brass and is not, I repeat is not a decal or a decal slide and is not pad printed. Tell me what you think.

 5 points
 -
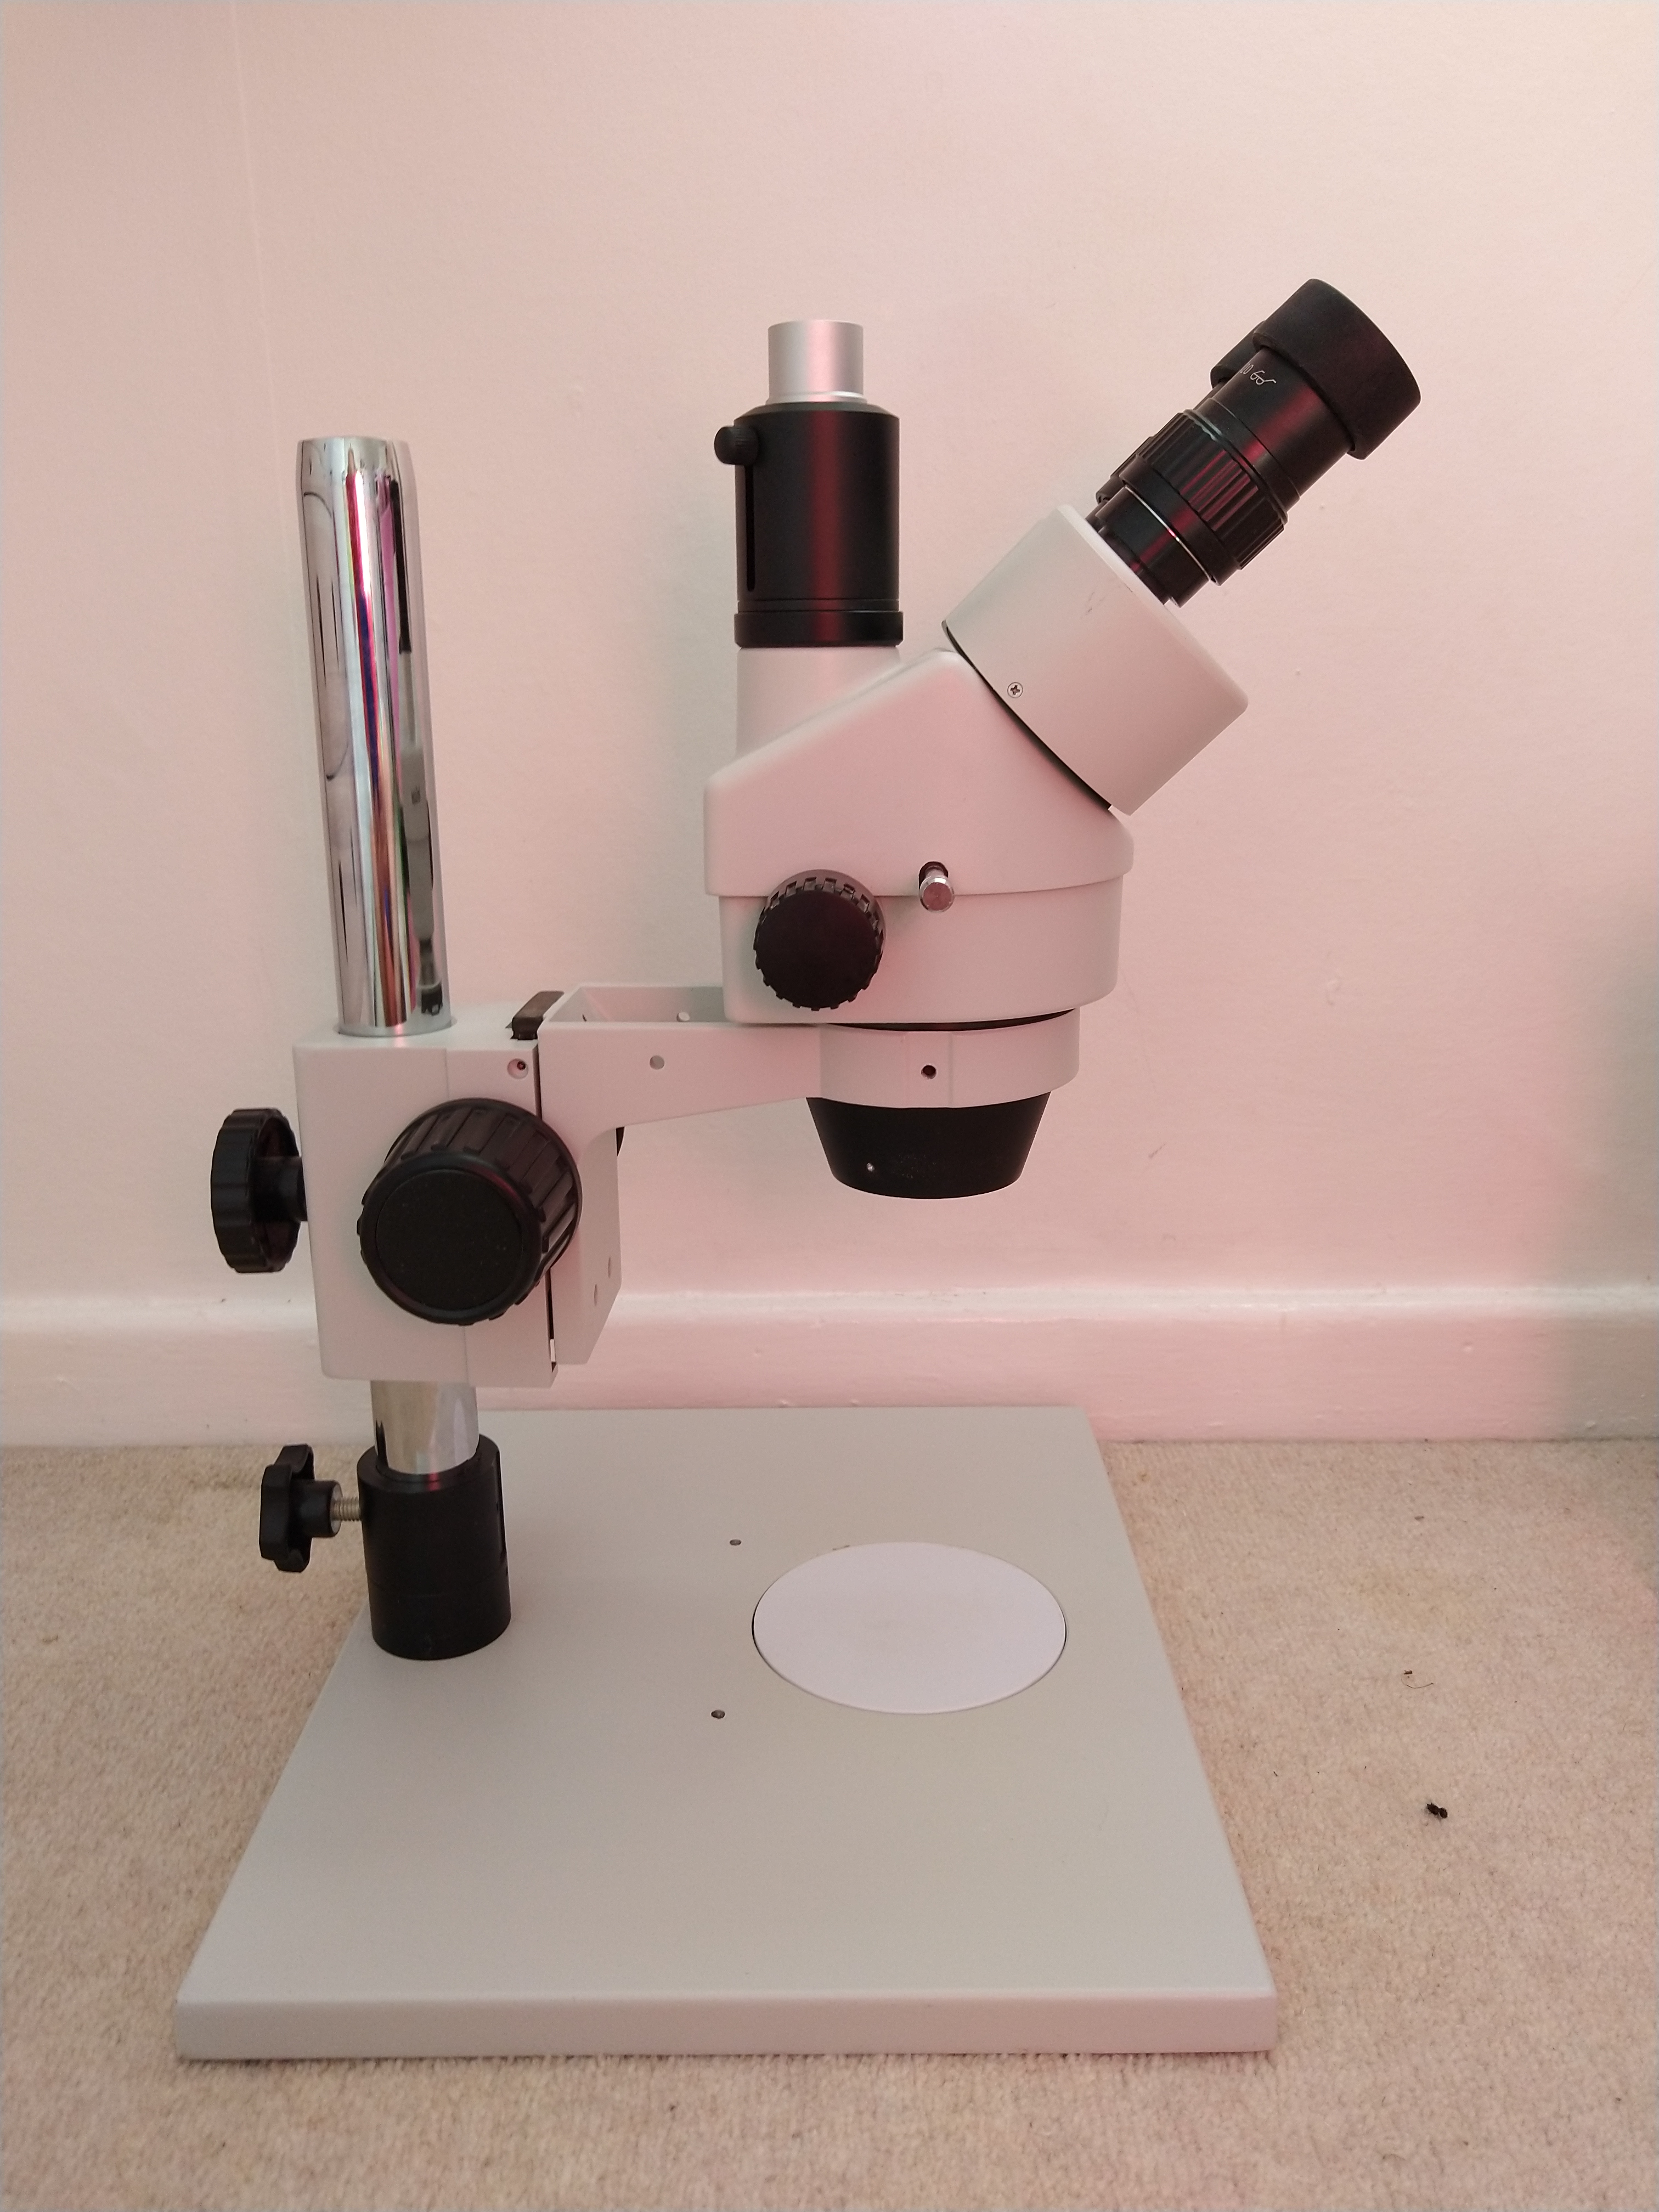
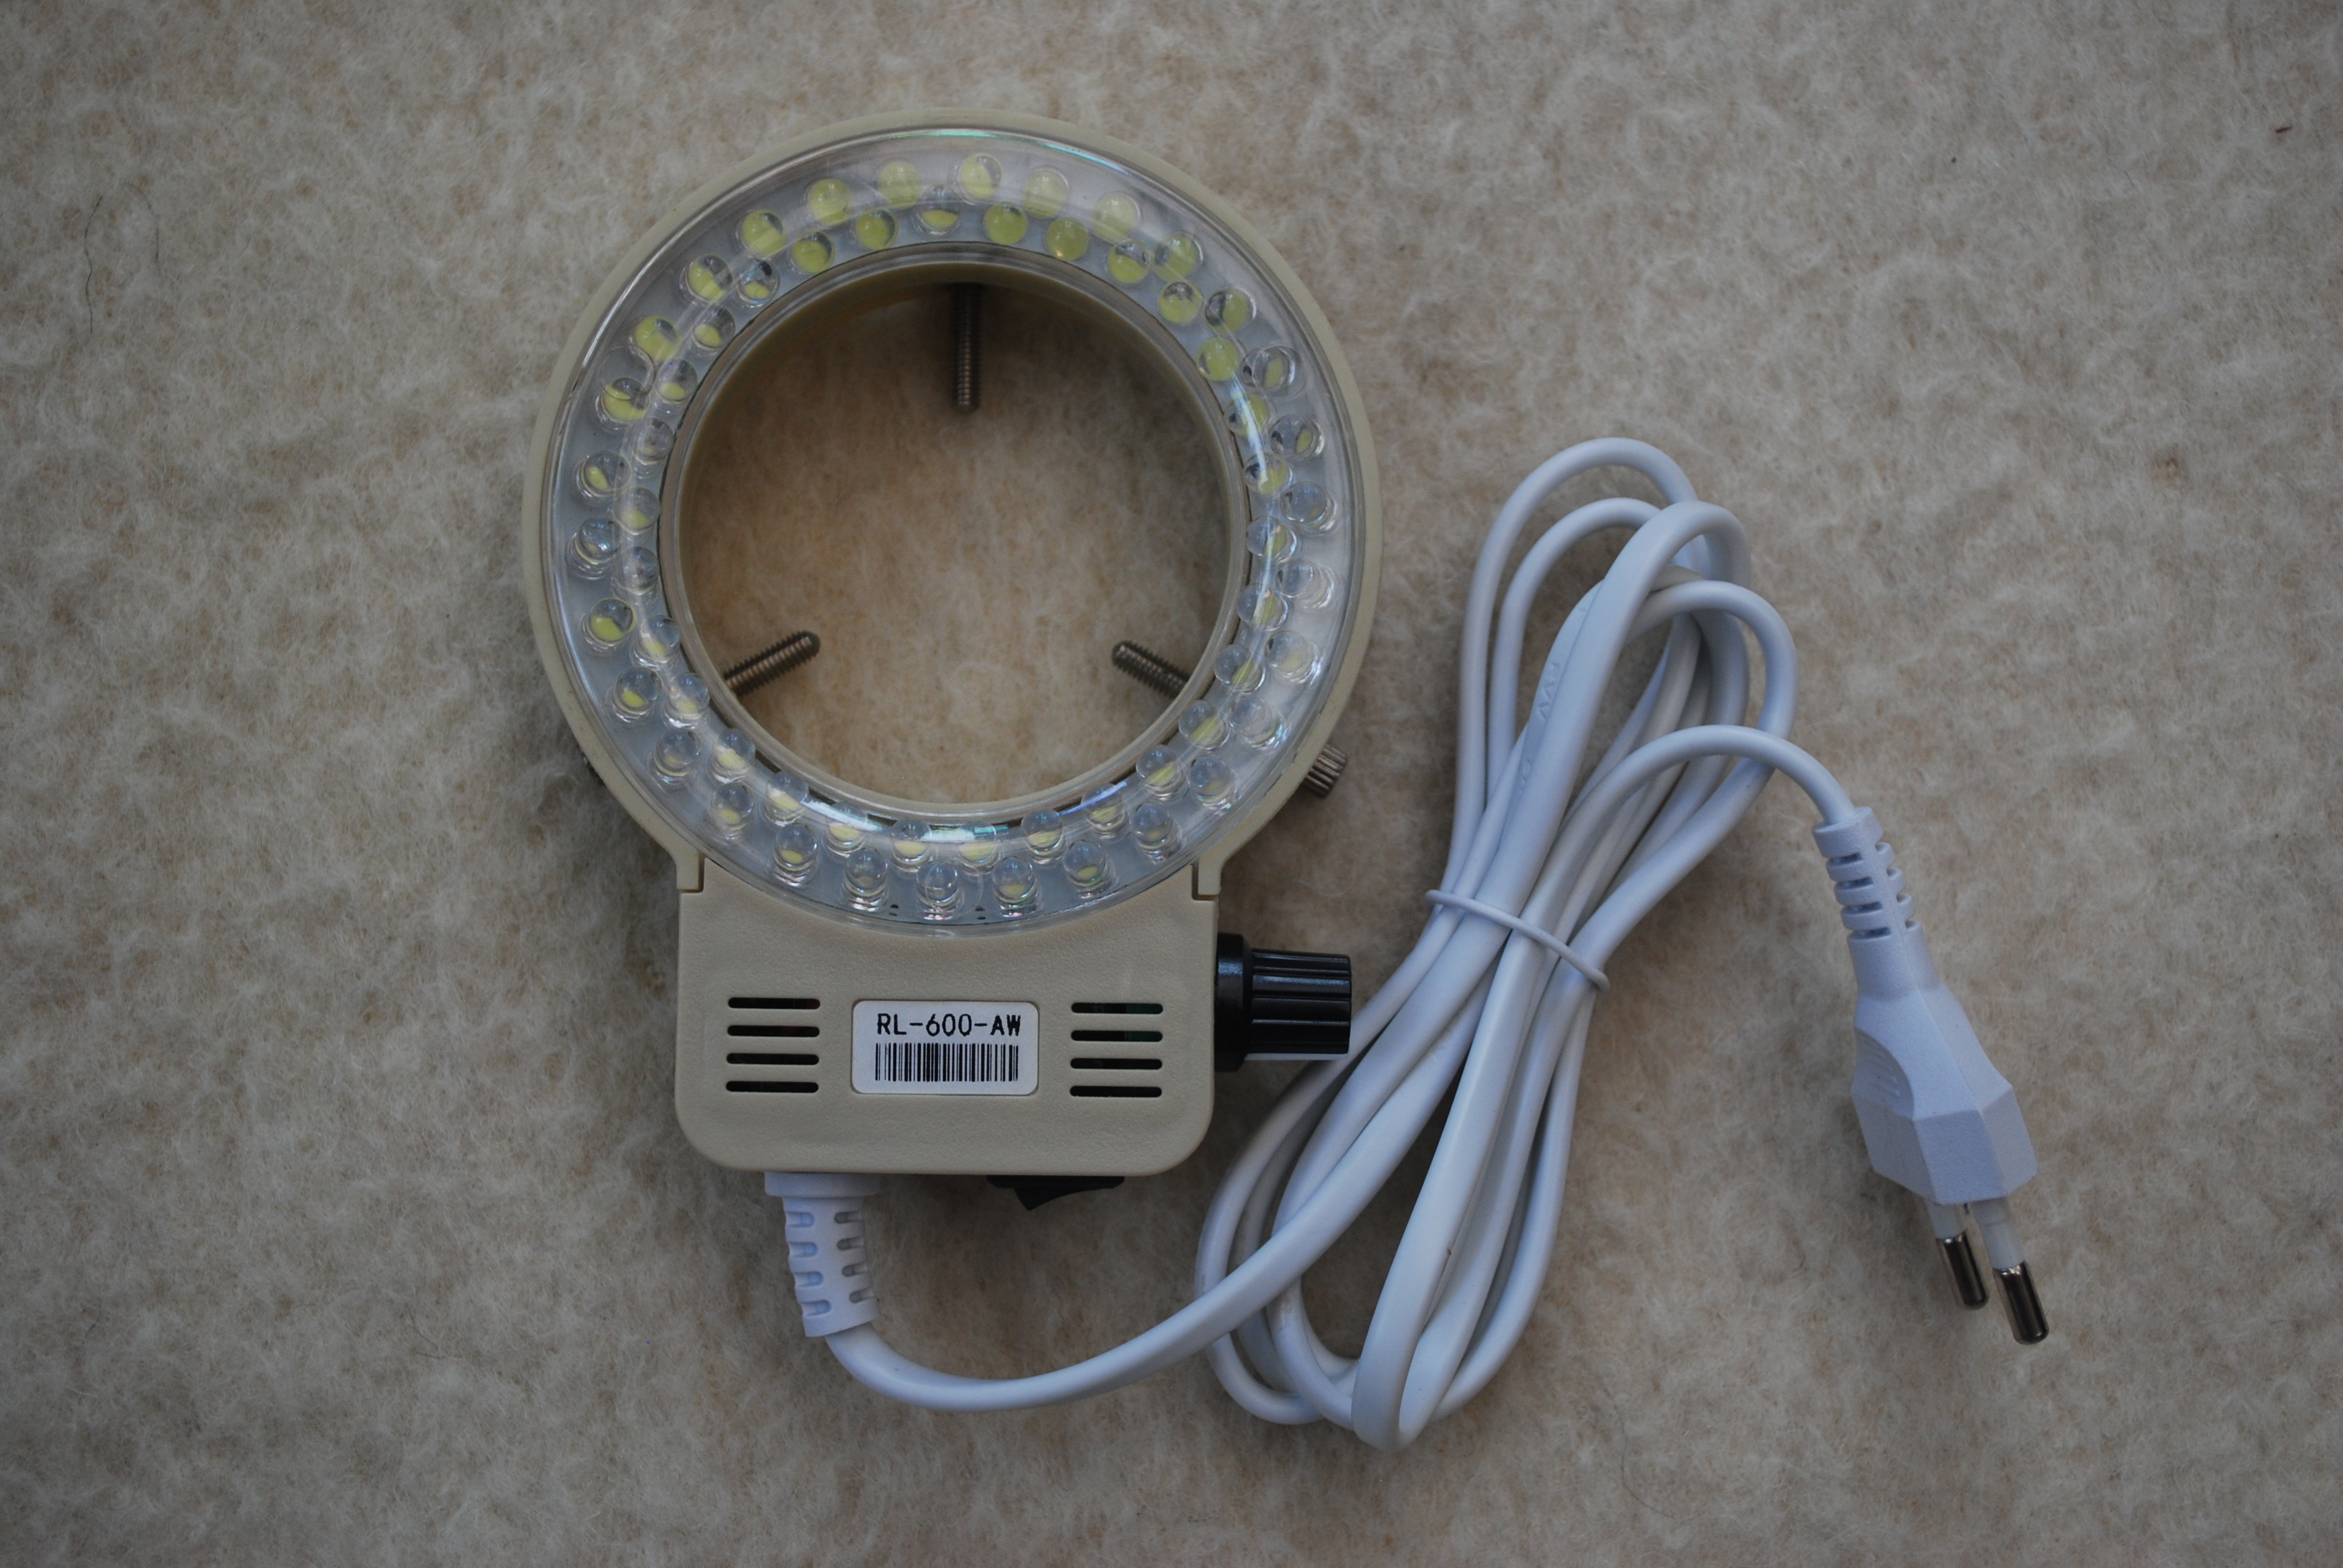
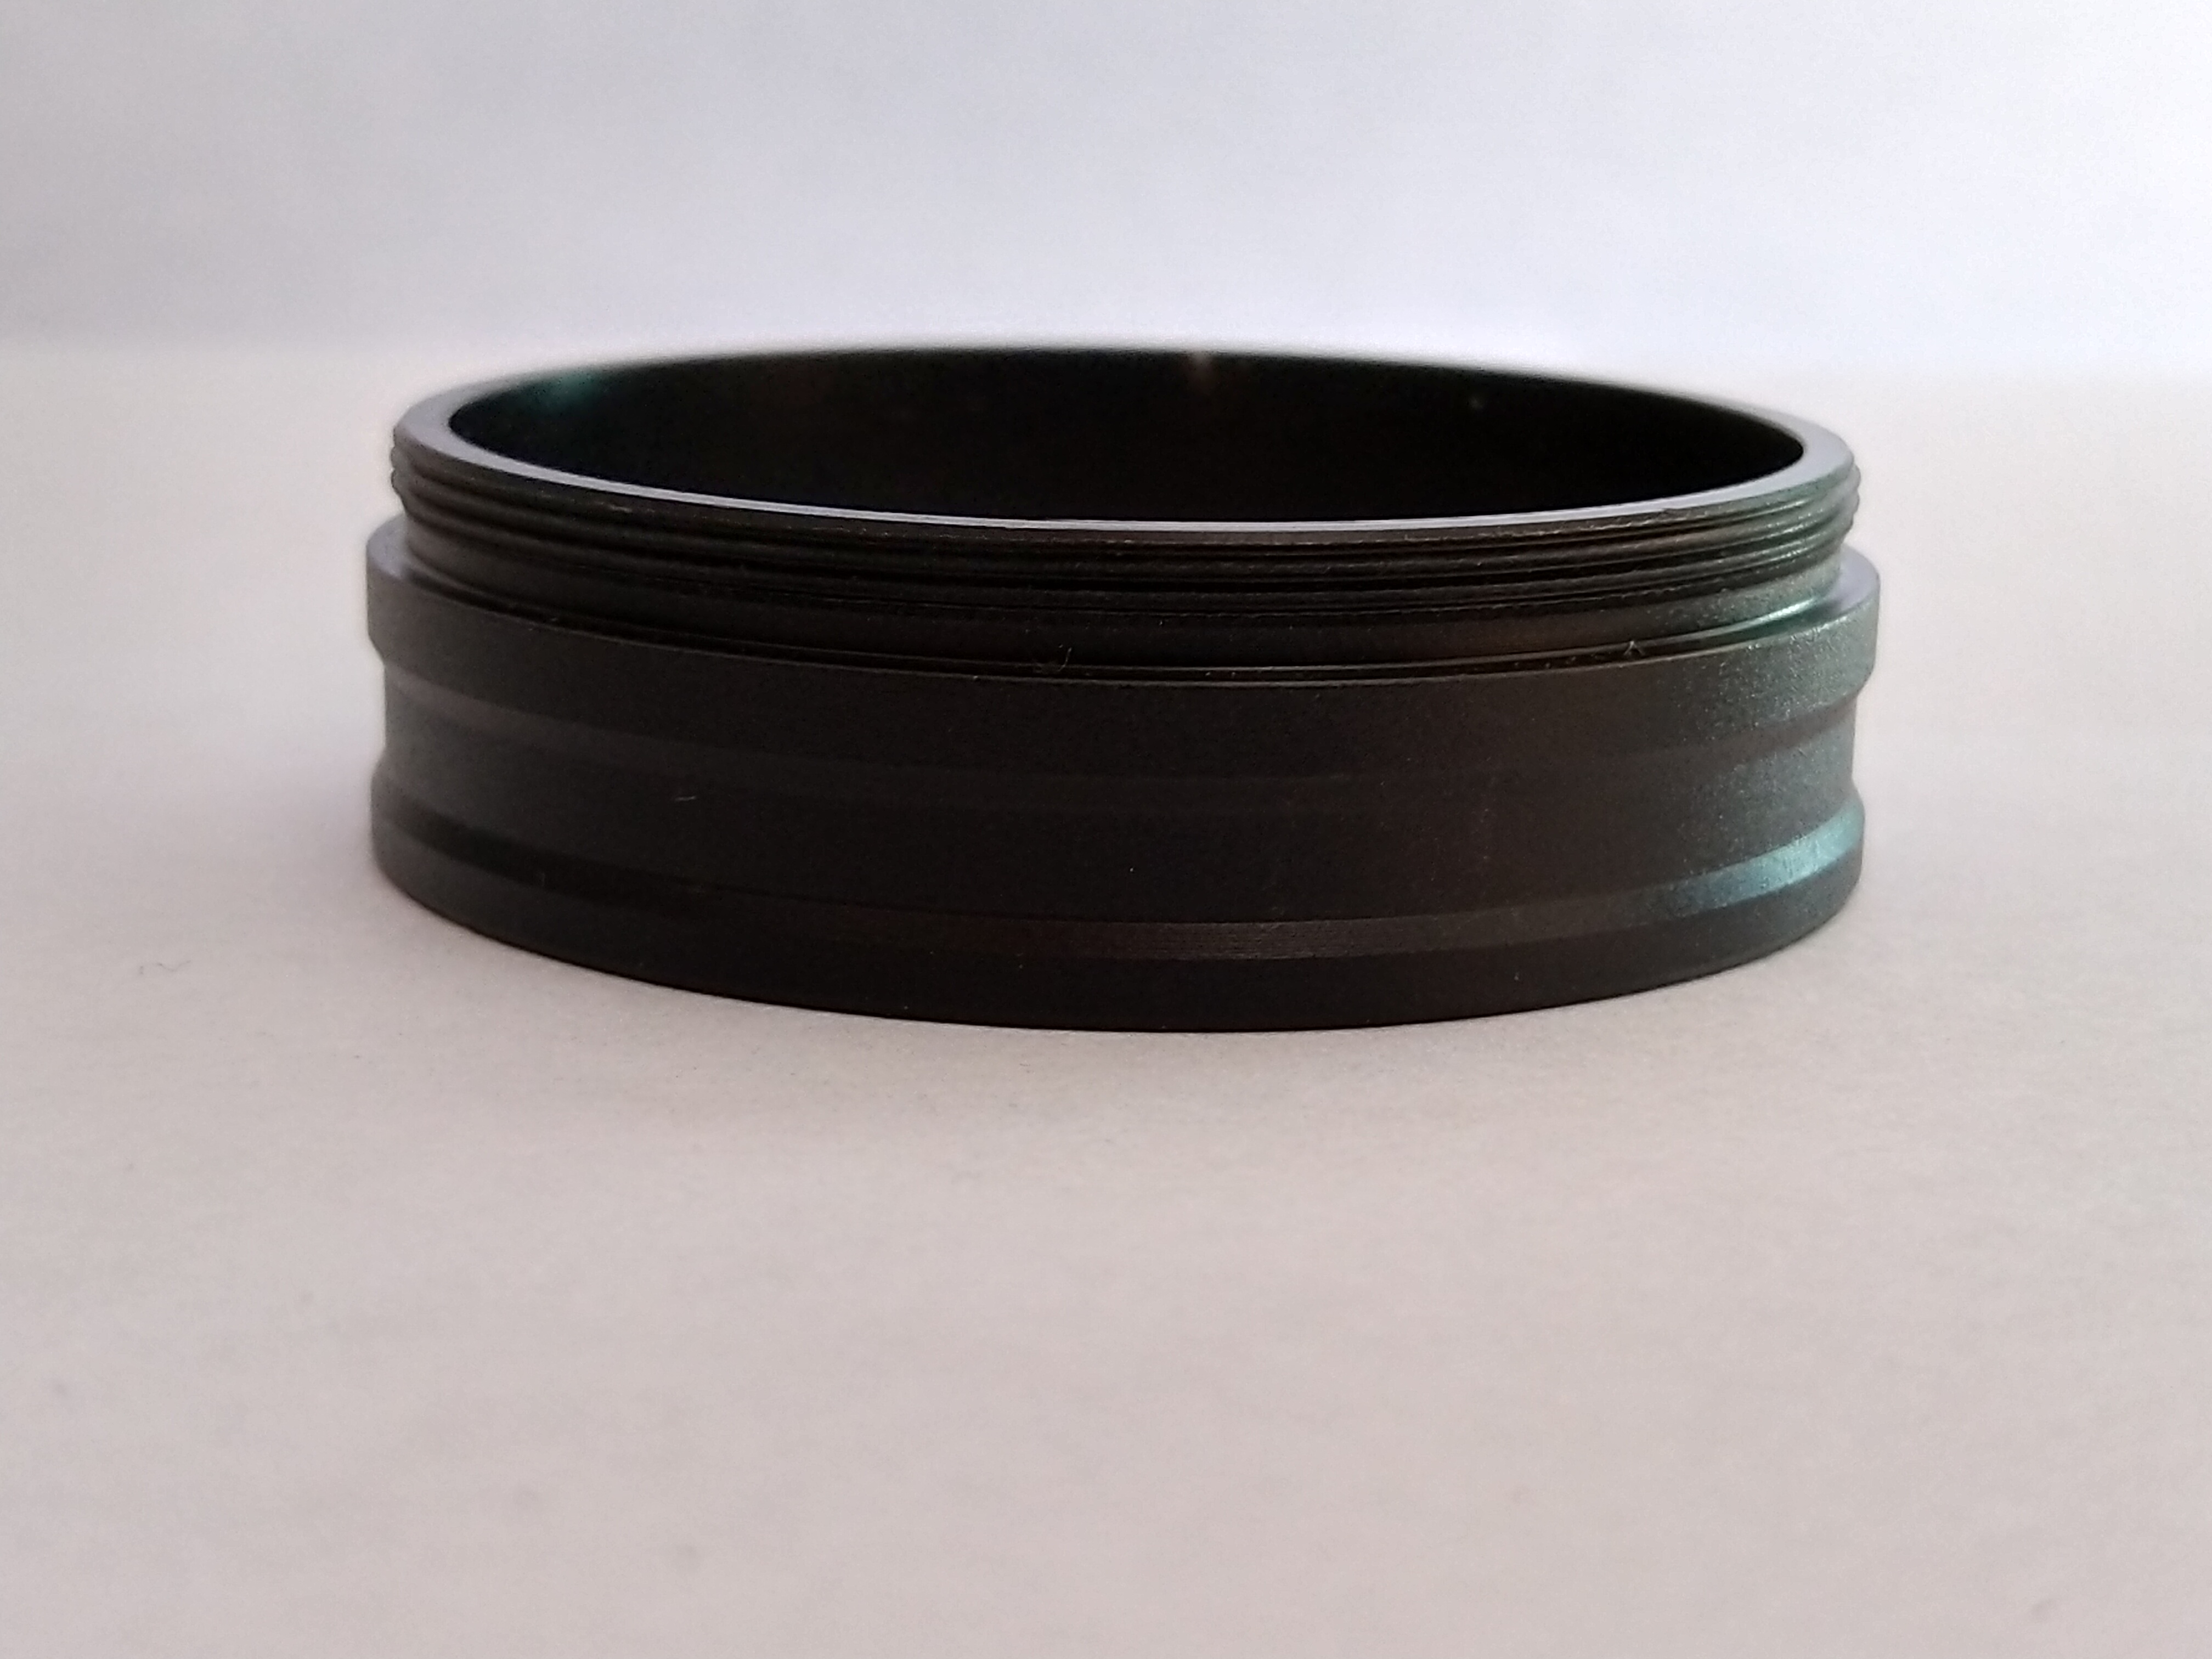
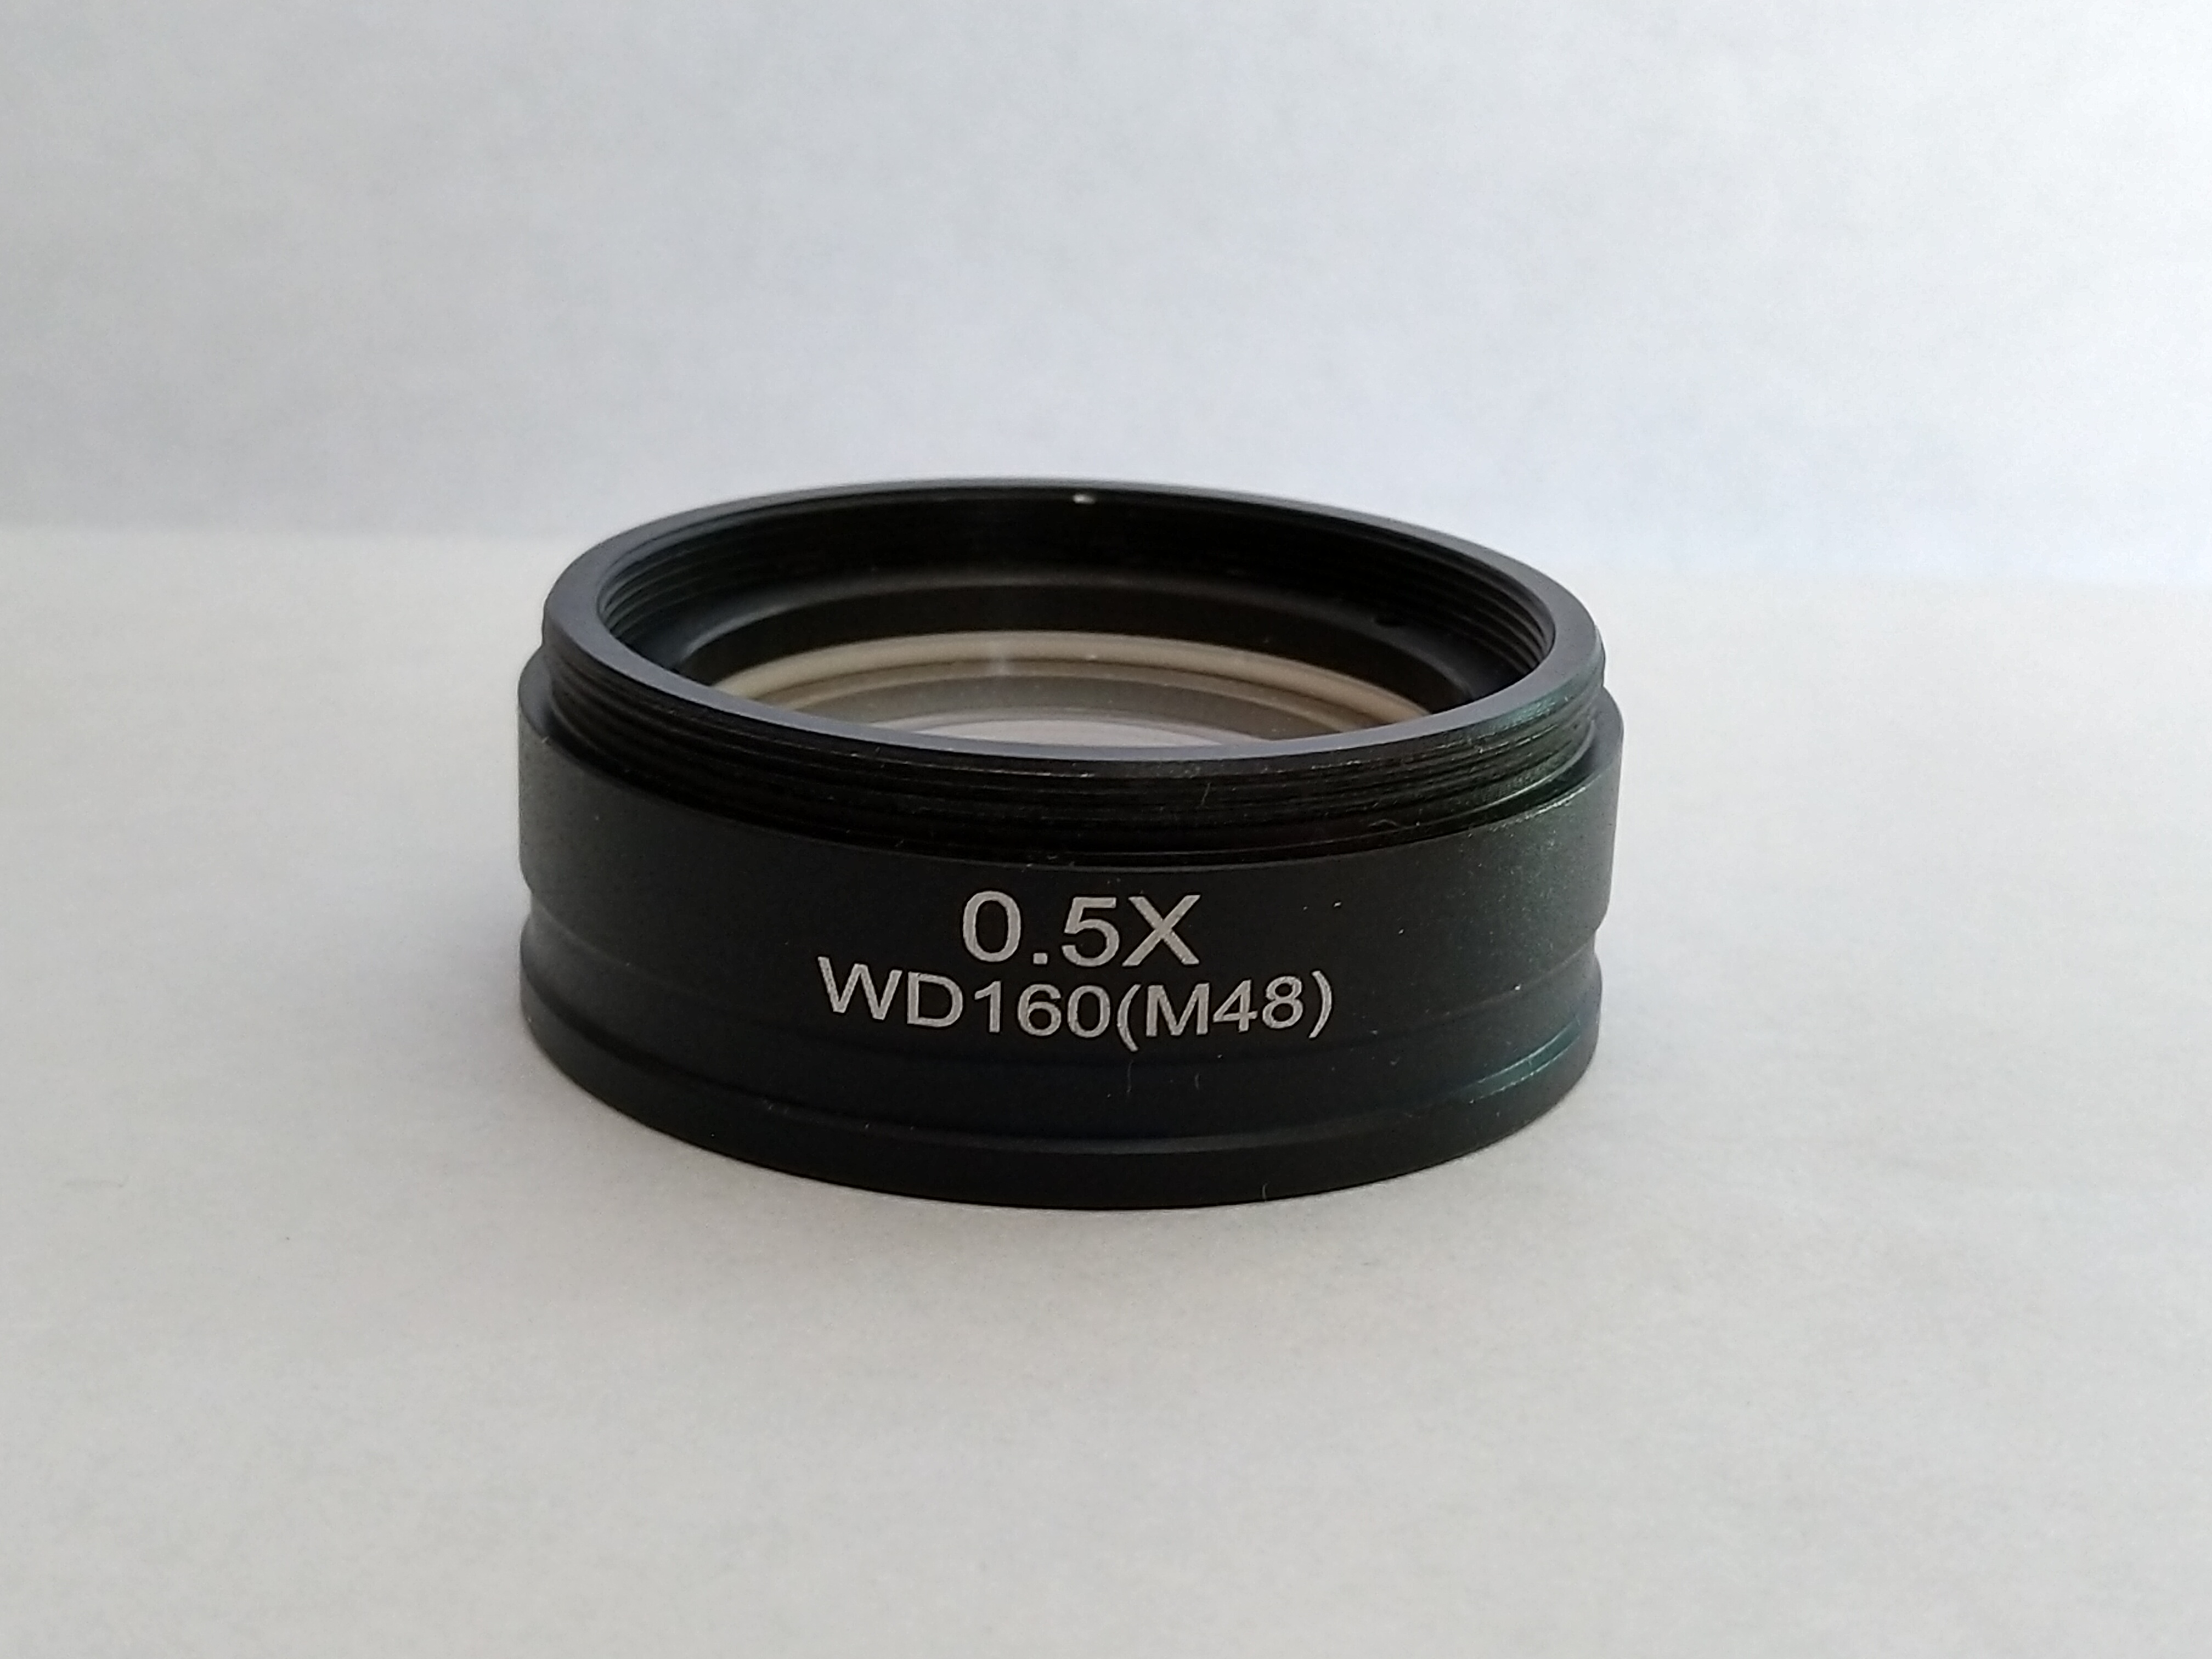
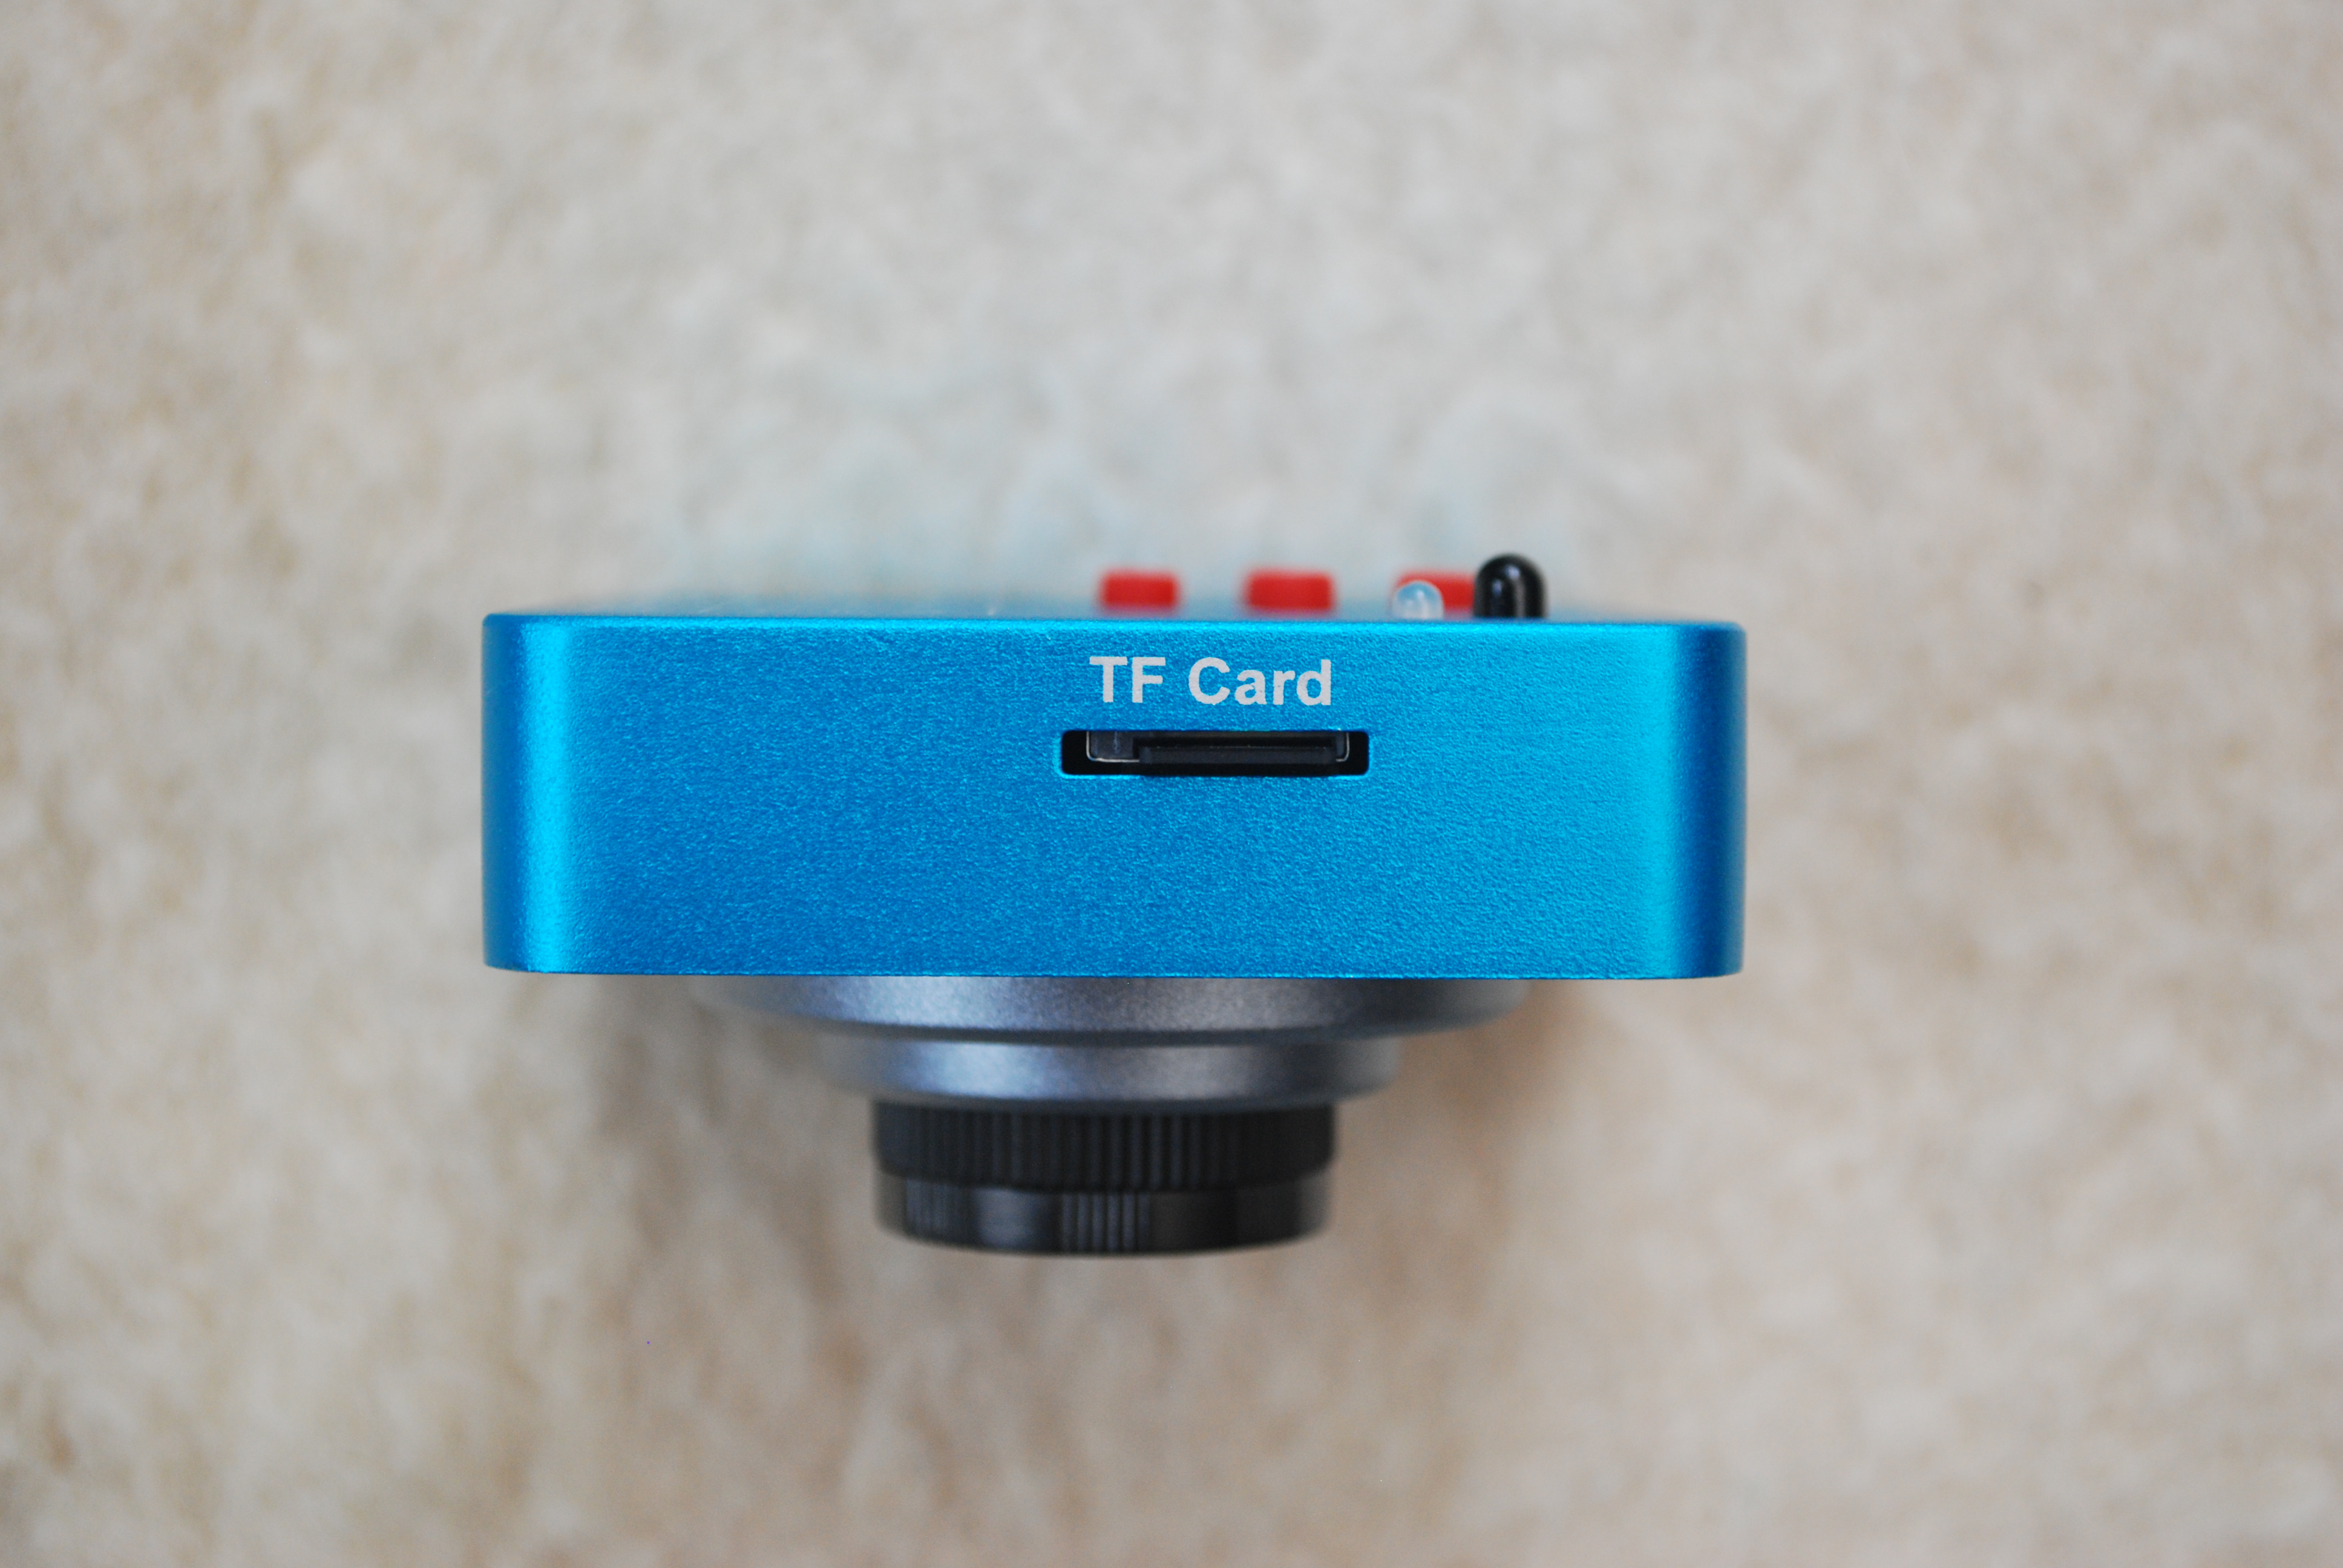
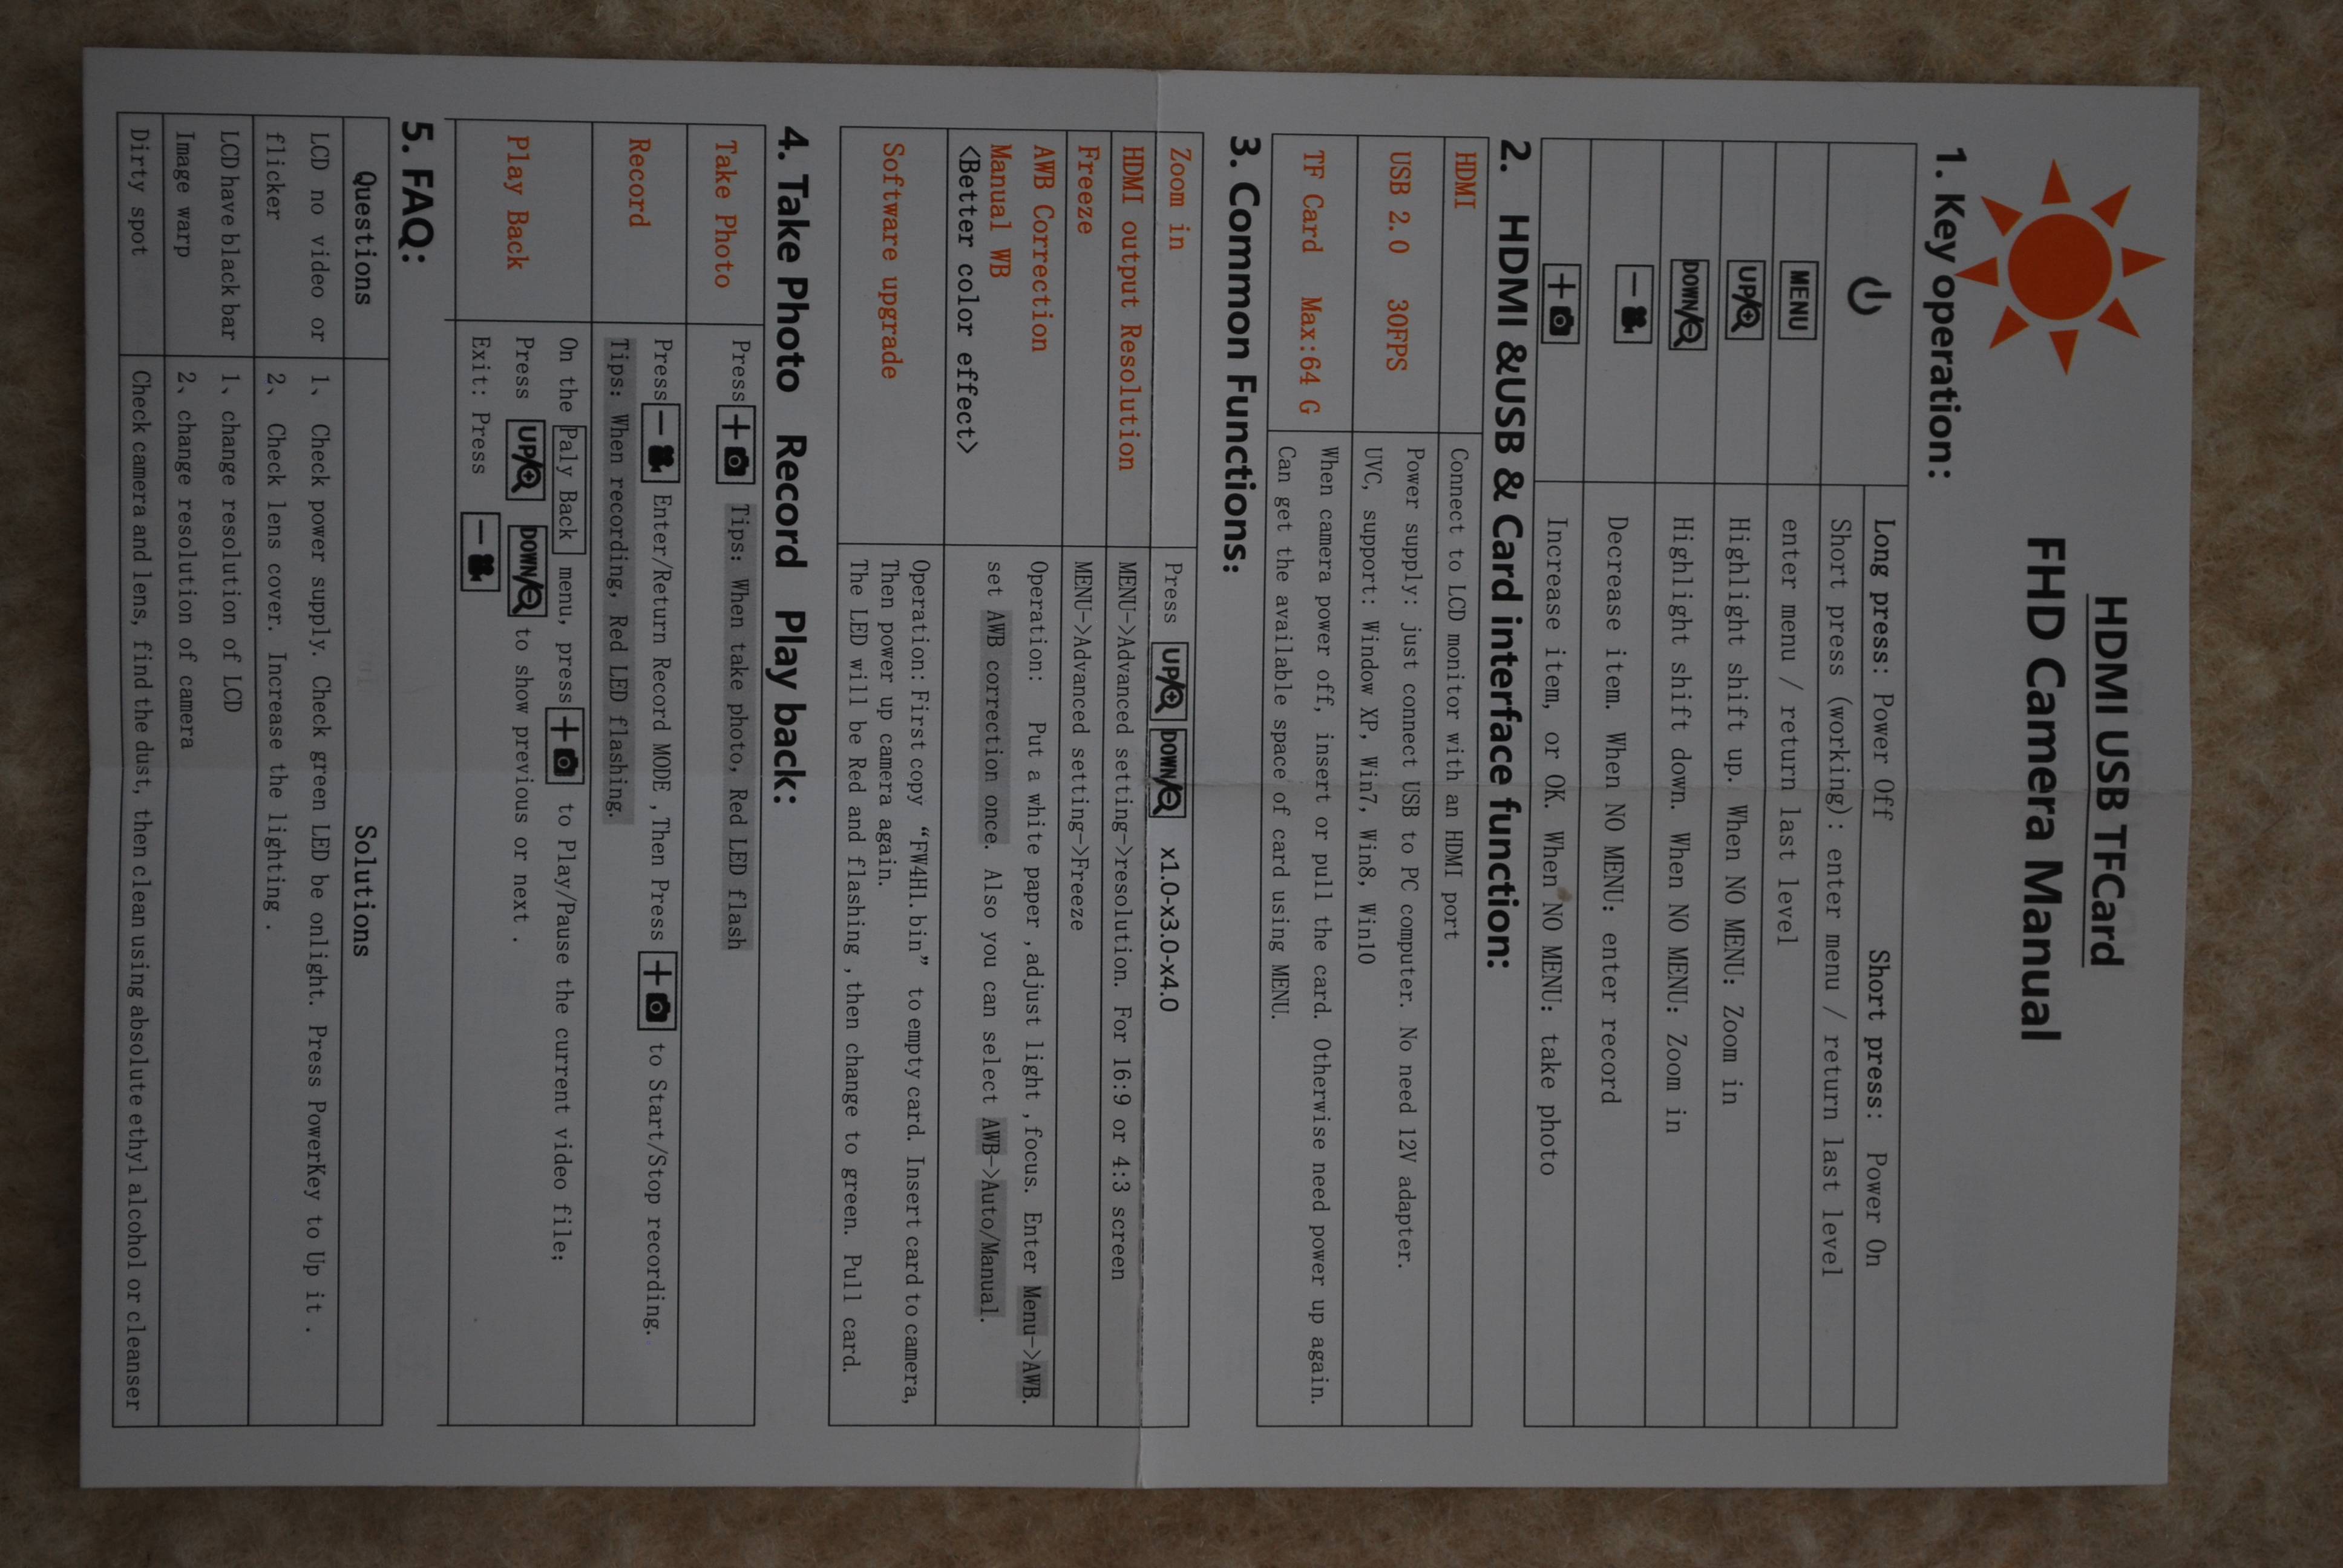
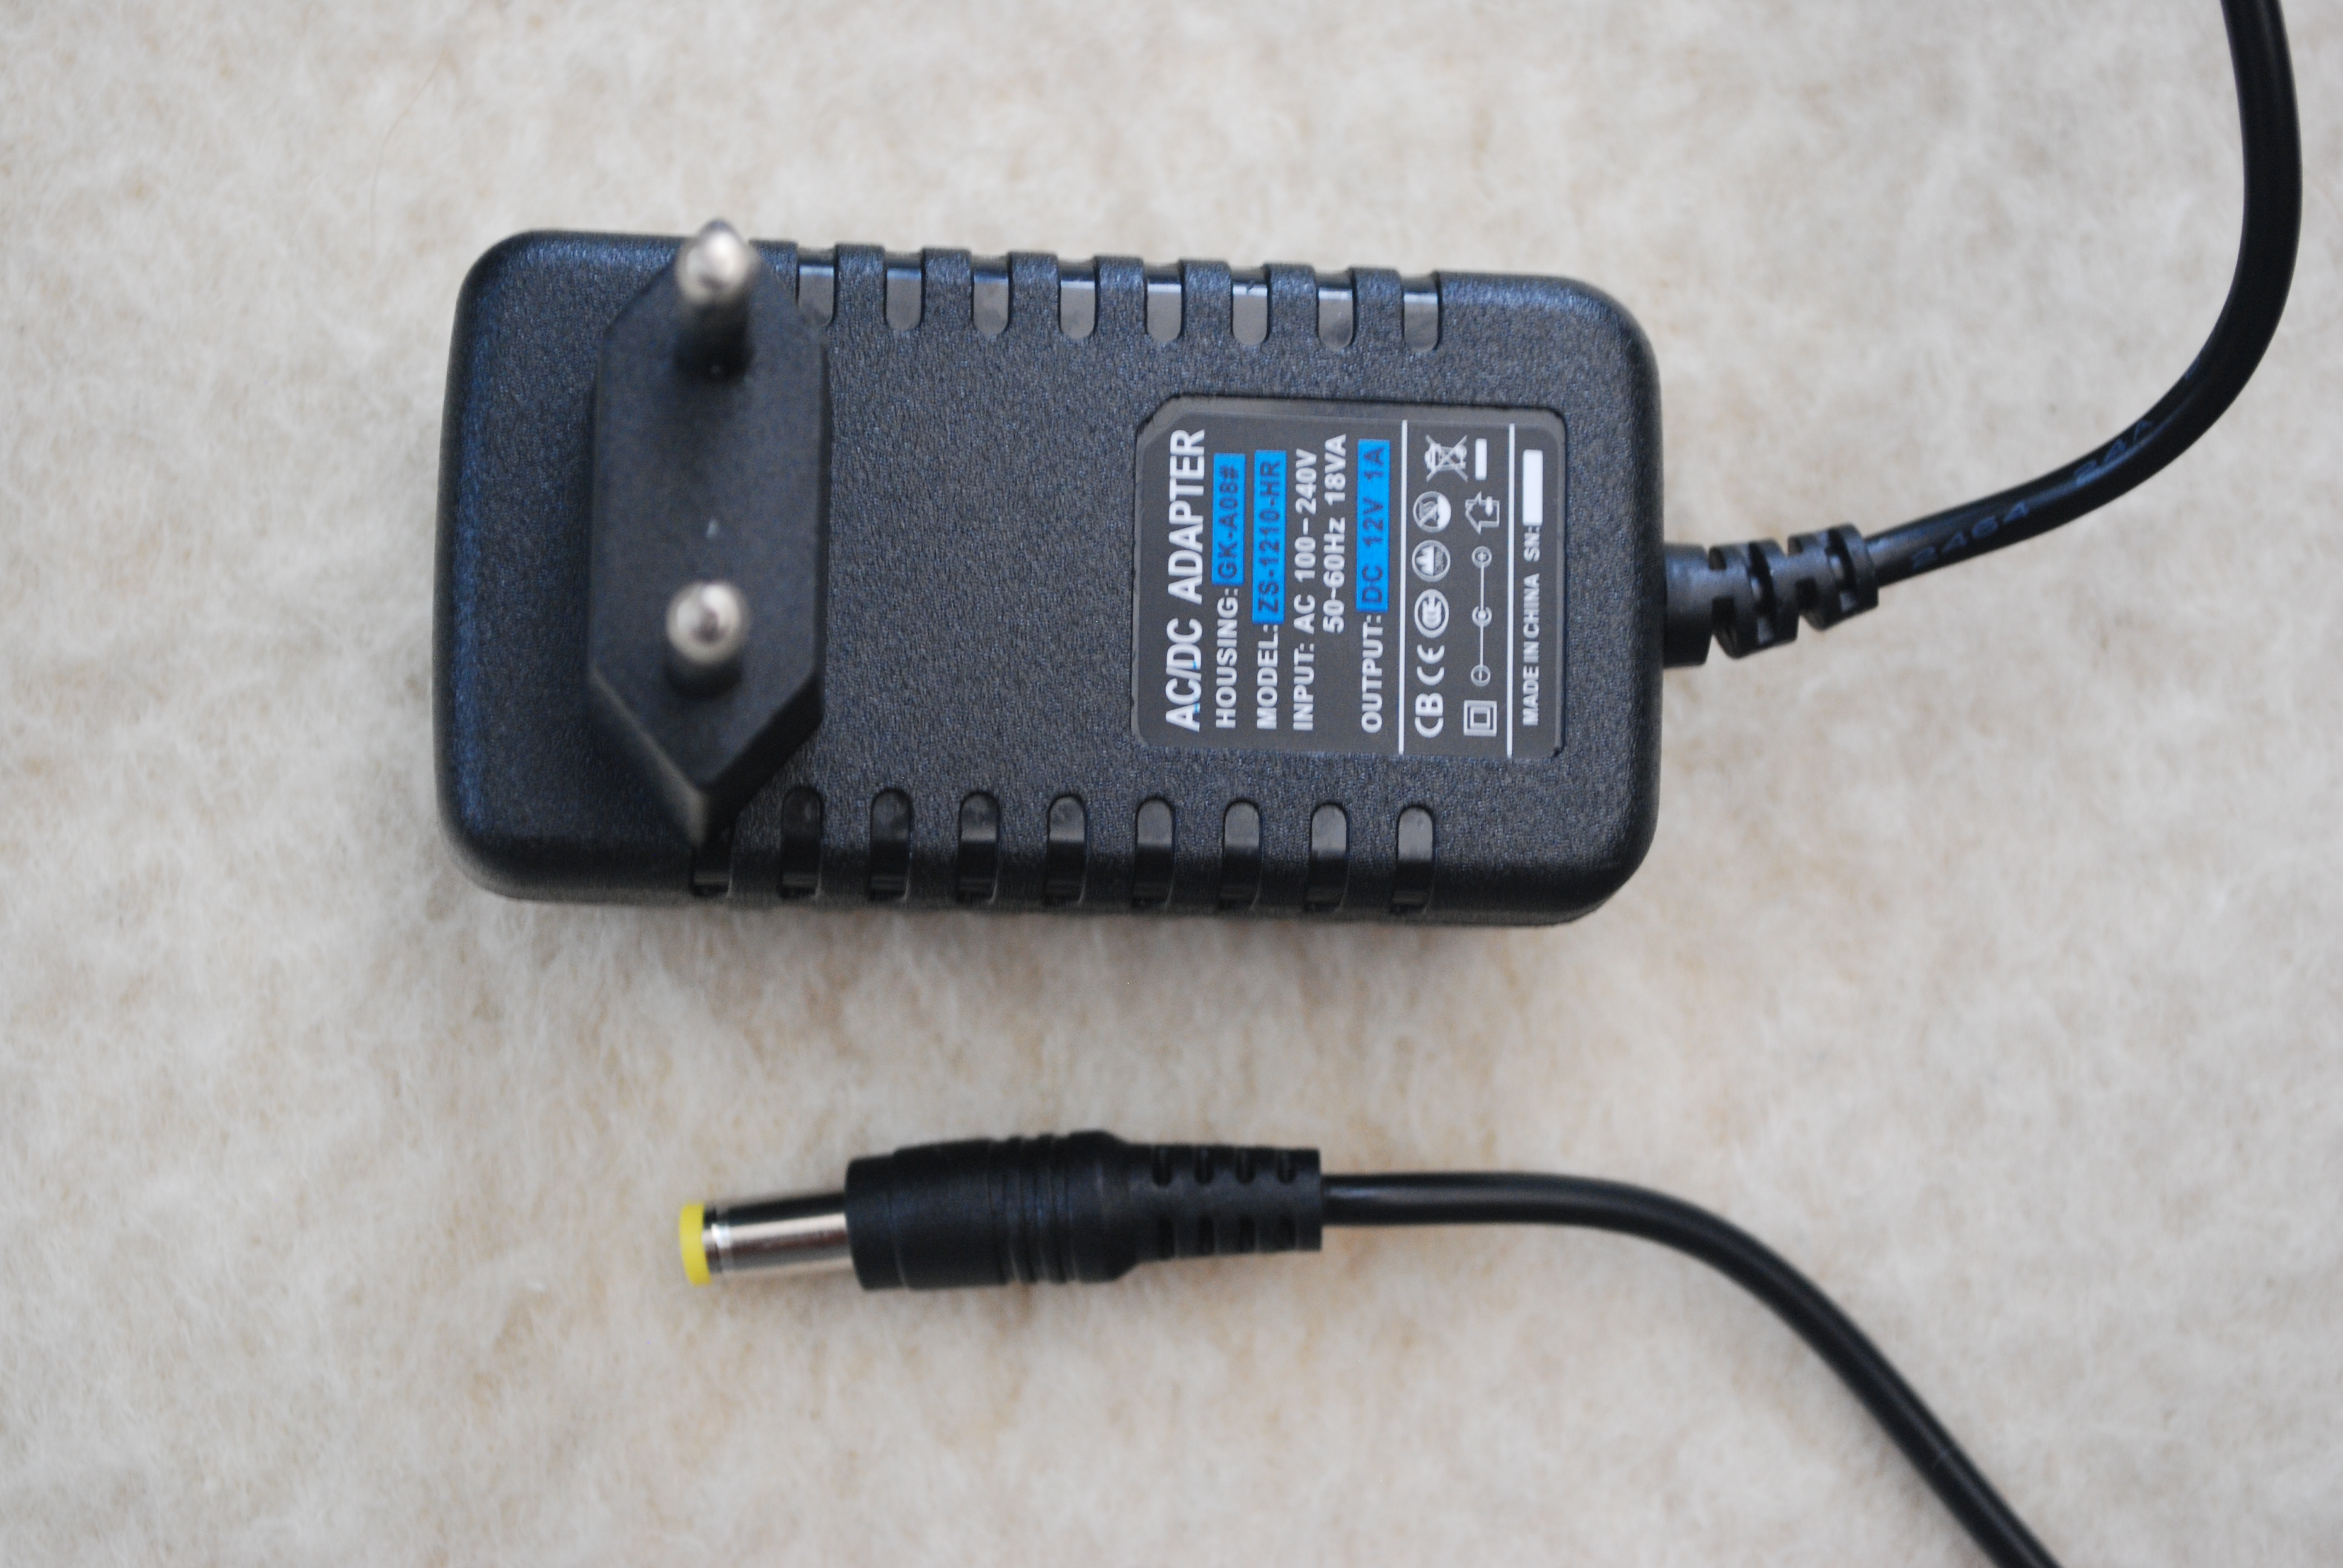
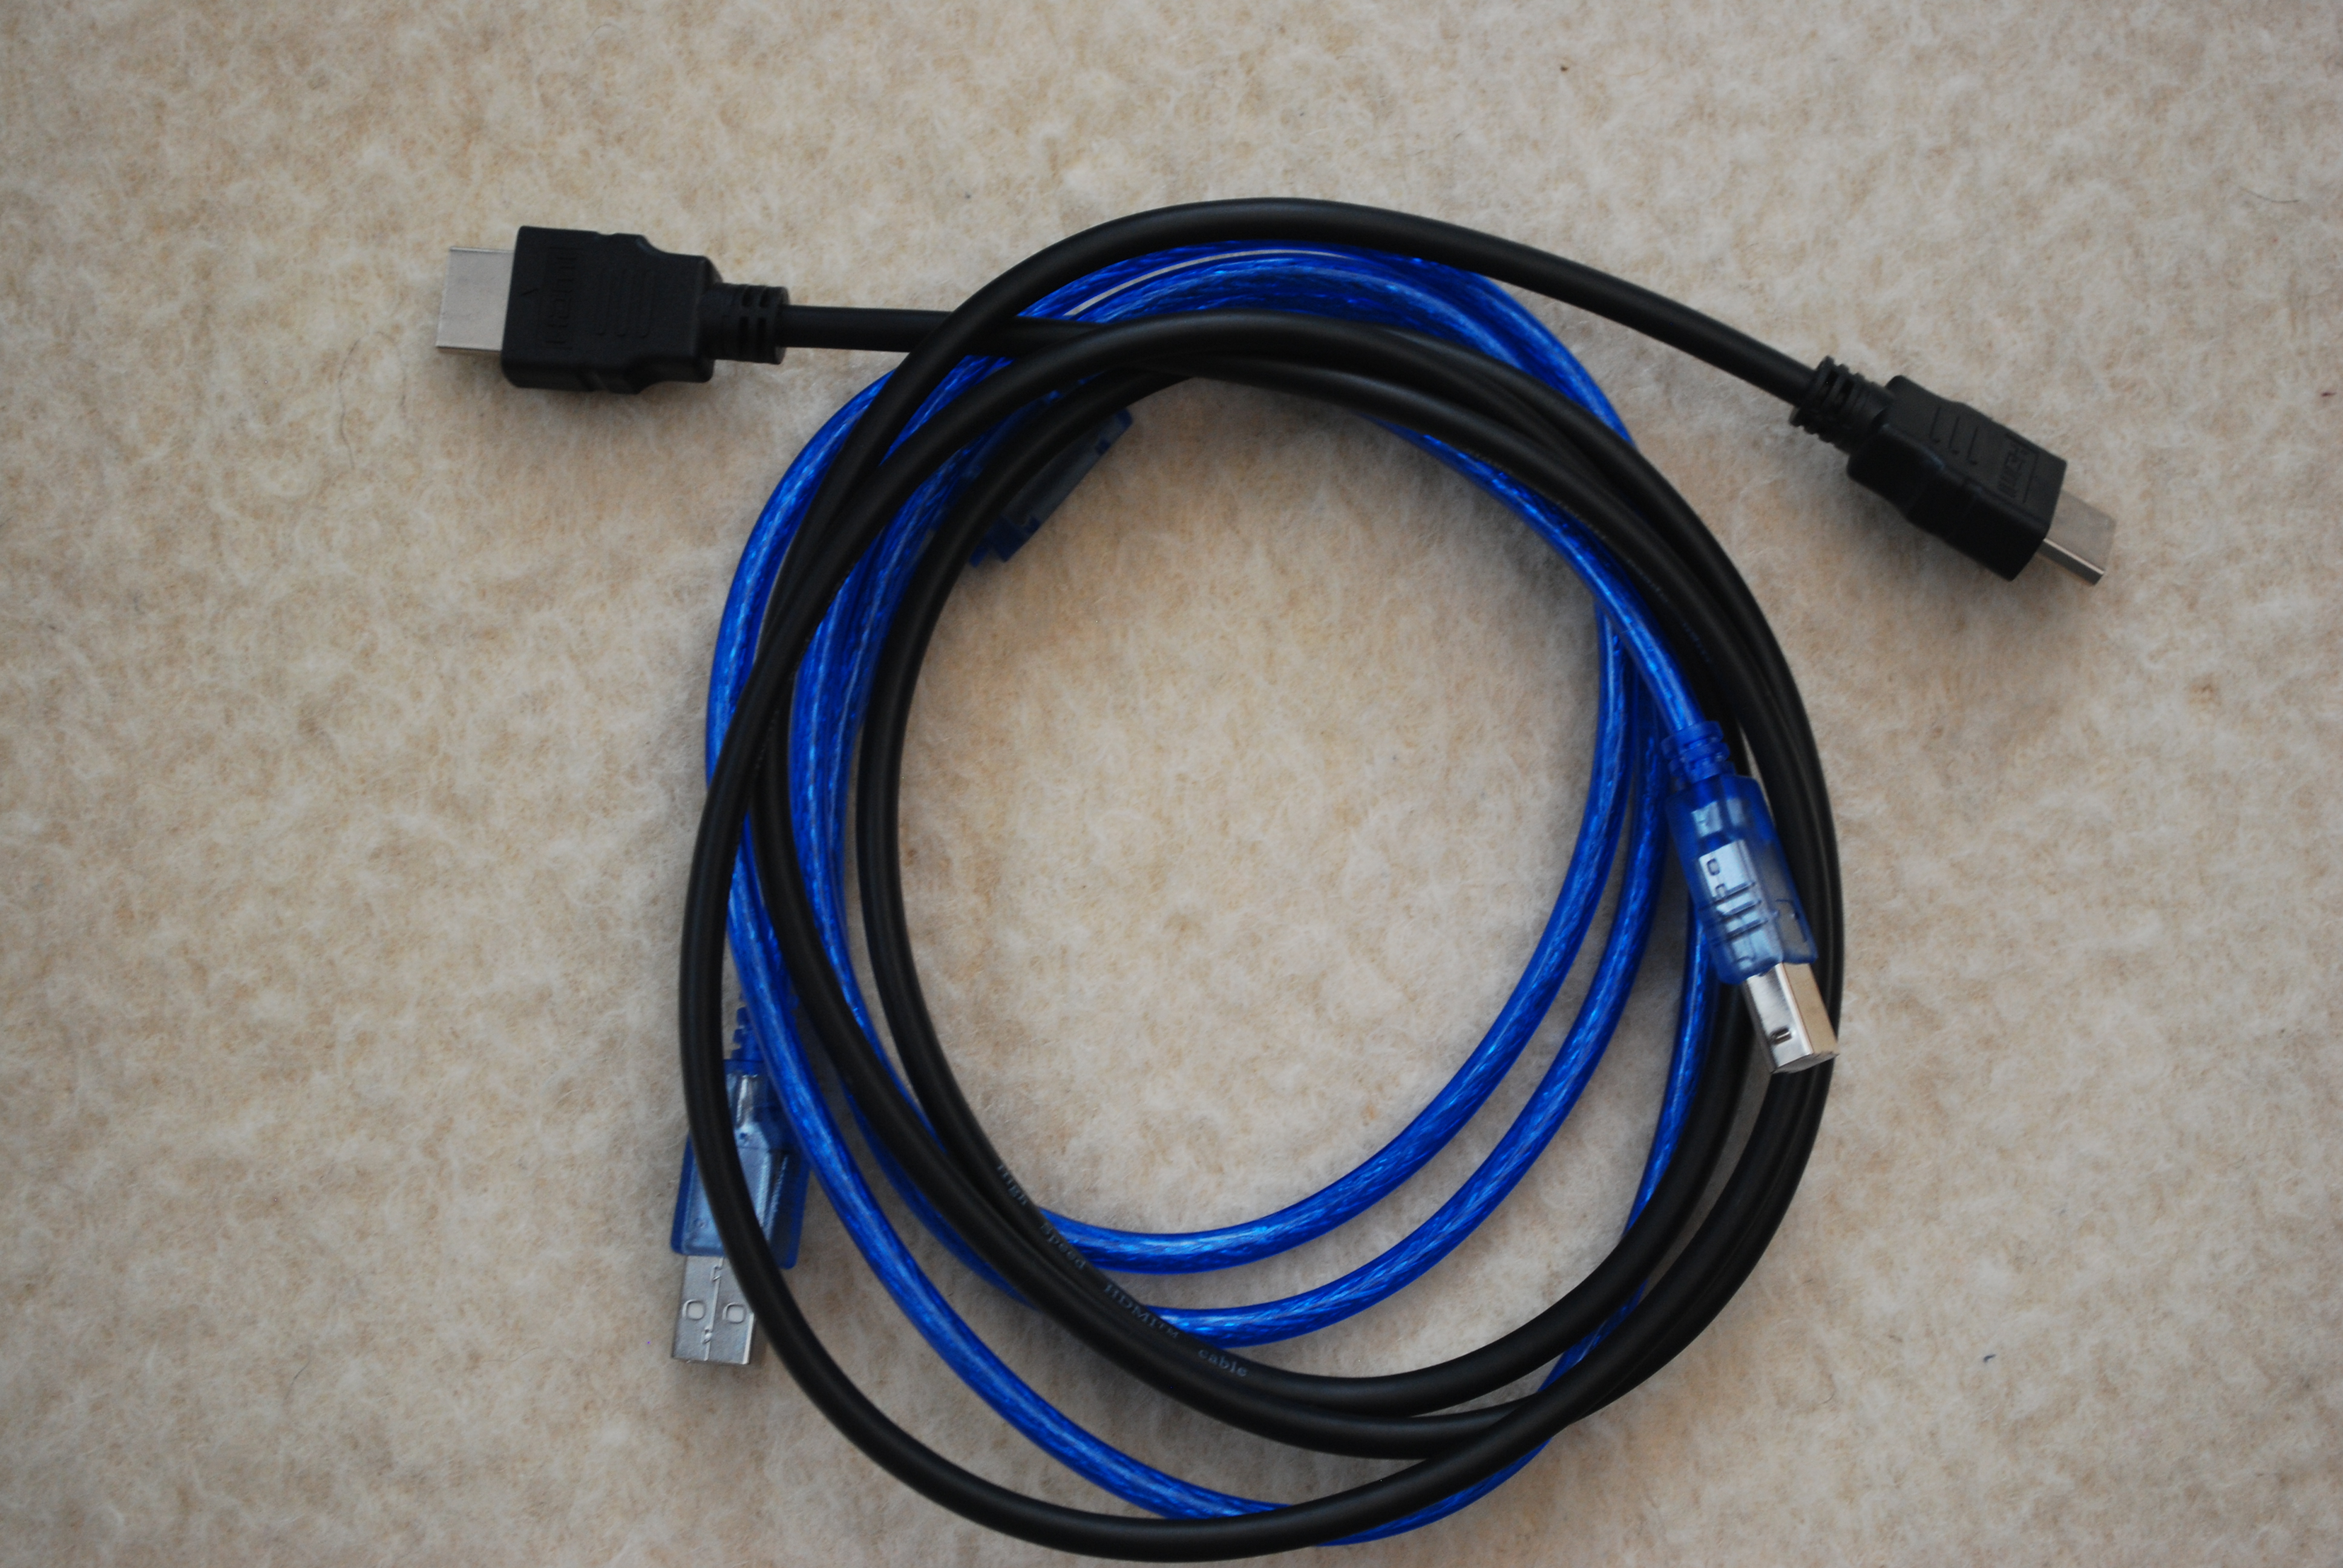
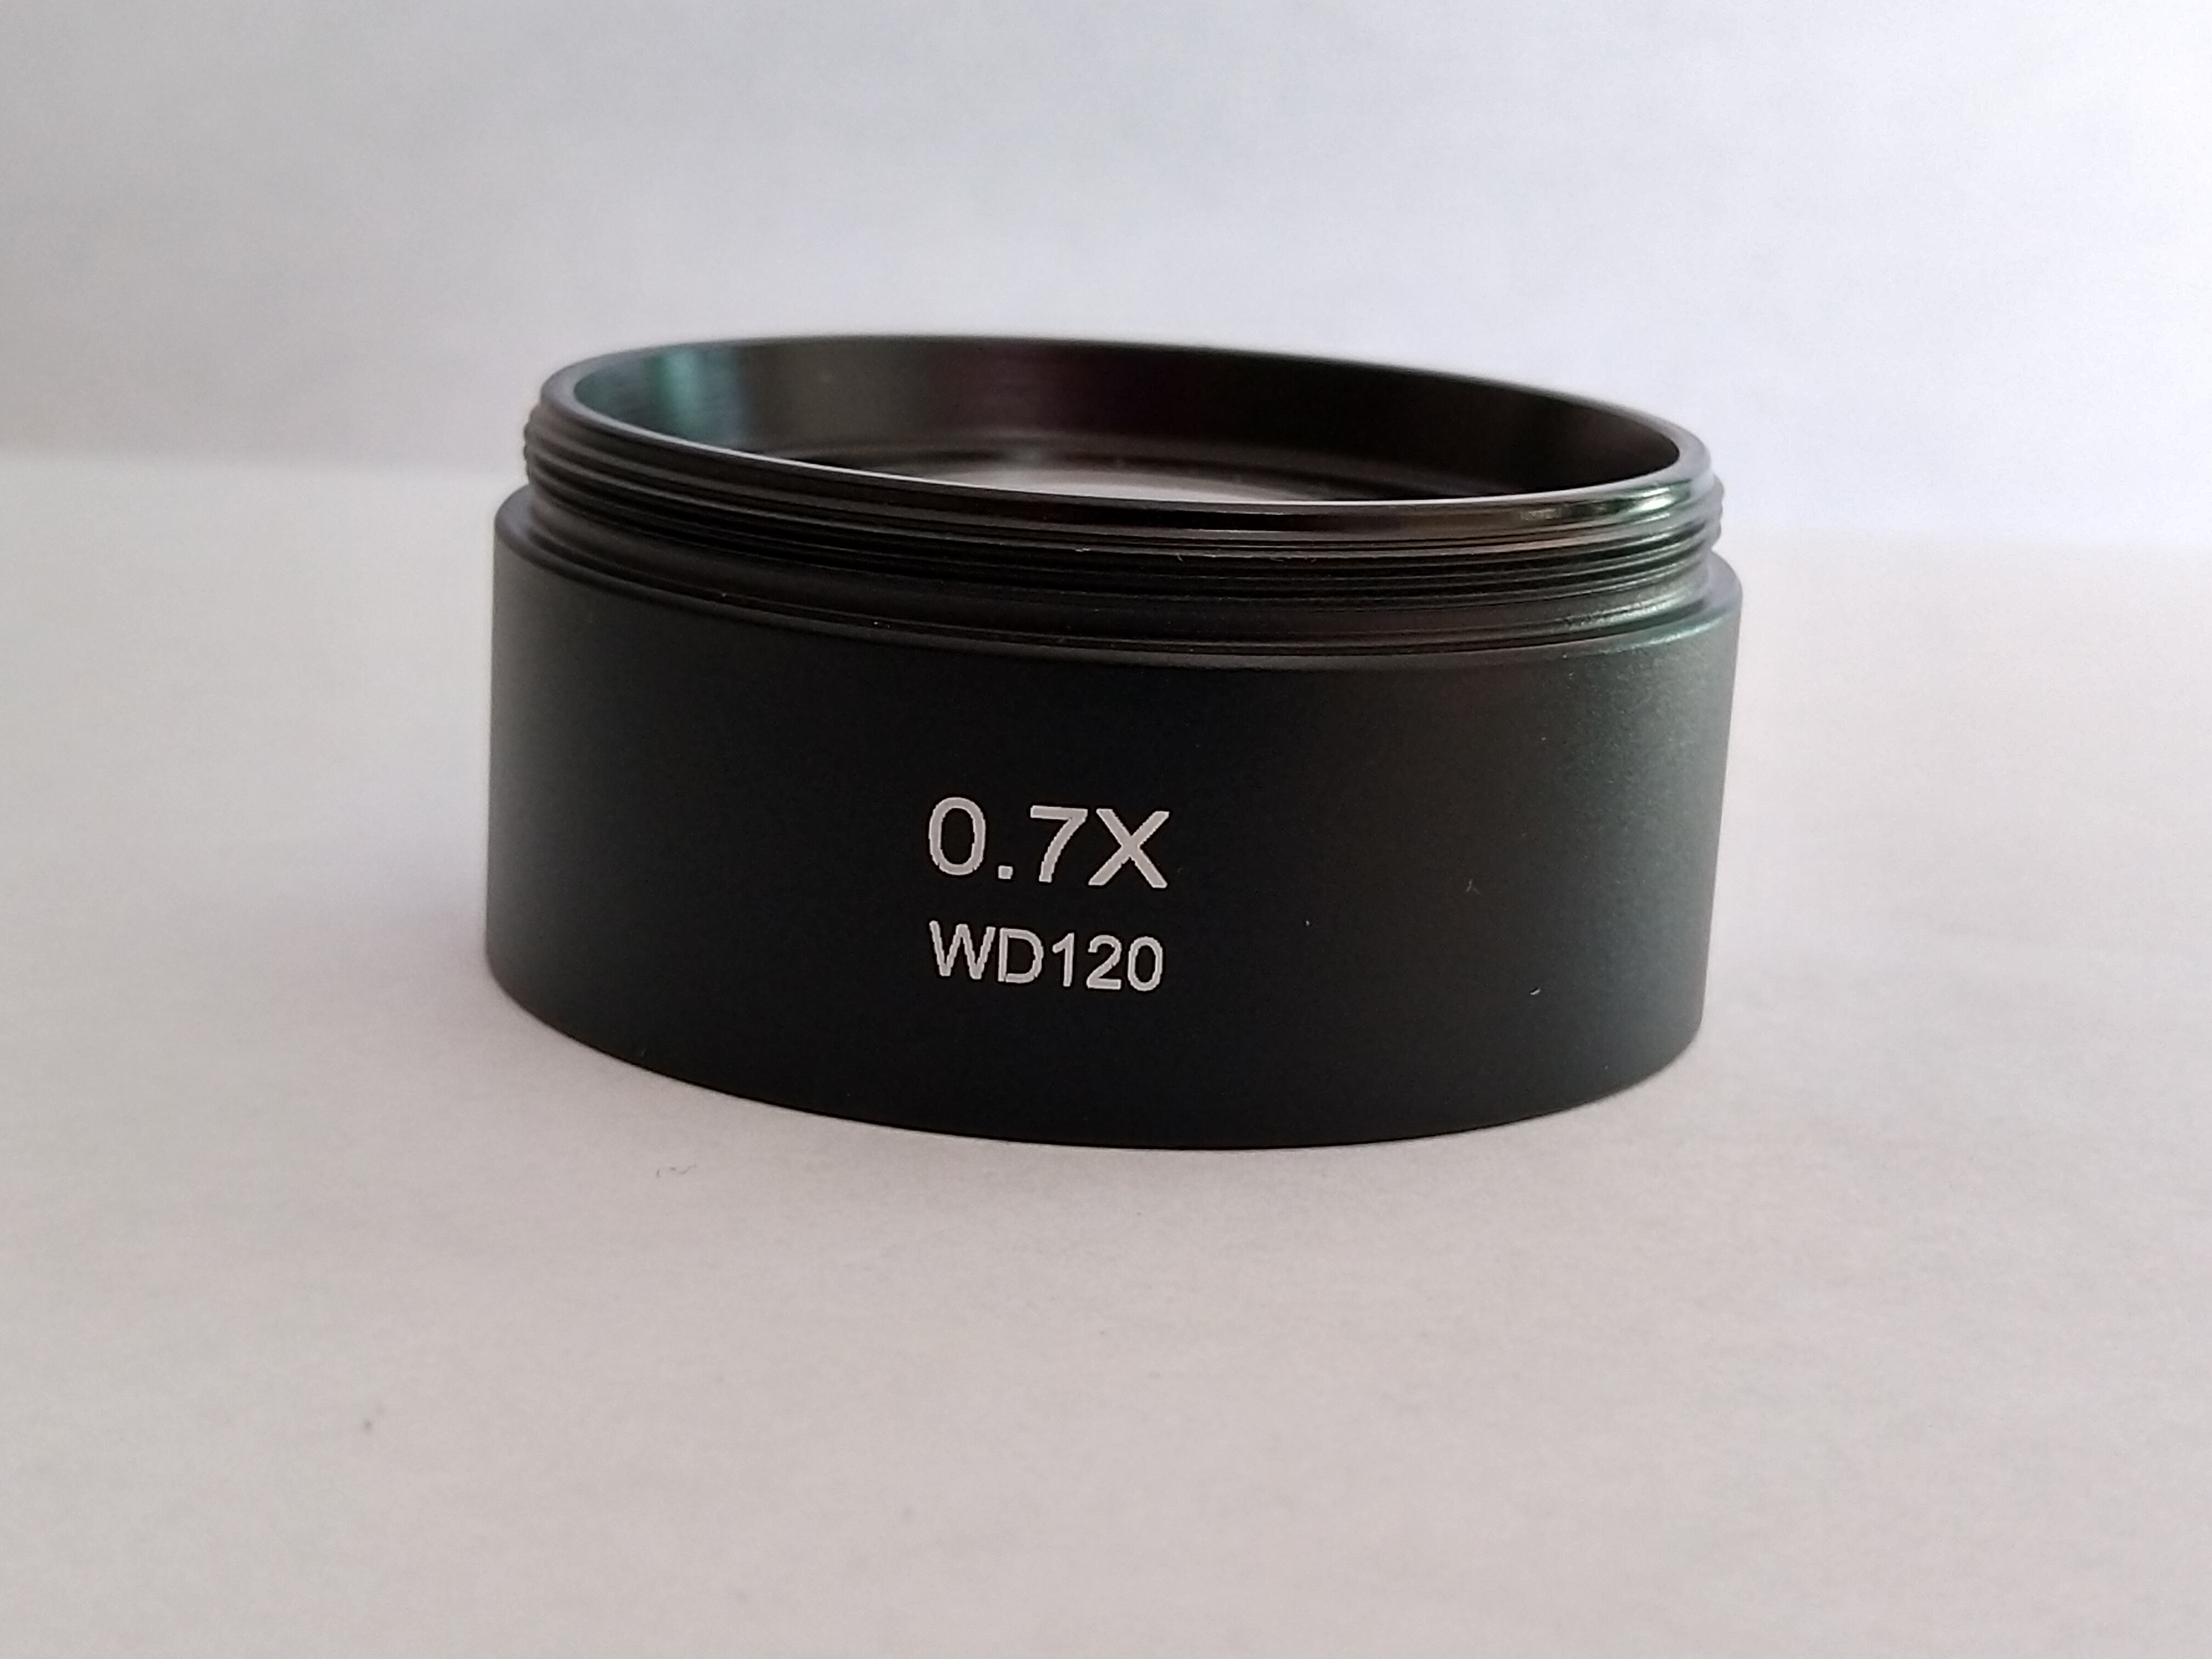
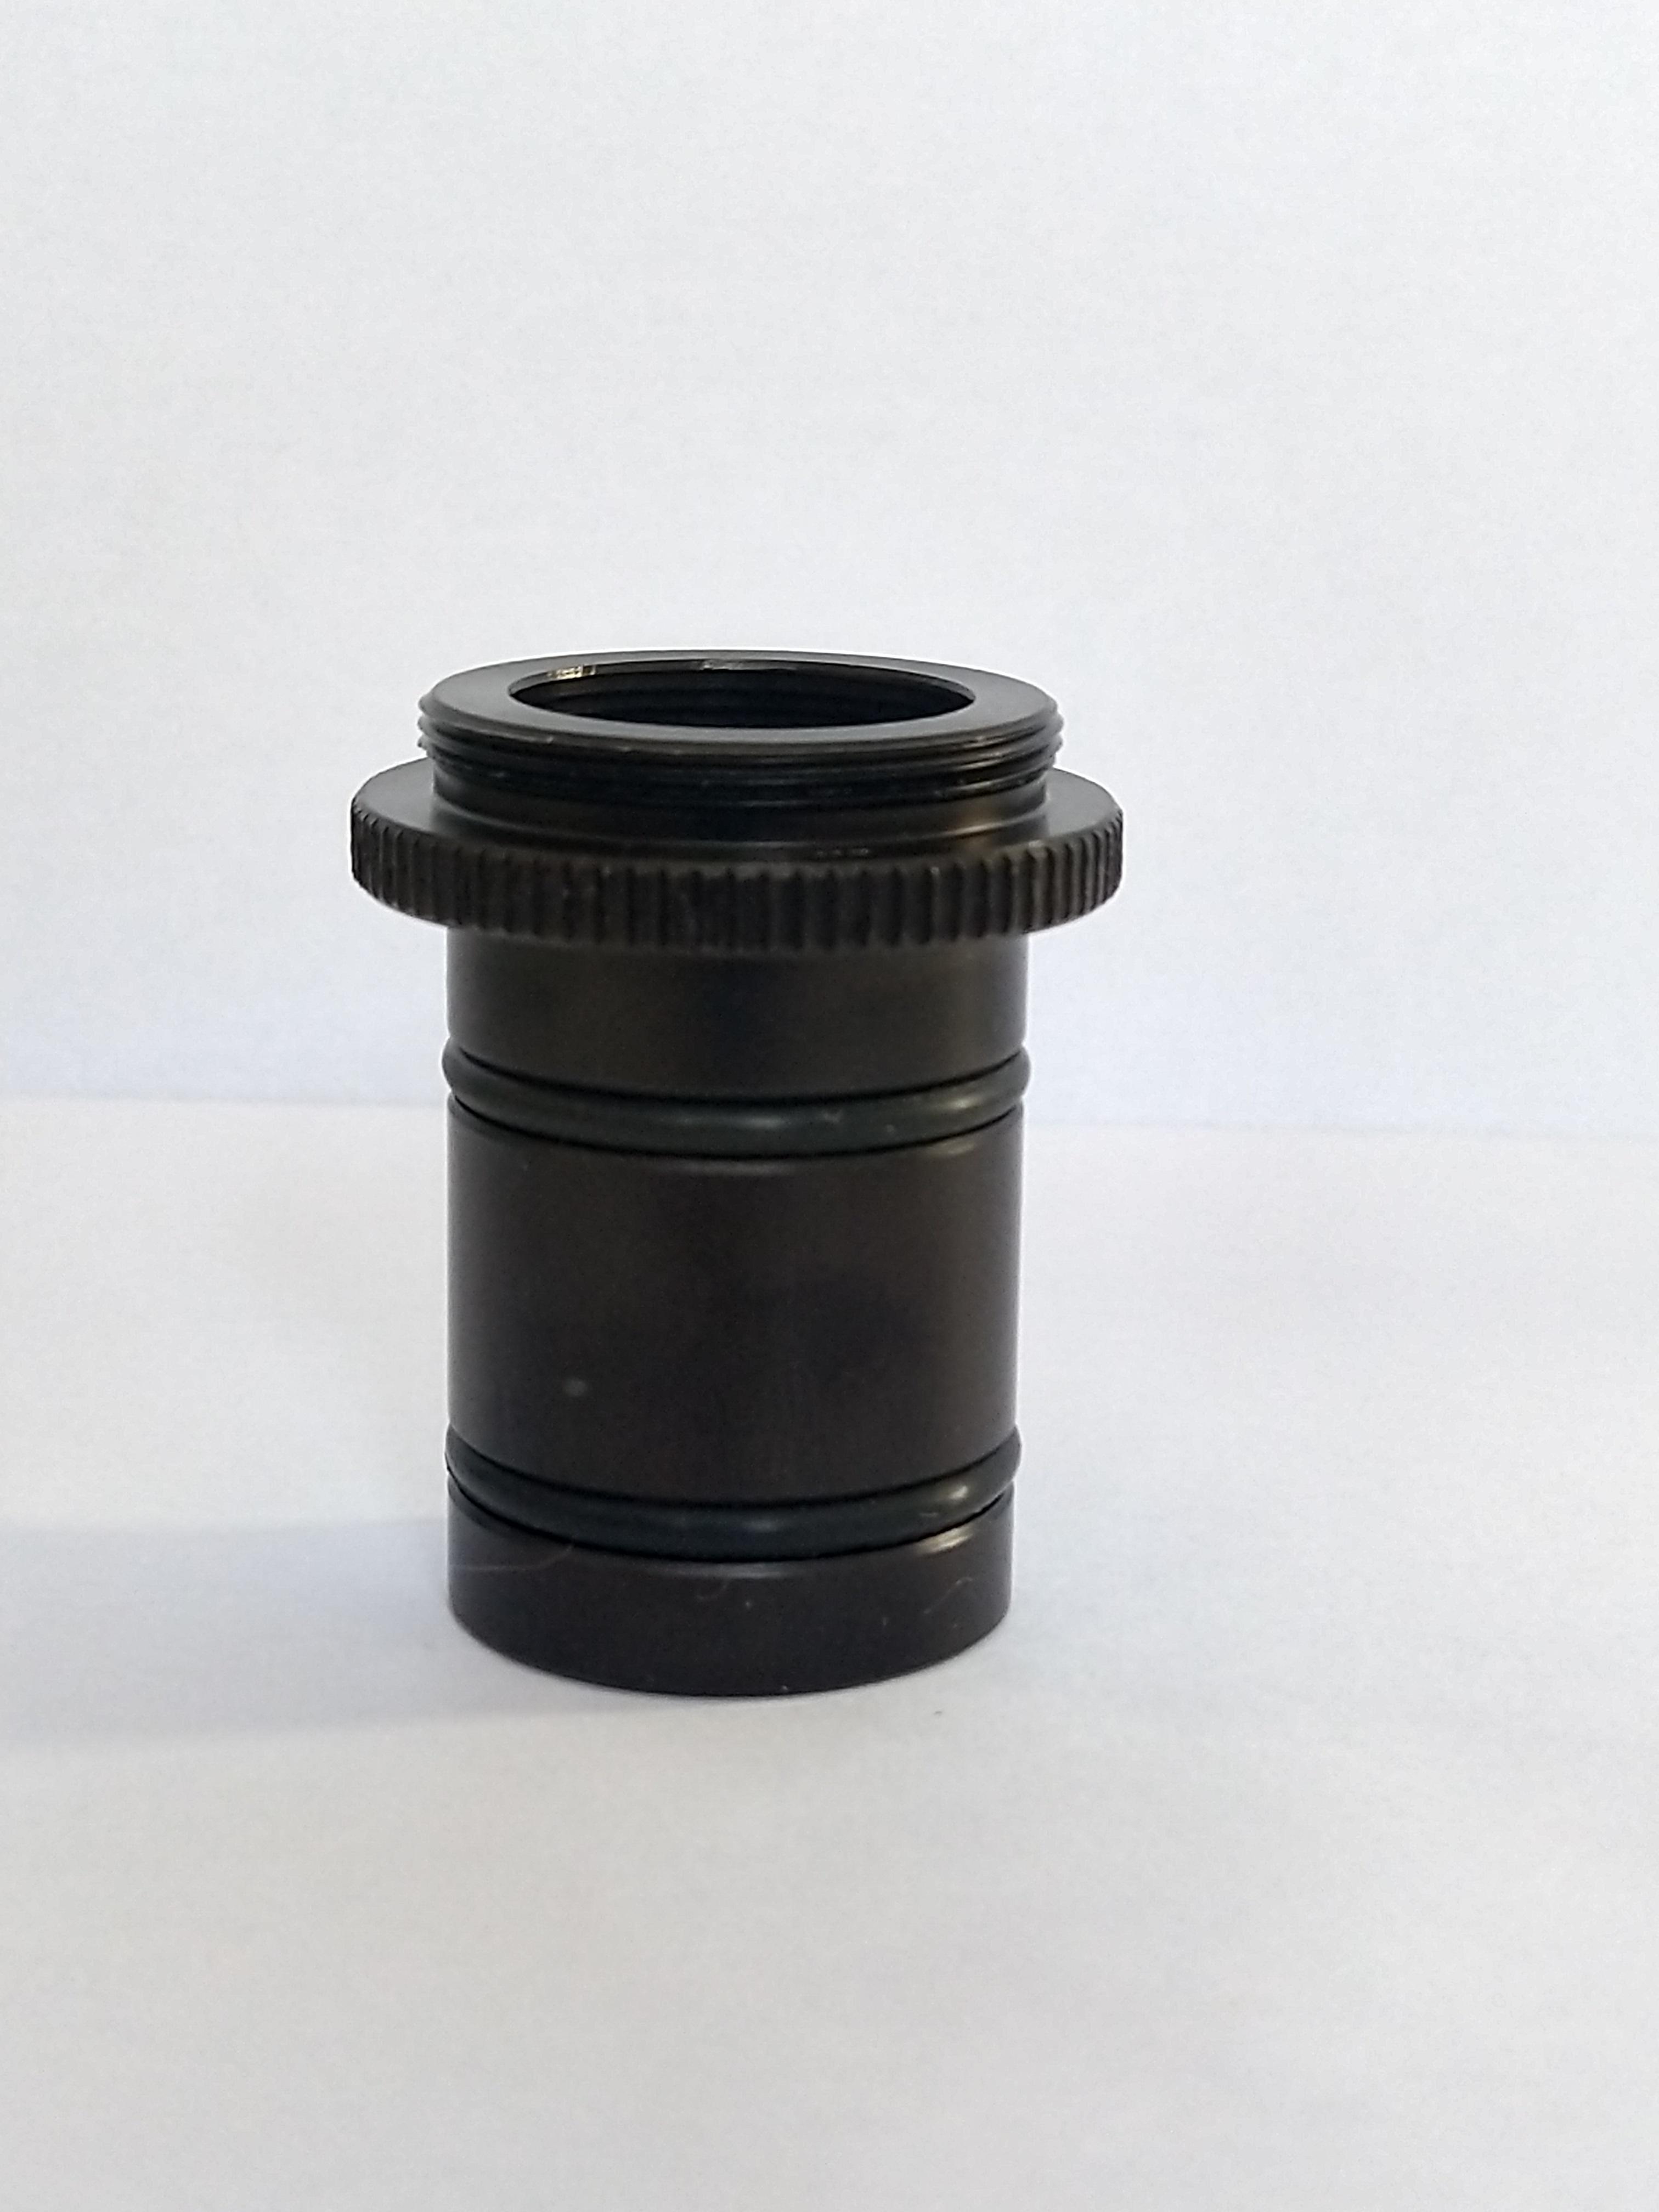
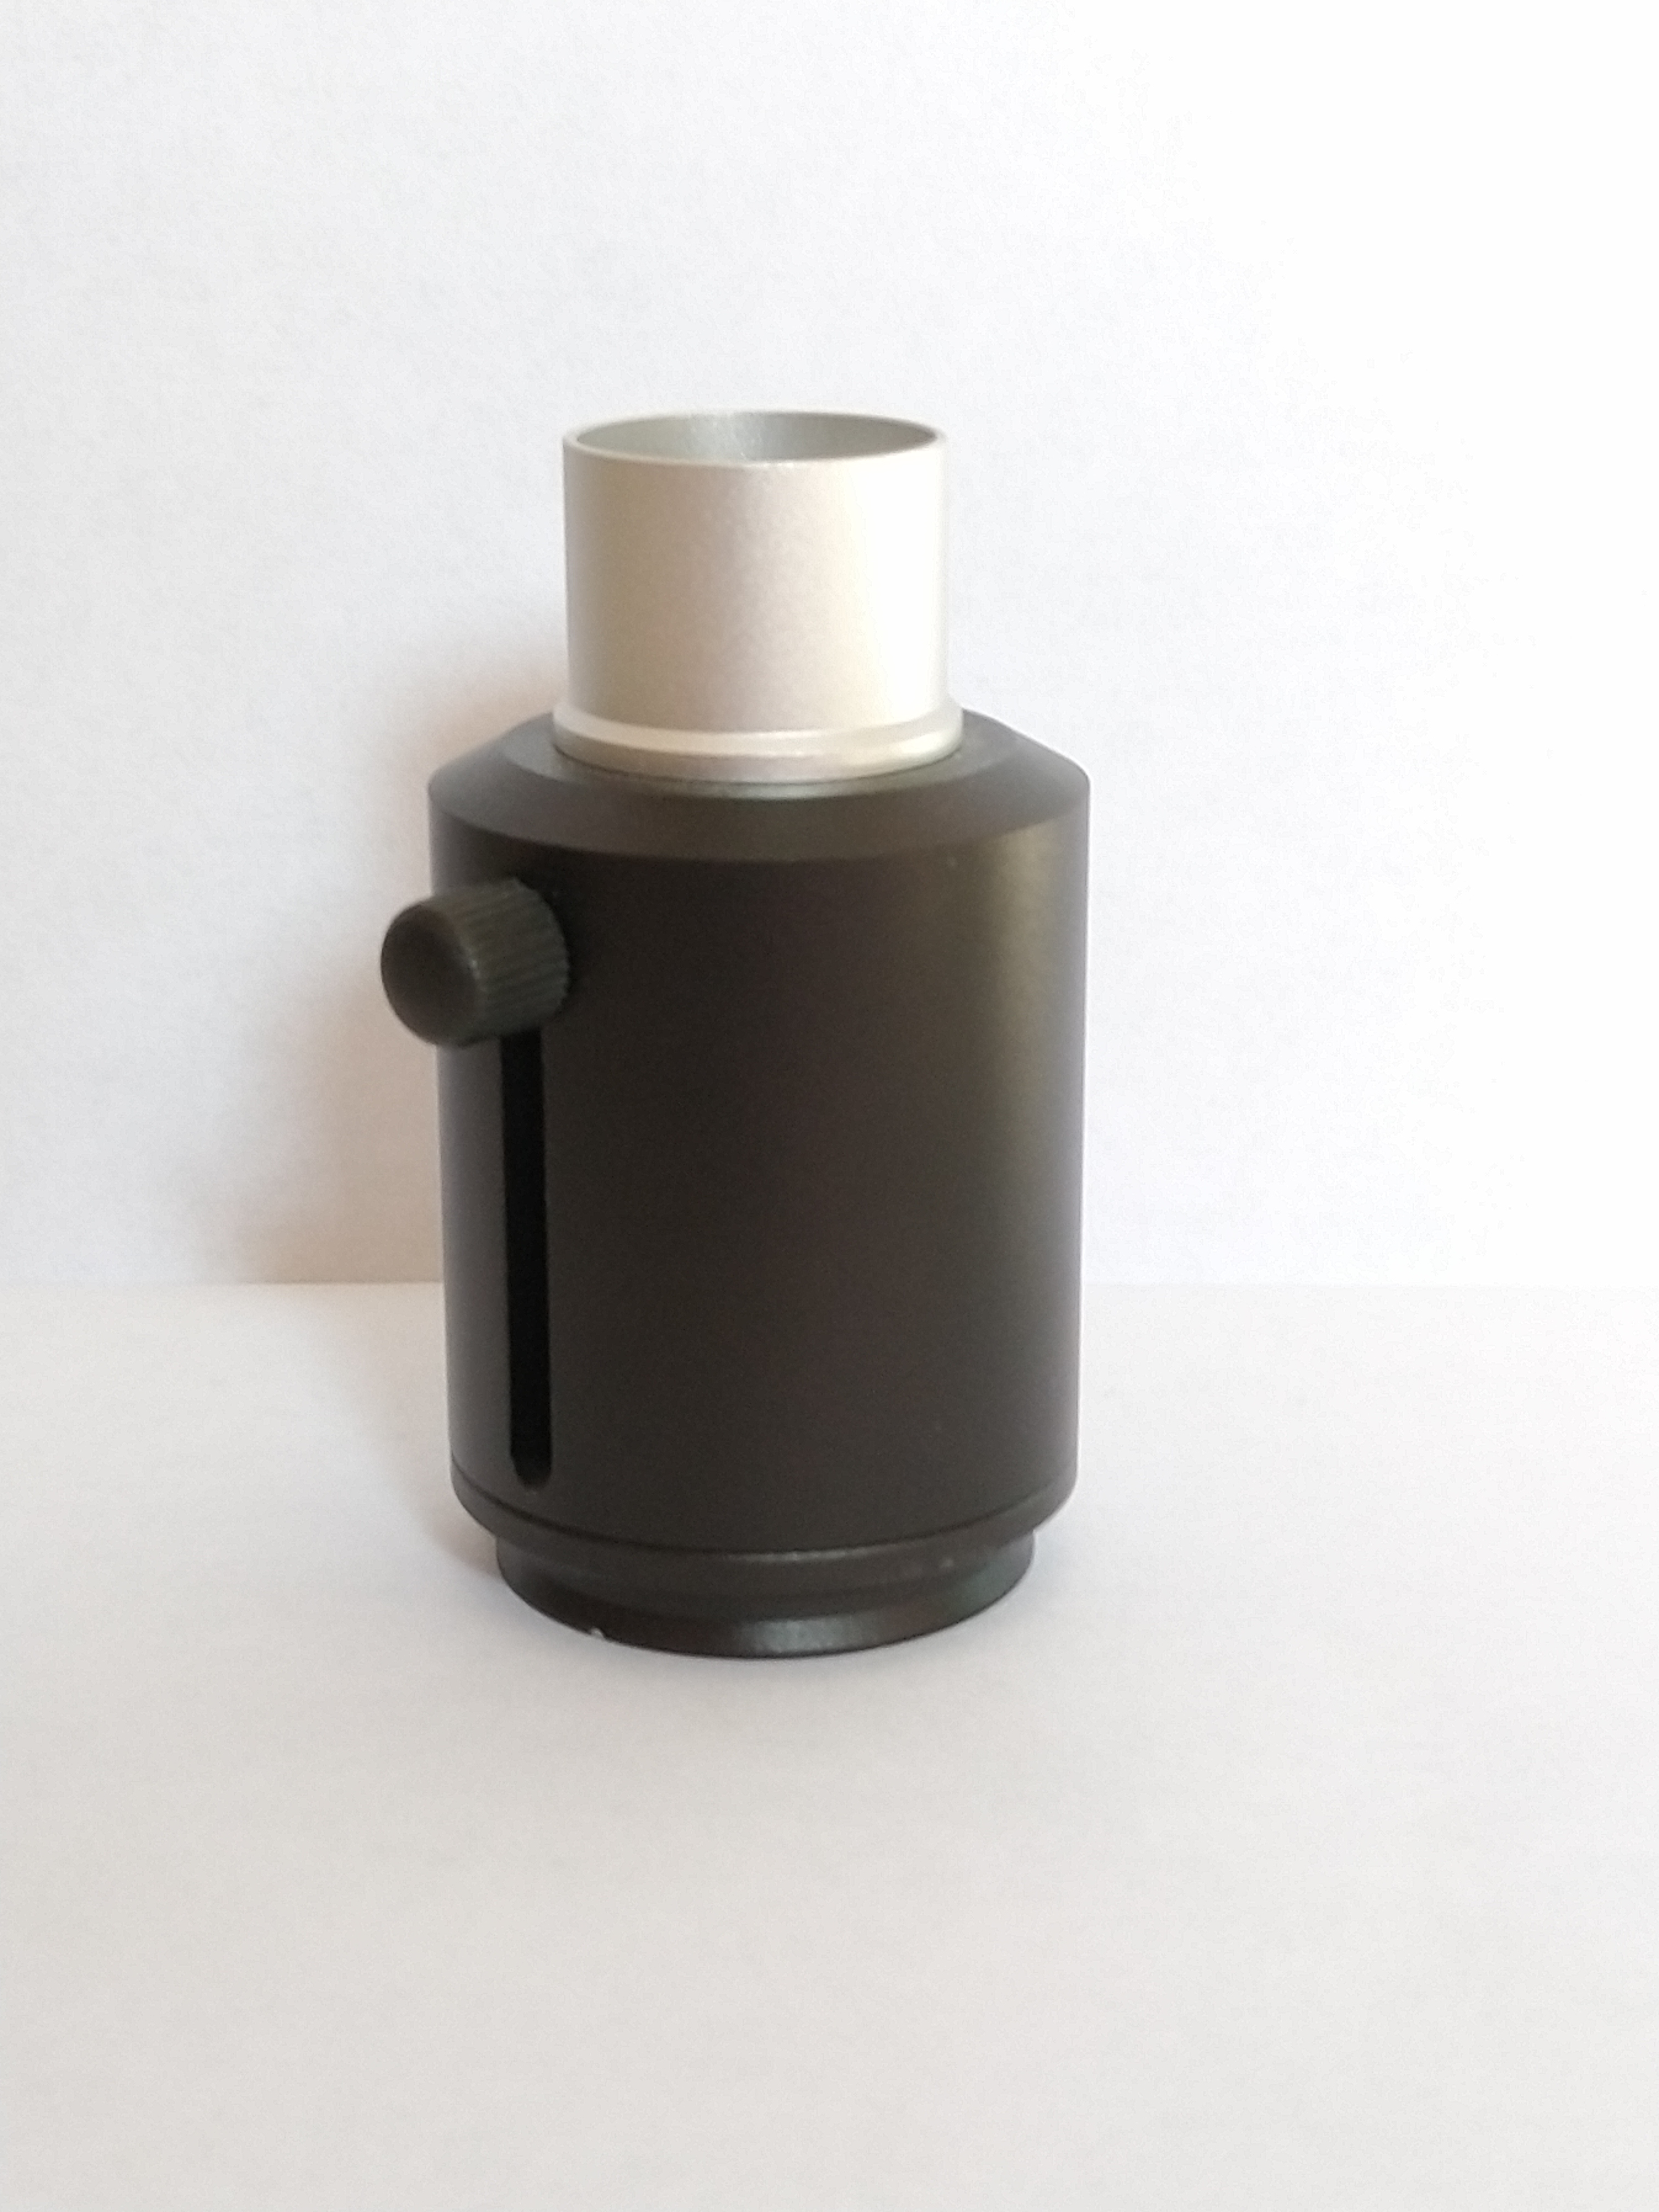
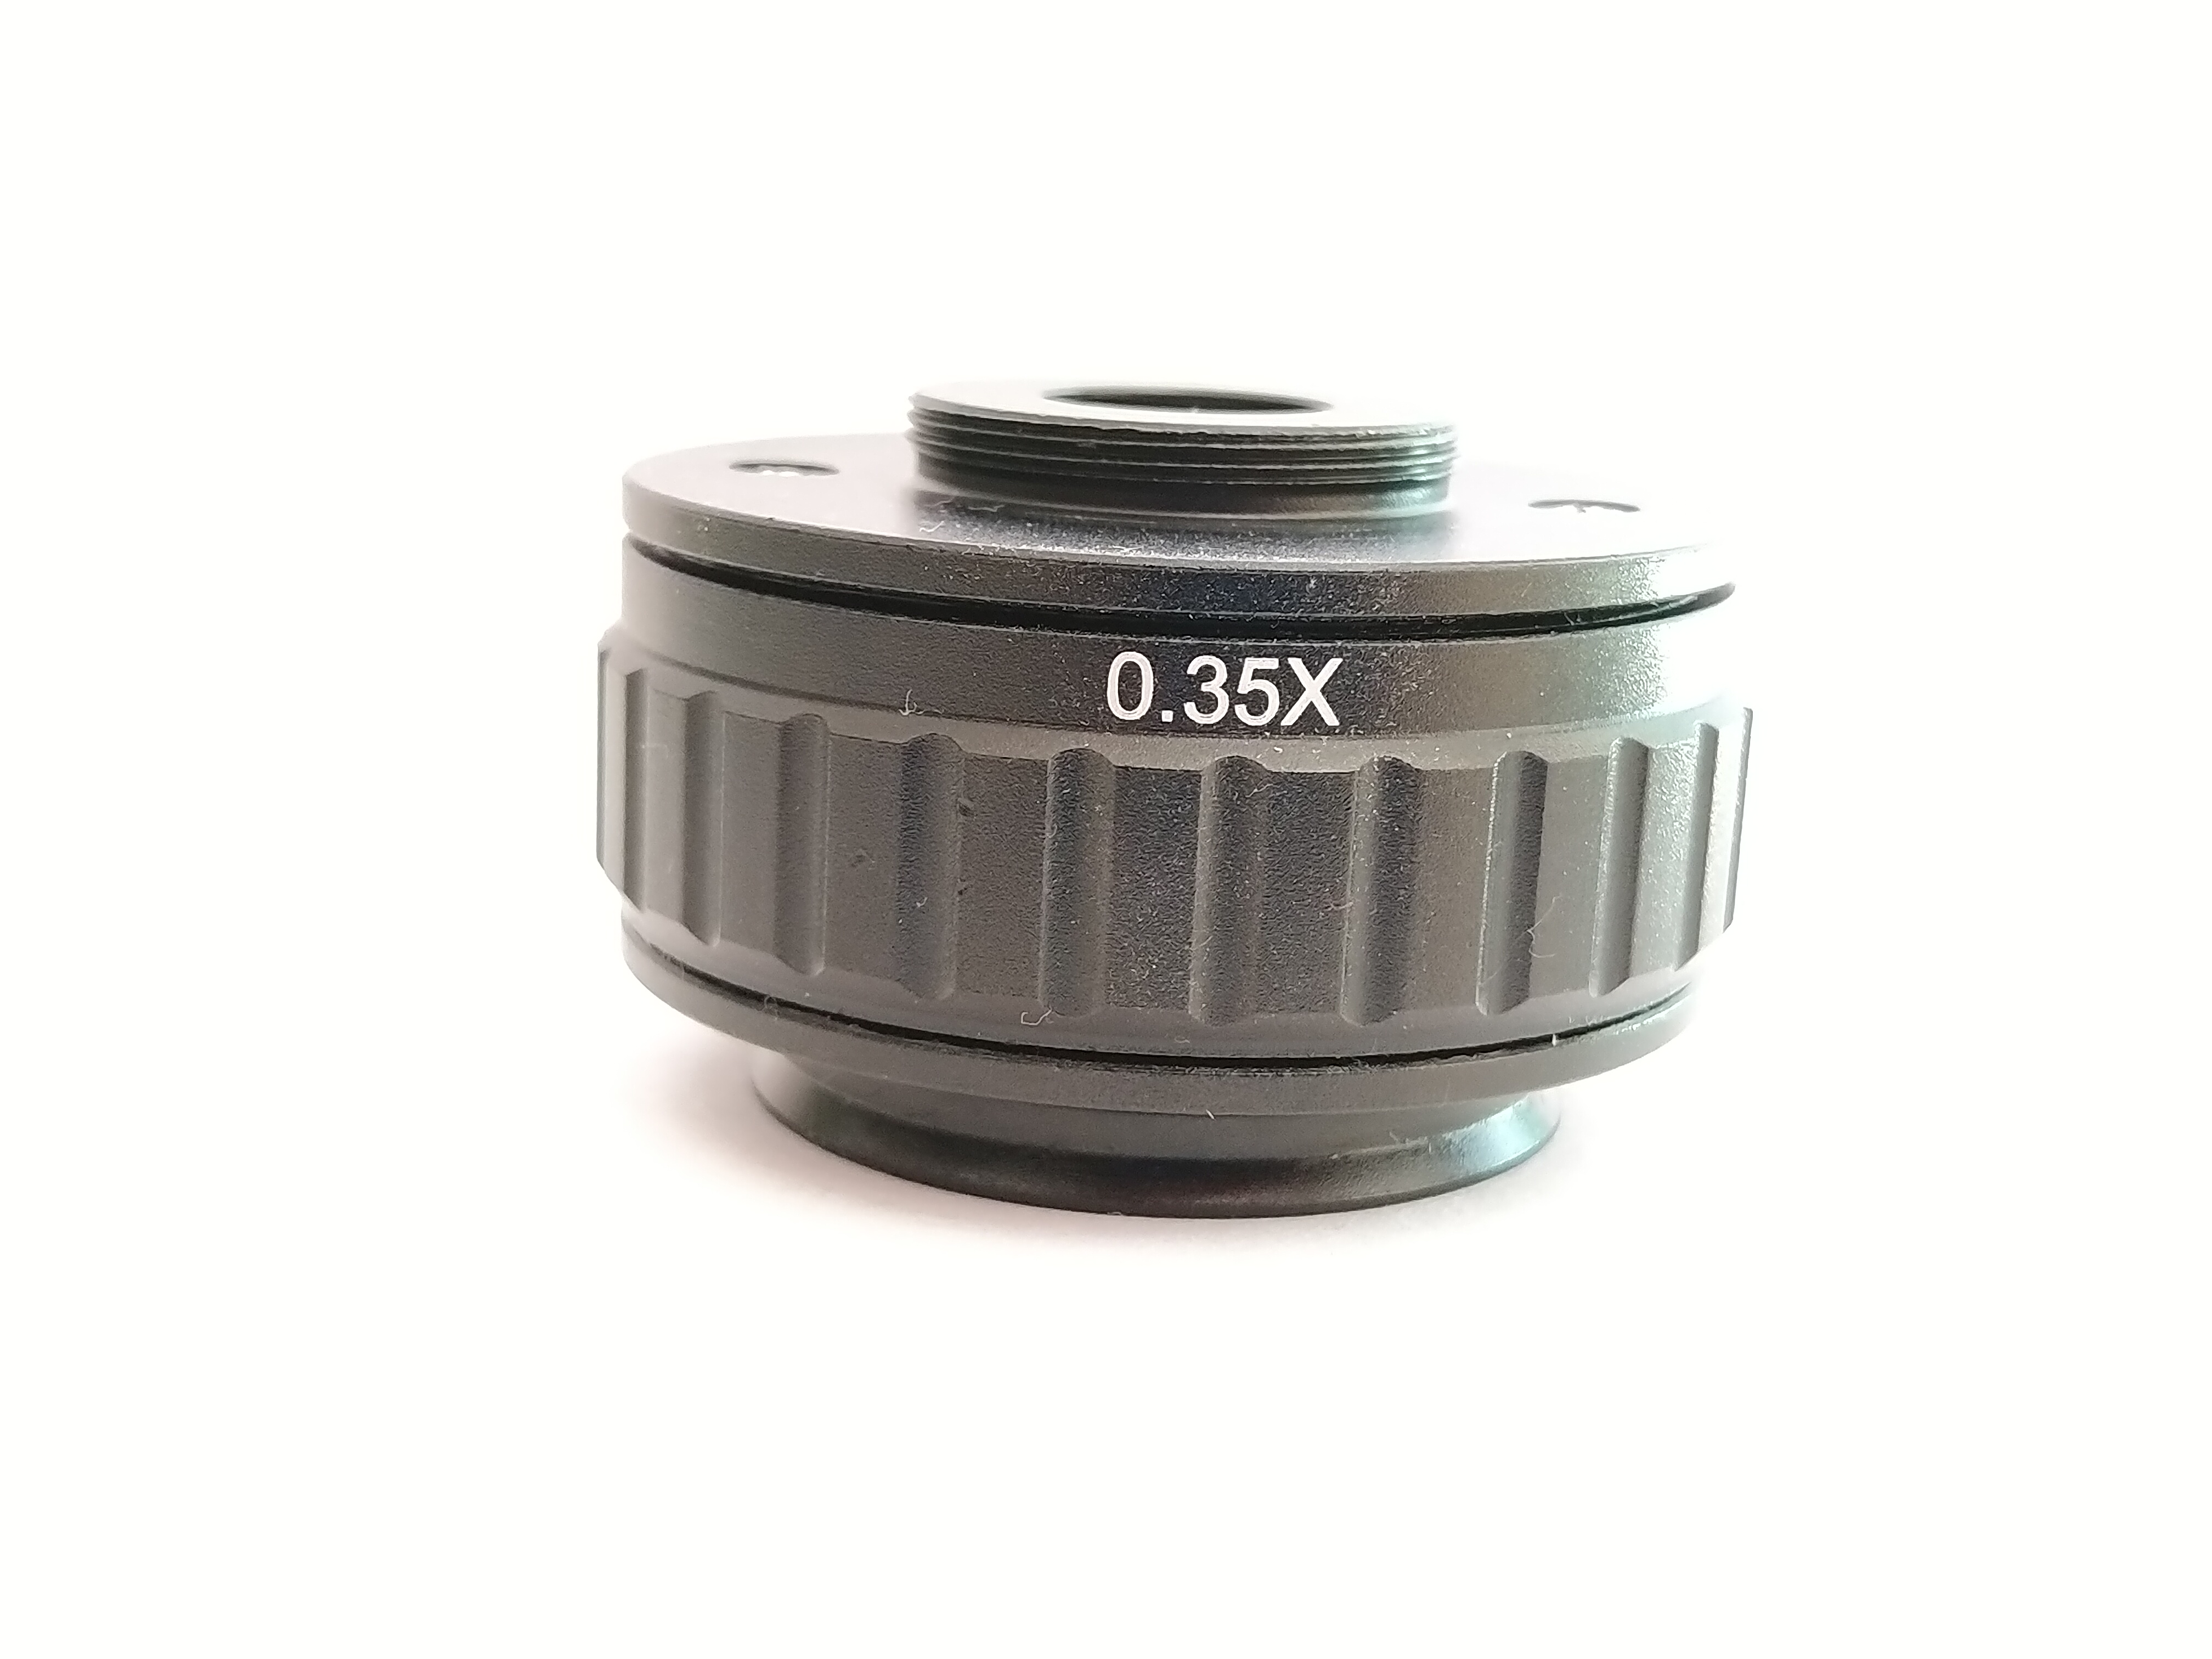
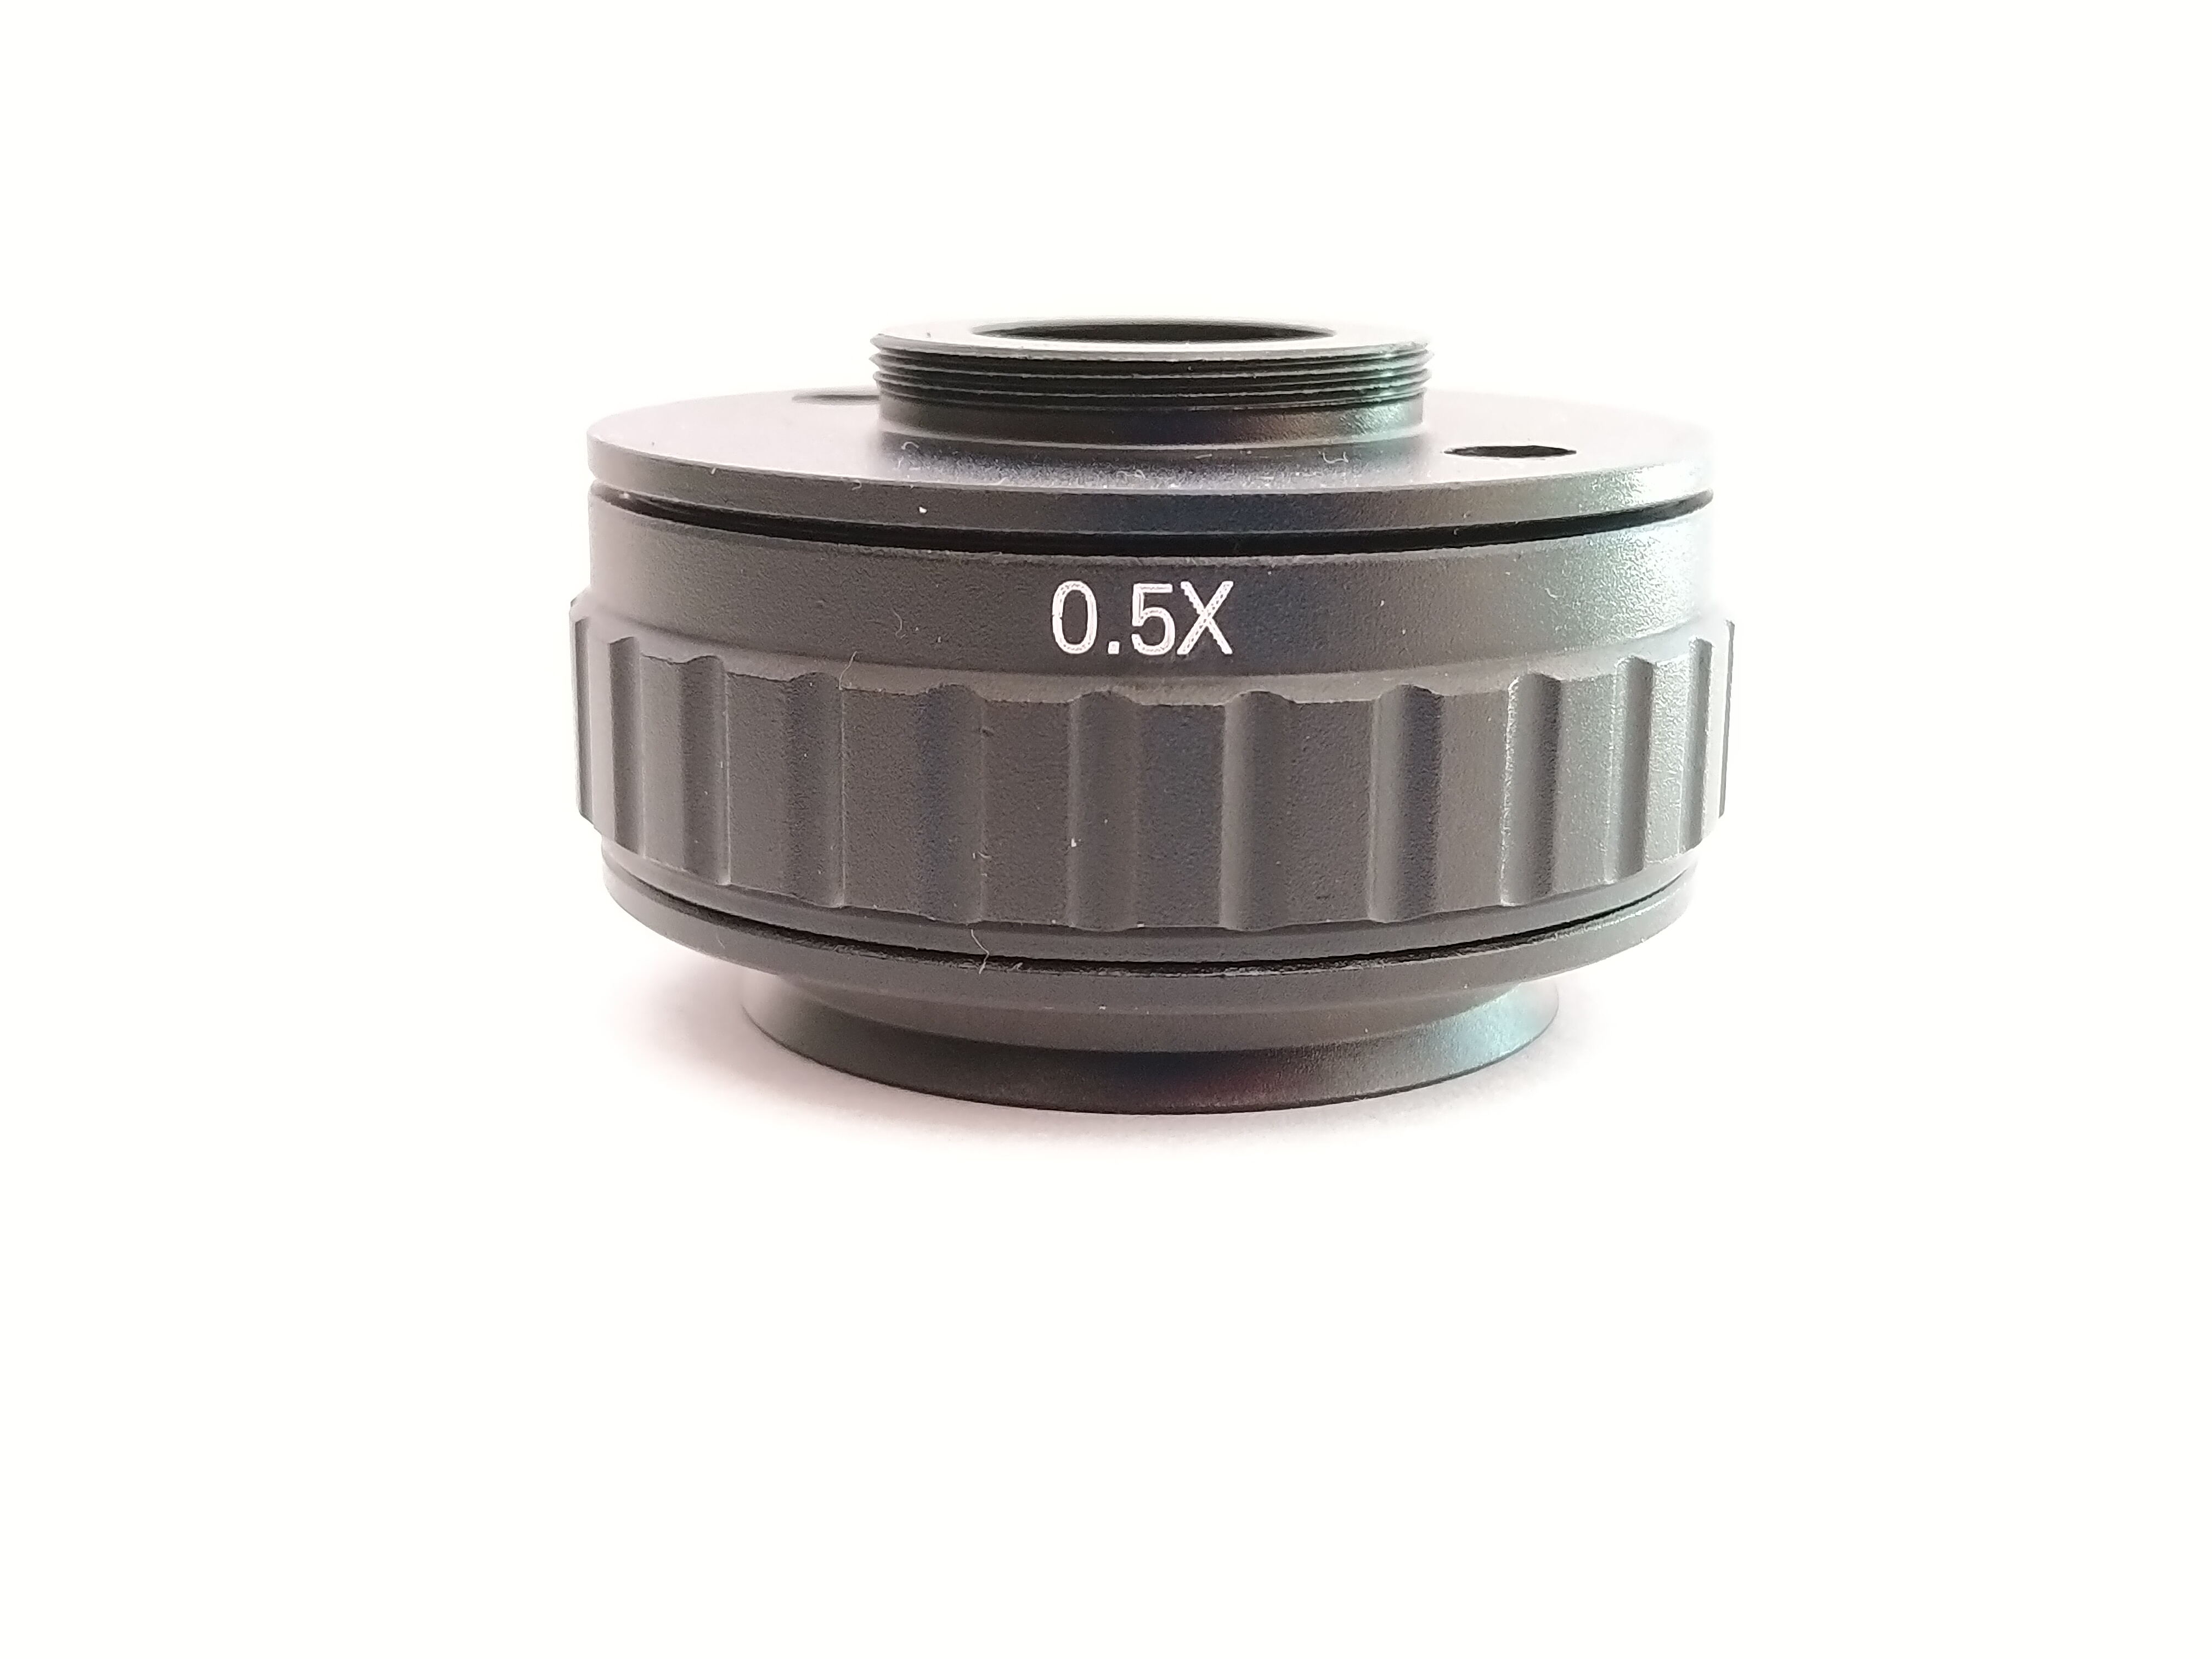
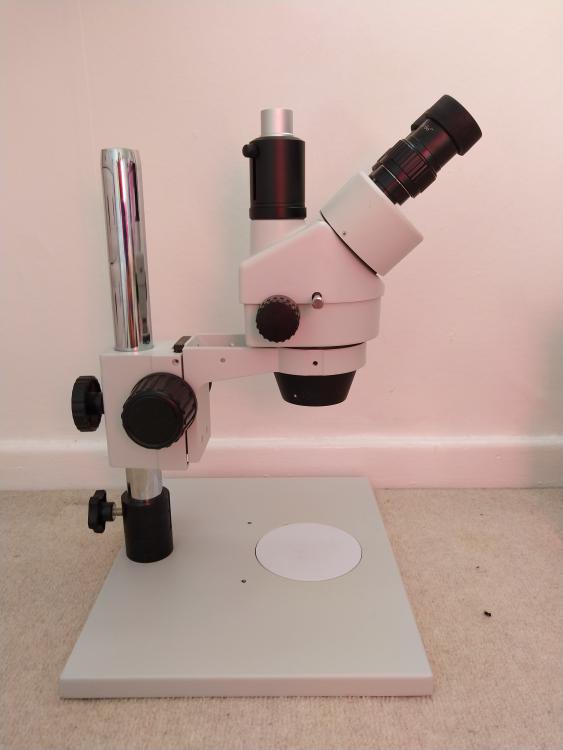
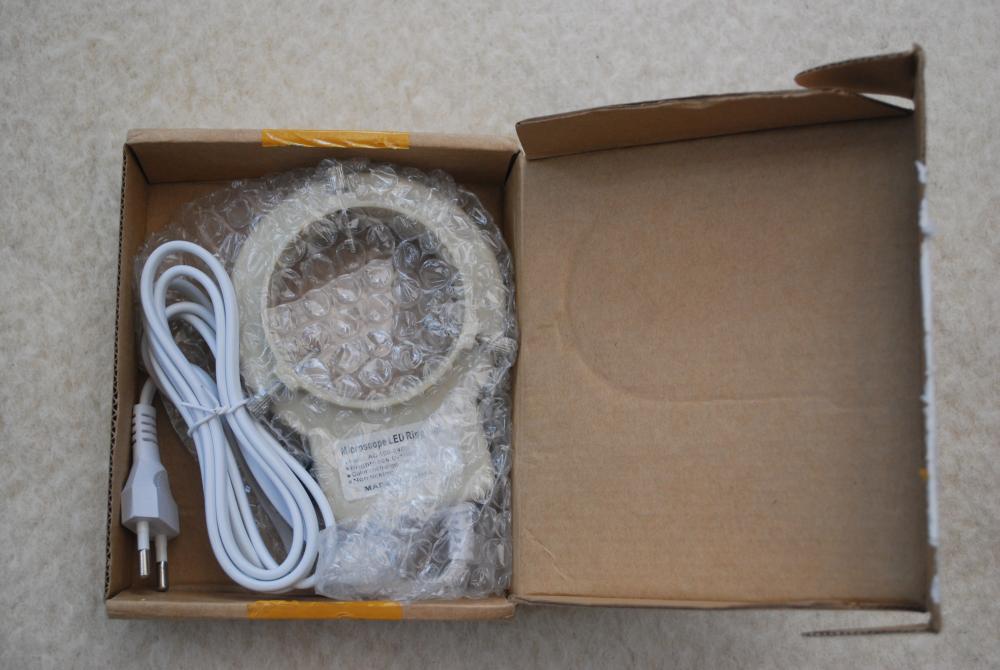
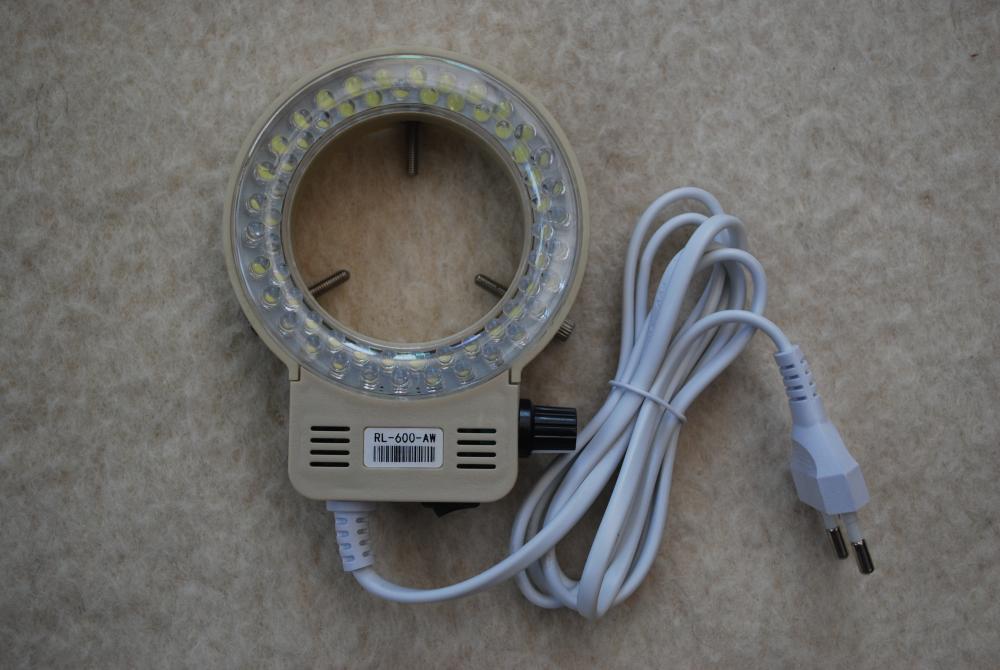
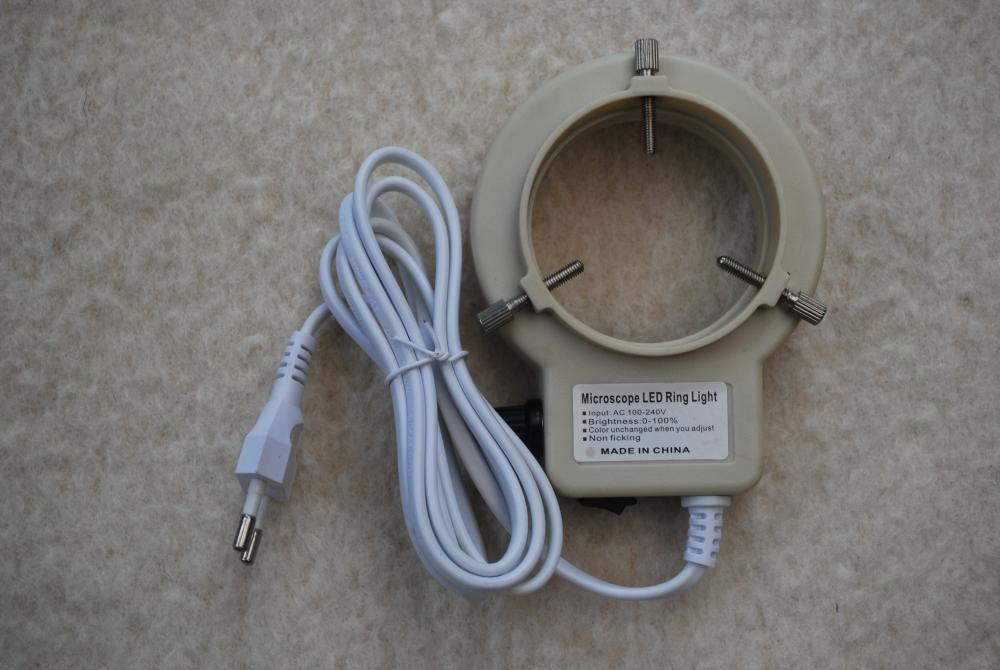
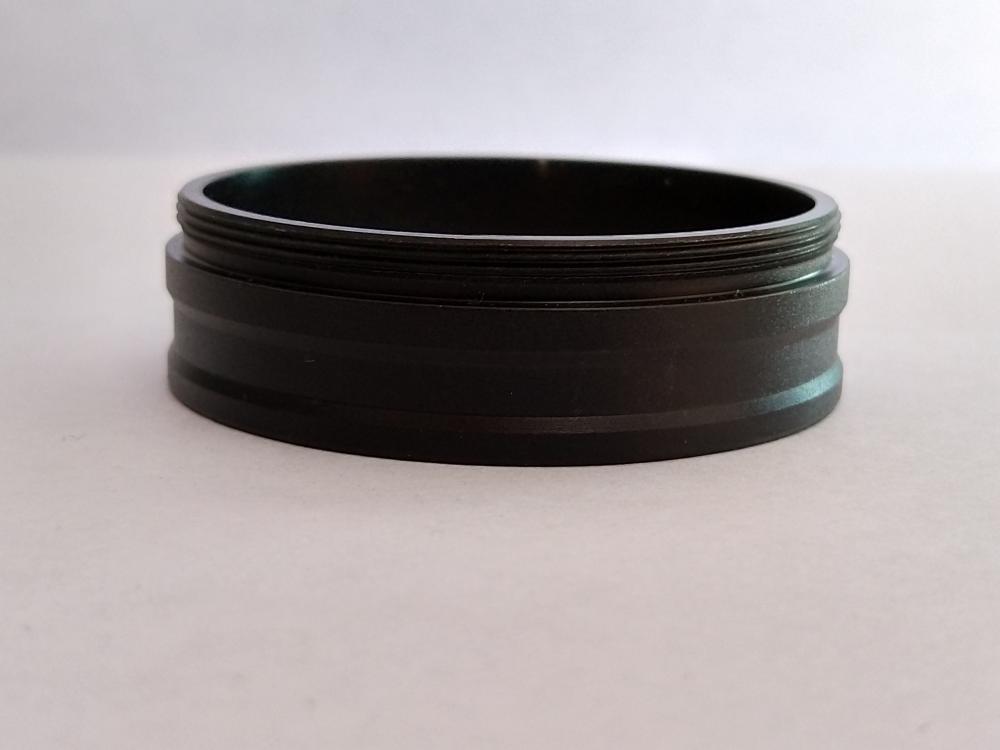
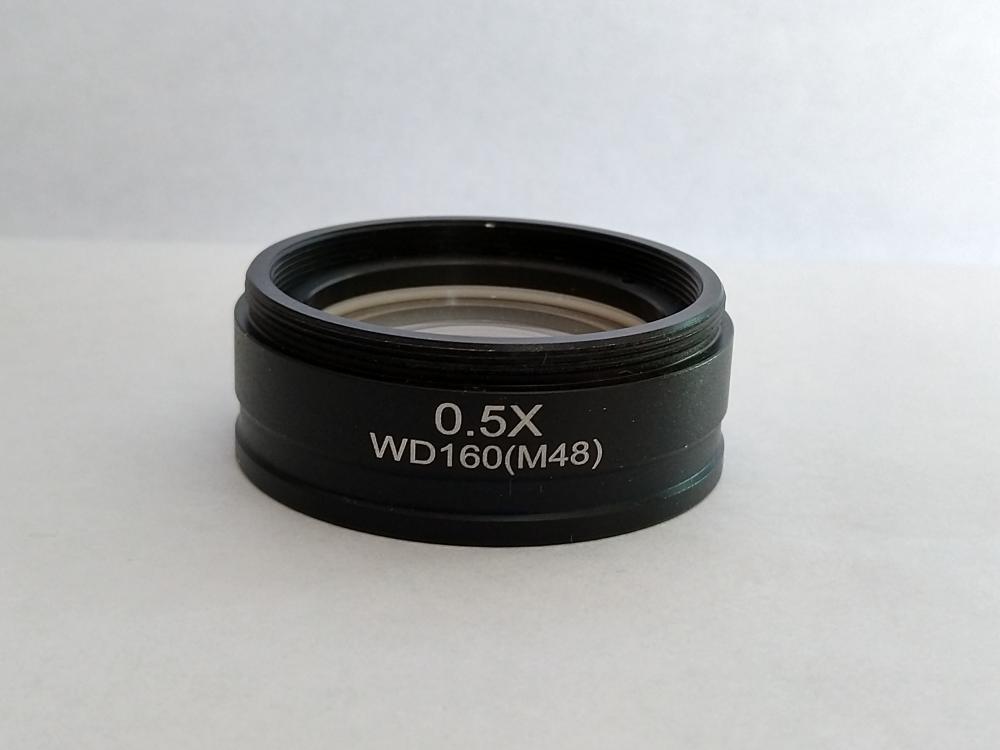
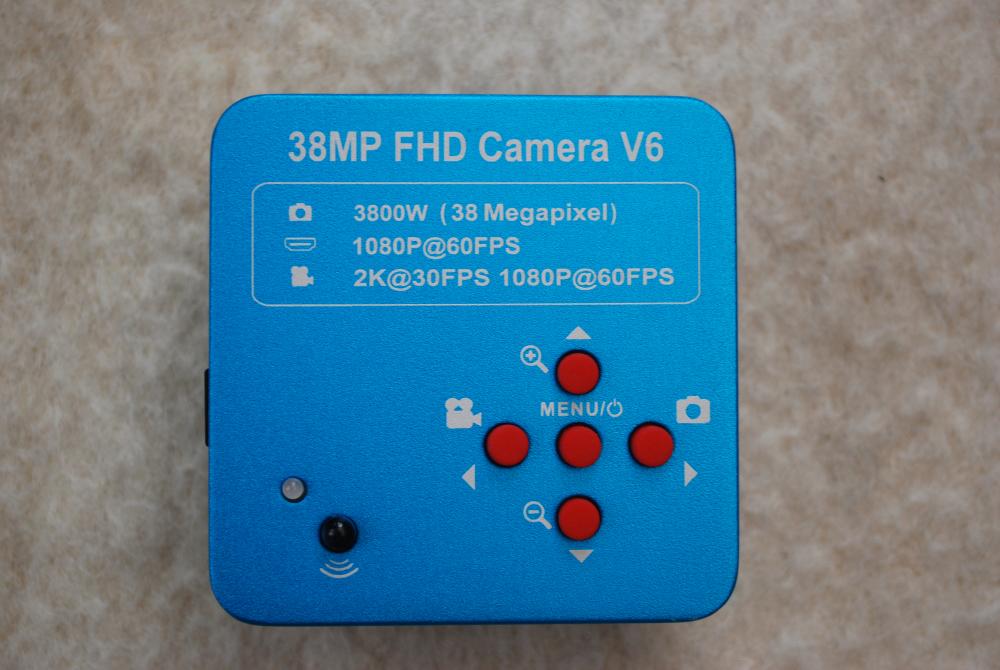
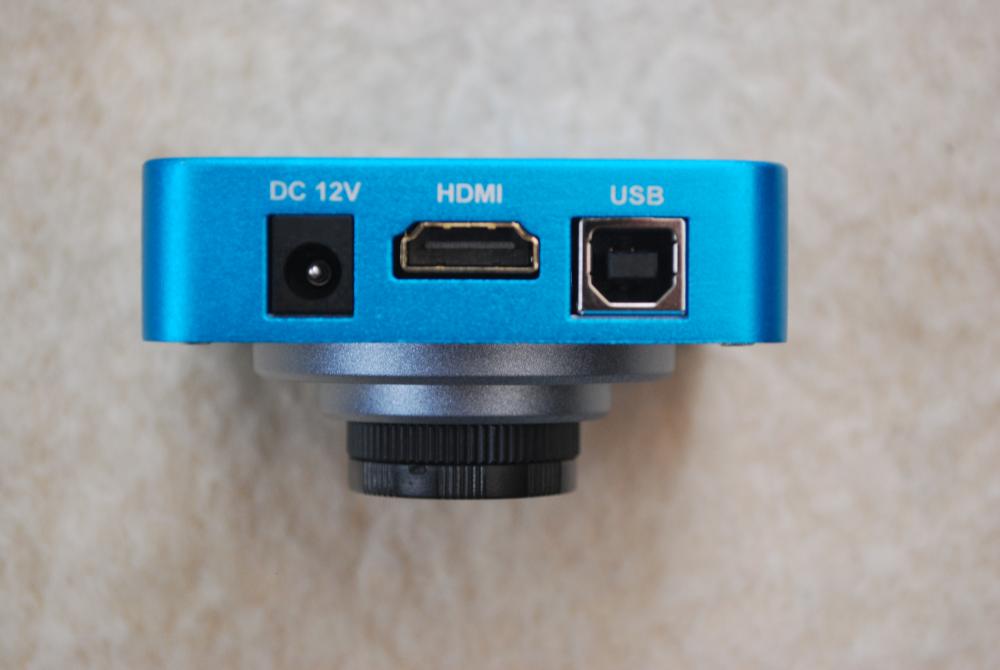
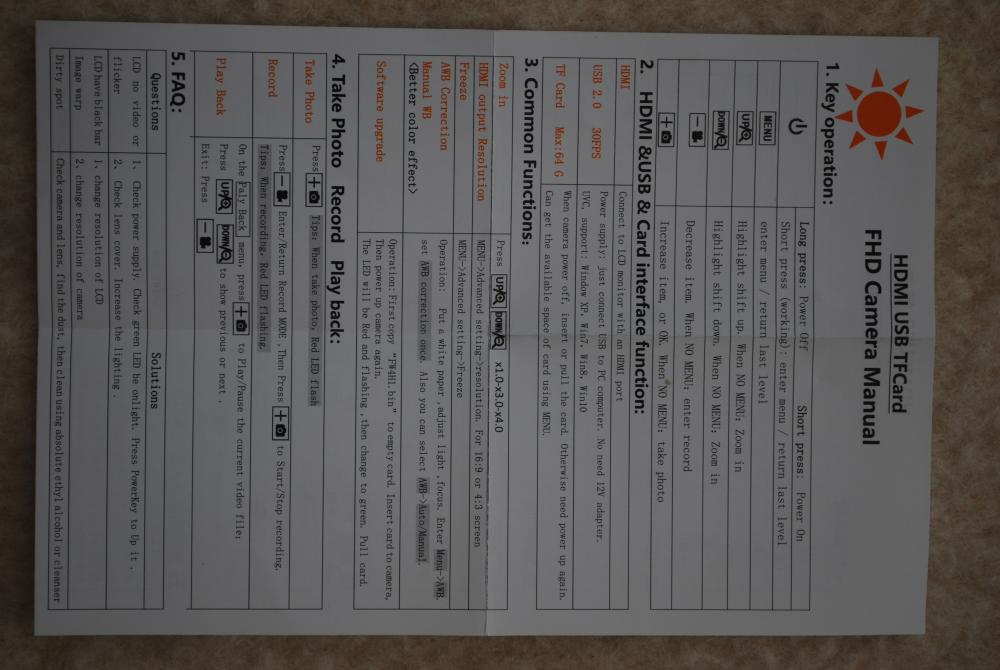
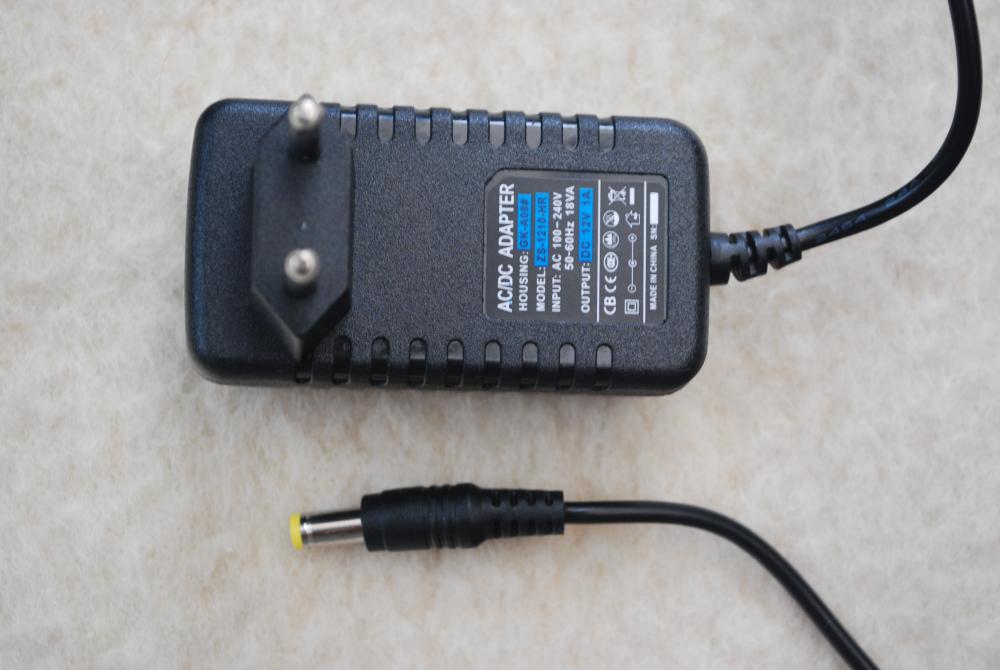
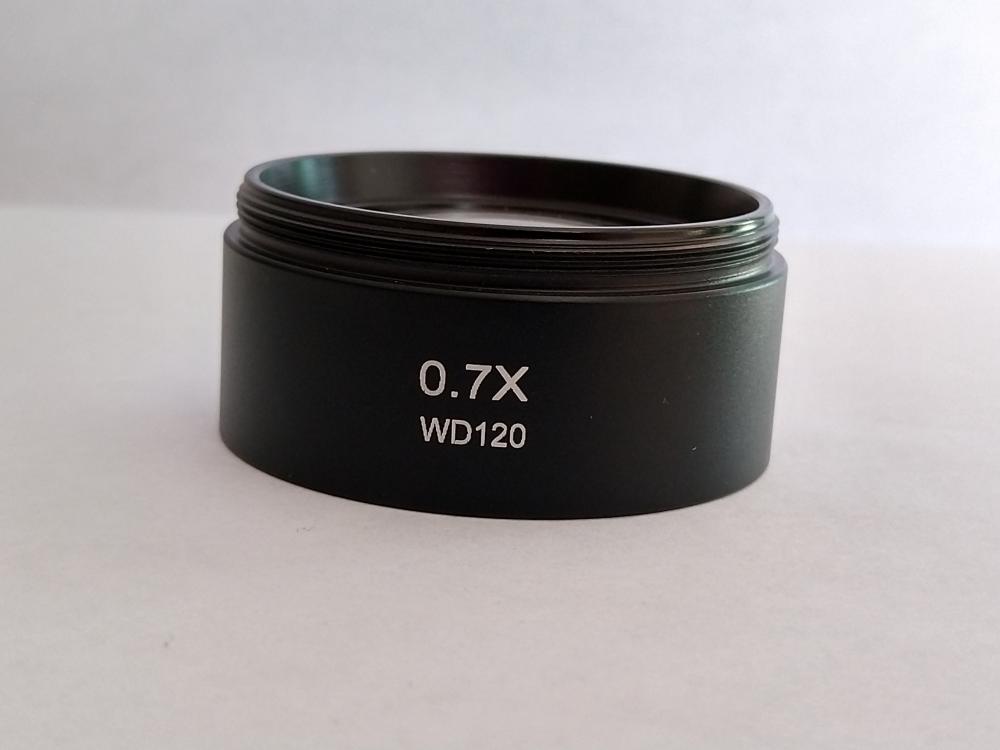
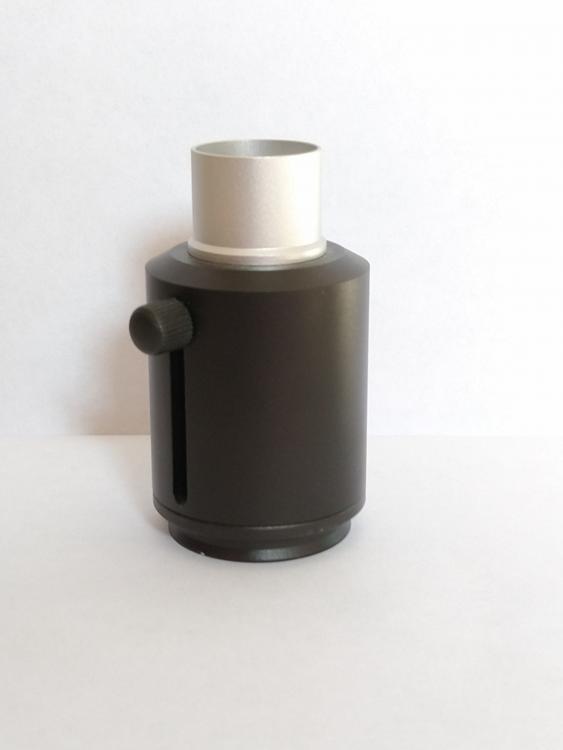
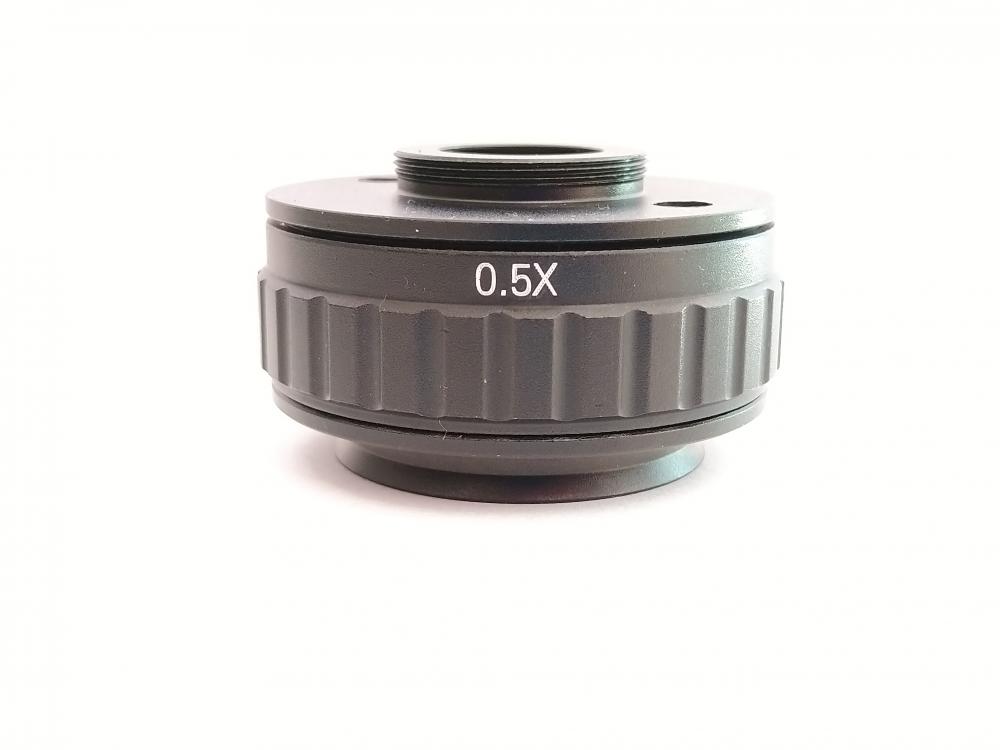
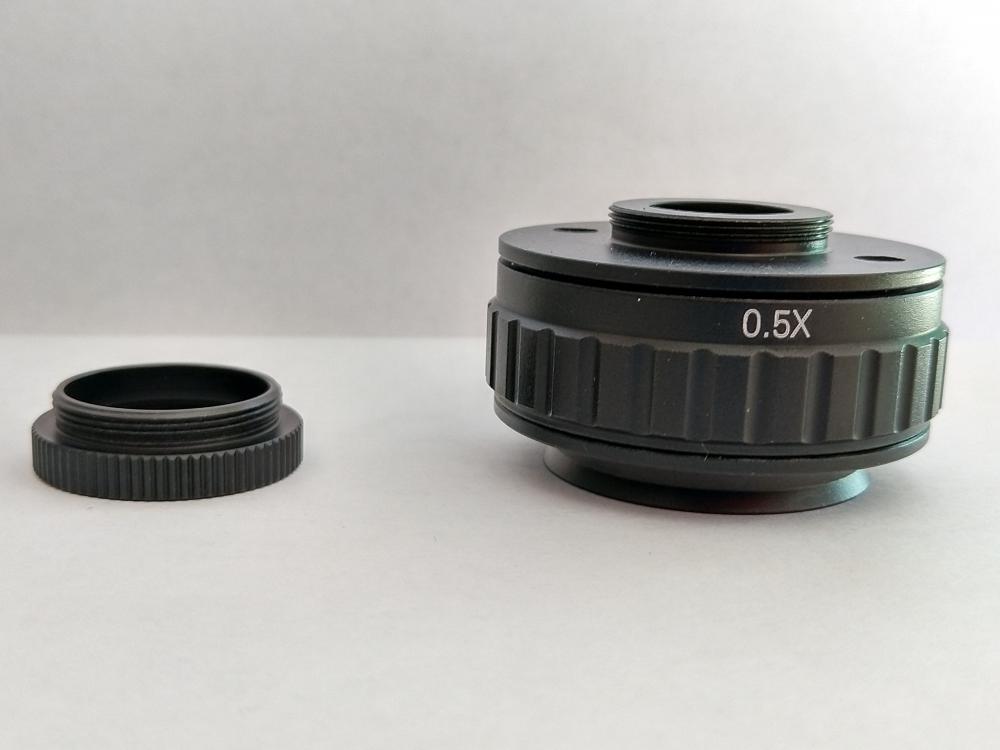
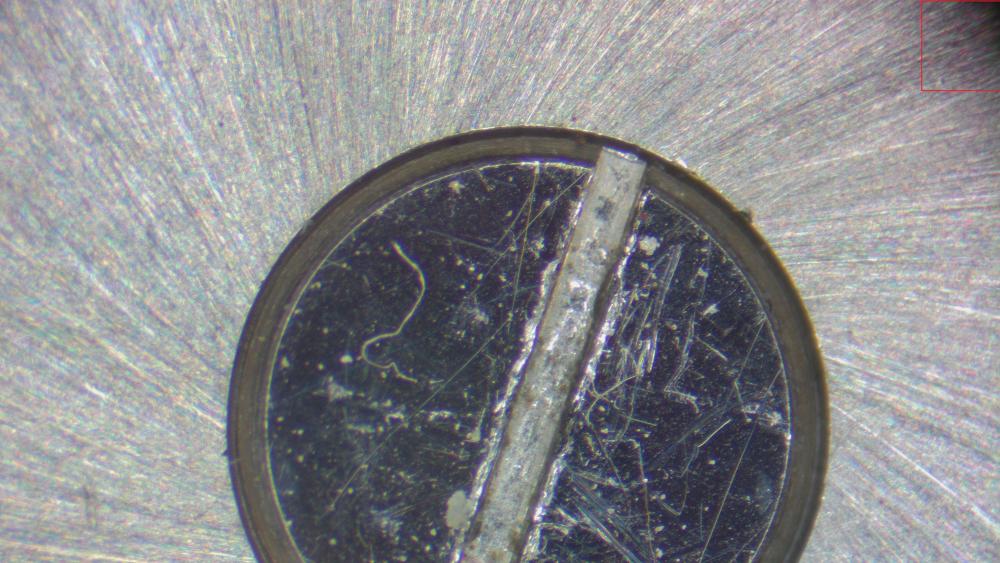
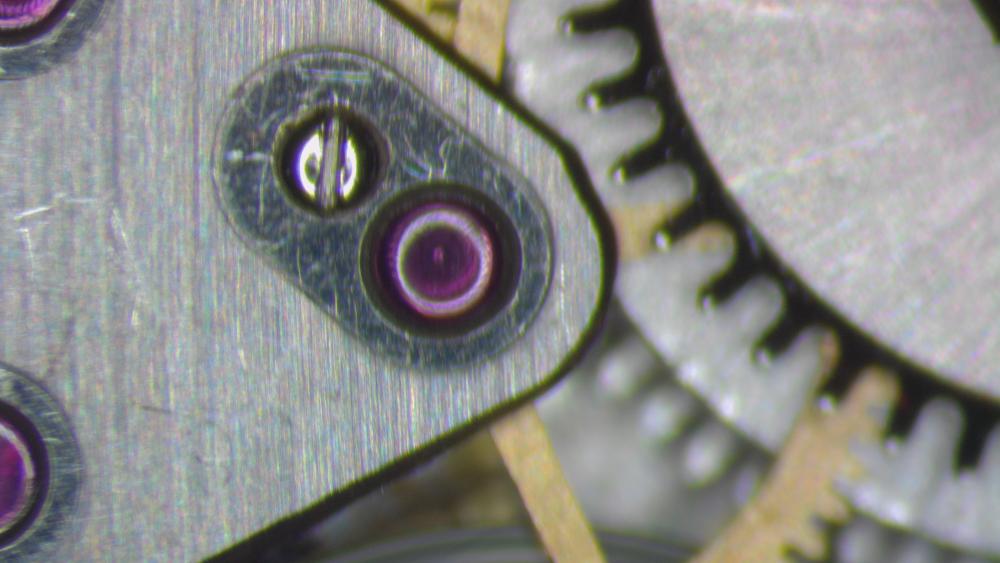
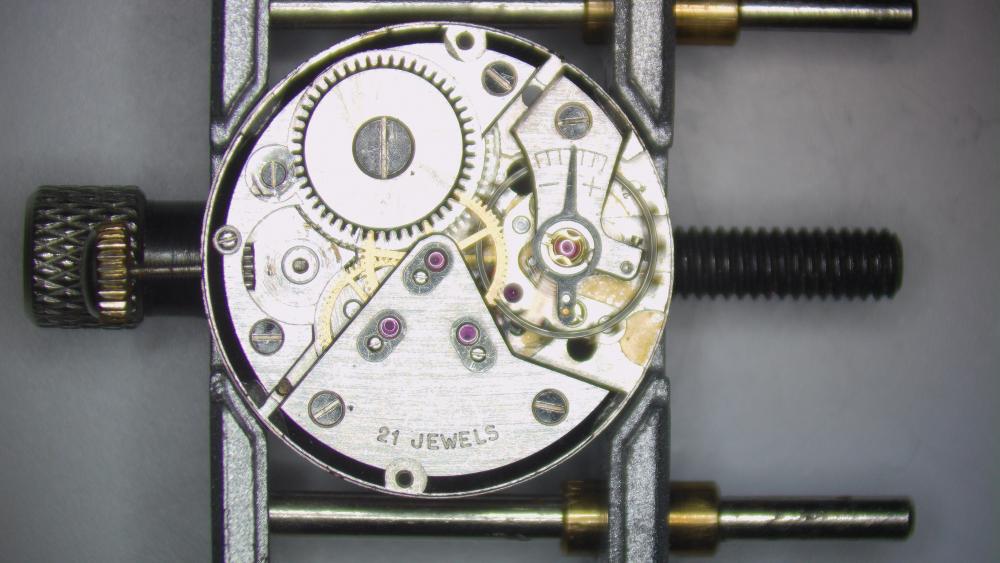
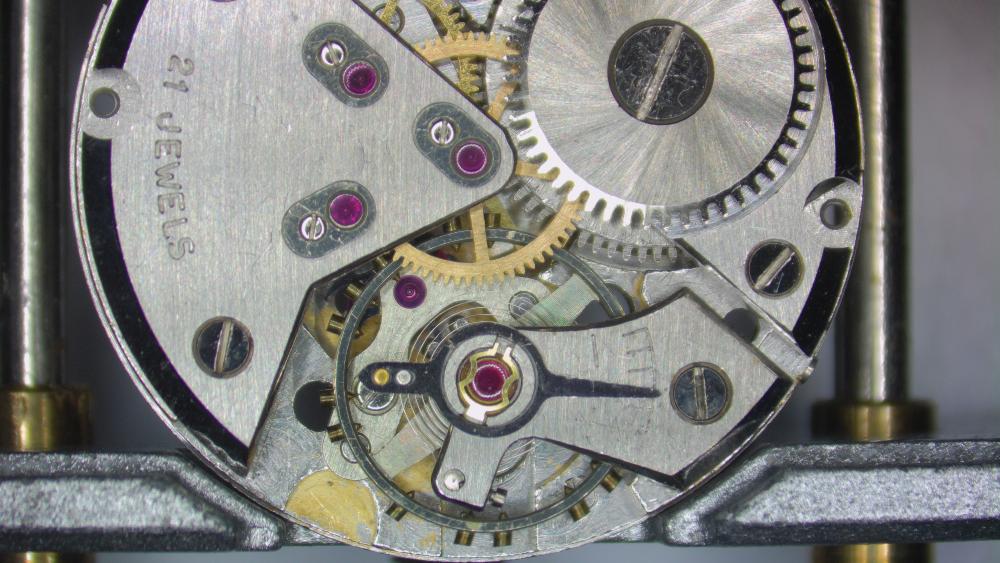
Hello Everyone, I am going to share the details of my adventure with a trinocular stereo microscope and a digital camera attached to it. I bought a second hand AmScope SM-1T (1st purchase) and I had no experience with stereo microscopes before. What I am going to write might be evident for some, but probably will help someone out with limited experience with trinocular stereo microscopes, I might be even wrong with some of the things I am writing/thinking, please feel free to correct me as the last thing what I would like to do is to mislead somebody else. You might have a different type of stereo microscope and you might have a different type of digital camera so you might be in a different situation I have been. A stereo microscope is incredibly useful and is a completely new world for the watchmaker in my opinion. You can see things you were not able to see before, worn pivot holes, pivots, cracks in jewels, bent hairsprings, and dirt everywhere, etc. I wanted higher working distance though and I also wanted to take pictures and record videos about watch movements and one of my initial goal was also to be able to take a picture about the whole movement. To achieve this I bought a number of things one buy one waiting weeks between the different items as I was not sure what to buy exactly. The AmScope SM-1T I own: The only thing I was sure about was the illumination so I bought a led light ring (2nd purchase): "220V 60000LM Adjustable Microscope LED Ring Light Illuminator Lamp For STEREO Microscope Excellent Circle Light EU plug" The first one did not work for long, its circuit board died after a week or so. I got a replacement however I am still using the original led light ring without its original circuit feeded directly by my bench power supply with 12V. I did not know that time that there are adapter rings for ring lights so I drilled 3 little holes into the head of the microscope. Now this sounds silly and indeed it is, but it became handy later as I can use these three little holes to attach my ring light to the microscope head without loosing much of the working distance if I want to. I bought an adapter anyway (3rd purchase): "M48X0.75 48 mm Thread Aluminum Objective Adapter Ring Stereo Microscope to Attached LED or Fluorescence Ring Light" The adapter ring: The next thing what I bought was a 0.5x barlow lens (4th purchase) for the AmScope as I knew it would increase the working distance and the field of view and additionally would decrease the magnification. I went again for aliexpress and my number one priority was to get one as cheap as possible. Now this might be one of my biggest mistake here. I cannot compare the one I bought to any other 0.5x barlow lens, but I am not happy with this one: "0.5x WD160 Working Distance 160 mm Barlow Auxiliary Reduction Objective Lens with Mounting Thread 48 mm for Stereo Microscope" I cannot get a sharp image with this one so ended up not using it at all. You can attach your ring light directly to this one. This article talks about the barlow lens and suggests to buy a quality product from a trustworthy manufacturer: https://www.microscopemaster.com/barlow-lens.html 0.5x barlow lens for the AmScope: Blurry images when fully zoomed in: Fully zoomed out, too much light and not very sharp: Then I bought a digital camera (5th purchase) for the trinocular port namely: "2020 Full HD 1080P 60FPS 2K 3800W 38MP HDMI USB Industrial Electronic Digital Video Microscope Camera For Phone CPU PCB Repair" but it was not compatible with the adapter the AmScope came with as it was designed for AmScope own digital camera, i did not know that at this stage though so I bought (6th purchase) a "CMOS CCD USB HDMI Industrial Video Camera Adapter Electronic Eyepiece Microscope 23.2mm to C Mount For Biological Microscope" because i hoped that it would help me to attach the digital camera to the AmScope adapter and I would be able to focus it. It turned out that this was not the case. I could not get any useful image, not even close. The digital microscope camera: AmScope adapter for their own digital camera what I could not use: And the adapter which fits into the AmScope adapter above but it did not help: Meanwhile I bought (7th purchase) a "0.7X WD120 Trinocular Microscope Stereo Microscope Auxiliary Objective Lens Barlow Lens" barlow lens for the AmScope. The other issue with the 0.5x barlow lens for AmScope was that the working distance went to the sky and I could not comfortably sit in my chair as I could not reach the eyepieces easily. I was hoping that the 0.7x barlow lens would sort that out, but it did not turn out the way I hoped for, I am going to write about the working distances later. However I am satisfied with the 0.7x barlow lens, I can get sharp images. You have to use a ring light adapter with this one as you cannot directly attach your ring light to it. I am happy with this/ fully zoomed in: Still happy, fully zoomed out: Then I was advised to buy a 0.5x or 0.35x c mount adapter for the digital camera so I bought (8th purchase) "0.5X C mount Lens Adapter Focus Adjustable Camera Installation C mount Adapter" first, and yes it worked finally! The digital camera came with a ring and that ring must be used otherwise you cannot sync the focus between the digital camera and the microscope. 0.5x adapter for the digital camera: And the ring what must be used: As I was not happy with the 0.5x barlow lens for the AmScope but I still wanted to take pictures about the whole movement I thought i would buy (9th and final purchase) a 0.35x c mount adapter for the digital camera what would bring me a wider field of view so I bought a "0.35X C mount Lens Adapter Focus Adjustable Camera Installation C mount Adapter" too. And indeed it was the case, but it seems that the body of the microscope comes into the picture, what you can see in the upper right corner of the following picture so I ended up not using it. 0.35x: Check the upper right corner: When you use the microscope your field of view is a circle, but when you use your digital camera your field of view is a rectangle. So i give you and idea about the dimensions and the working distances now. Digital Camera with 0.5x adapter for all cases. Field of view with 0.5x barlow lens for the stereo microscope: Zoom full in 7.5 mm x 4 mm Zoom full out 5.3 cm x 2.9 cm Field of view with 0.7x barlow lens for the stereo microscope: Zoom full in 4.5 mm x 2.5 mm Zoom full out 2.9 cm x 1.6 cm Field of view without barlow lens for the stereo microscope: Zoom full in 4.5 mm x 2.5 mm Zoom full out 2.9 cm x 1.6 cm Stereo microscope field of view and working distance. No barlow lens. Zoom full in diameter: 4.5 mm Zoom full out diameter: 30 mm Working distance: 8 cm (from the workpiece and the bottom of the ring light which is attached to the 3 drilled holes) 0.7x barlow lens. Zoom full in diameter: 5.5 mm Zoom full out diameter: 40 mm Working distance: 11.6 cm (from the workpiece and the bottom of the ring light which is attached to the 3 drilled holes, ring light adapter is not attached to the barlow lens as it would further reduce the working distance.) 0.5x barlow lens. Zoom full in diameter: 10.5 mm Zoom full out diameter: 70 mm Working distance: 20.5 cm (from the workpiece and the bottom of the ring light which is attached to the 3 drilled holes) Conclusion: I ended up using the 0.7x barlow lens for the microscope, and the 0.5x adapter for the digital camera which is a must have. The ring came with the camera is also a must so you would be able to sync the digital camera with the microscope so they would be both in focus at the same time. I had to ditch the 0.35x mount adapter for the digital camera because the body of the microscope came into the picture and I had to ditch the 0.5x barlow lens for the stereo microscope as it did not give me sharp images. Even if I would have a good quality 0.5x barlow lens which would give me sharp images I still would need to sort out the seating position by purchasing an adjustable chair (mine is adjustable too but it did not go high enough to reach the eyepieces) however it would give you an amazing working distance of about 20 cm bearing in mind that it halves the original magnification. My original wish to be able to take a picture about the whole movement probably was not something reasonable. First of all a microscope as its name suggests is about to focus on tiny things not on things like a whole movement, my phone takes better quality pictures than this microscope if we talk about the whole movement. Additionally I could not take a good quality picture (apart from the blurriness) about the whole movement when the 0.5x barlow lens were on the stereo microscope (and they had to be on to be able to get the whole movement in the field of view), because there was too much light and regardless of the settings of the digital microscope i could not sort it out. An additional thought, as I mentioned earlier I hoped that the 0.7x barlow lens would sort out the "too high" working distance and instead of 20cm it would be around 15 cm, but it came to 11.6 cm which is doing the match is about right as the original working distance without any barlow lens is 8 cm, the 0.5x gives me 20.5 cm, but if it doubles the working distance it should really be about 16 cm. The 10.5 cm what I have with the 0.7x barlow lens is just about enough, it would be better if it would be a bit bigger. Probably a new chair and quality 0.5x barlow lens for the stereo microscope would be ideal for repairing, but none of the setup would be ideal for taking pictures about whole movements. AmScope video about the Barlow lens: https://youtu.be/ozPae_nnbH4 My setup: This video is captured by the digital camera itself, its size was just too big ~ 160M so I could not upload to wrt, however I wanted to show you its original quality so decided to upload it to my google drive, to my surprise when you click on the link the video quality is much worse than the original I uploaded, i dont know why is that happening, probably google tries to save the bits going trough the network: digital camera recording This is what I see from my chair: digital_camera_1.mp4 One more thing to add, the digital camera started to play up after a while, its main menu came up and it switched itself off. Contacted the seller and they gave me a new firmware. I flashed the camera and there is no issue since. This is my longest post so far, I am happy I am at it's end.


 3 points
 -
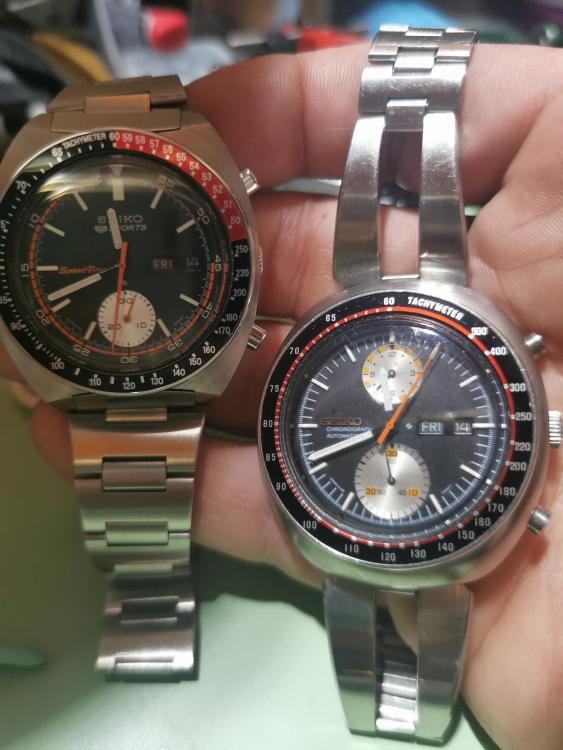
Howdy all, picked up a couple of nice seiko pieces other day, a 6319 6032 black pogue, and a 6138 0011 ufo. Both run beautifully.
 2 points
 -
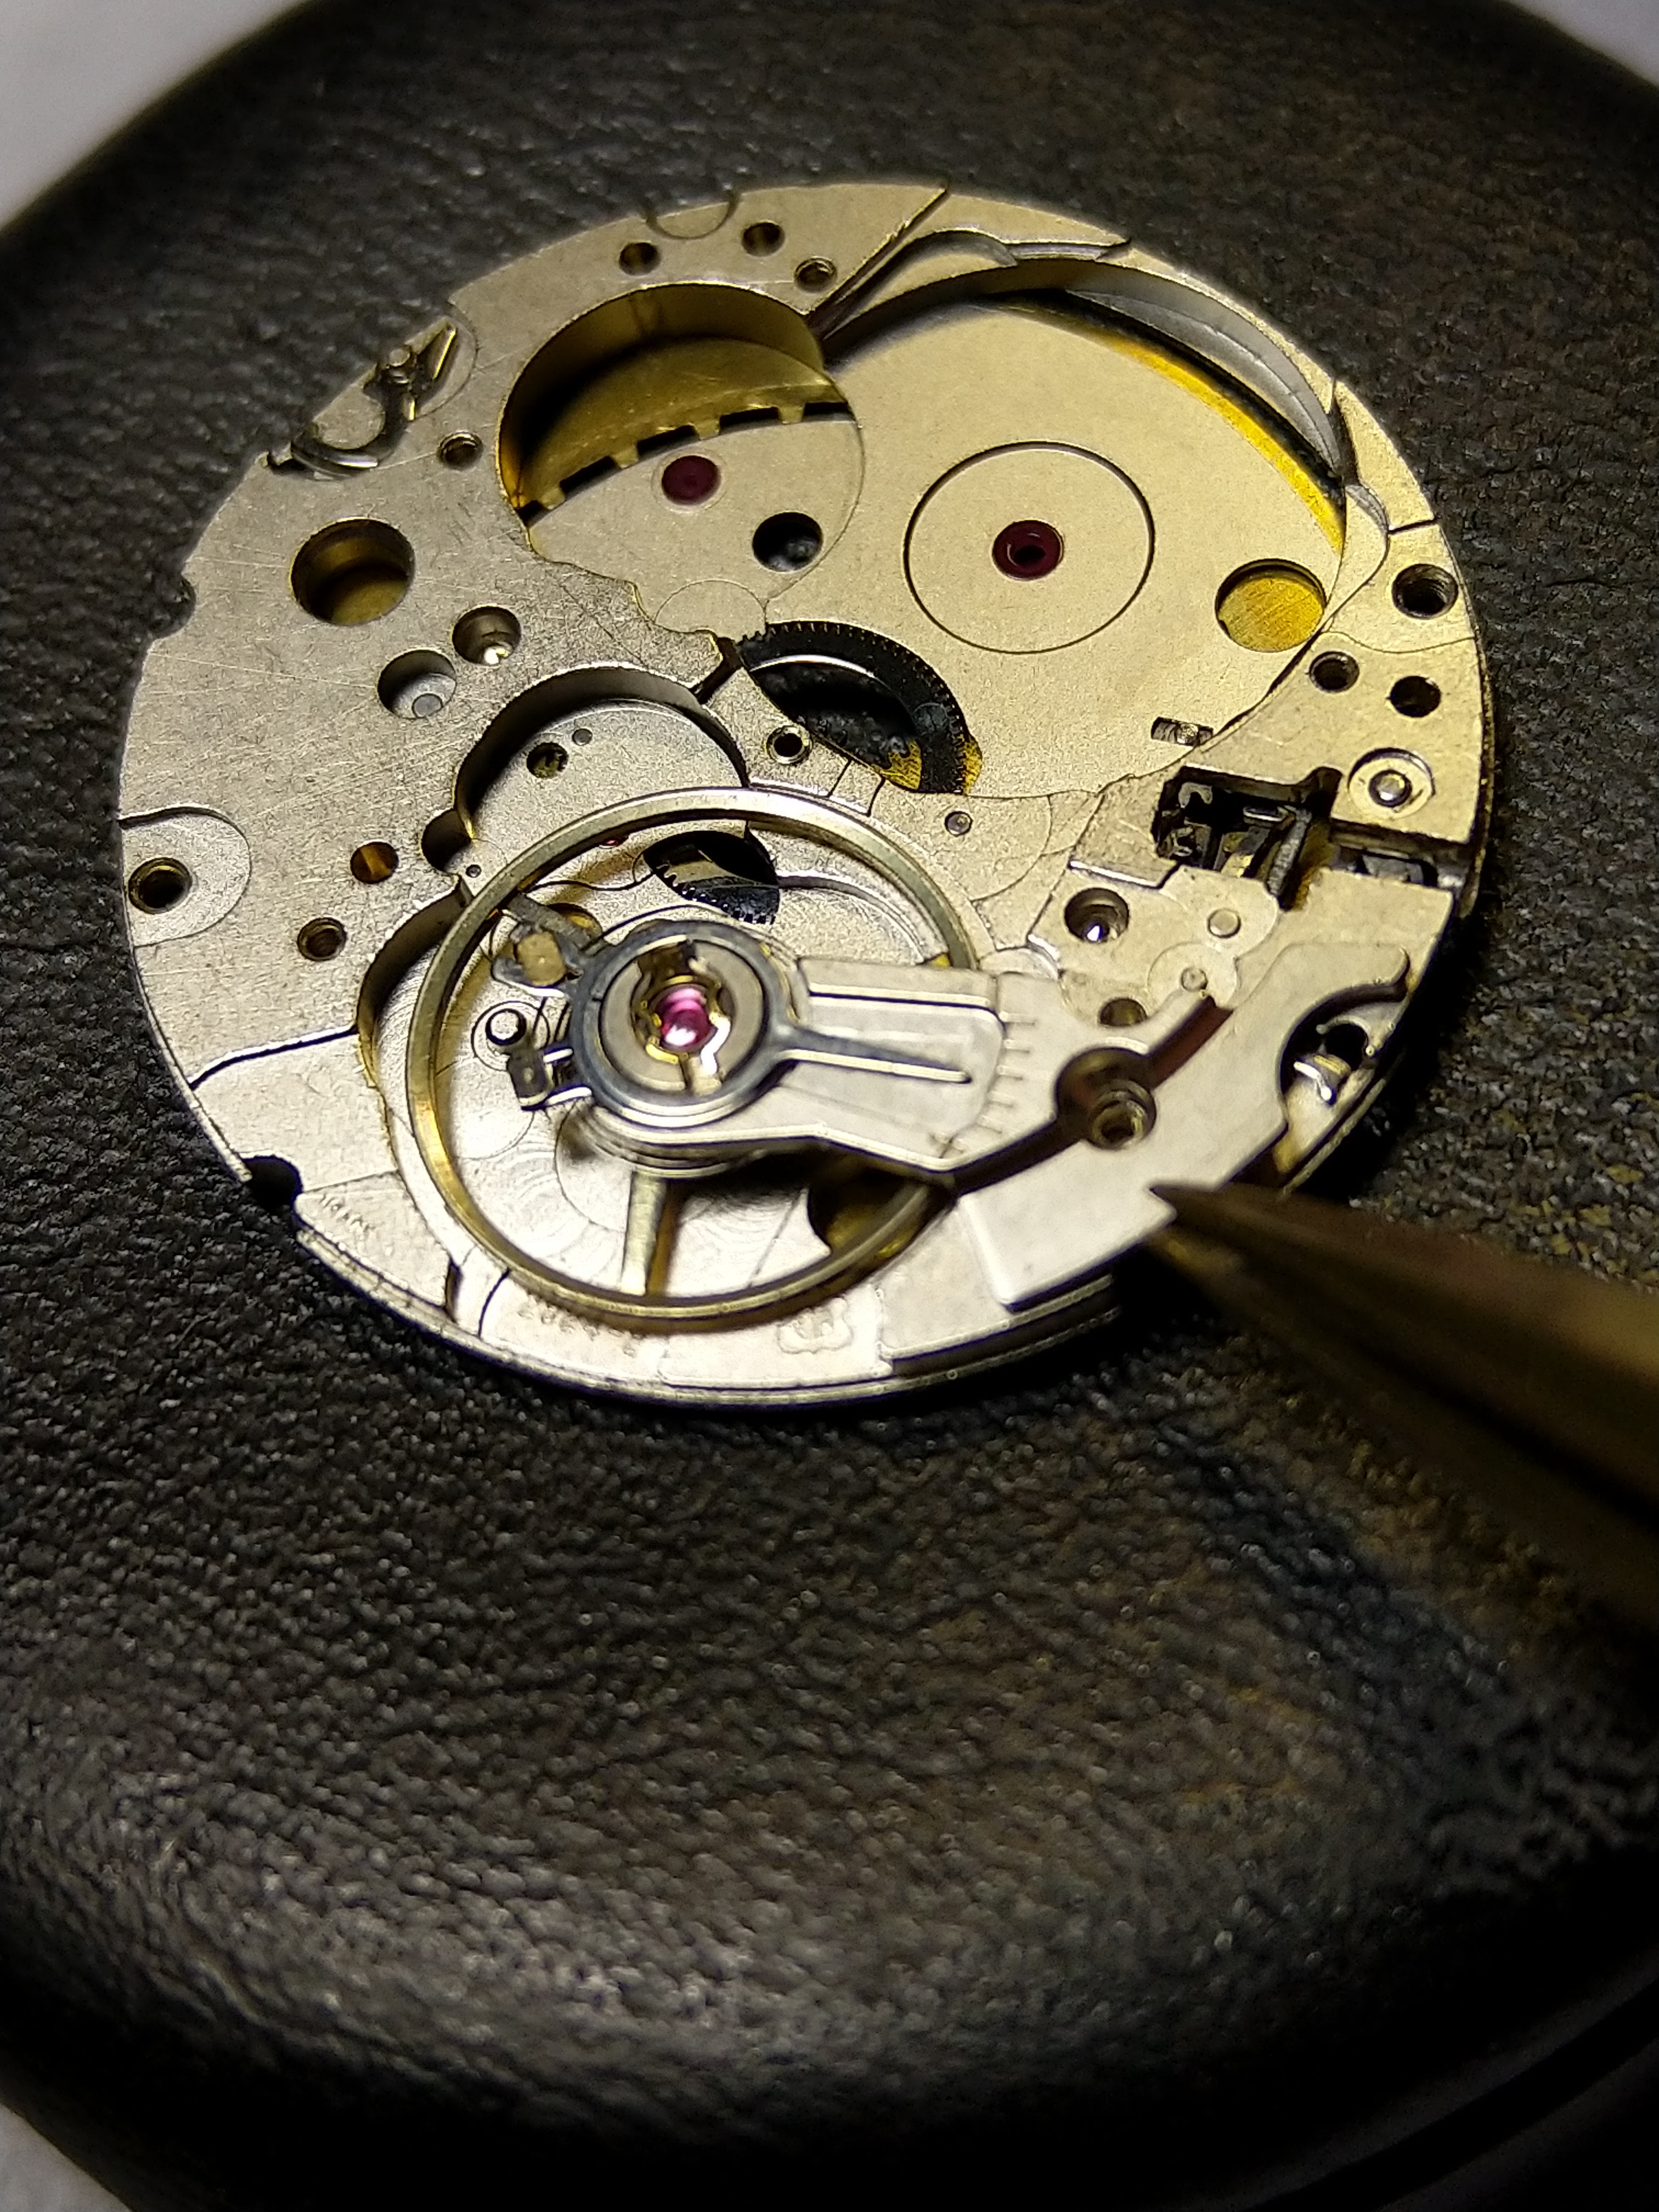
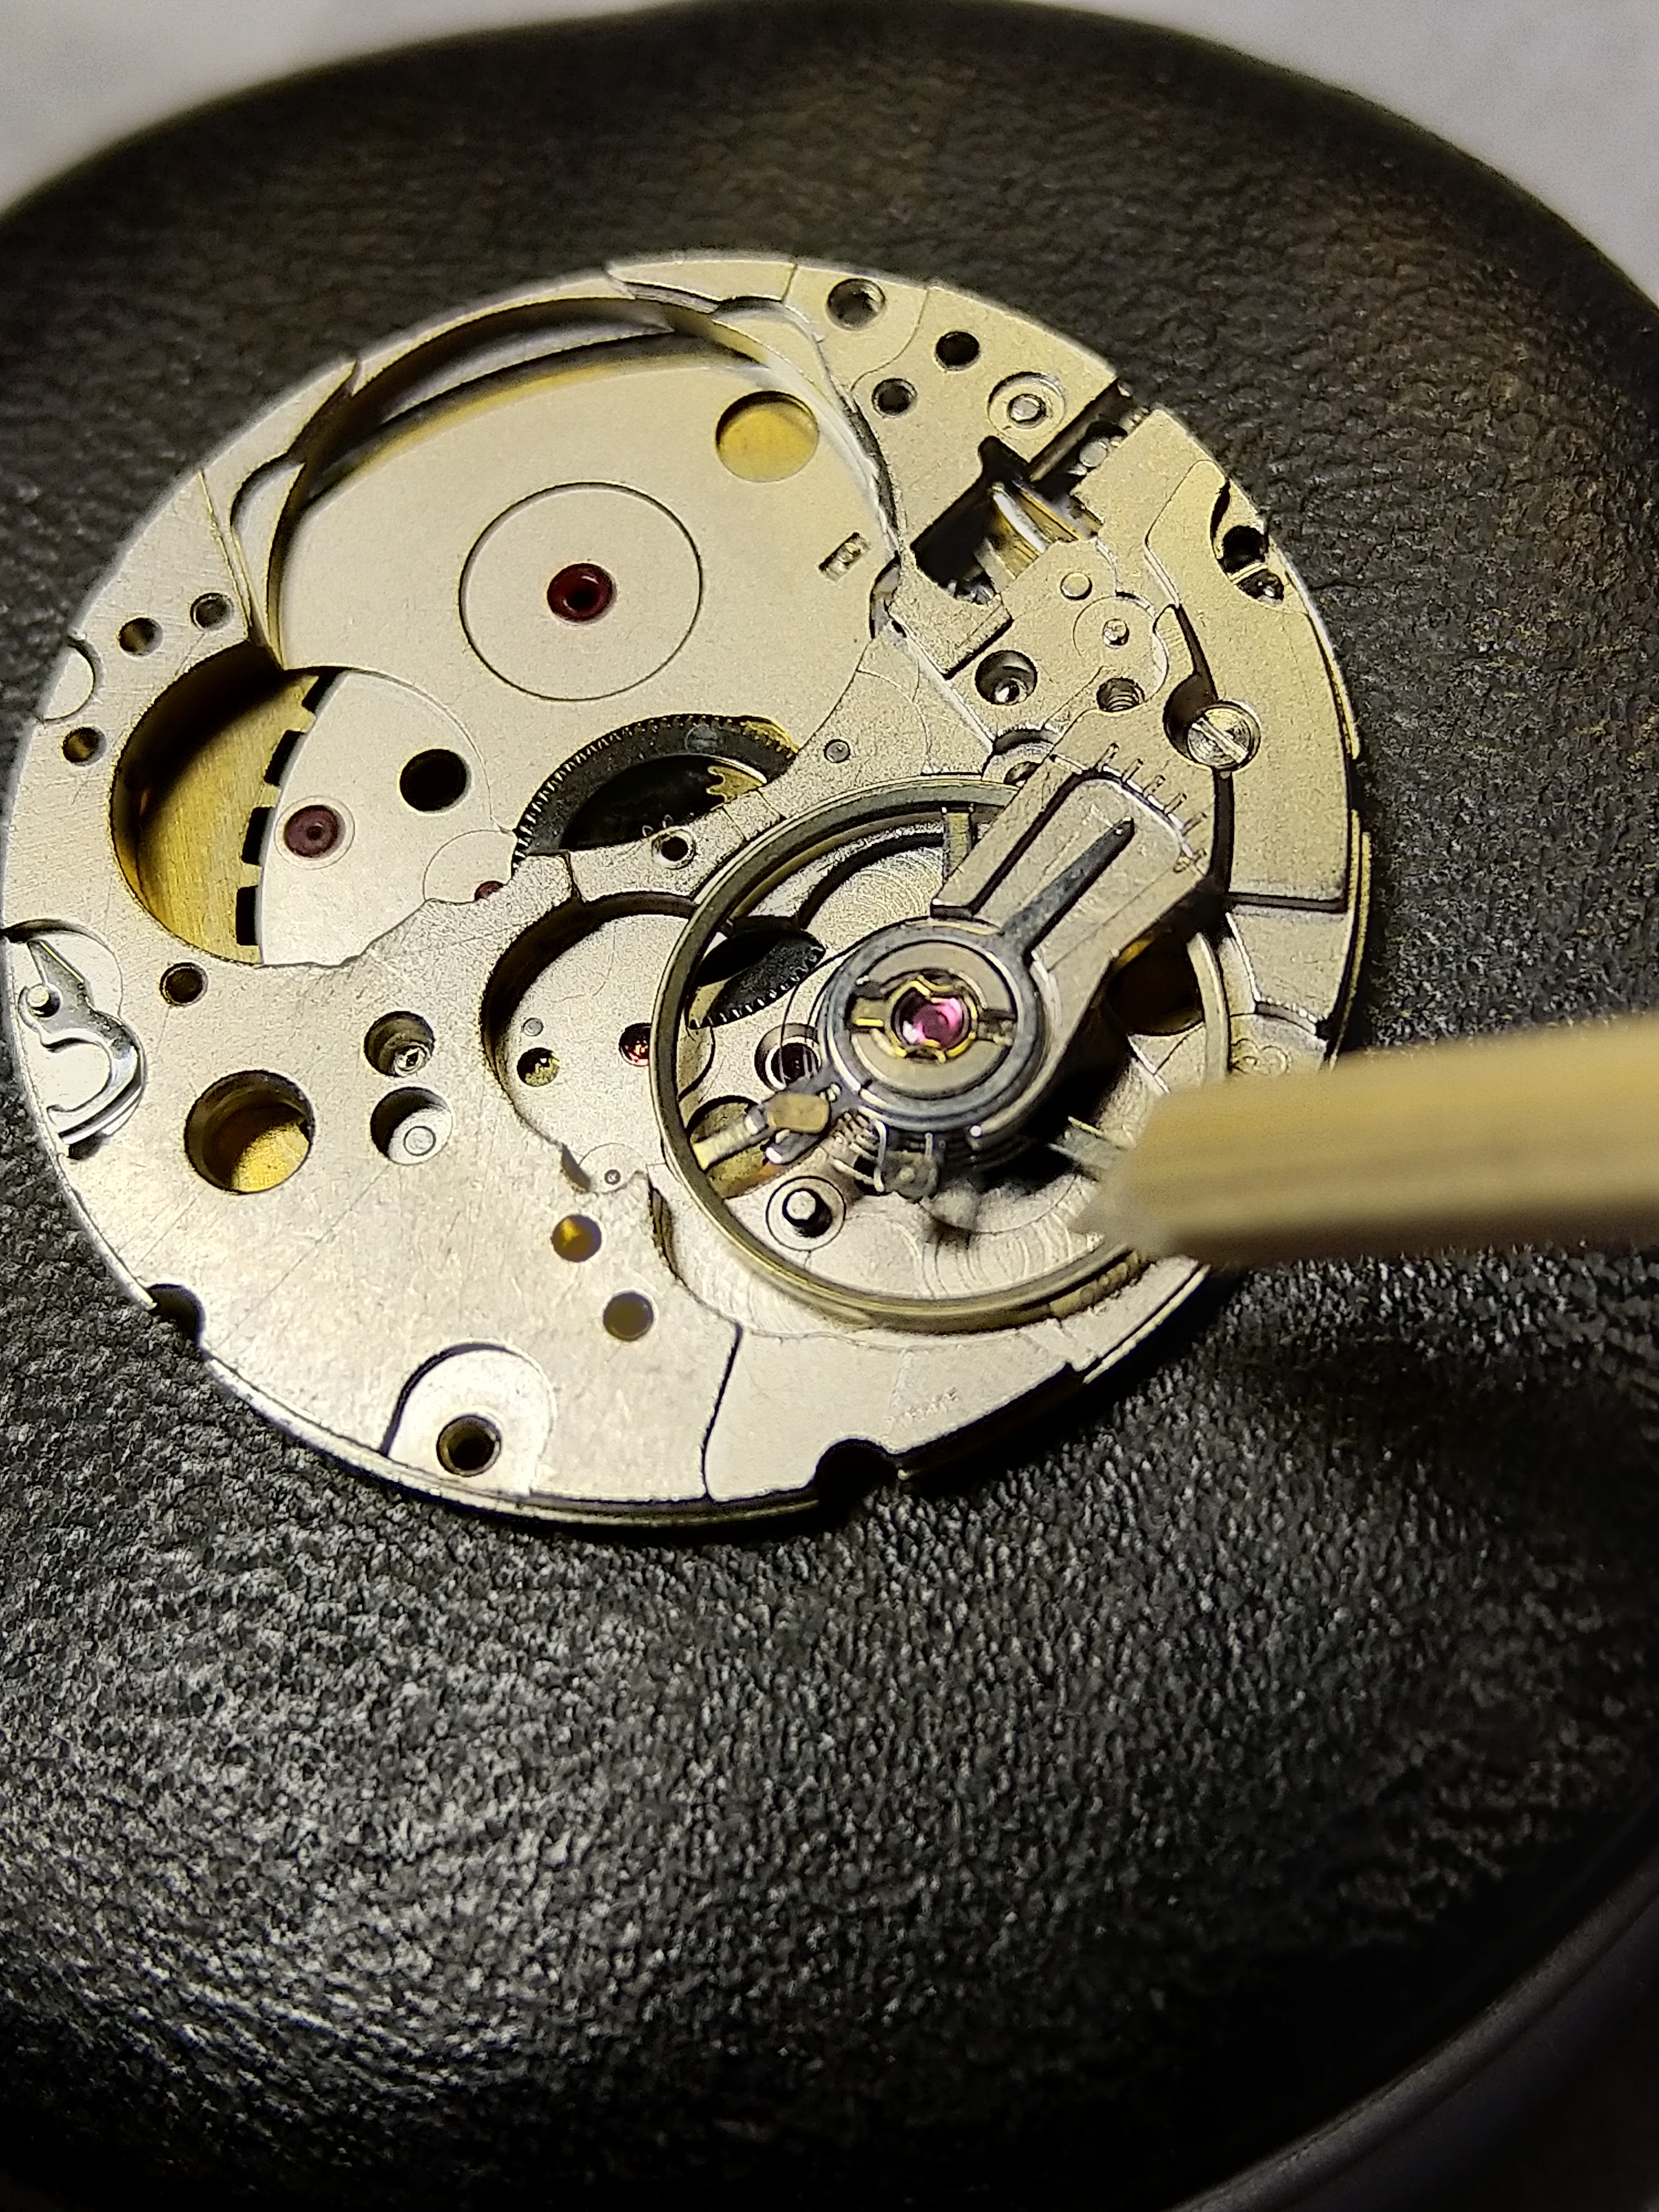
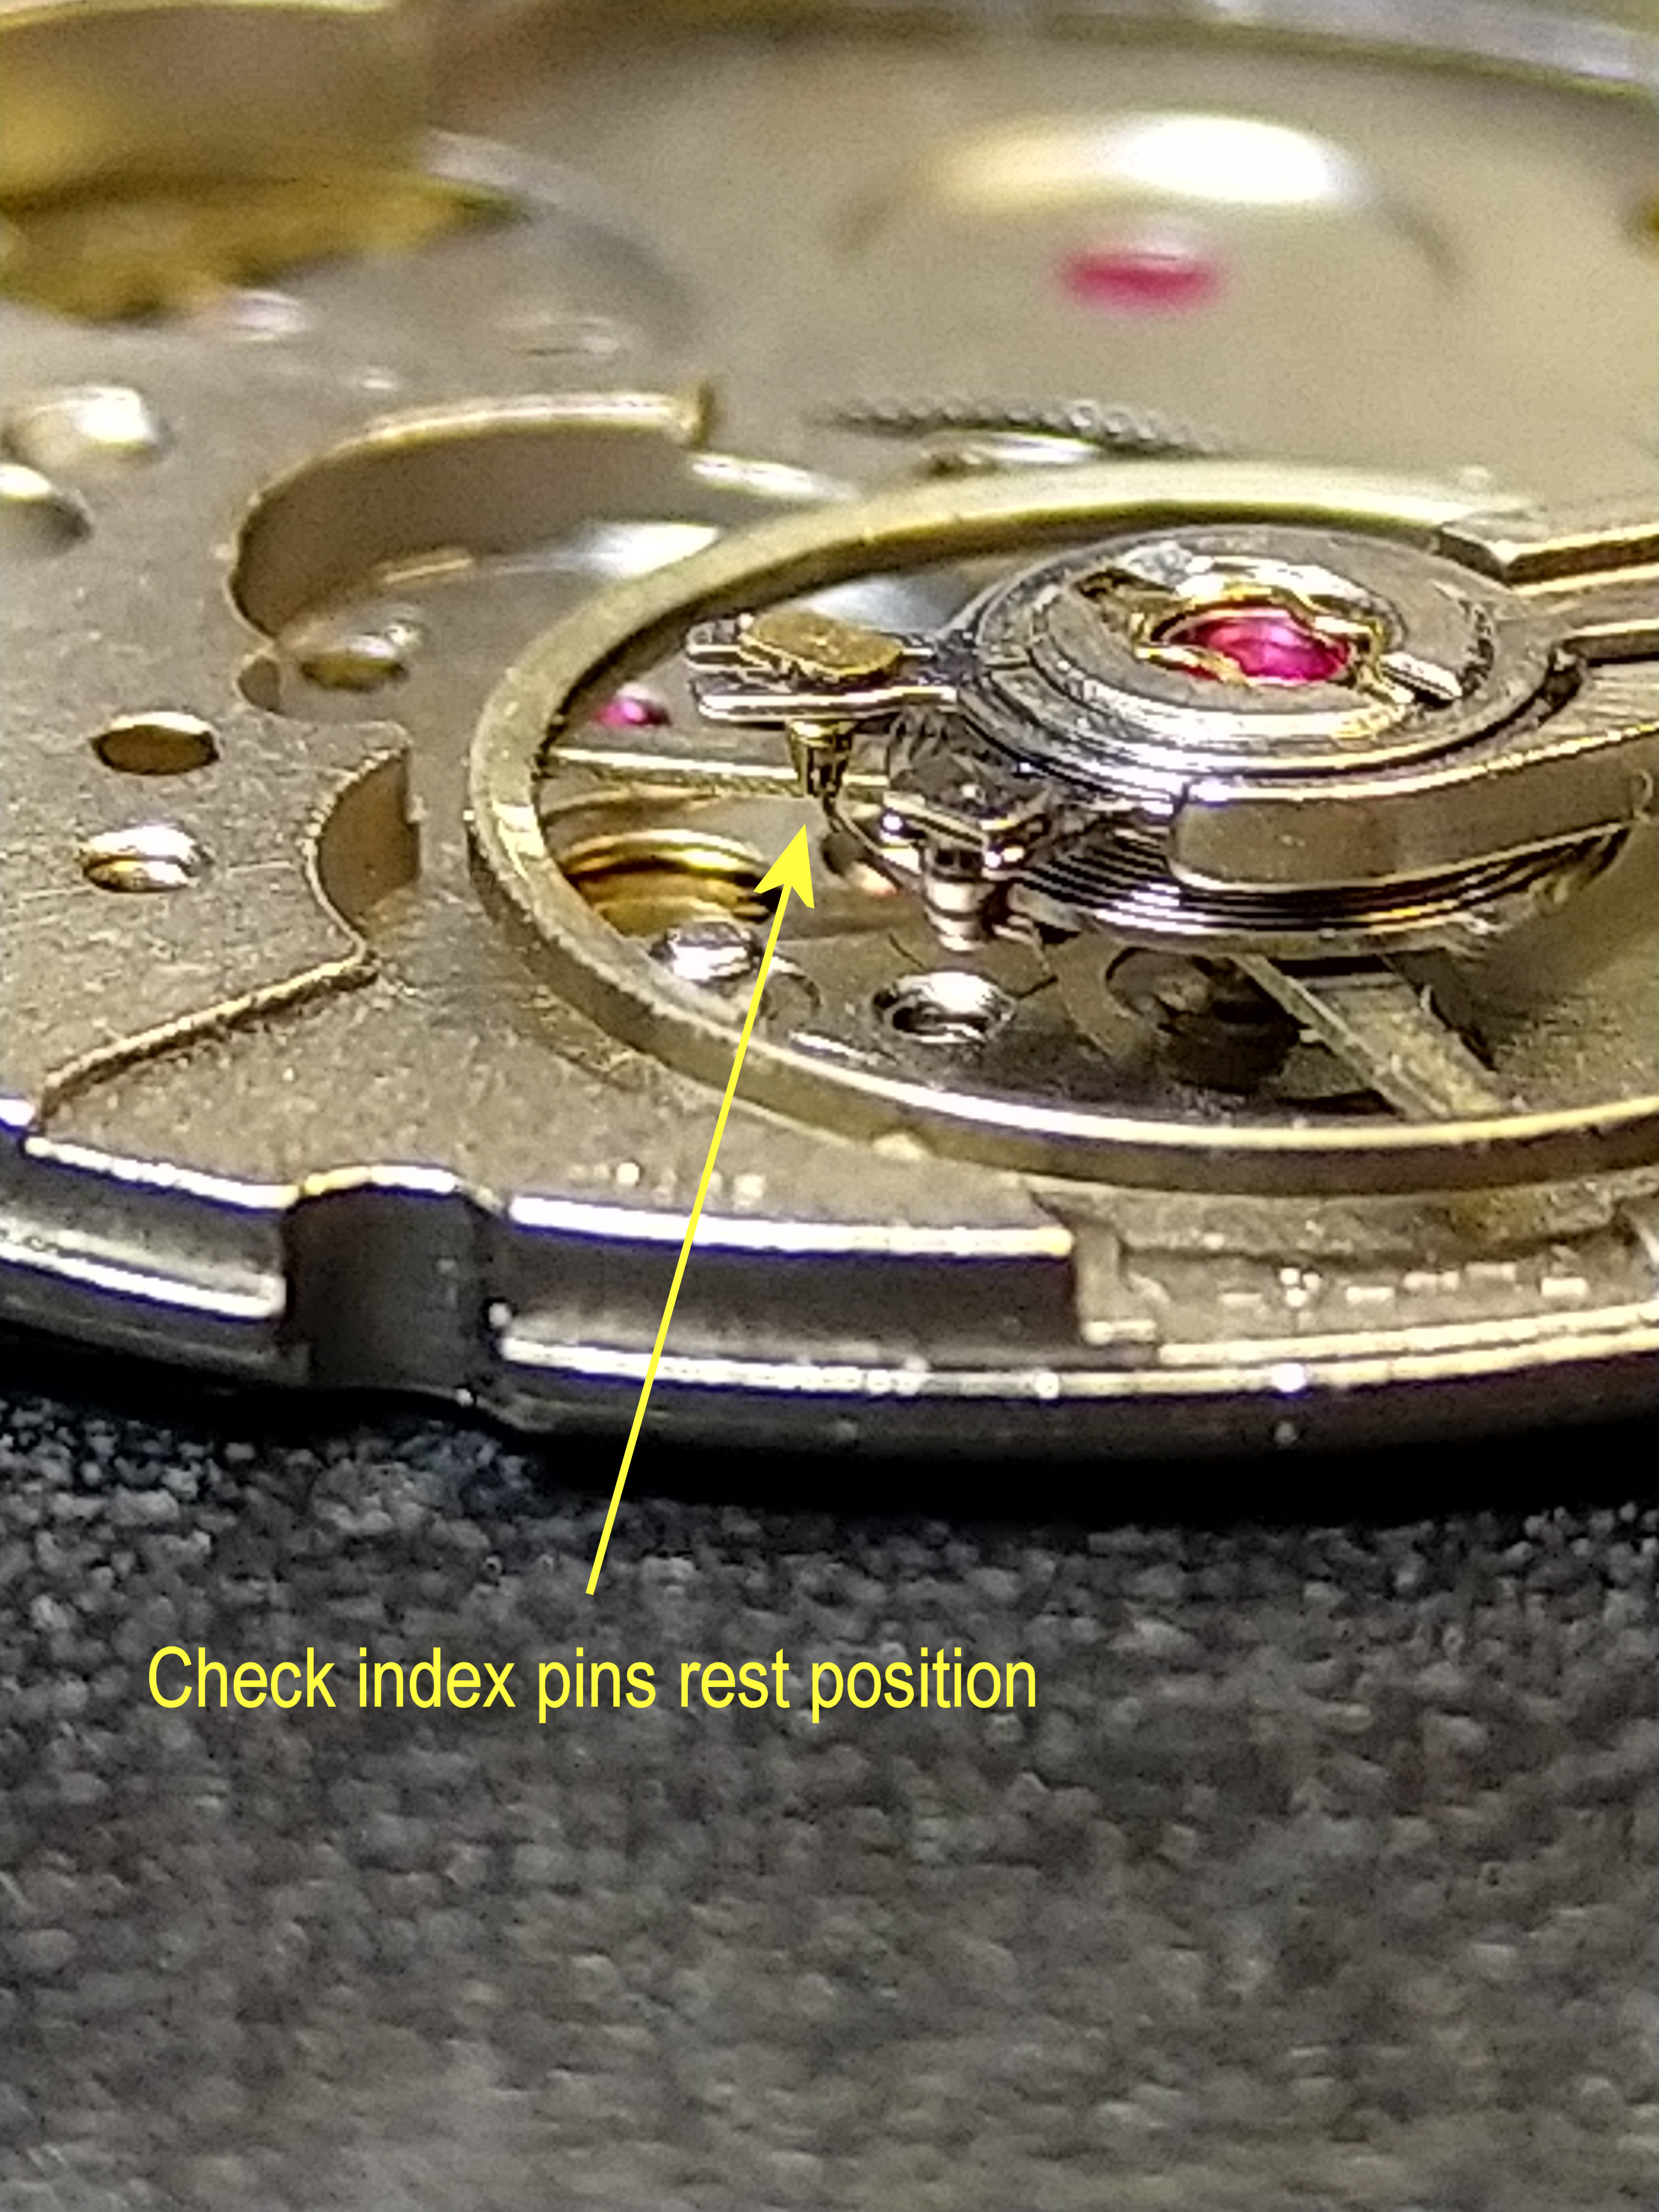
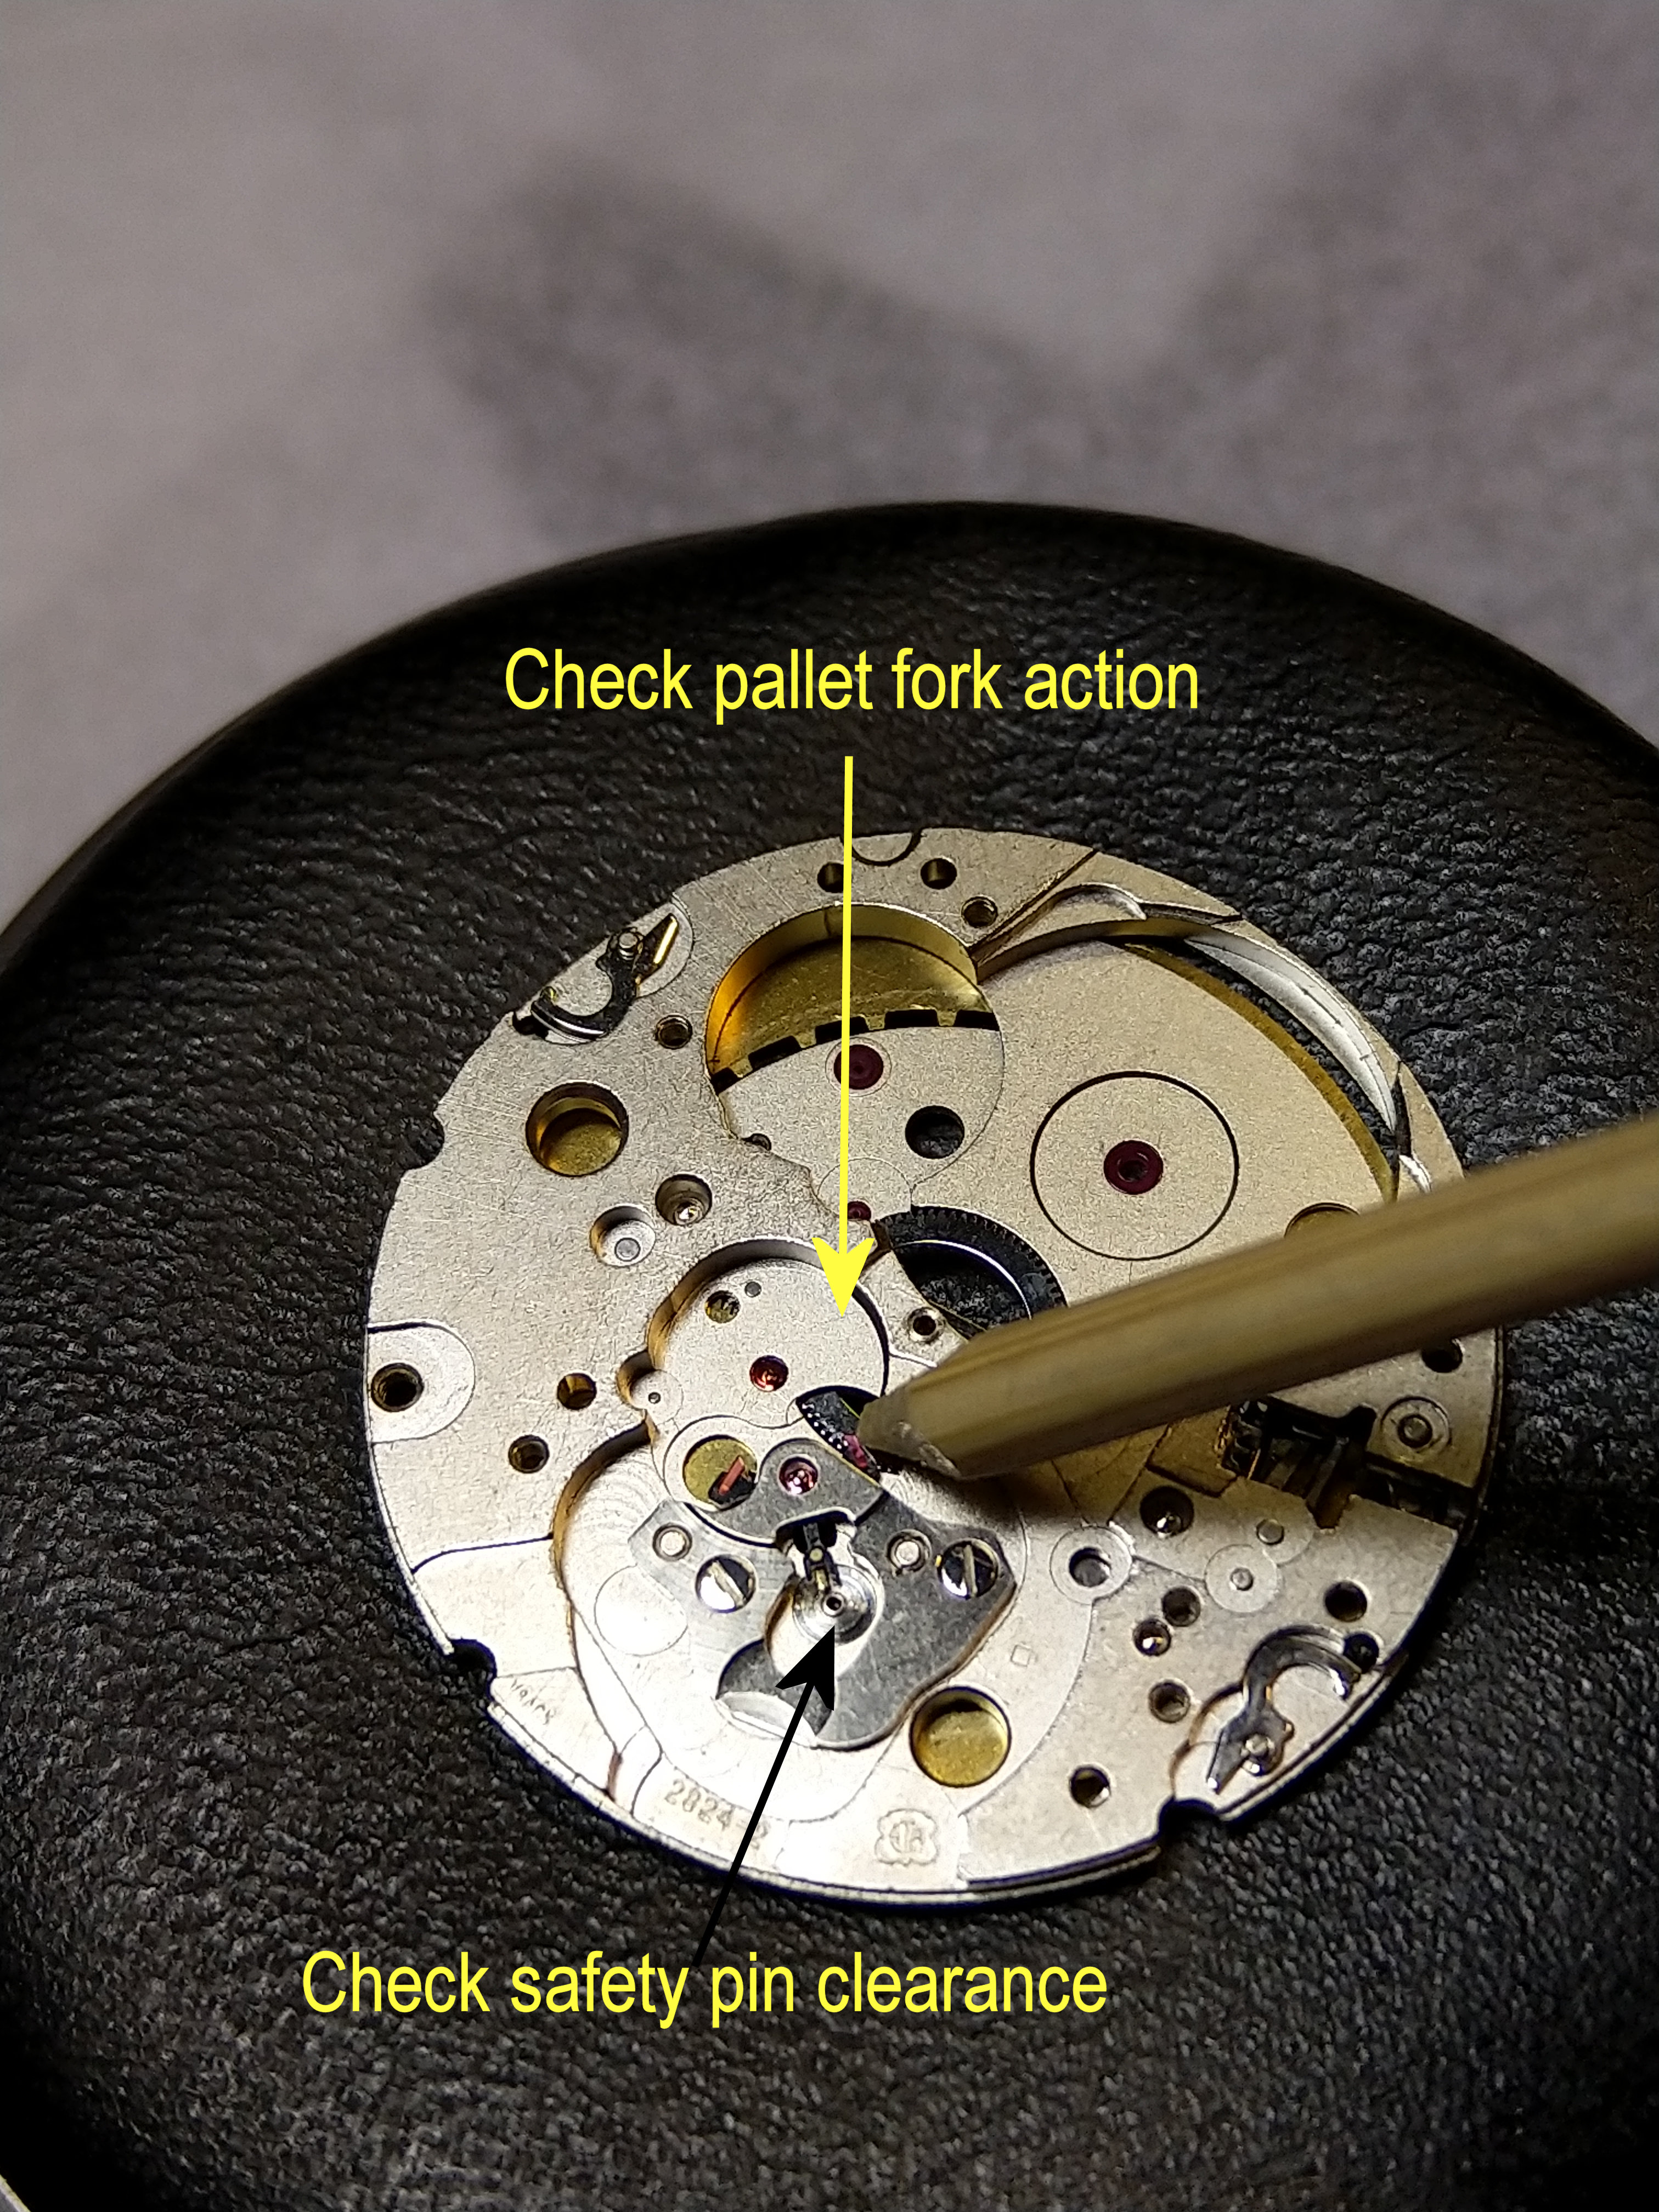
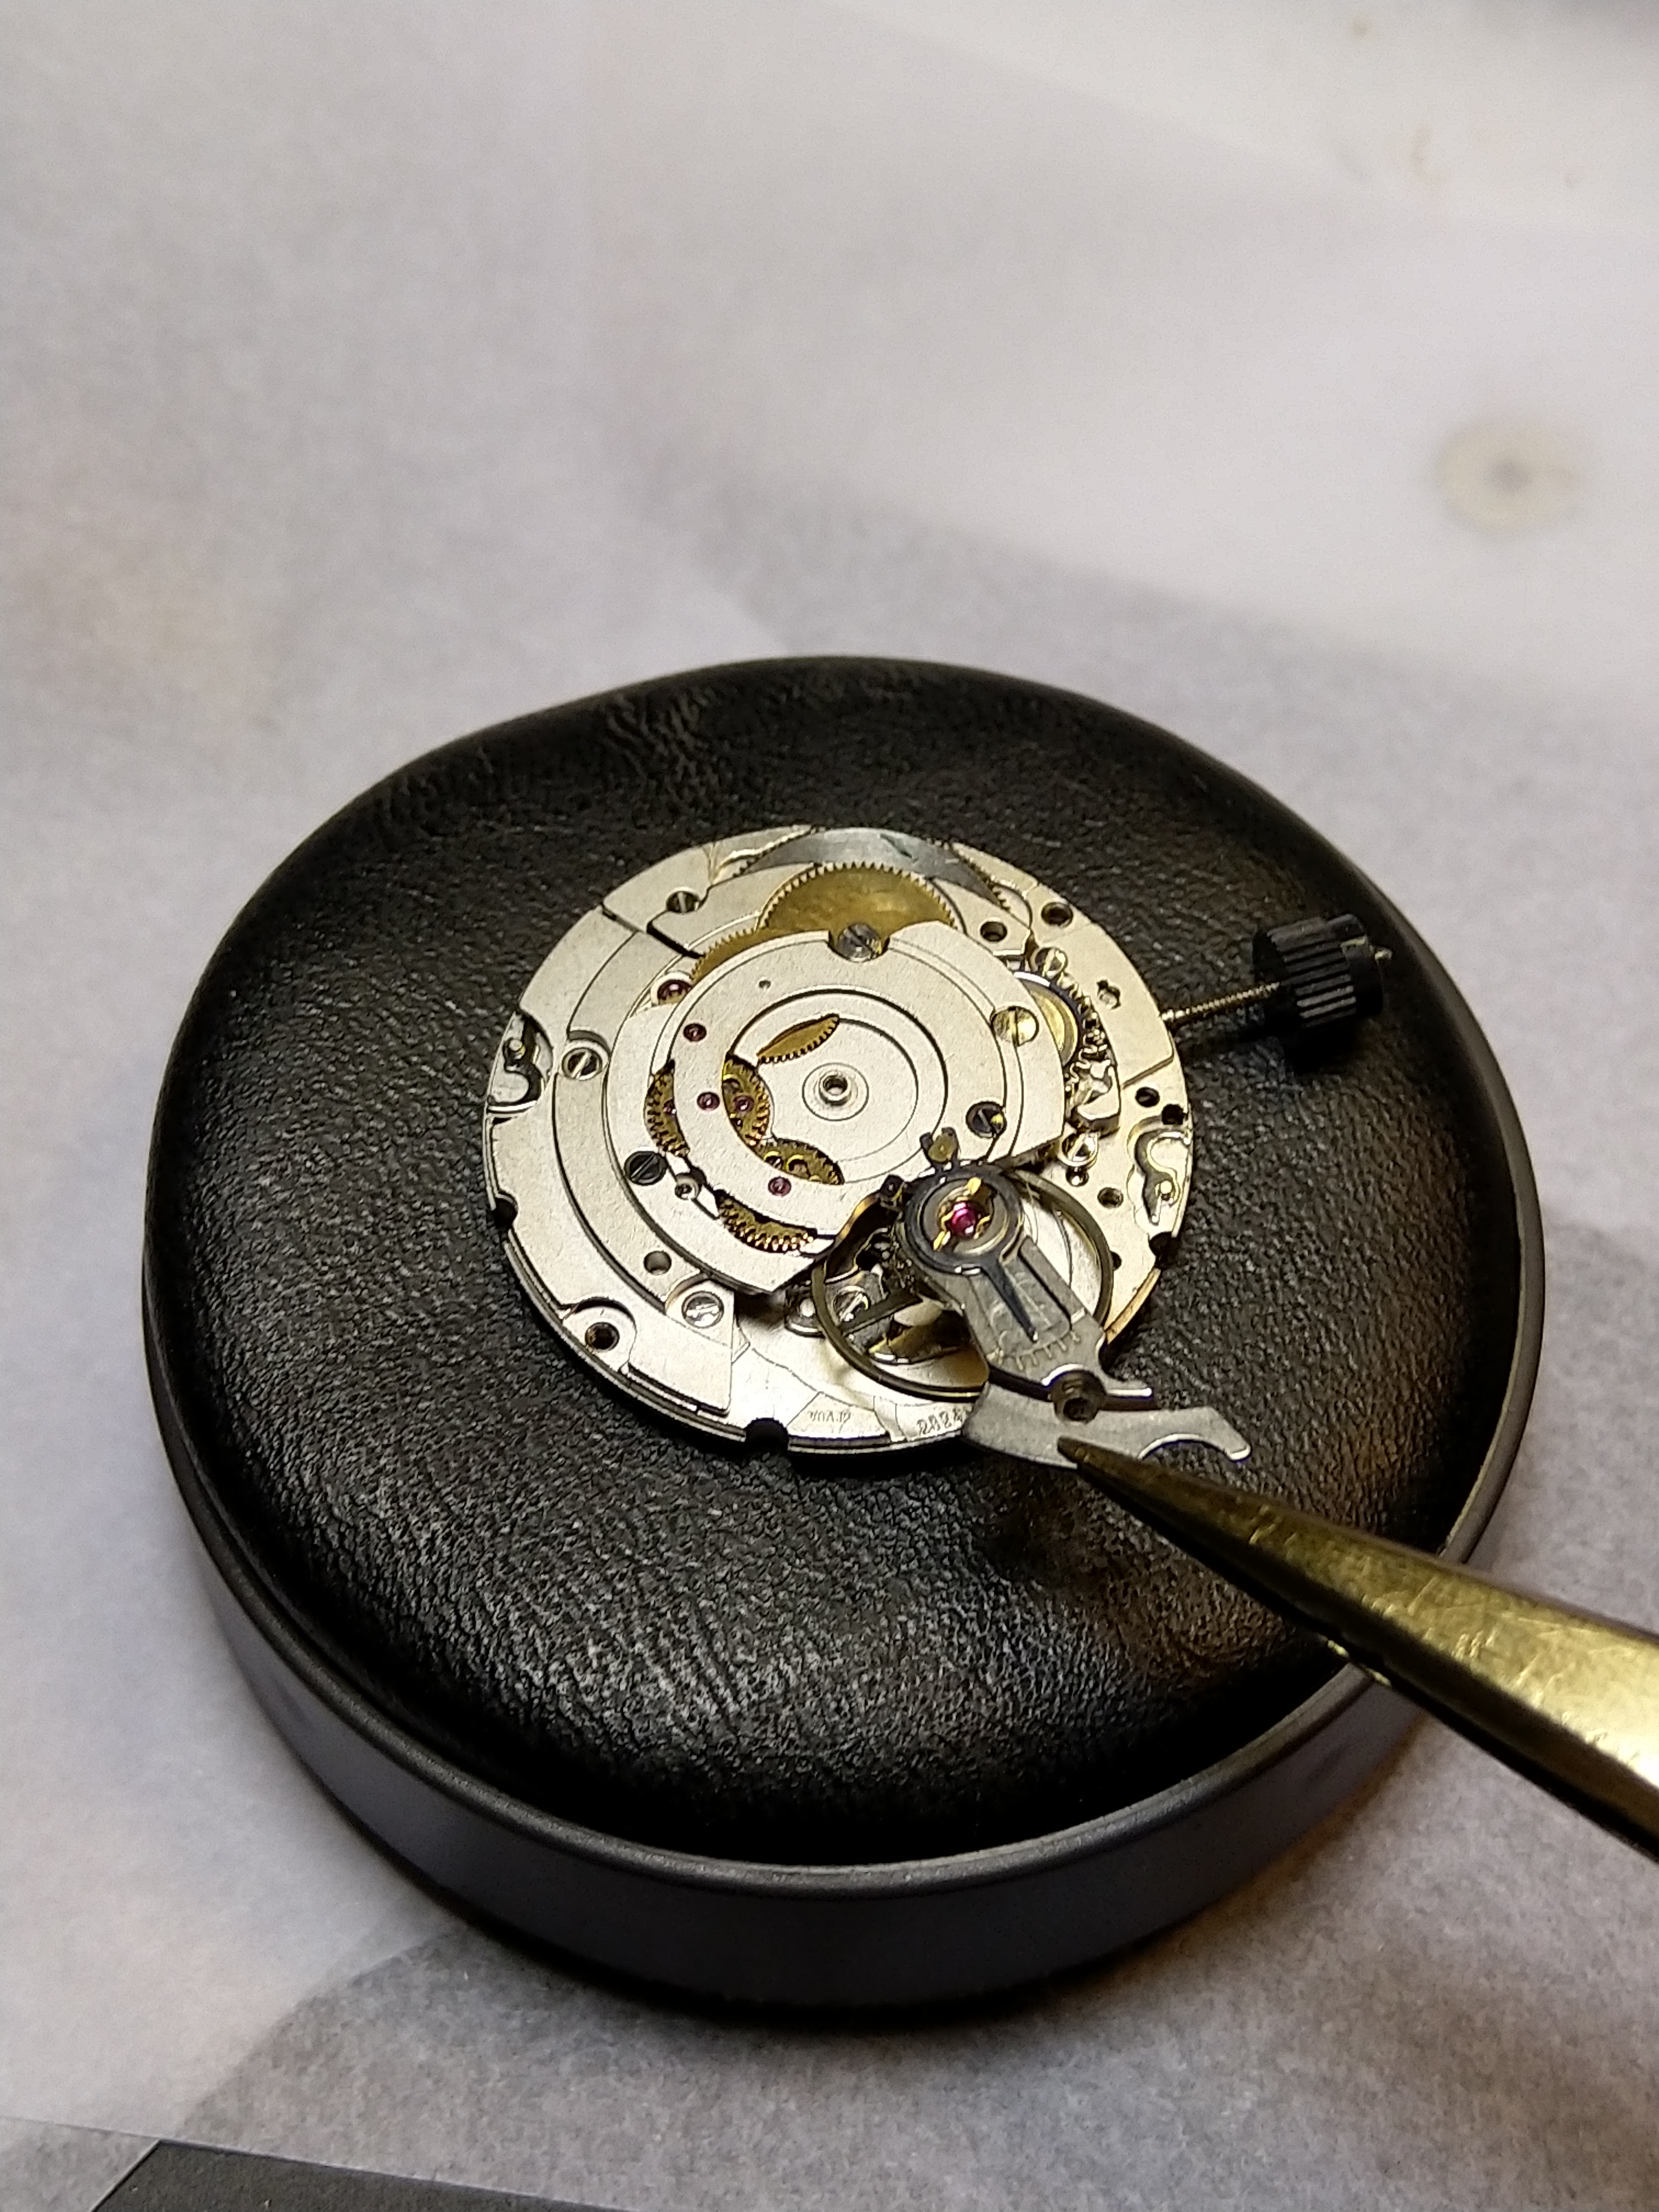
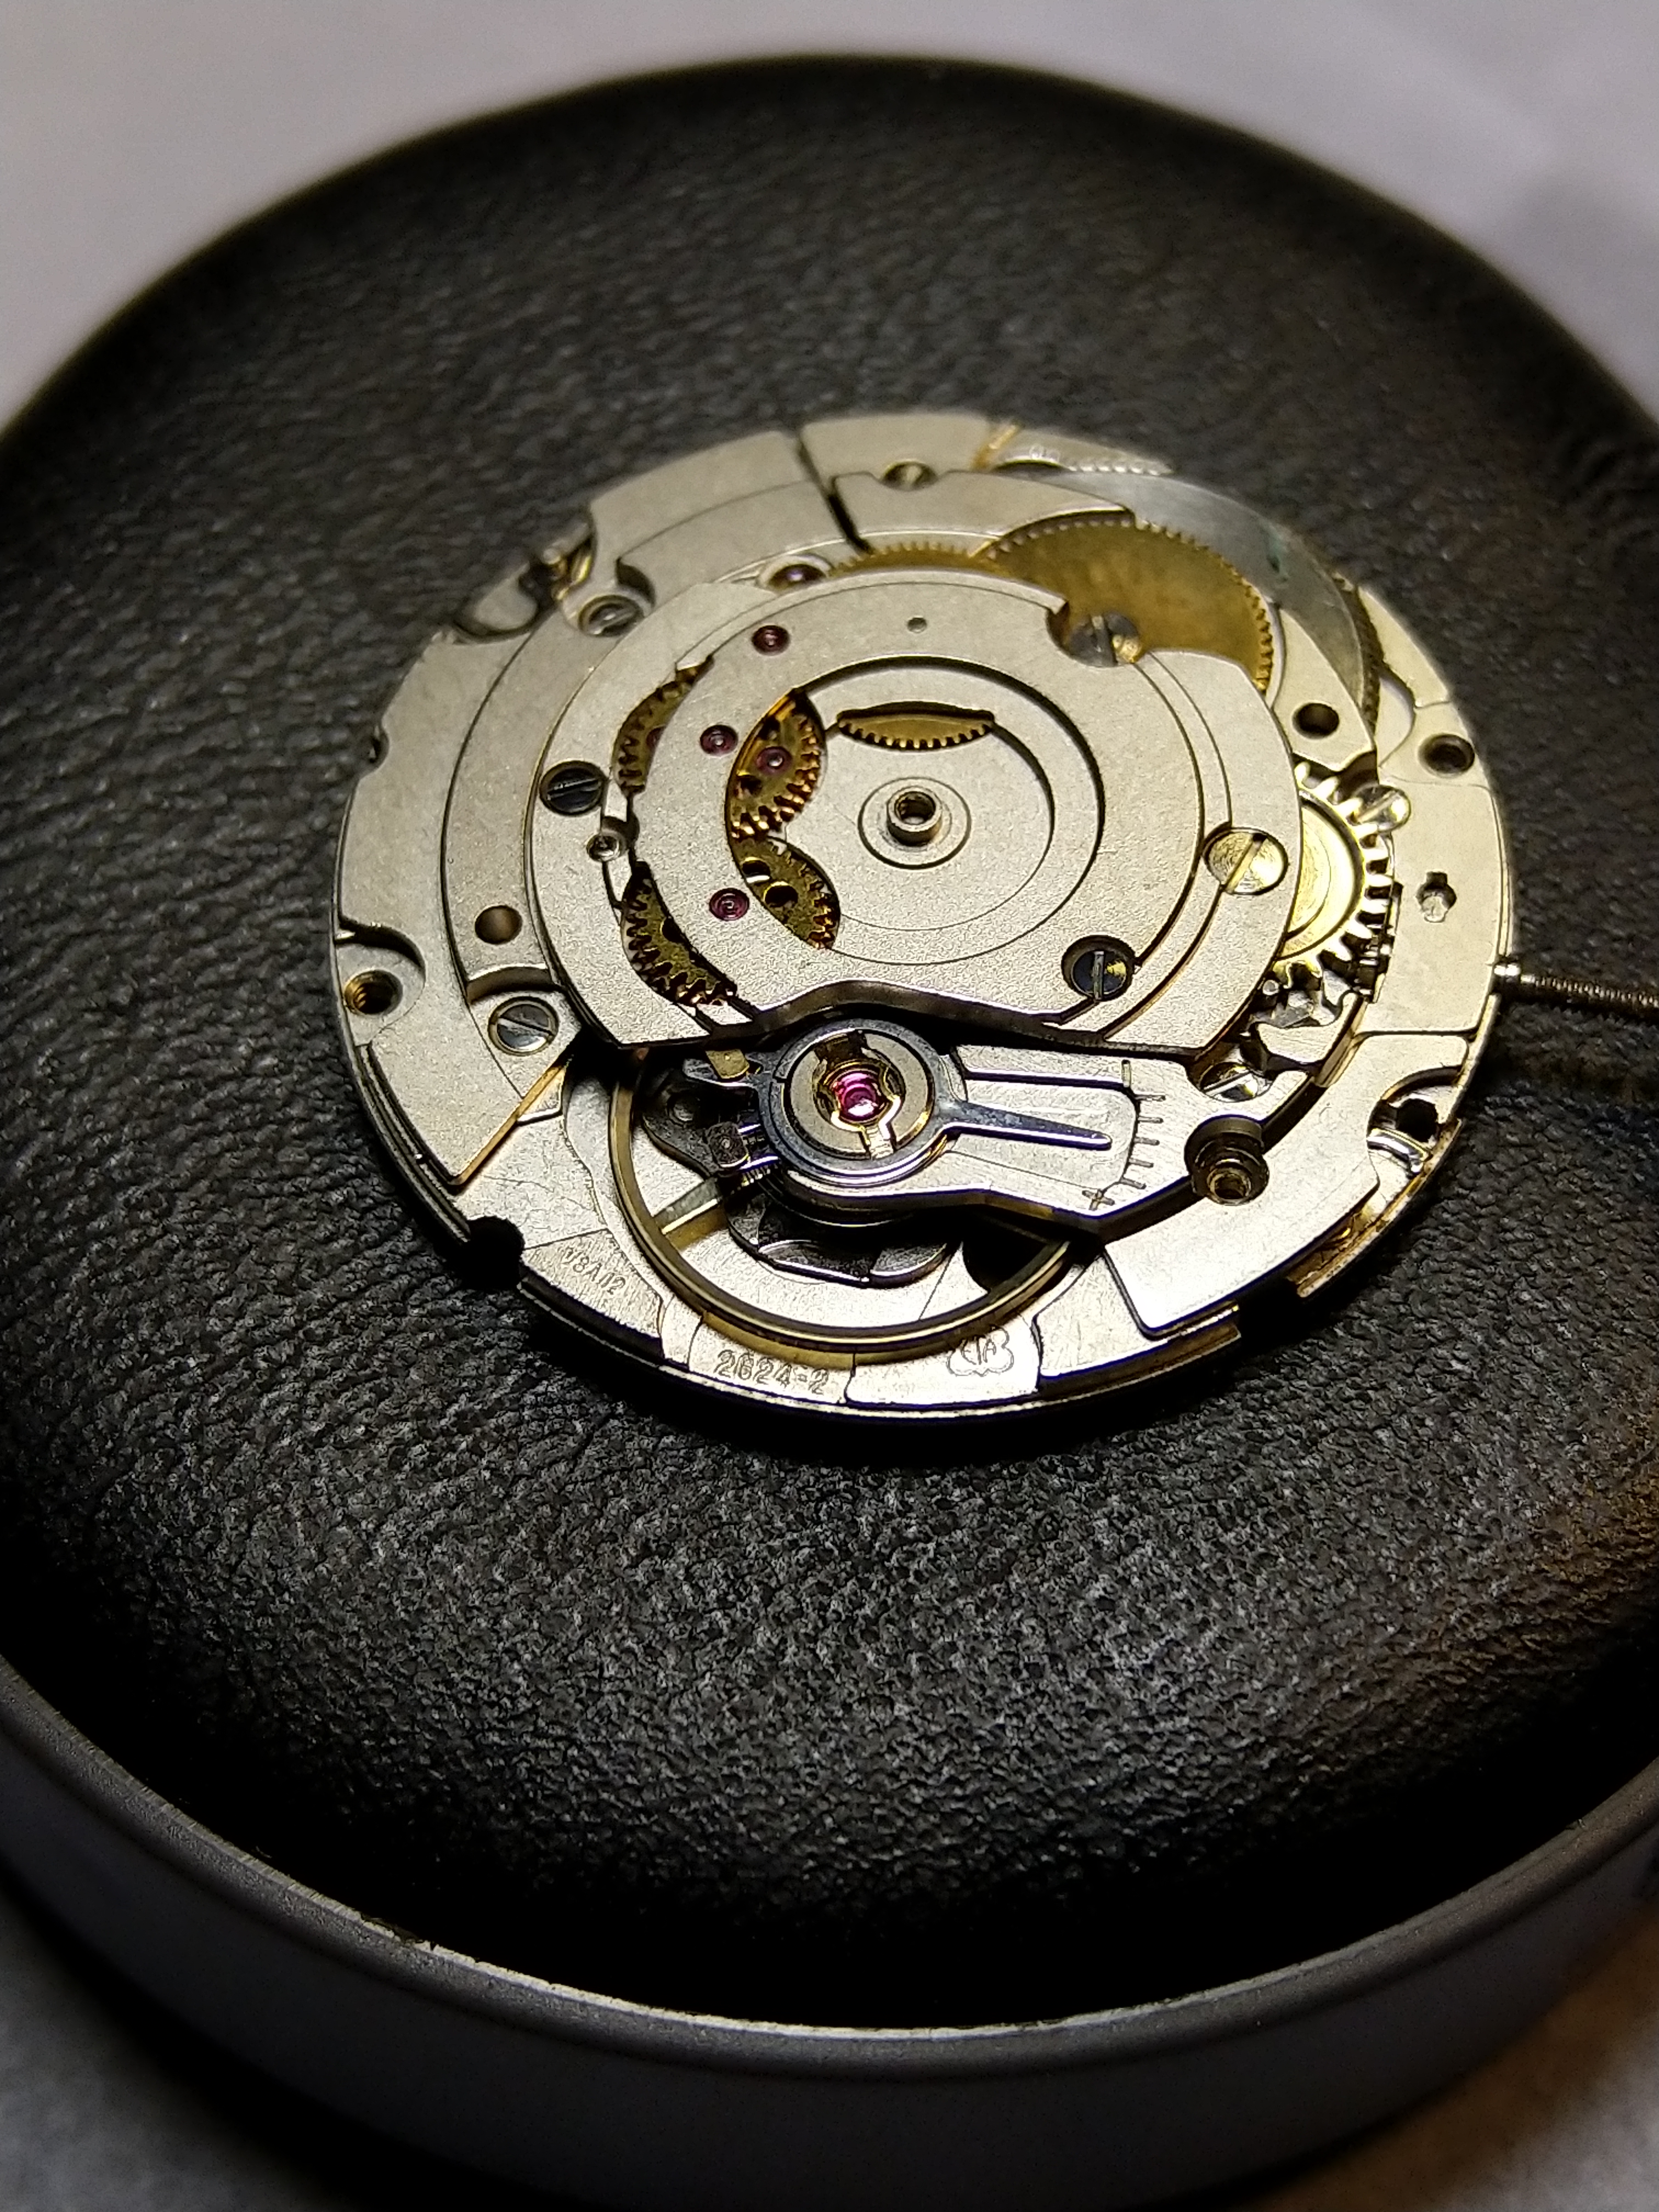
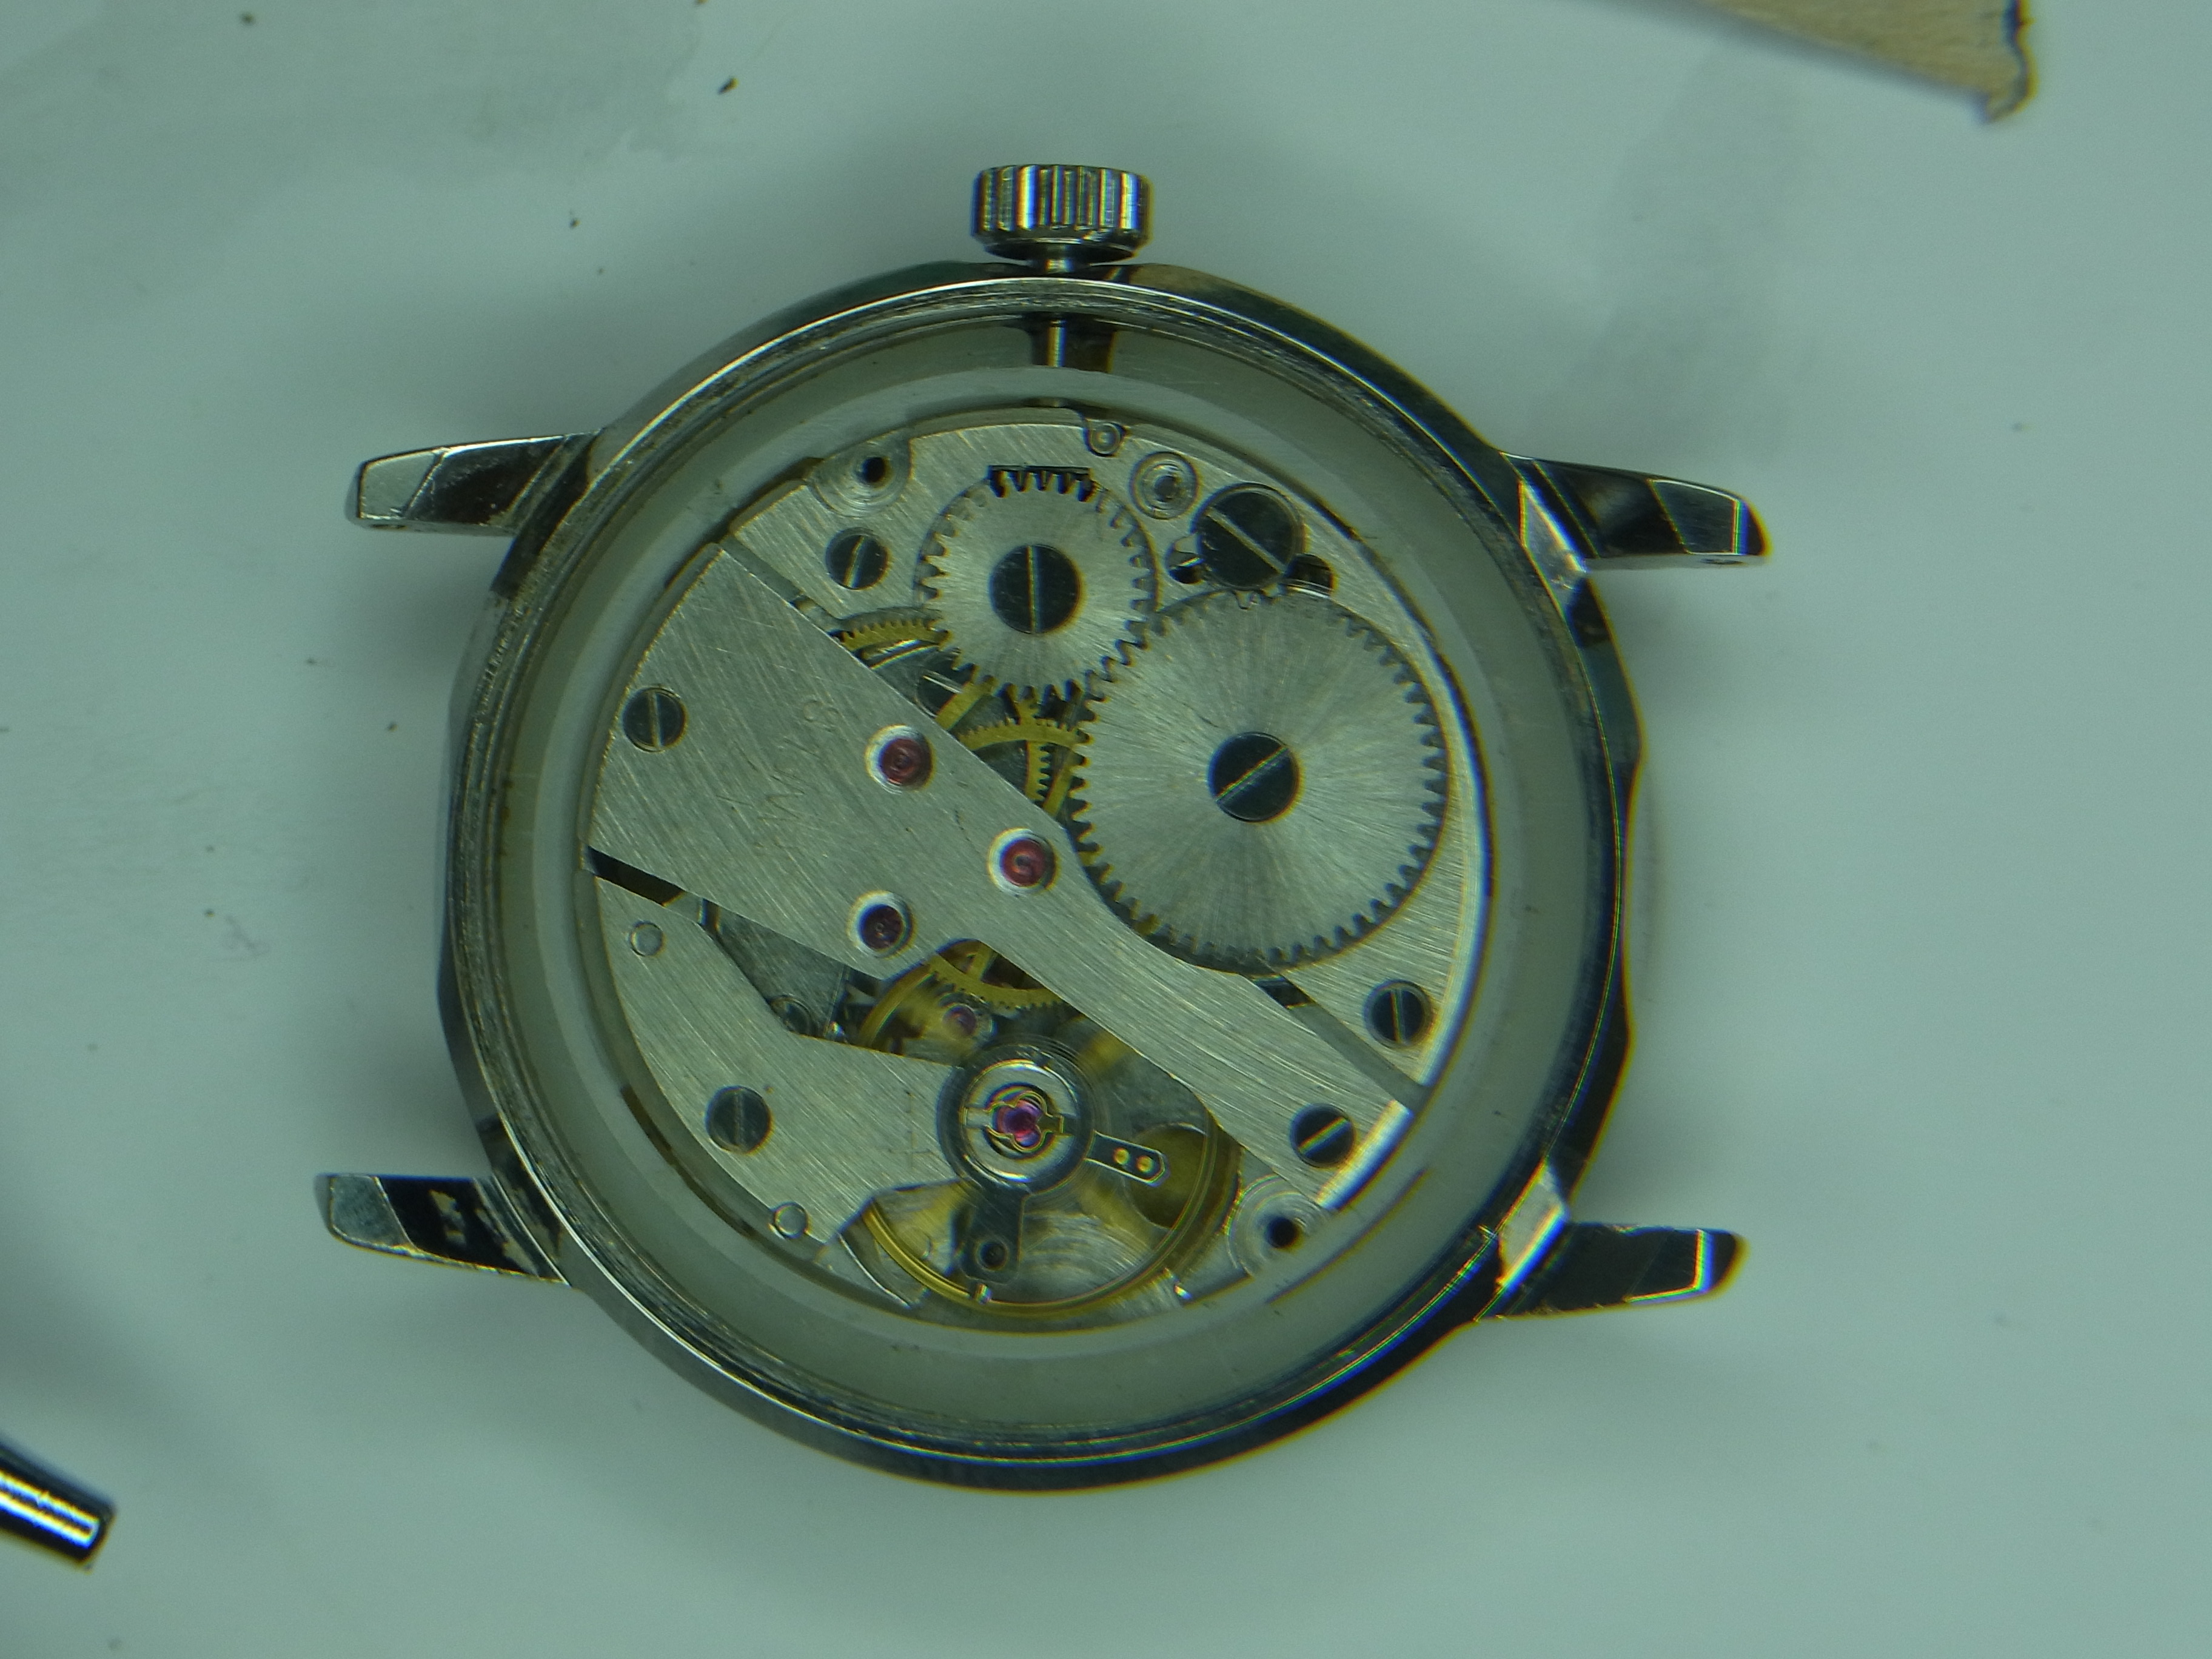
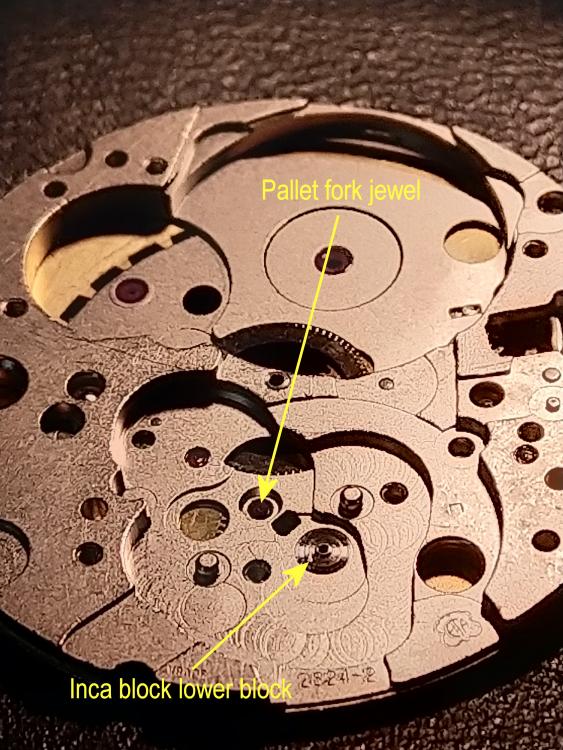
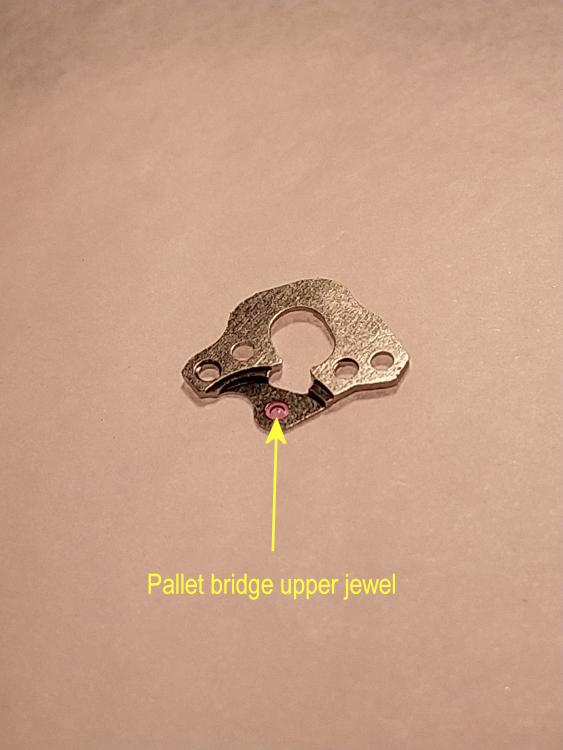
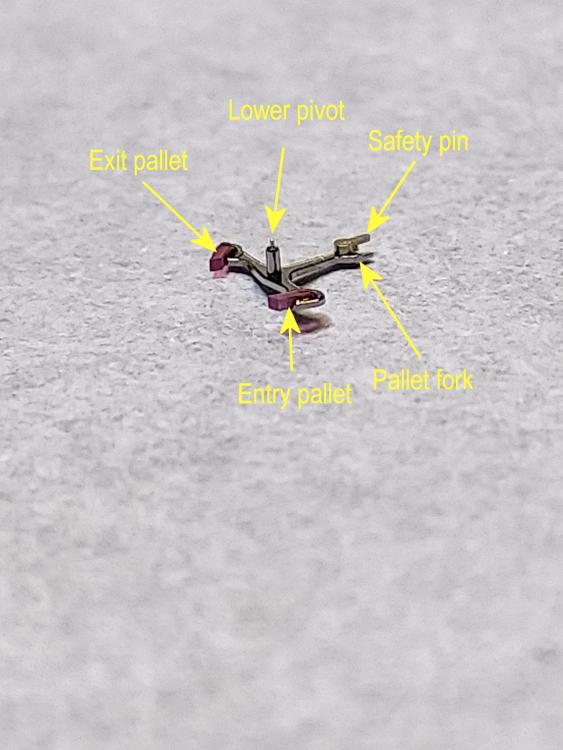
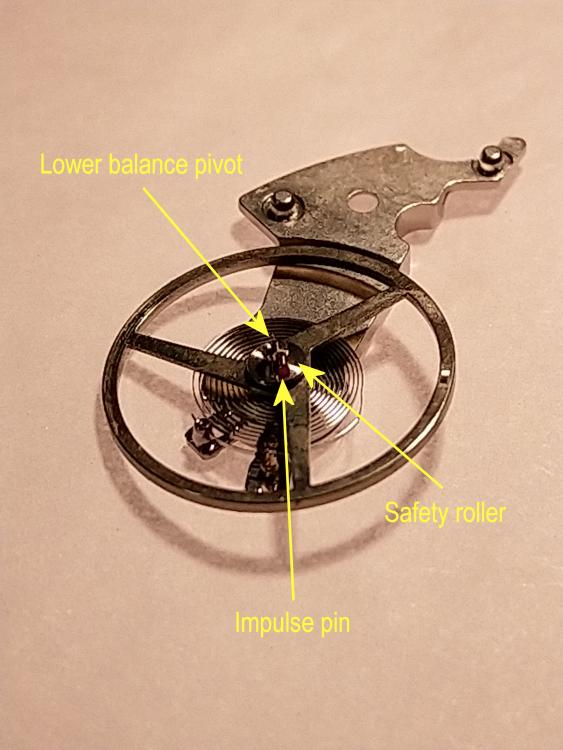
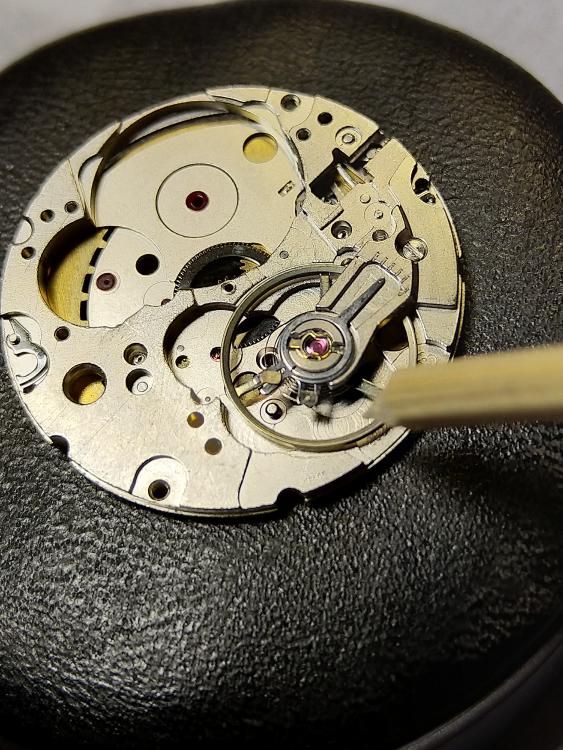
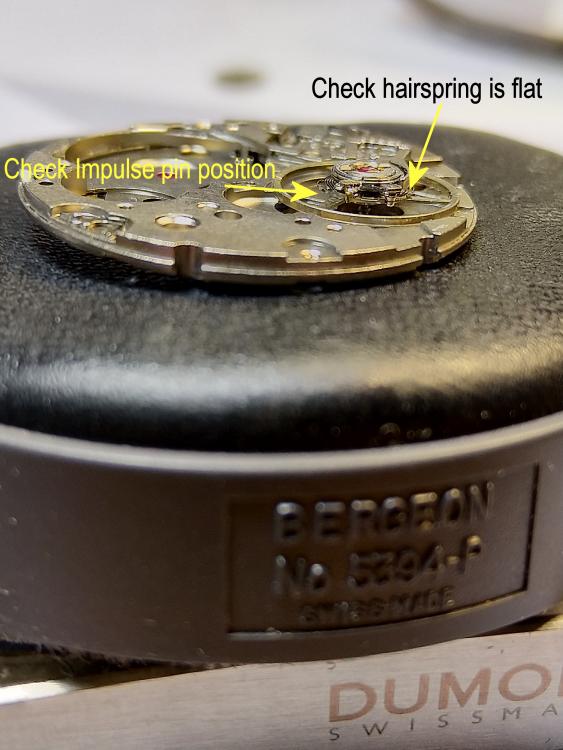
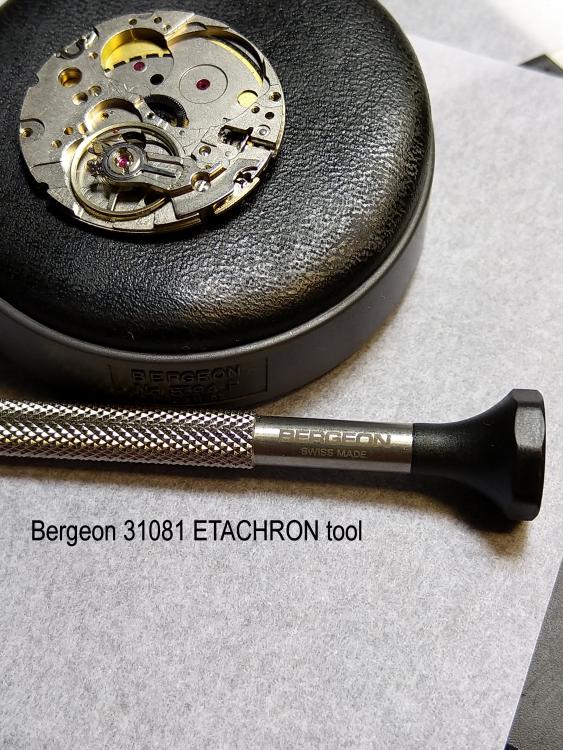
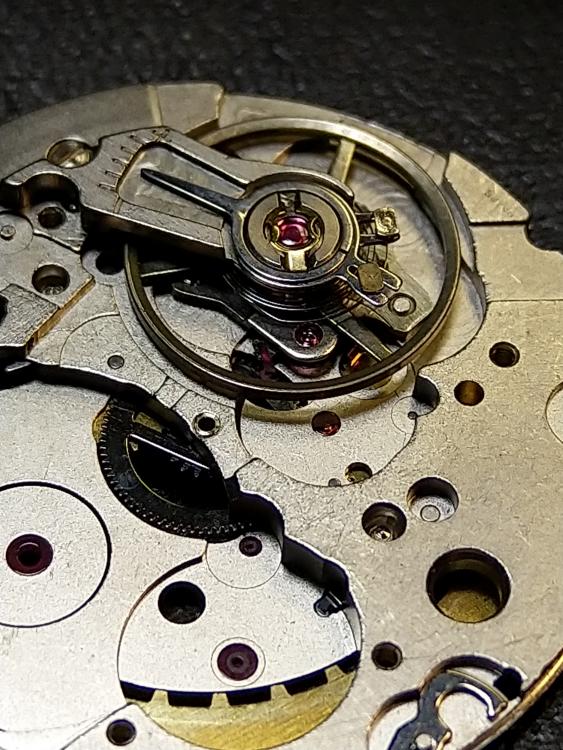
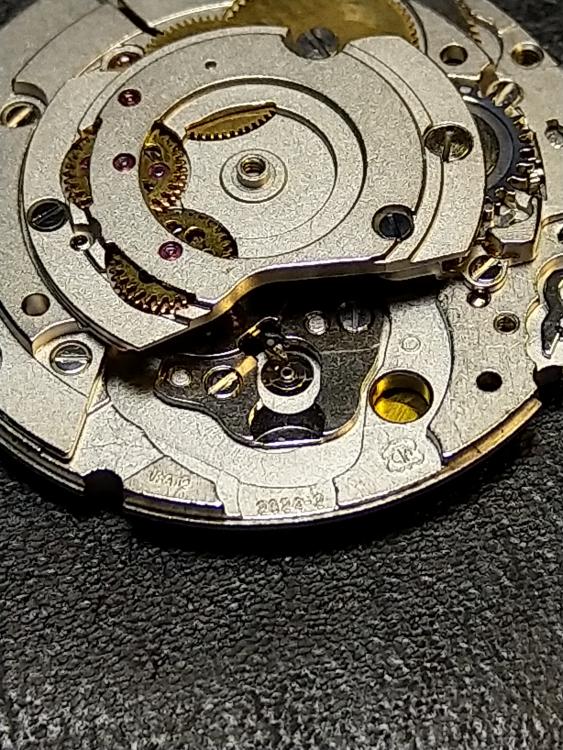
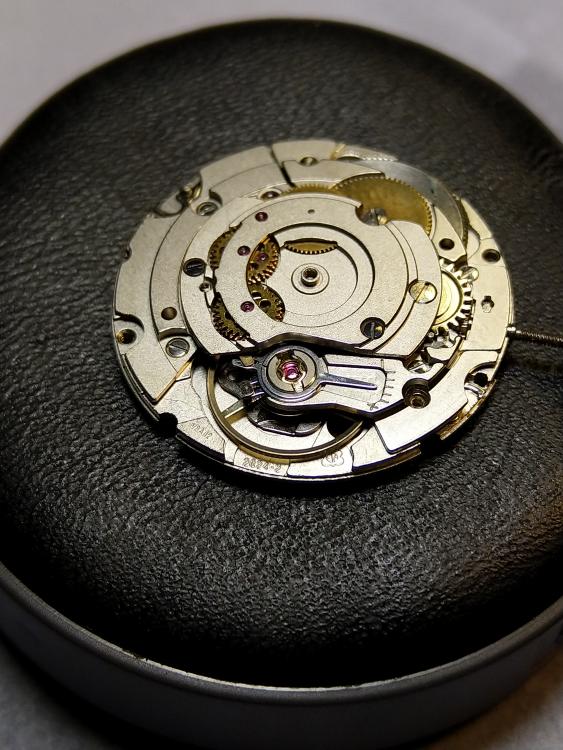
It's friday night over here and what is better than having an small party with wine, chips and a small check. Just because it is ticking it might not be ready to be adjusted. Since this question is freqently occuring in different shapes I will just make a small guide which can help you decide if you done the minimal checks. Maybe it will avoid this beeing an 50 + page post There are some initial checks one can do while servicing a watch after the repair, here I use a ETA 2824-2 as an example. First of all, I assume you cleaned the movement properly. After and before cleaning always check the status of the jewels in the bridge. Just as an assurance use a peg wood and clean the holes in the jewels again. Most of your focus should be on the lower pallet fork jewel and the Inca block lower block. If you want to adjust end shakes you can do it with these two ones. Check for cracks or worn holes. These steps should be done when changing parts, the original one did after all fail for some reason. Next you can check the pallet bridge upper jewel, here too you check for cracks in the jewel and the condition of the hole. The holes on the jewels should always be round and nice. If it looks dirty or not take a extra run with the peg wood just in case . Check the pallet fork. Look carefully at the pallet jewels impulse faces, they should be in a mirror finish. If there are scratches buy a new or change the pallet jewel. The action depends on your skill level. Check the upper and lower pivot, they should be perfectly cylindric and straight. Even the slightest dent from wear will affect the performance. If the pivot isn’t straight it will stop in certain positions depending on the bend. Check the safety pin it should be straight and level, perfectly centered. Check the fork, here you examine it for wear and tear. Check so both the entry and exit pallet is firmly in place. The pallet fork must be perfectly clean. Check the balance staffs pivots they can’t have any wear or be even the slightest bent, the same applies here as with the pallet fork pivots. Check the impulse pin it should be clean with a polished finish. Check it is firmly in place. Check the safety roller isn’t t loose. Now Put only the balance complete and bridge into place. With a gentle push on a spoke on the balance you now try if the balance will swing freely. If it is not you first look if the lover balance is touching the small collet on the Inca block. If there is a clearance between the balance and the collet then you have to check the lower cap jewel for wear, if it is good then you have to adjust the lower Inca block seat a bit downwards, avoid using any shims under the balance bridge. You can’t adjust the upper Inca block since the regulator arm is tightened with it. If it runs freely check the end and side shake with brass tweezers. You should have only minimal movements of the balance. If you visually see the balance wiggle more than the rims height then it is a big chance the balance pivots are to worn and the balance staff has to be changed. One gets a feeling of the correct end and side shake with time. Next you should examine so the hairspring is flat al the way around. If it touches the bridge, the plate or some of the studs the performance suffers greatly and the graph on your timing machine will look like snowfall in January. From the side you now can check the position of the impulse pin, if you look from the side where the arrow in the picture is you should see the rest position of the impulse pin. It should be in between the two banking pins, on the 2824-2 it is the sides of the bridge which are the pins. If you put the hairsprings collet approximately as it is in one of the previous pictures you now should be able to put the impulse pin centered with the regulator arm to the right, a fine tuning can later be done on the time graph. While you are at it you could look if the hairspring is in the middle of the index pins. If not, you could use a tool like the Bergeon 31081 to adjust it into position. You remove the balance and put the pallet fork and bridge in place. Check the end and side shake. The pallet should move with ease when you move it back and forth. Check the clearance of the safety pin, it should go totally free and not touch the Inca block below. When the pallet fork and bridge cleared your examination, it is once again time to put the balance bridge into place. Give it a push on the spoke and observe the balance and pallet fork action. If the safety pin is too long the balance would stop at almost center position of the impulse pin. The same goes if the safety pin is to low then it should hit the top of the impulse pin. If everything is good, take the balance and pallet fork off and assemble the rest of the movement. Like the chefs on TV I already have one assembled. I put some tension on the mainspring by winding it a couple of turns. This gives me a chance to see so the pallet fork has a snappy and nice action. I almost always leave the fork to the right banking position. There is probably lots of theories too in how to put the balance back, since I know in which position, I left the fork it is easier for me to put the balance back. I have a clear line of sight so I can push the index pin approximately in the pallet fork. I adjust the lower balance pivot in place. With a small twist I put the balance down onto the two guide pins. I slightly adjust the upper pivot so it gets into position. Most of the times the balance swings into action. The movement is now ready to be adjusted.


 2 points
 -
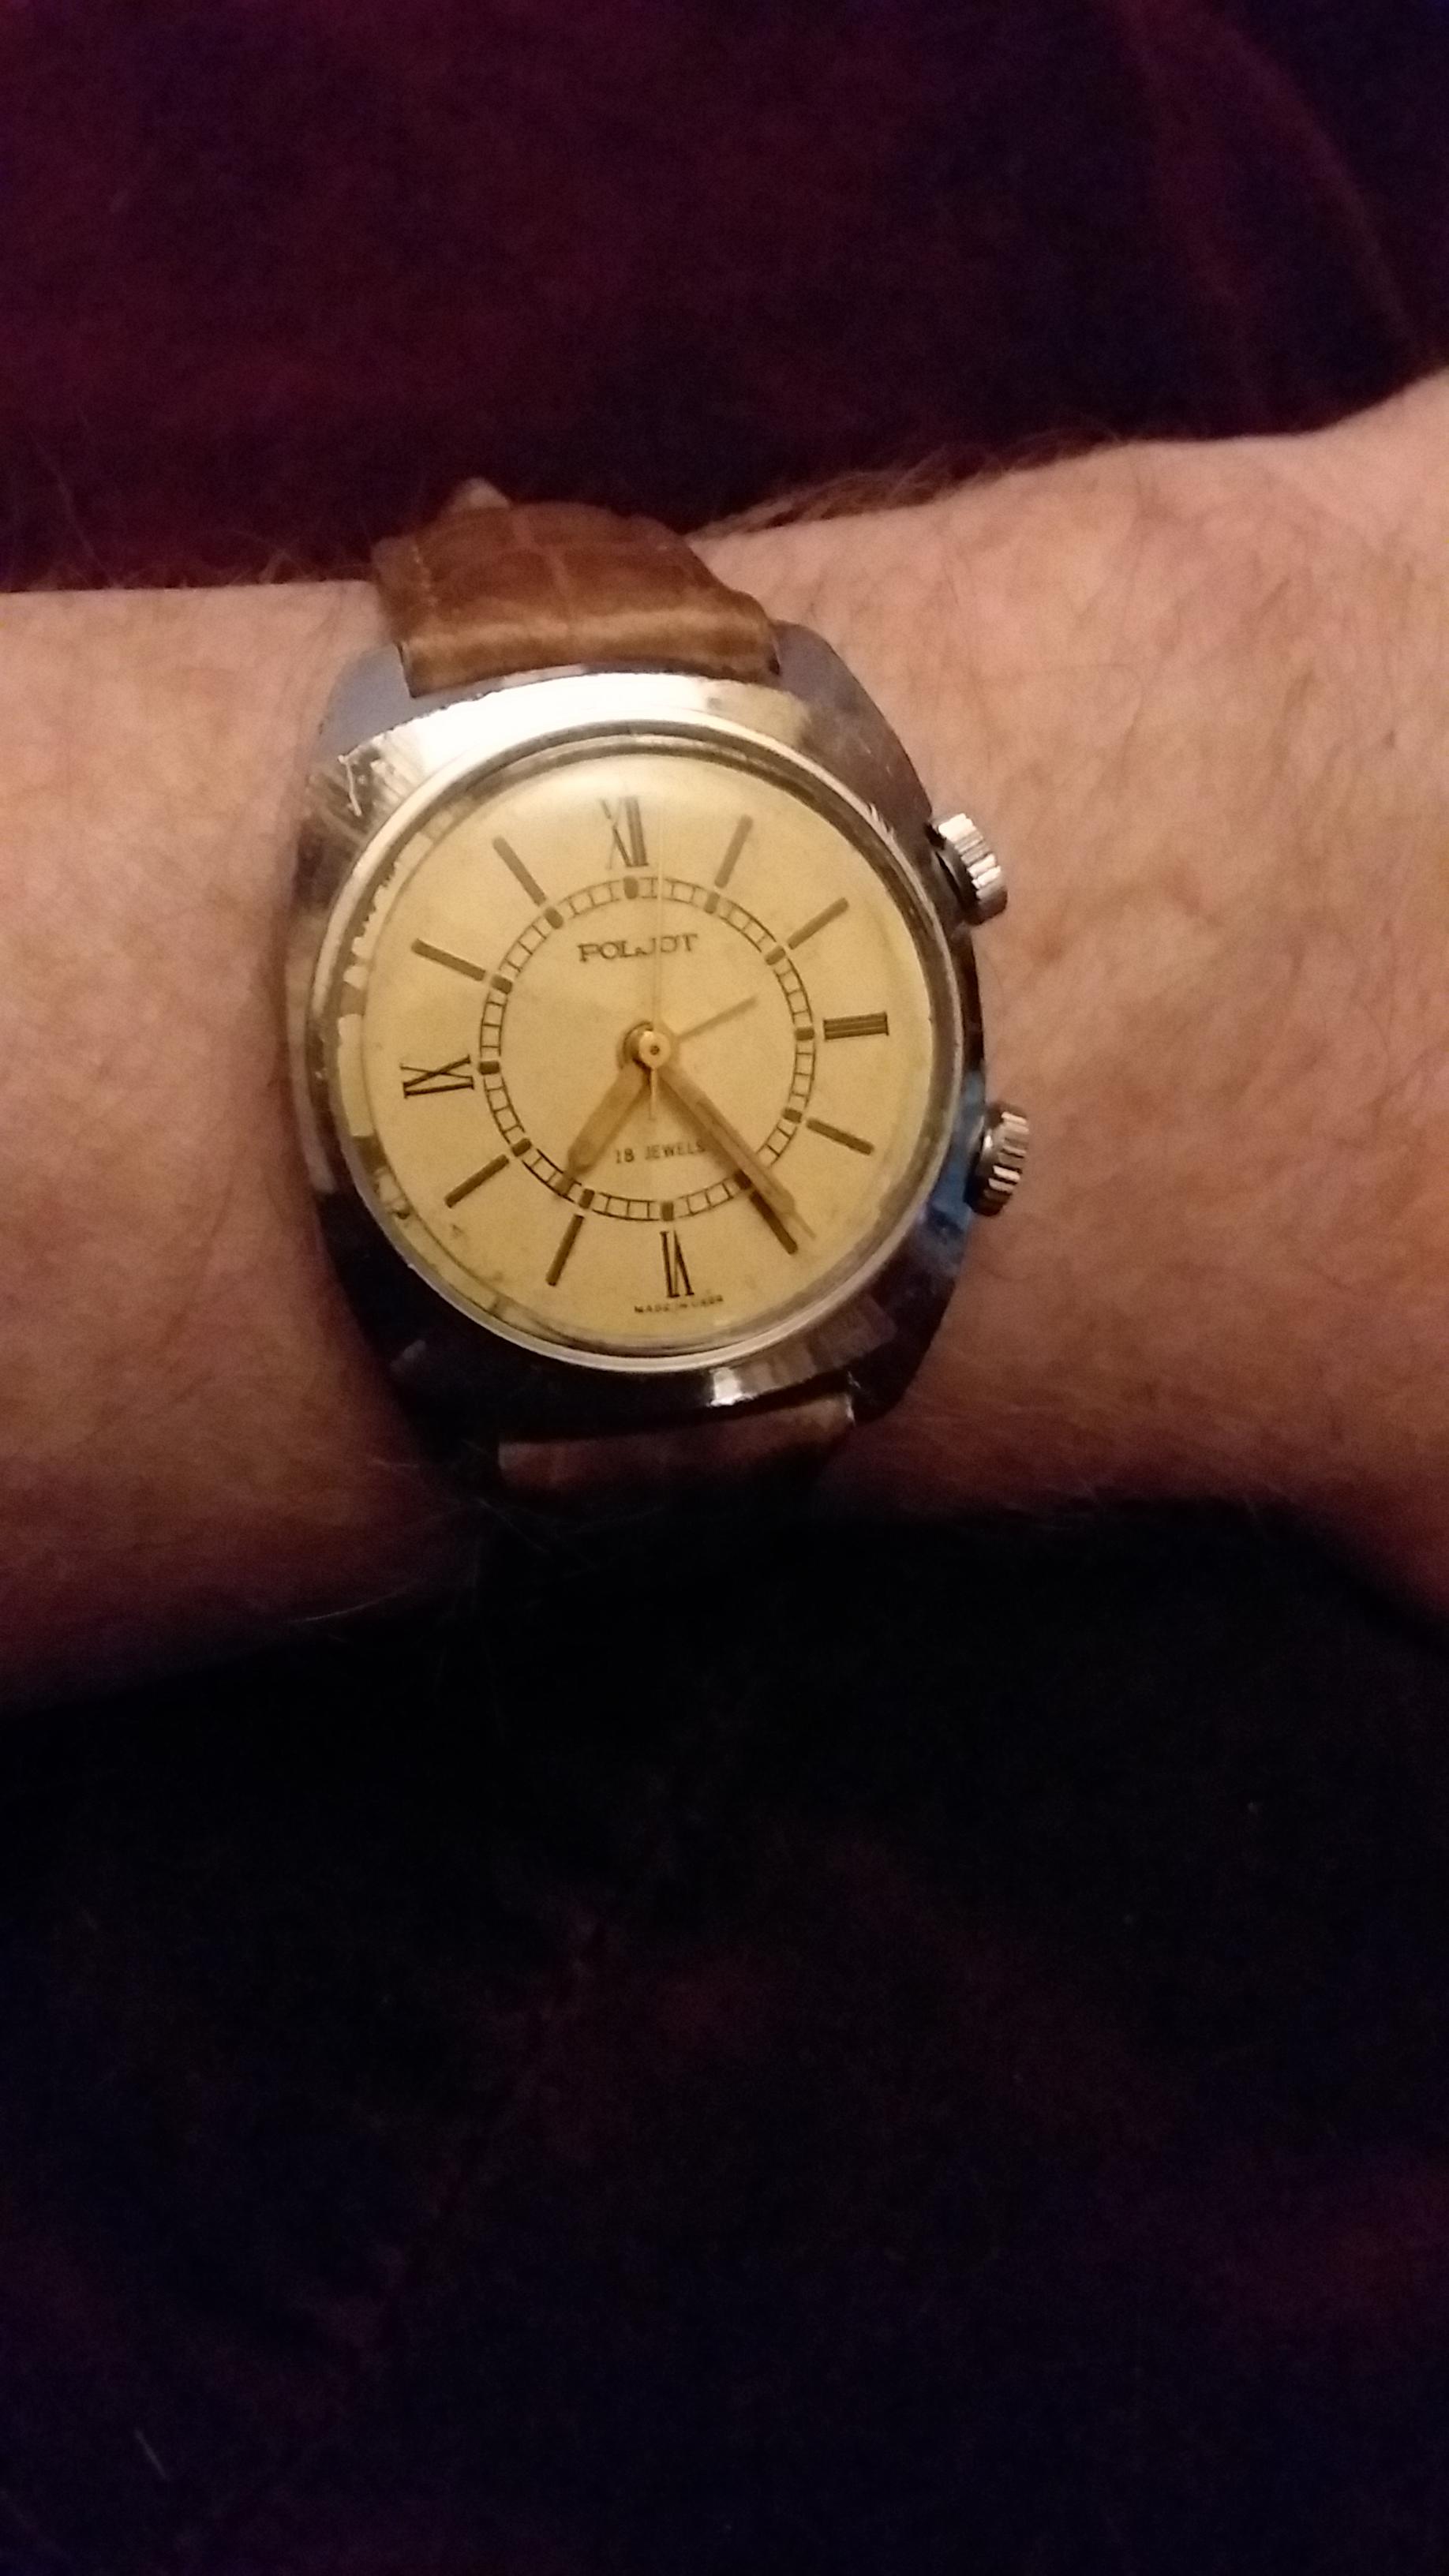
I was going to make a "coming in the mail" post about this circa-1965 Poljot Signal, but it's already here. I do not wear *wrist* watches often, but the alarm on this watch is just so doggone handy. I can be forgetful. I adore alarm watches.
 2 points
 -
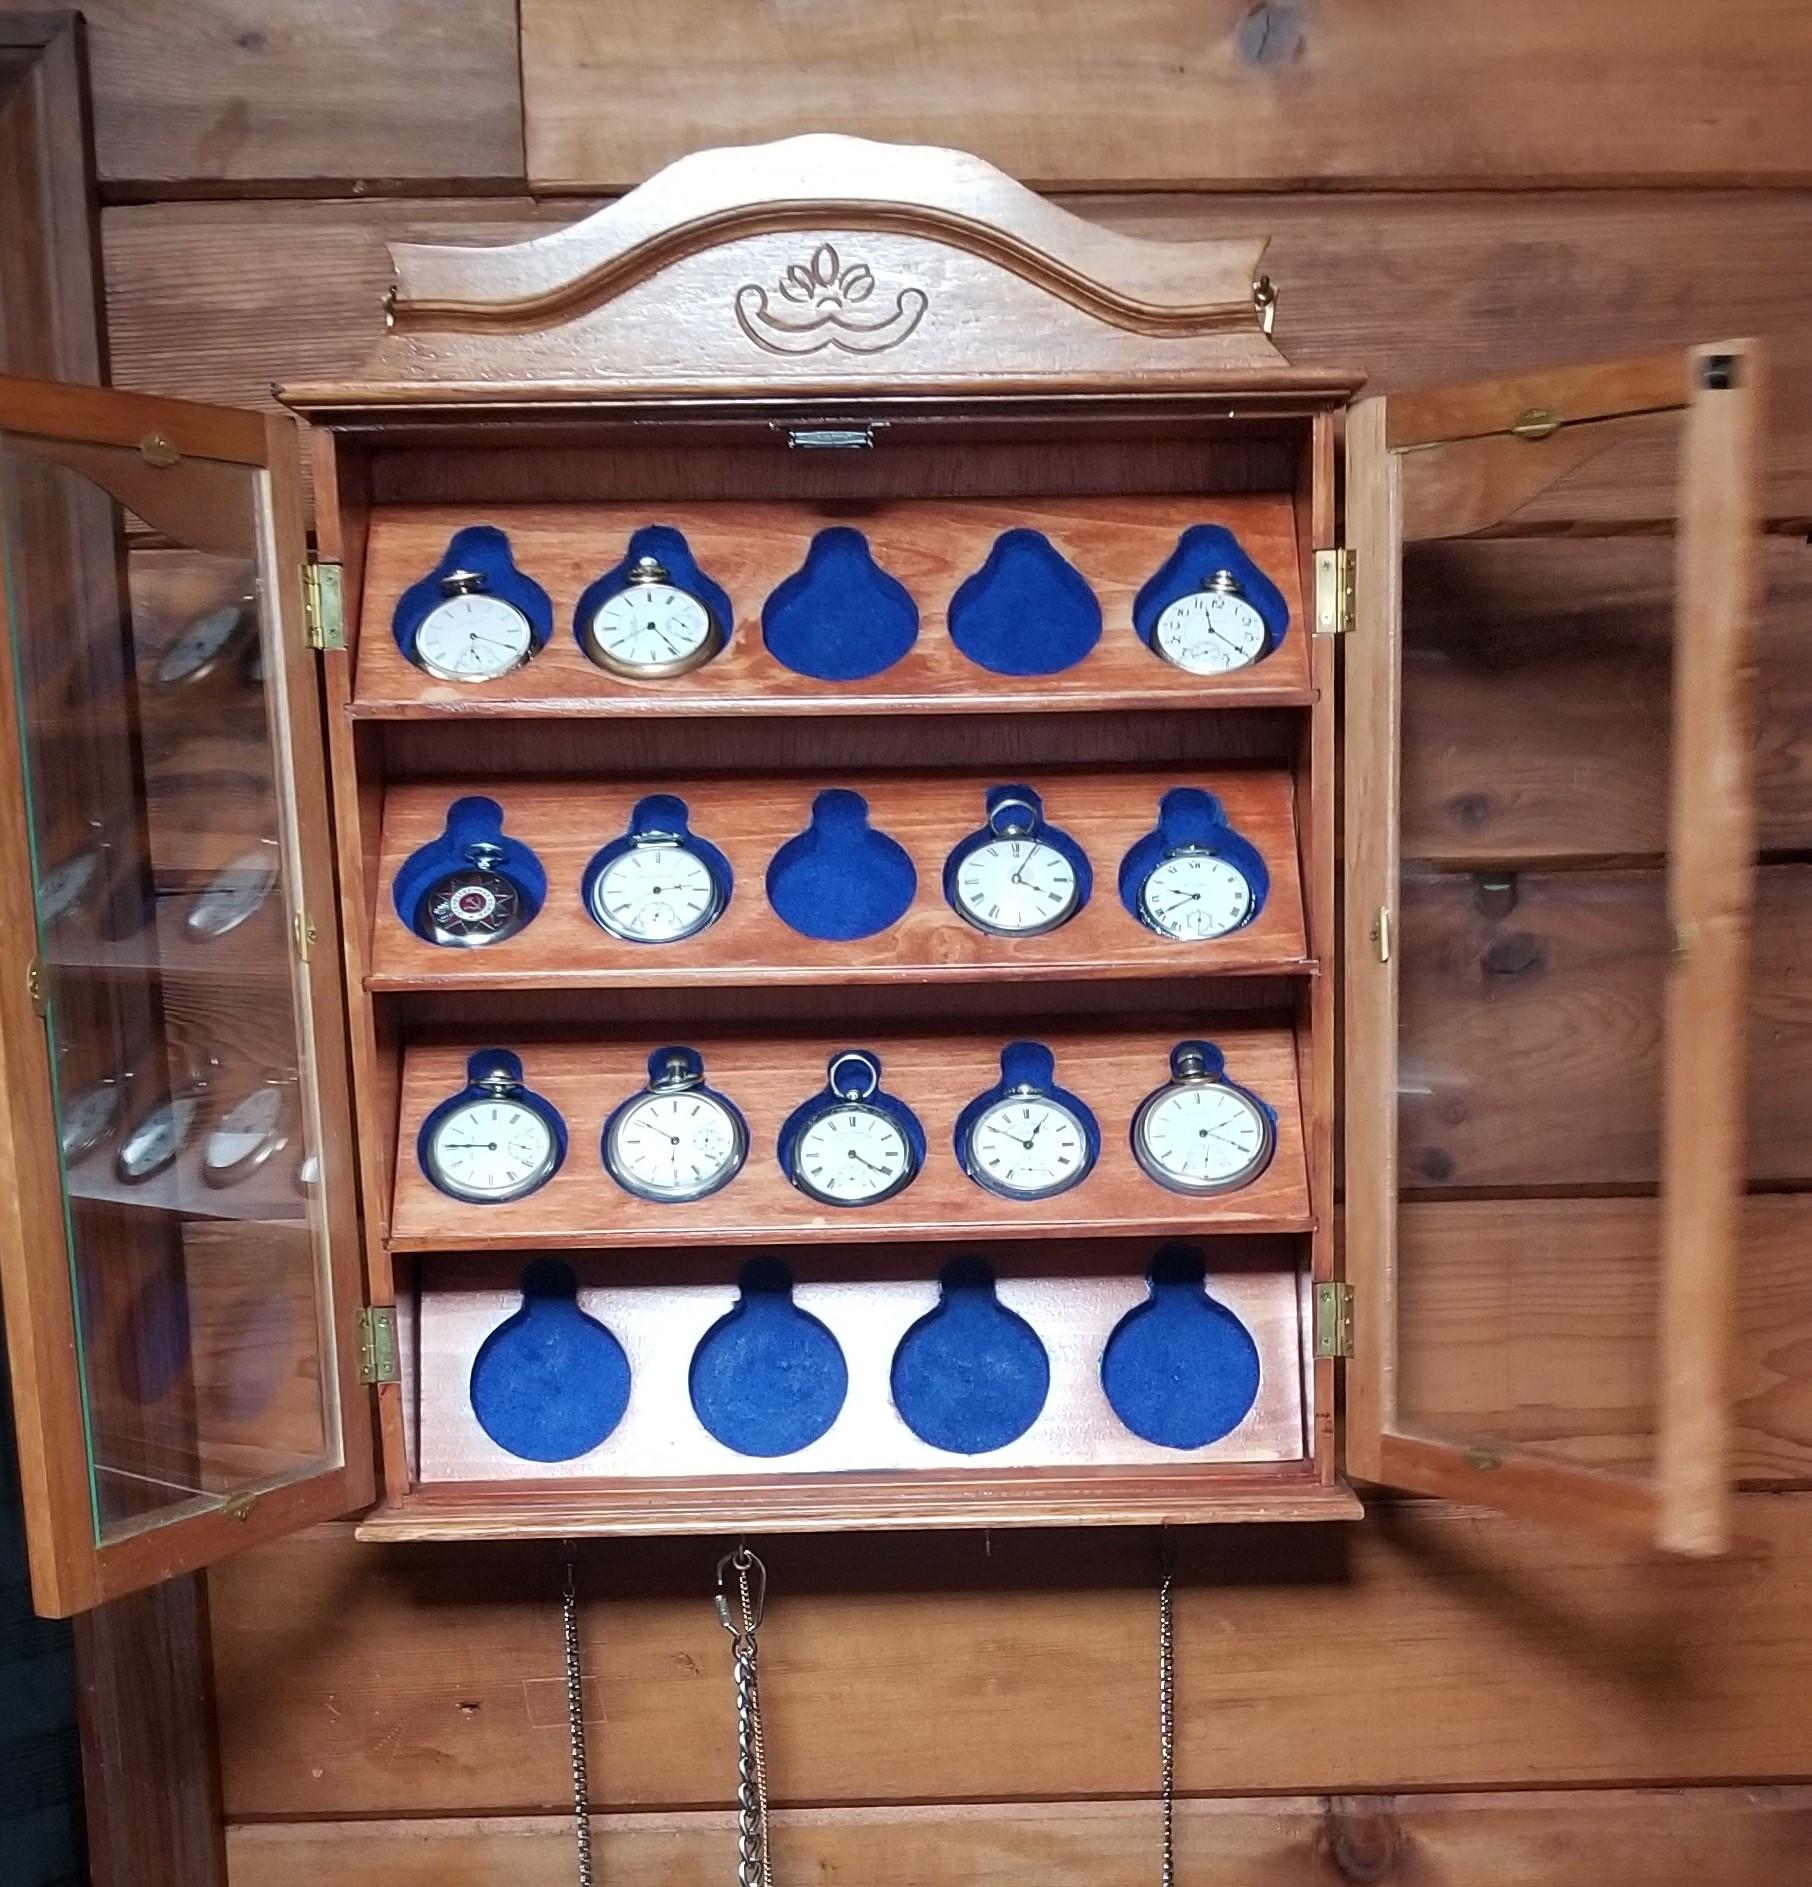
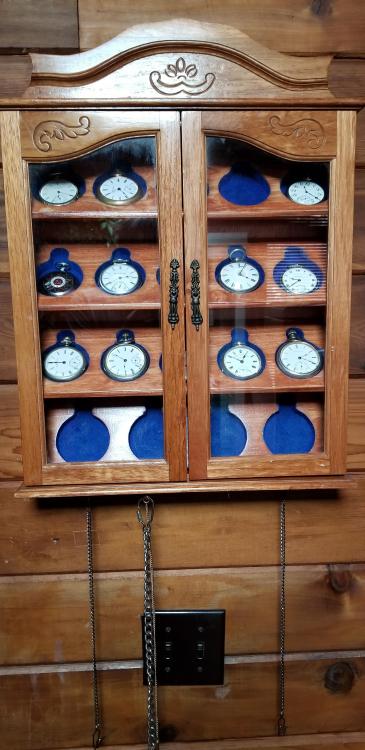
I wear one every day. Most of my jeans have those watch pockets and all but my largest pocket watch fits in them. I never, ever carry a pocket watch without some kind of chain. I dropped a watch once....ONCE! Here is where I store mine. This was a small display cabinet for something, I dunno what originally. I got it at Goodwill for $2.50. My father made the drop in shelf adapters .My biggest Pocket watch is way to big to fit in the case, so it sits under a dome.

 2 points
 -
Hello everyone, please let me introduce myself. I am Nick. I have had a keen interest in clocks and watches since I was a small child as one of my uncles used to repair both at his home and I would stand watching him for hours. I didn’t do anymore than that and grew to the ripe old age of 15 yrs and my first job was a toolmaker ... that was it my interest started to burn again. However my path took a different direction and at the age of 52 yrs I found myself pensioned out of my job with a non-stop shaking right hand and a diagnosis of Complicated PTSD, I am lucky enough to still be receiving treatment for it. As my head slowly started to see my world again the first thing to burn away at me was my desire foe old clocks. Cutting a very long story short, I was given a very old Longcase Clock to try and fix. I invested in some on-line learning, which was and still is excellent and I now go to my workshop when I can - about half of the week. I call it my home therapy as bizarrely my arm shakes so much that I can hardly write and yet I am able to work mostly shake free in my workshop. Sorry I rambled on a while!1 point
-
I'm intrigued, and even though toptime810 is a little cagey about his methods, that wont stop me from speculating. Ignore the fact that the video in the link below uses a lot of expansive hardware, the basic idea that I would like to explore is the thermal transfer films. Ignore the fact that youtube embedding is currently not working, I'm sure that will be fixed soon. https://www.youtube.com/watch?v=IMr8uFlsvtU This is one of a bunch of techniques I would be keen to apply. Thermal transfer films allow the use of titanium whites, metallics and a bunch of other stuff that would be pretty difficult to do any other way. You can also get some small rolls of thermal films from ebay, and application could be with something as simple as a clothes iron or a pouch laminating machine.1 point
-
That's good that they're not for sale because had you've offered to sell me a dial I would've reported this discussion to Mark as you would be in violation of the message board rules. There's a section in the rules titled "Advertising, self promotion and posting links." As someone else pointed out were an open discussion group we share ideas and knowledge. You asked for our help you need our feedback and you don't want to share other than look what I did isn't it nifty. Just my personal view that doesn't seem like you're embracing why this group is in existence.1 point
-
Out comphrensive, pinned topic. There are others for pretty much any tool subject.1 point
-
I'm sure everyone will respect your decision to keep your technique a secret, but I'm not sure you appreciate the nature of this forum and its community, where the sharing of knowledge, ideas and experience go a long way to develop those who show an interest and passion in all things watches. I also agree that some things in watchmaking should remain a secret but I see that as the domain of those who profit through their intellectual property. I don't believe that is what this forum is for. I'm also sure that your intentions when posting were honest.1 point
-
Rare as hens teeth!1 point
-
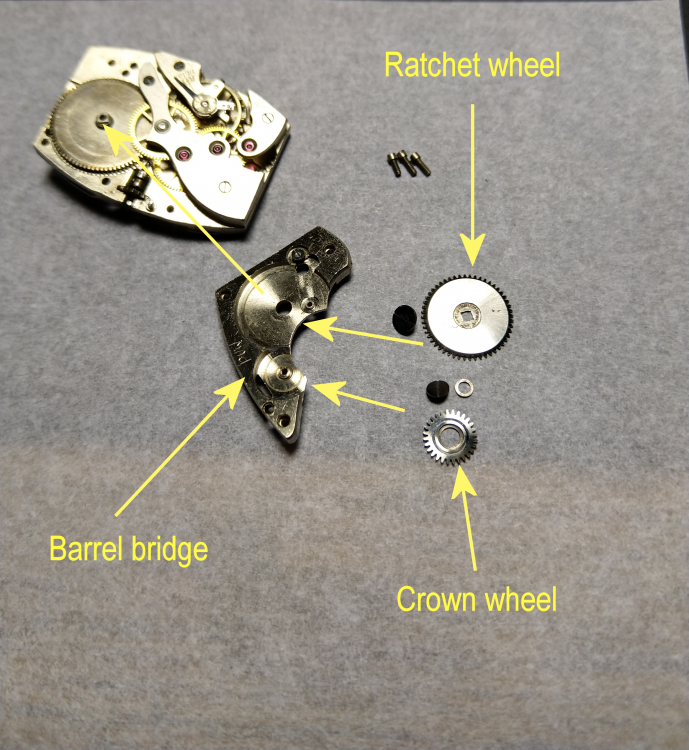
I think he means the crown wheel on the barrel bridge (105), at least it is what it says in the text. The ratchet wheel comes on the barrel arbor, hence the square hole. But one never knows, just in case I put a picture of a PUW 500 I found in the scrap box, seems an over enthusiastic German watch repairer put a PUW tag on the bridge...
 1 point
 -
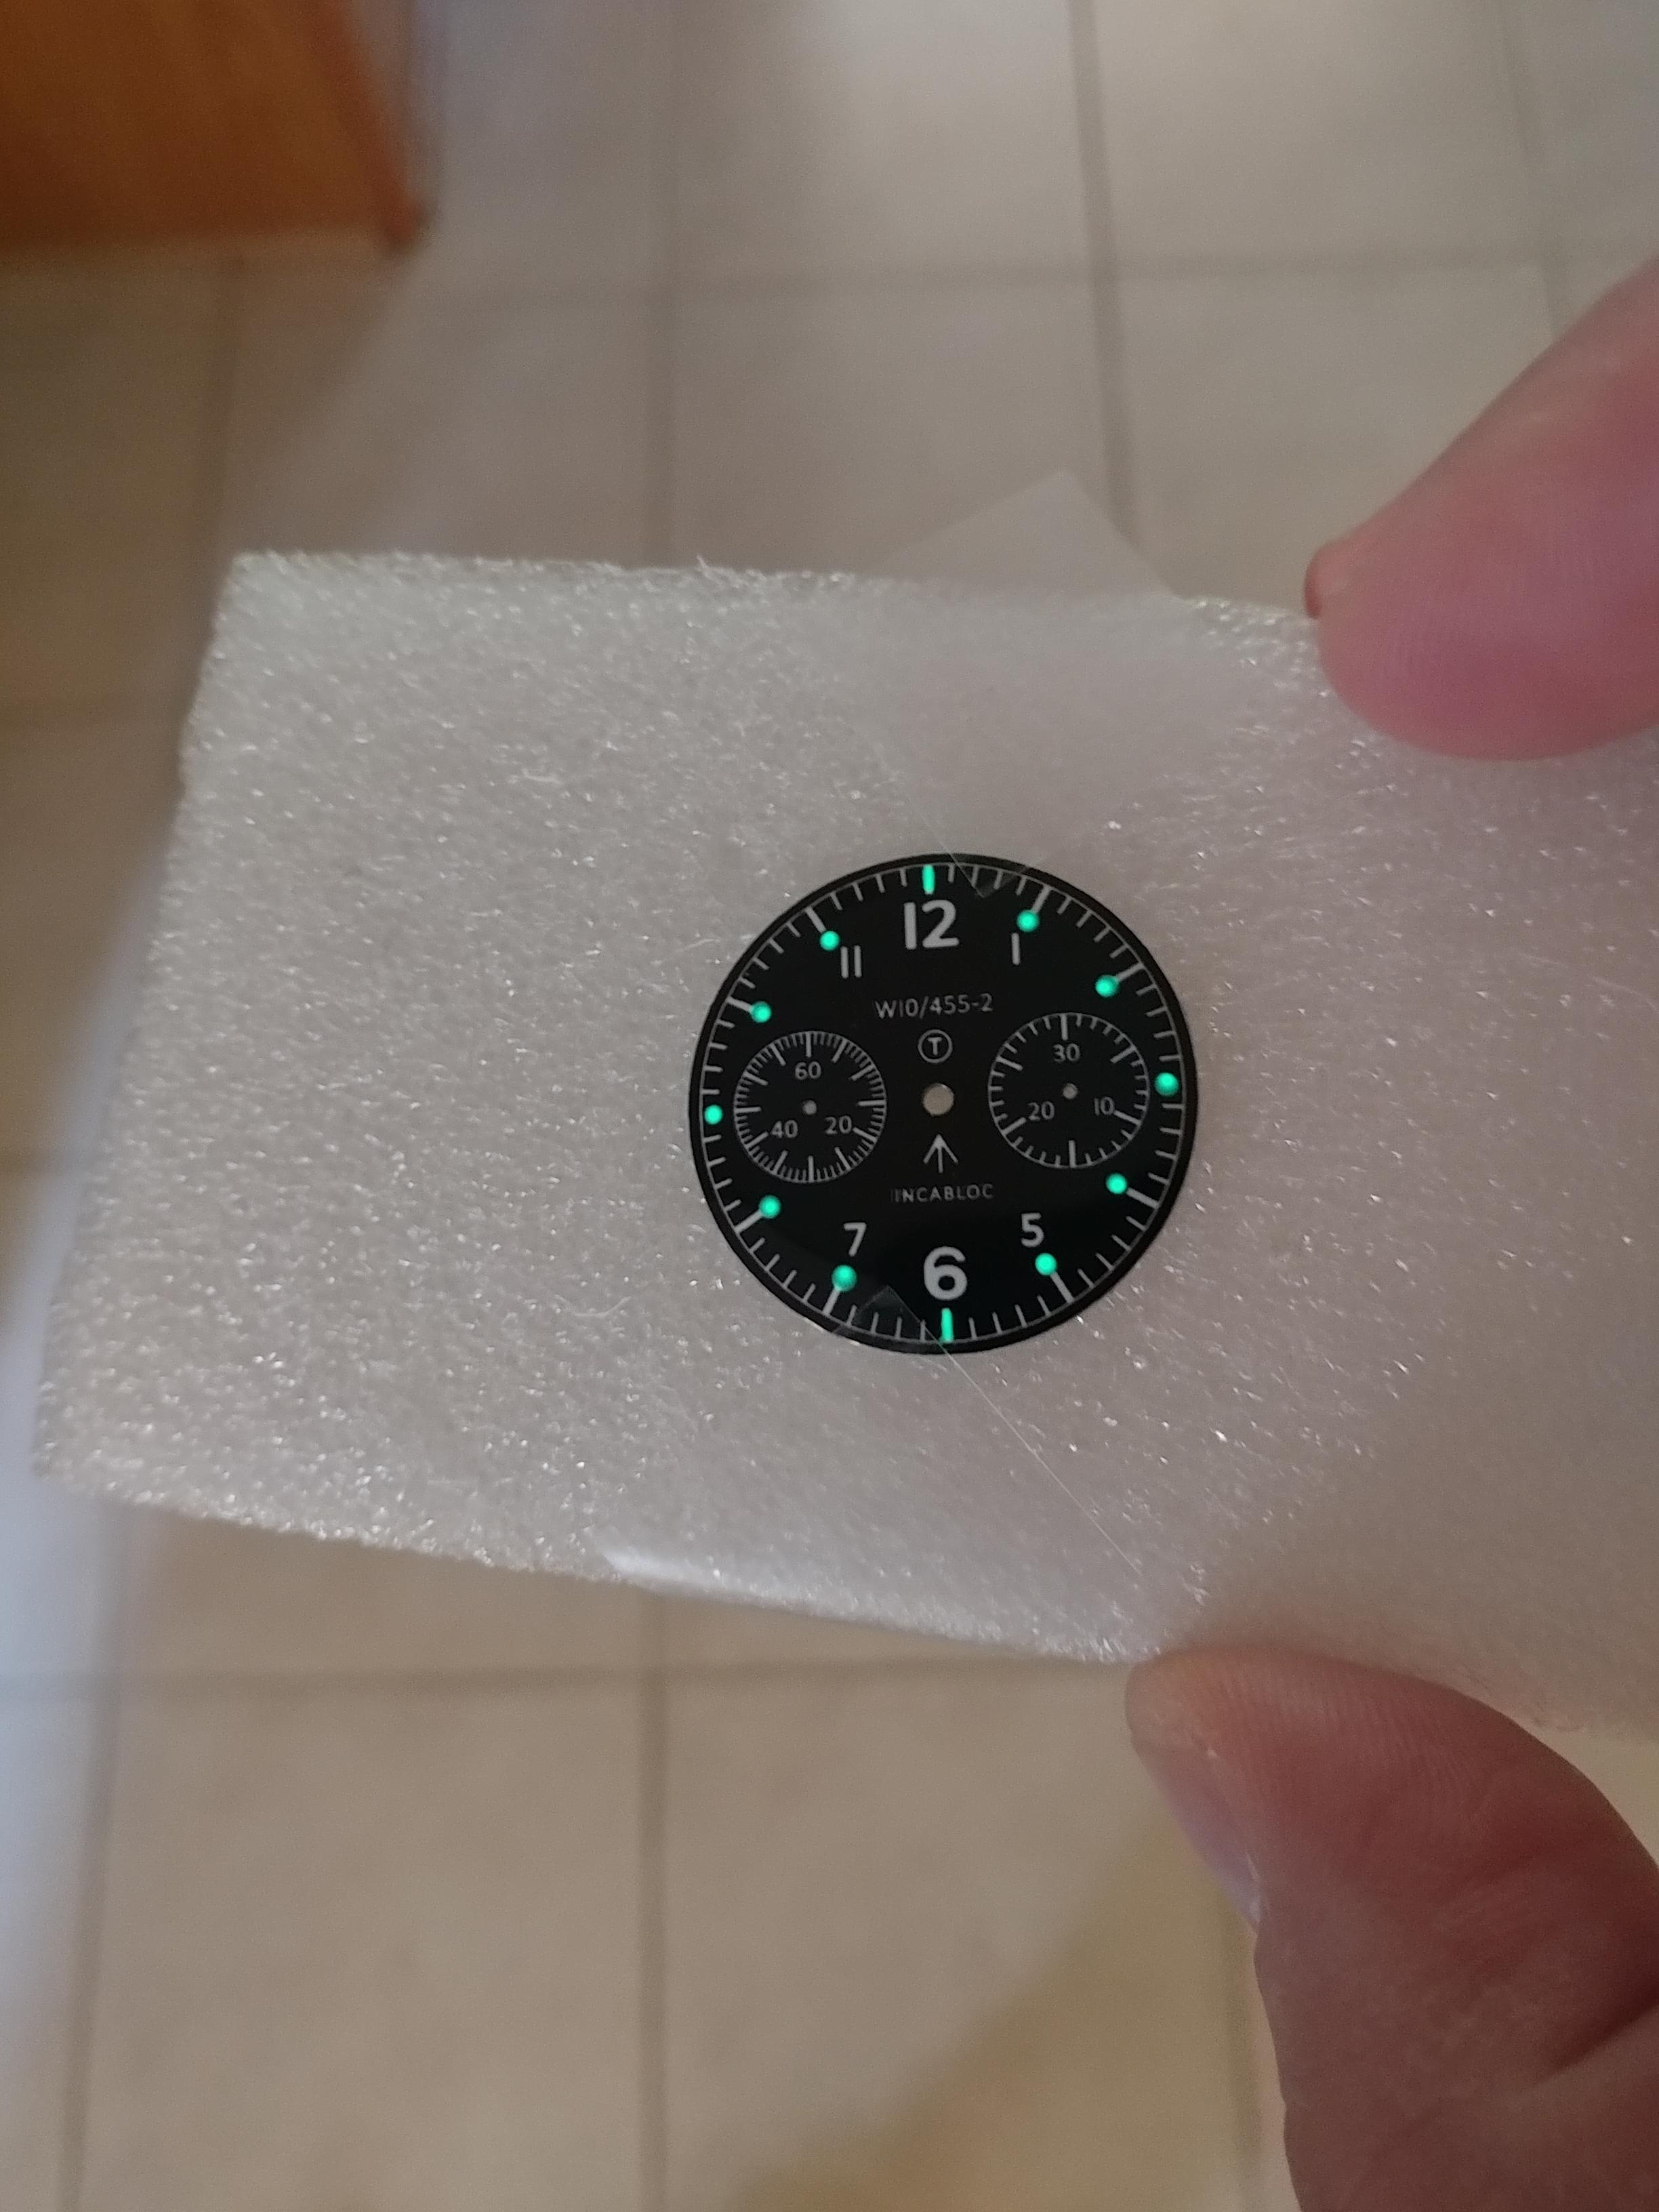
Cool lume
 1 point
 -
Reveal your secrets wizard! Sent from my SM-G973F using Tapatalk1 point
-
I don't agree that this movement is beyond saving, for the level of performance you are looking for. However, you need the right tools and materials to do the work. If you are not able to DIY then the sensible option is to replace the movement. If you are sure that a genuine NH36 will fit, then that would be the was to go.1 point
-
Get a real Seiko or at least an SII watch. They are the best value ever in automatics, are accurate, robust and widely appreciated.1 point
-
Always go for as near as possible when replacing providing the spring is the correct size to the barrel. It is good practice to measure the barrel for height and width. To give you a rough guide on springs and barrel size, the barrel should be split into 3. 1 third barrel arbor, 1 third spring and 1 third free space.1 point
-
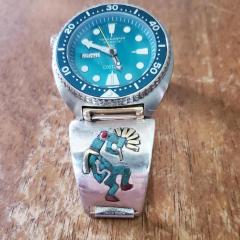
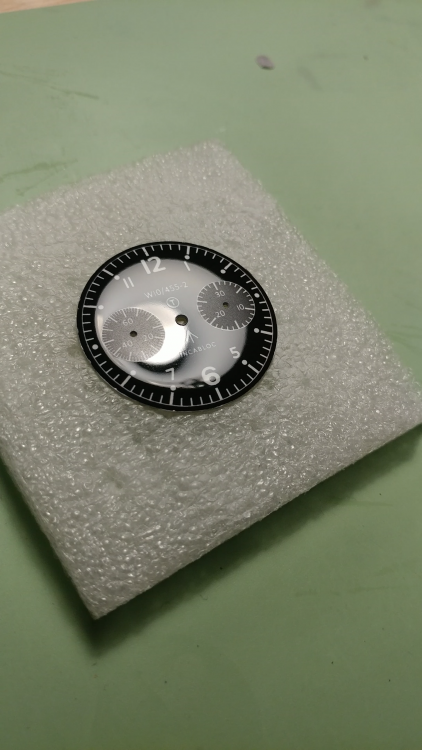
This is also a dial I made but didnt finish it I prefer the numeric brand.
 1 point
 -
I know that the raketa 2609 and the 2609 ha were totally different. I know also that the 2628 has a date and maybe a day complication. I am not aware that the 2609 had such complications. They may exist. So there is I would think a very good likelyhood that the 2628 and the 2628 h are the same. Do image searches. I think they will back me up.1 point
-
That's awesome. In non-power delivery gearing, often you can get by with some serious leeway as long as nothing binds. A friend of mine worked at Breguet around 2000, he had an 80s vintage watch come in with two brass pins in the minute wheel where teeth had stripped off. His boss said ,"if it works, leave it", which he did and promptly quit haha (Breguet has massively improved in that time btw).1 point
-
If those are your options go with the first one. Maybe a slight reduction in power reserve. At that height you can also consider 1.55 or 1.5 height, all other dimensions the same, no difference in performance.1 point
-
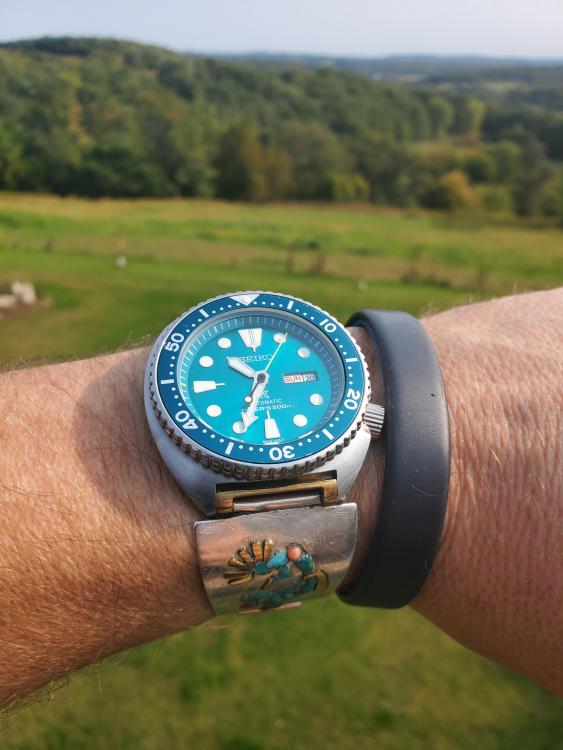
My only watch, not a real seiko, I bought it specifically for the brilliant "turquoise" color to go with the inlay I did on the watch tips in the band.
 1 point
 -
I've found the chart on pp. 6-7 in the Jules Borel Horological Catalog to have essentially all of the movement marks I've come across so far. It's a pdf download on their website. Very handy reference.1 point
-
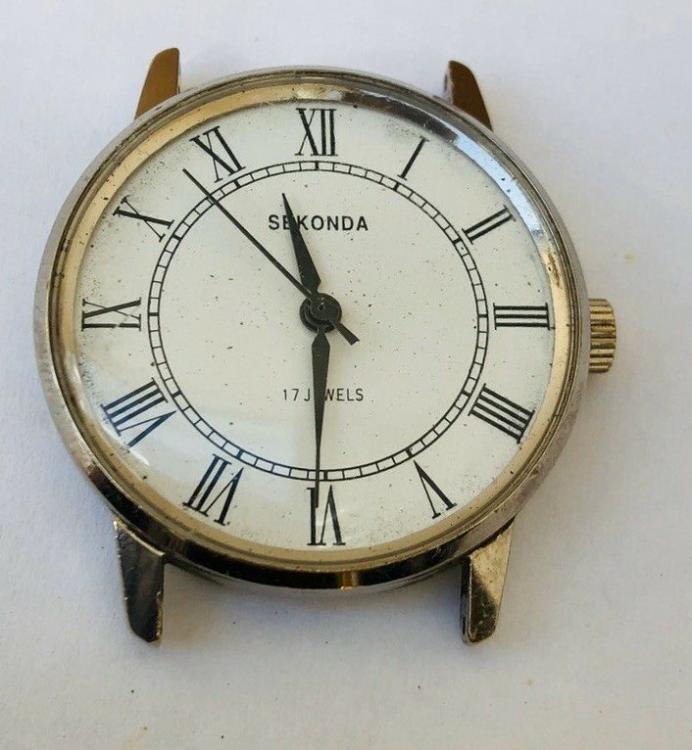
Well I have to admit, this little watch wasn't quite what I expected. It works fine, and after a clean and lubrication it even puts in a fairly reasonable performance. However I was expecting it to be a USSR movement, but unless I miss my mark, it appears to be a variant of the Chinese Standard 17 jewel instead. Whatever it is, the finish of the movement is not too shabby, clean and functional with at least a hint of a care having been take with it. The case too is in almost new condition. The dial however has a very odd and barely discernable rash and there are a couple of tiny scratches on the crystal. The sellers pictures looked as if the thing had a gold finish, but it actually has what appears to be a high shine stainless case, or at least one with perfect plating of some sort so I guess the gold look was a trick of the light. Determinately a little bit of an odd ball Sekonda, and well worth the 0.99p I paid for it. Mind you at that kind of money, I guess the bar is pretty low, so getting something that actually works is always a bonus. For the time being at least, it has deposed the re-discovered Casio QA-321 as my daily beater watch.
 1 point
 -
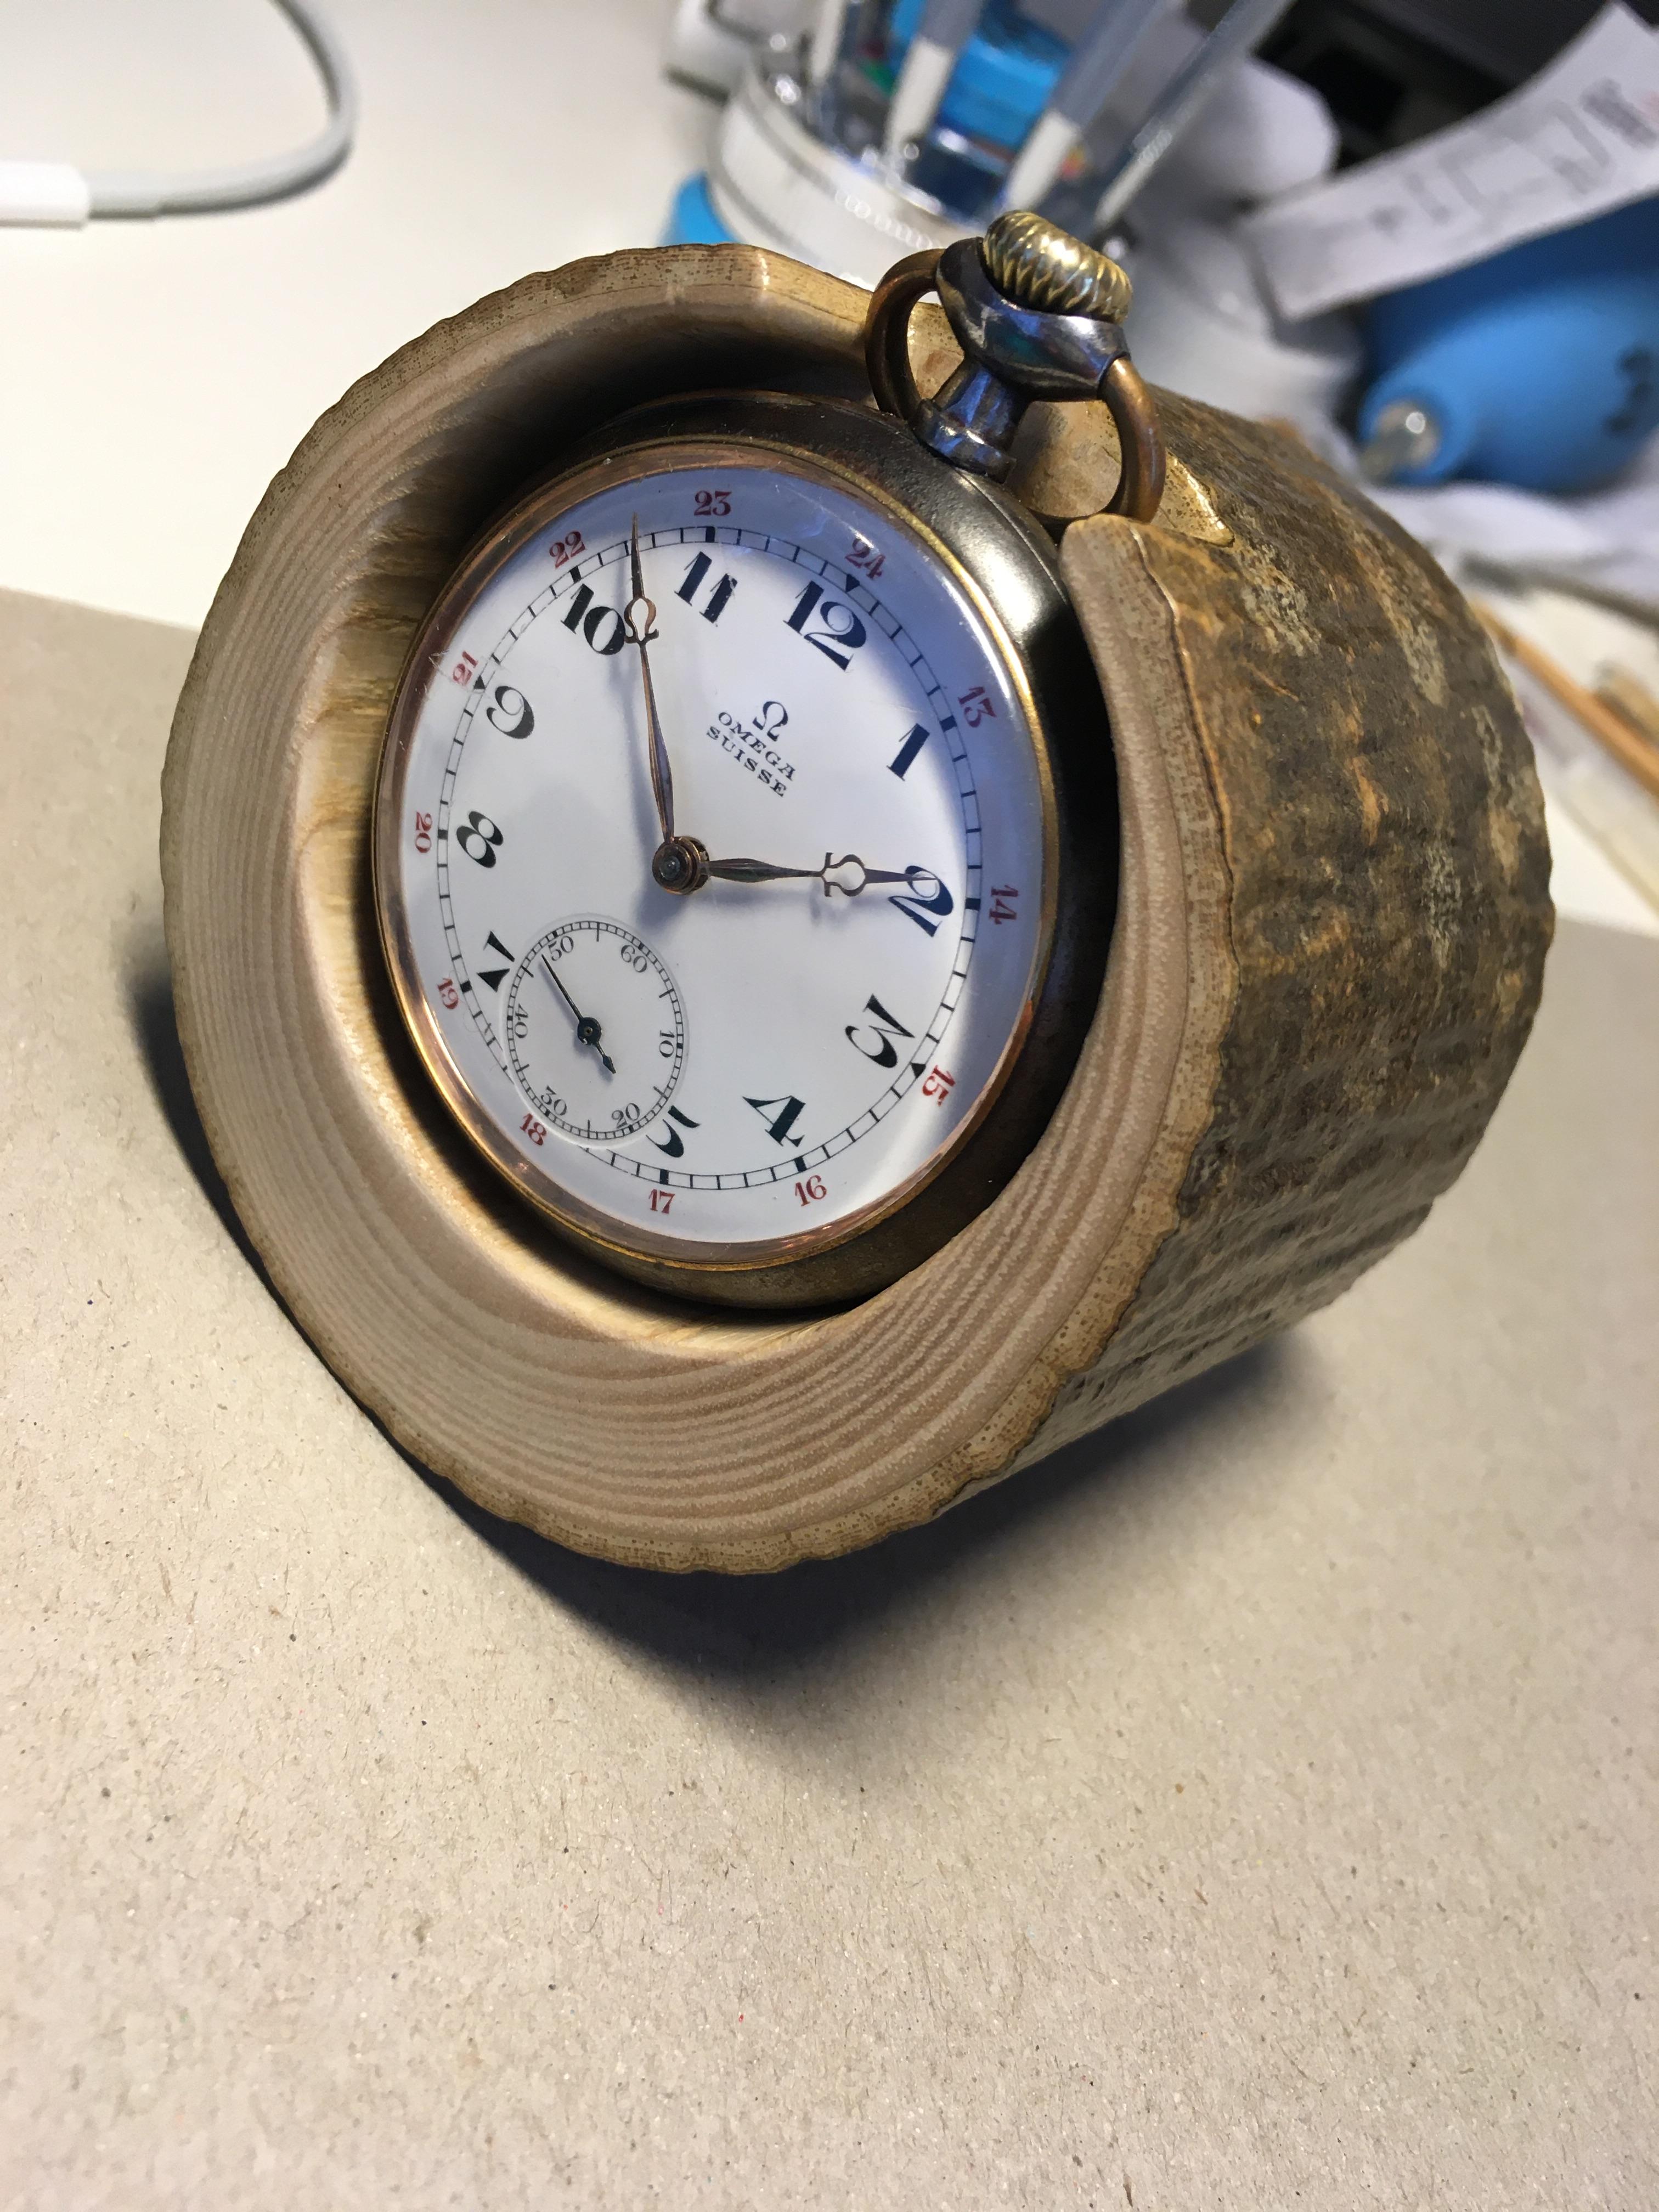
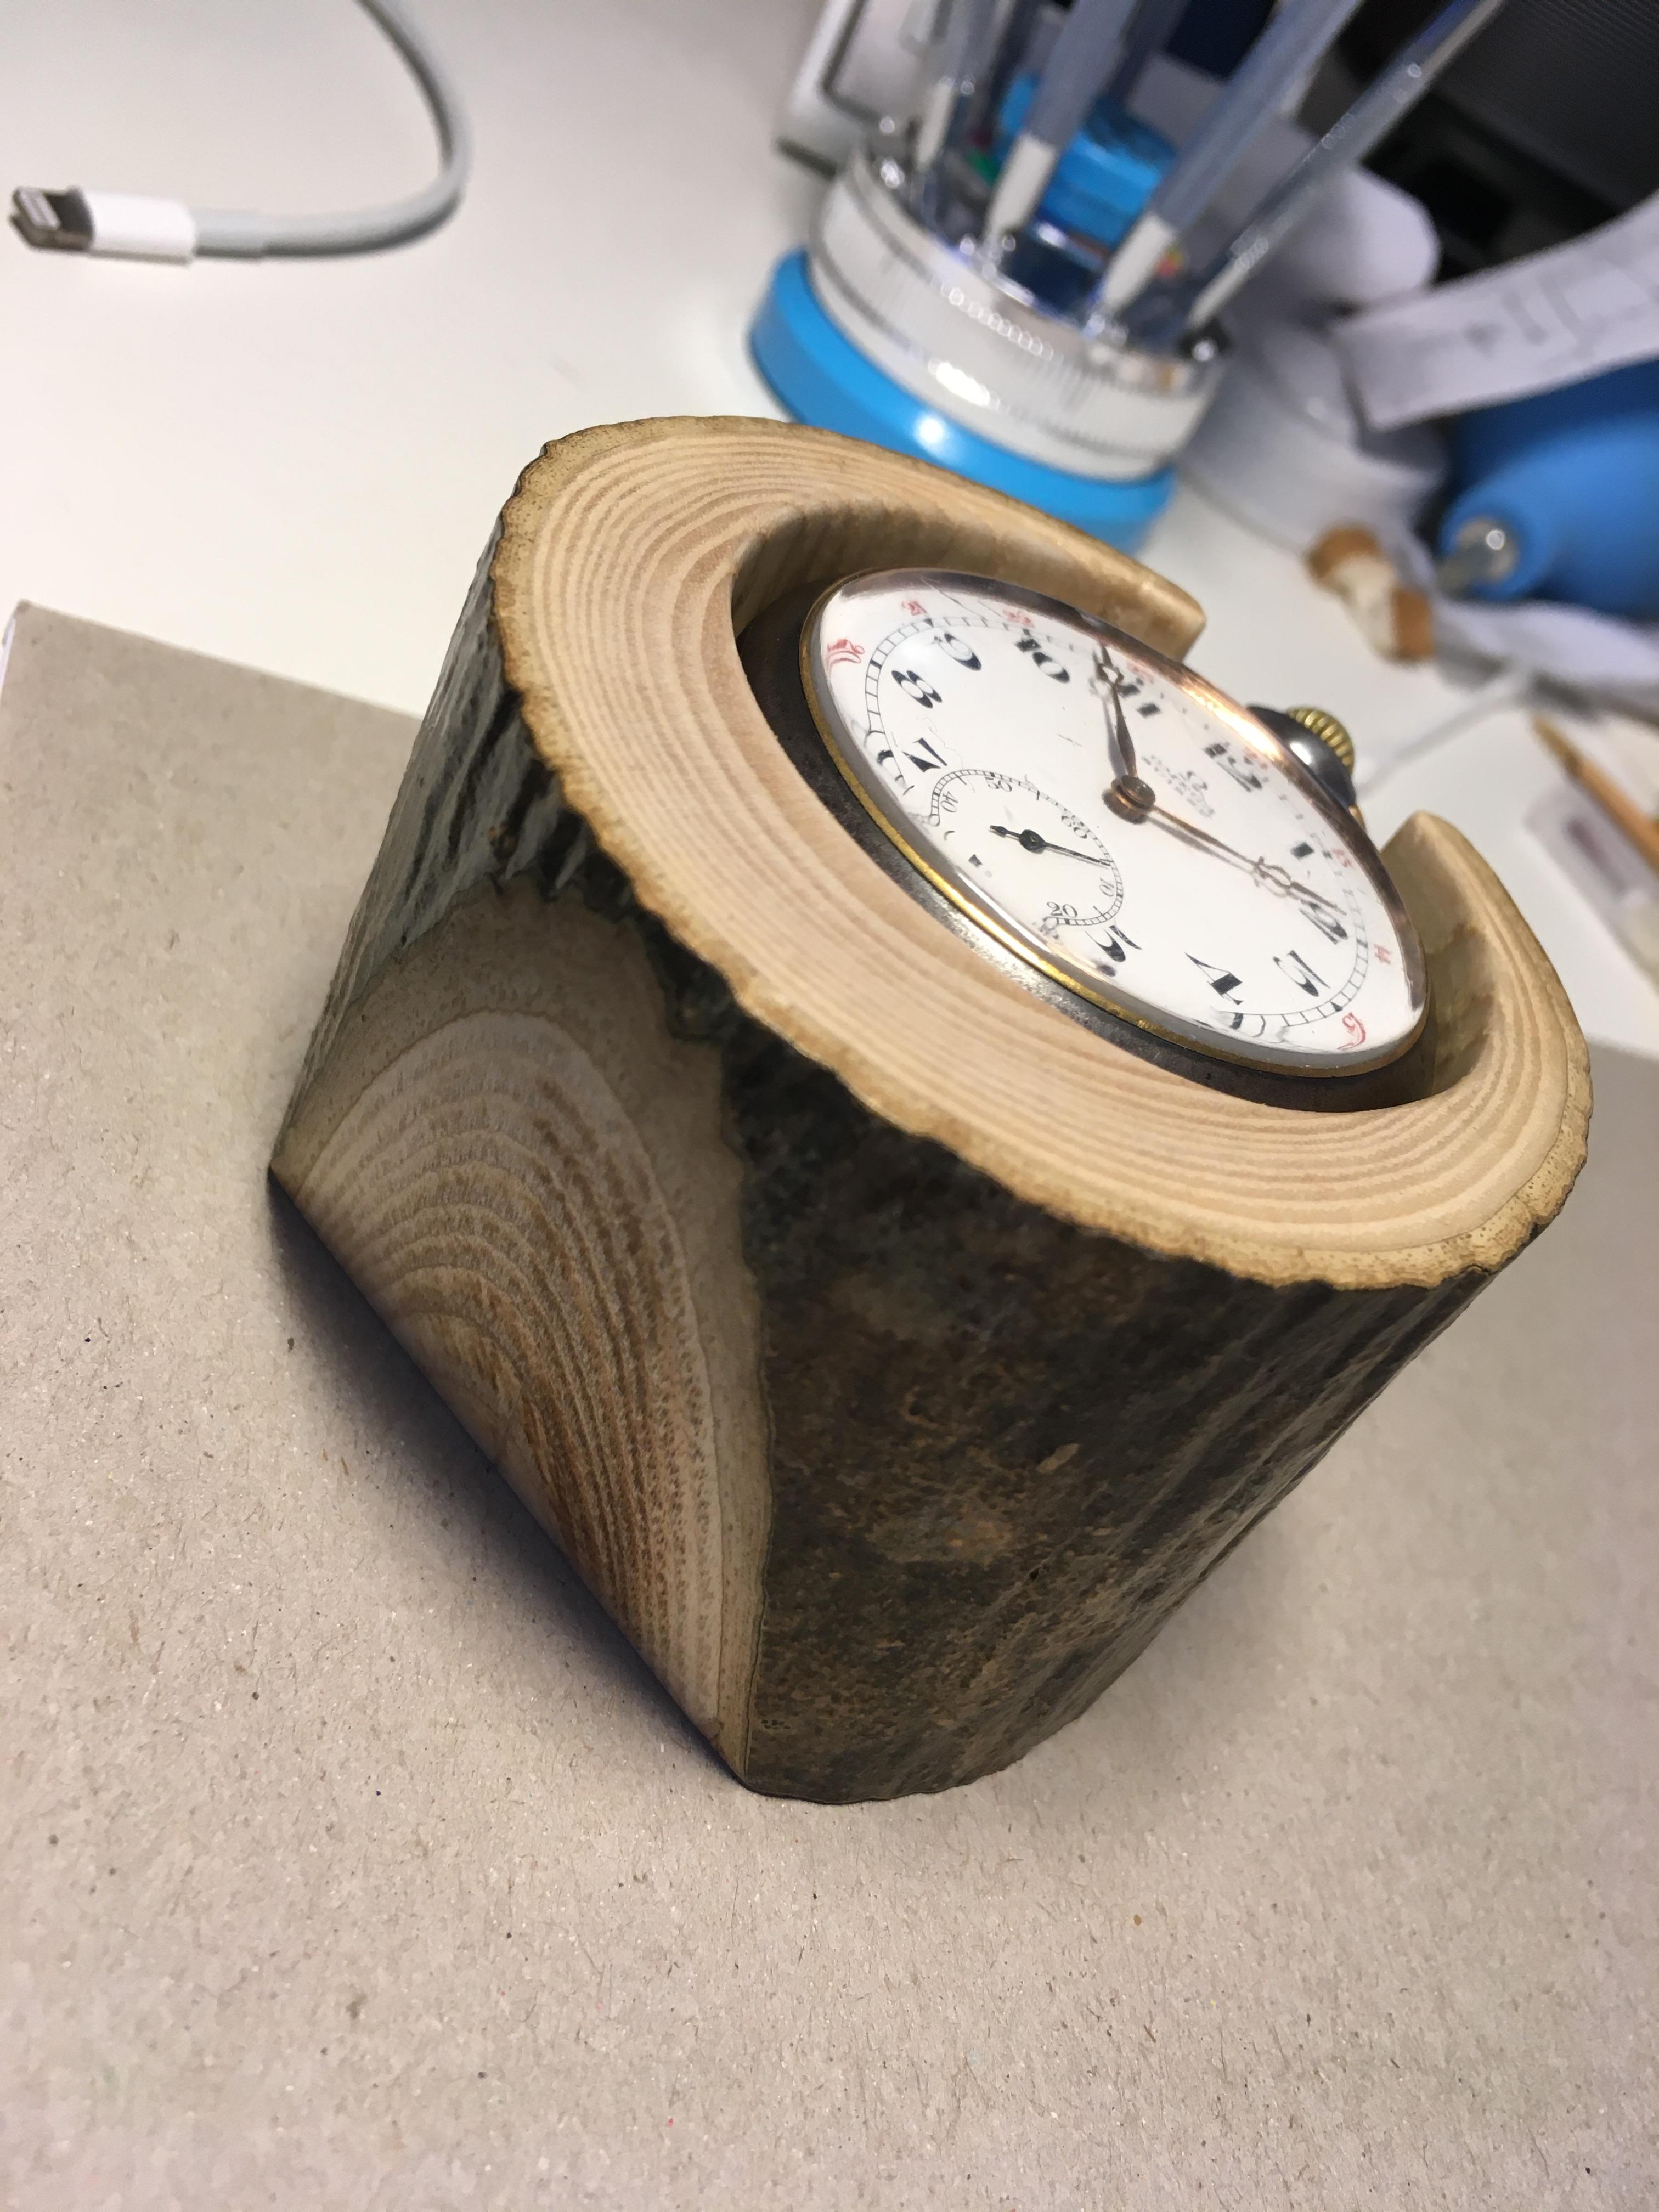
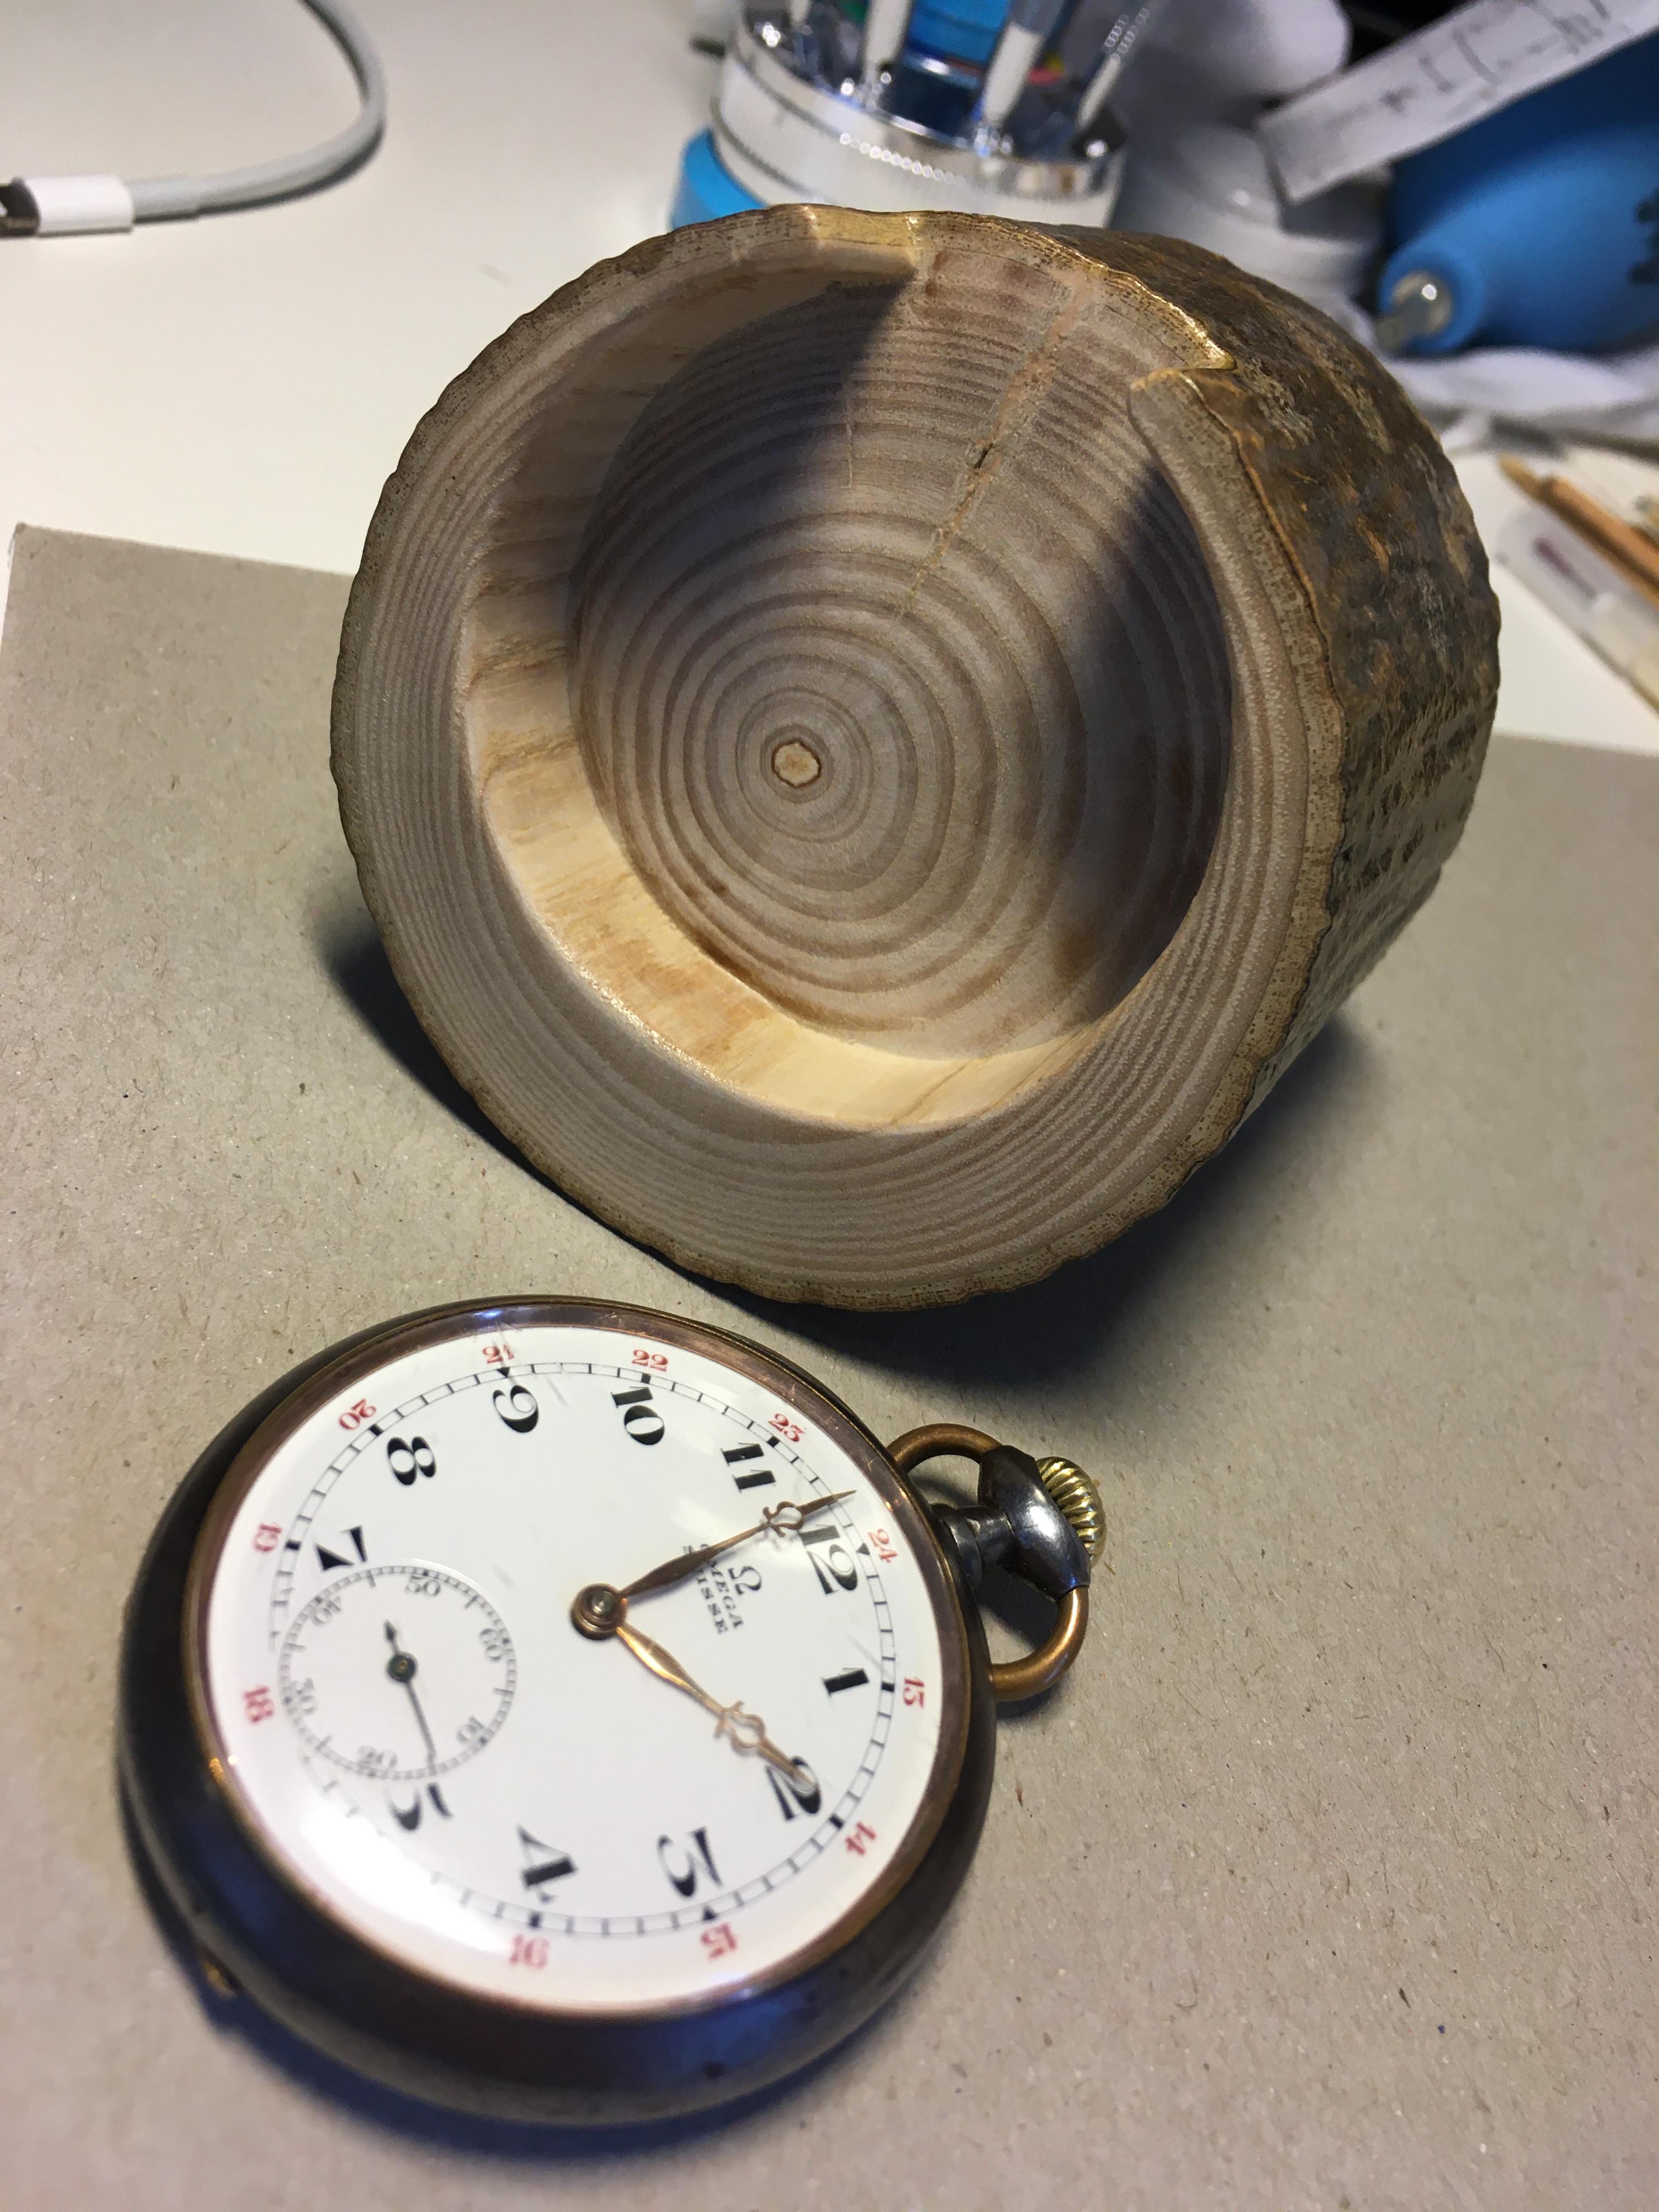
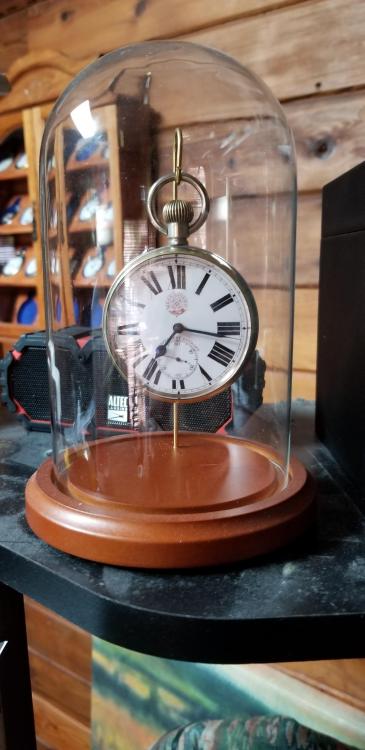
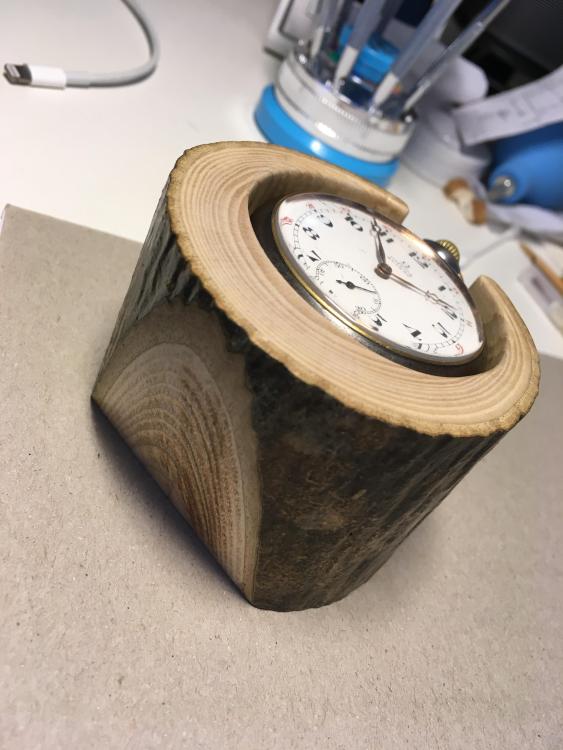
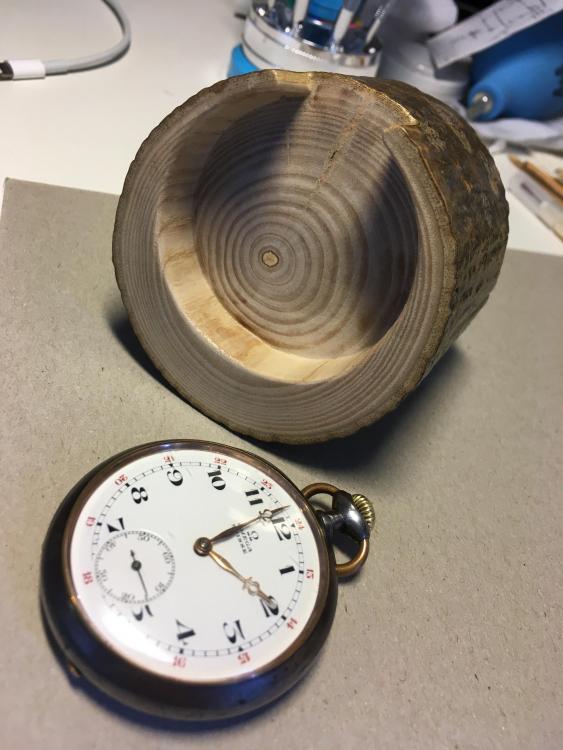
I wanted to use a pocket watch as a desk clock while I’m WFH. Fortunately I found this display stand hidden inside a small log from an ash tree in my wood pile . Interested to see what others do with theirs...

 1 point
 -
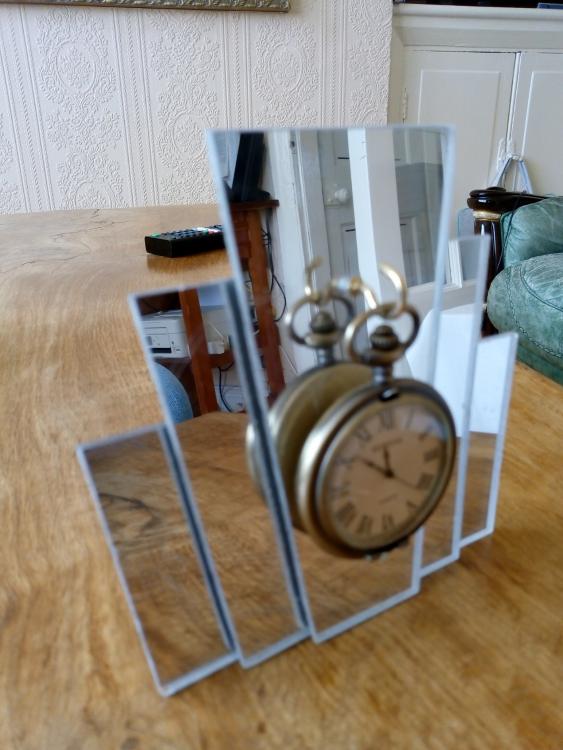
One I made earlier...... Simple DIY project. 3 layers of acrylic mirror glued to form an art deco style stand.
 1 point
 -
as above post my swiss emperor kept very good time but i hadnt worn it for some time and the stem seems a little stiff so when i get around to it i will give it a clean and service.(busy sorting out a load of raketa movements i got for a song and worth doing up) it looks a nice watch and you should spruce it up! i prefer this size of watch and the simple but clean easy on the eye dial.1 point
-
A 17 Jewel Sekonda. Almost certainly USSSR made, and quite possibly gold plated. I'm not sure if the speckling is on the dial or the crystal, however at a mere 0.99p whatever it is it won't disappoint, especially since the seller claims it is running.
 1 point
 -
https://media3.giphy.com/media/3o72F8t9TDi2xVnxOE/giphy.gif It does want a 12V[b]AC[/b] supply... I'm so used to DC supplies that it didn't register... I just assumed they were relying on a DC power supply for rectification to cut part count and costs, and the doubler never registered in my mind as needing AC... There was exactly a sum total of 0 documentation with the thing, and the ad copy was just bad chinglish. I tried to find a schematic for this particular amplifier, but never quite found one that matched what was in front of me. OK... So maybe the first step here is to find a suitable power supply...1 point
-
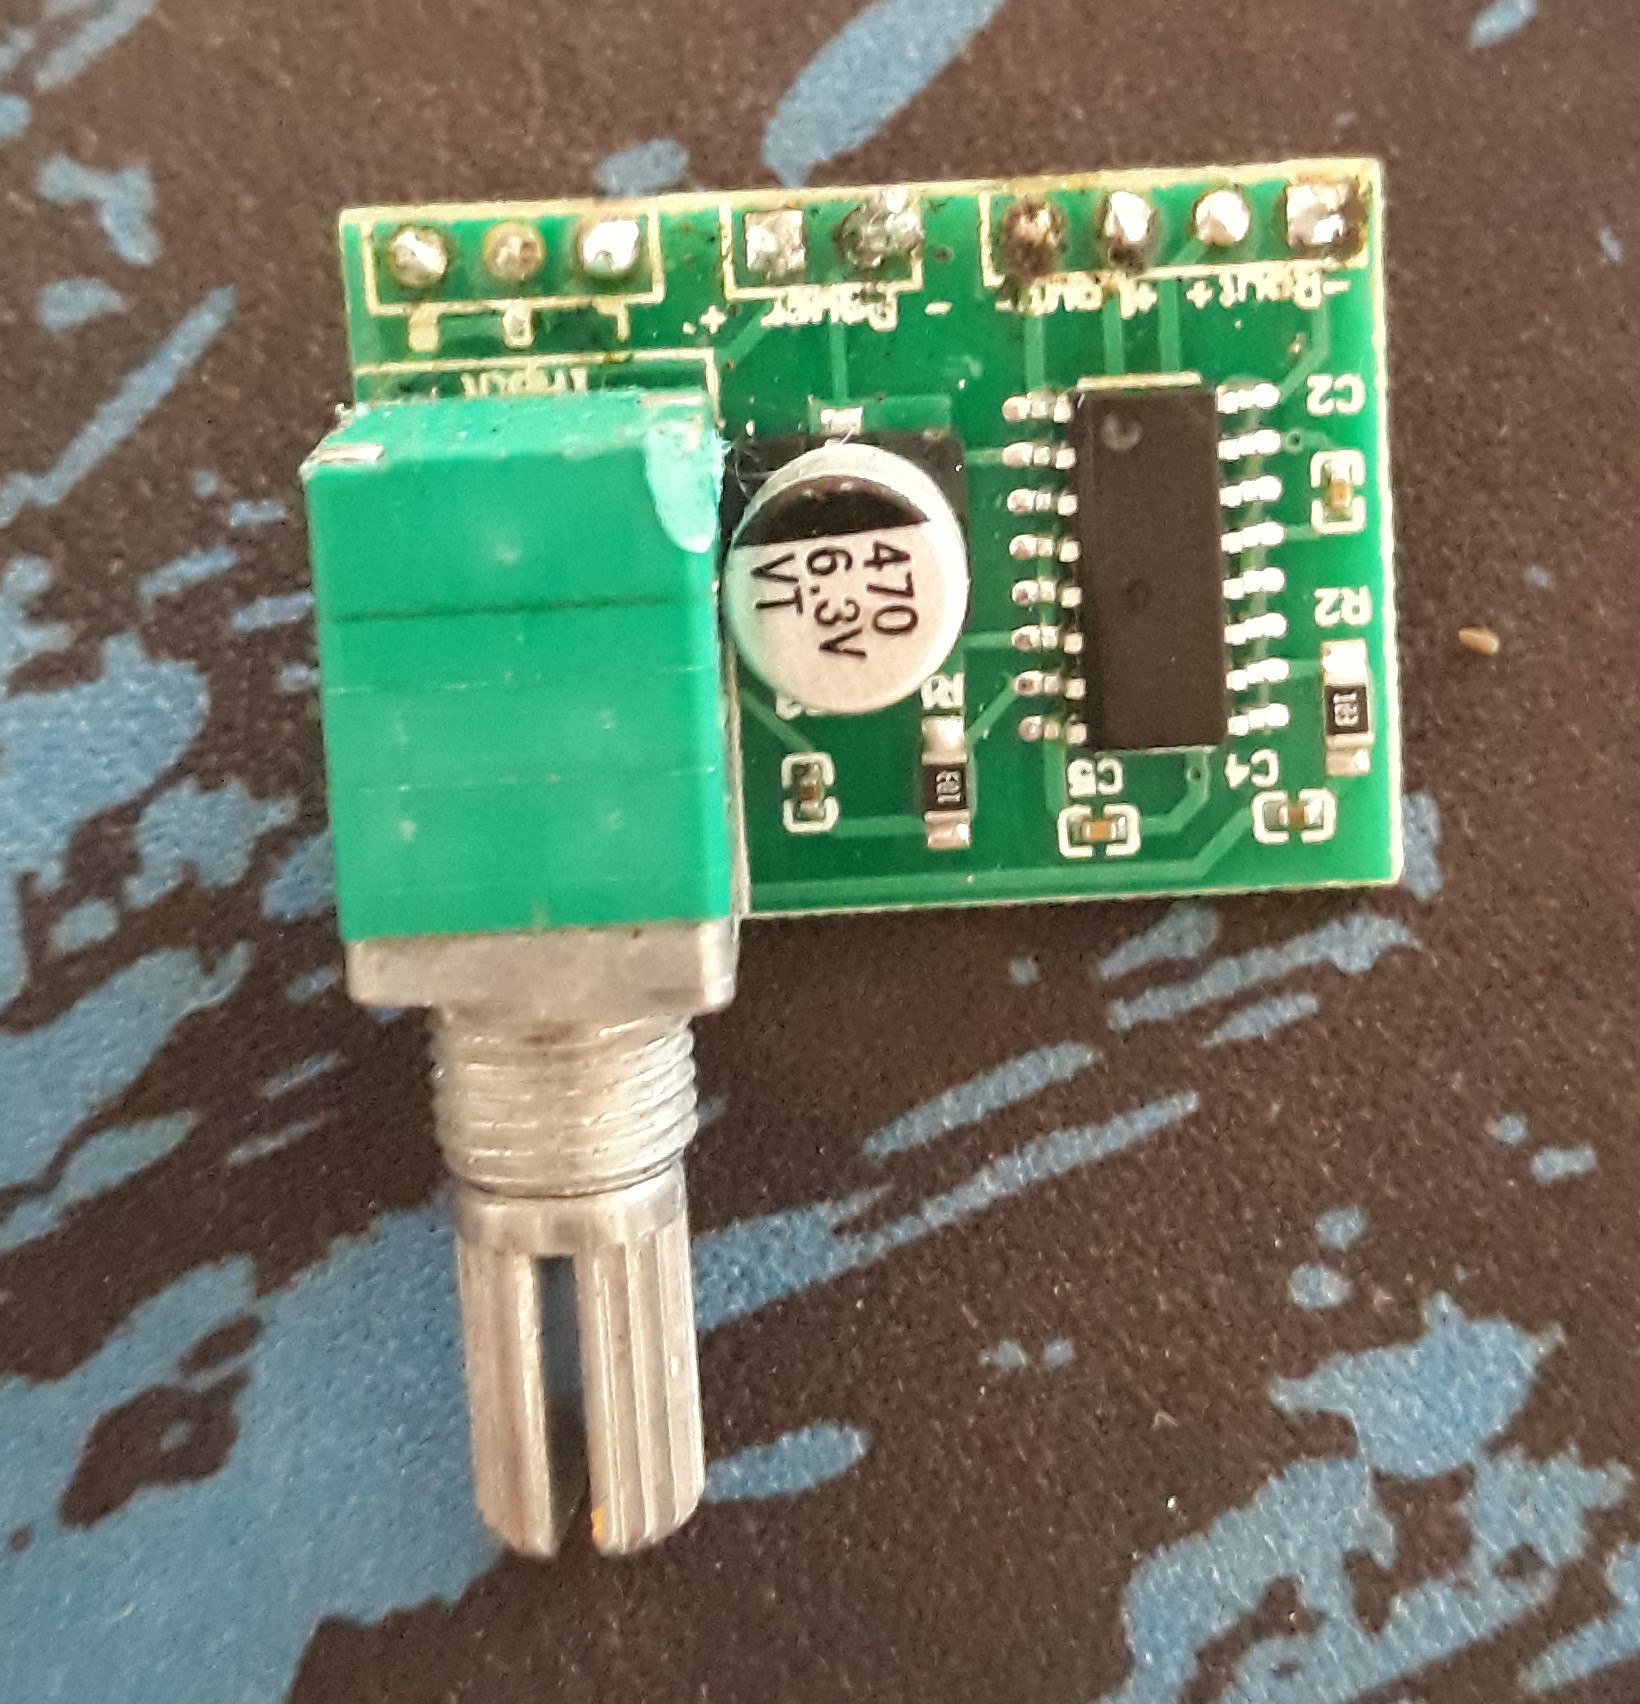
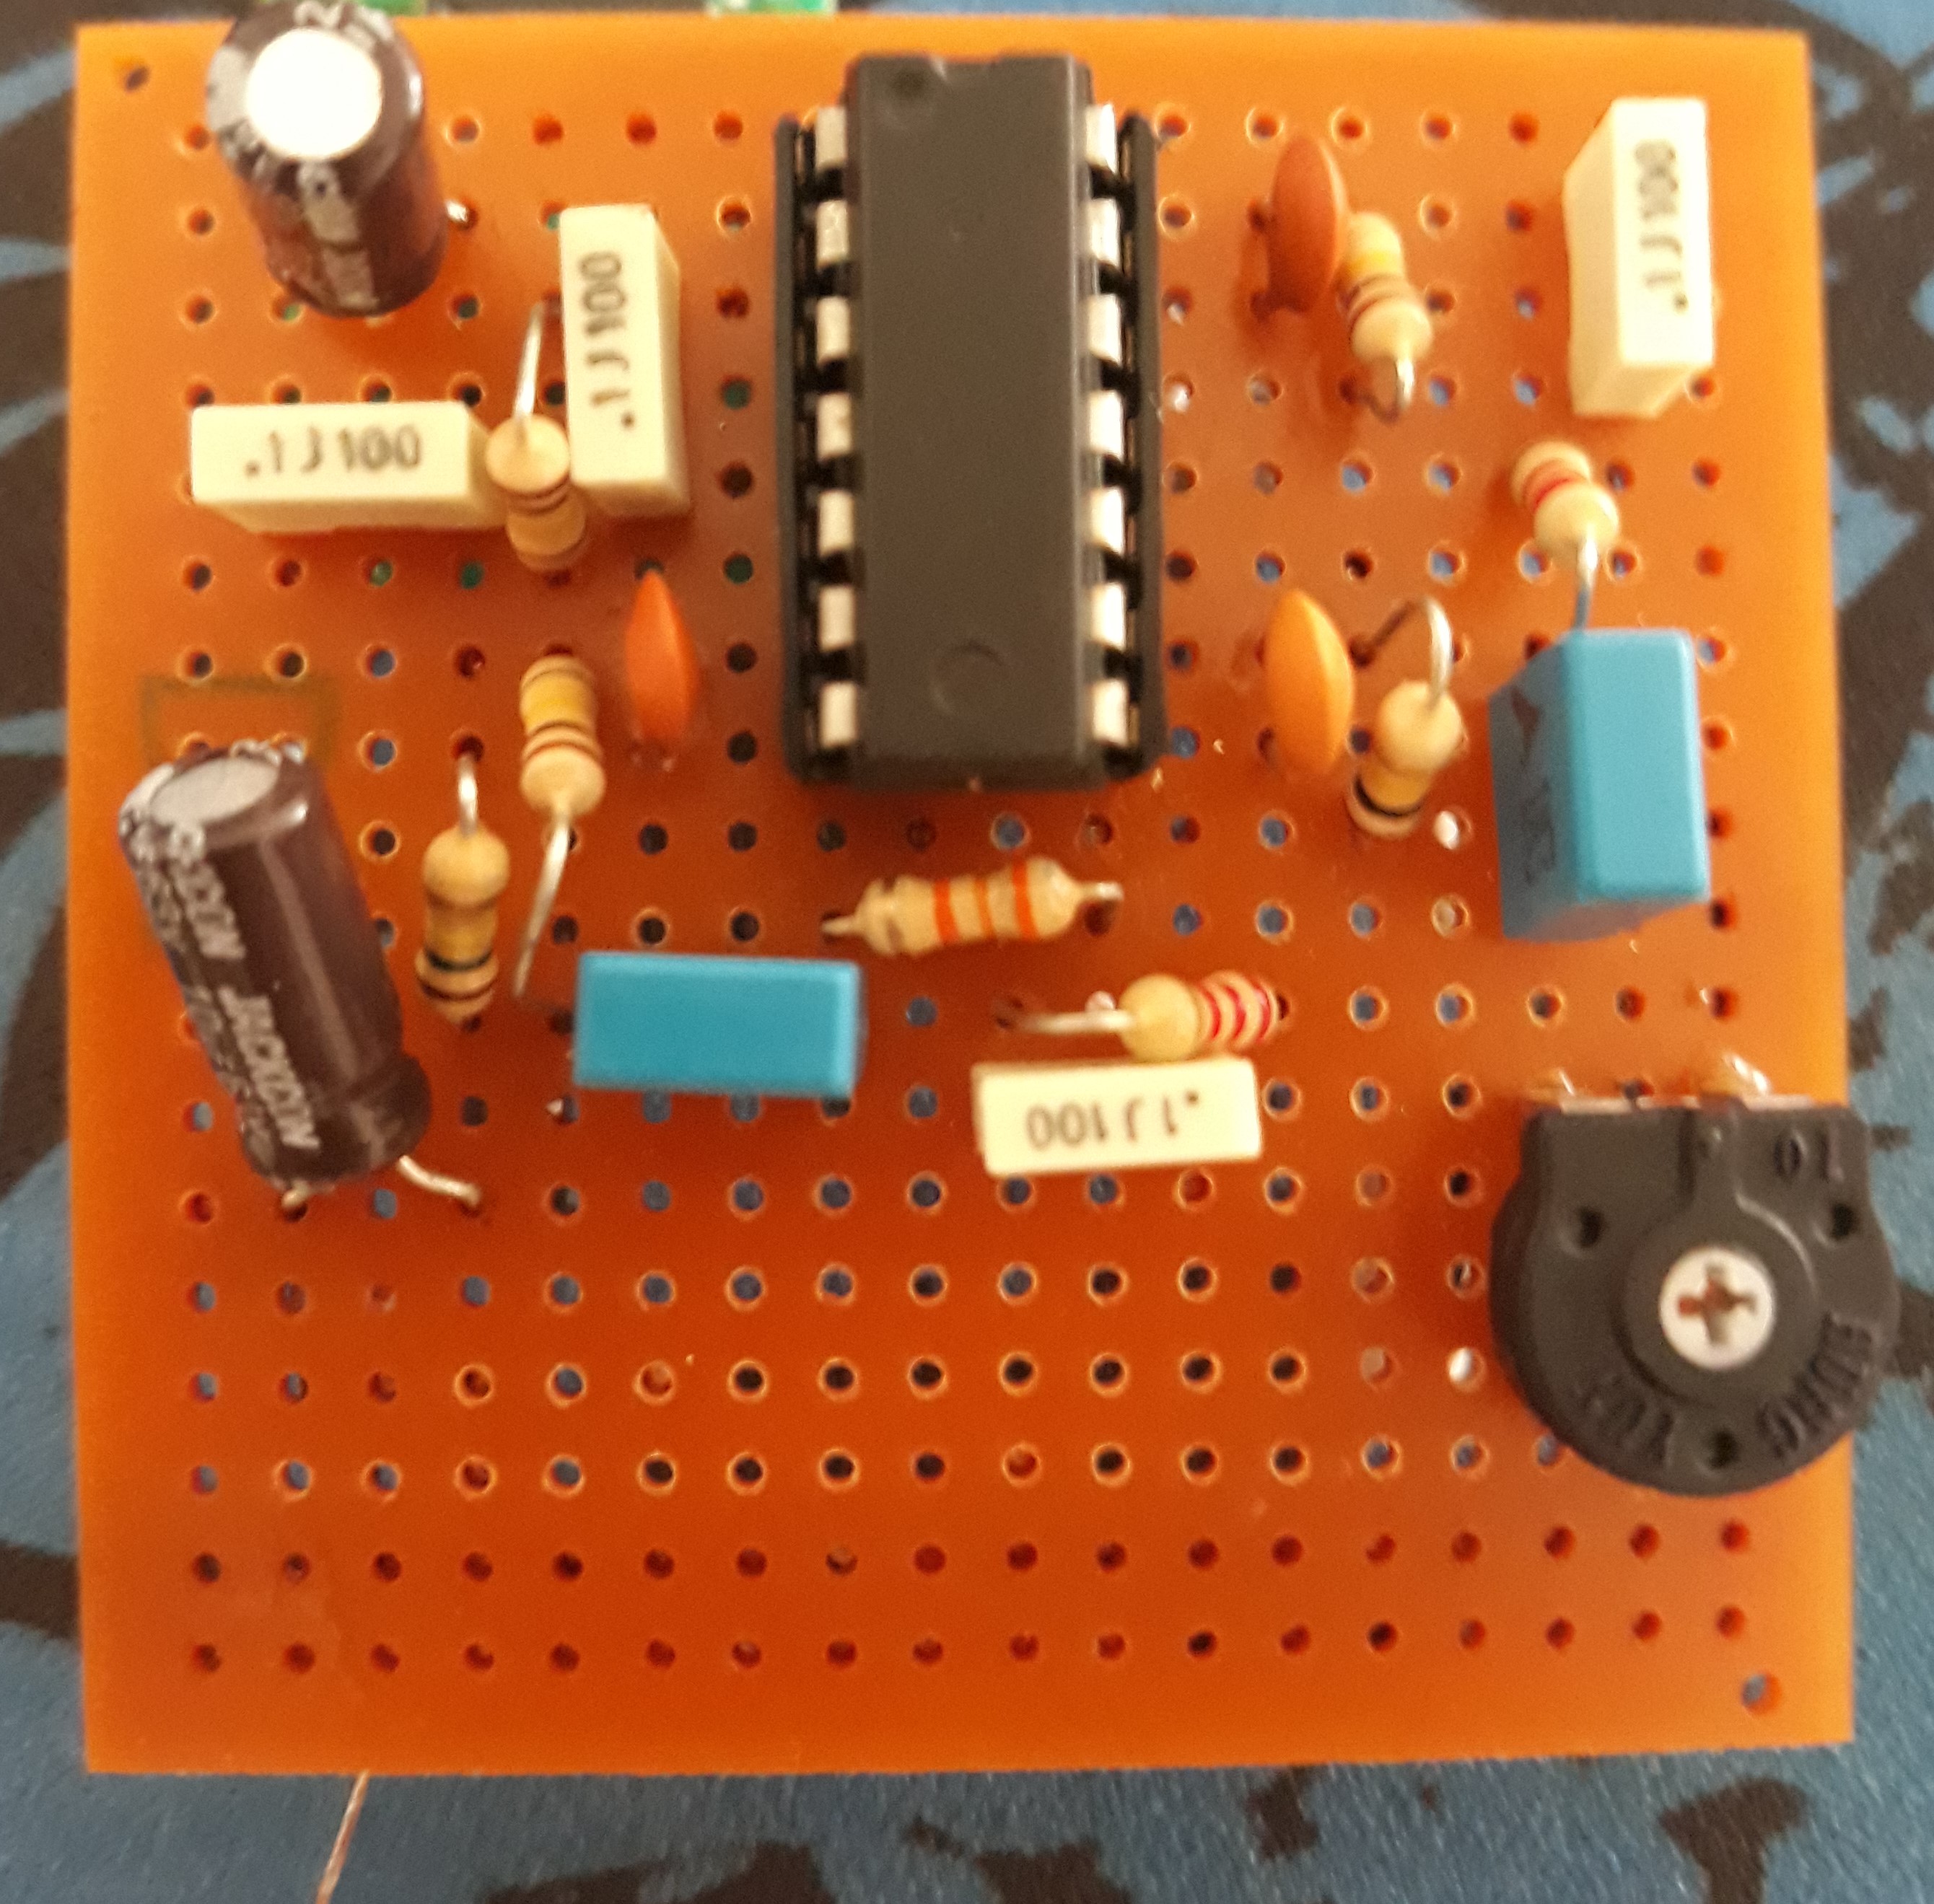
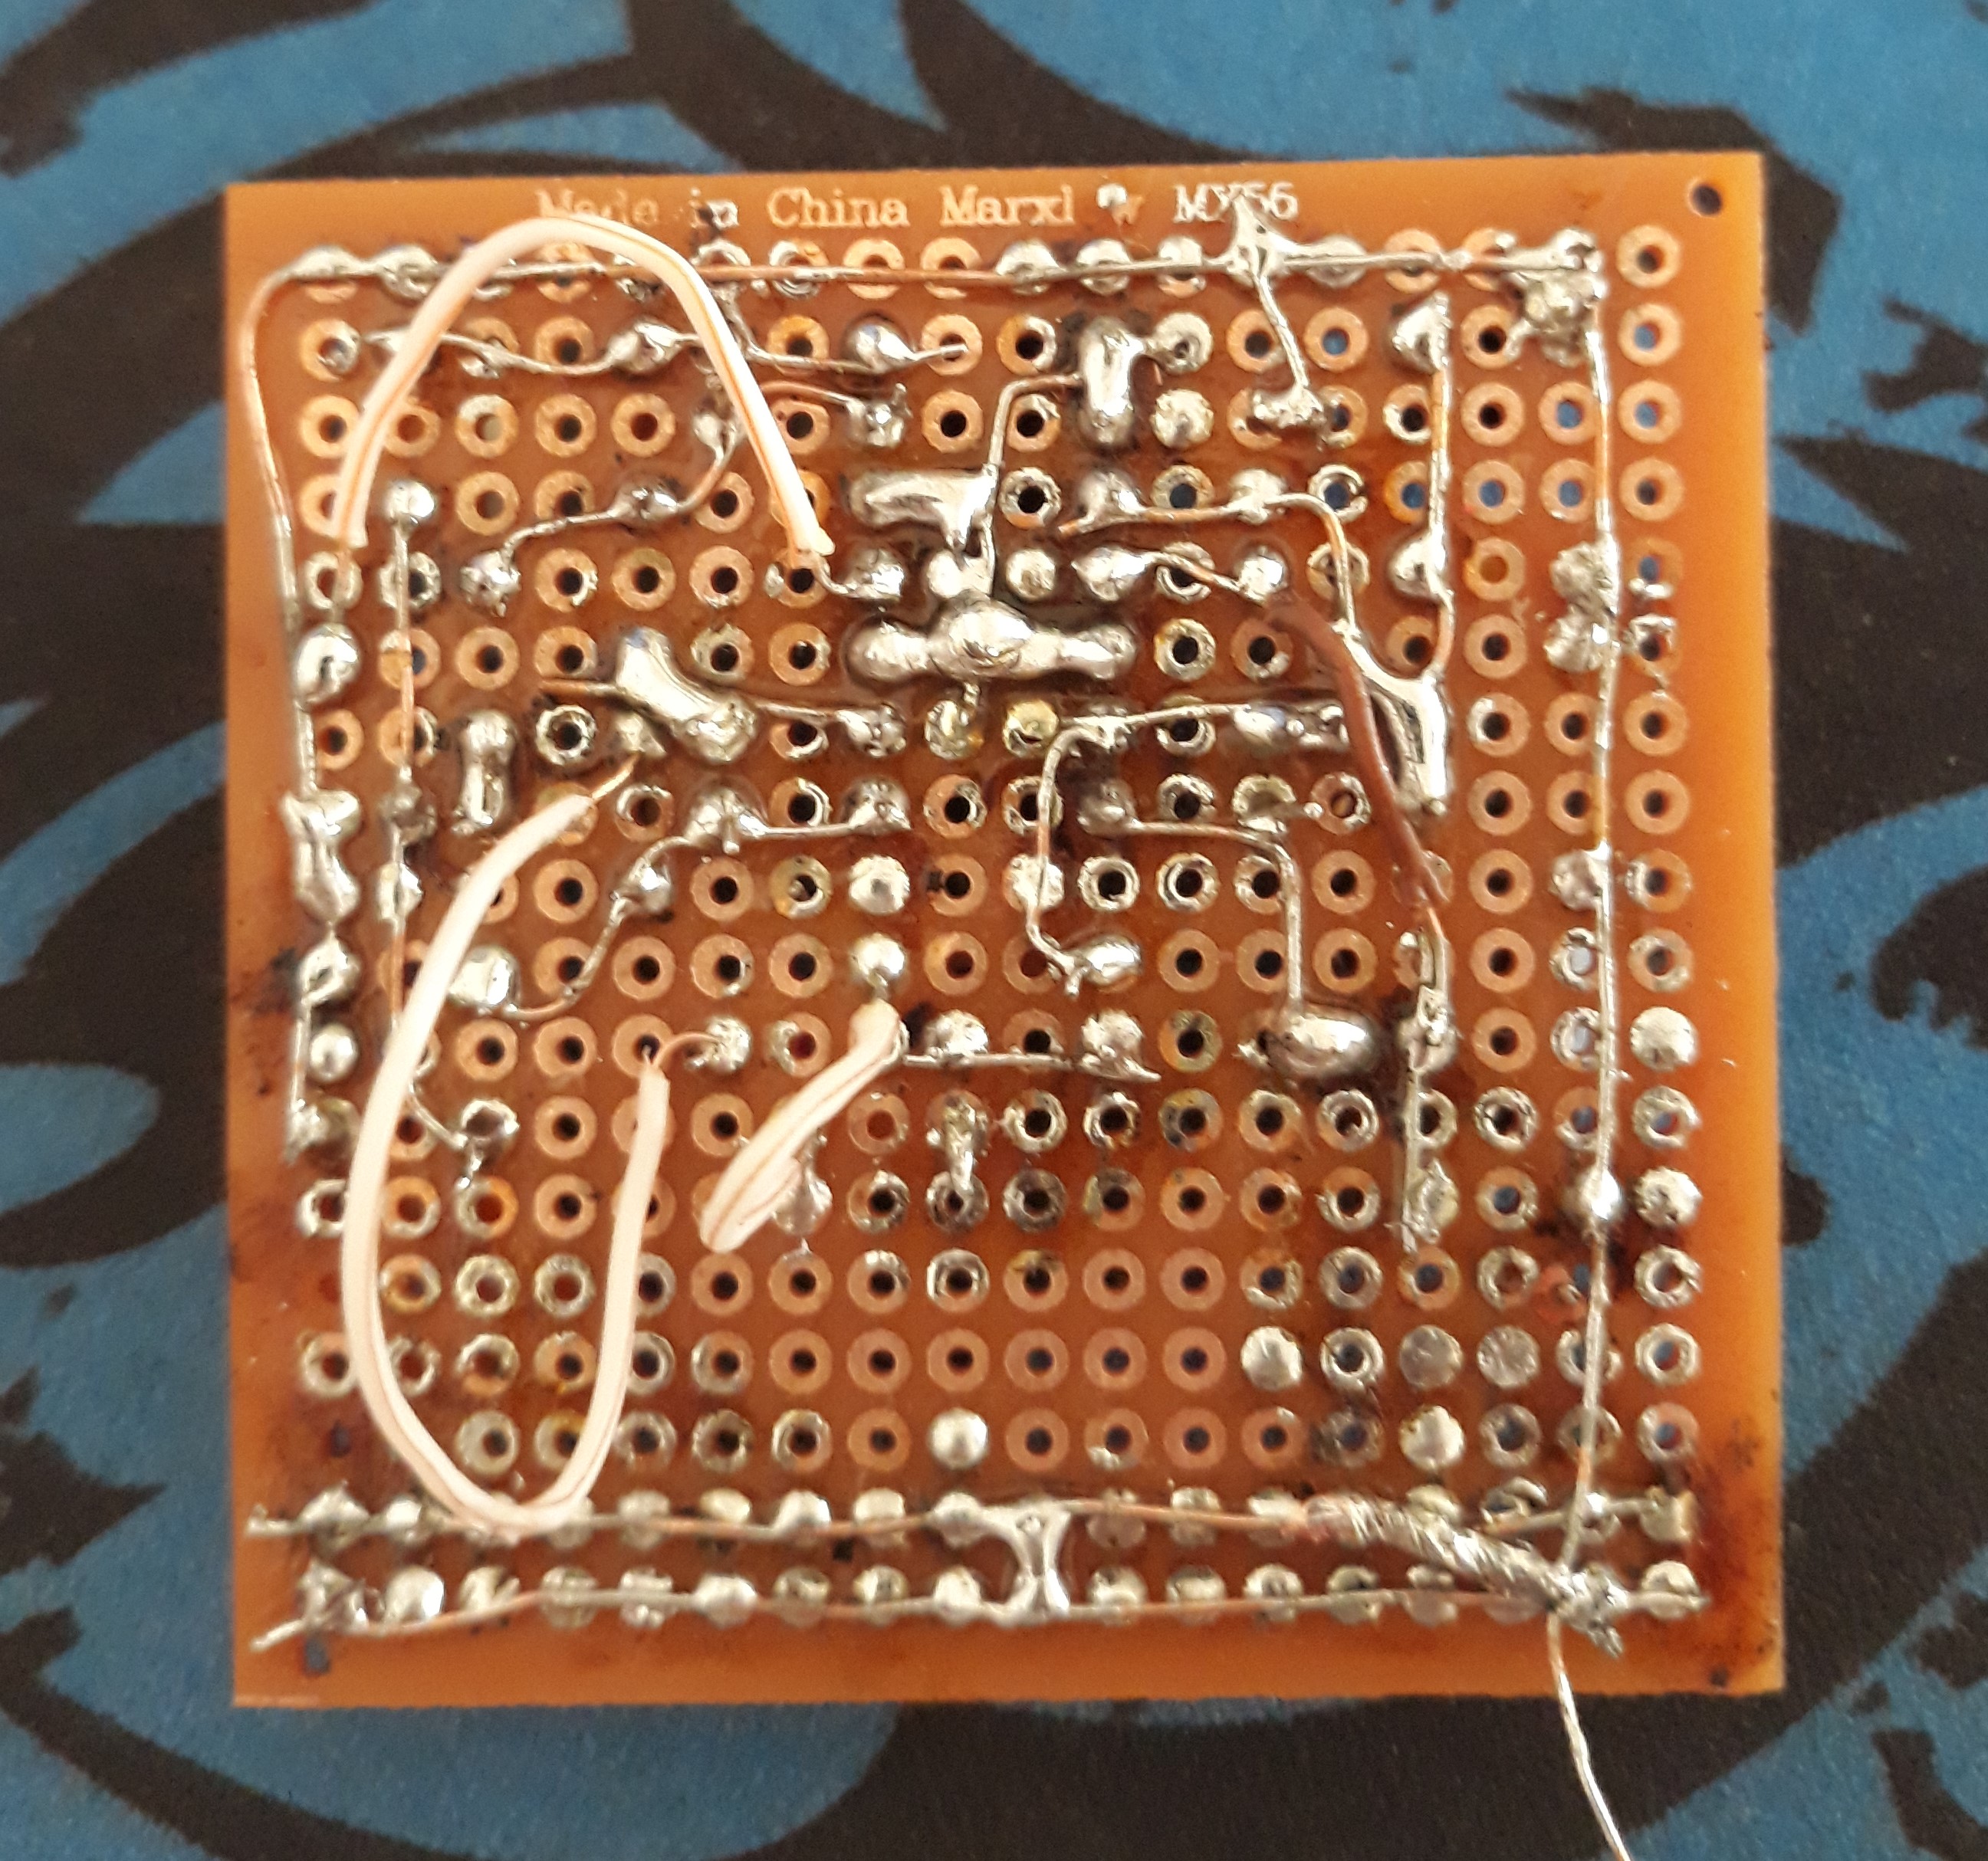
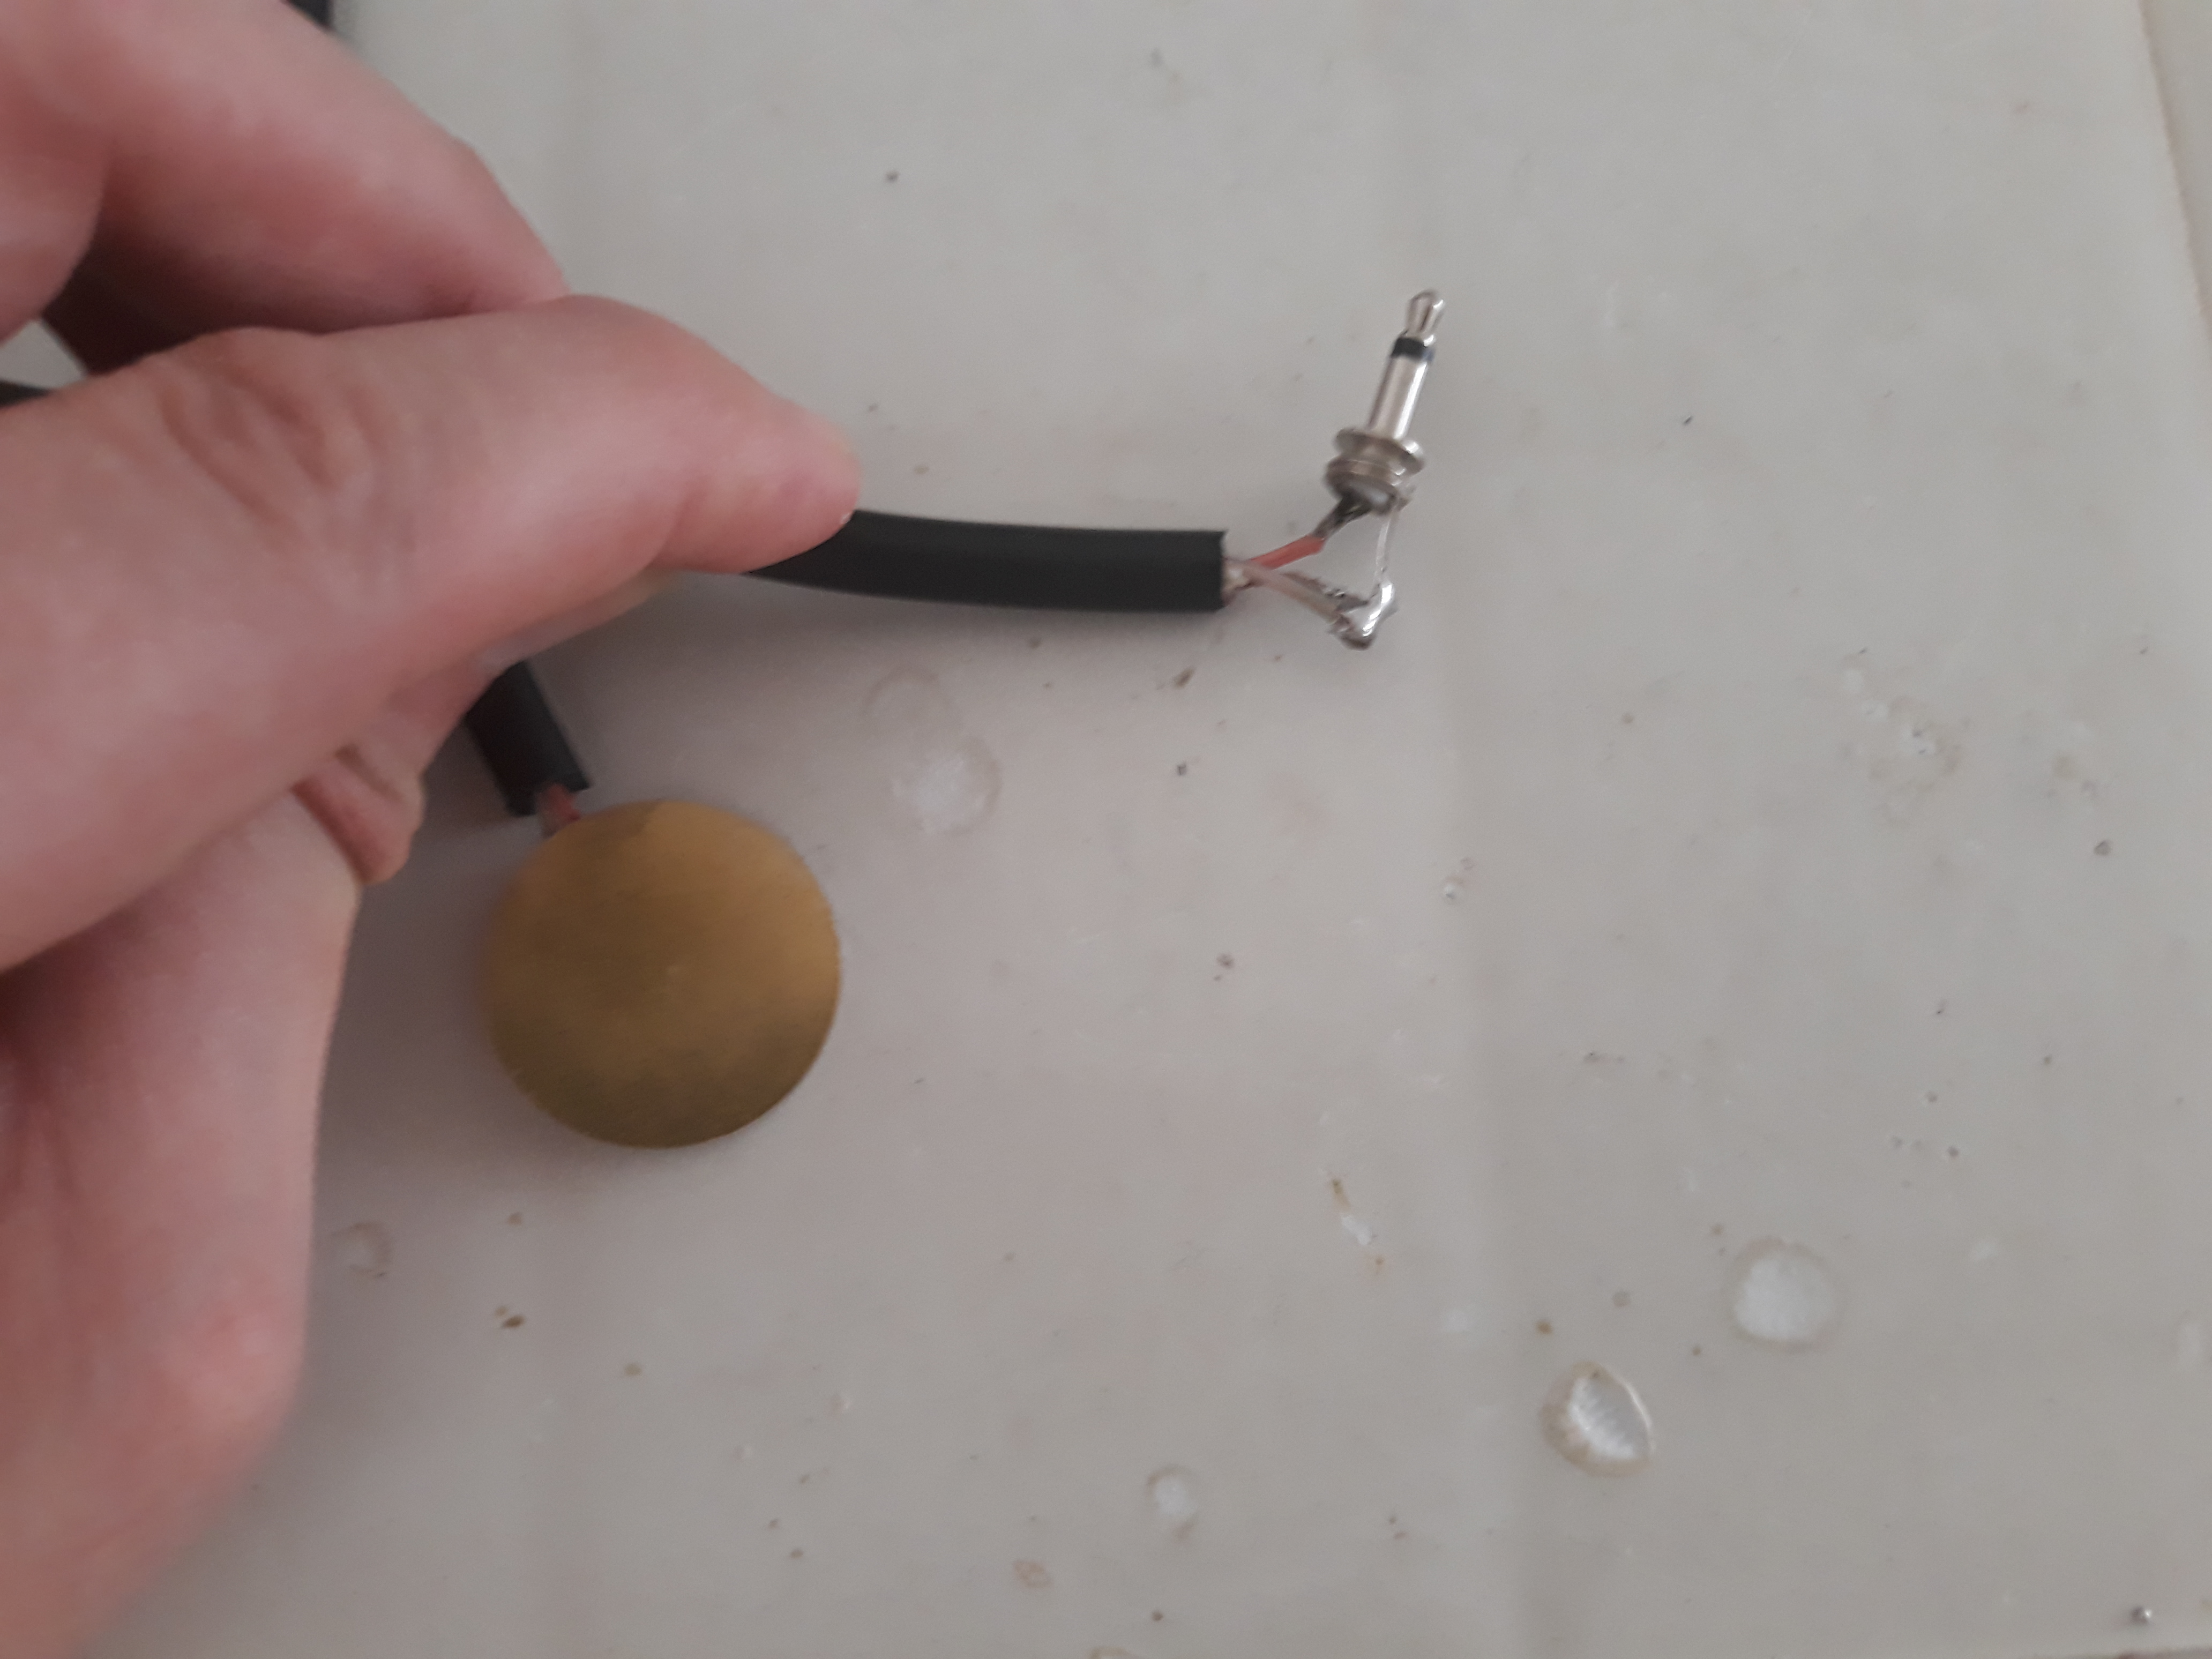
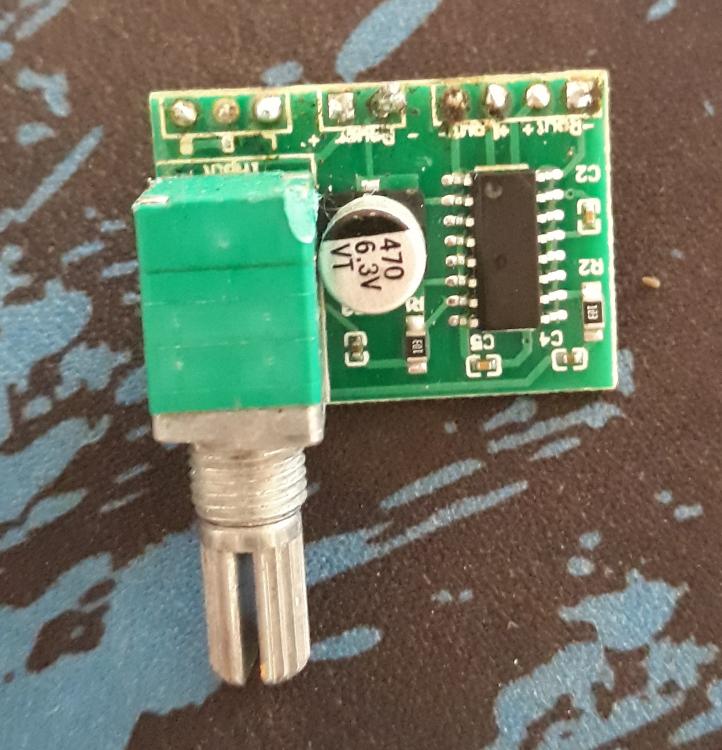
Hello everybody, I posted this topic a couple of months ago but my depression got worse and I spent alot of time just sitting around doing nothing, I satrted feeling better a couple of weeks ago so I decided to make this little "project" Please note that I'm not being stingy or I don't want to buy a proper timegrapher the thing is it's not really worth it for me to buy one because I'm barely finding a decent watch to work on every couple of months I'll most definitely but one if things get better. the other thing I want to point out is I have no idea what I'm doing I'm absolutely ignorant when it comes to electronics ad acoustics so I've been learning as I go. now I started buy buying this amp circuit thing with a bunch of piezo elements, I wired it and connected it to my laptop and it sounded decent with very low noise BUT when I tried listening to a watch the noise was lowed compared to the watch tick and I started experimenting with cables and options and nothing helped and the watch tick wasn't so loud anyway, I was using batteries and shielded cables as I have been told in the previous post. I did some googling and I found this video: I thought well this is easy I'll give a go spoiler alert it didn't work and I had the same problem watch tick to low and the noise is high compared to it. I wasn't ready to give up though so I decided to make this amplifier in Watch-O-Scope website: http://www.watchoscope.com/amplifier.html I got the components and sat down to make the circuit but the I realized I have no idea how to read schematics and make circuits so I had to watch some videos and read about it. the first version looked terrible and had a really really high noise so I thought to my self "I messed this up gotta start again" so I made another one which to be honest looked better than the first one (to me at least) and I was a little bit proud of my self but the thing is I didn't work either and had the same really loud noise I checked all the connections and everything seems to be fine I don't know what could be causing this and this is why I'm posting this long boring post. I tried pulling the laptop charger off and even tried two more laptops but it made no difference. can you guys tell me what I did wrong please?


 1 point
 -
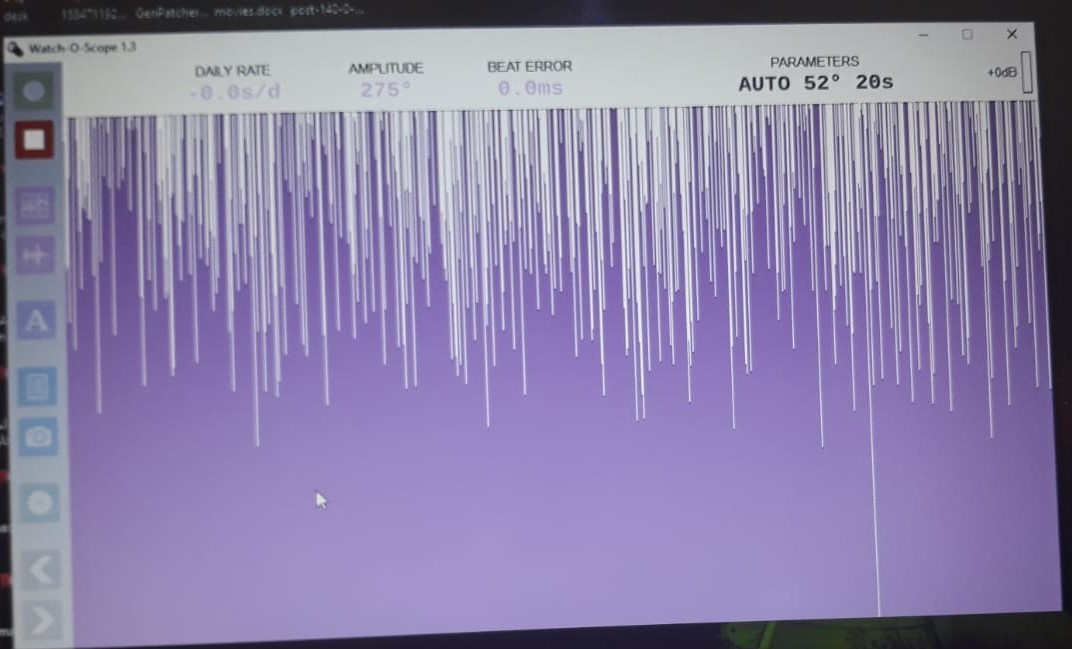
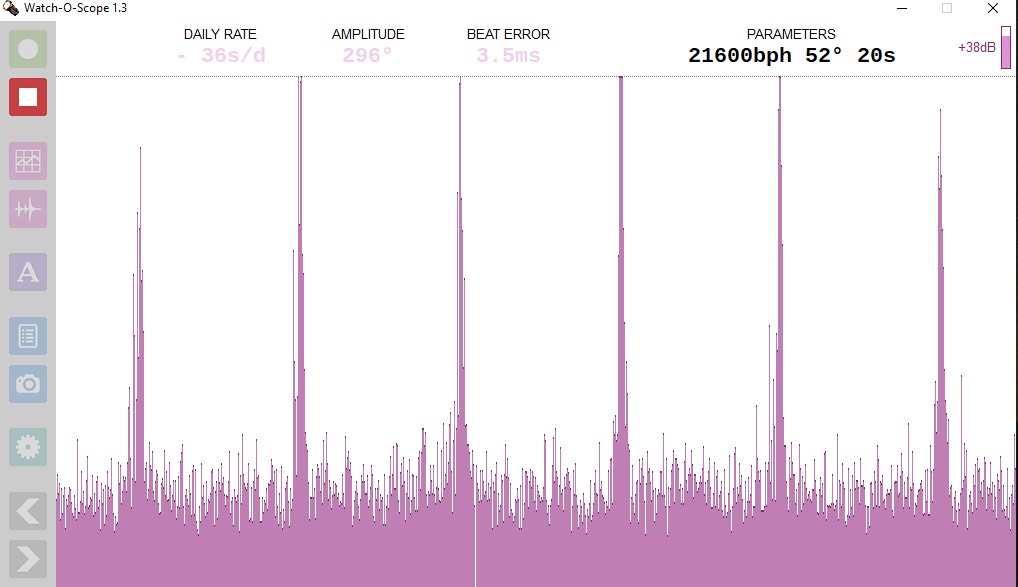
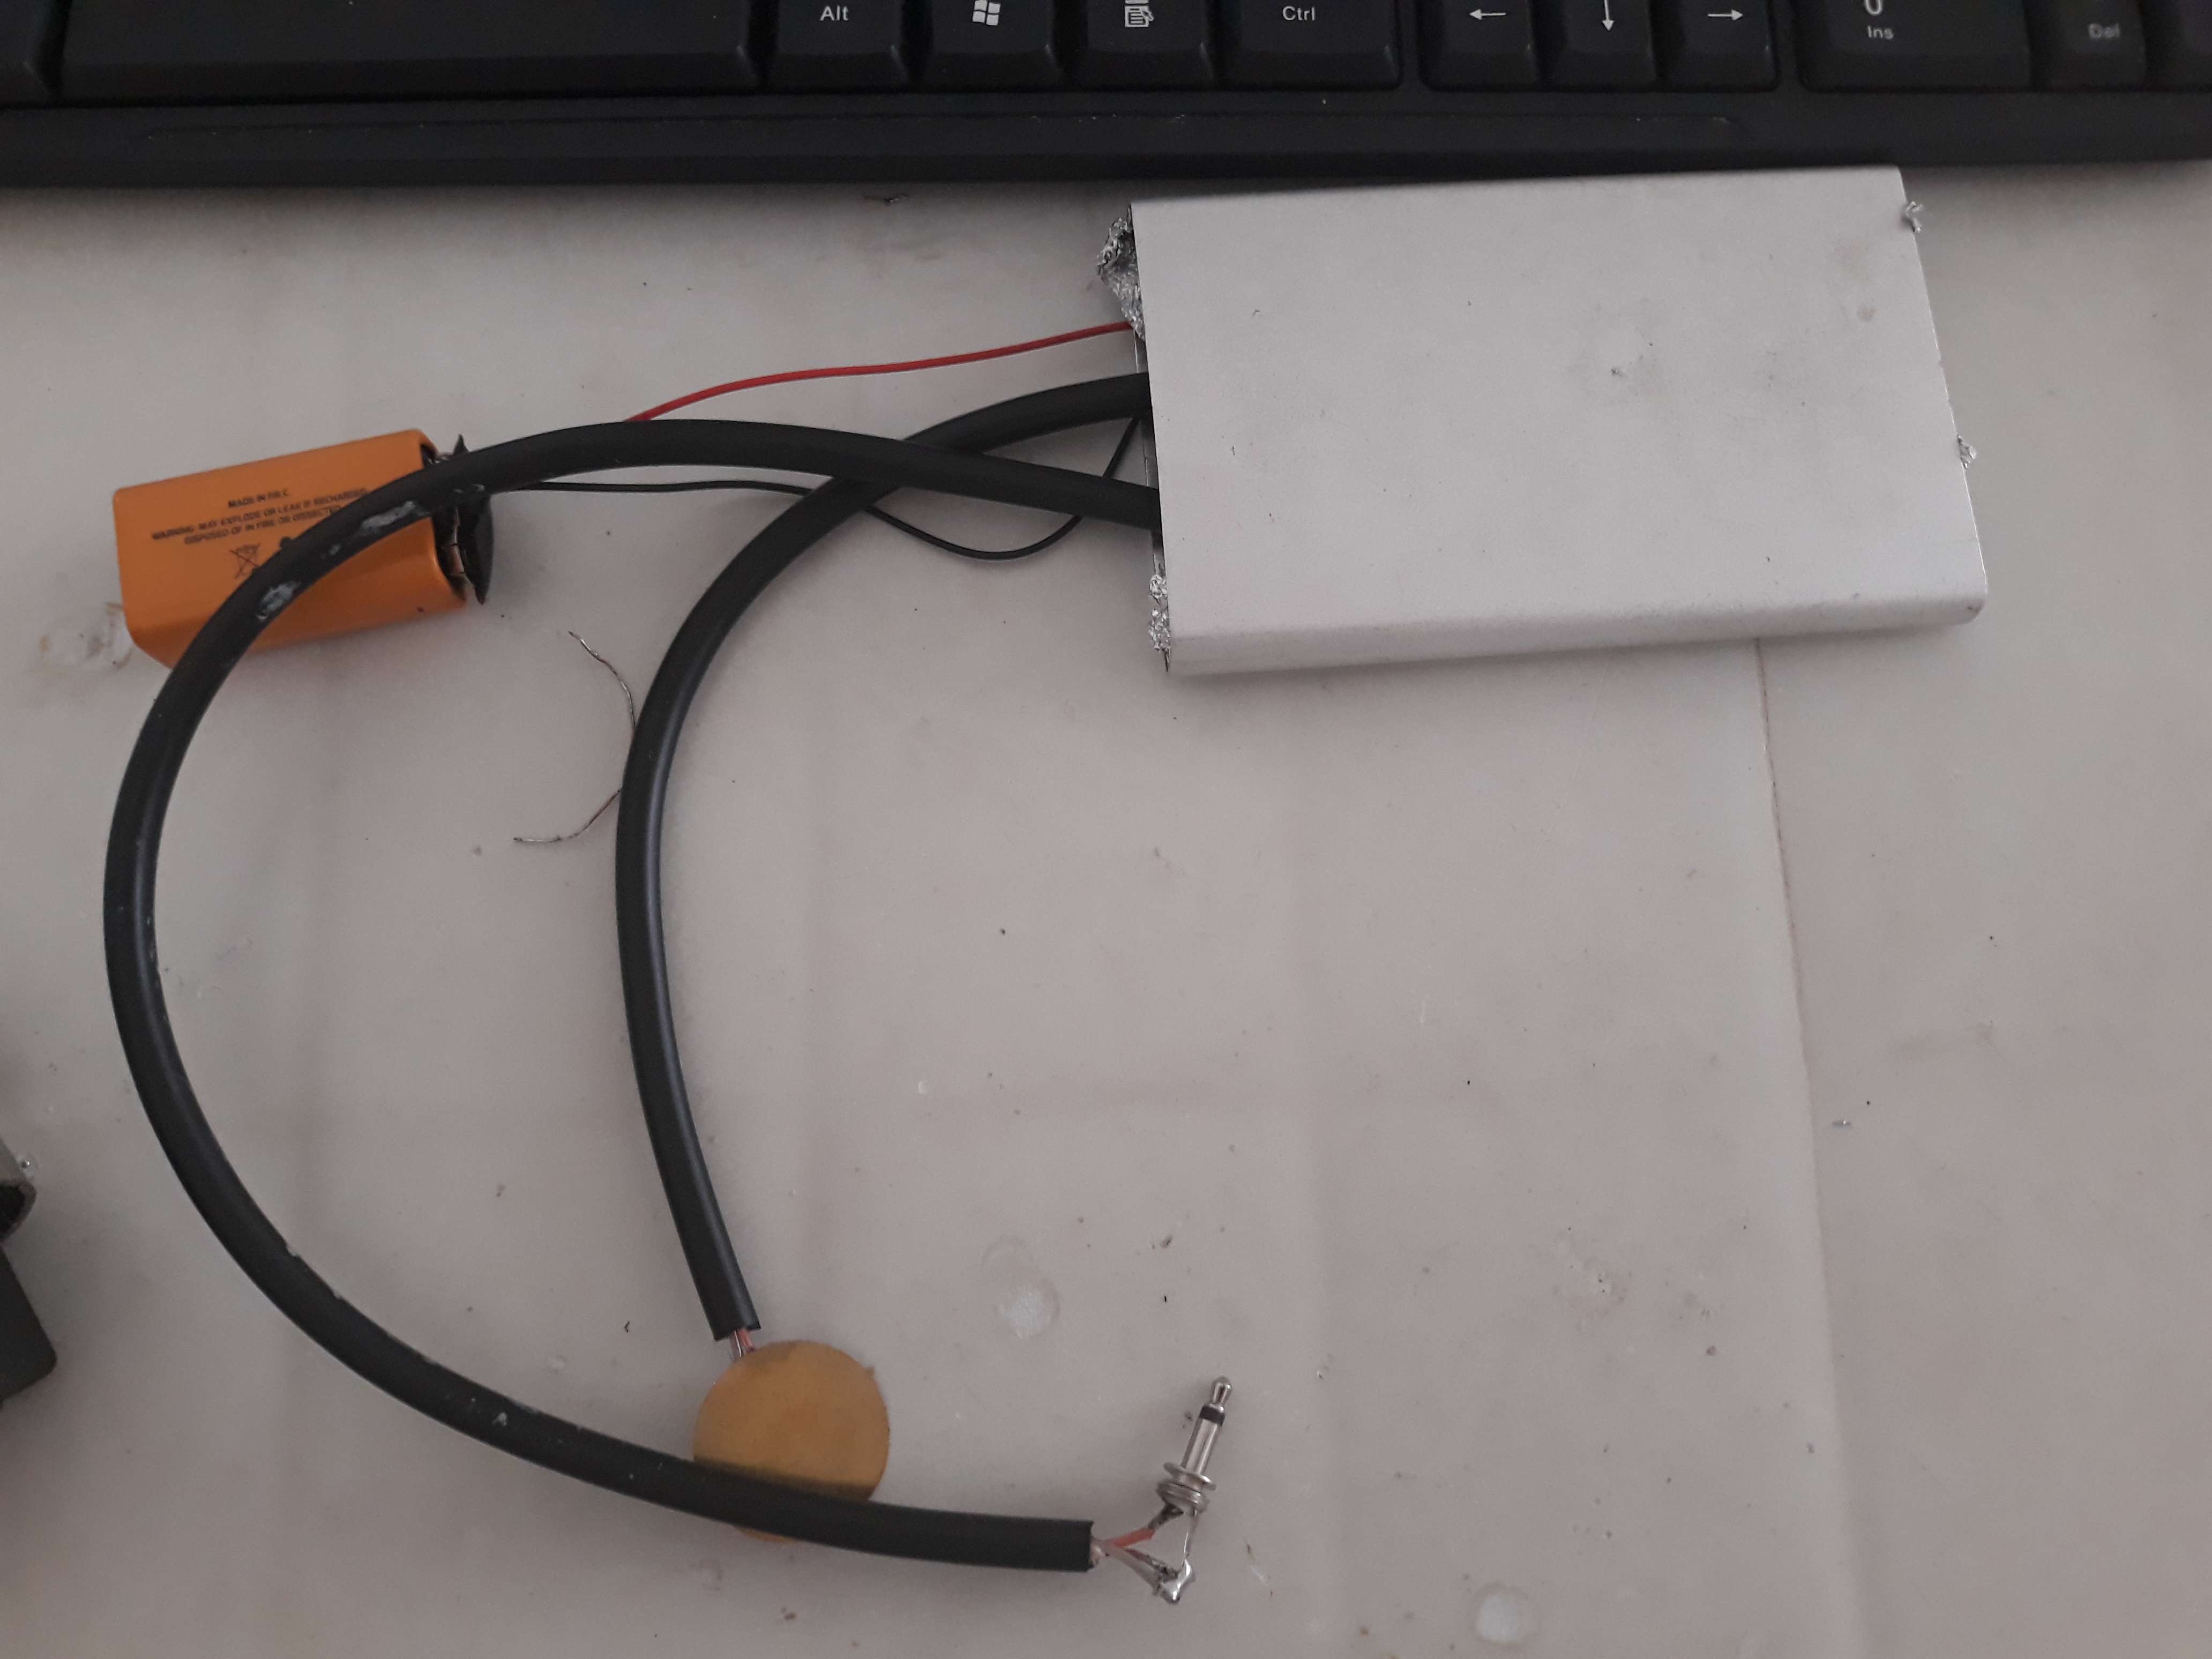
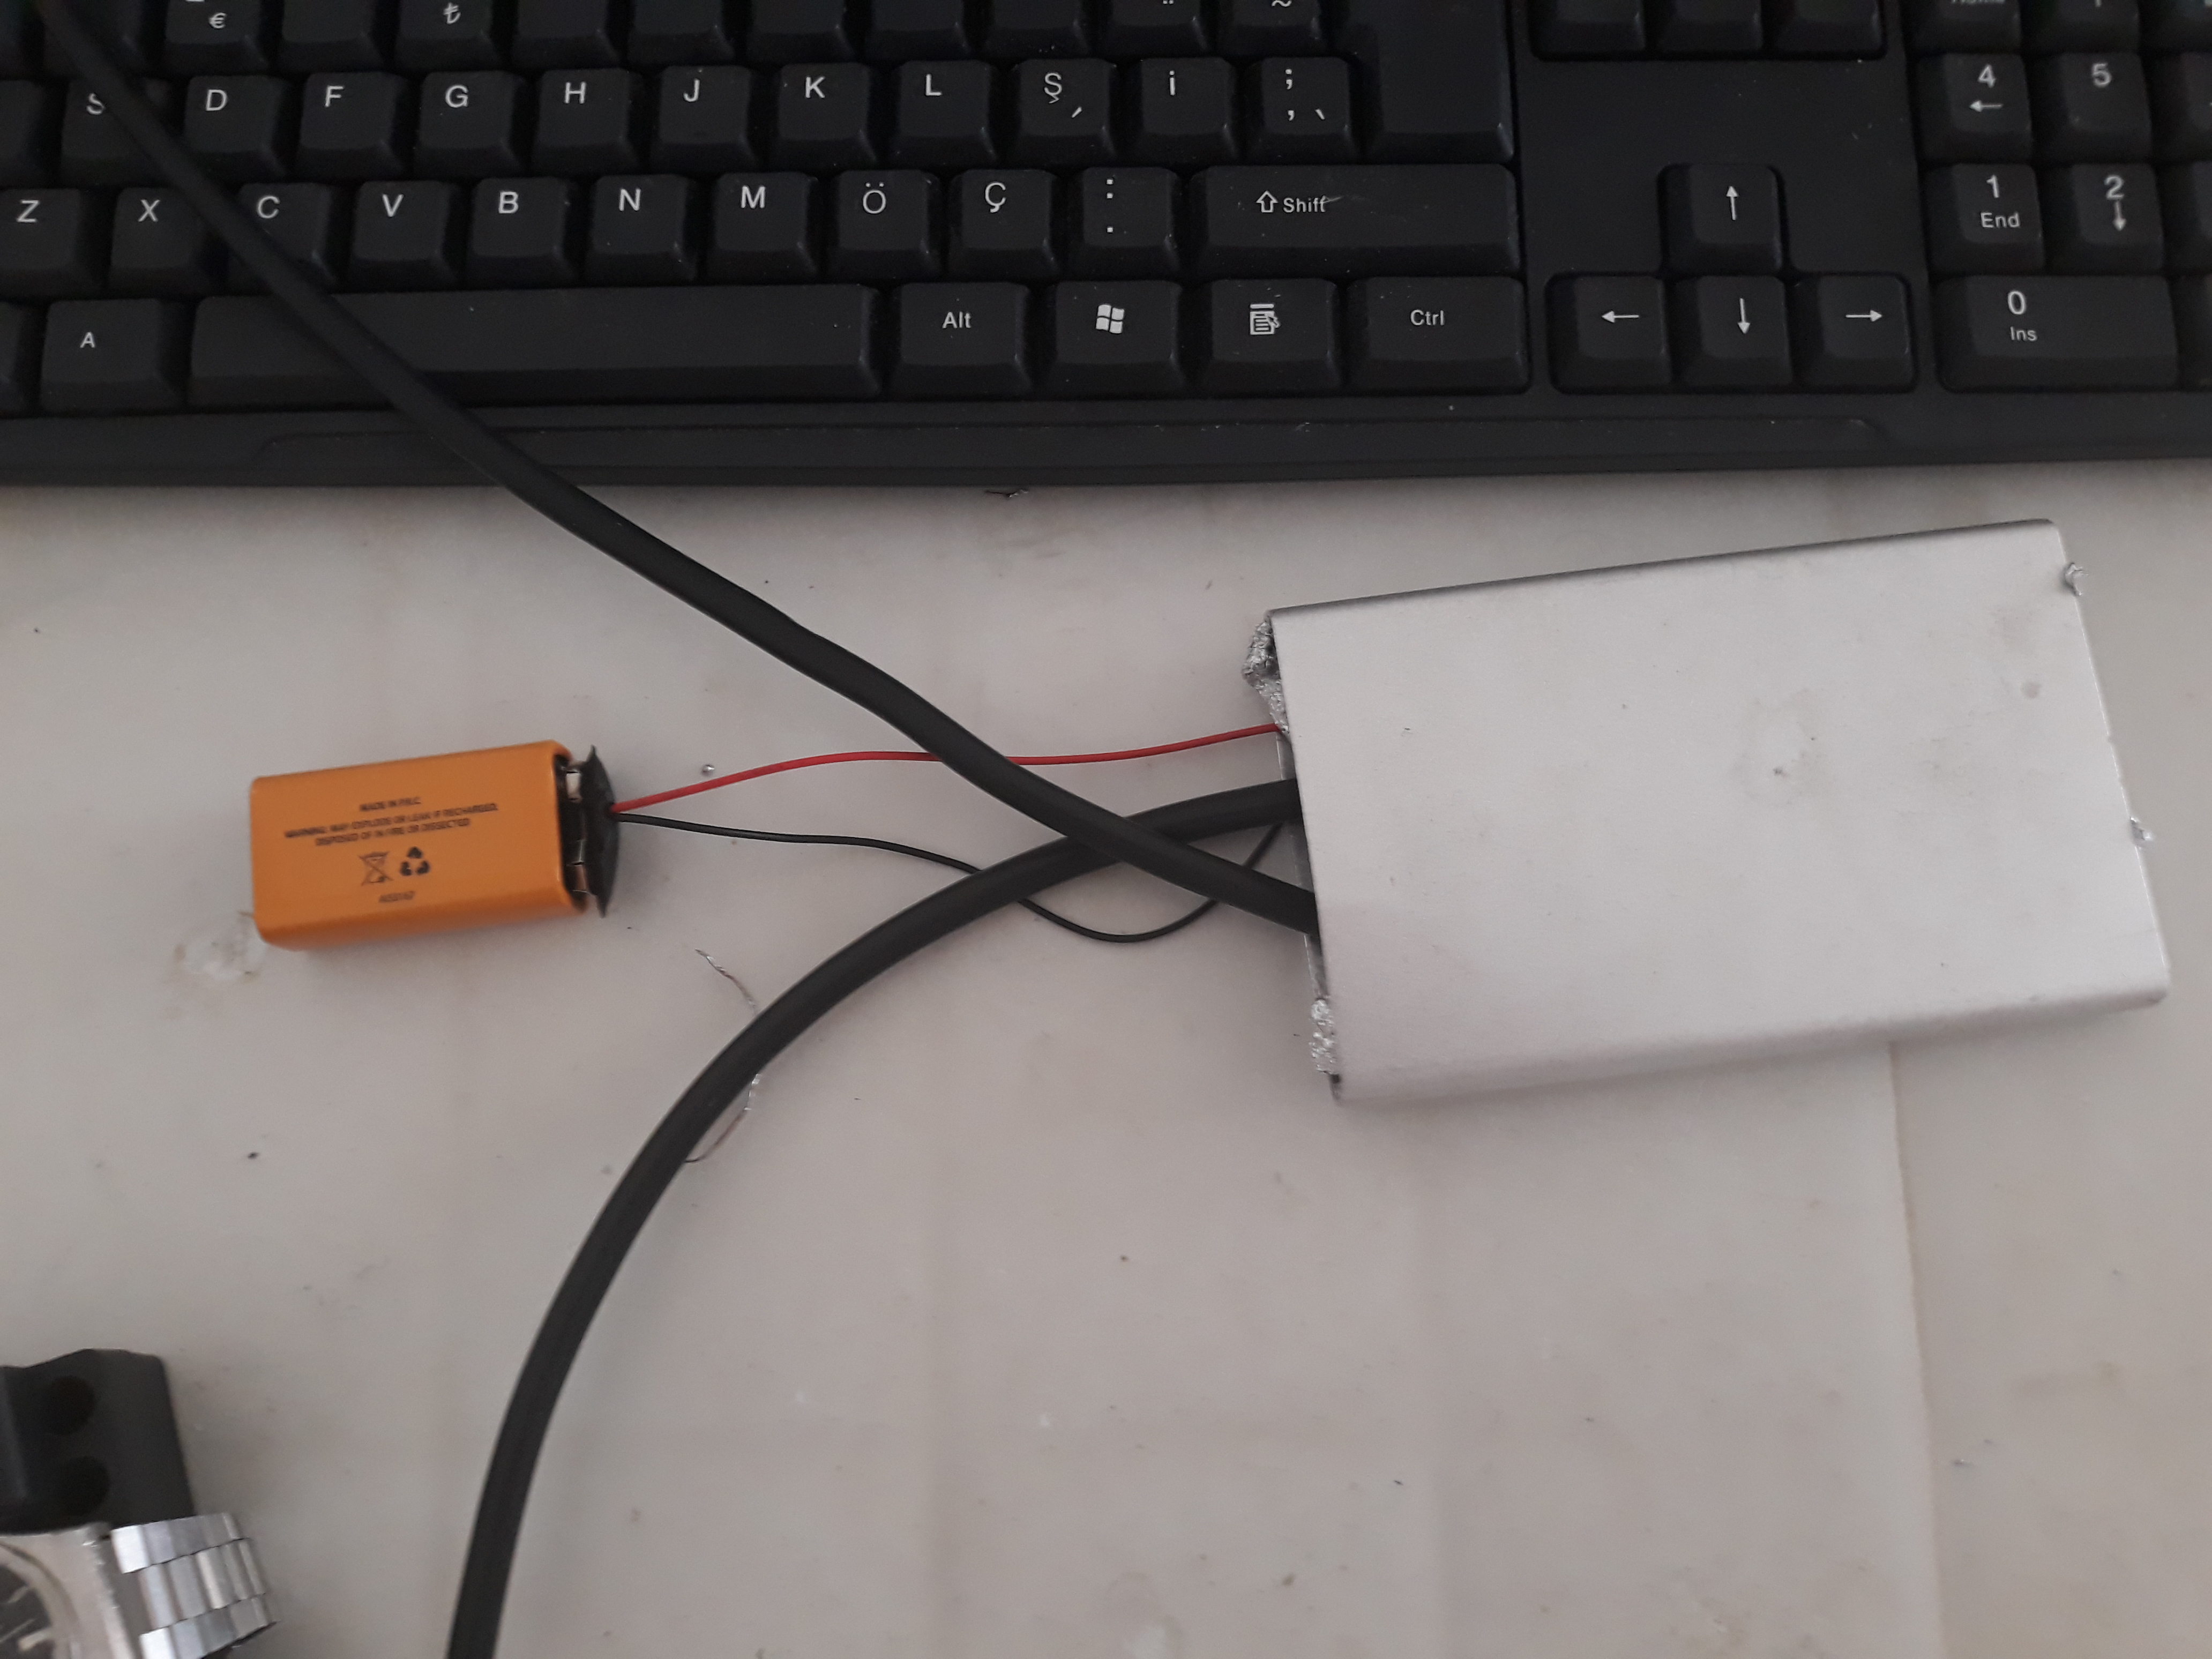
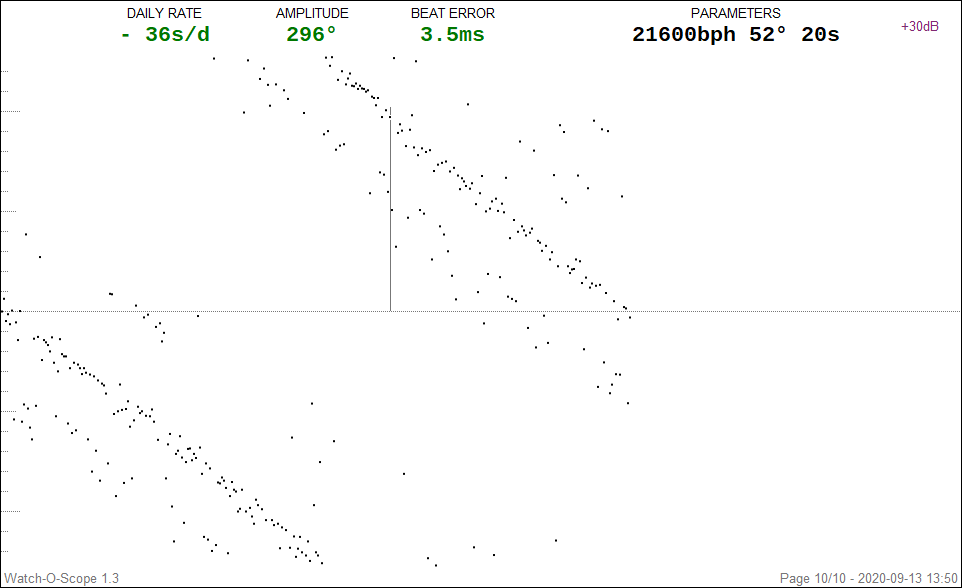
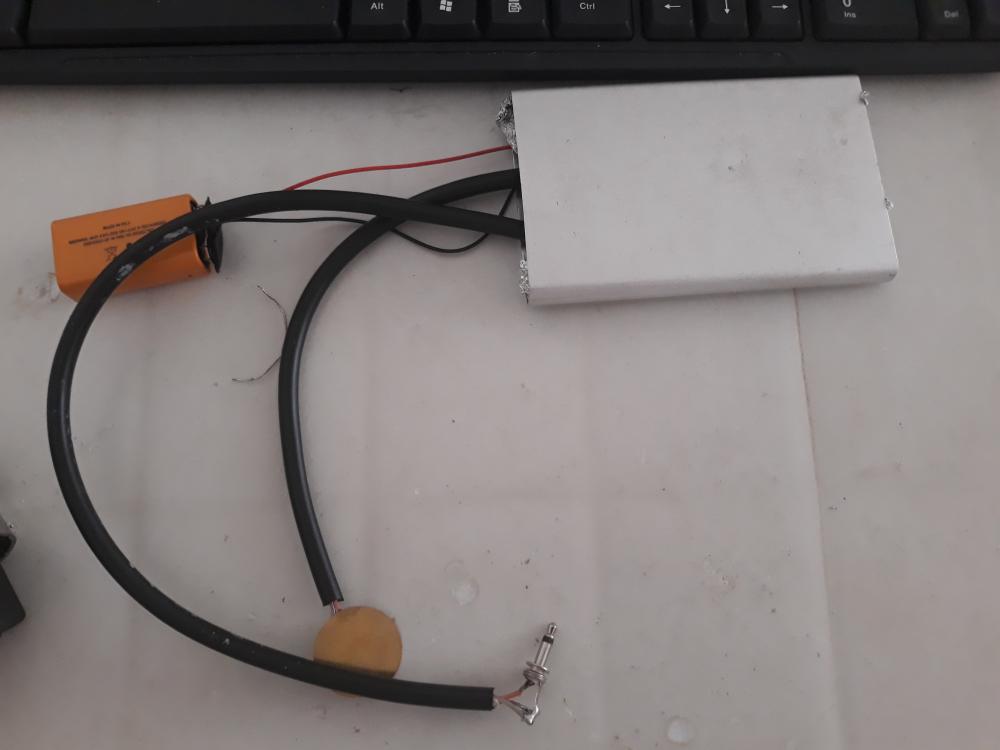
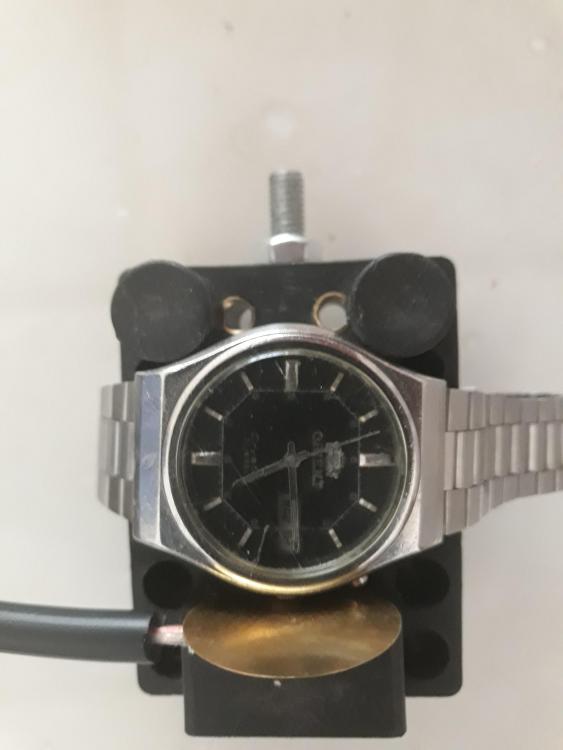
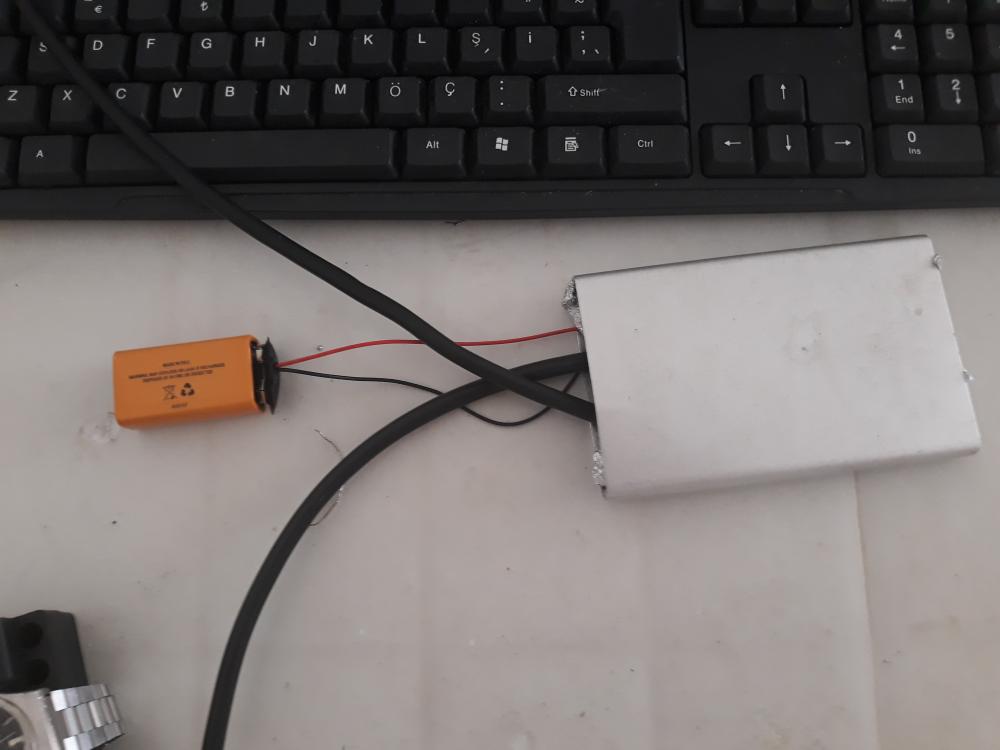
Guys I did it it's working I cleaned the ground soldering and soldered a new wire then put it in an aluminum external hard drive case and stuffed the front and the back with aluminum foil and voilà it's working perfectly (well I don't know it it's perfect but who cars it's working). I tried a citizen 8200a and a Seiko 7009 and an Orient 46941 on Watch-o-scope and the results weren't satisfying at all looks like I have to service them again the Citizen and the Seiko rates are all jumping all over the place so I'm not including them to save my self some embarrassment . the Orient however was consistent not good but consistent but hey that's why I'm building this thing in the first place. Now I need to put the circuit in a proper case and solder the jacks and do some organizing then build some sort of proper stand for the pick up the Piezo element I'm using is about 20 mm I tried a 35 mm one and a 10 mm one but the 20 mm one seems the be the best. I have this DVB that I took it's guts out I think it would look neat but the problem is it's plastic I'm not sure if I line the inside with aluminum foil what would happen I might try that now these are the schematics and links I used in this project (I flipped some of the pictures and put them over each other so I can understand what's going on): http://www.watchoscope.com/amplifier.html 46943.mp3


 1 point
 -
Though I would share this here mostly for someone new like me who just started in this hobby. I think it be fair to say most of us started with this movement and is the one Mark uses in his watch repair course although it's says ETA the Chinese clone is the same. I used this myself and save me from having to take pictures all the time also show where to lub and what kind. This might have been posted before, not sure. Make sure you have flash player enable . https://www.eta.ch/swisslab/6497/6947.html1 point
-
Well here she is all done

 1 point
 -
I am an odd duck. I wear mine, to work and elsewhere. But I also wear a suit with vest, or trousers with watch pocket. I kept trying to like wrist watches, but I either kept getting a rash underneath, or kept banging them up somehow. Below is my Longines right before I had it polished. I am having trouble finding other files that will upload.
 1 point
 -
I did that for about a year straight and developed 2 massive calluses. Made my fingers look like hell, so I quit. Now I just let them run down naturally and wind them when I wear them.1 point