Leaderboard


Popular Content
Showing content with the highest reputation on 07/09/20 in all areas
-
Hi All, I managed to reshape the hairspring in my Ricoh 61 project tonight. I am absolutely elated that I didn't give up and was successful in the end. I managed to make some mistakes on the way but in the end I corrected them all. I used hand remove levers to remove the hairspring from the balance wheel. The tips were too thick and I slipped and twisted the hairspring at the collet. Job for another day before I attempt it again is to thin down the hand levers. To correct the above I placed the collet on a pin and used tweezers to press down on the inner coil opposite where it was twisted up (under a binocular microscope). Tweezers got dirty and I managed to transfer that to the hairspring causing the coils to stick together. I solved that with a quick dip in IPA followed by a quick dry. Best to try and avoid that in the first place. Outer coil had to be reshaped to follow the path of the regulator pin. That took me a while to sort out. I did review some Ricoh hairspring images on Google and eBay to give me an idea of how the outer coil should be and then followed the helpful videos on YouTube. Hairspring fitted back on balance, managed to position it so the jewel was 180 degrees to how it should be. Corrected this with tweezer tip in the collet slot while gently turning. What I would do better next time. Better lighting would be the most important improvement I could make. It would have been a lot easier I believe with good lighting. It was very tricky but I am a beginner. It was my first success with a hairspring reshape. I am 52 years old so a late starter. Hope this write up can help someone in future. Sent from my Moto G (5) Plus using Tapatalk5 points
-
Yes. My best teacher says one has to begin from bell tower clocks, I know he's not joking since he has repaired a good few ones. But, every other day we have absolute beginners declaring their firm intention to attack their rare, valuable, and difficult time pieces. Sometime they can be convinced to know better, sometime they are not. But rarely they are then heard again.2 points
-
I would not recommend Seiko lubricants. They don't know even say if they are synthetic based, I suspect they are not, plus are expensive, especially when bough all together do do perhaps few watches per year.. Like it or not, the best standards and range is offered by Moebius.2 points
-
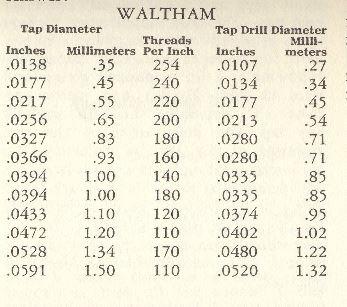
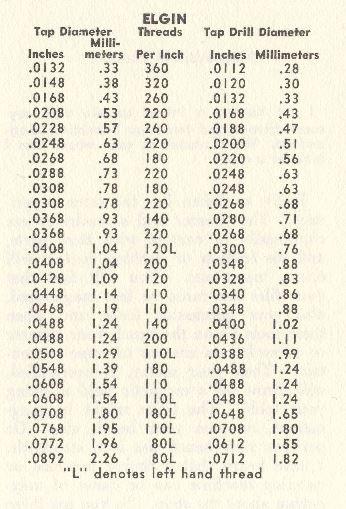
I'm attaching images of the screw sizes for Elgin and Waltham. Then I've only ever seen Elgin has a set of taps available occasionally it shows up on eBay like at the link below. https://www.ebay.com/itm/Antique-Elgin-Watch-One-Set-Taps-For-All-Size-Screws-Set-27-Complete-1920s-RARE/124245232784?hash=item1ced97cc90:g:YIAAAOSwoPRe~f8e
 2 points
 -
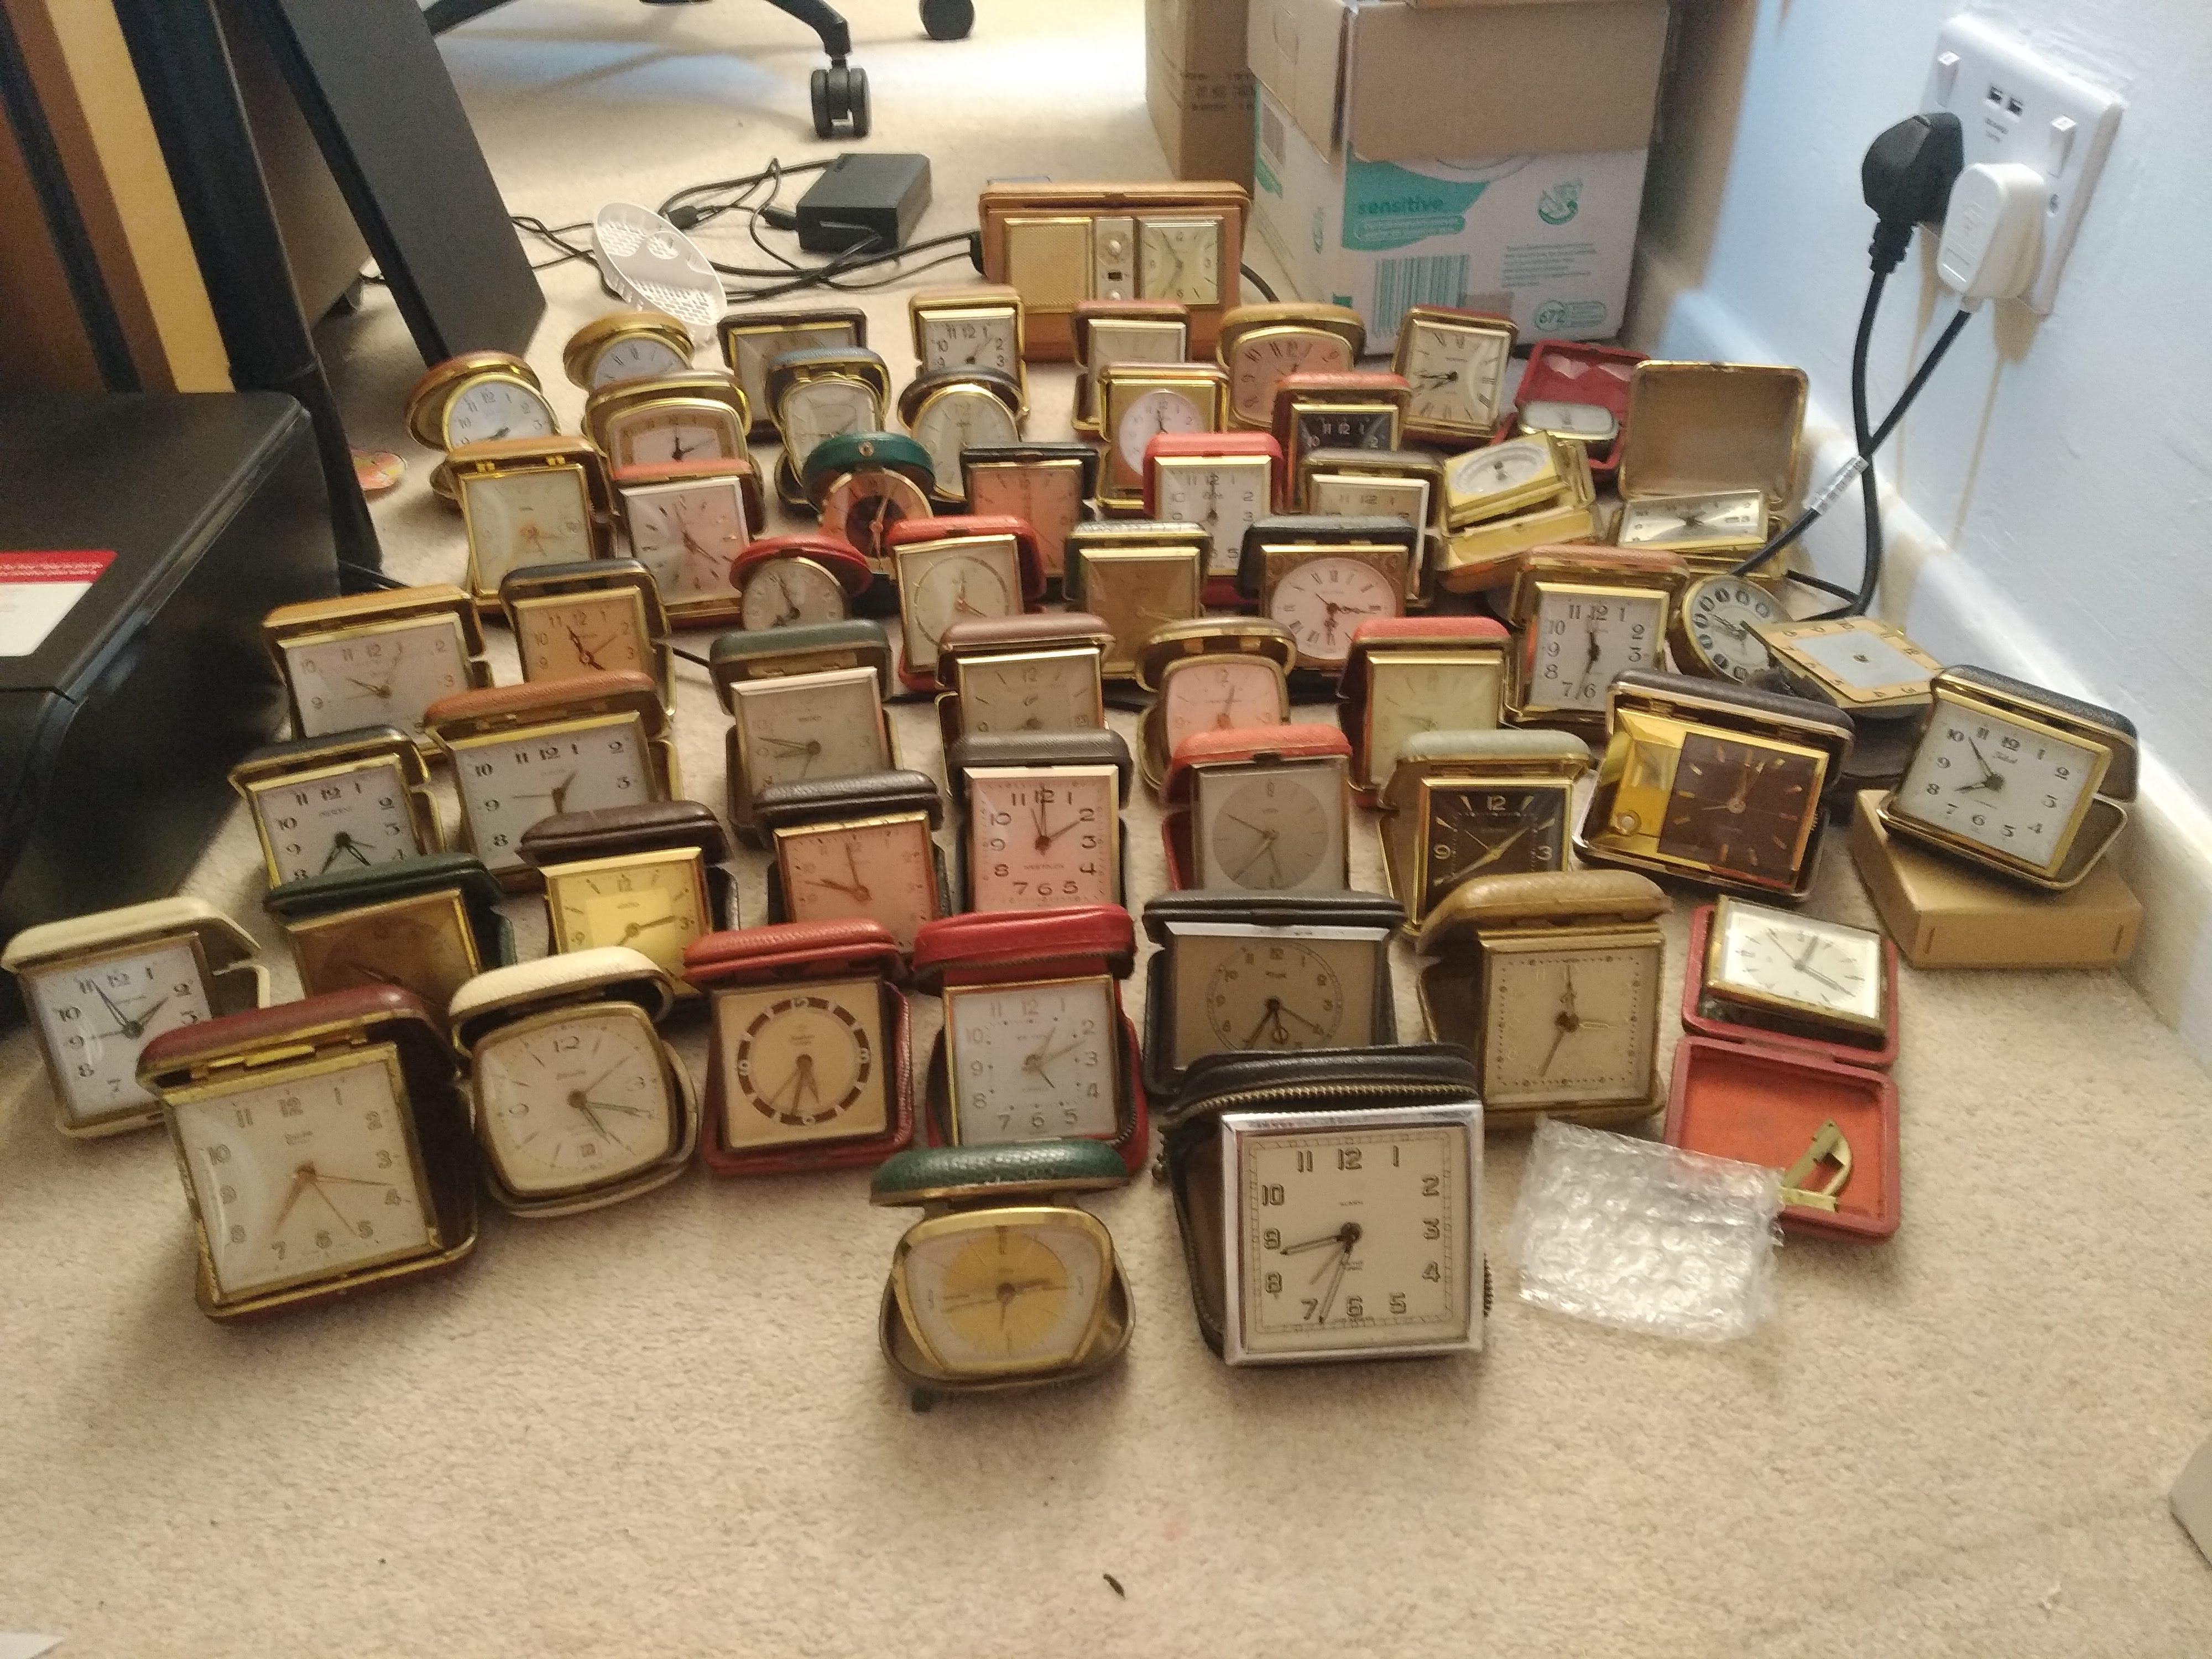
I must be the luckiest chap on earth, I found travel clocks in hidden boxes in the house! The most expensive thing on the picture is not a clock though. Its the carpet, filled with invisible watch parts, and who know what else is there. When I hear the birds singing in the morning, and I am still not in bed, i have the feeling that it want to suck me in with my chair together.
 2 points
 -
Hi guys … I had promised that I would make a « custom decal dial tutorial » on another thread there So here we are … There are many variations of decal dials, the best IMHO being the « negative gilt » dials which gives the best results. The process I’m showing today is aabout how to make a dial with black printings on a one color background. I had a cheap quartz diver waiting in my drawers so I’ll make a Heuer diver hommage based on the 980.016 model (quartz one too). DAY 01 : It’s 4:30 AM (I’m an early bird) and I have 2 hours to kill before a business trip to Paris (I’m French) so I decide I have time enough to begin. The first part of the process is to prepare the dial plate : - stripped it, removing all the lumes bars and dots - soaked the dial for some minutes in acetone to remove the paint - filled the tiny holes where the bars and dots go with cyanolite glue - sand everything flat I sand with 800 and don’t try to get a smooth surface as I want the paint to adhere perfectly to thedial plate. Here is the result … Then I want to spray paint. I make a tube with some painter’s tape, from a « curve » with it and place it on a plastic bottle cap. I want it curved so that I can stick the dial on it without any risk of bstructing the center hole or the date window of the dial plate. So I stick the sanded dial plate on the tape tube. As you can guess from the pic below … that’s not the first time a make an orange dial. Then I place the bottle cap and dial plate on a paper sheet and spray paint in orange. I use street art spray paint as it is « water resistant ». As you can see on the next pic, I don’t try to get a smooth surface, or even to perfectly cover the dial plate at first. I will let this coat dry, sand it with 2000 grade, then spray 1 or 2 coats until I get a perfectly smooth orange dial plate, ready for receiving a decal. So I place the bottle cap and dial under a shooter glass and will let it dry for about 24 hours before sanding and spraying the second paint coat. The 24 hours drying time is really important (though it could depend on the paint you use). The paint I use looks perfectly dry after about 5 hours but if you spray the second coat without waiting enough, that coat won’t perfectly adhere to the first and you could get a granular surface like an orange peel. And here is the dial waiting under the shooter glass. On the right is a « negative gilt » dial (third and last matte varnish coat) On the background there are two Raketa 2609 movements from the 70ies, quietly (really loudly to be honest) ticking for test after I‘ve recently serviced them. Now it’s 5:45 AM so I will have a and go to the train station. I’ll sand the dial plate this evening and spray the second paint coat tomorrow morning. Then sand it in the evening and spray the third coat (if needed) the day after. DAY 02 - DAY 03 : So here's what you get after the first paint coat … doesn't look really good but no matter as there's still some work to do to get a better result. And here's what you get after 3 coats of paint, each one sanded with 2000 grade, to get a perfect finish, flat and smooth. Now the dial plate is eady to receive the decal. DAY 03 : I won’t explain anything about Photoshop and Illustrator here … I’ll only explain how I print my decals. One thing really important, from my own experience, is the definition of the design. I’ve tried several, from 1200ppp to 6000pp and the best results I’ve got on printing decal sheets were with a 4000ppp definition. So all my dial designs are done in 4000ppp. The result is really BIG files … for example an A6 template with 12 dial desings ready to print is about 800Mo. As that dial is black printing only I open it with Photoshop and let the softwre (so ont the printer) deal with the printing quality. My printer is an old Epson Picturemate with a 1200 maximum definition. As the good quality decal sheets are not cheap and as I’m a « skinflint» I often print on A7 sheets … 6 dial designs on one sheet. When printed you should let it dry for about 4 hours then spray 2 really thin coats of matte varnish, letting each coat dry for at least 12 hours (24 hours is better). DAY 04 - DAY 05 : 2 days of speed-hiking with my wife so I didn’t worked on that tuto. You can check on the net what speed-hiking is, but to summarize it’s hiking as fast as you can with really light backpacks, trying not to run (or only short runs). On a good day you can walk 5 to 6 miles/hour … when trained you can walk up to 6,5 miles/hour … and while I trained for my first 62 miles ultra I achieved to walk (no running) up to 6,85 miles/hour (11 km/heure). DAY 06 : Today is Monday 6:00 AM. It’s been 5 days since I begun that tutorial and … my legs ache and all my body is painful (see Day 04 - Day 05) The dial plate is ready and the decal sheet too. You can see that the decal sheet looks matte now. That is because I have sprayed 2 coats of matte varnish on it, to protect the inkjet ink while I’ll soak the decal in water. Of course if you print with a laser you won’t have to spray varnish as the laser inks are (almost) water resistant. First thing to do is to chose the best item on the decal sheet and cut it round. Then you are ready to go. On the next pic you can see all you need now : - dial plate … fixed on a foam board using the dial feets - decal dial … nicely cut round - tweezers - thin and smooth brush (mine’s a watercolor brush) - some « micro set » … or just vhite wine vinegar (it helps the decal to set on the dial plate) - cold water Now you put the decal in cold water and while it soaks you brush some micro-set (or white vinegar) on the dial plate. Then you put the decal on the dial plate. Here you can see why I prefer using clear decal sheets on coloured dial plates … because it’s much easier to « perfectly » positionate the decal, using the central hole and the date-window. When you’re happy with the position of your decal you use a paper tissue to absorb the excess of water. Do that carefully as you don’t want to move the decal on the plate. And here we are … everything worked fine while absorbing the water and the decal position is OK. I’ll let it dry for about 12 hours before I cut the central hole and the date window, before I proceed to the varnish finish. Still Day 06 but 7:00 PM The decal has dried for about 13 hours so now I can proceed on cutting the decal sheet That's what I do then I : - fix it back on the foam board - apply some « micro set » around the center hole, the date-window and the outer diameter - gently press with a paper tissue so that the decal is perfectly applied (no more «air bubbles) And I let dry for 3 hours more Evening … 10:00 PM Now the decal is « perfectly » applied and dried and ready for the finish Last pic for today is after spraying the first coat of glossy varnish I will let it dry for 12 hours, sand it with 2000 grade paper and apply the 2nd coat. DAY 07 : 20:00 AM … only 1 pic today just after finely sanding with 2000 grade the 2nd varnish coat I applied yesterday DAY 08 : Yesterday evening I applied the 3rd and final varnish coat after finelt sanding and cleaning And today I can show you the final result … and say I'm pretty happy That dial is so glossy it’not easy to get a good pic, even on close-up. May I say that me hpone is nit the best at shooting pics (just like me) and the actual dial is much much better that it looks on the pictures below. I hope that you liked that tutorial and that it could be helpfull to members who want to try to build their own watch dials. I’ll try to make better pics with a real camera and a better lens … next week of the week after, after luming the dial together with the hands. Then I will still have to get a case and rework it so that it could be a 980,016 lookalike. Some of you may wonder how much time did I spend to make that dial. It took 8 days to achieve the all process but I spent only 1 hour the first day then only from 15mnm to 5mn the days after. So, apart from the design work on Illustrator and Photoshop (which took me hours), I would say that the whole process is about 2 to 3 hours. I must say that it's not my first try at dial making and I've trained for 2 years now. So if you want to try you should consider spending a few more hours but it's really worth the time spent as at the end you get your unique DIY dial.1 point
-
Hello, As a 'Newbie' I'm browsing the net to discover technics , guidelines etc. on my new hobbie. I found that document from US war department dating 1945 about : 'Ordnance maintenance for Wrist watches' ...as you'll notice it's also an introduction manual for vintage watches, and some american watch models Looking at it, I thought to myself how lucky we're to have internet and online courses ... P.S : name of the attachment, is the official document name in US army archives TM 9-1575.pdf1 point
-
Getting there.
 1 point
 -
yes I'm going to be extremely disappointed with you if you do not throw away all your lubrication's when they expire. Then if they don't have an expiry date their incredibly old and should have been thrown away years ago. I was at a lecture once where the professional watchmaker Jeff was talking about upgrading & replacing your lubricants. I thought about it realized I hadn't bought any new oils in quite a few years? So armed with $200 cash I went to the material house. I think Debbie was amused because normally watchmakers cry about the price and I said I had $200 and I wasn't concerned about the costs I wanted to replace all my lubrication's. unfortunately the HP oils were relatively new and only in the large bottles the same size as a bottle D5 at five times its cost. So this means I have roughly $200 of miscellaneous lubrication's and another $200 of two types of HP oils. Then I thought about it for a while decided that at least at home I have zero intention on ever replacing these oils unless the bottle runs out which based on the consumption of the previous oils I was using is extremely unlikely especially the HP oils I will never go through all of that. Everything at home is for personal use I have zero intention on ever upgrading my oils. If something nifty new comes out I might buy that maybe or I might buy a lubrication for amusement sake but at home I really wouldn't worry about the expiring dates of synthetic oil. My understanding from the watch companies is that there is concern about each time you get oil out of the bottle there's a risk of contamination. That's why supposedly Rolex has all of their lubrication's in syringes so there's less contamination issue. Then you're supposed to replace the oil in your cups on a very regular basis so all of this becomes irrelevant because you go through your oil in a lightning fast speed if you really did that. My personal recommendation for lubrication is stay away from natural oils as I have a shorter life time even though the indications were they were much better lubricants at least while they were lubricating. The staying with synthetic and mineral oils or whatever with long life find whatever you you like and go with that. with modern cheap timing machines you can now check your performance and because are your watches you can check your performance over years you'll figure out eventually what you like what you don't like what works and what doesn't work go with that. Except if you make poor lubrication choices on an automatic for instance a lot of times the automatic mechanism will suffer and might disintegrates from use. this tended to be a more common problem with earlier automatics it didn't have jeweled bearings and to some degree this is all irrelevant if the gaskets in your watch disintegrate and moisture gets in. Rust and any form of lubrication is a really nice grinding compound.1 point
-
if you're looking for a recommendation here's a recommendation. If you look at their website they look impressive and they still can get Rolex parts officially versus the other way. https://www.nesbitswatchservice.com/1 point
-
this is a unfortunate problem for a lot of horological lubrication's zero specifications. At least with moebius you can download their tech sheets to look and see if there's any natural properties in the lubrication and see the shelf life. then yes as we discovered another discussion may still have natural substances and those lubrication's have a much shorter shelf life. then regarding lubrication I'm attaching an Omega document helpful hints for lubrication. Omega 8645_WI_40_rules for lubrication cousins uk.pdf1 point
-
Looks like you can crack the back open. Insert a safety blade into the seam, gradually widen the gap.1 point
-
That Seiko mantel tho.... and the whole 404 lot, very nice! Alot of work!1 point
-
Couldn’t leave well enough alone.
 1 point
 -
I have one of those and I'm happy with it. Doesn't cost a fortune, about $200+, and it will tell you a bunch of things about the state of a movement. And, even if you're not into repairing, it is very handy when collecting watches. Personally, I consider it a must have. Compare the price to how much you spend on watches!1 point
-
Might just need to remove those worn links as bracelet is way oversized anyway. Would be good to know if it was fixable though for future reference. Plenty of videos on YouTube showing how to size these bracelets. Sent from my Moto G (5) Plus using Tapatalk1 point
-
These CAL400 movements can make Andy's 404 club. So you can replace both the main plate and the train wheel plate from a donor movement or you just put the movement into your junk pile, and reuse its parts if there is a need. I like the idea to rebush or jewel these pivot holes, i have many of these movements and I bought them because I like them and because its a cheap way to practice without worrying too much that you destroy a movement. Even though they are cheap I have a bad dream when i do something irreversible and irreversibly bad to any movement. Once OldHippy told us that they used to bring Timexes out and destroyed them with a hammer. I must try that out at some point as a brain therapy. So what is easier, re-bushing or jeweling? And what tools are required? Be aware that if you go down on the jeweling path you also need to work on the dial as it currently says 5 jewels.1 point
-
Either things can be done. Questions for a beginner are, do you have all the tools needed? And (maybe more than one) cheap / disposable movements to practice? Then, consider if the money and time related to solving the above can be better spent for something else still in the field of learning repairing / servicing?1 point
-
The length of an extended pivot whether to take a hand or a driving wheel really depends on the design, but 1.5-2mm is reasonable. I sometimes add a little Loctite 648 or 638 when friction fitting the new pivot, but I think it's mostly psychological, as there really isn't any room for it if the pivot is correctly sized for a friction fit. If the pivot is loose enough in the drilled hole for the Loctite to have room, then it won't hold anyway, there just isn't enough surface area for it to do its magic. You really have to watch the size of the new pivot- often the wall thickness of the drilled arbor is quite thin, and the interference fit is on the order of a few microns. Too much and you can split the arbor... and of course too little and it doesn't hold.1 point
-
Another place to look and ask are owner's forums like WUS. Most members there are from the USA.1 point
-
Did a search found the discussion others making recommendations. Otherwise cousins has some of them. Then for D5 typically it's HP 1300 there just about the same viscosity. https://www.tapatalk.com/groups/seikoholicssupportforum/question-about-seiko-oils-t83.html? https://www.cousinsuk.com/product/seiko-s6-grease https://www.cousinsuk.com/product/seiko-s4-grease https://www.cousinsuk.com/product/seiko-s3-grease http://www.moebius-lubricants.ch/en1 point
-
I started with pocket watches also. And with a few wristwatch exceptions here and there, I stayed with the nice, large pocket watches. They now seem to be my forté. That, and I passed 50 a while back and my eyesight has never been great, and it's not going to get better, so there's only so small I'm willing to go. The members before me gave good advice and, being something of a novice here myself, I will let them guide you as they guide me. You will find many enthusiastic words of encouragement in this forum. We all like our "time machines" here.1 point
-
try bluing yourself. its a fun experiment. I'm just a noob myself, even newer to this forum, working on vintage pocket watches, buying non working ones using them as a training tool to service and repair them. naturally bluing and I crossed paths. use some of the hands your getting in the lot. make sure they're clean and free of any coating. test them to see if they're metal(yes, I didn't once, and immediately melted one). thin sheetmetal is very temperature-sensitive. apply a low heat/flame such as a pocket lighter, or better yet, a small alcohol/white gas jewelers/watch makers lamp(you can buy the little buggers at even Wal-*** for a few bucks. I'm gonna catch flak about that one from the watch elite on here but I don't care)I bought a vintage one on ebay for cheap but I got lucky. I've tried a couple ways: one-lay the hand on a piece of brass if you can find one and slowly apply the heat under the said brass, and then watch slowly as the hand starts to turn colors. don't hold the flame in one place. slowly guide it around as if you're lighting tobacco in a pipe. start with the flame about 1/2-3/4 inch away from the underside of the brass. it's amazing. you can basically color your hands to any color on the spectrum! blue, you say? well, what shade of blue? light? dark? purple? gold? you name it. just watch your color turn from light tan, to light cobalt...the color is only limited by your hand and the time allowed under the flame, and distance of the flame. try a couple for practice and you'll have the hang of it. it's easy. the other I try but only because I'm a machinist and I have access to brass small brass chips and dust. I made a small tray-like device out of brass and I put the chips and dust in it, lay the hands into the chips and set the flame to the underside of that. make its a little easier for me to hold and control. but you get the idea. the tube you speak of, and I'm not familiar much with ETA movements yet per se, but I think that has to stay. the other thing if you don't know the diameter, it if you have a staking device, you can open or close the bore in the hand by staking it, with the correct stake and stump. hey, have fun tho! dang things are addicting! then move onto your own screws. thats even more fun! oops almost forgot-watch your fingers! and use a vise grip or pliers of some sort to hold on to the brass! of course, I've NEVER burned a finger or two. ha1 point
-
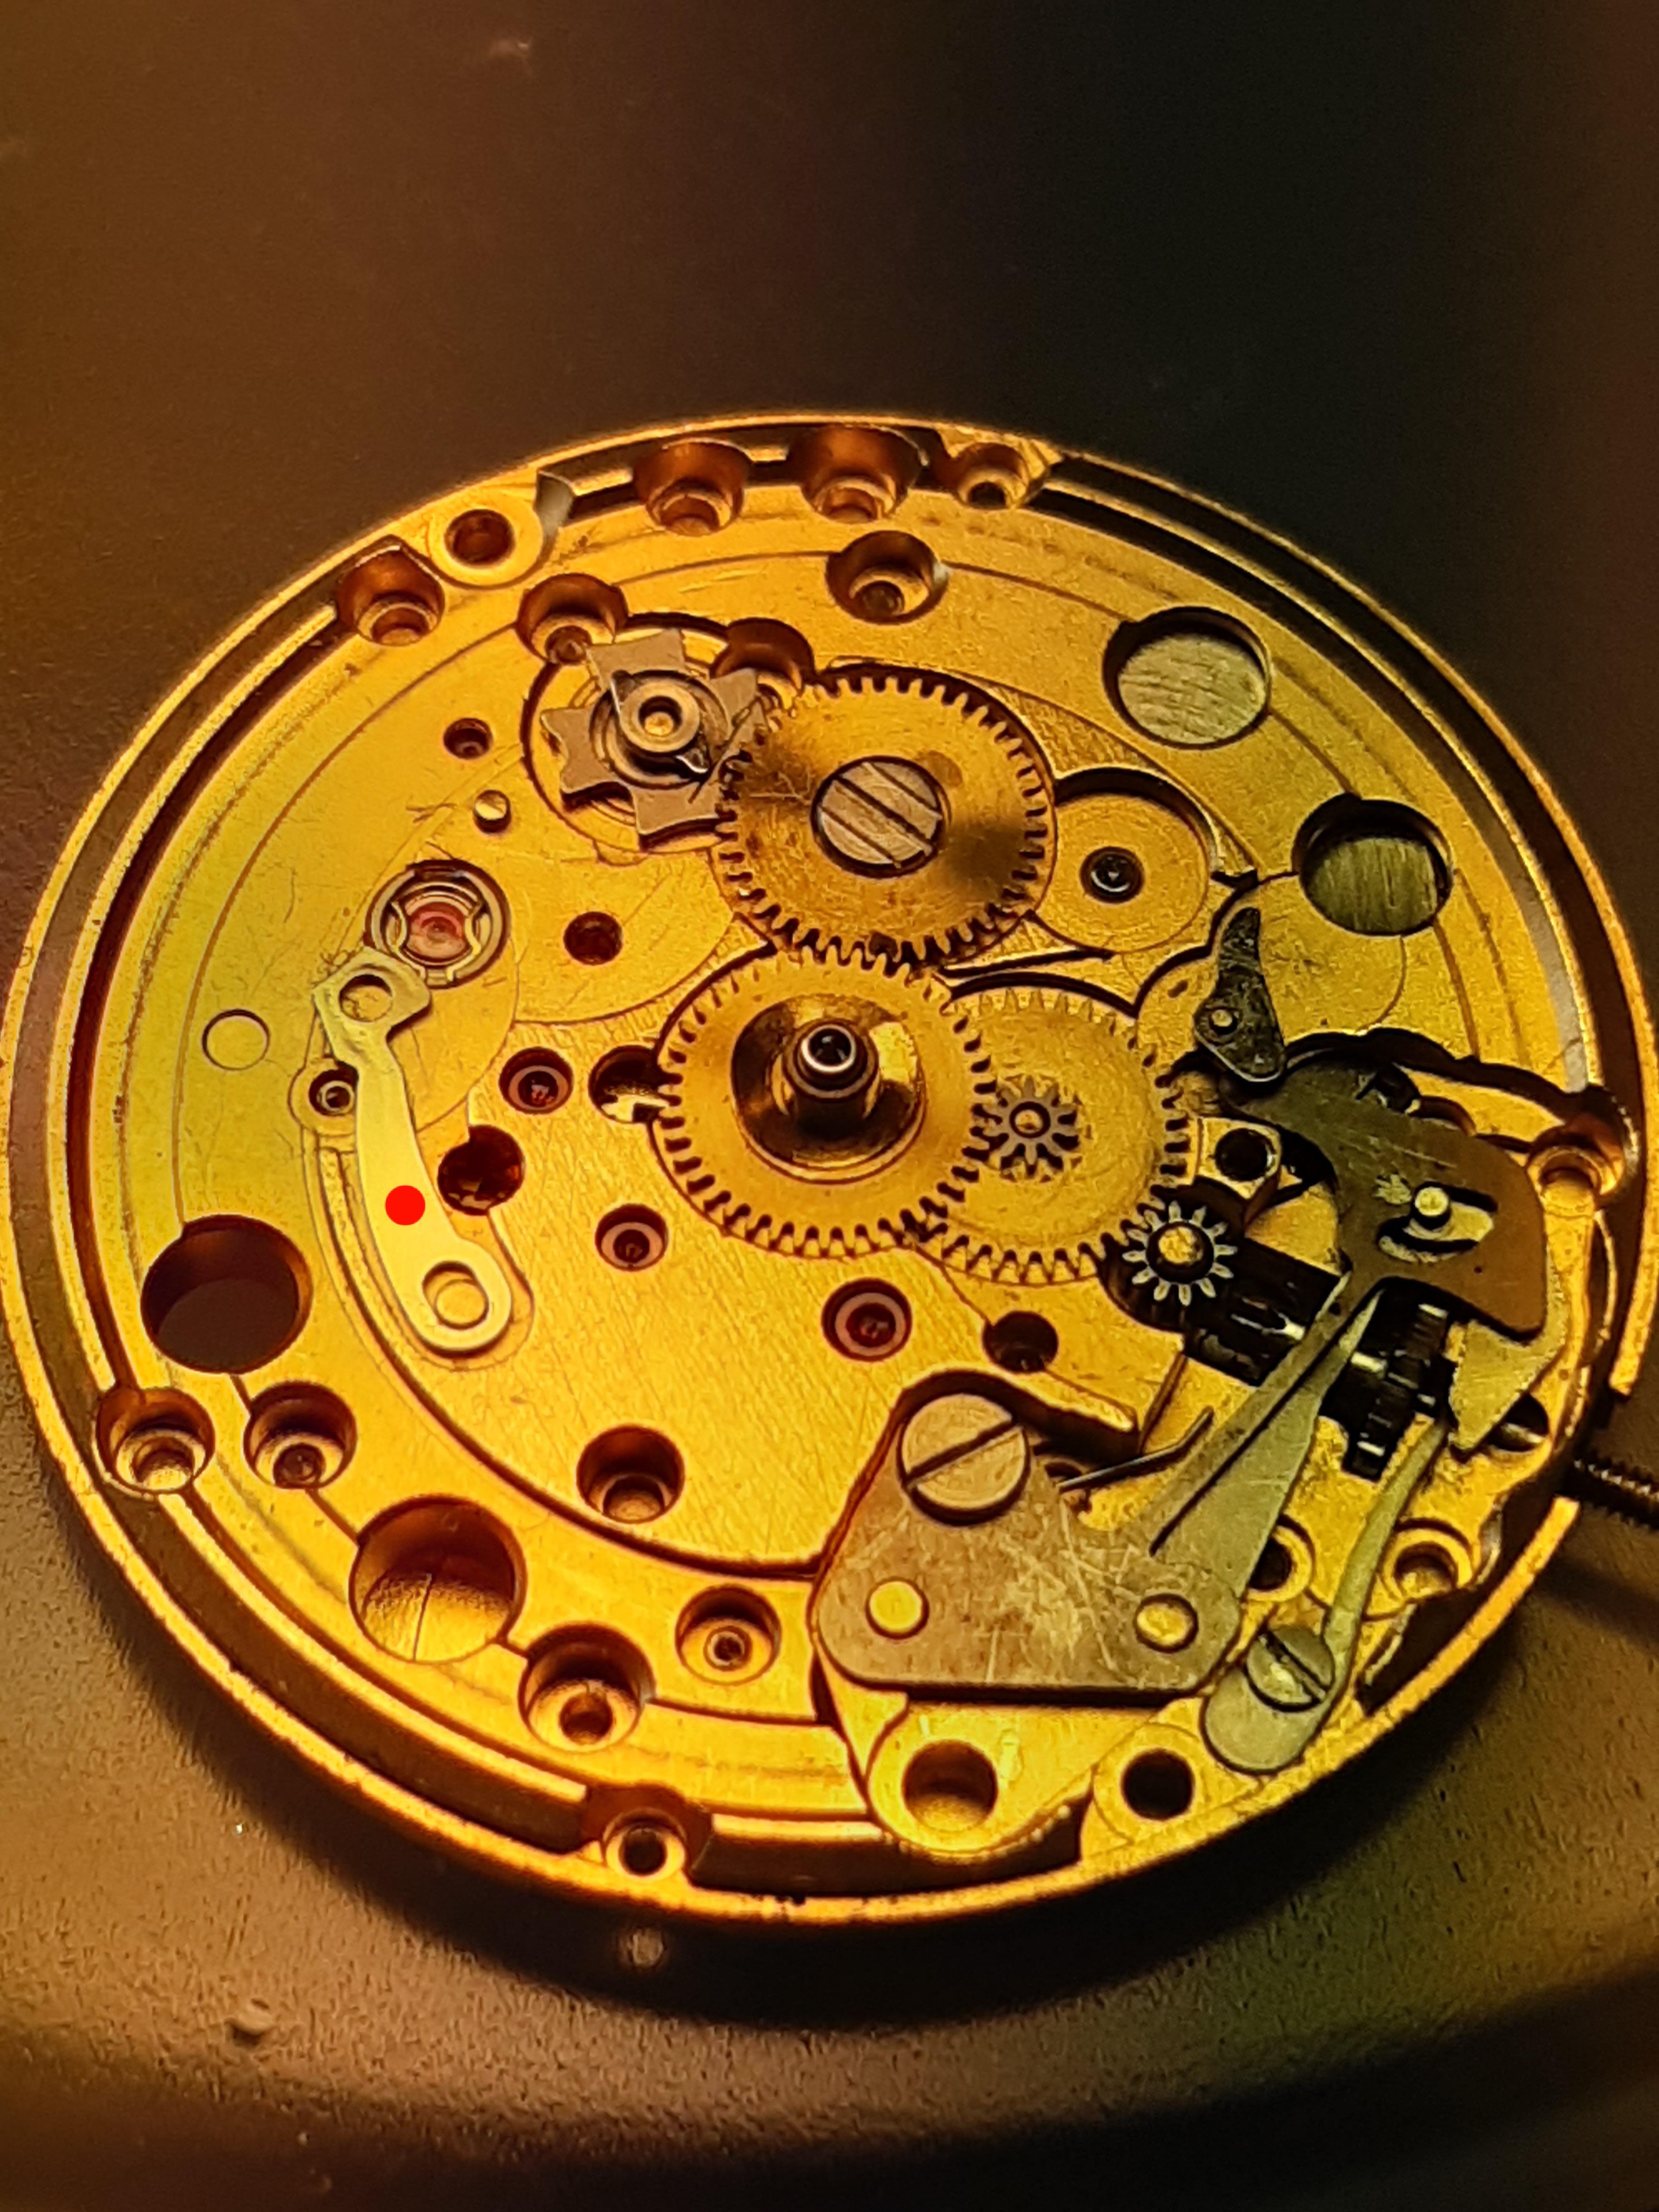
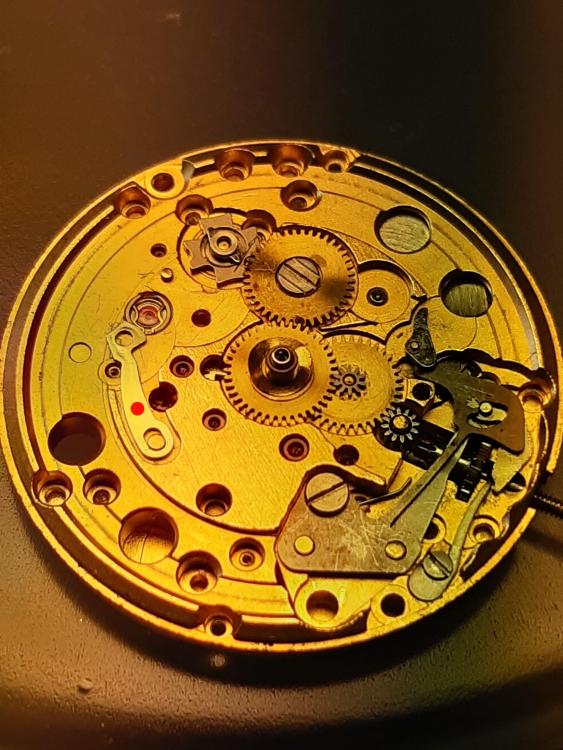
Hi Challenge solved. I made the "spring" stiffer and wider, the spring that reacts with the date jumper at 9 (the red dot on image). That gives more reaction and power when pushing crown in.
 1 point
 -
I believe my machine comes with a basket for that purpose, pictured here: https://imgur.com/7kdCVrj Thanks1 point
-
No worries, For the ultrasonic machine, you'll need to put some water in the machine so that the ultrasonic waves are transmitted to the parts in the jars - to about 1/2 or 3/4 the height of the little jars but not so much that they float about, I also keep the tops fastened when cleaning. I should also mention that you shouldn't let the jars sit directly on the bottom of the tank as it can shorten the life of the piezo element on the bottom of the tank (underneath, on the other side). Most ultrasonic cleaning machines come with a plastic insert or a sort of basket which hangs from the top (like a soap and shower gel wire shelf/trap which sits on a bath, above the water).. I just use a bit of slightly wavy thin plastic in the bottom with lots of holes punched in it - some of the plastic mesh which whiskey bottles are protected with might work if cut to shape.1 point
-
Hello, well done in getting this far. Firstly, for Seiko there are more knowledgeable people than me. Regarding oil, there is a sticky in one of the forums here - I think it's the watch tool area.. Basically you'll probably want (or equivalents of) 9010, 9415, HP-1300.. there are also a couple of different slipping greases for automatic watch mainspring barrels which you can choose from but budget will probably be the biggest factor with those. I'm aware that Seiko has it's own specifications which include Moebius 9010. In terms of cleaning, I use little single serving jam jars in an ultrasonic machine - that allows me to use a volatile cleaner and clean parts by groups of mating parts or by muckiness. Rodico.. I use it all the time for holding things more than actual cleaning - it's really useful for holding things while inspecting.. that being said, it's good to practice picking up and moving things with tweezers. It's really important that tweezers are correctly dressed at the tips as it makes the difference between huge amounts of frustration or being able to pick up really small stuff without problem (with a bit of practice). I switch between the outside and inside of the tips to bring both surfaces to where they need to be in shape and position. I've found a hand-held diamond hone is about the right thickness (6-8mm thick suits me) to do the inside in a way which will allow both tips to meet nicely - switching between them so one tip is on the abrasive, and the other underneath on the smooth plastic.. as well as making sure the tip is relatively flat to the middle of the inside. Tweezers.. partly covered above.. there are a few types which are handy. I mostly like to use brass tweezers for most stuff, switching between a wide 2mm tip and some really fine tipped - suitable size for hairsprings, can't remember the number/ 5?. The brass tweezers rarely leave scratches but need to be touched up a bit from time to time - the finest brass tips can also bend easily.. I've got nice quality tweezers and some cheap brass ones shaped by myself.. for steel the anti-magnetic tweezers are usually worth considering over plain steel (which seem to be stronger but need to be demagnetized periodically). I don't have experience with the carbon fibre tweezers but realise they will have some uses.. I really like to aim for greater precision and have gradually gone smaller with my usual tweezers. Oilers.. the smallest basic Black or sometimes Red oiler is generally a safe "if only one" choice but a set aren't overly expensive and will allow you to get a feel for what you prefer. I keep meaning to get a nice basic set but the cheap ones are good enough. Oil Cups.. There are some really cheap and good options on places like ebay or the Cousins website. Oil cups are used at the bench so that oil bottles are not contaminated and so that they can be stored somewhere less likely to get knocked over etc. You don't really need anything fancy but in use they should be cleaned, partially filled with a little bit of oil in the bottom of each, and the top replaced when not in use so that dirt and dust is less likely to get mixed in. Oil should be replaced at reasonably regular intervals to reduce dirt building up in it.1 point
-
You did say you wanted more.
 1 point
 -
Quite a lot of them have already been posted on WRT at some stage, but I have no shame, so I'll post them again.1 point
-
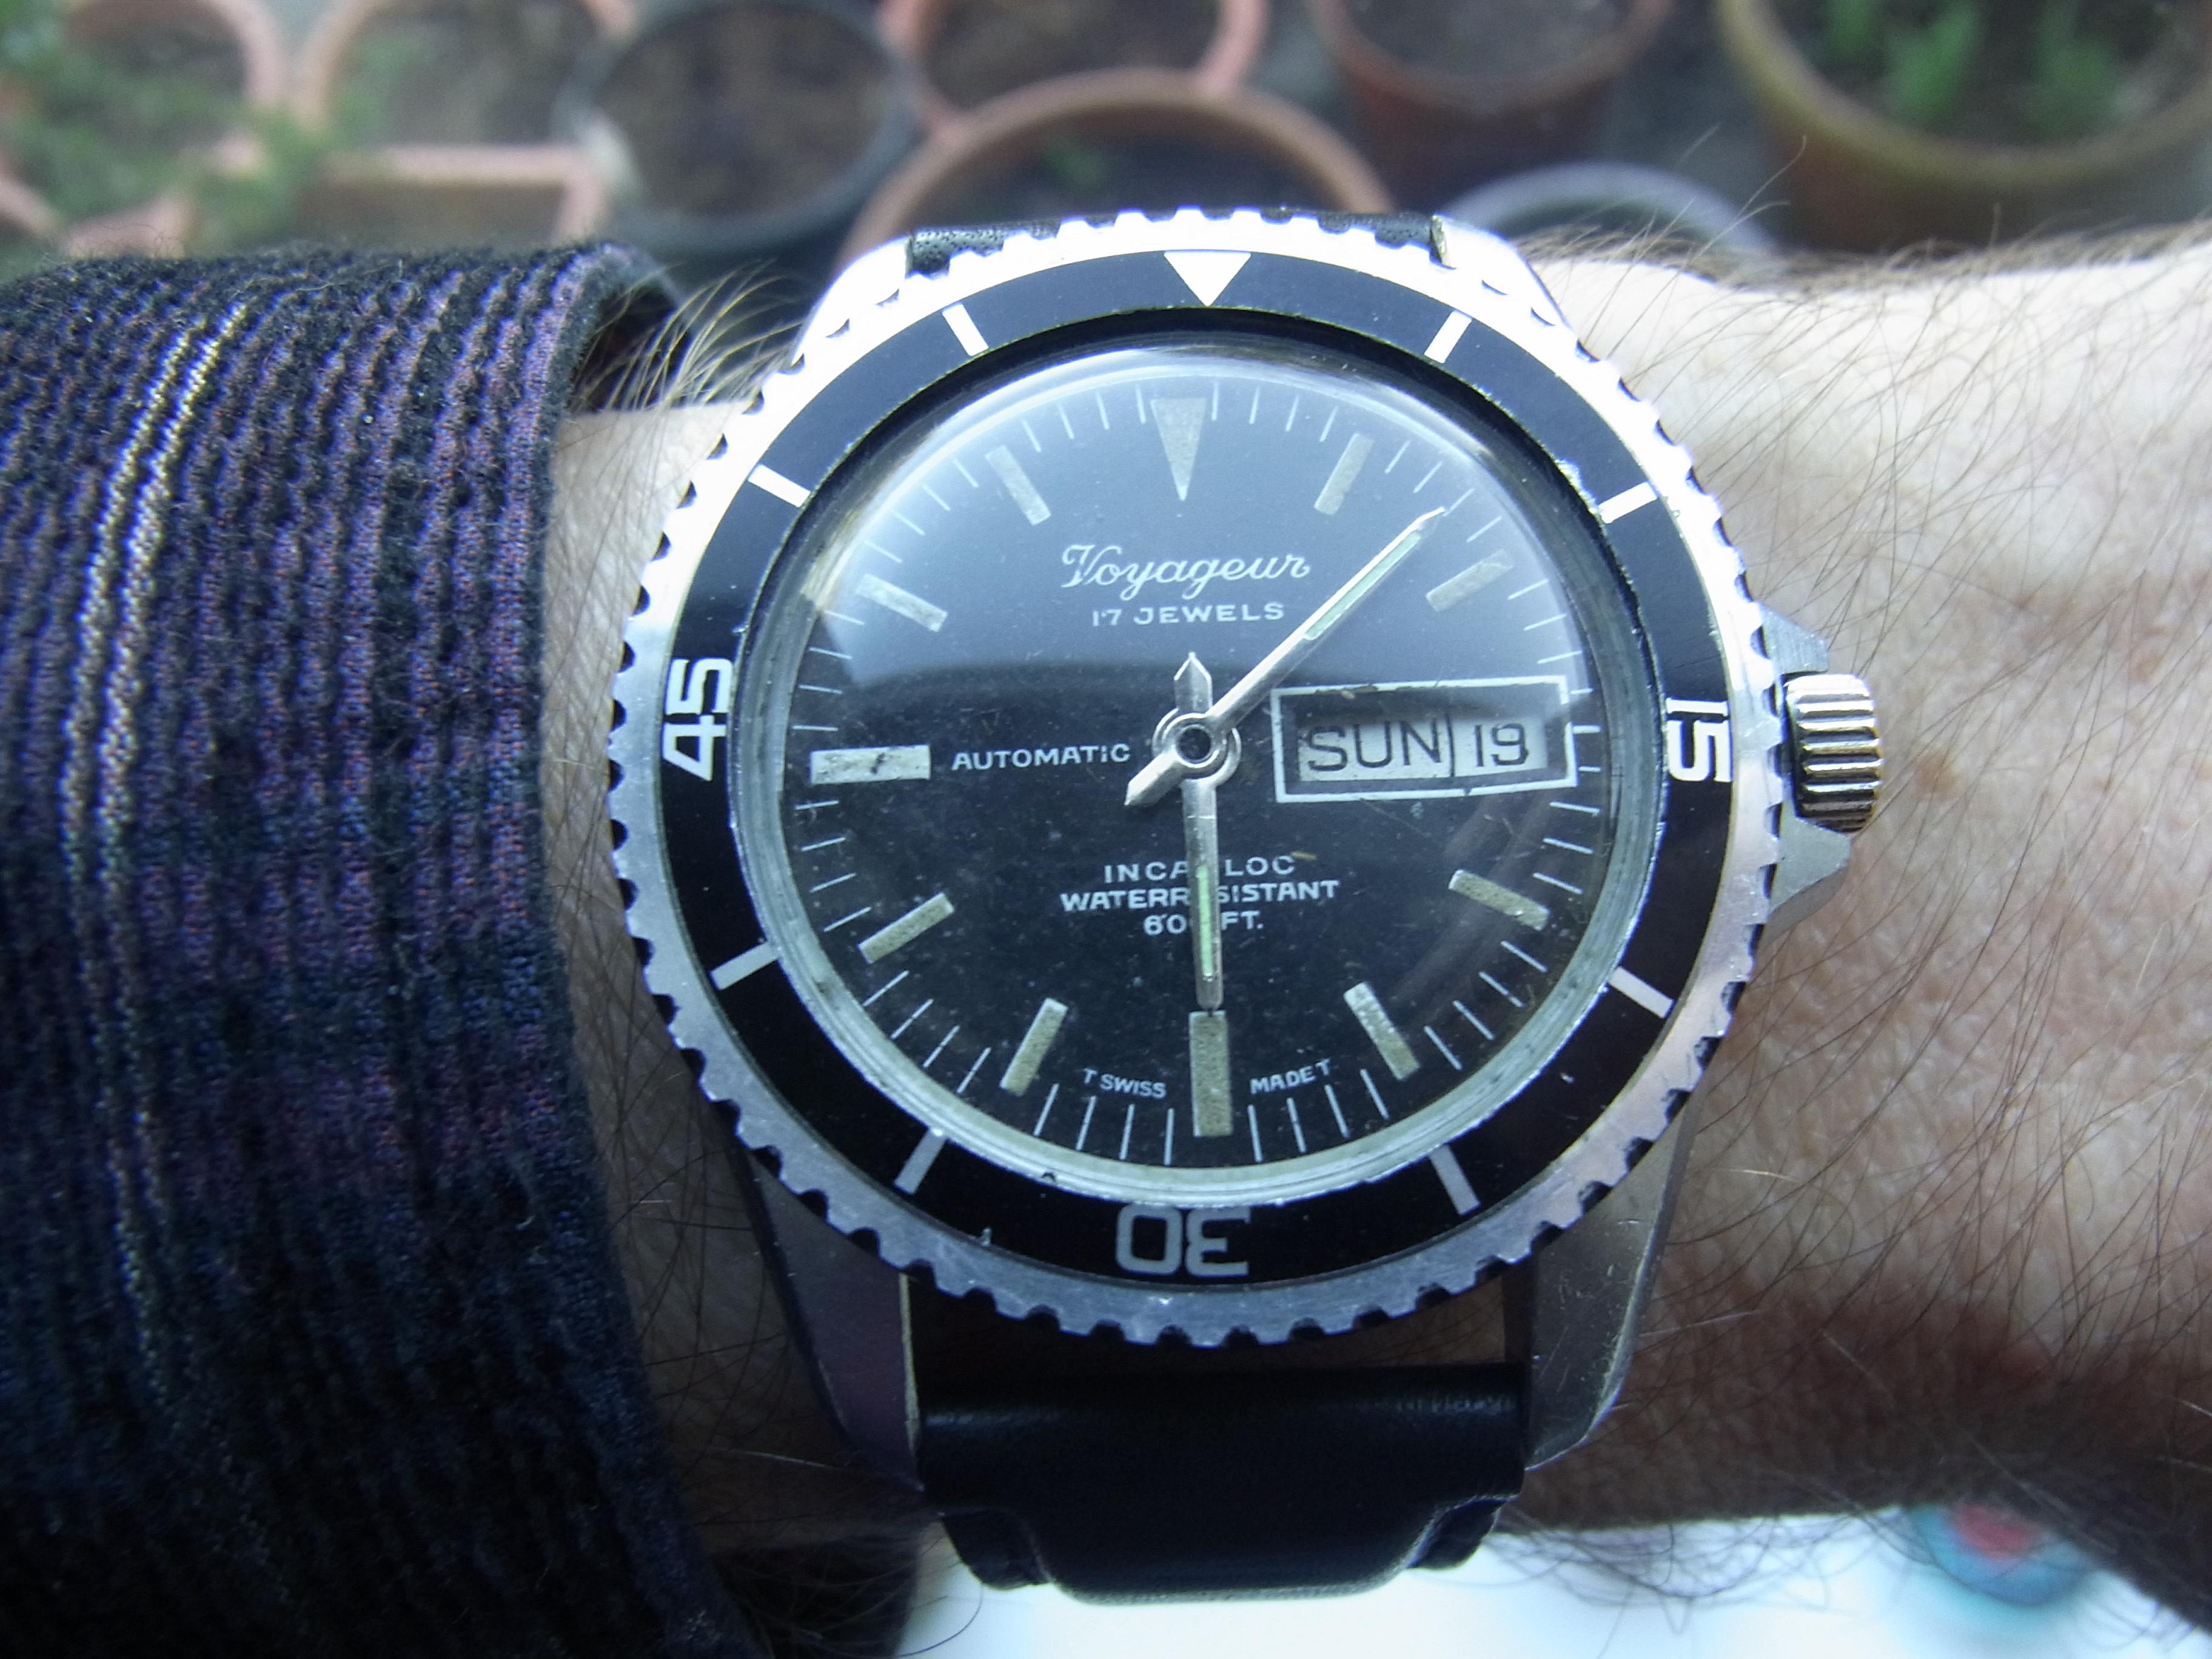
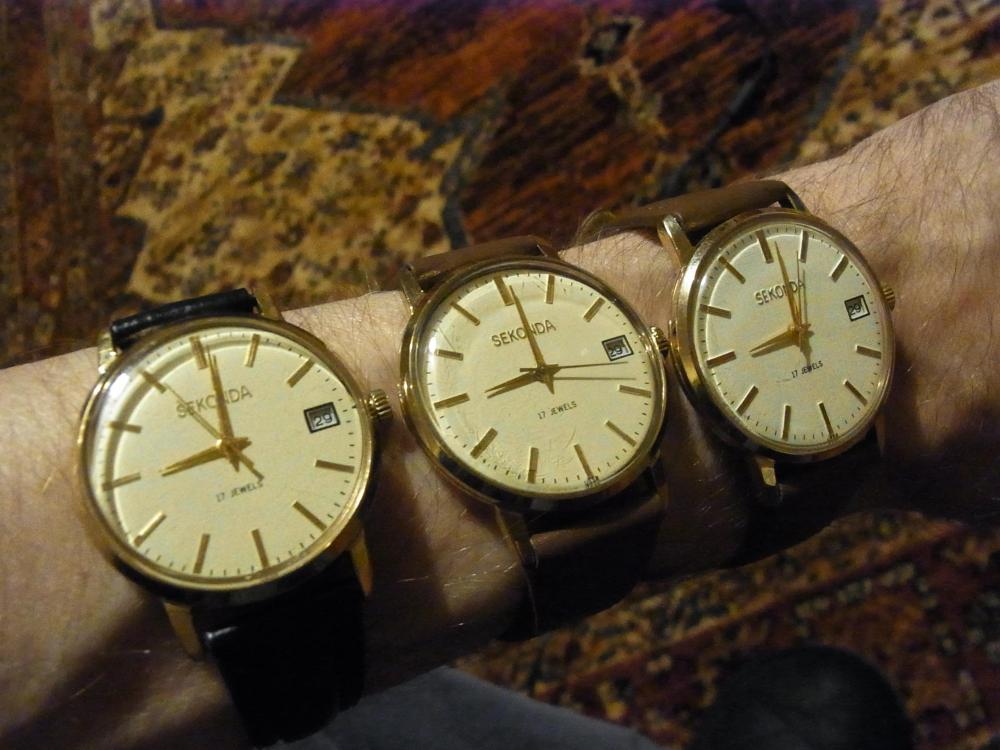
Here is the watch that started it all. A Sicura "Voyageur" 17 jewel Ronda automatic.
 1 point
 -
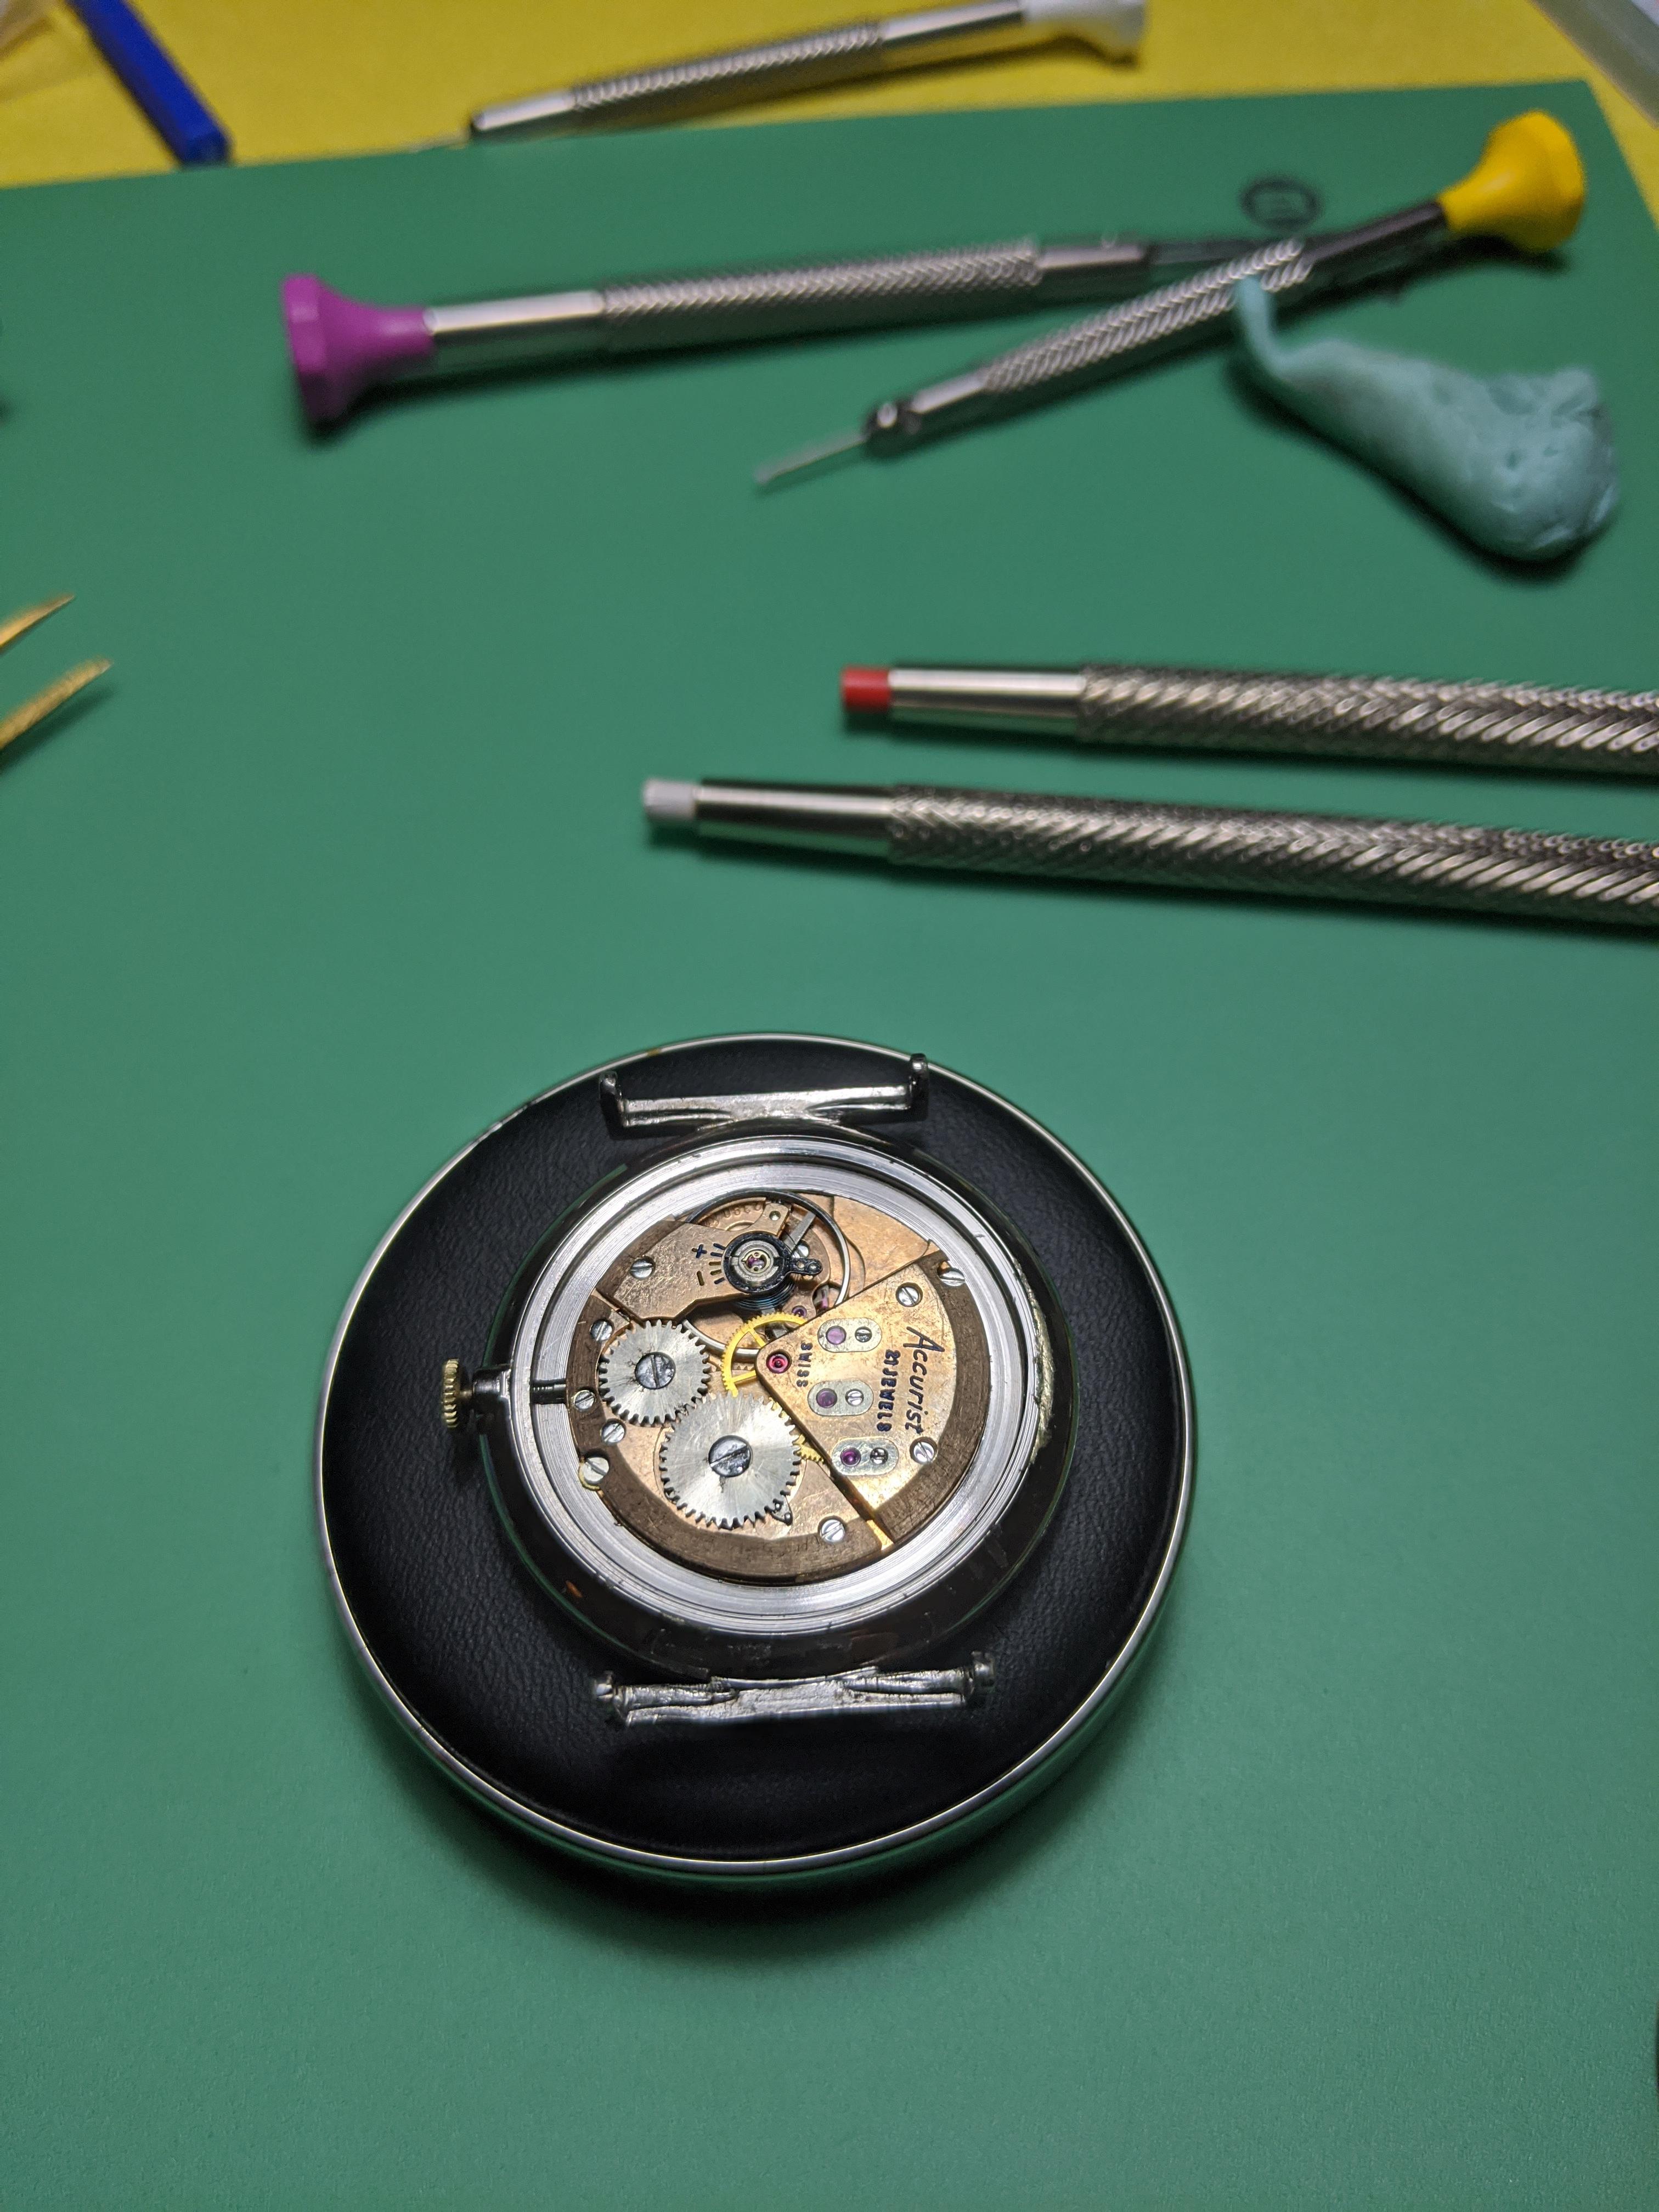
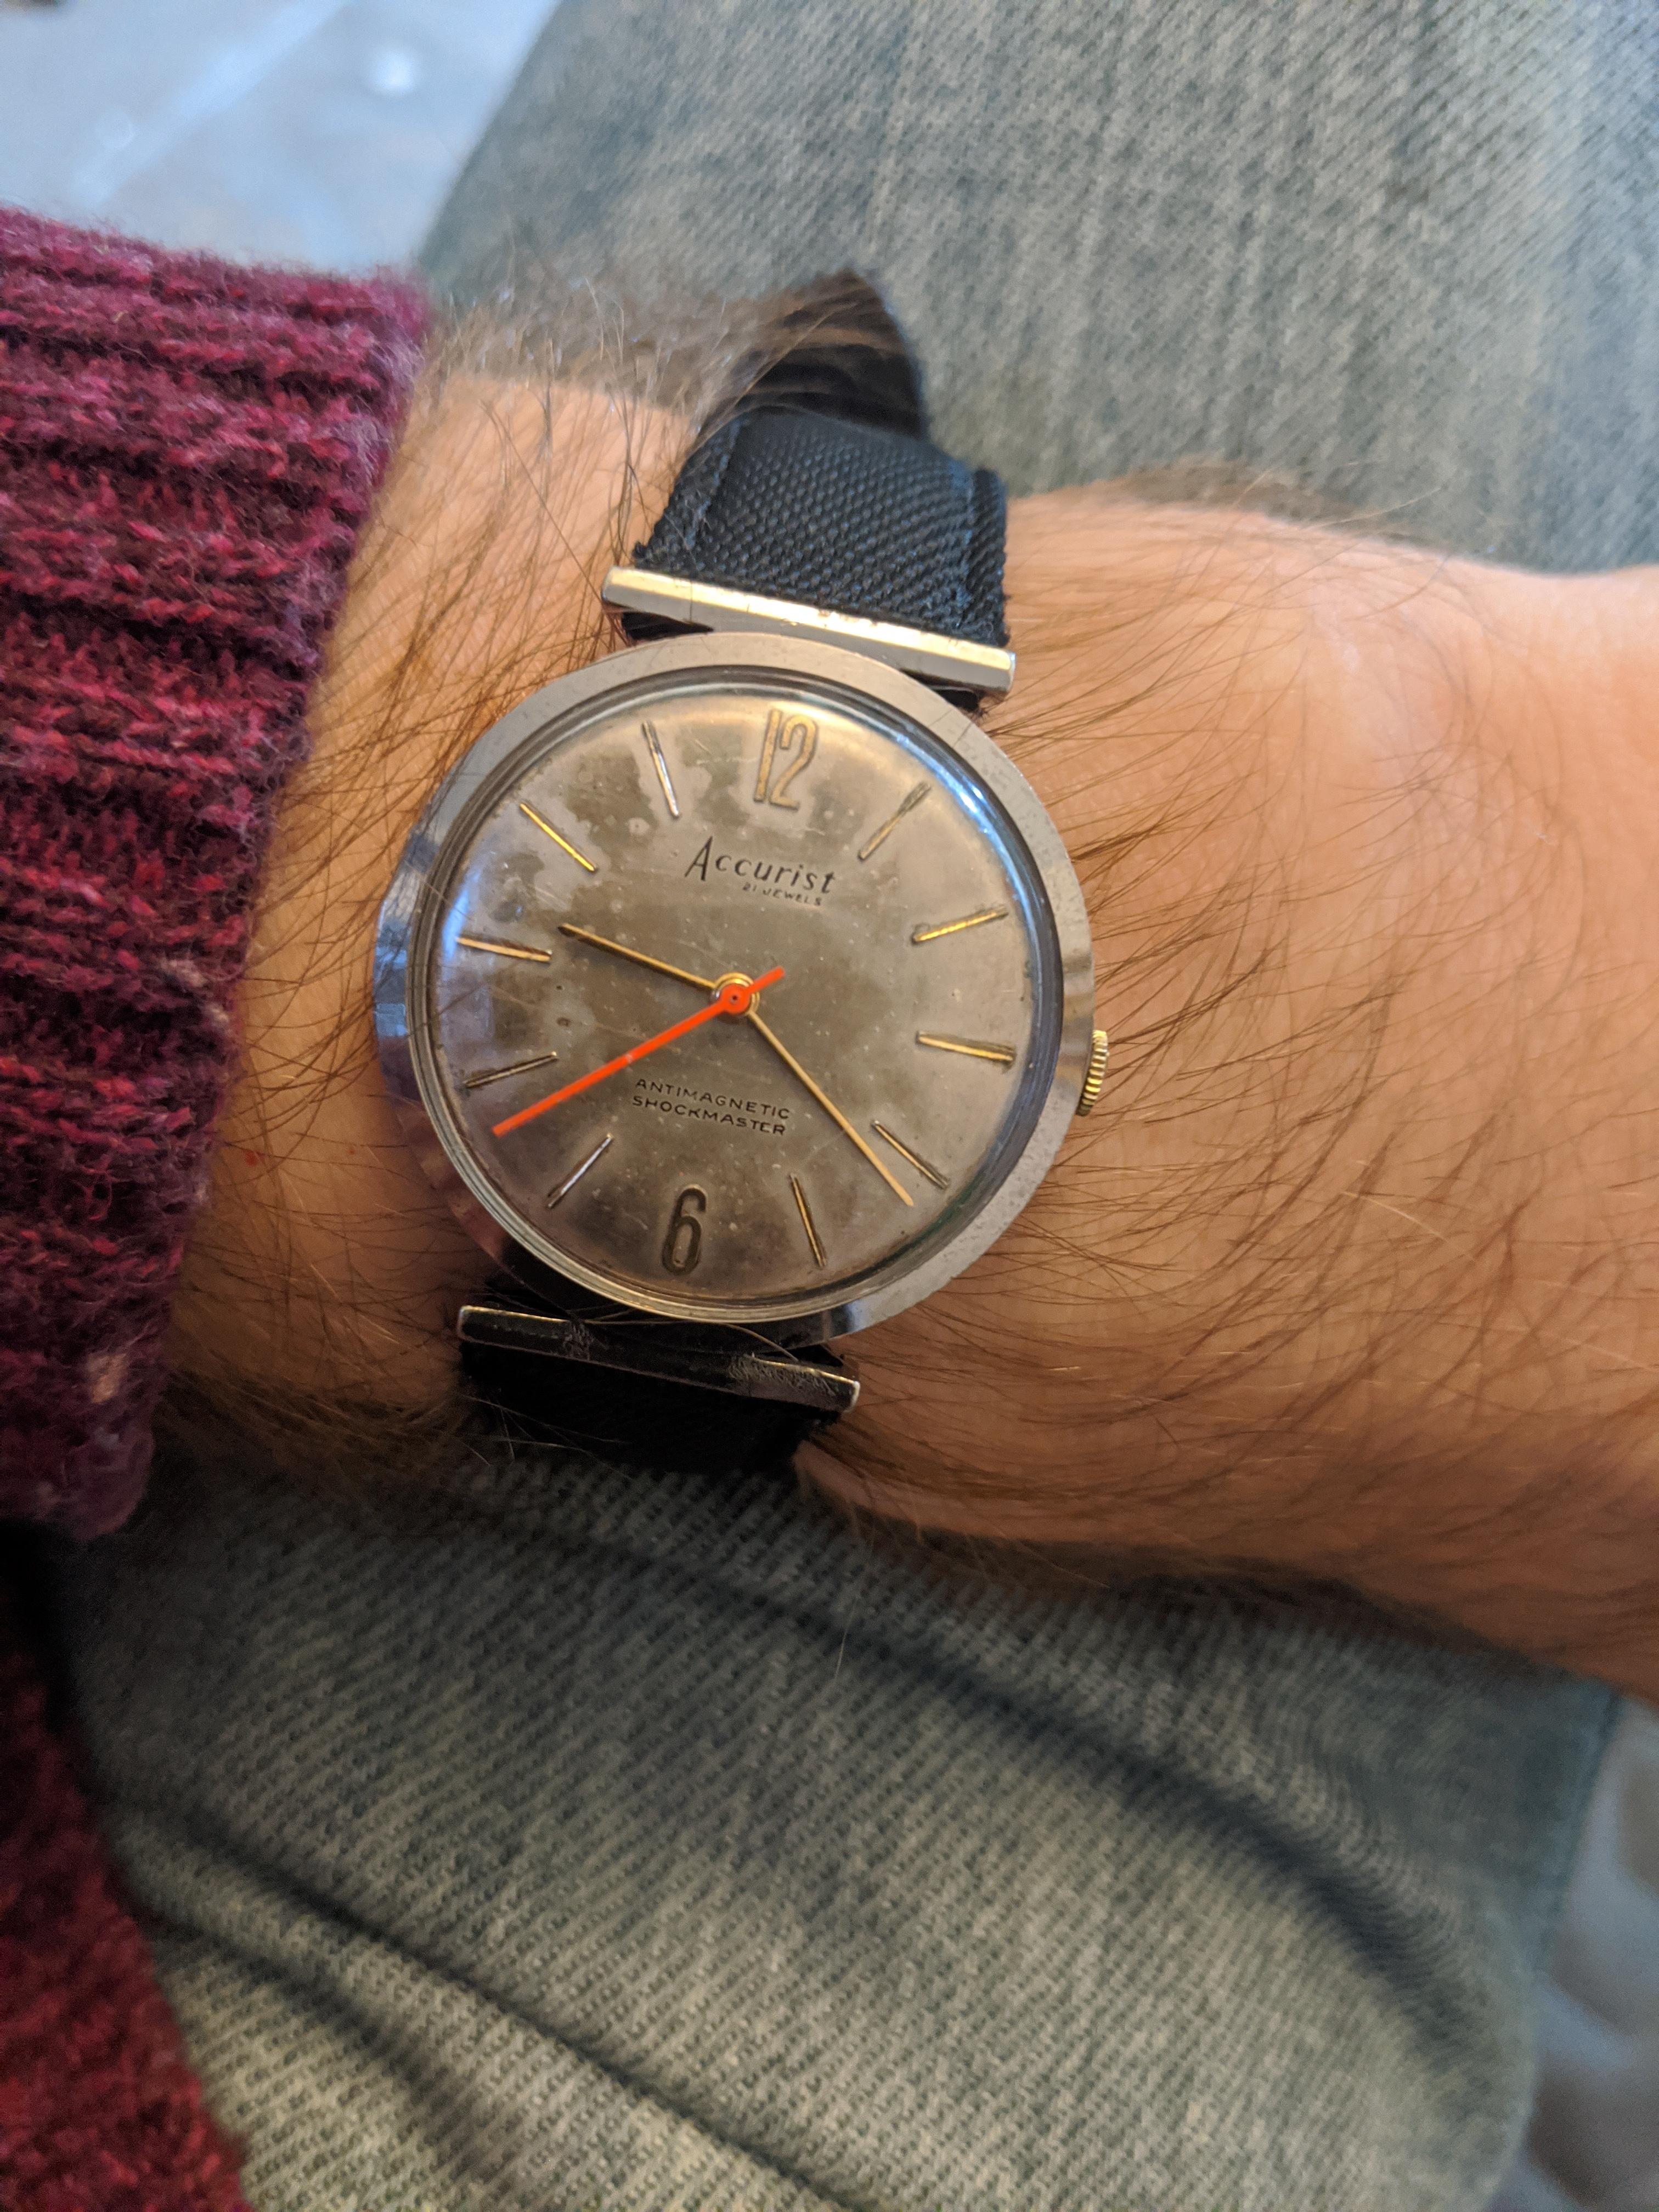
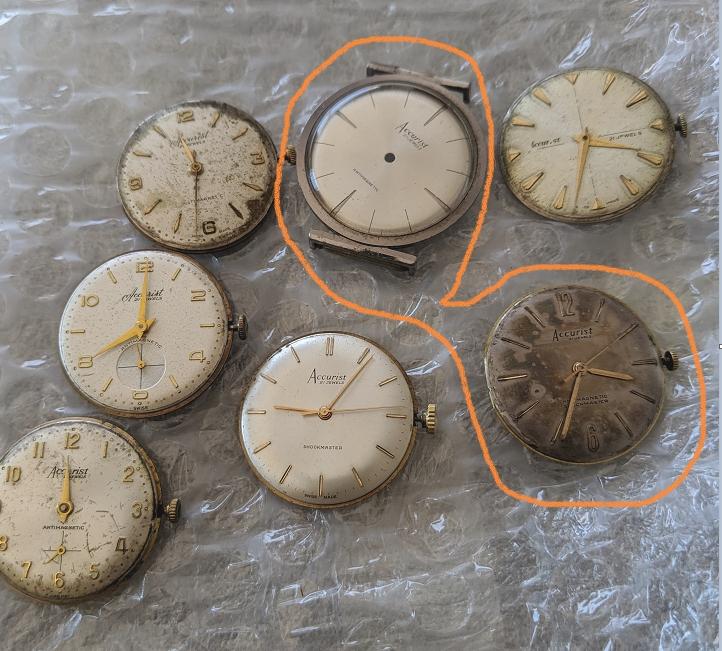
Think this should just about qualify?.. this job lot of 6 'dead' Accurist movements + 1 case was £12.85 including postage (so less than £4.04 with $10 postage for the whole 6), 4 of them were ETA 2390s, 3 of which I have killed now... but one I have got running well enough that I built it back into the case that was also in the lot and it has been running with reasonable accuracy (within +30s/day dial up, better than that if worn) for a couple of weeks now. I used the most patina'd of the dials as I kind of like it and jazzed it up with a bright orange second hand. Since it is my first 'saved' watch since starting this hobby I intend to keep it! I haven't done anything yet with the 2 other movements, but since I don't have another case it will be tough to rescue them fully!


 1 point
 -
My first 404 Club member to arrive: Purchase price: $3.93 out of the Czech Republic. I haven't put it on the timegrapher yet, and the amplitude is obviously low, but it runs! Fully jeweled Swiss movement! I have 7 watches in transit that collectively came in under the 500 limit. All NOS, silver plated (I assume), and with fully jeweled French movements. I also won auctions for two watches out of Germany well under the limit, but Coronavirus craziness surprised the seller and I with shipping that was NOT OK, so they were cancelled. Bummer.
 1 point
 -
Do you have the original mainspring to measure? The reason I ask is that you've been supplied a 1.00 x .12 x 300 x 9.5 whilst ranfft says you should have a 1.00 x .11 x 260 x 9.0 So is a GR2453 more appropriate than a GR2467 if ranfft is correct?1 point
-
Second and third choices are definately not good ones, there is no gurantee replacements off ebay run any better. You can have a long story to tell and 2500 bucks short in no time. Did Rolex service your watch before? and do we know of a better choice. What is wrong if anything with your watch is unknown. Even if your watch keeps on loosing 20 seconds a day after a service, it's sentimental value is genuinely invaluable. Regards1 point
-
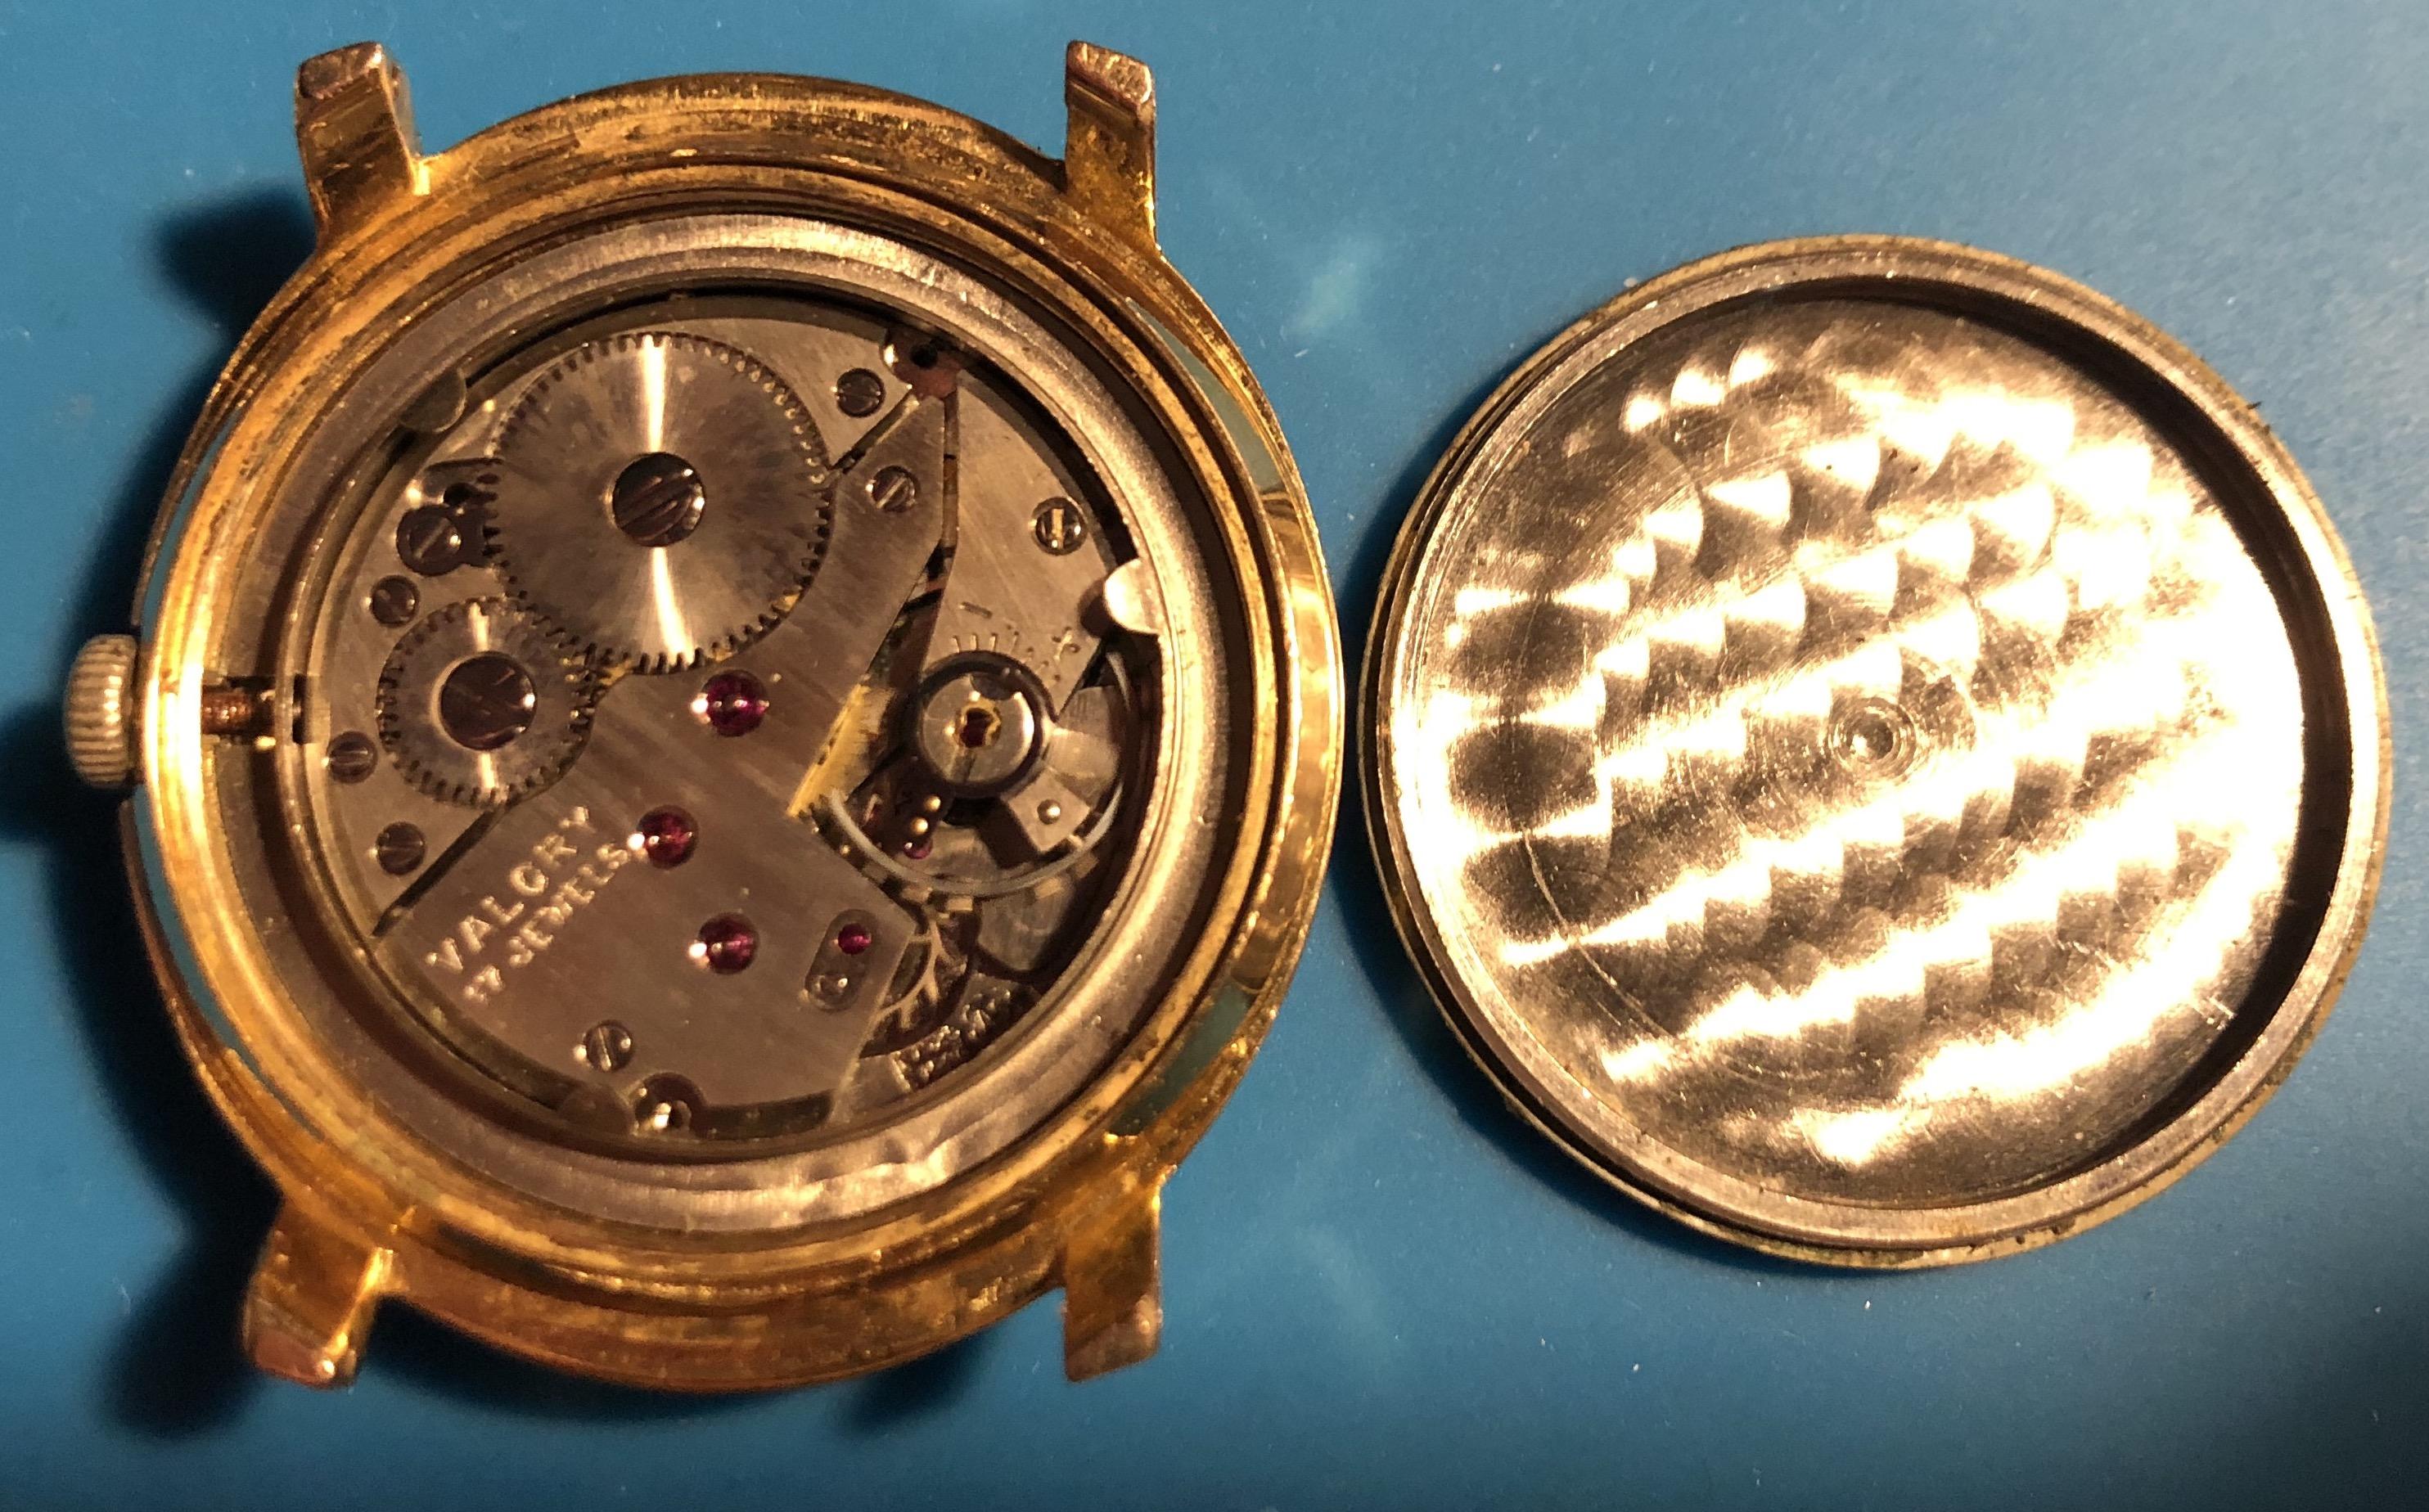
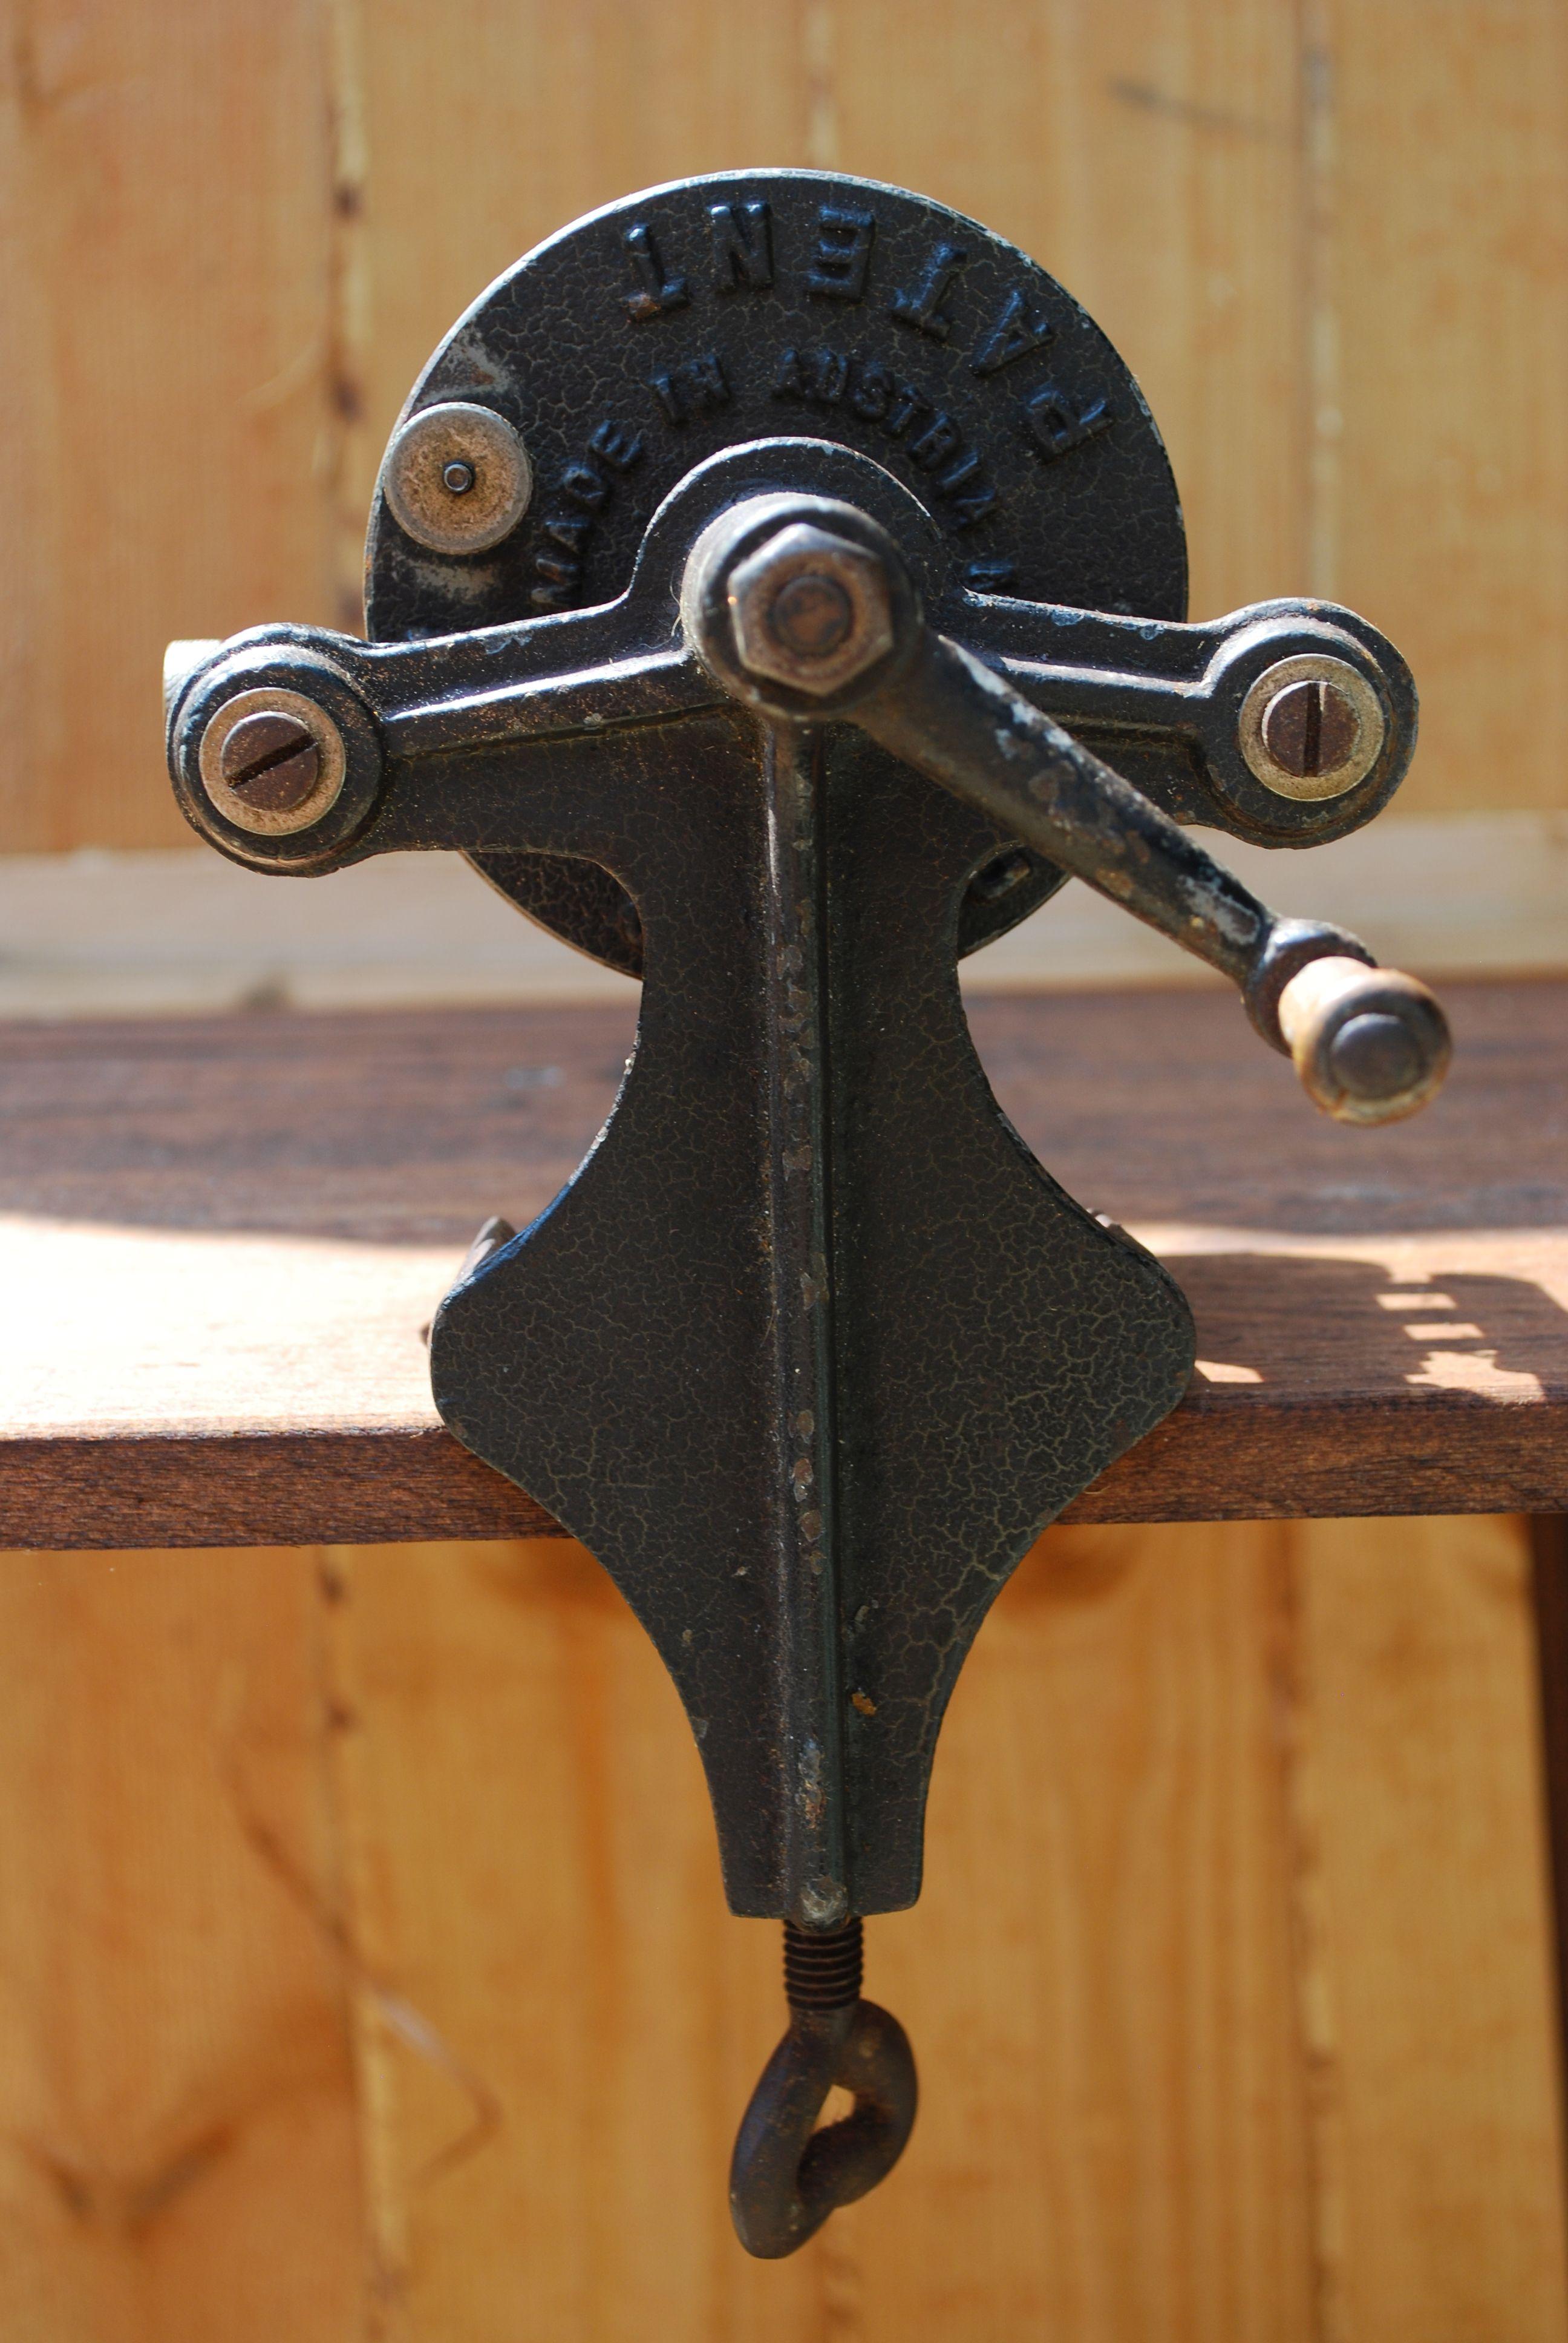
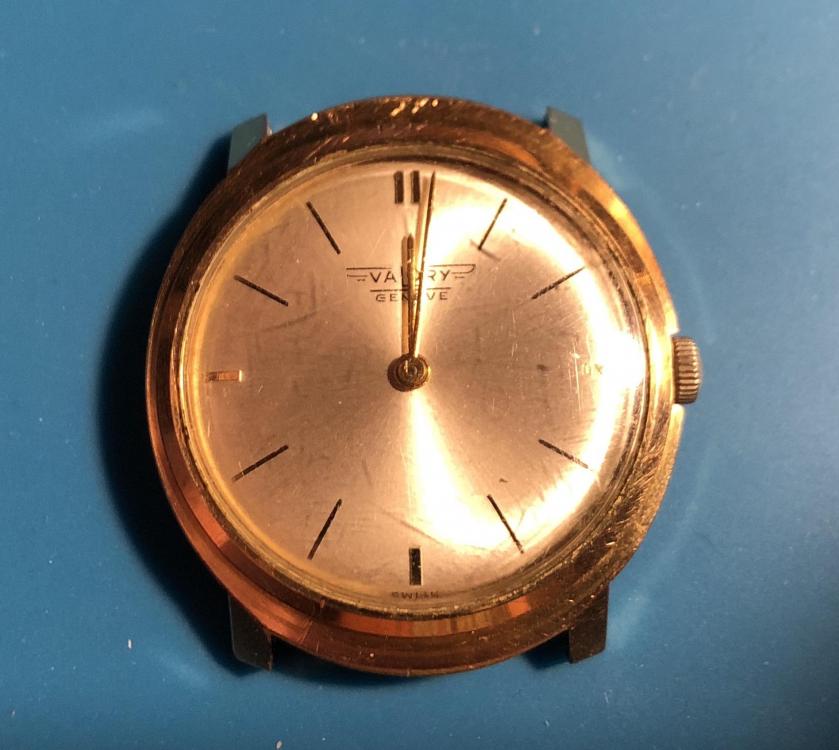
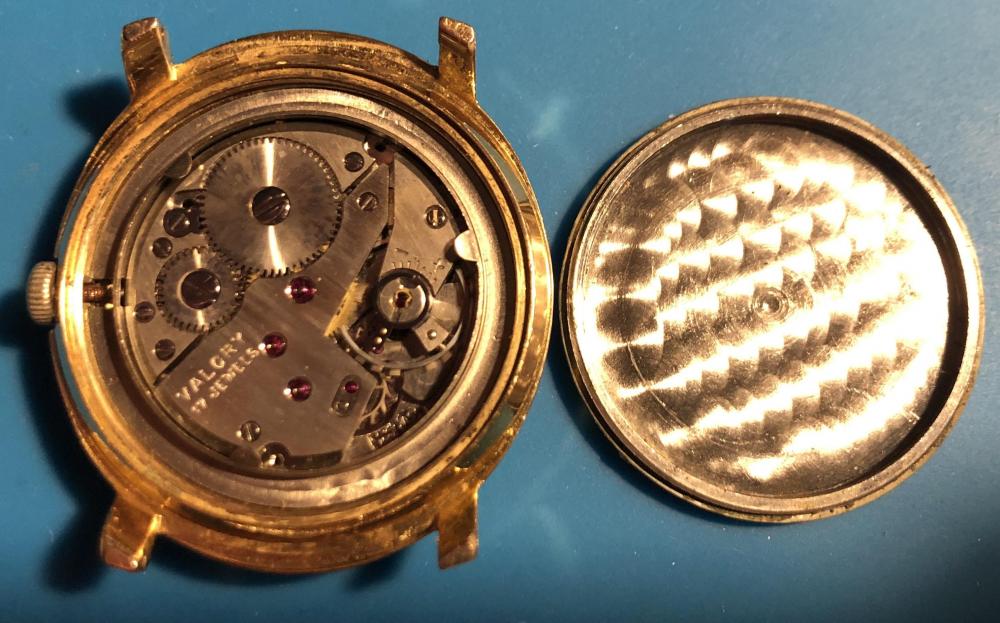
I could not resist. £5.5 + £17.99 delivery from eBay. It is in a better shape than I would hoped for, lubrication is still in place and turns smooth without side and end shake. I am going to clean it up, i might leave the paint as i like it as it is. RPV marque deposee Made in Austria

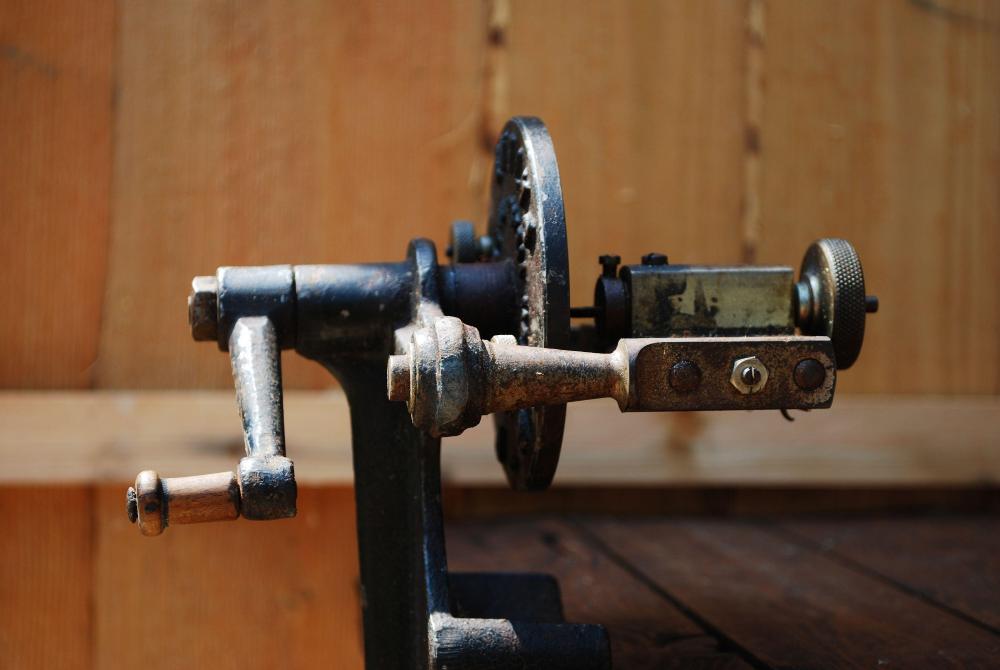
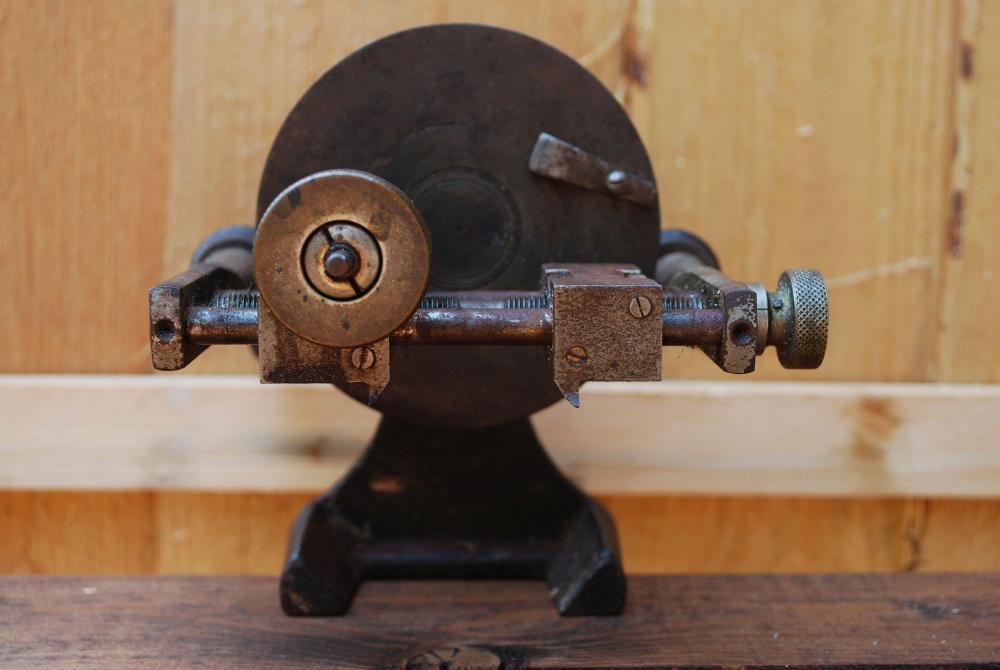

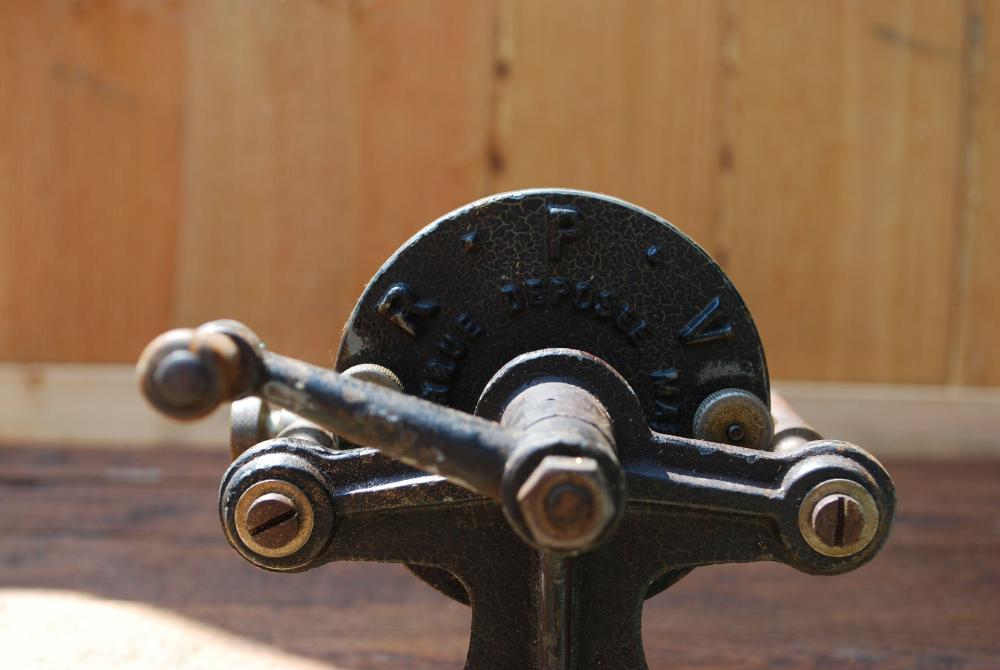
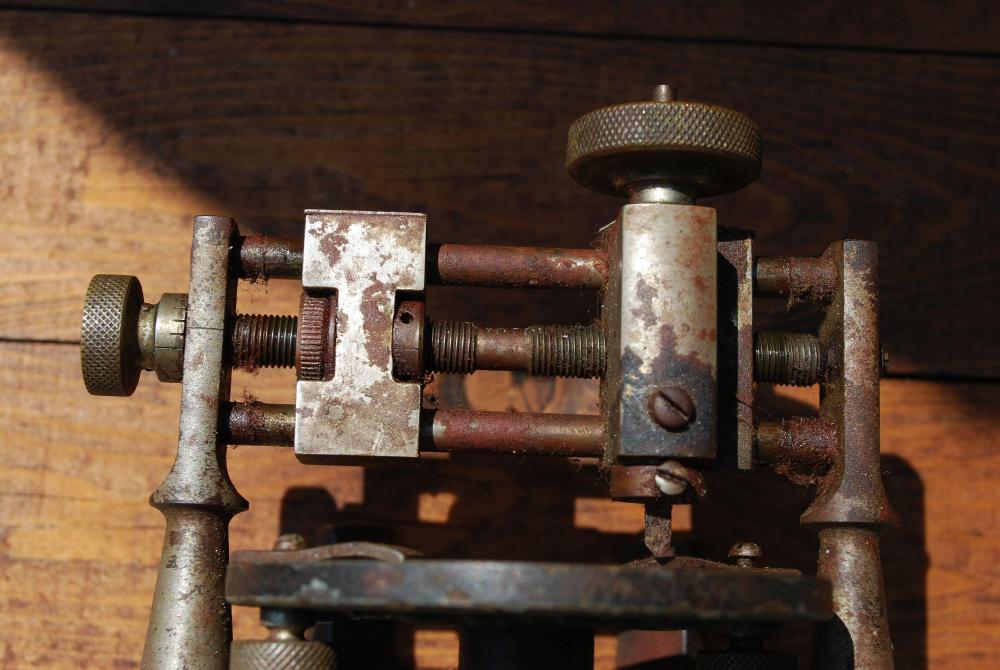 1 point
 -
Much better after running for 10h! [emoji846][emoji846] Sent from my SM-G975F using Tapatalk1 point
-
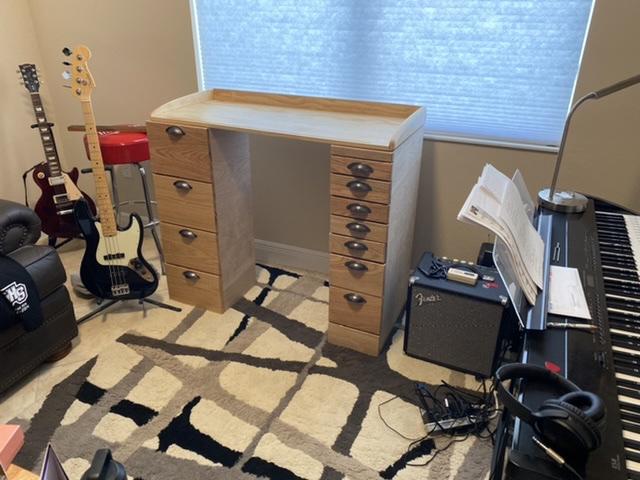
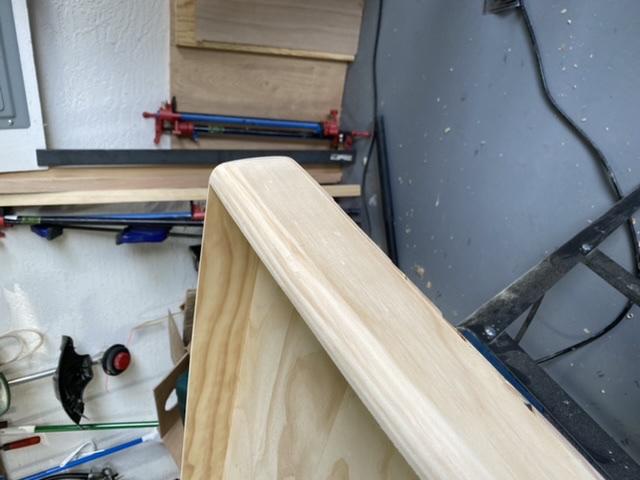
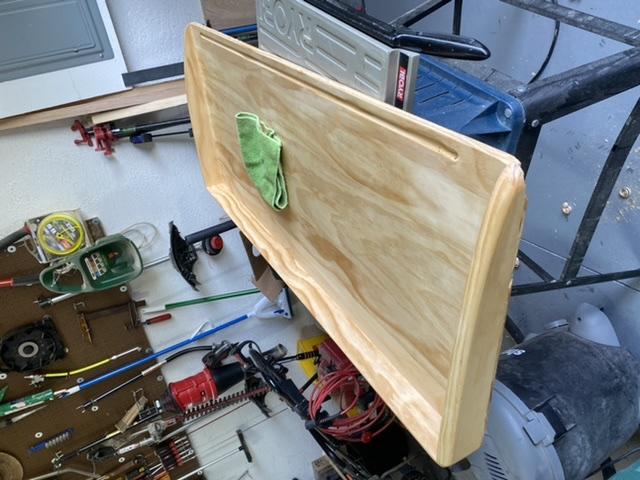
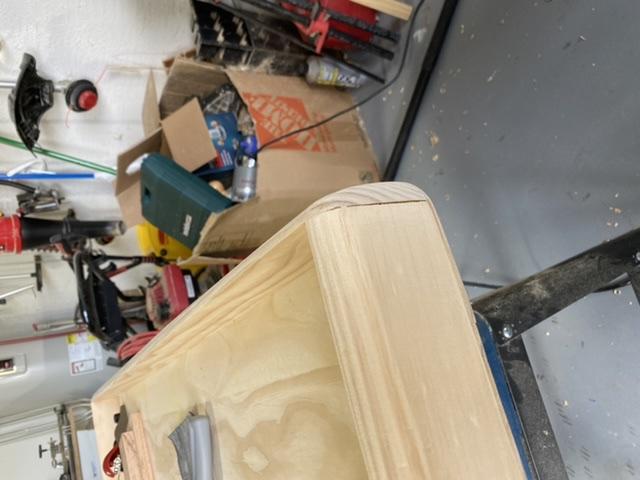
I'm no furniture maker, but I think this will work. First milestone complete. Next is the back and sides, then the working surface. I'll then bring it in and make the other case of drawers at a less hurried pace.
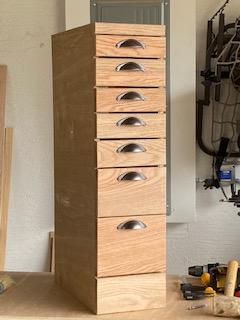
 1 point
 -
Also, an obvious point, but make sure you use a screwdriver with a blade as wide as the screw head.1 point
-
Hi try applying the tip of a soldering iron to the two stuck screw heads for a wee while to warm up the screws If they are just stuck the heat will expand the screw hopefully breaking its hold be it loctite or rust. As mentioned the crown wheel screw will be a left hand thread and will undo clockwise, use a little wd40 on the screw but be sure to clean everything. and re lubricate.1 point
-
No no no ... reverse threaded opens by turning clockwise1 point
-
Penetrating oil applied to the screw and let soak for a day even two, is the norm to loosen it. You should not resort to excess force as it may break thus creating a bigger headache. A picture always helps. Use of heat and other approaches may become neccessary.1 point
-
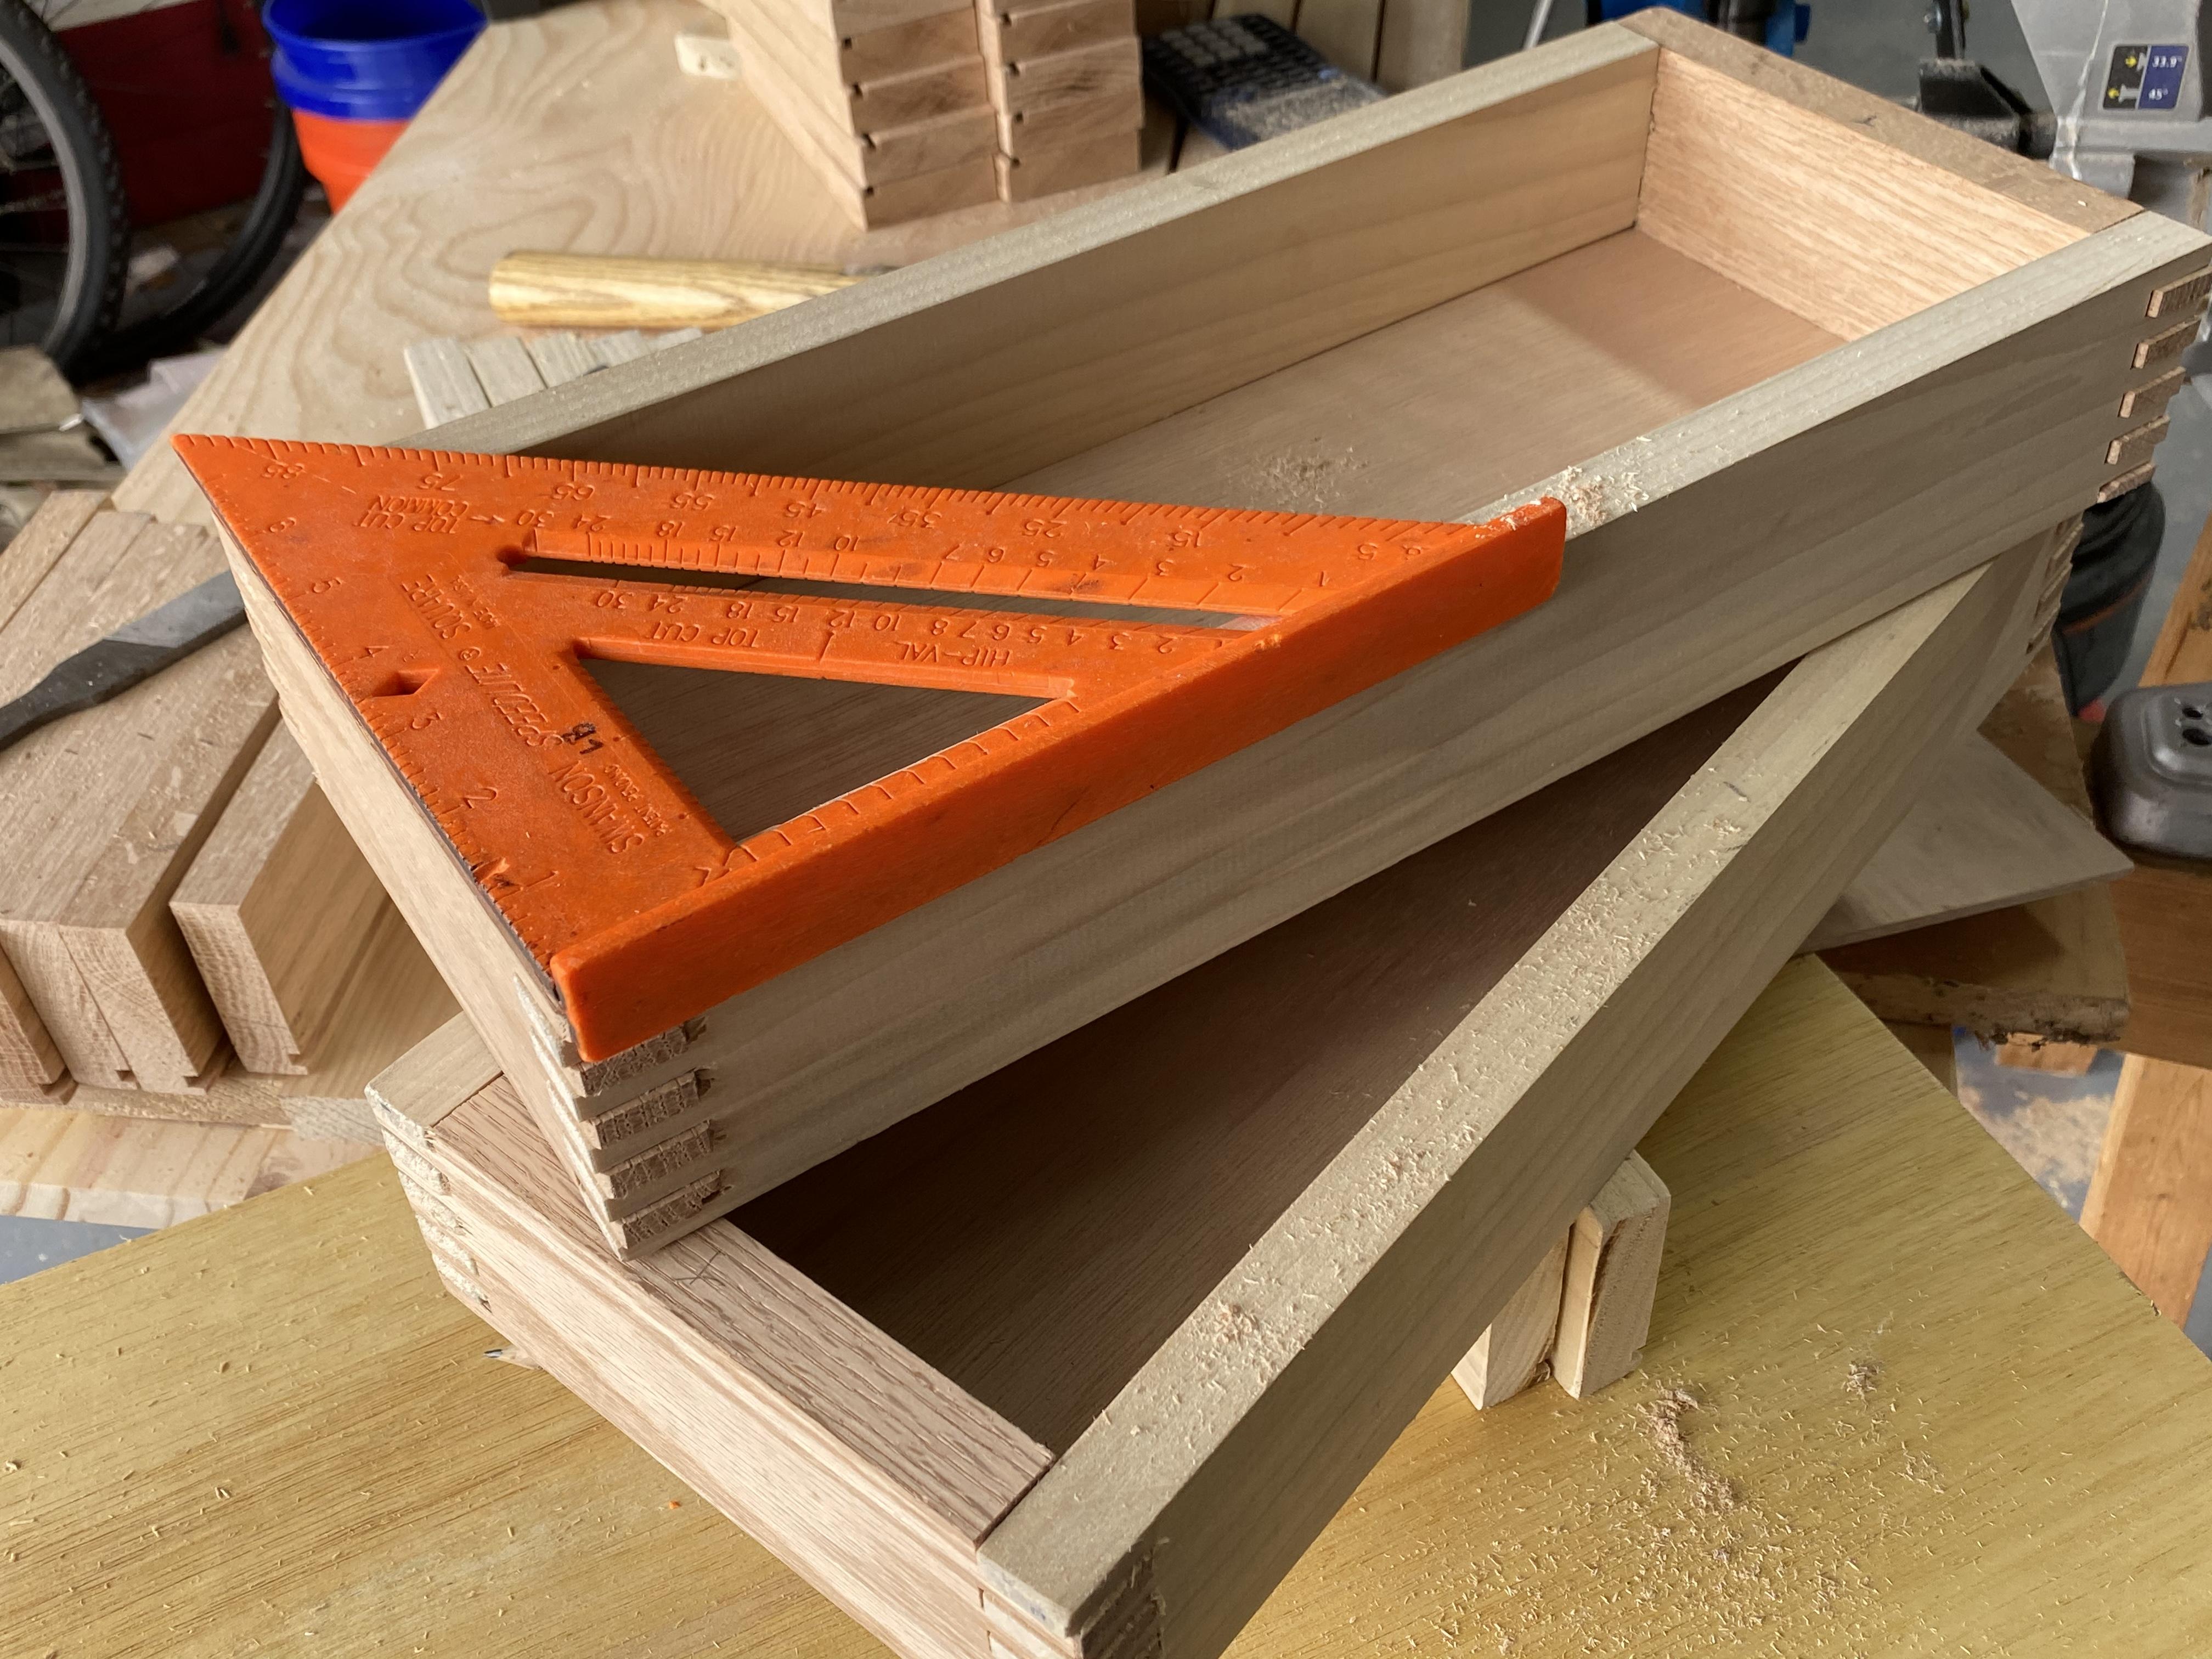
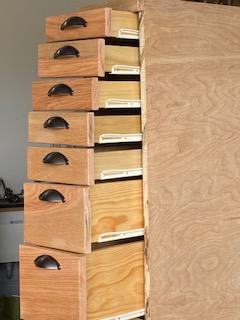
The drawers laid out. I’ll space them and install the sliders.
 1 point
 -
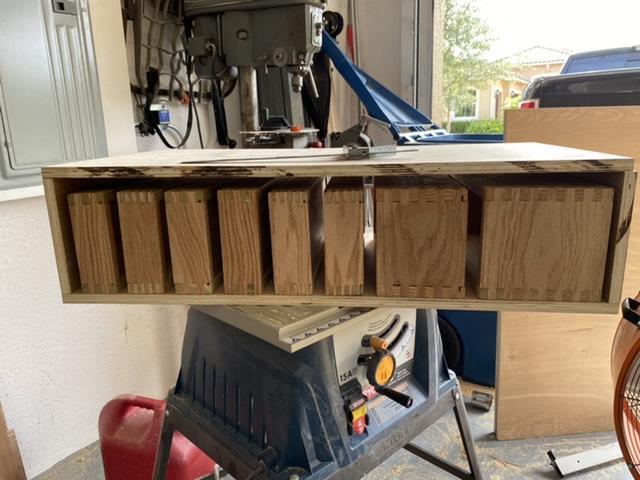
Two done. Glue-up, sand and finish later.
 1 point
 -
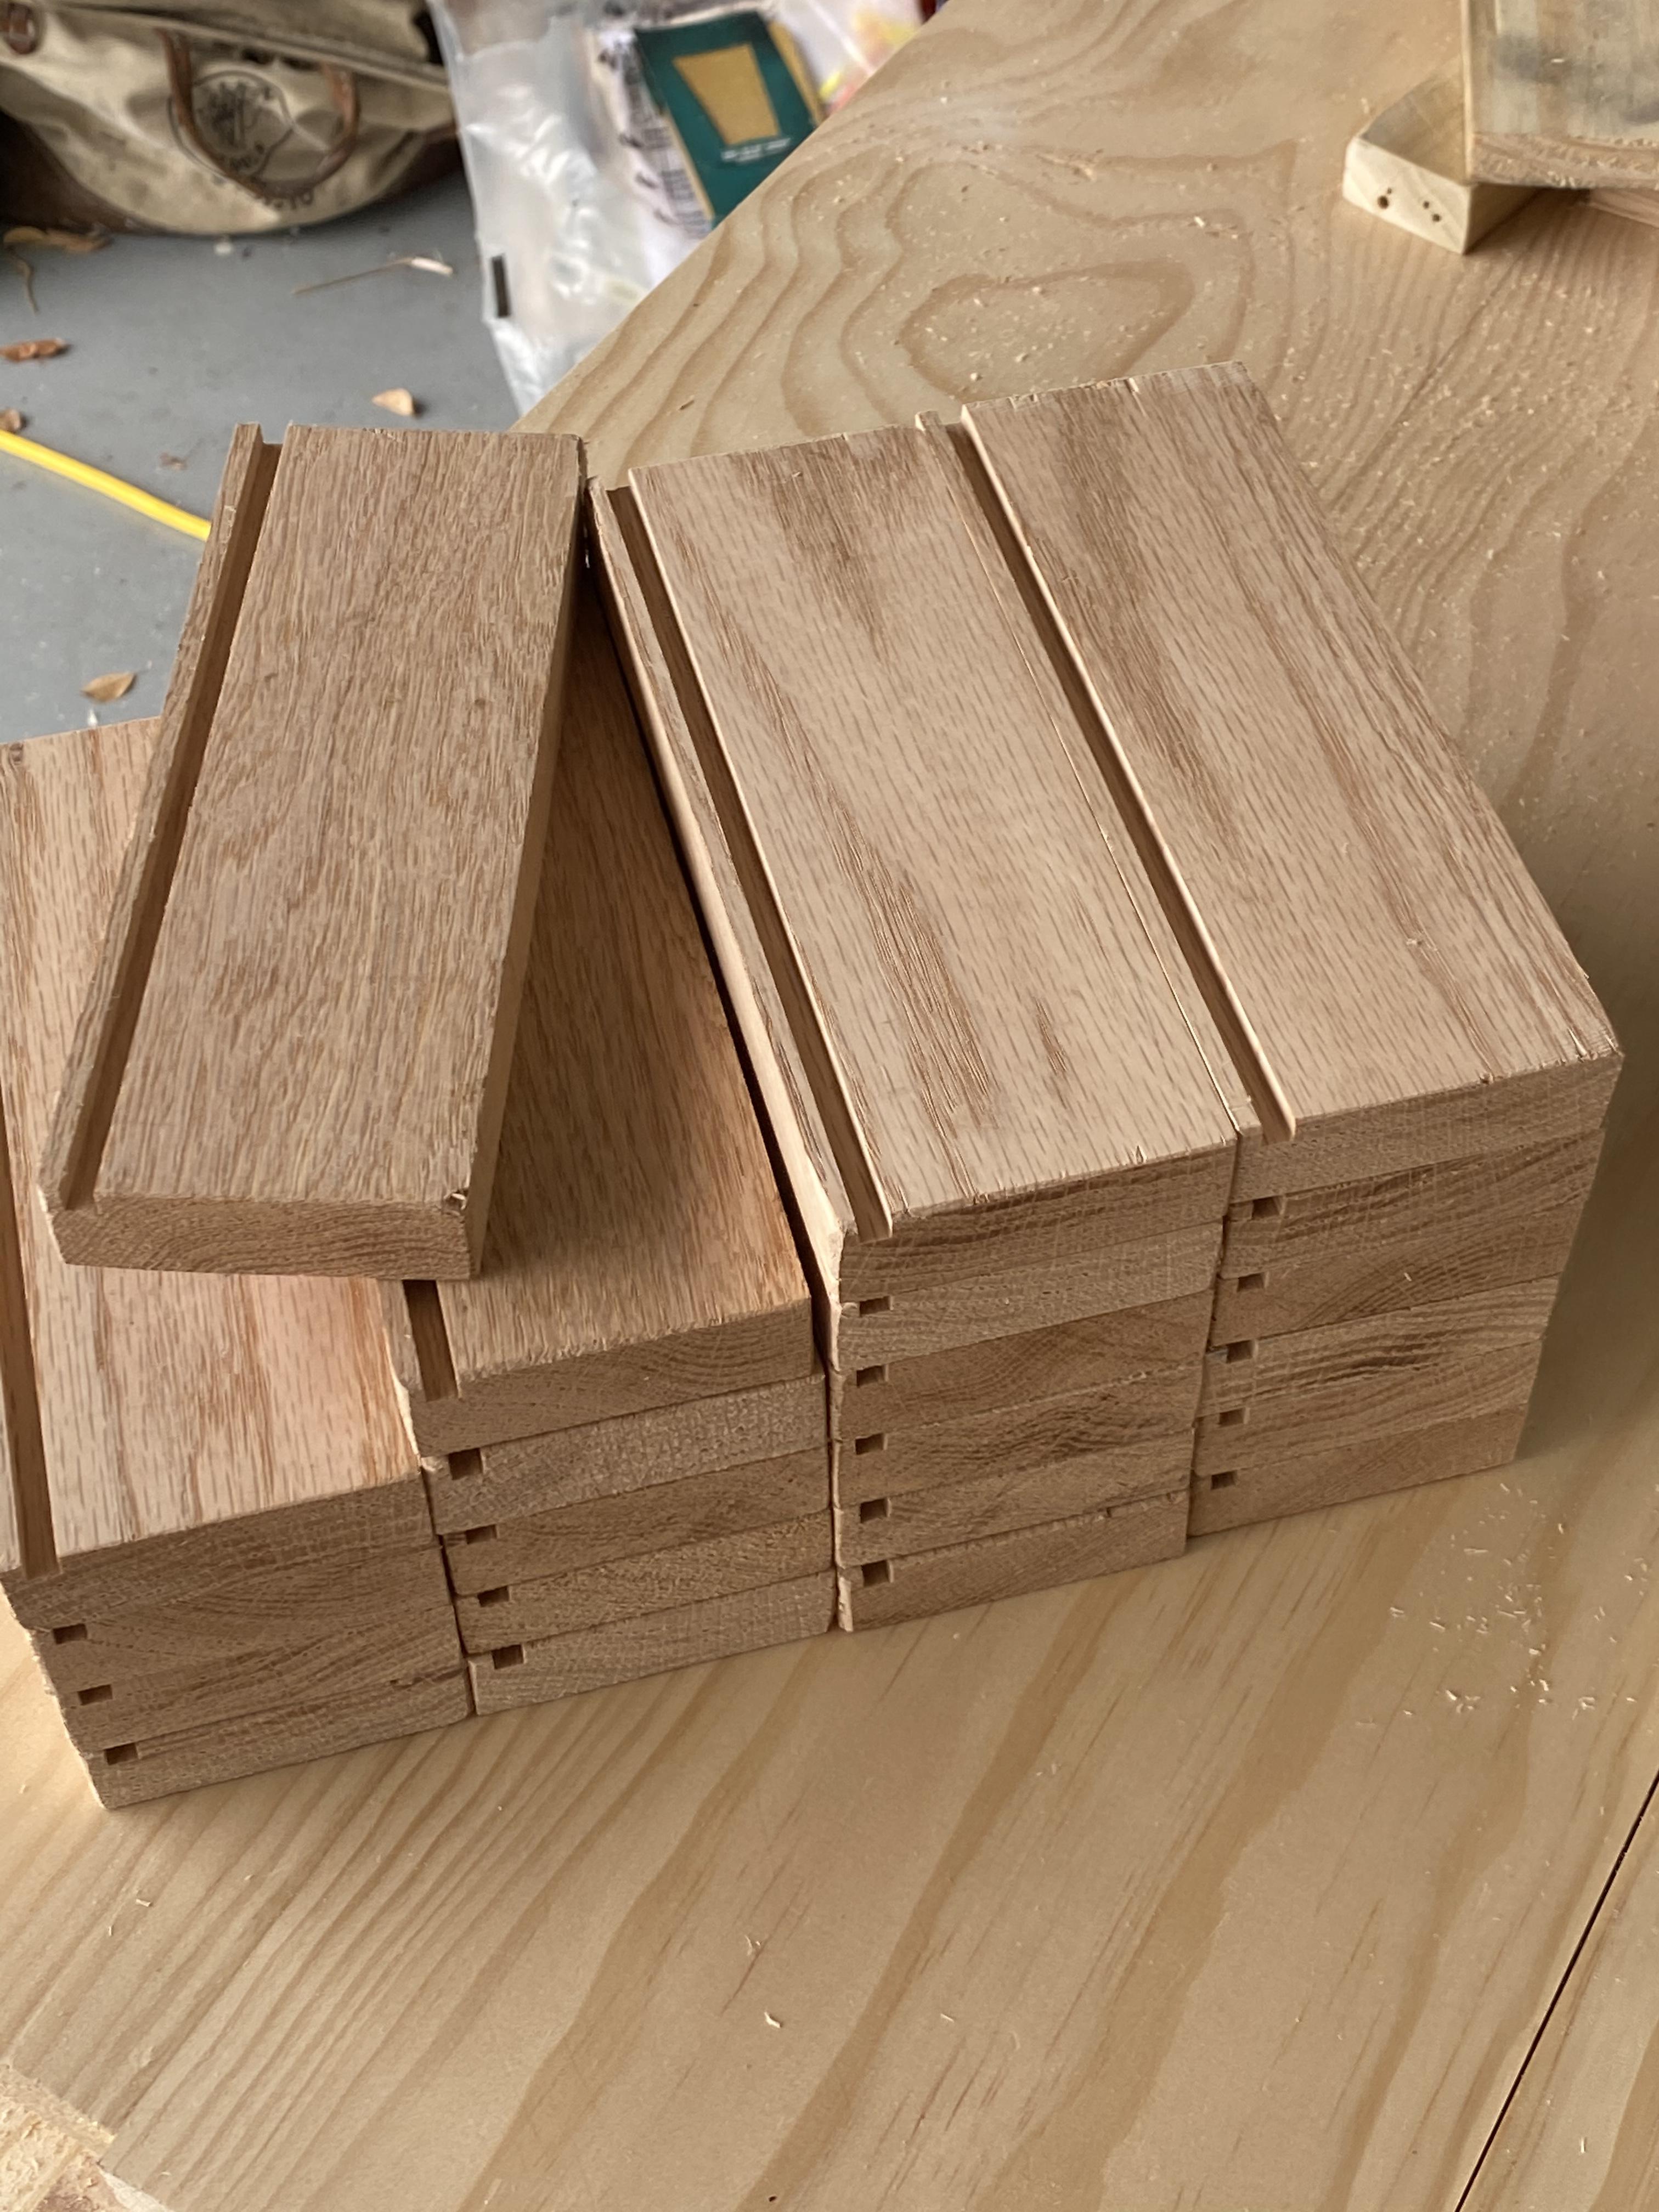
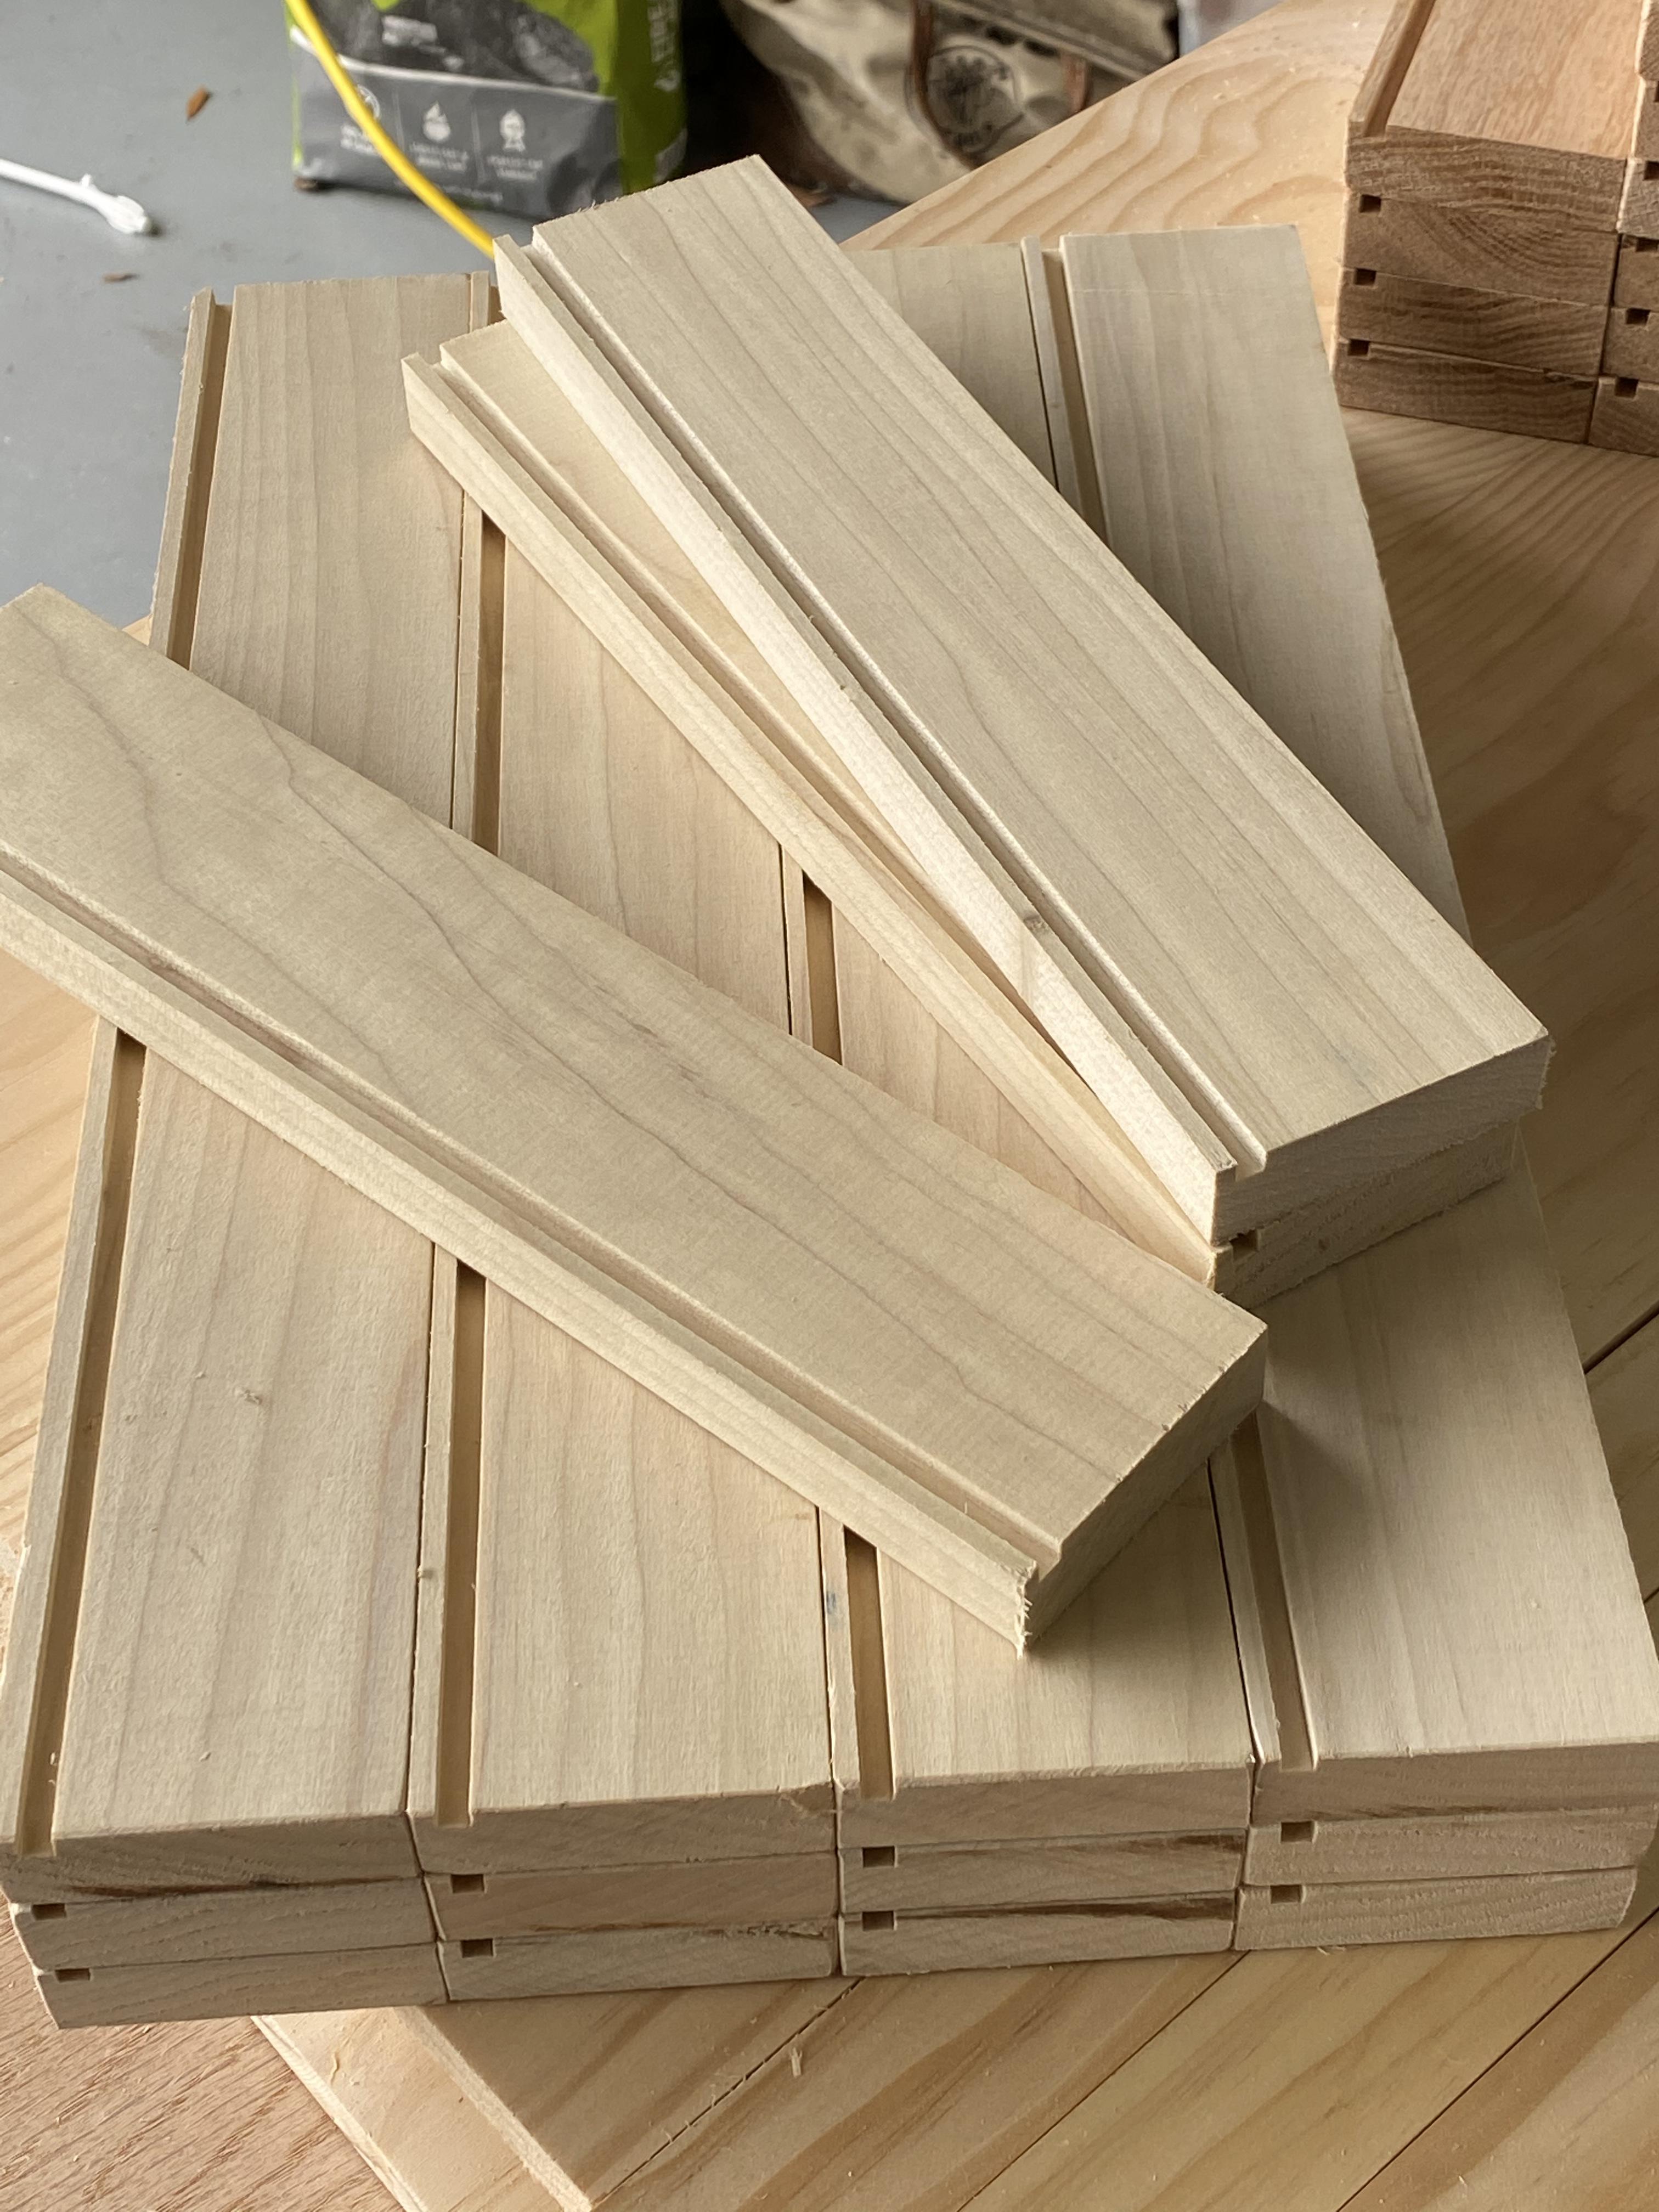
Slotted oak. Slotted poplar
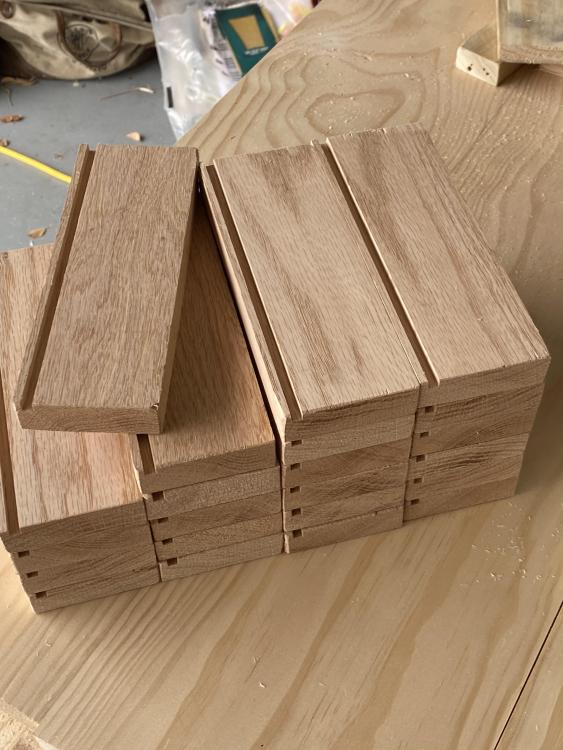
 1 point
 -
If it were a construction site I'd be fired. An 8-hour day and one successful joint to show for it. I had to tweak the jig and lots of trial and error before I got my tools to behave. Having that behind me, the rest of the drawers will take far less time. So my 14 drawers will be box jointed just like this.
 1 point
 -
I live in a very hostile environment, my misses told me that if I ever wind up my quarter striking mantel clock once again she will throw it out of the window. My tactic is to bring these things out slowly just one or two on the shelf at the time.1 point
-
My first ever mantel clock is serviced now. mantel_clock_2.mp4
 1 point
 -
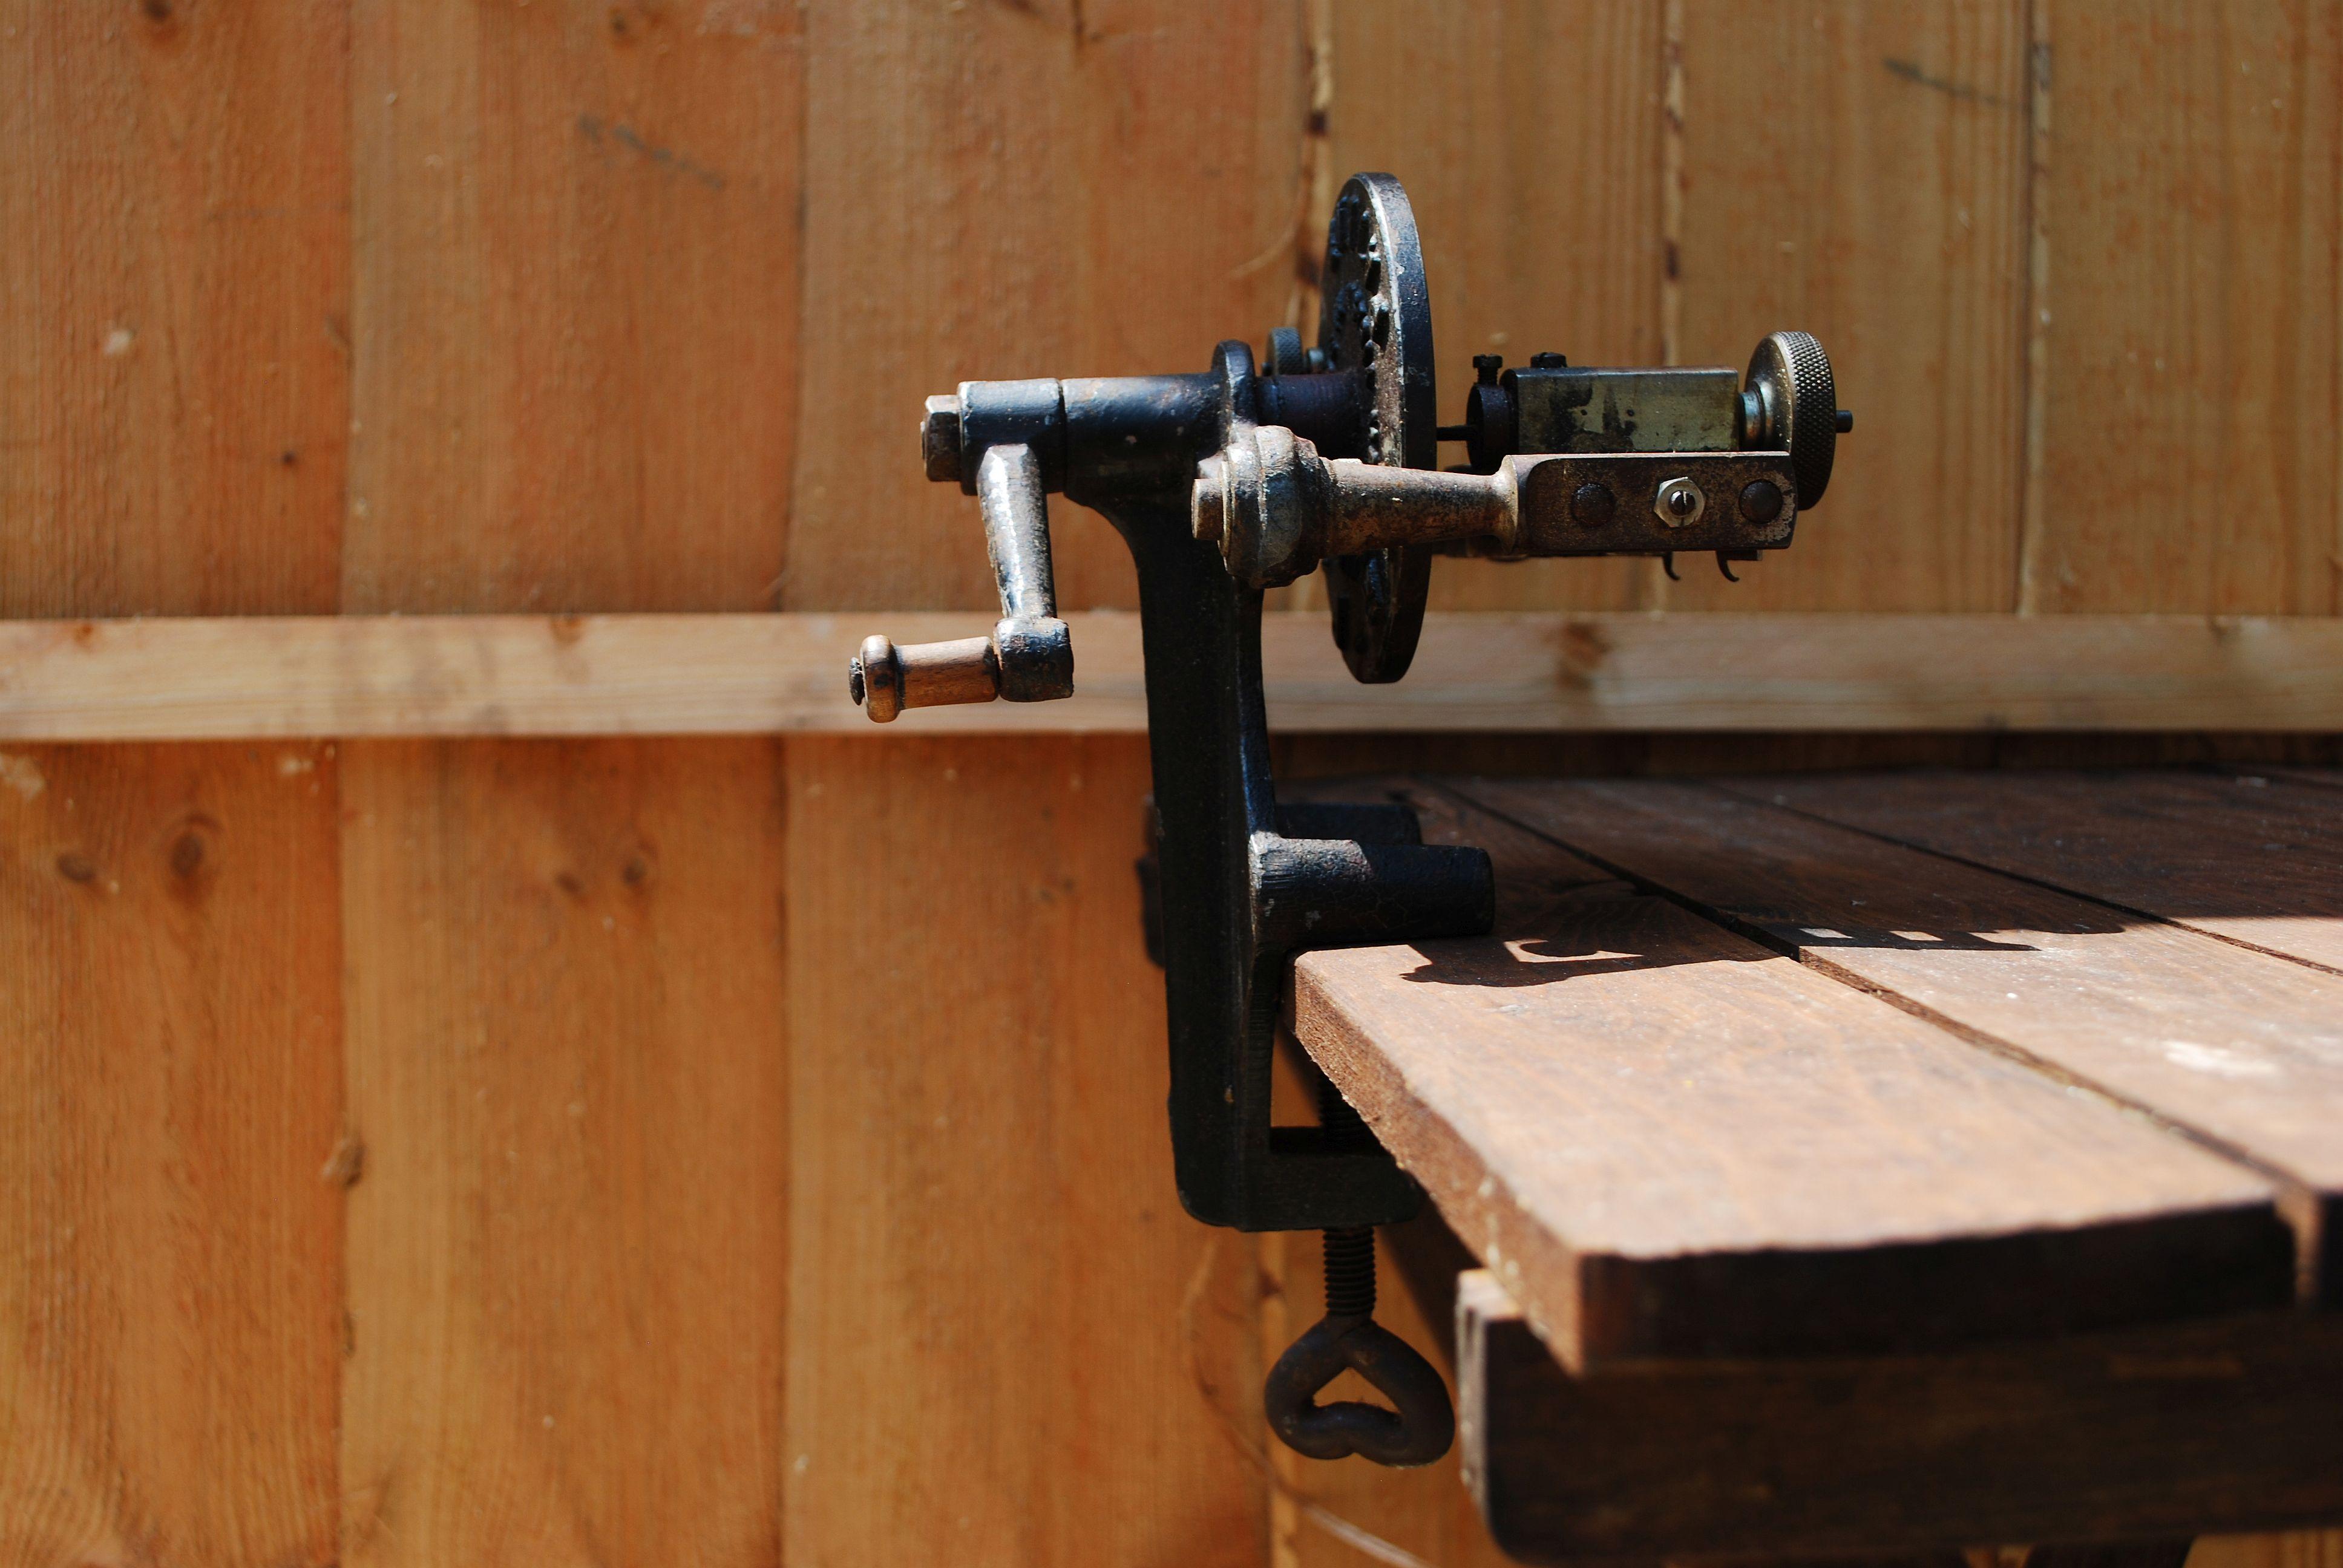
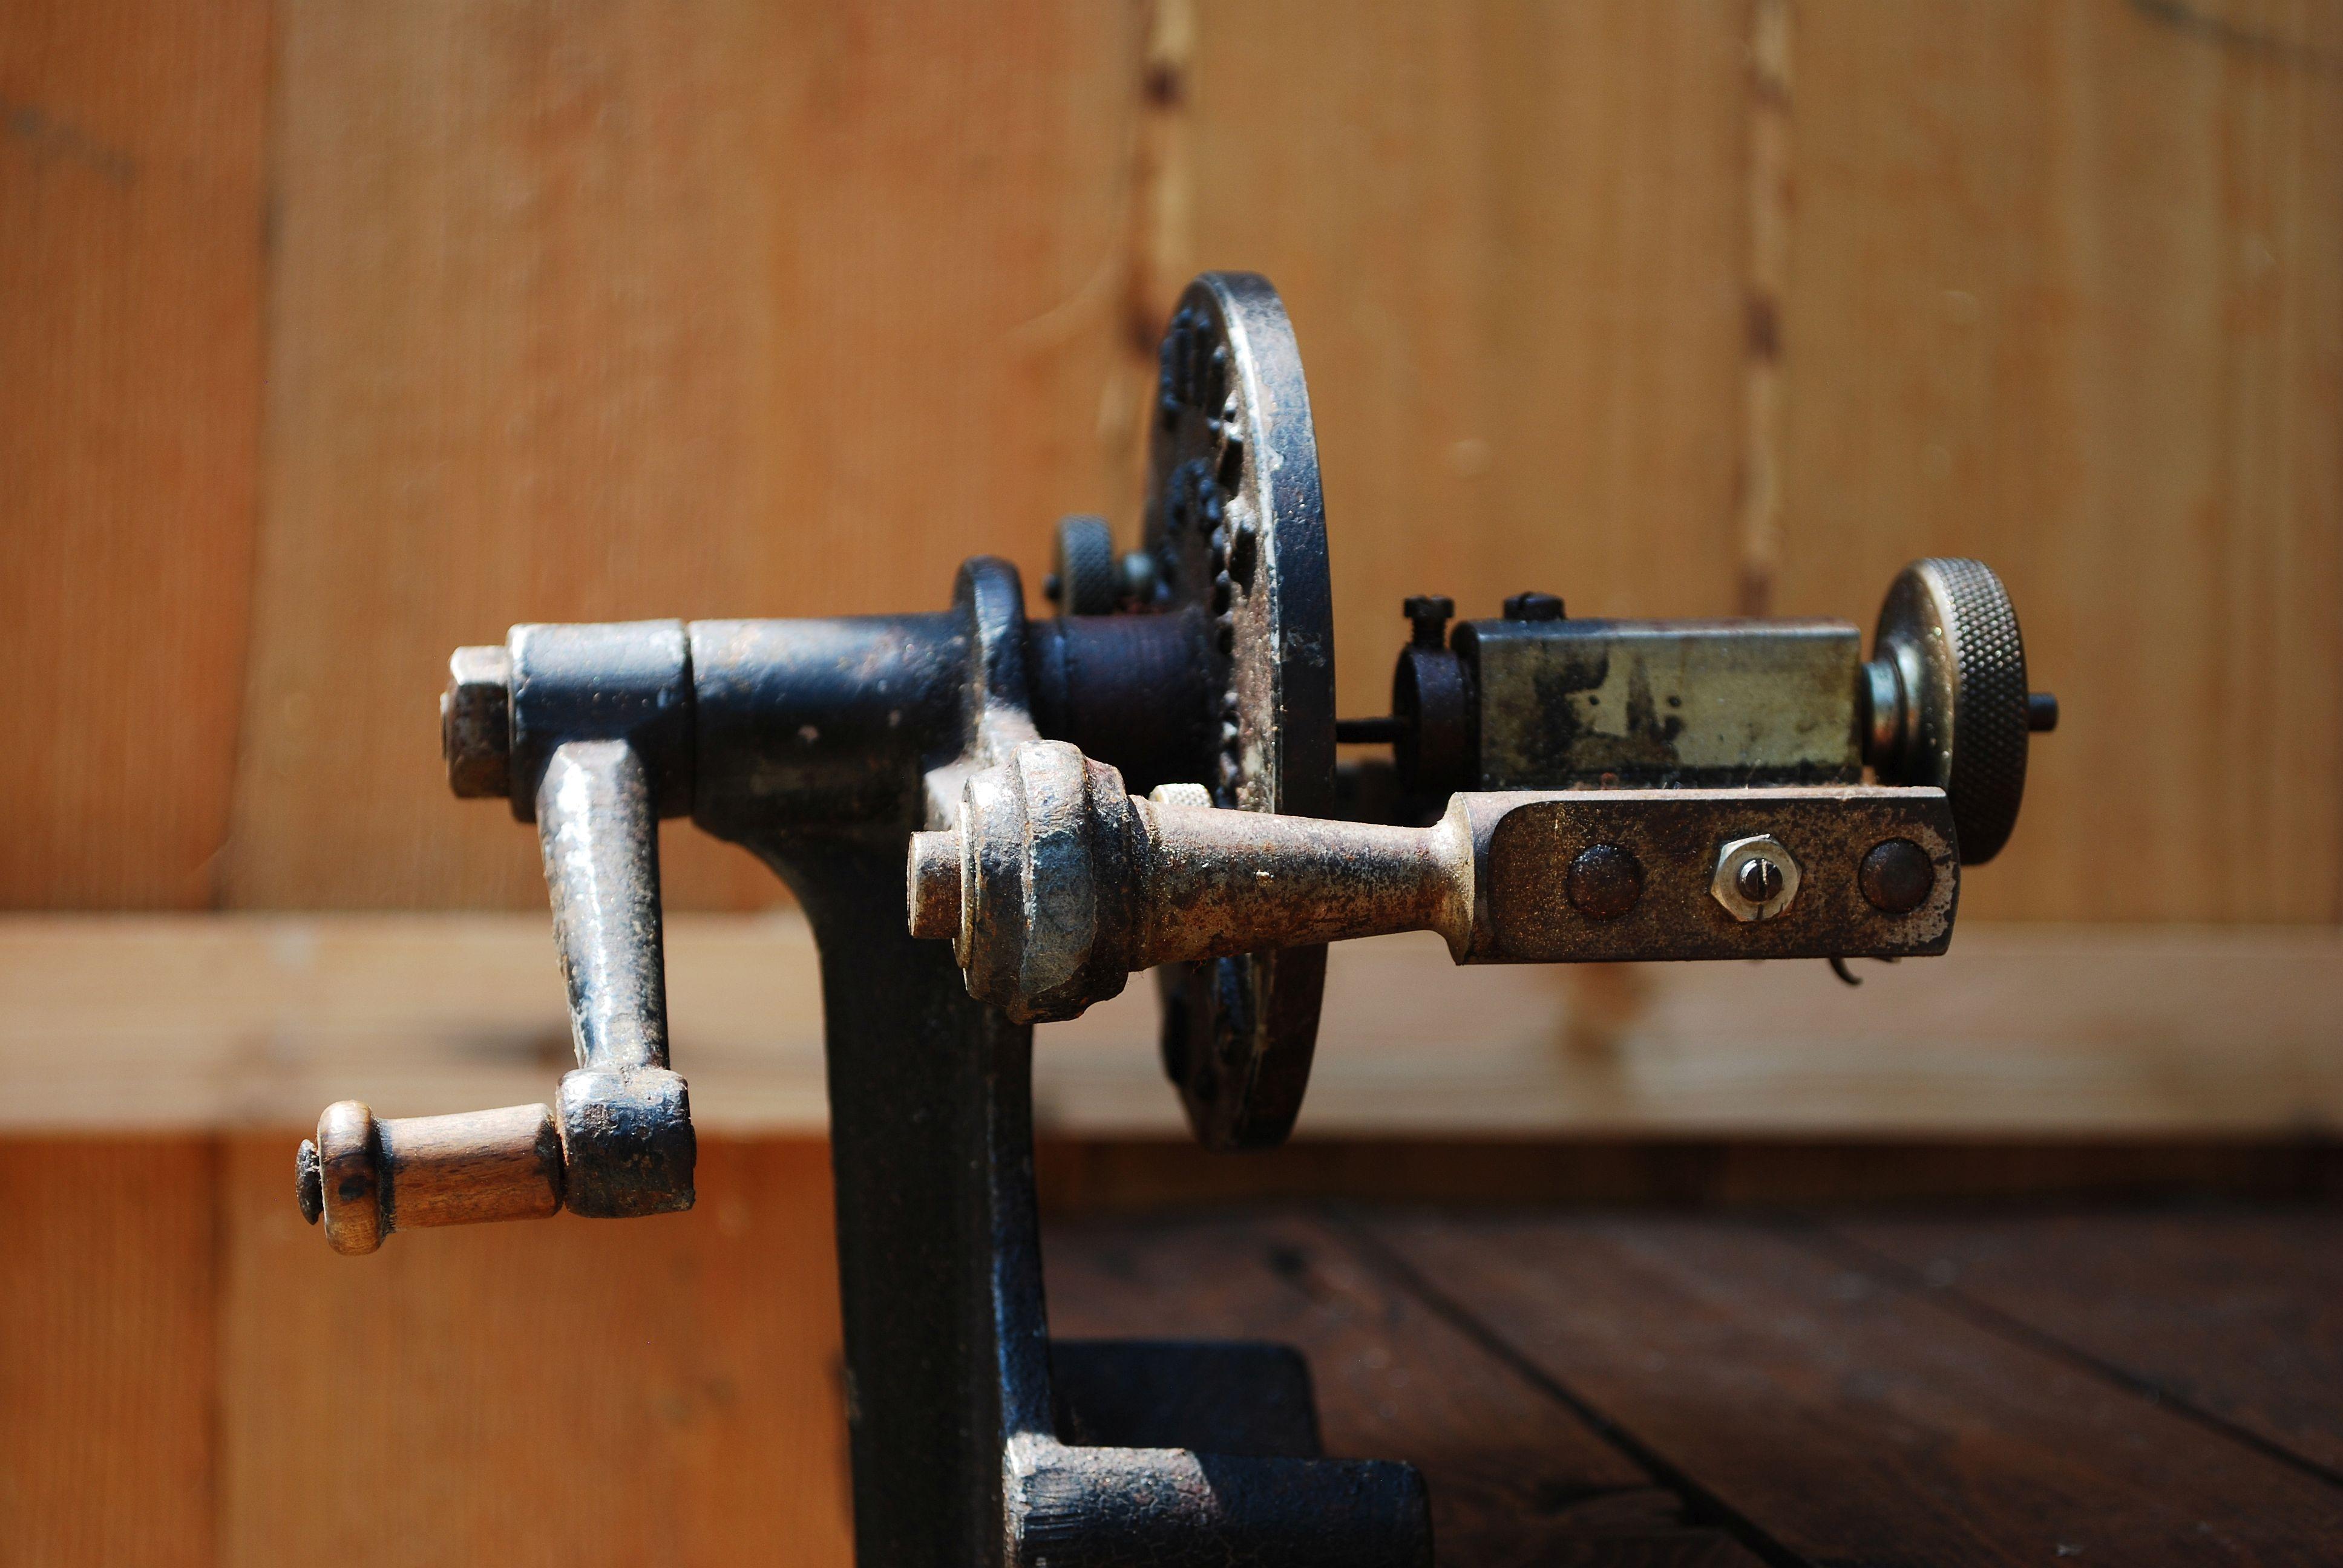
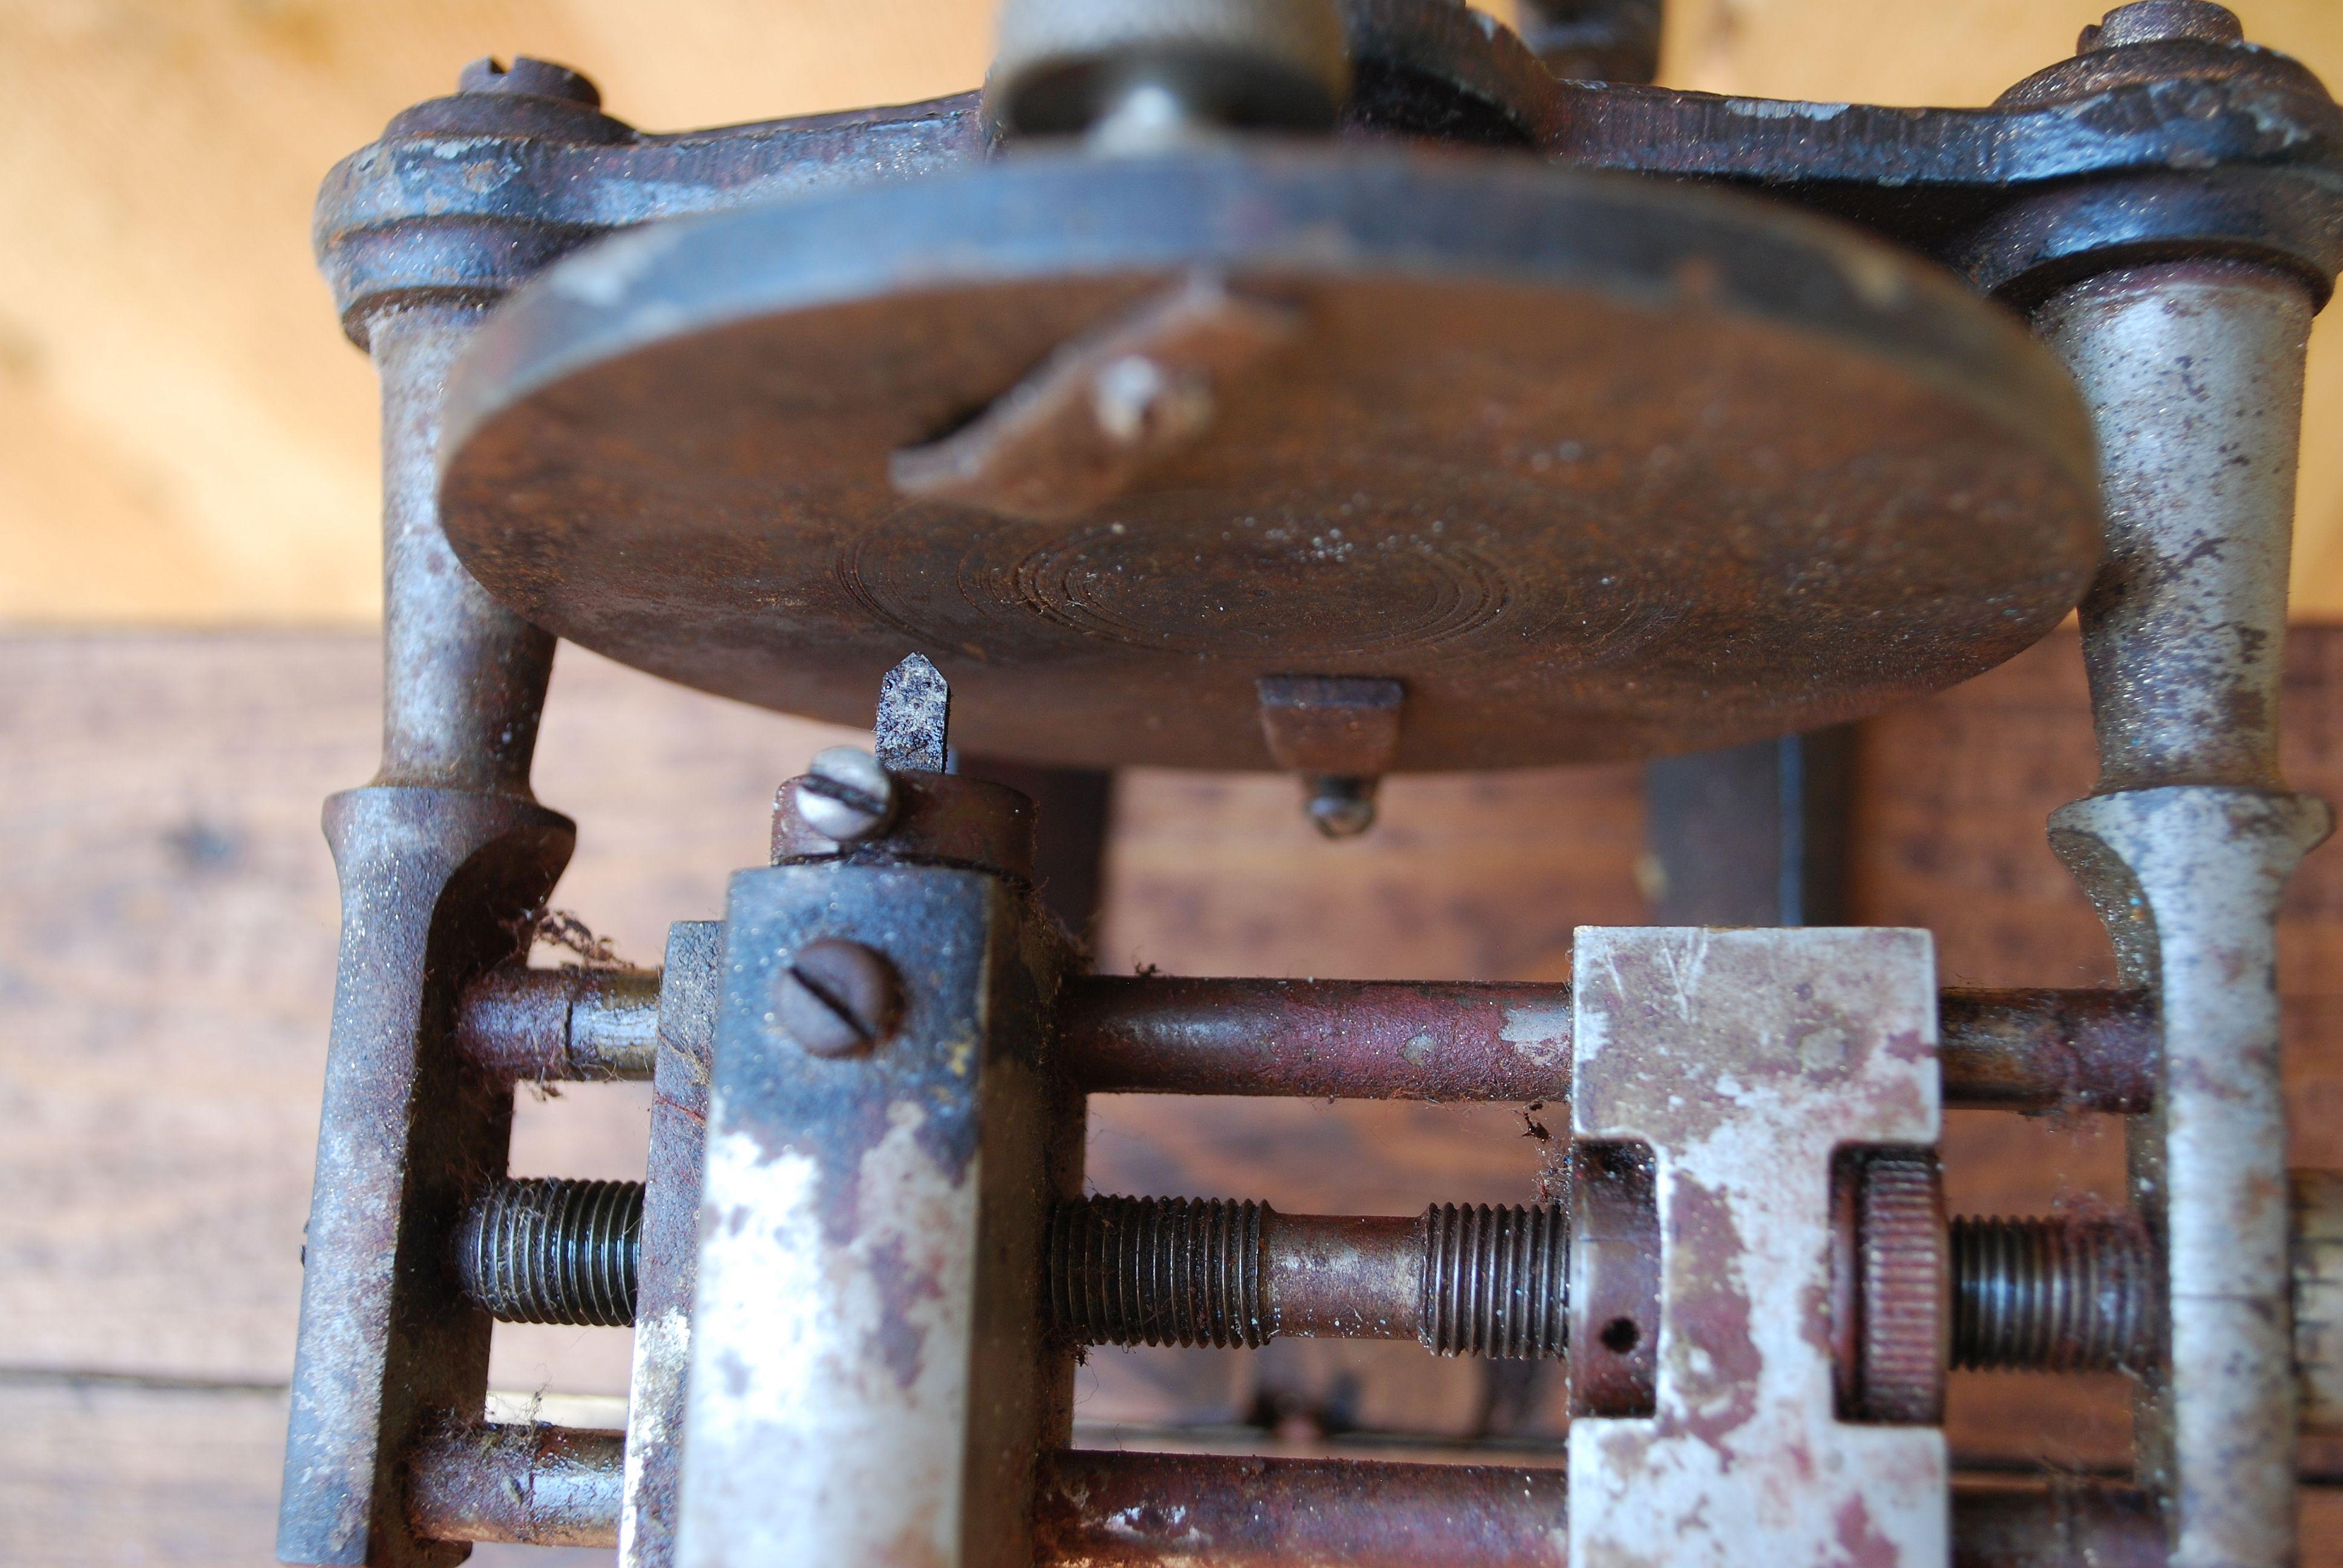
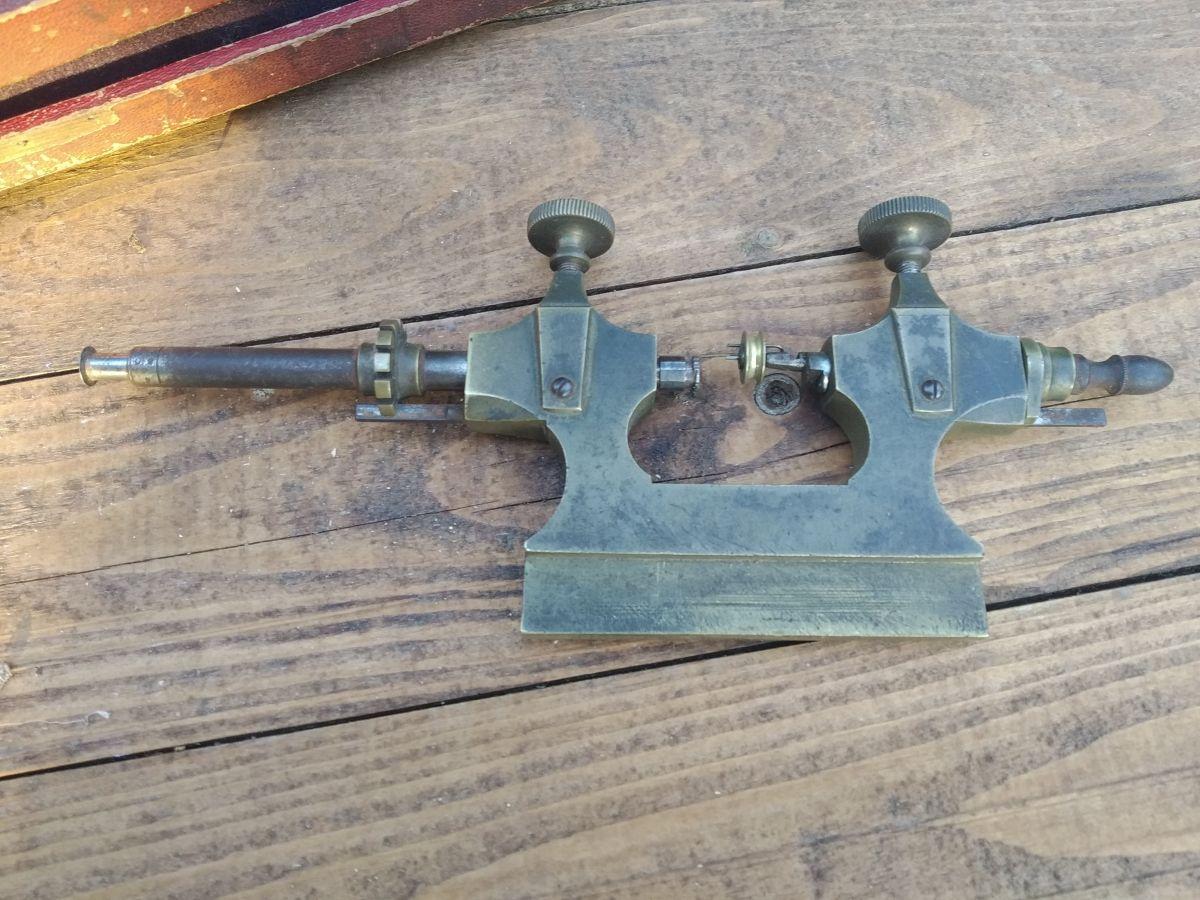
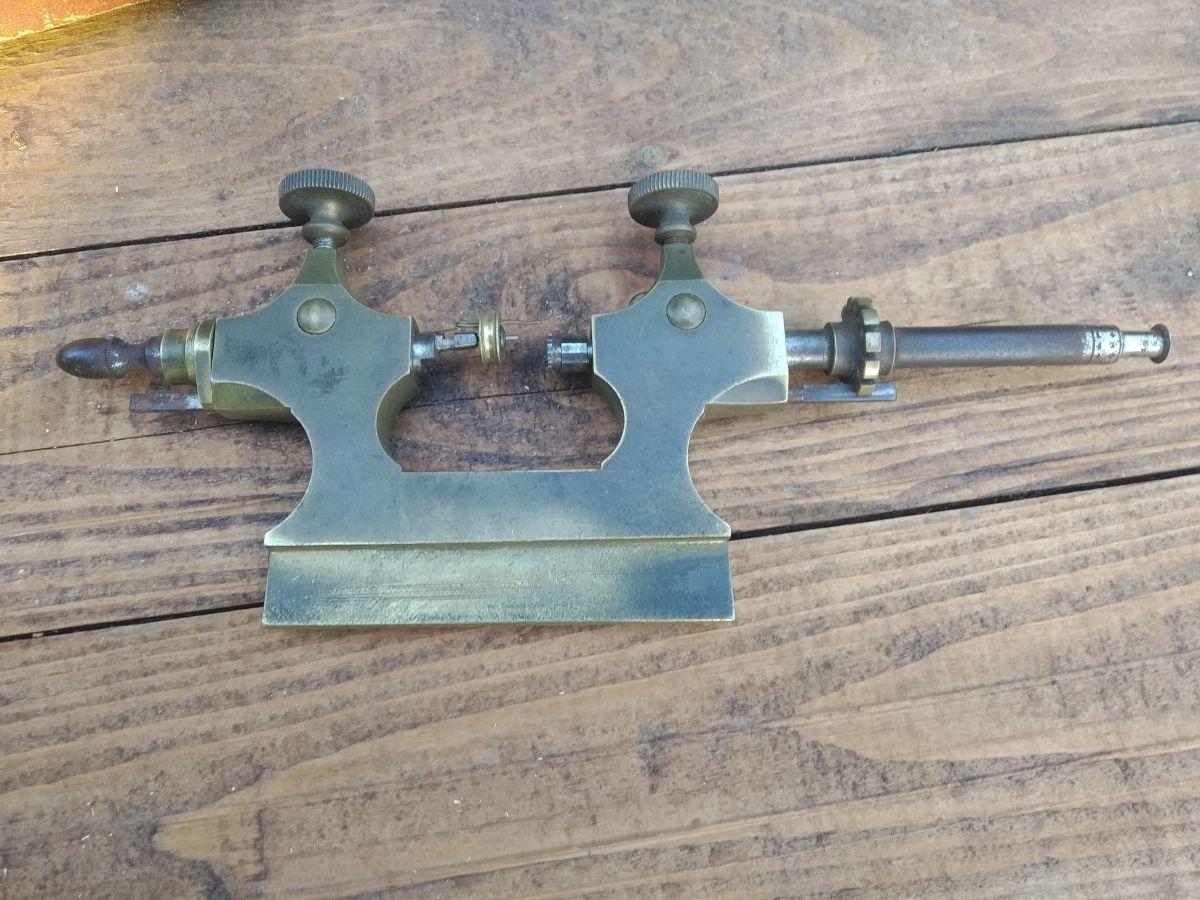
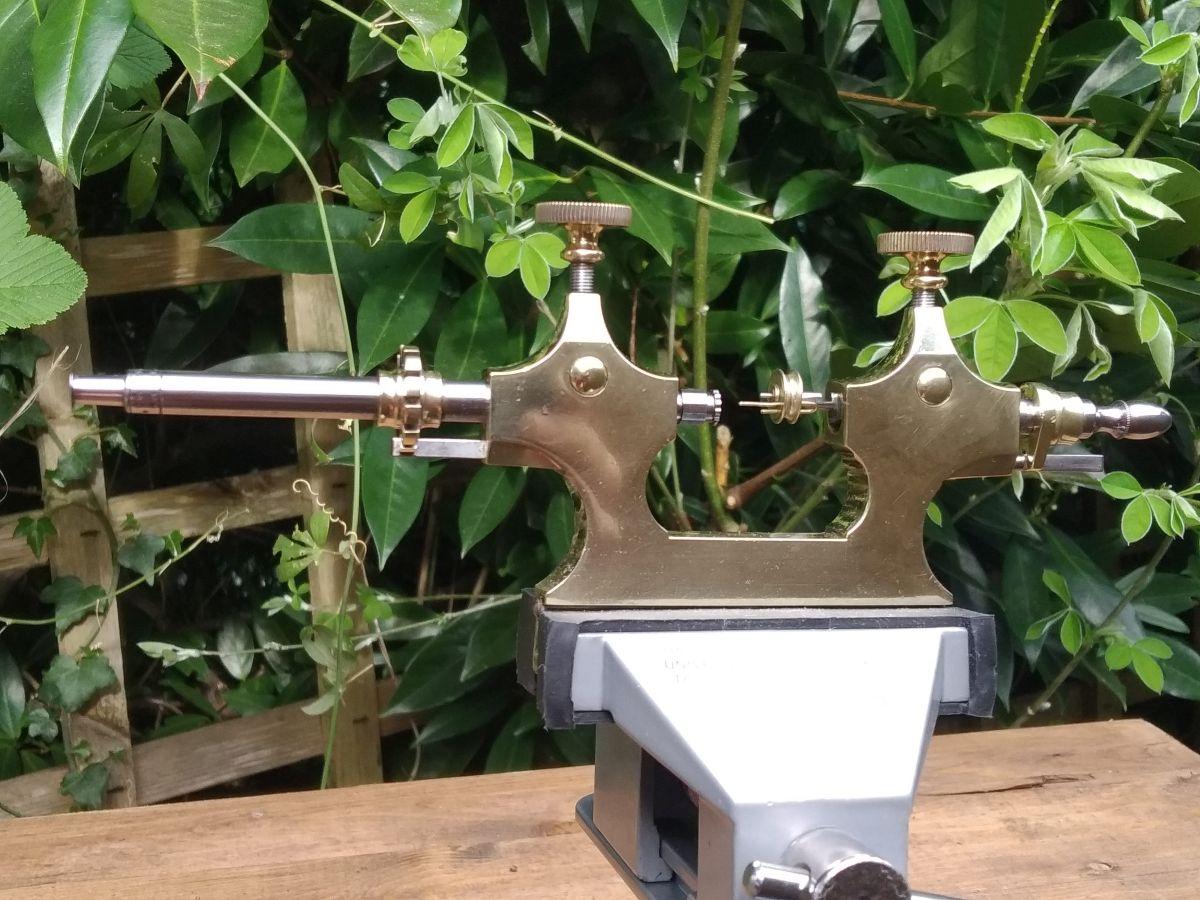
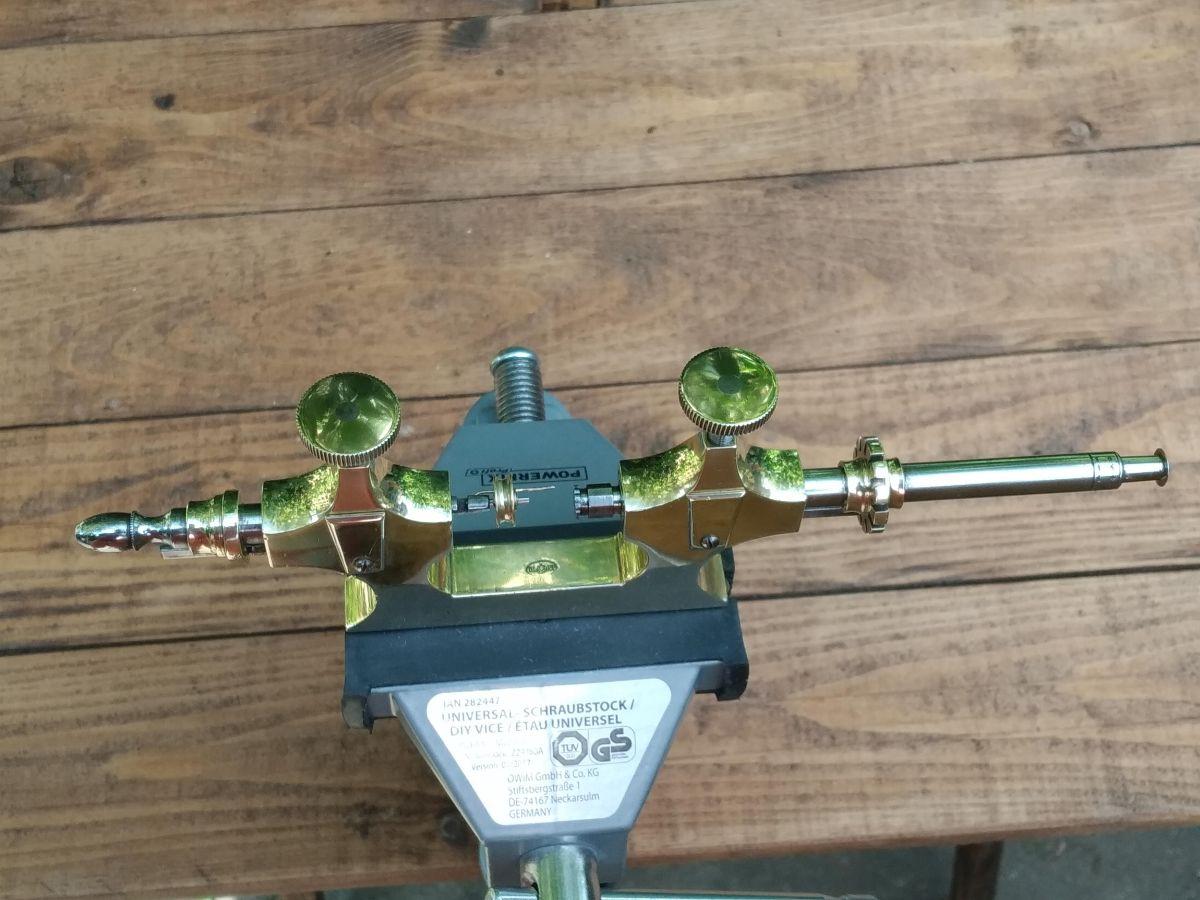
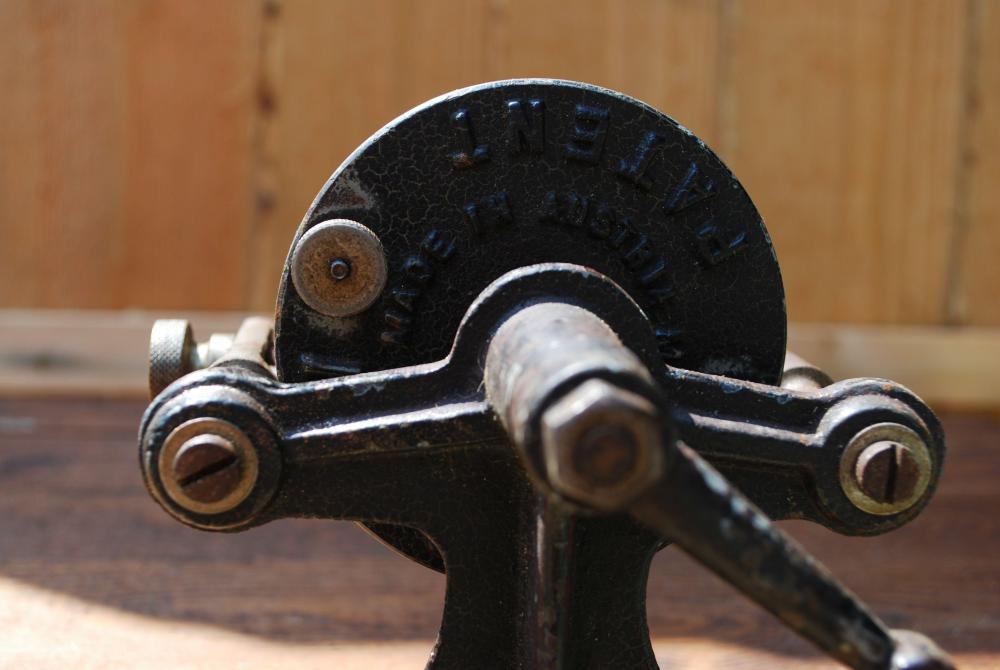
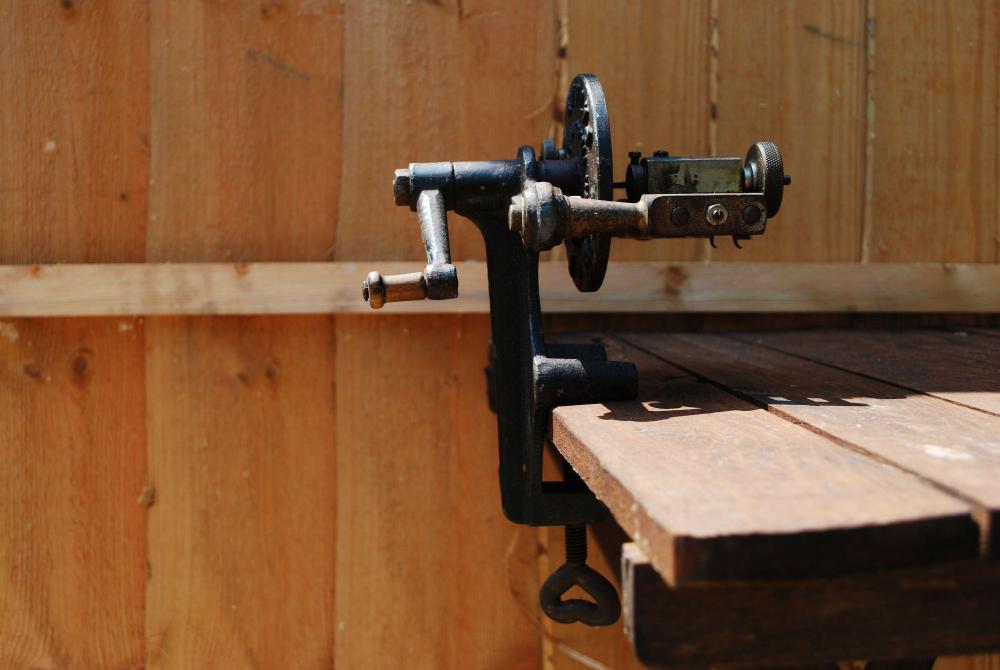
Garden keeps me busy, but I could not resist and bought this on eBay, an incomplete set for £10.5 + £2.9 P&P. Box still needs fixing, but I cleaned the pivoter up a little bit. My first jacot tool, and I know that not the last one as I bought another one. Before: After:

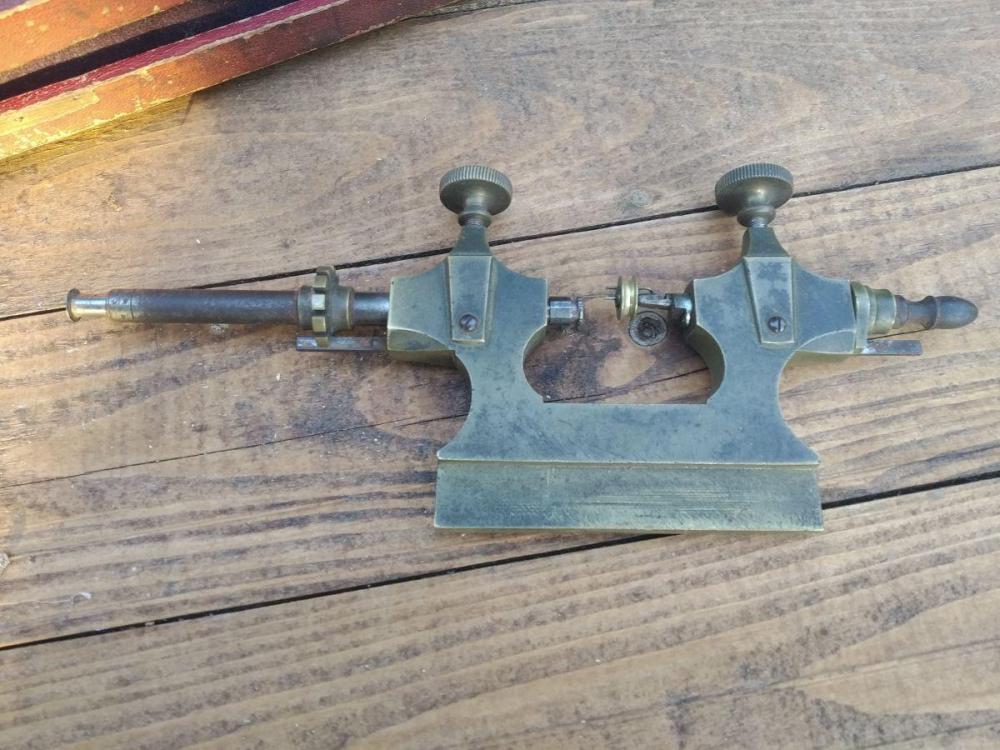


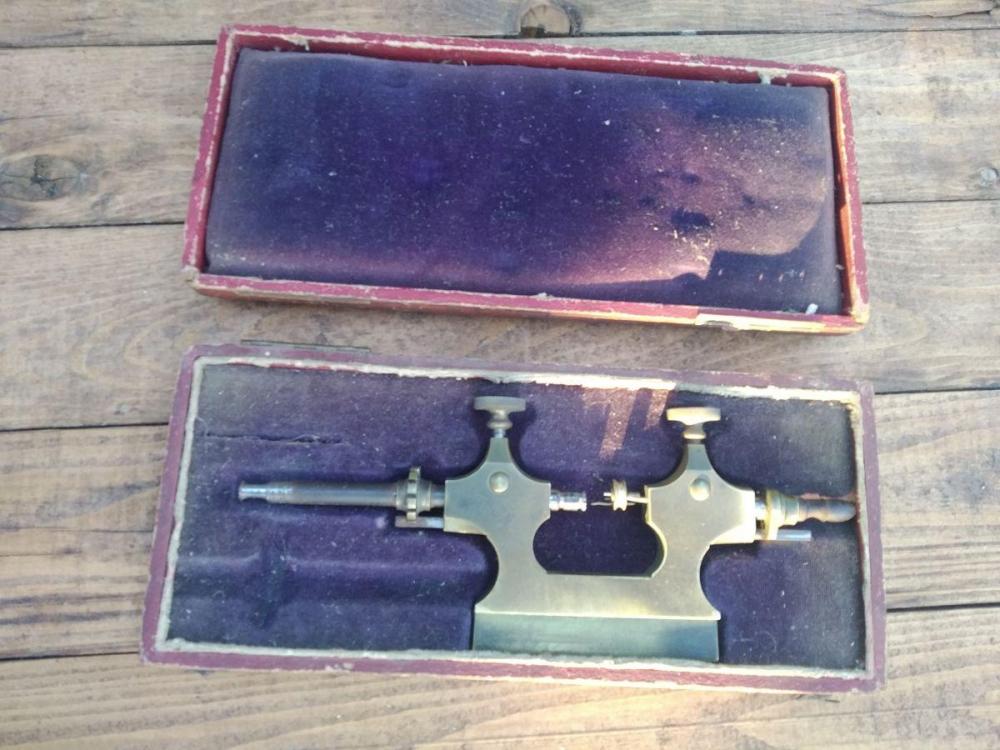


 1 point
 -
Ummm... all right, I go home and a scrub my "bow milling machine" a little bit more. TheNakedWatchmaker Bastards! Ahh and I quickly add this before my time runs out for modifying the post:1 point
-
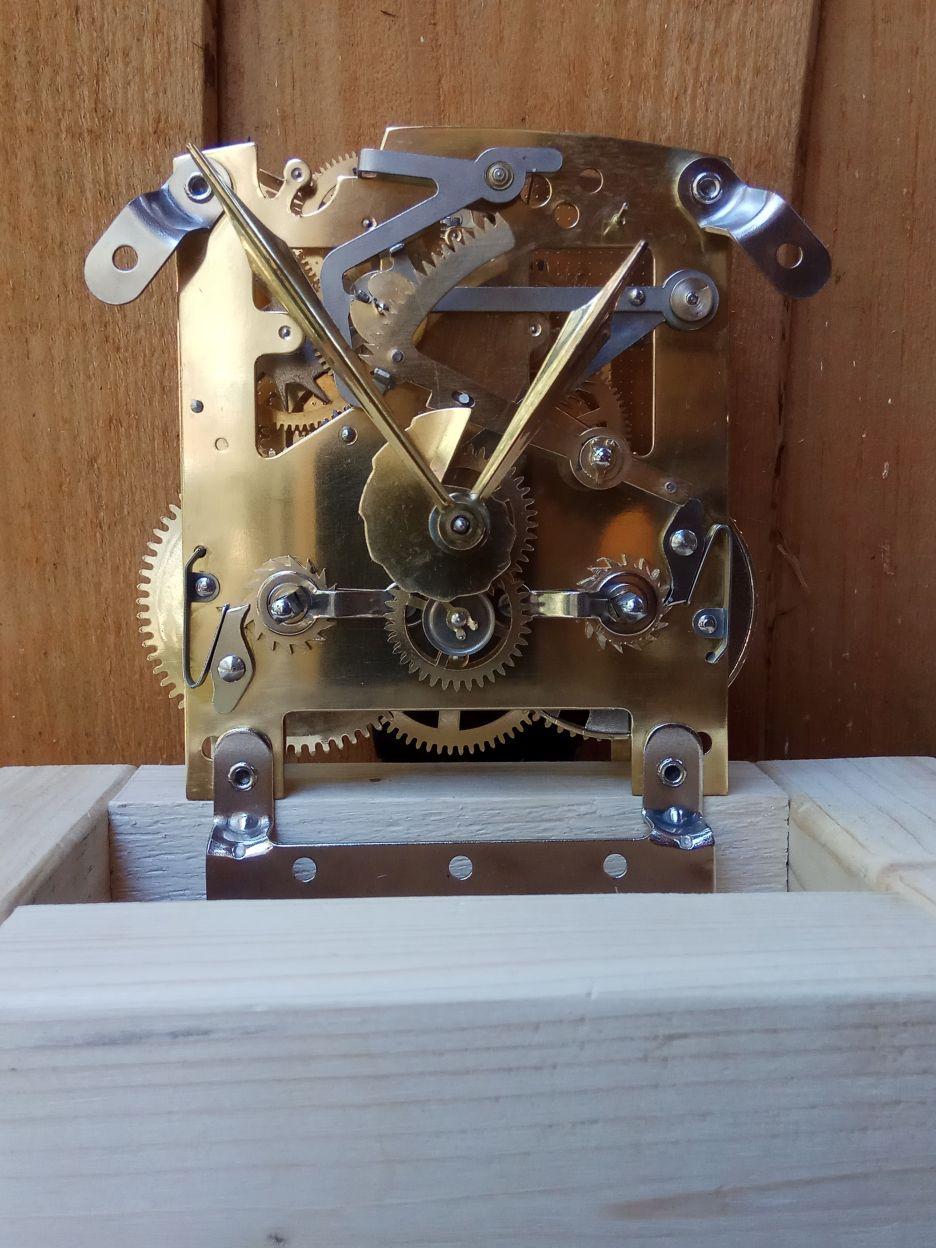
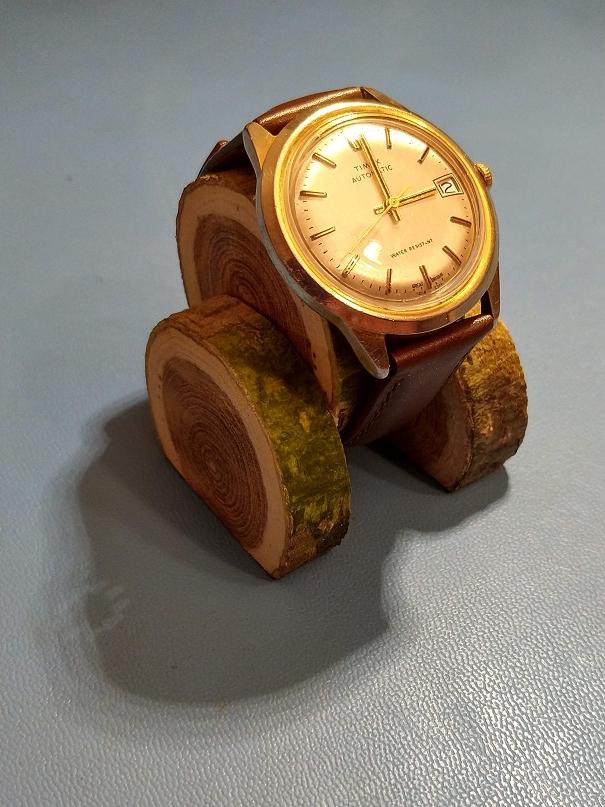
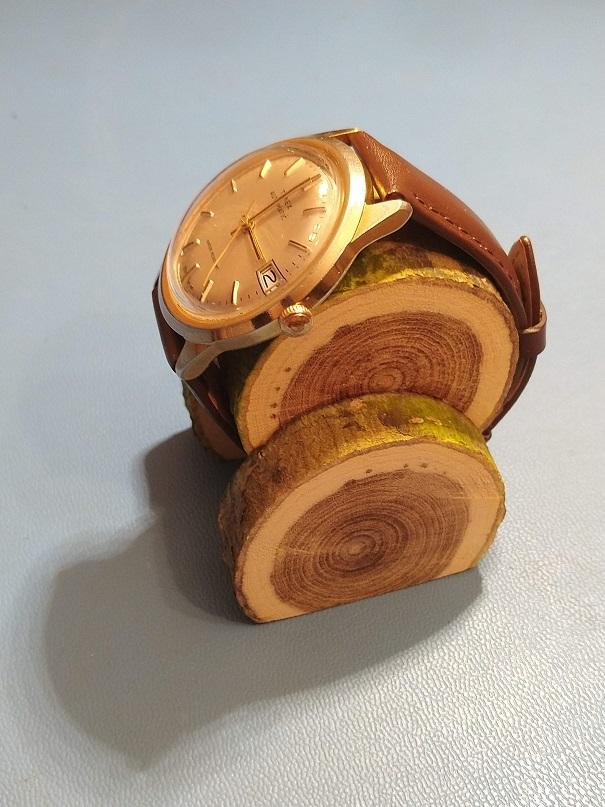
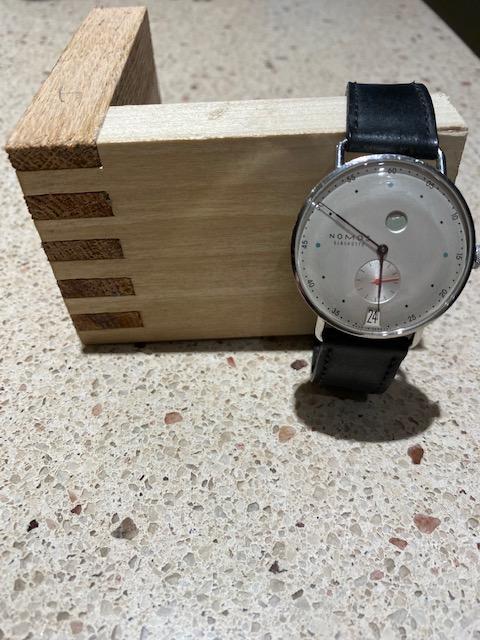
Hi *, Inspired by Andy I decided to record the things I do with clocks and watches here, for the unforeseen future it will mean that I am going to describe the mistakes i make and complain a lot, and cry, and cry a like a baby a little bit more. Mark put a Valjoux (ETA) 7750 movement together using spare parts from the scrap heap, now i am planning to do something similar, if I can spend enough time with watches I am going to try to put a movement together using parts coming from my carpet only. Tonight there is no mistake or complaints i made a few wrist watch display holders still made out of my neighbor cut-down tree. I am planning to make another set where the middle section will be wider. lui


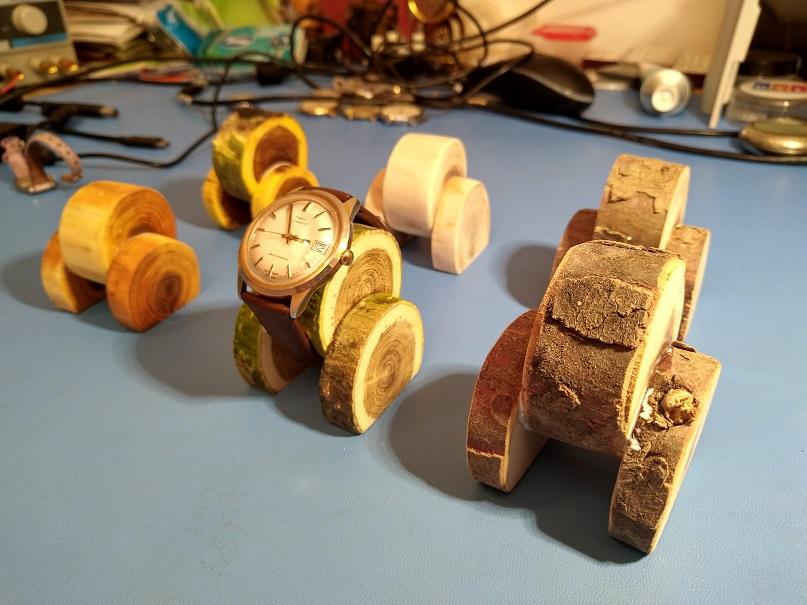
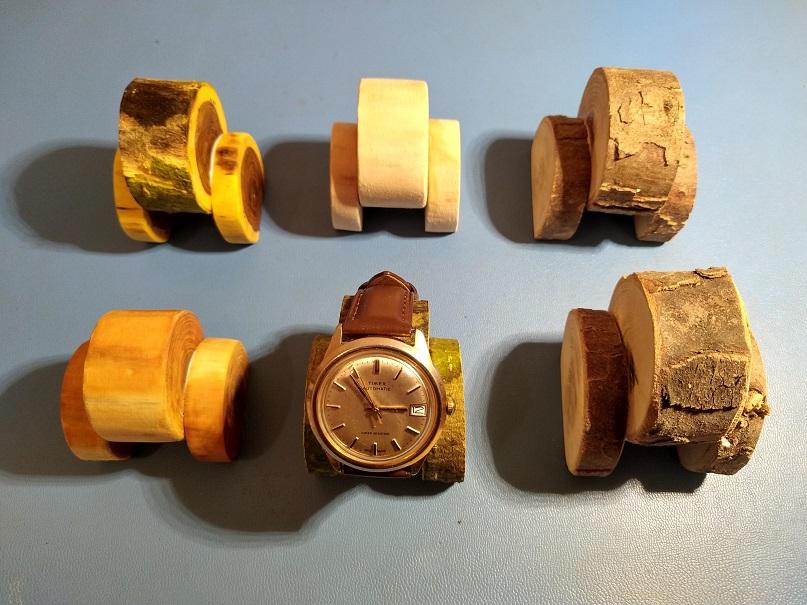 1 point