Leaderboard


Popular Content
Showing content with the highest reputation on 02/18/20 in all areas
-
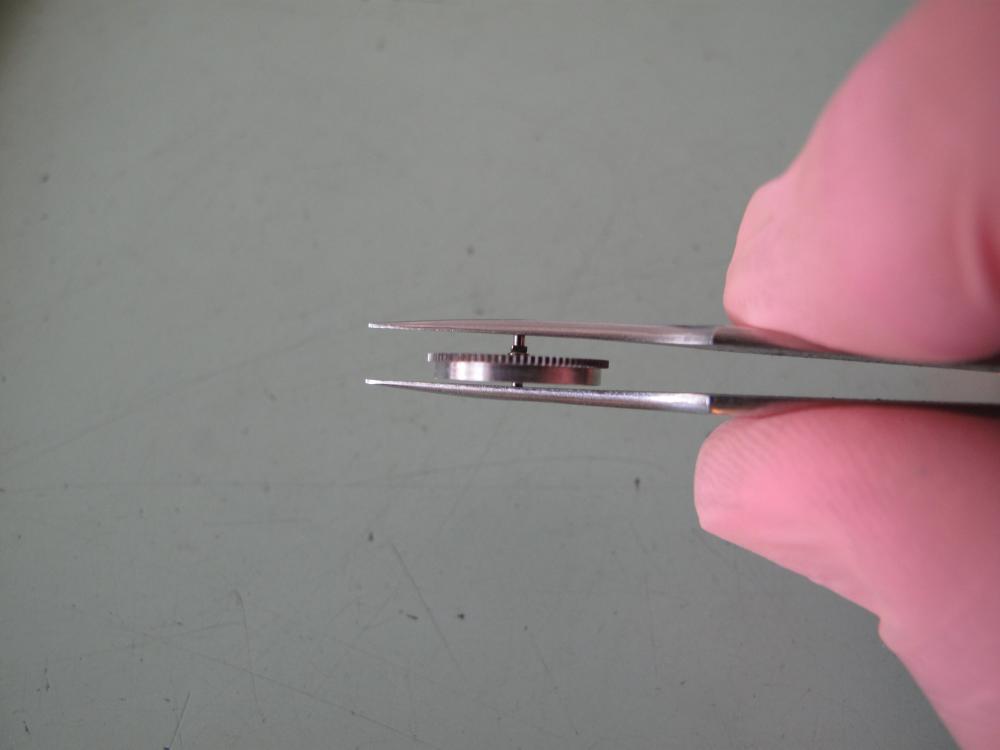
Normally this check is done clean and dry, but clean and oiled is OK too. Ideally it should move with a blower but just moving it by hand will tell you if it's free. You need some endshake, not excessive, and as said above it shouldn't have too much "tilt", this is a sign that the holes need to be closed. If holding with a pinvice you have to watch that the pinvice isn't influencing things. I prefer to capture the ends of the arbor in the flats of stout tweezers.
 3 points
 -
To check if your cleaining fluid is really clean, put a drop on a mirror and leave it to evaporate. Any residue will the stuff that is left on the parts you clean. Anilv3 points
-
I've heard this effect called 'tropicalized', meaning heat has changed the color. If this is the current term to use of if it is even a word I don't know. but it sounds interesting. Picture yourself on the beach, the waves are rolling, the palms swaying in the breeze, a cold drink in hand... endless parade of bikinis walking by and ..... than suddenly the calm is broken by "HEY ARE YOU STAYING AT THAT WOMAN?".... Have a nice day!3 points
-
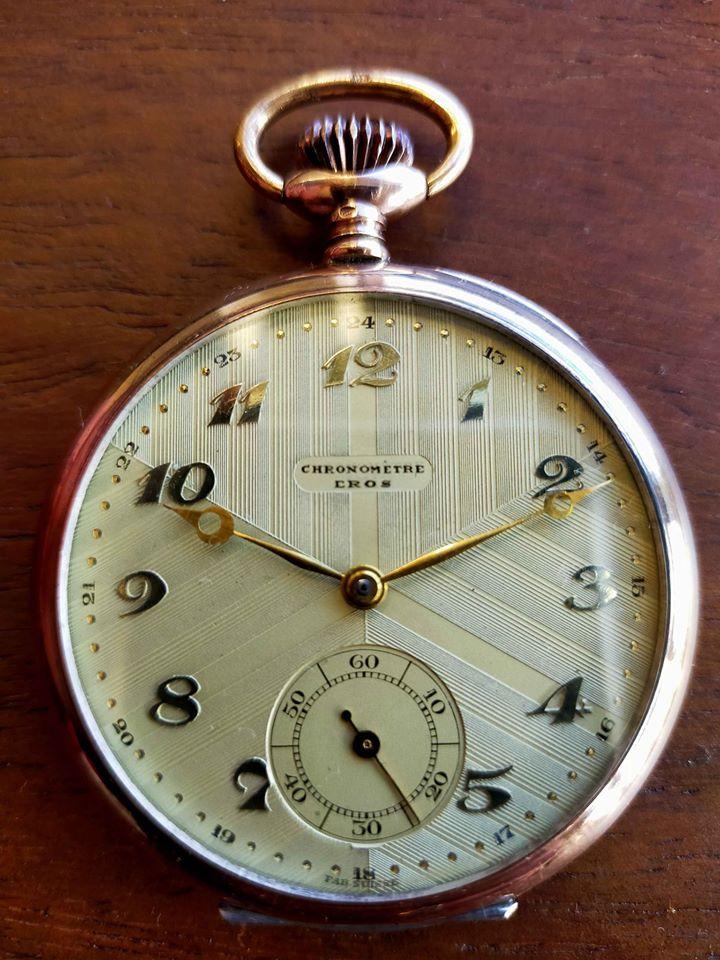
I found this on one of my vintage watch Facebook pages. Probably have to wait for ten days or so as I'm in the US and it's coming from the UK. That dial is amazing. I also love the gold hands and numbers with a silver case. I'm 73 and SHOULD stop collecting and start selling my collection as my daughter wants so that she doesn't have to deal with it but being addicted and all I can't stop. Lol.. Plus I have many watches in a drawer in my watch work bench to be serviced.

 2 points
 -
Hi Find attached a comprehensive list of watch lift angles. gamma.pdf2 points
-
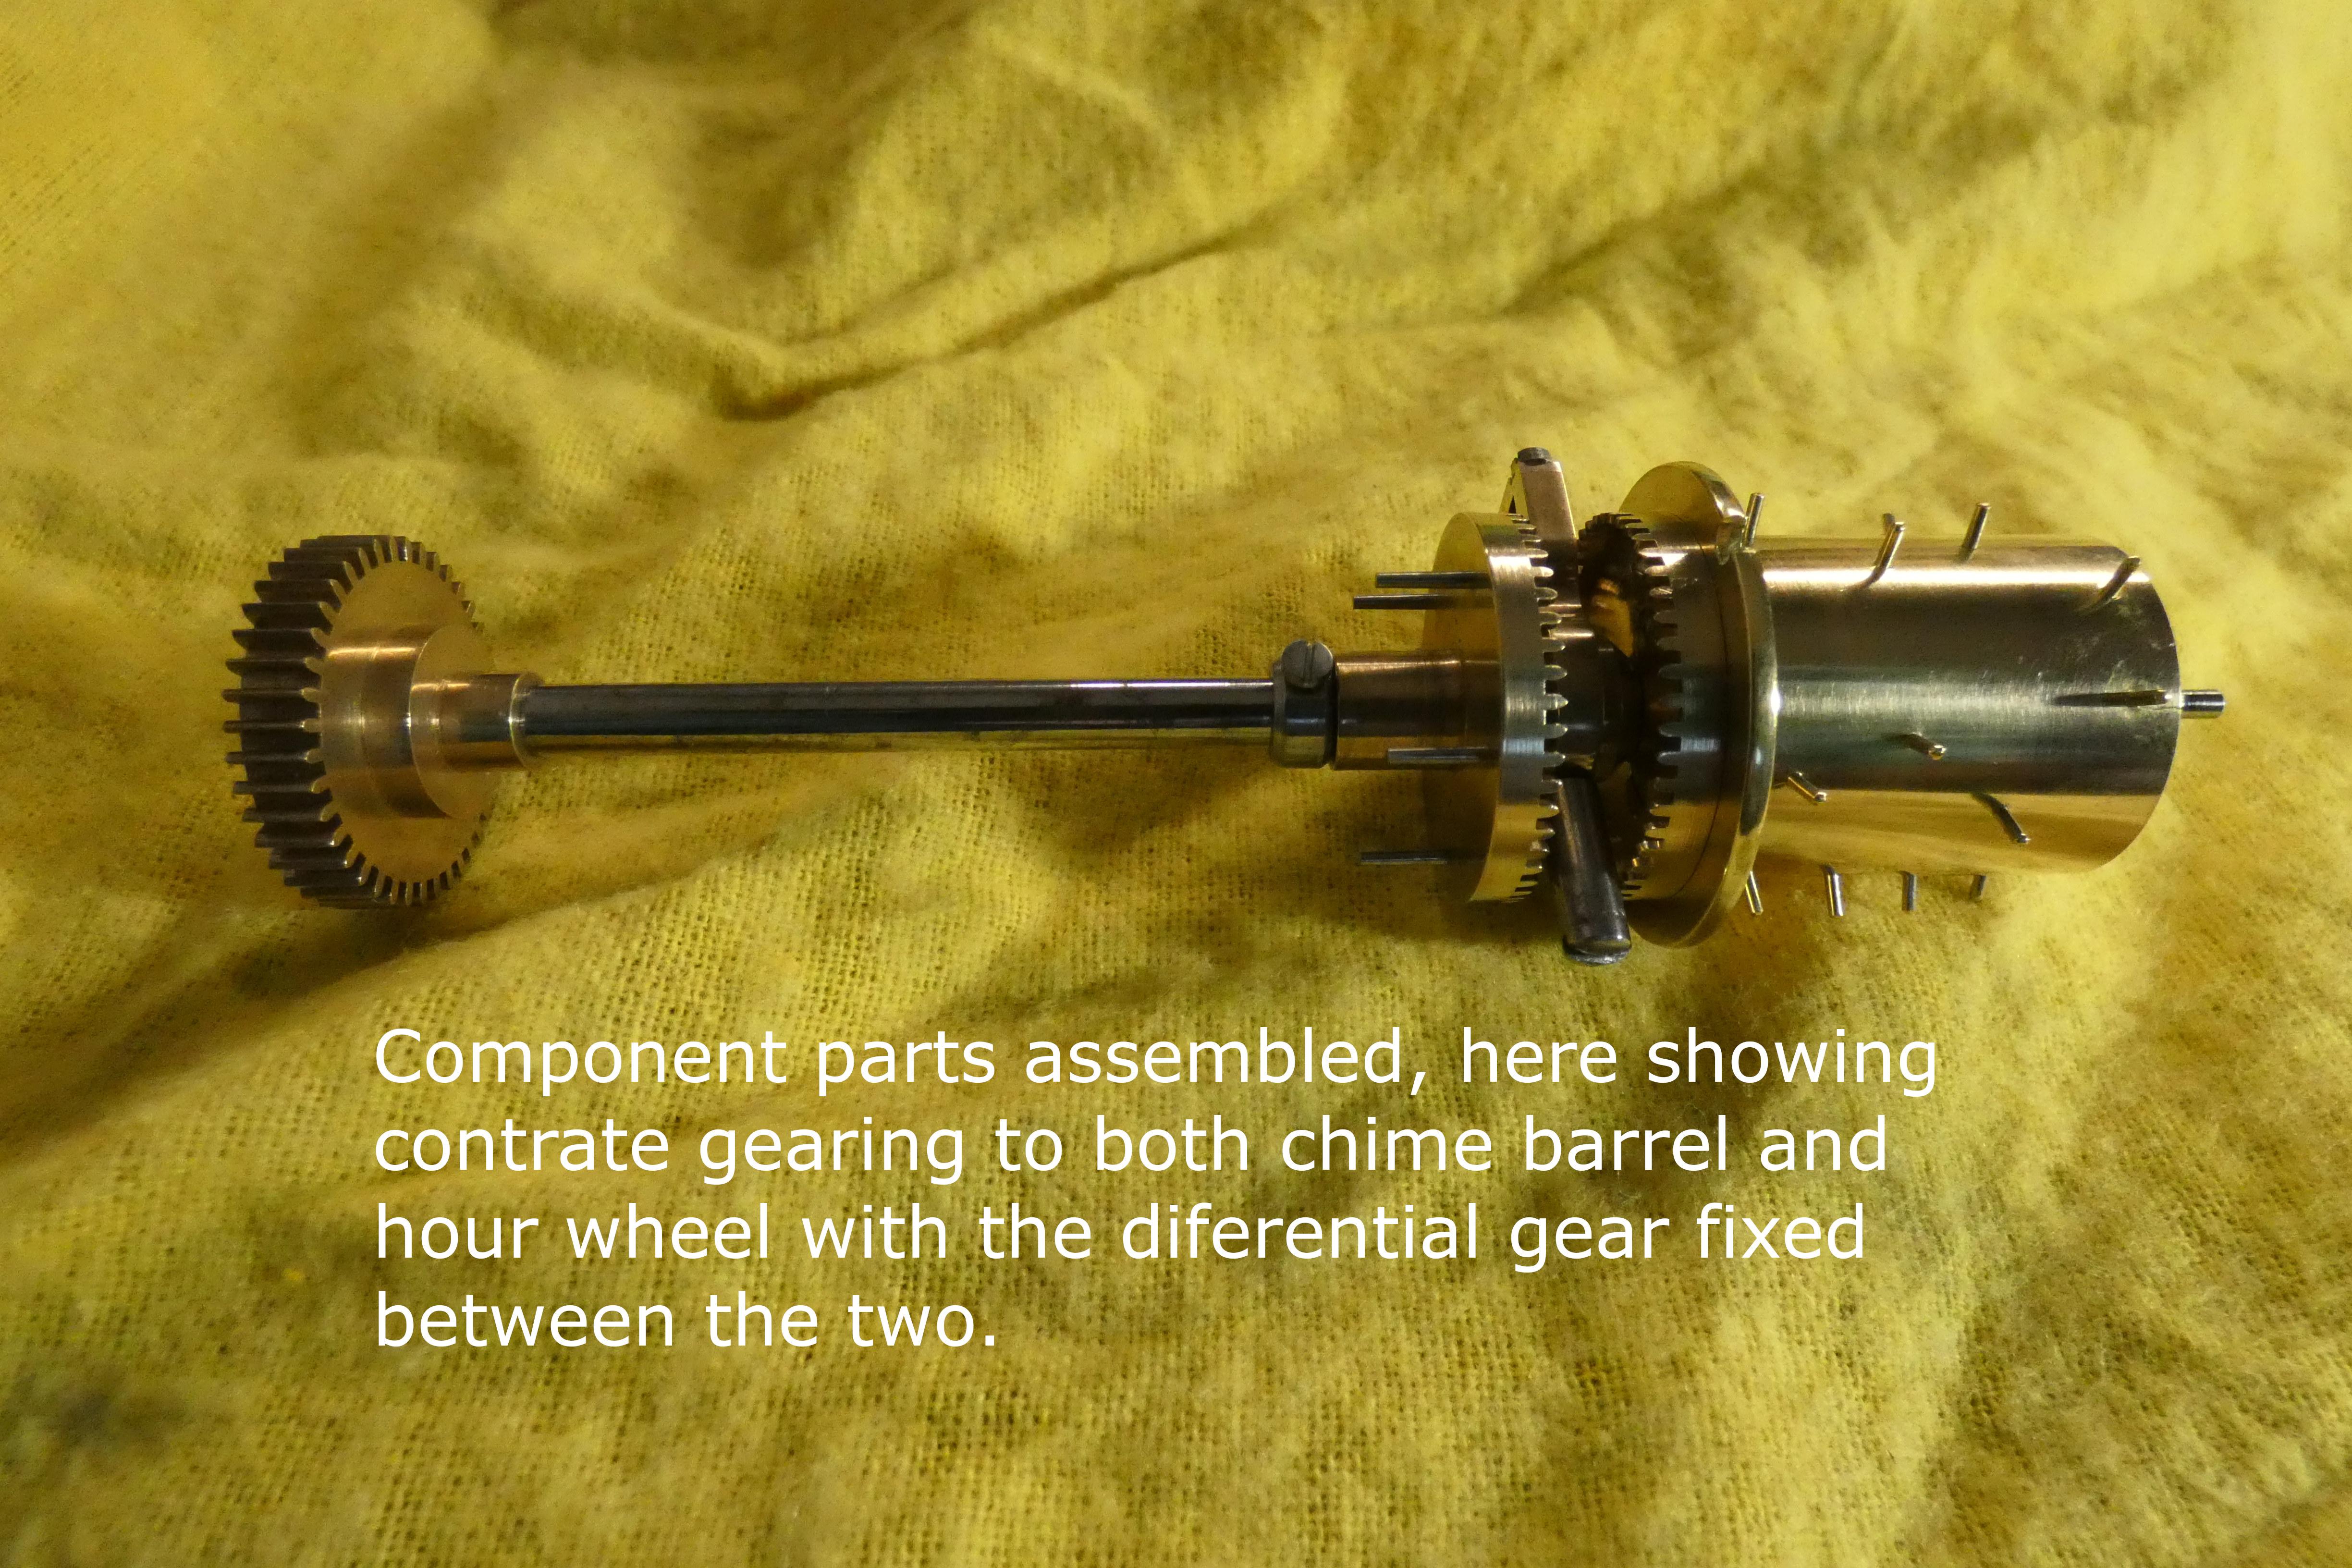
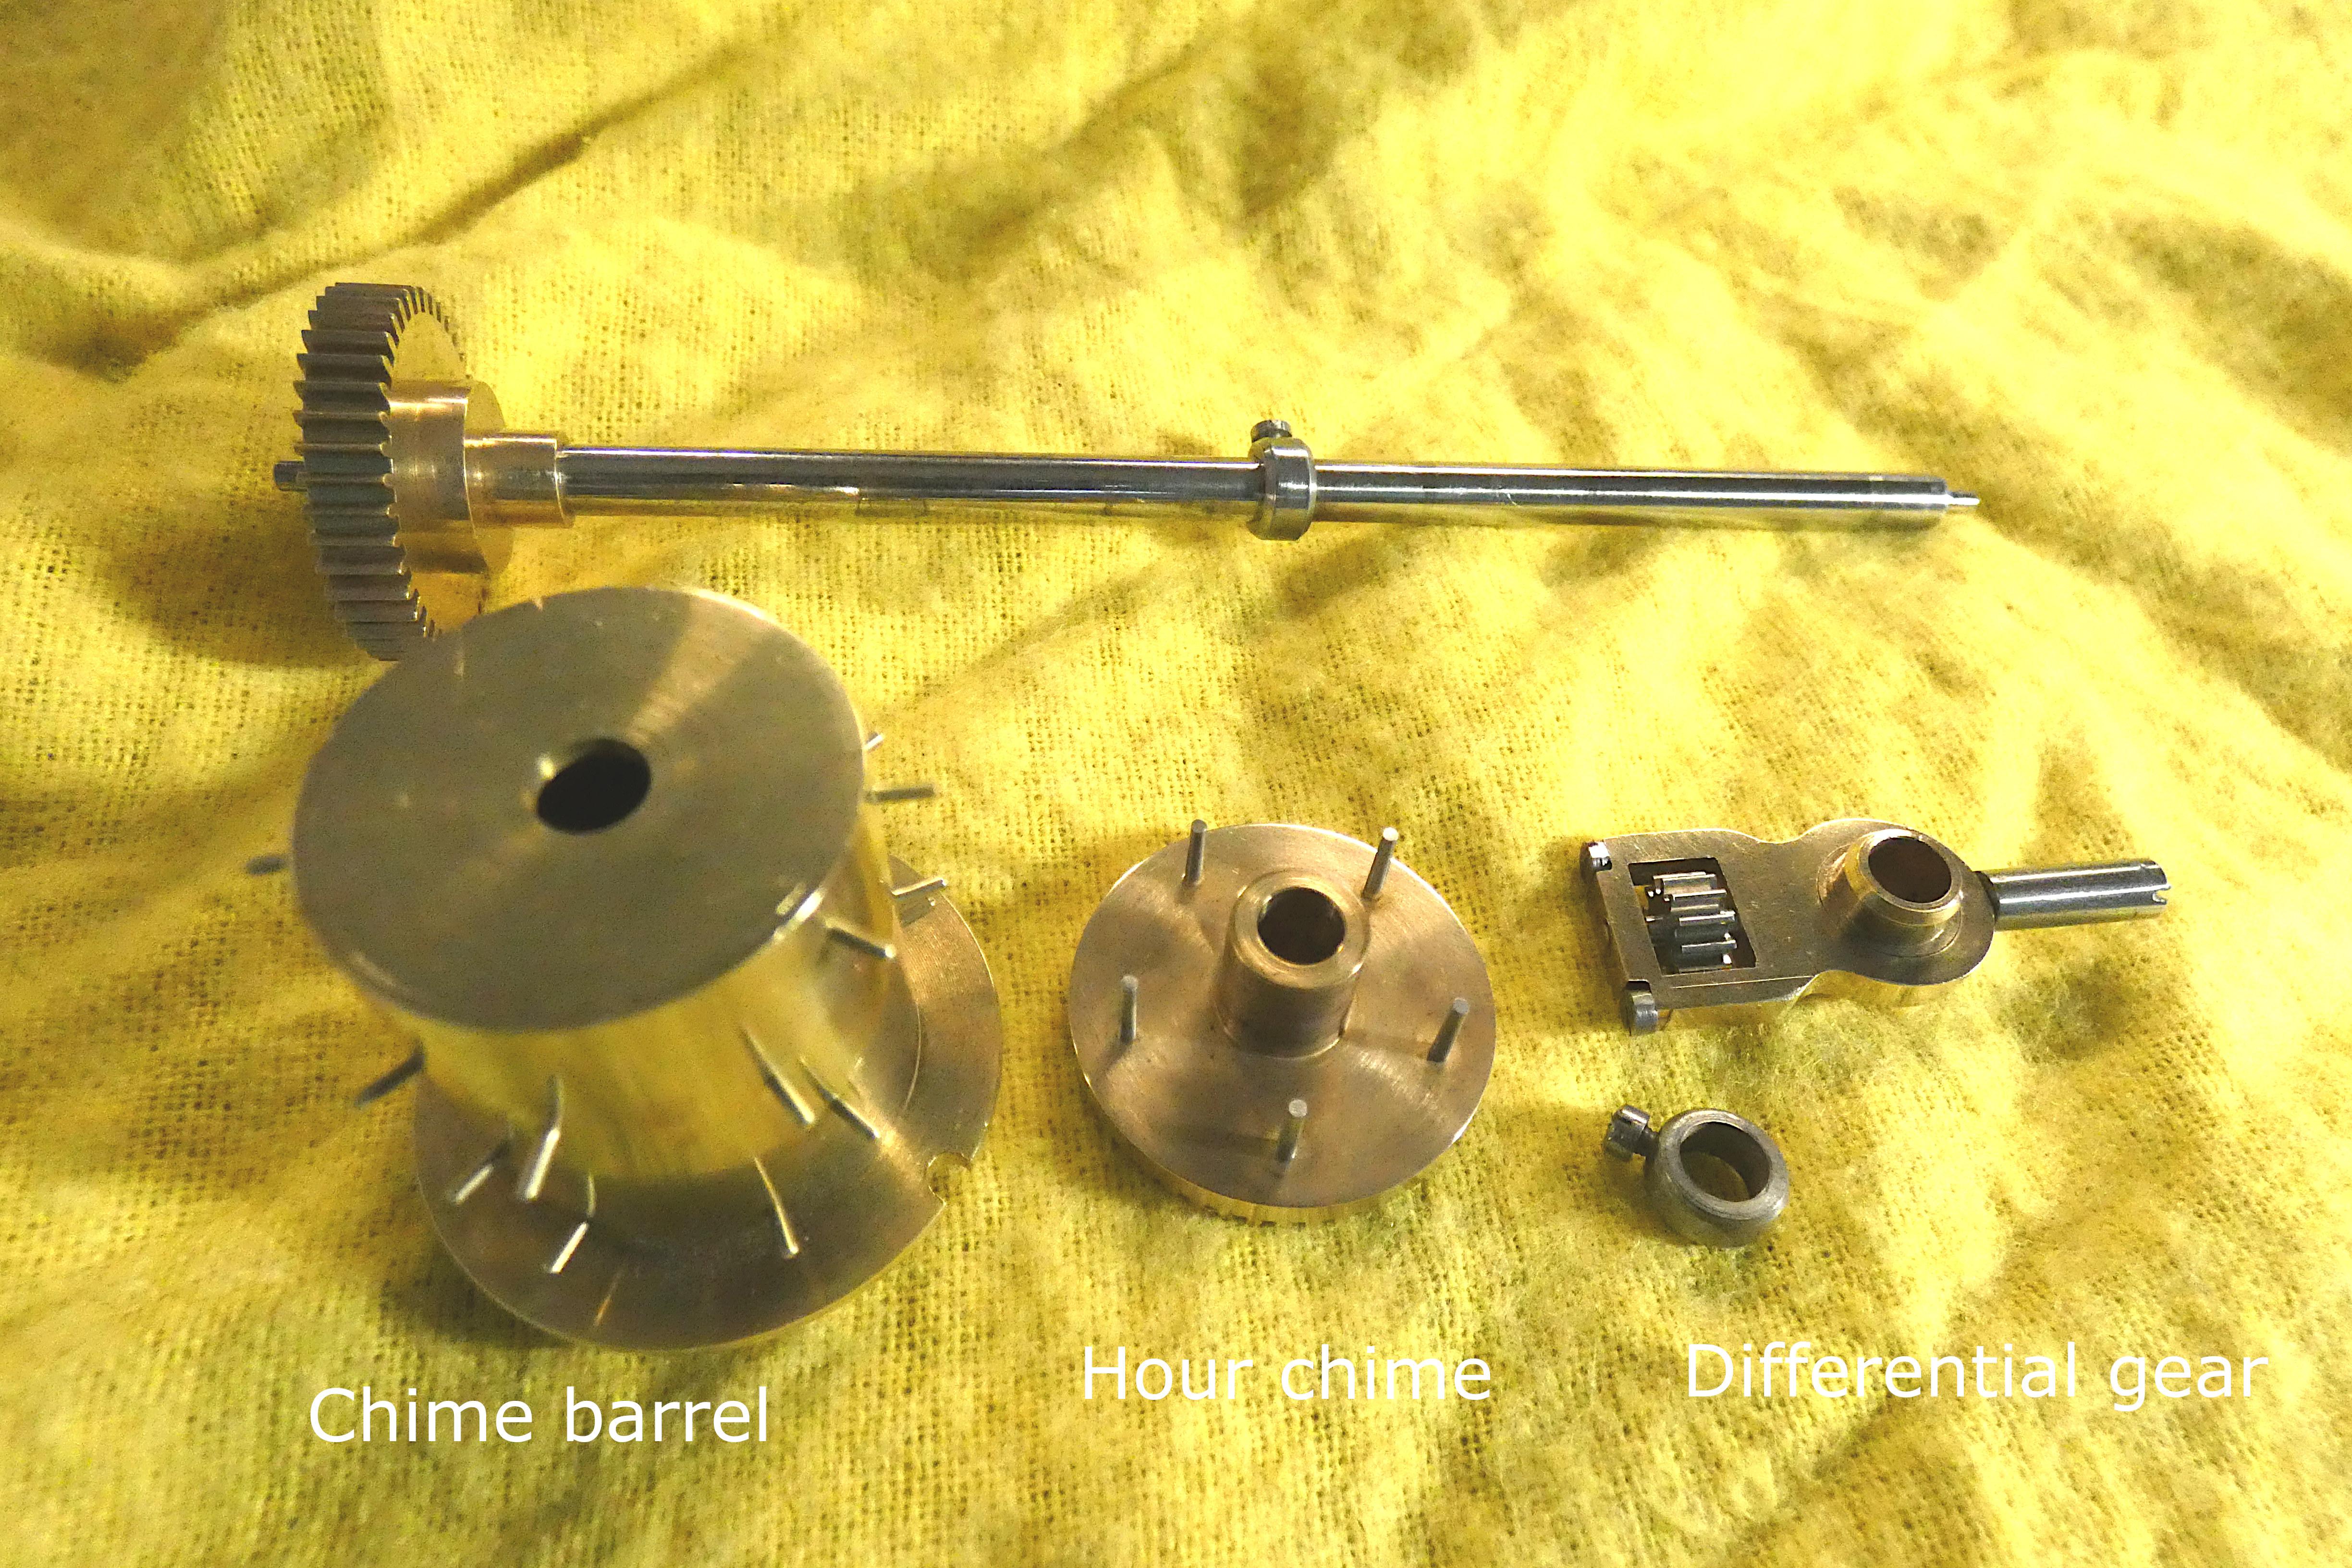
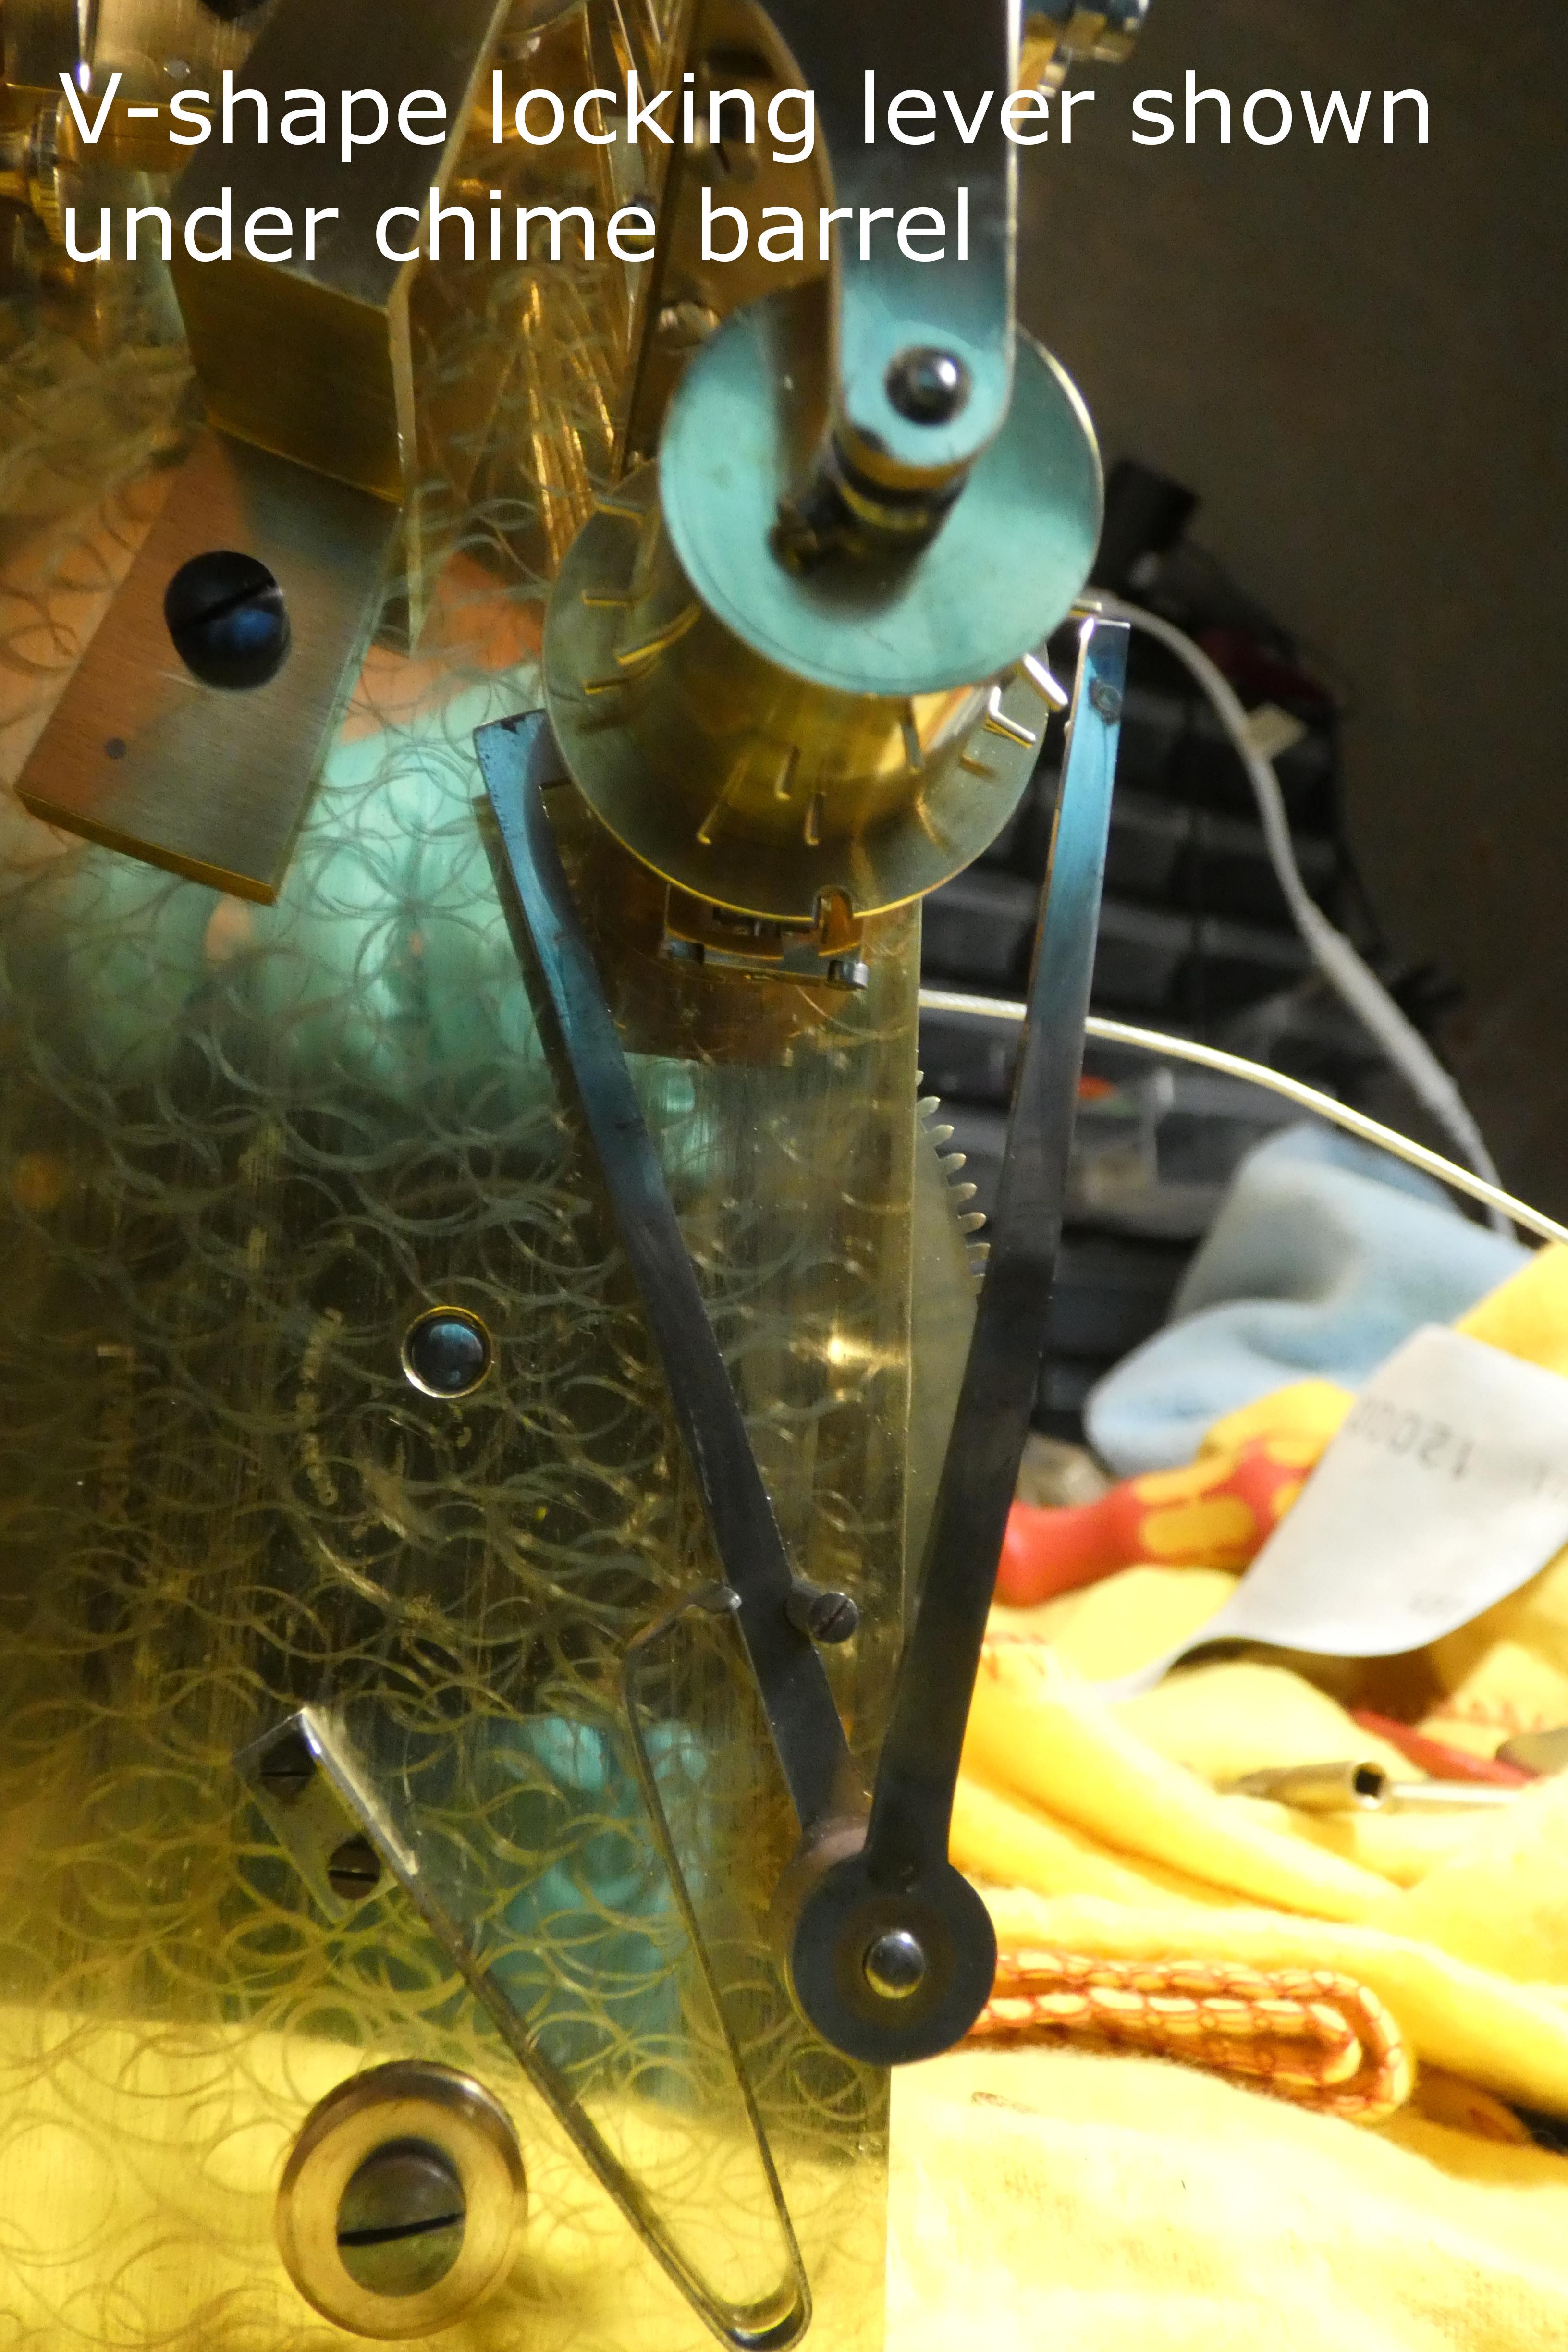
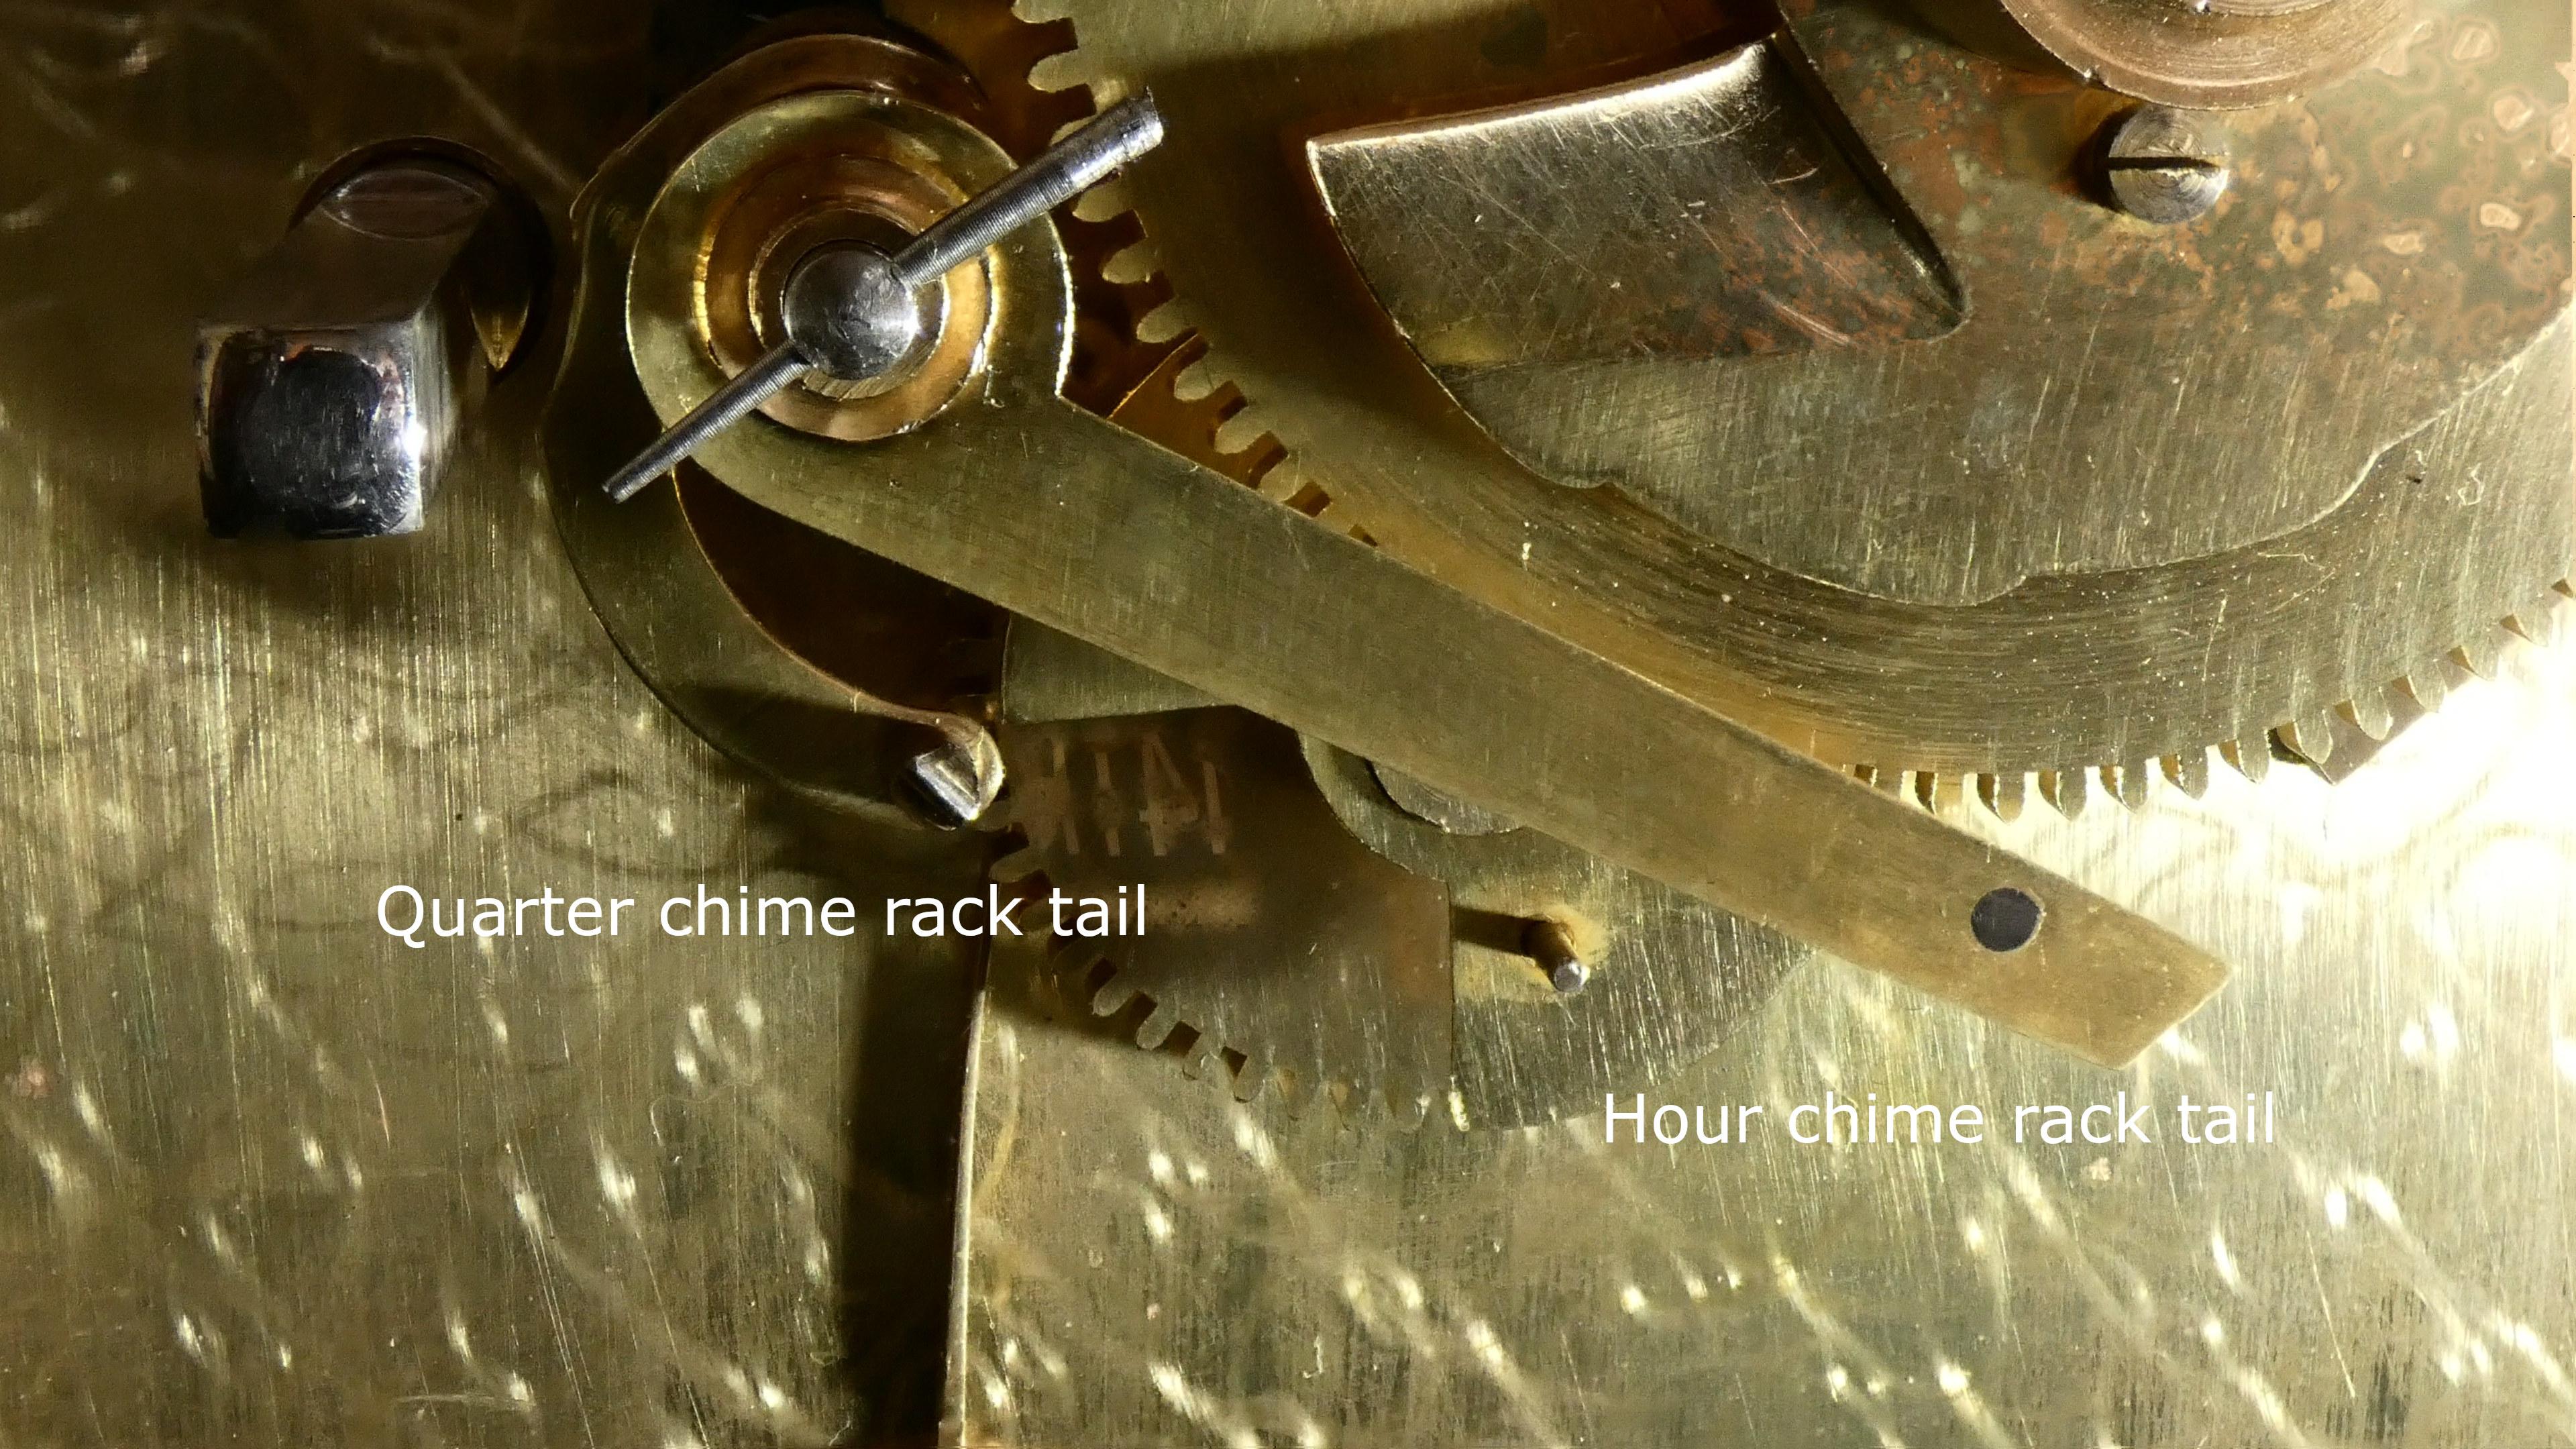
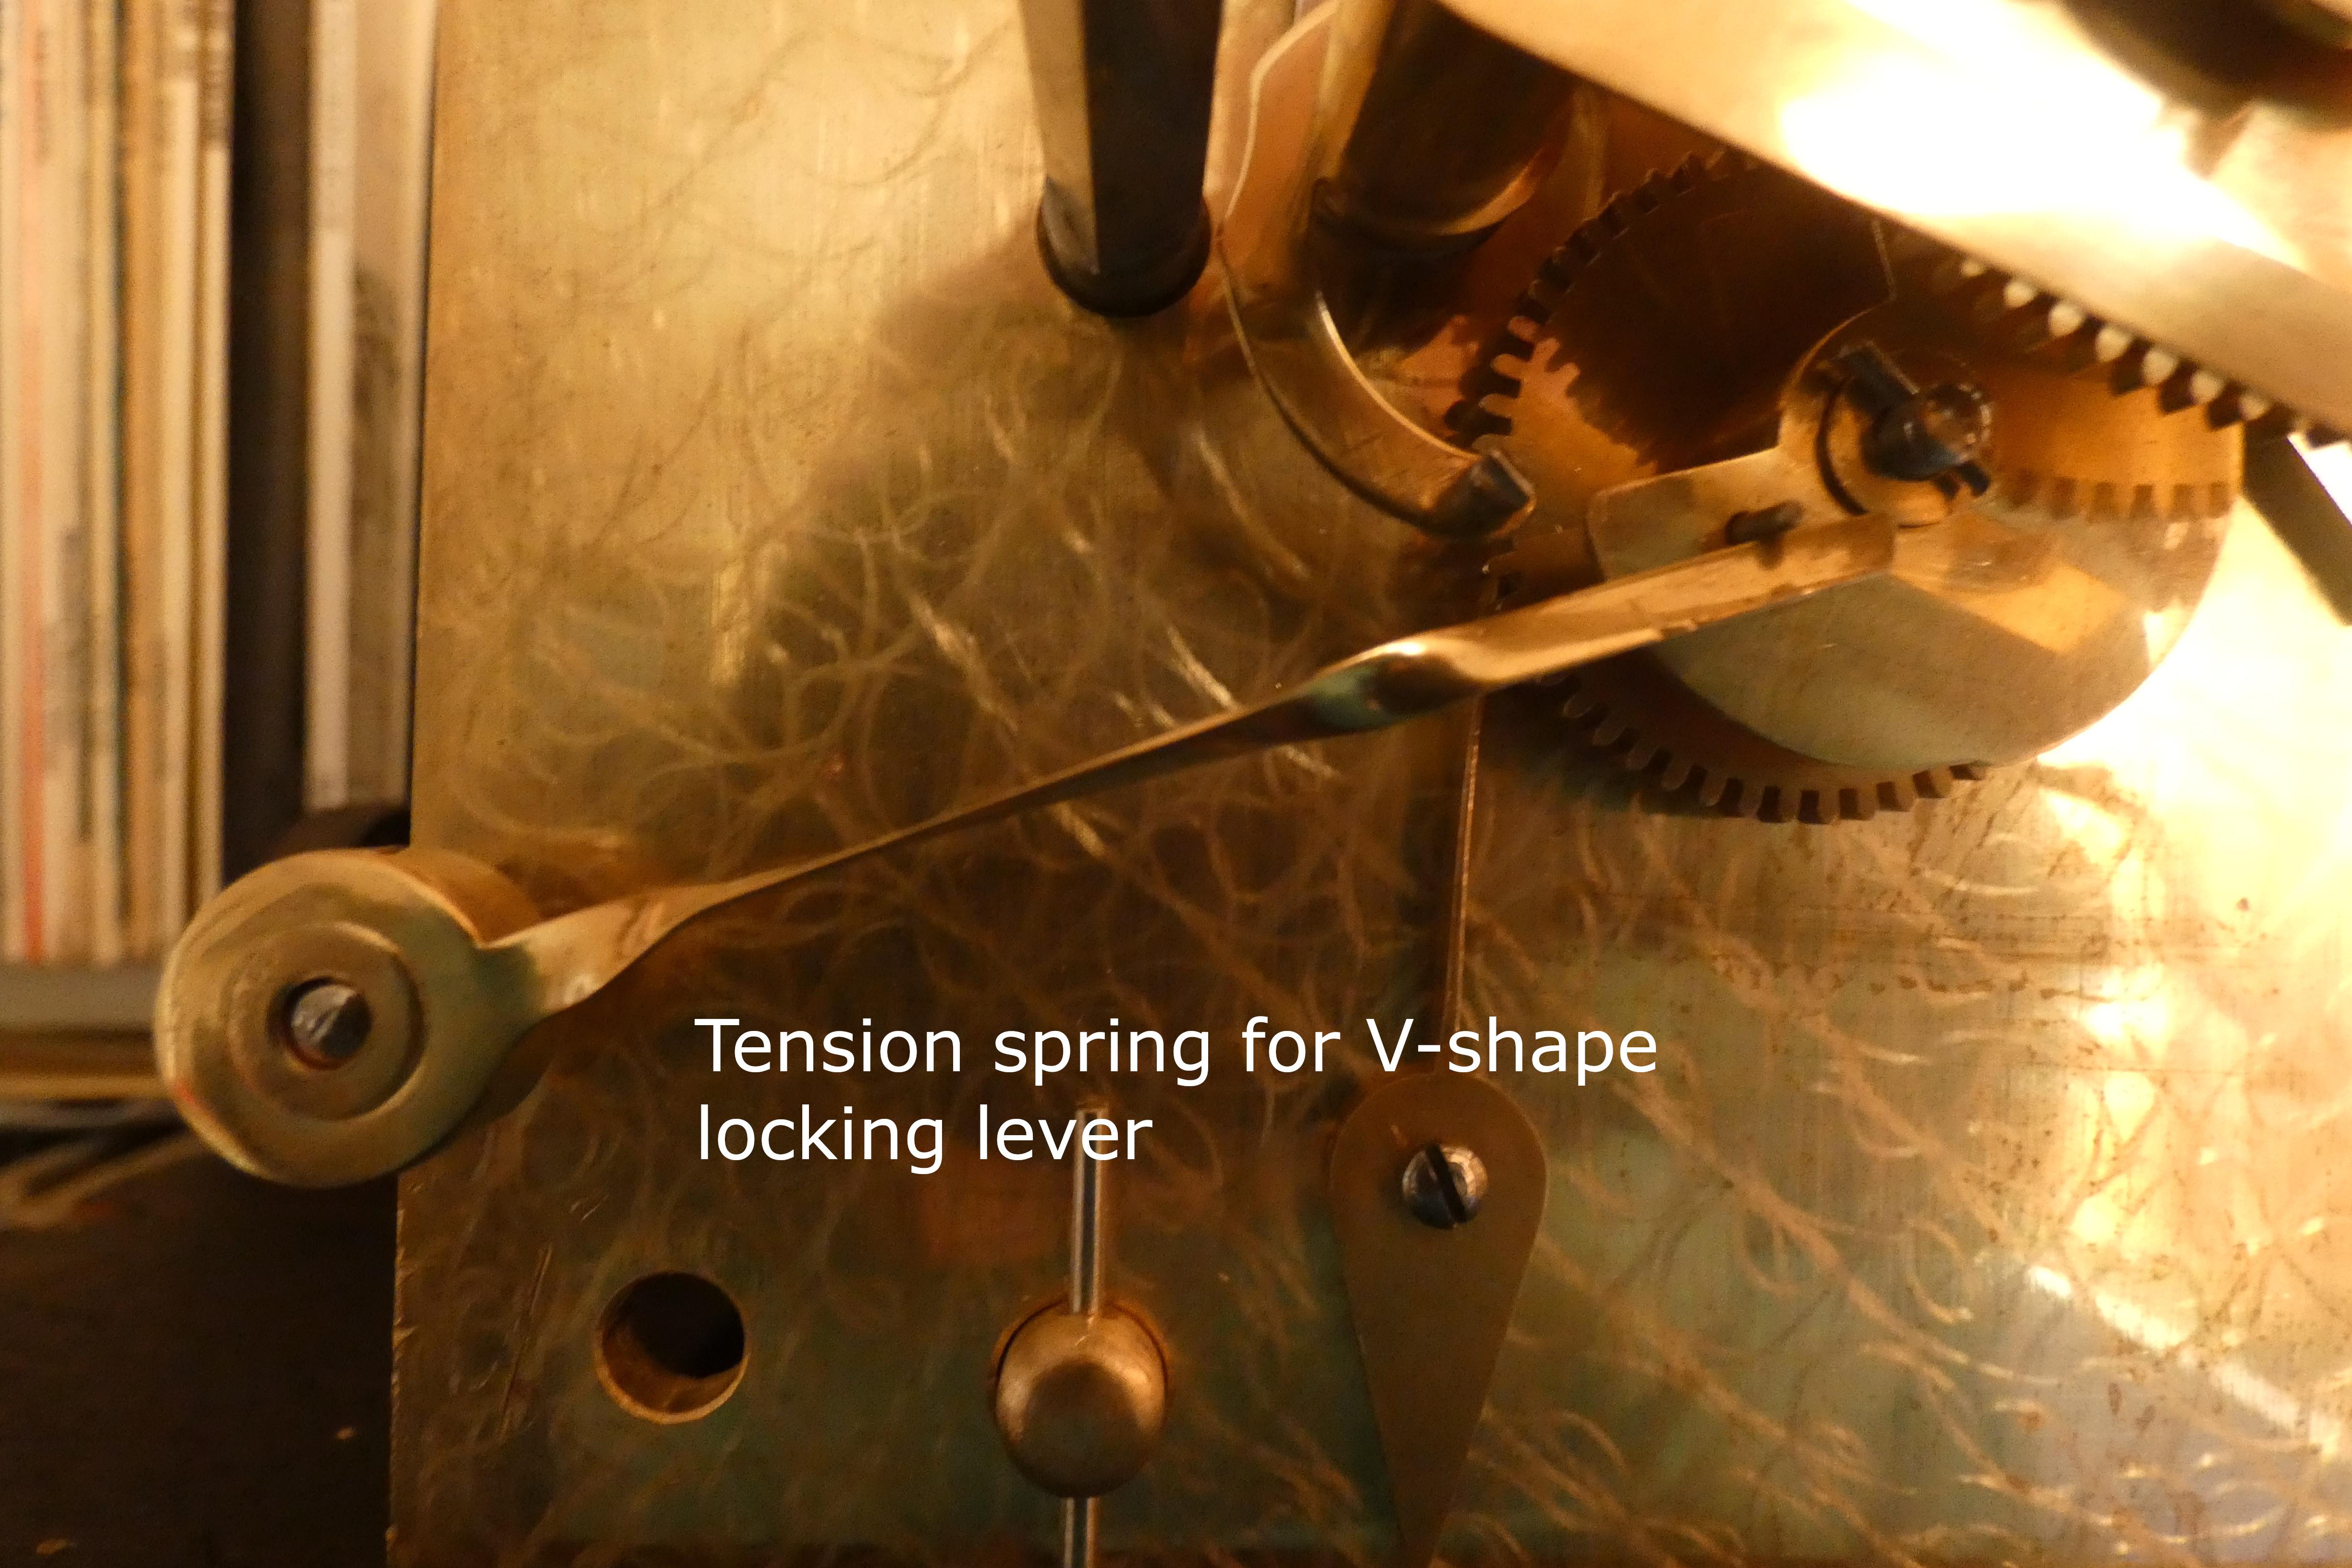
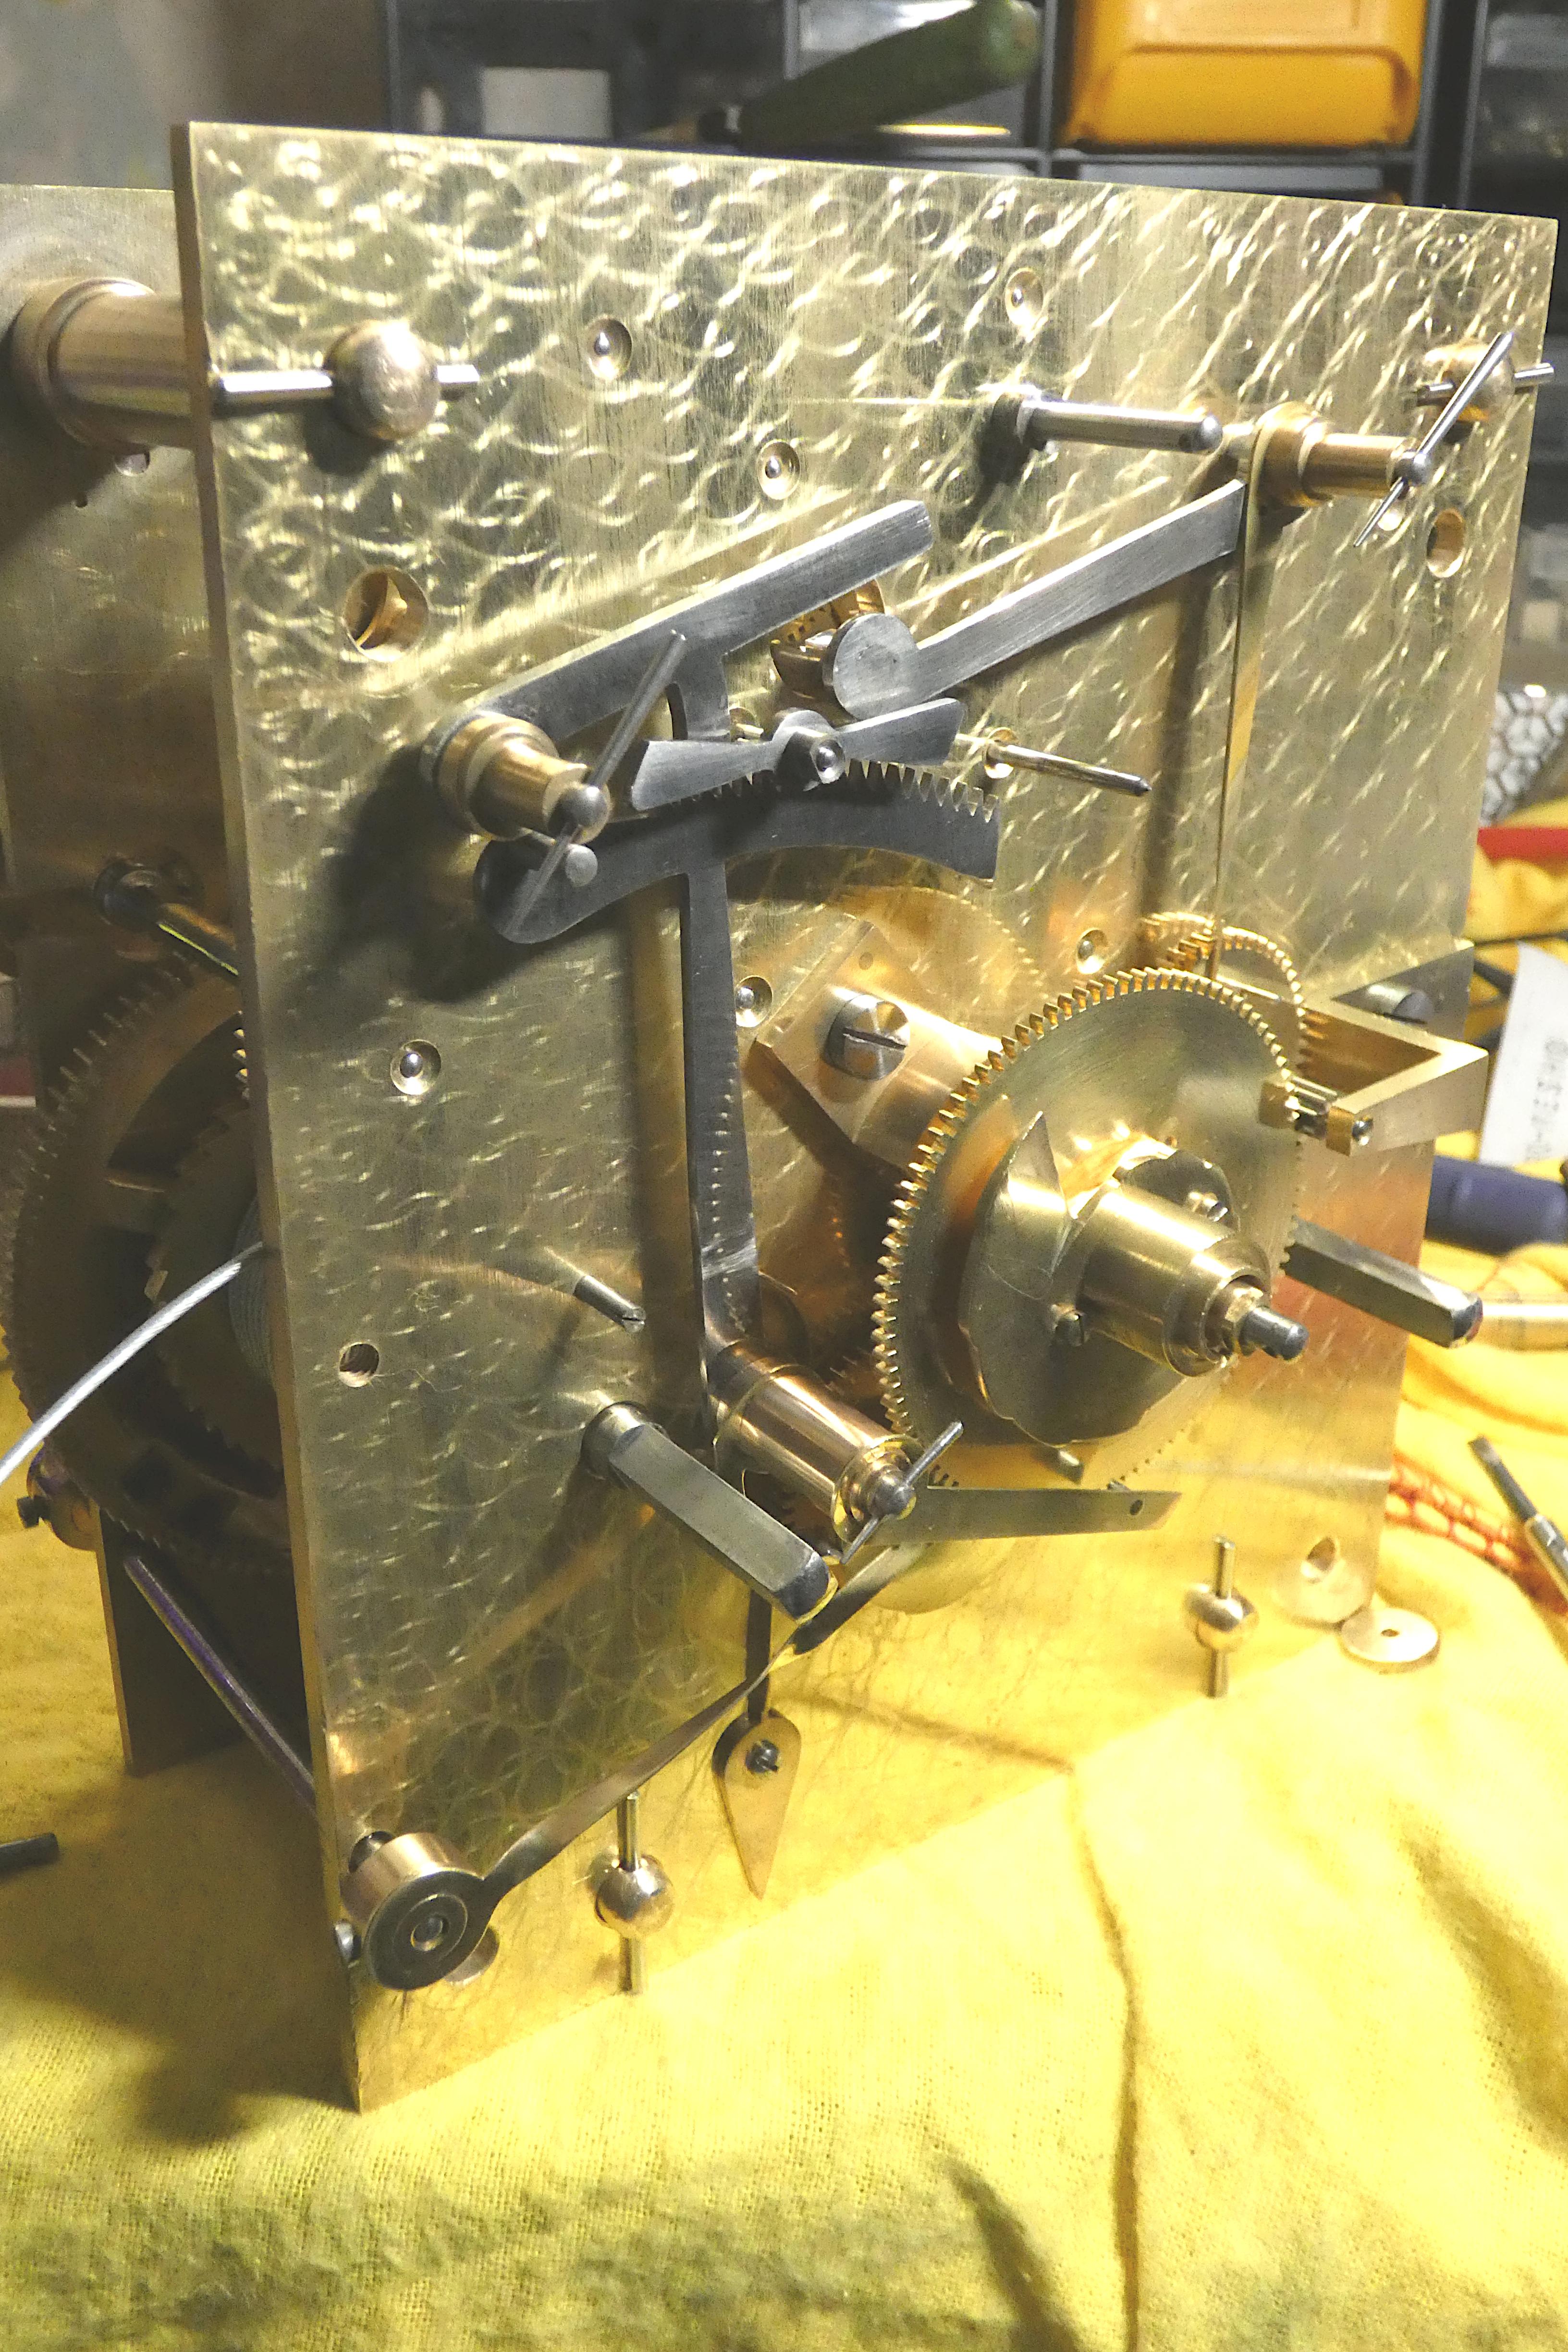
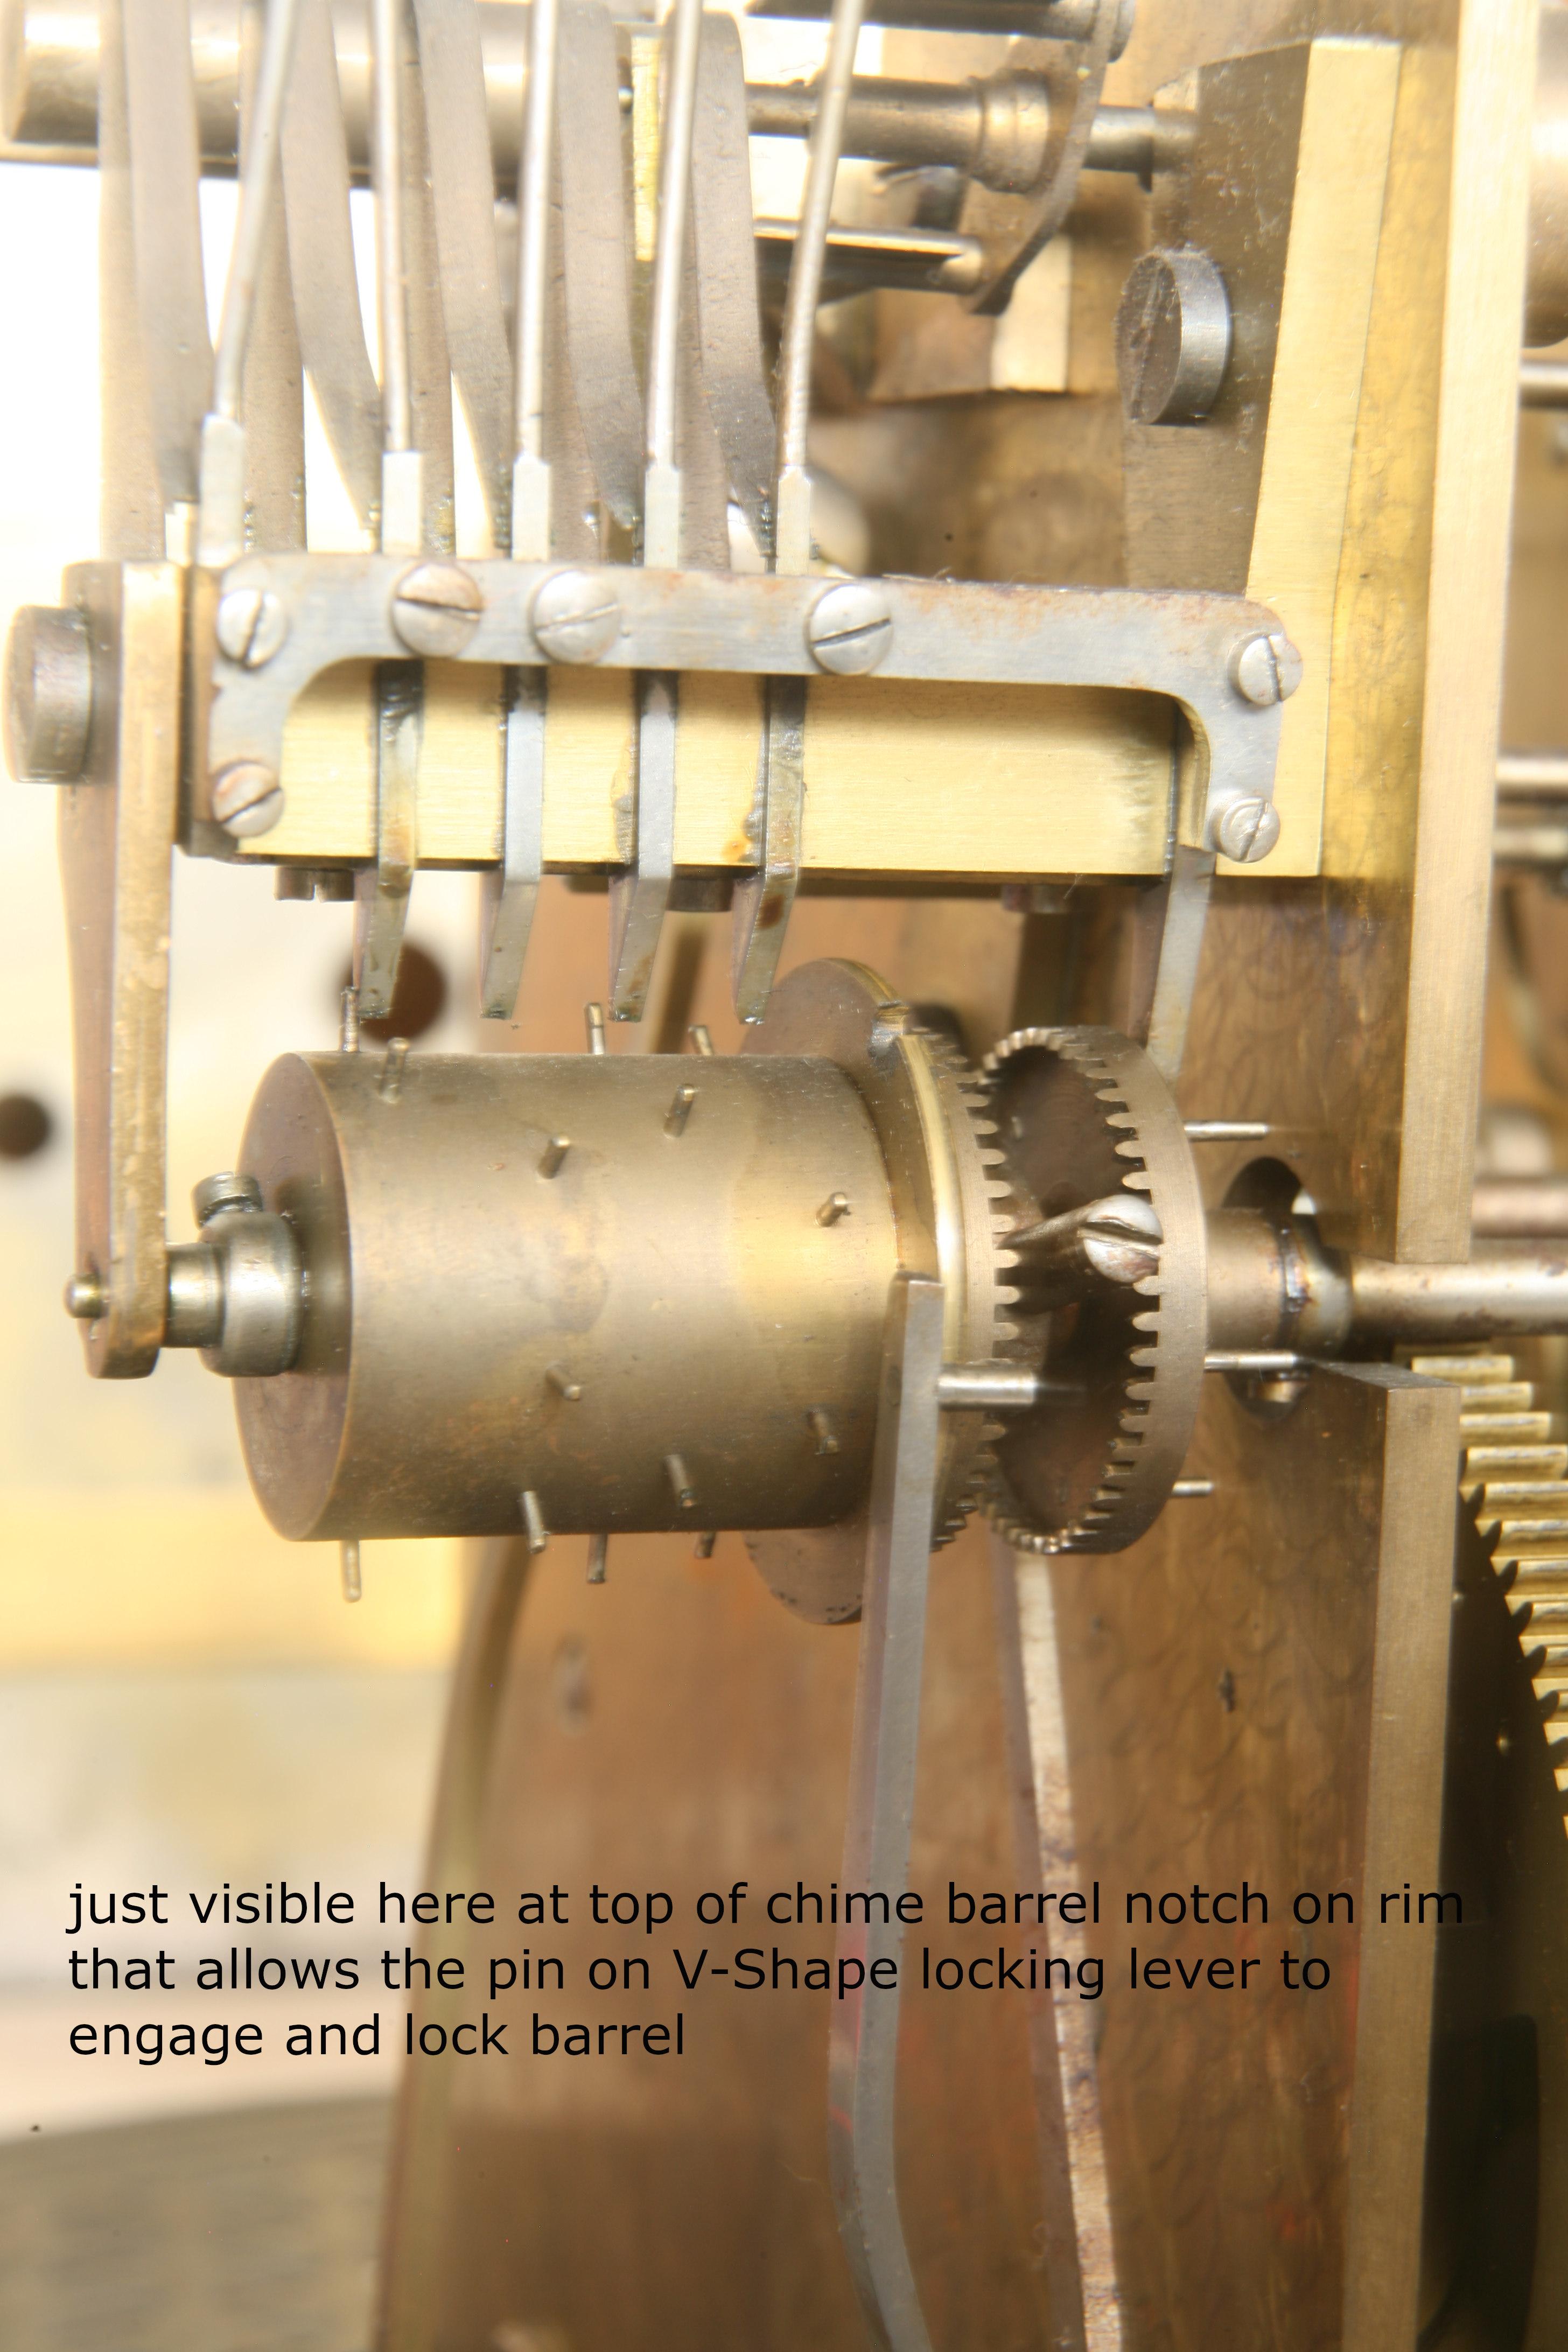
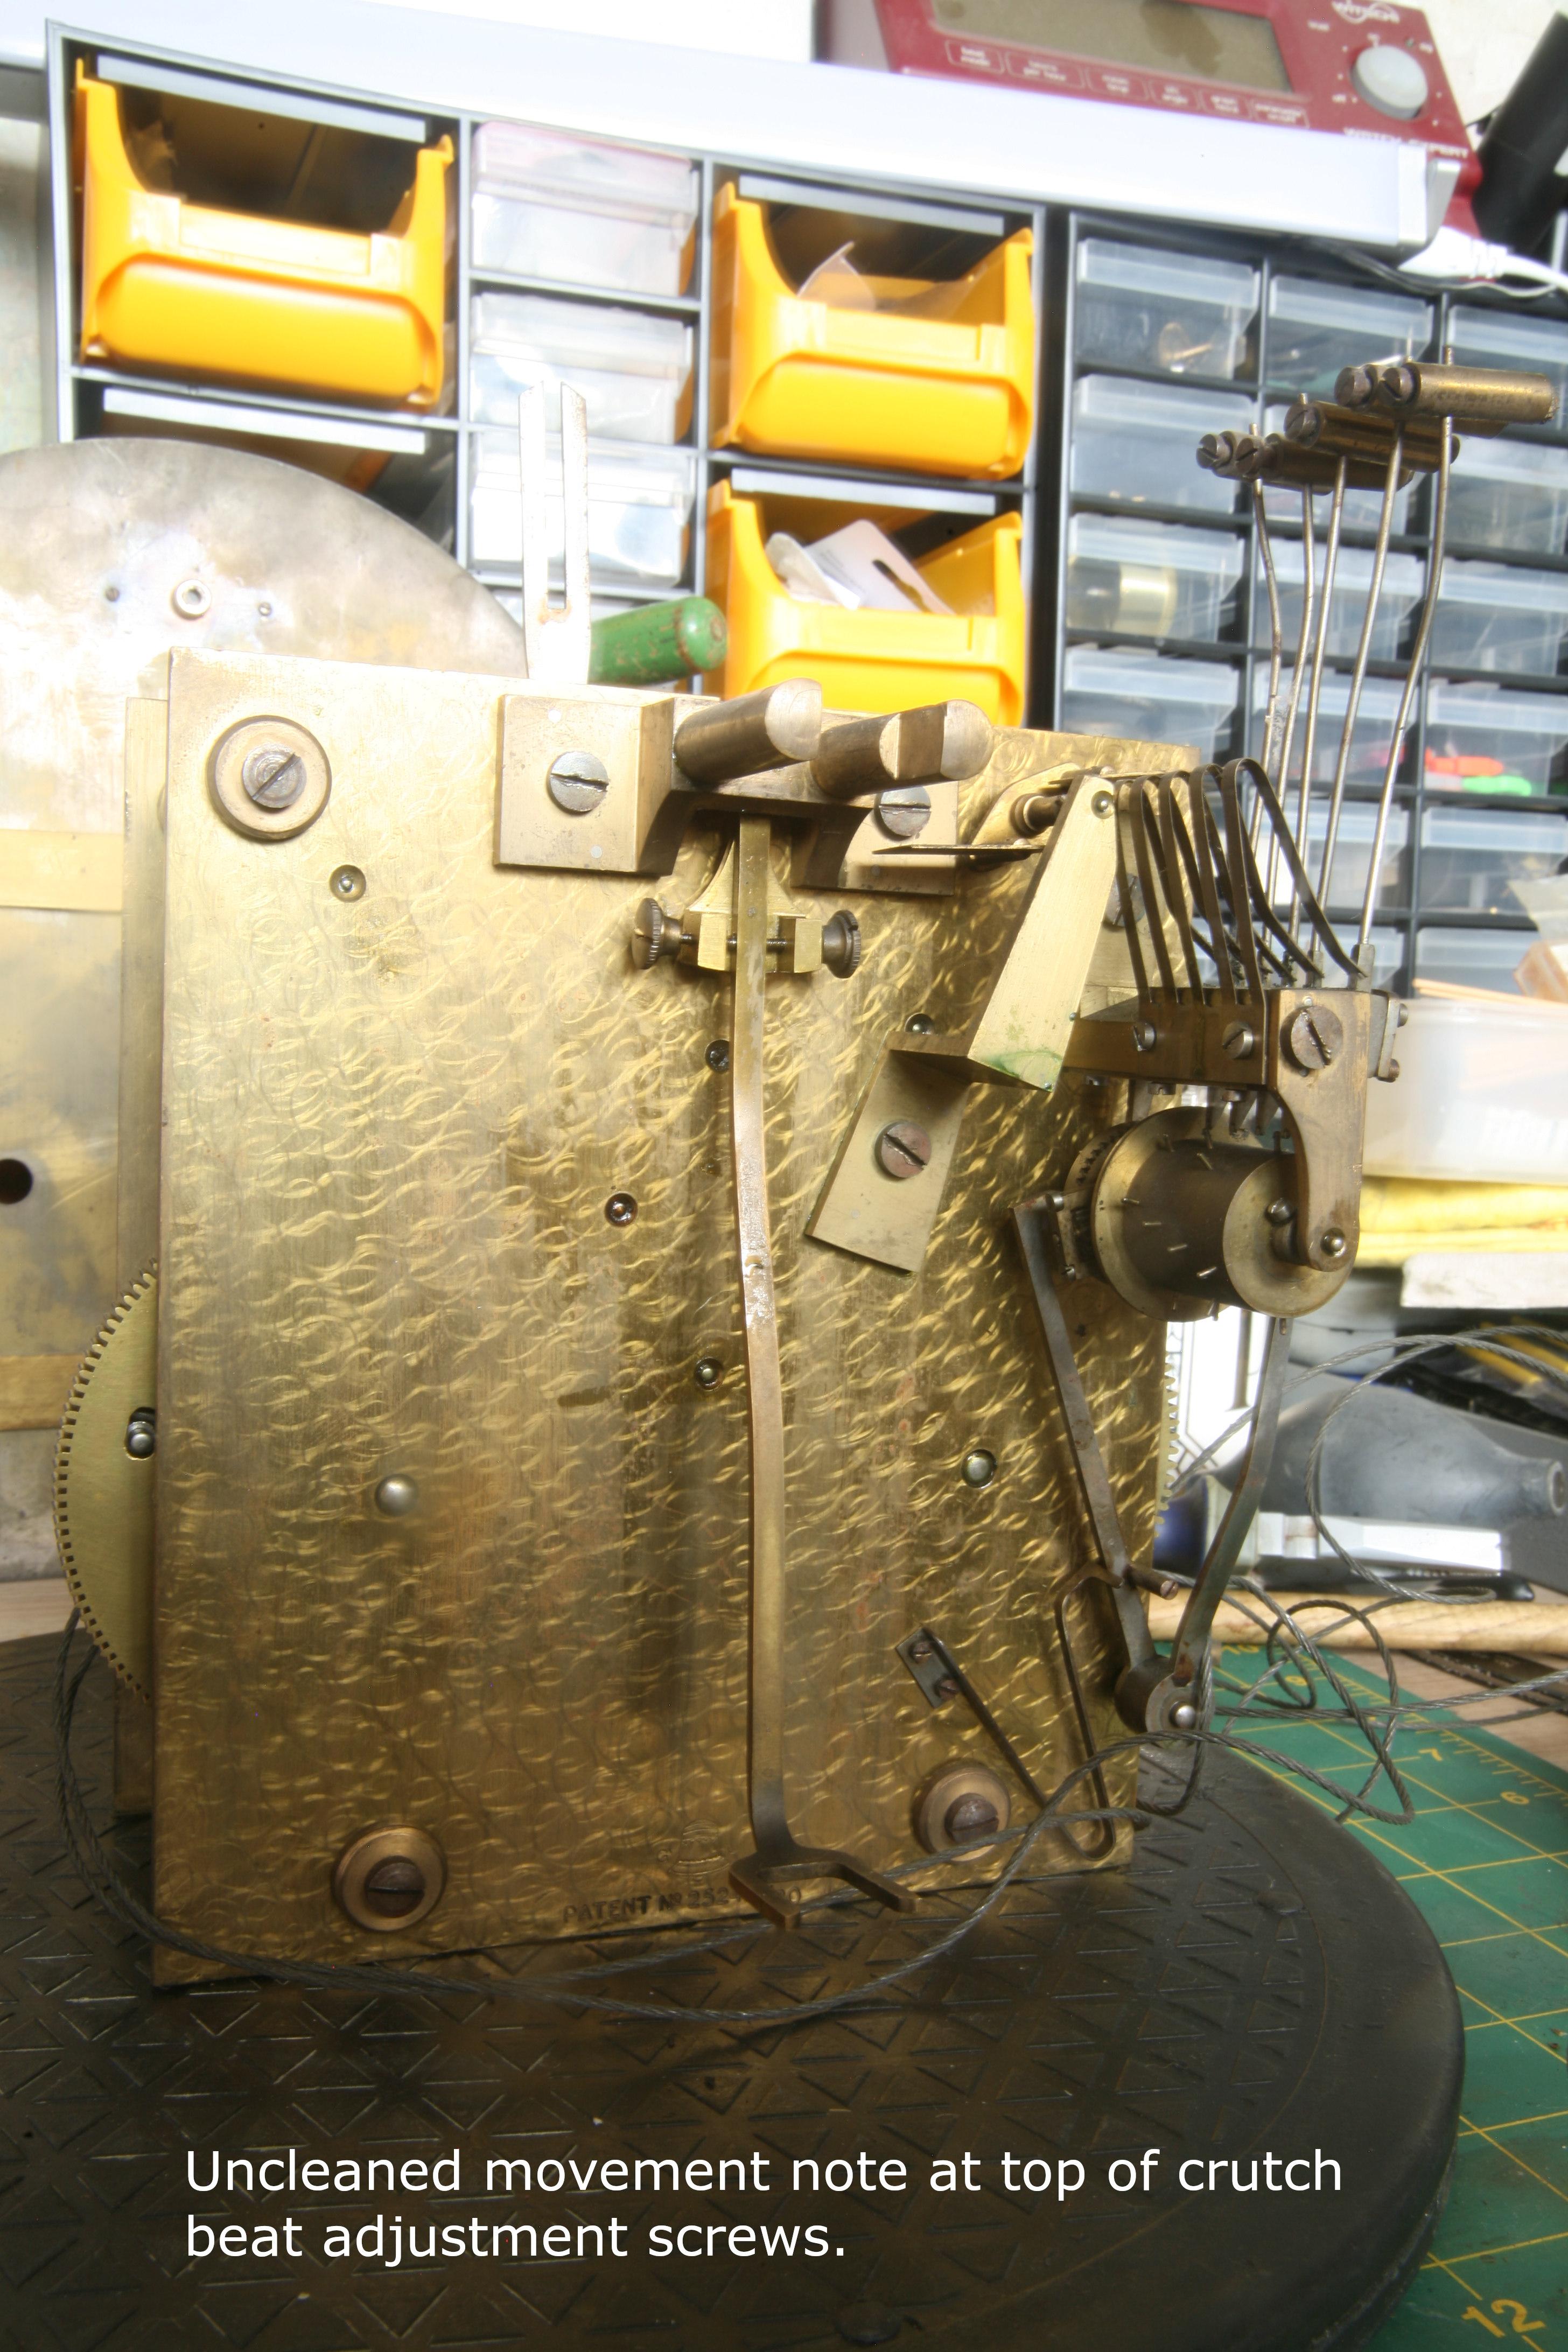
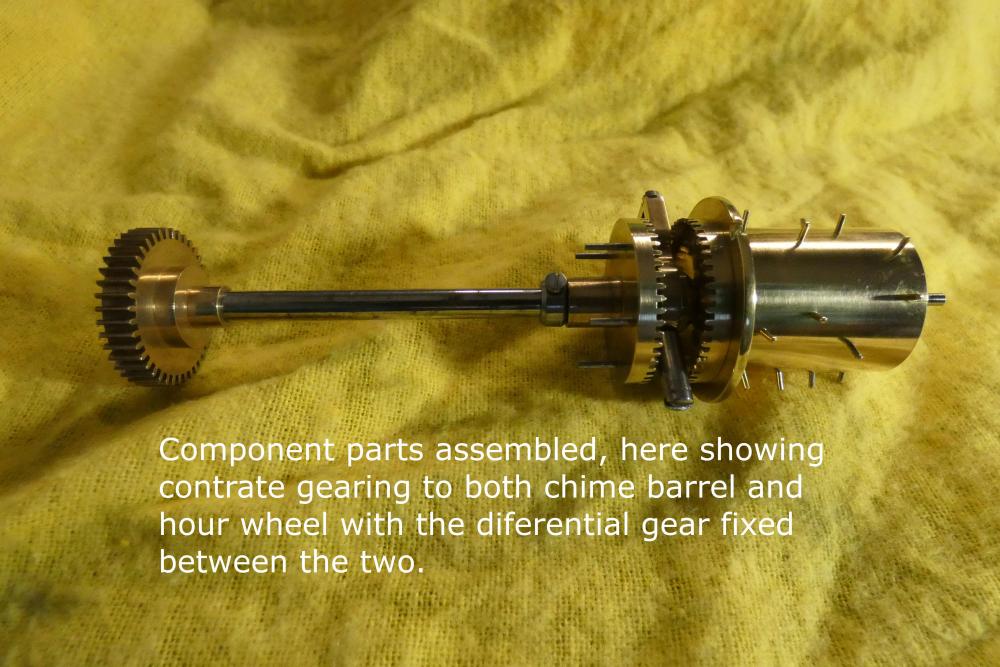
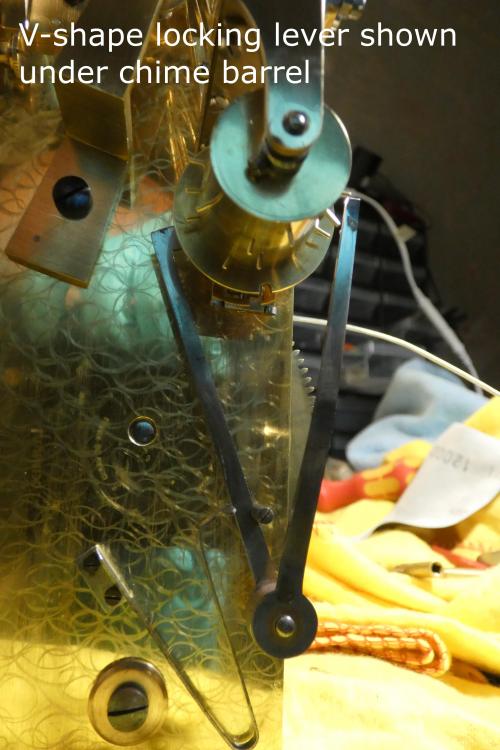
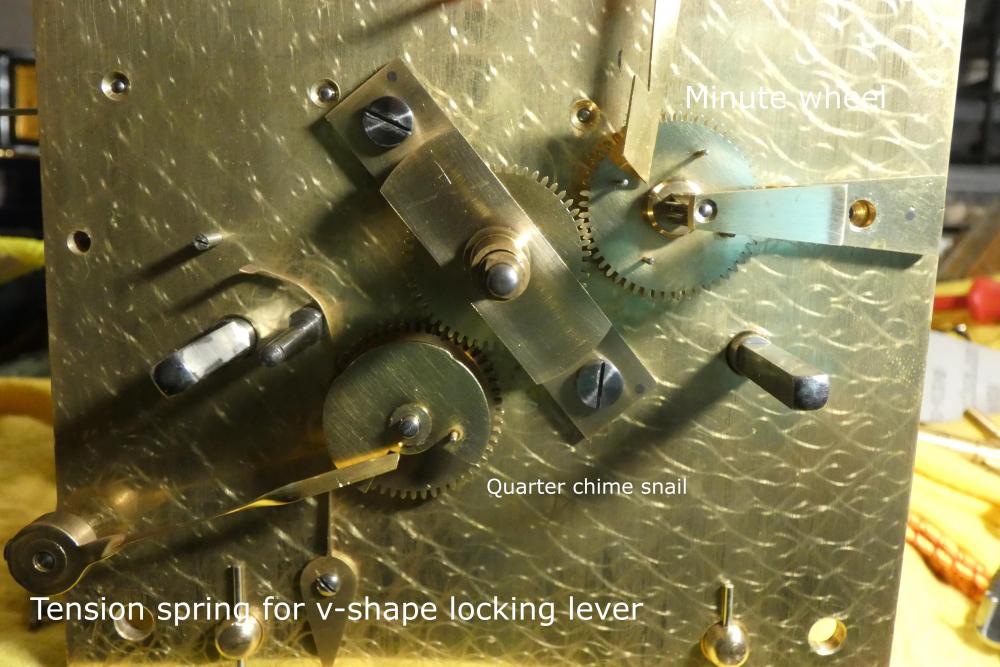
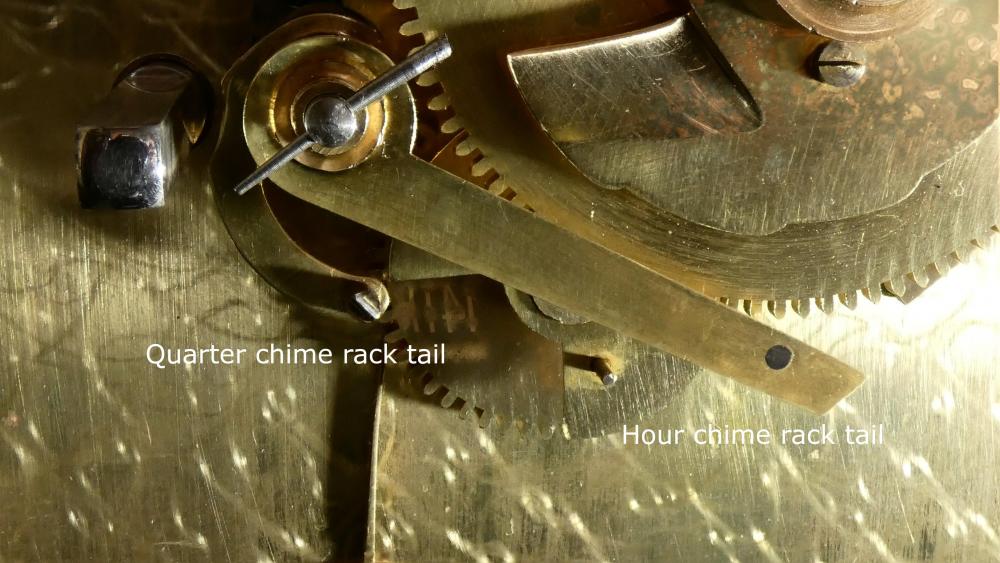
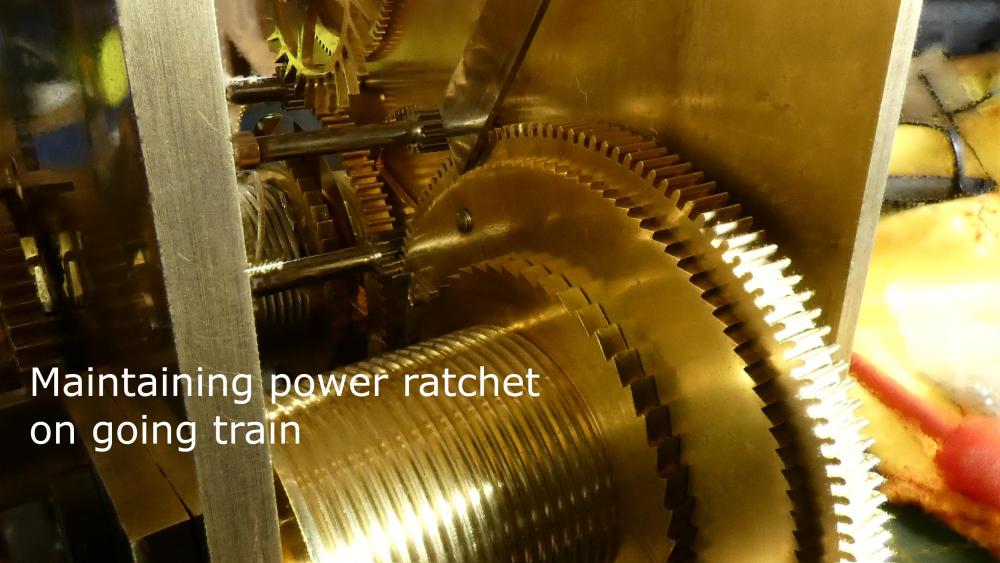
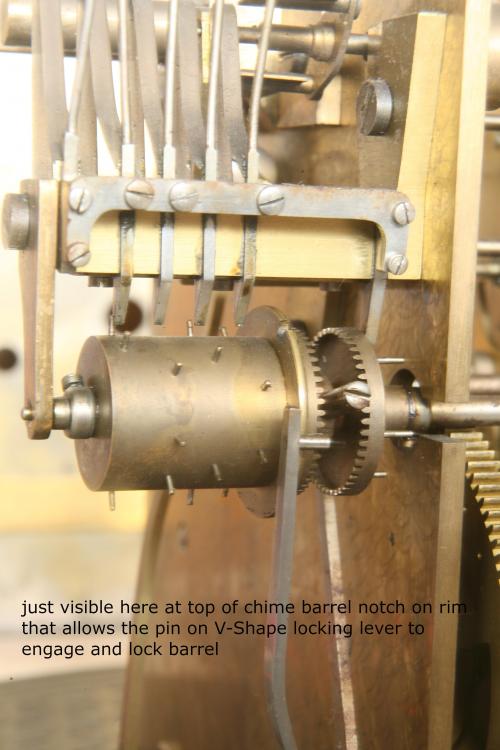
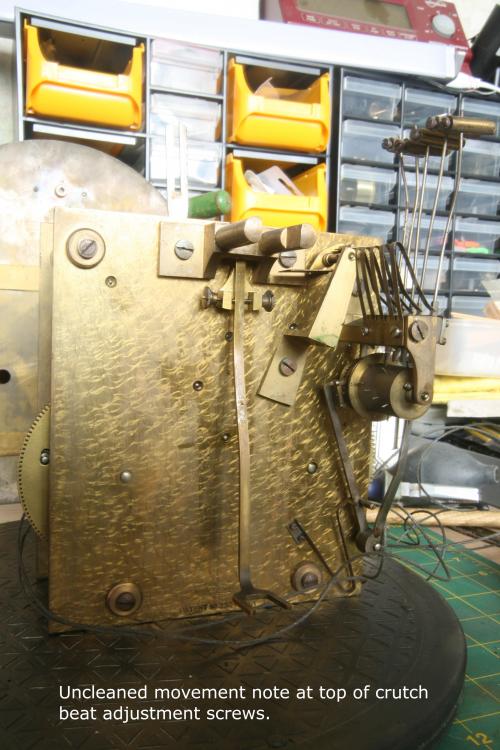
I have now cleaned the movement of the clock and after being under test for a week it has been re instated into the case and just needs adjusting for time keeping over the next couple of weeks, the clock had very little wrong with it, minor wear to the pallets and a broken spring on the maintaining power ratchet. below is a copy of the original patent application form: https://patentimages.storage.googleapis.com/cb/23/0f/34b4fc44f86b51/US1468267.pdf The main advantage for the use of two trains in a chiming clock was to simplify the servicing and Maintenance of the clock and reduce manufacturing costs it also allowed the movement to be much more compact than a traditional three train chiming clock of the period, although most of the mantle and bracket clocks made where in appearance no smaller than three train clocks of the time with the exception of some of the mantle clocks with platform escapement which where very compact in design. The movement was best employed in the construction of Grandfather clocks with Tubular bells which before where very large and imposing in size, the compact design also made it practical to manufacture Grandmother clocks with tubular bells, having been recently shown a 9 tube grandmother clock by a collector that was even smaller than the rod chiming one I now own. The key to the design is the ability to seamlessly split the drive between chime and strike, in order to do that the design has a two part contrate geared chime strike drum that allows the chime barrel to be locked and drive transferred to the strike via a differential gear as seen in the photos below: side view of movement with chime strike barrel in situe In order to lock and unlock the chime and strike a large V-shaped lever is used When chiming the lever is pushed to the right by a spring this engages the lever with the striking wheel pins preventing it from running but allowing power to the chime drum. The clock works in much the same way a Ting Tang type clock would it is fitted with a rack that has twin rack tails one for the quarter chime sequence and one for the hour chime/strike sequence which can only engage with the hour snail when a cut out section of the quarter snail is reached near the hour as shown below: In order to lock the chime and unlock the strike a tension spring is employed, this is connected to the V shape locking lever and is tensioned on the hour by a pin located on the quarter chime snail this pushes the lever to the left but is prevented from moving by the rim of the chime barrel after a full 16 note chime sequence the lever engages with a slot on the chime barrel rim locking it, at the same time this disengages the lock on the strike and that begins to run striking the hours. At about 5 past the hour the pin on the snail releases tension on the spring and the V-shape lever is pushed out of the slot on the chime barrel and back on to the hour strike pins allowing once again quarter chiming.


 2 points
 -
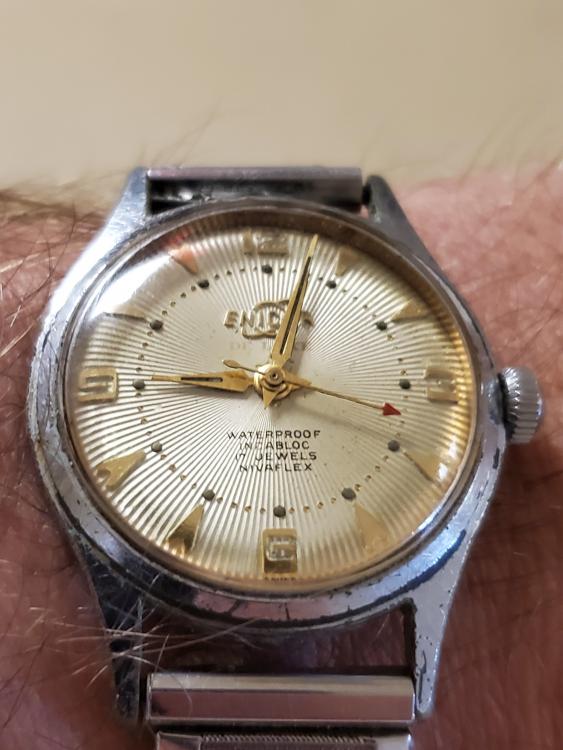
Today im wearing my new 50's Enicar.
 2 points
 -
Clean the holes in the barrel and lid properly, lightly oil and test. I usually move it with my finger and see if it spins. Usually the problem is too much clearance so that the barrel rocks a bit on the arbor. Also check the barrel installed in the movement (with or without mainspring) and see if you can rock it. Too much rock and the barrel will bind up. Usually its because the barrel pivots are worn, there are bodges to get around this but thats another story. Anilv2 points
-
Never had the privilege to work on an Omega, so I can't say for sure, but why would they be different? The arbor and the spring still need room to move freely in the barrel. Are you talking about this article: https://adjustingvintagewatches.com/testing-mainspring-barrels/ There are some good tips in there about what the causes could be and how to remedy them. As long as you have cleaned everything thoroughly, I cannot see a problem with testing dry. Better than testing with a viscous lubricant on the parts, in my opinion.2 points
-
Hi A lot depends on the amount of batteries you are storing and the turn over, If its quite a lot then the above mentioned cabinet is ideal. There are storage module with four drawers which clip together so as the collection increases so does the cabinet. My own storage is a 28 compartment plastic box, each type in its own slot in numerical order easy to find the correct one.2 points
-
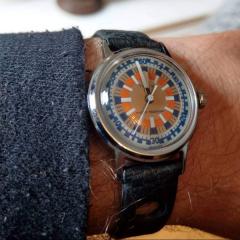
I think more like this one. This dial is from 1963 and hasn't changed much. It was likely kept in a drawer and not exposed to much sunlight or cigarette smoke or anything else.
 2 points
 -
I've often wondered this myself. I had an indiglo fail and timex shipped me a new watch instead of repairing. EL material can fade over time. It matters what kind of failure if its electronics or the sheet itself but it might be possible to cut an EL sheet to size. I'm guessing no one ever tries this due to the low cost of timex watches. I haven't bothered as it isn't worth the effort.1 point
-
Minus the obvious "SEIKO" text, I would have thought this was a swatch given the styling.1 point
-
I am wearing a Seiko Arctura Kinetic. It's from the 90' of last century. I repalced the capacitor in it, as well as the crystal and made my own leather band. Love this thing!1 point
-
Check the barrel on its own. If it's ok, then add the centre wheel. If those spin freely when meshed, then check that they turn smoothly when under torque by applying drag to the centre wheel while turning the barrel. If it becomes "lumpy" then you possibly have a depthing issue due to side-shake.1 point
-
Do you have endshake? It is unlikely (essentially impossible) for the holes to become tight over time, but it is possible for the cap to sit too low in the center, zapping the endshake and causing drag. If you're motivated to do it, it would be interesting to see what your amplitude is as is, then after correcting the barrel.1 point
-
Klassiker that's my thoughts exactly thinking there should be no difference from one brand to the next. Yes that is the exact article that I was referring too, lots of good info in there for sure! When I am at the point of doing this test, the parts have been pegged and put through the cleaning machine and inspected so I'm fairly confident in the fact that grim would not be a contributing factor in this case. Nickelsilver that looks to be a much better way to do the test than what I was doing, thanks for the advice! I can rotate the barrel by hand but there is resistance when I do so. Maybe I should assemble it the way it is and check my amplitude reading. That way I can have a feel of what may be too much and what may be acceptable for future projects.1 point
-
As far as I know only Rolex specifies using Fixodrop (epilame) on their reversers, this is because they very much need oil at specific locations and absolutely cannot have oil at others, or they won't work. The epilame keeps the oil from creeping to the wrong place. Typical reversers are oiled in a bath of solvent with a little oil added (old school technique, example would be a couple of drops of 9020 in 10ml of benzine), or with Moebius Lubeta v105 (current practice).1 point
-
Fixodrop is a recommended grease for reversers. Refer to Moebius oil site. At high reverser speed oil gets thrown out of its bearings. This grease seals the oil in place, thereby keeps the selfwinder device efficient. It is also recommended for pallet jewel- escape teeth interface. Stays put. Many discussions to be found on the subject, through the search function. Regards1 point
-
I put some penetrating oil on the stud screw and top of the stud as well as the boot, let soak over night, if needed soak longer to remove balance complete. Oil around the jewel housing too. Dismantle the cock, remove the regulator arm and stud career. Remove the jewel housing, shock spring go in lighter fluid. Show a picture of the coil while on balance wheel. Except balance complete, balance jewels, the rest takes a 24 hr bath in Cocacola ( I mean the entire movement). Other screws that have enjoyed the coke bath will unscrew real easy. brush all with tooth brush use powder laundrey detergent. Gears and pinions take a half hr bath in vinager and get rinsed and brushed under tap water, use powder detergent. Important to time the vinegar bath, no longer than thirty mins.1 point
-
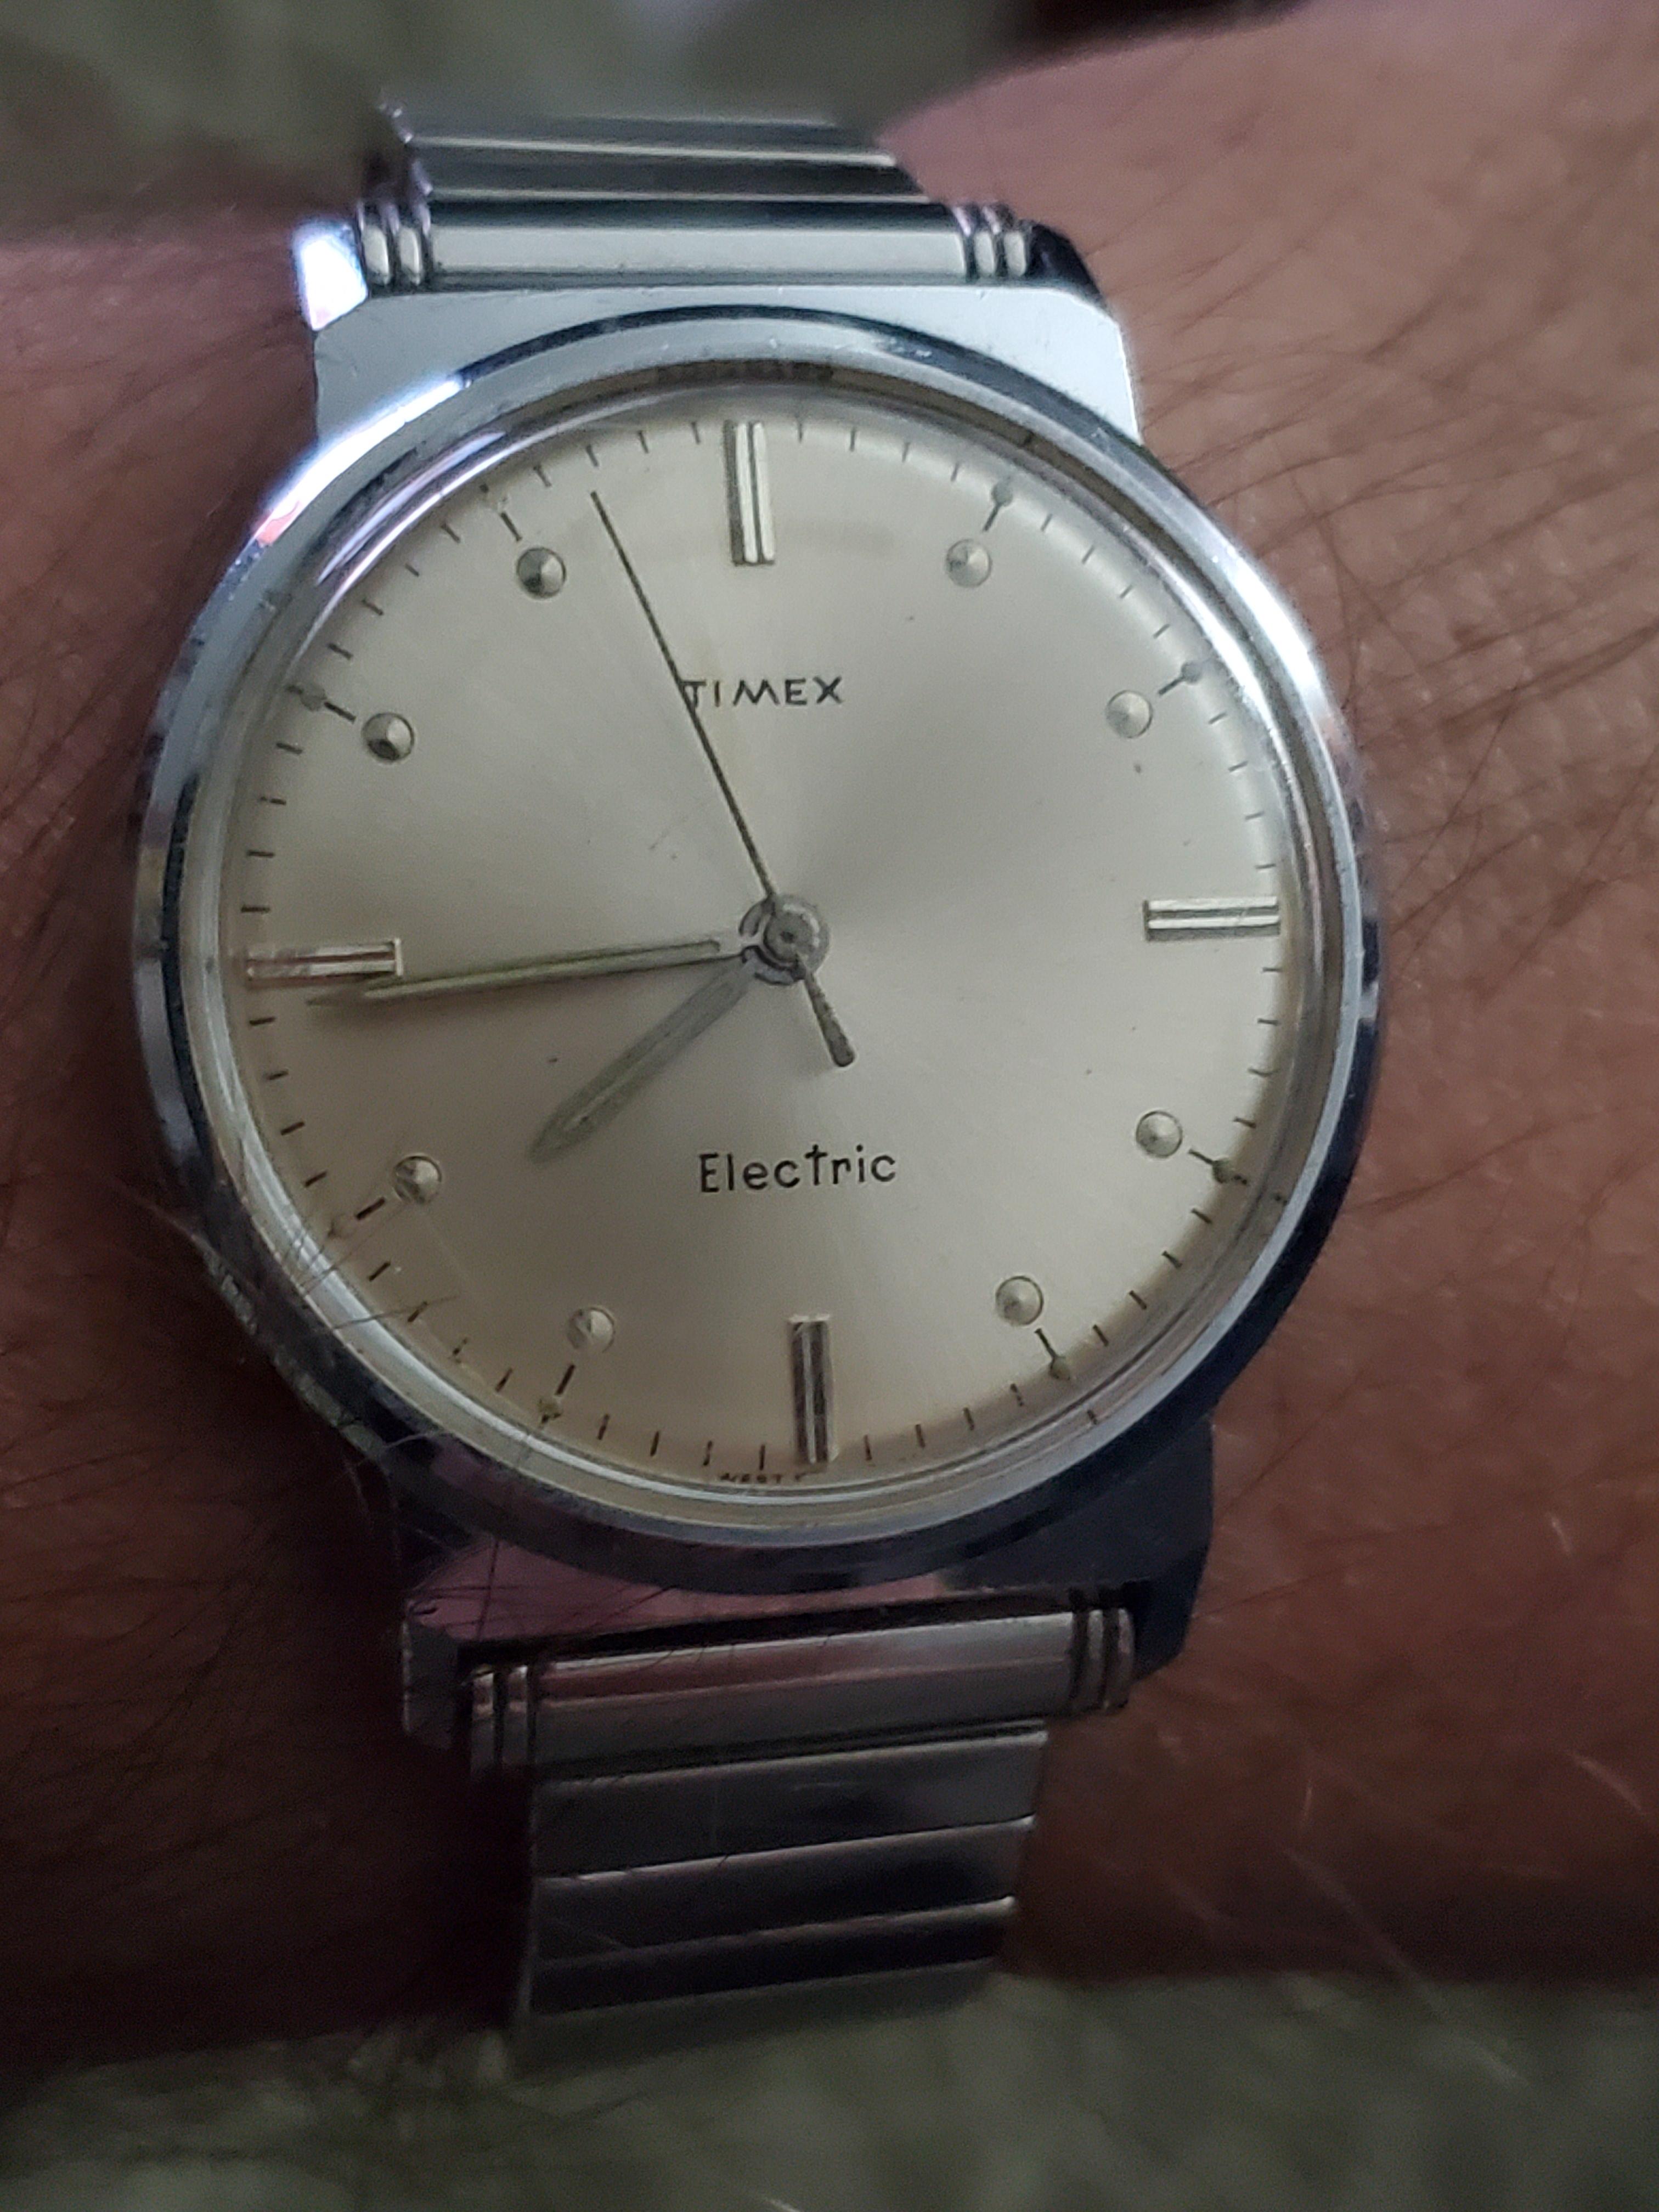
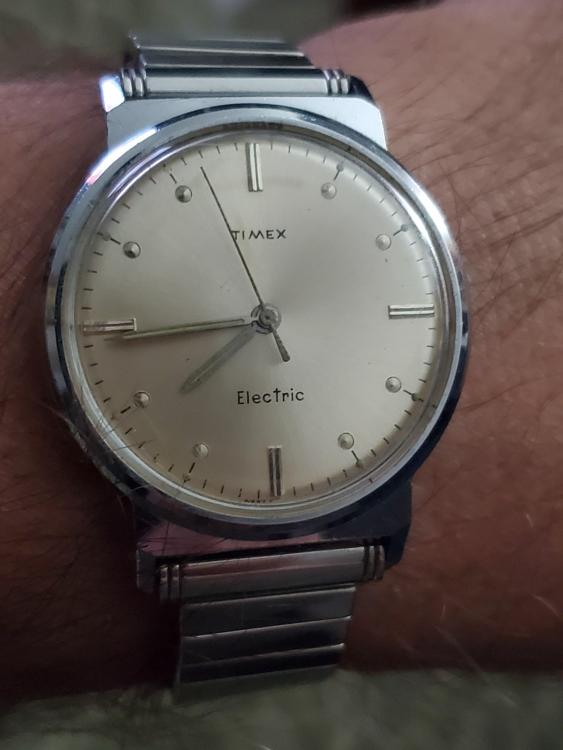
Very nice backset Timex I have a few of those also. Sent from my SM-G975F using Tapatalk1 point
-
Absolutely, the hairspring is the most delicate thing in the watch- when it comes to manipulation. It's unlikely that the hairspring was like that before you removed the balance cock. It simply wouldn't have run. It can't get like that from a drop or even being thrown from a rooftop. As I understand it, the Chinese movements often leave the factory unlubricated and even with manufacturing debris present. This was probably the cause of stopping.1 point
-
I would say at some time that watch has been dropped onto something hard or its taken one hell of a knock.1 point
-
You need to detach the balance from the bridge to see exactly how bad the hairspring is, when it is still attached looks can be deceiving. The other thing I have spotted is someone has put two nicks on the bottom plate where the balance bridge sits and screwed down, this will affect the end shake to the balance and also the angle of the balance bridge.1 point
-
The hairspring is destroyed. That it even ticks is surprising!1 point
-
I did a full resurrection on a 2428 which may also be of interest here.... https://www.watchrepairtalk.com/topic/5232-those-crazy-russians-my-1000th-post/?tab=comments#comment-530221 point
-
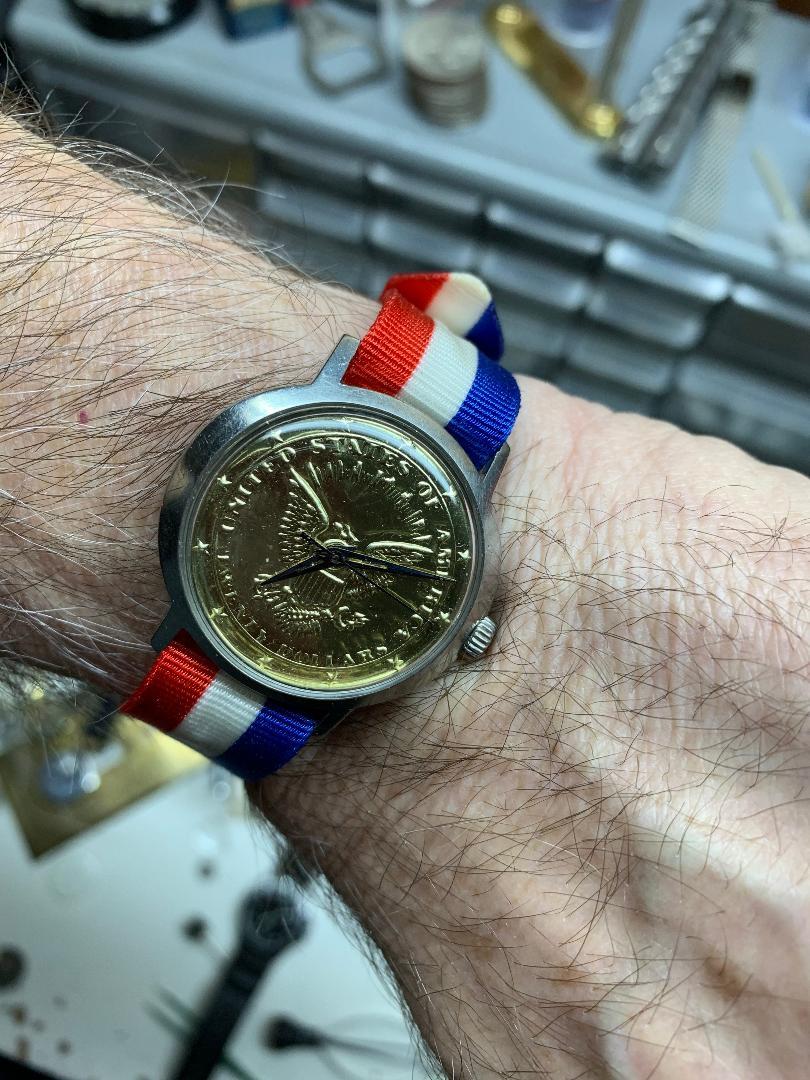
Did you get the foil from a chocolate coin?1 point
-
- dial was roached on this Waltham so I used this foil lay over to give the watch a new life.
 1 point
 -
Hi Gary I am afraid there is no point putting a duff watch on the machine when trying to understand it. Out a watch on that you know its characteristics and that it is a good one that way you know the machine works and you know what you are looking at. So once having acertained how it works and able to analyse its out put then introduce a watch like the everite and analyse its out put according to the instructions. Its a new toy and will take a little time to understand.1 point
-
The instrument is doing his job correctly, telling you this piece at the minimum needs a complete, accurate service.1 point
-
I found that exact one at Harbor Freight For $151 point
-
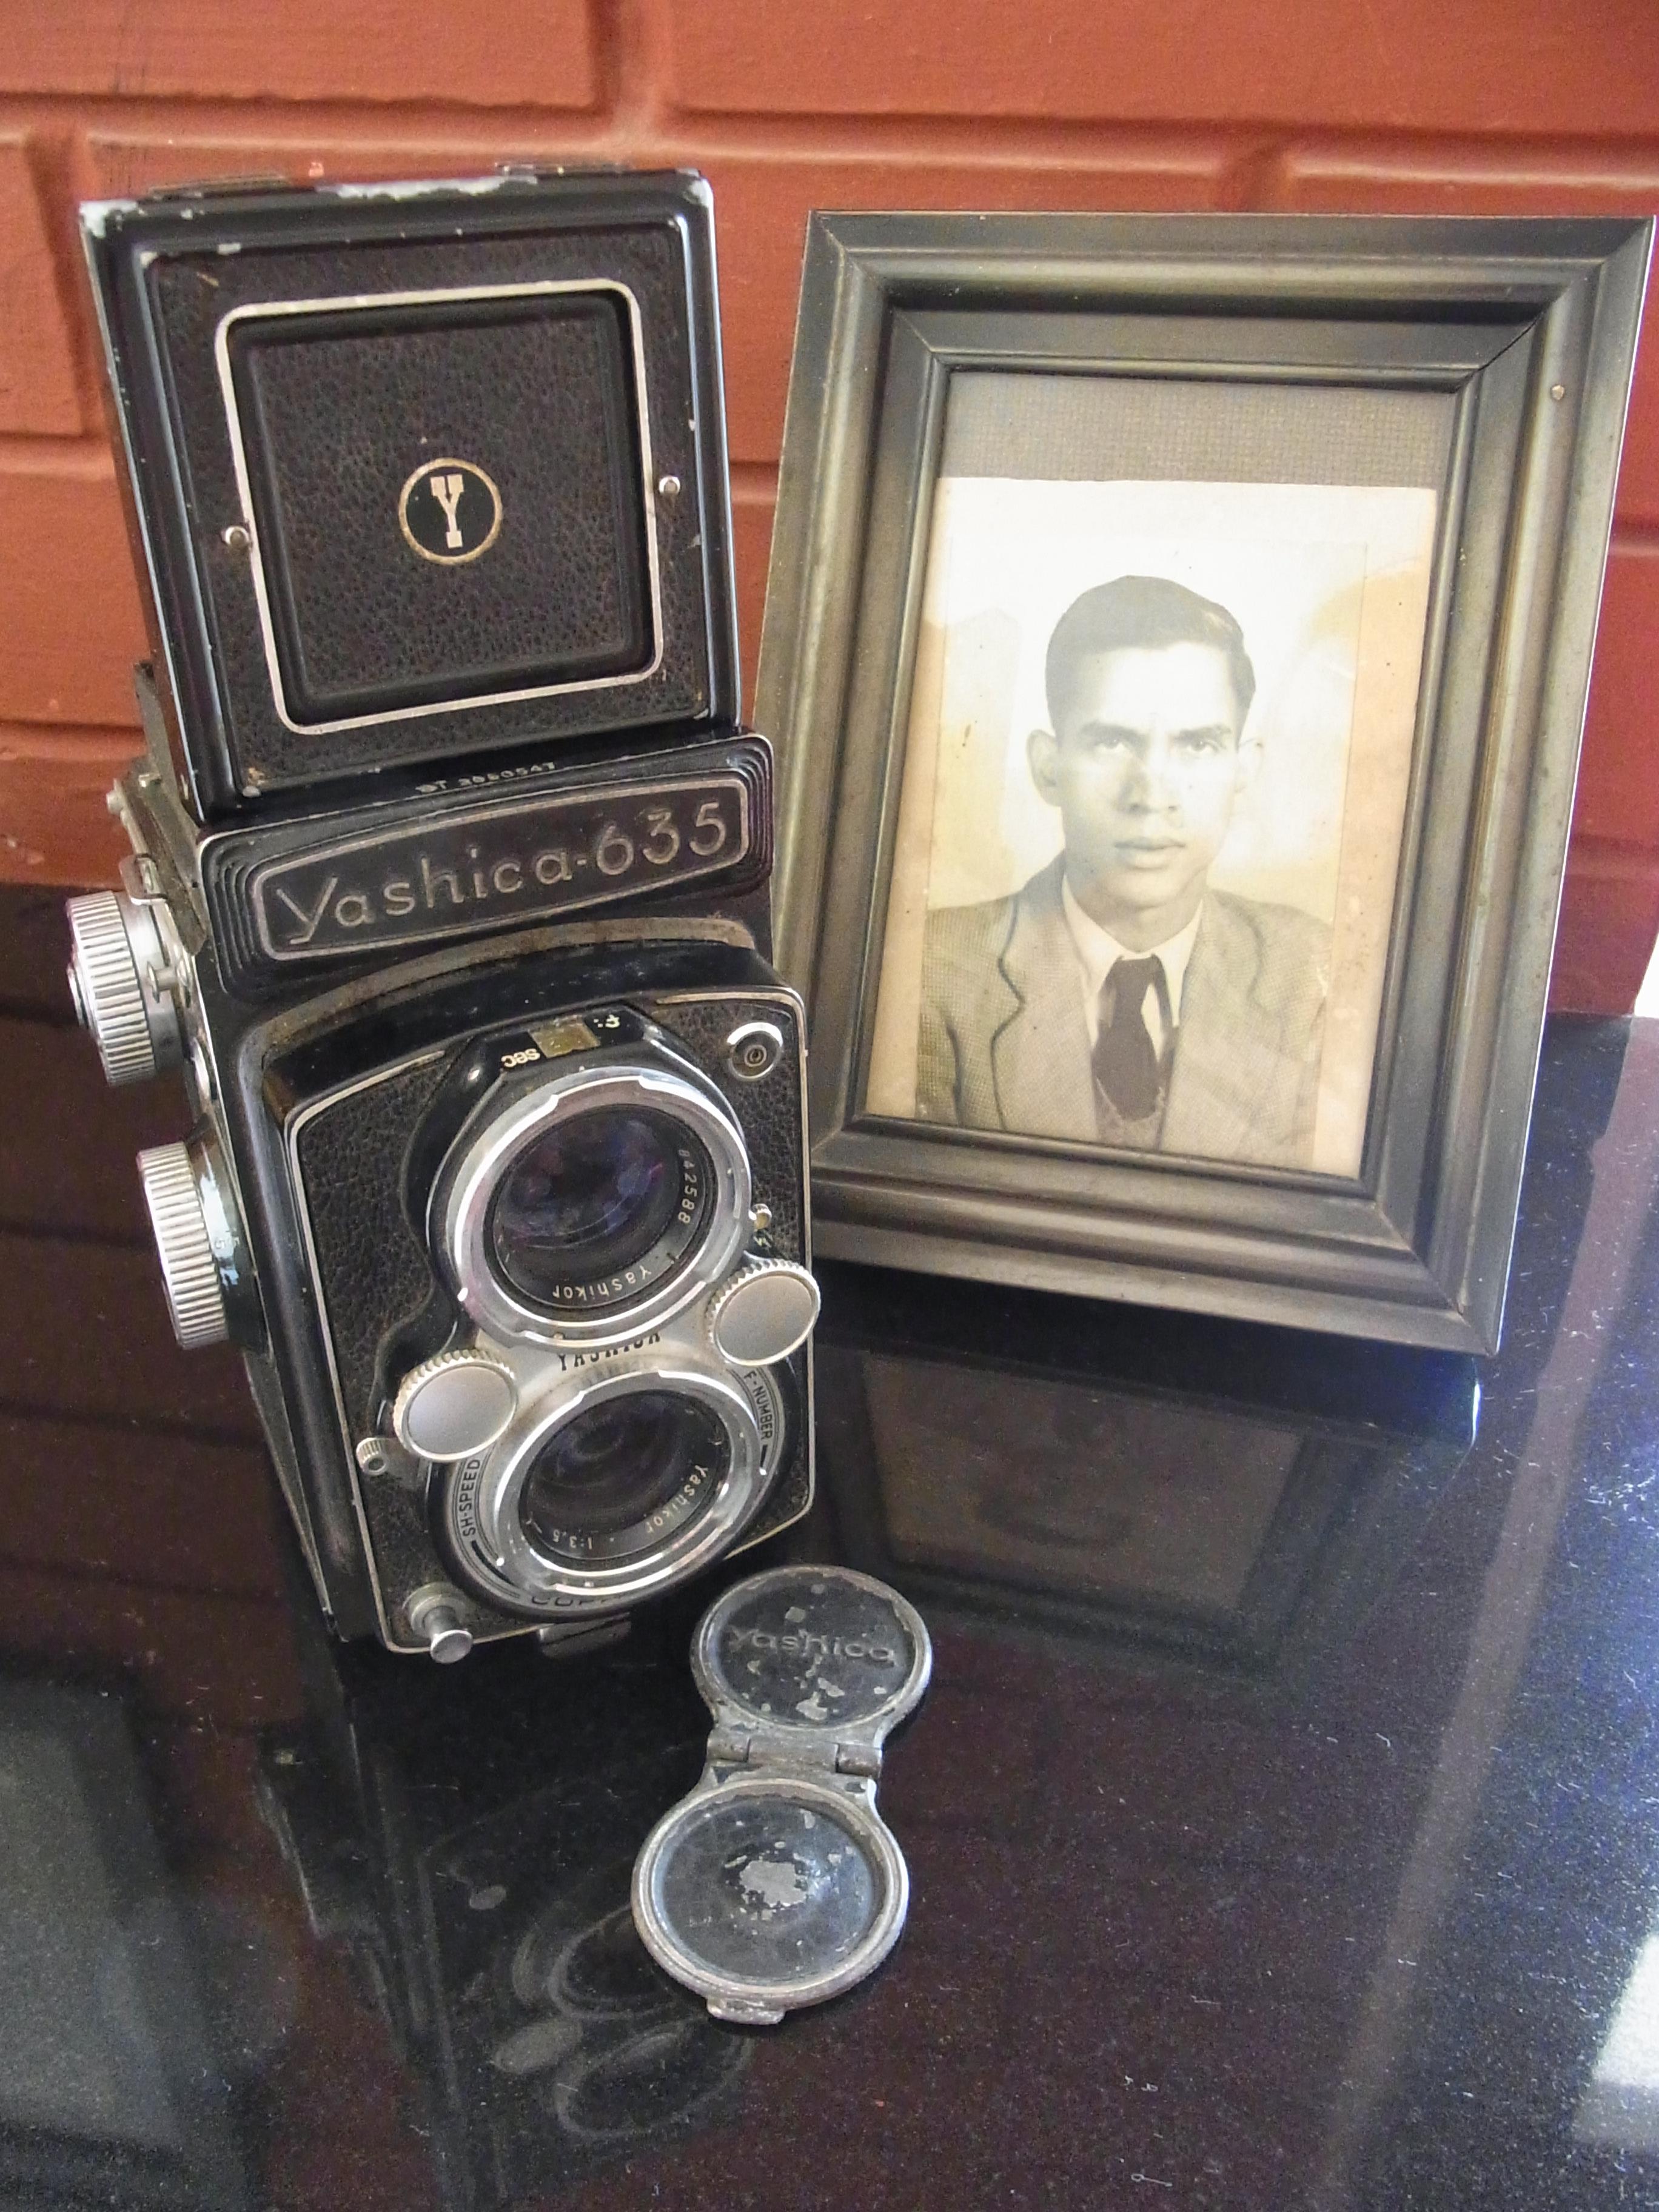
Those take me back! You might like this, which appeared in my youtube's suggested vids recently. BTW I've not been fixing many clocks while on holiday, but I did a quick fix on this camera. It belonged to my late father in law, who is in the picture, and which picture may have been taken with this very camera Sadly I never met him as he passed away a good few years before I met my wife. I cleaned things up as best I could given the lack of proper tools, and re- seated the mirror, which was lying loose inside. It would need a little more work to clean up and lubricate the self timer, shutter etc. before it could take pictures, but for that I would need access to my normal array of tools, but at least now you can look through the viewfinder and see the "view" once more. The mirror has suffered a bit over the years, but the lenses look clean.
 1 point
 -
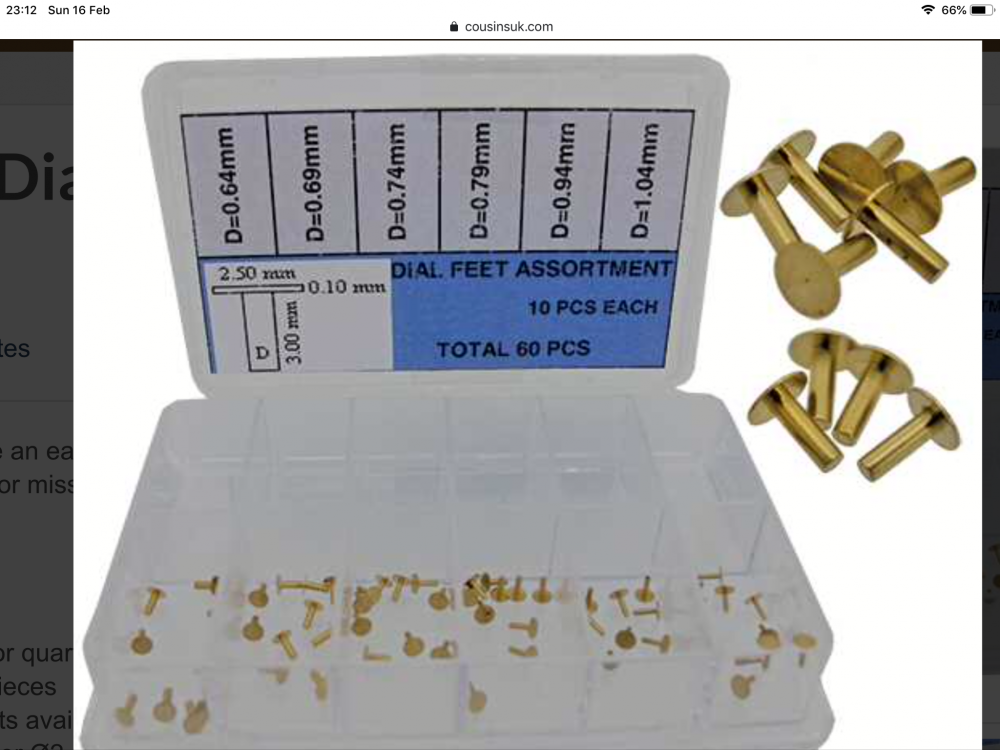
I tried those little dial feet you glue, I was very impressed how strong they are when used with 5 minutes epoxy resin
 1 point
 -
I apologize, but an error has slipped into the assembly sequence of pictures. For detailed info please see the following post: https://www.watchrepairtalk.com/topic/12634-eta-calibre-2472-service-walkthrough/?tab=comments#comment-115897 When I first started out trying to service and repair watches I took a picture of every step, and I really needed those pictures as I didn’t have the knowledge to deduct where the parts should go, how they worked, and how they interacted. Now that I’ve gained some experience, I no longer need all those pictures, but I still need some pictures. For example, it’s very convenient to have pictures of the train of wheels or certain parts of a date complication, and so on. Anyway, I really enjoy taking these pictures as I go and I organize them and keep them on my OneDrive for future use. For this project, servicing my brother’s Atira Plana housing an ETA 2472, I felt it would be fun, interesting and perhaps even useful not only to take the pictures but to edit the pictures adding visual and textual instructions. These pictures are made for my personal use and are not intended as a tutorial or to tell other people how to service an ETA 2472. The pictures simply document how I went about it. Nevertheless, I guess others may find my work useful so I’m happy to share it. There are many ways to service a watch and I’m still learning. That said, I do follow the practices taught on watchrepairlessons.com and they work very well for me! Here are links to my other service walkthroughs here on WRT: Unitas Calibre 6325 Service Walkthrough ETA cal. 2824-2 (17 jewels) disassembly/assembly Vostok 2409 Service Walkthrough ETA Calibre 2472 Disassembly (132 pictures) ETA Calibre 2472 Assembly (131 pictures)1 point
-
You can still access it through the history books... https://web.archive.org/web/20130806005336/http://raulhorology.com/2012/08/eta-6498-escapement-fitting-the-pallet-staff-and-jewels-setting-depth-of-lock-and-run-to-banking/1 point
-
I’m sure we are all intrigued about your lingerie searches my friend lol1 point