Leaderboard


Popular Content
Showing content with the highest reputation on 02/03/20 in Posts
-
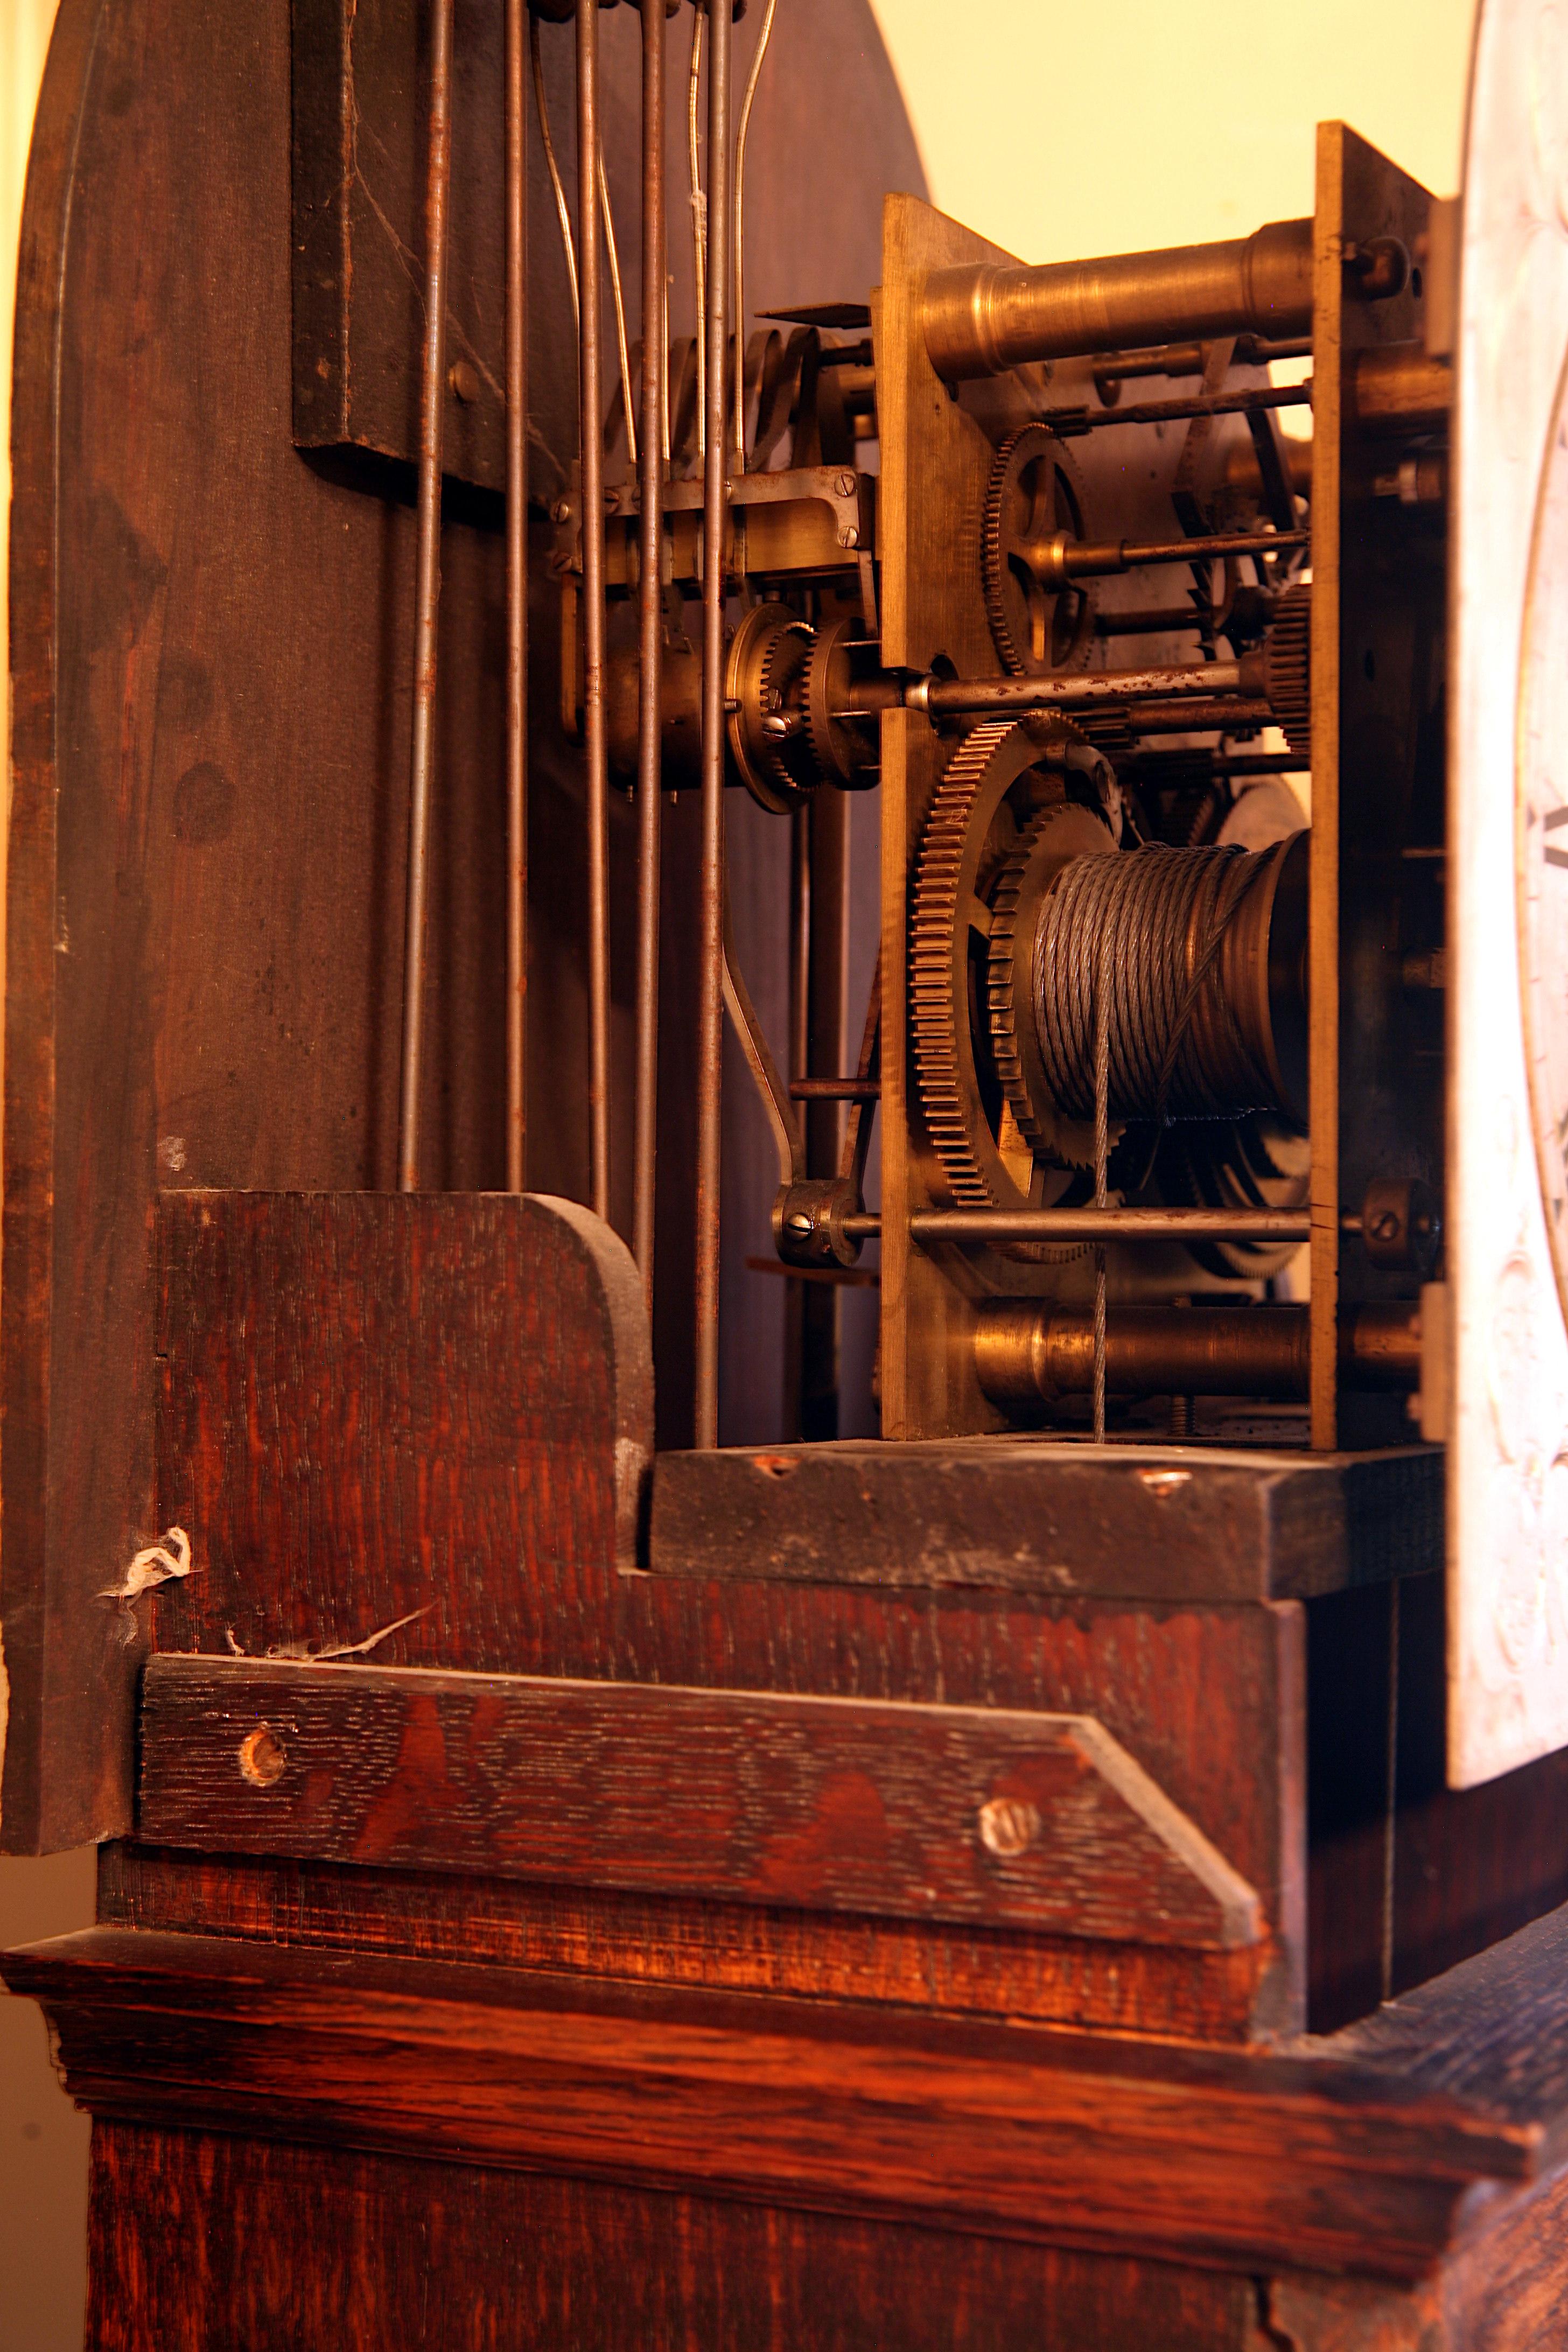
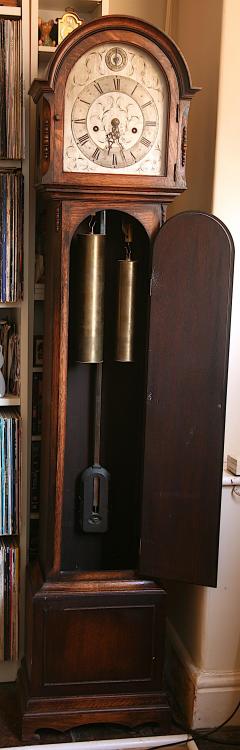
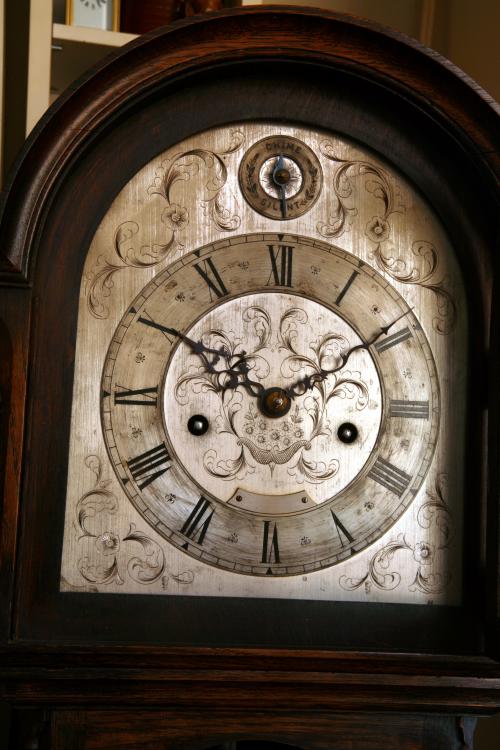
I picked up my latest project today, listed on Ebay yesterday as a Victorian Grandmother clock, The clock is certainly not Victorian it dates from 1924 this can be pinpointed quite accurately because it has a two train full Westminster strike movement utilising a locking differential gear although patent applied for in 1920 its first use by Gillett in a commercial clock was around 1924, this clock movement is stamped with the Gillett and Johnston trademark, some time in 1924 F.W Elliott purchased Gillett and subsequent production was stamped Elliott. I already own a couple of Gillett and Johnston two train Westminster clocks one a small spring driven platform escapement mantle clock and the other a twin fusee bracket clock, I have wanted one of the weight driven variety for a while but auction prices and dealer prices are too high for my pocket. I took a gamble on the clock because the ebay listing gave scant details and poor pictures and the elderly seller could only say that the clock had been inherited many years ago from her aunt because no one else in the family had wanted it, but a few things helped make up my mind that the clock was a Gillet and Johnston, although the ebay listing did not show the pendulum it did show the flat pendulum rod, this is a very distinct feature of later Gillett clocks from around 1920 onwards which used a patented Invar self temperature compensating pendulum as seen in the picture I have taken below, the pendulum bob is a lead antimony alloy. The other clue to its maker is in the unsigned engraved dial, in nearly all engraved Gillett dials the motif is a basket of flowers in the central portion of the dial this features on longcase and bracket clocks they made and is considered as a unofficial trademark amongst collectors very few Gillett and Johnston dials of this period are signed because most of their production wasn't sold directly to the public, but through retail jewellers and a plaque featured on the dial for the retailer to engrave their company name onto, and any dial actually signed Gillett and Johnston would be unusual. The Movement is typical of Gillett and Johnston production of the time being of high quality, with thick plates, deadbeat escapement, with beat adjustment on the crutch and maintaining power on the going train, the weights are of brass cased lead, the strike, chime weight is very heavy weighing 26 pounds, as with all two train Westminster they do require a lot of power to run. The clock is very dirty and I shall be cleaning it some time soon so shall post pictures of the cleaning and also explain how the two train striking system works.
 4 points
 -
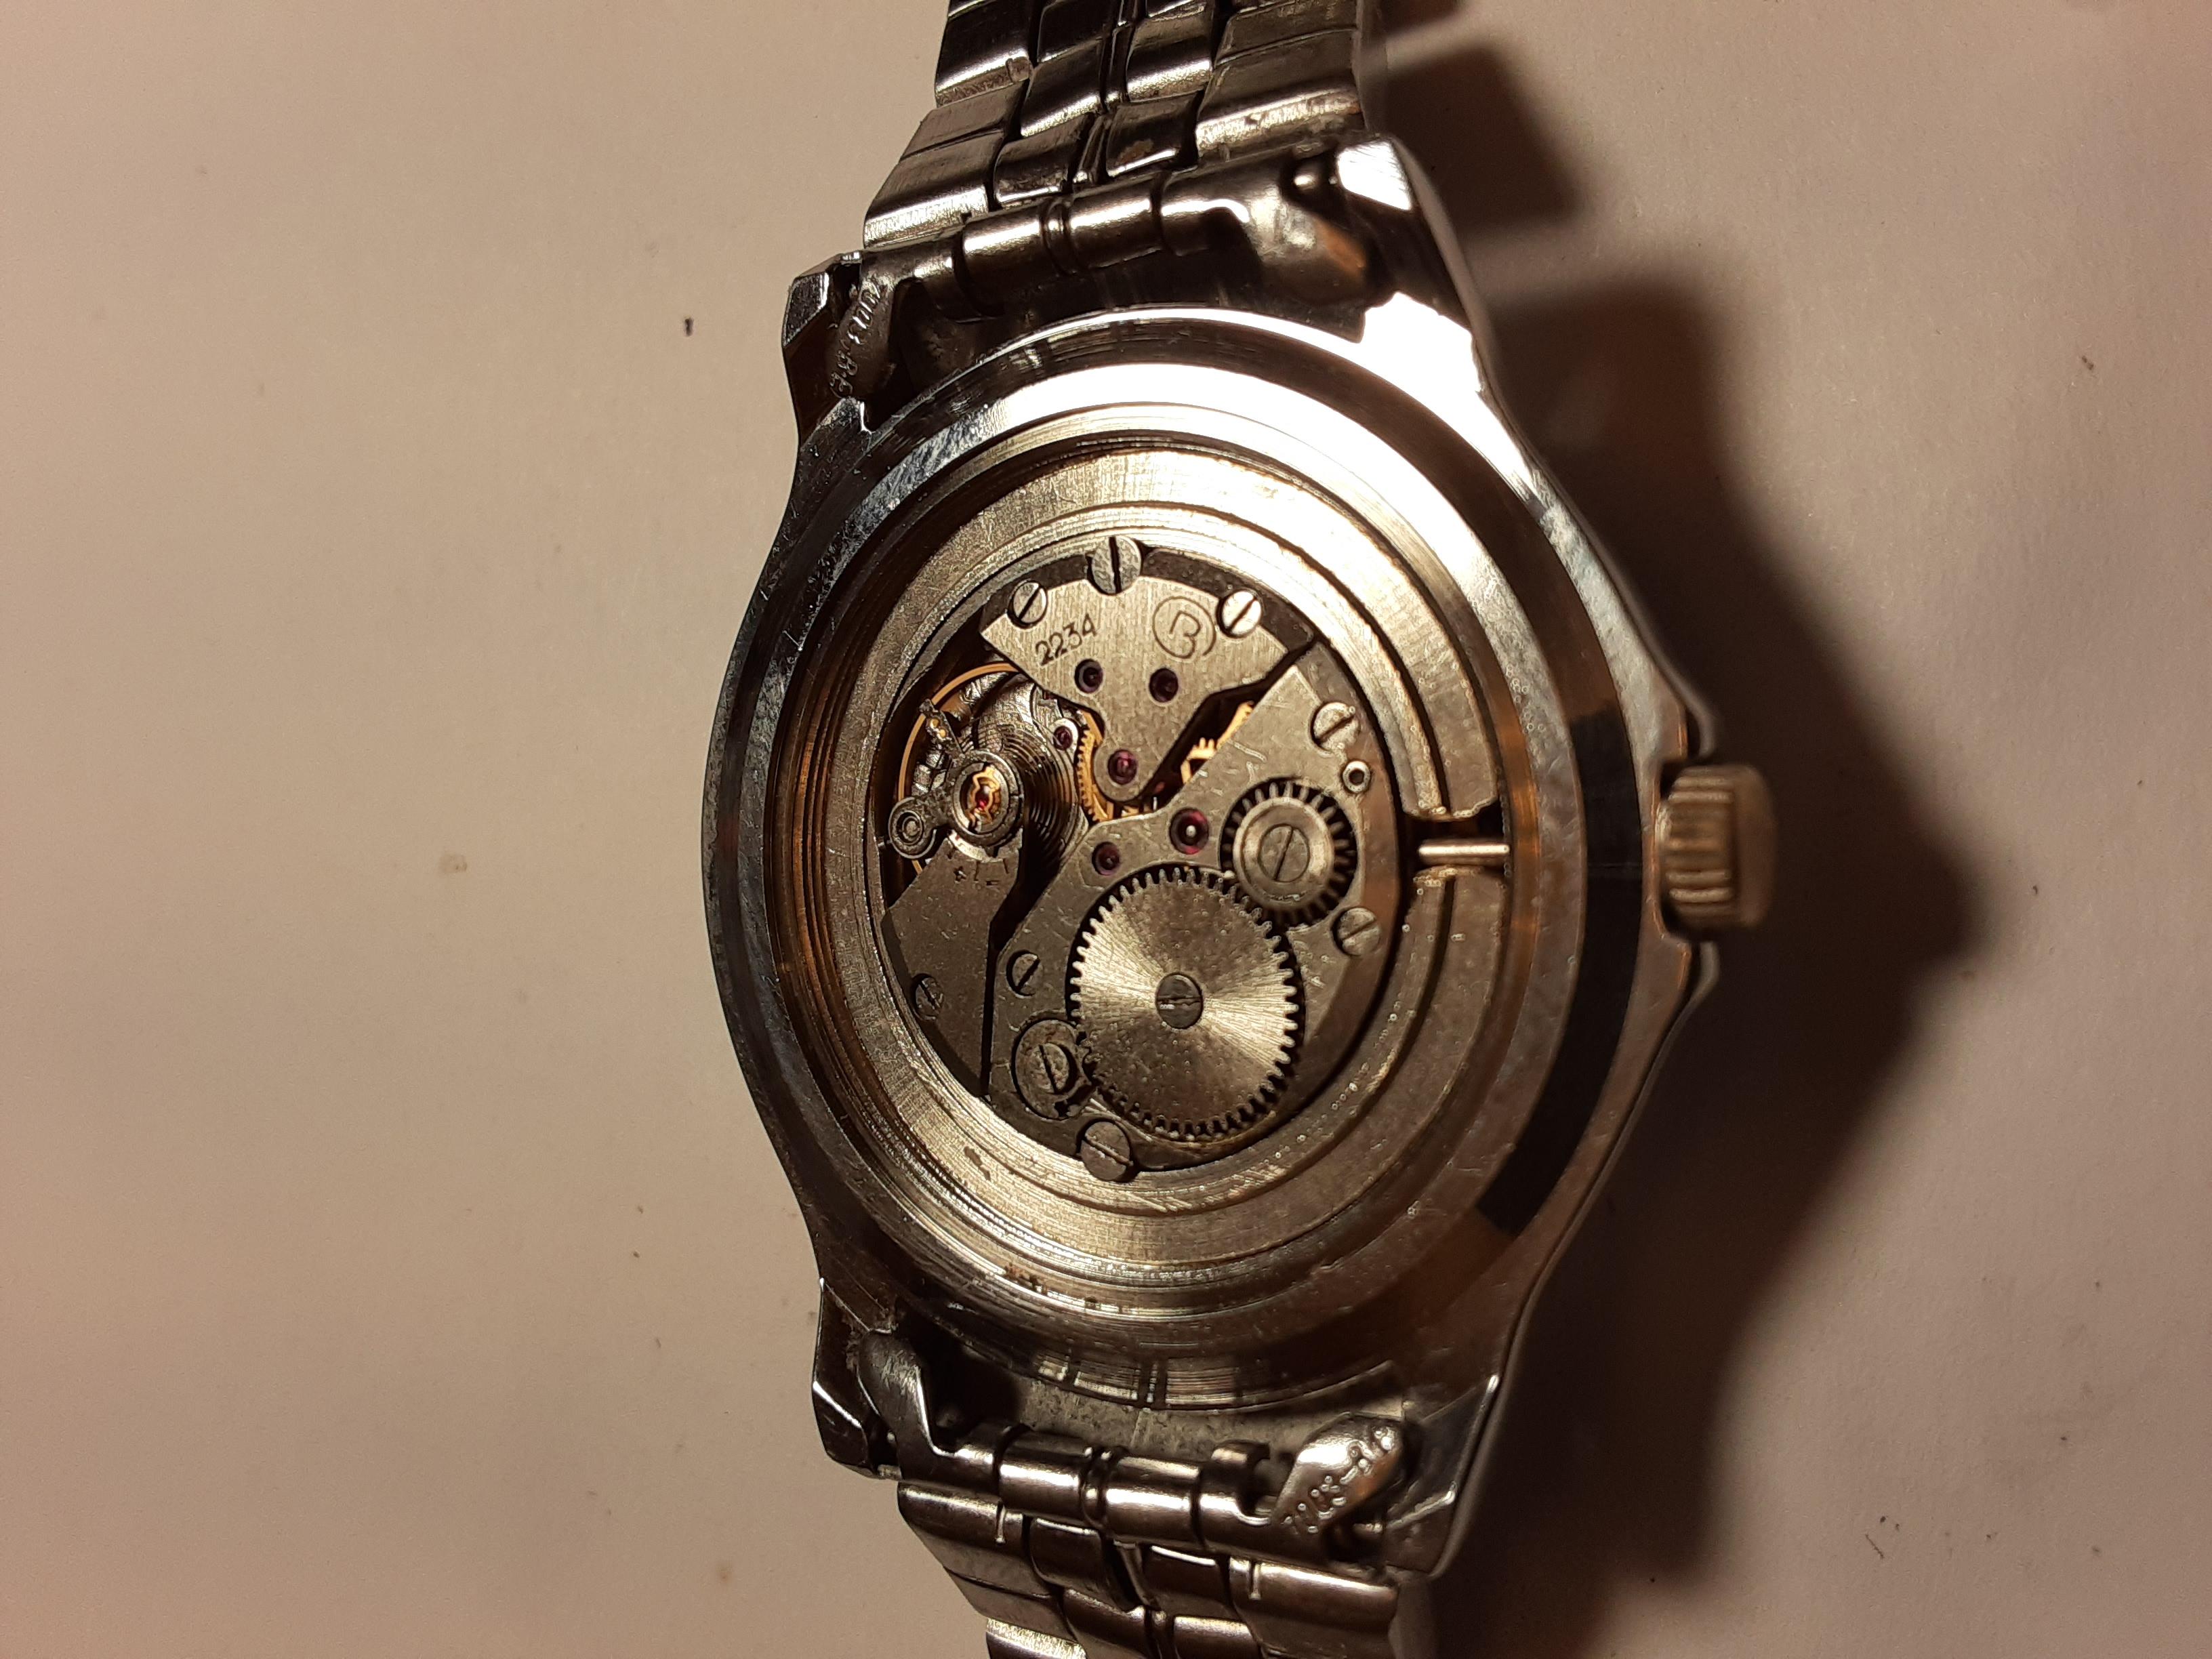
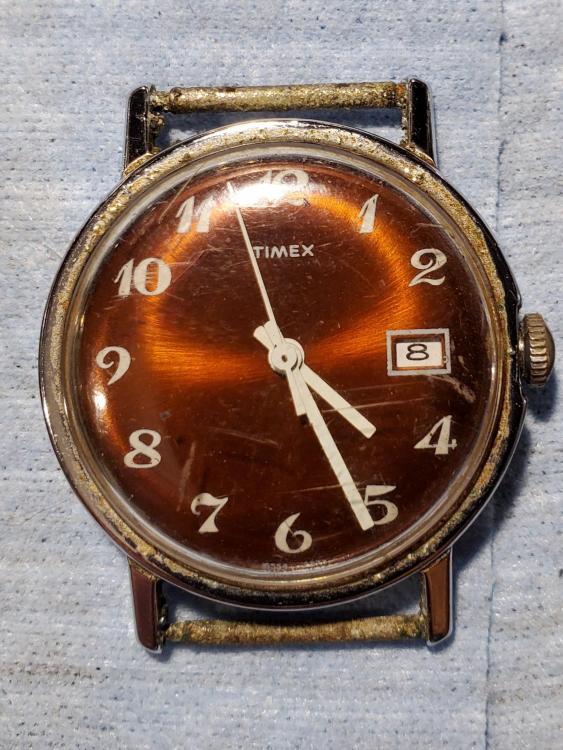
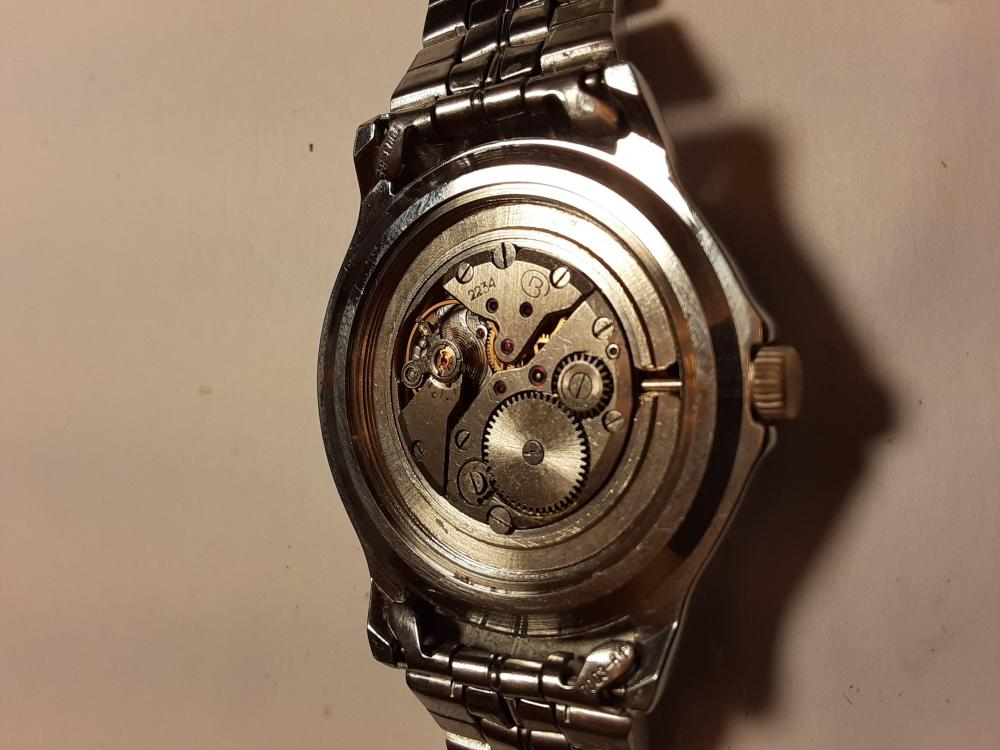
I'm not familiar with that type of watch at all, but on your pic the hairspring looks absolutely not concentric. That will cause the coils touch each other and the watch will run way too fast.2 points
-
Also a closeup of the Rolex crown etched into the crystal. It should be sharp and no feathering at the edges of the dots.2 points
-
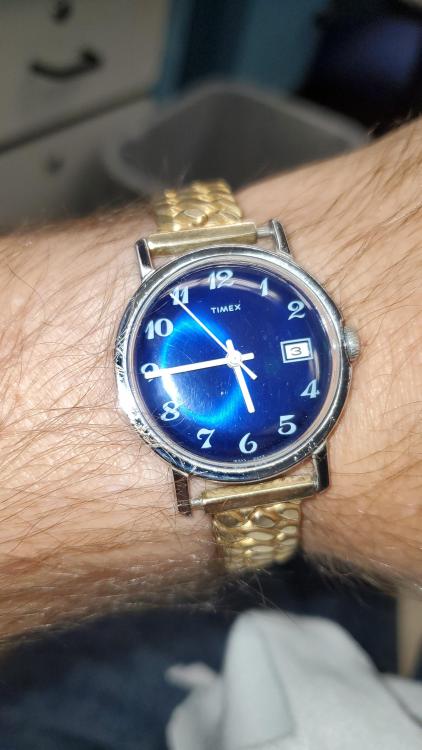
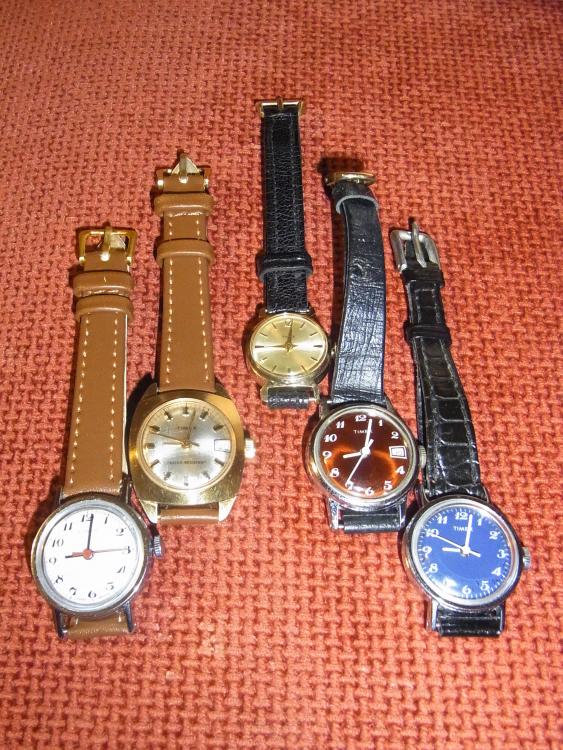
With all the talk of blue dial watches lately, I figure it's time for me to jump in. This is another birth year ('73) Timex (Mercury I believe). The metallic blue dial is captivating. I just finished servicing this watch and it's keeping great time. First thing to go will be the ladies sized "epilator" expansion band. Maybe @JerseyMo can steer me in the right direction of a period correct band or strap.
 2 points
 -
Hi guys … I had promised that I would make a « custom decal dial tutorial » on another thread there So here we are … There are many variations of decal dials, the best IMHO being the « negative gilt » dials which gives the best results. The process I’m showing today is aabout how to make a dial with black printings on a one color background. I had a cheap quartz diver waiting in my drawers so I’ll make a Heuer diver hommage based on the 980.016 model (quartz one too). DAY 01 : It’s 4:30 AM (I’m an early bird) and I have 2 hours to kill before a business trip to Paris (I’m French) so I decide I have time enough to begin. The first part of the process is to prepare the dial plate : - stripped it, removing all the lumes bars and dots - soaked the dial for some minutes in acetone to remove the paint - filled the tiny holes where the bars and dots go with cyanolite glue - sand everything flat I sand with 800 and don’t try to get a smooth surface as I want the paint to adhere perfectly to thedial plate. Here is the result … Then I want to spray paint. I make a tube with some painter’s tape, from a « curve » with it and place it on a plastic bottle cap. I want it curved so that I can stick the dial on it without any risk of bstructing the center hole or the date window of the dial plate. So I stick the sanded dial plate on the tape tube. As you can guess from the pic below … that’s not the first time a make an orange dial. Then I place the bottle cap and dial plate on a paper sheet and spray paint in orange. I use street art spray paint as it is « water resistant ». As you can see on the next pic, I don’t try to get a smooth surface, or even to perfectly cover the dial plate at first. I will let this coat dry, sand it with 2000 grade, then spray 1 or 2 coats until I get a perfectly smooth orange dial plate, ready for receiving a decal. So I place the bottle cap and dial under a shooter glass and will let it dry for about 24 hours before sanding and spraying the second paint coat. The 24 hours drying time is really important (though it could depend on the paint you use). The paint I use looks perfectly dry after about 5 hours but if you spray the second coat without waiting enough, that coat won’t perfectly adhere to the first and you could get a granular surface like an orange peel. And here is the dial waiting under the shooter glass. On the right is a « negative gilt » dial (third and last matte varnish coat) On the background there are two Raketa 2609 movements from the 70ies, quietly (really loudly to be honest) ticking for test after I‘ve recently serviced them. Now it’s 5:45 AM so I will have a and go to the train station. I’ll sand the dial plate this evening and spray the second paint coat tomorrow morning. Then sand it in the evening and spray the third coat (if needed) the day after. DAY 02 - DAY 03 : So here's what you get after the first paint coat … doesn't look really good but no matter as there's still some work to do to get a better result. And here's what you get after 3 coats of paint, each one sanded with 2000 grade, to get a perfect finish, flat and smooth. Now the dial plate is eady to receive the decal. DAY 03 : I won’t explain anything about Photoshop and Illustrator here … I’ll only explain how I print my decals. One thing really important, from my own experience, is the definition of the design. I’ve tried several, from 1200ppp to 6000pp and the best results I’ve got on printing decal sheets were with a 4000ppp definition. So all my dial designs are done in 4000ppp. The result is really BIG files … for example an A6 template with 12 dial desings ready to print is about 800Mo. As that dial is black printing only I open it with Photoshop and let the softwre (so ont the printer) deal with the printing quality. My printer is an old Epson Picturemate with a 1200 maximum definition. As the good quality decal sheets are not cheap and as I’m a « skinflint» I often print on A7 sheets … 6 dial designs on one sheet. When printed you should let it dry for about 4 hours then spray 2 really thin coats of matte varnish, letting each coat dry for at least 12 hours (24 hours is better). DAY 04 - DAY 05 : 2 days of speed-hiking with my wife so I didn’t worked on that tuto. You can check on the net what speed-hiking is, but to summarize it’s hiking as fast as you can with really light backpacks, trying not to run (or only short runs). On a good day you can walk 5 to 6 miles/hour … when trained you can walk up to 6,5 miles/hour … and while I trained for my first 62 miles ultra I achieved to walk (no running) up to 6,85 miles/hour (11 km/heure). DAY 06 : Today is Monday 6:00 AM. It’s been 5 days since I begun that tutorial and … my legs ache and all my body is painful (see Day 04 - Day 05) The dial plate is ready and the decal sheet too. You can see that the decal sheet looks matte now. That is because I have sprayed 2 coats of matte varnish on it, to protect the inkjet ink while I’ll soak the decal in water. Of course if you print with a laser you won’t have to spray varnish as the laser inks are (almost) water resistant. First thing to do is to chose the best item on the decal sheet and cut it round. Then you are ready to go. On the next pic you can see all you need now : - dial plate … fixed on a foam board using the dial feets - decal dial … nicely cut round - tweezers - thin and smooth brush (mine’s a watercolor brush) - some « micro set » … or just vhite wine vinegar (it helps the decal to set on the dial plate) - cold water Now you put the decal in cold water and while it soaks you brush some micro-set (or white vinegar) on the dial plate. Then you put the decal on the dial plate. Here you can see why I prefer using clear decal sheets on coloured dial plates … because it’s much easier to « perfectly » positionate the decal, using the central hole and the date-window. When you’re happy with the position of your decal you use a paper tissue to absorb the excess of water. Do that carefully as you don’t want to move the decal on the plate. And here we are … everything worked fine while absorbing the water and the decal position is OK. I’ll let it dry for about 12 hours before I cut the central hole and the date window, before I proceed to the varnish finish. Still Day 06 but 7:00 PM The decal has dried for about 13 hours so now I can proceed on cutting the decal sheet That's what I do then I : - fix it back on the foam board - apply some « micro set » around the center hole, the date-window and the outer diameter - gently press with a paper tissue so that the decal is perfectly applied (no more «air bubbles) And I let dry for 3 hours more Evening … 10:00 PM Now the decal is « perfectly » applied and dried and ready for the finish Last pic for today is after spraying the first coat of glossy varnish I will let it dry for 12 hours, sand it with 2000 grade paper and apply the 2nd coat. DAY 07 : 20:00 AM … only 1 pic today just after finely sanding with 2000 grade the 2nd varnish coat I applied yesterday DAY 08 : Yesterday evening I applied the 3rd and final varnish coat after finelt sanding and cleaning And today I can show you the final result … and say I'm pretty happy That dial is so glossy it’not easy to get a good pic, even on close-up. May I say that me hpone is nit the best at shooting pics (just like me) and the actual dial is much much better that it looks on the pictures below. I hope that you liked that tutorial and that it could be helpfull to members who want to try to build their own watch dials. I’ll try to make better pics with a real camera and a better lens … next week of the week after, after luming the dial together with the hands. Then I will still have to get a case and rework it so that it could be a 980,016 lookalike. Some of you may wonder how much time did I spend to make that dial. It took 8 days to achieve the all process but I spent only 1 hour the first day then only from 15mnm to 5mn the days after. So, apart from the design work on Illustrator and Photoshop (which took me hours), I would say that the whole process is about 2 to 3 hours. I must say that it's not my first try at dial making and I've trained for 2 years now. So if you want to try you should consider spending a few more hours but it's really worth the time spent as at the end you get your unique DIY dial.1 point
-
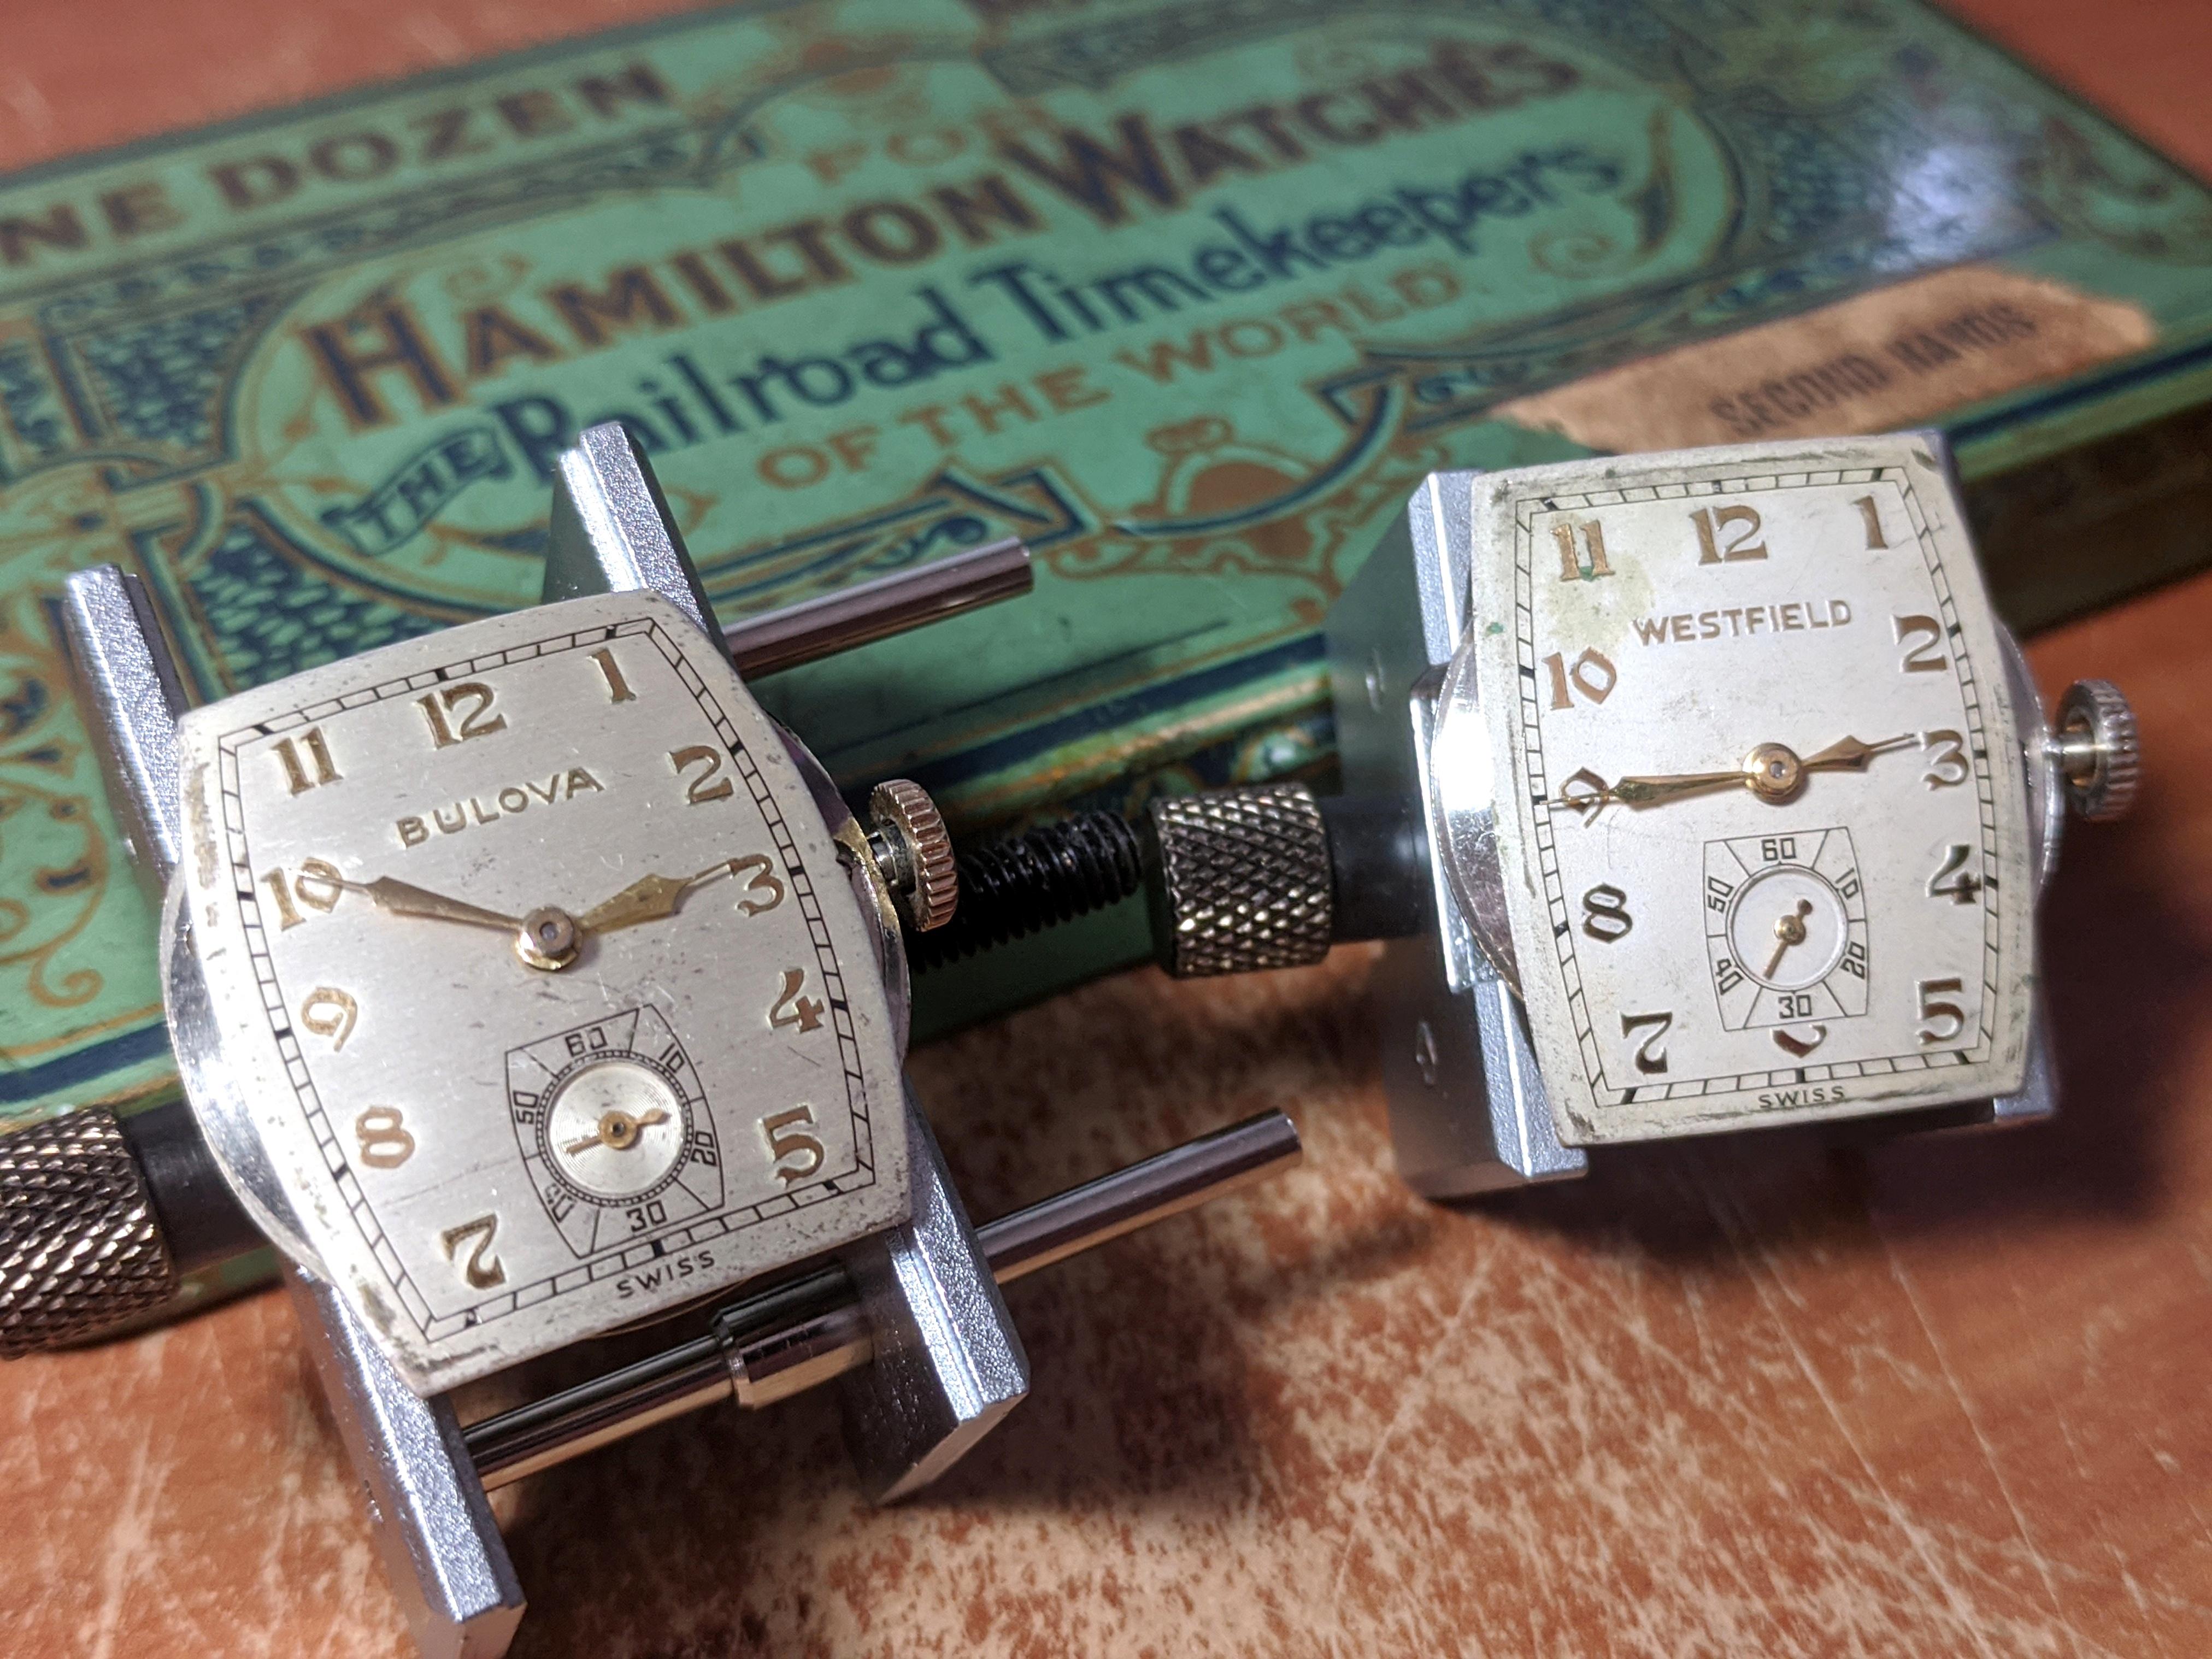
I picked the up the 1945 Bulova Cadet as a non-worker on eBay, then I received a parts lot that had a Westfield case and dial. Of course, I had to get a 1940 Westfield Trojan cousin movement for it. Unfortunately, I didn't notice til this morning that the replacement Westfield had a curved dial whereas my case had a flat dial and it doesn't fit. Oh well, guess I'll have to buy more watches.
 1 point
 -
Hi What a stunner, being a clock man I have a collection of around 30 but none as grand as that one A worthy purchase and one to cherish.1 point
-
Just for clarity of terminology and my own pedantic nature, The part in question is described in the manual as the "Setting Lever Axle". Which means it acts as both the setting lever pivot and the stem release. Describing it as the "setting Lever" is terribly confusing.1 point
-
Hi I am a long way from Milwaukee but its a very nice gesture1 point
-
Welcome. It’s a great group! Sent from my iPad using Tapatalk1 point
-
Your problem isn't the mainspring. However, if you really want to increase the strength I would suggest going to 0.13 thick maximum. Going higher will almost certainly cause rebanking and you will lose power reserve and cause undue stress and wear on the gear train as well. I am fairly convinced that you do have one or more damaged teeth either in the chrono runner or the clutch wheel or both. More likely is the chrono runner. That your problem is consistently with the chrono runner at 12h; this is the position that the coupling clutch engages the chrono from zero and the most likely to exhibit wear or damage. The damage can be very very small, and function OK, until it finds a tooth on the clutch wheel it doesn't like and then bang you're stopped. Just a tiny burr will suffice.1 point
-
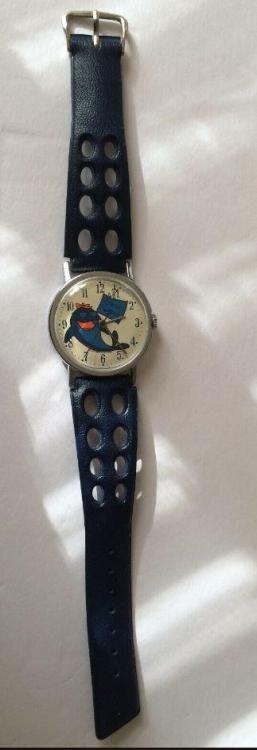
Yes, that is a Mercury and it would have come with a vinyl strap of the same color or the dial. These straps tended to get hard and brittle over time. If you are luck to find one, it also is common that the hold down is gone. Also just like in the picture I show which is Charlie Tuna. They also came without the date feature. Other colors, white, red, green, brown as I recall. Mu suggestion is to go with a nylon nato style as a replacement.
 1 point
 -
Nice. That would make a great clock dial. I may "borrow" it when I'm back from holiday. I haven't used Corel Draw for donkeys ages. Its is a very capable package, but I must admit Inkscape is giving it a good run for its money.1 point
-
I love these dials, I make paper/card dials and laminate them. At present I am working on Mark's version with the decal water slide transfer paper, I have some old scrap watch dials to practice on, I have made my dials and printed them on the decal paper (reversed) forgot about having to lacquer them before soaking them in water, I also have some cut polished brass to try, ready to slide onto it....Here is an old dial that I made in Coral draw from scratch.. Len
 1 point
 -
Ouch... I feel your pain. I have to confess, I managed to do the same to one of the Viscounts I was working on. I wasn't using excessive force, it just fatigued, honest. I was initially confused when I tried to refit the hand, and there was nothing there to attach it to. Obviously what I thought was quite gentle treatment wasn't quite gentle enough.1 point
-
I have the exact same reddish/orange dial from the same year as my blue. I haven't showcased it yet, because I snapped the tip off the seconds wheel shaft while removing the second hand. I have a donor, just need to disassemble the victim. Photo below is from prior to servicing and breakage.
 1 point
 -
I have a couple of "Petites" with similar dials, one Burgundy, and one blue like that. Its a great colour. Unfortunately it doesn't show too well in this picture, as the flash has made it look flat, but it has a similar shimmer to the burgundy one and your one above.
 1 point
 -
Hi I have attached the raketa tech sheet for reference, unfortunatly it has no exploded diagram and therefore may not be of much interest to you except for future use regarding parts and numbers. Raketa 2609A.pdf 4328_Raketa 2603.pdf1 point
-
Hi and welcome to the forum. You have come to the right place, As Old Hippy mentioned have a look at Marks video's there is a wealth of information for you.1 point
-
Thank you for your introduction and welcome to this friendly forum. You should watch Marks videos or better still enroll in his beginners class.1 point
-
Hi Chris, welcome to the forum.1 point
-
Date changes as hands advance past hr24. At this point turn hands anticlock to hr8 then forward past hr24, this will change the date.1 point
-
I checked that book out at the library a few months ago but didn't know this was in there. I'll have to check it out again. Thank you.1 point
-
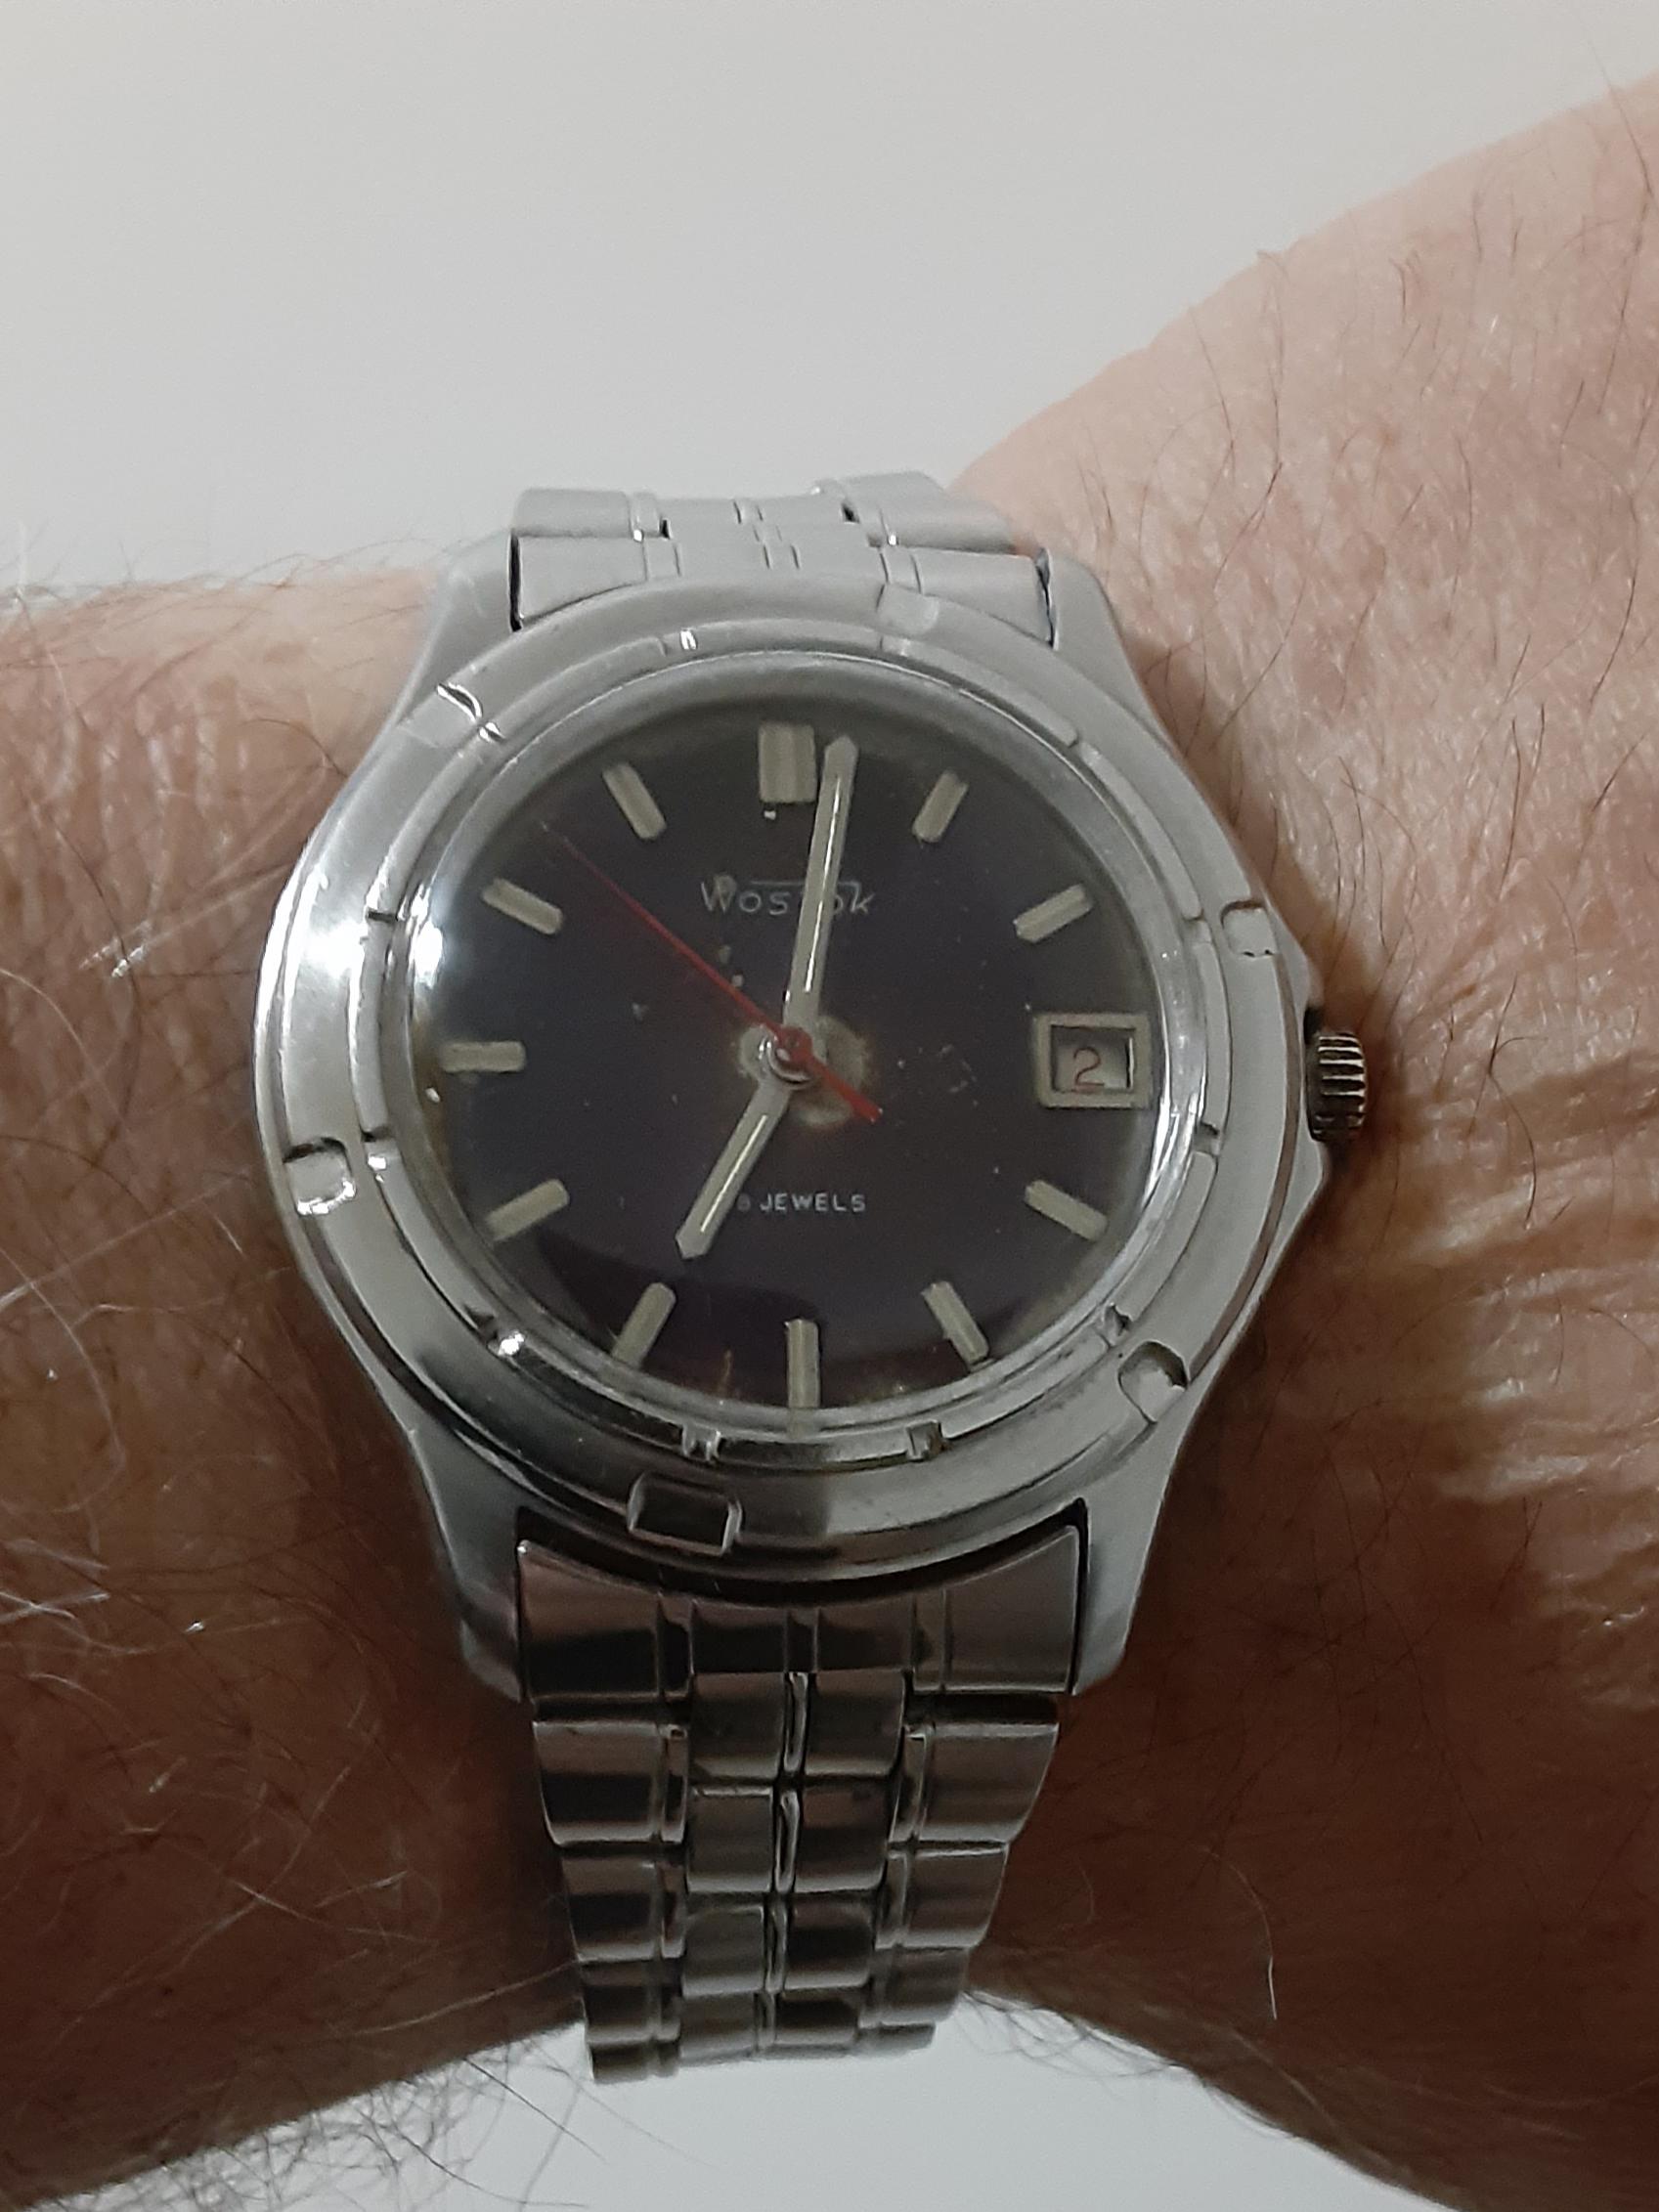
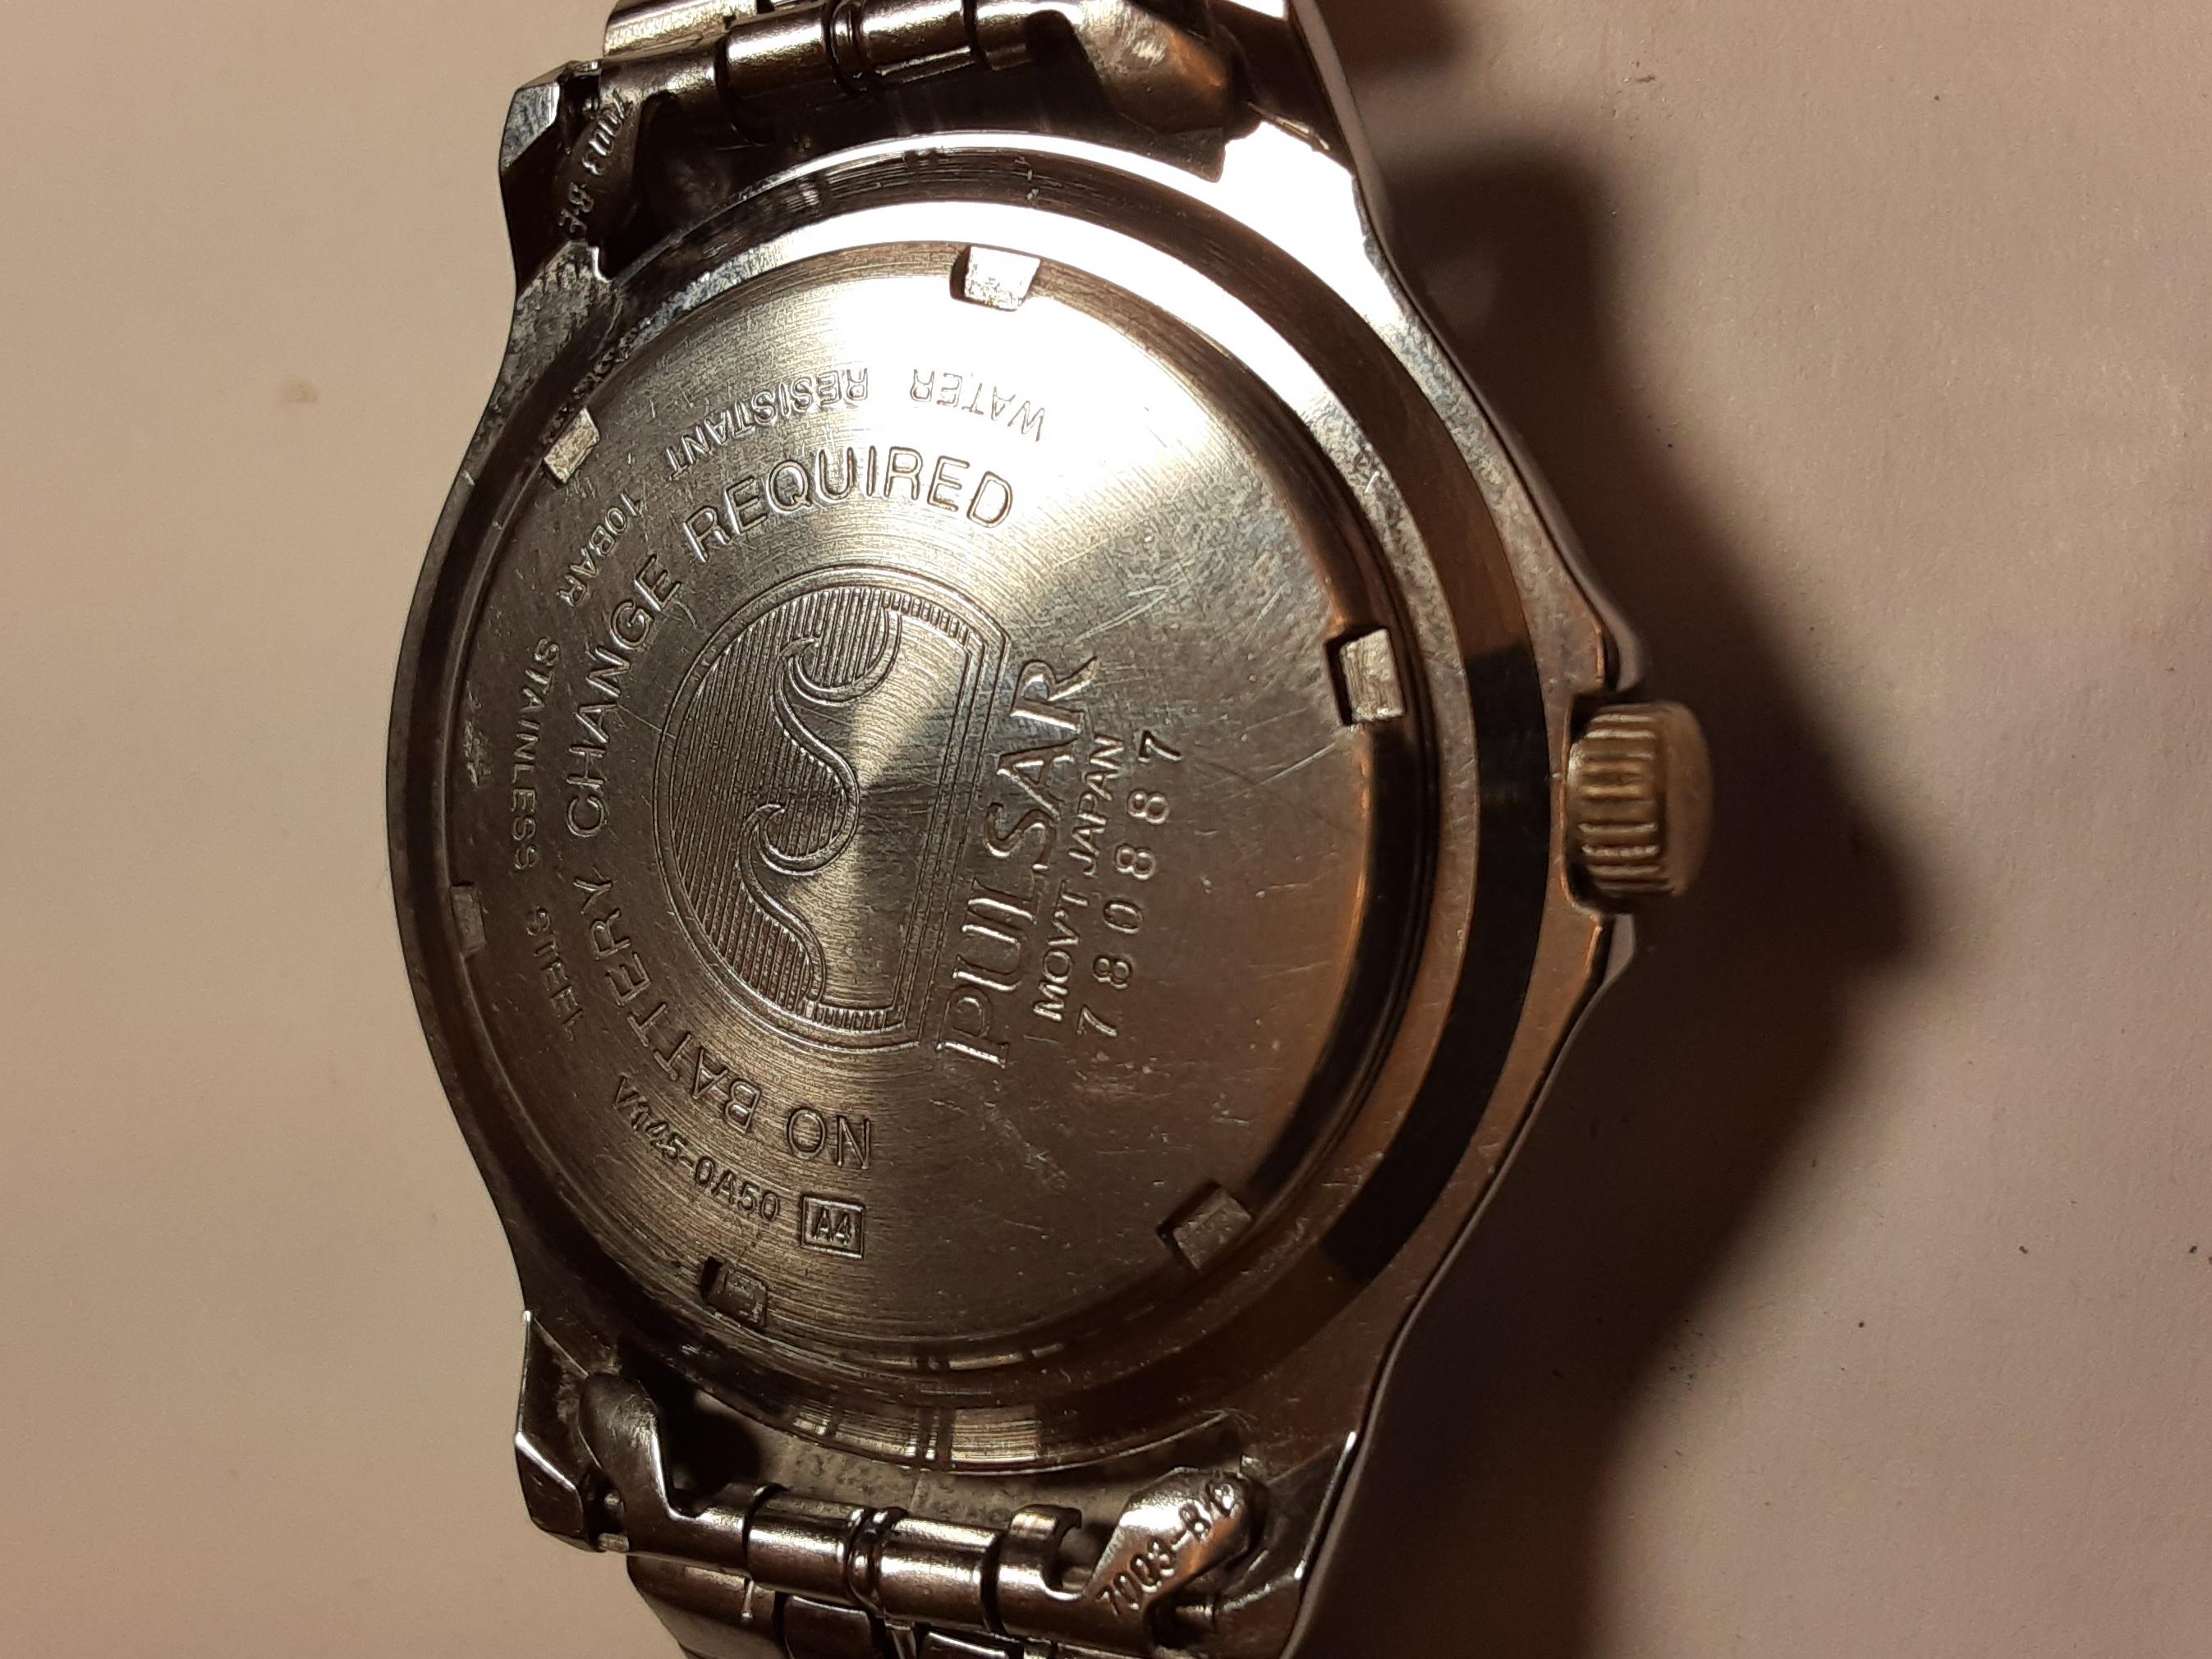
One of my petty annoyances, has been the vostok case. With the exception of the amphibia, they are pretty cheap.A recent trip to the salvation army netted me a solar pulsar with a bad cell.. what you see is the result of my brain "storm" .A nicely regulated 2234 with its retainer ring altered a bit and a different crystal. Nice stainless case and bracelet..now I have to do something about that dial.

 1 point
 -
Don't think so . But some screws from 6309 and other 6 series movement would fit. I have worked on lots of 6309 and 6138/39. They is also different even if they are the same . You can take an older 6139 movement and the look of the screws are different. As for me it tend to get it as good looking as i can . So searching around on my donor movement can be a lot of work. The 7 series screws have a lower and thicker head . The diameter of the threads i think are different to. Many of the screws are available to buy . From places like cousinsuk. Just check the parts number . May cost some but you should not need every screw there is?1 point
-
This is the other really 'different' one that I have...... Just waiting for these to arrive in the post, picked up as a job lot .... going to be busy for a bit...1 point
-
a book like "the machinery hand book " will spell it out for you. vin1 point
-
If you are turning annealed steel to size (like we are here) and it doesn't need to be extremely hard, but have enough carbon content to harden and temper, then I can recommend EN8. It is sometimes referred to as "medium carbon" or sometimes even "mild" but it has sufficent carbon content to harden and also to produce vivid colour if aesthetics are of consideration. The benefit here is that it is easier to turn than silver-steel / high carbon steel. As I mentioned in the 4th post, you don't need to temper to be very hard. And why would you? It'll only break. Take a piece of scrap rod of similar diameter and experiment with tempering. If you heat only at one end, you'll get a rainbow effect and can see how brittle it is as it transitions in colour. Only for larger parts with great thermal mass do you need to hold the heat (whether hardening or tempering) for a longer time to make sure that it is consistent all the way through. It's a bit like cooking a large piece of meat in the oven compared to frying a small piece. It might look cooked on the outside, but it might feel a bit different on the inside if it's large!1 point
-
Today I wore a Navajo silver cuff bracelet watch. The turquoise stones originated from the Sleeping Beauty mines in Arizona. I got interested in Native American jewelry (and watch cuffs), when I saw the late Burt Reynolds wearing one in a movie, I think it was Smokey and the Bandit. Some really crazy movies back then :o)
 1 point
 -
The first thing I do before pulling the balance out or trying to make adjustments institute is pull the pin and see if the spring lies any better. You might just just have an incorrectly installed pin. The spring will deform if you put "English" on it when inserting the pin. For a tool to insert the pin with, I cut just the tip off a toothpick (not the whole tapered end) and poking a small hole in the end with my tweezers. It gives enough control to avoid undo influence on the spring. Your spring, on the other hand, has problems. I believe this is covered in the videos listed above but if you're going to pull the spring from the balance don't forget to mark the springs orientation to the balance wheel before it is removed (it will save you time when setting it back into beat). Almost anyone on this forum can put their hand on a honorably deformed hairspring, practice on a junk one first (it takes the stress out of the practice). There are good people here to listen to. Good luck. Shane1 point
-
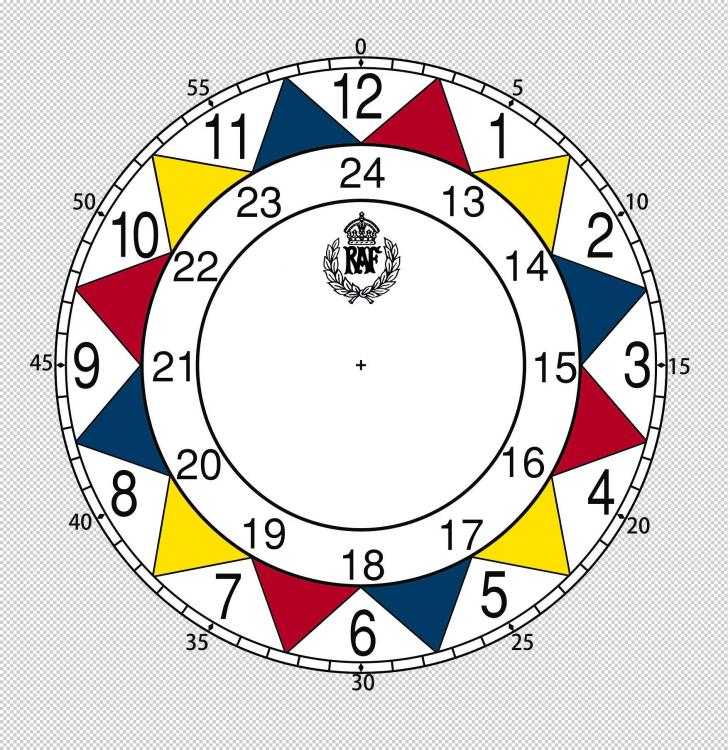
The finished version. I rounded the corners on the major indices and added sub-second marks. Grab yourselves an old Russian 1800 bph movement or one of those old beat up Chinese standard scrap watches in your junk box fire up the inkjet printer pop in some ebay special Chinese decal paper and have some fun with it. You could also grab a Quartz clock mechanism and make your own erzatz USSR ships clock. Attribution-ShareAlike CC BY-SA USSR30.100Centre1.79RoundCream.svg
 1 point
 -
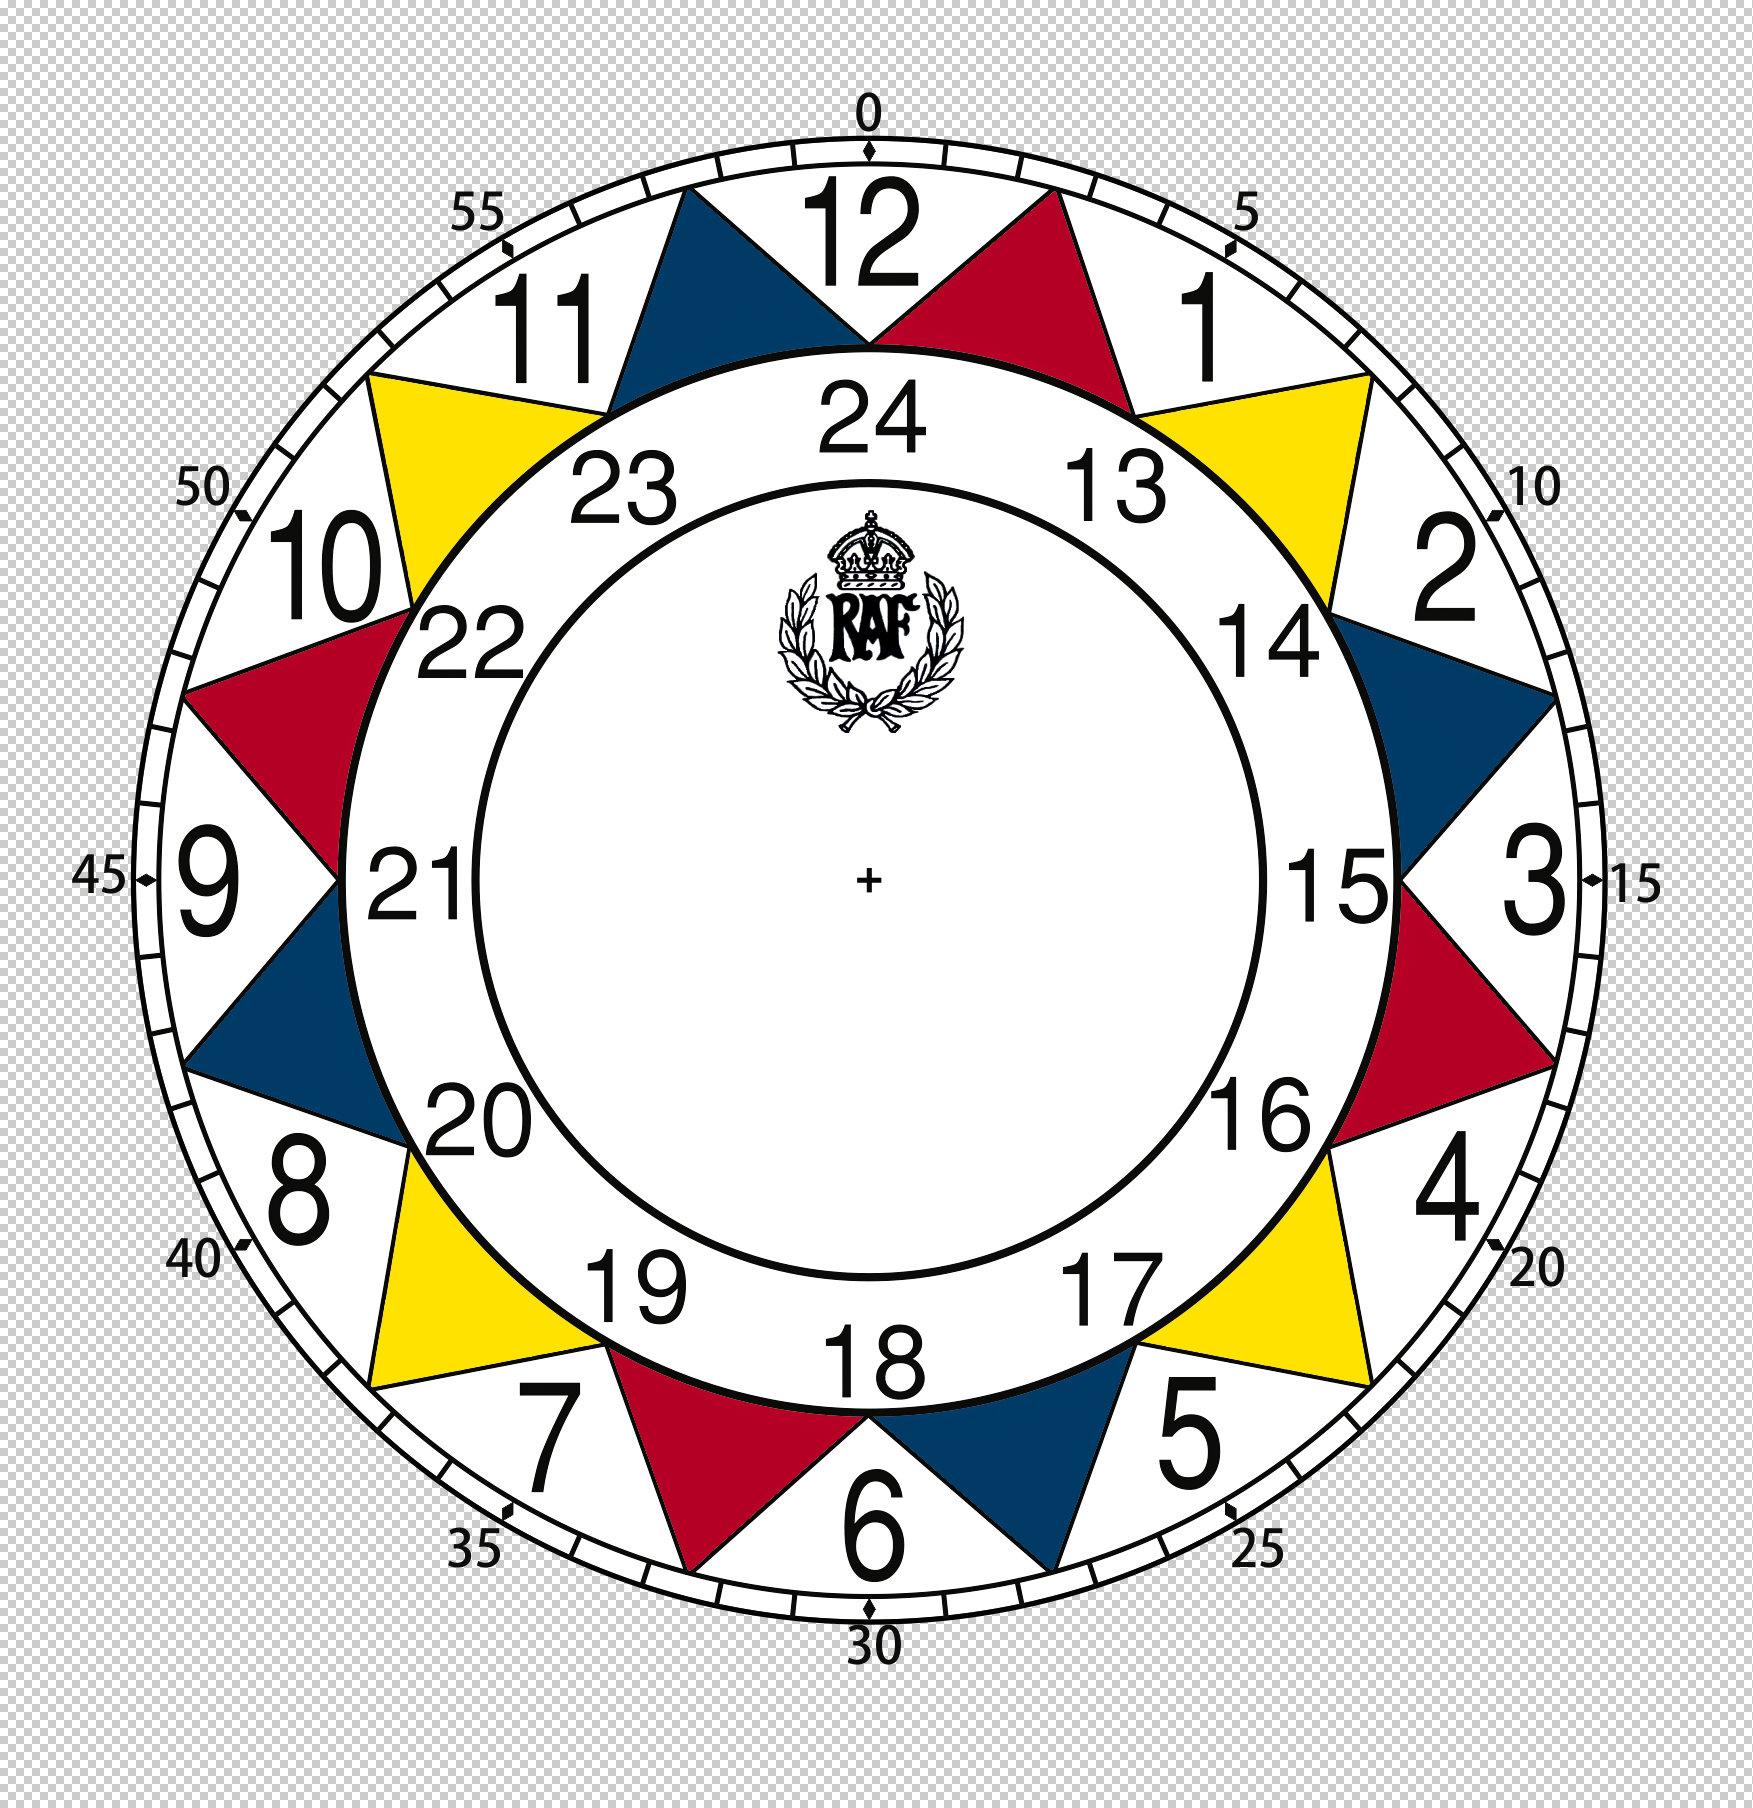
I had a little fun with the theme of the Lutch dial design above, and some open source SVG images from Wikipedia. Attribution-ShareAlike CC BY-SA USSR30.100Centre1.79Round20%Grey.svg I omitted the "Quartz" ( кварц ) and CCCP text, but they would be easy enough to add if you want them. Just pick a suitably 1970s chunky soviet vibe font, fill colour and stroke, and place them wherever you feel appropriate. This would almost certainly be a decal design, as there are way too many colours to realistically pad print it. As with the others, it should be around 30mm, and be the .SVG is easily scalable. No doubt this Red/Grey version would also be decal only, as pad printing is not great for shading, but it does look pretty authentic. A pad printable version might have to look more like this.


 1 point
 -
Ah, ok, as you mentioned 220 Amp with chrono running I didn't think about this area. So here are more candidates: - remove chrono runner friction spring nd observe amp (to check if tension was too high) - check engagement of driving wheel-clutch wheel-chrono runner (if its too high and teeth are touching the opposite wheels ground amp will collapse). Do the check with the chrono running for a whole minute in case not all the wheels are 100% concentric. I think you already checked that all bearings are absolutely clean and no teeth are damaged (esp on the runner).1 point
-
My son today gave me his Seiko Quartz Chronograph that he wears to school with the second Chronograph hand rattling around behind the glass. He tells me it just fell off, but I suspect the watch took a bit more of a harder blow as the minute hand and the large second hand were also knocked out of alignment and interfering with each other. This watch I had given my son a year or so ago after I had used it for one of my projects for my watch class and when I got it the chronograph hand had been loose and I had to tighten it up, so I wasn't overly surprised it had fallen off again. The easiest way to tighten a loose hand if to fit it into the end of a good quality pin vice and do it up so it is just touching the tube and then tighten it a few more degrees so it slightly crimps the tube. You then take it off and check and if still too loose repeat. I did this and the first time it was still too loose and fell back off, crimped it some more and it was still too loose, crimped it a third time and yes you can guess it I did it too tight and now it would not fit. If you do this you then need to broach it back out. I'm lucky in that I have a full set of watchmakers broaches that were my grandfathers so I had one small enough. I held the chronograph hand in my vintage hand pliers and broached it out ever so slightly, checked it was still too tight, so broached it some more and it was a perfect fit. Here is the watch with the hand fitted back on. It was the second hand sitting beside 9. I'm unsure exactly how small the broach was I used, but for comparison here it is next to the tip on my 0.6mm screwdriver and I only used the first 1/3 of the broach This is definitely the smallest hole that I have ever broached out and I'm pleased it worked so well. My son has his watch back so he is also pleased.
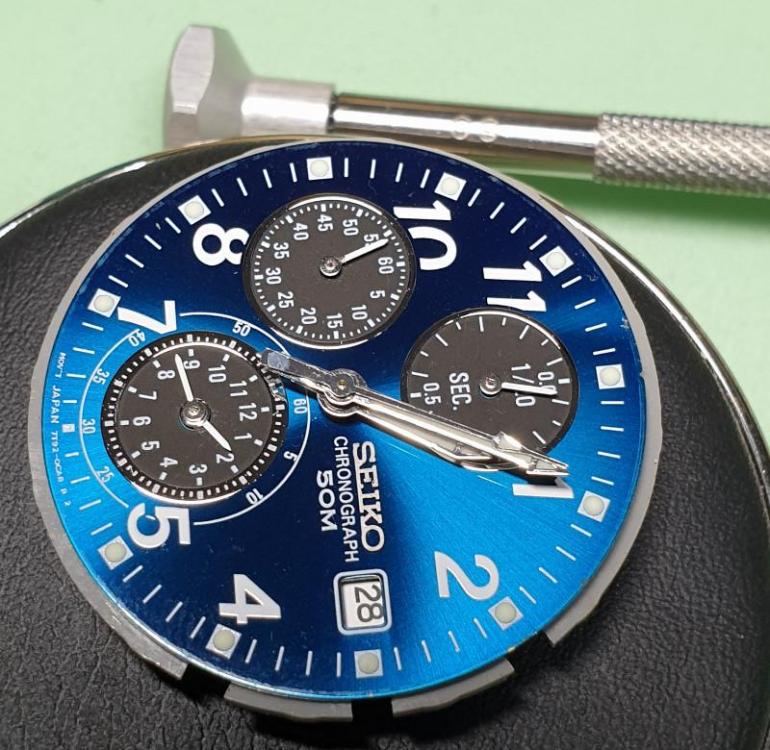
 1 point