Leaderboard


Popular Content
Showing content with the highest reputation on 01/19/20 in all areas
-
I recently put up a post about a Rotary watch that needed a new shock spring. Just a heads up it looks like the latest caliber of Rotary watches have Seiko movements fitted. The error I made was I thought the springs were KIF Trior BUT they are not although they look very similar they are a unique spring for Seiko's. Spot the difference see pics attached. I have found one from a donor movement. KIF shock springs.pdf
 4 points
 -
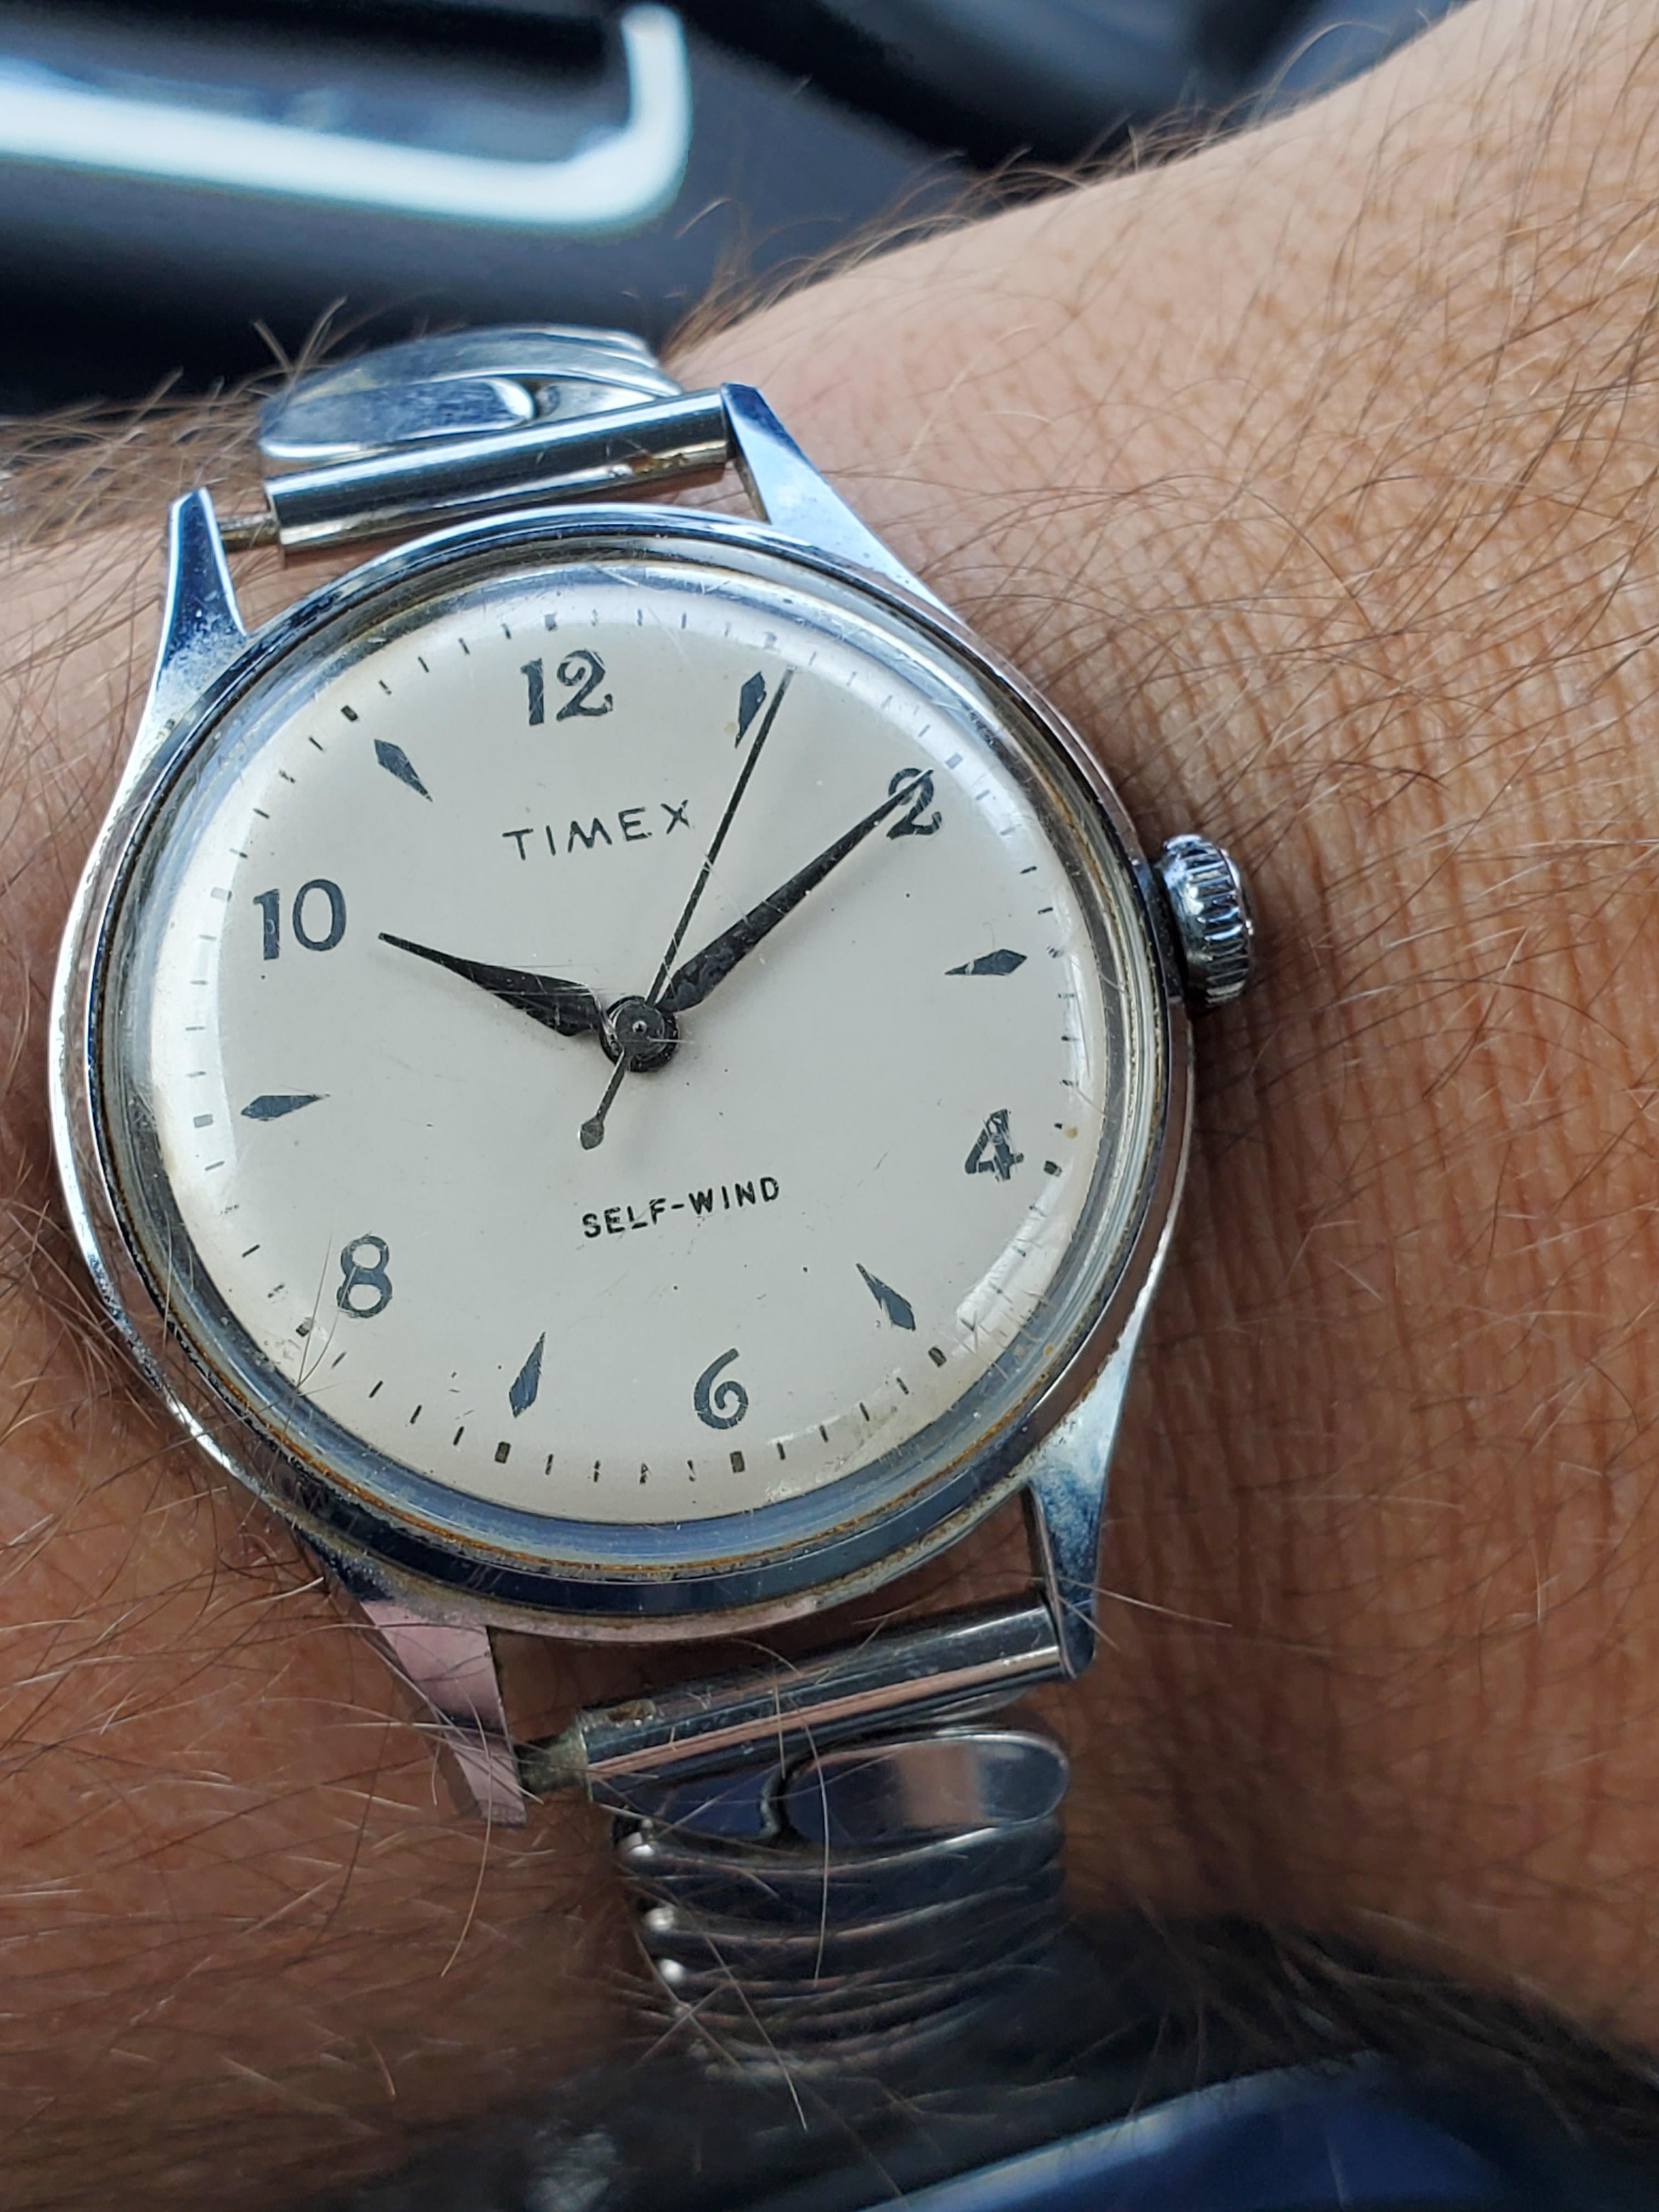
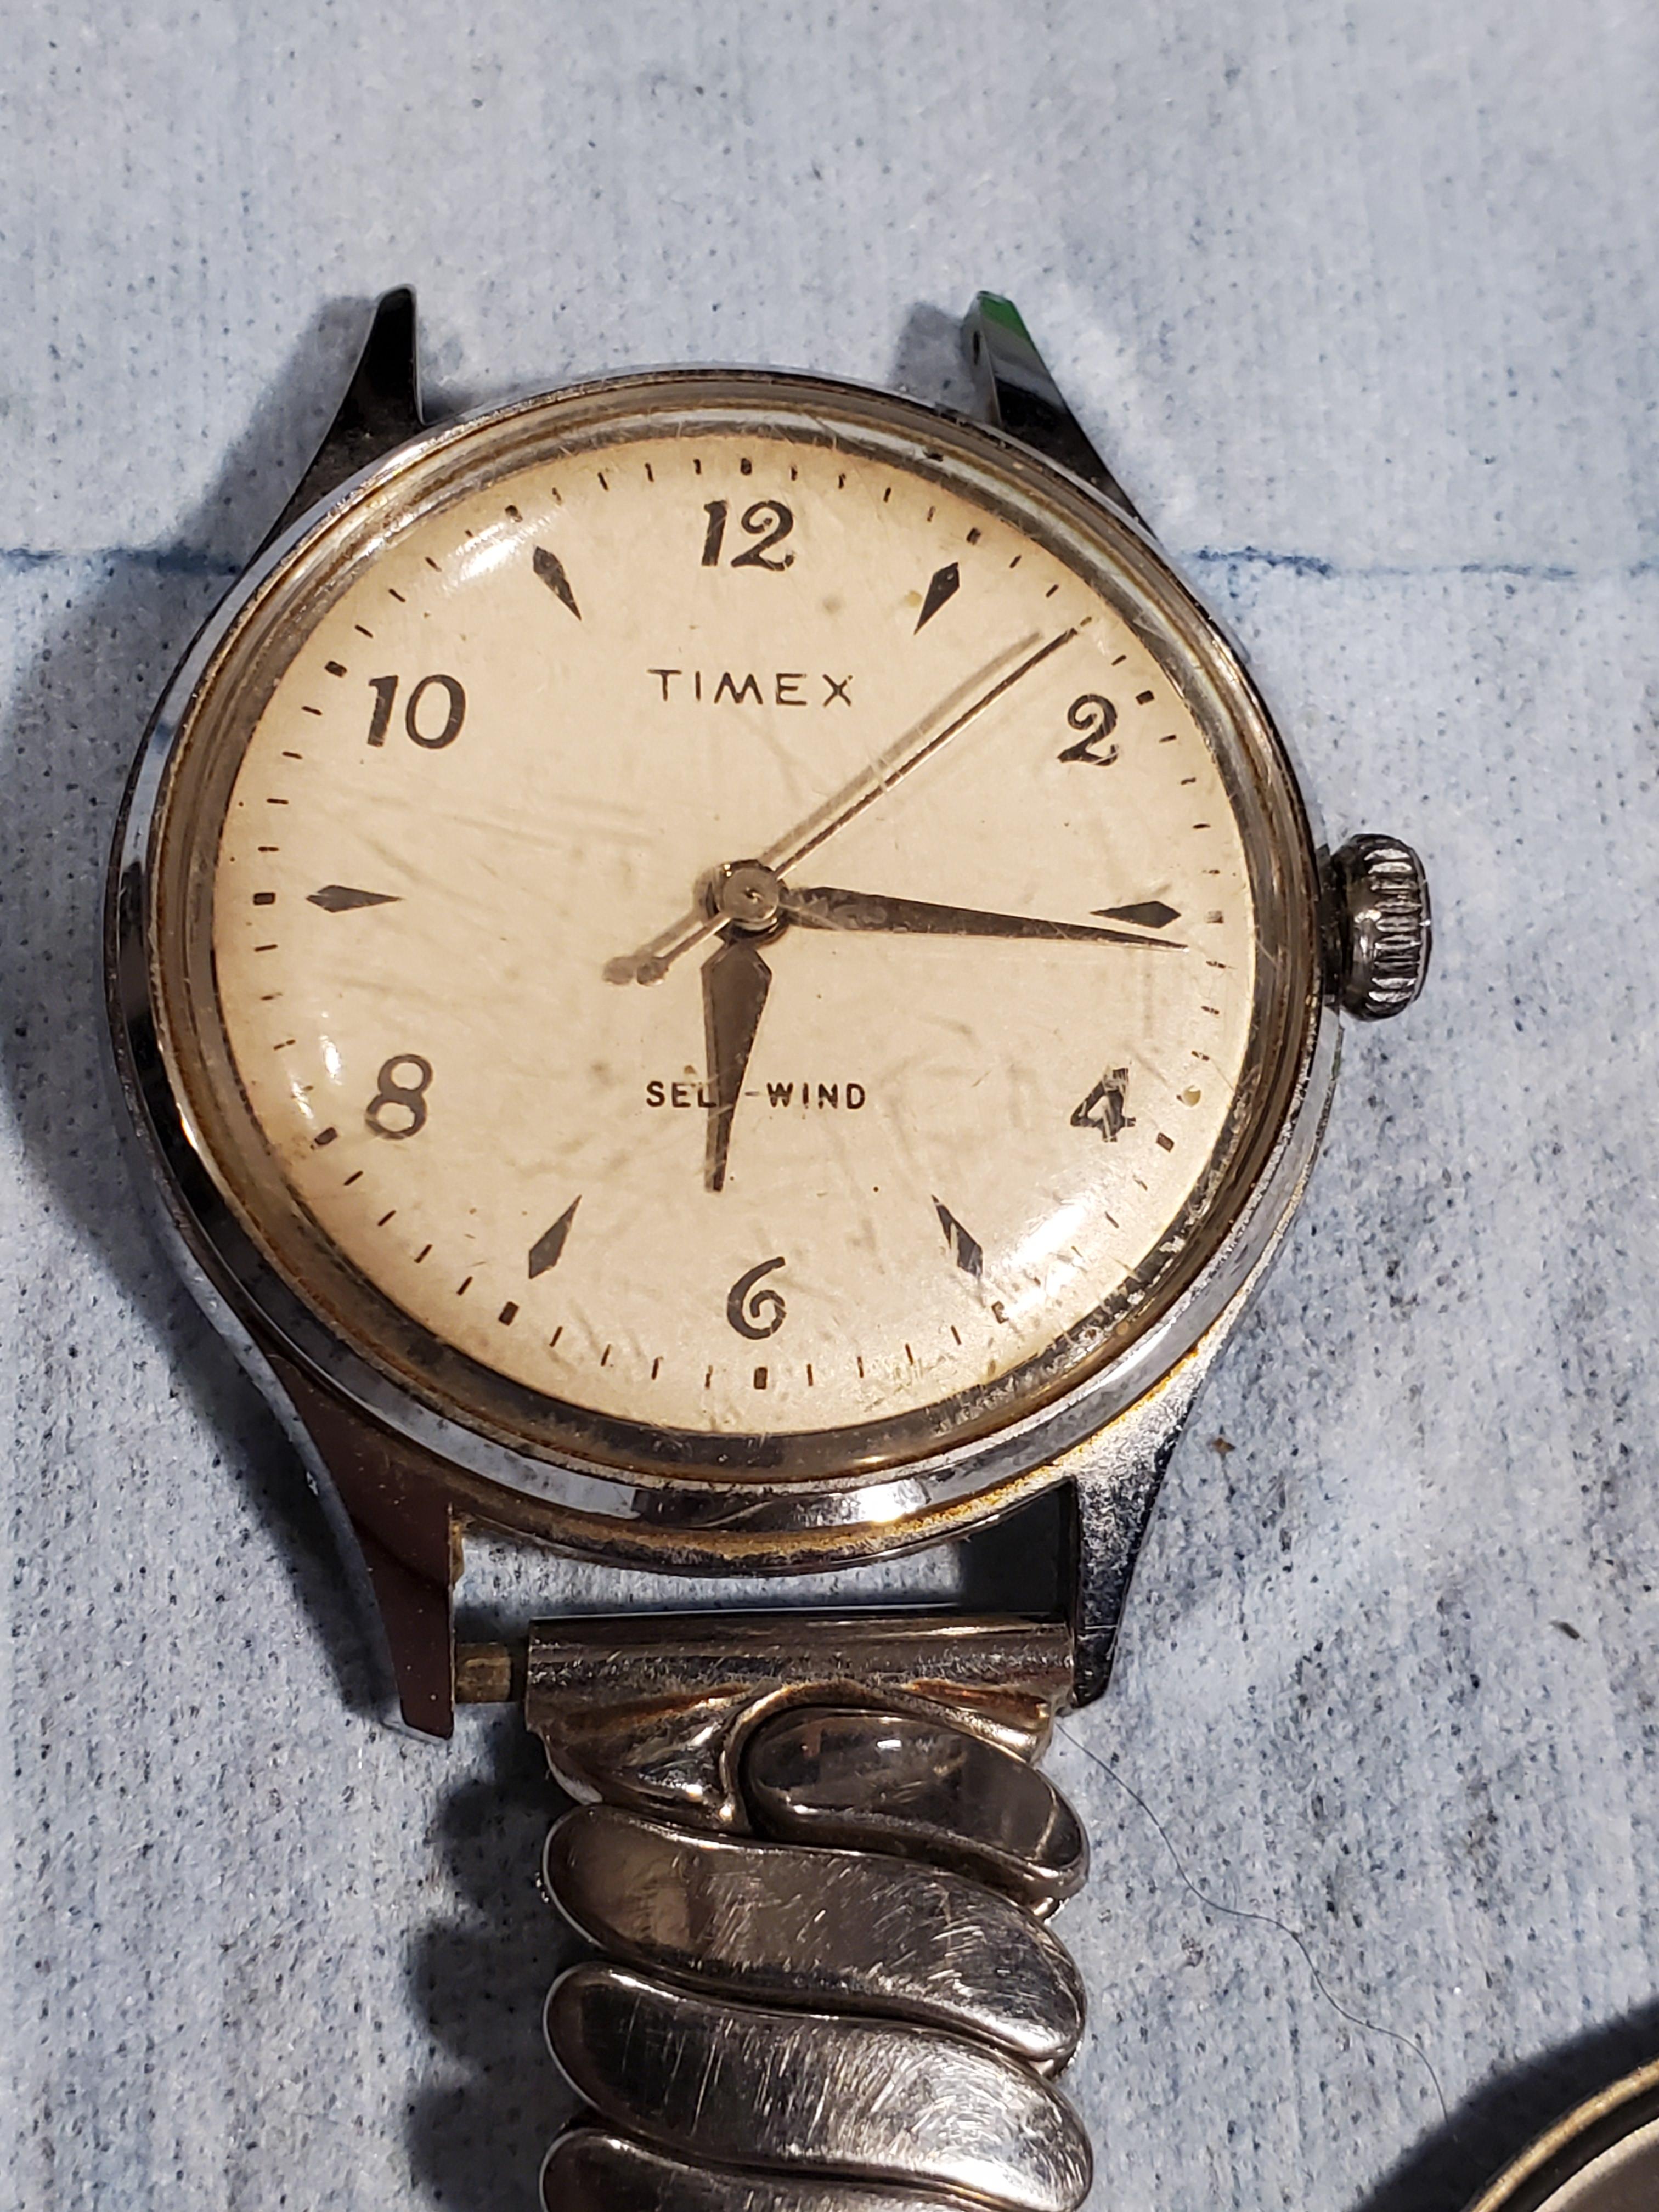
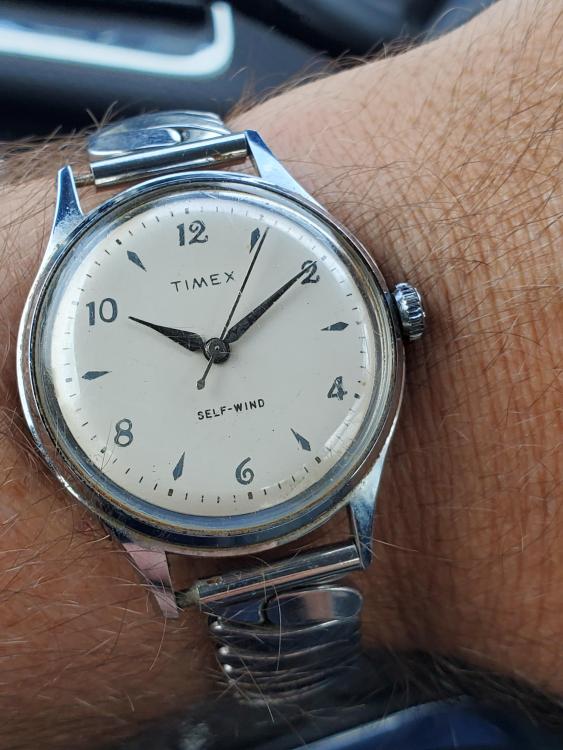
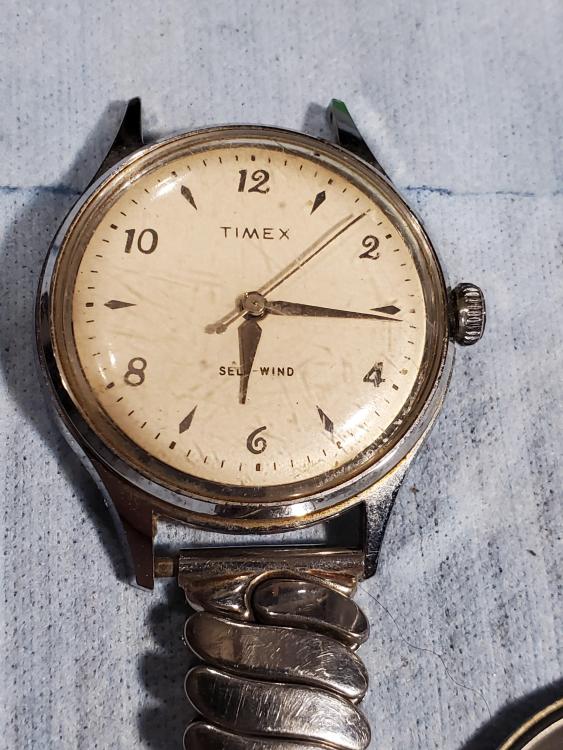
I figure today I'd wear my newly acquired Vintage Timex Viscount from 1958. All it needed mechanically was to refit the auto wind mechanism that had become detached from the movement. It's keeping fantastic time for a 62 year old "disposable" watch. I still need to polish the scratches out of the crystal and replace the ugly expansion bracelet.
 2 points
 -
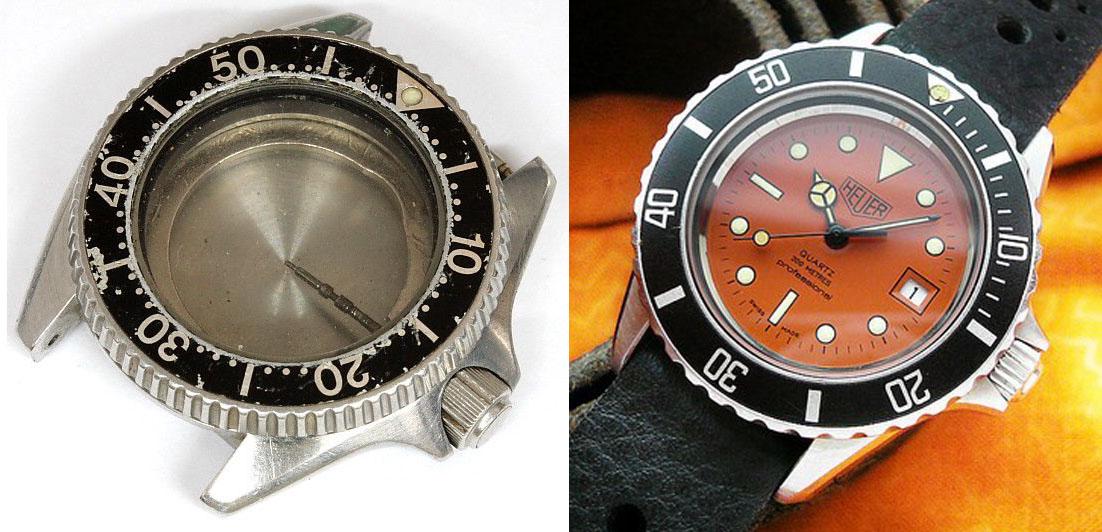
Hi guys … I had promised that I would make a « custom decal dial tutorial » on another thread there So here we are … There are many variations of decal dials, the best IMHO being the « negative gilt » dials which gives the best results. The process I’m showing today is aabout how to make a dial with black printings on a one color background. I had a cheap quartz diver waiting in my drawers so I’ll make a Heuer diver hommage based on the 980.016 model (quartz one too). DAY 01 : It’s 4:30 AM (I’m an early bird) and I have 2 hours to kill before a business trip to Paris (I’m French) so I decide I have time enough to begin. The first part of the process is to prepare the dial plate : - stripped it, removing all the lumes bars and dots - soaked the dial for some minutes in acetone to remove the paint - filled the tiny holes where the bars and dots go with cyanolite glue - sand everything flat I sand with 800 and don’t try to get a smooth surface as I want the paint to adhere perfectly to thedial plate. Here is the result … Then I want to spray paint. I make a tube with some painter’s tape, from a « curve » with it and place it on a plastic bottle cap. I want it curved so that I can stick the dial on it without any risk of bstructing the center hole or the date window of the dial plate. So I stick the sanded dial plate on the tape tube. As you can guess from the pic below … that’s not the first time a make an orange dial. Then I place the bottle cap and dial plate on a paper sheet and spray paint in orange. I use street art spray paint as it is « water resistant ». As you can see on the next pic, I don’t try to get a smooth surface, or even to perfectly cover the dial plate at first. I will let this coat dry, sand it with 2000 grade, then spray 1 or 2 coats until I get a perfectly smooth orange dial plate, ready for receiving a decal. So I place the bottle cap and dial under a shooter glass and will let it dry for about 24 hours before sanding and spraying the second paint coat. The 24 hours drying time is really important (though it could depend on the paint you use). The paint I use looks perfectly dry after about 5 hours but if you spray the second coat without waiting enough, that coat won’t perfectly adhere to the first and you could get a granular surface like an orange peel. And here is the dial waiting under the shooter glass. On the right is a « negative gilt » dial (third and last matte varnish coat) On the background there are two Raketa 2609 movements from the 70ies, quietly (really loudly to be honest) ticking for test after I‘ve recently serviced them. Now it’s 5:45 AM so I will have a and go to the train station. I’ll sand the dial plate this evening and spray the second paint coat tomorrow morning. Then sand it in the evening and spray the third coat (if needed) the day after. DAY 02 - DAY 03 : So here's what you get after the first paint coat … doesn't look really good but no matter as there's still some work to do to get a better result. And here's what you get after 3 coats of paint, each one sanded with 2000 grade, to get a perfect finish, flat and smooth. Now the dial plate is eady to receive the decal. DAY 03 : I won’t explain anything about Photoshop and Illustrator here … I’ll only explain how I print my decals. One thing really important, from my own experience, is the definition of the design. I’ve tried several, from 1200ppp to 6000pp and the best results I’ve got on printing decal sheets were with a 4000ppp definition. So all my dial designs are done in 4000ppp. The result is really BIG files … for example an A6 template with 12 dial desings ready to print is about 800Mo. As that dial is black printing only I open it with Photoshop and let the softwre (so ont the printer) deal with the printing quality. My printer is an old Epson Picturemate with a 1200 maximum definition. As the good quality decal sheets are not cheap and as I’m a « skinflint» I often print on A7 sheets … 6 dial designs on one sheet. When printed you should let it dry for about 4 hours then spray 2 really thin coats of matte varnish, letting each coat dry for at least 12 hours (24 hours is better). DAY 04 - DAY 05 : 2 days of speed-hiking with my wife so I didn’t worked on that tuto. You can check on the net what speed-hiking is, but to summarize it’s hiking as fast as you can with really light backpacks, trying not to run (or only short runs). On a good day you can walk 5 to 6 miles/hour … when trained you can walk up to 6,5 miles/hour … and while I trained for my first 62 miles ultra I achieved to walk (no running) up to 6,85 miles/hour (11 km/heure). DAY 06 : Today is Monday 6:00 AM. It’s been 5 days since I begun that tutorial and … my legs ache and all my body is painful (see Day 04 - Day 05) The dial plate is ready and the decal sheet too. You can see that the decal sheet looks matte now. That is because I have sprayed 2 coats of matte varnish on it, to protect the inkjet ink while I’ll soak the decal in water. Of course if you print with a laser you won’t have to spray varnish as the laser inks are (almost) water resistant. First thing to do is to chose the best item on the decal sheet and cut it round. Then you are ready to go. On the next pic you can see all you need now : - dial plate … fixed on a foam board using the dial feets - decal dial … nicely cut round - tweezers - thin and smooth brush (mine’s a watercolor brush) - some « micro set » … or just vhite wine vinegar (it helps the decal to set on the dial plate) - cold water Now you put the decal in cold water and while it soaks you brush some micro-set (or white vinegar) on the dial plate. Then you put the decal on the dial plate. Here you can see why I prefer using clear decal sheets on coloured dial plates … because it’s much easier to « perfectly » positionate the decal, using the central hole and the date-window. When you’re happy with the position of your decal you use a paper tissue to absorb the excess of water. Do that carefully as you don’t want to move the decal on the plate. And here we are … everything worked fine while absorbing the water and the decal position is OK. I’ll let it dry for about 12 hours before I cut the central hole and the date window, before I proceed to the varnish finish. Still Day 06 but 7:00 PM The decal has dried for about 13 hours so now I can proceed on cutting the decal sheet That's what I do then I : - fix it back on the foam board - apply some « micro set » around the center hole, the date-window and the outer diameter - gently press with a paper tissue so that the decal is perfectly applied (no more «air bubbles) And I let dry for 3 hours more Evening … 10:00 PM Now the decal is « perfectly » applied and dried and ready for the finish Last pic for today is after spraying the first coat of glossy varnish I will let it dry for 12 hours, sand it with 2000 grade paper and apply the 2nd coat. DAY 07 : 20:00 AM … only 1 pic today just after finely sanding with 2000 grade the 2nd varnish coat I applied yesterday DAY 08 : Yesterday evening I applied the 3rd and final varnish coat after finelt sanding and cleaning And today I can show you the final result … and say I'm pretty happy That dial is so glossy it’not easy to get a good pic, even on close-up. May I say that me hpone is nit the best at shooting pics (just like me) and the actual dial is much much better that it looks on the pictures below. I hope that you liked that tutorial and that it could be helpfull to members who want to try to build their own watch dials. I’ll try to make better pics with a real camera and a better lens … next week of the week after, after luming the dial together with the hands. Then I will still have to get a case and rework it so that it could be a 980,016 lookalike. Some of you may wonder how much time did I spend to make that dial. It took 8 days to achieve the all process but I spent only 1 hour the first day then only from 15mnm to 5mn the days after. So, apart from the design work on Illustrator and Photoshop (which took me hours), I would say that the whole process is about 2 to 3 hours. I must say that it's not my first try at dial making and I've trained for 2 years now. So if you want to try you should consider spending a few more hours but it's really worth the time spent as at the end you get your unique DIY dial.1 point
-
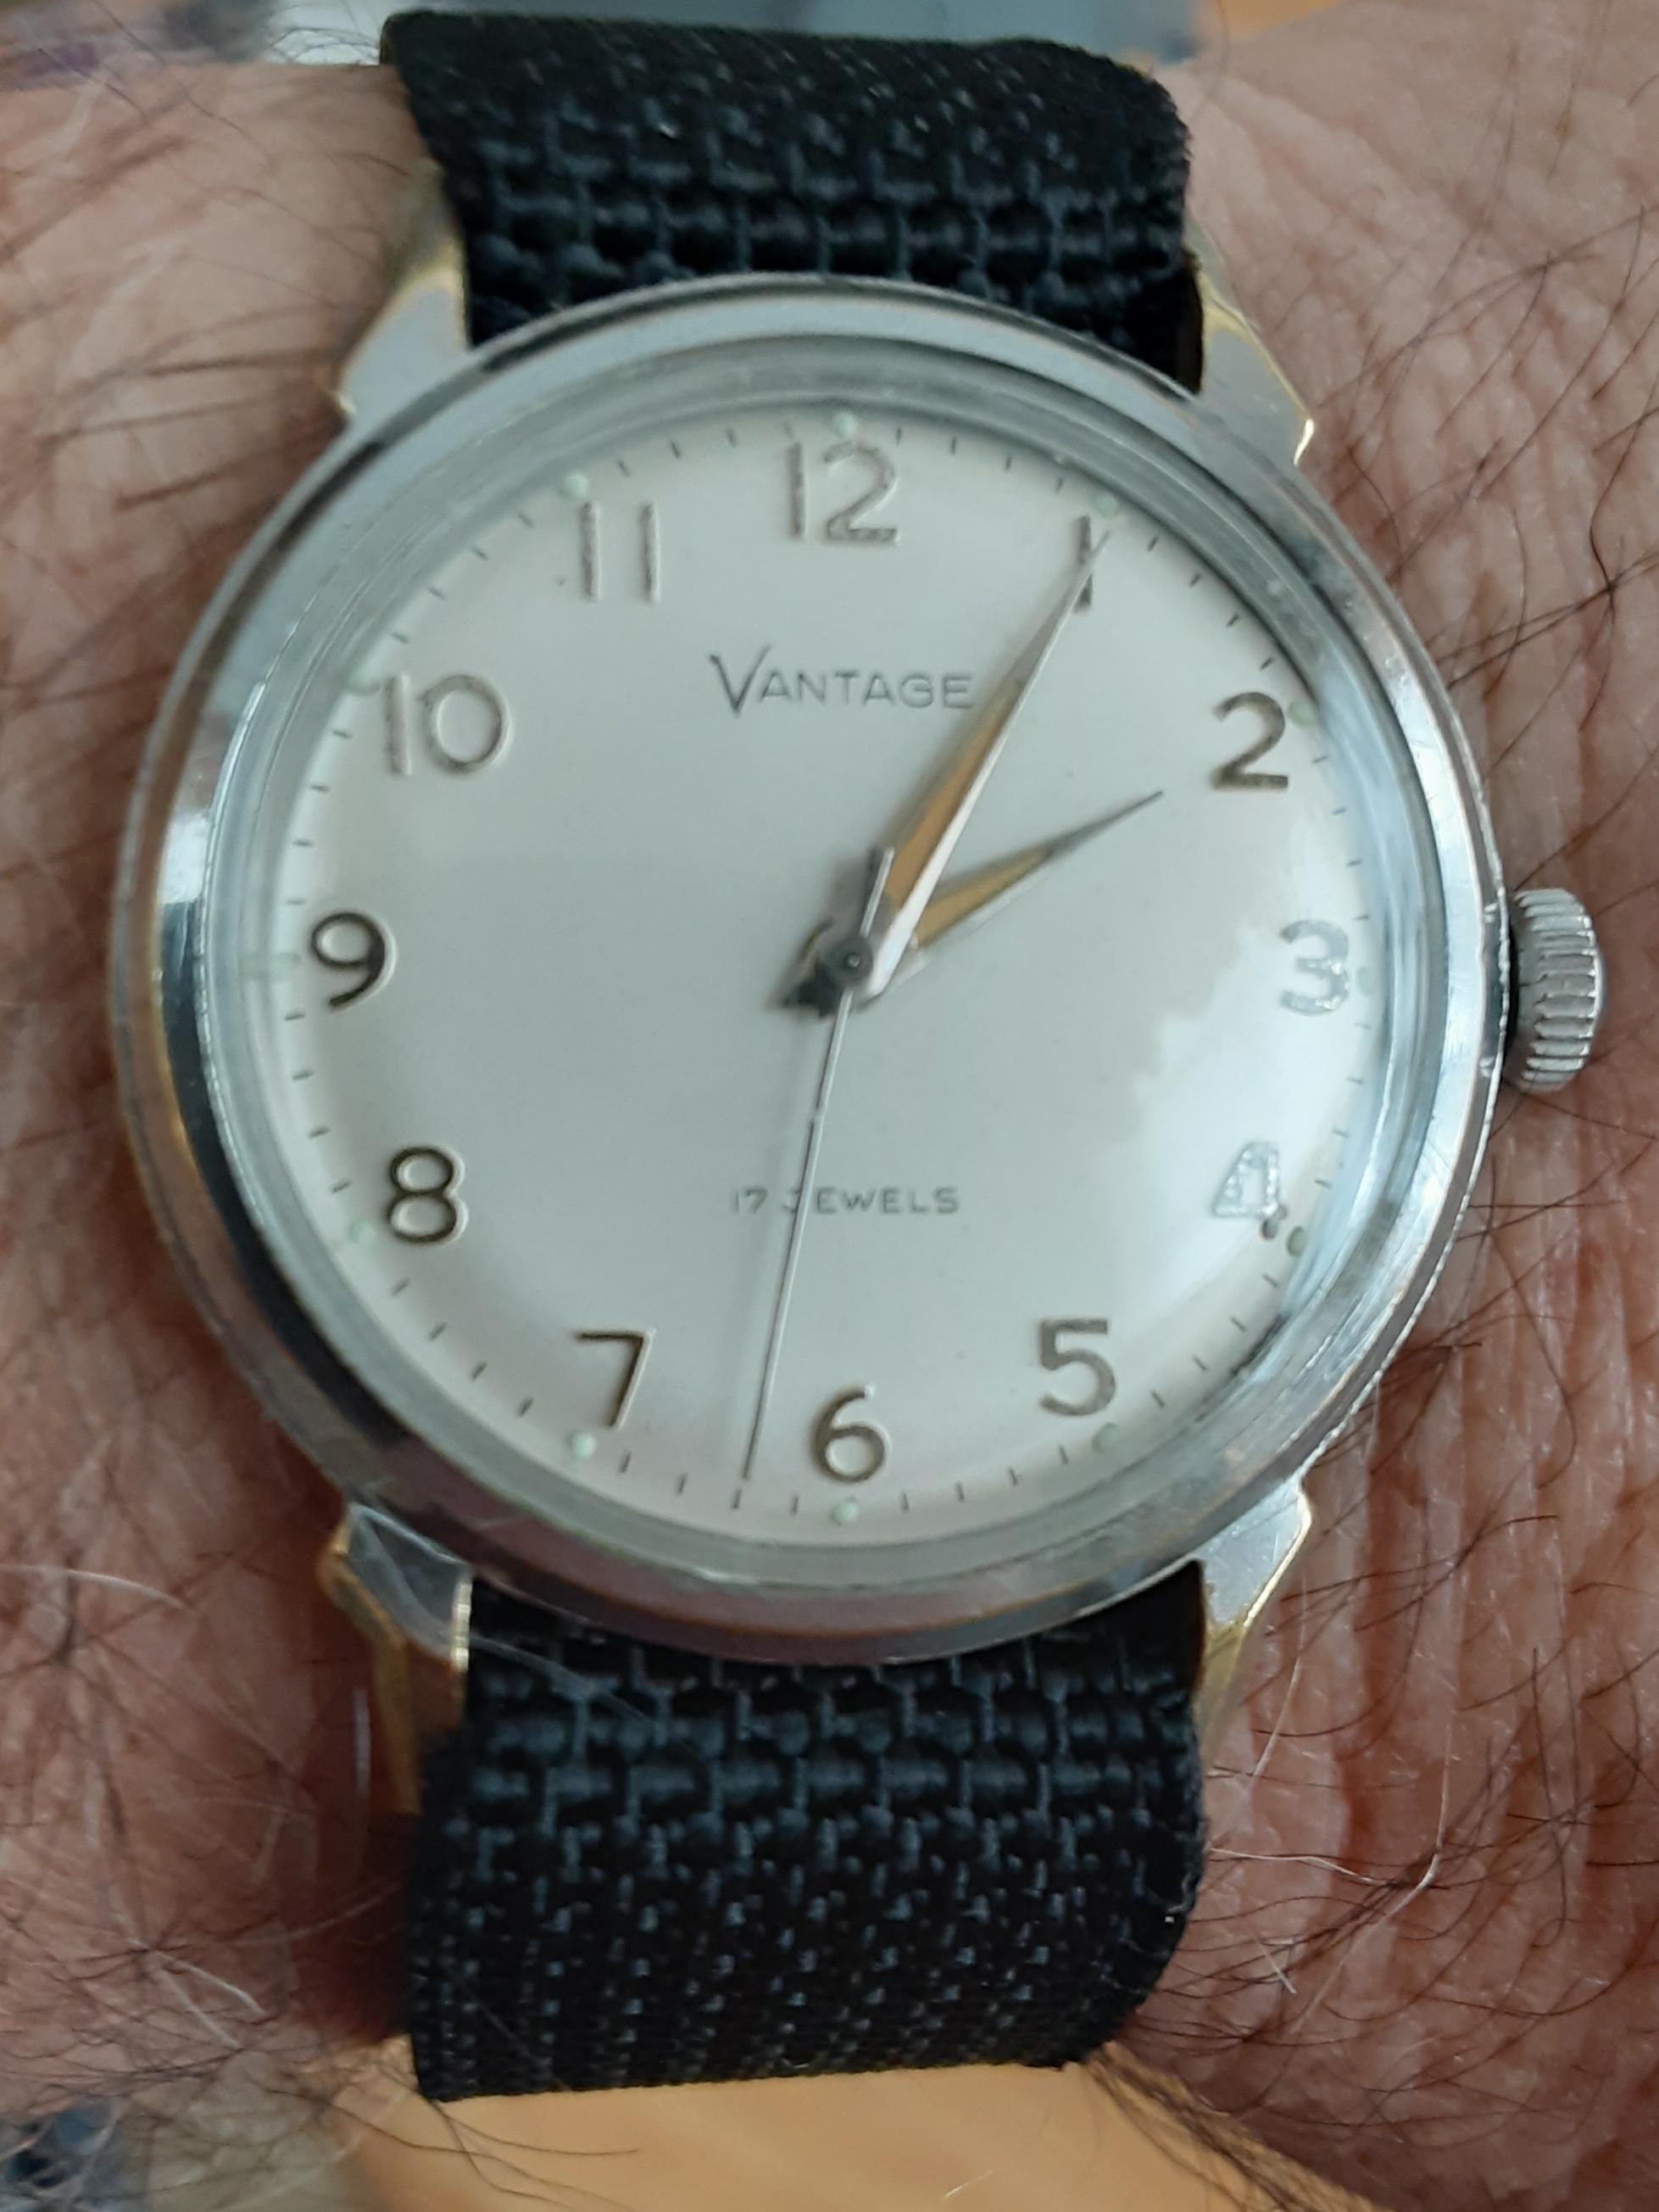
A vantage...with st 92 movement which I believe to be a laco. I found the crown wheel, screw and bushing loose inside. Previous owner never heard of left hand thread.
 1 point
 -
Yeah must have stolen that bracelet from his wife..it needs to go.1 point
-
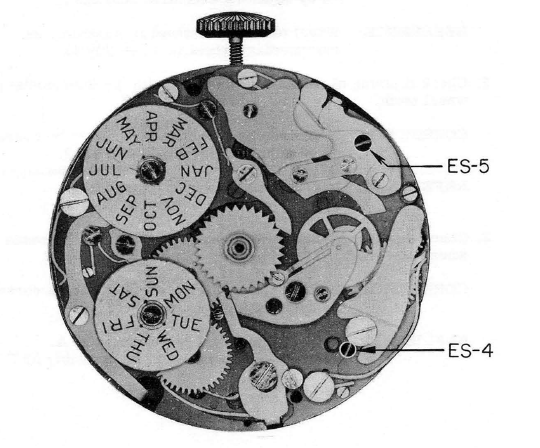
As I said, you have to remove the rotor along with the bridge underneath it (the one that holds a few other tiny gears as well). The screw that holds the rotor itself is on the other side btw. You can also turn halfway that screw that is cut to remove the 2 small gears. Also do that once you remove the ensemble. It'll be easier.1 point
-
Hi add this one to your list obsoletewatchandclockparts.co.uk run by John Senior in Yorkshire In the UK I have used him for bits. I had a look on his site but no eterna parts. If you ever find bits on his site you need PM me cheers1 point
-
You have to remove the entire automatic ensemble (the weight + the plate/bridge underneath it). Usually 2-3 screws. Then you turn around the ensemble and I imagine you'll figure out how it all comes apart.1 point
-
Welcome here! I'm noting your posting as a witness for the people which periodically show up here with the declared intention of repairing their expensive Rolex, complicated chronometer, or unreplaceable heirloom piece, based on their previous experience being a mechanic, or "very handy at things", that of course without any specific tool. But I'm sure you will accomplish many successful repairs, perhaps with the help of the great training by our Mark Lovick: watchrepairlessons.com1 point
-
next time you go ,you can borrow my truck.1 point
-
I think we all got hypnotized in similar ways. welcome.1 point
-
Not that i can remember now . millsys-watches.co.uk is one page i use . But nothing there . I post a request . Maybe takes a few days as they aren't the fastest around .1 point
-
It would be lovely if you could post such a request. I don't have Facebook, no. To be honest I keep hearing about people involved with watches using it more and more... Yes, a thread were people would ask/look for parts is what I had in mind. Not for profiteering but for helping each other out... Have just checked watchparts.co.uk but I don't it's there and I also don't have an account. Any other place where I can look ?1 point
-
the white dial self wind is from 1958 and the model is named 'Viscount' they aslo came with a black dial and most f the old Timex forum members consider those a grail watch. Yes, and no need to askas I do have two of them. BTW, the movement is a model 29.1 point
-
yes, 1958.1 point
-
Well what a haul was Mrs with you or has she given you up as a hopless case, did you have enough room in the car for them all.1 point
-
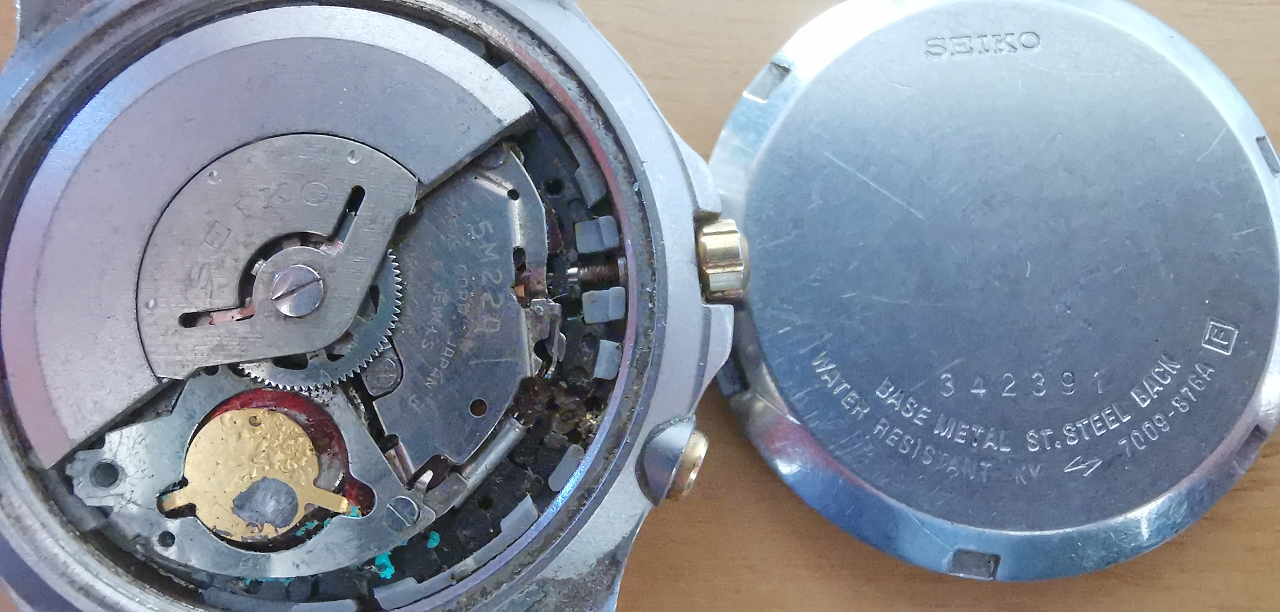
Hi Watchmaker So far sourcing a replacement has returned negative, references to the 5M22A apart from complete watches is as Rogart says scarce, I think Rogarts Offer is the way to go, If you are good on mechanicals then treat the seiko the same just be carefull. The origional movement looks a bit rusty but by striipng it you gain knowledge It may be workable, just see haow far the rust has penetrated. Wish you well1 point
-
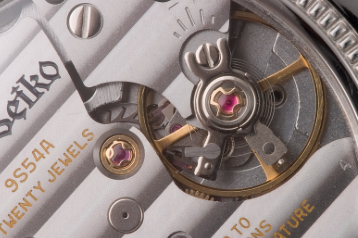
Thanks for the help and suggestions. I'm pretty self-sufficent when it comes to mechanical movements but a Seiko kinetic is a new one on me! The case and strap on this watch are titanium and from the front this looks like a great watch - dial unmarked; date and hands move etc. But this is the reality inside! ... It's looking pretty rusted up in there and the rotor doesn't even turn so I've automatically jumped to the conclusion that a replacement movement is the way to go! The '5M22A' is the identifier I mentioned on the movement; there's a '342391' on the case back. Hi @watchweasol - if your superior reference skills can locate an alternative that would be great! Thanks @rogart63 that is a very generous offer. If there's not an alternative movement then I'd like to take you up on this! There's nothing on ebay 5M22 related apart from buying a complete watch! Is the 'service and rebuild' you mention something realistic? I'm a good engineer in general and more specifically have serviced and repaired lots of mechnical watches but quartz and kinetic ... yikes!
 1 point
 -
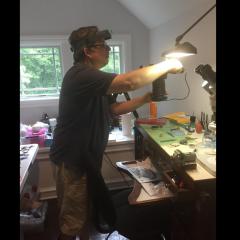
Having been repairing clocks for some years, I was told by my wife that watches take up a lot less room, so I have graduated? downsized? to watches. Have been doing it for a couple of years, my main interest is vintage mechanical but now trying kinetic. Watches, parts etc sourced mainly from eBay and learning all the time from YouTube videos. My main problems are hairsprings, and cat hairs from our two resident mogg (oops, will be in trouble now ) non-moggy cats.1 point
-
No doubt Chrono is complex, not recommended for novice. A pocket watch or manual wind wristwatch would be suitable.1 point
-
Opened the first of my new Timex's and I discovered the automatic works has fallen away from the movement because the 2 retaining screws had come undone. Question for @JerseyMo, was this one manufactured in 1958?
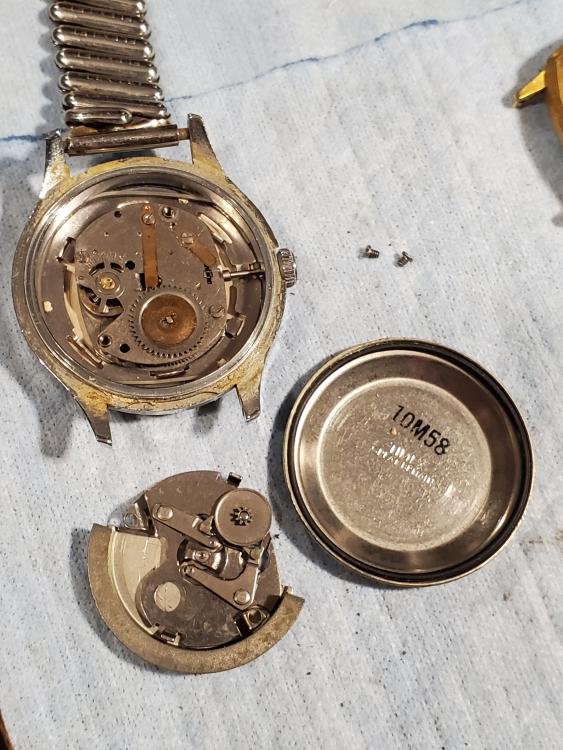 1 point
 -
Ok this movement is highly complex and it is not recommended for the novice, but then again when i started my first movement was a Seiko 6139 chrono and the watch is still running in my box but i had a couple donor parts movements. So if your going to undergo this endeavor you should try and get a parts movement which may be hard to find and also check out the link below. As far as cleaning goes an ultrasonic is not generally needed to do a good cleaning. Some distilled water with detergent nylon brushes and peg wood will suffice, you can rinse in 99% alcohol but make sure you DO NOT use alcohol on the pallet and balance wheel. You can get a decent ultrasonic for under $100 harbor freight has a nice one for $60 if you are in the USA. In that case you can use naphtha or Ronsonol lighter fluid. You can also do a naphtha soak prior to hand cleaning as well in order to attack dried up old oils. https://www.ebay.com/itm/Pierce-Cal-134-Chronograph-How-to-PDF-Book/372688650391?hash=item56c5f98097:g:R2YAAOSwRSddASsX1 point
-
Indeed.1 point
-
Sweet haul. I need to start tracking down some antique shows.1 point
-
fantastic haul.1 point
-
The movement is a 5M22. Have some if you like to service and rebuild a movement. Don't think there are any parts avalible out there . Have a few cases and such for this . I have what i think is a 3M22 movement in a ladies watch i really would like to get running again . As the watch is in nice condition. Would make a nice watch to give away .1 point
-
Hi I would think It's feaseable to do that just enough to fix the wheel though, no heavy hammer work1 point
-
Hi Can you post a picture of the movement please, The seiko corporation are part of Hattori, epson, pulsar, some of them interchage ie Seiko T32B is a Y182B pulsar. Although I looked through my references and so far nothing.1 point
-
Some liquid wisdom in this topic! I had to start from zero again and in my frugal style I tried to buy value. Should last for the rest of the winter.
 1 point
 -
4 digits Suffixes are the case number, together with the mov.t they make the basic watch reference. You can finnd size specifications oine or measure it. Before giving up on it check pulse at the coil, if there is try a line release or demag.1 point
-
Cats..I am allergic , I like them, but I like breathing more . Dogs are more to my liking ,I see in them all the virtues we call human but are too ashamed to admit we learned from them.1 point
-
Hi and welcome To The forum from another Old Twit, Fortunate to have a bothy at the house end The misses dont go in there except for the freezer. So a sanctuary with a buzzer iff needed Ahhh Luxury1 point
-
There! Those japanese really are workhorses1 point
-
Can you post a few pics? I agree a bent mainplate would be a new one on me and I have a couple of decades at the bench. That's a really fine movement and while robust in use rather delicate to work on, not one I'd recommend as a first watch.1 point
-
awesome job!1 point
-
Some news about the casing of that dial I've had the opportunity to get a 2625-001 Seiko case, which is not in really good condition. But just have a look at that comparison pic below ... it seems to be a good start case for a 980.016 hommage. I'll probably (certainly) have to redo all the dial making process as the rehaut opening is really short on the 2625, and the date window will be a little too close to the rehaut but if it's not under the rehaut I will live with that. Plus I'll probably build a custom "bakelite" bezel (in fact plexiglass with a printed underside). As I will redo the dial I have decided to change the color. I will make it pistacchio green and spray some really thin gold powder on the decal prior to varnishing. So if I succeed the dial should look matte in certain lighting conditions but sometimes there will be shiny gold spots
 1 point
 -
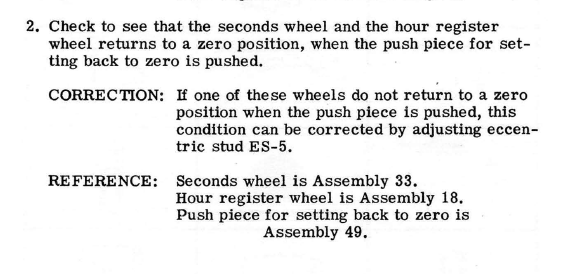
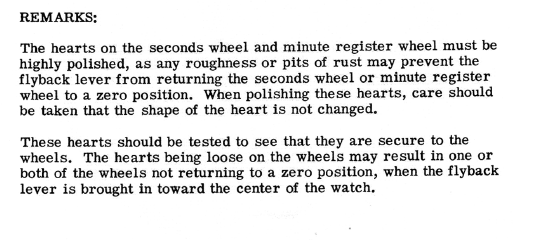
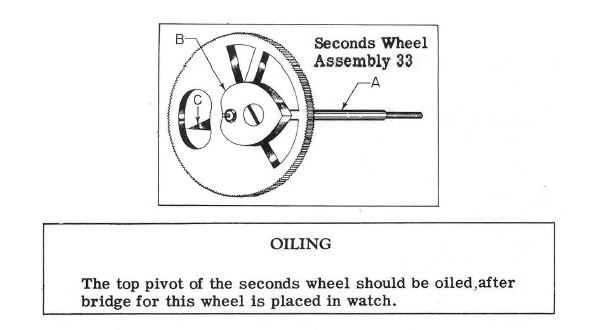
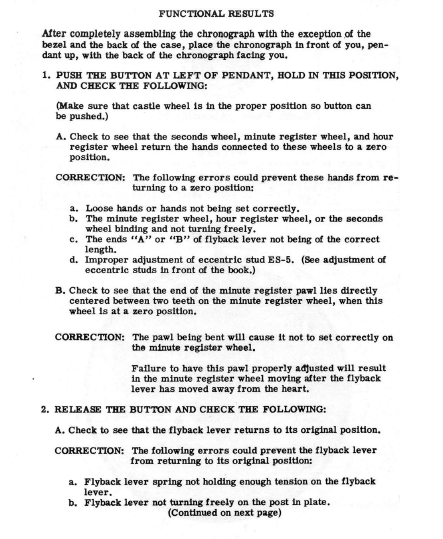
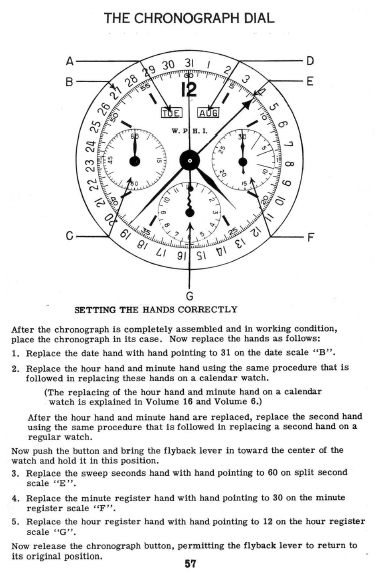
I agree that this is likely caused by the hands not being pressed on firmly enough. And to do that you certainly need to support the pivots when installing the hands. If you are working on the hands, presumably the watch is out of the case. The "underside" is actually the back of the watch - opposite the dial. You need to place the pivot on something like a stake of appropriate size, a movement-specific holder for this very purpose, or a platform such as a Bergeon 5409 which is designed to support the pivot. It is also possible that there is something wrong with the reset hammers and/or hearts. They need to be very smooth and properly adjusted. There is also an eccentric stud that is used to adjust the reset. See images attached as they may help!
 1 point