Leaderboard


Popular Content
Showing content with the highest reputation on 12/31/19 in all areas
-
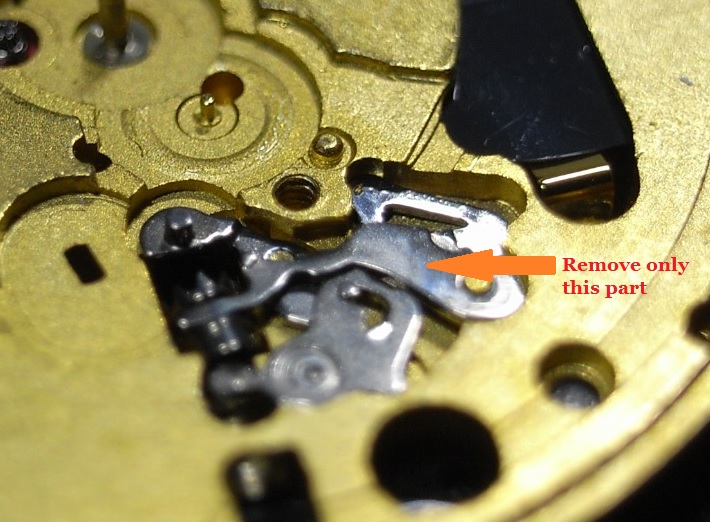
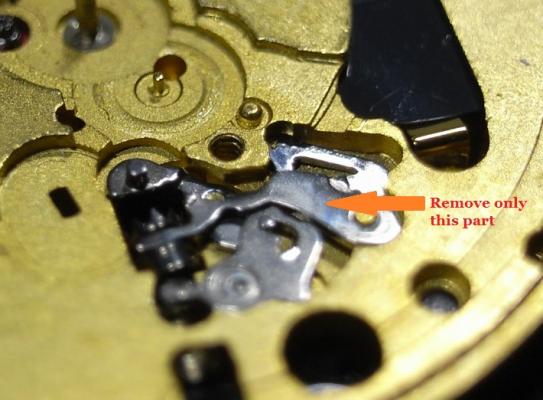
Press this button . If it's difficult to remove and there is rust . You can remove the circiut board . Then you can see the stem and maybe even remove the clips that holds the setting lever.
 3 points
 -
The reason to use nonconductive tweezers is to avoid shorting the battery. Skin contact won't short it- but skin oils can lead to corrosion and shortened life. There are numerous tweezers with plastic or wood or phenolic tips that are appropriate, or finger cots as above and just get it in there. I use the cots, even with high class tweezers batteries are surprisingly slippery!2 points
-
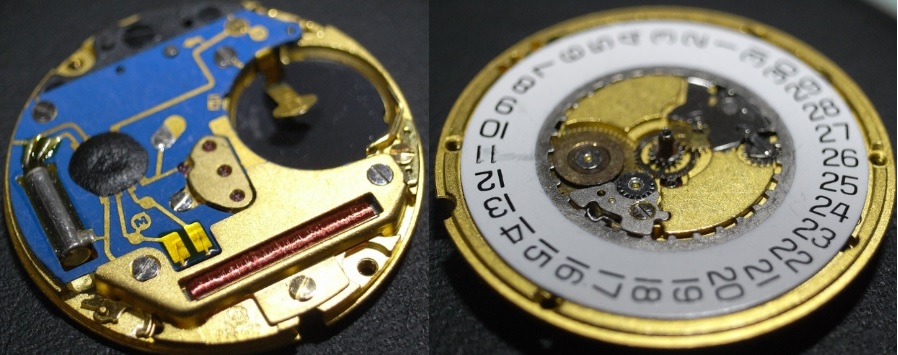
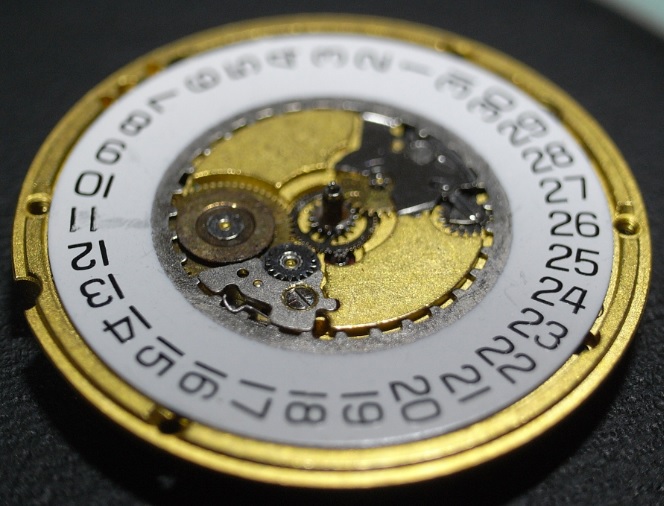
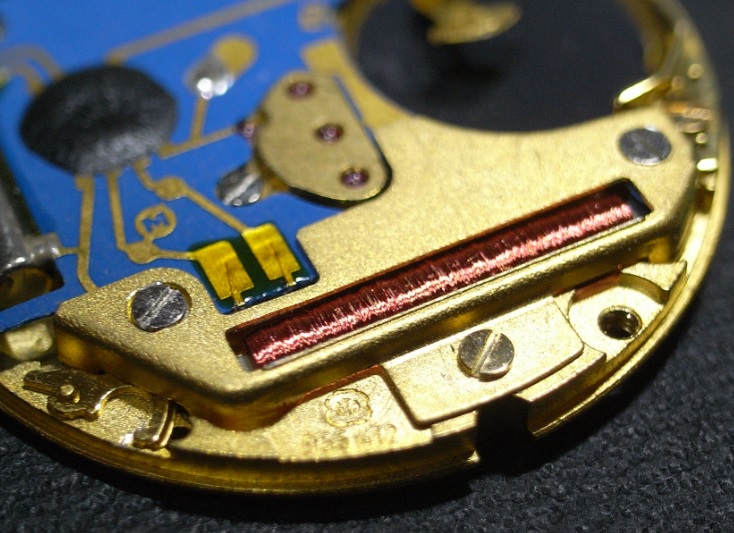
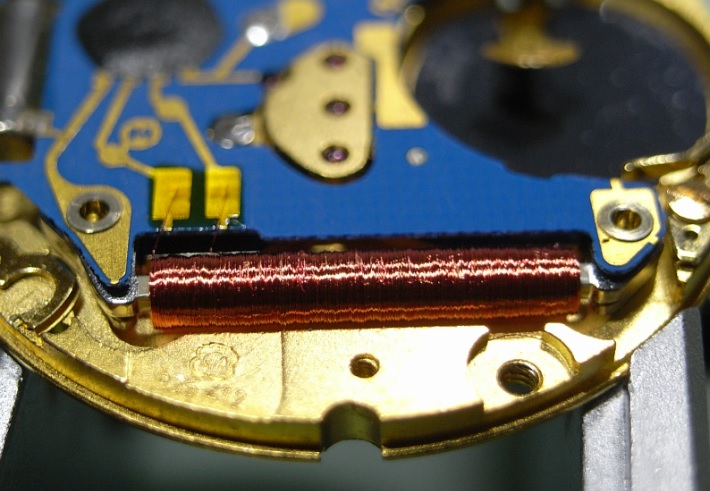
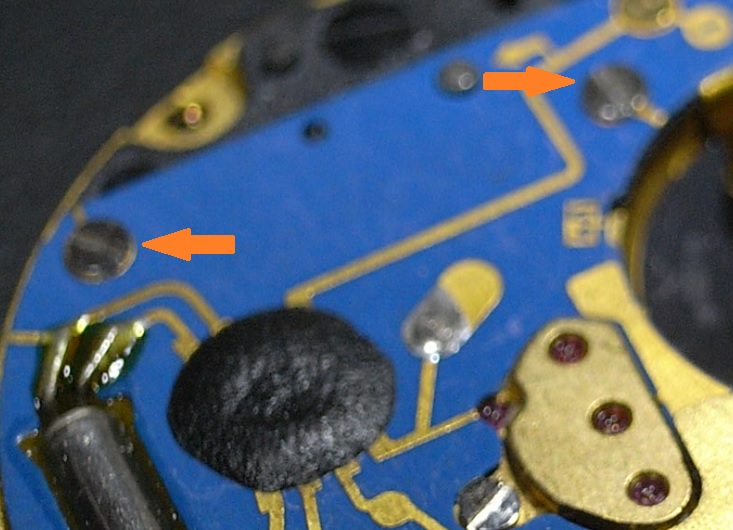
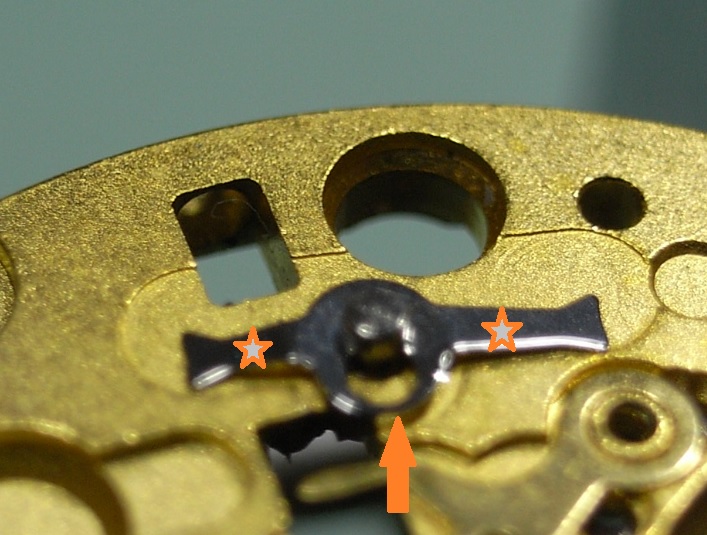
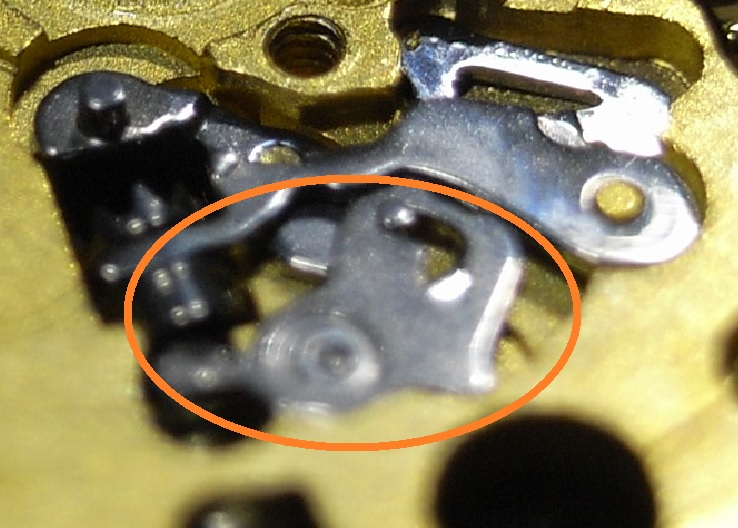
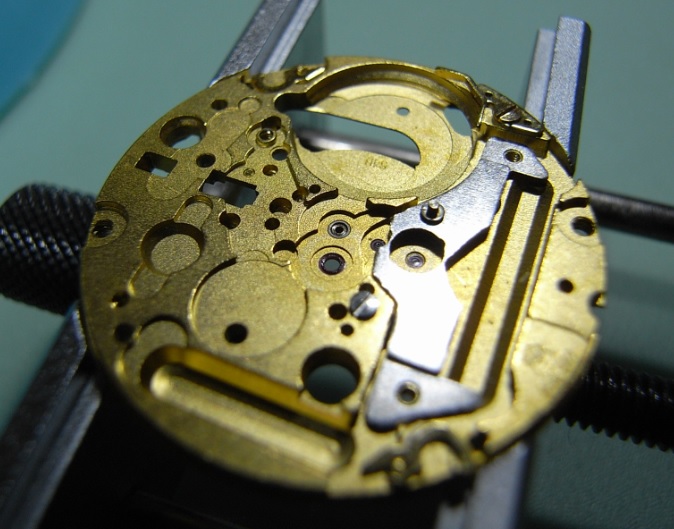
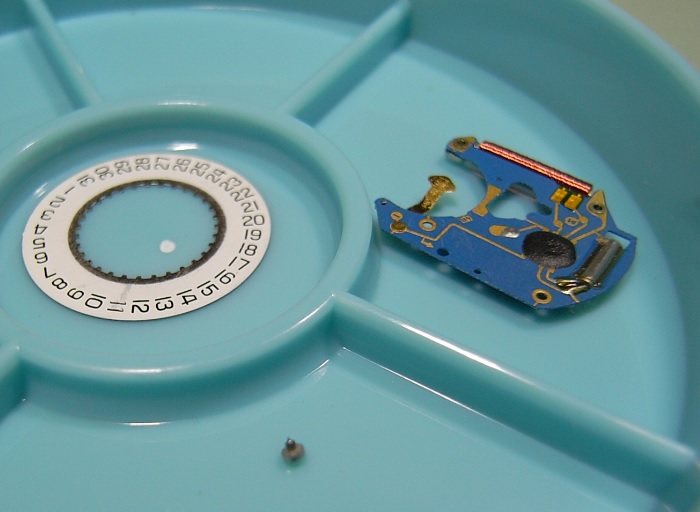
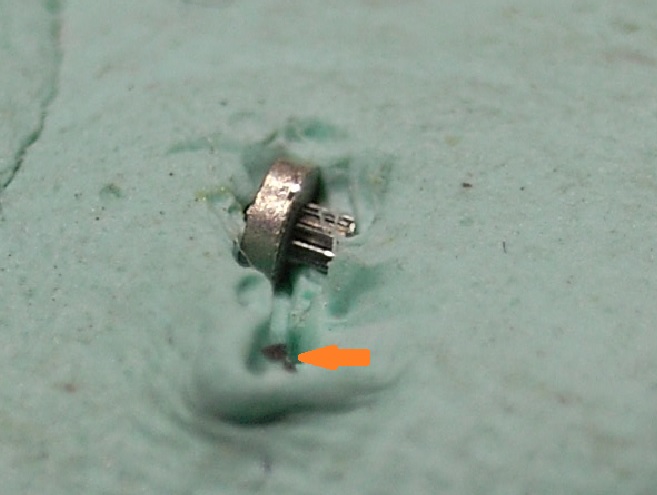
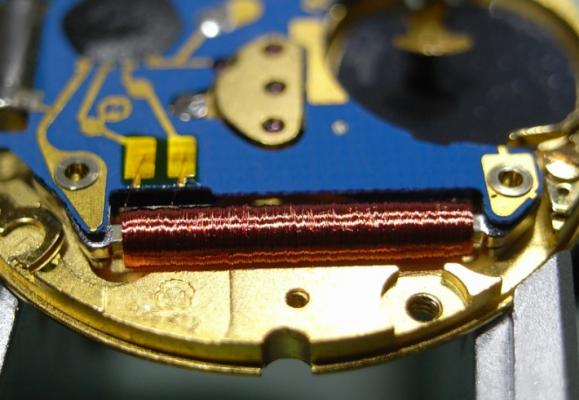
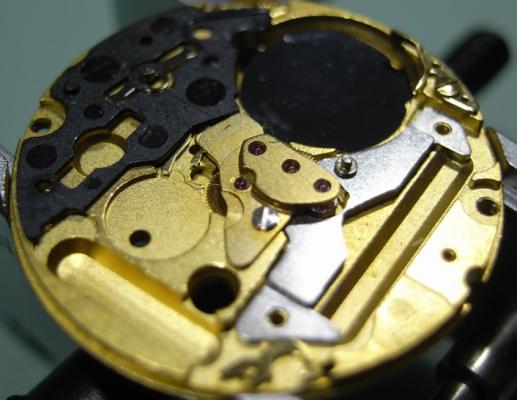
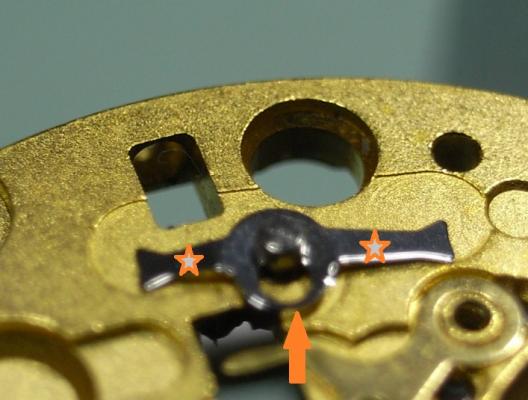
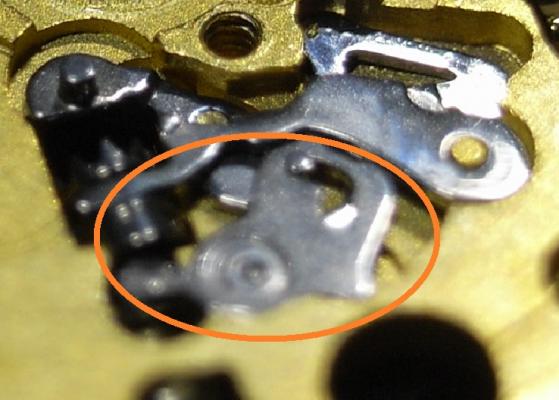
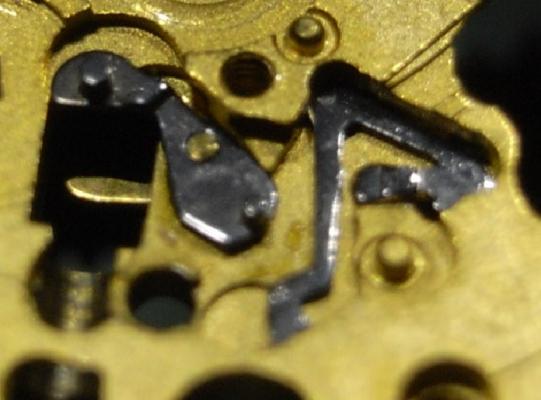
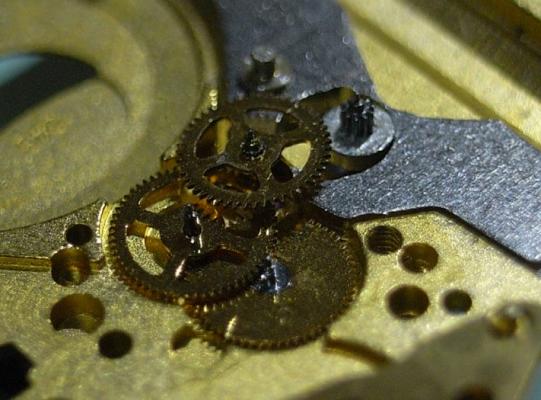
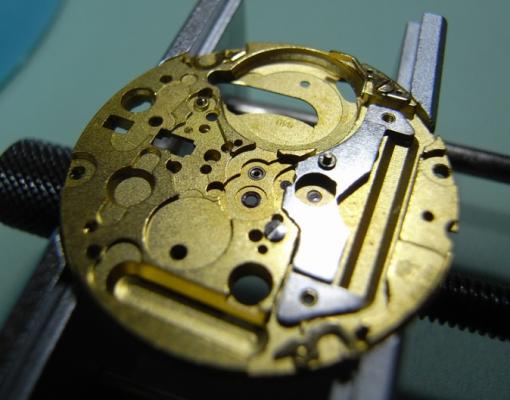
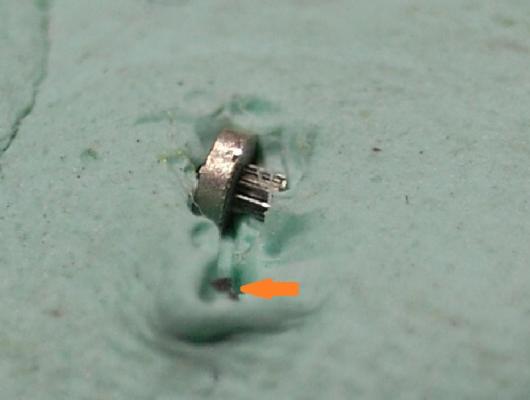
ETA 955 Service Walkthrough "The Workhorse of Highend Quartz" The ETA 955 and 956 Quartz Movements are the most commonly found movement in high-end quartz watches with three hands and a date feature. You will find them in Omega, Tag, and many other brands on the market. For this walkthrough I will be using an 955.412 Movement as my example; but the 956 is so similar to the 955, that this walkthrough will suffice for both. Please note that the numbers after the decimal place only relates to the factory in which the movement was made, so yours could read 955.112, or another factory number ... regardless, the parts are identical and interchangeable. As with all movements, quartz or mechanical, they have a service interval that should be adhered to for longevity of the movement. With quartz movements when the lubrication becomes dried out, or the movement becomes dirty, they will draw more and more current from the battery in order to maintain accurate time keeping. The ETA 955/6, when in optimum condition should draw around 800nA ~ 1.5uA, if the movement is drawing more power than this, a service is required. If a service is not performed, the battery life with decrease markedly, and can go as far as drawing more power from the battery than it was designed for, and damage the battery and cause it to leak and corrode your valuable time piece. Service Manual for the 955/6 Movement CT_956412_FDE_493024_06.pdf.PDF Disassembly Remove the two Date Wheel Keepers. I always start with the one holding the Date Jumper Spring in place. Sometimes the Date Jumper Spring can ping out of place, so be careful when removing the keeper plate above it. Here is a reference photo in case it moves before you see how it's properly seated. Next remove the Keepers and Date Wheel. Then remove the Date Jumper Spring, Motion and Calendar Work. This will leave only the Keyless Work; remove the Yoke and the Sliding Pinion only. We need to flip the movement over, and disassemble the IC Board before we can remove the rest of the Keyless Work. With the movement flipped over, remove the 3 screws holding the Coil Protector. Note for re-assembly the Gold Screw in the centre. Now that the Coil Protector is removed, GREAT care must be taken not to damage the exposed fine windings of the Coil. Then to remove the IC Board, simply remove the 2 remaining screws that hold it. Do this slowly and carefully, as you do not want to slip off the screw and damage this delicate circuit. The same level of care needs to be taken when removing the IC Board from the Main Plate. Take your time and carefully lift it off and store it immediately out of harms way. Next remove the black Insulator Block, and Battery Insulator. This will expose the Setting Lever Spring Clip, which will enable you to remove the rest of the Keyless Work. To remove the Setting Lever Spring Clip, place both points of your tweezers on the locations where I've placed the stars and gently push down on the spring. Then with a piece of Pegwood, push the spring in the direction of the arrow until it moves to the larger opening slot. This will now allow the Setting Lever to be removed, along with the rest of the Keyless Work. Next remove the Stop Lever and Switch, and remove the one screw holding the Train Bridge in place. Then carefully remove the Gear Train and the Rotor. The movement is now completely stripped and ready for inspection and cleaning. There are some parts that you do not place in the parts cleaner, they are as follows: Date Ring Rotor IC Board The rest should be demagnetized prior to cleaning to avoid any metal particles in your cleaning solution from sticking to your parts. When cleaning I also including the Insulator Block, and Battery Insulator in the basket, normal watch cleaning solutions do not harm these items and it is essential they are completely clean to provide the best insulation possible. The Rotor should be cleaned by use of Rodico. As you can see from the picture below, it's surprising the dirt and old oil this will remove ... and it is sufficient cleaning for the Rotor. I hope this has been a help to you, and I will post the assembly procedure later today, if time permits.


 1 point
 -
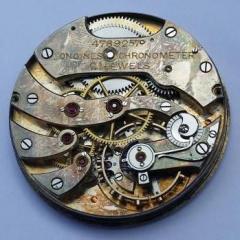
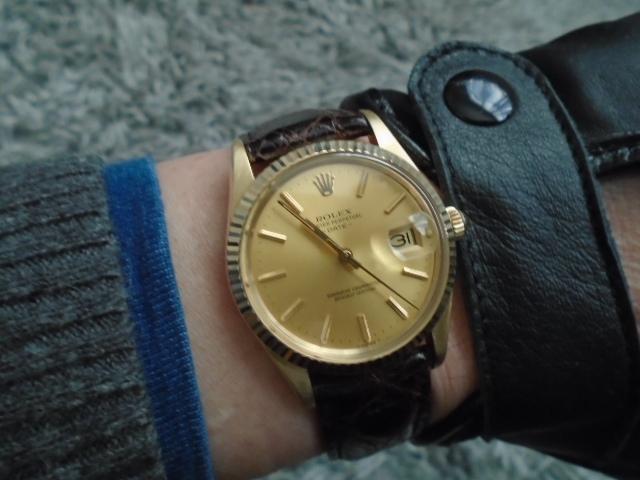
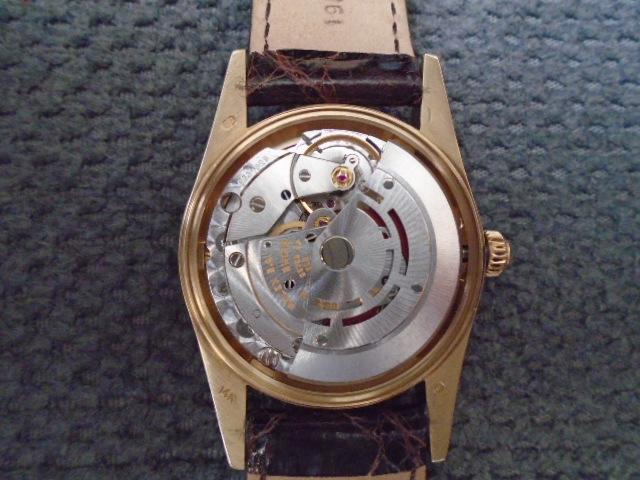
My trusted Rolex 15037 watch with a 3035 movement.
 1 point
 -
That is right by the book. But having worked on very, many watches identical to the OP's, I can tell that is not that easy to break the very robust 7S26 motion works. On the other hand (pun intended) I got a second hand tube snapped using a presto tool. I can't say if using levers would have made any difference. There is always a possibility that something breaks due to pre-existing fault, even when handling it the right way.1 point
-
+1 All I can say is... you might not break anything.... but there is a reasonably good chance you will strip some teeth, bend something, break something... scratch something... or in some other way, have a bad day.1 point
-
Definitely hold the crown and don't hold the hour hand if you're going to try to take this shortcut. Depending on how tight the hands are you are liable to damage the tiny and delicate pinion leaves on the minute wheel that drive the hour wheel.1 point
-
Hi Cliff and welcome to the asylum1 point
-
You may not even need it. Pull crown to set time position and hold it while gently adjusting the minute hand. Or use two wood or soft plastic sticks to hold hour while touching the minute. For minimal adjustment that is acceptable but for anything else get the basic tools, they are very affordable.1 point
-
If you tried just pushing on the hands to get them to sync better chances are when you push the minute hand the hour hand will just move accordingly. You'd just in essence be setting the time, but doing so through the hands like you would on many old clocks as opposed to setting through the crown. Hands would need to come off and refitted.1 point
-
If you had a pair of small/fine screwdrivers you could use the tips to carefully remove the hands. Afterwards you can align them as you please and push them inside. Ideally you should also need a pair of tweezers. You don't necessarily need special tools for this, if you're careful. The hardest part is to remove them, installing is easier. Tip: use transparent plastic bags as protection for the dial and hands when "operating". Also, watch some youtube videos. Here's one from Mark the forum owner.1 point
-
there are many techniques and skills required just to remove the movement from the case. Resetting the hands is not as straight forward as one might think especially if you have a day date chapter ring. you will need to buy some tools and watch a few of Marks vids first1 point
-
My first watch was a Timex, 53 years ago this Christmas still can see the little watch now. Love vintage watches, I think it’s because of the size and shape that makes them comfortable to wear There was an Ingersol watch factory just up the road from me, it was locally called the ticktock. Sent from my iPad using Tapatalk Pro1 point
-
Hitch hikers guide, a literary masterpiece that the series and sadly the movie failed to fully capture. I wanted a babelfish for many years.1 point
-
Ahh Politics,never let the truth stand in the way of propaganda !1 point
-
Hi, My usual method is pressing on the rotor on the edge away from the weight. If the rotor weight has noticeable movement I would consider tightening up the bearings. Problem with any bearings which are not fully to spec is that the more freeplay the faster it degrades. On my own watches I may not do so if I know that the watch will see limited use. A NOS rotor does turn up from time to time but this is only half the solution as it does not address wear on the other components. Previously you could 'harvest' the parts from other watches obtained cheaply but even these are thin on the ground. On these watches if you are using them regularly I would suggest an annual clean and oil of the automatic reversers and rotor bearings at least. When these are neglected, debris will be the result and this affects the running of the watch. Anil1 point
-
Pics 1 & 2 - canon pinion. This can be dismantled if needs be but there is a risk altering the tension at the friction coupling or distorting the sprung arms so I don't bother. Just run it through the cleaner as is and lubricate the friction coupling on reinstallation. Pics 3 & 4 - The date driving wheel doesn't come apart. Just through the cleaner as it is. Pic 5 - Auto winding reverser wheels. These don't come apart either. The official ETA guidance is that they shouldn't even be cleaned, just replaced. However that's is rarely required. Run them through the cleaner as they are. Lubricating these is a contentious subject. I have a 1 part 9010 to 30 parts naphtha solution that I dunk them in and then leave them to allow the naphtha to evaporate. This leaves them coated with the thinnest film of 9010, and I have never had any issues with them sticking. There is also a product called Lubeta which is specifically for lubricating reversers which is used in a similar way. Do a forum search or Google "lubricating reverser wheels" and you will find various solutions and much disagreement as to what should and shouldn't be considered. Find what works for you and ignore the critics Pic 6 - The main spring barrel. The damage doesn't look too bad but if it were mine I would use it as it is and see how the watch performed, but I would also look out for a replacement. You could try polishing out the damage but it's fiddly unless you have a lathe, in which case mount it up in a step collet and see if you can clean it up without either weakening the parts or making too much room inside the barrel. Easiest though is to replace. When you have the problem sorted check the main spring for flatness and if it is out replace it. The problem is most likely caused by a distorted M/S and highlights what can happen when a spring is inexpertly hand wound into the barrel. You should always use a M/S winder where possible, and perfect the art of hand winding for when a winder isn't an option.1 point