Leaderboard


Popular Content
Showing content with the highest reputation on 07/03/19 in all areas
-
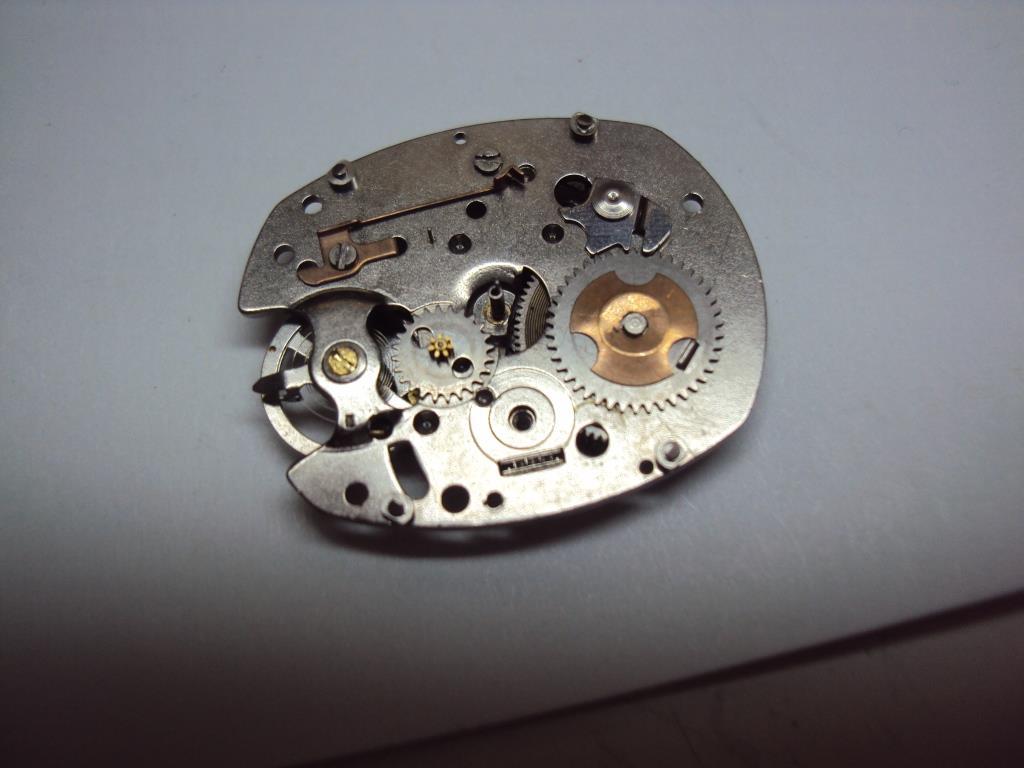
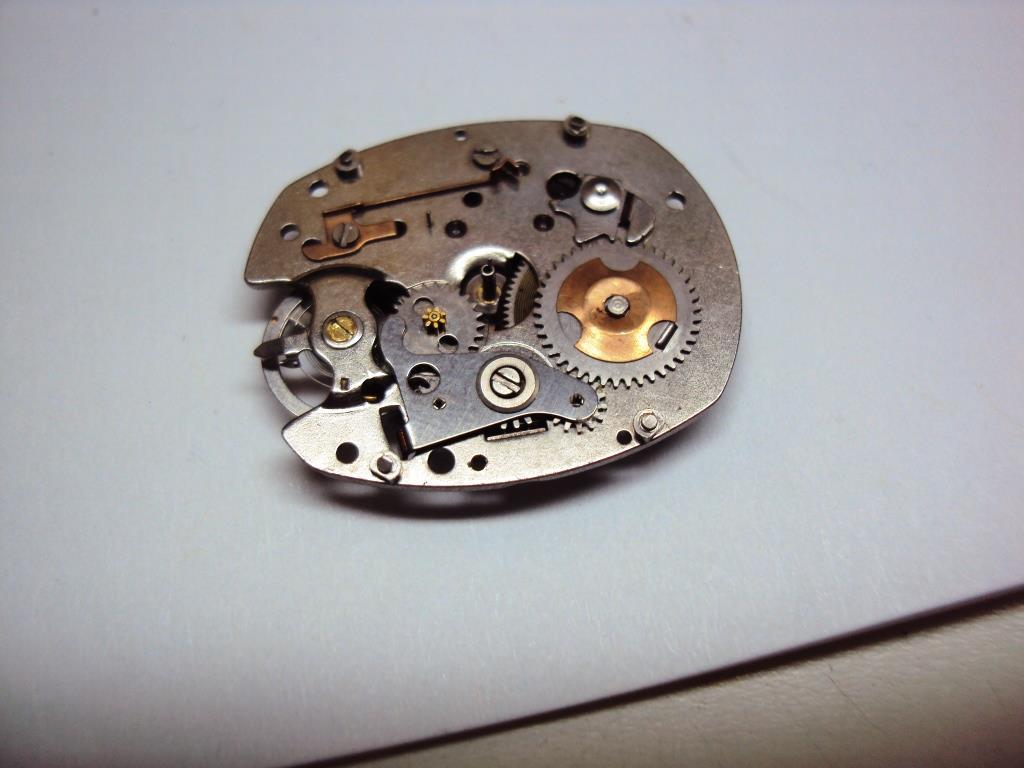
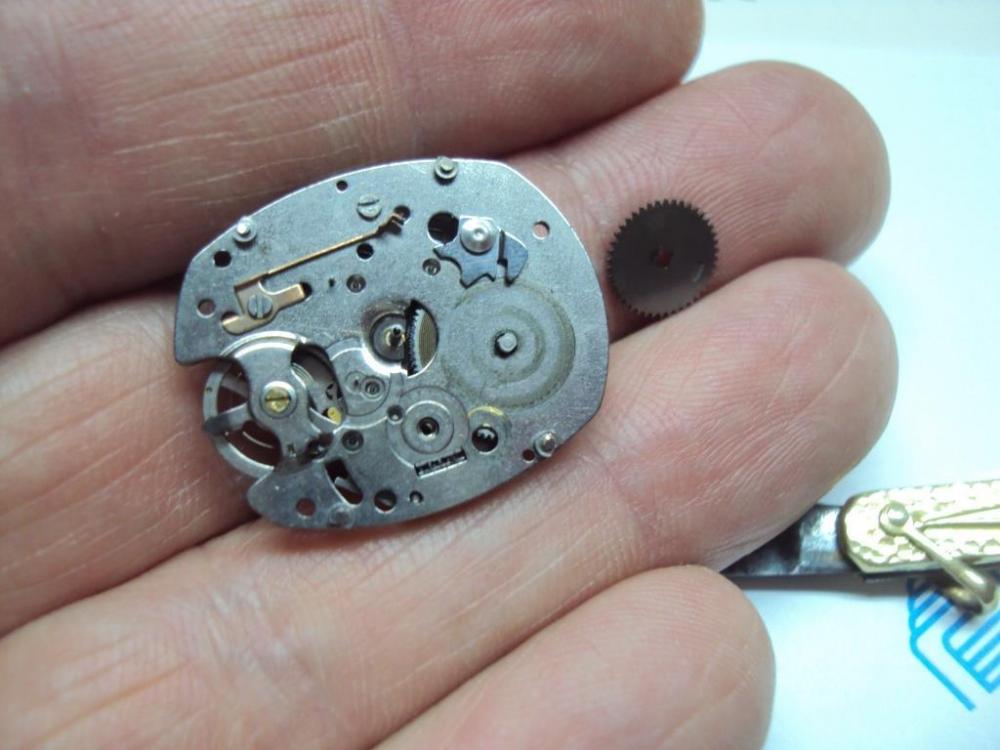
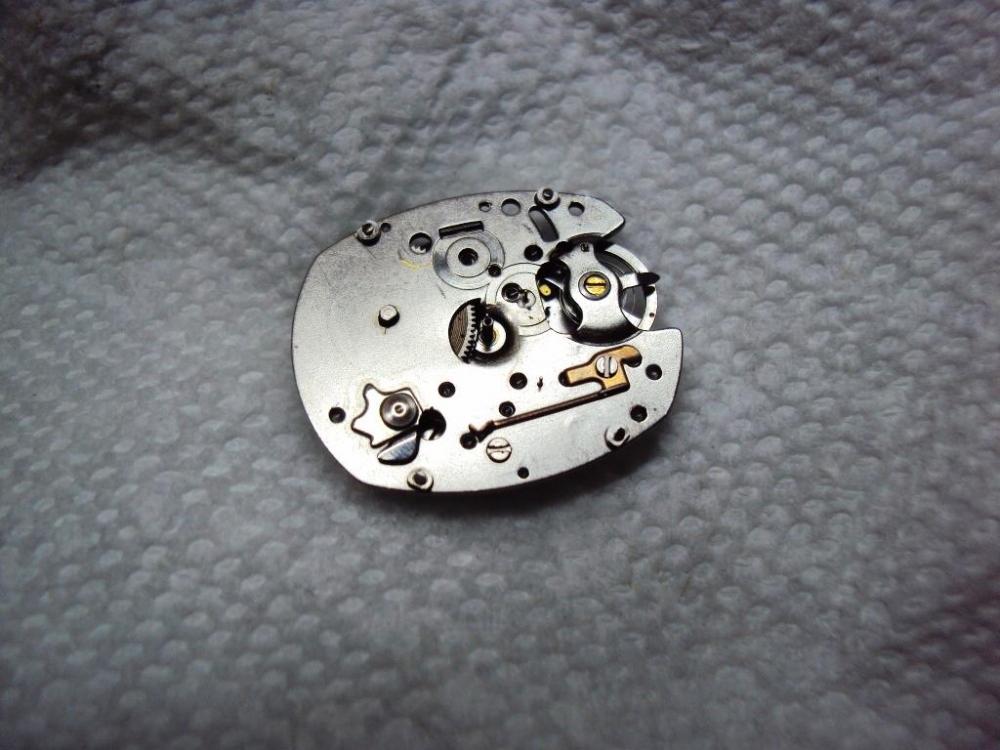
This movement has a friction tight crutch with an attached scale for the pendulum to show it is dead center. The clock should have a nice even tic tok. There is nothing in the way that can interrupt the pendulum that I can see, the suspension spring looks right. The escape wheel and pallets look dry so a little oiling will help a lot, that could be the reason why it is temperamental.2 points
-
After having struggled far too many times and for far too long with my budget Chinese eBay crystal press, I (after an interesting discussion here on WRT) decided to get myself a professional crystal press in the form of a Bergeon No 5500. I decided to video document my very first (and successful) attempt at using it and so for those of you interested you can watch it here. It's hardly an action movie but I reckon that for anyone considering buying this press the video could hopefully be useful and interesting.1 point
-
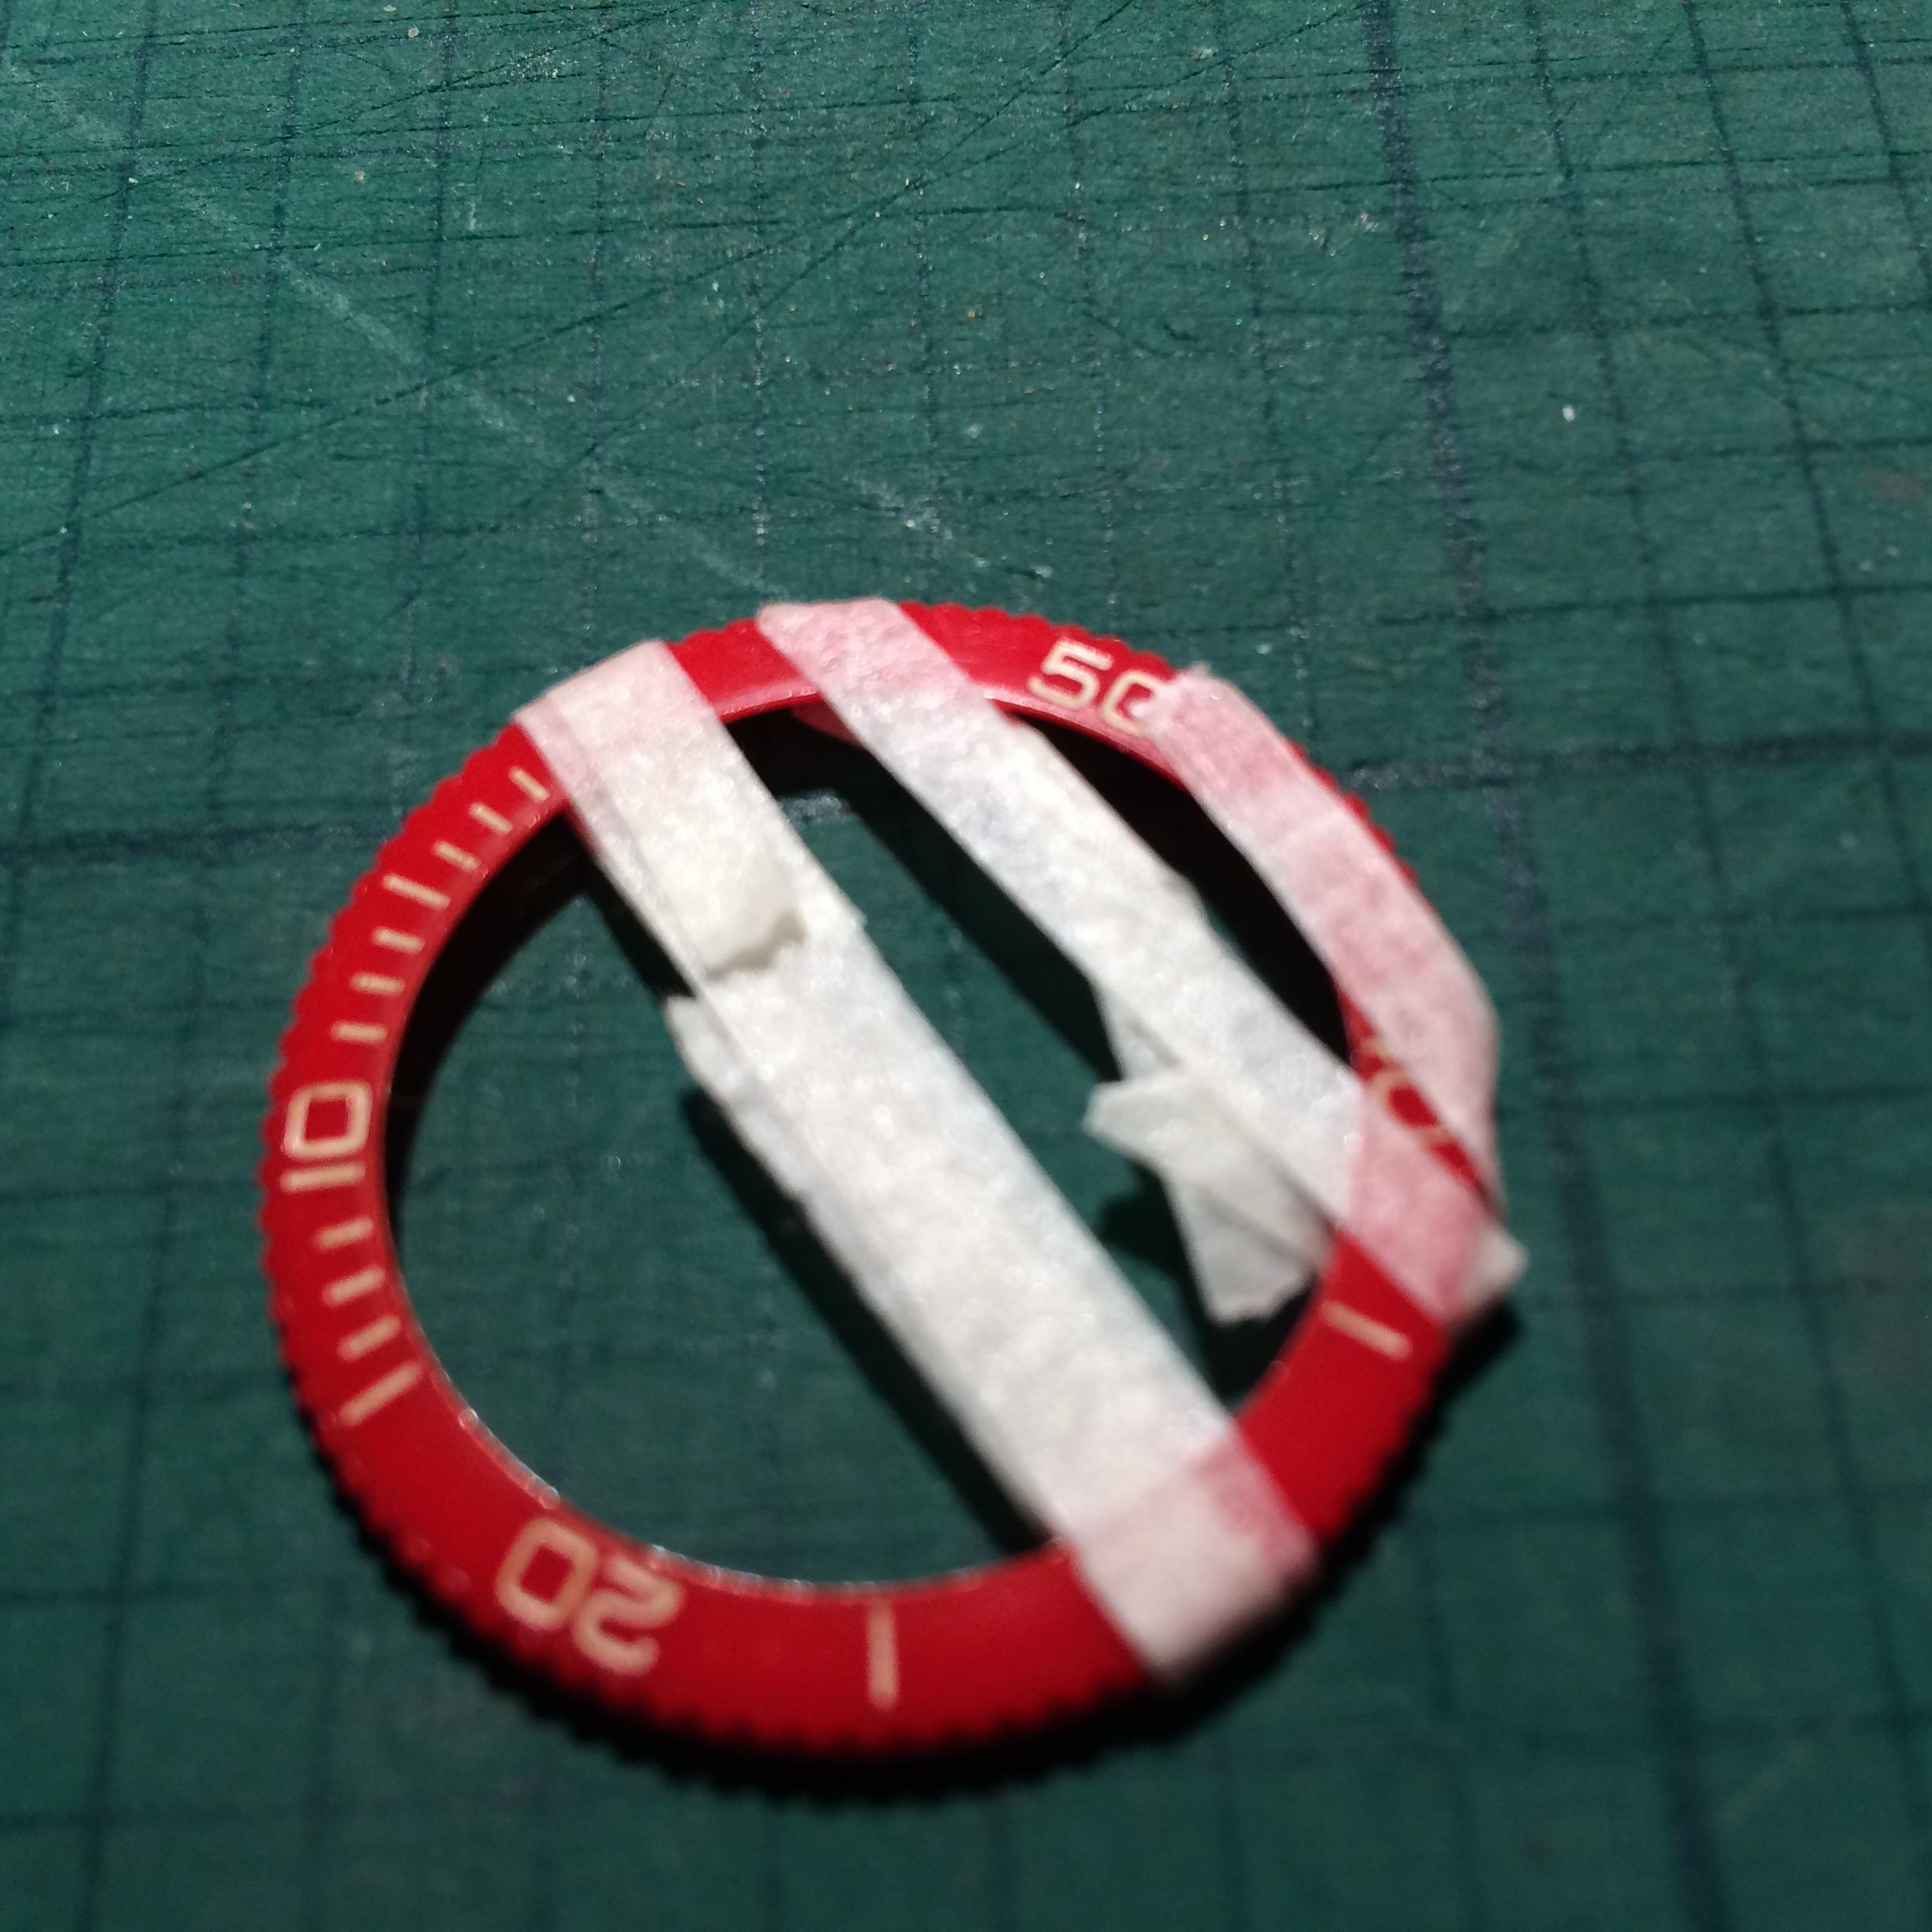
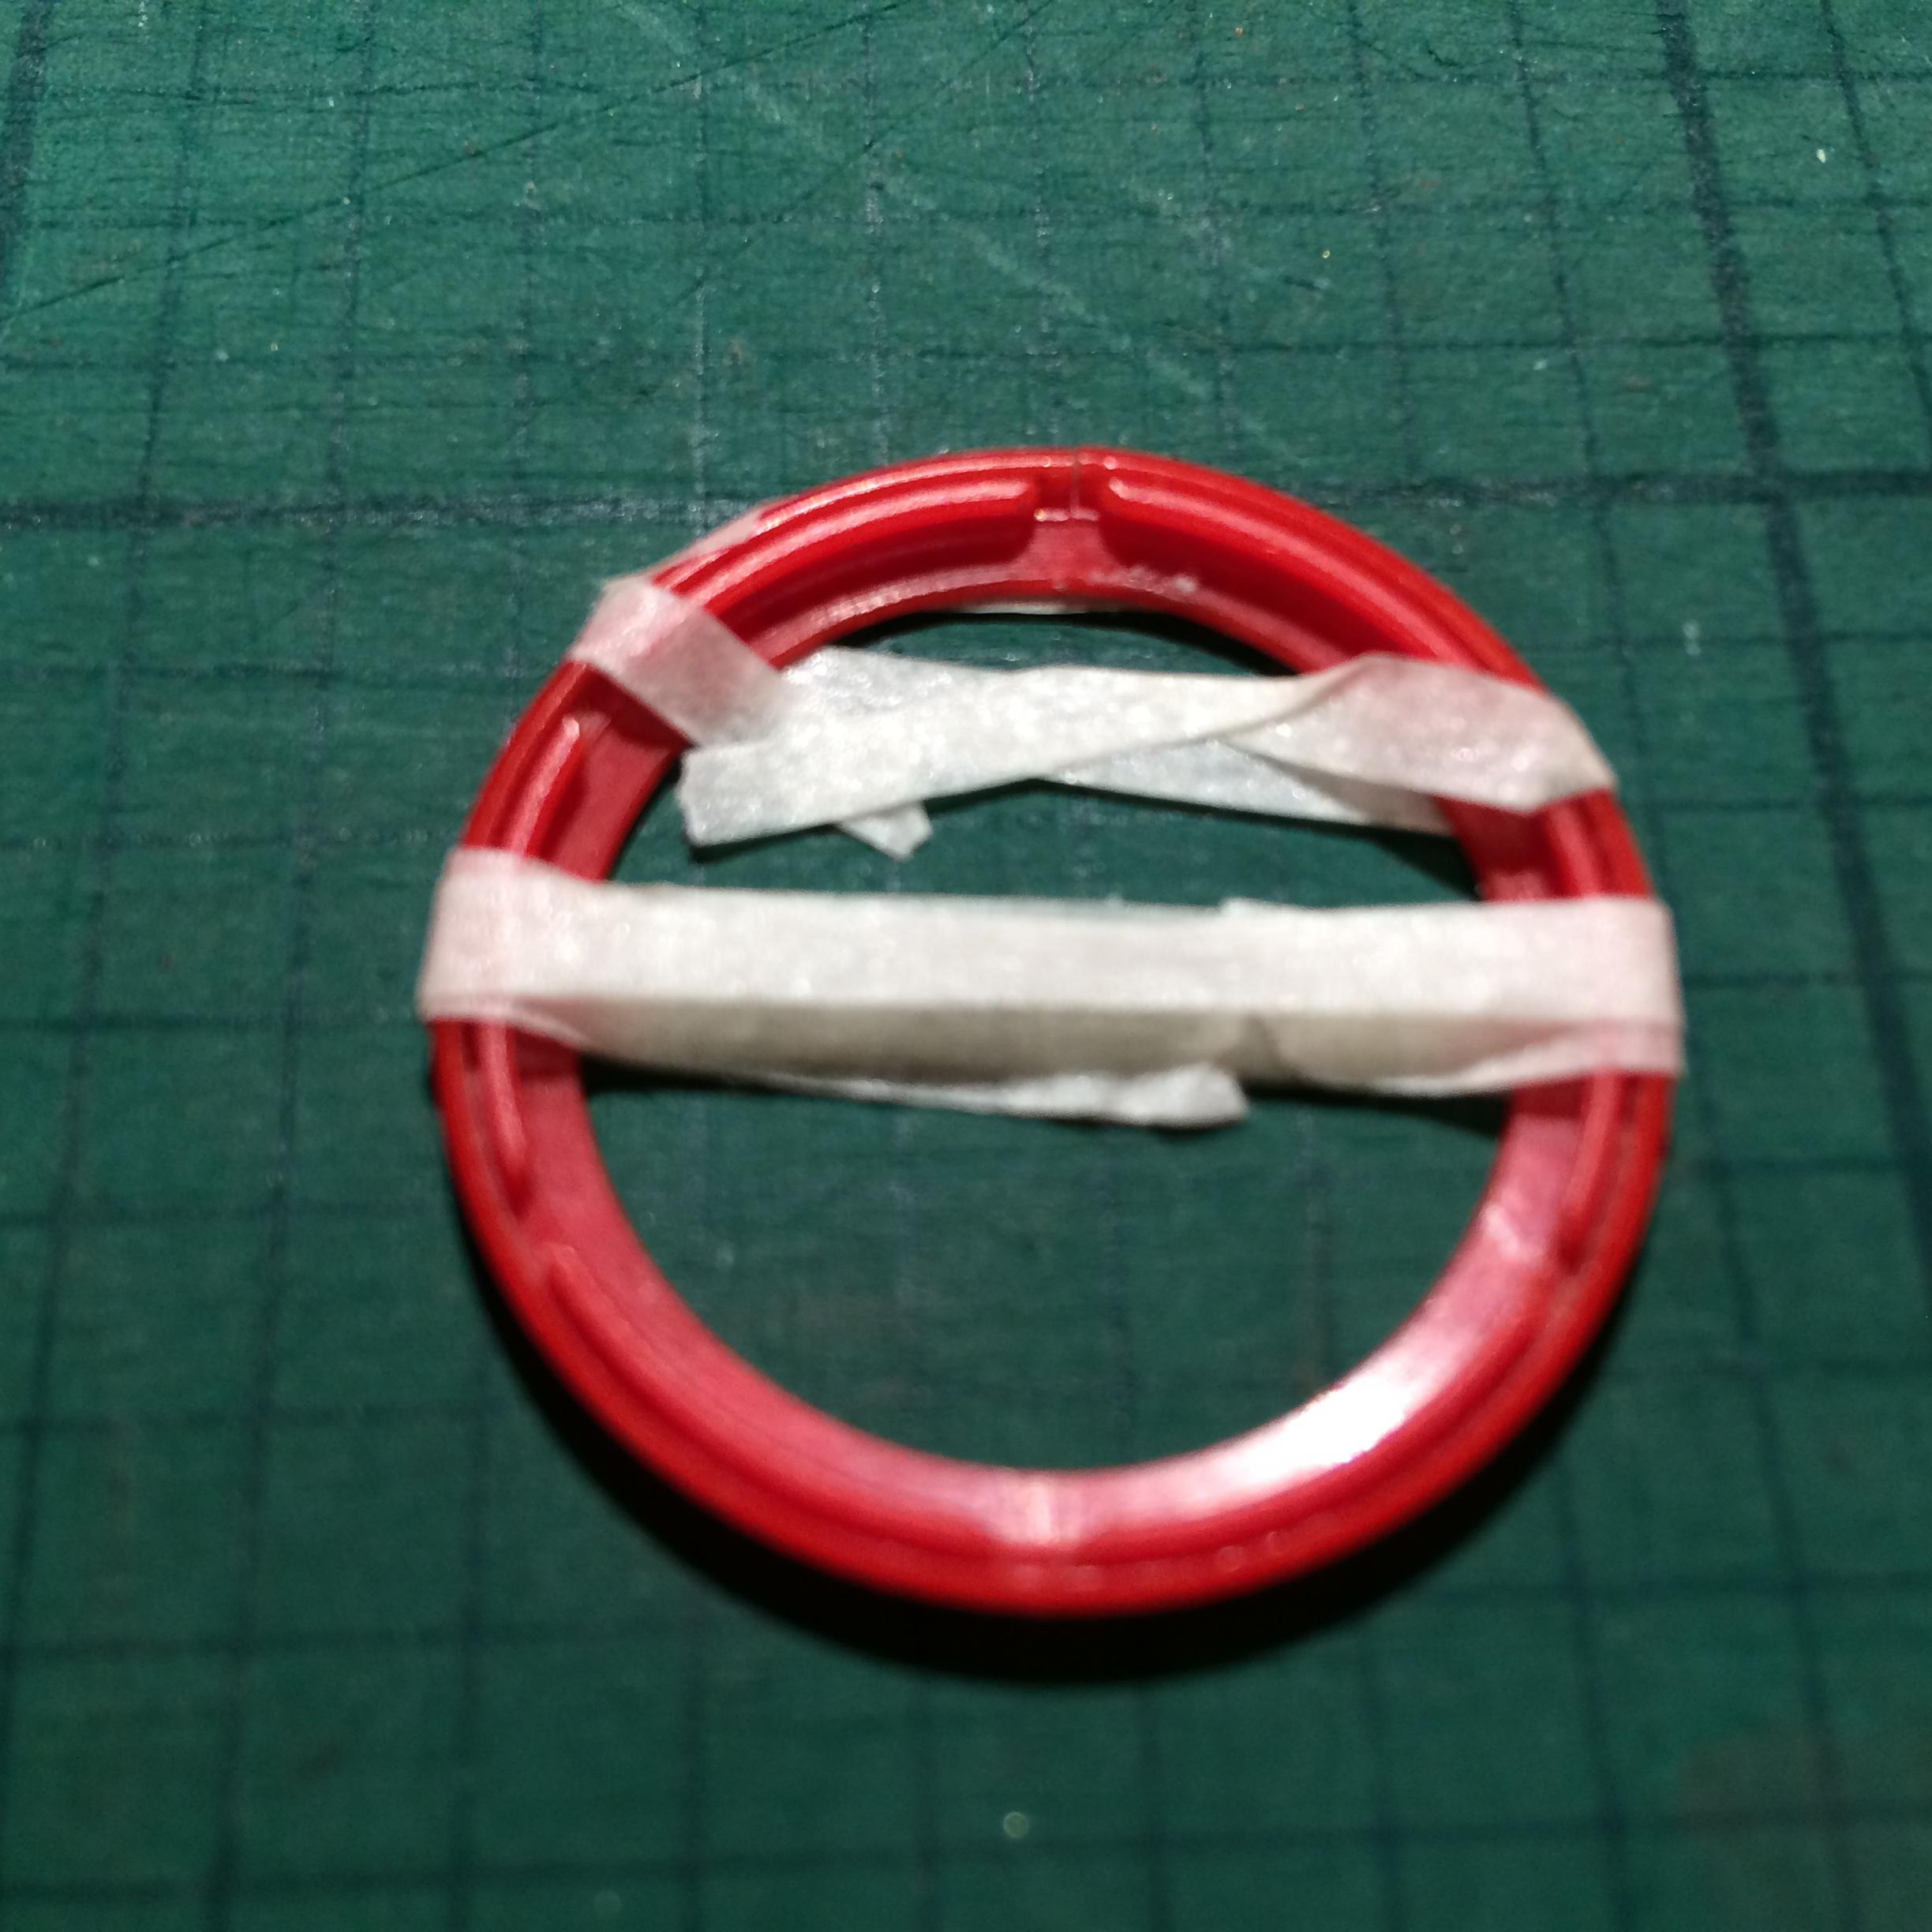
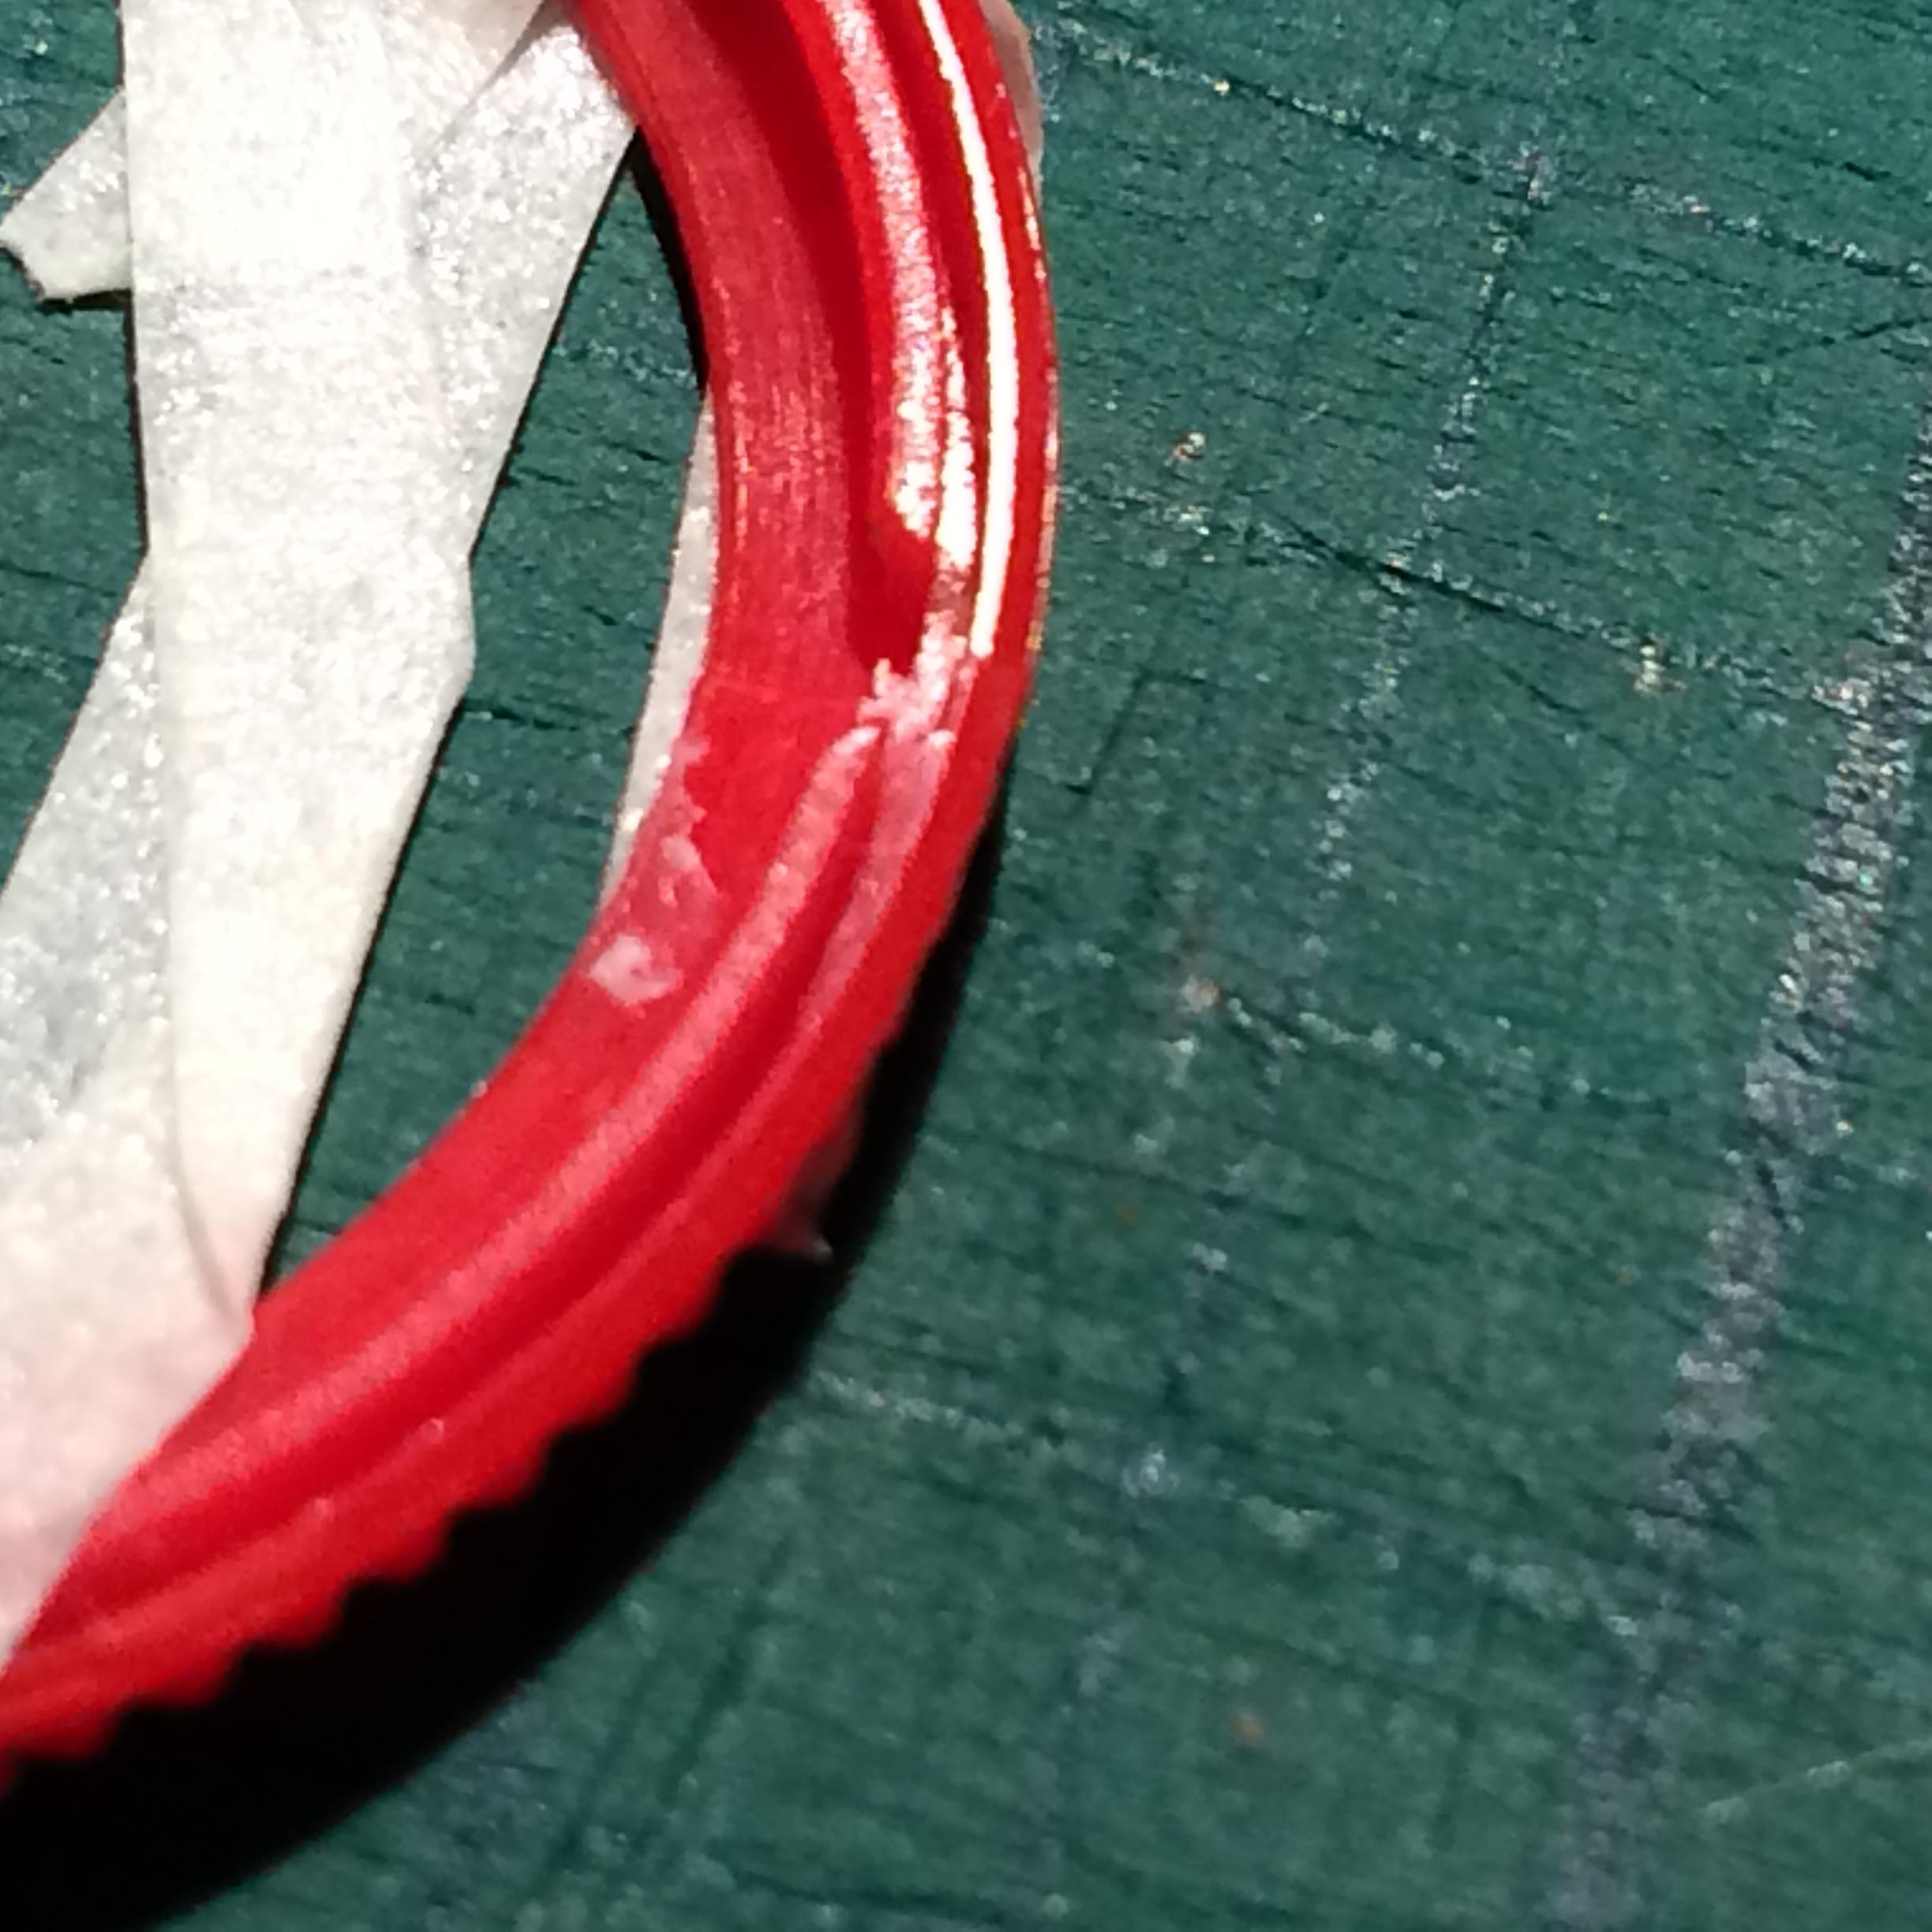
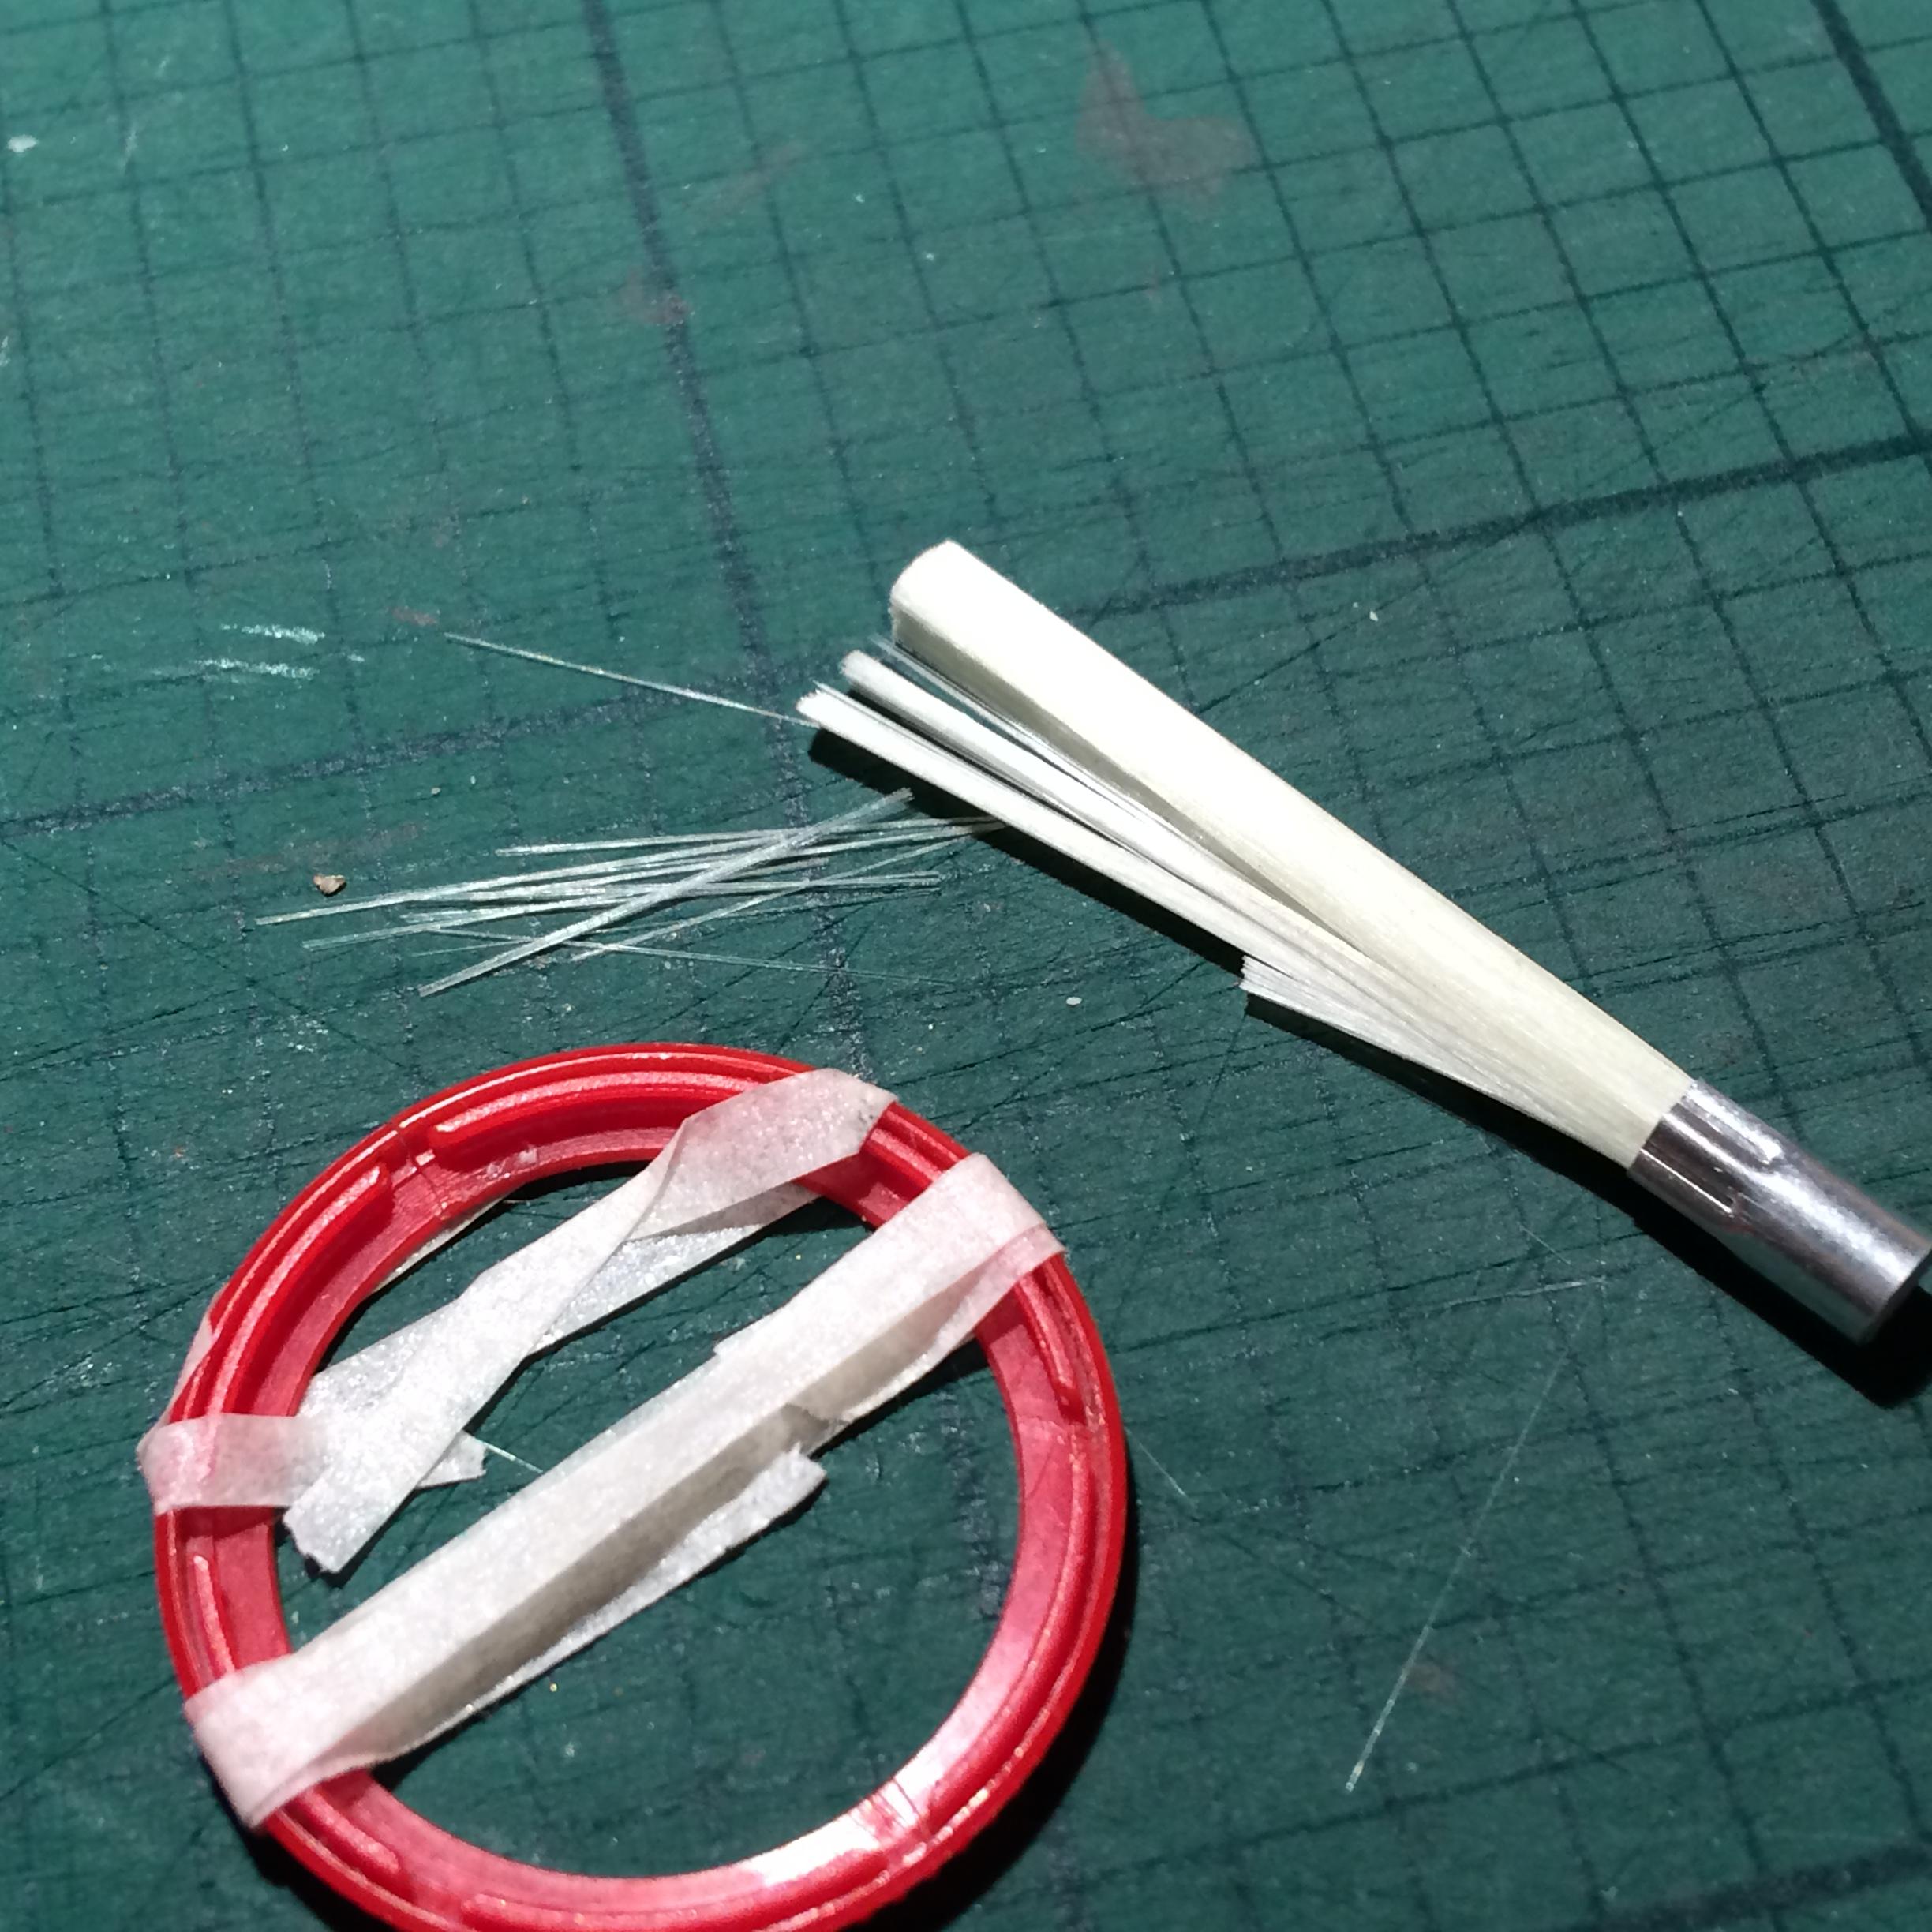
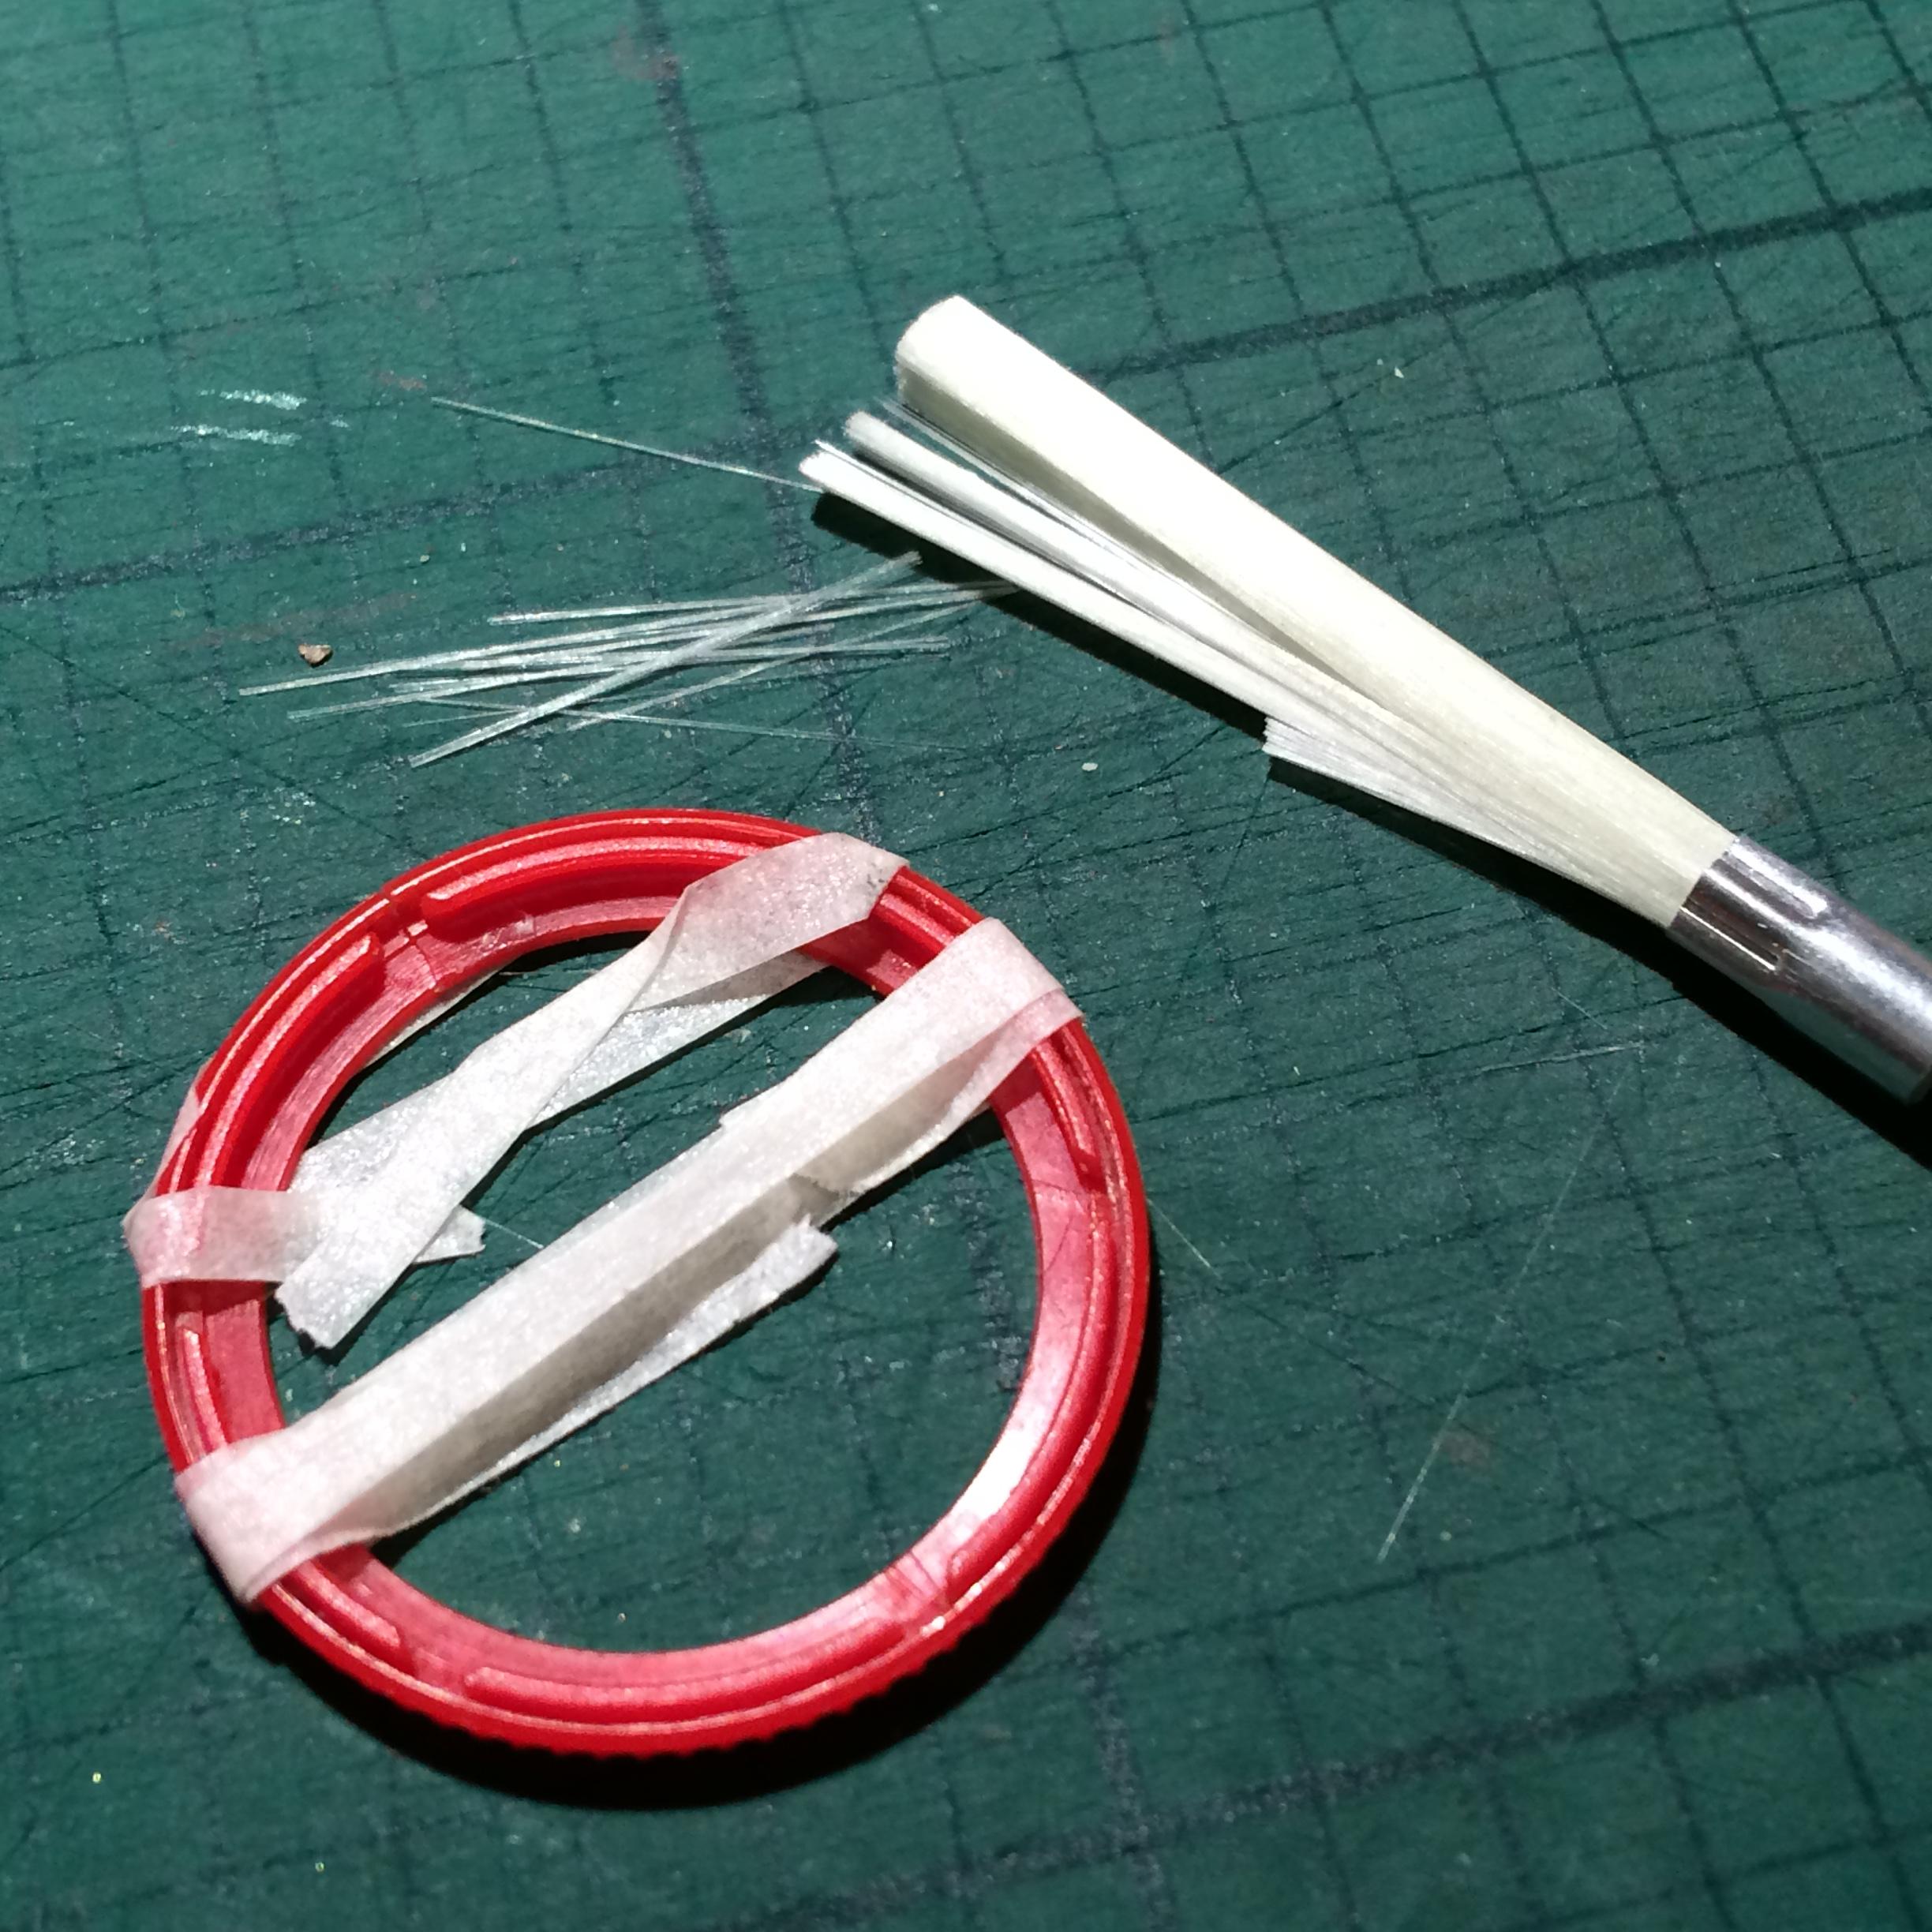
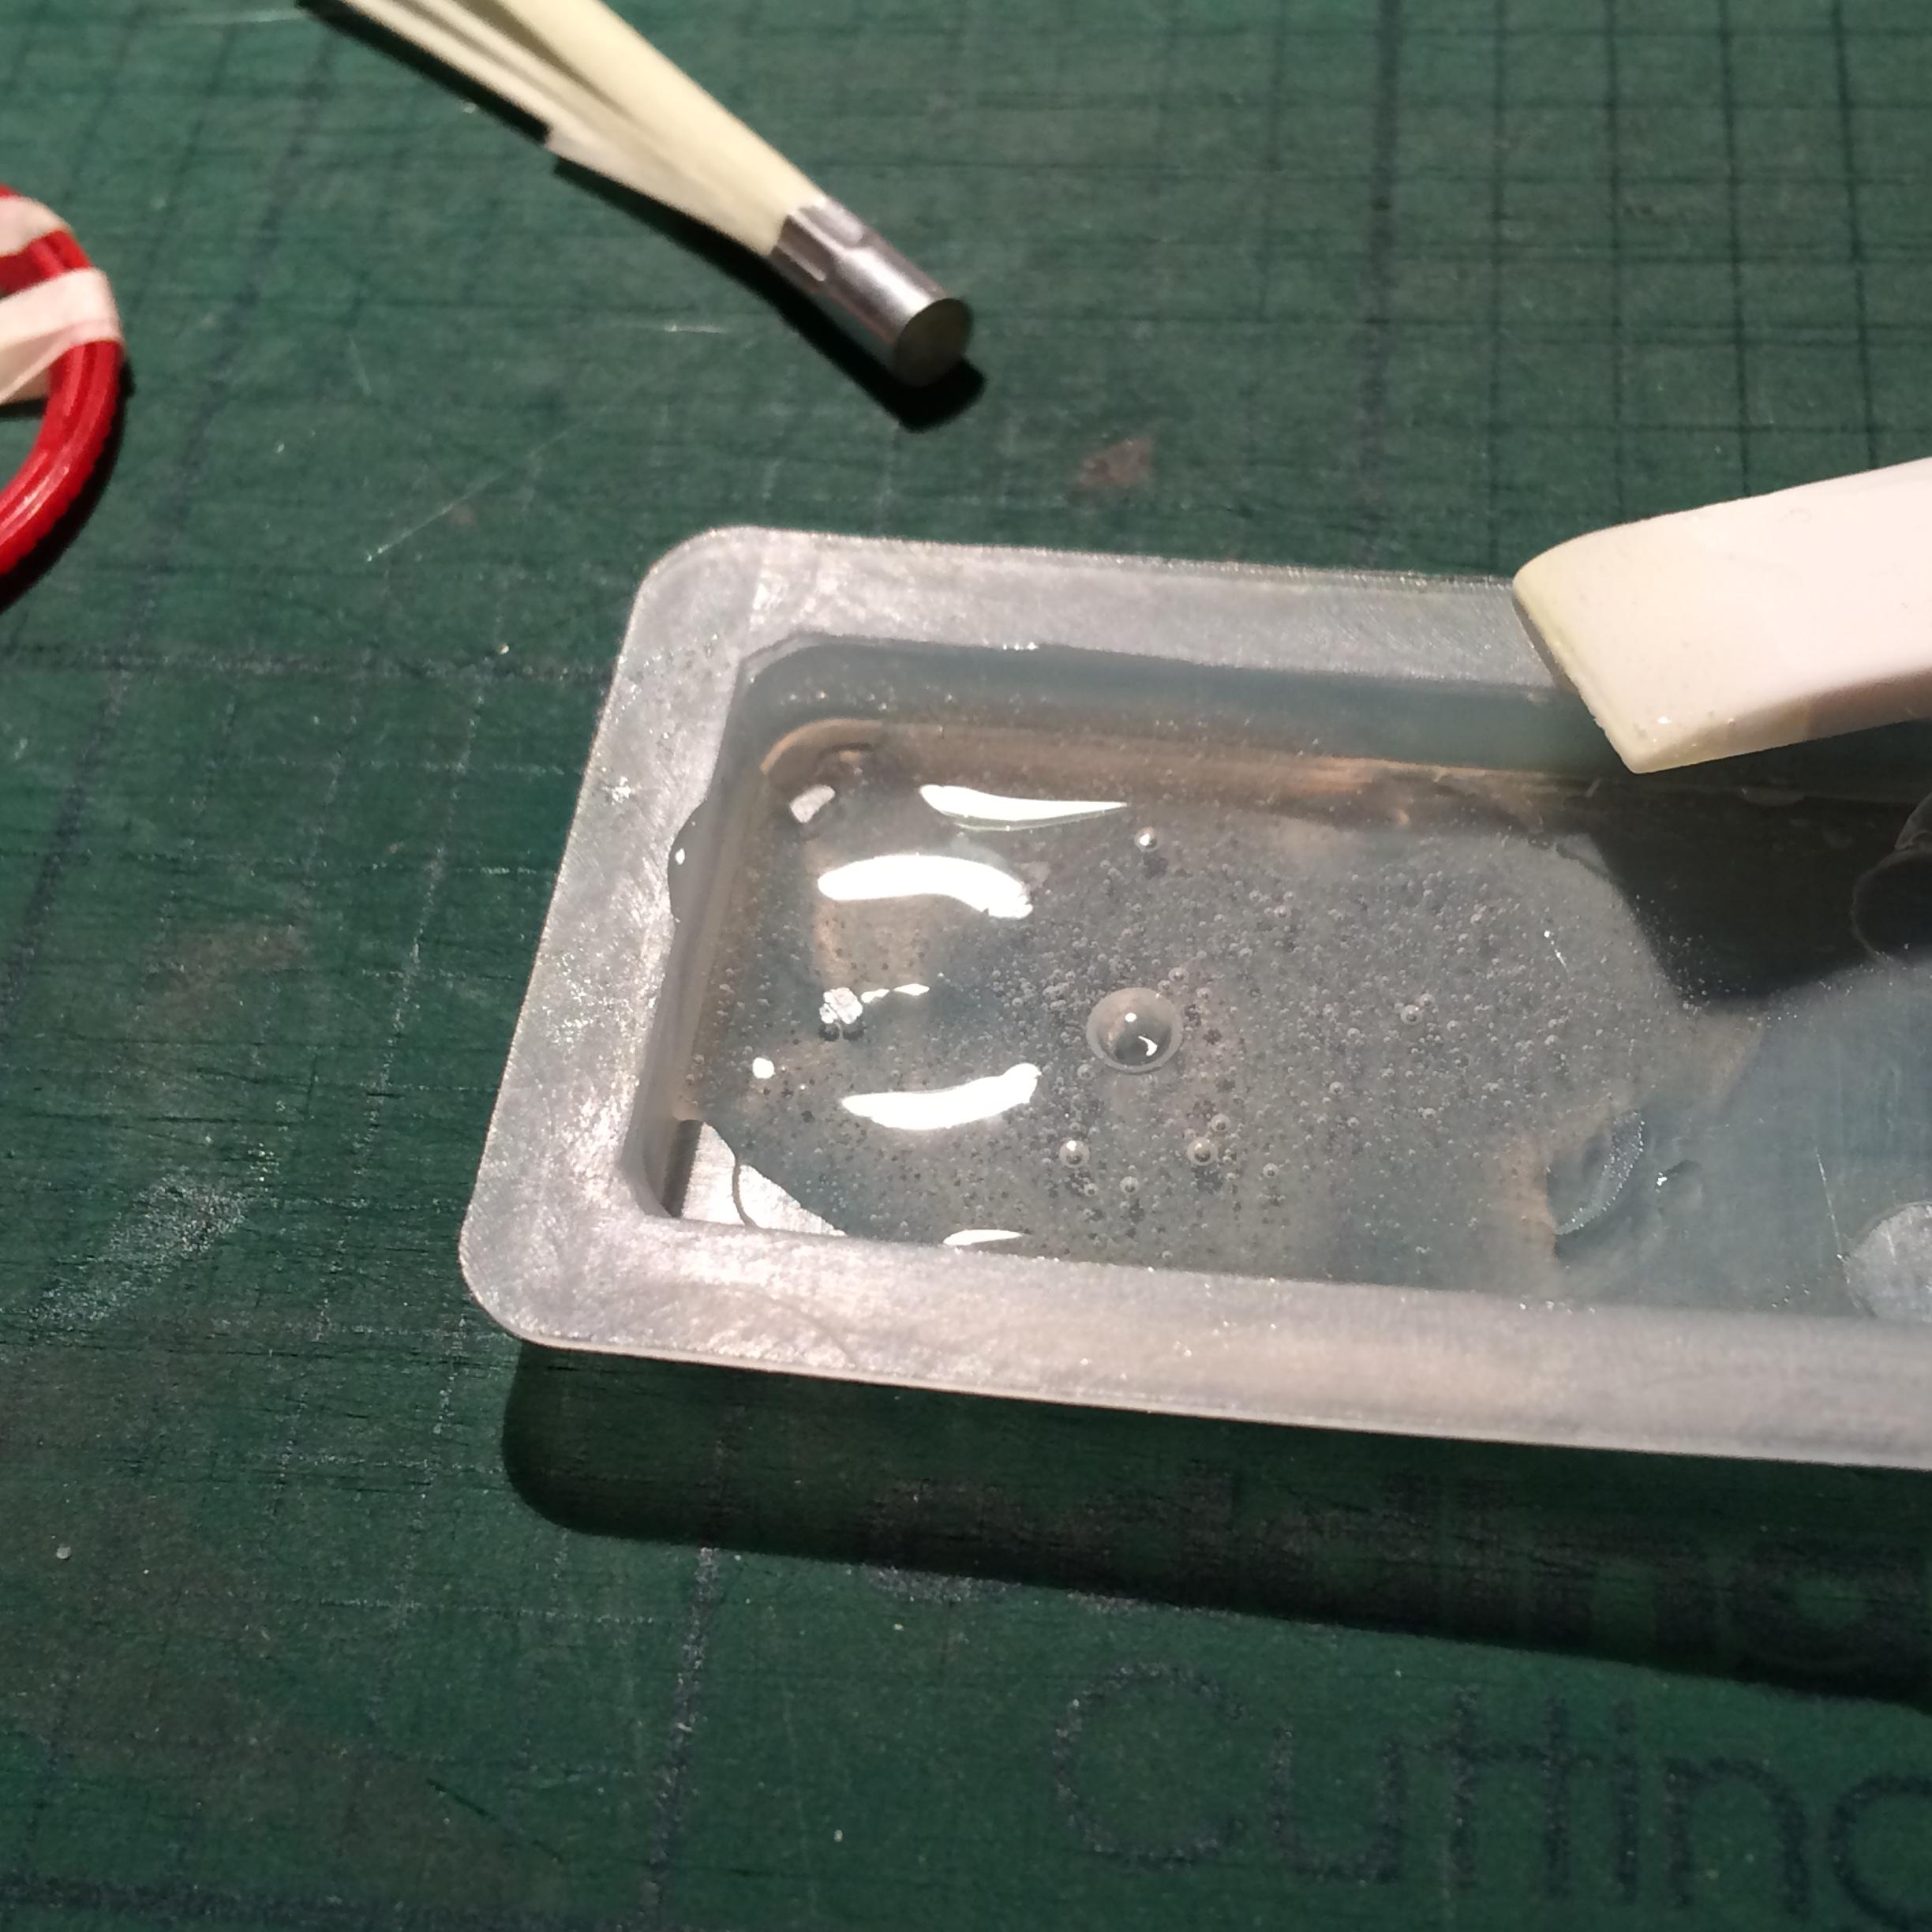
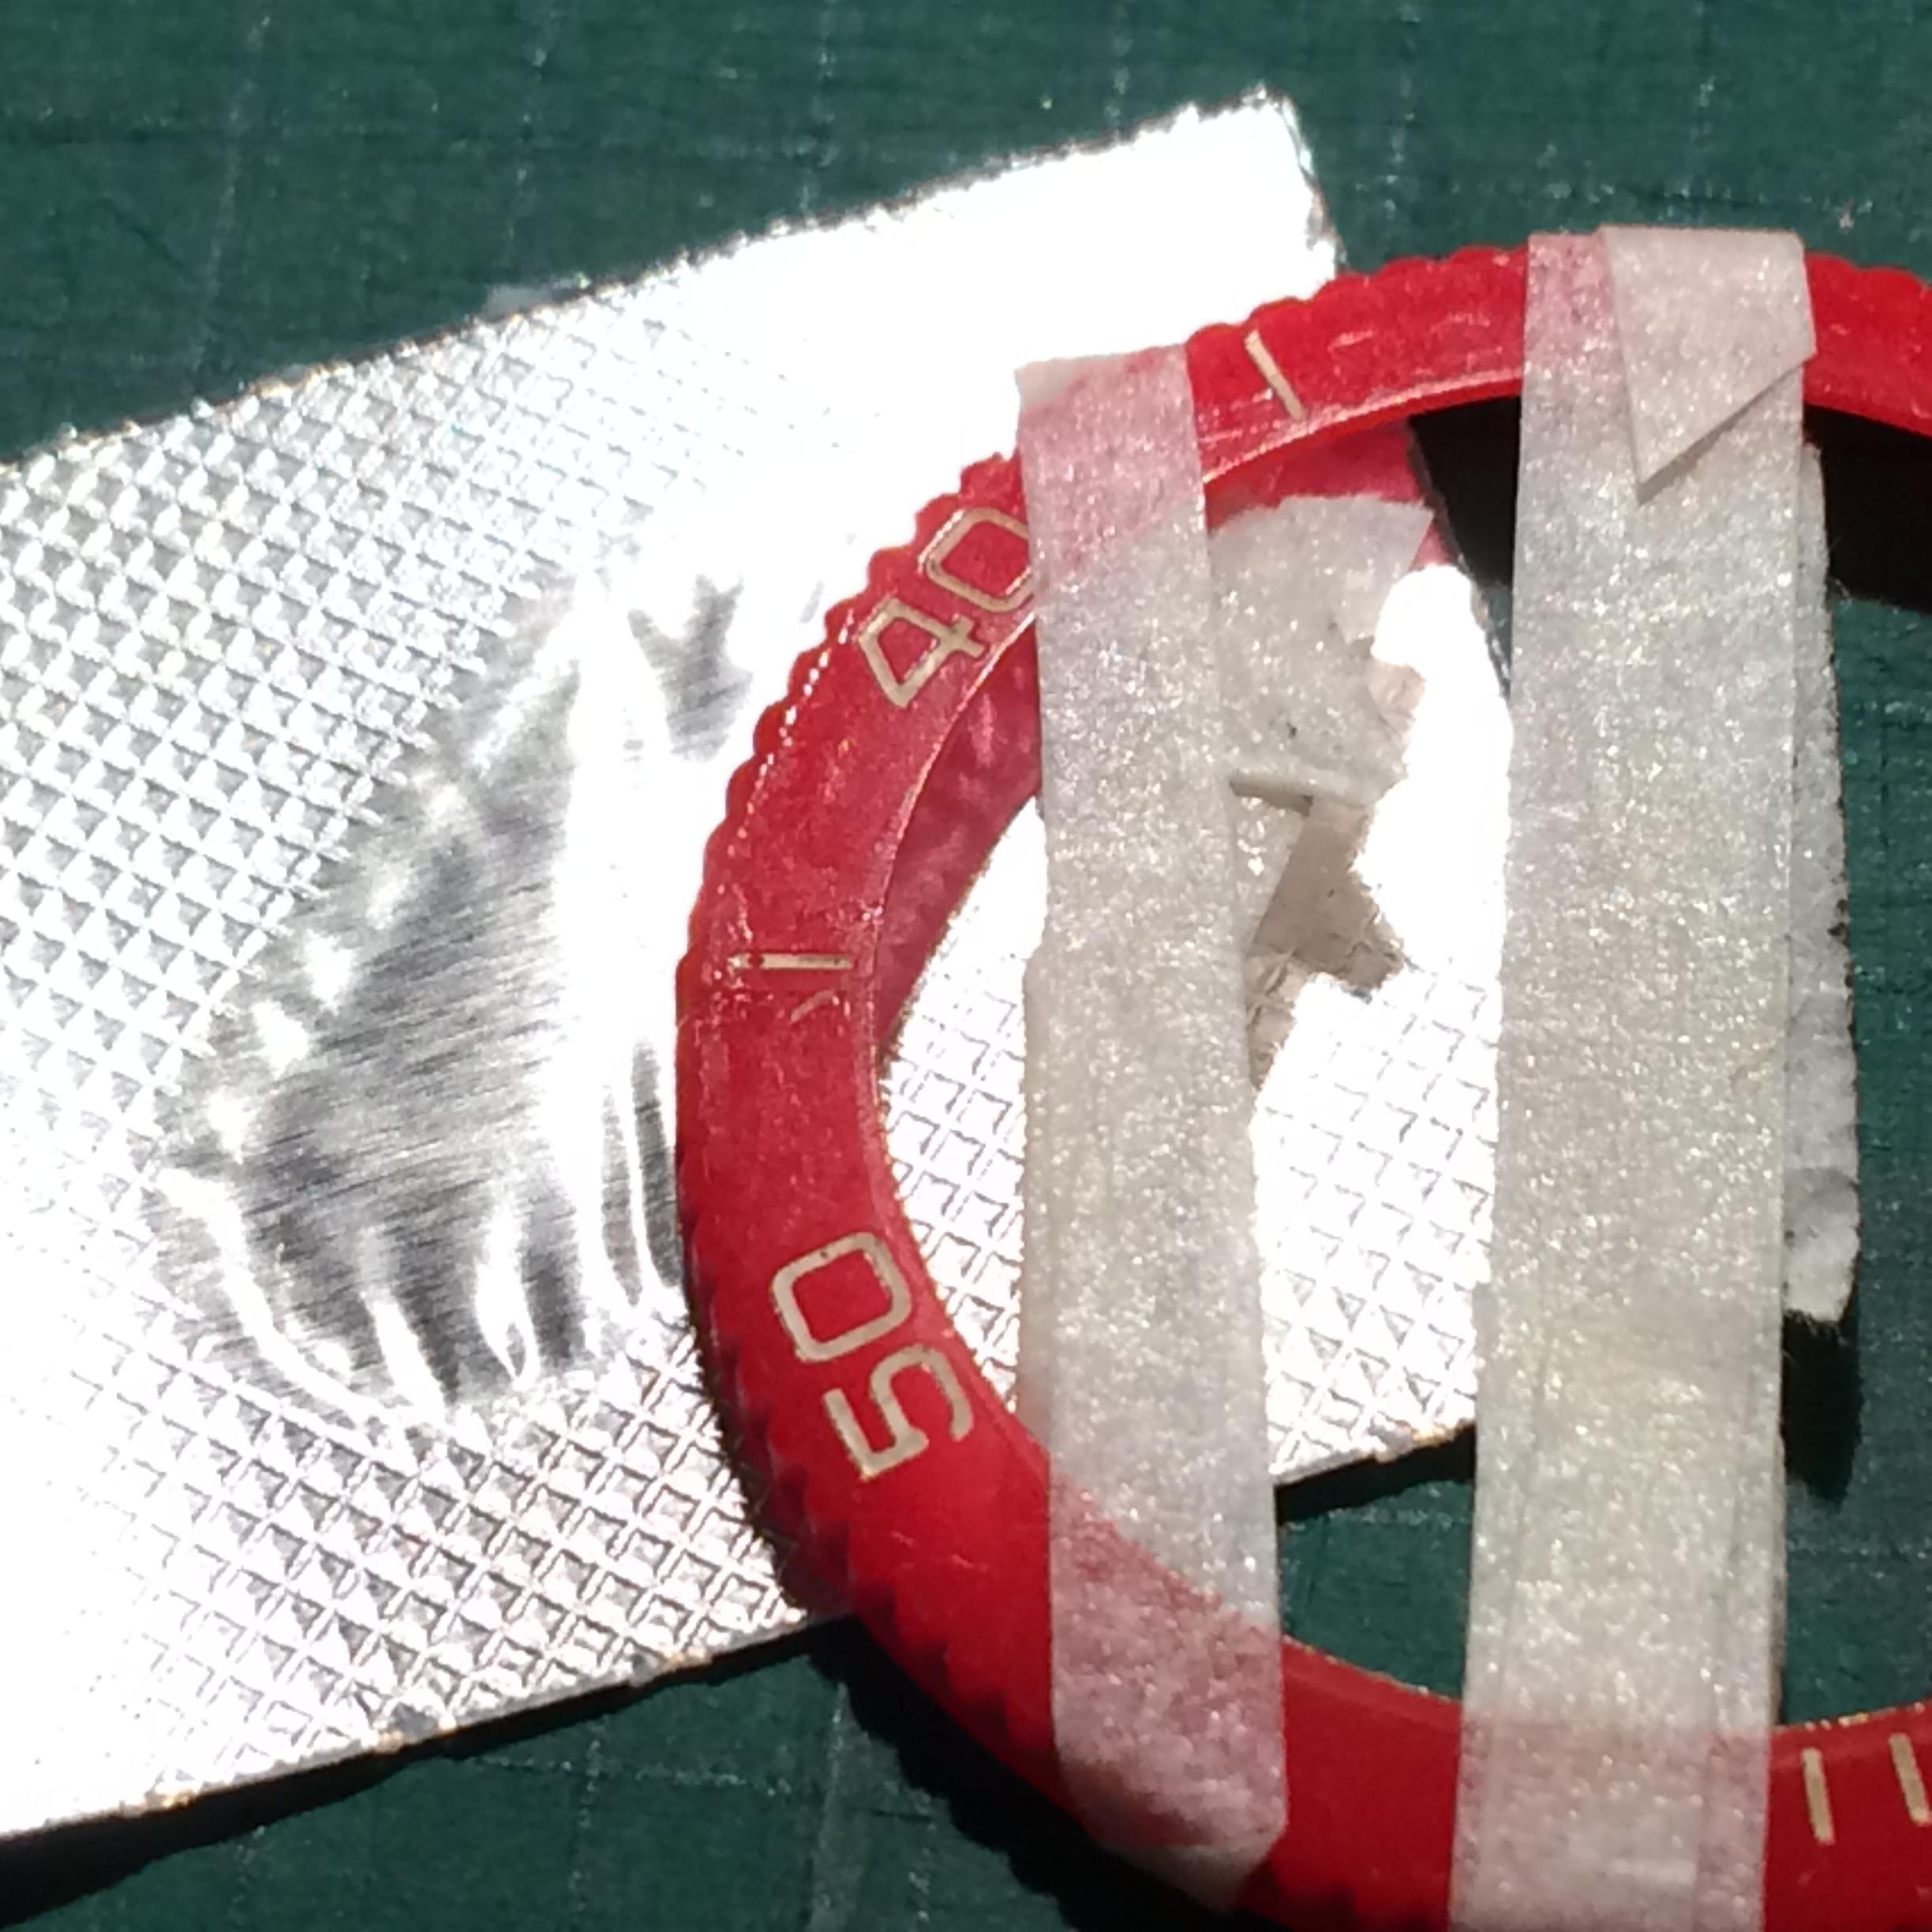
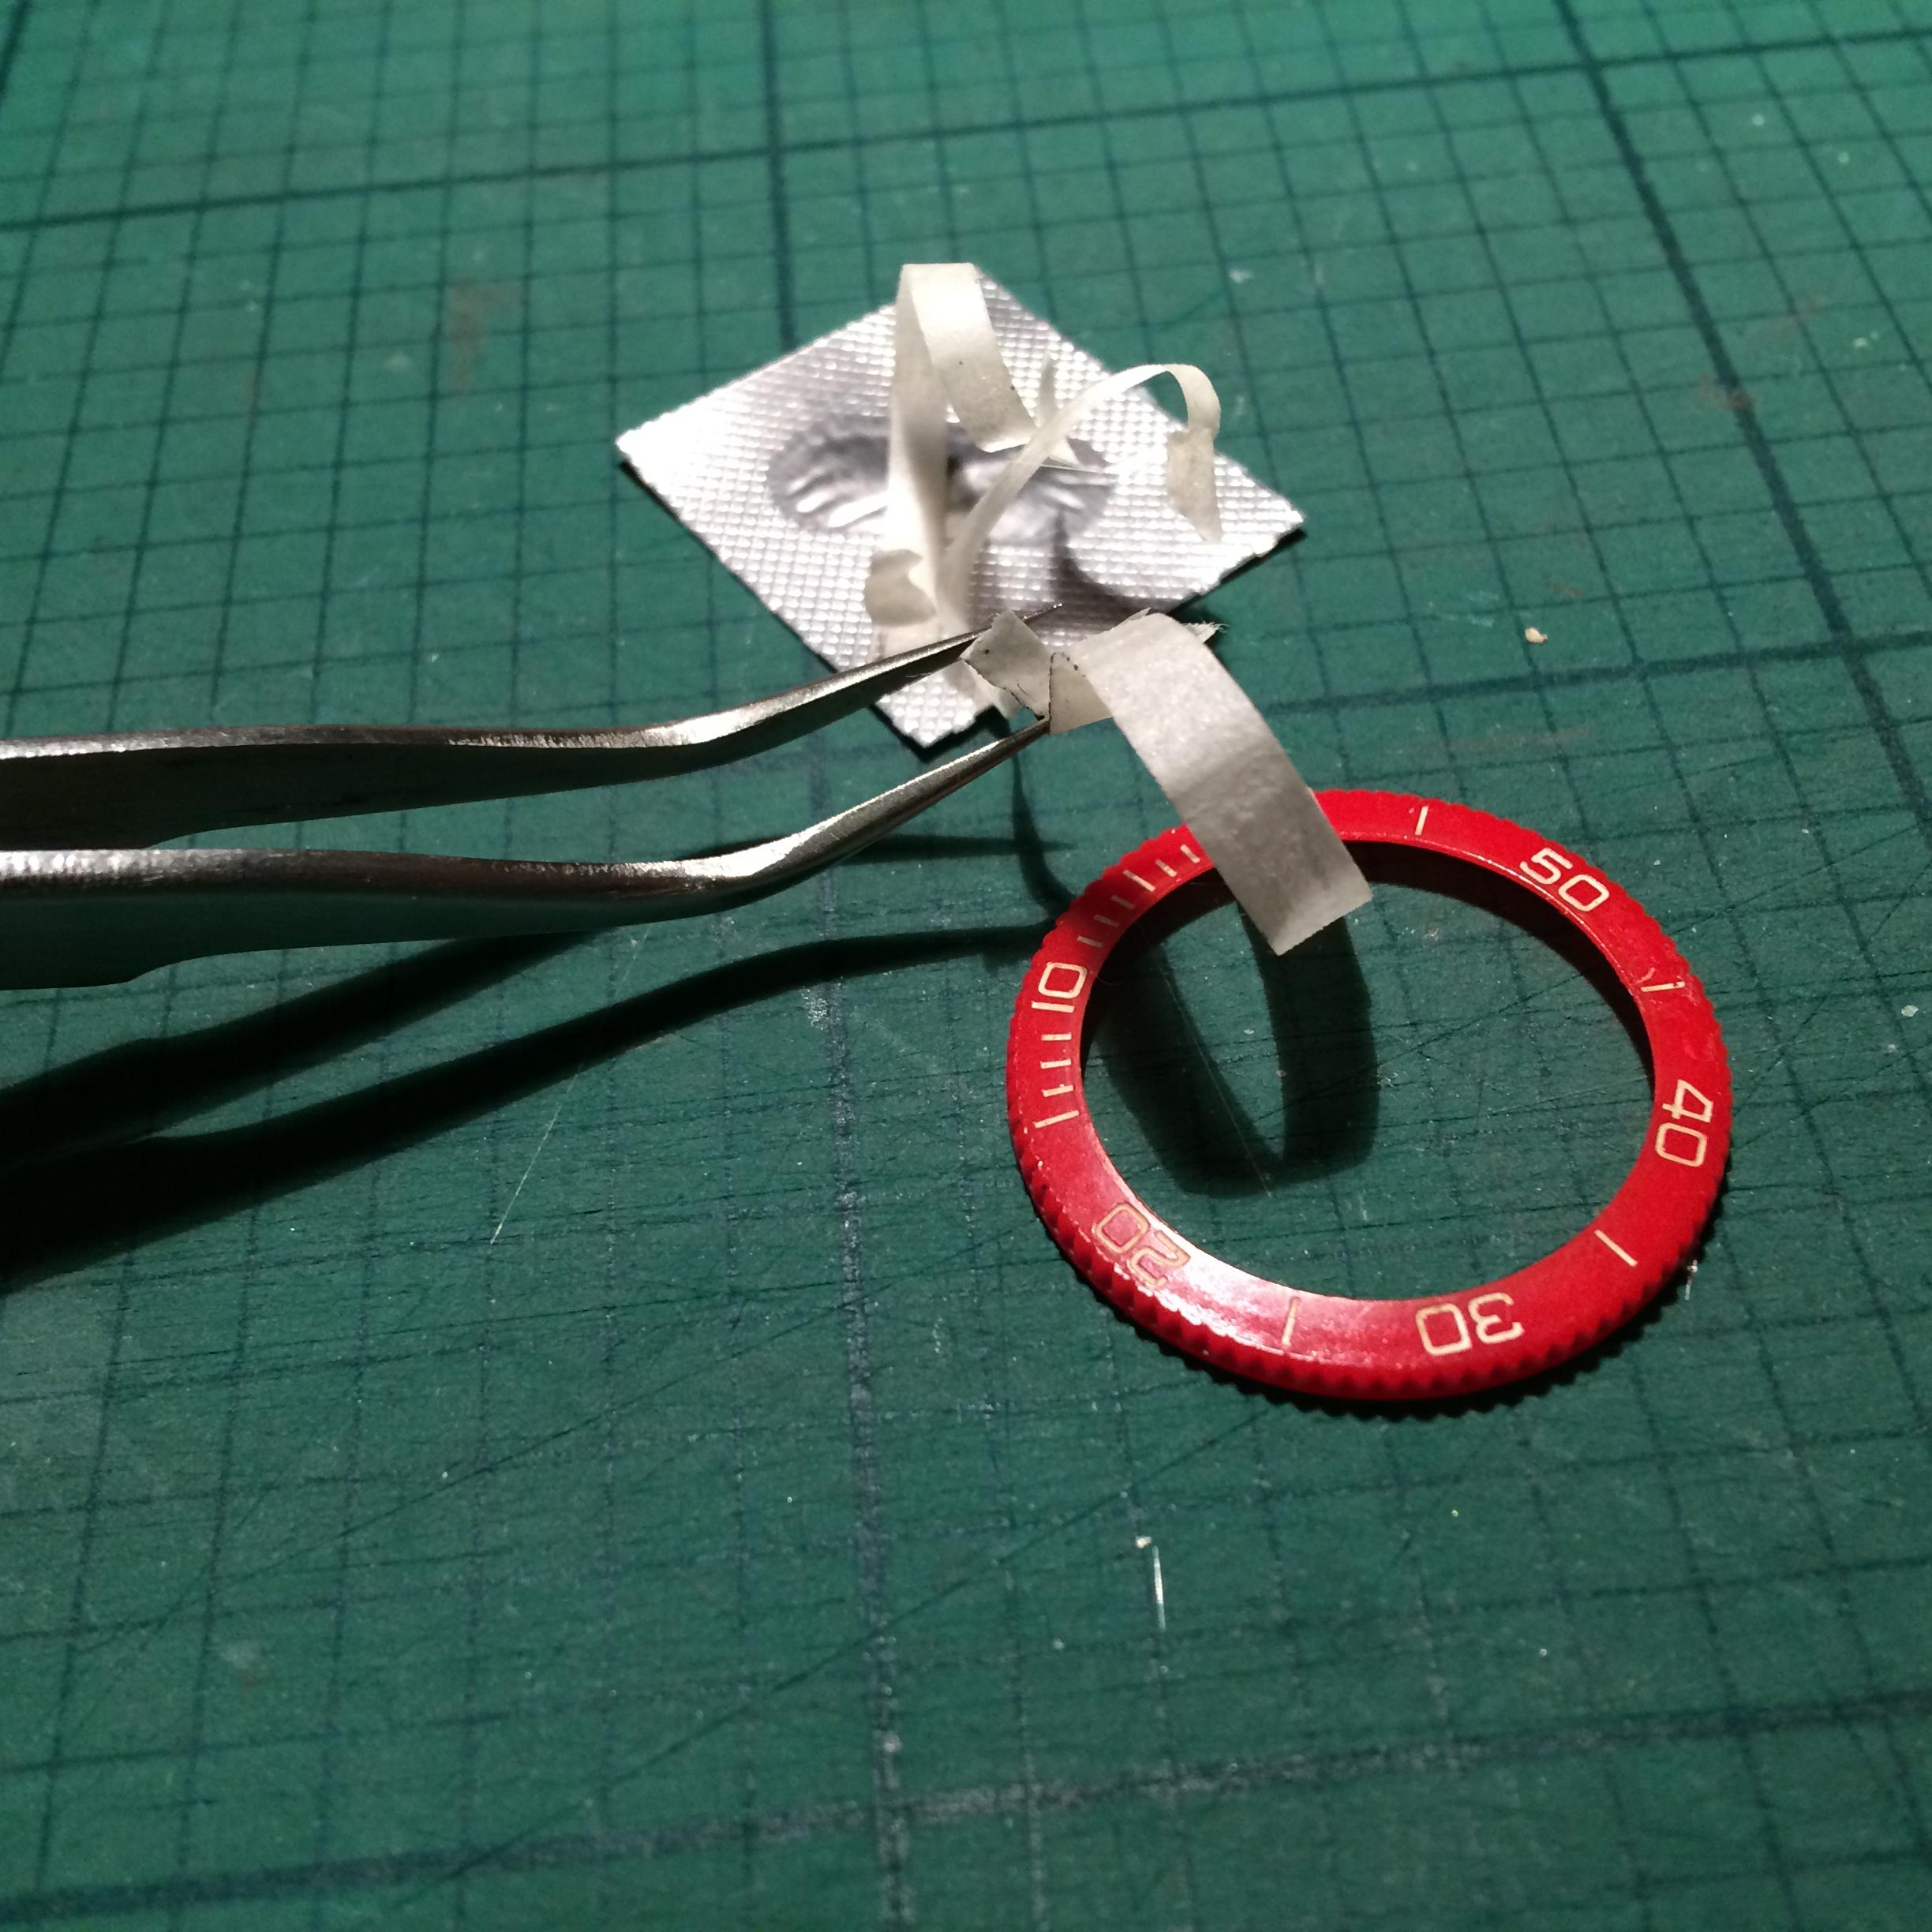
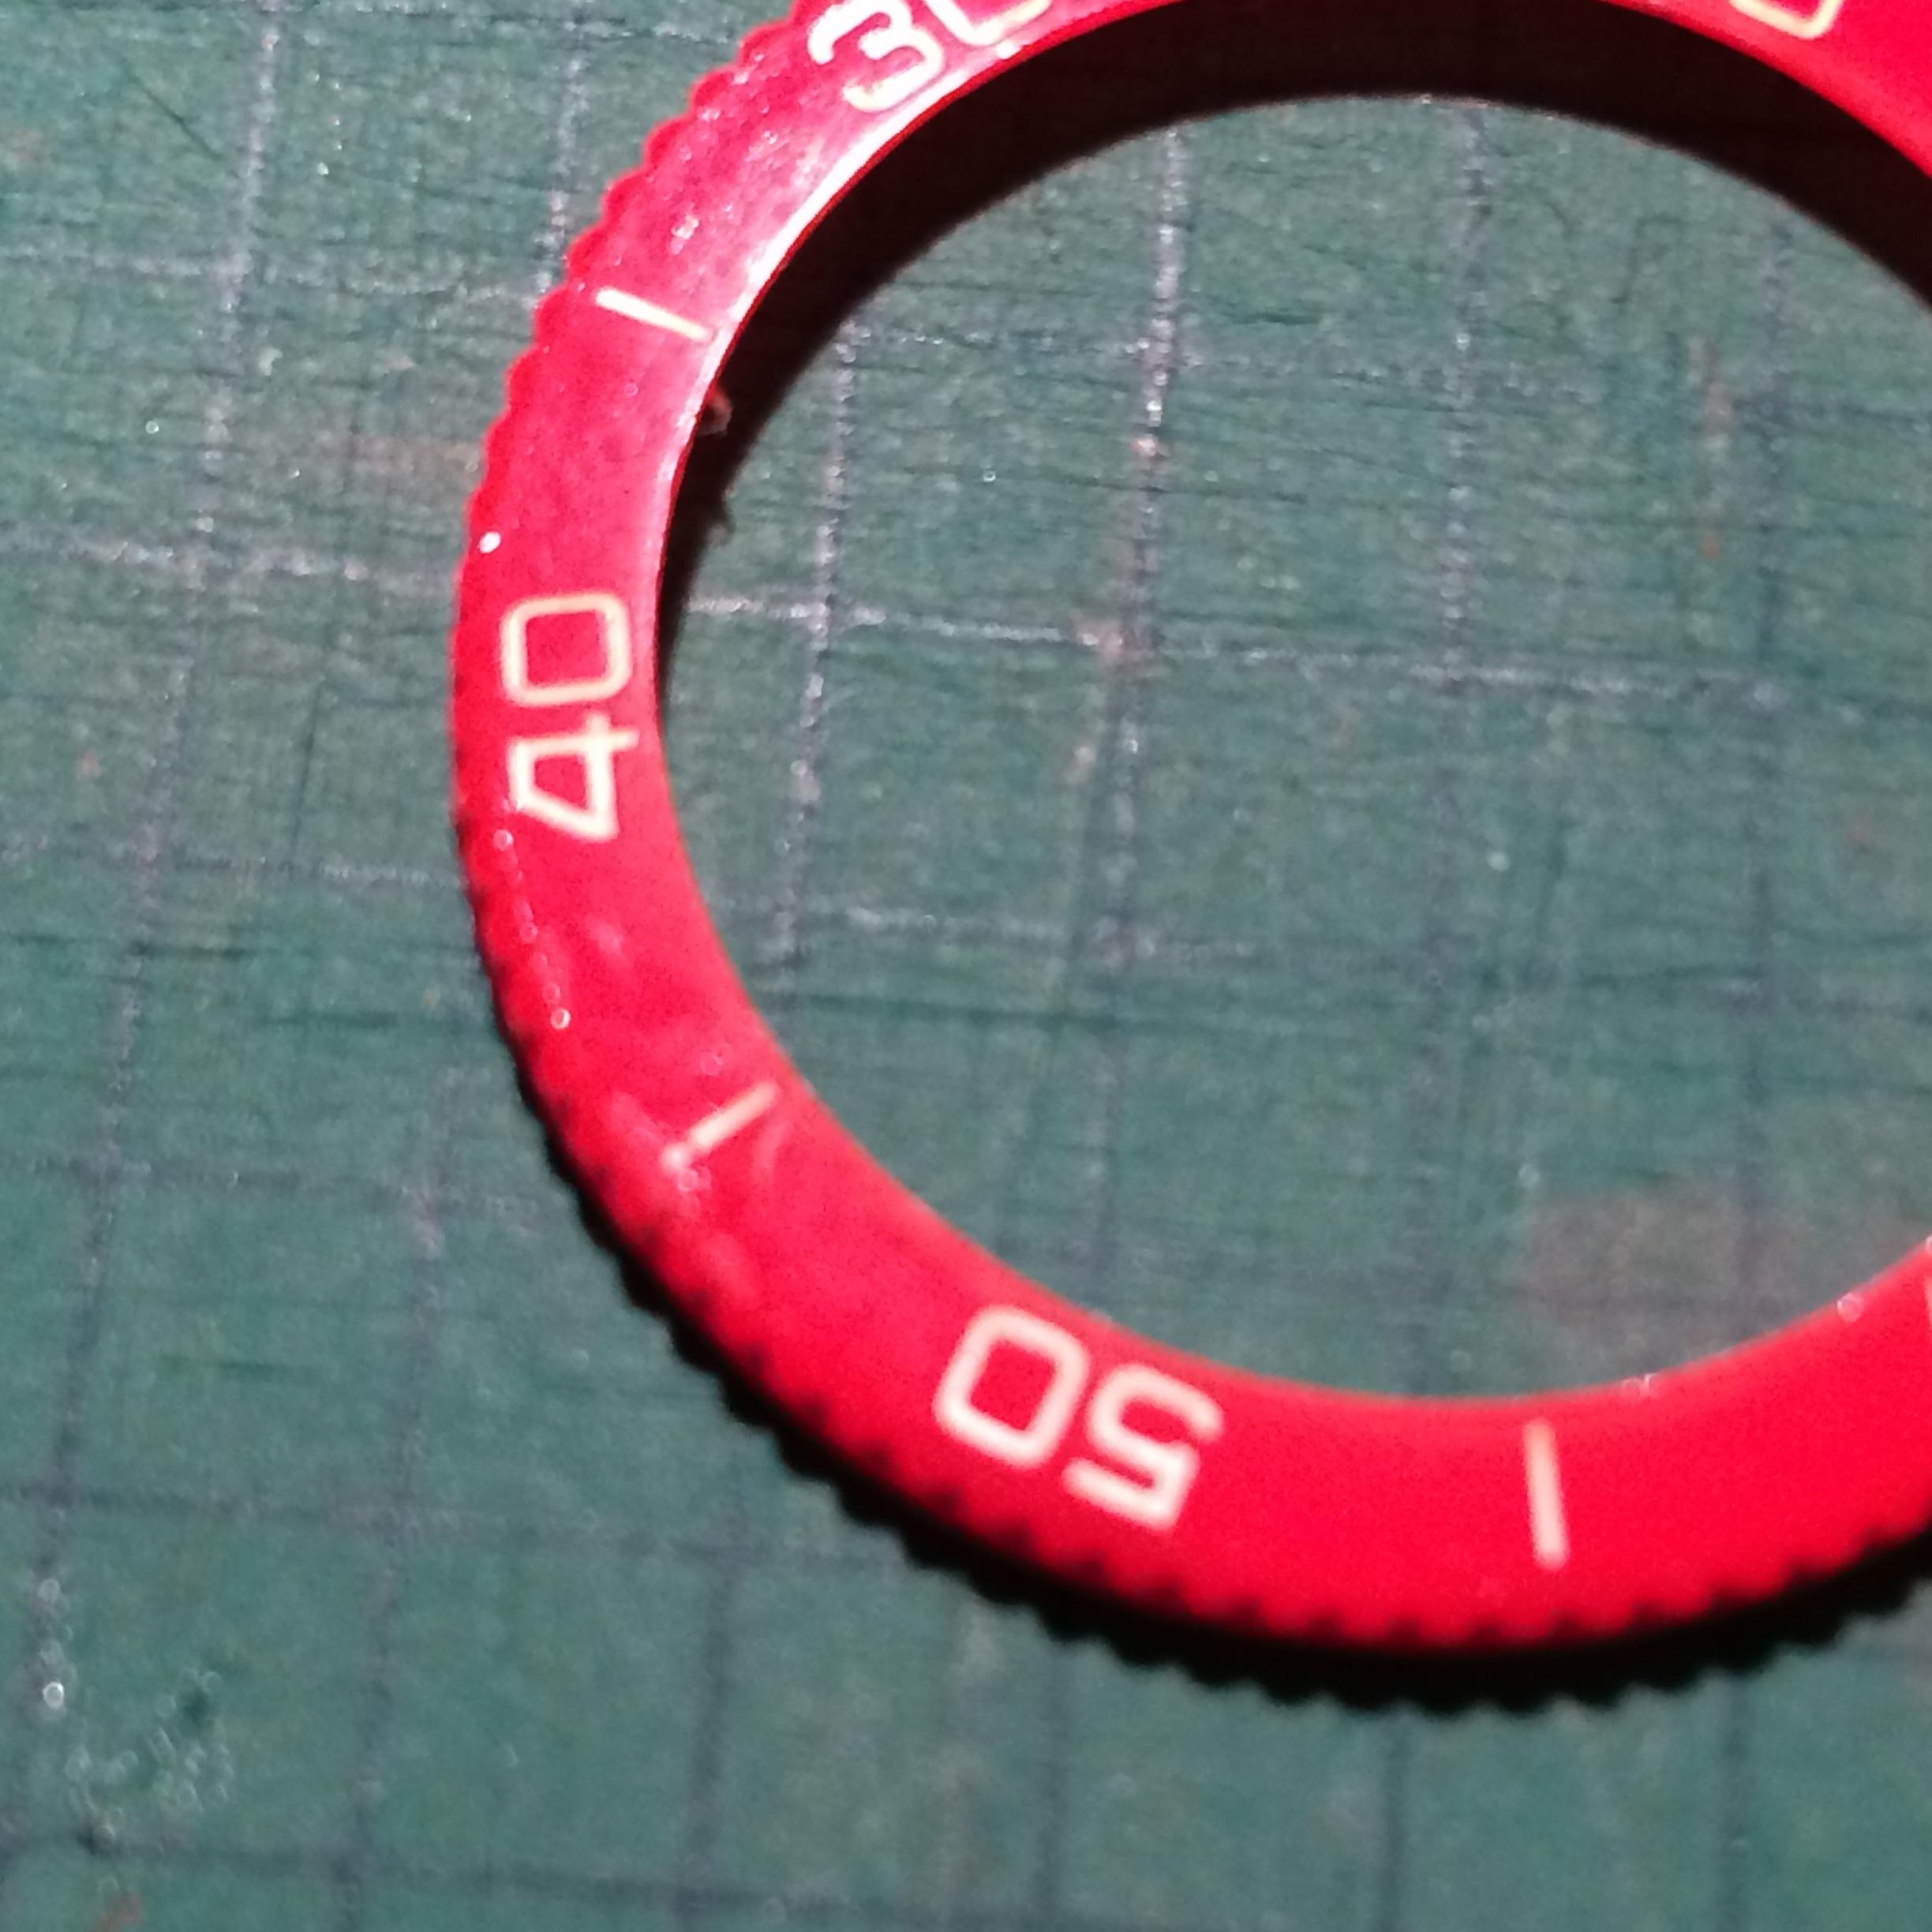
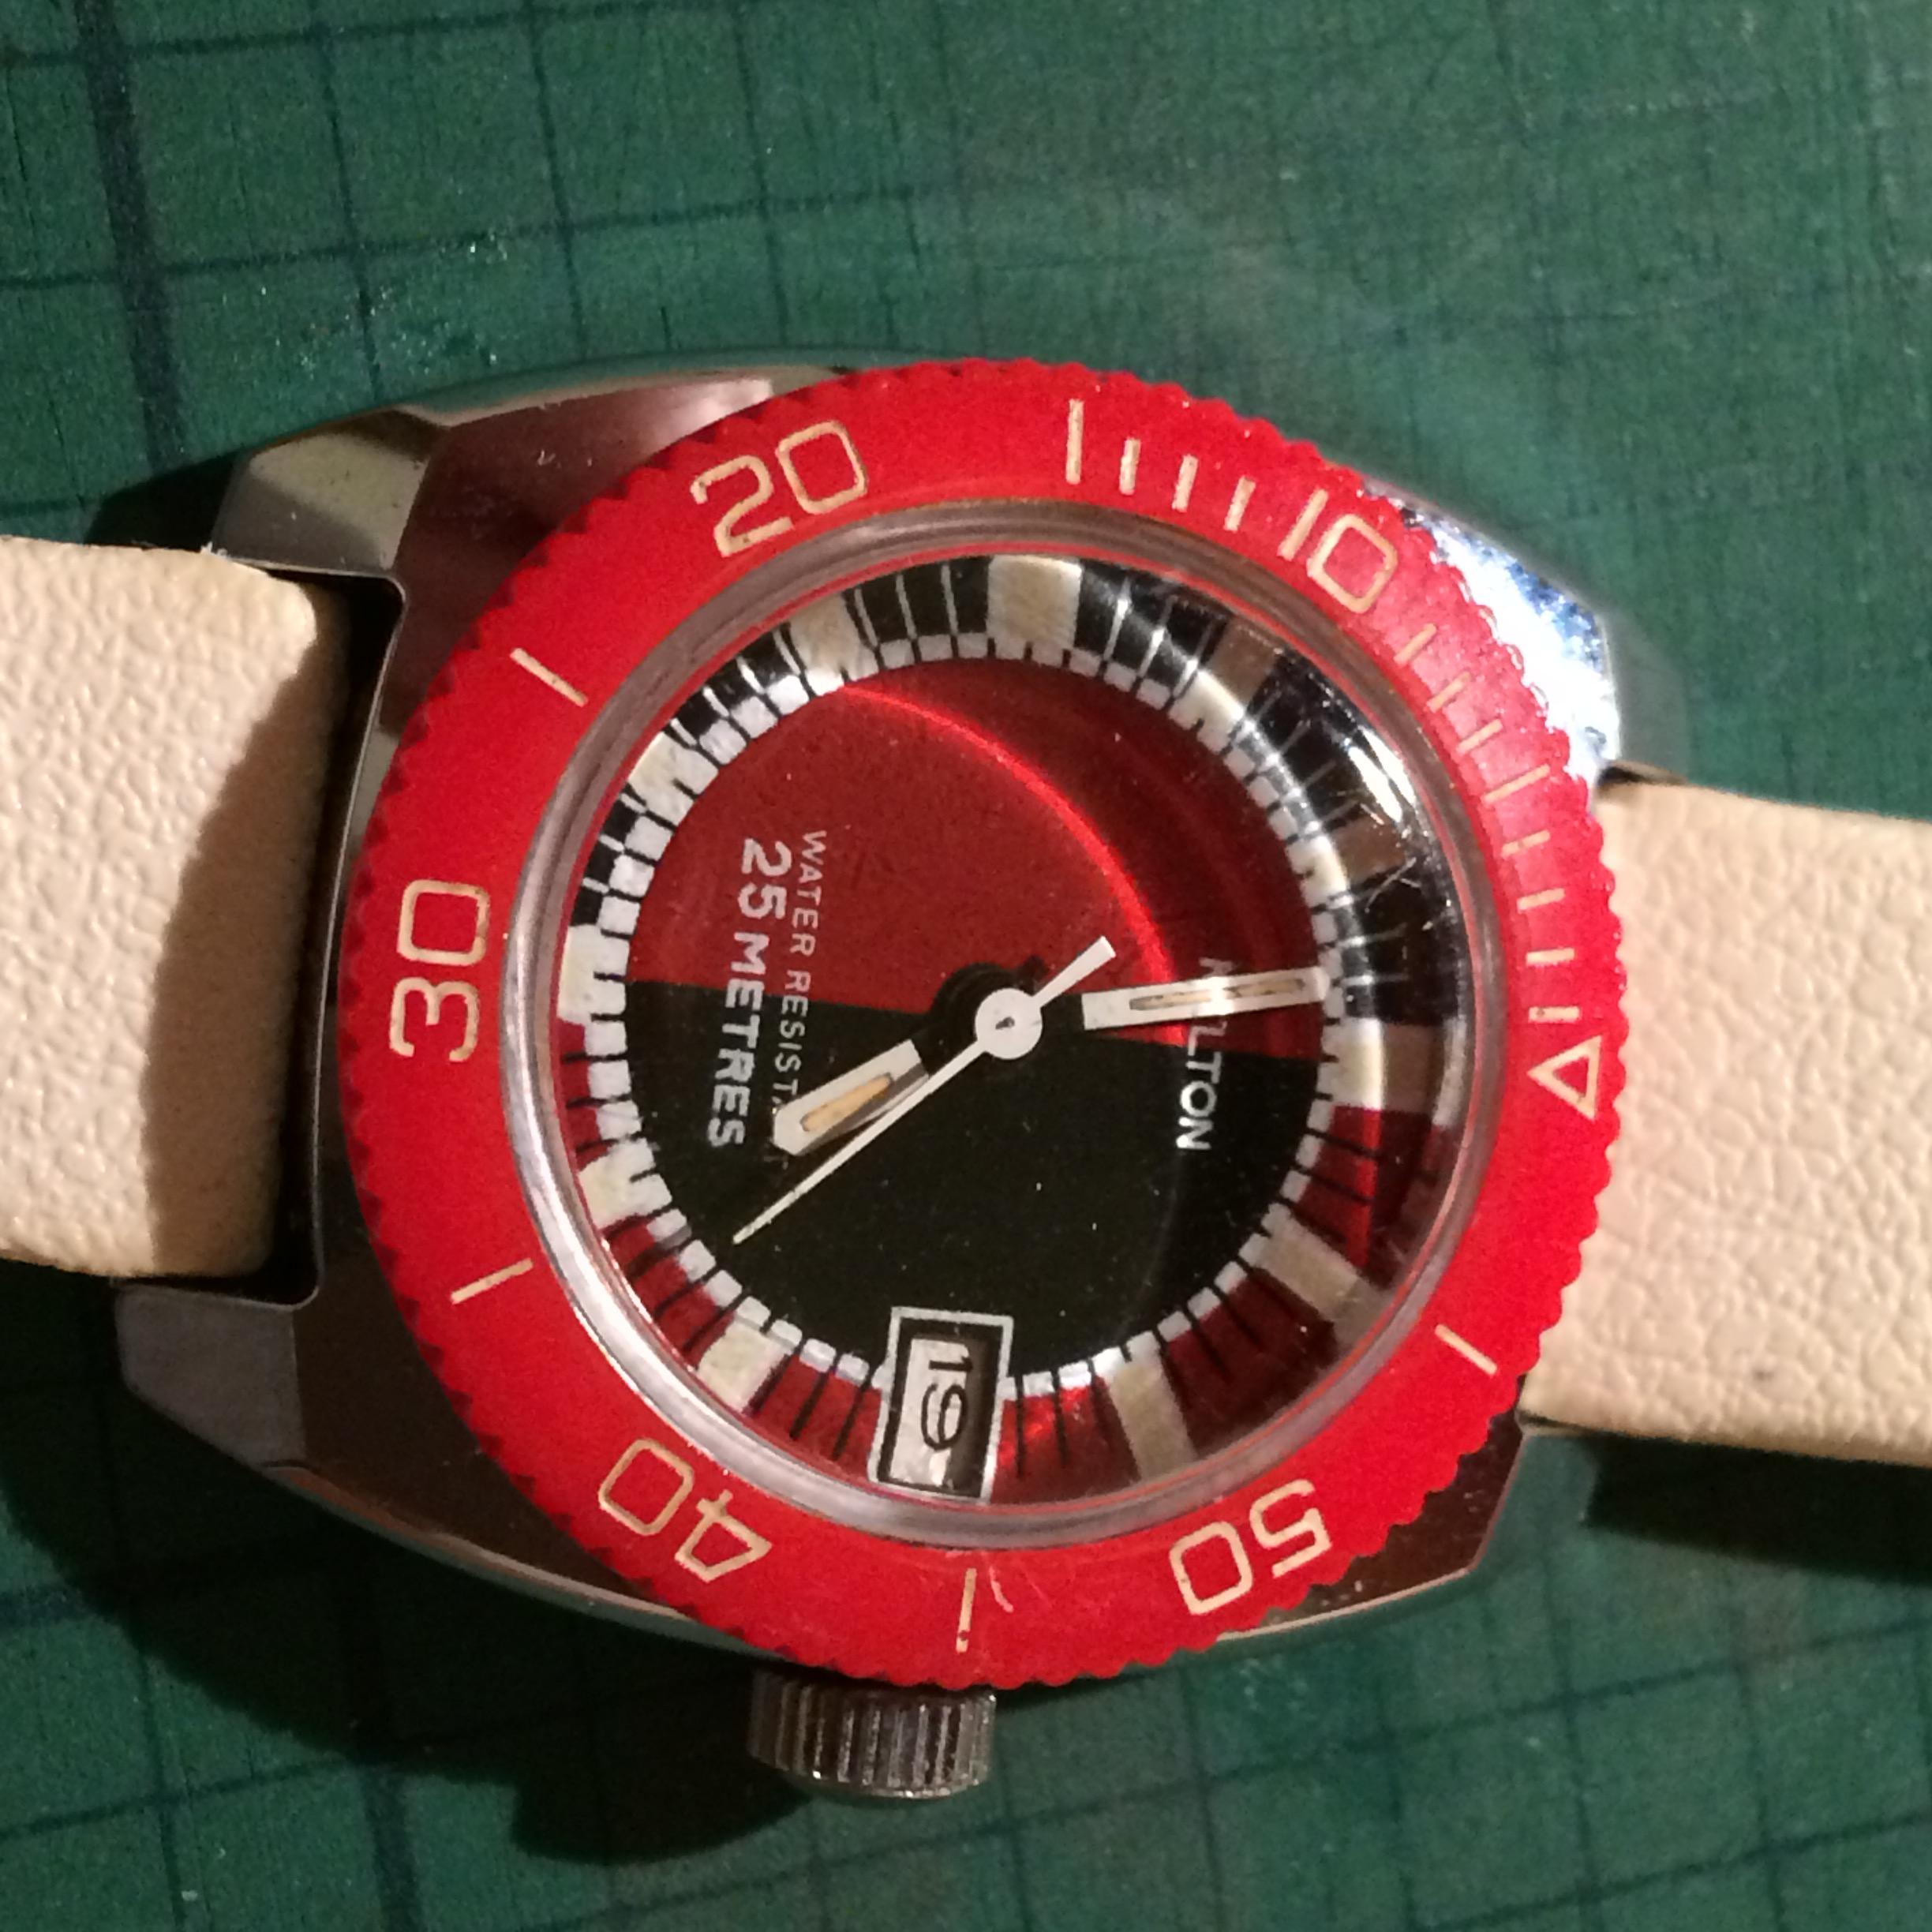
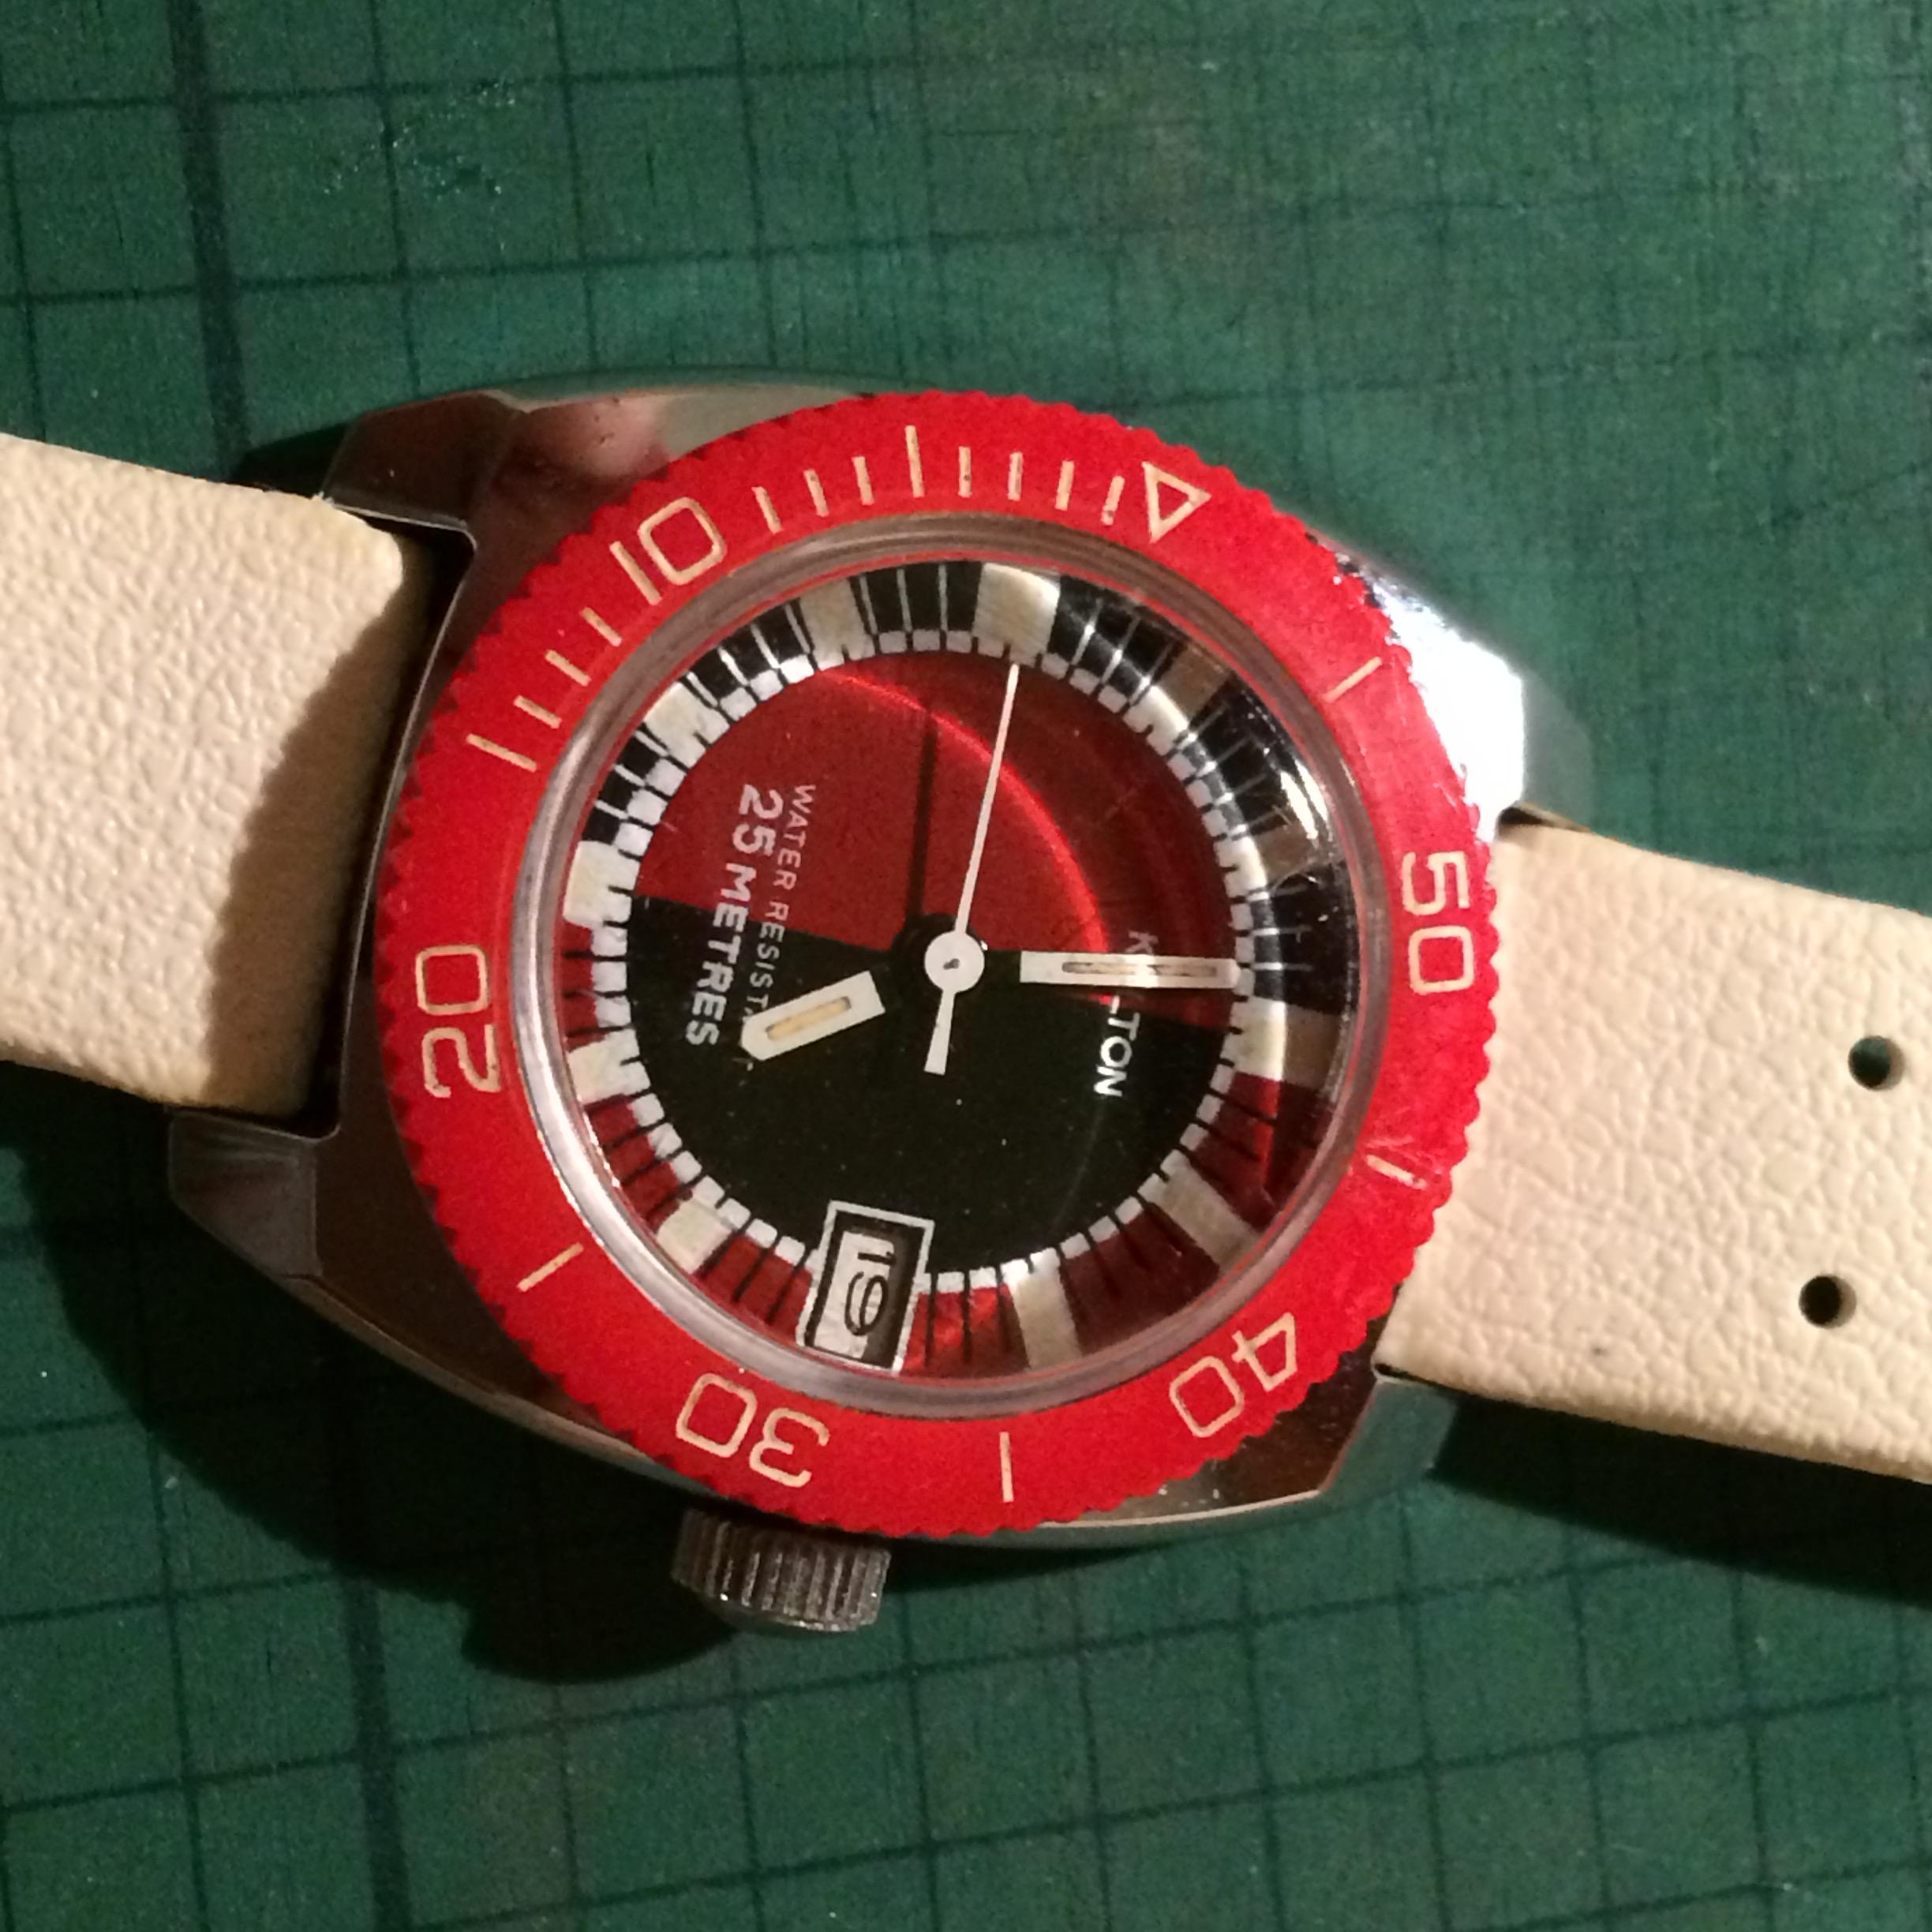
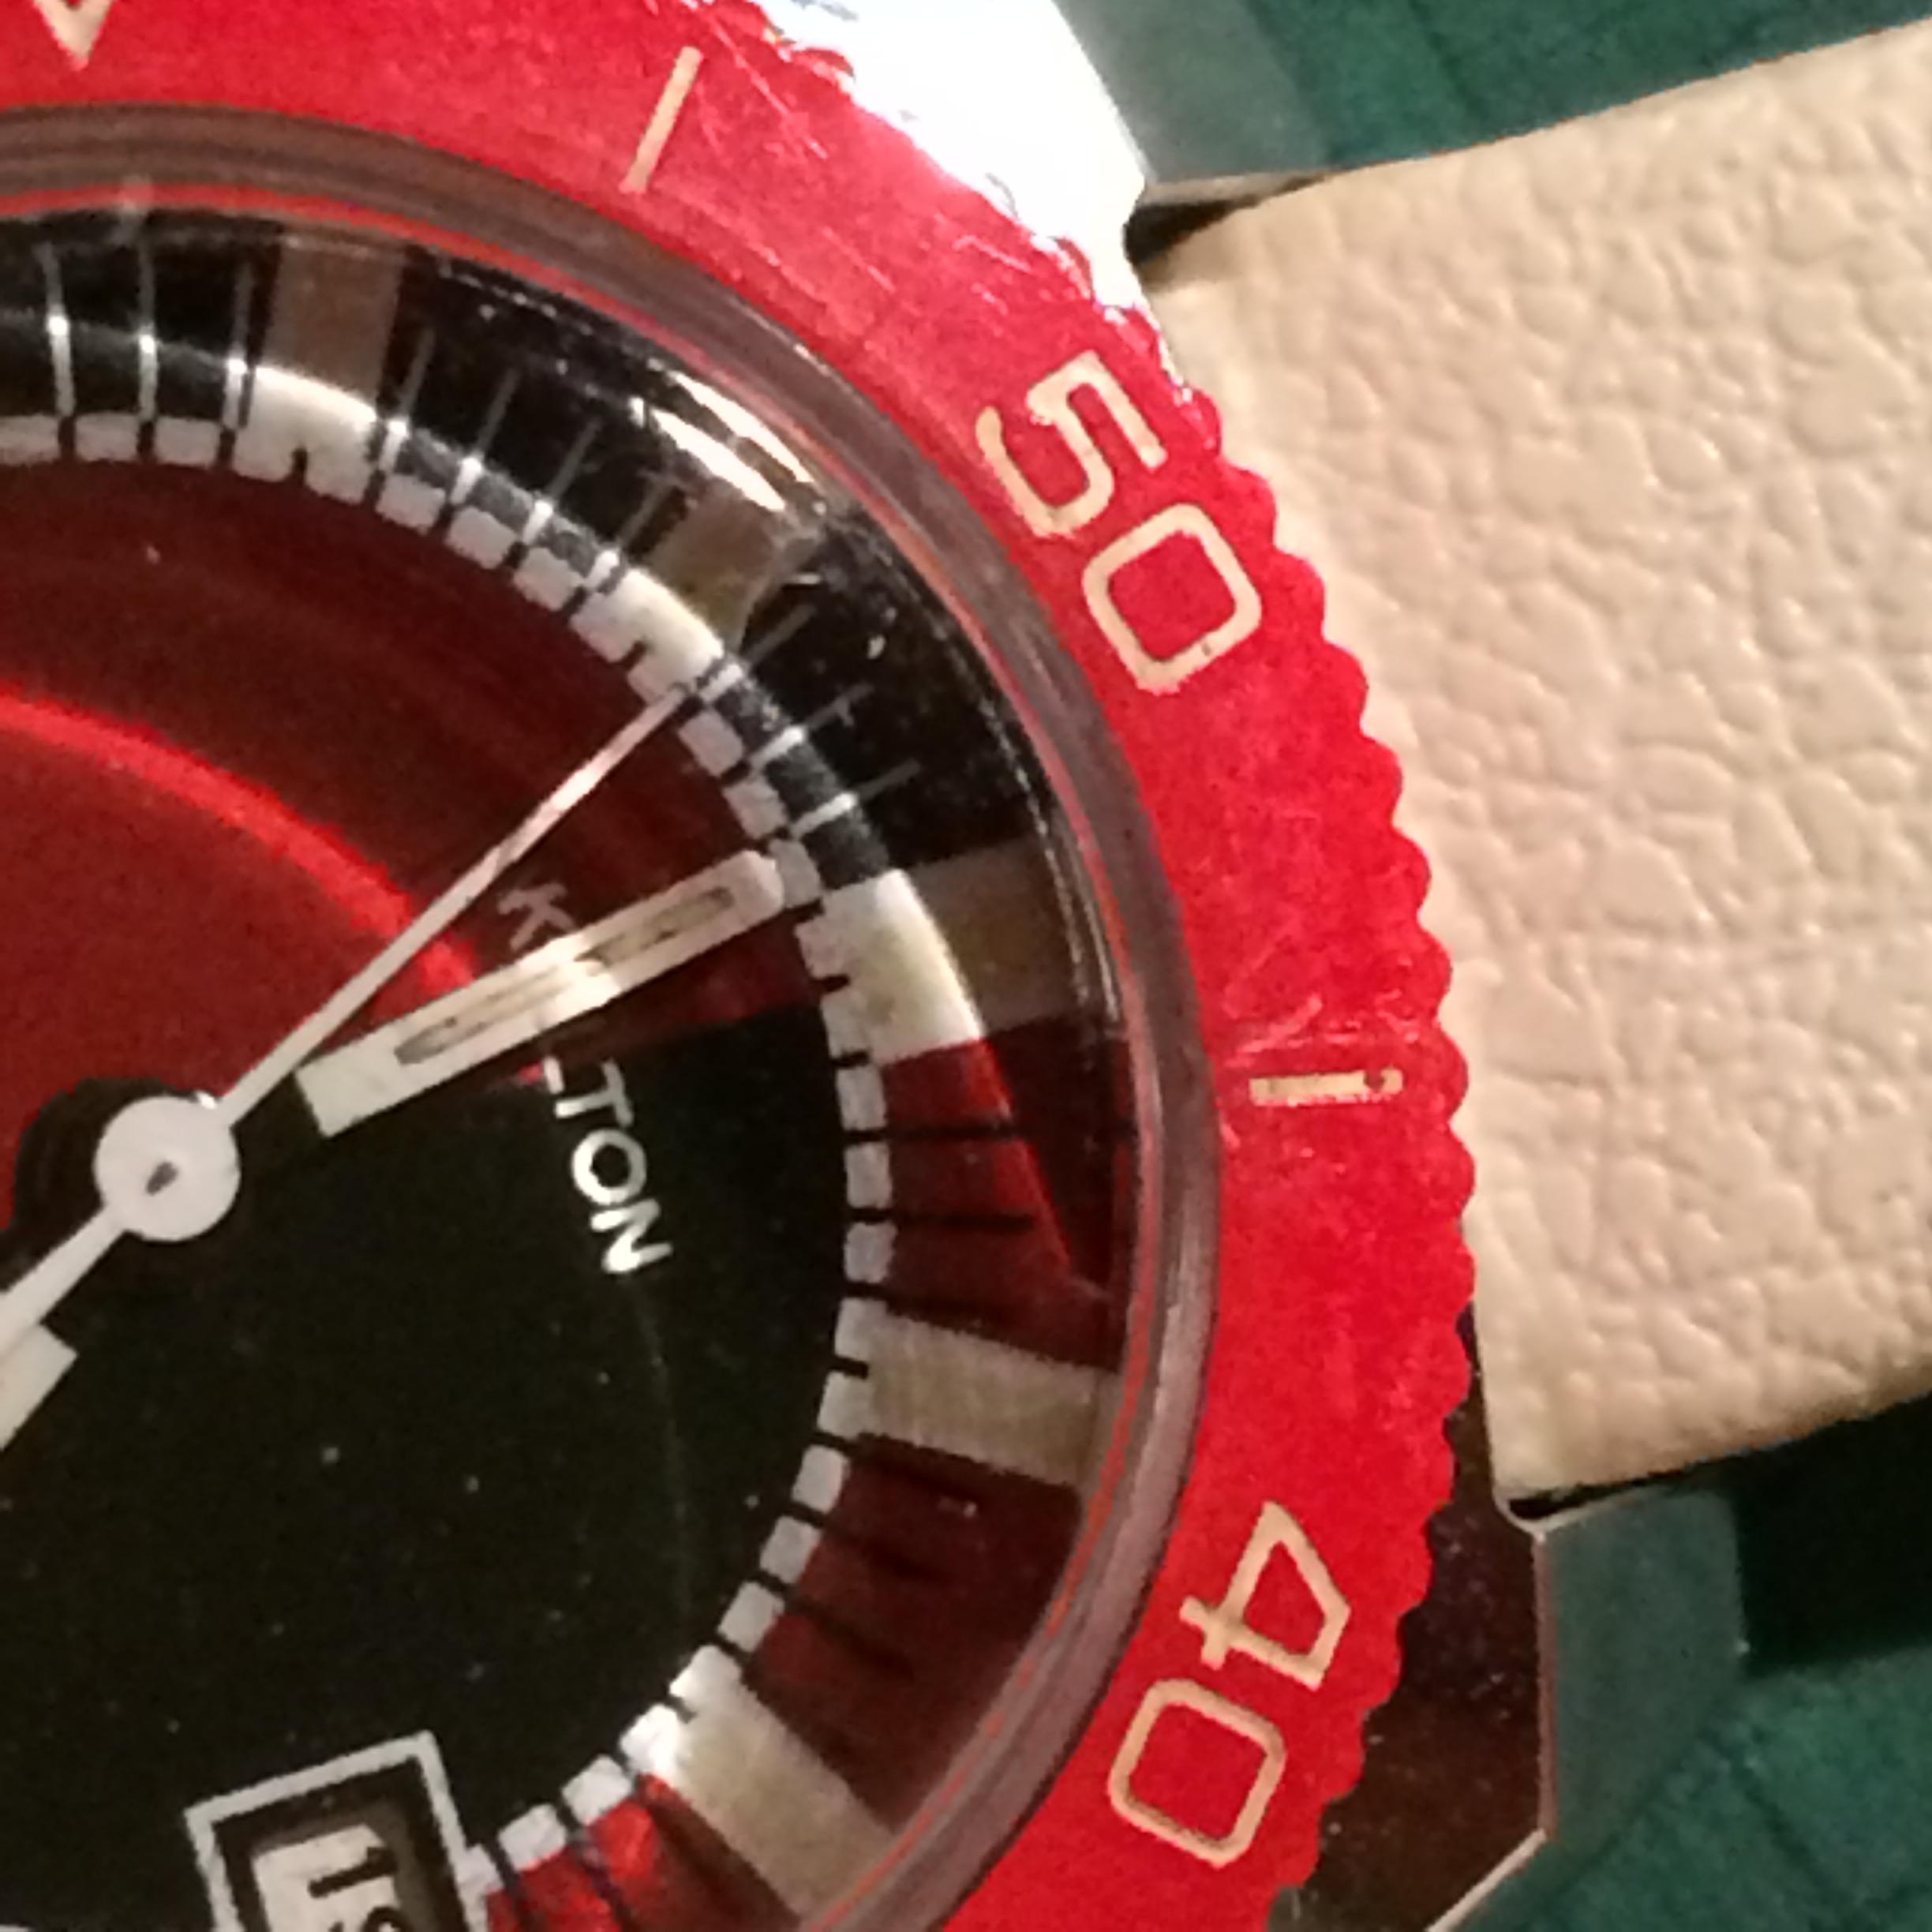
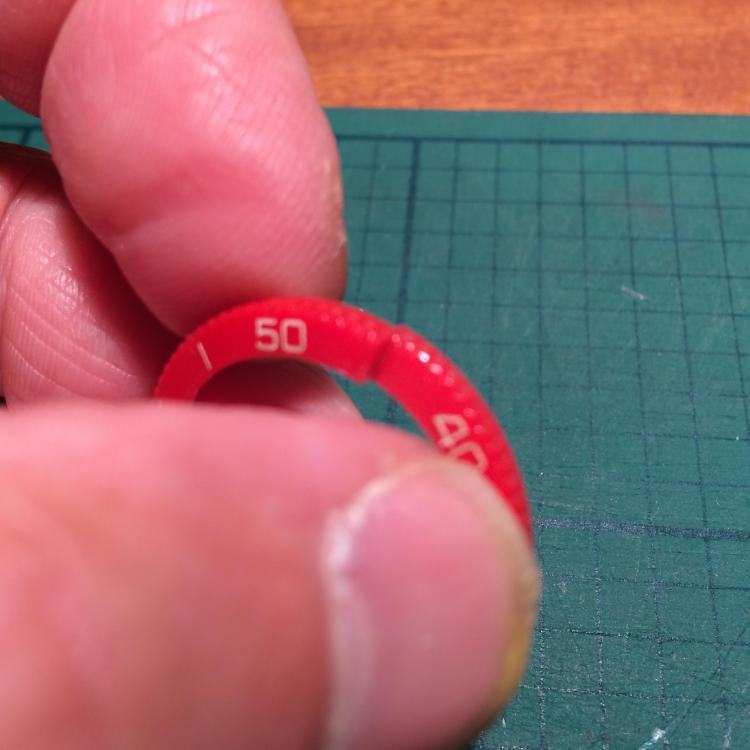
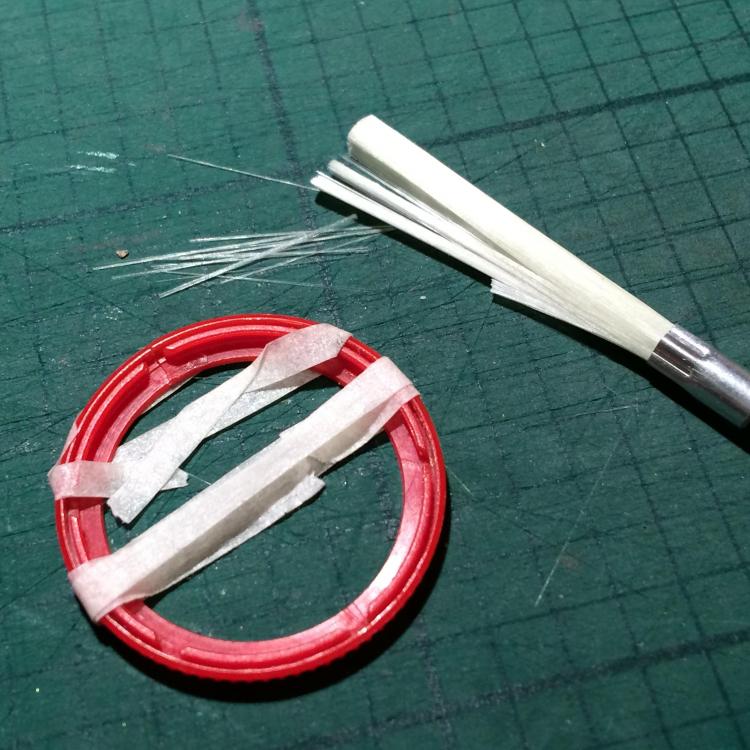
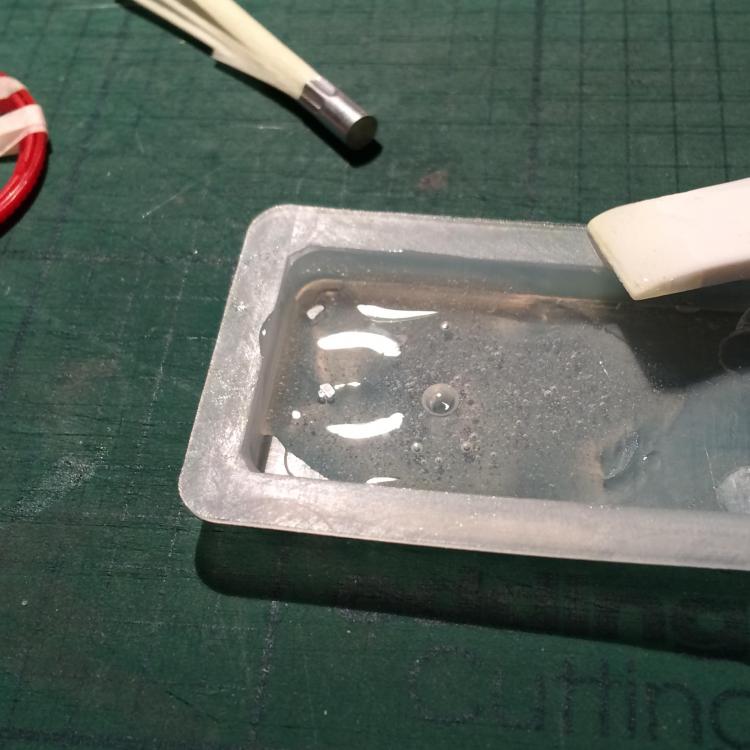
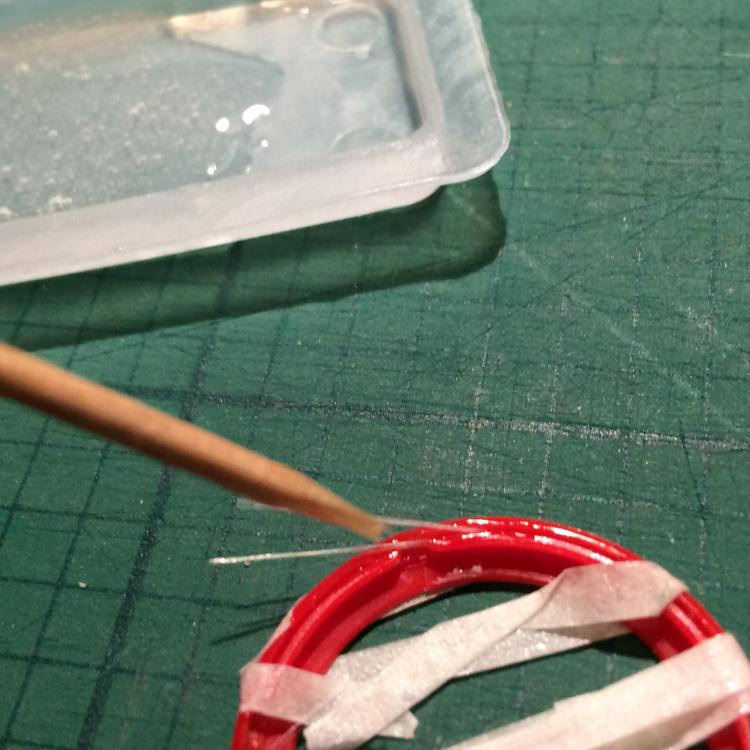
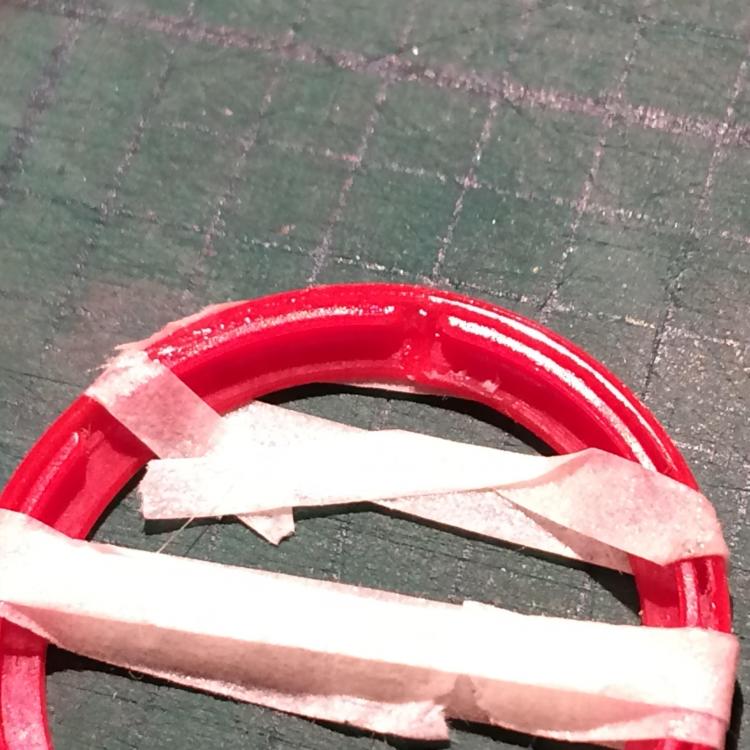
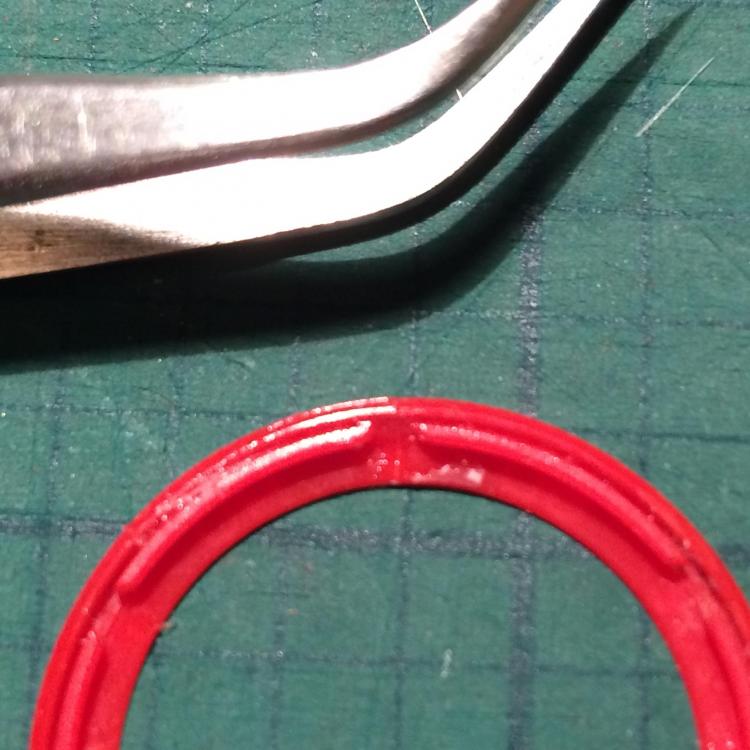
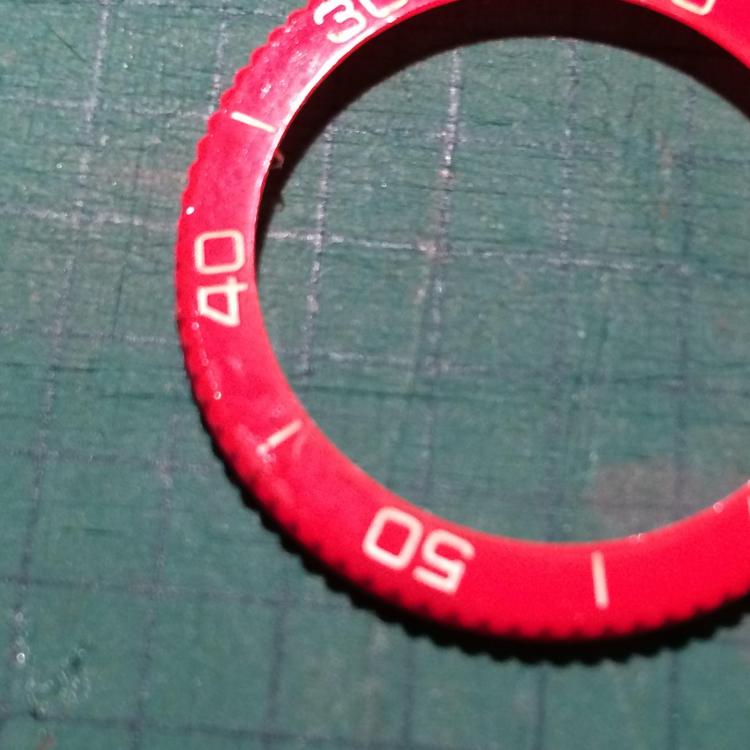
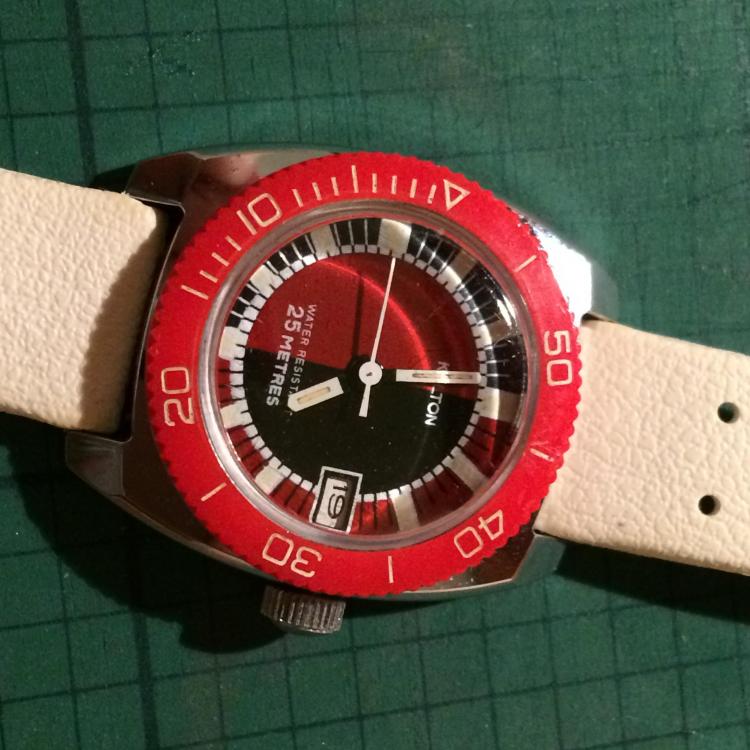
Hello I'm not certain if this is the right place to put that repair tutorial but no problem if the moderators move it elsewhere. So some month ago I had the opportunity to buy a 28mm KELTON "Yachting" for my wife ... 12€ shipped so the cheapiest watch she ever got but really nice and she loves it as much as her DJ I think. The watch was OK and nedeed just to be cleaned but the plastic rotating bezel was cracked so I first fixed it with doube-sided tape because my wife wanted to wear it for a "70es" party. But I wanted the bezel to rotate AND to be firmly clipped on the rehaut so I tried the following DIY repair. First I unclipped the bezel and removed all the doube-sided tape. Here you can see that the crack is clean but goes all through the bezel so that it cant stay clipped on the rehaut. 01 - Clamping: Before proceeding to the repair I tried my best to clamp the 2 sides of the cracked bezel as close as possible and without any height shift. I just cut thin bands of painter's tape and stitched the bezel ... just like one use steri-strips on a cut. Here one can see that the 2 sides of the crack are very closely adjusted 02 - Preparing the Repair : I used the refill of an adjustable sanding pen from which I cut some bits, about 1 cm long Then I prepared some slow curing (5mn) bi-component epoxy cement 03 - The "Surgery" phase : I thinned a toothpick using anX-Acto and used it to put some of the epoxy cement, from the downside, between the exterior of the bezel an the inner lip that is supposed to clip on the rehaut. I did that by 3 cm long, 1.5 cm long on either side of the crack. The I inserted the fiberglass cuts "perfectly" centered (0.5 cm on each side of the crack) in the cement. Then I put some more cement on the fiberglass cuts. Sorry if I took only 1 pics along the phase but I had only 5 minutes to do all that before the cement would cure On that pic one can see that the fiberglass is becoming "clear" as it gets soaked by the cement ... that shows everything is going well. Plus the bezel's plastic doesn't react with the epoxy cement, despite of my fears. Then I put the bezel on a support that do not react with expxy and ... wait for some hours. 04 - Test after 12 hours curing : I let the cement cure all night then I removed all the clamps Here one can see the the curing seems perfect and the 2 sides of the crack are almost invisible Then I had to test if the inner lip of the bezel is still smooth enough to clip on the rehaut so ... BINGO !!! The bezel clips firmly on the rehaut (no more risk of loosing it) and it turns perfectly, which is the least a rotating bezel can do. Plus the crack between the 40 and 60 is now almost invisible.


 1 point
 -
I rarely watch TV these days (but I still pay the license). Any BBC content I watch is typically online. There are some very interesting old vintage watch adverts and promotional material on line of course, but I don't think they count.1 point
-
Well fore sure he's missing to pay license1 point
-
Hi Clockmaster is only for i-phone There is another clock tuner whick is for anderoid and I think it was a free download whereas clockmaster is £9.99 but i think its the better of the two.1 point
-
Lever Vs screw type could be a personal preference but in the end you have more feeling with the first, better power and control with the second. The same happens with a lathe tailstock in drilling, in there normally lever type is preferred. But having set myself some tight crystal and bezels personally I prefer a screw type. For even more confusion there are even some expensive type which combines a screw-in case back opening function.1 point
-
Great. You can now fit crystals with confidence, knowing you have a good tool you can rely on. Good tools make work easier.1 point
-
May thanks.1 point
-
You don't need to be a member to join the message board. If you go to NAWCC.org and go to the watch forums, you'll probably see him posting in the European pocket-watch forum. You might then be able to send him a personal message. Good luck.1 point
-
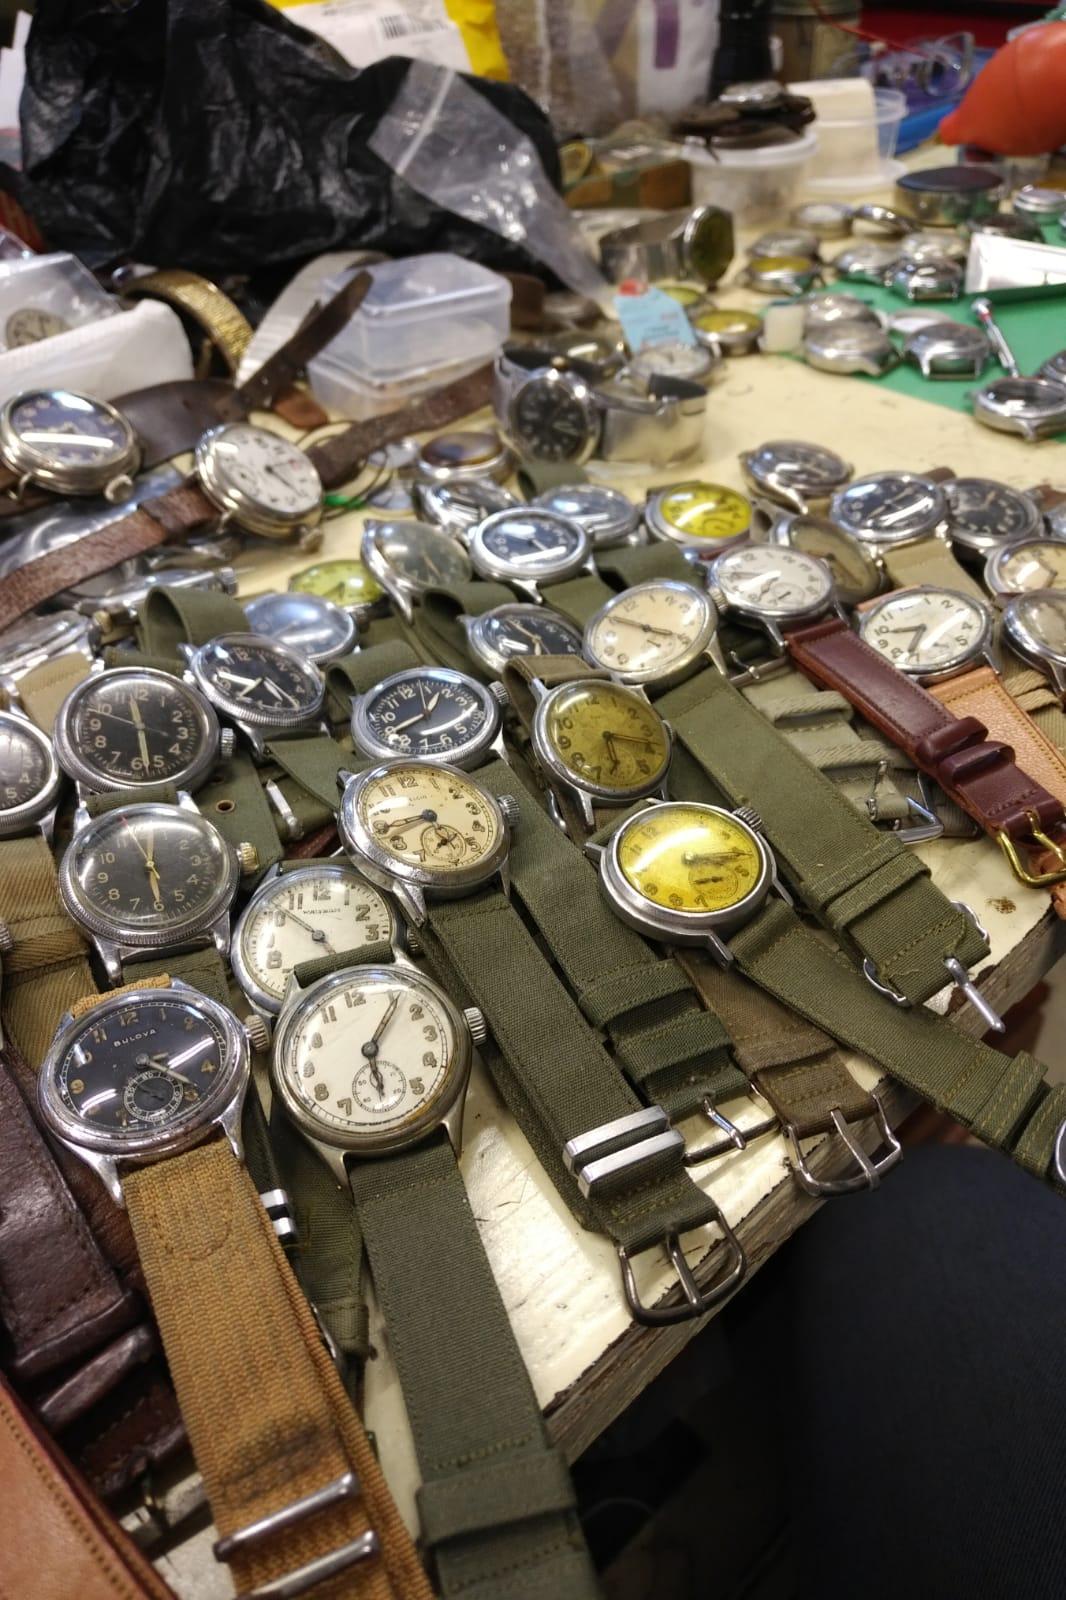
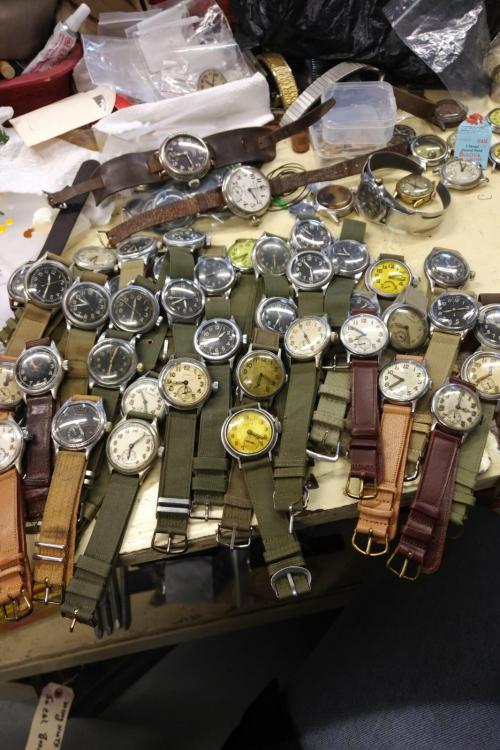
After receiving a watch from a WWII Veteran Uncle, I sent it out for a repair estimate.. I was shocked the price and decided I need to learn to do it myself. I didn't dare just jump in, so after watching dozens of Mark's videos I purchased a similar watch from eBay for practice.... it was a real learning exercise.. I learned what tools were good, best, and better. Which vendors to call for parts, and what was really needed to do a proper service and repair... Needless to say, I got my Uncle's watch running and wear it with pride. It was a long cold winter and I kept myself busy with all of that new gained knowledge and growing experience... I have attached a few photos of where I have gotten... I have cleaned, oiled and timed every single one... taken off the old straps and found original new old stock, or period correct straps to make them authentic. Some I left with patina, other cleaned up to near minty condition. Out of the 50-odd watches all but 3 or 4 keep time with a few seconds a day. I had so much fun learning that I started looking for more projects by cleaning out the local swap meets and pawn shops of their WWII watches (mostly Elgin, Waltham, Bulova, and Hamilton).. now I have a few extras and I owe it all to Mark. Thanks Mark! Now if I can get my work bench cleaned off I can get started working on my Willys Jeep transmission rebuild....


 1 point
 -
Thanks guys! I appreciate the welcome.1 point
-
Indeed so, a mixed breed dog.1 point
-
Made from parts of varied and indeterminate parentage. Usually, but not always, applied to dogs. Regards.1 point
-
Thanks MrRoundel. It's a candy blue over silver metallic base, clear coat overall. It's a high temp, oil, gas resistant finish. According to a German Watch historical museum the G. Boley vises are suppose to be a very precise parallel vise. They made a rotating base for the C60 and I've only seen one with it, which was on eBay. I didn't know if the Google translation of the German site is correct, if so then what I was referring to as a removable anvil is called a "saddle". Now restored I can tell you it's as smooth as silk. Just a beautifully made vise. I hope to make a couple add on jaws for it such as a felt set and a poly set that clip on using the detents on the side of the existing jaws. If not magnets.. lol I'm not into restoring vises per say, I have a few that were discarded, or left heading to the landfill such as this Boley C60 was. To me it's just a waste to throw them away when a little effort can bring something back and in some cases I can improve it and put it back in service. Saving the planet one project at a time. You guys here would have salivated over all the watch and clock repair tools and stuff that got tossed out of this unit where this vise came from. Very sad... I was there last person in asked to clean it up some. This and a couple other small items were all I could salvage. They destroyed most of the rest. A clock/watch repair man's entire life discarded after his passing. At least this vise is still around. And I left some of the marks he made in it just because. Restored it should last another 100 or so years if cared for properly. Still hoping to date it. Going to write the German museum to see if they can help in that regard. Cheers..1 point
-
Hi Mark and welcome to the asylum1 point
-
Thank you for your introduction Mark and welcome to this friendly forum.1 point
-
Hi Mark and welcome.1 point
-
Hi Mark, Welcome to WRT. I too collect, show off your watches in the thread " watch of today".1 point
-
I've always used Hirch straps they are very hard wearing and at around £25.00 for a padded one I think they are good value and I can get a good few years from one and a good range of styles available and their straps for fixed wire strap bars are very good. I do not think you would get any longer use out of the extortionately priced manufactures straps such as Omega and Breitling with prices starting at £200.00 even if it lasted 5 years you could still have many many years worth of straps at a fraction of the price of one branded strap they are another way of extracting money from the gullible.1 point
-
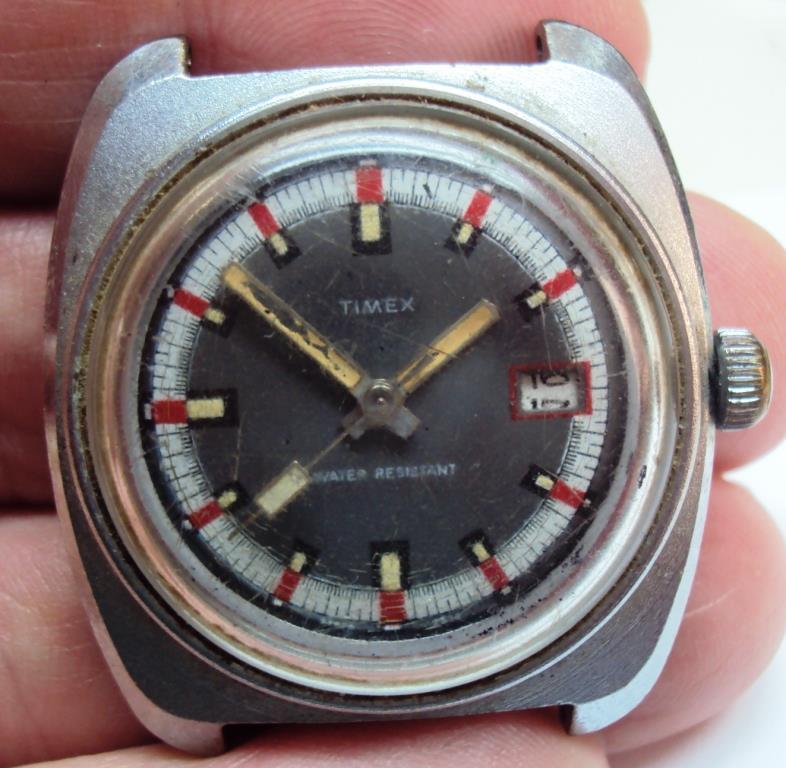
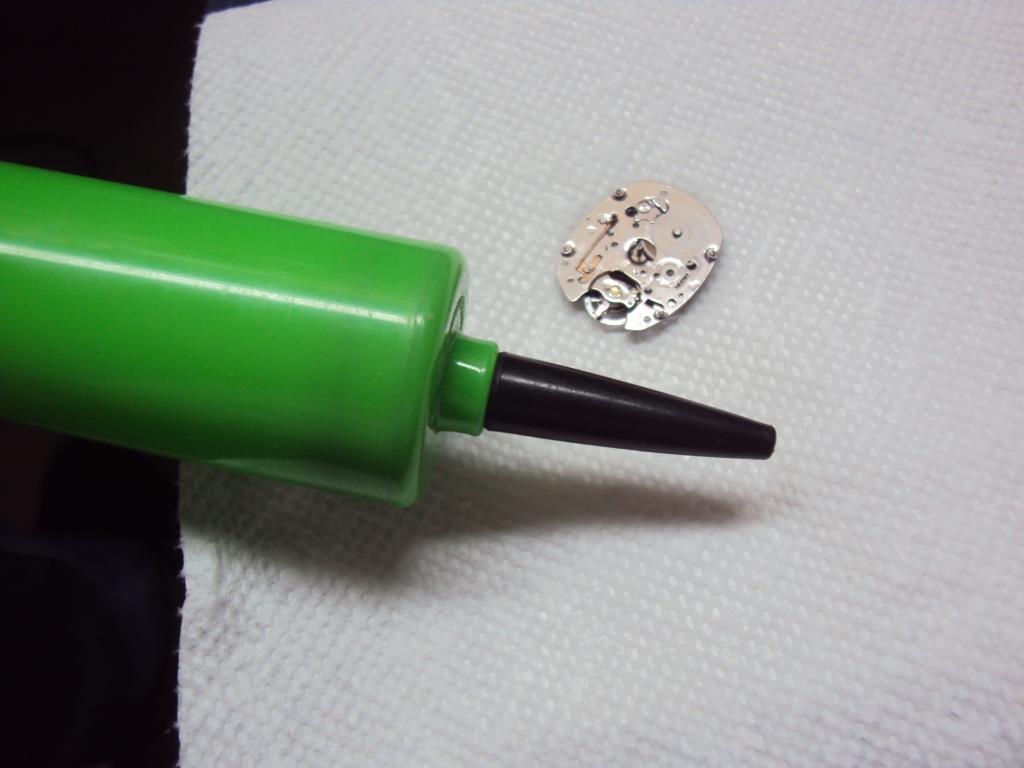
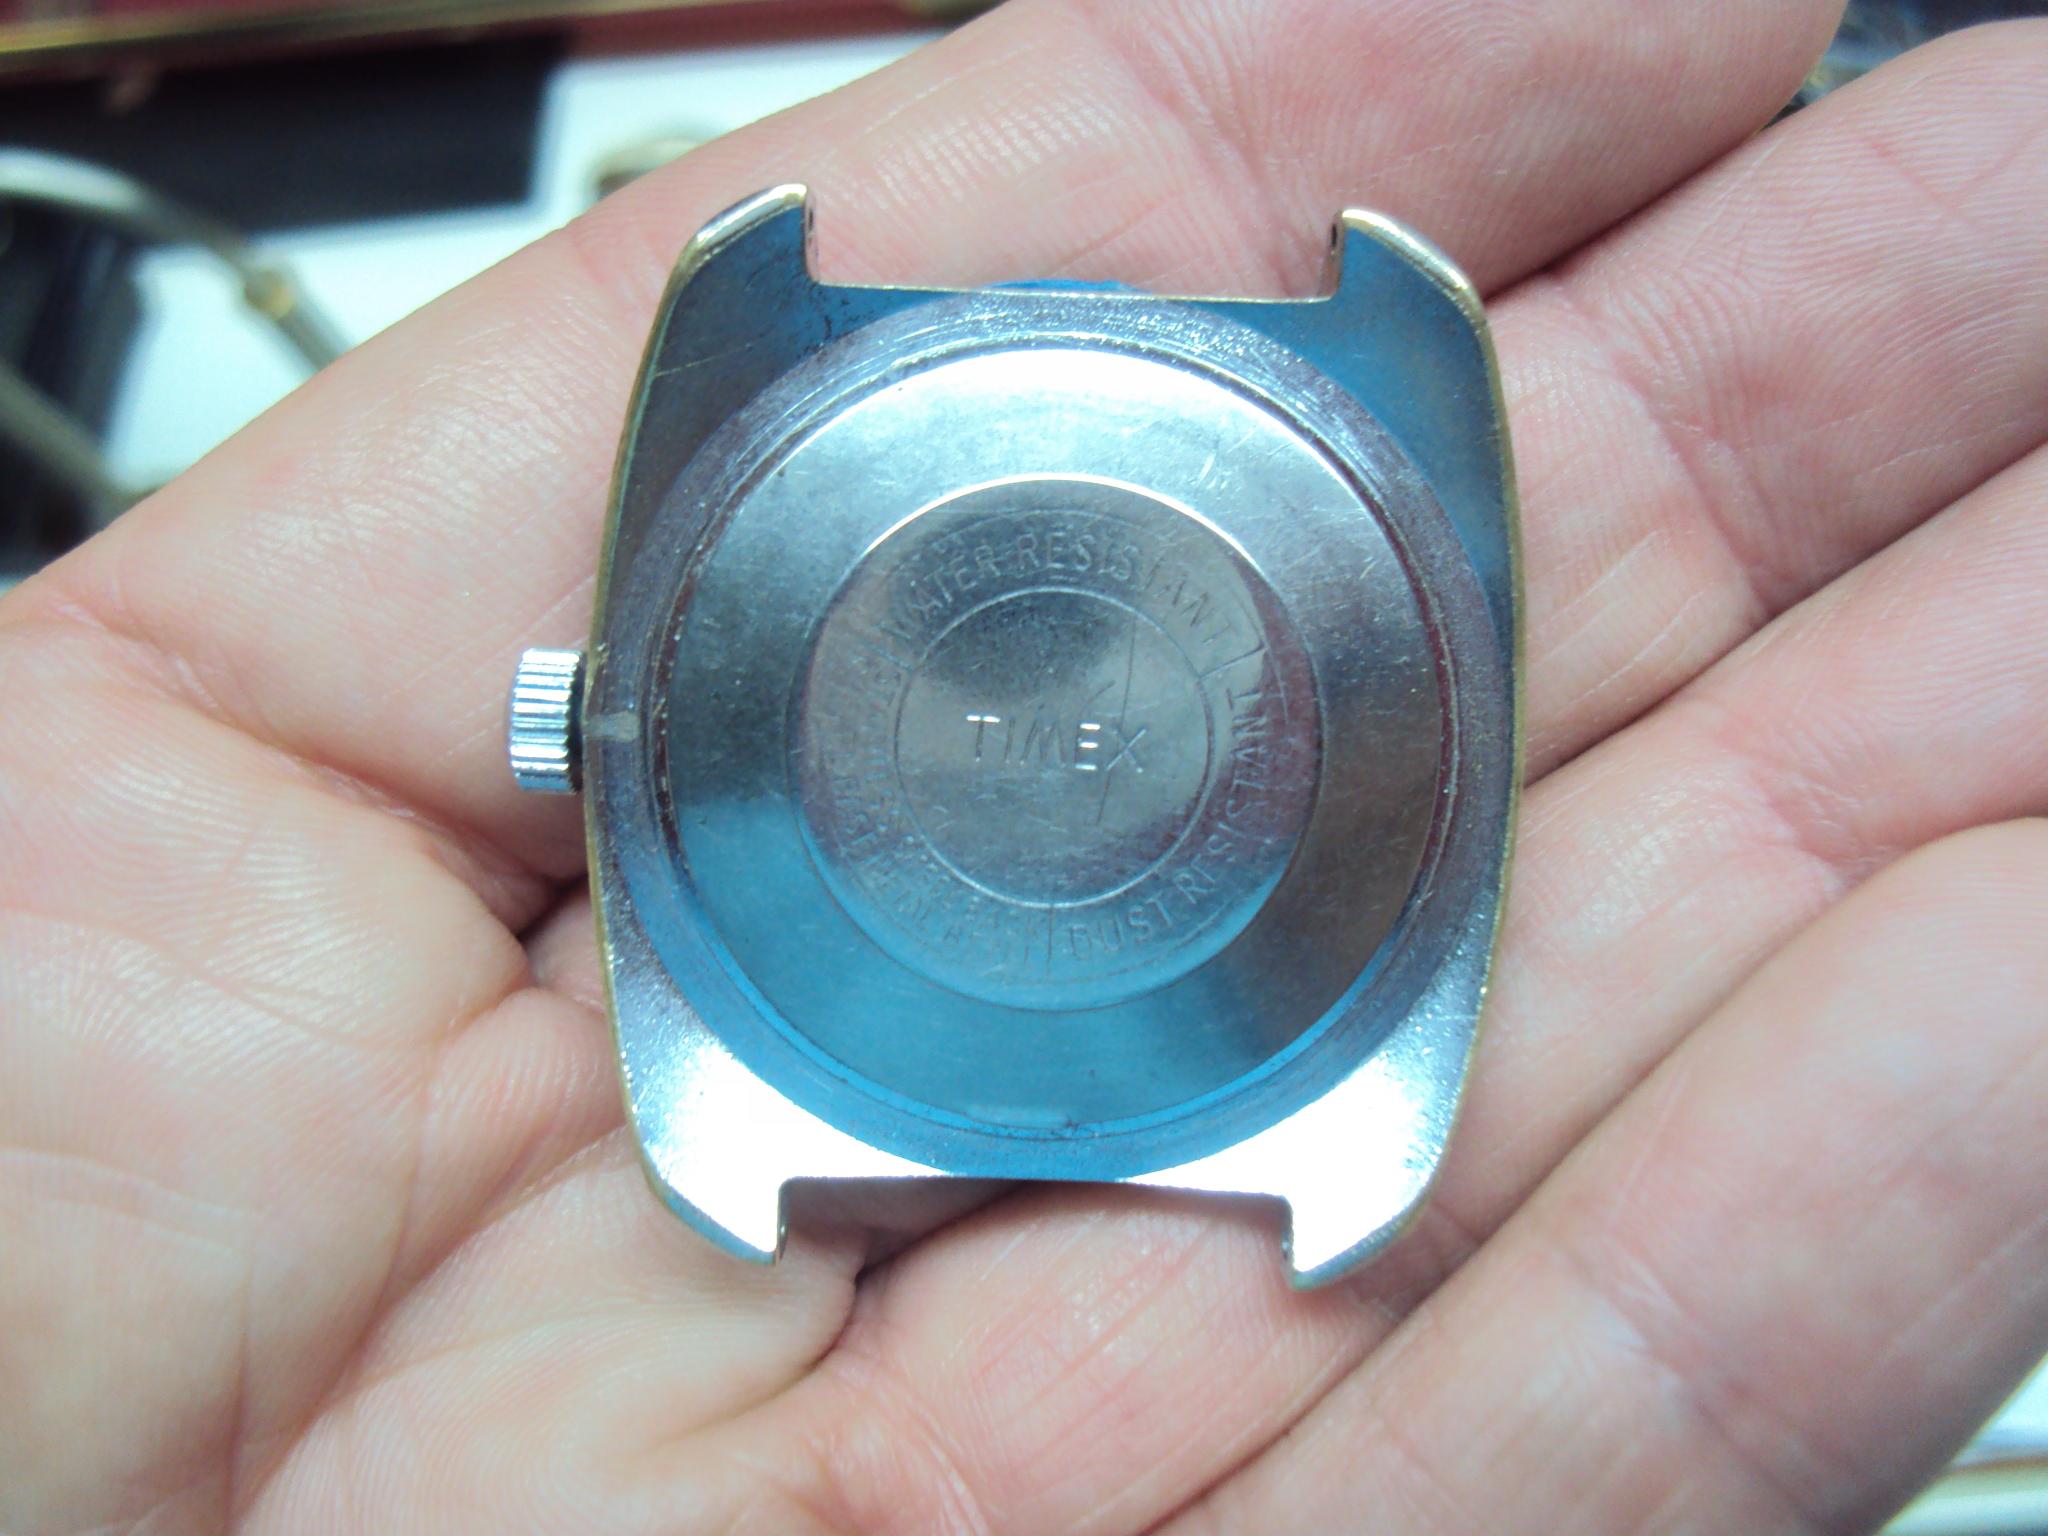
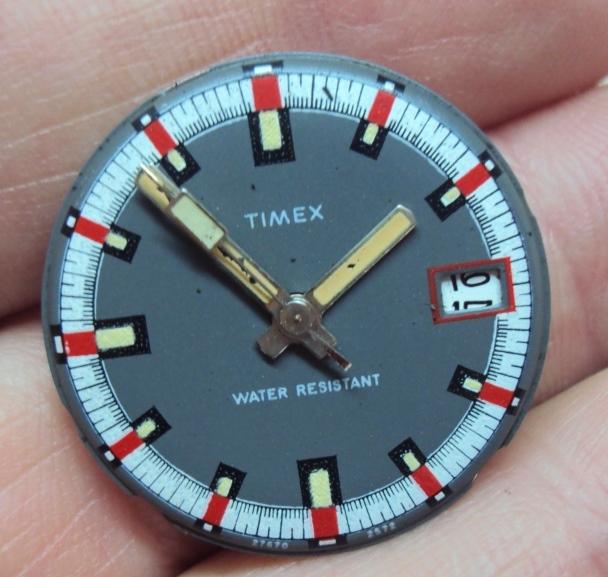
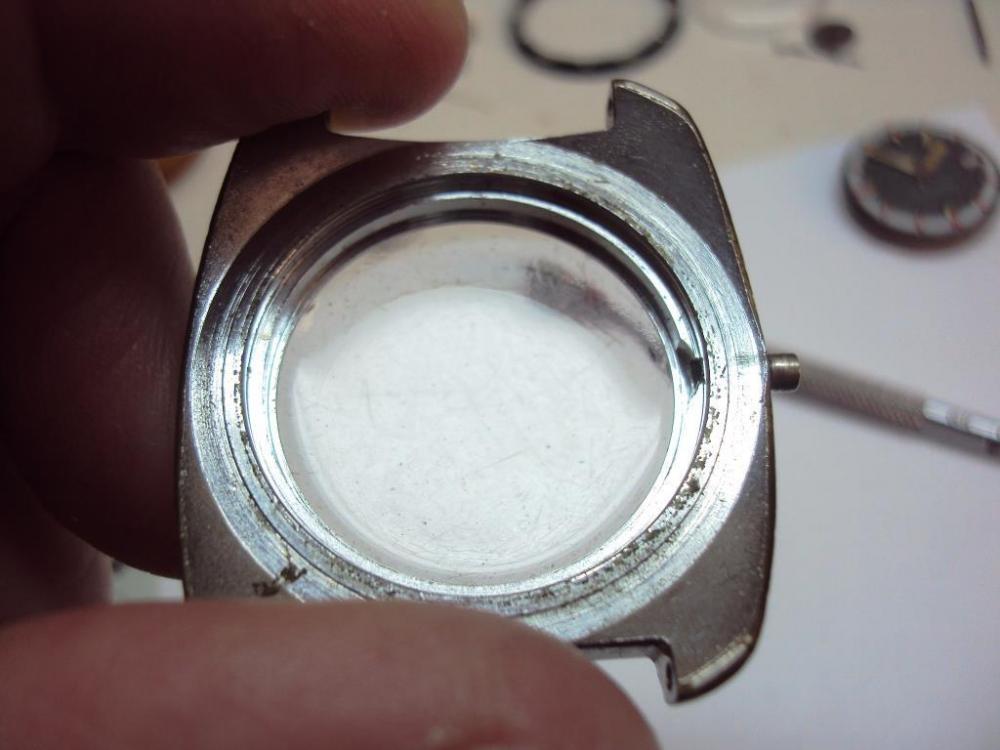
Hi Stu You are not wasting time most watches can be fixed the site expert on TIMEX is jerseyMo, Most timex were designed to be cleaned as is, remove dial and hands minding the dial washer and imerse in Naptha (lighter fuel) or alchol and leave on a kitchen towel to dry then have another look. The conical pivots on the balance wear but can be reshaped and the balance pivot cups get gunged up stopping the watch. I have enclosed the 1961 Timex manual in pdf some useful information in there. timex 1961 service manual.pdf1 point
-
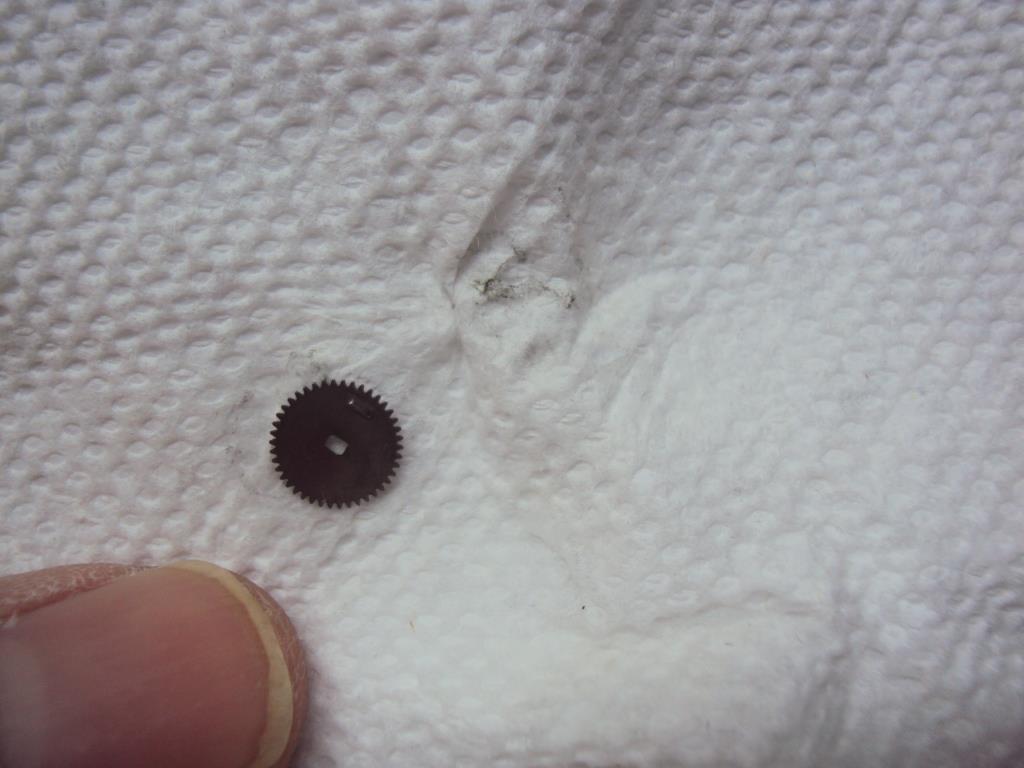
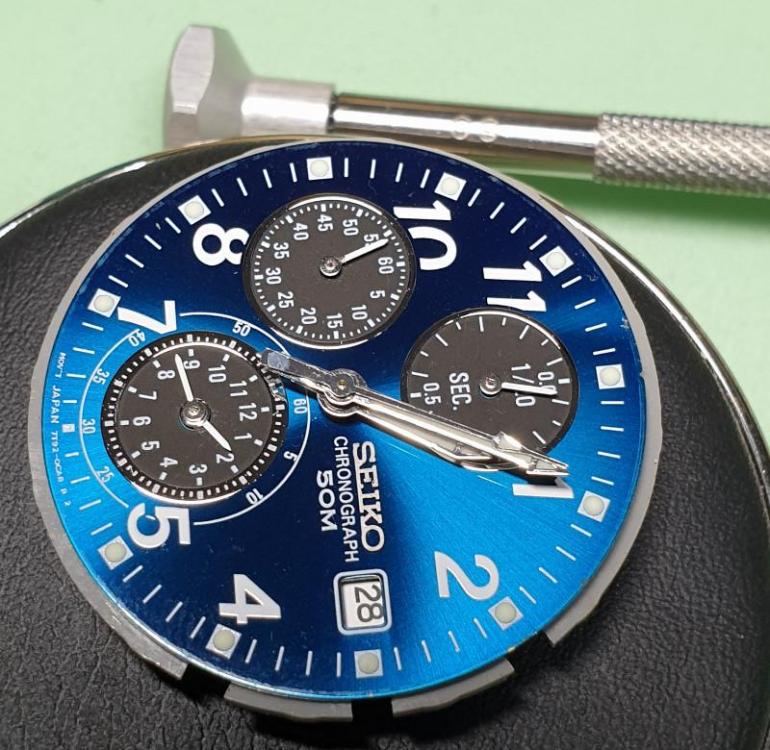
My son today gave me his Seiko Quartz Chronograph that he wears to school with the second Chronograph hand rattling around behind the glass. He tells me it just fell off, but I suspect the watch took a bit more of a harder blow as the minute hand and the large second hand were also knocked out of alignment and interfering with each other. This watch I had given my son a year or so ago after I had used it for one of my projects for my watch class and when I got it the chronograph hand had been loose and I had to tighten it up, so I wasn't overly surprised it had fallen off again. The easiest way to tighten a loose hand if to fit it into the end of a good quality pin vice and do it up so it is just touching the tube and then tighten it a few more degrees so it slightly crimps the tube. You then take it off and check and if still too loose repeat. I did this and the first time it was still too loose and fell back off, crimped it some more and it was still too loose, crimped it a third time and yes you can guess it I did it too tight and now it would not fit. If you do this you then need to broach it back out. I'm lucky in that I have a full set of watchmakers broaches that were my grandfathers so I had one small enough. I held the chronograph hand in my vintage hand pliers and broached it out ever so slightly, checked it was still too tight, so broached it some more and it was a perfect fit. Here is the watch with the hand fitted back on. It was the second hand sitting beside 9. I'm unsure exactly how small the broach was I used, but for comparison here it is next to the tip on my 0.6mm screwdriver and I only used the first 1/3 of the broach This is definitely the smallest hole that I have ever broached out and I'm pleased it worked so well. My son has his watch back so he is also pleased.
 1 point
 -
So - That's it... I hope someone gets some information and maybe, a little pleasure from reading this series of posts. These Nationals are likely to become increasingly rare, especially working examples, as it seems a certain generation of older watchmakers are disposing of their ancient equipment. Or more likely, and sadly, the descendants of older watchmakers and repairers dispose of their loved one's estates and wonder what can be done with this heavy old bit of junk in Grandad's shed... I really enjoyed working on this old machine and putting it back into useful service as my own, hobbyists watch cleaner. As well learning a little bit about the business of Mr Saul Lanzetter and his National brand and some of the patents in his name, which may or may not, have led to many such machines and their derivatives being sold all over the world. All that remains now, is to find a watch of mine that is next in line for a strip down, fix, clean and rebuild and put this little machine back into productive service. To that end, I'm waiting for the new 7750 video by Mark due anytime now. Ok - now where exactly did I put that tired old Valjoux 7750 when I cleared the decks for this old thing?
 1 point
 -
A video maybe... (if my upload works) It's not often these machines turn up, and less often they turn up working, so I feel justified. No commentary, just the noise of the machine itself. Dunno how it will sound to you, but right in front of me, its nice a quiet and completely unobtrusive. I start from switched off, turn it on, advance the control to what I think is likely to be normal for use in liquids. Finally turning off. Sorry - Francis Ford Coppola I'm not! IMG_1572.m4v1 point
-
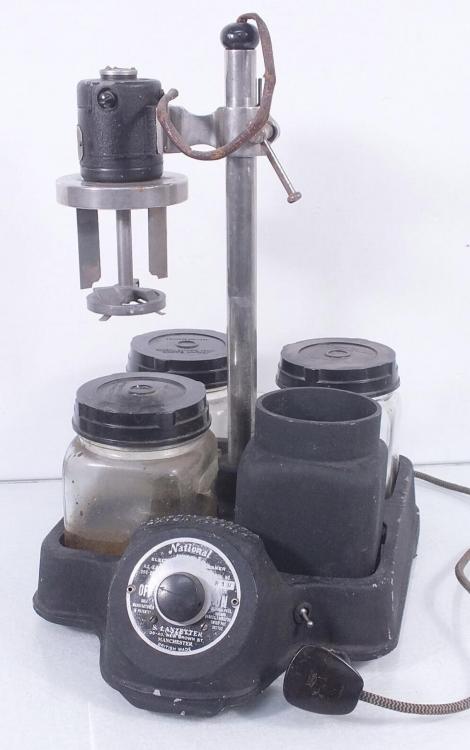
The "After" Shot. So - here it is after the work was done. I think it is a sympathetic restoration and I have tried to maintain the original look and function of the machine and have kept all of the real replacements out of sight. It looks well to my mind whilst still managing to wear it's age well. TESTING Speed control - easily controllable, steady speed when set. The new controller does have a different operating range than the old one. The new controller (when the power switch is ON) provides a minimum of 30 volts to the motor. This is not enough to move it in any visible way. Advancing the controller till the motor begins to move and I measured around 130 volts at the controller output. A slow and steady rotation happens when the control is further advanced and the output at this point is around 150 volts. Around 160 to 175 volts is needed to obtain a steady rotation at around the operational "washing" speed. This seems about right as the motor will rarely (if ever) be operated flat out. Over all speeds, the motor exhibits no detectable RF interference, according to my RF Test gear, so I'm guessing the new controller is well suppressed as standard, and the motor itself is not noisy. The heater was also measured for surface heat temperature and self-regulation. Essentially I just turned it on and measured it over a period of around 15 minutes. The surface temperature quickly reaches around 170C to 180C (after about 5 minutes), and seems to maintain that temperature fairly steadily, not really varying by more than about 10 degrees. Hot enough to burn yourself if you touch it, but well out of the way with the "tunnel" installed. Heat at the top of the tunnel was estimated to be no more than around 45 degrees (rising air temperature) with the tunnel itself remaining cool to touch over a test period of 20 minutes. My recommendation would be to turn the heater on when you start the first wash and it will be ready for you when needed at the end of the second rinse.
 1 point
 -
I think you made a great purchase, and yes, I admit bias. They are very robust machines that have already lasted likely over 60 to 70 years, and with a bit of TLC, should keep on going and providing useful service. Your machine looks to have the separate on/off switch for the speed control, which mine does not have, but is still identified as a Model 1, as is mine. Yours has a much better makers plate on the front than mine, so maybe has not has as much use. Hopefully then, yours will have plenty of life left in it. For cleaning fluids, I’m going to go with something very original. I have yet to find out exactly what the National recommended fluids consisted of, but are likely to be similar to what I am going to use. Now I know this risks “many” opinions from others as to what their particular recommendations are, and I respect that. But, all I am going to say is, this was always good enough for Elma, so it’s good enough for me, at least to get me started as a hobbyist. I will likely only do one cleaning a week and not on a commercial basis, so this will do nicely. For the first wash, I plan to use Elma 1:9 cleaner which, as it is named, is diluted 1 part cleaner, to nine parts tap water. Elma themselves say that tap water is OK as the formulation allows for this. For the first rinse, I will use de-ionised water, again in line with recommendations from Elma when using the sequence described. Final rinse will be Elma Suprol. Followed by a spin-off and then heat drying. I have not found any instructions for the National yet, but as these machines are all so generic, the Elma Instructions for the Super Elite, should easily work well for both the sequence, timings and cleaning fluids. (They are described in the attached instructions.) Others will also have their opinions as well, so we can always experiment to find out what works best in our own situations. I have uploaded the Elma instructions in full, which are freely available for download direct from Elma, Cousins and Walsh, so I do not believe there should be any copyright issues as long as they are reproduced in full. I’m looking forward to hearing about your National when you have time, and I hope That my ramblings here help out in some way, to get yours back into productive use. Instructions For HC511 - Elma Super Elite Watch Cleaning Machine.pdf1 point
-
With a lathe I can now precisely modify or start making my own tools. Milled the corners to a proper shape and now it grabs a lot more securely. The Taig milling attachment is a great, just as the seller is, Nick of cartertools.com
 1 point
 -
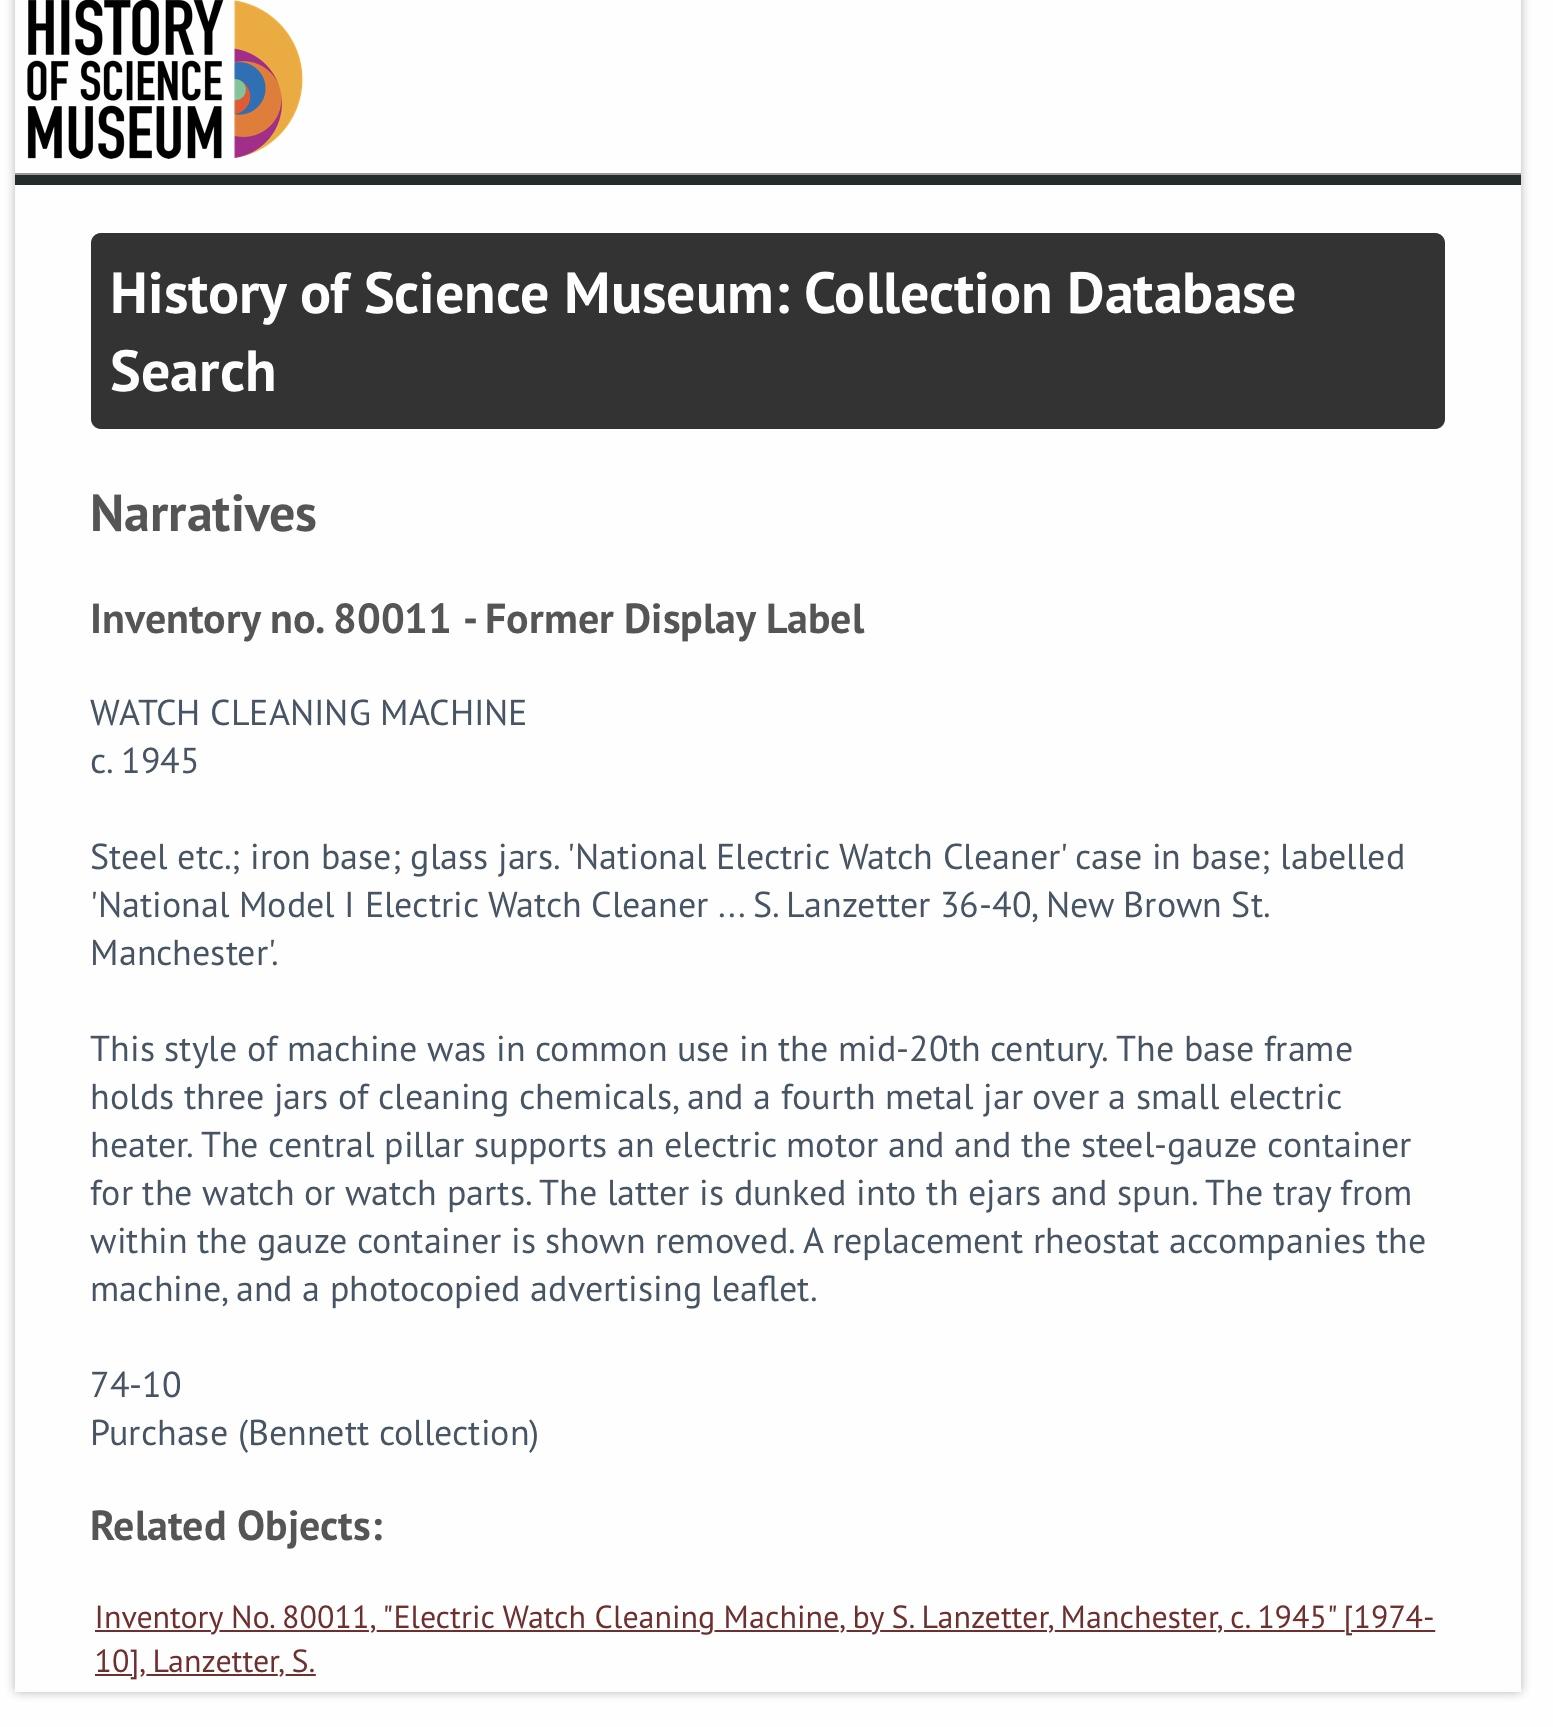
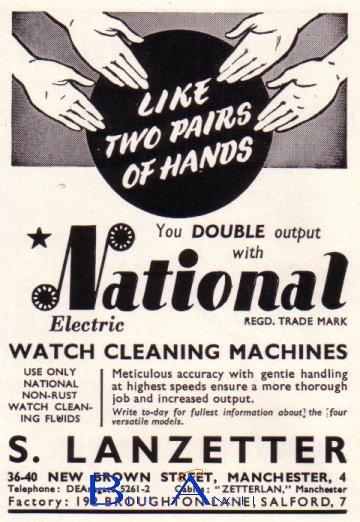
I have been doing a little research into these fine old machines and found some useful background. The National brand was used by the company S.Lanzetter of Manchester. That much can be found out easily by simply reading the information on the makers’s plate. It seems that S.Lanzetter was one of the key members of the Jewish watch making and jewellers community in Manchester from around the turn of the 19th century. At the time, they were a very well known watchmaker’s materials and machinery supplier, and also responsible in their own right for patenting some key items. Such as this particular style of watch cleaning machine ( and other variants) from around 1945, electric soldering machines, and watch crystal cutting/grinding machines. i managed to find a reference to a National Watch Cleaning machine that is retained in the UK’s History of Science Museum. I have included their extract for the item below. It describes the typical layout and functionality of this type of machine perfectly and mentions a spare rheostat, that seems to have been supplied with the exhibit. I would be interested to know which company copied what, as the original Elma machines were pretty much identical, and it gets me thinking if the National, as well as later National designs, pre-dated them all? Who knows... What I have further identified were other versions of what the manufacturer refers to as their “Model 1”. I have seen what appears to be later versions of model one that have an additional switch, which I presume isolates the rheostat and thus provides a proper off switch, rather than just relying on the rheostat being set to minimum (as mine is). A further version of the model 1 additionally has a small indicator lamp on the rheostat housing, indicating if the heater is switched on. Again, mine does not have that. This leads me to assume that my model 1 is one of the early versions, which perhaps dates it to between 1945 to 1950. As this makes my machine likely to be around 60 to 70 years old - I feel like I am restoring something quite special, even though it is quite an ordinary machine. I have also found an old advert for the National brand(as applied at the time) which may be an example of the advertising copy, as referred to in the science museum entry. This is really “of its time” and a delightful reminder of the whimsical advertising style, typical of the 1940’s and 50’s.

 1 point
 -
I don't think I have enough axes to grind to justify the cost.1 point
-
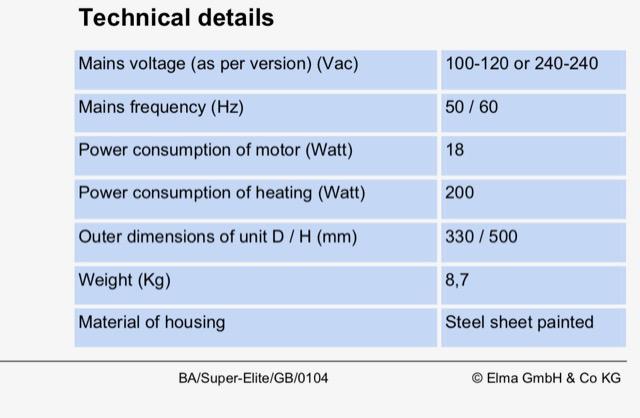
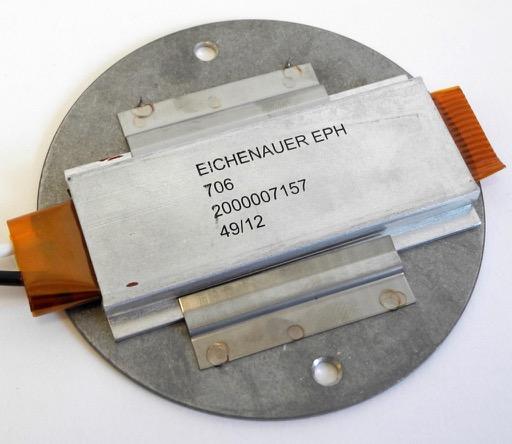
No suppression in sight. Again, typical of its age I guess. I am also a licensed Radio Amateur so well aware of looking out for and solving interference problems. As well as not annoying the neighbours, I have no intention of wiping out my HAM radios either. All those plates you see on the rheostat almost certainly contain asbestos as mentioned, but they are bonded into those plates and are in very good condition for their age. I have "fabricated" a plastic insulation shield that encloses the rheostat and provides much increased protection. Having said that - I have also, already ordered a more modern 240v motor speed controller as well which will arrive today. I'm pretty sure that even with the "new" protective cover - I still would feel uneasy putting this back into service, so will likely panel mount the new controller in the space vacated by the rheostat. I hope the measurements I took off the replacement are accurate, as it should be a straight swap (if I am lucky). I may even be able to use the original rotary control knob and maintain a bit more originality... Anyhoo... Having cleaned and painted the base (with rattle-can black Hammerite) I turned my attention to sourcing a replacement for the heater. My main design criteria was that It had to perform like the original, and fit in place of the original. Clearly finding a spare part (even if likely, which it is not, not without cannibalising another original machine and goes against the grain somewhat), would mean that I was re-introducing an old (unsafe) element, after taking away an old (unsafe) rheostat. This did not make logical sense. So something new was needed. Thee replacement heating element for the Elma Super Elite (RM80/RM90 etc.) are still available and they look like they would do the job, but are £45.00 plus postage from everywhere I could find them. This is the specification for the Elma Machine and a photo of the spare part. The spec. shows that the power consumption of the heater is 200W, which is important to know. A quick examination of the wiring diagram (found elsewhere on the forum) shows that the heater has no external temperature regulation circuitry, and therefore must regulate its temperature by itself. I recognised the heating element (the rectangular thing) as they are the sort of heater used for equipment cabinets etc. for frost protection and providing other low level heating needs. They are PTC elements, available in a variety of outputs and crucially, can be switched directly across mains voltage and self-regulate their temperature. They are easy enough to find as the likes of RS Components and Farnell (other suppliers are of course available). So - I ordered a 200W 240V element for about £23. This would provide the perfect solution for my application. Incidentally - As the Elma cleaning machines themselves are somewhat "vintage" these days, their original spare part heating elements are also likely (if they are not already) to become rare things. Therefore, knowing how to source replacements is useful to know. The Elma spare part comes with the circular metal disk (heating plate), but having a look at how the element fits onto it, looks like it just slides into those two grooves. Anyway - the solution to my National machine was sourced and the next instalment will cover fabrication and installation.
 1 point
 -
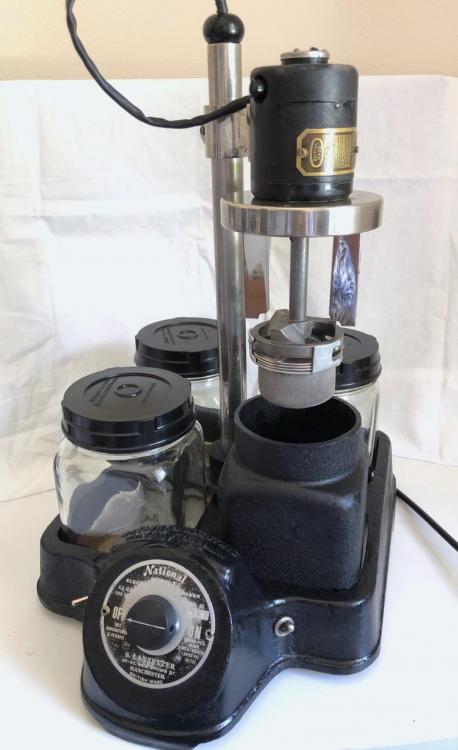
I have recently purchased a National, Electric Watch Cleaning Machine. Attached is a photo for reference and identification of the model type. As can be seen, it has a fairly typical design, reminiscent of many other types, particularly Elma Super Elite. In fact, I do wonder which came first - the National or the Elma. My musings on this point later. This is a very old machine, circa late 1940’s, 1950’s, but they seem to turn up sometimes on eBay, in various conditions ranging from the “beyond hope” and only really suitable as a donor for parts, and the “old but serviceable” and might-be-worth-a-punt-on machines. This one fell into the middle somewhere, as it was a bit tatty and the heating element did not work. On the plus side, it had all its original cleaning fluid jars and lids, and the motor and speed control gave smooth, controllable spinning and no play in the bearings. I went to visit the seller to inspect it and we did a deal on the spot. This is not always possible on eBay, but as the seller had listed it as for collection only (due to its weight), it was a possibility on this occasion. Once I had it home and gave it the once over, I decided that I would have to either do without heating for the drying stage, or find a replacement element. At the same time, it was very obvious that all of the original cabling was not safe to leave in place and it would all have to be removed and replaced. Any other electrical parts deemed unsafe would also be replaced as I inspected them. So - the idea of a restoration (of sorts) was born. Now - it is not my intention to restore it to the point where it could pass current electrical safety standards, but I will be making it as safe as possible, without losing any of the essential character of the original machine. This is not going to be for resale, so being safe to use is an acceptable compromise, in my opinion. I will however, perform testing on it once the electrical work is done, to make sure that the essential aspects of earth leakage, earth bonds and polarity etc. are passed. (PAT Testing included.) Whilst this is not likely to turn into another example of a superb restoration of an Elma Super Elite (as seen elsewhere on these forums), I hope at least to have at the end of it, a perfectly serviceable watch cleaning machine, and a restoration story - of sorts - of a vintage piece of English watch making and servicing machinery. So first off - the before pictures. This one is a good view of the machine and its cosmetic condition, as purchased. The base is a heavy, cast alloy jobbie, with its original crackle paint job beginning to flake away in places, where the years of cleaning chemicals have attacked it, but generally sound. The jars still had residues of cleaning and rinse chemicals present. The first wash jar (front left), was particularly grotty and can’t have been cleaned for years. Fairly ironic not to clean the thing, that cleans the things! Maybe it was just left unused and unloved for many years. The mains cable was a cloth-bound type I have not seen in years and could well have been original as it still had the old UK wiring standard colours of red/black/green. Also adding to the vintage-ness, was a very old, Bakelite three pin plug. This must have been one of the first of its type as I have not seen one in brown Bakelite before! (And I am 62...) Anyway, that’s enough for now, as I’m not even sure anyone wants to read much about such an old machine. If anyone is interested though, please add comments and I’ll add to the story as I make progress. At the very least, I hope I have found a potential solution to finding/ making your own heating elements for these old machines, which could also include providing replacements for Elma Super Elite, RM80/90 HCS511 etc. Machines. More details later...
 1 point
 -
Hi all, I'm using WOS 1.3 and I like it very much. I had some problems (freezing oscilloscope view) on a particular laptop (Lenovo with Realtek soundboard) so I moved it to an Asus Laptop; no more problems. I noticed that my old Timetrax ticking sensor was picking up a lot of noise from the surrounding ambient, surely related to 50 Hz mains and other sources, like LED lights. I looked at the cable connections: There were only one "hot" wire and a shield, connected to both the piezo ground side and the plug ground side. That creates what Audiophiles call a "ground loop", acting as an antenna to pick up the noise. So I replaced the cable with a good quality shielded Microphone Cable, with two wires inside and a good shield. The shield was connected ONLY to the plug ground side, and left "floating" at the sensor side; that's the important trick. Now the noise is reduced to near zero; I checked with an oscilloscope, and by hearing it at the output of the Timetrax amplifier. Hope that this will help some of you, Paolo from Italy1 point
-
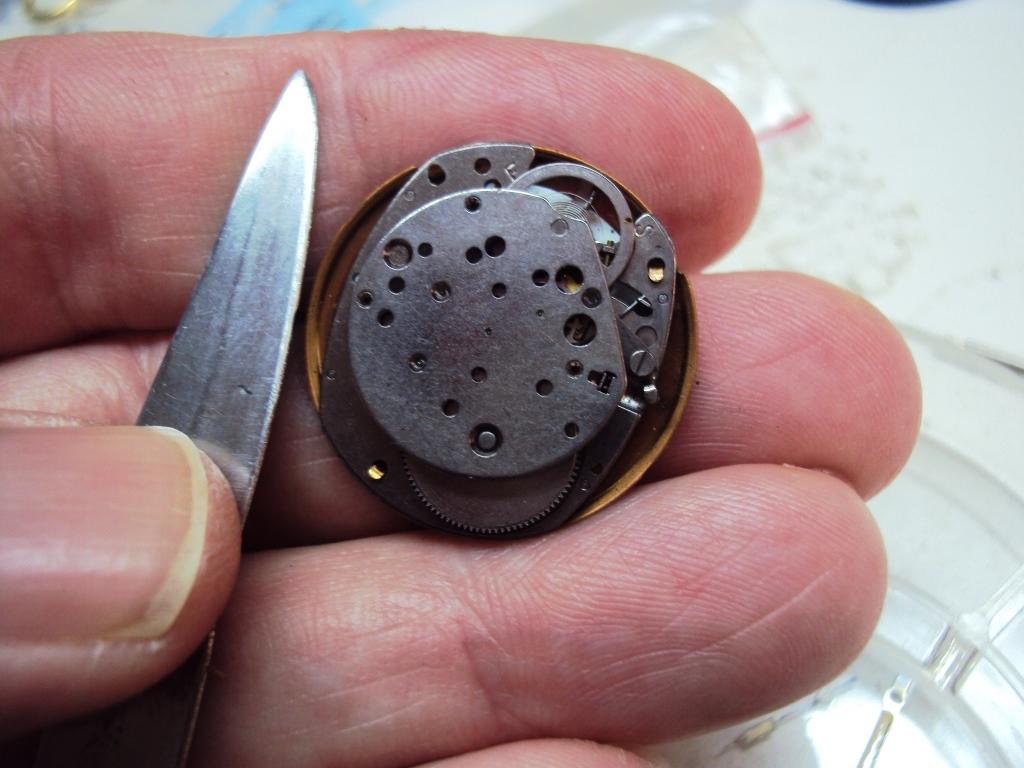
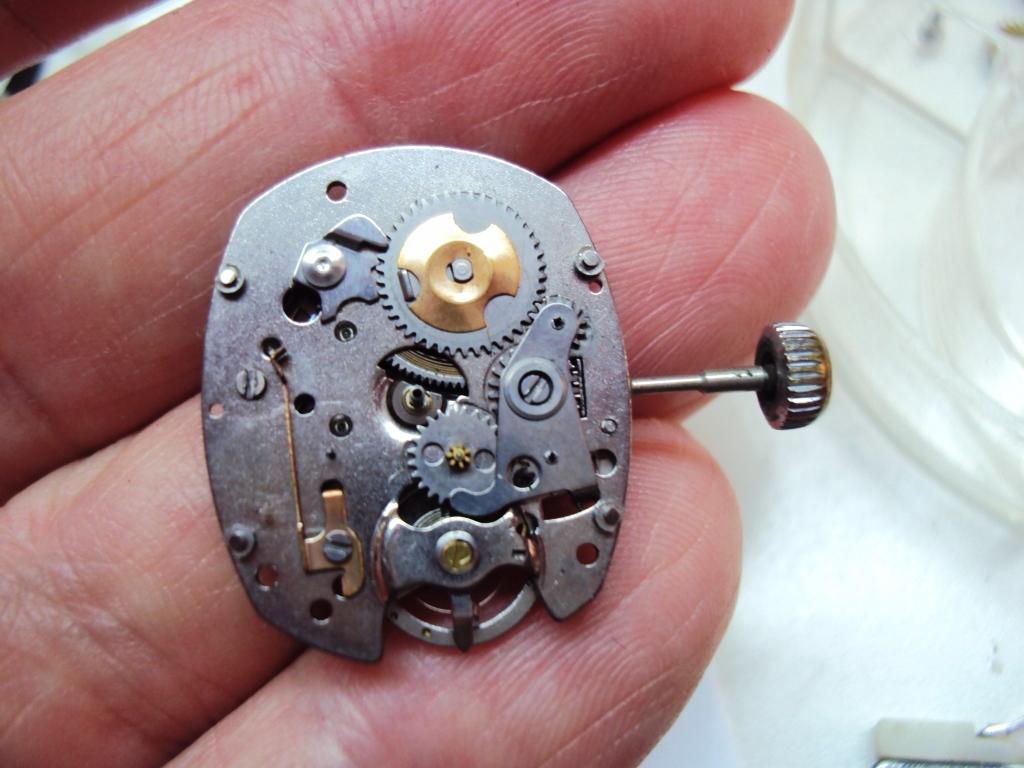
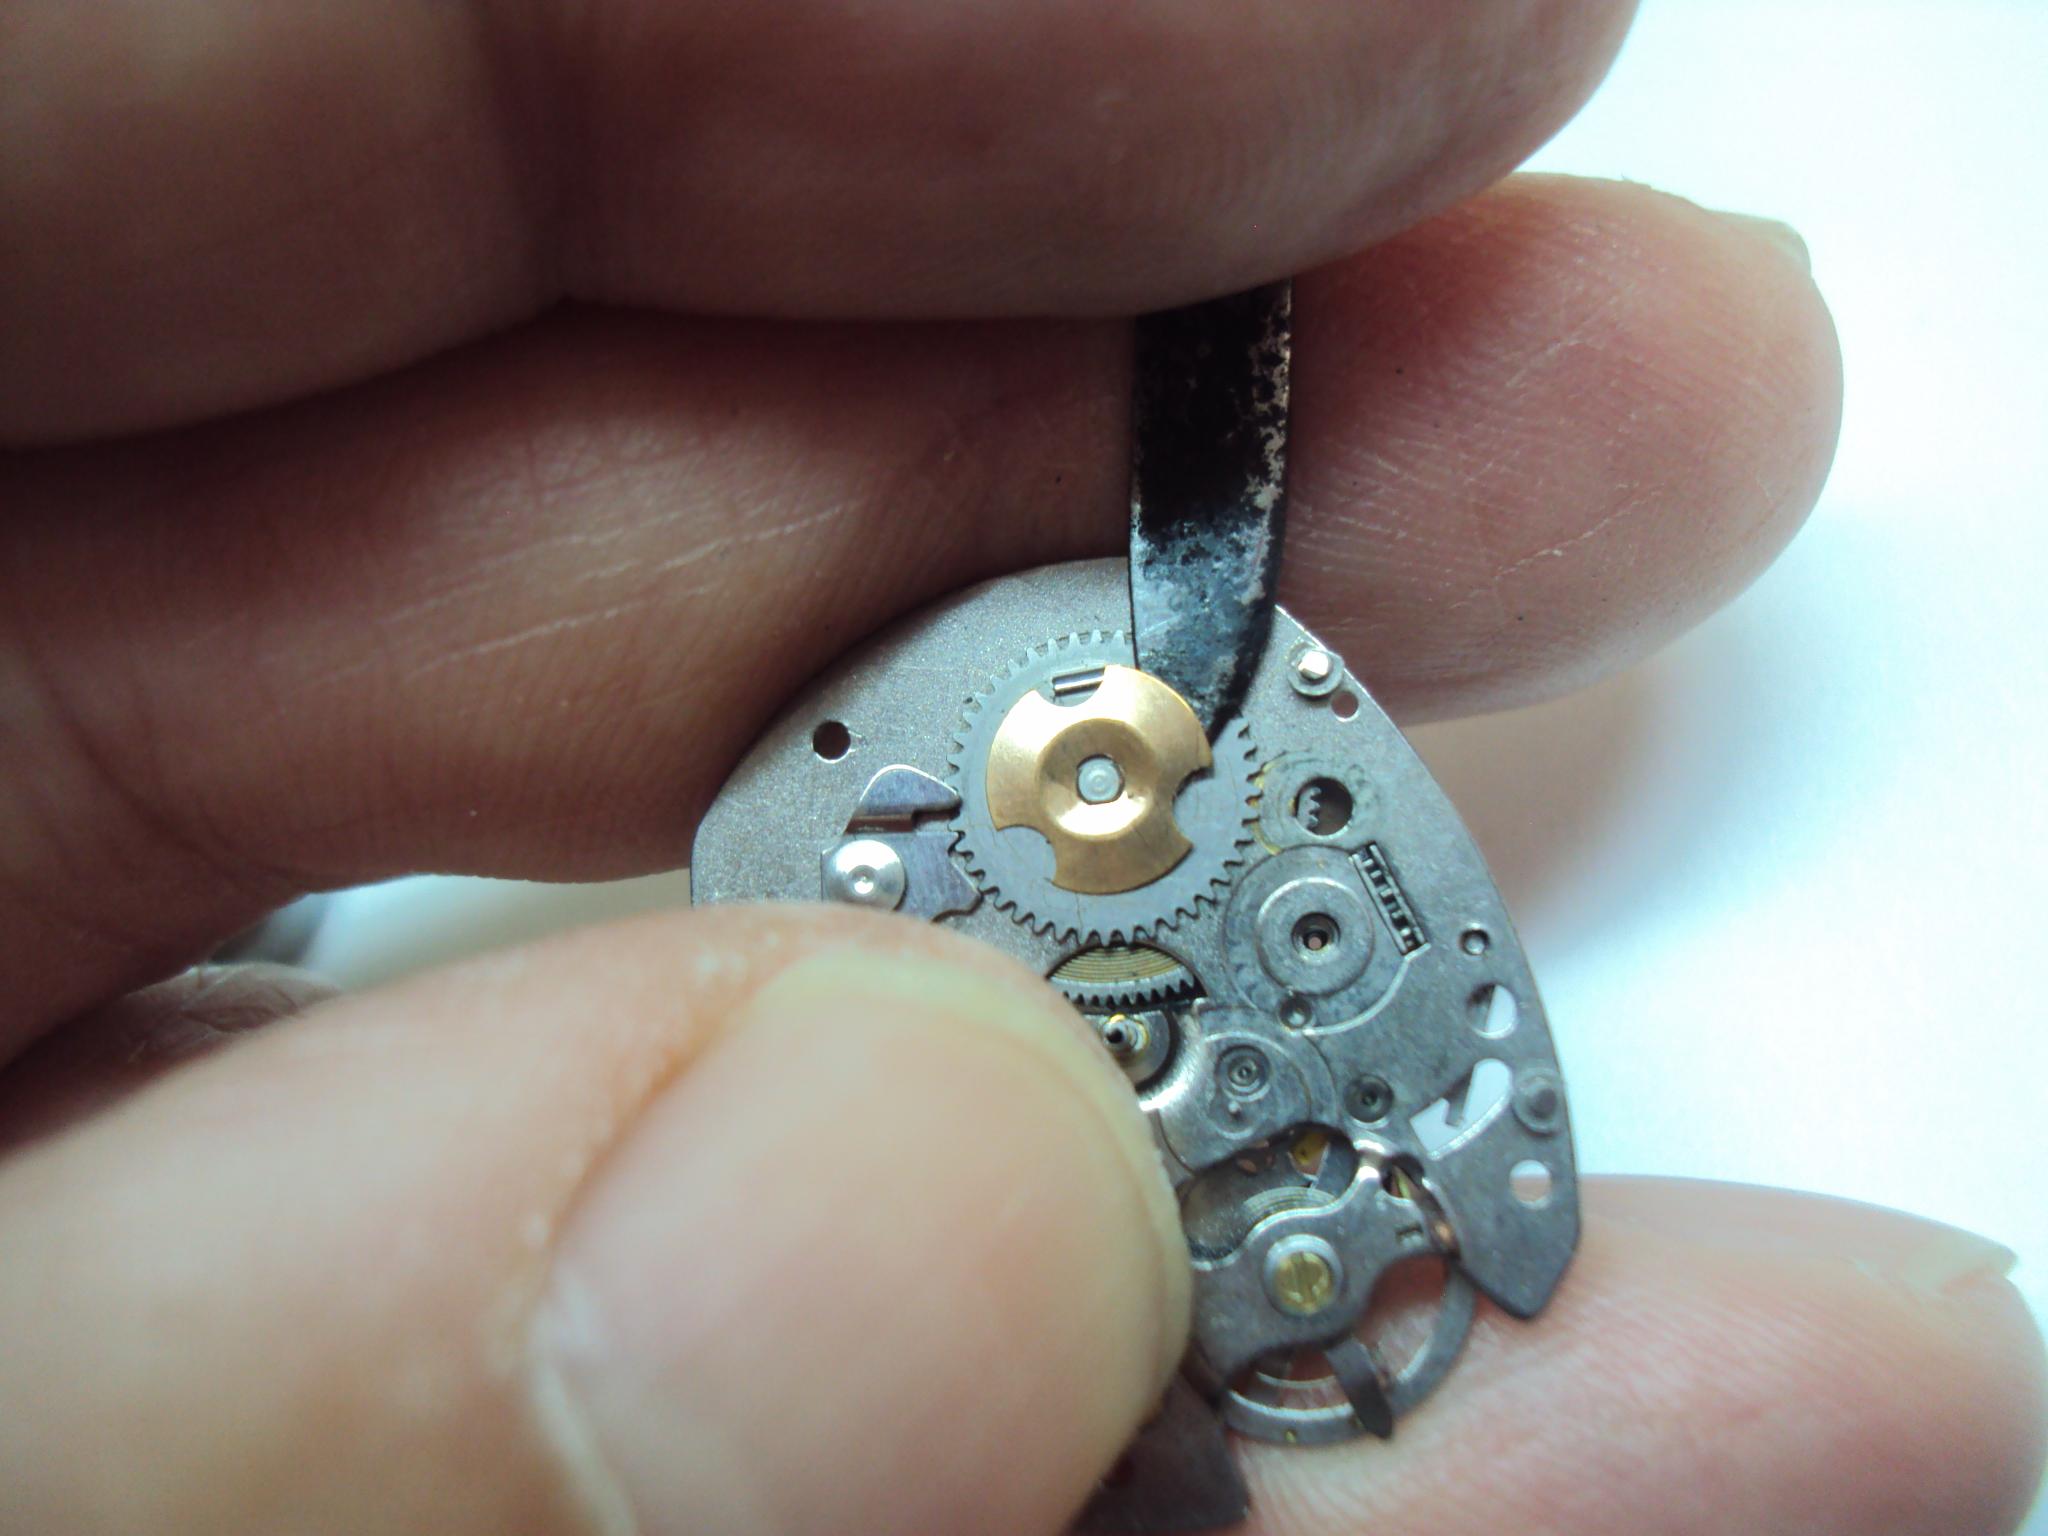
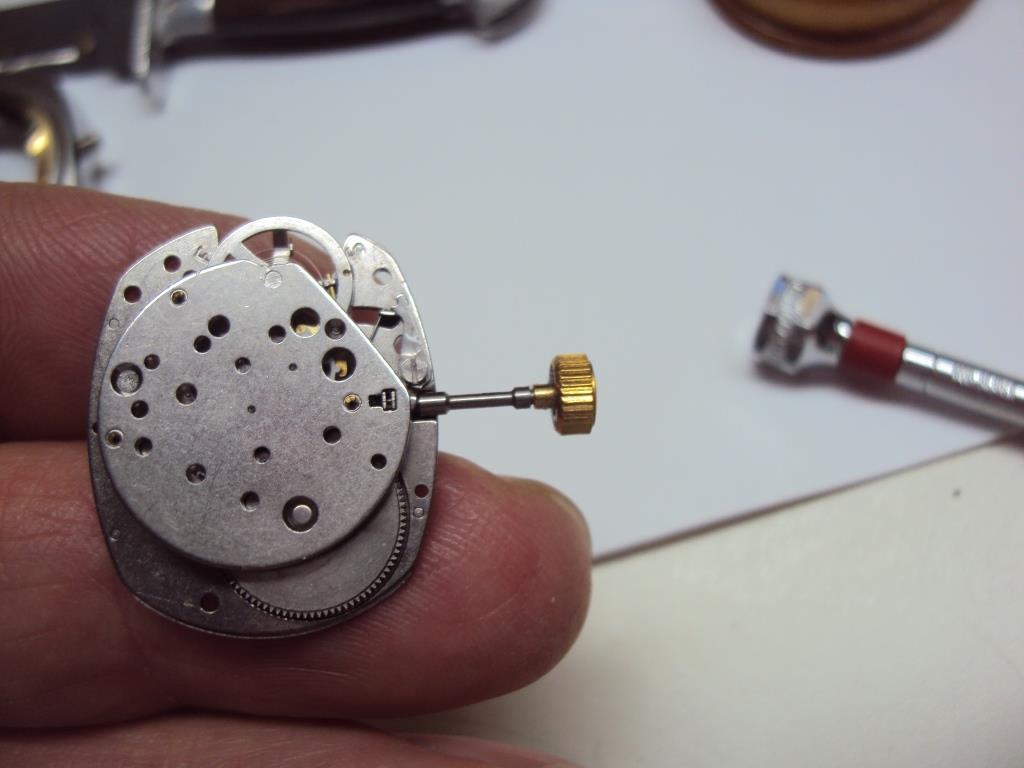
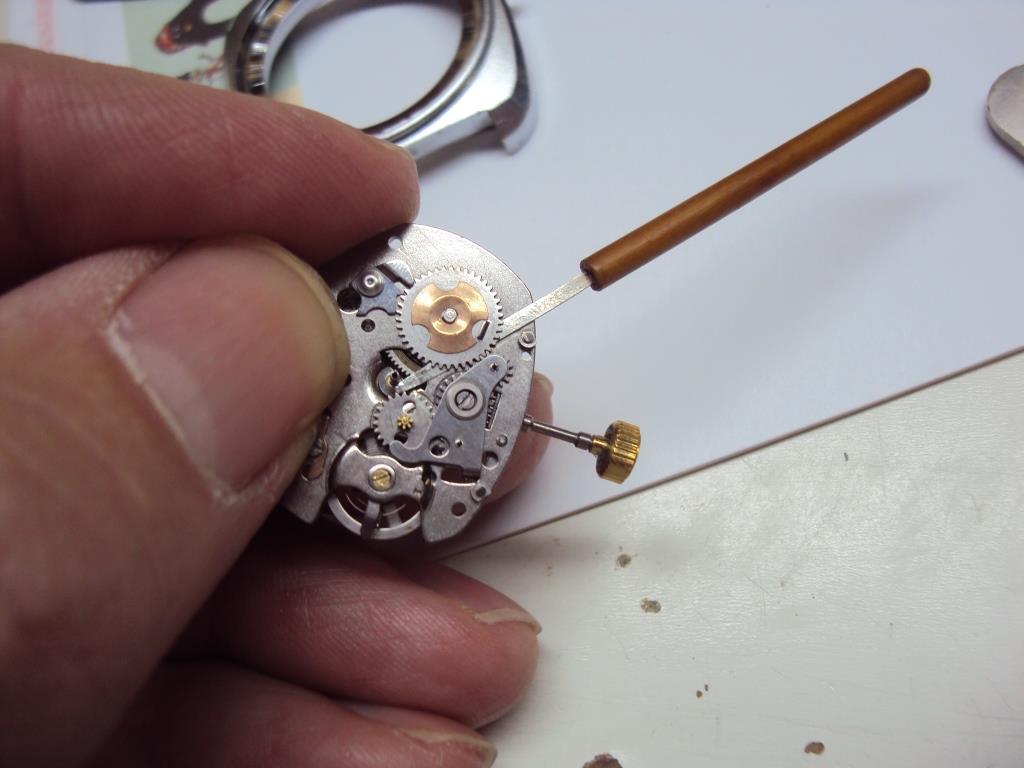
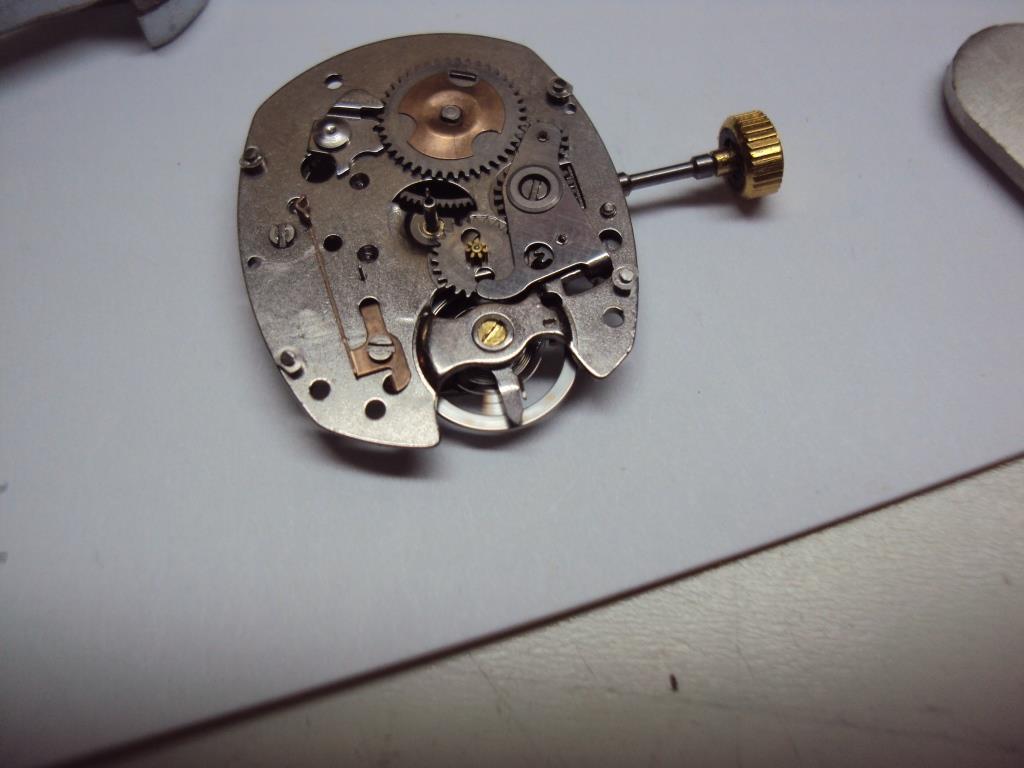
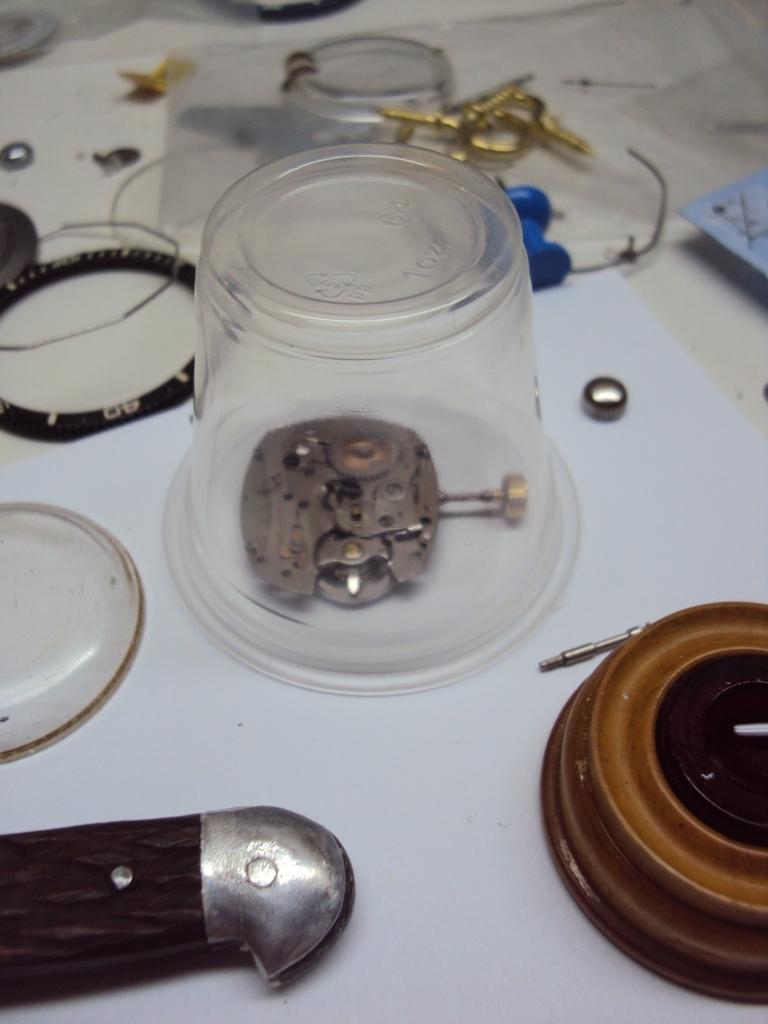
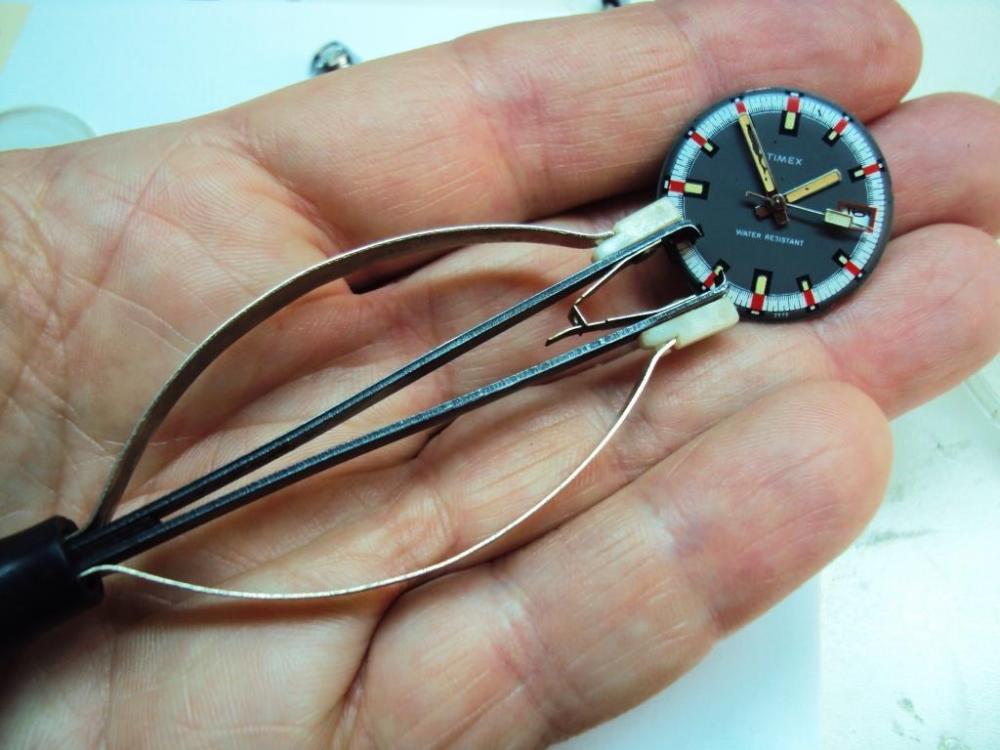
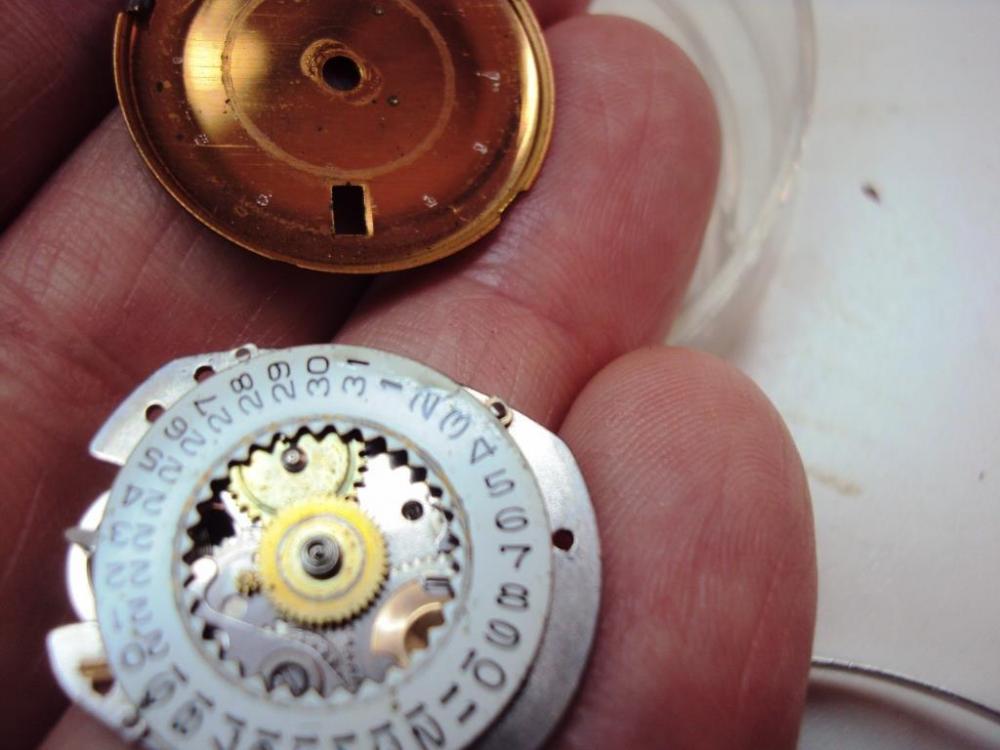
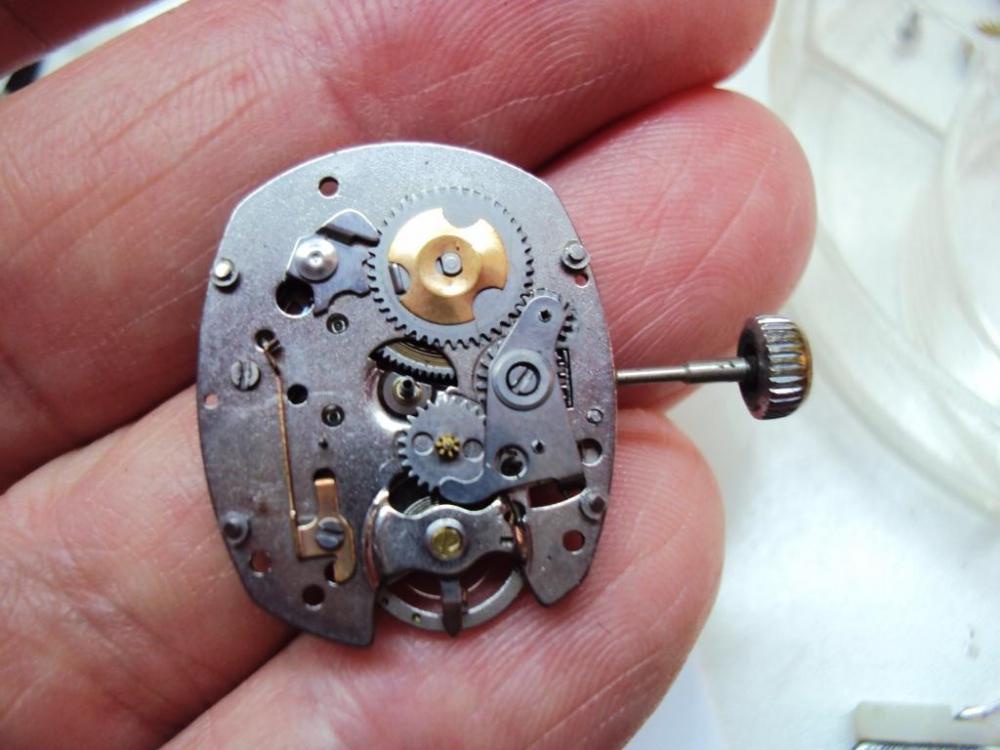
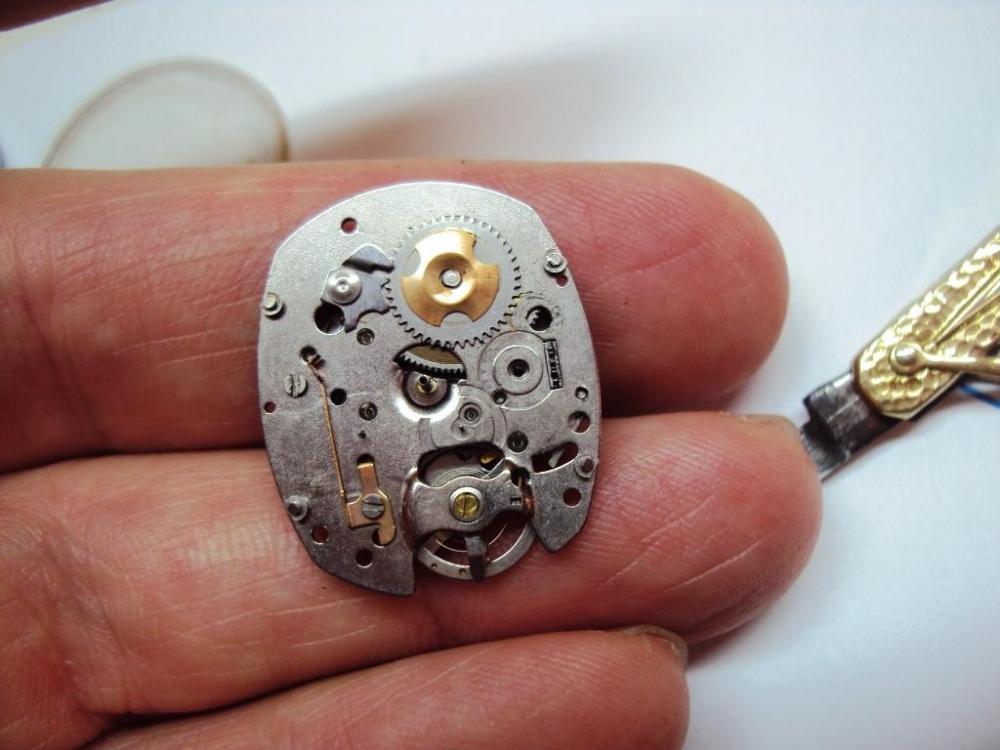
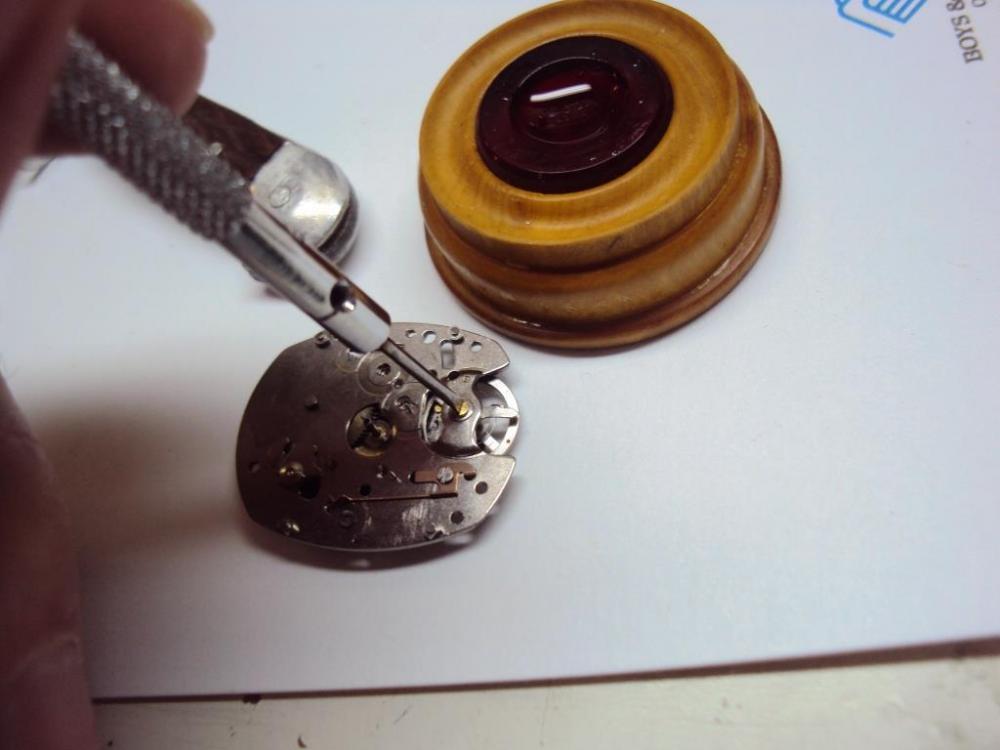
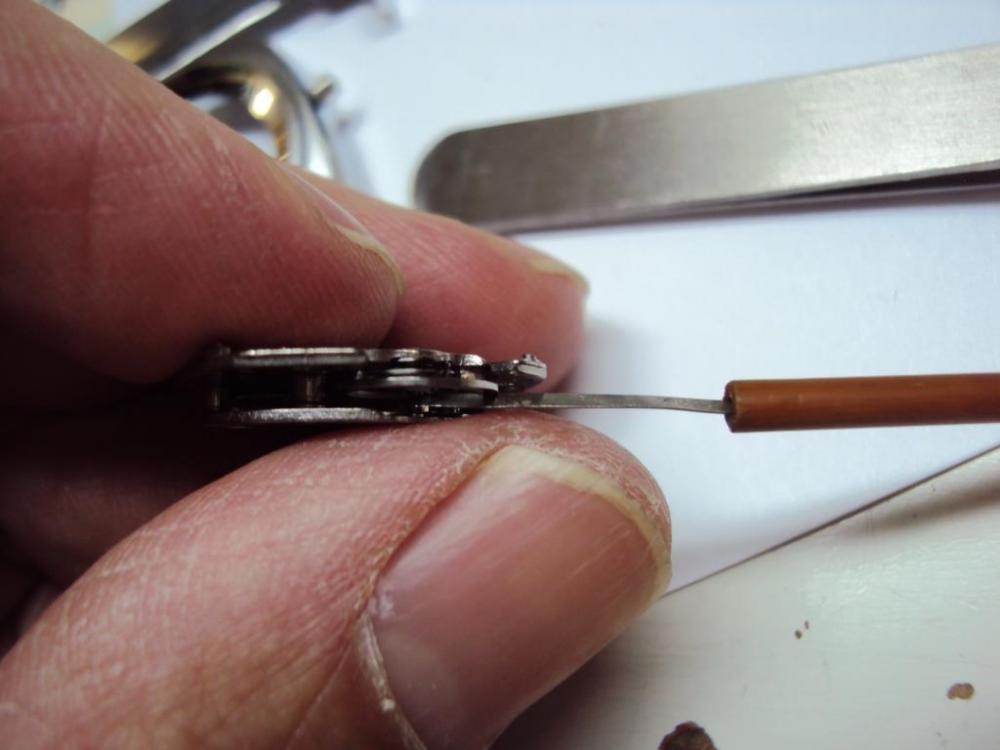
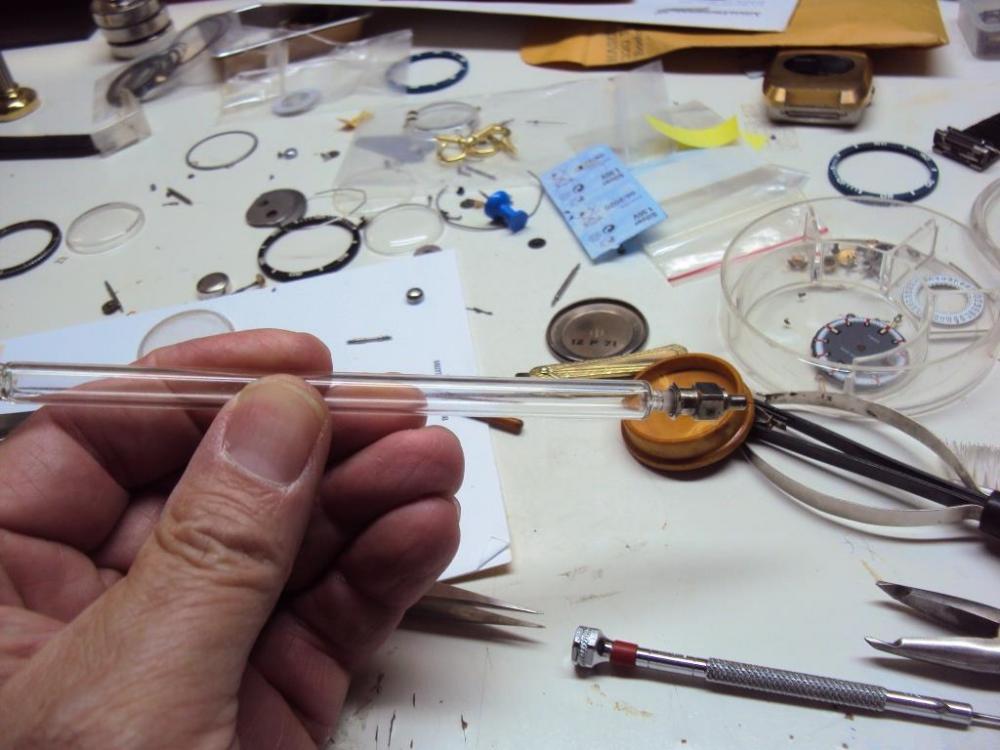
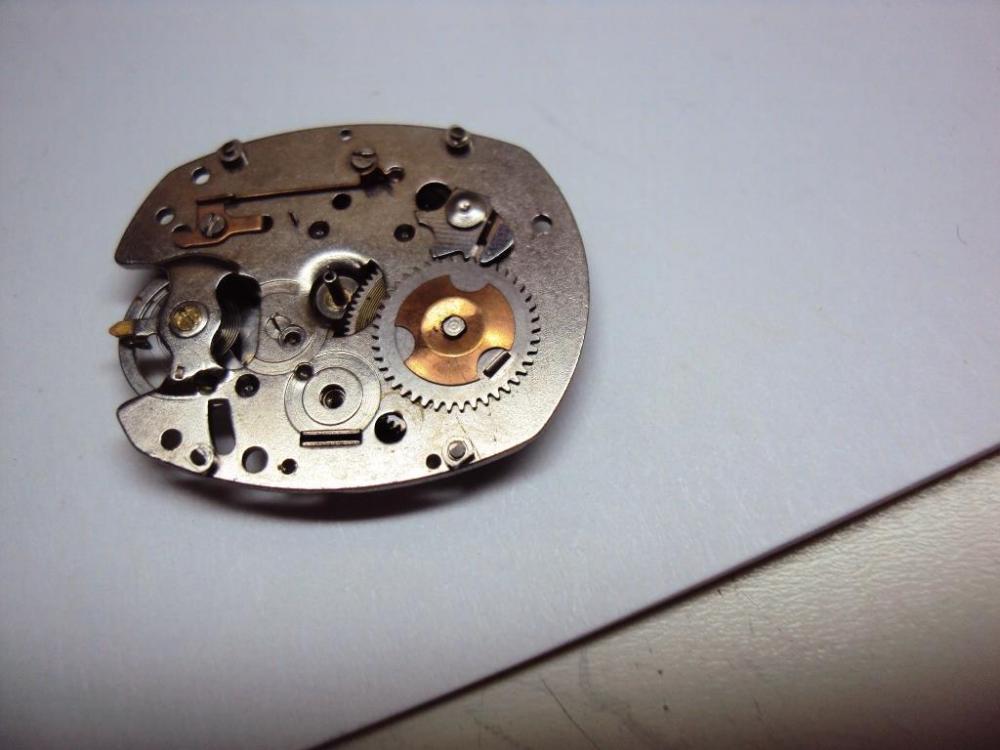
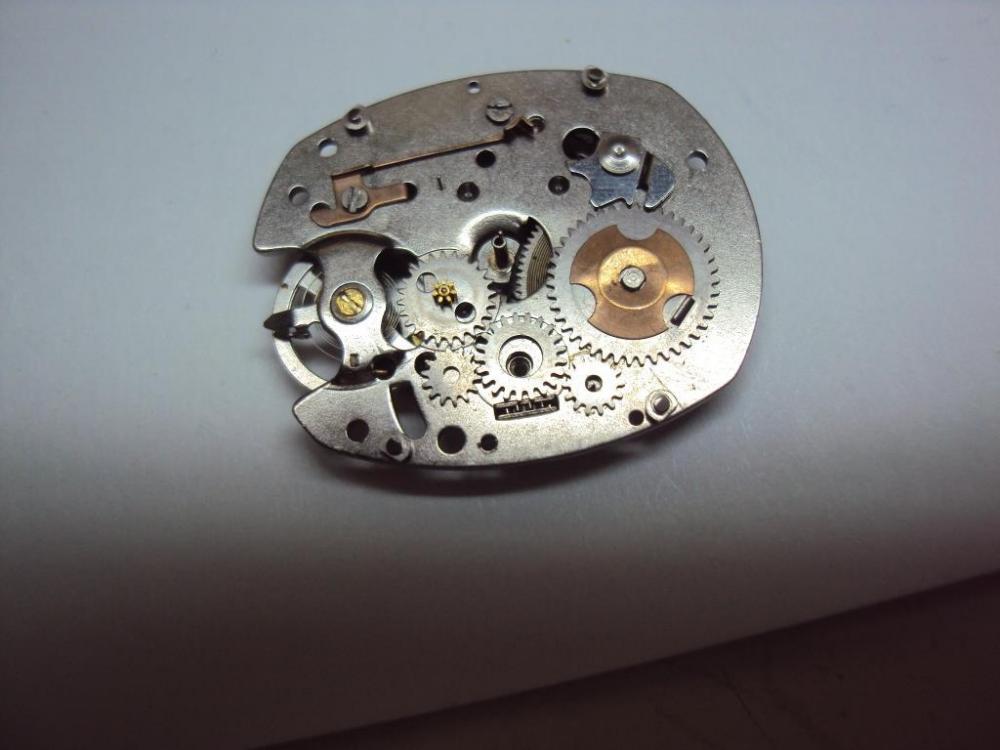
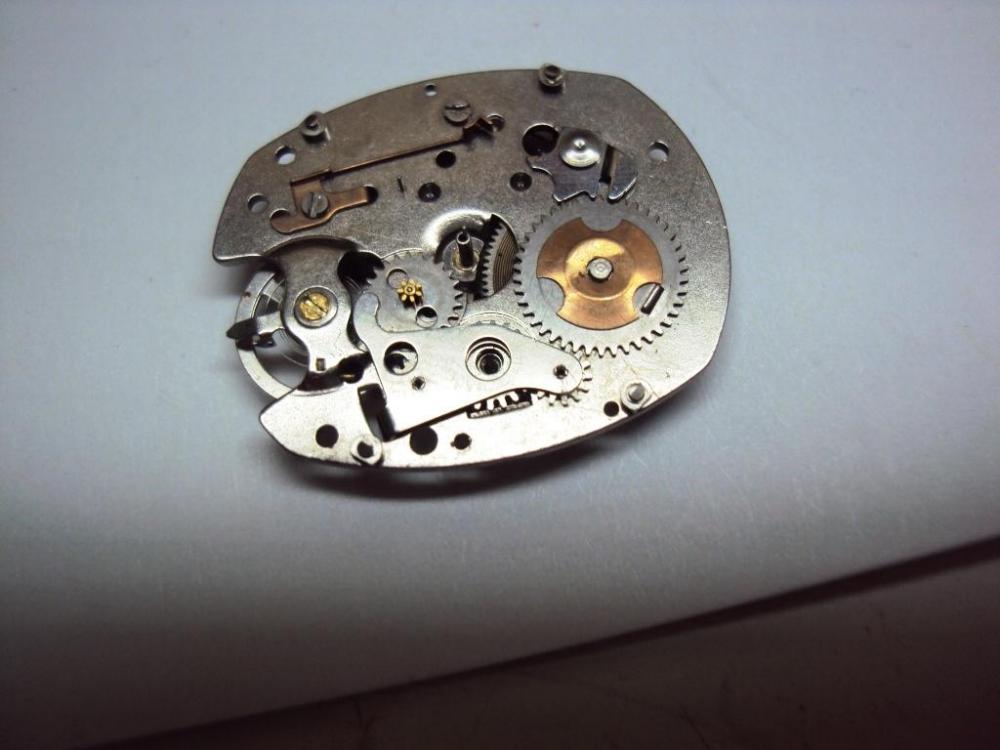
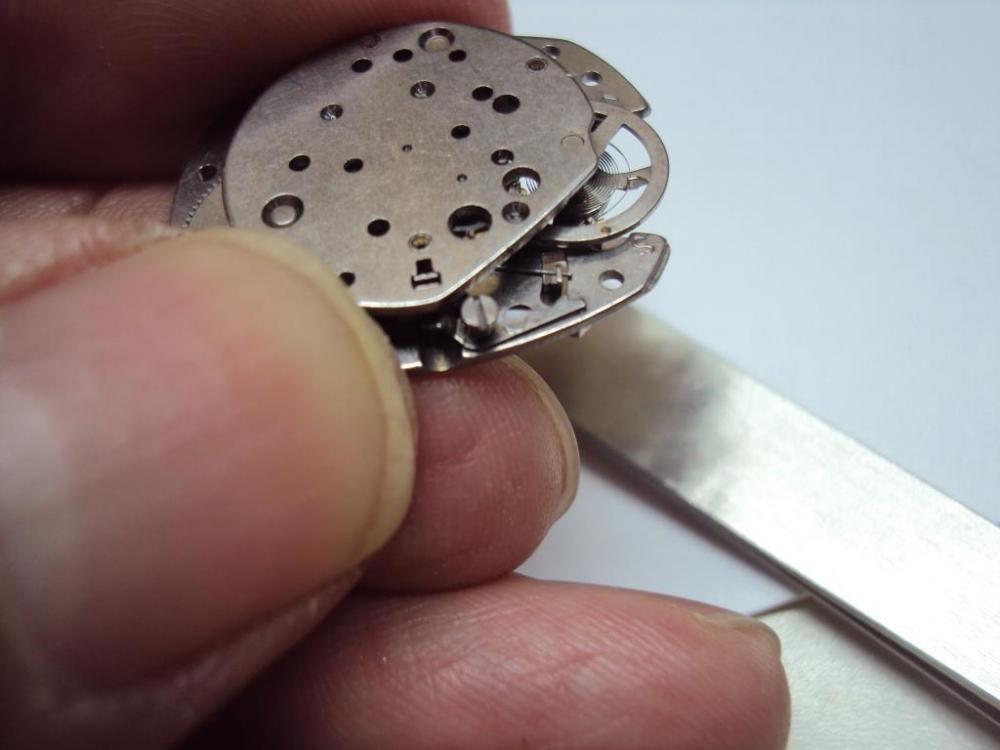
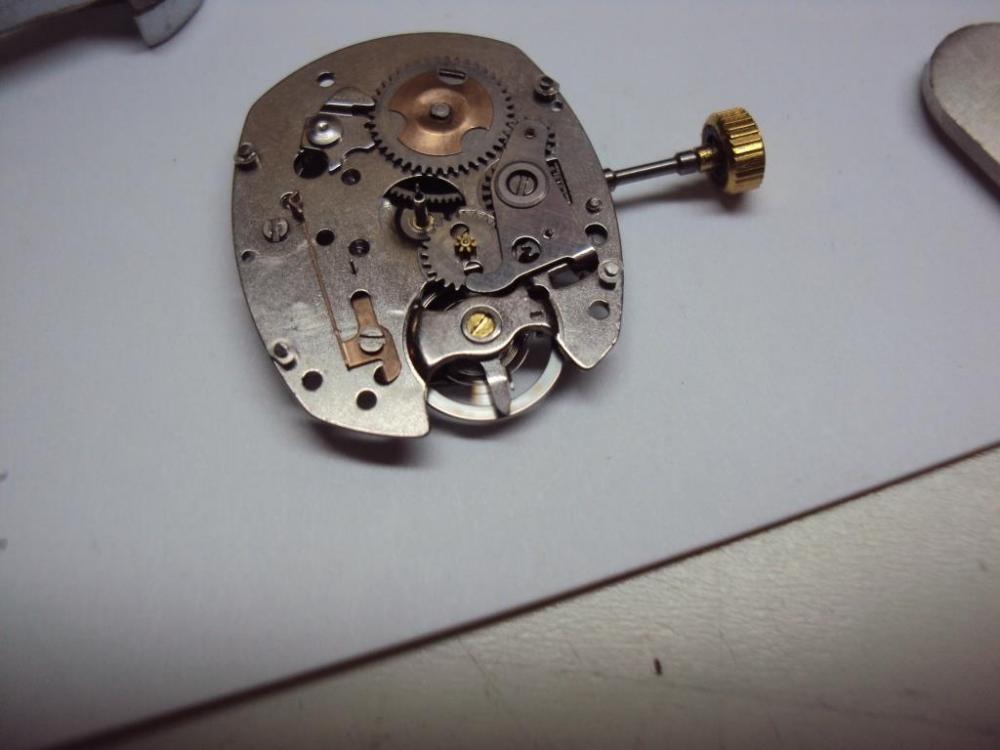
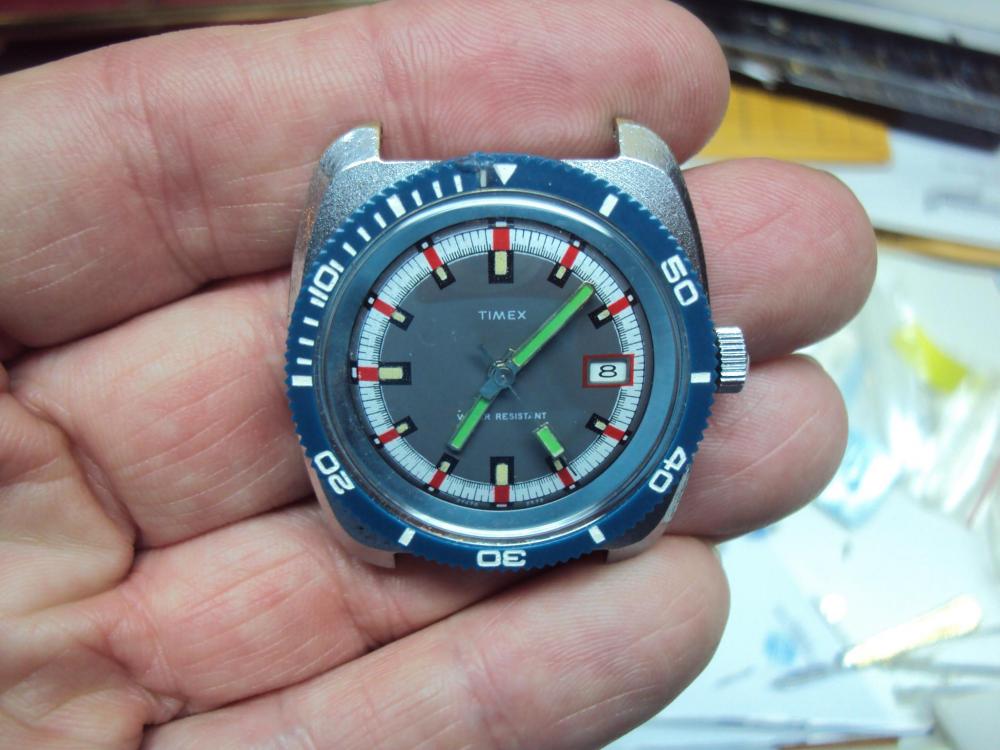
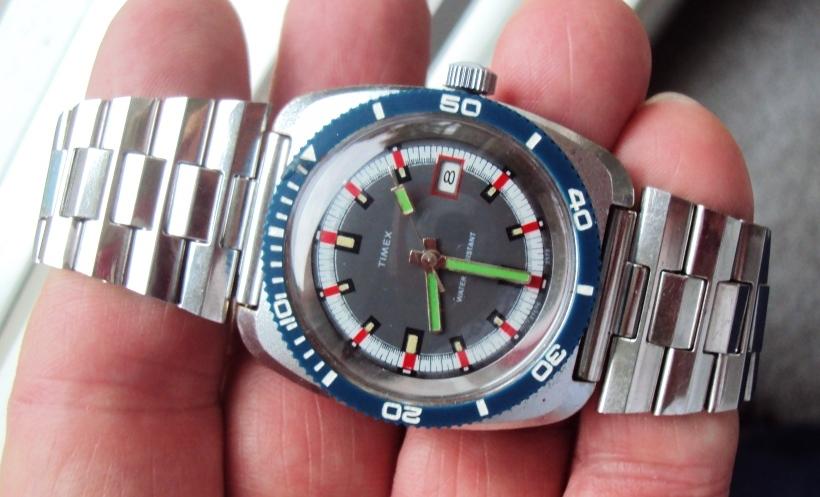
Just finished up this repair, a classic 1972 model in need of much TLC. Here is the before and After, followed by how I got there. and this is how I got there - pop the case off and unscrew the set lever screw about 2.5 turns. out comes the movement and the tear down begins. While doing so I see the crystal will have to be replaced as well as the crown\stem. I also spot an oil spill on the date ring, this means someone has been in here before and did not know what they were doing. So off we go for the cleaning and rebuild. Finished watch looks and runs great. Cleaned, oiled, missing and or worn parts replaced. How does it look? MOV08844.AVI


 1 point
 -
and here it is ready to wear.
 1 point
 -
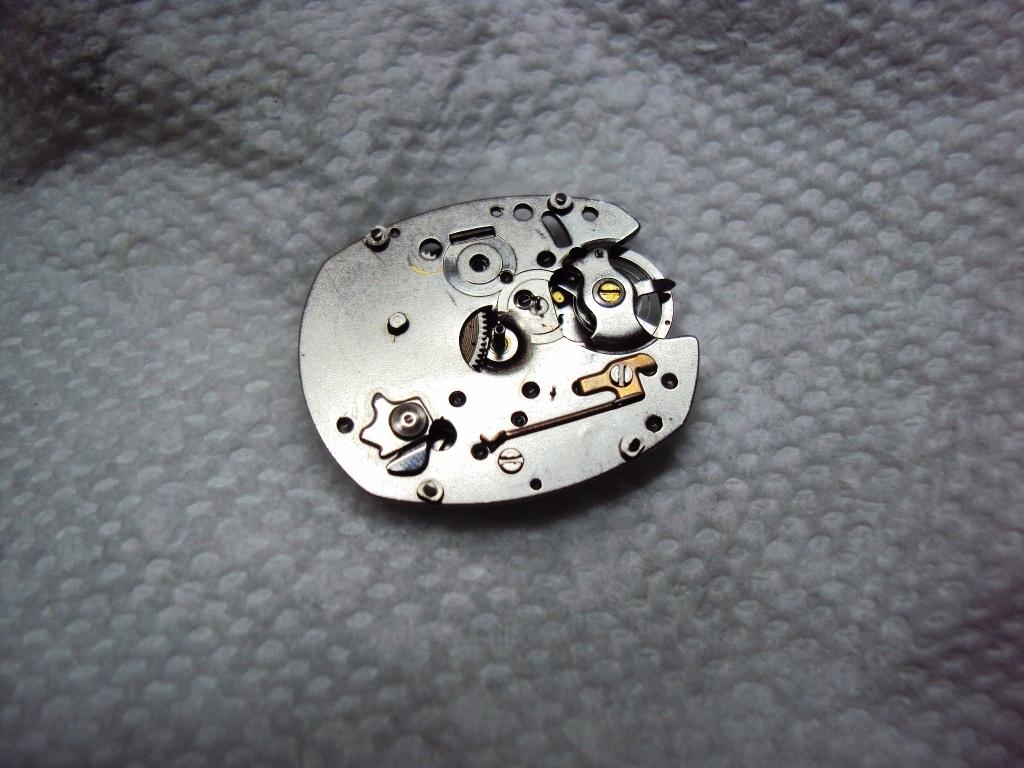
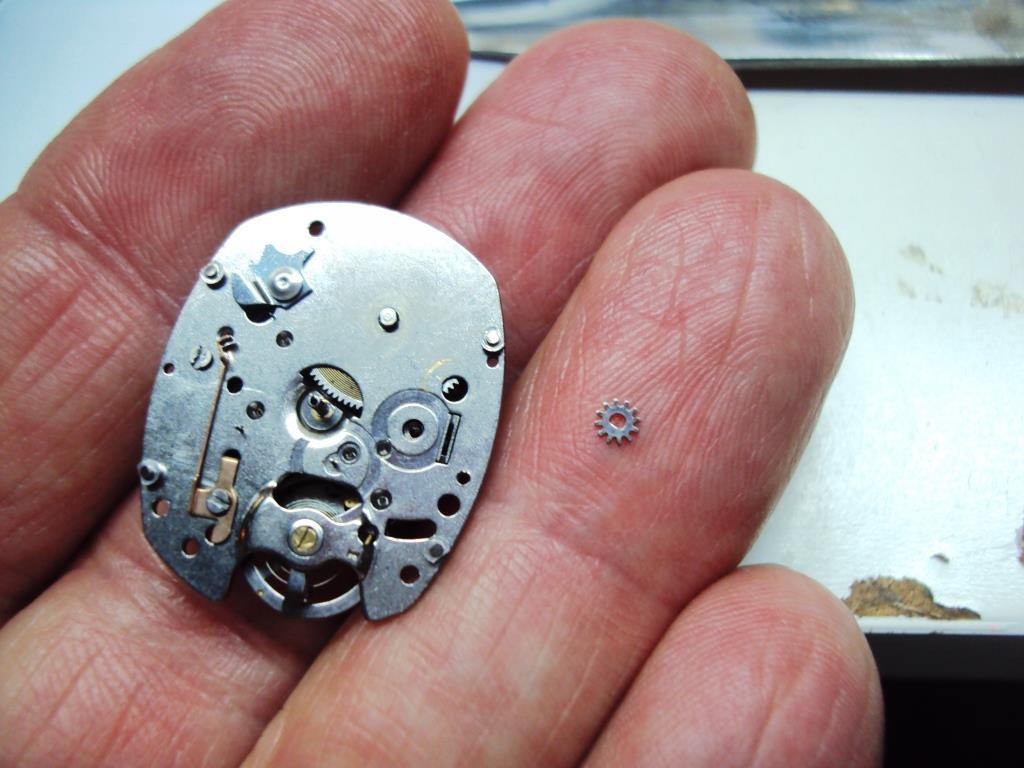
Just a day on this forum and I made huge success. I was able to open the watch (there was actually a bezel at the top but hard to see) swapped the battery (621SW). Had a tough time closing it back since I don't have a watch press. But I padded the nose of my pliers and applied gentle force till the front snapped shut. Watch is working great now. Thank you @jdm and @Ishima1 point