Leaderboard


Popular Content
Showing content with the highest reputation on 09/10/18 in all areas
-
Need to make a balance staff for a European picket watch. The old staff had both pivots broken off. First I disassembled the watch and removed the balance staff. Removing the roller table was the hardest part because it was a Three arm balance and my Magic Roller Remover would not work so I used the scissor type. I then determined the widest diameter of the balance staff and found a 2.0 mm piece of Blued Steel. I cut off 1 inch and sized the collet, and inserted in into my Boley Leinen Lathe. I then started to cut the Balance and Hairspring side by first using the old staff as a guide and marking the piece of steel with my carbide graver. I started cutting down the first diameter where the balance fits and simply cut and measure until it was snug but still room to stake it in place. I then cut the hairspring diameter next and fix and cut repeatedly until it was snug. I used a special gauge to measure as I went along. Once the part fit was good I worked on the pivot with the graver until I got it down to around 0.2 mm and then used a stone to get it to around 0.14. The rest I plan to do on a Jacot tool. I then flipped the part around with a different collet and started working the Roller Table side using the same technique. I Amos finished off the plate where both the rolled table on one side and the balance on the other side rest. Slight error in the description. I left the full part in and started working on the roller table side before cutting off the part and flipping it around...saves time. I worked on the other pivot as well and got it down to 0.14 with a graver and then a stone...on the Lathe. The final product looked great. I am waiting for a set of vintage pin gauges to get the pivot size exact. Will finish it off next week. Sent from my iPhone using Tapatalk Pro4 points
-
As a complete novice I am somewhat nervous about offering tips to you experts. However I had occasion to remove the caseback from my GS Mk2 pocket watch. It is so well machined there is virtually no visible joint to put a blade in without scratching it plus I did not know if it was screw on or not. I was thinking I needed a suction device which I don't have. After a few vodkas I came up with the idea of using the suction windscreen mount off my Garmin sat nav. It worked a treat. I also used it on my stepdaughter's Rolex ''replica'' which is tiny and has the authentic style Rolex caseback. I'm sure you guys have tools for every occasion but this tip might just get a hobbyist like myself out of trouble.1 point
-
Awesome, thanks for sharing those! Sent from my ONEPLUS A5000 using Tapatalk1 point
-
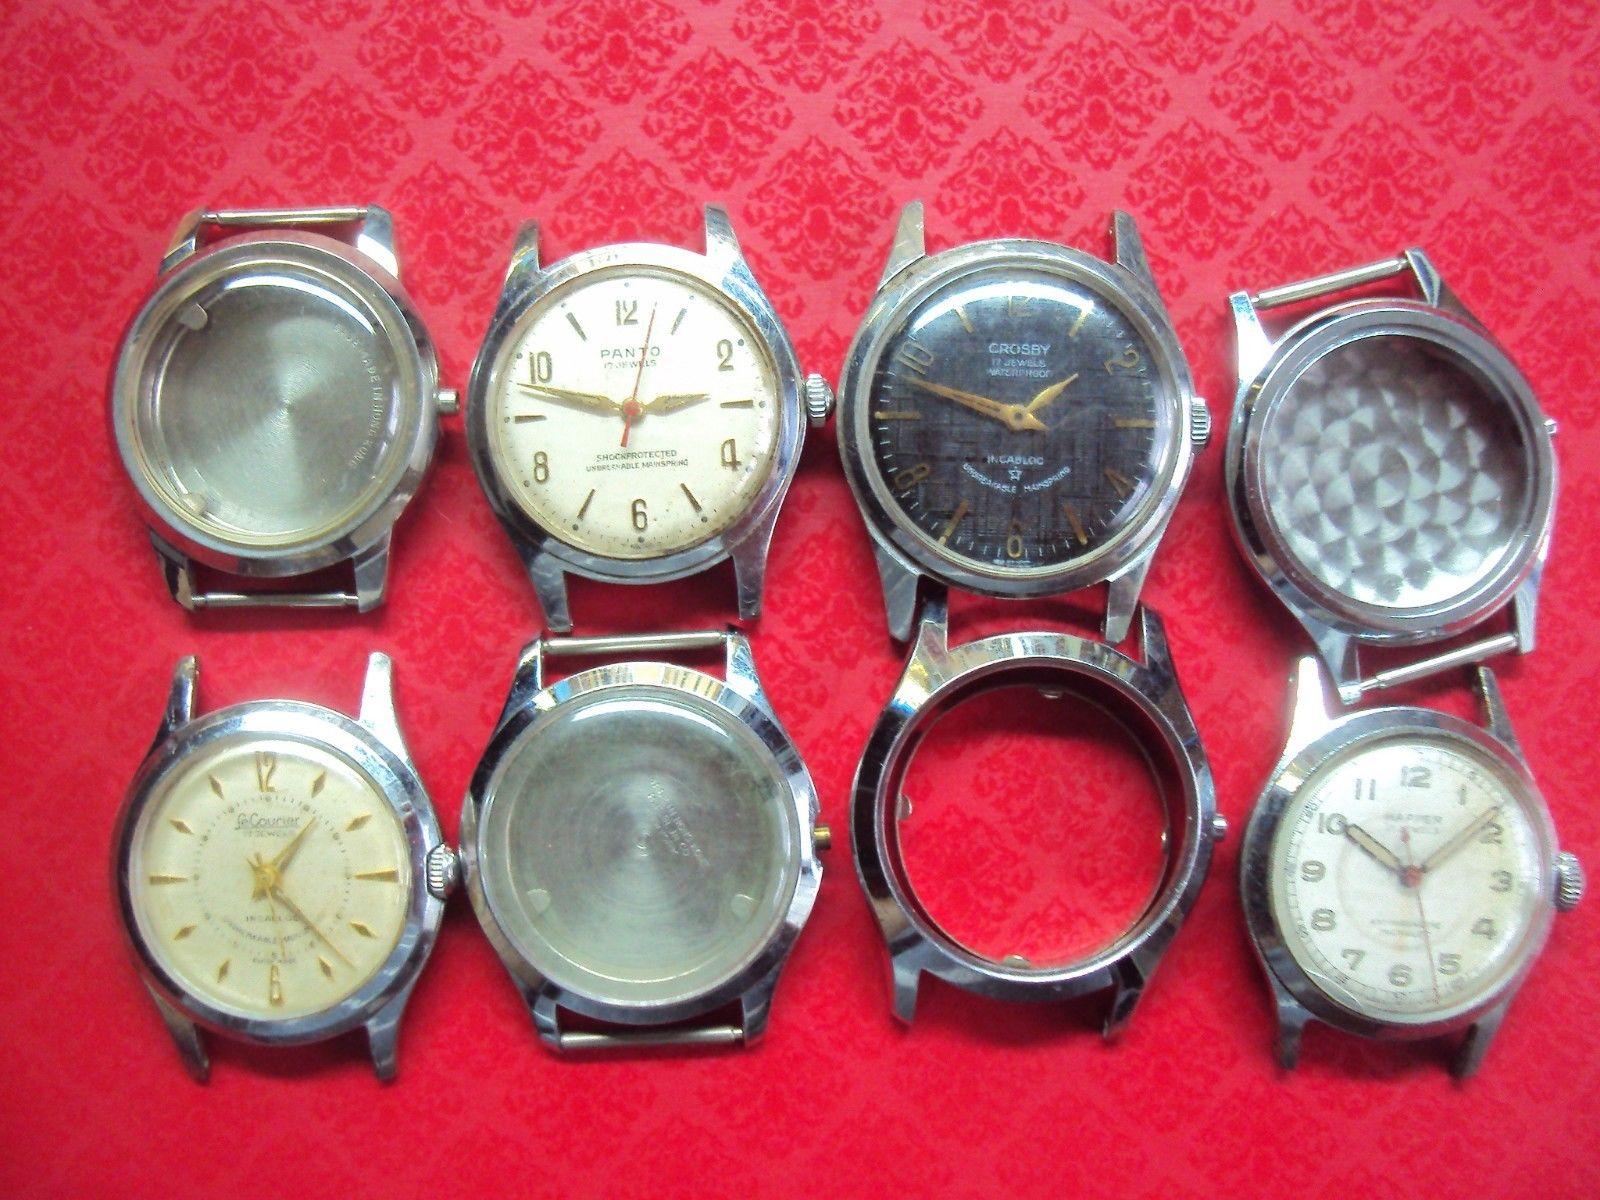
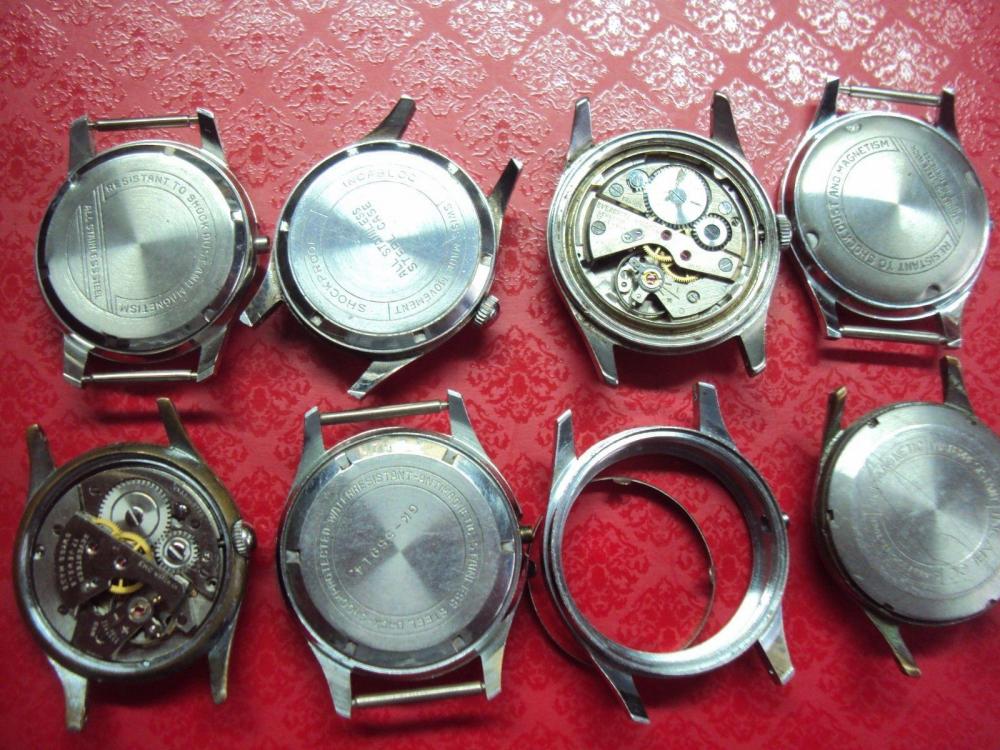
Here are examples of lower end watches form the 1950s - 1960s. All with screw down backs and typical 17 jewel movements inside. note the extreme wear to some as they were not made of stainless steel.

 1 point
 -
Ok. I've never seen it on the lower end stuff of that era, except pocket watches. Sent from my ONEPLUS A5000 using Tapatalk1 point
-
Screw down backs have been around for quite some time and can be found on both high and low end makers. Of course Rolex is a leader in this area as they developed the "oyster case".1 point
-
Oh endeaver, I hoped to get couple hundered degrees extra amplitute to save some for the next wtach. ha ha In case of no considerable amplitute gain. The next step I suggest would be to take revenge on all the other screws instead. Why not. Loosen all screws a bit, this would release any possible residual pretention, if you saw astonishing amplitute gain, tighten back one screw at time to identify the culprit. If no good at all, I think I snould fix me a cup of tea and check back.1 point
-
Thanks If I were you I would relume the dial at the same time as the hands, so that you can get a perfect matching ... that's what I dd on my "Black Rallye". About the "difficulty" ... honestly ... I would say it is really easy if you have a steady hand and some patience. I think almost all the tips I could give can be seen on the pics I posted here but here are some "tricks" : 1 - really thin luminous powder ... the thinner the easier in my opinion ... mine is a cheap product from a GB website (I'll post a link here when back home) not sold for watches but really thin and with a bright "vintage" green lume (they have other colors) 2 - waterbased medium (I use microflat from microscale ... a waterbased acrylic resin) 3 - cheap watercolours ... only if you want to colour your lume 4 - oilers ... I mostly use the yellow one but sometimes I use thinner ones for specifically precise lumes (like 3/6/9 dials) First I prepare the colour I want to get with my watercolour set then I use that coloured water to mix the waterbased resin and the lume. I first focus on the colour I want to get and do not bother with the thickness of the mix ... just dont forget that the color will be a little more "off" when the lume has cured. When the colour is OK I just add some clear water to get the thickness I need for the specific work I'm doing. If the mix is not thick enough I just wait for the water to evaporate a little or heat eat with a hair dryer, but I always try to get a thick mix at first then dilute it with water to get the "perfect" thickness. For example, to relume my "Black Rallye" I needed a "medium thick" mix for the lume dots around the dial because I wanted to do each dot in just one drop ... so I did the lume dots at first then added some water to make the mix smoother before luming the hands. If I want to redo a vintage 3/6/9 luming (will have to do that within a few weeks for a vintage pocket watch) I will add some water to get a really thin mix so that I can use my oilder as a pencil and the lume mix as ink ... plus I'll proceed in 2 stages : first stage the design with a really thin coat + second stage adding some thickness to the lume. About the lume powder thiness ... if you want to use your lume mix as ink you need a really thin powder and if you want to give some "raw" look to your lume you can always add a thicker powder to your mix (salt, sugar, really fine sand, etc ...) the lume effect will be weaker but it will be perfect for a "vintage" look. I think that's all about my "lume tricks" Hope it helps.1 point
-
This thread is too lenghtly to keep track of all siad/ done. How freely is freely? Have you checked the staffs axial play, are you sure the cab stones not pushing on staff pivots dispite face up and down data, I would loosen the two little screws of stone cab, if no impovement, I would put a drop of lighter fluid on upper and lower balance jewels while running. Are you sure of the roller? Bent pivots? Flattened pivot tip? Regard1 point
-
Case tubes are generally just held in by the crown. Sent from my ONEPLUS A5000 using Tapatalk1 point
-
It will depend on the watch. Usually watches put together this way have a two part stem. More detail: http://watchfix.info/Battery%20Replacement/One%20Piece%20Case/Battery%20Change%20on%20a%201%20piece%20case.php Sent from my ONEPLUS A5000 using Tapatalk1 point
-
If you don't have the usual tells, it can be tough. I just spent days fighting with a caseback on a pocket watch that I was sure had to be screw off, but I've come to the conclusion it wasn't meant to come off at all. Information on the specific watches would help. If you know how old they are, that can help inform things. Earlier than the 80's or so (I'm not an expert so don't use this as a hard date) screw backs were pretty rare. Especially on cheaper watches like Timex, those are almost always snap backs, or you have to pop the crystal and go in from the front. If the back splits the crown with the front, it's almost certainly a snap back, as the movement is meant to be removed from the case without taking the stem out.1 point
-
Beautiful work! J1 point
-
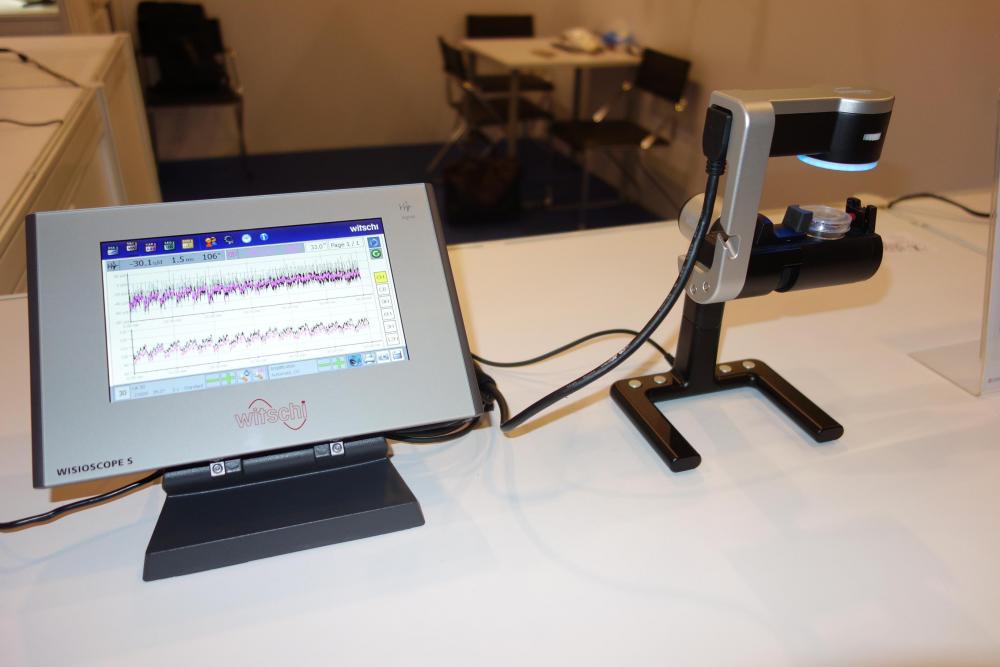
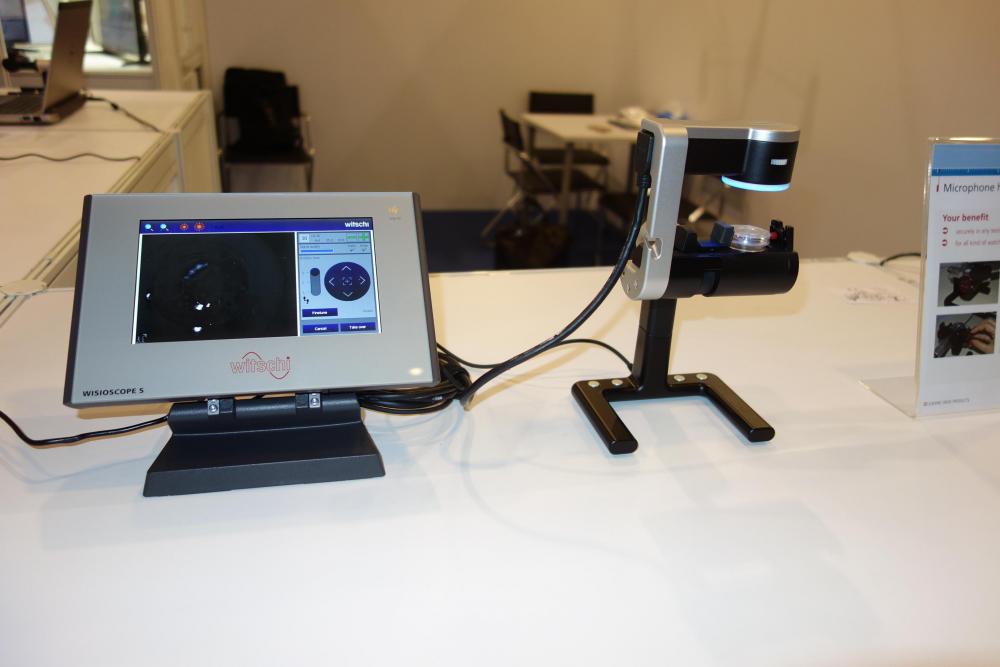
The Witschi representatives in Hong Kong are really nice people, today I visited their booth at the Hong Kong Watch & Clock fair and they gladly showed my the first ever analyzer using optical data acquisition (as well acoustic), the Wisioscope S. The balance wheel movement is captured by a lens ans sendors, that works even the movement is in a plastic case. After processing it's displayed together with the audio in an "overlapped" format using different colors for the two channels. In an another display mode (I suppose there are even more) the display shows frame-by-frame images from the high-speed camera for visual analysis, I suppose to diagnose issue like pallets depth, lift angle. The machine is hence able to accurately display the latter for any watch mov.t. The apparatus is meant for manufacturer's R&D centers, and cost in excess of 10,000 CHF. The other new product is their PC-based timegrapher, called CronoMaster. Sorry, no pictures for this one, physically it consist of a nice multi-position mic with USB interface for a Windows PC or tablet. I haven't played much it but it looked nice enough. Full specs and screenshots on their websites. Cost is about 2,000 CHF.
 1 point
 -
Hello All; Surely "invented" before, but I've never seen it..... therefor I call it the "Screw-peg" ® Struggling to get a 70-years old NOS ladies movement to run properly, I had some serious pegging of very small jewels to do, including the very small balance pivot jewels. (if curious, read https://www.watchrepairtalk.com/topic/9705-servicing-laco-503-501/) My experiences with these tiny holes are that if you get the tip of peg-wood in the jewel-bore, it brakes off easily. Next to that, once you got the peg-wood in, while rotating, your fingers slide & rotate down. Once the fingers are to the end of the peg-wood, and some more pegging is required, you either have to pull the wood and try it again or; try, with the peg-wood still in the bore, to get your fingers back on top of the peg-wood ........ with a very high probability that the peg-wood tip brakes off; left behind stuck in the jewel Something had to be thought of ........ ; I had a box full of toothpicks which were 1.6mm in diameter. One of my screwdrivers took 1.6mm steel tips. I removed the steel tip, cut one end of the toothpick off and inserted the toothpick in the screwdriver-handle. It's a nice press fit. The toothpick-tip can be sharpened multiple times by either a knife or dressing it on a diamond stone. Now, with the peg-wood tip in the jewel, you can rotate as long as you deem required. I also found to have very high control over steadiness, angle, rotation and applied pressure. It works for me like a treat ! Of course the ® isn't
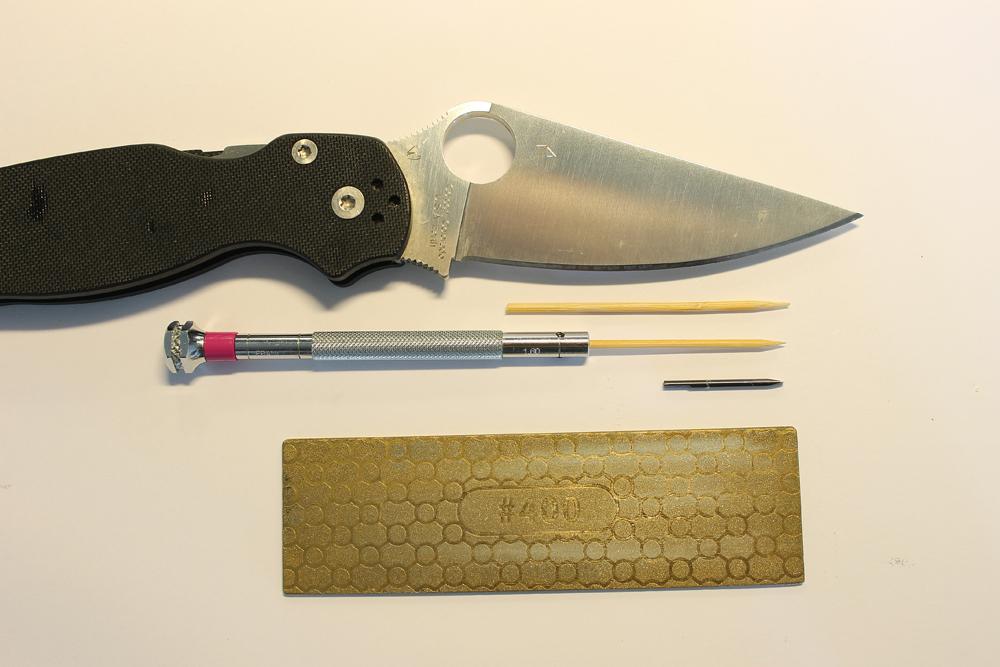 1 point