Leaderboard


Popular Content
Showing content with the highest reputation on 12/12/17 in all areas
-
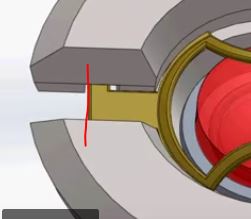
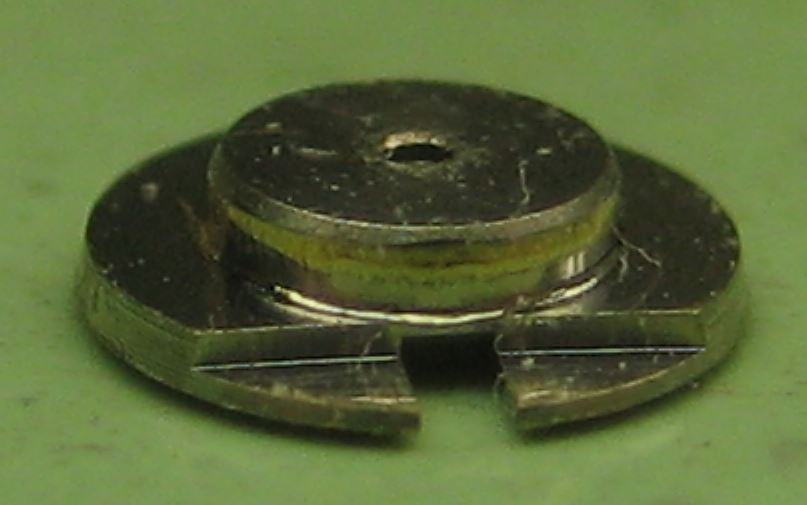
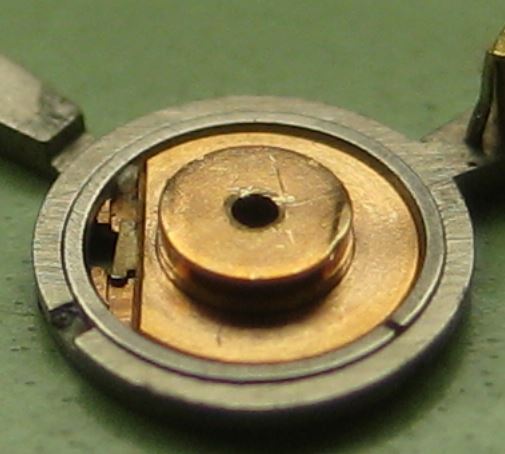
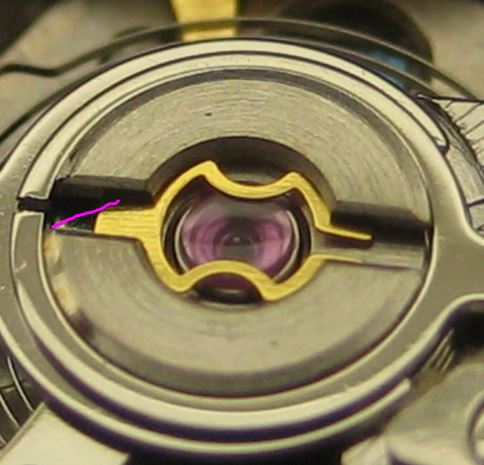
So I have far too many pictures to go through but I haven't given up but in the meantime I'll try to explain taking something out of the video above. So the very beginning it shows how things go together. At around 11 seconds to get a silhouette. If you look at the image I have attached notice I drew a red line and then look at the video you'll notice that the tail end of the Gold spring hinges In that convenient slot. Because there's a slot spring almost never comes out. But in the Chinese version cutting that extra groove was complicated so that's missing. This means when you hinge it up there is nothing to hold it in place it typically falls out. So found some of the pictures. I labeled one bad clone this is where should be the same setting that you have I do not recommend taking it out I only did it to get a picture. So you notice there is no cutaway slot like in the video there's nothing holding the spring once it's released its free to go where it feels like. Then there is a Omega setting and you'll see the cut part and the spring is also in there so you can see that does not come out. Now comes the problem attempting to describe something that I don't have a picture of. So in the picture labeled putting back in notice the pinkish colored line going at the angle? Whatever you do do not force the spring if you get it right it almost just floats in to place. So you need to put the spring in at a angle in other words basically Corner to corner of the open area underneath I can't remember if You have to stick one of the tabs in first I vaguely think you can just literally drop it in the corner to corner. Then basically rotated so it's in the correct position and then it hinge right down. Then I'm sorry if my description sucks hopefully it makes sense.
 2 points
 -
If you are an amateur or hobbyist be in the right frame of mind to undertake the task. People that make a living out of horology have to knuckle down and get on with it. One thing that helped me was to get up and walk around or undertake a different repair and this time of the year make sure the workshop was nice and warm.2 points
-
When fitting new stems to watches I use these tools :- Digital calipers, Fine grade diamond lap Wire cutter Pin vice Now for fitting. (1) Hold the stem in the pin vice and screw on the crown tightly by hand. (2) With the movement fitted correctly in the case, insert the stem until it locks in place. Now measure the gap between the case and the underside of the stem. In this case it is 2.16mm. (3) Subtract 0.2mm from this size and this will give the amount to remove from the stem. In this case it will be 1.96mm which will give 0.2mm clearance below the crown when fitted to the watch. (4) Now remove the crown from the stem and hold the stem very tightly in the pin vice, then place the pin vice and stem between the jaws of the digital calipers then zero the calipers. (5) Remove the calipers and without touching the zero button set them to minus 1.96mm. THEN RE-ZERO THE CALIPERS AT THIS LENGTH The wire cutters are now used cut off the excess thread leaving a small amount to be filed to the exact length. (6) All that is required now is to dress the stem with the diamond lap a little at a time until the calipers read zero. (7) Finally screw the crown on tightly and it should be ready to fit to the watch without further adjustment. I find that this method cuts down on trial and error. FOR SCREW DOWN CROWNS. A) Screw down the crown tightly onto the case without the stem and measure the distance nbetween the bottom of the crown and the case. B ) Screw the new stem tightly into the crown, then insert into the watch until it engages and locks into the movement. C) Press the crown down firmly as far as it will go and hold it there. D) Using the vernier callipers, measure the distance between the bottom of the crown and the case. E) Subtract the size determined in (D) from the size measured in (A) then subtract a further 0.15mm from this size. This is the amount to shorten the stem by. This should allow the crown to screw full home without compressing the stem too tightly between the movement and the inside of the crown. F) Cut the stem leaving it slightly longer than the size determined in (E), and dress down to size using the diamond lap and vernier callipers as described in the original post. G) Screw the crown onto the shortened stem and check fit and function, before using a tiny spot of Loctite 221 to secure. Click here to view the article1 point
-
I too have stepped back. But with limited time, I can't wait to long. I was super careful when I did the hairspring work on the other Peck and I know I will settle back for this one. Sent from my GT-N5110 using Tapatalk1 point
-
The reason why certain snap backs can't be closed by hand is that the pressure must be uniform on the entire edge, not on the center. One can try improvising shaping two pieces of wood as dies in a vice, but be careful, it is a matter of precision, not force.1 point
-
If you can't get it on with your thumbs it's going to need pressing back on , worth investing in a press if you plan on doing more in the future , they are cheap enough on eBay1 point
-
The above is a lesson I have learnt, when I am struggling and frustrated I now leave it and have a cup of tea! When I go back to it things seem to fall into place.1 point
-
use rodico to hold the spring and a fine tweezer to manipulate it into position. The last photo in the previous photo is the key.1 point
-
I will give you the info tomorrow.1 point
-
Lots of questions here... 1. “Non automatic” is the standard hook end spring, or normal bridle. 2. As I see it, the “fill” is an arbitrary outcome of potentially conflicting requirements... not overstressing the spring by winding it too tightly around the arbour; not pulling the outer end of the spring away from the barrel wall when fully wound; providing enough power through a long enough spring to run the watch for 30 to 40 hours. (In days of yore, there was a further challenge around maintaining a more constant torque which was achieved through “stopwork” which prevented use of the maximum and minimum wind conditions). Watch designers therefore need to concern themselves with fill, repairers can use it to help ensure they have the right spring by assuming the watch designer worked within standard parameters. 3. Spring thickness is a critical characteristic linked to the watch design. Torque will increase with the cube of the thickness and so small increases have a big impact. The torque should be sufficient to maintain a high balance amplitude without knocking (over banking). Within reason, at the design stage, the height can be reduced to achieve the optimum torque 4. So, 0.18 to 0.19 thickness will increase the balance amplitude slightly, but given the same spring length allow fewer turns and therefore a shorter run time. Adding length will overfill the barrel and may result in fewer rather than more turns. This difference of 0.01mm is reasonably insignificant, but I wouldnt want to go to a 0.2 spring if it could be helped. 5. The double brace and hole arrangement appears to serve 2 functions. Firstly, it holds the hole against the barrel hook when the spring is fully wound and secondly, in theory it spreads the load (although the likelihood of al 3 points being in contact seems low). Whether either is necessary with a modern alloy spring with a reverse final curve is a point way beyond my understanding. Clearly you could bypass all this effort and fit one like you found, but that’s not what the designer intended, and will we ever know all of the thought that originally went into this? Finally, I should say that I am an engineer who reads a lot and thinks a lot, rather than a qualified horologist... and every day is a school day!1 point
-
Right now it seems to stop when I set the time (probably due to the canon pinion...).1 point
-
Is the auto working before you screw it down? Are you sure you are using the correct screws because it sounds as if this could be the problem. Make sure the auto wheels are meshing correctly and are free; sometimes the two very small wheels need a very tiny drop of oil because I have found in the past they tighten up. I think it is a screw problem so check that first. Let us know how things go.1 point
-
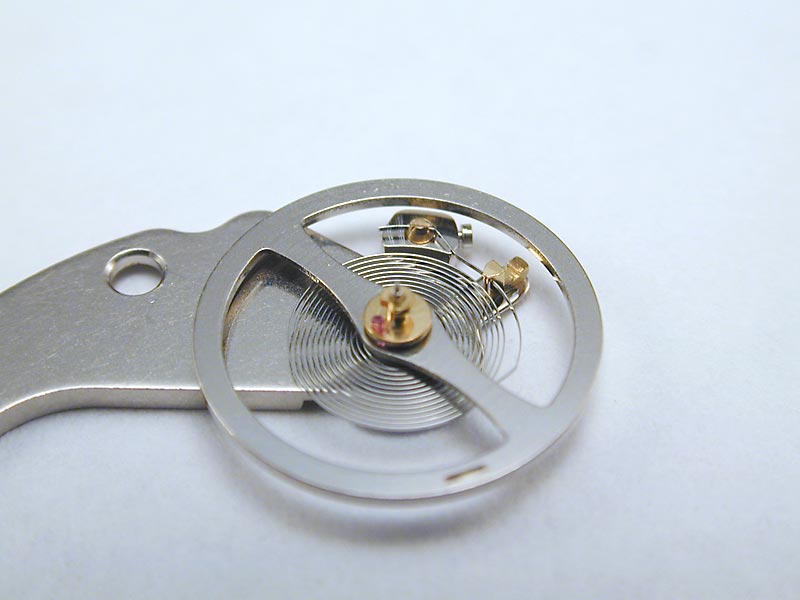
Check out the second dog leg after the regulator, this is what's missing and will bring the balance hairspring concentric again.
 1 point
 -
You've said it all . The chase or the hunt is half the adventure . Part of the equation of a self fulling prophesy that culminates with the prize on your wrist,……….as you begin the next chase . It's amazing how many times I have decided to look for a particular watch or item when they start to pop up .1 point
-
One method is to grind a slot into it with a Dremel tool with a thin disk on it, then screw it out. Another method is to make an extension to it with epoxy and a metal pin or even a toothpick and when it hardens, use the pin to turn it out. Someone else can chime in with other ideas. Steve Sent from my iPad using Tapatalk Pro1 point