Leaderboard


Popular Content
Showing content with the highest reputation on 09/16/17 in all areas
-
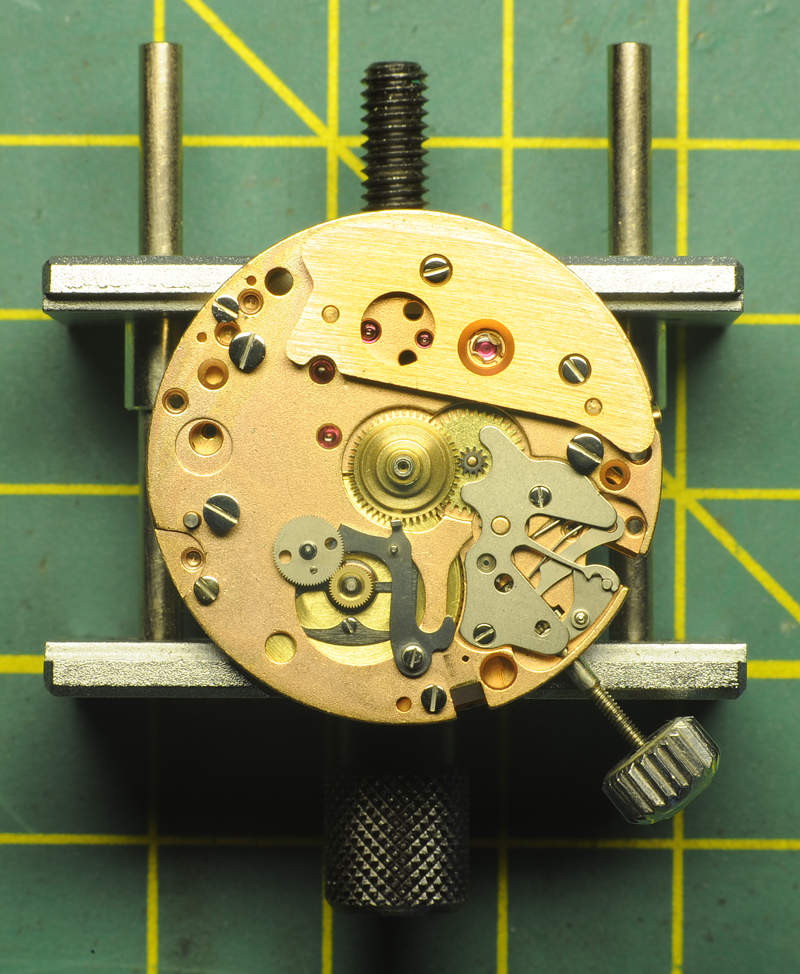
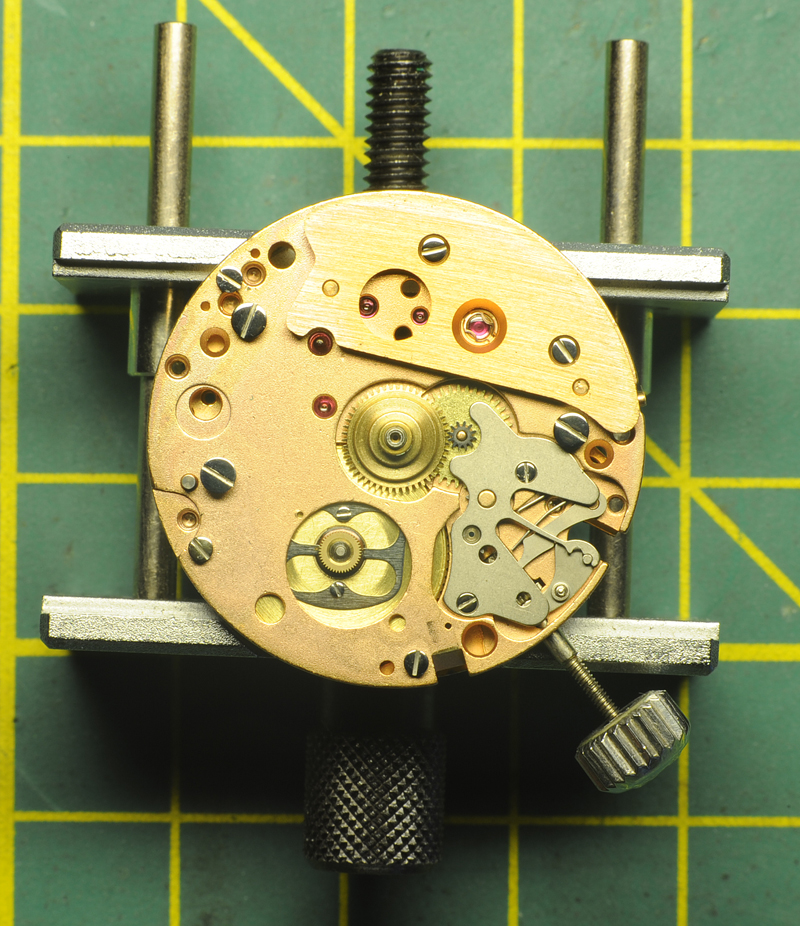
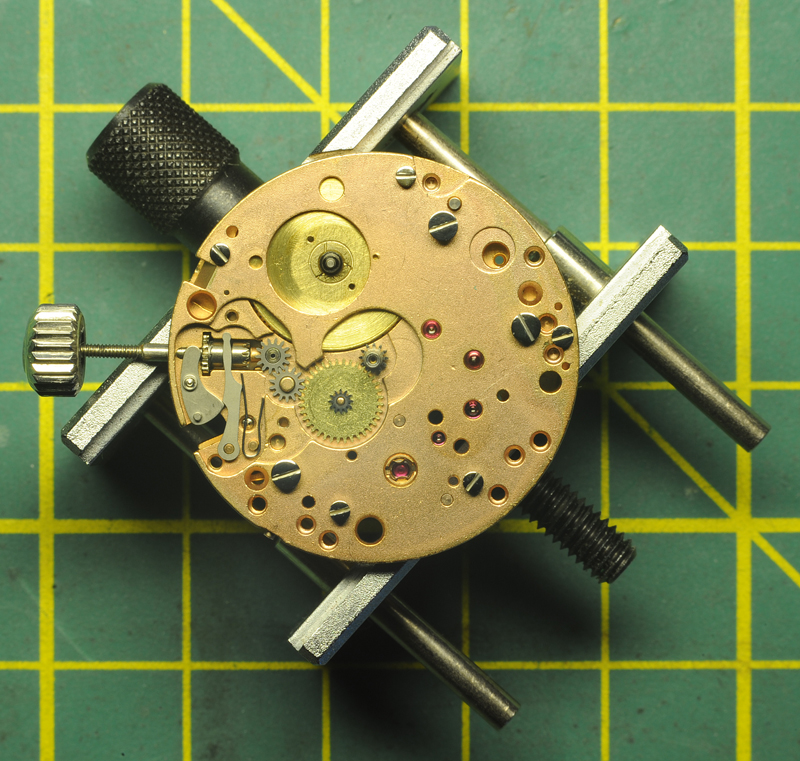
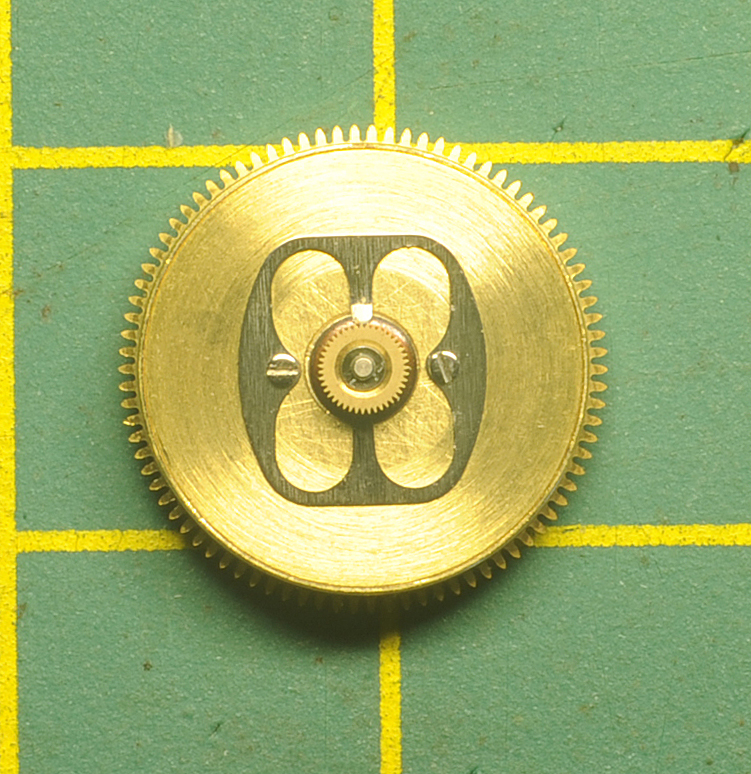
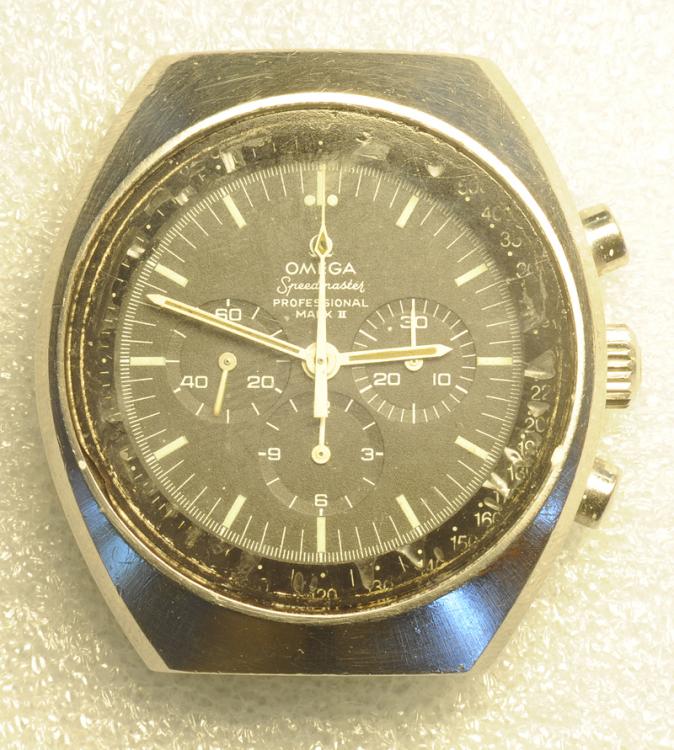
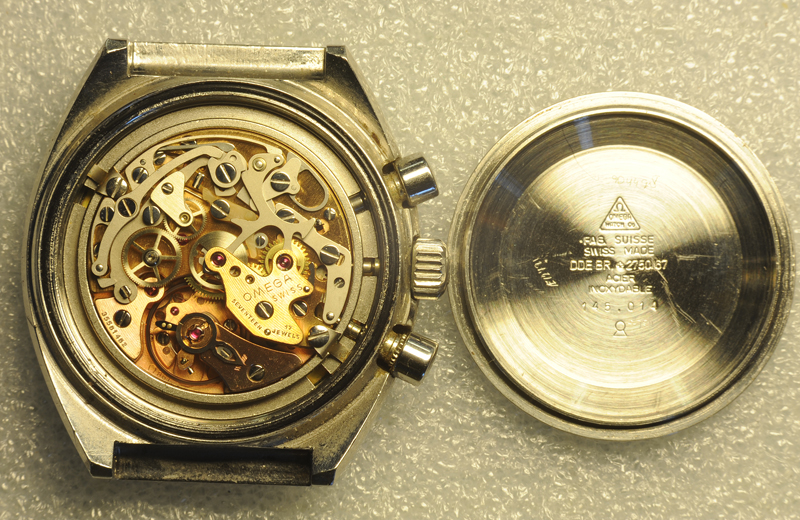
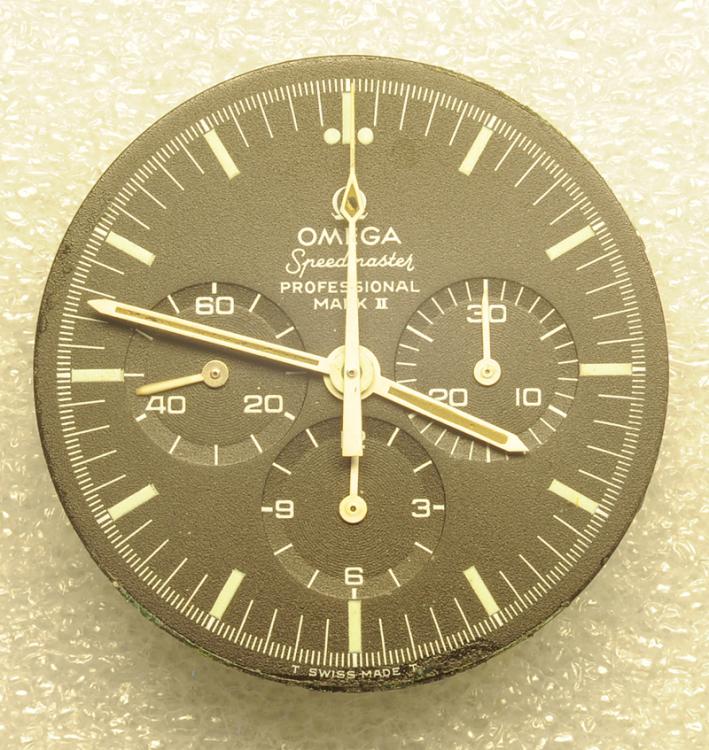
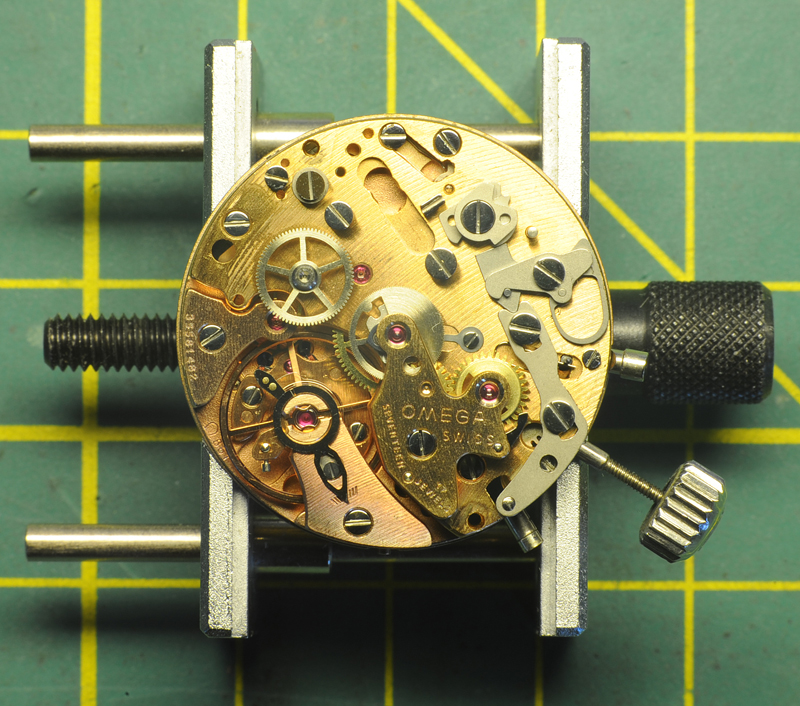
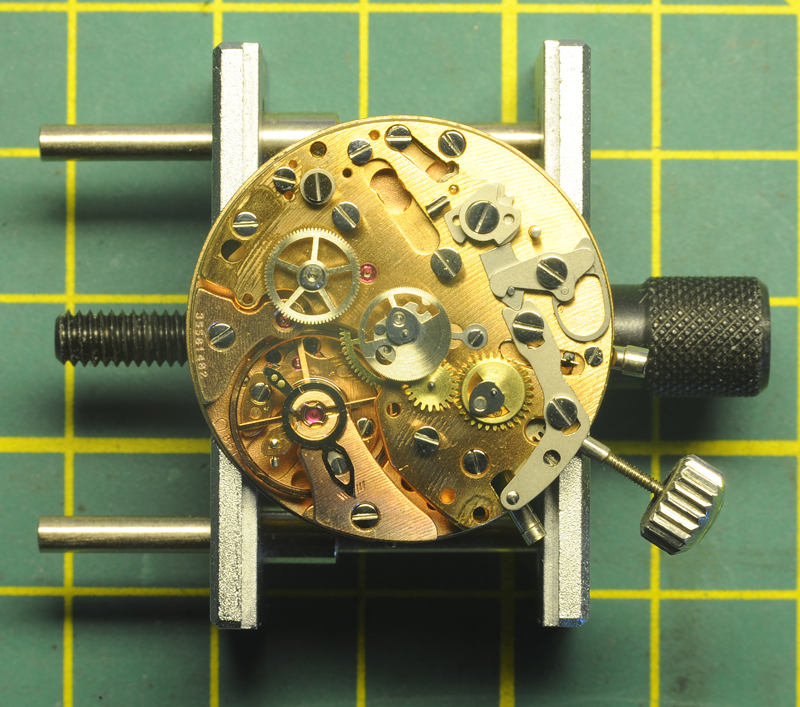
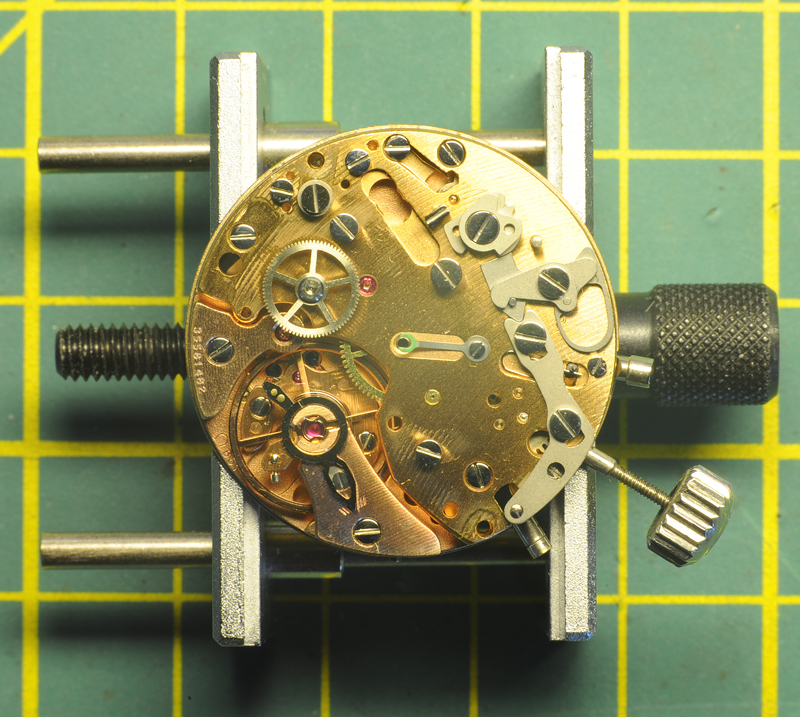
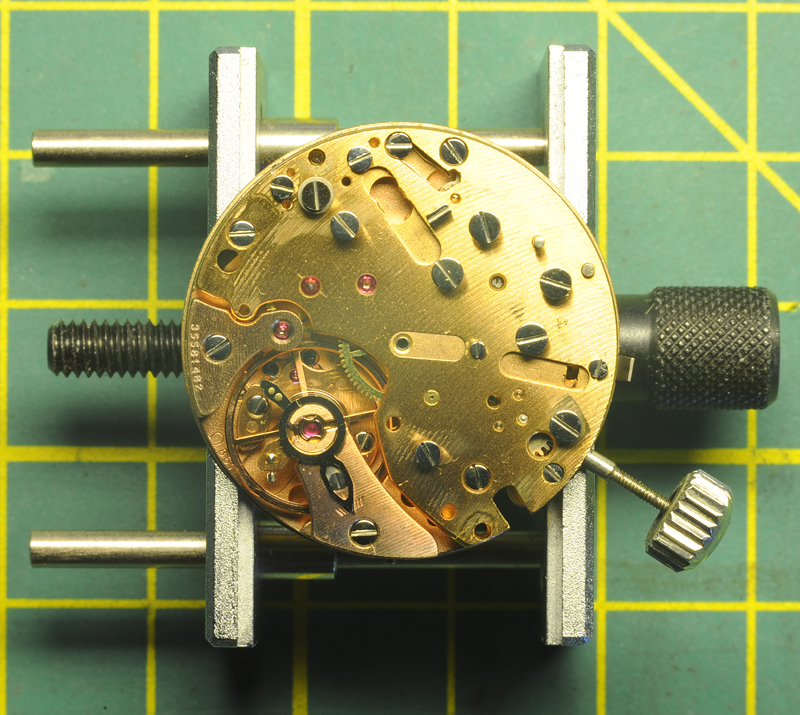
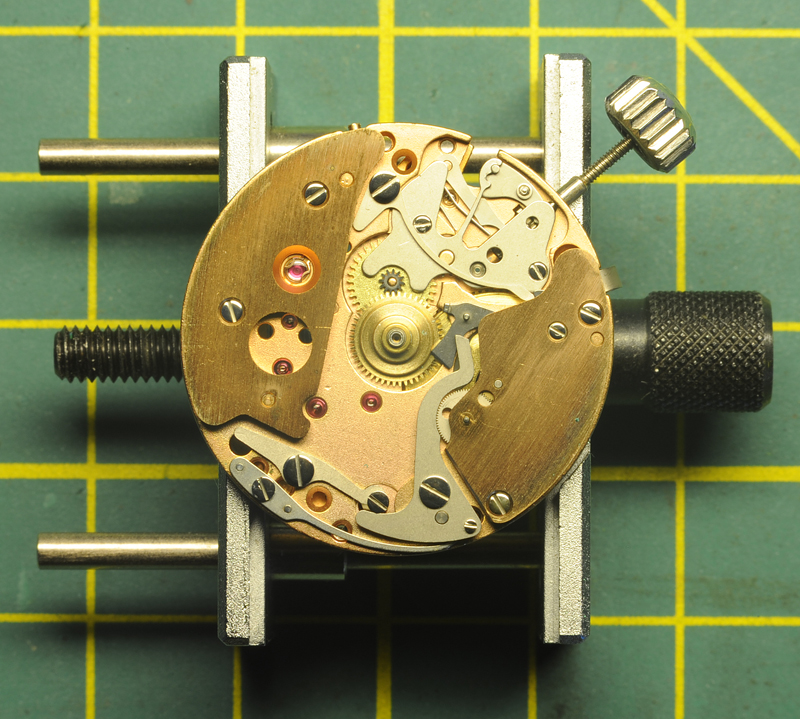
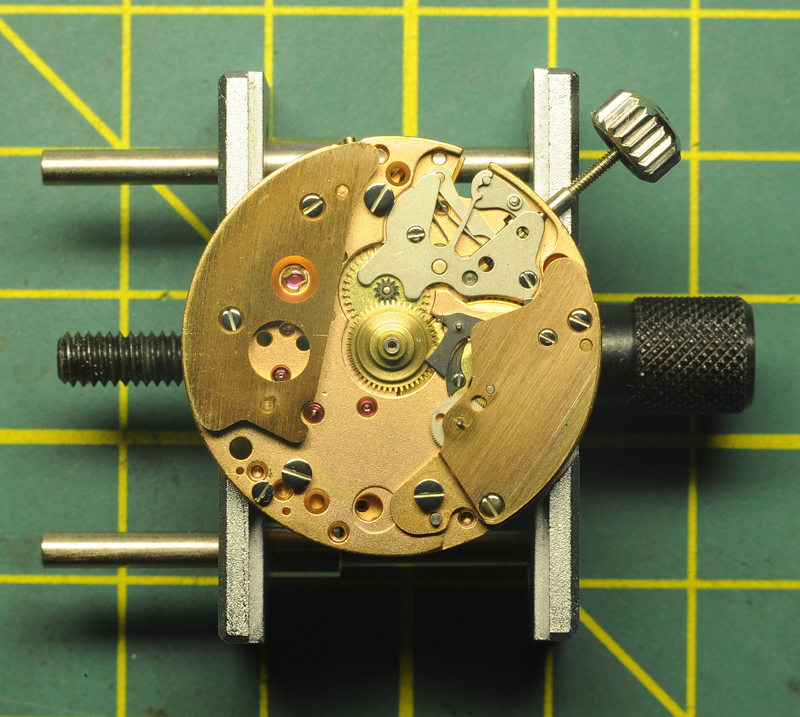
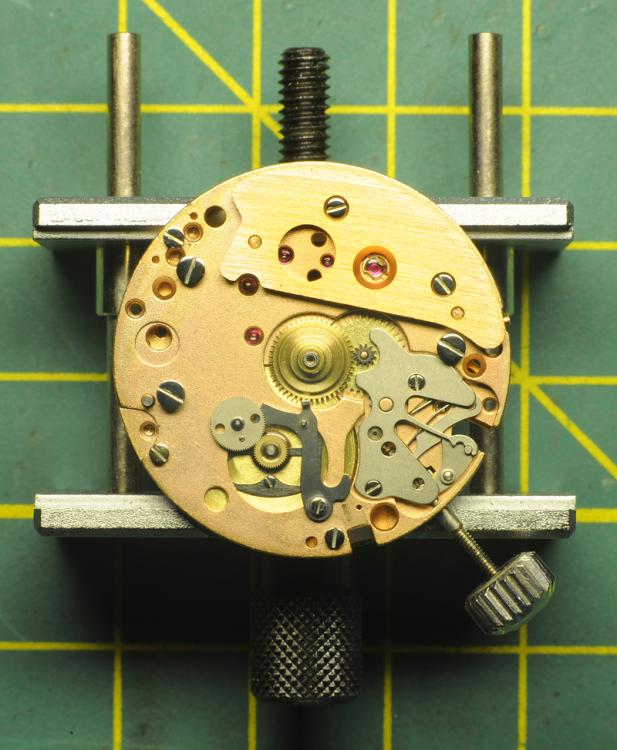
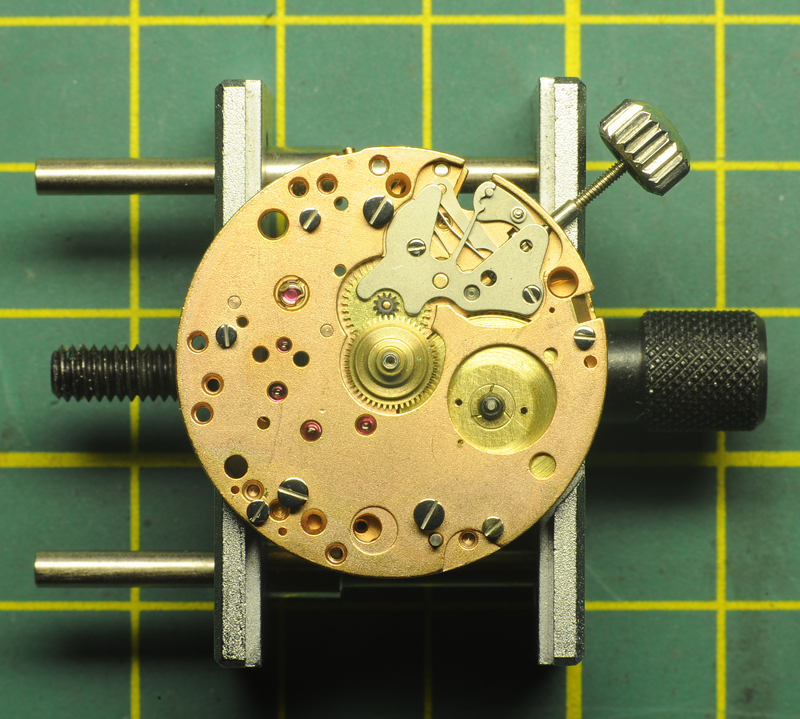
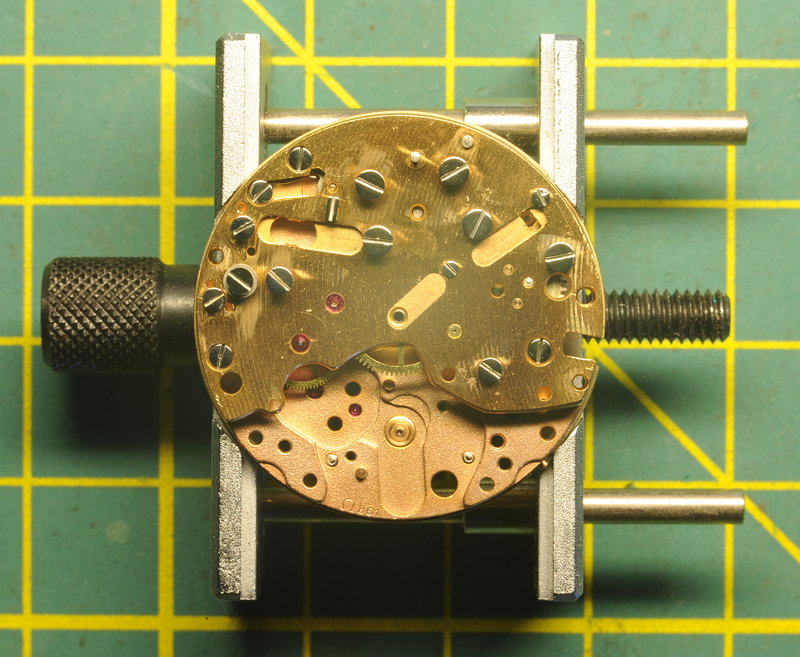
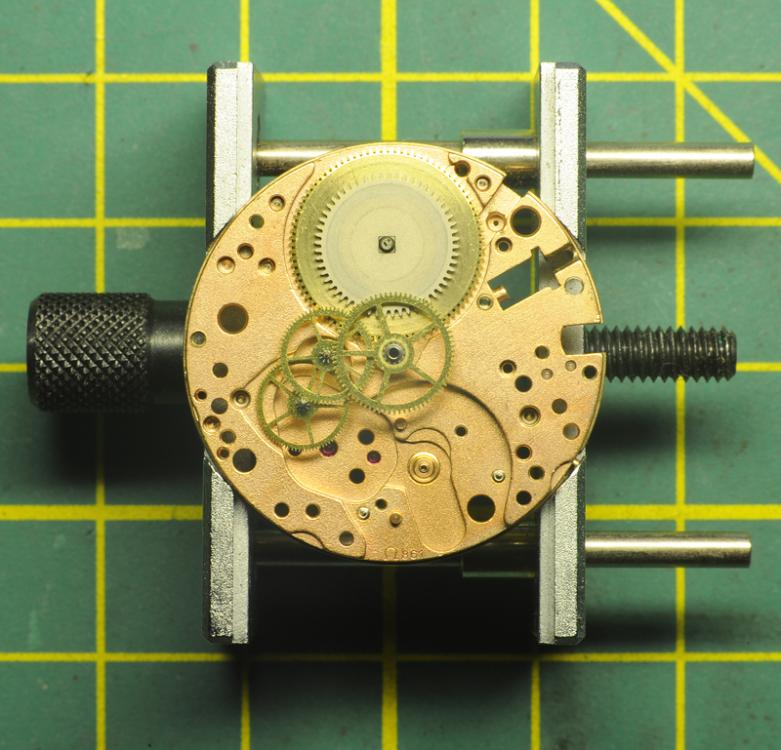
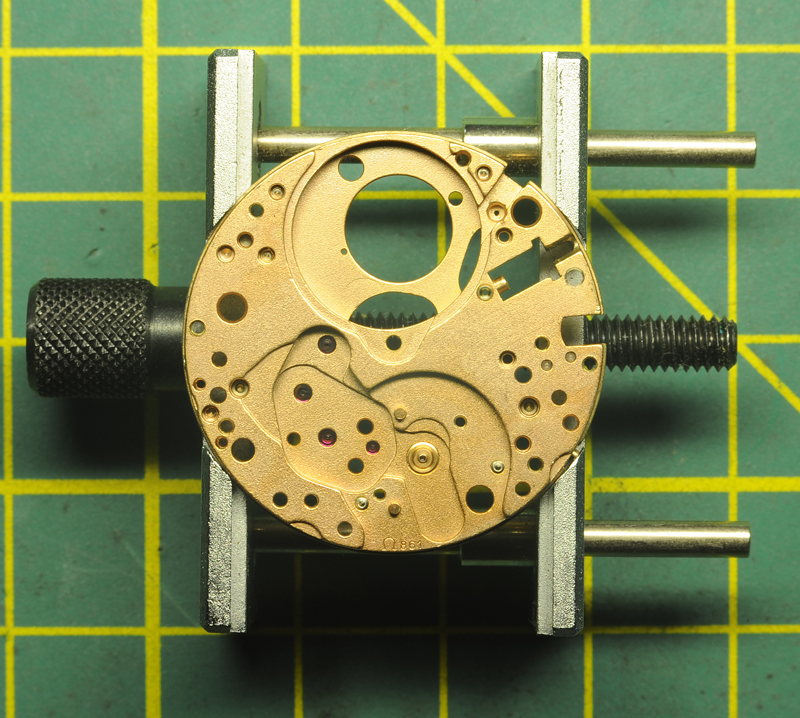
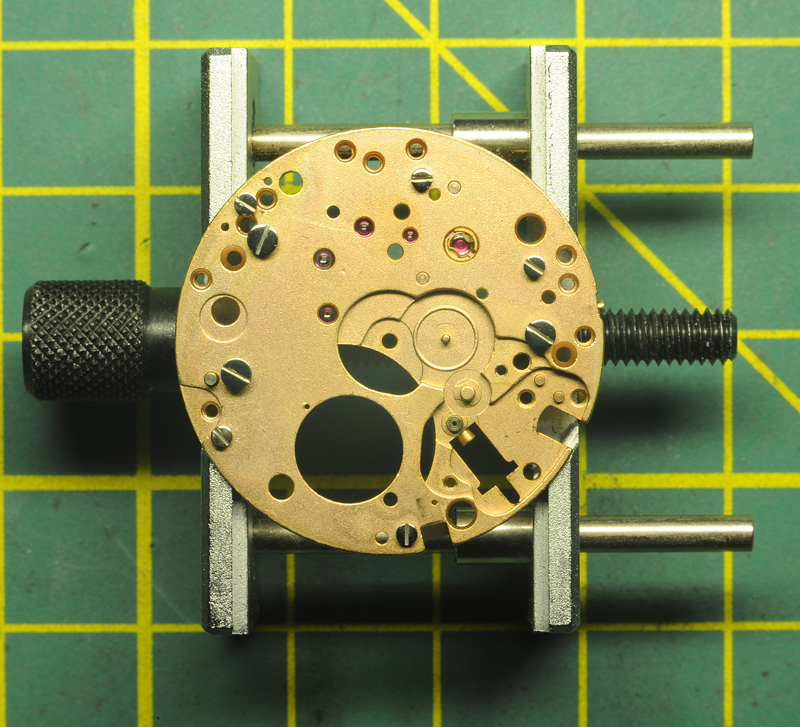
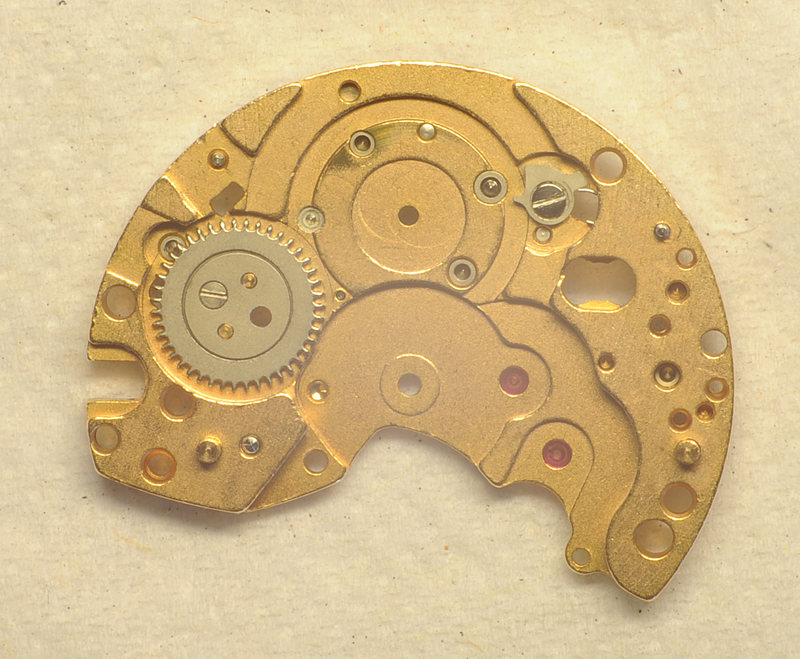
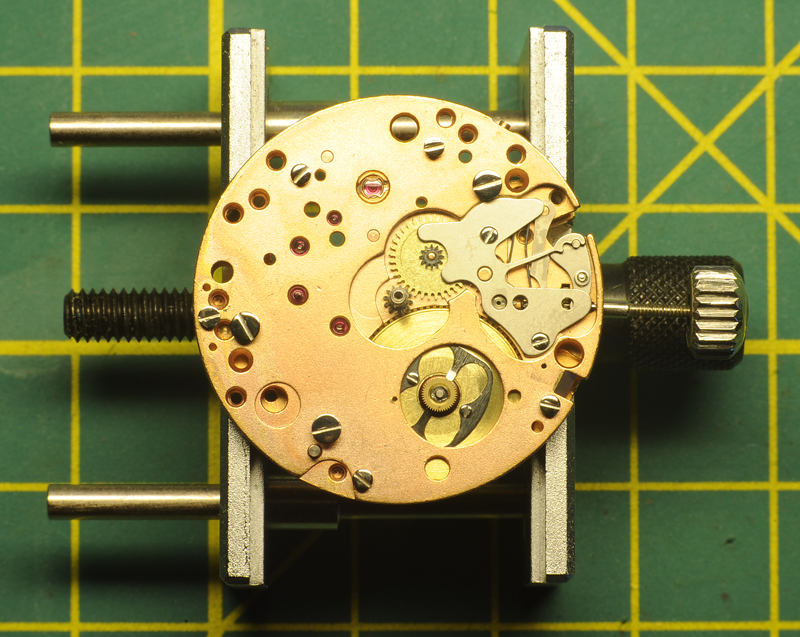
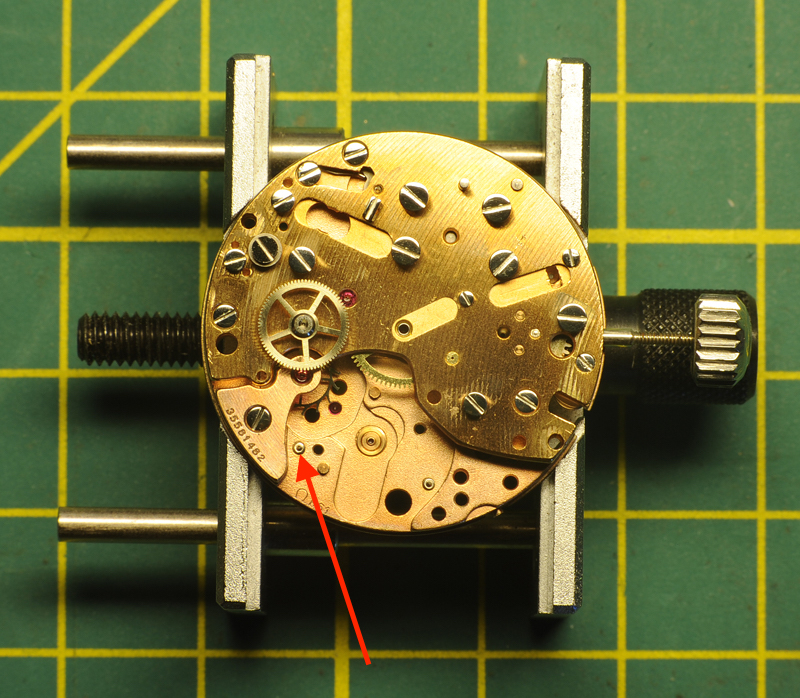
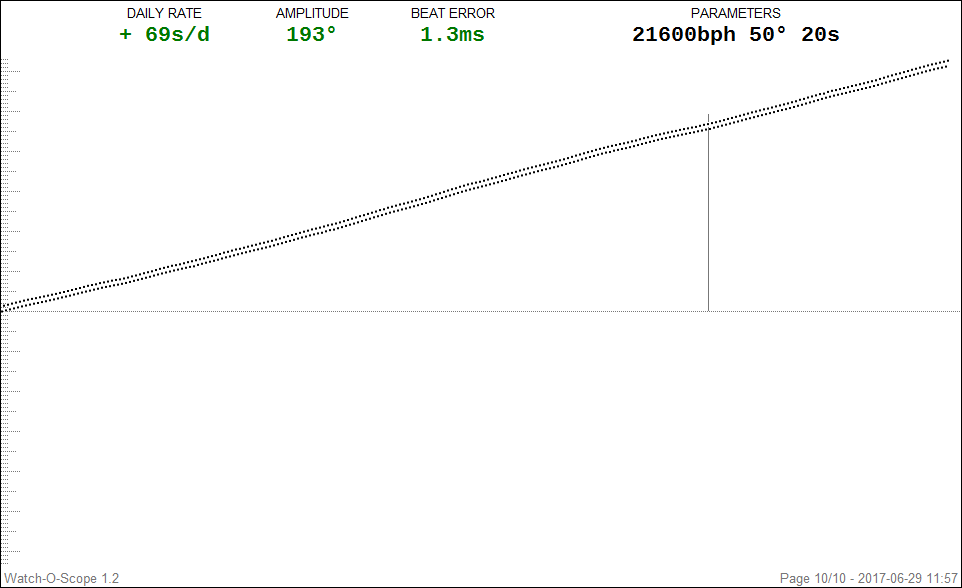
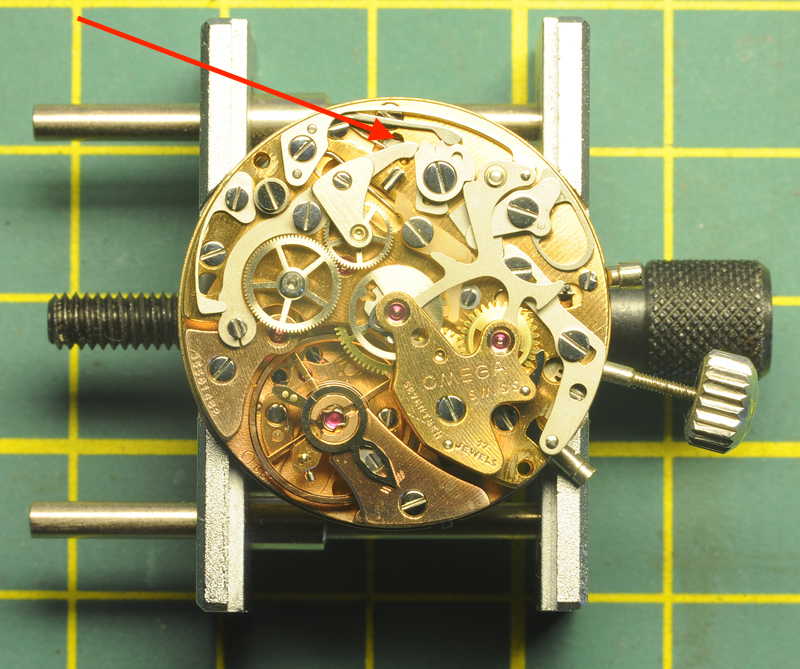
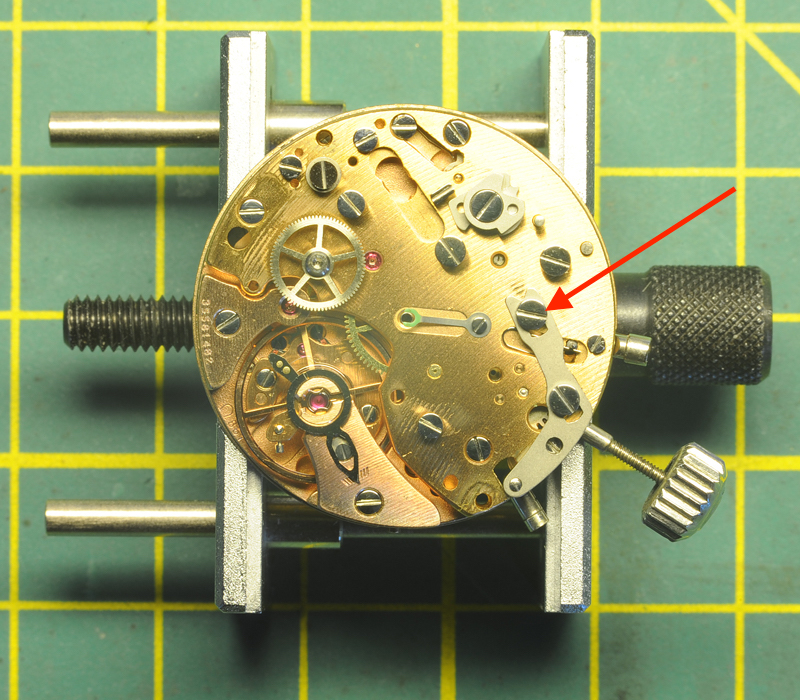
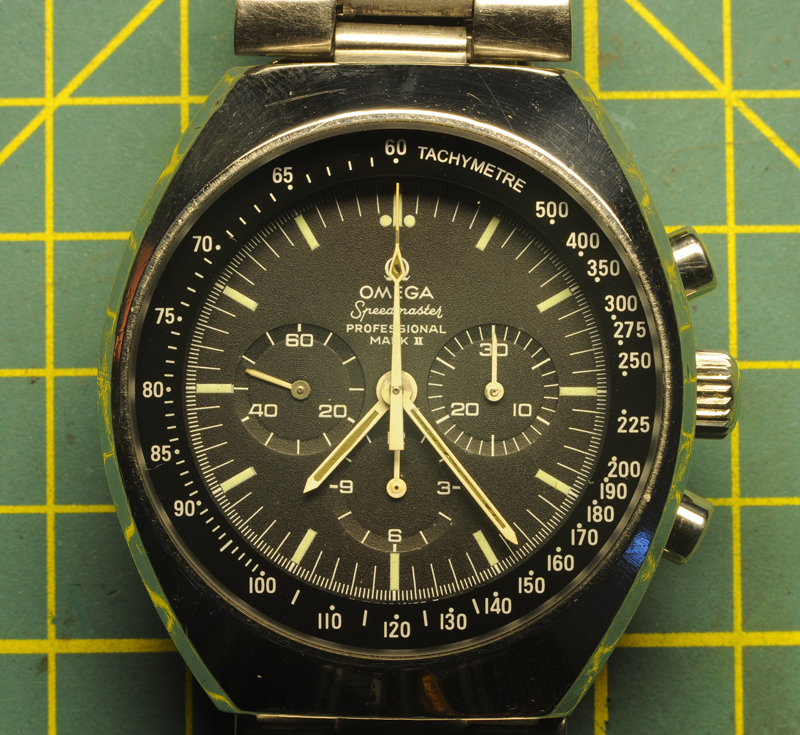
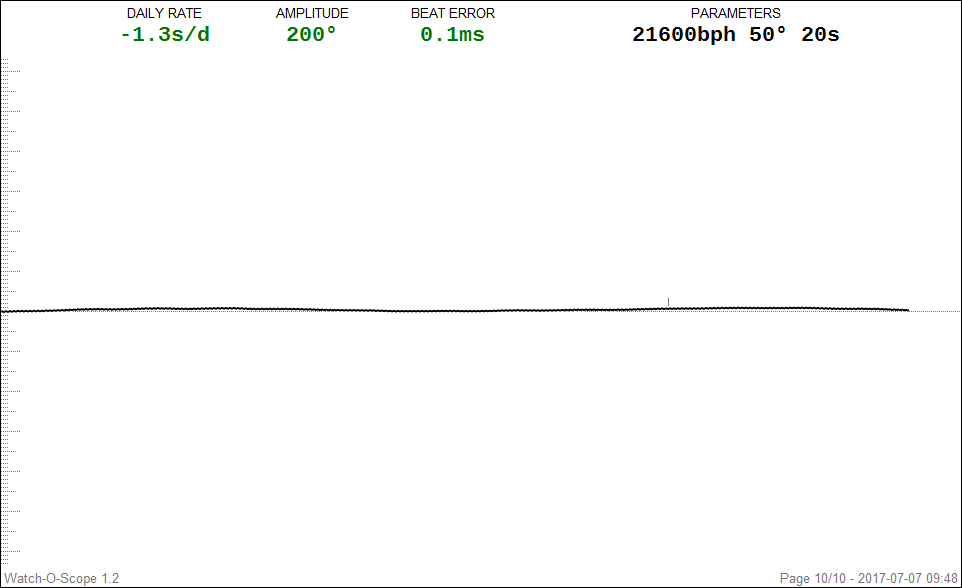
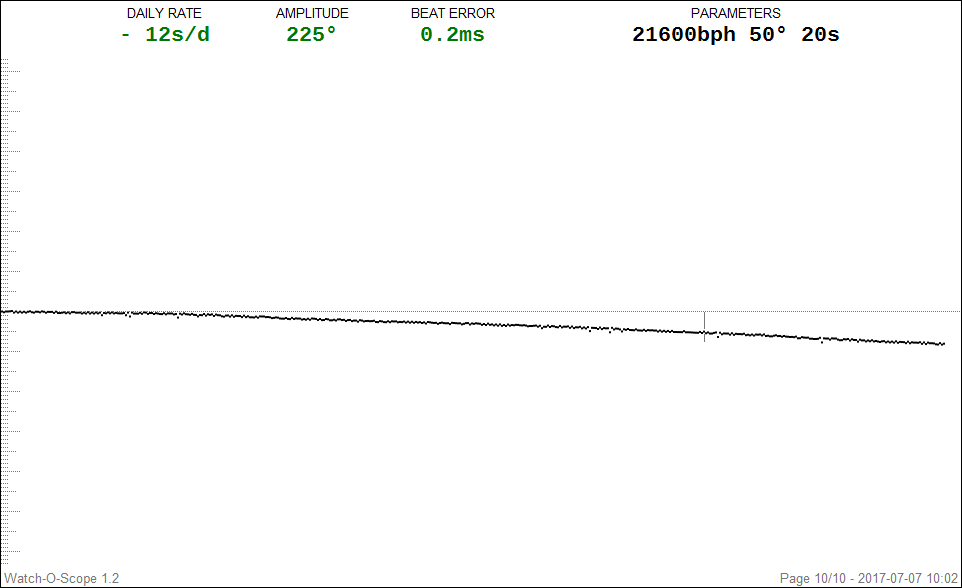
Hello All; On my desk landed a 1975 Omega Speedmaster professional Mark II. It was in a sorry state and water ingress was suspected. The last services were quite a few years ago, mid '80's towards the '90's. Those services were performed by a watchmaker working for a local highly reputable jeweler with a glossy facade. Instead of using the proper tools (a guide-ring) to replace the glass, for ease or necessity the official seal-ring was taken out and the glass was placed using a black sealing-kit. The back-cover received the same treatment, instead of the correct O-ring, the O-ring groove was filled with the same black sealing kit and the cover was thereafter closed. By a stroke of luck, the Omega was replaced by another watch and has for 20+ years been stored in a drawer; until recently. The owners current watch was sent away for a service and the Omega had to fill the gap. Unfortunately the Omega came in contact with water. The owner suspected water ingress and as soon as his current watch was back from servicing, the Omega was sent to me. Though time, the black sealing kit has eaten away the printed Tachograph-ring and made its way onto the edge of the dial. The task on hand; a full service of the movement, installation of a new mineral glass and replacing all seals. Perhaps some new luster to the watch-case........ Whether I show the full restoration of the watch-case needs to be seen, but I like to start off with a walk-through of the 861 movement. Two Omega 861 manuals were of enormous help; Omega 861 service manual.pdf Omega 861.pdf I printed them out and best is to read and cross reference both manuals before starting. Each manual contains important information, not necessarily mentioned in the other manual ! Once the information is combined, then there is enough information to do a proper service. For chronographs like this one, I replace each screw after the component has been removed. This avoids screw mix-ups, but can cause some problems too ...... read installing the pallet-fork bridge. Without any further ado; Here is the watch as I received it; Luckily the inside looked pretty okay and no visual signs of water. BTW, the black sealing kit on the back was already replace by a proper O-ring. Took some Watch-O-Scope shots (lift angle 50 degrees) Dial up: Dial down; Crown Up; Crown down, this one was harder to get due to a weak signal; All in all, not too bad.......... at least not "devastating" differences in the four positions. The movement is attached to the case with two clamps and a spacer ring. Remove those plus the winding stem and the movement can be taken out. Clearly visible is the black sealing-kit around the dial edges, starting from 5 till 10-o-clock. Pay special attention when removing the little hands, these have different tube sizes. I stored them separately, each in their own container; Left, Bottom and Right. Taking ample pictures was a great help to me as well. I had to consult them a few times during the assembly. Another remark I like to make is that the movement doesn't sit comfortable in an universal movement-holder. The movement-holder I used was a Bergeon 4040 and with great care it can be done, but later I've spotted on eBay Omega 861 movement holders for reasonable prices ..... On the picture below, the Joke 1774 has been removed. This exposes and give access to the click (see arrow). The main-spring can now be disarmed. Next is the hammer-spring 1734; it sits on two center-pins and has to be lifted at its heel. The hammer 1728 sits on a post and can be lifted straight off. Remove coupling spring 1731 and coupling yoke 1724. Be aware of the eccentric screw, it clearly has a different shape. I left the unit (wheel bridge 1716 and coupling wheel 1712) in one piece. Later I dismantled the unit and attention has to be paid which way around the coupling wheel is mounted. Removed the plastic blocking lever 1726 and blocking lever spring 1733: in the manuals different names and number are used for seemingly the same item. One end of the spring has a "hook". This "hook" has to face upwards against the blocking lever. Next to remove is the cam-jumper 1845. Next is the chronograph bridge 1037. The manuals are not very clear if one does this for the first time. Underneath and fixed to the bridge is a thin spring for the minute recording jumper. This spring will come together with the chronograph bridge. The spring pushes against the minute recording jumper 1767, which is attached to a post underneath the bridge. While lifting the chronograph bridge, the jumper 1767 may, or may not come as well. I my case, all lifted in one piece. By turning the bridge around, it all becomes clear .... Das "Aha Erlebnis" ;-) Remove chronograph runner 1705, minute recording runner 1708 and intermediate wheel for minute recording runner (1714); note which way around of the wheel ! Remove operating lever 1841, operating lever-spring 1842 and connecting lever 1840. Attention: The operating lever 1841 sits under tension. After I removed the screw and attempted to lift the lever 1841, the connecting lever 1840 had its personal launch ...... luckily not that far ...... Remove operating lever 1720. In my case, the "Glossy Facade Watchmaker" left a surprise; the top screw was sheared off right under the screw-head and screwed in by literally one thread (red arrow, picture above). I later attempted the remove the remaining stud, but no success. After consulting the owner and this being the second, more a guiding screw, the decision was taken to repeat the GFW-trick. The screw held for many years, so hopes are it will do it again. Remove (and note position) upper cam for hammer 1844, remove lower cam for coupling clutch 1843, remove stem for "Zero pusher" by undoing the screw, remove bolt-spring 1752 and bolt 1759. Carefully, use Rodeco, remove fragile friction spring for chronograph runner 1735. Carefully remove the driving wheel 1710; I managed to lift it using two hand-levers. I then removed the balance & bridge, the pallet fork-bridge & pallet and the escape wheel bridge & escape wheel. Flip the movement over; Remove bracket for operating lever 1784 (note position), remove hour hammer spring 1794 (not described in both manuals, note how it engages) and remove hour recorder stop lever 1750. Be aware: as soon as lever 1750 is lifted, spring for stop lever 1793 will jump free !! Remove spring for stop lever 1793, remove switch mounted 1779. Watch out !! Little screw at tail end is an eccentric (see arrow above) ...... do not touch !! Remove hour recorder bridge 1775; Remove hour hammer 1783, hour recorder runner 1788. Next is, according to the manual, removal of the friction spring for driving pinion 1792 and driving pinion 1791. I did this according to the manual, but found out that the removal of the friction spring 1792 and driving pinion 1791 can be done (much easier) later when the main-spring barrel is removed. Remove support bridge for dial 1776. Remove hour wheel and keyless works, note the two intermediate wheels. Remove canon-pinion. Flip movement over; Remove barrel bridge. Note crown wheel and click are underneath barrel bridge. Also note that ratchet wheel lays on top of the barrel. Remove wheel train; Open barrel and note spring position; Note arbor position; Install new spring; Install arbor, grease/oil and close barrel. Mount driving pinion for hour recorder 1791 and friction spring 1792. Grease as per manual. Service crown wheel and click. In my case the little screw of the crown wheel center was too tight and deemed not worth the risk. Applied some oil in the wheel groove. Now as for replacing the screws after each removed component; During the assembling I encountered a problem placing the pallet fork bridge and good pivot engagement of the pallet fork. After quite a few nerve-wrecking attempts, I noticed that a replaced screw on the other side of the main-plate stood proud of the main-plate and prevented the pallet bridge to seat. Once corrected, all fell in place ....... Assembling of the chronograph is the reverse of the above. Greasing / oiling is done as per attached manuals. Below; the movement is back together, running and all functions work ..... Tomorrow adjustment of the daily rate & bear error. As said, I may or may not follow up on the case restoration. Cleaning the dial is another challenge ....... Hope this walk through is to somebody of any use ....... ;-) Roland.


 1 point
 -
When much younger I've worked professionally on motorcycles, and I agree with you. That is why I'm amused when total beginners come here with the presumption that since they have some manual skills in whatever other field, it will be easy. And then you see that most of them disappear after a few postings. Hope you can find a balance complete for your Tissot, now that you've learned how delicate an hairsping really is.1 point
-
About 2 years ago I bought the complete set of 8mm WW collets from Sincere. The collet set cost me more than twice what I initially paid for the lathe. The lathe was $450.00 when I bought it many years ago. This price included the cross slide, lever collet holding tailstock and free shipping. Since I bought it, price increases have almost doubled the cost of the basic lathe package. When I brought this up on another forum years ago the usual nasty comments came out calling the machine "a piece of Chinese junk". These comments were made by people who never used the machine. With only a few exceptions (Boley F1, Star, Cowells) I also have every other model of watchmaker lathe in existence, so I had other machines to compare it to. In some respects, I took a chance when I bought it, but it turned out to be an extremely accurate, dependable lathe. Personally, I am very happy with the machine. I gradually added the other accessories over subsequent years and pretty much have everything Sincere offers for the lathe. Their quiet running induction motor was around $200.00 but I like it much better than the brush type universal motors that are normally used. The induction motor turns the same RPM whether running free or under a load during a cut. This helps keep a consistant chip load and reduces pivot breakage during the turning operation. david1 point
-
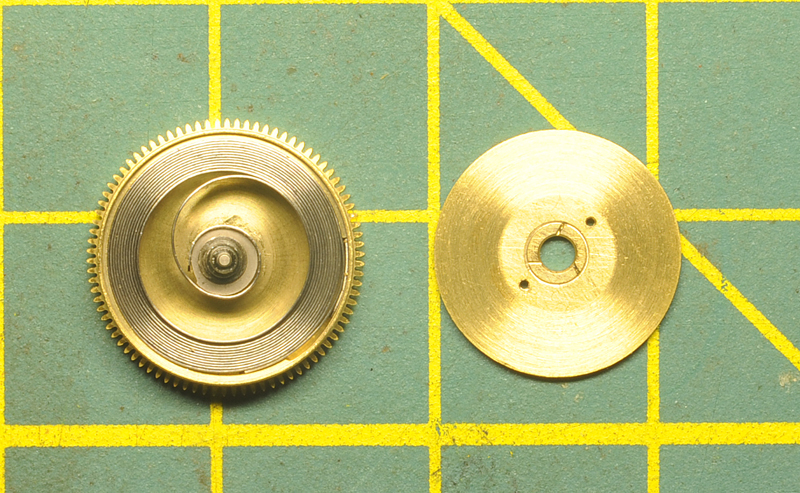
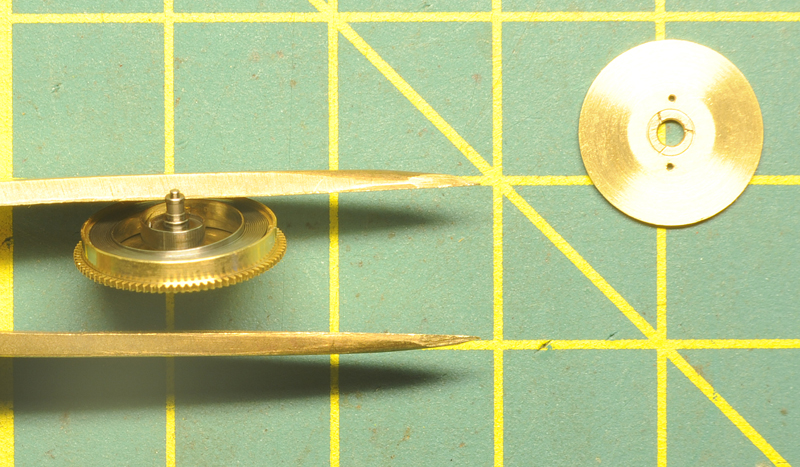
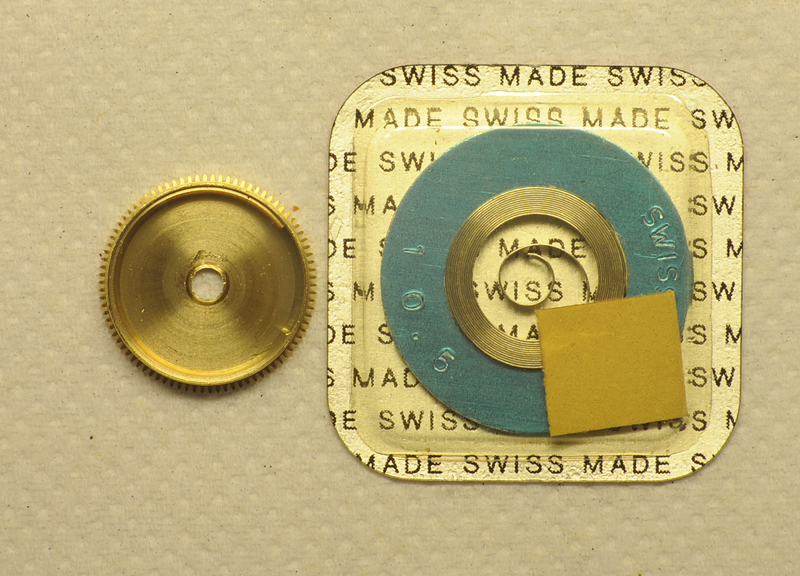
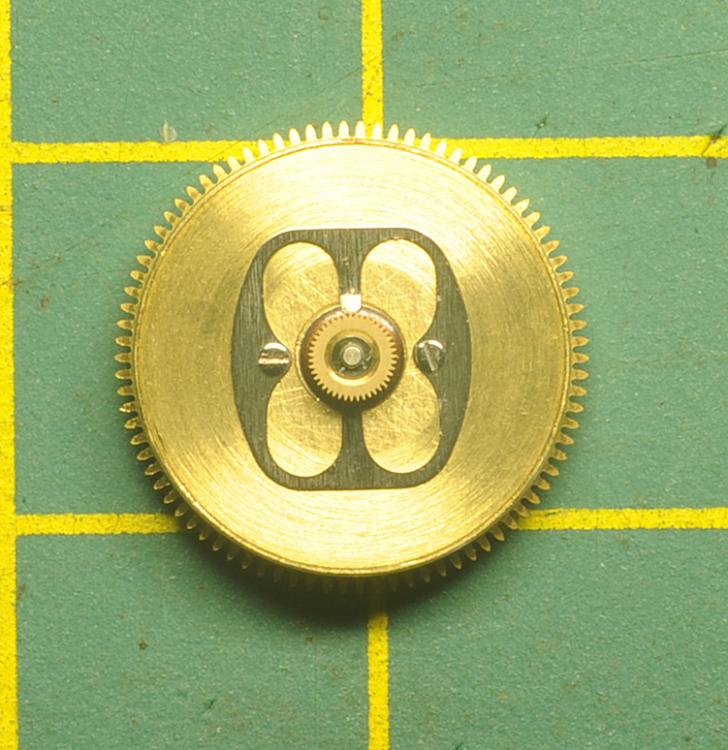
Hi all , and first of all thank you for all the pointers, it has given me the confidence to progress this. I applied the "24h rule" and came back to this today, and I am pleased to report I have successully disassembled the ratchet wheel. It turned out to be much easier than I expected. I started by lining up the square. As Stuart pointed out there are wear marks along the edge of the slot, which gave me the confidence to try a bit harder to slide the washer. I applied pressure at the end of the slot with a piece of pegwood to avoid any damage, and eventually the washer did move and its edge went over the recess. What became obvious only after disassembly is that the washer was actually dished, and therefore acting as a spring (hence the "no play" I had observed). So it had the ability to flex to go past the edge of the recess of the ratchet wheel. I was initially very reluctant to even try this as I expected a flat washer, which would have simply butted against the edge, no matter how much pressure was applied. Mystery solved, I have taken some detailed pictures given the interest this thread generated, so I will let them do the talking!1 point
-
A well known resource. [emoji106] Maybe it and many others should be listed somewhere?1 point
-
My tip is don't buy cheap. I made this mistake, purchased a Chinese set (mm) & the cut was terrible so purchased a better quality set from http://www.axminster.co.uk & the difference was significant.1 point
-
Very handy. Thank you.1 point
-
What type do you want? Are you after mm or ba size. This site should help. http://www.tracytools.com/1 point
-
Regarding oils for clocks... http://www.kensclockclinic.com/wp-content/uploads/2015/02/Clock-Oils.pdf A little history and types of oils used. I've been using Mobil 1 Synthetic 0W-40 and 10W-60 a couple of years now with good results. Cheap too!1 point
-
Impressive Sent from my iPhone using Tapatalk1 point
-
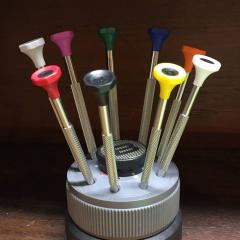
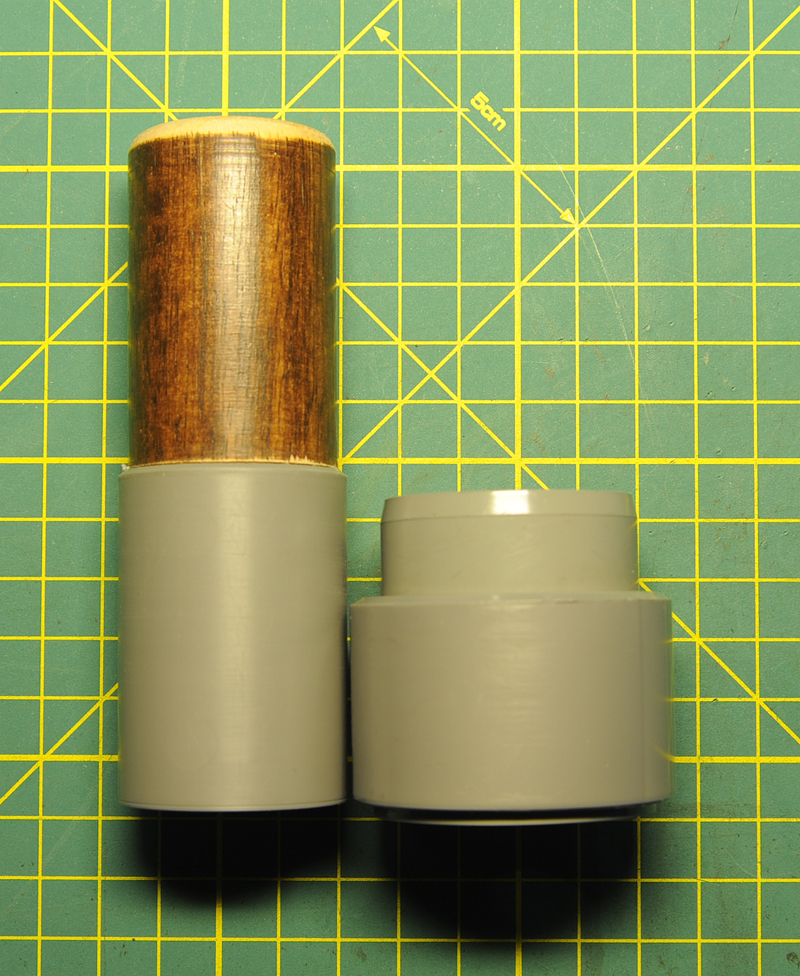
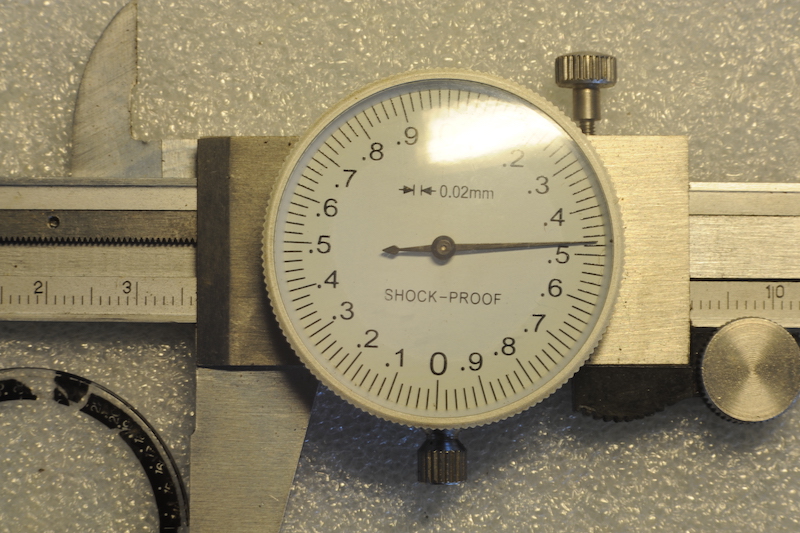
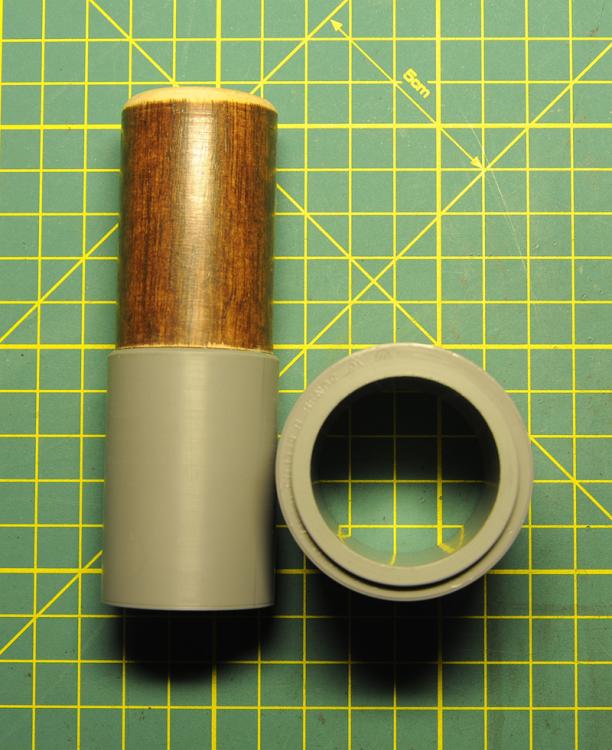
Latest and some additional info; Since the Omega was a "back-up" for the owner, it was decided not to "lap" the case. Instead, I just gave it a very light polish. The pusher O-rings were replaced by Micro O-ring gaskets from CousinsUK; 1.70 x 0.45 x 2.60mm Before one can install the glass, the movement, complete with hands, has to be put back in the case. This to orient the top of the glass with the 12-o-clock marker on the dial. The housing itself doesn't have an orientation point. I found out that installing the hands caused some paint to come off. Due to age, the paint on the hands had become like plaster on an old wall. It had lost its adhesion to the metal and cohesion held the thin paint-layer together. Just pushing the hands back caused the paint to break and flakes to fall off....... Hmmm . Taking great caution was the best I could do. For installing the glass, a special tool was required. Friends helped me out and instead of just making just a "guide"-ring, they made a whole sophisticated tool ...... out of materials they had laying around ! First here the dimensions and tolerances of the case and glass. The case ID, measured with my caliper is 36.54mm. The glass OD is 36.48mm in total a 0.06mm tolerance. The tool consisted of an internally tapered PVC inner-ring, a re-enforcement PVC outer-ring and a pusher. The internal tapered inner-ring was at the bottom so precisely machined that the glass, without an O-ring, was "air-tight" .....the top was wide enough to insert the glass + O-ring....... a fantastic job they've done !!! Smoothed the internals and O-rings with silicon-grease and the installation of the glass was a breeze. The "60" glass-marker was spot-on, even though I later found out that the glass can still be rotated. Perhaps this due to the low friction of the silicon-grease? After installation of the glass, I tested the chronograph and the daily-rate. Had the Chronograph run for 14 hrs without a hitch. Adjusted the daily-rate and while wearing the watch it ran +4.5sec / day, BE 0.2ms. I've given the DR a little tweak so it runs now even more precise and the watch-case was sealed off with an original Omega back gasket; CousinsUK: X13216. Today the watch has been send back to its owner. In my opinion the below picture doesn't justify the real looks ..... and compared to the first picture on top of this thread, I like to think that I saved the watch from water damage, given it a good service and made it presentable again... for sure, it runs like champ ! I hope the owner thinks so too and that he is happy !! Regards: Roland.


 1 point
 -
That was developed by a member here and the video is made by me Here is the topic for details1 point
-
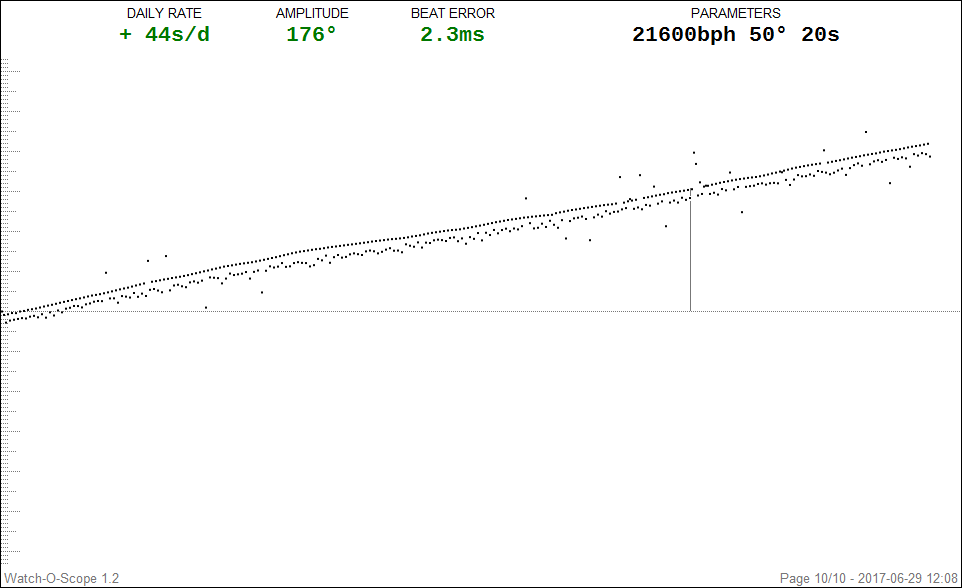
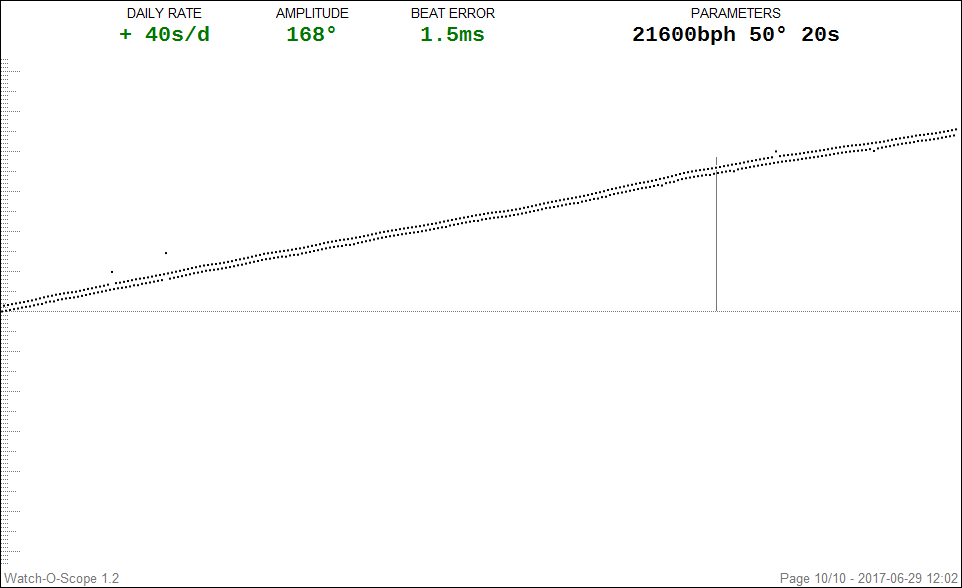
To conclude this walk through, here are the latest pictures of the Watch-o-Scope. I would have liked to see a bit higher Amplitude and perhaps / hopefully it will climb a bit further in time? A slight "wave-pattern", which is already visible on the graphs before the service. Again, not much to do about .... As for the case "Sunburst-lapping" and setting of the tachometer glass, I most likely need to source some professional help....... (under investigation) ...... Once all is build in, case done & glass set, perhaps a little more fine tuning of the Daily-rate; Dial Up; Dial Down; Crown Up; Crown Down; Doesn't seem too bad for a 42 years old movement ...... I'm happy with it ..... That's all folks ! Roland.

 1 point
 -
The missing pictures is due to photobucket changing their policy and holding everyone to ransom in the last few days. Photobucket will no longer allow photos hosted by them to be show elesewhere unless the account holder pays around $400 US a year, despite the fact this was exactly what most people had signed up with them before over the last 10 years. Needless to say I've not heard of one person say they were going to pay yet, but have heard many say they were closing their photobucket account.1 point
-
@oli Indeed, my first research pointed in the direction of starburst grinding, or sunburst finish with a lapping machine. Thank you for the link, but I can't see / open the pictures. This is what I get to see; Any tricks to make them visible or do you have the same?
 1 point
 -
Hello all. I'm about 4 months into learning watch repair. I've had some successes (gotten two dead watches running again), as well as some failures (to be expected). I'm trying to keep things simple, focusing on manual wind watches in the $10-$40 range on eBay, usually from the 1950s-1970s. I've got a pretty good tool set going, though definitely run into limits from time to time. In my current group of watches for regular wear I have a Welsbro, Roamer, Caravelle, Timex (birth year), and Lord McAdam(?). In my current group of project watches are a Bulova, Elgin, and Talis. I actually have a question related to my Bulova, but will post that in the appropriate forum. Thanks, all. Glad to be here. Seth1 point
-
Hi Rust, I am pretty new as well. This is a fantastic forum with many knowledgeable people (I am not one of them) who are always happy to give information. Hope you find it as addictive as I do. Best wishes Johnnie1 point