Leaderboard


Popular Content
Showing content with the highest reputation on 01/25/16 in all areas
-
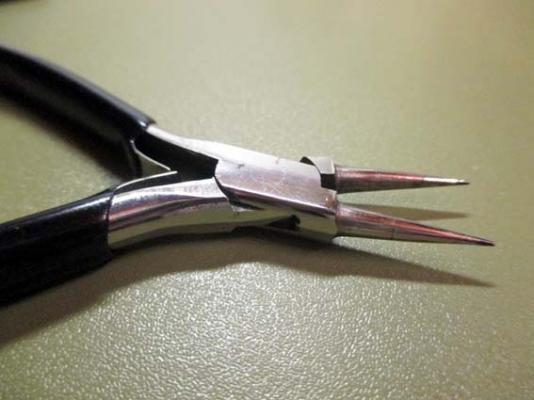
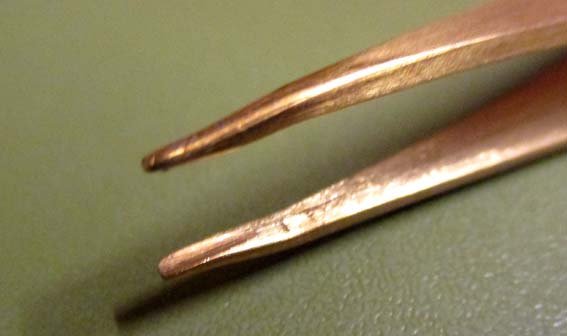
And here's my halfpenny worth: I would not use my precious overcoil pliers on mainsprings, even if I had a large enough size.. This is what I use: inexpensive and does the job perfectly.
 2 points
 -
Whatever you use to mark the outline, make the holes and the index (the bumps that give the click) first. Only then work on the outline. Otherwise you may find you have perfectly shaped piece but unusable due to the holes not being in the right places. HTH Anil2 points
-
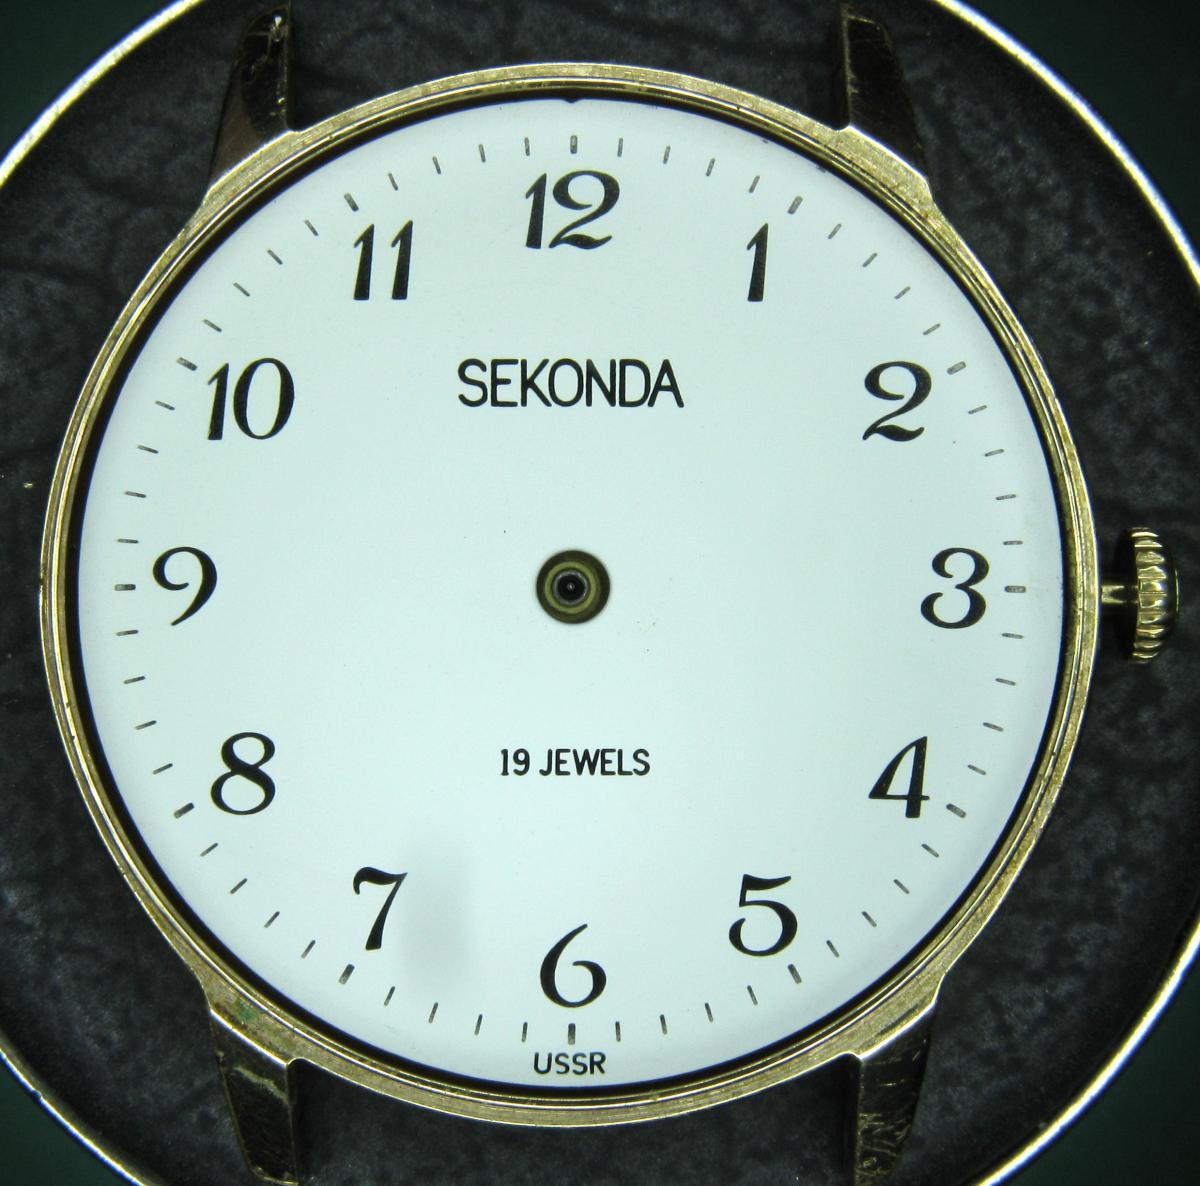
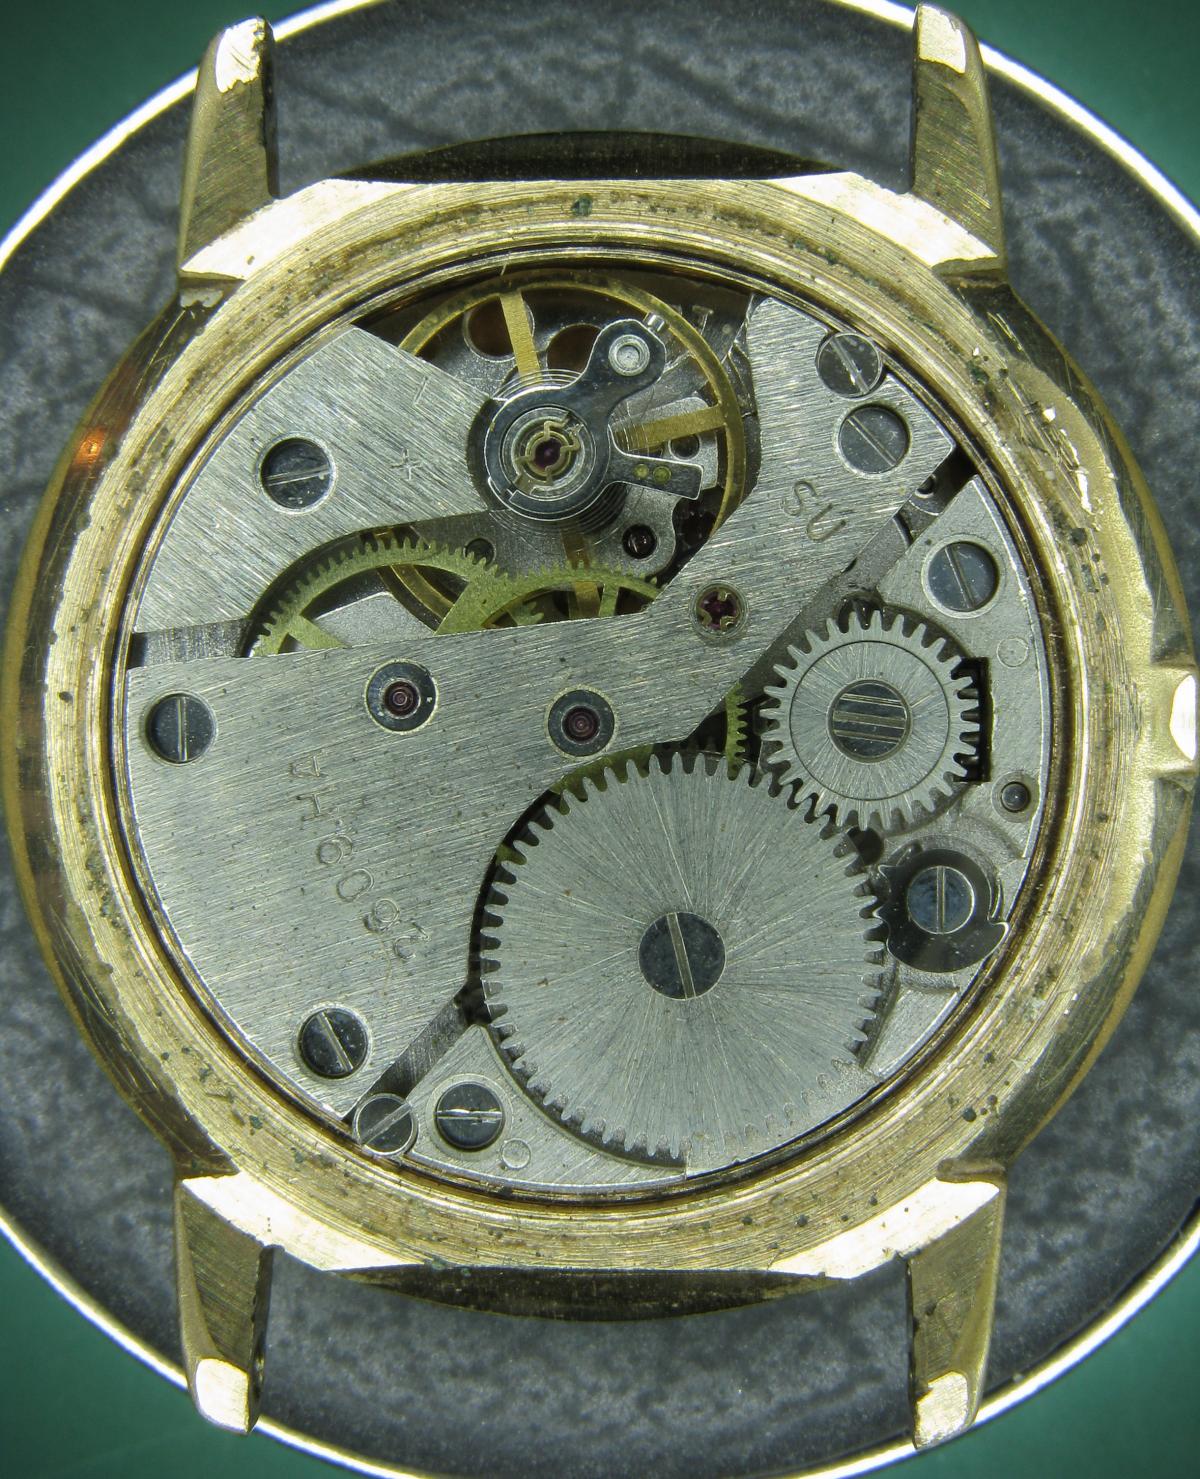
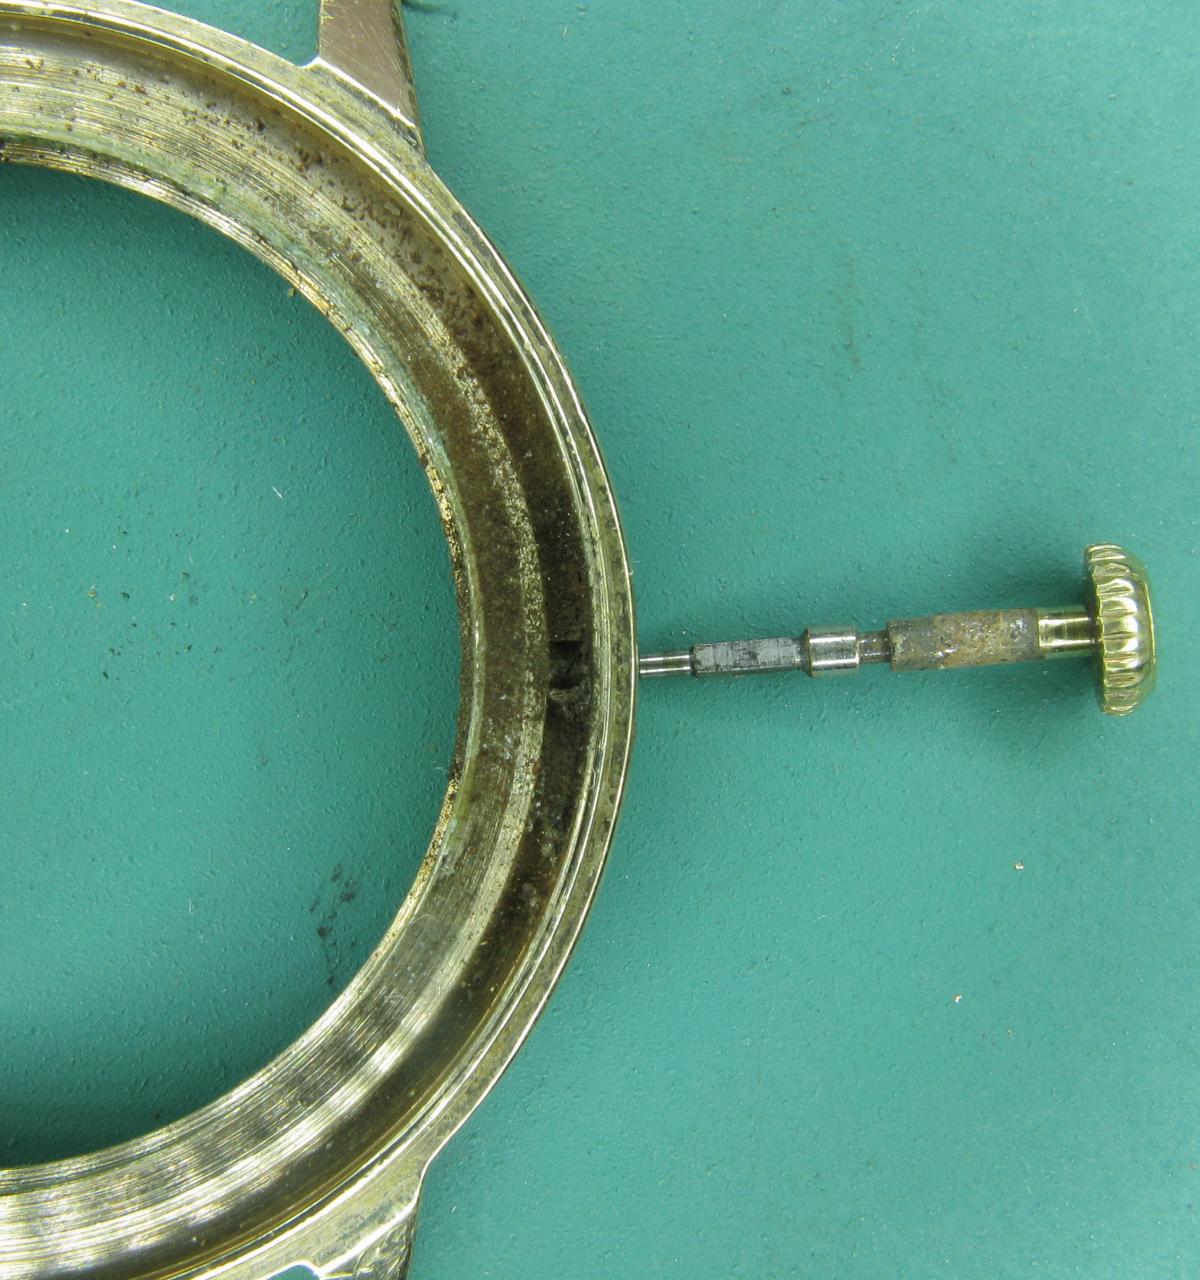
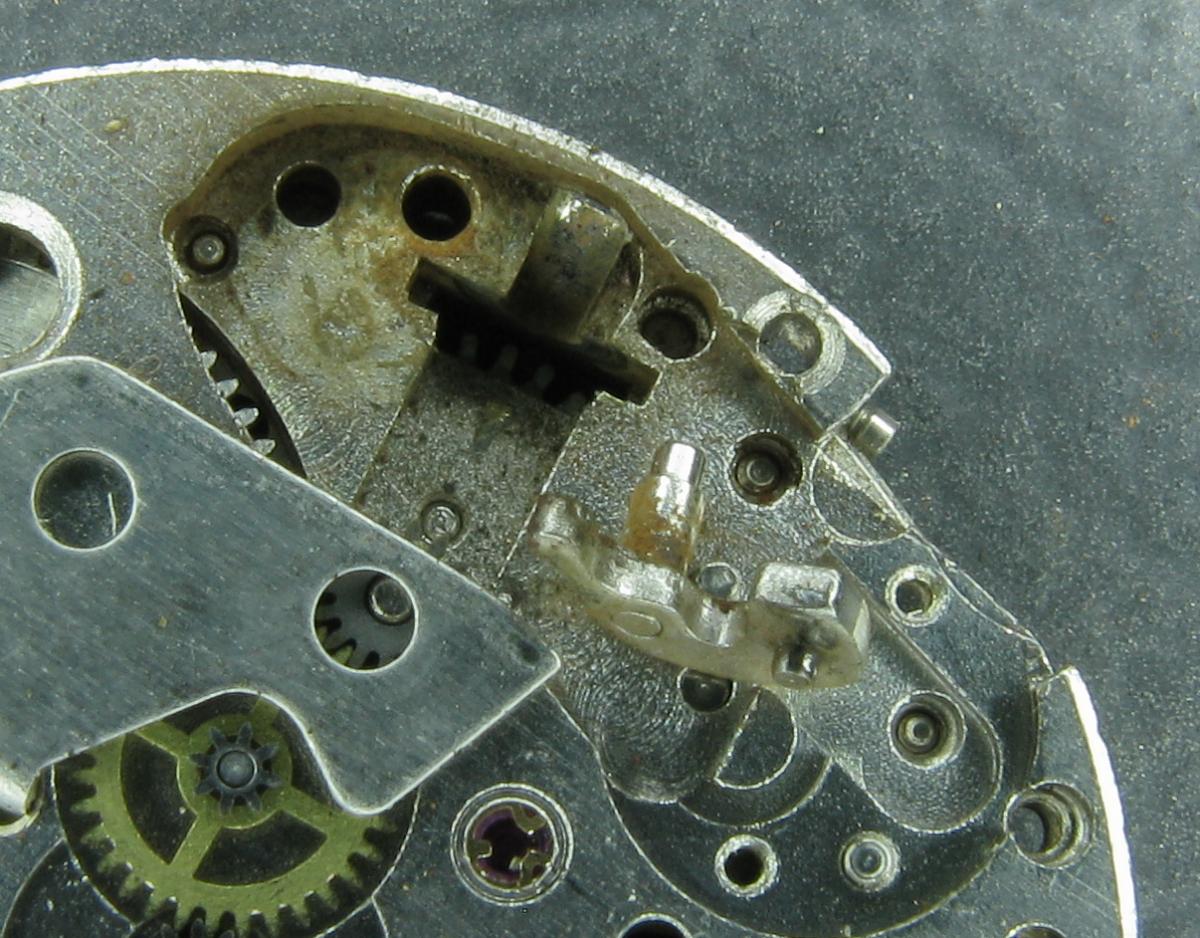
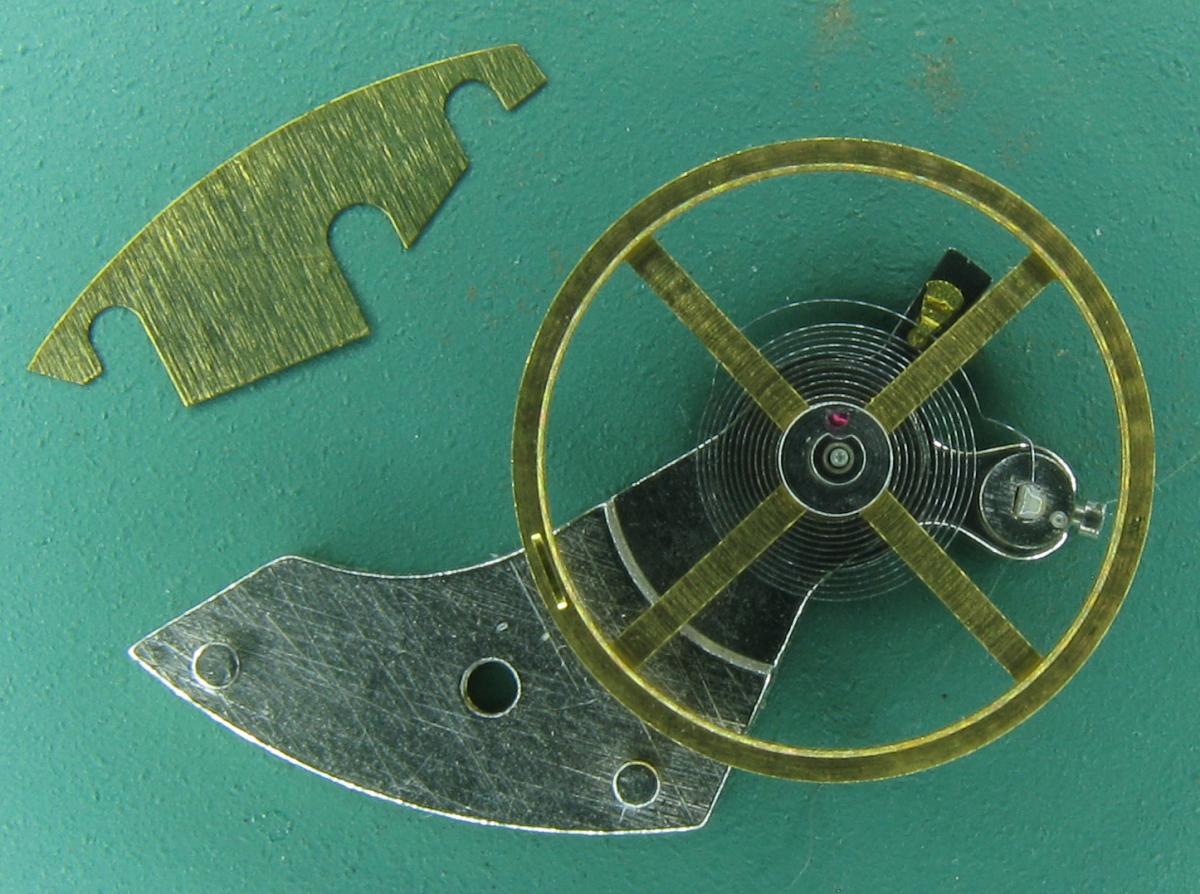
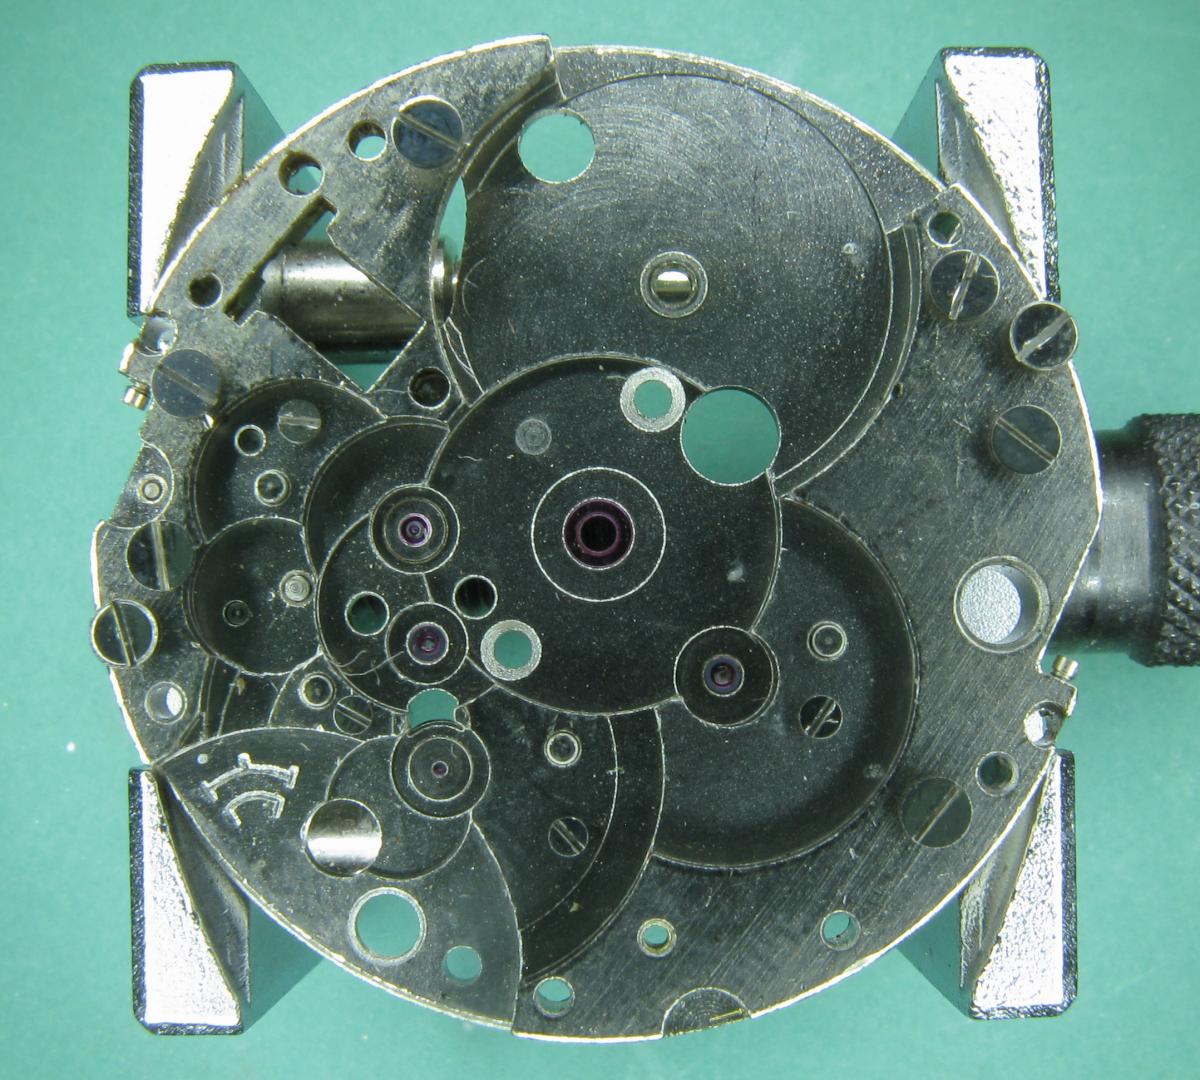
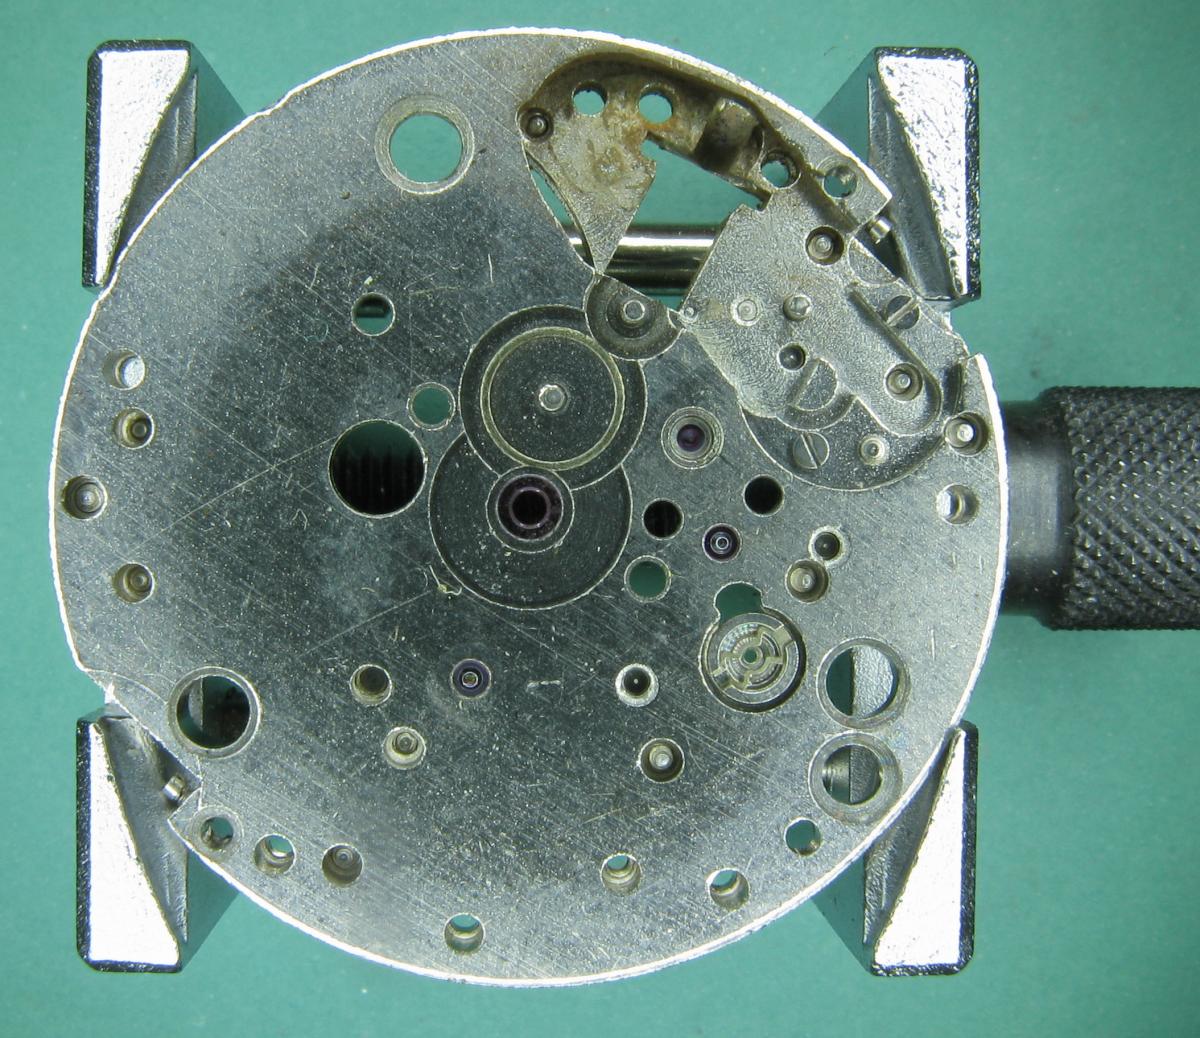
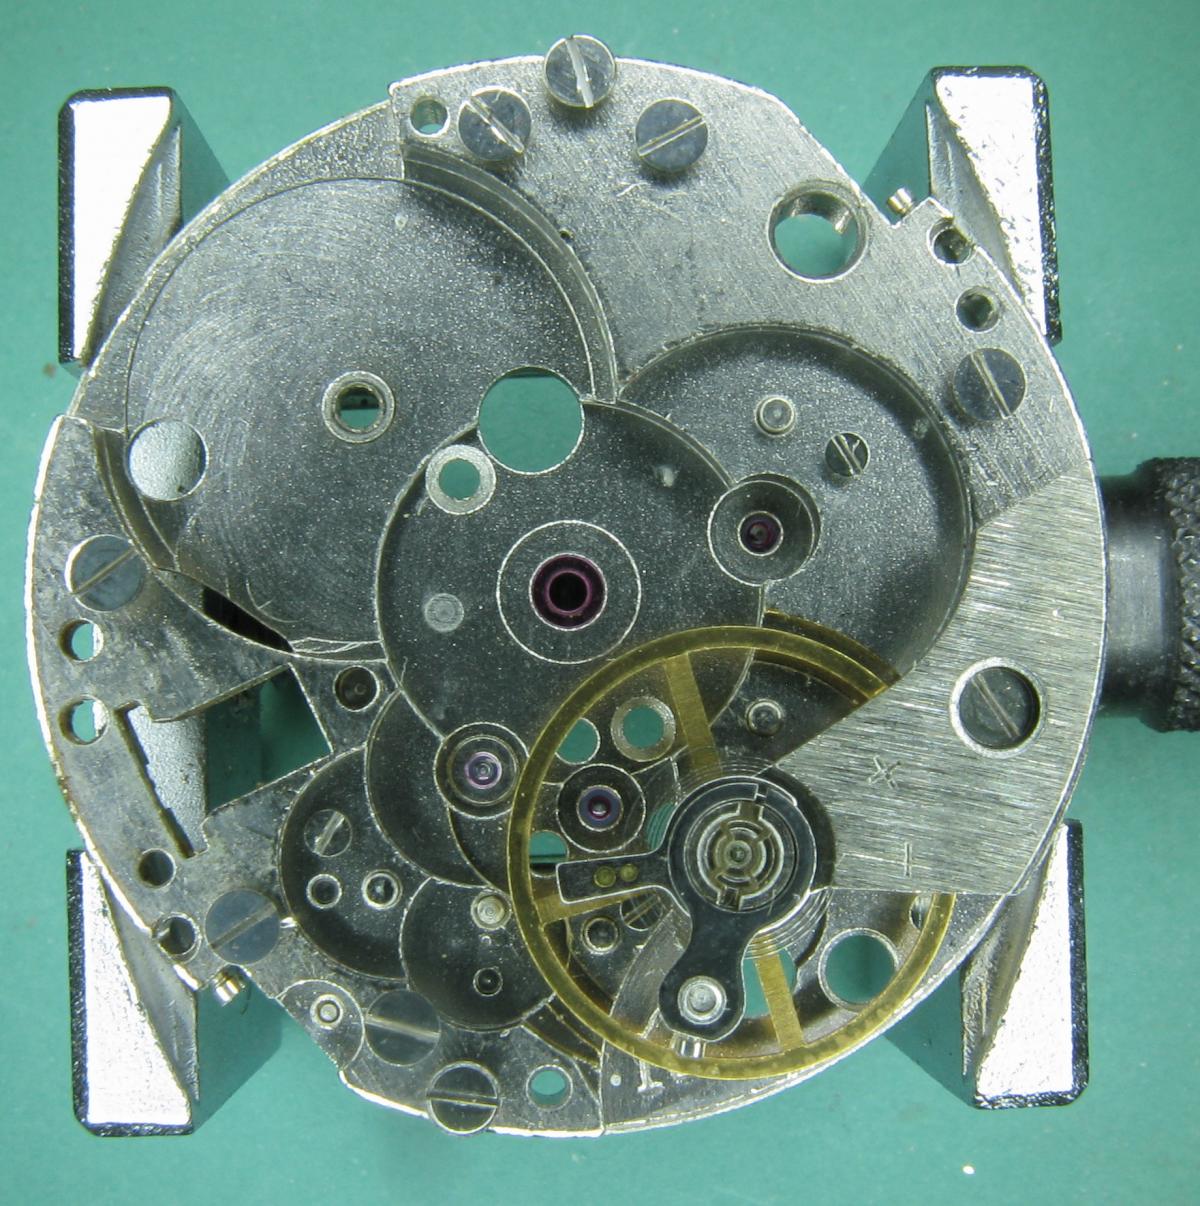
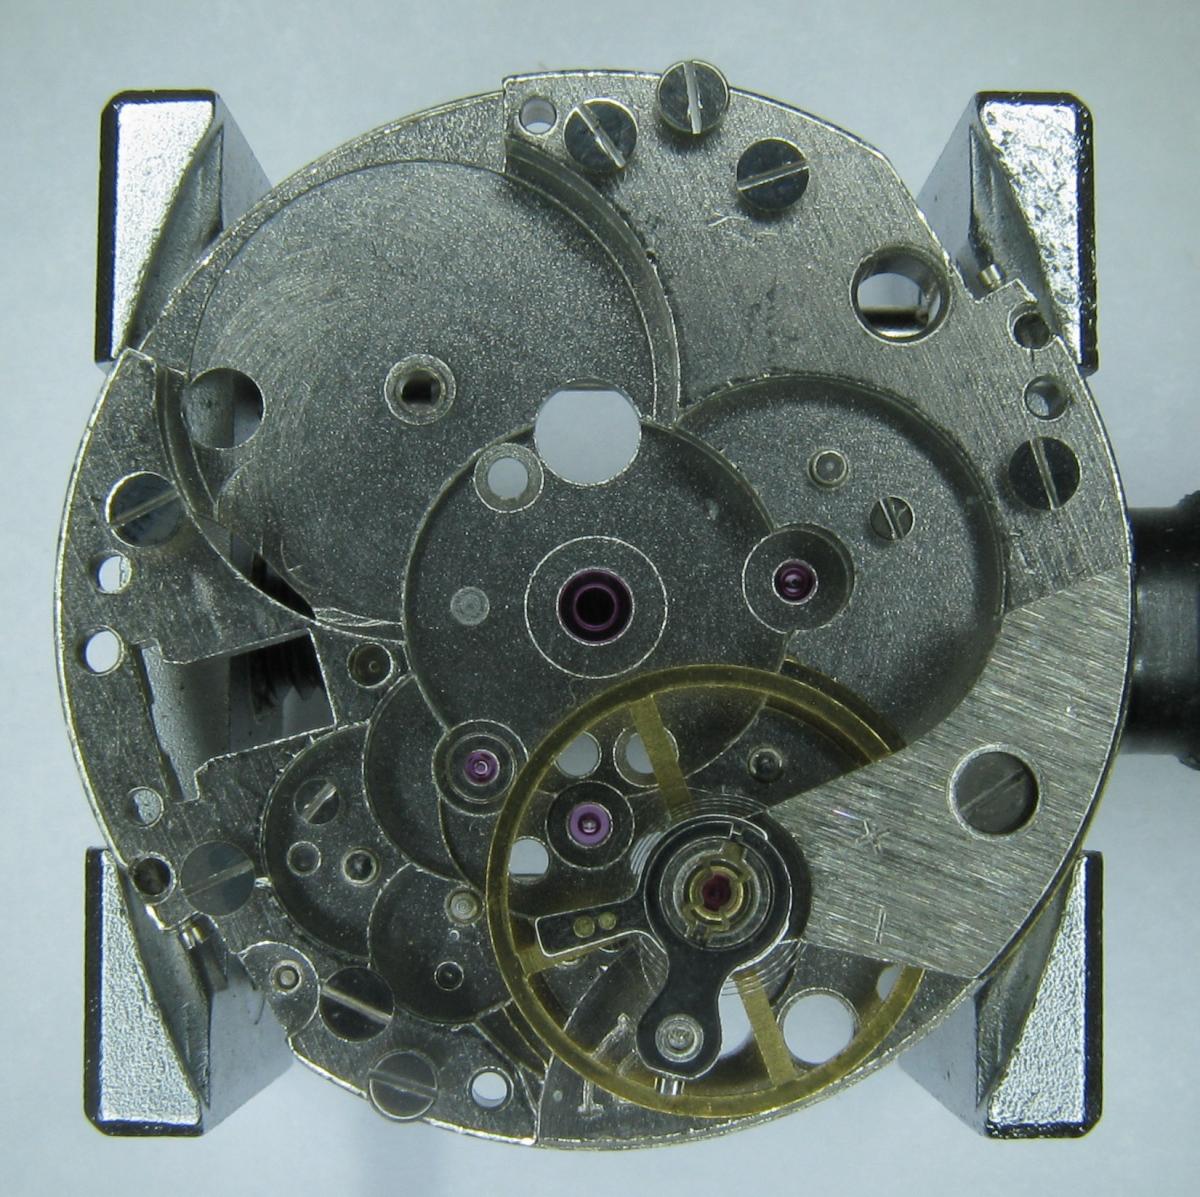
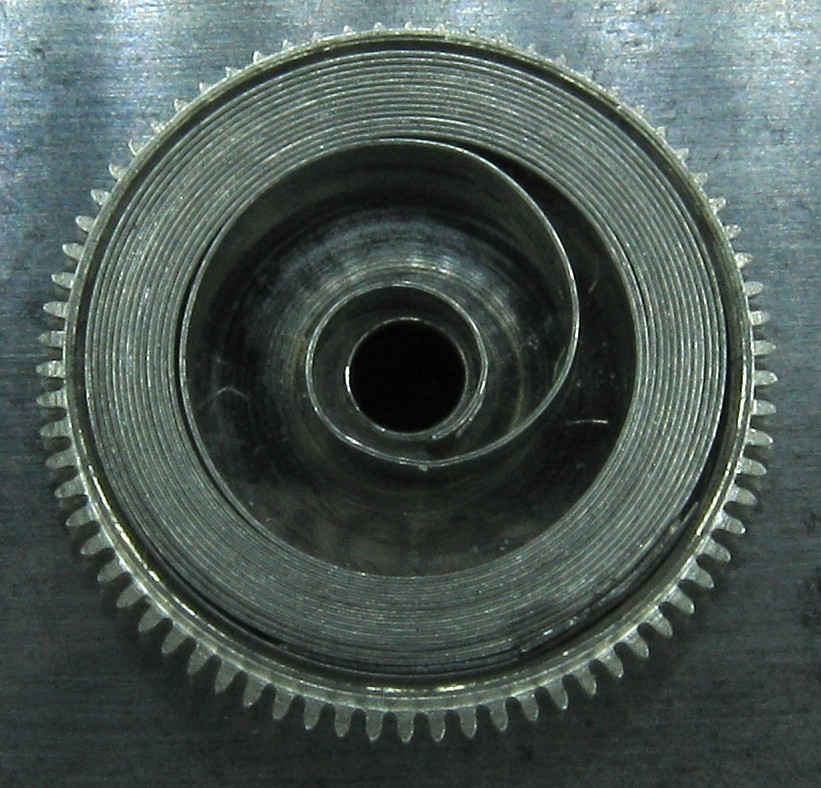
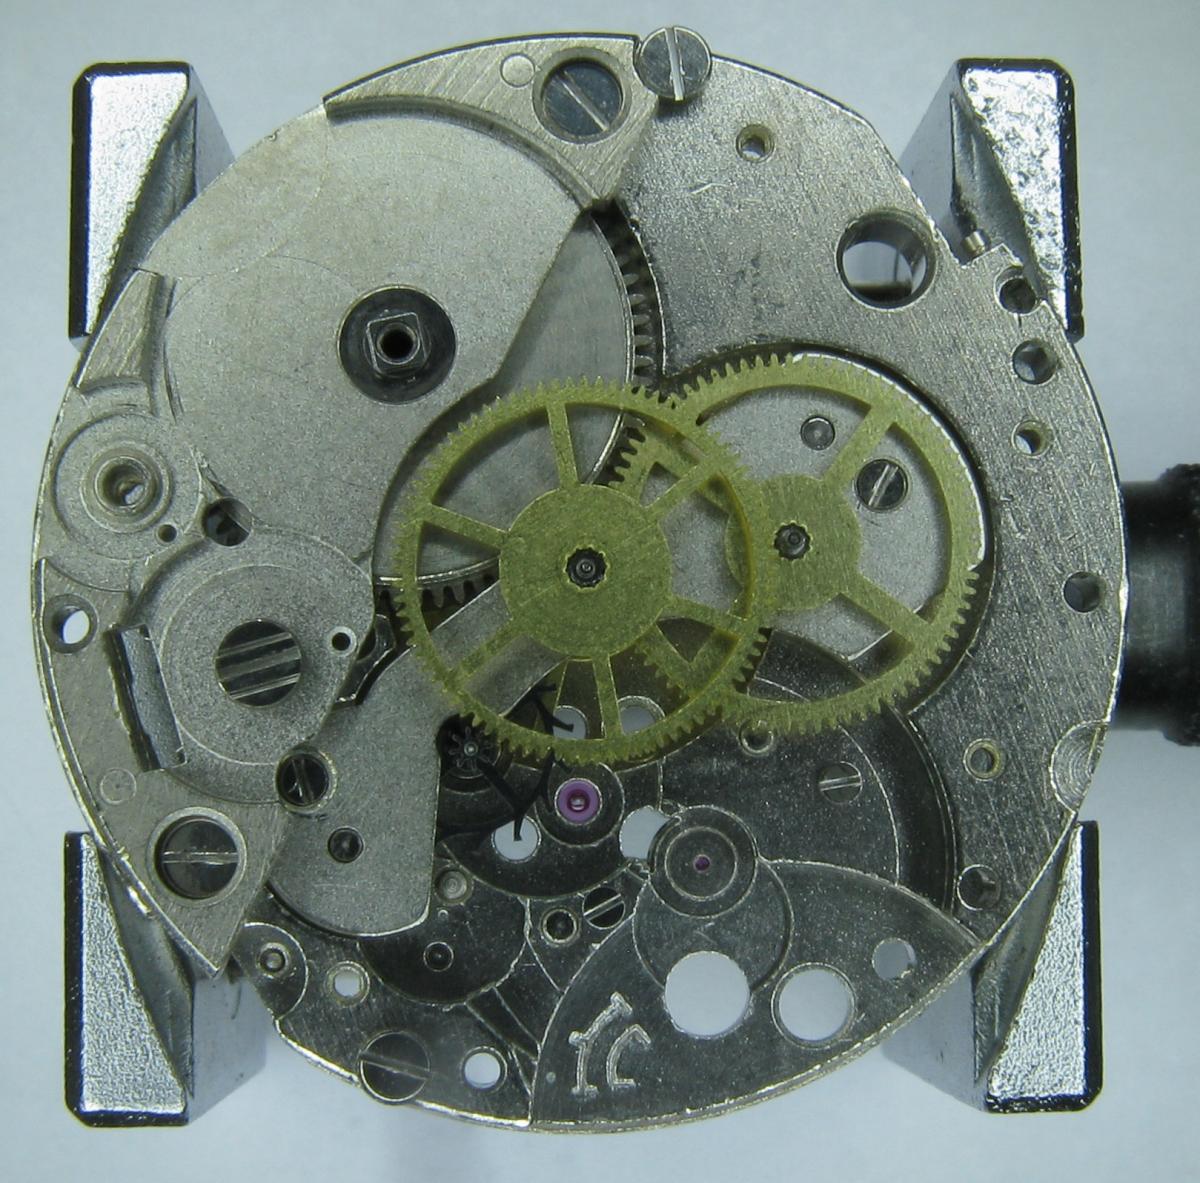
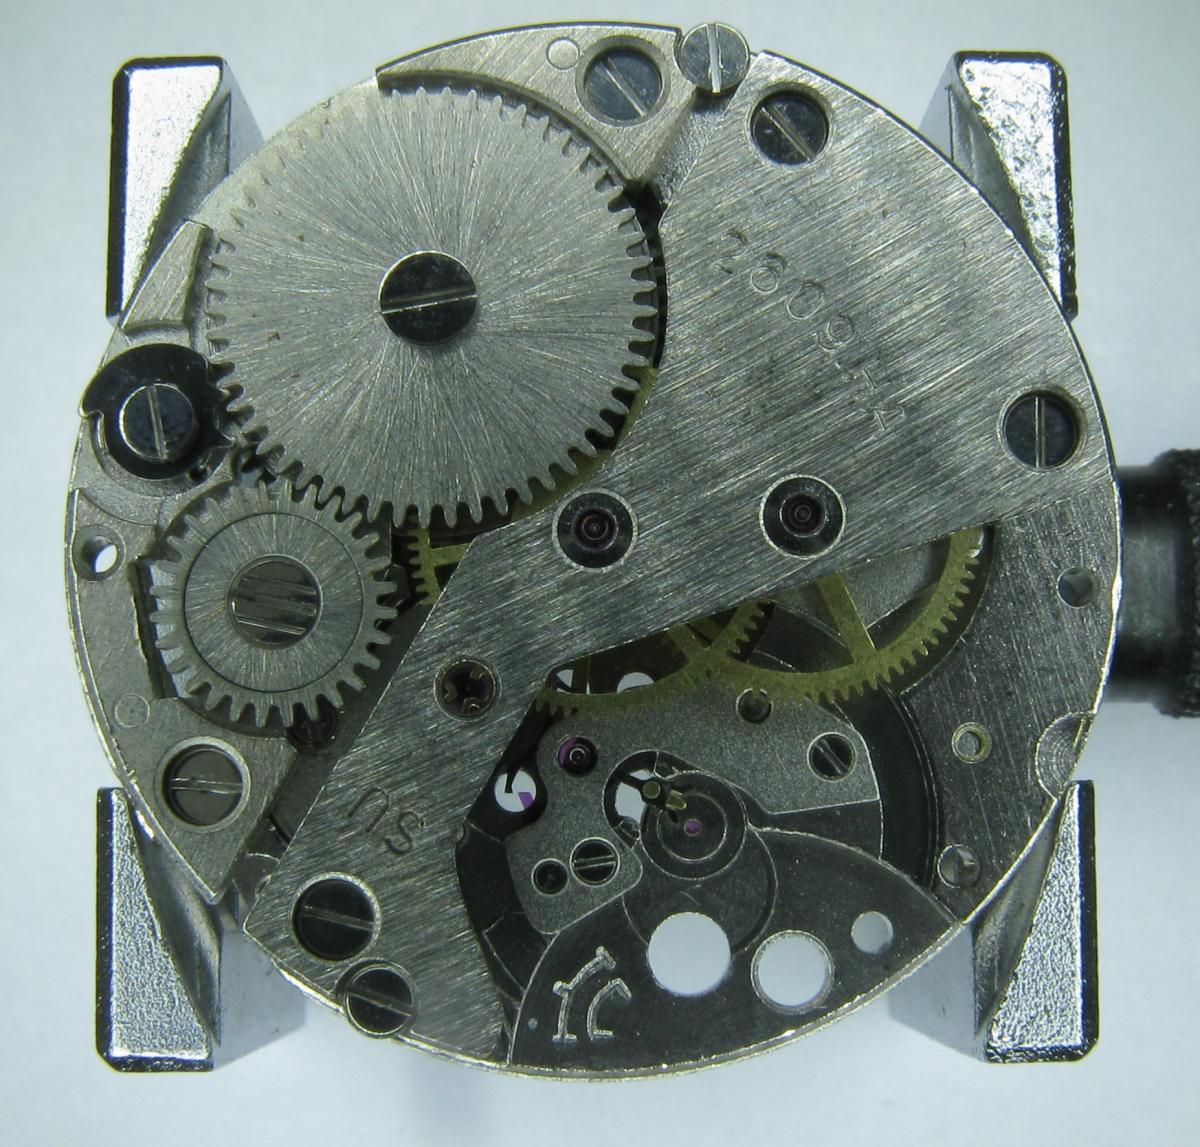
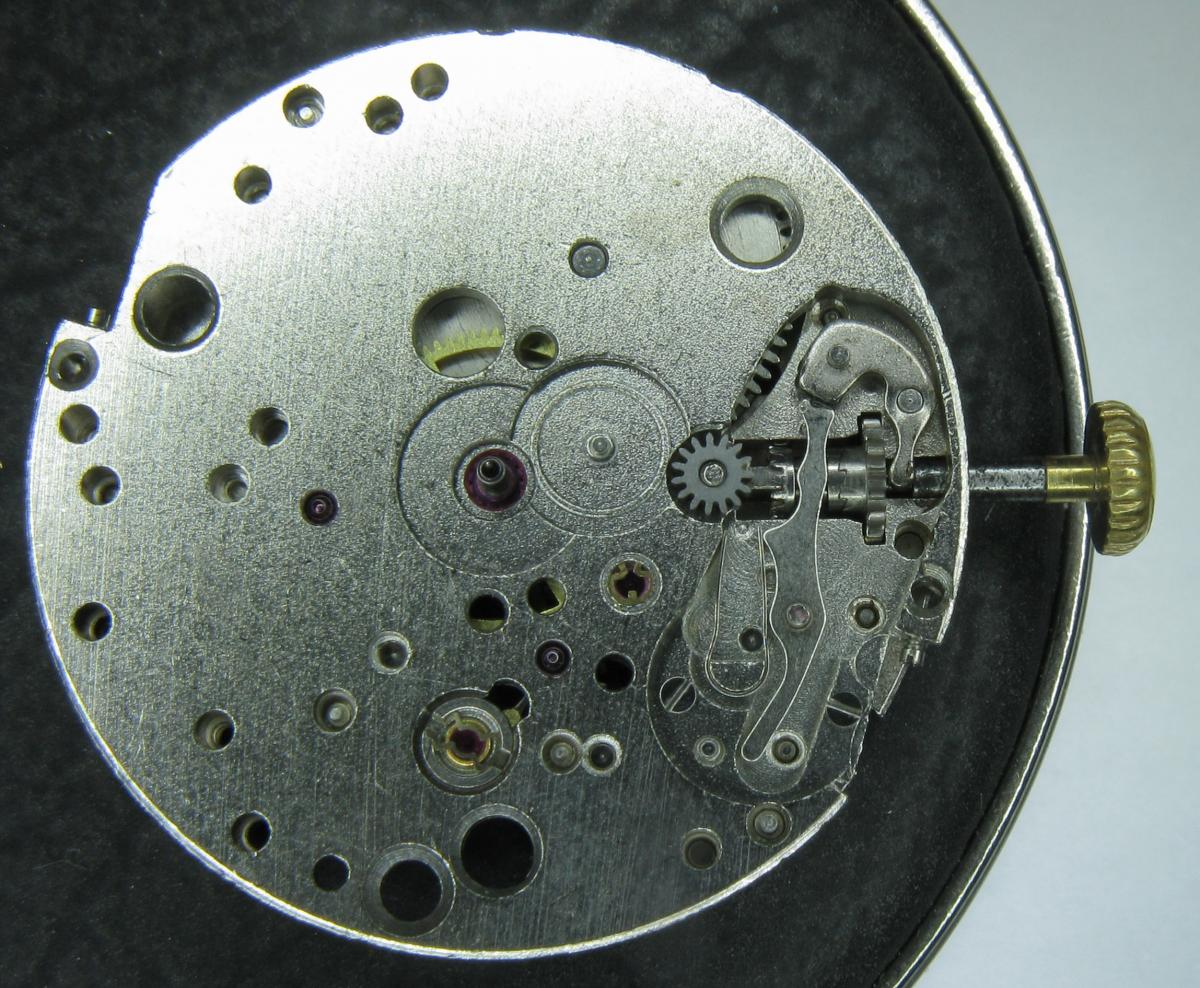
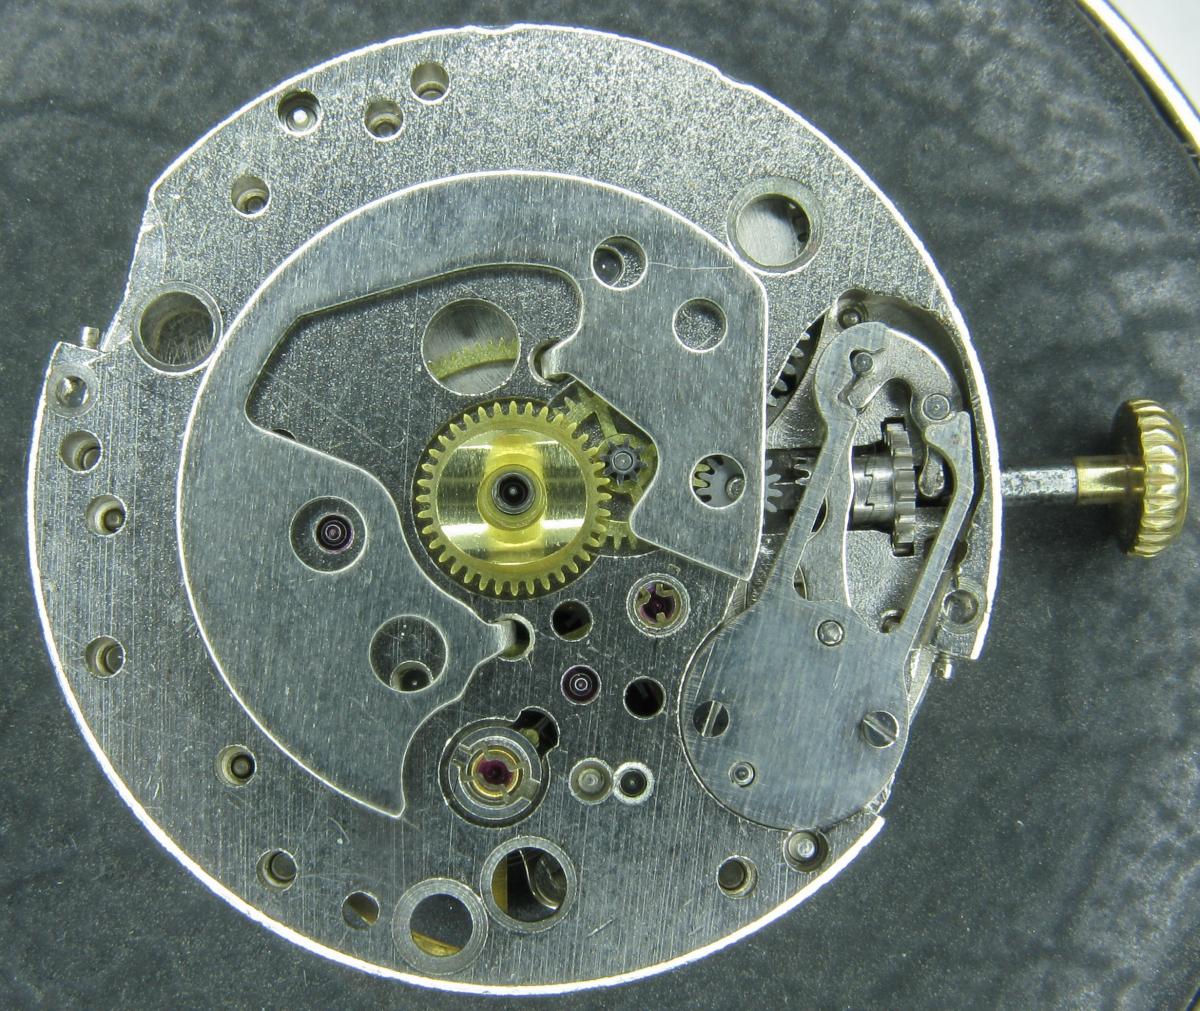
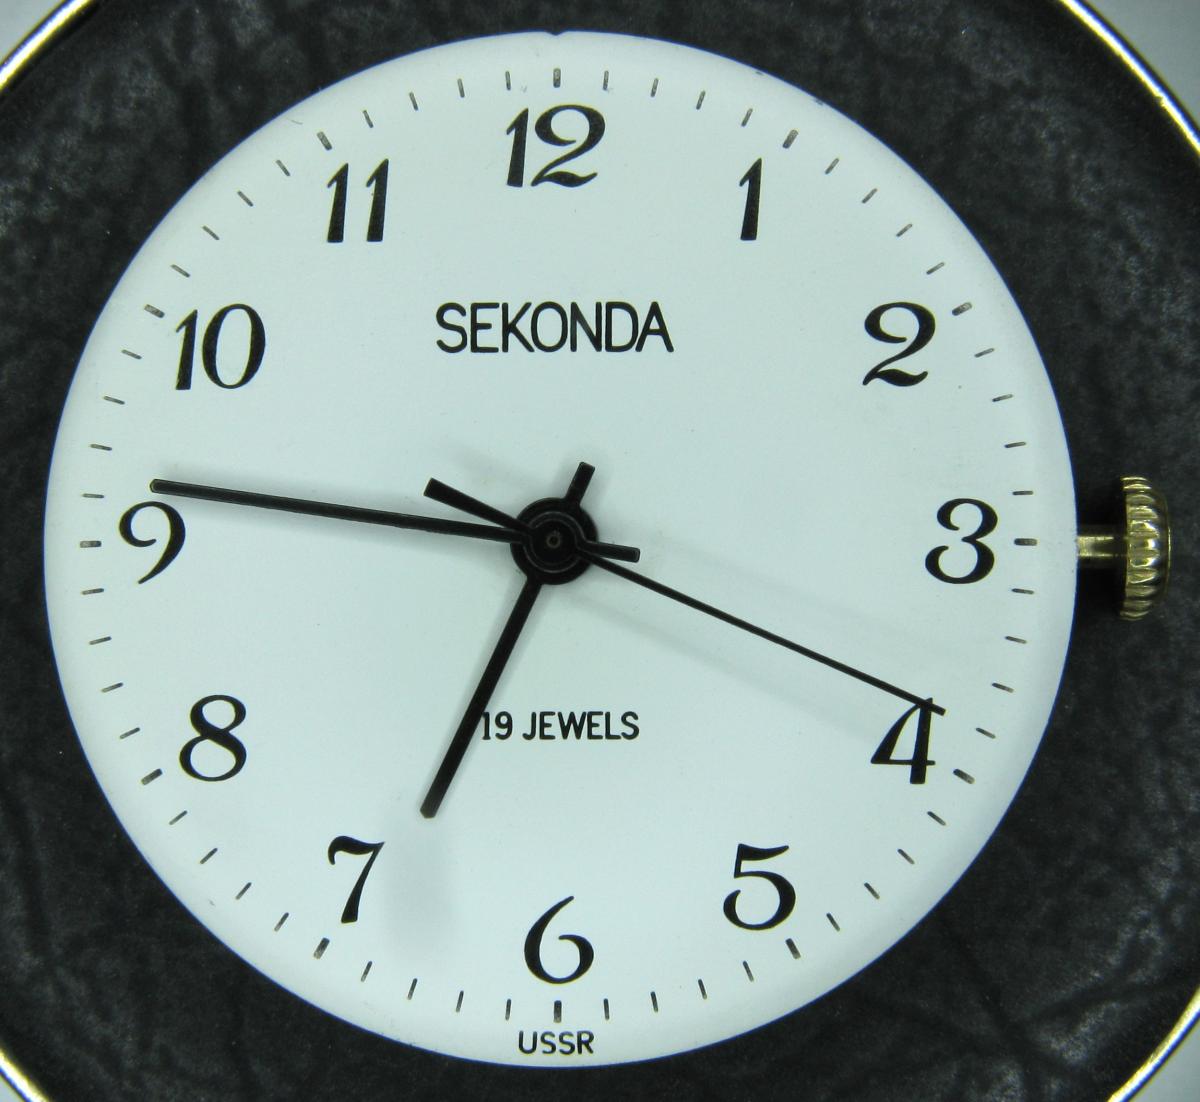
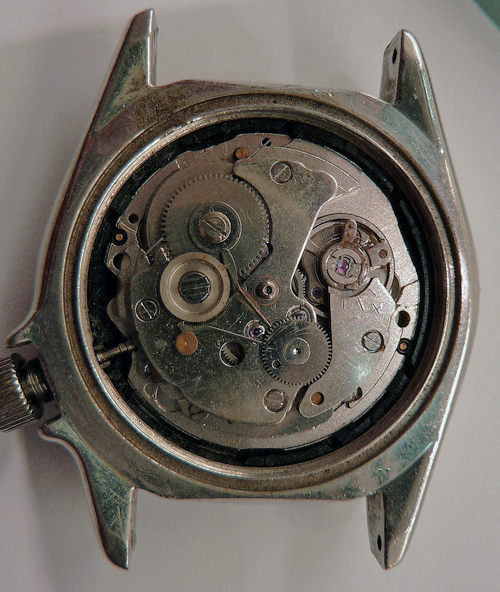
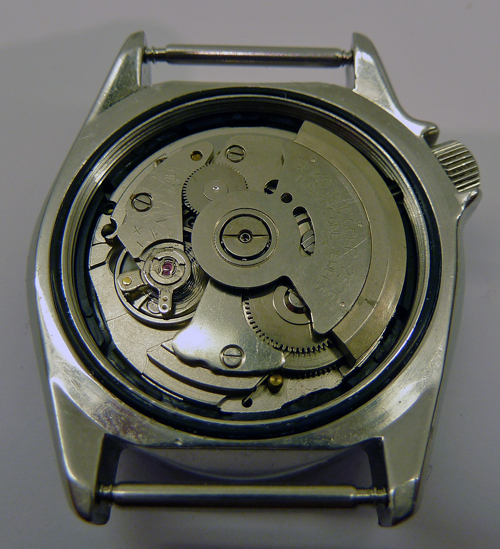
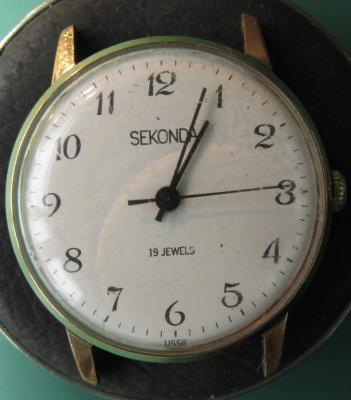
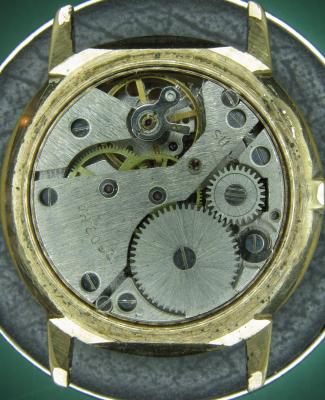
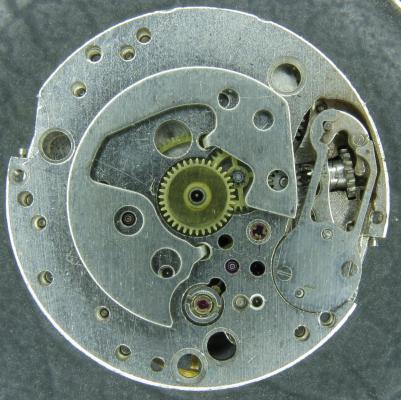
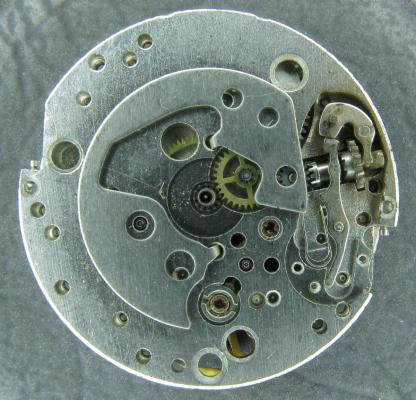
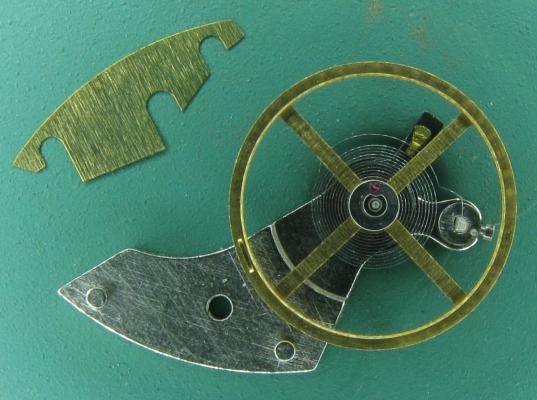
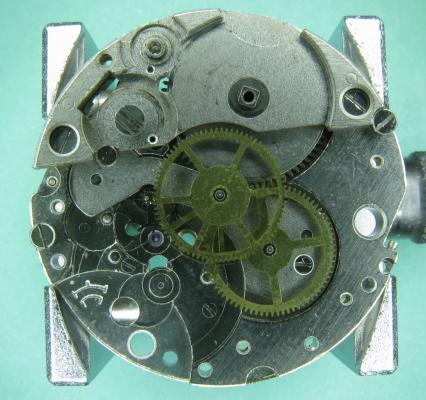
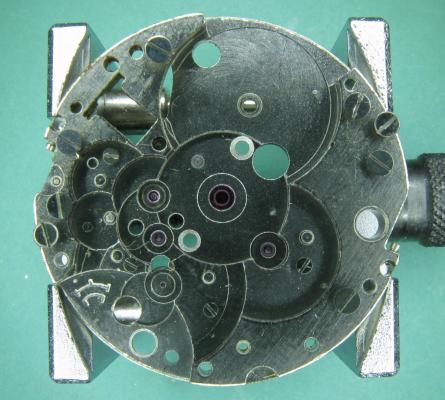
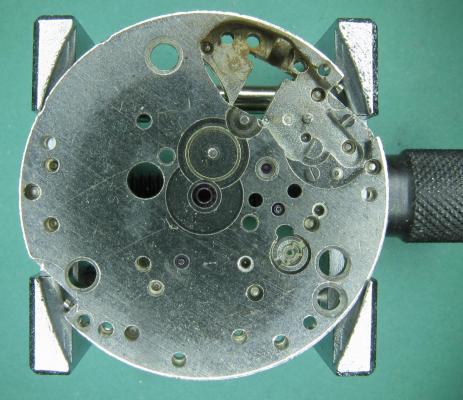
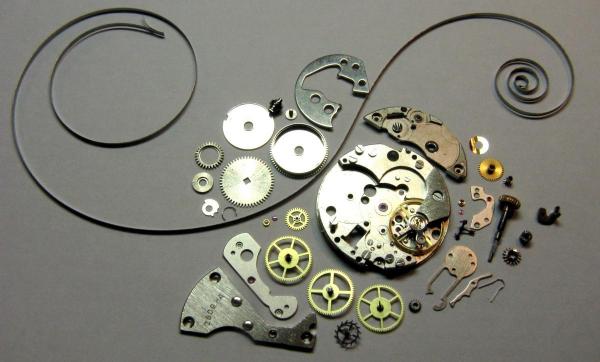
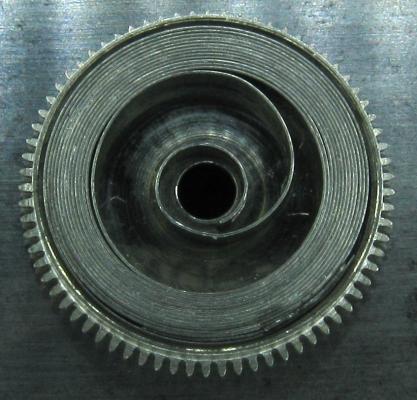
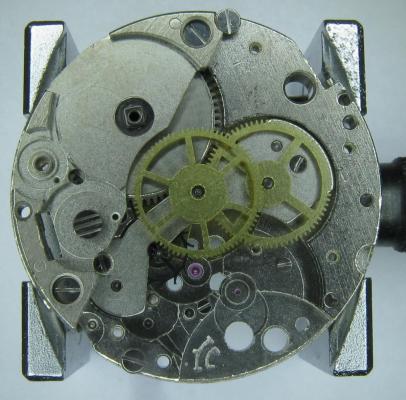
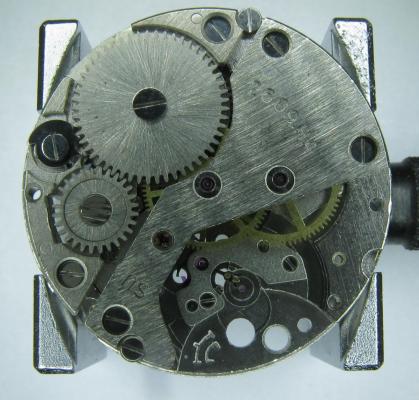
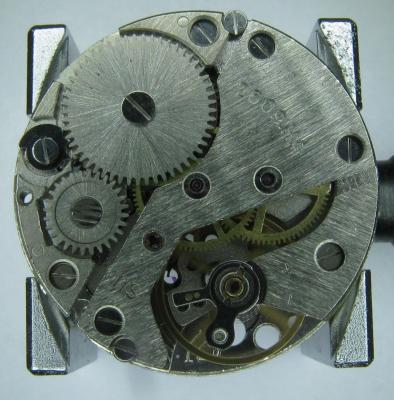
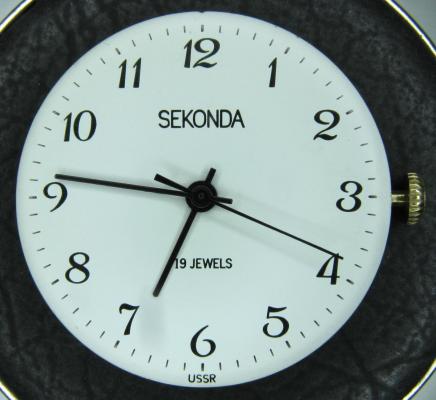
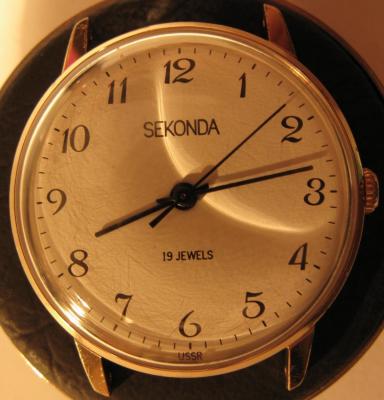
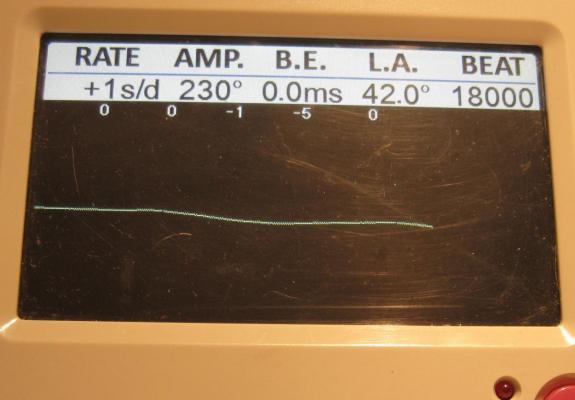
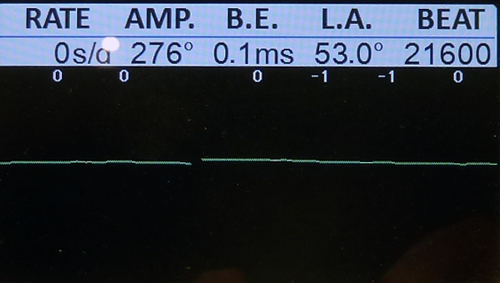
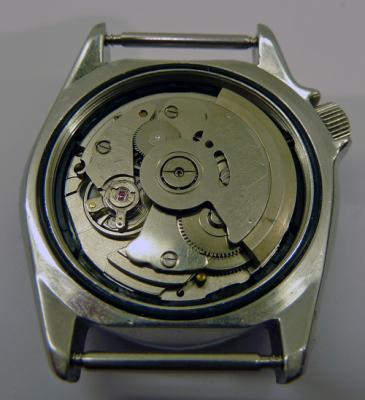
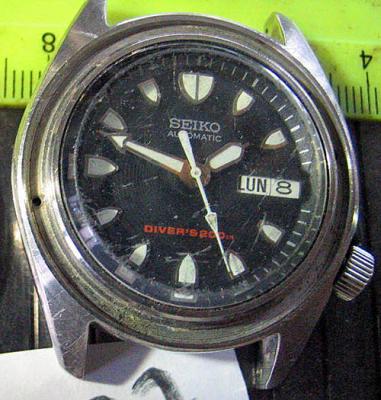
Just before Christmas I sold (through the good offices of eBay) an absolutely immaculate example of a 19 jewel Sekonda hand winder. I was a little sad to see it go as I don't think I am likely to see another in as good order for some time, and having just serviced it it was running like a champ but I couldn't justify holding on to it. Well, shortly after it had arrived with its new owner I received a message through eBay from the buyer. Huw had contacted me to say how pleased he was with his new acquisition, and did I service watches? as he had another example of one of these that was a little stiff in the winder and gained about a minute per day, and he felt that it maybe could benefit from a bit of a spruce up. I have done quite a few of these so am reasonably comfortable with them so I quoted a price and accepted the commission. A couple of weeks ago Huw's watch arrived so I thought I'd do this as a walk through. Looking well used but not abused, Huw had explained that he bought this not too long ago as a stop gap whilst his other watch (a Sekonda quartz chrono) was out of action with battery issues. First impressions are of a watch that has seen a lot of wrist time in its (probably) 40 years. The Timegrapher trace confirms the rate at roughly +60s/day, and confirms that a service is long over due. With the crystal out of the way the condition of the dial is actually rather good. The shadow to the right of the 7 is a lens fault on my camera, not the dial. With the back removed there is plenty of dirt speckled around the whole movement and everything is bone dry. The good news though is that it doesn't look like anyone has messed anything up inside. You can see the spring clip retainer on the escape wheel end stone (a bit like Seiko Diafix but not quite as clever). You can also see corrosion to the back of the bezel, this watch spent a lot of time on some ones wrist. With the movement out of the case the reason for the stiff winder and all of the dusty crud in the movement is brutally apparent. The outer end of the stem has started to rust causing it to bind in the case, and the resulting rust powder is thick on the inside of the case. These cases are a bit prone to this kind of problem as there is absolutely no attempt to seal them even against dust, let alone water, so even sweat on a hot day can seed the beginnings of a corrosion problem. With the dial off the press fit retaining plate for the motion works is exposed along with the keyless works. There's that little end stone retaining clip again, and the Raketa version of Incabloc on the balance. The rust doesn't seem to have got this far. With the set bridge out of the way though there is a hint of rust in the keyless works. Ouch!!! Just in time me thinks!! Balance and cock removed and the hairspring looks to be in good shape apart from the terminal curve which is off concentric. That will need to be sorted or the regulator will distort the hair spring as it is moved. Here also is the shim that Raketa are fond of using under the balance cock to adjust the balance end shake. A bit further in and plenty of gunge under the ratchet and crown wheels. Train bridge removed to reveal the train layout and a sub-bridge for the 2nd wheel. The main plate stripped with the screws put back in their respective holes. I do this so that screws don't go missing in the cleaning machine and I always know which screw goes where. The stripped main plate dial side. And then with the balance reinstalled (minus jewels) ready for the Elma. After a thorough clean everything is ready for inspection and reassembly..... ....starting with the balance jewels. This is when I check and adjust the hair spring for flatness and concentricity, eyeball the beat, check the end and side shake on the balance, and that everything swings freely. If you leave it until later there is too much other stuff in the way. Once I'm happy with it the balance/cock assembly comes back off until later. There is still a little work to do in this pic as the coils are still not quite concentric. The main spring re-lubricated and back in the barrel. This maybe could have been replaced but it wasn't too bad so went back in to help keep the cost down. Barrel, barrel bridge, 2nd wheel sub-bridge, and train back in place. Pallet fork and bridge installed. You can see the exit pallet poised ready to receive a drop of 941 on its impulse face. Walking the pallet too and fro then distributes the oil to the escape wheel teeth. Drop in the balance and away she goes. The cleaned up and de-rusted keyless works go back in.... ...and then the motion works and cover plate. Dial and hands back on, and ready to re-case. Again, to help keep the cost down I didn't replace the crystal with a new one, however, the original was just a little too deeply scored to easily polish out and there was what looked like a very small fracture. So a quick scout through my spares box and I found a second hand replacement which has cleaned up nicely. And the proof of the pudding ... as they say!! At 230 degrees the amplitude isn't anything to write home about but it is a significant improvement on the starting point. A new mainspring would almost certainly help this up into the high 200's (on the watch Huw bought from me I seem to remember it was 300+), but 230 is certainly usable. It is otherwise a nice clean trace with minimal beat error. It has been running for a week now in which it has gained just under a minute, so after a final tweak to the regulator it will be ready to return to Huw. I like these movements a lot. They are well designed and well executed, and capable of excellent results if looked after. They also seem to turn up quite frequently at the boot fairs. Unfortunately though, the lack of any attempt to keep moisture out of the case does mean that they quite often suffer from corrosion issues, and the relatively low cost (both when they were new, and when they turn up second hand) means that they are often used as a beginner watch smiths practice or learning watch, with the resultant butchery that many of us have dealt out as part of our learning curve. It's a shame in many respects, but then we all have to learn somehow. When you do find one that has survived unmolested though they are very well worth looking after. My thanks to Huw firstly for buying my watch, secondly for asking me to help this one to keep going for a few more years, and finally for allowing me to post his watch on here.


 1 point
 -
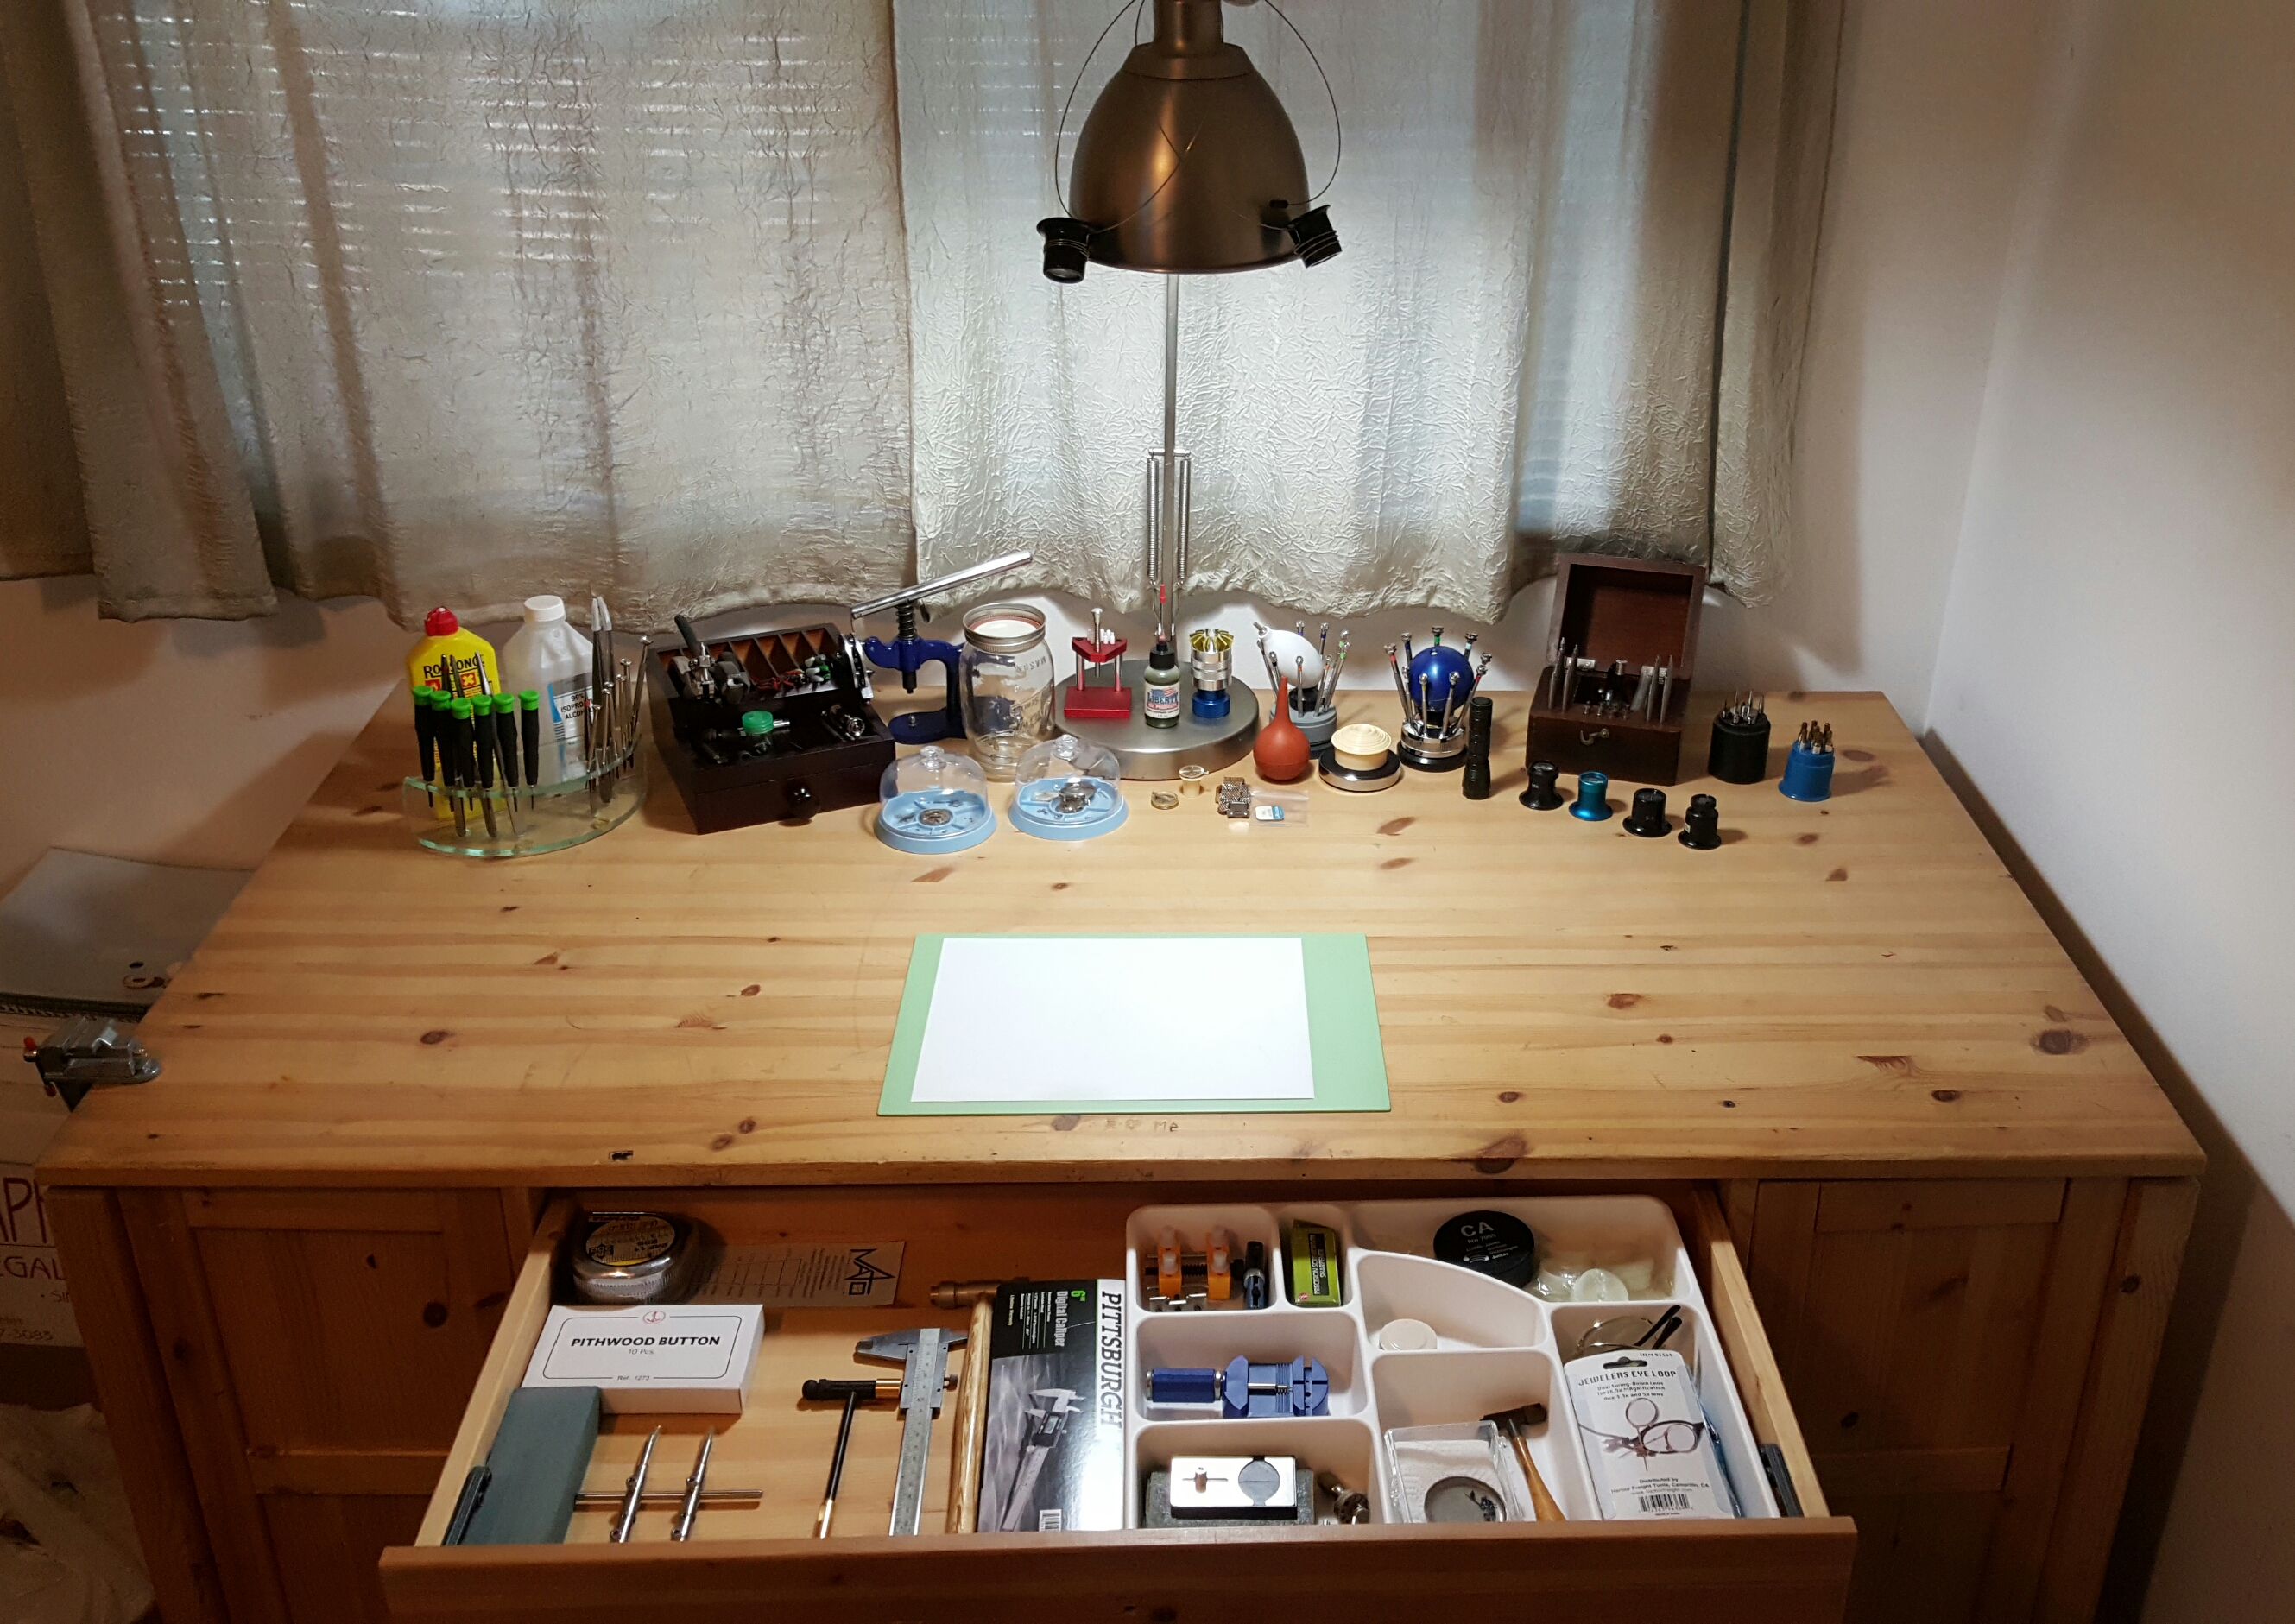
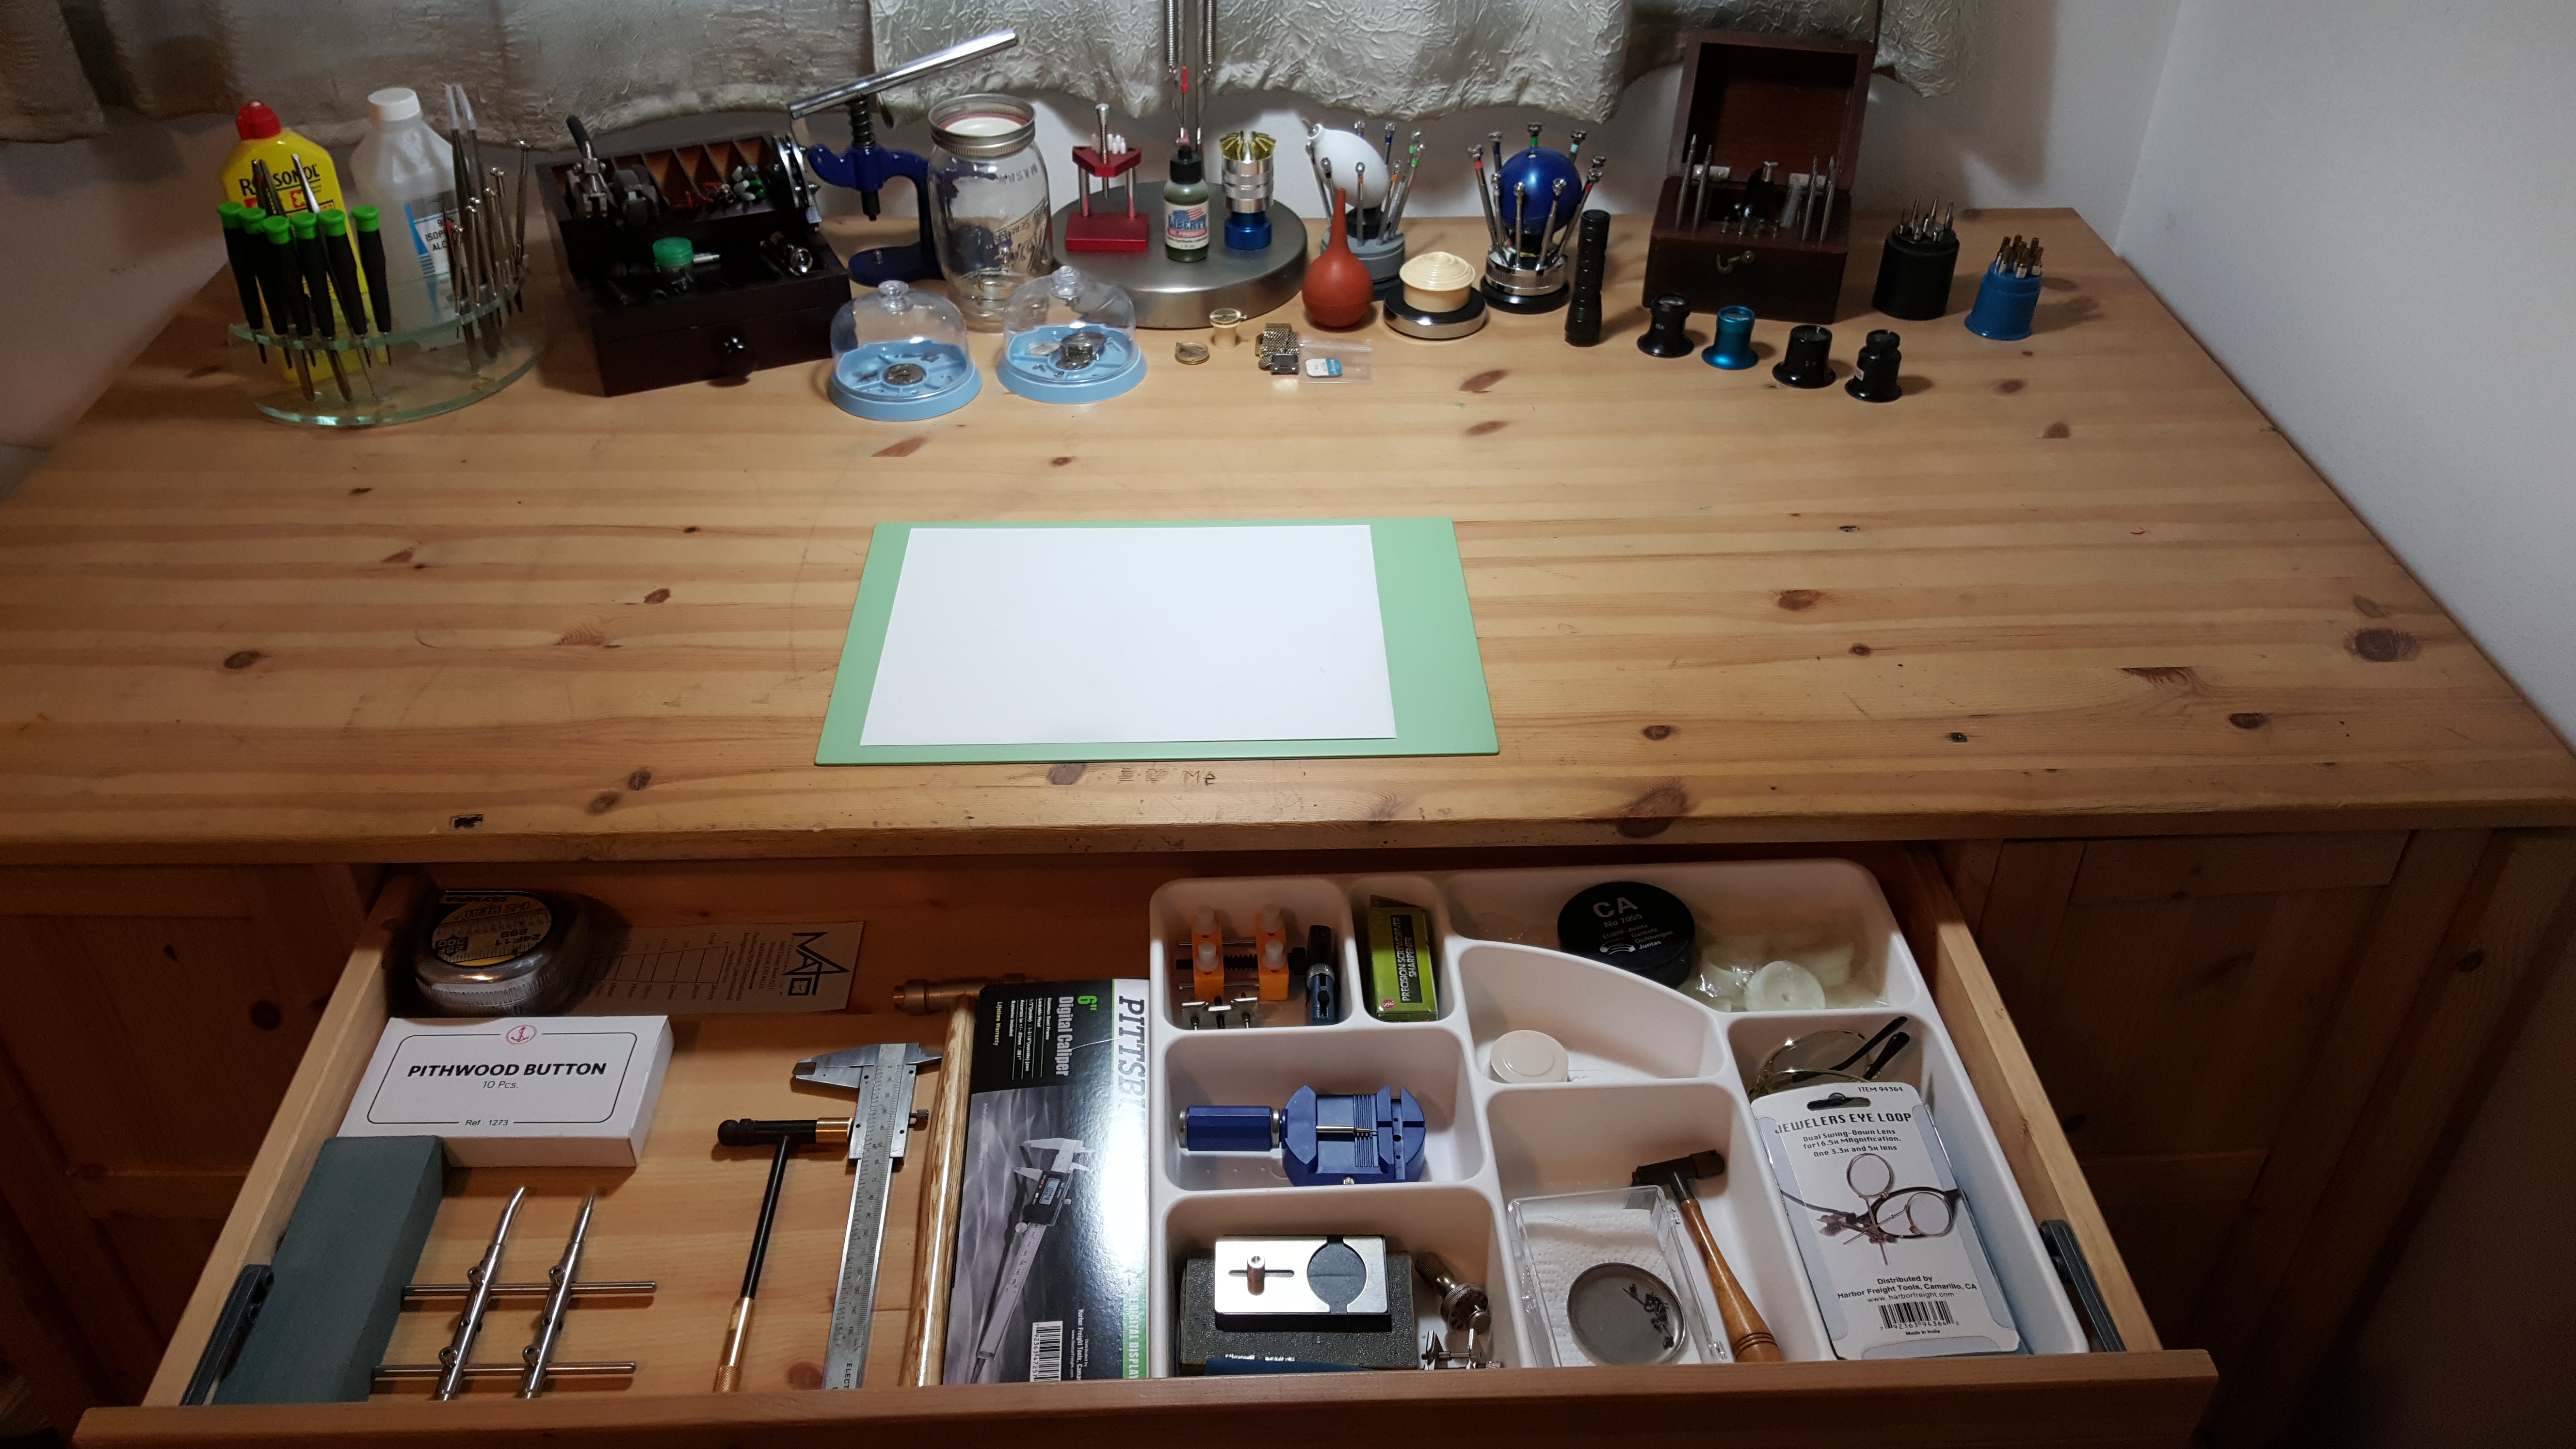
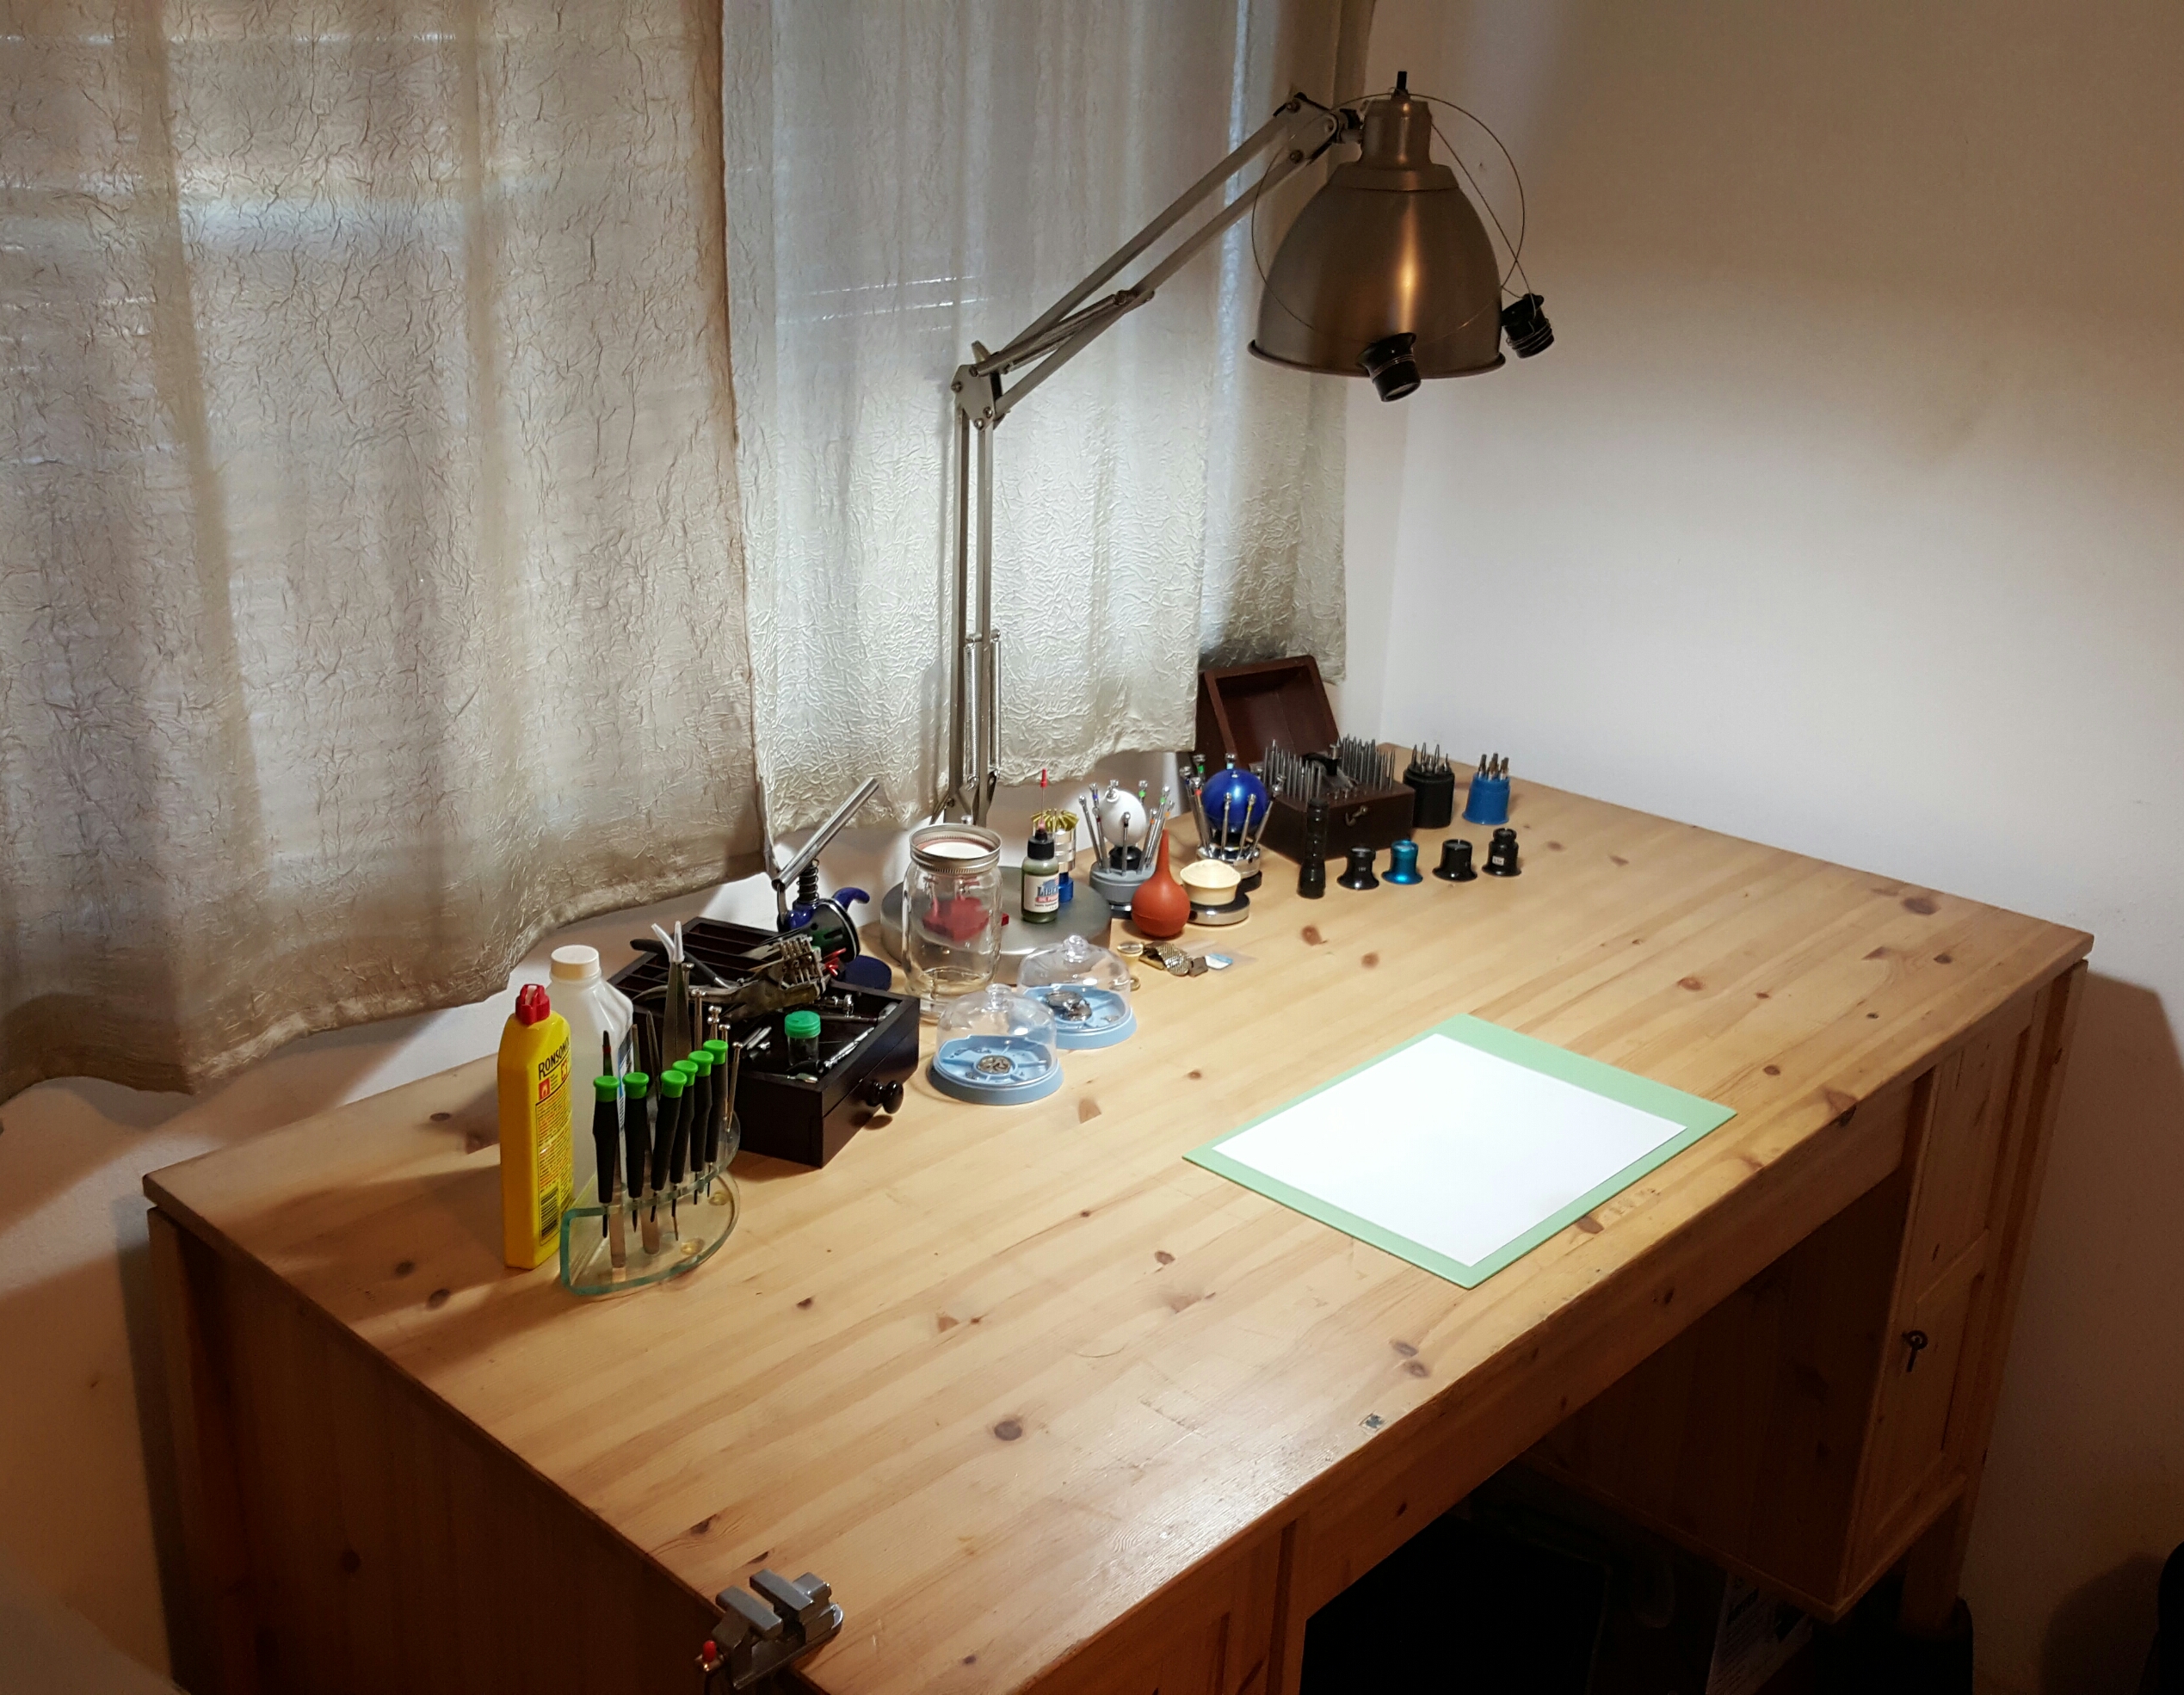
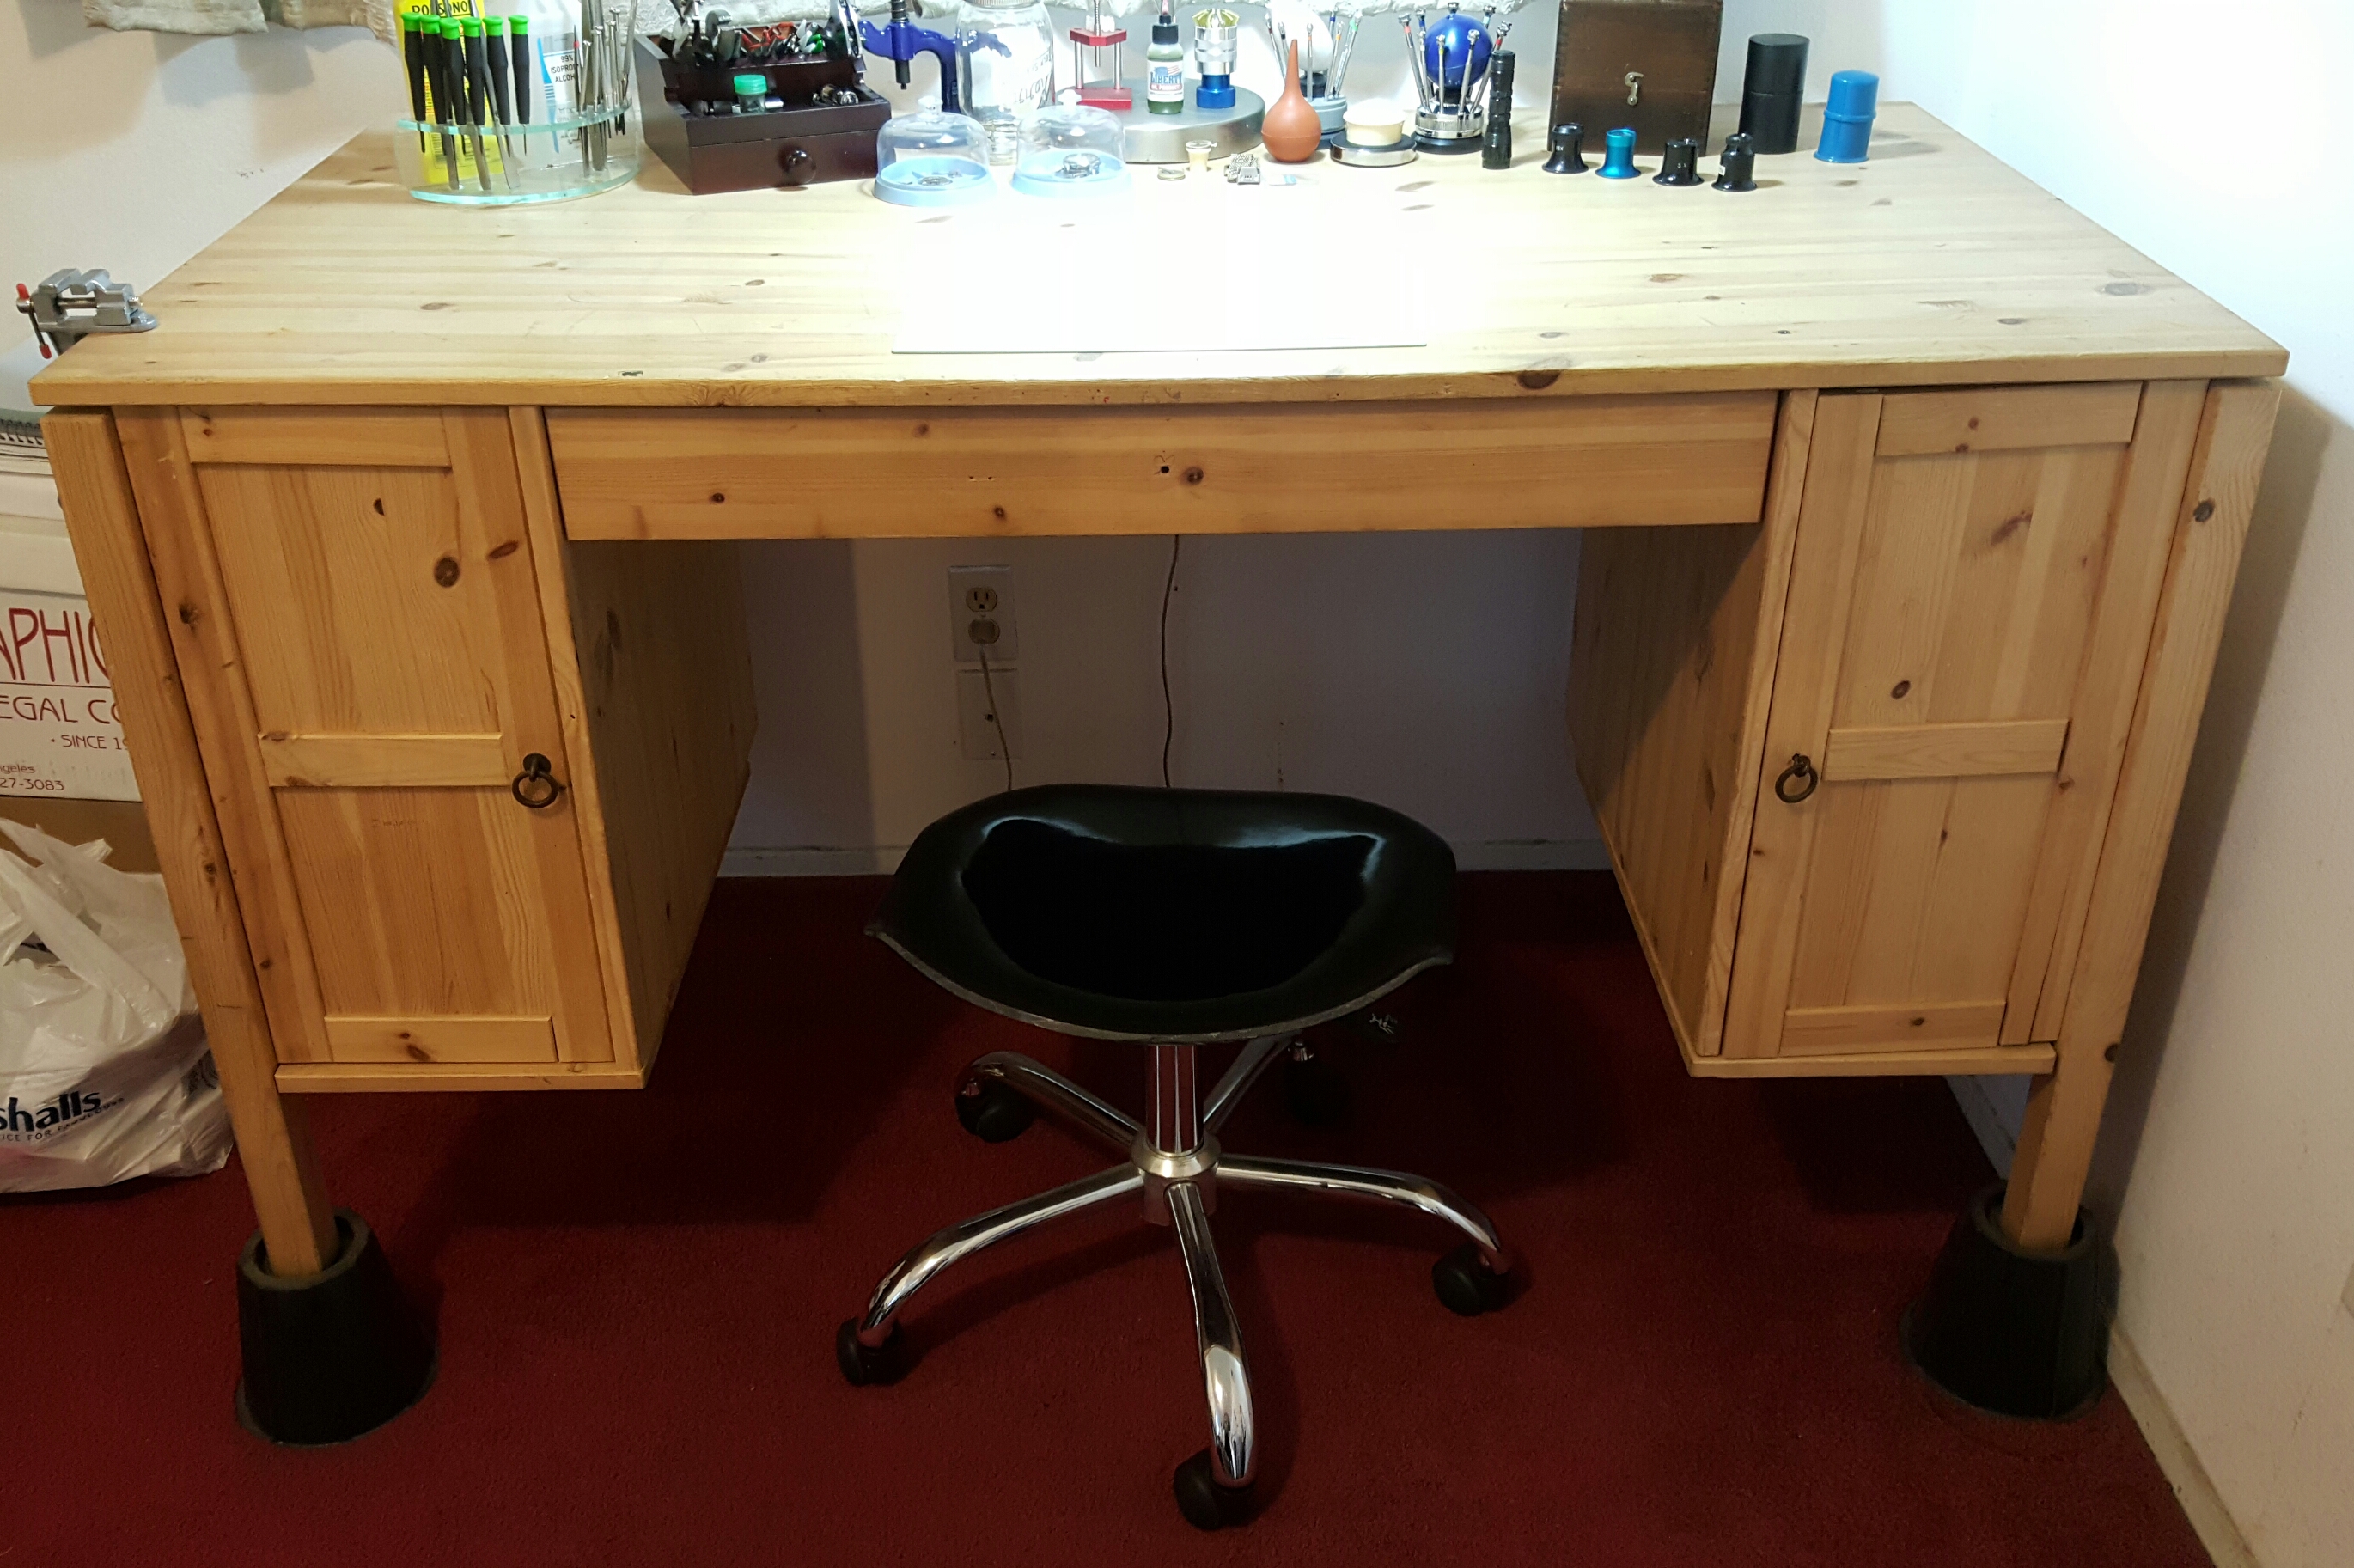
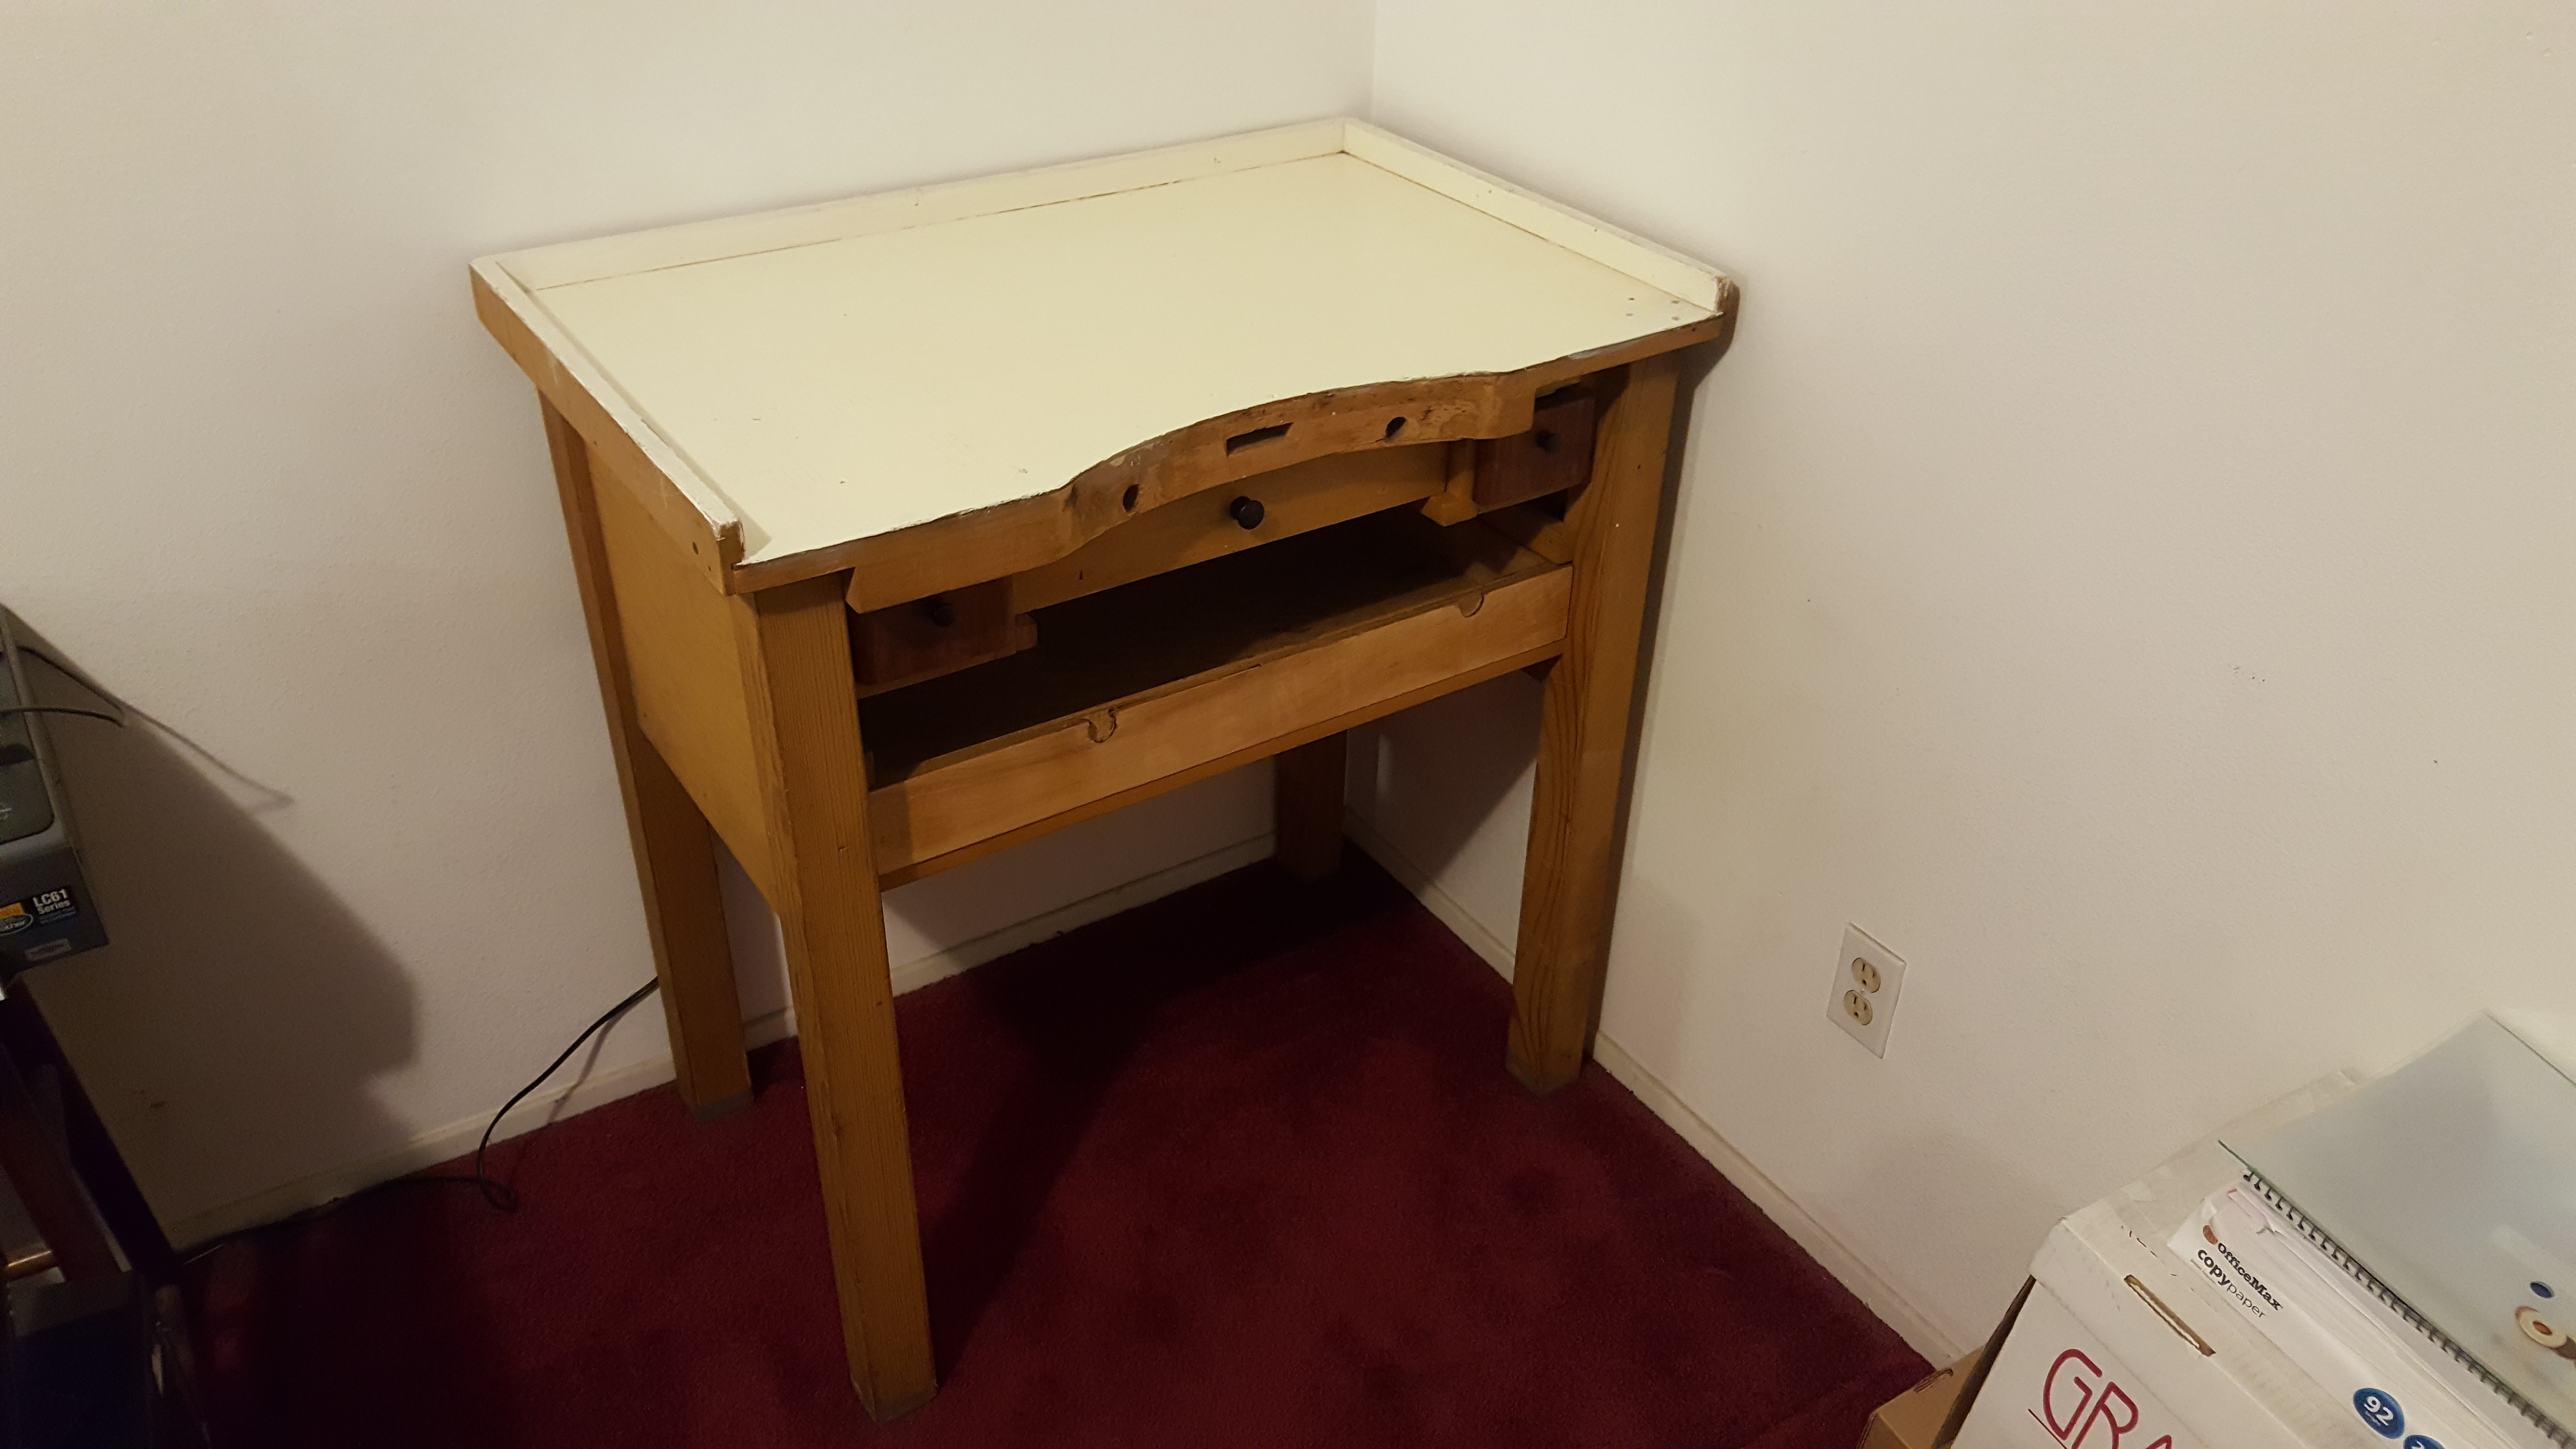
I love looking and watchmakers bench's and the tools that are used, it seems to say alot about a watchmaker and his work. This is my work bench at the moment. It's a regular computer desk elevated with risers to about 35 inches, just under 3 feet. As I'm just starting out I know my tools will have to gradually change to better quality than the Chinese tools that I mostly have....what's on your bench? Sent from my SM-N920T using Tapatalk
 1 point
 -
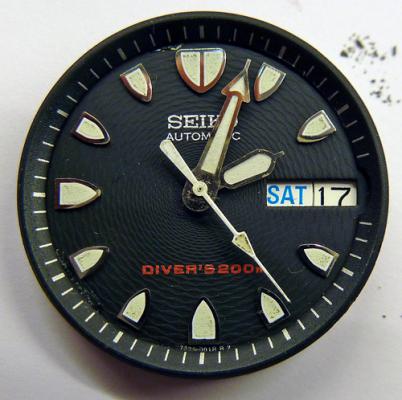
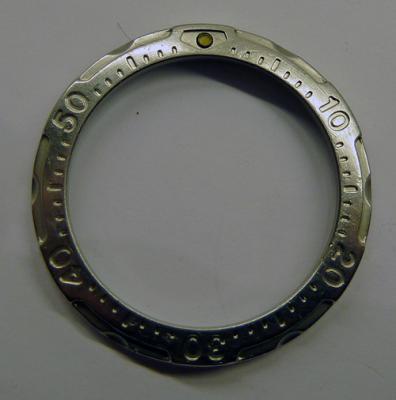
After a recent request from my eldest daughter for another mid size Seiko diver, I came across this item from Ramon aka thewatchcollector on fleabay: No bezel, 0050 caseback & not running but cheap & challenging, he's watches are just what I like. I have a bought a few from him in the past & they all scrub up well. Very mucky movement from a hard life in the Philippines: The chapter ring has been glued to the dial, the feet are detached, the four marker is loose, lume is grubby & the dial is marked: Manage to track down a bezel from speedtimerkollektion lacking some paint: I wont go through the stripdown of the movement as it has been well covered here and elswhere but after a few hours of VIM & the wire brush its back in the case with a new balance (the old one being a bit rusty): Glad I put the new balance in as it looks good on the timegraper: Dial cleaned & tidied (will need to re-fix the feet though, its a tad out), bezel repainted, new crystal, new o-rings & (just for a change) a nato strap:


 1 point
 -
Correction : in my previous post please read overcoil tweezers instead of overcoil pliers. I should also have pointed out that because of the taper, the round nosed pliers should be used gently on one side and then the other of the loop that is being closed. Another, perhaps better, suggestion is to make an overcoil-type pair of tweezers of large size, depending on the size of the mainspring barrel arbor, from a stout pair of brass tweezers. I have dug out this example that I used a couple of times before acquiring the pliers. The shaping was done with a couple of needle files; one round for the concave side and a flat one for the opposite side.
 1 point
 -
Hi, just my twopence worth and not wishing to offend anyone. I cant't believe that anyone would use hairspring tweeters or in fact any normal tweezer, which can cost an arm and a leg, to bend mainsprings. I think any daily use tweezers would be wrecked. Surely you would have to use small pliers.1 point
-
Never dealt with him, but I have just clicked your link and he has some nice watches. Where would somebody find so many "new" old watches? Are they reproductions or copies? It would be nice to think they were genuinely from that era as I would quite fancy one myself. Hopefully someone with a better knowledge than me will chime in. I like the one that you have your eye on.1 point
-
Wait for the last 2 minutes of the auction. Only then you can asses if you like the price beside the watch.1 point
-
how true. just today, i had a beloved seiko 7006 - 8030 sports diver movement out of the case. it was o.k. on the desk for hours. until i picked it up. i picked it up and it slipped a little. as i "regrabbed" it, the second hand was in the way and i ended up bending the second hand straight up 90 degrees. it also popped off of the pinion. fortunately, i straightened it and all is well. close call.1 point
-
you might see a theme developing here. the blue dial is already here, but the front office at my apartment complex has been closed from last thursday because of the storm. i'll get it tomorrow. the other two should be here this week.

 1 point
 -
There are two movement holders on the 552 as well as most movement? You can see one in the lower right corner on your picture. The other is on the other side. remove those and lift the movement gently out. Be very gentle with the dial? And change the gasket when you put the watch together again.1 point
-
The word was 'co**BLEEP**r' as in more co**BLEEP** or rough. Looks like the bottom fell out of it !! :D Oops done it again. For BLEEP try an anagram of 'sear' !!1 point
-
You should lubricate the pallets, but the pallet fork pivots should always be run dry. The lubrication chart is correct.1 point
-
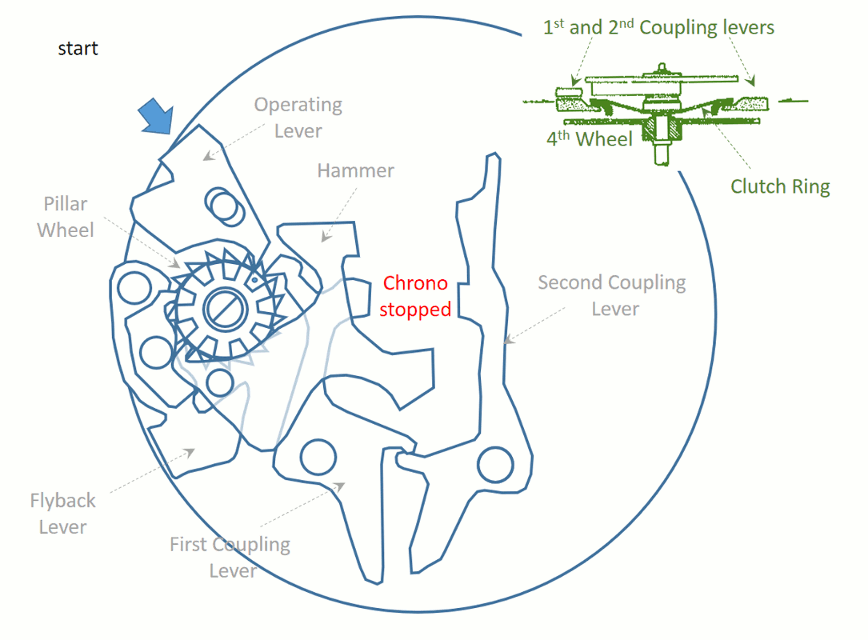
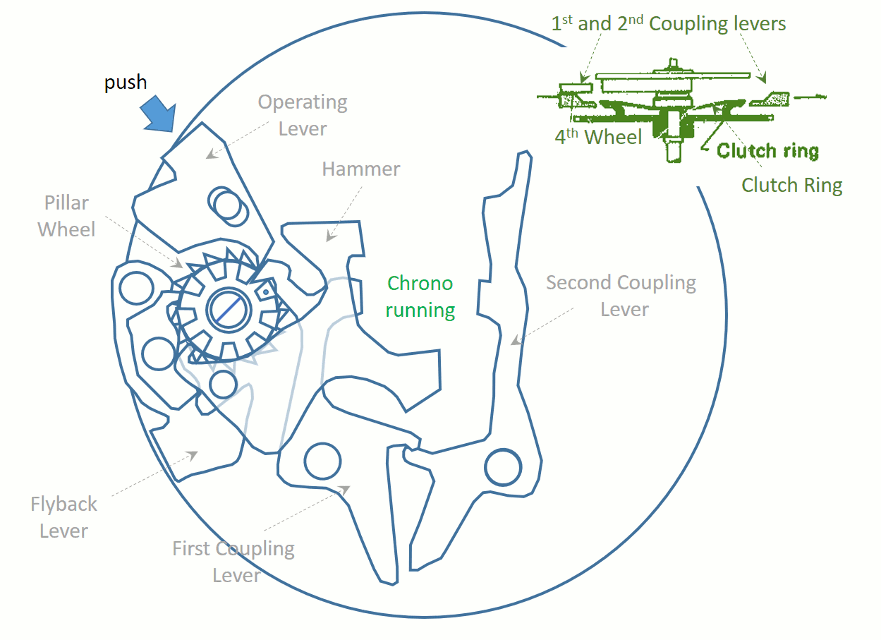
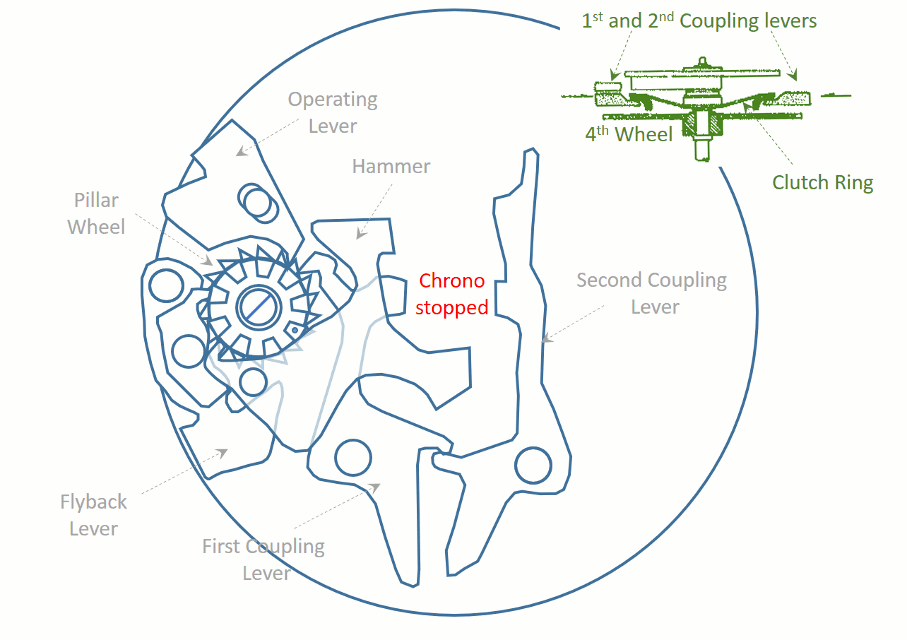
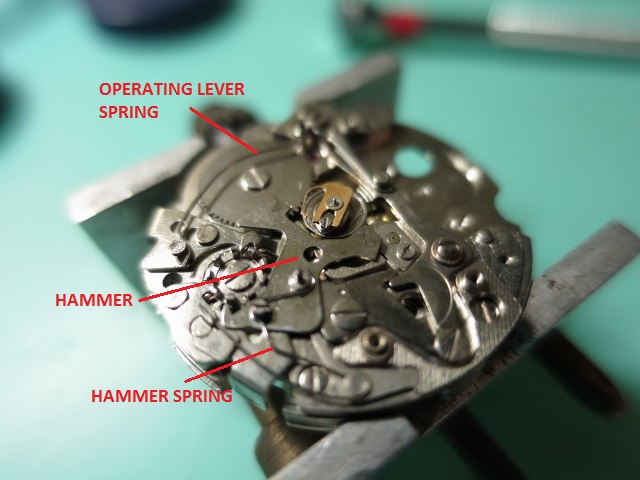
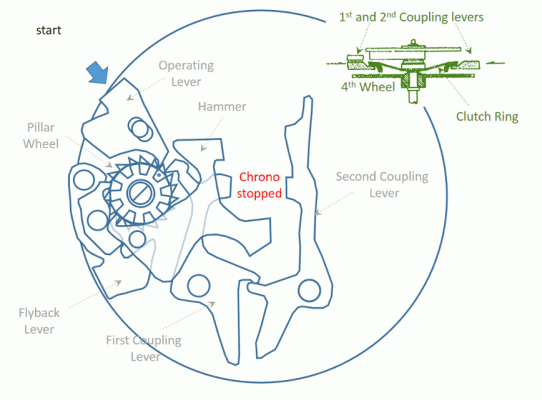
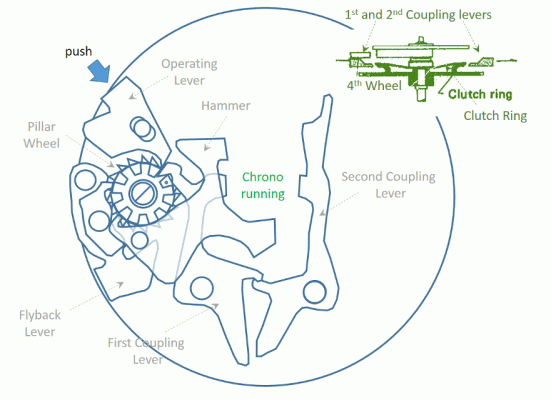
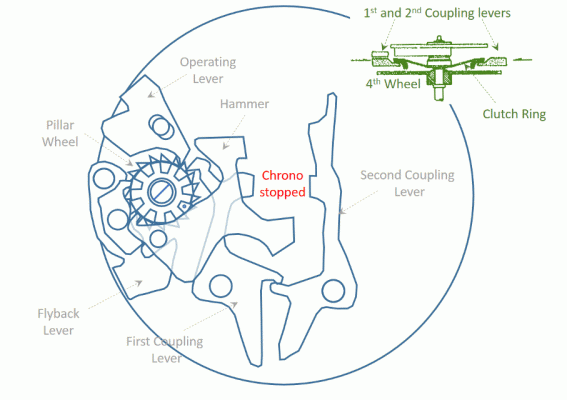
I believe that the best way to assemble and fix a movement is to first understand how everything about it works. So I made some animations to help in understanding how the chronograph assembly works. The Seiko 6139 features a column wheel and a vertical clutch. The chronograph second engages and engages with the 4th wheel via a clutch spring. The clutch is controlled by the first and second coupling levers. See how pressing the operating lever rotates the column wheel, which in turn, controls the coupling levers. While the chronograph is running, pressing the flyback lever will have no effect. But when the chrono is stopped, pressing the flyback lever will activate the hammer, which in turn, resets the chronograph second wheel and the minute recorder wheel. I hope these animations were helpful.
 1 point
 -
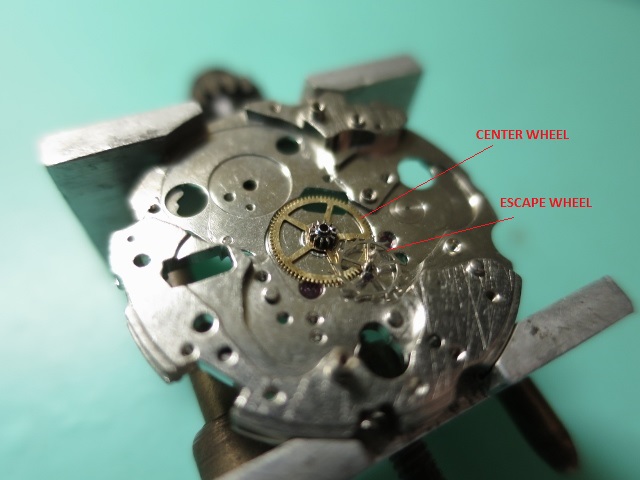
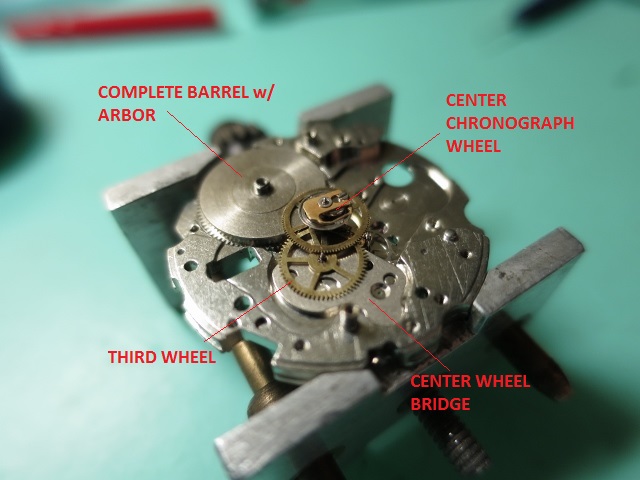
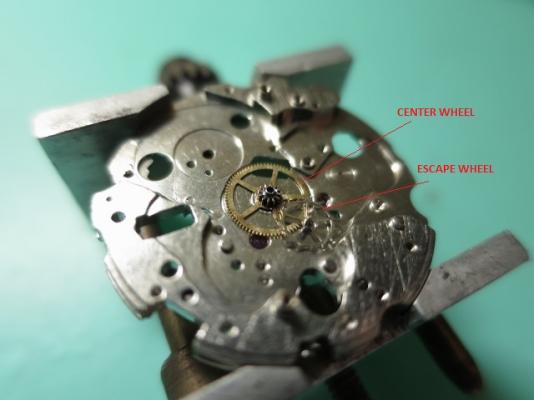
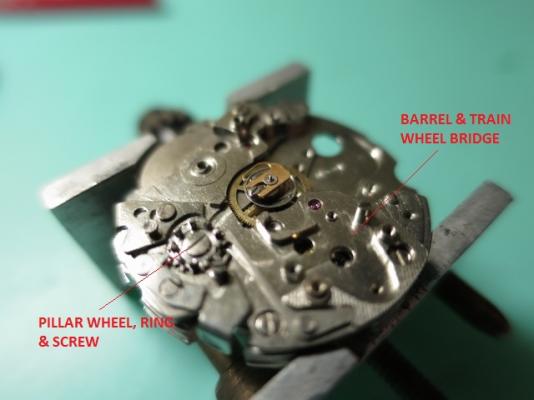
Good day,everyone! Finally had some time to update this post. I will now describe how I assembled the movement. But first, let me refer you to some documents that helped with the the service. Of course, the 6139 service manual: http://www.thewatchsite.com/files/Seiko%20Technical%20Manuals/6138A.pdf That document is for the 6139A. The movement I serviced is actually the 6139B: http://thewatchsite.com/files/Seiko%20Technical%20Manuals/6138B.pdf There are minor differences between the A and B variant but the 6139A service guide will do. I find Polly's Seiko Calibre 6139 Amateurs Guide: http://www.thewatchsite.com/39-watchmaking-tinkering-reference-materials-how-s/43929-seiko-calibre-6139-amateurs-guide.html I started the assembly my installing the center wheel and the escape wheel onto the main plate. ...followed by mounting the barrel assembly, the center wheel bridge, the third wheel and the chronograph wheel. The pillar wheel is then installed onto the barrel and train wheel bridge. Then I installed the assembled bridge. In my case, it helps not to install the pallet fork or the click wheel first. Freely rotating wheels help in aligning the pivots to their respective jewels. I then lubricated the pivots with Moebius 9010. Once the third wheel and escape wheel pivots are lubricated, i then installed the intermediate minute wheel recorder holder. After which I installed the coupling levers. I also installed the ratchet wheel. Next, I installed the hammer and the springs. ...to be continued.


 1 point
 -
After struggling with cerium oxide slurries that fly around all over the shop when spun on a Dremel mop, I was encouraged by other members to use diamond pastes, now very cheap, oil based and faster than cerium oxide. Here is one source: eBay # 3012950069531 point
-
On some dials buds can cause damage (see previous post by wls1971). A very soft artists brush is the best way to apply a little wiping action. This would be the only addition to my suggestion to rinse in very dilute calcium remover. But try first with distilled water and a soft brush: Windsor and Newton water colour brush size 4 or 5 http://www.winsornewton.com/row/shop/brushes/water-colour/professional-water-colour-squirrel-brushes/pure-squirel-pointed-wash-brush-pure-squirrel-pointed-wash-brushes-size-0-brush-5250300 or equivalent.1 point
-
Hello, Sorry for the delay. I am super-busy with school and stuff. I checked my spare movements and I have an EB 8481-73 and EB 8461-73. Both are working. Can you do some research to verify compatibility at least with the balance? We could arrange shipping if you figure out whether one of the two would work for your needs. Regards, JC1 point
-
I have done a restoration on a 7548 Diver , for a friend and with good results. Only needed an after market bezel insert and a crystal; the rest was a lot of polishing and and cleaning of parts. All together now and will be shipped back to my friend as soon as I install the inner bezel gasket and pop the bezel back on. Sent from my iPhone using Tapatalk1 point
-
This is mine - it's a secretaire that's reasonably high. I sit on a drummer's stool which goes reasonably low. Nevertheless, my neck is screaming at me for a better solution...1 point
-
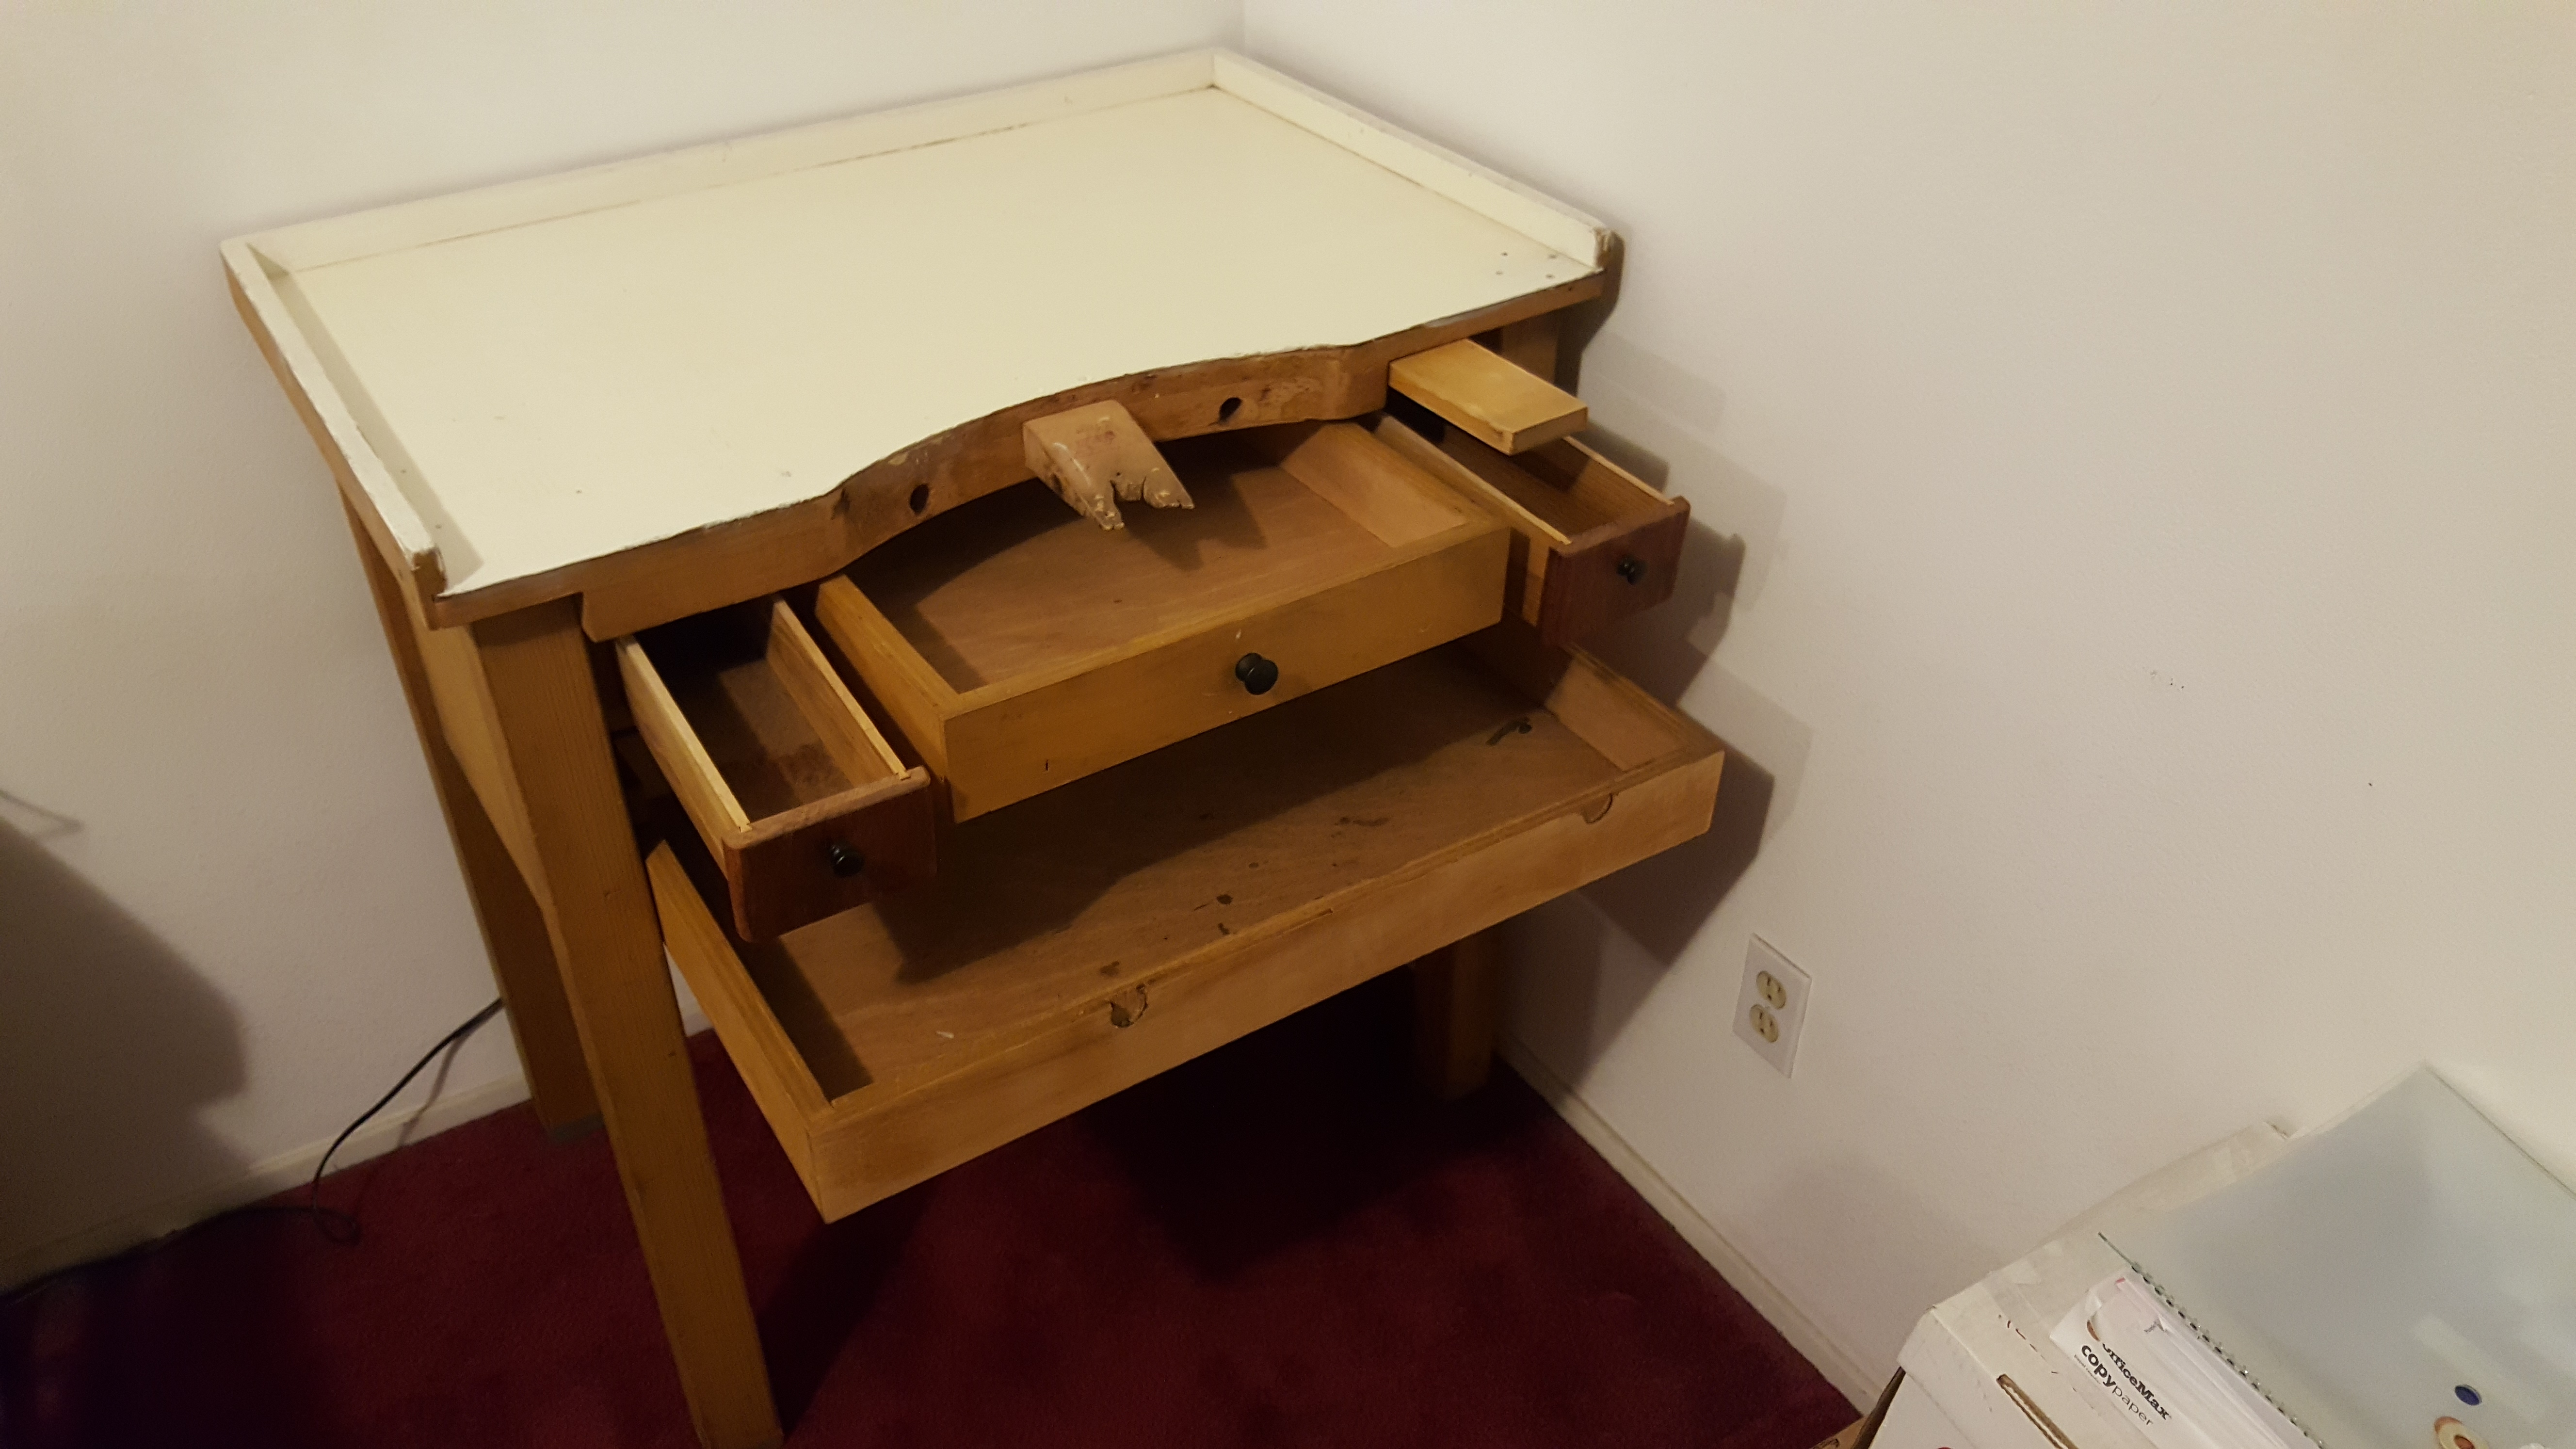
Just picked this up on Craigslist for $25.00...and added to my work bench, fits right in! Sent from my SM-N920T using Tapatalk
 1 point
 -
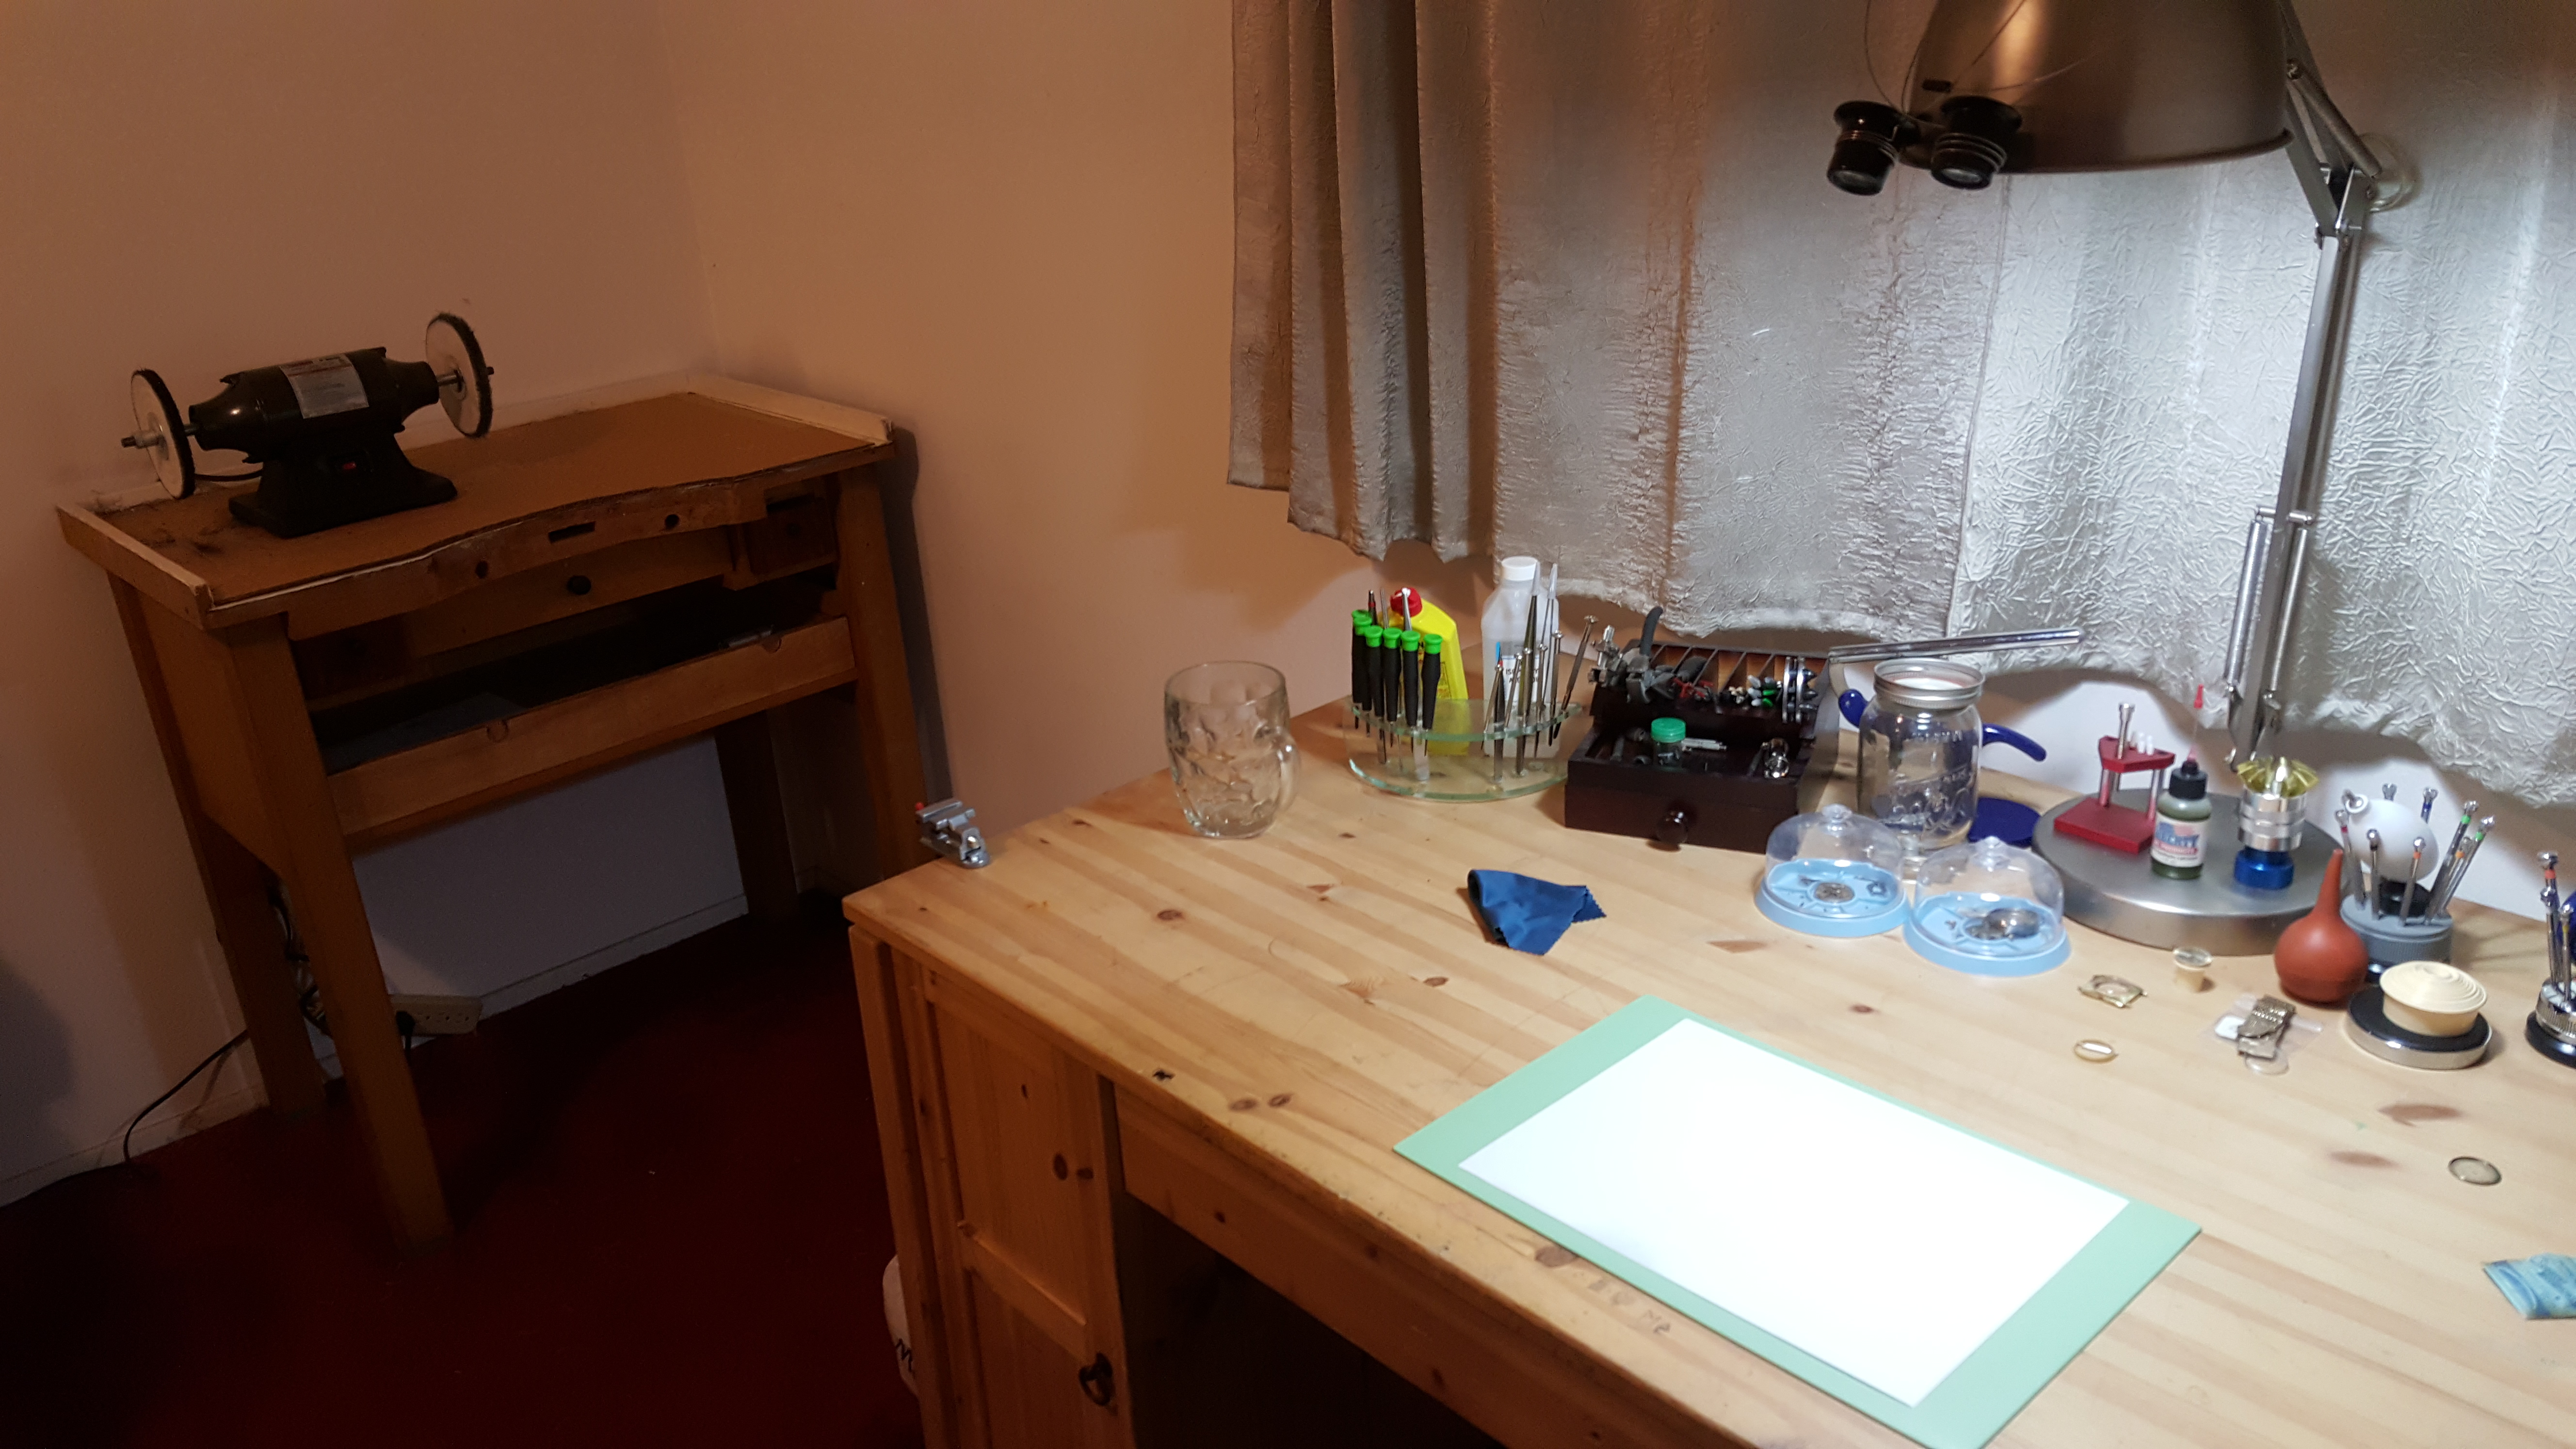
Thanks SSTEEL, you have a great setup and a great amount of tools, I can't wait til I get to that stage. I do have a bench buffer that I just got, but I'll need another table for that and more space...another table means more tools and I don't have a problem with that. I find more satisfaction in buying tools than watches! [emoji106] Sent from my SM-N920T using Tapatalk1 point
-
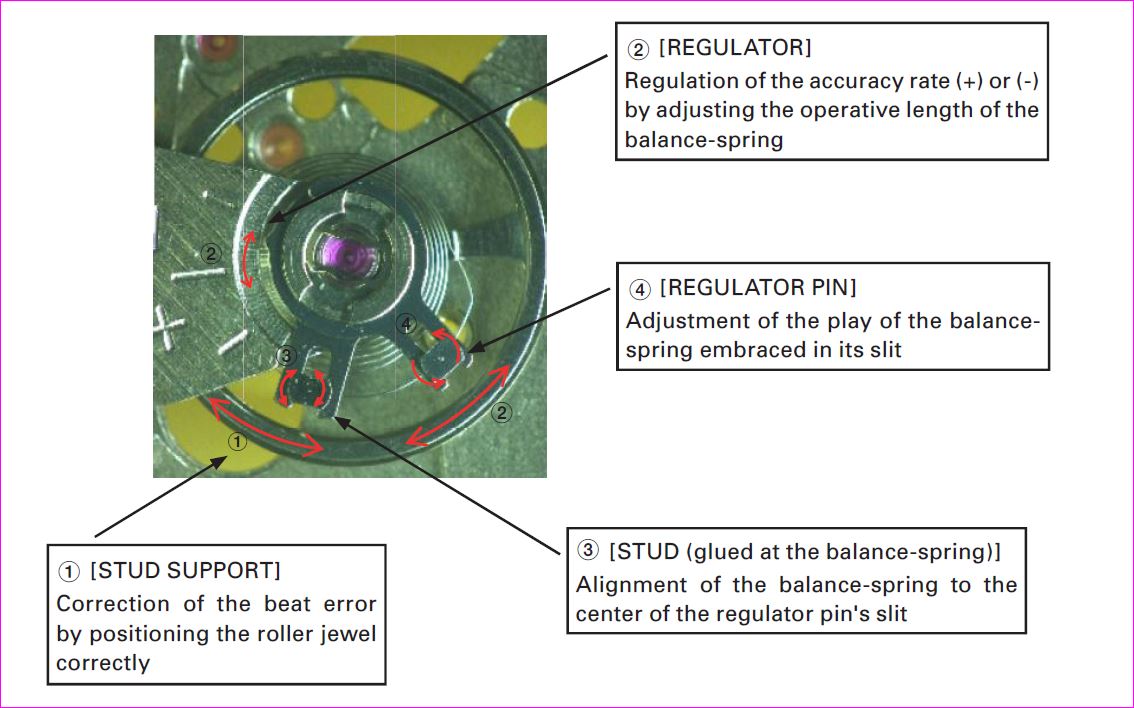
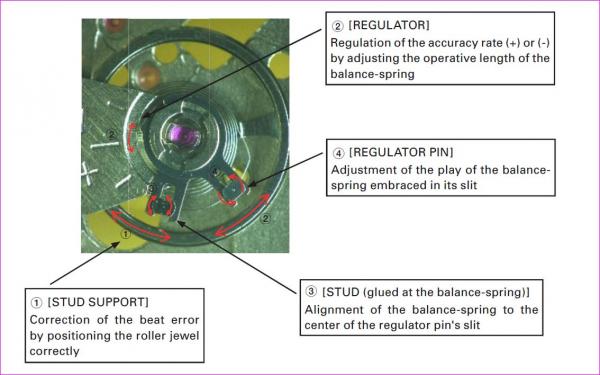
Nice that someone watched the videos. So in particular to refresh everyone's memory this video approximately 47 seconds he talks about the importance of the outer curvature corresponding to the rotation of the regulator pins. So in particular looking at your past picture of the new balance wheel it looks like the outer curve is closer in that you currently have it? .https://www.youtube.com/watch?v=4EYk787sjAM Then image attached as a reminder this is the Etachron system lots of things to adjust both good and bad. So initially rotate the regulator until the pins are maximum open. Then you rotate the stud To get the hairspring where it's supposed to be between the regulator pins. Then verify in several locations that the curvature is correct and you can then rotate the regulator to close the pins. But make sure you can still move the regulator I'm not sure how much rotation it would take but I suspect if you get carried away you can rotate the regulator to the point of bending the hairspring.
 1 point
 -
I don't have the answer , but I applaud your efforts to this point ....don't give up yet . Can you take the balance and cock out of the watch and turn it over so we can see how the hairspring looks from the other side ? .....Thanks1 point